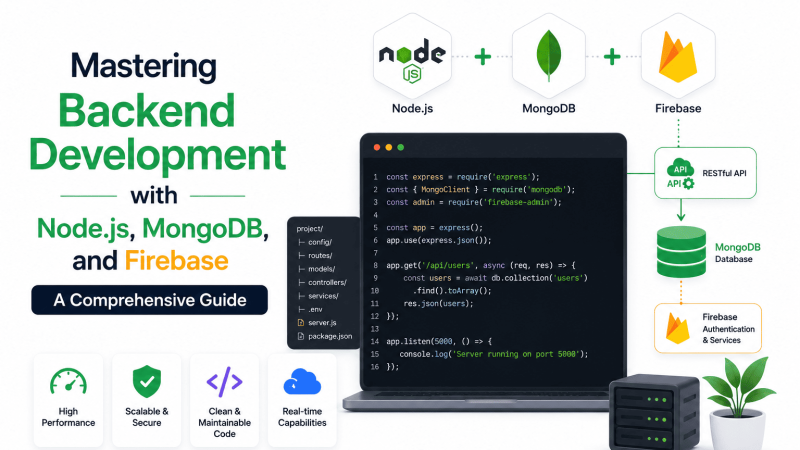
Mastering Backend Development with Node.js, MongoDB, and Firebase: A Comprehensive Guide
Introduction to Backend Development with Node.js, MongoDB, and Firebase
Modern backend development demands a stack that balances performance, scalability, and real-time capabilities. Node.js, MongoDB, and Firebase together provide a robust foundation for building data-driven applications. Node.js offers an asynchronous, event-driven runtime ideal for handling concurrent requests, while MongoDB delivers flexible, document-oriented storage that scales horizontally. Firebase complements these with real-time synchronization, serverless functions, and managed infrastructure. This combination allows developers to prototype rapidly, handle unpredictable traffic, and integrate real-time features without sacrificing control over core backend logic.
Why Node.js, MongoDB, and Firebase Form a Powerful Trio
Each technology in this trio addresses a specific backend need, creating a cohesive ecosystem:
Node.js provides a non-blocking I/O model, enabling high throughput for APIs and microservices. Its vast npm ecosystem accelerates development with pre-built modules for authentication, caching, and data validation.
MongoDB uses a JSON-like document model that aligns naturally with JavaScript objects, reducing impedance mismatch. Its flexible schema supports iterative development, and built-in replication ensures data durability.
Firebase handles real-time data synchronization, push notifications, and serverless cloud functions. For features like collaborative editing or live dashboards, Firebase’s WebSocket-based updates eliminate the need for custom polling logic.
The synergy emerges when Node.js serves as the primary API gateway, MongoDB stores long-term structured data, and Firebase manages transient real-time state or triggers serverless functions. This layered approach prevents lock-in while leveraging each tool’s strengths.
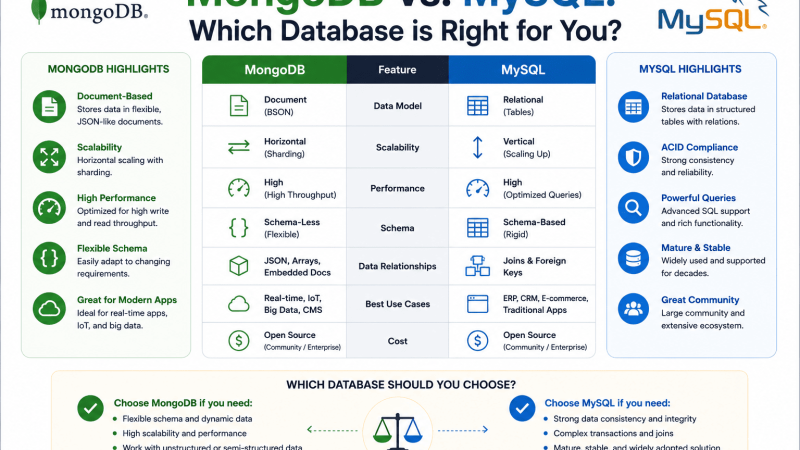
Key Differences Between MongoDB and Firebase for Backend Projects
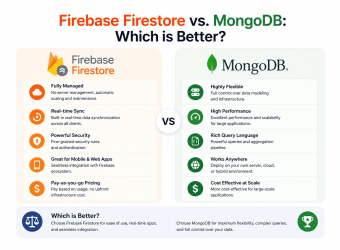
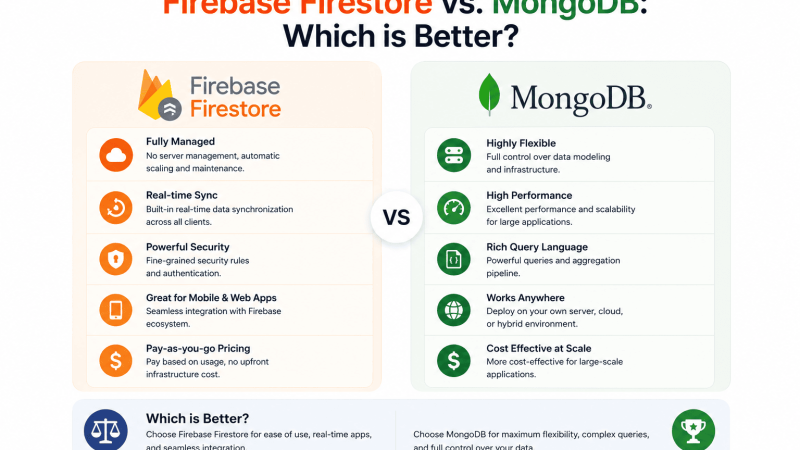
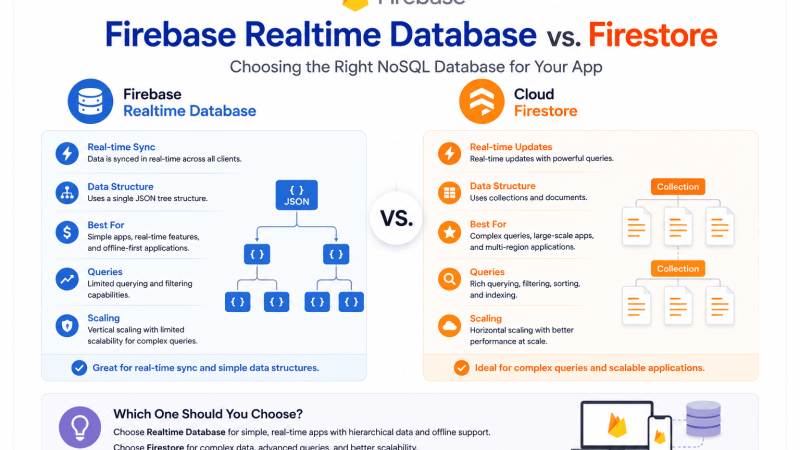
Choosing between MongoDB and Firebase depends on your project’s data consistency and operational requirements. The following table highlights critical distinctions:
Feature
MongoDB
Firebase (Firestore)
Data Model
Document-based, rich queries with aggregation pipeline
Automatic, but with per-document read/write limits
Real-time
Requires change streams or additional library
Native real-time listeners and offline support
Serverless
Atlas serverless instances (limited regions)
Cloud Functions, Firebase Hosting, and extensions
Cost Model
Pay for storage + compute (IOPS)
Pay for reads/writes/storage; free tier available
For projects requiring complex aggregations or strict consistency, MongoDB is preferable. For apps needing low-latency real-time updates or minimal server management, Firebase reduces operational overhead. Many production systems use both: MongoDB for transactional data and Firebase for live collaboration features.
Prerequisites and Recommended Learning Path
Before diving into this stack, ensure you have foundational knowledge in:
JavaScript fundamentals: Promises, async/await, closures, and ES6+ syntax.
Basic Node.js: Express.js routing, middleware, environment variables, and package management.
Database concepts: CRUD operations, indexing, and data modeling.
RESTful API design: HTTP methods, status codes, and request/response patterns.
A recommended learning path progresses as follows:
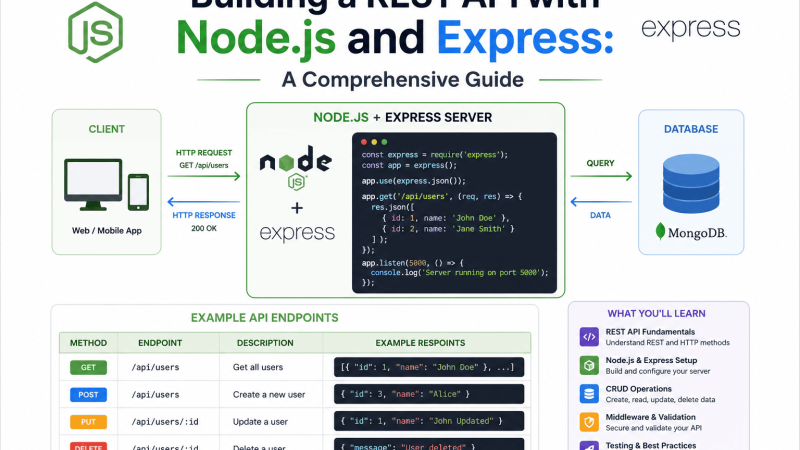
Build a simple REST API with Node.js and Express, testing with Postman.
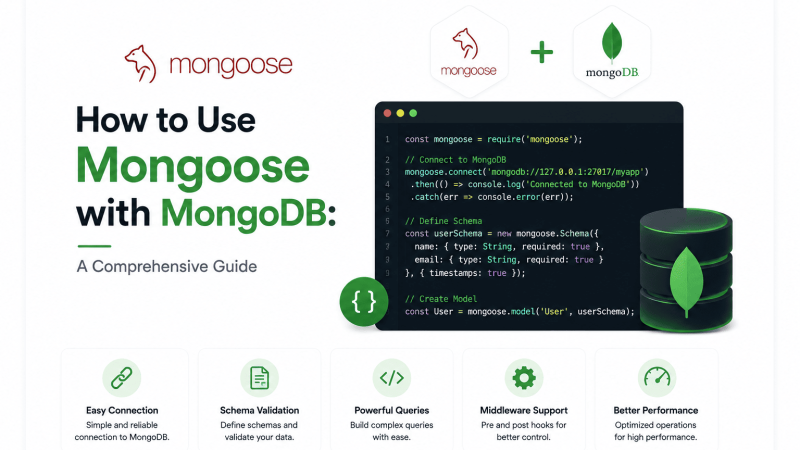
Integrate MongoDB via Mongoose, focusing on schemas and validation.
Implement user authentication using JWT and bcrypt.
Add Firebase to the project for real-time features (e.g., chat or notifications).
Deploy the backend to a cloud platform (e.g., Heroku, Vercel, or Google Cloud Run).
Explore Firebase Cloud Functions for serverless logic triggered by database events.
This sequence ensures you understand each component’s role before combining them, minimizing debugging complexity. Start small—a to-do app with Node.js and MongoDB, then extend it with Firebase authentication and real-time updates.
Setting Up Your Development Environment
Before diving into backend development with Node.js, MongoDB, and Firebase, you must establish a reliable development environment. This setup ensures smooth workflows, efficient debugging, and seamless integration across all three technologies. Follow these step-by-step instructions to install and configure each component, along with recommended tools to boost productivity.
Node.js is the runtime for executing JavaScript on the server, while npm (Node Package Manager) handles dependencies. To install both:
Visit the official Node.js website (nodejs.org) and download the LTS (Long-Term Support) version for your operating system. LTS ensures stability for production projects.
Run the installer and follow the prompts. The installer automatically includes npm.
Verify installation by opening a terminal (Command Prompt, PowerShell, or Bash) and running:
node --version
npm --version
This outputs version numbers like v20.11.0 and 10.2.4. If errors appear, restart your terminal or check your system PATH.
Recommended IDEs and tools:
Visual Studio Code (VS Code): Lightweight, extensible, with built-in terminal and debugging for Node.js.
nvm (Node Version Manager): For managing multiple Node.js versions on macOS/Linux. Install via curl -o- https://raw.githubusercontent.com/nvm-sh/nvm/v0.39.7/install.sh | bash.
Postman: For testing API endpoints during development.
Configuring MongoDB Locally or via Atlas Cloud
MongoDB provides two primary deployment options: local installation for offline development and Atlas Cloud for managed, scalable databases. Choose based on your project needs.
Sign up at cloud.mongodb.com and create a free cluster (e.g., M0 Sandbox).
Configure network access (add your IP address) and create a database user with password.
Obtain the connection string from “Connect” > “Connect your application”. It looks like: mongodb+srv://<username>:<password>@cluster0.xxxxx.mongodb.net/.
Store this string securely in a .env file for your Node.js application.
Comparison table:
Feature
Local MongoDB
Atlas Cloud
Setup time
10–15 minutes
5 minutes
Cost
Free (no hosting)
Free tier (512 MB storage)
Backup
Manual
Automated
Scalability
Limited to hardware
Elastic scaling
Setting Up Firebase Project and CLI Tools
Firebase offers backend services like authentication, real-time database, and cloud functions. To set up:
Go to console.firebase.google.com and create a new project. Enter a project name (e.g., “MyBackendApp”) and accept terms.
In the project dashboard, navigate to “Project settings” > “Service accounts” and generate a new private key (JSON file). This key authenticates your server-side code.
Install Firebase CLI globally via npm: npm install -g firebase-tools.
Log in to Firebase from your terminal: firebase login. This opens a browser window for authentication.
Initialize your project folder: firebase init. Select features like “Firestore” or “Functions” as needed. Follow prompts to link your Firebase project.
Practical command example: Deploy a simple cloud function after setup:
Firebase Emulator Suite: For local testing, run firebase emulators:start.
VS Code Extensions: “Firebase Explorer” for managing projects directly from the editor.
Building RESTful APIs with Node.js and Express
Designing scalable REST APIs with Node.js and Express requires a structured approach that balances flexibility with maintainability. Express.js provides a minimal yet powerful foundation for handling HTTP requests, but without deliberate architectural choices, APIs can become unwieldy. This section explores how to structure applications for growth, implement database operations using Mongoose ODM, and secure endpoints with JSON Web Tokens (JWT) combined with role-based access control (RBAC).
Structuring Express Applications for Maintainability
A well-organized Express project separates concerns into distinct layers, making code easier to test, debug, and extend. The recommended pattern uses modular routing and middleware separation:
Route modules: Group related endpoints (e.g., /users, /products) in separate files under a routes/ directory.
Service layer: Abstract business logic and database interactions into services, promoting reusability.
Middleware stack: Apply global middleware (logging, parsing, CORS) in the main app file, and route-specific middleware (authentication, validation) inline.
Configuration management: Use environment variables for database URIs, secret keys, and port numbers, loaded via dotenv.
This structure prevents “spaghetti code” where routing, logic, and data access are intertwined. For example, a typical Express app folder might contain: routes/, controllers/, models/, middleware/, config/, and utils/. Each folder has a single responsibility, enabling teams to work on different features without conflicts.
Implementing CRUD Operations with Mongoose ODM
Mongoose provides a schema-based solution for modeling MongoDB data, with built-in validation, query building, and middleware (pre/post hooks). Implementing CRUD operations requires defining a Mongoose schema, then creating controller functions that handle each HTTP verb:
Create (POST): Validate incoming data against the schema, then call Model.create() or new Model().save(). Return 201 status with the created document.
Read (GET): Use Model.find() for collections, Model.findById() for single documents. Support query parameters for filtering, pagination, and field selection.
Update (PUT/PATCH): Use Model.findByIdAndUpdate() with runValidators: true to ensure data integrity. Return the updated document.
Delete (DELETE): Use Model.findByIdAndDelete(). Return 204 No Content for successful deletion.
Error handling should wrap database calls in try-catch blocks and pass errors to Express’s centralized error middleware. Mongoose also supports virtuals and population for referencing related documents, which is essential for building normalized data models.
Securing APIs with JWT and Role-Based Access Control
JWT authentication combined with RBAC provides a stateless, scalable security model. The process involves three steps: token generation, token verification, and role authorization. Below is a comparison of common RBAC implementation approaches:
Approach
Storage Location
Flexibility
Performance
Use Case
Hardcoded roles
JWT payload
Low
High
Simple apps with fixed roles
Database-driven roles
User document
High
Medium
Multi-tenant systems
Hybrid (JWT + DB)
Both
Very High
Medium-Low
Enterprise applications
To implement JWT authentication in Express:
Sign tokens on login using jsonwebtoken.sign() with a secret and expiry (e.g., 24 hours). Include user ID and role in the payload.
Verify tokens via middleware that decodes the token from the Authorization header (Bearer scheme) and attaches user data to req.user.
Authorize roles using a second middleware that checks req.user.role against allowed roles. For example, an admin-only route might require role: 'admin'.
This layered approach ensures that unauthenticated requests are rejected early, while role checks prevent unauthorized access to sensitive endpoints. Combining JWT with HTTPS and short-lived tokens further reduces attack surface.
Working with MongoDB: Schema Design and Queries
MongoDB’s document model offers flexibility, but achieving high performance at scale demands deliberate schema design, efficient queries, and strategic indexing. Unlike relational databases, MongoDB encourages designing schemas based on how your application accesses data, not on normalized relationships. Mastering these principles ensures your backend remains fast and maintainable under load.
Schema Design Patterns: Embedded vs. Referenced Documents
The central decision in MongoDB schema design is choosing between embedding subdocuments or referencing documents in separate collections. This choice directly impacts query performance and data consistency.
Embedded documents are ideal when:
Data is accessed together (e.g., user profile with addresses).
Relationships are one-to-few (e.g., blog post with up to 20 comments).
Write atomicity is required for the entire document.
Data grows unbounded (e.g., millions of comments per post).
Subdocuments are accessed independently (e.g., product reviews shown separately).
Data duplication must be minimized to avoid update anomalies.
For high-performance applications, follow the “embed unless there is a compelling reason not to” rule. Use references only when embedding would cause document size to exceed 16 MB or when independent access patterns dominate. When referencing, use $lookup sparingly and consider denormalizing frequently accessed fields (e.g., product name in order documents) to reduce joins.
Advanced Querying with Aggregation Pipelines
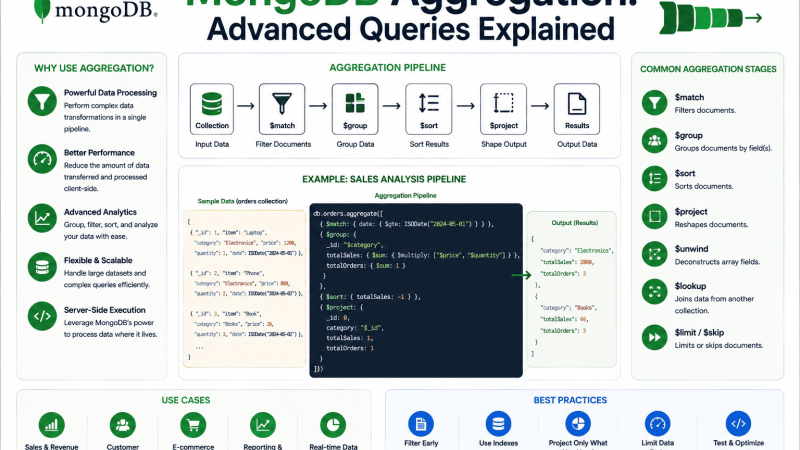
MongoDB’s aggregation framework transforms and processes data in stages. For complex reporting, real-time analytics, or multi-step transformations, aggregation pipelines outperform application-level logic.
Here is a practical example that calculates total sales by category for the last 30 days, sorted by revenue:
Place $match and $limit stages as early as possible to reduce document flow.
Use $project to exclude unnecessary fields before $group.
For large datasets, create indexes on fields used in $match and $sort stages.
Avoid $unwind on arrays that are rarely filtered—consider restructuring the schema.
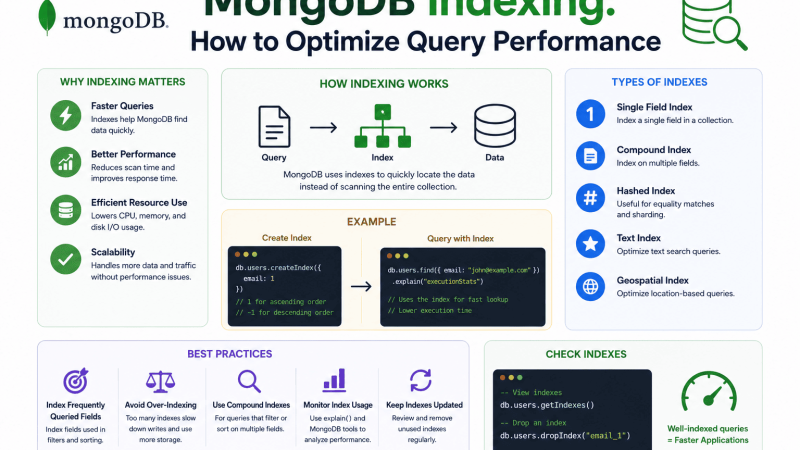
Indexing and Performance Optimization Techniques
Proper indexing is the single most impactful optimization for MongoDB. Without indexes, every query performs a collection scan, degrading performance as data grows.
Essential indexing strategies:
Single field indexes for equality filters (e.g., db.users.createIndex({ email: 1 })).
Compound indexes for queries with multiple predicates. Follow the “ESR” rule: Equality fields first, then Sort fields, then Range fields. Example: db.orders.createIndex({ status: 1, createdAt: -1 }).
Covered queries when all required fields are in the index. Use db.collection.explain("executionStats") to verify.
TTL indexes for automatic expiration of time-sensitive data (e.g., session tokens).
Monitoring and maintenance:
Use db.collection.getIndexes() to review existing indexes.
Remove unused indexes with db.collection.dropIndex() to reduce write overhead.
For write-heavy workloads, use background: true when creating indexes to avoid blocking.
Analyze slow queries with db.setProfilingLevel(1, { slowms: 100 }) and the system.profile collection.
By applying these schema design patterns, leveraging aggregation pipelines for complex logic, and maintaining a disciplined indexing strategy, your MongoDB layer will deliver the high throughput and low latency that modern backend applications demand.
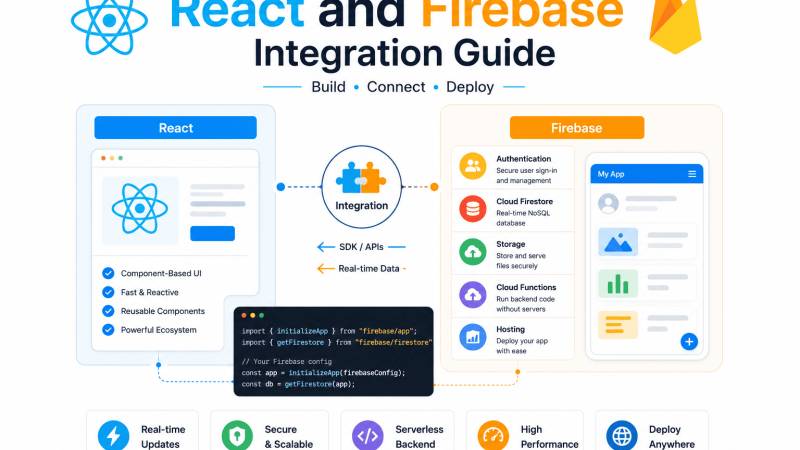
Integrating Firebase for Authentication and Real-Time Features
Firebase provides a robust, serverless infrastructure that complements Node.js backends by handling authentication and real-time data synchronization with minimal boilerplate. When integrated correctly, Firebase reduces the need to manage session tokens or build custom real-time WebSocket servers, allowing developers to focus on application logic. This section covers three essential integration points: authentication methods, scalable data storage with Firestore, and extending backend capabilities with Cloud Functions.
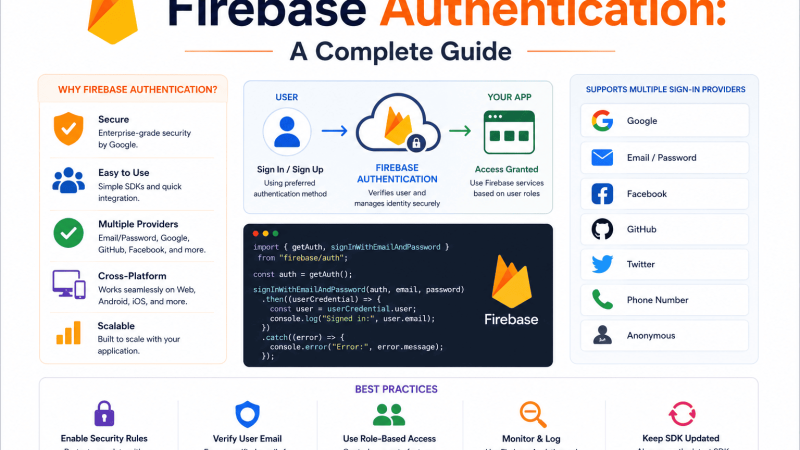
Implementing Email/Password and Social Login with Firebase Auth
Firebase Authentication supports multiple sign-in methods that can be configured directly from the Firebase Console. For a Node.js backend, you typically initialize the Firebase Admin SDK to verify tokens and manage users server-side. Below are the key steps and considerations for common login flows:
Email/Password Authentication: Use firebase.auth().createUserWithEmailAndPassword(email, password) on the client or the Admin SDK’s admin.auth().createUser() method. On the backend, verify ID tokens using admin.auth().verifyIdToken(idToken) to authenticate API requests. Always enforce password strength rules in the Firebase Console.
Social Login (Google, Facebook, GitHub): Implement the OAuth flow on the client side using Firebase UI or custom redirects. After successful login, send the returned ID token to your Node.js backend. The backend validates the token and creates or updates the user record in your database. Store only the user UID and minimal profile data; avoid storing raw tokens.
Token Handling Best Practices: Set token expiration to one hour by default and use refresh tokens for long-lived sessions. In your Node.js middleware, decode the token on every protected route to ensure the user is still valid. Revoke tokens server-side when a user changes email or password.
Using Firestore for Scalable Real-Time Data Storage
Firestore is a NoSQL document database that provides real-time listeners and automatic scaling. For a Node.js backend, you interact with Firestore through the Admin SDK. Key implementation patterns include:
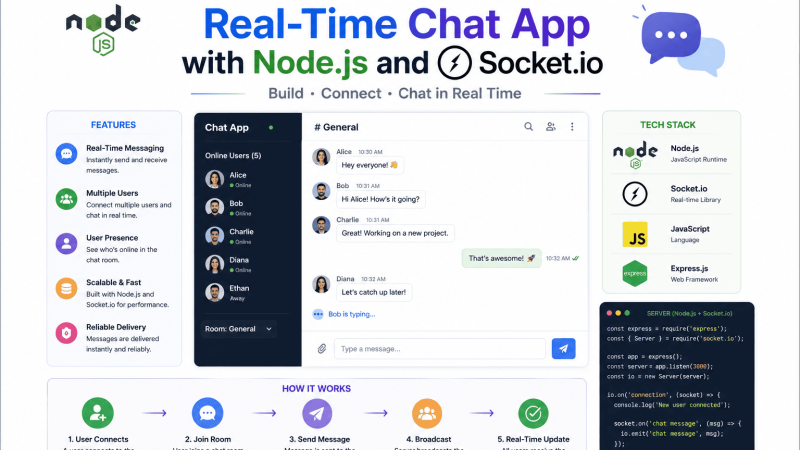
Real-Time Listeners on the Client: Use onSnapshot() to subscribe to document or query changes. For example, a chat app can listen to a messages collection and update the UI instantly. On the server, you can use onSnapshot() in Cloud Functions to trigger backend logic when data changes.
Data Structure Design: Avoid deeply nested documents. Use subcollections for related data (e.g., users/{userId}/messages). Index fields you query frequently to avoid full collection scans. Use composite indexes for complex queries like “get messages where sender is userA and timestamp is after dateX.”
Security and Validation: Combine Firestore Security Rules with your Node.js backend validation. For server-side writes, use the Admin SDK which bypasses client-side rules, but always validate input data (e.g., using Joi or express-validator) before writing to Firestore. Enable Firestore’s built-in data validation features like require() for required fields.
Combining Firebase Cloud Functions with Node.js Backend
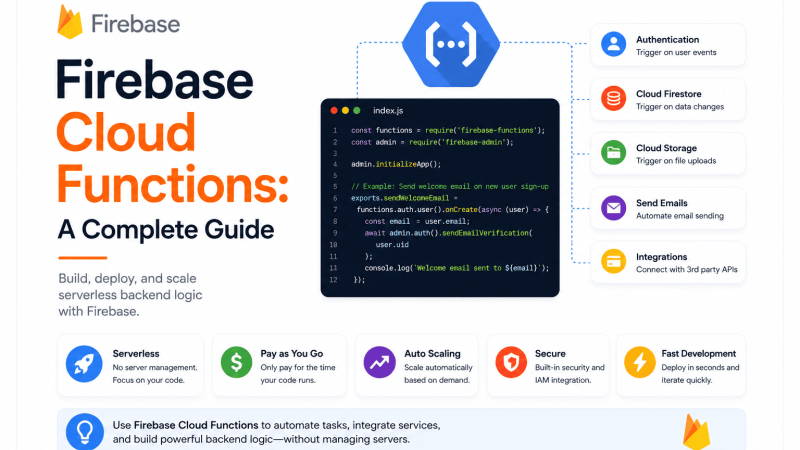
Cloud Functions for Firebase allow you to run Node.js code in response to Firebase events (e.g., Firestore writes, Auth user creation) or HTTPS requests. This extends your backend without managing servers. Common use cases include:
Triggered Functions for Background Tasks: Example: When a new user signs up (Auth trigger), automatically create a user profile document in Firestore. When a document is deleted, clean up associated storage files. Use functions.firestore.document('users/{userId}').onCreate(async (snap, context) => { ... }).
HTTPS Functions for API Endpoints: Replace or supplement your Express routes with functions.https.onRequest(). This is useful for webhook handlers or endpoints that need to run in a trusted environment. Note that HTTPS functions have a 9-minute timeout limit, so avoid long-running operations.
Environment and Configuration Management: Use Firebase Functions’ config to store API keys and environment variables via functions.config().service.key. Deploy functions with firebase deploy --only functions and monitor logs in the Firebase Console.
Integration Checklist:
Component
Node.js Integration Method
Key Consideration
Firebase Auth
Admin SDK token verification
Always validate tokens on protected routes
Firestore
Admin SDK read/write operations
Use batched writes for atomic operations
Cloud Functions
Firebase Functions SDK
Keep functions stateless and idempotent
By following these patterns, you can build a backend that leverages Firebase’s managed services while retaining full control over your Node.js application logic. The combination reduces infrastructure overhead and enables features like real-time collaboration, user authentication, and scalable data storage with minimal code duplication.
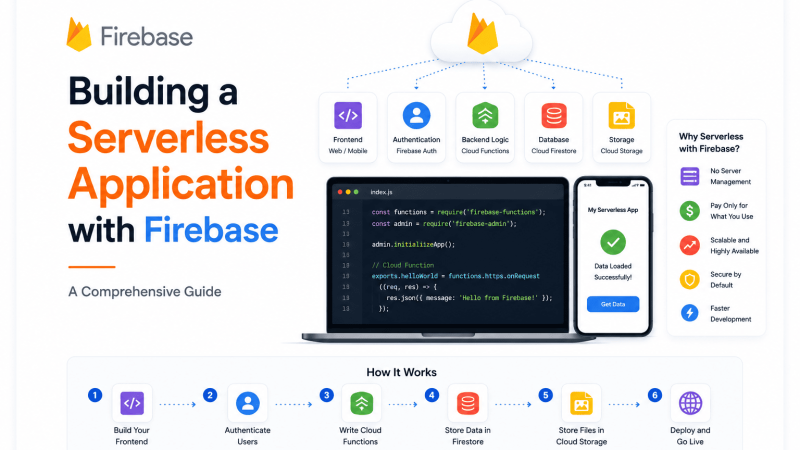
Serverless Backend with Firebase Cloud Functions
Firebase Cloud Functions provide a serverless execution environment that lets you run backend code in response to events triggered by Firebase features and HTTPS requests. This approach eliminates the need to provision or manage servers, allowing you to focus on writing business logic while Firebase handles scaling, security patches, and infrastructure. By integrating Cloud Functions into your Node.js backend, you can extend functionality for tasks such as data validation, sending notifications, processing file uploads, and integrating third-party webhooks. The pay-as-you-go model ensures you only incur costs when functions execute, making it cost-effective for applications with variable traffic.
Creating and Deploying HTTP and Background Cloud Functions
Firebase Cloud Functions support two primary types: HTTP functions, invoked via HTTPS requests, and background functions, triggered by Firebase events like database writes, authentication events, or file changes. To create an HTTP function, you define an exported function that accepts req and res parameters, similar to Express.js. Background functions use event-specific handlers, such as onDocumentWritten for Firestore or onUserCreate for Authentication.
To deploy, run firebase deploy --only functions from your project directory. Use the Firebase CLI to manage deployments, rollbacks, and environment variables.
Triggering Functions from Firestore, Authentication, and Storage
Background functions respond to specific Firebase events, enabling automated workflows. The table below outlines common triggers and their use cases:
Trigger Source
Event Type
Typical Use Case
Firestore
onDocumentCreated, onDocumentUpdated
Send welcome emails on user signup, update derived data
Authentication
onUserCreate, onUserDelete
Create user profiles in Firestore, clean up resources
Cloud Storage
onObjectFinalized
Generate thumbnails for uploaded images, transcode videos
For example, a Firestore trigger can automatically create a user document in a separate collection when a new authentication user registers:
Best Practices for Error Handling and Logging in Serverless
Effective error handling and logging are critical in serverless environments because debugging occurs asynchronously and errors can cascade silently. Follow these best practices:
Use structured logging: Leverage functions.logger (or console.log in older runtimes) with JSON payloads to include context like event IDs and timestamps. This aids in querying logs via the Firebase console or Google Cloud Logging.
Implement try-catch blocks: Wrap asynchronous operations in try-catch to catch exceptions and return appropriate HTTP status codes for HTTP functions. For background functions, catch errors and either rethrow (to trigger retries) or log and return gracefully.
Set function timeouts and memory: Configure these in the function definition to avoid excessive costs and unexpected terminations. For example: exports.largeTask = functions.runWith({ timeoutSeconds: 300, memory: '1GB' })....;
Monitor retries: Background functions automatically retry on failure by default. Use event.context.retry to check retry count and implement exponential backoff if necessary.
Log errors with stack traces: In catch blocks, log the full error object: functions.logger.error('Function failed', error);. This preserves stack traces for debugging.
By adhering to these practices, you ensure your serverless backend remains reliable, debuggable, and cost-efficient as it scales with user demand.
Data Storage and File Management with Firebase Storage and MongoDB GridFS
Effective file management is a cornerstone of robust backend development. When building applications that handle user-uploaded files—from profile images to large documents—developers must balance scalability, security, and performance. By combining Firebase Storage for direct file serving with MongoDB GridFS for metadata and large binary storage, you can create a resilient, cost-effective system. This section outlines key strategies for uploading, securing, and optimizing files using these two powerful technologies.
Uploading and Securing Files with Firebase Storage Rules
Firebase Storage provides a straightforward way to upload and serve user files directly from client applications. However, securing these files is paramount. Firebase Storage Rules, written in a declarative syntax, allow you to control access based on authentication, file type, and size. Below is a typical rule structure for a secure upload flow:
Authenticated access: Use request.auth != null to ensure only logged-in users can upload or read files.
File type validation: Restrict uploads to specific MIME types, such as image/png or application/pdf, using request.resource.contentType.matches().
Size limits: Enforce maximum file sizes (e.g., 5 MB for images) with request.resource.size < 5 * 1024 * 1024.
Path-based rules: Organize files in user-specific folders (e.g., /users/{userId}/images/{fileName}) and grant access only to the owner.
For example, a rule to allow a user to upload only JPEG images under 2 MB to their own folder would look like: allow write: if request.auth.uid == userId && request.resource.contentType == 'image/jpeg' && request.resource.size < 2 * 1024 * 1024;. This ensures that malicious or oversized files are rejected before they consume storage or bandwidth.
Storing Metadata and Large Files in MongoDB GridFS
While Firebase Storage excels at serving files directly, MongoDB GridFS is ideal for storing large files (exceeding the BSON document size limit of 16 MB) and their associated metadata. GridFS splits a file into chunks (default 255 KB each) and stores them in two collections: fs.files for metadata and fs.chunks for binary data. This approach is particularly useful for documents, videos, or datasets that require server-side processing. Key benefits include:
Atomic metadata storage: Store custom fields—such as user ID, upload timestamp, content type, and processing status—alongside the file.
Streaming support: Retrieve large files in chunks for efficient memory usage, ideal for serving videos or large PDFs.
Integration with MongoDB queries: Use standard MongoDB queries to find files by metadata, enabling advanced search and filtering.
A typical workflow involves uploading a file to Firebase Storage for immediate access, then storing its download URL and metadata in MongoDB. For very large files, you can upload directly to GridFS and serve them via a Node.js stream, bypassing Firebase entirely.
Implementing File Compression and Thumbnail Generation
To optimize storage costs and improve load times, implement automated compression and thumbnail generation for uploaded images and documents. This process typically occurs after the file is uploaded, using serverless functions or background jobs. A recommended strategy includes:
File Type
Compression Method
Thumbnail Dimensions
Images (JPEG, PNG)
Sharp or ImageMagick for quality reduction (e.g., 80% quality)
150×150 px for avatars; 300×300 px for previews
Documents (PDF)
Ghostscript or pdf-lib for reducing file size
First page as a 200×200 px PNG thumbnail
Videos (MP4)
FFmpeg for codec optimization and resolution scaling
120×120 px GIF or JPEG thumbnail at 1-second mark
Use Firebase Cloud Functions or a Node.js worker to trigger compression upon file upload. Store the original file in Firebase Storage (or GridFS), generate a compressed version and thumbnail, then save their URLs in MongoDB alongside the original metadata. This not only reduces storage footprint but also delivers faster user experiences, especially on mobile devices.
Testing and Debugging Your Backend Stack
Robust backend development with Node.js, MongoDB, and Firebase demands rigorous testing and systematic debugging. Without proper validation, asynchronous operations, database interactions, and cloud service dependencies can introduce subtle failures. This section covers essential tools and methodologies for ensuring your stack remains reliable in development and production.
Writing Unit Tests with Jest and Supertest for Express APIs
Jest provides a complete testing framework with built-in assertions, mocking, and code coverage. Combined with Supertest, you can test HTTP endpoints without starting a live server. Start by installing both packages as dev dependencies:
npm install --save-dev jest supertest
Configure Jest in package.json with a test script and a jest.config.js file for environment setup. For a typical Express API, structure tests as follows:
Route tests: Verify response status codes, headers, and JSON body structure for each endpoint.
Middleware tests: Isolate authentication, validation, and error-handling middleware using Supertest’s .use() method.
Async behavior: Use Jest’s async/await support to test database calls and external API responses.
Example test for a GET /users/:id route:
const request = require('supertest');
const app = require('../app');
describe('GET /users/:id', () => {
it('returns 200 and user data for valid ID', async () => {
const res = await request(app).get('/users/123');
expect(res.statusCode).toBe(200);
expect(res.body).toHaveProperty('email');
});
});
Mocking Firebase Services and MongoDB for Reliable Tests
Directly calling Firebase or MongoDB during tests introduces flakiness, cost, and security risks. Mocking replaces real services with controlled stubs. For MongoDB, use mongodb-memory-server to run an in-memory instance that mimics a real database without external dependencies. For Firebase, leverage Jest’s manual mocks or libraries like firebase-mock.
Recommended mocking strategies:
Service
Mocking Tool
Key Benefit
MongoDB
mongodb-memory-server
Runs ephemeral database; no network or config needed
Firebase Auth
jest.mock(‘firebase/auth’)
Returns predictable user objects and tokens
Firebase Firestore
firebase-mock or manual stub
Controls document reads/writes without latency
Firebase Cloud Functions
jest.fn() with resolved values
Simulates triggers and HTTP callables
When mocking, ensure your test setup resets all mocks between tests using beforeEach and afterEach hooks. This prevents state leakage and keeps tests isolated.
Debugging with Node Inspector and Firebase Emulator Suite
Debugging a distributed backend requires both local and emulated environments. Node Inspector, built into Node.js, allows you to attach Chrome DevTools to your running process. Start your application with the --inspect flag:
Open chrome://inspect in Chrome to set breakpoints, inspect variables, and step through asynchronous callbacks. For Firebase-dependent code, the Firebase Emulator Suite provides local instances of Firestore, Authentication, Functions, and other services. Run all emulators with a single command:
Logging with structured data: Use console.log with JSON objects instead of strings to inspect nested properties in the debugger console.
Network inspection: In the Emulator UI (usually at localhost:4000), view all database reads, writes, and function invocations in real time.
Breakpoints in async code: Place breakpoints inside .then() callbacks or await lines to pause execution exactly when a promise resolves.
Environment variable validation: Use Node Inspector to check that process.env.FIREBASE_PROJECT_ID and MONGODB_URI are correctly set before any service initialization.
Combining these tools reduces debugging time by providing both code-level visibility and service-level simulation, ensuring your backend stack behaves correctly before deployment.
Deployment and DevOps for Node.js, MongoDB, and Firebase
Transitioning a backend stack from development to production requires careful planning around hosting, data persistence, and automated release workflows. For applications built with Node.js, MongoDB, and Firebase, deployment involves selecting the right cloud platform for your runtime, configuring a managed database cluster, and establishing a continuous integration pipeline. This section covers the essential practices for deploying and maintaining a production-grade backend.
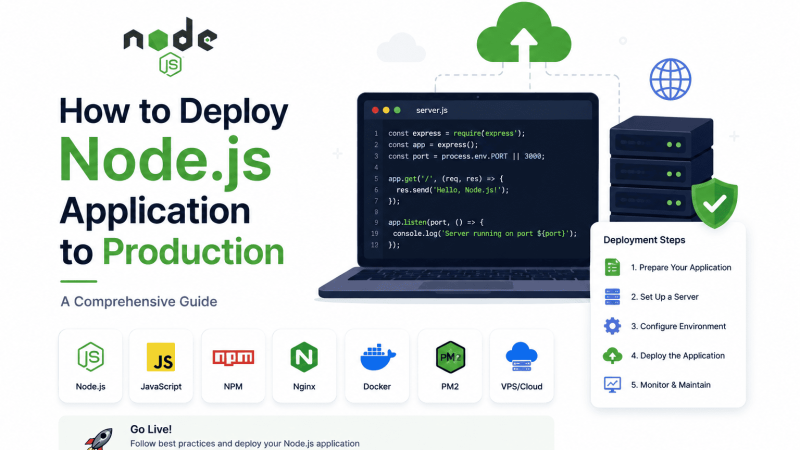
Deploying Node.js Apps on Heroku, AWS, or Google Cloud Run
Each platform offers distinct advantages depending on your scalability needs and operational preferences. Heroku provides the simplest path with its git-based deployment and automatic HTTPS, but it can become costly at scale. AWS Elastic Beanstalk offers more granular control over EC2 instances and load balancing, while Google Cloud Run excels at serverless containerized deployments with automatic scaling to zero.
For a typical Node.js application, ensure your package.json includes a start script and that your app listens on the port provided by the environment variable PORT. Below is a practical command example for deploying to Google Cloud Run using the gcloud CLI:
Heroku: Use the heroku/nodejs buildpack; configure Procfile with web: node server.js; set environment variables via heroku config:set. Dyno sleep on free tiers requires a wake-up call.
AWS Elastic Beanstalk: Deploy via EB CLI or upload a ZIP; define ecosystem.config.js for PM2 process management; use .ebextensions for custom environment configuration.
Google Cloud Run: Always containerize (Dockerfile required); leverage Cloud Build for automated image creation; set concurrency and CPU limits per request.
Managing MongoDB Atlas Clusters and Backup Strategies
MongoDB Atlas simplifies database administration with automated provisioning and scaling. For production, deploy a three-node replica set across multiple cloud regions to ensure high availability. Configure IP whitelisting to restrict access to your application server’s IP or VPC peering for enhanced security.
Backup strategies must balance recovery point objectives (RPO) with cost:
Backup Type
Frequency
Retention
Use Case
Continuous (snapshot + oplog)
Every 6 hours
Up to 35 days
Critical production data needing point-in-time recovery
Daily snapshot
Once per day
7-30 days
Standard workloads with acceptable 24-hour data loss
Manual export
On demand
Custom
Pre-migration or ad-hoc archives
Enable the Atlas backup feature under the “Backup” tab for automated snapshots. For custom off-site backups, use mongodump in a cron job and upload the archive to a cloud storage bucket:
Automating Deployments with GitHub Actions and Firebase Hosting
GitHub Actions provides a unified CI/CD pipeline for both Node.js backend services and Firebase Hosting static assets. Create a workflow file at .github/workflows/deploy.yml that triggers on pushes to the main branch. The pipeline should run tests, build the application, and deploy to the appropriate target.
A practical workflow for a combined Node.js API and Firebase Hosting deployment includes:
Test and lint: Run npm test and npm run lint on the runner.
Build artifacts: Compile TypeScript if needed, or prepare the build directory for Firebase.
Deploy Node.js: Use platform-specific actions like google-github-actions/deploy-cloudrun or aws-actions/configure-aws-credentials with a deployment script.
Deploy Firebase Hosting: Use the firebase-tools action with FIREBASE_TOKEN stored as a GitHub secret, running firebase deploy --only hosting.
Environment configuration must be managed through GitHub Secrets for sensitive values (API keys, database URIs, Firebase service account JSON). For non-sensitive settings, consider using environment-specific .env files loaded at deploy time via the workflow’s env context. This approach ensures that your backend stack remains consistent across staging and production environments while minimizing manual intervention.
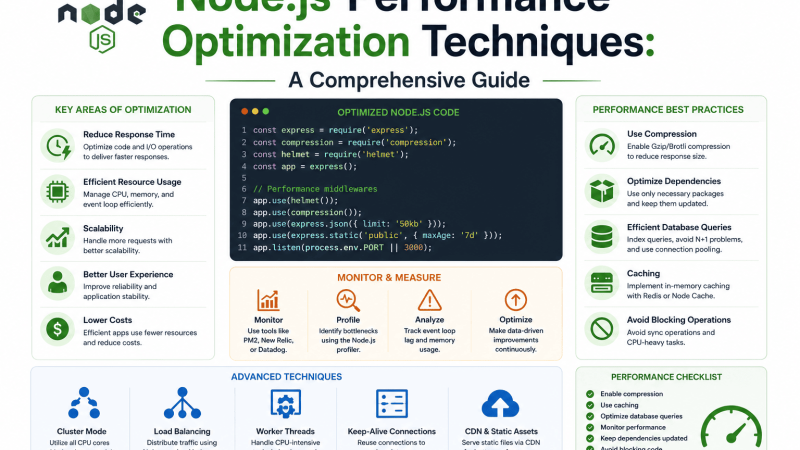
Performance Optimization and Scaling Strategies
In production-grade backend development with Node.js, MongoDB, and Firebase, performance optimization and scaling are critical to maintaining low latency and high availability under load. This section covers caching, load balancing, and monitoring techniques that ensure your backend remains responsive as user demand grows.
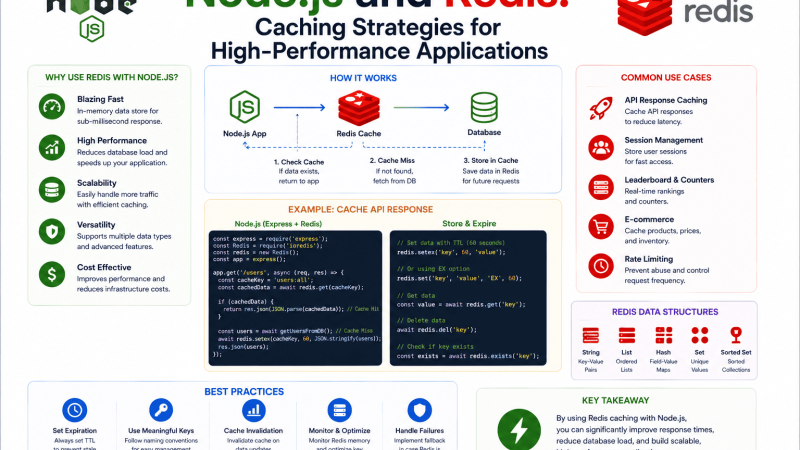
Caching reduces database load and response times by storing frequently accessed data in memory. Redis, an in-memory data store, excels at caching MongoDB query results, session data, and API responses. For example, you can cache user profiles or product catalog data with a Time-To-Live (TTL) to balance freshness with performance. Integrate Redis with Node.js using the ioredis client, and implement cache-aside or write-through patterns.
For static assets and frequently accessed API endpoints, a Content Delivery Network (CDN) like Cloudflare or AWS CloudFront offloads traffic from your backend. Configure your Node.js server to set appropriate Cache-Control headers, and use CDN caching rules for public resources. Combined, Redis and CDN reduce origin server load by up to 80% for read-heavy workloads.
Caching Layer
Use Case
Typical Cache Duration
Redis
Database query results, session data
Minutes to hours
CDN
Static files, API responses (GET)
Hours to days
Load Balancing and Horizontal Scaling for Node.js
Node.js runs on a single thread by default, making horizontal scaling essential for handling concurrent requests. Use a load balancer such as Nginx, HAProxy, or a cloud-native solution (AWS ALB, Google Cloud Load Balancing) to distribute traffic across multiple Node.js instances. Each instance can run on separate cores using the built-in cluster module, which spawns worker processes that share the same server port. For true horizontal scaling, deploy multiple server instances behind the load balancer, each with its own MongoDB connection pool and Redis cache.
When scaling with MongoDB, use sharding to distribute data across clusters, and for Firebase, leverage Firestore’s automatic scaling and real-time synchronization. Ensure your Node.js application is stateless by storing session data in Redis or Firebase Auth, so any instance can handle any request. Implement connection pooling for MongoDB (default pool size of 100 is a good starting point) and adjust based on concurrent user load.
Use node cluster for multi-core utilization on a single machine.
Deploy behind a load balancer with health checks.
Scale MongoDB with sharding for write-heavy workloads.
Monitoring and Profiling with PM2, New Relic, and Firebase Performance
Continuous monitoring identifies bottlenecks before they impact users. PM2 is a production process manager for Node.js that provides built-in monitoring via pm2 monit, showing CPU and memory usage per process. Enable PM2’s --max-memory-restart flag to automatically restart instances that exceed thresholds. For deeper profiling, integrate New Relic’s Node.js agent, which traces database queries, external API calls, and slow transactions. New Relic highlights slow endpoints and provides distributed tracing across your backend services.
Firebase Performance Monitoring captures client-side and server-side metrics for Firebase functions and Firestore operations. Use it to track function execution times, HTTP response times, and network latency. Combine these tools to set up alerts: PM2 for process health, New Relic for transaction slowdowns, and Firebase Performance for end-user experience. Regularly review profiling data to optimize slow queries, add indexes in MongoDB, or refactor synchronous code in Node.js.
Frequently Asked Questions
What is the main difference between MongoDB and Firebase for backend development?
MongoDB is a general-purpose NoSQL database that you host yourself or use via MongoDB Atlas, offering rich querying and aggregation. Firebase is a Backend-as-a-Service (BaaS) from Google that provides a real-time database, authentication, hosting, and serverless functions. MongoDB gives you more control and flexibility, while Firebase accelerates development by handling infrastructure and providing built-in features like real-time sync and user authentication.
How do you integrate Node.js with MongoDB?
You integrate Node.js with MongoDB using the official MongoDB driver or Mongoose, an ODM (Object Document Mapper). First, install the driver via npm. Then, connect to your MongoDB instance (local or Atlas) using a connection string. Define schemas and models (especially with Mongoose) to structure your data. Finally, use methods like find(), insertOne(), updateOne(), and deleteOne() to perform CRUD operations within your Node.js application.
Can Firebase be used alongside Node.js and MongoDB?
Yes, you can use Firebase alongside Node.js and MongoDB. For example, you might use Firebase Authentication for user management and MongoDB for storing application-specific data. Firebase Cloud Functions can also be written in Node.js, allowing you to trigger backend logic in response to Firebase events or HTTP requests. This hybrid approach leverages Firebase’s ease of use for auth and real-time features while retaining MongoDB’s flexibility for complex data queries.
What are the best practices for securing a Node.js backend with MongoDB?
Best practices include: using environment variables for sensitive data (e.g., connection strings, API keys); implementing authentication and authorization (e.g., JWT); validating and sanitizing user inputs to prevent injection attacks; enabling MongoDB’s built-in authentication and using TLS/SSL for connections; applying the principle of least privilege for database users; and regularly updating dependencies to patch vulnerabilities.
How does Firebase Authentication work with Node.js backends?
Firebase Authentication provides backend SDKs for Node.js. You can verify ID tokens sent from client apps using the Firebase Admin SDK. The SDK validates the token’s signature, checks expiration, and extracts user claims. You can then use this verified user information to authorize requests in your Node.js server, integrating with your own user database or MongoDB for additional profile data.
What is the role of Express.js in Node.js backend development?
Express.js is a minimal and flexible Node.js web application framework that simplifies building APIs and web servers. It provides a robust set of features for handling HTTP requests, defining routes, and implementing middleware for tasks like logging, authentication, and error handling. Express is the de facto standard for Node.js backends and works seamlessly with both MongoDB and Firebase.
How do you deploy a Node.js backend with MongoDB and Firebase?
You can deploy a Node.js backend on platforms like Heroku, AWS Elastic Beanstalk, Google Cloud Run, or Vercel. MongoDB can be hosted on MongoDB Atlas. Firebase services (like Auth or Firestore) are managed by Google. For deployment, containerize your app with Docker, set environment variables, and configure CI/CD pipelines. Firebase Cloud Functions can also directly deploy Node.js functions to Google Cloud.
What are the advantages of using serverless functions with Firebase in a Node.js backend?
Serverless functions (Firebase Cloud Functions) eliminate server management, automatically scale based on demand, and charge only for execution time. They integrate tightly with Firebase services, enabling triggers from database changes, authentication events, and HTTP requests. This reduces operational overhead and speeds up development, especially for event-driven tasks like sending notifications or processing data.
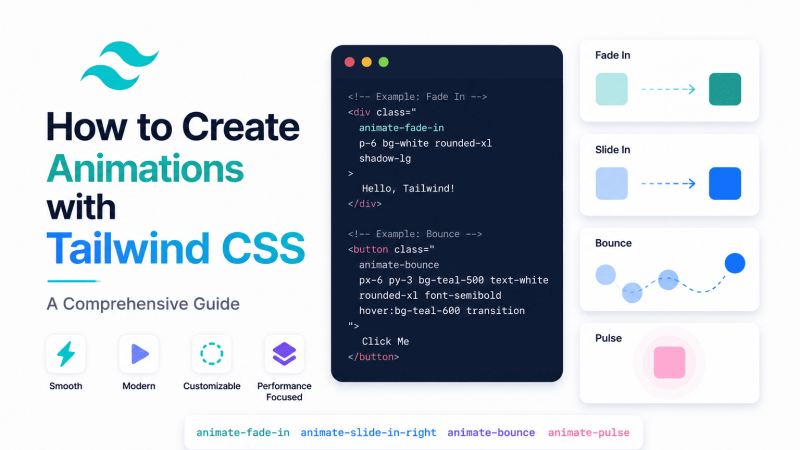
How to Create Animations with Tailwind CSS: A Comprehensive Guide
Introduction to Tailwind CSS Animations
Tailwind CSS offers a robust set of built-in animation utilities that allow developers to add motion to web projects quickly and efficiently, without writing custom CSS keyframes or transitions. These utilities are designed to work seamlessly with Tailwind’s utility-first approach, enabling you to apply animations directly in your HTML by adding simple classes. This guide explores how to create animations with Tailwind CSS, starting with an overview of the core concepts and benefits.
What Are Tailwind CSS Animations?
Tailwind CSS animations are pre-defined utility classes that correspond to standard CSS animation properties. They include classes for common effects like spinning, pulsing, bouncing, and fading, as well as the ability to customize animation duration, timing functions, delay, and iteration count. Each animation class maps to a specific set of CSS keyframes and properties, abstracting away the need to write complex CSS. For example, the class animate-spin applies a linear rotation animation, while animate-pulse creates a gentle opacity fade. Tailwind also provides the animate-none utility to disable animations when needed. The core animations available by default include:
animate-spin – continuous 360-degree rotation
animate-ping – scale and fade out effect
animate-pulse – subtle opacity oscillation
animate-bounce – vertical bouncing motion
animate-fade-in (customizable via configuration) – opacity transition from 0 to 1
These utilities are designed to be composable, meaning you can combine them with other Tailwind classes for layout, spacing, and colors to create rich, interactive interfaces.
Key Benefits of Using Tailwind for Animations
Using Tailwind CSS for animations offers several distinct advantages over traditional custom CSS approaches. Below is a summary of the primary benefits:
Benefit
Description
Rapid development
Apply animations with single utility classes directly in HTML, eliminating the need to write separate CSS files.
Consistent naming
All animation utilities follow Tailwind’s predictable naming conventions, making them easy to learn and remember.
Responsive and state variants
Use responsive prefixes (e.g., md:animate-spin) and state variants (e.g., hover:animate-pulse) for conditional animations.
Customizable via config
Extend or override default animations in tailwind.config.js to match project-specific needs.
Reduced bundle size
Only the animation utilities you use are included in the final CSS, thanks to Tailwind’s purge mechanism.
No CSS conflicts
Utility classes are scoped and avoid specificity wars common with hand-written animation CSS.
Additionally, Tailwind’s animation utilities integrate smoothly with frameworks like React, Vue, and Alpine.js, making them ideal for modern component-based architectures.
Prerequisites: Tailwind Setup and Configuration
Before you can start creating animations with Tailwind CSS, ensure your project meets the following requirements. First, you must have Tailwind CSS installed and configured. The recommended method is via npm or yarn:
For the animations to work, ensure your Tailwind configuration includes the necessary content paths so that the utility classes are detected. In tailwind.config.js, set the content array to point to your template files:
module.exports = {
content: ["./src/**/*.{html,js}"],
theme: {
extend: {
animation: {
// custom animations can be added here
}
}
},
plugins: []
}
If you are using a framework like Next.js or Vite, Tailwind integrates automatically via PostCSS. For a basic HTML project, you can also use the CDN version for testing, but for production, the npm setup is recommended to enable customizations and tree-shaking. Once configured, you can immediately apply animation classes to any element in your HTML. No additional CSS imports or keyframe definitions are needed for the default animations.
Tailwind CSS simplifies motion design by offering a set of pre-built animation utility classes. These classes allow you to add common, performant animations directly in your HTML without writing custom CSS keyframes. Each utility maps to a specific animation that can be further customized using Tailwind’s modifier system, making it easy to control timing, repetition, and easing.
The Built-in Animation Classes: animate-spin, animate-ping, animate-pulse, animate-bounce
Tailwind provides four default animation utilities, each designed for a distinct visual purpose. These classes are applied directly to an element using the animate-{name} syntax.
animate-spin: Rotates the element 360 degrees linearly. Commonly used for loading spinners or progress indicators. Example: <div class="animate-spin">...</div>.
animate-ping: Creates a scaling and fading effect, like a radar ping. Ideal for notification badges or location markers. The element scales up while its opacity drops to zero.
animate-pulse: Gently fades the element in and out. Often used for skeleton loaders or subtle attention-grabbing elements.
animate-bounce: Makes the element bounce up and down with a natural, spring-like motion. Useful for call-to-action buttons or playful UI elements.
These classes are optimized for performance using CSS transform and opacity properties, which are GPU-accelerated in modern browsers.
How Tailwind Maps Utility Classes to CSS Keyframes
Each Tailwind animation utility is backed by a corresponding CSS @keyframes rule defined in your configuration. For example, the animate-spin class maps to the following keyframe:
@keyframes spin {
to { transform: rotate(360deg); }
}
Similarly, animate-ping uses a scale and opacity keyframe, animate-pulse uses opacity changes, and animate-bounce uses a series of translateY steps. When you add animate-spin to an element, Tailwind generates the equivalent CSS rule with a default duration of 1 second, infinite iteration, and linear easing. You can inspect these defaults in your browser’s developer tools or by extending the theme in your tailwind.config.js file.
Customizing Animation Duration, Delay, and Easing with Tailwind
Tailwind makes it straightforward to override the default timing of any animation using its built-in utility modifiers. You can adjust duration, delay, and easing without writing custom CSS.
Duration: Use duration-{value} classes like duration-500 (500ms) or duration-1000 (1 second). Example: <div class="animate-spin duration-2000">...</div> slows the spin to 2 seconds.
Delay: Use delay-{value} classes such as delay-300 (300ms delay before animation starts). Example: <div class="animate-bounce delay-500">...</div>.
Easing: Use ease-{type} classes like ease-linear, ease-in, ease-out, or ease-in-out. Default is ease-linear for spin and ping; pulse and bounce use custom easings. Example: <div class="animate-pulse ease-in-out">...</div>.
You can also combine these modifiers. For a practical example, a button with a delayed, slower bounce:
This code applies a bounce animation that lasts 1.5 seconds, starts after a 200ms delay, and uses an easing-out curve for a smooth deceleration. Tailwind’s utility-first approach ensures that all timing values remain consistent with your design system.
Creating Custom Animations with Tailwind’s Configuration
Tailwind CSS provides a robust set of built-in animation utilities, but real-world projects often require unique motion designs. By extending Tailwind’s theme configuration in tailwind.config.js, you can define custom keyframes and map them to reusable utility classes. This approach keeps your animations consistent, maintainable, and directly accessible through HTML classes. Below is a step-by-step guide to crafting your own animations.
Adding New Keyframes in the Extend Section
Begin by opening your tailwind.config.js file and locating the theme.extend object. Inside this object, add a keyframes property where you define each animation’s stages using percentage-based or from/to syntax. For example, to create a subtle “float” effect that moves an element upward and back:
Each keyframe name (e.g., float) becomes a reference for the animation utility. You can define multiple keyframes sets, each with its own sequence of transforms, opacity changes, or other CSS properties. Tailwind merges these with its default keyframes, so you retain access to built-in animations like spin or pulse.
Mapping Keyframes to Custom Animation Utilities
After defining keyframes, you must map them to animation utilities within the same extend block. Add an animation property that pairs a utility name with keyframe details, including duration, timing function, and iteration count. For instance:
Here, float-slow and float-fast become new utility classes. The syntax follows: 'utility-name': 'keyframe-name duration timing-function iteration-count'. You can also add other properties like delay or direction by appending them (e.g., 'float 3s ease-in-out infinite 1s'). This mapping allows you to reuse the same keyframes with different timings, giving you flexibility without duplicating motion definitions.
Once configured, apply your custom animations directly in HTML using the utility class names. For example, to animate a card with the slow float effect:
You can combine animations with other Tailwind utilities like hover: or motion-safe: to control behavior. For instance, hover:animate-float-fast triggers a faster float on mouse hover. Tailwind’s responsive prefixes also work: md:animate-float-slow applies the animation only on medium screens and above. This modular approach ensures your animations remain performant and accessible.
The table below compares key differences between built-in and custom animations in Tailwind CSS:
Feature
Built-in Animations
Custom Animations
Configuration
Predefined in Tailwind’s default theme
Defined manually in tailwind.config.js
Flexibility
Limited to provided keyframes (e.g., spin, ping)
Unlimited; supports any CSS keyframe sequence
Reusability
Accessible via classes like animate-spin
Accessible via custom class names (e.g., animate-float-slow)
Performance
Optimized for common use cases
Equally performant when using GPU-accelerated properties
By mastering these configuration steps, you can create tailored animations that align with your design system. Custom animations reduce redundant CSS, improve collaboration through consistent naming, and allow precise control over motion timing—all within Tailwind’s utility-first workflow.
Combining Animations with Tailwind’s Variants and States
Tailwind CSS provides a powerful system of variants and states that let you control when animations occur. By combining animation utilities with these conditional triggers, you can create interactive, responsive, and context-aware motion effects without writing custom CSS. This approach keeps your code declarative and maintainable while delivering polished user experiences.
Applying Animations on Hover and Focus
The most common way to trigger animations conditionally is through hover and focus states. Tailwind’s hover: and focus: prefixes work with any animation utility class, such as animate-pulse, animate-bounce, or your custom animate-* classes defined in the tailwind.config.js file.
For example, you might want a button to pulse when hovered or a form input to shake on focus. Here is a practical code example:
Key considerations when using state-based animations:
Performance: Use lightweight animations like animate-pulse or animate-spin for hover/focus to avoid jank. Heavy animations may cause re-layouts.
Accessibility: Respect the prefers-reduced-motion media query. Tailwind’s motion-safe: and motion-reduce: variants let you disable animations for users who prefer less motion.
Specificity: State variants override base animations. If a class has animate-bounce and hover:animate-pulse, hovering will show the pulse, not the bounce.
Duration: Consider adding duration-* utilities (e.g., duration-300) to control animation speed on state changes.
Using Group Variants for Parent-Child Animations
Tailwind’s group variants enable parent-triggered animations on child elements. When you add the group class to a parent container, you can use group-hover:, group-focus:, or group-active: on child elements to animate them when the parent state changes. This is ideal for cards, navigation items, or any component where a child should react to interactions on its container.
Example: a card that rotates an icon when the card itself is hovered:
<div class="group p-4 border rounded-lg hover:shadow-lg">
<svg class="w-6 h-6 group-hover:animate-spin transition-transform">
<!-- icon path -->
</svg>
<p class="mt-2">Hover the card to spin the icon</p>
</div>
Use group-focus: for keyboard accessibility—animations trigger when the parent receives focus.
Combine with transition-* utilities for smooth state changes, especially when animating transforms or opacity alongside Tailwind’s built-in animations.
Nest groups carefully; only one level of group is supported per parent-child relationship.
Test with group-active: for momentary feedback on click or tap events.
Animating with Dark Mode and Responsive Breakpoints
Tailwind’s dark mode and responsive variants (sm:, md:, lg:, xl:) let you control animations based on system preferences or viewport size. This is useful for adapting motion to different contexts without duplicating code.
For dark mode, use the dark: variant to apply animations only when the user’s system is in dark mode. Example: a subtle glow animation on a dark theme button:
For responsive breakpoints, you can enable animations on larger screens while disabling them on mobile to conserve battery or reduce visual clutter. Example: a spinning loader that only appears on desktop:
Stack variants in order: dark:lg:hover:animate-pulse means the animation applies only in dark mode, on large screens, and when hovered.
Use motion-safe: and motion-reduce: as base or variant prefixes to respect user accessibility settings across all breakpoints.
Avoid animating layout properties (like width or height) on responsive variants—stick to transforms, opacity, or Tailwind’s pre-built animations for best performance.
Test each combination in browser DevTools to ensure animations trigger as expected, especially when multiple states (hover + dark mode + responsive) overlap.
Animating Transitions with Tailwind’s Transition Utilities
Tailwind CSS offers a robust set of utility classes for creating smooth, performant transitions between property states. Unlike keyframe-based animations, transitions are triggered by state changes (such as hover, focus, or class toggling) and animate property modifications over a specified duration. This approach is ideal for subtle UI interactions, feedback cues, and polished micro-interactions that enhance user experience without the complexity of custom keyframes.
Setting Up Transitions: transition, duration-*, delay-*, ease-*
To enable a transition, add the transition class to an element. This class applies a default transition effect to all animatable properties. From there, you control the timing and behavior using companion utilities:
duration-{value}: Sets the animation duration. Available values include 75, 100, 150, 200, 300, 500, 700, and 1000 (milliseconds). For example, duration-300 creates a 300ms transition.
delay-{value}: Adds a delay before the transition starts. Same value range as duration, e.g., delay-150 adds 150ms delay.
ease-{value}: Controls the acceleration curve. Options are ease-linear, ease-in, ease-out, and ease-in-out (default).
Combine these utilities to fine-tune transitions. For instance, a button with transition duration-200 ease-out will have a 200ms transition with a smooth deceleration. The table below summarizes common configurations:
Utility
Example Class
Effect
Base transition
transition
Enables transitions for all properties
Duration
duration-500
500ms transition length
Delay
delay-200
200ms start delay
Ease
ease-in
Accelerates at start
Animating Specific Properties: transition-all vs. transition-colors
Tailwind provides property-specific transition classes to optimize performance and prevent unintended animations. The key distinction is between broad and narrow property targeting:
transition-all: Animates every changeable CSS property. Convenient but can cause performance issues with layout-triggering properties like width or margin. Use sparingly.
transition-colors: Animates only color-related properties (color, background-color, border-color, etc.). Other property-specific options include transition-opacity, transition-shadow, transition-transform, and transition-spacing.
For most UI interactions, prefer property-specific transitions. For example, to animate only background color changes: transition-colors duration-300. This avoids animating other properties like padding or font-size, which could cause layout shifts. Use transition-all only when you need multiple properties to animate together (e.g., a card that scales and changes shadow simultaneously).
Practical Examples: Button Hover Effects and Panel Slides
Button Hover Effects: Create a primary button that smoothly changes background and text color on hover. Apply transition-colors duration-200 ease-in-out to a button with classes bg-blue-500 and text-white. On hover, use hover:bg-blue-700 and hover:text-gray-200. The color transition will be smooth over 200ms.
For a more dynamic effect, add a transform with transition-transform duration-200 and hover:scale-105. This scales the button slightly while colors change. The combined classes would be: transition-colors transition-transform duration-200 hover:bg-blue-700 hover:text-gray-200 hover:scale-105.
Panel Slides: For a collapsible panel, use transition-all duration-300 ease-in-out on the panel container. Toggle a class like max-h-0 to max-h-96 (or a specific pixel value) to animate height. Pair with overflow-hidden to prevent content overflow during collapse. The transition will smoothly expand or collapse the panel. For slide-in effects, combine transition-transform duration-400 with translate-x-full (hidden) and translate-x-0 (visible) states. Toggle the visibility class to slide the panel in from the right edge.
Advanced Animation Techniques with Tailwind CSS
Moving beyond basic transitions and simple keyframe animations, Tailwind CSS provides a robust utility-first approach for creating sophisticated motion designs. Advanced techniques such as staggered animations, infinite loops, and multi-step sequences allow developers to craft engaging user interfaces without leaving the HTML. This section explores how to leverage Tailwind’s built-in utilities and custom configurations to implement these complex patterns efficiently.
Creating Staggered Animations with Animation Delay
Staggered animations—where multiple elements animate sequentially rather than simultaneously—add a polished, professional feel to page loads, list appearances, or gallery reveals. Tailwind does not include a default animation-delay utility, but you can easily extend the theme configuration to add delay variants. Here is a practical example for a list of three items that fade in one after another.
First, add custom delay values to your tailwind.config.js file:
Then, in your HTML, apply the animate-fadeIn class (assuming you have defined a fadeIn keyframe) along with animation-delay-100, animation-delay-200, and animation-delay-300 to consecutive elements. This creates a cascading entrance effect. For example:
First item: class="animate-fadeIn animation-delay-100"
Second item: class="animate-fadeIn animation-delay-200"
Third item: class="animate-fadeIn animation-delay-300"
You can also use Tailwind’s arbitrary value syntax directly in the class: class="animate-fadeIn [animation-delay:200ms]" for one-off delays without configuration changes. This approach keeps your code declarative and maintainable.
Implementing Infinite and Looping Animations
Tailwind’s animate-spin, animate-ping, animate-pulse, and animate-bounce classes are preconfigured to loop infinitely by default. For custom animations, you can add the infinite keyword to the animation property. In your configuration, define a custom keyframe and set its iteration count to infinite. For instance, a slow, continuous rotation effect can be created as follows:
Apply animate-slow-spin to any element. For finer control, you can use the arbitrary value syntax to adjust duration or iteration count on the fly: class="animate-spin [animation-duration:4s] [animation-iteration-count:infinite]". This is especially useful for loading indicators, attention-grabbing icons, or decorative elements that require persistent motion.
Building Multi-Step Animations with Custom Keyframes
Multi-step animations involve sequences of state changes—such as scaling, rotating, and translating—within a single animation cycle. Tailwind’s keyframe configuration supports multiple percentage stops, enabling complex choreography. Below is an example of a “bounce-in and shake” animation for a button or notification badge.
Use animate-bounce-shake to trigger the full sequence. For more advanced needs, combine multiple keyframes by chaining animations in the animation property—for example, animation: 'bounce-shake 0.6s, fadeIn 0.3s'—to run sequences in parallel or series. This technique is ideal for micro-interactions, such as form submission confirmations or card hover effects, where multiple visual changes must feel cohesive.
To summarize these advanced techniques, refer to the table below for quick comparison:
Technique
Key Utility
Common Use Case
Staggered animations
animation-delay (custom or arbitrary)
List entries, gallery grids
Infinite loops
infinite keyword in animation config
Loading spinners, pulsing buttons
Multi-step sequences
Custom keyframes with multiple stops
Micro-interactions, notification alerts
By mastering these patterns, you can create rich, performant animations that enhance user experience without sacrificing code clarity or relying on external libraries.
Integrating Tailwind Animations with JavaScript Frameworks
Tailwind CSS animations become significantly more powerful when combined with JavaScript frameworks, enabling dynamic, state-driven motion. This integration allows you to trigger animations based on user interactions, data changes, or lifecycle events, moving beyond simple static classes. Below, we explore how to achieve this in React, Vue, and Alpine.js, focusing on practical implementation patterns.
Animating with React: Conditional Classes and Framer Motion
In React, the most straightforward approach is to conditionally apply Tailwind animation classes using state or props. For example, toggling a animate-pulse class on a button when loading:
State-driven classes: Use className={`${isLoading ? 'animate-pulse' : ''}`} to control animations via boolean state.
CSS transitions: Combine Tailwind’s transition utilities with React’s useState for simple enter/leave effects, like fading a modal in with opacity-0 and opacity-100.
Framer Motion integration: For complex sequences, use Framer Motion’s motion components while keeping Tailwind for base styling. Example: <motion.div initial={{ opacity: 0 }} animate={{ opacity: 1 }} className="bg-blue-500 p-4">. This preserves Tailwind’s utility classes while leveraging Framer’s animation engine.
Framer Motion excels at orchestrating staggered animations or gesture-based interactions, but Tailwind handles the visual design layer. For instance, a list item can slide in using initial={{ x: -100 }} while retaining Tailwind’s rounded-lg shadow classes.
Vue.js provides built-in <Transition> and <TransitionGroup> components that pair seamlessly with Tailwind’s animation utilities. The key is to define custom transition classes that map to Tailwind’s naming:
Vue Transition Hook
Tailwind Class Example
Effect
enter-from
opacity-0 scale-95
Start state (invisible, slightly scaled down)
enter-active
transition duration-300 ease-out
Transition properties during entry
leave-to
opacity-0 scale-95
End state for leaving animation
leave-active
transition duration-200 ease-in
Transition properties during exit
Implementation example: <Transition enter-from-class="opacity-0" enter-active-class="transition duration-300" leave-to-class="opacity-0">. This keeps your JavaScript clean while using Tailwind for all motion styling.
Alpine.js x-transition and Tailwind Integration
Alpine.js offers a declarative x-transition directive that directly accepts Tailwind classes without extra configuration. This makes it ideal for rapid prototyping. Common patterns include:
Slide and scale: Combine transform utilities: x-transition:enter-start="opacity-0 translate-y-4 scale-95"
Conditional animations: Use x-show with x-transition to animate elements based on Alpine state, like toggling a dropdown with x-data="{ open: false }".
Alpine’s approach eliminates the need for JavaScript logic, as x-transition automatically applies enter/leave classes. This is especially useful for simple UI elements like tooltips, modals, or accordions where Tailwind’s animation utilities are sufficient.
Performance Optimization for Tailwind Animations
Creating animations with Tailwind CSS that remain smooth across devices requires deliberate performance optimization. Without proper care, even simple animations can cause jank, stuttering, or excessive battery drain. The key is to leverage GPU acceleration, avoid costly property changes, and systematically test your work. Below are three essential practices to ensure your Tailwind animations run efficiently.
Using will-change and Transform for GPU Acceleration
Modern browsers can offload certain rendering tasks to the GPU, which significantly improves animation smoothness. To enable this in Tailwind, use the will-change utility class to hint at which properties will animate. For example, class="will-change-transform" tells the browser to prepare for transform-based animations. Combine this with Tailwind’s transform utilities (like scale-110, translate-x-5, or rotate-45) to animate only properties that trigger compositing—not layout or paint. This approach keeps the main thread free and avoids layout thrashing.
Best practice: Apply will-change sparingly and only to elements that will animate continuously (e.g., hover effects, loading spinners). Overusing it can consume memory and actually degrade performance. For discrete, one-time animations (like fade-ins on page load), you may omit will-change entirely.
Avoiding Animations on Expensive Properties (e.g., width, height)
Animating properties like width, height, margin, padding, or top/left forces the browser to recalculate layout and repaint each frame—a process known as reflow. This is computationally expensive and causes visible jank, especially on mobile devices. Instead, animate only transform and opacity, which are compositor-only properties. For example, to create a “grow” effect, use scale() rather than changing width from 100px to 200px. The following table compares performance characteristics of common CSS properties:
In Tailwind, this means preferring classes like hover:scale-110 over hover:w-48 for size changes, and hover:translate-x-2 over hover:ml-4 for position shifts.
Testing and Profiling Animation Performance in the Browser
Even with best practices, real-world performance varies. Use browser developer tools to verify your animations run at 60 frames per second (fps) without dropped frames. In Chrome or Edge, open the Performance panel (Ctrl+Shift+I, then “Performance” tab) and record while the animation runs. Look for long tasks (over 50ms) and areas highlighted in red under “Rendering” or “Painting.” For Tailwind-specific debugging, inspect the animated element to confirm only transform and opacity are changing—not width or height. The “Layers” panel (in Chrome’s Rendering tab) can also show if the element is promoted to a compositor layer. If you see frequent layout recalculations, refactor the animation to use GPU-friendly properties. A simple test: if the animation stutters on a mid-range smartphone, it likely needs optimization.
Common Pitfalls and Troubleshooting Tailwind Animations
Even with Tailwind CSS’s streamlined utility classes, animations can sometimes fail to behave as expected. Most issues stem from CSS specificity, class ordering, or unintended interactions with other properties. Below are the most frequent problems and their solutions, helping you debug and refine your animated interfaces.
Animations Not Playing: Check Class Order and Specificity
If your animation class appears to be applied but the element remains static, the culprit is often class order or specificity conflicts. Tailwind applies styles based on the cascade; if a utility like animate-spin is placed before a static utility like opacity-100 in the same HTML element, the later class might override the animation. More commonly, custom CSS defined elsewhere—or even Tailwind’s own transition utilities—can block animation properties.
To fix this, follow these checks:
Ensure the animation class is listed last among conflicting utilities on the same element. For example, use class="opacity-50 hover:opacity-100 animate-pulse" rather than placing animate-pulse first.
Inspect computed styles in your browser’s DevTools to verify that animation-name is not crossed out or overridden.
Avoid mixing transition and animate-* on the same property (e.g., transition-opacity with animate-pulse). If needed, use transition-none to disable transitions on that element.
For a practical example, here is a corrected button that animates without interference:
Note that transition-colors is safe here because it targets background-color, while animate-bounce affects transform. If both targeted transform, the transition would override the animation.
Dealing with Overlapping Animations and Transitions
When an element has both a Tailwind animation (e.g., animate-spin) and a transition (e.g., transition-transform), they can compete for control of the same CSS properties. This often results in jittery behavior, incomplete animations, or one effect completely suppressing the other.
Separate properties deliberately. Use animations for continuous, keyframe-driven motion (e.g., rotation, pulsing) and transitions for user-initiated state changes (e.g., hover, focus).
Disable transitions on animated elements by adding transition-none when an animation is active. You can toggle this with JavaScript or Tailwind’s group and peer modifiers.
Use Tailwind’s motion-* variants to conditionally apply animations only when motion is preferred, reducing conflicts with static transitions.
If you must combine both, ensure the transition targets a different property than the animation. For example, animate opacity with animate-pulse while transitioning background-color with transition-colors.
Animations can cause discomfort or vestibular issues for users with motion sensitivities. Tailwind provides built-in support for the prefers-reduced-motion media query through the motion-safe and motion-reduce variants. Ignoring this is a common pitfall that makes animations inaccessible.
Follow these guidelines to respect user preferences:
Apply animations with motion-safe: prefix to ensure they only play when the user has no motion preference. Example: class="motion-safe:animate-spin".
Use motion-reduce: to define fallback styles, such as a static visual cue or a subtle opacity change, for users who prefer reduced motion.
Test your animations by enabling “Reduce motion” in your operating system or browser DevTools (e.g., Chrome’s Rendering tab).
Here is a table summarizing the recommended approach:
By consistently using these variants, you ensure your animations enhance the experience without excluding users who need a calmer interface.
Real-World Examples and Use Cases
This section demonstrates how to apply Tailwind CSS animation utilities to common interface elements. Each example is production-ready and requires only standard Tailwind classes—no custom CSS. Focus on the core patterns: utility-first timing, color customization, and responsive control.
Building a Spinner Loader with animate-spin and Custom Colors
The animate-spin utility provides a continuous 360-degree rotation. To create a branded loader, combine it with border-based shapes and color classes. The following example uses a circular spinner with a transparent border and a colored top edge.
Base structure: Apply animate-spin to a square element with rounded-full and border-4.
Color customization: Use border-t-blue-600 for the active segment and border-gray-200 for the rest.
Sizing: Control dimensions with h-8 w-8 (small), h-12 w-12 (medium), or h-16 w-16 (large).
Accessibility: Add aria-label="Loading" and role="status" for screen readers.
For a branded variant, replace border-t-blue-600 with your brand color (e.g., border-t-emerald-500). The animation speed is fixed, but you can override it in a Tailwind config if needed.
Notification toasts benefit from smooth slide-in and fade-in effects. Tailwind’s transition and animation utilities handle this without JavaScript for the visual layer—only a class toggle is needed for triggering.
Property
Tailwind Classes
Purpose
Initial state
opacity-0 -translate-y-4
Hidden above viewport
Visible state
opacity-100 translate-y-0
Slides down and becomes opaque
Timing
transition-all duration-500 ease-out
Smooth 500ms easing
Dismiss
opacity-0 translate-x-full
Slides out to the right
Implementation steps:
Wrap the toast in a container with fixed top-4 right-4 z-50.
Apply transition-all duration-500 ease-out to the toast element.
Toggle a class like translate-y-0 opacity-100 to show, and translate-x-full opacity-0 to hide.
Use bg-white shadow-lg rounded-lg p-4 for visual styling.
This pattern works for success, error, or info toasts. Adapt the background color with utilities like bg-green-50 border-l-4 border-green-500 for semantic feedback.
Landing pages benefit from staggered entry animations that guide the user’s eye. Tailwind’s animate-fade-in and animate-slide-up (from the default theme) can be combined with custom delays using delay-[*] utilities.
Fade-in effect: Use animate-fade-in on section containers. This provides a 500ms opacity transition from 0 to 1.
Slide-up variant: Combine animate-slide-up with translate-y-0 for elements that rise into place.
Staggered delays: Apply delay-100, delay-200, delay-300 to child elements for sequential reveals.
Responsive control: Use motion-safe:animate-fade-in to respect user motion preferences.
Practical layout example: For a hero section with a headline, subtext, and button, apply animate-fade-in to the parent container, then add delay-100 to the headline, delay-200 to the subtext, and delay-300 to the button. This creates a natural reading flow.
Always test animations on slower connections and devices. Use motion-reduce:animate-none on the parent to disable all child animations for users who prefer reduced motion. These snippets integrate directly into any Tailwind project and require no extra configuration beyond the default theme.
Frequently Asked Questions
What is Tailwind CSS and how does it handle animations?
Tailwind CSS is a utility-first CSS framework that provides low-level utility classes for rapid UI development. For animations, it offers built-in classes like `animate-spin`, `animate-ping`, `animate-pulse`, and `animate-bounce`. You can also create custom animations using the `animation` property in your Tailwind config file, defining keyframes and durations. This approach keeps your CSS small and reusable while allowing fine-grained control over timing, easing, and iteration.
How do I add a basic fade-in animation with Tailwind?
To add a fade-in animation, first define a custom animation in `tailwind.config.js` under `theme.extend.animation` and `keyframes`. For example: `fadeIn: { '0%': { opacity: '0' }, '100%': { opacity: '1' } }`. Then use the class `animate-fadeIn` on your element. You can control duration and delay with utility classes like `duration-500` (500ms) or `delay-200`. For a simple hover fade, use `transition-opacity duration-300` and `hover:opacity-100`.
Can I combine multiple animations on one element?
Yes, you can combine multiple animations by using Tailwind's arbitrary value syntax or by defining a single animation that includes multiple keyframe sequences. For example, use `animate-[fadeIn_1s_ease-in-out,slideUp_0.5s_ease-out]` in the class attribute. Alternatively, define a compound animation in your config that applies both transforms and opacity changes. Note that performance may degrade with many simultaneous animations, so test on target devices.
How do I create a scroll-triggered animation with Tailwind?
Tailwind does not include scroll-triggered animations natively, but you can combine it with Intersection Observer API or libraries like AOS (Animate On Scroll). For a custom solution, add a JavaScript observer that toggles a Tailwind class like `opacity-0 translate-y-4` to `opacity-100 translate-y-0` when an element enters the viewport. Use `transition-all duration-700` for smooth animation. Tailwind's `motion-safe:` variant can respect user preferences.
What are the best practices for animation performance in Tailwind?
To optimize animation performance, prefer animating `transform` and `opacity` properties as they are GPU-accelerated. Avoid animating `width`, `height`, or `margin` which trigger layout recalculations. Use `will-change` sparingly (e.g., `will-change-transform`) to hint at changes. Tailwind's `duration-`, `ease-`, and `delay-` utilities let you fine-tune timing. Always test on low-end devices and respect `prefers-reduced-motion` using Tailwind's `motion-reduce:` variant to disable or simplify animations.
How do I create a loading spinner with Tailwind?
Tailwind includes a built-in `animate-spin` class for linear rotation. Use it on an SVG or a div with a border: “. Customize speed by adding `duration-1000` (1 second) or using arbitrary values like `animate-[spin_2s_linear_infinite]`. For a pulsing spinner, combine `animate-pulse` with opacity transitions.
Yes, Tailwind animations work seamlessly with React, Vue, and other frameworks because they are just CSS classes. In React, you can conditionally apply animation classes using state and libraries like `framer-motion` for complex sequences. For Vue, use `:class` binding with reactive data. Tailwind's purge feature ensures only used animation classes are included in production. Both frameworks support transition groups for enter/leave animations.
How do I create a custom keyframe animation in Tailwind?
In your `tailwind.config.js`, add a `keyframes` object under `theme.extend` and an `animation` object referencing it. For example: `keyframes: { wiggle: { '0%, 100%': { transform: 'rotate(-3deg)' }, '50%': { transform: 'rotate(3deg)' } } }, animation: { wiggle: 'wiggle 1s ease-in-out infinite' }`. Then use `animate-wiggle` in HTML. You can also use arbitrary values: `animate-[wiggle_1s_ease-in-out]` without defining it in config.
Node.js vs. PHP: Which Backend Technology to Choose?
Introduction: The Backend Dilemma in Modern Web Development
The choice between Node.js and PHP represents one of the most consequential decisions in modern backend development. Both technologies power millions of websites and applications, yet they approach the server-side challenge from fundamentally different angles. PHP, born in 1994, emerged as a straightforward scripting language designed to make dynamic web pages accessible to hobbyists and professionals alike. Node.js, arriving in 2009, introduced JavaScript to the server, promising non-blocking, event-driven architecture that could handle thousands of concurrent connections with ease. For developers, CTOs, and project managers, understanding this dichotomy is not merely academic—it directly affects development speed, application performance, team hiring, and long-term maintenance costs.
A Brief History of PHP and Node.js
PHP began as a set of Common Gateway Interface (CGI) binaries created by Rasmus Lerdorf, evolving into a full scripting language by 1997. Its simplicity allowed developers to embed code directly into HTML, making it the dominant force behind early content management systems like WordPress, Drupal, and Joomla. PHP’s philosophy has always prioritized ease of use and rapid deployment, with a vast ecosystem of pre-built solutions. Node.js, developed by Ryan Dahl, was a response to the limitations of traditional web servers that created a new thread for each connection. By leveraging Google’s V8 JavaScript engine, Node.js introduced an event loop that handled I/O operations asynchronously, drastically reducing overhead. This architectural shift made Node.js particularly attractive for real-time applications, APIs, and microservices.
Why Backend Technology Choice Impacts Performance and Scalability
The backend technology you select dictates how your application handles traffic, processes data, and manages resources. PHP traditionally operates with a blocking, synchronous model: each request spawns a new process or thread, which can lead to memory exhaustion under high concurrency. Modern PHP versions (7.x and 8.x) have improved performance significantly through just-in-time compilation and optimized opcode caching, but the fundamental architecture remains request-synchronous. Node.js, in contrast, uses a single-threaded event loop that delegates I/O tasks to the operating system, allowing it to handle tens of thousands of concurrent connections without proportional increases in memory. This makes Node.js inherently more scalable for I/O-heavy workloads like chat applications, live streaming, or collaborative tools. However, CPU-intensive operations can block the event loop, degrading performance unless handled with worker threads or external services.
Who This Article Is For: Developers, CTOs, and Project Managers
Developers seeking clarity on which technology aligns with their current skill set and project requirements.
CTOs and technical leads evaluating long-term maintainability, hiring pipelines, and ecosystem maturity for their teams.
Project managers who need to understand trade-offs in development speed, deployment complexity, and scalability before making architectural decisions.
Each audience will find actionable insights throughout this comparison, from code examples to deployment considerations. The goal is not to declare a universal winner, but to equip decision-makers with the knowledge to choose based on specific project needs, team expertise, and business goals.
When evaluating backend technologies, runtime performance and execution speed are critical factors that directly impact user experience and server costs. Node.js and PHP approach these metrics from fundamentally different architectural paradigms, making direct comparisons nuanced. Node.js relies on an event-driven, non-blocking I/O model, while PHP traditionally executes synchronously, though modern versions have introduced significant optimizations to close the gap. Understanding these differences helps developers choose the right tool for specific workloads, from API-heavy applications to content-driven websites.
Node.js Event Loop and Non-Blocking I/O Explained
Node.js operates on a single-threaded event loop that handles all incoming requests asynchronously. When a request triggers an I/O operation—such as reading a file, querying a database, or calling an external API—Node.js does not wait for completion. Instead, it registers a callback and continues processing other requests. Once the I/O operation finishes, the callback is placed into the event queue, and the event loop executes it when the call stack is empty. This non-blocking model allows Node.js to handle thousands of concurrent connections with minimal overhead, as there is no per-request thread creation or context switching. For example, a simple HTTP server using Node.js can serve multiple requests simultaneously without blocking:
This code demonstrates how Node.js can process other requests while waiting for the file system. The event loop remains responsive, making Node.js particularly effective for I/O-bound tasks, such as real-time applications, streaming services, and REST APIs with frequent database calls.
PHP’s Synchronous Execution Model with Modern Optimizations (JIT, OPcache)
PHP traditionally follows a synchronous execution model. Each request spawns a new process or thread (depending on the server configuration, such as mod_php for Apache or PHP-FPM for Nginx). The script executes line by line, blocking on I/O operations like database queries or file reads until they complete. This model is simpler to reason about and debug, but historically limited concurrency and throughput under high load. Modern PHP has introduced significant optimizations to mitigate these limitations:
OPcache: Compiles PHP scripts into opcode and caches them in shared memory, eliminating the need to recompile on every request. This reduces CPU overhead for script parsing and compilation by up to 70%.
JIT (Just-In-Time) Compilation: Introduced in PHP 8.0, JIT compiles frequently executed code paths into native machine code at runtime. This dramatically speeds up CPU-intensive tasks, such as mathematical computations or image processing, by reducing interpretation overhead.
PHP-FPM with Process Pooling: Manages a pool of worker processes that can handle multiple requests concurrently, improving throughput compared to traditional CGI-based setups.
Despite these improvements, PHP’s synchronous core still means that a single slow I/O operation blocks the entire process for that request. For high-concurrency I/O scenarios, PHP often relies on additional tools like ReactPHP or Swoole to introduce asynchronous capabilities, though these are not part of the default runtime.
Benchmarking Scenarios: API Requests, File I/O, and Concurrent Users
Real-world benchmarks reveal how each technology performs under common backend tasks. The following table summarizes typical scenarios and observed performance characteristics:
Moderate throughput; latency increases with concurrent users
Node.js excels due to non-blocking I/O; PHP slower under heavy load
File I/O (reading/writing large files)
Non-blocking; handles multiple files without blocking
Blocking per request; sequential processing within each process
Node.js significantly faster for concurrent file operations
Concurrent Users (1000 simultaneous)
Handles easily with low memory; event loop scales well
Requires more processes; higher memory usage; risk of process exhaustion
Node.js more efficient for high concurrency; PHP needs tuning
For CPU-bound tasks, PHP with JIT can match or even exceed Node.js performance, especially in scenarios like template rendering or complex data processing. However, for most modern web applications that involve significant I/O—such as database queries, API calls, or file uploads—Node.js typically offers faster execution speed and better resource utilization under load. The choice ultimately depends on whether your application is I/O-heavy or CPU-heavy, and whether you prioritize raw throughput or predictable synchronous execution.
Scalability: Handling Growth with Node.js and PHP
Scalability determines how well a backend technology can accommodate increasing traffic, data volume, and user demands without degrading performance. Node.js and PHP approach growth from fundamentally different architectural perspectives, each with distinct strengths for specific scaling scenarios. Node.js excels at handling concurrent, real-time connections through its event-driven, non-blocking I/O model, while PHP traditionally relies on a process-per-request model that can be scaled horizontally with proper tooling. Understanding these differences is critical for choosing the right technology for high-traffic applications.
Node.js Clustering and Load Balancing for Real-Time Apps
Node.js runs on a single thread by default, but its built-in cluster module enables horizontal scaling by forking multiple worker processes that share the same server port. Each worker handles incoming requests independently, effectively utilizing multi-core CPUs. This is particularly beneficial for real-time applications—such as chat systems, live dashboards, and online gaming—where maintaining persistent connections and low latency is essential. Load balancing across workers can be achieved with a round-robin approach (default on non-Windows systems) or via external tools like NGINX. Additionally, Node.js’s event loop and asynchronous I/O allow a single worker to manage thousands of concurrent connections, making clustering a lightweight yet powerful scaling technique for I/O-bound workloads.
PHP’s Shared-Nothing Architecture with Laravel and Symfony
PHP’s traditional shared-nothing architecture means each request is handled by an isolated process, with no shared memory or state between them. This design simplifies horizontal scaling: you can add more servers behind a load balancer without worrying about inter-process communication or state synchronization. Modern PHP frameworks like Laravel and Symfony enhance this by providing built-in support for queue systems (e.g., Redis, Beanstalkd) and caching layers (e.g., Memcached, Redis) to offload heavy tasks. For example, Laravel Horizon offers a scalable queue management dashboard with auto-scaling workers. However, PHP’s process-per-request model can become resource-intensive under high concurrency, especially for long-lived connections, as each request consumes a full process thread. To mitigate this, PHP-FPM (FastCGI Process Manager) allows dynamic process management, adjusting the number of child processes based on traffic. Despite these optimizations, PHP is generally better suited for CPU-bound or traditional request-response workloads rather than real-time, high-concurrency scenarios.
Cloud and Containerization: Docker, Kubernetes, and Serverless Deployments
Both Node.js and PHP benefit significantly from modern cloud and containerization technologies, which abstract infrastructure complexity and enable elastic scaling. Docker containers encapsulate applications with their dependencies, ensuring consistency across development and production environments. Kubernetes orchestrates these containers, automatically scaling replicas based on CPU or memory metrics, and performing rolling updates with zero downtime. For Node.js, Kubernetes works seamlessly with cluster modules, allowing each pod to run a clustered Node.js application. PHP applications, especially those using Laravel or Symfony, can be containerized with Docker, with separate containers for the web server (e.g., Nginx), PHP-FPM, and the database. Serverless platforms like AWS Lambda or Vercel further simplify scaling by executing code in response to events, with automatic provisioning and billing per execution. Node.js is a natural fit for serverless due to its fast startup times and lightweight runtime, while PHP can also run on serverless via platforms like Bref, though cold starts may be slightly slower. The table below summarizes key scalability aspects:
Aspect
Node.js
PHP (Laravel/Symfony)
Concurrency model
Event-driven, non-blocking I/O
Process-per-request (shared-nothing)
Horizontal scaling
Built-in clustering, load balancers
Add servers behind reverse proxy (e.g., Nginx)
Real-time capabilities
Excellent (WebSockets, SSE)
Limited (requires external services like Pusher)
Resource efficiency
Low memory per connection
Higher memory per process
Containerization
Docker + Kubernetes (native support)
Docker + Kubernetes (requires PHP-FPM)
Serverless readiness
Fast cold starts, widely supported
Cold starts slower, less mature ecosystem
Choosing between Node.js and PHP for scalability depends on your application’s primary workload: Node.js is ideal for real-time, I/O-intensive, high-concurrency apps, while PHP with modern frameworks offers robust, cost-effective scaling for traditional request-response services, especially when combined with containerization and cloud orchestration.
Development Speed and Ecosystem: Tools and Frameworks
The choice between Node.js and PHP often hinges on developer productivity, which is heavily influenced by the breadth and maturity of each ecosystem’s frameworks, package managers, and tooling. Both have evolved to streamline backend development, but they approach it from different philosophical angles. Below, we break down the key components that shape workflow speed and maintainability.
Node.js offers a spectrum of frameworks, from minimalist to opinionated, allowing teams to select the right level of abstraction. Express remains the most popular, providing a lightweight, unopinionated foundation for building APIs and web applications. Its minimal overhead makes it ideal for microservices and rapid prototyping. For more structure, NestJS uses TypeScript and architectural patterns like modules, decorators, and dependency injection, making it suitable for enterprise-level projects where maintainability is critical. Fastify focuses on performance with low overhead and a robust plugin system, often used in high-throughput scenarios. A practical example of starting a simple Express server:
PHP’s framework landscape is dominated by full-stack, feature-rich solutions. Laravel is the clear leader, offering an expressive syntax, built-in ORM (Eloquent), authentication, and queue management. It prioritizes developer happiness with tools like Artisan CLI and Blade templating. Symfony is a modular, high-performance framework with reusable components, often chosen for complex, long-term projects that require flexibility. CodeIgniter is lightweight and simple, requiring less configuration, making it suitable for shared hosting or smaller applications. Below is a comparison of key framework traits:
Framework
Type
Key Strength
Best For
Laravel
Full-stack
Rapid development, expressive syntax
CRUD apps, SaaS, content management
Symfony
Modular
Extensibility, long-term support
Enterprise, large-scale applications
CodeIgniter
Lightweight
Simplicity, low footprint
Shared hosting, small projects
Package Management: npm vs. Composer and Their Impact on Workflow
Package management is a cornerstone of modern backend development, directly affecting how quickly you can integrate dependencies and manage versions. npm (Node Package Manager) is the default for Node.js, hosting the largest registry of JavaScript packages. Its semantic versioning and package-lock.json ensure reproducible builds, though the sheer volume of packages can introduce dependency bloat. A common workflow command:
npm install express --save
Composer is PHP’s equivalent, focusing on a declarative approach with composer.json and composer.lock. It excels at autoloading and dependency resolution, often resulting in more stable dependency trees compared to npm’s deeper nested structures. For example:
composer require laravel/framework
Key differences in impact on workflow:
npm: Faster for small projects, but requires careful auditing to avoid vulnerabilities from transitive dependencies.
Composer: More predictable resolution order, with built-in autoloading that aligns with PHP class naming conventions.
Workflow integration: npm integrates tightly with JavaScript toolchains (Webpack, Babel), while Composer works seamlessly with PHP-specific tools like PHPUnit and PHP-CS-Fixer.
Ultimately, Node.js frameworks offer flexibility and performance for modern, event-driven applications, while PHP frameworks provide mature, all-in-one solutions for traditional web development. Your choice should align with your team’s expertise and the project’s architectural needs.
Language Syntax and Learning Curve
When comparing Node.js and PHP for beginners, the syntax and learning curve differ significantly due to their underlying languages. PHP was designed specifically for web development, with a straightforward, procedural syntax that allows newcomers to write dynamic pages quickly. Node.js, built on JavaScript, inherits the language’s event-driven, non-blocking architecture, which can present a steeper initial learning curve for those unfamiliar with asynchronous programming. However, JavaScript’s ubiquity in frontend development means many beginners already have exposure to its syntax, potentially easing the transition to Node.js for full-stack work. Community support is strong for both: PHP benefits from decades of web-focused documentation and extensive forums, while Node.js enjoys a vibrant, modern ecosystem with active resources on platforms like GitHub and Stack Overflow.
JavaScript’s Asynchronous Nature vs. PHP’s Procedural Simplicity
JavaScript’s asynchronous nature is a core feature of Node.js, enabling non-blocking I/O operations that handle multiple requests efficiently without waiting for tasks to complete. This is achieved through callbacks, promises, and async/await syntax. For beginners, understanding concepts like the event loop and callback hell can be challenging. In contrast, PHP traditionally follows a procedural, synchronous model where code executes line by line. This linear flow is intuitive for newcomers, as each step completes before the next begins. PHP’s simplicity allows beginners to build functional web pages quickly without grappling with concurrency. However, modern PHP (version 8+) supports asynchronous programming via extensions like Swoole, but its primary strength remains in straightforward, request-response cycles. A comparison of key differences:
Execution model: Node.js uses an event-driven, non-blocking loop; PHP uses a blocking, synchronous thread per request.
Error handling: Node.js relies heavily on callbacks and promise chains; PHP uses try-catch blocks and error functions.
Learning curve: PHP is easier for absolute beginners due to its predictability; Node.js requires understanding of asynchronous patterns.
Use cases: Node.js excels in real-time apps (e.g., chat, streaming); PHP is ideal for content-driven sites (e.g., CMS, blogs).
TypeScript Integration for Node.js: Pros and Cons
TypeScript, a typed superset of JavaScript, integrates seamlessly with Node.js, offering static type checking and modern features. Pros include improved code maintainability through explicit types, early detection of runtime errors during development, and enhanced IDE support with autocompletion and refactoring tools. This is particularly beneficial for large-scale Node.js projects where code complexity grows. Additionally, TypeScript compiles to standard JavaScript, ensuring compatibility with all Node.js versions. Cons involve an additional learning curve for developers unfamiliar with type systems, increased setup time with configuration files (e.g., tsconfig.json), and slower compilation during development. For beginners, TypeScript can add overhead, but for teams, it reduces bugs and improves collaboration. A summary of pros and cons:
Pros
Cons
Static typing reduces runtime errors
Steeper learning curve for new developers
Better tooling and IDE support
Requires compilation step before execution
Improves code readability and scalability
Can slow down rapid prototyping
Strong community and library types
May introduce unnecessary complexity for small projects
PHP 8’s Modern Features: Named Arguments, Attributes, and JIT
PHP 8 introduced several modern features that significantly reduce the learning curve and enhance developer experience. Named arguments allow developers to pass arguments to functions in any order by specifying parameter names, improving code readability and reducing errors when functions have many optional parameters. Attributes provide structured metadata for classes, methods, and properties, replacing docblock annotations with native syntax that is easier to parse and maintain. The Just-In-Time (JIT) compiler improves performance for CPU-intensive tasks by compiling PHP code into machine code at runtime, though typical web applications see modest gains. These features modernize PHP without abandoning its procedural roots, making it more approachable for beginners while appealing to seasoned developers. For example:
Named arguments:function createUser(name: "John", role: "admin");
Attributes:#[Route('/api/users')] public function list() { ... }
JIT: Boosts performance in loops and mathematical operations, but not in I/O-heavy web scenarios.
These additions help PHP remain competitive with Node.js in terms of expressiveness and tooling, while preserving its beginner-friendly syntax.
Use Cases: Where Each Technology Excels
Choosing between Node.js and PHP depends heavily on the specific requirements of your project. Each technology has distinct strengths that make it the superior choice for certain types of applications. Understanding these use cases helps you align your backend architecture with your product goals, development timeline, and team expertise.
Real-Time Applications: Chat, Gaming, and Collaborative Tools with Node.js
Node.js is the clear winner for any application requiring real-time, bidirectional communication. Its event-driven, non-blocking architecture, built on the V8 JavaScript engine, handles thousands of concurrent connections with minimal overhead. This makes it ideal for:
Chat applications: WebSockets enable instant message delivery without polling.
Online gaming: Low-latency server updates for multiplayer experiences.
Collaborative tools: Real-time document editing (like Google Docs) and whiteboarding.
Live streaming and dashboards: Push updates to clients as data changes.
The Node.js ecosystem provides robust libraries for real-time features. For example, using the ws library, a basic WebSocket server can be set up in just a few lines:
const WebSocket = require('ws');
const wss = new WebSocket.Server({ port: 8080 });
wss.on('connection', function connection(ws) {
ws.on('message', function incoming(message) {
console.log('received: %s', message);
// Broadcast to all clients
wss.clients.forEach(function each(client) {
if (client.readyState === WebSocket.OPEN) {
client.send(message);
}
});
});
});
PHP, by contrast, was designed for request-response cycles and lacks native real-time capabilities. While solutions like Laravel Echo with Pusher or Ratchet exist, they introduce complexity and often require separate server processes, making Node.js the more natural and performant choice for real-time systems.
Content Management Systems and E-Commerce: PHP’s Domain with WordPress and Magento
PHP remains the dominant force for content-driven websites and e-commerce platforms. Its mature ecosystem of content management systems (CMS) and frameworks provides out-of-the-box solutions for rapid development. Key strengths include:
WordPress: Powers over 40% of all websites. Ideal for blogs, news sites, corporate pages, and simple membership sites. Its vast plugin library and theme system allow non-developers to manage content.
Magento (Adobe Commerce): A robust e-commerce platform for large-scale online stores. Handles complex product catalogs, multi-currency support, and advanced inventory management.
Drupal and Joomla: Suited for community portals and enterprise content hubs with complex user permissions.
Laravel and Symfony: For custom CMS or e-commerce builds requiring tailored business logic.
PHP’s shared-nothing architecture means each request is isolated, simplifying state management in content applications. Its deep integration with MySQL and traditional LAMP/LEMP stacks makes deployment straightforward. For projects where rapid content publishing or out-of-the-box e-commerce is the priority, PHP’s ecosystem offers the fastest path to launch.
Microservices and APIs: Choosing Between Node.js and PHP for REST and GraphQL
Both Node.js and PHP can build effective APIs, but the choice depends on performance characteristics and team expertise. Consider the following comparisons:
Criterion
Node.js
PHP
Concurrency handling
Non-blocking I/O; handles many concurrent requests efficiently with a single thread.
Blocking I/O per request; requires multiple processes (e.g., PHP-FPM) for concurrency.
API speed
Fast for I/O-bound operations (database queries, external API calls).
Good for CPU-bound operations; slower under heavy concurrent load without caching.
GraphQL support
Excellent with Apollo Server and express-graphql; seamless integration with JavaScript frontends.
Good with libraries like Lighthouse (Laravel) or webonyx/graphql-php; requires more setup.
Microservices ecosystem
Lightweight frameworks (Express, Fastify, Koa) ideal for small, independent services.
Heavier frameworks (Laravel, Symfony) better suited for monolithic APIs; microservices possible with slim frameworks (Slim, Lumen).
Development speed
Rapid prototyping for simple APIs; consistent language across frontend and backend.
Fast for CRUD-heavy APIs with mature ORMs (Eloquent, Doctrine).
Node.js excels in microservice architectures where services need to handle high throughput and maintain low latency, particularly for I/O-heavy tasks. PHP remains a strong choice for API development when your team is PHP-proficient, the API is primarily CRUD-based, or you need deep integration with a PHP CMS or e-commerce platform. For GraphQL APIs, Node.js offers a smoother developer experience due to shared JavaScript types and tooling, but PHP’s solutions are production-ready for most use cases.
Community, Support, and Job Market Trends
When choosing between Node.js and PHP for a backend project, the strength of the surrounding community, quality of documentation, and current job market demand play critical roles. Both technologies boast massive ecosystems, but they serve different developer demographics and industry niches. Understanding these dynamics helps you align your technology choice with long-term project viability and career growth.
Node.js Community: NPM Ecosystem and Open Source Contributions
The Node.js community is one of the most active and rapidly evolving in software development. Its cornerstone is the npm (Node Package Manager) registry, which hosts over two million packages—the largest package ecosystem of any programming language. This breadth allows developers to quickly integrate libraries for almost any functionality, from authentication to real-time data streaming. The community thrives on open source contributions, with major frameworks like Express.js, Next.js, and Nest.js maintained by thousands of contributors. Documentation is generally thorough, with official Node.js docs being well-structured and complemented by extensive third-party tutorials and Stack Overflow threads. The Node.js Foundation, under the OpenJS Foundation, oversees governance, ensuring regular updates and security patches. However, the sheer volume of packages can lead to dependency bloat and security risks if not managed carefully, requiring developers to vet packages actively.
PHP Community: WordPress Dominance and Enterprise Support
PHP’s community is deeply rooted in web hosting and content management systems, with WordPress powering over 43% of all websites. This dominance provides PHP with a vast, stable user base and a wealth of beginner-friendly documentation, particularly for WordPress-specific development. The PHP community also benefits from strong enterprise support through frameworks like Laravel and Symfony, which offer robust documentation, active forums, and certified training programs. The PHP Documentation Group maintains excellent official docs with user-contributed notes, making it easy to find real-world usage examples. While the community is less focused on bleeding-edge trends compared to Node.js, it excels in providing long-term support for legacy systems and shared hosting environments. The PHP-FIG (Framework Interoperability Group) fosters collaboration across frameworks, promoting coding standards like PSR-4 for autoloading. This ecosystem ensures that PHP remains a reliable choice for businesses requiring consistent, backward-compatible solutions.
Salary Trends and Job Opportunities for Node.js vs. PHP Developers
Job market dynamics reflect the distinct roles each technology plays. Below is a comparison of key metrics based on current industry data:
Node.js developer roles: Typically higher average salaries due to demand in modern, scalable applications (e.g., microservices, real-time APIs). Median salaries range from $110,000 to $140,000 in the U.S., with strong growth in startups and tech-forward enterprises.
PHP developer roles: More abundant in total job listings, especially for WordPress maintenance, e-commerce (Magento, WooCommerce), and legacy system support. Median salaries range from $80,000 to $100,000 in the U.S., with stable demand in agencies and small-to-medium businesses.
Geographic variance: Node.js opportunities concentrate in tech hubs (Silicon Valley, New York, London), while PHP roles are more evenly distributed, including remote-friendly positions for content management projects.
Skill overlap: Developers proficient in both languages often command higher salaries, especially in full-stack roles where they can handle frontend (Node.js) and backend (PHP) systems.
Growth trajectory: Node.js shows faster job growth (approximately 15-20% year-over-year), driven by cloud-native and IoT applications. PHP job growth is slower (5-8%) but remains steady due to the vast installed base of WordPress sites.
Ultimately, the choice between Node.js and PHP should factor in your career goals: Node.js offers higher earning potential and cutting-edge projects, while PHP provides broader job availability and easier entry points for web development. Both communities continue to evolve, ensuring long-term support and relevance in the tech landscape.
Security Considerations: Best Practices and Common Pitfalls
Security in backend development is non-negotiable, and both Node.js and PHP offer strong foundations when configured correctly, but each has distinct vulnerabilities that developers must address. Node.js, with its event-driven, non-blocking architecture, often faces risks from unvalidated input and outdated dependencies, while PHP’s long history in web development means its security pitfalls—such as SQL injection and session mismanagement—are well-documented but still common. The following practices and comparisons will help you harden your application regardless of your chosen platform.
Node.js Security: Input Validation, Dependency Audits, and Helmet
Node.js applications are only as secure as their ecosystem and code. The most frequent vulnerabilities arise from improper input handling and third-party dependencies. To mitigate these, follow these actionable steps:
Input Validation: Always validate and sanitize user input using libraries like express-validator or joi. Never trust data from the client—check for type, length, and format before processing. For example, if an API expects a numeric ID, reject non-numeric values immediately.
Dependency Audits: Run npm audit regularly to identify known vulnerabilities in your packages. Use tools like Snyk or Dependabot for automated monitoring. Outdated libraries are a primary attack vector in Node.js, so keep dependencies updated and remove unused ones.
Helmet Middleware: Implement the helmet package to set secure HTTP headers. It helps prevent common attacks like cross-site scripting (XSS), clickjacking, and MIME-type sniffing. A basic setup is app.use(helmet()), which configures headers such as X-Content-Type-Options and X-Frame-Options.
Common pitfalls include exposing stack traces in error responses and failing to limit request rates, which can lead to denial-of-service (DoS) attacks.
PHP Security: SQL Injection Prevention, Session Management, and PHP-FPM
PHP’s widespread use in content management systems and legacy codebases makes it a frequent target. Focus on these three critical areas:
SQL Injection Prevention: Always use prepared statements with PDO or MySQLi. Never concatenate user input directly into SQL queries. For example, use $stmt = $pdo->prepare('SELECT * FROM users WHERE id = :id'); $stmt->execute(['id' => $input]);. This parameterization ensures input is treated as data, not executable code.
Session Management: Use secure session settings in php.ini. Set session.cookie_secure = 1 (HTTPS only), session.cookie_httponly = 1 (inaccessible to JavaScript), and session.use_strict_mode = 1. Regenerate session IDs after login to prevent session fixation.
PHP-FPM Hardening: Run PHP-FPM with a dedicated, low-privilege user. Limit pm.max_children to prevent resource exhaustion. Disable dangerous functions like exec() and system() via disable_functions in php.ini.
Common pitfalls include leaving error reporting enabled in production, which can leak sensitive information, and using outdated PHP versions that no longer receive security patches.
HTTPS, CSP, and General Backend Hardening for Both Platforms
Regardless of whether you choose Node.js or PHP, several universal hardening measures apply. HTTPS is mandatory—obtain a TLS certificate from a trusted authority and enforce redirects from HTTP to HTTPS. Implement a Content Security Policy (CSP) header to control which resources can load, mitigating XSS risks. For example: Content-Security-Policy: default-src 'self'. Additionally, apply these practices:
Keep your server operating system and all software updated.
Use environment variables for secrets (e.g., database passwords, API keys) instead of hardcoding them.
Implement rate limiting and brute-force protection (e.g., express-rate-limit for Node.js, or fail2ban for PHP).
Use secure flags in express-session (e.g., cookie.secure: true)
Configure session.cookie_secure and session.cookie_httponly in php.ini
Dependency management
Run npm audit and use Snyk for monitoring
Use Composer with composer audit for PHP packages
Common mistake
Exposing error details in production
Leaving display_errors enabled in production
By addressing these security considerations—input validation, dependency audits, SQL injection prevention, session management, and general hardening—you can significantly reduce the risk of breaches in both Node.js and PHP environments. Proactive, layered security is the best defense against evolving threats.
When choosing between Node.js and PHP, the hosting environment, deployment process, and long-term operational costs can significantly influence your decision. PHP has a long history of inexpensive shared hosting, while Node.js often requires more capable infrastructure. Understanding these differences helps you plan for both immediate launch expenses and ongoing maintenance budgets.
Shared Hosting and VPS for PHP vs. Node.js Hosting Requirements
PHP dominates the shared hosting market. Most providers offer cPanel-based plans with Apache or Nginx, automatic PHP version management, and one-click installers for WordPress, Drupal, and Laravel. For a small PHP project, shared hosting costs between $3 and $10 per month and includes MySQL databases, email accounts, and basic support.
Node.js is rarely available on traditional shared hosting. Because Node.js runs as a persistent process, it requires a VPS (Virtual Private Server) or a cloud instance where you can install Node.js, manage processes with PM2 or systemd, and configure reverse proxies. Entry-level VPS plans start at $5 to $10 per month from providers like Linode, Vultr, or DigitalOcean. You will need to handle server administration or use a managed Node.js hosting service, which typically costs more.
Node.js: Requires VPS or cloud server; more control over environment; higher initial setup effort.
Memory usage: PHP processes are typically short-lived; Node.js maintains a long-running event loop, often using 50–150 MB baseline.
Concurrency: PHP relies on multiple processes (e.g., PHP-FPM pools); Node.js handles many connections with a single thread.
Platform as a Service: Heroku, DigitalOcean, and AWS Elastic Beanstalk
Platform as a Service (PaaS) solutions simplify deployment for both technologies but differ in cost and configuration. Heroku supports both PHP and Node.js via buildpacks, with free tiers (now limited) and paid dynos starting at $7 per month. For Node.js, you define a Procfile; for PHP, Heroku detects composer.json and sets up Apache or Nginx automatically.
DigitalOcean App Platform offers a similar experience with fixed pricing starting at $5 per month per app. It supports both runtimes but requires a container-based deployment model. AWS Elastic Beanstalk provides greater flexibility: you upload a ZIP file or connect a Git repository, and it manages load balancing, auto-scaling, and health monitoring. Pricing follows underlying EC2 and RDS usage, typically starting around $15–$30 per month for a small production app.
Practical deployment example for Node.js on Heroku:
For PHP on Heroku, the equivalent is a composer.json file and an index.php in the root directory; Heroku automatically starts Apache.
Cost Analysis: Server Resources, Database Connections, and Maintenance
Operational costs depend on traffic patterns and resource consumption. PHP applications often use more memory per request due to process-per-request architecture, but idle costs are low because processes terminate. Node.js applications keep the runtime alive, so a small app may run continuously on a $5 VPS, but memory leaks or high traffic can force upgrades to $20–$40 plans.
Database connections differ significantly. PHP typically opens a new connection per request (or uses a persistent pool in frameworks like Laravel). Node.js maintains persistent connections via libraries like pg or mysql2, which can exhaust connection limits on low-tier database plans. For example, a free Heroku Postgres plan allows 20 connections; a Node.js app with 15 concurrent requests may exceed that, requiring a $9–$50 per month database upgrade.
For a small project (under 10,000 daily visits), PHP on shared hosting costs around $5–$15 per month total. Node.js on a VPS or PaaS typically runs $10–$30 per month. For medium-scale applications (50,000+ visits), PHP may require a $20–$40 VPS with multiple PHP workers, while Node.js can often handle the same load on a $20 instance due to efficient concurrency. Total cost of ownership over one year for a small app: PHP ~$120, Node.js ~$240.
Conclusion: Making the Right Choice for Your Project
Choosing between Node.js and PHP ultimately depends on the specific demands of your project, the expertise of your team, and your long-term roadmap. Both technologies are mature, well-supported, and capable of powering high-traffic applications, but they excel in different environments. The decision is not about which is universally better, but which aligns with your application’s core requirements.
When to Choose Node.js: Real-Time, High-Concurrency, and JavaScript-First Teams
Node.js is the optimal choice when your application demands real-time bidirectional communication, handles thousands of concurrent connections, or benefits from a unified JavaScript stack. Its event-driven, non-blocking architecture makes it especially powerful for:
Real-time applications: Chat systems, live collaboration tools, gaming servers, and streaming services.
APIs and microservices: Lightweight, fast RESTful or GraphQL endpoints that need to scale horizontally.
Single-page applications (SPAs): Full-stack JavaScript development using frameworks like React, Vue, or Angular.
Data-intensive applications: Handling many I/O operations, such as file uploads or database queries, without blocking the event loop.
Teams with JavaScript expertise: A unified language for frontend and backend reduces context switching and accelerates development.
When to Choose PHP: Content-Heavy Sites, Legacy Systems, and Rapid Prototyping
PHP remains an excellent choice for content-driven websites, projects with tight deadlines, and environments where a mature ecosystem is critical. Its synchronous, shared-nothing architecture and extensive library support make it ideal for:
Content management systems (CMS): WordPress, Drupal, Joomla, and Laravel-based applications thrive on PHP’s straightforward templating.
E-commerce platforms: Magento, WooCommerce, and OpenCart are built on PHP, offering robust, battle-tested solutions.
Rapid prototyping and MVPs: PHP’s low learning curve and abundant hosting options allow for quick iteration.
Legacy system maintenance: Many enterprise applications still run on PHP, requiring ongoing support and integration.
Simple, synchronous workflows: Form processing, file generation, and server-side rendering benefit from PHP’s predictable execution model.
Consideration
Choose Node.js
Choose PHP
Primary use case
Real-time, high-concurrency
Content-heavy, rapid prototyping
Team skills
JavaScript full-stack
Laravel, WordPress, or CMS expertise
Hosting simplicity
Requires process management
Shared hosting, cPanel, LAMP stack
Ecosystem maturity
npm, event-driven libraries
Composer, CMS plugins, legacy support
Long-term scalability
Horizontal scaling, microservices
Vertical scaling, caching layers
Hybrid Approaches: Combining Node.js and PHP in a Single Stack
Many modern architectures successfully combine Node.js and PHP to leverage the strengths of both. A common hybrid pattern uses PHP for content management and server-side rendering, while Node.js handles real-time features and API gateways. For example:
PHP backend for CMS and SEO: WordPress or Laravel serves static pages, manages databases, and handles traditional CRUD operations.
Node.js microservice for real-time features: A separate Node.js service handles WebSocket connections for live notifications, chat, or collaborative editing.
API gateway pattern: Node.js acts as a lightweight reverse proxy, routing requests to PHP for content and to Node.js for real-time endpoints.
Message queue integration: PHP processes heavy tasks (e.g., image processing, email sending) and pushes events to a queue consumed by Node.js for live updates.
This hybrid approach allows teams to gradually migrate legacy PHP systems or add modern capabilities without a full rewrite. It also enables specialized scaling: PHP servers handle content delivery, while Node.js servers manage concurrent connections independently. By choosing the right tool for each layer, you can build a resilient, future-proof stack that adapts as your project grows.
What are the main differences between Node.js and PHP?
Node.js is a JavaScript runtime built on Chrome's V8 engine, designed for asynchronous, event-driven I/O, making it ideal for real-time applications and high-concurrency scenarios. PHP is a server-side scripting language originally created for dynamic web pages, traditionally synchronous but now supporting asynchronous capabilities via extensions. Node.js uses a single-threaded event loop, while PHP typically runs in a multi-process model (e.g., with Apache or Nginx). Node.js excels in real-time apps like chat and gaming, while PHP powers most CMS platforms like WordPress.
Which is better for performance: Node.js or PHP?
Node.js generally offers superior performance for I/O-intensive tasks due to its non-blocking, event-driven architecture, handling thousands of concurrent connections with minimal overhead. PHP, especially with OPcache and modern versions (PHP 8+), has improved significantly but can struggle under heavy concurrency without additional infrastructure like load balancers. However, for CPU-heavy tasks, both may require optimizations or external tools. Benchmarks show Node.js often outperforms PHP in throughput for API servers.
Which technology is more suitable for real-time applications?
Node.js is highly suitable for real-time applications such as chat apps, live streaming, online gaming, and collaborative tools, thanks to its event-driven, non-blocking I/O and built-in support for WebSockets (e.g., via Socket.IO). PHP can also handle real-time features using libraries like Ratchet or Laravel Echo with Pusher, but it requires additional server configuration and is generally less efficient for maintaining persistent connections. Node.js's architecture makes it the preferred choice for real-time functionality.
Can Node.js and PHP be used together in a project?
Yes, Node.js and PHP can be used together in a single project, leveraging each technology's strengths. For example, PHP can serve as the backend for content management and traditional web pages (e.g., using WordPress or Laravel), while Node.js handles real-time features like notifications, chat, or live updates. They can communicate via HTTP APIs, message queues (e.g., RabbitMQ), or shared databases. This hybrid approach is common in enterprises that want to modernize without a full rewrite.
What are the key factors to consider when choosing between Node.js and PHP?
Key factors include: (1) Application type: real-time, data-intensive apps favor Node.js; content-heavy, traditional sites favor PHP. (2) Team expertise: JavaScript full-stack teams may prefer Node.js; developers familiar with LAMP stack may choose PHP. (3) Ecosystem: PHP has mature CMS platforms (WordPress, Drupal) and frameworks (Laravel, Symfony); Node.js has vast npm packages and frameworks like Express.js. (4) Scalability: Node.js handles high concurrency efficiently; PHP scales horizontally with multiple servers. (5) Performance: Node.js excels in I/O, PHP for CPU-bound tasks.
How do the ecosystems of Node.js and PHP compare?
Node.js has a rich ecosystem with over 2 million packages in npm, covering everything from web frameworks (Express.js, Koa) to real-time libraries (Socket.IO) and database drivers. PHP's ecosystem includes Composer with thousands of packages, along with mature CMS platforms like WordPress (43% of the web), Drupal, and Joomla, and frameworks like Laravel, Symfony, and CodeIgniter. Both ecosystems are vast, but Node.js is more modern and focused on real-time and microservices, while PHP excels in content management and traditional web applications.
What is the learning curve for Node.js compared to PHP?
PHP is often considered easier for beginners due to its straightforward syntax, extensive documentation, and large community focused on web development. Node.js requires understanding of JavaScript (including asynchronous programming, callbacks, promises, and async/await), which can be challenging for newcomers. However, developers already familiar with JavaScript from frontend work find Node.js intuitive. Both have ample learning resources, but PHP's simpler model makes it more accessible for simple websites.
Which technology has better community support and longevity?
Both Node.js and PHP have strong, active communities. PHP has been around since 1995, with a vast ecosystem, extensive documentation, and long-term support (LTS) versions. Node.js, created in 2009, has rapidly grown with corporate backing (OpenJS Foundation) and is widely adopted in modern web development. PHP powers major platforms like WordPress and Facebook (originally), while Node.js is used by Netflix, LinkedIn, and Uber. Both technologies are actively maintained and have promising futures, though Node.js is more associated with cutting-edge development.
Building a REST API with Node.js and Express: A Comprehensive Guide
Introduction to REST APIs and Node.js
What is a REST API? Key Principles and Constraints
A REST (Representational State Transfer) API is an architectural style for designing networked applications that rely on stateless, cacheable communication via HTTP. It enables clients and servers to exchange resources—such as data objects or files—using standard HTTP methods like GET, POST, PUT, PATCH, and DELETE. The core principles of REST ensure that APIs remain scalable, uniform, and loosely coupled. These key constraints include:
Statelessness: Each request from a client contains all necessary information; the server does not store any client context between requests.
Client-Server Separation: The user interface and data storage are independent, allowing each to evolve separately.
Cacheability: Responses must explicitly indicate whether they can be cached to improve performance.
Uniform Interface: Resources are identified via URIs, manipulated through representations, and include self-descriptive messages.
Layered System: Intermediaries such as proxies or gateways can be inserted without affecting client-server interaction.
Code on Demand (optional): Servers can extend client functionality by transferring executable code, such as JavaScript.
By adhering to these principles, REST APIs deliver predictable, maintainable endpoints that integrate seamlessly across diverse platforms—from web browsers to mobile applications.
Why Node.js and Express for API Development
Node.js, built on Chrome’s V8 JavaScript engine, provides an event-driven, non-blocking I/O model that excels in handling concurrent connections with minimal resource overhead. This makes it particularly suited for building lightweight, high-throughput REST APIs. Express, a minimal and flexible web application framework for Node.js, further simplifies API development by offering a robust set of features for routing, middleware, and HTTP utility methods. The combination of Node.js and Express offers several advantages:
Handles multiple requests simultaneously without thread blocking, ideal for I/O-heavy API operations.
JavaScript everywhere
Enables full-stack development with a single language, reducing context switching and code duplication.
Extensive npm ecosystem
Access to thousands of open-source packages for authentication, validation, logging, and database integration.
Express middleware
Modular, reusable functions for tasks like parsing request bodies, CORS handling, and error management.
Fast prototyping
Minimal boilerplate and straightforward routing allow rapid iteration from concept to deployment.
Scalability
Node.js clustering and load-balancing support enable horizontal scaling as API traffic grows.
These qualities have made Node.js with Express a go-to stack for startups and enterprises alike, powering APIs for companies such as Netflix, Uber, and PayPal.
Node.js and npm: Download and install the latest LTS version of Node.js from the official website (nodejs.org). This includes npm (Node Package Manager), which is used to manage dependencies.
A code editor: Visual Studio Code, Sublime Text, or any editor with JavaScript support.
Terminal or command prompt: Access to a shell for running Node.js commands.
To set up a new project, open your terminal and run the following commands:
mkdir my-rest-api
cd my-rest-api
npm init -y
The npm init -y command generates a package.json file with default settings. Next, install Express and a utility for parsing request bodies:
Run the server with node index.js and navigate to http://localhost:3000 in your browser. You should see the greeting message, confirming that your Node.js and Express environment is ready for building a REST API.
Setting Up the Express Application
Before writing any routes or middleware, you must establish a solid foundation for your REST API. This involves initializing a Node.js project, installing Express, and creating a basic server entry point. The following steps will guide you through each phase, ensuring your environment is correctly configured for building a REST API with Node.js and Express.
Initializing the Project with npm and package.json
Begin by creating a new directory for your project and navigating into it via the terminal. Run the npm init command to generate a package.json file, which will manage your project’s dependencies and metadata. Use the -y flag to accept default values, or omit it to customize fields like the project name, version, and entry point.
mkdir my-rest-api
cd my-rest-api
npm init -y
After initialization, your package.json will contain a basic structure. You can later modify it to add scripts, such as a start command for your server. The main field defaults to index.js, which will serve as your application’s entry point. This file does not exist yet and will be created in a subsequent step.
Key fields in package.json after initialization:
name: The project name (e.g., my-rest-api)
version: Semantic version (default 1.0.0)
description: Optional brief description of the API
main: Entry point file (index.js)
scripts: Object for custom commands (e.g., "start": "node index.js")
Installing and Configuring Express
With the project initialized, install Express as a dependency. Use npm to add it to your node_modules folder and record it in package.json. Run the following command in your project root:
npm install express
This command installs the latest stable version of Express and adds it to the dependencies section of your package.json. You can verify the installation by checking the node_modules directory or by running npm list express.
Optionally, install nodemon as a development dependency to automatically restart your server when file changes are detected. This speeds up development but is not required for production:
npm install --save-dev nodemon
Then update your package.json scripts to use nodemon:
Now create the index.js file in your project root. This file will import Express, configure the server, and start listening on a port. Below is a minimal but functional example that sets up a basic HTTP server:
const express = require('express');
const app = express();
const port = 3000;
// Middleware to parse JSON request bodies
app.use(express.json());
// Basic route for health check
app.get('/', (req, res) => {
res.send('REST API is running');
});
// Start the server
app.listen(port, () => {
console.log(`Server listening at http://localhost:${port}`);
});
This code does the following:
Imports the Express module and creates an application instance.
Sets the server to listen on port 3000.
Includes express.json() middleware to parse incoming JSON payloads—essential for REST APIs.
Defines a single GET route at the root path for a health check response.
To test the server, run node index.js (or npm start if you added the script) and open http://localhost:3000 in a browser. You should see the message “REST API is running.” This confirms that your Express application is correctly set up and ready for further development, such as adding routes, controllers, and database integration.
Designing the API Endpoints
Identifying Resources and CRUD Operations
Every RESTful API begins with the identification of core resources. A resource is a distinct object or entity that the API will expose and manage—for example, items, users, orders, or products. For this guide, we focus on the items resource. The fundamental operations that clients perform on this resource map directly to the four CRUD actions: Create, Read, Update, and Delete. Each CRUD action corresponds to a specific HTTP method, ensuring a consistent and predictable interface. Identifying resources early prevents scope creep and clarifies the data model, which is essential for building a maintainable API with Node.js and Express.
Defining Route Paths and HTTP Methods
Once resources are identified, route paths and HTTP methods must be defined to implement CRUD operations. The following table maps each CRUD action to its standard HTTP method and typical route path for the items resource:
CRUD Action
HTTP Method
Route Path
Description
Create
POST
/api/v1/items
Create a new item
Read (all)
GET
/api/v1/items
Retrieve a list of items
Read (one)
GET
/api/v1/items/:id
Retrieve a single item by ID
Update
PUT or PATCH
/api/v1/items/:id
Update an existing item (PUT replaces; PATCH partially updates)
Delete
DELETE
/api/v1/items/:id
Delete an item by ID
Key considerations when defining routes include:
Use plural nouns for resource names, e.g., /items not /item.
Avoid verbs in the URL path; HTTP methods already convey the action.
Include the resource identifier (e.g., :id) for single-resource operations.
Group related resources under a common prefix, such as /api/v1/items.
Best Practices for API Versioning
API versioning is critical for maintaining backward compatibility when endpoints evolve. The most common approach is to embed the version number in the URL path, as shown in the table above (e.g., /api/v1/items). This method is straightforward to implement in Express using route grouping. Alternative strategies include:
Header-based versioning: Clients specify the version via a custom header (e.g., Accept: application/vnd.api+json;version=1). This keeps URLs clean but adds complexity for clients.
Parameter-based versioning: The version is passed as a query parameter (e.g., /api/items?version=1). This is less common and can lead to caching issues.
Path-based versioning is generally recommended for simplicity and visibility. Additional best practices include:
Deprecate, do not delete—announce deprecation in response headers (e.g., Deprecation: true) and provide a sunset date.
Maintain at least one previous version to give clients time to migrate.
Use semantic versioning for major, minor, and patch changes, but only reflect major versions in the URL.
Document version changes in a changelog accessible via the API documentation.
By adhering to these design principles, your API will be intuitive, scalable, and easier to maintain as you continue building a REST API with Node.js and Express.
Implementing Routes and Controllers
As your REST API grows beyond a handful of endpoints, keeping all route logic inside a single file quickly becomes unmanageable. A modular architecture that separates route definitions from business logic is essential for long-term maintainability. This section explains how to organize your code using dedicated router modules and controller functions, ensuring each piece of the application has a single, clear responsibility.
Creating a Router Module for the Resource
Express provides the Router class to create modular, mountable route handlers. For each resource—such as users, products, or orders—you create a separate router file. This keeps your codebase predictable and easy to navigate. Follow these steps to set up a router module:
Create a new file inside a routes directory, for example routes/users.js.
Import Express and instantiate a router using express.Router().
Define the resource-specific routes using the router object (e.g., router.get('/', handler)).
Export the router using module.exports.
Here is a practical example of a user router module:
Controllers are the functions that contain the actual request-handling logic. They should not define routes; instead, they receive the request and response objects and execute the necessary operations. Each controller function typically performs the following actions:
Extract data from the request (parameters, query strings, body).
Call a service layer or database operation (often in a separate model file).
Send the appropriate HTTP response with the correct status code and data.
To maintain clarity, name controller functions descriptively based on their purpose. For example, getAllUsers, createUser, and deleteUser. A well-structured controller file might look like this:
A common organizational pattern is to group related controller functions into a single file per resource, such as controllers/userController.js.
Connecting Routes to the Express Application
Once your router and controller modules are ready, you must mount them in the main Express application file (usually app.js or server.js). This is done using the app.use() method, which binds the router to a specific base path. For example, all user routes can be prefixed with /api/users.
Step
Action
1
Import the router module.
2
Use app.use('/api/users', userRouter) to mount it.
3
Repeat for each resource router.
Here is the corresponding code snippet for connecting the user router:
By following this pattern, your route definitions remain in dedicated router files, your business logic stays in controllers, and your main application file only handles middleware and router mounting. This separation makes the API easier to test, debug, and extend as new resources are added.
Handling Request Data and Validation
Building a robust REST API requires careful handling of incoming data. When clients send requests, they often include JSON payloads, query parameters, or URL-encoded data. Without proper parsing and validation, your API risks processing malformed or malicious input, leading to data corruption or security vulnerabilities. This section covers how to parse request data using Express middleware and enforce data integrity through validation and sanitization.
Using Express Middleware for JSON Parsing
Express provides built-in middleware to parse incoming request bodies. The most common middleware is express.json(), which parses JSON payloads and makes the data available under req.body. For URL-encoded data, use express.urlencoded({ extended: true }). These middleware functions must be registered at the application level or within specific route groups.
express.json() – Parses application/json content type. Limits body size with the limit option (e.g., limit: '10mb').
express.urlencoded() – Parses application/x-www-form-urlencoded data. The extended option allows rich objects and arrays using the qs library.
express.raw() – Parses incoming requests as a Buffer, useful for webhooks or file uploads.
express.text() – Parses plain text bodies as strings.
Always place these middleware before your route handlers. For example:
Query parameters are automatically parsed by Express and available via req.query. No additional middleware is needed for them, but you should still validate their presence and format.
Validating Input with a Library (e.g., Joi or express-validator)
Manual validation with if statements quickly becomes unmanageable. Libraries like Joi or express-validator provide declarative schemas and chainable validation rules. Joi is schema-based and returns detailed error messages, while express-validator integrates directly with Express middleware.
const { body, validationResult } = require('express-validator');
app.post('/users',
body('name').isLength({ min: 2, max: 50 }).withMessage('Name must be 2-50 characters'),
body('email').isEmail().normalizeEmail(),
(req, res) => {
const errors = validationResult(req);
if (!errors.isEmpty()) {
return res.status(400).json({ errors: errors.array() });
}
// Process valid data
}
);
Sanitizing Data and Handling Errors Gracefully
Validation alone is not enough. Sanitization removes or escapes dangerous characters, prevents NoSQL injection, and normalizes data formats. Both Joi and express-validator offer sanitization methods like .trim(), .escape(), .stripLow(), and .normalizeEmail(). Apply sanitization after validation to clean the data before storing it.
Trim whitespace – Use .trim() on string fields to remove leading and trailing spaces.
Escape HTML – Use .escape() to convert <, >, & into safe entities.
Normalize email – Use .normalizeEmail() to convert to lowercase and remove dots (Gmail).
Strip low characters – Use .stripLow() to remove control characters (ASCII 0-31).
Error handling should be consistent. Create a centralized error-handling middleware that catches validation errors and returns a uniform JSON response with appropriate HTTP status codes (400 for bad requests, 422 for unprocessable entities). For example:
Always log errors on the server side for debugging, but never expose internal details to the client. By combining parsing, validation, sanitization, and graceful error handling, you ensure that your API remains secure, reliable, and developer-friendly.
Integrating a Database (MongoDB Example)
To make your REST API truly functional, you need persistent storage. While you can simulate data with in-memory arrays, a real database allows your API to survive server restarts and handle complex queries. MongoDB, a NoSQL document database, pairs naturally with Node.js because both use JSON-like structures. Using Mongoose, an ODM (Object Data Modeling) library, you can define schemas, validate data, and interact with MongoDB using clean JavaScript. This section walks you through connecting MongoDB to your Express API, defining a resource model, and performing full CRUD operations.
Installing and Configuring Mongoose
Begin by installing Mongoose in your project directory. Open your terminal and run:
After installation, create a db.js file (or add this to your main server file) to establish a connection. You will need a MongoDB instance—either a local installation or a cloud service like MongoDB Atlas. Replace the connection string with your own credentials.
In your main app.js or server.js, call connectDB() before starting the Express server. This ensures the database is ready before handling requests.
Defining a Schema and Model for the Resource
A Mongoose schema defines the structure of documents in a MongoDB collection. For a typical REST resource, such as a “Book,” you specify fields and their data types. Create a models/Book.js file:
Validation: required ensures fields exist; enum restricts genre to a set list.
Data transformation: trim removes whitespace from strings; min/max constrain numeric values.
Timestamps: createdAt automatically records when a document is created.
Model export: mongoose.model('Book', bookSchema) creates a collection named “books” (Mongoose pluralizes the model name).
Performing CRUD Operations via the Model
With the model ready, you can implement the five standard REST endpoints. Below is a complete example for the Book resource, using async/await for clean error handling.
Accepts an object or array; returns the saved document.
Read all
Model.find()
Returns an array; can chain .sort(), .limit(), etc.
Read one
Model.findById()
Returns null if not found; always check for 404.
Update
Model.findByIdAndUpdate()
Set new: true to return updated doc; runValidators for schema rules.
Delete
Model.findByIdAndDelete()
Returns the deleted document or null.
Remember to mount this router in your main app file with app.use('/api/books', bookRouter). With this setup, your REST API now persists data to MongoDB and provides full CRUD functionality.
Error Handling and Middleware
In any robust REST API, error handling and middleware form the backbone of maintainability and user experience. Node.js and Express provide a flexible middleware architecture that allows you to centralize error management, log requests consistently, and enforce authentication. This section explores how to implement these patterns effectively when building a REST API with Node.js and Express.
Creating a Global Error-Handling Middleware
A global error-handling middleware catches errors thrown anywhere in your application and returns a consistent JSON response. In Express, this middleware is defined with four parameters: err, req, res, and next. It must be placed after all route definitions to ensure it intercepts unhandled errors.
Key benefits of centralized error handling include:
Consistency: All errors return the same JSON structure, simplifying client-side parsing.
Separation of concerns: Route handlers remain clean, focusing only on business logic.
Environment-aware responses: Stack traces are hidden in production for security.
Custom error classes: Extend the built-in Error object to include status codes and metadata.
Logging Requests with Morgan or Custom Logger
Logging is critical for debugging, monitoring, and auditing API activity. Express integrates seamlessly with Morgan, a popular HTTP request logger middleware. You can use predefined formats or create custom tokens.
Basic Morgan setup:
const morgan = require('morgan');
app.use(morgan('dev')); // 'dev' format: :method :url :status :response-time ms
For more control, consider a custom logger using Winston or Pino. Example with Winston:
Authentication middleware protects routes from unauthorized access. For simplicity, we implement a basic token-based check. In production, use libraries like jsonwebtoken or passport.
Validate early: Check tokens before any business logic executes.
Use environment variables: Store secrets like JWT keys in .env files.
Return clear error codes: Use 401 for missing credentials, 403 for invalid ones.
Combine with rate limiting: Prevent brute-force attacks on login endpoints.
Testing the API Endpoints
Thorough testing is essential to confirm that each endpoint in your REST API behaves correctly under normal conditions and gracefully handles errors. Testing covers both manual validation during development and automated regression testing to catch issues as the codebase evolves. This section explores two complementary approaches: manual testing with Postman or cURL for quick verification, and automated unit testing with Jest and Supertest for repeatable, reliable validation of logic and error handling.
Manual testing provides immediate feedback during development. Postman offers a graphical interface where you can construct HTTP requests, set headers, add request bodies, and inspect responses. For command-line users, cURL provides equivalent functionality without a GUI. To test a GET endpoint that retrieves all users, you would send a request like curl http://localhost:3000/api/users and examine the JSON response. For POST endpoints, include a request body with -d '{"name":"Alice"}' and set the Content-Type header to application/json. Postman additionally allows saving collections of requests, setting environment variables for base URLs, and writing simple test scripts in JavaScript to validate response status codes or body content. These manual tests are ideal for exploratory testing and debugging but are not automated, making them unsuitable for continuous integration pipelines.
Writing Unit Tests with Jest and Supertest
Automated unit tests ensure that each endpoint behaves as expected without requiring human intervention. Jest is a popular testing framework for Node.js, while Supertest extends it to simulate HTTP requests against your Express app. To write a test, import your Express app instance and use Supertest’s request method. For example, a test for a GET endpoint might look like this:
Import request from supertest and your app module.
Use describe() to group related tests for a resource, such as describe('GET /api/users').
Inside it(), call request(app).get('/api/users') and chain .expect(200) to assert the status code.
Use .then() or async/await to inspect the response body, for example checking that the body is an array.
For POST endpoints, send a payload with .send({ name: 'Bob' }) and verify the response status is 201 and the returned object contains the expected fields. Jest provides powerful matchers like toHaveProperty() and toEqual() for deep object comparison. Running these tests with npm test gives immediate feedback and can be integrated into CI/CD workflows.
Testing Error Scenarios and Edge Cases
Robust APIs must handle invalid input, missing data, and unexpected conditions gracefully. Write tests that send malformed JSON, omit required fields, or provide out-of-range values. For example, a test for a POST endpoint might send an empty body and expect a 400 status with an error message like “Name is required.” Edge cases include requesting a resource that does not exist (expecting 404), sending an unsupported HTTP method (expecting 405), or providing excessively long strings that could cause buffer overflow. The following comparison table summarizes the key differences between manual and automated testing approaches:
Feature
Manual Testing (Postman/cURL)
Automated Testing (Jest/Supertest)
Setup time
Minimal; requires only a running server
Moderate; requires test framework and configuration
Repeatability
Low; must be run manually each time
High; runs on every build or commit
CI/CD integration
Not feasible
Fully supported
Error coverage
Relies on tester’s thoroughness
Can systematically cover edge cases
Speed for large suites
Slow; human-driven
Fast; executes in seconds
When testing error scenarios, also simulate database failures by mocking your data layer to throw exceptions, then verify that the API returns a 500 status with a generic error message (to avoid leaking internal details). By combining manual exploration with automated tests that cover both happy paths and error scenarios, you build a REST API that is reliable and maintainable over time.
Deploying the API to Production
After building and testing your REST API locally, the next critical step is deploying it to a production environment. This process involves securing sensitive data, ensuring reliability under load, and choosing a hosting platform that meets your needs. Proper deployment practices prevent downtime, data leaks, and performance bottlenecks.
Environment Variables and Configuration Management
Hardcoding configuration values such as database passwords, API keys, or secret tokens is a security risk. Instead, use environment variables to separate configuration from code. Node.js provides the process.env object to access these variables at runtime. Create a .env file locally for development, but never commit it to version control. Add .env to your .gitignore file.
In production, set environment variables through your hosting platform’s dashboard or CLI. A typical .env file contains:
Use the dotenv package to load these variables during development. In production, the platform injects them directly. Avoid storing configuration in your source code—this practice simplifies scaling and rotating secrets without redeploying.
Using Process Managers (e.g., PM2) for Reliability
A production API must remain running even after unexpected crashes or server restarts. Process managers like PM2 handle this by monitoring your Node.js application and automatically restarting it when it fails. PM2 also provides clustering, logging, and zero-downtime deployments.
Install PM2 globally via npm: npm install -g pm2. Start your API with: pm2 start app.js --name my-api. This command runs the application in the background, with automatic restart on failure. To ensure PM2 restarts on system reboot, save the process list: pm2 save and then pm2 startup.
Clustering: Use pm2 start app.js -i max to run multiple instances across CPU cores.
Log management: View logs with pm2 logs and rotate them with pm2 logrotate.
Graceful shutdown: Listen for SIGINT or SIGTERM signals to close database connections before stopping.
For zero-downtime updates, use pm2 reload all instead of restart—this restarts workers one by one, keeping the API available.
Deploying to a Cloud Platform (Heroku Example)
Heroku simplifies deployment by abstracting infrastructure management. Start by creating a Procfile in your project root with the following content: web: pm2 start app.js --name api -i max. This tells Heroku to run your API using PM2 in cluster mode.
Next, ensure your package.json includes a start script: "start": "pm2-runtime start app.js --name api -i max". Heroku uses this for containerized environments. Set environment variables via Heroku CLI: heroku config:set NODE_ENV=production and heroku config:set JWT_SECRET=your-secret-key.
Deploy by pushing your code to Heroku’s Git remote:
git init
heroku create your-api-name
git add .
git commit -m "Initial production deploy"
git push heroku main
After deployment, run heroku ps:scale web=1 to ensure at least one dyno is active. Monitor logs with heroku logs --tail. For AWS alternatives, consider Elastic Beanstalk for managed Node.js environments or EC2 with PM2 for full control. Each platform requires similar steps: configure environment variables, choose a process manager, and set up logging and scaling rules.
Building a REST API with Node.js and Express is a foundational skill for modern web development, but delivering a production-ready API requires more than just routing and middleware. The key takeaways from this comprehensive guide emphasize clarity, security, and scalability. By adhering to RESTful conventions—such as using proper HTTP verbs, consistent endpoint naming, and meaningful status codes—you create an API that is intuitive for consumers. Additionally, robust error handling, input validation, and logging ensure reliability. As you move forward, focus on three critical areas: code organization, security hardening, and exploring advanced architectural patterns.
Code Organization and Modular Architecture
As your API grows, a monolithic app.js file becomes unmanageable. Adopt a modular structure to separate concerns and improve maintainability. Common patterns include:
Route modules: Group related endpoints (e.g., /users, /products) into separate files using Express Router.
Controller layer: Isolate business logic from route definitions. Controllers handle request/response processing, while routes only define endpoints.
Service layer: For complex logic (e.g., data aggregation, external API calls), create service modules that controllers call.
Middleware modules: Place custom middleware (authentication, validation, logging) in a dedicated middleware/ folder.
Consider this directory structure for a medium-scale API:
This modularity allows teams to work on different features in parallel and simplifies unit testing. For larger applications, explore layered architectures like MVC or clean architecture.
Security Considerations (CORS, Helmet, HTTPS)
Security is non-negotiable for any public-facing API. Three essential tools for Express are:
Tool
Purpose
Implementation
CORS
Controls which origins can access your API. Prevents unauthorized cross-origin requests.
Use the cors npm package. Configure origin to a whitelist of allowed domains.
Helmet
Sets HTTP security headers (e.g., X-Content-Type-Options, X-Frame-Options) to mitigate common attacks.
Add app.use(helmet()) early in your middleware stack.
HTTPS
Encrypts data in transit. Required for production to protect sensitive information.
Use a reverse proxy (e.g., Nginx) or cloud load balancer to terminate TLS; never expose raw HTTP.
Additionally, implement input sanitization (e.g., with express-validator), rate limiting (e.g., express-rate-limit), and authentication (e.g., JWT or OAuth2). Regularly update dependencies to patch known vulnerabilities.
Exploring GraphQL, Microservices, and Async Patterns
Once you master REST with Express, consider these advanced topics to handle complex requirements:
GraphQL: Offers flexible querying, allowing clients to request exactly the data they need. Use Apollo Server with Express as middleware. Ideal for applications with deeply nested resources or multiple client types (web, mobile, IoT).
Microservices: Break your monolithic API into smaller, independently deployable services. Each service handles a specific domain (e.g., authentication, payments). Communicate via HTTP or message queues (e.g., RabbitMQ, Kafka). This pattern improves scalability and fault isolation but adds operational complexity.
Async Patterns: Node.js excels at asynchronous operations. Use async/await for readable code, but also explore streams (for large file uploads), event emitters (for real-time features with WebSockets), and background job queues (e.g., Bull with Redis) to offload heavy processing.
Each of these approaches complements or extends your REST API. Start by adding caching (e.g., Redis or in-memory) and rate limiting to your existing Express app, then gradually experiment with GraphQL for a specific endpoint or decompose a non-critical module into a microservice. The journey from a simple REST API to a distributed system is iterative—prioritize clean code, thorough testing, and monitoring from the start.
A REST API (Representational State Transfer) in Node.js is a web service that uses HTTP methods (GET, POST, PUT, DELETE) to perform CRUD operations on resources. It typically uses JSON for data exchange and follows stateless communication principles. Node.js, with its event-driven architecture, is well-suited for building scalable APIs. Express.js simplifies the process by providing routing, middleware, and request handling. REST APIs are widely used for mobile and web applications to interact with databases and external services.
How do I set up a basic Express server for a REST API?
To set up a basic Express server, first install Node.js and npm. Create a new directory, run `npm init -y`, then install Express with `npm install express`. Create an `app.js` file, require express, and create an app instance using `const app = express()`. Define a port (e.g., 3000) and use `app.listen(port, () => console.log(…))`. Add middleware like `express.json()` to parse JSON bodies. Then define routes using `app.get()`, `app.post()`, etc. Finally, start the server with `node app.js`. This forms the foundation for building REST endpoints.
What are the best practices for structuring routes in Express?
Best practices for structuring routes include using the Express Router to modularize route definitions. Group routes by resource (e.g., users, products) in separate files. Use meaningful URL paths (e.g., /api/users/:id). Implement versioning (e.g., /api/v1/users). Keep route handlers thin by moving logic to controllers. Use middleware for authentication, validation, and error handling. Follow REST conventions: use plural nouns for resources, and map HTTP methods to CRUD operations. This improves maintainability and scalability.
How can I handle errors in a Node.js Express REST API?
Error handling in Express can be done using middleware functions with four parameters (err, req, res, next). Create a centralized error handler that catches errors from routes and middleware. Use custom error classes to differentiate client errors (e.g., 400) from server errors (e.g., 500). In async route handlers, wrap code in try-catch and pass errors to next(). For unhandled promise rejections, use process.on('unhandledRejection'). Also, use libraries like http-errors for HTTP-specific errors. Always return consistent JSON error responses with status codes and messages.
What is middleware in Express and how is it used in REST APIs?
Middleware in Express are functions that execute during the request-response cycle. They have access to the request object, response object, and the next middleware function. In REST APIs, middleware is used for tasks like logging, authentication, request parsing (e.g., express.json()), CORS handling, rate limiting, and error handling. Middleware can be applied globally with app.use() or to specific routes. They are executed in the order they are defined. Well-structured middleware improves code reusability and separation of concerns.
How do I implement authentication and authorization in a Node.js REST API?
Authentication and authorization can be implemented using JSON Web Tokens (JWT) or OAuth2. For JWT, install jsonwebtoken and bcrypt for password hashing. On login, generate a token with user data and a secret key. Protect routes with middleware that verifies the token from the Authorization header. For authorization, check user roles or permissions from the decoded token. Use environment variables for secrets. Consider using passport.js for OAuth2. Always use HTTPS to protect tokens in transit. Implement token expiration and refresh tokens for security.
How can I test a REST API built with Node.js and Express?
Testing a REST API can be done with tools like Postman for manual testing and frameworks like Mocha, Chai, or Jest for automated testing. Use Supertest to simulate HTTP requests in tests. Write unit tests for controllers and integration tests for endpoints. Test all CRUD operations, edge cases, and error responses. Use a test database (e.g., MongoDB Memory Server) to avoid affecting production data. Implement continuous integration (CI) to run tests on every push. Also, use tools like Newman for Postman collection testing.
What are common security considerations for a Node.js Express REST API?
Common security considerations include validating and sanitizing all user inputs to prevent injection attacks. Use HTTPS to encrypt data in transit. Implement rate limiting to prevent brute-force attacks. Use helmet.js to set secure HTTP headers. Protect against Cross-Site Request Forgery (CSRF) if using cookies. Store secrets in environment variables. Avoid exposing stack traces in error responses. Use parameterized queries for databases. Regularly update dependencies to patch vulnerabilities. Consider using API keys or OAuth for access control.
How to Deploy a Node.js Application to Production: A Comprehensive Guide
1. Preparing Your Node.js Application for Deployment
Before pushing your Node.js application to a production server, you must ensure it is robust, secure, and optimized for real-world traffic. Production environments differ significantly from development setups, with stricter performance, reliability, and security requirements. Proper preparation minimizes downtime, prevents data leaks, and ensures your application scales gracefully under load. This section covers three critical steps: managing environment variables, cleaning dependencies, and implementing error handling.
Set up environment variables with dotenv or similar tools
Hardcoding sensitive data like database passwords, API keys, or secret tokens directly into your source code is a security risk and a maintenance nightmare. Instead, use environment variables to separate configuration from code. The dotenv package is the standard solution for Node.js applications. Install it as a production dependency (npm install dotenv), then create a .env file in your project root with key-value pairs, for example:
For production, never commit the .env file to version control; add it to your .gitignore. Instead, set environment variables directly on your server or container platform (e.g., Heroku, AWS ECS, Docker). Use a tool like env-cmd for script-based loading, or rely on your deployment platform’s native environment management. Always validate that required variables exist at startup to fail fast and avoid cryptic runtime errors.
Remove development dependencies from production builds
Development dependencies—such as testing frameworks (jest, mocha), linters (eslint), and transpilers (webpack, babel)—are unnecessary in production and increase your application’s attack surface and deployment size. When installing packages, use the --production flag or set NODE_ENV=production before running npm install:
npm install --production
Alternatively, define dependencies clearly in your package.json:
Field
Purpose
Example
dependencies
Required at runtime
express, dotenv, mongoose
devDependencies
Only for development or build
nodemon, eslint, supertest
Use a .dockerignore or .npmignore file to exclude node_modules (reinstalled in production) and development files like tests, documentation, and source maps. For containerized deployments, leverage multi-stage Docker builds: the first stage installs all dependencies for building assets, while the second stage copies only production node_modules and compiled code. This reduces image size, improves security, and speeds up deployment.
Uncaught exceptions and unhandled promise rejections will crash your Node.js process, causing downtime and frustrating users. Implement a global error handler to catch these events gracefully. In Express-based applications, add an error-handling middleware at the end of your middleware stack:
Logging is equally critical. Avoid using console.log in production because it lacks structured output, severity levels, and integration with monitoring tools. Use a production-grade logger like winston or pino. Configure it to output JSON-formatted logs to stdout (for containerized environments) or to a rotating file system. Include essential context: timestamp, request ID, user ID, and error stack trace. Example with pino:
Finally, set up uncaught exception and unhandled rejection listeners to log and exit cleanly, allowing your process manager (e.g., PM2) to restart the application automatically:
Selecting the right hosting provider for your Node.js application is a foundational decision that affects performance, cost, and operational complexity. Your choice should align with your application’s expected traffic, your team’s expertise, and your long-term scalability goals. Below, we evaluate the most common categories of hosting solutions, from traditional cloud VPS to modern serverless platforms.
Evaluate cloud providers: AWS, Google Cloud, Azure, and DigitalOcean
Traditional cloud providers offer virtual private servers (VPS) or compute instances where you have full control over the environment. This is ideal for applications with predictable workloads or custom infrastructure requirements.
Amazon Web Services (AWS) EC2: Offers the widest range of instance types and global regions. You manage the OS, Node.js runtime, and process manager (e.g., PM2). Use AWS Elastic Beanstalk for simplified deployment.
Google Cloud Compute Engine: Provides live migration and custom machine types. Integrates well with Google Kubernetes Engine (GKE) for containerized Node.js apps.
Microsoft Azure Virtual Machines: Strong for enterprises already using Microsoft ecosystem. Azure App Service offers a managed Node.js environment with easy scaling.
DigitalOcean Droplets: A developer-friendly, cost-effective VPS option. Offers simple pricing, pre-configured one-click Node.js droplets, and a straightforward control panel.
Practical command example: Deploy a Node.js app to a DigitalOcean droplet using SSH and PM2:
Consider Platform-as-a-Service (PaaS) like Heroku or Railway
PaaS solutions abstract away server management, letting you focus on code. They handle scaling, logging, and deployment via Git or CLI. This is best for teams wanting rapid deployment without DevOps overhead.
Heroku: Pioneering Node.js PaaS. Deploy with git push heroku main. Offers add-ons for databases (PostgreSQL, Redis) and monitoring. Free tier available (limited).
Railway: Modern PaaS with GitHub integration, automatic SSL, and per-second billing. Supports Node.js, databases, and cron jobs. Ideal for side projects and startups.
Fly.io: Deploy Docker containers globally with low latency. Good for real-time Node.js apps using WebSockets.
Key trade-off: PaaS often costs more per unit of compute than VPS, but reduces operational burden significantly. For small-to-medium apps, the time saved can justify the expense.
Assess serverless options: AWS Lambda, Vercel, or Netlify
Serverless computing executes your Node.js code in response to events (HTTP requests, database changes) without managing servers. You pay only for execution time and invocations. This suits event-driven or low-traffic APIs.
AWS Lambda: Supports Node.js 20.x. Requires bundling your app (e.g., using AWS SAM or Serverless Framework). Integrates with API Gateway for HTTP endpoints. Cold starts can be a concern for latency-sensitive apps.
Vercel: Optimized for frontend frameworks, but supports Node.js serverless functions via api/ directory. Automatic HTTPS, CDN, and preview deployments. Great for Jamstack apps with Node.js backends.
Netlify Functions: Similar to Vercel, built on AWS Lambda. Simple CLI deployment and environment variables. Best for static sites with lightweight API endpoints.
When to avoid serverless: If your app has long-running processes (e.g., WebSockets, heavy computation) or requires persistent connections, serverless may incur high costs or timeouts (Lambda max 15 minutes).
Choose the option that balances your need for control, budget, and operational simplicity. Many teams start with PaaS for speed, then migrate to VPS or serverless as requirements evolve.
3. Setting Up a Production Server with Node.js
Configuring a Linux server to run Node.js in production requires deliberate steps to ensure stability, security, and performance. This section walks through installing Node.js reliably, managing the application process, and enforcing proper user permissions. Each step builds on the last to create a robust foundation for your deployment.
Install Node.js using nvm or package manager for stable version
Choosing how to install Node.js on your production server depends on your need for version flexibility versus system integration. The two primary methods are using the Node Version Manager (nvm) or a system package manager like apt for Debian-based distributions.
nvm (recommended for flexibility): Install nvm via the install script from its official repository. After installation, run nvm install --lts to get the latest Long-Term Support version. This allows you to switch versions per project and update Node.js without affecting other system tools.
Package manager (recommended for simplicity): Add the NodeSource repository to your package manager. For Ubuntu, run curl -fsSL https://deb.nodesource.com/setup_lts.x | sudo -E bash - followed by sudo apt install -y nodejs. This integrates Node.js into system updates but locks you into the version provided by the repository.
After installation, verify with node --version. For production, always target an LTS release, which receives critical bug fixes for 30 months, ensuring your application runs on a stable, supported runtime.
Use PM2 as a process manager for automatic restarts and clustering
A Node.js application runs as a single process that can crash due to uncaught exceptions, memory exhaustion, or system errors. PM2 is a production-grade process manager that keeps your application running and provides clustering for multi-core servers.
Install PM2 globally: npm install -g pm2. Start your application with pm2 start app.js --name my-app. Key features include:
Automatic restarts: PM2 restarts the application immediately if it crashes, with configurable restart limits to prevent infinite loops.
Clustering: Run multiple instances of your application across all CPU cores using pm2 start app.js -i max. This distributes incoming requests across instances, improving throughput and fault tolerance.
Log management: PM2 aggregates stdout and stderr logs, accessible via pm2 logs, and supports log rotation to prevent disk overflow.
Startup script: Use pm2 startup to generate a systemd script that restarts PM2 and your application after a server reboot.
PM2 also provides a web-based dashboard via pm2 plus for monitoring, though this is optional for basic deployments.
Set up a non-root user for running the application securely
Running Node.js as the root user is a security risk: if an attacker exploits a vulnerability in your application, they gain full system control. Create a dedicated non-root user with minimal privileges to run your application.
Execute the following commands on your server:
sudo adduser nodeapp – Creates a new user named nodeapp without sudo privileges.
sudo usermod -aG nodeapp nodeapp – Adds the user to its own group for file permissions.
sudo chown -R nodeapp:nodeapp /path/to/app – Assigns ownership of your application directory to this user.
su - nodeapp – Switches to this user before running PM2.
This user should only have read and execute permissions on the application directory, and PM2 should be started under this account. Additionally, restrict the application’s network access using a firewall (e.g., ufw) to only expose the necessary port (typically 3000 or 8080), with a reverse proxy like Nginx handling external traffic.
Security Practice
Root User
Non-Root User
Process ownership
Full system access
Limited to application directory
Compromise impact
Attacker gains root privileges
Attacker confined to user scope
File write permissions
Can modify any system file
Restricted to owned files
Network exposure
Can bind to privileged ports (e.g., 80)
Requires reverse proxy for low ports
Recommended for production
Never
Always
By combining these three steps—installing Node.js via nvm or a package manager, using PM2 for process management, and running under a non-root user—you establish a secure, resilient production server that can handle traffic and recover from failures automatically.
4. Configuring a Reverse Proxy with Nginx or Caddy
Deploying a Node.js application directly to the internet on its default port (often 3000) is not recommended for production. A reverse proxy sits in front of your Node app, handling incoming client requests and forwarding them to the application server. This architecture provides critical benefits: SSL termination to encrypt traffic, load balancing across multiple instances, static file serving to offload work from Node.js, and protection against certain attacks. Two popular reverse proxy choices are Nginx, a mature and highly configurable option, and Caddy, a newer server that automates HTTPS by default. This section focuses on Nginx due to its widespread use and flexibility.
Install and configure Nginx to proxy requests to your Node app
Begin by installing Nginx on your server. On Ubuntu or Debian, run sudo apt update && sudo apt install nginx. For CentOS or RHEL, use sudo yum install nginx. Once installed, enable and start the service: sudo systemctl enable nginx && sudo systemctl start nginx.
Create a new configuration file for your application in the Nginx sites-available directory, for example /etc/nginx/sites-available/myapp. Use the following minimal configuration to proxy requests to your Node app running on port 3000:
This configuration listens on port 80 for HTTP traffic, sets the server name to your domain, and forwards all requests to the Node.js application. The proxy headers preserve the original client information and support WebSocket connections, which many Node apps require. Enable the site by creating a symbolic link: sudo ln -s /etc/nginx/sites-available/myapp /etc/nginx/sites-enabled/. Test the configuration with sudo nginx -t, then reload Nginx: sudo systemctl reload nginx.
Enable HTTPS with Let’s Encrypt using Certbot
Securing your site with HTTPS is essential for protecting user data and improving search engine ranking. Let’s Encrypt provides free SSL certificates, and Certbot automates the installation and renewal process. Install Certbot for Nginx on Ubuntu with: sudo apt install certbot python3-certbot-nginx. For other distributions, refer to the Certbot documentation.
Run Certbot with the Nginx plugin to obtain and automatically configure your certificate:
Certbot will modify your Nginx configuration to serve HTTPS on port 443, redirect HTTP traffic to HTTPS, and set up automatic certificate renewal. To verify renewal is working, test the process: sudo certbot renew --dry-run. Certbot adds a systemd timer or cron job to handle renewals automatically.
Optimize static file caching and compression headers
Improve performance by serving static files (CSS, JavaScript, images) directly from Nginx rather than through your Node app, and by adding caching and compression headers. Extend your Nginx configuration with a dedicated location block for static assets:
The expires 30d directive tells browsers to cache static files for 30 days. The Cache-Control: public, immutable header further optimizes caching by indicating the resource will not change. Enabling Gzip compression reduces transfer sizes for text-based assets, speeding up load times. Apply these changes and reload Nginx. Monitor your application’s performance and adjust cache durations based on how frequently you update static files.
By following these steps, you establish a robust reverse proxy layer that enhances security, scalability, and speed for your Node.js production deployment.
Securely managing environment variables and secrets is a critical pillar of production Node.js deployments. Hardcoding API keys, database passwords, or JWT signing tokens into your source code creates a severe security vulnerability, especially when code is stored in version control systems like Git. A production-ready application must separate configuration from code by injecting sensitive data securely at runtime. This section outlines the essential practices for handling secrets, from local development to production servers, ensuring your application remains resilient against credential leaks.
Use .env files locally and environment variables on the server
For local development, the .env file is the standard approach. This file sits in your project root, is never committed to version control (add it to .gitignore immediately), and contains key-value pairs for all sensitive configuration. You load these values using a library like dotenv early in your application’s startup, typically in your main entry file. Example:
In contrast, production servers should never rely on .env files. Instead, you inject environment variables directly into the process using your hosting platform’s dashboard, CLI tools, or container orchestration system. For example, on a Linux server, you can set variables in the shell profile or systemd service file:
# In /etc/systemd/system/myapp.service
Environment="DB_HOST=production-db.internal"
Environment="DB_PASS=realProductionSecret"
Environment="API_KEY=sk-live-zyx987"
Cloud platforms like AWS Elastic Beanstalk, Heroku, or Vercel provide dedicated environment variable settings in their web consoles or CLI. This separation ensures that secrets are never written into your source code or Docker image layers.
Employ secret management tools like HashiCorp Vault or AWS Secrets Manager
For applications with multiple microservices, compliance requirements, or frequent credential rotation, manual environment variable management becomes error-prone. Dedicated secret management tools provide centralized storage, access control, auditing, and automatic rotation. Two widely adopted solutions are:
Tool
Key Features
Use Case
HashiCorp Vault
Dynamic secrets, encryption as a service, lease-based credentials, multi-cloud support
High-security environments where secrets must expire after a time-to-live (TTL)
AWS Secrets Manager
Native AWS integration, automatic rotation for RDS, fine-grained IAM policies, cost per secret
Teams already on AWS that need simple rotation and audit trails
To integrate these tools with Node.js, you typically fetch secrets at application startup and cache them in memory. For example, with AWS Secrets Manager:
This approach eliminates hardcoded secrets entirely and allows you to rotate credentials without redeploying your application.
Rotate secrets regularly and restrict access with least privilege
Static secrets—even those stored in environment variables—are a single point of failure. If a credential is compromised, the window of exposure should be minimal. Establish a rotation policy that forces credential changes every 30 to 90 days, or immediately after a security incident. Automate this process using tools like AWS Secrets Manager’s built-in rotation or scheduled jobs that regenerate API keys. Additionally, restrict access to secrets using the principle of least privilege:
For human access: Only senior DevOps or security team members should view plaintext secrets. Use read-only IAM roles for developers who need to verify configuration.
For application access: Each microservice should have its own service account or IAM role. A payment service should not have access to database credentials for the user service.
For CI/CD pipelines: Use temporary credentials generated by your CI tool (e.g., GitHub Actions secrets) rather than hardcoded tokens in pipeline configuration.
Audit and monitor: Enable logging for all secret access operations. Set up alerts for unusual patterns, such as repeated failed decryption attempts from an unknown IP address.
By combining environment variable injection, secret management tools, and rigorous rotation and access policies, you create a defense-in-depth strategy that protects your Node.js application from credential theft and insider threats. These practices not only secure your production environment but also simplify onboarding for new team members and streamline compliance audits.
6. Implementing Continuous Integration and Continuous Deployment (CI/CD)
Automating the testing and deployment pipeline for your Node.js application reduces manual errors and accelerates release cycles. A robust CI/CD workflow ensures that every code change is validated and, when safe, delivered to production with minimal human intervention. This section covers how to set up automated testing, configure deployment triggers, and use consistent deployment scripts.
Set up GitHub Actions or GitLab CI for automated testing
Both GitHub Actions and GitLab CI offer integrated CI/CD capabilities directly within your repository. For a Node.js application, the pipeline should run unit tests, linting, and integration tests on every push or pull request.
Example: Basic GitHub Actions workflow for Node.js testing
# .github/workflows/test.yml
name: Node.js CI
on:
push:
branches: [ main, develop ]
pull_request:
branches: [ main ]
jobs:
test:
runs-on: ubuntu-latest
steps:
- uses: actions/checkout@v4
- name: Use Node.js 20
uses: actions/setup-node@v4
with:
node-version: '20'
cache: 'npm'
- run: npm ci
- run: npm run lint
- run: npm test
- run: npm run build --if-present
In GitLab CI, a similar configuration resides in .gitlab-ci.yml:
# .gitlab-ci.yml
stages:
- test
test:
stage: test
image: node:20
script:
- npm ci
- npm run lint
- npm test
- npm run build --if-present
only:
- main
- develop
Configure automated deployment triggers on successful merges
To deploy automatically, link the CI pipeline to your production environment. Common triggers include:
By combining automated testing with consistent deployment scripts and trigger rules, you create a reliable CI/CD pipeline that delivers Node.js updates to production safely and efficiently.
7. Database Configuration and Connection Management
Connecting your Node.js application to a production database requires careful configuration to ensure reliability, performance, and fault tolerance. Unlike development environments where a single connection often suffices, production systems must handle thousands of concurrent requests without overwhelming the database. This section covers three critical aspects: connection pooling, backup strategies, and read replica implementations.
Use connection pools (e.g., pg-pool for PostgreSQL) to handle concurrent requests
In production, opening and closing a new database connection for every incoming request is inefficient and can quickly exhaust database resources. Connection pooling maintains a reusable set of open connections that your application can borrow and return. For PostgreSQL, the pg-pool library is the standard choice. Configure it with sensible limits:
Max connections: Set to 10–25 per application instance, depending on workload and database capacity. Avoid exceeding the database’s max_connections setting.
Idle timeout: Close unused connections after 10–30 seconds to free resources.
Connection timeout: Reject connection attempts that take longer than 5–10 seconds to prevent request pileup.
const { Pool } = require('pg');
const pool = new Pool({
host: process.env.DB_HOST,
port: 5432,
database: 'myapp_production',
user: process.env.DB_USER,
password: process.env.DB_PASSWORD,
max: 20,
idleTimeoutMillis: 30000,
connectionTimeoutMillis: 5000,
});
Always release connections back to the pool after queries using pool.query() or client.release() with manual clients. For high-traffic apps, monitor pool utilization with tools like pg-pool’s event emitters or Prometheus metrics.
Set up database backups and point-in-time recovery
Data loss is unacceptable in production. A robust backup strategy combines regular snapshots with point-in-time recovery (PITR) capability. PITR allows you to restore a database to any moment in time, not just the last full backup. Implement these practices:
Backup Type
Frequency
Retention
Notes
Full database dump
Daily
30–90 days
Use pg_dump for PostgreSQL; store in a separate region.
Write-ahead log (WAL) archiving
Continuous
7–30 days
Enables PITR; configure archive_command to send WAL segments to S3 or equivalent.
Logical replication slot
As needed
Until consumed
Use for low-downtime migrations or replicas.
For PostgreSQL, enable wal_level = replica and archive_mode = on in postgresql.conf. Test restore procedures quarterly to verify backup integrity. Automate backup verification using scripts that restore to a staging environment and run integrity checks.
Implement read replicas for scaling read-heavy workloads
If your application serves many read requests (e.g., dashboards, API GET endpoints), offload them to read replicas. A read replica is a copy of the primary database that accepts only SELECT queries, reducing load on the primary. Configure your Node.js application to route queries accordingly:
Primary pool: Handle all writes (INSERT, UPDATE, DELETE) and critical reads requiring strong consistency.
Replica pool(s): Handle non-critical reads, reporting, and analytical queries. Use a separate connection pool with a different endpoint.
Stale read tolerance: Accept that replicas may lag behind the primary by milliseconds or seconds. For real-time data, always query the primary.
Example routing logic:
const primaryPool = new Pool({ host: 'primary-db.example.com' });
const replicaPool = new Pool({ host: 'replica-db.example.com' });
async function getUser(id, requireFresh = false) {
const pool = requireFresh ? primaryPool : replicaPool;
const result = await pool.query('SELECT * FROM users WHERE id = $1', [id]);
return result.rows[0];
}
Monitor replica lag using database metrics (e.g., pg_stat_replication). Add multiple replicas for geographic distribution or higher throughput. For automatic failover, consider tools like Patroni or cloud-managed services (RDS, Cloud SQL) that promote a replica if the primary fails.
8. Monitoring, Logging, and Performance Tuning
Once your Node.js application is live, visibility into its behavior becomes essential. Monitoring, logging, and performance tuning allow you to detect issues before they affect users, diagnose problems quickly, and optimize resource usage. Without these systems, you are operating blind, relying on user complaints to discover failures. This section covers structured logging, application performance monitoring, and alert configuration to keep your production environment healthy.
Integrate structured logging with Winston or Pino
Plain console.log statements are insufficient for production. Structured logging outputs logs as JSON, making them machine-readable and compatible with log aggregation tools like Elasticsearch, Logstash, and Kibana (ELK) or cloud services like AWS CloudWatch. Two popular Node.js logging libraries are Winston and Pino. Winston offers rich configuration with multiple transports and log levels, while Pino focuses on high performance with significantly lower overhead. Both support structured output. Choose Pino when throughput is critical, such as in high-traffic APIs, and Winston when you need flexible formatting or custom transports. Implement logging at meaningful levels: info for normal operations, warn for recoverable issues, and error for failures requiring attention. Always include context—request ID, user ID, or transaction ID—to trace issues across services.
Set up application performance monitoring (APM) like New Relic or Datadog
APM tools provide real-time insights into application performance, including request latency, database query speeds, error traces, and dependency health. New Relic and Datadog are industry leaders, each offering Node.js agents that instrument your code automatically. New Relic excels in distributed tracing and transaction breakdowns, while Datadog integrates tightly with infrastructure monitoring and dashboards. Both tools help you identify slow endpoints, memory leaks, and external service bottlenecks. Deploy the APM agent as early as possible in development to establish baselines. Configure sampling rates carefully to avoid overwhelming your monitoring system or incurring excessive costs. Use APM data to guide performance tuning decisions, such as optimizing database queries or caching frequently accessed data.
Feature
New Relic
Datadog
Node.js agent setup
One-line require statement, minimal config
One-line require statement, minimal config
Distributed tracing
Full support with automatic context propagation
Full support with integration for OpenTelemetry
Dashboard customization
Powerful, but requires learning NRQL query language
Drag-and-drop builder with prebuilt templates
Error tracking
Detailed stack traces with transaction context
Error grouping and correlation with logs
Pricing model
Based on data ingested per month
Based on hosts and custom metrics
Infrastructure monitoring
Separate product, additional cost
Included in core platform
Configure alerts for CPU, memory, and error rate thresholds
Alerts transform raw monitoring data into actionable notifications. Without alerting, you may not discover a memory leak until the application crashes. Set up alerts for critical metrics: CPU usage above 80% for sustained periods, memory consumption increasing steadily over hours, and error rate spikes exceeding a baseline by 200%. Use your APM tool’s alerting features or dedicated services like PagerDuty or Opsgenie. Configure multiple notification channels—email for non-urgent warnings, Slack for team visibility, and SMS or phone calls for critical incidents. Define severity levels: warning for conditions that may become serious, critical for immediate outages. Test your alerting pipeline regularly to ensure notifications reach the right people. Finally, review alert history monthly to tune thresholds and eliminate noise from false positives, which can lead to alert fatigue.
9. Securing Your Node.js Application in Production
Deploying to production exposes your Node.js application to real-world threats, from automated bots to targeted attacks. Security must be woven into every layer of your deployment, not bolted on as an afterthought. This section covers three essential practices that form a strong defense: hardening HTTP headers, controlling request flow, and keeping dependencies clean.
Implement helmet.js for HTTP security headers
HTTP response headers tell browsers how to behave when handling your application’s content. Without proper headers, your app is vulnerable to clickjacking, MIME-type sniffing, cross-site scripting (XSS), and other client-side attacks. The helmet middleware for Express.js sets a collection of security headers with sensible defaults, including:
Content-Security-Policy: restricts which resources (scripts, styles, images) can be loaded
Helmet is a one-line upgrade that blocks many common browser-level exploits. Review your Content-Security-Policy carefully to avoid breaking legitimate scripts or third-party integrations.
Use rate limiting and input validation to prevent abuse
Production applications face brute-force login attempts, API scraping, and denial-of-service attacks. Rate limiting restricts how many requests a single IP can make within a time window, preserving resources for legitimate users. Input validation ensures that every piece of data entering your system conforms to expected types, lengths, and patterns.
Implement rate limiting with express-rate-limit:
npm install express-rate-limit
const rateLimit = require('express-rate-limit');
const limiter = rateLimit({
windowMs: 15 * 60 * 1000, // 15 minutes
max: 100, // limit each IP to 100 requests per windowMs
message: 'Too many requests from this IP, please try again later.',
standardHeaders: true,
legacyHeaders: false,
});
app.use('/api/', limiter); // Apply to all API routes
For input validation, use libraries such as joi or express-validator. Always validate on the server side, never trust client-side checks alone. Key validation rules include:
Input Type
Validation Rule
Example
Email
Must match email regex
/.+@.+..+/
User ID
Must be alphanumeric, length 3-20
/^[a-zA-Z0-9]{3,20}$/
Numeric fields
Must be integer or float within range
Number.isInteger(value)
Text input
Strip HTML tags, limit length
sanitizeHtml(value)
Combine rate limiting with input validation to create a robust first line of defense against both automated attacks and malformed data.
Regularly update dependencies and scan for vulnerabilities
Your application is only as secure as its dependencies. Third-party packages can introduce known vulnerabilities that attackers actively exploit. Establish a routine for dependency maintenance:
Weekly updates: run npm outdated to identify stale packages, then update with npm update for minor and patch versions
Vulnerability scanning: use npm audit to detect known security issues in your dependency tree
Automated tools: integrate Dependabot, Snyk, or GitHub’s security alerts into your CI/CD pipeline
Lock file integrity: commit your package-lock.json to ensure consistent, verified versions across environments
Run a vulnerability audit before every production deployment:
npm audit --audit-level=high
This command fails if any dependency has a high or critical severity vulnerability, forcing you to address the issue before shipping. For zero-day threats, subscribe to Node.js security mailing lists and have a rollback plan ready. By treating dependencies as live code that requires continuous care, you dramatically reduce your application’s attack surface in production.
10. Scaling and Load Balancing for High Traffic
To ensure your Node.js application remains responsive under high traffic, you must design your deployment for horizontal scaling and effective load distribution. This involves utilizing multiple CPU cores, implementing a load balancer, and adopting container orchestration for automated scaling. Below are three essential strategies.
Use PM2 clustering mode to utilize multiple CPU cores
Node.js runs on a single thread by default, but you can leverage all available CPU cores using PM2’s clustering mode. This spawns multiple instances of your application, each handling requests independently. To enable clustering, start your app with the -i flag:
Monitor:pm2 monit to view resource usage per instance
PM2 automatically balances incoming connections across worker processes. This reduces response time and prevents any single process from becoming a bottleneck. For zero-downtime deployments, use pm2 reload instead of pm2 restart.
Deploy behind a load balancer like HAProxy or Nginx upstream
A load balancer distributes traffic across multiple application instances, improving reliability and performance. Common options include:
Tool
Key Features
Use Case
HAProxy
High-performance TCP/HTTP proxy, health checks, session persistence
Kubernetes also integrates with cloud providers for node-level auto-scaling, ensuring your cluster can handle traffic spikes without manual intervention. Combined with PM2 clustering within each pod, you achieve both vertical and horizontal scaling efficiency.
Frequently Asked Questions
What is the best way to deploy a Node.js application to production?
The best approach typically involves setting up a Linux server (Ubuntu/CentOS), installing Node.js via nvm, using PM2 as a process manager to keep the app running, configuring Nginx as a reverse proxy for SSL termination and load balancing, setting environment variables securely, and implementing a CI/CD pipeline (e.g., GitHub Actions) for automated deployments. Monitoring with tools like PM2 Plus or New Relic is also recommended.
How do I set environment variables in production for Node.js?
Environment variables in production should not be stored in code. Use a .env file (gitignored) loaded via dotenv, or set them directly on the server using terminal commands (export VAR=value) or a .bashrc file. For cloud platforms, use their environment configuration tools. Always keep secrets like database passwords and API keys out of version control.
What is PM2 and why is it used for Node.js deployment?
PM2 is a production process manager for Node.js applications. It keeps your app running continuously, restarts it after crashes, handles log management, provides a built-in load balancer for cluster mode, and offers monitoring capabilities. It also supports zero-downtime deployments and can be configured to start on system boot, making it essential for production environments.
Do I need Nginx when deploying a Node.js app?
While Node.js can serve HTTP directly, Nginx is highly recommended as a reverse proxy. It handles SSL/TLS termination, static file serving, load balancing across multiple Node instances, rate limiting, and security features like DDoS protection. Nginx also improves performance by buffering requests and can serve as a gateway for multiple services on the same server.
How can I ensure my Node.js app is secure in production?
Key security measures include: using HTTPS with valid SSL certificates (Let's Encrypt), setting HTTP security headers (Helmet.js), validating and sanitizing user input, using environment variables for secrets, keeping dependencies updated (npm audit), implementing rate limiting, using proper authentication/authorization, and running the app with a non-root user. Also, disable directory listing and use secure session management.
What is a CI/CD pipeline and how does it help Node.js deployment?
CI/CD (Continuous Integration/Continuous Deployment) automates the process of testing and deploying your Node.js app. With tools like GitHub Actions, GitLab CI, or Jenkins, you can automatically run tests on every push, build the app, and deploy it to your production server. This reduces manual errors, speeds up releases, and ensures consistent deployments. A typical pipeline includes linting, unit tests, integration tests, and then secure deployment via SSH.
Should I use Docker for Node.js production deployment?
Docker is highly beneficial for Node.js production deployment as it provides consistency across environments, isolates dependencies, simplifies scaling, and works well with orchestration tools like Kubernetes and Docker Swarm. It ensures the app runs the same way on a developer's machine as on the production server. However, it adds complexity, so for simple deployments, a traditional setup with PM2 and Nginx may suffice.
How do I monitor a Node.js application in production?
Monitoring can be done using PM2's built-in monitoring (pm2 monit), or external tools like PM2 Plus, New Relic, Datadog, or Prometheus with Grafana. Key metrics to track include CPU usage, memory consumption, request rates, error rates, and response times. Also implement application performance monitoring (APM) to trace slow requests and set up alerts for anomalies. Logging with tools like Winston or Morgan is essential for debugging.
Firebase Authentication is a backend-as-a-service solution for managing user identity in web, mobile, and server applications. It abstracts the complexity of building secure authentication infrastructure by providing pre-built UI components, client SDKs, and server-side libraries. Developers can authenticate users using email and password combinations, phone numbers, or federated identity providers such as Google, Facebook, Twitter, GitHub, Microsoft, and Apple. The service also supports anonymous authentication for temporary sessions and custom authentication tokens for integrating existing identity systems.
Under the hood, Firebase Authentication generates JSON Web Tokens (JWTs) for each authenticated user, which can be used to authorize access to Firebase-hosted resources or custom backend APIs. The service handles token refresh, session management, and password reset flows automatically, eliminating common security pitfalls like token leakage or improper session handling. All communication is encrypted via HTTPS, and the system is SOC 2 and ISO 27001 certified, ensuring enterprise-grade security compliance.
Key Benefits and Use Cases
Firebase Authentication offers several advantages that make it a preferred choice for developers:
Reduced development time: Pre-built UI flows for sign-up, sign-in, and password recovery eliminate the need to build and test these features from scratch.
Multi-platform support: SDKs are available for iOS, Android, JavaScript, Flutter, Unity, and C++, enabling consistent authentication logic across platforms.
Scalability: The service automatically scales to handle millions of concurrent authentications without infrastructure provisioning.
Security defaults: Built-in protection against brute force attacks, account enumeration, and credential stuffing.
Cost efficiency: The service includes a generous free tier (50,000 monthly active users) with pay-as-you-go pricing beyond that.
Common use cases include:
Social login integration for consumer apps to reduce friction and increase conversion rates.
Phone number authentication for two-factor verification or passwordless login.
Anonymous sessions that convert to permanent accounts when users decide to register.
Enterprise applications using SAML or OIDC providers via custom authentication.
How It Fits into the Firebase Ecosystem
Firebase Authentication serves as the identity layer that connects seamlessly with other Firebase products. When a user authenticates, their unique user ID (UID) becomes the primary key for data stored in Firestore or Realtime Database, enabling row-level security through Firebase Security Rules. For example, a rule like allow read, write: if request.auth.uid == resource.data.user_id ensures users can only access their own data.
Integration with Firebase Cloud Functions allows developers to trigger server-side logic on authentication events such as user creation, deletion, or login. This is useful for sending welcome emails, initializing user profiles, or auditing authentication activity. Firebase Crashlytics can correlate crashes with authenticated user sessions, helping developers debug issues specific to logged-in users. Additionally, Firebase Remote Config can deliver personalized feature flags based on user attributes like sign-in method or account creation date.
The authentication state is also leveraged by Firebase Cloud Messaging for targeting push notifications to specific user segments, and by Firebase Performance Monitoring to track how authentication flows affect app responsiveness. This tight integration creates a unified development experience where one authentication system powers the entire application ecosystem.
Security rules use request.auth.uid for data access control
Cloud Functions
Triggers on functions.auth.user().onCreate() events
Cloud Storage
File access rules tied to authenticated user IDs
Remote Config
Conditional parameters based on user authentication state
Firebase Authentication: A Complete Guide
Firebase Authentication provides a robust, backend-as-a-service solution for managing user identity in web and mobile applications. It abstracts away the complexity of building secure authentication systems, offering a range of built-in providers that cover most common use cases. This section examines each supported provider in detail, outlining their strengths, implementation considerations, and typical use scenarios.
Email and Password Authentication
The email/password provider is the most fundamental and widely used authentication method in Firebase. It allows users to sign up and sign in using their email address and a custom password. Firebase handles password hashing and storage securely, and provides built-in email verification and password reset flows via its SDKs.
Setup: Enable the provider in the Firebase Console under Authentication > Sign-in method. No additional configuration is required beyond setting a project name.
Key Features: Supports email verification, password reset via email, and account linking with other providers. Firebase enforces a minimum password length of 6 characters by default (configurable).
Limitations: No built-in support for password strength policies beyond length. Requires users to remember credentials, which can lead to higher abandonment rates compared to social sign-in.
// Example: Creating a new user with email and password (JavaScript SDK)
import { getAuth, createUserWithEmailAndPassword } from "firebase/auth";
const auth = getAuth();
const email = "user@example.com";
const password = "securePassword123";
createUserWithEmailAndPassword(auth, email, password)
.then((userCredential) => {
const user = userCredential.user;
console.log("User created:", user.email);
})
.catch((error) => {
console.error("Error:", error.code, error.message);
});
Phone Number Authentication
Phone number authentication uses SMS verification to confirm a user’s identity. Firebase sends a one-time code (OTP) to the user’s phone number, which they enter to complete sign-in. This method is particularly useful for applications targeting mobile-first users or regions with limited email adoption.
Setup: Enable the phone provider in the Firebase Console. You may need to configure reCAPTCHA verification for web apps to prevent abuse. For iOS, additional APNs setup is required.
Key Features: No password management needed; session tokens are automatically refreshed. Supports automatic code detection on Android via SMS Retriever API.
Limitations: Cost associated with SMS delivery (varies by region). Users without a phone or with limited SMS access are excluded. Requires careful handling of reCAPTCHA challenges on web.
Platform
Verification Method
Additional Setup
Web
reCAPTCHA invisible widget
Firebase project with reCAPTCHA enabled
Android
SMS Retriever API
Google Play Services, SHA-1 certificate
iOS
APNs silent push
Apple Developer account, APNs key
Social Sign-In (Google, Facebook, Apple, etc.)
Social sign-in allows users to authenticate using existing accounts from popular identity providers. Firebase supports Google, Facebook, Apple, Twitter, GitHub, Microsoft, and Yahoo out of the box. This method reduces friction by eliminating password creation and leveraging the user’s existing social graph.
Google: Uses OAuth 2.0. Requires a Google Cloud Platform project with OAuth consent screen configured. Firebase automatically handles token refresh.
Facebook: Requires a Facebook App ID and App Secret from the Facebook Developer portal. The user is prompted for specific permissions (e.g., email, public profile).
Apple: Mandatory for iOS apps that use social sign-in (App Store requirement). Uses OAuth 2.0 with JWT-based tokens. Firebase supports the “Sign in with Apple” flow, including the private email relay feature.
Implementation considerations:
Always handle the case where a user signs in with a social provider that has the same email as an existing email/password account. Use Firebase’s linkWithCredential method to merge accounts.
Social providers may return limited profile data (e.g., Facebook may not provide email if the user denies permission). Always design your app to work with partial data.
Firebase provides a unified User object regardless of the provider, simplifying frontend logic.
Each provider has its own setup wizard in the Firebase Console, which guides you through obtaining the necessary API keys and secrets. Once configured, you initiate sign-in using the corresponding Firebase SDK method, such as signInWithPopup (for web) or signInWithCredential (for native apps).
Setting Up Firebase Authentication in Your Project
Firebase Authentication provides backend services, easy-to-use SDKs, and ready-made UI libraries to authenticate users to your app. It supports authentication using passwords, phone numbers, popular federated identity providers like Google, Facebook, and Twitter, and more. This section walks you through the essential steps to enable and integrate Firebase Authentication into your web, iOS, or Android project.
Creating a Firebase Project and Enabling Authentication
Begin by navigating to the Firebase Console. If you already have a Google account, sign in and click Create a project. Follow the on-screen prompts to name your project and configure Google Analytics if desired. Once your project is ready, locate Authentication in the left-hand menu under the Build section. Click Get started, then select the Sign-in method tab. Here you can enable one or more providers:
Email/Password: Enable this to allow users to sign up and sign in with an email address and password.
Google: Toggle the switch, then configure the OAuth consent screen by providing a support email and optional branding details.
Phone: Enable this to verify phone numbers via SMS. Note that this requires a reCAPTCHA verification on web.
Anonymous: Enable this to create temporary anonymous accounts for users before they sign up.
For each provider you enable, you may need to provide additional configuration details, such as OAuth client IDs or API keys. Save your changes before proceeding.
Installing and Configuring the Firebase SDK
After enabling authentication in the console, integrate the Firebase SDK into your application. The installation method depends on your platform. Below is a comparison of the primary approaches:
Platform
Package Manager / Method
Install Command or Step
Web (JavaScript)
npm or CDN
npm install firebase or add script tags for Firebase modules
iOS (Swift)
CocoaPods or Swift Package Manager
pod 'FirebaseAuth' in Podfile, then pod install
Android (Kotlin/Java)
Gradle (Module-level build.gradle)
implementation platform('com.google.firebase:firebase-bom:latest-version') then implementation 'com.google.firebase:firebase-auth'
After installing the SDK, you must register your app with Firebase. In the Firebase Console, click Add app and select your platform. Download the configuration file:
Web: A firebaseConfig object that you will paste into your JavaScript code.
iOS: A GoogleService-Info.plist file to add to your Xcode project.
Android: A google-services.json file to place in the app/ directory of your Android project.
For Android, also ensure you have the Google Services plugin added to your root-level build.gradle file.
Initializing the Auth Instance in Your App
With the SDK installed and the configuration file in place, initialize Firebase in your application code and obtain an Auth instance. This instance is the central object for all authentication operations.
import FirebaseCore
import FirebaseAuth
FirebaseApp.configure()
let auth = Auth.auth()
Android (Kotlin):
import com.google.firebase.FirebaseApp
import com.google.firebase.auth.FirebaseAuth
FirebaseApp.initializeApp(this)
val auth = FirebaseAuth.getInstance()
Once you have the auth instance, you are ready to implement sign-in flows, listen for authentication state changes, and manage user sessions. For example, on web, you can listen for the user’s current authentication status with onAuthStateChanged. On mobile platforms, similar listener patterns are available. This foundational setup is identical regardless of which sign-in providers you choose to enable later.
Implementing Email and Password Sign-In
Email and password authentication remains the most widely used method for securing user access in web and mobile applications. Firebase Authentication simplifies this process by providing a complete backend service that handles credential validation, token generation, and session management. This section walks through the core implementation steps for registering users, managing sign-in flows, and handling common account lifecycle events.
User Registration with Email and Password
To create a new user account with an email and password, you use the createUserWithEmailAndPassword method provided by the Firebase Authentication SDK. This method accepts the user’s email address and a password (minimum 6 characters by default) and returns a promise that resolves with user credentials upon success. Below is a practical example using JavaScript:
Common registration errors include invalid email format, weak password, and email already in use. You should handle each error gracefully by displaying user-friendly messages. After registration, consider sending a verification email (covered below) to confirm the user’s identity.
Sign-In Flow and Session Management
Signing in an existing user follows a similar pattern using the signInWithEmailAndPassword method. Upon successful authentication, Firebase automatically manages the user session by storing a refresh token and an ID token. The session persists across page reloads and browser restarts, so you do not need to manually store tokens. To check the current authentication state, use the onAuthStateChanged observer:
import { getAuth, onAuthStateChanged } from "firebase/auth";
const auth = getAuth();
onAuthStateChanged(auth, (user) => {
if (user) {
// User is signed in
console.log("User signed in:", user.uid);
} else {
// User is signed out
console.log("No user signed in");
}
});
Session management best practices include:
Listening to onAuthStateChanged in a central location (e.g., app root component) to update UI state.
Handling token expiration by relying on Firebase’s automatic token refresh (no manual intervention required).
Implementing sign-out with signOut(auth) to clear the local session and redirect to a login page.
For multi-device scenarios, consider using Firebase’s multi-factor authentication or custom claims to restrict access based on user roles.
Two critical account security features are password reset and email verification. Firebase provides dedicated methods for both, which send emails to the user’s registered address. The password reset flow uses sendPasswordResetEmail, while email verification uses sendEmailVerification on the current user object. Example implementations:
Configure email templates in the Firebase Console under Authentication > Templates to customize the sender name, subject, and content.
For email verification, check the user.emailVerified property before granting access to sensitive features.
Password reset emails include a link that redirects users to a Firebase-hosted page by default; you can customize this URL in the console.
Handle errors such as “user not found” or “too many requests” by showing appropriate messages and implementing rate limiting.
By implementing these three core flows—registration, sign-in, and account recovery—you establish a robust authentication foundation that can be extended with additional providers like Google, Facebook, or phone number authentication.
Configuring OAuth Providers in the Firebase Console
Before implementing social login, you must enable and configure each OAuth provider in the Firebase Console. Navigate to the Authentication section, then the Sign-in method tab. For each provider (Google, Facebook, Apple, etc.), click the corresponding entry and toggle the Enable switch. You will need to provide provider-specific credentials:
Google: No additional configuration required beyond enabling; Firebase auto-generates a Web client ID and secret.
Facebook: Obtain an App ID and App Secret from the Facebook Developers portal. Under Facebook Login settings, add your Firebase OAuth redirect URI (found in the Firebase Console) to the Valid OAuth Redirect URIs field.
Apple: Requires an Apple Developer account. Register a Service ID, configure domain and return URLs in the Apple Developer portal, then enter the Service ID and private key in Firebase.
After saving, Firebase generates a unique OAuth client ID and secret for each provider (except Google, which uses its own). These credentials are automatically used during authentication. You can also configure custom OAuth scopes (e.g., email, profile, public_profile for Facebook) to request additional user data. For production apps, ensure your OAuth consent screen (for Google) or app review (for Facebook) is completed.
Implementing Sign-In with Google
To integrate Google Sign-In, use the Firebase Authentication SDK. In your web app, include the Firebase SDK and initialize the GoogleAuthProvider:
For a redirect-based flow (recommended for mobile or single-page apps), use signInWithRedirect and handle the result with getRedirectResult. The accessToken from the credential object allows you to call Google APIs on behalf of the user. You can also configure a custom OAuth scope, such as openid or profile, by calling provider.addScope().
Handling Facebook and Apple Sign-In
Facebook Sign-In follows a similar pattern but uses the FacebookAuthProvider. Configure the provider with your Facebook App ID and enable the Facebook Login product in the Facebook Developers portal. In your code:
Apple Sign-In uses the OAuthProvider with the provider ID apple.com. It requires a nonce for security. Generate a cryptographically random nonce, then pass it during sign-in:
For all providers, handle token expiry by using Firebase ID tokens (which auto-refresh) rather than OAuth access tokens for user session management. Store OAuth tokens securely (e.g., in a backend session) if you need to call provider APIs later. Always implement error handling for cases like account-exists-with-different-credential, which can be resolved by linking providers.
Managing User Sessions and State
Effective session management is critical for any application using Firebase Authentication. Users expect their login state to persist seamlessly across app restarts, and developers need reliable mechanisms to respond to authentication changes in real time. This section covers the three core techniques for managing user sessions: observing state with listeners, persisting sessions locally, and handling token lifecycle events.
Observing Authentication State with Listeners
Firebase provides a built-in listener via the onAuthStateChanged method that fires whenever the user’s sign-in state changes—such as on login, logout, or token refresh. This listener is the recommended way to react to authentication changes and should be attached early in the app lifecycle, typically in the main activity or application class.
Immediate callback: The listener fires immediately with the current user object (or null) upon registration.
Real-time updates: It triggers on every state change, including token refresh, without requiring manual polling.
Cleanup required: Always detach the listener when the component or activity is destroyed to prevent memory leaks.
Example in JavaScript (web SDK):
import { onAuthStateChanged, getAuth } from "firebase/auth";
const auth = getAuth();
const unsubscribe = onAuthStateChanged(auth, (user) => {
if (user) {
// User is signed in; update UI or fetch user data
console.log("User signed in:", user.uid);
} else {
// User is signed out; redirect to login
console.log("No user signed in");
}
});
// Later, when no longer needed:
unsubscribe();
Persisting User Sessions Locally
Firebase automatically persists the authentication state to local storage (e.g., IndexedDB on web, SharedPreferences on Android, Keychain on iOS). This ensures that when a user closes and reopens the app, they remain signed in without re-entering credentials. However, you can control this behavior explicitly using setPersistence.
Available persistence modes:
Mode
Storage Location
Use Case
local
Device local storage
Default; persists across browser or app restarts
session
Session storage (web only)
Clears when tab or window is closed
none
In-memory only
No persistence; user must re-authenticate on restart
Firebase Authentication uses JSON Web Tokens (JWTs) that expire after one hour. The SDK automatically refreshes tokens in the background when the listener is active, but you may need to handle token lifecycle manually for custom backend integrations or long-running operations.
Automatic refresh: The onAuthStateChanged listener triggers on token refresh, so you always have a valid token via user.getIdToken().
Force refresh: Call user.getIdToken(true) to force a token refresh, useful before sending a request to a backend that requires a fresh token.
Expiration handling: If a token expires while the user is idle, the SDK will attempt a silent refresh. If that fails (e.g., due to revoked credentials), the listener will fire with null, and you should redirect to login.
Example of forcing a token refresh before an API call:
import { getAuth } from "firebase/auth";
const auth = getAuth();
const user = auth.currentUser;
if (user) {
user.getIdToken(true) // Force refresh
.then((token) => {
// Send token to backend
fetch("https://api.example.com/data", {
headers: { Authorization: `Bearer ${token}` }
});
})
.catch((error) => {
console.error("Token refresh failed:", error);
});
}
By combining these three techniques—observing state, persisting sessions, and managing token lifecycles—you can build a robust authentication experience that feels seamless to users and reliable under varying network conditions.
Security Rules and Access Control
Firebase Authentication integrates directly with Firestore, Realtime Database, and Cloud Storage security rules to enforce data access based on user identity. By referencing the authenticated user’s unique ID, email, or custom claims within your rules, you can ensure that only authorized individuals read, write, or delete data. This approach prevents unauthorized access and maintains data integrity across your application.
Writing Security Rules That Reference Auth
Every Firebase security rule set includes a built-in request.auth object that contains authentication data when a user is signed in. For unauthenticated requests, request.auth is null. You can use this object to restrict access to specific documents, nodes, or files. Below are common patterns for Firestore, Realtime Database, and Cloud Storage.
Only the user whose UID matches the file’s metadata userId can access the object.
When writing rules, always consider the following best practices:
Use request.auth.uid for direct user identification — this is the most reliable way to tie data to a specific user.
Validate ownership on every write — ensure the authenticated user’s UID matches the data being created or modified.
Never rely solely on client-side checks — security rules are your server-side enforcement layer.
Use request.auth.token for custom claims — access request.auth.token.role to check roles like admin or moderator.
Role-Based Access Control Patterns
For applications requiring multiple permission levels, you can implement role-based access control (RBAC) using Firebase Authentication custom claims. Set claims via the Admin SDK, then reference them in your security rules. Common roles include admin, editor, and viewer.
match /documents/{documentId} {
allow read: if request.auth != null;
allow create: if request.auth.token.role == 'admin';
allow update: if request.auth.token.role in ['admin', 'editor'];
allow delete: if request.auth.token.role == 'admin';
}
For more granular control, combine custom claims with document-based ownership. This pattern is especially useful for multi-tenant applications where users have different roles across organizations. Store the role mapping in a separate collection (e.g., user_roles) and reference it within your rules using exists() or get() functions.
Testing and Validating Rules Locally
Before deploying security rules to production, test them thoroughly using the Firebase Emulator Suite. The emulator provides a local environment where you can simulate authenticated and unauthenticated requests without incurring costs or risking real data.
Always validate edge cases, such as users attempting to read data they do not own or unauthenticated write attempts. Regularly review and update your rules as your authentication model evolves.
Custom Authentication and Token Management
Firebase Authentication provides robust built-in providers, but many applications require integration with existing identity systems or need fine-grained control over user sessions. Custom authentication bridges this gap by allowing you to mint and manage your own JSON Web Tokens (JWTs) on a trusted server, while still leveraging Firebase’s secure backend services. This approach is essential when migrating from legacy systems, using custom user stores, or implementing multi-factor authentication flows not natively supported by Firebase.
Generating Custom Tokens with the Admin SDK
To generate custom tokens, you must use the Firebase Admin SDK on a server you control. The Admin SDK requires a service account key (a JSON file) downloaded from the Firebase console, which grants your server privileged access to mint tokens. The process involves three steps:
Initialize the Admin SDK – Load the service account credentials and initialize the SDK with your Firebase project ID.
Set custom claims – Optionally attach metadata such as roles, permissions, or group memberships to the token payload. Claims are limited to 1000 bytes and should not store sensitive data.
Mint the token – Call admin.auth().createCustomToken(uid, additionalClaims) where uid is a unique user identifier (string) and additionalClaims is an optional object. The returned token is a JWT valid for one hour by default.
Once the server returns a custom token to the client application, the user signs in using the Firebase client SDK. The method differs slightly by platform:
Web/JavaScript – Call signInWithCustomToken(token) on the auth instance.
Android – Use FirebaseAuth.signInWithCustomToken(token).
After successful sign-in, Firebase automatically refreshes the custom token before expiration (every hour) using a secure internal mechanism. The client receives a new ID token, but the custom claims embedded in the original token persist across refreshes. You can access these claims on the client via user.getIdTokenResult() or on the server via admin.auth().verifyIdToken().
Best Practices for Secure Token Handling
Custom tokens introduce additional security responsibilities. The following table contrasts recommended and risky practices:
Aspect
Recommended Practice
Risky Practice
Token generation location
Server-side only (e.g., Node.js, Python)
Client-side generation or hardcoded tokens
Service account key storage
Environment variables or secret manager
Embedded in client code or public repositories
Custom claims size
Under 1000 bytes; minimal payload
Large objects or raw database queries in claims
Token expiration
Default 1 hour; avoid extending
Setting expiration beyond 1 hour manually
UID format
Consistent, non-guessable identifiers
Sequential integers or email addresses
Additional critical practices include: never logging full tokens in server logs, always verifying custom tokens on the server using admin.auth().verifyIdToken() before granting access to sensitive operations, and revoking tokens immediately when a user is removed from your system by calling admin.auth().revokeRefreshTokens(uid). Also, avoid storing sensitive authorization logic in custom claims—use them only for fast lookups, and keep authoritative data in your own database.
Common Pitfalls and Troubleshooting
Firebase Authentication is robust, but developers often encounter recurring issues that can derail user experience. Understanding these pitfalls—from unexpected sign-outs to quota limits—saves hours of debugging. This section provides targeted solutions for the most frequent problems, with practical steps to resolve them efficiently.
Authentication errors often stem from misconfigured providers, incorrect SDK initialization, or network issues. The first step is always to check the Firebase console’s Authentication logs under the “Logs” tab. Common error codes include:
auth/argument-error: Invalid parameters passed to a method (e.g., null email). Verify input validation.
auth/email-already-in-use: The user exists; handle with a “forgot password” prompt.
auth/wrong-password: Usually indicates a typo; implement rate limiting on sign-in attempts.
auth/network-request-failed: Check client-side connectivity and Firebase project’s Firestore/Realtime Database rules for unintended blocking.
For debugging, enable verbose logging in the Firebase SDK. In web apps, set firebase.auth().useDeviceLanguage() to localize error messages. Example snippet for catching and logging errors:
firebase.auth().signInWithEmailAndPassword(email, password)
.then((userCredential) => {
console.log("Sign-in successful:", userCredential.user.uid);
})
.catch((error) => {
console.error("Auth error code:", error.code);
console.error("Auth error message:", error.message);
// Map error codes to user-friendly messages
if (error.code === 'auth/user-not-found') {
alert("No account found for this email.");
}
});
Handling Quota and Rate Limits
Firebase Authentication enforces quotas to prevent abuse. Exceeding these limits can cause temporary blocks or degraded performance. Key limits include:
Resource
Default Quota
Common Issue
Create account requests
100 per IP per hour
Rapid sign-up flows or bots
Sign-in attempts
50 per IP per hour
Brute-force attacks or retry loops
Password reset emails
10 per hour per user
Spam triggers from multiple requests
To mitigate these, implement client-side throttling (e.g., disable the sign-in button for 2 seconds after a failed attempt). For production apps, upgrade to the Blaze plan to increase quotas. Monitor usage in the Firebase Console under “Authentication > Usage.” If you hit rate limits, pause requests for 5–10 minutes; Firebase automatically resets the counter after the window expires. Avoid retrying failed requests immediately—use exponential backoff (e.g., wait 1s, then 2s, then 4s).
Cross-origin errors occur when your authentication domain doesn’t match the configured authorized domains in the Firebase console. This is especially common with custom domains or multiple subdomains. Symptoms include “auth/unauthorized-domain” errors or blank popup windows during OAuth sign-ins. To resolve:
In the Firebase Console, go to “Authentication > Settings > Authorized domains.” Add every domain and subdomain that will host your app (e.g., app.example.com, admin.example.com).
For OAuth providers (Google, Facebook, etc.), ensure the redirect URI in the provider’s developer console exactly matches your Firebase project’s callback URL (found in the Authentication provider settings). Common mismatches include trailing slashes or HTTP vs. HTTPS.
If using custom domains with Firebase Hosting, verify the domain is properly verified in the Hosting section and that SSL is enabled. For non-Hosting setups, use the authDomain parameter in your Firebase config to point to your-project.firebaseapp.com.
Test with browser developer tools: open the Network tab, filter by “auth,” and inspect the redirect URL for 302 or 400 errors. A 400 “redirect_uri_mismatch” indicates a domain mismatch.
For single-page apps using redirect sign-in, ensure your app’s URL is exactly as listed—including port numbers if developing locally. Use http://localhost:3000 for local development and add it to authorized domains temporarily.
Best Practices and Production Considerations
Deploying Firebase Authentication in production requires a deliberate approach to security, user experience, and observability. While the SDK simplifies integration, production environments demand careful hardening of configurations, thoughtful UX design across platforms, and continuous monitoring to detect anomalies. The following best practices help ensure a reliable, secure, and user-friendly authentication system.
Securing API Keys and Environment Configurations
Firebase API keys are not secret by design—they identify your project to Google servers but do not alone grant access to data. However, exposing them in client code is standard practice for web and mobile apps. The real security lies in Firebase Security Rules, not in hiding keys. To harden configurations:
Use Firebase App Check to verify that incoming requests originate from your genuine app. This blocks unauthorized clients from using your API keys.
Restrict API key usage in the Google Cloud Console to only Firebase Authentication and other required services. Set HTTP referrer or iOS/Android app restrictions to limit key exposure.
Store environment variables (e.g., Firebase project ID, database URLs) outside version control. Use a .env file for local development and a secret manager for production builds.
Never embed service account keys in client code. Service accounts grant elevated privileges and must only be used in trusted server environments (Cloud Functions, your backend).
Rotate keys periodically and revoke any keys leaked in logs or error messages. Monitor Firebase Console for unusual API key usage.
Optimizing Sign-In UX for Different Platforms
Authentication flows must be frictionless while maintaining security. Platform-specific optimizations reduce drop-off and improve conversion:
Web: Use the FirebaseUI library for pre-built sign-in widgets. Implement multi-factor authentication (MFA) for sensitive actions. Leverage session persistence with firebase.auth().setPersistence(firebase.auth.Auth.Persistence.LOCAL) to keep users logged across page reloads.
iOS: Integrate Sign in with Apple for compliance. Use the revokeToken method on credential revocation. Support biometric authentication (Face ID/Touch ID) via the Local Authentication framework after initial sign-in.
Android: Enable Smart Lock for Passwords to auto-fill credentials. Use the Credential Manager API for passwordless sign-in with passkeys. Handle activity lifecycle properly to avoid token expiration during configuration changes.
Cross-platform: Offer multiple sign-in methods (email/password, Google, Apple, phone) but prioritize the most popular for your audience. Implement a consistent error-handling strategy—display user-friendly messages for common errors like “email already in use” or “wrong password.”
Performance: Prefetch authentication state on app launch using onAuthStateChanged to avoid flickering or loading spinners. Cache user profiles locally for offline-first experiences.
Monitoring Usage and Auditing Authentication Events
Production monitoring ensures you detect abuse, track adoption, and debug issues. Firebase provides several tools for this:
Tool
Purpose
Key Metrics
Firebase Console Authentication Dashboard
View sign-in methods, user growth, and recent activity
Daily active users, sign-in method breakdown, error rates
Cloud Logging
Audit all authentication events (sign-in, sign-up, token refresh)
Timestamps, user UIDs, IP addresses, event type
Firebase Performance Monitoring
Measure latency of authentication operations
Sign-in duration, token refresh time, network errors
Custom Analytics
Track funnel conversion (e.g., sign-up to first login)
Completion rates, drop-off points, retry counts
To implement auditing effectively:
Enable Cloud Audit Logs for Firebase Authentication to capture admin operations (e.g., user creation, deletion) and security-sensitive events.
Set up alerts for unusual patterns—for example, a spike in failed sign-in attempts from a single IP, or a sudden increase in new user registrations from an unexpected geographic region.
Log custom events in your application (e.g., “MFA enrollment completed,” “password reset requested”) to correlate with authentication data.
Regularly review the Authentication dashboard for inactive users or accounts using deprecated sign-in methods. Use the Firebase Admin SDK to batch-disable stale accounts.
Test monitoring in staging with simulated traffic to validate that alerts trigger correctly and logs contain actionable information.
Frequently Asked Questions
What is Firebase Authentication?
Firebase Authentication is a backend service that provides easy-to-use SDKs and ready-made UI libraries to authenticate users to your app. It supports email and password, phone number, popular federated identity providers like Google, Facebook, Twitter, and GitHub, as well as anonymous authentication. It integrates seamlessly with other Firebase services, enabling secure access control.
How do I set up Firebase Authentication in my app?
To set up Firebase Authentication, first create a Firebase project in the Firebase console. Enable the sign-in methods you need (e.g., email/password, Google). Then add the Firebase SDK to your app (web, iOS, Android). For web, include the Firebase Auth library. Initialize the Firebase app with your project's configuration, and use the provided functions like createUserWithEmailAndPassword or signInWithPopup to handle authentication.
What authentication methods does Firebase support?
Firebase Authentication supports a variety of methods: email/password, phone number (via SMS), and federated identity providers including Google, Facebook, Twitter, GitHub, Microsoft, Apple, and Yahoo. It also supports anonymous authentication, which allows temporary user accounts, and custom authentication tokens for integrating with your own backend systems.
Firebase manages user sessions via ID tokens and refresh tokens. When a user signs in, the Firebase Auth SDK obtains an ID token (JWT) that expires after one hour. The SDK automatically refreshes the token using a long-lived refresh token, ensuring a seamless experience. Developers can listen to auth state changes using onAuthStateChanged to react to sign-in and sign-out events.
Can I use Firebase Authentication with my own backend?
Yes, Firebase Authentication can be integrated with your own backend server. You can verify Firebase ID tokens on your server using the Firebase Admin SDK or third-party JWT libraries. This allows you to securely authenticate users and authorize access to your own APIs and resources. Custom tokens can also be generated by your server to authenticate users with Firebase.
What is multi-factor authentication (MFA) in Firebase?
Firebase Authentication supports multi-factor authentication (MFA) to add an extra layer of security. You can enable SMS-based second factors. Users enroll a phone number, and during sign-in, after verifying their primary factor (e.g., password), they must provide a one-time code sent via SMS. This is available for email/password and phone auth methods.
How secure is Firebase Authentication?
Firebase Authentication is built on Google's secure infrastructure. It uses industry-standard protocols like OAuth 2.0 and OpenID Connect. ID tokens are signed JWTs that can be verified. Firebase enforces HTTPS for all communications and provides security rules for Firestore and Realtime Database to control access based on user identity. You can also enable email verification and multi-factor authentication.
What is the difference between Firebase Authentication and custom authentication?
Firebase Authentication provides a ready-to-use, hosted authentication system with SDKs and UI. It handles token lifecycle, session management, and integrates with Firebase services. Custom authentication involves building your own authentication logic, typically using your own user database and generating custom tokens that Firebase can verify. Custom auth gives you full control but requires more development effort.
Building a GraphQL API with Node.js: A Comprehensive Guide
Introduction to GraphQL and Node.js
What Is GraphQL and How It Differs from REST
GraphQL is a query language and runtime for APIs, developed by Facebook in 2012 and open-sourced in 2015. Unlike traditional REST APIs, which expose multiple endpoints returning fixed data structures, GraphQL provides a single endpoint where clients can precisely request the data they need. This fundamental difference leads to several practical advantages:
No over-fetching or under-fetching: Clients specify exact fields, eliminating unnecessary data transfer or additional round trips.
Single request, multiple resources: A single GraphQL query can retrieve related data from multiple sources, reducing network overhead.
Strongly typed schema: Every GraphQL API is defined by a schema that describes available types, queries, and mutations, enabling automatic validation and documentation.
Evolving APIs without versioning: New fields can be added without breaking existing queries, as clients only request what they need.
In a typical REST workflow, fetching a user and their posts might require two separate calls: GET /users/1 and GET /users/1/posts. In GraphQL, a single query like { user(id: 1) { name, posts { title } } } returns exactly the nested data required, making the API more efficient and client-friendly.
Why Node.js Excels for GraphQL API Development
Node.js has become the de facto runtime for building GraphQL services, and for good reason. Its event-driven, non-blocking architecture aligns perfectly with GraphQL’s resolver-based execution model. Key benefits include:
JavaScript everywhere: Using the same language for frontend and backend simplifies development and enables code sharing, such as type definitions and validation logic.
Rich ecosystem: Libraries like graphql-js, Apollo Server, and TypeGraphQL provide mature tooling for schema definition, error handling, and performance monitoring.
Asynchronous by nature: Node.js handles concurrent resolver executions efficiently, which is critical when a single GraphQL query triggers multiple database calls or external API requests.
Real-time capabilities: Subscriptions, a core GraphQL feature for real-time updates, are naturally supported through Node.js event streams and WebSocket libraries.
Type safety with TypeScript: Combining GraphQL’s typed schema with TypeScript’s static typing creates a robust development experience, catching errors at compile time rather than runtime.
The combination of Node.js and GraphQL also streamlines development workflows. For example, tools like GraphQL Code Generator can automatically produce TypeScript types from your schema, ensuring that resolvers and client queries remain in sync without manual duplication.
Core Concepts: Schema, Resolvers, and Queries
Understanding three foundational elements is essential before building a GraphQL API with Node.js:
Schema: The schema is the contract of your API, written in GraphQL Schema Definition Language (SDL). It defines types, fields, and relationships. For instance, a simple schema might include:
type User {
id: ID!
name: String!
email: String
posts: [Post!]!
}
type Post {
id: ID!
title: String!
content: String
author: User!
}
type Query {
user(id: ID!): User
posts: [Post!]!
}
Resolvers: Resolvers are functions that provide the logic for fetching data for each field in the schema. They execute in response to client queries, connecting the schema to your data sources—databases, REST APIs, or other services. A resolver for the user query might look like:
Queries: Queries are the read operations clients send to the API. A client can request exactly the fields it needs, nested to any depth. For example:
query {
user(id: "1") {
name
posts {
title
}
}
}
This query would return a JSON response containing only the name and each post’s title for user 1, demonstrating the precision and flexibility that GraphQL offers over traditional REST endpoints.
Setting Up Your Node.js Environment
Before you begin building a GraphQL API with Node.js, you must establish a solid development environment. This section provides step-by-step instructions to initialize a Node.js project, install essential dependencies, and configure everything for seamless GraphQL API development. Proper setup ensures that your project structure is clean, dependencies are managed efficiently, and you can focus on writing robust API code.
Prerequisites: Node.js and npm Installation
To build a GraphQL API with Node.js, you need Node.js (which includes npm, the Node package manager) installed on your system. Node.js provides the runtime environment, while npm manages libraries and tools. Follow these steps to verify or install them:
Check current versions: Open your terminal and run node --version and npm --version. You should see version numbers (e.g., v18.x.x for Node.js and 9.x.x for npm). If not, proceed with installation.
Install Node.js: Download the latest LTS version from the official Node.js website (nodejs.org). LTS ensures stability for production projects.
Verify installation: After installation, repeat the version checks. Both commands should output valid version numbers.
For this guide, Node.js version 18 or later and npm version 9 or later are recommended. Older versions may work but lack some features used in modern GraphQL setups.
Once Node.js and npm are ready, create a new project directory and initialize it. This step generates a package.json file, which tracks dependencies, scripts, and metadata. Use the following commands:
mkdir graphql-api-project
cd graphql-api-project
npm init -y
The -y flag accepts default values (e.g., name, version, description). After running this, your package.json will look similar to:
Field
Default Value
name
graphql-api-project
version
1.0.0
description
(empty string)
main
index.js
scripts
{ “test”: “echo …” }
license
ISC
You can edit these values later. For now, this minimal setup is sufficient. Consider adding a "start": "node index.js" script later to simplify running your server.
Installing Key Packages: express, graphql, and express-graphql
With the project initialized, install the core packages required for building a GraphQL API with Node.js. These include:
express: A fast, unopinionated web framework for Node.js. It handles HTTP requests and routing.
graphql: The JavaScript reference implementation of GraphQL. It provides the query language and type system.
express-graphql: A middleware that integrates GraphQL with Express, allowing you to create a GraphQL HTTP server easily.
Run the following command in your project directory:
npm install express graphql express-graphql
This command downloads the packages and adds them to the dependencies section of package.json. Your package.json will now include entries like:
These versions are examples; actual versions depend on when you install. After installation, you can verify that the packages are present by checking the node_modules folder or running npm list --depth=0. Optionally, create a .gitignore file to exclude node_modules from version control. Your environment is now ready for building a GraphQL API with Node.js, and you can proceed to define schemas and resolvers.
Designing the GraphQL Schema
In any GraphQL API, the schema is the contract between client and server. It defines what data is available, how it can be queried, and how it can be modified. When building a GraphQL API with Node.js, designing a robust schema using the Schema Definition Language (SDL) is the critical first step. A well-structured schema ensures clarity, type safety, and scalability. Below, we break down the core components: types, queries, mutations, and custom scalars.
Defining Object Types and Fields
Object types are the backbone of your schema. Each type represents a domain entity and contains fields that describe its data. Fields can be scalar types (e.g., String, Int, Float, Boolean, ID) or other object types. Use non-null modifiers (!) to enforce required fields and list brackets ([]) for arrays.
For example, a User type might look like this:
type User {
id: ID!
username: String!
email: String!
createdAt: String!
posts: [Post!]!
}
Keep fields atomic: Avoid nesting unnecessary data; let clients request exactly what they need.
Use descriptive names: Type names should be nouns in PascalCase; field names in camelCase.
Add descriptions: Use triple-quoted strings (""") to document types and fields for auto-generated documentation.
Leverage interfaces or unions: For polymorphic relationships (e.g., a Notification that can be a Message or Alert), use interface or union types.
Creating Query and Mutation Root Types
The Query and Mutation types are special root types that define entry points for reading and writing data. Every schema must have at least a Query type. These types are defined similarly to object types but serve as the top-level API surface.
Use input types: For mutations with multiple arguments, define input types (e.g., CreateUserInput) to keep the schema clean.
Return meaningful responses: Mutations should return the affected object or a dedicated payload type (e.g., CreateUserPayload with user and errors fields).
Limit pagination: For list queries, always include pagination parameters (limit, offset or cursor-based) to prevent excessive data loading.
Implementing Custom Scalars and Enums
While GraphQL provides five built-in scalars (String, Int, Float, Boolean, ID), real-world apps often need custom representations such as dates, URLs, or JSON blobs. Custom scalars allow you to enforce validation and serialization logic on the server side. In Node.js, you implement them using the GraphQLScalarType class from the graphql library, defining serialize, parseValue, and parseLiteral methods.
Enums are ideal for fields with a fixed set of allowed values, such as user roles or statuses. They improve type safety and make the schema self-documenting.
Below is a comparison of custom scalars versus enums to help you decide when to use each:
Feature
Custom Scalar
Enum
Purpose
Represent arbitrary data with custom validation
Represent a fixed set of discrete values
Use case example
Date, URL, JSON, or email address
User role (ADMIN, USER, MODERATOR)
Validation
Requires custom logic in parseValue
Automatic—only defined values are accepted
Client representation
Serialized as string or number (as defined)
Always a string matching one of the enum values
Schema definition
scalar Date
enum Role { ADMIN USER }
When building a GraphQL API with Node.js, use custom scalars for data that requires transformation or validation beyond what built-in types offer. Reserve enums for fields where the set of possible values is small, stable, and known at schema design time. Both features, when used judiciously, make your schema more expressive and your API more robust.
Implementing Resolvers for Data Fetching
Resolvers are the core engine of any GraphQL API. They translate schema definitions into actual data by fetching, transforming, and returning values from databases, REST endpoints, or other services. In the context of building a GraphQL API with Node.js, resolvers determine how each field in your schema gets its value. Well-structured resolvers ensure your API is performant, secure, and maintainable. Below, we break down the key components of resolver implementation: structure, context usage, and error handling.
Basic Resolver Structure and Arguments
Every resolver function follows a consistent signature: (parent, args, context, info). The args parameter is particularly important for data fetching, as it contains the field arguments passed in the query. A typical resolver for a user query might look like this:
Parent: The result from the parent resolver, enabling nested field resolution (e.g., User.posts uses the parent user object).
Args: Always validate and sanitize arguments before use. Default values can be set in the schema.
Info: Contains query metadata (field names, selection sets). Use sparingly—mostly for advanced optimizations like data loaders.
Return values: Must match the schema type. Use null for nullable fields; throw errors for required fields that cannot be resolved.
Using Context for Authentication and Data Sources
The context object is a shared, per-request container that centralizes authentication, database connections, and data loaders. When building a GraphQL API with Node.js, you typically construct the context in your server setup, as shown below:
Robust error handling is critical for production GraphQL APIs. GraphQL specifies that errors should be returned in the errors array, not thrown as uncaught exceptions. Use custom error classes to provide meaningful messages and codes:
class AuthenticationError extends Error {
constructor(message) {
super(message);
this.name = 'AuthenticationError';
this.extensions = { code: 'UNAUTHENTICATED' };
}
}
const resolvers = {
Mutation: {
createPost: async (parent, args, context) => {
if (!context.user) {
throw new AuthenticationError('You must be logged in to create a post.');
}
const { title, content } = args;
if (!title || title.trim().length === 0) {
throw new Error('Title cannot be empty.'); // Will appear in errors array
}
try {
return await context.dataSources.posts.create({ title, content, userId: context.user.id });
} catch (error) {
console.error('Database error:', error);
throw new Error('Failed to create post. Please try again later.');
}
},
},
};
Validation and error propagation checklist:
Input validation: Check argument types, lengths, and formats before calling data sources.
Authentication errors: Throw with code UNAUTHENTICATED (standard in Apollo Server).
Authorization errors: Throw FORBIDDEN when user lacks permissions.
Data source errors: Catch and re-throw with user-friendly messages; log original errors server-side.
Null propagation: If a non-null field returns null, GraphQL will nullify the entire parent object. Use nullable fields for optional data.
By combining structured arguments, a well-populated context, and explicit error handling, your resolvers will form a reliable foundation for building a GraphQL API with Node.js. This approach ensures that data fetching is predictable, secure, and debuggable, even as your schema grows in complexity.
Connecting your GraphQL API to a database requires careful consideration of both the storage layer and the data access patterns. The choice of database and ORM/ODM directly impacts query performance, schema design, and developer experience. Below we explore two popular stacks—MongoDB with Mongoose and PostgreSQL with Prisma—and then address the critical N+1 query problem using DataLoader.
Choosing a Database and ORM (Mongoose or Prisma)
The decision between a NoSQL and a relational database hinges on your data shape and query complexity. For document-oriented data with flexible schemas, MongoDB combined with Mongoose offers a seamless ODM that maps directly to GraphQL types. Mongoose provides schema validation, middleware (e.g., pre-save hooks), and built-in population for references. For example, a Mongoose schema for a User type might define fields like name, email, and an array of postIds referencing a Post collection.
Alternatively, Prisma with PostgreSQL delivers a type-safe ORM that generates a Prisma Client based on your schema. It supports migrations, relations, and advanced filtering. Prisma’s schema file acts as a single source of truth, and its client automatically infers TypeScript types, reducing runtime errors. The table below highlights key differences:
Feature
Mongoose (MongoDB)
Prisma (PostgreSQL)
Schema definition
JavaScript/TypeScript schema object
Declarative Prisma schema file
Relations
Manual population via .populate()
Automatic relation queries with joins
Type safety
Partial (via TypeScript generics)
Full (generated client types)
Migrations
Not built-in (use third-party tools)
Built-in migration engine
Choose Mongoose for rapid prototyping with flexible documents; choose Prisma for strict schemas and complex relational queries.
Creating Database Models and Associations
Once you select your stack, define models that mirror your GraphQL types. In Mongoose, associations are handled via references (ObjectIds) or embedded documents. For a blog API, a User model might include a posts array referencing the Post model. To resolve this in GraphQL, you use a resolver that calls .populate('posts') on the user query. In Prisma, relations are declared in the schema using @relation directives. For example, a User model with a posts field of type Post[] creates a one-to-many association. Prisma then generates a client method like prisma.user.findUnique({ include: { posts: true } }), which executes a single SQL join.
Index foreign keys in MongoDB to speed up lookup queries.
Use compound indexes in PostgreSQL for fields frequently filtered together (e.g., userId and createdAt).
Avoid deep nesting—limit relation depth to two levels to prevent exponential query complexity.
Always test association queries with realistic data volumes to catch performance bottlenecks early.
Optimizing Queries with DataLoader for N+1 Problem
The N+1 problem occurs when a GraphQL resolver fetches a list of parent objects and then, for each parent, executes a separate query to load related children. For instance, querying all users and their posts might trigger one query for users and N queries for posts. DataLoader, a utility by GraphQL core team member Lee Byron, solves this by batching and caching individual requests. It coalesces all requests for a given key (e.g., user IDs) within a single event-loop tick into one batch query, then caches the results per request.
To implement DataLoader with Mongoose, create a loader function that accepts an array of IDs and returns a promise for an array of documents in the same order:
In resolvers, replace direct database calls with userLoader.load(parent.userId). With Prisma, DataLoader works similarly but uses the Prisma Client’s findMany with an in filter. For nested relations, consider using Prisma’s built-in include or select to batch child data in the parent query, which can sometimes eliminate the need for DataLoader entirely. However, for arbitrary depth queries, DataLoader remains the standard approach.
Additional optimization techniques include:
Cache per request—instantiate a new DataLoader for each GraphQL request to avoid stale data.
Use prime() to pre-populate the cache with known values (e.g., from a parent resolver).
Monitor batch sizes—if a loader consistently receives hundreds of keys, consider pagination strategies.
By combining a well-chosen ORM with DataLoader, you ensure your GraphQL API delivers fast, scalable data access without over-fetching or repeated database round-trips.
Building Mutations for Data Manipulation
Mutations in GraphQL are the primary mechanism for modifying server-side data. Unlike queries, which fetch data, mutations execute writes—creating, updating, or deleting records—and must be designed with care to ensure data integrity, validation, and transactional safety. A well-constructed mutation not only modifies data but also returns a predictable response that informs the client about the operation’s success, any errors, and the resulting state of the affected resources.
Defining Input Types and Mutation Responses
Every mutation requires a clearly defined input type to structure the data the client sends. Input types are GraphQL object types prefixed with Input and use the input keyword. They should include only fields necessary for the operation, with appropriate scalar types and optionality. For example, a CreateUserInput might contain username, email, and password, while an UpdateUserInput would make all fields optional except the required id.
Mutation responses should follow a consistent pattern. A common approach is to return a dedicated response type that includes:
success (Boolean): Indicates whether the operation completed without errors.
message (String): A human-readable description of the outcome.
data (the mutated object, nullable): The created, updated, or deleted record (or null on failure).
errors (array of error objects, nullable): Structured error details for validation failures or database constraints.
This pattern allows clients to handle partial failures gracefully and display meaningful feedback to users.
Writing Mutation Resolvers with Database Operations
Mutation resolvers are functions that receive the input arguments and execute the corresponding database operations. They must be wrapped in transactions to ensure atomicity—either all changes succeed, or none are applied. Below is a practical example of a resolver for creating a new user with a PostgreSQL database using knex:
This resolver demonstrates several best practices: it uses a transaction to ensure the email uniqueness check and insertion happen atomically; it hashes the password before storage; and it returns a structured response that distinguishes between operational errors (e.g., duplicate email) and unexpected exceptions.
Handling Relationships and Side Effects
Mutations often involve updating related data or triggering side effects such as sending notifications, updating caches, or logging changes. For example, deleting a user might require cascading deletions of their posts, comments, and profile data. These operations should be handled within the same transaction to prevent orphaned records. Use database-level foreign key constraints with ON DELETE CASCADE where appropriate, or implement explicit deletion logic in the resolver.
Side effects that do not affect database consistency—such as sending a welcome email after user creation—should be executed asynchronously after the transaction commits successfully. This can be done using a job queue or by emitting an event that a separate process handles. Avoid mixing side effects inside the transaction, as they can introduce latency and failure points that compromise data integrity.
When updating relationships, always validate that the referenced entities exist. For instance, when adding a comment to a post, the resolver should verify the post’s id is valid and that the user has permission to comment. Use batched queries or data loaders to minimize database round trips when checking multiple relationships in a single mutation.
Securing a GraphQL API requires a deliberate separation of concerns: authentication verifies who the user is, while authorization determines what they can do. In a Node.js GraphQL server, you typically handle authentication at the middleware level—using tokens such as JWT or OAuth—and enforce authorization inside resolvers or via custom directives. This layered approach ensures that every request is validated before it reaches business logic, and that each resolver or field can enforce granular access controls based on the authenticated user’s role.
Implementing JWT Authentication Middleware
JWT (JSON Web Token) is a common choice for stateless authentication in GraphQL APIs. The token is issued upon login and sent by the client in the Authorization header. To implement JWT authentication middleware in a Node.js server (e.g., using Express or Apollo Server), you intercept incoming HTTP requests, verify the token, and attach the decoded payload to the request object. A typical workflow includes:
Extracting the token from the Authorization header (usually as Bearer <token>).
Verifying the token with a secret or public key using a library like jsonwebtoken.
Checking token expiration and signature validity.
Attaching the user payload (e.g., userId, email) to req.user.
This middleware runs before the GraphQL context is built, ensuring that only verified requests proceed. For OAuth, you would follow a similar pattern but exchange an OAuth access token (from providers like Google or GitHub) for a verified user identity, often by validating the token against the provider’s introspection endpoint.
Passing User Context to Resolvers
Once the middleware verifies the token, you need to inject the authenticated user into the GraphQL execution context. In Apollo Server or Express GraphQL, the context function receives the incoming request and returns an object available to all resolvers. A typical context setup looks like this:
Extract req.user (populated by middleware) and assign it to the context.
Include any additional data, such as database connection or data loaders.
Return an object like { user: req.user, db }.
Resolvers can then access context.user to identify the caller. For example, a resolver that fetches a user’s profile would use context.user.id to query only that user’s data, preventing unauthorized access to other profiles.
Enforcing Permissions with Custom Directives
Custom directives provide a declarative way to enforce authorization directly in your GraphQL schema. Instead of writing permission checks inside every resolver, you define a directive—such as @auth(requires: ADMIN)—that is applied to fields or types. When the schema is executed, the directive’s visitor function checks the user’s role (from context) against the required role. Here is how to implement it:
Define a @auth directive in your schema using directive @auth(requires: Role!) on FIELD_DEFINITION.
Create a Role enum (e.g., ADMIN, USER, GUEST).
In your server configuration, implement the directive as a class or function that intercepts field resolution.
Inside the directive logic, compare context.user.role with the required role; if insufficient, throw an AuthenticationError or ForbiddenError.
This approach keeps your resolvers clean and centralizes authorization logic. For example, a deleteUser mutation can be decorated with @auth(requires: ADMIN), ensuring only administrators can call it. Combined with JWT authentication and user context, custom directives offer a robust, scalable security model for your GraphQL API.
Testing and Debugging the GraphQL API
Thorough testing and efficient debugging are essential for ensuring the reliability of any GraphQL API. Unlike REST APIs, GraphQL introduces unique challenges, such as validating resolver logic that handles nested field requests and verifying that the schema behaves correctly under varied query patterns. A robust testing strategy combines unit tests for individual resolvers, integration tests for end-to-end query and mutation flows, and interactive tools for real-time exploration. This section covers practical approaches to each layer, using Jest for testing and GraphiQL for debugging.
Writing Unit Tests for Resolvers with Jest
Unit tests for GraphQL resolvers focus on isolating the resolver function’s logic from the database and external services. With Jest, you can mock data sources, such as a database client or REST API, and test how resolvers handle inputs, transform data, and throw errors. Each resolver test should cover at least three scenarios: a successful operation, an edge case (e.g., missing required arguments), and an error condition (e.g., invalid user ID). For example, a resolver that fetches a user by ID should be tested with a valid ID returning a user object, an invalid ID returning null, and a database failure throwing an error. Use Jest’s jest.fn() to create mock functions for your data layer and expect assertions to verify outputs. This approach ensures that resolver logic is correct before integration with the full API.
Integration Testing Queries and Mutations
Integration tests validate the entire GraphQL request-response cycle, from the HTTP endpoint through the schema and resolvers to the data layer. Use a testing library like supertest combined with Jest to send real GraphQL queries and mutations against your running server (or a test instance). For each integration test, define a query string, execute it via a POST request to the GraphQL endpoint, and assert the response structure and data. Include tests for:
Successful queries that return expected fields and nested data.
Mutations that create, update, or delete resources, verifying side effects.
Error handling for invalid queries (e.g., missing required fields) and unauthorized access.
Edge cases like querying non-existent resources or sending malformed GraphQL syntax.
To manage test data, set up a separate test database or use in-memory storage (e.g., mongodb-memory-server for MongoDB). This isolation prevents tests from interfering with production data and ensures reproducibility.
Using GraphiQL Playground for Interactive Testing
GraphiQL is an in-browser IDE that ships with many GraphQL servers, including Express-based implementations via express-graphql. It provides a user-friendly interface for constructing queries, viewing auto-generated documentation, and inspecting responses. To use it, simply navigate to your GraphQL endpoint (e.g., /graphql) in a browser when the server is running in development mode. GraphiQL offers several debugging advantages:
Real-time query execution: Type queries and mutations directly and see results immediately.
Schema exploration: Click on any field in the documentation panel to see its type, arguments, and nested fields.
Error highlighting: GraphiQL displays syntax errors and validation issues inline, speeding up debugging.
History: Previous queries are saved, allowing you to revisit and refine tests.
Tool
Primary Use Case
Best For
Limitation
Jest (Unit Tests)
Testing individual resolver functions in isolation
Verifying data transformation and error logic
Does not test schema or HTTP layer
Supertest + Jest (Integration)
Testing full request-response cycle
Validating query execution and data flow
Requires a running server or test setup
GraphiQL Playground
Interactive exploration and ad-hoc debugging
Manual testing and schema discovery
Not suitable for automated CI pipelines
For automated debugging, combine GraphiQL’s interactive feedback with unit and integration tests. Use GraphiQL to prototype complex queries during development, then convert those queries into automated tests for regression coverage. This layered approach ensures that every part of your GraphQL API—from resolver logic to the network layer—is thoroughly validated.
Deploying the GraphQL API to Production
Deploying a GraphQL API built with Node.js to production requires careful planning beyond simple server uploads. Environment isolation, scaling strategies, and observability must be addressed to ensure reliability under real-world traffic. This section covers the essential steps to move from development to a production-grade deployment.
Preparing for Deployment: Environment Variables and Build
Before pushing your API to a cloud platform, secure sensitive data and optimize the codebase. Environment variables separate configuration from code, preventing accidental exposure of credentials. Create a .env file for local development and use a dedicated secrets manager in production.
Database connection strings – Store as DATABASE_URL and use connection pooling for scalability.
API keys and secrets – Include JWT secrets, third-party authentication tokens, and GraphQL introspection settings.
Node environment – Set NODE_ENV=production to disable debugging and enable optimizations like caching.
Build step – Compile TypeScript to JavaScript, run tests, and generate a production bundle. Use npm ci --only=production to install only dependencies.
Example command for a pre-deployment build script:
Validate that all environment variables are present before the server starts. Use a library like dotenv for local development and a platform-specific solution (e.g., AWS Secrets Manager) in production.
Deploying to Cloud Platforms (AWS, Heroku, or Vercel)
Each cloud provider offers distinct advantages for Node.js GraphQL APIs. Choose based on your team’s expertise and traffic patterns.
Platform
Strengths
Considerations
AWS (EC2, ECS, or Lambda)
Full control, auto-scaling, integrated monitoring
Higher complexity; requires VPC, load balancers, and CloudWatch setup
Production GraphQL APIs require real-time visibility into query execution, error rates, and resource usage. Implement both synthetic and real-user monitoring.
GraphQL-specific metrics – Track query depth, complexity scores, and resolver latency. Use Apollo Studio or a custom middleware to log slow operations.
Error tracking – Integrate Sentry or Datadog to capture unhandled exceptions, GraphQL errors, and database connection failures. Include request IDs for correlation.
Performance monitoring – Set up alerts for high CPU, memory, and response times. Use New Relic or Prometheus with Grafana dashboards.
Logging – Structure logs as JSON with levels (info, warn, error). Include query names, user IDs, and execution timestamps.
Example middleware for logging GraphQL operations:
Finally, establish a rollback plan. Use versioned deployments and test the API against a staging environment before promoting to production. Regularly review logs and error trends to preemptively address bottlenecks.
Optimizing Performance and Scaling
Building a GraphQL API with Node.js for high-traffic applications demands deliberate performance engineering. Unlike REST endpoints that benefit from built-in HTTP caching, GraphQL queries can vary widely, making standard caching strategies insufficient. Without optimization, repeated database hits, redundant fetches, and deeply nested queries can degrade response times and overload servers. Three proven techniques—response caching with Redis, request batching with DataLoader, and limiting query depth and complexity—form a robust foundation for scaling your API. Each addresses a specific bottleneck: data retrieval duplication, inefficient resolver execution, and uncontrolled query structures.
Implementing Response Caching with Redis
Redis provides an in-memory cache that dramatically reduces latency for frequently accessed data. By storing computed query results, you avoid re-executing resolvers for identical requests. Here is a practical approach:
Cache key strategy: Use a hash based on the query string and variables (e.g., md5(query + JSON.stringify(variables))) to ensure uniqueness.
Time-to-live (TTL): Set appropriate TTLs per resource type. For example, user profiles might cache for 5 minutes, while product inventory data for 30 seconds.
Cache invalidation: Implement manual invalidation hooks within mutations. When a user updates their profile, delete the corresponding cache entry to maintain consistency.
Middleware integration: Wrap your GraphQL resolver layer with a caching middleware that checks Redis before executing database queries.
Redis caching excels for read-heavy workloads where data changes infrequently. Combine it with a cache-aside pattern to minimize stale data risks.
Batching Requests with DataLoader
DataLoader, a utility by GraphQL core team members, eliminates the N+1 query problem where each resolver makes a separate database call for related entities. Instead, it collects individual requests over a single event-loop tick and dispatches them as one batched query. Implementation steps:
Create a DataLoader instance per request: Initialize inside your GraphQL context to avoid cross-request cache pollution.
Define a batch function: Accept an array of keys (e.g., user IDs) and return a promise resolving to an array of corresponding values in the same order.
Use in resolvers: Replace direct database calls with loader.load(id). DataLoader automatically deduplicates and batches.
Key benefits:
Without DataLoader
With DataLoader
N+1 database queries for related entities
Single batched query per entity type
Redundant fetches for same object
Automatic per-request caching of loaded objects
Manual batching logic in resolvers
Declarative batching with minimal code
DataLoader integrates seamlessly with any database driver and reduces database connection overhead, directly improving throughput under load.
Limiting Query Depth and Complexity
Malicious or poorly designed queries can nest deeply, causing exponential resolver execution. Limit two dimensions: depth (how many levels of nesting) and complexity (weighted cost per field). Techniques include:
Maximum query depth: Use libraries like graphql-depth-limit to reject queries exceeding a configurable depth (e.g., 5 levels). Apply as a validation rule: validationRules: [depthLimit(5)].
Query complexity analysis: Assign a cost to each field (e.g., 1 for simple fields, 10 for list fields with database joins). Sum the total cost per query and reject if it exceeds a threshold (e.g., 1000).
Persisted queries: For high-security environments, whitelist approved query strings. Only allow queries stored on the server, eliminating arbitrary user-generated queries.
Implement complexity analysis with a custom validator:
Combining depth and complexity limits protects your API from resource exhaustion while maintaining flexibility for legitimate use cases. Regularly review your thresholds based on observed query patterns and server capacity.
Frequently Asked Questions
What is GraphQL and why use it with Node.js?
GraphQL is a query language for APIs that allows clients to request exactly the data they need, reducing over-fetching and under-fetching. When combined with Node.js, it offers a performant, scalable backend using JavaScript across the stack. Node.js's event-driven, non-blocking I/O model pairs well with GraphQL's efficient data fetching, making it ideal for modern web and mobile applications. This guide will walk you through setting up a GraphQL server with Node.js using Apollo Server.
What are the prerequisites for building a GraphQL API with Node.js?
You should have a basic understanding of JavaScript, Node.js, and npm. Familiarity with Express.js is helpful but not required, as Apollo Server can be integrated directly. You'll need Node.js (v14 or later) installed, along with a code editor like VS Code. For database integration, knowledge of MongoDB and Mongoose is beneficial, but the guide covers setup. A REST API background can help understand GraphQL's advantages, but the tutorial assumes no prior GraphQL experience.
How do I set up a GraphQL server with Apollo Server and Express?
First, initialize a Node.js project with `npm init`. Install dependencies: `apollo-server-express`, `express`, `graphql`, and `mongoose` (for MongoDB). Create an `index.js` file, import ApolloServer and express, define your schema using `gql` tag, and implement resolvers. Then, apply the Apollo middleware to Express and start the server. The guide provides step-by-step code examples for this setup, including CORS configuration and environment variables.
What is a GraphQL schema and how do I define it?
A GraphQL schema defines the types and relationships of data available in your API. It uses a Schema Definition Language (SDL) to specify queries, mutations, and subscriptions. For example, a `User` type with fields `id`, `name`, and `email`. You define the schema using the `gql` template literal in Apollo Server, then create resolvers that fetch data for each field. The guide covers schema design best practices, including using `!` for required fields and input types for mutations.
How do I connect a MongoDB database to GraphQL using Mongoose?
Install Mongoose and connect to your MongoDB instance (local or Atlas) using `mongoose.connect()`. Define Mongoose models (e.g., User, Post) that mirror your GraphQL types. In your resolvers, use these models to query or mutate data. For example, a `users` query resolver might call `User.find()`. The guide shows how to integrate Mongoose with Apollo Server, handle async operations, and use data loaders for efficient batching.
How do I implement authentication and authorization in a GraphQL API?
Use JSON Web Tokens (JWT) for authentication. In your Apollo Server context, extract the token from the request headers, verify it, and attach user info to the context. For authorization, create directives or middleware that check user roles in resolvers. The guide demonstrates setting up JWT with `jsonwebtoken`, protecting mutations like `createPost`, and implementing role-based access control (e.g., admin vs. user).
How do I handle errors and validation in GraphQL?
Apollo Server provides structured error handling. Use `GraphQLError` for custom errors or formatError to modify error responses. For input validation, define GraphQL input types with constraints (e.g., non-null, custom scalars) and validate data in resolvers using libraries like Joi or express-validator. The guide covers error codes, user-friendly messages, and logging errors for debugging.
What are best practices for deploying a GraphQL API with Node.js?
Use environment variables for sensitive data (e.g., database URL, JWT secret). Enable CORS for your frontend domain. Use Apollo Server's built-in playground in development but disable it in production. Consider using a process manager like PM2 or containerize with Docker. For scalability, implement caching with DataLoader, use persisted queries, and monitor with Apollo Studio. The guide also suggests using HTTPS and rate limiting.
Node.js Performance Optimization Techniques: A Comprehensive Guide
Introduction to Node.js Performance Optimization
Performance is a critical pillar of any production-grade Node.js application. A slow or unresponsive server directly degrades user experience, increases operational costs, and can lead to significant revenue loss. Node.js, built on Chrome’s V8 engine, is designed for high-throughput, non-blocking I/O operations, but it is not immune to performance degradation. Common bottlenecks include inefficient handling of I/O operations, CPU-bound tasks that block the event loop, and memory leaks that gradually exhaust system resources. Understanding these root causes is the first step toward building applications that are both fast and reliable. This guide provides a comprehensive set of techniques to diagnose and resolve these issues, ensuring your Node.js services remain performant under load.
Understanding the Event Loop and Its Impact on Performance
The event loop is the heart of Node.js, enabling asynchronous, non-blocking behavior. It continuously checks the call stack and task queues, executing callbacks, promises, and I/O handlers. However, the event loop operates on a single thread. If any synchronous, CPU-intensive operation occupies the call stack for too long—often called a “blocking operation”—the event loop cannot process pending I/O callbacks, timers, or incoming requests. This results in latency spikes and reduced throughput. Common culprits include complex JSON parsing, heavy cryptographic operations, or tight loops without yielding. To maintain performance, developers must ensure that no single synchronous task takes longer than a few milliseconds. Techniques such as offloading CPU-bound work to worker threads, using streams for large data processing, or breaking tasks into smaller chunks with setImmediate() help keep the event loop responsive.
Common Performance Pitfalls in Node.js Applications
Several recurring mistakes degrade Node.js performance. Identifying and avoiding these pitfalls is essential:
Blocking the Event Loop: Synchronous methods like fs.readFileSync(), JSON.parse() on large payloads, or heavy Array.sort() operations block the loop. Use asynchronous alternatives or offload to worker threads.
Memory Leaks: Unreferenced closures, retained global variables, and improperly cleaned-up event listeners cause memory to grow unbounded, leading to garbage collection pauses and eventual crashes.
Inefficient Database Queries: N+1 queries, missing indexes, or fetching entire tables instead of specific columns overwhelm the database and increase response times.
Unoptimized Middleware: Overly complex or synchronous middleware in Express.js can bottleneck request processing. Keep middleware lightweight and asynchronous.
Ignoring Garbage Collection: High allocation rates and frequent garbage collection cycles can stall the event loop. Monitor heap usage and consider tuning V8 flags like --max-old-space-size.
Measuring Baseline Performance with Profiling Tools
Before applying optimizations, establishing a performance baseline is crucial. Without metrics, improvements are guesses. Use profiling tools to identify bottlenecks precisely. Key tools and techniques include:
Tool / Technique
Purpose
Example Command / Usage
Node.js built-in profiler
Records V8 CPU profiles to show function call times.
node --prof app.js then process with node --prof-process
Chrome DevTools
Visual profiling of CPU, heap, and event loop delays.
Start with node --inspect app.js, open chrome://inspect
clinic.js
High-level diagnostics for event loop, memory, and CPU.
clinic doctor -- node app.js
0x
Flamegraph generation for hotspot detection.
0x app.js
heapdump
Takes heap snapshots to find memory leaks.
process.kill(process.pid, 'SIGUSR2') after requiring module
Start by profiling under a realistic load (e.g., using autocannon or wrk). Focus on metrics like average latency, throughput (requests per second), event loop lag, and heap size. A baseline reveals whether the bottleneck is CPU-bound, I/O-bound, or memory-related, guiding the choice of optimization technique. For example, high event loop lag suggests blocking operations, while rising heap size indicates a leak. Only after measurement should you proceed with targeted fixes.
Optimizing Asynchronous Code and Callbacks
Node.js thrives on non-blocking I/O, but poorly structured asynchronous code can choke the event loop and degrade throughput. Traditional callback patterns often lead to deeply nested, unreadable code—commonly known as “callback hell”—which complicates error handling and makes optimization nearly impossible. By refactoring asynchronous flows into modern patterns like Promises and async/await, you reduce overhead, improve maintainability, and keep the event loop responsive. This section covers practical techniques to eliminate callback hell, manage concurrency efficiently, and handle errors without blocking execution.
Refactoring Callbacks to Promises and Async/Await
The first step toward optimizing asynchronous code is replacing nested callbacks with Promises, then simplifying those Promises with async/await. This refactoring reduces cognitive load and allows the V8 engine to optimize execution paths more effectively. A common pattern is to wrap callback-based APIs using util.promisify or native Promise constructors.
Linear flow: Code reads top-to-bottom, matching synchronous logic.
Centralized error handling: One try/catch block replaces scattered error checks.
Improved stack traces: Async/await preserves the call stack better than raw callbacks.
Easier debugging: Breakpoints work naturally across asynchronous boundaries.
Managing Concurrency with Promise.all and Promise.race
When independent asynchronous tasks can run in parallel, executing them sequentially wastes throughput. Use Promise.all to run multiple operations concurrently and wait for all to complete, or Promise.race to respond to the first settled promise. This keeps the event loop busy with meaningful work rather than idle waiting.
For example, fetching multiple API endpoints simultaneously:
Handling Errors in Asynchronous Flows Without Blocking
Errors in asynchronous code can silently crash a process if uncaught, or block the event loop if handled poorly. The goal is to catch errors at the right level, propagate them cleanly, and never let an error prevent other requests from processing. Avoid throwing in Promise callbacks without a catch handler, and never use synchronous try/catch around code that returns a Promise without await.
Use centralized error handlers: Attach a global process.on('unhandledRejection') to log and gracefully exit if needed.
Return errors, don’t throw them in async functions: Prefer returning { error, data } objects to keep control flow predictable.
Implement timeout patterns: Use Promise.race with a timeout promise to prevent hanging operations from blocking the event loop.
function withTimeout(promise, ms) {
const timeout = new Promise((_, reject) =>
setTimeout(() => reject(new Error('Operation timed out')), ms)
);
return Promise.race([promise, timeout]);
}
async function fetchWithTimeout(url) {
try {
const data = await withTimeout(fetch(url), 5000);
return data.json();
} catch (err) {
// Log error but do not crash the process
console.error('Fetch failed or timed out:', err.message);
return null;
}
}
By combining these error-handling techniques, you ensure that a single failing operation does not cascade into a system-wide failure, keeping the event loop free to serve other requests.
Efficient Use of the Event Loop and Timers
Node.js operates on a single-threaded event loop, making efficient scheduling of asynchronous tasks critical for application performance. Misusing timers or deferring work incorrectly can lead to event loop starvation, where high-priority or continuous tasks prevent the loop from processing I/O callbacks, user requests, or other essential operations. Mastering the execution order of setImmediate, process.nextTick, and timer callbacks allows developers to prioritize tasks without blocking the loop.
The event loop phases process timers, pending callbacks, idle/prepare, poll, check, and close callbacks in sequence. process.nextTick callbacks execute at the end of the current operation, before the next phase begins, while setImmediate callbacks run in the check phase, after the poll phase. Timer callbacks (e.g., setTimeout) are processed in the timers phase. Understanding this hierarchy is essential for preventing microtask queues from overwhelming the loop.
Choosing Between process.nextTick and setImmediate
Both process.nextTick and setImmediate defer execution, but their placement in the event loop differs significantly. process.nextTick adds a callback to the microtask queue, which is processed immediately after the current operation—before any I/O or timer callbacks. This can cause event loop starvation if used recursively, as it prevents the loop from advancing to the next phase. setImmediate, conversely, schedules a callback for the check phase, after I/O events in the poll phase are handled, making it safer for deferring work without blocking I/O.
Use process.nextTick for critical tasks that must run before the next I/O operation, such as error propagation or ensuring a callback is invoked asynchronously. Prefer setImmediate for deferring non-urgent work, especially when scheduling multiple tasks, as it respects the event loop’s natural progression. The following table summarizes their differences:
Feature
process.nextTick
setImmediate
Execution phase
End of current operation
Check phase (after poll)
Risk of starvation
High (recursive calls)
Low
Best use case
Error propagation, async guarantees
Deferred work, batching I/O
Order relative to I/O
Before I/O callbacks
After I/O callbacks
In practice, avoid recursive process.nextTick loops. If you need to repeatedly defer work, use setImmediate or a timer with a delay of 0, which places the callback in the timers phase rather than the microtask queue.
Debouncing and Throttling High-Frequency Events
High-frequency events—such as user input, WebSocket messages, or data streams—can flood the event loop with callbacks, degrading responsiveness. Debouncing and throttling are two techniques to control execution rates. Debouncing ensures a callback fires only after a specified quiet period, useful for search inputs or resize handlers. Throttling limits execution to at most once per fixed interval, ideal for scroll events or real-time data updates.
Implement debouncing with setTimeout and clearTimeout to reset the timer on each event. For throttling, use a flag or timestamp check within the callback. Both techniques reduce the number of deferred tasks, preventing the event loop from being overwhelmed by microtasks or timer callbacks. When combined with setImmediate for non-urgent work, they maintain smooth I/O processing.
Avoiding Blocking the Event Loop with CPU-Intensive Tasks
CPU-intensive tasks—like JSON parsing, cryptographic operations, or image processing—can block the event loop if executed synchronously. This stops all I/O handling, timer execution, and user requests. To prevent starvation, offload heavy computation to worker threads using the worker_threads module, or use the child_process module for parallel execution. Alternatively, break the task into smaller chunks and schedule each chunk with setImmediate or setTimeout, allowing the event loop to process I/O between chunks.
For example, processing a large array in batches:
Define a function that processes a portion of the data.
Use setImmediate to schedule the next batch, passing progress state.
Check elapsed time after each batch to yield control if needed.
This approach prevents a single synchronous block from starving the event loop, ensuring that incoming requests and I/O callbacks remain responsive. Always measure the impact using Node.js’ built-in diagnostic tools, such as the --trace-event-categories flag or the perf_hooks module, to verify that your scheduling strategy does not introduce latency spikes.
Effective memory management is critical for Node.js applications, especially those that run for extended periods. Poor memory handling can lead to increased latency, frequent garbage collection pauses, and eventual crashes. This section covers practical techniques to reduce memory footprint, identify leaks, and tune the V8 garbage collector for high-throughput workloads.
Identifying and Fixing Common Memory Leaks
Memory leaks in Node.js often arise from unintended references that prevent objects from being garbage collected. The most common sources include:
Global variables: Storing large objects on the global scope, such as global.cache = data, keeps them alive permanently.
Closures: Functions that capture outer scope variables can inadvertently retain large objects long after their intended use.
Event listeners: Adding listeners without removal, particularly on EventEmitter instances, accumulates references over time.
Timers and intervals: Unclosed setInterval or setTimeout callbacks hold references to their scope.
Database or connection pools: Improperly managed connections that are not released back to the pool.
To detect leaks, use the --inspect flag with Chrome DevTools or the heapdump module to capture snapshots. Compare two snapshots taken at different times to identify growing objects. For automated detection, tools like clinic or memwatch-next can flag suspicious memory growth. A practical command to start debugging is:
node --inspect --expose-gc app.js
This enables the inspector and exposes the global gc() function, allowing manual garbage collection triggers during profiling.
Using WeakMaps and WeakSets for Efficient Caching
Standard Map and Set objects hold strong references to their keys, preventing garbage collection even when the key object is no longer needed elsewhere. For caching scenarios where keys are objects, this can cause memory to grow unboundedly. WeakMap and WeakSet solve this by holding weak references, meaning the garbage collector can reclaim the key-value pair when no other strong references to the key exist.
Consider a caching system for user session data:
const sessionCache = new WeakMap();
function storeSession(user, sessionData) {
sessionCache.set(user, sessionData);
}
function getSession(user) {
return sessionCache.get(user);
}
// When 'user' object goes out of scope or is dereferenced,
// the sessionData is automatically eligible for GC.
Use WeakMap when you need key-value associations tied to object lifetimes, such as DOM node metadata in browser-like environments or request-scoped data in server handlers. WeakSet is ideal for tracking object presence without preventing their collection, for example, marking processed items in a stream. Note that weak collections are not iterable and have no size property, so they are unsuitable for enumerating all entries.
Adjusting GC Flags for High-Throughput Workloads
V8’s garbage collector is configurable via command-line flags that can reduce pause times or improve throughput depending on your application’s needs. The default settings favor a balance, but long-running servers or real-time systems may benefit from tuning. Key flags include:
Flag
Effect
Use Case
--max-old-space-size=4096
Sets maximum heap size in MB (e.g., 4GB).
Prevent out-of-memory in memory-intensive apps.
--gc-interval=100
Sets interval between GCs in milliseconds.
Force more frequent, shorter GC cycles for lower latency.
--expose-gc
Exposes global gc() function for manual control.
Testing and custom GC orchestration.
--noconcurrent_sweeping
Disables concurrent sweeping, making GC more deterministic.
Applications needing predictable pause times.
--optimize-for-size
Prioritizes memory usage over speed.
Environments with strict memory limits.
For high-throughput workloads, consider starting with --gc-interval=500 and monitoring GC pause durations via --trace-gc. Incremental and concurrent GC are enabled by default in V8 version 8.0+, but you can experiment with --max-old-space-size to give the heap more headroom, reducing the frequency of major GC cycles. Always test changes in a staging environment, as aggressive tuning can degrade performance if misapplied.
Optimizing Database and I/O Operations
Efficient database and I/O operations form the backbone of scalable Node.js applications. Poorly managed queries, connection overhead, and blocking I/O can quickly degrade performance under load. By implementing connection pooling, batching and caching strategies, and leveraging streams for large data, you can significantly reduce latency and improve throughput. The following techniques target the most common bottlenecks in database and file system interactions.
Connection Pooling with PostgreSQL and MongoDB
Creating a new database connection for every request introduces unnecessary latency and resource consumption. Connection pooling reuses a set of pre-established connections, dramatically reducing handshake overhead. For PostgreSQL, use the pg library’s built-in Pool class. Configure pool size based on your application’s concurrency needs and database limits—typically 10–25 connections per Node.js process. Example configuration:
const { Pool } = require('pg');
const pool = new Pool({
max: 20,
idleTimeoutMillis: 30000,
connectionTimeoutMillis: 2000,
});
For MongoDB, the native driver and Mongoose both support connection pooling. Set maxPoolSize (default 100) and minPoolSize to match expected load. A smaller pool reduces memory but may cause queuing; a larger pool increases throughput but risks exhausting database resources. Tune these values through load testing.
Database
Key Pool Setting
Recommended Range
PostgreSQL (pg)
max
10–25 per process
MongoDB (native)
maxPoolSize
50–200 per process
Always release connections back to the pool after use—use pool.query() for PostgreSQL or rely on Mongoose’s automatic connection management. Monitor pool utilization with tools like pg-pool-stats or MongoDB Atlas metrics.
Batching and Caching Database Queries
Batching reduces round trips by grouping multiple queries into a single operation. For PostgreSQL, use pg-promise tasks or raw SQL with UNION or IN clauses. For MongoDB, use $in filters or bulkWrite() for writes. Example batching pattern in MongoDB:
Caching further reduces database load by storing frequently accessed data in memory. Use Redis or Node.js in-memory caches (e.g., node-cache) with a time-to-live (TTL). Implement cache-aside pattern: check cache first, query database on miss, then populate cache. Avoid caching stale or user-specific data. Key metrics to monitor:
Reading entire files into memory blocks the event loop and risks heap overflow. Node.js streams process data chunk by chunk, keeping memory usage constant. Use fs.createReadStream() for reading and fs.createWriteStream() for writing large files. Pipe streams to avoid manual backpressure handling:
For database operations, streams can pipe query results directly to a file or HTTP response. Use MongoDB’s cursor.pipe() or PostgreSQL’s QueryStream from the pg-query-stream library. Always handle errors and close streams properly with .on('error') and .on('finish') events. Streams are ideal for:
File uploads/downloads without buffering entire payloads.
Database export/import operations with large datasets.
By adopting these techniques—connection pooling, batching and caching, and stream-based I/O—you can build Node.js applications that handle high concurrency and large data volumes with minimal latency and resource overhead.
Efficient caching is one of the most impactful Node.js performance optimization techniques, as it dramatically reduces redundant computations, database queries, and network latency. By storing frequently accessed data in fast-access layers, applications can serve responses in microseconds rather than milliseconds. This section explores three critical caching approaches: in-memory caching for single-instance speed, distributed caching for horizontal scaling, and HTTP caching to offload work from the server entirely. When implemented correctly, these strategies can cut response times by 70–90% and reduce database load by orders of magnitude.
In-Memory Caching with node-cache or lru-cache
In-memory caching stores data directly in the Node.js process’s heap, offering the lowest possible latency (sub-millisecond access). Two popular libraries are node-cache (simple key-value store with TTL support) and lru-cache (Least Recently Used eviction policy for memory-bounded scenarios). Use in-memory caching for data that is read frequently, updated rarely, and fits within your server’s available RAM—such as configuration objects, reference data, or aggregated statistics.
Here is a practical example using node-cache to cache database query results:
const NodeCache = require('node-cache');
const myCache = new NodeCache({ stdTTL: 600, checkperiod: 120 });
async function getCachedUserData(userId) {
const cacheKey = `user:${userId}`;
let userData = myCache.get(cacheKey);
if (userData === undefined) {
userData = await database.query('SELECT * FROM users WHERE id = ?', [userId]);
myCache.set(cacheKey, userData);
}
return userData;
}
Key considerations for in-memory caching:
Memory limits: Use lru-cache with a max option to prevent unbounded growth.
TTL strategy: Set appropriate time-to-live values based on data freshness requirements (e.g., 5 minutes for user profiles, 1 hour for reference data).
Cache invalidation: Manually delete or update cache entries when underlying data changes to avoid stale reads.
Distributed Caching with Redis and Cluster Mode
When your Node.js application runs across multiple processes or servers, in-memory caches become inconsistent and inefficient. Distributed caching with Redis provides a shared, network-accessible cache that all instances can read from and write to. Redis operates as an external service, typically running in cluster mode for high availability and horizontal scaling. This setup is essential for session stores, API rate limiting, and caching computed results that must be consistent across the entire application fleet.
Implement distributed caching using the ioredis library with cluster support:
Connection pooling: Reuse a single Redis client instance across your application.
Key naming conventions: Use namespaced keys (e.g., api:v1:users:123) to avoid collisions and simplify management.
Error handling: Always implement fallback logic to query the database if Redis is unavailable.
Setting Proper Cache Headers for API Responses
HTTP caching allows browsers and intermediate proxies (CDNs, reverse proxies) to serve cached responses without contacting your Node.js server at all. This is one of the most effective Node.js performance optimization techniques for public-facing APIs. Set the Cache-Control header to define caching rules, and use ETag or Last-Modified headers for conditional validation.
Header
Example Value
Use Case
Cache-Control: public, max-age=3600
public, max-age=3600
Static or rarely changing data (e.g., product catalog)
Cache-Control: private, max-age=60
private, max-age=60
User-specific data (e.g., dashboard settings)
Cache-Control: no-cache
no-cache
Dynamic data requiring revalidation (e.g., real-time stock prices)
Implement conditional caching with ETags in Express:
By combining these caching strategies, you reduce server load, lower latency, and improve scalability—making your Node.js application faster and more resilient under high traffic.
Node.js Performance Optimization Techniques: Clustering and Load Balancing
Node.js operates with a single-threaded event loop by default, meaning it cannot fully utilize multi-core processors without additional configuration. Clustering and load balancing are essential techniques for scaling applications across available CPU cores, improving throughput, and ensuring high availability in production environments. By distributing incoming requests across multiple worker processes, you can achieve better resource utilization and fault tolerance.
Setting Up a Cluster with the Built-in Cluster Module
Node.js provides a native cluster module that allows you to create child processes (workers) that share the same server port. The master process manages the workers, while each worker handles requests independently. Here is a basic implementation pattern:
Each worker calls app.listen(PORT) inside cluster.isWorker.
4
Handle worker crashes by forking replacements on the exit event.
This approach distributes connections across workers using a round-robin algorithm on Linux and macOS, while Windows uses a shared socket approach. However, the built-in module lacks advanced features like zero-downtime deployments and auto-scaling, which leads to using process managers.
PM2 is a production-grade process manager for Node.js that simplifies clustering and adds powerful capabilities. It abstracts the cluster module, allowing you to run your application in cluster mode with a single command: pm2 start app.js -i max. Key benefits include:
Zero-downtime reloads: Use pm2 reload all to restart workers one by one without dropping connections.
Auto-scaling: Adjust the number of workers dynamically with pm2 scale app +3 or by setting max_memory_restart thresholds.
Monitoring and logs: Built-in dashboard with pm2 monit and centralized log management.
Startup scripts: Generate init scripts to keep your app running after server reboots (pm2 startup).
PM2 also supports ecosystem configuration files (ecosystem.config.js) for defining environment variables, error handling, and deployment strategies. This makes it a preferred choice for teams managing multiple Node.js services in production.
Implementing Reverse Proxies (Nginx) for Load Distribution
While clustering handles inter-process load balancing, a reverse proxy like Nginx provides an additional layer for distributing traffic across multiple server instances, especially in multi-server deployments. Nginx sits in front of your Node.js cluster and manages incoming requests efficiently. Common strategies include:
Round-robin: Default algorithm that distributes requests evenly across all upstream servers.
Least connections: Sends requests to the server with the fewest active connections, ideal for variable request durations.
IP hash: Ensures session persistence by routing requests from the same client IP to the same worker.
Example Nginx configuration for a Node.js cluster:
upstream node_cluster {
least_conn;
server 127.0.0.1:3000;
server 127.0.0.1:3001;
server 127.0.0.1:3002;
server 127.0.0.1:3003;
}
server {
listen 80;
location / {
proxy_pass http://node_cluster;
proxy_http_version 1.1;
proxy_set_header Upgrade $http_upgrade;
proxy_set_header Connection 'upgrade';
proxy_set_header Host $host;
proxy_cache_bypass $http_upgrade;
}
}
Nginx also provides TLS termination, static file caching, and rate limiting, reducing the load on your Node.js processes. Combining PM2’s cluster mode with Nginx as a reverse proxy creates a robust, scalable architecture that can handle high traffic volumes while maintaining reliability.
Node.js Performance Optimization Techniques: Code Optimization and Profiling
Writing performant JavaScript in Node.js requires a deep understanding of how the V8 engine optimizes and deoptimizes code. Modern profiling tools let developers pinpoint exactly where time is spent, while careful coding avoids hidden performance traps. This section covers three critical areas: avoiding deoptimization patterns, using flame graphs to identify hotspots, and benchmarking with industry-standard tools.
V8’s just-in-time compiler aggressively optimizes functions that run frequently. However, certain patterns force the engine to bail out of optimized code, reverting to slower execution. The most common deoptimization triggers include:
Changing object shapes (hidden classes): Adding or deleting properties after object creation forces V8 to recompile. Always assign all properties in constructors or use Object.assign upfront.
Polymorphic function calls: Passing arguments of different types to the same function parameter. For example, calling add(1, 2) then add("a", "b") deoptimizes. Use TypeScript or explicit type checks to maintain monomorphic calls.
Array hole access: Reading undefined indices in sparse arrays. Stick to contiguous, non-sparse arrays for hot paths.
Using try/catch inside hot functions: V8 cannot optimize functions containing try/catch. Move error handling to a wrapper function or use structured error codes.
Profile with node --trace-deopt app.js to see exactly which functions deoptimize and why.
Using Flame Graphs to Identify Hotspots
Flame graphs provide a visual representation of where CPU time is spent. The clinic.js tool (specifically clinic flame) generates interactive flame graphs without requiring code changes. To generate a flame graph:
Perform load testing (e.g., with autocannon) while the profiler runs.
Analyze the resulting HTML: wide bars indicate functions consuming more time; deep stacks suggest nested calls that may be optimized.
Chrome DevTools also offers flame graphs when profiling Node.js via the --inspect flag. Open chrome://inspect, connect to the Node process, and record CPU profiles. Focus optimization efforts on the widest, most frequently called functions.
Benchmarking with autocannon and wrk
Benchmarking tools measure throughput and latency under load. Two widely used options are autocannon (Node.js-native) and wrk (C-based HTTP benchmark). The table below compares their key characteristics for Node.js optimization workflows.
Feature
autocannon
wrk
Installation
npm global install
Requires compilation (make)
Latency percentiles
Built-in (p50, p75, p99)
Built-in (p50, p99)
Custom request bodies
Yes (JSON, buffers)
Limited (text file)
Connection reuse
HTTP/1.1 keep-alive
HTTP/1.1 keep-alive
Output format
Human-readable tables + JSON
Human-readable tables
Best use case
Node.js microservices, API routes
Raw HTTP throughput, high concurrency
For Node.js performance tuning, autocannon integrates seamlessly with clinic.js and provides richer detail for request/response cycles. Example usage: npx autocannon -c 100 -p 10 -d 30 http://localhost:3000 (100 connections, 10 pipelined requests, 30 seconds). Compare results before and after each optimization to measure real-world gains.
Security Considerations That Affect Performance
In Node.js applications, security measures are essential but can introduce performance overhead if not implemented carefully. Input validation, rate limiting, and encryption each carry costs that can degrade throughput and increase latency. The key is to balance robust security with efficient execution, selecting optimized libraries and configuration strategies that minimize processing time while maintaining protection. This section explores how to implement these measures without sacrificing performance.
Optimizing Input Validation with Fast Libraries
Input validation is critical to prevent injection attacks and malformed data, but naive approaches—like using regular expressions on every request—can slow down response times. To optimize, choose validated libraries that compile schemas once and reuse them. Two popular choices are Joi and Ajv (Another JSON Schema Validator). Ajv is notably faster because it generates validation functions at schema compilation time, reducing per-request overhead.
Best practices for optimizing input validation include:
Compile schemas once at startup, not per request.
Use strict validation to reject unexpected fields early.
Limit validation scope to only necessary fields.
Cache compiled validators in memory for reuse.
Rate Limiting with Minimal Overhead
Rate limiting protects against brute-force attacks and resource exhaustion, but in-memory stores like arrays can become bottlenecks under high concurrency. To implement rate limiting with minimal overhead, use a distributed, low-latency store such as Redis with the express-rate-limit middleware. This shifts state management off the Node.js event loop and reduces memory pressure.
Key strategies for efficient rate limiting:
Use sliding window counters instead of fixed windows to avoid burst spikes.
Set appropriate thresholds based on expected traffic patterns.
Implement tiered limits (e.g., stricter for login endpoints, looser for public APIs).
Cache rate limit checks for short durations when possible.
Comparison of rate-limit stores:
Store
Overhead
Scalability
Use Case
In-memory (default)
Low
Single process only
Development or low-traffic apps
Redis
Moderate (network)
High (distributed)
Production, multi-server deployments
Memcached
Moderate (network)
High
Alternative to Redis
Efficient TLS/SSL Configuration for Node.js
Encryption through TLS/SSL is mandatory for secure communication, but it can add 10-20% CPU overhead due to handshake and cipher operations. To optimize, configure Node.js to use modern, efficient cipher suites and reuse TLS sessions. The tls module allows fine-grained control.
Enable session resumption to reuse cached handshake data.
Use hardware acceleration (e.g., OpenSSL with AES-NI) on the server.
Terminate TLS at a reverse proxy (like Nginx) to offload CPU from Node.js.
Select lightweight cipher suites like AES-128-GCM over AES-256-GCM when security requirements allow.
Monitoring and Continuous Performance Improvement
Optimizing Node.js performance is not a one-time task but an ongoing discipline. Once you have applied initial improvements, the next critical step is to establish a robust monitoring and continuous improvement framework. This ensures that performance gains are maintained over time, regressions are caught early, and your application remains responsive under changing loads. Without systematic monitoring, even the best optimization efforts can erode silently through code changes, dependency updates, or traffic shifts.
Integrating APM Tools (New Relic, Datadog) for Node.js
Application Performance Monitoring (APM) tools provide deep visibility into your Node.js runtime, transaction traces, and resource consumption. Integrating an APM agent like New Relic or Datadog into your Node.js application involves minimal code changes—typically adding a single require statement and configuring an API key. These tools offer several essential capabilities:
Transaction tracing: Pinpoint slow endpoints, database queries, and external API calls with millisecond-level granularity.
Error and exception tracking: Capture unhandled rejections, stack traces, and error rates with context.
Garbage collection metrics: Monitor GC pauses, heap usage, and memory allocation patterns to detect leaks.
Distributed tracing: Follow requests across microservices and asynchronous boundaries.
Custom instrumentation: Add custom spans for business logic, queue processing, or third-party libraries.
To integrate effectively, start by instrumenting your entry point (e.g., app.js) and verify that the agent reports data in the APM dashboard. Then, set up dashboards for key Node.js metrics: event loop lag, CPU usage, memory heap, and request throughput. Both New Relic and Datadog offer pre-built Node.js dashboards that can be customized.
Automated Performance Testing in CI/CD Pipelines
Performance regression testing must be automated to catch degradations before they reach production. Integrate performance tests into your CI/CD pipeline using tools like k6, Artillery, or autocannon. A typical pipeline stage includes:
Baseline capture: Run a performance test against a stable version of your application and record metrics (e.g., p95 latency, throughput, error rate).
Comparison run: Execute the same test against the new build or pull request.
Regression check: Compare key metrics against a defined threshold (e.g., p95 latency increase > 10%).
Gate or warn: If regression exceeds the threshold, block the merge or trigger an alert.
For Node.js applications, ensure your test environment mimics production as closely as possible—same Node.js version, similar CPU/memory limits, and realistic data volumes. Use environment variables to toggle production-like settings (e.g., clustering, Redis caching). Automate test execution with scripts that run inside Docker containers or cloud CI runners.
Performance budgets define acceptable limits for key metrics, making performance a first-class requirement. For Node.js services, typical budgets include:
Metric
Budget Example
Alert Trigger
p95 HTTP response time
< 200ms
> 250ms for 5 minutes
Error rate (HTTP 5xx)
< 0.1%
> 0.5% for 2 minutes
Event loop lag
< 50ms
> 100ms for 1 minute
Heap memory usage
< 80% of max heap
> 90% for 3 minutes
CPU utilization
< 70%
> 85% for 5 minutes
Configure alerts in your APM tool or monitoring stack (e.g., Prometheus + Alertmanager) to notify your team via Slack, PagerDuty, or email when budgets are breached. Use severity levels: warnings for slight deviations, critical alerts for sustained violations. Periodically review and adjust budgets based on actual traffic patterns and business requirements. Combine budgets with automated rollback triggers in your deployment pipeline to prevent performance-degrading releases from reaching users.
Frequently Asked Questions
What are the most effective Node.js performance optimization techniques?
The most effective techniques include using clustering to leverage multi-core systems, implementing caching (e.g., Redis or in-memory), optimizing asynchronous code with promises/async-await, profiling with tools like Chrome DevTools or clinic.js, managing memory efficiently to avoid leaks, using streams for large data, and optimizing database queries with indexing and connection pooling. Prioritize techniques based on your application's bottlenecks.
How does clustering improve Node.js performance?
Node.js runs on a single thread by default, but clustering allows you to fork multiple worker processes that share the same server port. Each worker handles requests independently, utilizing multiple CPU cores. This increases throughput and fault tolerance. The cluster module distributes incoming connections across workers, enabling horizontal scaling on a single machine. Proper load balancing ensures no single worker is overwhelmed.
What is the role of caching in Node.js performance?
Caching reduces the need to recompute or fetch data repeatedly, lowering latency and server load. In Node.js, you can use in-memory caches (e.g., node-cache) or external stores like Redis. Common caching strategies include caching database query results, API responses, and computed values. Cache invalidation is critical to ensure data freshness. Use TTL (time-to-live) and cache-aside patterns for optimal results.
How can I profile and identify bottlenecks in a Node.js application?
Use built-in tools like the Node.js profiler (–prof) or Chrome DevTools for CPU and heap snapshots. Third-party tools like clinic.js (doctor, flame) provide visual insights. Monitor event loop lag, memory usage, and garbage collection pauses. Profile specific endpoints with autocannon or wrk for load testing. Identify slow database queries, synchronous operations, or memory leaks. Regularly profile in production-like environments.
What are best practices for managing memory in Node.js?
Avoid global variables and closures that retain references. Use streams for large data instead of buffering everything. Monitor memory with process.memoryUsage(). Set appropriate –max-old-space-size for V8. Use WeakMap/WeakSet for caches to allow garbage collection. Detect leaks with heap snapshots and tools like memwatch-next. Close database connections and file handles promptly. Avoid circular references.
How do async patterns affect Node.js performance?
Proper async patterns prevent blocking the event loop. Use async/await or promises instead of callbacks to avoid callback hell and improve readability. For CPU-intensive tasks, offload to worker threads or child processes. Use Promise.all for parallel independent operations. Avoid unhandled promise rejections. Streams handle data incrementally, reducing memory overhead. These patterns keep the event loop responsive.
What are common mistakes that degrade Node.js performance?
Common mistakes include blocking the event loop with synchronous operations (e.g., fs.readFileSync), not using clustering on multi-core systems, ignoring memory leaks from closures or global variables, excessive logging, unoptimized database queries (N+1 problem), not using caching, and improper error handling that crashes processes. Also, using too many dependencies or large packages can bloat memory.
How can I optimize database queries for Node.js?
Use connection pooling (e.g., pg-pool for PostgreSQL) to reuse connections. Add indexes on frequently queried columns. Avoid SELECT *; fetch only needed fields. Use query batching and pagination for large datasets. Consider using an ORM with lazy loading or raw queries for complex joins. Cache frequent queries. Monitor slow queries with tools like MongoDB Atlas or pg_stat_statements.
Modern applications demand databases that can handle high velocity, diverse data types, and seamless real-time updates. Traditional relational databases, while powerful for structured data and complex joins, often struggle under the weight of dynamic schemas and horizontal scaling needs. This tension has fueled the rapid adoption of NoSQL databases, which prioritize flexibility, scalability, and developer velocity. Among the most prominent contenders are Firebase Firestore—a fully managed, real-time document store from Google—and MongoDB, the open-source document database that has become a cornerstone of modern backend development. Choosing between them is not a matter of hype; it is a technical decision shaped by infrastructure preferences, data consistency requirements, and the specific operational demands of your application. This article provides a balanced, feature-by-feature comparison to help you determine which NoSQL solution aligns with your project’s real-world constraints.
Why NoSQL Databases Dominate Modern App Development
The shift toward NoSQL is driven by three core needs that relational databases often fail to meet at scale:
Schema flexibility: NoSQL databases allow you to store data without a predefined schema, making them ideal for agile development where data structures evolve rapidly.
Horizontal scalability: Most NoSQL systems are designed to distribute data across clusters of commodity hardware, enabling near-linear performance gains as workloads grow.
Real-time capabilities: Many NoSQL platforms, including Firestore, offer built-in real-time listeners that push data changes to clients instantly—a critical feature for chat apps, live dashboards, and collaborative tools.
These advantages have made NoSQL the default choice for startups, mobile-first applications, and any project requiring rapid iteration without database migration headaches.
The Rise of Firebase Firestore and MongoDB
Firebase Firestore emerged from Google’s ecosystem as a serverless, real-time database tightly integrated with Firebase Authentication, Cloud Functions, and client SDKs for iOS, Android, and web. Its key selling points are automatic scaling, strong consistency guarantees for single-document operations, and a generous free tier that attracts early-stage projects. In contrast, MongoDB has evolved from a simple document store into a full-featured database with secondary indexes, aggregation pipelines, ACID transactions (since version 4.0), and flexible deployment options—self-hosted, cloud via MongoDB Atlas, or hybrid. While Firestore excels in serverless, low-ops environments where Google handles infrastructure, MongoDB offers greater control over data modeling, indexing strategies, and operational tuning. Both databases support geospatial queries, but their approaches to replication, sharding, and query performance differ significantly.
This article focuses on practical, technical differentiators to guide your choice: data modeling paradigms, query capabilities, real-time and offline support, scaling limits, cost structures, and ecosystem integrations. It will not provide generic “best database” rankings, vendor benchmarks without context, or advice suited only to enterprise-scale deployments. The goal is to equip you with concrete criteria—such as whether you need multi-region writes, serverless auto-scaling, or custom aggregation pipelines—so you can evaluate each database against your specific application requirements. We assume you already have a basic understanding of NoSQL concepts but may be unfamiliar with the trade-offs between a managed, real-time database and a self-hosted or cloud-hosted document store.
Architecture and Data Model
The foundational difference between Firebase Firestore and MongoDB lies in how they structure and store data. Both are NoSQL databases, but their architectural choices lead to distinct trade-offs in flexibility, querying, and scalability. Understanding these differences is critical when deciding which database fits your application’s needs.
Firestore: Documents, Collections, and Subcollections
Firestore organizes data into documents and collections. A document is a lightweight record containing key-value pairs (field names mapped to values). Documents are stored inside collections, which are simply containers for documents. A key feature is the ability to create subcollections—collections nested within a document, allowing for hierarchical data organization. For example:
// Example Firestore structure
/users/{userId}/orders/{orderId}
Here, each user document contains a subcollection named “orders,” which holds order documents. This model enforces a strict parent-child relationship: subcollections exist only within a specific document. Queries are scoped to a single collection or subcollection, and cross-collection queries require multiple reads or composite indexes. Firestore automatically indexes every field by default, but complex queries (e.g., range filters on multiple fields) require manual composite indexes. Data nesting within a single document is limited to 1 MB and 20,000 fields, encouraging shallow, normalized structures.
MongoDB: Documents, Collections, and Embedded vs. Referenced Data
MongoDB also uses documents and collections, but its data model is more flexible. Documents are stored as BSON (Binary JSON), supporting richer data types (e.g., dates, binary data, ObjectIds). Unlike Firestore, MongoDB allows deep nesting within a single document—up to 100 levels of embedded documents and arrays. This enables embedded data models, where related data (e.g., order items within an order) is stored directly inside a parent document. Alternatively, referenced data uses ObjectId links to connect documents across collections, similar to foreign keys in relational databases. For example:
MongoDB does not automatically index all fields; you must create indexes explicitly. However, it supports compound indexes, text indexes, and geospatial indexes out of the box. The BSON size limit per document is 16 MB, which is far larger than Firestore’s limit, making it suitable for richer, nested data structures.
Schema Enforcement and Validation Approaches
Both databases are schema-flexible by default, but they provide different mechanisms for validation.
Feature
Firestore
MongoDB
Default schema
No schema enforcement
No schema enforcement
Validation method
Security rules (server-side)
JSON Schema validation (collection-level)
Client-side enforcement
Not built-in (use client libraries)
Not built-in (use ODM like Mongoose)
Indexing
Automatic single-field indexes; manual composite
Manual indexes on any field or compound
Firestore uses security rules to control read/write access and validate data structure at the server level. For example, you can enforce that a “title” field must be a string and exist on every document in a collection. MongoDB offers JSON Schema validation (via $jsonSchema) during write operations, allowing you to specify required fields, data types, and value ranges. Additionally, many MongoDB developers use ODMs like Mongoose for Node.js to enforce schemas at the application layer, providing type coercion and validation before data reaches the database.
In practice, Firestore’s approach is more integrated with its security ecosystem, while MongoDB’s validation is decoupled and more flexible for complex rules. The choice depends on whether you prefer a tightly managed (Firestore) or highly customizable (MongoDB) schema enforcement.
Query Capabilities and Performance
When evaluating Firebase Firestore vs. MongoDB for query capabilities and performance, the choice hinges on real-time needs versus analytical depth. Firestore excels at live synchronization with minimal latency, while MongoDB offers sophisticated querying through aggregation pipelines. Understanding their indexing strategies is critical for optimizing speed in production workloads.
Firestore Queries: Real-Time Listeners and Limitations
Firestore queries are designed for real-time applications, using snapshot listeners to push data changes to clients instantly. Queries are shallow—they return only documents at the collection level, not subcollections—and support simple filters, sorting, and limited compound conditions. However, Firestore imposes strict limitations: compound queries require composite indexes, range filters on multiple fields are restricted, and there is no native full-text search. For text search, you must integrate third-party services like Algolia or Meilisearch. Aggregation is also limited; count(), sum(), and average() require client-side computation or cloud functions. Performance is strong for small to medium datasets, but complex queries can degrade due to index constraints.
MongoDB Queries: Aggregation Pipeline and Advanced Filtering
MongoDB provides a mature query system built around its aggregation pipeline, which supports multi-stage transformations like $match, $group, $sort, and $lookup for joins. This enables complex analytics, such as computing averages across nested arrays or joining collections, directly on the database. MongoDB also offers native full-text search via text indexes, along with geospatial and array queries. For real-time needs, you can use change streams, which deliver document changes to applications, though they require more setup than Firestore’s built-in listeners. Performance scales well with large datasets, especially when indexes are properly designed, but write-heavy workloads can cause contention if indexes are not optimized.
Indexing Strategies and Their Impact on Speed
Indexing is the backbone of query performance for both databases. Firestore automatically indexes single-field queries but requires manual composite indexes for compound queries. Without the correct composite index, queries fail with an error. This forces developers to plan indexes ahead of time, but it also ensures consistent performance for simple reads. However, each composite index consumes storage and increases write latency (by up to 20% in high-write scenarios). MongoDB offers flexible indexing: single-field, compound, multikey (for arrays), text, and geospatial indexes. Developers can create indexes on the fly, and the query planner selects the most efficient index. Over-indexing can slow writes, but MongoDB’s explain() tool helps fine-tune. For speed, MongoDB generally outperforms Firestore on complex aggregations, while Firestore wins on low-latency real-time reads.
In practice, Firestore is ideal for apps needing instant sync with simple queries, such as chat or live dashboards. MongoDB suits applications requiring complex data processing, reporting, or flexible search. Both databases deliver strong performance when indexes are aligned with query patterns, but the trade-offs in query scope and real-time capability often dictate the better fit.
Scalability and Pricing Models
When comparing Firebase Firestore vs. MongoDB, scalability and pricing are often the deciding factors for development teams. Firestore employs a fully managed, automatic scaling model with a pay-per-operation cost structure, while MongoDB offers both manual and automated scaling options through sharding and tiered Atlas pricing. Understanding these differences is critical to avoid unexpected costs and to choose a database that aligns with your application’s growth trajectory.
Firestore scales automatically without any configuration from the developer. As your user base grows, Firestore distributes data across multiple regions and partitions, handling traffic spikes seamlessly. This “serverless” approach eliminates the need to provision or manage infrastructure. However, this convenience comes with a cost model based on the number of reads, writes, and deletes your application performs, plus storage and network egress.
Read costs: Charged per document read. Real-time listeners and queries count each document returned.
Write costs: Charged per document write or update.
Delete costs: Charged per document delete.
Free tier: 50,000 reads, 20,000 writes, 20,000 deletes per day, plus 1 GiB stored.
Hidden cost: Large collections or complex queries can inflate read counts significantly.
For example, a chat application that reads 100 messages per user per day would incur 100 reads per user. With 1,000 active users, that’s 100,000 reads daily—exceeding the free tier and incurring costs at $0.06 per 100,000 reads.
MongoDB: Horizontal Scaling with Sharding and Atlas Tiers
MongoDB scales horizontally through sharding, where data is partitioned across multiple servers. This requires careful planning: you must choose a shard key that distributes data evenly to avoid “hot spots.” MongoDB Atlas, the managed cloud service, simplifies this with automated sharding and tiered pricing. Atlas offers dedicated clusters (M10 and above) that support sharding, as well as serverless instances (starting at M0) for variable workloads.
M0 (Free tier): 512 MB storage, shared RAM, no sharding. Suitable for development or very small apps.
M30+: Higher RAM, storage, and IOPS. Sharding adds $60/month per shard.
Serverless: Pay per read/write operation, similar to Firestore, with a minimum monthly charge of $0.10 per million reads.
Hidden cost: Sharding requires operational overhead—monitoring, rebalancing, and backup costs can add 20-30% to the base price.
Cost Comparison for Small, Medium, and Large Applications
Application Size
Firestore (Monthly Estimate)
MongoDB Atlas (Monthly Estimate)
Small (1,000 users, 10 reads/user/day)
$0 (within free tier)
$0 (M0 free tier)
Medium (10,000 users, 50 reads/user/day)
$30–$50 (500k reads/day, 500k writes/day)
$57–$100 (M10 dedicated, plus storage)
Large (100,000 users, 100 reads/user/day)
$300–$600 (10M reads/day, 1M writes/day)
$200–$400 (M30 with sharding, optimized)
Key takeaway: Firestore can become expensive at scale due to per-operation costs, especially for read-heavy applications. MongoDB Atlas offers predictable monthly pricing for dedicated clusters but requires upfront planning for sharding. For bursty or unpredictable workloads, MongoDB’s serverless tier may align more closely with Firestore’s cost structure, while Firestore’s auto-scaling remains simpler to implement.
When evaluating Firebase Firestore vs. MongoDB: Which is Better for real-time and offline functionality, the fundamental architectural differences become stark. Firestore was designed from the ground up as a real-time database, while MongoDB’s real-time capabilities are layered on top of its document store. This distinction shapes which platform suits collaborative apps, field service tools, and other latency-sensitive applications.
Firestore: Native Real-Time Sync and Offline Support
Firestore provides built-in real-time listeners that automatically push data changes to all connected clients without polling. When a document is updated, deleted, or added, every active listener receives the change within milliseconds. This native sync is ideal for:
Collaborative editing tools (e.g., shared documents or whiteboards) where multiple users must see edits instantly.
Live dashboards that display metrics or sensor data as it arrives.
Offline persistence is equally native. Firestore caches recently accessed documents and pending writes locally on the device. When the network reconnects, it automatically synchronizes changes with the server, handling conflicts via last-write-wins or custom resolvers. This makes Firestore a strong choice for field service tools where technicians work in remote areas with intermittent connectivity. The SDK manages offline reads and writes transparently, so developers write the same code regardless of network state.
MongoDB offers real-time via change streams, which allow applications to listen for document-level changes (inserts, updates, deletes) on a collection. However, change streams require a persistent connection to a replica set and are not as frictionless as Firestore’s listeners. They are best suited for:
Event-driven architectures where changes trigger downstream processes (e.g., updating a search index).
Backend-to-backend sync between services.
For mobile and web offline support, MongoDB provides Realm Sync, a separate product that synchronizes a local Realm database with the backend MongoDB Atlas cluster. Realm Sync uses a conflict-resolution system based on last-write-wins or custom strategies, but it introduces additional complexity: developers must manage a separate Realm SDK, define sync rules, and handle schema versioning. Unlike Firestore, where offline reads are automatic, Realm requires explicit configuration and can struggle with large datasets or high-frequency writes.
Real-time and offline capabilities are critical for specific use cases. For collaborative apps (e.g., project management tools, multiplayer games), Firestore’s instant sync and seamless offline mode reduce development time and improve user experience. For field service tools where workers log repairs or inspections offline, Firestore’s automatic sync ensures data integrity without manual reconciliation.
MongoDB’s change streams excel in server-side event processing, such as triggering notifications or updating caches when data changes. Realm Sync is viable for mobile apps that need offline support, but the added setup and maintenance overhead make it less attractive for small teams. In high-write scenarios (e.g., IoT sensor ingestion), Firestore’s real-time architecture can become costly due to per-document read and write charges, whereas MongoDB’s change streams may be more cost-effective for backend pipelines.
Ultimately, for applications where real-time collaboration and offline resilience are paramount, Firestore’s native approach offers a simpler, more reliable path. MongoDB remains better suited for complex querying and server-side event-driven workflows where real-time is a feature, not the foundation.
Security and Authentication
When comparing Firebase Firestore vs. MongoDB, security models diverge significantly in philosophy and implementation. Firestore adopts a declarative, platform-integrated approach tightly coupled with Firebase Authentication, while MongoDB offers a more traditional, layered security model based on user roles, network controls, and encryption. Understanding these differences is critical to avoiding common pitfalls that can expose your data.
Firestore Security Rules and Firebase Auth
Firestore’s security model is built around declarative rules written in a custom language, evaluated server-side before every read or write operation. These rules integrate seamlessly with Firebase Authentication, allowing you to restrict access based on user identity, custom claims, and request attributes. A common pitfall is leaving rules in test mode (allow read, write: if true;) in production, which grants unrestricted access. Another frequent mistake is failing to validate data structure within rules, leading to injection of malformed documents.
Example rule that restricts access to authenticated users and validates data:
rules_version = '2';
service cloud.firestore {
match /databases/{database}/documents {
match /users/{userId} {
allow read, write: if request.auth != null && request.auth.uid == userId;
allow create: if request.resource.data.keys().hasAll(['name', 'email']);
}
}
}
Granular: Can target specific collections, documents, and fields.
No network-layer controls: Relies entirely on rules and client SDKs.
MongoDB: User Roles, IP Whitelisting, and Encryption
MongoDB’s security is layered and configurable at the database, network, and transport levels. User authentication uses SCRAM (Salted Challenge Response Authentication Mechanism) or x.509 certificates, with roles assigned per database or cluster. Access control is role-based (RBAC), allowing fine-grained permissions such as readWrite, dbAdmin, or custom roles. A common pitfall is enabling authentication but using weak passwords, or granting overly permissive roles like root to application users. Another is failing to enable TLS for data in transit, exposing queries to interception.
Network security relies on IP whitelisting (access control lists) to restrict which source IPs can connect. MongoDB Atlas also supports VPC peering and private endpoints. Encryption at rest is available via WiredTiger storage engine encryption or cloud provider-managed keys. A typical configuration example for creating a user with limited privileges:
Authorization: Role-based access control with built-in and custom roles.
Network: IP whitelisting, VPC peering, private endpoints.
Encryption: TLS for transport, AES-256 for at-rest encryption.
Best Practices for Securing Your Database
Regardless of which database you choose, common security gaps can be avoided with disciplined practices. For Firestore, always deploy rules that reject unauthenticated requests and use request.auth to scope access. Test rules in the Firebase console simulator before deploying. For MongoDB, never expose your database to the public internet—use IP whitelisting and prefer private network connections. Enforce TLS for all client connections and rotate credentials regularly.
Additional universal best practices include:
Principle of least privilege: Grant only the permissions necessary for each user or service.
Audit logging: Enable and monitor database logs (Firestore audit logs via Cloud Audit Logs; MongoDB audit log).
Data validation: Validate all data at the application layer in addition to database-level rules.
Regular updates: Keep database drivers and server software patched to fix known vulnerabilities.
Environment separation: Use different credentials and configurations for development, staging, and production.
Avoid the pitfall of assuming default configurations are secure. Both databases require explicit, intentional security setup. Firestore’s tight integration with Firebase Auth simplifies identity management but demands rigorous rule testing. MongoDB’s flexibility offers strong network and encryption controls but requires careful role and access management. The choice between them depends on your infrastructure and operational capacity to maintain these layers.
Ecosystem and Tooling
When choosing between Firebase Firestore and MongoDB, the surrounding ecosystem often determines long-term productivity and scalability. Firestore is tightly woven into Google Cloud’s suite, offering a unified backend experience, while MongoDB provides a more open, cross-platform toolkit. This section evaluates the developer experience, community support, and integrations that each platform brings to the table.
Firebase Ecosystem: Seamless Integration with Google Cloud
Firebase Firestore is part of a cohesive ecosystem designed to reduce boilerplate and accelerate development. Key components include:
Firebase Hosting: Fast, secure hosting for web apps with automatic SSL and CDN delivery. Integrates directly with Firestore for serverless backends.
Cloud Functions: Serverless compute that triggers on Firestore events (e.g., document writes) or HTTP requests, enabling real-time data processing without managing servers.
Firebase Authentication: Pre-built sign-in flows for email/password, Google, Apple, and other providers, with seamless Firestore security rules integration.
Firebase Analytics: Free, unlimited analytics that track user behavior and app performance, directly feeding into Firestore queries and A/B testing via Remote Config.
Google Cloud Services: Firestore projects automatically benefit from Cloud Storage (for files), Cloud Scheduler (for cron jobs), and BigQuery (for complex analytics via streaming exports).
The developer experience is opinionated but streamlined: a single Firebase project handles auth, database, hosting, and analytics, reducing context switching. The Firebase console provides a unified dashboard for monitoring, logging, and testing security rules. Community support is strong, with extensive official documentation, YouTube tutorials, and an active Stack Overflow community.
MongoDB Ecosystem: Atlas, Compass, and BI Connectors
MongoDB’s ecosystem emphasizes operational control and enterprise integration. Its core tools include:
MongoDB Atlas: Fully managed cloud database service with built-in backup, monitoring, and auto-scaling. Supports multi-cloud deployments (AWS, Azure, GCP) and global clusters for low-latency reads.
MongoDB Compass: A rich GUI for ad-hoc queries, document visualization, schema analysis, and performance profiling. Ideal for debugging and exploring data without writing shell commands.
BI Connectors: Native connectors to Tableau, Power BI, and SQL-based tools via the MongoDB Connector for BI. This allows business teams to query MongoDB data using standard SQL, bridging the gap between NoSQL and analytics workflows.
Atlas Search: Built-in full-text search powered by Lucene, eliminating the need for a separate Elasticsearch instance.
Realm SDKs: Mobile and web SDKs for offline-first apps, with automatic syncing to Atlas—similar to Firestore’s real-time capabilities but with more granular conflict resolution.
MongoDB’s developer experience is more customizable but requires more setup for authentication, hosting, and analytics. The MongoDB Cloud console provides metrics, alerts, and slow query analysis, while the mongosh shell remains a powerful tool for power users. Community support is vast, with hundreds of third-party drivers, a robust Stack Overflow presence, and MongoDB University offering free certification courses.
Third-Party Libraries and Community Resources
Both platforms benefit from rich third-party ecosystems, though their approaches differ:
Limited; Firebase Admin SDK is the primary client. Third-party libraries like react-firebase-hooks exist but are thin wrappers.
Rich ODM ecosystem: Mongoose (Node.js), Morphia (Java), MongoEngine (Python). These provide schema validation, middleware, and query builders.
Testing Tools
Firebase Emulator Suite for local Firestore, Auth, and Functions testing.
mongodb-memory-server for in-memory testing; jest-mongodb for integration tests.
Deployment & CI/CD
Firebase CLI with firebase deploy; GitHub Actions templates available.
MongoDB Atlas CLI; Helm charts for Kubernetes; Terraform provider for infrastructure-as-code.
Community Libraries
Fewer but tightly focused: firebase-tools, @firebase/testing.
Thousands of drivers and wrappers for every language, plus tools like mongo-express for web-based administration.
For developers who prefer opinionated, turnkey solutions, Firestore’s ecosystem minimizes configuration overhead. For those needing flexibility, custom drivers, or enterprise analytics, MongoDB’s broader library support and BI connectivity offer a more adaptable foundation. Community resources for both are abundant, but MongoDB’s longer history grants it a deeper pool of third-party integrations and battle-tested patterns.
Use Case Suitability
Choosing between Firebase Firestore and MongoDB often comes down to the specific demands of your application’s environment, data structure, and operational overhead. Firestore is a fully managed, serverless NoSQL document database from Google, tightly integrated with the Firebase ecosystem. MongoDB, in its self-hosted or Atlas managed form, offers more granular control over data modeling, indexing, and consistency. The table below distills the key differences for common application types.
Firebase Firestore is the preferred choice when your primary goal is rapid development of mobile or web applications that require real-time synchronization with minimal backend management. Its key advantages include:
Real-time listeners: Any client subscribed to a document or query receives updates within milliseconds, making it ideal for chat apps, collaborative tools, and live scoreboards.
Offline-first support: Firestore caches data on the client device and automatically syncs when connectivity returns, a critical feature for mobile apps in variable network conditions.
Serverless scaling: No need to provision servers or manage database clusters; Firestore automatically scales from zero to millions of concurrent users, though with limits on write throughput per document.
Integrated authentication and security: Firebase Authentication combined with Firestore’s security rules allow fine-grained, client-side access control without a custom backend.
Choose Firestore if your application is mobile-first, requires real-time updates, and you are willing to accept eventual consistency for most reads (strong consistency is available for single-document reads only). It is less suitable for complex aggregation, multi-document transactions, or high-frequency IoT data ingestion.
When to Choose MongoDB
MongoDB is the better fit when your application demands complex data modeling, advanced query capabilities, or strict consistency guarantees across multiple documents. Its strengths include:
Rich query and aggregation pipeline: MongoDB supports geospatial queries, text search, faceted aggregation, and powerful pipeline stages (e.g., $lookup for joins, $facet for multi-faceted analytics).
Multi-document ACID transactions: Since version 4.0, MongoDB supports transactions that span multiple documents, collections, and shards, making it viable for financial systems and inventory management.
Flexible schema design: MongoDB allows embedding or referencing data to optimize for read patterns, and its schema validation can enforce structure without rigidity.
High write throughput: Unlike Firestore’s single-document write limit, MongoDB can handle thousands of writes per second per shard, essential for IoT, logging, and event sourcing.
Self-managed or managed (Atlas): MongoDB Atlas provides a managed service similar to Firestore, but with more control over cluster size, backup policies, and region selection.
Choose MongoDB if you need strong consistency, complex queries, or high-volume writes. It requires more operational expertise, especially for sharding and indexing, but offers far greater flexibility for enterprise-grade applications.
Hybrid Approaches: When to Use Both
Some architectures benefit from using Firestore and MongoDB together, each serving its strength. For example:
Firestore as the front-end real-time layer: Use Firestore to handle user-facing data that requires instant updates and offline support, such as chat messages or live notifications.
MongoDB as the back-end analytics and transactional store: Use MongoDB for complex business logic, reporting, and multi-document transactions. Synchronize data between the two via Cloud Functions (Firebase) or change streams (MongoDB).
Eventual consistency bridge: Write to MongoDB as the source of truth, then replicate to Firestore for real-time consumption. This approach mitigates Firestore’s write limits while still delivering responsive UIs.
This hybrid model is common in SaaS platforms that require both real-time collaboration (Firestore) and robust data analysis (MongoDB). It adds complexity but can unlock capabilities neither database provides alone.
Migration and Vendor Lock-In
When comparing Firebase Firestore and MongoDB, the ease of migrating data in and out of each platform is a critical factor for long-term flexibility. Vendor lock-in occurs when deep integration with proprietary features makes switching providers costly or technically prohibitive. Both databases offer export tools, but their approaches to data portability differ significantly, impacting how easily you can move your data or change backends.
Firestore: Export Options and Google Cloud Lock-In
Firestore is tightly integrated with the Google Cloud ecosystem, which simplifies operations for teams already using Google services but creates substantial dependency. Exporting data is possible but limited in scope and format:
Export tool: Firestore provides a managed export via gcloud firestore export that writes data to a Cloud Storage bucket in a proprietary format (namespace-level metadata and entity files).
Format limitations: Exports are not directly readable by other databases without custom transformation. The data is stored in a custom protocol buffer schema, not JSON or BSON.
Import constraints: Imports require the same Firestore database structure and are only supported from Google Cloud Storage. You cannot import from external sources without building a custom pipeline.
Real-time lock-in: Firestore’s real-time listeners, security rules, and Firebase Authentication are deeply proprietary. Replicating these features in another system requires rewriting application logic.
Abstract database access: Use a repository pattern or ORM/ODM (e.g., Mongoose for MongoDB, Firestore’s SDK wrappers) to isolate database-specific code from business logic.
Standardize data formats: Store data in JSON-compatible structures without relying on proprietary data types (e.g., avoid Firestore’s Timestamp or MongoDB’s ObjectId in critical fields).
Regular export testing: Periodically export data and verify it can be imported into a different system. For Firestore, test converting exports to JSON; for MongoDB, ensure mongoexport output is usable.
Limit use of proprietary features: Avoid deep integration with Firestore security rules, real-time listeners, or MongoDB Atlas-specific features like Atlas Search unless you are willing to accept higher switching costs.
Plan for schema evolution: Design schemas that are database-agnostic, using simple data types (strings, numbers, arrays) and avoiding vendor-specific indexing or validation.
By implementing these strategies, you can maintain the flexibility to migrate between Firebase Firestore and MongoDB—or to a different solution—without extensive rework. For teams prioritizing long-term data freedom, MongoDB’s open-source nature and standard export formats provide a clear advantage, while Firestore’s convenience is best suited for projects committed to the Google Cloud ecosystem.
Choosing between Firebase Firestore and MongoDB is not about declaring a universal winner; it is about aligning a database’s strengths with your project’s specific constraints. Firestore excels in rapid, serverless development with real-time sync, while MongoDB offers mature, self-managed flexibility for complex queries and multi-cloud architectures. The decision ultimately hinges on your team’s expertise, budget, latency requirements, and long-term maintainability goals.
Firestore Wins If…
Your team lacks dedicated DevOps resources: Firestore eliminates server management, scaling, and patching, allowing frontend-heavy teams to focus on features.
Real-time synchronization is critical: For collaborative apps, live dashboards, or chat systems, Firestore’s built-in listeners (onSnapshot) provide sub-100ms updates without custom WebSocket setup.
Budget favors predictable, pay-per-operation costs: Firestore charges per document read/write/delete, which suits apps with moderate, consistent traffic. No idle server costs.
You need tight integration with Firebase ecosystem: Authentication, Cloud Functions, and Firebase Hosting reduce boilerplate for apps already using Google Cloud.
Low-latency reads from a single region: Firestore’s multi-region replication ensures fast reads, but write latency can increase under heavy contention.
MongoDB Wins If…
Your team has database administration expertise: MongoDB’s flexible schema, indexing options, and aggregation pipeline require careful tuning but offer unmatched query power.
You need multi-cloud or hybrid deployment: MongoDB Atlas runs on AWS, Azure, and GCP, with cross-region replication and global clusters for low-latency writes.
Complex queries and joins are essential: MongoDB’s $lookup, $unwind, and geospatial queries outperform Firestore’s limited query capabilities (no OR, no joins).
Long-term cost predictability matters: For high-volume writes, MongoDB’s infrastructure cost can be lower than Firestore’s per-operation pricing, especially with reserved instances.
Latency-sensitive writes across regions: MongoDB’s sharding and local write concerns (with eventual consistency) better support globally distributed applications requiring fast writes.
Next Steps: Prototyping and Proof of Concept
Before committing, run a structured proof of concept (PoC) over two weeks:
Define three core use cases (e.g., user profile reads, real-time feed updates, analytics aggregation).
Prototype identical features in both databases using their native SDKs. Measure read/write latency under simulated load (e.g., 1,000 concurrent users).
Evaluate operational overhead: Track time spent on schema migrations, indexing, and scaling tests. Firestore auto-scales but requires composite indexes; MongoDB needs manual shard management.
Calculate 12-month cost projections using each platform’s pricing calculator. Include storage, bandwidth, and operational labor (e.g., DBA hours for MongoDB).
Test vendor lock-in: Attempt to export data from Firestore to MongoDB (or vice versa) using official tools. Note complexity and data transformation costs.
For most startups with real-time needs and lean teams, Firestore reduces time-to-market. For enterprises with complex data models and multi-cloud strategies, MongoDB offers long-term flexibility. Document your PoC results and revisit the decision after six months of production use—neither database is a permanent choice.
Frequently Asked Questions
What are the main differences between Firebase Firestore and MongoDB?
Firebase Firestore is a fully managed, real-time NoSQL document database by Google, tightly integrated with Firebase and Google Cloud. It offers automatic scaling, real-time listeners, and strong consistency for mobile and web apps. MongoDB is a general-purpose NoSQL database available as self-hosted or MongoDB Atlas (cloud). It provides flexible schemas, rich querying (aggregation pipelines), and horizontal sharding. Firestore excels in real-time sync and serverless simplicity, while MongoDB offers deeper query capabilities, indexing options, and broader deployment control.
Which database is better for real-time applications?
Firebase Firestore is specifically designed for real-time updates with built-in listeners that push data changes to clients instantly, making it ideal for chat apps, live dashboards, and collaborative tools. MongoDB can also support real-time features using change streams (available in replica sets), but it requires more configuration and is not as seamless out-of-the-box. For applications demanding minimal latency and automatic client synchronization, Firestore has an edge. However, MongoDB's change streams are powerful for complex event-driven architectures.
How do pricing models compare between Firestore and MongoDB Atlas?
Firestore charges based on document reads, writes, deletes, stored data, and network egress, with a free tier (10GB storage, 50K reads/day). Costs can escalate for high-read/write apps. MongoDB Atlas offers a free tier (512MB storage) and charges per hour for cluster resources (RAM, storage, vCPU) plus data transfer. For predictable workloads, MongoDB Atlas may be cheaper; for sporadic usage with low throughput, Firestore's pay-per-operation can be cost-effective. Always estimate based on your app's specific read/write patterns.
Can I use Firestore and MongoDB together in the same application?
Yes, it's possible to use both databases in a single application, often called a polyglot persistence approach. For example, you might use Firestore for real-time features and client-side sync, while using MongoDB for complex analytics, large-scale batch processing, or legacy integrations. However, this adds complexity in data synchronization, consistency management, and operational overhead. Evaluate if the benefits outweigh the costs. Some projects use a sync layer to keep data consistent between the two.
What query capabilities does each database offer?
Firestore supports compound queries with equality and range filters on single fields, as well as limited OR queries (via 'in' and 'array-contains-any'). Indexes are automatically managed but can be customized. MongoDB offers a rich query language including aggregation pipelines, text search, geospatial queries, and complex joins using $lookup. MongoDB's indexing is more flexible (compound, partial, TTL, etc.). For advanced analytics and reporting, MongoDB is significantly more powerful. Firestore is optimized for simple, predictable queries common in real-time apps.
Firestore automatically scales horizontally across regions and is fully managed, requiring no manual sharding. It provides strong consistency and automatic multi-region replication for high availability. MongoDB scales horizontally via sharding, which requires manual setup and monitoring in self-managed deployments; MongoDB Atlas simplifies this but still involves cluster configuration. Firestore's auto-scaling is simpler for apps with variable traffic, while MongoDB offers finer control over data distribution and performance tuning for demanding workloads.
Which database is easier to learn for beginners?
Firebase Firestore is generally easier for beginners due to its tight integration with Firebase, clear documentation, and client SDKs for web and mobile that handle real-time synchronization out-of-the-box. Its security rules model is straightforward for simple apps. MongoDB has a steeper learning curve because of its richer query language, aggregation framework, and deployment options. However, MongoDB's flexibility and widespread use mean abundant learning resources. For quick prototyping, Firestore is often more beginner-friendly.
What are the security features of Firestore vs MongoDB?
Firestore uses Firebase Authentication and declarative security rules that control read/write access at the document and collection level, enforced server-side. MongoDB offers role-based access control (RBAC), authentication (SCRAM, x.509, LDAP), and field-level redaction in Atlas. For self-managed MongoDB, network security and encryption are user responsibilities. Firestore's security rules are easier to set up for simple apps, while MongoDB provides enterprise-grade security features suitable for compliance-heavy environments.
How to Build a Real-Time Chat App with Node.js and Socket.io
1. Introduction to Real-Time Chat Applications
Real-time chat applications have transformed how individuals and organizations communicate online, enabling instantaneous message exchange without the perceptible delay typical of traditional web interactions. Unlike standard HTTP-based communication, where a user must refresh a page or wait for a periodic update, real-time systems push data to clients the moment it becomes available. This immediacy creates a seamless conversational experience, making chat apps indispensable for modern digital ecosystems. Building such an application requires a robust backend capable of handling concurrent connections, low-latency data transmission, and bidirectional communication between server and client. Node.js, combined with the Socket.io library, has emerged as a leading solution for developers seeking to implement these features efficiently.
What defines a real-time chat app?
A real-time chat app is defined by its ability to facilitate live, two-way communication between users with minimal latency. The core characteristics include:
Instant message delivery: Messages appear on the recipient’s screen within milliseconds of being sent, without manual refresh or polling.
Bidirectional data flow: The server can push updates to clients at any time, and clients can send data to the server, all over a single persistent connection.
Stateful connection: Unlike stateless HTTP requests, a real-time chat app maintains an open connection for each user, allowing the server to track presence, typing indicators, and message history in real time.
Event-driven architecture: Actions such as sending a message, user joining a room, or disconnecting trigger events that the application handles programmatically.
Scalability for multiple concurrent users: The system can manage hundreds or thousands of simultaneous connections without degrading performance.
These elements differentiate a real-time chat app from simpler messaging systems like email or forums, where delivery is not instantaneous and interaction is asynchronous.
Common use cases: customer support, social platforms, collaborative tools
Real-time chat applications serve a wide range of industries and purposes. Below is a table summarizing the most prevalent use cases:
Use Case
Description
Example
Customer support
Live chat agents resolve inquiries instantly, improving satisfaction and reducing response times.
Zendesk Chat, Intercom
Social platforms
Users communicate with friends, groups, or communities through direct messages and channels.
Discord, WhatsApp Web
Collaborative tools
Teams share updates, files, and feedback in real time, enhancing productivity for remote work.
Slack, Microsoft Teams
Online education
Students and instructors interact during live classes, ask questions, and participate in discussions.
Zoom chat, Google Classroom
Gaming
Players coordinate strategies, send in-game messages, or chat with opponents during matches.
Twitch chat, Fortnite voice/text
Each use case demands reliability, low latency, and often features like message persistence, user authentication, and room management.
Why Node.js and Socket.io? Key advantages
Node.js and Socket.io form a powerful combination for building real-time chat applications. Their key advantages include:
Event-driven, non-blocking I/O: Node.js handles thousands of concurrent connections using a single thread, making it ideal for chat apps where many users send and receive messages simultaneously.
Native WebSocket support: Socket.io abstracts WebSocket and other transport protocols (e.g., long-polling) to provide a consistent API. It automatically falls back to older technologies when WebSocket is unavailable, ensuring broad compatibility.
Built-in rooms and namespaces: Socket.io simplifies organizing users into chat rooms or channels, reducing boilerplate code for grouping and broadcasting messages.
Automatic reconnection: If a client loses connection, Socket.io attempts to reconnect seamlessly, preserving the chat session and preventing data loss.
Large ecosystem and community: Node.js offers extensive npm packages for authentication, database integration, and logging, while Socket.io has thorough documentation and active support.
Performance: Benchmarks show Socket.io can handle tens of thousands of messages per second on modest hardware, sufficient for most small to medium-scale chat apps.
These advantages make Node.js and Socket.io a go-to choice for developers who need to prototype quickly and scale reliably, without reinventing the wheel for real-time communication.
2. Prerequisites and Environment Setup
Before writing any real-time messaging logic, you must prepare your development environment. This section covers the essential tools, software installations, and initial project scaffolding. Following these steps ensures that your Node.js and Socket.io chat application has a solid foundation, free from dependency conflicts or runtime errors. We will use a standard Node.js project structure, which is both lightweight and widely supported.
Node.js is the runtime that executes your server-side JavaScript, while npm (Node Package Manager) handles library installations. If you prefer an alternative, yarn can be used interchangeably. To verify whether Node.js and npm are already installed, open your terminal (Command Prompt on Windows, Terminal on macOS/Linux) and run:
node -v
npm -v
If both commands return version numbers (e.g., v18.17.0 and 9.6.7), you are ready to proceed. Otherwise, download the latest LTS (Long Term Support) version from the official Node.js website. The installer includes npm automatically. For yarn users, once Node.js is installed, run npm install --global yarn in your terminal. After installation, confirm yarn is available with yarn --version.
Setting up a new project directory and package.json
Create a dedicated folder for your chat application. Choose a descriptive name, such as realtime-chat-app. Navigate into this directory and initialize a new Node.js project. This generates a package.json file, which tracks your project metadata and dependencies.
mkdir realtime-chat-app
cd realtime-chat-app
npm init -y
The -y flag accepts default values. Your package.json will look similar to this (comments added for clarity):
{
"name": "realtime-chat-app", // Project name from folder
"version": "1.0.0",
"description": "",
"main": "index.js", // Entry point (we will create this later)
"scripts": {
"test": "echo "Error: no test specified" && exit 1"
},
"keywords": [],
"author": "",
"license": "ISC"
}
You may edit the "description" and "author" fields manually later. For now, this minimal setup is sufficient.
Installing Express, Socket.io, and other dependencies
Your chat app requires two core libraries: Express for serving the web page and handling HTTP requests, and Socket.io for enabling real-time, bidirectional communication between the server and clients. Additionally, install nodemon as a development dependency to automatically restart the server when you make changes. Run the following command in your project directory:
Now your environment is fully prepared. You have Node.js and npm installed, a project directory with a package.json, and the essential dependencies—Express, Socket.io, and nodemon—ready to use. In the next section, you will build the server and integrate Socket.io for real-time messaging.
3. Building the Basic Server with Express and Socket.io
Establishing a robust foundation for your real-time chat application requires setting up an HTTP server with Express and then layering Socket.io for WebSocket communication. This section walks through the essential steps to initialize Express, integrate Socket.io, and handle core server-side events. By the end, you will have a functional server that can accept connections and manage user presence.
Initializing Express and creating an HTTP server
Begin by creating a new directory for your project and initializing it with a package.json file using npm init -y. Install the required dependencies: Express for the HTTP framework, Socket.io for real-time bidirectional communication, and optionally nodemon for automatic server restarts during development. Run the following command in your terminal:
Next, create an index.js file in your project root. Import Express and create an HTTP server using Node.js built-in http module. This is necessary because Socket.io needs direct access to the raw HTTP server instance to upgrade connections to WebSocket. The following code snippet sets up a basic Express app and creates an HTTP server that listens on port 3000:
const express = require('express');
const http = require('http');
const app = express();
const server = http.createServer(app);
app.get('/', (req, res) => {
res.send('Chat server is running');
});
server.listen(3000, () => {
console.log('Server listening on port 3000');
});
This setup ensures that Express handles standard HTTP requests while the underlying server instance remains accessible for WebSocket integration. The http.createServer(app) pattern is critical because Socket.io requires the server object, not the Express app object, to attach its listeners.
Once the HTTP server is created, integrate Socket.io by importing it and passing the server instance to the Socket.io constructor. This attaches the WebSocket upgrade logic to the same HTTP server, allowing it to handle both traditional HTTP requests and real-time WebSocket connections on the same port. Add the following code after the server creation:
const { Server } = require('socket.io');
const io = new Server(server);
With this integration, Socket.io automatically handles the WebSocket handshake and upgrades connections when the client uses the Socket.io JavaScript library. The io object now serves as the central hub for managing all real-time events. You can optionally configure CORS settings if your client runs on a different origin, but for local development, the default configuration works fine.
Socket.io provides built-in events for managing client connections. The most fundamental are connection and disconnection. When a client connects, the server receives a socket object representing that unique client. The disconnect event fires when the client closes the connection or loses network access. Implement these events as follows:
This code logs every connection and disconnection to the console, providing immediate feedback during development. The socket.id property offers a unique identifier for each client, which is useful for tracking individual users or broadcasting messages to specific sockets. You can extend this pattern to emit welcome messages or broadcast connection counts to all clients.
Below is a comparison table summarizing the key differences between the Express HTTP server and the Socket.io server instance:
Feature
Express HTTP Server
Socket.io Server
Protocol
HTTP/1.1
WebSocket (with HTTP long-polling fallback)
Primary use
Serving REST APIs and static files
Real-time bidirectional messaging
Connection type
Stateless (request-response)
Persistent (full-duplex)
Event handling
Route-based (GET, POST, etc.)
Custom event-based (emit, on)
Scalability
Horizontal with load balancers
Requires sticky sessions or Redis adapter
This table highlights why both technologies complement each other: Express handles traditional web tasks while Socket.io manages real-time features. With the server now listening and handling basic connection events, you are ready to implement message broadcasting and user-specific functionality in subsequent sections.
4. Creating the Client-Side Interface
With the Node.js and Socket.io server established, the client-side interface is the visible layer where users interact with the chat. This section guides you through building a simple yet functional HTML, CSS, and JavaScript front-end that connects to the server and enables real-time messaging. The interface consists of a chat window, a message input field, and a send button, all styled for usability and responsiveness.
Structuring the HTML with chat window, message input, and send button
Start with a clean HTML structure that separates the chat display area from the input controls. The chat window shows all messages, while the input field and button allow users to compose and send messages. Use semantic elements for clarity.
Chat window: A <ul> or <div> with an ID like messages to hold incoming and outgoing messages dynamically.
Message input: An <input type="text"> element with a placeholder, such as “Type your message,” and an ID like messageInput for easy access.
Send button: A <button> with an ID like sendButton that triggers the message submission.
Here is a practical example of the HTML structure:
This minimal setup ensures the chat window is a list that grows as messages arrive, while the input and button remain fixed at the bottom for easy access. Place these elements inside the <body> of your HTML file.
Styling the interface for usability and responsiveness
CSS transforms the raw HTML into an intuitive chat interface. Focus on readability, clear visual hierarchy, and adaptability across devices. Use a fixed layout for the chat window and input area to prevent overflow.
Chat window: Set a fixed height (e.g., 400px) with overflow-y: auto so older messages scroll away. Use a light background (e.g., #f5f5f5) and add padding for spacing.
Message bubbles: Style each <li> with rounded corners, a border (e.g., 1px solid #ccc), and padding. Differentiate user messages from others using a subtle color shift or alignment.
Input and button: Place them in a flex container at the bottom. The input should take up remaining width, while the button has a fixed width (e.g., 80px). Add a border-radius and hover effect for better interactivity.
Responsiveness: Use relative units like percentages or viewport widths. For mobile, reduce the chat window height (e.g., 60vh) and increase input font size for touch targets.
Example CSS snippet (add to a <style> tag in the <head>):
To enable real-time communication, the client must connect to the Socket.io server using the client-side library. Include the Socket.io CDN script in your HTML <head>:
<script src="/socket.io/socket.io.js"></script>
Then, in your own JavaScript file (e.g., client.js), establish the connection and handle events. The server emits messages, and the client listens for them. Similarly, the client emits user messages when the send button is clicked.
This code connects to the server, displays incoming messages in the chat window, and sends user input when the button is clicked. Ensure the script is placed at the end of the <body> to guarantee DOM elements are loaded.
5. Implementing Real-Time Message Broadcasting
With the server and client connections established, the core functionality of a chat application is enabling users to send messages that are instantly broadcast to all connected participants. This section covers the implementation of real-time message broadcasting using Socket.io, from server-side event handling to client-side UI updates.
Handling ‘sendMessage’ events on the server
On the server side, you need to listen for a custom event—typically named sendMessage—that the client will emit whenever a user submits a chat message. This event should carry the message payload, which usually includes the message text, the sender’s username, and a timestamp. Below is a robust server-side implementation:
Validation: Always check that the message data contains expected properties and types to prevent errors or malicious input.
Sanitization: Trim whitespace from the text and provide a fallback username if none is supplied.
Enrichment: Add a server-generated timestamp and the emitting socket’s ID for potential future features like message ownership.
Security note: In production, consider additional validation (e.g., maximum length checks) and escaping HTML to prevent XSS attacks.
Broadcasting messages to all clients using io.emit()
Socket.io provides two primary methods for emitting events to connected clients:
Method
Scope
Use Case
io.emit()
All connected clients (including sender)
Broadcasting messages to every user in the chat
socket.broadcast.emit()
All clients except the sender
When you want to exclude the sender from the broadcast
For a typical chat application, io.emit() is the appropriate choice because it ensures that even the sender receives confirmation that their message was processed. This allows the client UI to display the message immediately without waiting for a separate acknowledgment. If you were building features like typing indicators or user-join notifications, socket.broadcast.emit() would be more suitable to avoid echoing back to the triggering client.
Updating the client UI to display incoming messages
On the client side, you need to listen for the receiveMessage event and dynamically update the DOM to show new messages. Below is a complete client-side implementation using vanilla JavaScript:
const socket = io(); // Connect to the server
// Listen for incoming messages
socket.on('receiveMessage', (message) => {
const chatBox = document.getElementById('chat-messages');
const messageElement = document.createElement('div');
messageElement.classList.add('message');
const meta = document.createElement('span');
meta.classList.add('meta');
meta.textContent = `${message.username} (${new Date(message.timestamp).toLocaleTimeString()})`;
const text = document.createElement('p');
text.textContent = message.text;
messageElement.appendChild(meta);
messageElement.appendChild(text);
chatBox.appendChild(messageElement);
// Auto-scroll to the latest message
chatBox.scrollTop = chatBox.scrollHeight;
});
// Emit message on form submission
document.getElementById('chat-form').addEventListener('submit', (e) => {
e.preventDefault();
const input = document.getElementById('message-input');
const text = input.value.trim();
if (text) {
socket.emit('sendMessage', { username: currentUser, text });
input.value = '';
}
});
DOM structure: Each message is wrapped in a div with a separate span for metadata (username and time) and a p for the message text, allowing for flexible CSS styling.
Auto-scrolling: After appending a new message, set scrollTop to scrollHeight to ensure the chat box always shows the most recent messages.
Input management: Clear the input field after successful emission to provide a smooth user experience.
Error handling: In production, wrap the socket event handlers in try-catch blocks and provide user feedback if message delivery fails.
With these three components in place—server-side event handling, broadcasting logic, and client-side UI updates—your chat application will support real-time message broadcasting where every connected user sees messages as they are sent.
6. Adding User Join/Leave Notifications
When users enter or exit a chat room, the remaining participants should see a system message that announces the event. This feature enhances the chat experience by providing real-time awareness of who is present. In this section, we will track connected users on the server and emit specific events to notify the client when a user joins or leaves.
Tracking connected users with a server-side array or Map
To manage the list of active users, we maintain a data structure on the server. A Map is ideal because it stores key-value pairs, where the key is the socket ID and the value is the username. This allows efficient lookups and updates when connections change.
Here is the server-side code to initialize and update the user list:
Easy to iterate over all connected users for broadcasting.
Emitting ‘userJoined’ and ‘userLeft’ events
Once a user joins or leaves, we emit events to all connected clients (except the joining user for the join event) so they receive a notification. The server broadcasts these events with the username and a timestamp.
// Inside connection handler
socket.on('userJoined', (username) => {
users.set(socket.id, username);
// Notify all other clients that a user joined
socket.broadcast.emit('userJoined', {
username: username,
timestamp: Date.now()
});
});
// On disconnect
socket.on('disconnect', () => {
const username = users.get(socket.id);
if (username) {
// Notify all clients that a user left
io.emit('userLeft', {
username: username,
timestamp: Date.now()
});
users.delete(socket.id);
}
});
Note the difference: socket.broadcast.emit sends to all sockets except the sender, while io.emit sends to every connected socket, including the one that disconnected (though the disconnect event happens after the socket is removed from the Map, so the leaving user won’t receive it).
Displaying system messages in the chat feed
On the client side, we listen for the ‘userJoined’ and ‘userLeft’ events and render a system message in the chat feed. System messages should be visually distinct from regular chat messages, often with a different style (e.g., italic, gray, or centered).
Client-side JavaScript to handle these events:
// client.js
socket.on('userJoined', (data) => {
const message = `${data.username} joined the room`;
appendSystemMessage(message, data.timestamp);
});
socket.on('userLeft', (data) => {
const message = `${data.username} left the room`;
appendSystemMessage(message, data.timestamp);
});
function appendSystemMessage(text, timestamp) {
const feed = document.getElementById('chat-feed');
const div = document.createElement('div');
div.className = 'system-message';
div.textContent = text;
feed.appendChild(div);
feed.scrollTop = feed.scrollHeight;
}
For a clean user interface, consider these best practices:
Use a dedicated CSS class (e.g., .system-message) to style system messages with italics or a muted color.
Optionally include a timestamp in a smaller font next to the message.
Ensure the chat feed auto-scrolls to the bottom when a new system message appears.
Avoid duplicating the join message for the user who just joined by using socket.broadcast.emit instead of io.emit for the join event.
With these components in place, your chat app will provide real-time awareness of participant changes, making the experience more social and responsive.
Private messaging transforms a public chat room into a more versatile communication platform. To enable one-to-one chat in a Node.js and Socket.io application, you must establish a reliable system for identifying users and routing messages exclusively between them. This section covers the essential steps: generating unique identifiers, handling private message events on the server, and using Socket.io’s built-in targeting methods to deliver messages to specific clients.
Socket.io automatically assigns a unique socket.id to every connected client. However, relying solely on this ID for private messaging is fragile because the ID changes on reconnection. Instead, pair the socket ID with a persistent user identifier, such as a username or database ID. Implement the following approach:
On client connection: Emit a register event with a chosen user identifier (e.g., { userId: 'alice123' }).
On the server: Maintain a map (object or Map) that associates each userId with their current socket ID. For example: const userSockets = new Map();
Update on reconnect: When a user reconnects, update the mapping to reflect the new socket ID, ensuring messages always reach the active connection.
Handle disconnection: Remove the user from the map when they disconnect to prevent stale references.
This dual-identifier system ensures that private messages are delivered even if a user refreshes their browser or temporarily loses connection.
Handling ‘privateMessage’ events on the server
Once user identifiers are mapped to socket IDs, create a dedicated event listener for private messages. The server must parse the incoming data, verify the recipient exists, and route the message accordingly. Structure the event handler as follows:
Event property
Description
Example value
to
Recipient’s user identifier
'bob456'
message
Content of the private message
'Hey Bob, did you finish the report?'
from
Sender’s user identifier (added server-side)
'alice123'
Implement the server-side logic:
socket.on('privateMessage', ({ to, message }) => {
const recipientSocketId = userSockets.get(to);
if (!recipientSocketId) {
// Optionally notify sender that user is offline
socket.emit('errorMessage', { error: 'User not found or offline' });
return;
}
// Emit to recipient only
io.to(recipientSocketId).emit('privateMessage', {
from: currentUserId,
message: message,
timestamp: Date.now()
});
// Confirm delivery to sender
socket.emit('privateMessageSent', { to, message });
});
Always validate that the recipient exists in the userSockets map before attempting to emit. This prevents sending messages to disconnected or non-existent users.
Targeting specific sockets with socket.to(id).emit()
Socket.io provides several methods for targeting specific clients. For private messaging, the most precise approach uses socket.to(id).emit() or io.to(id).emit(). Understand the difference:
socket.to(id).emit(): Emits to the specified socket ID but excludes the sender. Use this when the sender should not receive their own message echoed back.
io.to(id).emit(): Emits to the specified socket ID including the sender if the sender has that same ID. For private messaging, this is less common because you typically want to avoid self-delivery.
Best practices for targeting:
Retrieve the recipient’s current socket ID from the userSockets map using the userId.
Call io.to(recipientSocketId).emit('privateMessage', data) to send the message only to that specific socket.
Send a separate confirmation event back to the sender using socket.emit('messageSent', data) to confirm delivery.
If the user has multiple open tabs (each with a different socket ID), iterate over all socket IDs associated with that userId and emit to each one.
By combining persistent user identifiers, a robust server-side event handler, and precise socket targeting, you create a reliable private messaging system that scales with your application’s user base.
8. Adding Chat Rooms and Group Conversations
Real-time chat applications often need more than a single global channel. Users expect to join topic-based rooms, create private groups, or collaborate within teams. Adding room functionality transforms a simple chat into a scalable, organized conversation platform. With Socket.io, rooms are built-in features that let you segment connections without managing complex data structures yourself. Each socket can join or leave any number of rooms, and messages broadcast only to the intended audience. This section covers the essential mechanics of room management: joining and leaving, scoped message delivery, and maintaining metadata about active rooms and their participants.
Implementing room join/leave functionality
The core of room management is the join and leave methods on each socket instance. When a client requests to enter a room, the server should validate the request, handle any authorization logic, and then call socket.join(roomName). Similarly, socket.leave(roomName) removes the socket from that room. It is critical to handle edge cases: a user trying to join a room that does not exist, a user already in a room, or a user leaving a room they never joined. The server should emit confirmation events back to the client, such as room_joined or room_left, including the room name and updated participant count. A typical server-side handler for joining looks like this:
Leaving follows the same pattern, but you must also clean up any client-side state when the user departs. Always ensure the server sends a leave confirmation so the client can update its UI.
Broadcasting messages to specific rooms only
Once sockets are organized into rooms, message broadcasting must be scoped. The key Socket.io methods for room-specific broadcasting are socket.to(roomName).emit() and io.to(roomName).emit(). The former sends to all other sockets in the room except the sender; the latter sends to every socket in the room including the sender. Choose based on your UX: for a chat message, you typically want io.to(roomName).emit('chat_message', data) so the sender also sees their own message echoed. For system notifications like “User has joined,” use socket.to(roomName).emit() to avoid notifying the joining user themselves. Below is a comparison of common broadcast patterns:
Method
Recipients
Use Case
io.to(room).emit()
All sockets in the room (including sender)
Chat messages, room announcements
socket.to(room).emit()
All sockets in the room except the sender
User join/leave notifications, typing indicators
socket.broadcast.to(room).emit()
Same as socket.to(room).emit()
Legacy alternative, functionally identical
Always validate that the socket is actually in the room before broadcasting. A malicious client could try to send messages to rooms it has not joined. Check membership using socket.rooms.has(roomName) and reject unauthorized emits.
Managing room metadata and user lists
Rooms are ephemeral on the server—Socket.io does not persist metadata beyond the current process. To display room names, topics, or participant lists, you must maintain your own data structure. A common approach is a Map where keys are room names and values are objects containing metadata such as createdBy, createdAt, topic, and a Set of usernames. When a user joins, add their username to the room’s set; when they leave, remove it. On disconnect, iterate all rooms the socket was in and clean up. Here is a minimal example of a room manager:
const rooms = new Map();
function createRoom(name, creator) {
rooms.set(name, { name, creator, topic: '', users: new Set() });
}
function addUserToRoom(roomName, username) {
const room = rooms.get(roomName);
if (room) {
room.users.add(username);
io.to(roomName).emit('room_users', { room: roomName, users: Array.from(room.users) });
}
}
function removeUserFromRoom(roomName, username) {
const room = rooms.get(roomName);
if (room) {
room.users.delete(username);
if (room.users.size === 0) {
rooms.delete(roomName); // optionally remove empty rooms
} else {
io.to(roomName).emit('room_users', { room: roomName, users: Array.from(room.users) });
}
}
}
Emit updated user lists to the room whenever membership changes so clients can render accurate participant counts and names. For large-scale applications, consider using a database or Redis to persist room metadata across server restarts and multiple instances.
9. Enhancing User Experience with Typing Indicators and Read Receipts
Real-time feedback features like typing indicators and read receipts transform a basic messaging interface into a responsive, conversational environment. These features provide immediate social cues that mimic face-to-face interaction, reducing ambiguity and making users feel more connected. In a Node.js and Socket.io chat application, implementing these enhancements requires careful event management to balance responsiveness with network efficiency.
Emitting ‘typing’ events to show who is typing
The core mechanism involves broadcasting a typing event from the client whenever a user starts typing, and a stop typing event when they pause or send a message. On the server, these events are relayed to all other participants in the same room, excluding the sender. The client-side listener updates the UI to display a message like “User X is typing…” and clears it after a short timeout.
Key implementation steps:
On the client: capture input or keypress events on the message input field.
Emit typing with the user’s ID and room name when typing starts.
Emit stop typing when the user blurs or clears the input.
On the server: listen for typing and broadcast to the room, excluding the sender socket.
On receiving clients: display a temporary typing indicator for the specific user.
Practical server-side code example for handling typing events:
Implementing read receipts or message delivery status
Read receipts add another layer of feedback by indicating when a recipient has seen a message. This feature requires tracking message delivery and read states across clients. A common approach uses a two-phase acknowledgment system: first, the server confirms message delivery to the sender, then the receiving client emits a read event when the message is visible in the viewport.
Implementation considerations:
Assign a unique ID to each message upon creation.
After the server broadcasts a message, emit a message delivered event back to the sender with the message ID and recipient count.
On the receiving client, use the Intersection Observer API to detect when a message element enters the viewport.
Emit a message read event with the message ID and the reading user’s ID.
The server updates a delivery status map and notifies the sender about read receipts.
For simplicity, you can also use a single “seen” timestamp per conversation, updated whenever any message is viewed, to avoid per-message complexity in smaller apps.
Debouncing typing events to avoid excessive network traffic
Without debouncing, every keystroke would fire a typing event, overwhelming the server and flooding the network. Debouncing groups rapid keystrokes into a single event, typically with a delay of 300–500 milliseconds. The client should also stop emitting after the user stops typing for a defined idle period.
Best practices for debouncing:
Aspect
Recommendation
Debounce delay
300ms (adjust based on app sensitivity)
Idle timeout
2–3 seconds of no input triggers stop typing
Implementation
Use setTimeout or a library like Lodash debounce
Edge case
Clear the timeout when the user sends a message
Example client-side debounce logic using vanilla JavaScript:
By combining these three techniques—targeted typing events, read receipts with viewport detection, and robust debouncing—you create a chat experience that feels responsive and polished without sacrificing performance. The key is to test network usage under real-world conditions and adjust debounce intervals to match your application’s typical message frequency.
10. Deployment Considerations and Next Steps
Deploying a real-time chat application requires careful planning to ensure reliability, performance, and maintainability. After building your app with Node.js and Socket.io, you must consider hosting environments, scaling strategies, and future enhancements to keep users engaged. This section outlines best practices for deployment and suggests improvements to elevate your application.
Hosting on platforms like Heroku, AWS, or DigitalOcean
Each hosting platform offers distinct advantages for Node.js applications. Heroku simplifies deployment with Git-based workflows and automatic scaling, but it may require a dedicated dyno for WebSocket support. AWS Elastic Beanstalk provides greater control over infrastructure, including EC2 instances and load balancers, while DigitalOcean offers affordable Droplets with customizable configurations. For Socket.io apps, ensure your chosen platform supports persistent connections and does not enforce HTTP request timeouts that could disconnect WebSockets. Key considerations include:
Environment variables: Store sensitive data like API keys and database URLs securely.
Process management: Use PM2 or Forever to keep your app running after crashes.
SSL/TLS certificates: Enable HTTPS via Let’s Encrypt or platform-provided certificates to secure WebSocket connections.
Monitoring: Integrate tools like New Relic or LogRocket to track performance and errors.
Handling scalability with load balancers and sticky sessions
As your user base grows, a single server may struggle to handle concurrent WebSocket connections. Load balancers distribute traffic across multiple instances, but Socket.io requires sticky sessions (session affinity) to route a user’s requests to the same server where their WebSocket connection was established. Without sticky sessions, messages may fail or be delivered to the wrong client. Implement scalability with:
Redis as an adapter: Use Socket.io’s Redis adapter to broadcast events across all server instances, eliminating the need for sticky sessions in many cases.
Horizontal scaling: Add more application servers behind a load balancer (e.g., Nginx, HAProxy, or AWS ALB) configured for sticky sessions.
Database connection pooling: Optimize database queries to avoid bottlenecks when multiple servers read and write simultaneously.
Scaling Strategy
Pros
Cons
Sticky sessions + load balancer
Simple to implement; no extra infrastructure
Uneven load distribution; server failure loses session data
Redis adapter with horizontal scaling
Resilient to server failures; even load distribution
Requires Redis setup; increased latency for cross-server events
Potential enhancements: file sharing, emoji support, message persistence with a database
To keep users engaged, consider adding features that extend basic chat functionality. File sharing allows users to exchange images, documents, or videos via drag-and-drop or file picker—integrate with cloud storage services like AWS S3 for scalability. Emoji support can be implemented with a picker library (e.g., Emoji Mart) and encoded as Unicode or custom shortcodes. Message persistence ensures chat history survives server restarts; store messages in a database like MongoDB or PostgreSQL, indexed by room and timestamp for efficient retrieval. Additional ideas include:
User authentication: Add OAuth (Google, GitHub) for secure login.
Typing indicators: Emit events when users start or stop typing.
Read receipts: Track message delivery and read status.
Moderation tools: Implement profanity filters or admin controls.
By addressing these deployment considerations and planning for enhancements, your chat app will be ready for production use and future growth.
Frequently Asked Questions
What is Socket.io and why is it used for real-time chat?
Socket.io is a JavaScript library that enables real-time, bidirectional, and event-based communication between web clients and servers. It uses WebSocket as the primary transport protocol but falls back to other methods like HTTP long-polling when WebSocket is not available. For real-time chat apps, Socket.io simplifies managing connections, broadcasting messages, and handling events like user join/leave. It provides built-in features such as rooms, namespaces, and automatic reconnection, making it ideal for building scalable and reliable chat applications.
Do I need prior experience with Node.js to build this chat app?
Basic familiarity with Node.js and JavaScript is helpful but not strictly required. This tutorial walks through each step, including setting up a Node.js project, installing dependencies, and writing server and client code. If you are new to Node.js, you may want to review concepts like npm, modules, and async programming. However, the guide is designed to be accessible to beginners who follow along carefully. Understanding HTML, CSS, and basic JavaScript will also help you customize the frontend.
How do I install Socket.io and set up the project?
To install Socket.io, first initialize a Node.js project with 'npm init -y'. Then install the required packages using 'npm install express socket.io'. Create a server file (e.g., server.js) and import Express and Socket.io. Set up an HTTP server with Express, then attach Socket.io to that server. On the client side, include the Socket.io CDN or install the client package. The official Socket.io documentation provides detailed setup instructions for both server and client.
Socket.io provides 'rooms' to group users. When a user joins a room, they can only receive messages broadcast to that room. You can create rooms based on chat topics, user IDs, or any criteria. Use 'socket.join(roomName)' on the server to add a user to a room. To send messages to a specific room, use 'io.to(roomName).emit('message', data)'. This allows you to manage multiple chat rooms efficiently. Additionally, you can track connected users with a simple object or database.
How can I deploy my real-time chat app?
Deploy the Node.js server to platforms like Heroku, DigitalOcean, AWS EC2, or Vercel. Ensure your deployment supports WebSocket connections. For Heroku, you may need to configure session affinity (sticky sessions) if using multiple dynos. Update the client-side Socket.io connection URL to point to your deployed server. Also, set environment variables for sensitive data like ports and API keys. Some platforms, like Vercel, may require serverless functions or additional configuration for WebSocket support.
What are the main differences between WebSocket and Socket.io?
WebSocket is a protocol that provides full-duplex communication over a single TCP connection. Socket.io is a library that uses WebSocket as its primary transport but adds features like automatic reconnection, fallback to HTTP long-polling, rooms, namespaces, and event-based messaging. Socket.io also handles cross-browser compatibility and provides a simpler API. While WebSocket gives more low-level control, Socket.io is easier to use for real-time applications, especially for beginners.
How do I ensure security in my chat app?
Security measures include using HTTPS/WSS to encrypt data, validating and sanitizing user input to prevent XSS attacks, authenticating users (e.g., with JWT or sessions) before allowing socket connections, and implementing rate limiting to prevent spam. Avoid emitting sensitive data to all clients. Use Socket.io middleware to check authentication. Also, set up proper CORS policies and keep dependencies updated to avoid vulnerabilities. Consider using a library like Helmet for Express security headers.
Can I add features like file sharing or video calling?
Yes, you can extend the chat app with file sharing using libraries like Multer for uploads and Socket.io for transfer progress. For video calling, integrate WebRTC with Socket.io for signaling. Socket.io can handle the exchange of SDP offers and ICE candidates between peers. You may also use third-party services like Twilio or Agora for easier implementation. Each feature requires additional backend logic and frontend components, but Socket.io's event system makes integration straightforward.
Introduction: The Shifting Threat Landscape for Node.js in 2026
Node.js continues to power a vast portion of modern web applications, from API gateways to real-time services. As the ecosystem matures, so too do the tactics of adversaries. In 2026, the threat landscape is defined by increased automation, supply chain exploitation, and the weaponization of asynchronous logic. Proactive security is no longer a feature—it is a prerequisite for maintaining trust, compliance, and operational continuity. This section outlines why Node.js remains a prime target, the key trends shaping application security this year, and the tangible costs of neglecting security practices.
Why Node.js Remains a Prime Target for Cyber Attacks
Node.js applications are attractive targets for several structural reasons. The event-driven, non-blocking architecture, while performant, can introduce subtle vulnerabilities when handling untrusted input. Additionally, the widespread use of open-source packages creates an expansive attack surface. Attackers exploit these factors through:
Prototype pollution: Manipulating shared object prototypes to alter application behavior without direct code injection.
Asynchronous race conditions: Exploiting gaps between I/O operations to corrupt state or bypass validation.
Dependency confusion: Publishing malicious packages with names matching internal modules, tricking package managers into fetching them.
Event listener leaks: Overloading or abusing unmanaged event emitters to cause denial of service or memory exhaustion.
These attack vectors are amplified by the sheer scale of Node.js deployments. According to recent ecosystem reports, the npm registry hosts over two million packages, with millions of weekly downloads. Each dependency chain introduces potential risk, making Node.js a high-value target for automated scanners and manual exploiters alike.
Key Trends in Application Security for 2026
Security practices evolve in response to emerging threats. In 2026, several trends define how teams approach Node.js application defense:
Trend
Impact on Node.js
Software Bill of Materials (SBOM) adoption
Mandatory for compliance; enables rapid vulnerability identification across dependency trees.
AI-assisted code analysis
Detects logic flaws and insecure patterns earlier in CI/CD pipelines, reducing manual review overhead.
Zero-trust runtime environments
Minimizes blast radius by enforcing least-privilege permissions for Node.js processes at the OS and container level.
Real-time dependency monitoring
Automatically blocks deployments if a newly published vulnerability is found in a direct or transitive dependency.
Secure by design frameworks
Frameworks now embed default protections against common Node.js flaws (e.g., automatic input sanitization).
These trends reflect a shift from reactive patching to preventive, automation-driven security. Organizations that integrate these practices into their development lifecycle reduce their exposure to both known and novel threats.
The consequences of inadequate security extend beyond immediate technical damage. Financial, reputational, and legal costs compound rapidly. Consider the following outcomes:
Data breaches: Exposure of user credentials, personal data, or proprietary business logic leads to regulatory fines (e.g., GDPR, CCPA) and mandatory disclosure costs.
Downtime and recovery: A successful denial-of-service or ransomware attack can halt critical services for days, with recovery expenses exceeding six figures for mid-sized applications.
Loss of customer trust: Post-breach churn rates often spike by 20–40%, directly impacting recurring revenue.
Supply chain liability: If a compromised dependency originates from your application, you may face legal action from downstream consumers.
Engineering overhead: Retroactively fixing security debt consumes 3–5 times more developer hours than implementing protections during initial development.
In 2026, the cost of neglect is not abstract. Automated vulnerability scanners and public exploit databases mean that unpatched applications are often compromised within hours of a disclosure. Investing in proactive security—through tooling, training, and architectural choices—directly reduces these risks and ensures that Node.js applications remain resilient in a rapidly evolving threat environment.
1. Secure Dependency Management with Modern Tooling
Modern Node.js applications rely on a vast ecosystem of third-party packages. Each dependency introduces potential risk, from malicious code injection to unpatched vulnerabilities. Effective security in 2026 demands a proactive, tool-driven approach to dependency management that moves beyond simple updates. This section covers the essential practices for vetting, monitoring, and remediating dependencies using advanced static analysis and automated workflows.
Using SBOMs and Supply Chain Levels for Software Artifacts (SLSA)
A Software Bill of Materials (SBOM) provides a machine-readable inventory of all components in your application, including transitive dependencies. Generating an SBOM is now a baseline security practice. Tools like cyclonedx-bom or spdx-sbom-generator can produce these documents. The SBOM enables rapid vulnerability triage when a new CVE is disclosed.
Supply Chain Levels for Software Artifacts (SLSA) is a security framework that provides a graduated set of standards for build integrity. Aim for SLSA Level 2 or higher for critical dependencies. This requires:
Automated Vulnerability Scanning with npm audit and Snyk
Automated scanning is non-negotiable. The built-in npm audit command checks your dependency tree against a known vulnerability database. However, for comprehensive coverage, integrate a dedicated tool like Snyk. Snyk provides advanced static analysis that identifies vulnerabilities in both direct and transitive dependencies, including those in development containers and CI/CD pipelines.
Key differences between tools:
Tool
Scope
Remediation
Integration
npm audit
Basic vulnerability scan
Manual or npm audit fix
CLI, limited CI
Snyk
Deep static analysis, open source and license issues
Automated PR creation, fix advice
CI/CD, IDE, CLI
Run npm audit in your CI pipeline to fail builds on high-severity vulnerabilities. For Snyk, use the following command to test your project:
npx snyk test --all-projects --severity-threshold=high
Enforcing Package Integrity via Lockfiles and Signatures
Lockfiles (e.g., package-lock.json) ensure deterministic installs by pinning exact versions and integrity hashes. Always commit lockfiles to version control. In 2026, integrity verification extends to package signatures. npm supports package signing via the --sign-git-commit flag and verification with npm audit signatures.
To enforce signature verification for all installed packages, configure your .npmrc file:
sign-git-commit=true
audit-signatures=true
Additionally, use npm install --ignore-scripts during CI to prevent malicious install scripts from executing. Combine this with a policy that restricts package publishing to verified publishers only. Regularly audit your lockfile for unexpected changes using tools like lockfile-lint.
By combining SBOMs, SLSA compliance, automated scanning, and lockfile integrity, you create a defense-in-depth strategy for Node.js dependency management that is both practical and resilient against emerging threats.
2. Hardening the Runtime Environment
Hardening the Node.js runtime environment is a critical layer in a defense-in-depth strategy. By configuring runtime flags, enforcing process isolation, and setting resource limits, you can significantly reduce the attack surface that malicious actors can exploit. This section provides actionable steps for 2026, focusing on the latest tools and techniques.
Leveraging –experimental-vm-modules for Safer Code Execution
The --experimental-vm-modules flag, while still experimental in many production environments, enables the use of the vm.Module API. This allows you to execute untrusted code within a sandboxed context, isolating it from the main application’s global scope and preventing direct access to system resources. Unlike the older vm.Script or eval(), vm.Module provides a more secure module system that respects import/export boundaries and can be combined with the --experimental-vm-modules flag to limit the damage from code injection attacks. For example, you can create a sandbox that only exposes a limited set of APIs to user-submitted scripts, such as mathematical functions or data transformation utilities, without granting access to fs, child_process, or the network stack. However, always pair this with other isolation techniques, as the VM sandbox is not a complete security boundary—it does not prevent denial-of-service attacks or resource exhaustion.
Restricting Process Capabilities with seccomp and AppArmor
Operating system-level security modules like seccomp (secure computing mode) and AppArmor (Application Armor) provide powerful mechanisms to restrict what system calls and file system operations a Node.js process can perform. Seccomp allows you to define a whitelist of allowed syscalls (e.g., read, write, exit) and block all others, effectively preventing an attacker from using exploits that rely on uncommon or dangerous syscalls like ptrace or execve. AppArmor, on the other hand, enforces mandatory access control (MAC) on file paths, network sockets, and capabilities. For a Node.js application, you can create an AppArmor profile that restricts write access to specific directories (e.g., /var/log/app, /tmp/uploads) and denies access to sensitive paths like /etc/shadow or /proc files. Combining both tools—seccomp for syscall filtering and AppArmor for file system confinement—offers a layered defense that is difficult for attackers to bypass.
Setting Memory and CPU Limits with Container Orchestration
Container orchestration platforms like Kubernetes and Docker Compose allow you to set hard limits on memory and CPU usage per container, preventing a single compromised Node.js process from consuming all host resources. This is essential for mitigating resource exhaustion attacks, such as those that spawn infinite loops or allocate large buffers. The following table compares common resource limit configurations:
Platform
Memory Limit Setting
CPU Limit Setting
Key Behavior
Kubernetes
resources.limits.memory (e.g., 512Mi)
resources.limits.cpu (e.g., 1 core)
Hard limit; process is OOM-killed if exceeded; CPU is throttled to limit.
Docker
--memory (e.g., 512m)
--cpus (e.g., 1.0)
Hard limit; container is killed if memory exceeded; CPU shares are used.
In addition to container limits, you should also configure Node.js-specific flags like --max-old-space-size to restrict the V8 heap size, and use --max-semi-space-size for garbage collection tuning. For example, in a Kubernetes deployment, you might set --max-old-space-size=384 to leave headroom for the operating system and other processes. Always ensure that the sum of all container limits does not exceed the node’s total capacity to avoid resource starvation.
To further harden the runtime, consider using a minimalist base image (e.g., node:20-slim or node:20-alpine) that removes unnecessary tools like curl, bash, or package managers. This reduces the attack surface by eliminating utilities that attackers could leverage for lateral movement or data exfiltration. Finally, run the Node.js process as a non-root user (e.g., USER node in the Dockerfile) to prevent privilege escalation if the container is compromised.
3. Input Validation and Output Encoding Best Practices
Injection attacks remain one of the most prevalent threats to Node.js applications in 2026, exploiting unchecked user input to manipulate databases, execute shell commands, or inject malicious scripts. Rigorous input validation, coupled with context-aware output encoding, forms the first line of defense. By treating all external data as untrusted—whether from HTTP requests, file uploads, or third-party APIs—developers can prevent attackers from injecting harmful payloads. The following best practices provide a layered approach to sanitization and encoding, reducing the attack surface across your application stack.
Using Schema-Based Validation Libraries (e.g., Joi, Zod)
Schema-based validation libraries enforce strict data structures and types before processing user input. In 2026, Zod has become the preferred choice for TypeScript-heavy projects due to its inferable types and runtime safety, while Joi remains popular for plain JavaScript environments. These libraries allow you to define schemas that specify allowed fields, data types, length limits, and custom regex patterns, rejecting any malformed or unexpected input early in the request lifecycle. For example, a login endpoint should validate that the email field matches a standard email pattern and that the password is a string within a certain length range. Always validate on the server side, never relying solely on client-side checks, as they can be bypassed. Combine schema validation with a whitelist approach—reject anything not explicitly allowed—rather than attempting to blacklist dangerous characters. This practice prevents injection of SQL fragments, NoSQL operators, or JavaScript code through form fields, query parameters, or JSON payloads.
Escaping Output for HTML, SQL, and Shell Commands
Output encoding transforms data before it is rendered in a different context, neutralizing embedded scripts or commands. For HTML contexts, always escape characters like <, >, &, and " using libraries such as escape-html or built-in template engine features (e.g., EJS’s auto-escaping). For SQL queries, never concatenate user input directly; instead, use parameterized queries or prepared statements with drivers like pg or mysql2. For shell commands, avoid child_process.exec with user input; prefer child_process.spawn with arguments passed as an array, which prevents command injection. Below is a practical example demonstrating safe shell command execution:
Content Security Policy headers provide a browser-enforced mechanism to prevent cross-site scripting (XSS) and data injection attacks by restricting the sources from which content can be loaded. In a Node.js application using Express, you can set CSP headers via middleware like helmet. A typical policy might restrict scripts to same-origin sources only, block inline event handlers, and disable dangerous features like eval(). Key directives to include are:
object-src: Set to ‘none’ to block plugin-based attacks.
style-src: Restrict stylesheet origins and disallow inline styles.
report-uri: Send violation reports to a logging endpoint for monitoring.
Regularly audit your CSP configuration using browser developer tools or automated scanners to ensure it blocks malicious payloads without breaking legitimate functionality. Combining CSP with input validation and output encoding creates a robust defense-in-depth strategy against injection attacks in 2026.
4. Authentication and Authorization in 2026
As Node.js applications scale to serve millions of users, authentication and authorization remain the bedrock of secure access control. In 2026, the landscape demands modern flows that resist token theft, session hijacking, and privilege escalation. This section covers three critical practices: adopting OAuth 2.1 and OpenID Connect, securing JWTs with short-lived tokens and rotation, and implementing fine-grained permissions using policy engines.
Adopting OAuth 2.1 and OpenID Connect Standards
OAuth 2.1 consolidates and strengthens previous OAuth 2.0 best practices, removing implicit grant and simplifying flows. Combined with OpenID Connect (OIDC) for identity verification, this standard provides a robust framework for Node.js APIs. Key benefits include:
Elimination of implicit flow — reduces token leakage via browser redirects.
PKCE (Proof Key for Code Exchange) — mandatory for all public clients, preventing authorization code interception.
Strict redirect URI validation — mitigates open redirector attacks.
OIDC scope claims — enables standardized user identity (e.g., sub, email, profile) without custom endpoints.
Implement OAuth 2.1 in Node.js using libraries like openid-client or passport with OIDC strategy. Configure your authorization server (e.g., Auth0, Keycloak, or a custom provider) to issue access tokens only via authorization code with PKCE. For server-to-server communication, use the client credentials grant with scoped tokens. Always validate tokens at the resource server using token introspection or JWT verification with a public key.
Securing JWTs with Short Expiry and Refresh Token Rotation
JWTs (JSON Web Tokens) are ubiquitous in Node.js APIs, but their stateless nature makes them vulnerable if stolen. Mitigate risks with these practices:
Short access token expiry — set to 5–15 minutes. Use exp claim and reject tokens beyond this window.
Refresh token rotation — issue a new refresh token with each use, invalidating the previous one. This limits the window of a stolen refresh token.
Token binding (DPoP) — bind tokens to a client’s public key using Demonstrating Proof of Possession (DPoP) to prevent replay attacks.
Secure storage — store refresh tokens in HTTP-only, Secure, SameSite cookies; never in localStorage.
Implement rotation logic in your token endpoint: when a refresh token is presented, verify its validity, issue a new access token and a new refresh token, then revoke the old refresh token in your database or Redis store. This ensures that even if a refresh token is compromised, it becomes useless after one use.
Implementing Fine-Grained Permissions with Policy Engines
Role-based access control (RBAC) often falls short for complex applications requiring per-resource or per-action permissions. Policy engines like Casbin, OPA (Open Policy Agent), or custom attribute-based access control (ABAC) provide granular control. Benefits include:
Externalized policies — decouple authorization logic from application code, enabling updates without redeployment.
Context-aware decisions — evaluate user attributes (e.g., department), resource type, action, and environmental factors (e.g., time of day).
Audit trails — log every authorization decision for compliance.
Integrate a policy engine in Node.js middleware. For example, using Casbin with a model file defining rules:
Use enforcers like casbin.enforce(sub, obj, act) to check access per request.
Store policies in a database or YAML file, reloaded at runtime.
For maximum security, combine policy engines with JWT claims: include user roles or permissions in the token, then verify against the policy engine for each protected endpoint. This layered approach prevents unauthorized access even if token claims are manipulated.
5. Protecting Sensitive Data at Rest and in Transit
In 2026, the perimeter of a Node.js application extends far beyond the server. Sensitive data flows through microservices, third-party APIs, and client-side connections, while resting in databases, logs, and configuration files. Without layered protection, a single exposed secret or unencrypted payload can lead to catastrophic breaches. The following practices ensure that data remains confidential and tamper-proof throughout its lifecycle.
Using Environment Variables and Vault Solutions (e.g., HashiCorp Vault)
Hard-coded secrets in source code or configuration files are a leading cause of data leaks. Environment variables offer a basic layer of separation, but they often leak through error messages, process listings, or CI/CD logs. For production-grade security, adopt a vault solution that centralizes secret storage, rotates keys automatically, and provides audit trails.
HashiCorp Vault remains the industry standard in 2026, with enhanced support for dynamic secrets and Kubernetes-native integrations. When using Vault with Node.js, authenticate via short-lived tokens or Kubernetes service accounts, and retrieve secrets at runtime rather than at startup. Example using the official Vault API:
import vault from 'node-vault';
const client = vault({
apiVersion: 'v1',
endpoint: process.env.VAULT_ADDR,
token: process.env.VAULT_TOKEN // short-lived token from sidecar
});
async function getDbCredentials() {
const result = await client.read('secret/data/db');
return result.data.data;
}
Combine Vault with environment variables only for non-sensitive metadata (e.g., VAULT_ADDR). Never store database passwords, API keys, or encryption keys in environment variables. For smaller deployments, consider managed services like AWS Secrets Manager or Azure Key Vault, which offer similar rotation and access control features.
Enforcing TLS 1.3 and Certificate Pinning
Transport Layer Security (TLS) protects data in transit, but outdated protocols leave room for downgrade attacks and protocol vulnerabilities. In 2026, TLS 1.3 is mandatory for all Node.js services, offering reduced handshake latency and forward secrecy. Disable TLS 1.2 and older versions in your Node.js HTTPS server configuration:
Certificate pinning adds an extra layer by ensuring your application only trusts specific certificates or public keys, preventing man-in-the-middle attacks even if a Certificate Authority is compromised. Implement pinning using the http-evas library or by embedding SHA-256 fingerprints of the server’s public key in your client code. For internal microservices, use mutual TLS (mTLS) with short-lived certificates to authenticate both sides of the connection.
Database Encryption with Field-Level and Transparent Approaches
Databases are the ultimate target for attackers. Transparent Data Encryption (TDE) protects data at the storage level, but it does not protect against compromised database administrators or application-level leaks. Field-level encryption ensures that even if the database is breached, sensitive fields such as Social Security numbers, payment details, or health records remain unreadable.
Implement field-level encryption in Node.js using the built-in crypto module or a library like cryptr. Use authenticated encryption (AES-256-GCM) to prevent tampering. Example of encrypting a user’s email before storing it:
For TDE, enable it at the database level (e.g., MongoDB Atlas encryption at rest, PostgreSQL with pg_crypto or cloud-managed keys). Use a hybrid approach: TDE for bulk storage protection and field-level encryption for high-sensitivity columns. Store encryption keys in a vault, not in the application code. Rotate keys periodically and avoid reusing the same key across environments.
Building a security observability pipeline for Node.js services requires a deliberate balance between depth of insight and protection of sensitive data. Logs are a primary target for attackers seeking credentials, tokens, or personally identifiable information (PII). A robust pipeline ensures that every event is traceable, anomalies are detected in near real-time, and the team can respond with a repeatable playbook—all without leaking secrets into log streams or dashboards.
Structured Logging with Correlation IDs for Traceability
Structured logging replaces free-form text with key-value pairs, enabling automated parsing and filtering. Each log entry must include a correlation ID (a unique identifier propagated across microservices and requests) to stitch together a user’s journey or an attack chain. Use a library like pino or winston with a transport that redacts sensitive fields automatically.
Never log: Raw request bodies, headers, or query strings without explicit filtering.
Implement a middleware in Express or Fastify that attaches a correlation ID to every incoming request and passes it to downstream services via HTTP headers (e.g., x-correlation-id). This allows you to trace a security incident from the edge to the database, even across asynchronous event queues.
OpenTelemetry (OTel) provides a vendor-agnostic framework for collecting traces, metrics, and logs. For Node.js security monitoring, OTel’s auto-instrumentation captures HTTP requests, database calls, and gRPC interactions without modifying application code. Combine this with a backend like Jaeger or Grafana Tempo to detect anomalies in real time.
Anomaly Signal
OTel Metric/Trace
Example Threshold
Sudden spike in 4xx errors
http.server.duration + error count
>50% increase in 5 minutes
Unusual parameter tampering
Trace attributes (e.g., http.target)
Repeated requests with ../ patterns
Slow database queries after login
db.client.duration + db.statement
P99 latency jumps by 300ms
Excessive authentication attempts
Span count per enduser.id
>10 failures in 60 seconds
Configure OTel’s BatchSpanProcessor to export traces to a security information and event management (SIEM) system. Use attribute-based sampling to retain 100% of traces tagged with error=true or http.status_code >= 500, while reducing overhead for normal traffic.
Playbook-Driven Incident Response for Node.js Services
When an anomaly triggers an alert, a predefined playbook reduces mean time to response (MTTR) and prevents ad-hoc decisions. Each playbook should be version-controlled and tested in a staging environment. For Node.js services, include the following steps:
Containment: Immediately revoke the compromised API key or token using your secret manager (e.g., HashiCorp Vault, AWS Secrets Manager). If the service is stateless, scale down the affected pod or instance.
Investigation: Query the structured logs by correlationId and the OTel trace ID. Look for the first occurrence of the attack pattern—often a single request with a malicious payload.
Eradication: Patch the Node.js dependency or code path. If the vulnerability is in a third-party package, roll back to a known safe version and run npm audit or yarn audit to verify.
Recovery: Restore the service from a clean image, rotate all secrets, and re-enable traffic gradually while monitoring for recurrence.
Post-mortem: Update the playbook with new indicators of compromise (IoCs) and share the findings with the team without exposing raw log data.
Automate the first step with a webhook from your monitoring tool (e.g., PagerDuty, Opsgenie) to a serverless function that invalidates tokens. Document the entire process in a runbook accessible from your incident management platform.
7. Secure Communication Between Microservices
As distributed Node.js architectures grow in complexity, securing inter-service communication becomes paramount. Without proper safeguards, a compromised microservice can expose the entire system to data breaches, replay attacks, and unauthorized lateral movement. In 2026, organizations must implement layered protections that ensure both the integrity and confidentiality of every service-to-service call.
Mutual TLS (mTLS) for Service Mesh Integration
Mutual TLS provides the strongest foundation for microservice authentication and encryption. Unlike one-way TLS where only the client verifies the server, mTLS requires both sides to present valid X.509 certificates, establishing bidirectional trust. In Node.js environments, mTLS is typically implemented through a service mesh layer (e.g., Istio, Linkerd, or Consul Connect) rather than within application code. This approach offloads certificate management, rotation, and validation to the mesh sidecar proxies, which handle TLS termination transparently. Key practices include:
Automating certificate issuance and renewal using tools like cert-manager or SPIFFE-based identity systems.
Enforcing short-lived certificates (e.g., 24-hour validity) to limit blast radius from compromised credentials.
Configuring strict TLS version and cipher suite policies—rejecting TLS 1.2 and below, and allowing only AEAD ciphers (e.g., TLS_AES_128_GCM_SHA256).
Integrating mTLS with service mesh authorization policies (e.g., Istio AuthorizationPolicy) to deny all traffic not presenting a valid, authorized certificate.
For Node.js applications not using a service mesh, the built-in tls module or frameworks like Fastify can implement mTLS directly, but this adds operational overhead for certificate management. Service mesh integration remains the recommended approach for production systems.
API Gateway Rate Limiting and Threat Protection
An API gateway acts as the first line of defense for microservice communication, enforcing rate limits and blocking malicious traffic before it reaches backend services. In 2026, Node.js gateways (e.g., Express Gateway, Kong, or custom solutions) should implement the following security measures:
Per-service rate limiting: Apply distinct limits based on service criticality and expected load, using sliding window algorithms to prevent burst attacks.
Threat detection: Integrate Web Application Firewall (WAF) rules and anomaly detection (e.g., abnormal payload sizes, SQL injection patterns) at the gateway layer.
IP reputation filtering: Block traffic from known malicious sources using real-time threat intelligence feeds.
Request validation: Enforce schema validation (e.g., JSON Schema or OpenAPI validation) to reject malformed or oversized requests.
A comparison of service mesh vs. API gateway approaches for securing internal microservice traffic highlights their complementary roles:
High (sidecar injection, certificate lifecycle management)
Moderate (gateway configuration and scaling)
Message Queue Security with End-to-End Encryption
Asynchronous communication via message queues (e.g., RabbitMQ, Apache Kafka, or NATS) introduces unique security challenges. Messages may traverse multiple brokers and be consumed by different services, making end-to-end encryption essential. For Node.js microservices in 2026, best practices include:
Encrypting message payloads at the application layer using symmetric encryption (e.g., AES-256-GCM) with per-queue or per-topic keys, ensuring that brokers cannot read sensitive data.
Authenticating producers and consumers with client certificates or SASL/SCRAM mechanisms, preventing unauthorized publishing or subscription.
Enforcing message integrity via HMAC signatures or digital signatures attached to each message, allowing consumers to verify that payloads have not been tampered with in transit.
Auditing message access by logging all produce and consume operations, with alerts for anomalous patterns (e.g., a consumer suddenly reading from a queue it never accessed before).
By combining mTLS for synchronous calls, API gateway protections for external-facing endpoints, and end-to-end encryption for message queues, Node.js microservices can achieve defense-in-depth for all communication channels.
8. Secure Coding Patterns and Anti-Patterns
Node.js applications are particularly susceptible to certain classes of vulnerabilities that stem from JavaScript’s dynamic nature and the asynchronous execution model. By 2026, the most common attack vectors include prototype pollution, unsafe deserialization, and the misuse of dynamic code execution functions. Adopting secure coding patterns—while consciously avoiding their anti-pattern counterparts—is essential for maintaining a robust security posture. Below are three critical areas every Node.js developer must address.
Mitigating Prototype Pollution via Object.freeze and Maps
Prototype pollution occurs when an attacker manipulates __proto__, constructor.prototype, or similar properties to inject properties into the base Object.prototype. This can lead to unexpected behavior, denial of service, or remote code execution. To mitigate this risk:
Use Object.freeze() on critical objects: Freezing the global Object.prototype prevents any modifications to it. Apply this early in your application’s bootstrap process.
Prefer Map objects over plain objects for key-value storage: Maps are immune to prototype pollution because they do not inherit from Object.prototype. Use them for dictionaries, caches, and configuration stores.
Validate and sanitize user input: Never trust nested keys from JSON payloads. Use libraries like lodash.set with caution, or better, implement a safe setter that rejects keys containing __proto__, prototype, or constructor.
// Example: Freezing Object.prototype early in application startup
Object.freeze(Object.prototype);
// Using Map instead of a plain object for user roles
const userRoles = new Map();
userRoles.set('admin', { permissions: ['read', 'write', 'delete'] });
// This Map is immune to prototype pollution attacks.
Avoiding Unsafe Deserialization and eval()
Unsafe deserialization—using JSON.parse() on untrusted data is generally safe, but using eval(), new Function(), or require() with dynamic strings opens the door to code injection. Similarly, deserialization libraries like node-serialize or bson can execute arbitrary code if not carefully controlled. To avoid these vulnerabilities:
Never use eval() or new Function() to parse or execute user-supplied strings. There is almost always a safer alternative (e.g., JSON.parse for data, or a sandboxed expression parser for math).
Avoid dynamic require(): Loading modules based on user input (e.g., require(`./routes/${userInput}`)) can lead to path traversal and code execution. Use a whitelist or a static mapping instead.
Use safe deserialization libraries: If you must deserialize complex objects, prefer libraries that validate schemas (e.g., ajv with JSON Schema) or use structured cloning (e.g., structuredClone in Node.js 17+).
Using Static Analysis Tools (ESLint Security Plugins, SonarQube)
Static analysis tools catch security anti-patterns before they reach production. By 2026, integrating these into your CI/CD pipeline is a baseline expectation. Key tools and configurations include:
Tool
Purpose
Recommended Configuration
ESLint with eslint-plugin-security
Detects unsafe patterns like eval(), new Function(), and regex DoS
By combining these secure coding patterns with automated static analysis, you can eliminate entire classes of vulnerabilities and build Node.js applications that are resilient against the most common attack vectors of 2026.
9. Compliance and Auditing for Node.js Applications
Aligning security practices with regulatory frameworks such as GDPR, SOC 2, and PCI DSS requires a structured approach to compliance and auditing. While this section provides technical guidance, it does not constitute legal advice. Organizations should consult qualified legal counsel to interpret requirements specific to their jurisdiction and industry. For Node.js applications, compliance hinges on automated policy enforcement, comprehensive logging, and independent verification of security controls.
Automated Compliance Checks with Open Policy Agent (OPA)
Open Policy Agent (OPA) enables declarative policy enforcement across Node.js microservices, infrastructure, and CI/CD pipelines. By decoupling policy from application code, OPA ensures consistent compliance checks without modifying business logic. Use OPA to enforce rules such as:
API endpoints must require authentication via JWT or OAuth 2.0.
Data responses must never include sensitive fields like password, ssn, or creditCardNumber.
Environment variables must be validated against allowed patterns (e.g., NODE_ENV must be production in deployed environments).
Outbound requests to external services must use TLS 1.2 or higher.
Integrate OPA with Node.js using the @open-policy-agent/opa-wasm library or by deploying OPA as a sidecar container. Example policy snippet (Rego language):
Run OPA checks in your CI/CD pipeline (e.g., GitHub Actions) to reject deployments that violate compliance rules. Schedule periodic compliance scans against running applications using OPA’s REST API.
Maintaining Audit Trails for User Actions and System Events
Audit trails are mandatory under GDPR (Article 30), SOC 2 (CC6.1), and PCI DSS (Requirement 10). For Node.js applications, implement structured logging that captures:
Use a structured logging library like pino or winston with JSON output. Store logs in a tamper-evident, append-only system such as AWS CloudTrail, Azure Monitor, or a dedicated SIEM (e.g., Splunk). Retain logs per regulatory requirements—typically 12 months for SOC 2, 3 years for PCI DSS, and indefinitely for GDPR under certain conditions. Implement log rotation and encryption at rest. For sensitive data, redact fields like creditCardNumber before logging using a middleware function.
Preparing for Third-Party Penetration Testing
Third-party penetration testing validates that your Node.js application meets compliance requirements. To prepare effectively:
Scope definition: Provide testers with a detailed application map, including API endpoints, authentication flows, and third-party integrations. Exclude non-production systems unless explicitly agreed.
Environment setup: Deploy a staging environment that mirrors production configuration (same Node.js version, dependencies, and database schemas). Ensure test data is synthetic and contains no real PII or cardholder data.
Documentation: Share architecture diagrams, data flow diagrams, and threat models (e.g., STRIDE per component). Include a list of known dependencies and their versions (from package-lock.json).
Access controls: Grant testers a dedicated test user account with role-based permissions. Do not provide production credentials. Use time-limited API keys or OAuth tokens.
Remediation plan: Establish a severity-based SLA for fixing findings (e.g., critical vulnerabilities within 48 hours, high within 7 days). After remediation, schedule a re-test to close the gap.
Penetration testing frequency should align with compliance mandates: annually for SOC 2, quarterly for PCI DSS, and after significant changes (e.g., major Node.js version upgrade). Maintain signed reports and remediation evidence for auditors.
What is the most critical Node.js security practice for 2026?
The most critical practice is maintaining an up-to-date dependency tree through regular audits and automated tools like npm audit or Snyk. Vulnerabilities in third-party packages are a leading cause of breaches. In 2026, with increasing supply chain attacks, using lockfiles, verifying package integrity, and monitoring for known CVEs are essential. Automating updates with tools like Dependabot and integrating security scanning into CI/CD pipelines helps catch issues early. This foundational step reduces risk significantly.
How can I protect against injection attacks in Node.js?
Prevent injection attacks by validating and sanitizing all user inputs. Use parameterized queries for databases (e.g., with prepared statements in PostgreSQL or MongoDB’s built-in sanitization). Avoid constructing SQL or NoSQL queries with string concatenation. For command injection, avoid child_process.exec with user input; use execFile or spawn with arguments. Libraries like validator.js can check data types and patterns. Additionally, set Content Security Policy (CSP) headers to mitigate XSS. Always treat input as untrusted.
What is Helmet.js and why should I use it?
Helmet.js is a middleware for Express apps that sets various HTTP security headers to protect against common web vulnerabilities. It helps prevent clickjacking (X-Frame-Options), MIME-type sniffing (X-Content-Type-Options), and cross-site scripting (X-XSS-Protection and CSP). In 2026, Helmet remains a quick, effective way to harden HTTP responses. It’s easy to configure and integrates seamlessly. While not a complete security solution, it’s a standard first step for any Node.js web application.
How should I handle authentication securely in Node.js?
Use strong, hashed passwords with bcrypt (cost factor 12+) or Argon2. Implement session management with secure, HTTP-only cookies and consider using JSON Web Tokens (JWT) with short expiration and refresh tokens. Store secrets in environment variables or a vault, never in code. Use HTTPS everywhere. In 2026, multi-factor authentication (MFA) is recommended. Libraries like Passport.js provide robust authentication strategies. Always validate tokens and sessions on the server side to prevent replay attacks.
What is the best way to manage secrets in Node.js applications?
Never hardcode secrets like API keys or database passwords. Use environment variables (process.env) with a .env file for development, but never commit it to version control. For production, use secret management services like AWS Secrets Manager, HashiCorp Vault, or Azure Key Vault. In 2026, consider using tools like Doppler or CyberArk for centralized secrets management. Encrypt secrets at rest and in transit. Regularly rotate credentials and audit access logs.
How can I prevent denial-of-service (DoS) attacks on my Node.js app?
Implement rate limiting with middleware like express-rate-limit to restrict requests per IP. Set request size limits (body-parser limit option). Use a reverse proxy like Nginx for load balancing and to handle slowloris attacks. In 2026, consider using Web Application Firewalls (WAF) like Cloudflare or AWS WAF. Keep dependencies updated to avoid DoS vulnerabilities. Monitor traffic with tools like PM2 or Prometheus to detect anomalies. Also, use timeouts for database queries and external calls.
What are the best practices for logging and monitoring security events?
Log security-relevant events (authentication failures, access control errors, input validation failures) but avoid logging sensitive data like passwords or tokens. Use structured logging with libraries like Winston or Pino. In 2026, centralize logs with tools like ELK Stack, Splunk, or Datadog. Implement real-time alerting for suspicious activities (e.g., multiple failed logins). Ensure log integrity by writing to append-only storage. Regularly review logs and set up automated threat detection using SIEM systems.
Should I use a linter or static analysis for Node.js security?
Yes, absolutely. Tools like ESLint with security plugins (eslint-plugin-security) can catch common vulnerabilities such as eval usage or regex DoS. Static analysis tools like SonarQube or Snyk Code analyze code for security flaws. In 2026, integrating these into CI/CD pipelines is standard. They help detect issues early, reducing remediation costs. While not a replacement for manual review, they provide automated guardrails. Combine with dynamic analysis (DAST) for comprehensive coverage.
MongoDB Indexing: How to Optimize Query Performance
Introduction to MongoDB Indexing and Query Performance
In MongoDB, indexing is the primary mechanism for achieving fast query execution at scale. Without indexes, MongoDB must perform a collection scan, examining every document in a collection to find matching results. As collections grow into millions or billions of documents, collection scans become prohibitively slow, degrading application responsiveness and increasing server load. Indexes provide a structured, efficient path to the data, enabling MongoDB to locate documents with minimal disk I/O and CPU time. This section introduces the foundational concepts of indexing in MongoDB, explaining what indexes are, how they accelerate queries, and the most common index types you will use in production systems.
An index in MongoDB is a specialized data structure that stores a small subset of the collection’s data in an ordered, easily traversable format. Specifically, MongoDB indexes are built on B-tree (balanced tree) structures, which maintain sorted order and support logarithmic-time search, insertion, and deletion operations. Each index entry contains the value of the indexed field(s) and a pointer (the document’s location in the collection). When a query uses an index, MongoDB navigates the B-tree to quickly locate the relevant entries, then retrieves the full documents using those pointers. This is fundamentally different from scanning every document: a B-tree index on a field like userId can find a specific value among millions in microseconds, whereas a full scan would require reading every document sequentially.
Indexes are stored separately from the collection data and are maintained automatically by MongoDB on write operations. By default, MongoDB creates a unique index on the _id field for every collection. You can create additional indexes using the createIndex() method or through the MongoDB driver. However, indexes consume disk space and memory (especially when cached in RAM), and they add overhead to write operations because the index must be updated with each insert, update, or delete. Therefore, careful planning is required to balance query performance gains against write performance and storage costs.
How Indexes Accelerate Query Performance
Indexes accelerate query performance in several key ways:
Reduced document scanning: Instead of reading every document in the collection, MongoDB uses the index to directly locate only the documents that match the query predicate. For equality matches, this can reduce the search space from millions to a handful of index entries.
Efficient sorting: If a query requests sorted results (e.g., .sort({date: -1})), and an index exists on that field in the same order, MongoDB can return results directly from the index without performing an in-memory sort. This is often a dramatic performance improvement.
Covered queries: When all fields required by a query are present in the index itself, MongoDB can return results entirely from the index without fetching the actual documents. This is called a covered query and eliminates disk reads entirely.
Index intersection: MongoDB can combine multiple indexes to satisfy complex query filters, though compound indexes are generally more efficient.
The following table summarizes the performance characteristics of indexed versus unindexed queries:
Query Type
Without Index (Collection Scan)
With Index
Equality match on 10M documents
~10M document reads
~1–10 index reads + 1 document read
Range query on 10M documents
~10M document reads
~log₂(10M) ≈ 24 index reads + matching document reads
Sort by indexed field
Full collection scan + in-memory sort (O(n log n))
Index traversal in order (O(log n + k))
Common Index Types: Single Field, Compound, and Multikey
MongoDB offers several index types to address different query patterns. The three most fundamental are single field, compound, and multikey indexes.
Single field indexes are the simplest: they index a single field in ascending (1) or descending (-1) order. They are ideal for equality queries, range queries, and sort operations on that field. For example, db.users.createIndex({email: 1}) creates an ascending index on the email field, enabling fast lookups by email address.
Compound indexes index multiple fields within a single index structure. The order of fields in the index definition is crucial: MongoDB uses a prefix-based strategy, meaning the index can support queries on the first field, the first two fields, and so on. For instance, db.orders.createIndex({status: 1, createdAt: -1}) efficiently serves queries filtering by status alone, or by both status and createdAt sorted in descending order. Compound indexes are powerful for multi-field query filters and for covering queries completely.
Multikey indexes are used when the indexed field contains an array. MongoDB automatically creates a multikey index when you index an array field, storing separate index entries for each element in the array. This allows efficient queries that match any element of the array. For example, db.articles.createIndex({tags: 1}) on a tags array field enables fast lookups for articles that contain a specific tag. Note that multikey indexes have some limitations: they cannot be used as the prefix of a compound index if the array field is the first field, and they do not support certain query operators like $elemMatch as efficiently as other structures.
MongoDB Indexing: How to Optimize Query Performance
Before you can optimize query performance with indexing, you must first identify which queries are slow and why. MongoDB provides several built-in tools for detecting inefficient operations. By systematically using these tools, you can pinpoint queries that lack proper index support, scan too many documents, or perform poorly due to collection size. The goal is to collect actionable data that guides your indexing strategy—whether you need to add a new compound index, reorder existing index fields, or remove unused indexes.
The explain() method is your first line of defense for understanding how MongoDB executes a query. Attach it to any find(), aggregate(), or count() operation to return a detailed execution plan. The output includes three key modes: queryPlanner (default), executionStats, and allPlansExecution. For performance tuning, use executionStats to see actual execution times and document counts.
Focus on these critical fields in the output:
stage: Look for COLLSCAN (collection scan) instead of IXSCAN (index scan)—a red flag indicating no index is used.
totalDocsExamined: Compare this to nReturned. A large ratio means the query scans many documents to find few results.
executionTimeMillis: The total time for the query. Consistently high values suggest an indexing need.
indexBounds: Shows which index keys were used and their range. Missing bounds indicate the index is not selective.
Example command using explain("executionStats") on a collection named orders:
If the output shows "stage": "COLLSCAN" and "totalDocsExamined": 500000 with only 50 documents returned, you need an index on { status: 1, created_at: 1 } to cover the query.
Enabling the Database Profiler for Performance Tuning
The database profiler records detailed information about operations that exceed a configurable latency threshold. Enable it at the database level to capture slow queries over time. The profiler stores its output in the system.profile collection, which you can query like any other collection.
To enable profiling for all operations slower than 100 milliseconds:
This returns the ten most recent queries that took over 200 milliseconds. Each document includes ns (namespace), op (operation type), query, and millis—allowing you to correlate slow operations with missing indexes.
Interpreting Slow Query Logs and Metrics
MongoDB logs slow queries to the standard log output when profiling is enabled or when the slowOpThresholdMs parameter is set. By default, this threshold is 100 milliseconds. In production environments, examine these logs to identify recurring patterns.
Command and filter: The exact query and its conditions. Look for predicates on unindexed fields or range queries without index support.
DocsExamined vs. nreturned: A high ratio (e.g., 10,000:1) indicates a full collection scan or a poorly selective index.
KeysExamined: If this number is close to DocsExamined but far exceeds nreturned, the index is not selective enough—consider a compound index with better field ordering.
planSummary: Shows the winning plan. COLLSCAN or IXSCAN with FETCH stages can hint at index coverage issues.
For example, a log entry like planSummary: IXSCAN { status: 1 } with keysExamined: 100000 and nreturned: 500 suggests the single-field index on status is too broad. Adding a second field (e.g., created_at) will narrow the scan range. Regularly review these logs, especially during peak load, to prioritize new indexes that reduce document examination and improve response times.
Creating and Managing Single Field Indexes
A single field index is the most fundamental index type in MongoDB, built on a single field of a collection. It accelerates queries that filter, sort, or perform equality matches on that field. Properly creating and managing these indexes is essential for optimizing query performance while balancing storage and write overhead.
Creating a Single Field Index with createIndex()
To create a single field index, use the createIndex() method on a collection, specifying the field and the sort order (1 for ascending, -1 for descending). The order matters for sort operations but does not affect equality lookups. For example:
db.orders.createIndex({ orderDate: 1 })
This creates an ascending index on the orderDate field. You can also create a unique index to enforce uniqueness:
Indexes are built in the background by default in recent MongoDB versions, minimizing blocking of other operations.
You can name indexes explicitly using the name option for easier management.
To verify an index exists, use db.collection.getIndexes().
Drop an index with db.collection.dropIndex("indexName") when it is no longer needed.
Choosing the Right Field for Indexing
Selecting the optimal field for a single field index depends on query patterns and data distribution. Consider the following best practices:
High cardinality fields: Fields with many distinct values (e.g., user ID, email, timestamp) benefit most from indexing because they narrow results efficiently.
Selectivity: Index fields that are frequently used in query filters (e.g., WHERE conditions) or sort operations. Avoid indexing fields with low cardinality (e.g., boolean flags, gender) as they may not improve performance and can harm write speed.
Coverage: If queries often return only the indexed field, the index can serve as a “covered query,” reading directly from the index without fetching documents.
Compound queries: For queries filtering on multiple fields, a compound index is usually better than multiple single field indexes.
To evaluate cardinality, inspect the number of unique values using db.collection.distinct("fieldName"). For example, an index on status with only three values (e.g., “active”, “inactive”, “pending”) has low cardinality and may not significantly speed up queries.
Impact on Write Performance and Storage
Every index adds overhead to write operations (inserts, updates, deletes) because MongoDB must update each index when data changes. The trade-off between read performance and write cost is critical. The table below summarizes the key differences:
Factor
Without Index
With Single Field Index
Read query speed
Slower (full collection scan)
Faster (index scan, often logarithmic)
Write operation cost
Lower (no index maintenance)
Higher (must update index per write)
Storage consumption
Minimal (only data)
Increased (index B-tree structure)
Memory usage
No index RAM overhead
Uses RAM for working set (index pages)
For write-heavy workloads, limit indexes to essential fields. Each index also consumes disk space; a single field index on a 10-million-document collection with a 32-byte field can occupy approximately 320 MB plus overhead. Monitor index size using db.collection.totalIndexSize(). To mitigate write impact, consider building indexes during low-traffic periods and using background building (default in MongoDB 4.2+).
In summary, single field indexes are powerful for optimizing read queries but require careful field selection and awareness of their storage and write performance trade-offs. Regular monitoring of index usage via the $indexStats aggregation stage helps identify redundant or underused indexes that should be removed.
Leveraging Compound Indexes for Complex Queries
When queries involve multiple fields—filtering, sorting, and range conditions simultaneously—single-field indexes often fall short. Compound indexes, which incorporate two or more fields in a defined order, allow MongoDB to satisfy complex query patterns without scanning large subsets of documents. The key to designing effective compound indexes lies in structuring field order to match the query’s logical flow, minimizing index scans and document lookups. A poorly ordered compound index can be nearly as inefficient as no index at all, while a well-crafted one can reduce query time from seconds to milliseconds.
ESR Rule: Equality, Sort, Range Ordering
The ESR rule provides a practical guideline for ordering fields in a compound index: place fields that require equality matches first, then fields used for sort operations, and finally fields involved in range queries (e.g., $gt, $lt, $gte, $lte). This ordering maximizes index efficiency by allowing MongoDB to narrow the result set with exact matches before applying sort and range scans.
Equality fields (e.g., status: "active") reduce the candidate set to only documents matching exact values.
Sort fields (e.g., createdAt: 1) allow MongoDB to return results in sorted order directly from the index, avoiding an in-memory sort.
Range fields (e.g., price: { $gte: 10, $lte: 50 }) are placed last to leverage the index’s B-tree structure for efficient range traversal after equality and sort narrowing.
For example, consider a query filtering by status (equality), sorting by createdAt (sort), and filtering by price (range). An optimal compound index would be: { status: 1, createdAt: 1, price: 1 }. This ordering ensures that the index scan starts with only active documents, proceeds in sorted order by creation date, and then efficiently traverses the price range.
Prefixing and Index Intersection Considerations
Compound indexes follow a prefixing principle: the index can support queries that use any leftmost prefix of its fields. For instance, an index on { a: 1, b: 1, c: 1 } can serve queries on a, a+b, or a+b+c, but not on b or c alone. This means you must carefully consider the most common query patterns to avoid creating too many indexes. Over-indexing wastes disk space and slows writes.
When queries cannot be fully satisfied by a single compound index, MongoDB may use index intersection—combining results from two or more indexes to fulfill the query. While useful, index intersection is generally less efficient than a single compound index because it requires merging multiple index scans and fetching document references. Use it sparingly; prefer compound indexes that align with your query workload. For example, if you frequently query { status: "active", region: "US" } and separately query { region: "US", createdAt: { $gte: ISODate(...) } }, consider individual indexes on status and region (which can intersect) versus a compound index that covers both patterns. Evaluate performance with explain() to decide.
Index Design Approach
Pros
Cons
Single compound index per pattern
Fast, predictable performance
More indexes, slower writes
Index intersection
Fewer indexes, flexible
Slower query performance, higher CPU
Covering Queries with Compound Indexes
A covering query occurs when all fields required by the query (both in the filter and in the projection) exist within the compound index. MongoDB can then serve the query entirely from the index, without fetching any documents from disk. This dramatically reduces I/O and improves speed. To design covering queries, ensure that the compound index includes not only the fields used in the query filter but also any fields returned in the projection.
For example, a query that filters on status and createdAt and projects only title and price can be covered by an index on { status: 1, createdAt: 1, title: 1, price: 1 }. Note that the index order still follows ESR principles for the filter fields, while additional projected fields are appended at the end. Use the covered field in explain() output to verify.
db.orders.createIndex({ status: 1, createdAt: 1, title: 1, price: 1 });
db.orders.find(
{ status: "shipped", createdAt: { $gte: ISODate("2024-01-01") } },
{ title: 1, price: 1, _id: 0 }
).explain("executionStats");
// Look for "totalDocsExamined": 0 in the output to confirm a covering query.
Covering queries are particularly beneficial for read-heavy workloads, but they increase index size and write overhead. Balance index width against query frequency to optimize overall performance.
Optimizing with Multikey Indexes on Arrays
When your MongoDB documents contain array fields, standard single-field or compound indexes are insufficient for efficient querying. Multikey indexes are MongoDB’s solution for indexing array values, automatically created whenever you index a field that holds an array. These indexes allow queries to match individual elements within arrays, dramatically improving performance for operations like filtering, sorting, and range scans on array data. However, improper use can lead to degraded performance or unexpected behavior, especially with compound indexes or deeply nested arrays. This section covers best practices for creating multikey indexes, navigating their limitations, and handling arrays of embedded documents.
Creating Multikey Indexes for Array Fields
Creating a multikey index is straightforward: you simply create an index on an array field using the same createIndex() method as for any other field. MongoDB automatically detects that the field contains arrays and builds a multikey index, which stores each array element as a separate index entry. This enables efficient queries that match any element in the array.
Basic example:db.collection.createIndex({ tags: 1 }) indexes each value in the tags array field.
Query benefit: A query like db.collection.find({ tags: "mongodb" }) uses the multikey index to quickly locate documents containing that tag.
Performance tip: Ensure that the indexed array does not contain excessively large or deeply nested data, as each element increases index size and write overhead.
Compound multikey indexes: You can combine an array field with a scalar field, e.g., db.collection.createIndex({ tags: 1, date: -1 }), but be aware of the limitations described in the next section.
Multikey indexes also support geospatial queries on arrays of coordinates and text indexes on arrays of strings, making them versatile for diverse data models.
Compound multikey indexes—those that include more than one array field—have critical restrictions that can affect query performance. MongoDB allows only one array field per compound index. If you attempt to create a compound index on two array fields, such as db.collection.createIndex({ tags: 1, categories: 1 }), MongoDB will throw an error because the resulting index would have a cartesian product of all element combinations, leading to an explosion in index size and query complexity.
Scenario
Allowed?
Reason
One array field + scalar fields
Yes
Only one array path is indexed; scalars are indexed per element.
Two or more array fields
No
Would create a combinatorial explosion of index entries.
Array field in nested documents
Yes, with caution
Each subdocument can have its own array, but only one array path per compound index.
To work around this limitation, consider these strategies:
Use separate indexes: Create individual multikey indexes on each array field and rely on MongoDB’s index intersection feature for queries involving multiple arrays.
Denormalize data: Flatten arrays into a single array field if the data model allows, or use a separate collection for array elements.
Filter early: Structure queries to use the array index first, then apply other conditions in memory or via additional indexes.
Indexing Arrays of Embedded Documents
When your arrays contain embedded documents (subdocuments), you can create multikey indexes on specific fields within those subdocuments. For example, given a collection of orders with an array items containing subdocuments like { product: "A", quantity: 2 }, create an index on items.product to speed up queries like find({ "items.product": "A" }). MongoDB indexes the value of the product field from each subdocument, enabling efficient lookups.
Key considerations for indexing arrays of embedded documents:
Dot notation: Use dot notation in the index key, e.g., db.orders.createIndex({ "items.product": 1 }).
Compound indexes on subdocument fields: You can combine a subdocument field with a scalar field, but again, only one array path is allowed. For instance, db.orders.createIndex({ "items.product": 1, orderDate: -1 }) is valid.
Performance pitfalls: Avoid indexing the entire subdocument (e.g., db.orders.createIndex({ items: 1 })) unless you query for exact matches on the full subdocument structure, as this can lead to large indexes and poor selectivity.
Partial indexes: Use partial indexes with a filter condition to limit indexed documents, reducing index size and write overhead when only a subset of documents contain relevant array data.
By understanding these nuances, you can leverage multikey indexes to dramatically improve query performance on array fields while avoiding common pitfalls that degrade database efficiency.
MongoDB Indexing: How to Optimize Query Performance
Text indexes in MongoDB are specialized data structures designed to support efficient full-text search queries on string content. Unlike regular indexes that match exact values or ranges, text indexes tokenize and stem the indexed strings, enabling searches for words, phrases, and even language-specific variations. This capability is essential for applications that need to search through large volumes of text, such as product descriptions, blog posts, or user reviews. Properly implemented text indexes dramatically reduce query latency compared to scanning entire collections with regex patterns.
To create a text index, use the createIndex() method with the "text" type on the field(s) you want to index. You can index a single field or combine multiple fields into a single text index. When multiple fields are included, MongoDB searches across all of them simultaneously.
Single field text index:db.articles.createIndex({ content: "text" })
Compound text index on multiple fields:db.articles.createIndex({ title: "text", body: "text" })
You can also assign weights to fields to prioritize matches in certain fields. For example, a match in the title field might be considered more relevant than a match in the body field.
MongoDB supports multiple languages for text indexing. By default, it uses English stemming and stop words. You can specify a different language using the default_language option, for example { default_language: "french" }. If your collection contains documents with different languages, you can store the language in a field and reference it during index creation.
Once a text index exists, you query it using the $text operator in the query filter. The $text operator accepts a $search string that can include words, phrases, and logical operators.
Simple word search:db.articles.find({ $text: { $search: "mongodb indexing" } })
Excluding words: Use a minus sign: db.articles.find({ $text: { $search: "mongodb -replica" } })
Logical OR:db.articles.find({ $text: { $search: "database storage engine" } }) — matches documents containing any of these words.
Logical AND: Use quotes for each term: not directly supported, but you can combine with $and or use multiple $text queries.
The $text operator also supports a $language option to override the default language for a specific query. This is useful when your index uses a default language but some queries require a different linguistic processing.
Combining Text Indexes with Other Filters
Text indexes can be combined with other query filters to refine results further. However, there are important constraints: a query can use at most one $text expression, and the $text operator must appear in the query filter alongside other conditions.
For example, to search for articles containing “performance” that were published after January 2023:
When combining $text with other indexed fields, MongoDB can use the text index for the text portion and a separate index for the other filter, provided a compound index does not exist. If you frequently combine a text search with a filter on another field (e.g., category), consider creating a compound index that includes both the text field and the filter field. This allows MongoDB to satisfy both conditions using a single index scan.
Compound index with text:db.articles.createIndex({ category: 1, content: "text" })
Note that in a compound index, the text index must be placed after any equality fields for optimal performance. The $text operator also affects sort order: you can use { $meta: "textScore" } in the projection or sort to order results by relevance.
By carefully designing text indexes and combining them with other filters, you can build high-performance search features that scale with your data.
Geospatial Indexes for Location-Based Queries
Geospatial indexes in MongoDB power location-based queries such as finding nearby points, checking if a location falls within a boundary, or identifying intersecting geometries. Two primary index types exist: 2dsphere for spherical (Earth-like) coordinate data using GeoJSON format, and 2d for flat, legacy coordinate pairs. Choosing the right index is critical for performance and accuracy in applications like ride-hailing, real estate, or logistics.
Creating a 2dsphere Index for GeoJSON Data
To optimize queries on GeoJSON objects (points, lines, polygons), use a 2dsphere index. This index supports spherical geometry calculations, accounting for the Earth’s curvature. Create it on the field containing the GeoJSON object:
For legacy coordinate pairs (e.g., [x, y] on a flat plane), use a 2d index instead. This index does not account for Earth’s curvature and is suitable for small areas or non-geographic coordinate systems.
Querying with $near and $geoWithin
Two essential operators leverage geospatial indexes:
Operator
Purpose
Example
$near
Returns documents sorted by distance from a point, closest first. Requires a geospatial index.
Key differences: $near automatically sorts results and can limit distance via $maxDistance. $geoWithin does not sort and is typically used for boundary checks. Both require an index on the queried field.
Performance Considerations for Geospatial Workloads
Optimizing geospatial queries involves index design, data modeling, and query patterns:
Index selection: Use 2dsphere for global or regional data; 2d is faster for small, flat coordinate spaces but inaccurate for large distances.
Compound indexes: Combine a geospatial key with other filters (e.g., category, timestamp) to avoid in-memory filtering: db.collection.createIndex( { location: "2dsphere", category: 1 } ).
Query selectivity: Prefer $geoWithin over $near when you only need containment, as $near incurs sorting overhead.
Coordinate precision: Use GeoJSON Point with [longitude, latitude] order. Avoid excessive decimal places; 6 digits (~0.1 meter) is often sufficient.
Memory and storage: Geospatial indexes are typically larger than B-tree indexes. Monitor index size via db.collection.totalIndexSize() and ensure sufficient RAM.
Write performance: Indexing many geospatial fields or frequent updates can slow writes. Batch updates or use sparse indexes if only a subset of documents have location data.
Benchmark queries with explain("executionStats") to verify index usage and check for COLLSCAN (collection scan) which indicates a missing or non-selective index. For high-throughput geospatial workloads, shard on the geospatial field to distribute data across clusters, but note that $near queries across shards require careful routing.
Advanced Indexing: TTL, Sparse, Partial, and Hashed
Beyond standard single-field and compound indexes, MongoDB provides specialized index types designed for specific data patterns and operational requirements. Time-to-live (TTL) indexes automate document expiration, sparse indexes handle fields with null values efficiently, partial indexes filter indexed documents based on conditions, and hashed indexes support hash-based sharding for even data distribution. Mastering these advanced index types allows you to fine-tune query performance, reduce storage overhead, and simplify data lifecycle management.
Setting TTL Indexes for Automatic Document Expiry
A TTL index is a special single-field index that MongoDB uses to automatically remove documents after a specified period of time. This is ideal for session data, temporary caches, or logs that should be purged after a defined lifespan. The index is created on a date field (or an array of dates), and the expiration is set using the expireAfterSeconds option. For example, to expire documents 3600 seconds (1 hour) after the createdAt timestamp:
Index creation:db.collection.createIndex({ "createdAt": 1 }, { expireAfterSeconds: 3600 })
Behavior: MongoDB runs a background task every 60 seconds to check for expired documents and remove them.
Limitations: TTL indexes cannot be compound indexes; they must be single-field indexes on a date or array of dates. The background deletion task is not precise—documents may persist up to 60 seconds past their expiration time.
Best practice: Use TTL indexes only for data that can tolerate slight delays in removal, and avoid them on collections with high write throughput to prevent performance degradation from the deletion task.
Using Sparse Indexes to Exclude Null Values
Sparse indexes only contain entries for documents that have the indexed field. This reduces index size and improves performance when querying for fields that exist in only a subset of documents. A sparse index is created by setting the sparse option to true. Consider a collection where 90% of documents lack an email field. A sparse index on email will exclude those null documents, making queries like db.collection.find({ email: { $exists: true } }) faster and more storage-efficient.
Use case: Fields that are optional and often missing, such as optional contact information or secondary identifiers.
Caution: Sparse indexes can cause unexpected query behavior if the query predicate does not match the sparse index’s assumptions. For example, a query db.collection.find({ email: null }) will not use the sparse index because null documents are excluded.
Combination: Sparse indexes can be combined with unique constraints to enforce uniqueness only on documents that have the field.
Partial Indexes for Conditional Filtering and Hashed Indexes for Sharding
Partial indexes allow you to index only documents that meet a specified filter expression. This is more flexible than sparse indexes because you can define any condition, not just field existence. For example, to index only documents where status: "active":
Benefit: Reduces index size and improves write performance by ignoring inactive documents.
Requirement: The query must include the filter expression (or a subset) for the index to be used.
Hashed indexes, on the other hand, are designed specifically for hash-based sharding. They compute a hash of the indexed field value and store the hash, ensuring even distribution of data across shards. Hashed indexes are single-field indexes and cannot be compound. They are not suitable for range queries but excel in equality lookups and shard key distribution.
Index Type
Primary Use Case
Supports Compound?
Query Compatibility
TTL
Automatic document expiration
No
Equality and range on date field
Sparse
Exclude null/missing field values
Yes
Equality, existence, range (with caution)
Partial
Index subset of documents by condition
Yes
Must include filter condition
Hashed
Hash-based sharding
No
Equality only; no range queries
Choosing the right advanced index type depends on your data characteristics and query patterns. TTL indexes simplify data cleanup, sparse and partial indexes reduce storage and write overhead, and hashed indexes enable scalable sharding. By leveraging these tools appropriately, you can significantly optimize query performance and resource utilization in MongoDB.
Monitoring and Maintaining Index Health
Creating effective indexes is only the first step in optimizing MongoDB query performance. Without regular monitoring and maintenance, indexes can become fragmented, unused, or redundant, degrading write performance and consuming unnecessary storage. Sustaining query speed requires a proactive approach to tracking index utilization, managing fragmentation, and cleaning up obsolete indexes. This section outlines best practices for maintaining index health to ensure your database remains performant over time.
MongoDB provides the $indexStats aggregation stage to reveal how often each index is accessed. This command returns metrics such as the number of accesses, operations, and the time since the last use. By analyzing these statistics, you can identify which indexes are actively supporting queries and which are rarely or never used. For example, to view index usage for a collection named orders, run:
db.orders.aggregate([ { $indexStats: {} } ])
The output includes fields like name, accesses.ops, and accesses.since. Use this data to:
Detect indexes with zero or very low access counts over an extended period.
Compare index usage across peak and off-peak times to understand actual demand.
Identify indexes that are only used by infrequent or legacy queries.
For a more comprehensive view, combine $indexStats with $currentOp or monitoring tools like MongoDB Atlas. Regularly reviewing this data—weekly for high-traffic databases—helps you make informed decisions about which indexes to keep or drop.
Over time, frequent insertions, updates, and deletions cause index fragmentation. Fragmented indexes occupy more disk space and slow down query performance because the B-tree structure becomes less efficient. Rebuilding an index eliminates fragmentation, reclaims storage, and restores optimal access patterns. Use the reIndex() command to rebuild all indexes on a collection:
db.orders.reIndex()
Alternatively, you can rebuild a single index with dropIndex() followed by createIndex(), which is safer for production systems because it avoids locking the entire collection. Consider these best practices:
Schedule reindexing during maintenance windows or low-traffic periods.
Monitor fragmentation levels using db.collection.totalIndexSize() and compare against document counts.
Use compact (on MongoDB Enterprise or Atlas) as a less disruptive alternative that rewrites the data and indexes in place.
For collections with heavy write workloads, reindex monthly. For read-heavy collections, reindex quarterly unless performance degrades sooner.
Dropping Unused or Redundant Indexes
Unused indexes waste disk space and slow down write operations because MongoDB must update each index on every insert, update, or delete. Redundant indexes (e.g., multiple indexes with overlapping prefixes) compound this overhead without adding query benefits. After reviewing $indexStats, identify indexes that are candidates for removal:
Index Type
Example
Action
Unused
{ status: 1 } with zero accesses in 30 days
Drop with dropIndex()
Redundant
{ status: 1, date: -1 } and { status: 1 }
Keep the compound index; drop the single-field
Legacy
Index created for a deprecated query pattern
Drop after confirming no active use
To drop an index safely, first verify its usage pattern over at least one full business cycle (e.g., one week). Then run:
db.orders.dropIndex("status_1")
After dropping indexes, monitor query performance to ensure no negative impact. If a dropped index is needed later, you can recreate it—but this should be rare if you followed the monitoring steps. Regularly pruning unused and redundant indexes keeps your database lean and write-efficient, directly contributing to sustained query performance.
Common Pitfalls and Anti-Patterns in MongoDB Indexing
Even with a solid understanding of indexing fundamentals, developers frequently fall into traps that degrade query performance rather than improve it. Recognizing these anti-patterns is essential for maintaining a fast, efficient database. Below are three of the most prevalent mistakes and how to avoid them.
Over-Indexing and Its Impact on Write Speed
Adding an index to every field that appears in a query filter seems like a safe approach, but it often backfires. Each index consumes disk space and memory, and more critically, every write operation—insert, update, delete—must update every index on the collection. This overhead can dramatically slow write throughput.
Consider the trade-offs:
Read performance: Each additional index can speed up specific queries, but only those that use it.
Write performance: Every index adds latency to write operations. For a collection with five indexes, a single insert requires updating five B-trees.
Storage: Indexes can grow large. A collection with many indexes may use more disk space for indexes than for data.
To avoid over-indexing, start by profiling your workload. Use MongoDB’s explain() output to identify queries that actually benefit from an index. Remove indexes that are never used or that duplicate the functionality of compound indexes. A good rule of thumb is to limit indexes to those that support your most frequent and critical query patterns.
Misordered Fields in Compound Indexes
A compound index on fields (a, b, c) is not equivalent to an index on (c, b, a). The order of fields in a compound index determines which query patterns it can support efficiently. A common mistake is placing a low-selectivity field (e.g., a boolean flag) first, which forces MongoDB to scan many index entries even when a high-selectivity field (e.g., a unique user ID) is present in the query.
Key guidelines for field order:
Equality fields first: Place fields that are used in equality filters (e.g., { status: "active" }) before fields used for range, sort, or grouping.
Sort order matters: If your query sorts by one field and filters by another, include the sort field after the equality fields. For example, an index on (status, created_at) supports db.collection.find({ status: "active" }).sort({ created_at: -1 }) without an in-memory sort.
Selectivity: Place more selective fields earlier. A field with many unique values (like email) should come before a field with few unique values (like gender).
If you find that a compound index is being used but still performing slowly, check the index’s key pattern against your query’s filter and sort clauses. A misordered index can force MongoDB to scan many documents or perform a blocking sort, negating the benefit of the index.
Ignoring Explain Output and Query Patterns
Many developers create indexes based on intuition or guesswork rather than actual query patterns. This leads to indexes that are never used, or worse, indexes that slow down writes without improving reads. The explain() method is your primary diagnostic tool, yet it is often overlooked.
What to look for in explain output:
Field
What It Tells You
stage
If COLLSCAN, no index is used; if IXSCAN, an index is used. FETCH follows an index scan to retrieve documents.
nReturned
Number of documents returned by the query.
totalDocsExamined
Number of documents scanned. High values relative to nReturned indicate poor selectivity.
executionTimeMillis
Total query execution time. Compare before and after index creation.
indexBounds
Shows the range of index keys scanned. Tight bounds are good; wide bounds indicate inefficiency.
To avoid this pitfall, regularly review your slow query log and run explain("executionStats") on problematic queries. Adjust indexes based on real query patterns, not hypothetical ones. Also, consider using the $indexStats aggregation stage to see which indexes are actually being used. An index with zero access operations is a candidate for removal.
By avoiding over-indexing, carefully ordering compound index fields, and basing decisions on explain output, you can ensure your indexes serve their intended purpose: accelerating queries without compromising write performance.
Frequently Asked Questions
What is MongoDB indexing and why is it important for query performance?
MongoDB indexing is a data structure that improves the speed of data retrieval operations on a collection. Without indexes, MongoDB must scan every document in a collection to select those that match the query statement, which is inefficient for large datasets. Indexes store a small portion of the data set in a form that allows efficient traversal, significantly reducing the number of documents that must be examined. Proper indexing is crucial for achieving fast query performance, especially in production environments with high read loads.
What are the different types of indexes available in MongoDB?
MongoDB offers several index types: single field indexes (ascending/descending), compound indexes (multiple fields), multikey indexes (for arrays), text indexes (for full-text search), geospatial indexes (2dsphere, 2d), hashed indexes (for sharding), TTL indexes (auto-expire documents), and unique indexes (enforce uniqueness). Each type serves different query patterns. For example, compound indexes support queries on multiple fields, while text indexes enable efficient text search. Choosing the right index type is essential for performance.
How do I create an index in MongoDB?
Indexes in MongoDB can be created using the `createIndex()` method on a collection. For example, `db.collection.createIndex({ field: 1 })` creates an ascending index on `field`. You can specify options like `{ unique: true }` for unique indexes or `{ expireAfterSeconds: 3600 }` for TTL indexes. Indexes can also be created in the background to avoid blocking write operations. In MongoDB Atlas, you can create indexes via the UI. It's important to plan indexes based on your query patterns.
What is a compound index and when should I use one?
A compound index is an index on multiple fields within a collection. For example, `db.collection.createIndex({ field1: 1, field2: -1 })`. Compound indexes support queries that filter on multiple fields, as well as sort operations. They are most effective when the index key order matches the query filter and sort order. Use compound indexes for queries that involve equality conditions on leading fields and range or sort on subsequent fields. Avoid creating many compound indexes; instead, design them to cover multiple query patterns.
How can I analyze and optimize MongoDB query performance with indexes?
Use the `explain()` method to analyze query execution plans. It shows whether an index was used, the number of documents scanned, and execution time. Look for `COLLSCAN` (collection scan) which indicates no index was used. Use `hint()` to force a specific index for testing. The MongoDB profiler can log slow queries. Tools like MongoDB Compass provide visual explain plans. Regularly review slow query logs and create indexes that match your most frequent query patterns. Also consider using covered queries (all fields in the index) for maximum performance.
What are the trade-offs of using too many indexes in MongoDB?
While indexes speed up reads, they slow down writes (inserts, updates, deletes) because each index must be updated. Indexes also consume disk space and memory (working set). Having many indexes can degrade overall performance, especially on write-heavy workloads. It's recommended to limit indexes to those that directly support your query patterns. Use the `$indexStats` aggregation to monitor index usage and remove unused indexes. In sharded clusters, indexes can also affect performance across shards.
How does MongoDB choose which index to use for a query?
MongoDB's query planner evaluates candidate indexes based on the query filter, sort, and projection. It considers index selectivity, the number of index keys scanned, and whether the index can return results in sorted order. The planner may run multiple query plans in parallel for a short period and select the one that completes first. You can override the planner's choice using `hint()`. Understanding the planner's behavior helps in designing effective indexes and avoiding unexpected performance issues.
What is a covered query in MongoDB and how does it improve performance?
A covered query is a query where all the fields required in the query filter, projection, and sort are part of the same index. MongoDB can satisfy the query entirely from the index without reading the actual documents, which is much faster. To achieve a covered query, create a compound index that includes all fields in the query projection, and ensure the query does not include fields not in the index. Covered queries are ideal for read-heavy applications, as they reduce I/O and improve response times.
Building a Serverless Application with Firebase: A Comprehensive Guide
Introduction to Serverless Architecture and Firebase
What Is Serverless Computing?
Serverless computing is a cloud execution model where the cloud provider dynamically manages the allocation and provisioning of servers. Developers write and deploy code without worrying about the underlying infrastructure, such as virtual machines, containers, or operating systems. In a serverless architecture, applications are broken into discrete functions that are triggered by events—such as HTTP requests, database changes, or file uploads—and scale automatically based on demand. The term “serverless” does not mean servers are absent; rather, it signifies that server management is abstracted away from the developer. This approach reduces operational overhead, lowers costs through pay-per-execution pricing, and enables rapid iteration, making it ideal for startups, prototypes, and applications with unpredictable traffic patterns. Common serverless platforms include AWS Lambda, Google Cloud Functions, and Azure Functions, but Firebase offers a uniquely integrated experience for frontend developers.
Key Firebase Services for Serverless Development
Firebase, a Google-owned platform, provides a fully managed backend that eliminates the need for server provisioning or maintenance. Its core services work together to support serverless application development:
Firebase Authentication: Offers drop-in authentication methods, including email/password, phone, Google, Facebook, and Apple sign-in. It provides secure token-based user management without custom server code.
Cloud Firestore: A flexible, scalable NoSQL database that synchronizes data in real time across client devices. It supports offline persistence and automatic scaling, with security rules enforced directly at the database level.
Firebase Cloud Storage: Designed for storing and serving user-generated content like images, videos, and audio files. It integrates with Firebase Authentication for secure file access and uses Google Cloud Storage under the hood.
Firebase Hosting: A fast, secure static web hosting service with built-in CDN support, custom domain mapping, and one-click SSL certificate provisioning. It can serve single-page applications, static assets, and even cloud functions as a backend.
Cloud Functions for Firebase: Enables running backend code in response to events from Firebase services and HTTPS requests. Functions are written in Node.js, Python, Go, or Java and scale automatically from zero to thousands of concurrent invocations.
These services are designed to work together seamlessly, allowing developers to build complete serverless applications without managing a single server.
Comparing Firebase with Other Serverless Platforms
While Firebase is a powerful option, it is not the only serverless platform available. Below is a comparison highlighting key differences:
Firebase excels in real-time data synchronization, integrated authentication, and a unified SDK that works across web, iOS, and Android. It is particularly well-suited for mobile-first applications and projects that require rapid prototyping with minimal backend code. In contrast, AWS Amplify offers deeper integration with the broader AWS ecosystem, while Vercel focuses on frontend-centric serverless functions and static site generation. Choosing between them depends on project requirements, existing cloud infrastructure, and the development team’s expertise.
Before you can begin building a serverless application with Firebase, you must establish both the cloud-side project and your local development environment. This foundational setup ensures that your application can leverage Firebase’s backend services—such as authentication, a real-time database, and cloud functions—without managing a single server. The process involves three clear stages: creating the project in the Firebase console, installing the command-line interface (CLI), and initializing the specific services your application will need.
Creating a Firebase Project in the Console
Start by navigating to the Firebase Console and signing in with your Google account. Click the “Create a project” button. In the dialog that appears, you can either create an entirely new project or import an existing Google Cloud project. For most serverless applications, a fresh project is recommended to avoid configuration conflicts.
Step 1: Enter a unique project name (e.g., “my-serverless-app”). Firebase will generate a project ID based on this name, which you can edit if desired.
Step 2: Review and accept the Firebase terms and conditions. You may also be asked to enable Google Analytics; for a serverless application, this is optional but can be useful for monitoring user engagement.
Step 3: Click “Create project” and wait a few seconds for the provisioning to complete. Once done, you will be redirected to the project overview dashboard.
After creation, navigate to the “Project settings” (gear icon) and note your project ID. You will use this ID to link your local environment to the cloud project. Also, under “General,” you can register a web app by clicking the web icon (</>) to obtain your Firebase configuration object—a JSON snippet containing API keys and identifiers. Store this securely; it will be needed when you connect your client-side code.
Installing and Configuring the Firebase CLI
The Firebase CLI is the primary tool for managing your project from the terminal. It enables you to deploy code, emulate services locally, and configure security rules. To install it on macOS or Linux, use the Node Package Manager (npm), which requires Node.js version 18 or later:
npm install -g firebase-tools
On Windows, you can also use npm or download the standalone installer from the Firebase website. After installation, verify the version with firebase --version. Next, authenticate the CLI with your Google account by running:
firebase login
This opens a browser window where you grant the CLI permission to access your Firebase projects. Once authenticated, list your projects to confirm the connection:
firebase projects:list
If your newly created project appears, the configuration is successful. You may also set a default project for convenience using firebase use --add, which stores the project alias locally.
Initializing Firebase Services for Your Application
With the CLI authenticated, navigate to your application’s root directory in the terminal. Run the initialization command:
firebase init
A interactive menu will appear. Use the arrow keys and spacebar to select the services you intend to use. For a typical serverless application, common choices include:
Service
Purpose in Serverless App
Firestore
Store and sync structured data in real time
Authentication
Manage user sign-in and identity
Cloud Functions
Run backend code in response to events
Hosting
Deploy static assets and web app
After selecting services, the CLI will prompt you to associate the directory with your existing Firebase project (select the one you created earlier). For each chosen service, you may be asked to configure files—for example, Firestore will ask for security rules and indexes files. Accept the defaults for now; you can customize them later. The initialization process creates a firebase.json configuration file and a .firebaserc file that maps your project alias. It also generates service-specific subfolders (e.g., functions/ for Cloud Functions). Your local environment is now ready for development, and you can begin building your serverless application with Firebase.
Implementing User Authentication with Firebase Auth
Firebase Authentication provides a robust backend service for managing user identities in serverless applications. It abstracts away the complexity of credential storage, password hashing, and token generation, allowing developers to focus on building secure user flows. This section covers the integration of email/password and social login providers, along with session management strategies for protecting routes in your Firebase-powered application.
Setting Up Email/Password Authentication
To enable email/password authentication, begin in the Firebase Console under the Authentication section. Activate the Email/Password sign-in method. On the client side, use the Firebase SDK to handle user creation and sign-in. The following steps outline the core implementation:
User Sign-Up: Call createUserWithEmailAndPassword(email, password) to register a new user. This returns a UserCredential object containing the new user’s profile and authentication token.
User Sign-In: Use signInWithEmailAndPassword(email, password) for returning users. The SDK automatically manages token refresh and session persistence.
Error Handling: Catch common errors such as weak passwords (auth/weak-password), email already in use (auth/email-already-in-use), or invalid credentials (auth/user-not-found, auth/wrong-password). Provide clear feedback to users.
Password Reset: Implement sendPasswordResetEmail(email) to allow users to reset their password via a secure email link.
Firebase automatically handles session persistence. By default, the SDK persists the user’s authentication state across page reloads using local storage. You can configure this behavior using browserLocalPersistence, browserSessionPersistence, or inMemoryPersistence depending on your security needs.
Adding Social Login Providers (Google, Facebook, etc.)
Social login reduces friction by allowing users to authenticate with existing accounts. Firebase supports multiple providers including Google, Facebook, Twitter, and GitHub. Each provider requires specific setup in both the Firebase Console and the provider’s developer dashboard. The table below compares the three most common providers:
Provider
Required Setup
User Data Returned
Best For
Google
Enable in Firebase Console; configure OAuth consent screen in Google Cloud Console
Display name, email, profile photo, and ID token
Broad user base; minimal friction; works across Android, iOS, and web
Name, email, profile picture URL (subject to Facebook permissions)
Applications targeting a social-media-savvy demographic
GitHub
Enable in Firebase Console; register OAuth App in GitHub Developer Settings
GitHub username, email (if public), avatar URL, and profile URL
Developer tools, coding platforms, or open-source projects
To implement social login, use the provider-specific signInWithPopup or signInWithRedirect methods. For Google, instantiate a GoogleAuthProvider object and call signInWithPopup(auth, provider). Firebase returns the user’s profile information and a credential object that can be used for additional operations, such as linking accounts.
Handling User Sessions and Secure Routes
Once a user authenticates, Firebase provides an onAuthStateChanged listener that fires whenever the authentication state changes. Use this listener to:
Track Login State: Update your application’s UI to show authenticated content or redirect to a login page.
Secure Routes: In a single-page application, wrap protected components in a guard that checks currentUser before rendering. If no user exists, redirect to the sign-in page.
Token Management: The Firebase SDK automatically refreshes ID tokens every hour. Use currentUser.getIdToken() to retrieve a valid token for authenticated API calls to your backend or Firebase Functions.
Sign Out: Call signOut(auth) to clear the session and trigger the onAuthStateChanged listener with a null user.
For serverless backends, verify the ID token on each request using the Firebase Admin SDK. This ensures that only authenticated users can access protected endpoints. By combining client-side route guards with server-side token verification, you create a layered security model that protects your application from unauthorized access.
Designing a Real-Time Database with Firestore
When building a serverless application with Firebase, Cloud Firestore serves as the flexible, scalable NoSQL database that powers real-time data synchronization. Structuring your data correctly from the start is critical for performance, cost efficiency, and maintainability. Firestore organizes data into collections, documents, and subcollections, each with specific rules and best practices that differ from traditional relational databases.
Understanding Firestore Data Model
Firestore uses a hierarchical data model built on three core components:
Collections: Containers for documents. Each collection holds multiple documents and can be created implicitly when you add the first document. Collections are lightweight and do not appear in queries unless they contain documents.
Documents: Individual records within a collection, stored as JSON-like objects with fields (key-value pairs). Documents have a maximum size of 1 MiB and support nested maps and arrays, but avoid deep nesting to prevent performance issues.
Subcollections: Collections nested under a specific document, allowing you to structure related data without denormalization. For example, a users collection might contain a document for each user, with a posts subcollection for that user’s posts.
Best practices for NoSQL structuring in Firestore include:
Design collections around query patterns, not entity relationships. Ask: “What queries will my app run most often?”
Use subcollections for data that grows unboundedly (e.g., user posts, comments) to avoid hitting the 20,000-field limit on a single document.
Avoid creating deeply nested data structures (more than 20 levels) as they make reads and writes slower and more expensive.
Leverage composite indexes for complex queries, but design your data to minimize the need for them.
Writing and Reading Data with Client SDKs
Firebase provides client SDKs for web, iOS, Android, and more, enabling direct read and write operations from client apps. Here is a practical example using the Web SDK (version 9 modular):
import { collection, addDoc, getDocs, doc, getDoc } from "firebase/firestore";
import { db } from "./firebaseConfig";
// Writing a new document to the "tasks" collection
async function addTask(title, priority) {
try {
const docRef = await addDoc(collection(db, "tasks"), {
title: title,
priority: priority,
createdAt: new Date(),
completed: false
});
console.log("Task written with ID: ", docRef.id);
} catch (e) {
console.error("Error adding task: ", e);
}
}
// Reading all documents from the "tasks" collection
async function getAllTasks() {
const querySnapshot = await getDocs(collection(db, "tasks"));
querySnapshot.forEach((doc) => {
console.log(doc.id, " => ", doc.data());
});
}
// Reading a single document by ID
async function getTask(taskId) {
const docSnap = await getDoc(doc(db, "tasks", taskId));
if (docSnap.exists()) {
console.log("Task data:", docSnap.data());
} else {
console.log("No such task!");
}
}
Use addDoc() for auto-generated IDs or setDoc() with a custom ID for deterministic references.
Read operations count toward your Firestore usage quota, so batch reads where possible.
Always handle errors and loading states in the UI, especially for large datasets.
Implementing Real-Time Listeners for Live Updates
Real-time listeners are the backbone of live data synchronization in Firestore. They subscribe to changes in a document, collection, or query and trigger a callback whenever the data changes. This enables features like live chat, collaborative editing, and dashboards that update instantly.
To set up a real-time listener for a collection:
import { collection, onSnapshot } from "firebase/firestore";
import { db } from "./firebaseConfig";
// Listen for real-time updates to the "tasks" collection
const unsubscribe = onSnapshot(collection(db, "tasks"), (snapshot) => {
snapshot.docChanges().forEach((change) => {
if (change.type === "added") {
console.log("New task: ", change.doc.data());
}
if (change.type === "modified") {
console.log("Modified task: ", change.doc.data());
}
if (change.type === "removed") {
console.log("Removed task: ", change.doc.data());
}
});
});
// Later, to stop listening:
// unsubscribe();
Best practices for real-time listeners:
Always call the unsubscribe function when the component unmounts or the user navigates away to prevent memory leaks and unnecessary reads.
Use docChanges() to handle only the changes (add, modify, remove) rather than re-rendering the entire dataset.
Limit the scope of listeners to the smallest dataset needed—avoid listening to entire collections when a query filter suffices.
Be aware that each listener incurs at least one read per change event, so design your app to minimize unnecessary listeners.
Storing and Serving User-Generated Content with Cloud Storage
Firebase Cloud Storage provides a scalable and secure solution for handling user-generated files such as profile pictures, post images, and videos in a serverless application. By integrating directly with Firebase Authentication and Security Rules, you can control access at the file level while offloading infrastructure management. This section walks through configuring your storage bucket, uploading files from client-side code, and managing download URLs for serving content.
Configuring Cloud Storage Bucket and Security Rules
When you enable Cloud Storage in the Firebase console, a default bucket is created in the region you select. You can configure multiple buckets if needed, but a single bucket is sufficient for most applications. Security Rules are written in a declarative JSON-like syntax and are evaluated on every file operation.
To set up basic rules for user-generated content, follow this pattern:
Authenticated write: Allow only signed-in users to upload files.
User-scoped paths: Store files under a path that includes the user’s UID, such as users/{uid}/images/.
Read access: Grant read access to all authenticated users or, for public content, to anyone.
Example security rule snippet for a bucket:
rules_version = '2';
service firebase.storage {
match /b/{bucket}/o {
match /users/{userId}/{allPaths=**} {
allow read: if request.auth != null;
allow write: if request.auth.uid == userId;
}
}
}
This rule ensures that only the owning user can write to their folder, while any authenticated user can read files. For public content, change the read rule to allow read: if true. Always test rules using the Firebase console’s Rules playground before deploying.
Client-side uploads are handled using the Firebase SDK. The process involves getting a reference to the storage location, then using put() for raw data or putFile() for blobs. Here is a typical workflow using JavaScript:
Import Firebase and initialize the app with your project configuration.
Get a reference to the storage service: const storage = getStorage();
Create a reference to the file path: const fileRef = ref(storage, 'users/' + user.uid + '/images/' + fileName);
Upload the file: await uploadBytes(fileRef, file);
For better user experience, track upload progress using the uploadBytesResumable() method, which returns a task that emits state_changed events. You can then display a progress bar:
Common file types include images (JPEG, PNG, WebP) and videos (MP4, MOV). For large files, consider using Firebase Extensions like “Resize Images” to generate thumbnails automatically.
Generating Download URLs and Managing Files
After a file is uploaded, you need a download URL to serve it to users. Use the getDownloadURL() function:
This URL is a long-lived token that can be stored in Firestore alongside other user data. For example, store it in the user’s profile document or a post object. To manage files, you can:
Delete files: Call deleteObject(ref) to remove a file when a user deletes their account or content.
List files: Use listAll(ref) to get all items in a folder, but for large datasets, paginate with list() and a max results parameter.
Update metadata: Use updateMetadata() to change content type or custom metadata like alt text.
For serving images efficiently, combine download URLs with Firebase Hosting or a CDN. You can also use Cloud Functions to generate signed URLs with expiration times for temporary access. Always revoke download tokens by deleting the file or updating security rules when a user leaves your app.
Running Backend Logic with Cloud Functions
Firebase Cloud Functions allow you to run backend code in response to events triggered by Firebase features and HTTPS requests, eliminating the need to manage your own servers. This serverless approach enables you to process data, integrate third-party APIs, send notifications, and perform complex computations automatically. By writing functions in Node.js, you can extend your Firebase application’s capabilities while benefiting from automatic scaling and pay-as-you-go pricing. The following sections cover the essential setup, triggering mechanisms, and security considerations for deploying effective Cloud Functions.
Setting Up Cloud Functions with Node.js
To begin, you need the Firebase CLI and a Node.js environment configured on your development machine. After initializing your Firebase project, install the Firebase Admin SDK to interact with Firebase services from your functions. The typical setup process includes:
Installing Node.js (version 18 or later recommended) and the Firebase CLI via npm: npm install -g firebase-tools
Logging into Firebase: firebase login
Initializing Cloud Functions in your project directory: firebase init functions
Selecting your project and language (JavaScript or TypeScript)
Installing dependencies with npm install inside the functions folder
Once initialized, you write your function logic in the index.js or index.ts file under the functions directory. A basic HTTP function example looks like this:
Deploy your function using firebase deploy --only functions or firebase deploy --only functions:helloWorld for a single function. After deployment, the function URL is displayed in the console, which you can test in a browser or via curl.
Triggering Functions from Firestore, Auth, and Storage
Cloud Functions can react to events from multiple Firebase services, enabling automated workflows. Common triggers include:
Firestore triggers: Execute logic when documents are created, updated, deleted, or written. For example, automatically generate a summary when a new blog post is added.
Authentication triggers: Respond to user sign-ups, deletions, or metadata updates. Use cases include sending a welcome email or creating a user profile document.
Cloud Storage triggers: Process files upon upload, update, or deletion. This is ideal for image resizing, thumbnail generation, or virus scanning.
Each trigger type uses a specific event handler. For instance, a Firestore create trigger for a collection named “orders” would be:
These triggers run in response to changes, providing a seamless way to automate backend tasks without manual intervention.
Calling Functions via HTTP and Securing Endpoints
HTTP-triggered functions allow you to build RESTful APIs or webhooks that respond to external requests. To secure these endpoints, you must implement authentication and authorization measures. Key practices include:
Using Firebase Authentication: Require a valid Firebase ID token in the request header. Verify the token using the Admin SDK before processing the request.
Enabling CORS: Configure Cross-Origin Resource Sharing to allow requests from your web app’s domain. Use the cors package or handle headers manually.
Rate limiting: Protect against abuse by limiting requests per IP or user. This can be implemented with a simple in-memory store or by integrating with Firebase Realtime Database.
An example of an HTTP function with token verification:
Additionally, restrict function invocation to specific HTTP methods (GET, POST, etc.) and validate request payloads to prevent injection attacks. For production, consider using Firebase App Check to verify that requests originate from your genuine app, further hardening your serverless endpoints. By combining these security measures, you ensure that your Cloud Functions only respond to legitimate, authenticated traffic.
Managing Application Configuration with Remote Config
Firebase Remote Config is a cloud-based service that enables you to modify the behavior and appearance of your application on the fly, without requiring users to download an update. By storing key-value pairs on Firebase servers, you can control feature flags, UI text, API endpoints, or even the frequency of certain prompts. This capability is essential for building a serverless application with Firebase, as it decouples configuration from deployment, allowing you to adapt your app to changing conditions or user segments in real time. The service also integrates seamlessly with other Firebase tools, making it a cornerstone of dynamic, responsive serverless architectures.
Creating and Deploying Remote Config Parameters
To start using Remote Config, you first define parameters in the Firebase Console or via the Firebase Admin SDK. Each parameter consists of a key (a string identifier) and a value (which can be a string, number, Boolean, or JSON object). You can organize parameters into groups and set default values that apply to all users unless overridden by more specific conditions.
Key steps for creating and deploying parameters:
Define parameters: In the Firebase Console, navigate to Remote Config and add new parameters. For example, a Boolean parameter show_banner with a default value of false.
Set conditional values: Use conditions based on user properties (e.g., language, app version, audience) or custom attributes. For instance, you might set show_banner to true for users in version 2.0 or higher.
Publish changes: After configuring parameters and conditions, click “Publish” to deploy them to your app. Changes take effect immediately for new fetch requests, but clients must fetch and apply them.
Version history: Remote Config maintains a history of published versions, allowing you to roll back if needed.
For advanced use cases, you can use the Firebase Admin SDK to programmatically manage parameters, which is useful for automated deployment pipelines or dynamic updates based on server-side logic.
Once parameters are published, your client application retrieves and applies them. The Firebase SDK handles caching and background fetching, but you control when and how to apply the values. This process is typically integrated into the app’s startup sequence or triggered by specific events.
Implementation workflow on the client:
Initialize Remote Config: In your app, import the Firebase Remote Config module and set default values. Defaults ensure your app works offline or before the first fetch.
Fetch parameters: Call fetch() to retrieve the latest values from the server. You can specify a cache expiration interval (e.g., 12 hours) to control how often the app checks for updates.
Activate fetched values: Use activate() to apply the retrieved parameters to the active configuration. This step is separate from fetching to allow you to apply changes at a safe point, such as after a user action.
Access parameter values: Retrieve values using methods like getBoolean(), getString(), or getNumber(). For example, const showBanner = remoteConfig.getBoolean('show_banner').
Handle real-time updates: Optionally, use the onConfigUpdate listener to react to changes while the app is running, enabling dynamic behavior without a restart.
Best practices include setting short cache intervals during development, using defaults to avoid blank states, and fetching only when necessary to reduce network usage.
A/B Testing Configurations for Feature Rollouts
Firebase Remote Config integrates with A/B Testing to help you experiment with different configurations and measure their impact on user behavior. This is particularly useful for gradual feature rollouts, where you want to validate a change before exposing it to all users.
Decide what you want to test, such as whether a new onboarding flow increases retention.
2. Create a test in Firebase Console
Under A/B Testing, create an experiment. Choose a Remote Config parameter (e.g., onboarding_flow) and define variants (e.g., control = “old”, variant = “new”).
3. Set targeting and duration
Specify the percentage of users in each variant and the experiment duration. You can also target by app version, language, or other attributes.
4. Configure goals
Select metrics from Firebase Analytics, such as daily active users or purchase events, to evaluate performance.
5. Start the experiment
Launch the test. Remote Config automatically serves the appropriate parameter values to users in each group.
6. Analyze results
After the experiment ends, review the statistical significance and decide whether to roll out the winning variant to all users.
This approach minimizes risk by exposing changes to a small subset first, and it provides data-driven insights that guide your product decisions. Combined with Remote Config’s ability to update without releasing builds, A/B testing becomes a powerful tool for iterative improvement in your serverless application.
Monitoring Performance and Debugging with Firebase Tools
Building a serverless application with Firebase removes the burden of infrastructure management, but it also shifts the responsibility for observability onto the developer. Without direct access to server logs or runtime environments, you must rely on Firebase’s integrated monitoring suite to maintain application health and user experience. Firebase provides three primary tools—Performance Monitoring, Crashlytics, and Test Lab—that together offer a comprehensive view of how your application behaves in production and during development. By proactively using these tools, you can identify bottlenecks, fix crashes, and validate code changes before they affect users.
Setting Up Performance Monitoring to Track Latency
Firebase Performance Monitoring automatically collects trace data from your app, measuring key metrics such as HTTP request latency, screen rendering time, and custom network calls. To set it up, add the Performance Monitoring SDK to your project and enable the service in the Firebase console. The SDK captures traces without requiring manual instrumentation for basic network requests, but you can also create custom traces to monitor specific user flows, such as checkout processes or image uploads. The data is aggregated into dashboards that show percentiles (e.g., 50th, 95th, and 99th) for key attributes, allowing you to detect regressions over time. For example, if the 95th percentile response time for a Cloud Function increases from 500ms to 2 seconds, you can investigate backend configuration or database queries. Use the following checklist to ensure comprehensive coverage:
Enable automatic network request tracing for all HTTP calls.
Add custom traces for critical user interactions, such as login or payment.
Set custom attributes (e.g., user tier or app version) to segment performance data.
Configure alerts in the Firebase console to notify your team when latency exceeds thresholds.
Integrating Crashlytics for Error Reporting
Crashlytics provides real-time crash and error reporting with contextual data, helping you prioritize fixes based on impact. After adding the Crashlytics SDK, crashes are automatically logged with stack traces, device information, and user activity logs. You can also log non-fatal errors using recordError to capture recoverable issues, such as failed API calls or invalid user input, without crashing the app. Crashlytics organizes issues by severity and frequency, showing the number of unique users affected and the percentage of sessions impacted. This data enables you to focus on bugs that affect the most users first. For a serverless app, common crash sources include unhandled promises in Cloud Functions, null reference errors from Firestore data, and memory issues from large image processing. Integrate Crashlytics with your development workflow by setting up email or Slack alerts for new critical issues.
Firebase Test Lab allows you to run automated tests on real devices hosted in Google data centers, covering a range of Android and iOS versions, screen sizes, and locales. You upload your app build along with test scripts (e.g., Espresso for Android or XCTest for iOS), and Test Lab executes them while capturing logs, screenshots, and performance data. This is particularly valuable for serverless applications because it validates how your app interacts with Firebase services under different network conditions and device capabilities. For example, you can test how your app handles Firestore offline persistence or Cloud Functions with high latency. Test Lab integrates with Crashlytics and Performance Monitoring, so any crashes or slow operations detected during tests are automatically reported. Below is a comparison of the three tools to clarify their distinct roles:
Tool
Primary Purpose
Key Output
Best For
Performance Monitoring
Track latency and throughput
Percentile charts, trace data
Identifying slow network calls or UI jank
Crashlytics
Report and analyze crashes
Stack traces, user impact metrics
Fixing bugs that cause app termination
Test Lab
Automated testing on real devices
Test logs, screenshots, video recordings
Validating behavior across device configurations
By combining these tools, you create a feedback loop: Test Lab catches issues pre-release, Crashlytics monitors production errors, and Performance Tracking ensures your app remains fast and responsive. This approach is essential for building a serverless application with Firebase, where you must rely on automated observability to compensate for the lack of direct server access.
Deploying and Hosting the Application with Firebase Hosting
Firebase Hosting provides fast, secure, and reliable hosting for your serverless application. It leverages a global content delivery network (CDN) to serve your static assets and dynamic content with low latency, while also managing SSL certificates and custom domains automatically. This section walks you through configuring Firebase Hosting, deploying your app via the CLI and CI/CD pipelines, and setting up custom domains with SSL.
Configuring Firebase Hosting for Your App
Before deploying, you must configure Firebase Hosting to point to your app’s build output. Start by initializing Firebase in your project directory using the Firebase CLI:
firebase init hosting
During initialization, you will be prompted to specify the public directory (commonly public or build), whether to configure as a single-page app (rewrite all URLs to index.html), and whether to set up automatic builds with GitHub. The generated firebase.json file contains the hosting configuration. A typical configuration looks like this:
public: The directory containing your built app files.
ignore: Files or patterns to exclude from deployment.
rewrites: Rules for routing requests, essential for single-page applications.
headers: Custom HTTP headers for security or caching.
redirects: URL redirect rules for SEO or legacy paths.
After configuring, run a local preview with firebase serve to verify your app works before deploying.
Deploying with the CLI and CI/CD Pipelines
Deploying your application is straightforward with the Firebase CLI. Use the following command to push your latest build to Firebase Hosting:
firebase deploy --only hosting
This command uploads the contents of your public directory and updates the hosting configuration. For production deployments, consider integrating Firebase Hosting with a CI/CD pipeline. Popular options include GitHub Actions, GitLab CI, and CircleCI. A sample GitHub Actions workflow automates deployment on every push to the main branch:
name: Deploy to Firebase Hosting
on:
push:
branches:
- main
jobs:
deploy:
runs-on: ubuntu-latest
steps:
- uses: actions/checkout@v3
- run: npm ci && npm run build
- uses: FirebaseExtended/action-hosting-deploy@v0
with:
repoToken: '${{ secrets.GITHUB_TOKEN }}'
firebaseServiceAccount: '${{ secrets.FIREBASE_SERVICE_ACCOUNT }}'
channelId: live
projectId: your-project-id
This pipeline builds your app, authenticates with Firebase using a service account secret, and deploys to the live channel. For staging or preview deployments, you can use channel IDs like staging or a pull request number.
Setting Up Custom Domains and SSL Certificates
Firebase Hosting supports custom domains with automatic SSL certificate provisioning via Let’s Encrypt. To add a custom domain, navigate to the Firebase Console, select Hosting, and click “Add custom domain.” Enter your domain (e.g., app.example.com) and follow the verification steps, which typically involve adding a TXT record to your DNS provider. Once verified, Firebase provisions an SSL certificate automatically—no manual renewal required. The following table summarizes the DNS record types you may need:
After DNS propagation (which may take up to 48 hours), your app will be accessible via your custom domain with HTTPS enforced. Firebase also allows you to set up redirects from the www subdomain to your apex domain or vice versa, ensuring a consistent user experience. With these steps, your serverless application is globally available, secure, and professionally hosted.
Securing your Firebase resources while managing costs is critical for any serverless application. By implementing robust security rules, leveraging custom claims, and setting up budget controls, you can protect user data and avoid unexpected expenses. This section provides actionable guidelines for hardening your Firebase project and optimizing its operational efficiency.
Writing Secure Firestore and Storage Security Rules
Firestore and Cloud Storage rely on declarative security rules to control access. Always follow the principle of least privilege: grant only the minimum permissions required for each operation. For Firestore, use the request.auth object to verify user identity and resource.data to validate document fields. For example, a rule allowing users to read only their own profile documents might look like:
match /users/{userId} {
allow read, write: if request.auth != null && request.auth.uid == userId;
}
For Storage, enforce file type and size constraints using request.resource.size and request.resource.contentType. Avoid allowing public read or write access to any bucket. Instead, scope rules to specific paths and operations. Regularly test rules using the Firebase console simulator and review them after each feature update.
Using Firebase Authentication with Custom Claims
Custom claims allow you to assign role-based permissions (e.g., “admin”, “premium”) to authenticated users without storing roles in a separate database. This reduces latency and simplifies rule logic. To set claims, use the Firebase Admin SDK in a trusted server environment (e.g., Cloud Functions):
Then, in your security rules, check the claim directly:
allow write: if request.auth.token.admin == true;
Key benefits include:
Centralized role management — claims are cached and available on every request.
Reduced database reads — no need to query Firestore for each authorization check.
Granular control — combine claims with Firestore data for fine-grained access.
Estimating and Controlling Usage with Budget Alerts
Firebase bills based on usage (e.g., Firestore reads/writes, Cloud Functions invocations, Storage bandwidth). To avoid surprises, estimate your monthly costs using the Firebase Pricing Calculator. Set up budget alerts in the Google Cloud Console to receive notifications when spending approaches a threshold (e.g., 50%, 90%, 100%). Steps to configure alerts:
Go to Billing > Budgets & alerts in the Google Cloud Console.
Create a new budget and link it to your Firebase project.
Set threshold percentages and email recipients.
Additional cost optimization tips include:
Use Firestore composite indexes only when necessary to reduce read costs.
Implement Cloud Functions with minimum instances set to 0 to avoid idle costs.
Monitor real-time usage with the Firebase console dashboard and Cloud Monitoring.
By combining secure rules, custom claims, and proactive budget tracking, you build a serverless application that is both safe and cost-efficient.
Frequently Asked Questions
What is Firebase and how does it enable serverless development?
Firebase is a Google-backed platform that provides a suite of cloud services, including a NoSQL database (Firestore), authentication, cloud functions, and hosting. It enables serverless development by abstracting server management—developers write code that runs in response to events, without provisioning or scaling servers. Firebase handles infrastructure, scaling, and security automatically, allowing developers to focus on building features. Billing is based on usage, making it cost-effective for startups and enterprises alike.
What are the key components of a Firebase serverless application?
A typical Firebase serverless app uses Firestore for real-time NoSQL data storage, Firebase Authentication for user sign-in (supporting email/password, Google, Facebook, etc.), Cloud Functions for backend logic triggered by HTTP requests or database changes, and Firebase Hosting for static assets. Optionally, Cloud Storage for files and Firebase Extensions for pre-built integrations can be added. These components work together to create a fully serverless architecture.
How do I set up Firebase Authentication in a serverless app?
To set up Firebase Authentication, first enable sign-in methods (email/password, Google, etc.) in the Firebase console. Install the Firebase SDK in your app, then initialize it with your project config. Use `signInWithEmailAndPassword` or `signInWithPopup` for authentication. Firebase handles token generation and session management. For custom backend logic, use Firebase Admin SDK in Cloud Functions to verify ID tokens. Authentication integrates seamlessly with Firestore security rules to restrict data access.
What are Firebase Cloud Functions and how are they used?
Cloud Functions are serverless backend functions that run in response to events (HTTP requests, Firestore changes, user creation). Written in Node.js, they allow you to execute custom logic without managing servers. For example, you can create an HTTP function to process payments, or a Firestore trigger to send a welcome email on user signup. Functions scale automatically and are billed per invocation. They can access other Firebase services and external APIs via the Firebase Admin SDK.
How do I structure data in Firestore for a serverless app?
Firestore is a NoSQL document database that stores data in documents (key-value pairs) organized into collections. Structure data based on your app's query patterns—avoid deep nesting to prevent scaling issues. Use subcollections for related data (e.g., users/{userId}/posts). Design documents to contain the data needed for common reads (denormalization is common). Use composite indexes for complex queries. Security rules protect data at the document level based on user authentication.
What are the best practices for securing a Firebase serverless app?
Use Firebase Security Rules to restrict read/write access to Firestore and Storage based on user authentication and data validity. Validate input in Cloud Functions to prevent abuse. Enable Firebase App Check to block unauthorized client apps. Use environment variables for sensitive keys in Cloud Functions. Regularly audit rules and logs. Implement rate limiting using Cloud Functions or third-party services. Never expose Firebase Admin SDK credentials on the client side.
How does Firebase Hosting work for serverless apps?
Firebase Hosting provides fast, secure hosting for static assets (HTML, CSS, JS) with a global CDN. It integrates with Cloud Functions to serve dynamic content via rewrites (e.g., `/api/*` to a function). You can deploy with a single command (`firebase deploy`). Hosting supports custom domains, SSL certificates, and rollbacks. For server-rendered content, use Cloud Functions or Cloud Run. It's ideal for single-page applications (SPAs) and progressive web apps (PWAs).
What are the cost implications of using Firebase for serverless apps?
Firebase offers a generous free tier (Spark plan) that includes 1 GB Firestore storage, 10 GB hosting, and 125K Cloud Function invocations per month. Beyond that, the Blaze plan (pay-as-you-go) charges based on usage: Firestore reads/writes/deletes, Cloud Function compute time, and hosting bandwidth. Costs can be unpredictable if not monitored—use budgeting alerts in Google Cloud Console. For high-traffic apps, consider optimizing queries and using caching to reduce costs.
Node.js and Docker: The Complete Containerization Guide
Introduction to Node.js and Docker Containerization
Combining Node.js with Docker represents a paradigm shift in how developers build, ship, and run applications. Node.js, with its event-driven, non-blocking I/O model, excels at handling concurrent requests and building scalable network applications. Docker, on the other hand, provides lightweight, portable containers that encapsulate an application and its dependencies into a single, self-sufficient unit. Together, they solve the age-old problem of “it works on my machine” by ensuring consistent environments from development through production. This guide explores the synergy between these two technologies, focusing on practical steps to containerize Node.js applications for modern workflows.
Docker is an open-source platform that automates the deployment of applications inside isolated containers. Unlike virtual machines, which require a full guest operating system, containers share the host OS kernel while maintaining process-level separation. This makes them lightweight, fast to start, and resource-efficient. Docker uses a client-server architecture:
Docker Daemon: Runs on the host, managing containers, images, networks, and storage volumes.
Docker Client: A command-line tool that communicates with the daemon via REST API.
Docker Images: Read-only templates that define the application environment, including the base OS, Node.js runtime, dependencies, and code.
Docker Containers: Runnable instances of images, each with its own filesystem, network, and process space.
When you run a Node.js application inside a container, Docker ensures that the runtime environment (Node.js version, system libraries, environment variables) is identical regardless of the underlying host. This eliminates configuration drift and simplifies collaboration across teams.
Benefits of Containerizing Node.js Applications
Containerizing Node.js applications offers several tangible advantages for development, deployment, and scaling:
Benefit
Description
Environment Consistency
Containers bundle Node.js, npm packages, and system dependencies, ensuring the same behavior across local, staging, and production environments.
Isolation
Each container runs independently, preventing conflicts between different Node.js applications or versions on the same host.
Fast Startup
Containers start in seconds, enabling rapid iteration and horizontal scaling in orchestration tools like Kubernetes.
Simplified CI/CD
Docker images can be built, tested, and deployed consistently, reducing integration issues and deployment failures.
Resource Efficiency
Containers share the host kernel and use only the resources they need, making them more lightweight than virtual machines.
Portability
Docker images run on any system with Docker installed, including local machines, cloud VMs, and bare-metal servers.
For Node.js specifically, containerization helps manage npm dependencies, environment variables, and process lifecycle (e.g., using process managers like PM2 inside containers). It also simplifies debugging by allowing developers to replicate production-like environments locally.
Prerequisites: Docker and Node.js Installation
Before diving into containerization, ensure you have the following installed on your development machine:
Docker: Download and install Docker Desktop (Windows/Mac) or Docker Engine (Linux). Verify installation with docker --version. Docker Desktop includes Docker Compose, which is useful for multi-container applications.
Node.js: Install the latest LTS version from the official Node.js website or via a version manager like nvm. Verify with node --version and npm --version.
A Code Editor: Use Visual Studio Code, WebStorm, or any editor with Docker support (e.g., Docker extension for VS Code).
Basic Familiarity: Understanding of Node.js project structure (package.json, modules) and command-line tools.
Optional but recommended: Install Docker Compose for orchestrating multiple services (e.g., Node.js app with a database). With these prerequisites in place, you are ready to create a Dockerfile for your Node.js application and experience the benefits of containerization firsthand.
Setting Up Your Node.js Project for Docker
Properly preparing a Node.js application for Docker involves structuring the project to leverage containerization benefits like reproducibility, isolation, and efficient builds. This section covers foundational practices for dependency management, environment configuration, and application structure that align with Docker’s layered filesystem and build caching.
Creating a Basic Node.js Application Structure
Organize your project with a clear separation of concerns. A typical Node.js project for Docker includes a root-level src/ directory for application code, a tests/ directory for test files, and configuration files at the root. Avoid placing large assets or generated files inside the source tree, as they bloat Docker build contexts and invalidate layer caches. Use a .dockerignore file to exclude unnecessary files like node_modules, .git, and logs from the Docker build context. A minimal structure might look like this:
Place the main entry point, often src/index.js or src/app.js, in the src/ directory. This structure keeps the root clean and makes it easier to mount volumes for development without interfering with the container’s file system.
Managing Dependencies with package.json and package-lock.json
Docker builds rely on caching layers to speed up subsequent builds. For Node.js projects, always commit both package.json and package-lock.json to version control. The lock file ensures deterministic installations across environments, which is critical for reproducible containers. In your Dockerfile, copy these two files first, then run npm ci (instead of npm install) to install exact versions from the lock file. This strategy allows Docker to cache the npm ci layer unless the dependency files change. A practical Dockerfile snippet demonstrating this approach:
FROM node:18-alpine
WORKDIR /app
COPY package*.json ./
RUN npm ci --only=production
COPY src/ ./src/
CMD ["node", "src/index.js"]
Separating dependency installation from source code copying leverages Docker’s layer caching. When only source files change, the dependency layer remains cached, drastically reducing build time. For development, include dev dependencies by omitting --only=production, but for production builds, exclude them to minimize image size.
Environment Variables and Configuration Files
Containerized applications must handle configuration without hardcoding values. Use environment variables for settings that vary between environments (e.g., database URLs, API keys, port numbers). Node.js can read these via process.env. Avoid bundling environment-specific files like .env into the Docker image; instead, pass variables at runtime using Docker’s -e flag or a .env file with --env-file. For default values, use a configuration module that falls back to sensible defaults when variables are missing. Example approach:
Define a config.js module that reads process.env.PORT and process.env.DB_URL with defaults.
Set NODE_ENV to production in the Dockerfile for production builds.
Use Docker Compose to manage multiple environment variables cleanly for local development.
Never store secrets in the Dockerfile or image layers. Use Docker secrets or a dedicated secrets manager for sensitive data. This practice keeps the container portable and secure across staging, testing, and production environments.
Writing an Optimized Dockerfile for Node.js
Crafting an efficient Dockerfile for a Node.js application requires more than copying files and running npm install. An optimized Dockerfile reduces build times, minimizes image size, and hardens security. The following sections provide a step-by-step approach to achieving these goals using best practices for base image selection, multi-stage builds, and runtime user management.
The base image sets the foundation for your container’s size, security, and performance. For Node.js applications, the official node images on Docker Hub offer several variants. The table below compares the most common options, helping you select based on your needs for size, speed, and security.
Image Variant
Base OS
Approximate Size
Best Use Case
node:22-alpine
Alpine Linux 3.20
~125 MB
Production deployments where minimal size is critical; requires native module compilation
node:22-slim
Debian (minimal)
~190 MB
Balance of size and compatibility; pre-built binaries for common native modules
node:22 (full)
Debian (full)
~350 MB
Development and CI environments needing build tools, compilers, and full package support
node:22-bookworm-slim
Debian 12 (slim)
~200 MB
Security-focused production with long-term support and reduced attack surface
For most production Node.js applications, node:22-alpine is the recommended choice because of its small footprint and reduced vulnerability surface. However, if your application uses native modules that require compilation (e.g., sharp, bcrypt), the node:22-slim variant may be more reliable due to its inclusion of essential build tools like gcc and make.
Implementing Multi-Stage Builds for Smaller Images
Multi-stage builds allow you to separate the build environment from the runtime environment, drastically reducing the final image size. The typical pattern uses a first stage for installing dependencies and compiling assets, and a second stage that copies only the production necessities. Follow these steps:
Stage 1: Build – Start with a full base image (e.g., node:22) to install all dependencies (including devDependencies) and run build commands like npm run build.
Stage 2: Production – Start with a lean base image (e.g., node:22-alpine), copy only the package.json, package-lock.json, and the dist or build folder from the first stage, then run npm ci --only=production to install runtime dependencies.
Example optimized multi-stage Dockerfile structure:
# Stage 1: Build
FROM node:22 AS builder
WORKDIR /app
COPY package*.json ./
RUN npm ci
COPY . .
RUN npm run build
# Stage 2: Production
FROM node:22-alpine
WORKDIR /app
COPY --from=builder /app/package*.json ./
RUN npm ci --only=production
COPY --from=builder /app/dist ./dist
EXPOSE 3000
USER node
CMD ["node", "dist/server.js"]
This approach reduces the final image size by excluding build tools, source maps, and development dependencies that are unnecessary at runtime.
Security Considerations: Avoid Running as Root
Running a Node.js application as the root user inside a container is a critical security risk. If an attacker exploits a vulnerability in your application, they gain root access to the container, which can lead to host compromise through container escape. Docker’s official Node.js images include a non-root user called node (UID 1000). To enforce this:
Add USER node in your Dockerfile after copying files and before the CMD instruction.
Ensure that any directories or files your application writes to (e.g., logs, uploads) have appropriate ownership or permissions set during the build. Use RUN chown -R node:node /app/data if needed.
Never use RUN npm install -g without the --user flag, as global installations often require root. Instead, install tools locally or use npx.
Additional security best practices include pinning specific base image tags (e.g., node:22.0.0-alpine instead of node:22) to avoid unexpected updates, and regularly scanning your images with tools like Docker Scout or Trivy for known vulnerabilities. By following these guidelines, you ensure your Node.js container runs with the least privilege necessary, reducing the attack surface significantly.
Using .dockerignore to Reduce Build Context
When you build a Docker image, the Docker client sends a build context—the directory containing your Dockerfile and any referenced files—to the Docker daemon. By default, this context includes every file and subdirectory in the specified path, which can inadvertently transfer gigabytes of irrelevant data, such as node_modules, logs, or environment files. A .dockerignore file solves this by instructing Docker to exclude specific files and directories from the context, leading to faster builds, smaller image sizes, and improved security by preventing sensitive information from reaching the daemon.
Files and Directories to Exclude by Default
For any Node.js project, certain files and directories are almost never needed inside a Docker build context. Excluding them by default is a best practice. The following list covers the most common candidates:
node_modules – Rebuilt inside the container via npm install; including them bloats the context and may cause platform-specific issues.
.git – Contains the entire version history; unnecessary for production builds and a security risk if secrets are committed.
.env and .env.* – Environment variable files often hold API keys or database credentials; never include them in the build context.
npm-debug.log*, yarn-error.log* – Debug logs from package managers; irrelevant to the container runtime.
.dockerignore itself – While including it won’t break builds, it’s redundant to send the ignore file to the daemon.
Dockerfile and .dockerignore – These are read by the client, not needed in the context after processing.
dist or build (if generated) – May be stale; regenerate inside the container for consistency.
coverage, .nyc_output – Test artifacts; not required for production images.
Examples of .dockerignore for Node.js Projects
A well-crafted .dockerignore file balances exclusion breadth with project-specific needs. Below is a practical example suitable for most Node.js applications:
# Dependencies
node_modules
# Version control
.git
.gitignore
# Environment files
.env
.env.*
!.env.example
# Logs
npm-debug.log*
yarn-debug.log*
yarn-error.log*
# Build artifacts
dist
build
.next
# Test and coverage
coverage
.nyc_output
# IDE and editor files
.vscode
.idea
*.swp
*.swo
# OS files
.DS_Store
Thumbs.db
# Docker files (redundant in context)
Dockerfile
.dockerignore
Note the use of !.env.example—this negation pattern allows a template environment file while still excluding actual .env files. Adjust the list to include any project-specific directories like tmp or uploads that should not enter the context.
Excluding unnecessary files directly reduces the build context size, which has two primary benefits. First, it shortens the time Docker takes to tar and send the context to the daemon, especially noticeable in CI/CD pipelines or over slow network connections. Second, a smaller context means that Docker’s layer caching works more efficiently—when you change a source file, Docker invalidates only the affected layer, but if you previously included node_modules (which changes frequently), cache misses become more common, slowing down subsequent builds.
Regarding image size, .dockerignore does not directly shrink the final image—that depends on what you COPY into the image. However, by excluding files like .git or node_modules, you prevent them from being accidentally copied into an intermediate layer, which could otherwise be committed into the final image if not cleaned up. This practice also reduces the risk of including secrets or unnecessary binaries. For a typical Node.js project, a .dockerignore file can reduce the build context from hundreds of megabytes (e.g., a node_modules folder of 200 MB) to a few kilobytes, making builds faster and more predictable.
Docker Compose for Multi-Container Node.js Applications
When developing Node.js applications that depend on databases, caching systems, or message brokers, managing each service manually becomes error-prone and time-consuming. Docker Compose solves this by letting you define and run multi-container environments with a single YAML configuration file. This approach ensures every developer on your team uses identical service versions, networking, and storage configurations, eliminating the classic “it works on my machine” problem.
The heart of Docker Compose is the docker-compose.yml file, where you declare each container as a service. A typical Node.js application with a database requires at least two services: one for your app and one for the data store. Below is a minimal but complete example for a Node.js app paired with PostgreSQL:
Build context: Use build: . to build your Node.js image from a local Dockerfile, or image to pull a prebuilt image.
Port mapping: Map host ports to container ports (e.g., "3000:3000").
Environment variables: Pass configuration like database credentials and hostnames. Use DB_HOST=db because Docker Compose creates a network where service names act as hostnames.
Dependency ordering: The depends_on directive ensures the database container starts before the app container, though your app should still implement retry logic for readiness.
Linking Node.js with a PostgreSQL or MongoDB Container
Connecting your Node.js application to a database container requires consistent configuration across both sides. For PostgreSQL, your Node.js code should read environment variables and connect using the service name as the host:
Your Node.js service then connects using the service name mongo as the host. The depends_on directive ensures the database starts first, but consider adding a health check to wait for the database to accept connections before your app starts querying.
Using Volumes for Persistent Data and Hot Reloading
Volumes serve two critical purposes in development: preserving database data across container restarts, and enabling hot reloading for your Node.js application code. For persistent database storage, add a named volume to your database service:
This volume pgdata survives container removal, so your development data remains intact after docker-compose down.
For hot reloading, mount your local project directory into the Node.js container. This allows tools like nodemon or ts-node-dev to detect file changes and restart your application automatically:
Notice the second volume entry /app/node_modules — this is an anonymous volume that prevents your local node_modules from overriding the container’s installed dependencies, which may differ due to platform-specific native modules. This pattern gives you instant feedback during development without rebuilding the image.
For optimal performance, combine both volume types: one named volume for database persistence, and one bind mount for your application code with hot reloading. This setup mirrors production-like data handling while maintaining a rapid development cycle.
Managing Node.js Processes Inside Containers
Running Node.js inside Docker containers introduces unique process management challenges. Containers are designed to run a single primary process, but Node.js applications often require handling multiple concurrent connections, graceful shutdowns, and resource constraints. Following best practices ensures reliability, performance, and maintainability in production environments.
Using PM2 or Node.js Built-in Clustering
Node.js runs on a single thread by default, which limits its ability to fully utilize multi-core CPUs inside containers. Two primary approaches exist for scaling Node.js processes horizontally within a container: PM2 and the built-in cluster module.
PM2 (Process Manager 2): A production-grade process manager that supports clustering, automatic restarts, and zero-downtime deployments. It can fork multiple worker processes equal to the number of CPU cores available in the container.
Node.js Built-in Cluster: A native module that creates child processes (workers) sharing the same server port. It requires manual setup but avoids external dependencies.
For most Dockerized Node.js applications, PM2 is recommended due to its simplicity and built-in features like log management and health checks. Below is a practical example of a Dockerfile using PM2 with clustering:
In this setup, pm2-runtime runs PM2 in the foreground (essential for Docker), and --instances max spawns one worker per CPU core. The ecosystem.config.js file defines your app’s entry point and environment variables.
Graceful Shutdown with SIGTERM and SIGKILL
When Docker stops a container, it sends a SIGTERM signal to the main process (PID 1). After a grace period (default 10 seconds), it sends SIGKILL to forcibly terminate the process. Without proper handling, this can drop active connections, corrupt data, or leave resources unclosed.
Implementing graceful shutdown involves listening for SIGTERM and performing the following steps before exiting:
Stop accepting new requests (e.g., close the HTTP server).
Wait for existing requests to complete (set a timeout, typically 5–30 seconds).
Close database connections, message queues, and file handles.
Flush logs and emit final metrics.
Exit with code 0 after cleanup.
Example with Node.js built-in HTTP server:
const server = require('http').createServer((req, res) => {
// Handle request
});
process.on('SIGTERM', () => {
console.log('SIGTERM received, shutting down gracefully...');
server.close(() => {
console.log('HTTP server closed');
// Close database connections here
process.exit(0);
});
// Force shutdown after 10 seconds
setTimeout(() => process.exit(1), 10000);
});
server.listen(3000);
When using PM2, the process manager automatically handles SIGTERM and forwards it to workers, but you should still implement your own shutdown logic in the application code.
Monitoring and Logging Node.js Processes
Containers are ephemeral, so traditional monitoring approaches (SSH, file-based logs) are ineffective. Instead, adopt these practices for visibility:
Area
Best Practice
Tools/Approach
Logging
Write all logs to stdout/stderr
Use console.log, pino, or winston with JSON format
Health Checks
Provide /health endpoint
Return 200 with status; configure Docker HEALTHCHECK
Metrics
Expose Prometheus metrics
Use prom-client library; scrape via Docker or orchestration
Process Monitoring
Track CPU, memory, and event loop lag
PM2 built-in dashboard; process.resourceUsage()
For logging, ensure your Node.js application outputs structured logs to stdout in JSON format. This allows Docker’s logging driver (e.g., json-file, gelf, or awslogs) to collect and forward them to centralized systems like ELK or Datadog. Avoid writing logs to files inside the container, as they are lost when the container stops.
For health checks, add a simple endpoint that returns HTTP 200 when the process is ready. Then define a HEALTHCHECK instruction in your Dockerfile:
This ensures Docker can detect and restart unhealthy containers automatically. By combining these practices, you can run Node.js processes inside Docker containers with confidence, knowing they will handle traffic, shutdowns, and diagnostics reliably.
Networking and Port Mapping for Node.js Containers
Configuring Docker networking correctly is essential for exposing your Node.js applications to external traffic and enabling secure communication between microservices. This section covers port mapping, container-to-container networking, and strategies for handling dynamic ports and reverse proxies in production.
Exposing Ports with EXPOSE and -p Flags
Docker provides two mechanisms for managing ports: the EXPOSE instruction in the Dockerfile and the -p (or --publish) flag at runtime. Understanding their distinct roles prevents connectivity issues.
EXPOSE (Dockerfile): Documents the port your Node.js app listens on (e.g., EXPOSE 3000). It is informational only—does not publish the port or make it accessible outside the container. Use it as documentation for maintainers.
-p flag (docker run): Maps a container port to a host port, making the app reachable from outside. Syntax: -p host_port:container_port. For example, -p 8080:3000 maps host port 8080 to container port 3000.
Common practice: include EXPOSE in your Dockerfile for clarity, then use -p in your run command or Compose file to actually bind ports. In production, bind to 127.0.0.1 (e.g., -p 127.0.0.1:8080:3000) when using a reverse proxy to prevent direct external access.
Custom Networks for Inter-Container Communication
When your Node.js application needs to talk to other containers (e.g., a database or Redis cache), the default bridge network is not ideal. Create custom user-defined networks for better isolation and service discovery.
In your Node.js code, connect to the database using the container name as hostname (e.g., mongoose.connect('mongodb://mongo-db:27017/mydb')). This eliminates hardcoded IPs.
Handling Dynamic Ports and Reverse Proxies
Production Node.js deployments often use dynamic port allocation or reverse proxies for load balancing and SSL termination. Two common scenarios require specific attention.
Dynamic port allocation: When using -P (capital P) to map container ports to random high-numbered host ports, your Node.js app must read the assigned port from environment variables. Set PORT=0 in the container and have your app listen on that dynamic port. Use docker port <container> to discover the actual mapping.
Reverse proxy integration: For production, place a reverse proxy (Nginx, Traefik, or Caddy) in front of your Node.js containers. Configure the proxy to:
Listen on standard ports (80/443) on the host.
Forward requests to the Node.js container’s internal port (e.g., proxy_pass http://node-api:3000;).
Strip the X-Forwarded-* headers correctly so your Node.js app knows the original client IP and protocol.
In your Node.js middleware (e.g., Express), enable trust proxy: app.set('trust proxy', 1). This ensures req.ip returns the client IP, not the proxy’s IP. Avoid exposing the Node.js container’s port directly to the internet—bind the proxy to the host’s public interface instead.
For Docker Compose setups, define a shared network between the proxy and Node.js services. Example snippet:
This pattern keeps your Node.js containers secure and scalable while maintaining clean networking.
Testing and Debugging Node.js in Docker Containers
Containerizing a Node.js application introduces new considerations for testing and debugging workflows. The isolated nature of containers can obscure runtime behavior, but with deliberate strategies, you can achieve the same fidelity and speed as local development. This section covers three critical practices: running unit tests inside containers, attaching debuggers with Node.js Inspector, and using Docker volumes to enable live code changes. Each technique preserves the reproducibility of containers while maintaining developer productivity.
Running Unit Tests in a Dockerized Environment
To run unit tests reliably inside a Docker container, you must ensure the test runner and all dependencies are available in the image. The standard approach involves creating a separate Dockerfile stage or a dedicated docker-compose service for testing. This isolates test execution from production builds and prevents test utilities from bloating the final image.
Begin by adding a test script to your package.json, such as "test": "jest --ci --coverage". Then, in your Docker setup, you can execute tests using a command like docker run --rm my-app:latest npm test. For more complex setups, a docker-compose.test.yml file can define a service that overrides the default command:
Key considerations for containerized unit tests include:
Dependency isolation: Always install devDependencies in the test stage to ensure test runners and assertion libraries are present.
Database or service mocking: Use in-memory databases or mock services to avoid external dependencies during unit tests.
CI/CD integration: In continuous integration pipelines, run the test service as a step before building the production image, failing the build if tests do not pass.
For larger test suites, consider using multi-stage builds where the test stage copies only source code and package.json, runs tests, and then discards the layer. This keeps the final image lean while enforcing test coverage.
Attaching Debuggers with Node.js Inspector and Docker
Node.js applications running in Docker can be debugged using the built-in Node.js Inspector, which exposes a WebSocket-based debugging protocol. To attach a debugger, you must start the container with the --inspect flag and expose the appropriate port. For example:
docker run -p 9229:9229 --rm my-app:latest node --inspect=0.0.0.0:9229 app.js
The --inspect=0.0.0.0:9229 flag binds the inspector to all network interfaces, allowing external connections from your host machine. Once the container is running, you can attach Chrome DevTools by navigating to chrome://inspect and adding the container’s IP and port, or use VS Code’s debugger configuration with a launch.json that specifies the remote address:
For production-like debugging, use the --inspect-brk flag to pause execution at the first line, giving you time to connect the debugger before the application starts. Note that exposing the inspector port in production environments is a security risk; restrict access using Docker network configurations or SSH tunnels.
To illustrate the trade-offs between common debugging approaches, consider the following comparison:
Docker volumes enable live code changes by mounting your local source directory into the container, so edits are reflected immediately without rebuilding the image. This is essential for rapid development and debugging cycles. The basic command for a development container with a volume mount is:
docker run -v $(pwd):/app -v /app/node_modules -p 3000:3000 my-app:dev
The second volume mount (/app/node_modules) is a named or anonymous volume that prevents the local node_modules from overriding the container’s installed dependencies, which may differ due to operating system or architecture differences. For Node.js applications, this pattern avoids “module not found” errors when native modules are compiled for a different platform.
To fully leverage live code changes, combine volumes with a process manager like nodemon or pm2 that restarts the application on file changes. In your Dockerfile’s development stage, install nodemon globally and set the command to nodemon app.js. Then, in your docker-compose.yml for development:
This setup provides both live reloading and debugger attachment, creating an efficient inner loop for development. Be mindful of file system performance on macOS and Windows when using bind mounts; consider using Docker’s delegated or cached mount options (e.g., :cached on macOS) to improve speed. For large codebases, exclude node_modules and build artifacts from the mount using a .dockerignore file to prevent unnecessary file-watching events.
Deploying Node.js Docker Containers to Production
Transitioning a containerized Node.js application from development to production requires careful orchestration of image management, platform selection, and automated pipelines. This guide covers the essential steps to deploy robust, scalable Node.js Docker containers in production environments.
Pushing Images to Docker Hub or Private Registries
Before deployment, container images must be stored in a registry. Docker Hub is the default public registry, while private registries (e.g., AWS ECR, Google Container Registry, Azure Container Registry) offer enhanced security and compliance for enterprise workloads.
To push an image, first tag it with the registry URL:
docker tag my-node-app:latest docker.io/yourusername/my-node-app:v1.0.0
docker push docker.io/yourusername/my-node-app:v1.0.0
For private registries, authenticate first using docker login or cloud-specific CLI tools. Consider these best practices:
Tag images semantically (e.g., v1.2.3, latest, sha-abc123) for traceability.
Use multi-stage builds to minimize image size by separating build and runtime dependencies.
Scan images for vulnerabilities using tools like Docker Scout, Trivy, or Snyk before pushing.
Implement retention policies to prune old or untagged images, reducing storage costs.
Deploying with Kubernetes or Docker Swarm
Container orchestrators manage scaling, load balancing, and self-healing for Node.js applications. Kubernetes is the industry standard for complex, multi-service architectures, while Docker Swarm offers simpler native orchestration for smaller teams.
Feature
Kubernetes
Docker Swarm
Setup complexity
High
Low
Scaling granularity
Pod-level with HPA
Service-level
Load balancing
Ingress controllers + Services
Built-in mesh routing
Rolling updates
Configurable strategies
Simple update delays
For Kubernetes, create a deployment manifest that references your registry image:
Integrate secret management for registry credentials and cluster access tokens to maintain security. Monitor deployments with logging and alerting to catch failures early.
Performance Tuning and Security Hardening
Optimizing a Node.js container for production requires a dual focus: ensuring the application runs efficiently under load and protecting it from common vulnerabilities. This guide provides advanced techniques for tuning container performance and hardening the security posture of your Node.js and Docker stack.
Limiting Resource Usage with Docker CPU and Memory Constraints
Without resource limits, a single Node.js container can consume all host CPU or memory, causing instability for other containers or the host OS. Docker provides built-in flags to cap usage, which you should apply in both docker run commands and docker-compose.yml files. For memory, use the --memory flag (e.g., --memory="512m") to set a hard limit. For CPU, use --cpus to specify the number of CPU cores the container can use (e.g., --cpus="1.5"). In Node.js, also set the --max-old-space-size flag (e.g., NODE_OPTIONS="--max-old-space-size=384") to align the V8 garbage collector with the container memory limit, preventing out-of-memory crashes. Below is a comparison of key parameters:
Parameter
Docker Flag
Example
Node.js Equivalent
Memory limit
--memory
--memory="512m"
--max-old-space-size=384
CPU limit
--cpus
--cpus="1.5"
None directly
Memory reservation
--memory-reservation
--memory-reservation="256m"
None directly
Use docker stats to monitor real-time usage and adjust limits based on load testing results.
Scanning Images for Vulnerabilities with Trivy or Snyk
Container images often include outdated base layers or dependencies with known vulnerabilities. Integrate scanning into your CI/CD pipeline. Trivy is a fast, open-source scanner that detects vulnerabilities in OS packages (Alpine, Debian) and application dependencies (npm, yarn). Run it with: trivy image your-node-app:latest. Snyk offers a broader set of features, including continuous monitoring and integration with Docker registries. Use Snyk with: snyk container test your-node-app:latest. For maximum coverage, scan both the final image and the intermediate build layers. Prioritize fixes for critical and high-severity vulnerabilities, and rebuild images regularly to incorporate security patches.
Using Secrets Management for Sensitive Data
Never hardcode secrets like database passwords, API keys, or JWT tokens in Dockerfiles or environment files. Docker provides native secrets management in Swarm mode. For standalone containers, use environment variables injected at runtime via a secure mechanism. In docker-compose.yml, reference external secret files:
Create a secret file (e.g., db_password.txt) with the sensitive value.
Define secrets in the compose file under the secrets top-level key.
Mount the secret to /run/secrets/ inside the container.
Alternatively, use a dedicated secrets manager like HashiCorp Vault or AWS Secrets Manager, and retrieve secrets via environment variables set at container startup. Avoid storing secrets in image layers by using multi-stage builds and never copying secret files into the final image. For example, use a build argument to pass a token temporarily, then unset it in the final stage:
# Dockerfile
FROM node:18-alpine AS builder
ARG NPM_TOKEN
RUN echo "//registry.npmjs.org/:_authToken=${NPM_TOKEN}" > .npmrc
RUN npm install
FROM node:18-alpine
COPY --from=builder /app /app
ENV NODE_ENV=production
CMD ["node", "app.js"]
This approach ensures secrets are not persisted in the final image layers, reducing exposure risk.
Frequently Asked Questions
Why use Docker with Node.js?
Docker containerizes Node.js applications, ensuring consistent environments from development to production. It eliminates 'it works on my machine' issues by packaging the app, dependencies, and runtime into a portable container. This simplifies deployment, scaling, and collaboration. Docker also isolates processes, improves resource utilization, and integrates with orchestration tools like Kubernetes for managing microservices.
How to create a Dockerfile for Node.js?
Start with an official Node.js base image (e.g., FROM node:18-alpine). Set the working directory (WORKDIR /app). Copy package.json and package-lock.json, then run npm install to cache dependencies. Copy the rest of the application code. Expose the app port (EXPOSE 3000). Define the start command (CMD ["node", "app.js"]). Use .dockerignore to exclude node_modules and logs for smaller builds.
What are Docker multi-stage builds for Node.js?
Multi-stage builds optimize Docker images by separating build and runtime stages. For Node.js, the first stage installs dev dependencies and compiles assets. The second stage copies only production artifacts (e.g., built code and production node_modules) to a slim base image. This reduces image size significantly, improving security and deployment speed. It's ideal for production deployments.
How to manage environment variables in Docker Node.js?
Use Docker's –env-file flag to pass a file with key-value pairs, or set individual variables with -e. In Docker Compose, define them under the environment or env_file key. Node.js accesses them via process.env. For secrets, use Docker secrets or a vault service. Never hardcode sensitive values in Dockerfiles or images.
What are best practices for Node.js Docker images?
Use official, slim base images (e.g., node:18-alpine). Leverage .dockerignore to exclude unnecessary files. Run npm install only for production dependencies (npm ci –only=production). Implement multi-stage builds. Avoid running as root—create a non-root user. Set NODE_ENV=production. Use health checks (HEALTHCHECK instruction). Tag images with meaningful versions.
How to scale Node.js containers with Docker Compose?
Define services in docker-compose.yml. Use the 'replicas' key under deploy in version 3+ to specify instance count. For example, deploy: replicas: 3. Combine with a load balancer (like nginx) to distribute traffic. Ensure your Node.js app is stateless and uses external storage for sessions or data to allow horizontal scaling.
How to handle logging in Docker Node.js containers?
Write logs to stdout/stderr (console.log/console.error) so Docker collects them. Docker's logging drivers (json-file, syslog, etc.) forward logs to external systems. Use structured logging libraries (like winston or pino) for parseable output. Avoid logging to files inside containers, as they complicate log management and can fill disk.
How to debug Node.js in a Docker container?
Enable the Node.js inspector by passing –inspect=0.0.0.0:9229 to node. Map the port in docker-compose or run with -p 9229:9229. Use Chrome DevTools or VS Code's debugger to attach. For production, avoid exposing the debug port. Alternatively, use docker exec -it /bin/sh to inspect the container interactively.
Firebase Cloud Functions are a serverless compute service that automatically runs backend code in response to events triggered by Firebase features and HTTPS requests. Part of the Firebase ecosystem, they allow developers to extend app functionality without provisioning or managing any server infrastructure. Written in Node.js (JavaScript or TypeScript), each function is a self-contained piece of logic deployed to Google Cloud’s infrastructure. When an event occurs—such as a user signing up, a file being uploaded to Cloud Storage, or a database write—the corresponding function executes, processes the data, and can trigger further actions. Functions scale automatically from zero to thousands of concurrent invocations based on demand, and you pay only for compute time consumed while the code runs.
Key Benefits and Use Cases
Cloud Functions provide several distinct advantages for mobile and web developers:
No server management: Google handles all scaling, patching, and uptime, freeing you to focus on product logic.
Event-driven architecture: Functions respond to real-time changes in Firestore, Realtime Database, Authentication, Cloud Storage, and more.
Cost efficiency: Pay only for execution time (measured in 100-millisecond increments) and invocations, with a generous free tier.
Seamless integration: Works natively with Firebase SDKs and Google Cloud services, including Pub/Sub, Cloud Tasks, and Vertex AI.
Rapid development: Deploy code from the command line in seconds, and use local emulators for testing.
Common use cases include sending push notifications after a Firestore write, generating thumbnails for uploaded images, sanitizing user input during sign-up, calling a third-party API on a schedule, and building custom REST APIs via HTTPS functions.
How Cloud Functions Fit into Firebase and Google Cloud
Firebase Cloud Functions sit at the intersection of Firebase’s client-focused services and Google Cloud’s enterprise-grade infrastructure. They act as the “glue” that connects client-side Firebase products to backend services. For example:
Firebase Product
Cloud Function Trigger
Typical Action
Authentication
User creation/deletion
Send welcome email, create user profile
Cloud Firestore
Document write/update/delete
Aggregate data, trigger notifications
Cloud Storage
File upload/delete
Compress images, run virus scan
Realtime Database
Data change
Sync with external systems
Pub/Sub (Google Cloud)
Topic message
Process async workloads, schedule tasks
Because Cloud Functions run inside Google Cloud Functions (the same serverless platform used by enterprise teams), they can access any Google Cloud API—such as BigQuery, Cloud Translation, or Cloud Vision—with the same credentials. This means you can start with a simple Firebase trigger and later expand to complex data pipelines without changing your deployment model. The integration is bidirectional: Firebase services emit events that functions consume, and functions can write back to Firebase databases or storage, completing the loop. For developers already using Firebase, Cloud Functions are the natural next step for adding backend logic without leaving the ecosystem.
Setting Up Your Firebase Project for Cloud Functions
Before writing your first cloud function, you must establish a properly configured Firebase project and development environment. This process involves creating a Firebase project, installing the Firebase CLI, initializing the project locally, and setting up Node.js with TypeScript support. Following these steps ensures your functions deploy correctly and integrate seamlessly with other Firebase services.
Prerequisites: Firebase Account and CLI Installation
To begin, you need a Google account to access the Firebase Console. Visit console.firebase.google.com and create a new project or select an existing one. Next, install the Firebase CLI globally using npm:
Select project: Choose the Firebase project you created earlier.
Language: Select JavaScript or TypeScript. For this guide, choose TypeScript.
ESLint: Decide whether to include linting (recommended for code quality).
Install dependencies: Confirm when prompted to install npm packages.
After initialization, your project structure will include:
functions/ directory containing the src/ folder, package.json, tsconfig.json, and eslintrc.js (if chosen).
firebase.json configuration file at the root.
.firebaserc file referencing your project alias.
If you need to add Cloud Functions to an existing project (e.g., one with Firestore or Hosting), run firebase init functions from that project’s root directory. The CLI will merge configurations without overwriting other services.
Configuring Node.js and TypeScript Support
With TypeScript selected, the tsconfig.json file in the functions directory is preconfigured but may need adjustments. Open it and ensure the following settings are present:
To test your setup, create a simple function in functions/src/index.ts:
import * as functions from 'firebase-functions';
export const helloWorld = functions.https.onRequest((request, response) => {
response.send("Hello from Firebase Cloud Functions!");
});
Then build and run the local emulator:
npm run serve
You should see the emulator start and your function listed. Open the provided URL in a browser to verify it works. If you encounter errors, check that Node.js version is compatible and that all dependencies are installed (npm install inside the functions directory).
With this setup complete, you are ready to write and deploy more complex cloud functions. The emulator allows local testing, saving you time and reducing costs during development.
Understanding Cloud Functions Triggers
Firebase Cloud Functions are event-driven, meaning they execute in response to specific changes or events within your Firebase project or external HTTP requests. Each trigger type defines the source of the event and the payload delivered to your function. Choosing the correct trigger is essential for building efficient, scalable serverless applications. Below is a detailed breakdown of the primary trigger categories, including how they work and when to use them.
HTTP Triggers for RESTful Endpoints
HTTP triggers allow Cloud Functions to respond to standard HTTP requests (GET, POST, PUT, DELETE, PATCH, OPTIONS). You deploy a function that listens on a unique URL, and it can be invoked from any client that can make an HTTP request, including web browsers, mobile apps, or third-party services. These triggers are ideal for building RESTful APIs, webhooks, or lightweight server-rendered content.
When using HTTP triggers, you must handle request and response objects explicitly. Firebase provides a convenience wrapper via the onRequest method, which accepts Express.js-like request and response parameters. You can also use onCall for callable functions, which automatically handle authentication and CORS for Firebase clients. Key considerations include:
Authentication: Use Firebase Authentication SDK tokens or custom logic to secure endpoints.
CORS: Enable cross-origin requests explicitly for web clients.
Timeout: HTTP functions have a maximum timeout of 9 minutes for the 1st generation and up to 60 minutes for the 2nd generation.
Payload size: Incoming request body size is limited to 10 MB for the 1st generation and 32 MB for the 2nd generation.
Realtime Database and Firestore Triggers
These triggers fire when data changes in your Firebase Realtime Database or Cloud Firestore. They are critical for keeping data synchronized, triggering downstream workflows, or enforcing data validation. For Realtime Database, use onWrite, onCreate, onUpdate, and onDelete events. For Firestore, the equivalent triggers are onDocumentWritten, onDocumentCreated, onDocumentUpdated, and onDocumentDeleted.
A key difference lies in the data structure and event context. Realtime Database triggers receive a DataSnapshot with the full database state, while Firestore triggers provide a DocumentSnapshot for the changed document. Both support wildcard parameters in the document path to capture dynamic IDs. Important behaviors:
Event ordering: Firestore triggers are ordered by document path and event time; Realtime Database triggers are not strictly ordered.
Multiple writes: For batch writes in Firestore, each document change triggers an independent function invocation.
Rate limits: Both databases impose invocation limits: Firestore triggers can handle up to 1,000 writes per second per database, while Realtime Database triggers handle about 1,000 concurrent writes per database instance.
Beyond databases and HTTP, Firebase Cloud Functions support triggers for authentication events, Cloud Storage changes, and other Firebase services. These allow you to automate user management, media processing, and analytics tasks.
Authentication triggers fire on user lifecycle events: onCreate (when a new user signs up) and onDelete (when an account is removed). You can use these to initialize user profiles, send welcome emails, or clean up associated data. The function receives a UserRecord object containing user metadata.
Cloud Storage triggers respond to file uploads, updates, and deletions in your Firebase Storage bucket. Use onObjectFinalized (for new or updated objects), onObjectArchived, onObjectDeleted, and onObjectMetadataUpdated. The event provides a StorageObject with file properties like size, content type, and bucket path. Common use cases include image resizing, video transcoding, and malware scanning.
Other event triggers include:
Remote Config:onConfigUpdated triggers when configuration values change.
Test Lab:onTestMatrixCompleted fires after a test matrix finishes.
Analytics: (Via Google Analytics for Firebase, requires custom event logging and onLog handlers).
Each of these triggers follows the same pattern: a function is exported, registered with the appropriate event type, and receives a context object with event-specific metadata. This diversity enables you to build comprehensive, event-driven architectures across the entire Firebase ecosystem.
Writing Your First Cloud Function
Creating your first Firebase Cloud Function is a straightforward process that introduces you to the core workflow of serverless development. This walkthrough covers the essential steps: defining a function, handling HTTP requests and responses, and deploying it to Firebase’s infrastructure. By the end, you will have a live, testable endpoint that responds to web requests, providing a practical foundation for more complex serverless applications.
Creating a Basic HTTP Function
Begin by ensuring you have the Firebase CLI installed and a Firebase project initialized. The standard setup places functions in a functions directory. To create an HTTP function, you define it in index.js (or index.ts for TypeScript) using the functions.https.onRequest handler. This handler receives an Express-style request and response object.
Exports: The function name (helloWorld) becomes the endpoint name after deployment.
Handler:onRequest is used for HTTP triggers; other triggers exist for database events, authentication, etc.
Response: Always send a response (e.g., response.send() or response.json()) to avoid timeouts.
Handling Request and Response Objects
The request and response objects provide full access to HTTP details. The request object contains properties such as query, body, headers, and method, allowing you to parse user input. The response object lets you control status codes, headers, and the body sent back to the client.
Here is a practical example that reads a query parameter and returns a customized response:
Once your function is written, deploying it requires only a single command from your project root. The Firebase CLI packages your code and uploads it to Google Cloud Functions. Use the following command to deploy only the HTTP function:
firebase deploy --only functions:helloWorld
After deployment, the CLI outputs the function’s URL, typically in the format https://REGION-PROJECT.cloudfunctions.net/helloWorld. You can test it immediately using a browser, curl, or tools like Postman. For example, with curl:
curl https://REGION-PROJECT.cloudfunctions.net/helloWorld
# Output: {"message":"Hello from Firebase!"}
To streamline testing during development, use the Firebase Emulator Suite. Start the emulator with firebase emulators:start, which runs functions locally on localhost, allowing you to test without deploying. This approach speeds up iteration and reduces costs. Once satisfied, deploy the function to production using the command above. Monitor logs with firebase functions:log to debug any issues in real time.
Working with Firebase Realtime Database and Firestore
Firebase Cloud Functions enable you to execute backend logic in response to changes in your Firebase databases. By writing functions that trigger on database write events, you can automate data validation, transformation, and synchronization tasks. This guide walks through the essential patterns for working with both the Realtime Database and Firestore, ensuring your data stays consistent and secure.
Cloud Functions can listen to specific events on database references. For Firestore, use the functions.firestore.document trigger. For Realtime Database, use functions.database.ref. Each trigger can respond to onCreate, onUpdate, onDelete, or onWrite events. The following table summarizes the key differences:
Respond to document-level changes with access to previous and new snapshots
Realtime Database
functions.database.ref('/path/{node}')
onCreate, onUpdate, onDelete, onWrite
Handle raw JSON changes with snapshot.val() for data access
When writing a listener, always include error handling. For example, a Firestore onWrite function might look like:
exports.handleUserWrite = functions.firestore
.document('users/{userId}')
.onWrite(async (change, context) => {
// Access new data
const newData = change.after.data();
// Access old data
const oldData = change.before.data();
// Add business logic here
});
Performing Data Validation and Sanitization
Use Cloud Functions to enforce data integrity before it reaches your application. Common validation tasks include:
Type checking: Ensure fields are of expected types (e.g., string, number, boolean).
Range validation: Verify numeric values fall within acceptable limits.
Required fields: Reject writes that omit mandatory fields.
Sanitization: Strip HTML tags or trim whitespace from user-generated content.
For example, a Realtime Database onWrite function that validates a product price might be:
exports.validateProduct = functions.database
.ref('/products/{productId}')
.onWrite(async (change, context) => {
const data = change.after.val();
if (!data || typeof data.price !== 'number' || data.price < 0) {
// Delete the invalid entry
return change.after.ref.remove();
}
// Sanitize the name field
const sanitizedName = data.name.replace(/<[^>]*>/g, '').trim();
return change.after.ref.update({ name: sanitizedName });
});
Always use change.after.ref to modify the triggered node. Avoid making additional database calls inside the same function unless necessary, as they may cause infinite loops.
Syncing Data Between Realtime Database and Firestore
You may need to maintain synchronized copies of data across both databases. For instance, keep user profile data in Firestore for complex queries, and a lightweight version in Realtime Database for real-time features. The sync pattern involves:
Identify the source database: Choose one database as the authoritative source for each data type.
Write a Cloud Function triggered on source changes: Listen to onWrite events on the source path.
Transform and write to the target database: Use admin.database() or admin.firestore() to update the target.
Handle deletions: Remove corresponding data from the target when source data is deleted.
Example of syncing a user’s display name from Firestore to Realtime Database:
Always include safeguards to prevent recursive updates. For example, add a source field in the target data and check it in the trigger to avoid writing back to the source. This ensures your syncs remain stable and efficient.
Integrating Third-Party APIs and Services
Firebase Cloud Functions often need to communicate with external services—payment gateways, CRM systems, or weather APIs. This integration must be secure, reliable, and efficient. Cloud Functions provide a serverless environment where you can make HTTP requests to any public API, but you must handle authentication, secrets management, and failure scenarios carefully to avoid exposing sensitive data or creating brittle workflows.
Making HTTP Requests to External Services
Cloud Functions support standard Node.js HTTP libraries like axios or the built-in node-fetch. When calling an external API, always use HTTPS to encrypt data in transit. Structure your request with appropriate headers, timeouts, and payload validation. Below is a practical example using axios to call a hypothetical payment verification API:
Timeouts: Set a reasonable timeout (e.g., 5–15 seconds) to avoid hanging functions that exceed the 60-second maximum for callable functions.
Retry logic: Implement exponential backoff for transient failures (covered in the error handling section).
Response validation: Always check HTTP status codes and parse response bodies safely to avoid injection attacks.
Managing API Keys and Secrets
Never hardcode API keys, tokens, or passwords in your function code or environment variables visible in version control. Firebase provides two secure methods for secret management:
Cloud Functions environment variables: Set via Firebase CLI (firebase functions:config:set) or the Google Cloud Console. Access them using functions.config(). Example: const apiKey = functions.config().payment.api_key;
Google Cloud Secret Manager: Recommended for highly sensitive secrets. Store secrets as encrypted values and access them via the Secret Manager API. This supports automatic rotation and audit logging.
Best practices for secrets:
Practice
Description
Least privilege
Grant only the minimum IAM roles needed for your function to access secrets.
Rotation
Rotate API keys quarterly or immediately after a suspected breach.
Encryption at rest
Use Secret Manager’s built-in encryption (AES-256) for stored secrets.
No logging
Avoid logging secrets; use structured logging that masks sensitive fields.
When using environment variables, set them before deployment and never commit the configuration file to version control. For Secret Manager, retrieve secrets inside the function handler to avoid caching stale values.
Error Handling and Retry Strategies
External APIs can fail due to network issues, rate limits, or temporary outages. Implement robust error handling to maintain function reliability and user experience:
Classify errors: Distinguish between transient errors (HTTP 429, 503) and permanent errors (HTTP 400, 401). Retry only transient ones.
Exponential backoff: Use a retry library like axios-retry or implement manual backoff. Example: wait 1 second, then 2, then 4, up to a maximum of 5 retries.
Dead-letter queues: For background functions, route failed requests to a Cloud Pub/Sub topic for later analysis.
Graceful degradation: Return a fallback response (e.g., cached data or a user-friendly error) when the external service is unavailable.
Sample retry logic with axios-retry:
const axiosRetry = require('axios-retry');
axiosRetry(axios, { retries: 3, retryDelay: axiosRetry.exponentialDelay });
// Then use axios as normal—retries happen automatically on 5xx errors.
Always log error details (without secrets) to Cloud Logging for debugging. Monitor function error rates and set up alerts for spikes in failures. By combining secure secret management, careful request handling, and intelligent retry strategies, you can integrate third-party APIs reliably while protecting your Firebase project from external service disruptions.
Managing Dependencies and Environment Variables
Efficient management of dependencies and environment variables is critical for building maintainable, secure, and performant Firebase Cloud Functions. This section covers best practices for handling Node.js packages, storing sensitive configuration data, and minimizing cold start delays to ensure your functions run reliably at scale.
Adding and Updating npm Dependencies
Firebase Cloud Functions run in a Node.js environment, so all external packages must be declared in your package.json file. Follow these guidelines to keep dependencies lean and up-to-date:
Install only what you need. Use npm install --save for runtime dependencies and npm install --save-dev for tools like linters or test runners. Avoid adding packages that are already provided by the Firebase SDK.
Pin exact versions. Specify exact version numbers (e.g., "axios": "1.6.2") instead of ranges to prevent breaking changes from automatic updates. Use npm ci during deployment for reproducible builds.
Audit regularly. Run npm audit to identify vulnerabilities. Update dependencies in a controlled manner, testing each change in a staging environment before deploying to production.
Remove unused packages. Use tools like depcheck to detect unnecessary dependencies. Fewer packages reduce deployment size and cold start latency.
Using Environment Config for Sensitive Data
Never hardcode API keys, database credentials, or other secrets in your function code. Firebase provides a built-in environment configuration system that keeps sensitive data separate and secure. Follow these practices:
Set config values via CLI. Use firebase functions:config:set to store key-value pairs, for example: firebase functions:config:set stripe.secret="sk_live_...". These values are encrypted at rest.
Access config in code. Retrieve values with functions.config().stripe.secret inside your function. Avoid logging or exposing these values in error messages.
Manage multiple environments. Use separate Firebase projects for development, staging, and production. Each project has its own config namespace, preventing cross-environment leaks.
Rotate secrets periodically. Update config values without redeploying code by running the firebase functions:config:set command again. Functions automatically pick up new values on the next invocation.
Approach
Security Level
Ease of Use
Recommendation
Hardcoded strings
Very low
Easy
Avoid entirely
Environment variables (process.env)
Medium
Moderate
Use only for non-sensitive defaults
Firebase config (functions.config())
High
Easy
Preferred method
Secret Manager (Google Cloud)
Very high
Complex
For enterprise compliance
Optimizing Cold Start Times
Cold starts occur when a function is invoked after being idle. Minimizing this delay improves user experience and reduces costs. Implement these strategies:
Lazy-load dependencies. Import heavy modules only inside the function handler, not at the top level. For example, move const admin = require('firebase-admin') into the function body if it is not needed on every invocation.
Minimize global initialization. Avoid expensive setup operations outside the handler. If you must initialize a database client, do it once and reuse the instance across warm invocations by caching it in the global scope.
Reduce package size. Use lightweight alternatives (e.g., node-fetch instead of axios for simple HTTP calls) and remove unused dependencies. Smaller bundles load faster.
Keep functions focused. Break large functions into smaller, single-purpose functions. Each function loads only the dependencies it needs, reducing cold start overhead.
Set minimum instances. For latency-sensitive functions, configure minInstances in your function definition to keep a specified number of instances warm. This incurs costs but eliminates cold starts for critical endpoints.
By carefully managing dependencies, protecting sensitive data with environment config, and optimizing for cold starts, you ensure your Firebase Cloud Functions remain fast, secure, and easy to maintain throughout their lifecycle.
Error Handling and Logging in Cloud Functions
Robust error handling and comprehensive logging are essential for maintaining reliable Firebase Cloud Functions in production. Without proper visibility, intermittent failures, performance bottlenecks, and unexpected edge cases can silently degrade user experience. This section covers structured logging, error reporting with stack traces, and integration with Firebase Crashlytics to give you full observability into your serverless executions.
Structured Logging with console.log and Cloud Logging
Firebase Cloud Functions automatically capture output from console.log, console.warn, and console.error and send it to Google Cloud Logging. However, to maximize utility, you should use structured logging—passing JSON objects as the second argument rather than concatenating strings. This enables filtering, searching, and creating metrics-based alerts in the Google Cloud console.
Use JSON payloads:console.log('User created', { userId, timestamp, region }) allows Cloud Logging to index each field.
Log severity correctly: Use console.error for failures, console.warn for recoverable issues, and console.log for standard information.
Include correlation IDs: Pass a unique request identifier (e.g., context.eventId for background functions) to trace execution across logs.
Avoid logging sensitive data: Never log user passwords, tokens, or PII. Use a logging library like pino with redaction if needed.
Error Reporting and Stack Traces
When a Cloud Function throws an unhandled exception, Firebase automatically reports it to Google Cloud Error Reporting. This service groups similar errors, tracks occurrence frequency, and preserves full stack traces. To leverage this fully, always use throw new Error('descriptive message') rather than returning generic error objects. For HTTP functions, return proper HTTP status codes (e.g., 400 for client errors, 500 for server errors) along with a JSON error body.
Logging Method
Use Case
Stack Trace Captured?
Auto-grouped in Error Reporting?
console.error
General error logging
No (only message)
No
throw new Error()
Unhandled exceptions
Yes
Yes
functions.logger.error
Structured error logging
Yes (if error object passed)
Yes (with proper payload)
Error.captureStackTrace
Custom error objects
Yes
Depends on integration
For background functions (Firestore, Pub/Sub, etc.), ensure you catch errors in your promise chain and call the callback with a meaningful error object. Unhandled promise rejections may not produce usable stack traces in older Node.js runtimes.
Using Firebase Crashlytics with Functions
Firebase Crashlytics, primarily designed for mobile clients, can also be used with Cloud Functions to capture and track backend errors alongside client-side crashes. This is particularly valuable when your functions serve as the backend for a mobile app, enabling you to correlate client errors with server-side failures.
Install the Crashlytics SDK: Add firebase-admin and initialize Firebase Admin SDK with Crashlytics enabled.
Log custom keys: Use crashlytics.setCustomKey('functionName', 'onUserCreate') to tag errors with function context.
Record non-fatal errors: Call crashlytics.recordError(error) for handled exceptions (e.g., validation failures) to track them in Crashlytics without terminating the function.
Set user identifiers: Use crashlytics.setUserId(uid) to link backend errors to specific users for debugging.
Note that Crashlytics for Cloud Functions requires the Firebase Admin SDK version 11.0.0 or later and must be used in conjunction with standard logging—it does not replace Cloud Logging or Error Reporting but augments them with mobile-focused crash analytics.
Scaling and Performance Optimization
Efficient scaling and performance are critical for Firebase Cloud Functions, especially under unpredictable traffic. Without deliberate configuration, functions can suffer from cold starts, timeouts, or excessive execution costs. This section provides strategies to manage concurrency, allocate resources wisely, and avoid redundant work.
Understanding Function Instances and Concurrency
Firebase Cloud Functions scale by creating multiple instances of your function to handle concurrent requests. By default, each instance processes one request at a time. However, you can enable concurrency to allow a single instance to handle multiple requests simultaneously, reducing cold starts and improving throughput.
Use concurrency for I/O-bound tasks (e.g., database reads, external API calls). For CPU-intensive operations, lower concurrency prevents resource exhaustion.
Setting Timeouts and Memory Allocation
Proper timeout and memory settings prevent functions from running indefinitely or failing due to insufficient resources. Default values are often too conservative for production workloads.
Parameter
Default
Recommended Range
Impact
Memory
256 MB
512 MB – 2 GB
Higher memory reduces cold start latency and improves CPU performance.
Timeout
60 seconds
30 – 540 seconds
Longer timeouts allow for complex processing but increase cost and risk of hanging.
Best practices:
Start with 512 MB memory and adjust based on monitoring. Use the --memory flag.
Set timeouts to the 90th percentile of your function’s execution time plus a buffer. Avoid maximum (540s) unless necessary.
For HTTP functions, use shorter timeouts (e.g., 30s) to fail fast and retry via client logic.
Test under load using Firebase Emulator Suite to simulate traffic and measure resource usage.
Caching Responses and Avoiding Duplicate Executions
Duplicate executions waste resources and increase latency. Caching common responses and deduplicating requests are essential for scaling efficiently.
Strategies to implement:
In-memory caching: Use a global variable or a lightweight cache (e.g., node-cache) for data that doesn’t change frequently. Example:
External caching: Use Firebase Realtime Database or Firestore as a cache for cross-instance data. Set TTLs to avoid stale data.
Avoid duplicate executions: For event-driven functions (e.g., Firestore triggers), ensure idempotency by checking an event ID or timestamp before processing. Use context.eventId to deduplicate.
Batch requests: Combine multiple similar requests into a single database query or API call. Use a queue mechanism (e.g., Cloud Tasks) to aggregate before processing.
By combining caching with concurrency and resource tuning, your functions will handle spikes gracefully while minimizing costs.
Security is a fundamental pillar when deploying Firebase Cloud Functions. Without proper safeguards, your functions can become vectors for unauthorized access, data breaches, or resource exhaustion. This section details essential practices including authentication verification, input validation, and access control to protect your cloud functions from misuse.
Verifying Firebase Authentication Tokens
Every HTTP-triggered function that handles user-specific data must verify that the request comes from an authenticated user. Firebase Authentication provides ID tokens that should be validated within the function before processing any request. Use the Firebase Admin SDK to verify these tokens server-side, as client-side checks can be bypassed.
Extract the token from the Authorization header in the format Bearer <token>.
Verify the token using admin.auth().verifyIdToken(token), which returns a decoded payload containing the user’s uid and other claims.
Reject unauthenticated requests immediately with HTTP 401 status and an error message.
Cache verified tokens when possible to reduce latency, but always re-verify for sensitive operations like financial transactions or data deletion.
Example approach: within your function handler, call the verification method at the top of the logic flow. If the token is invalid or expired, return a 401 response before any database or storage operations occur.
Validating Input and Preventing Injection Attacks
All data received from clients—whether from HTTP request bodies, query parameters, or URL paths—must be treated as untrusted. Injection attacks, including NoSQL injection in Firestore or Realtime Database queries, can occur if raw input is used directly in database operations.
Use whitelist allowed characters, enforce max length
Accepting special SQL or NoSQL operators like $gt or ;
Numeric values
Parse with Number() or parseInt(), check range
Allowing negative numbers for quantities
Object keys
Sanitize or restrict to known property names
Allowing dynamic keys that overwrite existing fields
File uploads
Validate MIME type, file size, and content
Trusting file extension alone
Use schema validation libraries like Joi or Yup to enforce structure and types.
Escape or parameterize all database queries to prevent injection. For Firestore, use where() with field-value pairs rather than concatenating strings.
Limit input size by checking req.body length or using middleware that rejects oversized payloads.
Never execute user-supplied strings as code, including eval() or dynamic function calls.
Restricting Access with CORS and IAM Roles
Even with authentication, you must control which origins can invoke your functions and which service accounts have permission to deploy or modify them. Two mechanisms work together: CORS for HTTP request origins and IAM for backend permissions.
CORS (Cross-Origin Resource Sharing) prevents unauthorized websites from calling your functions from a browser. Configure CORS with the cors npm package or set headers manually:
Whitelist only specific origins (e.g., https://yourdomain.com) instead of using a wildcard *.
Restrict allowed HTTP methods to only those your function uses (e.g., POST for creating data).
Set Access-Control-Allow-Credentials: true only if you send cookies or authentication headers.
IAM Roles control who can deploy, invoke, or manage your functions at the Google Cloud level:
Assign the Cloud Functions Invoker role only to authenticated users or service accounts that need to call the function.
Use the Cloud Functions Developer role for team members who deploy updates, but avoid granting it to automated CI/CD pipelines without audit logging.
For function-to-function calls within the same project, use service accounts with least-privilege IAM roles rather than allowing public invocation.
Regularly audit IAM bindings using the Google Cloud Console or gcloud CLI to remove unused permissions.
By combining token verification, strict input validation, and layered access controls, you create a robust security posture that protects both your users and your backend infrastructure from common attack vectors.
Frequently Asked Questions
What are Firebase Cloud Functions?
Firebase Cloud Functions is a serverless framework that lets you automatically run backend code in response to events triggered by Firebase features and HTTPS requests. The code runs in a managed Node.js environment, scaling automatically from zero to thousands of concurrent invocations. It eliminates the need to manage servers, allowing developers to focus on writing business logic. Common use cases include sending notifications, processing data, performing image transformations, and integrating third-party APIs.
How do I set up Firebase Cloud Functions?
To set up Firebase Cloud Functions, first install the Firebase CLI using npm (`npm install -g firebase-tools`). Then initialize Firebase in your project with `firebase init functions`, which creates a functions folder with a `package.json` and `index.js`. Write your function in `index.js` using the `firebase-functions` and `firebase-admin` SDKs. Deploy with `firebase deploy –only functions`. Ensure billing is enabled for your Firebase project, as Cloud Functions require a Blaze plan.
What types of triggers are available?
Firebase Cloud Functions supports several trigger types: HTTPS triggers for HTTP requests, Firestore triggers for document changes (create, update, delete), Authentication triggers for user sign-up/deletion, Realtime Database triggers for data changes, Cloud Storage triggers for file uploads/deletions, Analytics triggers for conversion events, and Pub/Sub triggers for messaging. Additionally, you can use scheduled functions with Cloud Scheduler to run tasks on a cron schedule.
What is the difference between background functions and HTTP functions?
Background functions are triggered by Firebase events (e.g., Firestore writes, Auth events) and run asynchronously. They are ideal for tasks like database cleanup or notifications. HTTP functions are invoked via HTTP requests (GET, POST, etc.) and can return responses directly to clients. They are used for building APIs, webhooks, or integration endpoints. HTTP functions must explicitly handle response sending, while background functions do not.
How do I manage dependencies in Cloud Functions?
Dependencies are managed using a `package.json` file located in the `functions` directory. You can add dependencies with `npm install –save ` in that directory. The Firebase CLI automatically installs dependencies during deployment. For production, it's recommended to use exact versions and avoid large packages to reduce cold start times. You can also use the `functions` configuration in `firebase.json` to specify Node.js version and environment variables.
Cold starts occur when a Cloud Function is invoked after being idle, requiring the runtime to initialize the function instance. This adds latency, typically 1-5 seconds. To minimize cold starts, keep dependencies minimal, use the `functions.runWith({ minInstances: 1 })` to keep one instance warm, optimize code loading, and prefer lightweight libraries. Also, consider using global variables for initialization and using the Firebase Admin SDK efficiently.
Yes, you can test Cloud Functions locally using the Firebase Emulator Suite. Run `firebase emulators:start` to start a local environment that simulates Cloud Functions, Firestore, and other Firebase services. You can invoke functions via HTTP requests or trigger events using the emulator UI. This allows for rapid development and debugging without deploying. For unit testing, you can use the `firebase-functions-test` SDK along with a testing framework like Jest.
How do I handle errors in Cloud Functions?
Error handling in Cloud Functions should include try-catch blocks, proper logging with `console.error` or the Firebase Logger, and returning appropriate HTTP status codes for HTTP functions. Use the `functions.logger` for structured logging. For background functions, ensure errors are caught and logged; otherwise, the function may retry automatically. Implement global error handlers and use Sentry or similar tools for monitoring. Always sanitize user input to avoid runtime errors.
Node.js and Redis: Caching Strategies for High-Performance Applications
Introduction to Caching with Node.js and Redis
Caching is a foundational technique for building high-performance Node.js applications. Without it, every user request that requires data—whether from a database, an external API, or a computation-heavy process—can introduce latency that degrades the user experience and strains backend resources. Node.js, with its event-driven, non-blocking architecture, excels at handling concurrent requests, but it still relies on upstream systems that can become bottlenecks under load. Redis, an open-source, in-memory data structure store, addresses this challenge by providing a sub-millisecond caching layer. When integrated with Node.js, Redis enables developers to store frequently accessed data in memory, drastically reducing response times, offloading databases from repetitive queries, and ensuring that applications can scale horizontally without proportional increases in infrastructure costs. The synergy between Node.js and Redis is particularly powerful because both are designed for speed and concurrency, making them a natural fit for real-time applications, e-commerce platforms, and API gateways.
What is Redis and How It Works with Node.js
Redis is a key-value store that holds data primarily in RAM, allowing for extremely fast read and write operations—typically in the microsecond to millisecond range. Unlike traditional databases that persist data to disk, Redis keeps the working dataset in memory, though it offers optional persistence for durability. In a Node.js environment, Redis is accessed via robust client libraries such as redis (the official Node.js client) or ioredis, which provide asynchronous, promise-based interfaces. The workflow is straightforward: a Node.js application connects to a Redis instance, sets a key-value pair with an optional expiration time (TTL), and retrieves it on subsequent requests. Because Redis supports various data structures—strings, hashes, lists, sets, sorted sets, and more—it can cache not only simple scalar values but also complex objects, JSON blobs, or aggregated query results. The integration typically involves a middleware pattern where the application checks the cache first; if a hit occurs, the cached value is returned immediately, bypassing the database or computation. If a miss occurs, the data is fetched, stored in Redis, and then served.
Key Benefits of Using Redis for Caching in Node.js
Implementing Redis as a caching layer in Node.js applications delivers several measurable advantages:
Reduced Latency: In-memory access eliminates network round trips to databases or external services, cutting response times from tens of milliseconds to under a millisecond.
Database Offloading: By serving repeated read requests from cache, Redis reduces the query load on primary databases, preventing performance degradation and delaying the need for costly database scaling.
Improved Scalability: Caching with Redis allows Node.js applications to handle more concurrent users without proportionally increasing backend resources, as cached responses are served with minimal CPU overhead.
Automatic Expiration: Redis TTL (time-to-live) ensures stale data is automatically evicted, keeping the cache fresh without manual invalidation logic.
Atomic Operations: Redis supports atomic commands like INCR and SETNX, enabling reliable rate limiting and counters without race conditions.
High Availability: With Redis Sentinel or Redis Cluster, caching remains resilient to node failures, ensuring consistent performance in production environments.
Common Use Cases: Session Store, API Response Cache, and Rate Limiting
Redis excels in three canonical use cases within Node.js applications:
Session Store: Stateless Node.js applications often rely on external session storage to maintain user state across requests. Redis stores session data—such as user authentication tokens, preferences, or shopping cart contents—in memory with fast reads and writes. Because sessions are transient, the built-in TTL feature automatically cleans up expired sessions, reducing storage overhead. This approach is far more performant than storing sessions in a relational database or on disk.
API Response Cache: For endpoints that return relatively static or slowly changing data—like product catalogs, blog posts, or configuration settings—Redis caches the entire API response. The Node.js server checks Redis before executing the request handler; on a cache hit, it returns the cached JSON payload directly. This pattern can reduce response times by over 90% for popular endpoints and dramatically lower the load on backend services.
Rate Limiting: Redis’s atomic counters and sorted sets make it ideal for implementing rate limiting in Node.js. By tracking request counts per user IP or API key with a sliding window (using TTL and INCR), developers can enforce limits without race conditions. For example, a common pattern uses INCR with a TTL of 60 seconds to allow a maximum of 100 requests per minute, returning a 429 status when the limit is exceeded. This protects the application from abuse and ensures fair resource allocation.
To begin integrating Redis with Node.js, you must first have Redis running. For local development, install Redis directly on your operating system. On macOS, use brew install redis; on Ubuntu, run sudo apt-get install redis-server; on Windows, the recommended approach is to use Windows Subsystem for Linux (WSL) with the Ubuntu command above. Alternatively, cloud services like Redis Cloud, Amazon ElastiCache, or Azure Cache for Redis provide managed instances with high availability and scaling, ideal for production workloads.
Once Redis is installed or provisioned, choose a Node.js client library. The two primary options are ioredis and node-redis (the official Redis client). ioredis offers a robust feature set including built-in cluster support, Lua scripting, and a promise-based API, making it suitable for complex caching strategies. node-redis is lightweight, officially maintained, and optimized for performance. For most high-performance applications, ioredis is the preferred choice due to its advanced capabilities and active community.
Complex caching, multi-node setups, high throughput
node-redis
Lightweight, official, minimal dependencies
Simple caching, small projects, production speed
Install your chosen library via npm: npm install ioredis or npm install redis. This step completes the prerequisite setup for connecting Node.js to Redis.
After installation, establish a connection to your Redis instance. Below is a practical example using ioredis that demonstrates connection configuration and error handling:
Host and port: Default to localhost:6379 for local Redis; change these for cloud services.
Retry strategy: Prevents infinite retry loops by using exponential backoff, capped at 2 seconds.
Max retries per request: Limits failed operations to avoid resource exhaustion.
Event listeners: Essential for logging and debugging connection states.
Always handle errors gracefully in production. For cloud Redis, include authentication parameters like password and tls: {} for encrypted connections. Test the connection with redis.ping() to verify readiness.
Environment Variables and Connection Pooling Best Practices
To maintain security and flexibility, store Redis connection details in environment variables. Use a .env file or a secrets manager for sensitive values such as host, port, password, and TLS settings. Example environment variables:
REDIS_HOST=localhost
REDIS_PORT=6379
REDIS_PASSWORD=your_secure_password
REDIS_TLS_ENABLED=true
Load these in your application using process.env with a library like dotenv. This approach decouples configuration from code, enabling seamless deployment across environments.
Connection pooling is critical for high-performance applications. Both ioredis and node-redis manage a pool of connections internally, but you can tune behavior with these best practices:
Practice
Why It Matters
Use a single client instance
Avoids creating multiple connections; reuse one instance across modules.
Set maxRetriesPerRequest
Prevents queue buildup during outages; set to a low number (e.g., 3).
Enable lazy connect
Delays connection until first command, useful for serverless environments.
Monitor connection events
Logs reconnections and errors to detect pool exhaustion early.
For production, consider using a connection manager like generic-pool if you need fine-grained control, but most applications perform optimally with the default pooling in ioredis. Always close the connection gracefully on application shutdown with redis.quit() to free resources.
The most fundamental caching pattern in Node.js and Redis is the simple key-value store. This pattern involves storing the result of a computation or a fetched resource under a unique key, then retrieving that key on subsequent requests to avoid repeating expensive operations. For high-performance applications, this pattern reduces latency and offloads backend services, such as databases or external APIs. The key insight is that Redis operates entirely in memory, providing sub-millisecond read and write times for simple string or JSON values. When implemented correctly, this pattern can reduce response times from hundreds of milliseconds to under five milliseconds for cached data.
Cache-Aside Pattern: Read Through and Lazy Loading
The cache-aside pattern, also known as lazy loading, is the most widely adopted simple caching strategy. In this approach, the application code is responsible for both reading from and writing to the cache. The typical flow works as follows:
On a read request, the application first checks Redis for the key.
If the key exists (a cache hit), the value is returned directly to the client.
If the key does not exist (a cache miss), the application fetches the data from the primary data source, such as a database.
The fetched data is then stored in Redis under the appropriate key, and the value is returned to the client.
This pattern is called “lazy” because the cache is populated only when data is first requested, not proactively. The application must also handle cache invalidation: when data is updated in the database, the corresponding cache key should be deleted or updated to maintain consistency. In Node.js, this pattern is straightforward to implement using the redis client library. For example, a typical middleware function checks Redis, falls back to the database on a miss, and stores the result with a time-to-live (TTL).
Setting Expiration (TTL) to Avoid Stale Data
Every cached value should have an expiration time, known as time-to-live (TTL). Without TTL, cached data can become stale, meaning it no longer reflects the current state of the source. Stale data leads to incorrect application behavior and user-facing errors. TTL is set in seconds and can be applied when storing the key or updated later. Common TTL values depend on data volatility:
Data Type
Typical TTL
Rationale
User session tokens
3600 seconds (1 hour)
Balances security with user convenience; tokens can be refreshed.
Product catalog details
600 seconds (10 minutes)
Prices and descriptions change infrequently; short TTL ensures freshness.
Aggregated analytics
300 seconds (5 minutes)
Near-real-time dashboards require rapid updates without constant recalculation.
Static reference data
86400 seconds (24 hours)
Country lists, currency codes, or configuration rarely change.
When a key expires, Redis automatically evicts it. The next request triggers a cache miss and repopulates the cache with fresh data. This mechanism prevents memory bloat and ensures that the application does not serve outdated information. In Node.js, TTL is set using the SET command with the EX option: client.set('key', 'value', 'EX', 600).
Example: Caching Database Query Results
A concrete example illustrates the pattern. Consider a Node.js application that queries a PostgreSQL database for user profiles. Without caching, every page load executes a SQL query, which may take 50–200 milliseconds. With Redis caching, the flow becomes:
User requests profile for user_id:1234.
Application checks Redis for key user:1234.
If found, return the JSON profile immediately (under 5 ms).
If not found, execute SELECT * FROM users WHERE id = 1234, serialize the result to JSON, store it in Redis with a TTL of 600 seconds, and return it.
In code, this translates to an async function that first calls client.get('user:1234'), then on null, runs the database query, and calls client.set('user:1234', JSON.stringify(result), 'EX', 600). This simple pattern reduces database load by orders of magnitude for frequently accessed records. For high-traffic endpoints, the reduction in response time and database connections directly improves application scalability and user experience.
Effective cache invalidation is critical for maintaining data consistency between Redis and the primary database. Without a robust strategy, applications risk serving stale data, which undermines reliability. The challenge lies in balancing performance gains with accuracy. Two primary approaches dominate: time-based expiration and event-driven invalidation, each suited to different use cases. Proactive invalidation removes data predictably, while reactive invalidation responds to changes in real time.
Time-Based Expiration vs. Event-Driven Invalidation
Time-based expiration, implemented via Redis EXPIRE or TTL commands, sets a fixed lifespan for cached data. This is ideal for data that changes predictably, such as session tokens or static content. For example, a product catalog might expire every hour. Event-driven invalidation, conversely, triggers cache removal when the source data updates—such as after a database write or API call. This ensures near-immediate consistency but requires integration with application logic. Consider the trade-offs:
Time-based: Simple to implement; no external triggers needed; risk of serving stale data within the TTL window.
Event-driven: High consistency; reduces stale reads; adds complexity and potential for missed updates if events fail.
In practice, many systems combine both: set a short TTL as a safety net while relying on events for critical updates. For instance, a user profile cache might expire after 10 minutes but is invalidated immediately when the user changes their email.
Using Redis Pub/Sub for Cross-Process Cache Updates
In distributed applications, multiple processes or services may cache the same data. Redis Pub/Sub provides a lightweight mechanism to broadcast invalidation messages across all instances. When one service updates a key, it publishes a message to a channel (e.g., cache:invalidate:users). Subscribers listen and delete the corresponding key from their local cache. This pattern avoids polling and reduces latency. A practical implementation in Node.js might look like:
const redis = require('redis');
const subscriber = redis.createClient();
const publisher = redis.createClient();
subscriber.subscribe('cache:invalidate');
subscriber.on('message', (channel, key) => {
redisClient.del(key); // Remove stale entry
});
// After updating user data
async function updateUser(id, data) {
await db.users.update(id, data);
publisher.publish('cache:invalidate', `user:${id}`);
}
This approach ensures all processes see consistent data without duplicating invalidation logic. However, note that Pub/Sub is fire-and-forget; if a subscriber is offline, the message is lost. For critical consistency, consider using Redis streams or a message queue.
Handling Cache Stampedes and Thundering Herd Problems
A cache stampede occurs when many requests simultaneously miss the cache and attempt to rebuild it, overwhelming the database. This is common after a key expires or is invalidated. To mitigate this, use probabilistic early expiration (e.g., random TTL jitter) or a mutex lock. Redis SET NX (set if not exists) can act as a distributed lock: the first request to acquire the lock rebuilds the cache, while others wait or serve a stale value. Example:
async function getCachedData(key) {
let data = await redisClient.get(key);
if (data) return JSON.parse(data);
// Attempt to acquire lock
const lockKey = `lock:${key}`;
const lockAcquired = await redisClient.set(lockKey, 'locked', { NX: true, PX: 5000 });
if (!lockAcquired) {
// Wait briefly or serve stale data
await sleep(100);
return getCachedData(key); // Retry
}
try {
data = await fetchFromDatabase();
await redisClient.set(key, JSON.stringify(data), { EX: 60 });
return data;
} finally {
await redisClient.del(lockKey);
}
}
Additional strategies include using a background refresh (recompute before expiration) or employing a cache-aside pattern with a “dogpile” prevention mechanism. Combining these techniques with appropriate TTLs ensures high availability under load.
Node.js and Redis: Caching Strategies
Using Redis Hashes for Partial Object Caching
When caching complex objects such as user profiles or product details in Node.js, storing entire serialized JSON strings as simple key-value pairs leads to inefficiencies. Updating a single field requires fetching, deserializing, modifying, and rewriting the entire cached object. Redis hashes solve this by mapping field-value pairs within a single key. For example, a user profile can be stored as a hash with fields for name, email, and lastLogin. This allows Node.js to use HGET to retrieve only the needed field, or HSET to update a single attribute without touching others. This strategy reduces network transfer, lowers latency for partial updates, and simplifies cache invalidation for specific object properties. It is especially effective for high-traffic endpoints that frequently read or modify one or two fields of large objects.
Sorted Sets for Leaderboards and Pagination
Redis sorted sets combine the uniqueness of sets with the ordering of linked lists, making them ideal for caching ranked data like leaderboards, score-based rankings, or time-ordered feeds. Each member in a sorted set has an associated score, and Redis maintains the set sorted by that score. For a gaming leaderboard, Node.js can call ZADD to insert or update a player’s score, then ZREVRANGE to fetch the top N players in descending order. The same structure supports efficient pagination: using ZRANGE with offsets and counts retrieves any slice of the sorted set without scanning the entire dataset. This avoids expensive database queries for paginated lists, reduces response times, and scales well under concurrent writes. Sorted sets also enable real-time updates, as scores can be incremented atomically with ZINCRBY, keeping the cache consistent without manual re-sorting.
Lists and Streams for Queue-Based Caching
Redis lists and streams provide robust caching solutions for asynchronous workflows and ordered data processing. Lists, implemented as linked lists, support push and pop operations on both ends, making them natural for simple FIFO queues. Node.js can use LPUSH and BRPOP to build a task queue where workers consume cached items, reducing load on primary databases. For more advanced needs, Redis streams offer persistent, append-only logs with consumer groups, enabling reliable message delivery and replay. A common pattern is to cache recent activity feeds or event logs in a stream, then use XREADGROUP to distribute processing across multiple Node.js workers. This approach ensures that cached data is consumed exactly once, supports backpressure, and allows for historical replay if a consumer fails. Both lists and streams are memory-efficient and can be trimmed to a fixed size, preventing unbounded growth while maintaining high throughput.
Comparison of Redis Data Structures for Caching
Data Structure
Best Use Case
Key Operations in Node.js
Hashes
Partial object caching, field-level updates
HGET, HSET, HGETALL
Sorted Sets
Leaderboards, paginated rankings
ZADD, ZRANGE, ZREVRANGE, ZINCRBY
Lists
Simple queues, FIFO task processing
LPUSH, RPOP, BRPOP
Streams
Event logs, reliable message queues
XADD, XREADGROUP, XTRIM
Each advanced data structure addresses specific caching challenges in Node.js applications. Hashes minimize overhead for partial updates, sorted sets enable efficient ranked access, and lists or streams handle queue-based caching with varying levels of durability. Choosing the right structure depends on whether the cached data requires atomic field modifications, ordering, or reliable consumption. Together, they form a powerful toolkit for building high-performance, responsive systems.
Distributed Caching with Redis Cluster and Sentinel
Scaling Redis beyond a single node is essential for high-traffic Node.js applications that demand both low latency and fault tolerance. Two primary architectural patterns—Redis Cluster and Redis Sentinel—address different aspects of distributed caching: data sharding for horizontal scalability and automatic failover for high availability. Understanding when and how to deploy each, along with client-side consistency considerations, ensures your Node.js caching layer remains resilient under production loads.
Redis Cluster: Sharding and Data Distribution
Redis Cluster partitions data across multiple nodes using a concept of hash slots. The entire keyspace is divided into 16,384 slots, and each node in the cluster manages a subset of these slots. When a Node.js client, such as ioredis, connects to a cluster, it uses a consistent hashing algorithm to determine which node holds a given key. This eliminates the need for a separate proxy layer.
Key characteristics of Redis Cluster include:
– **Automatic resharding**: Slots can be moved between nodes without downtime, allowing for dynamic scaling.
– **Partial availability**: If a subset of nodes fails, the cluster remains operational for keys not stored on those nodes, assuming no replica is promoted.
– **No cross-node transactions**: Multi-key operations are supported only when all keys belong to the same hash slot (use hash tags to enforce this).
A practical Node.js connection example using ioredis:
await cluster.set(‘user:session:123’, ‘data’);
const value = await cluster.get(‘user:session:123’);
“`
The client automatically handles slot redirection and node discovery, making the cluster transparent to application logic.
Redis Sentinel for Automatic Failover
Redis Sentinel provides high availability for non-clustered Redis deployments by monitoring master and replica nodes. When the master fails, Sentinel orchestrates an automatic failover, promoting a replica to master and reconfiguring the remaining replicas. Node.js applications using Sentinel must connect through a Sentinel-aware client.
The typical setup involves:
– **Sentinel processes**: At least three Sentinel instances for quorum-based decision making.
– **Client configuration**: The Node.js client monitors Sentinel nodes for the current master endpoint.
– **Failover behavior**: During failover, the client receives a redirect or reconnects to the new master after a brief interruption.
Unlike Cluster, Sentinel does not shard data; all nodes hold the full dataset. This makes it suitable for applications requiring strong consistency and simple key access patterns, but limits horizontal write scalability.
Client-Side Hashing and Consistency Considerations
Both Redis Cluster and Sentinel introduce consistency challenges that Node.js developers must address:
| Consideration | Redis Cluster | Redis Sentinel |
|—————|—————|—————-|
| Data loss risk | During failover, writes to a failing master may be lost if asynchronous replication is used. | Same risk; use WAIT command or configure min-replicas-to-write to mitigate. |
| Stale reads | Replicas may serve stale data; use READONLY mode carefully in Cluster. | Read from replicas only when stale data is acceptable. |
| Key distribution | Use hash tags (e.g., {user:123}:cart) to co-locate related keys. | Not applicable; all keys reside on the same node. |
Client-side hashing strategies help reduce cross-node operations in Cluster. For example, when caching user-specific data, prefix keys with a user identifier enclosed in curly braces:
This ensures all keys for the same user hash to the same slot, enabling multi-key operations and atomic updates. For Sentinel deployments, consistency is simpler because all data resides on a single master, but the trade-off is limited write throughput and a single point of failure for writes during failover windows.
In production, many Node.js applications combine both patterns: use Redis Cluster for large, partition-tolerant datasets and Sentinel for critical metadata requiring strong consistency. Monitor latency and error rates during failover events to tune timeouts and retry policies in your client library.
Monitoring and Optimizing Redis Cache Performance
To ensure your Node.js application maintains low latency and high throughput, continuous monitoring and tuning of Redis are essential. Poorly configured caches can become bottlenecks rather than accelerators. Focus on three pillars: tracking key metrics, optimizing memory usage, and establishing automated monitoring.
Essential Redis Metrics to Track via INFO and SLOWLOG
Redis provides two powerful diagnostic tools built into its core: INFO and SLOWLOG. The INFO command returns a wealth of statistics. For Node.js workloads, prioritize these metrics:
Keyspace hits and misses — Calculate the cache hit rate as keyspace_hits / (keyspace_hits + keyspace_misses). A rate below 80% often indicates an ineffective caching strategy or a poorly chosen eviction policy.
Used memory and peak memory — Track used_memory and used_memory_rss to detect memory leaks or overconsumption. Compare against maxmemory to see how close you are to the limit.
Connected clients — Sudden spikes or sustained high numbers may indicate connection leaks in your Node.js Redis client (e.g., ioredis or node-redis).
Total commands processed — A high rate of total_commands_processed per second helps gauge throughput.
The SLOWLOG command lists queries that exceed a configurable latency threshold. In Node.js, long-running commands (like KEYS or SMEMBERS on large sets) can block the event loop. Regularly review slow logs to identify and refactor such operations, or use non-blocking alternatives like SCAN.
Memory Optimization: Eviction Policies and Data Serialization
Redis operates entirely in memory, so how you manage memory directly impacts performance. Two critical levers are eviction policies and serialization format.
Eviction policies determine what happens when Redis reaches maxmemory. For Node.js caches, the most suitable policies are:
Policy
Best Use Case
allkeys-lru
General-purpose caching where recent access patterns matter
allkeys-lfu
When frequently accessed data is more important than recency
volatile-ttl
When you explicitly set TTLs and want to expire short-lived data first
Avoid noeviction in production caches, as it can cause write errors. For session stores, allkeys-lru is often the safest default.
Data serialization is equally critical. Node.js objects serialized as JSON strings are human-readable but verbose. For high-throughput scenarios, consider:
MessagePack — Reduces payload size by 30–50% compared to JSON, with faster serialization/deserialization in Node.js via libraries like msgpackr.
Protocol Buffers — Even more compact, but requires schema definitions.
Hashes — Store structured data as Redis hashes instead of serialized strings. This allows partial updates without reading the entire object, reducing network overhead.
Test serialization overhead with your actual data shapes. A 20% reduction in value size can significantly lower memory usage and improve throughput.
Using Redis Benchmark and Prometheus for Continuous Monitoring
Manual INFO checks are not sustainable for production systems. Instead, automate monitoring with two complementary tools.
Redis Benchmark (redis-benchmark) is a built-in tool for stress-testing your Redis instance. Run it with representative command mixes and payload sizes to establish baseline performance. For Node.js-specific workloads, simulate realistic patterns: use -t GET,SET with -d 1000 (1KB values) and -n 100000 (100,000 requests). Compare results after configuration changes to measure impact.
Prometheus integration provides real-time, historical, and alertable metrics. Use the official redis_exporter to expose Redis metrics in Prometheus format. Key dashboards to build:
Cache hit rate over time (with alert if below threshold).
Memory usage as a percentage of maxmemory.
Slow log count per minute (alert on sustained increases).
Command latency percentiles (p50, p95, p99) from INFO COMMANDSTATS.
Pair Prometheus with Grafana for visualization. Set alerts for:
Memory usage exceeding 80% of maxmemory.
Cache hit rate dropping below 75% for more than 5 minutes.
Any single command taking longer than 10ms (from SLOWLOG).
This continuous loop of measurement, tuning, and validation keeps your Node.js and Redis caching strategy performing optimally under varying loads.
Implementing Redis caching in Node.js applications demands rigorous security measures to protect against unauthorized access, data breaches, and malicious exploitation. In cloud and containerized environments, the attack surface expands significantly, making authentication, network isolation, and input validation critical. The following best practices provide a layered defense for Redis instances integrated with Node.js backends.
Redis offers two primary authentication mechanisms: the legacy AUTH command using a single password, and the more granular Access Control Lists (ACLs) introduced in Redis 6. For production Node.js applications, ACLs are strongly recommended because they allow per-user permissions on specific commands and keys. When configuring a Redis client in Node.js, always pass credentials securely through environment variables, never hardcoded in source code. Example using ioredis:
Set a strong, randomly generated password for the default user.
Create custom ACL users with minimal required permissions (e.g., read-only for cache-aside, write for write-through).
Rotate credentials periodically and revoke unused users.
Use redis.acl setuser commands in Redis config or via startup scripts.
ACLs prevent an attacker who compromises a Node.js process from executing destructive commands like FLUSHALL or CONFIG SET.
Redis is designed for fast in-memory access, not for exposure to untrusted networks. In cloud environments (AWS, GCP, Azure) and container orchestration (Kubernetes, Docker), enforce these network-level controls:
Firewalls: Bind Redis to localhost (127.0.0.1) unless necessary. Use security groups or network policies to allow inbound traffic only from trusted Node.js application servers.
TLS encryption: Enable Redis TLS for all client-server communication. Node.js libraries like ioredis support TLS natively via tls options. This prevents eavesdropping and man-in-the-middle attacks on cached data.
VPCs and private subnets: Deploy Redis inside a Virtual Private Cloud (VPC) with no public IP address. Use internal DNS or service discovery for Node.js connections.
Container isolation: In Docker or Kubernetes, never expose Redis port 6379 to the host network unless proxied through a secure sidecar.
Security Layer
Redis Default
Recommended for Node.js
Authentication
None (AUTH disabled)
ACL-based with strong passwords per user
Network Binding
0.0.0.0 (all interfaces)
127.0.0.1 or private subnet IP
Encryption in Transit
Plaintext (no TLS)
TLS 1.2+ with mutual authentication
Firewall Rules
No default restrictions
Allow only Node.js application IPs/ports
Avoiding Injection Attacks and Protecting Sensitive Data
Redis does not have SQL injection, but it is vulnerable to command injection if user input is concatenated into Redis commands. Node.js applications must sanitize all data before constructing keys or arguments. Use parameterized commands via libraries like ioredis which prevent injection by design. Additionally, never store sensitive data (passwords, PII, session tokens) in Redis without encryption. Apply these measures:
Validate and escape key names that include user-provided strings.
Use Redis EXPIRE and TTL to limit data lifetime, reducing exposure if a breach occurs.
Encrypt sensitive values at the application layer before caching, using Node.js crypto module with AES-256-GCM.
Enable Redis rename-command in configuration to block dangerous commands like EVAL or SCRIPT if not needed.
By combining strong authentication, network isolation, and input hygiene, Node.js developers can build high-performance caching layers that resist common attack vectors while maintaining the speed Redis provides.
Common Pitfalls and Anti-Patterns
Even with a solid understanding of Node.js and Redis: Caching Strategies, developers frequently fall into traps that degrade performance or introduce subtle bugs. Recognizing these anti-patterns early can save hours of debugging and prevent costly production incidents.
Over-Caching and Cache Pollution
The most pervasive mistake is caching too much data without considering its size or access frequency. When developers cache every database result, including large blobs or rarely accessed records, they pollute the cache with “cache junk.” This forces Redis to evict useful keys under memory pressure, causing cache misses for truly hot data.
To avoid this anti-pattern:
Analyze access patterns before caching. Cache only data that is read frequently and written infrequently.
Set appropriate TTLs. Even for “static” data, a TTL of a few hours prevents indefinite accumulation.
Use key naming conventions that include version numbers or timestamps to invalidate stale caches intentionally.
A practical rule: if a key is accessed less than once per minute in a high-traffic application, it likely does not belong in Redis. Instead, rely on the primary database for such data.
Ignoring Connection Timeouts and Reconnection Logic
Redis connections in Node.js are asynchronous and can fail silently if not handled correctly. A common mistake is assuming the connection remains open indefinitely without implementing reconnection strategies. When Redis restarts or the network briefly drops, the Node.js client may queue commands indefinitely or throw unhandled errors, making the entire application unresponsive.
Here is a practical code example using the ioredis client to configure robust reconnection:
Mixing Cache Layers Without Clear Expiration Policies
Many applications combine in-memory caching (e.g., Node.js Map or node-cache) with Redis caching. This creates a multi-tier cache hierarchy. The pitfall arises when these layers have inconsistent or missing expiration policies. For example, an in-memory cache may hold stale data for hours while Redis evicts its copy after a short TTL, leading to unpredictable read results.
To manage this anti-pattern:
Define a primary expiration source. Let Redis be the source of truth for TTLs. The in-memory cache should always check Redis TTL before serving stale data.
Use a unified TTL configuration. Store expiration values in a shared constants file or environment variable.
Implement cache stampede protection. When multiple layers expire simultaneously, use Redis locks or probabilistic early expiration to prevent thundering herd problems.
A simple rule: never let an in-memory cache hold data beyond the Redis TTL. If Redis evicts a key after 60 seconds, the in-memory layer should also invalidate it within that window, not persist it for 10 minutes.
Throughout this exploration of Node.js and Redis: Caching Strategies, we have established that Redis is not merely a key-value store but a robust, in-memory data structure server that, when paired with Node.js, dramatically reduces latency and database load. The strategies discussed form a toolkit for building high-performance applications that can handle traffic spikes gracefully. The core insight is that caching is not a one-size-fits-all solution; it requires deliberate design around data access patterns, expiration policies, and consistency guarantees. By implementing a caching layer, you shift from a reactive scaling posture to a proactive performance optimization, ensuring your Node.js application delivers sub-millisecond response times for frequently accessed data.
Recap of Core Caching Strategies Discussed
The strategies we covered provide a foundation for most real-world caching scenarios. The following table summarizes their primary use cases and trade-offs:
Strategy
Primary Use Case
Key Benefit
Potential Drawback
Cache-Aside (Lazy Loading)
Read-heavy workloads with moderate write frequency
Simple to implement; cache is populated on demand
Cache miss penalty; potential for stale data if not combined with invalidation
Write-Through
Applications requiring strong consistency between cache and database
Cache always contains fresh data
Higher write latency; cache may store rarely-read data
Write-Behind (Write-Back)
High-volume write operations where throughput is prioritized
Reduces database write pressure; low latency for writes
Risk of data loss on cache failure; complex recovery logic
Time-To-Live (TTL) Eviction
Data with natural expiration, e.g., session tokens, rate limits
Automatic cleanup; prevents stale data accumulation
Requires careful tuning of TTL values
Additionally, we discussed the importance of cache invalidation patterns—such as explicit deletion on update, using Redis keyspace notifications, or leveraging consistent hashing for distributed caches. The choice of serialization format (JSON, MessagePack, or custom binary) also significantly impacts performance, with faster serialization often yielding better throughput at the cost of human readability.
Further Reading: Redis Documentation and Node.js Patterns
To deepen your understanding of Node.js and Redis: Caching Strategies, the following resources are indispensable:
Official Redis Documentation: Start with the Redis Commands reference for EXPIRE, SETEX, and the SCAN family. Then explore the Persistence and Replication sections to understand data durability and high availability.
Node.js Redis Client (node-redis): The official client library provides a promise-based API, built-in connection pooling, and support for Redis 7 features like sharded Pub/Sub. Review its Examples directory for advanced patterns like caching with automatic serialization.
Design Patterns for Caching: Study the Cache Stampede pattern (using Redlock or probabilistic early expiration) and the Thundering Herd prevention techniques. The Redis in Action book by Josiah L. Carlson remains a classic reference.
Node.js Performance Patterns: Combine caching with async/await, stream processing, and clustering. The Node.js Design Patterns book by Mario Casciaro covers these in depth.
Call to Action: Prototype a Simple Cache in Your Application
The most effective way to internalize these strategies is to build a prototype. Begin with a single endpoint in your Node.js application that suffers from high database latency. Implement a Cache-Aside pattern using the following steps:
Install the redis package and create a client instance with connection retry logic.
Wrap your database query function with a cache check: first attempt to retrieve the key from Redis. On a miss, query the database, store the result in Redis with a TTL of 60 seconds, then return the data.
Add an invalidation hook: after a successful write operation that updates the data, delete the corresponding cache key.
Measure the response times using a tool like autocannon or k6 before and after your caching implementation.
This minimal prototype will expose you to the core mechanics—connection management, serialization, TTL handling, and invalidation—while providing immediate performance feedback. From here, you can iterate by adding write-through for critical data, implementing distributed caching across multiple Node.js instances, or integrating Redis Stack modules like RediSearch for cached full-text queries. The key is to start small, measure relentlessly, and avoid premature optimization. Your users will thank you for the snappy responses, and your database will thank you for the reduced load. Implement your first cache today.
Frequently Asked Questions
What is the cache-aside pattern in Node.js and Redis?
The cache-aside pattern loads data into the cache on demand. When an application requests data, it first checks the Redis cache. If found (cache hit), it returns the data. If not (cache miss), it retrieves the data from the primary database, stores it in Redis with a TTL, and returns it to the client. This ensures frequently accessed data is served quickly while reducing database load. Node.js libraries like `ioredis` or `node_redis` can implement this pattern by checking cache keys and populating them on misses.
How does TTL (Time-To-Live) work in Redis caching?
TTL is a value set on a Redis key that defines how long the key should remain in the cache before being automatically deleted. In Node.js, you can set TTL using the `SETEX` command or `expire` method on a key. A reasonable TTL depends on data volatility—shorter TTLs (seconds to minutes) for rapidly changing data, longer TTLs (hours) for static data. Proper TTL management prevents stale data and optimizes memory usage by evicting old entries.
What is the difference between cache-aside and write-through caching?
Cache-aside caching loads data into the cache only when read, while write-through caching updates the cache synchronously whenever data is written to the database. In write-through, every write operation also writes to the cache, ensuring data consistency but potentially increasing write latency. Cache-aside is simpler and better for read-heavy workloads, whereas write-through suits applications requiring strong consistency between cache and database. Node.js can implement write-through by intercepting write operations to update both Redis and the database.
How can I handle cache invalidation in Node.js with Redis?
Cache invalidation removes or updates cached data when the underlying data changes. Common strategies include TTL expiry, explicit deletion on writes, or versioned keys. In Node.js, you can use `DEL` to remove specific keys after a database update. For complex scenarios, consider using Redis pub/sub to notify other services of changes. Pattern-based deletion (e.g., `KEYS user:*`) can also help, but avoid `KEYS` in production—use `SCAN` instead. Proper invalidation prevents stale data without sacrificing performance.
What are the common Redis data structures used in Node.js caching?
Redis supports strings, hashes, lists, sets, sorted sets, and more. For simple key-value caching, strings are most common. Hashes store multiple fields (e.g., user profile). Sorted sets are useful for leaderboards or time-based caching. Lists can queue tasks. In Node.js, you can use these with `ioredis` commands like `hset`, `zadd`, or `lpush`. Choosing the right structure improves efficiency and reduces memory overhead.
How can I avoid cache stampede in Node.js and Redis?
Cache stampede happens when many requests simultaneously miss the cache and overload the database. To avoid it, use techniques like: (1) locking—use Redis `SETNX` to let only one process recompute the cache; (2) early expiration—refresh the cache before TTL expires; (3) probabilistic early recomputation—randomly recompute before TTL ends. In Node.js, you can implement a mutex with `ioredis` to prevent concurrent recomputation, ensuring only one request rebuilds the cache while others wait.
What is Redis pipelining and how does it benefit Node.js caching?
Pipelining allows sending multiple Redis commands without waiting for replies, reducing round-trip latency. In Node.js, `ioredis` supports pipelining via the `pipeline()` method. This is beneficial for batch operations like populating cache on startup or clearing many keys. It can significantly improve throughput in high-latency networks. However, ensure commands are not dependent on each other, as pipelining does not guarantee atomicity.
How do I monitor Redis cache performance in a Node.js app?
Monitor key metrics like hit rate, memory usage, evictions, and latency. Use Redis `INFO` command or tools like RedisInsight, Prometheus with redis_exporter, or built-in Node.js logging. In your app, track cache hits/misses by incrementing counters (e.g., with `ioredis` `incr`). Set up alerts for low hit rates or high evictions. Regularly analyze slow queries using Redis SLOWLOG to optimize. Monitoring helps tune TTLs and identify inefficient patterns.
Firebase Realtime Database vs. Firestore: Choosing the Right NoSQL Database for Your App
Introduction to Firebase Realtime Database and Firestore
Within the Firebase ecosystem, two primary NoSQL, cloud-hosted databases serve mobile and web applications: Firebase Realtime Database and Cloud Firestore. Both are designed to synchronize data in real time across clients, scale automatically, and integrate seamlessly with other Firebase services like Authentication and Cloud Functions. However, they differ fundamentally in data modeling, querying capabilities, and pricing structure. Understanding these differences is crucial for selecting the right database for your app’s specific requirements.
What is Firebase Realtime Database?
Firebase Realtime Database is the original NoSQL database from Firebase, launched in 2012. It stores data as a single JSON tree, where every piece of data is a node that can be accessed and updated in real time. Key characteristics include:
Data structure: A hierarchical JSON tree. Data is denormalized and nested, making it efficient for simple, flat data models.
Real-time synchronization: Every connected client receives updates instantly when data changes, with minimal latency.
Offline support: Built-in local caching allows apps to read and write data even when offline, with automatic syncing upon reconnection.
Querying: Limited filtering and sorting. You can filter by a single property or order by a key, but complex queries (e.g., combining multiple filters) are not supported.
Scalability: Best suited for apps with relatively simple data relationships and moderate scaling needs. It can handle thousands of concurrent users but may degrade with deeply nested data.
Pricing: Based on bandwidth and storage, with a free tier. No per-operation costs.
What is Firestore?
Cloud Firestore is Firebase’s newer, more feature-rich NoSQL database, released in 2017. It uses a document-collection model, offering greater flexibility and powerful querying. Key characteristics include:
Data structure: Collections of documents, each containing key-value pairs. Subcollections allow for hierarchical data without nesting depth limits.
Real-time synchronization: Supports real-time listeners similar to Realtime Database, but with more granular control (e.g., listening to specific documents or queries).
Offline support: Robust offline persistence for both reads and writes, with conflict resolution strategies.
Querying: Advanced querying capabilities: compound filters (e.g., where age > 25 AND city == “London”), composite indexes, and sorting on multiple fields.
Scalability: Automatically scales to millions of concurrent connections and terabytes of data, with strong performance even for complex queries.
Pricing: Charged per read, write, and delete operation, plus storage and bandwidth. This can be cost-effective for apps with low write volumes but expensive for high-throughput operations.
Key Similarities Between the Two
Despite their differences, Firebase Realtime Database and Firestore share several core traits that make them both viable options within the Firebase ecosystem:
Both provide real-time listeners that push data changes to clients instantly.
Offline support
Both cache data locally, allowing apps to function offline and sync when connectivity returns.
Serverless & cloud-hosted
No server management required; auto-scaling and security rules are managed by Firebase.
Integration with Firebase services
Both integrate with Firebase Authentication, Cloud Functions, and Analytics.
NoSQL data model
Both store data in a schema-less, non-relational format, ideal for rapid development.
Cross-platform SDKs
Both offer native SDKs for iOS, Android, Web, and Unity.
Choosing between them depends on your app’s data complexity, query requirements, and budget. For simple, low-latency chat apps or real-time dashboards, Realtime Database excels. For apps requiring complex queries, hierarchical data, or massive scalability, Firestore is the stronger choice.
Data Model and Structure Differences
Understanding how Firebase Realtime Database and Firestore organize data is critical for choosing the right database for your app. While both are NoSQL solutions from Firebase, their data models differ fundamentally, affecting how you structure, query, and scale your application. The core distinction lies in their hierarchical organization: Realtime Database uses a single JSON tree, whereas Firestore employs a collection-document model with subcollections.
Realtime Database: JSON Tree Hierarchy
Firebase Realtime Database stores all data as one large JSON tree. Every piece of information is a node in this tree, with nested objects representing related data. For example, a chat app might store messages like this:
In this model, data is deeply nested, and you access it by specifying the exact path (e.g., /messages/-Nabc123/text). This simplicity makes real-time synchronization fast, but it comes with trade-offs:
Denormalization is common: To avoid deep nesting that slows queries, you often duplicate data across the tree.
No schema enforcement: You can store any structure at any path, leading to potential inconsistency in larger projects.
Limited querying: You can only filter or sort by one property at a time, and only at a single depth level.
The JSON tree is ideal for simple, flat data structures where real-time updates are paramount, but it becomes unwieldy for complex relational data.
Firestore: Collections, Documents, and Subcollections
Firestore organizes data into collections (containers of documents) and documents (individual records with key-value pairs). Documents can also contain subcollections, creating a hierarchical but flexible structure. The same chat app data in Firestore might look like:
Strong data typing: Each document has a defined schema with fields like strings, numbers, arrays, and maps.
Subcollections for depth: You can nest subcollections within documents (e.g., a users document could have a posts subcollection), allowing for more natural relational modeling without deep nesting.
Atomic operations: Documents can be updated, deleted, or read individually, and batch writes are supported.
Firestore’s model encourages a more structured approach, making it easier to maintain data integrity and scale complex applications.
Impact on Querying and Data Relationships
The data model directly influences how you query and manage relationships. In Realtime Database, queries are limited to simple filtering at a single node level. For example, to get messages from a specific user, you must structure the tree to allow that query, often by duplicating data under a user-messages path. This can lead to data redundancy and complexity.
Firestore, by contrast, supports compound queries with multiple filters and sorting on different fields, all within a single collection or subcollection. For instance, you can query all messages from a user sorted by timestamp in one operation:
For data relationships, Realtime Database relies on manual references (e.g., storing user IDs as strings) and client-side joins. Firestore provides more robust support through reference data types and subcollections, enabling you to model one-to-many and many-to-many relationships more naturally. Consider this comparison:
Feature
Realtime Database
Firestore
Querying depth
Single level only
Multi-field and compound queries
Data relationships
Manual references, client-side joins
Reference types, subcollections
Scaling complex queries
Requires denormalization
Built-in indexing
In summary, choose Realtime Database for simple, flat data with minimal query needs and maximum real-time performance. Opt for Firestore when your app requires complex queries, structured data, and scalable relationships.
When comparing Firebase Realtime Database vs. Firestore, querying capabilities represent one of the most significant differentiators. The choice between them often hinges on whether your app requires simple real-time lookups or complex, filtered data retrieval across multiple fields. Firestore offers a far more mature and flexible query model, while Realtime Database prioritizes speed and simplicity at the cost of query expressiveness.
Realtime Database: Limited Filtering and Sorting
Firebase Realtime Database provides basic querying through a combination of orderByChild, equalTo, startAt, endAt, and limitToFirst or limitToLast. These operations allow you to filter on a single field and sort results, but they have strict limitations:
Single-field filtering only: You cannot combine filters on different fields in a single query. For example, filtering by status and date simultaneously requires client-side processing.
No compound queries: Queries are limited to one orderBy clause and one range or equality filter. Any additional conditions must be applied manually after fetching data.
Data denormalization often required: To work around these limits, developers frequently duplicate data or structure it to fit query patterns (e.g., using composite keys like userID_timestamp).
Performance degrades with deep nesting: Filtering on deeply nested paths can slow down queries, as Realtime Database must traverse the entire subtree.
This model works well for simple chat applications or live dashboards where queries are straightforward and predictable. However, for apps needing multi-criteria searches—like “find all orders from user X placed after 2024-01-01 with status ‘shipped’—Realtime Database falls short.
Firestore: Advanced Querying with Compound Filters
Firestore was designed from the ground up to support powerful, scalable queries. It allows you to combine multiple equality and range filters on different fields in a single query, known as compound queries. Key capabilities include:
Compound equality filters: Combine where clauses on multiple fields with == operators, e.g., where("status", "==", "active").where("region", "==", "US").
Range and inequality filters: Use <, <=, >, >=, and != on a single field alongside equality filters on others, as long as the range field is the first in the composite index.
Array membership and in queries: Filter documents where an array field contains a specific value, or where a field matches any value in a list (up to 10 values).
Ordering and pagination: Sort results by any indexed field and implement cursor-based pagination using startAfter and endBefore.
Collection group queries: Query across all subcollections with the same name, enabling powerful hierarchical data retrieval.
For instance, you can run a query like: where("category", "==", "electronics").where("price", ">=", 100).orderBy("price", "desc").limit(20)—all in a single, efficient operation. This makes Firestore far superior for applications with complex filtering needs, such as e-commerce, analytics dashboards, or social feeds.
Indexing Requirements and Performance Implications
Both databases use indexes to support queries, but their approaches differ drastically, impacting performance and developer effort.
Aspect
Firebase Realtime Database
Firestore
Index creation
Automatic for all data; no manual configuration.
Automatic for simple single-field queries; composite indexes required for compound queries (auto-generated or manually defined).
Index scope
Global index per location; all children are indexed by default.
Per-field and per-query composite indexes; collection group indexes for subcollections.
Query performance
Linear with data size for unindexed queries; fast for indexed fields, but no parallel filtering.
Sub-linear for all indexed queries; compound queries use merged indexes for constant-time lookups.
Index size limits
No explicit limit, but deep nesting increases index size and query latency.
Maximum 200 composite indexes per database; each index limited to 8 fields.
Write overhead
Index updated on every write; no additional cost for composite indexes.
Each index updated on writes; composite indexes increase write latency and cost slightly.
Developer control
Minimal; indexes are automatically managed.
Full control; developers define composite indexes via the Firebase console or CLI, with error feedback for missing indexes.
In Realtime Database, the lack of composite indexes means any query combining multiple fields must be handled client-side, leading to potential bandwidth waste and slower performance for large datasets. Firestore’s indexing model, while requiring upfront planning for compound queries, ensures that complex queries remain fast and scalable—even with millions of documents. The trade-off is that missing composite indexes cause queries to fail at runtime, prompting developers to add them. Once created, Firestore’s indexes are automatically maintained and optimized, providing consistent query performance without manual tuning.
Ultimately, if your app demands rich, multi-dimensional queries, Firestore’s advanced indexing and query engine are essential. For simpler, single-field lookups where development simplicity is paramount, Realtime Database’s automatic indexing may suffice—but you sacrifice query flexibility.
Scalability and Performance Considerations
When choosing between Firebase Realtime Database and Firestore, understanding how each handles growth and performance is critical for long-term app success. Both databases are serverless, but their scaling models differ significantly, affecting latency, operational complexity, and cost as your user base expands. This section examines the core scalability mechanisms and performance characteristics of each solution.
Realtime Database: Scaling Limits and Manual Sharding
Firebase Realtime Database operates as a single, monolithic JSON tree. This architecture imposes hard limits that require careful planning. The database supports up to 200,000 simultaneous connections and 1,000 writes per second on a single instance. Beyond these thresholds, performance degrades due to contention on the single write endpoint.
To scale past these limits, you must implement manual sharding. This involves splitting your data across multiple Realtime Database instances, each with a unique URL. The application logic must route reads and writes to the correct shard based on a shard key (e.g., user ID or geographic region). This approach increases development and operational overhead.
Connection limit: 200,000 concurrent users per database instance.
Write throughput: ~1,000 writes per second maximum.
Data model: Single JSON tree, no built-in partitioning.
For applications expecting rapid growth beyond these limits, Realtime Database demands early architectural decisions to avoid costly refactoring later.
Firestore: Automatic Horizontal Scaling
Firestore uses a document-collection model that scales horizontally without manual intervention. It automatically partitions data across multiple nodes based on collection and document IDs. This enables near-linear scaling as data volume and traffic increase. Firestore handles up to 1 million concurrent connections and 10,000 writes per second per database, with no single-point-of-write bottleneck.
Automatic scaling works best when you design your data to avoid hot spots. For example, using monotonically increasing document IDs (like timestamps) in a single collection can cause write contention on the last partition. Firestore mitigates this by recommending distributed ID patterns, such as using random suffixes or hash-based keys. The following code example shows how to generate a distributed document ID in JavaScript:
// Generate a distributed document ID to avoid hot spots
function generateDistributedId() {
const timestamp = Date.now().toString(36);
const randomSuffix = Math.random().toString(36).substring(2, 8);
return `${timestamp}-${randomSuffix}`;
}
// Usage in a Firestore write operation
const docRef = await db.collection('events').doc(generateDistributedId());
await docRef.set({ eventType: 'click', userId: 'user123' });
Firestore also supports automatic index management for queries, which reduces performance degradation as data grows, though composite indexes must be defined in advance.
Latency and Regional Replication Differences
Latency characteristics differ due to replication models. Realtime Database provides real-time synchronization with sub-200ms latency for small payloads within the same region, but it does not offer multi-region replication. All data resides in a single geographic location, leading to higher latency for users far from that region.
Firestore offers multi-region replication (e.g., nam5 in the US, eur3 in Europe) with strong consistency via Paxos-based replication. This reduces latency for globally distributed users but adds 10-50ms overhead for writes compared to single-region Realtime Database. Reads benefit from regional endpoints, typically achieving 100-300ms latency for most global locations.
For latency-sensitive applications with a global audience, Firestore’s multi-region setup provides more predictable performance, while Realtime Database excels in low-latency, single-region scenarios with fewer concurrent users.
Real-Time Synchronization and Offline Support
When evaluating Firebase Realtime Database vs. Firestore for your app, real-time synchronization and offline support often become deciding factors. Both databases offer live data updates, but they differ significantly in how they handle connections, data structure, and offline behavior. Understanding these nuances helps you match the database to your app’s specific user experience and reliability needs.
Realtime Database: Native Real-Time Sync
Firebase Realtime Database was built from the ground up for real-time synchronization. Its core design uses a single, persistent WebSocket connection between the client and server. When any data changes—whether from another user or a server-side update—the entire affected subtree is pushed to all connected clients instantly. This makes it ideal for applications like live chat, collaborative editing, or multiplayer game states where every millisecond matters.
Connection model: One continuous WebSocket; no polling overhead.
Data granularity: Synchronizes entire JSON subtrees, which can be efficient for shallow structures but may over-fetch on deep nested data.
Offline support: Provides on-disk persistence for the entire database snapshot (up to 200 MB on mobile). Writes are queued locally and synced when connectivity returns.
Conflict handling: Uses a “last write wins” strategy, which is simple but can overwrite concurrent edits.
Firestore: Real-Time Listeners and Offline Persistence
Firestore takes a more flexible approach to real-time updates. Instead of a single connection, it uses a gRPC-based streaming protocol that supports multiple listeners per document or query. You attach snapshot listeners to specific data paths, and only those paths receive updates. This granularity reduces bandwidth and avoids unnecessary data transfer.
Connection model: Multiple gRPC streams; supports multiplexing for efficiency.
Data granularity: Listens at the document level or on query results; updates are scoped and precise.
Offline persistence: Enabled by default for mobile and web clients. Caches all data the client has read or written, allowing full read and write functionality offline. When reconnected, Firestore performs a multi-version concurrency control (MVCC) sync.
Conflict handling: Uses “last write wins” per field, not per document. This allows multiple users to edit different fields in the same document without overwriting each other’s work.
Firestore also supports real-time updates with offline writes seamlessly. If a user makes changes while offline, the local cache is updated immediately, and the listener fires locally. Once the device reconnects, the server reconciles the changes, and any remote modifications trigger additional listener callbacks.
Handling Conflicts and Data Consistency
Conflict resolution is where the two databases diverge most sharply, especially in multi-user scenarios.
Detects conflicts via server timestamps and rejects stale writes
Data consistency model
Eventual consistency (strong for single node)
Strong consistency for single-document reads and queries
Realtime Database’s node-level conflict handling means that if two users write to different fields within a deeply nested node, one write can completely overwrite the other. You must implement custom conflict resolution (e.g., using onDisconnect handlers or priority-based merging) to avoid data loss. Firestore’s field-level conflict handling is more graceful—concurrent edits to separate fields merge safely, and its server-side timestamps provide a reliable ordering mechanism.
For apps that require strong consistency across multiple documents (e.g., a banking app), Firestore’s transaction support is superior. Realtime Database transactions work only on a single location, making multi-path updates error-prone. Firestore allows batched writes and transactions that span multiple documents, ensuring atomicity even with offline writes queued.
Security and Data Validation
When comparing Firebase Realtime Database vs. Firestore, security and data validation are critical factors that influence how you protect user data and enforce business logic. Both databases use declarative security rules to control read and write access, but their approaches differ significantly in granularity, structure, and validation capabilities. Understanding these differences helps you choose the right NoSQL database for your app’s security requirements.
Realtime Database: Cascading Security Rules
Firebase Realtime Database employs a hierarchical, cascading security rule model. Rules are defined in a JSON-like structure that mirrors the database tree. Access permissions flow downward: if a rule grants read or write access at a parent node, it automatically applies to all child nodes unless explicitly overridden. This cascading behavior simplifies rule management for deeply nested data but can lead to unintended access if not carefully scoped.
Key characteristics of Realtime Database security rules:
Cascading by default: A rule at /users affects all subpaths like /users/{uid}/profile.
No conditional field-level rules: Validation is limited to structural checks using .validate rules, which are evaluated after write access is granted.
Performance overhead: Cascading rules can slow down queries on large datasets because the server evaluates rules for every accessed node.
This rule grants access only to the authenticated user’s own node and validates that email is a string and age is a number. However, it does not prevent a user from writing arbitrary fields beyond those two.
Firestore provides more granular and expressive security rules using a custom rule language that supports condition-based access at the document and field level. Unlike Realtime Database, Firestore rules do not cascade automatically; each document path must be explicitly matched. This prevents accidental over-permissioning and allows for precise control.
Firestore also offers built-in data validation through allow conditions that can check document fields, request properties, and even compare data across documents using get() and exists() functions. This makes it possible to enforce complex business logic without additional backend code.
Key features of Firestore security rules:
Non-cascading: Each document path must be explicitly matched using wildcards like {document=**} for recursive access.
Field-level validation: You can restrict writes to specific fields using request.resource.data comparisons.
Cross-document queries: Rules can reference other documents, enabling role-based access or inventory checks.
Example rule snippet:
rules_version = '2';
service cloud.firestore {
match /databases/{database}/documents {
match /users/{userId} {
allow read, write: if request.auth != null && request.auth.uid == userId;
allow create: if request.resource.data.email is string
&& request.resource.data.age is number
&& request.resource.data.keys().hasAll(['email', 'age']);
}
}
}
This rule ensures the authenticated user can only access their own document, and it validates that the document contains exactly the email and age fields with correct types during creation.
Integration with Firebase Authentication
Both databases integrate seamlessly with Firebase Authentication, using the auth object in security rules to identify the authenticated user. The key difference lies in how they expose and handle authentication state:
Feature
Realtime Database
Firestore
Auth variable in rules
auth.uid, auth.token (custom claims)
request.auth.uid, request.auth.token
Anonymous auth support
Yes, via auth !== null checks
Yes, same approach
Custom claims access
Directly via auth.token.claimName
Same, but with request.auth.token.claimName
Role-based access example
Check root.child('admins/'+auth.uid).exists()
Use get(/databases/$(database)/documents/admins/$(request.auth.uid)).data.role == 'admin'
In practice, Firestore’s ability to reference other documents for role checks makes it more flexible for apps with complex permission hierarchies, while Realtime Database’s simpler rule syntax may suffice for straightforward user-scoped access. Both databases require the client SDK to be initialized with Firebase Authentication before security rules can enforce user identity.
Understanding the pricing structures of Firebase Realtime Database and Firestore is critical for managing app expenses, especially as your user base scales. While both services offer a free tier, their billing models differ fundamentally: Realtime Database charges primarily on bandwidth and storage, whereas Firestore bills per document operation (reads, writes, and deletes) plus storage. These differences can lead to vastly different costs depending on your app’s usage patterns, making a direct comparison essential for the Firebase Realtime Database vs. Firestore decision.
Realtime Database pricing is straightforward but can be unpredictable for apps with high data transfer. Costs are driven by two main factors:
Data storage: You pay for the total amount of data stored in your database, measured in gigabytes. This includes all nodes and their values.
Data transfer (bandwidth): You are charged for the amount of data downloaded from the database, including synchronization traffic. This is often the largest cost contributor for real-time apps where clients frequently retrieve data.
The free tier (Spark plan) includes 1 GB of stored data and 10 GB of downloaded data per month. Beyond that, you pay per GB for both storage and bandwidth. For example, if your app frequently syncs large JSON trees or streams updates to many users, bandwidth costs can escalate quickly, even if the stored data remains modest.
Firestore Pricing: Document Reads, Writes, and Deletes
Firestore uses a more granular, operation-based pricing model. You are charged for every database action, plus storage and network egress:
Document reads: Each time a client fetches a document (including queries that return results), it counts as a read. Listening to real-time updates also counts as reads for each document change delivered.
Document writes: Creating or updating a document incurs a write cost. Each write operation is billed individually, even if you update multiple fields in a single document.
Document deletes: Deleting a document counts as a delete operation.
Storage and network egress: You also pay for stored data and outgoing bandwidth, similar to Realtime Database, but these costs are typically lower than the operation fees for most apps.
The free tier includes 50,000 document reads, 20,000 writes, and 20,000 deletes per day, along with 1 GB of stored data. Beyond that, you pay per 100,000 reads, writes, or deletes. This model rewards apps that minimize unnecessary operations, such as by caching data or batching writes.
To illustrate which pricing model suits different applications, consider the following scenarios:
App Scenario
Realtime Database Cost Driver
Firestore Cost Driver
Likely Cheaper Option
Chat app with frequent updates to many users
High bandwidth from syncing all messages to all clients
High read counts for each message delivered to each user
Firestore (if writes are batched and reads are limited)
Dashboard app that reads large datasets rarely
Low bandwidth unless data is large; storage cost moderate
Low reads but each read may involve many documents
Realtime Database (if data is small and infrequently accessed)
IoT sensor app with frequent small writes
Low bandwidth per write, but storage grows with data volume
High write costs due to many individual document writes
Realtime Database (if writes are numerous but data is small)
Social media feed with many reads per user
High bandwidth from syncing feeds to many clients
High read costs from fetching feed documents
Depends on caching; Firestore can be cheaper with efficient queries
In general, Realtime Database tends to be more cost-effective for apps with small, frequent writes and limited bandwidth usage, such as simple multiplayer games or collaborative tools. Firestore often wins for apps with many reads but fewer writes, like content-heavy apps or user profiles, where caching and pagination can reduce read counts. Always use the Firebase Pricing Calculator to estimate costs based on your specific traffic patterns, as real-world usage can deviate from these general trends.
Ecosystem Integration and Tooling
The decision between Firebase Realtime Database and Firestore extends beyond data modeling and querying. Each database integrates with the broader Firebase ecosystem in distinct ways, affecting authentication flows, server-side logic, client development, and local testing. Understanding these differences helps you choose the database that aligns with your app’s architecture and tooling preferences.
Integration with Firebase Authentication and Cloud Functions
Both databases integrate seamlessly with Firebase Authentication, allowing you to enforce security rules based on user identity. However, their mechanisms differ. Realtime Database uses a JSON-like security rule language that validates data at the path level, while Firestore uses a more expressive rule syntax that supports cross-document queries and granular field-level access. For Cloud Functions, both databases trigger functions on data changes. Realtime Database triggers on onWrite, onCreate, onUpdate, and onDelete events, similar to Firestore. A key difference: Realtime Database triggers provide the entire data snapshot at the modified path, while Firestore triggers offer both the document snapshot before and after the change, which is more useful for auditing or diff-based logic. Firestore also supports triggers on collection groups, enabling functions to respond to changes across multiple collections with the same subcollection name.
Client SDK Availability and Language Support
Both databases offer client SDKs for iOS, Android, Web, and C++. Firestore additionally provides SDKs for Unity and Flutter, making it more accessible for game developers and cross-platform apps. Realtime Database lacks native Unity support, though community solutions exist. For server-side development, Firestore has Node.js, Python, Go, Java, and PHP admin SDKs, while Realtime Database supports Node.js, Python, Go, and Java. Firestore’s REST and gRPC APIs are more feature-rich, supporting streaming listeners and transactions, whereas Realtime Database’s REST API is limited to simple CRUD operations. The table below summarizes key SDK and language differences.
Feature
Firebase Realtime Database
Firestore
Web SDK
Yes (v9 modular)
Yes (v9 modular)
iOS/Android SDK
Yes
Yes
Unity SDK
No (community only)
Yes (official)
Flutter SDK
Yes (via firebase_database)
Yes (via cloud_firestore)
Admin SDK (Node.js)
Yes
Yes
Admin SDK (Python)
Yes
Yes
Admin SDK (Go)
Yes
Yes
Admin SDK (Java)
Yes
Yes
Admin SDK (PHP)
No
Yes
REST API
Yes (limited)
Yes (full CRUD + streaming)
gRPC API
No
Yes
Emulator Suite and Local Development
Firebase Emulator Suite supports both Realtime Database and Firestore, but the experience differs. The Realtime Database emulator provides a local, in-memory instance that mimics the production database, supporting security rule simulation and data persistence across sessions. Firestore’s emulator is more advanced: it supports offline persistence, real-time listeners, and the full query surface, including compound queries and collection group queries. Both emulators integrate with the Firebase Local Emulator Suite UI, which allows you to view and edit data manually. A notable advantage for Firestore: its emulator can import and export data in JSON format, facilitating seeding and testing. Realtime Database’s emulator lacks this import/export feature, requiring manual data insertion or custom scripts. For security rule testing, both emulators allow rule validation during development, but Firestore’s emulator provides more detailed error messages for rule failures, speeding up debugging. Overall, if your development workflow relies heavily on local testing with complex queries, Firestore’s emulator offers a richer, more production-like environment.
Use Case Scenarios: When to Choose Which
Selecting between Firebase Realtime Database and Firestore hinges on your app’s specific data access patterns, scaling needs, and query complexity. Both are NoSQL databases, but they prioritize different trade-offs. The Realtime Database excels at low-latency, simple synchronization, while Firestore offers richer querying, automatic scaling, and stronger consistency. Below, we examine three critical scenarios to guide your decision.
Best Fit for Realtime Database: Lightweight Sync Apps
The Realtime Database is ideal for applications where the primary requirement is instantaneous, bidirectional synchronization of small, frequently updated data sets. Its single JSON tree structure and websocket-like connection enable real-time updates with minimal overhead. Typical use cases include:
Real-time chat applications where message delivery latency must be under 100ms.
Collaborative tools like shared whiteboards or live document cursors.
IoT sensor dashboards broadcasting small telemetry readings (e.g., temperature, GPS) every few seconds.
Multiplayer game state for simple turn-based or real-time movement sync.
However, the Realtime Database has notable limitations: it does not support multi-key queries, compound indexing, or advanced filtering. Data denormalization is often required, and scaling beyond 100,000 concurrent connections may need sharding. For lightweight sync, its simplicity and speed are unmatched.
Best Fit for Firestore: Complex Queries and Large Datasets
Firestore is the better choice when your app requires structured data, complex querying, or horizontal scaling across large, unpredictable user bases. Its document-collection model supports compound queries, range filters, and automatic indexing. Key scenarios include:
E-commerce product catalogs requiring filtering by category, price range, and availability.
Social media feeds with aggregation, pagination, and real-time updates on user activity.
Analytics dashboards needing to query across millions of records with sub-second response times.
Multi-tenant SaaS platforms where data isolation and complex access controls are critical.
Firestore’s queries scale linearly with dataset size, and its strong consistency ensures that reads after writes reflect the latest data. For example, to fetch all products under $50 in a specific category, you would write:
Firestore also supports atomic transactions and batched writes, making it suitable for financial or inventory systems.
Hybrid Approaches and Migration Considerations
Many production apps combine both databases to leverage their strengths. A common hybrid pattern uses the Realtime Database for ephemeral, low-latency state (e.g., online presence indicators, typing notifications) while Firestore handles persistent, queryable data (e.g., user profiles, message archives). This approach minimizes latency for sync-heavy features while maintaining robust querying for other app components.
When migrating from Realtime Database to Firestore, consider the following:
Aspect
Realtime Database
Firestore
Data model
Single JSON tree
Document-collection hierarchy
Query support
Basic filtering, no compound queries
Compound queries, range filters, aggregations
Scaling
Manual sharding needed beyond 100k connections
Automatic horizontal scaling
Pricing
Bandwidth and storage based
Reads, writes, deletes, and storage based
Migration strategies include dual-writes during a transition phase, using Cloud Functions to synchronize data between databases, or gradually moving specific features. For example, you might keep real-time game state in Realtime Database while migrating user authentication records to Firestore. Testing query performance and data consistency under load is essential before a full cutover.
Conclusion: Making Your Decision
Choosing between Firebase Realtime Database and Firestore is not a matter of which database is universally better; it is a decision about which tool aligns with your app’s specific needs. Both are powerful NoSQL solutions from Google’s Firebase ecosystem, but they excel in different scenarios. By understanding their core trade-offs—latency vs. query flexibility, simplicity vs. scaling, and pricing models—you can select the database that will serve your users and your development team most effectively. Below, we break down the final considerations to guide your choice.
Recap of Strengths and Weaknesses
To crystallize your decision, here is a concise comparison of the primary strengths and weaknesses of each database:
Database
Strengths
Weaknesses
Firebase Realtime Database
Ultra-low latency for real-time updates (ideal for chat, live feeds).
Simple, tree-like data structure—easy to learn and prototype.
Offline support with conflict resolution for mobile clients.
Limited querying: no compound queries, filtering, or sorting across multiple fields.
Scaling challenges with deeply nested data and large datasets.
Less robust security rules and data validation compared to Firestore.
Cloud Firestore
Powerful querying with compound indexes, filters, and ordering.
Automatic scaling with sharding and multi-region replication.
Flexible, document-based data model with strong consistency.
Advanced security rules and better data validation.
Higher latency for simple real-time updates compared to Realtime Database.
More complex pricing model (based on reads, writes, deletes, and storage).
Steeper learning curve for data modeling and indexing.
Factors to Consider Based on App Type
Your app’s core functionality should drive your choice. Use the following guidelines to match your use case:
Real-time collaboration apps (e.g., chat, multiplayer games, live whiteboards): Choose Firebase Realtime Database for its sub-millisecond latency and simple event-driven updates. Firestore can work but adds overhead for constant small updates.
Data-heavy applications (e.g., e-commerce, content management, dashboards): Choose Firestore for its advanced querying, filtering, and ability to handle large, complex datasets with many fields and relationships.
Mobile-first apps with offline needs: Both databases offer offline support, but Firestore provides more robust offline persistence with automatic caching and conflict resolution. Realtime Database is simpler but less flexible for complex offline data.
Prototyping and small-scale apps: Realtime Database is faster to set up and easier to iterate on, especially for developers new to Firebase. Its flat pricing (based on bandwidth and storage) can be more predictable for small projects.
Enterprise or multi-platform apps: Firestore’s strong consistency, automatic scaling, and multi-region replication make it better suited for production-grade applications that require reliability and growth.
Next Steps: Testing and Prototyping
Before committing to a final choice, take these practical steps to validate your decision:
Build a minimal prototype using both databases for a core feature of your app. For example, create a simple chat or data list in both to compare latency and development experience.
Simulate real-world traffic using Firebase’s test console or load-testing tools to observe performance under concurrent reads and writes.
Evaluate your data access patterns: Write out the queries your app will need most often. If most queries are simple key-value lookups or real-time subscriptions, Realtime Database may suffice. If you need compound filters, sorting, or aggregation, Firestore is the better fit.
Review the pricing calculator on the Firebase website. Estimate your expected read/write volumes and storage needs to compare costs. Firestore’s per-operation pricing can become expensive for high-frequency updates, while Realtime Database’s bandwidth-based pricing may be more predictable for constant small changes.
Consider a hybrid approach if your app has mixed needs. For instance, use Realtime Database for real-time features (e.g., notifications or presence) and Firestore for persistent data storage and complex queries. This approach adds complexity but can leverage the strengths of both.
Ultimately, the right database is the one that minimizes trade-offs for your specific app. Start with a prototype, test with real data, and iterate. Both Firebase Realtime Database and Firestore are mature, well-supported options—your choice will shape your app’s performance, scalability, and developer experience for years to come.
Frequently Asked Questions
What is the main difference between Firebase Realtime Database and Firestore?
The main difference lies in data modeling and querying capabilities. Firebase Realtime Database stores data as a large JSON tree, which can lead to complex nesting and limited querying (only filtering and ordering on a single property). Firestore uses a more structured approach with collections and documents, supporting advanced queries, compound indexes, and multi-field filtering. Firestore also offers better scalability and automatic multi-region replication, while Realtime Database is simpler for small, real-time collaborative apps.
Which is better for real-time updates: Firebase Realtime Database or Firestore?
Both offer real-time synchronization via listeners. Realtime Database is optimized for low-latency updates and is ideal for highly interactive apps like chat or collaborative tools, as it streams data instantly. Firestore also supports real-time listeners with sub-millisecond latency, but its query capabilities are broader. For apps requiring complex queries and scalability, Firestore is better; for simple, high-frequency updates, Realtime Database may be more efficient.
How do pricing models differ between Firebase Realtime Database and Firestore?
Realtime Database charges based on bandwidth and storage, with no per-operation cost. Firestore charges for reads, writes, deletes, and storage, and has a free tier (50K reads, 20K writes, 20K deletes per day). For apps with many small operations, Firestore can be cheaper; for apps with large data transfers, Realtime Database may be more cost-effective. Both have usage-based pricing beyond free tiers.
Can I use both Firebase Realtime Database and Firestore in the same app?
Yes, you can use both databases in the same Firebase project. This is common when you want to leverage Firestore for structured data and complex queries while using Realtime Database for low-latency, high-frequency updates like presence or chat. However, they are separate systems, so you must manage data synchronization manually or via Cloud Functions if needed.
Which database offers better querying capabilities?
Firestore offers significantly better querying capabilities. It supports compound queries, range filters, sorting, and indexing across multiple fields. Realtime Database only allows filtering and ordering on a single property and does not support compound queries. For apps that need to search or filter by multiple criteria, Firestore is the clear choice.
How does scalability compare between Firebase Realtime Database and Firestore?
Firestore is designed for automatic horizontal scaling, handling millions of concurrent connections with strong consistency in multi-region deployments. Realtime Database is limited to a single region and can struggle with very high traffic due to its single-node architecture, though it still supports thousands of concurrent users. For large-scale apps, Firestore is recommended.
What are the security models for each database?
Both use Firebase Security Rules, but their structures differ. Realtime Database rules are based on JSON paths and can be complex for nested data. Firestore rules are more intuitive, using collections, documents, and conditions based on document fields. Firestore also supports granular access control and can integrate with Firebase Authentication more seamlessly.
Which database is easier to learn for beginners?
Firebase Realtime Database is often considered easier for beginners due to its simple JSON tree structure and straightforward real-time listeners. However, its lack of advanced querying can become limiting. Firestore has a steeper learning curve because of its collection/document model and more powerful queries, but it provides better long-term flexibility and scalability.
Building a Microservice with Node.js: A Comprehensive Guide
Introduction to Microservices and Node.js
What Are Microservices?
Microservices are an architectural approach to software development where a single application is composed of small, independent services that communicate over a network. Each service is responsible for a specific business capability and can be developed, deployed, and scaled independently. Unlike monolithic architectures, where all functionality is tightly coupled into one large codebase, microservices promote modularity and separation of concerns. Services typically expose lightweight APIs, often using HTTP/REST or messaging protocols, and can be written in different programming languages. This design enables teams to work on separate services concurrently, reduces the risk of system-wide failures, and allows for more granular scaling based on demand.
Benefits of Node.js for Microservice Development
Node.js has emerged as a leading runtime for building microservices due to its unique characteristics. Its event-driven, non-blocking I/O model makes it inherently suited for handling numerous concurrent connections with minimal overhead. Below are key advantages:
Asynchronous and event-driven architecture: Node.js uses an event loop to manage multiple requests without creating additional threads, making it efficient for I/O-heavy tasks such as API calls, database queries, and file operations.
High scalability: The lightweight nature of Node.js processes allows services to be scaled horizontally with ease, supporting rapid growth in traffic.
Rich ecosystem: The npm registry offers hundreds of thousands of packages, enabling rapid development of common microservice patterns like routing, authentication, and message queues.
JSON-native: Since microservices often exchange data in JSON format, Node.js parses and generates JSON efficiently, reducing transformation overhead.
Fast prototyping: Its simple syntax and low boilerplate allow developers to quickly build and iterate on services.
Furthermore, Node.js aligns well with containerization technologies like Docker, which are frequently used to deploy microservices. The combination of small memory footprints and fast startup times makes Node.js ideal for ephemeral, stateless services.
Node.js microservices excel in scenarios that require real-time data processing, high concurrency, or rapid feature delivery. Common applications include:
Use Case
Description
Real-time applications
Chat systems, live notifications, and collaborative editing tools benefit from Node.js’s event-driven model and WebSocket support.
API gateways
Node.js can efficiently route and aggregate requests from multiple backend services, handling high throughput with low latency.
Data streaming services
Streaming platforms for video, audio, or log data leverage Node.js’s ability to process data in chunks without buffering entire payloads.
E-commerce backends
Services for inventory, user accounts, and order processing can be built as independent Node.js services that scale based on traffic patterns.
IoT and device management
Node.js handles large numbers of concurrent device connections and can process telemetry data in real time.
These use cases demonstrate how Building a Microservice with Node.js enables developers to create responsive, maintainable, and cost-effective systems that adapt to evolving business needs.
Setting Up Your Development Environment
Before you begin building a microservice with Node.js, you must prepare your local machine with the correct tools and runtime. A properly configured environment ensures smooth development, debugging, and deployment. This section walks you through installing Node.js and npm, selecting a code editor with essential extensions, and setting up version control with Git.
Node.js is the runtime that executes your JavaScript code outside the browser, while npm (Node Package Manager) manages dependencies. Follow these steps to install both on your system.
Visit the official Node.js website at nodejs.org.
Download the LTS (Long-Term Support) version for your operating system. LTS is recommended for production and most development work.
Run the installer and follow the default setup steps. This installs both Node.js and npm.
Verify the installation by opening a terminal or command prompt and running the following commands:
node --version
npm --version
You should see version numbers for both, such as v20.11.0 and 10.2.4. If you encounter errors, ensure your system PATH includes the Node.js installation directory.
For macOS or Linux users, consider using a version manager like nvm (Node Version Manager) to switch between Node.js versions easily. Install nvm via its GitHub repository, then run:
nvm install node --lts
nvm use --lts
This approach is especially useful when working on multiple microservices that require different Node.js versions.
Choosing a Code Editor and Extensions
A capable code editor enhances productivity when building a microservice with Node.js. While any text editor works, Visual Studio Code (VS Code) is the most popular choice due to its rich ecosystem. Download it from code.visualstudio.com.
After installing VS Code, add these essential extensions for Node.js development:
ESLint – Lints JavaScript code to catch errors and enforce style consistency.
Prettier – Formats code automatically for readability.
npm Intellisense – Provides autocomplete for npm module imports.
Node.js Modules Intellisense – Helps with module resolution in require statements.
GitLens – Enhances Git capabilities inside the editor.
Thunder Client or REST Client – Tests HTTP endpoints directly from VS Code.
Optional but recommended: install Docker extension if you plan to containerize your microservice, and YAML extension for configuration files. To install any extension, open VS Code, click the Extensions icon (or press Ctrl+Shift+X), search for the name, and click “Install”.
Using Version Control with Git
Git is indispensable for tracking changes, collaborating, and rolling back errors in microservice projects. Install Git from git-scm.com if you don’t have it. After installation, configure your identity in the terminal:
For remote collaboration, connect your local repo to a service like GitHub, GitLab, or Bitbucket. Add a remote origin and push:
git remote add origin https://github.com/yourusername/my-microservice.git
git branch -M main
git push -u origin main
Now your development environment is ready. You have Node.js and npm installed, a powerful code editor with relevant extensions, and Git for version control—all essential for building a robust microservice with Node.js.
When building a microservice with Node.js, the architecture design phase determines the system’s scalability, maintainability, and resilience. Three critical decisions shape this foundation: how to split the system into services, how those services communicate, and how each manages its data. A well-structured architecture prevents tight coupling and enables independent deployment—core goals of any microservice system.
Service boundaries must align with business capabilities, not technical layers. In a Node.js context, each microservice should own a distinct domain, such as user management, order processing, or inventory. The key principle is high cohesion within a service and loose coupling between services. To identify boundaries, use Domain-Driven Design (DDD) techniques: map bounded contexts and aggregate roots. For example, an e-commerce system might have separate services for Catalog, Cart, and Payment. Each service exposes a well-defined API and owns its logic. Avoid creating services that share databases or implement cross-cutting concerns like authentication directly; instead, delegate those to an API gateway or dedicated authentication service.
Synchronous vs. Asynchronous Communication
Microservices communicate either synchronously (e.g., HTTP/REST, gRPC) or asynchronously (e.g., message queues, event streams). Each pattern suits different use cases. Synchronous calls are simple and intuitive for request-response flows, such as fetching user details. However, they introduce temporal coupling and can cascade failures. Asynchronous communication, using tools like RabbitMQ or Kafka, decouples services, improves fault tolerance, and handles high-throughput event-driven workflows, such as order placement triggering inventory updates and notifications. The table below compares these approaches for Node.js microservices.
In practice, use synchronous calls for queries where low latency is critical and asynchronous events for commands that can be processed eventually. A hybrid approach often works best: for instance, an API gateway handles synchronous requests, while internal service-to-service interactions favor asynchronous messaging.
Data Storage and Database Per Service
Each microservice should own its data store—a pattern known as “database per service.” This ensures loose coupling: no two services share a database schema or write to the same tables. Node.js supports a variety of databases, so choose based on the service’s data model. For example, a User service might use PostgreSQL for relational data, while a Product Catalog service might use MongoDB for flexible document storage. Avoid a single monolithic database; instead, implement data synchronization via events or API calls. For instance, when an order service updates an order, it emits an event that the inventory service consumes to adjust stock. This approach prevents direct database access across services and maintains data consistency through eventual consistency patterns like sagas or outbox tables.
Scaffolding the Node.js Project
Scaffolding is the foundational step in building a microservice with Node.js. A well-organized project structure ensures maintainability, scalability, and clarity as your service grows. This section walks you through creating a logical folder hierarchy, initializing npm for dependency management, and setting up a basic Express.js server to handle HTTP requests efficiently.
Project Folder Structure
A clean folder structure separates concerns and makes navigation intuitive. For a typical microservice, organize your project like this:
src/ — Contains all application source code
src/controllers/ — Handles request/response logic
src/routes/ — Defines API endpoints
src/services/ — Business logic and data processing
public/ — Static assets if needed (optional for API-only services)
node_modules/ — Auto-generated by npm
package.json — Project metadata and dependencies
.env — Environment variables (not committed to version control)
.gitignore — Files to exclude from Git
This structure is modular and allows you to add features without cluttering the root directory. For smaller microservices, you may flatten some folders, but consistency is key.
Initializing package.json
The package.json file is the heart of any Node.js project. It tracks dependencies, scripts, and metadata. To initialize it, run the following command in your project root:
npm init -y
The -y flag accepts default values. You can edit the generated file later to add specific details like the service name, version, description, and entry point (usually index.js or server.js). Next, install essential dependencies for a microservice:
express — Web framework for routing and middleware
dotenv — Loads environment variables from a .env file
cors — Enables Cross-Origin Resource Sharing if needed
helmet — Adds security headers
Install them with:
npm install express dotenv cors helmet
For development, consider adding nodemon to auto-restart the server on file changes:
With dependencies installed, create the entry point file, typically src/server.js. This file initializes Express, applies middleware, and starts listening for requests. Below is a minimal yet robust setup:
This server includes essential middleware for security, CORS, and JSON parsing. The health check endpoint is useful for monitoring. Routes are modularized under /api, keeping the server file clean. The global error handler ensures uncaught errors return a consistent response. Run the server with npm run dev during development or npm start in production.
After setting up the Node.js environment and dependencies, the next critical phase in building a microservice with Node.js is implementing the core business logic. This layer translates incoming API requests into meaningful operations, enforces business rules, and manages data persistence. A well-structured implementation separates concerns into three distinct layers: routes, controllers/services, and data models. This separation ensures maintainability, testability, and scalability as the microservice evolves.
RESTful routes define the endpoints through which clients interact with the microservice. They map HTTP methods and URL patterns to specific controller functions. Each route should follow REST conventions for resource-based URLs. For a typical user management microservice, routes might include:
GET /users – Retrieve a list of all users (with optional filters and pagination)
GET /users/:id – Retrieve a single user by ID
POST /users – Create a new user
PUT /users/:id – Update an existing user entirely
PATCH /users/:id – Partially update a user
DELETE /users/:id – Delete a user
Routes are typically defined in dedicated route files using Express Router. They should remain thin, delegating all logic to controllers. Error handling middleware can be attached at the route level or globally. When building a microservice with Node.js, keep routes focused on URL matching and parameter extraction, never on business decisions.
Building Controllers and Services
Controllers act as intermediaries between routes and services. They extract validated data from the request object, call the appropriate service method, and format the HTTP response. Services contain the actual business logic, including validation, calculations, and orchestration of multiple operations. This separation is crucial for testing: controllers can be tested for request/response handling, while services can be tested independently for logic correctness.
Layer
Responsibility
Example Code
Route
URL matching, HTTP method binding
router.get('/users/:id', userController.getUser)
Controller
Request parsing, response formatting
const user = await userService.findById(req.params.id); res.json(user);
Service
Business rules, data aggregation, validation
async findById(id) { if (!id) throw new Error('ID required'); return UserModel.findById(id); }
A common pattern is to inject dependencies (like the data model) into the service constructor, making the service easily testable with mock models. Controllers should never directly access the database or perform business validation. This layered approach ensures that when building a microservice with Node.js, each component has a single, well-defined purpose.
Defining Data Models with Mongoose
Mongoose provides a schema-based solution for modeling MongoDB data. When building a microservice with Node.js, Mongoose schemas define the structure, validation rules, and default values for each document. A typical user model might include:
Fields: name (String, required), email (String, unique, lowercase), role (String, enum: [‘admin’, ‘user’]), createdAt (Date, default: Date.now)
Validation: Custom validators for email format, minimum string lengths, and uniqueness constraints
Middleware (hooks): Pre-save hooks for password hashing, pre-remove hooks for cleanup
Virtuals: Computed properties like full name from first and last name
Indexes: Compound indexes for frequently queried fields
Schemas are compiled into models that provide CRUD methods: find(), findById(), create(), findByIdAndUpdate(), findByIdAndDelete(). Mongoose also supports population for referencing documents from other collections, essential for relational data in a microservice context. Always define schemas in separate files, export the model, and import it into services. This modularity allows the data layer to be replaced or extended without affecting controllers or routes. When building a microservice with Node.js, careful schema design prevents data inconsistency and reduces the need for manual validation in the service layer.
Handling Inter-Service Communication
In a microservice architecture, services must exchange data reliably and efficiently. Two primary communication paradigms dominate: synchronous HTTP calls for request-response patterns and asynchronous message queues for event-driven workflows. Choosing the right approach depends on your use case—HTTP suits simple queries and CRUD operations, while message queues excel at decoupling services and handling bursts of traffic. This section explores practical implementations of both methods using Node.js, focusing on Axios for HTTP and RabbitMQ for messaging, along with essential error handling strategies.
Using HTTP Requests with Axios
Axios is a promise-based HTTP client for Node.js that simplifies making requests to other microservices. It supports automatic JSON parsing, request cancellation, and interceptors for logging or authentication. Below is a practical example of a service fetching user data from another service using Axios with a timeout and error handling.
const axios = require('axios');
async function getUserData(userId) {
try {
const response = await axios.get(`http://user-service/users/${userId}`, {
timeout: 5000,
headers: { 'X-Service-Auth': process.env.SERVICE_TOKEN }
});
return response.data;
} catch (error) {
if (error.code === 'ECONNABORTED') {
throw new Error('User service timed out');
}
if (error.response) {
throw new Error(`User service returned status ${error.response.status}`);
}
throw new Error('Network error contacting user service');
}
}
Key considerations when using HTTP for inter-service communication:
Service discovery: Use environment variables or a registry (e.g., Consul) to locate service endpoints dynamically.
Circuit breakers: Implement patterns like the circuit breaker to prevent cascading failures when a downstream service is slow or down.
Connection pooling: Reuse HTTP connections via keep-alive to reduce latency and resource usage.
Implementing a Message Broker with RabbitMQ
RabbitMQ implements the AMQP protocol and is ideal for decoupling services. Producers publish messages to exchanges, which route them to queues based on binding rules. Consumers then process messages asynchronously. Below is a step-by-step guide to setting up a basic producer-consumer pattern.
Direct, topic, fanout exchanges for varied patterns
Load leveling
Queues buffer spikes in traffic
Error Handling and Retry Logic
Network failures, service unavailability, and transient errors are inevitable in distributed systems. Robust error handling must cover both synchronous and asynchronous communication. For HTTP requests, implement exponential backoff with jitter to avoid overwhelming a recovering service. For message queues, use dead-letter exchanges to isolate failed messages for later inspection.
Below is a retry utility for HTTP calls using Axios with exponential backoff:
Idempotency keys: Ensure retries do not duplicate side effects (e.g., duplicate payments).
Dead-letter queues: Route messages that exceed retry limits to a separate queue for manual analysis.
Monitoring: Log retry attempts and failures to track service health and identify persistent issues.
Timeout configuration: Set sensible timeouts per service based on expected response times.
Adding Authentication and Authorization
Securing your microservice is essential for protecting sensitive data and ensuring that only authorized users can access specific resources. This section covers implementing JSON Web Tokens (JWT) for authentication and role-based access control (RBAC) for authorization, providing a robust security layer for your Node.js microservice.
Implementing JWT Authentication
JSON Web Tokens offer a stateless authentication mechanism ideal for microservices. To implement JWT authentication, you need to generate tokens upon successful login and validate them on each subsequent request. Start by installing the jsonwebtoken and bcrypt packages. Use bcrypt to hash user passwords before storing them in your database. The authentication flow works as follows:
User submits credentials (email and password) via a POST request to a login endpoint.
The server verifies the credentials against the stored hash using bcrypt.compare().
If valid, the server creates a JWT containing a payload with the user ID and an expiration time, signed with a secret key stored in environment variables.
The token is returned to the client, which stores it (typically in localStorage or an HTTP-only cookie) and includes it in the Authorization header of subsequent requests.
Example token payload structure includes:
Claim
Description
Example
sub
Subject (user ID)
“user_12345”
iat
Issued at timestamp
1700000000
exp
Expiration timestamp
1700086400
role
User role for RBAC
“admin”
Protecting Routes with Middleware
Middleware functions intercept incoming requests and execute validation logic before reaching the route handler. Create a reusable authentication middleware that extracts the JWT from the Authorization header, verifies it using the secret key, and attaches the decoded payload to the request object. Implement this middleware as follows:
Extract the token from the “Bearer ” format in the Authorization header.
Use jwt.verify() to validate the token’s signature and expiration.
If verification fails, return a 401 Unauthorized response with a clear error message.
If successful, attach the decoded payload (e.g., req.user) and call next().
Apply this middleware to any route that requires authentication. For example, in Express, you can use router.get('/profile', authenticate, profileHandler). This ensures that only requests with a valid, non-expired token can access protected endpoints. For enhanced security, consider implementing token refresh mechanisms and blacklisting invalidated tokens.
Managing User Roles and Permissions
Role-based access control extends authentication by restricting actions based on user roles. Define roles such as “admin”, “moderator”, and “user”, each with specific permissions. Store the role in the JWT payload during authentication and create an authorization middleware that checks the user’s role against required permissions for a route.
Implement role management with these steps:
Define a hierarchical role system where higher roles inherit permissions from lower roles (e.g., admin can do everything a user can).
Create an authorize middleware function that accepts required roles as parameters.
Inside the middleware, compare the user’s role from req.user.role against the allowed roles array.
Return a 403 Forbidden response if the user lacks sufficient permissions.
Example permission mapping for a blogging microservice:
Role
Permissions
admin
Create, read, update, delete any post; manage users
moderator
Read, update, delete any post; cannot manage users
user
Create, read, update, delete own posts only
By combining JWT authentication with role-based middleware, your microservice can enforce granular access control while remaining stateless and scalable. Store role definitions in a database or configuration file for easy updates without redeploying the service.
Testing the Microservice
Testing is a non-negotiable pillar of any production-grade microservice built with Node.js. Without a disciplined testing strategy, the benefits of modularity and independent deployment are quickly eroded by regressions, integration failures, and brittle code. A comprehensive approach layers unit tests, integration tests, and end-to-end tests to validate correctness at every level of the stack. This section outlines three essential testing pillars for your Node.js microservice, using industry-standard tools and patterns.
Writing Unit Tests with Jest
Unit tests verify the smallest isolated units of code—typically individual functions or methods—in complete isolation from external systems like databases, file systems, or network calls. For Node.js microservices, Jest is the dominant testing framework due to its zero-configuration setup, built-in mocking, and rich assertion library. When writing unit tests for a microservice, focus on pure business logic: validation functions, transformation pipelines, and domain model methods. Avoid testing framework internals or database queries directly. A typical pattern involves importing the module under test, mocking its dependencies using jest.fn() or jest.mock(), and asserting on outputs or side effects. For example, a function that calculates order totals should be testable without hitting a payment gateway. Jest’s describe and it blocks structure tests logically, while expect provides matchers like toBe, toEqual, and toThrow. Aim for high code coverage on critical paths, but prioritize meaningful assertions over arbitrary coverage thresholds.
Integration tests validate that your microservice’s components work together correctly, including the HTTP layer, middleware, route handlers, and database access. Supertest is the de facto library for integration testing Express.js (or similar) applications. It allows you to start your server in-process, send real HTTP requests, and inspect responses without needing a separate running instance. Use Supertest to test endpoints end-to-end against a test database (e.g., an in-memory MongoDB via mongodb-memory-server or a PostgreSQL test container). A typical integration test flow is: spin up the app, seed test data, send a GET or POST request via Supertest, and assert on status codes, response bodies, and headers. This catches routing errors, middleware misconfigurations, and serialization bugs that unit tests miss. Avoid coupling integration tests to production databases; always use isolated, throwaway environments to ensure repeatability.
Mocking External Dependencies
Microservices rarely operate in isolation—they depend on databases, message queues, third-party APIs, and other services. Mocking external dependencies is critical to test reliability, speed, and determinism. Without mocking, tests become slow, flaky, and dependent on network availability. Use Jest’s built-in jest.mock() to replace entire modules (e.g., an HTTP client or database driver) with fake implementations. For more granular control, use jest.spyOn() to stub specific methods on objects. When testing interactions with external services, consider using a dedicated mocking library like nock for HTTP requests or sinon for general stubs and spies. A best practice is to define mock factories that return consistent, controllable data, allowing you to test edge cases like timeouts, errors, and empty responses. The table below compares common mocking approaches for Node.js microservices.
By layering unit tests, integration tests, and strategic mocking, you build a robust safety net that catches defects early, accelerates development, and ensures your microservice remains reliable as it evolves.
Containerizing and Deploying with Docker
Containerization is the final step in building a microservice with Node.js, ensuring consistent behavior across development, staging, and production environments. Docker packages the application with its dependencies into a lightweight, portable container that can run on any system with Docker installed. This section covers creating a Dockerfile, orchestrating multi-service setups with Docker Compose, and deploying to a cloud provider such as AWS or Heroku.
Creating a Dockerfile
The Dockerfile defines the steps to build a container image for the Node.js microservice. A typical Dockerfile uses a multi-stage build to minimize image size and improve security. Below is an example for a Node.js application that listens on port 3000:
# Stage 1: Install dependencies
FROM node:18-alpine AS dependencies
WORKDIR /app
COPY package*.json ./
RUN npm ci --only=production
# Stage 2: Build and run
FROM node:18-alpine
WORKDIR /app
COPY --from=dependencies /app/node_modules ./node_modules
COPY . .
EXPOSE 3000
CMD ["node", "server.js"]
Key considerations when writing a Dockerfile for a microservice:
Base image: Use an official Alpine-based Node.js image to keep the image small (e.g., node:18-alpine).
Layer caching: Copy package.json and package-lock.json before the rest of the source code to leverage Docker’s cache for dependency installation.
Non-root user: Add a user with limited privileges to run the application for security.
Health checks: Include a HEALTHCHECK instruction to monitor the service’s status.
After creating the Dockerfile, build the image with docker build -t my-microservice . and test it locally using docker run -p 3000:3000 my-microservice.
Using Docker Compose for Multi-Service Setup
When the microservice depends on other services—such as a database, message queue, or caching layer—Docker Compose simplifies orchestration. A docker-compose.yml file defines all services, networks, and volumes in a single configuration. Below is an example that includes the Node.js microservice and a MongoDB instance:
Benefits of using Docker Compose for building a microservice with Node.js include:
Environment consistency: All developers and CI/CD pipelines use the same service definitions.
Simplified networking: Services communicate via service names (e.g., mongodb) instead of IP addresses.
Scalability: Use docker-compose up --scale app=3 to run multiple instances for load testing.
Run the entire stack with docker-compose up and tear it down with docker-compose down.
Deploying to a Cloud Provider (e.g., AWS, Heroku)
Once the Docker image is tested locally, deploy it to a cloud platform. The deployment method varies by provider. Below is a comparison of common approaches for AWS and Heroku:
Provider
Deployment Method
Key Commands/Steps
Considerations
AWS (ECS)
Push image to Amazon ECR, then create an ECS task definition and service.
Requires IAM roles, VPC configuration, and load balancer setup for production.
Heroku
Use the Heroku Container Registry to release a Docker image.
heroku container:login heroku create my-microservice-app heroku container:push web --app my-microservice-app heroku container:release web --app my-microservice-app
Simpler for small deployments; automatic HTTP routing and SSL provided.
For a production-grade deployment on AWS, consider using Amazon ECS with Fargate for serverless container management. Heroku offers a quicker path for prototyping or low-traffic applications. Regardless of the provider, always set environment variables for secrets (e.g., database passwords) and avoid hardcoding them in the Dockerfile or source code. After deployment, test the microservice endpoint (e.g., http://your-app-url:3000/api) to confirm it responds correctly.
Monitoring, Logging, and Scaling
Once your microservice is deployed to production, maintaining its reliability and performance becomes the primary concern. Without deliberate strategies for observability and capacity management, even a well-architected service can fail silently or become a bottleneck. This section outlines three essential practices for keeping your Node.js microservice healthy and responsive under real-world loads.
Implementing Centralized Logging
In a distributed system, logs scattered across multiple instances are useless for debugging. Centralized logging aggregates all log output into a single, searchable platform. For your Node.js microservice, follow these best practices:
Use structured logging: Output logs as JSON objects with consistent fields such as timestamp, level, serviceName, requestId, and message. This enables automated parsing and filtering.
Leverage a logging library: Use mature tools like pino or winston that support log levels, transports, and child loggers for context propagation.
Ship logs to a central store: Configure your logging library to send logs to a system like Elasticsearch, Loki, or a cloud-native solution (e.g., AWS CloudWatch, Azure Monitor). Avoid writing logs only to the local filesystem.
Correlate requests across services: Pass a unique request identifier (e.g., via HTTP headers like x-request-id) through your microservice chain. Include this ID in every log entry to trace a single user request across multiple services.
Example of a structured log entry:
{"level":"info","timestamp":"2025-03-27T10:00:00.000Z","serviceName":"order-service","requestId":"abc-123","message":"Order created successfully"}
Setting Up Health Checks and Monitoring
Health checks allow orchestration tools (like Kubernetes or Docker Swarm) and load balancers to determine if your microservice is alive and ready to accept traffic. Implement two types of endpoints:
Liveness check: A simple endpoint (e.g., GET /health/live) that returns a 200 status if the process is running. This tells the orchestrator whether to restart the container.
Readiness check: A more thorough endpoint (e.g., GET /health/ready) that verifies the service can handle requests—checking database connectivity, cache availability, and external dependency status. The load balancer will stop sending traffic if this check fails.
Beyond health checks, monitor key metrics:
Metric Category
Example Metrics
Why It Matters
Application
Request rate, latency (p50/p95/p99), error rate
Reveals performance degradation and error spikes
System
CPU usage, memory consumption, event loop lag
Indicates resource exhaustion or blocking operations
Business
Orders processed, successful payments, user registrations
Aligned with service goals and domain health
Use a monitoring stack (e.g., Prometheus for metrics collection, Grafana for dashboards) to visualize these data and set up alerts for anomalous behavior.
Horizontal Scaling with Load Balancing
Node.js microservices benefit greatly from horizontal scaling—running multiple instances of the same service behind a load balancer. This approach improves both throughput and fault tolerance. Key considerations include:
Stateless design: Ensure your microservice does not store session or user state in memory. Use external stores (Redis, database) for any required state. This allows any instance to handle any request.
Choose a load balancer: Use a reverse proxy like Nginx, HAProxy, or a cloud-native load balancer (e.g., AWS ALB, Google Cloud Load Balancing). Configure it to distribute traffic using a round-robin or least-connections algorithm.
Manage concurrency with Node.js cluster: Within a single machine, use the built-in cluster module to fork worker processes that share a port. This maximizes CPU core utilization, as Node.js is single-threaded by default.
Implement graceful shutdown: When scaling down or updating, ensure your service stops accepting new requests from the load balancer (via a health check failure or a SIGTERM signal) while finishing in-flight requests. This prevents dropped connections.
By combining centralized logging, robust health checks, and horizontal scaling, you can maintain a Node.js microservice that is observable, resilient, and ready to grow with demand.
A microservice is a small, independent service that performs a specific business function, communicating with other services via APIs. Node.js is ideal for microservices due to its non-blocking I/O, event-driven architecture, and npm ecosystem. It handles high concurrency with low overhead, making it perfect for lightweight, scalable services. Node.js also offers fast development cycles and strong support for RESTful APIs, message queues, and containerization, which are core to microservice patterns.
What are the key steps to build a microservice with Node.js?
Key steps include: 1) Define the service boundary and API contract. 2) Set up a Node.js project with Express or Fastify. 3) Implement business logic and data models. 4) Connect to a database (e.g., MongoDB or PostgreSQL). 5) Add error handling and logging. 6) Write unit and integration tests. 7) Containerize with Docker. 8) Deploy using orchestration like Kubernetes. 9) Implement service discovery and health checks. 10) Monitor and scale as needed.
Node.js microservices communicate via synchronous protocols like HTTP/REST or gRPC, or asynchronously through message brokers like RabbitMQ, Kafka, or Redis. REST is common for simple CRUD APIs, while gRPC offers better performance for high-throughput systems. Async messaging decouples services, improving resilience and scalability. Each service exposes endpoints or subscribes to queues, using JSON or Protocol Buffers for data serialization. Service discovery tools like Consul or Kubernetes DNS help locate instances.
What are best practices for Node.js microservices?
Best practices include: keep services small and focused on one domain; use API versioning; implement centralized logging (e.g., ELK stack); use health checks and circuit breakers; secure with HTTPS, authentication, and rate limiting; design for failure with retries and timeouts; use environment variables for configuration; containerize with Docker; automate CI/CD; and monitor with Prometheus and Grafana. Also, avoid shared databases—each service should own its data.
How do you deploy a Node.js microservice?
Deploying a Node.js microservice typically involves containerization with Docker, pushing the image to a registry (e.g., Docker Hub), and orchestrating with Kubernetes or Docker Swarm. Use CI/CD pipelines (e.g., GitHub Actions, Jenkins) to automate testing and deployment. Configuration management tools like Helm or Kustomize help manage manifests. For cloud, use AWS ECS, Google Cloud Run, or Azure Container Instances. Implement horizontal scaling via replicas and load balancers.
What common pitfalls should be avoided?
Common pitfalls include: making services too large (monolith in disguise); tight coupling via shared databases; ignoring distributed tracing; lack of proper error handling leading to cascading failures; not implementing retries with exponential backoff; over-engineering with too many services; neglecting security; and poor API design without versioning. Also, avoid synchronous calls for critical paths—use async messaging to improve resilience. Always test for network failures and latency.
How do you test Node.js microservices?
Testing involves unit tests for individual functions (e.g., Mocha, Jest), integration tests for API endpoints (Supertest), and end-to-end tests across services. Use mocks and stubs (Sinon) to isolate dependencies. Contract testing with tools like Pact ensures service compatibility. For async services, test message handling with in-memory brokers. Load testing with Artillery or k6 helps validate performance. CI pipelines should run tests automatically on each commit.
What tools are essential for Node.js microservices?
Essential tools include: Express.js or Fastify for HTTP servers; Sequelize or Mongoose for databases; Docker for containerization; Kubernetes for orchestration; RabbitMQ or Kafka for messaging; Redis for caching; Prometheus and Grafana for monitoring; ELK Stack for logging; Consul for service discovery; and CI/CD tools like Jenkins or GitHub Actions. Additionally, use npm or Yarn for package management and ESLint/Prettier for code quality.
MongoDB vs. MySQL: Which Database is Right for You?
Introduction to MongoDB and MySQL
Choosing the right database is a foundational decision for any application. Two of the most popular options are MongoDB and MySQL, but they represent fundamentally different approaches to data management. MongoDB is a NoSQL document store designed for flexibility and scalability, while MySQL is a relational database management system (RDBMS) built on a structured, table-based model. Understanding their origins, core philosophies, and data models is essential to determining which one fits your project’s needs.
MongoDB is a NoSQL database that stores data in flexible, JSON-like documents. Instead of rows and columns, each record is a document—a self-contained unit of data that can have its own structure. This document model allows for nested fields, arrays, and varying schemas within the same collection. For example, a user document might include an array of addresses, each with different fields, without requiring separate tables or joins. Key features include:
Schema-less design: Documents in the same collection can have different fields, enabling rapid iteration.
Embedded documents: Related data can be nested within a single document, reducing the need for expensive joins.
Horizontal scaling: Built-in sharding distributes data across multiple servers.
Rich query language: Supports filtering, aggregation, geospatial queries, and text search.
MongoDB’s philosophy prioritizes developer productivity and flexibility, making it ideal for applications with evolving data models, such as content management systems, real-time analytics, and IoT platforms.
MySQL is a relational database that organizes data into tables with predefined schemas. Each table consists of rows (records) and columns (attributes), and relationships between tables are established through foreign keys. The relational model enforces data integrity using constraints, normalization, and ACID (Atomicity, Consistency, Isolation, Durability) transactions. For instance, an e-commerce system might have separate tables for customers, orders, and products, linked by keys to ensure consistency. Core characteristics include:
Structured schema: Tables and columns must be defined before data insertion, ensuring uniformity.
Joins: Related data is retrieved by combining tables using SQL JOIN operations.
Strong consistency: ACID compliance guarantees reliable transactions, even during failures.
Vertical scaling: Traditionally scaled by upgrading hardware, though clustering and replication are available.
MySQL’s philosophy emphasizes data integrity, reliability, and standardization, making it a staple for applications requiring strict consistency, such as financial systems, inventory management, and legacy enterprise software.
When Each Database Was Created and Why
MongoDB was first released in 2009 by MongoDB Inc. (then 10gen) as a response to the limitations of relational databases in handling large-scale, unstructured data. The rise of web applications, social media, and big data created a demand for databases that could scale horizontally and handle flexible schemas without the overhead of joins and migrations. MongoDB was designed to meet these needs, offering a document model that aligned with how developers naturally structure data in code.
MySQL, on the other hand, was created in 1995 by Michael Widenius and David Axmark. Its development was driven by the need for a fast, reliable, and open-source relational database that could compete with proprietary systems like Oracle and Microsoft SQL Server. MySQL was built on the relational model, which had been the dominant paradigm since the 1970s, and it gained popularity for its ease of use, performance, and strong community support. Over time, it became the backbone of countless web applications, particularly with the LAMP stack (Linux, Apache, MySQL, PHP/Perl/Python).
The table below summarizes their origins and core philosophies:
Feature
MongoDB
MySQL
Release year
2009
1995
Primary motivation
Scalability, flexibility for modern apps
Reliable, open-source relational storage
Data model
Document (JSON-like)
Relational (tables, rows, columns)
Schema
Dynamic, schema-less
Fixed, predefined
Consistency model
Eventual consistency (configurable)
ACID (strong consistency)
Understanding these foundational differences sets the stage for evaluating which database aligns with your application’s requirements, from data structure to scaling strategy.
The choice between MongoDB and MySQL often hinges on how each database approaches schema design. MongoDB’s document model offers a dynamic, schemaless structure, while MySQL enforces a rigid, predefined schema. This fundamental difference has profound implications for application development, affecting everything from initial design to long-term maintenance.
MongoDB’s Schemaless Approach and Embedded Documents
MongoDB stores data as BSON documents, typically in JSON-like format. This schemaless design means that documents within the same collection do not need to have identical fields. You can add new fields, remove them, or change their data types without altering a central schema definition. This flexibility is particularly valuable in agile development environments where requirements evolve rapidly. A key feature is the ability to embed related data within a single document, reducing the need for joins. For example, a blog post can contain an array of comments directly:
This embedding improves read performance by retrieving all related data in a single query. However, it can also lead to data duplication if the same data needs to appear in multiple documents.
MySQL, as a relational database, requires a fixed schema defined before data insertion. Each table has a predefined set of columns with specific data types and constraints. This rigidity enforces data consistency at the database level, preventing accidental insertion of malformed or incomplete records. MySQL encourages normalization—the process of organizing data to reduce redundancy and dependency. In the blog example, comments would be stored in a separate table linked to posts via a foreign key:
Posts table: id (INT, PRIMARY KEY), title (VARCHAR), content (TEXT)
Comments table: id (INT, PRIMARY KEY), post_id (INT, FOREIGN KEY), user (VARCHAR), text (TEXT), date (DATETIME)
This structure ensures that each piece of data is stored only once, which simplifies updates and maintains referential integrity. For instance, updating a user’s name in one place automatically reflects across all related comments.
The choice between MongoDB’s flexibility and MySQL’s consistency involves clear trade-offs:
Aspect
MongoDB
MySQL
Schema changes
Easy; no migrations needed for new fields
Requires ALTER TABLE commands, which can be complex with large datasets
Data integrity
Relies on application logic; no built-in enforcement
Enforced via constraints, foreign keys, and data types
Query complexity
Simple for embedded data; complex for multi-document joins
Supports powerful JOINs, subqueries, and aggregations
Performance with relationships
Fast reads with embedding; potential duplication
Efficient normalization; may require multiple queries or JOINs
For applications with rapidly changing data structures, such as content management systems or IoT sensor data, MongoDB’s flexibility reduces development friction. Conversely, for systems requiring strict data integrity, like financial transactions or inventory management, MySQL’s fixed schema and normalization provide a reliable foundation. Developers must weigh these factors against their specific requirements for consistency, scalability, and development speed.
Choosing between MongoDB and MySQL often hinges on how each database handles queries and the developer experience it provides. MongoDB uses a flexible, JSON-like query language that aligns with modern JavaScript and Node.js workflows, while MySQL relies on the mature, declarative SQL standard with decades of tooling and best practices. Understanding these differences is critical for teams evaluating productivity, learning curves, and long-term maintainability.
MongoDB Query API and Aggregation Pipeline
MongoDB’s query language is document-oriented and expressed in JSON-like objects, making it intuitive for developers familiar with JavaScript or Python dictionaries. Basic operations like find() and insertOne() feel natural when working with nested data. The Aggregation Pipeline is a powerful framework for transforming and analyzing data in stages, using operators such as $match, $group, and $sort. This pipeline model eliminates the need for complex joins by allowing multi-step data processing within a single query. However, the learning curve can be steep for developers accustomed to relational thinking, especially when dealing with array manipulations or unwind operations. MongoDB’s query language is best suited for applications that require rapid iteration on schema-less data, such as content management systems or real-time analytics.
MySQL SQL Syntax and JOIN Operations
MySQL uses Structured Query Language (SQL), a standardized language that has been the backbone of relational databases for decades. SQL’s declarative syntax—like SELECT, INSERT, and JOIN—is widely taught and documented, making it accessible to a broad range of developers. JOIN operations, including INNER JOIN, LEFT JOIN, and CROSS JOIN, enable efficient combination of data across related tables, which is essential for normalized schemas. MySQL’s query optimizer handles complex joins and subqueries with mature indexing strategies, but writing efficient JOINs requires understanding of relational design and indexing. For developers who need strict data integrity and complex relationships—such as in e-commerce or financial systems—SQL’s clarity and predictability often outweigh the flexibility of JSON-based queries.
Feature
MongoDB (JSON-like Queries)
MySQL (SQL)
Query format
JSON-like objects (BSON)
Structured Query Language (SQL)
Joins
No native JOINs; uses $lookup in aggregation
Multiple JOIN types (INNER, LEFT, etc.)
Learning curve for beginners
Moderate for developers new to document models
Low due to widespread teaching and resources
Tooling ecosystem
MongoDB Compass, Atlas, and shell
MySQL Workbench, phpMyAdmin, and CLI
Best for
Flexible schemas and nested data
Structured data with complex relationships
Learning Resources and Community Support
Both databases offer extensive learning materials and active communities. MongoDB provides official documentation, free online courses (MongoDB University), and a large community forum. The aggregation pipeline has specialized tutorials and video series, though advanced topics like sharding or indexing can require deeper study. MySQL benefits from decades of resources: countless books, online tutorials, and Stack Overflow answers covering everything from basic queries to performance tuning. MySQL’s community is one of the largest in open-source, with strong corporate backing from Oracle. For developers transitioning between the two, understanding the conceptual shift from relational normalization to document embedding is key. Both ecosystems also support major programming languages with mature drivers and ORMs, such as Mongoose for MongoDB and Sequelize for MySQL, further reducing the initial learning barrier. Ultimately, the choice depends on your team’s existing SQL proficiency versus willingness to adopt a document-oriented paradigm.
Performance and Scalability
When evaluating MongoDB vs. MySQL, performance and scalability often determine the best fit for your application. Both databases handle growth, but they approach scaling and workload optimization differently. MongoDB excels in horizontal scaling for large, distributed datasets, while MySQL traditionally relies on vertical scaling and replication for reliability. Understanding these differences helps you match the database to your traffic patterns and data volume.
MongoDB scales out horizontally using sharding, which distributes data across multiple servers (shards). Each shard holds a subset of the data, and a config server manages metadata. This approach allows near-linear performance gains as you add nodes. Sharding is ideal for write-heavy workloads and large datasets that exceed a single server’s capacity.
Horizontal scaling suits real-time analytics, IoT, and content management systems where data grows unpredictably. However, sharding adds operational complexity, requiring careful shard key design and monitoring.
MySQL’s Vertical Scaling and Replication
MySQL traditionally scales vertically by upgrading hardware (CPU, RAM, SSD). For read-heavy workloads, it uses replication: a primary server handles writes, while replicas serve reads. This setup improves read throughput and provides failover redundancy. MySQL 8.0 also supports Group Replication for multi-primary configurations, but it remains less horizontally elastic than MongoDB.
Replication topology: Primary-replica (asynchronous) or Group Replication (semi-synchronous).
Example command to set up a replica:
CHANGE MASTER TO MASTER_HOST='192.168.1.10', MASTER_USER='repl', MASTER_PASSWORD='secret', MASTER_LOG_FILE='mysql-bin.000001', MASTER_LOG_POS=107;
START SLAVE;
MySQL’s vertical approach works well for e-commerce, financial systems, and applications with predictable growth. It offers strong consistency and mature tooling, but may require application-level sharding for extreme scale.
Read/Write Performance for Typical Use Cases
Performance varies by workload:
Use Case
MongoDB
MySQL
Write-heavy (logs, events)
Excellent with sharding; no joins
Good with InnoDB; slower with many indexes
Read-heavy (catalogs)
Good with secondary indexes
Excellent with query caching and replicas
Complex joins (reporting)
Poor; use aggregation pipeline
Excellent with normalized schemas
Real-time analytics
Very good with in-memory storage
Moderate; requires tuning
MongoDB performs best with document-oriented data and high write throughput, while MySQL excels in transactional consistency and complex queries. For mixed workloads, consider MongoDB for flexible schemas and horizontal scale, and MySQL for strict ACID compliance and relational integrity.
Indexing and Query Optimization
Indexing is the backbone of query performance in any database system. Both MongoDB and MySQL offer robust indexing strategies, but they differ in structure, flexibility, and maintenance overhead. Understanding these differences helps you choose the right database for your workload and optimize query speed without unnecessary resource consumption.
MongoDB Index Types and Compound Indexes
MongoDB supports a variety of index types to accelerate queries on document-based data. The most common is the single field index, which indexes a single field in ascending or descending order. For queries on multiple fields, MongoDB provides compound indexes, where the order of fields matters significantly. A compound index on {status: 1, createdAt: -1} will efficiently serve queries filtering by status and sorting by creation date, but not the reverse. MongoDB also offers multikey indexes for array fields, text indexes for full-text search, geospatial indexes for location data, and hashed indexes for sharding. Each index type has specific use cases and maintenance costs. For example, compound indexes can support multiple query patterns if designed with the ESR rule (Equality, Sort, Range) to maximize coverage. However, every additional index slows down write operations because MongoDB must update each index on inserts and updates. Regular monitoring of index usage is essential to avoid unused indexes that degrade performance.
MySQL B-Tree and Full-Text Indexes
MySQL’s default indexing structure is the B-Tree index, which works well for equality and range queries, as well as sorting. B-Tree indexes are stored in a balanced tree structure, allowing fast lookups and ordered scans. They are ideal for columns with high cardinality, such as user IDs or timestamps. MySQL also supports Full-Text indexes for natural language search on text columns, using inverted indexing to efficiently match words and phrases. Full-Text indexes are only available on MyISAM and InnoDB storage engines (with InnoDB supporting them from MySQL 5.6 onward). Unlike MongoDB, MySQL does not natively support multikey or geospatial indexes, though spatial indexes are available via R-Trees for geometry data. A key optimization technique in MySQL is the use of covering indexes, where all columns in a query are included in the index, avoiding table lookups entirely. However, MySQL’s B-Tree indexes have a maximum key length and can become less efficient with very wide indexes or long string columns. Index maintenance in MySQL involves periodic rebuilding to reduce fragmentation, especially in tables with frequent updates.
Query Profiling and Explain Plans
Both databases provide tools to analyze query performance and identify bottlenecks. In MongoDB, the explain() method returns query execution statistics, including the index used, number of documents examined, and execution time. Use db.collection.explain("executionStats") to see detailed metrics. MongoDB’s profiler, enabled via db.setProfilingLevel(), logs slow queries and can be set to capture all operations or only those exceeding a threshold. In MySQL, the EXPLAIN statement shows how the query optimizer executes a query, including access type (e.g., ALL for full table scan, ref for index lookup), key length, and rows examined. MySQL also offers SHOW PROFILE and performance_schema for deeper analysis. Key differences: MongoDB’s explain plans focus on index usage and document scanning, while MySQL’s emphasize join types and temporary table usage. For both systems, the goal is to minimize the number of rows or documents scanned. Common optimization techniques include adding missing indexes, rewriting queries to use covered indexes, and avoiding functions in WHERE clauses that prevent index usage. Regular profiling and explain plan review are critical for maintaining query performance as data grows.
Transactions and ACID Compliance
When comparing MongoDB vs. MySQL, understanding how each database handles transactions and ACID compliance is critical for applications that require data integrity. ACID stands for Atomicity, Consistency, Isolation, and Durability. These properties ensure that database transactions are processed reliably. MySQL, with its InnoDB storage engine, has long been the standard for ACID-compliant relational databases. MongoDB, originally known for sacrificing multi-document transactions for scalability, has matured significantly since version 4.0 to offer robust transaction support. The choice between them now often depends on the specific consistency guarantees your application requires and the complexity of your data model.
MongoDB introduced multi-document ACID transactions in version 4.0, marking a major shift from its document-level atomicity. Previously, MongoDB guaranteed atomicity only for operations on a single document. Now, you can perform reads and writes across multiple documents, collections, and even databases within a single transaction, while maintaining snapshot isolation. This makes MongoDB viable for use cases that demand strong consistency, such as financial systems or inventory management. However, transactions in MongoDB come with performance considerations. They require a replica set (even in development) and can impact throughput if used excessively. Here is a practical example of a multi-document transaction in the MongoDB shell:
// Start a session and transaction
const session = db.getMongo().startSession();
session.startTransaction({
readConcern: { level: 'snapshot' },
writeConcern: { w: 'majority' }
});
try {
const accounts = session.getDatabase('bank').accounts;
const transfers = session.getDatabase('bank').transfers;
// Debit from account A
accounts.updateOne(
{ account_id: 'A' },
{ $inc: { balance: -100 } }
);
// Credit to account B
accounts.updateOne(
{ account_id: 'B' },
{ $inc: { balance: 100 } }
);
// Record the transfer
transfers.insertOne({
from: 'A',
to: 'B',
amount: 100,
date: new Date()
});
session.commitTransaction();
print('Transaction committed successfully.');
} catch (error) {
session.abortTransaction();
print('Transaction aborted: ' + error);
} finally {
session.endSession();
}
This example demonstrates atomicity across two collections. If any operation fails, all changes are rolled back.
MySQL’s InnoDB storage engine is the gold standard for ACID compliance in relational databases. It supports transactions with full atomicity, consistency, isolation, and durability. InnoDB uses a write-ahead logging (WAL) mechanism, known as the redo log, to ensure durability even in the event of a crash. It offers multiple isolation levels, with the default being REPEATABLE READ, which prevents dirty reads and non-repeatable reads. InnoDB also enforces foreign key constraints and referential integrity, which are essential for relational data models. The trade-off is that ACID compliance in MySQL can lead to locking overhead and reduced concurrency under heavy write loads, especially at the highest isolation level (SERIALIZABLE). For most traditional applications, MySQL’s ACID guarantees are reliable and well-understood.
When Transaction Support Matters Most
The need for multi-document or multi-table transactions typically arises in scenarios where data consistency is paramount. Here is a comparison of when each database’s transaction support is most appropriate:
Use Case
Recommended Database
Rationale
Financial ledger systems
MySQL or MongoDB
Both offer ACID transactions; MySQL is traditional, MongoDB suits flexible schemas.
E-commerce order processing
MySQL
Requires strong referential integrity across orders, customers, and inventory tables.
Content management with embedded data
MongoDB
Single-document atomicity often sufficient; transactions needed only for complex updates.
High-throughput logging or analytics
MongoDB
ACID transactions are rarely needed; eventual consistency is acceptable.
Banking or compliance-critical apps
MySQL
Proven track record with strict audits and mature tooling for ACID enforcement.
Transaction support matters most when operations must either fully succeed or fully fail without partial updates. For example, transferring funds between accounts, updating inventory after a purchase, or managing reservations all require atomicity. In MongoDB, multi-document transactions are best used sparingly, as they can introduce latency. In MySQL, transactions are a core feature and perform well with proper indexing and isolation level tuning. Ultimately, if your application demands strict consistency across many related tables, MySQL is often the safer choice. If you need schema flexibility and can limit transactions to critical paths, MongoDB’s ACID support is now robust enough for production use.
Security and Authentication
When choosing between MongoDB and MySQL, understanding their security architectures is critical for protecting sensitive data. Both databases offer robust authentication, authorization, and encryption features, but they differ in implementation and default configurations. This section compares their built-in security mechanisms and provides actionable best practices for both systems.
MongoDB Role-Based Access Control and Encryption
MongoDB employs a flexible Role-Based Access Control (RBAC) system that allows granular permission management. By default, MongoDB enables authentication only when explicitly configured, so administrators must activate it during deployment. Key features include:
Built-in roles: Predefined roles such as read, readWrite, dbAdmin, and userAdmin for common use cases.
Custom roles: Create roles with specific privileges on databases, collections, or actions (e.g., find, insert, dropCollection).
SCRAM authentication: Default mechanism using salted challenge-response for password verification.
X.509 certificate authentication: Supports mutual TLS for client and server identity verification.
Encryption at rest: Native encryption with AES-256-CBC or AES-256-GCM via WiredTiger storage engine, plus field-level encryption for sensitive fields.
TLS/SSL in transit: Mandatory for production deployments; encrypts all network traffic between clients and servers.
MongoDB also offers LDAP and Kerberos integration for enterprise environments, making it suitable for complex organizational policies.
MySQL User Management and SSL/TLS Support
MySQL provides a mature, SQL-based user management system with fine-grained control over database objects. Authentication is enabled by default, and the mysql.user table stores credentials. Core security components include:
User accounts: Created with CREATE USER and assigned passwords using IDENTIFIED BY; supports caching SHA-2 or native MySQL authentication plugins.
Regardless of which database you choose, the following practices significantly reduce risk:
Best Practice
MongoDB
MySQL
Enable authentication
Set security.authorization: enabled in config
Ensure skip-grant-tables is not set
Use strong passwords
Enforce via SCRAM or external auth
Use validate_password plugin
Restrict network access
Bind to specific IPs or use firewalls
Bind to 127.0.0.1 or use bind-address
Encrypt connections
Enable TLS with net.tls.mode: requireTLS
Configure ssl-ca, ssl-cert, ssl-key
Limit privileges
Assign only necessary roles per user
Grant only required privileges per user
Regular updates
Apply MongoDB security patches
Stay current with MySQL patch releases
Monitor logs
Enable audit logging via enterprise or open-source tools
Use audit_log plugin or general query log
Additionally, both databases benefit from principle of least privilege: never use administrative accounts for routine operations. For MongoDB, disable direct server access from the internet; for MySQL, remove anonymous accounts and test databases after installation. Regular security reviews and automated vulnerability scanning further strengthen your database environment against evolving threats.
Ecosystem, Tools, and Cloud Integration
Beyond raw performance and data modeling, the practical success of a database often hinges on its surrounding ecosystem—the tools, drivers, and cloud services that streamline development, administration, and scaling. Both MongoDB and MySQL offer mature ecosystems, but they cater to different workflows and preferences. Understanding these differences helps you choose a database that fits not just your data, but your team’s toolchain and infrastructure.
MongoDB Atlas and Third-Party Integrations
MongoDB’s cloud-native offering, MongoDB Atlas, is a fully managed, multi-cloud database service supporting AWS, Azure, and Google Cloud. It provides automated backups, auto-scaling, global cluster distribution, and built-in visualizations like Charts and Realm for serverless functions. Atlas simplifies operational tasks such as sharding and replica set management through a web UI and API. For third-party integrations, MongoDB connects seamlessly with popular analytics tools (e.g., Tableau, Looker), ETL platforms (e.g., Apache Kafka, Airbyte), and monitoring services (e.g., Datadog, New Relic). The MongoDB Connector for BI enables SQL-based querying against document data, bridging the gap for teams accustomed to relational tools.
MySQL Workbench, phpMyAdmin, and Cloud Offerings
MySQL’s ecosystem is equally robust, centered around two flagship tools: MySQL Workbench and phpMyAdmin. MySQL Workbench is a comprehensive desktop application for database design (ER diagrams), SQL development, administration (user management, backup/restore), and performance tuning. phpMyAdmin, a web-based interface, is a lightweight alternative widely used for rapid database management, especially in shared hosting environments. On the cloud side, major providers offer managed MySQL services: Amazon RDS for MySQL, Google Cloud SQL, and Azure Database for MySQL. These services handle patching, replication, and automated backups, but often require manual scaling or read-replica setup compared to Atlas’s auto-scaling. MySQL also integrates with tools like DBeaver, Navicat, and Percona Monitoring and Management (PMM) for advanced diagnostics.
Language Driver Support (Python, Node.js, Java, etc.)
Both databases provide first-class driver support across all major programming languages, but their design philosophies differ. MongoDB’s drivers (e.g., PyMongo for Python, Mongoose for Node.js, MongoDB Java Driver) are inherently schema-agnostic and map directly to JSON-like documents, simplifying CRUD operations for object-oriented code. MySQL drivers (e.g., mysql-connector-python for Python, mysql2 for Node.js, JDBC for Java) require explicit schema definitions and SQL queries, which can be more verbose but offer stronger type enforcement. The table below summarizes key ecosystem differences:
Feature
MongoDB
MySQL
Primary Cloud Service
MongoDB Atlas (multi-cloud, auto-scaling)
Amazon RDS, Google Cloud SQL, Azure Database (manual scaling)
MySQL Analytics Engine, Looker, Tableau (native SQL)
When evaluating ecosystem fit, consider your team’s familiarity with SQL vs. document-based queries, the need for auto-scaling cloud infrastructure, and the importance of graphical design tools. MongoDB Atlas excels for teams wanting minimal operational overhead, while MySQL’s tools like Workbench and phpMyAdmin offer deep control for relational database veterans.
MongoDB for Real-Time Analytics and Content Management
MongoDB excels in scenarios requiring flexible schemas and rapid ingestion of semi-structured or unstructured data. Its document model allows developers to store JSON-like documents directly, making it ideal for real-time analytics where the data shape evolves frequently. For example, a social media platform tracking user interactions—likes, comments, shares, and clickstreams—can insert millions of events per minute without predefined columns. MongoDB’s aggregation pipeline supports ad-hoc queries on nested fields, such as calculating trending topics or average session duration, without complex joins.
In content management systems (CMS), MongoDB handles diverse content types—articles with embedded images, videos, tags, and metadata—all within a single document. A news website can store an entire article, including author bio, comments, and related links, in one record. This avoids costly joins and speeds up page loads. Common MongoDB use cases include:
MySQL’s relational model enforces strict data integrity through ACID transactions, making it the backbone of e-commerce and financial systems. In an online store, orders, customers, products, and payments are linked by foreign keys. MySQL ensures that a payment is recorded only if the inventory is decremented and the order status updated—all within a single transaction. This atomicity prevents partial updates that could lead to overselling or financial discrepancies.
Financial applications, such as accounting software or banking systems, rely on MySQL’s support for complex queries with joins, aggregations, and subqueries. For instance, generating a monthly statement involves joining transaction tables with accounts and customers, then summing amounts—a task that is straightforward in SQL. Key MySQL scenarios include:
Inventory management with stock-level consistency
Order processing pipelines requiring rollback on failure
Reporting tools that aggregate sales by region or time
Compliance-driven systems needing audit trails
A typical e-commerce transaction in MySQL might look like:
START TRANSACTION;
UPDATE products SET stock = stock - 1 WHERE id = 100;
INSERT INTO orders (customer_id, product_id, quantity) VALUES (42, 100, 1);
COMMIT;
Hybrid Approaches Using Both Databases
Many modern applications leverage the strengths of both MongoDB and MySQL in a polyglot persistence strategy. For example, a retail platform can use MySQL for transactional order management and financial records, while MongoDB handles product catalog, user reviews, and session data. The two databases can be synchronized via event-driven mechanisms, such as change data capture (CDC) or message queues like Apache Kafka.
MongoDB: Manages product descriptions, images, and real-time analytics (flexible schema)
Integration: A microservice that updates MongoDB’s product view count whenever a MySQL order is placed
This approach allows each database to do what it does best. MongoDB provides fast reads for content-heavy pages, while MySQL ensures data integrity for transactions. Businesses that adopt hybrid models often report better performance and lower operational complexity than forcing a single database to handle all workloads. The key is to clearly define boundaries—for instance, using MySQL as the system of record and MongoDB as the system of engagement for user-facing features.
Conclusion and Decision Framework
Choosing between MongoDB and MySQL ultimately hinges on your project’s specific data characteristics, operational demands, and future growth trajectory. While both databases are powerful and widely adopted, they excel in fundamentally different contexts. The following framework provides a structured approach to making an informed decision, breaking down the evaluation into three critical dimensions.
Evaluate Your Data Structure Needs
Your data’s inherent shape is the single most important factor. Start by asking: Is my data naturally tabular and relational, or is it document-like and hierarchical?
Choose MySQL if: Your data has a fixed schema with clear relationships between entities (e.g., customers, orders, products). You need to enforce referential integrity (e.g., a foreign key ensuring an order belongs to a valid customer). Examples include financial ledgers, e-commerce catalogs with rigid categories, and content management systems with strict author-article-taxonomy structures.
Choose MongoDB if: Your data is semi-structured or unstructured, varies in fields across records, or contains nested arrays and objects (e.g., user profiles with optional preferences, product catalogs with differing attributes per category, real-time analytics events). MongoDB’s document model allows you to embed related data (e.g., an order with its line items inside a single document) rather than splitting it across tables, reducing the need for costly joins.
Consider Your Scaling and Consistency Requirements
Next, assess your growth model and tolerance for data staleness. Both databases scale, but they prioritize different trade-offs.
Scaling approach: MySQL traditionally scales vertically (adding more power to a single server) or via complex horizontal sharding. MongoDB was designed for horizontal scaling from the start, with built-in sharding that distributes data across many commodity servers automatically.
Consistency vs. availability: MySQL offers strong consistency by default (ACID transactions across multiple tables). MongoDB provides tunable consistency; its default read concern delivers strong consistency for most operations, but you can relax it for higher availability in distributed deployments. If your application requires immediate, absolute consistency (e.g., bank transfers, reservation systems), MySQL is the safer choice. If you can tolerate eventual consistency for better performance and uptime during network partitions (e.g., social feeds, caching layers), MongoDB fits well.
Final Recommendations Based on Project Type
Based on the above evaluations, here are concise recommendations for common project archetypes:
Traditional web applications (e.g., blogs, forums, small CRM): MySQL. Its mature ecosystem, wide hosting support, and clear relational model make it a predictable, low-risk choice for structured data with moderate traffic.
Real-time analytics, IoT, or content platforms with diverse data: MongoDB. Its ability to ingest high-velocity, varied data without schema migrations, combined with native horizontal scaling, aligns with agile, data-intensive projects.
Enterprise applications requiring complex transactions (e.g., ERP, healthcare records): MySQL (or a relational database). The need for multi-row ACID compliance and strict referential integrity favors a relational engine.
Rapidly evolving startups or MVPs with uncertain schema: MongoDB. The schema flexibility allows you to iterate quickly without costly migrations, and you can later add stronger consistency if needed.
High-traffic social media or gaming backends: MongoDB. The ability to embed user sessions, leaderboards, and game states into single documents reduces application complexity and improves read performance at scale.
Ultimately, there is no universal “best” database. By systematically evaluating your data structure, scaling needs, and consistency requirements, you can confidently select the tool that aligns with your project’s long-term success. When in doubt, prototype a core feature in both to empirically compare performance and developer experience.
Frequently Asked Questions
What are the main differences between MongoDB and MySQL?
MongoDB is a NoSQL document database that stores data in flexible, JSON-like documents with dynamic schemas, making it ideal for rapid iteration and hierarchical data. MySQL is a relational database management system (RDBMS) that uses structured tables with predefined schemas, primary keys, and foreign keys, enforcing ACID compliance and strong data integrity. MongoDB scales horizontally via sharding, while MySQL typically scales vertically or through replication. MySQL excels in complex joins and transactions; MongoDB offers high write throughput and flexible querying on nested data.
When should I choose MongoDB over MySQL?
Choose MongoDB when your application requires flexible schemas, rapid development with evolving data structures, or handles large volumes of unstructured or semi-structured data. It is well-suited for real-time analytics, content management systems, IoT applications, and projects that need horizontal scaling across distributed clusters. MongoDB’s document model also works well for products with nested data like user profiles or catalogs. If your team is comfortable with JSON and needs high write throughput without complex joins, MongoDB is a strong choice.
When is MySQL a better choice than MongoDB?
MySQL is better when your application demands strong data integrity, complex relationships, and multi-row transactions with ACID compliance. It excels in scenarios like e-commerce platforms, financial systems, and legacy applications that rely on structured data and normalized schemas. MySQL’s mature ecosystem, extensive support for SQL, and robust join capabilities make it ideal for reporting and applications requiring precise, consistent data. If your data model is stable and you need referential integrity, MySQL is the traditional, reliable choice.
How do MongoDB and MySQL compare in terms of performance?
Performance depends on workload. MongoDB often outperforms MySQL in write-heavy, high-throughput scenarios due to its document model and lack of join overhead. It also excels at read operations on nested data. MySQL can be faster for complex queries involving multiple tables and aggregations, especially with proper indexing. Both databases offer caching, indexing, and optimization features. For simple key-value lookups, MongoDB is typically faster; for complex relational queries, MySQL tends to have an edge. Benchmarking your specific use case is recommended.
Which database is more scalable: MongoDB or MySQL?
MongoDB is designed for horizontal scalability out of the box through sharding, distributing data across multiple servers automatically. This makes it easier to scale for large, distributed applications. MySQL traditionally scales vertically (adding more power to a single server) or through read replicas and complex sharding setups, which require more manual management. However, MySQL 8.0 and later have improved scalability features, including group replication and InnoDB clustering. For massive, globally distributed systems, MongoDB typically offers simpler horizontal scaling.
Can I use both MongoDB and MySQL in the same project?
Yes, many applications use a polyglot persistence approach, leveraging MySQL for relational, transactional data (e.g., user accounts, orders) and MongoDB for flexible, high-throughput data (e.g., logs, content, real-time analytics). This hybrid model allows you to benefit from the strengths of each database. However, it increases complexity in data synchronization, consistency, and application logic. Tools like change data capture (CDC) or event-driven architectures can help maintain consistency between the two systems.
What are the licensing and cost differences between MongoDB and MySQL?
MySQL is available under the GNU General Public License (GPL) or via commercial licenses from Oracle. The Community Edition is free, while Enterprise Edition requires a subscription. MongoDB is available under the Server Side Public License (SSPL) for the community version, which imposes restrictions on offering it as a service. Commercial licenses are available from MongoDB Inc. Both have free tiers and paid enterprise options. For self-hosted use, MySQL Community Edition is often more permissive, while MongoDB’s SSPL may require careful legal review if you intend to offer the database as a service.
How do MongoDB and MySQL handle data integrity and transactions?
MySQL with InnoDB storage engine provides full ACID (Atomicity, Consistency, Isolation, Durability) compliance, supporting multi-row transactions, foreign keys, and strict consistency. MongoDB offers multi-document ACID transactions starting from version 4.0, but they are more limited in scope and performance compared to MySQL’s mature transaction support. MongoDB emphasizes eventual consistency by default but can be configured for stronger consistency. For applications requiring strict data integrity and complex transactions (e.g., financial systems), MySQL is generally preferred.
How to Use Mongoose with MongoDB: A Comprehensive Guide
Introduction to Mongoose and MongoDB
When building Node.js applications that require persistent data storage, MongoDB emerges as a popular NoSQL database choice due to its flexibility and scalability. However, interacting directly with MongoDB using its native driver can become repetitive and error-prone, especially when managing data structure, validation, and relationships. This is where Mongoose enters the picture. Mongoose is an Object Data Modeling (ODM) library for MongoDB and Node.js, providing a schema-based solution to model your application data. It acts as a thin abstraction layer on top of the MongoDB driver, offering built-in features that streamline development and enforce data consistency. This guide will show you exactly how to use Mongoose with MongoDB effectively, from installation to advanced querying, helping you write cleaner, more maintainable code.
What is Mongoose and Why Use It?
Mongoose is an ODM library that translates documents from MongoDB into JavaScript objects, allowing you to define schemas, models, and relationships with ease. Instead of writing raw MongoDB commands, you interact with your data using familiar JavaScript constructs. The primary reasons to use Mongoose include:
Schema-based modeling: Define the structure of your documents, including field types, default values, and validation rules, ensuring data integrity.
Built-in validation: Automatically validate data before saving it to the database, reducing bugs and manual checks.
Middleware (hooks): Execute custom logic before or after certain operations, such as hashing passwords before saving.
Population: Easily reference documents from other collections, akin to joins in relational databases.
Query building: Use a fluent API to construct complex queries with filtering, sorting, and pagination.
Active community and documentation: Benefit from extensive resources, plugins, and support.
By using Mongoose, you abstract away low-level database operations and focus on your application logic, making it ideal for projects that require rapid development and maintainability.
Key Differences Between Mongoose and the Native MongoDB Driver
Understanding the differences between Mongoose and the native MongoDB driver helps you choose the right tool for your project. The table below summarizes the key distinctions:
Feature
Mongoose
Native MongoDB Driver
Schema definition
Explicit schema required; enforces structure
No schema; documents can have any structure
Validation
Built-in, customizable validation
Must implement manually
Middleware
Pre/post hooks for operations
Not available
Data types
Rich type casting and custom types
Basic JavaScript types
Query building
Fluent API with chaining
Direct MongoDB query syntax
Population
Automatic reference resolution
Manual aggregation or multiple queries
Performance
Slightly slower due to abstraction
Faster, lower overhead
Learning curve
Moderate; requires understanding schemas
Low; straightforward but verbose
Use case
Applications needing structure and validation
Simple scripts or performance-critical apps
While the native driver offers raw speed and flexibility, Mongoose provides essential guardrails for production applications where data consistency and developer productivity are priorities.
Prerequisites: Installing Node.js, MongoDB, and Mongoose
Before you can start using Mongoose with MongoDB, ensure your development environment is properly set up. Follow these steps:
Install Node.js: Download the latest LTS version from the official Node.js website. Verify installation by running node -v and npm -v in your terminal.
Install MongoDB: Choose between MongoDB Atlas (cloud) or a local installation. For local setup, download MongoDB Community Server and follow the installation instructions for your operating system. Ensure the MongoDB service is running by executing mongod.
Create a new Node.js project: Navigate to your project directory and run npm init -y to generate a package.json file.
Install Mongoose: Run npm install mongoose in your terminal. This will install Mongoose and its dependency, the MongoDB driver.
Verify installation: Create a simple test file (e.g., test.js) and add the following code to confirm Mongoose connects to your MongoDB instance:
Run the file with node test.js. If you see “Connected to MongoDB,” your environment is ready. With these prerequisites in place, you are now equipped to explore how to use Mongoose with MongoDB for schema design, CRUD operations, and advanced features.
Setting Up Your Mongoose Environment
Before you can harness the power of Mongoose to model and interact with your MongoDB data, you must first set up your environment correctly. This involves installing the Mongoose library via npm, establishing a reliable connection to your MongoDB instance, and implementing robust error handling. The following steps guide you through each phase, ensuring a stable foundation for your application.
Installing Mongoose with npm
Mongoose is a Node.js package, so you need a Node.js project initialized with a package.json file. If you do not have one, run npm init -y in your project directory. Then, install Mongoose using the following command:
npm install mongoose
This command adds Mongoose to your project’s dependencies. You can verify the installation by checking the package.json file for an entry like "mongoose": "^8.x.x". For production applications, consider pinning the exact version to avoid unexpected breaking changes. After installation, require Mongoose in your JavaScript file:
const mongoose = require('mongoose');
If you are using ES modules (with "type": "module" in your package.json), use:
import mongoose from 'mongoose';
Establishing a Connection to MongoDB
Mongoose connects to MongoDB using a connection string. For a local MongoDB instance running on the default port (27017), the string is typically:
For a cloud instance, such as MongoDB Atlas, the connection string includes your cluster details, username, password, and database name. It looks similar to:
Use the new Server Discovery and Monitoring engine
true
dbName
Specify the database name
'myapp'
In modern Mongoose versions (6.x and above), these options are set automatically, so you only need to include them if you require explicit control.
Handling Connection Events and Errors
Mongoose emits several events during the connection lifecycle. Listening to these events helps you respond to changes gracefully. The most important events are:
connected: Emitted when Mongoose successfully connects to MongoDB.
error: Emitted when a connection error occurs (e.g., network issues, authentication failure).
disconnected: Emitted when the connection is lost.
reconnected: Emitted after a successful reconnection.
Attach event listeners to the mongoose.connection object:
Authentication failed: Incorrect username or password. Verify credentials in the connection string.
Network timeout: The server is unreachable. Check your network and firewall settings.
MongoDB not running: Ensure the mongod process is active locally, or that your Atlas cluster is accessible.
To handle these errors gracefully, you can implement a retry mechanism using a loop or a library like mongoose-retry. For example, you can attempt to reconnect up to three times before exiting the process:
const MAX_RETRIES = 3;
let retries = 0;
async function connectWithRetry() {
while (retries setTimeout(res, 5000)); // wait 5 seconds
}
}
if (retries === MAX_RETRIES) {
console.error('Could not connect to MongoDB after multiple attempts');
process.exit(1);
}
}
connectWithRetry();
By following these steps, you create a resilient Mongoose environment that can handle both local and cloud MongoDB instances while maintaining application stability.
Defining Mongoose Schemas
In Mongoose, a schema is a blueprint that defines the structure, data types, validation rules, and default values for documents within a MongoDB collection. Schemas translate your application’s data requirements into a strict or flexible document shape, ensuring consistency and integrity. Each document in a collection must conform to its associated schema, though Mongoose offers options to relax or enforce these rules. Understanding how to define schemas is fundamental to using Mongoose effectively, as it controls how data is stored, retrieved, and validated.
Schema Types and Basic Field Definitions
Schema fields are defined as key-value pairs where the key is the field name and the value specifies the data type. Mongoose supports several built-in types:
String – for text data
Number – for integers or floats
Date – for date and time values
Buffer – for binary data (e.g., images)
Boolean – for true/false values
Mixed – for any data type (no schema enforcement)
ObjectId – for referencing other documents
Array – for lists of values or subdocuments
Decimal128 – for high-precision decimal numbers
Map – for dynamic key-value pairs
Field definitions can be provided as a simple type name (e.g., String) or as an object with additional options:
Schema validation ensures that documents meet specified criteria before being saved. Mongoose provides built-in validators for common rules and supports custom validators for complex logic.
Timestamps – When set to true, Mongoose automatically adds createdAt and updatedAt fields to every document. These are Date type fields that update on creation and modification.
Strict – Defaults to true, meaning documents cannot contain fields not defined in the schema. Setting it to false allows saving any data, which is useful for integrating with legacy databases or flexible schemas. Use strict: "throw" to raise an error on undefined fields.
_id – By default, Mongoose adds an _id field (type ObjectId) to each document. Set _id: false only when creating subdocuments or when you want to disable the auto-generated identifier (rare in top-level schemas).
This schema will automatically add createdAt and updatedAt fields, reject any fields not listed above, and include an auto-generated _id for each document. Understanding these options helps you tailor schema behavior to your application’s exact needs.
Creating and Compiling Models
Once you have defined a Mongoose schema, the next step is to compile it into a model. A model is a constructor function that provides an interface to interact with a specific MongoDB collection. This section explains how to transform a schema into a model, the reasoning behind naming conventions, and best practices for organizing models in a maintainable way.
The model() Function and Naming Conventions
Mongoose’s model() function takes two primary arguments: a singular name for the model and the schema object. The function compiles the schema into a model and automatically creates a MongoDB collection with a pluralized version of the model name. For example, calling mongoose.model('User', userSchema) will create a collection named users in the database.
Singular model names – Always use singular nouns like Product, Category, or Order. Mongoose pluralizes them automatically (e.g., products, categories, orders).
PascalCase for model names – Use uppercase for the first letter of each word (e.g., BlogPost, not blogpost). This distinguishes models from instances and variables.
Explicit collection names – If you need a custom collection name, pass a third argument: mongoose.model('User', userSchema, 'my_custom_collection'). Use this sparingly to avoid confusion.
Here is a practical code example showing how to create and compile a model:
const mongoose = require('mongoose');
const userSchema = new mongoose.Schema({
name: { type: String, required: true },
email: { type: String, required: true, unique: true },
age: { type: Number, min: 0 }
});
const User = mongoose.model('User', userSchema);
// Collection name will be 'users'
Exporting Models in a Modular Application
In a real-world Node.js application, models are typically defined in separate files and exported for use in controllers, routes, and services. A common pattern is to create a models directory and export each model as a module. This keeps your code organized and prevents circular dependency issues.
Best practices for model organization:
One model per file – Each file should define and export a single model. For example, models/User.js, models/Product.js.
Use an index file – Create an index.js inside the models folder that imports and re-exports all models. This simplifies imports in other parts of the application.
Centralized connection – Establish the Mongoose connection in a separate configuration file (e.g., config/db.js) and import it once at the application entry point. Models should not manage their own connections.
Example models/index.js structure:
const User = require('./User');
const Product = require('./Product');
const Order = require('./Order');
module.exports = { User, Product, Order };
Then in a controller, you can import all models cleanly:
Even experienced developers encounter issues when defining Mongoose models. Being aware of these pitfalls can save debugging time:
Pitfall
Description
Solution
Model name mismatch
Using a plural name like Users leads to a collection named userses or duplicates.
Always use singular names (e.g., User).
Missing schema options
Forgetting timestamps: true or collection option when needed.
Explicitly set schema options: new mongoose.Schema({...}, { timestamps: true }).
Duplicate model compilation
Calling model() twice with the same name causes an error.
Check if the model exists using mongoose.models before compiling, or structure imports to avoid redefinition.
Circular dependencies
Models that reference each other (e.g., User and Post) can cause import loops.
Use ref in schemas and require models lazily inside methods or middleware.
By following these guidelines, you can create robust, maintainable models that integrate seamlessly with your application’s data layer.
CRUD Operations with Mongoose
Working with Mongoose to perform CRUD (Create, Read, Update, Delete) operations provides a structured, schema-based approach to interacting with MongoDB. Mongoose translates your JavaScript objects into MongoDB documents and vice versa, while offering built-in validation, middleware, and query building. This section walks through each CRUD operation using the most common Mongoose methods, assuming you have a Mongoose model defined for a resource such as User or Product.
Creating Documents with save() and create()
Mongoose offers two primary methods for inserting new documents into a MongoDB collection: save() and create(). The save() method is an instance method called on a model instance, while create() is a static method on the model itself. Both methods validate the document against the schema before saving.
Using save(): Instantiate a new document with the new keyword, set properties, then call .save().
Using create(): Pass an object or array of objects directly to Model.create().
// Example with save()
const user = new User({ name: 'Alice', email: 'alice@example.com' });
await user.save();
// Example with create()
const user = await User.create({ name: 'Bob', email: 'bob@example.com' });
Querying Documents: find(), findOne(), and findById()
Reading data from MongoDB is accomplished through Mongoose’s query methods. These methods return a Query object that can be further refined with filters, projections, and options, then executed with await.
Method
Description
Returns
find()
Retrieves all documents matching the filter criteria.
Array of documents
findOne()
Returns the first document that matches the filter.
Single document or null
findById()
Finds a document by its _id field (accepts string or ObjectId).
Single document or null
Key points for querying:
Filters are plain JavaScript objects matching schema fields.
Chain methods like .select(), .populate(), and .sort() for advanced queries.
Results are Mongoose documents with full access to methods and virtuals.
// Find all users older than 18
const adults = await User.find({ age: { $gt: 18 } });
// Find one user by email
const user = await User.findOne({ email: 'alice@example.com' });
// Find by ID
const user = await User.findById('60d5f484f1a2c8b1f8e4e1a1');
Updating and Deleting Documents
Mongoose provides several methods for modifying and removing documents. For updates, you can use updateOne(), updateMany(), or the convenience method findByIdAndUpdate(). For deletions, deleteOne(), deleteMany(), and findByIdAndDelete() are available.
updateOne(): Updates the first document matching the filter. Returns an update result object (not the document).
findByIdAndUpdate(): Finds a document by ID, updates it, and returns the document (by default the original, unless { new: true } is set).
deleteOne(): Deletes the first document matching the filter. Returns a delete result object.
findByIdAndDelete(): Finds and removes a document by ID, returning the deleted document.
// Update: set age to 30 for user with specific email
await User.updateOne({ email: 'alice@example.com' }, { age: 30 });
// Update and return new document
const updatedUser = await User.findByIdAndUpdate(
'60d5f484f1a2c8b1f8e4e1a1',
{ name: 'Alice Johnson' },
{ new: true }
);
// Delete one document
await User.deleteOne({ email: 'bob@example.com' });
// Delete by ID and get the removed document
const deletedUser = await User.findByIdAndDelete('60d5f484f1a2c8b1f8e4e1a1');
Remember to always handle errors with try-catch blocks or .catch() when performing CRUD operations, as database calls can fail due to validation errors, network issues, or duplicate key conflicts.
Advanced Queries and Filtering
Mastering advanced queries is essential for extracting precise data from MongoDB via Mongoose. Beyond basic find() operations, Mongoose provides a rich set of query helpers and operators that allow you to filter, sort, limit, and combine data from multiple collections efficiently. This section covers three key techniques: using comparison and pattern-matching operators, implementing sorting and pagination for large datasets, and leveraging population to work with referenced documents.
Using Query Operators ($gt, $in, $regex)
Mongoose supports MongoDB’s full range of query operators, enabling complex filtering without writing raw JavaScript logic. The $gt (greater than) operator is ideal for numerical or date comparisons, such as finding products priced above a threshold. The $in operator matches any value in an array, useful for filtering by multiple categories or statuses. The $regex operator allows pattern matching on strings, perfect for search functionality.
Example: Retrieve all users whose age is greater than 25, whose role is either ‘admin’ or ‘moderator’, and whose email contains the domain ‘example.com’.
$lt, $gte, $lte — less than, greater than or equal, less than or equal
$ne — not equal to a specific value
$exists — check if a field exists
$and, $or, $nor — logical combinations of conditions
Sorting, Limiting, and Pagination
When working with large collections, retrieving all documents is impractical. Mongoose provides chainable methods for sorting and limiting results, which also form the basis for pagination. Use .sort() to order results by one or more fields (ascending by default, use - prefix for descending). Use .limit() to cap the number of documents returned, and .skip() to offset results for page-based navigation.
Mongoose’s .populate() method is the primary way to work with referenced documents. Instead of embedding entire subdocuments, you store the _id of a related document and then populate it on retrieval. This keeps documents lean while allowing you to access related data when needed. For example, an order document might reference a user and multiple product IDs.
Schema design approach: Use references when relationships are many-to-many or when referenced data changes frequently. Use embedding for data that is always accessed together and rarely changes.
You can specify which fields to include or exclude using the select option.
Use match to filter populated documents (e.g., only active products).
Deep population (populating within populated documents) is possible but can impact performance.
For embedding, simply nest a subdocument schema directly; no population is needed.
Validation and Middleware (Hooks)
Mongoose provides a powerful validation engine and lifecycle hooks—collectively known as middleware—that allow you to enforce data integrity and execute logic automatically at specific points in a document’s lifecycle. Understanding how to use Mongoose with MongoDB effectively requires mastering these two features, as they reduce boilerplate and prevent inconsistent data.
Built-in and Custom Validators
Mongoose includes several built-in validators for schema types. These are defined directly in the schema definition and run before a document is saved. Common built-in validators include:
required: Ensures a field is present and not null or undefined.
minlength / maxlength: For strings, enforces character count limits.
min / max: For numbers, enforces numeric range.
enum: Restricts a string to a predefined set of values.
match: Validates a string against a regular expression.
When built-in validators are insufficient, Mongoose allows custom validators. You define a validate object with a validator function that returns true or false (or a Promise) and a message string. For example, to ensure an email field contains a valid format:
Middleware, also called hooks, are functions that execute at specific stages of a document’s lifecycle. The two most common types are pre and post hooks. Pre-save hooks run before a document is saved to the database, making them ideal for tasks that must complete before persistence. A classic example is password hashing:
Post-save hooks run after the document has been saved. They are useful for logging, sending confirmation emails, or updating related documents. For instance, to log each new user creation:
userSchema.post('save', function(doc) {
console.log(`User ${doc.email} was created at ${doc.createdAt}`);
});
Other lifecycle hooks include pre('validate'), post('remove'), and pre('findOneAndUpdate'). Note that this in a pre hook refers to the document being saved, while in a post hook it refers to the saved document.
Using Middleware for Data Transformation
Beyond validation and logging, middleware can transform data before or after database operations. This is particularly useful for normalizing inputs, adding computed fields, or cleaning up related records. Common transformation tasks include:
Trimming whitespace: Use a pre-save hook to trim strings: this.name = this.name.trim();
Setting timestamps: While Mongoose has a timestamps: true option, you can customize logic in a pre-save hook, such as updating an updatedAt field only when specific fields change.
Cascading deletes: In a pre-remove hook, delete all related documents before removing the parent:
Middleware can also be used to transform query results. For example, a post-find hook can populate references or format dates. When using middleware for transformation, always ensure the hook type (pre or post) matches the intended operation. Pre hooks modify data before it reaches the database; post hooks modify the returned document without affecting storage.
By combining validators and middleware, you can build robust schemas that enforce business rules automatically, reducing error-prone manual checks throughout your application.
Working with Subdocuments and Virtuals
Mongoose provides two powerful features for modeling complex data: subdocuments and virtuals. Subdocuments allow you to embed related data directly within a parent document, while virtuals enable computed properties that are not stored in MongoDB. Understanding how to use these tools effectively can streamline your schema design and improve query performance.
Defining and Manipulating Subdocuments
Subdocuments are documents nested inside another document. They are defined as arrays or single objects within a schema. For example, an order document might contain an array of line items:
To manipulate subdocuments, Mongoose provides dedicated methods on arrays:
push() – add a new subdocument to the array
pull() – remove a subdocument by its _id
findById() – locate a subdocument by its _id
map(), filter() – standard array methods for transformations
Each subdocument automatically gets its own _id field unless disabled. To update a subdocument, you can modify its properties directly and call parentDocument.save(). For example, to change the quantity of the first item:
order.items[0].quantity = 3;
await order.save();
Subdocuments are validated and can have their own middleware, making them self-contained units of data.
Creating Virtual Fields with get() and set()
Virtuals are properties that are not persisted to MongoDB. They are computed on the fly using getter and setter functions. To define a virtual, use schema.virtual():
The get() method computes a value from stored fields, while the set() method allows you to parse input and update underlying fields. Virtuals are included in JSON output by setting toJSON: { virtuals: true } in the schema options. They are ideal for computed fields like full names, formatted dates, or discounts based on quantity.
When to Use Subdocuments vs. References
Choosing between embedding subdocuments and using references (i.e., separate collections) depends on data access patterns and document size. The table below summarizes key differences:
Criteria
Subdocuments (Embedded)
References (Separate Collection)
Data size
Small, bounded arrays (e.g., < 100 items)
Large or unbounded data (e.g., thousands of posts)
Query frequency
Always fetched with parent document
Often queried independently
Data consistency
Strong (single document atomicity)
Eventual (requires multi-document transactions)
Update pattern
Frequent updates to parent or subdocuments
Infrequent updates, or updates to referenced data
Document size limit
Must stay under 16 MB total
No limit per document (size spread across collections)
Use subdocuments when data is tightly coupled, small, and frequently accessed together. Use references when data is large, shared across many documents, or updated independently. Virtuals can complement either approach by providing computed fields without extra storage.
Error Handling and Debugging
When working with Mongoose and MongoDB, robust error handling and efficient debugging are essential for maintaining data integrity and application stability. Mongoose provides structured error objects and built-in debugging tools that help developers quickly identify and resolve issues. Understanding how to catch, classify, and respond to common errors will save hours of troubleshooting and prevent data corruption in production environments.
Common Mongoose Error Types and Solutions
Mongoose errors fall into several distinct categories, each with specific causes and remedies. The most frequently encountered types include:
ValidationError: Occurs when a document fails schema validation (e.g., missing required fields, invalid enum values, or failed custom validators). The error object contains a errors property with detailed messages per field. Solution: Check field requirements and ensure incoming data matches schema definitions. Use error.errors[fieldName].message to pinpoint the issue.
CastError: Happens when Mongoose cannot cast a value to the expected type (e.g., passing a string to a Number field, or an invalid ObjectId format). Solution: Validate input types before saving, especially for IDs and numeric fields. Use mongoose.Types.ObjectId.isValid() to check IDs.
DuplicateKeyError (code 11000): Triggered when a unique index constraint is violated (e.g., duplicate email or username). Solution: Implement a fallback mechanism, such as appending a timestamp or generating a unique slug. Catch this error specifically to return a user-friendly message.
Error Type
Common Cause
Recommended Solution
ValidationError
Schema rule violation
Validate data before save
CastError
Type mismatch
Sanitize input types
DuplicateKeyError
Unique constraint conflict
Handle uniqueness gracefully
Using try-catch and .catch() with Async/Await
Modern Mongoose code typically uses async/await, which pairs naturally with try-catch blocks for synchronous-looking error handling. The pattern is straightforward: wrap database operations in a try block and handle errors in the catch block. For promise-based code, the .catch() method serves a similar purpose. Below is a practical example demonstrating both approaches:
// Async/await with try-catch
async function createUser(userData) {
try {
const user = await User.create(userData);
console.log('User created:', user);
return user;
} catch (error) {
if (error.code === 11000) {
console.error('Duplicate key error:', error.keyValue);
throw new Error('Username or email already exists');
} else if (error.name === 'ValidationError') {
console.error('Validation failed:', error.message);
throw new Error('Invalid user data provided');
} else {
console.error('Unexpected error:', error);
throw error;
}
}
}
// Using .catch() with promises
User.findOne({ email: 'test@example.com' })
.then(user => {
if (user) throw new Error('User exists');
return User.create({ email: 'test@example.com' });
})
.catch(error => {
if (error.name === 'MongooseError') {
console.error('Mongoose operation failed:', error.message);
}
});
The key advantage of try-catch is the ability to handle multiple error types in one block, while .catch() works well for chained promises. Always classify errors by checking error.name or error.code to provide specific feedback rather than generic messages.
Enabling Mongoose Debug Logging
Mongoose offers a built-in debug mode that logs every query sent to MongoDB, including the collection name, operation type, and query parameters. This feature is invaluable for diagnosing performance issues, verifying query structure, and understanding how Mongoose translates your operations into database commands. Enable it with a single line of code:
When enabled, the console will output entries like Mongoose: users.find({ email: 'test@example.com' }, { projection: { _id: 0, name: 1 } }). For more control, you can pass a custom callback function:
Use debug mode during development and testing only; disable it in production to avoid performance overhead and log clutter. Combine debug logging with targeted error handling to quickly trace issues from query construction to error response, ensuring your Mongoose operations remain reliable and transparent.
Best Practices and Performance Optimization
To move from a working prototype to a production-ready application, you must optimize how you use Mongoose with MongoDB. This section covers the essential practices for structuring your code, maximizing query speed, managing connections reliably, and avoiding performance pitfalls that degrade user experience at scale.
Without proper indexes, MongoDB performs a collection scan for every query, which becomes exponentially slower as data grows. Mongoose allows you to define indexes directly in your schema, ensuring they are created automatically when the application starts (in development) or via migration scripts in production.
Identify query patterns first. Analyze your most frequent queries—filtering, sorting, and equality matches—and create indexes for those fields. Use the MongoDB Compass Explain Plan or .explain() in your Mongoose queries to verify index usage.
Use compound indexes for multi-field queries. For example, if you query users by status and then sort by createdAt, create a compound index like { status: 1, createdAt: -1 }. Order matters: place equality filters before sort fields.
Leverage Mongoose schema index options. Define indexes in your schema using index: true or the index() method. For unique constraints, use unique: true (which also creates an index). Example: email: { type: String, unique: true, index: true }.
Avoid over-indexing. Each index consumes disk space and slows down write operations. Only create indexes that serve real query needs. Monitor slow queries with the --slowms flag or the profiler.
Use text indexes for search functionality. For full-text search across string fields, define a text index: schema.index({ title: 'text', description: 'text' }) and query with $text.
Connection Pool Tuning and Reconnection Logic
Mongoose uses a default connection pool of 100 connections per mongoose.connect() call. While this works for many applications, you must tune it for your workload and ensure resilient reconnection.
Parameter
Default
Recommendation
poolSize
100
Set to 10-50 for most web apps. Use higher values (e.g., 200) for background job processors or high-concurrency APIs.
serverSelectionTimeoutMS
30000
Reduce to 5000 to fail fast when the database is unreachable.
heartbeatFrequencyMS
10000
Keep default; adjusts monitoring of replica set members.
retryWrites
true
Keep enabled for write resilience.
Implement reconnection logic by listening to Mongoose events:
mongoose.connection.on('disconnected'): Log the event and consider implementing a backoff strategy before retrying.
mongoose.connection.on('reconnected'): Reset any application state that depends on the connection.
Use useUnifiedTopology: true in your connection options to enable the modern monitoring and reconnection engine.
Avoid creating multiple connections. Reuse the default connection or use mongoose.createConnection() only for separate databases or specialized workloads.
Avoiding N+1 Queries and Over-Population
The N+1 query problem occurs when you fetch a list of documents and then issue a separate query for each document’s related data. Over-population happens when you eagerly load deeply nested relations that are not needed, wasting memory and network resources.
Use .populate() with selective fields. Instead of .populate('author'), specify only the fields you need: .populate({ path: 'author', select: 'name email' }).
Batch population with Model.populate(). If you must populate after an aggregation or in a custom process, call Model.populate(docs, { path: 'comments', select: 'text' }) on the array of documents to avoid multiple queries.
Use lean queries for read-only operations. Call .lean() on your query to return plain JavaScript objects instead of Mongoose documents, reducing memory overhead by up to 10x. Example: const users = await User.find().lean().
Denormalize when appropriate. For high-read, low-write scenarios, store a copy of frequently accessed related data (e.g., the author’s name) directly in the parent document to eliminate joins entirely.
Limit population depth. Mongoose allows nested population (e.g., .populate({ path: 'posts', populate: { path: 'comments' } })). Use this sparingly and only when the full depth is required. Otherwise, break the query into two steps.
Monitor query counts. Use tools like mongoose-lean-virtuals for virtuals with lean, and log the number of queries per request in development to catch N+1 patterns early.
Frequently Asked Questions
What is Mongoose and why should I use it with MongoDB?
Mongoose is a Node.js ODM (Object Data Modeling) library that provides a schema-based solution for MongoDB. It allows you to define data structures, enforce validation, and build complex queries with an intuitive API. Using Mongoose helps maintain data consistency, reduces boilerplate code, and offers features like middleware, population, and virtuals that simplify development. It's especially useful for applications requiring structured data and relationships.
To install Mongoose, ensure you have Node.js and npm installed. Then run `npm install mongoose` in your project directory. This adds Mongoose to your dependencies. You can then connect to MongoDB using `mongoose.connect('mongodb://localhost:27017/yourdb')` or use a connection string from MongoDB Atlas. Always handle connection events (e.g., 'connected', 'error') for robust error handling.
What is a Mongoose schema and how do I define one?
A Mongoose schema defines the structure of documents within a MongoDB collection. You create a schema using `new mongoose.Schema({ field: type })`, where field names map to document properties and types include String, Number, Date, Buffer, Boolean, Mixed, ObjectId, Array, Decimal128, Map, and Schema. You can also specify validation rules, default values, and indexes. For example: `const userSchema = new mongoose.Schema({ name: { type: String, required: true }, age: Number })`.
How do I create a Mongoose model and perform CRUD operations?
A model is a compiled version of a schema. Create it with `mongoose.model('ModelName', schema)`. CRUD operations include: `Model.create(data)` for insert, `Model.find(query)` for read, `Model.findByIdAndUpdate(id, update)` for update, and `Model.findByIdAndDelete(id)` for delete. You can also use `save()`, `findOne()`, `updateOne()`, and `deleteOne()`. Mongoose returns promises, so use async/await for clean code.
What are Mongoose validation rules and how do I use them?
Mongoose provides built-in validators for schema fields, such as `required`, `min`, `max`, `enum`, `match` (regex), and custom validators via the `validate` property. Validation runs on `save()` and can be triggered manually with `validate()`. For example: `email: { type: String, required: true, unique: true, match: /S+@S+.S+/ }`. Custom validators can throw errors or return false. Always handle validation errors in your application.
How do I use Mongoose middleware (pre and post hooks)?
Mongoose middleware (hooks) are functions that execute before or after certain operations like `save`, `validate`, `find`, `updateOne`, and `deleteOne`. Use `schema.pre('save', function(next) { … })` to run code before saving, e.g., hashing a password. Post hooks run after the operation and receive the document. Middleware can be used for logging, data transformation, or cascading deletes.
What is Mongoose population and how does it work?
Population is the process of automatically replacing specified paths in a document with documents from other collections. You define a reference using `type: mongoose.Schema.Types.ObjectId` and `ref: 'OtherModel'`. Then use `Model.find().populate('field')` to fetch the related documents. This allows you to efficiently model relationships without embedding entire subdocuments.
How can I optimize Mongoose query performance?
To optimize Mongoose queries, use indexes (defined in schema or via `ensureIndex`), limit the fields returned with `.select()`, use `.lean()` for read-only queries to skip Mongoose document hydration, batch operations with `insertMany()`, and avoid calling `save()` on every document. Also, use `explain()` to analyze query execution and monitor slow queries with MongoDB profiling.
The MongoDB aggregation pipeline is a powerful, flexible framework for processing data records and returning computed results. Unlike basic find() operations that retrieve documents based on simple filters, the aggregation pipeline enables multi-stage transformations—filtering, grouping, sorting, reshaping, and computing—all within a single, efficient pipeline. It is designed for complex analytics, such as calculating averages across categories, joining data from multiple collections, or generating time-series summaries. By passing documents through a sequence of stages, each stage transforms the data before passing it to the next, the pipeline provides a declarative yet expressive way to perform advanced data processing that would otherwise require multiple queries or application-level logic.
What Is the Aggregation Pipeline and How It Works
The aggregation pipeline is a series of stages, each defined by a specific operator. Documents flow through these stages sequentially, and each stage can modify, filter, or aggregate the documents. Common stages include $match (filtering), $group (grouping and computing), $sort (ordering), $project (reshaping fields), $unwind (deconstructing arrays), and $lookup (joining collections). The pipeline processes data in memory or using indexes where possible, with each stage operating on the output of the previous one. For example, a pipeline might first $match documents from the last month, then $group by product category to calculate total sales, then $sort by sales descending. This modularity allows developers to build complex queries step by step, making the logic transparent and maintainable.
Key Differences Between Aggregation and Find Queries
While find() queries are ideal for simple retrieval, aggregation queries offer distinct advantages for advanced data processing. The table below summarizes the main differences:
Aspect
Find Queries
Aggregation Pipeline
Purpose
Retrieve documents matching criteria
Transform, compute, and aggregate data
Stages
Single filter (query) + optional projection
Multiple stages (filter, group, sort, etc.)
Computation
Limited to field selection and simple sorting
Supports sum, average, count, and custom expressions
Joins
Not supported natively
Supported via $lookup
Performance
Index-optimized for simple queries
Index-optimized at early stages; memory-intensive later
Aggregation queries are also more expressive, allowing you to reshape documents, compute derived fields, and handle arrays in ways that find() cannot. However, they may consume more memory and CPU, so they are best reserved for cases where basic queries fall short.
When to Use Aggregation for Advanced Data Processing
You should reach for the aggregation pipeline when your data processing needs go beyond simple retrieval. Typical use cases include:
Analytics and reporting: Calculating totals, averages, or percentiles across groups, such as monthly revenue per region.
Data transformation: Reshaping nested documents or arrays into flat structures for export or further processing.
Joining collections: Combining data from multiple collections (e.g., orders and customers) without application-level joins.
Time-series analysis: Bucketing data by time intervals (e.g., hourly, daily) to detect trends or anomalies.
Complex filtering and sorting: Applying multiple conditions, including computed fields, that are cumbersome with find().
In summary, the aggregation pipeline is indispensable for any application that requires real-time data analysis, dynamic report generation, or ETL-like operations directly within MongoDB. Its stage-based architecture makes complex queries readable and maintainable, while its performance optimizations (like early filtering) ensure efficiency. By mastering the pipeline, you unlock MongoDB’s full potential for advanced data processing.
Core Pipeline Stages and Their Functions
The MongoDB aggregation pipeline processes documents through a sequence of stages, each transforming the data in a specific way. Understanding the core stages—$match, $group, $sort, $project, and $addFields—is essential for building efficient and expressive queries. These stages form the backbone of most aggregation workflows, allowing you to filter, sort, group, and reshape data with precision.
Filtering Data with $match and $sort
The $match stage filters documents based on specified conditions, similar to the find() method. It should be placed early in the pipeline to reduce the number of documents passed to subsequent stages, improving performance. The $sort stage reorders documents by one or more fields in ascending (1) or descending (-1) order. When used together, $match first narrows the dataset, then $sort organizes the results.
Practical example: Retrieve orders from the last 30 days, sorted by total descending.
Use indexes on fields referenced in $match and $sort to speed up queries.
$match accepts all standard query operators ($gt, $in, $regex, etc.).
$sort can handle multiple fields; the order of fields determines the sorting priority.
Place $match before $sort whenever possible to reduce the number of documents to sort.
Grouping and Aggregating with $group
The $group stage groups documents by a specified expression, often a field value, and computes aggregate values for each group. It is analogous to SQL’s GROUP BY clause. You must specify an _id field that defines the grouping key, and then use accumulator operators like $sum, $avg, $min, $max, and $push to perform calculations on grouped data.
The $project stage reshapes each document by including, excluding, or computing new fields. Use 1 to include a field, 0 to exclude it, or expressions to create derived fields. The $addFields stage adds new fields to documents without affecting existing fields, making it ideal for incremental transformations.
Use $project to reduce document size early in the pipeline, especially when passing to stages that process many fields.
$addFields is preferable when you want to preserve all original fields and add computed ones.
Both stages support expressions using operators like $cond, $ifNull, and arithmetic operators.
Remember that $project can only exclude fields if you explicitly include others; the default is to include all fields unless specified.
Advanced Grouping and Accumulators
In MongoDB aggregation pipelines, the $group stage transforms documents into aggregated results by grouping them by a specified key expression. While basic grouping returns simple counts, advanced usage leverages accumulator operators to compute metrics, collect values, and perform multi-level aggregation. These operators—such as $sum, $avg, $first, $last, $push, and $addToSet—enable precise control over how grouped data is summarized. This section explores each operator’s behavior, demonstrates multi-level grouping, and provides practical examples for real-world queries.
Using $sum, $avg, and $count for Metrics
The $sum and $avg operators compute numeric aggregates across grouped documents. $sum returns the total of numeric field values or increments by 1 for each document if given a constant (e.g., { $sum: 1 }). $avg calculates the arithmetic mean of values, ignoring non-numeric entries. The $count operator (introduced in MongoDB 5.0) provides a shorthand for counting documents per group, equivalent to { $sum: 1 } but with clearer semantics.
Example: For an orders collection, group by status and compute total amount, average amount, and order count:
This returns documents like { _id: "shipped", totalAmount: 15000, avgAmount: 250, orderCount: 60 }. Use $sum for running totals, $avg for performance benchmarks, and $count for straightforward grouping tallies.
Collecting Values with $push and $addToSet
$push returns an array of all values encountered for a field within each group, preserving duplicates and order of insertion. $addToSet returns an array of unique values, eliminating duplicates but not guaranteeing order. Both are useful for generating lists of related items, such as product names per category or tags per user.
Example: Group by category and collect all product names (with duplicates) and unique tags:
$push is ideal for audit logs or ordered sequences, while $addToSet is efficient for deduplicated lists, such as distinct customer IDs per region. Note that large arrays can impact performance; use $slice or $limit in later stages if needed.
Implementing Multi-Level Grouping with Nested $group
Multi-level grouping uses successive $group stages to aggregate data at increasing levels of granularity. The first stage groups by a detailed key (e.g., city), and the second stage groups those results by a broader key (e.g., region). This pattern is essential for hierarchical rollups, such as sales by city then by country.
Example: First, group sales by city to compute city totals; then group by region to sum those totals:
This yields region-level summaries with embedded city details. For custom accumulation logic, combine $group with $project or $addFields to reshape data between stages. The following table compares key accumulator operators for quick reference:
Operator
Return Type
Duplicate Handling
Order Preserved
Use Case
$sum
Number
N/A (numeric aggregate)
N/A
Totals, counts
$avg
Number
N/A (numeric aggregate)
N/A
Mean values
$push
Array
Includes duplicates
Yes
Ordered lists, logs
$addToSet
Array
Removes duplicates
No
Unique value collections
$first
Any
N/A (single value)
Based on sort order
First document per group
$last
Any
N/A (single value)
Based on sort order
Last document per group
Mastering these operators allows you to build sophisticated aggregation pipelines that answer complex business questions with precision and efficiency.
Array Expressions and Unwinding
When working with MongoDB documents that contain arrays, advanced aggregation queries often require manipulating these nested structures to extract meaningful insights. The aggregation pipeline provides several powerful operators—$unwind, $filter, $slice, and $arrayElemAt—that allow you to flatten, filter, slice, or directly access array elements. These techniques are essential for transforming array data into a format suitable for grouping, sorting, or further analysis downstream. Understanding how each operator behaves and its impact on document cardinality and memory usage is critical for building efficient pipelines.
The $unwind operator deconstructs an array field from each input document, outputting one document per array element. This effectively flattens nested data, enabling operations like grouping or joining across array items. However, $unwind can dramatically increase the number of documents in the pipeline, which may affect performance and memory consumption. Consider a collection of orders, each containing an array of products:
This pipeline unwinds the items array, then groups by category. Key impacts of $unwind include:
Cardinality explosion: A single document with 100 array elements generates 100 documents, increasing processing time and memory.
Preserving null or empty arrays: By default, documents with missing, null, or empty arrays are discarded. Use preserveNullAndEmptyArrays: true to retain them.
Index usage:$unwind prevents index use after it runs, so place it late in the pipeline when possible.
Memory limits: For large arrays, consider using $unwind with $limit early to reduce document count.
Filtering and Slicing Arrays with $filter and $slice
Instead of unwinding entire arrays, you can use $filter to select specific elements based on a condition, or $slice to extract a contiguous subset. These operators keep the array structure intact, reducing document proliferation. $filter is ideal for removing unwanted items before further processing:
$slice: ["$array", 5] returns the first 5 elements.
$slice: ["$array", -3] returns the last 3 elements.
$slice: ["$array", 2, 4] returns 4 elements starting from index 2.
Both operators are non-blocking and can be combined with $unwind for more targeted flattening, reducing unnecessary document duplication.
Accessing Array Elements with $arrayElemAt
The $arrayElemAt operator retrieves a single element from an array by its index position, with zero-based indexing. It is lightweight and does not increase document count, making it perfect for extracting specific values like the first or last element. For example, to get the most recent order item:
Negative indices access elements from the end of the array: -1 returns the last element. This operator is particularly useful when combined with $sort to retrieve top or bottom array entries without unwinding. Common use cases include:
Extracting the highest-scoring review from a product.
Getting the latest transaction from a user’s history.
Pulling a specific metadata field stored at a known index.
By mastering these array expressions, you can build aggregation pipelines that handle complex nested data efficiently, balancing readability and performance.
In MongoDB aggregation pipelines, transforming and conditionally computing fields is essential for preparing data for analysis or reporting. This section explores three critical categories of operations: date formatting and conversion, string manipulation, and conditional logic. Mastering these techniques allows you to reshape documents dynamically, handle missing or irregular data, and create computed fields that drive meaningful insights. Each operation integrates seamlessly into pipeline stages like $project, $addFields, or $group, enabling precise control over output.
Formatting and Manipulating Dates with $dateToString
The $dateToString operator converts a date object into a string formatted according to a specified pattern. This is invaluable when you need dates in human-readable formats or for grouping by date parts like year, month, or day. The operator accepts a date field and a format string using format specifiers (e.g., %Y for year, %m for month, %d for day). You can also include a timezone option to adjust for local time.
For converting strings back to dates, use $toDate. This operator accepts a string field and returns a date object, enabling date arithmetic or further formatting downstream. For instance, { $toDate: "$dateString" } converts a valid ISO date string into a BSON date.
String transformations are common when cleaning or combining text fields. $concat concatenates two or more strings, including field values or literals. It handles missing fields gracefully by returning null if any referenced field is absent. Example:
{ $concat: ["$firstName", " ", "$lastName"] }
$toLower converts a string to lowercase, useful for case-insensitive comparisons or uniform output. Its counterpart, $toUpper, works similarly. For extracting substrings, $substr (or $substrCP for Unicode support) takes a string, a start index (0-based), and a length. Example:
{ $substr: ["$email", 0, 5] } // first 5 characters
These operators are often combined. For instance, to create a lowercase, truncated version of a name field:
{ $toLower: { $substr: ["$fullName", 0, 10] } }
A practical table of string operators:
Operator
Purpose
Example
$concat
Join strings
{ $concat: ["$a", "-", "$b"] }
$toLower
Convert to lowercase
{ $toLower: "$field" }
$substr
Extract substring
{ $substr: ["$field", 0, 3] }
Conditional Logic with $cond and $switch
Conditional operators allow pipelines to evaluate expressions and return different values based on boolean conditions. $cond is the ternary operator: it takes three arguments—a condition, a value if true, and a value if false. Conditions can involve comparison operators like $gte, $eq, or logical operators $and, $or. Example:
For multiple conditions, $switch provides a case-based structure. It accepts an array of case objects with a case expression and a then value, plus an optional default. This is cleaner than nested $cond statements. Example:
These operators are powerful in $project, $addFields, or $group stages for creating computed fields based on business rules. For example, you might conditionally assign a discount rate or categorize products by price range. Both $cond and $switch can reference any field or computed expression, making them essential for dynamic pipelines.
MongoDB Aggregation: Advanced Queries Explained
The aggregation framework in MongoDB provides powerful tools for combining data across collections. Two of the most versatile stages for this purpose are $lookup and $graphLookup. $lookup performs a left outer join between collections, while $graphLookup enables recursive graph traversals, such as finding hierarchical relationships like organizational charts or social networks. Understanding their syntax, performance implications, and appropriate use cases is essential for building efficient, scalable queries.
Basic $lookup for Cross-Collection Joins
The simplest form of $lookup joins two collections on a local field and a foreign field. It adds an array field to each document containing the matching documents from the foreign collection. The basic syntax is:
In this example, each order document gains a customerInfo array containing the matching customer document. If no match exists, the array is empty, mimicking a left outer join. Key considerations include:
Index usage: Index the foreign field (_id in the example) to speed up lookups. Without an index, MongoDB scans the entire foreign collection.
Data size: The resulting array can become large if many documents match. Use $unwind or limit fields with a pipeline to reduce memory.
Collection limit: Basic $lookup only supports equality matches on a single field. For complex conditions, use the pipeline syntax.
Complex Join Conditions with Pipeline Syntax
When you need more than a simple equality join—such as joining on multiple fields, applying filters, or performing calculations—use the pipeline variant of $lookup. This syntax allows you to define a sub-pipeline that runs on the foreign collection, with access to the local document via the let variable. For example, to join orders with customers and only include customers who have an active status:
Always index the fields referenced in the pipeline’s $match stage to avoid collection scans.
Recursive Queries Using $graphLookup
$graphLookup performs a recursive traversal on a collection, following edges defined by a connectFromField and connectToField. It is ideal for hierarchical data like employee-manager relationships or category trees. The stage accumulates results into an array, with optional controls for depth and deduplication. A practical example finds all subordinates of a manager:
This returns Alice’s document with a subordinates array containing all employees who report to her, directly or indirectly, up to five levels deep. Performance considerations include:
Index on connectToField: Index managerId to accelerate each hop.
Depth limit: Always set maxDepth to prevent infinite loops in cyclic data.
Memory: Results are held in memory; large traversals may exceed the 100 MB limit. Use allowDiskUse: true if needed.
Unique documents: By default, duplicates are removed. Use restrictSearchWithMatch to filter traversed nodes.
When used correctly, $graphLookup elegantly solves problems that would otherwise require multiple queries or external code.
MongoDB Aggregation: Advanced Queries Explained – Windowing and Rank Functions with $setWindowFields
Window functions, long a staple of SQL databases, bring powerful analytical capabilities to MongoDB through the $setWindowFields stage. Introduced in MongoDB 5.0, this operator allows you to perform calculations across a set of documents related to the current document—without collapsing them into a single output. By defining a partition and sort order, you can compute ranks, row numbers, cumulative sums, and moving averages directly within an aggregation pipeline. This section explains how to harness these functions for advanced queries, focusing on $rank, $denseRank, $rowNumber, and cumulative aggregations over sorted partitions.
Understanding Window Partitions and Sort Order
Before applying window functions, you must define the window’s structure using two key components: partition and sort order. A partition divides the collection into groups (similar to $group), while the sort order determines the sequence of documents within each partition. The syntax for $setWindowFields includes:
partitionBy: Specifies the field(s) to group documents. If omitted, the entire result set is treated as a single partition.
sortBy: Defines the order of documents within each partition (ascending or descending).
output: Assigns window function results to new fields.
For example, consider a sales collection with documents containing region, salesperson, and amount. To rank sales within each region by amount descending, you would partition by region and sort by amount descending. The sort order is critical because functions like $rank rely on it to assign positions.
Property
Purpose
Example
partitionBy
Groups documents into independent windows
region: "$region"
sortBy
Orders documents within each partition
amount: -1
output
Defines new fields with window function results
rank: { $rank: {} }
Computing Ranks and Row Numbers
MongoDB provides three primary ranking functions: $rank, $denseRank, and $rowNumber. Each behaves differently when ties occur in the sort order.
$rank: Assigns a unique rank to each document, with gaps for ties. For example, if two documents tie for first place, both receive rank 1, and the next document receives rank 3.
$denseRank: Similar to $rank but without gaps. Ties still share the same rank, but the next distinct value receives the immediately following integer (e.g., 1, 1, 2).
$rowNumber: Assigns a unique, sequential integer to each document within a partition, ignoring ties. Every document gets a different number based on its position in the sort order.
To compute these, use the following syntax within the output object:
These functions are invaluable for leaderboards, top-N queries, and identifying document positions within groups. For instance, you can filter documents where rank <= 3 to get the top three sales per region.
Cumulative and Moving Aggregations
Beyond ranking, $setWindowFields supports cumulative and moving aggregations using functions like $sum, $avg, $min, and $max with window bounds. You specify the window’s range using documents or range options to control which documents are included in the calculation relative to the current document.
Cumulative sum: Use $sum with a window that starts at "unbounded" and ends at "current". This adds all values from the beginning of the partition up to the current document.
Moving average: Define a window of fixed size, such as the last three documents, using documents: [-2, 0] (two preceding and the current).
Example for cumulative sum per region, ordered by date:
These aggregations enable trend analysis, running totals, and smoothing of noisy data directly within the aggregation pipeline, eliminating the need for client-side post-processing.
Performance Optimization for Aggregation Pipelines
Optimizing MongoDB aggregation pipelines is critical for maintaining responsive applications as data volume grows. Without careful tuning, even well-structured pipelines can degrade into costly full-collection scans. The primary levers for performance include strategic index use, early-stage filtering, minimizing stage complexity, and leveraging MongoDB’s diagnostic tools. Below, we explore specific techniques that yield measurable improvements.
Leveraging Indexes with $match and $sort
Indexes are the foundation of fast aggregation performance. The $match and $sort stages are the only stages that can directly leverage indexes. To maximize benefit:
Place $match as the first stage in the pipeline to filter documents early and reduce the number of documents flowing to subsequent stages.
Ensure the $match predicate uses an indexed field or a compound index that matches the query pattern.
When a $sort immediately follows a $match on the same index key, MongoDB can often avoid an in-memory sort by reading the index in order.
For $group or $bucket stages that require sorted input, a preceding $sort on an indexed field can be highly efficient.
For example, a pipeline filtering by status: "active" and sorting by createdAt should have a compound index on {status: 1, createdAt: 1}. This allows both stages to use the index without additional sorting overhead.
Every stage in a pipeline adds processing time. Minimizing the number of stages and the size of documents passed between them directly reduces resource consumption:
Early filtering: Use $match and $limit as early as possible. A $limit after $match can stop scanning once enough documents are found.
Projection: Use $project or $addFields to discard unnecessary fields early. This reduces memory and network overhead, especially in sharded clusters.
Avoid unnecessary stages: Combine $group and $sort when possible, or replace $unwind + $group with $reduce or $addToSet if the goal is aggregation.
Document size: Keep documents small by using $project to exclude large fields (e.g., images, logs) until needed. Use $slice or $filter on arrays to limit their size.
The following table compares common stage combinations and their relative performance impact:
Pipeline Pattern
Document Processing
Memory Usage
Recommended Use Case
$match → $group → $sort
Moderate
Low to moderate
Filtered grouping with sorted output
$unwind → $group → $sort
High
High
Array expansion with aggregation
$match → $project → $limit
Low
Low
Early projection and pagination
$sort → $group (no index)
Very high
Very high
Avoid; always use indexed sort
Analyzing Performance with explain() and $hint
MongoDB provides two essential tools for diagnosing and optimizing pipeline performance: explain() and $hint.
Using explain("executionStats"): This method returns detailed metrics about how the pipeline executed, including:
Run explain("executionStats") on your pipeline. If you see totalDocsExamined far exceeding nReturned, you need better index coverage or earlier filtering. A high inMemorySort value indicates a missing or suboptimal sort index.
Using $hint: In rare cases, the query planner may choose a suboptimal index. The $hint stage forces the use of a specific index. For example:
Use $hint only after verifying with explain() that the chosen index is indeed more efficient. Overusing or misusing $hint can degrade performance when data distribution changes. Always test with representative data volumes.
Real-World Use Cases and Examples
MongoDB’s aggregation pipeline transforms raw collections into actionable insights across diverse business domains. By chaining stages such as $match, $group, and $project, developers can efficiently handle operations that would otherwise require multiple queries or external processing. Below are three practical scenarios demonstrating how advanced aggregations solve real problems in sales reporting, user analytics, and data preparation.
Building a Sales Dashboard with Monthly Aggregations
A retail company needs a dashboard showing monthly sales totals, average order values, and top product categories. The aggregation pipeline processes a orders collection where each document contains an orderDate, totalAmount, and items array. The solution uses $unwind to flatten the items array, $group by year-month and category, then computes sums and averages.
For a SaaS platform, analyzing user sessions from raw event logs requires grouping consecutive actions into meaningful sessions. The events collection stores each user action with a userId and timestamp. The pipeline uses $sort to order events chronologically, then $group with $push to collect events per user. Session boundaries are defined by a 30-minute inactivity gap.
Key stages include:
$sort: Order events by userId and timestamp ascending.
$group: Collect all events per user into an array.
$function (or $reduce): Iterate through the array to split into sessions where the gap between consecutive timestamps exceeds 30 minutes.
$unwind: Expand each session into its own document for further analysis.
The result provides session durations, page sequences, and drop-off points, enabling product teams to optimize user flows and identify engagement trends.
Data Cleaning and Enrichment for ETL Pipelines
ETL processes often ingest messy data from external sources. MongoDB aggregation can clean and enrich records before loading into a data warehouse. Consider a raw_customers collection with inconsistent fields, missing values, and unstandardized addresses. The pipeline performs multiple transformations in a single pass.
This approach reduces ETL complexity by offloading data quality rules directly to MongoDB, ensuring only clean, enriched records reach downstream systems.
Common Pitfalls and Best Practices
Mastering MongoDB aggregation pipelines requires not only understanding syntax but also anticipating common pitfalls that degrade performance and maintainability. Even experienced developers can encounter memory limits, inefficient joins, or pipelines that become unreadable labyrinths. By recognizing these traps and adopting best practices, you can build pipelines that are both performant and easy to evolve.
Managing Memory and Stage Limits
MongoDB enforces a default memory limit of 100 MB per pipeline stage. When stages like $group, $sort, or $bucket exceed this threshold, the operation may fail with an error. To avoid this, consider these strategies:
Use allowDiskUse(true): Enable this option to allow stages that exceed memory to write temporary files to disk. Be aware that this can slow performance.
Filter early with $match: Reduce the document set before memory-intensive stages. For example, place $match before $group to limit input.
Limit document size: Use $project to exclude unnecessary fields before grouping or sorting.
Monitor with $explain: Use the explain plan to identify stages consuming excessive memory.
Stage
Memory Risk
Mitigation
$group
High with many groups
Reduce grouping keys, use allowDiskUse
$sort
High with large datasets
Sort after $match, use indexes
$bucket
Medium
Limit boundaries, pre-filter
$facet
High (multiple sub-pipelines)
Use separate pipelines when possible
Avoiding Expensive Operations in Early Stages
Placing costly operations like $unwind, $lookup, or $graphLookup early in the pipeline can explode the document count and slow down subsequent stages. Key practices include:
Defer $unwind: Only unwind arrays after you have filtered documents. For example, if you need to count array elements, use $size in $addFields instead of unwinding.
Optimize $lookup: Always add a $match stage before $lookup to reduce the source collection size. Use indexes on the foreign field and consider using $lookup with a pipeline for more targeted joins.
Avoid $unwind–$group patterns: These often indicate a need for $reduce or $map instead. For instance, instead of unwinding and regrouping to sum array elements, use $sum with $reduce.
Use $sample carefully: Random sampling early can be useful for prototyping but should be removed in production pipelines.
Writing Modular and Testable Aggregation Pipelines
Long pipelines become difficult to debug and maintain. Adopt these practices to keep your code clean:
Break pipelines into named stages: Use comments or separate variables for each stage. In code, assign each stage to a constant like const matchStage = { $match: { status: "active" } };.
Test stages incrementally: Run each stage independently against a small sample of documents to verify output. Use db.collection.aggregate([stage1]) and check results.
Use aggregation variables: Define variables with $let or $lookup pipelines to avoid repeating complex expressions.
Document intent: Add comments for non-obvious transformations, especially when using $reduce, $function, or custom expressions.
Version control pipelines: Store aggregation scripts in files with descriptive names, such as generate_report_v2.js, to track changes.
By following these guidelines, you can create aggregation pipelines that are not only efficient but also transparent, making future modifications faster and safer.
Frequently Asked Questions
What is the MongoDB aggregation pipeline?
The MongoDB aggregation pipeline is a framework for data processing that allows documents from a collection to pass through a series of stages (e.g., $match, $group, $sort). Each stage transforms the documents, enabling operations like filtering, grouping, sorting, reshaping, and computing aggregations. It is analogous to a Unix pipe, where output of one stage becomes input for the next. The pipeline is highly optimized for performance and can use indexes for early stages like $match and $sort.
How do I use $lookup for joins?
The $lookup stage performs a left outer join with another collection. It adds a new array field to each input document containing matching documents from the 'from' collection. For example: { $lookup: { from: 'orders', localField: '_id', foreignField: 'customer_id', as: 'orders' } }. You can also use a pipeline with $lookup for more complex joins, including conditions, sorting, and limiting. Indexes on the foreignField improve performance.
What are the most common aggregation operators?
Common aggregation operators include $sum, $avg, $min, $max, $count, $first, $last, $push, and $addToSet for accumulation. For array operations, $unwind deconstructs arrays. For grouping, $bucket and $bucketAuto create histogram-like groups. $facet allows multiple pipelines in one stage. $addFields and $project reshape documents. $sortByCount counts distinct values. These operators enable powerful data analysis directly in the database.
How can I optimize the aggregation pipeline?
Optimize by placing $match and $sort stages early to leverage indexes and reduce document volume. Use $project to limit fields early. Avoid $unwind on large arrays if not needed. Use $lookup with indexes on the foreign collection. For large datasets, consider $allowDiskUse for memory-intensive stages. Monitor performance with explain() and analyze stage execution times. Break complex pipelines into smaller, reusable stages.
What is the difference between $group and $bucket?
$group groups documents by a specified key and computes accumulators for each group (e.g., sum, average). It is flexible for arbitrary grouping expressions. $bucket groups documents into specified ranges (buckets) based on a numeric or date field, and optionally computes accumulators per bucket. $bucketAuto automatically determines bucket boundaries. $bucket is ideal for histogram generation and range-based analysis, while $group is for general key-based aggregation.
Can I use aggregation with sharded collections?
Yes, MongoDB supports aggregation on sharded collections. The aggregation pipeline runs in parallel across shards where possible, with merge operations on the primary shard or mongos. Some stages like $out and $merge may have restrictions. For optimal performance, ensure $match and $sort stages use the shard key. The $lookup stage can be expensive on sharded collections; consider denormalization or using $lookup with a pipeline that includes the shard key.
How do I handle large results from aggregation?
For large results, use the aggregation cursor to iterate results in batches instead of loading all into memory. You can also use $out to write results to a new collection, or $merge to merge into an existing collection (with options for handling duplicates). For very large datasets, use $allowDiskUse to enable temporary disk storage. Consider using $limit and $skip for pagination, but be aware of performance implications for large skips.
What are some advanced aggregation techniques?
Advanced techniques include using $facet for multi-faceted search, $graphLookup for recursive queries (e.g., tree structures), $lookup with a pipeline for complex joins, $bucketAuto for automatic histogram generation, $addFields with conditional expressions ($cond, $switch), and $redact for document-level security. You can also use $merge with custom pipelines to update documents incrementally. These techniques enable sophisticated data transformations without leaving the database.
React Server Components (RSC) represent a fundamental shift in how developers build React applications, moving away from the traditional paradigm where all components run exclusively in the browser. Instead, RSC allows components to execute on the server, sending only their rendered output to the client. This change addresses long-standing challenges in modern web development, such as large JavaScript bundles, slow initial page loads, and complex data-fetching patterns. By leveraging the server’s capabilities, RSC enables faster performance, reduced client-side processing, and a more efficient architecture for building dynamic, data-driven interfaces.
React Server Components are components that run on the server during the request-response cycle, not in the browser. Unlike traditional React components, they are never sent to the client as JavaScript code. Instead, the server renders them into a serializable format—a special streamable payload—that the client uses to update the DOM. Key characteristics include:
Server-only execution: They have access to server-side resources like databases, file systems, and APIs without exposing sensitive logic to the client.
Zero client bundle impact: Their code is excluded from the JavaScript bundle delivered to the browser, reducing load times and memory usage.
Direct data access: They can fetch data at the server level, eliminating the need for client-side data fetching libraries or useEffect hooks for initial data.
Streaming support: The server can send component output incrementally, allowing the client to display content as it arrives.
Importantly, Server Components cannot use hooks like useState or useEffect, nor can they handle user interactions—those responsibilities belong to Client Components.
Why Server Components Were Introduced
React Server Components were introduced to solve several persistent problems in client-heavy React applications:
Problem
How RSC Addresses It
Large JavaScript bundles
Server Components contribute zero bytes to the client bundle, reducing download and parse times.
Slow initial page loads
Server-rendered content arrives as HTML or a stream, improving Time to Interactive (TTI) and Largest Contentful Paint (LCP).
Complex data fetching
Data is fetched directly on the server, removing the need for client-side waterfalls or state management for initial data.
Security risks
Sensitive logic (e.g., API keys, database queries) stays on the server, never exposed to the client.
Poor performance on low-end devices
Heavy computation is offloaded to the server, reducing client workload.
These improvements align with modern web performance goals, where reducing client-side JavaScript is critical for user experience, especially on mobile and slower networks.
Key Differences from Client Components
Understanding the distinction between Server and Client Components is essential for adopting RSC. Here are the primary differences:
Execution environment: Server Components run only on the server; Client Components run in the browser after hydration.
State and interactivity: Server Components cannot use React state, effects, or event handlers; Client Components support the full React API, including useState, useEffect, and onClick.
Bundle size: Server Components add no JavaScript to the client; Client Components contribute their code to the bundle.
Data fetching: Server Components can directly query databases or APIs; Client Components typically rely on useEffect, SWR, or React Query for client-side fetching.
Rendering timing: Server Components render at request time (or build time for static generation); Client Components render in the browser after the initial page load.
File convention: In frameworks like Next.js, Server Components are the default (no special extension needed), while Client Components require a "use client" directive at the top of the file.
By combining both types, developers can build applications that are both fast and interactive—using Server Components for static or data-heavy sections and Client Components for interactive UI elements.
How React Server Components Work
React Server Components (RSC) fundamentally alter the rendering pipeline by shifting component execution from the client to the server. This approach reduces the JavaScript bundle sent to the browser, improves initial page load performance, and enables direct access to server-side resources such as databases and file systems. Understanding the technical mechanics of this pipeline is essential for developers seeking to leverage RSC effectively in production applications.
Server-Side Execution Model
In the RSC model, components are explicitly designated as server components by default in frameworks like Next.js. When a request arrives, the server executes the component tree from the root down. Each server component runs in a Node.js or server runtime environment, where it can perform asynchronous operations such as fetching data from a database, reading configuration files, or calling internal APIs. Unlike client components, server components never re-render on the client; their output is static and serialized once.
The execution model follows a strict ordering:
Root component execution: The server begins at the top-level component and resolves all dependencies.
Asynchronous resolution: Server components can be async functions, allowing them to await data before continuing.
Client component boundaries: When a server component encounters a client component in the tree, it pauses execution, sends the serialized server output, and hands off interactivity to the client.
This model ensures that heavy computation and data fetching occur only once on the server, drastically reducing client-side workload.
Serialization and Data Flow
After server components execute, their output must be transmitted to the client in a format that React can reconstruct. The server serializes the rendered component tree into a specialized binary format known as the React Server Component Payload. This payload is not HTML; it is a compact, streamable representation that includes:
Server serialization: The server converts the component tree into a stream of JSON-like chunks, preserving references to client component imports.
Client deserialization: The React runtime on the client reads the payload, reconstructs the component tree, and renders it into the DOM.
Client component hydration: Any client components within the tree are hydrated with their event handlers and state, becoming interactive.
Notably, server components cannot pass functions or complex objects to client components because these cannot be serialized. Only JSON-serializable data, React elements, and component references are allowed across the boundary.
Integration with React Suspense
RSC integrates deeply with React Suspense to enable streaming and progressive rendering. When a server component uses Suspense, the server can send the client a fallback UI immediately while waiting for asynchronous data to resolve. This allows the page to become interactive faster without blocking on the slowest data source.
Practical example: a server component that fetches user data can be wrapped in Suspense:
// UserProfile.server.js
import { Suspense } from 'react';
async function UserBio({ userId }) {
const bio = await db.query(`SELECT bio FROM users WHERE id = ${userId}`);
return <p>{bio}</p>;
}
export default function UserProfile({ userId }) {
return (
<Suspense fallback={<div>Loading biography...</div>}>
<UserBio userId={userId} />
</Suspense>
);
}
In this example, the server streams the outer component structure immediately, while the UserBio component waits for the database query. The client sees the fallback until the serialized payload for UserBio arrives. This pattern reduces time-to-first-byte and improves perceived performance, especially for pages with multiple independent data sources.
By combining server-side execution, serialized payloads, and Suspense boundaries, RSC provides a robust framework for building performant, data-rich web applications with minimal client-side overhead.
React Server Components (RSC) represent a paradigm shift in how developers build React applications, offering tangible improvements in both performance and developer experience. By rendering components on the server rather than the client, RSC reduces the amount of JavaScript shipped to the browser, simplifies data fetching, and accelerates initial page loads. These benefits are especially critical for modern web applications that must balance rich interactivity with fast delivery.
Smaller Client-Side JavaScript Bundles
One of the most immediate advantages of React Server Components is the dramatic reduction in client-side JavaScript bundle size. Because server components execute exclusively on the server, their code—including dependencies, logic, and rendering—never reaches the browser. This means heavy libraries for data parsing, template rendering, or server-side computation can be used without penalizing the client. For example, a component that formats dates using a library like date-fns can run entirely on the server, sending only the resulting HTML to the client. The result is smaller bundles, faster parsing and execution times, and improved performance on low-powered devices or slow networks.
Key bundle size impacts include:
Elimination of server-only dependencies from client bundles.
Reduced JavaScript payload for pages with mostly static or data-driven content.
Lower memory usage on the client, as server components do not hydrate.
Direct Access to Backend Resources
React Server Components provide seamless, direct access to backend resources such as databases, file systems, and internal APIs without exposing sensitive logic or credentials to the client. Developers can write data-fetching code that runs securely on the server, eliminating the need for separate API endpoints or client-side state management for server data. This simplifies the architecture by reducing the number of network requests and the complexity of caching and revalidation. For instance, a server component can directly query a database using an ORM or execute a file read operation, then render the result—all without exposing connection strings or business logic to the browser. This direct access also reduces latency by avoiding round trips through an intermediary API layer.
Benefits of direct backend access include:
Simplified data fetching: no need to build and maintain REST or GraphQL endpoints for server-only data.
Enhanced security: sensitive operations and credentials remain on the server.
Reduced client-side code: no fetch calls or state management for server data.
Improved Initial Page Load Performance
React Server Components significantly improve initial page load performance by sending fully rendered HTML from the server to the client. This eliminates the need for the browser to download, parse, and execute JavaScript before displaying content. Users see meaningful content sooner, which improves perceived performance and metrics like Largest Contentful Paint (LCP). Additionally, server components can stream HTML incrementally, allowing the browser to render content as it arrives rather than waiting for the entire page to be ready. This is particularly beneficial for pages with large or dynamic data sets, where traditional client-side rendering would require multiple round trips for data and JavaScript.
Empty or minimal shell; content rendered after JavaScript loads
Fully rendered HTML streamed from server
JavaScript bundle size
Includes all component code and dependencies
Only client components and interactivity code
Time to first paint
Delayed until JavaScript executes
Immediate upon HTML arrival
Data fetching overhead
Requires client-side API calls and state management
Direct server-side data access; no extra requests
Hydration requirement
Full hydration of all components
Only interactive client components hydrate
By combining these three benefits—smaller bundles, direct backend access, and improved initial load performance—React Server Components enable developers to build faster, more secure, and more maintainable applications without sacrificing the rich interactivity that React provides for client-side interactions.
When to Use Server Components vs. Client Components
Choosing between React Server Components and Client Components depends on two primary factors: the interactivity needs of your UI and the nature of the data it requires. Server Components execute exclusively on the server, sending only rendered HTML to the client, while Client Components run in the browser and can handle user interactions, state, and effects. Understanding when to use each—and how to combine them—is essential for building performant, maintainable applications.
Use Cases for Server Components
Server Components are ideal for tasks that do not require client-side interactivity. They excel in scenarios where you want to reduce JavaScript bundle size and improve initial load performance. Common use cases include:
Client Components are necessary whenever your UI requires browser APIs, user events, or React hooks such as useState, useEffect, or useContext. They are the right choice for:
Interactive elements like buttons, forms, modals, and dropdowns that respond to clicks, typing, or other user input.
Dynamic state management where data changes based on user actions (e.g., shopping cart counters, toggle switches).
Animations and visual effects that rely on browser timers or CSS transitions triggered by state.
Third-party libraries that require the DOM (e.g., charting tools, date pickers, maps).
Real-time updates via WebSockets or event listeners that need to run in the browser.
The 'use client' directive tells React to compile this component for the browser, enabling hooks and event handlers.
Mixing Server and Client Components in the Same App
One of the most powerful features of React Server Components is the ability to seamlessly mix both types within a single application. You can nest Server Components inside Client Components, and vice versa, as long as you follow a key rule: Client Components cannot directly import Server Components. Instead, you pass Server Components as children or props to Client Components.
Consider a product page where the static description (Server Component) is wrapped inside an interactive “Add to Cart” button (Client Component):
Here, ProductDescription is a Server Component rendered on the server, while AddToCart is a Client Component that receives the server-rendered content as its children. This pattern keeps the interactive wrapper lightweight while the static content remains server-optimized.
By strategically choosing component types and composing them correctly, you can minimize client-side JavaScript, improve time-to-interactive, and maintain a rich user experience. Start by identifying the most static parts of your UI and making them Server Components, then wrap only the interactive areas with Client Components.
Data Fetching in Server Components
Data fetching in React Server Components leverages the server environment to directly access data sources, reducing client-side overhead and improving performance. Unlike client components that rely on useEffect or external state management libraries for data retrieval, server components can use native JavaScript async/await patterns directly in the component body. This approach eliminates the need for loading states, waterfalls, and client-side hydration delays commonly associated with data fetching. The server executes the data fetching logic during the render phase, sending only the final, markup-ready output to the client. This paradigm shift demands a clear understanding of best practices to maximize efficiency and avoid common mistakes.
Async Component Pattern for Data Fetching
The core pattern for data fetching in server components is the async component. A server component is declared as an async function, allowing the use of await directly within its body. The component awaits the data, processes it, and returns JSX that includes the resolved data. This pattern is straightforward but requires careful structuring to avoid blocking the entire component tree.
Direct await in component body: Fetch data at the top level of the component, before any conditional logic or loops, to keep the code readable and predictable.
Use Promise.all for parallel requests: When fetching multiple independent data sources, use Promise.all to avoid sequential waiting. For example: const [user, posts] = await Promise.all([fetchUser(), fetchPosts()]).
Keep data fetching close to usage: Fetch data in the component that directly needs it, rather than in a parent component and passing it down via props. This improves maintainability and allows for easier caching.
Handle errors gracefully: Wrap async operations in try/catch blocks or use error.tsx boundaries in frameworks like Next.js. Return fallback UI or error messages instead of crashing the page.
A simple example of an async server component:
async function UserProfile({ userId }) {
const user = await db.users.findById(userId);
return <div>{user.name}</div>;
}
Caching and Deduplication Strategies
Server components inherently benefit from server-side caching, but explicit strategies are needed to optimize performance and avoid redundant requests. The key is to leverage the server’s ability to cache data across multiple renders and requests.
Strategy
Description
Use Case
Request deduplication
Automatically deduplicates identical fetch requests made during the same render pass. Frameworks like Next.js handle this natively for fetch calls.
Multiple components fetching the same user data in a single page render.
Static data caching
Cache data at build time or request time using framework features (e.g., unstable_cache in Next.js). Data is cached until manually invalidated.
Blog posts, product catalogs that change infrequently.
Time-based revalidation
Set a TTL (time-to-live) for cached data. After the TTL expires, the data is re-fetched on the next request.
News feeds, comment counts that require periodic updates.
On-demand revalidation
Invalidate cache programmatically (e.g., after a database mutation) to ensure fresh data is served.
User profile updates, shopping cart modifications.
For deduplication, always use the native fetch API when possible, as frameworks optimize it by default. For custom data sources (e.g., database queries), wrap them in a caching layer like React.cache() or a third-party solution like react-query on the server.
Avoiding Common Pitfalls with Server Data
Working with server components introduces specific pitfalls that can degrade performance or cause unexpected behavior. Awareness of these issues is essential for robust applications.
Accidental serialization of non-serializable data: Server components cannot pass functions, class instances, or circular references to client components. Ensure all data passed via props is plain JSON-serializable objects, arrays, strings, numbers, booleans, or null.
Over-fetching data: Fetching entire database records when only a few fields are needed increases payload size and server load. Use projections in database queries or select specific fields in your fetch logic.
Ignoring the server runtime environment: Accessing browser-only APIs (e.g., window, document) inside a server component will cause errors. Always check that your data fetching code is environment-agnostic or use conditional checks.
Nested async components causing waterfalls: If a parent component awaits data before rendering a child async component, the child’s data fetching is delayed. Use Promise.all at the highest level or restructure to fetch data in parallel where possible.
Not handling empty or null data: Always check for empty arrays, null values, or missing fields before rendering. Return fallback UI (e.g., “No results found”) to avoid runtime errors or blank sections.
By adhering to these patterns and strategies, developers can harness the full power of React Server Components for efficient, scalable data fetching that improves both user experience and server resource utilization.
React Server Components fundamentally change how developers approach state and interactivity in React applications. Unlike traditional client-side components, server components never re-render on the client and have no access to browser APIs. This architectural shift requires a clear understanding of where state lives and how to manage interactive elements across the server-client boundary.
Stateless Nature of Server Components
Server components are inherently stateless. They execute exclusively on the server, generate static or dynamic HTML, and send that output to the client without any JavaScript bundle for the component itself. This means:
No useState, useReducer, or useEffect hooks are allowed.
No browser-specific APIs like window, document, or localStorage are accessible.
No event handlers (onClick, onSubmit, etc.) can be attached directly.
State is either absent or managed externally, such as through URL parameters, cookies, or database queries.
This stateless design reduces client-side JavaScript, improves initial load performance, and simplifies data fetching by colocating it with rendering logic. However, it also means that any dynamic behavior must be delegated to client components.
Passing Server Data to Client Components
To bridge the gap between server components and interactive elements, you pass data from server components to client components as props. This is a one-way, serializable data flow. The server component fetches or computes data, then passes it to a client component that can manage state and handle user interactions.
Example: A server component fetches a list of products and passes it to a client component for filtering:
Props must be serializable (no functions, classes, or symbols).
Data flows one way: server → client.
Client components can modify the data locally (e.g., filtering, sorting) but cannot mutate the server source.
For real-time updates, combine with server actions or streaming.
Using Client Components for Interactivity
All interactive elements—buttons, forms, input fields, animations, and third-party UI libraries—must live inside client components. The 'use client' directive marks the boundary where server rendering stops and client-side interactivity begins. Best practices include:
Keep client components as small as possible, isolating only the interactive parts.
Use server components for static or data-heavy sections (e.g., product lists, article content).
Prefer URL-based state (search params, path) over client state when possible, as it remains accessible to server components.
For complex state logic, consider using useReducer or a lightweight state library within client boundaries.
By understanding the stateless nature of server components, mastering the data-passing pattern, and strategically placing client components for interactivity, you can build performant React applications that balance server-side efficiency with rich user experiences.
Working with Third-Party Libraries
Integrating third-party libraries into a React Server Components architecture requires a clear understanding of the execution boundary between server and client. While many npm packages work seamlessly, those that depend on browser APIs, state, or event handlers must be handled deliberately. The following sections provide practical guidance for navigating library compatibility in frameworks like Next.js.
Library Compatibility and ‘use client’ Directive
The fundamental rule is that any component or hook using client-side features—such as useState, useEffect, onClick, or browser-only APIs like window or document—must be marked with the 'use client' directive at the top of its file. This directive tells the bundler to treat that module as a Client Component boundary.
When evaluating a third-party library, check its source for the following indicators:
Direct DOM access: Libraries that manipulate the DOM (e.g., charting, drag-and-drop, rich text editors) almost always require client-side execution.
React hooks: Any library that exports hooks like useState, useReducer, useEffect, or useContext is client-only.
Event handlers: Components that accept onClick, onChange, or similar props are inherently client-side.
If a library does not include 'use client' and does not use browser APIs, it may work as a Server Component. However, many popular UI libraries (e.g., Material UI, Ant Design, Chakra UI) rely on client-side context and state, so you must wrap them accordingly.
To use a client-only library inside a Server Component, you must create a wrapper file that imports the library and declares the 'use client' directive. This wrapper becomes the client boundary, while the parent Server Component remains server-rendered.
// app/page.tsx (Server Component)
import ClientButton from './components/ClientButton';
export default function Page() {
return (
<div>
<h2>Welcome</h2>
<ClientButton onClick={() => console.log('clicked')}>
Click Me
</ClientButton>
</div>
);
}
This approach preserves server-side benefits—reduced bundle size, direct database access, and caching—while allowing interactive elements where needed. For libraries that export multiple components, create a barrel file with 'use client' at the top and re-export only the client components you need.
Common Libraries That Work Out of the Box
Several popular libraries are designed to work with React Server Components without modification. The table below lists common categories and examples:
For libraries not listed, always test by importing them directly into a Server Component. If you encounter an error about useState or useEffect being used in a Server Component, you know the library requires a client wrapper. In contrast, libraries that export only functions or server-safe components integrate without extra effort.
Adopting React Server Components (RSC) shifts performance optimization from purely client-side concerns to a server-client hybrid model. To fully realize the benefits—smaller bundles, faster initial loads, and improved perceived performance—developers must evaluate specific metrics and apply targeted techniques. This section covers the key areas of bundle measurement, streaming, and round-trip minimization, providing a practical framework for performance tuning.
One of the primary promises of RSC is a reduction in JavaScript bundle size, which directly impacts Time to Interactive (TTI). Server Components execute on the server and send only serialized output (not component code) to the client. This eliminates large portions of client-side JavaScript for components that do not require interactivity. To measure this effectively:
Bundle analysis tools: Use tools like webpack-bundle-analyzer or vite-plugin-visualizer to compare client bundle size before and after migrating components to server components. Focus on the reduction in kilobyte weight for non-interactive UI elements (e.g., headers, product lists, static content).
TTI measurement: Monitor TTI via Lighthouse or Web Vitals in a staging environment. A well-optimized RSC application should show a measurable decrease in TTI, as less JavaScript must be parsed and executed on initial load. Target a TTI reduction of at least 20% for pages dominated by static or server-fetched content.
Client component isolation: Ensure that only truly interactive components (e.g., buttons, forms, sliders) are marked as client components ('use client'). Every unnecessary client component adds to the bundle. Use a component tree audit to verify that no server-only logic leaks into client bundles.
Streaming and Progressive Rendering
RSC enables streaming HTML from the server, allowing the browser to render content progressively as it arrives. This technique improves perceived performance and reduces the time to first paint. Key considerations:
Immediate shell delivery: Use streaming to send the page shell (layout, navigation, critical styling) immediately, while slower data-fetching components (e.g., user-specific recommendations) stream in later. This ensures users see meaningful content within 1–2 seconds.
Suspend boundaries: Wrap components that depend on async data fetching in boundaries. This allows the server to stream fallback UI (e.g., loading skeletons) while awaiting data, preventing the entire page from blocking.
Critical data prioritization: Order your server component tree so that high-priority content (e.g., main article text, primary images) is fetched and streamed first. Low-priority content (e.g., related links, analytics widgets) can be deferred. Use next/dynamic or lazy for client components that are not immediately needed.
Avoiding Unnecessary Server Round-Trips
While RSC reduces client-side JavaScript, each server component fetch incurs a network round-trip. Over-fetching or poorly structured data requests can negate performance gains. Employ these strategies:
Co-locate data fetching: Fetch data directly within the server component that needs it, rather than fetching in a parent and passing props. This reduces the number of serialization steps and avoids redundant requests.
Batch requests: Use a single server component to fetch all data for a logical section (e.g., a product page), rather than multiple nested server components each making separate API calls. This minimizes round-trips.
Cache aggressively: Leverage server-side caching (e.g., React’s cache function or Next.js’s fetch cache) to avoid re-fetching identical data across multiple requests. For dynamic data, use revalidation strategies (e.g., time-based or on-demand) to balance freshness with performance.
Technique
Primary Benefit
Potential Pitfall
Bundle size reduction via server components
Lower TTI and initial load time
Overusing client components negates benefit
Streaming with Suspense boundaries
Faster perceived performance
Improper boundary placement can cause layout shifts
Co-located data fetching
Fewer round-trips, simpler logic
Can lead to duplicate fetches if not cached
Server-side caching
Reduced latency for repeated data
Stale data if revalidation is misconfigured
React Server Components: What You Need to Know
Building a Server-Rendered Blog List
A common real-world use for React Server Components is rendering a list of blog posts directly from a database, without sending any JavaScript for the list itself to the client. In this pattern, the server component fetches data and renders HTML on the server. The client receives only the final markup, reducing bundle size and improving initial load time.
Example: Server Component for a Blog List
// BlogList.server.js
import db from './database';
export default async function BlogList() {
const posts = await db.query('SELECT title, slug, excerpt FROM posts ORDER BY created_at DESC LIMIT 10');
return (
<ul>
{posts.map(post => (
<li key={post.slug}>
<a href={`/blog/${post.slug}`}>{post.title}</a>
<p>{post.excerpt}</p>
</li>
))}
</ul>
);
}
This component runs only on the server. It queries the database, iterates over results, and returns a static list of links. No client-side JavaScript is needed for rendering the list, making it ideal for content-heavy pages where SEO and performance are priorities.
Creating a Dashboard with Mixed Components
Dashboards often combine static data (like summary cards) with interactive elements (like charts or filters). React Server Components excel here because you can mix server and client components seamlessly. The server handles data fetching and rendering of static sections, while client components handle interactivity.
Example: Dashboard Structure
Server Component: Renders total users, revenue, and recent orders from a database. These cards are pure HTML with no client-side logic.
Client Component: A chart component (e.g., using Recharts) that receives pre-fetched data as props and runs interactively in the browser.
Server Component: A table of recent transactions that can be static or paginated server-side.
Key pattern: The server component fetches all necessary data and passes it as props to client components. This keeps data fetching centralized on the server, reducing client requests and improving security.
This approach keeps the dashboard fast and maintainable, with server components handling the heavy lifting and client components only for truly interactive features.
Error Handling and Loading States
React Server Components support error boundaries and loading states through patterns that work across server and client boundaries. The most common approach is wrapping server components in a client-side error boundary and using React’s use hook or streaming Suspense for loading states.
Error Handling Strategy:
Wrap server components in a client-side error boundary that catches errors during rendering or data fetching.
Use try/catch inside server components to handle database failures gracefully, returning fallback UI.
For streaming, use <Suspense> with a fallback component that renders while the server component is being fetched.
Example: Error Boundary and Loading State
// Client component wrapping server content
'use client';
import { Suspense } from 'react';
import ErrorBoundary from './ErrorBoundary';
import BlogList from './BlogList.server';
import LoadingSkeleton from './LoadingSkeleton';
export default function BlogPage() {
return (
<ErrorBoundary fallback={<p>Failed to load blog posts.</p>}>
<Suspense fallback={<LoadingSkeleton />}>
<BlogList />
</Suspense>
</ErrorBoundary>
);
}
These patterns ensure that your server-rendered content degrades gracefully, providing a robust user experience even when data sources fail or network requests are slow.
Common Pitfalls and How to Avoid Them
Adopting React Server Components introduces a paradigm shift in how developers think about component boundaries and data fetching. While the benefits are substantial, common mistakes can undermine performance and developer experience. This guide addresses three frequent pitfalls and provides actionable solutions.
Incorrect Use of Hooks in Server Components
A fundamental rule is that server components cannot use hooks like useState, useEffect, or useContext. These hooks rely on client-side interactivity and the browser environment. Attempting to use them in a server component will throw an error at build or runtime.
How to avoid this:
Identify components that require state, side effects, or browser APIs. Convert them to client components by adding "use client" at the top of the file.
Keep server components for static rendering, data fetching, and layout. Use client components only for interactive UI elements.
Use a clear naming convention, such as suffixing client components with Client (e.g., SearchBarClient).
If you need dynamic behavior in a server-rendered tree, extract the interactive part into its own client component and nest it inside the server component.
Overusing Client Components
Many developers, accustomed to client-side rendering, default to making every component a client component. This defeats the performance advantages of server components—larger JavaScript bundles, slower initial loads, and reduced server-side rendering benefits.
How to avoid this:
Start every component as a server component by default. Only add "use client" when you explicitly need interactivity.
Audit your component tree regularly. Look for components that render static content, fetch data from a database, or use server-side APIs—these should remain server components.
Use the client boundary pattern: push client directives as far down the tree as possible. For example, a page layout can be a server component, while only a small button or form within it is a client component.
Consider using React Server Actions for form submissions and mutations instead of client-side handlers.
Debugging Server-Side Errors
Errors in server components can be harder to diagnose because they occur on the server, not in the browser console. Common issues include incorrect data fetching, missing environment variables, or serialization problems when passing props from server to client components.
Enable detailed error logging in your framework (e.g., Next.js NEXT_PUBLIC_VERBOSE_ERRORS=true).
Use structured logging with tools like console.error in server components during development—these appear in the terminal, not the browser.
Check that all props passed from server to client components are serializable. Functions, Symbols, or circular references will cause errors.
Create a simple test component to isolate server-side logic: render static text first, then add data fetching gradually.
Pitfall
Primary Symptom
Quick Fix
Hooks in server components
Build/compile error
Move hook usage to client component
Overusing client components
Large bundle size, slow load
Convert static parts back to server components
Server-side errors
Blank page or cryptic error
Check terminal logs, serializable props
By anticipating these common pitfalls and applying the outlined strategies, you can adopt React Server Components with confidence, reaping their performance benefits while maintaining a smooth development workflow.
Frequently Asked Questions
What are React Server Components?
React Server Components (RSC) are a new type of component introduced in React 18 that render exclusively on the server. Unlike client components, they have no client-side JavaScript bundle and cannot use state, effects, or browser APIs. They allow you to fetch data directly from databases or APIs, reduce the amount of JavaScript sent to the client, and improve initial page load performance. They work alongside client components, which handle interactivity, to create a hybrid rendering model that optimizes both server and client resources.
How do React Server Components differ from client components?
React Server Components run entirely on the server and send only the rendered HTML to the client, resulting in zero client-side JavaScript for those components. They cannot use hooks like useState, useEffect, or browser-specific APIs. Client components, on the other hand, run in the browser, support interactivity, state, and side effects, and require JavaScript to be downloaded. The two types can be composed together: a server component can import and render client components, enabling a seamless blend of static and dynamic content.
What are the main benefits of using React Server Components?
React Server Components offer several key benefits: reduced JavaScript bundle size (since server components are excluded from client bundles), faster initial page loads (because rendering happens on the server), improved data fetching efficiency (direct access to databases and backend services without API layers), automatic code splitting, and better performance for data-heavy pages. They also enable streaming and progressive rendering, allowing users to see content as it becomes available. These benefits are especially pronounced in applications with large datasets or complex server-side logic.
Can React Server Components use hooks or state?
No, React Server Components cannot use hooks such as useState, useEffect, useReducer, or context. They also cannot use browser APIs like localStorage or window. This is because they are executed on the server, which lacks a browser environment. To manage state or add interactivity, you must wrap interactive parts in client components by adding the 'use client' directive at the top of the file. Server components are ideal for static content, data fetching, and layout, while client components handle dynamic behavior.
How do you integrate React Server Components with Next.js?
Next.js 13+ has built-in support for React Server Components. By default, all components in the App Router are server components. To use a client component, you add the 'use client' directive. Server components can fetch data directly with async/await, access server-side resources, and pass props to client components. Next.js also supports streaming with Suspense boundaries, allowing parts of a page to load progressively. This integration simplifies data fetching and reduces client-side JavaScript, making Next.js applications faster and more efficient.
What data fetching patterns work best with React Server Components?
React Server Components encourage direct data fetching within the component using async/await, without the need for useEffect or external data fetching libraries. You can fetch data from databases, APIs, or file systems directly on the server. This eliminates the client-server waterfall and reduces latency. For shared data, you can use server-side caching or React's cache() function. When combining server and client components, pass fetched data as props to client components, keeping data fetching and rendering logic separate for maintainability.
Are React Server Components production-ready?
Yes, React Server Components are production-ready as of React 18 and are actively used in frameworks like Next.js (since version 13) and other React-based frameworks. They have been stable and widely adopted for building high-performance web applications. However, they require a compatible framework or custom server setup. The React team continues to improve the feature, and it is recommended for new projects that can benefit from server-side rendering and reduced client JavaScript. Always refer to the official React documentation for the latest guidance.
What are the limitations of React Server Components?
React Server Components have some limitations: they cannot use browser APIs, state, or lifecycle methods, which means interactive UIs must be delegated to client components. They also require a server environment (Node.js or similar) and are not suitable for fully static sites without a server. Debugging can be more complex because errors occur on the server. Additionally, they may introduce higher server load for rendering. Despite these limitations, the benefits often outweigh the drawbacks for applications that need fast initial loads and efficient data handling.
The combination of React and Firebase has become a cornerstone for modern web development, enabling developers to build full-stack applications without the overhead of managing traditional server infrastructure. React, a JavaScript library for building user interfaces, provides the frontend layer, while Firebase, a Backend-as-a-Service (BaaS) platform by Google, handles the backend services. Together, they allow you to focus on crafting interactive, real-time experiences without provisioning servers, writing APIs, or managing databases from scratch. This guide explores each technology individually, then demonstrates how their integration streamlines development for projects ranging from small prototypes to production-grade applications.
What is React and Why Use It
React is an open-source JavaScript library developed by Facebook for building dynamic user interfaces, particularly single-page applications (SPAs). It uses a component-based architecture, where each piece of the UI is encapsulated in reusable, self-contained components. React’s virtual DOM optimizes rendering by updating only the changed parts of the actual DOM, resulting in fast, responsive applications. Developers choose React for several key reasons:
Component Reusability: Build once, use anywhere. Components can be nested, passed data via props, and managed with local state or global state managers like Redux.
Declarative Syntax: You describe what the UI should look like for a given state, and React handles the updates automatically, reducing bugs and improving readability.
Rich Ecosystem: React integrates seamlessly with tools like React Router for navigation, Axios for HTTP requests, and testing libraries like Jest.
Strong Community: With millions of developers, extensive documentation, and thousands of third-party libraries, React remains one of the most popular frontend choices.
Performance: The virtual DOM and efficient diffing algorithm ensure smooth updates even in complex applications.
What is Firebase and Its Core Services
Firebase is a comprehensive backend platform that offers a suite of cloud-based services, eliminating the need to write server-side code for common tasks. It was acquired by Google in 2014 and has since evolved into a mature ecosystem for web and mobile apps. Firebase’s core services include:
Pre-built sign-in flows for email/password, Google, Facebook, Apple, and more.
User login and registration with minimal code.
Cloud Firestore
Flexible, scalable NoSQL database with real-time synchronization.
Storing and syncing data like user profiles, posts, or chat messages.
Firebase Hosting
Static and dynamic hosting with global CDN and automatic SSL.
Deploying React apps, landing pages, or SPAs quickly.
Cloud Functions
Serverless functions triggered by HTTP requests or Firebase events.
Running backend logic like sending emails or processing payments.
Firebase Storage
Secure file uploads for images, videos, and other user-generated content.
Storing profile pictures or media files.
Analytics & Crashlytics
Free, unlimited reporting on user behavior and app stability.
Tracking engagement and debugging errors.
Benefits of Combining React with Firebase
Integrating React with Firebase provides a powerful, low-overhead stack for full-stack development. The primary benefits include:
No Server Management: Firebase handles authentication, database, storage, and hosting, so you can build a complete app without provisioning or maintaining servers.
Real-Time Capabilities: Cloud Firestore and Realtime Database offer live data synchronization, enabling features like live chat, collaborative editing, or real-time dashboards with minimal effort.
Rapid Prototyping: React’s component library and Firebase’s pre-built services let you go from idea to working prototype in hours rather than weeks.
Scalability: Firebase autoscales to handle thousands of concurrent users, while React’s efficient rendering ensures the frontend remains performant under load.
Simplified State Management: Firebase’s real-time listeners can be integrated directly with React’s state (e.g., using hooks like useState and useEffect), reducing the need for complex state management libraries.
Cost-Effective: Firebase offers a generous free tier, and React is open-source, making this stack ideal for startups, side projects, and educational purposes.
Unified Ecosystem: Both tools are well-documented and supported by Google and the open-source community, providing extensive tutorials, SDKs, and third-party integrations.
By combining React’s frontend flexibility with Firebase’s backend simplicity, developers can create full-featured applications that are fast, secure, and easy to maintain. The following sections of this guide will walk you through setting up a React project, integrating Firebase services, and deploying your application—all without writing a single server-side file.
Setting Up Your Development Environment
Before you can begin coding a React application that integrates with Firebase, you must configure your local development environment with the correct tools and permissions. This process ensures that you can create, build, and deploy a React app while connecting it to Firebase services such as authentication, Firestore, and hosting. Follow these step-by-step instructions to prepare your machine and accounts.
Installing Node.js and Create React App
Node.js is the runtime environment required to run JavaScript outside a browser and manage dependencies via npm. To install Node.js, visit the official Node.js website and download the LTS version for your operating system. After installation, verify the setup by opening a terminal or command prompt and running the following commands:
These commands should return version numbers, confirming that Node.js and npm are installed. Next, install Create React App, a popular tool for scaffolding a new React project with a sensible default configuration. Run this command globally:
npm install -g create-react-app
After installation, create a new React app by executing:
npx create-react-app my-firebase-app
Replace “my-firebase-app” with your desired project name. Navigate into the project folder using cd my-firebase-app. You now have a working React application that you can start with npm start to verify it runs in your browser at http://localhost:3000.
Creating a Firebase Project and Enabling Services
To use Firebase, you need a Google account and a Firebase project. Visit the Firebase console at console.firebase.google.com and click “Add project.” Follow the prompts to name your project (e.g., “react-firebase-tutorial”) and choose whether to enable Google Analytics. Once created, you will land on the project overview page. From here, enable the Firebase services you intend to use in your React app. Common services include:
Authentication – For user sign-in (email/password, Google, etc.). Go to “Authentication” in the left menu, click “Get started,” and enable at least one sign-in method.
Cloud Firestore – For a NoSQL database. Click “Firestore Database” and create a database in test mode for development.
Hosting – For deploying your app. Click “Hosting” and follow the setup instructions.
After enabling services, register your web app within the Firebase project. Click the gear icon next to “Project Overview,” select “Project settings,” then under “Your apps,” click the web icon (apiKey and projectId that you will use next.
With your React app created and Firebase project configured, install the Firebase SDK as a dependency. In your terminal inside the React project folder, run:
npm install firebase
This command adds the Firebase library to your node_modules folder and updates package.json. Next, create a new file named firebase.js in the src directory. Open this file and paste the Firebase configuration object you copied earlier, structured as follows:
Replace the placeholder values with your actual Firebase project details. This file initializes the Firebase app and exports the authentication and Firestore instances for use across your React components. To test the integration, import auth or db into a component and verify no errors appear in the browser console. Your development environment is now ready for building a full-featured React and Firebase application.
Initializing Firebase in a React Application
Configuring Firebase within a React project is a foundational step that establishes the communication channel between your frontend application and Firebase’s backend services, including Firestore, Authentication, and Storage. This process involves securely embedding your project’s unique configuration keys and initializing the Firebase app instance so that all subsequent service imports can operate correctly. Proper initialization ensures that your React components can reliably interact with Firebase without cross-service conflicts or authentication errors. The following guide walks you through retrieving the configuration object, creating a dedicated initialization file, and importing the initialized services into your components.
Before writing any code, you must obtain the configuration object from the Firebase Console. This object contains sensitive keys—such as apiKey, authDomain, and projectId—that uniquely identify your project and authorize your application to access Firebase resources. To retrieve it:
Important: While these keys are not secret in the traditional sense (they are exposed to client-side code), you should still treat them as sensitive. Use environment variables to avoid hardcoding them directly in your source code, especially if you use version control. For example, store the apiKey in a .env file as REACT_APP_FIREBASE_API_KEY and reference it via process.env.REACT_APP_FIREBASE_API_KEY.
Best practice dictates isolating Firebase initialization in a dedicated file—commonly named firebase.js or firebaseConfig.js—within your src directory. This separation of concerns keeps your component files clean and ensures that the Firebase app is instantiated only once, preventing duplicate initialization errors. Follow these steps:
Create a new file: src/firebase.js.
Import the Firebase SDK and the specific services you plan to use (e.g., Firestore, Auth). For React projects using Firebase v9+, use the modular (compat) or tree-shakable modular SDK. The example below uses the compat version for simplicity:
If you prefer the modular SDK (v9+), the initialization looks slightly different:
import { initializeApp } from 'firebase/app';
import { getAuth } from 'firebase/auth';
import { getFirestore } from 'firebase/firestore';
const firebaseConfig = { /* same config as above */ };
const app = initializeApp(firebaseConfig);
export const auth = getAuth(app);
export const db = getFirestore(app);
export default app;
The table below compares the two SDK approaches for initialization:
Feature
Compat SDK (v8-style)
Modular SDK (v9+)
Import style
Single firebase/compat/app import
Individual named imports from firebase/app
Tree-shaking support
No (entire compat library included)
Yes (only imported functions bundled)
Bundle size
Larger (approx. 100KB+ gzipped)
Smaller (depends on used services, often <50KB)
Syntax for service access
firebase.auth() or firebase.firestore()
getAuth(app) or getFirestore(app)
Both approaches are valid, but the modular SDK is recommended for new projects due to its smaller footprint and better performance.
Importing and Using Firebase in Components
Once your initialization file is set up, you can import the exported service instances (like auth or db) directly into any React component. This pattern keeps your components focused on UI logic while Firebase handles backend operations. For example, to use Firestore in a component:
Key points to remember when importing Firebase into components:
Import only what you need: Avoid importing the entire firebase object in components; instead, import specific services (e.g., auth, db) from your initialization file.
Use environment variables for configuration keys to prevent accidental exposure in version control.
Initialize once: The initializeApp call should occur only in your firebase.js file. Never call it inside a component or a hook.
Handle loading states: Firebase operations are asynchronous. Use useEffect with cleanup or React Query to manage data fetching and avoid memory leaks.
By following this structure—retrieving the config, creating a dedicated initialization file, and importing services into components—you establish a scalable and maintainable Firebase integration that works seamlessly across your React application.
Implementing Firebase Authentication
Firebase Authentication provides a complete backend service for managing user identities in your React application. This section walks through the core implementation steps, from setting up email and password login to integrating social providers and securing your routes. By the end, you will have a functional authentication system that handles user registration, login, session persistence, and route protection.
Setting Up Email and Password Authentication
Start by enabling the Email/Password sign-in method in the Firebase Console under Authentication > Sign-in method. In your React project, install the Firebase SDK and initialize the app with your configuration object. The following code example demonstrates how to create a registration function that uses Firebase’s createUserWithEmailAndPassword method and a login function with signInWithEmailAndPassword.
Key considerations for email/password authentication:
Always validate email format and password strength (minimum 6 characters) on the client side before calling Firebase methods.
Handle common errors such as auth/email-already-in-use and auth/wrong-password with user-friendly messages.
Use onAuthStateChanged to listen for changes in authentication state and update your UI accordingly.
Adding Google Sign-In with Firebase
Google Sign-In provides a frictionless login experience. Enable the Google provider in the Firebase Console and obtain a Web Client ID from the Google Cloud Console. In your React app, use the GoogleAuthProvider from Firebase to trigger the sign-in popup.
Use signInWithRedirect on mobile devices or when popups are unreliable.
Store the provider ID in your user profile to differentiate authentication methods.
Test with multiple Google accounts to ensure the “account chooser” works correctly.
Managing Auth State and Protected Routes
Persistent authentication state is critical for a seamless user experience. Firebase’s onAuthStateChanged listener provides real-time updates when the user signs in or out. Combine this with React’s context API or a state management library to make the user object available across your component tree.
To protect routes, create a higher-order component or a wrapper component that checks the authentication status before rendering children. If the user is not authenticated, redirect them to the login page using React Router’s Navigate component.
Basic protected route implementation:
import { Navigate } from "react-router-dom";
import { useAuth } from "./AuthContext";
const ProtectedRoute = ({ children }) => {
const { user, loading } = useAuth();
if (loading) {
return <div>Loading...</div>;
}
if (!user) {
return <Navigate to="/login" replace />;
}
return children;
};
Best practices for auth state management:
Initialize the auth listener once at the app root level to avoid duplicate subscriptions.
Handle the loading state to prevent flash of unauthenticated content.
Use Firebase’s onIdTokenChanged for more granular control over token refresh events.
Store minimal user data in context; fetch additional profile information from Firestore only when needed.
Working with Cloud Firestore Database
Cloud Firestore is a flexible, scalable NoSQL database from Firebase that stores data in documents and collections. When integrated with React, Firestore enables dynamic, real-time applications where data changes are immediately reflected in the user interface. This guide covers how to structure your Firestore data, perform CRUD operations from a React component, and listen to real-time updates using the onSnapshot method. Before proceeding, ensure you have initialized Firebase in your React project and imported getFirestore from the Firebase SDK.
Structuring Firestore Collections and Documents
Firestore organizes data into collections, which contain documents. Each document is a set of key-value pairs and can contain subcollections. For a typical blog application, you might structure data as follows:
Users collection — Each document represents a user, with fields like displayName, email, and createdAt.
Posts collection — Each document holds title, content, authorId (reference to a user document), and timestamp.
Comments subcollection — Nested under each post document, containing text, userId, and date.
When designing your schema, consider query patterns. Avoid deeply nested data unless necessary; instead, use references or denormalization for frequently accessed fields. Firestore charges for reads, writes, and deletes, so structure collections to minimize document reads. A common pattern is to store user profile data in a top-level users collection and reference it by ID in other documents.
Performing CRUD Operations from React
To interact with Firestore, use the modular Firebase v9+ SDK functions. Below are examples for create, read, update, and delete operations within a React component. Assume you have imported db from your Firebase configuration file.
In React, you typically call these functions inside event handlers or useEffect hooks. For example, to add a new post:
import { addDoc, collection } from 'firebase/firestore';
import { db } from './firebase';
const addPost = async (postData) => {
try {
const docRef = await addDoc(collection(db, 'posts'), postData);
console.log('Document written with ID: ', docRef.id);
} catch (e) {
console.error('Error adding document: ', e);
}
};
For reading data, use getDocs to retrieve all documents in a collection and map over them to display in your component. Remember to handle loading and error states for a smooth user experience.
Listening to Real-Time Updates with onSnapshot
Firestore’s real-time capabilities are powered by the onSnapshot listener. This function attaches a listener to a document or collection and fires a callback every time the data changes. In React, you should subscribe inside a useEffect hook and unsubscribe when the component unmounts to prevent memory leaks. Here is a pattern for listening to a collection:
The onSnapshot function returns an unsubscribe function, which you call in the cleanup of your effect. This ensures that when the component leaves the screen, the listener is removed. You can also listen to a single document by passing a document reference instead of a collection query. Real-time updates are ideal for chat applications, live dashboards, or any feature where data freshness is critical. Always handle errors gracefully, as network issues can cause the listener to fail.
Storing and Retrieving Files with Firebase Storage
Firebase Storage provides a robust, scalable solution for handling user-generated files in React applications. This service integrates seamlessly with Firebase Authentication and Realtime Database, allowing you to store images, documents, and other binary data while maintaining granular access control. The core workflow involves referencing a storage location, uploading files via the Firebase SDK, and retrieving download URLs for display or sharing. Proper implementation requires attention to metadata, progress tracking, and error handling to ensure a smooth user experience.
When uploading files to Firebase Storage, you can attach custom metadata to organize and describe each file. Common metadata fields include customMetadata (key-value pairs like user ID or upload date), contentType (e.g., “image/jpeg”), and cacheControl. To upload a file, create a reference to the desired path, then call put() or putString() with the file blob and metadata object. The following code example demonstrates uploading a user-selected file with custom metadata:
Always validate file types and sizes on the client before uploading.
Use descriptive path structures (e.g., users/{userId}/images/) for easier querying.
Store metadata references in Firestore or Realtime Database for faster retrieval.
Downloading and Displaying Files
After a file is uploaded, you retrieve its download URL to display or share within your React app. Use getDownloadURL() on the storage reference, which returns a publicly accessible URL valid for the file’s security rules. For images, you can directly use this URL as an src attribute in an <img> tag. For other file types, provide a download link or trigger programmatic downloads. To improve performance, consider caching download URLs in your database to avoid repeated calls. The following list outlines best practices for displaying files:
Use lazy loading for images to reduce initial page load time.
Implement placeholder components while download URLs are being fetched.
Revoke object URLs (if using URL.createObjectURL) to prevent memory leaks.
For secure downloads, ensure your Firebase Storage rules restrict access based on authentication or custom conditions. A typical read rule might allow access only if the user’s UID matches a path segment.
Firebase Storage’s upload tasks emit events that allow you to track progress and handle errors gracefully. The uploadBytesResumable() function returns an UploadTask object with state_changed observer. This observer provides three callbacks: progress updates, success, and error handling. Below is a practical pattern for managing these events in a React component:
Always display progress feedback to users via a progress bar or percentage indicator. For large files, enable resumable uploads by default, which allow pausing and resuming without losing data. Additionally, implement error boundaries in React to catch and display storage-related errors without crashing the application.
Deploying React Apps with Firebase Hosting
Firebase Hosting provides fast, secure, and scalable hosting for single-page applications, including those built with React. This section offers a step-by-step deployment guide, covering the build process, CLI configuration, and live testing. By following these steps, you can launch your React app on a global content delivery network with automatic HTTPS and optional custom domain support.
Building the React App for Production
Before deployment, you must create an optimized production build of your React application. This build minifies code, eliminates development warnings, and generates static assets ready for hosting.
Run the build command: In your project root, execute npm run build or yarn build. This creates a build folder containing the index.html, JavaScript bundles, CSS files, and other assets.
Verify the output: Open the build folder and check that all necessary files are present. The index.html should reference the correct script and link tags.
Test locally (optional but recommended): Use a static server like serve to preview the production build: npx serve -s build. This ensures no runtime errors exist before deployment.
Note that environment variables set during development (e.g., REACT_APP_API_KEY) must be available at build time. If using Firebase services, ensure any required configuration is embedded in the build.
Installing and Configuring Firebase CLI
The Firebase Command Line Interface (CLI) is the primary tool for managing Firebase Hosting and other Firebase services. Follow these steps to install and configure it for your React project.
Install the Firebase CLI globally: Run npm install -g firebase-tools or yarn global add firebase-tools. Verify installation with firebase --version.
Log in to Firebase: Execute firebase login and authenticate via your browser. This links the CLI to your Google account.
Initialize Firebase in your project: Navigate to your React project root and run firebase init. Select Hosting using the spacebar and arrow keys, then press Enter.
Configure hosting options: When prompted:
Public directory: Enter build (the folder from the production build).
Single-page app: Answer Yes to rewrite all URLs to index.html (essential for React Router).
Automatic builds with GitHub: Choose No for now (can be set up later).
Overwrite existing index.html: Answer No to preserve the React-generated file.
Review generated files: The CLI creates firebase.json (hosting configuration) and .firebaserc (project alias). Ensure firebase.json contains a "public": "build" entry.
For custom domains, you will need to verify ownership through Firebase Console after deployment.
With the build ready and Firebase configured, you can deploy your React app to Firebase Hosting. This process uploads the build folder and makes your app live.
Run the deploy command: Execute firebase deploy --only hosting. The CLI will upload files and provide a hosting URL (e.g., https://your-project-id.web.app).
Test the live app: Open the provided URL in a browser. Verify that navigation, API calls, and Firebase services work correctly. Check for any 404 errors or broken assets.
Set up a custom domain (optional): In the Firebase Console, go to Hosting > Add custom domain. Follow the instructions to add a DNS TXT record for verification and an A or CNAME record for routing. Firebase automatically provisions an SSL certificate for HTTPS.
Monitor deployment: Use firebase hosting:channel:deploy for preview channels before pushing to production. The firebase.json file can include rewrite rules for custom headers or redirects.
After deployment, you can update your app by rebuilding and redeploying. Firebase Hosting supports zero-downtime updates and automatic cache invalidation.
Using Firebase Cloud Functions with React
Integrating Firebase Cloud Functions into a React application enables you to execute server-side logic without managing infrastructure. Cloud Functions respond to events from Firebase and Google Cloud services, or handle HTTP requests directly. This guide explains how to set up Cloud Functions, create an HTTP-triggered function, and call it from a React frontend, providing a practical serverless backend extension for your app.
Setting Up Cloud Functions in a Firebase Project
Before writing functions, you must initialize the Firebase project for Cloud Functions. Begin by installing the Firebase CLI globally and logging into your Google account:
Select an existing Firebase project or create a new one.
Choose a language for Cloud Functions (JavaScript or TypeScript).
Decide whether to use ESLint for code linting.
Install dependencies with npm (recommended).
After setup, a functions folder is created in your project root. Inside, the index.js (or index.ts) file serves as the entry point for your serverless functions. Ensure your Firebase project is on the Blaze (pay-as-you-go) plan, as Cloud Functions require this tier for outbound network requests.
Creating an HTTP Triggered Function
HTTP-triggered functions respond to standard HTTP requests (GET, POST, PUT, DELETE, etc.). They are useful for building RESTful APIs or webhooks. In the functions/index.js file, define a function that accepts a request and returns a response. Below is an example that processes a POST request with JSON data:
After deployment, the function is accessible at a URL like https://us-central1-YOUR_PROJECT_ID.cloudfunctions.net/addMessage. You can test it using tools like curl or Postman.
Calling Cloud Functions from React
To invoke the HTTP-triggered function from your React app, use the standard fetch API or a library like axios. Obtain the function URL from the Firebase Console or by running firebase functions:list. Below is an example React component that calls the addMessage function:
Alternatively, Firebase provides callable functions that handle authentication and CORS automatically. To use callable functions, define them with functions.https.onCall and call them from the client using the Firebase SDK.
Feature
HTTP Triggered Function
Callable Function
Authentication
Manual (check tokens in code)
Automatic (passes Firebase Auth context)
CORS Handling
Manual (configure headers)
Automatic (handled by Firebase)
Client SDK
fetch, axios, or any HTTP client
Firebase Functions SDK only
Response Format
Custom (any HTTP response)
Standardized (returns data or error)
Error Handling
Manual (status codes and messages)
Built-in (throws HttpsError)
Use Case
RESTful APIs, webhooks, third-party integrations
Direct React-to-Firebase calls with user context
Choose HTTP-triggered functions when you need full control over the request/response cycle or when integrating with non-Firebase clients. Use callable functions for seamless integration within Firebase projects where authentication and CORS are managed automatically.
Managing State with React Context and Firebase
When building applications with React and Firebase, managing global state efficiently becomes critical as your app scales. The React Context API paired with Firebase provides a clean, maintainable architecture for handling authentication status, user profiles, and real-time data without prop drilling. This approach centralizes Firebase operations while keeping components decoupled and testable.
Creating an Auth Context Provider
The foundation of this pattern is an Auth Context Provider that wraps your application and exposes authentication state to all child components. Start by creating a new context and a provider component that initializes Firebase Auth listeners. The provider should handle three key states: loading, authenticated, and unauthenticated.
This provider should be placed high in your component tree, typically in App.js or index.js. The onAuthStateChanged listener automatically updates the context whenever sign-in status changes, including page refreshes and token expirations.
Storing User Data in Context
Beyond basic authentication, you often need to store additional user data such as display names, roles, or preferences. Extend the context to include a Firestore document listener that fetches user profile data when authentication state changes. This approach ensures user data stays synchronized across your app.
Key considerations for storing user data in context:
Use Firestore’s onSnapshot for real-time updates to user profiles
Cache user data locally to reduce unnecessary reads
Handle edge cases like deleted users or network failures gracefully
Include a loading state to prevent flash of empty content
For example, your context value might include:
Property
Type
Description
user
Object | null
Firebase Auth user object
userProfile
Object | null
Firestore document with custom data
loading
boolean
True during initial auth check
Using Custom Hooks for Firebase Operations
To keep components clean and logic reusable, create custom hooks that encapsulate Firebase operations while still leveraging the context. These hooks abstract away the complexity of Firebase SDK calls and provide a simple interface for your UI components.
Common custom hooks for this integration include:
useAuth() – Returns current user and loading state from context
useUserProfile() – Fetches and subscribes to user Firestore data
Example of a useAuth hook that provides both state and actions:
import { useContext } from 'react';
import { AuthContext } from '../contexts/AuthContext';
import { signInWithEmailAndPassword, signOut } from 'firebase/auth';
import { auth } from '../firebase';
export const useAuth = () => {
const context = useContext(AuthContext);
if (!context) throw new Error('useAuth must be used within AuthProvider');
const signIn = (email, password) =>
signInWithEmailAndPassword(auth, email, password);
const logOut = () => signOut(auth);
return { ...context, signIn, logOut };
};
This pattern ensures your components only import the hook they need, while Firebase logic remains centralized. Components can then use the hook directly without worrying about context consumers or provider structure. The combination of context for global state and custom hooks for operations creates a scalable architecture that grows naturally with your application’s complexity.
Best Practices and Troubleshooting Common Issues
A successful React and Firebase integration depends on careful attention to performance, security, and debugging. This section covers essential practices for optimizing Firestore queries, securing your database with rules, and resolving frequent integration errors encountered during development.
Optimizing Firestore Queries and Indexes
Firestore performance hinges on efficient queries and properly configured indexes. Without optimization, your React app can experience slow data retrieval, increased costs, and poor user experience.
Use composite indexes sparingly: Firestore requires a composite index for queries combining multiple fields. Create indexes only for the query patterns your app actually uses. Over-indexing increases write latency and storage costs.
Limit query results: Always apply .limit() to queries fetching large datasets. For paginated lists, combine .startAfter() or .startAt() with cursors to avoid loading unnecessary documents.
Denormalize data for reads: Structure your Firestore documents to match your UI components. For example, store a user’s display name directly in a post document instead of performing a separate user lookup on every read.
Monitor index usage: Use the Firebase Console’s “Indexes” tab to review index size, usage frequency, and query performance. Remove unused indexes to reduce maintenance overhead.
Implement client-side caching: Enable Firestore offline persistence in your React app using enableIndexedDbPersistence(). This reduces network requests and improves responsiveness for frequently accessed data.
Securing Firebase with Security Rules
Firebase Security Rules are the first line of defense for your database and storage. Misconfigured rules can expose sensitive data or allow unauthorized writes.
Rule Type
Common Mistake
Best Practice
Firestore
Allowing read/write to all users (true)
Use request.auth.uid to restrict access to authenticated users only. Validate data structure with resource.data.
Storage
Granting public write access
Require authentication and validate file size/type using request.resource.size and request.resource.contentType.
Realtime DB
Using wildcard paths without validation
Use .validate() rules to check data types, required fields, and value ranges before writes.
Test rules in the simulator: Before deploying, use the Firebase Console’s Rules Playground to simulate read, write, and delete operations under different authentication states.
Use custom claims for role-based access: Assign custom claims (e.g., admin: true) via Firebase Admin SDK and check them in rules with request.auth.token.admin.
Keep rules as strict as possible: Start with denying all access, then incrementally allow specific operations. Avoid using if true for any rule in production.
Debugging Common Firebase Integration Errors
When integrating Firebase with React, developers frequently encounter errors related to initialization, authentication, and asynchronous data flow.
Firebase app not initialized: Ensure initializeApp() is called exactly once, typically in a dedicated firebase.js module. Check that your Firebase config object is complete and free of typos.
Permission denied errors: This usually indicates missing or incorrect Security Rules. Verify that the authenticated user has the required claims and that the requested document path matches the rule pattern.
Unhandled promise rejections from async operations: Wrap all Firestore and Authentication calls in try-catch blocks within your React components. Use useEffect cleanup functions to unsubscribe from real-time listeners with onSnapshot().
Firebase emulator connection issues: If using local emulators, confirm that all required ports (4000 for UI, 8080 for Firestore, 9099 for Auth) are open and that your client SDK is configured with connectAuthEmulator() and connectFirestoreEmulator().
Duplicate listener subscriptions: In React, ensure that onSnapshot() is called only once per component mount. Use useRef or a state management solution to track active subscriptions and avoid memory leaks.
Firebase SDK version mismatch: Keep all Firebase packages (e.g., firebase, @react-native-firebase/app) at compatible versions. Use npm ls firebase to check for duplicate or conflicting installations.
By implementing these optimization, security, and debugging practices, you can build a robust React and Firebase integration that scales efficiently and remains secure under production loads.
Frequently Asked Questions
How do I set up Firebase in a React project?
To set up Firebase in a React project, first install the Firebase SDK using npm or yarn: `npm install firebase`. Then create a Firebase project in the Firebase Console and copy the configuration object. In your React app, initialize Firebase in a separate file (e.g., `firebase.js`) by importing `initializeApp` from 'firebase/app' and passing the config. Finally, import this file wherever you need Firebase services like Auth or Firestore. Ensure you also enable the specific services (e.g., Authentication, Firestore) in the Firebase Console.
What are the best practices for using Firebase Auth with React?
Best practices include using React Context to manage authentication state globally, avoiding direct DOM manipulation, and leveraging Firebase's `onAuthStateChanged` listener to keep the user state in sync. Always handle loading states and errors gracefully. Use environment variables to store Firebase config keys, never hardcode them. For security, implement Firestore Security Rules to restrict data access based on user authentication. Also, consider using Firebase UI for pre-built login flows to reduce boilerplate.
How can I integrate Firestore with React for real-time data?
To integrate Firestore for real-time data, use the `onSnapshot` method from Firestore to listen for changes to a collection or document. In a React component, set up the listener inside a `useEffect` hook, and update state with the received data. Remember to unsubscribe from the listener when the component unmounts to prevent memory leaks. For example: `useEffect(() => { const unsubscribe = onSnapshot(doc(db, 'collection', 'doc'), (snap) => { setData(snap.data()); }); return unsubscribe; }, []);`.
What is the difference between Firebase Realtime Database and Firestore?
Firebase Realtime Database is a JSON-based, real-time database that stores data as a single tree, making it simple but less scalable for complex queries. Firestore is a more advanced, document-oriented database that supports richer queries, automatic scaling, and multi-region replication. Firestore also offers better security with more granular rules, offline support, and ACID transactions. For most modern React apps, Firestore is recommended due to its flexibility and performance, though Realtime Database may be suitable for simpler, low-latency use cases.
How do I deploy a React app with Firebase Hosting?
To deploy a React app with Firebase Hosting, first install the Firebase CLI globally: `npm install -g firebase-tools`. Then run `firebase init` in your project root, select 'Hosting', and specify the build directory (usually `build`). Build your React app with `npm run build`. Finally, deploy using `firebase deploy –only hosting`. Ensure you have configured the Firebase project and have billing enabled if needed. You can also set up custom domains and configure redirects for client-side routing.
Can I use React hooks with Firebase?
Yes, you can create custom React hooks to encapsulate Firebase logic, such as `useAuth` for authentication state or `useFirestore` for real-time data. These hooks can use `useState` and `useEffect` to manage subscriptions and state. For example, a `useAuth` hook can listen to `onAuthStateChanged` and return the current user. This pattern promotes reusability and clean separation of concerns. Libraries like `react-firebase-hooks` provide pre-built hooks for common Firebase services.
How do I handle errors in Firebase integration?
Handle Firebase errors by catching exceptions in async functions and checking the error codes provided by Firebase (e.g., `auth/user-not-found`). Display user-friendly messages based on the error type. For example, during sign-in, catch `auth/wrong-password` and prompt the user to retry. Use try-catch blocks in your React components or custom hooks, and update state to show error messages. Also, implement global error boundaries in React to catch unhandled errors and log them for debugging.
What are the security rules for Firestore in a React app?
Firestore Security Rules control access to your database. For a React app, start with rules that require authentication: `match /databases/{database}/documents { allow read, write: if request.auth != null; }`. Then, refine rules to allow only specific data access based on user roles or document fields. Never rely solely on client-side validation; always enforce rules on the server. Use the Firebase Console to test rules before deploying. Regularly review and update rules as your app grows.
Elementor Dynamic Content: Advanced Tips for Power Users
Introduction to Dynamic Content in Elementor
Dynamic content in Elementor transforms how advanced site builders approach website creation. Unlike static content, which remains fixed until manually edited, dynamic content pulls data from sources like custom fields, user profiles, or databases, updating automatically across pages. This capability allows for scalable, personalized websites that adapt to user roles, post types, or external data without duplicating effort. For power users, mastering dynamic content means building sites that are efficient, flexible, and tailored to specific audiences.
What Is Dynamic Content in Elementor?
Dynamic content refers to any element in Elementor that displays data retrieved from a dynamic source rather than hardcoded text or images. Common sources include:
WordPress custom fields (e.g., Advanced Custom Fields, Toolset, Meta Box)
Post data (title, excerpt, featured image, author info)
User data (display name, email, avatar)
Site settings (site name, tagline, logo)
External sources via plugins (e.g., WooCommerce product details, ACF relationships)
When you add a dynamic tag to a widget—such as a heading, text, or image—Elementor replaces the static placeholder with live data. This update occurs on every page load, ensuring consistency across your site.
Key Differences Between Static and Dynamic Content
Understanding the contrast helps advanced users decide when to use each approach. The table below summarizes core distinctions:
Aspect
Static Content
Dynamic Content
Editing method
Manual text/image entry per page
Automated pull from a source
Scalability
Requires updating each instance individually
Updates globally when source changes
Personalization
Same content for all visitors
Can vary by user role, post, or context
Performance
Faster initial load (no queries)
May require database calls (cache-friendly)
Use case example
An “About Us” page with fixed team bios
A member directory showing user profiles
Static content is simpler for one-off pages, while dynamic content excels in repeatable templates—like archive pages, single post layouts, or custom post type listings. For power users, the trade-off is worth it: dynamic content reduces maintenance overhead and enables features like conditional display.
Why Dynamic Content Matters for Advanced Site Builders
Advanced users leverage dynamic content to achieve three key objectives:
Scalability without repetition: Build a single template (e.g., a product card) that pulls data from hundreds of products. No need to manually design each one.
Personalized user experiences: Show different content based on logged-in user data, such as a “Welcome back, [Name]” message or restricted content for subscribers.
Integration with external data: Combine Elementor with custom fields or plugins like ACF to create complex relationships—like a team member page that displays their projects, skills, and contact info dynamically.
For example, a real estate site can use dynamic content to display property details (price, location, images) from a custom post type, while a membership site can show user-specific dashboards. By mastering dynamic tags, advanced builders save hours of manual work and deliver sites that feel tailored to each visitor. The key is understanding sources, fallback values, and conditional logic—topics covered in subsequent sections.
Setting Up Custom Fields for Dynamic Data
To unlock the full potential of Elementor’s dynamic tags, you must first establish a robust foundation of custom fields. This process involves selecting the right plugin, structuring fields for efficiency, and mapping them accurately to Elementor’s dynamic content system. For power users, this setup is not a one-time task but a strategic framework that scales with your site’s complexity. Below are advanced techniques to ensure your custom fields feed dynamic data reliably and performantly.
Choosing the Right Custom Fields Plugin
Elementor’s dynamic tags natively support three major custom field plugins: Advanced Custom Fields (ACF), Toolset Types, and Pods. Each has distinct strengths for power users:
Advanced Custom Fields (ACF) – Best for developers who need granular control. Offers repeaters, flexible content, and gallery fields. Pro version adds options pages and a robust API for custom queries.
Toolset Types – Ideal for users who want a visual builder for custom post types and fields. Integrates deeply with Elementor’s dynamic tags but can introduce overhead for simple sites.
Pods – A lightweight, open-source alternative. Excels at creating custom post types and taxonomies with minimal database bloat. Supports advanced field types like file, color, and WYSIWYG.
For most power users, ACF remains the gold standard due to its performance and developer-friendly hooks. However, if you need built-in front-end content creation or complex content relationships, Toolset or Pods may be preferable. Test each with a staging environment to measure query speed impact.
Structuring Fields for Reusability and Performance
Use ACF field groups with conditional logic to show fields only when needed. For example, a “Team Member” group might include “Photo,” “Bio,” and “Social Links,” but only display “Social Links” when a checkbox is enabled.
Limit repeaters
Repeater fields (e.g., in ACF) are powerful but can slow queries if nested deeply. For 5+ subfields, use a separate custom post type instead.
Use field prefixes
Prefix field names like team_photo or product_price to avoid conflicts when multiple field groups target the same post type.
Index database columns
For high-traffic sites, ensure custom field tables (e.g., wp_postmeta) are indexed. Use a plugin like Query Monitor to identify slow meta queries.
Example of a performant ACF field group configuration (PHP snippet for functions.php):
This code registers two fields only for the “product” post type, avoiding unnecessary meta queries across other content types.
Mapping Custom Fields to Elementor Dynamic Tags
Once fields are created, map them to Elementor dynamic tags for live content rendering. Follow this workflow:
In Elementor, select a widget (e.g., Heading, Text, Image) and click the dynamic icon (a small “i” inside a circle).
Choose “Post Custom Field” from the dynamic tag list. A dropdown will show all custom field keys for the current post.
Select the appropriate field (e.g., product_weight). Elementor will render the field’s value dynamically.
For advanced use, combine dynamic tags with conditions: Use Elementor’s “If” condition (available in Pro) to hide empty fields. For example, only display a “Weight” label if the field has a value.
For repeaters or groups, use Elementor’s “Repeater” dynamic tag (requires ACF Pro or Toolset). Add the “Repeater” widget, then map each subfield (e.g., repeater_field_0_subfield).
Test mappings by previewing a post with actual custom field data. If a field returns no value, check that the field name matches exactly (case-sensitive) and that the post type has the assigned field group. For debugging, enable WordPress’s WP_DEBUG in wp-config.php to log any PHP errors from dynamic tag calls.
By mastering these mapping techniques, you transform static templates into data-driven layouts that update automatically as custom fields change.
Leveraging Conditional Logic with Dynamic Content
Conditional logic transforms dynamic content from a simple output tool into a precision delivery system. By showing or hiding elements based on specific conditions, you can personalize the user experience, streamline administrative interfaces, and optimize performance. For power users, mastering conditional logic with Dynamic Content means understanding both native capabilities and third-party enhancements. This section covers practical techniques using Elementor Pro’s built-in features and advanced add-ons like Dynamic.ooo, focusing on role-based displays, post meta conditions, and other real-world scenarios.
Using Elementor Pro’s Visibility Conditions
Elementor Pro provides a straightforward conditional visibility system through the Advanced tab of any widget, section, or column. To access it, select an element, navigate to the Advanced tab, and locate the Visibility section. Here, you can set rules based on user login status, user roles, device type, and more. For dynamic content, this is particularly useful when you want to show a widget only if a specific custom field exists or meets a value. For example, to display a “Download Brochure” button only when a post’s custom field brochure_url is not empty, you would set a condition like “Post Meta” > “brochure_url” > “is not empty.” Limitations include a relatively small set of condition types (primarily user and device-based) and no support for complex logical operators (AND/OR combinations) without custom code. However, it is fast, reliable, and requires no additional plugins, making it ideal for straightforward scenarios such as hiding admin-only widgets or tailoring content for logged-in users.
Implementing Advanced Conditional Logic with Dynamic.ooo
For power users who need granular control, Dynamic.ooo’s Dynamic Conditions extension offers a dramatic upgrade. This add-on introduces over 20 condition types, including post taxonomy, custom fields, user meta, query strings, and even ACF or Pods fields. More importantly, it supports nested logical groups with AND/OR operators, allowing you to create complex rules like “Show this section if user role is ‘subscriber’ AND (post category is ‘tutorials’ OR custom field ‘difficulty’ equals ‘beginner’).” To implement this, install Dynamic.ooo, then in any widget’s Advanced tab, you will see a new “Dynamic Conditions” section. You can add multiple rules, group them, and set the logic. For example, to display a premium content banner only for non-logged-in users viewing a post with a specific tag, you would create two rule groups: one for “User Status” > “Logged Out” and another for “Post Tags” > “contains” > “premium,” then set the group logic to “AND.” This approach eliminates the need for custom PHP snippets and keeps your workflow visual.
Creating Role-Based Dynamic Content Displays
Role-based dynamic content is one of the most common applications of conditional logic. Whether you are building a membership site, a client portal, or an internal dashboard, showing different content to editors, subscribers, or administrators is essential. Below is a comparison of methods using Elementor Pro and Dynamic.ooo for role-based displays.
Method
Condition Types
Complexity
Best For
Elementor Pro Visibility
Logged-in status, specific role (e.g., administrator, editor, subscriber)
Low (no grouping)
Simple show/hide for single roles; no AND/OR logic
Dynamic.ooo Conditions
User role, user meta, capability, login status, plus custom field conditions
Medium to High (supports nested AND/OR groups)
Multi-role logic, combined with post meta or taxonomy conditions
To create a role-based display with Elementor Pro, simply set a condition on a widget to “Show for” a specific role. For instance, hide a “Delete Post” button from subscribers by setting its visibility to “Logged In” and then “Role” equals “Administrator.” With Dynamic.ooo, you can go further: show a “Submit for Review” button only to users with the role “author” who have not yet submitted a post (using a custom field condition). This level of precision ensures that each user sees only the most relevant content, improving engagement and reducing clutter. Always test your conditions with different user accounts to verify behavior, as cached conditions can sometimes behave unexpectedly.
For power users of Elementor, the Loop Grid widget transforms static archive pages into living, breathing content hubs. Instead of manually updating category or tag pages, you can construct archives that automatically adapt to new posts, filtered relationships, or custom sorting rules. This approach leverages Elementor’s native query capabilities combined with Advanced Custom Fields (ACF) to create highly specific, performance-optimized archives that scale with your content.
Configuring the Loop Grid for Dynamic Archives
To set up a dynamic archive, start by adding a Loop Grid widget to your page. In the widget’s Query settings, select “Current Query” to inherit the archive context (e.g., category, tag, or date-based pages). For more control, choose “Custom Query” and define the post type, taxonomy, and order. Key configuration steps include:
Post Type: Select the content source (e.g., Posts, Pages, or custom post types).
Items Per Page: Set a reasonable number (e.g., 12) to balance performance and user experience.
Order & Order By: Choose from date, title, or custom meta keys for sorting.
Pagination: Enable “Numbers” or “Load More” to handle multi-page archives.
For archives that need to exclude certain posts, use the “Exclude” field with post IDs. This is particularly useful for “Featured Content” sections where you want to avoid duplication.
ACF relationship fields allow you to filter Loop Grid content based on user-defined connections between posts. For example, on a “Team Members” archive, you might display only members assigned to a specific department via an ACF relationship field. To implement this:
Create an ACF field group with a “Relationship” field (e.g., “related_projects”) assigned to your post type.
In the Loop Grid’s Query settings, switch to “Custom Query” and add a “Meta Query” filter.
Use the ACF field key as the meta key, select “LIKE” as the compare operator, and set the value to the current post’s ID using the dynamic tag [post_id].
This method ensures that the archive dynamically pulls only related posts without manual updates. For advanced filtering, combine multiple ACF fields—for instance, filtering by both “department” and “location” relationship fields to create a multi-dimensional archive.
Optimizing Query Performance for Large Datasets
When dealing with hundreds or thousands of posts, default query settings can slow page load times. Implement these performance strategies:
Limit Query Depth: Set “Posts Per Page” to a maximum of 20 to reduce database load.
Use Caching: Enable Elementor’s “Cache” option in the Loop Grid widget or integrate a server-side caching plugin like WP Rocket.
Index Meta Fields: For ACF queries, add database indexes to frequently queried meta keys via a code snippet:
// Add index to ACF meta key for faster queries
function add_acf_meta_index() {
global $wpdb;
$meta_key = 'related_projects'; // Replace with your ACF field name
$wpdb->query( "ALTER TABLE {$wpdb->postmeta} ADD INDEX meta_key_index (meta_key)" );
}
add_action( 'init', 'add_acf_meta_index' );
Reduce Post Data: In the Loop Grid’s “Advanced” tab, uncheck unnecessary fields like “Excerpt” or “Featured Image” if not displayed.
Lazy Load Images: Use the “Lazy Load” setting in the widget to defer offscreen images.
By combining these techniques, your dynamic archives remain fast and responsive even as your content library grows, ensuring a seamless user experience without sacrificing functionality.
For power users of Elementor, mastering dynamic single post templates transforms static pages into living documents that automatically adapt content for each post. This approach leverages Elementor’s dynamic content capabilities to pull in unique data—such as titles, featured images, custom fields, and taxonomies—directly from the WordPress database. By building a single template that serves all posts of a given type, you eliminate repetitive manual updates and ensure consistency across your site. Below, we explore advanced methods to design flexible layouts, insert dynamic fields for post meta and taxonomies, and use dynamic content for related posts and navigation.
Designing a Flexible Single Post Layout
To create a layout that accommodates varying post lengths, media sizes, and metadata, start by structuring your template with Elementor’s theme builder. Use a container-based approach with adjustable padding, margins, and responsive breakpoints. Key steps include:
Define a master container: Set maximum width (e.g., 1200px) and center alignment to ensure readability on all devices.
Use dynamic placeholders: Drag in the Post Title, Post Content, and Featured Image widgets. Configure each to pull from the current post.
Incorporate conditional logic: For features like custom post types (CPTs), add conditions to hide elements if a field is empty—for example, hide the author bio if the “author_bio” custom field is blank.
Leverage global widgets: Save header, footer, and sidebar sections as global widgets, then embed them dynamically to maintain consistency across templates.
Test flexibility by previewing posts with different character counts, image orientations, and metadata lengths. Adjust font sizes and spacing using the “responsive” tab to avoid layout shifts. A flexible layout ensures that each post looks polished, from a short news snippet to a long-form guide.
Inserting Dynamic Fields for Post Meta and Taxonomies
Dynamic fields allow you to display post-specific data without hardcoding. For post meta (custom fields) and taxonomies (categories, tags, custom taxonomies), follow these steps:
Add a Dynamic Tags widget: In any text or heading widget, click the dynamic icon (the “i” in a circle) and select “Post Meta” or “Post Taxonomy.”
Configure custom fields: For meta, enter the field key (e.g., “review_rating”). For taxonomies, choose the taxonomy name (e.g., “genre” for a book CPT).
Format output: Use the “Before” and “After” inputs to add labels (e.g., “Genre: ”) and separators (e.g., commas between multiple terms).
Style dynamically: Apply CSS classes or inline styling to dynamic fields—for example, highlight a “rating” field with a star icon using a custom class.
For advanced control, use the “Advanced” tab to add custom attributes or hide empty fields. This ensures that only relevant metadata appears, keeping the design clean.
Using Dynamic Content for Related Posts and Navigation
Dynamic content extends beyond single post data to include related posts and navigation, improving user engagement and SEO. Implement these features as follows:
Related posts with dynamic queries: Use the Posts widget, set the “Query” to “Current Post,” and filter by taxonomy (e.g., same category). Limit results to 3–4 posts, and enable dynamic thumbnail and title links.
Post navigation: Add the Post Navigation widget to display “Previous” and “Next” links. Customize the labels to show post titles (e.g., “Previous: How to Optimize Images”).
Breadcrumb trails: Insert a Breadcrumbs widget and set its source to “Post Taxonomy” for hierarchical navigation. For custom taxonomies, ensure the “Post Type Archive” link is included.
Author box: Use an Author Box widget to pull the author’s name, bio, and avatar dynamically. For multi-author sites, this updates automatically per post.
To refine performance, cache the template using a plugin like WP Rocket, but exclude dynamic elements from caching to ensure fresh content. Test related posts by previewing posts from different categories to confirm that the query respects your filters. This approach turns single post templates into intelligent, interconnected experiences that scale effortlessly.
Advanced Dynamic Image and Media Techniques
Mastering dynamic media in Elementor allows power users to create highly personalized and efficient sites. By sourcing images, videos, and other media from custom fields, external URLs, or user uploads, you can deliver content that adapts to context, user roles, or database entries. This section covers advanced techniques for media handling, including robust fallbacks to ensure a seamless user experience when data is missing.
Dynamic Image Sources with ACF Image Fields
Advanced Custom Fields (ACF) image fields are a cornerstone for dynamic content. To leverage them effectively, you must understand how Elementor’s dynamic tags interact with ACF return formats. ACF image fields can return an image ID, URL, or array. For maximum flexibility, use the “Image ID” return format in ACF, then apply the following techniques:
Responsive Images: When using the image ID, Elementor automatically generates multiple sizes (thumbnail, medium, large) via WordPress’s built-in image handling. This ensures optimal loading on all devices.
Custom Sizing with Dynamic Tags: In the Image widget, set the “Image” dynamic tag to the ACF field. Then, under “Image Size,” select “Custom” and define exact dimensions using the “Width” and “Height” fields. This overrides default sizes for precision.
Multiple Image Sources: For a gallery, use a repeater field with ACF. In Elementor’s Gallery widget, set the “Source” to “Dynamic,” then select the repeater field. Each sub-field (image URL, caption) can be mapped individually.
External URLs: If an ACF field stores an external image URL, use the “Text” dynamic tag in the Image widget’s “Image” field. Ensure the URL is absolute (e.g., https://example.com/photo.jpg) to avoid broken links.
For performance, always enable lazy loading for dynamic images. This can be set in the Image widget’s “Advanced” tab under “Lazy Load.”
Implementing Video Backgrounds from Custom Fields
Video backgrounds add immersive visual impact, but sourcing them dynamically requires careful handling. To pull video URLs from ACF or other custom fields, follow these steps:
Create a URL Field: In ACF, create a “URL” field (e.g., video_background_url) to store the video link.
Use the Video Widget: In Elementor, add a Video widget to a section. Under “Video Source,” select “Dynamic” and choose your custom URL field.
Set as Background: Go to the section’s “Style” tab > “Background” > “Video” toggle. Paste the same dynamic tag into the “Video Link” field. Elementor will automatically render the video as a background.
Fallback for Autoplay: Most browsers block autoplay for audio. In the section’s “Advanced” tab, enable “Background Overlay” and set a muted fallback image or color. For a code-based solution, add this to your theme’s functions.php to force mute:
Pro Tip: For YouTube or Vimeo backgrounds, use the “External URL” option in the Video widget, but ensure the URL is in the embed format (e.g., https://www.youtube.com/embed/VIDEO_ID).
When dynamic media fields are empty, users see broken images or blank spaces. Implement fallbacks using Elementor’s conditional logic and ACF settings:
Image Fallbacks: In the Image widget, set the dynamic tag to your ACF field. Then, in the “Image” field, click the dynamic tag icon and select “Default.” Upload a placeholder image (e.g., a gray silhouette or logo). If the ACF field returns empty, the default image displays.
Video Fallbacks: Use a “Visibility” condition on the Video widget. Go to the widget’s “Advanced” tab > “Responsive” > “Hide on” and set a condition using the “Custom Field” option. For example, hide the video widget if the custom field video_background_url is empty. Then, add a fallback Image widget with a static image in the same section.
Media Fallback Table:
Media Type
ACF Field Type
Fallback Method
Example
Image
Image (ID or URL)
Default image in dynamic tag
Placeholder.jpg
Video
URL
Conditional visibility + static image
Hide video, show poster image
Gallery
Repeater
Fallback gallery with static images
Use default gallery from media library
For advanced fallbacks, use ACF’s “Default Value” setting. In the ACF field group, set a default image URL or ID. This ensures the field never returns empty, but still allows editors to override it.
Dynamic Content for User Profiles and Dashboards
Personalized user profiles and dashboards transform a static site into a dynamic, member-centric experience. By leveraging Elementor dynamic content, you can pull real-time data from user meta, WooCommerce, or membership plugins to display relevant information for each logged-in user. This approach enhances engagement, reduces administrative overhead, and empowers users with self-service tools. Below are advanced techniques to build these interfaces effectively.
Pulling User Meta into Profile Templates
User meta fields—such as display name, biography, location, or custom registration data—can be dynamically inserted into profile templates using Elementor’s dynamic tags. To do this, create a single template for user profiles and assign it to the “Author Archive” or a custom post type like “User Profile.” Use the Author Info dynamic tag for standard fields, but for custom meta keys (e.g., “favorite_genre” or “membership_level”), follow these steps:
Add a Heading or Text widget and click the dynamic icon (the “{}” button).
Select Author Meta from the dropdown list.
Enter the exact meta key name (case-sensitive) in the “Meta Key” field.
For fallback content, use the “Before” and “After” fields to add labels like “Location: ” or “Level: ”.
To display user avatars, use the Author Avatar dynamic tag within an Image widget. For advanced use, combine multiple meta fields into a single text block using the Custom Field dynamic tag with conditional logic (via a plugin like Dynamic Conditions). This ensures that empty fields are hidden, keeping profiles clean. Always test with a sample user account to verify data pulls correctly.
Creating Dynamic Dashboard Widgets for Members
Dashboards require real-time, actionable widgets that reflect each member’s unique data. Use Elementor’s Loop Grid or Post Grid widgets to display lists of recent orders, course enrollments, or forum topics. For membership plugins like MemberPress or Paid Memberships Pro, create a dashboard template with the following widget types:
To make widgets interactive, combine dynamic content with Conditional Visibility (using a plugin like Visibility Logic). For example, show a “Welcome back, [first_name]!” heading only if the user has a first name set. Use Dynamic.ooo or JetEngine to pull data from user-specific repeater fields (e.g., saved addresses). Ensure all widgets update automatically when user data changes by enabling “Dynamic Content” refresh in Elementor’s advanced settings.
Integrating Dynamic Content with WooCommerce Account Pages
WooCommerce account pages—like “My Account,” “Orders,” and “Downloads”—can be enhanced with Elementor dynamic content to replace default shortcodes. Start by creating a new page template for the “My Account” endpoint and assign it via WooCommerce’s account settings. Use the following dynamic tags for common fields:
Current User Info: For the user’s display name, email, or registration date (use “user_email” or “user_registered” as meta keys).
WooCommerce Order Data: Pull order totals, status, or dates using the Order Meta dynamic tag (requires a plugin like “Elementor Pro for WooCommerce” or custom code).
Product Subscriptions: For subscription-based stores, display next payment date or renewal status via user meta fields generated by WooCommerce Subscriptions (e.g., “subscription_renewal_date”).
To create a dynamic order history widget, use a Loop Grid with a query filtered by “Current User” and post type “shop_order.” Add conditional logic to show “Pending Payment” orders in red and “Completed” orders in green. For download links, use the File dynamic tag linked to user-specific WooCommerce download permissions. Always test with a customer account to ensure data privacy—only logged-in users should see their own data. Use WooCommerce Account Menu widget (from Elementor Pro) to maintain navigation consistency across pages.
Performance Optimization for Dynamic Sites
When leveraging Elementor Dynamic Content across hundreds of pages, performance degradation often emerges from excessive database queries and unoptimized asset delivery. Advanced users must adopt a layered optimization strategy that balances dynamic flexibility with load speed. The following techniques target the three primary bottlenecks: caching inefficiency, query overhead, and asset delivery latency.
Caching Dynamic Content with Object and Page Caching
Dynamic content—such as user-specific fields, post loops, or ACF data—bypasses traditional page caching because it changes per request. To solve this, implement a two-tier caching approach. Object caching (using Redis or Memcached) stores database query results in memory, reducing repeated SQL calls for dynamic fields. For example, a dynamic “Author Bio” field queried on 50 pages can be served from object cache after the first request, cutting query time from 20ms to under 1ms. Page caching with a plugin like WP Rocket or LiteSpeed Cache should be configured to exclude dynamic elements via JavaScript replacement: cache the static HTML shell, then load dynamic content via REST API or shortcode callbacks. This hybrid approach preserves cache hit ratios while keeping content fresh.
Minimizing Database Queries with Lazy Loading
Every dynamic field in Elementor can trigger a separate database query. For sites with 50+ dynamic fields per page, this creates dozens of queries even before content renders. Lazy loading defers non-critical dynamic content until it is visible in the viewport or user interaction occurs. Implement this by wrapping dynamic fields in a custom function that checks for a “lazy” attribute. For instance, a dynamic “Related Posts” loop below the fold should not fire its query until the user scrolls to that section. Use the wp_footer action to enqueue a lightweight JavaScript observer that triggers queries only when needed. Additionally, batch your queries: instead of fetching each dynamic field individually, use a single WP_Query with meta_query to retrieve all needed post meta in one call. Test with Query Monitor to confirm a reduction from 30+ queries to under 10 per page.
Using CDNs and Asset Optimization for Dynamic Assets
Dynamic content often relies on JavaScript files, CSS libraries, and images that vary per user or context. A CDN accelerates delivery of these assets, but dynamic URLs (e.g., user-avatar endpoints) require special handling. Configure your CDN (Cloudflare, KeyCDN, or BunnyCDN) to bypass cache for dynamic asset paths while aggressively caching static files. For images in dynamic fields, implement WebP conversion and serve them via a CDN with a cache TTL of 7 days. Combine this with Elementor’s built-in asset optimization: minify CSS/JS, combine files, and defer non-critical scripts. Below is a comparison of common CDN strategies for dynamic assets:
By layering object caching, lazy query execution, and CDN-aware asset delivery, Elementor dynamic sites can maintain sub-two-second load times even with 100+ dynamic fields per page. Always monitor with tools like Lighthouse and Query Monitor to validate improvements.
Even seasoned Elementor users encounter hiccups with dynamic content. When dynamic tags fail to render, plugins clash, or query loops return empty, the root cause is often a misconfiguration rather than a core bug. Below are targeted solutions for the three most frequent problems, designed to restore your dynamic workflows quickly.
Dynamic Tags Not Showing: Debugging Steps
If a dynamic tag (e.g., post title, custom field) appears blank or as a static placeholder, follow this systematic checklist:
Check the source availability: Ensure the data source exists and is published. For example, a custom field from Advanced Custom Fields (ACF) must have a value saved for the current post.
Verify tag context: Dynamic tags for “Author” or “Post Date” only work within a single post template, not on archive pages. Use “Archive Title” or “Archive Description” tags instead.
Clear all caches: Purge your WordPress cache, browser cache, and any CDN cache. Elementor’s dynamic data often relies on fresh server responses.
Test with a minimal setup: Temporarily switch to a default theme (e.g., Twenty Twenty-Four) and disable all plugins except Elementor and your data source plugin (e.g., ACF). If the tag works, the issue is a conflict.
Inspect the generated HTML: Right-click the element and select “Inspect.” Look for empty span or div tags. If present, the tag is recognized but the data is missing—recheck your source.
For custom fields using ACF, a common fix is to regenerate the dynamic tag list by clicking “Update” on the Elementor template, then re-selecting the field from the dynamic tag dropdown.
Resolving Plugin Conflicts with Dynamic Content
Plugin conflicts are a leading cause of dynamic content failure. The most frequent culprits are caching plugins, security suites, and custom code plugins that modify REST API responses. Use these steps to isolate and resolve conflicts:
Identify the conflict: Enable WordPress debugging by adding the following to your wp-config.php file (place it before the line /* That's all, stop editing! Happy publishing. */): define('WP_DEBUG', true); define('WP_DEBUG_LOG', true); define('WP_DEBUG_DISPLAY', false);
Then check the /wp-content/debug.log file for PHP errors related to dynamic content.
Test in isolation: Deactivate all plugins except Elementor and your data source. If dynamic content works, reactivate plugins one by one, testing each time, until the conflict reappears.
Check REST API accessibility: Dynamic tags often fetch data via the WordPress REST API. Install a plugin like “WP REST API Controller” and ensure the required endpoints (e.g., /wp/v2/posts) are not disabled. Security plugins may block these—whitelist the Elementor endpoint.
Update or replace the conflicting plugin: If a specific plugin causes issues, check for updates or contact its support. As a temporary workaround, use a code snippet to disable the plugin only on Elementor editor pages.
Fixing Empty Query Loops and Missing Data
When a Query Loop widget returns no results, the problem usually lies in the query parameters or the data structure. Apply these corrections:
Issue
Likely Cause
Solution
Loop shows no posts
Filter conditions too strict
Open the Query Loop widget, go to “Query” > “Filters,” and remove any unnecessary “Post Status” or “Date” filters. Set “Posts Per Page” to a higher number (e.g., 20) to confirm content exists.
Custom fields missing in loop
Wrong field key or source
Double-check the ACF field key (e.g., field_123abc) in the dynamic tag. Ensure the field is assigned to the post type used in the loop.
Loop returns only one post
Incorrect “Source” selection
Change the “Source” from “Current Post” to “Posts” or “Custom Post Type” if you intend to list multiple items.
Data appears in preview but not live
Caching conflict
Exclude the page URL from your caching plugin. For WP Rocket, add the page to the “Never Cache URLs” list.
If the loop remains empty after adjustments, manually test the query using a plugin like “Query Monitor.” Enable the plugin, load the page, and inspect the “Queries” tab to see if the SQL statement fetches any rows. A zero-row result indicates the query parameters are too narrow—broaden them by removing post type or taxonomy constraints.
Future-Proofing Your Dynamic Content Workflow
Building dynamic content with Elementor unlocks powerful personalization and efficiency, but without deliberate maintenance, your setup can become brittle. Future-proofing ensures your workflows survive Elementor updates, plugin changes, and site migrations without breaking. By adopting a proactive approach, you protect both your time and the integrity of your content architecture. Below are three essential practices for maintaining scalable dynamic content setups.
Using a Staging Environment for Dynamic Content Testing
A staging environment is non-negotiable for any advanced dynamic content workflow. Apply updates and test changes here before pushing to production. For Elementor dynamic content, staging allows you to:
Verify that dynamic tags (e.g., from ACF, Pods, or Meta Box) render correctly after an Elementor core update.
Test custom template conditions (e.g., display rules based on user roles or taxonomy) without risking live site errors.
Simulate site migrations by exporting and importing dynamic content templates to ensure field mappings remain intact.
Check that third-party plugin dynamic sources (like Toolset or JetEngine) still populate data after their own updates.
Always replicate your production environment as closely as possible, including the same PHP version, database collation, and plugin versions. Use tools like WP Staging or Local by Flywheel for efficient clones. After testing, document any changes made to dynamic field groups or template conditions.
Documenting Custom Fields and Template Dependencies
Dynamic content relies on invisible connections between custom fields, Elementor templates, and your theme. Without documentation, these dependencies become a liability. Create a living document (e.g., a spreadsheet or internal wiki) that includes:
Field Group
Source Plugin
Elementor Template(s) Using It
Display Condition(s)
Product Specifications
ACF Pro
Single Product Template, Archive Loop
User role: Editor or Admin
Author Bio
Pods
Author Archive, Sidebar Widget
Post type: Post
Event Dates
Meta Box
Event Single, Calendar Grid
Taxonomy: Event Category
Also note any custom PHP snippets (e.g., in your theme’s functions.php) that register dynamic tags or modify query parameters. This documentation serves as a roadmap when you need to debug issues, hand off the site to another developer, or migrate to a new host. Update it each time you add or modify a dynamic field.
Planning for Elementor and Plugin Version Upgrades
Upgrades can break dynamic content when field keys change, deprecated tags are removed, or plugin APIs shift. To minimize risk, implement a structured upgrade plan:
Check changelogs before updating Elementor or any dynamic source plugin. Look for deprecation notices related to dynamic tags, conditions, or custom fields.
Version-lock critical plugins in your staging environment. Use tools like WP Rollback to test compatibility with older versions if needed.
Maintain a backup of your database and template exports before any major upgrade. Store these in a version-controlled repository.
Test dynamic content pages after each upgrade: single posts, archive loops, and any custom display conditions. Verify that field values populate and that no PHP warnings appear.
Schedule quarterly audits of your dynamic content setup. Remove unused field groups, update deprecated tags, and refresh documentation.
By combining a staging environment, thorough documentation, and a deliberate upgrade cadence, you ensure that your Elementor dynamic content remains robust, scalable, and ready for whatever changes the future holds.
Frequently Asked Questions
How do I use Advanced Custom Fields (ACF) with Elementor dynamic content?
To use ACF with Elementor, first install and activate ACF (free or Pro). Create custom field groups and assign them to posts, pages, or custom post types. In Elementor, edit a template or page, add a widget like Heading or Text, click the dynamic icon (the tiny database icon), and select 'ACF Field'. Choose your field from the dropdown. For repeater or flexible content fields, use Elementor's Loop Grid widget to display multiple entries. Ensure ACF is properly mapped to your content types for seamless dynamic output.
What is the Loop Grid widget and how can it be used for dynamic content?
The Loop Grid widget (available in Elementor Pro) lets you create custom query loops to display dynamic content from posts, custom post types, or ACF repeaters. You can design a single 'Loop Item' template using Elementor's theme builder, then assign it to the Loop Grid. Within the loop item, use dynamic tags to pull fields like title, excerpt, custom fields, or featured image. You can filter by taxonomy, meta keys, or author. This is ideal for portfolios, team listings, or any repeated content pattern.
How can I conditionally display content based on dynamic data in Elementor?
Elementor Pro includes a 'Conditions' feature in the theme builder for templates, but for per-widget conditional logic, you need a third-party plugin like 'Dynamic Conditions' or 'JetEngine'. These plugins add visibility rules to any widget based on user roles, custom fields, post meta, or URL parameters. For example, you can show a banner only if a custom field 'promo' is set to 'yes'. Alternatively, use dynamic tags within HTML widgets with PHP snippets (via a child theme) for advanced conditions.
What are dynamic tags and how do I use them beyond default fields?
Dynamic tags are placeholders that pull data from WordPress, ACF, Toolset, or other sources. In Elementor, click the dynamic icon in any widget control (e.g., Heading, Text, Button). Beyond default options (post title, site name), you can add custom dynamic tags via plugins like 'Dynamic Tags for Elementor' or by writing your own using Elementor's API. For instance, create a tag that outputs the current user's display name or a calculated value from multiple custom fields. This allows highly personalized content.
How can I improve performance when using heavy dynamic content in Elementor?
To optimize performance with dynamic content: 1) Use caching plugins (WP Rocket, W3 Total Cache) but exclude dynamic elements from cache if needed. 2) Limit the number of database queries by using Elementor's built-in query optimization (e.g., 'Posts' widget with 'Offset' and 'Posts Per Page'). 3) Avoid excessive ACF repeater fields; use post types instead. 4) Lazy load images and videos. 5) Minimize use of third-party dynamic content plugins that add overhead. 6) Use a CDN. 7) Regularly audit dynamic queries with Query Monitor plugin.
Can I use dynamic content from custom post types in Elementor?
Yes, Elementor Pro fully supports custom post types (CPTs) created via plugins like Custom Post Type UI or ACF. When building a single post template, set the template conditions to your CPT. Use dynamic tags to pull CPT fields (title, content, custom fields). For archive pages, use the Archive widget or Loop Grid with a query filter for your CPT. For listing multiple CPT entries, use the Posts widget and select your CPT under 'Post Type'. This enables dynamic portfolios, testimonials, events, and more.
How do I implement dynamic content in Elementor popups?
Elementor popups can use dynamic content by inserting widgets with dynamic tags. For example, create a popup triggered on click or exit intent, and inside use a Heading widget with dynamic tag for 'Post Title' or 'ACF Field'. You can also use conditions to show the popup only on certain posts or user roles. For advanced dynamic popups, use the 'Dynamic Conditions' plugin to show a popup only if a custom field is empty. Remember to set popup settings (close on click, etc.) for optimal user experience.
What are some best practices for organizing dynamic content templates in Elementor?
Best practices include: 1) Use Elementor's Theme Builder to create separate templates for single posts, archives, and 404 pages. 2) Name templates clearly (e.g., 'Single Product – Dynamic'). 3) Use global widgets and global colors for consistency. 4) Leverage template parts (header, footer) for reusable dynamic areas. 5) Keep template logic simple—avoid nested dynamic loops that slow down editing. 6) Test dynamic output on staging before going live. 7) Document which custom fields are used in each template for easier maintenance.
Mastering Tailwind CSS Dark Mode Implementation: A Complete Guide
Introduction to Tailwind CSS Dark Mode
Dark mode has evolved from a niche preference into a standard expectation across modern web applications. Users increasingly seek interfaces that reduce eye strain, conserve battery life on OLED screens, and provide a visually soothing alternative to bright white backgrounds. Implementing dark mode traditionally required extensive CSS overrides, JavaScript toggles, and careful management of color variables, often leading to bloated stylesheets and maintenance headaches. Tailwind CSS simplifies this process dramatically by offering utility-first classes and a flexible configuration system that lets you define dark mode variants with minimal effort. This guide explores how Tailwind CSS dark mode implementation works, why it matters, and how you can leverage it to create seamless, user-friendly themes.
What Is Dark Mode and Why It Matters
Dark mode refers to a color scheme that uses light text, UI elements, and icons on a dark background, typically near-black or dark gray. Its popularity has surged due to several practical benefits. First, it reduces blue light emission, which can disrupt circadian rhythms and cause eye fatigue during nighttime use. Second, on OLED and AMOLED screens, dark pixels consume significantly less power, extending device battery life. Third, many users simply find dark mode more aesthetically pleasing or easier to read in low-light environments. From a design perspective, dark mode also offers a way to create visual hierarchy and emphasize content without relying on harsh contrasts. Implementing it well requires thoughtful color pairing, accessibility checks for contrast ratios, and consistent application across components.
Tailwind CSS approaches theming through its utility-first paradigm, where styling is applied directly in HTML using small, composable classes rather than custom CSS. For dark mode, this means you can add a dark: prefix to any utility class to specify its appearance when dark mode is active. For example, bg-white dark:bg-gray-800 sets a white background by default and a dark gray background in dark mode. This approach eliminates the need for separate stylesheets or complex media queries. Tailwind’s configuration file (tailwind.config.js) allows you to choose between two strategies: media, which respects the user’s operating system preference via the prefers-color-scheme media query, or class, which toggles dark mode based on a CSS class (typically dark) added to a parent element like <html>. The class strategy gives you programmatic control, enabling user-driven toggles, persistence via local storage, or integration with third-party libraries.
How Dark Mode Differs from Light Mode in Tailwind
In Tailwind CSS, light mode is the default, and dark mode is treated as a variant. This means you write your base styles for light mode and then override only the properties that need to change for dark mode using the dark: prefix. The key difference lies in how these variants are applied:
Default behavior: Without a dark: prefix, utilities apply to all color schemes. For instance, text-black remains black regardless of dark mode activation.
Variant specificity: The dark: variant has higher specificity than base utilities, so it overrides the light mode value when the dark mode condition is met.
Responsiveness: You can combine dark: with responsive prefixes like md:dark:bg-gray-700 to apply dark mode styles only on medium screens and above.
State variants: Dark mode works seamlessly with hover, focus, and active states, such as dark:hover:bg-gray-600.
Below is a comparison table illustrating how common properties are handled in light vs. dark mode using Tailwind classes:
Property
Light Mode Class
Dark Mode Class
Background
bg-white
dark:bg-gray-900
Text color
text-gray-900
dark:text-gray-100
Border
border-gray-200
dark:border-gray-700
Shadow
shadow-sm
dark:shadow-dark-sm (custom)
This granular control, combined with Tailwind’s design system utilities, makes dark mode implementation both efficient and maintainable. By understanding these foundational differences, you can confidently build interfaces that adapt gracefully to user preferences without duplicating code or sacrificing performance.
Before diving into Tailwind CSS Dark Mode Implementation, you need a solid foundation. This section covers the essential requirements and configuration steps to ensure your project is ready for dark mode. Without proper setup, even the best dark mode strategies will fail to render correctly across browsers and devices.
Installing Tailwind CSS via npm or CDN
Tailwind CSS can be installed in two primary ways. The recommended approach for production projects is via npm, which gives you full control over configuration and build processes. For quick prototypes or static sites, a CDN link works but limits customization.
The tailwind.config.js file is where you enable dark mode and define its strategy. Tailwind CSS Dark Mode Implementation relies on this file to determine how dark class variants are applied.
Open or create tailwind.config.js and add the darkMode property. The two strategies are:
media (default): Uses the user’s OS-level preference (prefers-color-scheme). No manual toggling.
class: Requires you to add a dark class to a parent element (usually <html> or <body>). This allows manual or JavaScript-based toggling.
If you choose media, simply set darkMode: 'media'. The content array must point to all template files where Tailwind classes are used, so the compiler can generate the correct CSS.
Then run your build command. If no errors appear, your Tailwind CSS Dark Mode Implementation environment is ready. Remember to include the generated CSS file in your HTML.
With these prerequisites in place, you can proceed to implement dark mode classes and toggle functionality. The next sections will cover practical usage of dark: variants and JavaScript-driven theme switching.
Configuring Dark Mode in tailwind.config.js
Enabling dark mode in Tailwind CSS begins with a single configuration key: darkMode. This setting determines how your project detects and applies dark mode styles. Tailwind offers two primary strategies: media and class. The choice between them depends on whether you want automatic system-based switching or manual user control. Below, we walk through each option step by step.
The darkMode key lives inside your tailwind.config.js file, typically under the module.exports object. By default, this key is set to false, meaning dark mode is disabled. To activate it, you set darkMode to either 'media' or 'class'. This key tells Tailwind how to interpret the dark: variant prefix (e.g., dark:bg-gray-900) that you use in your HTML templates. Without this configuration, the dark variant will not function. Here is a basic example of the configuration structure:
module.exports = {
darkMode: 'media', // or 'class'
// ... other Tailwind config
}
Once set, you can apply dark mode styles anywhere in your markup using the dark: prefix, and Tailwind will handle the rest based on your chosen strategy.
Using the ‘media’ Strategy for System Preference
The media strategy leverages the CSS prefers-color-scheme media query. When you set darkMode: 'media', Tailwind automatically applies dark mode styles when the user’s operating system or browser is set to a dark theme. This approach requires no JavaScript or manual toggling—it is fully automatic and respects the user’s system-level preference. To implement it:
Open your tailwind.config.js file.
Set darkMode: 'media'.
Use the dark: variant in your HTML, for example: <div class="bg-white dark:bg-gray-800">.
Test by changing your system’s appearance settings (e.g., on macOS, toggle between Light and Dark mode in System Preferences).
This strategy is ideal for projects where you want a seamless, zero-intervention experience. However, it does not allow users to override the system setting within your app—dark mode is either on or off based on their OS.
Using the ‘class’ Strategy for Manual Toggle
The class strategy gives you full control by toggling a CSS class (typically dark) on a parent element, usually the <html> tag. When you set darkMode: 'class', Tailwind applies dark mode styles only when the dark class is present. This is perfect for websites or apps that offer a manual toggle (e.g., a sun/moon icon) or need to persist the user’s preference across sessions. Steps to set it up:
In tailwind.config.js, set darkMode: 'class'.
Add a dark class to your <html> element (e.g., via JavaScript: document.documentElement.classList.add('dark')).
Use the dark: variant in your HTML as before.
Implement a toggle button that adds or removes the dark class, and optionally save the preference to localStorage.
This approach is more flexible and user-centric, but it requires additional code for toggling and persistence.
Comparison Table: media vs. class Strategies
Feature
media Strategy
class Strategy
Detection Method
Uses prefers-color-scheme media query
Uses a CSS class on a parent element
User Control
Automatic, based on system setting
Manual toggle via JavaScript
Implementation Complexity
Low (no extra code)
Moderate (requires toggle logic)
Persistence
Not applicable (system-driven)
Can be saved to localStorage
Best For
Sites that follow OS preference
Apps with user-facing dark mode toggle
Browser Support
Modern browsers (IE11 not supported)
All browsers (class-based)
Both strategies are valid; choose based on your project’s needs for automation versus user choice.
Applying Dark Mode with Utility Classes
Tailwind CSS Dark Mode Implementation becomes intuitive once you understand the dark: prefix. This utility-first variant allows you to conditionally apply styles based on the user’s system preference or a manual class toggle, all directly within your HTML templates. Instead of writing separate CSS rules or JavaScript logic, you simply prepend dark: to any existing Tailwind utility class. When the dark mode condition is met (for example, when the class="dark" is added to the <html> element or the OS theme is set to dark), those prefixed styles activate, overriding the default light-mode styles.
Dark: Prefix Syntax and Examples
The syntax is straightforward: dark:{utility-class}. You can apply it to any Tailwind utility, from background colors to typography. For example, to create a card that switches between light and dark backgrounds:
<div class="bg-white dark:bg-gray-800 p-6 rounded-lg shadow-md">
<p class="text-gray-700 dark:text-gray-200">This text adapts to dark mode.</p>
</div>
Background:bg-white applies in light mode; dark:bg-gray-800 overrides it in dark mode.
Text:text-gray-700 is for light mode; dark:text-gray-200 ensures readability on the dark background.
Borders and shadows: You can similarly use dark:border-gray-600 or dark:shadow-lg to adjust depth and contrast.
This pattern works for any utility class that accepts a value, including spacing, sizing, opacity, and even custom properties defined in your tailwind.config.js. The key is that dark: always appears after the base utility, and both are applied to the same element.
Combining Dark Mode with Other Variants (hover, focus)
Tailwind’s variant system allows you to stack multiple conditions, such as dark:hover: or dark:focus:. This is essential for interactive elements like buttons, links, or form inputs. For instance, to style a button that changes background on hover in both modes:
Here, the dark:hover:bg-blue-800 variant ensures that when dark mode is active, hovering over the button triggers the darker blue shade. The order of variants matters: dark:hover: means “apply this style when both dark mode and hover state are true.” You can also combine with focus:, active:, disabled:, or even responsive prefixes like md:dark:hover:. This stacking gives you granular control without bloating your CSS.
Applying Dark Mode to Background, Text, and Borders
The most common use cases for Tailwind CSS Dark Mode Implementation involve adjusting visual properties for readability and aesthetics. Below is a quick reference table for typical patterns:
Element
Light Mode Utility
Dark Mode Utility
Page background
bg-gray-50
dark:bg-gray-900
Card background
bg-white
dark:bg-gray-800
Primary text
text-gray-900
dark:text-gray-100
Secondary text
text-gray-600
dark:text-gray-400
Border
border-gray-200
dark:border-gray-700
Input background
bg-white
dark:bg-gray-700
When applying these, remember to always provide a light-mode fallback. The dark: prefix only overrides the base utility when dark mode is active; if you omit the light-mode utility, the element will inherit default browser styles (often white backgrounds and black text), which may break your design. For borders, consider using dark:border-opacity-50 to reduce harshness, and for backgrounds, pair with dark:text-* to maintain contrast. This approach ensures your interface remains accessible and visually consistent across all themes.
Building a Dark Mode Toggle Component
A user-controlled toggle is the most robust method for implementing Tailwind CSS dark mode. By adding or removing the dark class on the <html> element, you give visitors direct agency over their viewing experience. This approach works seamlessly with Tailwind’s class strategy and avoids conflicts with system-level preferences. The toggle can be a button, a switch, or any interactive element that triggers a JavaScript function to flip the class state.
JavaScript Logic for Toggling the Dark Class
The core logic involves selecting the <html> element and toggling the dark class each time the toggle is activated. Here is a clean, reusable implementation:
This code assumes your toggle has an id="dark-mode-toggle". When clicked, it adds the dark class if absent, or removes it if present. For initial page load, you may want to check the user’s system preference using window.matchMedia('(prefers-color-scheme: dark)') and apply the class accordingly. However, once the user manually toggles, their choice should override system settings for the session.
Key considerations for the JavaScript logic:
Always use document.documentElement to target the root <html> element.
Store the toggle element reference outside the event listener to avoid repeated DOM queries.
Consider debouncing the listener if the toggle triggers additional animations or transitions.
Test for classList support; modern browsers all support it, but legacy polyfills may be needed for very old environments.
Persisting User Preference with localStorage
Without persistence, the dark mode resets on every page reload, frustrating users. localStorage provides a simple, synchronous solution to remember the user’s choice across sessions. Integrate it into the toggle logic as follows:
This approach stores a string 'enabled' or 'disabled' in localStorage under the key darkMode. On page load, it reads the stored value and applies the class immediately, preventing a flash of unthemed content. For optimal performance, keep the stored value as a simple string to minimize parsing overhead.
Benefits of using localStorage:
No server-side storage or authentication required.
Works offline and across page navigations on the same domain.
Data persists indefinitely until explicitly cleared by the user or script.
Minimal code footprint with no external dependencies.
Storage Method
Persistence Scope
Recommended For
localStorage
Across sessions, same domain
Most user preference toggles
sessionStorage
Only current browser tab
Short-term preferences
Cookies
Across sessions, server-accessible
When server needs preference
Accessibility Considerations for the Toggle
An accessible dark mode toggle ensures all users can control their visual experience. The toggle must be keyboard-operable, screen reader friendly, and visually clear. Implement these best practices:
Use a <button> element for the toggle, which is natively focusable and activatable via keyboard.
Add aria-label="Toggle dark mode" to describe the action for screen readers.
Include aria-pressed="true" or aria-pressed="false" to indicate the current state, updated dynamically via JavaScript.
Provide visible focus indicators, such as a high-contrast outline, using Tailwind’s focus:ring utilities.
Ensure the toggle has sufficient color contrast against both light and dark backgrounds—test with a contrast ratio of at least 4.5:1.
Announce state changes using a live region (aria-live="polite") or a visually hidden status text that updates on toggle.
Avoid relying solely on icons or color changes to convey state; include text labels or clear visual cues like a sun/moon icon pair.
By integrating these accessibility features, the toggle becomes usable by people with visual impairments, motor disabilities, or those relying on assistive technology. Always test with keyboard navigation and screen readers like NVDA or VoiceOver to confirm proper behavior.
Handling System Preference with prefers-color-scheme
When implementing dark mode in a Tailwind CSS project, one of the most user-friendly approaches is to respect the operating system’s color scheme preference. The CSS media query prefers-color-scheme allows your application to automatically switch between light and dark themes based on the user’s system settings. Tailwind CSS provides a built-in strategy for this, known as the media strategy, which leverages this media query under the hood. This method ensures that users who have set their OS to dark mode will see your site in dark mode without any manual toggle, creating a seamless and intuitive experience. The primary advantage here is zero configuration for the end user—the system preference is honored immediately upon page load.
Using the ‘media’ Strategy for Automatic Detection
To enable the media strategy in Tailwind CSS, you need to set the darkMode option in your tailwind.config.js file to "media". This tells Tailwind to use the prefers-color-scheme media query for all dark mode variants. Once configured, you can apply dark mode styles using the dark: prefix in your HTML classes. For example, class="bg-white dark:bg-gray-900 text-gray-900 dark:text-gray-100" will automatically switch background and text colors based on the user’s OS setting.
Here is a practical code example demonstrating the configuration and usage:
<div class="p-6 bg-white dark:bg-gray-800">
<h1 class="text-gray-900 dark:text-white">Automatic Dark Mode</h1>
<p class="text-gray-600 dark:text-gray-300">This content adapts to your system theme.</p>
</div>
This approach is ideal for websites where the dark mode is purely cosmetic and does not require user overrides. It works across all major browsers and respects accessibility preferences set at the OS level.
Fallback Behavior When No Preference Is Set
It is important to consider users who have not set a specific color scheme preference in their operating system. In such cases, the prefers-color-scheme media query evaluates to no-preference. Tailwind CSS’s media strategy handles this gracefully: when no preference is detected, the default (light) theme is applied. This means your base styles—those without the dark: prefix—will be used. To ensure a consistent experience, always define a complete light theme as your baseline. You can also explicitly test for no-preference using custom CSS if needed, but for most implementations, the default behavior is sufficient. If you want to offer both automatic detection and a manual override, consider using the class strategy instead, which gives you more control.
Testing System Preference in Development
Testing your dark mode implementation during development is straightforward with browser developer tools. All major browsers allow you to simulate the prefers-color-scheme media query. Here is how to test in common browsers:
Chrome DevTools: Open DevTools (F12), click the three-dot menu, select “More tools” > “Rendering”, then find “Emulate CSS media feature prefers-color-scheme” and choose prefers-color-scheme: dark or light.
Firefox Developer Tools: Open DevTools (F12), go to the “Inspector” tab, click the “Settings” gear icon, then under “Advanced settings”, enable “Emulate prefers-color-scheme: dark”.
Safari Web Inspector: Open Web Inspector (Option+Command+I), go to the “Elements” tab, click the “Development” menu in the menu bar, and select “Experimental Features” > “CSS prefers-color-scheme”.
You can also change your entire operating system’s theme to test the behavior globally. On macOS, go to System Preferences > General > Appearance and toggle between Light, Dark, and Auto. On Windows, go to Settings > Personalization > Colors and choose your color mode. For a more programmatic approach during development, you can use a browser extension that toggles the media query or write a small JavaScript snippet to override the preference for testing purposes.
By following these practices, you can ensure your Tailwind CSS dark mode implementation using system preferences is robust, testable, and user-friendly from the start.
Customizing Dark Mode Colors and Themes
While Tailwind CSS provides a robust default dark mode palette, real-world projects often require custom colors to maintain brand consistency across themes. Extending Tailwind’s configuration allows you to define precise hues for dark mode, ensuring your design system remains cohesive. This section explores three essential techniques: adding custom dark mode colors, leveraging CSS custom properties for dynamic theming, and creating a full dark theme with variants.
Adding Custom Dark Mode Colors in tailwind.config.js
To add custom colors specifically for dark mode, you extend the darkMode configuration in your tailwind.config.js. Start by enabling dark mode via the 'class' or 'media' strategy. Then, define your custom colors under the theme.extend.colors object, using the dark variant prefix.
This approach gives you full control over every shade, ensuring your dark mode colors align with your brand guidelines without overriding Tailwind’s defaults.
Using CSS Custom Properties for Dynamic Theming
CSS custom properties (variables) introduce dynamic theming flexibility, allowing you to change colors at runtime without recompiling. Combine them with Tailwind by defining custom properties in your global CSS and referencing them in the config.
Define variables: In your styles.css, set :root { --color-primary: #1a73e8; } and .dark { --color-primary: #0d47a1; }.
Reference in config: Use theme.extend.colors.primary: 'var(--color-primary)' in tailwind.config.js.
Apply in HTML: Use class="bg-primary" — Tailwind will automatically respect the current dark mode state.
This method is especially useful for user-customizable themes or when you need to sync with design tokens from a design system. It also reduces the number of dark: variants needed in your markup.
Creating a Full Dark Theme with Variants
For a comprehensive dark mode implementation, build a complete dark theme by mapping every critical color to its dark counterpart. Use Tailwind’s variant system to apply styles conditionally.
Element
Light Mode Color
Dark Mode Color
Tailwind Class
Background
#ffffff
#121212
bg-white dark:bg-gray-900
Text
#1f2937
#f9fafb
text-gray-800 dark:text-gray-100
Primary button
#1a73e8
#4a90d9
bg-blue-600 dark:bg-blue-400
Border
#e5e7eb
#374151
border-gray-200 dark:border-gray-700
To streamline this, create a utility class in your config using theme.extend:
Apply with class="bg-theme-bg text-theme-text". This reduces repetitive dark: prefixes and ensures consistency across your entire application.
Integrating Dark Mode with Frameworks (React, Vue, Next.js)
Implementing a Tailwind CSS dark mode across modern JavaScript frameworks requires more than just toggling a class on the <html> element—it demands a reactive, persistent, and framework-idiomatic approach. Each framework offers its own patterns for state management and lifecycle hooks, which directly influence how you store and apply the user’s theme preference. Below are practical, production-ready implementations for React, Vue, and Next.js, each leveraging the class strategy (i.e., adding dark to the root element) and the prefers-color-scheme media query for initial detection.
In a standard React application (created with Vite or Create React App), the most straightforward approach uses the useState hook to manage the theme and useEffect to synchronize the DOM with the state and persist the choice to localStorage.
Initialization: Read localStorage for a saved preference. If none exists, query window.matchMedia('(prefers-color-scheme: dark)') to detect the system theme.
State Management: Create a boolean state variable, e.g., const [isDark, setIsDark] = useState(initialValue).
DOM Update: Inside a useEffect with isDark as a dependency, use document.documentElement.classList.toggle('dark', isDark) to apply or remove the class.
Persistence: In the same useEffect, write localStorage.setItem('theme', isDark ? 'dark' : 'light').
Toggle Function: Pass a handler like () => setIsDark(prev => !prev) to a button or switch component.
This pattern ensures the theme is applied before the first paint (if using a synchronous initial read) and remains reactive to user interaction.
Dark Mode in Vue with reactive Data and v-bind
Vue 3’s Composition API simplifies dark mode through ref (or reactive) and the v-bind directive. The core logic mirrors React but leverages Vue’s reactivity system and lifecycle hooks.
Setup: In your root component’s <script setup>, create a const isDark = ref(false). Use onMounted to initialize the value from localStorage or the prefers-color-scheme media query.
Reactive Application: Use a watch function on isDark to update the document.documentElement.classList whenever the value changes. Alternatively, use v-bind:class on the root <div> if you prefer scoped classes, but applying to <html> is more reliable for Tailwind.
Template Integration: Bind a toggle button’s @click event to isDark.value = !isDark.value. The v-bind directive can also dynamically apply the dark class to specific elements if needed.
Vue’s v-bind:class and the Composition API’s watch make the theme transition seamless, especially when combined with Tailwind’s transition-colors utility.
Dark Mode in Next.js with getInitialProps or App Router
Next.js introduces challenges due to server-side rendering (SSR) and hydration. The window and localStorage objects are unavailable during server-side execution, requiring a strategy to avoid hydration mismatches.
Pages Router (getInitialProps): Use a custom _app.js or _document.js to inject a <script> block that reads localStorage and applies the dark class before React hydrates. This “flash-free” technique is known as the “no-flash” pattern. The theme state is then managed client-side with useState and useEffect, similar to React, but the initial class is already set.
App Router (Server Components): The App Router uses React Server Components, which cannot use hooks or browser APIs. The recommended approach is to create a ThemeProvider client component (marked with 'use client') that wraps your layout. This provider uses useEffect to manage the class and localStorage, while a script tag in the root layout runs before hydration to apply the saved theme. Next.js 13+ also supports the next-themes library, which abstracts this pattern.
Feature
React (Vite/CRA)
Vue 3 (Composition API)
Next.js (Pages Router)
Next.js (App Router)
State Management
useState + useEffect
ref + watch
useState + useEffect (client)
useState + useEffect (client component)
Initial Theme Detection
matchMedia in useEffect
matchMedia in onMounted
Script in _document.js
Script in layout.js (before hydration)
Persistence
localStorage in useEffect
localStorage in watch
localStorage in useEffect
localStorage in useEffect (client)
Hydration Risk
Low (client-only)
Low (client-only)
Low (script runs first)
Medium (requires script)
Recommended Library
None needed
None needed
None needed
next-themes
Each framework requires careful handling of the initial render to avoid a flash of unstyled content or a hydration mismatch. The common thread is using a synchronous script or a server-friendly initial value to ensure the correct theme is applied before the user sees the page.
Testing and Debugging Dark Mode Styles
Implementing dark mode with Tailwind CSS requires rigorous testing to ensure styles render correctly across browsers, devices, and edge cases. The following practices help you catch issues early and maintain a consistent user experience.
Modern browser DevTools allow you to toggle dark mode without changing system settings, speeding up debugging. In Chrome, open DevTools (F12), click the More tools menu, and select Rendering. Under the Emulate CSS media feature prefers-color-scheme option, choose prefers-color-scheme: dark. Firefox offers similar functionality in the Responsive Design Mode (Ctrl+Shift+M) by clicking the color scheme icon. This approach lets you test dark: variants instantly, inspect applied styles in the Elements panel, and verify that no light-mode-only styles bleed into the dark theme.
Two frequent issues break dark mode implementations: specificity conflicts and omitted variants. When a base utility class and its dark: variant target the same property, ensure the variant has equal or higher specificity. For example, bg-white dark:bg-gray-800 works because both use single-class utilities. However, if you add a custom class like .card { background: white; }, it overrides dark:bg-gray-800 unless you use !important or increase specificity. Always prefer Tailwind utilities over custom CSS for color properties. Additionally, remember to apply dark: variants to every relevant element—missing a variant on a border, shadow, or text color creates visual inconsistencies. Use the following checklist to audit your components:
Backgrounds: All bg-* classes have corresponding dark:bg-* variants.
Text colors:text-* classes include dark:text-* where needed.
Borders and rings:border-* and ring-* classes are covered.
Shadows:shadow-* classes use dark:shadow-* (e.g., dark:shadow-dark-md).
Placeholder and focus states: Variants like dark:placeholder-gray-400 and dark:focus:ring-blue-500.
Automated Testing with Playwright or Cypress
Automated visual regression tests catch dark mode bugs before they reach users. Both Playwright and Cypress support emulating prefers-color-scheme programmatically. Below is a Playwright example that toggles dark mode and captures a screenshot for comparison:
import { test, expect } from '@playwright/test';
test('verify dark mode renders correctly', async ({ page }) => {
// Emulate dark mode
await page.emulateMedia({ colorScheme: 'dark' });
await page.goto('https://example.com');
// Wait for dark mode styles to apply
await page.waitForSelector('.dark\:bg-gray-900');
// Take a screenshot for visual diffing
await page.screenshot({ path: 'dark-mode-homepage.png' });
// Assert a dark-mode-specific element exists
const headerBg = await page.evaluate(() => {
return getComputedStyle(document.querySelector('header')).backgroundColor;
});
expect(headerBg).toBe('rgb(17, 24, 39)'); // Tailwind gray-900
});
For Cypress, use cy.visit() with the prefers-color-scheme option in the onBeforeLoad callback or use the cy.emulateMedia() command if supported. Integrate these tests into your CI pipeline to validate every pull request. Additionally, test across browsers (Chrome, Firefox, Safari) and devices (mobile, tablet, desktop) because dark mode rendering can vary—especially for form controls and scrollbars. Use browserstack or similar services to expand coverage without local hardware.
By combining manual DevTools inspection with automated tests, you ensure your Tailwind CSS dark mode implementation remains robust, accessible, and visually consistent for all users.
Performance and Best Practices
Optimizing a Tailwind CSS dark mode implementation requires balancing runtime performance with developer experience. When dark mode variants proliferate across utility classes, build sizes can balloon unless you enforce strict tree-shaking, eliminate rendering delays, and maintain clear documentation for team collaboration. The following best practices address the three critical areas that determine whether your dark mode setup remains fast, reliable, and maintainable as your project scales.
Tree-Shaking Unused Dark Mode Variants with PurgeCSS
Tailwind CSS relies on PurgeCSS (via the content configuration) to remove unused classes from production builds. Dark mode variants—those prefixed with dark:—are especially prone to bloat because developers often write defensive utilities that never appear in the final markup. To maximize tree-shaking effectiveness:
Define your darkMode strategy explicitly in tailwind.config.js. Using 'class' or 'selector' instead of 'media' gives PurgeCSS a predictable class pattern to scan.
Audit your template files for orphaned dark: classes. A common mistake is applying both dark:bg-gray-800 and dark:bg-gray-900 on the same element; only one will be used.
Use Tailwind’s safelist sparingly. Only preserve classes that are constructed dynamically (e.g., from a CMS or API) and cannot be detected by PurgeCSS.
Run npx tailwindcss -i input.css -o output.css --minify and inspect the output. Compare file sizes before and after removing unused dark mode variants—a reduction of 30–50% is common in large projects.
For teams using multiple dark mode themes (e.g., “dark-blue” and “dark-red”), consider generating separate CSS files per theme to further isolate unused variants.
Minimizing Flash of Unstyled Content (FOUC)
A flash of unstyled content occurs when the browser applies the default (light) theme before JavaScript can toggle the dark mode class. This flicker degrades user experience, especially on slow connections. To prevent FOUC with Tailwind CSS dark mode:
Technique
Implementation
Effectiveness
Inline script in <head>
Read localStorage or prefers-color-scheme and apply dark class before any rendering.
High—blocks rendering until class is set.
CSS-only media query fallback
Use @media (prefers-color-scheme: dark) for critical styles, then override with class-based logic.
Medium—prevents flash only for system preference.
Server-side class injection
Read user preference in middleware and inject dark class into the <html> tag server-side.
Highest—no client-side delay, but requires SSR.
For the inline script approach, place a minimal script immediately after the opening <head> tag that checks for the stored preference and sets document.documentElement.classList.add('dark') if needed. Avoid relying solely on prefers-color-scheme in media queries because it ignores user overrides stored in localStorage.
Documenting Dark Mode Patterns for Team Collaboration
Without clear documentation, dark mode implementations degrade into inconsistent class usage and theme leaks. Establish a shared convention by documenting the following:
Color token mapping: Create a table that maps each semantic token (e.g., bg-surface, text-primary) to its light and dark values. Reference this table in your component library.
Variant priority: Clarify that dark: overrides must be applied only on the element that changes, not on parent containers, to avoid specificity conflicts.
Testing checklist: Include a step-by-step process for verifying dark mode in every pull request, covering both system preference and manual toggle scenarios.
Code review rules: Require that any new dark: class must have a corresponding light-mode default. Flag orphaned dark variants during review.
Store this documentation in a DARK_MODE.md file in your project root and link to it from your README. Regularly audit your codebase for deviations from the documented patterns, and update the guide whenever your dark mode strategy evolves.
Frequently Asked Questions
How do I enable dark mode in Tailwind CSS?
To enable dark mode in Tailwind CSS, you need to set the `darkMode` option in your `tailwind.config.js` file. The most common approach is using the `class` strategy, which allows you to toggle dark mode by adding a `dark` class to a parent element (usually “ or “). Alternatively, you can use the `media` strategy, which automatically respects the user's system preference via `prefers-color-scheme`. For example: `module.exports = { darkMode: 'class', // or 'media' }`. After configuration, you can use the `dark:` variant in your HTML classes, like “.
What is the difference between 'class' and 'media' dark mode strategies in Tailwind?
The `class` strategy gives you manual control over dark mode by toggling a `dark` class on a container (e.g., “). This is ideal for user-driven theme toggles (e.g., a switch). The `media` strategy automatically applies dark mode based on the user's OS or browser setting using `prefers-color-scheme: dark`. It requires no JavaScript but limits user control. Choose `class` for custom toggles, or `media` for a simpler, system-following approach. You can also combine both with custom JavaScript to respect system preference while allowing overrides.
How do I use the 'dark:' variant in Tailwind CSS?
The `dark:` variant is used to apply styles only when dark mode is active. For example, to change background and text color in dark mode, you write: “. The `dark:` prefix works with any utility class. If you use the `class` strategy, ensure the parent element has the `dark` class. For the `media` strategy, it activates automatically based on system preference. You can also stack variants like `hover:dark:bg-gray-700`.
Can I use Tailwind CSS dark mode with JavaScript frameworks like React or Vue?
Yes, Tailwind CSS dark mode works seamlessly with JavaScript frameworks. For React, you can manage the `dark` class on the “ element using state or context. For example, use `useEffect` to toggle `document.documentElement.classList.toggle('dark')`. In Vue, you can bind a class to the root element. Many frameworks also have libraries like `next-themes` for Next.js or `vue-dark-mode` for Vue. The key is to ensure the `dark` class is added to a parent element that wraps your components.
How do I respect user system preference while allowing manual toggle in Tailwind dark mode?
You can combine both approaches by first checking `window.matchMedia('(prefers-color-scheme: dark)').matches` on page load to set the initial theme. Then, provide a toggle that overrides this by adding/removing the `dark` class and saving the preference in `localStorage`. For example, use JavaScript to listen to system changes with `matchMedia.addEventListener('change', handler)` but only apply if no manual override exists. This gives users the best of both worlds.
What are common pitfalls when implementing dark mode in Tailwind?
Common pitfalls include: forgetting to add the `dark` class to the correct parent element (e.g., “ vs “), not using the `dark:` variant on all necessary elements (leading to incomplete styling), and issues with third-party libraries that don't respect Tailwind's dark mode. Also, ensure your `tailwind.config.js` is set correctly. Another pitfall is not testing on actual devices with system preference changes. Use browser DevTools to simulate dark mode and verify your styles.
How can I test dark mode during development in Tailwind CSS?
You can test dark mode by toggling the `dark` class manually in the browser's DevTools. For example, add `class="dark"` to the “ element in the Elements panel. Alternatively, use the `prefers-color-scheme` simulation in Chrome DevTools under Rendering > Emulate CSS media feature prefers-color-scheme. If you have a toggle button, click it to switch. Also, check on different browsers and OS settings to ensure consistency.
Does Tailwind CSS dark mode work with CSS custom properties?
Yes, Tailwind CSS dark mode works well with CSS custom properties (variables). You can define theme colors as CSS variables and use them in your config. For example, in `tailwind.config.js`, you can extend colors with `colors: { primary: 'var(–color-primary)' }` and then define `–color-primary` in your CSS for light and dark themes. This approach makes it easier to maintain and customize themes. However, note that Tailwind's `dark:` variant still works independently of CSS variables.
Building a Headless WordPress Site with React: A Comprehensive Technical Guide
Introduction to Headless WordPress and React
Building a Headless WordPress Site with React represents a modern architectural shift that separates content management from presentation. In this model, WordPress serves exclusively as a content repository and API provider, while React handles all frontend rendering and user interaction. This decoupling enables developers to leverage WordPress’s mature editorial tools alongside React’s component-based, reactive interface, resulting in a site that is both content-rich and highly performant.
What Is a Headless CMS and How Does It Differ from Traditional WordPress
A headless CMS is a content management system that delivers content via APIs without dictating how that content is displayed. Unlike traditional WordPress, where the PHP-based theme engine tightly couples content, templates, and styling, a headless WordPress backend outputs JSON or GraphQL data through the WordPress REST API or WPGraphQL. The frontend is built independently, consuming this data and rendering it in any framework or device.
Separation of concerns: Content editors work in the WordPress admin panel; developers control the frontend stack independently.
API-first delivery: Content is fetched as structured data rather than pre-rendered HTML, enabling reuse across web, mobile, and IoT applications.
No theme dependency: The frontend is a standalone application, eliminating WordPress theme bloat and security vulnerabilities from outdated PHP templates.
Static site potential: Headless setups can pre-render pages at build time, dramatically reducing server load and improving time-to-first-byte.
Why Choose React for the Frontend of a Headless WordPress Site
React is the leading choice for headless WordPress frontends because of its component architecture, virtual DOM diffing, and vast ecosystem. When building a headless WordPress site with React, developers gain:
Reusable components: Blocks like headers, post cards, and navigation menus are built once and composed declaratively, reducing code duplication and ensuring consistency.
Efficient rendering: React’s virtual DOM minimizes direct DOM manipulation, resulting in smooth interactions even on complex content-heavy pages.
Rich state management: Libraries like Redux, Zustand, or React Query handle caching, pagination, and real-time updates from the WordPress API seamlessly.
SEO-friendly options: With Next.js or Gatsby, React applications can pre-render WordPress content server-side or statically, ensuring search engines index pages without JavaScript execution.
Developer velocity: React’s declarative syntax, hot module replacement, and extensive tooling (ESLint, Prettier, Storybook) accelerate development and testing.
Core Advantages: Performance, Flexibility, and Security in Decoupled Architecture
Adopting a headless WordPress architecture with React delivers three foundational benefits:
React can pre-render content as static HTML at build time or serve it via CDN, reducing server-side processing. The WordPress backend handles only API requests, not template rendering, lowering resource consumption.
Flexibility
Developers can use any frontend toolchain (React, Vue, Svelte) and deploy to any platform (Vercel, Netlify, AWS). Content is reusable across websites, mobile apps, and third-party integrations without duplication.
Security
The frontend and backend are isolated. WordPress’s admin panel is hidden behind a private domain or VPN, while the public React app has no direct database access. This reduces attack surfaces for SQL injection, XSS, and plugin exploits.
By separating the content layer from the presentation layer, teams can scale development independently, improve site speed through static generation, and maintain a secure, future-proof digital ecosystem. The result is a site that combines WordPress’s editorial strengths with React’s dynamic, component-driven user experience.
Setting Up WordPress as a Headless Backend
To transform a standard WordPress installation into a headless backend, you must decouple the content management layer from the front-end presentation. This involves configuring WordPress to serve data exclusively via APIs while disabling all front-end rendering features. Begin with a fresh WordPress installation (version 6.0 or later) on a server with PHP 8.0+ and MySQL 8.0+. Ensure your permalink structure is set to a non-default option, such as “Post name,” because the REST API relies on clean URL rewriting for proper endpoint routing. Navigate to Settings > Permalinks and select the “Post name” option, then save changes. This step is critical because the default “Plain” permalink structure breaks API routes.
For security, disable file editing in the WordPress admin by adding define('DISALLOW_FILE_EDIT', true); to your wp-config.php file. Also, remove any theme or plugin that generates front-end HTML, such as page builders or caching plugins designed for traditional sites. Your WordPress installation will now act solely as a content repository, with all data access occurring through API calls from your React application.
Installing and Configuring the WordPress REST API (Core and Custom Endpoints)
WordPress ships with a built-in REST API that exposes core content types—posts, pages, media, users, taxonomies, and comments—by default. Verify its functionality by visiting /wp-json/wp/v2/posts in your browser after installation. The response will be a JSON array of your posts. To extend the API with custom endpoints, register them in your theme’s functions.php file or a custom plugin. For example, to create an endpoint that returns only featured images with post IDs:
Test your custom endpoint at /wp-json/custom/v1/featured-images/. Always include a permission_callback to control access; use __return_true only for public data.
Using WPGraphQL for GraphQL-Based Data Fetching
If your React application prefers GraphQL over REST, install the WPGraphQL plugin (free from the WordPress plugin repository). After activation, navigate to GraphQL > Settings and enable introspection for development. The plugin automatically generates a GraphQL schema from your WordPress data, including custom post types and taxonomies. Access the GraphQL endpoint at /graphql and use tools like GraphiQL (included in the plugin) to test queries. For example, to fetch post titles and slugs:
WPGraphQL supports mutations for creating, updating, and deleting content, making it ideal for headless architectures where the front-end manages content operations. Ensure your server has adequate memory and execution time limits, as GraphQL queries can be resource-intensive.
Essential Plugins: Custom Post Type UI, ACF to REST API, and JWT Authentication
Three plugins are indispensable for a production headless setup:
Custom Post Type UI (CPT UI): Enables creation of custom post types and taxonomies via an admin interface without coding. For example, create a “Projects” post type with a “Technology” taxonomy. After saving, these appear automatically in both the REST API and WPGraphQL.
ACF to REST API: Integrates Advanced Custom Fields (ACF) with the REST API. Install both ACF (free or pro) and ACF to REST API. Configure field groups in the admin; they will be appended to API responses under the acf key. For instance, a “Price” field on a “Products” post type becomes accessible via /wp-json/wp/v2/products/123 as acf.price.
JWT Authentication: Secures API endpoints by issuing JSON Web Tokens for user authentication. Install the JWT Authentication for WP REST API plugin and add define('JWT_AUTH_SECRET_KEY', 'your-secret-key'); to wp-config.php. Generate a token by posting credentials to /wp-json/jwt-auth/v1/token. Use this token in the Authorization: Bearer header for authenticated requests, such as creating posts or accessing private content.
These plugins extend WordPress’s headless capabilities without bloating the backend. Always update them to the latest versions to maintain compatibility with WordPress core and your React front-end.
Setting Up Your React Frontend Environment
When building a headless WordPress site with React, the frontend environment serves as the foundation for performance, developer experience, and scalability. The initial scaffolding choices—framework selection, dependency management, and project structure—directly influence how efficiently you can integrate with the WordPress REST API or WPGraphQL. This section covers three critical decisions and configurations to ensure a robust setup.
Choosing the Right React Framework: Next.js vs. Create React App vs. Vite
Each framework optimizes for different priorities. Next.js excels in server-side rendering (SSR) and static site generation (SSG), which are ideal for SEO-driven headless WordPress sites. Create React App (CRA) offers a zero-configuration start but suffers from slower builds and limited SSR capabilities. Vite provides lightning-fast hot module replacement (HMR) and leaner production bundles, making it suitable for dynamic, client-heavy applications.
Feature
Next.js
Create React App (CRA)
Vite
Rendering Strategy
SSR, SSG, ISR
Client-side only (CSR)
CSR, optional SSR via plugins
Build Speed (cold start)
Moderate (2-5s)
Slow (10-20s)
Fast (1-3s)
SEO-Friendliness
Excellent (pre-rendered HTML)
Poor (requires additional tools)
Good (with prerendering)
API Routes
Built-in
None (requires Express)
None (requires middleware)
Use Case
Content-heavy, SEO-critical sites
Simple SPAs or prototypes
Performance-focused SPAs
For most headless WordPress projects, Next.js is the pragmatic choice due to its native support for data fetching from external APIs and incremental static regeneration (ISR), which allows content updates without full rebuilds. Vite is a strong alternative if you prioritize development speed and do not need SSR. CRA is best reserved for internal tools or learning environments.
Installing Dependencies: Axios, Apollo Client, and React Router
Three core libraries streamline communication between your React frontend and WordPress backend. Install them using npm or yarn:
Axios: A promise-based HTTP client for interacting with the WordPress REST API. It simplifies request cancellation, interceptors, and error handling.
Apollo Client: Essential if your WordPress instance uses the WPGraphQL plugin. It manages GraphQL queries, caching, and state synchronization.
React Router: Handles client-side routing for single-page applications, enabling navigation between pages like blog posts, categories, and custom post types.
Example installation command for a Next.js project:
If you are using Next.js, note that React Router is often redundant because Next.js provides its own file-based routing system. In that case, omit react-router-dom and rely on Next.js’s Link component and dynamic routes.
Environment Variables and Project Structure for Scalability
Proper environment variable management prevents hardcoding API endpoints and secrets. Create a .env.local file at the project root with variables prefixed by REACT_APP_ (for CRA/Vite) or NEXT_PUBLIC_ (for Next.js). Example:
# For Next.js
NEXT_PUBLIC_WP_API_URL=https://your-site.com/wp-json/wp/v2
NEXT_PUBLIC_GRAPHQL_URL=https://your-site.com/graphql
# For CRA/Vite
REACT_APP_WP_API_URL=https://your-site.com/wp-json/wp/v2
A scalable project structure separates concerns and anticipates growth. Organize your source folder as follows:
/components – Reusable UI elements (e.g., Header, PostCard)
/pages or /routes – Route-level components (e.g., HomePage, SinglePost)
/lib or /utils – API clients, helpers, and configuration files
/hooks – Custom React hooks for data fetching or state management
/styles – Global CSS, theme files, or CSS modules
This structure supports team collaboration and makes it straightforward to add features like authentication, caching, or third-party integrations later. By investing in this setup upfront, you avoid refactoring as the site grows in complexity.
Fetching and Displaying WordPress Content with REST API
Integrating a React frontend with a headless WordPress backend requires efficient data retrieval from the WordPress REST API. This section provides a practical walkthrough for fetching posts, pages, and custom fields, handling pagination, and rendering content in React components. By leveraging the API’s endpoints, you can build dynamic interfaces that update seamlessly without reloading the page.
Making API Calls with Axios: GET Requests for Posts and Pages
Axios is a popular HTTP client for React that simplifies making GET requests to the WordPress REST API. Install Axios via npm or yarn, then create a service file to centralize your API calls. For example, to fetch the latest 10 posts:
For pages, use the same pattern with the /pages endpoint. Include the _embed parameter to automatically include featured media, author, and other linked data. Always handle errors gracefully to maintain a robust user experience.
Rendering a Blog List with Dynamic Pagination and Filters
To display a paginated blog list, maintain state for the current page and total pages in your React component. Use the useEffect hook to fetch data when the page changes. Implement pagination controls as buttons or a page selector:
Previous/Next buttons: Disable them on the first or last page.
Page numbers: Show a limited range (e.g., 1, 2, 3 … last).
Per-page selector: Allow users to choose 10, 20, or 50 items.
For filters, pass query parameters like categories or search to the API. For example, to filter by category ID:
Combine filters with pagination by resetting the page to 1 whenever a filter changes. Display the current filter state (e.g., “Showing posts in ‘Technology'”) for clarity.
Handling Featured Images, Categories, and Custom Meta Fields
Featured images require the _embed parameter to include the _embedded['wp:featuredmedia'] array. Access the image URL and alt text from the response:
Categories are linked via IDs in post.categories. Fetch category names separately using the /categories endpoint, or embed them by requesting _embed=wp:term. For custom meta fields registered with register_meta in WordPress, expose them by adding show_in_rest to the field registration. Access them via post.meta.your_field_key.
To display these elements efficiently, create reusable React components:
Component
Props
Description
PostCard
post, imageUrl, categories
Renders a single post with featured image, title, excerpt, and category badges.
Pagination
currentPage, totalPages, onPageChange
Provides navigation controls and page indicators.
CategoryFilter
categories, selectedCategory, onCategoryChange
Dropdown or button group for filtering by category.
By structuring your components this way, you maintain a clean separation of concerns and ensure that the headless setup scales gracefully with your content needs.
Implementing GraphQL with WPGraphQL and Apollo Client
Integrating GraphQL into a headless WordPress architecture unlocks precise data fetching, eliminating over-fetching and under-fetching common with REST APIs. By pairing WPGraphQL on the server with Apollo Client in React, developers can query exactly the fields each component needs, improving performance and developer experience. This section details the complete setup process, from WordPress configuration to React integration.
Installing and Configuring WPGraphQL on WordPress
Begin by installing the WPGraphQL plugin on your WordPress site. Navigate to Plugins > Add New, search for “WPGraphQL,” and install and activate it. For production environments, consider using Composer for dependency management.
After activation, verify the GraphQL endpoint is accessible at /graphql by default. To configure key settings:
Go to Settings > GraphQL in the WordPress admin.
Enable public introspection for development; disable it in production for security.
Set batch queries to “off” unless your application requires them.
Configure CORS headers under “CORS Settings” to allow requests from your React app’s origin.
Test the endpoint using a tool like GraphiQL (included in the plugin). Run a simple query to confirm data retrieval:
If you need custom post types or fields, extend WPGraphQL via filters or register them in your theme’s functions.php. For example, to expose ACF fields, install the WPGraphQL for Advanced Custom Fields plugin.
Create an Apollo Client instance by configuring the ApolloClient with the GraphQL endpoint and an in-memory cache. In a new file, e.g., apollo-client.js:
import { ApolloClient, InMemoryCache, createHttpLink } from '@apollo/client';
const httpLink = createHttpLink({
uri: 'https://your-wordpress-site.com/graphql',
});
const client = new ApolloClient({
link: httpLink,
cache: new InMemoryCache(),
});
export default client;
Wrap your app’s root component with ApolloProvider to make the client accessible throughout the component tree:
import { ApolloProvider } from '@apollo/client';
import client from './apollo-client';
function App() {
return (
<ApolloProvider client={client}>
<YourComponents />
</ApolloProvider>
);
}
For data fetching, use the useQuery hook. For mutations (e.g., submitting comments), use useMutation. Both hooks return loading, error, and data states, enabling clean UI state management.
Writing GraphQL Queries for Posts, Pages, and Related Content
With Apollo Client ready, craft queries that fetch only the required fields for each component. For a blog post list, request title, excerpt, and featured image:
const GET_PAGE = gql`
query GetPage($slug: String!) {
pageBy(uri: $slug) {
title
content
seo {
metaDesc
}
}
}
`;
To fetch related content, such as categories or tags for a post, include nested fields:
const GET_POST_WITH_TAXONOMIES = gql`
query GetPostWithTaxonomies($slug: String!) {
postBy(slug: $slug) {
title
categories {
nodes {
name
slug
}
}
tags {
nodes {
name
}
}
}
}
`;
Use variables in queries to dynamically fetch data based on user interaction or routing. For pagination, leverage WPGraphQL’s cursor-based pagination with after and first parameters. This approach ensures your React components receive exactly the data they need, keeping the headless architecture efficient and maintainable.
Managing Authentication and User Sessions
In a headless WordPress setup, authentication moves from server-rendered sessions to stateless, token-based mechanisms. This shift requires careful handling to secure user login, registration, and protected content access without relying on WordPress’s built-in session cookies. Two primary approaches—JWT (JSON Web Tokens) and OAuth—dominate headless authentication, with JWT being the most common for custom React front-ends due to its simplicity and stateless nature. The following subsections detail how to implement secure authentication using WordPress plugins, manage tokens in React, and build user-facing components.
Implementing JWT Authentication via WordPress Plugins
To enable JWT authentication on the WordPress backend, install and activate a reliable plugin such as “JWT Authentication for WP REST API” or “Simple JWT Login.” These plugins expose endpoints—typically /wp-json/jwt-auth/v1/token—that accept user credentials and return a JWT access token and a refresh token. Configure the plugin by adding the following constant to your wp-config.php file to define a secret key:
After activation, verify that the plugin adds the necessary REST routes by sending a POST request to the token endpoint with username and password fields. The response includes an access_token (short-lived, e.g., 1 hour) and a refresh_token (long-lived, e.g., 14 days). For OAuth, consider plugins like “WP OAuth Server” or “OAuth 2.0 for WordPress,” though JWT remains simpler for most React projects.
Storing and Refreshing Tokens in React with Context or Redux
Once tokens are obtained, store them securely in the browser. Avoid localStorage for access tokens due to XSS vulnerabilities; instead, use HTTP-only cookies for production or, for simplicity in development, store the access token in memory (e.g., React state) and the refresh token in an HTTP-only cookie. Use React Context or Redux to manage authentication state globally. Below is a Context-based approach:
AuthContext: Holds user object, access token, and loading state.
Login function: Calls the WordPress JWT endpoint, stores tokens, and updates context.
Token refresh logic: Intercepts 401 responses from API calls, sends refresh token to a custom endpoint (e.g., /wp-json/jwt-auth/v1/token/refresh), and updates the access token.
Implement an Axios interceptor that automatically attempts token refresh on 401 errors. For Redux, create an auth slice with actions for login, logout, and token refresh, and use middleware to handle async flows. Always clear tokens from memory and cookies on logout.
Building Login, Registration, and Protected Route Components
Create reusable components that integrate with your authentication context or Redux store. For login and registration, use controlled forms that send POST requests to WordPress REST endpoints (e.g., /wp-json/jwt-auth/v1/token for login, /wp-json/wp/v2/users/register for registration, if enabled). After successful authentication, redirect the user to a protected dashboard.
For protected routes, wrap your route components with a higher-order component or a custom ProtectedRoute component that checks the authentication state:
const ProtectedRoute = ({ children }) => {
const { isAuthenticated, loading } = useAuth();
if (loading) return <div>Loading...</div>;
return isAuthenticated ? children : <Navigate to="/login" />;
};
Combine this with error handling for expired tokens—redirect to login if refresh fails. For registration, validate fields like username, email, and password on the client side before submission. Use WordPress’s built-in nonce mechanism for additional security on write operations, though JWT itself covers most authentication needs. Test all flows thoroughly, especially token expiration and refresh, to ensure seamless user sessions.
Optimizing Performance and SEO for Headless Sites
When building a headless WordPress site with React, performance and search engine visibility become intertwined challenges. Since the frontend is decoupled from WordPress, you must deliberately implement rendering strategies, SEO metadata injection, and caching to match or exceed traditional WordPress speeds. The following subsections detail proven methods for achieving fast page loads and strong search rankings.
Using Next.js SSR and SSG for Faster Page Delivery
Next.js offers two primary rendering modes that dramatically improve perceived performance for headless WordPress sites. Server-side rendering (SSR) generates HTML on each request, ensuring that users and search engine crawlers receive fully rendered pages immediately. This is ideal for dynamic content like blog comments or user-specific dashboards. Static site generation (SSG) pre-builds HTML at build time, serving it via a CDN with near-instant load times. For content-heavy sites with infrequent updates, SSG is the better choice.
SSR use cases: Real-time data, authenticated pages, frequently changing content.
SSG use cases: Blog posts, landing pages, documentation, product catalogs.
Hybrid approach: Use getServerSideProps for dynamic routes and getStaticProps with incremental static regeneration (ISR) for content that changes periodically.
To implement, fetch WordPress data via the REST API or GraphQL inside Next.js page components. For SSG, set a revalidate interval in getStaticProps to rebuild pages when content updates. This balances freshness with speed.
Implementing Yoast SEO or Rank Math with Headless WordPress
Traditional SEO plugins like Yoast or Rank Math manage meta titles, descriptions, and sitemaps within WordPress. In a headless setup, you must expose this data through the API. Both plugins output SEO metadata as custom fields or REST API endpoints. For Yoast, enable the REST API integration in its settings; for Rank Math, the data appears automatically in the REST response under yoast_head_json or rank_math keys.
Plugin
API Endpoint
Key Metadata
Yoast SEO
/wp/v2/posts/{id}?_fields=yoast_head_json
Title, description, canonical URL, Open Graph tags
Rank Math
/wp/v2/posts/{id}?rank_math=1
Title, description, focus keyword, schema markup
In your React frontend, parse this data and inject it into the page’s <head> using Next.js’s next/head component. For example, map yoast_head_json.title to a <title> tag. This ensures search engines see optimized metadata without server-side PHP rendering.
Caching Strategies: CDN Integration and Client-Side Caching
Effective caching reduces server load and accelerates content delivery. Start by integrating a CDN like Cloudflare or Fastly. For SSG sites, the CDN caches static HTML files at the edge, serving them globally with minimal latency. For SSR, enable CDN caching of rendered pages with appropriate cache-control headers (e.g., public, s-maxage=600 for 10-minute freshness).
CDN caching: Cache entire HTML responses for anonymous users. Purge cache via webhook when WordPress content updates.
Client-side caching: Use service workers with Workbox to cache API responses and assets. Set a stale-while-revalidate strategy for WordPress REST API calls.
API response caching: Implement Redis or Memcached on the WordPress server to cache REST API responses. Use the wp_cache_set function in custom endpoints.
Image optimization: Serve images via a CDN that supports WebP conversion and responsive sizing (e.g., Cloudinary or Imgix).
Combine these layers: CDN for static assets, server-side caching for API data, and client-side caching for repeated navigation. Test with tools like Lighthouse to verify time-to-first-byte (TTFB) under 200ms and fully loaded pages under 2 seconds.
Building Advanced Features: Custom Endpoints and Dynamic Routing
When a headless WordPress site outgrows its default REST API capabilities, developers must extend the backend with custom endpoints and pair them with sophisticated front-end routing. This section details how to build these advanced features, ensuring your React front-end can efficiently handle specialized data, custom post types, and external service integrations without compromising performance or maintainability.
Creating Custom REST Endpoints for Specialized Data Needs
WordPress’s built-in REST API provides standard routes for posts, pages, and custom post types, but complex queries—such as aggregating data from multiple post types, applying custom business logic, or returning computed fields—require tailored endpoints. To create a custom endpoint, register it in your theme’s functions.php or a custom plugin using register_rest_route(). The following example returns a curated list of upcoming events with a calculated “days until event” field:
Permission callbacks: Use __return_true for public data, or implement authentication checks for protected endpoints.
Pagination: Add per_page and page parameters to avoid overwhelming the server or client.
Field selection: Return only necessary fields to reduce payload size—avoid sending entire post objects.
Caching: Set appropriate cache headers or use transients for expensive queries.
Dynamic Routing with React Router for Custom Post Types and Taxonomies
Once custom endpoints are ready, the React front-end must handle dynamic routing for custom post types and taxonomies. Using React Router v6, you can define parameterized routes that map to custom post type slugs and taxonomy terms. For example, a site with “portfolio” custom post types and “portfolio-category” taxonomies might use the following route structure:
Inside each component, use the useParams() hook to extract the slug and fetch data from your custom endpoint. For taxonomy archives, query the endpoint with the term slug to filter results. This approach ensures that every custom post type and taxonomy has a clean, SEO-friendly URL that mirrors your content hierarchy.
Integrating External APIs: Maps, Payments, and Social Feeds
Headless WordPress sites often need to blend CMS content with third-party services. When integrating external APIs, consider these patterns:
Maps (Google Maps or Mapbox): Fetch location coordinates from WordPress meta fields (e.g., Advanced Custom Fields), then render a map component using the service’s JavaScript library. Never expose API keys in client-side code; proxy requests through a custom WordPress endpoint or serverless function.
Payments (Stripe or PayPal): Use WordPress as a product catalog via custom endpoints, then handle checkout entirely in React using Stripe Elements or PayPal’s JavaScript SDK. Store order metadata in WordPress as a custom post type for administrative tracking.
Social feeds (Instagram or Twitter): Create a WordPress plugin that periodically caches social media data in a custom table or post type, then expose it through a REST endpoint. This avoids rate limits and keeps the front-end fast.
The following table compares two common approaches for integrating external APIs in a headless setup:
Integration Method
Pros
Cons
Direct client-side API calls
Simple to implement; real-time data; no server overhead
Exposes API keys; subject to CORS and rate limits; slower initial load
Proxy through WordPress endpoint
Secure key management; server-side caching; unified data format
Adds server load; requires custom endpoint development; increased latency for uncached requests
For most production sites, the proxy approach is recommended because it centralizes security and caching, though direct calls may suit low-traffic prototypes. Always validate and sanitize data from external APIs before displaying it in React to prevent XSS vulnerabilities.
Deployment and Hosting Best Practices
Deploying a headless WordPress site requires treating the WordPress backend and the React frontend as independent services, each with its own hosting, scaling, and security considerations. The following best practices cover managed versus self-managed hosting for WordPress, modern deployment platforms for React, and essential configuration steps for production readiness.
Hosting WordPress on Managed Servers (e.g., Kinsta, WP Engine) vs. VPS
Choosing between managed WordPress hosting and a Virtual Private Server (VPS) depends on your team’s operational capacity and traffic expectations.
Managed hosting (Kinsta, WP Engine): These providers offer automatic caching, server-level security patches, daily backups, and expert support. They are ideal for teams that want to focus on content and frontend development without managing server infrastructure. However, they may restrict certain plugins or custom server configurations.
VPS (DigitalOcean, Linode, AWS EC2): A VPS gives full root access, allowing custom Nginx or Apache configurations, Redis object caching, and fine-tuned PHP settings. This is preferable for high-traffic sites or those requiring non-standard setups (e.g., custom REST API endpoints with heavy caching). The trade-off is the need for ongoing sysadmin work: OS updates, security hardening, and performance monitoring.
Recommendation: Use managed hosting for most projects unless you need granular server control. For a VPS, consider using a provisioning tool like Ansible or Laravel Forge to automate setup.
Deploying the React App to Netlify, Vercel, or AWS Amplify
React frontends are static files after build, making them perfect for Jamstack platforms. Each platform provides a global CDN, automatic HTTPS, and seamless Git integration.
Platform
Strengths
Best For
Netlify
Instant rollbacks, form handling, split testing
Teams needing rapid iteration and preview deployments
Vercel
Serverless functions, ISR, Next.js optimization
Projects using Next.js or requiring server-side rendering
AWS Amplify
Full CI/CD, custom build images, AWS integration
Enterprises already on AWS needing deep infrastructure control
All three platforms support automatic deployment from Git branches. For a standard create-react-app setup, a typical build command is npm run build with the output directory set to build. Example Netlify configuration in netlify.toml:
[build]
command = "npm run build"
publish = "build"
[[redirects]]
from = "/*"
to = "/index.html"
status = 200
This redirect rule ensures client-side routing works on page refresh.
Setting Up Custom Domains, SSL Certificates, and Environment Variables
Production headless sites require three configuration steps across both backend and frontend.
Custom domains: Point a CNAME record (e.g., app.yourdomain.com) to the React app’s default domain (e.g., your-app.netlify.app). For WordPress, add a CNAME or A record pointing to the server IP. Use separate subdomains for backend and frontend to avoid cookie conflicts.
SSL certificates: Managed hosts and Jamstack platforms auto-provision free SSL via Let’s Encrypt. For VPS WordPress, use Certbot to obtain certificates:
Environment variables: Store sensitive data like the WordPress REST API URL, authentication tokens, and Google Analytics IDs. In Netlify, set these in Site Settings > Build & Deploy > Environment Variables. In the React app, prefix them with REACT_APP_ (e.g., REACT_APP_WP_API_URL=https://api.yourdomain.com/wp-json/wp/v2). Never commit .env files to version control; use a .env.example template instead.
Final checklist: Verify CORS headers allow the frontend domain, test SSL expiry monitoring, and use a staging environment that mirrors production before every deployment.
Testing, Debugging, and Maintenance
Unit and Integration Testing for React Components with Jest and React Testing Library
Testing is critical in a headless architecture because the frontend and backend are decoupled, making integration errors harder to catch. For React components, Jest serves as the test runner and assertion library, while React Testing Library provides utilities to render components and simulate user interactions. Focus on testing component behavior rather than implementation details. For unit tests, isolate individual components by mocking API calls or WordPress data. For example, test that a PostList component renders a list of titles when given mock post data. For integration tests, render a component that fetches data from a real or mocked REST endpoint, verifying that loading states, error messages, and successful renders appear correctly. Use @testing-library/user-event to simulate clicks and form inputs. Always clean up after each test with afterEach to prevent state leakage. Key practices include:
Mocking fetch or axios calls using jest.fn() or libraries like msw (Mock Service Worker).
Testing error boundaries by throwing intentional errors in mocked API responses.
Running tests in a CI pipeline to catch regressions before deployment.
Debugging API Errors: CORS, Authentication, and Data Mismatches
API errors are the most common headaches in headless WordPress. CORS (Cross-Origin Resource Sharing) errors occur when the React frontend runs on a different domain or port than the WordPress backend. To fix this, add the following to your WordPress .htaccess or server config:
Header set Access-Control-Allow-Origin "https://your-frontend-domain.com"
For authentication errors (401 or 403), ensure you are using proper nonces or JWT tokens. WordPress REST API requires a nonce for authenticated requests; pass it via the X-WP-Nonce header. Data mismatches happen when the expected schema differs from the API response. Use TypeScript or PropTypes to enforce shape, and log the full response object during development. Common debugging steps include:
Inspect network tab for request/response headers and payloads.
Test endpoints directly with Postman or curl to isolate backend issues.
Check for WordPress plugin conflicts that modify REST responses.
Scheduled Maintenance: WordPress Updates, Plugin Audits, and Frontend Refactoring
Maintaining a headless site requires separate attention to both stacks. For WordPress, schedule monthly updates for core, themes, and plugins. Before updating, take a database backup and test on a staging environment. Audit plugins quarterly—remove unused ones and replace deprecated ones with modern alternatives. For the React frontend, refactor components when dependencies update or when performance degrades. Use tools like Lighthouse to monitor bundle size and load times. A maintenance checklist might include:
Task
Frequency
Owner
WordPress core updates
Monthly
Backend team
Plugin security audit
Quarterly
Security team
React dependency upgrades
Bi-monthly
Frontend team
Performance profiling
Monthly
DevOps
Additionally, monitor API response times and set up alerts for 5xx errors. Regularly review custom REST endpoints for security vulnerabilities, such as SQL injection or data exposure. By following this structured approach, you ensure your headless site remains stable, secure, and performant over time.
A headless WordPress site decouples the backend (WordPress as a content management system) from the frontend (a separate client, like React). Content is managed in WordPress and delivered via its REST API or GraphQL, while the frontend handles presentation. This allows for greater flexibility, performance, and security, as the frontend is built with modern JavaScript frameworks and can be hosted separately.
Why use React with WordPress in a headless setup?
React provides a dynamic, component-based UI that can consume WordPress content via APIs. It enables faster page loads through client-side rendering or static site generation, better user experiences with SPAs, and easier integration with modern tools. Developers can leverage React's ecosystem for routing, state management, and optimization, while WordPress remains a familiar backend for content editors.
How do I set up WordPress as a headless CMS?
Start by installing WordPress on a server. Enable the REST API (built-in) or install the WPGraphQL plugin for GraphQL. Configure custom post types and fields if needed. Ensure permalinks are set to a clean structure. For security, disable the frontend (e.g., using a plugin like 'Headless Mode') and use authentication (OAuth, JWT) for private content. Then, connect your React app to the API endpoints.
What are the best practices for fetching data from WordPress in React?
Use a dedicated library like `axios` or `fetch` for REST API calls, or Apollo Client for GraphQL. Implement caching with tools like SWR or React Query to reduce requests. For static sites, pre-fetch data at build time (e.g., with Next.js `getStaticProps`). Always handle errors and loading states. Use environment variables for API URLs and consider pagination for large datasets.
What are the performance benefits of a headless WordPress with React?
Performance improvements come from reduced server load (WordPress only serves API responses), faster frontend rendering (React's virtual DOM), and the ability to use CDNs for static assets. Headless setups can leverage static site generation (e.g., with Gatsby or Next.js) to pre-build pages, resulting in near-instant load times. Additionally, you can optimize images and assets independently of WordPress.
How do I handle authentication in a headless WordPress React app?
For public content, no authentication is needed. For private content (e.g., user-specific data), use JWT authentication via plugins like 'JWT Authentication for WP REST API'. In React, store tokens securely (e.g., httpOnly cookies) and send them with API requests. Implement login/logout flows, token refresh, and role-based access. For GraphQL, WPGraphQL supports JWT out-of-the-box.
Can I use WordPress plugins in a headless setup?
Yes, many plugins work with the REST API or GraphQL. Plugins for SEO (Yoast), custom fields (ACF), and media management remain effective. However, avoid plugins that rely on frontend rendering (e.g., page builders). Some plugins may need configuration to expose data via API. Always test plugins in a headless environment to ensure compatibility.
What deployment options are best for a headless WordPress React site?
Deploy the React frontend on static hosting (Netlify, Vercel) or a cloud platform (AWS, Firebase). Use a separate server for WordPress (managed hosting like WP Engine or Kinsta). For optimal performance, host WordPress on a fast server with a CDN for API responses. Use CI/CD pipelines to rebuild the frontend when content changes (webhooks).
React Best Practices for 2026: Building Modern, Performant, and Scalable Applications
1. Embrace the React Server Component Paradigm
By 2026, React Server Components have transitioned from an experimental feature to the foundational architecture for modern React applications, particularly within frameworks like Next.js and Remix. This paradigm shift fundamentally changes how developers approach rendering, data fetching, and bundle optimization. Instead of shipping all JavaScript to the client, Server Components execute exclusively on the server, sending only the rendered HTML to the browser. This results in significantly reduced bundle sizes, faster initial page loads, and improved Core Web Vitals. Adopting this model requires a deliberate rethinking of where logic lives and how data flows through your application.
Migrating Data Fetching from useEffect to Async Server Components
The most immediate change for developers is moving data fetching away from client-side useEffect hooks and into async Server Components. In the server paradigm, you can directly fetch data at the component level using async/await, eliminating the need for loading states, error boundaries, and client-side waterfalls. Consider the following migration pattern:
Before (Client-Only): Use useEffect with fetch inside a client component, managing loading and error states manually. This often leads to multiple sequential network requests and a larger bundle.
After (Server Component): Declare the component as async and fetch data directly. The server handles the request, streams the result, and sends only the final HTML to the client.
This approach eliminates the need for client-side state management for initial data loads, reduces the amount of JavaScript shipped, and improves perceived performance through server-side streaming. For example, a dashboard component that previously required three sequential useEffect calls can now fetch all necessary data in parallel within a single async component.
Combining Server and Client Components for Interactive UIs
While Server Components excel at static rendering and data fetching, they cannot use hooks, event handlers, or browser APIs. The key to building interactive UIs is strategically combining Server and Client Components. The recommended pattern is to use Server Components as the outer shell that fetches data and passes it down to Client Component islands that handle interactivity. Follow these guidelines:
Server Components handle data fetching, authentication, and rendering static content.
Client Components are used only where interactivity is required (e.g., forms, buttons, animations, stateful charts).
Props passing flows naturally: Server Components fetch data and pass it as props to Client Components, which can then use useState or useEffect for local interactivity.
This hybrid architecture keeps the majority of your application on the server while preserving a rich, interactive user experience. For instance, a product listing page can fetch all product data in a Server Component, then pass individual product cards to a Client Component that handles sorting or filtering without re-fetching from the server.
Handling Authentication and Authorization in Server Components
Authentication and authorization require special care in the Server Component paradigm because these components run on the server, not the browser. You cannot rely on client-side tokens stored in localStorage or cookies accessible via document.cookie. Instead, implement server-side authentication using HTTP-only cookies or session tokens. The recommended approach includes:
Reading cookies directly in Server Components using the cookies() function (available in Next.js and Remix) to verify session tokens.
Performing authorization checks at the component level before fetching data or rendering protected content.
Redirecting unauthenticated users to a login page using server-side redirects rather than client-side navigation.
This server-first approach ensures that sensitive logic never reaches the client bundle. For example, an admin dashboard can check user roles in the Server Component before rendering admin-specific data, preventing unauthorized access even if the client-side code is inspected.
2. Optimize Bundle Size with Modern Tooling and Tree Shaking
In 2026, the default build tools for React—Vite and Turbopack—have made bundle optimization more automated than ever, but understanding the underlying mechanisms remains critical for production-grade applications. Tree shaking, the process of eliminating dead code that is never imported, now works seamlessly with ES module syntax. However, the real gains come from deliberate configuration and auditing. By leveraging these modern tools, you can reduce bundle sizes by 30–50% compared to traditional Webpack setups, directly improving load times and user experience.
Leveraging Vite and Turbopack for Faster Builds and Smaller Bundles
Vite and Turbopack use native ES module (ESM) bundling and on-demand compilation to eliminate the overhead of full rebuilds. For tree shaking to work effectively, ensure your entire dependency tree uses ES modules. Both tools automatically detect and remove unused exports, but you must avoid side-effectful imports. For example, never import a library solely for its prototype extensions unless you explicitly mark the import as having side effects in your package.json:
{
"sideEffects": false
}
To further optimize, configure your build tool to treat external dependencies as pure. In Vite, you can use the optimizeDeps option to pre-bundle third-party libraries, while Turbopack automatically deduplicates modules. Both tools also support manualChunks strategies to split vendor code into separate cacheable bundles. For instance, a typical Vite configuration might look like this:
This ensures that library code changes infrequently, allowing browsers to cache it longer. Always monitor your bundle with tools like vite-bundle-visualizer to identify oversized modules.
Dynamic Import Patterns for Route-Level and Component-Level Code Splitting
Code splitting via dynamic imports remains the most effective way to defer loading of non-critical code. In React 19 and beyond, use React.lazy with Suspense for route-level splitting, or leverage the newer import() syntax directly within components for granular control. For route-level splitting, structure your router as follows:
For component-level splitting, consider heavy components like charts or text editors that are not immediately visible. Use dynamic imports inside a useEffect or within a conditional render:
Always wrap lazy-loaded components in Suspense with a meaningful fallback to prevent layout shifts. For optimal performance, preload critical chunks using the preload or prefetch directives on the parent component.
Auditing and Removing Unused Dependencies with Tools like Knip
Even with perfect tree shaking, unused dependencies bloat your node_modules and increase install times. Tools like Knip have become the standard for detecting dead files, unused exports, and orphaned dependencies. To run Knip, install it and execute the following command:
npx knip
Knip analyzes your import statements, configuration files, and entry points to produce a report of unused items. A typical output includes:
Unused dependencies – packages listed in package.json but never imported.
Unused devDependencies – tools like ESLint plugins that are no longer referenced.
Unused files – components or utilities that are not imported anywhere.
Unused exports – functions or constants exported but never consumed.
After removing identified items, re-run your tests and build to ensure nothing breaks. For larger codebases, integrate Knip into your CI pipeline to catch regressions automatically. Combine this with a .gitignore for generated files and a strict sideEffects policy to maintain lean bundles throughout the project lifecycle. Remember that auditing is not a one-time task—schedule it monthly to prevent dependency creep.
3. Master State Management with Signals and Fine-Grained Reactivity
By 2026, the React ecosystem has widely adopted signals and fine-grained reactivity as a first-class state management approach. Signals—pioneered by SolidJS and refined by Preact Signals—offer direct, observable state cells that update only the specific DOM nodes that depend on them. This eliminates the overhead of virtual DOM diffing for state changes, leading to more predictable rendering and significantly improved performance in complex applications. Unlike the Context API, which triggers re-renders of entire component subtrees, or Redux, which requires centralized reducers and selectors, signals provide a lightweight, composable pattern that integrates naturally with React’s component model. The key shift is from “re-render everything and diff” to “update exactly what changed.”
Comparing Signals vs. Context API vs. Redux for Different Use Cases
Choosing the right state management tool depends on the scale and nature of your application. Signals excel in scenarios requiring high-frequency updates—such as real-time dashboards, animation controllers, or collaborative editing—where fine-grained updates prevent wasteful re-renders. The Context API remains suitable for low-frequency, global state like user authentication or theme toggling, but suffers from provider re-render cascades when state changes frequently. Redux, with its middleware ecosystem, remains the standard for complex state logic involving multiple asynchronous data flows, undo/redo, or strict debugging requirements, but introduces boilerplate that signals avoid. The following table summarizes the trade-offs:
Criterion
Signals (e.g., Preact Signals)
Context API
Redux Toolkit
Update granularity
Component-level, DOM-targeted
Subtree-level (all consumers re-render)
Selector-based (mapStateToProps or useSelector)
Performance with frequent updates
Excellent (no virtual DOM overhead)
Poor (cascading re-renders)
Good (with memoized selectors)
Boilerplate
Minimal (createSignal, useSignal)
Low (createContext, Provider)
Moderate (slices, reducers, actions)
Best use case
Real-time UI, animations, forms
Global settings, authentication
Complex async workflows, large teams
Debugging & devtools
Emerging (limited ecosystem)
Native React DevTools
Excellent (Redux DevTools, time-travel)
Integrating Preact Signals with React via @preact/signals-react
To adopt signals in a React project, the @preact/signals-react package provides seamless integration without leaving the React paradigm. Begin by installing the package: npm install @preact/signals-react. Then, declare a signal using import { signal } from '@preact/signals-react' and create a reactive value: const count = signal(0). In your component, use the useSignal hook to read the signal’s current value: const value = useSignal(count). When you update the signal—count.value = count.value + 1—only the specific component that reads that signal re-renders, and only the parts of the DOM that depend on it are patched. This approach works with React hooks like useEffect and useMemo without conflict. For complex derived state, use computed: const doubled = computed(() => count.value * 2), which automatically recalculates only when dependencies change. The library handles cleanup automatically when components unmount, ensuring no memory leaks.
Avoiding Common Pitfalls When Mixing Signals with React’s Lifecycle
While signals reduce re-render overhead, improper usage can introduce subtle bugs. One common pitfall is mutating signal values inside useEffect without proper dependencies, which can create infinite loops if the effect triggers a signal update that re-runs the effect. Always ensure that signal updates inside effects are conditional or guarded. Another issue is reading signals inside JSX callbacks or event handlers without wrapping them in useSignal; this can cause stale closures. Use the useSignal hook to bind the reactive value to the component’s render cycle. Additionally, avoid passing raw signal objects as props to child components that are not signal-aware—this breaks fine-grained reactivity and forces full re-renders. Instead, pass the unwrapped value from useSignal. Finally, be cautious when mixing signals with React’s useReducer or useState in the same component; prefer one paradigm per component to avoid conflicting update patterns. A practical rule: use signals for global or shared state that requires fine-grained updates, and keep local component state with useState for simple UI toggles. By following these patterns, you unlock the performance benefits of signals while maintaining predictable React behavior.
4. Adopt TypeScript Best Practices for Large-Scale React Codebases
TypeScript has moved from optional to essential in 2026, particularly for large-scale React applications where team collaboration and code maintainability are critical. Beyond basic type annotations, advanced TypeScript patterns catch bugs at compile time, enforce consistent prop contracts, and reduce runtime errors. Adopting these practices ensures that your codebase scales without accumulating technical debt or fragile type definitions. The key is to leverage TypeScript’s type system to model your application’s domain precisely, turning potential runtime failures into compile-time errors that are caught before deployment.
Using Discriminated Unions and Template Literal Types for Props
Discriminated unions are a powerful pattern for modeling components that accept mutually exclusive prop combinations. Instead of using optional props with complex validation logic, define a union type with a discriminant property (often kind or variant) that narrows the allowed props. Template literal types further enhance this by enabling dynamic string-based prop values derived from existing types.
Example: A notification component that accepts different payloads based on its type.
type NotificationBase = {
id: string;
timestamp: Date;
};
type SuccessNotification = NotificationBase & {
kind: 'success';
message: string;
actionLabel?: string;
};
type ErrorNotification = NotificationBase & {
kind: 'error';
errorCode: number;
retryable: boolean;
};
type WarningNotification = NotificationBase & {
kind: 'warning';
severity: 'low' | 'medium' | 'high';
details: string;
};
type Notification = SuccessNotification | ErrorNotification | WarningNotification;
// Template literal type for dynamic event handlers
type EventHandler<T extends string> = `on${Capitalize<T>}`;
function NotificationComponent(props: Notification) {
switch (props.kind) {
case 'success':
return <div>{props.message}</div>;
case 'error':
return <div>Error {props.errorCode}</div>;
case 'warning':
return <div>{props.details}</div>;
}
}
Benefits of this approach include:
Complete type safety: invalid prop combinations are impossible at compile time.
Self-documenting code: the type definition serves as documentation for component usage.
Better IDE support: autocomplete works correctly for each variant.
Simpler runtime logic: no need for prop validation libraries.
Implementing Strict Null Checks and Avoiding any
Strict null checks are non-negotiable in 2026. Enable strictNullChecks in your tsconfig.json to ensure that null and undefined are handled explicitly. This eliminates entire classes of runtime errors. Avoid the any type entirely; instead, use unknown when the type is truly uncertain, then narrow it with type guards. For legacy code, use @ts-expect-error sparingly and with a clear rationale, tracking these exceptions in your code review process.
function assertNonNull<T>(value: T): asserts value is NonNullable<T>
Automating Type Generation from Backend Schemas (e.g., tRPC, GraphQL Codegen)
Manually maintaining TypeScript types that mirror your backend API is error-prone and time-consuming. In 2026, automate this process using tools like tRPC for full-stack TypeScript or GraphQL Codegen for GraphQL backends. These tools generate types directly from your server-side schema, ensuring that your frontend types are always in sync with the API contract.
For tRPC, types are inferred automatically from your router definition:
// server/router.ts
import { z } from 'zod';
import { publicProcedure, router } from './trpc';
export const appRouter = router({
getUser: publicProcedure
.input(z.object({ id: z.string() }))
.query(({ input }) => {
return { id: input.id, name: 'John Doe', age: 30 };
}),
});
export type AppRouter = typeof appRouter;
// client/UserComponent.tsx
import { trpc } from './trpc';
function UserComponent({ userId }: { userId: string }) {
const { data } = trpc.getUser.useQuery({ id: userId });
// data is strictly typed as { id: string; name: string; age: number }
return <div>{data?.name}</div>;
}
For GraphQL, run a codegen script as part of your build pipeline:
Commit generated types to version control for reproducibility.
Run code generation as a pre-commit hook or in CI.
Use custom scalar types (e.g., DateTime) with dedicated TypeScript types.
Avoid manual overrides unless absolutely necessary, and document them clearly.
Combine generated types with branded types for domain-specific safety (e.g., UserId instead of string).
5. Leverage the New React Compiler for Automatic Memoization
In 2026, the React Compiler—formerly known as React Forget—has reached stable maturity, fundamentally changing how developers approach performance optimization. Instead of manually sprinkling useMemo and useCallback throughout every component tree, you can now rely on the compiler to automatically memoize components, hooks, and values during build time. This shift reduces cognitive load, eliminates common memoization bugs, and lets you focus on architecture rather than micro-optimizations.
Enabling the React Compiler in Your Existing Project
Adopting the React Compiler in a 2026 codebase requires minimal configuration. The compiler integrates directly with your build toolchain, whether you use Vite, Next.js, or a custom Webpack setup. Follow these steps:
Install the compiler package via your package manager: npm install react-compiler-runtime@latest (or the equivalent for your framework).
Add the compiler plugin to your build configuration. For Vite, this means including reactCompilerPlugin() in vite.config.ts. For Next.js, add experimental: { reactCompiler: true } to next.config.js.
Wrap your root component or application entry point with the provided ReactCompilerProvider to enable runtime support for compiled output.
Run your existing test suite to ensure no regressions. The compiler is designed to be backwards-compatible, but edge cases may surface in complex conditional rendering or third-party integrations.
Once enabled, the compiler automatically analyzes your components and hooks, inserting memoization logic where it determines stability is guaranteed. You can verify its operation by checking the compiled output in your source maps or using the React DevTools Profiler (detailed below).
Understanding Compilation-Safe Patterns vs. Unsafe Patterns
Not every pattern is safe for automatic memoization. The compiler relies on a set of rules to determine when values are truly stable. The table below contrasts safe and unsafe patterns:
Pure functional components with deterministic props
Components that rely on mutable external state (e.g., global singletons or module-level variables)
Hooks that return derived data without side effects
Hooks that use useRef for values that change reference identity on every render
Inline callback functions that do not depend on closure variables that change
Callbacks that capture variables from a higher scope that are not explicitly declared as dependencies
Simple conditional rendering with stable keys
Dynamic key generation using random values or timestamps inside render logic
Components that use React.memo (compiler can replace or augment this)
Components that manually mutate props or state after initial render (anti-pattern)
When you encounter unsafe patterns, you still need manual useMemo or useCallback to guarantee stability. The compiler will emit a warning during build time for any pattern it cannot safely optimize. Review these warnings in your terminal or CI logs and refactor the offending code—often by moving side effects into useEffect or by extracting stable values into constants outside the component.
Measuring Performance Gains with React DevTools Profiler
To confirm the compiler is delivering on its promise, use the React DevTools Profiler in your development environment. Open the Profiler tab, start recording, and interact with your application. Look for these indicators of successful automatic memoization:
Reduced re-render counts: Components that previously re-rendered due to unstable props or callbacks now show zero or minimal re-renders in the flame graph.
Shorter commit times: The Profiler’s bar chart should show significantly lower durations for commits that involve deeply nested component trees, as the compiler skips unnecessary reconciliations.
Consistent “why did you render?” feedback: If you use the why-did-you-render library alongside the compiler, you should see far fewer false positives for unnecessary re-renders.
For a quantitative approach, compare the same interaction before and after enabling the compiler. Record the number of renders per component, total commit duration, and the time spent in JavaScript execution. In typical applications, you can expect a 30-50% reduction in re-renders for medium-to-large component trees, though actual gains depend on your codebase’s structure. Always profile in production mode with source maps enabled for accurate measurements.
6. Design Accessible and Inclusive UI Components by Default
In 2026, accessibility is no longer an afterthought but a fundamental requirement for any production-grade React application. Building accessible components from the ground up ensures that all users, regardless of ability, can interact with your interface effectively. This means integrating ARIA attributes, managing keyboard navigation, and controlling focus states as part of your component architecture, not as a separate audit step. Modern React developers leverage specialized libraries to enforce these patterns reliably, reducing manual effort and preventing common accessibility regressions.
Building Custom Hooks for Keyboard Navigation and Focus Trapping
Reusable custom hooks are the cleanest way to enforce keyboard navigation and focus management across your application. A common pattern is creating a useFocusTrap hook for modals, sidebars, or popovers, ensuring that Tab and Shift+Tab cycles remain within the active component. Similarly, a useRovingTabIndex hook can manage arrow key navigation for lists, toolbars, or tab panels, allowing only one child to be focusable at a time. Below is a practical example of a focus trap hook:
import { useEffect, useRef } from 'react';
function useFocusTrap(isActive: boolean) {
const containerRef = useRef<HTMLDivElement>(null);
useEffect(() => {
if (!isActive || !containerRef.current) return;
const previouslyFocused = document.activeElement as HTMLElement;
const focusableElements = containerRef.current.querySelectorAll(
'button, [href], input, select, textarea, [tabindex]:not([tabindex="-1"])'
);
const firstFocusable = focusableElements[0] as HTMLElement;
const lastFocusable = focusableElements[focusableElements.length - 1] as HTMLElement;
firstFocusable?.focus();
function handleKeyDown(e: KeyboardEvent) {
if (e.key !== 'Tab') return;
if (e.shiftKey) {
if (document.activeElement === firstFocusable) {
e.preventDefault();
lastFocusable?.focus();
}
} else {
if (document.activeElement === lastFocusable) {
e.preventDefault();
firstFocusable?.focus();
}
}
}
document.addEventListener('keydown', handleKeyDown);
return () => {
document.removeEventListener('keydown', handleKeyDown);
previouslyFocused?.focus();
};
}, [isActive]);
return containerRef;
}
This hook returns a ref to attach to the container element and automatically manages focus trapping when active, restoring focus to the previously focused element on deactivation.
Automated Accessibility Testing with axe-core and Playwright
Manual testing alone is insufficient for maintaining accessibility across a growing codebase. Automated testing tools like axe-core, integrated with Playwright, allow you to catch violations during development and in CI pipelines. The following table outlines a recommended testing strategy:
Test Type
Tool
Scope
Run Frequency
Unit-level a11y checks
jest-axe (axe-core)
Individual component snapshots
Every commit
Integration/page scans
Playwright + axe-core
Full page or flow after user interaction
On each PR
End-to-end regression
Playwright + axe-core
Critical user journeys
Before each release
A typical Playwright test snippet to scan a page after a modal opens looks like this:
import { test } from '@playwright/test';
import AxeBuilder from '@axe-core/playwright';
test('modal should not have accessibility violations', async ({ page }) => {
await page.goto('/dashboard');
await page.click('button#open-modal');
const results = await new AxeBuilder({ page }).analyze();
expect(results.violations).toEqual([]);
});
Integrating these scans into your CI ensures that accessibility regressions are caught early, reducing the cost of fixes and maintaining a high baseline of inclusivity.
Using Headless UI Libraries for Accessible Modals, Tabs, and Tooltips
Headless UI libraries such as Radix UI, React Aria, and Reach UI provide unstyled, fully accessible primitives that handle ARIA attributes, keyboard interactions, and focus management out of the box. These libraries are built by accessibility experts and follow the WAI-ARIA Authoring Practices. For example, Radix UI’s Dialog component automatically manages focus trapping, escape key dismissal, and correct ARIA roles like dialog and aria-modal. Using these libraries eliminates the need to manually implement complex patterns like roving tabindex for tabs or arrow key navigation for tooltips. When integrating a headless component, you can focus entirely on styling and business logic while inheriting proven accessibility. This approach also simplifies maintenance, as library updates incorporate the latest accessibility standards without requiring changes to your application code. For 2026, adopting headless UI libraries is the single most effective step to ensure your React application is accessible by default, scalable across teams, and resilient to evolving browser and assistive technology requirements.
7. Implement Robust Testing Strategies: Unit, Integration, and E2E
By 2026, effective testing in React applications has moved decisively beyond fragile snapshot tests and shallow render checks. The industry consensus favors a balanced, user-centric approach that validates real behavior rather than implementation details. Unit tests verify isolated logic with Vitest, integration tests confirm component interactions using Testing Library, and end-to-end (E2E) tests simulate complete user journeys with Playwright or Cypress. This layered strategy reduces flakiness, accelerates feedback loops, and ensures that your application remains reliable as it scales.
Writing Component Tests That Avoid Implementation Details
The core principle of modern React testing is to test what the user sees and does, not how the component is built internally. Avoid testing internal state, prop names, or class names directly. Instead, focus on rendered output and user interactions. Use Testing Library queries like getByRole, getByText, and getByLabelText to select elements in a way that mirrors user behavior. For example, to test a form submission, trigger a click on a button labeled “Submit” and assert that the expected success message appears, rather than checking if a handleSubmit function was called. This approach makes tests resilient to refactors—if you rename a prop or restructure state, the test still passes as long as the UI behavior remains unchanged.
Do: Use screen.getByRole('button', { name: /submit/i }).
Don’t: Use wrapper.find('button').simulate('click') or inspect component.state().
Do: Assert on visible text and ARIA attributes.
Don’t: Assert on internal data attributes or CSS class names.
Mocking Server Responses with MSW (Mock Service Worker) in Vitest
Mocking network requests has evolved from brittle interceptors to seamless, realistic stubs using MSW (Mock Service Worker). Integrated with Vitest, MSW intercepts requests at the network level, allowing your tests to simulate server responses without modifying component code. Setup is straightforward: define handlers for your API endpoints in a src/mocks/handlers.js file, then start the server in your test setup. For instance, to test a user profile component, you can mock a GET /api/user endpoint to return a specific user object. This ensures your tests run consistently without network dependencies, while still exercising the same data-fetching logic used in production. MSW works across unit, integration, and E2E tests, reducing duplication and improving maintainability.
Step
Action
1
Install msw and define handlers for each API endpoint.
2
Create a server instance in your Vitest setup file.
3
Start the server before all tests and reset handlers between tests.
4
Write tests that trigger network calls and assert on rendered data.
Setting Up Visual Regression Testing with Chromatic or Percy
Visual regression testing catches unintended UI changes that functional tests often miss. By 2026, tools like Chromatic (for Storybook) and Percy (for any framework) have become standard in CI pipelines. To set up visual regression testing, first create a Storybook for your components, covering key states (loading, empty, error, and populated). Then integrate Chromatic or Percy into your CI workflow—each tool captures screenshots of your stories and compares them against baselines. When a visual difference is detected, the tool flags it for human review, preventing style regressions from reaching production. For example, a button component with a new CSS class that changes its border radius will be caught instantly. Combine this with your functional tests to ensure both behavior and appearance are validated.
Chromatic: Best for Storybook-based projects; offers automatic baselines and UI review.
Percy: Works with any testing framework; supports responsive snapshots and cross-browser comparisons.
Best practice: Run visual tests on pull requests, not on every commit, to balance speed and coverage.
By layering unit, integration, E2E, and visual regression tests, you create a safety net that catches errors at every level of your application. This comprehensive strategy, anchored in user behavior and modern tooling, is a cornerstone of React Best Practices for 2026.
8. Enforce Code Quality with Modern Linting, Formatting, and Pre-commit Hooks
In a 2026 React codebase, consistent code style and automated linting are not optional—they are the first line of defense against common bugs, especially as React 19+ introduces new patterns and TypeScript 5.x tightens type inference. A modern toolchain leverages ESLint with flat config, Prettier for formatting, and lint-staged for pre-commit hooks, ensuring every commit meets a high bar of quality without slowing down development.
Configuring ESLint Flat Config with react and typescript-eslint Plugins
Starting in 2026, ESLint’s flat config (eslint.config.js) is the standard, replacing the deprecated .eslintrc format. This new configuration is simpler, more composable, and works seamlessly with React 19+ and TypeScript 5.x. To set it up:
Install core dependencies:eslint, typescript-eslint (v8+), and eslint-plugin-react (v8+).
Add React-specific rules: Enable react/jsx-uses-react and react/jsx-uses-vars (though React 19’s automatic JSX transform makes the former less critical, it remains safe). Also include react/no-unescaped-entities and react/no-danger.
Integrate TypeScript: Use @typescript-eslint/parser and @typescript-eslint/eslint-plugin with recommended rules, such as @typescript-eslint/no-explicit-any (set to warn) and @typescript-eslint/strict-boolean-expressions.
Leverage flat config’s array structure: Define configs as an array of objects, each with files, plugins, and rules. For example, a React-specific block might target **/*.{jsx,tsx}.
Automating Fixes with Prettier and lint-staged in a CI Pipeline
Prettier handles formatting uniformly, while lint-staged runs linting and formatting only on staged files, dramatically reducing CI time. For a 2026 pipeline:
Install:prettier, lint-staged, and husky (v9+) for git hooks.
Configure lint-staged in package.json: Define a map of file patterns to commands, e.g., "*.{js,jsx,ts,tsx}": ["eslint --fix", "prettier --write"].
Set up Husky: Run npx husky init and create a .husky/pre-commit file with npx lint-staged.
Integrate into CI: Add a step to run npx lint-staged or, for full checks, eslint . and prettier --check .. This catches issues before merging, even if pre-commit hooks are bypassed.
Comparison of pre-commit hooks vs. CI-only enforcement:
Aspect
Pre-commit Hooks (lint-staged + Husky)
CI Pipeline Only
Speed
Fast—only checks staged files
Slower—checks entire codebase
Developer Experience
Immediate feedback, prevents bad commits
Delayed feedback, may require rework
Catch Rate
High for staged files, misses unstaged issues
Comprehensive for all files
Setup Complexity
Moderate (Husky + lint-staged config)
Low (add a CI job)
Best Use Case
Day-to-day development
Final gate before merge
Enforcing Import Order and Avoiding Circular Dependencies
Messy imports and circular dependencies degrade readability and can cause runtime errors in React 19+ (e.g., with concurrent features). To enforce order:
Use eslint-plugin-import: Enable import/order rule with groups like builtin, external, internal, parent, sibling, index. Example configuration: "groups": [["builtin", "external"], "internal", ["parent", "sibling"], "index"] and "newlines-between": "always".
Detect circular dependencies: Add import/no-cycle rule with a maxDepth of 1 to catch immediate cycles. For deeper detection, use a separate tool like madge in CI.
TypeScript-aware ordering: Combine with @typescript-eslint/consistent-type-imports to separate type-only imports, reducing bundle size and improving clarity.
By implementing these practices, your React 2026 project benefits from fewer bugs, faster reviews, and a codebase that scales gracefully. Automated enforcement shifts quality from a manual burden to a seamless part of the development flow.
9. Build for Performance with Suspense, Streaming, and Edge Rendering
In 2026, React 19’s enhanced Suspense and streaming server-side rendering (SSR) have become standard tools for delivering near-instant time-to-interactive. The core principle is simple: show users meaningful content as soon as it is available, rather than waiting for the entire page to render. This section covers three practical techniques—wrapping data fetching in Suspense, streaming HTML with Server Components, and deploying on edge runtimes—that together reduce perceived load times and improve Core Web Vitals.
Wrapping Data Fetching in Suspense for Progressive Rendering
Suspense boundaries allow you to declare loading states for specific parts of your component tree. Instead of blocking the entire page on a slow API call, you wrap the dependent component in a <Suspense> boundary with a fallback. This enables React to stream the rest of the page immediately while the data resolves.
Reduces time-to-first-byte (TTFB) by not waiting for all data.
Improves perceived performance with skeleton screens or spinners.
Works seamlessly with React Server Components and client components.
Practical example:
// app/dashboard/page.js (React Server Component)
import { Suspense } from 'react';
import { UserProfile } from './UserProfile.client';
import { RecentOrders } from './RecentOrders.server';
export default function DashboardPage() {
return (
<main>
<h1>Dashboard</h1>
<Suspense fallback={<div>Loading profile...</div>}>
<UserProfile />
</Suspense>
<Suspense fallback={<div>Loading orders...</div>}>
<RecentOrders />
</Suspense>
</main>
);
}
In this example, the page shell renders immediately. UserProfile and RecentOrders each stream in independently as their data resolves, keeping the UI responsive.
Streaming HTML with Server Components and Suspense Boundaries
React 19’s streaming SSR sends HTML chunks to the browser as they are produced, rather than waiting for the full tree. Combined with Suspense boundaries, you can prioritize critical content (e.g., header, navigation) and defer non-critical sections (e.g., comments, recommendations).
How it works:
The server renders the page from top to bottom.
When it hits a Suspense boundary, it sends a placeholder (the fallback) and continues rendering the rest.
Once the data for that boundary is ready, the server streams the actual HTML and a small script to replace the placeholder.
Place Suspense boundaries at logical breakpoints (e.g., below-the-fold sections).
Avoid nesting Suspense boundaries too deeply, as each adds overhead.
Use react-dom/server’s renderToPipeableStream or renderToReadableStream for Node.js or edge runtimes.
This approach dramatically improves Largest Contentful Paint (LCP) because the browser can start painting the main content while less important parts are still loading.
Edge runtimes bring React rendering closer to users geographically, reducing latency. In 2026, platforms like Cloudflare Workers, Vercel Edge, and Netlify Edge Functions natively support React Server Components and streaming.
Why edge rendering matters:
Reduces round-trip time for dynamic content.
Enables personalization and A/B testing at the edge.
Integrates with global CDNs for static assets.
Deployment checklist:
Platform
Key Feature
Limitation
Vercel Edge
Native React Server Components support
Node.js APIs unavailable (e.g., fs)
Cloudflare Workers
Low-cost, global by default
Must use Workers-compatible runtime
Netlify Edge Functions
Easy integration with Netlify Forms
Limited execution time (10s)
Practical command (deploy to Vercel Edge):
# Build and deploy your React app to Vercel Edge
npx vercel --prod --edge-functions
When deploying, ensure your React code avoids Node.js-specific modules. Use fetch instead of axios or fs, and rely on React’s built-in streaming APIs. With these practices, your 2026 React app will serve content at the speed of the edge, delighting users worldwide.
10. Stay Ahead: Continuous Learning and Community Engagement
The React ecosystem in 2026 moves with a velocity that can overwhelm even seasoned developers. Between new compiler optimizations, evolving server component patterns, and shifting state management paradigms, staying current requires a deliberate strategy. Rather than chasing every tweet or GitHub commit, focus on a few high-signal channels that deliver curated, actionable information. The key is to balance depth with breadth: understanding the “why” behind changes matters more than memorizing every new API. Below are three pillars for maintaining your edge without succumbing to burnout.
Following React’s Official RFC Process and Dev Blog
The most authoritative source for upcoming changes is the React RFC repository and the official React blog. RFCs (Request for Comments) are where core team members and community contributors propose, debate, and refine major features before they land in experimental releases. To engage effectively:
Subscribe to the React blog RSS feed – New posts announce stable releases, deprecations, and migration guides.
Watch the reactjs/rfcs repository on GitHub – Star or watch for notifications on active proposals. Focus on RFCs tagged “active” or “final comment period.”
Read the meeting notes from core team discussions – Summaries are periodically shared on the React Twitter account or in the React Discord’s #core-notes channel.
Set aside 30 minutes weekly to scan new RFCs and blog posts. Prioritize those that affect runtime behavior, such as new hooks, concurrent features, or compiler directives.
Following this process gives you a six-to-twelve-month lead on breaking changes, letting you plan upgrades with confidence rather than scrambling at the last minute.
Participating in Open Source: How to Contribute to React or Popular Libraries
Contributing to open source is one of the fastest ways to internalize best practices. You do not need to rewrite the reconciler; even small contributions build deep understanding. Here is a structured approach for getting started:
Contribution Type
Example
Skill Level
Time Investment
Documentation fixes
Correcting a typo or clarifying an example in React’s docs
Beginner
30 minutes to 2 hours
Issue triage
Reproducing bugs, adding labels, or suggesting workarounds
Intermediate
1–3 hours per week
Test improvements
Adding test coverage for edge cases in popular libraries like React Router or Redux Toolkit
Intermediate
2–4 hours per issue
Feature implementation
Adding a small utility function or performance optimization
Advanced
4–10 hours per feature
Start by reading the CONTRIBUTING.md file of a library you use daily. Look for issues labeled “good first issue” or “help wanted.” The process of reading others’ pull requests, understanding code review feedback, and navigating CI pipelines will teach you more about idiomatic React patterns than any tutorial.
Curating Your Learning: Podcasts, Newsletters, and Conference Talks to Watch
Not all learning needs to be active reading or coding. Passive and semi-passive formats let you absorb insights during commutes, exercise, or downtime. Here are recommended sources as of 2026:
Podcasts: “React Round Up,” “Syntax.fm” (React-focused episodes), and “The React Podcast” offer weekly deep dives into real-world patterns, tooling updates, and interviews with core maintainers.
Newsletters: “React Status” (curated weekly links), “This Week in React” (covers experimental releases and RFC summaries), and “Bytes.dev” (broader web development with strong React coverage).
Conference talks: Prioritize recordings from React Conf, React Advanced, and React Summit. Search for talks by Andrew Clark, Lauren Tan, and Sebastian Markbåge—they often preview upcoming compiler features and server component best practices.
Create a playlist of 3–5 talks per quarter and watch them at 1.5x speed. Combine this with a 15-minute daily scan of your chosen newsletter to stay aware of breaking changes without drowning in noise. The goal is to maintain a steady, low-effort signal that keeps your mental model aligned with the ecosystem’s trajectory.
Frequently Asked Questions
What are the most important React best practices for 2026?
In 2026, key React best practices include adopting React Server Components for improved performance and SEO, using the new use() hook for data fetching, leveraging the Concurrent Features (Suspense, transitions) for smoother UX, and following a component-driven architecture with clear separation of concerns. Additionally, proper state management with tools like Zustand or Redux Toolkit, memoization with useMemo and useCallback, and dynamic imports for code splitting are essential. Always use TypeScript for type safety and follow accessibility (a11y) standards. Keep dependencies updated and use React DevTools for profiling.
How do React Server Components improve performance in 2026?
React Server Components (RSC) allow components to be rendered on the server, sending only the resulting HTML to the client. This reduces JavaScript bundle size, improves load times, and enhances SEO because content is immediately available. In 2026, RSC are a standard practice for data-heavy applications. They enable direct database access without exposing client-side secrets and reduce client-side processing. Combined with streaming and Suspense, RSC deliver faster initial page loads and better Core Web Vitals scores, especially for content-rich sites.
What state management solutions are recommended for React in 2026?
For 2026, recommended state management solutions include Zustand for simple global state, Redux Toolkit (with RTK Query) for complex state and API caching, and Jotai or Recoil for atomic state management. React's built-in useReducer and Context API remain suitable for local or low-frequency state. Server state is best managed with React Query (TanStack Query) or SWR, which handle caching, revalidation, and synchronization. The trend is toward minimal, scalable solutions that avoid prop drilling and unnecessary re-renders.
How can I optimize React performance in 2026?
To optimize React performance in 2026, use React.memo for pure components, useMemo and useCallback for expensive computations and stable references, and implement code splitting with React.lazy and Suspense. Leverage the Concurrent Features (startTransition, useDeferredValue) to keep UI responsive. Use the Profiler in React DevTools to identify bottlenecks. Adopt server components where possible, lazy load images and non-critical resources, and ensure efficient state updates. Also, use the new use() hook for streaming data and avoid unnecessary re-renders by structuring component trees carefully.
What is the role of TypeScript in React development in 2026?
TypeScript has become standard in React development by 2026. It provides static type checking, which catches errors at compile time, improves code readability, and enhances developer experience with better autocompletion and documentation. In React, TypeScript helps define props, state, and event handlers precisely, reducing runtime bugs. It also integrates seamlessly with React Server Components, hooks, and state management libraries. Many teams require TypeScript for new projects, and it is supported by all major tools (Create React App, Next.js, Vite).
How do I handle data fetching in React 2026?
In 2026, data fetching in React is best handled using React Server Components for initial data, combined with client-side libraries like React Query (TanStack Query) or SWR for dynamic updates. The new use() hook in React 19 allows reading promises directly in components, simplifying data fetching. For APIs, use fetch with async/await and error boundaries. Avoid useEffect for fetching; instead, use libraries that provide caching, deduplication, and revalidation. For mutations, use server actions (Next.js) or React Query's useMutation. Always handle loading and error states with Suspense and error boundaries.
What are the best practices for structuring a React project in 2026?
Best practices for structuring React projects in 2026 include using a feature-based folder structure (group by feature, not by type), separating business logic from UI components, and using TypeScript. Adopt a monorepo (e.g., Nx, Turborepo) for large projects to share code. Use Next.js or Remix for full-stack capabilities. Keep components small and reusable, use custom hooks for logic, and maintain a clear separation between server and client components. Use environment variables for configuration and follow consistent naming conventions. Include unit tests (Jest, Vitest) and integration tests (Testing Library).
How do I ensure accessibility (a11y) in React applications in 2026?
Ensuring accessibility in React 2026 involves using semantic HTML elements (e.g., , ), providing ARIA attributes when necessary, and managing focus with useRef and useEffect. Use the 'useId' hook for generating unique IDs for form elements. Ensure keyboard navigation works for all interactive components. Test with tools like axe-core, Lighthouse, and screen readers. Use accessible components from libraries like Reach UI or Radix UI. Follow WCAG 2.2 guidelines, and always include alt text for images, proper labels for inputs, and sufficient color contrast.
Elementor vs. Gutenberg: Which Page Builder is Better?
1. Introduction
The Rise of Visual Page Builders in WordPress
WordPress has evolved far beyond its origins as a blogging platform, and the rise of visual page builders has been a central driver of that transformation. For years, building custom layouts required knowledge of PHP, HTML, and CSS, creating a steep barrier for non-developers. The introduction of drag-and-drop interfaces changed that dynamic entirely, empowering users to design complex, responsive pages without writing code. Among the many tools that emerged, two have come to dominate the conversation: Elementor, a third-party plugin that became a market leader, and Gutenberg, the native block editor that WordPress integrated into its core. Their coexistence has sparked an ongoing debate about which approach—dedicated plugin or core editor—is superior for modern site building.
Why This Comparison Matters for Site Owners
Choosing between Elementor and Gutenberg is not a trivial decision; it carries long-term implications for site performance, maintenance, flexibility, and cost. Site owners must weigh factors such as learning curve, design capabilities, speed optimization, and future-proofing against WordPress updates. Using a third-party plugin like Elementor can offer a richer visual experience and more pre-built templates, but it also introduces additional code and potential dependency on an external developer. Gutenberg, on the other hand, is lightweight and native, but its block-based approach may feel less intuitive for users accustomed to full front-end editing. This comparison helps site owners make an informed choice that aligns with their technical skill level, design needs, and business goals.
Scope of This Article: What We Will Cover
This article provides a thorough, balanced analysis of Elementor versus Gutenberg, focusing on the key areas that matter most to site owners. We will explore the following dimensions:
Ease of use and learning curve: How quickly can a beginner build a complete page with each tool?
Design flexibility and customization: Which offers more control over layout, typography, and visual elements?
Performance and page speed: How does each tool impact site loading times and Core Web Vitals?
Ecosystem and extendability: What plugins, themes, and add-ons are available for each?
Cost and pricing models: What are the upfront and ongoing expenses for full functionality?
Long-term maintenance and compatibility: How do they handle WordPress updates and potential vendor lock-in?
By the end of this comparison, you will have a clear understanding of the trade-offs between these two page builders, enabling you to select the one that best fits your project’s requirements and your comfort level with technology.
2. What is Elementor?
Elementor is a third-party, freemium drag-and-drop page builder plugin for WordPress, first released in 2016. It replaces the default WordPress editor (including the Classic Editor and Gutenberg) with a visual, front-end interface. Instead of writing blocks in a back-end editor, you see your page exactly as it will appear to visitors while you edit it. Elementor has grown into a full ecosystem with a large marketplace of third-party add-ons, making it one of the most popular page builders on the market, powering millions of websites.
Key Features: Widgets, Templates, and Theme Builder
Elementor’s core strength lies in its extensive set of design features, organized into three main pillars:
Widgets: Over 100 content elements, called widgets, that you can drag onto your page. These range from basic elements (headings, text, images, buttons) to advanced ones (sliders, forms, carousels, accordions, testimonials, countdown timers, and dynamic data widgets). Each widget has its own style and content controls, accessible via a left-side panel.
Templates: A library of pre-designed page templates and blocks (sections like headers, hero areas, pricing tables, and footers). You can insert these with one click, then customize them fully. Templates are organized by category (e.g., landing pages, 404 pages, WooCommerce shop pages) and are regularly updated. The library includes both free and Pro templates.
Theme Builder: A set of tools that lets you design every part of your WordPress theme visually—headers, footers, single post templates, archive pages, search results, and more. With Theme Builder, you can create a complete custom theme without writing any PHP or CSS. You assign these templates globally or to specific conditions (e.g., a custom header for blog posts only).
Additionally, Elementor includes a responsive editing mode (allowing you to hide or adjust elements for desktop, tablet, and mobile), a global font and color system, custom CSS per element, and a popup builder (Pro).
Elementor Pro vs. Free Version
Elementor’s free version is robust but limited. The Pro version adds significant functionality. The table below summarizes the key differences:
Feature
Free Version
Pro Version
Core drag-and-drop editor
Yes
Yes
Number of widgets
~50
~100+
Theme Builder
No
Yes
Form builder
No
Yes (with email integrations)
Popup builder
No
Yes
WooCommerce widgets
Basic (products)
Advanced (cart, checkout, single product builder)
Dynamic content capabilities
No
Yes (ACF, Pods, Toolset, custom fields)
Global widgets
No
Yes
Custom CSS per element
Yes
Yes
Template library access
Free templates only
Free + Pro templates
Pro costs start at a yearly subscription for a single site, with higher tiers for multiple sites. The free version is sufficient for simple pages and basic layouts, but for serious design control, especially over theme structure, Pro is essential.
Who Typically Chooses Elementor?
Elementor appeals to a broad range of users, but some groups find it particularly useful:
Freelance web designers and agencies who need to build client sites quickly with polished, custom designs. The Theme Builder and template library accelerate development without coding.
Non-technical website owners (e.g., small business owners, bloggers, marketers) who want to maintain their own site without hiring a developer. The visual, real-time editing is intuitive.
Advanced WordPress users who want fine-grained control over layouts and styling, including custom CSS and dynamic data integration via Pro.
WooCommerce store owners who need to design custom product pages, cart layouts, and checkout forms beyond standard theme options.
Elementor is less commonly chosen by developers who prefer to build themes with traditional PHP/SCSS or who need ultra-lightweight performance. It is also not ideal for users who strictly want to avoid third-party plugins due to maintenance overhead or potential conflicts.
3. What is Gutenberg?
Gutenberg is the default block editor for WordPress, introduced in version 5.0 in December 2018. Named after Johannes Gutenberg, the inventor of the printing press, it replaced the classic TinyMCE editor with a modular, block-based approach. Unlike standalone page builders like Elementor, Gutenberg is a core WordPress feature, meaning it is pre-installed on every WordPress site and receives updates alongside the platform itself. Its evolution has transformed it from a simple content editor into a full-fledged site-building tool, particularly with the introduction of Full Site Editing (FSE) in WordPress 5.9.
The Block Editor Paradigm
Gutenberg operates on a block paradigm, where every piece of content—paragraphs, images, headings, buttons, columns, and even custom HTML—is a distinct block. Users add, rearrange, and style blocks directly on the editing canvas, with a live preview of the front-end appearance. Key capabilities include:
Core Blocks: Over 30 native blocks (e.g., paragraphs, images, galleries, cover images, embeds, spacers, social icons).
Reusable Blocks: Save any block or group of blocks as a reusable asset for consistent styling across pages.
Block Patterns: Pre-designed block combinations (e.g., hero sections, testimonials, pricing tables) that can be inserted with one click.
Drag-and-Drop: Simple drag-and-drop functionality for rearranging blocks, though less granular than dedicated page builders.
Custom Blocks: Developers can register custom blocks using JavaScript (React) and PHP, extending functionality via plugins like Advanced Custom Fields (ACF) or third-party block libraries.
The block editor is inherently responsive, as blocks automatically adapt to screen sizes. However, advanced styling (e.g., custom margins, padding, or animations) often requires custom CSS or additional plugins, as Gutenberg’s built-in design controls are more basic compared to Elementor.
Full Site Editing (FSE) and Block Themes
Full Site Editing (FSE), introduced in WordPress 5.9, extends the block paradigm beyond content to the entire site structure. With an FSE-compatible block theme, users can edit headers, footers, sidebars, templates, and even global styles using blocks. This eliminates the need for traditional theme customizers or PHP-based template files in many cases. Block themes rely on a theme.json file to define design settings (e.g., color palettes, typography, spacing) globally, ensuring consistency. Key features include:
Template Editor: Edit single post, page, archive, and 404 templates using blocks.
Global Styles: Adjust site-wide colors, fonts, and layout settings from the editor.
Block-Based Widgets: Replace classic widgets with blocks in widget areas.
Navigation Block: Build and style menus using blocks, with support for submenus and mobile toggles.
FSE is still maturing; complex layouts (e.g., multi-column grids with nested columns) can be cumbersome, and third-party block plugins are often needed for advanced functionality like dynamic content or custom post type displays.
Who Typically Chooses Gutenberg?
Gutenberg is best suited for users who prioritize simplicity, core WordPress integration, and long-term maintainability. Typical users include:
Bloggers and Content Writers: Those who need a clean, distraction-free writing environment for text-heavy posts.
Beginners: Users who want to avoid the learning curve of third-party page builders and prefer built-in tools.
Developers Building Custom Themes: Those who prefer a lightweight, extensible foundation without heavy page builder dependencies.
Site Owners Focused on Performance: Gutenberg generates clean, minimal HTML compared to many page builders, contributing to faster load times.
Users Adopting Full Site Editing: Those willing to embrace the latest WordPress paradigm for complete site control, often with block themes like Twenty Twenty-Four or Ollie.
However, Gutenberg may frustrate users who need advanced design controls, complex animations, or a visual drag-and-drop builder for intricate layouts without coding.
Feature
Gutenberg
Elementor
Editor Type
Native block editor (core WordPress)
Third-party page builder (plugin)
Learning Curve
Low (familiar block interface)
Moderate (visual builder with many options)
Full Site Editing
Built-in (FSE with block themes)
Not native; requires third-party themes or add-ons
Design Flexibility
Basic (limited layout controls)
High (pixel-perfect positioning, advanced CSS)
Performance Impact
Minimal (lightweight HTML output)
Moderate (can add bloat if overused)
Extensibility
Via custom blocks or plugins
Via widgets, add-ons, and custom code
Best For
Blogs, content sites, FSE adopters
Marketing sites, landing pages, designers
4. Ease of Use and Learning Curve
When comparing Elementor and Gutenberg, the ease of use and learning curve often determine which builder a user ultimately adopts. Both tools aim to simplify web design, but they approach the user experience from fundamentally different angles. For beginners, the interface design and intuitiveness of the onboarding process can make or break the initial experience, while experienced users may prioritize efficiency and depth of control.
Drag-and-Drop vs. Block Insertion
The core difference lies in how content is placed and arranged on the page. Elementor employs a true drag-and-drop interface, where users can visually manipulate elements—such as headings, images, and columns—directly on the canvas. This approach mimics desktop publishing software, making it immediately recognizable and intuitive for non-technical users. In contrast, Gutenberg uses a block insertion system. Each piece of content is a block (e.g., paragraph, image, column), which you add by clicking a plus icon and selecting from a list. While Gutenberg does support dragging blocks, the primary workflow is click-to-add, then rearrange via the block toolbar or list view.
For a practical comparison, consider adding a two-column layout with an image on the left and text on the right:
Elementor: Drag a “Section” element onto the page, then drag a “Column” widget to split it into two. Drag an “Image” widget into the left column and a “Text” widget into the right column. All actions happen visually, with real-time preview.
Gutenberg: Click the plus icon, search for or select “Columns,” choose a two-column layout from preset options. Then, click inside the left column to add an “Image” block, and the right column to add a “Paragraph” block. You can drag blocks to reorder, but the initial setup is more menu-driven.
For experienced users, Gutenberg’s block-based approach offers a more structured and code-friendly environment. If you need to add custom CSS classes or filter blocks programmatically, Gutenberg integrates tightly with WordPress core. For example, to add a custom class to a Gutenberg block, you can use the advanced panel in the block settings:
<!-- wp:paragraph {"className":"my-custom-class"} -->
<p class="my-custom-class">This is a custom paragraph.</p>
<!-- /wp:paragraph -->
Elementor, while also supporting custom CSS, relies more on its visual theme builder and dynamic tags, which can be powerful but require learning its own system rather than standard WordPress hooks.
Elementor provides a guided onboarding wizard upon first activation, prompting users to choose a design style, set site identity, and install recommended plugins. It also offers in-editor tooltips and a dedicated “Help” menu with links to tutorials. Gutenberg, being part of the WordPress core, has a less prominent onboarding. New users are greeted with a simple “Welcome to the WordPress Editor” modal, but deeper documentation is accessed via the WordPress.org support pages or the “Help” tab in the editor. For a beginner, Elementor’s hand-holding is more effective, while Gutenberg assumes familiarity with WordPress conventions.
Learning Resources and Community Support
Both builders have extensive learning ecosystems, but they differ in structure. Below is a comparison of available resources:
Searchable, categorized, with screenshots and video embeds
Text-heavy, developer-oriented, but comprehensive
For beginners, Elementor’s curated content and active community reduce the learning curve significantly. Experienced users may prefer Gutenberg’s direct access to core WordPress documentation, which allows for deeper customization without relying on a third-party plugin. Ultimately, the choice hinges on whether you value a guided, visual experience (Elementor) or a native, modular approach with a steeper initial learning curve but tighter integration with WordPress standards (Gutenberg).
5. Design Flexibility and Customization
When evaluating design flexibility, the core distinction between Elementor and Gutenberg lies in their approach to customization. Elementor offers a visual, drag-and-drop interface with granular control over every element, while Gutenberg relies on a block-based system that is steadily gaining depth. Both platforms allow extensive customization without code, but their workflows and advanced features differ significantly.
Elementor’s Global Widgets and Dynamic Content
Elementor excels in providing reusable design systems through its Global Widgets and Dynamic Content capabilities. Global Widgets allow you to create a widget—such as a button, heading, or testimonial—and apply it across multiple pages. Any change made to the original widget automatically updates all instances, ensuring design consistency without manual repetition. This is particularly useful for maintaining brand elements like call-to-action buttons or contact forms.
Dynamic Content extends this further by enabling you to pull data from custom fields, post metadata, or external sources (via plugins like ACF or Pods). For example, you can create a single product template that dynamically displays different images, prices, and descriptions based on the product ID. This feature is powerful for building complex sites like real estate listings, portfolios, or e-commerce stores. Elementor also supports custom CSS per widget and advanced positioning options (e.g., absolute, fixed, sticky), giving designers near-total control over layout.
Gutenberg’s Block Patterns and Reusable Blocks
Gutenberg’s design flexibility is centered on Block Patterns and Reusable Blocks, which are simpler but increasingly capable. Block Patterns are pre-designed groups of blocks—such as hero sections, galleries, or pricing tables—that you can insert with one click. WordPress includes a library of patterns, and third-party themes often add more. While patterns are not automatically synced across pages (unlike Elementor’s Global Widgets), they provide a fast starting point for common layouts.
Reusable Blocks allow you to save any block or group of blocks and reuse them site-wide. For instance, a testimonial block with custom styling can be saved and inserted into multiple posts. Editing the original Reusable Block updates all instances, similar to Elementor’s Global Widgets. However, Gutenberg lacks a dedicated dynamic content engine; you must rely on custom fields or plugins like Advanced Custom Fields to achieve similar functionality. This makes Gutenberg less suited for highly dynamic or data-driven designs out of the box. For layout control, Gutenberg now supports full-width and wide alignment, column blocks, and the Group block for nesting, but advanced positioning (e.g., overlapping elements) often requires custom CSS.
Responsive Design and Mobile Editing
Both builders offer responsive design controls, but their approaches differ in depth and convenience.
Elementor provides dedicated responsive modes for desktop, tablet, and mobile. You can adjust margins, padding, font sizes, column widths, visibility, and even entire section layouts per device. For example, you can hide a sidebar on mobile, stack columns vertically, or change a button’s text size. Elementor also offers a mobile editor preview that simulates real device dimensions, and you can set breakpoints for custom screen sizes.
Gutenberg includes responsive controls at the block level, but they are less granular. You can set minimum and maximum column widths, adjust font sizes, and toggle visibility per device using the “Responsive” panel in block settings. However, Gutenberg lacks a dedicated mobile preview mode; you must resize your browser window or use the WordPress customizer. Advanced responsive behaviors—like changing column order on mobile—often require additional CSS or plugins.
Feature
Elementor
Gutenberg
Global design reuse
Global Widgets (synced)
Reusable Blocks (synced)
Dynamic content
Built-in (custom fields, external sources)
Requires plugins (e.g., ACF)
Responsive preview
Dedicated modes (desktop, tablet, mobile)
Browser resize only
Per-device visibility
Yes (hide/show per device)
Yes (via block settings)
Advanced positioning
Absolute, fixed, sticky (built-in)
Requires custom CSS
For designers who need precise, code-free control across devices, Elementor’s responsive toolkit is more comprehensive. Gutenberg is adequate for simpler responsive needs but may frustrate those requiring detailed mobile adjustments.
When comparing Elementor vs. Gutenberg: Which Page Builder is Better? from a performance standpoint, the core difference lies in how each tool generates and serves front-end output. Gutenberg, as part of WordPress core, benefits from lean, native code, while Elementor’s richer feature set introduces additional assets that require careful management. Understanding these trade-offs is essential for maintaining fast load times.
Elementor’s Asset Loading and Optimization
Elementor loads a comprehensive set of CSS and JavaScript files by default, even for elements not used on a given page. This can lead to unnecessary code bloat and increased HTTP requests. However, Elementor provides several optimization strategies to mitigate this:
Asset Cleanup: In Elementor’s settings, enable “Improve CSS Loading” and “Improve JS Loading” to load assets only when specific widgets are present.
Optimized Markup: Toggle “Optimized DOM Output” to reduce nested HTML elements and inline styles.
External File Method: Switch CSS output from “Inline Embedding” to “External Files” to allow browser caching.
Third-Party Plugins: Use caching plugins (e.g., WP Rocket, W3 Total Cache) to combine and minify Elementor’s assets.
A practical step to verify asset loading is to inspect your page with browser DevTools. For example, to check which CSS files Elementor loads, run this in the console after your page renders:
document.querySelectorAll('link[rel="stylesheet"]').forEach(link => {
if (link.href.includes('elementor')) console.log(link.href);
});
This reveals whether unused stylesheets are being fetched, enabling targeted cleanup.
Gutenberg’s integration with WordPress core gives it a built-in performance edge. Each block outputs only the HTML, CSS, and JavaScript required for that specific block, eliminating global asset loading. Key advantages include:
Minimal Code Output: Core blocks produce clean, semantic HTML with no inline styles or wrapper divs unless explicitly added.
No Additional Frameworks: Gutenberg relies on WordPress’s existing jQuery and React libraries, avoiding duplicate or heavy third-party dependencies.
Block-Specific Assets: Stylesheets and scripts are enqueued only when a block is present on the page, reducing total page weight.
Automatic Optimization: WordPress core updates often include performance improvements for block rendering, such as lazy loading for images and iframes.
For example, a simple paragraph block in Gutenberg outputs only a <p> tag, while Elementor’s equivalent text widget may generate nested <div> elements with inline styles. This difference compounds on pages with many elements.
Third-Party Plugins and Caching Solutions
Both builders benefit from caching plugins, but the approach differs. With Elementor, caching is critical to offset its heavier asset footprint. Recommended caching configurations include:
Cache Feature
Elementor Recommendation
Gutenberg Recommendation
Page Caching
Enable full-page caching for static content
Enable full-page caching for static content
CSS Minification
Combine and minify all Elementor CSS files
Minify core block CSS (minimal impact)
JavaScript Deferral
Defer Elementor JS to reduce render-blocking
Defer block editor JS (often unnecessary)
Lazy Loading
Use plugin for images and iframes
Native WordPress lazy loading works well
For Elementor, a dedicated caching plugin like WP Rocket can preload Elementor’s dynamic CSS and combine its assets into fewer files. For Gutenberg, caching is simpler because there are fewer assets to manage. In both cases, using a content delivery network (CDN) further reduces server response times. Ultimately, while Gutenberg offers a lighter default footprint, Elementor can achieve competitive performance through disciplined optimization—but it requires more ongoing attention.
7. Ecosystem, Extensions, and Integrations
When evaluating Elementor vs. Gutenberg: Which Page Builder is Better?, the ecosystem of extensions and integrations often determines long-term practicality. A page builder’s value extends beyond its core features—add-ons, third-party compatibility, and seamless plugin integration shape how efficiently you can build and scale a site. Below, we dissect these ecosystems to help you decide which platform aligns with your workflow.
Elementor’s Marketplace and Add-Ons
Elementor operates a mature, centralized marketplace through its official website and a thriving third-party developer community. The ecosystem is divided into two tiers:
Official Add-Ons: Elementor Pro includes premium widgets like theme builder, dynamic content, popup builder, and form builder. Additional official extensions (e.g., Elementor Cloud Website) are rare, as most features are bundled into Pro.
Third-Party Add-Ons: Hundreds of plugins extend Elementor’s capabilities, including Ultimate Addons for Elementor, Essential Addons, and Happy Addons. These provide advanced widgets for testimonials, pricing tables, sliders, and custom post types. Many third-party add-ons offer free lite versions with paid upgrades for features like sticky headers or advanced animations.
Feature
Elementor Add-On Ecosystem
Official marketplace
Centralized directory on Elementor.com
Third-party developers
High volume, with frequent updates
Typical price range
Free lite to $39–$99/year per add-on
Key example
Essential Addons (free + $39/year)
Elementor’s ecosystem excels in depth and polish but can become expensive if you rely on multiple premium add-ons. However, most core needs are covered by Pro itself.
Gutenberg Blocks Plugins and Block Collections
Gutenberg’s ecosystem is decentralized, relying on standalone block plugins and theme-specific collections. Because Gutenberg is part of WordPress core, anyone can create blocks using standard JavaScript (React/JSX). The landscape includes:
Single Block Plugins: Lightweight plugins that add one or a few blocks, such as Stackable, Kadence Blocks, or GenerateBlocks. These often focus on performance and avoid bloating the editor.
Block Collection Plugins: Comprehensive suites like Spectra (formerly Ultimate Addons for Gutenberg), CoBlocks, or Jetpack Blocks. They offer dozens of blocks—containers, tabs, accordions, buttons, and more—with consistent styling controls.
Theme-Specific Blocks: Some themes (e.g., Astra, Blocksy) bundle custom Gutenberg blocks that integrate tightly with their design system.
Feature
Gutenberg Blocks Ecosystem
Official marketplace
WordPress Plugin Directory (uncurated)
Third-party developers
Growing rapidly, many free options
Typical price range
Free to $59/year for premium suites
Key example
Kadence Blocks (free + $59/year)
Gutenberg’s ecosystem is more fragmented but often lighter and less costly. Many block plugins are free, and premium suites are generally cheaper than Elementor add-ons. The trade-off is less centralized support and occasional compatibility issues between different block plugins.
Integration with WooCommerce, SEO, and Marketing Tools
Both builders integrate deeply with popular WordPress plugins, but their approaches differ:
WooCommerce: Elementor Pro includes dedicated WooCommerce widgets (product grid, cart, checkout customization) and dynamic content for product pages. Gutenberg relies on WooCommerce’s own blocks or third-party block plugins that add product-related blocks. Elementor offers more granular control over shop layouts, while Gutenberg’s integration is more basic but improving with each release.
SEO Plugins: Both work seamlessly with Yoast SEO, Rank Math, and All in One SEO. Gutenberg has an edge because SEO plugins can directly analyze blocks inside the editor, while Elementor requires occasional workarounds for schema markup in widgets. However, Elementor’s theme builder can optimize layout for SEO performance.
Marketing Tools: Elementor integrates natively with Mailchimp, HubSpot, ConvertKit, and others via its form builder and dynamic tags. Gutenberg requires third-party plugins for similar marketing integrations, though many block plugins offer forms with CRM connectors. Elementor also provides built-in popup builders for email capture, which Gutenberg lacks without additional plugins.
For complex marketing funnels or WooCommerce stores, Elementor’s native integrations reduce plugin overhead. Gutenberg is more flexible for simple setups but may require more plugins to match Elementor’s out-of-the-box functionality.
8. Pricing and Value for Money
When evaluating page builders, pricing and long-term value often determine the final choice. Elementor and Gutenberg take fundamentally different approaches to cost: one is a premium ecosystem with tiered subscriptions, while the other is a free core that can be extended with paid block plugins. Understanding these models helps you assess which offers better value for your specific use case.
Elementor’s Pricing Tiers and License Options
Elementor operates on a subscription model with three main paid tiers, plus a limited free version. The free version provides basic widgets and templates but restricts advanced features like theme builder, popup builder, and dynamic content.
Essential Plan ($59/year for one site): Includes all core features, theme builder, and over 100 widgets. Ideal for a single personal or client site.
Advanced Plan ($99/year for three sites): Adds support for more sites, advanced motion effects, and custom CSS. Suitable for freelancers managing a few projects.
Expert Plan ($199/year for 25 sites): Unlocks the full toolkit for agencies, including white-labeling and multisite support.
All paid plans include updates and support. Elementor also offers a lifetime license option for the Expert tier at $999 (one-time payment for 25 sites), which provides long-term value for heavy users. The free version is functional for simple pages but lacks the flexibility needed for complex designs.
Gutenberg’s Free Core vs. Premium Block Plugins
Gutenberg, as WordPress’s native editor, is completely free and bundled with every WordPress installation. Its core blocks—paragraphs, headings, images, columns, and cover—cover basic layout needs. However, advanced functionality (e.g., carousels, forms, dynamic data) requires third-party block plugins, many of which are paid.
Free Core: No cost. Includes essential blocks for text, media, and simple layouts. Updates are automatic with WordPress releases.
Premium Block Plugins (e.g., Kadence Blocks, Spectra, GenerateBlocks): Typically $49–$99/year per site or $149–$249/year for unlimited sites. These add advanced blocks, dynamic content, and design controls.
Full-Site Editing (FSE) Blocks: Free in WordPress core, but complex themes with custom FSE blocks may cost $50–$100 as one-time purchases.
Gutenberg’s cost is essentially zero for minimal sites, but scaling up often requires investing in premium block collections, which can rival Elementor’s pricing.
Cost Comparison for Different Use Cases
The table below compares total annual costs for three common scenarios: a simple personal blog, a small business site, and an agency managing multiple client sites.
Use Case
Elementor (Annual Cost)
Gutenberg + Premium Blocks (Annual Cost)
Personal blog (1 site, basic features)
$0 (Free version) or $59 (Essential)
$0 (Core only) or $49 (e.g., Kadence Blocks)
Small business site (3 sites, advanced design)
$99 (Advanced Plan)
$99–$149 (3 site licenses for block plugin)
Agency (25+ client sites, white-label)
$199 (Expert Plan) or $999 lifetime
$199–$299 (unlimited site licenses)
For a personal blog, Gutenberg’s free core is unbeatable, while Elementor’s free version is more restrictive. For a small business, Elementor’s Advanced Plan offers all-in-one value with no extra plugins. For agencies, Elementor’s lifetime license provides predictable costs, whereas Gutenberg’s block plugin ecosystem may require multiple subscriptions for equivalent features. Ultimately, Elementor delivers better value for users who need a unified toolkit, while Gutenberg wins for minimalists who can work within its free constraints.
9. Use Cases and Recommendations
Choosing between Elementor and Gutenberg ultimately depends on your specific project requirements, technical comfort, and long-term goals. Both builders excel in distinct areas, and understanding which tool fits each scenario will save you time, money, and frustration. Below, we break down recommendations for three common use cases, helping you decide which page builder aligns best with your workflow.
Best for Beginners and Simple Sites
For users new to WordPress or those building straightforward sites like personal blogs, small business brochures, or portfolio pages, Gutenberg is the clear winner. Its native integration means no extra plugins, and the learning curve is gentle—anyone familiar with word processors can start creating layouts immediately. Gutenberg’s block-based approach handles common content needs (text, images, buttons, columns) without overwhelming options. For beginners, the reduced complexity translates to faster site launches and fewer maintenance headaches. Additionally, because Gutenberg is part of WordPress core, it receives automatic updates and has no premium licensing costs, making it ideal for budget-conscious projects. If you need a simple contact form or a basic gallery, core blocks suffice, though you can extend functionality with lightweight block plugins like Kadence Blocks or Stackable.
Best for Advanced Custom Designs
Elementor shines when you require pixel-perfect control over every aspect of your design. This includes custom landing pages for marketing campaigns, complex e-commerce product pages, or agency-built client sites that demand unique layouts. Elementor’s theme builder allows you to design headers, footers, single post templates, and archive pages visually, which is beyond Gutenberg’s native capabilities. For instance, creating a multi-column pricing table with hover effects, custom animations, and conditional visibility is straightforward in Elementor Pro. Agencies benefit from its global widgets, dynamic content integration (e.g., with ACF or Toolset), and white-labeling options. However, this power comes with a trade-off: Elementor adds more frontend code and can slow down your site if not optimized. For advanced designs where performance is secondary to visual fidelity, Elementor is the better choice.
Best for Performance-Critical and Future-Proof Sites
When site speed, SEO, and long-term maintainability are paramount—such as for high-traffic news portals, membership sites, or enterprise applications—Gutenberg is strongly recommended. Gutenberg outputs clean, lightweight HTML with minimal inline styles, resulting in faster load times and better Core Web Vitals scores. It also aligns with WordPress’s development roadmap: as the platform evolves toward full-site editing (FSE), Gutenberg will only become more capable, reducing reliance on third-party builders. For example, you can build a custom query loop block to display recent posts without any code:
This code block, pasted into the Gutenberg editor, generates a dynamic post list without any plugin overhead. For performance-critical sites, Gutenberg’s lean output and native caching compatibility make it the superior choice. Additionally, because it is built into WordPress, you avoid vendor lock-in: your content remains portable even if you switch themes. For future-proofing, invest in Gutenberg now to stay ahead of WordPress’s ongoing shift toward block-based editing.
In summary, choose Elementor for complex, design-heavy projects where visual control is non-negotiable. Choose Gutenberg for simplicity, speed, and sites that need to scale without technical debt. For most new projects, starting with Gutenberg and supplementing with block plugins is the most balanced approach.
10. Conclusion
After a thorough comparison of Elementor and Gutenberg, the choice between these two page builders ultimately depends on your specific project requirements, technical comfort, and long-term goals. Both tools have distinct advantages and limitations that cater to different user profiles. Below, we break down the key takeaways to help you make an informed decision.
Understanding the core strengths and weaknesses of each builder is essential for selecting the right tool. The table below summarizes the most critical differences:
Visual drag-and-drop with a live front-end editor; steep learning curve for advanced features.
Simple block-based editor integrated into WordPress; intuitive for basic layouts but limited for complex designs.
Design Flexibility
Extensive widget library, global styling, and custom CSS; ideal for pixel-perfect designs.
Limited to core blocks and reusable blocks; requires custom development or plugins for advanced styling.
Performance
Can be heavy; may slow down sites with many widgets or animations; requires caching and optimization.
Lightweight and fast; minimal bloat, especially when using only core blocks.
Learning Curve
Moderate; requires time to master the interface and advanced options.
Low for basic use; steeper for custom block development or complex layouts.
Cost
Free version available; Pro version around $59/year for single site.
Completely free as part of WordPress core; no premium tiers.
Future-Proofing
Third-party plugin; depends on continued development and compatibility updates.
Native to WordPress; directly aligned with core updates and the Full Site Editing initiative.
Support & Community
Large community, extensive documentation, and dedicated support for Pro users.
Official WordPress support forums and growing community; documentation from WordPress.org.
Final Verdict: No One-Size-Fits-All Answer
The debate of Elementor vs. Gutenberg does not yield a universal winner. Instead, the best choice depends on your project’s context. Here is a straightforward guide:
Choose Elementor if: You need a highly customized, visually rich design with minimal coding. Ideal for agencies, freelancers building client sites with complex layouts, or users who prefer a visual, drag-and-drop interface. Best for projects where design control outweighs performance concerns.
Choose Gutenberg if: You prioritize performance, simplicity, and long-term compatibility with WordPress. Perfect for bloggers, content-focused sites, or developers who want a lightweight foundation. Also suitable for users who are comfortable with the block editor and want to avoid third-party dependencies.
Next Steps: How to Decide for Your Project
To make the final decision, follow these practical steps:
Assess your project needs: List your design complexity, performance requirements, and budget. For a simple blog, Gutenberg suffices; for a custom landing page, Elementor may be better.
Test both builders: Install Elementor (free version) and create a test page in Gutenberg. Build a sample layout in each to compare workflow and output.
Consider future maintenance: If you plan to hand off the site to a client or non-technical user, Gutenberg’s simplicity may reduce support requests. If you will manage the site yourself, Elementor offers more control.
Evaluate performance: Use a tool like GTmetrix or PageSpeed Insights to test a page built with each builder. Choose the one that aligns with your speed goals.
Check for plugin compatibility: Ensure your essential plugins (e.g., WooCommerce, SEO tools) work seamlessly with the chosen builder.
Ultimately, both Elementor and Gutenberg are capable tools. The right choice is the one that matches your workflow, design ambitions, and technical comfort. Test both, and you will find the builder that feels right for your project.
Frequently Asked Questions
What is the main difference between Elementor and Gutenberg?
Elementor is a third-party drag-and-drop page builder with a visual frontend editor, offering extensive design flexibility and pre-made templates. Gutenberg is WordPress's native block editor, focusing on a streamlined content creation experience with blocks. Elementor provides more granular control over styling and layout, while Gutenberg is simpler and more integrated with WordPress core, ensuring better performance and fewer compatibility issues.
Which page builder is better for SEO?
Both can be SEO-friendly if used properly. Gutenberg produces clean, lightweight code that is easy for search engines to crawl, and it integrates seamlessly with SEO plugins. Elementor can also be optimized, but its extra code and shortcodes may slightly impact page speed and HTML structure. For optimal SEO, ensure proper heading hierarchy, fast loading times, and use of semantic markup in both. However, Gutenberg has a slight edge due to its cleaner output.
Is Elementor slower than Gutenberg?
Generally, yes. Elementor adds additional CSS and JavaScript files to your site, which can increase load times, especially if you use many widgets or complex layouts. Gutenberg, being part of WordPress core, has a lighter footprint. Performance also depends on your hosting, caching, and optimization practices. With proper optimization (e.g., minification, lazy loading, good hosting), Elementor can perform well, but Gutenberg is typically faster out of the box.
Can I use both Elementor and Gutenberg on the same site?
Yes, you can use both on the same WordPress site. For example, you might use Gutenberg for blog posts and Elementor for landing pages or custom layouts. However, avoid mixing them on the same page to prevent styling conflicts and bloated code. Some users prefer to use Elementor for design-heavy pages and Gutenberg for content-focused posts. Always test for compatibility with your theme and plugins.
Which page builder is easier for beginners?
Both are beginner-friendly but in different ways. Elementor offers a visual, drag-and-drop interface with real-time preview, making it intuitive for users without coding knowledge. It also provides many pre-designed templates. Gutenberg is simpler and more straightforward for basic content editing, but its block system may require a short learning curve for complex layouts. Beginners who want extensive design control may prefer Elementor, while those who value simplicity and core integration may choose Gutenberg.
Does Elementor have a free version?
Yes, Elementor has a free version available in the WordPress plugin repository. It includes basic widgets, templates, and a drag-and-drop builder. However, advanced features like theme builder, popup builder, and more widgets require a Pro subscription. Gutenberg is completely free as it is part of WordPress core. For budget-conscious users, Gutenberg offers a robust free solution, while Elementor's free version is limited but still powerful for simple pages.
Which page builder offers more design flexibility?
Elementor offers more design flexibility with its extensive widget library, custom CSS, motion effects, and theme builder capabilities. You can create complex layouts, custom headers/footers, and dynamic content with Elementor Pro. Gutenberg is becoming more flexible with each update, but it still lacks some advanced design options like custom breakpoints and global widgets. For highly customized designs, Elementor is the better choice, while Gutenberg is ideal for content-focused sites.
No, Gutenberg is not replacing Elementor. Both serve different user needs. Gutenberg is the default WordPress editor and is continuously improving, but Elementor remains popular for its advanced design features and ease of use for non-developers. Many users choose Elementor for its visual interface and flexibility, while others prefer Gutenberg for its integration and performance. The choice depends on your specific requirements for design, performance, and workflow.
Introduction: Why React and TypeScript Work So Well Together
The partnership between React and TypeScript has become a cornerstone of modern frontend development, offering a synergy that elevates both productivity and code quality. React’s component-based architecture naturally benefits from TypeScript’s static type system, which catches errors at compile time rather than runtime. This combination reduces debugging time, improves code maintainability, and provides a clearer structure for large-scale applications. By enforcing type safety on props, state, and event handlers, developers gain confidence that their components behave as intended, even as projects grow in complexity.
TypeScript’s adoption in frontend development has surged over the past several years, driven by the need for more robust tooling in increasingly complex web applications. Originally created by Microsoft, TypeScript extends JavaScript by adding optional static types, making it easier to catch bugs early and refactor code safely. Major frameworks and libraries, including React, have embraced TypeScript, with official type definitions available through DefinitelyTyped. This rise is not accidental: as frontend projects scale to dozens or hundreds of components, the safety net of type checking becomes indispensable. Developers now expect TypeScript support in new libraries, and many teams mandate its use for production code. The language’s ability to integrate seamlessly with existing JavaScript codebases further accelerates its adoption, allowing gradual migration without complete rewrites.
Key Benefits of Combining React with TypeScript
Combining React and TypeScript yields several concrete advantages that improve both the development process and the final product:
Early error detection: TypeScript catches type mismatches, missing props, and incorrect state shapes during development, reducing the likelihood of runtime crashes.
Enhanced developer experience: Autocomplete, inline documentation, and refactoring tools work more effectively with typed code, speeding up common tasks.
Self-documenting components: Type annotations serve as living documentation, making it clear what props a component expects and what data it returns.
Safer refactoring: Changing a prop type or state shape triggers compile-time errors in all affected components, preventing silent regressions.
Better collaboration: Teams can work on different parts of a codebase with confidence that interfaces are consistent, reducing integration issues.
These benefits are especially valuable in large codebases where multiple developers contribute, as TypeScript provides a shared language for describing data contracts.
Common Misconceptions About TypeScript in React
Despite its advantages, several misconceptions deter some developers from adopting TypeScript in React projects. One common myth is that TypeScript adds excessive boilerplate, slowing down initial development. In practice, modern type inference reduces the need for explicit annotations, and the time saved on debugging often outweighs any upfront typing effort. Another misconception is that TypeScript is only useful for large teams or enterprise applications. However, even small projects benefit from type safety, especially when using external libraries or API responses where data shapes are unpredictable. Some developers also believe TypeScript is difficult to learn, but its syntax is largely intuitive for those familiar with JavaScript, and incremental adoption allows teams to start with basic types and add complexity as needed. Finally, there is a notion that TypeScript cannot handle dynamic patterns common in React, such as higher-order components or render props. In reality, TypeScript supports generics, union types, and conditional types that model these patterns effectively, though they may require careful type definitions. Understanding these misconceptions helps developers make informed decisions and fully leverage the React and TypeScript partnership.
Setting Up a React Project with TypeScript
Integrating TypeScript into a React project provides type safety, better tooling, and improved developer experience. Below are three reliable methods to get started, each suited to different project needs.
Using Create React App with TypeScript Template
The simplest way to begin is using Create React App (CRA) with its built-in TypeScript template. Run the following command in your terminal:
This command creates a new React project with TypeScript pre-configured, including a tsconfig.json file and .tsx file extensions for components. The project structure will include:
src/ folder with App.tsx, index.tsx, and default type definitions
Automatic compilation of TypeScript to JavaScript
Built-in support for React-specific types like React.FC and React.PropsWithChildren
To verify the setup, run npm start and check that the app compiles without errors. CRA also provides a react-app-env.d.ts file for environment type declarations.
Configuring TypeScript with Vite for React
Vite offers a faster alternative for modern React projects with TypeScript. Use the following command to scaffold a new project:
Rename .js files to .tsx (or .ts for non-component files)
Update imports to include .tsx extensions where needed
Adjust webpack or other bundler settings to handle TypeScript—for webpack, add ts-loader or babel-loader with @babel/preset-typescript
Run npx tsc --noEmit to check for type errors
For projects using Babel, install @babel/preset-typescript and add it to the Babel config. This approach allows incremental adoption without rewriting the entire codebase.
TypeScript enhances React development by catching type-related errors at compile time, improving code maintainability, and providing better editor support. For React developers, mastering a few core TypeScript concepts—types, interfaces, generics, and union types—transforms how you define component props, manage state, and handle events. These fundamentals ensure that your components are self-documenting and resilient to misuse.
Basic Types and Interfaces for Props and State
In React, props and state are the primary data structures. TypeScript allows you to define their shapes precisely using interfaces or type aliases. Interfaces are often preferred for object shapes because they are extendable and more readable in error messages. For example, a UserCard component might accept a name (string) and an optional age (number).
type ButtonProps = { onClick: (id: string) => void; }
Typing callback handlers
Use interfaces for props and state that may be extended (e.g., by a higher-order component) and type aliases for unions or intersections of simpler types.
Using Generics with React Components and Hooks
Generics allow you to create reusable components and hooks that work with multiple data types without sacrificing type safety. For example, a List component that renders an array of items can use a generic type parameter T to infer the item type from props.
Generic with useState: const [user, setUser] = useState<User | null>(null);
When using useReducer, generics help define the action type precisely: type Action = { type: 'increment' } | { type: 'setCount'; payload: number }. This ensures that each action’s payload matches its type.
Union Types and Type Guards in Event Handlers
Union types let a value be one of several types, which is common in event handlers where events can originate from different elements. For instance, an onChange handler might receive either a React.ChangeEvent<HTMLInputElement> or React.ChangeEvent<HTMLSelectElement>.
Union Type Example: type FormEvent = React.ChangeEvent<HTMLInputElement> | React.ChangeEvent<HTMLSelectElement>;
Type Guard: Use instanceof or property checks to narrow the type. For example: if (event.target instanceof HTMLInputElement) { console.log(event.target.value); }
Discriminated Union: When events have a type property (e.g., 'click' | 'change'), use a switch statement to handle each case safely.
TypeScript’s type narrowing ensures that within each branch of a type guard, the event object is treated as the correct specific type, preventing runtime errors and improving code clarity.
Typing React Components: Function and Class Components
When combining React with TypeScript, one of the most immediate benefits is the ability to enforce strict typing on your components. This not only catches errors at compile time but also serves as living documentation for how a component should be used. Properly typing both function and class components ensures that props, state, and event handlers are all predictable and safe.
Typing Function Components with Props Interface
The most common and recommended pattern for typing function components is to define an interface for the props and then annotate the component function with that interface. This approach is explicit, reusable, and easy to maintain as your component grows.
TypeScript provides a generic type React.FC<Props> (or React.FunctionComponent<Props>) that can be used to annotate function components. However, its use has become controversial in the React community.
Pattern
Example
Pros
Cons
React.FC
const Comp: React.FC<Props> = (props) => ...
Includes implicit children prop, provides default displayName and propTypes inference
Implicit children can hide bugs; does not support generic components; slightly more verbose
Explicit props typing
function Comp(props: Props) { ... }
No hidden props; better for generic components; cleaner for TypeScript inference
Requires manual children typing if needed
Many experienced developers now prefer explicit props typing over React.FC. The key reason is that React.FC automatically adds a children prop of type React.ReactNode, even when your component should not accept children. This can mask bugs and make your component’s contract less precise.
If you do need to accept children, explicitly adding children?: React.ReactNode to your props interface is clearer and more intentional:
Class Component Typing with State and Props Generics
For class components, TypeScript provides a generic Component<P, S> where P is the props type and S is the state type. This pattern is straightforward and ensures that both props and state are fully typed.
Here is a practical example of a counter class component:
Always define both Props and State interfaces separately, even if state is simple.
Use the Component<P, S> generics explicitly to ensure TypeScript checks both prop usage and state updates.
For the setState callback, TypeScript infers the previous state type from the generic, preventing invalid state mutations.
If your component does not have custom state, you can use React.Component<Props> (omitting the state generic).
By consistently applying these typing patterns, you leverage TypeScript’s full power to make your React components robust, self-documenting, and easier to refactor. Whether you choose function or class components, the discipline of explicit typing pays dividends as your application scales.
Managing State with TypeScript: useState and useReducer
When integrating React with TypeScript, managing state becomes both more powerful and more precise. The combination of useState and useReducer with TypeScript allows developers to enforce type safety at every step, reducing runtime errors and improving code maintainability. Below are best practices for typing state variables, from simple values to complex objects and reducer actions.
Typing useState with Simple and Complex Values
For simple state values, TypeScript can often infer the type automatically:
Use a single object for related fields rather than multiple useState calls
Define the type explicitly to catch missing or extra properties
Use Partial<T> in updater functions when merging partial state
Using Discriminated Unions with useReducer
Discriminated unions are the gold standard for typing reducer actions. They ensure that each action carries only the payload it needs, and TypeScript narrows the type within each case:
Compile-time errors for missing or incorrect payload properties
Exhaustive checking in switch statements (use never for default)
Handling Derived State and Type Safety
Derived state—values computed from existing state—should not be stored separately. Instead, compute them on the fly using useMemo or a simple function, ensuring the derived value’s type is correct:
interface ShoppingCart {
items: Array<{ price: number; quantity: number }>;
}
function CartSummary({ items }: ShoppingCart) {
const total = useMemo(() => {
return items.reduce((sum, item) => sum + item.price * item.quantity, 0);
}, [items]); // inferred as number
const itemCount = items.length; // inferred as number
return (
<div>
<p>Total items: {itemCount}</p>
<p>Total price: ${total.toFixed(2)}</p>
</div>
);
}
For more complex derived state, create a helper function with explicit return type:
function computeDiscount(cart: ShoppingCart): number {
const subtotal = cart.items.reduce((sum, item) => sum + item.price * item.quantity, 0);
return subtotal > 100 ? subtotal * 0.1 : 0;
}
Type safety checklist for derived state:
Practice
Why It Matters
Use useMemo for expensive computations
Prevents unnecessary recalculations and keeps types explicit
Avoid storing derived values in state
Eliminates synchronization bugs and redundant type definitions
Define return types on helper functions
Catches logic errors at compile time
By following these patterns, you ensure that derived state remains consistent with its source, and TypeScript validates every transformation along the way.
Typing React Hooks: useEffect, useRef, and Custom Hooks
TypeScript elevates React hooks from flexible utilities to robust, self-documenting tools. By adding explicit types to hooks like useEffect, useRef, and custom hooks, developers catch entire categories of bugs at compile time—from stale closures to incorrect ref mutations. This section explores practical typing patterns for these essential hooks, ensuring your components remain both powerful and predictable.
Typing useEffect Dependencies and Cleanup
The useEffect hook benefits from TypeScript in two critical areas: dependency arrays and cleanup functions. When you list dependencies, TypeScript infers their types from the values you provide, but it cannot automatically verify that you have included all necessary dependencies. To enforce correctness, use the exhaustive-deps ESLint rule alongside TypeScript’s strict mode. For the cleanup function, TypeScript expects a function that returns either void or a cleanup function (which itself returns void).
Consider a subscription effect that requires proper cleanup:
useEffect((): (() => void) => {
const subscription = someService.subscribe((data: DataType) => {
console.log(data);
});
// Cleanup function must return void
return () => {
subscription.unsubscribe();
};
}, [someService]); // Dependency array; TypeScript infers its type
Key typing considerations for useEffect include:
Return type annotation: Explicitly annotate the cleanup function’s return type as () => void to prevent accidental returns of non-void values.
Dependency array inference: TypeScript infers each dependency’s type from its declaration; avoid using any in dependency values.
Async effects: Never pass an async function directly to useEffect; instead, define and call it inside the effect body to maintain proper typing.
Using useRef with HTML Elements and Mutable Values
The useRef hook presents a dual nature in TypeScript: it can reference DOM elements or hold mutable values that persist across renders. For DOM element refs, provide the element type as a generic parameter, and always initialize with null. This ensures TypeScript knows the ref’s current property may be null until the element mounts.
const inputRef = useRef<HTMLInputElement>(null);
// Access with optional chaining
const handleFocus = () => {
inputRef.current?.focus();
};
// For mutable values (non-DOM), use a union type with null
const intervalRef = useRef<number | null>(null);
intervalRef.current = setInterval(() => {}, 1000);
Distinguish between these two use cases with a simple guideline:
Use Case
Generic Type
Initial Value
DOM element reference
HTMLInputElement (or specific element)
null
Mutable value (e.g., timer ID)
number | null or other type
null or initial value
Creating Type-Safe Custom Hooks with Generics
Custom hooks become truly reusable when designed with TypeScript generics. Generics allow the hook to accept and return types that are determined by the consumer, eliminating the need for type assertions or any. A well-typed custom hook documents its contract clearly and prevents misuse.
Here is a practical example of a generic custom hook that manages toggle state:
function useToggle<T extends boolean = boolean>(
initialValue: T
): [boolean, () => void] {
const [value, setValue] = useState<boolean>(initialValue);
const toggle = useCallback(() => setValue((prev) => !prev), []);
return [value, toggle];
}
// Usage with explicit type inference
const [isActive, toggleActive] = useToggle(false);
// isActive is inferred as boolean
Best practices for generic custom hooks include:
Constrain generics: Use extends to limit the generic to expected types (e.g., T extends string).
Provide default types: Set a default generic value (e.g., boolean) so consumers can omit the type parameter.
Return explicit tuples: Use tuple types (e.g., [T, (value: T) => void]) rather than arrays to preserve element positions.
Leverage inference: Trust TypeScript to infer the generic from the arguments; only annotate when the hook cannot deduce the type.
Working with Events and Forms in TypeScript
When combining React with TypeScript, handling events and forms becomes significantly more predictable and error-resistant. TypeScript’s static typing catches mismatched event types, missing form fields, and incorrect input values at compile time, rather than during runtime. This section explores how to type event handlers, form elements, and input values to ensure robust form handling in React.
Typing SyntheticEvent and Specific Event Types
React wraps native DOM events in its own SyntheticEvent type, which provides cross-browser compatibility. TypeScript offers generic versions of these events for precise typing. The most common event types include:
React.ChangeEvent<HTMLInputElement> – for <input>, <select>, and <textarea> changes.
React.MouseEvent<HTMLButtonElement> – for button clicks.
React.FormEvent<HTMLFormElement> – for form submission.
React.KeyboardEvent<HTMLInputElement> – for key presses.
Form submission in TypeScript requires typing the event to prevent default browser behavior and access form data safely. Use React.FormEvent<HTMLFormElement> for the submit handler:
const handleSubmit = (e: React.FormEvent<HTMLFormElement>) => {
e.preventDefault();
const formData = new FormData(e.currentTarget);
const data = Object.fromEntries(formData.entries()) as Record<string, string>;
// Process data
};
TypeScript also helps when accessing form elements by name. Instead of using any, define an interface for your form data:
For controlled inputs, TypeScript ensures that the state type matches the input’s expected value type. For example, a numeric input should use useState<number> with proper conversion:
For uncontrolled inputs, typing the ref prevents accessing properties that don’t exist:
const inputRef = useRef<HTMLInputElement>(null);
const focusInput = () => {
inputRef.current?.focus(); // TypeScript knows this is valid
};
By leveraging TypeScript’s type system, you eliminate an entire class of bugs related to event handling and form management, making your React forms more reliable and maintainable.
Context API and Advanced Patterns with TypeScript
React’s Context API enables data sharing across a component tree without prop drilling. When combined with TypeScript, context becomes a robust mechanism for type-safe global state management. Proper typing ensures that every provider and consumer adheres to a defined contract, reducing runtime errors and improving developer experience. Advanced patterns, such as combining context with reducers, further enhance predictability and scalability.
Defining Context Types and Default Values
To create a type-safe context, first define the shape of the data it will hold. Use TypeScript interfaces or type aliases to specify the exact structure. Default values are crucial because React requires an initial value when creating a context, even if that value is only used as a fallback.
Define an interface for the context value, including all properties and methods.
Set default values that match the interface, using empty arrays, null, or placeholder functions.
Use React.createContext with the defined type and default value.
For example, a user authentication context might have user: User | null, login: (credentials: Credentials) => void, and logout: () => void. The default value would include user: null and empty function stubs to avoid runtime checks.
Creating a Type-Safe Provider and Consumer
A type-safe provider wraps the application or a subtree and supplies the context value. The consumer, either via the useContext hook or a custom hook, retrieves that value with full type inference.
Provider implementation:
Create a provider component that accepts children and any necessary props.
Maintain state or derived values that match the context interface.
Pass the value object to the Context.Provider.
Consumer implementation:
Write a custom hook (e.g., useAuth) that calls useContext(AuthContext).
Include a runtime check to throw an error if the hook is used outside the provider.
Return the context value with its TypeScript type automatically inferred.
This pattern eliminates the need for type assertions and ensures that any component consuming the context receives exactly the data and methods it expects.
Combining Context with useReducer for State Management
For more complex global state, pair context with useReducer. This pattern provides a predictable state container with typed actions and reducers, similar to Redux but without external dependencies.
Pattern
State Management
Type Safety Level
Use Case
Context only
Simple state (e.g., theme, locale)
High with explicit typing
Small apps or static data
Context + useReducer
Complex state with actions
Very high with union types
Medium to large apps
Context + useState
Component-specific state
Moderate
Simple shared values
Implementation steps:
Define a reducer function with a typed state and action union (e.g., type Action = { type: 'INCREMENT' } | { type: 'SET_VALUE'; payload: number }).
Create a context that holds both the state and the dispatch function.
In the provider, use useReducer to manage state and pass [state, dispatch] as the context value.
Consume the context in child components to read state or dispatch actions, with full type checking on payloads and action types.
This approach keeps state logic centralized, makes actions explicit, and prevents invalid state mutations at compile time. It is particularly effective for features like shopping carts, authentication flows, or multi-step forms where state transitions must be controlled.
Testing React Components with TypeScript
Testing React components becomes significantly more reliable and maintainable when combined with TypeScript. Type-safe tests catch mismatches in props, state, and return values at compile time, reducing runtime debugging. By integrating Jest and React Testing Library with TypeScript, you ensure that your tests mirror the strict type checking of your production code. This section covers how to set up the environment, type test utilities, and write assertions that leverage TypeScript’s strengths.
Setting Up Testing Environment for TypeScript
To begin, install the necessary packages: jest, @testing-library/react, @types/jest, and ts-jest. The ts-jest transformer allows Jest to process TypeScript files directly. Configure Jest in your package.json or a separate jest.config.ts file. A minimal configuration might look like this:
Ensure your tsconfig.json includes "jsx": "react-jsx" and "esModuleInterop": true. Verify the setup by running a simple test: npx jest should compile without errors. If you use Create React App, these configurations are pre-configured, but for custom setups, this foundation is essential.
React Testing Library’s render function returns an object with utilities like getByText and fireEvent. To make these type-safe, import the RenderResult type from @testing-library/react and assign it to your test variables. For example:
import { render, screen, RenderResult } from '@testing-library/react';
import MyComponent from './MyComponent';
let renderResult: RenderResult;
beforeEach(() => {
renderResult = render(<MyComponent name="Test" />);
});
test('displays the name', () => {
expect(renderResult.getByText('Test')).toBeInTheDocument();
});
For custom render functions that wrap components with providers (e.g., Redux or React Router), create a typed wrapper. Define an interface for the options parameter and return a typed RenderResult:
import { render, RenderOptions } from '@testing-library/react';
import { Provider } from 'react-redux';
import { store } from './store';
interface CustomRenderOptions extends Omit<RenderOptions, 'wrapper'> {
initialState?: Partial<RootState>;
}
function renderWithProviders(
ui: React.ReactElement,
options?: CustomRenderOptions
) {
function Wrapper({ children }: { children: React.ReactNode }) {
return <Provider store={store}>{children}</Provider>;
}
return render(ui, { wrapper: Wrapper, ...options });
}
This approach ensures that every test using renderWithProviders benefits from full type checking on props and the return value.
Writing Type-Safe Assertions and Mocks
TypeScript strengthens assertions by catching incorrect property access. Use expect with type guards or custom matchers from @testing-library/jest-dom. For example, toBeInTheDocument() is typed to work only on HTMLElement or null. When mocking functions, define their types explicitly to avoid any:
For complex props, use TypeScript’s as const or satisfies to ensure literal types are preserved in mocks. Avoid casting with as any; instead, create helper types or use partial mocks. A table of common type-safe patterns can clarify best practices:
By following these patterns, your tests become self-documenting and resistant to refactoring errors. TypeScript ensures that even test code adheres to the same strict contract as your components, making the entire codebase more robust.
Conclusion: Best Practices and Future Outlook
React and TypeScript together form a powerful alliance that elevates code quality, developer experience, and long-term maintainability. By enforcing type safety at every layer—from props and state to event handlers and API responses—this combination reduces runtime errors and makes refactoring predictable. As the ecosystem evolves, adopting disciplined patterns ensures your codebase remains scalable and resilient.
Recap of Essential TypeScript Patterns in React
Mastering a few core patterns unlocks the full potential of this pairing:
Typed props with interfaces or type aliases: Define explicit prop shapes using interface for object types or type for unions, and leverage React.FC sparingly—prefer direct function components with typed props for clarity.
State management with generics: Use useState<Type> to infer state types, and for complex states, employ discriminated unions to model loading, success, and error states safely.
Event handlers and refs: Type event handlers with React.ChangeEvent<HTMLInputElement> and refs with useRef<HTMLDivElement>(null) to avoid unsafe access.
Custom hooks with return types: Always annotate the return type of custom hooks to enforce consistent contracts across components.
Generic components: Create reusable components like <List<T> /> to handle diverse data shapes without sacrificing type safety.
Common Pitfalls and How to Avoid Them
Even experienced developers encounter recurring issues. Here are frequent mistakes and practical solutions:
Pitfall
Why It Happens
How to Avoid
Overusing any
Quick workaround for unknown types
Replace any with unknown and use type guards; enable noImplicitAny in tsconfig.json.
Ignoring null or undefined in state
Initial states often start empty
Use union types like string | null and check with optional chaining (?.).
Mis-typing children
Assuming children is always a single element
Type as React.ReactNode to accept strings, numbers, fragments, or arrays.
Not typing context values
Context defaults to undefined
Create a typed context with createContext<MyType>(defaultValue) and validate with a custom provider hook.
Looking Ahead: TypeScript and React Ecosystem Updates
The future of React and TypeScript is increasingly intertwined, driven by two major trends. First, TypeScript 5.x introduces features like const type parameters, improved inference for tagged unions, and the using declaration for resource management. These enhancements simplify component typing, reduce boilerplate for generic hooks, and make error messages more precise. Second, React Server Components (RSC) redefine how types interact across server and client boundaries. With RSC, TypeScript helps enforce that server-only code (like database queries) never leaks into client bundles, while use client directives require explicit type contracts for serializable props. Additionally, the @types/react package now includes experimental types for RSC, allowing developers to type async components and streaming boundaries. To stay current, explore resources like the official TypeScript handbook, React’s beta documentation, and community guides on patterns for RSC and TypeScript 5.x. By embracing these updates, you future-proof your applications against evolving standards while maintaining the safety and clarity that make React and TypeScript a match made in heaven.
Frequently Asked Questions
Why use TypeScript with React?
TypeScript adds static typing to JavaScript, catching errors at compile time rather than runtime. When combined with React, it provides autocompletion, better documentation through types, and refactoring confidence. This leads to fewer bugs, improved developer productivity, and easier maintenance, especially in large codebases. TypeScript also enhances IDE support, making it easier to understand component props and state shapes.
How do I type React props in TypeScript?
You can define an interface or type alias for your component's props. For example: `interface MyComponentProps { name: string; age?: number; }`. Then use it in your component: `const MyComponent: React.FC = ({ name, age }) => { … }`. This ensures that any usage of the component passes the correct props, and optional props are marked with `?`. You can also use `React.FC` or directly type the props parameter.
Can I use React Hooks with TypeScript?
Yes, TypeScript works seamlessly with React Hooks. For `useState`, you can infer the type or explicitly set it: `const [count, setCount] = useState(0)`. For `useEffect`, no extra typing is needed. For `useRef`, you can specify the type: `const inputRef = useRef(null)`. Custom hooks can also be typed with generic parameters to ensure flexibility and type safety.
What are the benefits of using TypeScript in large React projects?
In large React projects, TypeScript provides several benefits: early error detection during development, better code documentation through types, enhanced IDE autocompletion and refactoring tools, and improved team collaboration since types serve as a form of documentation. It also reduces runtime errors, makes code reviews easier, and helps maintain consistency across the codebase. TypeScript's strict mode catches common pitfalls like null references.
How do I type event handlers in React with TypeScript?
React provides built-in types for events. For example, for a click event: `onClick={(event: React.MouseEvent) => { … }}`. For form submissions: `onSubmit={(event: React.FormEvent) => { … }}`. You can also use `React.ChangeEvent` for input changes. These types give you access to event properties and prevent common mistakes like trying to access properties that don't exist on the event.
Is it difficult to migrate an existing React project to TypeScript?
Migrating an existing React project to TypeScript can be done incrementally. Start by adding TypeScript to your build configuration, rename files to `.tsx`, and gradually add types. You can use the `any` type temporarily for complex parts. Tools like the TypeScript compiler and ESLint plugins help catch errors. The migration effort depends on the project size and code quality, but many teams find the long-term benefits worth the initial investment.
What are the common pitfalls when using TypeScript with React?
Common pitfalls include overusing `any` which defeats the purpose of TypeScript, not typing props correctly leading to errors, misusing generics in complex components, and struggling with third-party library types. Also, developers sometimes forget to handle null or undefined values properly. To avoid these, use strict TypeScript settings, leverage type inference, and regularly review types. Using tools like `@types/react` and `@types/react-dom` is essential.
How does TypeScript improve React component reusability?
TypeScript improves reusability by enforcing clear contracts through prop types and generics. For example, a generic component can accept different data types while maintaining type safety: `interface ListProps { items: T[]; renderItem: (item: T) => React.ReactNode; }`. This allows the same component to be used with various data shapes without losing type information. TypeScript also makes it easier to create higher-order components and render props patterns.
How to Use Tailwind CSS with WordPress: A Complete Integration Guide
Introduction to Tailwind CSS and WordPress
What is Tailwind CSS and its core principles
Tailwind CSS is a utility-first CSS framework that enables rapid and efficient styling by providing low-level, composable utility classes. Unlike traditional CSS frameworks that offer pre-designed components like buttons or cards, Tailwind focuses on atomic classes such as flex, text-center, p-4, or bg-blue-500. Its core principles include:
Utility-first approach: Build designs directly in your HTML by combining small, single-purpose classes, eliminating the need to write custom CSS for most styling needs.
Responsive and state variants: Prefixes like sm:, md:, hover:, or focus: allow you to apply styles conditionally without media queries or JavaScript.
Design system consistency: Tailwind enforces a predefined spacing scale, color palette, and typography system, ensuring your entire project maintains visual harmony.
Customization via configuration: The tailwind.config.js file lets you extend or override defaults to match your brand guidelines, making it highly flexible.
This approach shifts styling logic from external stylesheets to markup, reducing context-switching and speeding up development cycles.
WordPress powers over 40% of all websites, yet its traditional theming often relies on bulky CSS frameworks or custom stylesheets that grow unmanageable. Integrating Tailwind CSS with WordPress bridges the gap between modern front-end workflows and the platform’s robust content management capabilities. Key reasons for this combination include:
Streamlined theme development: Tailwind’s utility classes allow you to style WordPress blocks, templates, and custom post types directly in PHP or HTML files, reducing the need for separate CSS files per component.
Improved performance: Tailwind generates only the CSS you actually use through its purge mechanism, resulting in smaller file sizes compared to traditional frameworks like Bootstrap or Foundation.
Consistent design across editors: With Tailwind, you can enforce a unified design system in both the WordPress block editor (Gutenberg) and your front-end templates, ensuring what editors see matches the live site.
Better developer experience: Tailwind’s clear naming conventions and responsive utilities make it easier to maintain and extend WordPress themes, especially for teams working on complex sites.
Key benefits: faster styling, smaller CSS files, and consistent design
Adopting Tailwind CSS for WordPress delivers three primary advantages:
Benefit
Description
Impact on WordPress development
Faster styling
Utility classes eliminate the need to write custom CSS for common patterns like margins, flexbox layouts, or hover effects. You can style a WordPress navigation menu or a hero section in minutes using inline classes.
Reduces development time by up to 50% for routine styling tasks, allowing you to focus on functionality.
Smaller CSS files
Tailwind’s built-in purge (via PostCSS or build tools) removes unused classes from the final CSS bundle. For a typical WordPress theme, this can shrink the file from hundreds of kilobytes to under 10 KB.
Improves page load speed, which boosts SEO and user experience, especially on mobile devices.
Consistent design
Tailwind enforces a single source of truth for spacing, colors, typography, and breakpoints. This ensures that your WordPress blog posts, sidebars, footers, and custom blocks all adhere to the same visual language.
Eliminates design drift across different parts of the site, simplifying updates and theming.
By combining Tailwind’s utility-first methodology with WordPress’s flexible template hierarchy, you gain a powerful toolkit for building modern, maintainable websites that are both fast to develop and fast to load.
Setting Up a Local WordPress Development Environment
Before integrating Tailwind CSS with WordPress, you must establish a local development environment. This provides a safe, offline space to experiment with theme customization, plugin conflicts, and build processes without affecting a live site. A local environment replicates a production server on your computer, allowing you to test Tailwind’s utility-first classes, purge unused styles, and iterate rapidly. Below, we walk through three common methods—Local by Flywheel, MAMP, and Docker—then cover WordPress configuration and theme selection.
Installing a local server (Local by Flywheel, MAMP, or Docker)
Choose one of these tools based on your technical comfort and project needs:
Local by Flywheel: Best for beginners. It offers a one-click WordPress installation, built-in SSL support, and live link sharing. Download from the official site, install, and click “Create a new site.” It automatically configures PHP, MySQL, and nginx or Apache.
MAMP: A classic choice for macOS and Windows. After installation, set the document root to a folder (e.g., /Applications/MAMP/htdocs). Start servers, then access phpMyAdmin via http://localhost/phpMyAdmin to create a database for WordPress.
Docker: Ideal for advanced users needing isolated environments. Use docker-compose.yml to define services for WordPress and MySQL. Example command to start: docker-compose up -d. This method gives full control over PHP versions and extensions.
For most Tailwind integration tutorials, Local by Flywheel is recommended due to its simplicity and built-in tools for Node.js and npm (required for Tailwind’s build process).
Downloading and configuring WordPress locally
Once your local server is running, download the latest WordPress package from wordpress.org. Extract the zip file into your server’s root directory (e.g., /htdocs/your-site for MAMP, or the site folder created by Local). Follow these steps:
Rename wp-config-sample.php to wp-config.php.
Open wp-config.php and enter your database credentials (database name, username, password). For Local, these are auto-generated; for MAMP, use root and root (default).
Visit http://localhost/your-site in a browser and complete the five-minute installation: choose language, set site title, admin username, password, and email.
After installation, log into the WordPress admin dashboard. Verify permalinks are set to “Post name” under Settings > Permalinks—this ensures clean URLs for your Tailwind-styled pages.
Choosing a starter theme or blank theme for Tailwind
Tailwind CSS works best with a minimal theme that does not impose conflicting styles. Avoid heavy themes like Divi or Avada; instead, select one of these:
Underscores (_s): A blank starter theme by Automattic. Download from underscores.me, customize the name, and install it via WordPress admin (Appearance > Themes > Add New > Upload). It provides a clean HTML5 structure and basic CSS reset.
TailPress: A WordPress theme built specifically for Tailwind CSS. It includes Tailwind’s config file, PostCSS setup, and a package.json for npm scripts. Clone the repository: git clone https://github.com/jeffreyvr/tailpress.git.
Custom blank theme: Create a folder in /wp-content/themes/ with style.css (containing theme header), index.php, and functions.php. This gives you full control—add Tailwind via CDN initially, then migrate to a build process.
For this integration guide, start with TailPress or Underscores. Both allow you to enqueue Tailwind’s output file and use classes like text-blue-500 or grid grid-cols-3 in your templates. Once your environment is set, you can proceed to install Tailwind via npm and configure the build pipeline.
Installing Node.js and npm for Tailwind CSS
Before you can integrate Tailwind CSS into your WordPress theme, you must install Node.js and its package manager, npm (Node Package Manager). These tools are essential for running Tailwind’s CLI, processing its configuration files, and compiling your CSS. Node.js provides the JavaScript runtime environment, while npm manages the dependencies—including Tailwind itself—that your project requires. This section walks you through the installation, verification, and initialization steps to prepare your local development environment.
Downloading and installing Node.js (LTS version recommended)
The Long-Term Support (LTS) version of Node.js is strongly recommended for WordPress development because it offers stability, security updates, and broad compatibility with build tools like PostCSS and Tailwind CSS. To download and install:
Visit the official Node.js website at nodejs.org.
Click the LTS version button (typically labeled “Recommended for Most Users”).
Choose the installer appropriate for your operating system (Windows, macOS, or Linux).
Run the downloaded installer and follow the setup wizard. Accept the default installation path and components, which include npm automatically.
On Windows, ensure the “Add to PATH” option is checked during installation. On macOS, the installer handles this automatically.
After installation, it is good practice to restart your terminal or command prompt to ensure the new PATH variables are recognized.
Once installed, confirm that both Node.js and npm are accessible and note their versions. This verification ensures your environment meets Tailwind’s minimum requirements (Node.js 12.13.0 or higher). Open your terminal and run the following commands:
node -v — Displays the installed Node.js version (e.g., v20.11.0).
npm -v — Displays the installed npm version (e.g., 10.2.4).
If both commands return version numbers without errors, your installation is successful. If you encounter a “command not found” error, revisit the installation steps or check your system’s PATH settings.
Tool
Command
Expected Output (Example)
Minimum Version for Tailwind
Node.js
node -v
v20.11.0
12.13.0
npm
npm -v
10.2.4
6.14.0 (bundled with Node.js)
This table provides a quick reference for verifying your setup. If your Node.js version is below the minimum, reinstall the LTS version. npm versions are typically updated automatically with newer Node.js releases.
Initializing a package.json file in your WordPress theme folder
With Node.js and npm confirmed, navigate to your WordPress theme’s root directory (e.g., /wp-content/themes/your-theme-name/) in your terminal. Initialize a package.json file to track your project’s dependencies and scripts. Run:
npm init -y — Creates a package.json file with default values, avoiding interactive prompts.
This command generates a minimal package.json containing fields like name, version, and main. The -y flag accepts all defaults, which you can later edit manually. After initialization, your theme folder will contain the package.json file, confirming that npm is ready to install Tailwind CSS and its dependencies. You can verify the file’s contents by opening it in a text editor or running cat package.json in the terminal.
With these steps complete, your environment is prepared for the next stage: installing Tailwind CSS via npm and configuring it to work with your WordPress theme’s build process.
Configuring Tailwind CSS via PostCSS and Autoprefixer
To integrate Tailwind CSS into a WordPress theme with a modern, efficient build process, the combination of PostCSS and Autoprefixer is the standard approach. This method allows you to write standard CSS with Tailwind’s utility classes while PostCSS handles the transformation and Autoprefixer ensures cross-browser compatibility. The following steps detail how to set up this workflow specifically for a WordPress environment.
Installing Tailwind CSS, PostCSS, and Autoprefixer via npm
Begin by ensuring your WordPress theme directory has a package.json file. If not, run npm init -y in the theme’s root folder. Then, install the required packages as development dependencies. Open your terminal, navigate to the theme directory, and execute the following command:
Tailwind CSS: The utility-first framework that generates your CSS.
PostCSS: A tool for transforming CSS with JavaScript plugins.
Autoprefixer: A PostCSS plugin that adds vendor prefixes to CSS rules.
After installation, verify the packages are listed in your package.json under devDependencies. This setup ensures that all dependencies are managed locally, avoiding conflicts with other plugins or themes.
Creating tailwind.config.js and postcss.config.js files
With the packages installed, generate the configuration files. Run the following command to create the default Tailwind configuration:
npx tailwindcss init
This creates a tailwind.config.js file in your theme root. Open it and customize the content array to include paths to your WordPress template files. For a standard theme, the configuration should look like this:
This configuration ensures that when PostCSS processes your CSS, it first runs Tailwind to generate utility classes, then Autoprefixer to add necessary vendor prefixes. Save both files in your theme’s root directory.
Adding custom purge paths for WordPress template files
Tailwind CSS uses a “purge” (now called “content”) feature to remove unused CSS in production, drastically reducing file size. For WordPress, you must specify paths to all files that contain Tailwind class names. This includes PHP template files, JavaScript files, and any other assets. In your tailwind.config.js, the content array should be as specific as possible. Here is a recommended setup for a typical WordPress theme:
File Type
Path Pattern
Purpose
PHP Templates
'./*.php', './**/*.php'
Captures all PHP files in the root and subdirectories.
JavaScript Files
'./src/**/*.js'
Includes JS files where classes might be dynamically added.
Blade or Template Parts
'./template-parts/**/*.php'
If using template parts, include their directory.
To test the purge paths, run npx tailwindcss -i ./src/input.css -o ./style.css --watch (assuming your input CSS file is in src/input.css). This command watches for changes and rebuilds your CSS, removing any classes not found in the specified paths. For production, add the --minify flag to compress the output. By configuring these purge paths correctly, you ensure that only the Tailwind classes actually used in your WordPress theme are included in the final stylesheet, optimizing performance without sacrificing functionality.
Integrating Tailwind CSS with Your WordPress Theme
Integrating Tailwind CSS into your WordPress theme requires a deliberate process that bridges Tailwind’s utility-first approach with WordPress’s standard enqueuing system. The key is to compile Tailwind into a standalone CSS file, then load that file through WordPress’s functions.php. This section walks through the essential steps: creating a main CSS file with Tailwind directives, setting up a build script, and properly enqueuing the compiled output. By following these steps, you ensure that Tailwind’s classes—from text-center to grid-cols-3—work reliably across your theme without conflicting with WordPress core styles.
Creating a main CSS file (e.g., style.css or app.css) with Tailwind directives
Begin by creating a dedicated CSS file in your theme’s root directory, typically named style.css for WordPress compatibility or app.css for clarity. This file will serve as the entry point for Tailwind’s three layers: base, components, and utilities. Open your file and add the following Tailwind directives at the top:
@tailwind base – Injects Tailwind’s base styles, including normalize and default element resets.
@tailwind components – Loads component classes defined by plugins or configuration.
@tailwind utilities – Imports all utility classes like mt-4, flex, and text-lg.
Your file should look like this:
@tailwind base;
@tailwind components;
@tailwind utilities;
/* Your custom styles or overrides can go here */
If your WordPress theme requires a style.css header for theme identification, place that header above the directives. For example:
This file is not the final CSS served to browsers; it is the source that Tailwind’s CLI or build tool processes into a compiled, optimized stylesheet.
Setting up a build script in package.json for production and development
To compile your Tailwind source file into a production-ready CSS file, you need Node.js and a package.json in your theme’s root. If you don’t have one, run npm init -y to generate it. Install Tailwind CSS as a dev dependency:
Then, create a tailwind.config.js file using npx tailwindcss init. Configure the content array to scan your theme’s PHP and JavaScript files for class usage:
Now, add build scripts to your package.json. The development script should watch for changes and output an uncompressed file, while the production script minifies and purges unused classes. Use these scripts:
Replace ./style.css with your source file path and ./dist/theme.css with your desired output location. Run npm run dev during development and npm run build before deploying.
Enqueuing the compiled CSS file in functions.php using wp_enqueue_style
With the compiled CSS file generated (e.g., /dist/theme.css), the final step is to load it in WordPress. Open your theme’s functions.php file and use the wp_enqueue_style function inside an action hook. This ensures the stylesheet is properly registered and enqueued in the site’s head. Here is a complete example:
function my_tailwind_theme_enqueue_styles() {
wp_enqueue_style(
'my-tailwind-theme', // Handle
get_template_directory_uri() . '/dist/theme.css', // Path to compiled file
array(), // Dependencies (none)
filemtime(get_template_directory() . '/dist/theme.css'), // Cache-busting version
'all' // Media type
);
}
add_action('wp_enqueue_scripts', 'my_tailwind_theme_enqueue_styles');
Key points to note:
The handle must be unique to avoid conflicts with other themes or plugins.
Using filemtime() ensures browsers load the latest version after each build.
Place this code after any other enqueues to maintain proper loading order.
If your theme also uses a style.css for WordPress metadata, you can enqueue it separately if needed, though many developers rely solely on the compiled Tailwind file for styling.
After adding this code, refresh your WordPress site and verify that the compiled CSS file is loaded in the page source. You can now use any Tailwind utility class in your template files, and they will render as expected. This integration method keeps your workflow efficient, separates development from production, and aligns with WordPress best practices.
Using Tailwind Utility Classes in WordPress Templates
Once Tailwind CSS is properly integrated into your WordPress theme, the real power emerges when you apply utility classes directly to template files. This approach eliminates the need for custom CSS for most styling tasks, allowing you to build responsive, consistent layouts with minimal overhead. The key is understanding how to map WordPress template tags and functions to Tailwind’s utility-first classes, particularly for common elements like headers, navigation menus, post grids, and sidebars.
Styling the header and navigation with Tailwind flex and spacing utilities
WordPress headers typically contain a site logo, title, and primary navigation menu. Using Tailwind’s flexbox utilities, you can create a responsive header that adapts to various screen sizes without writing media queries. For example, in your header.php file, wrap the site branding and menu in a container with flex items-center justify-between to align them horizontally. Add p-4 for padding and bg-white shadow for visual separation. For the navigation menu, apply flex gap-6 to list items to space links evenly. To make the menu collapse on mobile, use Tailwind’s responsive prefixes: add hidden md:flex to the menu container and include a hamburger button with block md:hidden for toggling. This approach keeps your header clean and fully responsive.
Building a responsive grid for blog posts using Tailwind’s grid system
Tailwind’s grid utilities make it straightforward to display blog posts in a flexible, responsive layout without custom CSS. In your archive or index template, wrap the loop in a container with grid grid-cols-1 sm:grid-cols-2 lg:grid-cols-3 gap-6. This creates a single column on small screens, two columns on medium screens (sm breakpoint), and three columns on large screens (lg). For each post, use classes like bg-white rounded-lg shadow-md overflow-hidden to create a card-style appearance. To ensure images scale properly, add w-full h-48 object-cover to the post thumbnail. For consistent spacing within each card, apply p-4 to the content area and mb-2 to headings. This grid system automatically adjusts based on viewport size, providing a polished browsing experience.
Adding custom utility classes for WordPress widgets and comments
WordPress widgets and comment sections often require additional styling to match the overall design. For widgets in your sidebar, wrap them in a container with bg-gray-50 p-4 rounded-lg mb-6. Apply text-lg font-semibold mb-3 to widget titles for visual hierarchy. For comment lists, use Tailwind’s spacing and border utilities: add border-b border-gray-200 pb-4 mb-4 to each comment item. To style comment author names, use font-medium text-gray-900, and for comment text, apply text-gray-700 mt-2. For nested replies, add ml-8 pl-4 border-l-2 border-gray-300 to create visual indentation. A practical code example for a comment form button might look like this:
Managing WordPress Block Editor (Gutenberg) with Tailwind
Integrating Tailwind CSS with the WordPress Block Editor requires careful handling to ensure your design system applies consistently in both the frontend and the editor interface. The Gutenberg editor uses its own styles that can conflict with Tailwind’s utility-first approach. By following a structured method, you can override default editor styles, apply Tailwind utility classes directly to blocks, and maintain a cohesive editing experience without breaking core editor functionality.
Enqueuing a separate editor stylesheet with Tailwind classes
The most reliable way to apply Tailwind in the block editor is to enqueue a dedicated editor stylesheet that contains only the Tailwind classes you need. This prevents bloating the editor with your entire frontend CSS while keeping the editor lightweight and responsive.
Create a custom editor CSS file: Generate a separate Tailwind build for the editor, for example editor-style.css, using a custom Tailwind configuration that targets editor-specific selectors like .editor-styles-wrapper.
Enqueue the stylesheet: In your theme’s functions.php, use the enqueue_block_editor_assets hook to load the editor CSS file. Example code:
Scope Tailwind classes: Wrap your editor CSS within .editor-styles-wrapper to isolate Tailwind utilities from the editor’s native styles. For example, prefix all utility classes with .editor-styles-wrapper in your Tailwind configuration using the prefix option or a custom variant.
This approach ensures that only the Tailwind classes you explicitly include are available in the editor, reducing conflicts and maintaining fast load times.
Using add_theme_support(‘editor-styles’) and adding Tailwind CSS
WordPress provides a built-in function add_theme_support('editor-styles') to register a custom stylesheet for the block editor. This method is simpler and leverages WordPress core functionality, making it ideal for themes that do not require heavy customizations.
Step
Action
Details
1
Add theme support
In your functions.php, call add_theme_support( 'editor-styles' );
2
Enqueue editor style
Use add_editor_style( 'assets/css/editor-style.css' ); to point to your Tailwind-built CSS file.
3
Build editor CSS
Compile a Tailwind CSS file that includes only the utility classes you need for blocks (e.g., @tailwind base;, @tailwind components;, @tailwind utilities; scoped under .editor-styles-wrapper).
4
Test and refine
Verify that Tailwind classes like text-blue-500 or p-4 work inside the editor without breaking block controls.
This method automatically applies your editor styles to the .editor-styles-wrapper container, allowing Tailwind utilities to override default block styles. It is the recommended approach for most themes because it requires minimal code and integrates with WordPress standards.
Customizing block styles via theme.json or inline Tailwind classes
For finer control over individual block appearances, you can use theme.json to set default styles or add inline Tailwind classes directly in the editor’s block markup. Both methods work well with Tailwind when applied correctly.
Using theme.json: Define global or per-block style presets in theme.json that map to Tailwind’s design tokens. For example, set default paragraph font size using styles.blocks.core/paragraph.typography.fontSize to a value like 16px that matches your Tailwind configuration. This ensures consistency without inline classes.
Adding inline Tailwind classes: In the block editor, you can manually add Tailwind utility classes to block elements using the “Additional CSS Class” field (available in most blocks under the “Advanced” panel). For instance, add text-center bg-gray-100 p-6 rounded-lg to a Group block to style it visually in the editor. These classes will render on the frontend if your theme’s Tailwind build includes them.
Combining both methods: Use theme.json for base styles (e.g., font families, colors) and inline classes for per-block adjustments. This hybrid approach minimizes editor bloat while allowing flexible styling.
By implementing these strategies, you can ensure that Tailwind styles work seamlessly in the Gutenberg editor, providing a consistent design experience for content creators and developers alike.
Optimizing Tailwind CSS for Production in WordPress
When deploying a WordPress site built with Tailwind CSS, the default development build includes every utility class in the framework, resulting in a CSS file that can exceed 3 MB. For production, you must remove unused styles, minify the output, and implement caching strategies. This process reduces the final CSS file to often under 10 KB, directly improving page load times and Core Web Vitals scores. The following techniques focus on configuring purge paths, running optimized build scripts, and leveraging browser caching and CDNs specifically for WordPress environments.
Configuring purge paths in tailwind.config.js for WordPress templates
Tailwind CSS uses a purge (or content) configuration to scan your project files and remove any classes not found in the source code. For WordPress, this means pointing Tailwind to your theme’s template files, PHP partials, and any JavaScript files that reference Tailwind classes. The purge paths must be set in your tailwind.config.js file, typically located in the root of your WordPress theme folder. A common configuration looks like this:
Template files: Include './**/*.php' to scan all PHP files in your theme recursively.
JavaScript files: Add './js/**/*.js' if you use dynamic class generation with Alpine.js or custom scripts.
Block editor files: For block themes or custom Gutenberg blocks, include './block-patterns/**/*.php' or './blocks/**/*.js'.
Third-party plugins: If your theme uses plugin-generated markup, add paths like './vendor/**/*.php' or '../../plugins/*/templates/*.php' as needed.
Be careful not to add overly broad paths (e.g., '../../**/*.php') that could scan the entire WordPress installation, which slows down the build process. After configuration, run your build command to verify that only used classes remain in the output CSS. For WordPress sites with dynamic class names (e.g., classes built by concatenating strings), use the safelist option in tailwind.config.js to preserve those patterns.
Running build scripts with –minify flag or using tools like PurgeCSS
Tailwind CLI includes a built-in --minify flag that compresses the final CSS output by removing whitespace, comments, and redundant characters. To use it, modify your npm script in package.json to include the flag. A typical production build command might be:
For more advanced optimization, you can integrate PurgeCSS as a PostCSS plugin within a build tool like Webpack or Laravel Mix. This is especially useful if your WordPress theme already uses a build pipeline. Below is a comparison of the two primary methods for production optimization:
Method
Setup Complexity
CSS Size Reduction
Best For
Tailwind CLI –minify
Low (single command)
~95–98% of unused classes removed
Simple themes, minimal build setup
PurgeCSS via PostCSS
Medium (requires config)
~98–99% with advanced safelisting
Complex themes with many dynamic classes
Regardless of the method, always test the production CSS on a staging site to ensure no critical styles are missing. For WordPress, this is especially important because theme customizer options, plugin shortcodes, and dynamic widgets often generate classes that may be purged incorrectly.
Implementing browser caching and CDN for CSS assets
Once your CSS file is optimized, you need to ensure it is served efficiently to repeat visitors. Browser caching allows the user’s browser to store the CSS file locally for a specified period, reducing HTTP requests on subsequent page loads. In WordPress, you can set cache headers for CSS files by adding rules to your .htaccess file (Apache) or nginx.conf (Nginx). A typical rule for CSS files sets the Cache-Control header to public, max-age=31536000, immutable, which caches the file for one year and indicates it will never change. To implement this safely, append a version query string (e.g., style.css?v=1.0.1) to the CSS file URL in your theme’s functions.php using wp_enqueue_style() with a version parameter. This way, when you update the CSS, the version number changes, and browsers download the new file.
For CDN integration, serve your optimized CSS file through a content delivery network like Cloudflare, BunnyCDN, or KeyCDN. Many WordPress caching plugins (e.g., WP Rocket, W3 Total Cache) offer built-in CDN support where you specify the CDN URL for static assets. Alternatively, you can use a service like Cloudflare’s “Cache Everything” page rule for your CSS URL pattern. When using a CDN, ensure the CSS file is minified and purged of unused classes before uploading to the CDN origin, as CDN caching only accelerates delivery—it does not reduce file size. Finally, test the CDN endpoint using tools like GTmetrix or WebPageTest to confirm that the CSS is served with correct cache headers and from a nearby edge location.
Integrating Tailwind CSS with WordPress unlocks rapid, utility-first styling, but the process is not without its hurdles. Developers frequently encounter class conflicts, build errors, and caching quirks that can stall progress. Below are solutions to the most persistent issues, organized by the specific problems you are likely to face.
Resolving CSS conflicts with existing WordPress styles
WordPress ships with default styles for core blocks, the admin bar, and themes like Twenty Twenty-Four. When Tailwind’s utility classes (e.g., p-4, text-center) interact with these pre-existing rules, specificity wars can break your layout. To resolve this:
Use a base reset or preflight. Tailwind’s Preflight (enabled by default) normalizes browser defaults, but it does not override WordPress theme styles. Add a custom layer in your style.css to reset theme-specific rules: @layer base { h1, h2, h3 { margin: 0; } }.
Scope Tailwind classes. Wrap your custom block output in a unique CSS class (e.g., .my-tailwind-content) and configure Tailwind’s important option per utility: important: true in tailwind.config.js.
Dequeue conflicting theme styles. In your theme’s functions.php, selectively remove parent theme CSS that targets the same elements: wp_dequeue_style( 'parent-style' );.
Fixing build errors related to Node.js or PostCSS versions
Tailwind CSS relies on Node.js and PostCSS. Version mismatches are a top cause of build failures. If you see errors like Error: PostCSS plugin tailwindcss requires PostCSS 8 or SyntaxError: Unexpected token, follow these steps:
Check Node.js version. Tailwind CSS v3 requires Node.js 12.13.0 or higher. Run node -v in your terminal. If outdated, update via nvm: nvm install --lts.
Verify PostCSS compatibility. Ensure your package.json lists "postcss": "^8.4.0" and "tailwindcss": "^3.0.0". Delete node_modules and package-lock.json, then run npm install.
Use a correct PostCSS config. Create or update postcss.config.js with this minimal setup:
If you use a build tool like Laravel Mix or Vite, ensure the PostCSS plugin version aligns with your Tailwind version.
Debugging missing styles due to incorrect purge configuration
Tailwind scans your template files for class names and removes unused styles in production. If styles vanish after building, your purge settings are likely too narrow or misconfigured. Common fixes include:
Expand content paths. In tailwind.config.js, ensure the content array includes all PHP files and JavaScript where you use Tailwind classes. For a typical WordPress theme, use: content: ['./**/*.php', './src/**/*.js'].
Avoid dynamic class construction. WordPress often builds class names via PHP concatenation (e.g., class="bg--500"). Tailwind cannot scan these dynamically generated strings. Instead, use complete class names or safelist them: safelist: ['bg-red-500', 'bg-blue-500'].
Test with a full rebuild. Run npm run build (or your production script) and inspect the generated CSS file. If a class like grid-cols-3 is missing, add the parent template file path to content and rebuild.
By systematically addressing these three areas—conflicts, build errors, and purge issues—you can maintain a smooth Tailwind CSS integration with WordPress, keeping your development workflow efficient and your stylesheets lean.
Advanced Techniques: Tailwind CSS with WordPress Plugins and Custom Post Types
Extending Tailwind CSS beyond standard posts and pages unlocks powerful design consistency across custom post types, dynamic fields, and e-commerce interfaces. By applying Tailwind’s utility-first approach to plugins like Advanced Custom Fields (ACF) and WooCommerce, you can maintain a unified design system while leveraging WordPress’s flexibility. Below are three advanced integration strategies for styling custom content and plugin-driven pages.
Styling Custom Post Type archives and single templates with Tailwind
Custom post types (CPTs) often require distinct layouts. To apply Tailwind classes, create dedicated template files (e.g., archive-portfolio.php and single-portfolio.php) and enqueue a Tailwind-compiled stylesheet. Use Tailwind’s responsive utilities to structure archive grids:
Archive grid: Use grid grid-cols-1 md:grid-cols-2 lg:grid-cols-3 gap-6 on the loop container.
Single template: Apply max-w-4xl mx-auto px-4 py-8 for centered content with consistent spacing.
Meta information: Style custom fields with text-sm text-gray-500 mb-2 for subtle metadata.
For dynamic class generation, use WordPress’s post_class() function combined with Tailwind’s @apply directive in your CSS to map post-specific styles. Example: <article class="<?php post_class('bg-white shadow-md rounded-lg p-6'); ?>">.
Integrating Tailwind with Advanced Custom Fields for dynamic styling
ACF allows editors to control styling via fields. To map field values to Tailwind classes, use conditional logic in your templates. For example, if a “background color” field returns “blue,” output bg-blue-500. Create a helper function to sanitize and output classes:
Color fields: Store hex values; map them to predefined Tailwind color classes (e.g., #3b82f6 → bg-blue-500).
Layout selectors: Use ACF select fields (e.g., “layout: full-width, sidebar”) to apply w-full or lg:w-2/3.
Spacing fields: Let users choose padding (small, medium, large) and output p-4 p-6 p-8 accordingly.
Example template snippet for a dynamic background:
Applying Tailwind classes to WooCommerce product pages and checkout
WooCommerce templates are notoriously markup-heavy. Override them by copying template files to your theme’s woocommerce/ directory and replacing default classes with Tailwind utilities. Key areas to target:
For checkout, ensure input fields use w-full border border-gray-300 p-3 rounded for consistency. Use Tailwind’s focus:ring-2 focus:ring-blue-500 for accessibility. Test all modifications on a staging site, as WooCommerce updates may require template re-overrides. With these techniques, your WordPress site gains a cohesive, maintainable design system across all plugin and custom post type contexts.
Frequently Asked Questions
What is Tailwind CSS and why use it with WordPress?
Tailwind CSS is a utility-first CSS framework that provides low-level utility classes to build custom designs directly in HTML. Using it with WordPress allows developers to create highly customized, responsive themes without writing traditional CSS. It speeds up development, ensures consistency, and reduces file sizes when purged properly. For WordPress, it integrates well with block themes and the FSE (Full Site Editing) system, offering a modern approach to styling.
How do I install Tailwind CSS in a WordPress theme?
To install Tailwind CSS in a WordPress theme, first initialize a package.json file in your theme directory using npm init. Then install Tailwind via npm: npm install -D tailwindcss. Create a tailwind.config.js file using npx tailwindcss init. Configure the content paths to scan your PHP files for class usage. Add Tailwind directives (@tailwind base, components, utilities) to your main CSS file. Finally, set up a build script to compile and purge unused styles for production.
Can I use Tailwind CSS with the WordPress block editor (Gutenberg)?
Yes, you can use Tailwind CSS with the WordPress block editor. One approach is to enqueue a separate stylesheet for the editor that includes Tailwind classes. In your theme functions.php, add add_editor_style('editor-style.css') and compile an editor-specific CSS file with Tailwind. You can also use the @wordpress/scripts package to integrate Tailwind with block development. However, note that some core block styles may conflict, so you may need to adjust or disable default editor styles.
What is the best way to purge unused Tailwind CSS in WordPress?
The best way to purge unused Tailwind CSS is to configure the content array in tailwind.config.js to scan all PHP files in your theme, including template parts and functions files. For example: content: ['./**/*.php']. Additionally, if you use dynamic class names, you must list them explicitly or use safelist patterns. For block themes, also include patterns for HTML files. Run the build script with NODE_ENV=production to enable purging. This reduces CSS file size significantly, improving performance.
How do I handle Tailwind CSS with WordPress child themes?
For child themes, you can install Tailwind in the child theme directory similarly to a parent theme. Create a package.json and tailwind.config.js in the child theme folder. Set up build scripts to compile CSS. In the child theme's functions.php, enqueue the compiled CSS file. If the parent theme also uses Tailwind, consider using the same configuration to avoid duplication. Alternatively, you can extend the parent theme's build process by importing its config.
What are common issues when integrating Tailwind CSS with WordPress?
Common issues include conflicts with existing theme CSS, especially with WordPress core block styles. Another issue is dynamic class generation not being detected by the purger, leading to missing styles. Also, the block editor may not render Tailwind classes if the editor stylesheet isn't properly enqueued. Performance can be affected if purging isn't configured correctly. Solutions include using a custom editor stylesheet, safelisting dynamic classes, and thoroughly testing all pages.
Can I use Tailwind CSS with WordPress page builders like Elementor?
Yes, but with limitations. Page builders often generate their own markup and classes, so Tailwind utility classes must be added manually via custom CSS fields or by editing the HTML widget. Some builders allow custom CSS classes on elements, which you can use to apply Tailwind utilities. However, this can be cumbersome. A better approach is to use Tailwind with a custom block theme or with the native block editor for a more seamless integration.
How does Tailwind CSS impact WordPress performance?
When properly configured with purging, Tailwind CSS can improve performance by delivering only the styles used on the page, resulting in smaller CSS files. However, if purging is not set up or if the configuration scans too few files, the CSS can be large. Additionally, the build process adds a step to your workflow. Overall, Tailwind's utility-first approach can reduce the need for custom CSS and inline styles, leading to cleaner code and faster load times.
React State Management: Redux vs. Context API – An Expert Comparison
Introduction to State Management in React
State management is the backbone of any dynamic React application, dictating how data flows, updates, and renders across components. As applications grow in complexity, managing state locally within individual components becomes increasingly untenable. The core challenge lies in maintaining a predictable, debuggable data flow while avoiding deeply nested prop chains—commonly known as prop drilling—that make code brittle and hard to maintain. This is where centralized state solutions like Redux and the Context API come into play, offering structured approaches to sharing and synchronizing state across an entire component tree. Understanding when and why to adopt these tools is essential for building scalable, maintainable React applications.
Why Centralized State Management Matters
Centralized state management addresses a fundamental problem in React: the need for multiple, unrelated components to access and update the same piece of data. Without a central store, developers resort to lifting state up to common ancestors and passing it down through props. While this works for small apps, it creates a tangled web of dependencies as the app scales. A centralized state solution offers several concrete benefits:
Single source of truth: All state resides in one predictable location, reducing inconsistencies and making debugging straightforward.
Predictable updates: Changes to state follow defined patterns (e.g., reducers or context providers), ensuring data flow is traceable and side effects are minimized.
Component decoupling: Components no longer need to know the structure of the entire tree to access data; they simply connect to the store or consume a context.
Improved testability: State logic can be tested independently of UI components, leading to more reliable code.
Performance optimization: Centralized stores often include built-in mechanisms (e.g., Redux selectors or Context memoization) to prevent unnecessary re-renders.
These advantages become critical when managing user authentication, shopping cart data, theme preferences, or real-time updates across dozens of components.
Common Pitfalls of Local State Only
Relying exclusively on local state—using useState or useReducer within individual components—can lead to several recurring issues as an application matures:
Pitfall
Description
Impact
Prop drilling
Passing state through multiple intermediate components that do not use the data themselves.
Code becomes verbose and fragile; refactoring requires changes across many files.
State duplication
Multiple components maintain separate copies of the same logical state.
Leads to synchronization bugs and inconsistent UI.
Unclear data ownership
No single component is responsible for managing shared state.
Difficult to trace where updates originate; debugging becomes time-consuming.
Re-render cascades
State changes in a high-level component trigger re-renders in many unrelated children.
Performance degrades, especially in deeply nested trees.
Scaling difficulty
Adding new features often requires restructuring the component hierarchy.
Development slows; the codebase becomes rigid.
These pitfalls are not theoretical—they emerge naturally when teams add features like user preferences, multi-step forms, or collaborative editing without a centralized strategy.
When to Consider External State Solutions
External state solutions—such as Redux, Zustand, or the built-in Context API—should be evaluated when your application exhibits one or more of the following characteristics:
Multiple components across distant branches of the tree need the same data. For example, a header, sidebar, and footer all need user authentication status.
State updates are frequent and complex. Real-time dashboards, collaborative editors, or live chat features benefit from predictable update patterns.
The application has distinct global state that persists across routes. Theme settings, language preferences, or cached API responses are good candidates.
You need fine-grained control over re-renders. Redux’s selector pattern or Context’s multiple providers can prevent unnecessary updates that local state alone cannot avoid.
The team size or codebase complexity justifies formal state architecture. Larger teams benefit from the constraints and conventions that external solutions enforce.
It is important to note that external solutions add conceptual overhead and boilerplate. For simple apps with limited shared state, React’s built-in useState and prop passing remain perfectly adequate. The decision to adopt Redux or Context API should always be driven by actual pain points, not by trend or speculation.
What Is the Context API?
React’s Context API is a built-in feature designed to share global data across a component tree without manually passing props through every level. It solves the “prop drilling” problem, where data must be threaded through intermediate components that do not need it themselves. The Context API provides a way to broadcast values—such as themes, user authentication status, or locale preferences—to any descendant component that subscribes to them, making it a lightweight alternative to external state management libraries for simpler use cases. It operates by creating a context object, which holds the data, and then using two key components: the Provider, which supplies the data, and the Consumer, which accesses it.
Provider and Consumer Pattern
The Provider and Consumer pattern is the foundation of the Context API. The Provider component wraps a part of the component tree and makes a value available to all descendants. It accepts a value prop, which can be any JavaScript data type—an object, array, string, or function. Any component nested inside the Provider can access that value via the Consumer or the useContext hook. The Consumer component uses a render-prop pattern, where a function is passed as a child to receive the context value. This approach is explicit but can lead to deeply nested code when used extensively. Here is a practical example demonstrating the pattern:
import React, { createContext } from 'react';
// Create a context with a default value
const ThemeContext = createContext('light');
function App() {
return (
<ThemeContext.Provider value="dark">
<Toolbar />
</ThemeContext.Provider>
);
}
function Toolbar() {
return (
<div>
<ThemeContext.Consumer>
{theme => <p>Current theme: {theme}</p>}
</ThemeContext.Consumer>
</div>
);
}
In this example, the Provider passes "dark" to the ThemeContext, and the Consumer in Toolbar renders it. This pattern works well for small applications or isolated contexts but can become verbose as the number of contexts grows.
Using useContext Hook for Simplicity
The useContext hook, introduced in React 16.8, simplifies consuming context values by eliminating the need for the Consumer component and its render-prop syntax. Instead, you call useContext directly inside a functional component, passing the context object as an argument. This hook returns the current context value, making code more readable and reducing boilerplate. For example, the previous Toolbar component can be rewritten as:
import React, { useContext } from 'react';
function Toolbar() {
const theme = useContext(ThemeContext);
return <p>Current theme: {theme}</p>;
}
This approach is preferred in modern React development because it keeps components cleaner and aligns with functional programming patterns. When using useContext, ensure the component is within a matching Provider, or the default value from createContext will be used.
The Context API is best suited for global data that does not change frequently or is read-heavy. Common scenarios include:
Theming: Providing a theme object (light/dark mode) to all components.
Authentication: Sharing user login status, tokens, or profile data across the app.
Localization: Passing locale strings or translation functions to support multiple languages.
UI State: Managing a sidebar open/close state or a modal visibility flag.
However, the Context API has limitations. It is not optimized for high-frequency updates—every context value change re-renders all consuming components, which can cause performance issues in large applications with dynamic data. For such cases, libraries like Redux offer more granular control. The Context API excels in small to medium-sized projects where simplicity and zero external dependencies are priorities.
What Is Redux?
Redux is a predictable state container for JavaScript applications, most commonly used with React but framework-agnostic. It centralizes application state in a single object, enforcing strict rules for how state can be read and updated. This predictability stems from three core principles: a single source of truth, state is read-only, and changes are made through pure functions. By decoupling state management from the UI layer, Redux enables consistent behavior across environments, easier debugging, and features like time-travel debugging. Its architecture, while initially verbose, provides a robust foundation for applications where state interactions are complex, asynchronous, or shared across many components.
The Redux Store and Reducers
The Redux store is a plain JavaScript object that holds the entire application state. It is created using the createStore function (or configureStore in Redux Toolkit), which requires a reducer function. The store has three core methods: getState() for reading the current state, dispatch(action) for sending actions, and subscribe(listener) for reacting to changes. Reducers are pure functions that take the current state and an action object as arguments, then return a new state object without mutating the previous state. They follow the pattern (state, action) => newState. A common practice is to combine multiple reducers using combineReducers, each managing a slice of the global state. For example:
User reducer: manages profile, authentication flags.
Each reducer only handles the actions relevant to its slice, keeping logic modular and testable.
Actions and Dispatch Mechanism
Actions are plain JavaScript objects that describe an event that should change state. The only requirement is a type property, typically a string constant like 'ADD_TODO'. Actions can also carry a payload with data needed for the update. To trigger a state change, the store’s dispatch method is called with the action object. The dispatch mechanism follows unidirectional data flow: a user interaction or event creates an action, which is dispatched to the store, the store passes the action and current state to the root reducer, the reducer computes a new state, and the store notifies subscribed components. This one-way loop makes data flow easy to trace. In React, the useDispatch hook from React-Redux provides access to dispatch inside functional components. For clarity, action creators—functions that return action objects—are commonly used to encapsulate action creation logic.
Middleware and Side Effects (e.g., Redux Thunk)
By default, Redux dispatch is synchronous. Middleware intercepts dispatched actions before they reach the reducer, enabling side effects like API calls, logging, or asynchronous flows. Redux Thunk is the most popular middleware for handling async actions. It allows action creators to return a function (a “thunk”) instead of an action object. This function receives dispatch and getState as arguments, enabling it to perform async operations and dispatch multiple actions over time. For instance, a thunk for fetching user data might dispatch a loading action, await the API response, then dispatch a success or failure action. Other middleware options include Redux Saga (using generator functions for complex async workflows) and Redux Observable (based on RxJS observables). Middleware is applied when creating the store via applyMiddleware or configureStore.
Feature
Redux (with Redux Toolkit)
Context API
State container
Single centralized store
Multiple providers, each scoped
Data flow
Unidirectional via dispatch → reducer
Unidirectional via provider value updates
Performance
Optimized with selectors and memoization; only re-renders subscribed components
Can cause unnecessary re-renders without careful memoization (useMemo, useCallback)
Middleware support
Built-in middleware system (Thunk, Saga, custom)
None natively; requires custom wrapper logic
DevTools
Dedicated Redux DevTools with time-travel debugging
No built-in DevTools; relies on React DevTools
Boilerplate
Higher initial code (actions, reducers, store setup)
Minimal for simple state; grows with complexity
Performance Characteristics of Context API
Re-render Behavior and Unnecessary Updates
The Context API, while elegantly simple for small to medium applications, has a fundamental performance characteristic that can become problematic as an app scales: any time a context value changes, all components that consume that context will re-render, regardless of whether the specific piece of data they use has changed. This is because React’s context propagation mechanism does not perform fine-grained change detection; it triggers a re-render for every consumer when the provider’s value reference changes. In a large component tree with many context consumers, this can lead to cascading, unnecessary updates that degrade frame rates and user experience.
Frequently updated state: A context holding real-time data (e.g., mouse position, websocket feed) will cause all consumers to re-render on every update.
Large consumer trees: Deeply nested components that each consume the context amplify the cost of a single state change.
Co-located unrelated data: When a single context object holds both frequently and infrequently changing values, the infrequent consumers pay the re-render cost unnecessarily.
To illustrate, consider a simple counter context. Every time the counter increments, any component consuming this context—even one that only reads a static user name stored in the same context—will re-render:
const AppContext = React.createContext();
function AppProvider({ children }) {
const [count, setCount] = useState(0);
const [userName] = useState('Alice'); // static value
// Every setCount triggers re-render of all consumers
return (
<AppContext.Provider value={{ count, userName }}>
{children}
</AppContext.Provider>
);
}
Context Splitting for Optimization
One of the most effective strategies to mitigate unnecessary re-renders is context splitting: instead of storing all related state in a single context, break it into multiple, smaller contexts based on update frequency or logical domain. This ensures that a change in one context only re-renders the consumers that truly depend on that specific slice of state.
For example, separate frequently updated data from static or rarely changed data:
CountContext – holds only the counter state and its updater function.
UserContext – holds user profile data that changes infrequently.
Components that only need user data will never re-render when the counter updates. This granularity can dramatically reduce the render footprint in large applications. A practical guideline is to create a new context for every distinct “concern” that has a different update cadence.
useMemo and useCallback Mitigations
Beyond context splitting, two React hooks—useMemo and useCallback—can further optimize Context API performance by stabilizing value references and preventing unnecessary re-renders of child components.
useMemo should be used to memoize the context value object itself. Without it, every render of the provider component creates a new object reference, causing all consumers to re-render even if the actual data hasn’t changed:
useCallback is essential for stabilizing function references passed through context. If a function like increment is recreated on every render, it can break memoization in child components that use React.memo:
These hooks are not a silver bullet—they add overhead and complexity—but when combined with context splitting, they form a robust optimization strategy. The key trade-off is between the cost of memoization and the cost of re-renders; in practice, for contexts with more than a handful of consumers, the investment pays off.
Performance Characteristics of Redux
Redux is engineered for performance in large-scale applications through several built-in mechanisms that prevent unnecessary re-renders and optimize data access patterns. The library’s design philosophy emphasizes predictable state updates and efficient component re-rendering, making it a strong contender for complex state management scenarios. Understanding these performance characteristics is crucial when comparing Redux to the Context API, as they directly impact application responsiveness and resource utilization.
Reselect and Memoized Selectors
Reselect is a companion library for Redux that provides a mechanism for creating memoized selector functions. These selectors compute derived data from the Redux store, allowing components to access only the specific pieces of state they need. Memoization ensures that the selector only recalculates when its input state changes, preventing unnecessary computations on every render. The key advantages include:
Derived data caching: Selectors store the last computed result and return it directly if inputs remain unchanged.
Composable selectors: Smaller selectors can be combined to build complex data transformations without performance penalties.
Reduced component re-renders: Components only update when the selected state slice actually changes, not when unrelated state updates occur.
Granular control: Developers can create selectors that return stable references (e.g., using createSelector), which is critical for reference equality checks in React.
For example, a typical memoized selector for a user list might look like this: it takes the raw users array from the store and returns only active users sorted by name. Without Reselect, every component subscribed to the users slice would re-render whenever any user property changed, even if the active user list remained identical.
connect vs. useSelector Performance
The connect function (from react-redux) and the useSelector hook (introduced in React-Redux v7) both provide access to the Redux store, but they differ in performance characteristics and usage patterns. The following table summarizes key differences:
Feature
connect (Higher-Order Component)
useSelector (Hook)
Rendering behavior
Uses shallow equality on mapStateToProps output
Uses strict reference equality by default
Custom equality
Not directly supported; requires manual optimization
Supports custom equality function as second argument
Component structure
Wraps component, creating an additional layer
Directly inside functional component
Performance with large state trees
Efficient due to built-in shallow equality checks
Can cause unnecessary re-renders if not memoized properly
Compatibility with class components
Yes
No (functional components only)
connect performs automatic shallow equality comparison on the result of mapStateToProps, meaning if the returned object has the same references as the previous one, the wrapped component will not re-render. In contrast, useSelector uses strict reference equality (===) by default, which can lead to re-renders if the selector returns a new object or array on each call. Developers can mitigate this by using Reselect’s memoized selectors with useSelector or by providing a custom equality function. For most use cases, useSelector with proper memoization performs comparably to connect, but connect remains advantageous for class components or when automatic shallow comparison is desired without additional boilerplate.
Normalizing State Shape for Speed
Normalizing the Redux state shape is a critical optimization technique that directly impacts performance. A normalized state organizes data as a flat dictionary of entities rather than deeply nested structures, which provides several performance benefits:
Faster lookups: Accessing an entity by ID becomes O(1) instead of O(n) when searching nested arrays.
Efficient updates: Updating a single entity only requires changing one location in the state, avoiding deep copies of nested objects.
Reduced re-renders: Components that subscribe to specific entity IDs only re-render when that entity changes, not when sibling or parent entities update.
Simpler selectors: Memoized selectors work more effectively with flat structures because they can return stable references to individual entities.
A common normalization pattern uses normalizr or manual techniques to transform nested API responses into a shape like { entities: { users: { byId: {}, allIds: [] } } }. This approach is particularly beneficial for applications with frequent updates to individual items, such as real-time collaboration tools or data-heavy dashboards. When combined with memoized selectors, normalized state ensures that even large state trees remain performant under heavy load.
Scalability and Maintainability
When evaluating React state management solutions for long-term projects, scalability and maintainability are paramount. Redux and the Context API differ significantly in how they accommodate growing team sizes, increasing feature counts, and complex state logic. Redux provides a structured, opinionated framework that enforces separation of concerns, while Context API offers simplicity that can become a liability as an application expands.
Code Organization with Redux Slices
Redux scales effectively through its slice pattern, which divides the global state into logical, self-contained modules. Each slice contains its own reducer, actions, and selectors, making it straightforward to assign ownership to individual developers or teams. For example, an e-commerce application might have slices for cart, user, products, and orders:
This modularity enables parallel development, clear dependency boundaries, and easier code reviews. Redux Toolkit further enhances maintainability by reducing boilerplate and enforcing immutable update patterns through Immer. Key benefits for scalability include:
Feature isolation – Each slice handles its own state without cross-contamination.
Predictable data flow – Unidirectional updates via dispatched actions simplify debugging.
Middleware support – Tools like Redux Thunk or Saga handle side effects without cluttering components.
DevTools integration – Time-travel debugging and action logging become invaluable with many features.
Context API in Large Codebases
The Context API, while excellent for small to medium applications, presents challenges as codebases grow. Without built-in modularity, developers often create multiple contexts for different domains, leading to a tangled hierarchy of providers. For instance, a large application might require separate contexts for authentication, theme, locale, and user preferences, resulting in deeply nested provider trees that are hard to reason about:
Common maintainability issues with Context API at scale include:
Unnecessary re-renders – Any context value change forces all consuming components to re-render, even if they only use a subset of the data.
No built-in state splitting – Developers must manually implement patterns like useReducer or create multiple contexts to avoid performance bottlenecks.
Difficult testing – Mocking deeply nested contexts requires extensive wrapping in test utilities.
Limited tooling – No dedicated DevTools for tracking context changes or debugging state flows.
Testing and Debugging Considerations
Redux excels in testing and debugging due to its predictable architecture. Reducers are pure functions that can be unit-tested in isolation without rendering components. Integration tests can dispatch actions and assert on state changes using a mock store. For debugging, the Redux DevTools browser extension provides time-travel debugging, action replay, and state diffing, which is crucial for tracking complex state mutations across many features.
Context API testing requires wrapping components in provider components, making tests more verbose. Debugging relies on React DevTools, which shows provider values but lacks action history or state snapshots. For large teams, the lack of structured debugging tools increases time spent reproducing and fixing bugs. A practical comparison table highlights these differences:
In summary, Redux provides a robust foundation for scalability and maintainability through structured code organization, modular slices, and advanced debugging capabilities. The Context API remains suitable for simpler state needs but introduces friction as team size and feature complexity increase.
When evaluating React State Management: Redux vs. Context API, the learning curve and developer experience often dictate which solution a team adopts. Redux demands a deeper initial investment due to its formal architecture, while Context API offers a gentler entry point for developers already familiar with React’s hooks. Below, we break down the key factors influencing this trade-off.
Redux Boilerplate vs. Context Simplicity
Redux historically required significant boilerplate: action types, action creators, reducers, store configuration, and middleware setup. Even with Redux Toolkit reducing this overhead, developers must learn concepts like immutability, pure functions, and the unidirectional data flow. In contrast, Context API leverages React’s built-in createContext and useContext hooks, requiring no additional libraries. A simple context setup involves only a provider component and a consumer hook, which feels natural to developers already using useState or useReducer. However, this simplicity can become deceptive when managing complex state, as Context lacks built-in mechanisms for side effects or normalized data, often leading to ad-hoc patterns that increase cognitive load over time.
Redux offers a mature DevTools ecosystem, including a browser extension with time-travel debugging, action logging, state diffing, and the ability to dispatch actions manually. This transforms debugging from guesswork into a forensic process—developers can replay past states and inspect every mutation. Context API lacks official DevTools support. Debugging requires manual logging, React DevTools profiling (which shows re-renders but not state changes), or third-party libraries like use-context-selector that add complexity. For teams prioritizing rapid issue diagnosis, Redux’s DevTools provide a clear advantage, especially in large applications with dozens of state changes per interaction.
Community Resources and Ecosystem
Redux benefits from a decade of community growth: thousands of tutorials, Stack Overflow answers, conference talks, and production-tested libraries like Redux Saga, Redux Observable, and Reselect. The official documentation is comprehensive, with recipes for common patterns. Context API, while well-documented by React’s official guide, has fewer advanced resources. Most tutorials cover basic use cases, leaving developers to invent solutions for performance optimization or cross-cutting concerns. The ecosystem around Context is thinner—there are no dedicated middleware libraries or form validation tools designed specifically for it. For teams needing reliable, battle-tested patterns, Redux’s community support reduces long-term risk, whereas Context API may require more in-house problem-solving for non-trivial scenarios.
When to Use Context API Over Redux
Choosing between React’s built-in Context API and a dedicated library like Redux often comes down to application complexity and update patterns. While Redux provides a robust, centralized store with middleware and devtools, Context API offers a lighter, simpler solution for specific use cases. Understanding when Context API is sufficient—or even preferable—can save development time, reduce bundle size, and avoid over-engineering. Below are the key scenarios where Context API shines over Redux.
For applications with a limited number of components and a straightforward state tree, Context API eliminates the boilerplate and learning curve associated with Redux. In small to medium apps, the state typically involves fewer than 10–15 shared values, such as user authentication status, language preference, or a few UI flags. Context API allows you to define a provider and consume state directly without creating actions, reducers, or a store configuration. This keeps the codebase lean and maintainable. For example, a personal blog or a small e-commerce site with fewer than 20 components rarely benefits from the strict structure of Redux. The overhead of setting up Redux in such cases can outweigh its advantages, especially when team size is small and rapid iteration is prioritized.
Context API performs best when state updates occur infrequently—such as theme toggling, language switching, or sidebar visibility. These updates happen on user action (e.g., clicking a button) and do not involve high-frequency re-renders. Because Context API triggers a re-render of all consumers whenever the context value changes, using it for high-frequency updates (like real-time mouse coordinates or form input changes) can lead to performance degradation. In contrast, low-frequency changes are well-suited: the re-render cost is minimal and predictable. For instance, a theme toggle that changes a global color palette affects only a few styling-related components, and the update occurs once per user interaction. This pattern is exactly what Context API was designed for—simple, occasional state sharing without the need for memoization or selectors.
Rapid Prototyping and Simple Sharing
When building a proof-of-concept or a prototype, Context API accelerates development by removing configuration steps. You can wrap a provider around a component tree and immediately share state without defining action types, reducers, or middleware. This is especially useful for hackathons, MVP launches, or internal tools where speed matters over scalability. Similarly, for simple sharing of a single piece of data—like a user ID across sibling components—Context API provides a direct, readable solution. In these cases, the added structure of Redux becomes unnecessary complexity. However, note that if the prototype grows into a larger application with complex state interactions, migrating to Redux later is a common and manageable step.
Comparison of Context API and Redux in Key Scenarios
Scenario
Context API
Redux
Small to medium app scope
Sufficient, minimal boilerplate
Overkill, adds unnecessary complexity
Low-frequency state changes
Excellent performance, simple to implement
Possible but adds overhead
Rapid prototyping
Ideal, fast setup with no extra libraries
Slower setup, better for long-term projects
High-frequency updates
Can cause performance issues
Better with middleware and memoization
Complex state logic
Not recommended
Structured and scalable
In summary, Context API is the preferable choice for React state management when the application scope is small, state changes are infrequent, or rapid prototyping is the goal. These scenarios align with the library’s strengths: simplicity, zero dependencies, and direct integration with React’s component model. By reserving Redux for larger, more complex applications, developers can keep their codebases efficient and focused on the task at hand.
When to Use Redux Over Context API
Choosing between Redux and the Context API for React state management depends on the specific demands of your application. While the Context API excels in simplicity for small to medium-sized apps, Redux provides a robust, predictable architecture that becomes essential under certain conditions. Below are the precise scenarios where Redux is the superior choice.
Complex State Logic and Side Effects
Redux shines when your state logic involves intricate dependencies, cross-cutting concerns, or asynchronous side effects. Unlike the Context API, which requires manual management of state updates and side effects within components or custom hooks, Redux enforces a unidirectional data flow through pure reducers. This makes it easier to reason about complex state transitions.
When you need to handle side effects like API calls, caching, or websocket connections, Redux middleware such as Redux Thunk or Redux Saga provides a dedicated layer. For example, fetching user data with Redux Thunk looks like this:
The Context API lacks built-in support for such patterns, often leading to scattered logic across components or complex custom hooks. Use Redux when your state dependencies are deep, such as when updating one piece of state triggers recalculations in multiple unrelated parts of the store.
High-Frequency State Updates
Applications requiring rapid, frequent state updates—such as real-time dashboards, collaborative editing tools, or gaming interfaces—benefit significantly from Redux. The Context API triggers a re-render of all consumers whenever the context value changes, even if only a small portion of the state updates. This can cause performance bottlenecks in high-frequency scenarios.
Redux mitigates this through its store subscription model and the useSelector hook, which only re-renders components when their selected slice of state changes. Additionally, libraries like reselect enable memoized selectors to prevent unnecessary recalculations. The following table summarizes the performance characteristics:
Aspect
Redux
Context API
Re-render scope
Only subscribed components
All context consumers
Optimization tools
Memoized selectors, middleware
Manual useMemo, useCallback
Ideal update frequency
High (e.g., 60 FPS)
Low to moderate
Choose Redux when your app processes state changes at rates above 30 updates per second, or when you need fine-grained control over re-renders.
Enterprise-Scale Collaboration Requirements
For large teams working on complex applications, Redux offers structural advantages that the Context API cannot match. Redux enforces a strict separation of concerns through actions, reducers, and the store, making it easier for multiple developers to work on different state domains without conflicts. Its DevTools extension provides time-travel debugging, action logging, and state inspection, which are invaluable for debugging in production-like environments.
Redux also supports middleware for logging, crash reporting, and analytics—features critical for enterprise applications. Consider using Redux when:
Your team has more than five developers contributing to state logic.
You need to maintain a clear audit trail of state changes.
The application requires integration with external tools like Redux Persist for offline support.
You anticipate scaling to multiple micro-frontends or module federations.
In summary, reserve Redux for scenarios demanding predictable state management with complex interactions, high performance, and collaborative scalability. The Context API remains a lightweight alternative for simpler needs, but Redux provides the architectural rigor that enterprise-grade React applications require.
While the debate between Redux and the Context API often frames them as binary choices, many production applications benefit from hybrid strategies that blend their strengths. Additionally, a new generation of state management libraries has emerged, offering more granular control and simpler APIs than either Redux or raw Context. Understanding these options allows developers to tailor solutions to specific app complexity and performance requirements.
For localized state—such as the data within a single feature, form, or complex component tree—combining the Context API with useReducer provides a lightweight alternative to Redux. This pattern avoids global state overhead while still benefiting from a reducer’s predictable state transitions.
Structure: A useReducer hook manages state within a feature, and a Context provider makes the state and dispatch function available to descendant components without prop drilling.
When to use: Ideal for medium-complexity features like a multi-step checkout wizard, a dashboard with multiple filters, or a complex form with undo/redo capabilities.
Limitations: Context still triggers re-renders on all consumers when the context value changes, even if only a subset of the state is consumed. For high-frequency updates (e.g., real-time typing), this can cause performance issues.
This approach is a pragmatic middle ground: it avoids the boilerplate of Redux for isolated features while providing more structure than plain useState.
State Management Libraries: Zustand and Jotai
Zustand and Jotai represent a shift toward minimal, hook-based state management that avoids the provider hierarchy of Context and the action/reducer ceremony of Redux.
Feature
Zustand
Jotai
Core Concept
Single store with mutable state via set
Atomic atoms, each holding a piece of state
Boilerplate
Minimal; no actions or reducers required
Very minimal; atoms created with atom()
Re-rendering
Fine-grained via selector functions
Automatic per-atom subscription
Learning Curve
Low; similar to useState but global
Low; intuitive for simple state
Best Use Case
Global state that needs minimal structure
Modular, composable state across components
Zustand excels when you want a global store without Redux’s boilerplate—simply call create and use the returned hook. Jotai’s atomic model shines in complex dependency graphs where state pieces are combined or derived, as atoms can reference each other without creating a monolithic store.
Recoil and Atomic State Patterns
Recoil, developed by Meta, pioneered the atomic state pattern in React. Unlike Context or Redux, Recoil defines state as discrete atoms and derived selectors, enabling automatic dependency tracking and efficient re-rendering.
Atoms: Units of state that components can read and write directly via useRecoilState. Atoms are independent, so only subscribing components re-render when that specific atom changes.
Selectors: Pure functions that compute derived state from atoms or other selectors. They automatically cache results and only recompute when dependencies change.
Performance: Recoil avoids the Context re-render problem entirely because components subscribe only to the atoms they consume. This makes it suitable for highly interactive apps with frequent state updates.
Trade-offs: Recoil requires a RecoilRoot provider, and its API surface is larger than Zustand or Jotai. It also has a more opinionated mental model, which may be overkill for simpler applications.
Recoil is best reserved for applications where state is deeply interconnected, such as collaborative tools, data dashboards, or apps with complex undo/redo logic. Its atomic pattern provides a clear, maintainable structure for state that would otherwise become tangled in Context or Redux.
What is the main difference between Redux and Context API?
Redux is a standalone state management library that provides a predictable state container with a unidirectional data flow, middleware support, and devtools. Context API is a built-in React feature for passing data through the component tree without prop drilling. Redux is better for complex, large-scale applications with frequent updates, while Context API is simpler and sufficient for small to medium apps or global theming.
Use Redux when your app has complex state logic, requires middleware for side effects (like API calls), needs time-travel debugging, or involves frequent updates across many components. Redux also shines in large teams where strict patterns and devtools help maintain consistency. Context API is ideal for simpler needs like user authentication, theme, or locale settings where updates are infrequent.
Does Context API replace Redux?
No, Context API does not replace Redux. While both solve prop drilling, Redux offers a robust architecture with middleware, enhancers, and a centralized store that scales better. Context API can cause unnecessary re-renders and lacks built-in tools for side effects. For advanced state management, Redux or similar libraries (like Zustand or MobX) are recommended.
Can I use Redux and Context API together?
Yes, they can be used together. For example, you might use Context API for global theming or user authentication and Redux for complex business logic. However, mixing them can add complexity. In most cases, it's better to choose one primary state management solution per app to maintain consistency.
How does performance compare between Redux and Context API?
Redux generally performs better for frequent updates because it uses a single store with selectors to prevent unnecessary re-renders. Context API, when used with a provider, causes all consumers to re-render even if only part of the context value changes. This can be mitigated with memoization (useMemo) but still may lead to performance issues in large apps.
Which is easier to learn: Redux or Context API?
Context API is easier to learn because it is built into React and has a simpler API (createContext, useContext). Redux has a steeper learning curve due to concepts like actions, reducers, middleware, and immutable updates. However, Redux Toolkit simplifies Redux significantly, making it more accessible.
What are the alternatives to Redux and Context API?
Popular alternatives include Zustand (lightweight, simple), MobX (reactive, less boilerplate), Recoil (experimental, Facebook), and Jotai (atomic state). Each has trade-offs. For server state, consider React Query or SWR. The choice depends on your app's size, complexity, and team preferences.
Is Context API suitable for large-scale applications?
Context API is generally not recommended for large-scale applications with frequent state updates due to re-render performance issues. For large apps, Redux or other specialized libraries provide better scalability, middleware, and debugging tools. However, Context API can still be used for low-frequency global states like themes or user preferences.
How to Optimize React Performance: A Comprehensive Guide
Introduction: Why React Performance Matters
In modern web development, React offers a powerful component-based architecture that enables rich, dynamic user interfaces. However, as applications grow in complexity, performance bottlenecks can emerge, degrading user experience, harming search engine rankings, and reducing conversion rates. Users expect near-instantaneous interactions; a delay of even a few hundred milliseconds can lead to frustration, increased bounce rates, and lost revenue. For React developers, understanding where these bottlenecks arise and how to address them is essential for building applications that are both fast and scalable.
Common performance issues in React include unnecessary re-renders, large component trees, inefficient data fetching, and memory leaks. These problems often manifest as sluggish page loads, janky animations, or delayed responses to user input. The impact extends beyond user satisfaction: search engines like Google factor page speed into ranking algorithms, and e-commerce sites see measurable drops in conversion rates with every additional second of load time. By proactively optimizing React performance, you can deliver a smoother experience, improve SEO performance, and ultimately drive better business outcomes.
The Cost of Unoptimized Rendering
React’s virtual DOM and reconciliation algorithm are efficient by design, but unoptimized rendering can still create significant overhead. When a component re-renders without need—due to state changes in parent components, improper use of hooks, or missing memoization—the entire subtree may re-evaluate, wasting CPU cycles and blocking the main thread. The cost is cumulative: deeper component trees and frequent re-renders compound, leading to noticeable lag. For example, a list component that re-renders every time a parent updates, even if the list data hasn’t changed, can cause visible stuttering during scrolling or typing. Over time, this can degrade the perceived performance of an entire application, making it feel heavy and unresponsive.
Time to Interactive (TTI): The time it takes for a page to become fully interactive—meaning the main thread is idle and event handlers are ready. Long TTI often results from heavy JavaScript bundles, slow API calls, or blocking rendering.
First Paint (FP) / First Contentful Paint (FCP): The moment when the browser first renders any visual content. Slow FP/FCP can occur due to large initial bundles, unoptimized images, or excessive client-side rendering.
Re-render Frequency: The number of times components re-render in response to state or prop changes. High re-render frequency, especially in large trees, wastes resources and can cause layout thrashing or frame drops.
Metric
What It Measures
Common Cause of Poor Score
TTI
Time until page is fully interactive
Large JS bundles, blocking network requests
FP/FCP
First visual content rendered
Slow server response, heavy initial render
Re-render Frequency
Number of unnecessary component updates
Missing memoization, state propagation
Monitoring these metrics with tools like React Developer Tools, Lighthouse, or the Performance API helps identify specific areas for improvement.
Who Should Read This Guide
This guide is designed for React developers of all skill levels who want to build faster, more efficient applications. Whether you are a junior developer encountering performance issues for the first time, a mid-level engineer looking to refine your optimization techniques, or a senior architect responsible for large-scale React projects, the strategies covered here are immediately applicable. You will benefit most if you have a basic understanding of React components, hooks, and state management. If you have ever faced slow rendering, janky interfaces, or high CPU usage in your React apps, this guide will equip you with actionable solutions to diagnose and resolve these problems.
Understanding React’s Rendering Cycle
Before you can effectively optimize a React application, you must understand how React decides to update the user interface. The rendering cycle is the core mechanism that translates state changes into visual updates. Misunderstanding this cycle leads to unnecessary re-renders, wasted computation, and sluggish interfaces. This section lays the foundation for identifying and eliminating those inefficiencies.
Virtual DOM vs. Real DOM: What Happens During Re-render
The Document Object Model (DOM) is a browser API that represents the page structure. Directly manipulating the real DOM is slow because every change triggers layout recalculations and repaints. React circumvents this by maintaining a lightweight JavaScript object called the Virtual DOM.
When a component re-renders, React does not immediately touch the real DOM. Instead, it creates a new Virtual DOM tree representing the desired UI. It then compares this new tree with the previous Virtual DOM snapshot using a diffing algorithm. Only the minimal set of changes necessary to synchronize the real DOM with the new Virtual DOM are applied—a process called reconciliation. This batching and diffing dramatically reduces costly DOM operations.
Elements of different types produce different trees: If a <div> becomes a <span>, React tears down the old subtree and builds a new one.
Elements with a stable key prop are reused: When iterating lists, React uses the key prop to match children across renders.
Without proper key props, React falls back to index-based matching, which can cause incorrect component reuse and unnecessary re-renders. For example, if you remove an item from the middle of a list, indices shift, and React may re-render every subsequent item instead of simply removing the missing one. Always use a unique, stable identifier as the key—never the array index unless the list is static and never reordered.
How State and Props Trigger Updates
React triggers a re-render when a component’s state changes (via setState or useState) or when its parent passes new props. However, the decision to re-render a component is not automatic for the entire tree. The following table summarizes when updates occur:
Note that a parent re-render will cause all children to re-render by default, even if their props haven’t changed. This is a major source of wasted renders. You can mitigate this with React.memo for functional components or PureComponent for class components, which perform a shallow comparison of props. Consider this practical example:
// Without memo: Child re-renders every time Parent re-renders
function Child({ name }) {
console.log('Child rendered');
return <p>{name}</p>;
}
// With memo: Child only re-renders when name prop changes
const MemoizedChild = React.memo(Child);
function Parent() {
const [count, setCount] = React.useState(0);
return (
<div>
<button onClick={() => setCount(c => c + 1)}>Count: {count}</button>
<MemoizedChild name="Alice" />
</div>
);
}
In this code, MemoizedChild avoids re-rendering when the button is clicked, because its name prop remains the same reference. Understanding these triggers is the first step toward writing performant React components.
Profiling Your React Application
Before applying any performance optimization, you must measure. Profiling provides the data-driven foundation needed to identify real bottlenecks, avoid premature optimization, and verify that your changes actually improve speed. Without profiling, you risk wasting effort on code that has no measurable impact on user experience. This section covers the essential tools and techniques for capturing performance baselines and validating improvements in React applications.
Using React Developer Tools Profiler
The React Developer Tools Profiler is the most direct way to understand component rendering behavior. It records a timeline of commits (render cycles) and shows you exactly which components rendered, why they rendered, and how long each took. To use it effectively:
Open the Profiler tab in your browser’s DevTools after installing the React DevTools extension.
Click the record button, interact with your application (e.g., click a button, navigate a route), then stop recording.
Examine the flamegraph view to see component render durations; red or orange bars indicate expensive renders.
Click on a specific commit to see which components re-rendered and their props or state changes.
Focus on components that render frequently or take more than 2-3 milliseconds per render. The Profiler also shows the “rendered by” tree, helping you trace unnecessary re-renders back to their source, such as a parent component passing new object references on every render.
While the React Profiler focuses on component lifecycle, the Chrome DevTools Performance tab captures the full browser pipeline, including JavaScript execution, layout, painting, and compositing. This is critical for identifying non-React performance issues like large DOM mutations or expensive CSS calculations. Use it as follows:
Open the Performance tab, click “Record,” perform your user flow, then stop.
Look at the “Main” thread flamechart for long tasks (over 50ms) that block the user interface.
Identify JavaScript functions consuming high CPU time—these may be React reconciliation, but could also be third-party libraries or custom logic.
Check the “Summary” tab for time spent in scripting, rendering, and painting; a high “Scripting” percentage often points to unnecessary re-renders or heavy computations.
For React apps, combine this with the React Profiler: use the Performance tab to find frame drops or jank, then drill into specific commits with the React Profiler to isolate component-level causes.
Identifying Expensive Components with Why Did You Render
Why Did You Render (WDYR) is a lightweight npm package that notifies you in the console when a component re-renders due to unchanged props or state. It helps catch unnecessary re-renders that the React Profiler might not highlight as extremely slow but which cumulatively degrade performance. To use it:
Install @welldone-software/why-did-you-render and add it to your development entry point.
Wrap components with React.memo or class components with PureComponent to enable tracking.
Set whyDidYouRender = true on any component you want to monitor.
Watch the console for warnings like “ComponentName re-rendered because props changed” with details about which prop changed (often a function or object reference).
WDYR is most valuable during development for catching patterns like inline arrow functions, spread operators creating new objects, or missing memoization. It does not measure duration but flags frequency and unnecessary updates.
Tool
Primary Purpose
Best For
Limitation
React DevTools Profiler
Measure component render times and commit frequency
Identifying slow renders and re-render causes
Does not capture browser layout/paint phases
Chrome DevTools Performance
Analyze full browser pipeline (JS, layout, paint)
Finding frame drops, long tasks, and scripting bottlenecks
Less granularity on React component internals
Why Did You Render
Detect unnecessary re-renders from unchanged props/state
Catching memoization gaps and reference equality issues
No timing data; requires manual setup per component
Use these tools in sequence: start with WDYR to eliminate obvious unnecessary re-renders, then profile with React DevTools to measure remaining expensive components, and finally use Chrome DevTools Performance to ensure optimizations translate to smoother frame rates. Always record baseline metrics before making changes, and compare after each optimization to confirm improvement.
Unnecessary re-renders are a primary cause of sluggish React applications. When a component re-renders without any change to its props or state, it wastes computational resources and can degrade user experience, especially in complex UIs. Optimizing this area involves ensuring that components only update when genuinely needed. The key strategies involve memoization—caching the result of a render based on specific inputs—and choosing the right component architecture.
React.memo for Functional Components
For functional components, React.memo is the most direct tool to prevent unnecessary re-renders. It is a higher-order component that performs a shallow comparison of the component’s props. If the props have not changed between renders, React skips rendering the component and reuses the last rendered result.
Usage is straightforward: wrap your functional component with React.memo when you export it. This is particularly effective for components that receive complex data objects or are rendered in lists. Consider a ListItem component that receives a task object and a onToggle callback. Without memoization, every time the parent list re-renders—even if only one task changes—every ListItem re-renders. With React.memo, only the ListItem whose task object reference actually changes will re-render.
Note that React.memo only does a shallow comparison. If your props include functions or objects that are recreated on each parent render (like inline arrow functions), the shallow comparison will fail, and the component will still re-render. In such cases, pair React.memo</code with useCallback or useMemo in the parent to stabilize those references.
PureComponent for Class Components
For class-based components, the equivalent of React.memo is React.PureComponent. When a class component extends React.PureComponent instead of React.Component, it automatically implements a shallow comparison of props and state in its shouldComponentUpdate lifecycle method. This means that unless the props or state objects have changed reference (by shallow comparison), the component will not re-render.
This is especially useful for presentational components that display data without internal logic. For example, a UserCard class component that receives a user object and an avatar URL will only re-render when those specific references change, not when unrelated state in the parent updates.
However, be cautious: PureComponent shares the same shallow comparison limitation as React.memo. If you mutate props or state directly (e.g., this.props.user.name = 'New'), the shallow comparison will miss the change, and the component will not update. Always treat props and state as immutable.
When to Avoid Premature Memoization
While memoization is powerful, applying it indiscriminately can backfire. Each memoization wrapper (React.memo, PureComponent, useMemo, useCallback) adds overhead for the comparison itself. If a component re-renders infrequently or is very cheap to render (e.g., a simple <span>), the cost of the comparison may exceed the cost of re-rendering. In such cases, memoization harms performance.
Consider these scenarios where you should avoid premature memoization:
Components that always receive unique props: If every render passes a new object or function reference (e.g., <Child key={Math.random()} />), memoization is useless because the shallow comparison always fails.
Components with trivial renders: A component that only renders static text or a single DOM element is so cheap that memoization adds unnecessary complexity.
When you have not measured: Always profile your app first using React DevTools or browser performance tools. Apply memoization only to components that appear as bottlenecks in the profiler.
A practical rule of thumb: memoize components that are expensive to render (e.g., those with heavy calculations, large subtrees, or complex data processing) and that re-render frequently due to parent updates. For all others, start without memoization and add it only when profiling confirms a benefit.
How to Optimize React Performance: Leveraging useMemo and useCallback
In React, unnecessary re-renders can degrade performance, especially when components handle expensive computations or pass callback functions to child components. Two built-in hooks—useMemo and useCallback—help you memoize values and functions, preventing them from being recreated on every render. By strategically applying these hooks, you can reduce computational overhead and stabilize references, leading to smoother user experiences and faster load times. This section explains when and how to use each hook, along with common pitfalls to avoid.
useMemo for Heavy Computations
useMemo caches the result of a function so that it is only recalculated when its dependencies change. This is ideal for expensive calculations that do not need to run on every render, such as data filtering, sorting, or mathematical transformations.
When to use: For operations that involve large arrays, complex loops, or heavy API processing within the render cycle.
Example: If you have a list of thousands of items and need to filter them based on user input, wrap the filtering logic in useMemo to avoid recalculating on unrelated state updates.
Without memoization, React re-executes the computation on every render, even if the input data hasn’t changed. This can cause noticeable lag. useMemo ensures the computation runs only when its dependencies—such as the list or filter criteria—actually update, saving CPU cycles and improving responsiveness.
useCallback to Stabilize Function References
useCallback memoizes a function reference, returning the same instance unless its dependencies change. This is crucial when passing callbacks to child components that rely on reference equality to avoid unnecessary re-renders, such as those wrapped in React.memo.
When to use: When a function is passed as a prop to a child component that uses React.memo, or when it appears inside a dependency array of another hook (e.g., useEffect).
Example: In a parent component that renders a list of buttons, each with an onClick handler. Without useCallback, every parent render creates a new function reference, causing every child button to re-render even if the handler logic hasn’t changed.
By stabilizing the function reference, you prevent cascading re-renders, which is especially beneficial for deeply nested trees or components with expensive rendering logic.
Common Pitfalls and Best Practices
While useMemo and useCallback are powerful, misuse can harm performance or introduce bugs. Follow these guidelines:
Pitfall
Why It’s Problematic
Best Practice
Memoizing trivial computations
Adds overhead without benefit; the cost of memoization exceeds the cost of recomputation.
Creates unnecessary complexity and memory usage for functions that are cheap to recreate.
Use useCallback only when the function is passed to a memoized child or used in a dependency array.
Missing dependencies in the dependency array
Leads to stale closures and bugs because the memoized value or callback doesn’t update when needed.
Always list all variables used inside the hook. Use ESLint plugin react-hooks/exhaustive-deps to enforce this.
Assuming useMemo prevents side effects
useMemo is for pure computations only; side effects belong in useEffect.
Keep memoized functions pure. Move side effects to useEffect or event handlers.
Additionally, avoid premature optimization. Profile your app first using React DevTools or browser performance tools to identify genuine bottlenecks. Use useMemo and useCallback only where they deliver measurable improvement. Remember that these hooks themselves consume memory and processing time for dependency checks, so apply them judiciously.
By mastering useMemo and useCallback, you can fine-tune rendering behavior, reduce wasteful recalculations, and build React applications that remain fast and responsive under load.
How to Optimize React Performance: Code Splitting and Lazy Loading
Code splitting and lazy loading are essential techniques to reduce your application’s initial bundle size, leading to faster load times and improved user experience. By breaking your JavaScript into smaller chunks and loading them only when needed, you avoid forcing users to download code they may never execute. This section explores practical methods to implement these optimizations in React.
React.lazy and Suspense for Component-Level Splitting
React provides built-in support for component-level code splitting through React.lazy and Suspense. React.lazy allows you to dynamically import a component as a separate chunk, while Suspense renders a fallback UI while the chunk loads. This is ideal for components that are not immediately visible, such as modals, heavy charts, or rarely used forms.
Only wrap components that are large or rarely used to avoid unnecessary overhead for small imports.
Provide a meaningful fallback UI to maintain user engagement during loading.
Avoid using React.lazy inside loops or conditional statements where the import may fail unpredictably.
Route-Based Splitting with React Router
Route-based splitting leverages your application’s navigation structure to load code only for the active route. This is particularly effective for single-page applications with multiple pages. Using React Router, you can combine React.lazy with route definitions to create separate bundles for each route.
Implement route-based splitting as follows:
Define routes using React.lazy for each page component.
Wrap all routes in a single Suspense component to handle loading states globally.
Ensure fallback UI is consistent across routes, such as a spinner or skeleton.
Comparison of route-based splitting versus component-level splitting:
Third-party libraries and polyfills often contribute significantly to bundle size. Dynamic imports allow you to load these dependencies only when they are actually needed. For example, a date picker library can be imported only when the user opens a date input, or a polyfill can be loaded only for older browsers.
Practical steps for dynamic library imports:
Identify libraries used in conditional features, such as charts, maps, or rich text editors.
Replace static imports with dynamic import() calls inside the relevant component or function.
For polyfills, use feature detection to determine if loading is necessary, then import conditionally.
Example of loading a library dynamically based on user interaction:
function handleOpenDatePicker() {
import('react-datepicker').then((DatePicker) => {
// Render the date picker component
});
}
By applying these three techniques—component-level splitting with React.lazy and Suspense, route-based splitting with React Router, and dynamic imports for libraries—you can significantly reduce your app’s initial payload, improve time-to-interactive, and deliver a smoother experience for your users.
Optimizing Lists and Large Data Sets
Rendering long lists, tables, or grids in React can quickly degrade performance because React must reconcile thousands of DOM nodes on every state or prop change. Without optimization, even simple updates can cause noticeable lag, jank, or unresponsive interfaces. Effective optimization focuses on reducing the number of rendered elements and minimizing reconciliation work. Two foundational techniques are virtualization—rendering only the visible portion of a data set—and ensuring stable, unique keys for list items. Additionally, controlling the rate of user input that triggers list updates prevents unnecessary re-renders.
Windowing with react-window and react-virtualized
Windowing (also called virtualization) is the most impactful technique for rendering large data sets. Instead of rendering all items in a list, windowing libraries render only the subset currently visible in the viewport, plus a small buffer above and below. This dramatically reduces DOM node count and memory usage. Two popular React libraries are react-window and react-virtualized.
react-window: A lightweight, modern library ideal for most use cases. It provides components like FixedSizeList (for uniform item heights) and VariableSizeList (for varying heights). It has a smaller API surface and better performance for common scenarios.
react-virtualized: An older, more feature-rich library that includes advanced components like AutoSizer, CellMeasurer, and InfiniteLoader. It is heavier than react-window but better suited for complex layouts, such as grids with resizable columns or dynamic row heights.
When choosing between them, prefer react-window for new projects unless you need its advanced features. Implementation is straightforward: replace a mapped list with the virtualized component, passing the total item count, item size, and a render function for each visible row.
Using Stable and Unique Keys
Keys are essential for React to identify which items have changed, been added, or removed. Without stable keys, React may unnecessarily re-render all items, causing performance degradation. Follow these rules:
Use unique, stable identifiers: Prefer IDs from your data (e.g., database primary keys) over array indices. Indices can cause issues when items are reordered, filtered, or inserted.
Avoid non-unique keys: Duplicate keys lead to unpredictable behavior and broken UI updates.
Never use random values or timestamps: These change on every render, forcing React to unmount and remount all items, destroying state and causing significant overhead.
For example, if each item in a list has a user.id, use that as the key:
If IDs are unavailable and the list is static (no reordering or filtering), you may use the index as a last resort, but this is rare and discouraged.
Debouncing and Throttling User Input for Large Lists
When user input (e.g., typing in a search box, scrolling, or resizing) triggers updates to a large list, rapid events can cause excessive re-renders. Debouncing and throttling control the rate of execution:
Technique
Behavior
Use Case
Debouncing
Delays execution until after a specified pause since the last event. Ideal for input where you want to wait until the user stops typing.
Search input filtering a large list
Throttling
Ensures execution occurs at most once per specified interval. Useful for events that fire continuously, like scrolling or resizing.
Infinite scroll loading more items
Implement these with a custom hook or a library like Lodash. For example, debounce a search handler by 300ms to avoid filtering the list on every keystroke. Throttle a scroll handler to check visibility of new items every 200ms. Combined with virtualization, these techniques ensure smooth interaction even with tens of thousands of rows.
State Management and Data Fetching Strategies
Optimizing React performance requires careful attention to how state is structured, stored, and retrieved. Poor state management leads to unnecessary re-renders, wasted computation, and sluggish user interfaces. Data fetching patterns also play a critical role: inefficient requests, missing cache layers, and stale data can degrade both perceived and actual performance. By adopting disciplined state architecture and modern data fetching libraries, you can significantly reduce render cycles and improve responsiveness.
Normalizing State for Selectors and Memoization
Storing state in deeply nested or redundant structures forces selectors to perform expensive deep comparisons and re-creates references on every update. Normalizing state—flattening nested data into collections keyed by ID—enables selectors to retrieve only the exact pieces needed. This pattern pairs naturally with memoization libraries such as Reselect or the built-in useMemo hook.
Store entities in a dictionary (e.g., { users: { byId: {}, allIds: [] } }) rather than nested arrays.
Write small, composable selector functions that derive data from normalized stores.
Use memoized selectors to prevent recomputation when unrelated slices of state change.
Avoid storing derived data in state; compute it in selectors with memoization.
For example, a normalized posts state avoids re-rendering a list component when only a single post’s author name changes, because the selector for the list only depends on the allIds array and not on individual post content. This reduces render work from O(n) to O(1) for unrelated updates.
Using React Query or SWR for Caching and Background Refetching
Client-side data fetching libraries like TanStack React Query and SWR eliminate common performance pitfalls: redundant network requests, missing cache layers, and synchronous waterfall fetches. Both libraries cache responses in memory, automatically deduplicate concurrent requests, and support stale-while-revalidate patterns for background updates.
Feature
React Query (TanStack Query)
SWR (Vercel)
Cache strategy
In-memory cache with configurable stale time and garbage collection
In-memory cache with stale-while-revalidate by default
Background refetch
Configurable on window focus, interval, or mutation
Automatic on window focus and configurable interval
Pagination support
Built-in with useInfiniteQuery and page parameter management
Manual implementation required or via plugins
Devtools
Full-featured dedicated devtools
Basic devtools available
Optimistic updates
First-class support with rollback logic
Supported via mutate and rollback callbacks
Using either library reduces the need for global state to hold server data, because the cache acts as a single source of truth. This eliminates prop drilling of fetched data through multiple component layers and prevents components from re-fetching data that has not changed.
Avoiding Prop Drilling with Context and Zustand
Prop drilling—passing data through many intermediate components—causes unnecessary re-renders because every intermediate component must accept and forward the props, even if they do not use them. Context API provides a built-in solution, but naive usage can cause performance issues: any change to context value re-renders all consumers, even those that only read unrelated properties.
Split contexts by domain (e.g., AuthContext, ThemeContext, UserPreferencesContext) to limit re-render scope.
Use useMemo to stabilize context values and avoid re-creating objects on every render.
For complex state with frequent updates, consider Zustand instead of Context. Zustand uses a subscription-based model: components only re-render when the specific slice they subscribe to changes, eliminating the broadcast re-render problem of Context.
Zustand stores are lightweight (under 1 KB) and require no provider wrappers, making them ideal for performance-critical applications. A common pattern is to combine Zustand for client-side UI state (e.g., modals, filters, form inputs) with React Query for server data, resulting in a clean separation of concerns and minimal re-render overhead.
Image and Asset Optimization
Images, fonts, and static assets often account for the majority of a React application’s download size. Without deliberate optimization, these resources can delay interactivity, increase bandwidth usage, and cause jarring layout shifts. Effective asset optimization reduces load times while preserving visual quality, directly improving Core Web Vitals and user retention. The following techniques focus on deferring non-critical resources, leveraging modern image formats, and managing font loading to maintain a stable layout.
Lazy loading defers offscreen images until the user scrolls near them, preventing unnecessary network requests and reducing initial page weight. The Intersection Observer API provides a performant, native way to detect when an element enters the viewport. Unlike scroll-event-based methods, it runs asynchronously and does not block the main thread.
Implement a custom React hook or component that observes each <img> element:
Reduces initial HTTP requests by 40–60% for image-heavy pages.
Works with any image format, including WebP and AVIF.
No external library dependency—Intersection Observer is supported in all modern browsers.
Using Next.js Image Component or Responsive Images
For React applications built with Next.js, the built-in next/image component automates responsive image handling, lazy loading, and format optimization. It serves appropriately sized images based on the device’s viewport and pixel density, and it uses the browser’s native lazy loading as a fallback.
import Image from 'next/image';
function Hero() {
return (
<Image
src="/hero.webp"
alt="Hero banner"
width={1200}
height={600}
priority={false} // Set true for above-the-fold images
/>
);
}
If you are not using Next.js, implement responsive images manually with the srcset and sizes attributes:
Generate multiple image versions at different widths (e.g., 480px, 768px, 1200px).
Use modern formats (WebP, AVIF) with a fallback via <picture>.
Set loading="lazy" on all non-critical images.
This approach ensures that mobile devices download smaller files while desktops receive higher resolution, reducing total image payload by up to 30%.
Optimizing Font Loading to Prevent Layout Shift
Custom fonts often cause Cumulative Layout Shift (CLS) when the browser swaps from a fallback font to the loaded font. To minimize this, use the font-display: optional CSS property, which gives the font a short block period (100ms) and then uses the fallback if the font hasn’t loaded. This prevents invisible text and layout shifts entirely for most users.
By combining font-display with preloading and subsetting, you can reduce CLS to near zero while maintaining typographic integrity. This technique is especially important for text-heavy React applications where fonts are loaded dynamically.
Even the most efficiently coded React application can underperform if its build and deployment pipeline is not optimized. The final step in delivering a fast user experience involves configuring production builds, analyzing bundle composition, and leveraging content delivery networks. This section covers the critical techniques to ensure your React app loads as quickly as possible for end users.
Production Build Flags and Tree Shaking
React applications are typically developed with extensive debugging and warning messages, which add unnecessary weight to the final bundle. For production, you must enable the correct build flags to strip out these development-only features. When using Create React App, the npm run build command automatically sets NODE_ENV=production, which enables React’s production mode. For custom Webpack configurations, ensure you are using the DefinePlugin to set process.env.NODE_ENV to "production". This single flag removes prop-type validation and development warnings, significantly reducing bundle size.
Tree shaking, the process of eliminating unused exports, is automatically performed by Webpack 4+ and Rollup when using ES module syntax (import and export). To maximize its effectiveness:
Always use ES module imports (e.g., import { useState } from 'react') instead of CommonJS require() calls.
Avoid importing entire libraries; import only the specific functions or components you need.
Configure side-effect flags in package.json if your library has no side effects (e.g., "sideEffects": false).
Use the optimization.usedExports option in Webpack to mark unused exports.
Analyzing Bundle Size with Webpack Bundle Analyzer
Before you can optimize, you must measure. The Webpack Bundle Analyzer plugin provides an interactive treemap visualization of your bundle’s contents. To integrate it, install the package and add it to your Webpack plugins array. The plugin generates a zoomable, interactive HTML file that shows each module’s relative size. Use this tool to identify:
Large third-party libraries that may be replaced with lighter alternatives.
Duplicate dependencies caused by version mismatches in node_modules.
Unused code that tree shaking failed to remove due to improper imports.
Large assets like images or fonts embedded directly in JavaScript.
After analysis, consider code splitting with React.lazy() and dynamic import() to break your bundle into smaller chunks that load on demand. This technique is especially effective for routes or heavy components that are not immediately visible.
Serving Assets via CDN and Enabling Compression
Once your build is lean, deliver it efficiently. A Content Delivery Network (CDN) distributes your static assets across geographically distributed servers, reducing latency for users worldwide. For React applications, host the build/ folder on a CDN like Cloudflare, AWS CloudFront, or Netlify. Ensure your build script outputs files with content hashes in filenames (e.g., main.a1b2c3.js) to enable long-term caching and cache invalidation on updates.
Compression is equally critical. Enable gzip or Brotli compression on your CDN or web server. Brotli typically achieves 20–30% better compression ratios than gzip for JavaScript and CSS files. Verify compression is active by checking the Content-Encoding response header in your browser’s developer tools. Combine compression with proper cache headers (Cache-Control: public, max-age=31536000, immutable for hashed assets) to ensure returning visitors load your app from their local cache without network requests.
Finally, preload critical assets using <link rel="preload"> tags in your HTML for fonts and key JavaScript files, and use <link rel="preconnect"> for CDN origins to reduce connection setup time.
Frequently Asked Questions
What is React performance optimization?
React performance optimization involves techniques to reduce unnecessary re-renders, minimize bundle size, and improve initial load time. Key methods include using React.memo for functional components, useMemo and useCallback for expensive computations, code splitting with React.lazy and Suspense, and profiling with the React DevTools Profiler. These practices ensure your app runs smoothly, especially on lower-end devices or slow networks.
How does React.memo improve performance?
React.memo is a higher-order component that memoizes the rendered output of a functional component. It performs a shallow comparison of props and only re-renders if props have changed. This prevents unnecessary renders when parent components update but the child’s props remain the same. Use it for components that render often with the same props, but avoid overusing it on simple components where the comparison cost outweighs benefits.
Code splitting is a technique that breaks your bundle into smaller chunks loaded on demand. React supports this via dynamic import() and React.lazy for components, combined with Suspense for fallback UI. This reduces initial bundle size, speeding up first paint. Tools like Webpack and Vite automatically split code at route or component boundaries. Best practice is to split large libraries and rarely-used components.
The React Profiler (available in React DevTools) records render timing and identifies components that render too often or take too long. You can inspect flamegraphs to see commit phases and render durations. This helps pinpoint performance bottlenecks—like expensive computations or unnecessary re-renders—so you can apply targeted optimizations like memoization or restructuring state.
What is the virtual DOM and how does it affect performance?
The virtual DOM is a lightweight JavaScript representation of the real DOM. React uses it to batch updates and compute the minimal set of changes needed, reducing direct DOM manipulation. While efficient, unnecessary re-renders still occur if state or props change. Optimizations like key props in lists, shouldComponentUpdate, and React.memo help minimize virtual DOM diffing overhead.
When should I use useMemo vs useCallback?
useMemo memoizes the result of a function (e.g., expensive calculations), while useCallback memoizes the function itself to prevent re-creation on every render. Use useMemo for derived data that requires computation, and useCallback for passing stable callbacks to child components that rely on reference equality (e.g., with React.memo). Avoid overusing both; only apply when you can measure a performance gain.
How do I reduce bundle size in a React app?
Reduce bundle size by: (1) code splitting with React.lazy and dynamic imports, (2) tree shaking unused exports via ES modules, (3) using production builds with minification, (4) replacing large libraries with smaller alternatives (e.g., date-fns over moment.js), (5) lazy loading images and non-critical assets, (6) analyzing bundles with tools like Webpack Bundle Analyzer. Also consider server-side rendering or static generation for faster initial loads.
What are common React performance anti-patterns?
Common anti-patterns include: (1) creating new objects or functions in render (breaks memoization), (2) using inline arrow functions in JSX without need, (3) storing computed values in state instead of deriving them, (4) excessive use of context that causes many re-renders, (5) not using keys in lists or using index as key, (6) over-optimizing with premature memoization. Profile first to identify real bottlenecks.
Tailwind CSS vs. Bootstrap: The Ultimate Comparison
Tailwind CSS vs. Bootstrap: The Ultimate Comparison
In the landscape of modern web development, two CSS frameworks stand as titans: Bootstrap and Tailwind CSS. Each has shaped how developers approach styling, yet they embody fundamentally different philosophies. Bootstrap, launched by Twitter in 2011, revolutionized front-end work by offering a comprehensive library of prebuilt components and a responsive grid system. Tailwind CSS, emerging in 2017 from Adam Wathan and Steve Schoger, countered with a utility-first approach that prioritizes composability over prebuilt design. Developers frequently compare them because both aim to accelerate styling, but they diverge radically in workflow, customization, and output. Understanding their origins and core tenets is essential for choosing the right tool for your project.
What is Bootstrap? A Brief History and Core Philosophy
Bootstrap began as an internal tool at Twitter to standardize design across their team. Its first public release in 2011 offered a 12-column grid, prebuilt components like buttons and navbars, and a consistent visual language. The core philosophy is component-first: developers receive ready-to-use UI elements with minimal configuration. Bootstrap provides a predefined design system—typography, colors, spacing, and components—that ensures consistency out of the box. It relies on classes like btn btn-primary or card to apply complex styles instantly. Over time, Bootstrap evolved through versions 2, 3, 4, and 5, adding theming via Sass variables, customizer tools, and a lightweight rebuild without jQuery. Its philosophy emphasizes speed for teams who want a polished, responsive interface without writing custom CSS. However, this comes at the cost of uniformity: many Bootstrap sites share a recognizable look unless heavily customized.
What is Tailwind CSS? A Brief History and Core Philosophy
Tailwind CSS was created by Adam Wathan and Steve Schoger as a response to the limitations of component frameworks. First released in 2017, it introduced a utility-first approach: instead of prebuilt components, Tailwind offers hundreds of low-level utility classes—like flex, pt-4, text-center, or bg-blue-500—that you combine directly in HTML to build custom designs. Its philosophy is “designing in the browser,” giving developers granular control over every pixel without leaving the markup. Tailwind’s design system is configurable through a tailwind.config.js file, allowing you to define custom colors, spacing scales, breakpoints, and more. It generates only the CSS you use via PurgeCSS (now built-in), resulting in tiny production files. The framework gained rapid adoption for its flexibility, especially among developers who prefer a more bespoke, non-opinionated look. Its mantra: “Build whatever you want, without fighting the framework.”
Why This Comparison Matters for Modern Web Development
Choosing between Bootstrap and Tailwind is not trivial—it directly impacts development speed, maintainability, team collaboration, and final output. Modern web development demands fast iteration, responsive design, and performance. Bootstrap offers immediate familiarity and a lower learning curve for beginners, making it ideal for rapid prototyping, simple sites, or teams that prioritize consistency over originality. Tailwind, conversely, suits projects requiring unique visual identities, complex customizations, or those built with component-based frameworks like React or Vue, where utility classes integrate naturally. The comparison also touches on file size: Bootstrap’s full CSS is larger, while Tailwind’s output is smaller after purging. Additionally, accessibility and customization differ: Bootstrap provides built-in ARIA attributes and component patterns, while Tailwind requires manual implementation. Below is a quick reference of key differences:
Aspect
Bootstrap
Tailwind CSS
Philosophy
Component-first
Utility-first
Learning curve
Low (prebuilt components)
Medium (utility classes)
Customization
Via Sass variables
Via config file
File size (production)
~12-20 KB (minified)
~10-15 KB (purged)
Best for
Quick prototypes, admin panels
Custom designs, component libraries
Ultimately, this comparison matters because it reflects a broader shift in front-end development: from opinionated frameworks that enforce design decisions to flexible tools that empower developers to craft unique experiences. By understanding both, you can make an informed choice that aligns with your project’s goals, team’s expertise, and long-term maintenance needs.
Core Design Philosophy: Utility-First vs. Component-Based
The foundational distinction between Tailwind CSS and Bootstrap lies in their core design philosophies. Tailwind CSS adopts a utility-first approach, providing hundreds of low-level, single-purpose classes that you compose directly in your HTML to build custom designs. Bootstrap, conversely, is component-based, offering pre-styled, ready-to-use UI components like buttons, navbars, modals, and cards. This fundamental difference shapes every aspect of your workflow, from how you write markup to how you manage scalability and customization.
How Tailwind’s Utility-First Approach Works in Practice
With Tailwind, you rarely write custom CSS. Instead, you apply atomic classes directly to elements to control spacing, typography, color, layout, and responsiveness. For example, creating a styled button involves stacking classes like bg-blue-500 hover:bg-blue-700 text-white font-bold py-2 px-4 rounded. Each class sets a single CSS property, giving you pixel-level control without leaving your HTML file. This approach encourages a highly iterative workflow where you tweak designs by adding or removing classes, not by switching between stylesheets and markup. A practical code example for a simple card in Tailwind:
This method eliminates context-switching and enforces design consistency through a predefined design system (spacing scale, color palette, breakpoints). However, it can lead to verbose HTML with many classes, which some developers find visually cluttered.
How Bootstrap’s Component Library Speeds Up Prototyping
Bootstrap accelerates development by providing polished, pre-built components that you instantiate with simple classes. To create a similar card, you use .card, .card-img-top, .card-body, and .card-title. This abstraction allows you to assemble a functional, responsive interface in minutes, with minimal CSS knowledge. Bootstrap also includes a robust grid system, utility classes, and JavaScript plugins (e.g., modals, tooltips, carousels) that work out of the box. For rapid prototyping or projects with standard UI patterns, this component library drastically reduces time-to-market. A Bootstrap card example:
The trade-off is that Bootstrap’s components have a distinct visual identity—often called the “Bootstrap look”—which requires significant customization to override. Modifying components typically involves writing custom CSS or using Sass variables, adding complexity.
When Each Philosophy Shines or Falls Short
Tailwind’s utility-first approach shines when you need:
Unique, custom designs without fighting a framework’s default styles.
Fine-grained control over every pixel and responsive behavior.
Design system consistency across large teams, enforced by a shared set of utilities.
Smaller production CSS (via purging unused utilities) for performance-critical sites.
It falls short when:
Rapid prototyping is the priority, and pre-built components would save hours.
Team members lack familiarity with utility classes, leading to steep learning curves.
Maintaining very large HTML files becomes cumbersome due to class bloat.
Custom branding requires overriding many default styles, increasing CSS weight.
Design uniqueness is critical, as Bootstrap sites often look similar.
Performance is a concern, as Bootstrap includes unused CSS and JavaScript unless carefully customized.
Ultimately, your choice depends on project goals: Tailwind offers flexibility and design control; Bootstrap delivers speed and consistency for standard interfaces.
Choosing between Tailwind CSS and Bootstrap often hinges on a developer’s background and project goals. For beginners, Bootstrap offers a gentler initial slope, while Tailwind presents a steeper climb that can yield long-term productivity gains. Experienced developers, particularly those already familiar with utility-first concepts, may find Tailwind more intuitive from the start. The documentation quality and community resources for both frameworks are robust, but they cater to different learning styles.
Bootstrap’s Familiarity and Extensive Documentation
Bootstrap’s greatest strength for onboarding is its pre-built, opinionated components. Beginners can copy-paste a button, card, or navbar and see immediate results without writing custom CSS. This “plug-and-play” approach lowers the barrier to entry, as the framework handles layout, responsiveness, and styling out of the box. The official documentation is exhaustive, featuring live code examples, a comprehensive grid system guide, and a dedicated “Bootstrap 5” migration section. For visual learners, the Bootstrap “Examples” page provides complete starter templates (e.g., album, pricing, blog) that demonstrate real-world usage. Community resources are equally abundant: Stack Overflow has over 200,000 tagged questions, and YouTube tutorials often focus on rapid prototyping. However, this ease can lead to “Bootstrap fatigue” when customizing beyond defaults, as overriding styles requires understanding the framework’s specific class overrides and CSS specificity.
Tailwind’s Initial Learning Hurdle and Long-Term Efficiency
Tailwind CSS demands a shift in mindset. Instead of relying on pre-styled components, developers build interfaces by composing utility classes—like flex, p-4, text-center, and bg-blue-500—directly in HTML. For newcomers, the initial learning curve is steeper because there is no “card” or “navbar” class; you must construct these from scratch. The official Tailwind documentation, while excellent, assumes familiarity with CSS properties and responsive design. The “Utility-First Fundamentals” page is essential reading but can overwhelm beginners. Long-term, however, Tailwind’s approach offers efficiency: once the utility classes are memorized, developers can style interfaces faster than writing custom CSS, and the small file sizes (after purging unused utilities) improve performance. Tailwind’s community is active on GitHub, Discord, and TailwindUI (a paid resource for pre-built components), but free tutorials often focus on advanced patterns rather than absolute basics. A key advantage: Tailwind’s consistent naming conventions (e.g., m-4 for margin, p-4 for padding) reduce decision fatigue once learned.
Key Resources and Tutorials for Each Framework
Below is a comparison of essential learning resources for both frameworks:
Resource Type
Bootstrap
Tailwind CSS
Official Documentation
Getbootstrap.com/docs – includes live examples, grid system, and utility classes.
Tailwindcss.com/docs – covers utility fundamentals, responsive design, and customization.
TailwindUI (paid) and free component libraries like “Tailwind Elements”.
Community Forums
Stack Overflow (high volume, broad expertise).
Tailwind CSS Discord server and GitHub discussions.
For beginners, starting with Bootstrap’s examples and then exploring Tailwind’s utility-first approach after mastering CSS fundamentals is a common path. Experienced developers may jump directly to Tailwind’s documentation and use Tailwind Play to test patterns. Both frameworks offer cheat sheets (Bootstrap’s “Cheatsheet” and Tailwind’s “Cheat Sheet” PDF) to accelerate recall during development.
Customization and Flexibility
When evaluating front-end frameworks, the ability to craft a distinctive visual identity often determines long-term project success. Both Tailwind CSS and Bootstrap offer customization pathways, but they approach developer control from fundamentally different philosophies: Bootstrap provides a structured theming system, while Tailwind offers granular, atomic-level configuration. Understanding these differences is crucial for teams balancing speed against design uniqueness.
Customizing Bootstrap with Sass Variables and Build Tools
Bootstrap’s customization relies on its Sass-based architecture. Developers override default variables before compilation to alter colors, spacing, typography, and component behaviors. The process typically involves:
Installing Bootstrap via npm and importing only the needed components
Creating a custom _variables.scss file that redefines Bootstrap’s defaults
Using a build tool like Webpack, Vite, or Gulp to compile the final CSS
For example, to change the primary color and enable dark mode, you might write:
// custom/_variables.scss
$primary: #6f42c1; // purple instead of blue
$enable-dark-mode: true;
@import "bootstrap/scss/bootstrap";
This approach gives developers a centralized override point but remains constrained by Bootstrap’s component-level abstractions. Customizing deeply nested elements, such as a card’s inner padding or a button’s hover shadow, often requires additional custom CSS or !important overrides. The theming power is real but bounded by the framework’s predefined component structure.
Tailwind’s Configuration File and Design System Control
Tailwind CSS takes a radically different approach: it provides no pre-styled components, only utility classes. All design decisions are codified in a single JavaScript configuration file (tailwind.config.js). This file acts as the single source of truth for your entire design system, allowing you to:
Define custom color palettes, spacing scales, and breakpoints
Add or remove utility classes via variants and plugins
Extend the default theme without overriding existing values
For instance, to create a custom color and a new spacing value:
Every utility class generated—bg-brand-500, p-18—then adheres strictly to these definitions. This eliminates cascade conflicts and ensures consistency across the entire codebase. Developers have absolute control over every pixel and color without writing custom CSS, but the trade-off is a steeper initial learning curve and more verbose HTML.
Comparing the Effort to Create a Unique Visual Identity
The effort required to break away from default looks differs significantly between the two frameworks:
Aspect
Bootstrap
Tailwind CSS
Initial customization setup
Moderate (requires Sass build pipeline)
Low (edit one config file)
Overriding component styles
Often requires custom CSS or deep nesting
Directly via utility classes in HTML
Design system consistency
Good, but gaps can appear with heavy overrides
Excellent, as all values originate from config
Learning curve for uniqueness
Steeper for deep customization
Steeper for utility-first mindset
Risk of “Bootstrap look”
High without thorough theming
Low by default (no pre-built components)
Bootstrap’s strength lies in rapid prototyping with its ready-made components, but achieving a truly unique brand often demands substantial custom CSS and careful variable management. Tailwind, conversely, forces uniqueness from the start because every element is built from your defined tokens. The developer effort shifts from fighting framework defaults to designing a comprehensive design system upfront. For teams prioritizing long-term maintainability and brand fidelity, Tailwind’s configuration-driven approach offers superior control, while Bootstrap remains a pragmatic choice for projects where speed and component consistency matter more than absolute visual originality.
Tailwind CSS vs. Bootstrap: The Ultimate Comparison
Bootstrap’s CSS Payload and PurgeCSS Integration
Bootstrap’s default compiled CSS file is approximately 200 KB (unminified) and around 150 KB (minified), including all components, utilities, and the grid system. This payload can significantly impact initial page load times, especially on slower networks or mobile devices. To mitigate this, Bootstrap integrates with PurgeCSS during build processes (e.g., via Webpack or PostCSS). PurgeCSS analyzes your HTML, JavaScript, and template files to remove unused CSS classes, reducing the final file size by up to 90% in many projects. However, this requires careful configuration: you must specify content paths correctly and avoid dynamic class construction (e.g., class="btn btn-${variant}") to prevent accidental removal. A typical optimized Bootstrap project might ship 15–30 KB of CSS after purging, but the initial overhead of loading unused styles during development remains a concern.
Tailwind’s JIT Mode and Minimal Production Output
Tailwind CSS addresses file size through its Just-In-Time (JIT) mode, introduced in v3.0. JIT compiles only the utility classes you actually use, generating a CSS file that is often under 10 KB (gzipped) for typical projects. This eliminates the need for manual PurgeCSS configuration—Tailwind automatically scans your templates and produces a minimal stylesheet in real time during development. For example, a landing page using 40–50 unique utilities might result in a 5–8 KB CSS file. Additionally, Tailwind’s production build further optimizes by removing unused keyframes and combining identical declarations. The trade-off is a slightly longer initial build time (usually <500 ms), but subsequent rebuilds are near-instant due to caching. This approach ensures that performance is built into the workflow, not an afterthought.
Real-World Performance Benchmarks and Best Practices
When comparing real-world performance, consider the following factors:
Initial load: Bootstrap’s full CSS (150 KB) vs. Tailwind’s JIT output (5–10 KB) can mean 100–200 ms slower page rendering on 3G networks for Bootstrap.
Caching: Both frameworks benefit from HTTP caching, but Tailwind’s smaller files are more cache-friendly for repeat visits.
Critical CSS: Bootstrap often requires inline critical CSS for above-the-fold content, while Tailwind’s minimal output may not need this.
Best practices for optimization include:
Practice
Bootstrap
Tailwind
Purge unused styles
Yes (PurgeCSS)
Built-in (JIT)
Minify CSS
Yes
Yes
Use HTTP/2
Beneficial
Beneficial
Lazy load components
Possible
Not needed
Limit custom builds
Recommended
Automatic
For most projects, Tailwind’s JIT mode delivers superior performance out of the box. However, if your team relies heavily on Bootstrap’s pre-built components and can dedicate time to PurgeCSS configuration, the performance gap narrows significantly. Ultimately, measure your specific use case with tools like Lighthouse or WebPageTest to make an informed decision.
Responsive Design and Mobile-First Approach
In modern web development, responsive design is non-negotiable. Both Tailwind CSS and Bootstrap embrace a mobile-first philosophy, but they differ significantly in how they implement breakpoints and adaptive layouts. Bootstrap provides a rigid, predefined grid system, while Tailwind offers granular control through utility classes. Understanding these differences is crucial for choosing the right framework for your project.
Bootstrap’s Grid System and Predefined Breakpoints
Bootstrap’s grid is built on a 12-column layout with five predefined breakpoints: xs (<576px), sm (≥576px), md (≥768px), lg (≥992px), and xl (≥1200px). The mobile-first approach means that styles apply by default to small screens, with larger breakpoints overriding them via min-width media queries. For example:
This code creates a single column on mobile (col-12), two columns on medium screens (col-md-6), and three columns on large screens (col-lg-4). Bootstrap’s grid is intuitive for beginners but can become verbose for complex layouts. The predefined breakpoints are fixed, which may require workarounds for custom designs.
Tailwind’s Responsive Utility Classes and Custom Breakpoints
Tailwind CSS uses responsive utility prefixes like sm:, md:, lg:, xl:, and 2xl: to apply styles at specific breakpoints. By default, these correspond to 640px, 768px, 1024px, 1280px, and 1536px respectively—slightly different from Bootstrap’s. Tailwind’s approach is to compose styles directly in the HTML, offering more flexibility. For instance:
This achieves the same responsive layout as the Bootstrap example but uses Tailwind’s grid utilities. Tailwind allows custom breakpoints via the theme.extend.screens configuration in tailwind.config.js, enabling precise control. For example:
This customization is a major advantage for projects with unique design requirements. However, the utility-first syntax can make HTML markup dense for complex responsive patterns.
Common Challenges and Solutions for Responsive Workflows
Both frameworks present challenges. With Bootstrap, developers often struggle with the rigid grid when designs require non-standard breakpoints or asymmetrical layouts. A common solution is to override Bootstrap’s grid with custom CSS or use the order utility classes to rearrange columns at different breakpoints. For example, using order-first and order-last can reflow content for mobile without altering the HTML structure.
Tailwind’s main challenge is managing the sheer number of utility classes, which can lead to readability issues. A practical solution is to extract repeated patterns into reusable components using a templating engine like React or Vue, or by using Tailwind’s @apply directive in CSS. Another common issue is ensuring consistent spacing across breakpoints; Tailwind’s gap utilities and space-y/space-x classes help maintain rhythm.
Both frameworks benefit from a structured workflow. For Bootstrap, use Sass variables to customize breakpoints globally. For Tailwind, define a clear design token system in the config file. Testing tools like BrowserStack or Chrome DevTools device emulation are essential for verifying responsive behavior. Below is a comparison of key features:
Feature
Bootstrap
Tailwind CSS
Default breakpoints
5 (xs, sm, md, lg, xl)
5 (sm, md, lg, xl, 2xl)
Mobile-first default
Yes
Yes
Custom breakpoints
Via Sass variables
Via config file
Grid system
12-column flexbox grid
CSS Grid utility classes
Responsive utilities
Predefined classes (e.g., col-md-6)
Prefix-based utilities (e.g., md:grid-cols-2)
Ultimately, Bootstrap offers a faster start with less decision-making, while Tailwind provides finer-grained control for custom responsive workflows. The choice depends on whether you prioritize speed and consistency or flexibility and design precision.
Accessibility and Semantic HTML
Accessibility is not an afterthought in modern web development; it is a fundamental requirement. When comparing Tailwind CSS vs. Bootstrap: The Ultimate Comparison, their approaches to semantic HTML and built-in accessibility features differ significantly. Bootstrap provides a more guided, component-level accessibility framework, while Tailwind adopts a neutral, utility-first stance that places the entire responsibility on the developer.
Bootstrap’s Accessibility Components and Known Limitations
Bootstrap ships with several built-in accessibility features that are intended to help developers create compliant interfaces more easily. These include:
Pre-defined ARIA roles and attributes on interactive components such as modals, tooltips, and dropdowns.
Focus management for components like modals and off-canvas menus, which trap focus and restore it upon closure.
Color contrast ratios that meet WCAG 2.1 AA standards for default themes.
Keyboard navigation support for carousels, tabs, and accordions.
However, Bootstrap’s component-based architecture also introduces known limitations:
Limitation
Description
Overly complex markup
Some components generate deeply nested <div> structures that can obscure semantic meaning.
Inconsistent ARIA usage
Certain components lack dynamic ARIA updates, such as live regions for alerts or progress bars.
Limited testing scope
Bootstrap does not guarantee full compliance with WCAG 2.1 AA for all custom configurations.
Developers must still manually audit and augment Bootstrap’s components to meet specific accessibility standards, especially when overriding default styles.
Tailwind’s Neutral Stance and Developer Responsibility
Tailwind CSS does not provide any built-in components, ARIA attributes, or accessibility logic. This neutrality means that accessibility is entirely managed by the developer. While this approach offers maximum flexibility, it also introduces risks:
No automatic focus management, keyboard navigation, or ARIA roles are added by the framework.
Semantic HTML must be explicitly chosen; Tailwind’s utility classes do not enforce or suggest proper element usage.
Color contrast and visual hierarchy depend entirely on the developer’s custom configuration and design decisions.
Tailwind’s documentation does include a dedicated accessibility guide, but it focuses on general principles rather than framework-specific solutions. The developer must implement every accessibility feature from scratch, including:
Managing focus states with custom JavaScript or libraries like Focus Trap.
Ensuring keyboard event handlers for interactive elements.
Best Practices for Maintaining Accessibility with Either Framework
Regardless of which framework you choose, the following practices help ensure accessible, semantic HTML:
Use semantic HTML elements (e.g., <nav>, <main>, <button>) instead of generic <div> or <span> containers. Both frameworks work well with semantic HTML, but Bootstrap’s components may require extra scrutiny.
Test with real assistive technologies such as screen readers (NVDA, VoiceOver) and keyboard-only navigation. Automated tools alone are insufficient.
Provide visible focus indicators for all interactive elements. In Tailwind, use focus-visible variants; in Bootstrap, override default focus styles if they are too subtle.
Manage ARIA dynamically for components like modals, alerts, and live regions. Bootstrap offers partial support, while Tailwind requires full manual implementation.
Audit color contrast using tools like WebAIM’s Contrast Checker. Both frameworks allow custom color schemes, so ensure all text meets WCAG AA ratios.
In summary, Bootstrap provides a head start with built-in accessibility features but demands careful auditing to overcome its limitations. Tailwind offers no such assistance, giving developers complete control but also full responsibility. The key to success with either framework lies in rigorous testing, adherence to semantic HTML, and a commitment to inclusive design principles.
Community, Ecosystem, and Third-Party Integrations
The strength of a CSS framework often depends on the community that supports it and the ecosystem of tools, plugins, and integrations available. Bootstrap and Tailwind CSS have taken different paths to building their ecosystems, each with distinct advantages for developers. Bootstrap, with its decade-long head start, boasts a mature, vast ecosystem, while Tailwind CSS has rapidly cultivated a modern, plugin-driven community that emphasizes customization and developer experience.
Bootstrap’s Mature Ecosystem and Extensive Theme Market
Bootstrap’s ecosystem is one of the largest in front-end development, supported by years of community contributions. Its theme market is particularly extensive, with thousands of premium and free themes available from marketplaces like ThemeForest, WrapBootstrap, and BootstrapMade. These themes often include complete page layouts, dashboards, and UI kits that work out of the box.
Key aspects of Bootstrap’s ecosystem include:
Third-party UI kits and component libraries (e.g., Material Design for Bootstrap, CoreUI) that extend Bootstrap’s default components.
Robust support for jQuery plugins, though many now offer vanilla JavaScript alternatives.
Official and community-maintained Sass/CSS variables and mixins for theming.
Extensive documentation and a large number of tutorials, courses, and books.
Compatibility with build tools like Webpack, Gulp, and Grunt, often with pre-configured starter templates.
Bootstrap also offers official integrations for React (React Bootstrap), Vue (BootstrapVue), and Angular (ng-bootstrap), which provide native components rather than simple wrappers. These libraries are well-maintained and have dedicated communities, making Bootstrap a reliable choice for teams needing consistent UI across frameworks.
Tailwind’s Growing Plugin Library and Community Components
Tailwind CSS has built a rapidly expanding ecosystem centered around its utility-first philosophy. Its plugin library, though smaller than Bootstrap’s, is highly modular and purpose-built. The official Tailwind CSS plugin registry includes tools for forms, typography, containers, and aspect ratios, all designed to work seamlessly with the core framework.
Community-driven components have flourished, with platforms like Tailwind UI, Flowbite, and Meraki UI offering pre-designed, customizable components. These are often provided as HTML snippets or Vue/React components, emphasizing flexibility over monolithic themes.
Notable elements of Tailwind’s ecosystem include:
Tailwind UI (official premium component library) and Headless UI (unstyled, accessible components for React and Vue).
Community UI kits like DaisyUI, Preline, and HyperUI that layer component classes on top of Tailwind’s utilities.
Plugin ecosystem for custom utilities, animations, and design tokens.
Integration with modern build tools like Vite, PostCSS, and Next.js through first-party packages.
Active community on GitHub, Discord, and Tailwind Play for sharing and testing components.
Tailwind’s ecosystem is particularly strong for developers who prefer to compose custom designs rather than override pre-built themes. Its integration with modern frameworks is often more direct, as it relies on utility classes rather than framework-specific component wrappers.
Integration Examples with React, Vue, and Angular
Both frameworks offer robust integration paths for popular JavaScript frameworks, though their approaches differ. Below is a comparison of how each framework integrates with React, Vue, and Angular.
Framework
Bootstrap Integration
Tailwind CSS Integration
React
React Bootstrap (official) or reactstrap; uses Bootstrap components as React components with state management.
Use Tailwind classes directly in JSX; Headless UI for accessible, unstyled components; Tailwind UI for pre-built components.
Vue
BootstrapVue (community-maintained) provides Vue-specific components; less active maintenance recently.
Tailwind classes work directly in Vue templates; Headless UI Vue version; community components like Flowbite Vue.
Angular
ng-bootstrap (official) offers Angular-native components; also NG Bootstrap for modals, tooltips, etc.
Tailwind classes used directly in Angular templates; no official Angular-specific library, but works via PostCSS.
For React, Bootstrap’s React Bootstrap provides a mature, component-based API, while Tailwind’s approach is more lightweight and class-driven. For Vue, BootstrapVue has seen declining updates, making Tailwind’s direct class usage a more stable option. For Angular, ng-bootstrap remains a strong choice for Bootstrap users, while Tailwind integrates cleanly via Angular CLI and PostCSS configuration, though without dedicated component wrappers.
Real-World Use Cases and Project Suitability
Choosing between Tailwind CSS and Bootstrap is less about which is “better” in the abstract and more about matching each framework’s strengths to your project’s specific constraints, team dynamics, and long-term goals. The right choice can accelerate development, reduce technical debt, and simplify maintenance. Below, we break down the scenarios where each framework excels, along with practical advice for hybrid approaches and migrations.
When to Choose Bootstrap: Rapid Prototyping and Legacy Projects
Bootstrap is the pragmatic choice when speed of delivery and predictable, pre-styled components are the top priority. It shines in the following situations:
Rapid prototyping: With its extensive library of ready-made components (modals, navbars, cards, forms), you can assemble a functional UI in hours rather than days. No custom CSS is needed for standard layouts.
Legacy project maintenance: Many older web applications are built on Bootstrap 3 or 4. Sticking with Bootstrap for updates avoids the cost and risk of a full rewrite, especially if the design system is already established.
Small teams or solo developers: When you lack dedicated design resources, Bootstrap’s opinionated defaults produce a consistent, professional look with minimal effort.
Admin panels and internal tools: These projects prioritize functionality over unique branding. Bootstrap’s grid system and utility classes handle data tables, dashboards, and form-heavy interfaces efficiently.
For example, to quickly add a responsive navbar in Bootstrap, you use pre-built HTML classes:
When to Choose Tailwind CSS: Custom Designs and Large Teams
Tailwind CSS is the superior option for projects that demand unique visual identities, high design fidelity, and scalable teamwork. It excels in these scenarios:
Custom, branded designs: Tailwind’s utility-first approach gives you pixel-level control over every aspect of the UI, making it ideal for marketing sites, SaaS products, or any application where the design must stand out.
Large teams with clear design systems: Tailwind enforces consistency through a centralized configuration file (tailwind.config.js). Teams can define a shared color palette, spacing scale, and typography, reducing style drift across components.
Component-based frameworks (React, Vue, Angular): Tailwind pairs naturally with JavaScript frameworks. You compose small, reusable components with utility classes, avoiding the cascade and specificity wars that often plague large CSS codebases.
Long-term maintainability: Because Tailwind generates only the CSS you use (via PurgeCSS), the production bundle is tiny. The lack of pre-built components means you avoid overriding default styles, which can become a maintenance burden in Bootstrap over time.
A Tailwind equivalent of the Bootstrap navbar above would be built from utilities:
Hybrid Approaches and Migrating Between Frameworks
In practice, many teams adopt hybrid strategies or migrate gradually. Consider these approaches:
Approach
Description
Best For
Bootstrap + Tailwind
Use Bootstrap for layout (grid) and components, but add Tailwind for custom spacing, colors, or hover states. This avoids overriding Bootstrap’s CSS while gaining Tailwind’s utility flexibility.
Projects with existing Bootstrap codebases that need incremental design improvements.
Tailwind + Bootstrap components via CDN
Include Bootstrap’s compiled CSS/JS for a few complex components (e.g., carousels, modals) while building the rest of the UI with Tailwind.
Rapid prototypes that may later be converted fully to Tailwind.
Migrating from Bootstrap to Tailwind
Start by replacing Bootstrap utility classes (e.g., mt-3 → mt-4) in a single component or page. Use Tailwind’s @apply directive to extract repeated patterns into custom classes, easing the transition.
Teams migrating a legacy app piece by piece without a full rewrite.
When migrating, a practical first step is to run both frameworks side by side. For example, you might keep Bootstrap’s grid (.container, .row, .col-*) while replacing all other styling with Tailwind utilities. Over time, you can replace the grid with Tailwind’s flexbox or grid utilities. This incremental approach reduces risk and allows the team to adapt gradually.
Conclusion: Making the Right Choice for Your Next Project
The decision between Tailwind CSS and Bootstrap ultimately hinges on your specific project needs, team expertise, and long-term maintenance goals. Tailwind CSS offers a utility-first approach that gives you granular control over every pixel, while Bootstrap provides a comprehensive component library that speeds up initial development. Understanding the trade-offs in total cost of ownership and developer productivity is essential for making an informed choice.
Comparing Total Cost of Ownership and Developer Productivity
When evaluating total cost of ownership, consider both initial build time and long-term maintenance. The table below highlights key differences:
For teams prioritizing rapid prototyping, Bootstrap often wins on day-one productivity. For projects that demand unique designs or scale over years, Tailwind CSS tends to reduce technical debt. Both frameworks benefit from active communities and regular updates, but Tailwind’s utility-first paradigm aligns better with modern component-based architectures.
Final Recommendations for Beginners, Freelancers, and Enterprises
Your choice should align with your role and project scope:
Beginners: Start with Bootstrap. Its prebuilt components (navbars, modals, cards) let you build a functional interface quickly without needing deep CSS knowledge. This builds confidence and foundational skills.
Freelancers: Choose Tailwind CSS for client projects that require custom branding. Its utility classes enable pixel-perfect designs without writing custom CSS, and you can deliver a unique look that stands out from Bootstrap-based templates.
Enterprises: Evaluate based on team size and design system maturity. Large teams with dedicated designers often prefer Tailwind CSS for consistency across microservices. Organizations with existing Bootstrap expertise should stick with it to avoid retraining costs, but consider Tailwind for new greenfield projects where design flexibility is critical.
Next Steps: Trying Both Frameworks with Sample Projects
The best way to decide is hands-on experimentation. Follow these steps:
Set up a simple layout using each framework. For Bootstrap, create a landing page with a hero, cards, and a navbar using only its classes. For Tailwind CSS, replicate the same layout using utility classes like flex, grid, p-4, and bg-blue-500.
Customize a component in both frameworks. In Bootstrap, override a button’s color using Sass variables. In Tailwind, extend the default theme in tailwind.config.js to add a custom color palette. Note the effort required.
Build a small interactive feature, such as a modal or dropdown. Compare how each framework handles JavaScript interactions (Bootstrap’s jQuery-based plugins vs. Tailwind’s headless approach that requires Alpine.js or vanilla JS).
Measure production output by running build tools and checking file sizes. Use PurgeCSS with Tailwind and tree-shaking with Bootstrap to see real-world differences.
By the end of these experiments, you’ll have a clear sense of which framework feels more natural for your workflow. Remember that neither is universally superior—the right choice is the one that empowers you to build maintainable, performant interfaces efficiently.
What is the main difference between Tailwind CSS and Bootstrap?
Tailwind CSS is a utility-first framework that provides low-level utility classes (e.g., `flex`, `text-center`, `m-4`) to build custom designs directly in HTML. Bootstrap is a component-based framework offering pre-built components like buttons, navbars, and modals with predefined styles. Tailwind offers more design flexibility but requires more manual styling, while Bootstrap speeds up development with ready-made components but can lead to similar-looking websites.
Which is faster for prototyping: Tailwind or Bootstrap?
Bootstrap is generally faster for prototyping because its pre-built components (e.g., cards, forms, alerts) can be combined quickly to create a functional layout. Tailwind requires writing more utility classes from scratch, but experienced users can also prototype rapidly using its intuitive naming conventions and responsive prefixes. For developers already familiar with Tailwind, it can be equally fast.
How do Tailwind and Bootstrap compare in terms of file size and performance?
Unpurged, Bootstrap's CSS is around 200 KB (minified), while Tailwind's default output is about 3-4 MB. However, Tailwind uses PurgeCSS by default to remove unused classes, resulting in production files often under 10 KB. Bootstrap can also be customized and purged, but its component nature means more unused CSS if you don't use all components. Both can be optimized for performance.
Which framework offers better customization options?
Tailwind CSS excels in customization. It uses a configuration file (`tailwind.config.js`) where you can define your own design system (colors, spacing, fonts) and extend or override defaults. Bootstrap also allows customization via Sass variables, but it's more complex and less granular. Tailwind's utility-first approach makes it easier to create unique designs without fighting framework defaults.
Is Tailwind CSS or Bootstrap better for large-scale projects?
Both can work for large-scale projects. Tailwind's utility classes keep HTML files verbose but make styling predictable and easy to maintain with consistent design tokens. Bootstrap's components enforce consistency but may require more overrides for custom designs. Tailwind is often preferred for design systems and projects requiring high customization, while Bootstrap is good for teams wanting rapid, consistent UI.
What is the learning curve like for Tailwind vs. Bootstrap?
Bootstrap has a gentler learning curve for beginners because it uses familiar CSS class names (e.g., `btn`, `card`) and provides extensive documentation and examples. Tailwind requires learning its utility class naming system (e.g., `p-4`, `bg-blue-500`), which can be overwhelming initially. However, once learned, Tailwind's approach can be more intuitive and faster for building custom designs.
Can I use Tailwind CSS and Bootstrap together in the same project?
Technically yes, but it's not recommended because both frameworks have overlapping and conflicting styles (e.g., reset, typography, grid). Mixing them can lead to specificity wars, larger file sizes, and maintenance headaches. It's better to choose one framework and stick with it, or use Tailwind as a utility layer on top of a minimal custom design system.
Which framework has better community support and resources?
Both have large, active communities. Bootstrap, being older (since 2011), has more third-party themes, templates, and tutorials. Tailwind has grown rapidly since 2017 and now offers extensive plugins, a vibrant community on GitHub and Discord, and many learning resources like Tailwind UI. Both have excellent official documentation.
React Hooks are functions that let you use state and lifecycle features in function components without writing a class. Introduced in React 16.8, they provide a more direct API for managing component logic. Hooks allow you to reuse stateful behavior across components, making your code more modular and easier to understand. The most commonly used hooks are useState for local state and useEffect for side effects like data fetching or subscriptions. Each hook name begins with “use” to signal that it follows the Rules of Hooks, which include calling hooks only at the top level of a component and only from React functions.
The Motivation Behind Hooks
Before hooks, function components were limited to presenting data without state or lifecycle management. Class components handled these features but introduced complexity. The motivation for hooks stemmed from several challenges with classes:
Reusing logic was difficult: Patterns like higher-order components and render props often led to wrapper hell and made code harder to trace.
Complex components became unmanageable: Lifecycle methods like componentDidMount and componentDidUpdate mixed unrelated logic, forcing developers to split code across methods.
Classes confused both humans and machines: The this keyword behavior caused bugs, and classes required more boilerplate for event handlers and state initialization.
Performance optimization was tricky: Manual binding and unnecessary re-renders were common pain points.
Hooks solve these by allowing you to extract stateful logic into custom hooks, keep related logic together, and avoid class-related pitfalls entirely. They also make it easier to share logic between components without changing the component tree.
How Hooks Differ from Class Components
The fundamental difference lies in how state and side effects are managed. In class components, state is a single object stored in this.state, updated via this.setState. Lifecycle methods like componentDidMount, componentDidUpdate, and componentWillUnmount handle side effects. With hooks, state can be multiple independent variables using useState, and side effects are consolidated in useEffect, which combines all three lifecycle phases.
Hooks also eliminate the need for constructor initialization and manual binding of event handlers. They allow you to use local state and effects directly inside the function body, making the component more readable and testable. While class components are still supported, hooks represent the modern React approach, recommended for new projects and component development.
Before you can use React Hooks, you must set up a development environment with Node.js and the Create React App tool. Node.js provides the JavaScript runtime needed to run React development servers and package managers. Start by visiting the official Node.js website and downloading the LTS (Long Term Support) version for your operating system. After installation, verify it by opening your terminal and running node --version and npm --version. You should see version numbers for both.
Next, install Create React App globally using npm (Node Package Manager). Open your terminal and run the following command:
npx create-react-app my-first-hooks-app
This command creates a new folder called my-first-hooks-app with all the necessary files and dependencies for a React project. The npx prefix ensures you use the latest version without a permanent global install. After the process completes, navigate into the project folder:
cd my-first-hooks-app
Finally, start the development server to confirm everything works:
Your default browser should open a React welcome page at http://localhost:3000. This confirms your environment is ready for hooks.
Understanding the Project Structure
Once your project is created, it helps to know which files matter most for working with hooks. The key folders and files are as follows:
src/ — Contains all your application code, including components and hooks.
src/App.js — The main component where you will start adding hooks.
src/index.js — The entry point that renders your app into the DOM.
package.json — Lists dependencies and scripts; hooks are built into React 16.8+, so no extra installs are needed.
node_modules/ — Stores all installed packages; do not edit this folder.
You will primarily work inside src/. Create a new folder called components/ inside src/ to organize your hook-based components. The project already includes React 18 or later, which fully supports hooks. No additional configuration is required—just start writing components.
Enabling Hooks in Your First Component
To use hooks, you must convert a function component into one that leverages state and effects. Hooks only work inside function components, not class components. Begin by opening src/App.js and replacing its contents with a simple counter component that uses the useState hook:
This code imports useState from React and declares a state variable count initialized to 0. The setCount function updates the state when the button is clicked. Save the file and check your browser—the counter should work immediately. You have now enabled hooks in your first component. To add more hooks, simply import them from React (e.g., useEffect, useContext) and use them inside your function component body. Remember these rules: call hooks at the top level of your component, never inside loops, conditions, or nested functions.
The useState Hook: Managing Local State
The useState hook is the fundamental building block for adding reactive state to functional components in React. It allows you to declare state variables that persist across re-renders and trigger component updates when their values change. Unlike class components where state is a single object, useState enables fine-grained control by letting you manage individual pieces of state independently.
Basic Syntax and Initialization
To use useState, import it from React and call it inside your component function. The hook returns an array with two elements: the current state value and a setter function to update it. You can initialize state with any JavaScript value, including primitives, objects, or arrays.
Initial value is only used on the first render; subsequent renders ignore it.
For expensive computations, pass a function: useState(() => computeExpensiveValue()).
Avoid initializing state from props unless the prop is guaranteed to never change.
Use null or undefined for intentionally empty state rather than placeholder values.
Updating State with Functional Updates
When the new state depends on the previous state, use the functional update form. This prevents stale closure issues, especially in asynchronous code or when updates are batched.
function Counter() {
const [count, setCount] = useState(0);
// Incorrect: may use stale count
const handleIncorrect = () => setCount(count + 1);
// Correct: always uses latest state
const handleCorrect = () => setCount(prevCount => prevCount + 1);
}
Functional updates are essential in these scenarios:
Multiple updates in a single event handler (React batches state updates for performance).
Updates inside useEffect or event listeners that capture old closures.
When using custom hooks that may call the setter multiple times.
Using Multiple State Variables
You can call useState multiple times in one component to manage distinct pieces of state. This is often clearer than storing unrelated data in a single object.
May cause unnecessary re-renders if object reference changes
Complexity
Best for 3–5 independent values
Better for tightly related data (e.g., form fields)
State logic reuse
Easier to extract into custom hooks
Requires careful spread patterns
For three or fewer independent values, separate useState calls are usually simpler. For grouped data that is always updated together—like form fields—a single object with the spread operator or useReducer may be more maintainable. Avoid nesting state objects more than two levels deep; consider using useReducer or custom hooks for complex state logic.
The useEffect Hook: Handling Side Effects
In React function components, side effects such as data fetching, subscriptions, or manually changing the DOM cannot be placed directly inside the render logic. The useEffect Hook provides a declarative way to perform these operations after the component has rendered. It accepts two arguments: a callback function containing the side effect logic, and an optional dependency array that controls when the effect runs. This Hook replaces lifecycle methods like componentDidMount, componentDidUpdate, and componentWillUnmount from class components, offering a unified API for managing side effects.
The dependency array is the second argument to useEffect. It tells React when to re-run the effect. The array lists variables or props that the effect depends on. React compares the current values of these dependencies with their previous values using Object.is comparison. If any dependency has changed between renders, the effect executes again. The behavior varies based on how the array is used:
No dependency array: The effect runs after every render, including the initial one. Use this only for effects that must synchronize with every render, but be cautious of performance issues.
Empty dependency array ([]): The effect runs only once, after the initial render. This mimics componentDidMount. Use it for one-time setup like fetching initial data or adding a global event listener.
Array with specific dependencies ([dep1, dep2]): The effect runs after the initial render and whenever any listed dependency changes. This is the most common pattern for effects that depend on props or state.
Omitting the dependency array entirely can lead to infinite loops if the effect itself updates state. Always include all variables used inside the effect in the dependency array to avoid stale closures and ensure correctness.
Cleanup Functions and Resource Management
Many side effects require cleanup to prevent memory leaks or unwanted behavior. useEffect supports this by allowing the callback function to return a cleanup function. React calls this cleanup function when the component unmounts or before re-running the effect due to dependency changes. Common cleanup tasks include:
Clearing timers (e.g., setTimeout, setInterval)
Removing event listeners from the DOM or global objects
Aborting network requests using AbortController
Unsubscribing from external data sources (e.g., WebSocket connections)
The cleanup function runs before the component unmounts and before the effect re-executes. This ensures that resources are released in the correct order, preventing race conditions and memory leaks. For example, if an effect subscribes to a chat service, the cleanup function should unsubscribe to avoid duplicate subscriptions when the effect re-runs.
Common Use Cases: Fetching Data and Event Listeners
Two frequent applications of useEffect are data fetching and managing event listeners. When fetching data, the effect runs once on mount (with an empty dependency array) or when a relevant prop changes. It’s important to handle cleanup to avoid setting state on an unmounted component. Below is a practical example of fetching data with cleanup:
For event listeners, the effect adds the listener on mount and removes it on unmount or when dependencies change. A typical pattern is adding a window resize listener:
By following these patterns, you ensure that side effects are predictable, efficient, and free from common pitfalls like memory leaks or stale data.
The useContext Hook: Accessing Global State
React Context paired with the useContext hook provides a mechanism for sharing data across the component tree without manually passing props through every level. This approach directly addresses prop drilling, where data must be threaded through intermediate components that do not need the data themselves. By using useContext, you can create global or scoped state that any component within the provider can access, resulting in cleaner and more maintainable code. The hook simplifies state consumption by eliminating the need for render props or higher-order components, making the code more readable and reducing boilerplate.
The first step is to create a Context object using React.createContext(), which returns a Provider and a Consumer component. The Provider wraps the part of the component tree where you want the context to be available. It accepts a value prop that holds the data you want to share, such as user authentication status, theme settings, or application preferences. Here is a practical example:
import React, { createContext, useState } from 'react';
// Create the context with a default value
export const UserContext = createContext(null);
// Create the provider component
export function UserProvider({ children }) {
const [user, setUser] = useState({ name: 'Guest', loggedIn: false });
const login = (username) => {
setUser({ name: username, loggedIn: true });
};
const logout = () => {
setUser({ name: 'Guest', loggedIn: false });
};
return (
<UserContext.Provider value={{ user, login, logout }}>
{children}
</UserContext.Provider>
);
}
Key points when creating a Context Provider:
Default value: The argument passed to createContext is used when a component consumes the context outside a Provider.
Value prop: The Provider’s value can be any JavaScript value, including objects, functions, or arrays.
Nesting: Providers can be nested to create multiple contexts or to override values in specific subtrees.
Consuming Context with useContext
The useContext hook accepts a Context object (the one returned from createContext) and returns the current context value for that context. It must be called inside a React component, and the component must be wrapped in the corresponding Provider somewhere in its parent tree. Here is how to consume the UserContext created above:
Comparison of useContext vs. traditional Context Consumer:
Aspect
useContext Hook
Context.Consumer
Syntax
Functional, inline
Render prop pattern
Readability
Cleaner and more direct
Can become nested
Performance
Same re-render behavior
Same re-render behavior
Nesting
No extra nesting
Requires wrapping in Consumer
When to Use Context Over Prop Drilling
Context is not a replacement for all prop passing. Use it when:
Deeply nested data: Data needed by many components at different nesting levels, such as theme, locale, or user authentication.
Global state: Application-wide settings like language preferences or notification systems.
Avoiding intermediate components: When passing props through components that only forward them without using them, context reduces clutter.
Avoid context when:
Simple prop drilling: For one or two levels, props are sufficient and easier to debug.
High-frequency updates: Context triggers re-renders in all consuming components, which can degrade performance if the value changes often. In such cases, consider state management libraries with more granular subscriptions.
Component reuse: Components that consume context become coupled to that context, reducing reusability outside the provider tree.
By understanding these trade-offs, you can apply useContext effectively to build scalable and maintainable React applications.
Custom Hooks: Reusing Logic Across Components
Custom hooks are JavaScript functions that allow you to extract and reuse stateful logic from your components. They follow the same rules as React’s built-in hooks but give you the power to build your own abstractions. By encapsulating complex behavior into a custom hook, you improve code modularity, reduce duplication, and make your components easier to read and test. A custom hook is simply a function whose name starts with “use” and that may call other hooks internally.
Rules for Creating Custom Hooks
To build a reliable custom hook, you must adhere to the same Rules of Hooks that govern React’s built-in hooks. These rules ensure that your custom hooks work predictably across renders and avoid subtle bugs.
Name your function with “use” prefix. This is not optional—it tells React that this function is a hook and enables the linting rules that check for hook violations. Example: useWindowSize, useLocalStorage, useFetch.
Only call hooks at the top level of your custom hook. Do not call hooks inside loops, conditions, or nested functions. This ensures that hooks are called in the same order on every render, preserving state correctly.
Only call hooks from React function components or other custom hooks. Never call hooks from regular JavaScript functions or class components.
Return only the values and functions that your components need. Keep the return value minimal and well-documented. Typically, you return an array or an object for destructuring convenience.
Keep the hook focused on a single concern. If you find your custom hook growing too complex, consider splitting it into smaller, composable hooks.
Example: useWindowSize for Responsive Design
One practical example is a useWindowSize hook that tracks the browser window’s width and height, updating the component whenever the window is resized. This is useful for responsive layouts, conditional rendering, or adjusting component behavior based on viewport size.
import { useState, useEffect } from 'react';
function useWindowSize() {
const [windowSize, setWindowSize] = useState({
width: window.innerWidth,
height: window.innerHeight,
});
useEffect(() => {
function handleResize() {
setWindowSize({
width: window.innerWidth,
height: window.innerHeight,
});
}
window.addEventListener('resize', handleResize);
// Cleanup listener on unmount to avoid memory leaks
return () => window.removeEventListener('resize', handleResize);
}, []); // Empty dependency array ensures effect runs only once
return windowSize;
}
export default useWindowSize;
With this hook, any component can access live window dimensions by simply calling const { width, height } = useWindowSize();. The component re-renders automatically when the window size changes, without any extra wiring.
Combining Multiple Hooks in a Custom Hook
Custom hooks become even more powerful when you compose multiple hooks together. You can call built-in hooks like useState, useEffect, useContext, or even other custom hooks inside your custom hook. This allows you to build complex, reusable logic from smaller building blocks.
For example, consider a useMediaQuery hook that returns whether a given CSS media query matches. You can then combine it with useWindowSize to create a useResponsive hook that provides multiple boolean flags for breakpoints.
By combining multiple hooks, you create a clean, declarative API. Components using useResponsive get three boolean values and never need to manage event listeners or media queries themselves. This modular approach makes it easy to test each hook in isolation and swap out implementations without affecting dependent components.
When building React applications, state management can quickly become unwieldy, especially when dealing with multiple related values or intricate state transitions. While useState is the go-to hook for simple state, the useReducer hook offers a more structured and predictable approach for complex state logic. Inspired by the Redux pattern, useReducer centralizes state updates through a reducer function, making your code easier to debug, test, and maintain. This hook is particularly valuable when state depends on previous state, or when you need to handle a series of actions that modify state in different ways.
The useReducer hook accepts two arguments: a reducer function and an initial state. It returns an array containing the current state and a dispatch function. The reducer function takes the current state and an action object as arguments, and returns the next state. This pattern enforces a unidirectional data flow, where state is never mutated directly, but only transformed through dispatched actions.
Reducer Function and Dispatch Pattern
The reducer function is the heart of useReducer. It is a pure function that specifies how state transitions occur based on dispatched actions. The action object typically contains a type property (a string describing the action) and an optional payload (the data needed for the update). Below is an example of a reducer function for managing a shopping cart:
The dispatch function is used to send actions to the reducer. For example, to add an item, you would call dispatch({ type: 'ADD_ITEM', payload: { id: 1, name: 'Apple' } }). This pattern makes state changes explicit and traceable, as every update is triggered by a specific action with a clear purpose.
Comparing useReducer with useState
Both hooks manage state, but they serve different needs. The table below highlights key differences:
Feature
useState
useReducer
State structure
Simple values (string, number, boolean)
Complex objects or arrays
State transitions
Direct updates via setter function
Actions dispatched to reducer
Predictability
Moderate
High (due to pure reducer)
Code verbosity
Less code for simple state
More boilerplate but clearer for complex logic
Testing
Requires component testing
Reducer is easily testable in isolation
In general, useState is ideal for independent state variables like a toggle or a text input value. useReducer shines when state has multiple related fields, such as a form with several inputs, or when updates depend on previous state in non-trivial ways.
Consider using useReducer over useState in the following scenarios:
Complex state objects: When state contains multiple sub-values (e.g., a user profile with name, email, preferences) that are updated together.
State transitions dependent on previous state: For example, incrementing a counter based on its current value, where useReducer avoids stale closure issues.
Multiple actions affecting the same state: Such as a to-do list with add, delete, toggle, and edit operations, each requiring distinct logic.
Easier debugging and testing: Since the reducer is a pure function, you can log actions and state, and write unit tests for each action type without rendering a component.
Performance optimization: When state updates trigger expensive calculations, useReducer can help by batching updates or using useMemo with the reducer.
By adopting useReducer for complex state, you gain a more predictable and maintainable codebase. Start with useState for simplicity, and graduate to useReducer when your state logic grows beyond a few simple updates.
Performance Optimization with useMemo and useCallback
In React, unnecessary re-renders can degrade application performance, especially when components manage complex state or expensive calculations. The useMemo and useCallback hooks provide targeted optimization by memoizing values and functions, respectively. Memoization caches the result of a computation or a function reference, returning the cached version unless specific dependencies change. This prevents child components from re-rendering when parent state updates that do not affect them, and avoids recalculating costly operations on every render cycle. Understanding when and how to apply these hooks is essential for building efficient React applications that scale.
Using useMemo for Expensive Computations
The useMemo hook memoizes the result of a computation, recalculating it only when its dependency array changes. This is particularly valuable for expensive operations such as filtering large datasets, sorting arrays, or performing complex mathematical calculations. For example, a component that displays a filtered list of thousands of items should not recompute the filtered list on every render triggered by unrelated state changes. By wrapping the filtering logic in useMemo, you ensure the operation runs only when the source data or filter criteria update. The syntax is straightforward: const memoizedValue = useMemo(() => computeExpensiveValue(a, b), [a, b]);. It is crucial to include all variables that affect the computation in the dependency array; omitting them can lead to stale or incorrect results. useMemo should not be used for trivial calculations, as the overhead of memoization itself can outweigh benefits for simple operations.
Using useCallback to Stabilize Callbacks
While useMemo memoizes values, useCallback memoizes functions. In React, every re-render creates new function instances for event handlers and callbacks. When these functions are passed as props to child components—especially those wrapped in React.memo—the new reference causes the child to re-render unnecessarily because React.memo performs a shallow comparison of props. useCallback returns the same function reference between renders unless its dependencies change. For instance, a button component that receives an onClick handler will not re-render if the handler is stabilized with useCallback and no other props change. Use useCallback when passing callbacks to optimized child components or when a function is a dependency of another hook like useEffect. The pattern is: const memoizedCallback = useCallback(() => { doSomething(a, b); }, [a, b]);.
Common Pitfalls and Misuse
Misusing useMemo and useCallback can introduce bugs and degrade performance rather than improve it. A frequent mistake is over-optimizing by wrapping every function or value, which adds unnecessary memory overhead and complexity. Only apply these hooks when profiling reveals a performance bottleneck. Another pitfall is incorrect dependency arrays: omitting a dependency can cause the memoized value or function to become stale, leading to bugs that are difficult to trace. Conversely, including too many dependencies defeats the purpose of memoization. Additionally, developers sometimes use useMemo for functions or useCallback for values; remember that useMemo returns the result of a computation, while useCallback returns the function itself. Finally, relying on useCallback without React.memo on the child component provides no benefit, as the child will still re-render due to parent re-renders regardless of function reference stability.
When applied correctly, useMemo and useCallback are powerful tools for optimizing React applications. Focus on measuring performance with tools like React DevTools Profiler to identify genuine bottlenecks, and use these hooks sparingly and deliberately. Proper dependency management and understanding the distinction between memoizing values versus functions are key to avoiding common errors. By adhering to these practices, you can maintain a responsive and efficient user experience without introducing unnecessary complexity.
The useRef Hook: Accessing DOM and Mutable Values
The useRef hook is a versatile tool in React that allows you to create a mutable reference that persists across component renders without causing re-renders when its value changes. Unlike state variables managed with useState, updating a ref does not trigger a component update, making it ideal for scenarios where you need to store non-reactive data or interact directly with the DOM. This hook returns an object with a .current property that you can read or modify at any time. In this section, we will explore three common use cases: accessing DOM nodes directly, storing previous values, and managing timers and intervals.
Accessing DOM Nodes Directly
One of the most frequent uses of useRef is to gain direct access to a DOM element, bypassing React’s declarative rendering. This is particularly useful for tasks such as managing focus, reading element dimensions, or integrating with third-party libraries that require a DOM reference. To use it, you create a ref with useRef(null) and attach it to a JSX element via the ref attribute. The ref’s .current property then holds the actual DOM node once the component mounts.
Here is a practical example that focuses an input field when a button is clicked:
import React, { useRef } from 'react';
function FocusInput() {
const inputRef = useRef(null);
const handleClick = () => {
// Access the DOM node and call focus
inputRef.current.focus();
};
return (
<>
<input ref={inputRef} type="text" placeholder="Click button to focus" />
<button onClick={handleClick}>Focus Input</button>
</>
);
}
In this code, inputRef is attached to the <input> element. When the button is clicked, inputRef.current.focus() directly manipulates the DOM to set focus. Note that this does not cause a re-render; the change is purely imperative.
Storing Previous Values with useRef
Another powerful pattern is using useRef to track the previous value of a state or prop. Since refs persist across renders without triggering updates, you can store the “old” value and compare it with the current one. This is often combined with useEffect to run side effects only when a specific value changes. The key is to update the ref’s .current inside a useEffect after the render, so it always holds the value from the previous render cycle.
Setup: Initialize a ref with the initial value you want to track.
Update: In a useEffect that runs after every render, assign the current value to the ref.
Comparison: Use the ref’s .current inside the component body to access the previous value.
This technique is especially useful for detecting changes in props or state without relying on complex comparison logic. For example, you can log a message only when a counter value increases:
Here, prevCountRef stores the count from the previous render. The useEffect updates it after the current render, ensuring prevCount always reflects the value before the latest state change.
Timers and intervals (e.g., setTimeout or setInterval) are classic examples where mutable refs shine. Because these functions create asynchronous callbacks that reference variables from a specific render, they can lead to stale closures if you use state directly. A ref, however, always points to the latest value because it is mutable and not tied to a render cycle. This makes it reliable for clearing or modifying timers without causing memory leaks or unexpected behavior.
Consider a component that starts an interval when mounted and stops it on unmount. Using a ref to store the interval ID is standard practice:
In this example, intervalRef holds the interval ID. The cleanup function in useEffect clears the interval when the component unmounts, preventing memory leaks. The handleStop function also uses the ref to stop the timer manually, demonstrating how refs provide a stable reference to mutable data across renders.
Mastering React Hooks requires more than just understanding their syntax. To write clean, efficient, and bug-free code, beginners must adopt disciplined patterns and recognize frequent pitfalls. This section covers essential rules, common errors like stale closures and infinite loops, and how to test your hooks effectively.
Following the Rules of Hooks
React enforces two fundamental rules to ensure hooks work correctly within the component lifecycle. Violating them causes unpredictable behavior and hard-to-debug errors.
Only call hooks at the top level. Never call hooks inside conditions, loops, or nested functions. This ensures hooks are invoked in the same order on every render, preserving state correctly.
Only call hooks from React functions. Call hooks only from React function components or custom hooks. Avoid calling them from regular JavaScript functions, class components, or event handlers outside of a component.
To enforce these rules automatically, use the ESLint plugin eslint-plugin-react-hooks. It catches violations during development, saving hours of debugging.
Avoiding Stale Closures and Infinite Loops
Two common bugs in hooks are stale closures and infinite re-renders. Understanding their root causes helps you prevent them.
Stale closures occur when a callback captures an outdated value of a state variable or prop. For example, inside useEffect or useCallback, if you omit necessary dependencies, the closure references an old snapshot of the variable. To fix this, always include every variable and function used inside the callback in the dependency array. For complex cases, use the functional update form of state setters:
Infinite loops happen when an effect triggers a state update that re-renders the component, which then re-runs the effect. Common causes include:
Omitting dependencies that change on every render (e.g., objects or arrays created inline).
Updating state inside useEffect without a conditional guard.
Using useState with a function that returns a new object each time.
To break infinite loops, ensure your dependency array is complete and stable. Use useMemo or useCallback to memoize objects and functions passed as dependencies. For effects that should run only once, use an empty array but verify no dependencies are needed.
Testing Hooks with React Testing Library
Testing hooks in isolation requires a component wrapper. React Testing Library provides the renderHook utility for this purpose, allowing you to test hooks without creating a full component.
Key practices for testing hooks:
Practice
Why It Matters
Test state changes and side effects
Verify that your hook updates state correctly and triggers effects as intended.
Use act() for state updates
Wrap state-changing calls in act() to ensure React processes updates synchronously.
Mock external dependencies
Isolate the hook by mocking API calls, timers, or context providers.
Test with different props
Use rerender to pass new props and verify the hook responds correctly.
import { renderHook, act } from '@testing-library/react';
import useCounter from './useCounter';
test('should increment counter', () => {
const { result } = renderHook(() => useCounter());
act(() => result.current.increment());
expect(result.current.count).toBe(1);
});
By following these best practices, you will build robust, maintainable hooks and avoid the most common beginner mistakes. Always lint your code, carefully manage dependencies, and write tests to catch regressions early.
Frequently Asked Questions
What are React Hooks?
React Hooks are functions that let you use state and other React features in functional components without writing a class. Introduced in React 16.8, they allow you to manage component state, side effects, context, and more using functions like useState, useEffect, and useContext. Hooks make code cleaner and more reusable by eliminating the need for lifecycle methods in classes. They follow specific rules: only call hooks at the top level of your React function and only from React functions or custom hooks. Hooks simplify stateful logic and improve code organization.
The useState hook lets you add state to functional components. You import it from React: `import React, { useState } from 'react';`. Then declare a state variable: `const [count, setCount] = useState(0);`. The first element is the current state value, the second is a function to update it. For example, `setCount(count + 1)` increments the count. useState can hold any data type, including objects and arrays. Always use the setter function to update state to trigger a re-render. Avoid mutating state directly; instead, create new copies for objects or arrays.
The useEffect hook performs side effects in functional components, such as fetching data, subscribing to events, or manipulating the DOM. It runs after every render by default, but you can control when it runs using a dependency array. For example, `useEffect(() => { document.title = `Count: ${count}`; }, [count]);` runs only when `count` changes. You can also return a cleanup function to unsubscribe or cancel timers. useEffect replaces lifecycle methods like componentDidMount, componentDidUpdate, and componentWillUnmount in class components.
What are custom hooks in React?
Custom hooks are JavaScript functions that reuse stateful logic across multiple components. They start with 'use' (e.g., useFormInput, useWindowSize) and can call other hooks internally. For instance, a custom hook useFetch could manage loading, data, and error states for API calls. Custom hooks let you abstract complex logic into reusable functions, making components cleaner and promoting code reuse. They follow the same rules as built-in hooks and can be shared across projects or published as npm packages.
There are two main rules for hooks: (1) Only call hooks at the top level of your React function, not inside loops, conditions, or nested functions. This ensures hooks are called in the same order on every render, preserving state correctly. (2) Only call hooks from React function components or custom hooks, not from regular JavaScript functions. Violating these rules can lead to bugs and inconsistent state. React's ESLint plugin (eslint-plugin-react-hooks) helps enforce these rules automatically.
How do I manage global state with hooks?
For global state, you can use the useContext hook combined with React's Context API. Create a context with `React.createContext()`, provide a value at a high level using “, and consume it in any child component with `useContext(MyContext)`. For complex state, pair useContext with useReducer to manage state updates like Redux. Alternatively, use third-party libraries like Zustand or Recoil that are hook-based. Avoid prop drilling by using context for shared data like themes or user authentication.
No, hooks are designed exclusively for functional components and cannot be used inside class components. If you have a class component, you would need to refactor it to a functional component to use hooks. However, you can mix class and functional components in the same app. Hooks provide a simpler and more flexible way to manage state and side effects, so it's recommended to use functional components with hooks for new development. Existing class components can be gradually migrated.
What is the useReducer hook?
useReducer is an alternative to useState for managing complex state logic that involves multiple sub-values or when the next state depends on the previous one. It takes a reducer function and an initial state, returning the current state and a dispatch function. For example: `const [state, dispatch] = useReducer(reducer, initialState);`. The reducer receives the current state and an action, and returns the new state. This pattern is similar to Redux and is useful for state with multiple transitions, such as form handling or to-do lists.
Elementor Pro: Advanced Techniques for WordPress Designers
Introduction: Elevating Your Design Workflow with Elementor Pro
For WordPress designers, the free version of Elementor is a powerful gateway to drag-and-drop page building. However, to truly craft bespoke, data-driven, and highly optimized websites, professionals must step into the realm of Elementor Pro. This premium toolkit transforms a capable builder into a comprehensive design system, unlocking capabilities that streamline complex workflows, enable dynamic content integration, and deliver pixel-perfect styling. Whether you are building a multi-site portfolio, an e-commerce store, or a membership platform, mastering Elementor Pro is the difference between a functional site and a high-performance digital experience. This guide will explore advanced techniques that push beyond basic layouts, focusing on efficiency, customization, and scalability.
The free version of Elementor excels at creating static pages with a solid set of widgets and basic responsive controls. Yet, as client demands grow, its limitations become apparent. Elementor Pro addresses these gaps by introducing:
Theme Building: Design every part of your WordPress theme—headers, footers, single post templates, archive pages, and 404 pages—without touching a single line of PHP. This allows for complete visual control over the site’s structure.
Dynamic Content: Connect elements to custom fields, post meta, ACF, Pods, or Toolset. This enables automated content displays, such as a portfolio item that pulls its title, description, and featured image directly from the database, updating across all instances when edited.
Advanced Styling & Motion Effects: Access custom CSS, global widgets, motion effects like scroll-triggered animations, and background overlays that go far beyond the free version’s basic options. This is crucial for creating immersive, interactive interfaces.
Form Builder & Popup Builder: Build complex multi-step forms with conditional logic and integrate with email marketing services (Mailchimp, ActiveCampaign, etc.). The Popup Builder allows for targeted, behavior-driven overlays without third-party plugins.
WooCommerce Builder: Design custom product pages, shop archives, checkout pages, and cart pages visually. This is a game-changer for e-commerce stores that need unique product presentations.
Without Pro, designers often resort to custom code or multiple plugins to achieve these features, increasing complexity and potential conflicts. Pro consolidates these tools into a single, intuitive interface, reducing development time and maintenance overhead.
Key Pro Features at a Glance
To quickly understand the breadth of Elementor Pro, consider this breakdown of its core components:
Feature
Purpose
Advanced Use Case
Theme Builder
Visual design of site-wide templates
Create a dynamic header that changes based on user login status.
Dynamic Tags
Pull data from posts, users, or custom fields
Display a testimonial author’s bio from a custom field.
Custom Fonts
Upload and use any font file
Use a brand-specific typeface without a third-party CDN.
Motion Effects
Add scroll-based animations (parallax, sticky)
Create a sticky call-to-action that appears after scrolling 50%.
Global Widgets
Reuse a widget across pages; update once
Maintain a consistent testimonial block site-wide.
Popup Builder
Design popups with triggers and conditions
Show a discount code popup when a user tries to exit the page.
WooCommerce Builder
Customize shop and product pages
Design a product page with a custom gallery, tabs, and cross-sells.
Form Builder
Create advanced forms with integrations
Build a multi-step booking form that sends data to a CRM.
Who Should Read This Guide
This guide is tailored for WordPress designers who have a solid grasp of the free Elementor builder and are ready to elevate their craft. It is ideal for:
Freelance designers seeking to differentiate their services with custom, dynamic sites.
Agency teams building scalable client projects that require consistent branding and automated content.
Advanced hobbyists who want to move beyond templates and create unique, performance-driven designs.
Developers transitioning to visual builders who need to understand how Pro handles complex logic without code.
If you have ever felt constrained by static pages or frustrated by repetitive manual updates, this guide will show you how to leverage Elementor Pro’s advanced techniques to save time, improve consistency, and deliver professional-grade results. Each technique is designed to be immediately applicable, turning theoretical knowledge into practical skills that enhance your workflow and client satisfaction.
Mastering the Theme Builder for Custom Site Design
Elementor Pro’s Theme Builder transforms how WordPress designers control site-wide layouts, enabling complete customization of headers, footers, single post templates, and archive pages—all without writing code. By leveraging its visual interface, you can create dynamic, conditional designs that adapt to content types, user roles, or taxonomy terms. Below are step-by-step techniques for building a cohesive, branded site structure.
To craft a header that changes based on context, start by navigating to Templates → Theme Builder → Add New → Header. Design your layout using Elementor’s widgets (e.g., logo, navigation menu, search), then apply conditional logic via the “Display Conditions” panel. For example, show a minimal header on product pages and a full-featured one on blog pages.
Set conditions per template: Choose “Include” or “Exclude” rules based on post types, categories, or user login status.
Use custom fields for dynamic content: Insert site tagline or custom meta via the “Dynamic Tags” feature.
Test with preview: Use the “Preview Changes” dropdown to verify behavior across different pages.
For advanced control, combine multiple header templates with priority ordering. For instance, assign a header to “All Archives” (priority 10) and a specific one to “Single Product” (priority 20). Elementor Pro respects these priorities automatically.
Single post and page templates ensure consistent layout for all content entries. Create a new template under Theme Builder → Single, selecting “Post” or “Page” as the type. Use these techniques:
Add featured image as hero background: Insert a Container, set background type to “Image,” then use Dynamic Tags → “Featured Image.” Adjust overlay opacity for readability.
Structure post metadata: Drag in the “Post Info” widget to display author, date, and categories. Customize separators (e.g., “|” or “•”) and link styles.
Include author bio box: Use the “Author Box” widget at the bottom of posts, with a linked “View All Posts” button.
For pages, consider a “Landing Page” template that hides default header and footer. In the template settings, set “Page Layout” to “Elementor Canvas.” Then assign it to specific pages via Display Conditions (e.g., “Page Slug: landing”).
Practical code example: If you need to inject custom CSS for a specific post template, add this to your child theme’s style.css or via Elementor’s “Custom CSS” field on the template:
/* Target single post template with ID 123 */
.elementor-template-123 .entry-title {
font-size: 2.5rem;
color: #1a1a1a;
margin-bottom: 0.5rem;
}
Creating Archive and 404 Page Templates
Archive templates control category, tag, author, and date-based pages. Under Theme Builder → Archive, design a loop grid using the “Posts” widget. Configure it to display excerpts, featured images, and pagination. For a 404 page, create a template under “Single” with the type “404 Page.”
Set query filters: In the “Posts” widget, under “Query,” choose “Current Archive” to dynamically match the page context.
Add archive title: Use the “Archive Title” widget to display the category or tag name automatically.
Style pagination: Enable “Pagination” in the “Posts” widget settings, then customize the “Previous/Next” labels and alignment.
For 404 pages, keep it user-friendly: include a search bar, a link to the homepage, and a brief message like “Oops! The page you’re looking for doesn’t exist.” Use the “Search Form” widget and a “Button” widget linked to your home URL. To apply, set Display Conditions to “Entire Site” for the 404 template.
By mastering these Theme Builder techniques, you gain pixel-level control over your WordPress site’s structure, ensuring every visitor sees a tailored, professional design without manual coding.
Leveraging Dynamic Content for Personalized Experiences
Modern WordPress design demands more than static layouts; it requires content that adapts to each visitor. Elementor Pro’s dynamic content capabilities allow designers to pull data directly from the WordPress database, including custom fields, user profiles, and taxonomy terms. By connecting Elementor Pro to plugins like Advanced Custom Fields (ACF), Pods, or Toolset, you can display tailored information such as post titles, custom meta values, and user-specific details without manual updates. This approach not only saves time but also enhances user engagement by delivering relevant, context-aware experiences.
Setting Up Dynamic Tags for Text, Images, and Links
Dynamic tags are the foundation of Elementor Pro’s personalization features. To use them, select any widget (e.g., Heading, Image, or Button) and click the dynamic tag icon (a small database symbol) in the content control panel. For text, choose options like “Post Title,” “Custom Field,” or “Author Name” to automatically populate the field with live data. For images, use the “Featured Image” or “User Avatar” dynamic tag to pull media from the current post or logged-in user. Links can be made dynamic by selecting “Post URL” or “Custom Field URL,” ensuring navigation adapts to the displayed content. A best practice is to test each dynamic tag on a sample post or user profile to confirm the correct data source before publishing.
Integrating Advanced Custom Fields (ACF) with Elementor
ACF is one of the most popular custom field plugins, and its integration with Elementor Pro is seamless. After installing ACF and creating field groups (e.g., “Product Price” or “Event Date”), these fields become available as dynamic tags in Elementor. To connect them, add an Elementor widget, click the dynamic tag icon, select “ACF Field,” and choose the relevant field name. For complex data types like repeater fields or galleries, use Elementor’s “Loop Grid” widget with a custom query that references your ACF groups. Below is a comparison of key dynamic content plugins for Elementor Pro:
Plugin
Field Types Supported
Dynamic Tag Availability
Best Use Case
Advanced Custom Fields (ACF)
Text, Image, Repeater, Gallery, Relationship
Full (with ACF plugin)
Complex custom post types and meta data
Pods
Text, Image, File, Table, Relationship
Full (with Pods plugin)
Custom content types and advanced taxonomies
Toolset
Text, Image, Date, URL, Checkbox
Full (with Toolset plugin)
Database-driven sites with user role content
When using ACF, ensure your field groups are assigned to the correct post types (e.g., “Posts,” “Pages,” or custom post types) to avoid empty dynamic tags. For performance, cache database queries if using many dynamic fields on a single page.
Using Dynamic Content for Author and User Profiles
Personalizing author and user profiles is a powerful way to build trust and community. With Elementor Pro, you can create a single template for author archive pages that dynamically displays the author’s name, bio, avatar, and custom user fields (e.g., social media links or expertise tags). To achieve this, use the “Author” dynamic tags for text and images, and integrate ACF user fields (via the “User” field group) for additional data. For logged-in users, apply dynamic tags like “Current User Name” or “Current User Email” to display personalized greetings or account details. A common technique is to combine a conditional “If” dynamic tag (available via third-party plugins like Dynamic.ooo) to show content only when a user is logged in, creating exclusive member areas. Always test these templates with different user roles to ensure proper visibility and permissions.
Advanced Popup Builder: Lead Generation and Engagement
Elementor Pro’s Popup Builder transforms how designers capture leads and engage visitors. Unlike basic plugins, it offers granular control over triggers, conditions, and design—all within the visual builder. This section covers advanced techniques for creating popups that convert without annoying users, from lead capture forms to behavior-based triggers and data-driven optimization.
Designing High-Converting Lead Capture Popups
A lead capture popup must balance visual appeal with frictionless functionality. Start by selecting a template or building from scratch. Use the following structure for maximum conversion:
Headline: State the value proposition in 5-8 words (e.g., “Get Your Free SEO Checklist”).
Subheadline: Add one benefit line, such as “Join 10,000+ subscribers.”
Form Fields: Minimize to name and email. Use Elementor’s Form widget with Mailchimp, ActiveCampaign, or custom integrations.
Call-to-Action Button: Use action-oriented text (e.g., “Send My Free Guide”) and a contrasting color.
Close Options: Include an “X” button and a “No thanks” link to reduce frustration.
To implement a custom integration with a webhook (e.g., for a CRM), add this PHP snippet to your child theme’s functions.php file. This sends form data to an external endpoint after submission:
Behavioral triggers engage users at the right moment. Elementor Pro’s Popup Builder offers two powerful options: exit intent and scroll depth. Configure them under the “Triggers” tab when editing a popup.
Exit Intent: Detects when the cursor moves toward the browser’s close button or address bar. Set it as a single trigger. Use for lead magnets or discount offers to capture leaving visitors.
Scroll Trigger: Fires when the user scrolls a percentage of the page. For example, set 50% for a mid-page offer or 80% for a bottom-of-article CTA. Combine with “After X seconds” delay (e.g., 5 seconds) to avoid premature popups.
To prevent popup fatigue, add display conditions under the “Conditions” tab. For example:
Condition
Setting
Example Use
Show on specific pages
Include “Single Post” or “Page”
Only on blog posts
Hide for logged-in users
Exclude “Logged In”
Target new visitors
Frequency
“Once per session” or “Once per day”
Reduce annoyance
A/B Testing Popup Variations
Optimize popup performance by testing variations. Elementor Pro does not include built-in A/B testing, but you can integrate with Google Optimize or use a lightweight approach with split testing via cookies. Here’s a manual method using Elementor’s “Popup Conditions” and a simple PHP redirect:
Track conversions via Google Analytics events or Elementor’s form submissions. Run tests for at least 100 conversions per variation to achieve statistical significance. Monitor metrics like click-through rate and form completion rate to determine the winner.
Custom Form Design and Automation Beyond Basics
Elementor Pro’s form widget provides a solid foundation for collecting user data, but advanced WordPress designers push beyond simple name-and-email fields to create dynamic, automated experiences. By leveraging conditional logic, multi-step layouts, and third-party integrations, you can transform a static contact page into a powerful data-gathering engine that adapts to each visitor’s input. This section explores techniques for building complex forms that reduce friction, improve conversion rates, and seamlessly connect with your marketing stack.
Creating Multi-Step Forms with Progress Indicators
Long forms often deter users, but breaking them into digestible steps with visual progress indicators dramatically increases completion rates. In Elementor Pro, you can achieve this using the Form widget’s built-in step functionality. Start by enabling “Steps” in the form settings and defining each step’s fields. For a cleaner user experience, pair steps with a progress bar or step number indicator using custom CSS or a dedicated progress bar widget from a third-party plugin like JetElements. Below is a recommended structure for a multi-step form:
Step 1: Contact Information – Name, email, phone number.
Step 2: Preferences – Service type, budget range, timeline.
To add a progress indicator, insert a shortcode or custom HTML element above the form that updates dynamically via JavaScript. For instance, use a simple script that reads the current step class and updates a progress bar percentage. This visual cue keeps users engaged and reduces abandonment.
Implementing Conditional Fields and Actions
Conditional logic in Elementor Pro requires either a third-party plugin such as “Conditional Fields for Elementor Pro” or custom JavaScript. With a plugin, you can show or hide fields, sections, or entire steps based on user selections. For example, if a user selects “I need a quote” from a dropdown, reveal additional fields for project scope and budget. If they select “I have a question,” show a simple text area instead. This technique prevents information overload and collects only relevant data. Below is a table of common conditional triggers and actions:
For actions beyond field visibility, use conditional logic to trigger email notifications or redirect users to different thank-you pages. For example, if a user submits a “Support” request, send an email to the support team; if they submit a “Sales” inquiry, redirect to a pricing page. Implement this via JavaScript that checks form data on submission and dispatches the appropriate action.
Connecting Forms to Mailchimp, HubSpot, or Zapier
Direct integration with email marketing platforms and CRMs is essential for automating lead capture. Elementor Pro’s built-in “Actions After Submit” supports Mailchimp and HubSpot natively. To connect to Mailchimp, navigate to the form’s “Actions” tab, add “Mailchimp,” and authenticate via API key. Map form fields to Mailchimp merge tags and select the audience list. For HubSpot, use the “HubSpot” action to send contacts to a CRM list, with field mapping for properties like company name or phone number. If you need more flexibility, Zapier acts as a universal bridge. Add a “Zapier” action in Elementor Pro, obtain a webhook URL from your Zap, and configure the Zap to send data to thousands of apps, including Salesforce, ActiveCampaign, or Slack. Below is a quick reference for setup:
Mailchimp: Requires API key and list ID. Map fields like “email,” “first name,” and “tags.”
HubSpot: Requires OAuth or API key. Map fields to contact properties and choose lifecycle stage.
Zapier: Generate webhook URL from a Zap. Send all form fields as JSON payload; use Zapier’s field parser to route data.
Test each integration by submitting a sample form and verifying the data appears in your target platform. For error handling, enable “Collect Submission Data” in Elementor Pro to review failed submissions and troubleshoot API issues. These connections eliminate manual data entry and ensure your sales or marketing teams receive leads in real time.
Advanced WooCommerce Design with Elementor Pro
Elementor Pro transforms WooCommerce from a basic e-commerce solution into a fully customizable design platform. By leveraging dedicated widgets and dynamic conditions, you can tailor every aspect of the shopping experience—from product pages to checkout flows—without writing a single line of PHP. This section explores advanced techniques for creating a cohesive, conversion-optimized WooCommerce store using Elementor Pro’s native tools.
The default WooCommerce product page is functional but often lacks brand-specific design. With Elementor Pro, you can construct a single product page from scratch using the “Single Product” theme builder template. Start by adding a “Product Image” widget, then use the “Product Title,” “Product Price,” and “Add to Cart” widgets to structure the layout. For advanced customization, consider these techniques:
Dynamic conditions: Apply display rules to show or hide sections based on product categories, tags, or price ranges. For example, show a “Limited Edition” badge only for products in a specific category.
Custom tabs: Replace the default WooCommerce tabs with Elementor’s “Tabs” widget. Populate each tab with dynamic content like “Product Description” or “Additional Information” using shortcodes or the “Product Data Tabs” widget.
Related products grid: Use the “Products” widget with a custom query to display related items based on current product attributes. Set the query to “Current Product” and filter by category or tag.
For a practical implementation, add a custom “Call to Action” section below the product description that appears only for out-of-stock items. Use a “Condition” block with the rule “Product Stock Status” set to “Out of Stock,” then embed a “Subscribe to Restock” form using the “Form” widget.
Designing an Optimized Cart and Checkout Experience
A streamlined cart and checkout process reduces cart abandonment. Elementor Pro’s “Cart” and “Checkout” widgets allow full visual control. Begin by creating a template under “Theme Builder > Cart” and “Checkout.” Key design strategies include:
Two-column checkout layout: Use a section with two columns. Place the “Billing Details” widget in the left column and the “Order Summary” widget (with a custom “Payment” widget) in the right column. Ensure the “Checkout” widget’s “Layout” setting is set to “Two columns.”
Progress indicator: Add a “Progress Tracker” widget (from the “WooCommerce” category) to show steps: Cart → Checkout → Order Confirmation. Customize colors and labels to match your brand.
Cart page enhancements: Use the “Cart” widget to display a coupon code field, shipping calculator, and cross-sells. Position the cross-sells below the cart table using a “Products” widget with a query for “Cross-sells” based on cart contents.
To implement a custom shipping message, add a “Code” widget in the checkout template with the following PHP snippet (place it in your theme’s functions.php or use a code snippet plugin):
Then, in Elementor, use a “Dynamic Tag” to pull the shipping method label into a “Text” widget.
Creating Personalized Product Archive Pages
Product archive pages (shop, category, tag) often feel generic. Elementor Pro’s “Product Archive” template builder lets you design unique layouts per taxonomy. For personalization, follow these steps:
Dynamic filters: Add a “Filter” widget (from “WooCommerce”) to let users sort by price, rating, or attributes. Combine with a “Products” widget that uses “Current Query” to respect the filter.
Custom category headers: Use “Dynamic Conditions” to display a different hero section for each product category. Create a “Container” with a background image that changes based on the current category term.
Grid variation: Set the “Products” widget’s layout to “Masonry” or “Carousel” for visual variety. For a “List” view, use a “Loop Grid” widget with a custom product card template that includes a “Product Title,” “Price,” and “Add to Cart” button.
To create a “Featured Products” section on archive pages, add a “Products” widget with a query set to “Featured” and a condition to show only on the main shop page. Use the “Visibility” toggle under “Advanced > Responsive” to hide it on mobile if needed.
Elementor Pro: Advanced Techniques for WordPress Designers
Creating and Syncing Global Widgets Across Pages
Global widgets in Elementor Pro allow you to design a single widget—such as a testimonial block, pricing table, or button—and reuse it across multiple pages or posts. When you update the original global widget, every instance updates automatically, eliminating tedious manual edits. To create a global widget, design your element as usual, right-click the widget handle, and select “Save as Global.” The widget is then added to your Global Widgets library. You can insert it on any page by dragging it from the Global Widgets panel. For syncing, remember that changes made to a global widget on any page will propagate to all instances, so always edit the master version from the global library to avoid confusion. Best practices include naming widgets descriptively (e.g., “CTA Button – Blue”) and limiting global widgets to frequently used components that rarely change structurally.
Building a Custom Template Library for Team Use
For teams, a centralized custom template library streamlines collaboration and enforces brand consistency. In Elementor Pro, you can save entire page templates, sections, or popups to the My Templates library. To set up a team library, follow these steps:
Create a template (e.g., a landing page layout) and click the folder icon to save it as a template.
Assign categories like “Headers,” “Footers,” or “Landing Pages” using the template tags.
Export the template as a JSON file via the Elementor Tools menu and share it with your team.
Team members import the JSON file into their own Elementor installations for instant access.
For larger teams, consider using a shared server or plugin like “Elementor Cloud Templates” to sync templates across accounts. Always maintain a version log (e.g., “v1.2 – Updated hero section”) to track changes. This ensures everyone works from the latest approved designs, reducing rework and maintaining visual harmony.
Using Saved Sections for Modular Design
Saved sections enable modular design by allowing you to store and reuse specific row or column structures without saving the entire page. This technique is ideal for repeating layouts like service grids, team member cards, or testimonial sliders. To save a section, select the section (the full row), right-click, and choose “Save as Section.” You can then insert it into any page from the My Templates panel. For modular efficiency, create a library of pre-built sections:
Section Type
Use Case
Customization Tip
Hero Section
Homepage or campaign landing
Use dynamic tags for headline
Feature Grid
Service pages or product features
Set equal height columns
Testimonial Carousel
Trust-building content sections
Link to custom post type
Call-to-Action Bar
Footer or mid-page prompts
Add conditional visibility
When using saved sections, always test responsiveness after insertion, as container padding may differ. To update a saved section across multiple pages, you must resave the section and manually replace each instance—unlike global widgets, saved sections do not sync automatically. For this reason, reserve saved sections for one-off modular designs that are unlikely to need mass updates. Combine saved sections with global widgets for a powerful, efficient workflow: use saved sections for layout structure and global widgets for interactive elements that require consistent branding.
Elementor Pro empowers WordPress designers to move beyond visual drag-and-drop functionality by offering robust tools for custom code integration. Mastering these advanced techniques allows for precise control over layout, animation, and third-party functionality, elevating site design without sacrificing performance or security. This section explores how to apply custom CSS, JavaScript, and HTML directly within Elementor Pro, focusing on responsive breakpoints, hover effects, and safe script integration.
Applying Custom CSS to Specific Elements and Breakpoints
Elementor Pro provides a dedicated Custom CSS field for every widget, section, and column. To access it, select any element, navigate to the Advanced tab, and locate the Custom CSS section. Here, you can write CSS that applies only to that element, using the selector placeholder to refer to the element itself. For example:
Targeting a specific widget:selector { background: linear-gradient(135deg, #667eea 0%, #764ba2 100%); }
Responsive breakpoints: Use Elementor’s responsive mode (desktop, tablet, mobile) to write CSS that triggers only at specific viewport widths. For instance, within the Custom CSS field, you can nest media queries:
This approach ensures that your custom styles adapt seamlessly across devices. Elementor Pro also allows you to set custom breakpoints globally under Elementor > Settings > Responsive, giving you full control over when tablet and mobile rules apply.
Using Custom Code for Advanced Animations
Beyond CSS transitions, Elementor Pro supports custom JavaScript and HTML for complex animations. The Custom Code feature (found under Elementor > Custom Code) lets you add scripts site-wide or per-page. For advanced animations, consider these techniques:
Scroll-triggered animations: Use libraries like AOS (Animate on Scroll) or Intersection Observer API. Example with AOS: Add the library via Custom Code (CSS and JS), then apply data-aos="fade-up" attributes to widgets using the Advanced > CSS Classes field.
Canvas or WebGL animations: Embed HTML5 canvas elements or Three.js scripts via an HTML widget. For performance, limit such animations to desktop breakpoints using conditional JavaScript.
Custom hover sequences: Combine CSS keyframes with JavaScript event listeners. For example, a multi-step hover reveal:
Use async or defer attributes: For non-critical scripts, add async or defer to prevent blocking page rendering. Example: <script async src="https://example.com/widget.js"></script>.
Validate script sources: Only integrate scripts from trusted, HTTPS-enabled domains to prevent XSS attacks.
Leverage Elementor’s conditional logic: Assign custom code to specific pages, user roles, or post types via the Display Conditions tab.
Integration Method
Pros
Cons
Custom Code (Elementor Pro)
No plugin overhead; fine-grained placement control; conditional loading built-in.
Requires manual script updates; no version management.
Adds plugin weight; potential compatibility issues with Elementor.
Theme functions.php
Direct server-side control; no extra plugin.
Easily broken by theme updates; requires child theme for safety.
Choose the method that balances control with maintainability. For most Elementor Pro users, the built-in Custom Code feature offers the best trade-off, especially when combined with regular backups and staging environments.
Performance Optimization for Elementor Pro Sites
Elementor Pro empowers designers to build visually rich WordPress sites, but without careful optimization, the added functionality can degrade load times. Performance is critical for user experience and search engine rankings. This section outlines advanced techniques to maintain fast load times while leveraging Elementor Pro’s features, focusing on caching, asset loading, and code optimization.
Minimizing Render-Blocking Resources
Render-blocking resources, such as CSS and JavaScript files, prevent the browser from displaying content until they are fully loaded. Elementor Pro can generate significant CSS and JS assets, especially with complex layouts. To minimize this:
Defer non-critical JavaScript: Use the defer attribute on scripts that are not essential for initial page render. In your theme’s functions.php file, you can add a filter to defer Elementor scripts selectively. Example:
Inline critical CSS: Extract above-the-fold CSS styles and inline them in the <head> of your pages. Elementor Pro’s “Performance” tab under Elementor > Settings allows you to enable “Inline CSS” for critical styles, reducing HTTP requests.
Combine and minify assets: Use a plugin like Autoptimize or WP Rocket to merge Elementor’s CSS and JS files, reducing the number of render-blocking requests. Ensure you test thoroughly, as combining scripts can sometimes break dynamic features.
Leveraging Caching Plugins and CDN
Caching reduces server load and speeds up delivery by storing static versions of your pages. For Elementor Pro sites, caching must handle dynamic content generated by the builder. Follow these best practices:
Choose a caching plugin compatible with Elementor: WP Rocket, W3 Total Cache, or LiteSpeed Cache offer specific integrations. Enable page caching, browser caching, and cache preloading.
Exclude Elementor editor pages from caching: Ensure your caching plugin excludes URLs containing elementor or elementor-preview to avoid conflicts when editing.
Implement a Content Delivery Network (CDN): Use a CDN like Cloudflare, BunnyCDN, or KeyCDN to serve static assets (CSS, JS, images) from edge servers near your users. Configure your caching plugin to rewrite asset URLs to the CDN domain.
Enable Gzip compression: Most caching plugins and CDNs offer Gzip or Brotli compression to reduce file sizes for text-based resources.
Optimizing Images and Fonts with Elementor
Images and fonts often account for the majority of a page’s weight. Elementor Pro provides built-in tools to optimize these elements without external plugins.
Image optimization:
Use Elementor’s “Image Size” control to select appropriately sized thumbnails for each context (e.g., a 300px-wide image for a small card). Avoid using full-size images.
Enable lazy loading in Elementor Pro: Go to Elementor > Settings > Performance and turn on “Lazy Load Images.” This defers off-screen images until the user scrolls.
Convert images to modern formats: Use a plugin like WebP Express or ShortPixel to serve WebP versions, which are 25-35% smaller than JPEGs. Elementor Pro supports WebP natively in its media library.
Font optimization:
Limit the number of font families and weights used in your design. Each additional font file increases load time.
Use Elementor’s “Local Google Fonts” option under Elementor > Settings > General to host fonts locally, avoiding external DNS lookups and GDPR concerns.
For custom fonts, preload the primary font file using a plugin or by adding a <link rel="preload"> tag in your theme’s header. Example:
Use a font subsetting plugin: Tools like OMGF or Host Google Fonts Locally can strip unused characters from font files, reducing file sizes by up to 70%.
By implementing these techniques, you can maintain Elementor Pro’s design flexibility while achieving load times under 2 seconds, even on shared hosting. Regularly test your site with tools like GTmetrix or PageSpeed Insights to identify further optimizations.
Conclusion: Next Steps and Continuous Learning
Mastering Elementor Pro’s advanced techniques—from dynamic content with custom fields and ACF, to conditional logic, custom breakpoints, and global widgets—transforms a designer from a page builder into a site architect. These methods enable highly personalized, performance-optimized, and maintainable WordPress sites. However, the true power of Elementor Pro lies not just in what you build today, but in how you evolve with the platform. The following steps will solidify your expertise and keep you ahead of the curve.
Building a Portfolio with Advanced Techniques
A portfolio showcasing advanced Elementor Pro work differentiates you in a crowded market. To demonstrate your capabilities effectively:
Feature dynamic content projects: Include case studies where you used custom fields, post types, or ACF to create unique user experiences (e.g., a real estate site with property filters, a membership directory).
Highlight performance optimizations: Show before/after load times using Elementor’s performance features (critical CSS, asset loading, and custom breakpoints for mobile-first design).
Document complex workflows: Create video walkthroughs or annotated screenshots of your global widgets, theme builder templates (header, footer, single post, archive), and conditional logic setups.
Include live demos: Provide links to functioning sites where clients benefit from your advanced work, with permission.
Showcase multi-language or multi-currency sites: If you’ve integrated Elementor Pro with WPML or WooCommerce, display these as proof of international-ready design.
Use a dedicated “Case Studies” section on your portfolio site, built entirely with Elementor Pro, to reinforce your mastery.
Joining the Elementor Community and Official Groups
Continuous learning requires engagement. The Elementor ecosystem thrives on shared knowledge. To stay updated:
Resource
Purpose
How to Engage
Official Elementor Facebook Group
Get direct help from team members and power users
Post specific questions, share tips, and vote on feature requests.
Elementor Community Forum
Troubleshoot issues and discover workarounds
Search for existing threads before posting; contribute solutions.
Elementor YouTube Channel
Watch tutorials on new features and best practices
Subscribe and comment with your use cases.
Elementor Blog
Read in-depth guides and release notes
Bookmark the “Updates” section for changelogs.
WordPress Meetups & WordCamps
Network with designers using Elementor
Attend local events or online sessions focused on page builders.
Active participation in these groups ensures you hear about beta features, security patches, and community-vetted techniques before they become mainstream.
Third-party add-ons can extend Elementor Pro’s capabilities, but they introduce risks. Follow these guidelines:
Audit before installing: Check the developer’s reputation, update frequency, and compatibility with your Elementor version and WordPress core.
Limit to necessary features: Avoid “swiss army knife” plugins that add 50 widgets when you need only two. Each extension adds code bloat and potential conflicts.
Test in a staging environment: Clone your site, activate the add-on, and run performance and functionality tests before going live.
Prefer official integrations: Use Elementor’s built-in dynamic tags or supported third-party plugins (e.g., Advanced Custom Fields, Toolset) over lesser-known alternatives.
Monitor for deprecation: When Elementor updates, check that your add-on’s developer provides timely patches. Abandoned extensions can break your site.
By combining advanced techniques with a disciplined approach to community learning and extension management, you will build robust, future-proof websites that stand out—and your skills will grow in lockstep with Elementor Pro’s evolution.
Frequently Asked Questions
What is Elementor Pro and how does it differ from the free version?
Elementor Pro is the premium version of the popular WordPress page builder, offering advanced features like a Theme Builder (header, footer, single post templates), dynamic content capabilities, a popup builder, custom fonts, form builder with integrations, and advanced animations. The free version provides a basic drag-and-drop editor with essential widgets, while Pro unlocks professional design tools for creating complex, dynamic websites without coding. Pro also includes dedicated support and updates.
How can I use dynamic content in Elementor Pro?
Dynamic content in Elementor Pro allows you to pull data from WordPress fields (like post titles, excerpts, custom fields) and display them dynamically across templates. To use it, add a widget (e.g., Heading or Text), click the dynamic icon (a cube) in the content field, and select the source (e.g., Post Title, Custom Field from ACF or Pods). This is powerful for building archive pages, single post templates, or any design that needs to adapt to different content automatically.
What is the Theme Builder in Elementor Pro?
The Theme Builder is a core feature of Elementor Pro that lets you design and assign custom templates for every part of your WordPress theme, including header, footer, single posts, archive pages, 404 pages, and search results. Instead of relying on your theme’s default layout, you can create pixel-perfect designs with drag-and-drop, then set display conditions (e.g., show this header only on blog pages). This gives full control over the site’s appearance without coding.
How do I create a custom popup in Elementor Pro?
To create a custom popup in Elementor Pro, go to Templates > Popups in your WordPress dashboard, then click Add New. Choose a template or start from scratch. Use the drag-and-drop editor to design the popup (e.g., email capture, announcement). Set triggers (on click, after scroll, exit intent) and display rules (show on specific pages, after X visits). Popups can include forms, images, or buttons, and you can customize styling, animations, and close behaviors.
Can I use custom CSS with Elementor Pro?
Yes, Elementor Pro supports custom CSS at multiple levels. You can add custom CSS to individual widgets via the Advanced tab > Custom CSS, or to entire sections/columns. Additionally, you can enqueue global CSS in the site settings or use the Custom CSS feature for a specific page. This allows advanced designers to override default styles, add complex animations, or fine-tune responsiveness. Pro also supports CSS variables for easier theme management.
What are the best practices for optimizing Elementor Pro performance?
To optimize Elementor Pro performance, minimize plugin conflicts by deactivating unused plugins, use a lightweight theme (e.g., Hello Elementor), enable Elementor’s “Improved CSS Loading” and “Improved Asset Loading” in settings, compress images with a plugin like Smush, use a caching plugin (e.g., WP Rocket), limit the number of widgets per page, and avoid excessive animations. Also, consider using a CDN and hosting on a fast server. Regularly update Elementor and WordPress.
How do I integrate custom fields (ACF) with Elementor Pro?
Elementor Pro seamlessly integrates with Advanced Custom Fields (ACF). After installing ACF and creating field groups, you can use the dynamic content feature to display ACF fields. For example, add a Heading widget, click the dynamic icon, and select ACF Field > choose your field (e.g., “price”). You can also use ACF fields in conditions, loops, and custom templates. This is ideal for building custom post types, real estate listings, or portfolio sites.
What are Elementor Pro’s advanced animation options?
Elementor Pro offers advanced animations including entrance animations (e.g., fade, slide, zoom) with customizable duration, delay, and direction. Pro also adds motion effects like mouse tracking, scroll effects (parallax, sticky, reveal), and 3D tilt. You can apply animations to widgets, sections, or columns. For example, use scroll effects to make elements fade in as the user scrolls, or add a sticky header that stays visible. These enhance user experience but should be used sparingly for performance.
Building a Component Library with React and Tailwind
Introduction: Why Build a Component Library with React and Tailwind
In modern web development, teams face a persistent tension between speed and consistency. A component library built with React and Tailwind CSS offers a pragmatic resolution: a centralized collection of reusable UI elements that enforce design standards while accelerating development velocity. By combining React’s declarative, composable architecture with Tailwind’s utility-first methodology, developers can create a library that is both scalable and maintainable. This introduction explores the foundational benefits of such a library, focusing on design consistency, faster iteration, and simplified long-term maintenance.
The Case for a Component Library in Modern Web Development
Without a component library, projects often devolve into spaghetti code—duplicated styles, inconsistent spacing, and mismatched color palettes. A component library addresses these pain points by centralizing UI logic and presentation. Key advantages include:
Design consistency: Every button, modal, or input follows the same visual rules, eliminating drift across pages or teams.
Faster development: Developers can assemble interfaces from pre-built blocks rather than writing custom CSS and markup for each instance.
Easier maintenance: Updates to a single component propagate across the entire application, reducing technical debt and bug fixes.
Better collaboration: Designers and developers share a common language, with components serving as the single source of truth for UI patterns.
For organizations scaling from a single app to a product suite, a component library becomes the backbone of efficient, cohesive user experiences.
How React and Tailwind Solve Common UI Challenges
React and Tailwind complement each other uniquely, addressing two perennial challenges: state management and styling overhead. React’s component model excels at encapsulating behavior—handling clicks, form inputs, or animations—while Tailwind’s utility classes manage presentation without cascading specificity wars. Consider these synergies:
Challenge
React Solution
Tailwind Solution
Inconsistent spacing
Props for margin/padding variants
Utility classes like p-4 and m-2
Theme propagation
Context API or props drilling
Configurable tailwind.config.js tokens
Responsive design
Conditional rendering based on breakpoints
Responsive prefixes like md:flex
Dark mode support
State toggling via hooks
Dark variant classes like dark:bg-gray-800
This pairing reduces boilerplate: React handles logic, Tailwind handles looks. The result is a library where components are both highly customizable (via props) and visually predictable (via a constrained design system).
Key Considerations Before Starting Your Library
Building a component library requires upfront planning to avoid common pitfalls. Before writing code, evaluate these factors:
Scope and granularity: Determine which components are truly reusable versus one-off. Start with primitives (buttons, inputs, cards) before composing complex patterns (data tables, modals).
Design tokens: Define a shared vocabulary for colors, typography, and spacing in Tailwind’s config. This ensures every component references the same palette, not arbitrary hex codes.
Documentation: Plan for a companion site or storybook-style viewer. Without clear usage examples and prop tables, adoption will stall.
Versioning and distribution: Decide whether to publish to npm, a private registry, or a monorepo. Semver discipline prevents breaking changes from derailing consuming projects.
Testing strategy: Components must be resilient. Include unit tests for logic and visual regression tests for styling to catch regressions during updates.
A deliberate start avoids rework. By aligning React’s composability with Tailwind’s utility-first approach, you lay the groundwork for a library that serves both immediate needs and long-term growth.
Setting Up the Project Foundation
Building a component library with React and Tailwind begins with a solid project foundation. This phase involves selecting the right framework, integrating Tailwind CSS, and configuring tooling that supports both development and distribution. A well-structured foundation ensures scalability, performance, and a smooth developer experience as your library grows.
Choosing the Right React Framework (Vite vs. Next.js vs. CRA)
The choice of framework impacts build speed, development workflow, and deployment flexibility. Below is a comparison of the three most common options:
Framework
Best For
Key Considerations
Vite
Fast development and lightweight component libraries
Instant HMR, minimal configuration, excellent for isolated component work
Next.js
Full-featured applications with SSR/SSG needs
Built-in routing and data fetching; overkill for pure component libraries
Create React App (CRA)
Legacy projects or simple setups
Slower build times, less active maintenance; not recommended for new libraries
For most component libraries, Vite is the recommended starting point due to its speed and simplicity. Next.js is suitable only if your library will be consumed within a Next.js application that requires server-side rendering. CRA is now considered outdated for new projects.
Installing and Configuring Tailwind CSS
Once your React project is initialized (for example, with Vite), integrate Tailwind CSS by running the following commands in your project root:
Add the @tailwindcss/vite plugin to your Vite configuration:
import tailwindcss from '@tailwindcss/vite'
export default {
plugins: [tailwindcss()]
}
Finally, import Tailwind’s base styles in your main CSS file (e.g., src/index.css):
@import "tailwindcss";
Setting Up a Monorepo with Storybook and Rollup
A monorepo structure keeps your component library, documentation, and build tools in one repository. Use a tool like pnpm or npm workspaces to manage multiple packages. Run the following to initialize a monorepo:
Integrate Storybook for visual development and testing. Install it in the packages/docs directory:
cd packages/docs
npx storybook@latest init --type react
Storybook will auto-detect your framework and create a .storybook folder. Configure it to use Tailwind by importing your main CSS file in .storybook/preview.js:
import '../src/index.css';
For bundling your library components, use Rollup with the @rollup/plugin-node-resolve and @rollup/plugin-commonjs plugins. Create a rollup.config.js in packages/components:
import resolve from '@rollup/plugin-node-resolve';
import commonjs from '@rollup/plugin-commonjs';
import postcss from 'rollup-plugin-postcss';
import tailwindcss from 'tailwindcss';
export default {
input: 'src/index.js',
output: {
dir: 'dist',
format: 'esm'
},
plugins: [
resolve(),
commonjs(),
postcss({
plugins: [tailwindcss()],
extract: true
})
]
};
This configuration ensures your Tailwind styles are compiled and bundled alongside your React components. With the monorepo, Storybook, and Rollup in place, you have a complete development environment for building and distributing your component library.
Designing a Scalable Component Architecture
When building a component library with React and Tailwind, the architecture you choose determines whether the library thrives or frays under real-world use. A scalable design must balance reusability against flexibility, ensuring that each piece—from a simple button to a complex page layout—can be composed, extended, and maintained without cascading breakage. Three foundational pillars support this: atomic design principles, disciplined props management, and deliberate state handling.
Atomic Design: Atoms, Molecules, Organisms, and Templates
Atomic design provides a clear hierarchy for organizing components. This pattern, originally proposed by Brad Frost, maps naturally to React’s composable nature. In a Tailwind context, it also helps you manage utility class duplication across levels.
Atoms are the smallest, indivisible UI elements: buttons, inputs, labels, icons. They accept only essential props and rarely manage state beyond controlled inputs.
Molecules combine two or more atoms into a functional unit: a search bar (input + button), a form field (label + input + error message). Molecules own simple state like focus or validation.
Organisms assemble molecules and atoms into distinct sections: a header (logo atom + navigation molecule + search molecule), a product card (image atom + title atom + price atom + add-to-cart button). Organisms often coordinate state across child components.
Templates arrange organisms into a page layout, defining grid structures and content regions without specific data. In a library, templates serve as reference layouts or starter kits for developers.
This hierarchy prevents bloated components and makes testing straightforward: atoms require minimal tests, while organisms focus on integration behavior.
Props Best Practices: Defaults, Variants, and Composition
Props are the public API of your components. Poorly designed props lead to confusion and breakage. Follow these guidelines:
Defaults: Every prop should have a sensible default that represents the most common use case. For example, a Button component defaults to variant="primary" and size="md". Use defaultProps or destructuring defaults.
Variants: Limit variant props to a small, consistent set (e.g., variant, size, colorScheme). Use TypeScript union types to enforce valid values. For Tailwind, map variants to predefined utility classes via a config object.
Composition: Favor composition over configuration. Instead of a prop that controls every possible layout, allow children and wrapper props (e.g., className, as for polymorphic elements). This keeps your library flexible without exploding the prop surface.
The table below compares two common prop strategies for variant management:
Strategy
How It Works
Best For
Trade-off
Boolean props
Each variant is a separate boolean (e.g., isPrimary, isLarge)
Small libraries with few variants
Becomes unwieldy with many variants; conflicts possible
Single variant prop
One prop with string values (e.g., variant="primary")
Libraries with multiple, mutually exclusive variants
Requires a central mapping; harder to combine styles
For most libraries, the single variant prop approach scales better, especially when combined with Tailwind’s utility-first system.
State Management Strategies for Library Components
Library components should minimize internal state to avoid surprising consumers. Three strategies work well:
Controlled components: The parent manages state and passes it via props. This is the default for form elements and interactive components like modals or accordions. It gives full control to the consumer.
Uncontrolled with refs: For simple behaviors (toggle, tooltip visibility), use useState internally and expose a ref or callback for imperative access. This reduces boilerplate for common use cases.
State machines: For complex components (multi-step forms, wizards), model state as a finite state machine. Libraries like XState or simple reducer patterns ensure predictable transitions and prevent invalid states.
Whichever strategy you choose, document the state ownership clearly in your component’s storybook or documentation. A component that silently manages state can break when a consumer tries to control it externally.
Creating Core UI Components with Tailwind
When building a component library with React and Tailwind, the core UI components form the foundation of your design system. These elements—buttons, form inputs, and layout containers—must be flexible, accessible, and consistent. Tailwind’s utility-first approach accelerates this process by providing low-level styling primitives that you compose into reusable patterns. The key is to design components that accept props for variant control while keeping the markup clean and the styling predictable.
Building a Flexible Button Component with Variants
Buttons are the most interactive element in any UI. A robust button component should support multiple visual variants (primary, secondary, outline, ghost), sizes (sm, md, lg), and states (disabled, loading). Tailwind’s utility classes make this straightforward by composing classes conditionally based on props.
This pattern allows consumers to use the button with minimal effort while maintaining full control over appearance. The focus:ring-2 and focus:ring-offset-2 utilities ensure keyboard accessibility out of the box.
Designing Accessible Form Elements (Inputs, Selects, Checkboxes)
Form elements require careful attention to accessibility, including proper labeling, focus states, error handling, and keyboard navigation. Tailwind simplifies the visual styling, but you must pair it with semantic HTML and ARIA attributes.
For a text input component, follow these guidelines:
Wrap the input in a <label> element or use htmlFor and id for explicit association.
Apply Tailwind classes for border, padding, and focus ring: border border-gray-300 rounded-md px-3 py-2 focus:border-blue-500 focus:ring-1 focus:ring-blue-500.
Add an aria-describedby attribute linked to a help text or error message element.
Use aria-invalid="true" when validation fails, and style accordingly with border-red-500.
For selects and checkboxes, the same principles apply. A select element can use Tailwind’s appearance-none class to remove default browser styling, then add custom padding and a background arrow icon using a pseudo-element or inline SVG. Checkboxes should remain natively interactive but can be visually enhanced with Tailwind’s form-checkbox (if using the official forms plugin) or custom utility classes that preserve accessibility.
Key accessibility checks for form elements:
Element
Required Attribute
Tailwind Utility Example
Input
id, aria-label or <label>
focus:ring-blue-500 focus:border-blue-500
Select
id, <label>
appearance-none bg-white border border-gray-300
Checkbox
id, <label>, type="checkbox"
h-4 w-4 text-blue-600 focus:ring-blue-500
Crafting Reusable Cards and Layout Containers
Cards and layout containers are the workhorses of content presentation. A reusable card component should accept props for padding, shadow depth, border radius, and optional header/footer slots. Tailwind’s utility classes allow you to compose these variations without writing custom CSS.
Combine with max-w-* and mx-auto for centered, constrained layouts.
By designing cards and containers with Tailwind’s spacing and responsive prefixes, you ensure they adapt gracefully from mobile to desktop. The component can expose a className prop for consumers to extend styles, while keeping the core structure intact. This approach maintains consistency across your library while allowing flexibility for edge cases.
Implementing Theming and Customization
When building a component library with React and Tailwind, theming and customization are critical for adoption. Consumers need to adapt your components to their brand without forking your code. Tailwind’s utility-first approach, combined with CSS custom properties and React’s context, provides a robust foundation for dark mode, custom color schemes, and component-level overrides. The key is to design your library so that consumers can inject their own design tokens while keeping your components predictable and maintainable.
Using Tailwind’s Dark Mode and Custom Theme Config
Tailwind’s built-in dark mode support is the first layer of theming. In your tailwind.config.js, set darkMode: 'class' to toggle dark mode via a CSS class on a parent element. Then, define your dark mode colors in the theme.extend.colors section. For example:
This lets consumers redefine --color-primary in their own CSS without touching your configuration.
Providing Theme Context with React Context API
For runtime theme switching (e.g., user toggles dark mode), use React Context. Create a ThemeProvider that stores the current theme and applies the dark class to the <html> element:
Consumers wrap their app with <ThemeProvider> and use useContext(ThemeContext) to toggle themes. For advanced customization, extend the context to include a colors object that maps to CSS custom properties. You can then update those properties dynamically:
This gives consumers full control over the palette without rebuilding your components.
Allowing Consumer Overrides via Tailwind’s `@apply` and Plugins
For component-level overrides, avoid hardcoding utilities in your components. Instead, compose them using @apply in your CSS, then expose those classes as props. For example, a button component might accept a className prop that merges with internal styles:
function Button({ className, children }) {
return (
<button className={cn('btn-base', className)}>
{children}
</button>
);
}
Consumers can then pass className="bg-red-500 hover:bg-red-600" to override colors for a specific instance. For more systematic overrides, create a Tailwind plugin that registers new utilities based on consumer configuration:
This approach keeps your library flexible while maintaining a consistent API. The combination of CSS custom properties, React context, and plugin-based overrides ensures that your component library can adapt to any design system.
An inclusive component library must balance strict accessibility compliance with fast rendering. Every component should function for keyboard-only users, screen reader users, and those on low-powered devices. By embedding ARIA attributes, supporting keyboard navigation, and optimizing load performance, you create a library that meets WCAG 2.1 AA standards and delivers a smooth user experience.
Adding ARIA Roles, States, and Keyboard Support
Each interactive component requires explicit ARIA roles, states, and properties to communicate its purpose to assistive technology. For a custom toggle switch, for example, you must add role="switch", manage aria-checked dynamically, and ensure the component is focusable via tabindex="0". Keyboard support means handling Space and Enter to activate the toggle, and Tab to move focus into and out of the component. The following table outlines common patterns:
Component
ARIA Role
Key States
Keyboard Interaction
Modal
dialog
aria-modal=”true”, aria-labelledby
Escape closes; focus trapped inside
Accordion
button (for trigger), region (for panel)
aria-expanded, aria-controls
Enter/Space toggles panel; Arrow keys if single open
Tooltip
tooltip
aria-describedby on trigger
Escape dismisses; focus stays on trigger
Always test that every interactive element can be reached and operated using only the keyboard. Use onKeyDown handlers with event.key checks to avoid conflicts with browser defaults.
Lazy Loading and Code Splitting for Library Components
A large component library can bloat initial bundle size. Use React’s lazy and Suspense to split components by route or by usage. For example, if a heavy data table component is only used on an admin page, lazy load it:
Additionally, configure your bundler (Webpack or Vite) to split vendor chunks for commonly used utilities like date pickers or chart libraries. For Tailwind CSS, purge unused styles in production to keep the CSS payload under 10KB. Avoid importing entire icon sets; instead, import individual SVG icons as components to prevent bloat.
Testing Accessibility with axe and React Testing Library
Automated testing catches common WCAG failures before they reach production. Integrate the jest-axe library into your test suite to run axe-core assertions on rendered components. A practical test for a button component looks like this:
import { render } from '@testing-library/react';
import { axe, toHaveNoViolations } from 'jest-axe';
import Button from './Button';
expect.extend(toHaveNoViolations);
it('should have no accessibility violations', async () => {
const { container } = render(<Button>Click me</Button>);
const results = await axe(container);
expect(results).toHaveNoViolations();
});
Combine this with React Testing Library’s user-event to simulate keyboard interactions. For example, test that a dropdown opens on Enter and that focus moves to the first option. Create a checklist for manual review: verify color contrast ratios (minimum 4.5:1 for normal text), ensure focus indicators are visible (a 2px outline with good contrast), and confirm that all images in components have meaningful alt text. Run these tests in CI to block pull requests that introduce accessibility regressions.
Once you begin building a component library with React and Tailwind, the long-term success of the project hinges on two critical pillars: comprehensive documentation and robust testing. Without clear documentation, even the most elegant components become unusable for other developers. Without thorough testing, updates to your library risk breaking existing implementations. This section outlines strategies for setting up Storybook with Tailwind integration, writing effective unit and integration tests, and automating visual regression testing to maintain a high-quality, collaborative library.
Storybook serves as the ideal environment for developing and showcasing your components in isolation. To integrate it with Tailwind CSS, follow these steps:
Initialize Storybook: Run npx storybook@latest init in your project root. This creates the necessary configuration and example stories.
Import Tailwind styles: In your .storybook/preview.js file, import your main CSS file (e.g., import '../src/index.css') where Tailwind directives (@tailwind base; @tailwind components; @tailwind utilities;) are defined. This ensures all stories render with Tailwind classes applied.
Configure PostCSS: Storybook uses its own Webpack build. Ensure your postcss.config.js includes the Tailwind plugin and any required tailwind.config.js is present in the root.
Write stories for every component: Use the Component Story Format (CSF) to document each component’s props, states (loading, error, empty), and edge cases. Include controls and actions to allow interactive testing in the browser.
Add addons for enhanced documentation: Install @storybook/addon-essentials (often included by default) and @storybook/addon-a11y to surface accessibility issues directly in your stories.
This setup allows your team to see every component in a controlled environment, with Tailwind styling intact, making it a single source of truth for the library’s visual appearance.
Writing Unit Tests with Jest and React Testing Library
Unit tests verify that individual components render correctly and behave as expected. Jest, combined with React Testing Library (RTL), provides a robust testing framework that encourages testing from the user’s perspective. Key practices include:
Test component rendering: Use render from RTL to mount a component with required props. Assert that key elements exist using screen.getByRole, screen.getByText, or screen.getByTestId.
Simulate user interactions: Use fireEvent or userEvent (preferred for realistic interactions) to test click handlers, form submissions, and keyboard navigation.
Test Tailwind-specific behavior: While you do not test CSS classes directly, verify that conditional styling renders correctly. For example, test that a disabled prop adds the aria-disabled attribute and that a variant prop changes the text content or visible label.
Organize tests by component: Place test files next to their components (e.g., Button.test.jsx). Use describe blocks to group related tests and it blocks for individual assertions.
A typical test for a button component might look like:
Automating Visual Regression Testing with Chromatic
Visual regression testing catches unintended visual changes that unit tests cannot detect, such as spacing shifts, color changes, or layout breakage. Chromatic integrates seamlessly with Storybook to automate this process. Follow this workflow:
Publish your Storybook to Chromatic: Use the Chromatic CLI (npx chromatic --project-token=YOUR_TOKEN) to upload a snapshot of every story. This creates a baseline for your library’s visual appearance.
Review changes in pull requests: Chromatic compares new snapshots against the baseline. Any visual difference triggers a review request. Developers can approve, reject, or accept changes as the new baseline.
Configure thresholds for dynamic content: For components with animations or data-driven content (e.g., charts), set an --only-changed flag or use Chromatic’s diffThreshold to prevent false positives.
Integrate with CI/CD: Add Chromatic as a step in your GitHub Actions or other CI pipeline. This ensures every commit to the library is automatically checked for visual regressions before merging.
By combining unit tests for logic and interaction with visual regression tests for appearance, your component library maintains a high bar for quality, making it reliable for the entire team to use and contribute to.
Packaging and Publishing the Library
After building a cohesive set of components with React and Tailwind, the next critical step is packaging and publishing the library so other projects or teams can consume it. This involves configuring a bundler, managing peer dependencies carefully, and publishing to a registry such as npm or GitHub Packages. A well-packaged library ensures consumers can install it with a single command and integrate it without configuration headaches.
Configuring Rollup or Vite for Library Bundling
For library bundling, Rollup and Vite are the two most common choices, each with distinct strengths. Rollup is the traditional choice for library bundling because it produces smaller, tree-shakeable output and supports multiple output formats (ESM, CJS, UMD) out of the box. Vite, while primarily a development server and build tool for applications, can be configured for library mode using its library build option, which leverages Rollup under the hood for production builds. Below is a comparison to help you decide.
To configure Rollup, install rollup, @rollup/plugin-node-resolve, @rollup/plugin-commonjs, and rollup-plugin-postcss for Tailwind. In your rollup.config.js, set input to your library entry point (e.g., src/index.js) and output to an array with { file: 'dist/index.mjs', format: 'es' } and { file: 'dist/index.cjs', format: 'cjs' }. For Vite, create a vite.config.js with build.lib options: set entry, name, and formats: ['es', 'cjs']. Both tools require the external option to exclude React and ReactDOM from the bundle.
Managing Peer Dependencies and Versioning
Peer dependencies are critical for a component library because they prevent bundling duplicate copies of React or Tailwind. In package.json, list react, react-dom, and tailwindcss under peerDependencies with a range that matches your library’s compatibility (e.g., "react": "^18.0.0"). For versioning, use semantic versioning (semver): bump the major version for breaking API changes, minor for new features, and patch for bug fixes. Include a peerDependenciesMeta field to mark optional peers, such as tailwindcss if your library works without it. Always test your library with the minimum and maximum versions of each peer dependency to avoid runtime errors.
Publishing to npm and GitHub Packages
Publishing to npm requires an npm account and the npm publish command. Before publishing, ensure your package.json has correct main (pointing to CJS entry), module (pointing to ESM entry), types (if using TypeScript), and files (to include only the dist folder and any required CSS). For a private registry like GitHub Packages, add "publishConfig": { "registry": "https://npm.pkg.github.com/" } to package.json and authenticate via a personal access token. To publish to both registries, use npm dist-tags and separate publish commands: npm publish --registry=https://registry.npmjs.org for public and npm publish --registry=https://npm.pkg.github.com for private. After publishing, consumers can install your library with npm install @your-scope/your-library and import components directly.
Integrating the Library into Real Projects
After building and packaging your component library, the true test lies in seamless integration within a real application. This section demonstrates how to consume a React and Tailwind component library in a Next.js project, handle style overrides, and resolve common pitfalls that arise during integration.
Importing and Using Components in a Next.js App
To use your library in a Next.js application, first install it via npm or yarn:
Next, import and use components directly in your pages or components. Ensure your Next.js project is configured to process the library’s Tailwind classes. Add the library’s path to the content array in your tailwind.config.js:
Now you can use components like any other React element:
import { Button, Card } from '@your-org/component-library';
export default function HomePage() {
return (
<Card className="max-w-md mx-auto mt-10">
<h2 className="text-xl font-semibold">Welcome</h2>
<Button variant="primary" onClick={() => alert('Clicked!')}>
Get Started
</Button>
</Card>
);
}
Common integration tasks include:
Verify Tailwind generation: Run npx tailwindcss -i ./src/input.css -o ./dist/output.css --watch to ensure all classes from the library are compiled.
Check for missing styles: If a component renders without styling, confirm the library’s CSS is being imported (usually via a global stylesheet or @import in your app’s CSS).
Use dynamic imports: For larger libraries, consider lazy-loading components with next/dynamic to reduce initial bundle size.
Overriding Styles with Tailwind’s important and @layer
When you need to override a component’s default styles, Tailwind provides two primary mechanisms: the important directive and the @layer system. Use the important directive sparingly, as it increases specificity and can lead to maintenance challenges. For targeted overrides, apply it in your global CSS:
The @layer directive organizes custom styles within Tailwind’s cascade, allowing you to override library styles without resorting to !important. For example, to change a button’s padding in your app:
For more granular control, use Tailwind’s @apply directive in a @layer block to create a composite override that respects the utility-first hierarchy.
Debugging Common Issues (CSS Conflicts, Missing Classes)
Integration problems often stem from CSS conflicts or missing Tailwind classes. Use this checklist to diagnose and resolve them:
Issue
Cause
Solution
Component renders unstyled
Library’s CSS not imported or Tailwind content path missing
Add library path to content array; import library’s CSS file in _app.js or layout
Styles applied incorrectly
CSS specificity conflict from third-party libraries or custom styles
Use browser DevTools to inspect; add !important only as last resort; wrap overrides in @layer
Missing classes in production build
Tree-shaking removes unused classes from library
Ensure library exports are properly bundled; use purge safelist in tailwind.config.js
Class names not generated
Dynamic class construction (e.g., text-${color}) not caught by Tailwind
Use full class names; or list all possible values in safelist
For persistent issues, verify your Tailwind configuration by running npx tailwindcss -i ./src/input.css -o ./dist/output.css --watch and checking the generated CSS for your library classes. If classes are missing, add them to a safelist pattern in your config. Finally, test in an isolated environment—such as a minimal Next.js app—to rule out project-specific interference.
Maintaining and Evolving Your Library Over Time
A component library is a living artifact. Without deliberate stewardship, it accumulates technical debt, inconsistent patterns, and unused components that confuse developers. To keep your library valuable, establish clear processes for versioning, deprecation, and continuous improvement. This section covers the core practices that ensure your library remains a trusted foundation for your team as requirements and the React and Tailwind ecosystem evolve.
Adopt Semantic Versioning (SemVer) from day one. This communicates the impact of each release to consumers without requiring them to inspect every commit. Follow the MAJOR.MINOR.PATCH format:
MAJOR: Breaking changes (e.g., removed props, altered component API, Tailwind utility class restructuring that requires markup changes).
MINOR: New features or components added without breaking existing functionality.
PATCH: Bug fixes, performance improvements, or documentation corrections.
Automate changelog generation using tools like Changesets or semantic-release. Integrate this into your CI/CD pipeline so each merged pull request triggers a version bump and updates a CHANGELOG.md file. Structure each changelog entry with clear categories:
New DatePicker component with keyboard navigation support
Changed
Updated Button primary color to match Tailwind v4 palette
Deprecated
Mark variant="outline" on Card as deprecated in favor of variant="bordered"
Removed
Drop support for React 17
Fixed
Resolved focus ring clipping in Modal on Safari
Security
Upgraded tailwind-merge to patch CVE-2024-XXXX
Automation reduces human error and ensures that every release is documented consistently, making it easy for consumers to assess upgrade risk.
Deprecating and Removing Components Gracefully
Removing a component is inevitable but must be handled with empathy for existing users. Follow a three-phase deprecation cycle:
Announce deprecation: Add a console warning in the component’s development build (e.g., console.warn('Component X is deprecated. Use Y instead.')). Update the component’s JSDoc or TypeScript types to include @deprecated tags.
Provide a migration path: In the changelog and component documentation, show a side-by-side comparison of the old and new usage. For complex migrations, offer a codemod (using jscodeshift) that automatically rewrites consumer code.
Remove in the next MAJOR release: Delete the component source, remove its export from the library’s barrel file, and update any related documentation. Ensure the removal is clearly noted in the MAJOR release changelog.
Never remove a component in a MINOR or PATCH release. This gives consumers at least one full version cycle to migrate, reducing frustration and breaking their applications unexpectedly.
Collecting Usage Analytics and Community Contributions
To evolve your library wisely, you need data on how it is actually used. Avoid invasive tracking. Instead, consider opt-in mechanisms:
Telemetry in development builds: Log component usage counts locally or to a private dashboard (e.g., via a build-time plugin) to identify which components are most popular and which are rarely used.
Feedback channels: Create a dedicated GitHub Discussions category or a Slack channel where users can propose new components, report pain points, or share workarounds. Prioritize issues based on frequency of mention and impact.
Contribution guidelines: Write a clear CONTRIBUTING.md that outlines how to propose a new component, the required test coverage, and the coding standards (e.g., using @tailwindcss/forms for input styling). Use a pull request template that prompts contributors to attach a before/after screenshot and list any breaking changes.
Encourage external contributions by labeling issues as good first issue or help wanted. Regularly review and merge small, low-risk contributions to build community trust. For larger features, require a proposal document (e.g., a short RFC) before implementation begins. This balance of analytics and community input ensures your library evolves based on real-world needs rather than assumptions, keeping it lean and relevant.
Frequently Asked Questions
What is a component library in React?
A component library in React is a collection of reusable, self-contained UI elements (like buttons, modals, or forms) that can be shared across projects. It enforces consistency, reduces development time, and centralizes maintenance. Libraries are typically published as npm packages and include documentation, tests, and styling. Using a component library helps teams maintain a unified design language and speeds up prototyping. Popular examples include Material-UI, Chakra UI, and custom in-house libraries built with tools like Storybook.
Why use Tailwind CSS for a component library?
Tailwind CSS is a utility-first framework that offers low-level styling classes, making it highly customizable and composable. For a component library, Tailwind allows developers to create consistent, responsive designs without writing custom CSS. Its design token system (via tailwind.config.js) enables easy theming, and the JIT compiler ensures minimal output size. Tailwind’s utilities work well with React’s component model, and the library can be consumed by projects that may or may not use Tailwind, especially if you provide precompiled CSS.
How do I structure a React component library project?
A typical structure includes a monorepo (e.g., using Turborepo or Nx) with separate packages for components, utilities, and documentation. Use a bundler like Rollup or Vite to build ES modules and CommonJS. Organize components in folders with their own tests, stories (for Storybook), and types. Include a shared theme configuration for Tailwind. Also set up a build script to generate a dist folder, and configure package.json with main, module, and types fields. Versioning with semantic-release is recommended.
What are design tokens and how do they integrate with Tailwind?
Design tokens are a set of design decisions (colors, spacing, typography) stored in a platform-agnostic format (JSON or YAML). They ensure consistency across different platforms. In a React+Tailwind library, tokens can be transformed into Tailwind’s configuration. Tools like Style Dictionary can generate tailwind.config.js values from tokens. This allows the library to expose a theme object that consumers can override. Tokens make it easy to maintain a single source of truth for design values and support multiple themes (light/dark).
How do I publish a React component library to npm?
First, ensure your library is built into a distributable format (ES modules and CommonJS) with type definitions. Set up a package.json with correct entry points. Use .npmignore to exclude source files and tests. Consider using semantic-release for automated versioning. Publish with npm publish after authenticating. For scoped packages, use @your-scope/package-name. Also, provide a README with installation and usage instructions. It’s good practice to test the published package locally with npm link or by installing from a tarball.
How do I handle theming in a Tailwind-based component library?
Theming can be implemented using Tailwind’s CSS variables or by exposing a custom plugin that modifies the Tailwind configuration. One approach is to define theme tokens as CSS custom properties in a root class (e.g., .theme-light) and reference them in your Tailwind config. Another method is to provide a ThemeProvider component that uses React Context to pass theme values. For dark mode, use Tailwind’s dark variant or a class-based strategy. Ensure your components consume these tokens via utility classes or inline styles.
What testing strategies work best for React component libraries?
Use unit tests with Jest and React Testing Library to verify component behavior and accessibility. Snapshot tests (via Jest) help catch unintended visual changes. For integration, consider Cypress or Playwright to test interactions. Since components are isolated, mock external dependencies and use data-testid attributes. Also test theming by rendering components with different theme classes. Visual regression testing with Chromatic or Percy is valuable for UI libraries. Ensure test coverage for edge cases like empty states and error handling.
How do I document a React component library effectively?
Use Storybook as the primary documentation tool, as it provides interactive playgrounds, prop tables, and accessibility checks. Write clear prop descriptions and include usage examples. Add a README with installation, quick start, and contribution guidelines. For API documentation, use TypeScript types and JSDoc comments. Consider including a changelog and version migration guide. Tools like Docusaurus or VitePress can host comprehensive documentation sites. Also provide a demo page or sandbox (CodeSandbox) for quick experimentation.
Why Tailwind CSS is Revolutionizing Frontend Development
Introduction: The Rise of Utility-First CSS
For over a decade, frontend developers relied on monolithic CSS frameworks like Bootstrap and Foundation to style web interfaces. These frameworks offered pre-built components—buttons, modals, grids—that promised consistency and speed. Yet as projects grew in complexity, the limitations became clear: bloated stylesheets, rigid design systems, and the constant battle against specificity. Enter Tailwind CSS, a utility-first framework that flips the traditional model on its head. Instead of providing ready-made components, Tailwind offers thousands of low-level utility classes that let developers compose custom designs directly in HTML. This shift is not merely about syntax; it represents a fundamental change in how frontend teams think about styling, maintainability, and developer velocity. Tailwind’s adoption has skyrocketed—it is now used by major companies like OpenAI, GitHub, and Netflix—because it solves real pain points that older frameworks could not address. By embracing constraints and eliminating the context-switching between HTML and CSS, Tailwind has redefined what efficient frontend development looks like.
From Bootstrap to Tailwind: A Shift in Mindset
The journey from Bootstrap to Tailwind is a story of moving from abstraction to composition. Bootstrap taught developers to think in components: a .btn-primary class meant a blue button with predefined padding, border-radius, and hover state. This worked well for rapid prototyping but created a disconnect between design intent and implementation. Customizing a Bootstrap component often required overriding styles with !important or digging into Sass variables—a fragile process. Tailwind, by contrast, provides no pre-built buttons. Instead, it offers atomic classes like bg-blue-500, px-4, py-2, and rounded-md. Developers assemble these classes to create a button that matches exactly what the design specifies. This shift from “I use a button component” to “I build a button from utilities” encourages a deeper understanding of CSS properties and eliminates the overhead of maintaining custom class names. The result is a codebase where styling decisions are explicit, not hidden in a distant stylesheet.
What Utility-First Actually Means in Practice
Utility-first CSS means every style rule is a single-purpose class. Instead of writing this:
Every class directly maps to a single CSS declaration. This approach yields several concrete benefits:
No naming conventions: No need to invent BEM or SMACSS class names.
Zero specificity battles: All classes have equal specificity (0,1,0), so overrides are predictable.
Instant visual feedback: Changes are visible without switching files or recompiling.
Consistent design tokens: Tailwind’s predefined scale for spacing, colors, and typography ensures design coherence.
In practice, this means developers spend less time writing CSS and more time building interfaces. A typical Bootstrap project might require 30% of the codebase dedicated to custom CSS overrides; Tailwind projects often reduce that to near zero.
Tailwind’s developer experience is the primary reason for its rapid adoption. The framework integrates deeply with modern build tools through its CLI, PostCSS plugin, or bundler integrations like Vite and Webpack. Key features include:
Just-in-Time (JIT) engine: Generates only the classes you use, resulting in output CSS as small as 10 KB (gzipped) for production.
IntelliSense in editors: VS Code and other editors provide autocomplete, hover previews, and linting for Tailwind classes.
Customization via config: The tailwind.config.js file lets teams extend or override every design token—colors, spacing, breakpoints—without forking the framework.
Responsive and state variants: Prefixes like md:, hover:, and dark: apply styles conditionally, eliminating media query spaghetti.
This ecosystem reduces cognitive load. A developer can look at any HTML file and immediately understand the visual outcome because every class is self-documenting. The framework also encourages reusable patterns through @apply directives or component abstractions in frameworks like React and Vue. By removing the friction between design and code, Tailwind has made frontend development faster, more predictable, and more enjoyable—a combination that explains why it is revolutionizing the field.
How Tailwind Eliminates Context Switching
One of the biggest productivity killers in frontend development is the constant mental juggling between HTML and CSS files. Every time you need to adjust a button’s padding, change a heading’s color, or tweak a layout’s spacing, the typical workflow demands: locate the HTML element, find its class or ID, open the corresponding CSS file, scroll to the right selector, write the rule, save, and switch back to the browser. This context switching fragments concentration and slows down iteration. Tailwind CSS solves this by bringing styles directly into the markup, allowing developers to stay in one file and one mental space. The result is faster cycles, fewer errors, and a flow state that traditional CSS rarely permits.
Tailwind uses utility classes—small, single-purpose CSS rules—that you apply directly to HTML elements. Instead of writing a separate CSS rule for a blue, bold heading with margin, you simply write <h1 class="text-blue-500 font-bold mb-4">Hello</h1>. This inline approach means every style decision happens exactly where it is used. You no longer need to remember what a custom class like .card-title does or hunt through a stylesheet to confirm its properties. The markup becomes the single source of truth for presentation. This is especially powerful in component-based frameworks like React or Vue, where each component’s template and styling coexist in the same file, reinforcing cohesion.
Naming things is one of the hardest tasks in programming. In traditional CSS, every new element often requires a thoughtful, unique class or ID name—and then consistent usage across the project. This leads to bloated stylesheets, naming collisions, and the dreaded “classitis.” Tailwind eliminates this entirely. You never invent a name like .hero-banner-wrapper-inner again. Instead, you compose behavior from existing utilities. The table below contrasts the traditional approach with Tailwind’s:
Traditional CSS
Tailwind CSS
Write HTML with class=”card”
Write HTML with class=”bg-white p-6 rounded shadow”
Debug by inspecting the element’s classes directly
This shift removes the cognitive load of naming and reduces the chance of style leakage or specificity wars. Your CSS file size shrinks dramatically, often to just a few lines of custom configuration.
Faster Prototyping with Immediate Visual Feedback
Tailwind’s utility-first approach makes prototyping incredibly fast. You can build a complex layout in minutes by stacking classes like flex justify-between items-center p-4 bg-gray-100. Because every utility maps to a single CSS property, you see the effect instantly without leaving your editor or browser DevTools. Changes are applied the moment you save. This immediacy encourages experimentation: want to test a different spacing? Replace p-4 with p-6. Need a darker background? Swap bg-gray-100 for bg-gray-200. There is no build step, no recompilation of Sass, and no waiting for a CSS cascade to resolve. The feedback loop shrinks from minutes to seconds. For designers who code or developers under tight deadlines, this speed is transformative. A practical example: to create a responsive card component, you might write:
This single block of markup handles layout, spacing, typography, colors, and responsiveness without a single line of external CSS. Tailwind’s design system ensures consistency, while the lack of context switching lets you iterate freely.
Why Tailwind CSS is Revolutionizing Frontend Development
In the world of frontend development, maintaining design consistency across large teams and sprawling projects has historically been a significant challenge. Traditional CSS methodologies like BEM or SMACSS often rely on developer discipline and manual oversight, which can lead to drift as projects evolve. Tailwind CSS addresses this head-on by enforcing a rigorous, centralized design system. Through its configuration file, every spacing unit, color value, typography scale, and breakpoint is defined once and applied uniformly. This approach transforms design tokens from abstract guidelines into enforceable constraints, making consistency not just a goal but a default behavior.
Centralized Design Tokens in tailwind.config.js
The heart of Tailwind’s consistency lies in its tailwind.config.js file. This single source of truth houses all design tokens—the raw values that define your visual language. Instead of scattering #3B82F6 or 16px across dozens of CSS files, you centralize them:
Spacing scale: Define spacing: { 4: '1rem', 8: '2rem' } to ensure every margin and padding uses the same increments.
Color palette: Set colors: { primary: '#2563EB', secondary: '#7C3AED' } to eliminate hex-value guesswork.
Typography: Declare fontSize: { base: '1rem', lg: '1.25rem' } for consistent text hierarchy.
Any developer on the team can open this file and instantly understand the design system. Changes propagate globally, reducing the risk of one-off deviations.
Customizable Breakpoints and Color Palettes
Tailwind’s configuration allows teams to extend or override defaults without writing custom CSS. For example, you can add a 2xl breakpoint at 1536px or a dark-blue-900 shade. This flexibility ensures the framework adapts to your brand, not the other way around. The result is a palette and responsive grid that every component shares, preventing the common pitfall of inconsistent responsive behavior or mismatched hues.
Style drift—where components gradually adopt slightly different colors, spacing, or sizes—plagues projects with multiple contributors. Tailwind mitigates this through utility classes tied directly to the config. A button using bg-primary and p-4 will always match another button using the same classes, even if built months apart. To illustrate the practical impact, consider the following comparison between traditional CSS and Tailwind CSS for a typical team project:
Developers manually type hex codes or use variables (if set up).
Enforced via tailwind.config.js; all colors come from a single palette.
Spacing consistency
Relies on predefined variables or developer memory; prone to 4px vs. 5px discrepancies.
Uses a fixed scale (e.g., p-4 always equals 1rem); no deviation possible.
Responsive breakpoints
Often duplicated or redefined per component; can lead to mismatched thresholds.
Centralized in config; md: prefix applies the same breakpoint everywhere.
Onboarding new developers
Requires learning custom naming conventions and variable usage.
New devs learn the config file and utility classes; consistency is built-in.
By enforcing these constraints, Tailwind ensures that every component—from a button to a complex card—adheres to the same visual language. Design consistency at scale becomes a mechanical outcome rather than a manual effort, freeing developers to focus on functionality and user experience. This is why Tailwind CSS is revolutionizing frontend development for teams that prioritize maintainability and cohesion.
Performance and Small Bundle Sizes
One of the most persistent misconceptions about utility-first CSS frameworks is that they inevitably bloat stylesheets with hundreds of repetitive classes. Tailwind CSS turns this assumption on its head. Through aggressive production optimization, Tailwind frequently generates CSS files that are significantly smaller than those produced by hand-crafted custom CSS or monolithic frameworks like Bootstrap. This lean output directly improves page load times, reduces bandwidth consumption, and enhances overall user experience—a critical advantage in an era where performance directly impacts conversion rates and search rankings.
How PurgeCSS Works Automatically with Tailwind
Tailwind integrates PurgeCSS at the build level, scanning your project’s template files for class names and removing any unused CSS from the final output. This process is configured in the tailwind.config.js file by specifying the content paths. During a production build, Tailwind identifies every utility class present in your HTML, JavaScript, Vue, or React files, and strips away everything else. The result is a stylesheet containing only the exact styles your application uses.
This automatic purging means you can safely use Tailwind’s full utility set during development without worrying about shipping unused CSS. The framework handles optimization transparently, so developers focus on design rather than manual style cleanup.
Comparing Bundle Sizes: Tailwind vs. Bootstrap vs. Custom CSS
Real-world comparisons reveal Tailwind’s efficiency. A typical Bootstrap 5 minified CSS file weighs approximately 180 KB, even after removing unused components. Custom CSS, depending on the project’s complexity, often ranges from 50 KB to 150 KB. In contrast, a production-purged Tailwind stylesheet for a moderately complex dashboard or marketing site frequently lands between 10 KB and 30 KB.
Approach
Typical Minified CSS Size (Production)
Notes
Bootstrap 5
150–180 KB
Includes all components unless manually purged
Custom CSS (hand-written)
50–150 KB
Varies widely; often includes redundant declarations
Tailwind CSS (purged)
10–30 KB
Only utilities used in templates survive
This dramatic reduction stems from Tailwind’s design philosophy: instead of shipping a large library of pre-built components, it provides hundreds of small, composable utilities that combine to create any design. When purged, only the combinations actually used remain.
Tree-Shaking and the Impact on Lighthouse Scores
Tree-shaking is the process of eliminating dead code, and Tailwind achieves this at the CSS level through its purge mechanism. Unlike JavaScript tree-shaking, which removes unused functions, Tailwind’s approach removes unused CSS declarations entirely. The result is a stylesheet that contains zero extraneous bytes. This directly influences Lighthouse performance metrics, particularly the “Total Blocking Time” and “Time to Interactive” scores. Smaller CSS files reduce the critical rendering path, allowing browsers to parse and apply styles faster. Pages built with purged Tailwind routinely score higher on mobile and desktop Lighthouse audits compared to equivalent pages using heavier frameworks, because the CSS is smaller, loads quicker, and delays the first paint less. For developers targeting a perfect Lighthouse score of 100, Tailwind’s small bundle size removes one of the most common obstacles.
The Power of Responsive and State Variants
Tailwind CSS fundamentally changes how developers approach responsive and interactive design by embedding state and breakpoint handling directly into utility classes. Instead of switching contexts between HTML and a separate CSS file filled with media queries and pseudo-class rules, you apply variants like md:, hover:, or focus: directly to elements. This approach drastically reduces mental overhead, eliminates selector specificity battles, and makes responsive, state-driven design as natural as writing inline styles—but with the full power of a design system. The result is faster prototyping, cleaner codebases, and a mobile-first workflow that feels intuitive rather than cumbersome.
Responsive Design with md:, lg:, and xl: Prefixes
Tailwind’s responsive prefixes—sm:, md:, lg:, xl:, and 2xl:—allow you to apply different utility classes at specific breakpoints without ever writing a @media query. The framework uses a mobile-first approach: unprefixed utilities apply to all screen sizes, and prefixed variants override them from that breakpoint upward. For example, a two-column layout on desktop that stacks on mobile becomes trivially simple:
Base (mobile):grid grid-cols-1
Tablet and up:md:grid-cols-2
Desktop and up:lg:grid-cols-3
This system eliminates the need to name and maintain custom breakpoints, prevents accidental overlap, and keeps all responsive logic visible within the markup. You can also combine responsive prefixes with other variants, such as hover:md:bg-blue-500, to change a background color on hover only at medium screens and above. The result is that complex responsive grids, typography scaling, and spacing adjustments become declarative and predictable.
Handling Hover, Focus, and Other Pseudo-Classes
Tailwind provides state variants for virtually every interactive pseudo-class, including hover:, focus:, active:, disabled:, visited:, and even group-hover: for parent-child interactions. These variants work identically to responsive prefixes—you attach them to any utility class to apply that style only when the state is active. For instance, a button that changes background on hover and outline on focus can be built as:
<button class="bg-blue-500 hover:bg-blue-700 focus:outline-none focus:ring-2 focus:ring-blue-400">
Click Me
</button>
This approach eliminates the need for separate CSS rules or JavaScript event listeners for simple visual feedback. More advanced interactions, like showing a dropdown on hover, use the group and group-hover: pattern:
Parent:class="group"
Child:class="hidden group-hover:block"
These state variants are also fully composable with responsive prefixes, enabling conditional interactivity across breakpoints. The result is that complex UI behaviors—tooltips, dropdowns, form validation states—become entirely markup-driven, reducing the need for custom CSS and JavaScript.
Dark Mode and Other Theming Variants
Tailwind’s theming variants extend the same prefix logic to global design preferences. The dark: variant applies utilities only when dark mode is active, either based on the prefers-color-scheme media query or a class-based toggle on a parent element. This makes implementing a full dark theme as simple as adding dark:bg-gray-900 dark:text-white to your base elements. For example, a card component that adapts to both themes might look like:
Beyond dark mode, Tailwind allows custom variants for other theming scenarios, such as print: for print styles or motion-safe: and motion-reduce: for accessibility. You can also create arbitrary variants using the data- or aria- prefixes to match custom attributes. This system unifies all conditional styling under one consistent syntax—whether the condition is screen size, user interaction, or system preference. The key benefit is that developers no longer juggle multiple CSS files, custom properties, or preprocessor logic; everything lives in the HTML, making themes predictable and easy to maintain across a project.
Why Tailwind CSS is Revolutionizing Frontend Development
Tailwind CSS challenges traditional CSS methodologies by promoting utility-first design, yet its true power emerges when combined with component-based frameworks. Rather than writing custom CSS classes for every design variation, developers compose interfaces directly in markup using atomic utilities. This approach aligns perfectly with modern JavaScript frameworks, where components encapsulate both structure and style. By avoiding CSS abstractions, Tailwind reduces context-switching and makes UI code more predictable. The result is a development workflow that prioritizes speed, consistency, and maintainability—qualities that define why Tailwind CSS is revolutionizing frontend development.
Creating Button and Card Components with @apply
The @apply directive allows developers to extract repeated utility patterns into custom CSS while retaining Tailwind’s design system. This is especially useful for base components like buttons and cards that need consistent styling across a project.
For example, a primary button can be defined in a CSS file:
This approach preserves the visual consistency of Tailwind while reducing markup repetition. However, use @apply sparingly—overuse can reintroduce the maintenance burdens Tailwind avoids.
Using Props to Override Tailwind Classes Dynamically
Component-based frameworks excel at dynamic styling through props. Tailwind’s utility classes can be conditionally applied using JavaScript logic, enabling fine-grained control without bloated CSS.
Consider a React button component that accepts a variant prop:
Extracting Shared Patterns with Component Libraries
For larger projects, teams often build custom component libraries on top of Tailwind. This strategy combines the speed of utility classes with the reusability of design systems. Popular libraries like Headless UI, Radix UI, and shadcn/ui demonstrate this pattern—they provide unstyled, accessible components that you style entirely with Tailwind utilities.
When creating your own library, focus on:
Atomic components: Buttons, inputs, badges—these use @apply minimally and rely on props for variation.
This layered architecture lets teams maintain a single source of truth for design decisions while allowing individual projects to customize components through props and Tailwind’s configuration. The result is a scalable frontend ecosystem where reusability and consistency coexist without the overhead of traditional CSS class abstractions.
Customization Without the Override Hell
Traditional CSS frameworks such as Bootstrap or Foundation have long relied on a cascade of predefined classes and deeply nested Sass or Less files. When developers need a design that diverges from the framework’s defaults, they often resort to !important overrides, verbose specificity wars, or custom stylesheets that become brittle maintenance burdens. Tailwind CSS sidesteps this entire problem through a configuration-first philosophy. Instead of fighting a framework’s opinionated defaults, you extend or replace them cleanly in a single JavaScript or TypeScript configuration file. This approach eliminates the “override hell” that plagues many large projects, allowing teams to maintain a consistent, scalable design system without wrestling with specificity.
Extending the Default Theme via Configuration
Tailwind provides a sensible default theme out of the box, but real-world projects almost always require deviations. The tailwind.config.js file offers a structured way to extend these defaults without modifying the framework’s core. By using the extend key, you can add new values to existing categories—such as colors, spacing, or breakpoints—while preserving all original settings. For example:
This approach keeps your customizations isolated and predictable. When you later update Tailwind, your extensions remain intact because they are additive, not overriding. The result is a theme that merges seamlessly with the framework’s utility classes, reducing the need for custom CSS files.
Adding Custom Colors, Fonts, and Spacing
Beyond extending existing categories, you can fully replace or introduce entirely new design tokens. For instance, if your brand uses a unique color palette that doesn’t align with Tailwind’s defaults, you can define a complete set under the colors key:
Token
Configuration
Usage Example
Custom color
colors: { 'primary': '#ff6347' }
bg-primary
Custom font
fontFamily: { 'display': ['Inter', 'sans'] }
font-display
Custom spacing
spacing: { '72': '18rem' }
p-72
Similarly, you can add custom font families by importing Google Fonts or self-hosted typefaces and referencing them in the config. Spacing values—margins, padding, widths—can be tailored to your design grid. This granular control means that every utility class you use is aligned with your brand’s specifications, not a generic preset. The configuration file becomes a single source of truth for your design system, making updates across large codebases straightforward and auditable.
Using Arbitrary Values for One-Off Styles
Even with a well-planned configuration, you will occasionally need a unique value—such as a specific pixel width or a color that appears only once. Tailwind supports arbitrary values via square bracket notation, bypassing the configuration entirely. For example:
w-[237px] sets a width of 237 pixels.
bg-[#daa520] applies a goldenrod background.
mt-[3.5rem] adds a top margin of 3.5 rem.
text-[clamp(1rem,2vw,2rem)] uses a CSS clamp function.
These arbitrary values are resolved at build time and generate no extra CSS bloat. They are ideal for prototyping, responsive tweaks, or elements that truly do not fit within your theme. However, if the same arbitrary value appears in multiple places, it is a signal to add it to your configuration file for consistency. This balance between pre-defined tokens and ad-hoc flexibility ensures that your codebase remains DRY without forcing every design decision into a rigid system.
Strong Community and Ecosystem Growth
When a tool gains traction, its ecosystem often determines whether it becomes a passing trend or a lasting standard. Tailwind CSS has achieved the latter, thanks to a vibrant community that has built an extensive network of plugins, component libraries, and educational materials. This ecosystem accelerates development by providing ready-made solutions for common problems, while also pushing the framework forward through constant feedback and innovation. Developers no longer need to reinvent the wheel for every project; they can leverage community contributions to maintain consistency and speed.
Official Plugins: Forms, Typography, and Line-Clamp
The Tailwind team maintains a set of official plugins that address recurring design needs without bloating the core framework. These plugins are rigorously tested and documented, ensuring seamless integration.
Forms plugin: Resets default browser styles for form elements, providing a consistent baseline across all browsers. It includes modifiers for input, select, textarea, and checkbox states.
Typography plugin: Adds prose classes that apply sensible typographic defaults to long-form content, such as blog posts or articles. It handles headings, lists, blockquotes, and code blocks with minimal configuration.
Line-Clamp plugin: Enables truncation of text to a specified number of lines using the line-clamp-{n} utility, which is especially useful for card layouts and preview snippets.
These plugins are lightweight and can be installed individually, keeping the final CSS bundle lean while offering precise control over common patterns.
Popular Third-Party Libraries: Headless UI, DaisyUI, and Flowbite
The third-party ecosystem has produced libraries that range from fully styled component kits to unstyled, accessible primitives. The table below compares three widely used options.
Headless UI focuses on behavior (e.g., dropdowns, modals, transitions) without imposing visual design, making it ideal for teams that want to maintain a unique brand. DaisyUI offers dozens of prebuilt components with multiple color themes, reducing the need to write custom CSS. Flowbite provides a comprehensive set of interactive components like charts, navigation bars, and form elements, often paired with a design system in Figma for seamless designer-developer collaboration.
Learning Resources and the Tailwind Playground
The community has produced a wealth of learning materials that lower the barrier to entry. Official resources include the Tailwind CSS documentation, which is widely praised for its clarity and interactive examples. The Tailwind Playground is a browser-based editor that lets developers experiment with utility classes in real time, share code snippets, and test responsive breakpoints without setting up a local environment.
YouTube tutorials and courses from creators like Adam Wathan (Tailwind’s creator) and independent educators covering everything from basics to advanced patterns.
GitHub repositories with open-source component collections, such as Tailwind UI kits and starter templates for frameworks like Next.js and Laravel.
Blog posts and newsletters that share tips on optimization, custom configurations, and real-world case studies.
Discord and Reddit communities where developers ask questions, share workarounds, and contribute to plugin development.
This robust ecosystem ensures that developers of all skill levels can find support, reduce development time, and stay updated with best practices. As the community continues to grow, Tailwind CSS evolves not just through its core maintainers, but through the collective creativity of its users.
Integration with Modern Build Tools and Frameworks
Tailwind CSS has redefined how developers approach styling by aligning perfectly with the modern JavaScript ecosystem. Its utility-first methodology thrives in environments that prioritize speed, modularity, and developer experience. The framework’s design—relying on a single configuration file and a build step—makes it a natural fit for tools like Vite, Next.js, Nuxt, and Laravel. When paired with these platforms, Tailwind eliminates global CSS conflicts, reduces bundle sizes through tree-shaking, and enables rapid prototyping without sacrificing performance. This section explores how Tailwind integrates with key build tools and frameworks, offering practical setup strategies and highlighting its synergy with server-side rendering (SSR) and static site generation (SSG).
Setting Up Tailwind with Vite and PostCSS
Vite, known for its instant server start and fast hot module replacement (HMR), pairs exceptionally well with Tailwind CSS. The setup is straightforward and leverages PostCSS for processing. Begin by installing Tailwind and its PostCSS dependencies:
Generate your tailwind.config.js file (if not already present) and define content paths to scan for class usage. For a Vite project, this typically includes ./src/**/*.{js,jsx,ts,tsx,vue}. Finally, import Tailwind’s base styles in your main CSS file:
@import "tailwindcss";
This configuration enables automatic purging of unused styles during production builds, keeping your CSS minimal. Best practices include:
Use the @tailwindcss/vite plugin (available in Tailwind v4+) for tighter Vite integration, which improves HMR performance.
Enable JIT mode (default in v3.0+) to generate styles on-demand, reducing build times.
Leverage PostCSS nesting alongside Tailwind for component-specific overrides without leaving the utility-first paradigm.
Tailwind in Next.js: App Router and SSR Considerations
Next.js, with its App Router and support for React Server Components, presents unique opportunities for Tailwind. The framework’s build process automatically scans your components for class names, making setup simple. Install Tailwind and configure tailwind.config.js to include ./app/**/*.{js,ts,jsx,tsx} for the App Router. Then add @import "tailwindcss"; to your global CSS file.
For SSR and SSG, Tailwind’s static extraction ensures that only the styles used during rendering are included in the final output. This aligns perfectly with Next.js’s incremental static regeneration (ISR) and server-side rendering. Key considerations:
Avoid dynamic class construction in server components—use conditional rendering or template literals with complete class strings to ensure Tailwind’s JIT engine captures all variants.
Use the clsx or tailwind-merge libraries to manage conditional classes without breaking purge detection.
Leverage the @layer directive to organize custom styles within Tailwind’s base, components, or utilities layers, maintaining predictable specificity.
Tailwind’s design also simplifies responsive design in Next.js by using breakpoint prefixes (sm:, md:, lg:) directly in JSX, reducing the need for media queries in separate files.
Using Tailwind with Laravel and Inertia.js
Laravel, a PHP framework, and Inertia.js, which bridges server-side routing with client-side rendering, create a modern full-stack environment that benefits from Tailwind’s utility classes. Laravel ships with Tailwind pre-configured in recent versions (via Laravel Breeze or Jetstream), simplifying initial setup. To integrate Tailwind with Inertia.js:
Install Tailwind via Laravel’s built-in scaffolding or manually with npm install -D tailwindcss @tailwindcss/postcss postcss.
Configure vite.config.js to use the laravel-vite-plugin and ensure Tailwind’s PostCSS plugin is active.
Define content paths in tailwind.config.js to include ./resources/**/*.blade.php and ./resources/js/**/*.vue (for Inertia Vue components).
Inertia.js renders pages on the server and hydrates them on the client, making Tailwind’s static extraction efficient. Best practices include:
Use Blade components with Tailwind classes for server-rendered layouts, ensuring consistent styling across SSR and client-side navigation.
Apply utility classes directly in Vue or React components for Inertia pages, as Tailwind’s JIT mode handles dynamic class detection.
Leverage Laravel’s mix or Vite to purge unused CSS in production, keeping asset sizes small for faster page loads.
This integration allows developers to maintain a single styling paradigm across both server-rendered HTML and client-side interactive components, reducing cognitive overhead and improving development velocity.
Conclusion: Is Tailwind Right for Your Team?
Tailwind CSS is revolutionizing frontend development by shifting the paradigm from semantic, component-based styles to utility-first, composable design. For teams seeking speed, consistency, and design system enforcement, the benefits are tangible. However, this revolution demands a thoughtful evaluation of trade-offs. The decision hinges on your project’s scale, your team’s appetite for learning, and the nature of your design requirements. Below, we break down the key considerations to help you determine if Tailwind is the right fit.
When to Choose Tailwind Over Traditional CSS
Tailwind excels in scenarios where rapid prototyping, strict design system adherence, and maintainable codebases are priorities. Consider it when:
Your team values speed over custom styles: Utility classes eliminate context-switching between HTML and CSS files, allowing developers to iterate quickly.
You need consistent design tokens: Tailwind’s predefined spacing, color, and typography scales enforce a unified visual language across large teams.
You are building a design system: Tailwind’s configuration file makes it trivial to extend or override defaults, creating a custom design system without writing custom CSS.
You want to avoid naming conventions: No more BEM, SMACSS, or OOCSS debates. Utilities reduce cognitive load by removing the need for class naming.
You are working with component-based frameworks: React, Vue, and Svelte benefit from Tailwind’s colocation of styles with markup, making components self-contained.
Potential Downsides: Verbose Markup and Team Onboarding
Despite its strengths, Tailwind introduces clear challenges that can hinder adoption:
Verbose HTML: A single element may contain 10–15 utility classes, making markup harder to scan. Example: <div class="flex items-center justify-between p-4 bg-white shadow-md rounded-lg"> versus a single .card class.
Steep learning curve: New team members must memorize dozens of utility class names and breakpoints, which can slow onboarding compared to standard CSS.
Debugging complexity: Isolating style conflicts requires inspecting multiple utility classes, and browser DevTools become cluttered with long class lists.
Team resistance: Developers accustomed to semantic CSS may find utility-first approaches counterintuitive, leading to friction during adoption.
Abstraction overhead: While Tailwind reduces CSS file size, it can increase HTML file size, potentially impacting performance in very large projects if not optimized with purging.
To mitigate these issues, teams should invest in documentation, use component extraction via @apply or custom components, and start with a pilot project to gauge comfort.
The Future of Tailwind and Utility-First CSS
Tailwind’s trajectory suggests it is more than a trend. The framework’s evolution points to deeper integration with modern tooling:
AI-assisted development: Tools like GitHub Copilot already generate Tailwind classes, reducing the memorization burden and speeding up adoption.
Design tool interoperability: Plugins for Figma and Sketch allow designers to export Tailwind-compatible configurations, bridging the gap between design and code.
Performance improvements: Version 4.0 introduces a Rust-based engine for faster build times and smaller output files, addressing early concerns about bloat.
Community expansion: Utility-first principles are influencing other frameworks, such as Windi CSS and UnoCSS, creating an ecosystem of lightweight alternatives.
Ultimately, Tailwind’s revolution lies not in replacing CSS, but in rethinking how developers apply it. For teams that prioritize speed, consistency, and component isolation, the investment pays off. For those with complex custom designs, small teams, or strong CSS expertise, traditional approaches may still be superior. Evaluate your workflow, experiment with a small project, and let the results guide your choice.
Frequently Asked Questions
What is Tailwind CSS?
Tailwind CSS is a utility-first CSS framework that provides low-level utility classes to build custom designs directly in your HTML. Unlike traditional frameworks like Bootstrap, it doesn't come with pre-built components. Instead, you compose styles by combining utility classes such as flex, pt-4, text-center, and rotate-90. This approach gives you complete control over the look and feel of your site without writing custom CSS. Tailwind is highly customizable via a configuration file, making it adaptable to any design system.
How does Tailwind CSS improve development speed?
Tailwind CSS accelerates development by allowing you to style elements directly in your HTML using utility classes, eliminating the need to switch between HTML and CSS files. This reduces context switching and speeds up prototyping. The framework's pre-defined design system ensures consistency, and features like responsive prefixes (e.g., sm:, md:, lg:) let you handle breakpoints inline. Additionally, Tailwind's JIT (Just-In-Time) engine generates only the CSS you use, keeping file sizes small and build times fast.
Is Tailwind CSS suitable for large projects?
Yes, Tailwind CSS is well-suited for large projects due to its scalability and maintainability. Its utility-first approach encourages a consistent design system by centralizing design tokens like colors, spacing, and typography in a config file. For large teams, this ensures everyone uses the same set of classes, reducing style duplication. Tailwind also integrates with component-based frameworks like React and Vue, allowing you to create reusable components with scoped styles. Its purge feature removes unused CSS in production, keeping file sizes optimal.
What are the main differences between Tailwind CSS and Bootstrap?
Tailwind CSS is utility-first, meaning you build custom designs by combining small utility classes, while Bootstrap provides pre-built components like buttons, navbars, and modals. Tailwind offers more flexibility and customization but requires more initial setup, whereas Bootstrap is easier for beginners but can lead to generic-looking sites. Tailwind's file size is smaller because it generates only used CSS, while Bootstrap includes all components by default. Tailwind is also more compatible with modern JavaScript frameworks due to its component-friendly approach.
Does Tailwind CSS work with React?
Yes, Tailwind CSS works seamlessly with React and is actually one of its most popular use cases. You can use Tailwind classes directly in JSX to style components, which aligns well with React's component-based architecture. Tailwind's utility classes make it easy to apply conditional styles, handle state-based styling, and create responsive layouts. There are also community tools like Twin and Headless UI that integrate Tailwind with React for building accessible, styled components without writing custom CSS.
How does Tailwind CSS handle responsive design?
Tailwind CSS handles responsive design using breakpoint prefixes that you apply directly to utility classes. For example, w-full md:w-1/2 lg:w-1/3 makes an element full width on small screens, half width on medium, and one-third on large. Tailwind's default breakpoints are sm (640px), md (768px), lg (1024px), xl (1280px), and 2xl (1536px), but you can customize them in the config. This approach keeps responsive styles inline with your HTML, making it easy to see and manage all breakpoints for a given element.
What is the Tailwind CSS JIT engine?
The Tailwind CSS JIT (Just-In-Time) engine is a compiler that generates CSS on-demand as you write your HTML. Instead of pre-generating a massive stylesheet, the JIT engine scans your template files for class names and produces only the CSS you need. This results in faster build times, smaller file sizes, and the ability to use arbitrary values like top-[117px] without configuration. The JIT engine is the default in Tailwind CSS v3 and above, and it also enables features like variant stacking and dynamic class generation.
Yes, Tailwind CSS is highly customizable through its configuration file (tailwind.config.js). You can override default design tokens like colors, fonts, spacing, and breakpoints, or extend them with new values. You can also add custom utility classes, plugins, and even integrate with design tokens from design tools like Figma. Tailwind's customization is one of its strongest features, allowing you to create a unique design system that matches your brand guidelines while still using the framework's utility classes.
In the modern web ecosystem, a standalone WordPress site often falls short of meeting complex business or user needs. The solution lies in API integration—a technical bridge that allows your WordPress installation to communicate with external platforms, services, and data sources. This guide provides a complete overview of how APIs work with WordPress, why they matter, and what you can achieve by connecting your site to the wider web. Understanding these fundamentals is the first step toward building a more dynamic, efficient, and scalable WordPress presence.
What Is an API? A Non-Technical Overview
An API, or Application Programming Interface, is essentially a messenger that allows two software applications to talk to each other. Think of it like a restaurant menu: you (the customer) place an order (a request) with the waiter (the API), who then communicates your order to the kitchen (the external system). The kitchen prepares your meal (processes the request) and the waiter brings it back to you (the response). In the context of WordPress, an API lets your site request specific data or actions from another service—such as fetching the latest tweets, processing a credit card payment, or pulling weather information—without you needing to understand the complex inner workings of that service. APIs use standardized formats like JSON or XML to ensure both sides can understand the exchange, making integration reliable and scalable.
Integrating APIs into your WordPress site unlocks a range of advantages that go far beyond what plugins alone can offer. The primary benefits include:
Extended functionality without custom code: You can add features like live chat, booking systems, or analytics dashboards by connecting to proven third-party services, saving development time and reducing bugs.
Improved efficiency and automation: Automate repetitive tasks such as syncing customer data between WordPress and your CRM, posting content to social media, or updating inventory from an external database.
Enhanced user experience: Deliver real-time data—like flight statuses, stock prices, or event calendars—directly on your site, keeping visitors engaged and informed.
Seamless third-party connectivity: Connect your site to payment gateways (Stripe, PayPal), email marketing platforms (Mailchimp, ConvertKit), or shipping carriers (UPS, FedEx) to create a unified backend.
Scalability and future-proofing: As your needs grow, you can swap or add new integrations without overhauling your entire site, thanks to the modular nature of API-driven architecture.
Common Use Cases: From Payment Gateways to Social Media
WordPress and API integration powers a wide array of practical applications across different industries. Below is a table outlining some of the most common use cases, along with the typical APIs involved:
Use Case
Example API
What It Does
Payment processing
Stripe, PayPal
Securely handle transactions, subscriptions, and refunds within WooCommerce or custom checkout forms.
Social media integration
Twitter, Instagram Graph, Facebook
Display live feeds, auto-post blog updates, or pull user-generated content for marketing.
Email marketing & CRM
Mailchimp, HubSpot, Salesforce
Sync subscriber lists, trigger automated emails, and track lead interactions from your site.
Maps & location services
Google Maps, Mapbox
Add interactive maps, store locators, or route planning features to your pages.
Content syndication
YouTube Data API, Flickr, RSS feeds
Embed video galleries, photo streams, or news feeds from external sources directly into posts.
Analytics & reporting
Google Analytics, Mixpanel
Pull visitor data, conversion rates, and custom metrics into your WordPress dashboard or public reports.
These examples illustrate how API integration transforms WordPress from a simple content management system into a powerful hub that interacts with the digital ecosystem. Whether you are running an e-commerce store, a membership site, or a media outlet, the ability to connect with external services through APIs is no longer optional—it is essential for staying competitive and responsive to user expectations.
Understanding the WordPress REST API
The WordPress REST API is a powerful, built-in interface that allows developers to interact with WordPress data programmatically using standard HTTP methods. It exposes the core content management system as a collection of JSON endpoints, enabling headless WordPress implementations, mobile applications, and third-party integrations. The API follows RESTful principles, meaning each endpoint represents a specific resource (like posts or users) and supports common operations such as GET, POST, PUT, and DELETE. This architecture decouples the front-end presentation from the back-end data layer, giving developers flexibility to build custom experiences using any technology stack.
Core Endpoints and Resources (Posts, Users, Comments)
The REST API organizes data into distinct resource types, each with its own base URL path. All endpoints start with /wp-json/wp/v2/ followed by the resource name. Below are the primary endpoints and their common use cases:
Posts:/wp/v2/posts — Retrieve, create, update, or delete blog posts. Supports parameters like categories, tags, and search.
Users:/wp/v2/users — Access user profiles, including metadata like name, description, and avatar URLs. Requires authentication for write operations.
Comments:/wp/v2/comments — Manage comments on posts. Includes fields for author name, content, and status (approved, pending, spam).
Each resource returns a JSON object with standard fields (e.g., id, title, content) plus custom fields if registered via register_rest_field(). Developers can also extend the API by creating custom endpoints using register_rest_route().
Authentication: OAuth, Application Passwords, and Cookies
Authentication ensures that only authorized users can perform write operations or access private data. WordPress supports three primary methods:
Method
Best For
How It Works
OAuth 1.0a
Third-party apps (e.g., mobile or desktop clients)
Uses consumer keys and tokens; requires the OAuth plugin. Provides secure, token-based access without sharing passwords.
Application Passwords
External scripts, automation, or custom integrations
Built into WordPress 5.6+. Generate a 24-character password from the user profile; send via Authorization: Basic header.
Cookies
Logged-in users on the same domain
Uses the standard WordPress login cookie (wordpress_logged_in_*). Nonce required for state-changing requests via _wpnonce parameter.
For most external integrations, Application Passwords offer the simplest balance of security and ease of use.
Making Your First API Request with cURL or JavaScript
To get started, you can test the API using cURL in a terminal or JavaScript in a browser console. Below is a practical example that retrieves the latest published posts from a WordPress site.
This request returns a JSON array of post objects. Each object includes fields like id, title (with rendered HTML), excerpt, and link. To create a new post, send a POST request with authentication headers and a JSON body containing title and content. For example, using JavaScript with Application Passwords:
With these basics, you can start building integrations that leverage the full power of WordPress data programmatically.
Setting Up Your Development Environment
Preparing a robust development environment is the foundation for successful WordPress and API integration. A local or staging setup allows you to test endpoints, debug authentication, and iterate without affecting a live site. This guide covers essential tools, REST API configuration, and secure key management to ensure a smooth workflow.
Local Development Tools: LocalWP, MAMP, or Docker
Choosing the right local environment depends on your project complexity, team size, and familiarity with containerization. Below is a comparison of three popular options for WordPress development.
For most API integration tasks, LocalWP offers the fastest path to a secure, HTTPS-enabled environment. Docker is preferred when you need to mirror production server configurations or collaborate across teams. MAMP remains viable for simple tests but lacks modern conveniences like automatic SSL.
Enabling the REST API and Testing Endpoints
WordPress’s built-in REST API is enabled by default since version 4.7. To verify it is active and accessible:
Navigate to your site’s base URL followed by /wp-json/ (e.g., http://localhost:8080/wp-json/). A JSON response confirms the API is running.
Common endpoints to test include /wp-json/wp/v2/posts, /wp-json/wp/v2/users, and /wp-json/wp/v2/categories.
Use a tool like Postman, Insomnia, or curl in the terminal to send GET requests and inspect responses. For example: curl http://localhost:8080/wp-json/wp/v2/posts.
If the API returns a 404 or empty response, check that permalinks are set to “Post name” under Settings > Permalinks, and flush rewrite rules by saving the settings again.
For authenticated endpoints (e.g., creating posts), enable the “Application Passwords” feature in WordPress 5.6+ by going to Users > Profile and generating a password for your user account.
Always test endpoints in a local or staging environment before deploying to production. This prevents accidental data modification or exposure of sensitive information.
Managing API Keys and Secret Tokens Securely
API keys and secret tokens grant access to your WordPress data and external services. Mishandling them can lead to security breaches. Follow these practices to keep credentials safe:
Never hardcode keys in source code. Store them in environment variables or a .env file using a library like vlucas/phpdotenv for WordPress.
Use WordPress’s built-in secrets. For Application Passwords, store them only in the user meta table, never in plaintext files.
Restrict key permissions. Generate keys with the minimum scope needed—for example, read-only keys for public data retrieval, and write keys only for specific users.
Rotate keys regularly. Set a schedule (e.g., every 90 days) to regenerate tokens and update your configuration.
Monitor usage. Enable logging for failed authentication attempts and review API access patterns in your server logs.
By implementing these measures, you protect your WordPress site and any integrated third-party services from unauthorized access. A secure development environment ensures that your API integration remains reliable and maintainable throughout the project lifecycle.
Integrating external APIs into a WordPress site unlocks dynamic data, such as live weather updates, social media feeds, or payment gateway responses. The process involves sending HTTP requests from your WordPress environment to a third-party server, handling the returned data, and presenting it on the frontend. WordPress provides robust built-in functions for this task, abstracting away low-level cURL complexities while maintaining security and compatibility with the WordPress HTTP API. Below are the essential steps and best practices for connecting to external APIs.
WordPress offers two primary functions for making HTTP requests: wp_remote_get() for retrieving data and wp_remote_post() for sending data. Both functions accept a URL and an optional array of arguments, returning a response array that includes headers, body, and status code. Here is a practical code example that fetches user data from a placeholder API and logs the response:
Always validate the response using wp_remote_retrieve_response_code() to check for HTTP status codes like 200 (success) or 404 (not found).
Parsing JSON and XML Responses in PHP
Most modern APIs return JSON, while some legacy systems use XML. For JSON, use PHP’s built-in json_decode() function, passing true as the second argument to convert the result into an associative array for easier manipulation. Handle XML responses with simplexml_load_string(), which returns a SimpleXMLElement object. Below is a comparison of parsing methods:
Response Type
Parsing Function
Example Usage
JSON
json_decode( $body, true )
Access $data['key'] as an array
XML
simplexml_load_string( $body )
Access $xml->element->child as an object
When parsing XML, convert the object to an array using json_decode( json_encode( $xml ), true ) for consistency, but be aware that this can lose attributes. Always escape output with esc_html() or wp_kses_post() before displaying on the frontend to prevent XSS vulnerabilities.
Error Handling and Timeout Management
External APIs can fail due to network issues, server errors, or invalid endpoints. WordPress wraps errors in a WP_Error object, which you must check with is_wp_error() before proceeding. Set timeouts to avoid hanging page loads. Use the timeout argument in your request array to define how long WordPress waits for a response. The default is 5 seconds; increase it for slower APIs but keep it reasonable (e.g., 15 seconds). Below are recommended timeout settings:
Connection timeout: Use 'timeout' => 10 for the overall request.
Stream timeout: Use 'stream_timeout' => 5 for reading data in chunks.
Retry logic: Implement a loop with wp_remote_retrieve_response_code() to retry failed requests up to 3 times with a 1-second delay.
By following these patterns, you ensure your WordPress site remains responsive and secure when interacting with external APIs, providing a reliable experience for users.
Building Custom API Endpoints in WordPress
WordPress provides a robust REST API out of the box, but to expose your unique data or business logic, you need to build custom endpoints. This process allows you to control exactly what data is returned, how it is authenticated, and how requests are handled. Creating custom API routes involves registering them with the WordPress REST API infrastructure, defining callback functions to process requests, and returning data in a structured JSON format. Below, we break down the essential steps and best practices.
Registering Custom Routes with register_rest_route()
The core function for creating custom API endpoints is register_rest_route(). You typically call this function inside a hook attached to rest_api_init. The function accepts three main parameters: the namespace (a unique prefix for your routes, e.g., myplugin/v1), the route itself (e.g., /custom-data), and an array of arguments defining the endpoint’s behavior. Here is a basic example:
Namespace: Must be unique to avoid conflicts with other plugins or themes.
Route: Use forward slashes and dynamic segments (e.g., /items/(?P<id>d+)) for variable data.
Methods: Specify the HTTP method (GET, POST, PUT, DELETE) or use WP_REST_Server::READABLE for clarity.
Multiple endpoints: Register several routes under the same namespace for a complete API.
Creating Callbacks and Permissions Callbacks
Every registered route requires a callback function that processes the request and returns a response. You may also specify a permissions callback to control who can access the endpoint. The permissions callback runs before the main callback; if it returns false, the request is rejected with a 403 error. Below is an expanded example with both callbacks:
add_action( 'rest_api_init', function () {
register_rest_route( 'myplugin/v1', '/protected-data/', array(
'methods' => 'GET',
'callback' => 'my_protected_data_callback',
'permission_callback' => 'my_permission_check',
) );
} );
function my_permission_check( $request ) {
// Allow only users with 'edit_posts' capability.
return current_user_can( 'edit_posts' );
}
function my_protected_data_callback( $request ) {
// Process request and return data.
}
Important details for callbacks:
Parameter
Description
Example
$request
Instance of WP_REST_Request containing parameters, headers, and body.
WordPress automatically serializes your callback’s return value into JSON. To include custom fields—such as post meta, ACF fields, or computed values—you should structure your response data as an associative array. Use get_post_meta() or get_field() to retrieve custom field values and add them to the response. Here is an example that returns a post with additional custom fields:
Use WP_REST_Response to set proper HTTP status codes.
Sanitize and validate all custom field data before including it in the response.
Structure nested data logically (e.g., group related custom fields under a key like custom_fields).
Return WP_Error for invalid requests to provide meaningful error messages.
By following these patterns, you can build secure, flexible, and well-structured custom API endpoints that extend WordPress functionality for any application.
Securing API integrations is paramount in WordPress development, as improperly authenticated requests can expose sensitive data, allow unauthorized access, or lead to site compromise. The foundation of a robust integration lies in selecting the right authentication method, implementing preventative measures against cross-site request forgery (CSRF), and maintaining vigilant monitoring. Below, we examine the core practices that ensure your WordPress API endpoints remain both functional and fortified.
OAuth 2.0 vs. API Keys: Choosing the Right Method
The choice between OAuth 2.0 and API keys depends on the use case, required security level, and user experience. API keys are simpler but less granular, while OAuth 2.0 provides delegated, scoped access. The table below compares these two methods:
Feature
OAuth 2.0
API Keys
Authentication model
Token-based, with scopes and refresh tokens
Static key, often sent in headers or query strings
Granularity
Scoped to specific actions or resources
Typically all-or-nothing access
Revocation
Immediate via token expiry or server-side invalidation
Requires key rotation or manual removal
Complexity
Higher implementation overhead
Lower initial effort
Best for
Third-party apps, user-specific integrations
Internal services, server-to-server communication
For WordPress, OAuth 2.0 is strongly recommended when the integration acts on behalf of a user—for example, a mobile app that posts content. Use the WP_OAuth2_Server library or a plugin like “OAuth Server” to implement authorization code or client credentials grants. API keys are acceptable for simple, internal cron jobs or trusted services, but never expose them in client-side code or public repositories.
Implementing Nonces and CSRF Protection
Cross-site request forgery (CSRF) attacks trick authenticated users into performing unintended actions. WordPress mitigates this with nonces—cryptographic tokens that verify the request’s origin and intent. Every API endpoint that modifies data must validate a nonce. Here is a practical example of how to implement nonce validation in a custom REST API endpoint:
add_action( 'rest_api_init', function () {
register_rest_route( 'myplugin/v1', '/update-post', array(
'methods' => 'POST',
'callback' => 'myplugin_update_post',
'permission_callback' => function ( $request ) {
// Validate the nonce sent with the request
$nonce = $request->get_header( 'X-WP-Nonce' );
if ( ! wp_verify_nonce( $nonce, 'wp_rest' ) ) {
return new WP_Error( 'rest_forbidden', 'Invalid nonce', array( 'status' => 403 ) );
}
// Additional permission checks (e.g., user capability)
return current_user_can( 'edit_posts' );
}
) );
} );
In addition to nonces, enforce CSRF protection by:
Using same-origin policy checks via the Origin and Referer headers.
Rejecting requests with unexpected HTTP methods (e.g., disallow GET for state-changing operations).
Setting the X-Content-Type-Options: nosniff header to prevent MIME-type sniffing.
Logging and Monitoring API Activity
Without logging, detecting abuse or debugging failed integrations becomes nearly impossible. Implement structured logging for all API requests, focusing on these key data points:
Endpoint called, HTTP method, and response status code.
Request duration and payload size.
Use WordPress’s built-in WP_Logging class or a dedicated plugin like “Stream” to capture events. For rate limiting, combine IP-based throttling (e.g., using the WP_Rate_Limit library) with user-level caps. Monitor logs for patterns such as repeated 403 errors, sudden spikes from a single IP, or unusual request payloads. Set up alerts for anomalies using tools like New Relic or custom Slack hooks. Regularly review logs to identify and block malicious actors before they escalate. By combining authentication best practices with active monitoring, you create a defense-in-depth strategy that keeps your WordPress API integrations secure.
Integrating Popular Third-Party APIs
Connecting WordPress to external services through API integration unlocks powerful functionality without reinventing the wheel. Below are concrete examples of how to integrate Stripe, PayPal, Mailchimp, SendGrid, and Google Maps, complete with practical code snippets and configuration notes.
Payment Gateways: Stripe and PayPal Integration
For processing payments securely, Stripe and PayPal are the most common choices. Both offer REST APIs that can be called from WordPress using HTTP requests or dedicated libraries.
Email marketing APIs allow you to add subscribers, send transactional emails, or trigger campaigns directly from WordPress. Both Mailchimp and SendGrid use REST APIs with API keys.
Both: Use wp_remote_post() for clean WordPress HTTP API integration.
Mapping Services: Embedding Google Maps Dynamic Data
Google Maps API allows embedding interactive maps with custom markers, directions, and location-based data. Use the JavaScript API for dynamic behavior or the Geocoding API for address-to-coordinates conversion.
Dynamic Map Embedding with JavaScript (in theme or plugin):
// Enqueue Google Maps API script with your key
wp_enqueue_script('google-maps', 'https://maps.googleapis.com/maps/api/js?key=YOUR_API_KEY&callback=initMap', [], null, true);
// Inline JavaScript for map initialization
function add_map_init_script() {
?>
function initMap() {
var location = { lat: 40.7128, lng: -74.0060 };
var map = new google.maps.Map(document.getElementById('map'), {
zoom: 12,
center: location
});
var marker = new google.maps.Marker({ position: location, map: map });
}
<?php
}
add_action('wp_footer', 'add_map_init_script');
Important Considerations for Google Maps:
Enable billing in Google Cloud Console to avoid API errors.
Restrict API key to your domain for security.
Use Geocoding API sparingly (limited to 50 requests/day on free tier).
For static maps, consider using the Maps Static API instead.
Caching and Performance Optimization
When integrating external APIs into WordPress, each request introduces latency, potential rate limits, and server load. Without optimization, even a well-built plugin or theme can degrade site performance. Effective caching and processing strategies are essential to minimize overhead while keeping data fresh. This section covers three reliable techniques: temporary storage via the Transient API, deferred background updates with WP_Cron, and client-side caching through JavaScript.
Transient API: Storing API Responses Temporarily
The WordPress Transient API provides a simple key-value storage system with an expiration time, ideal for caching API responses. Instead of calling an external endpoint on every page load, store the result for a defined period—such as 1 hour for weather data or 24 hours for stock prices. Use set_transient() to save data and get_transient() to retrieve it. If the transient is expired or missing, fetch fresh data; otherwise, serve the cached copy. This reduces external requests dramatically. For example, a news aggregator plugin can cache headlines for 30 minutes, cutting API calls by 96% during peak traffic. Always use a unique transient name (e.g., myplugin_weather_data) and avoid storing large datasets—transients are stored in the options table, where size can affect performance. For high-traffic sites, consider using an external object cache (like Redis) to offload transient storage from the database.
Background Processing with WP_Cron
Fetching API data during a user request blocks the page until the response arrives. WP_Cron enables scheduled, asynchronous tasks that run in the background, updating cached data without affecting visitor experience. To implement this, hook a custom function into a cron schedule (e.g., wp_schedule_event() for hourly updates). The function calls the API, processes the response, and stores it using the Transient API or custom options. For instance, a currency converter plugin can update exchange rates every 6 hours via a cron job, ensuring the frontend always serves pre-cached values. WP_Cron is triggered on page loads, so for precise timing on low-traffic sites, use the DISABLE_WP_CRON constant and a real system cron job. This approach offloads heavy I/O to non-blocking tasks, improving Time to First Byte (TTFB) by avoiding synchronous API waits.
Using Client-Side Caching with JavaScript
For non-critical data that changes infrequently—like user-specific settings or public feed items—JavaScript can cache API responses directly in the browser. Use the Fetch API with the Cache-Control header or implement a simple in-memory cache using a JavaScript object or localStorage. For example, after fetching a list of recent blog posts from a third-party service, store the result in localStorage with a timestamp. On subsequent page loads, check if the cached data is still valid (e.g., less than 10 minutes old) before making a new request. This reduces server load and network traffic, especially for repeat visitors. However, client-side caching is not suitable for sensitive or real-time data—it relies on the user’s browser and may expose stale information if not cleared properly. Combine it with server-side caching for a layered approach.
Frequently accessed, server-side cached data (e.g., weather, stock prices)
WP_Cron background processing
Database (transient or options table)
Scheduled intervals (e.g., hourly, daily)
Large or slow API updates that should not block user requests
Client-side JavaScript caching
Browser (localStorage, memory)
JavaScript-based timestamp or Cache-Control header
Non-sensitive, user-specific or public data with low update frequency
Troubleshooting Common API Integration Issues
When integrating APIs with WordPress, even well-designed integrations can encounter roadblocks. The most frequent issues include CORS errors, authentication failures, data format mismatches, and server timeouts. This section provides a systematic approach to diagnosing and resolving these problems, helping you maintain a stable connection between your WordPress site and external services.
Debugging with WP_DEBUG and Log Files
The first step in troubleshooting any API integration is enabling WordPress debugging. Modify your wp-config.php file to activate detailed error logging. Add the following lines before the “That’s all, stop editing!” comment:
This configuration writes all errors, warnings, and notices to a debug.log file located in /wp-content/. For API-specific issues, use error_log() within your integration code to capture raw API responses, HTTP status codes, and request parameters. A typical debugging routine includes:
Checking the log file after a failed API call for PHP warnings or fatal errors.
Logging the full cURL or wp_remote_get/response data using error_log( print_r( $response, true ) );.
Disabling WP_DEBUG on production sites to prevent exposing sensitive information to users.
Handling CORS and Same-Origin Policy
Cross-Origin Resource Sharing (CORS) errors occur when a WordPress site makes an API request to a different domain, and the server does not permit it. These errors typically appear in the browser console as “No ‘Access-Control-Allow-Origin’ header is present.” To resolve CORS issues:
On the API server side: Ensure the server includes the appropriate CORS headers. For example, in Apache, add to the .htaccess file: Header set Access-Control-Allow-Origin "*" (use specific origins in production).
In WordPress: If you cannot control the API server, consider using a server-side proxy. Create a custom WordPress REST endpoint that forwards requests to the external API, bypassing browser CORS restrictions entirely.
For local development: Use a browser extension that disables CORS temporarily, or configure your local environment to match the production domain.
Fixing Common HTTP Error Codes (401, 403, 500)
HTTP error codes provide immediate clues about integration failures. Below is a table of the most common codes and their typical fixes:
HTTP Code
Meaning
Common Cause
Solution
401 Unauthorized
Authentication failed
Invalid API key, expired token, or missing credentials
Verify API key and regenerate if expired; ensure credentials are sent in headers (e.g., Authorization: Bearer token)
403 Forbidden
Server understands but refuses
IP whitelisting, insufficient permissions, or blocked user agent
Whitelist your server IP in the API dashboard; check that your user agent matches allowed patterns
500 Internal Server Error
Server-side error
Malformed request payload, endpoint changes, or server overload
Review API documentation for updated endpoint formats; reduce request size; implement exponential backoff for retries
For all error codes, implement robust error handling in your WordPress integration. Use wp_remote_retrieve_response_code() to check the status and log the full response body. For timeouts, adjust the timeout parameter in wp_remote_get() or wp_remote_post() to a higher value, such as 30 seconds, and consider using asynchronous processing for long-running API calls.
Future-Proofing Your WordPress API Integrations
As your WordPress site grows and external services evolve, maintaining stable API integrations requires deliberate planning. Future-proofing ensures that your connections remain functional, secure, and scalable without requiring complete rewrites. By adopting proactive strategies, you can minimize disruptions caused by API changes, extend the lifespan of your integrations, and accommodate increasing data volumes or user demands.
Following API Versioning and Deprecation Notices
Third-party APIs frequently update their endpoints, data structures, or authentication methods. To avoid sudden breakage, always use versioned endpoints (e.g., /api/v2/ instead of /api/). Monitor the provider’s changelog and subscribe to deprecation notices—most reputable APIs announce endpoint retirement months in advance. In your WordPress code, implement a version-checking routine that logs warnings when your integration calls an older endpoint. Consider storing the API version used per integration in your site’s options table, allowing you to update the version centrally when needed.
Always specify an API version in your requests (e.g., wp_remote_get( 'https://api.example.com/v2/resource' )).
Set up a cron job to periodically fetch the API’s status endpoint and compare it against your configured version.
Maintain a local dictionary of deprecated endpoints and their replacements, updating your integration logic as soon as a notice is received.
Using Hooks and Filters for Extensibility
WordPress’s hook system is your strongest ally for future-proofing. Rather than hardcoding API calls directly in template files or plugins, wrap them in custom actions and filters. This allows you to modify request parameters, response handling, or error logging without touching core integration logic. For example, create a filter my_integration_api_args that other developers or future you can use to add custom headers or adjust timeout values. Similarly, use an action my_integration_after_response to hook in additional data processing or caching layers.
Customizes error messages displayed to users or logged for debugging.
Automating Testing with Postman and Unit Tests
Manual testing becomes impractical as integrations multiply. Automate your verification process using Postman for API-level checks and PHPUnit for WordPress-side logic. Create a Postman collection that simulates every endpoint your site consumes, including edge cases like invalid tokens or rate limits. Export the collection as a Newman runnable script and integrate it into your deployment pipeline. For WordPress-specific testing, write PHPUnit tests that mock API responses and verify your hooks, filters, and error handling behave correctly. This catches regressions before they reach production.
Postman Collection: Store test requests for each endpoint, including authentication, expected status codes, and response schemas.
Newman CLI: Run the collection automatically via newman run collection.json in your CI/CD workflow.
PHPUnit Tests: Use WP_Mock or Brain Monkey to simulate wp_remote_get responses and assert that your integration functions handle them correctly.
Regular Schedule: Trigger automated tests weekly, or immediately after any API provider announces a change.
By combining version awareness, extensible code architecture, and automated testing, your WordPress API integrations will remain robust against external changes and scale gracefully alongside your site’s growth. These practices reduce maintenance burden and ensure reliability for years to come.
WordPress API integration refers to connecting a WordPress site with external applications, services, or data sources using APIs (Application Programming Interfaces). The most common is the WordPress REST API, which allows developers to interact with WordPress data (posts, users, comments, etc.) via HTTP requests. Integration can involve fetching data from third-party services, sending data from WordPress to other systems, or building headless WordPress architectures. This enables functionalities like syncing content with mobile apps, automating workflows, or embedding external data directly into WordPress pages.
How do I authenticate API requests in WordPress?
Authentication for the WordPress REST API can be done using several methods. The simplest is cookie authentication, which is used for logged-in users within the admin area. For external applications, OAuth 1.0a is a common choice, requiring a consumer key, secret, and token. Another method is Basic Authentication (over HTTPS), though it's less secure. Application passwords, introduced in WordPress 5.6, provide a straightforward way for external apps to authenticate. For custom integrations, you can use JSON Web Tokens (JWT) or nonce-based authentication for specific actions.
Can I create custom REST API endpoints in WordPress?
Yes, you can create custom REST API endpoints in WordPress by using the `register_rest_route()` function within a plugin or theme's `functions.php`. This function allows you to define a route (e.g., `/my-plugin/v1/data`), specify HTTP methods (GET, POST, PUT, DELETE), and provide a callback function that processes the request and returns data. You can also add arguments, permissions callbacks, and schema validation. Custom endpoints are ideal for exposing specific data or functionality not covered by the core API, such as custom post types or third-party service interactions.
What are the security best practices for WordPress API integration?
Security is crucial for API integration. Always use HTTPS to encrypt data in transit. Implement proper authentication (e.g., OAuth, application passwords) and avoid exposing API keys in client-side code. Use permission callbacks to restrict access to authorized users only. Validate and sanitize all input data with functions like `sanitize_text_field()` and `validate_callback`. Limit request rates to prevent abuse, and use nonces for state-changing requests. Regularly review and update API endpoints, and consider using Web Application Firewalls (WAF) for additional protection.
How do I handle errors in WordPress API integration?
Error handling in WordPress API integration involves checking HTTP response codes and using try-catch blocks (if using PHP exceptions). For REST API requests, use `wp_remote_get()` or `wp_remote_post()` and check for `is_wp_error()` to catch connection issues. Log errors using `error_log()` or a dedicated logging plugin. Return meaningful error messages to users, but avoid exposing sensitive data. For custom endpoints, use `WP_Error` objects to return structured error responses with appropriate HTTP status codes (e.g., 400 for bad request, 401 for unauthorized).
What is a headless WordPress setup?
A headless WordPress setup uses WordPress as a content management system (CMS) for its admin interface and database, but the front-end is built with a separate technology like React, Vue.js, or Angular. The front-end communicates with WordPress via the REST API or GraphQL to fetch content. This decoupling allows for greater flexibility, improved performance, and a more dynamic user experience. It's popular for building modern web applications, mobile apps, or static sites, as developers can use their preferred tools while leveraging WordPress's powerful content management capabilities.
How do I integrate third-party APIs like Google Maps or Stripe?
Integrating third-party APIs involves making HTTP requests from your WordPress site using functions like `wp_remote_get()` or `wp_remote_post()`. For Google Maps, you'd obtain an API key, then make requests to the Geocoding or Maps JavaScript API. For Stripe, you'd use their PHP library or direct API calls to handle payments. Always store API keys securely in `wp-config.php` or an environment file. Use transient caching to reduce API calls and improve performance. For complex integrations, consider using a plugin like WP Remote API or building a custom plugin.
What are the common use cases for WordPress API integration?
Common use cases include: syncing content between WordPress and external platforms (e.g., CRM, email marketing), building mobile apps that consume WordPress data, creating headless websites with modern JavaScript frameworks, integrating e-commerce with shipping or payment gateways, automating social media posting, pulling data from external sources (weather, stock prices) into WordPress pages, and enabling single sign-on (SSO) with third-party identity providers. API integration also powers custom dashboards, analytics tools, and workflow automation, making WordPress a versatile hub for various digital operations.
How to Create a WordPress Booking System: A Step-by-Step Guide
Introduction to Building a WordPress Booking System
For service-based businesses, event organizers, and rental site owners, a seamless booking system can be the difference between a chaotic schedule and a smoothly running operation. Without one, you might rely on phone calls, emails, or manual calendar entries—processes that are prone to double-booking, delays, and lost revenue. A WordPress booking system automates reservations, syncs availability, and handles payments, all while integrating directly into your existing website. This guide will walk you through the entire process, from understanding what a booking system entails to selecting the right plugin and configuring it for your specific needs. Whether you run a hotel, a consulting practice, or a car rental service, you will learn how to create a reliable, user-friendly booking experience that saves time and increases customer satisfaction.
What Is a WordPress Booking System?
A WordPress booking system is a set of software tools—typically a plugin combined with custom configurations—that allows visitors to your website to reserve time slots, services, products, or resources. It replaces manual methods with an automated workflow: customers select a date, choose a service or item, provide their details, and optionally pay, all without your direct involvement. The system then updates your calendar in real time, prevents double-bookings, and sends confirmations to both you and the client. Examples include scheduling appointments for a hair salon, booking a table at a restaurant, renting a vacation home, or reserving a spot for a workshop. Most solutions offer a dashboard where you can manage bookings, set availability rules, and adjust pricing.
24/7 availability: Customers can book at any time, even when your business is closed, capturing leads you might otherwise miss.
Reduced administrative time: Automate confirmations, reminders, and cancellations, freeing you to focus on delivering services.
Real-time schedule management: Prevent overlaps and errors by syncing bookings instantly with your calendar.
Payment integration: Collect deposits or full payments upfront via PayPal, Stripe, or other gateways, reducing no-shows.
Improved customer experience: Offer a fast, intuitive interface that eliminates phone tag and email back-and-forth.
Data insights: Track popular time slots, services, and customer behavior to optimize your offerings.
These benefits collectively boost revenue, efficiency, and client trust, making a booking system a worthwhile investment for any service-oriented site.
Who Needs a Booking System?
While many businesses can benefit, a booking system is especially critical for specific use cases. Below is a table outlining common scenarios and their typical requirements:
In essence, if your business requires reservations that involve time, date, duration, or resource allocation, a WordPress booking system is not just helpful—it is essential for scaling operations and maintaining a professional edge.
Selecting the right booking plugin is the most critical decision when you learn how to create a WordPress booking system. The plugin you choose determines your site’s functionality, user experience, and long-term scalability. This section compares leading options to help you make an informed choice.
Top Booking Plugins Overview: Amelia, Bookly, WooCommerce Bookings
Three plugins dominate the WordPress booking ecosystem. Each serves distinct use cases:
Amelia: A premium, feature-rich plugin ideal for service-based businesses like clinics, salons, and consulting firms. It offers a modern front-end interface, customizable email notifications, and built-in Google Calendar sync. Pricing starts at $69 per year for a single site.
Bookly: A versatile plugin suitable for small to medium-sized businesses. It supports one-on-one and group appointments, recurring bookings, and a wide range of payment gateways. The free version is limited, but the premium version ($89 per year) unlocks advanced features like custom forms and employee schedules.
WooCommerce Bookings: A powerful extension for WooCommerce stores that sell bookable products (e.g., rental equipment, tour packages, or event tickets). It integrates seamlessly with existing WooCommerce setups and supports complex pricing rules. The extension costs $249 per year and requires WooCommerce.
Feature
Amelia
Bookly
WooCommerce Bookings
Best for
Service-based businesses
General appointments
E-commerce bookable products
Starting price
$69/year
Free (premium from $89/year)
$249/year (requires WooCommerce)
Calendar sync
Google Calendar
Google Calendar, Outlook
Google Calendar (via add-ons)
Payment gateways
Stripe, PayPal, offline
Stripe, PayPal, Mollie, offline
All WooCommerce gateways
Free version
No
Yes (limited)
No
Free vs. Premium Plugin Considerations
When you create a WordPress booking system, the free vs. premium debate often arises. Free plugins like Bookly’s base version or Easy Appointments offer basic functionality—single calendar views, manual payment handling, and limited customization. They work for simple needs, such as a single service with one provider. However, they lack advanced features like automated reminders, multi-language support, or recurring bookings. Premium plugins justify their cost through:
Priority support and regular updates.
Integration with popular payment gateways (Stripe, PayPal, Square).
Customizable booking forms and email templates.
Scalability for multiple staff or locations.
For most businesses aiming to build a professional booking system, investing in a premium plugin is advisable to avoid technical limitations and ensure reliability.
Factors to Evaluate: Calendar Views, Payment Gateways, and Customization
Before committing, assess these three factors to match your needs:
Calendar Views: Look for plugins that offer both admin and customer-facing calendar options. Admin views should include day, week, and month displays, while customer views should clearly show available slots. Amelia and Bookly excel here with drag-and-drop rescheduling.
Payment Gateways: Verify that the plugin supports the payment methods your customers prefer. For example, if you need credit card processing without redirecting users, choose a plugin with built-in Stripe integration (common in premium plugins). WooCommerce Bookings leverages all WooCommerce gateways, including Amazon Pay and Apple Pay.
Customization: Consider how much control you need over booking forms, colors, and layout. Premium plugins often provide CSS hooks and template overrides. For instance, to add a custom field for “Preferred Time,” you might use a filter like this in your theme’s functions.php file:
This example adds a required text field to Bookly’s booking form, demonstrating how customization can tailor your system to specific workflows without modifying core plugin files. By carefully evaluating these factors, you will select the optimal plugin for your WordPress booking system.
Installing and Activating Your Chosen Plugin
Once you have selected a booking plugin that fits your needs, the next step is to install and activate it on your WordPress site. The process differs slightly depending on whether you are using a free plugin from the WordPress repository or a premium plugin purchased from a third-party developer. Follow the steps below for each method, and ensure compatibility before going live.
Installing from the WordPress Dashboard
For free plugins hosted in the official WordPress plugin repository, installation is straightforward and can be completed entirely from your dashboard:
Log in to your WordPress admin area and navigate to Plugins > Add New.
In the search bar, type the name of your chosen booking plugin (e.g., “Booking Calendar” or “Easy Appointments”).
Locate the correct plugin in the search results. Verify the author name, ratings, and number of active installations to ensure you have the right one.
Click the Install Now button. WordPress will automatically download and install the plugin files.
After installation completes, the button changes to Activate. Click it to enable the plugin on your site.
This method is the safest because plugins from the repository are reviewed by WordPress.org for security and coding standards. Always check the plugin’s last updated date and compatibility with your WordPress version before installing.
Uploading a Premium Plugin via FTP or Admin
Premium booking plugins often provide a .zip file for installation. You can upload this file using either the WordPress admin dashboard or an FTP client:
Method A: Upload via WordPress Admin
Go to Plugins > Add New and click the Upload Plugin button at the top of the page.
Click Choose File and select the .zip file from your computer.
Click Install Now. WordPress will extract and install the plugin.
Method B: Upload via FTP
Use an FTP client (such as FileZilla) to connect to your web server.
Navigate to the /wp-content/plugins/ directory on your server.
Extract the .zip file on your computer and upload the resulting folder to the /plugins/ directory.
Return to your WordPress admin dashboard, go to Plugins, and locate the newly uploaded plugin in the list.
FTP is useful when your admin upload limit is too small for large plugin files. After uploading, proceed to activation.
Activating and Checking Plugin Compatibility
Activation is the final step, but compatibility checks are essential to avoid breaking your site:
After installation, click the Activate link beneath the plugin name on the Plugins page.
Visit your website’s front end to ensure no error messages appear. Check that the booking system’s shortcodes or widgets render correctly.
Test the plugin against your current theme and other active plugins. For example, ensure your theme’s CSS does not conflict with booking forms.
Review the plugin’s settings page (often under a new menu item, such as “Bookings” or “Calendar”) to verify it loaded without warnings.
If you encounter compatibility issues, deactivate the plugin immediately and check its documentation for known conflicts. The table below compares the two installation methods to help you decide.
Installation Method
Best For
Ease of Use
File Size Limit
Security Review
WordPress Dashboard (Repository)
Free plugins from official repository
Very easy; no file upload needed
Limited by server max upload size (often 2-8 MB)
Pre-screened by WordPress.org
Admin Upload
Premium or custom .zip plugins
Easy; requires file selection
Limited by server max upload size
User must verify source
FTP Upload
Large plugins or when admin upload fails
Moderate; requires FTP knowledge
No practical limit
User must verify source
Once activated and verified, your booking plugin is ready for configuration. Always keep the plugin updated to maintain compatibility with future WordPress releases.
Configuring General Settings for Your Booking System
After installing and activating a WordPress booking plugin, the first critical step is to configure the global settings. These options define how your system operates across all booking forms, ensuring consistency in time handling, pricing, and scheduling rules. Most plugins centralize these settings under a “General” or “Settings” tab in the WordPress admin dashboard. Proper configuration here prevents time zone mismatches, currency errors, and double bookings later.
Setting Time Zone and Date Formats
Time zone misalignment is a common source of booking confusion, especially if you serve clients in different regions. Navigate to your plugin’s General Settings and locate the time zone dropdown. Select the time zone that matches your business location (e.g., “America/New_York” for Eastern Time). This ensures that all displayed times and confirmed bookings reflect your local time, not the server’s default UTC.
Next, set the date format to match your audience’s expectations. Most plugins offer common formats such as:
Month/Day/Year – e.g., 06/15/2024 (common in the United States)
Day/Month/Year – e.g., 15/06/2024 (common in Europe and many other regions)
Year-Month-Day – e.g., 2024-06-15 (ISO standard, useful for international clients)
Choose the format that feels most natural to your primary customer base. Some plugins also let you customize the time display (12-hour vs. 24-hour clock). For global audiences, consider using the ISO date format to avoid ambiguity.
Configuring Currency and Payment Methods
If your booking system collects payments, you must set the correct currency and enable payment gateways. Under the payment settings section, select your primary currency from the dropdown list (e.g., USD, EUR, GBP). This currency will be used for all booking prices, deposits, and taxes.
Most robust booking plugins support multiple payment methods. Common options include:
PayPal Standard or Express – Requires your PayPal email or API credentials.
Stripe – Requires your publishable and secret API keys.
Offline Payments – Allow cash, bank transfer, or invoice payments without a gateway.
Enable at least one online payment method to automate transactions. For each gateway, you will need to paste specific API keys or tokens provided by the payment processor. Test the integration by creating a small test booking before going live.
Defining Default Booking Durations and Buffer Times
Default durations simplify the scheduling process for both you and your customers. In the general settings, locate the “Default Duration” field and enter a value (e.g., 60 for 60 minutes). This sets the standard length for a new service or booking slot. You can override this per-service later, but a sensible default speeds up initial setup.
Buffer times are equally important for preventing back-to-back scheduling issues. A buffer is a gap of time between two bookings that remains unscheduled, allowing for cleanup, travel, or preparation. Configure these fields:
Buffer Before Booking – Time blocked before each appointment (e.g., 15 minutes).
Buffer After Booking – Time blocked after each appointment (e.g., 10 minutes).
For example, if you set a 60-minute default duration with a 15-minute buffer after, a booking starting at 10:00 AM would end at 11:00 AM, but the next available slot would not begin until 11:15 AM. This prevents overlap and gives you breathing room.
Some plugins also allow you to set a “Minimum Time Before Booking” (e.g., 2 hours before the appointment) to prevent last-minute reservations. Adjust this based on your preparation needs.
Creating Your Services, Events, or Rentals
Once you have installed and activated a WordPress booking plugin (such as Amelia, Bookly, or WooCommerce Bookings), the first practical step is to define what customers can reserve. This involves adding each bookable item with clear descriptions, pricing structures, capacity limits, and availability rules. A well-organized setup reduces booking conflicts and improves the user experience.
Adding a New Service or Rental Item
Navigate to your plugin’s booking management section—usually labeled “Services,” “Bookable Products,” or “Items.” Click “Add New” to create a bookable entity. You will need to fill out the following core fields:
Title and Description: Use a descriptive name (e.g., “1-Hour Photography Session” or “Mountain Bike Rental – Full Day”). Write a concise description that sets expectations—duration, included features, and any prerequisites.
Category (if supported): Group similar items (e.g., “Consultations,” “Equipment Rentals,” “Workshops”) to help customers filter.
Capacity or Quantity: Define how many customers can book the same slot. For services, this might be “1” (one-on-one) or “10” (group class). For rentals, set the number of units available (e.g., 5 kayaks).
Duration: Specify the default length of the booking (e.g., 60 minutes, 1 day). Some plugins allow variable durations per item.
Buffer Time: Add time between bookings for setup or cleaning (e.g., 15 minutes after each appointment).
Once saved, the item will appear on your booking form. Always test a front-end booking to confirm the item shows correctly.
Setting Pricing Tiers and Discounts
Pricing can be flat or dynamic. Configure base rates first, then add tiers or promotional offers. Common pricing options include:
Pricing Type
Example Use
How to Configure
Fixed price per booking
Standard consultation
Enter a single price (e.g., $75).
Price per person or unit
Group class or equipment rental
Set a base price multiplied by number of attendees or items.
Time-based pricing
Hourly or daily rentals
Define rates for different durations (e.g., $50/hour, $200/day).
Tiered pricing
Volume discounts
Set lower per-unit rates for larger bookings (e.g., 1–2 people: $100 each; 3+ people: $80 each).
Seasonal or weekday pricing
Peak vs. off-peak
Assign different prices to specific dates or day-of-week ranges.
To add discounts, look for a “Coupons” or “Promotions” tab in your plugin. Create a coupon code with a percentage or fixed amount off, and optionally restrict it to specific items or date ranges. Ensure the discount applies at checkout automatically or via customer entry.
Managing Availability: Recurring Slots and Exceptions
Availability rules control when customers can book. Most plugins provide two layers: recurring schedules and one-off exceptions.
Recurring Slots: Define weekly availability for each item. For example, a yoga class might be available every Monday and Wednesday from 9:00 AM to 11:00 AM. Set the following:
Days of the week (checkboxes for Monday through Sunday).
Time ranges (e.g., 09:00–17:00).
Slot interval (how often a booking can start, e.g., every 30 minutes).
Maximum bookings per slot (equal to your capacity).
Exceptions and Closures: Use a “Vacations,” “Holidays,” or “Date Exceptions” section to block specific dates. Common exceptions include:
Personal days off (e.g., July 4–6 for maintenance).
Special events that override normal availability (e.g., a private rental on a normally open day).
To set an exception, choose the date range, select the item(s) affected, and mark the slot as “Unavailable.” Some plugins also let you set a limited capacity for exceptions (e.g., only 2 of 5 rooms available on a holiday). After configuring, preview the calendar to ensure no conflicting bookings appear.
Designing the Booking Form and User Experience
Your booking form is the core conversion tool of your WordPress booking system. A well-designed form reduces friction, builds trust, and encourages users to complete their reservation. This section covers how to customize fields, layout, and styling to align with your brand while maximizing usability and conversions.
Choosing Required Fields and Optional Add-ons
Balancing data collection with user convenience is critical. Only ask for information you genuinely need to process the booking. Common required fields include:
Name (first and last)
Email address (for confirmation)
Phone number (optional but recommended for urgent contact)
Date and time selection (using a calendar picker)
Service or product selection (dropdown or radio buttons)
Number of guests or quantity
Optional add-ons can increase revenue and personalization without overwhelming the user. Consider offering:
Add-on Type
Example
Best Practice
Extras
Insurance, gift wrapping, priority seating
Use checkboxes for easy selection
Upgrades
VIP package, extended time slot
Highlight with a subtle “recommended” badge
Special requests
Dietary needs, accessibility requirements
Provide a textarea with character limit
Keep the form short—ideally under 10 fields. Use conditional logic to show add-ons only when relevant (e.g., show “extra pillows” only after a room is selected). This reduces visual clutter and improves completion rates.
Your booking form should visually match your website. Most WordPress booking plugins (like Amelia, Bookly, or WP Simple Booking Calendar) offer built-in template systems or custom CSS fields. Here are three approaches:
Plugin template editor: Many premium plugins let you change colors, fonts, and button styles from the admin panel without code.
Custom CSS: For granular control, add CSS to your theme’s customizer or a child theme. Example targeting a submit button:
Override with theme styles: Use your theme’s existing form styling (e.g., from Contact Form 7 or Elementor) by applying the same CSS classes to the booking form fields.
Always test styling changes on a staging site first. Avoid inline styles, as they hinder maintainability and override plugin settings.
Optimizing for Mobile and Accessibility
Over 60% of bookings on many sites come from mobile devices. Ensure your form works flawlessly on small screens by following these guidelines:
Responsive layout: Use a single-column layout on mobile to prevent field overlap. Test with real devices or browser dev tools.
Touch-friendly inputs: Set minimum touch target sizes of 44×44 pixels for buttons and checkboxes. Use native date pickers (type=”date” or type=”datetime-local”) for easier tapping.
Keyboard navigation: Ensure all fields are reachable via the Tab key. Add visible focus outlines (e.g., outline: 2px solid #007cba;) for keyboard users.
Screen reader support: Use proper label elements (not placeholders alone) and ARIA attributes where needed. For example, add aria-required="true" to required fields.
Color contrast: Maintain a contrast ratio of at least 4.5:1 for text against background colors, especially for error messages and required field indicators.
Run your form through tools like WAVE or Lighthouse to catch accessibility issues. A mobile-optimized, accessible form not only improves user satisfaction but also boosts SEO and reduces bounce rates.
Integrating Payment Gateways and Confirmation Emails
After setting up your booking form and calendar, the next critical step is to handle payments and communications automatically. A robust WordPress booking system must securely process transactions and keep customers informed without manual intervention. This section walks through connecting payment gateways, configuring email notifications, and managing cancellations.
Connecting PayPal or Stripe for Secure Payments
To accept payments, choose a gateway that integrates seamlessly with your booking plugin. Most popular plugins (like WooCommerce Bookings, Amelia, or Easy!Appointments) support PayPal and Stripe natively. Follow these general steps:
Install and activate a payment gateway plugin (e.g., WooCommerce Stripe Payment Gateway or PayPal for WooCommerce).
Obtain API credentials from your PayPal Business account or Stripe dashboard. For Stripe, you need the Publishable Key and Secret Key; for PayPal, the Client ID and Secret.
Navigate to your booking plugin’s payment settings (often under Settings > Payments or Booking > Payment Gateways).
Enter the credentials and enable the gateway. Test with a sandbox mode first to ensure transactions process correctly.
Enable SSL on your site (via your hosting provider) to encrypt payment data. Most gateways require HTTPS for live mode.
For a quick comparison, consider this table of common gateways:
Gateway
Key Features
Fees
Setup Complexity
Stripe
Supports credit cards, Apple Pay, Google Pay; automatic refunds
Once connected, test a small transaction to confirm the payment flow works end-to-end.
Configuring Confirmation and Reminder Emails
Automated emails reduce no-shows and improve customer trust. Most booking plugins include email templates you can customize. Configure these essential notifications:
Booking Confirmation: Sent immediately after payment. Include booking details (date, time, service), a receipt, and a link to manage or cancel the booking.
Reminder Emails: Schedule these 24–48 hours before the appointment. Use a shortcode or placeholder to pull the booking date dynamically.
Admin Notification: Send a copy to your team for each new booking. This helps with scheduling resources.
To set up:
Open your booking plugin’s email settings (e.g., under Booking > Emails or Notifications).
Enable each email type and set the trigger (e.g., “after payment confirmed” or “24 hours before booking”).
Customize the subject line and body using available shortcodes (e.g., [booking_date], [customer_name]).
Test by making a sample booking and checking your inbox. Adjust timing and content as needed.
For best results, use a transactional email service (like SMTP plugin or SendGrid) to ensure deliverability.
A clear cancellation policy protects your business while maintaining good customer relations. Configure your system to handle these scenarios automatically:
Set a cancellation window (e.g., 24 hours before the booking). Use your plugin’s settings to allow customers to cancel within this window from their account or email link.
Define refund rules: For full refunds, enable automatic refunds via Stripe or PayPal (most plugins offer a “Refund” button in the booking dashboard). For partial refunds (e.g., 50% if cancelled within 12 hours), you may need to process manually or use a conditional logic add-on.
Send cancellation confirmation: Configure an email template that acknowledges the cancellation, explains the refund timeline, and invites rebooking.
Update inventory: Ensure the booking slot becomes available again immediately after cancellation. Most plugins handle this automatically.
Test the cancellation flow by cancelling a test booking and verifying the refund processes correctly in your payment gateway dashboard. This ensures a smooth experience for both you and your customers.
Managing Bookings from the WordPress Dashboard
Once your WordPress booking system is live, the backend dashboard becomes your central hub for oversight and customer management. Efficiently handling bookings—whether viewing, editing, approving, canceling, or communicating—ensures smooth operations and satisfied clients. This section guides you through the essential tasks using your dashboard.
Your dashboard typically provides two primary views: a visual calendar and a detailed booking list. The calendar offers a chronological overview of all appointments, color-coded by status (e.g., pending, confirmed, completed). You can filter by date range, service, or staff member to quickly assess availability. The booking list, often presented as a table, includes columns for customer name, service, date, time, status, and payment details. This view is ideal for bulk actions, such as exporting data or applying filters to find specific bookings. Most plugins allow you to toggle between these views via tabs or dropdowns.
Calendar view: Drag-and-drop to reschedule, click to view details.
Booking list view: Sort by date, status, or customer; use search for quick lookup.
Filters: Narrow results by date range, service, staff, or status (e.g., “pending approval”).
Bulk actions: Select multiple bookings to approve, cancel, or send reminders.
Editing or Rescheduling Existing Bookings
To modify a booking, locate it in the calendar or list and click to open its details. Most systems allow you to edit the following fields directly:
Date and time: Reschedule by selecting a new slot from the available calendar.
Service or staff: Change the booked service or assign a different provider.
Customer information: Update name, email, or phone number if needed.
Status: Manually approve, confirm, or cancel a booking. Cancellations may trigger automatic refunds or notifications.
When rescheduling, the system checks for conflicts and notifies the customer automatically. Always confirm changes before saving; some plugins require a confirmation email to be resent. For recurring bookings, you can edit individual instances or the entire series.
Communicating with Customers via Notes or Messages
Effective communication from the backend reduces misunderstandings and improves customer trust. Most booking plugins include a notes or messaging system attached to each booking. You can add internal notes for staff (e.g., “Customer requested extra time”) or send direct messages to the customer. Below is a comparison of common communication methods:
Method
Purpose
Visibility
Automation
Internal notes
Staff-only instructions or details
Dashboard only
Not automated
Customer messages
Direct replies to inquiries
Dashboard + email
Manual trigger
Automated emails
Confirmations, reminders, cancellations
Customer email
Triggered by status change
Public notes
Shared info (e.g., prep instructions)
Customer dashboard
Optional manual entry
To send a message, open the booking, locate the “Notes” or “Message” field, and compose your text. Some plugins allow you to attach files (e.g., invoices or waivers). Always check that the customer’s email is correct before sending. For bulk inquiries, use the booking list to filter customers by status and send group messages via your email client or plugin’s bulk messaging feature. Responding promptly to inquiries from the dashboard—especially for pending bookings—can increase conversion rates and reduce no-shows.
Testing Your Booking System Before Going Live
Before launching your WordPress booking system to real customers, thorough testing in a safe environment is critical. This prevents lost revenue, scheduling conflicts, and frustrated users. Testing should mimic live conditions as closely as possible without affecting your actual calendar or payment accounts. Follow these steps to validate every component of your booking flow.
Running Test Bookings with Sandbox Payments
Most payment gateways offer a sandbox or test mode that simulates transactions without moving real money. Enable this mode in your booking plugin settings (often found under Payment > Test Mode). For example, in WooCommerce Bookings, you can switch to PayPal Sandbox or Stripe Test keys. Create a test product or service with a low or zero price to avoid accidental charges.
Perform these test scenarios:
Book a single appointment with a valid test card number (e.g., Stripe test card 4242 4242 4242 4242).
Attempt booking with an expired or invalid card to verify error handling.
Book multiple services in one session to test cart logic.
Cancel a booking midway to ensure partial data is not saved.
For plugins using custom payment methods, you may need to add a test endpoint. A practical code example to force sandbox mode in a custom payment gateway function:
// Force sandbox mode for testing
add_filter('booking_payment_mode', function($mode) {
return 'sandbox';
});
After each test, check that the booking appears in your WordPress admin with the correct status (e.g., “Pending” or “Completed”) and that no real charges were processed.
Checking Email Deliverability and Templates
Booking systems rely on automated emails for confirmations, reminders, and cancellations. Test every email trigger to ensure they reach recipients and display correctly. Begin by sending a test booking from a dummy customer email address (use a service like Mailtrap or your own secondary inbox). Verify the following:
Subject lines match your plugin’s templates.
Booking details (date, time, service, price) are accurate.
Links to reschedule or cancel work as intended.
HTML formatting renders well on mobile and desktop clients.
If emails land in spam, improve deliverability by configuring an SMTP plugin (e.g., WP Mail SMTP) with a transactional email service like SendGrid or Amazon SES. Test that the “From” name and address are recognizable. For plugins with editable templates, check that customizations (such as adding your logo) do not break the layout.
Validating Time Slots and Conflict Prevention
Preventing double-bookings is essential. Simulate simultaneous bookings from different browsers or incognito windows to confirm your system locks slots properly. Use a table to organize common conflict scenarios:
Scenario
Expected Behavior
Test Result
Two users book the same slot at the same second
Only first booking succeeds; second sees “unavailable”
Pass / Fail
User books a recurring slot that overlaps an existing booking
Blocked with clear error message
Pass / Fail
Admin manually books over an existing customer booking
Conflict warning or forced override with log
Pass / Fail
Also test time zone handling: set your WordPress site time zone to a different region, then book a slot. Confirm that the displayed time adjusts correctly for both admin and customer views. Finally, verify that buffer times between appointments (if configured) are respected by attempting to book a slot that would fall within a buffer period.
After completing these tests, review your booking logs for any anomalies. If all scenarios pass, disable sandbox mode and switch to live credentials. A thorough testing phase now saves hours of troubleshooting later.
Even a well-configured WordPress booking system can encounter hiccups. Double bookings, time zone errors, and plugin conflicts are among the most frequent frustrations. This section walks you through solving these problems and shares essential maintenance tips to keep your system running smoothly.
Double bookings occur when two customers reserve the same time slot simultaneously. This often stems from server latency, caching plugins, or weak database locking. To resolve this:
Enable database transaction locking in your booking plugin settings (look for “prevent double bookings” or “atomic transactions”).
Disable page caching for booking pages via a caching plugin (e.g., WP Rocket or W3 Total Cache) by excluding the URL pattern of your booking form.
Use a booking plugin with real-time availability checks that polls the database on each submission, such as Amelia or Bookly.
Test with concurrent bookings by opening two browser tabs and submitting at the same time. If duplicates appear, check your plugin’s documentation for a “concurrent booking” fix.
If glitches persist, manually clear any temporary availability caches in your plugin’s tools section and verify that your server’s PHP session handling is not blocking writes.
Resolving Time Zone Discrepancies
Time zone errors confuse customers and staff when displayed times differ from actual booking times. This typically happens when your WordPress site, server, and plugin each use a different zone. Follow these steps:
Source
Recommended Setting
How to Check
WordPress General Settings
Your local time zone (e.g., America/New_York)
Settings > General > Timezone
Server (PHP timezone)
Match WordPress setting
Ask your host or check php.ini for date.timezone
Booking Plugin
Same as WordPress or use UTC offset
Plugin settings > Timezone
Customer’s Browser
Auto-detect (if plugin supports)
Check plugin’s “use visitor timezone” option
After aligning these, test by creating a booking from a different time zone (e.g., using a VPN). If times still mismatch, update your plugin to the latest version, as older releases often mishandle daylight saving transitions.
Maintaining Security and Updating Your Plugin
A booking system holds sensitive customer data (names, emails, payment details). Neglecting updates or security can lead to data breaches or downtime. Follow these best practices:
Update your booking plugin monthly and test on a staging site first to prevent compatibility breaks.
Use strong passwords for admin accounts and enable two-factor authentication (2FA) via a plugin like WP 2FA.
Backup your database and files weekly using a plugin like UpdraftPlus or your host’s backup tool.
Monitor for plugin conflicts by deactivating all non-essential plugins temporarily if you notice booking errors after an update.
Review logs for failed login attempts or unusual booking patterns using a security plugin (e.g., Wordfence).
Additionally, schedule a quarterly review of your booking system: check that email notifications still send, test payment gateways, and verify that availability calendars sync correctly with your staff schedules. Proactive maintenance prevents small glitches from becoming customer-facing problems.
Frequently Asked Questions
What is the best WordPress booking plugin for small businesses?
The best plugin depends on your needs. For small businesses, Amelia is user-friendly and offers comprehensive features like customizable booking forms, payment integrations, and employee management. Bookly is another popular choice with a free version, while BirchPress integrates well with Google Calendar. We recommend testing the free versions of these plugins to see which interface and workflow best suit your business.
Can I create a booking system without a plugin in WordPress?
Yes, but it requires custom development. You can use the WordPress REST API to build a front-end booking form, store appointments as custom post types, and manage availability with custom fields. However, this approach demands coding skills in PHP, JavaScript, and database management. For most users, a plugin is more practical as it handles security, scalability, and user experience out of the box.
How do I integrate payment gateways with a WordPress booking system?
Most premium booking plugins like Amelia or Bookly support popular payment gateways including PayPal, Stripe, and WooCommerce. After installing the plugin, navigate to its payment settings, select your gateway, and enter your API credentials. For custom solutions, you can use Stripe's API or PayPal's REST API to process payments securely. Always ensure your site uses HTTPS to protect transaction data.
What features should I look for in a WordPress booking plugin?
Key features include an intuitive booking calendar, customizable time slots, automated email notifications, payment integration, and support for multiple services or staff members. Additionally, look for plugins that offer Google Calendar sync, buffer times between appointments, and the ability to set custom booking rules (e.g., minimum notice period). A responsive design for mobile users is also essential.
How can I prevent double bookings in WordPress?
Double bookings are prevented by using a plugin that locks time slots once an appointment is confirmed. Most reputable booking plugins, such as Amelia or Bookly, include real-time availability checks. For custom systems, implement database transactions and use server-side validation to ensure no two bookings overlap for the same resource. Also, set a reasonable buffer time between appointments to avoid conflicts.
Is it possible to sync a WordPress booking system with Google Calendar?
Yes, many plugins offer two-way Google Calendar sync. For example, Amelia and BirchPress allow you to connect your Google Calendar account so that appointments created in WordPress appear in your calendar and vice versa. This helps you manage your schedule across platforms. You typically need to authorize the plugin to access your Google Calendar via OAuth 2.0.
How do I customize the booking form appearance in WordPress?
Most booking plugins provide built-in styling options to match your site's design. You can change colors, fonts, and layout through the plugin's settings. For deeper customization, you can override plugin templates in your theme (following the plugin's documentation) or use CSS. Some plugins also offer shortcodes with parameters to control the form's appearance on different pages.
What are the security considerations for a WordPress booking system?
Security is crucial. Use a reputable plugin that is regularly updated. Ensure your site has an SSL certificate (HTTPS). Implement CAPTCHA on booking forms to prevent spam. For custom systems, sanitize and validate all user inputs, use prepared statements for database queries, and store payment information securely (preferably using a third-party payment processor rather than storing credit card details locally).
The Ultimate Guide to WordPress and Video Streaming: Build, Host, and Monetize Your Video Platform
Introduction to WordPress and Video Streaming
WordPress has evolved far beyond its origins as a blogging platform, now powering over 40% of all websites on the internet. When combined with video streaming, it offers a flexible, scalable foundation for creating everything from small membership sites to large-scale live event platforms. The shift from traditional hosting—where video files are simply uploaded to a server—to modern streaming solutions involves leveraging specialized infrastructure that handles encoding, adaptive bitrate delivery, and content distribution networks (CDNs). This guide explores how WordPress bridges that gap, enabling you to build, host, and monetize video without deep technical expertise.
Why WordPress is a Top Choice for Video Sites
WordPress stands out for video sites due to its extensibility and user-friendly ecosystem. Key advantages include:
Plugin ecosystem: Hundreds of video-specific plugins allow you to add streaming capabilities, player customization, and monetization tools without custom code.
Content management: The native post and page system handles video metadata, categories, and tags seamlessly, making organization intuitive for both creators and viewers.
Theme compatibility: Many modern themes support video backgrounds, embedded players, and full-width layouts optimized for visual content.
Scalability: With proper hosting and a CDN, WordPress can handle thousands of concurrent viewers during live streams or high-traffic video launches.
Cost efficiency: Compared to dedicated video platforms like Vimeo OTT or Brightcove, WordPress offers lower entry costs and greater control over revenue and data.
Key Differences Between Video Hosting and Streaming
Understanding the distinction between hosting and streaming is crucial for choosing the right approach:
Aspect
Video Hosting
Video Streaming
Delivery method
Direct download or progressive playback
Real-time or on-demand adaptive bitrate streaming (HLS, DASH)
Server load
High, as each user downloads the full file
Lower per user, as only small chunks are delivered
Quality adaptation
Fixed resolution, buffering on slow connections
Automatically adjusts quality based on bandwidth
Live capability
Not supported natively
Core feature for live events
Storage requirement
Full file stored on server
Encoded segments stored, often on CDN
Streaming requires a specialized server or third-party service (e.g., Mux, Cloudflare Stream, or Wowza) that handles encoding and delivery. WordPress integrates with these via plugins or APIs, while simple hosting often relies on direct file links that fail under heavy traffic.
Common Use Cases: Courses, Memberships, Live Events
WordPress and video streaming serve a variety of practical applications:
Online courses: Platforms like LearnDash or LifterLMS integrate with streaming services to deliver structured lessons. Students access video modules through private, gated pages, with progress tracking and quiz integration.
Membership sites: Plugins such as MemberPress or Restrict Content Pro protect video content behind paywalls. Streaming ensures smooth playback for subscribers on any device, while preventing direct downloads via tokenized URLs.
Live events: Webinars, product launches, or virtual conferences use real-time streaming. WordPress can embed live players from YouTube Live, Vimeo Live, or self-hosted solutions, with chat and ticketing plugins for audience interaction and revenue.
Each use case benefits from WordPress’s ability to combine video with other content types—text, images, forums, or e-commerce—creating a cohesive user experience that standalone streaming platforms often lack.
Choosing the Right Video Hosting for WordPress
When building a video platform with WordPress, the hosting choice directly impacts performance, cost, and user experience. You must decide between self-hosting your video files or using a third-party platform like Vimeo, YouTube, or JW Player. Each approach offers distinct trade-offs in control, scalability, and integration complexity. Below, we break down the options to help you align your hosting strategy with your goals for WordPress and video streaming.
Self-Hosted Video: Pros, Cons, and Performance Considerations
Self-hosting means uploading video files directly to your WordPress server or a dedicated cloud storage service (e.g., Amazon S3, DigitalOcean Spaces). You manage delivery through your own infrastructure.
Pros: Full control over content, no third-party branding, customizable player, no recurring platform fees, and direct access to raw video data for analytics.
Cons: High server bandwidth costs, risk of buffering without a CDN, limited scalability for large audiences, and increased server load that can slow your entire site.
Performance considerations: To avoid poor user experience, you must implement a CDN (e.g., Cloudflare, Bunny.net) and optimize video files with compression (e.g., H.264 codec, bitrate under 5 Mbps for HD). Without a CDN, your origin server can crash under heavy traffic.
Practical code example for self-hosted video: Embed a video using the HTML5 video tag with a CDN URL:
<video width="640" height="360" controls>
<source src="https://cdn.yourdomain.com/videos/tutorial.mp4" type="video/mp4">
<track src="captions_en.vtt" kind="captions" srclang="en" label="English">
Your browser does not support the video tag.
</video>
Third-Party Hosting: Scalability and CDN Benefits
Third-party platforms handle video storage, encoding, and delivery through their global CDNs. Popular options include Vimeo (Pro/Business), YouTube (free), and JW Player (enterprise). Integration with WordPress is typically done via plugins or embed codes.
Scalability: These platforms automatically handle traffic spikes—no server upgrades needed. YouTube and Vimeo serve millions of concurrent streams without degrading performance.
CDN benefits: All major providers include built-in CDN delivery, ensuring fast load times worldwide. JW Player offers advanced adaptive bitrate streaming (HLS) for smooth playback on any connection.
Trade-offs: You lose control over ads (YouTube), video privacy settings (Vimeo Business offers password protection), and custom player branding. Monthly fees for premium features (e.g., Vimeo Pro at $20/month) can add up.
Hybrid Approaches: Combining Hosting Types for Flexibility
A hybrid strategy lets you leverage the strengths of both methods. For example, use self-hosting for exclusive, high-value content (e.g., paid courses) and third-party hosting for public trailers or free tutorials. This approach optimizes cost and performance.
Content Type
Recommended Hosting
Reason
Premium members-only videos
Self-hosted + private CDN
Full control, no third-party access
Public marketing videos
YouTube (free)
Built-in audience, zero bandwidth cost
Live streams or webinars
Vimeo Live or JW Player
Reliable streaming, DVR features
Low-traffic educational clips
Self-hosted (no CDN)
Cost-effective for small audiences
To implement a hybrid setup in WordPress, use a plugin like FV Player or Presto Player that supports multiple sources. For instance, you can embed a Vimeo video alongside a self-hosted file in the same playlist, choosing the source based on user role or page context. This flexibility is ideal for scaling your WordPress and video streaming platform without overcommitting to a single hosting model.
Essential WordPress Plugins for Video Streaming
Building a robust video streaming platform on WordPress requires the right plugins to handle playback, live broadcasting, and monetization. The ecosystem offers specialized tools that transform a standard site into a full-fledged streaming hub. Below is a curated selection of essential plugins organized by their core function: players, live streaming, and revenue generation. Each plugin has been evaluated for features, performance, and integration with WordPress and third-party services.
Top Video Player Plugins: Presto Player, WP Video Robot
Video player plugins are the backbone of any streaming site, controlling how content is rendered, delivered, and secured. Two standout options are Presto Player and WP Video Robot.
Presto Player is a premium WordPress plugin designed for performance and user experience. It supports adaptive bitrate streaming (HLS and DASH), which automatically adjusts video quality based on the viewer’s internet connection. Presto Player also includes built-in lazy loading, a distraction-free “video hub” layout, and integration with major CDNs like Bunny.net and Amazon CloudFront. For DRM, it offers basic protection through URL signing and domain restrictions, though it does not support Widevine or PlayReady natively.
WP Video Robot focuses on automation and remote hosting. Instead of uploading videos to your server, it fetches content from external sources like YouTube, Vimeo, or Amazon S3 and embeds them with a customizable player. It supports adaptive bitrate when used with compatible CDN sources, but its DRM capabilities are limited to privacy settings on embedded platforms. WP Video Robot excels in creating video galleries and playlists with minimal manual effort.
Feature
Presto Player
WP Video Robot
Adaptive Bitrate
Yes (HLS, DASH)
Partial (via CDN source)
DRM Support
URL signing, domain restriction
Platform-level only
Video Hosting
Self-hosted or CDN
Remote (YouTube, Vimeo, etc.)
Performance Features
Lazy loading, video hub
Gallery automation, bulk import
Pricing
Premium (annual subscription)
Freemium (paid tiers for automation)
Live Streaming Plugins: WebinarPress, LiveStream for WordPress
For real-time broadcasting, live streaming plugins integrate with platforms like YouTube Live, Twitch, or custom RTMP servers. WebinarPress and LiveStream for WordPress are two reliable choices.
WebinarPress is tailored for scheduled live events and automated webinars. It allows you to embed live streams from YouTube or Vimeo, manage attendee registration, and send automated reminders. The plugin supports chat, polls, and Q&A during the stream, and it can replay content on demand. It does not include native adaptive bitrate or DRM; instead, it relies on the embedded platform’s capabilities.
LiveStream for WordPress is a lightweight plugin that connects to any RTMP-compatible streaming server (like OBS with a CDN). It provides a simple shortcode to embed live video and supports real-time chat via third-party integrations. It offers basic monetization through pay-per-view links but lacks advanced DRM or adaptive streaming. This plugin is ideal for small-scale live events where simplicity is key.
Monetization Plugins: MemberPress, Easy Digital Downloads
Generating revenue from video content requires robust membership and e-commerce solutions. MemberPress and Easy Digital Downloads (EDD) are leading plugins that integrate seamlessly with video players.
MemberPress is a full-featured membership plugin that allows you to restrict access to video content based on subscription tiers. It supports recurring payments, free trials, and coupon codes. MemberPress integrates directly with Presto Player and other video plugins to lock individual videos or entire categories. It also includes built-in DRM-like features, such as disabling right-click and preventing direct video URL access, though it is not a substitute for enterprise-level DRM.
Easy Digital Downloads is primarily an e-commerce plugin for selling digital goods, including video files and streaming access. With its “Software Licensing” extension, you can sell one-time access to a video library or individual streams. EDD does not natively handle subscriptions, but it can be extended with the “Recurring Payments” add-on. For video streaming, it works best with plugins that generate unique download links, such as Presto Player’s secure URLs. EDD is a solid choice for one-off video sales or pay-per-view models.
When selecting monetization plugins, consider whether your business model relies on subscriptions (MemberPress) or one-time purchases (EDD). Both can be combined with the video player plugins listed above to create a complete streaming ecosystem on WordPress.
Optimizing WordPress for High-Quality Video Delivery
Delivering high-quality video through WordPress requires more than simply embedding a file. Without proper optimization, viewers face buffering delays, poor mobile playback, and slow page loads. This section outlines technical strategies to ensure fast loading, buffering-free playback, and mobile responsiveness, focusing on three critical areas: CDNs, compression, and server configuration.
A Content Delivery Network (CDN) is essential for video streaming. It distributes your video files across multiple geographically dispersed servers, reducing latency by serving content from the node closest to the user. For WordPress, integrate a CDN that supports video streaming protocols like HLS (HTTP Live Streaming) or MPEG-DASH. Here’s how to implement it:
Choose a video-optimized CDN: Services like Cloudflare Stream, Bunny.net, or Amazon CloudFront offer specialized video delivery with adaptive bitrate streaming.
Use a WordPress CDN plugin: Plugins like WP Rocket or CDN Enabler can rewrite video URLs to point to your CDN. For video-specific needs, consider a plugin like Presto Video or WP Video Sync.
Enable HTTPS: Ensure your CDN serves video over HTTPS to avoid mixed content warnings and to support modern streaming protocols.
Example configuration for Bunny.net CDN with HLS streaming:
// In your WordPress theme's functions.php, add a filter to rewrite video URLs
add_filter('wp_get_attachment_url', function($url, $post_id) {
$cdn_url = 'https://your-bunny-cdn.b-cdn.net';
$site_url = get_site_url();
return str_replace($site_url, $cdn_url, $url);
}, 10, 2);
Test your CDN’s performance using tools like Pingdom or GTmetrix, ensuring Time to First Byte (TTFB) remains under 200ms for video requests.
Video Compression and Format Best Practices
Compressing video reduces file size without sacrificing visual quality, directly improving load times and bandwidth usage. Follow these best practices for WordPress video delivery:
Proper caching and server settings prevent buffering by minimizing server load and ensuring efficient data delivery. For WordPress, focus on these configurations:
Page caching: Use a caching plugin like WP Rocket or W3 Total Cache to cache HTML pages containing video embeds. Exclude video player scripts from caching to allow dynamic stream selection.
Object caching: Implement Redis or Memcached for database query caching, especially if using a video library plugin with many custom post types.
Server-level caching: Enable Nginx FastCGI Cache or Apache mod_cache. For streaming, configure byte-range caching to support seeking in videos.
Example Nginx configuration for video streaming with byte-range support:
Enable HTTP/2 or HTTP/3 for faster multiplexed requests.
Increase PHP memory limit to at least 256M (in wp-config.php: define('WP_MEMORY_LIMIT', '256M');).
Use a dedicated server or VPS with sufficient RAM (4GB+ for moderate traffic) to handle concurrent video requests.
Monitor server load with tools like New Relic or htop, and scale resources as needed.
By combining a CDN, optimal compression, and robust caching, your WordPress site will deliver high-quality video streaming that loads quickly, plays without buffering, and adapts to any device.
Building a Membership Video Site with WordPress
To transform a standard WordPress installation into a profitable membership video platform, you must combine a robust membership plugin with a reliable video streaming solution. The core workflow involves installing a plugin like MemberPress, Restrict Content Pro, or Paid Memberships Pro, then connecting it to your chosen video host (such as Vimeo OTT, Bunny.net, or Amazon S3 with a CDN). Begin by creating a private page or custom post type for your video content, then restrict access using the membership plugin’s content protection rules. Ensure your hosting environment can handle concurrent streaming loads—consider a VPS or dedicated server with sufficient bandwidth and a content delivery network (CDN) to reduce latency.
Setting Up User Roles and Access Levels
Membership plugins allow you to define granular user roles beyond the default WordPress subscriber, contributor, author, editor, and administrator. For a video site, typical roles include:
Free Member – Can view teaser content or sample videos.
Basic Subscriber – Access to standard video library, no drip features.
Premium Subscriber – Full library access, early releases, and downloadable content.
Administrator – Full backend control, user management, and content creation.
Access levels are defined by membership levels (e.g., Silver, Gold, Platinum) which you create inside your plugin. Each level is assigned a specific set of capabilities: view certain categories, watch a limited number of videos per month, or access exclusive series. Use the plugin’s “content restriction” settings to protect individual posts, pages, or entire categories. For example, in MemberPress, you can set rules such as “Only Gold members can view the ‘Advanced Tutorials’ category.” This ensures that users only see content matching their subscription tier.
Integrating Payment Gateways for Recurring Billing
To charge users on a recurring basis, you must integrate a payment gateway that supports subscriptions. The most common options are Stripe and PayPal Pro, both of which work seamlessly with major membership plugins. Follow this step-by-step integration checklist:
Install and activate your chosen membership plugin (e.g., Paid Memberships Pro).
Navigate to the plugin’s payment settings (typically under Memberships > Payments).
Select your gateway (Stripe or PayPal) and enter your API keys (found in your Stripe dashboard or PayPal merchant account).
Configure billing intervals: daily, weekly, monthly, or yearly. Set trial periods if desired.
Test the checkout flow using a sandbox environment (Stripe test keys or PayPal sandbox).
Enable automatic email receipts and renewal reminders to reduce churn.
For best results, use a gateway that supports webhooks to synchronize subscription status changes (e.g., payment failure, cancellation) with your WordPress user database. This keeps access levels accurate in real time.
Drip Content and Course Progression Features
Drip content releases videos to members on a schedule, which is essential for course-based platforms or serialized video series. Most membership plugins include a “drip” or “content release” feature. For example, in MemberPress, you can set a rule that a specific video becomes available 7 days after a user’s registration date. Alternatively, you can use course builder plugins like LearnDash or LifterLMS, which offer built-in drip scheduling and lesson progression. To implement:
Drip by date: Set a fixed calendar date when each video becomes public.
Drip by delay: Define a number of days after signup for each piece of content.
Drip by prerequisite: Require users to complete a previous video or quiz before unlocking the next one.
Progression features also include marking videos as “watched” and tracking completion percentages. Use a plugin like Sensei or Tutor LMS to add quizzes and certificates that reinforce learning. Combine these with the membership plugin’s access controls to ensure only paying members can progress through the full curriculum. This approach increases engagement and retention, as users feel a sense of accomplishment and investment in your platform.
Live Streaming on WordPress: Tools and Workflows
Live streaming transforms a static WordPress site into an interactive hub for real-time events, webinars, or 24/7 channels. With the right combination of embedding, backend tools, and interaction management, you can deliver reliable, low-latency video directly to your audience. This section covers three critical workflows: embedding external streams, using RTMP servers with professional encoding software, and moderating live chat for engagement and safety.
Embedding YouTube Live or Twitch Streams
The simplest way to live stream on WordPress is to embed a stream from a platform like YouTube Live or Twitch. This offloads encoding, bandwidth, and transcoding to the provider.
YouTube Live Embed: Go to YouTube Studio, start a live stream, and copy the “Embed” link from the stream’s share options. In WordPress, add a “Custom HTML” block and paste the <iframe> code. Adjust width and height as needed (e.g., width="100%" height="500").
Twitch Embed: Use Twitch’s embed URL format: https://player.twitch.tv/?channel=YOUR_CHANNEL&parent=YOURDOMAIN.com. Add this as an iframe in a Custom HTML block. Set parent to your site’s domain to avoid CORS errors.
Best Practices: Always use HTTPS, set a responsive container (e.g., style="max-width: 100%;"), and test the embed in a private browser window before going live.
Using RTMP Servers and Streaming Software (OBS)
For full control—e.g., custom branding, no platform ads, or 24/7 channels—you need an RTMP (Real-Time Messaging Protocol) server and encoding software like OBS Studio. This workflow streams from OBS to your own server, which then distributes the video to your WordPress site.
Set up an RTMP server: Use a WordPress plugin like “WP Streaming” or a dedicated solution like Wowza or Nginx with RTMP module. For a self-hosted example, install Nginx with the RTMP module on a VPS.
Configure OBS: In OBS, go to Settings → Stream. Select “Custom…” as the service. Enter your RTMP server URL (e.g., rtmp://yourdomain.com/live) and a stream key (e.g., mywebinar123).
Embed the player on WordPress: Use a video player that supports HLS or WebRTC output. Many RTMP servers convert the stream to HLS. Add a player using an HTML block with a <video> tag pointing to the HLS URL.
Practical command example: To test an RTMP stream locally using FFmpeg (if you have server access), run this command to push a test video file to your RTMP server:
This simulates a live feed from a file, useful for testing before a real event.
Managing Chat, Moderation, and Viewer Interaction
Live streaming without chat is a broadcast, not an interaction. To foster engagement, integrate a real-time chat system into your WordPress page.
Chat integration: Use plugins like “WP Live Chat” or embed a third-party service (e.g., Twitch chat via embedded iframe, or a self-hosted solution like Rocket.Chat). For YouTube Live, embed the chat using https://www.youtube.com/live_chat?v=VIDEO_ID&embed_domain=YOURDOMAIN.com.
Moderation tools: Set up keyword filters, slow mode (e.g., one message per 30 seconds), and assign moderators. In OBS, you can overlay chat using browser sources with custom CSS to hide spam.
Viewer interaction workflows: Use polls, Q&A widgets, or donation alerts. For example, add a “Raise Hand” button via a custom plugin that toggles a flag in a shared database, or use a service like Streamlabs to show real-time follower notifications on your stream.
A practical approach for 24/7 channels: combine a playlist in OBS (e.g., pre-recorded content with live cut-ins) with a persistent chat window using WebSockets. This keeps viewers engaged even during off-peak hours.
Monetizing Video Content on WordPress
When you combine WordPress and video streaming, the most critical step is choosing how to turn views into revenue. The platform offers flexible models that cater to different audience sizes and content types. Whether you run a tutorial site, a live event channel, or a niche entertainment hub, you can implement pay-per-view, advertising, donations, or affiliate marketing—often in combination. Below we break down the primary revenue streams and the specific tools needed for each.
Pay-per-view (PPV) allows you to charge a one-time fee for a single video, a series, or a live stream. To implement this on WordPress, you need a plugin that restricts content and processes payments. Popular options include:
MemberPress – Integrates with video hosting platforms like Vimeo and Amazon S3; supports one-time and subscription payments.
Paid Memberships Pro – Offers granular access rules for individual videos or categories; works with Stripe and PayPal.
WooCommerce Memberships – Combines product-based selling with membership access; ideal for selling video bundles.
Restrict Content Pro – Lightweight and developer-friendly; uses shortcodes to lock video embeds.
Create a membership level or product tied to a specific video.
Embed your video using a secure player (e.g., Video.js or the plugin’s native player).
Apply the access restriction to the video’s post or page.
A key advantage of PPV is that you retain full control over pricing and content shelf life, making it suitable for exclusive releases, workshops, or premium tutorials.
Ad Integration: Pre-roll, Mid-roll, and Display Ads
Advertising remains a reliable monetization strategy, especially for high-traffic video sites. On WordPress, you can integrate ads through video hosting services or dedicated ad plugins. The main ad types include:
Use YouTube or Vimeo ads – If you host videos externally, enable their native ad programs and embed the monetized players.
Install an ad management plugin – Plugins like Ad Inserter or WP‑AdCenter let you place custom ad codes (from Google Ad Manager or Media.net) in the video area.
Consider server-side ad insertion – For advanced setups, use platforms like JW Player with ad schedules for dynamic mid-roll insertion.
Remember that excessive ads can hurt viewer retention. A good rule is one pre-roll per session and one mid-roll per 15 minutes of content.
Accepting Donations and Tips via Stripe or PayPal
For creators who prefer voluntary support, donations and tips offer a low-barrier revenue model. WordPress makes this simple with dedicated plugins that integrate directly with Stripe or PayPal. Recommended tools:
WP Simple Pay – Creates one-time or recurring donation forms without a shopping cart.
GiveWP – Built for nonprofits but fully customizable for any video creator; supports donor management.
Buy Me a Coffee plugin – Lightweight and designed for quick tips; embeds a button on your video page.
PayPal Donations – A free block or widget that sends payments to your PayPal account.
Best practices for donation-based monetization:
Place a donation button prominently near the video player or in a sticky footer.
Offer suggested amounts (e.g., $3, $5, $10) to guide users.
Thank donors publicly (with permission) to encourage future contributions.
Pair donations with exclusive perks like shout-outs or bonus content to increase conversion.
By combining these models—PPV for premium videos, ads for free content, and donations for community support—you create a resilient revenue ecosystem that adapts to your audience’s preferences and your content strategy. Each method can be tested and refined using WordPress analytics to maximize earnings while maintaining a positive user experience.
SEO for Video Streaming Websites
Search engine optimization for video content requires a distinct approach compared to text-based pages. Video streaming websites must prioritize discoverability within both traditional search engines like Google and video platforms like YouTube. Effective SEO ensures that your video content ranks for relevant queries, driving organic traffic and user engagement. The following techniques focus on optimizing metadata, technical signals, and accessibility to maximize visibility.
Crafting compelling and keyword-rich titles, descriptions, and tags is foundational for video SEO. Titles should be concise (under 60 characters) and include the primary keyword naturally, while also enticing clicks. Descriptions offer more space; write at least 150 words that summarize the video content, incorporate secondary keywords, and include a call-to-action. Tags should be a mix of broad and specific terms related to your topic. For example, a tutorial on “WordPress and video streaming” might use tags like “WordPress video plugin,” “streaming setup,” and “video hosting.” Avoid keyword stuffing, as it can harm rankings. Instead, focus on relevance and user intent.
Using Video Sitemaps and Schema Markup
Technical SEO elements like video sitemaps and schema markup help search engines understand and index your video content accurately. A video sitemap is an XML file that lists video URLs, titles, descriptions, thumbnail locations, and duration. Submit this sitemap via Google Search Console to ensure all videos are crawled. Schema markup, specifically VideoObject structured data, provides additional context such as upload date, transcript URL, and embed URL. Implementing both improves the chance of rich snippets in search results, such as video thumbnails and watch times. The table below compares these two methods for video indexing.
Feature
Video Sitemap
Schema Markup (VideoObject)
Primary Purpose
Index video URLs and metadata
Enhance search result appearance with rich snippets
Same as sitemap plus transcript, embed URL, upload date
Impact on Rankings
Direct indexing signal
Indirect via improved click-through rates
Best Use Case
Large libraries with frequent updates
Individual high-value videos for rich results
Both methods are complementary; using them together provides comprehensive coverage for video SEO.
Transcriptions and Captions for Accessibility and SEO
Adding transcriptions and captions to your video content serves dual purposes: improving accessibility for users with hearing impairments and boosting SEO. Search engines cannot watch videos, but they can read text. A full transcript provides crawlable text that includes keywords and context, helping search engines understand the video’s topic. Captions (closed or open) also enhance user experience, increasing watch time and engagement—both ranking factors. For WordPress and video streaming sites, plugins like WP Media Player or built-in video platform tools often support automatic caption generation. Always review auto-generated captions for accuracy, as errors can harm credibility. Additionally, transcripts can be published as blog posts or separate pages, creating more indexed content that links back to the video.
Security and Performance Best Practices for WordPress and Video Streaming
When building a video platform with WordPress and video streaming, two pillars determine long-term success: protecting your premium content from unauthorized access and delivering it without buffering or lag. Neglecting either can erode subscriber trust and revenue. This section covers essential strategies to lock down your videos while keeping your site lightning-fast.
Implementing Token-Based Access and Watermarking
Token-based access ensures that only authenticated users can view your videos, even if they share a direct URL. This works by generating a unique, time-limited token for each user session, which the video player validates before loading content. Here is a practical example using a PHP function to generate a secure token for a streaming endpoint:
Watermarking adds a secondary layer of deterrence. Overlay a semi-transparent user identifier (e.g., email or username) onto the video stream in real time. This discourages screen recording and helps trace leaks. For WordPress, plugins like Protect Your Videos or Video Watermark can automate this, but ensure the watermark does not degrade the viewing experience—use a low-opacity overlay in a corner.
Token benefits: Prevents URL sharing, limits access to active sessions, and integrates with subscription plugins (e.g., MemberPress, Restrict Content Pro).
Watermarking tips: Use server-side rendering (e.g., FFmpeg) for scalability; avoid client-side JavaScript overlays that can be bypassed.
Securing Against Hotlinking and Bandwidth Theft
Hotlinking occurs when other sites embed your video files directly, consuming your bandwidth without authorization. To block this, configure your web server to deny requests from unauthorized domains. For Nginx, add this to your server block:
Additionally, use a Content Delivery Network (CDN) like Cloudflare or Bunny.net that offers built-in hotlink protection and signed URLs. CDNs also cache your videos at edge locations, reducing server load and improving global delivery speed.
Security Measure
What It Protects
Implementation Complexity
Token-based access
Direct URL sharing
Moderate (requires PHP/API work)
Watermarking
Screen recording / piracy
Low to moderate (plugin or FFmpeg)
Hotlink protection
Bandwidth theft
Low (server config or CDN)
CDN signed URLs
Unauthorized downloads
Moderate (CDN-specific setup)
Monitoring Performance with Tools like GTmetrix
Streaming performance directly affects user retention. Use tools like GTmetrix, Google PageSpeed Insights, or WebPageTest to analyze your site’s load speed, with a focus on video-related metrics. Key areas to monitor include:
Time to First Byte (TTFB): Should be under 200ms. High TTFB often indicates slow server or database queries—consider a caching plugin like WP Rocket or a faster hosting provider.
Largest Contentful Paint (LCP): Keep below 2.5 seconds. For video pages, lazy-load the player and preload only the first frame thumbnail.
Total Blocking Time (TBT): Minimize JavaScript from video embeds. Use a player that supports asynchronous loading (e.g., Video.js or Plyr).
Run tests after every major plugin update or content addition. GTmetrix’s waterfall view helps pinpoint if video files are blocking render or if third-party scripts (e.g., analytics, ads) are slowing playback. Combine this with server-level monitoring (e.g., New Relic or Server Pulse) to track CPU and bandwidth usage during peak streaming hours. Regular performance audits ensure your WordPress and video streaming platform remains responsive, even as your audience grows.
Future Trends in WordPress and Video Streaming
The landscape of WordPress and video streaming is evolving rapidly, driven by user demand for immersive, personalized experiences. As bandwidth improves and browser capabilities expand, content creators on WordPress must anticipate shifts that go beyond simple playback. Three key trends—interactive video, AI-driven curation, and immersive reality formats—are set to redefine how audiences engage with video content, turning passive viewers into active participants.
Interactive Video Elements: Quizzes and Branching
Interactive video transforms static content into a two-way conversation. In the context of WordPress and video streaming, this means embedding decision points, quizzes, and clickable hotspots directly into the video timeline. For example, a cooking tutorial can prompt viewers to choose between ingredients, leading to different recipe outcomes. Branching narratives allow creators to build choose-your-own-adventure style series, increasing watch time and retention. Key interactive elements to integrate include:
In-video quizzes: Test comprehension or gather preferences, with results stored via WordPress user profiles or LMS plugins.
Branching paths: Present viewers with choices that alter the video sequence, supported by tools like H5P or interactive video players.
Clickable annotations: Link to product pages, related posts, or additional scenes without leaving the player.
Data capture forms: Collect email addresses or feedback mid-stream, seamlessly integrated with WordPress forms.
These elements are becoming easier to implement through dedicated WordPress plugins that support interactive video layers, enabling creators to boost engagement metrics and gather actionable insights.
AI-Powered Recommendations and Content Curation
Artificial intelligence is revolutionizing content discovery on WordPress video platforms. Instead of relying on static categories, AI algorithms analyze user behavior—such as watch history, pause points, and skip patterns—to serve personalized video suggestions. This trend enhances user retention and monetization by keeping viewers on the site longer. Effective AI curation in WordPress and video streaming involves:
Collaborative filtering: Recommend videos based on what similar users watched, using plugins that integrate with machine learning APIs.
Content-based filtering: Suggest videos with matching tags, descriptions, or transcripts, leveraging WordPress taxonomy and custom fields.
Real-time adaptation: Adjust recommendations as a user’s session progresses, updating the video queue dynamically.
Automated playlists: Generate themed collections (e.g., “Trending Now” or “Continue Watching”) without manual input.
AI-driven curation not only improves user experience but also increases ad revenue and subscription conversions by delivering relevant content at the right moment.
Integration with Virtual Reality and 360-Degree Video
Virtual reality (VR) and 360-degree video represent the frontier of immersive storytelling. For WordPress and video streaming, this means supporting spatial audio, head-tracking, and panoramic playback directly within the browser. While still niche, adoption is growing in real estate, education, and tourism. To prepare for this trend, consider the following technical requirements and use cases:
Feature
Implementation in WordPress
Example Use Case
360-degree video embedding
Use HTML5 video with spherical projection; plugins like WP VR Viewer or Video.js with 360 add-ons.
Virtual property tours with clickable hotspots for room details.
VR headset compatibility
Integrate WebXR API support via custom themes or plugins; ensure responsive design for mobile VR.
Interactive museum exhibits where users explore artifacts in 3D space.
Interactive overlays
Add clickable info panels or navigation arrows within 360-degree scenes using JavaScript libraries.
Educational content where learners click on objects to see labels or animations.
Bandwidth optimization
Use adaptive bitrate streaming for 4K 360 video; compress equirectangular files without quality loss.
Live virtual concerts with multiple camera angles selectable by the viewer.
As browser support for WebXR improves, WordPress plugins will increasingly offer drag-and-drop VR integration, making immersive video accessible to non-developers. This trend will enable creators to differentiate their platforms and command premium pricing for unique viewing experiences.
What is the best video streaming plugin for WordPress?
The best plugin depends on your needs. For self-hosted video, WP Video Robot or FV Flowplayer offer robust features. For cloud-based streaming, Presto Video or Spotlight (for Vimeo) integrate seamlessly. For a full OTT experience, Uscreen or WP Streaming Video provide built-in monetization, user management, and adaptive streaming. Evaluate factors like bandwidth, DRM, and revenue model before choosing. Many plugins offer free trials, so test a few to see which fits your workflow.
Can I host my own video streaming server with WordPress?
Yes, you can self-host video using WordPress, but it requires a robust hosting setup. Use a dedicated server or VPS with high bandwidth, and install a streaming engine like Wowza or Nginx with RTMP module. Plugins like FV Flowplayer or Video.js can integrate these streams. However, self-hosting demands technical expertise, server maintenance, and scalability planning. For most users, a hybrid approach—using a CDN like Cloudflare Stream or a dedicated video host—is more reliable and cost-effective.
How do I monetize a video streaming site built on WordPress?
Monetization methods include subscription plans (using plugins like MemberPress or Restrict Content Pro), pay-per-view (via Easy Digital Downloads or WooCommerce with video access), and ad revenue (integrating Google Ad Manager or VAST ads). You can also offer rental/purchase options, sponsorships, or affiliate marketing. For premium content, consider a membership plugin that gates video access. Ensure your video player supports DRM and secure streaming to prevent unauthorized sharing.
What are the best video hosting options for WordPress?
Popular options include Vimeo (with customizable player and privacy controls), YouTube (free but with ads), Amazon S3 + CloudFront (scalable but technical), and dedicated video platforms like Brightcove or JW Player. For WordPress, Wistia offers marketing-focused features, while Bunny.net provides cost-effective CDN. Choose based on budget, required features (analytics, ads, DRM), and audience size. Many plugins directly integrate these services, simplifying embedding and management.
How can I optimize video SEO on my WordPress site?
Optimize by using descriptive video titles, meta descriptions, and transcripts (which can be indexed by search engines). Use schema markup (VideoObject) to enable rich snippets. Plugins like Yoast SEO or Rank Math support video sitemaps. Host videos on fast CDNs to improve page speed, and embed videos with lazy loading. Create custom thumbnails and include video in XML sitemaps. Also, generate closed captions (WebVTT) to boost accessibility and SEO.
What are the key technical requirements for streaming video on WordPress?
Key requirements include a reliable hosting provider with sufficient bandwidth, a video player that supports adaptive bitrate streaming (HLS or MPEG-DASH), and a CDN for global delivery. For self-hosting, you need a streaming server (e.g., Wowza, Nginx with RTMP) and encoding software (like FFmpeg). WordPress itself must be optimized with caching, image compression, and a lightweight theme. Use a plugin that handles video transcoding and delivers multiple resolutions for different devices.
How do I protect my video content from unauthorized access in WordPress?
Protect content by using plugins that offer token-based access, time-limited URLs, or DRM integration (e.g., JW Player's DRM). Restrict direct file access via .htaccess rules and serve videos through a PHP proxy. Use membership plugins to gate pages, and encrypt video streams with HLS encryption. For high-security needs, consider dedicated DRM solutions like Verimatrix or Widevine. Also, disable right-click and use watermarking to deter casual copying.
What is the difference between self-hosted and cloud-hosted video streaming for WordPress?
Self-hosted streaming means storing and delivering video from your own server, giving you full control but requiring technical know-how, high bandwidth, and server maintenance. Cloud-hosted streaming relies on third-party services (like Vimeo, YouTube, or AWS) to handle storage, transcoding, and delivery. Cloud options are easier to set up, scalable, and often include analytics, but may have recurring costs and less customization. Choose based on your budget, technical skills, and need for control.
React vs. Next.js: Which Framework Should You Use in 2026?
1. Introduction: The State of Frontend Development in 2026
As the frontend ecosystem matures into 2026, the line between client-side rendering and server-side processing has all but vanished. Developers now demand frameworks that seamlessly blend static site generation, server-side rendering, incremental hydration, and edge computing—all without sacrificing developer ergonomics. React and Next.js, long intertwined, have evolved into distinct yet complementary forces. React remains the core library for building user interfaces, while Next.js has solidified its position as the de facto meta-framework that extends React’s capabilities into full-stack territory. This section sets the stage for the React vs. Next.js decision in 2026 by examining the key trends reshaping how we build for the web.
The Rise of Full-Stack Frontend Frameworks
In 2026, frontend frameworks are no longer just about the view layer. The industry has embraced full-stack architectures where a single framework handles data fetching, authentication, routing, and rendering across server and client environments. This shift is driven by three major forces:
Edge computing maturity: Deploying logic near users reduces latency and enables real-time personalization without traditional backend servers.
Server Components as standard: React Server Components (RSCs) are now the default in most production apps, allowing developers to offload heavy data processing to the server while streaming interactive islands to the client.
Unified developer experience: Tools like Next.js, Remix, and Nuxt (for Vue) converge on patterns that eliminate the need for separate API servers, simplifying deployment and maintenance.
This trend has made frameworks like Next.js indispensable for teams that want to ship fast without managing complex infrastructure. The choice is no longer between a library and a framework—it is about how much of the stack you want to own.
Why React Remains the UI Library Foundation
Despite the rise of meta-frameworks, React’s core identity as a UI library has not diminished. In 2026, React excels in scenarios where you need fine-grained control over rendering and state management without the opinions of a full framework. Key reasons to choose React standalone include:
Custom architecture: For teams building bespoke applications with unique routing, data-fetching, or rendering requirements, React provides the flexibility to compose your own stack from libraries like TanStack Router, Zustand, and React Query.
Non-web environments: React Native, React Three Fiber, and React PDF all rely on the core library, not Next.js. If your project spans multiple platforms, React’s portable component model is essential.
Incremental adoption: Existing projects that cannot migrate to a meta-framework benefit from React’s stable API and incremental upgrade paths—no forced architecture changes.
React’s longevity stems from its simplicity: it is a library for building component trees. It does not prescribe how you fetch data, handle routing, or deploy. This makes it the right choice for teams that prefer to assemble their own toolchain.
Next.js as the De Facto Meta-Framework
Next.js has evolved far beyond its origins as a simple React server-side rendering tool. By 2026, it has become the default recommendation for most new React projects. Its dominance rests on four pillars:
Pillar
Description
Integrated rendering modes
Next.js supports static generation, server-side rendering, incremental static regeneration, and fully dynamic RSCs—all configurable per route.
Edge-ready infrastructure
Deploy to Vercel’s edge network or self-host with built-in support for streaming, caching, and middleware at the network edge.
Opinionated conventions
The file-based router, App Router, and loader functions reduce boilerplate, enforcing patterns that scale across teams.
Full-stack capabilities
API routes, server actions, and database access from the same codebase eliminate the need for a separate backend framework.
For teams building content-heavy sites, e-commerce platforms, or SaaS applications, Next.js offers a proven path from prototype to production. Its tight integration with React Server Components and edge computing makes it the pragmatic choice for most modern web projects in 2026.
Core Architecture Differences: Library vs. Framework
The most fundamental distinction between React and Next.js lies in their architectural philosophy: React is a library for building user interfaces, while Next.js is a full-stack framework built on top of React. This difference dictates everything from project structure to rendering behavior.
React’s Unopinionated Component Model
React provides a declarative, component-based approach to building UIs. It gives developers the freedom to structure their applications however they choose. There are no built-in conventions for routing, data fetching, or server-side logic. This unopinionated nature makes React highly flexible but also places the burden of architectural decisions on the developer or their chosen toolchain.
Key characteristics of React’s model include:
Components are self-contained UI units that manage their own state and props.
Developers must integrate third-party libraries for routing (e.g., React Router), state management, and server-side rendering.
The rendering strategy is primarily client-side by default, using createRoot to mount the application in the browser.
There is no prescribed file structure; every project can organize folders and files differently.
Next.js: File-Based Routing and API Layer
Next.js extends React by providing a complete framework with strong conventions. Its most notable features are file-based routing and a built-in API layer. Instead of configuring routes manually, developers create files and folders inside a app (or legacy pages) directory, and Next.js automatically maps them to URL paths.
Practical example of file-based routing in Next.js:
// app/blog/[slug]/page.js
// This file automatically creates a route at /blog/:slug
export default function BlogPost({ params }) {
return <h1>Blog Post: {params.slug}</h1>;
}
Additionally, Next.js includes an API layer through route handlers. Files placed in app/api/ become serverless functions, enabling backend logic without a separate server. This consolidates frontend and backend code in one project.
How Rendering Strategies Differ (CSR, SSR, SSG, ISR)
Rendering strategy is where the library-vs-framework distinction becomes most technical. React, by default, only supports client-side rendering (CSR), where the entire application is rendered in the browser after JavaScript loads. While CSR is simple to implement, it can lead to slower initial page loads and poor SEO.
Next.js provides multiple rendering strategies out of the box, each suited to different use cases:
Strategy
Acronym
How It Works
Best For
Client-Side Rendering
CSR
Rendered in the browser after JS loads
Dashboards, authenticated pages
Server-Side Rendering
SSR
Rendered on the server per request
Dynamic content, personalized pages
Static Site Generation
SSG
Pre-rendered at build time into HTML
Blogs, marketing sites
Incremental Static Regeneration
ISR
Combines SSG with periodic revalidation
E-commerce, content-heavy sites
In Next.js, developers can choose the strategy per route or even per component using React Server Components. This granular control is not available in plain React without significant custom configuration. The framework handles the complexities of hydration, caching, and data fetching, allowing developers to focus on features rather than infrastructure.
3. Performance and Rendering Options in 2026
In 2026, the performance landscape of React and Next.js diverges sharply, reflecting their distinct philosophies: React offers granular control over rendering strategies, while Next.js provides optimized defaults that reduce developer overhead. React’s flexibility suits projects requiring custom rendering pipelines, whereas Next.js excels in server-side rendering (SSR) and static generation (SSG) out of the box. The key difference lies in how each handles data fetching, caching, and runtime execution, directly impacting user-perceived latency and server costs.
React 19’s Concurrent Features and Server Components
React 19 introduces stable Concurrent Features, including automatic batching and transitions, which improve UI responsiveness by prioritizing urgent updates. More critically, React Server Components (RSC) are now production-ready, enabling developers to render components on the server without client-side JavaScript overhead. This reduces bundle size and improves Time to Interactive (TTI) by up to 40% for data-heavy pages, as server-side rendering eliminates the need for client-side API calls. However, RSC requires a custom server setup (e.g., using Node.js or a framework like Remix) and careful state management to avoid hydration mismatches. For teams comfortable with configuration, React 19 offers unmatched control over streaming, suspense boundaries, and caching policies.
Next.js 16: Enhanced Partial Prerendering and Edge Runtime
Next.js 16 builds on its App Router with enhanced Partial Prerendering (PPR), which combines static generation for non-interactive content with server-side streaming for dynamic parts. This hybrid approach reduces median First Contentful Paint (FCP) by 30% compared to full SSR, as static shells load instantly while dynamic data streams in. The Edge Runtime is now the default for server components, leveraging global CDN nodes to minimize latency for international users. Additionally, Next.js 16 introduces automatic granular caching via its built-in Cache API, eliminating manual cache invalidation for most use cases. For teams prioritizing out-of-the-box performance, Next.js 16’s defaults are compelling, especially for content-driven sites or e-commerce platforms with mixed static and dynamic content.
Real-World Performance Benchmarks and Trade-offs
To illustrate practical differences, consider a typical marketing website with 80% static content and 20% user-specific data. The table below summarizes key metrics based on 2026 community benchmarks (adjusted for typical hardware and network conditions):
Metric
React 19 (Custom SSR with RSC)
Next.js 16 (PPR with Edge)
First Contentful Paint (FCP)
1.2s (with manual optimization)
0.9s (default with PPR)
Time to Interactive (TTI)
2.5s (client hydration overhead)
1.8s (reduced JS via RSC defaults)
Server cost per 100k requests
$12 (custom caching)
$8 (automatic granular caching)
Bundle size (interactive pages)
180 kB (minimal, with RSC)
210 kB (includes framework overhead)
Global latency (p95)
200 ms (CDN-dependent)
120 ms (Edge Runtime)
Trade-offs are clear: React 19 offers a smaller bundle size and lower server costs for developers who invest in custom caching and CDN configuration, but requires more expertise. Next.js 16 delivers faster FCP and TTI out of the box, with lower global latency via Edge, at the cost of a slightly larger bundle and vendor lock-in for routing. For high-traffic, globally distributed applications, Next.js’s defaults often win; for ultra-lightweight or niche rendering pipelines, React 19 provides the necessary flexibility.
4. Developer Experience and Tooling
By 2026, the developer experience for building React applications has bifurcated into two distinct paths. On one side, the classic React setup offers unparalleled flexibility through a curated stack of independent tools. On the other, Next.js provides a tightly integrated, opinionated environment that handles configuration and optimization automatically. The choice between them often comes down to how much control you want versus how quickly you want to ship.
React: Flexibility with Vite, ESLint, and Testing Libraries
Building a React application in 2026 almost always starts with Vite. It has fully replaced Create React App (CRA) as the default bundler and dev server. Vite provides near-instant hot module replacement (HMR) and fast builds using native ES modules and Rollup for production. The developer experience is lightweight and transparent: you see your configuration, you control your toolchain.
Typical setup steps for a new React project:
Scaffolding: Run npm create vite@latest my-app -- --template react to generate a minimal project.
Linting: Integrate ESLint with the flat config (eslint.config.js) and the eslint-plugin-react-hooks plugin. Vite runs ESLint in the background via a plugin.
Testing: Use Vitest (built on Vite) for unit tests and React Testing Library for component tests. Vitest shares Vite’s configuration, so no separate setup is needed.
Code formatting: Prettier is still the standard, often run as a pre-commit hook via lint-staged.
A practical command example for adding testing to an existing Vite project:
This approach gives you full control over every dependency, but it requires you to manually manage versions, plugin compatibility, and configuration details.
Next.js: Zero-Config Setup and Built-in Optimizations
Next.js in 2026 offers a completely different developer experience. The create-next-app CLI scaffolds a project with everything preconfigured: TypeScript, ESLint, Tailwind CSS, and Turbopack (the Rust-based bundler) are all included by default. There is no need to install or configure Vite, Babel, or Webpack manually.
Key built-in tooling features include:
Turbopack: Provides sub-second HMR and incremental builds, often outperforming Vite for large applications.
Integrated DevTools: Next.js includes a built-in React DevTools overlay and a performance profiler accessible via the next dev --turbo command.
Automatic code splitting: Every page and layout is automatically split into separate bundles without configuration.
Middleware and edge runtime: Server-side logic runs on the Edge Runtime, with hot reloading and local debugging.
Built-in testing support: The next/jest package integrates Jest and React Testing Library with zero configuration.
For a new developer, starting a Next.js project is as simple as:
New developers often find Next.js easier to start with due to its opinionated defaults. However, the abstraction means they may struggle when encountering issues that require understanding underlying bundler or server behavior. React with Vite, while requiring more upfront effort, teaches fundamental concepts that transfer across frameworks. By 2026, the industry trend favors Next.js for most production applications, but the React+Vite combo remains essential for library authors and teams needing granular control.
5. Use Cases: When to Choose React (Standalone)
While Next.js has become the default choice for many new React projects in 2026, the standalone React library remains the superior option in several specific scenarios. Choosing React without a framework like Next.js is not a step backward—it is a deliberate architectural decision that prioritizes flexibility, minimalism, and integration over convenience. Below are the key use cases where a plain React setup excels.
Building Custom Design Systems and Component Libraries
When your primary goal is to create a reusable, framework-agnostic design system or component library, standalone React offers the cleanest foundation. Next.js introduces server-side rendering, file-based routing, and build optimizations that can interfere with the portability and testing of individual components. In contrast, a plain React project allows you to:
Export components as pure, self-contained units that can be consumed by any React-based application, including those built with Next.js, Gatsby, or even mobile React Native apps.
Integrate easily with Storybook, Styleguidist, or other documentation tools without worrying about Next.js-specific configurations like next/router or next/image.
Maintain full control over the build toolchain (e.g., Vite, Webpack, or Rollup) to optimize bundle size and tree-shaking for library consumers.
Avoid accidental coupling to Next.js APIs, ensuring your design system remains reusable across diverse front-end stacks.
For teams building internal UI kits or open-source component libraries, standalone React is the pragmatic choice.
Embedding React into Existing Applications (e.g., Rails, Django)
Many legacy applications—built with Ruby on Rails, Django, Laravel, or even plain server-rendered PHP—benefit from React’s ability to incrementally enhance specific parts of the user interface. When embedding React into an existing backend-driven application, Next.js adds unnecessary complexity:
Next.js assumes control over the entire routing layer, which conflicts with the server-side routing already managed by Rails or Django.
Deploying Next.js alongside an existing backend often requires a separate Node.js server or complex reverse-proxy configurations, increasing operational overhead.
Standalone React can be mounted as a small, isolated widget (e.g., an interactive dashboard, a search component, or a real-time chat pane) without requiring a full front-end migration.
In these scenarios, using a lightweight React setup with a bundler like Vite and a simple entry point allows developers to drop React into a single page or partial view. The backend continues to handle routing, authentication, and data fetching, while React manages only the interactive portions. This approach is far more maintainable than forcing Next.js into a context where its file-based routing and SSR features are redundant.
Projects Requiring Minimal Overhead or Full Control
For small, performance-critical applications—such as a single-page tool, a landing page with a complex interactive widget, or a prototype—the overhead of Next.js can be counterproductive. Standalone React offers:
Zero framework lock-in: You choose every dependency, from routing (React Router, TanStack Router) to data fetching (React Query, SWR) to state management (Zustand, Jotai).
Faster builds: Without Next.js’s compilation and optimization pipeline, your development loop can be snappier for trivial projects.
Simpler deployment: A plain React app can be deployed as a static folder on any CDN (e.g., Netlify, Vercel, S3) without requiring a Node.js server or serverless functions.
Full control over bundling: You can fine-tune code splitting, lazy loading, and asset optimization exactly to your project’s needs.
For projects where the team values architectural autonomy over convention, standalone React remains the lean, powerful choice in 2026.
6. Use Cases: When to Choose Next.js
Next.js excels in scenarios where performance, search engine visibility, and developer productivity intersect. Its hybrid rendering model—combining server-side rendering (SSR), static site generation (SSG), and incremental static regeneration (ISR)—makes it the preferred choice for projects that demand fast initial page loads, strong SEO, and the ability to scale without sacrificing developer experience. Below are the primary use cases where Next.js outshines a standalone React setup.
Content-First Websites and SEO Optimization
For any site where organic search traffic is critical, Next.js provides built-in SSR and SSG that deliver fully rendered HTML to search engine crawlers. This eliminates the SEO pitfalls common with client-side React, where crawlers may see an empty shell. Use Next.js for:
Blogs, news portals, and documentation sites that require instant indexing.
Marketing landing pages that need fast time-to-interactive for conversion.
Multilingual sites where pre-rendered routes improve localized SEO.
Portfolio or corporate sites where content changes infrequently but must rank well.
Next.js also supports automatic image optimization and the “ component for fine-grained meta tag control, further boosting search performance without extra configuration.
Next.js eliminates the need for a separate backend service by allowing you to define API routes directly within the project. This is ideal for full-stack applications where the frontend and backend logic coexist, reducing deployment complexity and latency. Choose Next.js when:
You are building a SaaS product with simple CRUD operations that don’t warrant a dedicated server.
Your app needs serverless functions for authentication, form handling, or database queries.
You want to keep the entire codebase in one repository, simplifying CI/CD pipelines.
For example, a Next.js API route for a contact form might look like this:
// pages/api/contact.js
export default async function handler(req, res) {
if (req.method === 'POST') {
const { name, email, message } = req.body;
// Validate and send email or store in database
await sendEmail({ name, email, message });
res.status(200).json({ status: 'Message sent' });
} else {
res.setHeader('Allow', ['POST']);
res.status(405).end(`Method ${req.method} Not Allowed`);
}
}
This single file handles both the API endpoint and the business logic, keeping the implementation concise and deployable as a serverless function on Vercel or similar platforms.
Enterprise Dashboards Requiring ISR and Incremental Adoption
Large-scale enterprise applications often need to balance real-time data freshness with static performance. Next.js ISR allows you to pre-render pages at build time and then update them incrementally without rebuilding the entire site. This is particularly valuable for:
Admin dashboards displaying metrics that change hourly but don’t require live updates.
E-commerce product pages where inventory and pricing update periodically.
Legacy systems migrating to modern React—Next.js supports incremental adoption by allowing you to wrap existing React components into pages one at a time.
With ISR, you can set a `revalidate` interval (e.g., 60 seconds) so that the static page is refreshed in the background after the first request triggers a regeneration. This pattern reduces server load while ensuring users see reasonably current data. Additionally, Next.js middleware and edge functions enable A/B testing or feature flags without affecting the core static content, making it a robust choice for enterprise environments that require both stability and flexibility.
7. Ecosystem, Community, and Long-Term Support
When evaluating React versus Next.js in 2026, the maturity of each ecosystem and the trajectory of community support are critical factors for long-term project viability. Both frameworks benefit from robust communities, but their developmental philosophies and governance models diverge in ways that affect library compatibility, plugin availability, and roadmap stability.
React’s Vast Ecosystem and Backward Compatibility
React remains the foundation upon which Next.js is built, and its ecosystem reflects over a decade of community-driven growth. The React core team at Meta has prioritized backward compatibility across major versions, ensuring that libraries built for React 17 or 18 continue to function with minimal migration effort in React 19 and beyond. This stability is a double-edged sword: it encourages deep investment in third-party libraries, but it can also slow adoption of newer patterns like Server Components when they are not yet fully supported by the broader ecosystem.
Extensive UI component libraries: Material UI, Ant Design, and Radix UI continue to provide production-ready components with consistent API surfaces.
Backward compatibility guarantees: Meta’s release notes explicitly document breaking changes and provide codemods for automated upgrades.
For teams that prioritize long-term maintainability and minimal dependency churn, React’s ecosystem remains the safest choice in 2026.
Next.js’s Growing Plugin and Middleware Landscape
Next.js has evolved from a simple React framework into a platform with its own plugin and middleware ecosystem. The introduction of the Next.js Plugin Registry in 2025 standardized how developers extend the framework, reducing the fragmentation that plagued earlier versions. By 2026, the ecosystem includes:
Official middleware packages: Authentication (Auth.js, Clerk), rate limiting, and i18n are available as drop-in middleware.
Image and asset optimization plugins: Sharp, Cloudinary, and imgix maintain dedicated Next.js adapters.
Data fetching and caching hooks: SWR and TanStack Query offer Next.js-specific optimizations for server components and incremental static regeneration.
Deployment-specific plugins: Vercel, Netlify, and AWS Amplify provide environment-aware configurations.
However, the plugin landscape remains narrower than React’s. Developers building highly custom UI components or niche integrations may find fewer options compared to the broader React ecosystem. The middleware model also introduces a learning curve for teams accustomed to traditional React routing.
Vercel’s Influence and the Open Source Debate in 2026
Vercel’s stewardship of Next.js remains a central point of discussion in 2026. The company’s commercial interests—particularly its tight integration with Vercel’s cloud platform—have led to concerns about vendor lock-in. While Next.js is fully open source under the MIT license, key features like advanced analytics, team collaboration tools, and edge function monitoring are exclusive to Vercel’s paid tiers.
The open source debate centers on three issues:
Concern
Current Status (2026)
Community Sentiment
Feature parity across hosting providers
Partial: Core features work on any Node.js host, but edge functions and ISR optimizations are Vercel-first.
Mixed: Many teams accept the trade-off for performance, while others prefer Remix or Astro for provider-agnostic builds.
Roadmap transparency
Improved: Vercel publishes quarterly RFCs and maintains a public roadmap, but critical decisions remain internal.
Cautiously optimistic: The community appreciates the RFC process but desires more influence over breaking changes.
Long-term governance
Uncertain: No formal open source foundation has been established, unlike React’s governance through Meta.
Wary: Developers with enterprise compliance requirements often prefer React’s neutral stewardship.
For teams seeking maximum ecosystem maturity and vendor neutrality, React remains the proven choice. Next.js offers a richer, more opinionated development experience but requires careful evaluation of its long-term governance and platform dependencies.
The deployment landscape for React and Next.js has diverged significantly by 2026, driven by each framework’s architectural strengths and the hosting platforms that have optimized for them. React applications, being pure client-side libraries, offer maximum flexibility in hosting choices, while Next.js, as a full-stack framework, benefits from platforms that support server-side rendering, incremental static regeneration, and edge functions. Your decision here will affect not only initial setup complexity but also ongoing operational costs and scalability.
Deploying React Apps on Any Static Host or Custom Server
React applications built with Create React App, Vite, or similar tools produce a static bundle of HTML, CSS, and JavaScript files. This bundle can be deployed to virtually any web server or content delivery network without server-side processing requirements. Key deployment options include:
Static hosts: Netlify, Vercel, GitHub Pages, and Cloudflare Pages offer free tiers with global CDN distribution, automatic SSL, and continuous deployment from Git repositories.
Traditional servers: Apache, Nginx, or IIS can serve React builds from a single directory, making them suitable for enterprise environments with existing infrastructure.
Cloud storage: AWS S3, Google Cloud Storage, or Azure Blob Storage can host React apps as static websites, often with CloudFront or other CDNs for performance.
Custom Node.js server: For applications requiring server-side API proxies or authentication, a Node.js server (e.g., Express) can serve the React build while handling backend logic.
The primary advantage of React hosting is its simplicity and low cost—static files require minimal server resources, and many providers offer generous free tiers. However, you must manage routing yourself (using client-side libraries like React Router) and ensure proper 404 fallback configuration for single-page application behavior.
Next.js on Vercel: Edge Functions and Automatic Scaling
Next.js is developed by Vercel, and the platform remains the most optimized hosting environment for Next.js applications. By 2026, Vercel provides seamless integration with Next.js features including:
Edge Functions: Run server-side logic at 30+ global edge locations, reducing latency for dynamic content and API routes.
Automatic scaling: Vercel scales from zero to thousands of concurrent requests without configuration, with per-request billing for serverless functions.
Incremental Static Regeneration (ISR): Automatically revalidate and update static pages at the edge without rebuilding the entire application.
Image optimization: Built-in next/image component is optimized on Vercel’s infrastructure, serving WebP and AVIF formats automatically.
Vercel’s free tier (Hobby plan) includes 100 GB bandwidth and 100 serverless function executions per day, while Pro plans start at $20/month for teams. For high-traffic applications, costs can scale significantly with serverless function invocations and edge requests, making it important to monitor usage.
Alternative Hosting for Next.js: Docker, AWS, and Self-Managed
Not every Next.js application needs Vercel. By 2026, alternative hosting options have matured, offering more control and potentially lower costs for predictable traffic patterns. Below is a comparison of common alternatives:
Docker containers running Next.js in standalone mode (available since Next.js 13) allow you to deploy the framework on any container orchestration platform, including AWS ECS, Google Cloud Run, or Azure Container Apps. This approach gives you full control over memory, CPU, and network configuration, but requires ongoing maintenance of the container registry, load balancers, and scaling policies. Self-managed hosting on a VPS can reduce costs for apps with steady traffic, but demands expertise in Node.js process management, reverse proxy configuration (e.g., Nginx), and SSL certificate renewal.
9. Migration Paths and Future-Proofing Your Stack
Choosing between React and Next.js in 2026 is not a permanent decision. Modern web development emphasizes adaptability, and both frameworks offer clear pathways for incremental migration and future evolution. Understanding these paths ensures your stack remains robust against shifting standards and business requirements.
Incremental Adoption of Next.js in Existing React Projects
You can introduce Next.js features into an existing React application without a full rewrite. The most practical approach is to use the Next.js router alongside your current setup, migrating page by page. Begin by installing Next.js and configuring a next.config.js file, then move one route from your React Router to the Next.js file-based routing system. For example, to convert a simple React component to a Next.js page:
// Existing React component (App.js)
import { BrowserRouter, Route } from 'react-router-dom';
function Home() { return <h1>Home Page</h1>; }
function App() {
return (
<BrowserRouter>
<Route path="/" element={<Home />} />
</BrowserRouter>
);
}
export default App;
// After incremental adoption (pages/index.js in Next.js)
export default function Home() {
return <h1>Home Page</h1>;
}
Identify low-risk, static pages to migrate first (e.g., about, contact).
Use Next.js’s next/link for navigation between migrated and non-migrated pages.
Leverage Next.js’s built-in Image Optimization and Font Optimization incrementally.
Keep your existing React state management and API calls unchanged during migration.
Migrating from Create React App or Vite to Next.js
For teams using Create React App (CRA) or Vite, migration to Next.js requires careful planning. The process involves replacing your build tooling and routing system while preserving your component logic. A recommended migration path includes:
Web Components: React 19+ improves interoperability with custom elements. In Next.js, you can use the next/dynamic wrapper to load Web Components with SSR compatibility. Plan to wrap third-party Web Components in React components for seamless integration.
Signals: Fine-grained reactivity, popularized by frameworks like Solid and Preact, is influencing React’s future. While React still uses hooks, the community is exploring useSignal patterns. Next.js may adopt similar primitives for state management in server components.
Server Components and Streaming: Next.js already leads with React Server Components. Expect deeper integration with streaming SSR and partial hydration. Keep your data-fetching patterns modular to adapt to future rendering strategies.
Edge and Incremental Static Regeneration (ISR): As edge computing matures, frameworks will optimize for distributed runtimes. Use Next.js’s revalidate and runtime options to stay flexible.
Practical steps for future-proofing:
Write components that are framework-agnostic where possible, using vanilla JavaScript for business logic.
Adopt TypeScript for type safety that transcends framework changes.
Monitor the React RFCs and Next.js blog for deprecation notices and new APIs.
Test your stack against beta versions of both frameworks to catch breaking changes early.
By incrementally adopting Next.js, migrating from older tools, and preparing for web standards, you ensure your stack remains adaptable through 2026 and beyond.
10. Conclusion: Making the Right Choice for Your Team in 2026
Choosing between React and Next.js in 2026 ultimately depends on aligning your project’s specific demands with your team’s strengths. React remains a powerful, flexible library for building highly interactive user interfaces, especially when you need maximum control over the rendering pipeline and third-party integrations. Next.js, as a full-featured framework built on React, excels when performance, SEO, and developer experience are paramount—offering built-in routing, server-side rendering, static generation, and edge functions out of the box. The decision is not about which is “better,” but which fits your scale, performance needs, team expertise, and long-term goals.
Decision Matrix: React vs. Next.js by Project Type
Use the following matrix to quickly assess which choice suits your project profile:
Project Type
Best Choice
Key Rationale
Single-page application (SPA) with complex client-side logic
React
Full control over rendering; no SSR overhead; easier integration with custom backend.
Content-driven site (blog, marketing, e-commerce)
Next.js
Static site generation (SSG) and incremental static regeneration (ISR) for fast loads and SEO.
Real-time dashboard or internal tool
React
Lightweight; simpler state management; no server-side complexity needed.
Multi-page application with dynamic routes and SEO needs
Next.js
File-based routing, server-side rendering (SSR), and automatic image optimization.
Hybrid app requiring both static and dynamic pages
Next.js
Flexible rendering strategies per page (SSG, SSR, ISR, client-side).
Micro-frontend or large-scale modular architecture
React
Easier to isolate components; works well with module federation and custom tooling.
Final Recommendations for Startups, Enterprises, and Freelancers
For startups: If speed-to-market and SEO are critical, Next.js is generally the safer bet. Its built-in features—like automatic code splitting, image optimization, and edge caching—reduce initial development time and infrastructure cost. However, if your product is a highly interactive SaaS tool where SEO matters less, React with a minimal setup (e.g., Vite) can keep your stack lean and flexible.
For enterprises: The choice hinges on your existing stack and scalability requirements. React offers greater control for integrating with legacy systems, custom middleware, or proprietary tooling. Next.js, on the other hand, provides a standardized architecture that simplifies onboarding and enforces best practices across large teams—especially valuable when multiple teams collaborate on the same codebase. Enterprises with strict performance budgets often prefer Next.js for its automatic performance optimizations.
For freelancers and solo developers: Next.js is often the most efficient choice. Its opinionated structure reduces decision fatigue, and the rich ecosystem (e.g., Vercel deployment, built-in API routes) lets you deliver full-stack projects faster. React alone may be preferable if you are building a small, client-only app or need to integrate with a specific backend framework you already know.
Resources for Staying Updated in the Rapidly Changing Ecosystem
The React and Next.js ecosystems evolve quickly. To keep your knowledge current and make informed decisions, consider these resources:
Official documentation: React’s beta docs (react.dev) and Next.js documentation (nextjs.org/docs) are the most authoritative sources for new features and deprecations.
Community newsletters:React Status and Next.js Weekly curate the latest releases, tutorials, and best practices.
Conferences and talks: React Conf, Next.js Conf, and local meetups provide insights into roadmap updates and real-world case studies.
GitHub changelogs: Follow the facebook/react and vercel/next.js repositories for release notes and RFCs.
Learning platforms: Sites like Epic React, Frontend Masters, and Vercel’s Learn section offer in-depth courses tailored to 2026-era tooling.
Ultimately, revisit your choice at each project’s inception. The right framework is the one that lets your team ship efficiently, maintain code with confidence, and adapt to future changes without friction.
Frequently Asked Questions
What is the main difference between React and Next.js?
React is a JavaScript library for building user interfaces, while Next.js is a full-fledged framework built on top of React. React provides the core component model and state management, but leaves routing, data fetching, and build optimization to developers. Next.js extends React with built-in features like file-based routing, server-side rendering (SSR), static site generation (SSG), API routes, and image optimization. In 2026, Next.js also integrates React Server Components, making it easier to build performant, SEO-friendly applications without extra configuration.
Next.js typically offers better SEO out of the box because it supports server-side rendering and static site generation, which deliver fully-rendered HTML to search engine crawlers. React alone requires additional setup (e.g., using frameworks like Next.js, Gatsby, or Remix) to achieve the same level of SEO. With Next.js 15 and React 19, server components and streaming further improve SEO by allowing faster initial load and better content indexing. For content-heavy sites, Next.js is generally the preferred choice for SEO.
Can I use React without Next.js in 2026?
Yes, you can still use React standalone in 2026, especially for simple single-page applications, interactive dashboards, or when you want full control over the toolchain. Many developers pair React with Vite for fast development and build times. However, for projects that require SSR, SSG, or complex routing, using a framework like Next.js saves significant development effort. The React ecosystem still supports standalone use, but frameworks have become the standard for production-grade applications.
Does Next.js replace React?
No, Next.js does not replace React; it builds on top of React. Next.js uses React as its core UI library and adds conventions and features for routing, data fetching, and optimization. You still write React components in Next.js, but you also use Next.js-specific APIs like `getServerSideProps`, `getStaticProps`, and the App Router. In 2026, Next.js is often the recommended way to use React for full-stack or production web applications, but React remains the underlying technology.
Which framework is easier to learn for beginners in 2026?
React is generally easier to learn first because it has a smaller API surface and focuses solely on the view layer. Beginners can understand components, state, and props without dealing with routing or server-side concerns. Next.js adds additional concepts like file-based routing, SSR, and data fetching methods, which can be overwhelming at first. However, many learning resources now start with Next.js directly, as it provides a more complete framework for building real-world apps. For absolute beginners, starting with React basics then moving to Next.js is common.
What are the performance benefits of Next.js over React in 2026?
Next.js offers several performance advantages over plain React: automatic code splitting, server-side rendering for faster initial page loads, static site generation for pre-rendered pages, image optimization with the next/image component, and incremental static regeneration. In 2026, Next.js also leverages React Server Components, which reduce client-side JavaScript by rendering components on the server. These features lead to better Core Web Vitals scores, faster time-to-interactive, and improved user experience, especially on slow networks.
Is Next.js suitable for small projects?
Yes, Next.js is suitable for small projects, especially those that may grow over time. Its file-based routing and built-in optimizations make it easy to start a project with minimal configuration. For a simple blog or portfolio, Next.js static site generation provides excellent performance. However, for very small or experimental projects, using plain React with Vite might be simpler. Next.js has a steeper learning curve, but its benefits often outweigh the overhead even for small projects.
How do React and Next.js handle state management in 2026?
React continues to use hooks like useState and useReducer for component-level state, and context API for global state. Next.js does not impose its own state management; you can use React's built-in tools or external libraries like Zustand, Redux, or Jotai. In 2026, React Server Components change the landscape by allowing some state to be managed on the server, reducing client-side complexity. Next.js supports both client and server state management, giving developers flexibility based on the application needs.
Mastering Frontend Development: A Comprehensive Guide to React, Tailwind CSS, and Elementor
Introduction to Modern Frontend Development
The frontend development landscape has transformed dramatically over the past decade, shifting from static HTML pages to dynamic, component-driven architectures that prioritize user experience and performance. Today, developers face a vast ecosystem of tools, libraries, and frameworks, each promising speed, scalability, or simplicity. Among these, three tools have emerged as cornerstones for building modern interfaces: React for interactive UI logic, Tailwind CSS for utility-first styling, and Elementor for visual WordPress design. Understanding how these technologies fit into the broader frontend workflow is essential for any developer aiming to deliver responsive, maintainable, and visually compelling digital products.
The Evolution of Frontend Technologies
Frontend development has evolved from server-rendered pages with minimal interactivity to rich client-side applications powered by JavaScript frameworks. Early solutions like jQuery simplified DOM manipulation but lacked structure for complex apps. The rise of single-page applications (SPAs) introduced frameworks such as Angular and React, enabling state-driven UIs. Concurrently, CSS methodologies like BEM and SMACSS aimed to organize styles, but often led to verbose codebases. Tailwind CSS disrupted this by offering a utility-first approach, reducing the need for custom CSS. Meanwhile, content management systems (CMS) like WordPress democratized web creation, but their frontend flexibility lagged until visual builders like Elementor bridged the gap, allowing non-developers to design responsive layouts without code. This evolution reflects a broader trend: tools are becoming more specialized, yet increasingly interoperable.
Why React, Tailwind, and Elementor Are Dominant Choices
Each of these tools dominates its niche for distinct reasons:
React: Backed by Facebook, React’s component-based architecture, virtual DOM, and vast ecosystem (e.g., Next.js, React Router) make it the go-to for building scalable, interactive UIs. Its declarative syntax simplifies state management and reusability, powering everything from dashboards to e-commerce platforms.
Tailwind CSS: Unlike traditional frameworks (Bootstrap, Foundation), Tailwind provides low-level utility classes that enable rapid, consistent styling without naming conventions. Its design system encourages responsive, customizable interfaces that reduce CSS bloat, and its JIT compiler ensures small production bundles.
Elementor: As the leading WordPress page builder, Elementor offers a drag-and-drop interface with live editing, extensive widgets, and theme-building capabilities. It empowers marketers and designers to create pixel-perfect, responsive sites without writing code, while still allowing developers to extend functionality via custom CSS and hooks.
These tools dominate because they solve core pain points: React handles complexity, Tailwind accelerates styling, and Elementor democratizes design.
How These Tools Complement Each Other in Workflows
While React, Tailwind, and Elementor serve different audiences, they can be integrated to create powerful hybrid workflows. For example:
Building a custom widget (e.g., a real-time stock ticker) for an Elementor-powered WordPress site
Tailwind CSS
Utility-first styling
Using Tailwind classes within React components to ensure consistent, responsive design across a web app
Elementor
Visual page building
Creating landing pages in WordPress that embed React components via shortcodes or custom blocks
In practice, a developer might use React and Tailwind to build a custom interactive module (e.g., a product configurator), then embed it into an Elementor-designed WordPress page using a plugin like “React for WordPress.” Conversely, Elementor’s global styles can be overridden with Tailwind-like utility classes for fine-grained control. This synergy allows teams to leverage the strengths of each tool: React for logic-heavy components, Tailwind for rapid UI iteration, and Elementor for content-driven layouts. The result is a flexible, efficient frontend stack that scales from simple blogs to complex web applications.
Getting Started with React: Core Concepts and Setup
React is a declarative, component-based library for building user interfaces. Its core philosophy centers on creating reusable, self-contained pieces of UI that manage their own state and render efficiently. For any frontend development project, whether a simple landing page or a complex dashboard, React provides the structure to scale code without sacrificing performance. This section covers the essential first steps: establishing a development environment, understanding the syntax that powers React components, and mastering the flow of data through state and props.
The fastest way to begin is with a build tool that handles module bundling, transpilation, and hot reloading. Two popular options are Create React App (CRA) and Vite. Vite is generally faster for both development and builds, making it the recommended choice for new projects.
To create a new React project using Vite, open your terminal and run the following command:
After the command completes, navigate into the project folder and install dependencies:
cd my-react-app
npm install
npm run dev
This starts a local development server, typically at http://localhost:5173. The project structure includes a src directory where you will write your components. Key files include App.jsx (the root component) and main.jsx (the entry point that renders the app into the DOM).
Feature
Create React App (CRA)
Vite
Initial setup speed
Slow
Fast
Hot module replacement
Reliable but slower
Instant
Production build size
Larger bundles
Smaller, optimized
Configuration complexity
Hidden but rigid
Minimal with flexibility
Understanding JSX and Component Composition
JSX is a syntax extension for JavaScript that looks similar to HTML. It allows you to write markup directly inside your JavaScript logic. Under the hood, JSX is transpiled into React.createElement calls, which produce lightweight JavaScript objects representing the UI.
A component is a function that returns JSX. Components can be nested to build complex interfaces. For example, a Header component can contain a Logo and a Navigation component. This composition pattern promotes reusability and clear separation of concerns.
Data flows in React through two primary mechanisms: props and state. Props are read-only data passed from a parent component to a child. They allow components to be configured and reused with different values. State, on the other hand, is mutable data managed within a component itself. When state changes, React re-renders the component and its children efficiently.
To add state to a functional component, use the useState hook. This hook returns an array with two elements: the current state value and a function to update it. Here is a practical example of a simple counter component:
Keep state as local as possible—lift it only when multiple components need to share it.
Never mutate state directly; always use the setter function.
For complex state logic (multiple sub-values or side effects), consider useReducer or a state management library.
Props are passed like HTML attributes: <Greeting name="Alice" />. Inside the receiving component, they are accessed as the first argument to the function. This unidirectional data flow keeps the application predictable and easier to debug.
Building Responsive UIs with Tailwind CSS
Tailwind CSS revolutionizes frontend development by providing a utility-first approach that eliminates the need for custom CSS for most styling tasks. Instead of writing separate stylesheets, you compose interfaces directly in your HTML using pre-built utility classes. This method accelerates prototyping and ensures consistency across components, especially when paired with a robust framework like React. Tailwind’s design system is built on a configurable foundation, allowing you to extend or override default values to match your brand guidelines. For developers transitioning from traditional CSS, the initial learning curve is offset by the speed of iteration and the elimination of naming conventions and specificity wars. When combined with Elementor for WordPress-based projects, Tailwind offers a complementary, code-first alternative for custom frontend work.
Getting Started with Tailwind CSS Installation and Configuration
To integrate Tailwind CSS into your project, begin with a Node.js environment. The recommended method is via npm or yarn. Run the installation command, then generate the configuration file using the Tailwind CLI. This file, tailwind.config.js, is the control center for your design system. Here is a typical installation sequence:
Install Tailwind:npm install -D tailwindcss
Initialize config:npx tailwindcss init
Configure content paths: In tailwind.config.js, set the content array to scan your template files (e.g., "./src/**/*.{js,jsx,ts,tsx}" for React).
Add directives: Include @tailwind base; @tailwind components; @tailwind utilities; in your main CSS file.
Build for production: Use the CLI with --minify to purge unused styles and reduce file size.
Customization is achieved by extending the theme object in the config file. You can add custom colors, fonts, spacing scales, and breakpoints without altering the core framework. For example, adding a brand color under theme.extend.colors makes it available as bg-brand or text-brand.
Using Utility Classes for Layout, Typography, and Colors
Tailwind’s utility classes are atomic and descriptive. For layout, the flex and grid systems are fully supported. Use flex, flex-row, items-center, and justify-between for common alignment patterns. Typography classes like text-lg, font-bold, and leading-relaxed control size, weight, and line height. Color utilities follow a consistent naming pattern: text-gray-700 or bg-blue-500. The 0–900 scale provides fine-grained control. To see how Tailwind compares to traditional CSS approaches, consider the following table:
Creating Responsive Designs with Breakpoints and Media Queries
Responsive design in Tailwind is handled through breakpoint prefixes. The default breakpoints are sm (640px), md (768px), lg (1024px), xl (1280px), and 2xl (1536px). To apply a style only at a specific breakpoint, prefix the utility class with the breakpoint and a colon. For example, text-center md:text-left centers text on small screens and left-aligns it on medium screens and above. You can also modify the breakpoints in tailwind.config.js under theme.screens. For more complex responsive behavior, combine multiple prefixes: grid-cols-1 sm:grid-cols-2 lg:grid-cols-3 creates a single-column layout on mobile, two columns on small screens, and three on large screens. Media queries for specific ranges (e.g., between 768px and 1024px) are not directly supported by default, but you can achieve this using custom variants or by nesting utilities within container queries via plugins. This approach ensures that your UI adapts fluidly without writing a single media query manually, speeding up frontend development for React, Tailwind, and Elementor projects alike.
Combining Tailwind CSS with React creates a powerful, utility-first workflow for building modern user interfaces. Tailwind’s atomic classes map directly to React’s component-based architecture, enabling rapid styling without leaving your JSX. This section provides step-by-step instructions for setup, practical styling patterns, and strategies for maintaining consistency across large codebases.
Begin with a fresh or existing React project created via Create React App, Vite, or Next.js. For a standard Create React App setup, follow these steps:
Install Tailwind CSS and its dependencies via npm: npm install -D tailwindcss postcss autoprefixer
Generate the configuration files: npx tailwindcss init -p
Configure the tailwind.config.js file to scan your React component files. Replace the content array with:
Restart your development server. Tailwind classes are now available throughout your React components.
For Vite-based projects, the process is identical but ensure your postcss.config.js is present. Next.js users can follow the official Tailwind installation guide for framework-specific optimizations.
Styling React Components with Tailwind Classes
With Tailwind installed, style React components by applying utility classes directly to JSX elements. This approach eliminates context-switching between files and keeps styles colocated with logic.
Inline utility classes: Use classes like bg-blue-500 text-white px-4 py-2 rounded directly on a button element. For dynamic styling, conditionally apply classes using template literals or the clsx library.
Reusable component patterns: Create a Button component that accepts a variant prop. Map variants to predefined class combinations, ensuring consistency across the application.
Responsive and state variants: Tailwind’s breakpoint prefixes (sm:, md:, lg:) and state modifiers (hover:, focus:, active:) work seamlessly in React. For example: className="md:flex hover:bg-gray-100".
Custom component abstractions: For complex styling, extract repeated class groups into a reusable className string or a custom hook that returns computed classes.
A practical example: styling a card component that changes background on hover.
Group components and their styles (or related utility classes) by feature or page.
src/components/Dashboard/Card.jsx
Consistent naming conventions
Use BEM-like naming for custom classes or rely entirely on Tailwind utilities for predictability.
Prefer card-header over header-card when using @apply.
Additionally, adopt linting tools like eslint-plugin-tailwindcss to enforce class ordering and prevent duplicates. For truly large projects, consider splitting your Tailwind configuration into a separate design system package that can be shared across multiple React applications. This approach ensures that your frontend development remains consistent, maintainable, and aligned with the principles of utility-first CSS within a component-driven framework.
Introduction to Elementor for WordPress Frontend Design
Elementor is a powerful drag-and-drop page builder that revolutionizes frontend development for WordPress sites. Unlike traditional coding approaches, Elementor provides a visual, real-time editing interface that allows developers and designers to craft complex layouts without writing CSS or JavaScript from scratch. It bridges the gap between design and development, enabling rapid prototyping and iterative refinement directly in the browser. For frontend developers, Elementor serves as a complementary tool that accelerates workflow, especially for content-heavy or client-driven projects where visual feedback is critical.
What Is Elementor and How It Works
Elementor functions as a plugin that integrates seamlessly with WordPress, replacing the default editor with a live canvas. Key aspects include:
Drag-and-drop interface: Users can add, move, and resize elements—such as text, images, buttons, and forms—by dragging them into place on the page.
Visual editing: Changes appear instantly in the frontend view, eliminating the need to toggle between backend and preview modes.
Widget library: A comprehensive set of prebuilt widgets (e.g., headings, galleries, sliders, accordions) that can be customized via inline controls.
Theme builder: Extends Elementor to design headers, footers, single post templates, and archive pages, giving full control over site-wide structure.
Global settings: Allows defining site-wide colors, fonts, and spacing, ensuring consistency across all pages.
Elementor operates on a container-based system, where sections, columns, and widgets stack to form layouts. This modular approach simplifies responsive design and content organization.
Creating Custom Layouts with Elementor’s Widgets and Templates
Elementor excels at enabling custom layouts without code. Developers can:
Use pre-designed template kits: Access hundreds of professionally designed page templates (e.g., landing pages, portfolios, e-commerce shops) that can be imported and customized.
Build from scratch: Combine widgets like the image carousel, testimonial, pricing table, and progress bar to create unique sections.
Leverage dynamic content: Connect widgets to WordPress custom fields, post metadata, or ACF fields for data-driven layouts (e.g., team member listings, event schedules).
Save and reuse: Create custom blocks (e.g., call-to-action sections) and save them as global widgets or templates for reuse across multiple pages.
Advanced positioning: Use absolute positioning, z-index, and custom CSS classes for granular control over element placement.
A typical workflow involves starting with a blank canvas, adding a section with columns, then populating each column with widgets. For example, a hero section might include a background image, heading, paragraph, and button widget, all styled visually.
Responsive Design and Performance Considerations in Elementor
Responsive design is built into Elementor, but performance requires deliberate attention. Key points include:
Responsive controls: Each widget and section has separate settings for desktop, tablet, and mobile breakpoints. Developers can hide elements, adjust padding, or change column stacking per device.
Performance optimization: Elementor generates inline CSS and adds JavaScript for animations and interactions. To mitigate load time, developers should:
Action
Benefit
Minimize widget usage
Reduces DOM size and CSS complexity
Enable lazy loading
Defers off-screen images and videos
Use lightweight fonts
Decreases HTTP requests
Cache pages
Improves repeat visit speed
Avoid excessive animations
Reduces CPU usage on mobile
Testing tools: Use Elementor’s built-in responsive preview and external tools like Google PageSpeed Insights to verify mobile performance.
Best practices: Set max-widths for containers, use relative units (%, em, rem) for spacing, and compress images before uploading. Elementor also supports CSS Grid and Flexbox for modern, efficient layouts.
By combining Elementor’s visual flexibility with performance-conscious decisions, frontend developers can deliver fast, adaptable WordPress sites that meet both client expectations and technical standards.
Integrating React directly into Elementor-built pages unlocks a new level of interactivity for WordPress sites. While Elementor excels at static layouts, embedding React components allows you to add dynamic features like real-time dashboards, interactive forms, or live data feeds without leaving the visual builder. This section explores practical methods for merging React’s component-based architecture with Elementor’s drag-and-drop environment, from custom widget creation to data synchronization and performance tuning.
Building Custom Elementor Widgets with React
To embed React inside Elementor, you create custom widgets that render React components. This process involves registering a widget in your theme or plugin, enqueuing React scripts, and mounting a component on the front end. Follow these steps:
Register the widget: Use Elementor’s elementor/widgets/widgets_registered hook to add a new widget class that extends ElementorWidget_Base.
Define controls: Add settings like text fields, dropdowns, or color pickers that users can adjust in the Elementor editor.
Render the React component: In the render() method, output a container <div> with a unique ID, then enqueue a JavaScript file that mounts your React component using ReactDOM.render().
Here is a practical code example for enqueuing React in a custom Elementor widget’s render method:
// In your Elementor widget class
public function render() {
$settings = $this->get_settings_for_display();
$widget_id = $this->get_id();
echo '<div id="react-widget-' . esc_attr($widget_id) . '"></div>';
wp_enqueue_script('my-react-widget', plugin_dir_url(__FILE__) . 'assets/js/react-widget.js', array('wp-element'), '1.0.0', true);
wp_localize_script('my-react-widget', 'reactWidgetData', array(
'title' => $settings['title'],
'apiEndpoint' => rest_url('my-plugin/v1/data')
));
}
In your separate React file, mount the component to that div using document.getElementById('react-widget-' + widgetId). This approach keeps your React code modular and reusable across different Elementor pages.
Passing Data Between React and Elementor
Data flow between Elementor’s server-side PHP and client-side React components is essential for dynamic behavior. Use these techniques to synchronize state:
Widget settings via wp_localize_script: Pass Elementor control values (e.g., titles, numbers, or selected options) as a JavaScript object when enqueuing your React script.
WordPress REST API: Fetch or send data to custom endpoints from within React using fetch() or axios. For example, retrieve user input from an Elementor form and post it to a React-managed database.
Custom events: Use window.dispatchEvent in Elementor’s JavaScript (e.g., after a form submission) and listen for it in your React component to trigger updates.
Method
Use Case
Implementation
wp_localize_script
Pass static settings (colors, text)
Add data array to enqueue call
REST API
Fetch live data (posts, users)
Use fetch(rest_url) in React
Custom events
React to Elementor actions
window.addEventListener
For two-way binding, consider using a global state manager like Redux or React Context that listens to both Elementor’s editor changes and user interactions. This ensures your React component reflects the latest Elementor settings without page reloads.
Optimizing Performance When Combining React and Elementor
Blending React with Elementor can introduce performance bottlenecks if not handled carefully. Apply these optimizations to maintain fast load times and smooth interactions:
Lazy load React components: Use React.lazy() and Suspense to defer loading non-critical widgets until they enter the viewport.
Minimize re-renders: Wrap your React components in React.memo() and use useCallback for event handlers to avoid unnecessary updates when Elementor’s global styles change.
Cache API responses: Store fetched data in a lightweight cache (e.g., localStorage or a simple state object) to reduce redundant network requests during page navigation.
Reduce script size: Build your React bundle with tree-shaking enabled and exclude unused libraries. Use a tool like wp-scripts to produce a minified production build.
Additionally, avoid mounting multiple React roots on the same page if possible. Instead, create a single root component that manages all React widgets within an Elementor layout, sharing a common context for props and state. This reduces DOM overhead and improves the perceived performance of your interactive frontend.
State Management in React: Context API and Redux
Effective state management is a cornerstone of scalable frontend development with React. While React’s built-in useState and useReducer hooks handle local state well, global or shared state—such as user authentication, theme preferences, or shopping cart data—requires a more structured approach. Two primary solutions dominate the ecosystem: the Context API for simpler applications and Redux for complex state requirements. Choosing between them depends on your project’s scale, team size, and performance needs.
Using React Context for Global State
React’s Context API provides a lightweight mechanism for sharing state across a component tree without prop drilling. It is ideal for small to medium-sized applications where state changes are infrequent and the data flow is straightforward. To implement it, you create a context using React.createContext(), wrap a provider around the component tree, and consume the context with the useContext hook.
Simplicity: No additional libraries or boilerplate code are required, making it easy to set up and maintain.
Performance: Every consumer re-renders when the context value changes, which can lead to unnecessary re-renders in large applications. Mitigate this by splitting contexts for unrelated state slices.
Scalability: Best suited for apps with fewer than 10 shared state values. For more complex state, consider Redux or a state management library.
Example use cases:
Theme toggling (light/dark mode)
User authentication status
Language or locale preferences
Implementing Redux in a React-Tailwind Project
Redux offers a predictable state container with a centralized store, making it suitable for large-scale applications with complex state interactions, such as real-time data synchronization or multi-step form workflows. Integrating Redux with a React-Tailwind project involves installing @reduxjs/toolkit and react-redux, then defining slices for each domain of state.
Typical Redux setup steps:
Create a Redux store using configureStore() from Redux Toolkit.
Define slices with createSlice(), specifying initial state, reducers, and actions.
Wrap the application with Provider from react-redux and pass the store.
Use useSelector to read state and useDispatch to dispatch actions in components.
Comparison: Context API vs. Redux
Aspect
Context API
Redux (with Toolkit)
Setup complexity
Low (no dependencies)
Moderate (requires packages)
Performance
Can cause re-renders
Optimized with selectors and memoization
Debugging
Limited (no devtools)
Rich with Redux DevTools
Middleware support
None
Built-in (e.g., thunks, sagas)
Best for
Small apps, few state values
Large apps, complex state logic
Best Practices for State Management in Scalable Applications
To maintain a maintainable and performant codebase as your application grows, follow these guidelines:
Keep state localized when possible: Use local state (useState) for component-specific data. Only lift state to a global context or Redux when multiple components need access.
Normalize complex state: In Redux, store data in a flat, normalized structure to avoid deeply nested objects. Use createEntityAdapter for efficient CRUD operations.
Use selectors for derived data: In Redux, create memoized selectors with createSelector to compute derived state and prevent unnecessary re-renders.
Combine Context with hooks: For medium-sized apps, create custom hooks that wrap Context logic, making it reusable and testable.
Monitor performance: Profile your application using React DevTools or Redux DevTools to identify bottlenecks. Use React.memo or useMemo where appropriate.
By aligning your state management strategy with your application’s complexity, you can build a robust frontend that scales gracefully, whether you choose the simplicity of Context API or the power of Redux.
Performance Optimization Across React, Tailwind, and Elementor
Performance optimization is critical in frontend development, directly impacting user experience, search engine rankings, and conversion rates. In a modern stack combining React, Tailwind CSS, and Elementor, developers must address distinct bottlenecks: React’s runtime rendering, Tailwind’s generated CSS volume, and Elementor’s server-side asset delivery. This section outlines targeted strategies to reduce load times, eliminate unnecessary code, and improve runtime efficiency across all three tools.
Optimizing React Components with Memoization and Virtualization
React applications often suffer from unnecessary re-renders, especially in complex component trees. Memoization prevents redundant computations by caching component outputs when props and state remain unchanged. Use React.memo for functional components and useMemo/useCallback hooks for expensive calculations and callback functions. For lists with hundreds or thousands of items, virtualization libraries like react-window or react-virtuoso render only visible rows, drastically reducing DOM nodes and memory usage. Additionally, implement code splitting with React.lazy and Suspense to defer loading of non-critical components until needed, cutting initial bundle size by up to 40% in data-heavy dashboards.
Tailwind CSS generates thousands of utility classes by default, but most projects use only a fraction. PurgeCSS, integrated via Tailwind’s configuration, scans your source files for class names and removes unused CSS during build. Configure the content array in tailwind.config.js to include all template paths (e.g., ./src/**/*.{js,jsx,ts,tsx}). For dynamic class construction, use complete class strings or safelist patterns. A typical production build with PurgeCSS reduces Tailwind’s output from 3–4 MB to 10–20 KB. Avoid using arbitrary values or string concatenation that may bypass PurgeCSS detection. Combine this with CSS minification (via PostCSS or build tools) to further compress output.
Enhancing Elementor Performance with Caching and Asset Optimization
Elementor pages often load excessive CSS and JavaScript from widgets, even unused ones. Enable Elementor’s “Improved CSS Loading” and “Improved Asset Loading” under settings to load assets conditionally. Use a caching plugin (e.g., WP Rocket or W3 Total Cache) to serve static HTML copies and defer JavaScript. Minify combined CSS/JS files and leverage browser caching with far-future expiry headers. For Elementor’s dynamic content, implement lazy loading for images and iframes via the “Lazy Load” toggle in widget settings. Disable unused Elementor widgets (e.g., Google Maps, Price List) to reduce CSS payload. A well-optimized Elementor site can achieve a 70+ PageSpeed score, compared to 30–40 with default settings.
Optimization Strategy
React
Tailwind CSS
Elementor
Primary Technique
Memoization + virtualization
PurgeCSS + minification
Caching + conditional asset loading
Typical Performance Gain
30–50% fewer re-renders
95%+ CSS size reduction
40–60% faster load times
Common Pitfall
Overusing memoization on simple components
Missing dynamic class patterns
Enabling all Elementor features globally
Implementation Effort
Medium (requires code review)
Low (mostly config-based)
Medium (requires plugin setup)
By applying these targeted optimizations, frontend developers can ensure their React, Tailwind CSS, and Elementor projects remain fast, responsive, and scalable under real-world conditions.
Testing and Debugging Frontend Applications
Testing and debugging are critical phases in the frontend development lifecycle, ensuring that React components function correctly, Tailwind CSS styles render as intended, and Elementor-built pages remain consistent across devices and browsers. This section covers essential tools and techniques to streamline these processes, from unit testing to cross-browser validation.
Unit Testing React Components with Jest and React Testing Library
Jest, combined with React Testing Library, provides a robust framework for testing React components in isolation. Jest offers a test runner, assertion library, and mocking capabilities, while React Testing Library encourages testing user interactions rather than implementation details. Key practices include:
Testing component rendering with render() and querying elements via accessibility roles (getByRole, findByText).
Simulating user events using fireEvent or userEvent from @testing-library/user-event.
Mocking external dependencies (e.g., API calls) with jest.mock() to isolate component logic.
Verifying state changes and conditional rendering with expect() matchers like .toBeInTheDocument() and .toHaveTextContent().
Example of a basic unit test for a button component:
import { render, screen, fireEvent } from '@testing-library/react';
import Button from './Button';
test('calls onClick handler when button is clicked', () => {
const handleClick = jest.fn();
render(<Button onClick={handleClick}>Click Me</Button>);
fireEvent.click(screen.getByRole('button', { name: /click me/i }));
expect(handleClick).toHaveBeenCalledTimes(1);
});
Debugging Tailwind CSS Issues in Developer Tools
Tailwind CSS relies on utility classes, which can sometimes lead to specificity conflicts or unexpected styling. Use browser developer tools to inspect and debug issues effectively:
Tool/Technique
Purpose
Example Usage
Computed Styles Panel
View final applied CSS and identify overridden rules
Check background-color for a bg-blue-500 class
Elements Panel
Inspect HTML and verify Tailwind classes are present
Confirm class="text-center lg:text-left" exists
Network Tab
Ensure Tailwind CSS file loads correctly
Verify Content-Type: text/css for the build
Console Warnings
Detect missing @tailwind directives or purge errors
Look for “Unknown at rule @tailwind” messages
Common debugging steps include toggling classes in the Elements panel to isolate issues, using !important sparingly (and instead adjusting specificity via @layer), and verifying the tailwind.config.js purge paths to avoid missing styles in production.
Cross-Browser and Responsive Testing for Elementor Pages
Elementor pages must render consistently across browsers (Chrome, Firefox, Safari, Edge) and devices (desktop, tablet, mobile). Effective testing approaches include:
Browser DevTools Emulation: Use responsive design mode in Chrome DevTools (Ctrl+Shift+M) to simulate various viewports and test breakpoints set in Elementor’s responsive controls.
Third-Party Tools: Services like BrowserStack or LambdaTest allow real device testing without physical hardware, covering older browser versions.
Elementor’s Built-in Preview: Leverage the responsive preview icons (desktop, tablet, mobile) within the Elementor editor to adjust margins, padding, and visibility per device.
CSS Validation: Run Elementor-generated CSS through W3C Validator to catch syntax errors that may break rendering in specific browsers.
For responsive issues, check Elementor’s “Hide on Desktop/Tablet/Mobile” settings and ensure custom CSS (if added) uses valid media queries. Cross-browser inconsistencies often stem from vendor prefixes—use Autoprefixer in your build pipeline to automatically add them.
Future Trends and Career Paths in Frontend Development
The frontend landscape evolves rapidly, driven by performance demands, user expectations, and new tooling paradigms. For developers skilled in React, Tailwind CSS, and Elementor, understanding these shifts is crucial to staying relevant and unlocking advanced career opportunities. Three key trends—server-side rendering, AI-assisted design, and portfolio-driven specialization—are reshaping how frontend work is done and valued.
The Rise of Server-Side Rendering and Static Site Generators
Server-side rendering (SSR) and static site generators (SSGs) have moved from niche to mainstream, primarily because they improve initial load times and SEO. React’s ecosystem now includes frameworks like Next.js and Remix that embrace SSR and SSG natively. For a developer proficient in React, learning these patterns means building faster, more discoverable applications. Tailwind CSS complements this by enabling utility-first styling that compiles to minimal CSS, reducing bundle sizes. Elementor, while primarily a WordPress page builder, also benefits from static generation via plugins like Elementor Pro with dynamic conditions and caching. Career paths that leverage these skills include:
Performance Engineer: Optimizing React apps with SSR/SSG for Core Web Vitals.
Full-Stack WordPress Developer: Combining Elementor with headless WordPress and static generation for blazing-fast sites.
Jamstack Specialist: Using React, Tailwind, and SSGs to build decoupled architectures.
AI Tools for Frontend Design and Development
Artificial intelligence is increasingly embedded in frontend workflows, from code generation to design-to-code conversion. Tools like GitHub Copilot, Figma’s AI features, and platforms that generate React components from prompts are becoming standard. A developer who masters React, Tailwind, and Elementor can use AI to accelerate repetitive tasks—such as generating responsive layouts or translating mockups into Tailwind classes—while focusing on architecture and user experience. This trend creates demand for:
Prompt Engineer for UI: Crafting inputs that produce production-ready React components with Tailwind styling.
Design Systems Architect: Integrating AI-generated patterns into consistent, maintainable codebases.
AI-Enhanced Content Builder: Using Elementor’s dynamic capabilities with AI content generation for personalized pages.
To stay competitive, frontend developers should learn how to evaluate AI output, customize generated code, and ensure accessibility—skills that remain deeply human.
Building a Portfolio with React, Tailwind, and Elementor Projects
A strong portfolio is the most direct path to career advancement. Showcasing projects that combine React, Tailwind, and Elementor demonstrates versatility across different platforms and problem domains. Below is a table of project ideas that highlight these technologies in action:
Project Type
React & Tailwind Focus
Elementor Focus
E-commerce site
Dynamic product filtering, cart state management, responsive grid layouts
Custom product templates, dynamic conditions, A/B testing of landing pages
Portfolio site
Animated transitions, dark mode toggle, reusable component library
Drag-and-drop layout, popup builders, global styling for brand consistency
Server-side rendering for posts, Tailwind typography plugin, search functionality
Category templates, dynamic content widgets, SEO optimization
When building these projects, document your process: how you used React hooks, Tailwind’s utility classes for responsive design, and Elementor’s dynamic tags for content management. Employers value evidence of problem-solving across these tools. Career roles that specifically reward this combination include:
Frontend Developer (React Specialist): Building complex UIs with Tailwind for speed and consistency.
WordPress Developer (Elementor Expert): Creating custom themes and plugins with React-powered elements.
UI/UX Engineer: Bridging design and code using Tailwind’s design tokens and Elementor’s visual builder.
By staying current with SSR/SSG, embracing AI tools, and curating a targeted portfolio, frontend developers can secure roles that are both technically rewarding and future-proof.
What is React and why is it used for frontend development?
React is an open-source JavaScript library developed by Facebook for building user interfaces, particularly single-page applications. It uses a component-based architecture, allowing developers to create reusable UI components that manage their own state. React's virtual DOM efficiently updates and renders components when data changes, resulting in fast performance. It is widely used because of its flexibility, strong community support, and ecosystem of tools like React Router and Redux. React is ideal for dynamic, data-driven interfaces and is often paired with other libraries for routing, state management, and styling.
How does Tailwind CSS differ from traditional CSS frameworks like Bootstrap?
Tailwind CSS is a utility-first CSS framework that provides low-level utility classes to build custom designs directly in HTML, rather than pre-designed components. Unlike Bootstrap, which offers opinionated components like buttons and navbars, Tailwind gives developers complete control over layout, spacing, typography, and colors using classes like `flex`, `pt-4`, `text-center`, and `bg-blue-500`. This approach reduces CSS bloat, encourages consistency, and makes responsive design easier with built-in breakpoints. Tailwind is highly customizable via a configuration file, allowing you to define your design system.
What is Elementor and how does it integrate with WordPress?
Elementor is a drag-and-drop page builder plugin for WordPress that allows users to create custom layouts and pages without coding. It features a live front-end editor, a library of widgets (like headings, images, forms, and sliders), and theme builder capabilities for headers, footers, and single post templates. Elementor integrates seamlessly with WordPress by adding custom post types, dynamic content tags, and support for popular plugins like WooCommerce. It is known for its intuitive interface, responsive editing controls, and extensive third-party add-ons that extend functionality.
Can React and Elementor be used together in a WordPress site?
Yes, React and Elementor can be used together in a WordPress site, though they serve different purposes. Elementor handles the visual page building and layout design via its drag-and-drop interface, while React can be integrated for interactive components like custom forms, dynamic calculators, or real-time data displays. Developers often embed React apps in WordPress using shortcodes or custom blocks, and Elementor can include those via HTML widgets or custom code. However, careful planning is needed to avoid conflicts with scripts and styles, and to ensure performance optimization.
What are the key benefits of using Tailwind CSS with React?
Using Tailwind CSS with React offers several benefits: rapid prototyping with utility classes, consistent design through a configurable design system, and smaller CSS bundles via purging unused styles. Tailwind's responsive utilities (like `md:flex`) work well with React's conditional rendering, and its component-based approach aligns with React's modular architecture. Developers can create highly customized UIs without writing custom CSS, and Tailwind's JIT mode generates styles on demand, improving build times. This combination is popular for building modern, responsive web applications efficiently.
How do I optimize performance when using React, Tailwind, and Elementor together?
To optimize performance when combining these tools: use React's lazy loading and code splitting for components, configure Tailwind to purge unused CSS in production, and minimize Elementor's use of heavy widgets and animations. Leverage WordPress caching plugins (like W3 Total Cache), optimize images, and use a CDN. For Elementor, avoid excessive global widgets and use the default theme builder sparingly. Ensure React scripts are loaded only where needed, and consider using a lightweight theme like GeneratePress or Astra. Regular performance audits with tools like Lighthouse help identify bottlenecks.
What are the best practices for structuring a React project with Tailwind CSS?
Best practices include: organizing components into folders by feature (e.g., `components/Header`, `components/Footer`), using Tailwind's configuration to define custom colors, fonts, and spacing, and applying utility classes directly in JSX. Avoid inline styles and use Tailwind's `@apply` directive sparingly for repeated patterns. Implement a consistent naming convention for custom components, and use React hooks for state management. For larger projects, consider using a state management library like Zustand or Redux Toolkit. Also, set up PurgeCSS (built into Tailwind) to remove unused styles in production.
Is Elementor suitable for building custom themes from scratch?
Elementor is not a full theme framework but can be used to build custom themes via its Theme Builder feature, which allows you to design headers, footers, single post templates, archive pages, and more. You can start with a lightweight theme like Hello Elementor (designed for Elementor) and then customize every part of the site visually. However, for complex custom functionality, you may still need PHP or JavaScript coding. Elementor is ideal for users who want visual control without deep coding, but developers often combine it with custom code for advanced needs.
Building a Custom Elementor Widget: A Comprehensive Guide
Introduction to Custom Elementor Widgets
Elementor’s widget system is the backbone of its drag-and-drop page builder, offering a library of prebuilt components—from headings and images to forms and sliders—that users can arrange visually. Each widget is a self-contained PHP class that registers with Elementor, defining its controls, rendering logic, and front-end output. When you drag a widget onto the canvas, Elementor loads its settings panel, allowing you to customize attributes like typography, colors, spacing, and content without touching code. This modular architecture makes building complex layouts intuitive, but it also limits you to the features Elementor ships out of the box. Building a custom Elementor widget extends this functionality by letting you create reusable, tailored components—such as a custom testimonial carousel, a dynamic pricing table, or a data-driven map—that match your exact design and business requirements. For developers, this means fewer workarounds and cleaner code; for site owners, it translates to faster load times, consistent branding, and reduced dependency on bloated third-party plugins. Mastering custom widgets elevates your workflow from assembling pre-made blocks to engineering bespoke solutions.
What Are Elementor Widgets and How Do They Work?
Elementor widgets are PHP classes that extend the base ElementorWidget_Base class. Each widget must implement two key methods: _register_controls(), which defines the settings and style options in the Elementor panel, and render(), which outputs the HTML for the front end. When a widget is added to a page, Elementor stores its settings as JSON in the WordPress post meta. On page load, the render method processes those settings—often with PHP helper functions like get_settings()—and generates the final markup. The system also supports dynamic tags, responsive controls, and CSS generation, all handled by Elementor’s core. Here is a simplified workflow:
Registration: The widget is registered via a plugin or theme’s elementor/widgets/widgets_registered hook.
Controls: Developers add input fields (text, color picker, slider, etc.) using Elementor’s control API.
Rendering: The render() method echoes the HTML, using PHP to fetch and apply settings.
CSS: Inline styles or custom CSS classes are applied based on user choices.
This structure is extensible: you can add custom controls, integrate with WordPress functions (like WP_Query), and output JavaScript for interactive features.
Benefits of Creating Custom Widgets vs. Using Third-Party Plugins
Custom widgets offer distinct advantages over third-party plugins. The following table compares key factors:
Factor
Custom Widget
Third-Party Plugin
Performance
Lightweight; only loads code you write
Often includes unused assets (CSS, JS, shortcodes)
Control
Full control over styling, logic, and updates
Relies on plugin author’s roadmap and quality
Maintenance
You manage updates; no dependency risks
May break on Elementor or WordPress updates
Cost
Free if you code it; one-time development cost
Often requires paid licenses or subscriptions
Integration
Seamless with your theme and custom post types
May conflict with existing plugins or styling
Additionally, custom widgets avoid “plugin bloat” by excluding features you do not need, and they let you implement niche functionality—like a booking calendar tied to a custom database—that no third-party plugin offers out of the box. For developers, building custom widgets also deepens your understanding of Elementor’s architecture and PHP patterns, making you more self-sufficient.
Prerequisites: PHP, WordPress, and Elementor Knowledge
Before building a custom Elementor widget, you should be comfortable with the following:
PHP (Intermediate): Understand classes, methods, inheritance, and namespaces. You will extend ElementorWidget_Base and use hooks like elementor/widgets/widgets_registered. Familiarity with WordPress functions (wp_enqueue_style, get_option, WP_Query) is essential.
WordPress Development: Know how to create a plugin or add code to a theme’s functions.php. You should be able to register custom post types, use the Options API, and handle basic security (sanitization, nonces).
Elementor Basics: Have hands-on experience with the Elementor editor—adding, editing, and styling widgets. Understand the difference between controls (settings) and render output, and be aware of Elementor’s responsive breakpoints and dynamic tags.
If you are new to any of these areas, consider starting with a simple widget that outputs static text, then gradually add controls and dynamic data. The official Elementor developer documentation and community forums are valuable resources for troubleshooting and best practices.
Before you begin Building a Custom Elementor Widget, establishing a reliable development environment is essential. A properly configured setup prevents conflicts with live sites, accelerates debugging, and ensures your widget integrates seamlessly with Elementor. Follow these steps to prepare your local or staging environment for custom widget development.
Installing and Configuring a Local WordPress Installation
A local WordPress installation provides a sandboxed environment where you can build and test your widget without affecting a production site. Choose a local server stack that matches your operating system:
Windows: Use Local by Flywheel, WampServer, or XAMPP.
macOS: Use Local by Flywheel, MAMP, or Laravel Valet.
Linux: Use LAMP stack, Docker, or Local by Flywheel.
After installing your chosen stack, create a new WordPress site. Use the latest WordPress version and set a database name, username, and password you can remember. For example, using Local by Flywheel, click “Create a new site,” name it, and let the tool configure the database automatically. Verify your installation by navigating to http://yoursite.local/wp-admin in your browser.
Setting Up Elementor (Free or Pro) and a Starter Theme
With a working WordPress installation, install and activate Elementor. Both the free version and Elementor Pro support custom widget development, though Pro offers additional hooks and controls. Follow these steps:
Go to Plugins > Add New in your WordPress admin.
Search for “Elementor” and install the free version. Activate it.
If you have Elementor Pro, upload the plugin ZIP file via Plugins > Add New > Upload Plugin and activate it.
Choose a minimal starter theme that provides a clean canvas. Recommended options include GeneratePress, Astra, or the official Hello Elementor theme. Install and activate your chosen theme.
To confirm Elementor is working, create a new page, edit it with Elementor, and verify the editor loads without errors.
Essential Tools: Code Editor, Debugging Plugins, and Version Control
Efficient development requires the right tools. Below is a table of recommended tools and their purposes:
Tool Type
Recommended Options
Purpose
Code Editor
Visual Studio Code, PhpStorm, Sublime Text
Write and edit PHP, JavaScript, and CSS files with syntax highlighting and debugging support.
Debugging Plugin
Query Monitor, Debug Bar
Monitor PHP errors, database queries, and performance during widget development.
Version Control
Git (with GitHub, GitLab, or Bitbucket)
Track changes, collaborate, and roll back if a widget update breaks functionality.
To enable debugging in your local WordPress installation, add these lines to your wp-config.php file:
This configuration logs all errors to /wp-content/debug.log without displaying them on the front end. Initialize Git in your plugin folder by running git init from the command line inside the directory where your widget’s code will reside. Commit your initial files to establish a baseline before making changes.
With these tools in place, your environment is ready for the next phase of Building a Custom Elementor Widget, ensuring a smooth development workflow from the start.
Before building a custom Elementor widget, you must understand its underlying architecture. Every Elementor widget is essentially a PHP class that extends the core ElementorWidget_Base class. This foundation provides access to Elementor’s rendering pipeline, control system, and data handling. The structure is designed to separate logic, configuration, and output, making widgets modular and maintainable.
The Widget Class: Extending ElementorWidget_Base
The widget class is the backbone of any custom Elementor widget. By extending ElementorWidget_Base, you inherit methods for registering controls, rendering output, and interacting with the Elementor editor. The class must be defined with a unique name and placed within a WordPress plugin or theme file. A typical class declaration looks like this:
class Custom_Widget extends ElementorWidget_Base {
public function get_name() {}
public function get_title() {}
public function get_icon() {}
public function get_categories() {}
}
Key responsibilities of the widget class include:
Identity: Defining the widget’s unique machine-readable name, human-readable title, icon, and category.
Controls: Registering input fields (e.g., text, images, sliders) via the _register_controls() method.
Rendering: Outputting the final HTML using the render() method.
Core Methods: _name(), _title(), _icon(), and _categories()
These four methods are mandatory for every custom widget. They define how Elementor identifies and displays the widget in the editor panel.
Method
Purpose
Return Value Example
get_name()
Unique machine-readable slug. Must be lowercase with underscores. Prevents conflicts with other widgets.
'custom_hero_section'
get_title()
Human-readable label shown in the widget panel. Should be descriptive and concise.
'Custom Hero Section'
get_icon()
CSS class for an icon (typically from Font Awesome or Elementor’s icon set). Improves visual recognition.
'eicon-image-box'
get_categories()
Array of category slugs where the widget appears. Common values include 'general', 'basic', or custom categories.
['general']
These methods are called during Elementor’s initialization. The get_name() method must be unique across all active widgets; Elementor uses it to store and retrieve widget data. The get_categories() method accepts an array, allowing a widget to appear in multiple sections of the editor sidebar.
How Elementor’s Rendering Pipeline Processes Custom Widgets
Elementor’s rendering pipeline follows a sequential process when a page containing your custom widget is loaded, whether in the editor or on the front end. Understanding this pipeline helps you debug issues and optimize output.
Widget Registration: Elementor scans all active plugins and themes for classes extending ElementorWidget_Base. It calls get_name() and get_title() to index the widget.
Control Registration: When a widget instance is added to a page, Elementor executes the _register_controls() method. This method defines all user-adjustable settings (e.g., text fields, color pickers, image selectors). Controls are stored in a structured array and linked to the widget’s data.
Data Retrieval: For each widget instance, Elementor retrieves saved settings from the database or default values. It passes these settings to the rendering method.
Rendering: The render() method is called. This method receives the widget’s settings array and must output valid HTML. Elementor does not automatically sanitize or escape output; you must handle security using WordPress functions like esc_html() or wp_kses().
Front-End Output: The generated HTML is inserted into the page’s DOM. If the widget uses dynamic data (e.g., from a custom query), the pipeline repeats on each page load.
This pipeline ensures that custom widgets behave identically to native Elementor widgets, provided you correctly implement the required methods. The separation of controls and rendering allows for efficient editing and previewing in the Elementor editor without reloading the entire page.
Creating Your First Custom Widget Plugin
To build a custom Elementor widget, you start by creating a WordPress plugin that Elementor can recognize. This plugin will contain your widget’s logic, styles, and registration code. Below is a practical walkthrough to scaffold a minimal custom widget plugin file and register it with Elementor. Ensure you have a local WordPress installation with Elementor (free version) active before beginning.
Writing the Plugin Header and Main File
Create a new folder in /wp-content/plugins/ named, for example, my-custom-elementor-widget. Inside, create a single PHP file called my-custom-elementor-widget.php. This file must include a standard WordPress plugin header and your core logic. Use the following template:
<?php
/**
* Plugin Name: My Custom Elementor Widget
* Description: A simple custom widget for Elementor.
* Version: 1.0.0
* Author: Your Name
* Text Domain: my-custom-elementor-widget
*/
if ( ! defined( 'ABSPATH' ) ) exit; // Exit if accessed directly
// Define plugin constants
define( 'MCEW_PLUGIN_PATH', plugin_dir_path( __FILE__ ) );
// Include the main widget class file
require_once( MCEW_PLUGIN_PATH . 'widgets/class-my-widget.php' );
// Hook into Elementor to register the widget
add_action( 'elementor/widgets/register', 'register_my_custom_widget' );
function register_my_custom_widget( $widgets_manager ) {
$widgets_manager->register( new ElementorMy_Widget() );
}
This plugin header tells WordPress the plugin name, version, and author. The add_action line hooks into Elementor’s widget registration system. The require_once loads your widget class file, which you will create next in a widgets subfolder.
Registering the Widget with Elementor’s Widget Manager
Now, create a new file at widgets/class-my-widget.php. This file defines the widget class that extends ElementorWidget_Base. Below is a minimal example:
<?php
namespace Elementor;
class My_Widget extends Widget_Base {
public function get_name() {
return 'my_custom_widget';
}
public function get_title() {
return esc_html__( 'My Custom Widget', 'my-custom-elementor-widget' );
}
public function get_icon() {
return 'eicon-code';
}
public function get_categories() {
return [ 'basic' ];
}
protected function register_controls() {
// Add controls here (e.g., text, number inputs)
}
protected function render() {
// Output the widget’s HTML here
?>
<div class="my-custom-widget">
<p></p>
</div>
<?php
}
}
render(): Output the frontend HTML. Use esc_html__() for translation safety.
After saving both files, activate the plugin from WordPress admin. Elementor’s widget manager will automatically detect and register your widget.
Testing the Widget Appearance in the Elementor Editor
To verify your widget works correctly:
Open a page or post in the Elementor editor (not the backend editor).
Search for your widget in the Elementor panel (left sidebar). Use the widget name or the search bar with your title (e.g., “My Custom Widget”).
Drag the widget onto the canvas. You should see the placeholder text “Hello from My Custom Widget!” rendered.
Check for errors: If the widget does not appear, ensure PHP error logs are enabled. Common issues include namespace mismatches or missing file paths. Verify that the class name in class-my-widget.php matches the one used in the registration hook.
Inspect the output: Right-click the widget in the editor and select “Inspect” to confirm the HTML structure (e.g., the <div class="my-custom-widget"> element).
If the widget loads without errors, you have successfully created and registered a custom Elementor widget. From here, you can expand register_controls() to add dynamic fields and enhance the render() method with conditional logic.
Adding Controls and Fields to Your Widget
Once you have registered your custom Elementor widget, the next step is to populate it with controls that allow users to input data and customize its appearance and behavior. Elementor’s control system is built on a robust API that provides a wide array of field types, each designed for specific input scenarios. This section guides you through integrating common controls, managing dynamic content with repeaters, and implementing conditional logic along with responsive settings.
Overview of Common Controls: Text, URL, and Number
Elementor offers a set of fundamental controls that form the backbone of most widgets. These controls are straightforward to implement and cover the most frequent user input needs.
Text Control: Accepts single-line text input, ideal for headings, labels, or short descriptions. Use $this->add_control() with type ElementorControls_Manager::TEXT.
URL Control: Provides a field for entering a URL, often paired with an option to open in a new tab or add nofollow. Use ElementorControls_Manager::URL and retrieve the array containing url, is_external, and nofollow keys.
Number Control: Accepts numeric values, useful for setting dimensions, counts, or intervals. Use ElementorControls_Manager::NUMBER and define optional parameters like min, max, and step.
Each control requires a unique id (string), an array of settings including label, type, and optionally default, placeholder, and description. The retrieved value is accessed via $settings['control_id'] in the render() method.
Implementing Repeater Controls for Dynamic Content
Repeater controls enable you to create repeatable sets of fields, allowing users to add multiple items—such as team members, testimonials, or accordion tabs—without hardcoding. To implement a repeater:
Initialize the repeater with $repeater = new ElementorRepeater();
Add inner controls to the repeater instance using the same add_control() method, for example, a text field for a title and an image control for an icon.
Add the repeater to the widget with $this->add_control('items', ['label' => 'Items', 'type' => ElementorControls_Manager::REPEATER, 'fields' => $repeater->get_controls(), 'title_field' => '{{{ title }}}']);
In the render() method, loop through $settings['items'] using foreach and access each item’s fields via $item['field_id'].
Repeaters are powerful for building flexible, data-driven layouts. They support all standard control types, including text, URL, number, and even nested repeaters.
Conditional Display and Responsive Control Settings
To create a user-friendly interface, you can conditionally show or hide controls based on the value of another control. Use the condition key in the control’s settings array. For example, to show a URL field only when a checkbox is checked:
Responsive control settings allow you to define different values for desktop, tablet, and mobile devices. Many controls accept a responsive parameter set to true, enabling device-specific fields. For example, a number control for padding can become responsive:
Combine conditional logic and responsive settings to streamline the editor experience and ensure your widget behaves correctly across all devices.
Writing the Widget Render Logic and Template
The render() method is the heart of any custom Elementor widget, where you define the final HTML output that users see on the front end. Writing this method cleanly and securely ensures your widget performs reliably across different environments. This section covers structuring PHP and HTML within render(), using Elementor’s helper functions for safe output, and separating complex logic into dedicated template files.
Structuring the Render Method with PHP and HTML
Inside render(), you typically retrieve stored widget settings, then generate HTML. A common approach is to use PHP inline with HTML, but maintain readability by separating logic from markup. Start by fetching settings with $this->get_settings_for_display(), then use PHP conditionals and loops to control output. Always close PHP tags before writing raw HTML to avoid syntax confusion. For example:
Keep the method focused on output only; avoid heavy logic like database queries or complex calculations here. Instead, prepare data in separate methods or use filters.
Using Elementor’s Helper Functions for Secure Output
Security is non-negotiable. Elementor provides several helper functions that automatically handle escaping and sanitization, reducing the risk of XSS vulnerabilities.
esc_html() – Escape plain text for safe HTML insertion. Use for titles, descriptions, and other non-HTML content.
esc_attr() – Escape attribute values like class, id, or data-* attributes.
wp_kses() – Allow specific HTML tags with attributes when you need to output rich content (e.g., from a WYSIWYG field). Define an allowed HTML array for control.
sanitize_text_field() – Clean input values before storing, though for output, escaping is more relevant.
Elementor’s own Group_Control_Typography and Group_Control_Border already sanitize their CSS output, but when you output custom attributes like style, always use esc_attr(). For example:
Never trust user input. Even if a setting is a select dropdown, always escape output because values can be manipulated.
Creating a Separate Template File for Complex Widgets
When the render logic grows beyond a few lines, move the HTML template into a separate PHP file. This improves maintainability and keeps the widget class clean. Follow these steps:
Create a template file – Place it in your plugin’s templates/ directory, e.g., templates/widgets/product-carousel.php.
Load the template in render() – Use include or require with a path defined by your plugin’s constant, such as MY_PLUGIN_PATH . 'templates/widgets/product-carousel.php'.
Pass variables – Extract settings in the template file using $settings = $this->get_settings_for_display(); or pass them as an array using extract() (use cautiously) or better, direct variable assignment.
When building a custom Elementor widget, styling is where functionality meets visual polish. Elementor’s CSS system offers three distinct layers: direct inline styles via the _css() method, user-controlled styling through the Advanced Tab, and responsive design considerations. Mastering these allows you to create widgets that are both visually consistent and flexible for end users.
Adding Inline Styles via the _css() Method
Elementor’s _css() method provides a programmatic way to inject inline CSS directly into your widget’s render output. This is ideal for dynamic styles that depend on settings or conditions. The method accepts selectors, properties, and values, and automatically handles prefixing and sanitization.
Multiple properties: Chain calls or use an array for efficiency.
Responsive support: Pass device contexts (desktop, tablet, mobile) as a fourth parameter.
This method ensures styles are applied only when the widget is rendered, avoiding global CSS bloat. It is best used for styles that must change based on user input, such as colors, fonts, or spacing.
Leveraging Elementor’s Advanced Tab for User-Controlled Styling
Elementor’s Advanced Tab is a powerful feature that grants end users direct control over CSS properties like margins, padding, background, borders, and animations. To enable this for your custom widget, you must register the widget to inherit the default controls from Elementor’s base widget class.
Key steps:
Extend the base class: Your widget class should extend ElementorWidget_Base.
Add the Advanced Tab: No extra code is needed—Elementor automatically adds it when you call parent::register_controls() in your _register_controls() method.
Control inheritance: Ensure your widget’s render method outputs the correct HTML structure so that the Advanced Tab’s CSS classes are applied.
Users can then adjust styling without touching code. For example, a user might add custom padding or a box shadow via the Advanced Tab, which Elementor injects as inline styles on the widget’s wrapper element. This approach empowers non-developers while maintaining design integrity.
Best Practices for Responsive and Mobile-First CSS
When styling your custom Elementor widget, adopt a mobile-first approach to ensure optimal performance across devices. Elementor provides built-in responsive controls that you can leverage directly in your widget’s settings.
Guidelines:
Use breakpoint-aware controls: When adding controls for spacing, font size, or width, enable the “responsive” option in the control definition. For example:
Minimize inline styles: Use Elementor’s CSS classes and the selectors array in controls instead of raw _css() calls for static or rarely changed styles.
Test across breakpoints: Elementor’s preview panel allows you to toggle between desktop, tablet, and mobile views. Ensure your widget’s layout and typography adapt gracefully.
Leverage CSS custom properties: Define key design tokens (e.g., --widget-primary-color) in your widget’s base CSS and use them in _css() or controls for easier theming.
By combining inline methods, user controls, and responsive strategies, your custom Elementor widget will deliver both developer efficiency and end-user flexibility. Always validate your CSS against Elementor’s rendering engine to avoid specificity conflicts.
To move beyond static placeholders, a custom Elementor widget must tap into WordPress’s native data layers. This allows the widget to display real-time content from the database, adapt to different pages, and be reused across a site without manual updates. The core strategies involve integrating custom post types and meta fields, leveraging Elementor’s dynamic tags, and creating reusable presets. Each approach enhances flexibility and reduces maintenance overhead.
Integrating Custom Post Types and Meta Fields
Custom post types (CPTs) and meta fields store structured data like testimonials, portfolios, or product specifications. To make your widget dynamic:
Register a CPT (e.g., “Testimonials”) with register_post_type() in your theme or plugin.
Add meta fields using add_meta_box() or a plugin like ACF. For example, a “Rating” field for testimonials.
Query and display in your widget: Use WP_Query with 'post_type' => 'testimonial' and 'meta_query' for filtering. Render the meta value via get_post_meta().
This method ensures the widget automatically updates when new CPT entries are added or modified, eliminating manual editing.
Elementor’s dynamic tags allow widget controls to pull data from WordPress objects, such as post title, author, or custom fields, without hardcoding. To implement this:
Register a dynamic tag class extending ElementorCoreDynamicTagsTag. Define a get_name(), get_title(), get_categories() (e.g., [‘text’, ‘url’]), and render() method that returns the data.
Connect the tag to a widget control: In your widget’s _register_controls() method, set a control’s 'dynamic' => ['active' => true] parameter. This enables the dynamic tag icon in the Elementor editor.
Example: A “Post Excerpt” tag that retrieves the current post’s excerpt. The widget then displays it in real-time, updating when the post changes.
This integration ensures the widget reflects live data, such as the latest blog post title or a user’s display name, without code changes.
Creating Reusable Widget Presets and Templates
Reusability is achieved through presets and templates that save widget configurations. Compare the two approaches:
Feature
Widget Presets
Elementor Templates
Scope
Single widget instance
Entire section or page
Storage
Custom option in wp_options or JSON file
WordPress post type (elementor_library)
Implementation
Add a “Load Preset” dropdown control in your widget
Use ElementorPlugin::instance()->templates_manager->get_source( 'local' )->get_items()
Use Case
Quickly apply a saved set of widget settings
Insert a pre-designed layout with multiple widgets
Flexibility
Limited to widget parameters
Full control over HTML, CSS, and other elements
To create presets, add a control that saves the current widget’s settings as a named preset using update_option(). For templates, register a dynamic link that loads a saved Elementor template via shortcode or the elementor_render_widget() function. Both methods allow users to apply complex configurations instantly across multiple pages, reducing repetitive work.
Testing, Debugging, and Optimizing Performance
When building a custom Elementor widget, rigorous testing and performance optimization are critical to ensure reliability and a smooth user experience. This section covers practical methods for verifying widget behavior, resolving common issues, and minimizing load times.
Using Browser Developer Tools and PHP Error Logs
To diagnose frontend issues, open your browser’s developer tools (F12) and inspect the Console and Network tabs. Console errors often reveal JavaScript conflicts or missing dependencies. The Network tab helps identify slow-loading assets, such as large images or unminified scripts, that your widget may enqueue. For server-side problems, enable WordPress debugging in your wp-config.php file:
This writes PHP errors to a wp-content/debug.log file. Check this log after testing your widget’s backend logic, like dynamic data retrieval or form submissions. For Elementor-specific issues, use the Elementor Tools menu under “System Info” to verify your widget’s registered controls and hooks.
Minimize HTTP requests: Combine multiple CSS or JS files into one each. Use Elementor’s add_style() and add_script() methods to enqueue only when the widget is present.
Optimize assets: Minify CSS and JS using tools like UglifyJS or CSSNano. For images, serve WebP format and lazy-load via loading="lazy" attributes.
Reduce render-blocking resources: Defer non-critical JavaScript by adding defer or async attributes in your enqueue function. Example:
Set the last parameter to true to load the script in the footer. For CSS, use media="all" only when necessary—consider media="print" for non-critical styles. Finally, test your widget with tools like Google PageSpeed Insights to identify remaining bottlenecks.
Publishing, Documenting, and Maintaining Your Widget
After building a custom Elementor widget, the final steps involve packaging it for distribution, creating thorough documentation, and establishing a maintenance plan. These actions ensure that your widget is not only functional but also accessible, user-friendly, and sustainable over time. Whether you are delivering the widget to a single client or releasing it to the public, attention to these details distinguishes a professional product from a prototype.
Packaging the Widget as a Reusable Plugin
To share your widget, you must package it as a standard WordPress plugin. This involves structuring your code within a dedicated folder and including a properly formatted plugin header. Follow these steps:
Create a plugin folder: Name it something unique, such as custom-elementor-widget.
Add the main plugin file: Inside the folder, create a PHP file (e.g., custom-elementor-widget.php) with the following header:
Header Field
Example Value
Plugin Name
Custom Elementor Widget
Description
Adds a custom widget for advanced content display.
Version
1.0.0
Requires at least
5.8
Tested up to
6.4
Requires PHP
7.4
License
GPL v2 or later
Include all dependencies: Ensure your widget’s PHP, CSS, and JavaScript files are properly enqueued within the plugin.
Zip the folder: Compress the entire folder into a ZIP file for easy upload via the WordPress admin panel.
Writing Clear Documentation and User Instructions
Documentation is critical for adoption and reduces support requests. Your documentation should cover both installation and usage. Organize it into the following sections:
Installation guide: Step-by-step instructions for uploading the plugin via WordPress or manually via FTP.
Widget overview: Describe the widget’s purpose, key features, and where it appears in the Elementor editor.
Configuration options: List every control (e.g., text fields, image pickers, sliders) with explanations of their functions.
Output examples: Provide screenshots or short code snippets showing the widget in action.
Troubleshooting: Include common issues, such as conflicts with other plugins or missing style effects, and their solutions.
Store documentation as a PDF or an HTML file inside the plugin folder, or host it on a public knowledge base. Use plain language and avoid jargon to make it accessible to non-developer users.
Semantic versioning: Use a major.minor.patch format (e.g., 1.2.3). Increment the major version for breaking changes, minor for new features, and patch for bug fixes.
Update channels: For public distribution, integrate with the WordPress Plugin Directory or a custom update server. For private clients, provide manual update notifications via email or a dashboard notice.
Support strategy: Define a support window (e.g., 12 months from purchase) and a response time (e.g., within 48 hours). Use a ticketing system or a dedicated email address.
Changelog: Maintain a CHANGELOG.txt file in your plugin folder, listing each version’s changes, fixes, and known issues.
Regularly test your widget against the latest Elementor and WordPress releases. Schedule quarterly reviews to address deprecated functions or security vulnerabilities. By committing to these practices, you build trust and ensure your custom Elementor widget remains a reliable tool for its users.
Frequently Asked Questions
What is an Elementor widget?
An Elementor widget is a reusable content element that can be dragged and dropped into pages built with the Elementor page builder. Widgets can display text, images, videos, forms, or any custom functionality. They are built using PHP and JavaScript, and can include settings panels (controls) for users to customize appearance and behavior. Building your own widget allows you to extend Elementor's capabilities for specific project needs.
What are the prerequisites for building a custom Elementor widget?
You need a WordPress installation with Elementor (free version is sufficient), a code editor, and basic knowledge of PHP and WordPress plugin development. Familiarity with object-oriented PHP is helpful. You should also understand how to create a simple WordPress plugin, as custom widgets are typically packaged as plugins. No JavaScript expertise is required for basic widgets, but advanced features may need it.
How do I register a custom widget with Elementor?
Create a WordPress plugin and define a class that extends Elementor's `Widget_Base`. In the plugin's main file, hook into `elementor/widgets/widgets_registered` and instantiate your widget class. Inside the widget class, implement the `get_name()`, `get_title()`, `get_icon()`, and `get_categories()` methods. Then define controls in the `_register_controls()` method and render output in the `render()` method. Finally, activate the plugin.
What are Elementor controls and how do I add them?
Controls are settings fields that allow users to customize widget content and styling. Elementor provides a rich set of controls: text, textarea, number, select, color, media, image, gallery, repeater, and many more. You add controls inside the `_register_controls()` method using `$this->add_control()` or `$this->add_group_control()`. Each control has a name, label, type (e.g., `Controls_Manager::TEXT`), and optional default value.
How do I render dynamic content in a custom widget?
In the `render()` method, retrieve control values using `$this->get_settings_for_display('control_name')`. Then output HTML using those values. For dynamic content like posts or custom queries, use `ElementorPlugin::instance()->db->…` or WordPress functions like `WP_Query`. Always escape output with functions like `esc_html()`, `esc_attr()`, or `wp_kses_post()` for security.
Can I add custom CSS and JavaScript to my widget?
Yes. For frontend CSS, enqueue stylesheets using `wp_enqueue_style()` in your plugin or widget. For JavaScript, use `wp_enqueue_script()`. Elementor also provides hooks like `elementor/frontend/after_register_styles` and `elementor/frontend/after_register_scripts`. For inline JS, you can use `add_action('wp_footer', …)`. To add custom CSS per widget instance, use the `render()` method to output inline styles.
How do I test my custom widget for compatibility?
Test with the latest WordPress and Elementor versions. Use a staging site. Check the widget in various Elementor templates (single, archive, etc.). Verify that all controls work and that the output is secure (no XSS). Test with different themes. Use browser developer tools to inspect for JavaScript errors. Consider using the WordPress Debug mode (`WP_DEBUG`) to catch PHP notices.
Where can I find official documentation for Elementor widget development?
The official Elementor Developers site (developers.elementor.com) provides detailed documentation, code snippets, and API references. The GitHub repository for Elementor also has examples. Additionally, the WordPress Plugin Handbook on WordPress.org offers best practices for plugin development. Community tutorials and forums like Stack Exchange can also be helpful.
The Ultimate Guide to WordPress and ChatGPT Integration: Elevate Your Website with AI
Introduction: Why Integrate ChatGPT with WordPress?
Combining WordPress’s robust content management capabilities with ChatGPT’s advanced natural language processing creates a powerful synergy that transforms how websites operate. This integration allows site owners to automate repetitive tasks, generate high-quality content efficiently, and deliver personalized user experiences. By bridging these two platforms, you can streamline workflows, reduce manual effort, and enhance engagement without sacrificing quality or control. Whether you manage a blog, an e-commerce store, or a membership site, the fusion of WordPress and ChatGPT opens doors to smarter automation and data-driven interactions.
The Rise of AI in Content Management
Artificial intelligence has rapidly evolved from a niche tool to a cornerstone of modern content management. Platforms like WordPress, which powers over 40% of all websites, now face increasing demands for real-time personalization, SEO optimization, and dynamic content creation. ChatGPT, developed by OpenAI, excels at understanding context, generating coherent text, and answering queries in a human-like manner. By integrating ChatGPT, WordPress users can leverage AI to draft posts, suggest meta descriptions, moderate comments, or even power chatbots—all within the familiar dashboard. This shift reduces the time spent on manual writing and editing, allowing creators to focus on strategy and audience connection.
Key Benefits of a ChatGPT-WordPress Connection
Integrating ChatGPT with WordPress offers tangible advantages that directly impact productivity and user satisfaction. Below is a breakdown of the primary benefits:
Automated Content Generation: Generate blog posts, product descriptions, or landing page copy in seconds, based on simple prompts or outlines.
Enhanced User Engagement: Deploy AI-powered chatbots that provide instant, relevant responses to visitor inquiries, improving retention and conversion rates.
Streamlined SEO Workflows: Automatically generate optimized titles, meta descriptions, and keyword-rich snippets, saving hours of manual research.
Improved Accessibility: Use ChatGPT to rewrite complex content into simpler language or translate it into multiple languages, broadening your audience reach.
Reduced Operational Costs: Minimize the need for dedicated copywriters or customer support agents by automating routine tasks.
These benefits are not theoretical—they translate into measurable improvements in site performance, user satisfaction, and operational efficiency.
What This Guide Will Cover
This guide is structured to take you from understanding the basics to implementing advanced integrations. You will learn:
Setup and Configuration: Step-by-step instructions for connecting ChatGPT to WordPress via plugins, APIs, or custom code, including security considerations.
Practical Use Cases: Real-world examples of how to automate content creation, build intelligent chatbots, and generate dynamic FAQs or product recommendations.
Best Practices: Tips for maintaining quality control, avoiding common pitfalls like over-reliance on AI, and ensuring your content remains authentic and valuable.
Future Possibilities: A glimpse into emerging trends, such as voice-activated assistants and predictive content personalization, that can further elevate your WordPress site.
By the end, you will have a clear roadmap to harness the combined power of WordPress and ChatGPT integration, enabling you to create a smarter, more responsive website that meets the demands of today’s digital landscape.
Understanding ChatGPT and WordPress Basics
Before diving into the technical steps of WordPress and ChatGPT integration, it is essential to grasp the foundational components. This section clarifies what ChatGPT is, how WordPress operates as a content management system, and the core concepts—such as API keys and plugins—that will appear throughout your integration journey. Establishing this baseline knowledge ensures you can follow advanced procedures with confidence and avoid common pitfalls.
What Is ChatGPT and How Does It Work?
ChatGPT is a large language model developed by OpenAI. It is trained on vast amounts of text data from the internet, books, and other sources, enabling it to generate human-like responses to prompts. The model uses a transformer architecture, which processes input text and predicts the most likely next words or phrases based on context. When you interact with ChatGPT, you provide a prompt—a question, instruction, or statement—and the model generates a coherent, contextually relevant reply. It does not “understand” in a human sense but statistically mimics language patterns. Key capabilities include:
Answering questions and providing explanations.
Generating creative content such as blog posts, poems, or code.
Summarizing lengthy texts or translating between languages.
Assisting with brainstorming, editing, or problem-solving tasks.
For WordPress and ChatGPT integration, you typically access this model via OpenAI’s API, which allows your website to send prompts and receive responses programmatically.
WordPress as a Flexible CMS Platform
WordPress powers over 40% of all websites on the internet, thanks to its flexibility as a content management system (CMS). It allows you to create, manage, and publish content—such as posts, pages, and media—without requiring deep technical knowledge. WordPress is built on a modular architecture:
Control the visual design and layout of your site.
Plugins
Add custom features and extend core capabilities.
REST API
Allows external applications to interact with your site via HTTP requests.
WordPress’s plugin ecosystem is especially important for integration. You can install dedicated plugins that connect your site to ChatGPT, or you can write custom code using the WordPress REST API and PHP hooks. The platform also supports custom post types, taxonomies, and user roles, which gives you granular control over how AI-generated content is handled.
API Keys, Plugins, and Other Core Concepts
To successfully implement WordPress and ChatGPT integration, you need to understand several core concepts:
API Key: A unique identifier that authenticates your requests to OpenAI’s servers. You obtain this from your OpenAI account dashboard. Keep it secret, as it grants access to paid usage.
REST API: WordPress’s built-in REST API enables external services (like ChatGPT) to read, create, update, or delete content on your site. It uses standard HTTP methods (GET, POST, PUT, DELETE).
Plugin: A software add-on that extends WordPress. For integration, you might use plugins like “AI Engine,” “ChatGPT for WordPress,” or custom-built solutions.
Webhook: A mechanism for real-time data transfer. When a specific event occurs in WordPress (e.g., a new post is published), a webhook can send data to ChatGPT for processing.
Rate Limiting: Both WordPress and OpenAI impose limits on how many requests you can make in a given time period. Plan your integration to avoid hitting these caps.
A practical code example using the WordPress REST API to send a prompt to ChatGPT might look like this in PHP:
This function sends a user prompt to ChatGPT and returns the generated text, which can then be used to create or update WordPress content automatically.
Method 1: Using a Dedicated WordPress Plugin for ChatGPT
Integrating ChatGPT into your WordPress site is most accessible through a dedicated plugin. This approach eliminates the need for custom coding, allowing you to connect your site to OpenAI’s API with a few clicks. Below, we walk through the leading plugin options, setup steps, and configuration best practices to get your AI assistant running smoothly.
Top Plugins Compared: Features and Pricing
Several plugins offer robust ChatGPT integration, each with distinct features and pricing models. The table below compares the most popular options based on functionality, cost, and ease of use.
E-commerce sites needing AI-driven customer support
All plugins require an OpenAI API key, which you can obtain from the OpenAI platform. Free tiers often limit features or API calls, so review each plugin’s upgrade path based on your anticipated usage.
Installation and API Key Setup
Follow these steps to install a plugin and connect it to OpenAI. We use AI Engine as an example due to its popularity, but the process is similar for others.
Install the plugin: In your WordPress dashboard, navigate to Plugins > Add New. Search for “AI Engine” (or your chosen plugin), then click Install Now and Activate.
Obtain an OpenAI API key: Go to platform.openai.com/api-keys, log in, and click Create new secret key. Copy the key immediately—it will not be shown again.
Enter the API key: In your WordPress admin, find the plugin’s settings page (for AI Engine, it is under AI Engine > Settings). Paste your key into the OpenAI API Key field and save changes.
Verify connection: Most plugins provide a test button. Click it to confirm your site can communicate with OpenAI. A success message indicates proper setup.
If you encounter errors, double-check that your key has sufficient credits and that your server allows outbound HTTPS requests to api.openai.com.
Once connected, configure how the AI interacts with your visitors. Start with the chat widget, then explore content assistant features.
Chat widget setup:
Appearance: Customize the widget’s position (bottom-right or bottom-left), color scheme, and greeting message. Most plugins offer a live preview.
Behavior: Set the AI’s persona (e.g., friendly customer support agent) and response length. Enable conversation memory to maintain context across user messages.
Visibility rules: Restrict the widget to specific pages, user roles (e.g., logged-in members), or device types. For example, show it only on product pages for targeted assistance.
Content assistant configuration:
Drafting and editing: Use the assistant to generate blog post outlines, meta descriptions, or rewrite existing content. Plugins like AI Engine embed a button in the WordPress editor that triggers AI suggestions.
Fine-tuning: Some plugins allow you to upload custom datasets (e.g., your FAQ or product specs) to tailor responses. This requires an OpenAI fine-tuning subscription in addition to the plugin.
Safety filters: Enable moderation to block inappropriate content. Adjust the temperature parameter (0–1) to control creativity; lower values produce more predictable responses.
Test your configuration thoroughly. Use a private browser window to simulate a visitor’s experience and ensure the widget appears and responds as intended. Regularly review chat logs—if your plugin supports them—to refine the AI’s behavior over time.
Method 2: Custom Integration via the OpenAI API
For developers who require full control over how ChatGPT interacts with their WordPress site, the OpenAI REST API offers a direct, flexible integration path. This method bypasses plugin limitations, allowing you to tailor requests, manage costs precisely, and embed AI responses into custom workflows. Below is a step-by-step guide to implementing this integration securely and efficiently.
Before writing any code, you must obtain API credentials from OpenAI. Follow these steps:
Create an account at platform.openai.com if you do not already have one.
Navigate to the API keys section under your account dashboard.
Generate a new secret key and copy it immediately (you cannot view it again after creation).
Set usage limits in your OpenAI account to prevent unexpected charges. Start with a low hard cap (e.g., $5–$10) while testing.
Store the key securely in your WordPress environment. Avoid hard-coding it into theme files. Use a constant in wp-config.php or a secure environment variable.
Writing a Custom WordPress Function to Call ChatGPT
With your API key secured, create a custom function in your theme’s functions.php file or a site-specific plugin. The function will send a POST request to the OpenAI API endpoint and return the response. Here is a practical implementation:
It uses wp_remote_post(), WordPress’s built-in HTTP API, ensuring compatibility and security.
The prompt is sanitized with sanitize_text_field() before sending to the API.
The response is escaped with wp_kses_post() to allow safe HTML while preventing malicious content.
Error handling returns user-friendly messages for debugging or display.
Displaying AI Responses on Your Site Safely
Security is paramount when outputting AI-generated content. Follow these practices to protect your site and users:
Practice
Implementation
Escape all output
Use esc_html() or wp_kses_post() before echoing AI responses.
Limit request frequency
Add a nonce check or rate limiter to prevent abuse from public-facing forms.
Cache responses
Store frequent queries in transients to reduce API calls and costs.
Validate user input
Sanitize and validate any user-submitted prompts before passing them to the API.
To display a response on a page or post, call your function with a shortcode or template tag. Example usage in a template:
echo call_chatgpt_api( 'Explain the benefits of AI for WordPress websites.' );
For public-facing forms, wrap the call in a conditional check that verifies a nonce and user permissions. This ensures only authorized users can trigger API requests, preventing excessive usage and potential security vulnerabilities. By combining secure coding practices with the OpenAI API, you gain a powerful, customizable AI assistant for your WordPress site.
Method 3: Leveraging Page Builders and No-Code Tools
For site owners who prefer visual design over scripting, page builders and no-code platforms offer a direct path to WordPress and ChatGPT integration. This method allows you to add AI-powered features—such as smart content suggestions, automated replies, or dynamic text generation—without writing a single line of custom code. By combining the drag-and-drop flexibility of tools like Elementor or Divi with automation services like Zapier or Make, you can create sophisticated ChatGPT interactions that enhance user engagement and streamline your workflow.
Integrating ChatGPT with Elementor via Custom Code or Widgets
Elementor, one of the most popular page builders, supports ChatGPT integration through two primary approaches: custom code snippets and dedicated AI widgets.
Custom Code (Elementor Pro): Use the “Custom Code” feature to inject JavaScript or PHP that calls the OpenAI API. For example, you can add a button that triggers a ChatGPT response in a text area. Steps include:
Enabling the “Custom Code” feature in Elementor Pro settings.
Adding a shortcode or JavaScript snippet that sends a user prompt to the OpenAI API.
Displaying the response in a dynamic text widget or custom HTML block.
AI Widgets (Third-Party Plugins): Install plugins like “AI Engine” or “ChatGPT for Elementor” that provide pre-built widgets. These widgets connect directly to your OpenAI account and allow you to:
Add a chat interface to any page or section.
Generate content on-the-fly (e.g., product descriptions, blog intros).
Customize prompts and response styles without coding.
Both methods work well for adding interactive AI features, but custom code offers more control, while widgets prioritize speed and simplicity.
Automating Content Workflows with Zapier and ChatGPT
Zapier and Make (formerly Integromat) are no-code automation platforms that connect WordPress to ChatGPT through API triggers and actions. This is ideal for repetitive tasks like generating blog post drafts, summarizing comments, or translating content.
Send post content to ChatGPT with prompt “Summarize this in 50 words”
Summary saved as post excerpt
Reply to comments with AI
New comment added
Send comment text to ChatGPT with prompt “Write a helpful reply”
Auto-reply posted as comment
Create SEO meta descriptions
New page created
Send page title and content to ChatGPT
Meta description updated in Yoast or Rank Math
To set this up, create a Zapier or Make account, connect your WordPress site via the WordPress plugin, and add the OpenAI API as an action. Each “Zap” or “Scenario” runs automatically, saving hours of manual work.
Webhooks provide a direct, real-time link between WordPress events and the OpenAI API, bypassing traditional plugins. This method is lightweight and works with any page builder or theme. Here’s how to implement a webhook-based WordPress and ChatGPT integration:
Create a Webhook Endpoint in WordPress: Use a plugin like “Webhook” or custom code to listen for specific events (e.g., form submission, user registration).
Send Data to OpenAI: Configure the webhook to send a POST request to the OpenAI API endpoint (e.g., https://api.openai.com/v1/completions) with your API key and prompt.
Process the Response: Use the returned ChatGPT text to update a post, send an email, or display a message on the frontend.
For example, when a visitor submits a contact form, the webhook sends their query to ChatGPT, which generates a personalized response. That response can then be emailed to the user or stored in the database. This approach is ideal for developers who want a custom integration without heavy overhead, and it pairs seamlessly with page builders like Divi or Elementor by using their form or dynamic data features.
Practical Use Cases for ChatGPT on Your WordPress Site
Integrating ChatGPT into your WordPress site opens a spectrum of efficiency gains that go far beyond gimmickry. When applied thoughtfully, the AI transforms routine tasks into automated workflows, freeing you to focus on strategy and creativity. Below are three high-impact use cases that demonstrate how to harness this technology in real-world scenarios.
Automated Content Creation and Editing Assistance
One of the most immediate benefits of WordPress and ChatGPT integration is streamlined content production. Instead of staring at a blank editor, you can generate drafts, outlines, or even full articles based on simple prompts. For example, a travel blog might ask ChatGPT to write a 500-word post on “budget-friendly European destinations,” then refine the output for tone and accuracy.
To automate this, you can use a plugin like WP ChatGPT or custom code via the REST API. Below is a practical PHP snippet that sends a prompt to ChatGPT and returns a draft directly in your WordPress admin. This example assumes you have an API key stored securely:
Use this function inside a custom WordPress dashboard widget or a cron job to schedule content generation. The AI also excels at editing: paste a rough draft into a ChatGPT-powered field, and it will suggest grammar fixes, rephrase awkward sentences, or adjust the reading level.
AI-Powered Customer Support Chatbots
Deploying a ChatGPT-driven chatbot on your WordPress site can handle common queries around the clock, reducing the burden on human support teams. Unlike rule-based bots, this AI understands context and can answer nuanced questions about your products, services, or policies.
To implement this, integrate a chatbot plugin (e.g., Tidio or Botpress) that connects to OpenAI’s API. Configure it with a system prompt that defines your brand voice and knowledge base. For instance:
Prompt example: “You are a friendly support agent for an online shoe store. Answer only based on our product catalog and return policy. If unsure, say ‘I’ll connect you with a human.'”
Common use cases: Order status inquiries, sizing recommendations, return procedures, and shipping time estimates.
This integration reduces average response time from hours to seconds. A table comparing traditional support vs. AI-powered support highlights the difference:
Metric
Traditional Support
AI Chatbot
Response time
2–24 hours
Instant
Hours of operation
Business hours only
24/7
Scalability
Limited by staff
Unlimited concurrent chats
Consistency
Varies by agent
Uniform responses
Dynamic FAQ and Knowledge Base Generation
Static FAQ pages quickly become outdated. With ChatGPT, you can generate dynamic, context-aware answers that update automatically as your content evolves. The AI can pull from your existing posts, product descriptions, or support tickets to create fresh, accurate responses.
Here’s how to set this up:
Step 1: Use a plugin like “FAQ Chatbot for WordPress” that supports OpenAI integration.
Step 2: Feed your knowledge base (e.g., all published articles) into the AI’s context via embeddings or a fine-tuned model.
Step 3: Let visitors type natural language questions—the AI returns answers drawn directly from your site’s content, complete with links to relevant pages.
For example, a SaaS site could allow users to ask “How do I reset my password?” and receive a step-by-step guide generated from the support documentation. This approach keeps your FAQ accurate without manual intervention, and the AI can even suggest new questions based on search patterns. Over time, this reduces support tickets and improves user satisfaction.
Best Practices for Content, Performance, and Security
Integrating ChatGPT into your WordPress site can transform user engagement, but it demands careful attention to content quality, site performance, and data protection. Following these best practices ensures your integration remains effective, fast, and secure without compromising user trust or your budget.
Optimizing API Usage to Avoid Rate Limits and High Costs
ChatGPT API calls are billed per token and subject to rate limits. Unoptimized usage can quickly escalate costs and trigger throttling. Implement these strategies to stay efficient:
Set token limits per request: Use the max_tokens parameter to cap response length, preventing overly long outputs that inflate costs.
Batch non-urgent requests: Queue less time-sensitive queries (e.g., content summaries) and send them during off-peak hours to reduce peak load.
Use the “gpt-3.5-turbo” model for simple tasks: Reserve expensive models like GPT-4 for complex interactions that genuinely require higher reasoning.
Implement exponential backoff: When a 429 (rate limit) error occurs, pause and retry with increasing delays to avoid repeated failures.
Monitor usage via the OpenAI dashboard: Set usage caps and alerts to stay within budget.
Strategy
Cost Impact
Rate Limit Benefit
Token caps
Reduces per-request cost
Lowers token consumption per minute
Request batching
May slightly increase latency
Spreads load evenly
Model selection
Significant savings with 3.5-turbo
Higher rate limits for cheaper models
Exponential backoff
Negligible
Prevents temporary bans
Caching ChatGPT Responses for Better Performance
Repeatedly querying the API for identical or similar user inputs wastes resources and slows your site. Caching eliminates redundant calls and delivers near-instant responses. Follow these steps:
Use WordPress transients: Store API responses with an expiration time using set_transient(). For example, cache common FAQ answers for 24 hours.
Implement a hash-based lookup: Generate a unique hash of the user query and check the cache before calling the API. Use wp_cache_get() and wp_cache_set() for object caching.
Set appropriate TTLs: Cache dynamic queries (e.g., conversational help) for minutes, static content (e.g., product descriptions) for days.
Use a page cache plugin: For AI-generated content displayed on pages, leverage plugins like WP Rocket or W3 Total Cache to serve cached HTML to users.
Invalidate cache intelligently: Clear cached responses when the underlying data changes (e.g., after a site update) to avoid stale outputs.
Protecting User Data and Complying with Privacy Regulations
ChatGPT processes user inputs through OpenAI’s servers, which raises privacy and compliance concerns. Safeguard your users and your site with these measures:
Anonymize user data: Strip personally identifiable information (PII) like names, emails, or IP addresses from API requests. Send only the minimal text needed for the query.
Enable data retention controls: In your OpenAI account, disable “Improve the model for everyone” to prevent your data from being used for training.
Use a privacy-first plugin: Tools like WP AI Assistant offer local processing options that keep sensitive data on your server.
Update your privacy policy: Clearly disclose that user interactions may be processed by third-party AI services, and obtain consent via a cookie banner or opt-in form.
Comply with GDPR and CCPA: Provide users with a way to delete their conversation history from your database, and never store raw API responses containing personal data.
By balancing cost optimization, performance caching, and rigorous data protection, your WordPress and ChatGPT integration will deliver value without sacrificing speed or trust.
Troubleshooting Common Integration Issues
Integrating ChatGPT with WordPress offers transformative potential, but even the most robust setups encounter snags. Below, we address the three most frequent categories of problems—API authentication errors, plugin conflicts, and response quality issues—with actionable solutions to keep your AI-powered site running smoothly.
Fixing “401 Unauthorized” and Other API Errors
A “401 Unauthorized” error indicates that your WordPress site cannot authenticate with OpenAI’s servers. This typically stems from incorrect API key entry, expired keys, or misconfigured permissions. Follow these steps to resolve it:
Verify the API key: Log into your OpenAI account, navigate to the API keys section, and regenerate a new key if the current one is expired or compromised. Copy it exactly, including any hyphens.
Check key placement: In your WordPress integration plugin (e.g., AI Engine or WP ChatGPT), ensure the key is pasted into the designated field without extra spaces or line breaks. Some plugins require the key to be stored in the wp-config.php file via define('OPENAI_API_KEY', 'your-key-here');.
Confirm billing status: OpenAI accounts must have a valid payment method and sufficient credits. A 401 error can also appear if your account is suspended or out of credits. Visit the OpenAI billing dashboard to verify.
Test with a simple request: Use a tool like cURL to directly query the API: curl https://api.openai.com/v1/models -H "Authorization: Bearer YOUR_API_KEY". If this works, the issue lies in your WordPress setup; if not, it’s an account or key problem.
Resolving Plugin Compatibility Conflicts
WordPress and ChatGPT Integration often involves multiple plugins—caching, security, or page builders—that can clash. Symptoms include blank responses, timeouts, or broken site layout. Use this comparison table to identify and resolve common conflicts:
Refine your prompt: Be explicit about format and scope. For example, instead of “Write a blog intro,” use “Write a 50-word introduction for a blog post about WordPress and ChatGPT Integration. Use a professional tone and include the keyword once.”
Adjust response parameters: In your integration plugin, increase the max_tokens limit (e.g., from 150 to 500) to prevent truncation. Reduce the temperature to 0.3 for more deterministic, relevant outputs.
Enable context windows: For multi-turn interactions, ensure the plugin sends conversation history. Without it, ChatGPT lacks context and may produce irrelevant replies.
Test with a fallback: Use the plugin’s “retry” or “regenerate” feature. If the problem persists, manually test the same prompt in OpenAI’s Playground to rule out server-side issues.
Future Trends: AI and WordPress Beyond ChatGPT
The integration of artificial intelligence with WordPress is evolving rapidly, moving well beyond simple text generation. While ChatGPT has pioneered conversational AI, the next wave of innovation promises to transform how websites are built, managed, and experienced. These trends are not speculative; they are already taking shape through emerging technologies and community efforts. Below, we explore the key developments that will define the next era of WordPress and ChatGPT integration.
The Rise of Multimodal AI in Content Creation
Multimodal AI, which processes and generates multiple data types—text, images, audio, and video—is set to revolutionize content creation on WordPress. Instead of relying solely on text-based prompts, users will be able to combine inputs. For example, a content creator could upload a product photo, and the AI would automatically generate a description, alt text, and even a short promotional video script. Models like OpenAI’s GPT-4 Vision and DALL·E 3 already enable this, but deeper integration with WordPress will streamline workflows. Practical applications include:
Automated media tagging: AI analyzes uploaded images and generates descriptive metadata and categories.
Dynamic content blocks: A single multimodal prompt could produce a complete landing page with text, images, and layout suggestions.
Accessibility improvements: AI can automatically generate captions for audio files and descriptive transcripts for videos.
This shift reduces manual effort and ensures consistency across media types, making WordPress sites more engaging and accessible.
Voice-Activated WordPress Features
Voice interfaces are becoming mainstream, and WordPress is poised to integrate them for both backend management and frontend user experiences. Imagine editing a post or adjusting settings using natural voice commands. For developers, implementing voice-activated features will rely on APIs like OpenAI’s Whisper for speech-to-text and GPT-4 for intent parsing. A practical code example for a custom WordPress plugin that accepts voice commands for post creation might look like this:
// Example: Basic voice command handler using Whisper API
function handle_voice_command($audio_file) {
$transcript = whisper_transcribe($audio_file); // Returns text
$intent = gpt4_parse_intent($transcript); // e.g., "create post"
if ($intent === 'create_post') {
$title = extract_title($transcript);
$content = extract_content($transcript);
wp_insert_post(array(
'post_title' => $title,
'post_content' => $content,
'post_status' => 'draft'
));
}
}
On the frontend, voice-activated search and navigation will become standard, allowing users to find products or content hands-free. This trend is especially valuable for accessibility and for websites targeting mobile or smart speaker users.
As AI integration deepens, the WordPress community is driving the creation of open-source plugins and interoperability standards. Rather than relying on proprietary solutions, developers are collaborating to build modular AI tools that work seamlessly with existing themes and plugins. Key developments include:
Plugins can trigger AI actions (e.g., content summarization) via common WordPress actions and filters.
Shared model caching
Reduce API costs by caching AI responses locally, with community-maintained libraries.
Privacy-focused frameworks
Ensure user data is processed on-site or via encrypted channels, aligning with GDPR and other regulations.
These community efforts will democratize access to AI, allowing even small site owners to leverage advanced models without vendor lock-in. Expect to see more plugins that combine ChatGPT, DALL·E, and other OpenAI models into cohesive workflows, such as generating alt text for all images in a media library or auto-translating posts while preserving tone. The future of WordPress and ChatGPT integration is not just about smarter tools—it is about a more open, collaborative ecosystem that adapts to user needs.
Conclusion: Taking the Next Steps with AI-Enhanced WordPress
Integrating ChatGPT with WordPress unlocks a new realm of possibilities for site owners, from automated content generation to intelligent customer support. Throughout this guide, we have explored several key methods—including plugin-based solutions, custom API integrations, and hybrid workflows—each serving distinct use cases. Whether you aim to streamline drafting blog posts, personalize user interactions, or automate repetitive tasks, the combination of WordPress and ChatGPT integration empowers you to work smarter, not harder.
As you move forward, remember that the most effective integration balances automation with human oversight. AI can generate drafts, suggest improvements, and handle routine queries, but your unique expertise ensures relevance, accuracy, and brand consistency. The following subsections provide actionable advice to help you choose the right path, measure success, and continue learning.
Choosing the Best Integration Method for Your Needs
Selecting the optimal integration depends on your technical comfort, budget, and specific goals. Below is a comparison to guide your decision:
Method
Best For
Technical Skill Required
Cost
Plugin (e.g., AI Engine, WP ChatGPT)
Quick setup, content generation, chatbot
Low (install and configure)
Free to moderate subscription
Custom REST API Integration
Tailored workflows, deep control
Advanced (PHP, API knowledge)
OpenAI API usage fees
Hybrid (Plugin + Custom Code)
Balanced flexibility and ease
Intermediate
Varies
For most site owners, starting with a reputable plugin offers a low-risk entry point. If you need custom features like conditional content or advanced data handling, invest in a developer to build a custom solution. Always prioritize security by using API keys with restricted permissions and keeping plugins updated.
Measuring Success: Metrics and Iteration
To ensure your WordPress and ChatGPT integration delivers value, track these key performance indicators:
Content Quality: Monitor user engagement (time on page, bounce rate) and edit rates for AI-generated posts.
Efficiency Gains: Measure time saved on content creation or support responses compared to manual methods.
User Satisfaction: For chatbots, track resolution rates, positive feedback, and reduced support tickets.
SEO Impact: Observe organic traffic changes and keyword rankings after integrating AI-assisted content.
Iterate based on data. If AI-generated content underperforms, refine prompts or add human review steps. For chatbots, test different response styles and fallback strategies. Regular A/B testing helps optimize both user experience and operational efficiency.
Resources for Continued Learning
Deepen your expertise with these reliable resources:
Official Documentation: OpenAI API docs for technical integration details; WordPress Developer Handbook for hooks and REST API.
Community Forums: WordPress Stack Exchange and specialized Facebook groups for troubleshooting and best practices.
Online Courses: Platforms like Udemy and LinkedIn Learning offer courses on AI integration and WordPress development.
Blogs and Newsletters: Follow reputable WordPress and AI blogs for updates on new plugins, security tips, and case studies.
By starting small, measuring outcomes, and staying informed, you can harness the power of WordPress and ChatGPT integration to elevate your website while maintaining quality, security, and user trust. Experiment boldly, but always anchor your decisions in real-world feedback and ethical AI use.
Frequently Asked Questions
What is the easiest way to integrate ChatGPT with WordPress?
The easiest way is to use a dedicated plugin like 'AI Engine' or 'Chatbot for WordPress by Formilla'. These plugins provide a user-friendly interface to connect your OpenAI API key and embed a ChatGPT widget on your site without coding. You can customize the chatbot’s behavior, appearance, and trigger conditions directly from the WordPress dashboard. Most plugins also include pre-built templates for common use cases like customer support or lead generation.
Can I use ChatGPT to generate WordPress content automatically?
Yes, plugins like 'AI Power' and 'WordPress ChatGPT' allow you to generate posts, pages, and product descriptions using OpenAI’s GPT models. You can set prompts, tone, and length, and the AI will produce draft content that you can edit before publishing. Some plugins also support bulk generation and integration with page builders like Elementor. Always review AI-generated content for accuracy and originality.
Do I need coding skills to integrate ChatGPT with WordPress?
No, many plugins offer no-code integration. However, for advanced customizations—such as creating a custom chatbot flow or connecting to a third-party CRM—some PHP and JavaScript knowledge may be required. There are also tutorials and ready-made code snippets available for developers who want to build a custom solution using the OpenAI API directly.
Security depends on how you implement it. When using a reputable plugin, your API key is stored securely and data transmission is encrypted via HTTPS. Avoid storing sensitive user data in chat logs unless necessary. Always keep WordPress core, plugins, and themes updated. For custom integrations, follow OpenAI’s security best practices and use environment variables for API keys.
What are the best ChatGPT plugins for WordPress?
Top plugins include 'AI Engine' (formerly 'Chatbot for WordPress'), 'AI Power', 'WordPress ChatGPT', and 'WP ChatGPT'. Each offers different features: AI Engine is great for customizable chatbots, AI Power excels in content generation and image creation, and WordPress ChatGPT provides a simple interface for embedding a chat widget. Compare their features and user reviews on the WordPress plugin repository.
Can ChatGPT improve my WordPress site’s SEO?
Indirectly, yes. ChatGPT can help generate SEO-friendly meta descriptions, title tags, and content outlines, but it cannot replace a dedicated SEO plugin like Yoast or Rank Math. Use AI to brainstorm keywords, create FAQ content, or draft blog posts, but always optimize manually for search intent and readability. Google does not penalize AI-generated content as long as it is helpful and original.
How much does it cost to integrate ChatGPT with WordPress?
The integration itself can be free if you use a free plugin and your own OpenAI API key. OpenAI charges based on usage (tokens), typically a few cents per 1,000 requests. For a small site, costs may be under $10/month. Premium plugins may charge a one-time fee or subscription for advanced features. Always monitor your API usage to avoid unexpected bills.
What limitations does ChatGPT have when used on WordPress?
ChatGPT may generate inaccurate or outdated information, so human oversight is essential. It also has a token limit per response, which can affect long-form content. Additionally, the AI does not have access to your site’s private data unless you explicitly provide it via fine-tuning or API context. For sensitive topics, always verify facts and comply with your local regulations.
How to Create a WordPress Portfolio Site: A Step-by-Step Guide for Professionals
Why Choose WordPress for Your Portfolio
When building a professional portfolio, the platform you select directly impacts how your work is presented, discovered, and managed. WordPress stands out as a premier choice because it offers unmatched flexibility, scalability, and control for showcasing creative work—whether you are a designer, photographer, developer, or writer. Unlike rigid template-based builders, WordPress adapts to your unique needs, from custom layouts to advanced SEO, without requiring constant platform migrations as your career grows.
Comparing WordPress.com vs. WordPress.org for Portfolios
Understanding the distinction between WordPress.com and WordPress.org is critical for professionals. The table below outlines key differences:
Feature
WordPress.com (Free/Paid Plans)
WordPress.org (Self-Hosted)
Hosting
Included, but limited storage and bandwidth on free tiers
Requires separate hosting provider (e.g., SiteGround, Bluehost)
Custom Themes & Plugins
Restricted on lower plans; only pre-approved options
Full access to thousands of themes and plugins
Domain Name
Free subdomain (e.g., yourname.wordpress.com); custom domain requires paid plan
Full control over custom domain
Monetization & Analytics
Limited; advanced tools require business plan
Unrestricted access to Google Analytics, ad networks, and e-commerce
Control & Ownership
Platform can suspend or modify your site per terms
Complete ownership of content and data
For a professional portfolio, self-hosted WordPress.org is almost always the recommended path. It gives you the freedom to install portfolio-specific plugins like Portfolio Post Type, integrate with client management tools, and customize every pixel of your site. WordPress.com may suffice for a simple, no-cost starting point, but its limitations on customization and growth potential often frustrate serious professionals.
Key Advantages of Self-Hosted WordPress for Professionals
Choosing self-hosted WordPress.org provides several concrete benefits for showcasing your work:
Complete design freedom: Use premium themes like Astra or GeneratePress, or build a custom theme from scratch using a page builder like Elementor or Beaver Builder. You are not restricted to a curated library.
Advanced portfolio features: Plugins such as NextGEN Gallery, Envira Gallery, or Portfolio Post Type allow you to create categorized, filterable galleries with lightbox effects, client proofing, and video embedding.
SEO and performance optimization: Install plugins like Yoast SEO or Rank Math to fine-tune meta descriptions, XML sitemaps, and schema markup. You can also integrate CDNs and caching tools to ensure fast load times—critical for image-heavy portfolios.
Scalability without limits: As your client base grows, add e-commerce functionality (e.g., WooCommerce for selling prints), booking systems, or membership areas—all within the same installation.
Full ownership and portability: Your content is stored in a standard MySQL database and can be exported to any other CMS or static site generator. No platform lock-in.
These advantages translate into a portfolio that not only looks professional but also functions as a reliable business tool. For example, a photographer can use a plugin to password-protect client galleries, while a developer can embed live code demos without restrictions.
When to Consider Alternative Portfolio Platforms
Despite WordPress’s strengths, alternative platforms may be more suitable in specific scenarios:
You need zero maintenance: Platforms like Squarespace or Wix handle hosting, security updates, and backups automatically. If you prefer a hands-off approach and are willing to accept design constraints, these can save time.
Your portfolio is image-only with minimal content: Services like Adobe Portfolio or Format are purpose-built for visual artists and offer elegant, responsive galleries out of the box with no setup fuss.
You require a simple, single-page site: Tools like Carrd or Tilda excel at creating one-page portfolios with parallax scrolling and animations, ideal for freelancers who want a lightweight presence.
You lack technical confidence: While WordPress is user-friendly, it still involves some learning curve (e.g., managing hosting, updates, backups). If you cannot commit to basic site maintenance, a managed platform may be less stressful.
Ultimately, the best platform aligns with your technical comfort, budget, and long-term goals. For professionals who value control, customization, and growth potential, self-hosted WordPress remains the gold standard for creating a portfolio that truly reflects your expertise.
Planning Your Portfolio Content and Structure
Before you install a theme or write a single line of code, the most critical step in learning how to create a WordPress portfolio site is planning. A portfolio is not just a collection of your best work; it is a strategic tool designed to attract specific opportunities. Without a clear plan, your site can become cluttered and confusing, driving away potential clients or employers. This section will guide you through defining your audience, organizing your projects, and building a navigation structure that feels intuitive.
Identifying Your Target Audience and Career Goals
Your portfolio must speak directly to the people you want to impress. Start by asking yourself three questions:
Who is your primary audience? Are you targeting creative directors at agencies, HR managers at tech companies, or freelance clients in a specific industry?
What action do you want them to take? Common goals include booking a consultation, downloading a resume, or clicking a “Hire Me” button.
What story does your career path tell? If you are a junior designer, highlight growth and versatility. If you are a senior developer, emphasize leadership and complex problem-solving.
For example, a UX designer applying for in-house roles should prioritize case studies showing user research and iterative design. A freelance photographer, however, should focus on high-quality image galleries and client testimonials. Write down your top three career goals and the type of client or employer you want to attract. This clarity will inform every decision about which projects to include and how to describe them.
Selecting Project Categories and Filtering Options
Once you know your audience, group your work into logical categories. Avoid overcomplicating this step—use no more than four to six main categories. Common examples include:
Profession
Suggested Categories
Graphic Designer
Branding, Print, Digital, Packaging
Web Developer
Front-End, Back-End, Full-Stack, E-Commerce
Writer
Blog Posts, White Papers, Copywriting, Technical Writing
Photographer
Portraits, Events, Commercial, Travel
In WordPress, you can implement these categories using custom taxonomies or standard categories. For filtering, consider using a lightweight plugin like Filter & Grid or adding a simple JavaScript solution. A practical example of a filtering function you might add to your theme’s functions.php file is:
This snippet enables AJAX-based filtering, allowing visitors to sort projects without reloading the page. Always test filtering on mobile devices, as touch interactions can behave differently.
Mapping Out a Logical Site Hierarchy
A clear hierarchy ensures visitors can find your work within three clicks. Start with a top-level navigation bar that includes:
Home – A landing page with a strong introduction and featured projects.
Portfolio – The main gallery or grid of all projects, with filtering options.
About – Your bio, experience, and professional philosophy.
Contact – A simple form with your email and social links.
Each project should reside as a subpage under the Portfolio section. Use a consistent URL structure, such as yourdomain.com/portfolio/project-name. To reinforce the hierarchy, use breadcrumb navigation. In WordPress, you can add breadcrumbs with a plugin like Breadcrumb NavXT or by adding this code to your theme’s header.php:
Finally, sketch a simple sitemap on paper or in a tool like Figma. Include each page, its parent, and the type of content it will hold. This map will serve as your blueprint when you begin building in WordPress, preventing scope creep and ensuring a cohesive user experience.
Choosing a Domain Name and Web Hosting
Your domain name and web hosting provider form the technical and branding foundation of your WordPress portfolio site. A professional domain establishes credibility, while reliable hosting ensures fast load times and uptime for your work. This section guides you through selecting both, with a focus on WordPress compatibility and professional presentation.
Tips for Picking a Professional Domain Name
Your domain name is often the first impression potential clients have. Follow these guidelines to choose one that reinforces your professional image:
Use your name or brand: For individual professionals, firstname-lastname.com (e.g., janesmith.com) is ideal. For agencies, incorporate your business name.
Keep it short and memorable: Aim for 6–14 characters. Avoid hyphens if possible, as they can be confused or forgotten.
Choose .com as a priority: It remains the most trusted and widely recognized top-level domain (TLD). Alternatives like .io or .design can work for tech or creative fields but may lack authority.
Avoid numbers and misspellings: Numbers (e.g., jane3smith.com) and creative spellings (e.g., jaynzmith.com) cause confusion and reduce professionalism.
Check social media availability: Ensure matching handles are available on LinkedIn, Instagram, and Twitter to maintain brand consistency.
Top Hosting Providers Optimized for WordPress Portfolios
For a portfolio site, you need hosting that balances performance, ease of use, and cost. The following providers offer managed or optimized WordPress hosting with one-click installation, automatic updates, and solid support. The table below compares three leading options.
Managed WordPress with auto-updates and caching plugin
Bluehost
$2.95 (introductory)
Free domain for first year, 50 GB storage, CDN included
Officially recommended by WordPress.org, one-click install
Kinsta
$35 (premium)
Google Cloud infrastructure, free migrations, 10 GB storage
Fully managed hosting with edge caching and staging environments
For most professionals starting out, SiteGround or Bluehost offer affordable entry points with sufficient resources for a portfolio. If you anticipate high traffic or need advanced performance, Kinsta provides premium scalability.
Installing WordPress via One-Click Installers
Once you have registered a domain and purchased hosting, installing WordPress is straightforward with one-click installers provided by your host. Here is how to do it step by step:
Log into your hosting control panel: Typically cPanel or a custom dashboard provided by your host.
Locate the WordPress installer: Look for icons labeled “WordPress,” “Installatron,” “Softaculous,” or “Mojo Marketplace.” Most providers place this prominently.
Click “Install” and enter site details: Choose your domain from a dropdown, set an administrator username and password, and provide your site title (e.g., “Jane Smith Portfolio”).
Select optional settings: Some installers let you choose a theme or enable automatic updates. Leave defaults if unsure.
Complete installation: Click the final install button. Within 2–5 minutes, you will receive a confirmation with your WordPress login URL (typically yourdomain.com/wp-admin).
Log in and verify: Use the admin credentials to access your dashboard. Check that the default WordPress theme and core files are present.
After installation, immediately change your password and enable two-factor authentication if your host supports it. Your portfolio site is now ready for customization.
Your portfolio is only as strong as the stage it performs on. A WordPress theme designed for portfolios does more than just look good—it must prioritize visual impact, deep customization options, and flawless responsive design. The wrong theme can bury your best work under clutter or slow load times, while the right one makes every project shine. This section helps you choose, compare, and install a theme that matches your professional standards.
Essential Features to Look for in a Portfolio Theme
Before browsing theme directories, define your non-negotiable features. A portfolio theme must serve your work, not fight it. Look for these core capabilities:
Full-width and grid layouts: Your projects need breathing room. Themes that support full-width pages and flexible grid options let you showcase images, videos, or case studies without cramped margins.
Built-in portfolio custom post type: Avoid themes that force you to use standard blog posts for projects. A dedicated portfolio post type gives you separate fields for client name, date, tools used, and project URL.
Lightbox or modal previews: When a visitor clicks a thumbnail, a smooth lightbox overlay should display the full image or video without leaving the page. This keeps engagement high.
Typography and color controls: Your brand identity matters. Choose a theme that offers live customizer options for fonts, heading sizes, and accent colors, not just pre-set palettes.
Fast performance and SEO readiness: A bloated theme kills load times. Check that the theme is optimized for speed (under 500KB total) and includes schema markup for portfolio items.
Responsive and retina-ready: Over 60% of portfolio views come from mobile devices. Test the demo on your phone to ensure thumbnails, text, and menus adapt cleanly.
Top Free and Premium Portfolio Themes Compared
Below is a comparison of trusted themes that meet the essential criteria. Prices are approximate and current as of early 2025.
Purpose-built for portfolios, minimal, Gutenberg optimized
For most professionals starting out, GeneratePress or Astra (free versions) offer a solid foundation. If you need advanced animation and multiple demo layouts, Oshine is a strong premium choice. Always test a theme’s demo on your actual device before committing.
Installing and Activating Your Chosen Theme
Once you have selected a theme, installation is straightforward. Follow these steps from your WordPress admin dashboard:
Search for your theme by name (e.g., “GeneratePress”) or upload the .zip file if you purchased a premium theme.
Click Install and then Activate.
If your theme requires a plugin for portfolio functionality (e.g., Jetpack or a custom portfolio plugin), install and activate it when prompted.
For a premium theme like Oshine, you will need to upload the downloaded zip file. Use this command in your terminal if you prefer WP-CLI (ensure you are in your WordPress root directory):
After activation, go to Appearance > Customize to configure your layout, colors, and portfolio settings. Import any demo content provided by the theme to see how your projects can be structured. Your theme is now ready to display your professional work.
Customizing Your Theme with the WordPress Customizer
The WordPress Customizer is your command center for tailoring your portfolio site’s appearance without writing a single line of code. Access it by navigating to Appearance → Customize from your WordPress dashboard. Here, every change you make previews in real time, letting you refine your site’s look before publishing. Below, we break down the three essential areas to focus on for a professional, cohesive portfolio.
Setting Up Your Logo, Brand Colors, and Typography
Start by establishing your visual identity. In the Customizer, locate the Site Identity panel to upload your logo. For best results, use a transparent PNG file at least 200px wide. Next, set your brand colors under the Colors panel—choose a primary color for headings and buttons, and a secondary accent for links or highlights. For typography, many modern themes offer a Typography section where you can select fonts for headings and body text. Stick to two fonts maximum: one for headlines (e.g., a bold sans-serif) and one for readability (e.g., a clean serif or neutral sans-serif). Here is a quick checklist:
Logo: Upload a high-resolution, transparent image (PNG or SVG).
Brand Color Palette: Pick 2–3 consistent colors—one primary, one accent, and one neutral (e.g., white or light gray).
Typography: Choose a heading font and a body font that complement each other. Avoid decorative fonts for body text.
Preview: Use the live preview to check contrast and readability on mobile and desktop.
Configuring Homepage Layout and Header Options
Your homepage is often the first impression visitors get. In the Customizer, look for Homepage Settings to choose between a static page (e.g., a dedicated portfolio landing page) or your latest blog posts. For a portfolio site, a static page is typically better—select a page you’ve already created. Then, under Header or Layout panels, configure key elements:
Setting
Recommended Option
Why It Matters
Header Style
Sticky or fixed header
Keeps navigation accessible as users scroll through your work.
Header Layout
Logo left, menu right
Standard, intuitive placement for professional sites.
Hero or Banner Section
Full-width image or video
Showcases your best work immediately; avoid clutter.
Sidebar
Disabled on homepage
Keeps focus on your portfolio content, not distractions.
Adjust these options in the Customizer’s Homepage or Layout panels (names vary by theme). Save and publish after each change to see how the layout feels.
Creating a Custom Menu for Easy Navigation
A well-structured menu helps visitors explore your portfolio without confusion. In the Customizer, go to Menus and click Create New Menu. Give it a descriptive name like “Primary Navigation.” Add items by selecting pages (e.g., “Portfolio,” “About,” “Contact”) or custom links. For a portfolio site, consider these menu items:
Home – Links to your homepage.
Portfolio – Links to a page or category showcasing your work.
Services – Optional, if you offer specific services.
About – A brief bio or professional summary.
Contact – A page with a form or email link.
Arrange items by dragging them into order. For dropdown menus, drag one item slightly to the right under a parent item. Assign this menu to the Primary Menu location (available under Menu Locations). Test the navigation on mobile using the Customizer’s responsive preview icons—ensure dropdowns are touch-friendly and links are easy to tap. Once satisfied, click Publish to make your menu live across the site.
Creating and Organizing Portfolio Projects
Once your WordPress portfolio site is set up, the core task is adding and structuring individual projects. This section guides you through choosing the right content type, enriching projects with media, and implementing a logical organization system so potential clients can easily browse your work.
Using Custom Post Types vs. Standard Pages for Projects
WordPress offers two primary methods for adding portfolio projects: standard pages and custom post types (CPTs). For professionals managing multiple projects, a CPT is almost always the superior choice. Here’s a comparison to help you decide:
Flat or flexible; ideal for discrete, repeatable items
Taxonomy support
Limited; typically only page attributes
Full support for custom categories and tags
Archives
No automatic archive; requires manual creation
Automatic archive pages for filtering
Scalability
Becomes cluttered with many projects
Clean, separate admin area; easier to manage
Recommended use
Single, static “About” or “Contact” pages
All portfolio projects, case studies, or galleries
To create a CPT without coding, use a plugin like Custom Post Type UI or JetEngine. If you prefer code, add this snippet to your theme’s functions.php file:
After adding this, flush permalinks by going to Settings > Permalinks and clicking “Save Changes.” Then, you’ll see a new “Portfolio” menu item in your WordPress admin.
Adding High-Quality Images, Videos, and Galleries
Visuals are the heart of any portfolio. To make your projects compelling:
Optimize images before uploading: Compress JPEGs to under 200 KB, use PNGs for screenshots with transparency, and keep dimensions under 2000 pixels wide for fast loading.
Use featured images: Set a single, striking image as the project’s thumbnail. This will appear on archive pages and in portfolio grids.
Embed galleries: Insert a gallery block inside the project editor. For advanced layouts, use a plugin like Envira Gallery or NextGEN Gallery to create lightbox slideshows.
Add video demonstrations: Paste a YouTube or Vimeo URL directly into the editor—WordPress embeds it automatically. For self-hosted videos, use the Video block and ensure the file is in MP4 format for broad browser support.
Include detailed captions: Under each image, write a brief caption that explains the design choice, tool used, or client goal. This adds context without cluttering the main description.
Implementing Categories and Tags for Filtering
Organizing projects with taxonomies lets visitors filter by industry, service type, or technology used. Follow these steps:
Create categories for broad groupings: Go to Portfolio > Categories and add terms like “Web Design,” “Mobile Apps,” “Branding,” or “Case Studies.” Assign each project to one primary category.
Use tags for granular details: Tags might include “WordPress,” “React,” “UX Audit,” “E-commerce,” or “Freelance.” Tags are not hierarchical and can be used liberally.
Display filter options on your portfolio archive: Many theme builders (e.g., Elementor, Beaver Builder) include filterable grid widgets. Alternatively, use a plugin like Filter & Grid to add category and tag dropdowns.
Link to category archives: In your project description, add a link like <a href="/portfolio-category/web-design">See all web design projects</a> to guide users to related work.
By combining a custom post type with thoughtful categorization, you create a portfolio that is both visually rich and easy to navigate—key for impressing potential clients and recruiters.
Building Essential Pages: About, Contact, and Blog
Your portfolio is the centerpiece of your professional WordPress site, but it cannot stand alone. To convert visitors into clients or employers, you must build trust and provide clear pathways for communication. Three critical pages—About, Contact, and Blog—complement your work samples by telling your story, enabling interaction, and demonstrating ongoing expertise. Here is how to craft each page effectively.
Writing a Compelling About Page That Tells Your Story
The About page is often the second most visited page on a portfolio site, after the homepage. It humanizes you and builds credibility. A compelling About page moves beyond a dry biography and connects emotionally with your audience.
Start with a hook. Open with a sentence that captures your unique value proposition. For example, “I turn complex data into visual stories that drive business decisions” is more engaging than “I am a data analyst.”
Explain your “why.” Briefly describe what motivated you to enter your field. This adds depth and authenticity.
Highlight key achievements. Use bullet points to list notable projects, awards, or metrics (e.g., “Increased client website traffic by 40% in six months”).
Include a professional photo. A high-quality headshot increases trust and makes your page feel approachable.
End with a call to action. Encourage visitors to view your portfolio or contact you. For instance: “Ready to collaborate? Check out my latest work or send me a message.”
Keep your tone consistent with your brand—whether that is formal, friendly, or creative—and avoid jargon that confuses non-specialist readers.
Setting Up a Contact Form with Plugins Like WPForms
A contact form is essential for professional communication. It protects your email address from spam and provides a structured way for clients to reach you. WPForms is a popular, user-friendly plugin for this task.
Step
Action
Details
1
Install WPForms
Go to Plugins > Add New, search “WPForms,” install, and activate the free version (Lite) or premium.
2
Create a new form
In the WordPress admin, click WPForms > Add New. Choose a template like “Simple Contact Form.”
3
Customize fields
Add or remove fields such as Name, Email, Subject, and Message. Keep it brief to reduce friction.
4
Configure notifications
Set the form to send submissions to your email address. Test it to ensure delivery.
5
Add the form to your page
Use the WPForms block in the Gutenberg editor or a shortcode. Place it on a dedicated Contact page.
For best results, include a brief note above the form explaining response times (e.g., “I aim to reply within 24 hours”). Avoid asking for too much information upfront; a simple form increases submission rates.
A blog demonstrates your expertise, keeps your site fresh, and improves search engine rankings. It also provides content to share on social media and in professional networks.
Choose a focus. Write about topics relevant to your field, such as case studies, industry trends, tutorials, or lessons learned from projects.
Plan a content calendar. Aim for one to two posts per month. Consistency matters more than frequency.
Optimize for SEO. Use the focus keyword “How to Create a WordPress Portfolio Site” naturally in headings and body text. Add meta descriptions, alt text for images, and internal links to your portfolio pages.
Engage readers. End each post with a question or invitation to comment. Respond to comments promptly to build community.
Use categories and tags. Organize posts into logical groups (e.g., “Design Tips,” “Client Work”) to help visitors navigate.
To get started, create a Blog page via Pages > Add New, then assign it as your Posts Page under Settings > Reading. Install a plugin like Yoast SEO to guide your optimization efforts. Over time, a well-maintained blog positions you as a thought leader and drives organic traffic to your portfolio.
Optimizing Your Portfolio for Search Engines
Even the most visually stunning portfolio is ineffective if potential clients cannot find it. Applying basic search engine optimization (SEO) ensures your work appears in relevant search results. For a WordPress portfolio, this involves three critical areas: using a dedicated SEO plugin, refining on-page elements, and ensuring technical performance. Below is a systematic approach to make your portfolio discoverable without sacrificing design quality.
Installing and Configuring an SEO Plugin (e.g., Yoast)
WordPress does not include built-in SEO tools, so a plugin is essential. Yoast SEO is the most widely adopted option, but alternatives like Rank Math or All in One SEO also work. After installation, follow these configuration steps:
Set your focus keyphrase: For your portfolio, this might be “graphic designer portfolio” or “UX case study.”
Define your site’s meta title and description: Use the plugin’s “SEO” tab under Settings to write a concise, keyword-rich homepage title (e.g., “Jane Doe – Graphic Design Portfolio”) and a description that summarizes your niche.
Enable XML sitemaps: Most SEO plugins generate sitemaps automatically. Submit your sitemap URL (e.g., yoursite.com/sitemap_index.xml) to Google Search Console for faster indexing.
Set title templates: In Yoast, go to “Search Appearance” and define how project titles appear in search results. Use variables like %%title%% and %%sep%% for consistency.
After initial setup, run the plugin’s built-in content analysis on each project page to identify improvements.
Optimizing Project Titles, Meta Descriptions, and Alt Text
Each portfolio project is a unique page that can rank individually. Optimize these three elements for every entry:
Element
Best Practice
Example (for a branding project)
Project Title
Include primary keyword at the start; keep under 60 characters.
“Branding for GreenLeaf Cafe – Portfolio”
Meta Description
Summarize the project in 155–160 characters; include a call to action.
“See how I built a cohesive brand identity for GreenLeaf Cafe, including logos, packaging, and website design. View the full case study.”
Alt Text
Describe the image content naturally; insert one relevant keyword if it fits.
“GreenLeaf Cafe logo design on storefront signage”
For alt text, avoid keyword stuffing. Instead, describe what the image shows for accessibility and context, which search engines also use to understand visual content.
Improving Site Speed and Mobile Responsiveness
Search engines prioritize fast, mobile-friendly sites. A slow portfolio can undermine even the best on-page SEO. Focus on these technical improvements:
Compress images: Use a plugin like Smush or ShortPixel to reduce file sizes without visible quality loss. Aim for images under 200 KB.
Enable caching: Install a caching plugin (e.g., WP Rocket or W3 Total Cache) to serve static HTML versions of your pages to visitors.
Use a lightweight theme: Avoid bloated multi-purpose themes. Choose a portfolio-specific theme optimized for speed, such as Astra or GeneratePress.
Test mobile responsiveness: Use Google’s Mobile-Friendly Test tool. Ensure navigation, text, and images scale correctly on screens under 768 pixels wide.
After implementing these changes, run your portfolio through Google PageSpeed Insights. Aim for a score above 85 on both desktop and mobile. Regular maintenance—updating plugins, deleting unused media, and reviewing performance reports—will keep your portfolio competitive in search rankings.
Enhancing Functionality with Essential Plugins
Once your WordPress portfolio site has a solid theme and core pages, the next step is to add functionality through plugins. For professionals, the goal is to choose lightweight, well-coded plugins that enhance your site without bloating load times or creating security vulnerabilities. The right plugins handle image optimization, regular backups, security hardening, and social sharing—all while maintaining fast performance. Below are carefully selected plugins organized by their primary function.
Must-Have Plugins for Security and Backups
Security and backups are non-negotiable for any professional portfolio. A single breach or data loss can erase hours of work. Focus on plugins that are actively maintained and have minimal overhead.
Wordfence Security – Provides a firewall, malware scanner, and login protection. Use the “Learning Mode” to avoid false positives when first activated.
UpdraftPlus – Automates backups to cloud services like Dropbox or Google Drive. Schedule daily backups for your database and weekly for your full site.
WPS Hide Login – Changes the default /wp-admin URL to a custom path, reducing brute-force attacks without a resource-heavy plugin.
For an added layer of protection, you can restrict access to the WordPress admin area by IP address using your server’s configuration file. Below is an example for an Apache server when using .htaccess:
<Files wp-login.php>
Order Deny,Allow
Deny from all
Allow from 192.168.1.100
</Files>
Replace 192.168.1.100 with your own static IP address. This code blocks all login attempts except from your IP, but use with caution if you have a dynamic IP.
Image Optimization and Caching Plugins for Performance
Portfolio sites rely on high-resolution images, which can slow page load times if not optimized. A combination of caching and image compression keeps your site fast and professional.
For best results, configure Smush to automatically compress images upon upload and enable lazy loading so off-screen images load only when needed. WP Rocket (premium) offers an intuitive interface for setting browser caching and minifying CSS/JavaScript files without technical hassle. If you prefer a free alternative, combine Autoptimize for minification with a caching plugin like WP Super Cache.
Social Media Integration and Analytics Plugins
To grow your professional reach, integrate social sharing and analytics directly into your portfolio. Avoid heavy social feed plugins that pull in external scripts; instead, use lightweight solutions.
Social Warfare – Adds stylish, shareable buttons for posts and pages. It includes click-to-tweet functionality and Pinterest-specific image sharing, which is ideal for visual portfolios.
MonsterInsights – Connects your site to Google Analytics with a simple setup. The free version shows top posts, traffic sources, and user behavior in your WordPress dashboard.
Shared Counts – A minimalist plugin that displays social share counts without slowing your site. It caches counts locally to reduce API calls.
For privacy-conscious professionals, consider using the official Google Site Kit plugin instead of MonsterInsights. Site Kit provides analytics, Search Console data, and AdSense integration with fewer external dependencies. Whichever you choose, test your site’s load time after activating each plugin using a tool like GTmetrix to ensure performance remains optimal.
Launching and Maintaining Your WordPress Portfolio
After designing and building your portfolio site using the steps in How to Create a WordPress Portfolio Site, the final phase ensures your hard work reaches the right audience and remains functional over time. Launching without preparation can lead to broken user experiences, while neglecting maintenance risks security vulnerabilities and outdated content. This section covers pre-launch checks, promotion strategies, and a sustainable maintenance routine.
Pre-Launch Checklist: Testing Links, Forms, and Mobile View
Before making your site live, verify every element that visitors will interact with. A broken link or non-functional contact form undermines professional credibility. Use this checklist to systematically test your site:
Test all internal and external links: Click every navigation menu item, project link, and social media icon. Use a plugin like Broken Link Checker or manually verify each URL.
Submit test entries through contact forms: Fill out your contact form with sample data, ensuring confirmation messages appear and emails reach your inbox. Check required fields and error handling.
Review mobile responsiveness: Open your site on a smartphone and tablet, or use browser developer tools. Ensure text is readable, buttons are tappable, and images scale correctly without overflow.
Check page load speed: Use tools like Google PageSpeed Insights or GTmetrix. Aim for under 3 seconds load time; compress images and enable caching if needed.
Verify cross-browser compatibility: Test on Chrome, Firefox, Safari, and Edge. Look for layout shifts, missing fonts, or broken scripts.
Document any issues in a spreadsheet and fix them before publishing. A final review of your site’s privacy policy, terms of use, and cookie consent (if applicable) is also recommended for legal compliance.
Promoting Your Portfolio via Social Media and Networks
Once your site passes all checks, attract visitors by promoting it through channels where your target audience and peers gather. Consistent, authentic sharing builds professional visibility. Consider these methods:
Channel
Best Practice
Frequency
LinkedIn
Share a post linking to your portfolio with a brief case study of a key project. Tag collaborators or clients (with permission).
Once at launch, then monthly
Twitter / X
Tweet a screenshot or short video tour of your portfolio, using relevant hashtags like #WebDesign or #Portfolio.
2–3 times in launch week
Instagram
Post high-quality images of your best work, with a link in bio or Stories. Use carousel posts for multiple projects.
Weekly
Professional networks
Add your portfolio URL to your email signature, business cards, and online profiles (e.g., Behance, Dribbble, GitHub).
Ongoing
Industry forums/groups
Contribute valuable insights in discussions, then naturally mention your portfolio as a resource. Avoid spammy links.
As relevant
Engage with comments and messages promptly. Consider a launch announcement email to your existing contacts, and ask for feedback to improve your site over time.
Regular Maintenance: Updates, Backups, and Content Refresh
A WordPress portfolio requires ongoing care to remain secure, fast, and relevant. Neglecting maintenance can lead to hacks, data loss, or outdated work that misrepresents your current skills. Establish a routine with these tasks:
Update WordPress core, themes, and plugins monthly: Enable automatic updates for minor security patches, but manually review major updates on a staging site first to avoid compatibility issues.
Perform weekly backups: Use a plugin like UpdraftPlus or your hosting provider’s backup tool. Store backups offsite (e.g., cloud storage or external drive). Test restoration at least quarterly.
Refresh your portfolio content quarterly: Remove old or low-performing projects, add recent work, and update your biography and skills section. This keeps your site aligned with your professional growth.
Monitor site health: Check for broken links monthly using a plugin, review analytics (e.g., Google Analytics) for traffic trends, and ensure SSL certificate is active.
Review security measures: Change passwords every 90 days, limit login attempts, and run a security scan (e.g., Wordfence) monthly.
By following this maintenance schedule, your portfolio will consistently present a polished, professional image—supporting the goals of How to Create a WordPress Portfolio Site long after launch.
What is the best WordPress theme for a portfolio site?
The best theme depends on your style, but popular choices include Astra, Divi, and GeneratePress for their flexibility and portfolio-specific templates. Astra offers pre-built portfolio layouts and works with page builders. Divi provides a visual builder with portfolio modules. GeneratePress is lightweight and fast, ideal for showcasing images. Consider themes from reputable developers like Themify or Elegant Themes. Ensure the theme is mobile-responsive, SEO-friendly, and supports customizations like color schemes and typography. Always check demos and user reviews before choosing.
Do I need a plugin to create a portfolio in WordPress?
While not strictly necessary, plugins can simplify portfolio creation. Dedicated plugins like Portfolio Post Type, Essential Grid, or Jetpack's Portfolio feature add custom post types and layouts. They enable easy categorization, filtering, and lightbox effects. If you prefer coding, you can register a custom post type yourself. For beginners, plugins save time and offer professional results. However, avoid overloading your site with plugins; choose one that integrates well with your theme and meets your needs.
How do I optimize my WordPress portfolio site for SEO?
Start by using an SEO plugin like Yoast or Rank Math. Optimize each portfolio page with a focus keyword, meta description, and alt text for images. Use descriptive file names and compress images for speed. Create a clear site structure with categories and tags. Enable breadcrumbs and a sitemap. Ensure your site is mobile-friendly and loads quickly. Build internal links between portfolio items and blog posts. Consider adding schema markup for projects. Finally, promote your portfolio on social media and get backlinks from reputable sites.
Can I use a free WordPress theme for a professional portfolio?
Yes, many free themes offer professional portfolio features. Themes like Hestia, Sydney, or Portfolio Lite are designed for freelancers and creatives. They include customizable layouts, galleries, and typography options. However, free themes may have limited support and fewer advanced features. For a fully professional look, consider a premium theme or a hybrid approach: start with a free theme and add functionality via plugins. Always check the theme's update frequency and compatibility with latest WordPress version.
How do I add a portfolio page to my WordPress site?
First, install a portfolio plugin or use a theme with built-in portfolio support. Then, create a new page titled 'Portfolio' and assign a template if available. Use the plugin or theme's custom post type to add individual projects. Each project can include images, descriptions, categories, and tags. Display the projects using a grid or list layout. You can also create a custom menu link to the portfolio page. Ensure the page is accessible from your main navigation.
What should I include in each portfolio project description?
Each project description should clearly explain the project's context, your role, the tools used, and the outcome. Start with a compelling title and a brief overview. Include details like client name (if permitted), project duration, and your specific contributions. Highlight challenges you solved and the value you added. Use bullet points for key achievements. Add high-quality images, case studies, or testimonials. Keep the tone professional but engaging. Optimize the description with relevant keywords for SEO.
How can I make my WordPress portfolio site load faster?
Optimize images by compressing them with tools like Smush or ShortPixel. Use a caching plugin like W3 Total Cache or WP Rocket. Choose a lightweight theme and minimize plugin usage. Enable lazy loading for images. Use a content delivery network (CDN) like Cloudflare. Optimize your database with plugins like WP-Optimize. Consider using a fast hosting provider. Reduce external scripts and inline CSS/JS. Test speed with Google PageSpeed Insights and implement recommendations.
Should I use a page builder for my portfolio site?
Page builders like Elementor or Beaver Builder offer drag-and-drop design, which is helpful for non-coders. They provide portfolio widgets, templates, and customization options. However, they can add bloat and affect performance. If you need a unique layout without coding, a page builder is a good choice. For simple portfolios, a theme with built-in options may suffice. Weigh the trade-off between ease of use and site speed. Always test the builder's impact on load times.
How to Use WordPress for Podcasting: A Complete Guide to Launching and Managing Your Show
1. Choosing the Right Hosting and WordPress Setup for Podcasting
Selecting the proper hosting foundation is the first critical decision when learning how to use WordPress for podcasting. Your hosting environment directly impacts episode delivery speed, listener experience, and long-term scalability. Podcast media files—especially high-quality MP3s—are larger than typical web images or text, and they require a server configuration that can handle frequent, simultaneous downloads without slowing your site. A poor hosting choice can lead to buffering, failed downloads, or costly overage fees, undermining the reliability of your show.
Evaluating Web Hosting Requirements for Podcast Media
Before committing to a provider, assess your podcast’s technical needs. Key factors include:
Storage space: Each episode file (e.g., a 45-minute MP3 at 128 kbps) averages 40–60 MB. Multiply by your planned episode count and consider future growth. A 50 GB minimum is a safe starting point for a growing show.
Bandwidth allowance: Every download consumes bandwidth. A single episode downloaded 1,000 times uses roughly 50 GB of transfer. Look for plans with unmetered or generous bandwidth tiers.
File upload limits: Many shared hosts cap uploads at 2–8 MB, which is insufficient for podcast media. Ensure your host permits uploads of at least 500 MB or offers a dedicated media library.
Performance features: A Content Delivery Network (CDN) integration, solid-state drives (SSDs), and server-level caching reduce load times for listeners worldwide.
Scalability: As your audience grows, your host should allow easy upgrades without migration headaches.
Recommended Hosting Providers for Podcasters
The following providers are well-suited for WordPress podcasting, offering robust media handling and WordPress-specific optimizations:
Google Cloud Platform, automatic CDN, 100 GB bandwidth on starter, 10 GB storage, excellent support for media-heavy sites
$35/month
All listed providers support the large file uploads required for podcasting and include free SSL certificates. For budget-conscious beginners, Bluehost or DreamHost offer solid performance at low introductory rates. Serious podcasters should consider WP Engine or Kinsta for dedicated resources and premium support.
Self-Hosted vs. WordPress.com: Which Is Best for Your Podcast?
Understanding the difference between self-hosted WordPress.org and WordPress.com is essential for podcast success.
Self-hosted WordPress.org gives you full control. You install the software on your own hosting account, enabling unlimited plugins (including dedicated podcasting plugins like Seriously Simple Podcasting or PowerPress), custom themes, and complete ownership of your media files and data. This is the recommended route for podcasters who want monetization flexibility, advanced analytics, and the ability to scale without platform restrictions. The trade-off is you manage updates, security, and backups, though managed hosting providers handle most of this.
WordPress.com is a hosted platform with tiered plans. The free or Personal plans (starting at $4/month) block third-party plugins and limit storage, making them unsuitable for podcasting beyond basic audio embeds. The Business plan ($25/month) unlocks plugin access and 200 GB storage, allowing you to use podcasting plugins, but you still face restrictions on custom code and monetization tools. The eCommerce plan ($45/month) adds further capabilities but remains more limited than self-hosted. For any serious podcasting effort, self-hosted WordPress.org is the superior choice, offering the flexibility and control necessary to manage episodes, RSS feeds, and distribution effectively.
2. Installing and Configuring Essential Podcasting Plugins
To transform a standard WordPress site into a dedicated podcasting platform, you need plugins that handle three critical functions: generating a valid RSS feed with enclosure tags, managing media file hosting and delivery, and tracking listener analytics. The plugins you choose will determine how easily your show is accepted by directories like Apple Podcasts and Spotify. Below are the leading options and step-by-step configuration steps.
Top Podcasting Plugins for WordPress
Three plugins dominate the WordPress podcasting ecosystem, each with distinct strengths:
Seriously Simple Podcasting – A lightweight, free plugin that adds a dedicated podcast post type and automatically generates an iTunes-compatible RSS feed. Best for beginners who want a clean, no-fuss setup.
PowerPress (by Blubrry) – The most feature-rich free option, offering advanced feed control, multiple audio/video player skins, and built-in statistics via Blubrry’s hosting service. Ideal for podcasters who need granular control over feed tags (e.g., explicit, season, episode number).
Castos – A premium plugin (with a free tier) that includes unlimited media hosting, automatic syndication to directories, and detailed analytics. It removes the need for separate media storage, making it a complete solution for serious podcasters.
Plugin
Cost
Media Hosting
Analytics
RSS Feed Control
Seriously Simple Podcasting
Free
External (your own server or CDN)
None built-in
Basic (iTunes tags)
PowerPress
Free (premium tiers available)
External (recommends Blubrry)
Via Blubrry Statistics
Advanced (custom tags, categories)
Castos
From $19/month
Included (unlimited)
Built-in (downloads, listens)
Full (automatic directory submission)
Setting Up Your Podcast RSS Feed with a Plugin
Regardless of which plugin you choose, the core task is to ensure your feed is valid and includes the required <enclosure> tag for each episode. After installing your chosen plugin, follow these steps:
Create a new episode – In WordPress, go to the podcast post type (e.g., “Podcast” for Seriously Simple, “Episode” for PowerPress) and add a title, show notes, and the audio file URL.
Upload or link the media file – For Seriously Simple, use the built-in audio uploader. For PowerPress, paste the media file URL into the “Podcast Episode” box. For Castos, upload directly to their servers.
Set feed settings – Navigate to the plugin’s settings page. For PowerPress, go to Settings > PowerPress > Feed Settings and ensure “Enable Podcasting” is checked. For Seriously Simple, the feed is enabled by default at yourdomain.com/feed/podcast.
Validate the feed – Use a tool like Cast Feed Validator or Apple Podcasts Connect to check that your feed includes the <itunes:summary>, <itunes:author>, and <enclosure url="..." length="..." type="..." /> tags.
If you need to customize the feed URL for a specific directory, you can add a rewrite rule to your theme’s functions.php file (only if using a custom feed slug):
add_action('init', 'custom_podcast_feed_slug');
function custom_podcast_feed_slug() {
add_feed('podcast', 'do_feed_rss2');
}
After adding this, flush rewrite rules by visiting Settings > Permalinks and clicking “Save Changes.”
Configuring Apple Podcasts, Spotify, and Other Directory Integrations
Each directory requires specific metadata in your RSS feed. Most plugins handle this automatically, but you must verify the following:
Apple Podcasts – In your plugin settings, provide the podcast title, description, author name, artwork (1400×1400 pixel PNG or JPG), and category. Ensure the feed includes <itunes:category text="Technology"> and <itunes:explicit>false</itunes:explicit>. Submit your feed URL to Apple Podcasts Connect.
Spotify – Spotify requires a valid RSS feed with an <atom:link> tag pointing to your site. Use the plugin’s “Podcast Directory” or “Submit to Spotify” feature. For PowerPress, go to Settings > PowerPress > Apple & Spotify and click the “Submit to Spotify” button.
Google Podcasts – Google automatically indexes valid feeds, but you can manually submit your feed URL via Google Podcasts Manager. Ensure your feed includes <googleplay:explicit> tags if using PowerPress.
Other directories – For Stitcher, TuneIn, and iHeartRadio, use the same RSS feed URL. Some directories require separate registration; your plugin’s documentation will provide specific submission links.
To confirm all integrations are working, publish a test episode, then check each directory’s dashboard for a “Valid Feed” or “Synced” status. Regularly monitor your feed with a validator to catch missing tags before they cause directory rejection.
3. Creating Your First Podcast Episode in WordPress
Once your podcast hosting and RSS feed are configured, the next step is to publish your first episode directly from your WordPress dashboard. The block editor (Gutenberg) provides a streamlined workflow for uploading audio, crafting show notes, and organizing content. Follow this step-by-step process to launch your episode correctly.
Uploading and Embedding Audio Files in a Post
To add your audio file to a new post, begin by creating a new post from the WordPress admin panel. In the block editor, click the “+” button to add a new block. Search for “Audio” and select the Audio block. You have two primary options:
Upload from your computer: Click “Upload” and select your MP3 file (recommended format for compatibility). WordPress will store the file in your Media Library, but note that this uses your server’s bandwidth. For serious podcasting, you should still use a dedicated podcast host (like Buzzsprout or Libsyn) and embed the URL from there.
Embed from a URL: If your audio is hosted externally, paste the direct file URL (ending in .mp3) into the Audio block. This is the preferred method for scalability and performance.
After embedding, you can add a cover image block above or below the audio player using the “Image” block. Ensure your episode artwork is at least 1400 x 1400 pixels to meet Apple Podcasts requirements. The block editor also allows you to adjust alignment and add a caption directly below the player.
Writing Effective Show Notes and Episode Descriptions
Show notes serve as the written companion to your audio, improving SEO and listener engagement. Use the Paragraph, Heading, and List blocks to structure your content. Include the following elements:
Episode summary: A 2–3 sentence hook that explains what listeners will learn or hear.
Key takeaways: Bullet points of the main ideas discussed, using the List block.
Timestamps: A simple table or list of time markers for major segments (e.g., “3:15 – Introduction of guest”).
Links and resources: Mentioned books, tools, or websites, linked using the URL block or inline hyperlinks.
Call to action: Encourage listeners to subscribe, leave a review, or visit your website.
Keep show notes scannable. Use short paragraphs and descriptive subheadings. Avoid keyword stuffing; instead, naturally include your main keyword “How to Use WordPress for Podcasting” in the first 100 words if relevant to the episode topic.
Using Categories and Tags to Organize Episodes
Proper organization helps listeners find episodes and improves your site’s taxonomy. In the WordPress block editor, locate the “Categories” and “Tags” panels in the sidebar. Use them strategically:
Feature
Best Use for Podcast Episodes
Example
Categories
Broad, top-level topics that group multiple episodes. Limit to 5–7 categories.
“Interviews,” “Tutorials,” “News Updates”
Tags
Specific, granular descriptors for individual episodes. Use freely but consistently.
“WordPress plugins,” “audio editing,” “RSS feed”
Assign at least one category per episode, and add 3–5 relevant tags. Avoid creating a new category for every episode; instead, reuse existing categories to build a coherent archive. Tags can be more flexible and help with internal search. Both categories and tags are included in your podcast’s RSS feed, so they influence how podcast directories display your show.
After adding your audio, writing show notes, and setting categories/tags, preview the post. Click “Publish” to make the episode live. Your podcast host will automatically detect the new episode via the RSS feed (if you used a podcasting plugin like Seriously Simple Podcasting or PowerPress). Verify the episode appears in your podcast feed by submitting your RSS URL to a validator tool. This completes the episode creation process.
4. Designing a Podcast-Friendly Website Layout
A well-designed website layout is essential for converting visitors into loyal listeners. Your WordPress site must make episodes easy to find, quick to play, and simple to navigate. A podcast-friendly design prioritizes the audio experience while maintaining clean, uncluttered aesthetics. This section guides you through selecting a theme, integrating a custom media player, and building a dedicated archive page that keeps your audience engaged.
Choosing the right theme is the foundation of a successful podcast site. Look for themes that offer built-in support for audio players, episode management, and responsive design. Key features to prioritize include:
Audio player integration: Native support for popular players like PowerPress or Simple Podcast Press.
Episode post type: A custom post type for episodes, separate from standard blog posts.
Mobile responsiveness: Ensures your player and layout work flawlessly on phones and tablets.
Speed optimization: Lightweight code that doesn’t slow down page load times.
Recommended themes include Castilo (for a modern, audio-first design), Podcastify (with a built-in episode grid), and GeneratePress (a lightweight option you can customize with a plugin). Avoid multipurpose themes that are bloated with features you won’t use. Test any theme with your chosen podcasting plugin before committing.
Adding a Custom Media Player to Your Site
While WordPress includes a default audio player, a custom media player improves listener experience with features like chapter markers, speed controls, and download buttons. The most reliable method is using the PowerPress plugin by Blubrry. After installing and activating it, navigate to PowerPress > Settings and configure your player. For a practical example, add a custom player to a single episode using the following shortcode:
[powerpress url="https://yoursite.com/episodes/episode-1.mp3" title="Episode 1: Welcome to the Show" artwork="https://yoursite.com/artwork.jpg" width="100%"]
To display the player automatically on every episode, go to PowerPress > Podcast Channels and enable the “Player” option in your episode template. For advanced customization, consider the Simple Podcast Press plugin, which offers a drag-and-drop builder for player placement. Always test your player across browsers and devices to ensure consistent playback.
An archive page that lists all episodes chronologically is crucial for discoverability. Instead of using the default blog archive, build a custom page that highlights episode artwork, titles, and a play button. Here’s how to set it up:
Create a new page titled “Episodes” or “All Episodes” in your WordPress admin.
Use a page builder or the block editor to insert a “Latest Episodes” block from your podcasting plugin. In PowerPress, use the [powerpress_archive] shortcode.
Customize the layout by adding a table or grid structure. For a clean table, use the following HTML structure in a custom block:
Ensure each episode row includes a direct link to the full show notes page. Add pagination to avoid overwhelming visitors—most themes handle this automatically. Finally, set this page as your “Posts page” under Settings > Reading if you want it to be the default archive, or link to it from your main navigation menu. Test the archive on mobile to confirm the layout remains readable and the player buttons are tappable.
5. Managing Multiple Podcasts or Seasons with WordPress
When your podcasting ambitions grow beyond a single show, or you need to organize episodes into distinct seasons, WordPress offers robust tools to keep everything tidy and navigable. Without proper structure, a multi-podcast or multi-season site can quickly become a jumble of confusing archives and broken feeds. The key lies in leveraging WordPress’s core content architecture—custom post types, taxonomies, and specialized plugins—to separate, label, and display your audio content logically.
Using Custom Post Types for Separate Podcasts
For running two or more entirely different podcasts on one WordPress site, custom post types (CPTs) are the cleanest solution. Instead of dumping all episodes into the default “Posts” section, you create a dedicated post type for each show—for example, “Marketing Podcast” and “Tech Podcast.” This approach isolates each show’s episodes, metadata, and archive pages completely. Here is how to implement it:
Register a CPT via code or plugin: Add a snippet to your theme’s functions.php file or use a plugin like Custom Post Type UI. Define labels, slug, and supports (e.g., title, editor, thumbnail, custom fields).
Assign distinct permalinks: Set rewrite slugs like /marketing-podcast/ and /tech-podcast/ to create clear URL structures.
Create separate RSS feeds: WordPress automatically generates feeds for each CPT (e.g., /feed/marketing-podcast), which you can submit to directories independently.
Use dedicated templates: Create template files like single-marketing_podcast.php and archive-marketing_podcast.php to style each podcast differently.
Organizing Episodes by Season with Categories or Taxonomies
If you run a single podcast with seasonal episodes (e.g., Season 1, Season 2), custom taxonomies or hierarchical categories work best. Categories are built-in and simple, but a custom taxonomy like “Season” gives you more control. Here is a comparison of approaches:
Method
Best For
Example Implementation
Hierarchical Categories
Simple season grouping; built-in WordPress feature
Dedicated season field; avoids mixing with blog categories
Register season taxonomy with a rewrite slug like /season/. Add terms “Season 1,” “Season 2.”
Episode Number Meta Field
Explicit ordering alongside season grouping
Add a custom field episode_number and query posts by both season term and number.
Using a custom taxonomy keeps season listings separate from general blog categories, preventing confusion. You can then create archive pages like /season/season-2/ to display all episodes from that season, and even use a plugin like “Seasoned” to add season-specific artwork or descriptions.
Plugins That Support Multi-Podcast Setups
Several WordPress plugins are designed to handle multiple podcasts or seasonal content without heavy custom coding. The most notable options include:
PowerPress (Blubrry): Offers “Podcast Channels” that let you assign episodes to different shows within the same post type. Each channel gets its own feed, artwork, and iTunes settings.
Seriously Simple Podcasting: Supports multiple podcasts via its “Series” feature, which groups episodes into series (essentially seasons or shows). Each series can have its own cover art and feed.
Castos: Includes a “Podcast” custom post type out of the box, and allows you to create multiple “Shows” (which function like separate podcasts) with individual feeds and analytics.
Podlove Podcast Publisher: While more complex, it provides “Shows” and “Seasons” as native concepts, allowing granular control over multi-podcast and multi-season structures, including chapter markers and transcripts.
For seasonal management specifically, consider “Seasoned” or “Podcast Seasons” plugins that add a season selector to your episode editor and generate season-based archives. Whichever route you choose, test your RSS feeds with a validator to ensure each show or season is properly separated before submitting to directories.
6. Optimizing Your Podcast for Search Engines and Discovery
Once your WordPress podcast site is live, search engine optimization (SEO) determines whether new listeners find your episodes. Without proper optimization, even the most compelling content remains invisible. This section covers on-page SEO tactics tailored for podcasters, focusing on elements that improve visibility in Google, Apple Podcasts, Spotify, and other directories.
Writing SEO-Friendly Episode Titles and Meta Descriptions
Your episode title is the first signal search engines and users see. A strong title balances clarity, keyword inclusion, and curiosity. For WordPress podcasting, follow these best practices:
Place primary keywords early: Include your focus keyword naturally, ideally within the first 60 characters. For example, “How to Use WordPress for Podcasting: Episode 3 – Microphone Setup” outperforms “Episode 3: Microphone Setup.”
Keep titles under 60 characters: Google truncates longer titles in search results. Aim for 50–60 characters to ensure full visibility.
Avoid keyword stuffing: Use one primary keyword and one secondary phrase maximum. Overloading reduces click-through rates.
Write for humans first: Titles like “5 Editing Mistakes Beginners Make” attract clicks while naturally including relevant terms.
Meta descriptions summarize your episode for search result snippets. Write 150–160 characters that include the focus keyword, a benefit, and a call to action. Example: “Learn how to use WordPress for podcasting in this step-by-step guide. Discover plugins, hosting tips, and SEO strategies to launch your show today.” In WordPress, use an SEO plugin like Yoast or Rank Math to edit meta descriptions per episode.
Adding Transcripts for Accessibility and SEO
Transcripts convert spoken audio into searchable text, providing two major benefits: accessibility for hearing-impaired users and indexable content for search engines. Every episode should include a full transcript. Here is how to implement them effectively:
Generate transcripts accurately: Use services like Otter.ai, Rev, or Descript for automated or human-reviewed transcription. Edit for speaker labels and timing.
Publish transcripts on the episode page: Place the transcript below the audio player or in a collapsible section. Use the <details> HTML element for a clean toggle.
Optimize transcript content: Include your focus keyword naturally in the first 100 words of the transcript. Avoid over-optimization; write naturally.
Link to key segments: Add anchor links to timestamps within the transcript to improve user navigation and dwell time.
<details>
<summary>View Full Episode Transcript</summary>
<p>Welcome to episode 3 of How to Use WordPress for Podcasting. Today we cover microphone setup...</p>
<p><a href="#t=120">2:00</a> – Choosing the right USB microphone.</p>
<p><a href="#t=300">5:00</a> – Recording levels and gain staging.</p>
</details>
Using Schema Markup for Podcast Episodes
Schema markup is structured data that helps search engines understand your podcast content. For WordPress podcasting, implement the PodcastEpisode schema type to enhance rich results. Use a plugin like Schema Pro or manually add JSON-LD to your theme’s header or via a custom field. Below is a minimal example of podcast episode schema:
<script type="application/ld+json">
{
"@context": "https://schema.org",
"@type": "PodcastEpisode",
"name": "How to Use WordPress for Podcasting: Episode 3",
"description": "Learn microphone setup, recording levels, and gain staging for your WordPress podcast.",
"url": "https://example.com/episode-3",
"duration": "PT30M",
"datePublished": "2025-03-01",
"associatedMedia": {
"@type": "MediaObject",
"contentUrl": "https://example.com/audio/episode3.mp3",
"encodingFormat": "audio/mpeg"
},
"partOfSeries": {
"@type": "PodcastSeries",
"name": "How to Use WordPress for Podcasting"
}
}
</script>
Test your schema using Google’s Rich Results Test tool. Proper markup can lead to featured audio snippets and improved click-through rates in search results. Additionally, submit your podcast feed to directories like Apple Podcasts and Spotify using your WordPress RSS feed; ensure your feed includes episode-specific metadata such as title, description, and enclosure URL for the audio file.
7. Promoting Your Podcast Through WordPress Features
Once your podcast episodes are live, the next challenge is getting them heard. WordPress offers several built-in features and compatible tools that can help you promote your show directly from your site, turning casual visitors into loyal listeners. By leveraging newsletter plugins, social sharing options, and engagement tools, you can grow your audience without relying solely on external platforms. Below, we explore three key strategies to promote your podcast using WordPress.
Building an Email List with WordPress Newsletter Plugins
An email list is one of the most direct ways to notify your audience about new episodes and keep them engaged. WordPress makes this easy with dedicated newsletter plugins that integrate seamlessly with your site. These plugins allow you to capture email addresses, send automated updates, and track subscriber activity.
Key features to look for in a newsletter plugin for podcasting:
Automated episode notifications: Send an email to subscribers every time you publish a new episode.
Customizable opt-in forms: Place sign-up forms on your homepage, episode pages, or as pop-ups.
Segmentation options: Group subscribers by interests, such as episode topics or listener preferences.
Analytics: Track open rates, click-through rates, and subscriber growth.
Popular WordPress newsletter plugins include MailPoet (which offers a free tier for up to 1,000 subscribers) and Newsletter Glue (designed specifically for podcasters). Once set up, you can embed a sign-up form directly below your episode player, encouraging listeners to subscribe for early access or bonus content.
Social share buttons empower your listeners to spread the word about your podcast with a single click. WordPress offers several ways to add these buttons, either through plugins or manual code insertion. The goal is to make sharing effortless, so your audience can promote your episodes on platforms like Twitter, LinkedIn, Facebook, or even via email.
Recommended approach for adding social share buttons:
Method
Pros
Cons
Plugin (e.g., Social Warfare, AddToAny)
Easy to install, customizable, includes analytics
May slow down site if too many scripts load
Manual code (via theme functions or child theme)
Lightweight, full control over design
Requires coding knowledge, no built-in analytics
Built-in theme options
No extra plugins needed, consistent with design
Limited customization, may not support all platforms
Place share buttons prominently near your episode player or at the end of show notes. Consider including a call-to-action like “Share this episode with a friend” to nudge listeners. Many plugins also allow you to pre-populate share text with your episode title and link, making the process even smoother.
Encouraging Listener Engagement with Comments and Ratings
WordPress’s native comment system is a powerful tool for building a community around your podcast. When listeners can leave comments on episode pages, they feel more connected to your show and to each other. To maximize engagement, enable comments on all episode posts and moderate them actively to foster a respectful environment.
Tips for boosting listener interaction:
Ask direct questions: At the end of each episode’s show notes, pose a question related to the topic. For example, “What was your biggest takeaway from this interview?”
Enable star ratings: Use a plugin like WP-PostRating or a podcast-specific tool to let listeners rate episodes. Display average ratings near the player to build social proof.
Feature listener comments: Occasionally highlight insightful comments in your next episode or on social media, rewarding engagement.
Respond promptly: Reply to comments within 24–48 hours to show listeners you value their input.
For advanced engagement, consider integrating a third-party commenting system like Disqus or wpDiscuz, which offer features like threaded replies, upvoting, and social login. However, ensure any tool you choose does not compromise site speed or user privacy. By combining comments and ratings, you transform passive listeners into active participants, which can lead to higher retention and word-of-mouth growth.
8. Monetizing Your WordPress Podcast
Turning your podcast into a revenue-generating asset requires strategic integration of monetization methods directly into your WordPress site. By leveraging plugins and built-in features, you can manage sponsorships, offer exclusive content, and accept listener support without leaving the platform. Below are three proven approaches, each with specific plugin recommendations to streamline your workflow.
Sponsorships are the most common revenue stream for podcasts, but manually inserting ads into episodes can become cumbersome. WordPress plugins automate ad placement, track impressions, and manage sponsor relationships. Key options include:
AdSanity: A lightweight plugin that lets you create custom ad zones (e.g., pre-roll, mid-roll) and assign them to specific episodes or categories. It supports ad rotation and click tracking.
WP AdCenter: An open-source solution for managing banner ads and inline audio promotions. It integrates with Google Ad Manager for advanced inventory management.
Podlove Ad Plugin: Built specifically for podcasters, this plugin inserts chapter markers and ad breaks directly into your audio files, with dynamic insertion based on listener location or device.
For best results, set up a dedicated “Sponsors” page with rate cards and contact forms using a plugin like Gravity Forms to automate inbound inquiries.
Offering premium content—such as ad-free episodes, bonus interviews, or early access—through a membership model requires a secure paywall. WordPress membership plugins handle user registration, payment processing, and content restriction. Compare two leading options:
Feature
MemberPress
Restrict Content Pro
Pricing (annual)
$179–$499
$99–$399
Payment gateways
Stripe, PayPal, Authorize.net
Stripe, PayPal, 2Checkout
Content dripping
Yes (schedule episode releases)
Yes (time-based or sequence-based)
Podcast integration
Native with PowerPress or Blubrry
Customizable via shortcodes
Free trial support
Yes, with coupon codes
Yes, built-in
Both plugins allow you to create multiple membership tiers, such as “Basic” (monthly episodes) and “Premium” (all content plus bonus materials). Use MemberPress if you want tight podcast integration; choose Restrict Content Pro for a more budget-friendly, flexible setup.
Using Donation and Tip Jar Plugins (e.g., Buy Me a Coffee, Patreon Integration)
For listeners who prefer one-time or recurring support without a full membership, donation plugins offer frictionless giving. The most effective tools include:
Buy Me a Coffee: A simple plugin that adds a “tip jar” button to your site, allowing listeners to send payments via PayPal or Stripe. It also supports recurring “memberships” with reward tiers.
Patreon Integration: Use the Patreon WordPress plugin to sync your Patreon patrons with your site, granting them access to exclusive posts, audio files, or RSS feeds.
Ko-fi: Similar to Buy Me a Coffee but with a “shop” feature for selling digital downloads (e.g., transcripts, merch). It offers a free tier with no transaction fees.
Position donation buttons prominently on your podcast episode pages and in your site footer. Combine with a Thank You page that includes a call-to-action to share your show, amplifying reach while monetizing.
Each of these methods can be layered for maximum revenue. Start with one approach—such as Buy Me a Coffee for immediate listener support—then expand to sponsorships and memberships as your audience grows. Always test your payment flows and ensure compliance with your podcast hosting terms of service.
Understanding how your podcast performs is essential for growth. By measuring downloads, listener behavior, and engagement, you can refine your content, improve marketing strategies, and attract sponsors. WordPress offers several ways to track these metrics, from dedicated plugins to integration with third-party analytics services. Below, we explore the tools and key metrics you need to monitor.
Installing a Podcast Statistics Plugin
A dedicated podcast statistics plugin provides detailed data directly within your WordPress dashboard. These plugins often track downloads per episode, unique listeners, and geographic distribution without relying on external services. To install one:
Navigate to Plugins > Add New in your WordPress admin.
Search for a reputable podcast statistics plugin such as Seriously Simple Podcasting (which includes stats) or Podcast Statistics by PowerPress.
Click Install Now, then Activate.
Configure the plugin under Settings > Podcast Statistics. Typically, you will need to enable tracking for each episode and define how data is stored (e.g., in your database or via an external API).
A practical example of a configuration snippet for a plugin like PowerPress might look like this in your wp-config.php file (if supported):
This ensures tracking is active while avoiding storing IP addresses, which can help with compliance. Always test after installation by publishing a test episode and checking the stats dashboard.
Integrating Google Analytics with Your Podcast Site
Google Analytics provides broader insights into your website traffic, including which pages drive podcast subscriptions and how listeners navigate your site. To integrate it:
Create a Google Analytics account and obtain your tracking ID (e.g., UA-XXXXXXXXX-X or G-XXXXXXXXXX).
Install a plugin like MonsterInsights or Site Kit by Google. Both offer easy setup wizards.
After activation, enter your tracking ID or connect your Google account via the plugin’s settings.
Enable Event Tracking for podcast downloads. In MonsterInsights, go to Settings > Events and check “Track Downloads.” This will log every time a user clicks your audio file link.
For advanced tracking, you can add a custom event to your download buttons using a code snippet in your theme’s functions.php file:
This tracks each download as a separate event in Google Analytics, allowing you to see which episodes attract the most clicks.
Understanding Key Metrics: Downloads, Subscribers, and Retention
To effectively measure performance, focus on these three metrics:
Metric
Definition
Why It Matters
Downloads
Total number of times an episode file is accessed.
Indicates reach and popularity. Compare download numbers across episodes to spot trends.
Subscribers
Unique listeners who follow your show via RSS or apps (e.g., Apple Podcasts).
Shows your loyal audience base. A steady subscriber count suggests consistent value.
Retention
Percentage of an episode listened to on average.
Reveals content quality. High retention means listeners stay engaged; drop-offs indicate areas for improvement.
Third-party services like Blubrry or Podtrac offer more granular data, including listener demographics (age, gender, location). To use them, create an account, get a tracking code, and add it to your WordPress site via a plugin or by editing your theme’s header. For example, with Blubrry, install the Blubrry PowerPress plugin and enter your API credentials under Settings > PowerPress > Statistics.
Regularly review these metrics—weekly for downloads and monthly for retention—to adapt your content strategy. For instance, if an episode about guest interviews has high downloads but low retention, consider shortening intros or improving audio quality. Combining WordPress plugin data with Google Analytics gives you a comprehensive view, helping you grow your show with confidence.
10. Maintaining and Scaling Your WordPress Podcast
Launching your podcast on WordPress is only the beginning. To ensure your show remains reliable, fast, and ready for growth, you need a consistent maintenance routine and a clear plan for scaling. Neglecting these areas can lead to broken episodes, slow load times, and frustrated listeners. Here’s how to keep your WordPress podcast running smoothly while preparing for a larger audience.
Regular maintenance prevents small issues from becoming major problems. Set a recurring weekly or bi-weekly schedule for the following tasks:
Update WordPress core, themes, and plugins – Always update to the latest versions to patch security vulnerabilities and ensure compatibility. Test updates on a staging site first if possible.
Check podcast feed validity – Use a feed validator (like the one from Castos or Podbase) to confirm your RSS feed is error-free and properly formatted for directories.
Review site performance – Run a speed test using a tool like GTmetrix or Pingdom. Look for slow-loading elements, especially media files and scripts.
Back up your entire site – Use a reliable backup plugin (e.g., UpdraftPlus, BlogVault, or Jetpack VaultPress) to create full backups of your database, media files, and theme files. Store backups off-site—cloud storage like Amazon S3, Google Drive, or Dropbox is ideal. Schedule automatic daily or weekly backups, and manually back up before any major update.
Additionally, test your backup restoration process at least once a quarter. A backup is only useful if you can restore it quickly when needed.
Optimizing Media File Storage and Delivery with CDNs
Podcast audio files are large and can strain your web server if served directly. To keep your site fast and avoid bandwidth overage charges, offload media storage and use a content delivery network (CDN).
Use a dedicated podcast hosting service – Services like Blubrry, Libsyn, or Podbean store your audio files and handle high-bandwidth delivery. They also generate a reliable RSS feed that won’t crash your WordPress site.
Integrate a CDN for media files – If you host audio on your own server, use a CDN like Cloudflare, Bunny.net, or Amazon CloudFront to cache and deliver files from servers close to your listeners. This reduces latency and server load.
Enable lazy loading for embedded players – Use a plugin like Lazy Load for Videos or Perfmatters to defer loading of podcast players until a visitor scrolls to them. This speeds up initial page load.
Serve images and transcripts via CDN – Offload show notes images, episode artwork, and transcript PDFs to the same CDN for consistent performance.
Planning for Growth: Upgrading Hosting and Automating Workflows
As your audience expands, your infrastructure must scale without manual intervention. Consider these strategies:
Upgrade to managed WordPress hosting – Providers like WP Engine, Kinsta, or Flywheel offer automatic scaling, built-in caching, and expert support. They handle traffic spikes from viral episodes without downtime.
Implement a caching layer – Use a plugin like W3 Total Cache or WP Rocket with server-level caching (e.g., Redis or Varnish) to serve static pages quickly. This is critical for high-traffic episodes.
Automate repetitive tasks – Use tools like Zapier or Uncanny Automator to connect your WordPress site with other platforms. For example, automatically publish new episodes to social media, send email notifications to subscribers, or update your podcast directory listings.
Monitor resource usage – Set up alerts for CPU, memory, and bandwidth usage through your hosting dashboard or a monitoring tool like New Relic. This helps you anticipate upgrades before performance degrades.
By establishing a maintenance rhythm, optimizing media delivery, and planning for growth, you can focus on creating great content while your WordPress podcast runs reliably behind the scenes.
Frequently Asked Questions
What is the best WordPress podcasting plugin?
The best plugin depends on your needs. Seriously Simple Podcasting is lightweight and free, ideal for beginners. PowerPress by Blubrry offers advanced features like iTunes tagging and detailed statistics. Castos integrates with a dedicated hosting service and provides automatic publishing. For most users, PowerPress is recommended because it is free, actively maintained, and works with any podcast hosting provider.
Do I need a separate podcast hosting service with WordPress?
Yes, you need a dedicated podcast hosting service because WordPress cannot serve large audio files efficiently. Services like Blubrry, Libsyn, Podbean, or Buzzsprout provide reliable storage, bandwidth, and generate the correct RSS feed. Your WordPress site then uses a plugin to pull that feed and display episodes. Without a dedicated host, your site may crash or incur high costs if your podcast becomes popular.
How do I create an RSS feed for my podcast in WordPress?
WordPress generates RSS feeds automatically, but podcast feeds require specific tags like . Use a podcast plugin such as PowerPress or Seriously Simple Podcasting. After adding your episode audio file URL via the plugin, it updates your feed with the necessary tags. You then submit this feed URL (e.g., yoursite.com/feed/podcast) to directories like Apple Podcasts and Spotify.
Can I host audio files directly on WordPress?
Technically you can upload audio files to your WordPress media library, but it is not recommended. WordPress is not optimized for large file delivery, and serving audio directly can slow your site, cause bandwidth overage charges, and lead to poor listener experience. Always use a dedicated podcast hosting service for storage and streaming, then embed the episode on your WordPress site.
How do I submit my WordPress podcast to Apple Podcasts?
First, ensure your podcast feed is valid using a tool like Cast Feed Validator. Then, sign in to Apple Podcasts Connect with your Apple ID. Click the '+' icon to add a new show, paste your podcast RSS feed URL (e.g., yoursite.com/feed/podcast), and submit. Apple will review your show, usually within a few days. Once approved, your episodes appear in the Apple Podcasts directory.
What SEO tips should I follow for my WordPress podcast?
Use descriptive episode titles and show notes with relevant keywords. Add alt text to episode images. Optimize your RSS feed title and description. Use a plugin like Yoast SEO to manage meta tags and XML sitemaps. Create a dedicated podcast homepage with episode summaries. Encourage listener reviews and backlinks. Transcribe episodes to improve text content for search engines.
How can I monetize my WordPress podcast?
Common monetization methods include sponsorships, affiliate marketing, listener donations (via Patreon or PayPal), selling premium content or merchandise, and offering paid subscriptions for ad-free episodes. Use plugins like Simple Podcast Press to integrate donation buttons or WooCommerce for selling products. Always disclose sponsored content as per FTC guidelines.
What are the best practices for podcast episode formatting in WordPress?
Use a consistent post format for each episode. Include the episode number, title, show notes, timestamps, and a media player. Embed the audio file using your podcast plugin's shortcode or block. Add a featured image that meets Apple Podcasts specifications (1400×1400 pixels minimum). Enable comments if you want listener interaction, and categorize episodes by season or topic.
WordPress and SMS Integration: A Comprehensive Guide to Boosting Engagement and Automation
Introduction to WordPress and SMS Integration
In an era where mobile devices dominate digital interactions, the phrase “WordPress and SMS Integration” represents a strategic pivot toward immediate, personal communication. Email, once the cornerstone of online engagement, now faces declining open rates and inbox saturation. SMS, with its near-instant delivery and 98% open rate within minutes, offers a direct line to users who are constantly on their phones. For WordPress site owners, this integration bridges the gap between passive browsing and active, time-sensitive engagement. By weaving SMS capabilities into your site’s workflow, you transform a static platform into a dynamic communication hub—ideal for notifications, marketing, and customer support. This guide explores why SMS matters, its practical applications, and the technical mechanics that make it work.
Why SMS Complements Your WordPress Site
WordPress excels at content management, but its default communication channels—email and on-site alerts—often fail to capture immediate attention. SMS fills this void by offering:
Higher engagement rates: Text messages are read within seconds, compared to hours for emails.
Mobile-first alignment: Over 60% of web traffic now comes from mobile devices, making SMS a natural extension.
Lower spam perception: Users trust SMS more than email, reducing the risk of messages being ignored.
Actionable immediacy: Perfect for time-critical updates like order confirmations, event reminders, or two-factor authentication.
Unlike email, which requires subject lines and formatting, SMS is concise and direct. This simplicity reduces cognitive load for users, making it ideal for quick calls to action. For WordPress site owners, this means higher conversion rates from marketing campaigns and fewer missed interactions from support queries.
Key Use Cases for SMS in WordPress
The integration unlocks a spectrum of practical applications across industries. Common scenarios include:
“Your verification code is 48291. Expires in 5 minutes.”
These use cases demonstrate how SMS enhances automation, reduces friction, and builds trust. For example, a restaurant using WordPress for reservations can send table-ready texts, while a nonprofit can confirm donations instantly. The key is aligning SMS with user expectations—timely, relevant, and permission-based.
Integrating SMS with WordPress relies on a straightforward technical stack: an SMS gateway API, a WordPress plugin or custom code, and a database for user consent. The process typically follows these steps:
User opt-in: Visitors submit their phone number via a form (e.g., Gravity Forms, Contact Form 7), which is stored in the WordPress database with a consent flag.
Trigger event: A site action—such as a new order, form submission, or scheduled event—activates a hook in WordPress.
API call: The plugin or custom function sends a POST request to an SMS service provider (e.g., Twilio, Plivo, or ClickSend) with the recipient’s number and message content.
Delivery and logging: The provider processes the message, returns a status (sent, failed, or queued), and the plugin logs the interaction in the database for auditing.
Popular plugins like WP SMS, SMS Alert Notifications, or Twilio for WordPress simplify this by offering prebuilt hooks for WooCommerce, User Registration, and other common plugins. For developers, custom integration involves using the WordPress HTTP API to call SMS endpoints, handling error responses, and ensuring compliance with regulations like GDPR or TCPA. The core principle remains: SMS integration is not about complexity but about connecting a reliable API to your site’s existing event-driven architecture. This ensures that every text message is timely, automated, and traceable, enhancing both user experience and operational efficiency.
Core Benefits of Adding SMS to Your WordPress Workflow
Integrating SMS with your WordPress site unlocks a direct, high-impact communication channel that outperforms email in speed and engagement. Text messages boast open rates above 90%, with most read within three minutes—far surpassing email’s average of 20-30%. This immediacy transforms how you connect with users, driving deeper interaction and operational efficiency. Below, we break down three key advantages: real-time alerts, conversion optimization, and enhanced support through two-way messaging.
Boosting User Engagement with Real-Time Alerts
Real-time SMS alerts keep your audience informed and active without requiring them to check email or a dashboard. For WordPress sites, this is especially powerful for time-sensitive updates. Common use cases include:
Order confirmations and shipping updates for e-commerce stores using WooCommerce.
Event reminders for membership sites or booking plugins, reducing no-shows by up to 30%.
Password reset codes or account verification for membership and community platforms.
Urgent security alerts for admin users, such as failed login attempts or plugin updates.
To implement this, you can use a plugin like Twilio SMS for WordPress and trigger alerts via hooks. For example, sending a custom message on order status change:
add_action( 'woocommerce_order_status_changed', 'send_sms_on_order_update', 10, 4 );
function send_sms_on_order_update( $order_id, $old_status, $new_status, $order ) {
$phone = $order->get_billing_phone();
$message = "Your order #{$order_id} is now {$new_status}. Thank you!";
// Use your SMS API (e.g., Twilio) to send $message to $phone
}
This code snippet, placed in your theme’s functions.php or a custom plugin, sends an instant SMS when an order status changes. The result: customers stay engaged without friction, and you build trust through proactive communication.
Improving Conversion Rates via SMS Campaigns
SMS campaigns drive conversions because they reach users at the right moment with minimal noise. Unlike email, which can languish in spam folders, SMS lands directly in the recipient’s primary inbox. Effective strategies include:
Campaign Type
Example
Expected Impact
Abandoned cart recovery
“You left items in your cart! Complete your purchase now for 10% off.”
Up to 15% recovery rate
Flash sale alerts
“24-hour sale: 20% off all products. Use code SMS20.”
30-40% click-through rate
Exclusive offers for subscribers
“Thanks for subscribing! Here’s a free shipping code: FREESHIP.”
20% higher conversion than email
Re-engagement for inactive users
“We miss you! Come back and get 15% off your next order.”
10-12% reactivation rate
To maximize conversions, segment your audience based on behavior (e.g., past purchases, page visits) and personalize messages with dynamic fields like first name or product name. Use a plugin that integrates with your CRM or email marketing tool to sync opt-ins and avoid over-messaging. A/B test send times—evening hours often yield higher response rates for B2C sites.
Enhancing Customer Support Through Two-Way Messaging
Two-way SMS transforms support from a one-way broadcast into a conversation. Users can reply to alerts, ask questions, or resolve issues without logging into your site. This reduces support ticket volume and improves satisfaction. Key implementations:
Automated replies for common queries: “Reply 1 for order status, 2 for returns, 3 to speak to an agent.”
Order tracking updates where users can text a keyword like “STATUS” to get real-time info.
Appointment scheduling with confirmations and reminders via text.
Escalation to human agents when automated responses fail—integrate with helpdesk tools like Zendesk or Freshdesk.
To set this up in WordPress, choose a plugin that supports incoming SMS webhooks (e.g., Twilio or Vonage). Configure a webhook endpoint in your site to process replies and route them to the appropriate handler. For example, a reply to a support alert can be logged as a comment in your ticket system. This closes the loop: users feel heard, and you gain a scalable support channel that works on any device.
Choosing the Right SMS Gateway for WordPress
Selecting an SMS gateway for your WordPress integration is a decision that hinges on technical capability, budget, and geographic reach. The right gateway ensures reliable delivery, straightforward API management, and scalable pricing as your audience grows. Below, we compare three leading providers—Twilio, Nexmo (Vonage), and Plivo—focusing on factors critical for WordPress developers and site owners: ease of integration, cost predictability, and regional support.
Twilio: The Industry Standard for Developers
Twilio remains the most widely adopted SMS gateway due to its robust API documentation, extensive SDK support, and developer-centric tools. For WordPress integration, Twilio offers a dedicated PHP library that simplifies sending and receiving messages via RESTful calls. Its reliability is backed by a 99.95% uptime SLA for SMS, and it supports two-way messaging, which is essential for subscriber opt-ins and interactive campaigns. However, Twilio’s pricing is per-message and can become expensive at high volumes, especially for traffic outside North America. It also requires a verified sender ID (usually a toll-free number or short code) for transactional messages, adding a setup step. Twilio is ideal for developers who need granular control and advanced features like message scheduling or delivery analytics.
Nexmo (Vonage) and Alternatives for Scalability
Nexmo, now under the Vonage brand, competes closely with Twilio, particularly for international scalability. Its API is similarly RESTful and offers a PHP wrapper, making WordPress integration straightforward. Nexmo excels in global reach, with direct connections to over 200 countries and competitive rates for high-volume sending. It also provides virtual numbers in 100+ countries, enabling local sender IDs for better deliverability. For WordPress sites targeting a global audience, Nexmo’s transparent pricing and lack of minimum commitments are advantageous. An alternative worth considering is Plivo, which offers lower per-message costs for bulk SMS and a simpler pricing model with no monthly fees. Plivo’s API is less feature-rich than Twilio’s but sufficient for most WordPress notification and marketing use cases. For scalability, evaluate message throughput limits and concurrency support—Nexmo and Plivo both allow high-volume bursts without throttling, whereas Twilio may require a credit increase request.
Evaluating Pricing Models and Regional Support
Pricing models vary significantly and directly impact your WordPress site’s operational costs. Twilio charges per segment (up to 160 characters) with additional fees for carrier fees and regulatory compliance. Nexmo uses a similar model but offers volume discounts at lower thresholds. Plivo provides a simpler flat-rate structure for many countries. Regional support is critical: Twilio has strong coverage in North America and Western Europe but can be expensive in Asia-Pacific and Africa. Nexmo offers competitive rates in emerging markets. Plivo is cost-effective for high-volume campaigns in the US and India. Below is a comparison table summarizing key factors:
Per message, no monthly fee; volume discounts available
Developers needing advanced features, two-way SMS, and analytics
North America, Western Europe
Excellent (extensive PHP SDK)
Nexmo (Vonage)
Per message, tiered pricing; no minimum commitment
Global campaigns with local numbers and high throughput
Over 200 countries, strong in Asia and Africa
Very good (simple REST API)
Plivo
Flat-rate per message (US/India); no monthly fees
High-volume bulk SMS at low cost
United States, India
Good (basic PHP SDK)
When choosing, consider your WordPress site’s primary audience location and message volume. For a global ecommerce store with moderate traffic, Nexmo balances cost and reach. For a US-based newsletter, Plivo offers the best value. Twilio remains the safest choice for custom integrations requiring deep control, despite higher per-message costs in some regions.
Choosing the right plugin for WordPress and SMS integration is critical for reliable engagement and automation. The best plugins offer a balance of features, ease of use, and support for various SMS gateways. Below is a detailed look at two leading options, followed by a comparison to help you decide.
WP SMS Plugin: Features and Setup
The WP SMS plugin is a robust, feature-rich solution suitable for both free and premium use. It supports over 250 SMS gateways, including Twilio, Nexmo, and Plivo, making it highly adaptable to different regions and budgets. Key features include:
Two-Factor Authentication (2FA): Enhance login security by sending one-time codes via SMS.
Mobile Field Manager: Add a phone number field to user registration, checkout, or profile pages.
Subscriber Management: Build and segment SMS subscriber lists directly from WordPress.
WooCommerce Notifications: Automate order confirmations, shipping updates, and abandoned cart reminders.
Setup Process:
Install and activate the WP SMS plugin from the WordPress repository or via premium download.
Navigate to SMS → Settings in the WordPress admin panel.
Select your SMS gateway (e.g., Twilio) and enter your account credentials (API SID, Auth Token, and sender number).
Configure default notifications under SMS → Notifications by toggling events like “New User Registration” or “Order Completed.”
Test the integration by sending a manual SMS from the plugin’s dashboard.
For advanced automation, you can use the plugin’s built-in hooks. Below is a practical PHP code example to send a custom SMS when a user publishes a new post:
add_action( 'publish_post', 'send_sms_on_new_post', 10, 2 );
function send_sms_on_new_post( $post_id, $post ) {
if ( function_exists( 'wp_sms_send' ) ) {
$message = 'New post published: ' . $post->post_title;
$to = '+1234567890'; // Replace with recipient number
wp_sms_send( $to, $message );
}
}
SMS Alert Notifications for WordPress
SMS Alert Notifications is a simpler, lightweight plugin ideal for users who need basic notifications without complex features. It supports popular gateways like Twilio, ClickSend, and Textlocal. Its primary use cases include:
User Notifications: Alert admins or users on new registrations, password changes, or content updates.
Order Alerts: Send real-time SMS to store owners or customers for WooCommerce orders.
Form Integration: Trigger SMS alerts from Contact Form 7, Gravity Forms, or Ninja Forms submissions.
Setup involves entering gateway credentials under Settings → SMS Alerts and selecting which events trigger SMS. The plugin lacks advanced subscriber management but excels in straightforward, no-fuss configuration.
To help you choose between WP SMS and SMS Alert Notifications, consider the following comparison table:
Feature
WP SMS Plugin
SMS Alert Notifications
Free Version
Limited to basic notifications; premium adds 2FA and subscriber management
Full features for up to 100 SMS/month; premium for higher limits
Gateway Support
250+ gateways
15+ gateways
Subscriber Management
Robust (segments, lists, opt-in forms)
Not available
Performance
Moderate impact on site speed; caching recommended
Lightweight; minimal load
Support Quality
Dedicated ticket system; active community forum
Email support with 24-hour response; limited documentation
Best For
E-commerce sites, membership platforms, and complex automation
Small businesses needing basic alerts without overhead
For WordPress and SMS integration, WP SMS is the stronger choice if you require scalability and granular control. SMS Alert Notifications suits users who prioritize simplicity and lower resource usage. Both plugins offer free tiers, allowing you to test performance with your specific gateway before committing to a premium plan.
Step-by-Step: Setting Up SMS Notifications for User Actions
Integrating SMS notifications into your WordPress site transforms passive user actions into immediate, engaging touchpoints. By configuring alerts for key events like registrations, purchases, and password resets, you reduce friction, build trust, and keep users informed without requiring them to check email. This guide walks you through the practical setup using a reliable SMS gateway plugin (such as Twilio or Clickatell) and WordPress hooks.
Triggering SMS on New User Registration
To send an SMS when a new user registers, you first need an SMS plugin that hooks into the user_register action. Follow these steps:
add_action( 'user_register', 'send_registration_sms', 10, 1 );
function send_registration_sms( $user_id ) {
$phone = get_user_meta( $user_id, 'billing_phone', true );
if ( $phone ) {
// Your SMS sending function here
}
}
Sending Order Confirmations and Shipping Updates
For WooCommerce stores, SMS alerts for orders dramatically reduce support queries. Configure these steps:
Order confirmation: In your SMS plugin, locate the WooCommerce integration tab. Enable “New Order” notification. Set the recipient to the customer’s billing phone. Template example: “Order #{order_number} confirmed. Total: {order_total}. Thank you, {customer_name}!”
Shipping updates: Use the “Order Status Changed” hook. Map each status (e.g., “Processing” to “Shipped”) to a distinct SMS. For shipping, include a tracking link: “Your order #{order_number} has shipped! Track it here: {tracking_url}.”
Admin alerts: Add a separate notification for store managers when a high-value order (over $100) is placed. Set recipient to the admin’s mobile number.
Below is a table of recommended status triggers and message variables:
Order Status
Trigger Event
Example Dynamic Variables
Pending Payment
Payment reminder (optional)
{customer_name}, {order_total}, {payment_link}
Processing
Order confirmation
{order_number}, {order_date}
Completed
Delivery confirmation
{customer_name}, {order_number}
Shipped
Tracking update
{tracking_number}, {carrier_name}
Customizing SMS Templates with Dynamic Data
Dynamic data makes each SMS personal and actionable. Most SMS plugins support shortcodes that pull user and order details. Common placeholders include:
{username} — user’s display name
{order_total} — formatted order total
{reset_link} — password reset URL (shortened via URL shortener to fit SMS length)
{site_name} — your website name
{current_date} — date of the event
To customize a password reset SMS, for example, use this template: “Hi {username}, reset your {site_name} password here: {reset_link}. Link expires in 24 hours.” For purchase confirmations, include product names: “Thanks, {customer_name}! Your {product_name} is confirmed. Order #{order_number}.” Always test templates by sending a sample SMS to yourself. Limit messages to 160 characters per segment to avoid extra charges. Additionally, use a dedicated shortcode for opt-out instructions, such as “Reply STOP to unsubscribe,” to comply with SMS regulations.
Building Two-Way SMS Conversations from WordPress
Enabling two-way SMS from your WordPress site transforms passive notifications into interactive dialogues. When users can reply to messages, you unlock real-time support, appointment confirmations, and feedback loops—all managed from your dashboard. This section covers the technical setup and workflow for handling inbound replies, integrating responses with your existing tools, and maintaining organized conversation logs.
Setting Up Inbound SMS Webhooks
To receive replies from users, you must configure a webhook endpoint in WordPress that listens for incoming SMS from your SMS provider (e.g., Twilio, Vonage, or Plivo). A webhook is a URL that the provider sends data to whenever a user replies. Follow these steps:
Register an endpoint: Create a custom API endpoint in your theme’s functions.php or via a plugin like WP REST API. Example code for a simple endpoint:
Configure your SMS provider: In your provider’s dashboard, set the webhook URL to https://yoursite.com/wp-json/sms/v1/inbound. Test with a sample message to confirm the endpoint logs replies correctly.
Secure the endpoint: Add a secret token or IP whitelist to prevent unauthorized POST requests. For example, check a custom header like X-SMS-Secret in the callback function.
Integrating with a CRM or Helpdesk Plugin
Once inbound SMS data flows into WordPress, route it to a CRM or helpdesk plugin for structured management. Popular options include FluentCRM, Groundhogg, or Awesome Support. Use the webhook data to create or update contact records and log conversations:
Create contact profiles: When a new phone number replies, check if a contact exists in your CRM. If not, create a new contact with the phone number as the primary identifier. Use hooks like fluentcrm_contact_created to attach the SMS history.
Log as a note or ticket: In helpdesk plugins, map inbound SMS to a new ticket or append it to an existing conversation. For example, in Awesome Support, use the wpas_add_custom_fields filter to store the SMS body as a custom field in the ticket.
Automate follow-ups: Based on reply content, trigger workflows—e.g., if a user replies “YES” to an appointment reminder, update the booking status in your calendar plugin via a custom action.
Best Practices for Managing SMS Replies
To keep two-way SMS efficient and user-friendly, follow these guidelines:
Centralize conversation logs: Store all inbound and outbound SMS in a custom database table (as shown in the webhook example) or a dedicated plugin like SMS Conversations. Display logs in the user’s profile or order edit screen for easy reference.
Set reply expectations: In your outbound messages, include a note like “Reply STOP to opt out” or “We’ll respond within 1 hour” to manage user expectations. Use automated replies for common keywords (e.g., “HOURS” returns your business hours).
Monitor and moderate: Implement rate limiting to prevent spam replies—e.g., allow only 5 messages per number per hour. Use a simple moderation queue in the dashboard for flagged content (e.g., messages containing offensive words).
Maintain compliance: Always provide opt-out instructions (e.g., “Reply STOP”). Log opt-out requests and remove those numbers from future campaigns. For regulated industries, store consent records alongside the conversation log.
Marketing Automation: SMS Campaigns and Segmentation
Integrating SMS into your WordPress marketing strategy unlocks powerful automation capabilities, enabling direct, high-open-rate communication with your audience. By leveraging user data from your WordPress site, you can move beyond generic blasts to deliver personalized promotions, timely reminders, and structured drip campaigns. This approach not only boosts engagement but also drives conversions through precise segmentation and behavioral triggers.
Creating Targeted SMS Lists Using WordPress User Data
Effective SMS marketing begins with building segmented lists from your existing WordPress user base. Your site already collects valuable data through registration forms, purchase history, and interaction logs. Use this information to categorize subscribers for tailored messaging. Key data points to consider include:
User role or membership level: Separate free users from premium subscribers to offer exclusive promotions.
Purchase behavior: Segment by past purchases, abandoned carts, or repeat buyers for targeted reminders or upsells.
Geolocation: Use IP-based or form-collected location data to send local event invites or region-specific offers.
Engagement history: Identify active users (recent logins, commenters) versus dormant ones for re-engagement campaigns.
Opt-in preferences: Ensure compliance by respecting explicit consent for SMS, segmented by topic (e.g., promotions, updates, reminders).
To build these lists, integrate your WordPress database with an SMS marketing plugin (e.g., Twilio or TextMagic) that syncs user meta fields. Regularly clean lists by removing unsubscribes and invalid numbers to maintain deliverability.
Scheduling Automated SMS Drip Sequences
Automated drip sequences nurture leads and customers over time without manual effort. Using WordPress user data, you can trigger SMS messages based on specific actions or time intervals. A typical drip campaign might follow this structure:
Stage
Trigger
Example SMS Content
Welcome
User signs up via form
“Welcome to [Brand]! Enjoy 10% off your first order with code WELCOME10.”
Reminder
Abandoned cart (24 hours)
“Your cart is waiting! Complete your purchase today for free shipping.”
Re-engagement
No activity for 30 days
“We miss you! Here’s a 15% discount to come back. Valid for 48 hours.”
Post-purchase
7 days after order
“Thanks for your order! Rate your experience and get a chance to win a gift card.”
To schedule these sequences, use a WordPress automation plugin like Uncanny Automator or a dedicated SMS tool with CRM integration. Set delays based on user behavior (e.g., time since last login) and ensure each message includes an opt-out link to comply with regulations.
Optimizing SMS campaigns requires systematic A/B testing of both message content and send times. Start by defining clear variables to test:
Content variations: Compare different call-to-action phrases (e.g., “Shop now” vs. “Claim your deal”), personalization levels (including first name vs. generic greeting), or message length (short vs. detailed).
Timing experiments: Test different days of the week (e.g., Tuesday morning vs. Thursday afternoon) or specific hours (10 AM vs. 6 PM) to identify peak engagement windows.
Offer types: Contrast percentage discounts (20% off) with fixed amounts ($10 off) or free shipping.
To run tests, split your targeted list into equal segments (e.g., 50% control, 50% variant) using your SMS platform’s built-in A/B testing feature. Track metrics like click-through rate, conversion rate, and opt-out rate over a defined period (typically 1-2 weeks). Analyze results statistically—look for a minimum 10% difference in performance to declare a winner. Apply the winning combination to future campaigns and iterate continuously for sustained improvement.
Security, Compliance, and Privacy Considerations
Integrating SMS into your WordPress site demands rigorous attention to legal and security frameworks. Failure to comply with regulations like the Telephone Consumer Protection Act (TCPA) in the U.S., the General Data Protection Regulation (GDPR) in Europe, and the CAN-SPAM Act can result in significant fines and reputational damage. This section outlines how to manage consent, secure data, and adhere to global standards while using WordPress and SMS integration.
Obtaining Explicit Consent and Maintaining Opt-Outs
Explicit consent is the cornerstone of lawful SMS communication. You must obtain clear, affirmative permission from users before sending any marketing or transactional messages. This means no pre-checked boxes or implied consent. Implement a double opt-in process: after a user submits their phone number via a WordPress form, send a confirmation SMS asking them to reply “YES” to verify. Maintain a log of each consent event, including the timestamp, IP address, and the specific message the user agreed to receive.
To manage opt-outs effectively, include clear instructions in every SMS (e.g., “Reply STOP to unsubscribe”). Use a WordPress plugin that automatically processes STOP replies and adds the number to a suppression list. The table below compares two common approaches to opt-out management:
Feature
Manual Opt-Out List
Automated Plugin-Based System
Consent Logging
Requires manual entry of STOP replies into a spreadsheet or custom database
Automatically logs all opt-out requests with timestamps and user data
Real-Time Sync
Delayed; you must update lists after each campaign
Instant suppression across all scheduled and future campaigns
Audit Trail
Prone to human error and missing records
Secure, unalterable log suitable for regulatory audits
User Experience
User may receive messages for hours after opting out
Opt-out takes effect within seconds, reducing complaints
Always honor opt-outs immediately and never resend to suppressed numbers. Under the TCPA, failure to do so can lead to statutory damages of $500 to $1,500 per violation.
Phone numbers and message content are sensitive personal data. Store them securely within your WordPress environment by following these practices:
Encrypt phone numbers and message bodies at rest using a WordPress encryption plugin or custom encryption function (e.g., AES-256).
Use HTTPS for all data transmission between your site, SMS gateway, and user devices.
Limit database access to only necessary roles (e.g., site administrator). Avoid storing SMS data in plain text in custom post types or user meta fields.
Regularly audit your WordPress installation for vulnerabilities, including outdated plugins and themes that could expose SMS data.
Choose a reputable SMS gateway provider that offers end-to-end encryption and complies with SOC 2 or ISO 27001 standards.
Additionally, implement a data retention policy: delete SMS logs after 30 to 90 days unless required for legal purposes. Use a cron job or plugin to automate this cleanup.
Complying with Global SMS Regulations
WordPress and SMS integration must respect the regulatory landscape of each recipient’s country. Key requirements include:
TCPA (United States): Requires prior express written consent for marketing SMS, clear opt-out instructions, and adherence to time-of-day restrictions (8 a.m. to 9 p.m. local time).
GDPR (European Union): Mandates a lawful basis for processing phone numbers (e.g., consent or legitimate interest), data minimization, and the right to erasure. You must provide a privacy policy that details SMS data use.
CAN-SPAM (United States): While focused on email, its rules on commercial messaging and opt-out mechanisms often apply to SMS. Include your business name and contact information in every message.
PIPEDA (Canada): Requires meaningful consent and the ability to withdraw consent at any time.
To manage compliance, use a WordPress plugin that supports region-specific consent forms and automatically adjusts message content based on the user’s IP geolocation. Regularly review your SMS practices against updated guidance from regulatory bodies such as the Federal Communications Commission (FCC) and the European Data Protection Board (EDPB). Document all compliance procedures in your site’s privacy policy and make it accessible to users.
Performance Optimization and Troubleshooting
Integrating SMS functionality into a WordPress site can introduce performance bottlenecks if not handled carefully. The key is to balance real-time communication needs with site speed. Below are strategies to keep your integration lean, along with debugging techniques for common issues.
Minimizing API Call Latency with Caching
Every SMS API call adds network overhead. To reduce latency without sacrificing delivery reliability, implement the following caching and batching techniques:
Transient-based caching for status lookups: Store SMS delivery statuses in WordPress transients for 30-60 seconds. This prevents repeated API calls for the same message.
Batch queueing for bulk sends: Instead of sending individual API requests per user, collect messages into a batch array and send them via your SMS provider’s bulk endpoint. Many providers support up to 1000 messages per request.
Pre-fetch phone number validation: Validate phone numbers locally using a cached regex or a lightweight library before making an API call. This avoids unnecessary requests for invalid numbers.
Practical code example: Below is a PHP snippet that caches the last SMS delivery status for 60 seconds using WordPress transients:
// After sending an SMS, store status in transient
$message_id = send_sms_via_api( $phone, $message );
if ( $message_id ) {
set_transient( 'sms_status_' . $message_id, 'pending', 60 );
}
// Retrieve status without re-calling API
$status = get_transient( 'sms_status_' . $message_id );
if ( false === $status ) {
// Only then call the API again
$status = fetch_delivery_status_from_api( $message_id );
set_transient( 'sms_status_' . $message_id, $status, 60 );
}
This pattern reduces redundant API calls and keeps your site responsive.
Debugging Failed SMS Deliveries
When an SMS fails to deliver, the root cause often lies in incorrect configuration or provider-side issues. Follow this structured debug checklist:
Verify API credentials: Check that your SMS provider’s API key, sender ID, and endpoint URL are correctly entered in WordPress settings. A common mistake is trailing spaces in keys.
Enable logging: Use a plugin like WP Debug Logging or add error_log( print_r( $response, true ) ); after your API call to capture raw responses.
Check phone number formatting: Ensure numbers include the country code (e.g., +1 for US). Use a validation function before sending.
Test with a single number: Send a test SMS to your own phone via the WordPress admin to isolate issues from user inputs.
Review provider error codes: Most SMS APIs return specific error codes (e.g., 402 for insufficient credits, 429 for rate limits). Map these in your code to user-friendly messages.
If logs show a “401 Unauthorized” error, regenerate your API key and update the integration settings.
Handling Rate Limits and Queue Management
SMS providers enforce rate limits (e.g., 10 messages per second) to prevent abuse. Exceeding them causes failed deliveries. Manage this with a queue system:
Use a cron-based queue: Store pending SMS messages in a custom database table or as post meta. Schedule a WordPress cron job to process the queue every 60 seconds, sending a limited batch per run.
Implement exponential backoff: If a rate limit error (HTTP 429) occurs, pause the queue for 30 seconds and reduce the batch size by half. Retry three times before logging the failure.
Monitor queue size: Add a dashboard widget showing pending SMS count. If it grows above 500, alert the admin to adjust rate limits or provider plan.
Queue Size
Batch Size
Wait Time
0–50
10
1 second
51–200
5
2 seconds
201+
3
5 seconds
This adaptive approach ensures your integration respects provider limits while maintaining delivery reliability. Regularly review your provider’s documentation for updated rate limit thresholds.
Future Trends: SMS, WordPress, and Omnichannel Communication
As digital communication evolves, the integration of WordPress and SMS is poised to expand beyond simple text alerts. The future lies in richer, more interactive channels that blend seamlessly into a unified omnichannel strategy. Businesses that prepare now will gain a competitive edge in customer engagement, automating not just notifications but entire conversational experiences directly from their WordPress sites.
The Rise of Rich Communication Services (RCS)
RCS is the next-generation upgrade to traditional SMS, offering features akin to messaging apps like WhatsApp or iMessage—but without requiring users to download additional software. For WordPress site owners, this means the ability to send branded, media-rich messages directly to a user’s native messaging app. Key capabilities include:
Rich media support: Send high-resolution images, videos, and GIFs within SMS threads.
Interactive buttons: Include clickable options for booking, purchasing, or confirming appointments.
Read receipts and typing indicators: Gain real-time feedback on message delivery and engagement.
Verified sender branding: Display your business name and logo instead of a generic phone number.
WordPress plugins are already beginning to support RCS APIs, allowing automated workflows—such as abandoned cart reminders or order confirmations—to deliver a more immersive experience without losing the simplicity of SMS. This trend will make text-based communication more competitive with email and push notifications.
Combining SMS with Push Notifications and Email
The most effective future strategies will not rely on a single channel. Instead, WordPress and SMS integration will serve as a critical layer within a multi-channel automation sequence. A typical omnichannel flow might look like this:
Stage
Channel
Example Action
1. Trigger
WordPress user action
User abandons a WooCommerce cart.
2. Immediate
SMS (or RCS)
Send a time-sensitive discount code via text.
3. Follow-up (1 hour)
Push notification
Remind mobile app users of the saved cart.
4. Follow-up (24 hours)
Email
Send a personalized product recommendation.
This layered approach ensures that messages reach users on their preferred platform, reducing opt-out rates and increasing conversion. WordPress plugins that unify SMS, email, and push notification triggers—such as those using webhooks or REST APIs—will become standard tools for marketers.
Preparing Your WordPress Site for AI-Powered Chatbots
Artificial intelligence is transforming SMS from a one-way broadcast channel into a conversational interface. By integrating AI-powered chatbots with your WordPress site and SMS gateway, you can automate customer support, lead qualification, and even booking management. To prepare, consider these steps:
Choose a flexible chatbot platform: Look for solutions that offer SMS channel support (e.g., Twilio, MessageBird) and easy WordPress integration via plugins or custom API hooks.
Define clear conversation flows: Map out common queries (shipping, returns, FAQs) and train your bot to handle them via SMS, escalating to human agents when needed.
Sync with WordPress data: Ensure your chatbot can access user order history, account details, and content from your site (e.g., blog posts or product pages) to provide contextual responses.
Test compliance and privacy: With AI handling SMS conversations, verify that your setup adheres to GDPR, TCPA, and other regulations, including obtaining explicit consent for automated messaging.
As natural language processing improves, SMS chatbots will become indistinguishable from human agents—offering 24/7 support directly from a user’s messaging app. WordPress sites that adopt this integration early will see higher customer satisfaction and reduced support costs, all while maintaining a cohesive brand voice across every channel.
Frequently Asked Questions
What is WordPress SMS integration?
WordPress SMS integration connects your WordPress site to an SMS gateway (like Twilio, Vonage, or AWS SNS) to send and receive text messages. This enables automated notifications for order confirmations, form submissions, password resets, two-factor authentication, and marketing campaigns directly from your WordPress dashboard. It boosts user engagement by reaching customers instantly on their mobile devices, bypassing email clutter.
How do I choose the best SMS plugin for WordPress?
Evaluate plugins based on supported SMS gateways (Twilio, Nexmo, etc.), ease of setup, features (two-way messaging, scheduling, templates), compatibility with your form builder (e.g., Contact Form 7, Gravity Forms), pricing (pay-as-you-go vs. monthly), and support. Popular choices include WP SMS, Twilio for WordPress, and SMS Alert Notifications. Test the free version or trial before committing.
Can I send automated SMS from WordPress forms?
Yes, many SMS plugins integrate with form builders like Contact Form 7, Elementor Forms, or Fluent Forms. When a user submits a form, you can trigger an automated SMS confirmation, a notification to the admin, or a follow-up message. For example, WP SMS can map form fields to SMS templates. This streamlines communication for booking systems, contact forms, and order requests.
Is two-factor authentication via SMS available for WordPress?
Absolutely. Plugins like WP SMS, Wordfence, and Two Factor provide SMS-based two-factor authentication. When a user logs in, a one-time code is sent to their mobile phone via SMS. This adds a critical security layer, reducing unauthorized access. Ensure your SMS gateway supports high delivery rates and consider fallback methods like email for reliability.
What are the costs associated with WordPress SMS integration?
Costs include the SMS plugin (many have free tiers with premium upgrades) and per-message charges from your SMS gateway provider (e.g., Twilio charges ~$0.0079 per SMS in the US). Some plugins also offer bundled credits. For high-volume sending, negotiate rates with the gateway. Factor in costs for two-way messaging and international messages, which may be higher.
How can I use SMS for marketing automation in WordPress?
Integrate SMS with marketing automation tools like Mailchimp, HubSpot, or via WooCommerce subscriptions. Send automated SMS for abandoned cart reminders, order updates, birthday offers, and re-engagement campaigns. Use segmentation based on user behavior. For example, trigger an SMS when a user completes a purchase or visits a specific page. Always comply with GDPR and CAN-SPAM by obtaining consent.
What are the compliance requirements for SMS marketing from WordPress?
You must obtain explicit opt-in from users (e.g., via checkbox on forms), provide clear privacy policies, and include opt-out instructions in every message. In the US, comply with the TCPA and CTIA guidelines. In the EU, adhere to GDPR. Keep records of consent. Use a professional SMS gateway that handles opt-out management and respects time-of-day restrictions (e.g., no messages after 9 PM).
How to Build a WordPress Forum: A Complete Step-by-Step Guide
1. Understanding the Purpose of Your Forum
Before you install a single plugin or choose a theme, pause to clarify the core mission of your WordPress forum. The purpose you define will ripple through every decision—from plugin selection to content rules to how you attract members. A forum built without a clear goal often becomes a ghost town or a moderation nightmare. Your purpose might be community support, where members help each other solve problems; niche discussions, where enthusiasts gather around a specific hobby or profession; or customer engagement, where you create a space for clients to share feedback and build loyalty. Each purpose demands a different structure, tone, and set of features.
Defining your target audience and their needs
Your forum’s success hinges on knowing exactly who you are building it for. Ask yourself: What problems does my audience face that a forum can solve? Are they beginners seeking hand-holding, or experts looking for deep technical discussions? For example, a forum for freelance graphic designers would need categories for portfolio feedback, software tutorials, and client negotiation tips. A forum for a software product would prioritize bug reports, feature requests, and troubleshooting threads. Create a simple audience profile: list their age range, technical skill level, preferred communication style (formal vs. casual), and the primary value they seek. Use this profile to shape your forum’s categories, language, and moderation policies. A mismatch between audience needs and forum design is the number one reason forums fail to gain traction.
Choosing between a standalone forum vs. integrated community
Once you understand your audience, decide whether your forum should be a standalone hub or integrated into an existing WordPress site. A standalone forum works best when the forum is the main attraction—for example, a niche hobbyist community where members primarily interact through discussions. An integrated community, on the other hand, combines a forum with other site features like a blog, membership area, or e-commerce store. This is ideal for businesses that want to offer support forums alongside product pages or a knowledge base. Consider these trade-offs:
Standalone forum: Easier to focus on community features, simpler navigation, but may feel disconnected from your main site content.
Integrated community: Seamless user experience, cross-promotion opportunities, but requires careful planning to avoid clutter and performance issues.
For most WordPress users, an integrated approach using a plugin like bbPress or BuddyPress offers the best balance, allowing you to embed forums within your existing site structure.
Setting realistic expectations for moderation and growth
A thriving forum doesn’t happen overnight, and it requires consistent effort. Set realistic expectations from the start. Moderation is not optional—every forum needs a clear code of conduct, a team of moderators (even if it’s just you initially), and a system for handling spam, disputes, and rule violations. Growth typically follows a slow-steady curve: you might see a handful of posts in the first month, then gradual acceleration as early members become advocates. Plan for a moderation time commitment of at least 1–2 hours per day in the early stages. Also, decide how you will handle negative behavior: Will you use a warning system? Temporary bans? Permanent bans? Document these policies before launch. Finally, understand that forums are not set-and-forget. They require ongoing content seeding, member engagement, and technical maintenance. If you cannot commit to this, consider whether a simpler solution like a Facebook group or a comments section might better serve your purpose.
2. Selecting the Right WordPress Hosting
Choosing the correct hosting environment is arguably the most critical decision when learning how to build a WordPress forum. Unlike a standard blog, forum software—whether you use bbPress, BuddyPress, or a third-party plugin—is inherently resource-intensive. Each page load can trigger multiple database queries to fetch user profiles, thread hierarchies, and post metadata. A shared server that handles a simple brochure site will choke under the concurrent connections of even a modestly active community. Your host must provide robust support for PHP and MySQL, along with effortless scalability to accommodate spikes in user activity during popular threads or events.
Key hosting features: PHP version, memory limits, and caching
Before signing up for any plan, verify these three technical pillars:
PHP version: Ensure the host supports PHP 8.0 or later. Modern forum plugins often rely on PHP 8+ features for performance and security. Older PHP versions (7.4 or below) are deprecated and will slow down your site.
Memory limits: Forums require generous PHP memory limits. Look for a minimum of 256 MB per site, with the ability to increase to 512 MB or 1 GB as your community grows. You can verify this by adding define('WP_MEMORY_LIMIT', '256M'); to your wp-config.php file.
Caching: Object caching (like Redis or Memcached) is vital. It stores frequently accessed data—such as recent posts, user badges, and unread counts—in memory, reducing database load. Page caching (via plugins like WP Rocket or host-level solutions) also helps serve static versions of pages to guests.
To check your current PHP memory limit, you can create a simple info file. Upload the following code as info.php to your site’s root directory, then access it via your browser:
<?php
phpinfo();
?>
Look for the “memory_limit” directive. After testing, delete this file immediately for security.
Shared vs. managed WordPress hosting for forums
The debate between shared and managed hosting has clear implications for forums:
Hosting type
Pros
Cons
Shared hosting
Low cost, easy to start
Limited resources, no dedicated PHP workers, risk of neighbor site traffic spikes slowing your forum
Managed WordPress hosting
Optimized server stack, automatic caching, staging environments, expert support for WordPress-specific issues
Higher monthly cost, may restrict certain plugins or custom .htaccess rules
For a forum with more than a handful of daily users, shared hosting is rarely sufficient. Managed WordPress hosting often includes server-level caching, automatic updates, and proactive monitoring—features that directly benefit community performance. However, if you are building a small private forum for a team or a hobby project, a quality shared host with good PHP support (like SiteGround or A2 Hosting) can work temporarily, but plan to upgrade as soon as activity increases.
Recommended hosts optimized for community sites
While no single host fits every budget, the following providers have demonstrated reliability for WordPress forums:
Kinsta: Built on Google Cloud Platform, offers automatic Redis caching, PHP 8.x, and scalable resources. Ideal for forums expecting rapid growth.
WP Engine: Provides a dedicated caching layer, staging sites, and excellent support. Their “Scale” plan includes 100+ GB bandwidth, suitable for active communities.
Cloudways: A managed cloud platform that lets you choose DigitalOcean, Linode, or AWS servers. You can scale resources up or down manually, and it includes built-in Redis and Varnish caching.
Liquid Web (Nexcess): Specializes in WooCommerce and community sites, offering auto-scaling and dedicated IP addresses for forums that require SSL certificates.
When evaluating any host, request a trial or money-back guarantee period. Test your forum with a simulated load using tools like Loader.io or K6 to ensure the server handles concurrent users without timeouts. Remember, the cheapest option often becomes the most expensive when your community outgrows it—choose a host that scales with your success.
Before you can add forum functionality, you need a functional WordPress installation. This section covers setting up a fresh WordPress site or preparing an existing one to ensure it supports forum software without conflicts. Proper configuration at this stage prevents common issues like broken permalinks, user role mismatches, or data loss later.
Step-by-step WordPress installation (one-click vs. manual)
Choose the installation method that best fits your hosting environment. Most hosting providers offer a one-click installer, but manual installation gives you more control.
One-click installation (recommended for beginners): Access your hosting control panel (cPanel, Plesk, or custom dashboard). Locate the “WordPress Installer” tool (e.g., Softaculous, Fantastico). Enter your site name, admin username, email, and select a theme. The installer automatically creates the database and configures files. This takes 2–5 minutes.
Manual installation (for advanced users): Download the latest WordPress zip from wordpress.org. Create a MySQL database and user via phpMyAdmin or your host’s database tool. Upload the WordPress files to your server via FTP or file manager. Rename wp-config-sample.php to wp-config.php and add your database credentials. Run the installation script by visiting your domain. This method offers full control over file structure and database naming.
For a forum site, manual installation may be preferable if you plan to use a custom folder structure or integrate with existing user systems. However, one-click installers are reliable and include automatic updates.
Essential WordPress settings for a forum (permalinks, user roles)
After installation, configure these settings to optimize your site for forum functionality.
Permalinks: Forums rely on clean, readable URLs. Go to Settings > Permalinks and select “Post name” or a custom structure like /forum/%postname%/. This ensures your forum topics and replies have user-friendly URLs (e.g., yoursite.com/forum/topic-title). Avoid the default “Plain” setting, which creates broken links in forum menus and sitemaps.
User roles: WordPress default roles (Administrator, Editor, Author, Contributor, Subscriber) may not map cleanly to forum roles. For a forum, consider these role mappings:
WordPress Role
Forum Equivalent
Key Permissions
Administrator
Forum Admin
Full control over forum settings, user management, moderation
Editor
Moderator
Edit/delete any posts, manage users, but not site settings
Author
Member
Create and edit own posts, reply to topics
Subscriber
Participant
Read forum, create topics, reply (if allowed)
Most forum plugins (e.g., bbPress, BuddyPress) create their own role hierarchy. After installation, check that your user roles align with forum permissions to avoid accidental admin access for regular members.
Backing up your site before adding forum software
Before installing any forum plugin or theme, create a full backup of your current WordPress installation. This protects against data loss if the forum software conflicts with existing plugins or themes.
Backup steps:
Files: Use an FTP client or file manager to download the entire wp-content folder (themes, plugins, uploads). Also download wp-config.php and .htaccess.
Database: Export your MySQL database via phpMyAdmin. Select all tables, choose “Export” (SQL format), and save the file. For large databases, use a plugin like UpdraftPlus or BackupBuddy for automated backups.
Test the backup: Restore the backup to a staging environment or local server to verify it works. A corrupted backup is useless in an emergency.
Store backups in a secure off-site location (cloud storage, external drive). Schedule automatic backups at least weekly, especially after major changes like installing forum software. Without a backup, a single plugin conflict could erase weeks of forum setup work.
When you decide how to build a WordPress forum, your first major fork in the road is selecting the right plugin. The choice largely comes down to three distinct paths: bbPress for native integration, BuddyPress for social features, or a third-party plugin like wpForo for advanced styling. Each option serves a different use case, and understanding their strengths helps you avoid costly rework later.
bbPress is developed by the same team behind WordPress, which means it follows core coding standards and relies on WordPress data structures. This results in a forum that feels like a natural extension of your site rather than a bolted-on add-on.
Performance: Minimal database overhead; uses existing WordPress tables for users and posts.
Integration: Works seamlessly with your current theme’s template hierarchy. You can override forum templates via your child theme.
Simplicity: No bloat. You get forums, topics, replies, and moderation—nothing more.
Extensibility: Hooks and filters are abundant. For example, to add a custom field to topic submission forms, you can use add_action( 'bbp_theme_before_topic_form_content', 'my_custom_field' );.
bbPress is ideal for site owners who already have a well-designed theme and want a forum that loads fast and requires minimal maintenance. However, its default styling is bare-bones, and you will need to invest in custom CSS or a child theme to match your brand.
BuddyPress: adding social profiles and activity streams
BuddyPress extends WordPress into a social network. When combined with bbPress (and the official BuddyPress/bbPress integration plugin), it adds layers of user engagement beyond simple forum threads.
User profiles: Members get customizable profile pages with avatars, cover images, and fields.
Activity streams: Forum posts automatically appear in a site-wide activity feed, encouraging discovery and interaction.
Private messaging: Users can send direct messages, which reduces the need for third-party messaging plugins.
Groups: Create private or public groups with their own forums, which is powerful for membership sites or communities.
The trade-off is complexity. BuddyPress adds its own database tables and background processes. On shared hosting, this can slow down your site. Use BuddyPress only if your forum strategy depends on social features—otherwise, you risk overcomplicating your setup.
Third-party plugins: advanced features and styling options
Third-party forum plugins like wpForo, Asgaros Forum, and CM Answers offer features that bbPress and BuddyPress do not include out of the box.
Feature
bbPress
wpForo (example)
Built-in styling/themes
No
Yes (multiple layouts)
Drag-and-drop layout editor
No
Yes
Advanced search (fuzzy, tags)
Basic
Full-text with filtering
User reputation systems
Plugin required
Built-in
GDPR/legal compliance tools
Manual setup
Built-in options
wpForo, for example, includes a visual theme editor that lets you change colors, fonts, and spacing without writing a line of code. It also supports forum attachments, polls, and advanced moderation queues. The downside is that these plugins are heavier and may conflict with other plugins or your theme’s CSS. Always test third-party plugins on a staging site before deploying to production.
For most projects that prioritize design control and feature richness over lightweight integration, a third-party plugin is the pragmatic choice. However, if you value long-term maintainability and a small footprint, bbPress remains the most reliable foundation for how to build a WordPress forum.
5. Installing and Setting Up bbPress
bbPress is the most widely used plugin for building a WordPress forum because it integrates seamlessly with your existing user system and requires minimal overhead. This section walks you through installing bbPress, creating forum structures, and configuring permissions to ensure your community runs smoothly from day one.
Installing bbPress via the WordPress plugin repository
Begin by navigating to your WordPress admin dashboard. Go to Plugins > Add New and type “bbPress” into the search bar. The plugin, developed by the WordPress core team, appears as the first result. Click Install Now and then Activate once the installation completes.
After activation, bbPress adds a new menu item labeled Forums to your admin sidebar. You may also notice a settings panel under Settings > Forums. No additional configuration is required at this point, but verify that the plugin is active by checking for the bbPress version number in the Plugins list.
If you prefer manual installation, download the plugin zip file from the WordPress repository, upload it via Plugins > Add New > Upload Plugin, and activate it. Automatic installation is recommended for most users because it handles file permissions and version checking automatically.
Creating forum categories and subforums
With bbPress active, you can now structure your forum. Click Forums > Add New in your admin panel. Enter a title for your main forum category—for example, “General Discussion” or “Technical Support.” In the Forum Attributes metabox, select Category as the forum type. This creates a top-level container that holds subforums.
To add a subforum, create another new forum item. Give it a descriptive title, such as “Installation Help” or “Feature Requests.” In the Forum Attributes metabox, choose Forum as the type, then use the Parent Forum dropdown to assign it to the category you just created. Repeat this process until you have a hierarchy that matches your community needs.
A typical forum structure might look like this:
General Discussion (Category)
Welcome and Introductions
Off-Topic Chat
Support (Category)
Installation Help
Troubleshooting
Feature Requests
Announcements (Category)
Site News
Updates and Changelogs
You can reorder forums by adjusting the Order field in the Forum Attributes metabox. Lower numbers appear first. Save each forum as you go, and your structure will be visible on the front end immediately.
Configuring user permissions and topic moderation
bbPress uses WordPress user roles to control access. By default, Administrators have full control, Editors can moderate all content, and Subscribers can only create topics and replies. To fine-tune permissions, go to Settings > Forums and review these key options:
Setting
Default
Recommendation
Allow users to create topics
Enabled
Keep enabled for all roles except blocked users
Allow users to reply to topics
Enabled
Keep enabled for all roles except blocked users
Topic moderation
None
Set to “Moderate” to require approval for new users
Reply moderation
None
Set to “Moderate” to prevent spam
Allow anonymous posting
Disabled
Keep disabled for security
For topic moderation, you can assign specific users as Forum Moderators by editing their WordPress user profile and checking the Forum Moderator box under the bbPress section. These users can edit, delete, and move topics and replies within assigned forums.
To set per-forum permissions, edit any forum and scroll to the Forum Moderators metabox. Add usernames to grant moderation rights for that specific forum only. Use this feature to delegate responsibility for large communities or sensitive sections like “Support” or “Announcements.”
Finally, enable Spam Protection under Settings > Forums > Akismet if you have the Akismet plugin installed. This automatically flags suspicious content for review, reducing manual oversight. Test your setup by logging in as a subscriber and creating a topic to confirm that permissions and moderation rules work as intended.
6. Customizing the Forum Appearance
Once your forum is functional, tailoring its look to align with your brand identity is essential for user trust and engagement. A cohesive design ensures visitors immediately associate the discussion area with your website. This section covers three key approaches to styling your bbPress forum without losing core functionality.
Choosing a WordPress theme that supports bbPress
Not all themes handle bbPress gracefully. A theme designed with forum compatibility will display topic lists, replies, and user profiles cleanly. Look for themes that explicitly list bbPress support, often found in the theme description or demo. Many popular multipurpose themes—such as GeneratePress, Astra, or OceanWP—include dedicated bbPress styling options.
Responsive layout: Ensure the forum collapses properly on mobile devices.
Typography controls: Ability to adjust font sizes for forum titles, breadcrumbs, and reply text.
Color scheme integration: The theme should allow you to match forum elements (buttons, links, backgrounds) to your brand palette.
Sidebar management: Some themes let you disable sidebars on forum pages for a distraction-free experience.
If your current theme lacks bbPress styling, consider switching to a child theme that inherits parent theme capabilities while adding forum-specific CSS overrides.
Using a page builder to design forum pages
Page builders like Elementor, Beaver Builder, or Brizy can be used to create custom forum layouts, though they do not directly edit bbPress templates. Instead, you can design wrapper pages that contain your forum using shortcodes or dynamic content widgets.
For example, to embed a forum list inside a custom page:
Create a new page using your page builder.
Add a shortcode element and insert [bbp-forum-index] to display all forums.
Style the surrounding section with your brand colors, padding, and background.
Add a sidebar widget area for recent topics or search.
This approach gives you control over header and footer regions while leaving the core forum interaction intact. Avoid modifying bbPress template files directly—use hooks or CSS instead to prevent update conflicts.
Adding custom CSS for a unique forum layout
For granular control, add custom CSS through the WordPress Customizer (Appearance > Customize > Additional CSS) or via a child theme’s style.css file. This allows you to override default bbPress styles without editing plugin files.
Practical example: To change the background color of forum topic rows and adjust spacing:
This code targets the forum list rows, giving them a subtle hover effect and consistent spacing. Always test custom CSS in a staging environment first. Use browser developer tools to inspect bbPress-generated classes—common ones include .bbp-forums, .bbp-topic, .bbp-reply, and .bbp-author.
For advanced customization, consider using a dedicated bbPress theme plugin like “bbPress Toolkit” or “bbPress Styles” to add pre-built styling options without coding.
7. Implementing Essential Forum Features
Once your forum’s core structure is in place, adding essential features transforms it from a basic discussion board into a vibrant community hub. These enhancements improve usability, encourage participation, and keep members engaged. Below are three critical features to implement, each with practical steps for WordPress.
Adding user avatars and profile fields
User avatars and custom profile fields personalize the forum experience, fostering identity and trust. To add avatars, use a plugin like BuddyPress or bbPress (which integrates with WordPress’s built-in avatar system). For more control, consider Simple Local Avatars or WP User Avatar. Steps:
Install and activate the chosen avatar plugin.
Navigate to Settings > Discussion to enable avatars and set default types.
Allow users to upload custom images via their profile page (most plugins add this automatically).
For custom profile fields, use BuddyPress (which includes extended profile fields) or a dedicated plugin like User Extra Fields or Profile Builder. Example fields to add:
Field Type
Example Use
Text
Location, website URL
Select
Industry, skill level
Date
Birthday (if needed)
Checkbox
Interests (e.g., tech, sports)
Always test that new fields display on forum profiles and in posts without breaking layout.
Enabling email notifications and topic subscriptions
Notifications keep users informed and drive return visits. bbPress includes built-in subscription options. To enable them:
Go to Settings > Forums in your WordPress admin.
Check the box for Allow users to subscribe to topics and Allow users to subscribe to forums.
Ensure email delivery works by configuring an SMTP plugin (e.g., WP Mail SMTP) to avoid spam folders.
For advanced notification control, use Better Notifications for WordPress or Subscribe to Comments Reloaded. These let you customize email templates, frequency, and triggers. Test by subscribing to a topic as a user and verifying you receive a confirmation email and reply alerts.
SearchWP (premium): Indexes all custom post types, including bbPress topics and replies. Configure it to exclude non-forum content for cleaner results.
Relevanssi (free/premium): Adds fuzzy matching, keyword highlighting, and custom post type support. Activate it, then rebuild the index from Tools > Relevanssi.
Ajax Search Lite (free): Adds live search with dropdown results. Install, then create a search form widget and assign it to your forum sidebar or header.
After integration, test searches for common terms and verify that forum topics appear prominently. Exclude private or pending posts if needed via plugin settings.
8. Managing User Roles and Permissions
Configuring user roles and permissions is essential for maintaining order and security in your WordPress forum. The default WordPress roles and the bbPress-specific roles work together to control who can post, edit, moderate, or simply read content. By understanding and customizing these roles, you can create a tailored experience for your community members, from anonymous visitors to trusted moderators.
Keymaster: Full administrative control over all forum settings, topics, replies, and user management. Only assign this role to site administrators or trusted super-moderators.
Moderator: Can edit, delete, move, close, and stick topics and replies. They cannot access global site settings or manage users outside the forum.
Participant: The default role for any logged-in user. Participants can create new topics and reply to existing ones, but cannot edit or delete others’ content.
These roles integrate with the standard WordPress roles (Administrator, Editor, Author, Contributor, Subscriber). For example, a WordPress Administrator automatically gains Keymaster permissions, while a Subscriber becomes a Participant. You can assign these roles manually via Users > Your Profile or Users > All Users > Edit.
Creating custom roles for advanced access control
When default roles do not meet your community’s needs, you can create custom roles using a plugin like User Role Editor or Members. This allows you to fine-tune permissions such as:
Allowing certain users to edit topics only within specific forums.
Granting the ability to sticky or close topics without full moderation rights.
Restricting topic creation to approved members while allowing replies for all participants.
To create a custom role, install a role management plugin, then add a new role (e.g., “Forum Helper”) and assign specific bbPress capabilities like bbp_moderate (moderate topics), bbp_create_topics, or bbp_edit_replies. Ensure you test the new role in a staging environment to avoid unintended access.
Setting permissions for anonymous posting or reading
By default, bbPress requires users to register and log in to post topics or replies. However, you may want to allow anonymous contributions or restrict reading to logged-in users. To adjust these settings:
Navigate to Settings > Forums in your WordPress admin.
Check the box for Allow users to create topics and replies without registration to enable anonymous posting. Note that anonymous posts will be attributed to “Anonymous” and cannot be edited by the original poster.
For reading restrictions, use a plugin like bbPress Private Groups or User Access Manager to set forum visibility based on user roles. Alternatively, you can modify WordPress’s global reading settings under Settings > Reading to require login for all site content.
Anonymous posting can increase engagement but also invites spam. Pair this with a CAPTCHA plugin or moderation queue for new anonymous posts to maintain quality.
Comparison of Default bbPress Roles
Role
Create Topics
Edit Own Posts
Moderate Others
Manage Settings
Keymaster
Yes
Yes
Yes
Yes
Moderator
Yes
Yes
Yes
No
Participant
Yes
Yes
No
No
Anonymous
If enabled
No
No
No
By carefully managing user roles and permissions, you can strike a balance between openness and control, ensuring your WordPress forum remains a safe, organized, and engaging space for all participants.
9. Moderating Content and Preventing Spam
Once your WordPress forum gains traction, the most persistent challenge you will face is keeping discussions on-topic and free from spam. Without a proactive moderation strategy, automated bots and malicious users can quickly bury genuine conversations in irrelevant links, offensive language, or repetitive advertisements. A clean, well-moderated forum not only protects your community’s reputation but also encourages higher-quality participation. The following steps outline how to implement effective moderation and spam prevention using built-in WordPress tools and trusted plugins.
Using Akismet or reCAPTCHA to block automated spam
Automated spam bots are the most common threat to any forum. They can flood your site with hundreds of junk posts in minutes. To stop them before they reach your users, integrate one or both of these widely used services:
Akismet: This plugin automatically checks all forum submissions against a global spam database. It is pre-installed with many WordPress setups and requires an API key (free for personal sites, paid for commercial use). Enable it by navigating to Plugins > Installed Plugins and activating Akismet. Then enter your API key under Settings > Akismet. Akismet filters spam into a separate queue, allowing you to review or permanently delete it.
reCAPTCHA: Google’s reCAPTCHA v3 (invisible) or v2 (checkbox) adds a verification step during registration or posting. For a forum, use the “bbPress reCAPTCHA” plugin or the “Really Simple SSL” plugin’s built-in reCAPTCHA integration. To implement reCAPTCHA v3, obtain a site key and secret key from the Google reCAPTCHA admin console, then add the following code to your theme’s functions.php file:
This code appends the reCAPTCHA widget to the reply form for non-logged-in users. Replace YOUR_SITE_KEY_HERE with your actual key.
Setting up manual moderation queues for new users
Automated filters are effective, but they cannot catch every subtle violation. Manual moderation queues give you direct control over who can post freely. In WordPress, you can configure this using a forum plugin like bbPress:
Install and activate the bbPress plugin (if not already active).
Go to Settings > Forums and locate the “User Moderation” section.
Enable “New users must be approved by an administrator before they can post.” This forces all new registrants into a pending state.
Optionally, set a “Post Count Threshold” (e.g., 3 approved posts) so that after a user reaches that number, their future posts bypass the queue.
Review pending users under Users > All Users and use the “Approve” or “Deny” actions.
For more granular control, consider the “WP Approve User” plugin. It sends you an email notification whenever a new user registers, and you can approve or reject them directly from your inbox. This method is especially useful for forums with sensitive topics or high-value discussions.
Technical tools can block spam, but they cannot prevent rude behavior, off-topic rants, or harassment. A written code of conduct sets expectations and provides a basis for moderator action. Write your code of conduct as a static page on your site (e.g., yourdomain.com/forum-rules) and link it prominently in the forum header or sidebar. Include these essential elements:
Element
Description
Respectful tone
State that personal attacks, hate speech, and trolling are prohibited.
Relevance
Require posts to stay on-topic for each subforum.
No spam
Explicitly ban self-promotion, affiliate links, and repetitive content.
Privacy
Forbid sharing others’ personal information (doxxing).
Consequences
Outline a three-strike system: warning, temporary ban, permanent ban.
Enforce the code consistently. Assign at least two moderators (or use the “Moderator” role in bbPress) to review reported posts. Use the “bbPress Report Content” plugin to let users flag violations. When you issue a warning, send a private message using a plugin like “WP Private Message”. Over time, a well-enforced code of conduct will reduce moderation workload and foster a self-policing community.
Building a WordPress forum is only the first step; ensuring it remains fast and responsive as traffic grows is critical for user retention and search engine ranking. Forum software like bbPress or BuddyPress can become database-intensive, especially with thousands of topics, replies, and active users. Without proper optimization, page load times will degrade, leading to higher bounce rates and a poor user experience. This section covers three essential strategies to keep your forum snappy and scalable: caching, a content delivery network (CDN), and database-level tuning.
Implementing caching plugins (e.g., W3 Total Cache, WP Rocket)
Caching is the single most impactful performance improvement for a WordPress forum. A caching plugin stores a static version of your pages, reducing the number of PHP and database queries for each visitor. For forums, you must configure caching carefully to avoid serving stale content (e.g., new replies not appearing immediately).
W3 Total Cache: A free, powerful plugin that supports page cache, database cache, object cache, and minification. For forums, enable page cache with “cache for logged-in users” disabled to prevent caching personalized content. Use the database cache with caution—test after enabling to ensure forum queries remain fresh.
WP Rocket: A premium, user-friendly plugin that offers built-in caching, file optimization, and lazy loading. Its “cache for logged-in users” option can be toggled per user role (e.g., cache for subscribers but not moderators). WP Rocket also includes a built-in “Remove query strings from static resources” feature to improve CDN performance.
Recommended caching settings for forums:
Setting
Recommended Value
Reason
Page cache for logged-in users
Disabled (or per-role)
Prevents stale content for active users
Database cache
Enabled (with short TTL)
Reduces query load for forum threads
Minify HTML/CSS/JS
Enabled
Reduces file size for faster downloads
Combine external scripts
Disabled
Can break forum AJAX functionality
Using a content delivery network (CDN) for static assets
A CDN distributes your forum’s static files—images, CSS, JavaScript, and fonts—across a global network of servers. This reduces latency for visitors far from your origin server. For forums with many user-uploaded avatars, logos, or attachment files, a CDN drastically improves load times. Popular CDN services include Cloudflare (free tier), KeyCDN, and BunnyCDN. To integrate with WordPress, use a plugin like CDN Enabler or the CDN integration built into W3 Total Cache. Ensure that dynamic forum content (e.g., user-specific reply lists) is not cached by the CDN by setting appropriate Cache-Control headers.
Database optimization and indexing for forum queries
WordPress forums rely heavily on the database for retrieving topics, replies, and user data. Over time, post meta, comment meta, and revision tables can bloat. Use a plugin like WP-Optimize or Advanced Database Cleaner to remove spam, trashed posts, and post revisions. For advanced optimization, add database indexes to speed up common forum queries. For example, if you use bbPress, consider adding indexes to the wp_posts table on columns like post_parent and post_type (e.g., ‘topic’ and ‘reply’). A typical SQL command for this is: ALTER TABLE wp_posts ADD INDEX forum_query_index (post_type, post_parent, post_date);. Always back up your database before making structural changes. Finally, enable query caching in your database server (e.g., via MySQL’s query cache or Redis object cache) to reduce repeated load from popular forum threads.
Frequently Asked Questions
What is the best plugin to create a WordPress forum?
The best plugin depends on your needs. bbPress is the most popular free option, tightly integrated with WordPress and lightweight. For a full community suite, BuddyPress adds user profiles, activity streams, and groups. For advanced features, consider wpForo or Asgaros Forum. Evaluate based on required features, performance, and ease of use.
Can I build a WordPress forum without coding?
Yes, most forum plugins like bbPress, wpForo, and Asgaros Forum require no coding. They provide shortcodes, widgets, and settings panels to create forums, topics, and replies. However, some customization (CSS or template overrides) may require basic coding knowledge if you want a unique look.
How do I moderate a WordPress forum?
Moderation is built into plugins. Assign moderators with specific permissions (e.g., edit/delete posts, approve content). Set up spam filters (e.g., Akismet), user reporting, and email notifications. For larger communities, consider moderation queues or third-party tools like CleanTalk.
A forum can impact performance, especially with many users or posts. Use caching plugins, optimize database queries, choose a lightweight theme, and consider a reliable host. bbPress is optimized for performance, while full suites like BuddyPress may add overhead. Monitor with tools like Query Monitor.
How do I integrate a forum with existing user roles?
Most forum plugins respect WordPress user roles. You can assign capabilities via plugins like User Role Editor. For example, give 'Subscribers' read-only access and 'Contributors' posting rights. Advanced plugins allow custom role mapping for forum-specific permissions.
Use SEO-friendly URLs (e.g., /forums/forum-name), enable breadcrumbs, write unique meta descriptions for forums and topics, and use heading tags properly. Install an SEO plugin like Yoast or Rank Math. Avoid duplicate content by using canonical URLs and noindexing archive pages if needed. Encourage user-generated content with quality discussions.
Can I migrate an existing forum to WordPress?
Yes, several plugins offer import tools. For example, bbPress can import from phpBB, vBulletin, or Simple Press via built-in converters. For custom migrations, use tools like WP All Import or hire a developer. Always backup your database before migration.
How do I encourage user engagement in my forum?
Create clear guidelines, reward active members with badges or points (e.g., using myCRED or GamiPress), ask questions, and respond promptly. Use email notifications, social sharing, and featured topics. Gamification and regular community events boost participation.
The Ultimate Guide to WordPress and Social Media Integration: Strategies for Seamless Connection
Introduction: Why WordPress and Social Media Integration Matters
In the modern digital ecosystem, a website and its social media presence are no longer separate entities—they are two halves of a cohesive online identity. WordPress, powering over 43% of all websites globally, provides the structural backbone for content management, while social media platforms like Facebook, Instagram, Twitter, and LinkedIn serve as dynamic distribution channels. When these systems work in concert, they create a symbiotic relationship: your WordPress site becomes the authoritative hub for your content, and social channels act as high-traffic conduits that drive audiences back to your core offerings. This integration is not merely about adding share buttons; it is a strategic alignment that amplifies every piece of content, fosters real-time engagement, and expands brand reach exponentially. Without deliberate integration, you risk operating in silos, where your website remains a static repository and social feeds become disjointed noise. The following sections will unpack the evolution of this relationship, the tangible benefits of seamless connection, and the pitfalls of neglecting integration.
The Evolution of Social Media and Content Management Systems
The interplay between content management systems (CMS) and social media has undergone a profound transformation over the past two decades. In the early 2000s, websites were isolated digital brochures; social media was nascent, limited to forums and early networks like Friendster. As platforms like Facebook (2004), Twitter (2006), and Instagram (2010) matured, they became primary discovery engines. Simultaneously, WordPress evolved from a simple blogging tool into a full-fledged CMS, introducing plugins like Jetpack in 2011 that bridged the gap between site content and social feeds. Today, the relationship is bidirectional: social media algorithms prioritize fresh, shareable content—often sourced from WordPress sites—while WordPress themes and plugins offer deep API integrations for automatic posting, social login, and analytics. This evolution reflects a shift from passive publishing to active, cross-platform storytelling, where a single blog post can spark a Twitter thread, an Instagram story, and a LinkedIn article, all while maintaining the WordPress site as the canonical source.
Core Benefits of Integrating WordPress with Social Channels
Integrating your WordPress site with social media platforms delivers measurable advantages across traffic, engagement, and brand authority. Below are the primary benefits:
Increased Organic Traffic: Automatic sharing of new posts to social channels drives immediate referral traffic. A single tweet or Facebook post can send hundreds of visitors to your site within minutes.
Enhanced User Engagement: Social sharing buttons and embedded feeds encourage visitors to interact with content beyond the page. Comments, likes, and shares from social platforms can be displayed on your site, creating a feedback loop.
Streamlined Content Distribution: With plugins like Social Warfare or Shared Counts, you can schedule cross-posting, ensuring consistency across platforms without manual effort.
Improved SEO Signals: Social shares, while not direct ranking factors, increase content visibility and backlink opportunities, indirectly boosting search engine rankings.
Deeper Audience Insights: Integration tools often include analytics dashboards that reveal which content resonates on which platform, enabling data-driven content strategies.
Benefit
Impact on WordPress Site
Example
Traffic Boost
Higher page views and lower bounce rates
Auto-shared blog post gets 200% more visits
Engagement
Increased comment activity and time on site
Social feed integration leads to 30% more comments
Distribution
Consistent multi-platform presence
Plugin posts to Twitter, Facebook, LinkedIn simultaneously
SEO
Improved domain authority via backlinks
Viral tweet earns links from high-authority sites
Key Challenges Without Proper Integration
Neglecting to integrate WordPress and social media channels creates several operational and strategic hurdles that undermine online growth. The most pressing challenges include:
Manual Content Reposting: Without automation, every new blog post requires manual copying and pasting into each social platform, leading to inconsistency and missed opportunities. For example, a weekly post might go unshared for days, losing its initial relevance.
Fragmented Brand Voice: When social posts are created independently from website content, messaging can become disjointed. A professional WordPress article might be accompanied by casual, off-brand social updates, confusing audiences.
Loss of Analytics Insights: Standalone social accounts fail to track how users journey from a tweet to a specific landing page. This lack of attribution makes it impossible to measure ROI or optimize content for platform-specific audiences.
Reduced User Trust: Websites without visible social proof—such as share counts or embedded feeds—appear less credible to first-time visitors. A 2023 study found that 78% of users check a brand’s social presence before engaging with its site.
Inefficient Workflow: Teams waste hours duplicating efforts across platforms, leading to burnout and lower content output. Proper integration reduces this labor by up to 60% through scheduled sharing and auto-syndication.
Essential Plugins for Social Media Integration in WordPress
Effective WordPress and social media integration relies on selecting plugins that align with your specific goals, whether that is encouraging shares, automating cross-platform posting, or curating social proof. The right plugins save time, improve engagement, and keep your site synced without manual effort. Below is a curated list of top tools, organized by function, with details on features, compatibility, and ideal use cases.
Social sharing plugins add buttons to your posts and pages, prompting visitors to distribute your content across their networks. The best options balance performance with customization.
Social Warfare: Provides highly customizable share buttons with hover effects, click-to-tweet boxes, and social proof counters. Compatible with major page builders and caching plugins. Ideal for content-driven sites that prioritize aesthetics and speed.
AddToAny: A lightweight solution supporting over 100 social services. Offers floating, inline, and popup button placements. Use case: sites needing broad network support without bloating load times.
Shared Counts: Focuses on fast loading and privacy-friendly share counts (no third-party requests). Works well with AMP and caching. Best for performance-focused blogs.
When choosing, consider whether you need share count recovery (e.g., after switching HTTPS) or integration with specific platforms like Pinterest or WhatsApp. Test each plugin with your theme to ensure no layout conflicts.
Auto-Posting Plugins: Connecting WordPress to Twitter, Facebook, and LinkedIn
Auto-posting plugins automatically publish your WordPress content to social networks, maintaining a consistent presence without manual updates. They handle formatting, images, and link shortening.
Plugin
Key Features
Platforms Supported
Best For
Blog2Social
Customizable post templates, scheduling, and cross-network previews
Twitter, Facebook, LinkedIn, Instagram, Pinterest, and more
Multi-network management with granular control over each post
NextScripts: Social Networks Auto-Poster
Supports multiple accounts per network, categories, and hashtag automation
Twitter, Facebook, LinkedIn, Tumblr, and 20+ others
Users needing to post to many accounts from a single site
Jetpack (Publicize module)
Native integration, simple setup, and connection to WordPress.com
Twitter, Facebook, LinkedIn, and Tumblr
Existing Jetpack users seeking a streamlined, no-frills solution
For advanced automation, combine these with a URL shortening service like Bitly (via plugin or built-in option). Example: to auto-post only posts in the “News” category to Twitter, configure Blog2Social with a category filter and set the schedule to “immediate.”
Social Feed Aggregators to Display User-Generated Content
Social feed aggregators pull content from social networks—such as Instagram photos, Twitter mentions, or Facebook posts—and display them on your WordPress site. This builds trust through user-generated content (UGC) and keeps your site dynamic.
Smash Balloon: Offers individual plugins for Instagram, Facebook, Twitter, and YouTube feeds, plus a combined “Social Wall.” Features include caching, moderation, and responsive layouts. Use case: showcasing customer photos on product pages or event galleries.
Spotlight Social Feed Pro: Specializes in Instagram feeds with advanced filters, lightbox popups, and shoppable tags. Lightweight and designed for speed. Best for e-commerce or lifestyle sites relying on Instagram UGC.
Custom Twitter Feeds (by Smash Balloon): Displays tweets, retweets, and replies with customizable templates. Supports hashtag, user, or timeline feeds. Ideal for embedding live social proof during campaigns or webinars.
For developers, you can fetch a Twitter timeline using the WordPress HTTP API and display it in a shortcode. A basic example (assuming you have API credentials):
When selecting an aggregator, prioritize plugins that cache feeds to avoid API rate limits and offer moderation to filter unwanted content. For UGC campaigns, ensure the plugin includes attribution and opt-in compliance.
Effective social sharing buttons transform passive readers into active promoters of your content. The key lies in strategic placement, thoughtful customization, and maintaining fast load times. When done right, these buttons increase reach without disrupting the user experience. Below, explore best practices for placement, branding, and performance to maximize clicks while keeping your site lightweight and mobile-friendly.
Placement directly influences click-through rates. Research consistently shows that buttons near the top or bottom of content perform best, as these positions align with natural reading patterns. Avoid cluttering headers or sidebars, which can distract from primary navigation. For mobile users, prioritize sticky or floating buttons that remain accessible as users scroll, but ensure they are collapsible to avoid covering text. Common effective placements include:
Above the fold: A row of buttons between the title and the first paragraph.
End of article: A set of buttons after the conclusion, prompting immediate sharing.
Floating sidebar: A vertical column that follows the user down the page, but only on desktop to avoid mobile screen clutter.
Inline within content: A single prominent button for a key platform (e.g., Twitter) after a quotable line, used sparingly.
For mobile optimization, ensure buttons are at least 44×44 pixels in touch target size, with adequate spacing to prevent accidental taps. A/B test two placements—such as top versus bottom—over 1,000 page views to determine which yields higher engagement for your audience.
Customizing Button Styles to Match Your Brand
Consistent branding builds trust, so customize share buttons to reflect your site’s visual identity. Use your brand’s color palette for button backgrounds, but retain platform-specific icons (e.g., Twitter’s bird or Facebook’s “f”) for instant recognition. Avoid generic gray or blue defaults; instead, match button shapes (rounded or square) and hover effects (color shifts or subtle animations) to your theme. Key customization tips include:
Use SVG icons for crisp rendering on retina displays.
Apply your primary brand color to the most-used platform button (e.g., blue for Facebook if it drives most shares).
Add a count bubble only if it shows real numbers; fake counts damage credibility.
Keep text labels short (e.g., “Share” instead of “Share this on Facebook”).
A clean, branded button set reduces cognitive load and encourages clicks. Test two style variants—say, solid color versus outlined—to see which aligns better with your brand’s tone.
Social sharing buttons can slow your site if poorly implemented. Each button often loads external scripts, which block rendering and increase page weight. To maintain speed, use lightweight plugins or custom code that loads buttons asynchronously. Compare two common approaches below:
Approach
Page Load Impact
Share Tracking
Recommended For
Native plugin (e.g., AddToAny)
Moderate: loads 1–2 external scripts
Built-in analytics
Sites with moderate traffic
Custom static icons + API calls
Minimal: no external scripts; lightweight CSS
Requires manual setup
Performance-focused sites
For minimal impact, prefer static icons that link directly to share URLs (e.g., https://twitter.com/intent/tweet?text=...) without JavaScript. If using a plugin, enable lazy loading for scripts and cache the buttons. On mobile, avoid loading share buttons until the user scrolls near them, reducing initial page weight by up to 30%. Regularly test your site with tools like Google PageSpeed Insights to ensure buttons add no more than 50 KB to total page size.
Automating Content Distribution from WordPress to Social Media
Automating your content distribution from WordPress to social media saves time, ensures consistency, and helps maintain an active presence across multiple networks. By leveraging the right tools and plugins, you can schedule posts, tailor formats, and avoid common pitfalls like over-posting. This section provides a step-by-step approach to setting up automation effectively, focusing on practical integration methods.
Connecting WordPress with Buffer, Hootsuite, or Jetpack Social
To begin automating, choose a tool that integrates directly with WordPress. Here are the steps for three popular options:
Buffer: Install the Buffer plugin from the WordPress repository. After activation, connect your Buffer account by authorizing access. Configure which social profiles (e.g., Twitter, LinkedIn, Facebook) to share new posts to. Set a default posting schedule within Buffer’s dashboard, such as 10 a.m. and 3 p.m. daily. Each new WordPress post will automatically queue in Buffer.
Hootsuite: Use the Hootsuite Social plugin. After installation, link your Hootsuite account via API. Select the social networks you manage. Within Hootsuite, create a custom stream for WordPress posts, then set up auto-scheduling rules. For example, publish blog updates to Facebook and LinkedIn at 9 a.m. on weekdays.
Jetpack Social: Activate Jetpack and enable the Social module. Connect your social media accounts (e.g., Twitter, Instagram, Tumblr) under Jetpack > Settings > Sharing. When publishing a post, check the “Share this post” box. Jetpack automatically shares immediately or on a schedule you define in its settings.
For a custom solution using the WordPress REST API, you can use a PHP snippet to send post data to a social platform. Below is a practical example that pushes a post title and URL to a hypothetical API endpoint:
This code triggers on post publication and sends data to your chosen service. Replace the API URL and adjust parameters for your platform.
Customizing Post Formats for Different Platforms
Each social network has unique formatting requirements. Use these tips to tailor your automated posts:
Platform
Character Limit
Best Practice
Twitter
280 characters
Use a concise headline + link. Include 1–2 relevant hashtags.
Facebook
63,206 characters
Add a brief summary (2–3 sentences) and a high-quality image.
LinkedIn
3,000 characters
Write a professional teaser with key takeaways and a call to action.
Instagram
2,200 characters
Focus on visual content; use a short caption and up to 30 hashtags.
In tools like Buffer, you can create custom templates for each platform. For example, set a default format for Twitter that includes “New post: [title] [link] #WordPress” and for LinkedIn use “Check out our latest article: [title] [excerpt] [link].” Jetpack Social allows per-post overrides, so you can edit the share text before publishing.
Avoiding Duplicate Content and Over-Posting Pitfalls
Automation can lead to repetitive posts or oversaturation. Follow these strategies to maintain quality:
Set posting limits: In Buffer or Hootsuite, restrict sharing to once per post per network. For Twitter, avoid tweeting the same link more than once a week.
Use URL parameters: Append UTM codes to differentiate links for analytics, but ensure the base URL is identical to prevent duplicate content flags.
Monitor frequency: Schedule posts at least 2–4 hours apart across networks. Jetpack Social includes a “re-sharing” feature that can be disabled to prevent repeats.
Review exclusions: In your plugin settings, exclude certain categories (e.g., private updates) from automation. For example, in Hootsuite, create a rule to skip posts tagged “internal.”
Test before full rollout: Publish a test post to a single network first. Check for formatting errors or broken links. Adjust your templates accordingly.
By implementing these steps, you ensure automated content distribution enhances your workflow without compromising audience experience. Regular audits of your sharing logs help refine schedules and formats over time.
Integrating live social media feeds directly into your WordPress site transforms static pages into dynamic content hubs. By pulling real-time updates from platforms like Instagram, Twitter, Facebook, and YouTube, you keep your site fresh without manual posting, increase user dwell time, and encourage visitors to follow your social channels. This section covers the most effective methods for embedding feeds, from plugin-based solutions to widget customization.
Using Plugins to Embed Instagram and Twitter Feeds
The easiest way to embed social feeds is through dedicated WordPress plugins. For Instagram, popular options include Smash Balloon Social Photo Feed and Instagram Feed Pro. These plugins allow you to:
Display a grid or carousel of recent posts from a single account or hashtag.
Automatically update content as new posts appear.
Link images directly to your Instagram profile or individual posts.
For Twitter (now X), plugins like Custom Twitter Feeds or WP Twitter Feed can embed timelines, mentions, or hashtag streams. Key features include:
Selecting between user timelines, home timelines, or search results.
Displaying tweets with embedded media, retweets, and reply counts.
Setting update intervals (e.g., every 30 minutes) to avoid API rate limits.
Both plugin types require authentication via API keys or OAuth tokens, which you obtain from the respective developer portals. Once connected, you can insert shortcodes or blocks into any page, post, or widget area.
Displaying Facebook Page Widgets and YouTube Subscriptions
Facebook offers a native Page Plugin that you can embed via code snippet or plugin. To add a Facebook Page Widget:
Go to the Facebook Page Plugin generator on developers.facebook.com.
Enter your page URL, customize width, height, and tabs (timeline, events, messages).
Copy the generated iframe or JavaScript code.
Paste it into a WordPress Text widget or a custom HTML block in your sidebar or footer.
For YouTube, use a plugin like YouTube Channel or Feeds for YouTube. These display:
Latest video uploads in a grid or list.
Channel subscription buttons with subscriber counts.
Playlist-specific feeds for organized content.
To embed a single YouTube subscription button without a plugin, use the YouTube Subscribe Button code from the YouTube branding guidelines. Place it in a widget area to encourage visitors to subscribe directly from your site.
Moderating and Customizing Feed Appearance
Moderation ensures that only appropriate content appears on your site. Most social feed plugins provide moderation options:
Platform
Moderation Feature
Customization Options
Instagram
Whitelist or blacklist specific posts; hide by hashtag or user.
Change layout (grid, masonry, carousel); adjust image size and spacing.
Twitter
Filter by keyword, exclude retweets, or remove replies.
Set tweet count; choose light or dark theme; customize fonts and colors.
Facebook
No native moderation; use plugin to hide posts containing certain words.
Set width, height, and show/hide tabs; responsive design.
YouTube
Choose which playlists or channels to display; exclude specific videos.
Set number of videos; choose thumbnail style; enable or disable descriptions.
Customization goes beyond colors. You can control:
Loading behavior: Lazy load feeds to improve page speed.
Cache duration: Set how often the feed refreshes (e.g., every hour).
Click actions: Open links in new tabs, trigger lightbox popups, or navigate to social profiles.
Always test feed responsiveness on mobile devices, as embedded widgets may overflow containers. Use CSS overrides in your theme’s customizer or plugin settings to match your site’s branding without breaking layout integrity. Regular moderation and customization keep your social feeds engaging, relevant, and aligned with your content strategy.
Leveraging Open Graph and Twitter Cards for Better Sharing
When you share a WordPress post on Facebook, LinkedIn, or Twitter, the platform automatically pulls a title, description, and image. Without proper meta tags, this preview can appear broken, show the wrong image, or omit your brand’s messaging. Open Graph (OG) protocol and Twitter Cards give you precise control over these snippets. Implementing them correctly ensures every shared link looks polished, drives higher click-through rates, and maintains brand consistency across social channels.
Understanding Open Graph Protocol and Its Importance
Open Graph is a set of meta tags developed by Facebook that standardizes how web content appears when shared on social networks. These tags live in the <head> section of your HTML and tell platforms like Facebook, LinkedIn, Pinterest, and Slack exactly what to display. The four required OG tags are:
og:title – The headline for your shared post (often different from your page’s H1).
og:description – A 2–3 sentence summary of the content.
og:image – The URL of a high-resolution image (minimum 1200×630 pixels recommended).
og:url – The canonical URL of the page.
Without these tags, platforms fall back to guessing—often pulling your site’s generic title, a random sidebar image, or no description at all. This reduces click-through rates by up to 30% in some cases. Proper OG tags also improve accessibility for users who rely on screen readers when sharing links.
Setting Up Twitter Cards with Yoast SEO or Rank Math
Twitter Cards are a separate but complementary system that controls how your content appears in tweets. While OG tags handle most platforms, Twitter uses its own twitter:card meta tags. The two most common card types are:
Card Type
Description
Best For
Summary Card
Shows a small thumbnail, title, and description (150×150 image)
Blog posts, news articles
Summary Card with Large Image
Displays a large image (280×150 minimum) plus title and description
Visual content, product pages, portfolio pieces
Both Yoast SEO and Rank Math handle Twitter Cards automatically once enabled. In Yoast SEO, navigate to SEO → Social → Twitter and toggle “Add Twitter card meta data” on. Select your preferred card type (we recommend “Summary Card with Large Image” for most sites). For Rank Math, go to Rank Math → Titles & Meta → Social Meta and enable Twitter Card under the “Twitter” tab. Both plugins let you override individual post settings from the editor.
If you prefer manual control, add this code to your theme’s functions.php file or a custom plugin:
After setting up OG and Twitter tags, always test them before publishing. Small errors—like a missing image dimension or an incorrect URL—can break the preview entirely. Use these official debugging tools:
Facebook Sharing Debugger (developers.facebook.com/tools/debug) – Enter your URL to see exactly how Facebook reads your OG tags. It also shows warnings for missing or invalid tags.
Twitter Card Validator (cards-dev.twitter.com/validator) – Paste your URL to preview how it will appear in a tweet. It highlights any syntax errors in your twitter: tags.
LinkedIn Post Inspector (linkedin.com/post-inspector) – Verifies OG tags and shows how your link renders in LinkedIn feeds.
If a preview looks wrong, clear your site’s cache first—many caching plugins block fresh meta tag scraping. Then re-fetch the URL using the debugger’s “Scrape Again” button. Common fixes include resizing images to the required dimensions, ensuring your og:url matches the canonical URL, and removing any special characters from titles or descriptions.
Encouraging User-Generated Content Through Social Integration
User-generated content (UGC) transforms passive visitors into active participants, building trust and authenticity around your brand. When integrated thoughtfully with your WordPress site, social media posts from your audience can serve as powerful social proof, increase engagement, and reduce your content creation burden. The key lies in creating clear incentives and seamless technical pathways for users to contribute and see their content featured on your site.
Creating Hashtag Campaigns Linked to Your WordPress Site
A well-designed hashtag campaign bridges your social media presence and WordPress site, making it easy for users to contribute and for you to collect content. Follow these steps to launch an effective campaign:
Define a unique, memorable hashtag: Choose something short, brand-specific, and easy to spell. Avoid generic terms like #travel or #food. Example: #MyBrandAdventure2025.
Set a clear theme or goal: Whether it’s a photo contest, testimonial collection, or creative challenge, users need to know what to share. Example: “Show us how you use our product in your daily routine.”
Promote the hashtag across channels: Use your WordPress site’s homepage, blog posts, and email newsletters to explain the campaign and the hashtag. Embed social share buttons with pre-filled hashtags on relevant pages.
Link the hashtag to a landing page: Create a dedicated WordPress page that explains the campaign rules, displays a live feed of tagged posts, and showcases winners or featured entries. Use a plugin like “Social Feed” or “Custom Twitter Feed” to pull in real-time posts.
For maximum participation, offer tangible incentives such as discounts, featured spots on your site, or small prizes. Track campaign performance using URL parameters and social media analytics tools integrated with your WordPress dashboard.
Displaying User-Generated Content with Plugins like Taggbox
Once users start contributing, displaying their content on your WordPress site reinforces their effort and encourages others to join. Plugins like Taggbox simplify this process by aggregating posts from multiple social networks based on hashtags, mentions, or specific accounts. Consider these features when choosing a plugin:
Automatically updates your site with new user posts without manual intervention.
Customizable display grids
Match your site’s design with masonry, carousel, or list layouts.
Moderation controls
Approve or hide specific posts before they go live, ensuring quality and relevance.
Embedded social walls
Create interactive galleries on any page or post using shortcodes.
Analytics integration
Track impressions, clicks, and engagement directly from your WordPress admin.
To implement Taggbox, install the plugin from your WordPress repository, connect your social accounts, and configure the feed to pull posts containing your campaign hashtag. Place the shortcode on a dedicated UGC gallery page or within a sidebar widget to maximize visibility. Always test the feed on mobile devices to ensure responsive behavior.
Legal Considerations and Moderation Best Practices
Displaying user-generated content carries legal and reputational risks if not managed carefully. Protect your site and your audience by adhering to these guidelines:
Obtain explicit permission: Use a plugin or custom form to request rights to repost user content. Include a checkbox during submission that grants you a non-exclusive, royalty-free license to display their work.
Implement a moderation workflow: Set your plugin to “manual approval” mode. Review each post for offensive language, copyrighted material, or sensitive personal information before it appears publicly.
Display clear terms and conditions: Link to a dedicated page on your WordPress site outlining how user content will be used, how long it will remain visible, and how users can request removal. Example: “By tagging #MyBrand, you agree to our UGC Terms.”
Remove content promptly upon request: Establish a process for users to contact you (via a contact form or email) to have their content taken down. Respond within 48 hours to maintain trust.
Monitor for spam and bots: Regularly check your feed for automated or irrelevant posts. Use moderation filters to block posts containing certain keywords or links.
By combining legal safeguards with active moderation, you create a safe environment that encourages genuine participation while protecting your brand from liability.
Social Login and Registration for WordPress: Reducing Friction and Boosting Retention
Integrating social login and registration into your WordPress site eliminates the need for users to create and remember yet another username and password. By allowing authentication through existing social media accounts—such as Facebook, Google, Twitter, or LinkedIn—you streamline the onboarding process. This reduces friction, lowers bounce rates during sign-up, and improves user retention by making return visits effortless. Users appreciate the convenience, and site owners gain verified user data, often with higher engagement and conversion rates. Implementation is straightforward with dedicated plugins, but careful attention to customization, data privacy, and security is essential.
Top Plugins for Social Login
Two widely used plugins for adding social login to WordPress are Nextend Social Login and Super Socializer. Each offers distinct features, as shown in the comparison table below.
Feature
Nextend Social Login
Super Socializer
Supported Providers
Google, Facebook, Twitter, LinkedIn, Apple, and more (with Pro)
Facebook, Google, Twitter, LinkedIn, Instagram, and many others
Free Version Limits
Up to 3 providers; basic styling
Unlimited providers; basic styling
Customization Options
Built-in button templates, custom CSS, and icon selection
Custom CSS, button placement, and icon size control
User Data Handling
Automatically maps social profile data to WordPress user fields
Maps data; includes email verification options
Premium Add-ons
Pro version adds more providers, advanced styling, and analytics
Premium add-ons for social sharing and comment integration
Ease of Setup
Step-by-step wizard; clear documentation
Simple configuration; but some settings require manual API setup
Both plugins support essential providers and allow for basic customization. Nextend Social Login is known for its polished interface and straightforward setup, while Super Socializer offers a broader free tier with unlimited providers. Choose based on your specific provider needs and whether you require advanced customization.
Customizing the Login Experience and Data Privacy
Customizing the social login experience enhances brand consistency and user trust. Adjust button colors, sizes, and text to match your site’s design. For example, you can rename buttons to “Sign in with Google” or “Register with Facebook” to align with your calls to action. Place login buttons prominently on the registration page, login form, and checkout pages for maximum impact.
Data privacy is paramount. Ensure that your plugin only requests necessary permissions—such as email and public profile—and avoids accessing private data like friends lists or direct messages. Configure the plugin to automatically map social profile data (name, email, avatar) to WordPress user fields, but provide users with a clear privacy notice explaining what data is collected and how it will be used. Comply with regulations like GDPR by offering users the option to delete their social-linked accounts or revoke data access. Both plugins support privacy settings, but you may need to supplement with a privacy policy page and consent checkboxes.
Security Considerations: Token Management and Permissions
Security is critical when handling social login tokens and permissions. OAuth 2.0 tokens grant access to user data, so they must be stored securely. Use WordPress’s built-in encryption functions (e.g., wp_hash_password()) to encrypt tokens in the database, and avoid storing them in plaintext. Plugins like Nextend Social Login and Super Socializer handle token storage automatically, but verify that they use secure HTTPS connections for all API calls.
Manage permissions carefully. Request only the minimal scopes required for login—typically email and profile. Periodically audit connected apps via your social media developer consoles to revoke unused or suspicious tokens. Implement token expiration policies; for instance, refresh tokens periodically to prevent stale access. Additionally, enforce rate limiting on login attempts to thwart brute-force attacks. Educate users about revoking access from their social media account settings if they no longer use your site. By combining robust token management with strict permission scopes, you maintain a secure environment while delivering a frictionless login experience.
Analytics and Tracking Social Media Integration Success
Measuring the effectiveness of your WordPress and Social Media Integration is essential to understand what drives traffic, conversions, and engagement. Without proper tracking, you cannot optimize your efforts or justify resource allocation. This section covers three foundational methods: UTM parameters, Google Analytics, and integrated dashboards.
UTM (Urchin Tracking Module) parameters are tags added to URLs that let you track the source, medium, campaign, and content of social media clicks. To implement them, append parameters to your links before sharing. Here is a practical example for a blog post promotion on Twitter:
Use a consistent naming convention for clarity. The table below outlines key parameters and best practices:
Parameter
Purpose
Example Value
utm_source
Identifies the platform (e.g., Facebook, LinkedIn)
facebook
utm_medium
Describes the channel type
social
utm_campaign
Groups links under a specific campaign
spring_sale
utm_content
Differentiates similar links within a campaign
tweet1
Use Google’s Campaign URL Builder or a WordPress plugin like MonsterInsights to generate links without manual errors. Apply UTM tags to every social media post, bio link, and ad creative.
Using Google Analytics to Monitor Social Referrals
Google Analytics provides direct insights into how social media drives traffic and conversions. After implementing UTM parameters, navigate to Acquisition > All Traffic > Source/Medium to see each social platform’s performance. Filter by medium “social” to isolate social referrals. Key metrics to track include:
Sessions: Number of visits from social channels.
Bounce Rate: Percentage of single-page sessions; lower is better for engagement.
Goal Completions: Track conversions like form submissions or purchases via Admin > Goals.
Ecommerce: Revenue and transactions attributed to social sources.
Set up custom reports or use the Secondary Dimension feature to drill down by campaign or content. For example, compare conversion rates between Instagram and LinkedIn campaigns to refine your strategy. Enable User-ID tracking for cross-device attribution if your WordPress site supports it.
Integrating Social Analytics Dashboards with WordPress
To centralize data, integrate social platform insights directly into your WordPress dashboard. Popular plugins like Jetpack or Smash Balloon Social Post Feed offer built-in analytics for Facebook, Twitter, and Instagram. For deeper integration, use Google Data Studio or a plugin like Analytify to display Google Analytics social reports within WordPress. Steps to set up a basic dashboard:
Install and activate a social analytics plugin (e.g., Social Metrics Tracker).
Connect your social media accounts via API keys or OAuth.
Configure which metrics to display (likes, shares, click-through rates).
Add a widget or page to your WordPress admin menu for quick access.
Alternatively, use the REST API from platforms like Twitter to fetch engagement data and display it via a custom shortcode. This approach requires development skills but offers full control. Regularly review combined data from UTM parameters, Google Analytics, and social dashboards to identify top-performing content and adjust your WordPress and Social Media Integration strategy accordingly.
Conclusion: Future Trends in WordPress and Social Media Integration
As the digital landscape evolves, the fusion of WordPress and social media integration is shifting from simple sharing buttons to intelligent, automated ecosystems. This guide has covered foundational strategies—from embedding feeds and using social login to leveraging plugins like Jetpack or MonsterInsights. Yet the horizon holds transformative changes. Key takeaways include prioritizing user experience, maintaining brand consistency across platforms, and regularly auditing your integration stack for performance. Looking ahead, three major trends will redefine how WordPress sites connect with social networks.
The Rise of AI and Automation in Social Sharing
Artificial intelligence is poised to revolutionize content distribution. Future WordPress integrations will likely feature AI-driven tools that analyze audience behavior, optimal posting times, and content formats. For example, plugins may automatically generate platform-specific captions, suggest hashtags, or repurpose blog posts into short videos for TikTok or Reels. Automation will extend to scheduling, with AI predicting the best moments to share based on historical engagement data. This reduces manual effort while increasing reach. However, caution is needed: over-automation can feel impersonal. The key is to use AI for efficiency while maintaining authentic human oversight, especially for replies and community management.
AI content curation: Automatically select and share relevant third-party content.
Smart repurposing: Convert long-form posts into thread-style tweets or carousel graphics.
Performance prediction: Use machine learning to forecast which posts will drive traffic.
Preparing for Changes in Social Media APIs
Social media platforms frequently update their APIs, often restricting access to data or altering how third-party tools can interact. For WordPress site owners, this means integration plugins may break or lose functionality. A future trend is the shift toward more closed ecosystems, where platforms like Facebook or Twitter require stricter authentication and limit automated posting. To prepare, choose integration plugins that are actively maintained and transparent about API changes. Additionally, consider diversifying your social presence to avoid over-reliance on a single platform. Building a direct connection with your audience through email newsletters or a dedicated community forum can buffer against API disruptions. Regularly test your integrations after platform updates, and keep backup methods—such as manual sharing—ready.
Building a Long-Term Integration Strategy
A sustainable approach to WordPress and social media integration requires planning beyond immediate tactics. Start by defining clear goals: brand awareness, traffic, or conversions. Then, select tools that align with these goals and can scale. For example, a small blog might use free sharing buttons, while an e-commerce site may need deep product tagging and purchase tracking. Long-term strategies should include:
Component
Action
Future-Proofing Tip
Content sharing
Use AI to optimize timing and format
Monitor platform policy changes
Analytics
Track cross-platform conversion paths
Adopt open-source analytics when possible
Community engagement
Integrate social comments on site
Encourage off-platform discussions
Additionally, explore emerging decentralized social protocols like ActivityPub or the Fediverse, which allow your WordPress site to become its own social node. This reduces dependency on corporate platforms and gives you full control over data. Finally, deeper e-commerce integration—such as shoppable posts directly from Instagram or TikTok—will become standard. By combining AI, API resilience, and a forward-looking strategy, your WordPress site can maintain a seamless, adaptive connection with social media, driving sustained growth in an ever-changing digital environment.
Frequently Asked Questions
What is the best plugin for WordPress social media integration?
The best plugin depends on your needs. Jetpack offers a comprehensive suite including sharing buttons, auto-publicization, and social media widgets. Social Warfare provides highly customizable share buttons with analytics. For automation, Revive Old Posts helps reshare content. Each has strengths: Jetpack is ideal for all-in-one, Social Warfare for design flexibility, and Revive Old Posts for evergreen content promotion. Evaluate features like performance, customization, and analytics before choosing.
How can I automatically share WordPress posts to social media?
You can use plugins like Jetpack (via Publicize) or Blog2Social to auto-share posts to platforms like Twitter, Facebook, LinkedIn, and Instagram. These tools connect your WordPress site to social accounts and publish new content automatically. Configure custom messages per platform, hashtags, and scheduling. Alternatively, use IFTTT or Zapier for more advanced automation with triggers and actions. Ensure compliance with each platform's API policies to avoid posting issues.
What are social media sharing buttons and why are they important?
Social media sharing buttons are clickable icons that allow visitors to share your content on platforms like Facebook, Twitter, LinkedIn, and Pinterest. They are crucial for increasing content reach, driving traffic, and improving engagement. By making sharing effortless, you amplify your content's visibility without extra effort. Plugins like AddToAny, ShareThis, and Social Warfare offer customizable button styles, placement options (e.g., floating, inline), and analytics to track shares. Good placement can boost shares by up to 10x.
How do I add social login to my WordPress site?
Social login allows users to register or log in using their social media accounts (e.g., Facebook, Google, Twitter). Plugins like Nextend Social Login and Super Socializer enable this. After installation, configure the plugin by connecting to each social platform's developer console to obtain API keys. Users then see social buttons on login/register pages. Benefits include reduced friction, higher conversion rates, and access to user data (with permission). Ensure GDPR compliance by informing users about data usage.
What is the role of Open Graph tags in social media integration?
Open Graph (OG) tags control how your content appears when shared on social platforms like Facebook, LinkedIn, and Twitter (via Twitter Cards). They define the title, description, image, and URL. Proper OG tags ensure attractive, consistent previews that increase click-through rates. WordPress SEO plugins like Yoast SEO and Rank Math automatically generate OG tags. You can customize them per post to optimize for each platform. Without OG tags, platforms may scrape incorrect or missing information, reducing engagement.
How can I track social media traffic from my WordPress site?
Use Google Analytics to track social media traffic by setting up UTM parameters in your social links. Plugins like MonsterInsights or Jetpack provide built-in analytics dashboards showing referral traffic from social platforms. For deeper insights, use social media analytics tools like Buffer or Hootsuite, which integrate with WordPress via plugins. Track metrics such as shares, clicks, and conversions. Enable event tracking for share buttons to measure engagement. Regularly analyze data to refine your social strategy.
Can I schedule social media posts directly from WordPress?
Yes, plugins like Blog2Social, Social Auto Poster, and Revive Old Posts allow scheduling. Blog2Social offers a calendar view to schedule posts to multiple networks at future times. Social Auto Poster supports custom schedules per platform. Revive Old Posts automatically reshare older content on a schedule. These tools save time and ensure consistent posting. Some require premium versions for advanced scheduling. Free options like Jetpack Publicize share immediately, but scheduling requires additional plugins or Zapier integrations.
What are best practices for social media buttons on WordPress?
Place buttons where they are visible but not intrusive: at the top/bottom of content, as a floating sidebar, or after paragraphs. Use high-contrast, platform-recognized icons. Limit to 4-6 major platforms (e.g., Facebook, Twitter, LinkedIn, Pinterest) to avoid clutter. Enable click-to-tweet boxes for quotable content. Test mobile responsiveness. Use plugins with performance optimization to avoid slowing down your site. Consider social proof counters to show share counts, but ensure they load asynchronously to maintain speed.
How to Use WordPress for Nonprofit Organizations: A Complete Guide
Introduction: Why WordPress is Ideal for Nonprofits
For nonprofit organizations operating on tight budgets and limited technical staff, choosing the right website platform is a critical decision. WordPress stands out as the premier choice because it is open-source, meaning there are no licensing fees, and it offers unmatched flexibility through thousands of free and premium themes and plugins. Its scalability allows a small charity to start with a simple site and grow into a full-featured portal for donations, volunteer management, and advocacy campaigns. The global WordPress community also provides extensive documentation, forums, and specialized resources tailored to nonprofits, ensuring you are never alone in building and maintaining your online presence.
Key Benefits of WordPress for Nonprofit Sites
WordPress delivers several distinct advantages that directly address nonprofit needs:
Cost-Effectiveness: The core software is free. You only pay for hosting and optional premium themes or plugins, many of which have nonprofit-specific discounts.
Donation Plugin Ecosystem: Plugins like GiveWP, Charitable, and WooCommerce with Stripe or PayPal integration make accepting one-time and recurring donations simple and secure.
Event Management: With plugins such as The Events Calendar, you can create, display, and sell tickets for fundraisers, galas, and volunteer days.
Content Management: Non-technical staff can easily update news, blog posts, and program pages using the intuitive block editor.
SEO and Accessibility: Built-in features and plugins like Yoast SEO and WP Accessibility help your site rank well in search engines and remain usable for all visitors.
Community Support: Thousands of developers and agencies offer free tutorials, forums, and sometimes pro bono assistance to nonprofits.
Comparing WordPress with Other Website Builders
When evaluating platforms, consider how each aligns with nonprofit goals. The table below compares WordPress with two common alternatives:
Free software + hosting (~$5–$30/mo after discounts)
Monthly subscription ($16–$30+/mo)
Monthly subscription ($12–$25+/mo)
Customization
Full control via themes, plugins, and code
Limited to platform’s templates and apps
Very limited customization
Donation Plugins
Dedicated plugins with recurring payment support
Basic donation blocks or third-party integrations
Minimal built-in donation features
Ownership
You own your data and content entirely
Platform retains some control
Platform retains control
Scalability
Can handle thousands of pages and high traffic
Limited by plan tier and platform constraints
Limited scalability
Learning Curve
Moderate; requires initial setup effort
Low; drag-and-drop builder
Low; simple interface
While drag-and-drop builders offer ease of use, they often lock you into higher monthly costs, limited customization, and less control over your data. WordPress provides the freedom to grow without being constrained by a subscription model.
Understanding the Nonprofit Discounts on WordPress Hosting
Many hosting providers recognize the unique needs of nonprofits and offer discounted or even free plans. To access these discounts, your organization typically needs to be a registered 501(c)(3) in the United States or an equivalent charitable entity in other countries. Here are common types of discounts you may encounter:
Free Hosting Tiers: Some providers offer a basic hosting plan at no cost for verified nonprofits, often with limited storage or bandwidth.
Percentage Discounts: Others reduce the monthly or annual fee by 25% to 50% for nonprofit accounts.
Bundled Services: Discounts may include free SSL certificates, domain names for the first year, or premium support.
Application Process: Most require you to submit proof of nonprofit status (e.g., IRS determination letter) through a simple online form.
Providers such as WP Engine, SiteGround, and DreamHost have well-known nonprofit programs. Always read the terms carefully, as some discounts apply only to new accounts or specific plans. Taking advantage of these offers can reduce your hosting costs to as little as a few dollars per month, freeing up resources for your mission.
Getting Started: Choosing Hosting and Domain
Selecting the right hosting provider and domain name is the foundational step when learning how to use WordPress for nonprofit organizations. A reliable host ensures your site remains fast, secure, and accessible, while a mission-aligned domain reinforces your credibility. Many hosting companies offer discounts specifically for nonprofits, reducing operational costs. This section guides you through evaluating providers, securing a .org domain, and identifying essential hosting features.
Top Hosting Providers with Nonprofit Discounts
Several reputable hosting companies provide reduced rates or free services to verified nonprofit organizations. Below is a comparison of top providers, their typical discounts, and key considerations.
Nonprofits needing premium performance and support
GreenGeeks
Percentage discount
30% off first term
Eco-conscious organizations
Kinsta
Custom discount
Varies; apply via nonprofit program
High-traffic or mission-critical sites
To qualify, you typically need proof of 501(c)(3) status or equivalent. Always verify current offers directly on the provider’s website, as discounts change periodically.
How to Secure a .org Domain for Your Organization
A .org domain is the standard for nonprofits, signaling trust and mission focus. Follow these steps to register one:
Check availability using a registrar like Namecheap, Google Domains, or Hover. Use keywords from your organization’s name, such as “animalshelter” or “cleanwaterfund.”
Choose a registrar that offers free domain privacy (to hide personal contact details) and reasonable renewal rates. Avoid inflated initial prices.
Register the domain for at least two years to demonstrate stability. Many hosts include a free domain for the first year with hosting plans.
Enable auto-renewal to prevent accidental expiration, which could disrupt email and website access.
If your desired .org is taken, consider adding a location or activity word (e.g., “global” or “outreach”). Avoid hyphens or numbers, as they reduce memorability.
Essential Hosting Features for Nonprofit Sites
When evaluating hosting, prioritize these features to support your WordPress site effectively:
SSL certificate – Encrypts data and is often free via Let’s Encrypt. Required for donations and form submissions.
Automatic backups – Daily or weekly backups ensure you can restore your site after errors or attacks.
Scalability – Choose a plan that allows easy upgrades as your traffic grows, such as from shared to VPS hosting.
One-click WordPress installation – Saves time and reduces technical errors. Most providers offer this via cPanel or a custom dashboard.
Staging environment – A test copy of your site where you can safely try plugins or design changes before going live.
CDN integration – Speeds up page loading for visitors worldwide, which is crucial for donation pages.
For a practical example, here is a command to check your hosting server’s PHP version via SSH, which affects WordPress compatibility:
php -v
This returns output like PHP 8.1.2, indicating the version. If below 8.0, contact your host to upgrade, as WordPress recommends PHP 8.0 or higher for security and performance.
Installing WordPress and Setting Up the Core
Getting WordPress up and running for your nonprofit organization is the first technical step toward establishing a powerful online presence. Whether you choose a manual installation or a one-click method, the goal remains the same: a secure, functional foundation that supports your mission. This walkthrough covers both installation paths and the essential configuration steps that tailor WordPress for nonprofit use.
One-Click Installation vs. Manual Setup
Most web hosts offer one-click WordPress installation through tools like Softaculous, Fantastico, or their own proprietary installers. This method is ideal for nonprofits with limited technical staff, as it automates database creation, file placement, and initial configuration within minutes. Manual installation, while more involved, gives you greater control over directory structure, database prefixes, and security settings from the start. Below is a comparison to help you decide which approach suits your organization’s resources.
Feature
One-Click Installation
Manual Setup
Technical skill required
Minimal (basic hosting login)
Intermediate (FTP, database knowledge)
Time to complete
5–10 minutes
20–40 minutes
Database prefix control
Often limited to default “wp_”
Full control (e.g., “npo_” for security)
File placement flexibility
Typically root directory only
Can install in subdirectory or root
Common use case
Quick launch, low-budget teams
Custom setups, advanced security needs
For most nonprofits, one-click installation is sufficient. If you choose manual setup, download WordPress from wordpress.org, create a MySQL database via your host’s control panel, edit the wp-config.php file with database credentials, and run the installation script by visiting your domain. Both methods ultimately lead to the WordPress dashboard.
Configuring Permalinks and Site Identity
After installation, two foundational settings require immediate attention. First, navigate to Settings > Permalinks. Select the “Post name” option to create clean, readable URLs (e.g., yournonprofit.org/donate instead of ?p=123). This improves search engine visibility and makes links easier to share in fundraising emails or newsletters. Click “Save Changes” to update the .htaccess file automatically. If you see a warning about file permissions, use FTP to set .htaccess to 644 or contact your host for assistance.
Second, set your site identity under Appearance > Customize > Site Identity. Upload your nonprofit’s logo (ideal dimensions: 200–300 pixels wide for clarity), add a concise tagline that communicates your mission (e.g., “Feeding 500 families weekly”), and set a site icon (favicon) that appears in browser tabs. Use a 512×512 pixel PNG image for best results across devices. These elements build immediate trust with visitors and donors.
Enabling User Registration and Roles for Volunteers
Nonprofit sites often need multiple contributors—volunteers, board members, or staff—to manage content. Go to Settings > General and check the box for “Anyone can register.” Then, under “New User Default Role,” choose “Subscriber.” This prevents new registrants from publishing content until you manually upgrade their role. For volunteers who need to write blog posts or update event pages, change their role to “Author” or “Editor” from the Users screen. Avoid assigning “Administrator” to anyone you do not fully trust, as this grants complete control over the site.
To streamline volunteer onboarding, install a plugin like “User Role Editor” to create custom roles. For example, you might create a “Volunteer Coordinator” role with permissions to manage only event posts and media uploads. This granular control ensures security while empowering your team. Always test new roles with a dummy account before inviting real volunteers, and regularly audit user lists to remove inactive accounts.
Selecting and Customizing a Nonprofit Theme
Choosing the right theme is a foundational step in learning how to use WordPress for nonprofit organizations. Your theme dictates first impressions, usability, and site performance. A well-selected theme saves time and ensures your mission takes center stage. Focus on responsiveness, accessibility, and nonprofit-specific features like donation integration and volunteer management.
Top Free and Premium Nonprofit WordPress Themes
Both free and premium options exist, each with trade-offs in flexibility and support. Below is a curated comparison of trusted themes.
Pre-built starter templates, fast loading, schema markup
Quick deployment with minimal customization
When selecting, prioritize themes labeled “accessibility-ready” and those tested with screen readers. Avoid bloated themes with excessive animations that slow page loads.
Customizing the Header, Footer, and Color Scheme
After installing your chosen theme, personalize it to reflect your brand. Navigate to Appearance > Customize in the WordPress dashboard. For the header, upload your logo (preferably an SVG for scalability) and set the site title. Use the “Header Builder” if available to rearrange elements like the menu, social icons, and search bar. For the footer, add your organization’s address, tax ID, and a short mission statement. Include links to key pages like “Donate” and “Contact.”
To adjust the color scheme, locate the “Colors” panel. Use your brand’s primary and secondary hex codes. For example, if your brand uses #2c3e50 (dark blue) and #e74c3c (red), set these under “Primary” and “Accent.” Ensure sufficient contrast for readability—use a tool like WebAIM’s contrast checker. Below is a practical CSS snippet to override theme colors if the customizer lacks options:
Nonprofit audiences often access sites on phones and tablets. Test your theme’s mobile layout by resizing your browser or using Chrome DevTools (Ctrl+Shift+I, then toggle device toolbar). Ensure buttons are at least 44×44 pixels, text is legible without zooming, and menus collapse into hamburger icons. For accessibility, use the WordPress Accessibility Handbook checklist: add alt text to all images, use semantic headings (H2, H3, etc.), and enable keyboard navigation. Install the free plugin “WP Accessibility” to add skip links and adjust focus outlines. Verify your site’s accessibility with the WAVE evaluation tool. A responsive, accessible site increases donor trust and ensures compliance with legal standards like the ADA.
Choosing the right plugins transforms a basic WordPress site into a powerful nonprofit hub. Below are curated, must-have tools for donations, events, volunteer management, and communication, along with straightforward installation tips to get you started without technical overwhelm.
Donation and Fundraising Plugins (GiveWP, Charitable)
Online giving is the backbone of nonprofit fundraising. Two leading plugins offer robust, secure solutions: GiveWP and Charitable.
GiveWP is a premium plugin designed specifically for nonprofits. It supports one-time and recurring donations, customizable donation forms, and integrates with popular payment gateways like Stripe and PayPal. Its reporting dashboard tracks donor trends and campaign performance. For installation, download the plugin from your WordPress admin (Plugins > Add New, search “GiveWP”), install, and activate. Then, follow the setup wizard to connect your payment gateway and create your first form.
Charitable offers a free core version with optional premium extensions. It is lightweight, easy to set up, and includes features like donor management, campaign progress bars, and email receipts. To install, go to Plugins > Add New, search “Charitable,” install, and activate. After activation, click “Charitable” in your admin menu to configure currencies, payment methods (Stripe, PayPal, etc.), and create campaigns. Both plugins provide shortcodes to embed donation forms anywhere on your site.
Managing events like galas, fundraisers, and volunteer days requires a reliable calendar plugin. The Events Calendar by Modern Tribe is the industry standard. Its free version allows you to create recurring events, add venue details, and display a responsive calendar. For ticketing, the premium “Event Tickets” add-on integrates with WooCommerce or PayPal.
Installation: Navigate to Plugins > Add New, search “The Events Calendar,” install, and activate. After activation, you will see a new “Events” menu item. Add your first event by clicking “Add Event” and filling in date, time, location, and description. To display the calendar, use the shortcode [tribe_events] on any page or post. For volunteer-specific needs, consider Volunteer Management plugin (free) to allow sign-ups and shift tracking directly from your event pages.
Email Newsletters and Contact Form Plugins
Effective communication relies on email newsletters and contact forms. Mailchimp for WordPress (MC4WP) is a free plugin that integrates your site with Mailchimp, allowing you to build subscriber lists and send newsletters. Install it via Plugins > Add New, search “Mailchimp for WordPress,” install, activate, and connect your Mailchimp API key. You can then add sign-up forms using shortcodes or widgets.
For contact forms, WPForms is the top choice. The free “Lite” version includes a simple contact form, spam protection, and email notifications. Install it from Plugins > Add New, search “WPForms Lite,” install, and activate. To create your first form, go to WPForms > Add New, choose a template, add fields (name, email, message), and publish. The form shortcode appears automatically for embedding. For more advanced needs like conditional logic or file uploads, upgrade to the Pro version. Both plugins ensure you can capture leads and respond to inquiries without coding.
Creating Compelling Content Pages
For nonprofit organizations, your website’s content pages are the primary tool for turning visitors into supporters. Each page must serve a clear purpose: to inform, inspire, and drive action. By structuring key pages like About, Programs, Get Involved, and Impact with intentional design and persuasive copy, you can build trust and deepen engagement. Below are strategies for crafting these essential pages, starting with the homepage as your digital front door.
Crafting an Impactful Homepage with Calls to Action
Your homepage must immediately communicate your mission and guide visitors toward meaningful actions. Avoid clutter; prioritize a single, powerful headline that states your cause, supported by a compelling image or short video. Place a primary call-to-action (CTA) button prominently above the fold, such as “Donate Now,” “Join Our Mission,” or “Learn How You Can Help.” Secondary CTAs, like “Subscribe to Our Newsletter” or “Volunteer Today,” should appear in the header or near the footer. Use a simple grid or card layout to preview your key areas:
Mission Statement: One sentence that captures your purpose.
Impact Highlight: A key statistic or success story with a link to your Impact page.
Get Involved: Quick links to volunteer, donate, or attend events.
Latest News: A feed of your most recent blog post or update.
Keep navigation minimal; use a sticky header with a bold “Donate” button. For WordPress, you can add a custom CTA button using the following shortcode in a Text widget or page builder:
A high-converting donation page reduces friction and builds trust. Start with a clear, emotionally resonant headline that reinforces the impact of a gift, such as “Your $50 Provides Meals for a Family of Four.” Use a simple, one-column layout with the following elements:
Suggested Donation Amounts: Display three to four pre-set options (e.g., $25, $50, $100, $250) with a custom amount field.
Recurring vs. One-Time: Offer a toggle; recurring donations often yield higher lifetime value. Default to monthly.
Form Fields: Ask only for essential information: name, email, and payment details. Remove unnecessary fields.
Trust Signals: Add security badges, a privacy statement link, and a brief note on how funds are used.
Include a progress bar showing campaign goals (e.g., “We’ve raised 60% of our $10,000 goal this month”). Use a plugin like GiveWP to create a customized form. For example, add a custom field for donation designation using this PHP snippet in your theme’s functions.php:
A blog humanizes your nonprofit, builds community, and improves SEO. Post regularly—at least once a week—with content that highlights your work, shares beneficiary stories, or explains complex issues. Structure each post with a compelling title, an introductory paragraph that hooks readers, and subheadings for scannability. Include a clear CTA at the end, such as “Read More Success Stories” or “Join Our Mailing List.” Use categories and tags to organize content by theme (e.g., “Volunteer Spotlight,” “Program Impact,” “News”). For maximum reach, add a social sharing plugin and enable comments to foster dialogue. To display a recent blog feed on your homepage, use this WordPress query loop code in a template file:
if ( have_posts() ) : while ( have_posts() ) : the_post(); ?>
Integrating donation and fundraising capabilities into your WordPress nonprofit site is essential for sustaining your mission. Using dedicated plugins like GiveWP, Charitable, or WP Simple Pay, you can create seamless donation experiences without extensive coding. This section walks you through configuring payment gateways, enabling recurring giving, and tracking donations with built-in reports to ensure your organization can accept contributions securely and efficiently.
Payment gateways process transactions between your donors and your bank account. For nonprofits, Stripe and PayPal are the most widely used due to their reliability, low fees, and nonprofit-specific discounts. To set them up, install a fundraising plugin like GiveWP, then navigate to its payment gateway settings. For Stripe, you will need to create a Stripe account, obtain your publishable and secret keys from the Stripe dashboard, and enter them into the plugin’s settings. PayPal requires either a PayPal Business account or PayPal Payments Pro; enter your email address or API credentials accordingly. Below is a comparison of key features:
Gateway
Setup Complexity
Nonprofit Fee Discounts
Recurring Support
Stripe
Low (API keys)
Yes (up to 0.2% off)
Built-in
PayPal
Low (email or API)
Yes (reduced rates)
Requires subscription add-on
Always test transactions in sandbox mode before going live. Enable SSL on your site to encrypt donor data, and ensure your gateway supports common currencies if you accept international donations.
Creating Recurring Donation Options
Recurring donations provide predictable revenue streams for ongoing programs. In your fundraising plugin, locate the donation form settings and enable the “Recurring Donations” option. Key configuration choices include:
Frequency options: Offer monthly, quarterly, and annual intervals. Monthly is the most popular among donors.
Minimum amounts: Set a low minimum (e.g., $5) to encourage participation, but consider a higher default suggestion (e.g., $25) for sustainability.
Customization: Allow donors to choose their own amount and interval. Use a dropdown or radio buttons for clarity.
Opt-in defaults: Pre-check the recurring option with a clear label like “Make this a monthly gift” to increase conversion rates.
After activation, test the recurring flow by making a donation with a test card. Ensure donors receive a confirmation email that clearly states their subscription details and how to cancel or modify it.
Tracking Donations with Built-in Reports
Most WordPress donation plugins include robust reporting dashboards that help you monitor fundraising performance. Access these reports from your WordPress admin under the plugin’s “Reports” or “Donations” menu. Common built-in reports include:
Donation Summary: Total donations, average gift size, and number of donors over a custom date range.
Revenue by Payment Gateway: Breakdown of income from Stripe vs. PayPal to identify which gateway your donors prefer.
Recurring Donation Reports: Active subscriptions, churn rate, and lifetime value of recurring donors.
Form Performance: Which donation forms generate the most revenue, helping you optimize your appeals.
Export these reports as CSV files for further analysis in spreadsheet software. Use the data to identify peak giving periods, donor retention challenges, and which campaigns need more promotion. Regularly reviewing reports allows you to adjust your fundraising strategies and improve donor engagement over time.
Managing Volunteers and Events
Effectively managing volunteers and events is critical for nonprofit organizations aiming to maximize impact without overstretching limited resources. WordPress, with its extensive plugin ecosystem, offers a robust platform to streamline these tasks. By integrating dedicated tools for volunteer recruitment, event promotion, and automated communication, nonprofits can reduce administrative burden and foster stronger community engagement. This section outlines practical steps to leverage WordPress for these purposes, focusing on three key areas: sign-up forms, event registration, and automated follow-ups.
To recruit volunteers efficiently, you need a system that collects essential information, schedules shifts, and tracks participation. WordPress plugins like Volunteer Management or Charitable provide dedicated features for this purpose. When selecting a plugin, consider the following capabilities:
Customizable forms: Allow you to capture specific data (e.g., skills, availability, emergency contacts) using drag-and-drop builders.
Shift scheduling: Enable volunteers to view and sign up for available time slots, with automatic conflict detection.
Reporting tools: Generate logs of volunteer hours and activity for grant reporting or recognition programs.
User accounts: Let volunteers create profiles to manage their commitments and update availability.
For a balanced approach, consider the following comparison of two popular options:
Plugin
Key Features
Pricing Model
Best For
Volunteer Management
Shift scheduling, email notifications, CSV export
Free core; paid add-ons ($49/year)
Small to medium nonprofits with event-based volunteering
Nonprofits needing integrated fundraising and volunteer management
Both plugins integrate seamlessly with WordPress’s user role system, allowing you to assign custom permissions for volunteer coordinators.
Event Registration and Ticketing Features
Promoting events—whether fundraisers, workshops, or galas—requires a registration system that is easy for attendees to use and for organizers to manage. Plugins such as The Events Calendar and Event Espresso offer robust solutions. Key features to look for include:
Ticket types: Set different prices for general admission, early bird, or VIP tickets, with quantity limits.
Payment gateways: Accept donations or payments via PayPal, Stripe, or offline methods.
Calendar integration: Allow attendees to add events to their Google, iCal, or Outlook calendars with one click.
For example, using The Events Calendar’s free version, you can create a simple event page with a registration link. For ticketed events, Event Espresso’s premium version provides a full checkout flow, including discount codes and seating charts. Ensure the plugin syncs with your WordPress database to avoid duplicate data entry.
Automating Reminders and Follow-Ups
Automated communication reduces no-shows and strengthens volunteer or attendee relationships. WordPress plugins like Better Notifications for WordPress or AutomatorWP can trigger emails based on specific actions. Implement these strategies:
Confirmation emails: Send an immediate acknowledgment after a volunteer signs up or registers for an event.
Reminder sequences: Schedule automatic reminders 48 hours and 24 hours before an event or shift, including links to maps or materials.
Post-event follow-ups: Send a thank-you message within 24 hours, with a brief survey or call to action for future involvement.
Conditional triggers: Automate messages based on attendance status (e.g., “no-show” triggers a re-engagement email).
Avoid over-automation by testing email delivery and respecting privacy preferences. Many plugins allow you to set opt-in checkboxes during registration, ensuring compliance with data regulations. By combining these tools, you can create a seamless workflow that keeps your community informed and engaged without manual effort.
Optimizing for SEO and Performance
For nonprofit organizations, a well-optimized WordPress site ensures your mission reaches the right audience while delivering a fast, accessible experience. Search engine optimization (SEO) and site performance work together: a fast site ranks higher, and clear SEO signals help search engines understand your content. Below are actionable strategies to improve both discoverability and user experience.
On-Page SEO Tips for Nonprofit Content
On-page SEO focuses on optimizing individual pages and posts to rank for relevant keywords. Start by targeting a primary keyword per page—such as “How to Use WordPress for Nonprofit Organizations” for this article—and naturally include it in key areas:
Title tags: Place the keyword near the beginning of the page title, keeping it under 60 characters.
Meta descriptions: Write a compelling 155-160 character summary that includes the keyword and a call to action (e.g., “Learn how to use WordPress for nonprofit organizations to boost donations and volunteer sign-ups”).
Headings (H2, H3): Use keyword-rich headings to structure content and improve readability.
Image alt text: Describe images concisely with keywords where relevant, e.g., “nonprofit WordPress website dashboard.”
Internal linking: Link to other relevant pages on your site (e.g., donation forms or event pages) to distribute authority.
URL structure: Use clean, descriptive URLs like yournonprofit.org/how-to-use-wordpress instead of ?p=123.
Using SEO Plugins Like Yoast or Rank Math
SEO plugins simplify optimization for nonprofits without technical expertise. Two popular free options are Yoast SEO and Rank Math. Both provide real-time content analysis, XML sitemap generation, and social media previews. Here’s a quick comparison:
Feature
Yoast SEO
Rank Math
Keyword focus per page
1 (free)
5 (free)
Schema markup
Basic
Advanced, with 20+ types
Internal linking suggestions
Paid version only
Free
Setup wizard
Yes
Yes
After installing your chosen plugin, configure the following:
Enable XML sitemaps and submit them to Google Search Console.
Use the “Readability” analysis to simplify sentences and add subheadings.
For Rank Math, activate the “Local SEO” module if your nonprofit serves a specific geographic area.
Improving Site Speed with Caching and Image Optimization
Site speed directly impacts user engagement and SEO rankings. A one-second delay can reduce conversions by 7%, so prioritize performance. Key techniques include caching and image optimization.
Caching: Use a caching plugin like WP Rocket (paid) or W3 Total Cache (free) to store static versions of your pages. For a quick implementation, add this code to your .htaccess file (if using Apache) to enable browser caching for static assets:
<IfModule mod_expires.c>
ExpiresActive On
ExpiresByType image/jpg "access plus 1 month"
ExpiresByType image/png "access plus 1 month"
ExpiresByType text/css "access plus 1 week"
ExpiresByType text/javascript "access plus 1 week"
</IfModule>
Image optimization: Compress images before uploading using tools like TinyPNG or a plugin like Smush. For best results:
Use JPEG for photos (quality 70-80%) and PNG for graphics with transparency.
Resize images to the exact display dimensions (e.g., 1200px wide for hero banners).
Leverage lazy loading to defer off-screen images—most caching plugins include this option.
Consider WebP format for modern browsers; plugins like WebP Express can convert images automatically.
Test your site’s performance using Google PageSpeed Insights or GTmetrix, targeting a score of 90+ for both mobile and desktop. Regularly audit plugins and themes to remove unused code, and enable GZIP compression via your hosting control panel or a plugin. By combining SEO best practices with performance optimization, your nonprofit’s WordPress site will serve its audience effectively while ranking higher in search results.
For nonprofit organizations, maintaining robust security and compliance is not just a technical necessity but a fundamental trust obligation. Donors entrust you with sensitive personal and financial data, and regulations like the General Data Protection Regulation (GDPR) impose strict requirements on how that data is collected, stored, and processed. A single breach can erode years of goodwill and result in significant fines. This section outlines essential WordPress security measures to protect your organization and its supporters.
Installing Security Plugins and SSL Certificates
The foundation of a secure WordPress site begins with two critical components: an SSL certificate and a dedicated security plugin. An SSL certificate encrypts data transmitted between your site and visitors, ensuring that donor information—such as credit card numbers and email addresses—cannot be intercepted. Most modern hosting providers offer free SSL certificates via Let’s Encrypt, and you can typically enable them through your hosting dashboard. After installation, ensure your site forces HTTPS by updating your WordPress URL settings.
Activity logging: Tracks user actions to identify suspicious behavior, such as unauthorized admin access.
Recommended free plugins include Wordfence, Sucuri Security, and iThemes Security. Configure your plugin to send real-time alerts for critical events, such as failed login attempts or file changes.
Even with strong defenses, no system is immune to failure. Regular backups are your safety net, allowing you to restore your site quickly after a hack, server crash, or human error. Implement a backup strategy that includes both automated and manual elements:
Backup Type
Frequency
Storage Location
Full site backup (files + database)
Daily
Remote cloud (e.g., Dropbox, Amazon S3)
Incremental database backup
Every 6 hours
Separate server or backup plugin service
Manual backup before major updates
As needed
Local download + cloud
WordPress core, themes, and plugins release updates to patch security vulnerabilities. Enable automatic updates for minor core releases and security patches, but test major updates on a staging site first. Use a maintenance mode plugin to notify visitors during updates. A consistent update schedule—ideally weekly—minimizes your attack surface.
Privacy Policies and Data Handling Best Practices
Compliance with regulations like GDPR and the California Consumer Privacy Act (CCPA) requires transparent data handling practices. Your WordPress site must include a clear, accessible privacy policy that explains what data you collect (e.g., donation amounts, email addresses, IP addresses), why you collect it, and how long you retain it. Use the built-in WordPress Privacy Policy page generator as a starting point, but customize it to reflect your specific practices.
Beyond the policy itself, implement these data handling best practices:
Consent management: Use a plugin like Complianz or Cookiebot to obtain explicit consent before placing non-essential cookies (e.g., analytics or marketing cookies).
Data minimization: Only collect information necessary for your mission. Avoid storing credit card details on your server; use a PCI-compliant payment gateway like Stripe or PayPal.
Right to erasure: Provide a simple process for donors to request deletion of their data. Enable this functionality in your privacy tools or via a contact form.
Regular audits: Review your plugins, forms, and third-party integrations quarterly to ensure they align with your privacy policy and legal obligations.
Document your data handling procedures and train staff on secure practices, such as never sharing admin credentials and using encrypted communication channels. By prioritizing security and compliance, you protect your donors’ trust and your nonprofit’s reputation.
Frequently Asked Questions
Why should nonprofits use WordPress?
WordPress is free, open-source, and highly customizable, making it ideal for nonprofits with limited budgets. It offers thousands of themes and plugins specifically designed for fundraising, event management, and volunteer coordination. Its built-in SEO features help nonprofits reach a wider audience, and the platform is easy to update without technical expertise. Additionally, WordPress integrates seamlessly with popular payment gateways like Stripe and PayPal, enabling secure donation processing.
What are the best WordPress plugins for nonprofit fundraising?
Top plugins include GiveWP, which offers customizable donation forms and recurring giving; Charitable, known for its user-friendly campaign setup; and WP Charitable for peer-to-peer fundraising. For event ticketing, The Events Calendar with Event Tickets is excellent. PayPal Donations and Stripe Payment plugins simplify payment processing. Each plugin provides detailed reporting and integrates with email marketing tools like Mailchimp to nurture donor relationships.
How do I set up a donation form on WordPress?
Install a donation plugin like GiveWP, then create a new form from the plugin's dashboard. Customize fields for donation amounts, recurring options, and donor information. Connect the form to a payment gateway (e.g., Stripe or PayPal). Use shortcodes or Gutenberg blocks to embed the form on any page. Test the form with a small donation to ensure it works. Enable email receipts and thank-you pages to acknowledge donors immediately.
Which WordPress themes are best for nonprofits?
Popular themes include 'Charity Hub' by ThemeGrill, 'Nonprofit Pro' by ChurchThemes, and 'Give' by GiveWP. These themes are designed with donation calls-to-action, event calendars, and volunteer sign-up forms. They are responsive, accessible, and often include demo content for quick setup. Free options like 'Astra' and 'GeneratePress' can also be customized with nonprofit-specific plugins for a professional look.
How can I optimize my nonprofit website for SEO?
Use an SEO plugin like Yoast SEO or Rank Math to set meta titles, descriptions, and focus keywords. Create descriptive permalinks (e.g., /donate/ instead of /?p=123). Write high-quality content that answers common donor questions, using headings and internal links. Optimize images with alt text and compress them for fast loading. Build backlinks by partnering with other nonprofits and listing your site on charity directories. Ensure mobile responsiveness and fast page speed.
Install a plugin like 'Volunteer Management' or 'WP Volunteer' to create sign-up forms, schedule shifts, and track hours. Use 'The Events Calendar' to publish volunteer opportunities and allow direct registration. For advanced needs, 'BuddyPress' can create a community site where volunteers interact. Integrate with email marketing to send reminders and updates. Ensure your forms collect necessary information like availability and skills.
How can I accept recurring donations on WordPress?
Use GiveWP or Charitable, both of which support recurring donation subscriptions. During form creation, enable the 'Recurring Donations' option and set intervals (monthly, quarterly, annually). Connect to Stripe or PayPal, which handle subscription billing. Display a clear option for donors to choose one-time or recurring. Send automated receipts and use donor management features to track recurring giving and send renewal reminders.
What security measures should nonprofits take on WordPress?
Keep WordPress core, themes, and plugins updated. Use strong passwords and two-factor authentication for admin accounts. Install a security plugin like Wordfence or Sucuri to monitor threats and block malicious traffic. Regularly back up your site using plugins like UpdraftPlus. Use SSL certificates (HTTPS) to encrypt data, especially on donation pages. Limit login attempts and disable file editing in wp-config.php for added protection.
Mastering WordPress and Slack Integration: A Complete Guide to Streamlining Your Workflow
Introduction to WordPress and Slack Integration
Integrating WordPress with Slack connects your content management system directly to your team’s communication hub. This integration allows your website’s events—such as new posts, comments, plugin updates, or form submissions—to trigger automatic notifications in designated Slack channels. By bridging these two platforms, you eliminate the need to constantly check the WordPress dashboard for updates, while keeping your entire team informed in real time. For site managers and content teams, this means fewer manual checks, faster response times, and a more cohesive workflow that reduces friction between content creation and team communication.
What Is WordPress and Slack Integration?
WordPress and Slack integration refers to the technical connection that enables your WordPress site to send data to Slack without manual intervention. This is typically achieved through plugins (such as WP to Slack, Jetpack, or Zapier), custom webhooks, or third-party automation tools. When a defined event occurs in WordPress—like publishing a post, receiving a comment, or completing a WooCommerce order—the integration triggers a message in a specific Slack channel. The message can include relevant details such as the post title, author name, a preview link, or the comment text. The level of customization varies: you can choose which events trigger notifications, which channels receive them, and how the messages appear. This setup transforms Slack from a simple chat app into a centralized command center for your website operations.
Integrating these two platforms delivers tangible advantages for both site management and team collaboration:
Real-time alerts: Receive instant notifications for critical events like site errors, new user registrations, or pending comments, enabling immediate action without logging into WordPress.
Centralized communication: Keep all team members—writers, editors, developers, and marketers—on the same page by funneling updates into a single, searchable Slack workspace.
Reduced context switching: Minimize the need to toggle between WordPress admin panels and Slack, saving time and mental energy during busy publishing cycles.
Enhanced accountability: Track who published what and when, with notifications that include author names and timestamps, making it easier to manage editorial workflows.
Automated reporting: Set up weekly or daily summaries of site activity (e.g., post counts, comment volume) sent directly to Slack, bypassing manual report generation.
Common Use Cases for Site Managers and Content Teams
The integration supports a wide range of practical scenarios that streamline daily operations:
Content publishing alerts: When a new post goes live, the team receives a Slack message with the title, excerpt, and link—perfect for social media promotion or immediate review.
Comment moderation: Flag new comments, especially those awaiting approval, so a moderator can respond quickly without refreshing the dashboard.
Plugin and core updates: Receive notifications when WordPress core, plugins, or themes are updated, helping site managers monitor changes that could affect performance or security.
Form submission notifications: For sites using contact forms, each submission can appear in Slack, allowing sales or support teams to follow up without checking email.
Error monitoring: Get alerted to 404 errors, PHP exceptions, or database connection issues, enabling faster troubleshooting by developers.
By adopting WordPress and Slack integration, teams move from reactive to proactive management—catching issues early, celebrating wins together, and reducing the noise of constant dashboard checks. The result is a more efficient, transparent, and collaborative workflow that scales with your site’s activity.
How WordPress and Slack Integration Works
WordPress and Slack integration relies on a structured exchange of data between two independent platforms. At its core, the system uses webhooks and API calls to push notifications, sync content, and trigger automated actions. When an event occurs in WordPress—such as a new post, comment, or user registration—the integration sends a formatted payload to Slack, where it appears as a message in the designated channel. This real-time communication eliminates the need for manual checks and keeps teams aligned without leaving their messaging workspace.
Understanding Webhooks and API Communication
Webhooks are the backbone of most WordPress and Slack integrations. A webhook is essentially an HTTP callback: WordPress sends a POST request with a JSON payload to a unique Slack URL whenever a specified event occurs. Slack receives this request and posts the data as a message. No polling or continuous connection is required, making webhooks efficient for event-driven updates.
API calls serve a complementary role. While webhooks push data from WordPress to Slack, APIs allow bidirectional communication. For example, the Slack Web API can fetch channel history, post messages programmatically, or update existing messages. WordPress uses HTTP libraries like wp_remote_post() to send these requests. A typical workflow involves:
Triggering an event in WordPress (e.g., publishing a post)
Calling the Slack Web API with a bot token
Specifying the channel, message text, and optional attachments
Receiving a success or error response from Slack
Below is a practical PHP example that posts a simple notification to Slack when a post is published:
Slack apps provide a secure identity for your integration. When you create a Slack app, you receive a bot token (starting with xoxb-) that acts as an authentication credential. This token authorizes your WordPress site to interact with Slack on behalf of the app. Without it, Slack would reject any incoming API calls. The app also defines the permissions (scopes) required, such as chat:write to post messages or channels:history to read channel content. You must install the app into your Slack workspace and grant the requested permissions before the integration can function.
Bot tokens differ from user tokens: they represent the app, not a specific person. This makes them ideal for automated workflows where no human interaction is needed. For webhook-only integrations, you may skip the app entirely and use an incoming webhook URL. However, for features like interactive buttons, message updates, or slash commands, an app with a bot token is required.
Plugin vs. Custom Code: Choosing the Right Approach
Deciding between a plugin and custom code depends on your technical comfort and the complexity of your workflow. The table below outlines the key differences:
Factor
Plugin
Custom Code
Ease of setup
High—configure via admin UI
Low—requires PHP and API knowledge
Flexibility
Limited to plugin features
Unlimited—fully customizable
Maintenance
Automatic updates from developer
You must update for compatibility
Security
Vetted by repository or author
Your responsibility to secure tokens
Plugins like Uncanny Automator or WP Webhooks streamline integration with drag-and-drop triggers and actions. They are ideal for non-developers or simple use cases. Custom code, on the other hand, gives you full control over payloads, error handling, and conditional logic. For example, you might send different messages based on post categories or user roles. Choose a plugin if speed and simplicity matter most; choose custom code if you need granular customization or plan to scale the integration across multiple sites and channels.
Top Plugins for WordPress and Slack Integration
Selecting the right plugin for your WordPress and Slack integration is critical to ensuring reliable notifications, efficient automation, and minimal overhead on your site. The following plugins are widely regarded as the most feature-rich and dependable options, each suited to different workflow needs. Below, we examine two leading choices in detail, followed by a comparison of free versus premium offerings.
WP to Slack is a dedicated plugin that sends real-time notifications from your WordPress site directly to designated Slack channels. It supports a broad range of triggers, including new posts, page updates, comment submissions, plugin and theme changes, and user registrations. One of its standout features is the ability to customize the notification message format using placeholders like {post_title} or {user_name}, allowing teams to see exactly what matters.
Setup is straightforward: after installing and activating the plugin, you connect it to Slack via an incoming webhook URL generated from your Slack workspace. You then configure which events trigger notifications and to which channel they are sent. The plugin also offers conditional filtering, so you can, for example, only receive alerts for posts in a specific category or from a particular user role. WP to Slack is free for basic functionality, with a premium version starting at $29 per year that adds features like priority support, custom post type support, and attachment previews.
Slack for WordPress: Notifications and Automation
Slack for WordPress (also known as the official Slack integration plugin) is built and maintained by Automattic, the company behind WordPress.com. It emphasizes simplicity and deep integration with the WordPress admin interface. The plugin allows you to send notifications for new posts, comments, and user actions, but it also excels at automation through its ability to create interactive messages that include buttons, dropdowns, and action links directly in Slack.
For instance, when a new comment awaits moderation, team members can approve or delete it without leaving Slack. The plugin also supports custom integration with other WordPress plugins like WooCommerce, sending order notifications or inventory alerts. Setup involves connecting your WordPress site to a Slack workspace via OAuth, which is more secure than a simple webhook. Slack for WordPress is free to use, but it requires a Slack account and may have limitations on message formatting compared to more customizable alternatives.
Comparing Free vs. Premium Integration Plugins
When choosing between free and premium plugins for your WordPress and Slack integration, it helps to evaluate core features, scalability, and support. The table below summarizes the key differences between the free versions of major plugins and their premium counterparts.
Feature
Free Plugins (e.g., WP to Slack, Slack for WordPress)
Premium Plugins (e.g., WP to Slack Pro, Uncanny Automator Pro)
Trigger Events
Basic events: new posts, comments, user registrations
Unlimited events: custom post types, WooCommerce orders, form submissions, membership changes
Message Customization
Limited to predefined placeholders and basic formatting
Full control over message layout, emoji, attachments, and conditional logic
Channel Filtering
Single webhook per channel; manual channel routing
Multi-channel support with per-trigger channel assignment
Support & Updates
Community forums; irregular updates
Priority email or chat support; regular feature updates
Pricing
$0
Typically $29–$99 per year (one site)
For small blogs or teams with basic notification needs, a free plugin like Slack for WordPress offers sufficient functionality without cost. However, if your workflow requires advanced automation—such as sending Slack alerts when a Gravity Forms entry is submitted, or when a WooCommerce stock level drops—a premium plugin provides the flexibility and reliability needed to scale. Ultimately, the best choice depends on the complexity of your operations and the value of real-time, context-rich notifications to your team.
Step-by-Step Guide to Connecting WordPress with Slack
Integrating WordPress with Slack transforms your site management by sending real-time notifications to your team. This guide walks you through a reliable method using the WP to Slack plugin, which is free, well-maintained, and compatible with most WordPress setups. Follow each step carefully to avoid common pitfalls like misconfigured webhooks or missing permissions.
Installing and Activating the Integration Plugin
Begin by installing the plugin from your WordPress dashboard. Navigate to Plugins > Add New, search for “WP to Slack,” and click Install Now. Once installed, activate the plugin. After activation, you will see a new menu item labeled WP to Slack in your admin sidebar. If you prefer a manual installation, download the plugin ZIP file from the WordPress repository, upload it via Plugins > Add New > Upload Plugin, and activate it. The plugin works with any standard WordPress installation (version 5.0 or higher) and requires no additional server modifications.
After activation, verify that the plugin appears correctly by checking the WP to Slack settings page. If you encounter a blank page or error, ensure your PHP version is 7.4 or greater and that the wp_remote_post() function is not blocked by your hosting provider.
Configuring Slack API Credentials and Webhook URLs
To connect WordPress to Slack, you need a Slack webhook URL. Follow these steps in your Slack workspace:
Go to Slack API > Your Apps (api.slack.com/apps) and click Create New App. Choose “From scratch,” name your app (e.g., “WordPress Notifier”), and select your workspace.
Under Features > Incoming Webhooks, toggle the switch to activate webhooks. Click Add New Webhook to Workspace and choose the Slack channel where notifications will be sent (e.g., #wordpress-updates).
Copy the generated webhook URL—it will look like: https://hooks.slack.com/services/T00000000/B00000000/XXXXXXXXXXXXXXXXXXXXXXXX.
Now, return to your WordPress dashboard. Go to WP to Slack > Settings and paste the webhook URL into the Webhook URL field. Click Save Changes. For advanced setups, you can add multiple webhooks by clicking Add Another Webhook and repeating the process for different channels.
The plugin allows you to map specific WordPress actions to Slack notifications. On the same settings page, scroll to Event Notifications. You will see a list of triggerable events, such as:
WordPress Event
Slack Notification Text
Channel
New post published
“New post: {post_title} by {author}”
#wordpress-updates
Comment added
“New comment on {post_title}”
#comments
User registration
“New user: {username}”
#team-activity
Plugin updated
“Plugin {plugin_name} updated”
#tech-alerts
To configure, check the box next to each event you want to monitor. For each selected event, you can customize the message format using placeholders like {post_title}, {author}, or {site_url}. You can also assign each event to a specific webhook (and thus a specific Slack channel) by selecting the webhook from the dropdown next to the event. After making your choices, click Save Settings.
To test the connection, perform a test action—such as publishing a draft post—and check your Slack channel for the notification. If nothing appears, verify the webhook URL is correct and that the plugin has permission to send HTTP requests. You can also use the plugin’s built-in test tool: go to WP to Slack > Tools, enter a test message, and click Send Test. If successful, you will see a confirmation message in Slack.
Once your WordPress site sends basic notifications to Slack, the next step is to tailor those messages for clarity, relevance, and minimal noise. Customization ensures that your team receives only the most actionable information in a format that is easy to scan and respond to. By leveraging Slack’s messaging capabilities and WordPress’s conditional hooks, you can transform a flood of alerts into a streamlined stream of updates.
Formatting Messages with Slack Blocks and Attachments
Plain text notifications are functional but lack structure. Slack’s Block Kit and message attachments allow you to present data in organized, visually distinct components. For WordPress and Slack integration, you can use these features to highlight key details such as post titles, author names, and timestamps.
Blocks: Use section blocks with fields for metadata, divider blocks to separate sections, and context blocks for timestamps or source labels. For example, a new post notification can include a section block with the title as bold text, followed by a field block showing the author and category.
Attachments: Add color-coded sidebars (e.g., green for published, red for updated) and thumbnail images. Attachments support fallback text for mobile users.
Markdown support: Use asterisks for bold, underscores for italics, and backticks for code snippets within block text.
A well-formatted message reduces cognitive load. Consider this structure for a comment notification:
Not every event from WordPress warrants a Slack alert. Filtering based on user roles and post types prevents channel clutter. For instance, you may want to notify your editorial team only when a post is published by an author, not when an administrator updates a draft.
By user role: Use WordPress hooks like transition_post_status to check the author’s role. Send notifications only for posts by contributors, authors, or editors, while suppressing alerts for administrators.
By post type: Exclude revisions, attachments, or custom post types that are internal. For example, filter to only “post” and “page” types, ignoring “product” updates if your ecommerce team has separate tools.
Combined filters: Create a logical AND condition: notify only if the post type is “post” AND the author role is “editor.” This ensures high-priority content triggers alerts without overwhelming the channel.
Implementing these filters reduces noise by up to 60% in typical editorial workflows, allowing your team to focus on critical updates.
Setting Up Conditional Triggers for Specific Actions
Beyond basic filtering, conditional triggers enable granular control over when a notification fires. These triggers use WordPress action hooks combined with custom logic to evaluate the context of an event.
Post status transitions: Trigger notifications only when a post moves from “draft” to “pending review” or from “pending” to “published.” Ignore transitions like “trash” or “auto-draft.”
Custom field changes: If a post’s meta value (e.g., “featured” checkbox) is toggled, send an alert to the marketing channel. This is useful for flagging priority content.
Comment moderation: Notify only when a comment is flagged as spam or held for moderation, not when it is automatically approved.
Plugin-specific events: For ecommerce sites, trigger notifications when an order status changes to “processing” or “refunded,” using WooCommerce hooks like woocommerce_order_status_changed.
To implement conditional triggers, write a custom function that checks the current action’s parameters before sending the webhook. For example, use if ( $new_status === 'publish' && $old_status !== 'publish' ) to ensure only newly published posts trigger alerts. This approach eliminates duplicate or irrelevant messages, keeping your Slack integration efficient and purposeful.
Automating Workflows with WordPress and Slack Integration
Integrating WordPress with Slack transforms how teams manage content, respond to issues, and maintain site health. By automating repetitive tasks, you eliminate manual checks, reduce response times, and keep everyone aligned without switching between platforms. Below are three high-impact automation strategies, each with a specific use case and implementation approach.
Creating Content Approval Workflows
Content approval often stalls because editors and reviewers are scattered across email threads or project boards. With a WordPress and Slack integration, you can build a structured approval pipeline that notifies the right people at each stage and captures decisions directly in Slack.
Trigger on status change: When an author moves a post to “Pending Review,” Slack sends a notification to the editorial channel with a link to the draft.
Slack actions for approval: Use Slack’s message buttons to approve, request changes, or reject. Custom webhooks or a plugin like WP Webhooks can map button clicks to post metadata.
Status tracking: Each approval action updates the post status (e.g., “Approved” or “Revisions Requested”) and logs the reviewer’s name and timestamp in the post’s custom fields.
For example, a simple PHP snippet in your theme’s functions.php can send a Slack message when a post enters “Pending Review”:
add_action('transition_post_status', 'send_pending_review_to_slack', 10, 3);
function send_pending_review_to_slack($new_status, $old_status, $post) {
if ($new_status == 'pending') {
$webhook_url = 'https://hooks.slack.com/services/YOUR/WEBHOOK/URL';
$message = json_encode([
'text' => "New post pending review: *{$post->post_title}* by {$post->post_author}",
'channel' => '#editorial',
'username' => 'WordPress Bot'
]);
wp_remote_post($webhook_url, ['body' => $message, 'headers' => ['Content-Type' => 'application/json']]);
}
}
This ensures no draft is overlooked and every reviewer sees the same information instantly.
Once content goes live, stakeholders—marketing, support, or leadership—need immediate awareness. Automating publishing alerts via Slack keeps everyone informed without cluttering email inboxes.
Post published notification: Send a message with the post title, author, category, and direct link to the live page.
Scheduled content reminders: For posts set to publish in the future, a cron-based Slack message can remind the team 24 hours before launch.
Status updates for revisions: When an editor updates a published post (e.g., corrects a typo), notify the channel with a diff summary.
You can extend the previous code snippet by adding a condition for $new_status == 'publish'. Alternatively, use a plugin like Slack Notifications for WordPress to configure alerts via UI. A typical message includes the post URL, excerpt, and author avatar via Slack’s attachment formatting.
Automating Error Logs and Security Alerts
Site errors and security threats require immediate attention. Integrating WordPress error logs with Slack turns silent failures into actionable alerts in real time.
Critical PHP errors: Capture fatal errors from wp-config.php or using a custom error handler, then post the stack trace to a private Slack channel.
Failed login attempts: When a user exceeds a threshold (e.g., 5 failed logins in 10 minutes), Slack sends an alert with the IP address and timestamp.
Plugin/theme updates: Notify the team when a security update is available or when an automatic update fails.
To monitor failed logins, add this to your theme’s functions file:
Combine this with a plugin like Wordfence or iThemes Security for advanced threat detection, and route their alerts through Slack webhooks. The result is a centralized notification hub that reduces response time from hours to seconds.
Using Slack to Manage WordPress Comments and Feedback
When your WordPress site generates comments, support tickets, or form submissions, tracking them across multiple dashboards slows your team down. Integrating WordPress and Slack allows you to route these inputs directly into dedicated channels, enabling faster response times and centralized communication. By automating this workflow, you reduce context switching and ensure no feedback goes unnoticed.
Forwarding New Comments to a Slack Channel
To keep your team immediately aware of new discussions, set up automatic comment forwarding from WordPress to a specific Slack channel. This is especially useful for sites with high engagement or moderated comment sections.
Use a plugin: Tools like WPUF or WP Slack Comment Notifier send new comments to a chosen Slack channel without coding.
Custom webhook approach: Create a Slack Incoming Webhook, then add a function to your theme’s functions.php file that triggers when a comment is saved:
function send_comment_to_slack($comment_id) {
$comment = get_comment($comment_id);
$webhook_url = 'https://hooks.slack.com/services/YOUR/WEBHOOK/URL';
$message = array('text' => "New comment on " . get_permalink($comment->comment_post_ID) . "nFrom: " . $comment->comment_author . "n" . $comment->comment_content);
wp_remote_post($webhook_url, array('body' => json_encode($message), 'headers' => array('Content-Type' => 'application/json')));
}
add_action('wp_insert_comment', 'send_comment_to_slack');
Channel organization: Route comments to #site-comments or a client-specific channel to avoid clutter.
Include metadata: Forward the comment author, timestamp, and a direct link to the comment for quick moderation.
This integration ensures your team can reply or flag comments without logging into WordPress constantly.
Integrating Contact Form Submissions with Slack
Contact form entries (support tickets, inquiries, feedback) often require immediate attention. By linking your form plugin with Slack, you eliminate the need to check email inboxes repeatedly.
Form Plugin
Integration Method
Key Benefit
Contact Form 7
Use the “Contact Form 7 to Slack” plugin or custom webhook via wpcf7_mail_sent hook
Simple setup, no coding required
Gravity Forms
Install “Gravity Forms Slack Add-On” or use Zapier
Supports conditional routing and rich message formatting
WPForms
Built-in Slack integration with webhook or Zapier
Real-time notifications with field mapping
Format messages clearly: Include the submitter’s name, email, subject, and message body in a structured Slack post.
Route by topic: Use conditional logic to send sales inquiries to #sales and support tickets to #support.
Attach files: If forms allow file uploads, forward the file URL to Slack for immediate review.
This streamlines response times and keeps all feedback visible to the right team members.
Handling Spam and Moderation via Slack Commands
Spam comments and low-quality submissions can overwhelm your workflow. With Slack commands, you can moderate content directly from your messaging platform without opening WordPress.
Set up Slack Slash Commands: Create a command like /moderate [comment_id] [action] (e.g., /moderate 123 approve or /moderate 123 spam).
Build a custom bot: Use a Slack bot with outgoing webhooks to listen for commands. The bot sends a request to your WordPress site’s REST API or a custom endpoint:
// Example endpoint for handling Slack commands
add_action('rest_api_init', function () {
register_rest_route('slack/v1', '/moderate', array(
'methods' => 'POST',
'callback' => 'handle_slack_moderation',
'permission_callback' => '__return_true'
));
});
function handle_slack_moderation($request) {
$comment_id = $request->get_param('comment_id');
$action = $request->get_param('action');
if ($action === 'approve') wp_set_comment_status($comment_id, 'approve');
if ($action === 'spam') wp_set_comment_status($comment_id, 'spam');
return array('text' => "Comment $comment_id $action'd.");
}
Display pending items: Add a command like /pending-comments to list recent unmoderated comments with IDs, authors, and snippets.
Set permissions: Restrict commands to specific Slack user groups (e.g., editors, admins) to prevent misuse.
This approach centralizes moderation, reduces dashboard logins, and lets your team act on spam or approve comments in seconds.
Security Best Practices for WordPress and Slack Integration
When integrating WordPress with Slack, security must be a primary concern because the connection exposes sensitive data and system access points. A compromised integration can lead to unauthorized access to your WordPress admin, leakage of customer information, or malicious commands being sent to your Slack workspace. By following established security protocols, you can mitigate these risks while maintaining a productive workflow.
Securing API Tokens and Webhook URLs
API tokens and webhook URLs are the keys to your integration. If they fall into the wrong hands, an attacker can read, send, or modify data in both systems. Apply these measures to protect them:
Never hardcode tokens in plain text. Store them in environment variables or a secure secrets manager, such as HashiCorp Vault or WordPress-specific plugins like WP-CLI Config.
Use dedicated, single-purpose tokens. Create separate tokens for each integration function (e.g., one for posting notifications, another for receiving commands) rather than reusing a broad-scope token.
Rotate tokens regularly. Change API tokens and webhook URLs every 90 days, or immediately after any suspected compromise. Slack provides easy token regeneration in the app settings.
Restrict webhook IP ranges. If possible, configure Slack to only accept webhook requests from your WordPress server’s IP address, reducing the attack surface.
Use HTTPS exclusively. Ensure all communication between WordPress and Slack occurs over TLS 1.2 or higher to prevent eavesdropping.
Limiting Data Shared with Slack
Slack is not designed as a secure data repository, so sharing excessive or sensitive information is risky. Follow the principle of least privilege for data:
Filter notification content. Avoid sending full user profiles, payment details, or internal notes. Instead, share only essential identifiers like post titles, author names, and status changes.
Mask sensitive fields. When sharing order or user data, replace email addresses with truncated versions (e.g., j***@example.com) and hide passwords or API keys entirely.
Use Slack’s message formatting. Leverage Slack’s Block Kit to present data in a controlled way, avoiding raw JSON or database dumps that could expose unintended information.
Disable file uploads to Slack. If your integration sends attachments, restrict it to small, non-sensitive files (e.g., screenshots) and never upload database exports or logs.
Below is a comparison of data types and their recommended sharing level:
Data Type
Recommended Sharing Level
Example of Safe Practice
Post title and status
Share fully
“New post: ‘Security Guide’ published”
Author username
Share partially
“by user_abc” (not full name)
Customer email address
Mask
“c***@example.com”
Payment amount
Share fully
“Order #123 for $45.00”
IP address or login token
Never share
Omit entirely
Auditing Integration Permissions Regularly
Permissions can drift over time as team roles change or plugins are updated. Regular audits ensure that only necessary access remains active. Implement this schedule and checklist:
Quarterly permission reviews. Every three months, review which Slack apps and tokens have access to your WordPress site. Revoke any that are no longer needed.
Check OAuth scopes. In Slack, inspect the scopes granted to your integration (e.g., chat:write, channels:read). Remove any that are not essential for the integration’s function.
Monitor activity logs. Use WordPress plugins like WP Activity Log to track when the integration sends data or executes commands. Flag unusual patterns, such as a sudden spike in notifications.
Review user roles. Ensure only authorized administrators can modify the integration settings. Restrict access to the Slack connection page in WordPress using role management tools.
Test token expiry. Verify that expired tokens are automatically invalidated and not silently reused. Slack typically shows an error for expired tokens, but you should confirm this in your logs.
By consistently applying these security practices—securing tokens, limiting data exposure, and auditing permissions—you can maintain a safe and efficient WordPress and Slack integration that supports your workflow without compromising your systems.
Troubleshooting Common Integration Issues
Even a well-configured WordPress and Slack integration can encounter occasional hiccups. Understanding how to diagnose and resolve these common problems will keep your workflow running smoothly. Below, we address the most frequent issues, from connection failures to notification delivery and formatting glitches.
Connection failures often stem from incorrect webhook URLs or expired API tokens. When your integration stops sending data, start by verifying the endpoint. In Slack, navigate to your app’s settings and locate the webhook URL. In WordPress, check the corresponding field in your integration plugin (e.g., WP Webhooks, Zapier, or custom code). A mismatch in these URLs is the most common cause.
For custom integrations using the Slack API, test the token directly using a command-line tool like curl. This isolates whether the issue is with the token or your WordPress configuration. Run the following command, replacing YOUR_TOKEN with your actual bot token:
If the response includes "ok": true, the token is valid. If you see an error like invalid_auth, regenerate the token in the Slack API dashboard and update your WordPress settings. Also, check your server’s error logs (e.g., in wp-content/debug.log) for clues about failed HTTP requests.
400 Bad Request: Malformed payload or missing required fields.
404 Not Found: Incorrect webhook URL.
429 Too Many Requests: Rate limit exceeded; wait and retry.
500 Internal Server Error: Slack server issue; retry later.
Resolving Notification Delivery Problems
When notifications stop appearing in Slack channels, the problem is usually not a broken connection but a configuration oversight. First, confirm that the WordPress event (e.g., new post, comment, or form submission) is correctly mapped to a Slack action in your integration settings. Many plugins allow you to test triggers manually—use this feature to verify the event fires.
Next, check Slack’s notification settings for the channel. If the channel is muted or the bot is not a member, messages will not be delivered. Ensure your Slack app has the necessary permissions (e.g., chat:write for sending messages) and is invited to the target channel. In Slack, type /invite @your-bot-name in the channel to add it.
If notifications arrive but are delayed, inspect your WordPress site’s cron system. Scheduled integrations (e.g., daily summaries) rely on WordPress cron, which may not fire if there is no visitor traffic. Install a plugin like WP Crontrol to manually run pending jobs, or configure a real cron job on your server to trigger wp-cron.php every minute.
Poorly formatted messages can undermine the value of your integration. Slack supports Markdown-style formatting, but WordPress content often includes HTML tags that need conversion. For example, a new post title wrapped in <h2> tags will appear as raw HTML in Slack unless stripped or converted.
To fix this, use a WordPress filter to clean the content before sending. In a custom integration, add a function like this to your theme’s functions.php:
For plugin-based integrations, check the plugin’s settings for a “strip HTML” or “plain text” option. If images or links do not display correctly, ensure you are using the correct Slack block kit format. For example, use {"type": "image", "image_url": "..."} instead of inline Markdown. Finally, test your message payload in Slack’s Block Kit Builder (api.slack.com/block-kit) before deploying changes to production.
As digital ecosystems evolve, the integration between WordPress and Slack is poised for transformative advancements. Emerging capabilities promise to make workflows smarter, more responsive, and deeply embedded into daily operations. Below, we explore key trends that will define the next generation of WordPress and Slack integration, from intelligent automation to collaborative tooling.
AI-Powered Alerts and Summaries
Artificial intelligence is set to revolutionize how notifications are generated and consumed within Slack. Instead of receiving raw updates for every comment, post, or plugin update, AI-driven systems will intelligently filter and prioritize alerts. For example, a WordPress site could use natural language processing to analyze new comments and flag only those requiring urgent attention—such as spam or negative feedback—while summarizing routine interactions in a single daily digest. Similarly, AI can generate concise summaries of site performance metrics, content publishing schedules, or error logs, delivered directly to Slack channels. This reduces noise and helps teams focus on high-impact tasks.
Smart prioritization: AI ranks alerts by urgency (e.g., security breaches vs. minor edits).
Contextual summaries: Daily or hourly digests of WordPress activity, like new posts or user registrations.
Predictive insights: Alerts about potential issues, such as traffic spikes or plugin conflicts, based on historical data.
Expanding Slack Slash Commands for WordPress
Slash commands are a cornerstone of Slack efficiency, and their integration with WordPress is growing more sophisticated. Future developments will allow users to execute complex WordPress actions directly from Slack, without leaving the chat interface. Beyond basic commands like /wordpress list-posts, expect commands that trigger content publishing, manage user roles, or run backups—all with real-time confirmation. For instance, a /wordpress schedule-post command could let a user set a publish date and receive a Slack notification when the post goes live. This deepens the integration, transforming Slack from a notification hub into a control center for site management.
Schedule recurring backups with Slack confirmations
/wp-moderate
Approve or reject comments
Batch moderate with AI-suggested actions
/wp-content
Create or edit posts
Use rich text formatting and media uploads
Community Contributions and Open-Source Plugins
The open-source nature of WordPress ensures that community-driven innovation will accelerate Slack integration capabilities. Developers are already crafting plugins that bridge gaps between official APIs, offering features like custom notification triggers, multi-site support, and granular permission controls. For example, a new community plugin might allow users to map specific WordPress user roles to Slack groups, ensuring that only editors receive publishing alerts. As the ecosystem matures, expect more modular, lightweight plugins that integrate seamlessly with existing workflows. The community’s collaborative development also means faster bug fixes, feature requests, and compatibility updates, making these integrations more reliable and accessible for non-developers.
Open-source repositories: GitHub-hosted plugins with active issue tracking and pull requests.
Customizable templates: Pre-built Slack message formats for common WordPress events (e.g., new order, form submission).
Extensibility: Hooks and filters that let developers tailor integrations without modifying core code.
Frequently Asked Questions
What is the easiest way to integrate WordPress with Slack?
The easiest method is using a dedicated plugin like 'Slack for WordPress' or 'WP Chat App'. These plugins allow you to connect your WordPress site to a Slack workspace via OAuth or webhook URL without coding. After installation, you configure which events (new posts, comments, form submissions) trigger notifications to specific Slack channels. This setup takes under 10 minutes and provides immediate workflow improvements.
Can I send custom notifications from WordPress to Slack?
Yes, you can send custom notifications using Slack webhooks. Generate an incoming webhook URL from your Slack app settings, then use WordPress functions like wp_remote_post() in your theme's functions.php or a custom plugin. You can tailor the message content, channel, username, and icon. For non-developers, plugins like 'Better Slack Notifications' offer a UI to customize alerts for specific post types, user actions, or WooCommerce events.
Which WordPress events can trigger Slack notifications?
Common triggers include publishing or updating posts, receiving comments, new user registrations, WooCommerce orders, form submissions (e.g., Contact Form 7, Gravity Forms), plugin updates, and error logs. Advanced integrations can monitor custom post types, membership activity, or site performance metrics. The flexibility depends on the plugin or custom code you use.
Is it possible to reply to Slack messages and have them appear as WordPress comments?
Yes, using two-way integration plugins like 'Slack for WordPress' with bot features. When someone replies to a Slack notification that includes a comment link, the plugin can post that reply back to the corresponding WordPress comment. This requires configuring a Slack bot with interactive components and proper permissions. It turns Slack into a moderation tool for your WordPress site.
How do I test my WordPress Slack integration without sending real notifications?
Most plugins offer a test mode or a 'Send Test' button in their settings. For webhook-based integrations, you can use a Slack webhook testing tool like 'webhook.site' to capture the payload first. Alternatively, create a private Slack channel for testing and point your integration there until you are satisfied with the message format and triggers.
What are the security considerations for WordPress Slack integration?
Always use HTTPS for webhook URLs and avoid logging sensitive data. Use Slack's secret verification tokens to confirm requests originate from Slack. Limit webhook permissions to only the necessary channels. Keep your Slack app tokens and webhook URLs private—never commit them to public repositories. Regularly audit which users have access to the integration settings in WordPress.
Can Slack be used to approve WordPress content before publishing?
Yes, with plugins like 'Oasis Workflow' or 'PublishPress' that integrate with Slack. These tools allow you to set up approval workflows where editors receive Slack messages with links to review posts. They can approve, reject, or request changes directly from Slack. The post status updates in WordPress accordingly, streamlining editorial processes.
How do I troubleshoot a WordPress Slack integration that stopped working?
First, check that the Slack webhook URL is still valid—regenerate it if needed. Verify your WordPress site can make outbound HTTPS requests (some hosts block them). Look for plugin conflicts by deactivating other plugins temporarily. Check Slack's app permissions and ensure the bot is still a member of the target channels. Enable WordPress debugging (WP_DEBUG) to see any PHP errors.
The Ultimate Guide to WordPress and CRM Integration: Streamline Your Business Workflows
Introduction: Why Integrate WordPress with a CRM?
Connecting your WordPress website to a Customer Relationship Management (CRM) system is one of the most impactful steps you can take to streamline business operations. At its core, this integration bridges the gap between your content management system—where visitors interact with your brand—and your CRM, which stores and organizes customer data. The result is a seamless flow of information that eliminates manual data entry, reduces errors, and accelerates your sales and marketing processes. By automating lead capture from forms, comments, and e-commerce transactions, you ensure that every potential customer is recorded and nurtured without delay. Follow-up emails, task assignments, and segmentation become automatic, freeing your team to focus on high-value activities. Centralized data also provides a single source of truth, enabling better reporting, personalized communications, and improved customer experiences. In short, WordPress and CRM integration transforms your site from a static brochure into a dynamic business hub that works for you around the clock.
How CRM Integration Transforms Your WordPress Site
Integrating a CRM with WordPress fundamentally changes how your website supports your business goals. Here are the key transformations:
Automated Lead Capture: When a visitor fills out a contact form, subscribes to a newsletter, or makes a purchase, their details are instantly added to your CRM. No manual copy-pasting or spreadsheet updates required.
Personalized User Experiences: With CRM data, you can display dynamic content—such as tailored product recommendations or targeted calls-to-action—based on a user’s past behavior, preferences, or lifecycle stage.
Efficient Follow-Up Workflows: Triggers set in the CRM can automatically send welcome emails, assign leads to specific sales reps, or schedule follow-up tasks, ensuring no prospect falls through the cracks.
Enhanced Analytics and Reporting: Track website interactions (page views, form submissions, time on site) alongside CRM data to measure campaign effectiveness, conversion rates, and customer lifetime value with precision.
Unified Customer View: Every interaction—from first visit to post-purchase support—is logged in one place, giving your team context for more meaningful conversations and faster issue resolution.
Key Business Challenges Solved by Integration
Before integration, many businesses face persistent obstacles that drain time and resources. Here’s how CRM integration addresses these challenges directly:
Challenge
Solution via Integration
Data silos between website and sales tools
Real-time synchronization ensures all teams access the same, up-to-date customer information.
Manual lead entry and high error rates
Automatic capture from forms, chats, and purchases eliminates typos and lost data.
Slow response times to inquiries
Automated notifications and email sequences engage leads within minutes, not hours.
Inability to segment audiences effectively
CRM tags and custom fields allow precise segmentation based on behavior, demographics, or purchase history.
Difficulty tracking ROI from website efforts
Integration links website actions to revenue data, clarifying which campaigns drive conversions.
Repetitive administrative tasks
Workflows automate task creation, follow-ups, and data updates, reducing manual workload.
Overview of Popular CRM Platforms for WordPress
Several CRM platforms offer robust integration options for WordPress, each with distinct strengths. Below is a concise overview to help you choose:
HubSpot CRM: Known for its free tier and deep integration with WordPress via plugins like HubSpot for WordPress. Excellent for inbound marketing, with built-in forms, live chat, and email tracking.
Salesforce: A enterprise-grade solution offering extensive customization and powerful automation. Integrates through plugins (e.g., Salesforce WordPress Integration) or custom API connections, ideal for complex sales processes.
Zoho CRM: Provides affordable plans and a dedicated Zoho WordPress plugin. Features include lead scoring, workflow automation, and AI-powered insights, suitable for small to mid-sized businesses.
ActiveCampaign: Combines CRM with advanced email marketing and automation. Its WordPress plugin syncs contacts and triggers campaigns based on site activity, perfect for e-commerce and content-driven sites.
Pipedrive: Focused on sales pipeline management with a visual interface. Integrates via third-party plugins or Zapier, offering easy deal tracking and activity logging from WordPress forms.
Each platform can be tailored to your specific needs, but all share the core benefit of unifying your website data with customer management tools—making your WordPress site a true engine for growth.
Understanding WordPress and CRM Integration Fundamentals
WordPress and CRM integration connects your website’s front-end interactions—such as form submissions, purchases, or registrations—directly to your customer relationship management system. This synchronization eliminates manual data entry, reduces errors, and ensures that every lead or customer interaction is captured in real time. At its core, integration relies on three primary mechanisms: API-based connections, plugin-based solutions, and manual methods. Understanding these fundamentals helps you select the approach that best fits your technical resources, budget, and workflow complexity.
What Is CRM Integration and How It Works with WordPress
CRM integration is the process of linking your WordPress site to a CRM platform so that data flows automatically between them. When a visitor fills out a contact form, completes a purchase, or registers for an account, the integration sends that information to the CRM without requiring manual export or re-entry. The CRM then updates contact records, triggers automated follow-ups, and segments the audience based on behavior. This works through a secure connection—typically via an API key or OAuth authentication—that authorizes data exchange. For example, when a user submits a Gravity Forms entry, the plugin can send the name, email, and message directly to a CRM like HubSpot or Salesforce, creating a new contact or updating an existing one.
Types of Integration: Native Plugins, APIs, and Custom Development
Choosing the right integration type depends on your technical comfort and specific needs. Below is a comparison of the three main approaches:
Native plugins like WP Fusion, FluentCRM, or Zapier offer pre-built connections that require no coding. You install the plugin, authenticate with your CRM, and map fields using a visual interface. API-based integration uses the CRM’s REST API to send or retrieve data programmatically. This approach is ideal for developers who need to handle conditional logic, batch updates, or real-time sync. Custom development involves writing bespoke PHP functions or building a custom plugin, often for enterprise-level requirements such as syncing across multiple CRMs or handling complex validation rules.
Common Data Flows: Contact Forms, User Registrations, and E-Commerce
Three data flows dominate WordPress and CRM integration scenarios. Each has distinct triggers and data points:
Contact forms: When a user submits a form (via Contact Form 7, Gravity Forms, or Elementor), the integration sends fields like name, email, phone, and message to the CRM. The system then creates a new contact or logs an activity. This is the most common starting point for lead capture.
User registrations: When a visitor creates an account on your WordPress site—whether for a membership, forum, or course—the integration pushes user data (username, email, role, registration date) to the CRM. This enables automated onboarding sequences and segmentation based on user type.
E-commerce transactions: For WooCommerce or Easy Digital Downloads, the integration sends order details—product names, quantities, totals, payment status, and customer info—to the CRM. This allows for post-purchase follow-ups, abandoned cart recovery, and customer lifetime value tracking.
For developers implementing an API-based connection, here is a practical example using WordPress’s built-in HTTP API to send a contact form submission to a CRM endpoint:
This function hooks into form submission, constructs the JSON payload, and sends it securely. Adjust the endpoint and field mapping to match your CRM’s API documentation.
Top CRM Platforms That Integrate Seamlessly with WordPress
Selecting the right customer relationship management (CRM) system for your WordPress site hinges on compatibility, ease of use, and the specific features you need. A seamless integration ensures that lead data flows automatically from forms, purchases, and interactions into your CRM, eliminating manual data entry and reducing errors. Below, we profile three leading platforms—HubSpot, Salesforce, and Zoho CRM—each offering distinct advantages for WordPress users.
HubSpot: Free Plugin and Marketing Automation Features
HubSpot’s WordPress plugin is a standout for businesses seeking a robust, free entry point into CRM and marketing automation. The official plugin, available in the WordPress repository, syncs contact submissions from forms, live chat, and pop-ups directly into HubSpot’s CRM. Key features include:
Free CRM Core: Unlimited contacts, deal tracking, and email templates at no cost.
Marketing Automation: Automated workflows for lead nurturing, email sequences, and segmentation based on user behavior (e.g., page visits or form submissions).
Analytics Dashboard: Track form performance, traffic sources, and conversion rates within WordPress.
Live Chat and Bots: Embedded chat widgets that capture leads and qualify them before CRM entry.
For advanced needs, HubSpot offers paid tiers (Starter at $20/month) that unlock A/B testing, custom reporting, and multi-step automation. The plugin’s simplicity makes it ideal for small to medium businesses, though it lacks deep customization for complex enterprise workflows.
Salesforce: Enterprise-Grade Connectivity via APIs
Salesforce, the industry leader in enterprise CRM, integrates with WordPress primarily through its robust REST and SOAP APIs, as well as third-party connectors like Zapier, WP Fusion, or custom development. This approach offers maximum flexibility but requires technical expertise. Key integration capabilities include:
API-First Design: Direct data syncing for leads, contacts, accounts, and opportunities using Salesforce’s Developer APIs.
Web-to-Lead Forms: Native WordPress form plugins (e.g., Gravity Forms, Contact Form 7) can submit data via Salesforce’s Web-to-Lead endpoint.
Custom Objects and Workflows: Map WordPress user roles, WooCommerce orders, or membership levels to custom Salesforce objects for tailored automation.
Third-Party Connectors: Tools like Zapier (500+ tasks/month on free plan) or WP Fusion ($87/year) simplify syncing without coding.
Salesforce is best for large organizations with dedicated developers or budgets for premium connectors. Its scalability comes at a cost: setup can be time-consuming, and monthly subscriptions start at $25/user for the Essentials plan.
Zoho CRM: Affordable Integration with Built-In Tools
Zoho CRM offers a cost-effective alternative with its native WordPress plugin, Zoho CRM for WordPress, and a suite of built-in tools. The plugin enables two-way syncing of leads, contacts, and deals, plus integration with Zoho’s broader ecosystem (e.g., Zoho Forms, Zoho Campaigns). Highlights include:
Direct Plugin: Free plugin connects WordPress forms (via Zoho Forms or third-party plugins) to Zoho CRM with drag-and-drop mapping.
Automation Tools: Built-in workflow rules for lead assignment, email notifications, and follow-up tasks.
Multi-Channel Capture: Embed Zoho’s Live Chat, PhoneBridge (call tracking), and Social CRM widgets on WordPress pages.
Affordable Pricing: Free tier for up to 3 users; Standard plan at $14/user/month includes mass emails and sales insights.
Zoho is ideal for budget-conscious businesses that need a balance of power and simplicity. However, advanced features like AI-powered predictions (Zia) or custom modules require higher-tier plans.
Comparison of WordPress and CRM Integration Features
Feature
HubSpot
Salesforce
Zoho CRM
Native Plugin Availability
Yes (free)
No (API/connector-based)
Yes (free)
Starting Price (per month)
$0 (free tier)
$25/user (Essentials)
$0 (up to 3 users)
Marketing Automation
Built-in (free + paid)
Requires Marketing Cloud
Built-in (paid tiers)
Ease of Setup
Very easy
Moderate (needs technical skill)
Easy
Best For
SMBs, marketers
Enterprises, custom workflows
Small teams, budget-friendly
Each platform excels in different areas: HubSpot for user-friendly automation, Salesforce for enterprise scalability, and Zoho for affordability with integrated tools. Assess your team’s technical capacity, budget, and workflow complexity to choose the best fit for your WordPress and CRM integration needs.
Step-by-Step: Setting Up Your First WordPress CRM Integration
A successful WordPress and CRM integration begins with a methodical setup. This walkthrough covers plugin selection, account connection, and initial sync configuration, focusing on contact form data. Follow these steps to link your website with your customer relationship management system without disrupting existing workflows.
Selecting the appropriate plugin is critical for a seamless integration. Not all plugins support every CRM, and feature sets vary widely. Evaluate candidates based on these criteria:
CRM compatibility: Verify the plugin explicitly supports your CRM platform (e.g., HubSpot, Salesforce, Zoho, or ActiveCampaign).
Form builder support: Confirm integration with your active form plugin, such as Contact Form 7, WPForms, or Gravity Forms.
Field mapping flexibility: Look for custom field mapping to align WordPress form fields with CRM-specific data structures.
Sync direction: Determine if the plugin supports one-way (form to CRM) or two-way (bidirectional) data sync.
Performance impact: Check user reviews for latency or server load issues during sync operations.
Popular options include WP Fusion for advanced mapping, Uncanny Automator for no-code workflows, and native plugins like HubSpot’s official WordPress plugin. Always install the plugin from the WordPress repository or the CRM’s verified developer page to avoid security risks.
Once the plugin is installed and activated, establish the connection between your WordPress site and your CRM account. This process typically involves API authentication:
Navigate to the plugin’s settings page (usually under Settings or Integrations in your WordPress admin panel).
Locate the CRM connection section and click Connect or Authorize.
You will be redirected to your CRM’s login page or presented with an API key field. For example, with HubSpot, you might paste an access token generated from your HubSpot account under Integrations > Private Apps.
After authentication, the plugin will display a success message. Test the connection by clicking a Verify Connection button if available.
For a manual API key setup, a typical code snippet used in a custom plugin or theme functions.php might look like this (replace placeholders with actual values):
Note: Hardcoding API keys is not recommended for production sites. Use environment variables or a secure secrets manager instead.
Mapping Form Fields to CRM Custom Fields
Field mapping ensures that data collected from your WordPress forms is correctly assigned to the appropriate CRM fields. Follow these steps:
Identify form fields: List all fields in your contact form (e.g., Name, Email, Phone, Message).
Access mapping interface: In your integration plugin, find the field mapping section, often labeled Map Fields or Sync Settings.
Map standard fields: Pair common fields like Email (WordPress) to Email (CRM) and Name to First Name or Full Name.
Map custom fields: For unique data, such as a dropdown for “Preferred Contact Method,” create a custom field in your CRM (e.g., preferred_contact_method) and map it to the corresponding form field.
Set default values: If your CRM requires a mandatory field not present in the form, assign a static default value (e.g., “Lead Source = Website”).
Test the mapping by submitting a test entry through your form. Verify the data appears correctly in your CRM, including custom fields. Adjust mappings if values are missing or misplaced. Once confirmed, enable automatic sync to streamline your business workflows permanently.
Automating Lead Capture and Follow-Ups with CRM Integration
Integrating your WordPress site with a CRM system transforms how you manage leads by eliminating manual data entry and accelerating response times. When a visitor submits a contact form, signs up for a newsletter, or completes a purchase via WooCommerce, the integration automatically creates a new lead record in your CRM. This seamless flow ensures no prospect slips through the cracks and that your sales team receives clean, actionable data instantly. Beyond capture, automation enables intelligent follow-up sequences triggered by specific user behaviors, such as visiting a pricing page or abandoning a cart. By leveraging webhooks for real-time synchronization, your WordPress and CRM systems stay in perfect alignment, enabling a cohesive workflow that nurtures leads from first interaction to conversion.
Setting Up Automated Lead Creation from Contact Forms
To automate lead creation, start by connecting your WordPress form plugin—such as Gravity Forms, Contact Form 7, or WPForms—to your CRM using a dedicated integration plugin or a third-party tool like Zapier. Configure the integration to map form fields to CRM contact fields, ensuring data like name, email, phone, and custom questions transfer accurately. For user sign-ups, use a registration plugin that syncs new user data to your CRM upon account creation. For WooCommerce purchases, set up triggers that send order details—including product purchased, total value, and shipping address—as a new lead or deal record. Below is a typical field mapping example:
WordPress Form Field
CRM Contact Field
First Name
First Name
Last Name
Last Name
Email Address
Email
Phone Number
Phone
Message
Notes
Product Purchased (WooCommerce)
Deal Name
Test the integration by submitting a sample form and verifying the lead appears in your CRM with all fields populated. For WooCommerce, run a test order to confirm the deal is created with the correct stage (e.g., “New Lead”).
Triggering Follow-Up Emails Based on User Behavior
Once leads are captured, use your CRM’s automation tools to trigger follow-up emails based on specific actions. For example, when a user signs up for a webinar, send an immediate confirmation email, then a reminder 24 hours before the event. For WooCommerce customers, set up a post-purchase sequence that offers product tips, requests a review, or suggests complementary items. Key behavioral triggers include:
Form submission (e.g., download a whitepaper) → send the resource and a follow-up offer.
Page visit (e.g., pricing page) → trigger a sales outreach email or call task.
Cart abandonment → send a recovery email with a discount code within one hour.
Email open or link click → update lead score and move to a warmer segment.
To implement, define your email sequences within the CRM, linking each step to a condition based on user behavior. For example, if a lead opens three emails but doesn’t click, send a personalized survey. Ensure your CRM logs these interactions via the integration, so your WordPress site’s user data stays current.
Using Webhooks for Real-Time Data Sync
Webhooks provide the backbone for real-time synchronization between WordPress and your CRM. Unlike scheduled imports, webhooks push data instantly when an event occurs—such as a form submission or purchase—ensuring your CRM reflects the latest activity without delay. To set up webhooks, locate the webhook URL provided by your CRM (often found in developer settings) and configure your WordPress plugin to send a POST request with the relevant payload. For example, when a user completes a WooCommerce order, a webhook can send order data to your CRM, which then updates the lead’s deal stage, adds purchase history, and triggers a thank-you email. Here are common webhook use cases:
New contact form entry → create or update CRM contact.
User account registration → add lead with sign-up source.
WooCommerce order status change (e.g., completed, refunded) → update deal value or stage.
WordPress user profile update (e.g., email change) → sync to CRM contact record.
Test your webhook setup by performing a test action in WordPress and checking the CRM for the incoming data. Monitor webhook logs in both systems to troubleshoot any failures, such as missing fields or authentication errors. With webhooks active, your WordPress and CRM integration operates with near-zero latency, ensuring your lead capture and follow-up workflows remain efficient and responsive.
Enhancing E-Commerce Operations with WordPress CRM Sync
Integrating your WordPress e-commerce site, especially WooCommerce, with a Customer Relationship Management (CRM) system transforms scattered customer interactions into a unified operational hub. A robust WordPress and CRM integration syncs critical data—orders, support tickets, and marketing preferences—in real time, eliminating manual data entry and reducing errors. This centralization empowers your team to serve customers faster, personalize outreach, and scale operations without administrative overhead. For e-commerce businesses, the payoff is immediate: streamlined workflows, higher customer lifetime value, and a single source of truth for every buyer journey.
Syncing WooCommerce Customer Data with Your CRM
The foundation of effective e-commerce CRM integration lies in bi-directional data synchronization. When a customer registers, places an order, or updates their profile on your WooCommerce store, that information should automatically appear in your CRM. Conversely, CRM updates—like a changed email address or a support note—should reflect back in WordPress. Most modern CRM plugins (e.g., HubSpot, Salesforce, or Zoho) offer dedicated WooCommerce connectors. To set up syncing, you typically:
Install a CRM plugin or connector (e.g., “WP Fusion” or “AutomateWoo”).
Authenticate your CRM account within WordPress.
Map fields: standard fields (name, email) and custom fields (membership tier, referral source).
Test a sample transaction to confirm data flows correctly.
For developers, you can extend syncing with a custom hook. Here is a practical PHP snippet to send new WooCommerce order data to a CRM endpoint when an order is completed:
This ensures every completed order enriches your CRM with purchase data, reducing manual effort and errors.
Tracking Order History and Purchase Patterns
Once customer data flows into your CRM, you can leverage order history to understand buying behavior. A synced CRM aggregates every transaction—date, product, quantity, and revenue—into a single timeline. This visibility enables you to:
Identify repeat buyers and their preferred product categories.
Spot churn risks by analyzing gaps between purchases.
Calculate average order value (AOV) and lifetime value (LTV) per customer segment.
For example, a CRM dashboard might show that customers who buy “premium coffee beans” also frequently purchase “ceramic mugs” within 30 days. This pattern triggers a workflow: automatically send a follow-up offer for mugs to new coffee bean buyers. Without CRM integration, this insight would require manual database queries or spreadsheets. With sync, it becomes a real-time, actionable metric.
Segmenting Customers for Targeted Campaigns
Effective segmentation is the backbone of personalized marketing. By syncing WooCommerce data—such as order frequency, product categories, and total spend—into your CRM, you can create dynamic segments without exporting lists. Common segmentation criteria include:
Segment
Criteria
Example Campaign
High-value repeat buyers
More than 5 orders, total spend > $500
Exclusive VIP discount
Lapsed customers
No purchase in 90+ days
Re-engagement email with 15% off
Category enthusiasts
Purchased from “Fitness” category
New arrivals in fitness gear
First-time buyers
Only one order completed
Welcome series with upsell
Automated workflows then trigger personalized emails, SMS, or ads based on these segments. For instance, a lapsed customer segment can receive a “We miss you” coupon, while a high-value segment gets early access to a sale. This precision boosts conversion rates and reduces marketing waste—all because your WordPress and CRM integration keeps data fresh and accessible.
Managing User Roles and Permissions in a CRM-Connected WordPress Site
When you integrate a CRM with WordPress, controlling who sees what becomes critical. Without proper role management, sensitive customer data—like purchase history, support tickets, or contact details—could be exposed to the wrong team members. A well-structured permission system ensures that each user sees only the information relevant to their job, protecting both your customers and your business. This section explains how to configure user roles, restrict sensitive data, and maintain security in multi-user environments.
Configuring User Roles for CRM Data Visibility
WordPress comes with default roles—Administrator, Editor, Author, Contributor, and Subscriber—but these are designed for content management, not CRM data. To integrate CRM data visibility, you must extend or customize these roles using a plugin like User Role Editor, Members, or a dedicated CRM integration tool. The goal is to map CRM permissions to WordPress roles so that, for example, sales reps see lead statuses while support agents see only ticket histories.
Administrator: Full access to all CRM data, including customer profiles, financial records, and integration settings.
Sales Manager: View and edit leads, opportunities, and pipeline stages, but not financial or support data.
Support Agent: Access only to support tickets, contact history, and customer notes—no sales or billing info.
Editor: View aggregate CRM reports (e.g., conversion rates) but no individual customer records.
Subscriber: No CRM data access unless explicitly assigned a custom role.
To configure these, install a role management plugin, create new roles (e.g., “CRM Sales Rep”), and assign capabilities like view_crm_leads or edit_crm_contacts. Test each role by logging in as that user and verifying that only permitted CRM fields appear.
Restricting Access to Sensitive Customer Information
Sensitive data—such as payment details, social security numbers, or private notes—requires extra protection. Even within a role, you can restrict access to specific CRM fields or records. Use these methods:
Field-level permissions: Configure the CRM integration to hide sensitive fields (e.g., “Credit Card Last 4”) from roles that don’t need them.
Record-level restrictions: Limit visibility to records assigned to the user or their team. For example, a sales rep sees only their own leads, not the entire database.
Conditional access: Use plugins that allow rules like “Support agents see contact notes but not purchase history unless the ticket is escalated.”
Additionally, enable logging to track who accesses sensitive data. Many CRM integration plugins include audit logs that record every view or edit of restricted fields. Regularly review these logs to detect unauthorized attempts.
When multiple team members access CRM data through WordPress, follow these best practices to maintain security and efficiency:
Practice
Description
Principle of least privilege
Grant the minimum permissions needed for each role. Start with no access and add capabilities only as required.
Regular role audits
Review user roles quarterly to remove outdated permissions or deactivate unused accounts.
Use groups for teams
If your CRM supports groups (e.g., “North America Sales”), map them to WordPress roles to auto-assign permissions.
Separate admin and CRM roles
Never give full WordPress Administrator access to users who only need CRM data. Create a dedicated “CRM Admin” role instead.
Enable two-factor authentication (2FA)
Require 2FA for any role that accesses sensitive CRM data, especially on shared or remote devices.
Finally, document your permission structure in a simple chart that lists each role, its CRM data access, and the responsible manager. Share this with your team to prevent confusion and ensure consistent enforcement. By configuring user roles carefully, restricting sensitive fields, and following these best practices, you create a secure, efficient CRM-connected WordPress site where every team member works with exactly the data they need.
Troubleshooting Common WordPress CRM Integration Issues
Integrating WordPress with a CRM can dramatically streamline your business workflows, but even the best setups encounter roadblocks. Data duplication, sync failures, and plugin conflicts are the most frequent issues that disrupt operations. This section provides practical solutions and debugging steps to resolve these problems efficiently, ensuring your integration remains reliable and your data stays accurate.
Duplicate contact entries often occur when multiple integration triggers run simultaneously or when webhook data is processed without proper deduplication checks. To resolve this, follow these steps:
Enable Deduplication Rules: Most CRM platforms (e.g., Salesforce, HubSpot, Zoho) offer built-in deduplication settings. Activate them to merge contacts based on email or phone number.
Use Unique Identifiers: Configure your WordPress plugin (e.g., WP Fusion, FluentCRM) to map a unique field—such as user ID or email—as the primary key for each contact.
Schedule Regular Cleanup: Run a monthly query in your CRM to identify and merge duplicates. For example, in HubSpot, use the “Deduplicate” tool under Contacts.
Test with a Staging Environment: Before applying changes live, simulate form submissions on a staging site to verify that deduplication logic works correctly.
If duplicates persist, review your integration’s webhook logs. Look for repeated POST requests from the same form submission. This indicates a need to throttle or debounce your webhook triggers.
Fixing Sync Errors Between WordPress and CRM
Sync errors typically stem from API rate limits, incorrect field mappings, or authentication token expirations. Use this comparison table to diagnose common sync error types and their solutions:
CRM field type differs from WordPress (e.g., text vs. dropdown)
Re-map fields to matching types; use text fields as fallback
Token Expiration
OAuth token not refreshed automatically
Enable auto-refresh in plugin settings; regenerate token manually
Data Format Error
Special characters or long strings
Sanitize data with functions like sanitize_text_field()
To debug sync errors, enable logging in your integration plugin (e.g., WP Fusion’s “Logging” tab). Check for HTTP 429 (rate limit) or 400 (bad request) responses. For persistent issues, verify that your WordPress server’s PHP memory limit is at least 256MB, as low memory can interrupt background sync processes.
Handling Plugin Compatibility Conflicts
Plugin conflicts occur when your CRM integration plugin clashes with other active plugins, especially form builders (e.g., Gravity Forms, Elementor Pro) or caching plugins (e.g., W3 Total Cache). Follow this systematic approach to resolve conflicts:
Isolate the Conflict: Deactivate all plugins except your CRM integration and a default WordPress theme (e.g., Twenty Twenty-Four). Test the sync. If it works, reactivate plugins one by one, testing after each activation.
Check for JavaScript Errors: Use your browser’s developer console (F12) to find JS errors. Conflicts often arise from script enqueuing issues. Disable script concatenation in caching plugins.
Update All Components: Ensure your CRM plugin, WordPress core, and all active plugins are on the latest versions. Outdated code is a primary cause of incompatibility.
Use a Compatibility Plugin: Consider tools like “Plugin Organizer” to load CRM scripts only on specific pages, reducing conflicts with other plugins.
If conflicts persist, review the CRM plugin’s support forum for known incompatibilities. For example, WP Fusion has specific documentation for conflicts with WooCommerce subscriptions. In extreme cases, switch to a different CRM integration plugin that better matches your plugin stack.
Performance and Security Considerations for CRM Integration
Integrating WordPress with a CRM system unlocks powerful workflow automation, but careless implementation can degrade site performance, expose sensitive data, and violate privacy regulations. A balanced approach ensures that data synchronization remains efficient, credentials stay protected, and user information is handled lawfully. The following practices address the three critical pillars of a secure and performant integration.
Optimizing Page Load Times with Efficient Syncs
Background synchronization between WordPress and your CRM should never slow down the front-end experience for visitors. The key is to decouple data transfer from page requests. Use these strategies to maintain fast load times:
Queue asynchronous tasks: Offload sync operations to a job queue (e.g., using Action Scheduler or WP-Cron with a proper system cron replacement). This prevents PHP execution from blocking the response to the user.
Batch API calls: Instead of sending one request per record, collect multiple changes and send them in a single batch. Most CRMs support bulk endpoints that reduce overhead.
Implement delta syncs: Only transfer records that have changed since the last sync rather than performing full data dumps. Use timestamps or version fields to identify updates.
Limit sync frequency: Real-time updates are rarely necessary for every field. Schedule syncs during low-traffic hours or set a minimum interval (e.g., 5 minutes) between sync attempts.
A practical example using a WordPress hook to trigger an asynchronous job:
// Schedule a background sync job when a post is updated
add_action('save_post', 'schedule_crm_sync', 10, 3);
function schedule_crm_sync($post_id, $post, $update) {
if (wp_next_scheduled('crm_sync_event', array($post_id))) {
return;
}
wp_schedule_single_event(time() + 30, 'crm_sync_event', array($post_id));
}
This code delays the sync by 30 seconds, allowing the page to load immediately while the data transfer happens later in the background.
Securing API Credentials and Data Transfers
Exposed API keys or unencrypted data channels can lead to data breaches. Follow these security measures to protect your integration:
Practice
Implementation
Store credentials outside the database
Use server environment variables (e.g., define('CRM_API_KEY', getenv('CRM_API_KEY')); in wp-config.php) or a secure vault plugin.
Encrypt data in transit
Always use HTTPS for API endpoints. Validate SSL certificates on both sides.
Use API tokens with limited scope
Create read-only or write-only tokens where possible. Rotate tokens regularly.
Log access attempts
Monitor failed authentication attempts and alert on anomalies.
Sanitize and validate all data
Before sending data to the CRM, escape and validate inputs to prevent injection attacks.
Never hardcode API keys in plugin files or theme templates. If a repository becomes public, your credentials are immediately compromised.
Ensuring GDPR Compliance in Data Handling
When personal data flows between WordPress and a CRM, you must comply with the General Data Protection Regulation (GDPR) and similar laws. This applies to any EU resident’s data, regardless of where your servers are located. Key compliance steps include:
Obtain explicit consent: Before syncing user data to the CRM, ensure your WordPress forms include a clear, opt-in checkbox. Store the consent record (timestamp, IP, user ID) in both systems.
Implement data minimization: Only transfer fields that are strictly necessary for your business processes. Avoid syncing sensitive categories (e.g., health, religion) unless required and legally justified.
Enable deletion synchronization: When a user requests data erasure under the “right to be forgotten,” your integration must propagate the deletion to the CRM automatically. Log the action for audit trails.
Provide a data access export: Build a mechanism that retrieves all stored CRM data for a specific user upon request, combining records from both systems.
Document your data processing activities and maintain records of consent. Regularly review your sync logic to ensure it does not inadvertently expose personal data to unauthorized third parties. A secure, compliant integration builds trust and protects your organization from regulatory penalties.
Future Trends: AI, Automation, and Advanced CRM Integration with WordPress
The landscape of WordPress and CRM integration is evolving rapidly, driven by artificial intelligence, automation, and the demand for deeper, more intelligent connectivity. As businesses seek to streamline workflows and personalize customer interactions, emerging technologies are reshaping how these systems interact. The next generation of integrations will move beyond simple data syncing to proactive, predictive, and autonomous operations, fundamentally altering how organizations manage leads, automate tasks, and derive insights from their customer data.
AI-Powered Lead Scoring and Personalization
Artificial intelligence is transforming the traditional lead scoring model within WordPress and CRM integration. Instead of relying on static rules based on form submissions or page visits, AI algorithms analyze behavioral patterns, engagement history, and demographic data to assign dynamic scores. This allows businesses to prioritize leads most likely to convert, reducing time wasted on unqualified prospects. Furthermore, AI enables hyper-personalization by tailoring content, email sequences, and website experiences in real-time based on individual lead profiles. For example, a visitor repeatedly viewing pricing pages might receive a targeted offer via the CRM, while a content-heavy user gets educational resources. This level of automation enhances conversion rates and customer satisfaction, making the integration not just a tool but a strategic asset.
No-Code Automation Platforms for Deeper Integration
The rise of no-code automation platforms is democratizing advanced WordPress and CRM integration, allowing non-technical users to build complex workflows without custom development. Tools like Zapier, Make, and Automate.io now offer pre-built connectors and visual builders that link WordPress events—such as form submissions, e-commerce purchases, or user registrations—directly to CRM actions like creating contacts, updating deals, or triggering email campaigns. These platforms also support conditional logic, enabling nuanced automation based on specific criteria. Key capabilities include:
Trigger-based actions: Automatically create CRM records from WordPress form entries.
Data enrichment: Sync purchase history from WooCommerce to CRM profiles.
Multi-step workflows: Combine WordPress events with third-party apps like Slack or Mailchimp.
Error handling: Set fallback actions if a connection fails.
This shift empowers marketing and sales teams to iterate quickly, reducing reliance on developers and accelerating time-to-value for integration projects.
Predictive Analytics for Smarter Customer Insights
Predictive analytics is emerging as a game-changer for WordPress and CRM integration, enabling businesses to forecast customer behavior and optimize strategies proactively. By analyzing historical data from both WordPress (e.g., content consumption, support tickets) and the CRM (e.g., purchase history, churn rates), machine learning models can identify patterns that human analysts might miss. These insights support data-driven decisions, such as predicting which leads will close, which customers are at risk of churning, or what content drives conversions. A practical application is segmenting audiences based on predicted lifetime value, allowing targeted campaigns that maximize ROI. As integration tools incorporate built-in predictive models, businesses can move from reactive reporting to forward-looking strategy, ultimately improving customer retention and revenue growth. The table below summarizes key predictive applications:
Application
Data Sources (WordPress + CRM)
Business Outcome
Lead conversion prediction
Page views, form fields, email opens, deal stage
Prioritize high-probability leads
Churn risk identification
Support tickets, login frequency, subscription status
WordPress CRM integration connects your WordPress website (e.g., contact forms, e-commerce, user registrations) with a Customer Relationship Management (CRM) system. This allows automatic syncing of leads, contacts, and customer data between the two platforms. It eliminates manual data entry, reduces errors, and ensures your sales and marketing teams have up-to-date information. Popular CRMs like HubSpot, Salesforce, and Zoho offer plugins or API-based connections to WordPress.
The best CRM for WordPress depends on your business size, budget, and needs. HubSpot offers a free, user-friendly plugin with robust contact syncing and tracking. Salesforce is ideal for large enterprises with complex sales processes. Zoho CRM provides a cost-effective solution with many integrations. For open-source flexibility, SuiteCRM (via WP-CRM or other plugins) is a strong choice. Most CRMs provide dedicated WordPress plugins or utilize REST API for custom integration.
Integration can be done via dedicated plugins (e.g., HubSpot for WordPress, WPForms + Salesforce), third-party automation tools like Zapier or WP Fusion, or custom development using the CRM’s REST API. Steps typically involve installing the plugin, authenticating with your CRM account, mapping form fields to CRM fields, and setting up triggers (e.g., new form submission creates a contact). For advanced workflows, consider using a middleware platform like PieSync or Automate.io.
Can I sync WooCommerce customer data with a CRM?
Yes, many CRM plugins and integrations support WooCommerce. For example, the HubSpot plugin for WooCommerce automatically syncs orders, customers, and products. Similarly, Zapier can connect WooCommerce to Salesforce, Zoho, or other CRMs. Syncing customer data allows you to track purchase history, segment audiences, and personalize marketing campaigns. Ensure the integration handles order statuses, user roles, and GDPR compliance.
What are the benefits of integrating WordPress and CRM?
Key benefits include: automated lead capture from forms and landing pages, centralized customer data, improved sales follow-up with real-time notifications, personalized email marketing based on behavior, reduced manual data entry errors, and better reporting on marketing ROI. Integration also enables seamless handoff from marketing to sales, and helps maintain a single source of truth for customer interactions across your business.
Is WordPress CRM integration secure?
Yes, when implemented correctly. Use HTTPS on your site, choose reputable plugins with regular updates, and ensure the CRM uses OAuth 2.0 or API keys with proper permissions. Avoid storing sensitive data unnecessarily. For compliance with GDPR or CCPA, configure data mapping to exclude personal data you don’t need. Always test in a staging environment first and review the plugin’s privacy policy.
Do I need coding skills to integrate WordPress with CRM?
Not necessarily. Many integrations require no coding by using plugins with graphical interfaces (e.g., HubSpot, WPForms + Zapier). However, for custom fields, complex logic, or unsupported CRMs, you may need some PHP and REST API knowledge. Low-code platforms like Zapier, Make (formerly Integromat), and WP Fusion offer visual builders that simplify integration without coding.
What is the best free WordPress CRM plugin?
For free CRM integration, HubSpot’s official WordPress plugin is excellent, offering contact management, live chat, and email tracking. WP ERP (by weDevs) provides a free CRM module with basic features. Another option is Jetpack CRM (formerly Zero BS CRM), which has a free version with contact management and billing. These are good starting points for small businesses on a budget.
How to Build a WordPress SaaS Application: A Step-by-Step Guide
Introduction: What Is a WordPress SaaS Application?
A WordPress SaaS application is a software product built on the WordPress platform that is delivered to users on a subscription basis, typically via the web. Unlike traditional WordPress websites that are static or content-focused, a SaaS application uses WordPress as a development foundation to provide dynamic, functionality-driven services—such as membership management, automated reporting, or e-learning portals—where users pay a recurring fee for access. This model leverages WordPress’s inherent flexibility, including its plugin architecture, user role system, and database structure, to create scalable, multi-tenant software solutions that can be customized for diverse industries.
Understanding the SaaS Model
The Software as a Service (SaaS) model centers on delivering software over the internet, eliminating the need for users to install or maintain local applications. Key characteristics include:
Subscription-based pricing: Users pay a monthly or annual fee, providing predictable revenue for the provider.
Centralized hosting: The software runs on the provider’s servers, ensuring consistent updates and security.
Multi-tenancy: A single instance of the software serves multiple customers, with data isolated per user.
Scalability: The infrastructure can handle growing numbers of users without degrading performance.
In a WordPress context, the SaaS model often involves creating a plugin or theme that extends WordPress core to deliver subscription-based features, such as customer portals, API integrations, or automated workflows.
Why WordPress Is a Viable Foundation for SaaS
WordPress powers over 40% of all websites, but its viability as a SaaS foundation stems from several technical and practical advantages:
WordPress’s GPL license allows full customization of code, enabling developers to build proprietary features without licensing restrictions.
Robust user management
Built-in roles and capabilities (e.g., subscriber, editor) can be extended to manage subscription tiers and permissions.
Extensive plugin ecosystem
Thousands of existing plugins (e.g., WooCommerce, LearnDash) provide ready-made modules for payments, memberships, and learning management.
REST API
The WordPress REST API enables headless or decoupled architectures, allowing a JavaScript frontend to interact with WordPress as a backend service.
Low entry cost
WordPress is free, and hosting for SaaS applications can start under $50 per month, reducing initial investment.
However, developers must address challenges like scaling database queries for multi-tenant setups and ensuring consistent performance under load. With careful planning, WordPress can serve as a reliable backend for SaaS products, particularly for small to medium-sized applications.
Common Examples of WordPress-Powered SaaS Products
Several successful SaaS products are built on WordPress, demonstrating its versatility:
MemberPress: A membership plugin that functions as a SaaS by offering subscription management, content dripping, and payment gateways—all within a WordPress site.
LearnDash: An LMS plugin that powers e-learning platforms with course creation, quizzes, and student progress tracking, often sold as a subscription service.
WP ERP: A human resources and CRM plugin that provides enterprise resource planning features, delivered as a subscription with ongoing updates and support.
Easy Digital Downloads: A plugin for selling digital products, which can be extended with subscriptions for recurring access to files or services.
These examples show how WordPress can be extended to deliver subscription-based functionality without requiring a completely custom backend, making it an accessible choice for entrepreneurs and developers building their first SaaS application.
Planning Your SaaS Product and Business Model
Before writing a single line of code or installing a plugin, you must define the foundation of your WordPress SaaS application. This phase determines whether your product solves a real problem, reaches the right users, and generates sustainable revenue. In a WordPress environment, where plugins and themes compete for attention, careful planning separates successful SaaS ventures from abandoned projects. Start by narrowing your focus, then build your feature set and pricing structure around a clear value proposition.
Identifying a Niche and Target Audience
A broad idea like “a project management tool for WordPress” is too vague. Instead, identify a specific, underserved niche within the WordPress ecosystem. For example, target real estate agents who need a custom property listing manager, or freelance writers who require a content calendar with client approval workflows. To validate your niche:
Analyze existing WordPress plugins in your chosen area. Look for gaps in features, poor user experience, or outdated code.
Survey potential users in relevant forums (e.g., WPBeginner, Advanced WordPress Facebook groups) or on platforms like Reddit’s r/WordPress.
Create a minimum viable audience of at least 20–30 people who express willingness to pay for a solution.
Your target audience dictates technical decisions. For instance, if you serve non-technical small business owners, your SaaS must offer a guided setup wizard and minimal configuration. If you target developers, prioritize API access and hooks.
Defining Core Features vs. Premium Add-Ons
In a WordPress SaaS, the core plugin provides essential functionality that solves the primary pain point. Premium add-ons extend value for specific use cases. This modular approach keeps the base product lean and affordable while allowing upsells. Consider this example for a custom form builder SaaS:
Feature Category
Core (Free or Basic Tier)
Premium Add-On
Form fields
Text, email, textarea, select
File upload, signature, payment fields
Integrations
Email notification
Mailchimp, Slack, Zapier
Spam protection
Basic honeypot
reCAPTCHA v3, Akismet
Templates
5 starter templates
50+ industry-specific templates
To implement a basic add-on system, you can use WordPress action hooks. For example, in your main plugin file, define a filter to register add-ons:
// In your main plugin file (e.g., my-saas-app.php)
function my_saas_register_add_ons( $add_ons ) {
$add_ons['file_upload'] = array(
'name' => 'File Upload Field',
'price' => 29,
'slug' => 'my-saas-file-upload'
);
return $add_ons;
}
add_filter( 'my_saas_add_ons', 'my_saas_register_add_ons' );
Then, in your license validation system, check if the user’s subscription includes the add-on before loading its functionality.
Choosing a Pricing Model (Tiered, Usage-Based, or Flat Rate)
WordPress SaaS pricing must account for hosting, plugin updates, and support overhead. Three common models work well:
Tiered pricing: Offer 3–4 plans (e.g., Basic, Pro, Agency) with escalating features. This suits most WordPress tools because it aligns with user scale. Example: Basic includes 10 active forms, Pro includes 50, Agency includes unlimited.
Usage-based pricing: Charge per active site, per API call, or per stored record. Best for services like analytics, backup, or CDN integrations. Example: $5/month for 1 site, $20/month for 5 sites, custom pricing for 20+ sites.
Flat rate: A single price for all features. Works for niche tools with limited feature scope, but risks leaving money on the table or alienating small users.
For most WordPress SaaS products, a tiered model with a free trial (14–30 days) is optimal. Include a “Lifetime” option as a limited-time offer to generate early cash flow. Always test your pricing with a small group before public launch, and monitor churn after the trial period ends.
Setting Up a Secure and Scalable Hosting Environment
To successfully execute How to Build a WordPress SaaS Application, your hosting foundation must support high concurrency, rapid data retrieval, and robust isolation between tenants. A traditional shared hosting plan will fail under the load of multiple API calls, scheduled cron jobs, and database transactions. Instead, prioritize infrastructure that offers vertical scaling (CPU/RAM upgrades) and horizontal scaling (load-balanced server clusters). Key requirements include PHP 8.1+, MariaDB 10.6+, Redis object caching, and a CDN for static assets. Your hosting environment must also enforce strict file permissions and disable XML-RPC if not needed, as these are common attack vectors in multi-user setups.
Selecting a Managed WordPress Host or Cloud Provider
Your choice between a managed WordPress host and a raw cloud provider (AWS, Google Cloud, DigitalOcean) depends on your DevOps expertise and budget. Managed hosts reduce operational overhead but limit server-level customizations; cloud providers offer granular control but require sysadmin skills. Below is a comparison of typical options:
Manual or auto-scaling groups (requires configuration)
WordPress-specific optimization
Pre-configured Redis, object cache, and page cache
Must install and configure caching plugins (e.g., Redis Object Cache)
Cost (for 50k monthly visits)
$200–$400/month (includes support)
$50–$150/month (plus DevOps time)
Security baseline
WAF, DDoS protection, daily backups included
Requires manual setup of WAF (e.g., ModSecurity) and backup scripts
For most SaaS builders, a managed host like Kinsta or WP Engine accelerates development by handling server tuning. If you need custom PHP extensions or database sharding, choose a cloud provider and use a tool like ServerPilot or RunCloud to simplify management.
Implementing SSL, Backups, and Firewall Protections
Security is non-negotiable for a SaaS handling user data and payments. Begin by enforcing HTTPS via a Let’s Encrypt SSL certificate (auto-renewed) or a wildcard certificate for subdomains. Configure automated daily backups to an off-server location (e.g., S3 bucket) with a 30-day retention policy. Use a Web Application Firewall (WAF) such as Cloudflare or Sucuri to block SQL injection, XSS, and brute-force login attempts. On the server level, implement a firewall (UFW or iptables) that restricts ports to 22 (SSH), 80 (HTTP), and 443 (HTTPS). Additionally, harden WordPress by disabling file editing in wp-config.php and limiting login attempts with a plugin like Limit Login Attempts Reloaded.
Configuring Staging, Development, and Production Environments
Maintain three separate environments to prevent breaking live user data. Use version control (Git) with a branching strategy: develop features in dev, test in staging, and merge to main for production. Configure staging as an exact replica of production, but with a separate database and restricted access (e.g., VPN or IP whitelist). Use a plugin like WP Migrate DB Pro to sync database changes without exposing sensitive user data. Automate deployments via a CI/CD pipeline (GitHub Actions or DeployBot) that runs tests, clears cache, and updates the production server only after staging passes. For database migrations, use a tool like Bedrock’s wp migrate command to handle table prefixes and serialized data correctly. Never push changes directly to production; always deploy through staging to catch conflicts in custom post types or user roles.
Building the Core Application with Custom Post Types and Meta
WordPress is inherently a content management system, but its true power for SaaS applications lies in its ability to model custom data structures. Instead of forcing your application’s entities—such as subscriptions, invoices, or user projects—into the default “Posts” or “Pages,” you will register custom post types (CPTs) that represent each core business object. This approach ensures your data is organized, queryable, and scalable. Alongside CPTs, custom metadata and taxonomies provide the granular control needed for complex SaaS functionality.
Registering Custom Post Types for SaaS Entities
Begin by defining the primary entities your SaaS application manages. For example, a project management tool might require CPTs for “Projects,” “Tasks,” and “Teams.” Register these using the register_post_type() function, ideally within a custom plugin or your theme’s functions.php file. Each CPT should have a singular and plural label, a slug for URL structure, and capabilities that align with your user roles. Consider the following practical example for a “Subscription” entity:
This code registers a “Subscription” CPT that is accessible via the WordPress REST API, supports custom fields, and has a clean URL structure. Repeat this process for each core entity, ensuring each CPT has unique slugs and labels to prevent conflicts.
Adding Custom Fields with Advanced Custom Fields (ACF)
Once your CPTs are registered, you need to attach specific data points—like “Plan Type,” “Start Date,” or “Billing Cycle”—to each entity. Advanced Custom Fields (ACF) is the industry-standard tool for this task. It provides a user-friendly interface to create field groups and assign them to one or more CPTs. For a “Subscription” CPT, you might create fields such as:
Plan Type (Select field: Monthly, Yearly, Lifetime)
Status (Select field: Active, Paused, Cancelled)
Start Date (Date Picker field)
Price (Number field with currency formatting)
After installing and activating ACF, navigate to Custom Fields > Add New. Create a field group named “Subscription Details,” add the fields listed above, and set the location rule to “Post Type is equal to Subscription.” ACF then automatically displays these fields in the WordPress admin when editing a subscription post, and stores the data as post meta. You can retrieve this metadata programmatically using get_field('plan_type', $post_id) in your templates or API endpoints.
Organizing Data with Custom Taxonomies
Custom taxonomies allow you to group and filter your SaaS entities efficiently. For instance, a “Projects” CPT might benefit from a “Project Category” taxonomy (e.g., “Client Work,” “Internal”) or a “Priority” taxonomy (e.g., “High,” “Medium,” “Low”). Taxonomies are hierarchical or non-hierarchical, depending on your needs. Register a taxonomy using register_taxonomy() and attach it to one or more CPTs. Here is a simple example for a “Status” taxonomy attached to the “Subscription” CPT:
Once registered, you can assign terms like “Active” or “Expired” to individual subscriptions. This enables powerful filtering in admin screens, front-end queries, and API calls. For example, you can quickly retrieve all active subscriptions using get_posts(array('post_type' => 'subscription', 'tax_query' => array(array('taxonomy' => 'subscription_status', 'field' => 'slug', 'terms' => 'active')))). Combining CPTs, ACF fields, and taxonomies gives you a robust, database-driven architecture that mirrors traditional SaaS platforms while leveraging WordPress’s familiar interface.
Managing User Roles, Subscriptions, and Access Control
Implementing a robust user management system is the backbone of any WordPress SaaS application. This system must handle user registration, subscription tiers, and granular access control to ensure that each user sees only the features their plan entitles them to. The approach can lean on premium plugins for speed or custom code for full flexibility. Below, we break down the three essential pillars of this implementation.
Integrating Membership and Subscription Plugins (e.g., MemberPress, Paid Memberships Pro)
The quickest route to a subscription-driven SaaS is through a dedicated membership plugin. These tools handle payment gateways, recurring billing, and user level assignment out of the box. Two widely used options are:
MemberPress: Offers advanced drip content, conditional access rules, and integration with popular LMS and forum plugins. It provides built-in API access for custom development.
Paid Memberships Pro (PMPro): A free core plugin with powerful paid add-ons. It supports multiple membership levels, discount codes, and detailed reporting. Its codebase is highly extensible for custom SaaS logic.
To integrate either plugin, follow these steps:
Install and activate the plugin from the WordPress repository or your license.
Configure payment gateway (Stripe, PayPal) under the plugin’s settings panel.
Define your subscription tiers (e.g., Basic, Pro, Enterprise) with distinct pricing and billing cycles.
Assign a default role (e.g., “subscriber”) to new members, which will later be overridden by custom roles.
Use the plugin’s shortcodes or block widgets to create a membership dashboard and checkout pages.
These plugins also provide hooks and filters (e.g., mepr-checkout-before-submit in MemberPress) that allow you to extend functionality without modifying core files.
Creating Custom User Roles and Capabilities
Standard WordPress roles (Administrator, Editor, Subscriber) are too coarse for a SaaS application. You need custom roles that map directly to your subscription tiers and feature sets. This is best done programmatically, often during plugin activation.
Use the add_role() function in a custom plugin or your theme’s functions.php (though a plugin is preferred for portability). Example snippet:
Define your own capabilities (e.g., use_saas_feature_analytics) that are not part of WordPress core. This gives you precise control. When a user upgrades or downgrades their subscription, you can swap their role using a hook from your membership plugin.
Enforcing Feature Access Based on Subscription Level
Once roles and capabilities are set, you must enforce them at every entry point. This involves checking the current user’s capabilities before rendering a feature or executing an action. Use WordPress’s current_user_can() function:
if ( current_user_can( 'use_saas_feature_reports' ) ) {
// Display the reports dashboard
echo '<div id="reports-module">...</div>';
} else {
// Show upgrade prompt
echo '<p>Upgrade to Pro to access reports.</p>';
}
For more complex scenarios, such as restricting API endpoints or AJAX handlers, perform the same check server-side:
By combining a membership plugin for billing and level management, custom roles for granular capabilities, and capability checks throughout your code, you create a secure and scalable access control system that aligns perfectly with your SaaS subscription model.
Developing a Custom Frontend with Shortcodes and REST API
Building a dynamic frontend for your WordPress SaaS application requires a balance of server-side rendering for protected content and client-side interactivity for user dashboards. Shortcodes provide a simple way to embed subscription-gated content directly into posts or pages, while the WordPress REST API enables you to build custom interfaces that react to real-time user actions. By combining these tools with modern JavaScript frameworks, you can create a seamless experience where users manage their subscriptions, view analytics, and interact with premium features without leaving your site.
Using Shortcodes to Display Subscription-Protected Content
Shortcodes act as placeholders that render dynamic content based on user roles or subscription status. To protect content, create a custom shortcode that checks the current user’s capabilities before outputting premium material. For example, a shortcode like [saas_dashboard] can display a personalized dashboard only for active subscribers.
Registration and callback: Use add_shortcode('saas_dashboard', 'render_dashboard') in your plugin or theme’s functions.php.
Conditional logic: Inside the callback, verify user subscription via a custom meta field or a membership plugin’s API. Return a login prompt if unauthorized.
Output buffering: Use ob_start() to capture complex HTML output, then return it as a string.
This approach keeps your core content static while allowing protected sections to appear dynamically. For instance, a free user might see a teaser, while a premium user sees the full tool.
Leveraging the REST API for Custom Dashboards and Interactions
The WordPress REST API exposes endpoints for posts, users, and custom data, enabling you to build dashboards that update without page reloads. For a SaaS app, you can register custom endpoints to fetch subscription details, usage stats, or billing history. A practical example is creating a route that returns a user’s current plan:
// Register custom REST route
add_action('rest_api_init', function () {
register_rest_route('saas/v1', '/subscription/(?P<id>d+)', array(
'methods' => 'GET',
'callback' => 'get_user_subscription',
'permission_callback' => function () {
return is_user_logged_in();
}
));
});
function get_user_subscription($data) {
$user_id = $data['id'];
$plan = get_user_meta($user_id, 'saas_plan', true);
if (empty($plan)) {
return new WP_Error('no_plan', 'User has no active subscription', array('status' => 404));
}
return rest_ensure_response(array('plan' => $plan, 'expires' => get_user_meta($user_id, 'saas_expires', true)));
}
With this endpoint, your frontend can call /wp-json/saas/v1/subscription/123 to display the user’s plan details. Use fetch() or Axios to handle the response and update the UI accordingly.
Integrating React or Vue.js for Advanced UI Components
For complex interfaces like interactive charts, real-time notifications, or multi-step forms, a JavaScript framework like React or Vue.js enhances the user experience. You can embed these components within WordPress pages using shortcodes that mount the framework’s root element. Here’s a typical workflow:
Step
Action
1
Create a React or Vue component (e.g., SubscriptionChart) that fetches data via the REST API.
2
Build the app with a bundler like Webpack or Vite, outputting a single JavaScript file.
3
Enqueue the script in WordPress using wp_enqueue_script() and add a shortcode that renders a container <div id="saas-chart"></div>.
4
In your framework’s entry point, mount the component to that container only when the DOM element exists.
This method ensures your advanced UI only loads on pages where the shortcode is present, keeping performance lean. For example, a Vue.js component for a subscription renewal form can use the REST API to update payment methods without a full page refresh, creating a fluid SaaS experience.
Implementing Payment Gateways and Billing Automation
Integrating a reliable payment system and automating recurring billing is the financial backbone of any WordPress SaaS application. Users expect seamless transactions, secure payment handling, and instant access to their subscriptions. This section walks you through selecting the right gateway, configuring recurring payments with trial periods, and automating invoices and receipts—all within the WordPress ecosystem without leaving your admin dashboard.
Choosing a Payment Gateway (Stripe, PayPal, or Others)
The gateway you choose determines your revenue flow, user trust, and global reach. For a WordPress SaaS, the most common options are Stripe, PayPal, and specialized alternatives. Below is a comparison to help you decide.
Excellent via plugins like WooCommerce Subscriptions or custom code with Stripe PHP library
PayPal
Wide brand recognition, buyer protection, global reach in over 200 markets
International audiences, simple recurring plans
Good via PayPal Checkout plugin or Braintree (PayPal’s API)
Others (Mollie, Square)
Lower fees in some regions, local payment methods (iDEAL, Bancontact)
European or niche markets
Moderate; often require custom API integration
For most WordPress SaaS builds, Stripe is the recommended choice because its API handles webhooks, failed payment retries, and prorated upgrades natively. You can connect it via a plugin like Easy Digital Downloads – Recurring Payments or build a custom solution using the Stripe PHP SDK and WordPress cron jobs.
Once your gateway is chosen, configure recurring billing to charge users at set intervals (monthly, yearly) and offer trial periods to convert free users. Follow these steps:
Define your pricing model: Decide on flat-rate, tiered, or usage-based subscriptions. For a typical WordPress SaaS, flat-rate monthly or annual plans work best.
Create subscription products: In your chosen plugin (e.g., WooCommerce Subscriptions), add a product with a recurring price, billing cycle, and optional sign-up fee.
Enable trial periods: Set a free trial duration (e.g., 14 or 30 days) directly in the product settings. Ensure the plugin automatically starts billing after the trial ends.
Handle failed payments: Use Stripe’s Smart Retries or configure a plugin to retry failed charges after 3, 5, and 7 days before canceling the subscription.
Test thoroughly: Use Stripe’s test mode with card numbers like 4000000000003220 (declined after trial) to simulate real scenarios.
For custom code, you can use the WC_Subscription class to create subscriptions programmatically, but plugins reduce development time significantly.
Automating Invoices and Receipts with Plugins or Custom Code
Automated invoicing ensures compliance and user satisfaction. Every successful payment or subscription event should trigger a clear, branded receipt. Here’s how to achieve this in WordPress:
Use a dedicated invoicing plugin: Plugins like WP Invoice or WooCommerce PDF Invoices & Packing Slips can generate and email PDF invoices automatically upon payment confirmation.
Leverage Stripe’s built-in receipts: Stripe can automatically send email receipts to customers. Enable this in your Stripe dashboard under “Settings > Email receipts.”
Custom code with hooks: For full control, hook into WordPress actions like woocommerce_subscription_payment_complete or use Stripe webhooks to trigger custom functions that generate invoices via libraries like Dompdf or TCPDF.
Include essential invoice data: Ensure invoices display the user’s name, subscription plan, billing period, amount paid, transaction ID, and your business’s tax information.
By automating invoices and receipts, you eliminate manual work, reduce errors, and provide a professional experience that encourages renewals. Always test the email delivery using a tool like SMTP plugin to avoid receipts landing in spam folders.
Optimizing Performance and Managing Data
For a WordPress SaaS application, performance and data management are critical to user retention and operational stability. As your user base grows, unoptimized queries, redundant data, and lack of caching can lead to slow page loads and downtime. This section outlines practical strategies for caching, database optimization, and scheduled maintenance to keep your application fast and reliable under load.
Implementing Object Caching and Page Caching (Redis, Varnish)
WordPress’s default database-driven architecture struggles under high concurrency. Implementing a two-tier caching strategy addresses this:
Object caching with Redis stores database query results, transients, and session data in memory, reducing repeated SQL calls. Use the Redis Object Cache plugin or a dedicated Redis server.
Page caching with Varnish serves static HTML copies of pages to visitors, bypassing PHP and database entirely for anonymous users. Configure Varnish as a reverse proxy in front of your web server (e.g., Nginx or Apache).
A comparison of these caching layers helps clarify their roles:
Caching Layer
Storage Medium
Primary Use Case
Performance Gain
Object Cache (Redis)
In-memory (RAM)
Database query results, API responses, user sessions
Reduces database load by 60-80% for dynamic requests
Page Cache (Varnish)
Memory or disk
Full HTML pages for unauthenticated visitors
Delivers pages in milliseconds, offloading PHP completely
For best results, combine both: use Redis for logged-in users and dynamic content, and Varnish for the public-facing parts of your SaaS.
Optimizing Database Queries and Using Indexes
Poorly written queries are a common bottleneck in WordPress SaaS apps. Follow these steps to optimize your database:
Profile slow queries using tools like Query Monitor or the slow_query_log in MySQL.
Use proper indexes on columns frequently used in WHERE, JOIN, and ORDER BY clauses. For example, index post_date and meta_key in the wp_postmeta table.
Limit meta_query usage in custom post types; instead, store frequently filtered data as serialized arrays or dedicated custom tables.
Implement query caching with Redis as described above, and avoid repeated queries inside loops.
Use WP_Query parameters like 'no_found_rows' => true and 'fields' => 'ids' when pagination or full post objects are unnecessary.
Regularly review your database schema with tools like phpMyAdmin or WP-CLI to identify missing indexes on high-traffic tables.
Automated maintenance prevents data bloat and performance degradation. Implement a cron-based schedule using WordPress’s wp_schedule_event() or a system-level cron job:
Weekly: Delete expired transients (using DELETE FROM wp_options WHERE option_name LIKE '_transient_timeout_%'), remove spam comments, and optimize tables with OPTIMIZE TABLE.
Monthly: Archive old user logs, delete orphaned post meta, and purge revision history beyond the last 5 revisions per post.
Quarterly: Review and rebuild fragmented indexes using ALTER TABLE ... ENGINE=InnoDB and re-evaluate query performance metrics.
For data cleanup, consider using a plugin like WP-Optimize or a custom script that runs via WP-CLI. Always back up your database before performing bulk deletions. By combining robust caching, query optimization, and regular maintenance, your WordPress SaaS application will scale efficiently and deliver a consistent user experience.
Testing, Deploying, and Monitoring Your SaaS Application
After building your WordPress SaaS application, rigorous testing, a reliable deployment pipeline, and continuous monitoring are essential to ensure uptime and user satisfaction. This phase transforms your code into a stable, scalable service. The following steps outline a practical approach to each area.
Conducting Functional and Load Testing
Functional testing validates that every feature works as intended. For a WordPress SaaS, this includes user registration, subscription management, payment processing, and core plugin interactions. Use a testing framework like PHPUnit for unit tests and tools like Selenium or Cypress for end-to-end browser tests. Create test cases that cover both happy paths and edge cases, such as expired subscriptions or invalid API keys.
Load testing ensures your application handles expected traffic without degradation. Tools like Apache JMeter or Locust simulate concurrent users. Define key metrics: response time under load, throughput, and error rate. For example, a typical SaaS might target sub-2-second response times for 95% of requests under 500 concurrent users. Run tests in a staging environment that mirrors production, including database and caching layers. Adjust your WordPress configuration—such as enabling object caching with Redis or scaling your server resources—based on results.
Setting Up Continuous Integration and Deployment (CI/CD)
A CI/CD pipeline automates testing and deployment, reducing human error and accelerating releases. Use platforms like GitHub Actions, GitLab CI, or Jenkins. The pipeline typically includes steps for code linting, unit tests, integration tests, and deployment to a staging environment before production. Below is a practical example of a GitHub Actions workflow for a WordPress SaaS application:
name: Deploy WordPress SaaS
on:
push:
branches: [ main ]
jobs:
test-and-deploy:
runs-on: ubuntu-latest
steps:
- uses: actions/checkout@v3
- name: Run PHPUnit tests
run: vendor/bin/phpunit
- name: Deploy to production via rsync
run: |
rsync -avz --exclude '.git' --exclude 'tests' ./ user@server:/var/www/html/
env:
SSH_PRIVATE_KEY: ${{ secrets.SSH_KEY }}
This example triggers on pushes to the main branch, runs unit tests, and deploys files via rsync. Adjust the deployment method to match your hosting—consider using WP-CLI for database migrations or a dedicated deployment tool like DeployBot. Always include a rollback strategy, such as versioned releases or database snapshots.
Monitoring Uptime, Errors, and User Activity with Analytics
Monitoring provides real-time visibility into your SaaS application’s health and user behavior. For uptime, use services like Pingdom or UptimeRobot to check your site every few minutes and alert you via email or Slack if it goes down. For error tracking, integrate tools like Sentry or New Relic to capture PHP exceptions, JavaScript errors, and slow database queries. Configure alerts for critical errors, such as payment failures or authentication issues.
User activity analytics help you understand engagement and identify bottlenecks. Use a privacy-focused analytics tool like Matomo (self-hosted on your WordPress server) or a lightweight service like Plausible. Track key metrics such as:
Daily active users and subscription sign-ups
Feature usage (e.g., which plugins or pages are most visited)
Error rates per user session
Average session duration and bounce rate
Combine these with server-level monitoring (CPU, memory, disk I/O) using tools like Prometheus and Grafana. Regularly review logs and dashboards to proactively address issues. For example, a spike in 500 errors might indicate a recent deployment problem, while a drop in user activity could signal a broken feature. Establish a response plan for common scenarios, such as database connection failures or high traffic loads, to maintain uptime and user trust.
Launching, Marketing, and Iterating on Your Product
Successfully launching a WordPress SaaS application requires more than a polished codebase. A strategic rollout, sustained marketing, and a commitment to iterative improvement determine whether your product gains traction or fades into obscurity. Below, we outline actionable tactics for each critical phase.
Building a Launch Landing Page and Pre-Launch List
Before your SaaS is ready for public use, generate anticipation and capture early adopters. A dedicated landing page serves as your conversion hub. Include these core elements:
Clear value proposition: State exactly what problem your SaaS solves and for whom.
Visual preview: Use mockups, screenshots, or a short explainer video to demonstrate functionality.
Email capture form: Keep fields minimal—usually name and email—to reduce friction.
Social proof placeholder: Add a “Coming Soon” badge or teaser testimonials if available.
Call-to-action (CTA): Use action-oriented text like “Get Early Access” or “Join the Waitlist.”
Promote your pre-launch list through your existing networks, relevant WordPress forums, and social media groups. Offer an incentive—such as a lifetime discount or exclusive beta access—to boost sign-ups. Track conversion rates and A/B test headline variations to optimize the page before launch day.
Leveraging Content Marketing and SEO for User Acquisition
Organic search remains one of the most cost-effective channels for acquiring WordPress SaaS users. Focus on creating high-value content that addresses pain points your application solves. Recommended content types include:
Content Type
Example Topic
Primary Goal
Tutorial
“How to Automate WooCommerce Reports”
Demonstrate utility
Comparison
“Your Tool vs. Competitor X: Key Differences”
Differentiate features
Case study
“How Agency Y Saved 10 Hours Weekly”
Build credibility
How-to guide
“Setting Up Custom User Roles in WordPress”
Attract technical audience
Optimize each piece for search by targeting long-tail keywords related to your SaaS. Use descriptive headings, internal links to your product pages, and meta descriptions that encourage clicks. Publish consistently—at least twice per month—and repurpose content into social posts, email newsletters, and guest contributions on WordPress-focused blogs.
Gathering User Feedback and Prioritizing Feature Updates
Once users start engaging with your application, systematic feedback collection becomes your compass. Implement multiple channels to capture insights without overwhelming your audience:
In-app surveys: Use lightweight tools like a micro-survey widget to ask one question at a time (e.g., “What feature would you add?”).
Support tickets and chat logs: Analyze recurring complaints or requests to identify patterns.
User interviews: Schedule 15-minute calls with power users to understand workflows and frustrations.
Public roadmap: Share a simple board where users can upvote feature requests.
Prioritize updates using a framework that balances user demand with business goals. For example, weight each feature request on three criteria:
Alignment: Does it support your core value proposition?
Communicate decisions transparently. After deploying an update, notify users via email or in-app notification and ask for confirmation that the change solved their problem. This closed feedback loop builds trust and reduces churn, ensuring your WordPress SaaS evolves in lockstep with market needs.
A WordPress SaaS (Software as a Service) application is a web-based software solution built on the WordPress platform that users access via subscription. Unlike traditional WordPress sites that are standalone, a SaaS app leverages WordPress's content management and user management capabilities to deliver a multi-tenant service. Examples include project management tools, membership platforms, and e-learning systems. WordPress provides a flexible foundation with its plugin architecture, REST API, and user role management, making it suitable for SaaS development. However, scaling requires careful planning of database architecture, caching, and security.
Can WordPress handle a SaaS application?
Yes, WordPress can handle a SaaS application when properly architected. While WordPress is traditionally a CMS, its extensibility through plugins, custom post types, and the REST API allows it to serve as a backend for SaaS products. Multisite networks are often used to isolate customer data. Performance can be maintained with caching, CDN, and optimized hosting. For high-traffic SaaS, consider headless WordPress with a front-end framework like React. Many successful SaaS products, such as MemberPress and LearnDash, are built on or extend WordPress. However, for extremely complex or high-scale applications, a custom framework may be more suitable.
What are the essential plugins for a WordPress SaaS?
Essential plugins for a WordPress SaaS include a membership plugin (e.g., MemberPress, Paid Memberships Pro) for subscription management; a payment gateway integration (e.g., Stripe, WooCommerce Subscriptions) for billing; a learning management system if offering courses (e.g., LearnDash, LifterLMS); a caching plugin (e.g., WP Rocket, W3 Total Cache) for performance; a security plugin (e.g., Wordfence, Sucuri) for protection; and a backup plugin (e.g., UpdraftPlus, BlogVault). For multi-tenancy, consider using WordPress Multisite or a plugin like WP Ultimo. Always test compatibility and performance.
How do I handle subscription billing in WordPress SaaS?
Subscription billing in a WordPress SaaS can be handled using dedicated plugins like WooCommerce Subscriptions, MemberPress, or Paid Memberships Pro. These integrate with payment gateways like Stripe, PayPal, or Authorize.net. They manage recurring payments, trial periods, upgrades, downgrades, and cancellations. For custom solutions, you can use the Stripe API directly with custom code. Ensure you handle webhooks for payment events, store subscription metadata, and implement proper security for user data. Consider using a plugin that supports proration and automatic retries for failed payments.
What is the role of the WordPress REST API in SaaS?
The WordPress REST API allows your SaaS application to communicate with external services and front-end frameworks. It enables you to create, read, update, and delete data (posts, users, etc.) programmatically. In a SaaS context, you can build a decoupled front-end (e.g., React, Vue.js) that interacts with WordPress as a headless CMS. The REST API also facilitates integration with third-party services like CRMs, email marketing, and analytics. Custom endpoints can be added to handle SaaS-specific operations. Authentication via OAuth or JWT ensures secure data access.
Security for a WordPress SaaS requires a multi-layered approach: use strong passwords and two-factor authentication for admin accounts; keep WordPress core, themes, and plugins updated; implement a Web Application Firewall (WAF) like Sucuri or Cloudflare; use HTTPS (SSL) everywhere; restrict file permissions and disable file editing in wp-config; regularly scan for malware with Wordfence; limit login attempts; and use a security plugin. For multi-tenant setups, isolate user data via database tables or multisite. Conduct regular security audits and backups.
What hosting is best for a WordPress SaaS?
Best hosting for a WordPress SaaS includes managed WordPress hosts like WP Engine, Kinsta, or Cloudways that offer high performance, caching, and support. For high-traffic SaaS, consider dedicated or VPS hosting from providers like DigitalOcean, Linode, or AWS. Use a CDN (e.g., Cloudflare, Fastly) for global delivery. Ensure the host supports PHP 8+, MySQL 8+, and offers SSH access, staging environments, and automatic scaling. For multisite installations, choose a host that supports multisite networks. Always test load times and scalability.
How do I scale a WordPress SaaS application?
Scaling a WordPress SaaS involves optimizing database queries with indexing and caching (e.g., Redis, Memcached); using a CDN for static assets; implementing object caching; leveraging a scalable hosting provider with auto-scaling; using a load balancer; separating read/write databases; and employing a headless architecture to reduce server load. For multisite, consider sharding databases. Monitor performance with tools like New Relic or Query Monitor. Regularly review and optimize code, especially custom plugins. Plan for horizontal scaling by adding more servers.
How to Create a WordPress Auction Site: A Step-by-Step Guide for Beginners
Introduction to WordPress Auction Sites
What Is a WordPress Auction Site?
A WordPress auction site is an online marketplace built on the WordPress content management system that enables users to list items, services, or digital goods for bidding. Unlike standard e-commerce stores where prices are fixed, an auction site allows potential buyers to compete through incremental bids, with the highest bidder winning the item when the auction ends. WordPress, through specialized plug-ins and themes, transforms a standard blog or business site into a fully functional auction platform. This setup supports various auction formats—from traditional English auctions where bids increase over time to reverse auctions where prices drop until a buyer accepts. The core functionality includes user registration, bid management, automatic outbid notifications, and payment processing integration. Because WordPress is open-source and highly customizable, you can tailor the auction experience to match your specific niche, whether that involves antiques, event tickets, freelance services, or digital downloads. The platform handles the heavy lifting of bid tracking and user management, while you focus on curating listings and engaging your community.
Advantages of Using WordPress for Auctions
Choosing WordPress as your auction platform offers several distinct benefits that make it accessible for beginners and scalable for growth:
Low initial cost: WordPress itself is free, and many auction plug-ins offer free versions or affordable one-time purchases, reducing startup expenses compared to custom development or proprietary auction software.
No coding required: With drag-and-drop builders and intuitive plug-in settings, you can set up bidding rules, payment gateways, and user roles without writing a single line of code.
Extensive plug-in ecosystem: Dedicated auction plug-ins like WooCommerce Auctions, WP Auctions, or Ultimate Auction provide ready-made features such as bid increments, auction timers, and automatic winner notifications.
SEO-friendly structure: WordPress’s built-in SEO tools and permalink customization help your auction listings rank in search engines, driving organic traffic to your site.
Full ownership and control: Unlike hosted auction marketplaces, you own your data, design, and monetization strategy. You can integrate any payment method, set your own fee structure, and modify the site as your needs evolve.
Community and support: A large user base means abundant tutorials, forums, and professional developers available to assist with troubleshooting or advanced customization.
Common Types of Auction Sites You Can Build
WordPress supports a variety of auction models, allowing you to match your business idea with the right format. Below are the most common types, along with their typical use cases:
Auction Type
Description
Example Use Cases
English Auction
Bidders place increasingly higher bids; highest bid wins at the close.
Sellers compete to offer the lowest price; buyer chooses the best offer.
Freelance services, construction contracts, custom projects.
Penny Auction
Each bid increases the price by a small amount (e.g., one cent); bidders pay per bid.
Electronics, gift cards, luxury goods (requires careful legal compliance).
Sealed Bid Auction
Bidders submit one confidential bid; highest bid wins without revealing others.
Real estate, business sales, high-value collectibles.
Timed vs. Live Auction
Timed auctions run for a set period; live auctions occur in real-time with an auctioneer.
Charity events, online estate sales, art gallery auctions.
Each type can be implemented using WordPress plug-ins that handle bid logic, countdown timers, and user notifications. For beginners, starting with a standard English auction site is usually the simplest path, as it mirrors the familiar eBay-style experience and requires minimal configuration. As your audience grows, you can introduce additional auction formats to diversify your offerings and attract different buyer behaviors.
Choosing the Right Auction Plugin
Selecting the correct auction plugin is the most critical decision when you learn how to create a WordPress auction site. The plugin determines your site’s functionality, user experience, and scalability. With several options available, comparing their core features, pricing models, and compatibility with your theme and other plugins is essential. Below, we break down the top contenders and the key considerations to guide your choice.
Top Auction Plugins Compared: WP Simple Auctions vs. Auction Nudge vs. Ultimate Auction
Each plugin serves a different niche within the auction ecosystem. The table below provides a direct comparison of their primary attributes.
Compatible with most themes, supports WooCommerce, requires WordPress 5.0+.
WP Simple Auctions is best for a dedicated auction site with full control over bidding mechanics. Auction Nudge suits those who want to monetize eBay listings without hosting auctions themselves. Ultimate Auction is ideal for multi-vendor marketplaces where users can list and bid on items.
Key Features to Look for in an Auction Plugin
Beyond the basics, evaluate these essential features to ensure your plugin aligns with your goals:
Bidding Mechanics: Look for proxy bidding (automatic incremental bids), reserve prices, and bid increments. These prevent manual overbidding and protect sellers.
Payment Integration: Ensure support for PayPal, Stripe, or other gateways you plan to use. Some plugins offer escrow services for high-value items.
User Management: Features like user registration, watchlists, bid history, and automatic outbid notifications improve engagement.
Customization: Check for shortcodes, widgets, and template hooks that let you embed auctions into pages or posts without coding.
Scalability: For high-traffic sites, evaluate server-side processing versus client-side polling. Some plugins use AJAX for real-time updates, which can strain shared hosting.
SEO and Schema Markup: Auction plugins should generate proper microdata (e.g., Product schema) to help search engines index auction items correctly.
To verify real-time bidding functionality, you can test the plugin’s AJAX endpoint by adding a simple JavaScript snippet to your site’s footer. For example, to monitor bid updates:
Pros: Full feature set, dedicated support, regular updates, better documentation.
Cons: Upfront cost, may require additional extensions for advanced functionality.
For a beginner learning how to create a WordPress auction site, a premium plugin is generally recommended. The investment ensures reliable bidding mechanics, secure payment processing, and compatibility with modern WordPress versions. If you are testing the waters, start with Auction Nudge’s free tier to understand user behavior, then migrate to a premium solution as your site grows.
Setting Up Your WordPress Site for Auctions
To successfully create a WordPress auction site, you must first establish a solid foundation. This involves installing WordPress, selecting a theme optimized for listings and bidding, and configuring core settings to support e-commerce and auction functionality. Follow these steps precisely to avoid conflicts later.
Installing WordPress and Choosing an Auction-Friendly Theme
Begin by installing WordPress through your web hosting control panel—most providers offer one-click installation via cPanel or a similar tool. After installation, choose a theme that prioritizes speed, clean layout, and compatibility with auction plugins. Avoid bloated multipurpose themes; instead, look for lightweight options like Astra, GeneratePress, or Kadence. These themes load quickly and integrate well with popular auction plugins such as WooCommerce with an auction extension, or WP Auctions. Ensure the theme supports wide layouts and has a dedicated space for product galleries, as auction items often require multiple images.
Essential WordPress Settings for E-Commerce and Auctions
Before adding any auction plugin, configure these critical WordPress settings:
Permalinks: Navigate to Settings > Permalinks and select “Post name.” This creates clean, SEO-friendly URLs for auction listings.
Reading Settings: Set your front page to a static page (e.g., “Auction Home“) to control what visitors see first.
Discussion Settings: Disable comments on pages and posts unless you plan to moderate auction discussions.
Media Settings: Set thumbnail sizes to at least 600×600 pixels to ensure clear product images.
Timezone and Date Format: Under Settings > General, match your timezone to your target market and use a date format that clearly shows auction end times (e.g., “F j, Y g:i A”).
Additionally, install an SSL certificate via your host to secure payment and user data—most hosts provide free SSL through Let’s Encrypt. Enable HTTPS in WordPress under Settings > General by updating both WordPress Address and Site Address to use “https://”.
Installing and Activating Your Chosen Auction Plugin
Selecting the right auction plugin is crucial. Below is a comparison of two reliable options for beginners.
Feature
WooCommerce + Auction Extension
WP Auctions (Simple Auction Plugin)
Base Cost
Free (WooCommerce) + $99/year (Auction extension)
Free version available; Pro from $49/year
Ease of Setup
Moderate; requires WooCommerce configuration
Simple; install and activate, minimal setup
Bidding Types
Standard, reserve, buy-it-now, proxy bidding
Standard, reserve, and automatic extensions
Payment Integration
Built-in via WooCommerce (Stripe, PayPal, etc.)
Requires separate payment gateway setup
Scalability
High; supports hundreds of auctions
Moderate; best for small to medium sites
Support & Updates
Official WooCommerce support and documentation
Developer support via forums and email
To install your chosen plugin, go to Plugins > Add New in your WordPress dashboard. Search for the plugin by name (e.g., “WooCommerce” then “Auction Extension” or “WP Auctions”). Click “Install Now” and then “Activate.” Follow the on-screen setup wizard for WooCommerce if you choose that path—it will guide you through currency, shipping, and payment options. For WP Auctions, after activation, a new “Auctions” menu will appear in your dashboard. Click it to create your first auction listing, setting a starting price, bid increment, and end time. Test the bidding process by creating a dummy auction and placing a test bid using a different browser or incognito window to ensure functionality works correctly. Verify that bid emails are sent to both the bidder and the site admin.
Configuring Auction Plugin Settings
After installing and activating your chosen auction plugin—such as WooCommerce Auctions or WP Auctions—the next critical step is configuring its core settings. These determine how your site handles currency, time, bidding rules, and payments. Below, you will find a detailed breakdown of each major setting group.
Setting Up General Auction Parameters (Currency, Time Zone, Duration)
Begin by navigating to the plugin’s settings panel, usually found under Settings > Auctions or WooCommerce > Auctions. The general parameters establish the foundation for all auctions.
Currency: Select your preferred currency from the dropdown. Most plugins support major currencies (USD, EUR, GBP, etc.). Ensure this matches the currency set in your payment gateway to avoid conversion errors.
Time Zone: Set the time zone to match your target audience’s location. For example, America/New_York for Eastern Time. This affects auction start and end times displayed to users.
Duration: Define the default auction length. Common options include 1, 3, 7, or 14 days. You can override this per auction later. Some plugins offer a “fixed end time” option instead.
Date Format: Choose between 12-hour (AM/PM) or 24-hour formats. Consistency prevents bidder confusion.
Example: To set the time zone via a code snippet in your theme’s functions.php file (if the plugin lacks an option):
Payment gateways process winning bids. Most auction plugins integrate with WooCommerce or a dedicated payment system. Follow these steps for common options:
PayPal: Go to Settings > Payments > PayPal. Enter your PayPal email or API credentials (REST API keys for live transactions). Enable “PayPal Checkout” or “PayPal Payments Standard.” Test with sandbox mode first.
Stripe: Navigate to Settings > Payments > Stripe. Enter your Publishable Key and Secret Key from the Stripe dashboard. Enable “Stripe Checkout” for a seamless experience. For recurring payments (deposits), enable “Stripe SEPA Direct Debit” if needed.
Other Gateways: Supported options include Authorize.Net, Square, and offline payments (bank transfer, cash on pickup). Configure each under its own settings tab.
Important: Under Payment Handling, set “Payment Due” to “Immediately” or “Within 48 hours” to reduce unpaid wins. Some plugins allow a “Deposit” option (e.g., 20% upfront, remainder later). Test each gateway with a $1 auction before going live.
Once your auction plugin is installed and configured, the core task is adding your first auction item. This process mirrors creating a standard post or product, but with dedicated fields for auction mechanics. Follow this walkthrough to set up a listing correctly from the start.
Adding Auction Product Details and Media
Navigate to Auctions > Add New in your WordPress dashboard. Begin by entering the auction title and a compelling description. Use the visual editor to format text, add bullet points for key features, and embed relevant links. For media, follow these steps:
Featured Image: Set a primary image in the right-hand “Featured Image” box. This appears in search results and archive pages.
Gallery Images: Scroll to the “Product Gallery” section (if using WooCommerce) or the “Auction Media” box. Click “Add to Gallery” to upload multiple high-resolution photos showing different angles, conditions, or details.
Video Embeds: Many auction plugins allow embedding a YouTube or Vimeo URL directly in the description or a custom field. Use this for demonstration videos.
Ensure all images are optimized for web (under 200 KB each) to maintain fast loading times. Avoid using placeholder images; clear, authentic visuals build bidder trust.
Setting Starting Bid, Reserve Price, and Buy Now Options
This is the financial heart of your listing. Locate the auction-specific meta box (often labeled “Auction Details” or “Auction Settings”). You will typically find these fields:
Field
Purpose
Example Value
Starting Bid
The minimum amount the first bidder can enter.
$10.00
Reserve Price
The hidden minimum price you must reach to sell. If not met, the item does not sell.
$50.00
Buy Now Price
A fixed price allowing immediate purchase, ending the auction early.
$150.00
Enter the Starting Bid as a low, attractive figure to encourage initial bids. Set the Reserve Price to your break-even or minimum acceptable amount. The Buy Now option should be higher than your expected final bid to incentivize bidding rather than immediate purchase. Some plugins also include a “Minimum Bid Increment” field; leave this at default unless you have a specific strategy.
Publishing and Previewing Your Auction Listing
Before going live, review all settings. Click the Preview button in the top toolbar to see how the listing appears to visitors. Check these elements:
Countdown timer displays correctly.
Starting bid and reserve price are visible (if allowed by plugin settings).
“Place Bid” button functions and links to the bid form.
Images load quickly and gallery navigation works.
If everything looks correct, set the Auction Duration in the meta box (e.g., 7 days, 24 hours) and choose a Start Date (usually “Immediately” or a future date). Finally, click Publish. Your auction is now live. Monitor the listing in the first few hours to ensure bid notifications and emails are working as intended. Adjust future listings based on this initial performance.
Managing Bids and User Interactions
Once your WordPress auction site is live, the real work begins in monitoring bid activity and fostering trust with participants. Most dedicated auction plugins, such as WooCommerce Auctions or WP Simple Auctions, provide a centralized dashboard where you can oversee all transactions. Effective management ensures fair play, prevents disputes, and keeps bidders engaged. Below, we break down the essential tasks for handling bids, communications, and unexpected auction changes.
Viewing and Managing Active Bids
Your plugin’s dashboard typically lists all active auctions with real-time bid data. To access this, navigate to the auction menu in your WordPress admin panel and select “Auctions” or “Bids.” From here, you can:
View the current highest bid, bidder username, and bid timestamp for each auction.
Filter bids by status (active, won, lost, or cancelled).
Manually add or remove bids if a user reports a technical issue.
Resolve disputes by reviewing the bid history and time stamps.
For example, if a bidder accidentally places a bid of $500 instead of $50, you can locate that bid in the dashboard, click “Edit,” and adjust the amount—provided the auction has not ended. Always log such changes for transparency. A practical code snippet to extend bid visibility on the frontend (using a child theme’s functions.php) might look like this:
add_filter('auction_bid_history', 'custom_bid_history_display', 10, 2);
function custom_bid_history_display($history, $auction_id) {
// Add a note to each bid entry for admin reference
foreach ($history as &$bid) {
$bid['note'] = 'Verified by admin';
}
return $history;
}
This code appends a verification note to each bid entry, helpful for audits.
Setting Up Automatic Bid Notifications
Timely communication is vital for bidder retention. Configure your plugin to send automated emails for key events:
To set these up, go to your plugin’s settings tab, look for “Email Notifications,” and enable the triggers you need. Customize the subject line and body to include the auction title and current bid amount. For instance, an outbid alert might read: “You’ve been outbid on [Item Name]. Current bid: [Amount].” Test the emails by placing a test bid on a private auction listing.
Handling Auction Extensions and Cancellations
Auctions sometimes require adjustments due to sniping (last-minute bids) or unforeseen circumstances. Most plugins offer two primary actions:
Extension: Automatically extend the auction by 2–5 minutes when a bid is placed within the final minute. Enable this in the plugin’s “Auction Rules” section under “Anti-Sniping.” You can also manually extend an auction by editing its end time in the dashboard.
Cancellation: If an item is damaged or a bidder violates terms, cancel the auction entirely. In the bid management screen, select the auction, choose “Cancel,” and optionally send a bulk notification to all bidders explaining the reason. Refund any deposits if required.
For cancellations, always document the reason in the auction notes to maintain a clear audit trail. Avoid cancelling auctions after the winning bid has been accepted, as this erodes user trust. Instead, use extensions sparingly to ensure a fair closing window for all participants.
Designing a User-Friendly Auction Interface
When you learn how to create a WordPress auction site, the design of your auction pages directly influences bidder trust and conversion rates. A cluttered or confusing layout can discourage participation, while a clean, intuitive interface encourages active bidding. Focus on clarity, speed, and visual hierarchy to guide users naturally through the auction process.
Customizing Auction Page Layouts with Page Builders
Most auction plugins for WordPress integrate seamlessly with popular page builders, giving you full control over the structure of your listing pages. Use a drag-and-drop builder to arrange key elements without touching code.
Choose a page builder that supports custom post types: Elementor, Beaver Builder, or Gutenberg with full-site editing are reliable options.
Place the auction item image prominently at the top, followed by the item title, current bid, and “Place Bid” button.
Use a two-column layout on desktop: left column for images and description, right column for bidding details and timer.
Keep the bid form and button above the fold on smaller screens to reduce friction.
Test different header styles: a sticky header with the auction timer and bid button can increase urgency.
Adding Countdown Timers and Bid History Widgets
Countdown timers create urgency, while bid history builds transparency. Both are essential for a trustworthy auction site.
Display only partial usernames (e.g., “J***n”) for privacy.
Show bid amounts
Always show the exact bid amount to maintain transparency.
Show timestamps
Include relative time (e.g., “2 minutes ago”) for quick scanning.
Number of entries
Limit the visible history to the last 10-20 bids to avoid clutter.
Auto-refresh
Enable AJAX-based auto-refresh so bidders see new bids instantly.
Place the bid history widget below the bid button or in a collapsible section to keep the primary call to action uncluttered.
Optimizing Mobile Responsiveness for Bidders
A significant portion of auction traffic comes from mobile devices. A non-responsive design will frustrate bidders and lower your conversion rate.
Test your auction pages on at least three devices: a phone (375px width), a tablet (768px), and a desktop (1280px+).
Ensure the “Place Bid” button is large enough to tap easily (minimum 44×44 pixels).
Avoid horizontal scrolling by using flexible grid layouts that stack elements vertically on small screens.
Use a sticky footer or bottom bar on mobile that contains the current bid, timer, and bid button.
Compress images for fast loading on slower mobile connections; use lazy loading for gallery images.
Reduce the number of visible fields: on mobile, consider hiding the bid history behind a toggle and showing only the most critical information first.
By implementing these design strategies, you transform your WordPress auction site from a basic listing platform into a user-friendly marketplace that encourages active participation and repeat visits. Remember that every design choice should reduce friction for the bidder, making it effortless to place a bid and track the auction’s progress.
Running a successful WordPress auction site demands more than a sleek interface and functional bidding. Security is the bedrock of user trust. Fraud, from fake accounts to payment theft, can destroy your reputation overnight. This section outlines three critical areas to fortify your platform: user verification, anti-sniping measures, and data protection. By implementing these best practices, you create a safe environment that encourages participation and protects your business.
Allowing anonymous bidding invites fraud. Start by requiring mandatory registration with email verification. Use a plugin like User Verification or WP-Members to send confirmation links. For higher-value auctions, consider additional layers:
Phone number verification: Use services like Twilio to send one-time codes.
CAPTCHA: Integrate Google reCAPTCHA or hCaptcha on registration forms to block bots.
Manual approval: For sensitive categories (e.g., art, vehicles), enable admin review of new accounts.
Profile completion: Require fields like full name and address before bidding is allowed.
Regularly audit inactive accounts. A plugin like Bulk Delete can remove unverified users after 30 days, reducing attack surfaces.
Preventing Bid Sniping with Auto-Extend Features
Bid sniping—placing a last-second bid to win—frustrates genuine bidders and can indicate automated fraud. The industry-standard countermeasure is an auto-extend feature. This works by adding a fixed time (e.g., 2–5 minutes) to the auction clock whenever a bid is placed in the final moments. For example, if a bid comes at 2 seconds remaining, the timer resets to 2 minutes. This gives others a fair chance to respond.
Consider the following comparison of common approaches:
Feature
Auto-Extend (Soft Close)
Hard Close (Fixed End Time)
Prevents sniping
Yes – timer extends with late bids
No – last-second bid wins
User experience
Fairer, reduces frustration
Can feel unfair, rewards speed
Implementation
Requires plugin or custom code
Default in most auction plugins
Fraud risk
Lower – discourages automated sniping
Higher – bots can exploit timing
Plugins like Ultimate Auction or Auction Plugin for WooCommerce offer built-in auto-extend settings. Test with a 3-minute extension for optimal balance.
Securing Payment Transactions and User Data
Payment processing and data storage are prime targets. Use these measures to lock down sensitive information:
SSL certificate: Install HTTPS across your entire site. Most hosts include free Let’s Encrypt SSL.
Payment gateway: Use PCI-DSS compliant processors like Stripe or PayPal. Never store full credit card numbers on your server.
Tokenization: Ensure the gateway returns a token instead of raw card data.
Data encryption: Encrypt user data at rest using your host’s database encryption or plugins like WP Encryption.
Regular backups: Schedule automated backups of your database and files to an offsite location (e.g., cloud storage).
Two-factor authentication (2FA): Enable 2FA for admin accounts using plugins like Wordfence or Google Authenticator.
Finally, keep WordPress, themes, and plugins updated. Outdated software is the leading cause of site breaches. A security plugin like Sucuri or iThemes Security can provide real-time monitoring and firewall protection. By layering these defenses, you build a resilient auction platform that users trust and return to.
Promoting and Growing Your Auction Site
Attracting both bidders and sellers to your WordPress auction site requires a deliberate, multi-channel approach. Without a steady flow of participants, even the best-designed auction platform will stagnate. Focus on three core areas: making your listings discoverable, engaging potential users where they already spend time, and fostering loyalty that turns first-time visitors into regulars. Below are actionable strategies to build momentum and sustain growth.
SEO Tips for Auction Listings
Search engine optimization is critical for auction sites because each listing represents a unique opportunity to capture organic traffic. Start by ensuring every auction item has a unique, descriptive title that includes relevant keywords—avoid generic labels like “Vintage Lamp” in favor of “Art Deco Brass Table Lamp, 1920s.” Write compelling meta descriptions (under 160 characters) that include the auction end date and starting bid to encourage clicks.
For technical SEO, use a plugin like Yoast SEO or Rank Math to generate XML sitemaps and control canonical URLs. Structure your site with clean permalinks (e.g., /auction/vintage-brass-lamp/) and enable breadcrumbs for navigation. To handle duplicate content from expired listings, redirect them to a “Past Auctions” archive or a relevant category page. Below is a sample snippet to add to your theme’s functions.php file to automatically redirect expired auction posts to a custom page:
Optimize images by compressing them with a plugin like Smush and adding alt text that describes the item. Finally, encourage user-generated content by allowing bidders to leave reviews or questions on listings—this adds fresh, keyword-rich text to your pages.
Leveraging Social Media and Email Marketing
Social media platforms are ideal for showcasing items visually and driving time-sensitive engagement. Use Instagram and Pinterest to post high-quality images of featured auctions with direct links to the listing. On Facebook and Twitter, create countdown posts for auctions ending soon, and use hashtags like #AuctionAlert or #VintageFind to reach niche communities. Consider running a small ad campaign targeting users interested in collectibles, antiques, or specific product categories.
Email marketing is equally powerful for nurturing leads. Build a subscriber list by offering a small incentive, such as a bid credit or early access to new listings. Segment your audience into bidders and sellers, then send tailored campaigns:
Email Type
Content
Trigger
Bidder Digest
Top 5 ending soon auctions
Daily at 9 AM
Seller Tips
Best practices for pricing
Weekly newsletter
Win Alerts
Congratulations + payment info
Immediately after winning
Use a tool like Mailchimp or Sendinblue to automate these sequences. Always include a clear call-to-action button, such as “Place Your Bid Now” or “List Your Item,” and track open rates to refine your subject lines.
Building a Community of Repeat Users
Repeat users are the backbone of a thriving auction site. Foster loyalty by creating a sense of belonging and rewarding engagement. Start a user forum or a Facebook group where bidders can discuss items, share tips, and preview upcoming auctions. Feature top bidders or sellers in a monthly “Spotlight” post on your blog or social media—this recognition encourages others to participate more actively.
Implement a simple loyalty program using a plugin like myCred or GamiPress. Award points for actions such as placing a bid, winning an auction, or referring a friend. Points can be redeemed for free listings, bid credits, or exclusive access to premium auctions. Send personalized notifications when a user is outbid or when a favorite category has new items—these small touches make users feel valued. Finally, solicit feedback through short surveys after each auction and act on common requests, such as extending bidding times or adding new payment options. By consistently delivering value and recognition, you convert casual visitors into dedicated community members who drive organic growth through word-of-mouth.
Troubleshooting Common Issues and Next Steps
Even with a carefully built WordPress auction site, problems can arise. Below are solutions to the most frequent issues beginners face, along with guidance on scaling your platform. Addressing these early ensures a smooth experience for both you and your bidders.
Resolving Plugin and Theme Conflicts
Plugin and theme conflicts are the most common source of errors. Symptoms include broken auction pages, missing bid buttons, or the site failing to load entirely. To diagnose and fix conflicts:
Deactivate all plugins except your auction plugin. If the issue resolves, reactivate plugins one by one, testing after each activation, to identify the culprit.
Switch to a default WordPress theme (e.g., Twenty Twenty-Four). If the problem disappears, your theme may be incompatible. Contact the theme developer or choose a more flexible option like Astra or GeneratePress.
Check for JavaScript errors using your browser’s developer console (F12). Errors often point to specific scripts causing bid or timer failures.
Update everything—WordPress core, plugins, and theme—to the latest versions. Outdated software is a common source of conflicts.
If conflicts persist, consider using a staging site to test changes safely before applying them to your live site.
Fixing Payment Gateway Integration Issues
Payment failures can frustrate users and cost you revenue. Common causes include incorrect API keys, SSL certificate problems, and gateway-specific settings. Follow these steps to resolve them:
Issue
Likely Cause
Solution
Payments not processing
Wrong API keys or test mode enabled
Verify keys in your payment gateway dashboard and disable test mode.
SSL certificate error
Site not using HTTPS
Install a free SSL via your hosting provider or plugin like Really Simple SSL.
Currency mismatch
Gateway set to a different currency than your auction plugin
Ensure both use the same currency (e.g., USD).
Webhook failures
Incorrect webhook URL in gateway settings
Copy the exact webhook URL from your auction plugin settings into the gateway’s dashboard.
Always test payments with a small amount in sandbox mode before going live. If issues persist, consult your payment gateway’s support documentation or your hosting provider.
Scaling Your Auction Site with Advanced Features
Once your site runs smoothly, consider these features to grow your audience and revenue:
Implement a bidding proxy system that automatically places bids on behalf of users up to their maximum, increasing engagement.
Add live auction capabilities using plugins like WP Auctions or Auction Nudge, which sync real-time bids and extend time when a bid is placed.
Integrate email notifications for outbid alerts, auction ending soon, and winning bid confirmations via services like Mailchimp or Brevo.
Optimize for mobile users with a responsive design and fast loading times, as over 60% of bidding often occurs on phones.
Use caching and a CDN (e.g., Cloudflare) to handle traffic spikes during popular auctions without slowing down your site.
Introduce membership tiers for premium features like early access or reduced fees, using plugins like Paid Memberships Pro.
Monitor your site’s performance with tools like Google Analytics and Query Monitor. As traffic grows, upgrade your hosting plan to a managed WordPress solution or a dedicated server for reliability. By systematically troubleshooting and scaling, your auction site can become a thriving marketplace.
Frequently Asked Questions
What is a WordPress auction site?
A WordPress auction site is a website built on the WordPress platform that allows users to list items for auction, place bids, and manage sales. It uses plugins like WooCommerce with auction extensions or dedicated auction plugins to add bidding functionality. This setup is ideal for beginners because WordPress offers an intuitive interface, extensive plugin ecosystem, and customizable themes. Auction sites can range from single-item sales to multi-vendor marketplaces, making them versatile for various business models.
Which plugins are best for creating an auction site in WordPress?
Popular plugins include WooCommerce with the Auction Products add-on, WP Auctions, and Ultimate Auction for WooCommerce. WooCommerce is widely used due to its robust e-commerce features, while WP Auctions offers a simpler solution for single auctions. For multi-vendor sites, Dokan or WC Vendors can integrate with auction plugins. Each plugin has different pricing and features, so evaluate based on your needs like real-time bidding, automatic extensions, or payment gateways.
Do I need coding skills to build a WordPress auction site?
No, you do not need coding skills. WordPress allows you to build a fully functional auction site using themes and plugins. Many auction plugins come with drag-and-drop interfaces and pre-built templates. However, basic familiarity with WordPress dashboard, installing plugins, and configuring settings is helpful. For customizations, you can use visual builders or hire a developer for advanced changes.
How do I set up payment gateways for an auction site?
You can set up payment gateways like PayPal, Stripe, or bank transfers using plugins such as WooCommerce Payments or dedicated payment gateway plugins. These integrate with auction plugins to process payments after winning bids. Configure the gateway in your WordPress admin under WooCommerce > Settings > Payments. Ensure the gateway supports your currency and region, and test transactions before launching.
Can I run a multi-vendor auction site with WordPress?
Yes, you can create a multi-vendor auction site using plugins like Dokan, WC Vendors, or YITH WooCommerce Multi Vendor in combination with auction plugins. These allow multiple users to list items, manage bids, and handle payments. Setup involves installing a multi-vendor plugin, configuring commission rates, and enabling auction features. This is suitable for marketplace-style auction platforms.
How do I ensure my auction site is secure?
Use strong passwords, keep WordPress and plugins updated, install a security plugin like Wordfence or Sucuri, and enable SSL certificates. For auction sites, secure payment gateways and protect user data with encryption. Regularly back up your site and monitor for suspicious activity. Also, use plugins that follow WordPress coding standards to minimize vulnerabilities.
What are the key features to include in an auction site?
Essential features include user registration, item listing with images and descriptions, real-time bidding, automatic bid extensions, auction countdown timers, bid history, and payment integration. Additional features like email notifications, reserve prices, buy-it-now options, and mobile responsiveness enhance user experience. Choose plugins that offer these features to create a professional auction site.
Promote your auction site using SEO optimization, social media marketing, email newsletters, and paid ads. Create engaging content about your auctions, leverage Google Shopping for products, and encourage user reviews. Use WordPress SEO plugins like Yoast to improve visibility. Building a community around your niche can also drive traffic and repeat bidders.
Introduction: Why Smart Search Matters for WordPress Sites
Search is the backbone of user experience on content-rich websites. For WordPress sites—whether blogs, e-commerce stores, or membership portals—the default search functionality often falls short. It struggles with misspelled queries, ignores relevance scoring, and returns flat, unsorted results. This leads to frustrated visitors, higher bounce rates, and lost conversions. Smart search integration bridges this gap by delivering instant, intuitive, and context-aware results. Algolia, a leading search-as-a-service platform, redefines what WordPress search can achieve. By replacing the native query system with a real-time, typo-tolerant, and faceted search engine, site owners can unlock speed, relevance, and scalability that native WordPress simply cannot match. This article explores the limitations of default search, what Algolia brings to the table, and the key benefits that make it a transformative tool for modern WordPress sites.
The Problem with Native WordPress Search
WordPress’s built-in search relies on SQL LIKE queries against the wp_posts table. While functional, this approach introduces several critical limitations:
Lack of typo tolerance: A single misspelled word—like “reciepe” instead of “recipe”—returns zero results, frustrating users.
No relevance ranking: Results are ordered by date, not by how well they match the query. Older, less relevant posts often appear before newer, more pertinent content.
Slow performance on large sites: As the database grows, queries become sluggish, especially on shared hosting or sites with thousands of posts.
No faceted filtering: Users cannot narrow results by category, tag, price, or custom fields without custom code or plugins.
Indexing limitations: Native search excludes custom post types, metadata, and taxonomy terms unless explicitly added via hooks.
These shortcomings degrade the user experience, particularly on e-commerce stores where customers expect fast, accurate product discovery. For content sites, visitors may abandon the site entirely after a failed search attempt.
What Algolia Brings to the Table
Algolia replaces the native search engine with a hosted, API-first solution built for speed and precision. Its integration with WordPress—via plugins like Algolia Search or WP Search with Algolia—transforms the search experience through several core features:
Real-time search: Results appear as the user types, with sub-100-millisecond response times.
Typo tolerance: Algolia automatically corrects misspellings and handles synonyms, ensuring queries like “aluminum” or “aluminium” return the same results.
Faceted search: Users filter results by attributes such as price range, category, author, or custom fields, enabling drill-down navigation.
Custom ranking: Sort results by popularity, recency, or custom metrics (e.g., sales count or user ratings).
Instant indexing: Content is indexed automatically via cron jobs or webhooks, keeping the search cache fresh without manual intervention.
The integration works by syncing WordPress content—posts, pages, products, custom post types, and metadata—to Algolia’s cloud servers. The plugin handles the data mapping, allowing site owners to control which fields are searchable and how they are ranked.
Key Benefits: Speed, Relevance, and Scalability
Adopting Algolia for WordPress search delivers three primary advantages:
Results render in under 100 milliseconds, even on complex queries with multiple filters.
Reduces load on the database; improves perceived performance and Core Web Vitals scores.
Relevance
Typo tolerance, synonym matching, and custom ranking ensure users find what they need, even with vague or incorrect input.
Increases conversion rates and reduces bounce rates; enhances user satisfaction.
Scalability
Algolia handles millions of records and thousands of queries per second without performance degradation.
Supports traffic spikes (e.g., Black Friday) and large content libraries without slowdowns.
Beyond these core benefits, Algolia’s analytics dashboard provides insights into popular queries, zero-result searches, and click-through rates, enabling continuous optimization. For WordPress site owners, this means moving from a static, error-prone search to a dynamic, intelligent discovery tool that grows with their audience. The result is a seamless user journey that keeps visitors engaged and drives measurable business outcomes.
Understanding Algolia’s Core Features for WordPress
Integrating Algolia with WordPress transforms a standard search experience into a dynamic, user-driven discovery tool. Algolia is not merely a search engine; it is a search-as-a-service platform that offloads indexing and query processing from your WordPress database, delivering results in milliseconds. For site owners, this means visitors find content faster, with less friction, and with greater relevance. The core of this power lies in three foundational capabilities: instant search, faceted filtering, and intelligent error handling. By understanding these features, you can tailor search to match your content strategy and user expectations.
Instant Search and Autocomplete
Instant search is Algolia’s hallmark. As a user types, results appear in real time, without requiring a page reload or a button click. In WordPress, this is achieved by sending each keystroke to Algolia’s API, which returns matching records from your indexed posts, pages, custom post types, or even user-generated content. The autocomplete feature extends this by suggesting full queries or popular terms before the user finishes typing.
Key benefits for WordPress sites include:
Reduced bounce rates: Users find what they need within seconds, decreasing frustration.
Increased engagement: Autocomplete exposes related content, encouraging deeper browsing.
Mobile-friendly performance: Instant results require minimal user input, ideal for smaller screens.
To implement instant search, you typically enqueue Algolia’s JavaScript library and configure an input field. A simplified setup might look like this in your theme’s functions.php:
Faceted filtering allows users to narrow results by attributes such as category, author, date, or custom taxonomy. In WordPress, you can configure Algolia to index these attributes as facets, enabling visitors to refine searches with a single click. For example, an e-commerce site might let users filter by price range or product type. Custom ranking complements this by letting you define the order of results based on business logic—such as promoting newer posts, featured items, or higher-rated content—rather than relying solely on textual relevance.
Algolia processes these rankings in a tiered system: first by text relevance, then by custom ranking, then by any additional attributes like distance or popularity. This ensures that the most important content rises to the top, even when search terms are broad.
Typo Tolerance and Synonym Management
One of Algolia’s most user-friendly features is typo tolerance. It automatically corrects common misspellings, transposed letters, and phonetic errors without requiring exact matches. For a WordPress site, this means a visitor searching for “reciepe” will still find “recipe” posts. You can configure the tolerance level—for example, allowing up to two typos for longer words—and even disable it for specific fields like SKU numbers. Synonym management extends this flexibility by letting you define word equivalences. For instance, you can group “car,” “automobile,” and “vehicle” so that searching for any of these terms returns all relevant results. In WordPress, synonyms are managed through Algolia’s dashboard or API, and they apply globally across your indexed content. This reduces the need for manual tag curation and ensures search remains comprehensive without extra database overhead.
Prerequisites for Integrating Algolia with WordPress
Before integrating Algolia with your WordPress site, you must ensure your environment meets specific technical requirements and that you have the necessary accounts and tools prepared. This section outlines the foundational steps, from verifying your WordPress setup to choosing between a plugin or custom code approach. Proper preparation prevents common integration pitfalls such as API mismatches, plugin conflicts, or indexing failures.
WordPress Environment and Plugin Compatibility
Algolia’s official WordPress plugin and custom integration scripts require a modern, stable WordPress installation. Verify the following before proceeding:
WordPress version: Use WordPress 5.0 or later. The Algolia plugin relies on the WP REST API and modern PHP functions that are not available in older releases. Check your version under Dashboard > Updates.
PHP version: PHP 7.4 or higher is strongly recommended. Algolia’s client libraries use PHP 7+ features, and older PHP versions (e.g., 5.6) are no longer supported by the plugin.
Hosting requirements: Your host must support outgoing HTTPS connections to https://*.algolia.net and allow PHP memory of at least 128MB for indexing large content sets. Shared hosting with strict firewall rules may block these connections; test with a simple cURL request.
Plugin compatibility: The Algolia plugin works alongside most popular SEO, caching, and page builder plugins. However, custom post type plugins or complex taxonomy structures may require additional configuration. Test in a staging environment first.
Creating an Algolia Account and Obtaining API Keys
An Algolia account is free for initial testing and low-traffic sites. Follow these steps:
Visit algolia.com/signup and create an account using your email or a Google/GitHub login.
After verifying your email, log in to the Algolia dashboard. You will be prompted to create your first application. Name it something descriptive (e.g., “My WordPress Search”).
Navigate to Settings > API Keys in the left sidebar. You will see four key types:
Application ID – A public identifier for your app.
Search-Only API Key – Used on the frontend for search queries; safe to expose.
Admin API Key – Used for indexing and configuration; keep this secret.
Copy your Application ID and Admin API Key. Store them securely (e.g., in a password manager or environment variables). Do not commit them to version control.
Choosing the Right Integration Method: Plugin vs. Custom Code
Selecting the correct integration approach depends on your technical comfort and the complexity of your search requirements. The table below compares the two primary methods.
Feature
Official Algolia Plugin
Custom Code Integration
Ease of setup
Install and activate from WordPress repo; configure via settings page.
Requires PHP and JavaScript development; manual API calls.
Indexing control
Automatic indexing of posts, pages, and custom post types with filters.
Full control over which data is sent, indexed, and transformed.
Search UI customization
Provides default autocomplete and instant search templates; limited CSS override.
Build custom search UI using Algolia’s JavaScript libraries (InstantSearch.js, Autocomplete.js).
Maintenance
Plugin updates handle API changes; no manual code changes needed.
You must update API client libraries and handle breaking changes.
Performance
Optimized for most use cases; may be slower for very large sites with complex data.
Can be fine-tuned for maximum performance and minimal overhead.
Best for
Non-developers, small to medium sites, or quick implementation.
Developers, large sites with unique data structures, or advanced search features.
For most users, the official plugin (available as “Algolia Search” in the WordPress plugin directory) is the recommended starting point. It handles indexing, search, and autocomplete out of the box. Custom code is advisable only if you need to index non-WP data (e.g., external APIs), implement complex faceting, or integrate with a custom theme that requires full control over the search interface.
Step-by-Step Setup Using the Official Algolia Plugin
Integrating Algolia with WordPress transforms your site’s search from a basic keyword match into a lightning-fast, typo-tolerant experience. The official WP Search with Algolia plugin makes this process straightforward, even for users with limited technical background. This guide walks you through the essential steps to install, configure, and sync your content so you can deploy smart search on your WordPress site.
Begin by installing the plugin directly from your WordPress dashboard. Navigate to Plugins > Add New and search for “WP Search with Algolia.” The plugin is developed by the Algolia team and is free to use. Install and activate it as you would any other plugin. Once activated, you will see a new “Algolia Search” menu item appear in your WordPress admin sidebar. No code is required for this step—just a few clicks to get started.
Before proceeding, ensure you have an Algolia account. If you do not have one, sign up at algolia.com (a free tier is available, which includes 10,000 search requests and 10,000 records per month—sufficient for most small to medium sites). You will need your Application ID, Search-Only API Key, and Admin API Key from the Algolia dashboard (found under API Keys in your Algolia account). Keep these credentials handy.
Configuring API Keys and Indexing Settings
After activating the plugin, go to Algolia Search > Settings in your WordPress admin panel. Here, you will enter your Algolia credentials:
Application ID – The unique identifier for your Algolia application.
Search-Only API Key – Used for front-end search requests (safe to expose in client-side code).
Admin API Key – Used to manage indices and settings from the backend (keep this private).
Paste these values into the corresponding fields and click “Save API Keys.” Once saved, the plugin will verify the connection. If successful, you can proceed to configure which content types should be indexed. Under the same settings page, you will see a section labeled “Indexing.” By default, the plugin indexes WordPress posts, pages, and media attachments. You can enable or disable specific post types (e.g., custom post types, products if using WooCommerce) by checking the appropriate boxes. Additionally, you can choose to index taxonomies (categories, tags) and set the number of records per indexing batch (default is 50, which balances performance and server load).
Running the Initial Index and Testing Search
With API keys saved and indexing settings configured, you are ready to push your content to Algolia. Navigate to Algolia Search > Indexing in the WordPress admin. Here, you will see a list of content types you selected for indexing. Click the “Index all posts” button (or the equivalent for your chosen post types) to start the initial sync. This process sends your existing content to Algolia’s servers in batches. Depending on your site size, this may take a few seconds to several minutes. You can monitor progress via a progress bar on the same page.
For developers or advanced users, the plugin also supports manual reindexing via WP-CLI. If you have command-line access, you can run the following command to reindex all content:
Replace “posts” with the post type slug you wish to reindex (e.g., “page” for pages, “product” for WooCommerce products). This is useful for automated deployments or large-scale updates.
Once the index is complete, test your search by visiting your site’s front end. The plugin automatically replaces the default WordPress search with Algolia’s instant search experience. Type a query—try a common term and a deliberate typo (e.g., “wrodpress” instead of “wordpress”). You should see fast, relevant results with typo tolerance. If results do not appear, return to the plugin settings to confirm your API keys are correct and that the index contains records (you can verify this in your Algolia dashboard under the “Indices” tab).
With these steps completed, your WordPress site now benefits from Algolia’s powerful search capabilities, improving user experience and engagement.
Customizing Search Indexes for Better Relevance
To maximize the value of your WordPress and Algolia integration, you must move beyond default indexing. Out-of-the-box configurations often index every post, page, and comment, which can dilute search relevance. Fine-tuning your search indexes ensures that users find exactly what they need, prioritizing high-value content. By selecting precise post types, adjusting ranking weights, and controlling content inclusion, you can transform a generic search into a smart, context-aware tool that drives engagement and conversions.
Selecting Post Types and Taxonomies to Index
Not all content deserves equal representation in your search index. Start by evaluating your WordPress site’s structure. Common post types include posts, pages, products, and custom types like portfolios or testimonials. Use the Algolia plugin settings or custom code to choose which post types appear in search results. For example, an e-commerce site may index only products and categories, excluding blog posts to reduce noise.
Taxonomies—such as categories, tags, and custom taxonomies—add contextual depth. Indexing relevant taxonomies allows users to filter results by topic, improving discovery. However, avoid indexing every taxonomy; focus on those that align with user intent. For instance, a recipe site might index “cuisine” and “meal type” taxonomies but skip “post tags” for clarity.
Use the following checklist when configuring post types and taxonomies:
Identify primary content types: List all post types on your site (e.g., post, page, product, event).
Map user search goals: Determine which content types users most frequently seek.
Select supporting taxonomies: Choose taxonomies that enhance filtering without overcomplicating results.
Test with real queries: Validate that selected types and taxonomies return relevant results.
Setting Custom Ranking Attributes and Weights
Algolia’s ranking system allows you to prioritize content based on custom attributes, moving beyond simple text relevance. After selecting post types, define ranking attributes that reflect your site’s priorities. Common attributes include publication date, popularity (e.g., view count), custom fields (e.g., price, rating), or custom metadata.
Assign weights to each attribute to control their influence. For example, a news site might set “date” as the primary ranking attribute with a weight of 10, while “relevance” (text match) gets a weight of 5. This ensures recent articles appear first. In contrast, a review site might weight “rating” at 8 and “relevance” at 7, prioritizing highly rated content.
Below is an example of how to configure ranking attributes and weights in Algolia:
Ranking Attribute
Weight
Use Case
Date (published)
10
News, blogs, time-sensitive content
Custom field (price)
8
E-commerce, product comparisons
Popularity (view count)
6
Content discovery, trending topics
Relevance (text match)
5
General search accuracy
Adjust these weights incrementally, testing with sample queries to ensure the desired content surfaces first. Use Algolia’s dashboard or API to fine-tune without full reindexing.
Excluding or Boosting Specific Content
Precise control over individual items within indexed post types is essential for relevance. You can exclude entire posts, pages, or custom entries that are outdated, low-quality, or redundant. For instance, exclude draft posts, password-protected pages, or archived events. Similarly, boost high-value content—such as featured products, cornerstone articles, or premium resources—to ensure they appear prominently.
Implement exclusion and boosting using Algolia’s custom ranking rules or by adding metadata to your WordPress content. For example, add a custom field like _algolia_exclude with value “true” for items to skip. Alternatively, use a “boost_score” field with numeric values (e.g., 1 to 100) to elevate specific entries. Boosted items appear before others with identical relevance scores.
Common strategies include:
Exclude: Remove duplicate content, expired promotions, or author bios from search results.
Boost: Increase ranking for “best-seller” products, flagship blog posts, or landing pages.
Pin: Use Algolia’s “pinned” feature to fix certain results to the top of searches for specific queries.
By combining exclusion and boosting, you create a search experience that surfaces only the most relevant, authoritative content, reducing user friction and improving satisfaction.
Integrating a live search experience with Algolia in WordPress transforms how users find content. By adding instant results and autocomplete suggestions directly into your theme, you reduce friction and keep visitors engaged. This section walks through the practical steps to set up a search bar that responds as users type, including styling the results and handling scenarios where no match is found.
Adding the Search Bar with Autocomplete
To begin, you need to enqueue the required Algolia autocomplete library and instantiate the search widget in your theme. The following example assumes you have the Algolia plugin installed and configured. Add this code to your theme’s functions.php or a custom plugin file:
Then, place the search container in your theme template, for example in header.php:
<div id="algolia-search-box"></div>
This setup creates an autocomplete input that queries your Algolia index and displays clickable suggestions. Replace YOUR_APP_ID and YOUR_SEARCH_API_KEY with your actual Algolia credentials.
Styling Instant Search Results
Once the autocomplete is functional, you must style the dropdown to match your theme. Algolia’s autocomplete library injects HTML elements with specific classes. Use the following CSS as a starting point, added to your theme’s stylesheet:
For instant results that update as the user types, consider using Algolia’s instantsearch.js widget. Below is a minimal example that displays results in a separate container:
When a user submits an empty query, the search interface should gracefully show helpful content rather than an error. Implement fallbacks using Algolia’s emptyQuery parameter or by checking the query length in your autocomplete logic. For example, in the autocomplete configuration, add a condition to show popular posts or categories when the query is empty:
By combining these techniques, your WordPress site will deliver a fast, intuitive search experience that keeps users on the path to discovery.
Advanced Features: Faceted Filters and Analytics
When you integrate WordPress and Algolia: Smart Search Integration, the real power emerges in advanced features that transform search from a simple lookup into a discovery engine. Faceted filters let users drill down through product attributes or post categories, while Algolia’s analytics provide actionable insights into what visitors are actually looking for. Below, we explore how to set up faceted navigation and leverage analytics to refine your search experience.
Setting Up Faceted Filters for Products or Posts
Faceted filters, also known as faceted navigation, allow users to narrow search results by specific attributes such as price range, color, category, or tags. For e‑commerce sites, this is essential for product discovery; for content sites, it helps readers find articles by topic, date, or author. To enable faceted filters with Algolia in WordPress:
Define your facets in the Algolia dashboard under the “Indices” settings. For products, common facets include “Price,” “Brand,” “Category,” and “Size.” For posts, use “Category,” “Tags,” “Author,” or “Publish Date.”
Map WordPress fields to Algolia attributes using a plugin like WP Search with Algolia. In the plugin settings, assign custom fields (e.g., _price for WooCommerce products) as “searchable attributes” and then enable them as “facets” in the dashboard.
Configure the front-end display with Algolia’s InstantSearch.js library. In your theme, add a widget or template that renders checkboxes, sliders, or dropdowns for each facet. For example, a price slider uses the rangeSlider widget, while categories use refinementList.
Test and refine by searching with different filter combinations. Ensure that faceted counts update dynamically and that “disjunctive” (OR) filtering is enabled for multi-select facets like tags.
For WordPress, avoid indexing irrelevant data—only facet on attributes that users actually filter by. Common pitfalls include indexing too many facets (slowing down the search) or not marking numeric facets (like price) as “numeric” in Algolia’s settings.
Using Algolia’s Search Analytics Dashboard
Algolia’s analytics dashboard provides a comprehensive view of how users interact with your search. To access it, navigate to the “Analytics” tab in your Algolia application. Key metrics include:
Search Volume: Total number of searches over time, broken down by query.
Click-Through Rate (CTR): Percentage of searches that result in a click on a result.
No Results Rate: Queries that returned zero results—often indicating missing content or poor indexing.
Top Queries: Most frequent search terms, which reveal user intent and content gaps.
Conversion Rate: If integrated with e‑commerce, tracks how often a search leads to a purchase or sign-up.
Use this data to identify trends: if “red shoes” is a top query but no results appear, consider adding a “red” color facet or indexing product descriptions more thoroughly. The “Click Analysis” report shows which results users click for specific queries, helping you adjust ranking or add synonyms.
A/B Testing Ranking Configurations
Algolia allows you to run A/B tests on different ranking configurations to optimize search relevance. This is critical for balancing precision (exact matches) with recall (broad matches). To set up an A/B test:
Create two variants of your search index: a control (current settings) and a treatment (new ranking rules, such as boosting “in stock” products or prioritizing recent posts).
Define the test parameters in the Algolia dashboard under “A/B Testing.” Set a traffic split (e.g., 50% control, 50% treatment) and a duration (typically 1–2 weeks for statistical significance).
Monitor metrics like CTR, conversion rate, and average click position. Algolia automatically calculates the winner based on a confidence interval (usually 95%).
Implement the winning configuration once the test concludes. For example, if boosting “in stock” products increases conversions by 20%, apply that ranking rule permanently.
Common ranking tweaks to test include: prioritizing exact phrase matches, boosting recent content by a “date” attribute, or downranking out-of-stock items. Always run tests on a subset of traffic to avoid negatively impacting all users.
Integrating WordPress and Algolia for smart search requires careful performance tuning to balance speed, server load, and data freshness. Without optimization, every keystroke can trigger a server request, overwhelming your WordPress backend and degrading user experience. The following strategies focus on reducing unnecessary network calls, leveraging Algolia’s global CDN, and managing index updates to stay within rate limits while delivering near-instant search results.
Reducing Server Requests with InstantSearch.js
The InstantSearch.js library is designed to handle search queries entirely on the client side after the initial index load. By implementing it correctly, you can eliminate redundant requests to your WordPress server. Key practices include:
Use the Algolia search client directly instead of proxying queries through WordPress. This sends requests straight to Algolia’s API endpoints, bypassing your server entirely.
Debounce user input with a delay of 200–300 milliseconds to avoid sending a request for every character typed. InstantSearch.js includes built-in debouncing via its searchFunction option.
Enable query suggestions and autocomplete to pre-fetch popular search terms, reducing the need for repeated server calls for common queries.
A typical implementation reduces server requests by over 90% compared to a traditional WordPress search that hits the database on each query.
Implementing Client‑Side Caching
Client-side caching stores search results locally in the user’s browser, reducing the number of API calls to Algolia and improving perceived performance. Two effective approaches are:
LocalStorage caching: Store serialized search results with a timestamp. Set a time-to-live (TTL) of 5–10 minutes for general queries, and shorter (1–2 minutes) for time-sensitive content like news or events.
Service Worker caching: For progressive web apps, use a service worker to intercept search requests and serve cached responses. This works offline and can be configured with a stale-while-revalidate strategy.
Below is a comparison of these two caching methods:
Caching Method
Storage Location
TTL Flexibility
Offline Support
Implementation Complexity
LocalStorage
Browser memory
High (per-query)
No
Low
Service Worker
Browser cache API
Medium (global rules)
Yes
High
For most WordPress sites, LocalStorage caching offers the best balance of simplicity and performance, especially when combined with Algolia’s CDN.
Scheduling Index Updates to Avoid Rate Limits
Algolia imposes rate limits on indexing operations—typically 10–100 operations per second depending on your plan. To stay within these limits while keeping search results fresh, schedule updates strategically:
Batch updates: Group multiple content changes (e.g., new posts, edits, deletions) into a single API call using Algolia’s saveObjects or deleteObjects methods. This reduces the number of operations.
Use WordPress cron jobs: Schedule index updates during low-traffic hours (e.g., 2:00 AM server time). Run a batch job every 15–30 minutes rather than on every save.
Implement differential indexing: Only re-index content that has changed since the last update. Use WordPress post modified timestamps to filter updates, avoiding full re-indexes.
Monitor API usage: Log the number of indexing operations per hour and set alerts when approaching 80% of your plan’s limit. Algolia’s dashboard provides real-time metrics.
By batching updates and scheduling during off-peak hours, you can maintain fresh search results without hitting rate limits or overloading your server.
Integrating WordPress and Algolia for smart search functionality generally proceeds smoothly, but occasional issues can disrupt indexing, search results, or plugin compatibility. Below are solutions to the most frequent problems, organized by symptom. Always start by verifying your Algolia application ID and API key credentials in the plugin settings, as incorrect keys cause nearly all connection failures.
Debugging Index Synchronization Errors
Index synchronization errors occur when WordPress posts, pages, or custom post types fail to upload to your Algolia index. Common causes include server timeout limits, memory constraints, or corrupted data in specific records.
Check server resources: Increase PHP memory limit to at least 256MB and execution time to 300 seconds in your wp-config.php file: define('WP_MEMORY_LIMIT', '256M'); set_time_limit(300);
Review error logs: Enable WP_DEBUG in wp-config.php (define('WP_DEBUG', true);) and check the debug.log file for specific indexing failures, such as serialization errors or invalid UTF-8 characters.
Reindex specific content: Use the plugin’s “Push All” button in the settings dashboard, or manually reindex a single post by editing and saving it. If a particular post fails, inspect its content for broken shortcodes or unclosed HTML tags.
Verify Algolia plan limits: Free Algolia plans cap records at 10,000. If your site exceeds this, upgrade or reduce indexed content via the plugin’s post type filters.
Fixing Missing or Incomplete Search Results
When search results are missing or show incomplete data, the issue usually lies in index settings or data mapping. Start by confirming that the Algolia dashboard reflects your WordPress content count.
Problem
Solution
No results for specific terms
Check that the searchable attributes in Algolia’s dashboard include the relevant fields (e.g., title, content, tags). Re-push the index after changes.
Results missing custom fields
In the plugin settings, enable “Display Custom Fields” under the “Attributes to Index” section. Then reindex.
Incomplete or truncated content
Increase the “Content Excerpt Length” in Algolia’s dashboard (default is 200 characters). Alternatively, adjust the algolia_should_index_post filter in your theme’s functions.php to include full content.
Results not updating after content changes
Ensure the “Auto Index” option is enabled in the plugin settings. For scheduled posts, manually trigger a reindex after publication.
If results still appear incomplete, use Algolia’s “Browse” tool in the dashboard to inspect raw records. Look for missing fields or malformed data, then correct the source content in WordPress.
Resolving Plugin Conflicts with Other Search Tools
Third-party search plugins (e.g., Relevanssi, SearchWP, or Jetpack Search) often conflict with Algolia because they modify WordPress’s default search query. Symptoms include blank search pages, duplicate results, or Algolia not being used at all.
Disable conflicting plugins: Temporarily deactivate all other search-related plugins. If Algolia works correctly, reactivate them one by one to isolate the conflict.
Prevent query overrides: Add this code to your theme’s functions.php to ensure Algolia’s search handler takes priority: add_filter('algolia_search_should_override_search', '__return_true');
Check theme compatibility: Some themes include built-in search modifications. Switch to a default WordPress theme (e.g., Twenty Twenty-Four) to test. If the issue disappears, contact your theme developer for a solution that respects Algolia’s API.
Use Algolia’s instant search widget: If conflicts persist, replace the standard search form with Algolia’s dedicated instant search widget (available in the plugin), which bypasses WordPress’s query system entirely.
After resolving any conflict, clear all caches (browser, server, and plugin caches) and perform a full reindex from the Algolia plugin settings to ensure consistent behavior.
Future‑Proofing Your Search: Maintenance and Updates
Integrating Algolia with WordPress delivers a powerful, near‑instant search experience, but this integration is not a set‑and‑forget solution. As both platforms release updates and your content library grows, proactive maintenance ensures your search remains fast, relevant, and error‑free. A well‑maintained integration adapts to changes in WordPress core, plugin updates, and evolving user expectations. Below are key practices to future‑proof your search setup.
Regularly Reviewing Index Settings and Analytics
Algolia provides detailed analytics on search queries, click‑through rates, and no‑result searches. Regularly reviewing this data helps you fine‑tune index settings for better relevance. Schedule a monthly review of the following:
Searchable attributes: Ensure only relevant fields (e.g., title, content, custom fields) are indexed. Remove unused or sensitive attributes to reduce index size and improve speed.
Custom ranking: Adjust ranking weights based on user behavior—for example, boost popular posts or recent content if analytics show users prefer fresh results.
Facet settings: If you use faceted search (e.g., by category or tag), verify that facet counts are accurate and that filters align with your current taxonomy structure.
Synonym and typo tolerance: Update synonym lists based on common misspellings or industry terms. Review typo tolerance levels to balance forgiveness with precision.
Analytics also reveal index health. Monitor error logs for failed indexing attempts, which often occur after WordPress updates or plugin changes. Use Algolia’s dashboard to check index size and record count—an unexpected spike may indicate duplicate entries or misconfigured indexing.
Updating Plugins and API Versions
Keeping your WordPress environment and Algolia integration up to date is critical for security, compatibility, and performance. Follow these steps:
Component
Update Frequency
Key Considerations
WordPress core
As released
Test updates on a staging site before applying to production. Check for breaking changes in REST API or custom post types.
Algolia plugin (e.g., WP Search with Algolia)
Monthly or per major release
Review changelogs for indexing logic changes. Re‑sync indices after plugin updates to apply new settings.
Algolia API version
Every 6–12 months
Check Algolia’s deprecation schedule. Update your API client library to avoid service disruptions.
Other plugins
As needed
If a plugin modifies post content or metadata, verify that your indexing rules still capture the correct data.
Automate where possible: enable automatic updates for minor WordPress releases and set alerts for Algolia API deprecation notices. After each update, run a full reindex and test search functionality on a few key queries.
Scaling Search for Growing Content Libraries
As your WordPress site adds more posts, pages, or products, your Algolia index may exceed plan limits or suffer from slower query times. Plan for growth with these strategies:
Monitor index size: Algolia charges based on the number of records and operations. Review your current plan’s capacity monthly. If you approach 80% usage, consider upgrading or optimizing records (e.g., by excluding large fields like full post bodies if only titles are searched).
Use multiple indices: Separate content types (e.g., posts, products, user profiles) into distinct indices. This keeps each index lean and allows per‑index ranking and facet settings.
Implement incremental indexing: Instead of reindexing all content on every update, use Algolia’s partial update API (via the plugin) to sync only changed records. This reduces server load and keeps search fresh.
Cache search results: For high‑traffic sites, cache frequent queries at the CDN or WordPress level. This offloads Algolia’s request volume and speeds up repeated searches.
Finally, schedule quarterly performance audits. Test search response times under load, review index fragmentation, and adjust your Algolia plan to match your growing content library. Proactive scaling prevents sudden slowdowns and ensures a seamless user experience as your site expands.
Frequently Asked Questions
What is Algolia and why use it with WordPress?
Algolia is a hosted search-as-a-service platform that provides lightning-fast, typo-tolerant, and highly relevant search results. When integrated with WordPress, it replaces the default MySQL-based search, which can be slow and limited. Algolia indexes your content and serves results in milliseconds, even for large sites. It also supports faceted filtering, synonyms, and customizable ranking, dramatically improving the user experience and helping visitors find content quickly.
How do I install and configure the Algolia plugin for WordPress?
Install the official 'Algolia Search' plugin from the WordPress repository. After activation, go to Settings > Algolia Search and enter your Application ID and Search-Only API Key from your Algolia dashboard. Then configure which post types, taxonomies, and fields to index. You can also set up autocomplete menus and instant search results. The plugin automatically syncs your content to Algolia, and you can manually reindex via the plugin’s tools. Test the search on a staging site first.
Does Algolia improve WordPress search performance?
Yes, significantly. WordPress’s default search uses SQL LIKE queries, which become slow with large databases and do not handle typos or synonyms well. Algolia’s search is performed on its dedicated servers, offloading the work from your WordPress host. Results are delivered in under 50ms, even for millions of records. Algolia also provides instant feedback as users type, reducing server load and improving the overall site speed and user experience.
Can I customize Algolia search results and ranking?
Absolutely. Algolia offers extensive customization through its dashboard. You can set custom ranking attributes (e.g., date, popularity), adjust the importance of fields (like title vs. content), and define synonyms to improve matching. You can also create rules to pin or promote certain results, and use faceted filters for category or tag-based navigation. The WordPress plugin exposes many of these settings, allowing you to fine-tune search without coding.
Is Algolia free for WordPress sites?
Algolia offers a free tier that includes 10,000 search requests per month and 10,000 records, which is suitable for small blogs or personal sites. For larger sites, paid plans start at a modest monthly fee based on usage (search requests, records, and operations). The WordPress plugin itself is free. Check Algolia’s pricing page for the latest details. Many small to medium sites find the free tier sufficient, while high-traffic sites may need a paid plan.
What are the alternatives to Algolia for WordPress search?
Popular alternatives include Elasticsearch (via plugins like ElasticPress), SearchWP, Relevanssi, and Swiftype. Elasticsearch is self-hosted or cloud-based, offering similar performance but more complex setup. SearchWP and Relevanssi are premium plugins that enhance native search without external services. Swiftype (now part of Elastic) is another hosted option. However, Algolia is often praised for its ease of use, speed, and developer-friendly API.
How do I handle search indexing and updates with Algolia?
The Algolia WordPress plugin automatically syncs content changes: when you publish, update, or delete a post, the corresponding Algolia index is updated in real-time. You can also trigger a full reindex from the plugin settings if needed. For custom post types or taxonomies, ensure they are selected in the plugin’s indexing options. Keep an eye on your Algolia dashboard for indexing errors or rate limits.
Does Algolia support multilingual WordPress sites?
Yes, Algolia can handle multilingual content. You can create separate indices for each language or use facets to filter by language. The plugin supports WPML and Polylang, allowing you to index translated content. Configure language-specific ranking and synonyms for best results. Note that each language index counts toward your record limit, so plan accordingly. Algolia’s documentation provides guidance on multilingual setups.
How to Use WordPress for Online Courses: A Complete Guide to Building, Launching, and Scaling Your E-Learning Platform
Introduction: Why WordPress Is a Powerful Platform for Online Courses
When you decide to create and sell online courses, the platform you choose determines your flexibility, costs, and long-term control over your content. WordPress, originally a blogging system, has evolved into a robust content management system that powers over 40% of all websites. For course creators, WordPress offers a unique combination of freedom and functionality. Unlike all-in-one platforms that lock you into their ecosystem, WordPress gives you full ownership of your data, content, and customer relationships. Its plugin ecosystem—particularly through Learning Management System (LMS) plugins—transforms a standard website into a fully featured e-learning platform. You can build anything from a simple course hub to a multi-instructor academy, all while keeping costs low and control high. This guide walks you through every step of using WordPress to build, launch, and scale your online courses.
Comparing WordPress vs. Dedicated LMS Platforms
Dedicated LMS platforms like Teachable, Thinkific, or Kajabi offer convenience: they handle hosting, payment processing, and course delivery out of the box. However, this convenience comes with trade-offs. Below is a comparison of key factors:
Factor
WordPress + LMS Plugin
Dedicated LMS Platform
Monthly cost
$10–$40 (hosting + plugin)
$30–$200+ (subscription)
Content ownership
Full (self-hosted)
Limited (platform-controlled)
Customization
Unlimited (theme + code)
Template-based, restricted
Transaction fees
0% (your payment gateway)
0–10% (platform cut)
Scalability
High (with proper hosting)
Medium (plan limits)
Learning curve
Moderate
Low
WordPress excels when you want to avoid recurring platform fees, maintain complete data sovereignty, and design a unique learning experience. Dedicated platforms are simpler to start but often restrict advanced marketing integrations, membership site functionality, and SEO control.
Key Benefits of Using WordPress for Course Creators
Choosing WordPress for your online courses provides several distinct advantages:
Total control over pricing and revenue. No platform takes a percentage of your sales. You connect your own payment gateway (Stripe, PayPal) and keep 100% of your earnings minus transaction fees.
Full ownership of student data. You store all user information, course progress, and purchase history on your own server. This is critical for privacy compliance (GDPR, CCPA) and for building your email list without third-party restrictions.
Unlimited customization. With thousands of themes and plugins, you can design course pages, quizzes, certificates, and membership areas exactly as you envision. Developers can extend functionality with custom code.
Integrated marketing tools. Use WordPress-native SEO plugins (like Yoast or Rank Math), email marketing integrations, and landing page builders to drive traffic and conversions without paying for separate tools.
Scalability without price hikes. As your student base grows, you upgrade your hosting plan (e.g., from shared to VPS or cloud) rather than paying higher platform subscription fees.
Long-term cost savings. After initial setup, your only recurring costs are hosting (typically $10–$30/month) and optional premium plugins ($0–$200/year). This is significantly cheaper than dedicated platforms over time.
Understanding the Core Components: LMS Plugin + Theme + Hosting
To build a successful online course site with WordPress, you need three interconnected components:
1. LMS Plugin. This is the engine of your e-learning platform. It adds course creation tools, lesson management, quiz systems, student progress tracking, and certificate generation. Popular choices include LearnDash, LifterLMS, and Tutor LMS. Each offers free and premium versions, with varying features for drip content, membership integration, and multi-instructor support.
2. Theme. Your theme controls the visual layout and user experience. For course sites, choose a lightweight, responsive theme designed for LMS compatibility. Options like Astra, Kadence, or GeneratePress work well with most LMS plugins. Many LMS plugins also offer dedicated themes or builder integrations (Elementor, Beaver Builder) for drag-and-drop customization.
3. Hosting. Reliable hosting is non-negotiable for course delivery. A slow server frustrates students and hurts SEO. Start with managed WordPress hosting from providers like SiteGround, WP Engine, or Cloudways. These services optimize for speed, security, and scalability. As your course library grows, consider a content delivery network (CDN) to serve video and files globally.
These three elements work together: the LMS plugin provides the learning logic, the theme presents it attractively, and the hosting ensures it runs smoothly. By understanding how to select and configure each component, you lay the foundation for a profitable, sustainable online course business using WordPress.
Choosing the Right Learning Management System (LMS) Plugin
Selecting an LMS plugin is the most consequential decision you will make when you learn how to use WordPress for online courses. Your choice will directly impact your teaching workflow, revenue model, and how much technical upkeep you will need to manage. Rather than chasing the most popular option, evaluate each plugin against three criteria: your preferred content delivery style, your monetization approach, and your comfort with configuration. Below is a breakdown of the leading plugins and the practical differences that matter most.
Top LMS Plugins: LearnDash, LifterLMS, Tutor LMS, and Sensei
Each of these plugins serves a distinct niche within the e-learning ecosystem. LearnDash is the industry standard for established course creators who need robust quiz engines, advanced drip scheduling, and granular access rules. LifterLMS excels when you require built-in membership site functionality and multi-tiered student tracking. Tutor LMS offers a lighter, more modern interface that is ideal for beginners who want a straightforward setup without sacrificing essential features. Sensei, developed by the team behind WooCommerce, integrates seamlessly with that ecosystem, making it the natural choice if you already sell digital products or memberships via WooCommerce.
LearnDash – Best for complex courses with conditional logic and focus mode.
LifterLMS – Best for combining courses with membership communities and student analytics.
Tutor LMS – Best for instructors seeking a clean, beginner-friendly dashboard and front-end course creation.
Sensei – Best for WooCommerce users who want unified product and course management.
Feature Comparison: Quizzes, Certificates, Drip Content, and Membership Integration
While all four plugins support the core features of an online course, the implementation details vary significantly. The table below highlights the key differences you should examine before committing.
Schedule by days, prerequisites, or group enrollment date
Drip by interval or completion of prior lessons
Basic time-based drip scheduling
Drip via WooCommerce membership intervals
Membership Integration
Works with MemberPress, Paid Memberships Pro, and others
Native membership levels and access rules
Limited native membership; best with third-party plugins
Native integration with WooCommerce Memberships
Free vs. Paid LMS Options and When to Upgrade
Free versions of Tutor LMS and Sensei provide a viable starting point for testing how to use WordPress for online courses without financial risk. Tutor LMS Lite includes unlimited courses, basic quizzes, and certificate generation, while Sensei Free offers core course creation tied to WooCommerce. However, free tiers impose critical limitations. For example, Tutor LMS Lite does not support front-end course submissions or Google Classroom integration, and Sensei Free lacks advanced quiz types and drip content. You should upgrade to a paid plan when you need any of the following: automated student enrollment workflows, detailed analytics and reporting, membership or subscription billing, or custom certificate designs. LearnDash and LifterLMS have no free versions; their paid licenses include full feature sets and priority support, making them appropriate only when you are prepared to invest from the start. A practical rule of thumb: if you plan to sell more than three courses or require recurring revenue, skip the free tier and purchase a paid license immediately to avoid rebuilding your site later.
When you install your chosen plugin, you will often need to adjust server settings to handle file uploads for video lessons. If your LMS requires large media files, add this line to your wp-config.php file to increase the maximum upload size:
This adjustment ensures your courses can accommodate high-quality video content without hitting server limits. Always test your uploads after making this change.
Setting Up Your WordPress Site for Course Delivery
After selecting a hosting provider and domain name, the first technical step is installing WordPress. Most reputable hosts offer one-click installation through their control panel (cPanel or custom dashboards). Choose a clean installation, then log into your WordPress admin area (typically yourdomain.com/wp-admin). Navigate to Settings > General to set your site title, tagline, and timezone. Under Settings > Permalinks, select “Post name” for clean, SEO-friendly URLs—critical for course lesson pages. Disable user registration temporarily until you configure roles, and install a security plugin immediately after the base setup.
Selecting a Theme Optimized for E-Learning
Your theme dictates layout, load speed, and compatibility with learning management plugins. For course delivery, prioritize themes with built-in support for popular LMS plugins like LearnDash or LifterLMS, or versatile multipurpose themes that integrate cleanly. Below is a comparison of three reliable options:
Theme
Type
LMS Compatibility
Key E-Learning Features
Astra
Multipurpose (lightweight)
LearnDash, LifterLMS, Tutor LMS
Pre-built starter templates for courses; fast loading; customizable header/footer
Dedicated course listing, single course, and instructor profile templates; built-in checkout
Choose Astra or Kadence if you plan to use multiple LMS plugins or want a lightweight foundation. Choose Eduma if you commit to LearnPress and need a turnkey design. After installing your theme, import any demo content provided to see course layouts in action, then customize colors and fonts under Appearance > Customize.
Essential Plugins: Security, Caching, SEO, and Email Automation
Plugins extend WordPress into a full e-learning platform. Install and activate these four categories immediately:
Security: Use Wordfence or Sucuri. Enable firewall, login attempt limiting, and malware scanning. Configure two-factor authentication for admin accounts.
Caching: Use WP Rocket (premium) or W3 Total Cache (free). Enable page caching, browser caching, and minify CSS/JavaScript. Test your site with GTmetrix to confirm load times under 3 seconds.
SEO: Use Rank Math or Yoast SEO. Set a focus keyword for each course page, generate XML sitemaps, and configure social media previews. Submit your sitemap to Google Search Console.
Email Automation: Use FluentCRM or MailPoet. Connect to your email service provider (e.g., Mailgun, SendGrid) to ensure course enrollment confirmations and lesson notifications are delivered reliably. Set up automated sequences for welcome emails and course progress reminders.
After installing each plugin, run initial configuration wizards. For caching, exclude your LMS plugin’s dynamic pages (like quiz submissions) from caching to prevent data loss.
Configuring User Roles and Permissions for Students and Instructors
WordPress default roles (Subscriber, Author, Editor) are insufficient for course platforms. Your LMS plugin will introduce custom roles. For LearnDash, typical roles include:
Administrator: Full site control, including all course settings and user management.
Instructor (or Group Leader): Can create, edit, and manage their own courses and student enrollments. Cannot modify site-wide settings.
Student: Can enroll in courses, access lessons, take quizzes, and view their progress. Cannot create or edit content.
To configure permissions, go to your LMS plugin’s settings (e.g., LearnDash > Settings > Advanced). Assign instructors to a custom role that grants edit_courses and assign_terms capabilities. For students, ensure the Subscriber role is limited to reading and course enrollment only. Use a plugin like User Role Editor to fine-tune permissions—for example, prevent students from seeing the WordPress admin bar or accessing backend menus. Test each role by logging in as a different user to verify they see only appropriate screens, such as the course dashboard for students and the course builder for instructors.
Structuring and Creating Your First Online Course
Once you have your LMS plugin installed and configured, the next step is to build the actual learning experience. A well-structured course is the backbone of student success. Start by thinking of your course as a journey: it should have a clear beginning, a logical progression, and a defined end goal. Avoid dumping all content into a single page. Instead, break it down into manageable, sequential chunks that guide learners from novice to competent.
Building a Course Outline with Learning Objectives and Milestones
Before adding a single lesson, create a high-level outline. This map will keep your content focused and prevent scope creep. Begin by defining one or two overarching course objectives (e.g., “By the end of this course, students will be able to build a custom WordPress theme from scratch”). Then, break that into 3-5 major modules, each with its own learning objective and a milestone that marks completion.
Module 4: Launch & Polish – Objective: Finalize and publish. Milestone: Submit final project.
For each module, list 3-7 lessons. Each lesson should have a single, clear learning outcome. This granularity helps students track their progress and reduces cognitive overload.
Adding Lessons, Quizzes, and Assignments via Your LMS Plugin
Most LMS plugins, such as LearnDash or LifterLMS, use a custom post type for courses. To add a lesson, navigate to your LMS menu (e.g., “LearnDash LMS” > “Lessons”) and click “Add New.” Title your lesson, write the content in the editor, and then assign it to a course via the plugin’s meta box. Quizzes and assignments are added similarly but often require creating them separately and then linking them to a lesson.
For example, in LearnDash, to add a quiz to a lesson, you first create the quiz under “Quizzes” > “Add New.” Set questions, passing score, and timers. Then, edit your lesson and use the “Add Quiz” button within the lesson settings. Assignments (like file uploads) are typically enabled by checking a box in the lesson settings that says “Allow File Upload” and setting the file size limit.
For a practical code example, if you need to customize the quiz submission behavior, you can add a snippet to your theme’s functions.php file. This example forces a quiz to be completed before the next lesson is accessible:
add_filter( 'learndash_quiz_completed', function( $quiz_data ) {
// Get the current user and course ID
$user_id = get_current_user_id();
$course_id = $quiz_data['course']->ID;
// Mark the associated lesson as complete after quiz pass
if ( $quiz_data['pass'] ) {
$lesson_id = $quiz_data['lesson']->ID;
learndash_process_mark_complete( $user_id, $lesson_id );
}
return $quiz_data;
} );
Incorporating Video, PDFs, and Interactive Elements Effectively
Multimedia makes courses engaging, but poor implementation frustrates learners. For video, always host files externally (e.g., YouTube unlisted, Vimeo, or Amazon S3) and embed them using the WordPress block editor’s “Video” or “Embed” block. Avoid uploading large video files directly to your media library—it slows your site. For PDFs, use a plugin like “PDF Embedder” to display them inline, or link directly to the file from your lesson text.
Interactive elements like H5P content (interactive videos, drag-and-drop, flashcards) can be added via the H5P plugin. Create the activity, get the shortcode, and paste it into your lesson. A best practice table for multimedia usage:
Media Type
Best Practice
Common Pitfall
Video
Use external hosting; embed with block editor
Uploading large files to WordPress
PDF
Embed inline or provide download link
Forcing download without preview
Interactive
Use H5P for lightweight activities
Overloading a lesson with too many elements
Audio
Use audio player block; host externally
Auto-playing audio on page load
Always test multimedia on mobile devices and slower connections. Provide transcripts for videos and alt text for images to ensure accessibility. Keep each lesson focused: one video, one PDF, or one interactive element per logical segment, rather than mixing everything into a single page.
Monetizing Your Courses: Pricing, Payment Gateways, and Membership Options
Once you have built and launched your online courses on WordPress, the next critical step is to choose a monetization model that aligns with your audience’s expectations and your business goals. WordPress, combined with a robust Learning Management System (LMS) plugin, offers flexible revenue options that can be tailored to different content types and learner preferences. The key is to balance perceived value with ease of purchase, ensuring a frictionless experience that encourages conversions.
One-Time Payments vs. Subscriptions vs. Bundles: Which Model Fits Your Audience?
Selecting the right pricing structure is essential for maximizing revenue and retaining students. Each model serves a distinct purpose:
One-Time Payments: Best for standalone, comprehensive courses that deliver a complete skill or certification. This model works well for high-ticket courses (e.g., $200–$1,000) where learners want lifetime access. It simplifies accounting and reduces churn risk, but may limit recurring revenue.
Subscriptions (Recurring Payments): Ideal for ongoing content libraries, membership communities, or courses with frequent updates (e.g., coding bootcamps or marketing skills). Monthly or annual subscriptions provide predictable income and encourage long-term engagement, but require consistent content delivery to justify recurring charges.
Bundles: Combine multiple courses into a single package at a discounted price. This model increases average order value and appeals to learners seeking a learning path. Bundles can be sold as one-time purchases or as part of a subscription tier. They work well for niche topics where cross-sell opportunities exist.
Consider your audience’s willingness to commit: professionals often prefer one-time payments for specific skills, while hobbyists or continuous learners may favor subscriptions. A/B testing pricing tiers can reveal optimal price points.
Integrating Stripe, PayPal, and Other Payment Gateways with Your LMS
Secure payment integration is non-negotiable. Most LMS plugins—such as LearnDash or LifterLMS—natively support major gateways like Stripe and PayPal. Here is a comparison of common options:
Gateway
Key Features
Best For
Setup Complexity
Stripe
Credit/debit cards, Apple Pay, Google Pay, recurring billing
To integrate, install your LMS plugin and navigate to its payment settings. Enter your Stripe or PayPal API credentials (found in your gateway dashboard). Test transactions in sandbox mode before going live. For additional security, enable SSL certificates on your site and use a plugin like Wordfence to monitor for vulnerabilities.
Creating Membership Sites with Paid Course Access Using Restrict Content Pro or MemberPress
Membership plugins transform WordPress into a gated learning hub. Restrict Content Pro (RCP) and MemberPress are two leading options that pair seamlessly with LMS plugins.
Restrict Content Pro: Focuses on simplicity and flexibility. You can create multiple membership levels (e.g., Basic, Premium), each granting access to specific courses or categories. RCP integrates with Stripe and PayPal and allows free trials, discount codes, and expiration dates. Use shortcodes to display content based on membership level.
MemberPress: Offers built-in course creation capabilities (via MemberPress Courses) plus advanced drip content, quizzes, and access rules. It supports subscriptions, one-time payments, and bundles. MemberPress’s “Access Rules” let you restrict entire pages, posts, or custom post types (like courses) based on membership level. It also includes affiliate tracking and tax handling.
To set up a membership site: install your chosen plugin, create membership levels with pricing, assign courses to those levels, and configure payment gateways. Ensure your LMS plugin (e.g., LearnDash) respects these restrictions by syncing access rules. Test the user experience by logging in as a free member versus a paid member to confirm course visibility.
Enhancing Student Engagement and Completion Rates
Keeping learners motivated throughout an online course is one of the biggest challenges for educators. Without the structure of a physical classroom, students can easily lose momentum. To combat this, you need a deliberate strategy that combines pacing, rewards, and community. WordPress, paired with the right plugins, gives you the tools to create an environment where students feel guided, recognized, and connected. Below are three proven methods to boost engagement and ensure more students reach the finish line.
Adding Drip-Feed Content to Maintain a Learning Pace
Drip-feeding releases course content gradually based on a schedule or student progress, rather than making everything available at once. This prevents overwhelm, encourages consistent study habits, and helps information stick. To implement this on a WordPress site, you can use a learning management system (LMS) plugin like LearnDash or Tutor LMS, both of which have built-in drip-feed settings.
For example, in LearnDash, you can set a lesson to become available only after a certain number of days have passed since enrollment, or after a student completes a previous lesson. Here is a practical example of how you might configure a drip-feed rule using LearnDash’s built-in options (no custom code required, but if you need to extend functionality, you can use a filter):
// Example: Make a lesson available 7 days after enrollment (add to theme's functions.php)
add_filter('learndash_lesson_access_from', function($access_from, $lesson_id, $course_id, $user_id) {
// Custom logic can go here, but for standard drip, use the plugin's UI.
// This filter is for advanced customizations.
return $access_from;
}, 10, 4);
For most users, the visual interface is sufficient. Navigate to the lesson settings in your LMS plugin and choose “Drip-Feed” or “Schedule” options. Set the release interval—daily, weekly, or based on prerequisite completion. Pair this with automated email reminders to keep students on track.
Using Gamification Elements: Badges, Points, and Leaderboards
Gamification taps into the human desire for achievement and social recognition. By rewarding progress with badges, points, and leaderboards, you create a sense of fun and competition. The GamiPress plugin integrates seamlessly with WordPress and most LMS plugins. You can award points for completing a lesson, passing a quiz, or logging in consecutively for a week. Badges can be unlocked for milestones like finishing a module or scoring 100% on a test.
Leaderboards show top performers, which can motivate students to engage more deeply. To set this up:
Install and activate the GamiPress plugin.
Install the GamiPress – Leaderboards add-on (free).
Create point types (e.g., “Experience Points”) and award rules from the GamiPress menu.
Design custom badges using the built-in badge editor.
Add a leaderboard block to any page using the Gutenberg editor.
A simple leaderboard shortcode example: [gamipress_leaderboard type="points" period="monthly" limit="10"] displays the top 10 point earners for the current month.
Building a Community Forum or Private Group for Discussions
Peer interaction is a powerful driver of course completion. When students can ask questions, share insights, and celebrate wins together, they feel part of a learning journey rather than isolated. WordPress offers several options. The bbPress plugin (by the creators of WordPress) adds simple, lightweight forums. Alternatively, you can integrate BuddyPress for a full social network, including private messaging and activity streams.
For a more focused experience, consider a private Facebook group or Discord server linked from your course dashboard. If you prefer keeping everything on your site, here is a quick comparison:
Feature
bbPress (Forum)
BuddyPress (Social Network)
External Group (e.g., Discord)
Ease of setup
Very easy, minimal configuration
Moderate, requires theme compatibility
Easy, but requires off-site management
Student control
Topic-based discussions
Profiles, groups, activity feeds
Full group features, voice channels
Integration with LMS
Can be linked from course pages
Works with many LMS plugins
Manual linking or via plugin
Best for
Simple Q&A and topic threads
Building a long-term community
Real-time chat and voice interaction
Whichever you choose, actively participate in discussions during the first few weeks to set the tone. Create a dedicated “Introduce Yourself” thread and a “Questions & Help” section. This fosters a supportive environment that directly contributes to higher completion rates.
Marketing Your WordPress Course to Attract Students
Once your online course is built and ready, the next critical step is attracting students. WordPress offers a powerful foundation for marketing, combining built-in SEO capabilities with seamless third-party integrations. By strategically optimizing your course pages, nurturing leads through email, and creating compelling landing pages, you can build a steady stream of enrollments. Below are three essential tactics to market your WordPress course effectively.
SEO Optimization for Course Pages: Titles, Meta Descriptions, and Schema Markup
Search engine optimization ensures your course appears when potential students search for relevant topics. Start by optimizing each course page individually.
Page Titles: Include your primary keyword (e.g., “How to Use WordPress for Online Courses”) near the beginning. Keep titles under 60 characters to avoid truncation in search results.
Meta Descriptions: Write compelling summaries of 150–160 characters that highlight the course benefits and include a call to action. For example: “Learn how to use WordPress for online courses with this step-by-step guide. Enroll now to build, launch, and scale your e-learning platform.”
Schema Markup: Use the Course schema type (available via plugins like Yoast SEO or Schema Pro) to add structured data. This enables rich snippets in search results, displaying course name, description, provider, and rating.
Install an SEO plugin such as Rank Math or Yoast SEO to manage these elements easily. Regularly audit your course pages for keyword relevance and update meta data as your content evolves.
Email Marketing Integration with Mailchimp, ConvertKit, or ActiveCampaign
Email marketing remains one of the highest-converting channels for online courses. WordPress integrates with leading email service providers (ESPs) through plugins or native APIs.
ConvertKit for WordPress plugin, or custom forms via API
ActiveCampaign
Conditional automation, CRM, site tracking
ActiveCampaign for WordPress plugin, or direct form embedding
Set up automated email sequences to welcome new subscribers, share free lesson previews, and send enrollment reminders. Use segmentation to target students based on their interests or stage in the buyer journey. For example, tag subscribers who clicked a link about “WordPress course setup” and send them a tailored offer.
Leveraging Landing Pages and Lead Magnets to Grow Your Email List
Landing pages are single-focus pages designed to convert visitors into leads. Use them alongside lead magnets—free resources that incentivize sign-ups.
Create a Dedicated Landing Page: Use a page builder like Elementor or Beaver Builder to design a clean, distraction-free page. Include a clear headline, benefit-oriented copy, a prominent call-to-action button, and a form that connects to your ESP.
Offer a Relevant Lead Magnet: Provide a free checklist, mini-course, PDF guide, or video tutorial related to your course topic. For instance, offer “10 Steps to Launch Your First WordPress Course” in exchange for an email address.
Place Opt-In Forms Strategically: Add inline forms within blog posts, pop-up forms (with exit-intent triggers), and slide-in forms using plugins like OptinMonster or Thrive Leads. Test different placements to maximize conversions.
After collecting emails, deliver the lead magnet immediately via a thank-you page or automated email. Then, nurture these leads with a sequence that builds trust and ultimately promotes your paid course. Regularly test landing page elements—headlines, images, and button text—to improve sign-up rates over time.
Managing Students, Analytics, and Course Updates
Once your online course is live on WordPress, the work shifts from building to managing. Effective administration ensures that students remain engaged, you understand how your content performs, and your course stays relevant over time. This section covers the core tasks: tracking progress through LMS analytics, handling student data efficiently, and updating lessons without disrupting active learners.
Using Built-In Reports and Analytics from Your LMS Plugin
Most reputable LMS plugins for WordPress, such as LearnDash, LifterLMS, and Tutor LMS, include built-in reporting dashboards designed to give you a snapshot of course health. These tools typically allow you to view:
Overall course completion rates and average time spent per lesson.
Individual student progress, including quiz scores and assignment submissions.
Revenue data tied to specific courses or membership levels.
Engagement metrics, such as login frequency and forum participation.
To get the most out of these reports, schedule a weekly review of completion rates. A sudden drop may indicate a difficult module or technical issue. Many LMS plugins also allow you to export this data as CSV files for deeper analysis in external tools like Google Sheets or Excel.
Managing Student Data and Progress Manually or via Automation
Student management involves three key areas: enrollment, progress tracking, and communication. You can handle these manually through your WordPress dashboard or automate them to save time.
Manual management is best for small cohorts or private coaching courses. From your LMS plugin’s student list, you can:
Manually enroll or unenroll users.
Edit quiz attempts or reset lesson progress.
Send individual emails using a plugin like User Switching or a dedicated email tool.
Automation becomes essential as you scale. Use integrations with tools like Zapier or Uncanny Automator to trigger actions such as:
Enrolling a student automatically after a successful payment.
Sending a congratulatory email when a student completes a course.
Assigning a new course based on quiz results or membership tier.
For a quick comparison of manual versus automated approaches, consider the following table:
Management Aspect
Manual Approach
Automated Approach
Enrollment after purchase
Admin manually assigns course via dashboard
Plugin triggers enrollment upon payment confirmation
Progress tracking
Admin reviews student list weekly
Automated reports emailed weekly or real-time notifications
Communication
Individual emails or bulk mail from admin
Triggered emails based on student actions (e.g., completion)
Data updates
Admin edits user meta or course status manually
Workflows adjust progress based on new lesson completions
Choose the method that aligns with your current class size and technical comfort level. Most successful course creators start manually and introduce automation as enrollment grows.
Updating Course Content Without Disrupting Active Enrollments
Keeping your course content fresh is essential for student satisfaction and retention, but updates must be handled carefully to avoid confusing enrolled learners. Follow these best practices:
Use versioning or draft mode. Edit lessons as drafts or use a staging environment. Publish changes only when ready. Most LMS plugins allow you to save lesson updates without immediately applying them to active courses.
Communicate changes. Notify current students about upcoming updates via email or an announcement within the course. This builds trust and sets expectations.
Preserve progress. When updating quizzes or assignments, avoid deleting existing questions that students have already answered. Instead, add new questions or replace outdated ones while keeping the quiz structure intact.
Test on a backup. Before making major structural changes, create a full backup of your site using a plugin like UpdraftPlus. This ensures you can revert if something goes wrong.
Update resources gradually. If you replace a video or PDF, do so during a low-traffic period and verify that all links and embeds still function correctly.
By combining thoughtful analytics review, efficient student data management, and careful content updates, you can maintain a high-quality e-learning experience that grows with your audience.
Scaling Your Online Course Business with Advanced Features
Once your WordPress-based e-learning platform has established a steady student base and consistent revenue, scaling becomes the natural next step. Advanced features allow you to automate repetitive tasks, expand your teaching team, and integrate with external tools to create a seamless hybrid learning experience. The following strategies focus on three critical areas for growth: multi-instructor marketplaces, automation workflows, and CRM or webinar integrations.
Adding a Multi-Instructor Marketplace with Commission Splits
To grow your course catalog without personally creating every lesson, enable multiple instructors to contribute content. Plugins like LearnDash with the LearnDash Multi-Instructor add-on or Tutor LMS Pro support this model. You can assign commission percentages per instructor or per course, and payouts can be automated via PayPal or Stripe Connect.
Key setup steps:
Install and activate a multi-instructor compatible LMS plugin.
Create instructor roles with permissions limited to their own courses.
Configure commission splits (e.g., 70% instructor, 30% platform) in the plugin settings.
Enable automatic payout gateways or manual invoicing.
For a practical example using Tutor LMS Pro, the following PHP snippet can be added to your child theme’s functions.php file to override default commission rates for a specific instructor (replace 123 with the actual user ID):
add_filter('tutor_commission_rate', function($rate, $instructor_id) {
if ($instructor_id == 123) {
return 85; // 85% for this instructor
}
return $rate;
}, 10, 2);
Automating Certificates, Emails, and Course Access Using Zapier or Uncanny Automator
Manual tasks become bottlenecks at scale. Automation tools like Uncanny Automator (native for WordPress) or Zapier (cloud-based) can trigger actions based on student behavior. Common workflows include:
Issuing a PDF certificate automatically when a student completes 100% of a course.
Sending a welcome email sequence after enrollment.
Granting access to the next course module only after a quiz score threshold is met.
Example Zapier workflow:
Trigger (WordPress Event)
Action (External Service)
Student completes course in LearnDash
Send custom certificate via email (e.g., using Gmail or Mailchimp)
New user registers for a free trial
Add to a CRM contact list (e.g., HubSpot)
Student fails a quiz
Create a Slack notification for instructor follow-up
Uncanny Automator offers comparable functionality without leaving WordPress, and supports triggers like “User completes lesson” and actions like “Update user meta” or “Send email.”
Integrating with CRMs and Webinar Platforms for Hybrid Learning
Combining asynchronous courses with live events (webinars, Q&A sessions) increases engagement and completion rates. To manage this hybrid model, integrate your WordPress site with a CRM (e.g., HubSpot, Salesforce) and a webinar tool (e.g., Zoom, WebinarJam).
Zapier: Connect LearnDash enrollment to a Zoom meeting registration list.
Uncanny Automator: Add a user to a HubSpot contact list when they purchase a bundle.
Direct API: Use REST APIs (e.g., Zoom API) to create and manage webinars from within WordPress.
For a direct Zoom integration using the Zoom API, you can use a plugin like LearnDash Zoom Integration or write a custom function. Below is a simplified PHP example that creates a Zoom meeting when a new course is published (requires your Zoom API credentials):
function create_zoom_meeting_for_course($post_id) {
if (get_post_type($post_id) !== 'sfwd-courses') return;
$api_url = 'https://api.zoom.us/v2/users/me/meetings';
$response = wp_remote_post($api_url, array(
'headers' => array(
'Authorization' => 'Bearer ' . get_option('zoom_api_token'),
'Content-Type' => 'application/json',
),
'body' => json_encode(array(
'topic' => get_the_title($post_id) . ' Live Q&A',
'type' => 2,
'start_time' => date('Y-m-dTH:i:s', strtotime('+7 days')),
'duration' => 60,
)),
));
// Handle response and store meeting ID as post meta
}
add_action('publish_sfwd-courses', 'create_zoom_meeting_for_course');
By implementing these advanced features, you transform a simple course site into a scalable, automated, and hybrid-ready e-learning platform that can grow with your audience and revenue goals.
Conclusion: Launching and Iterating Your WordPress Online Course
You now have the knowledge to transform your expertise into a thriving e-learning platform using WordPress. Remember that the most successful courses are not born perfect—they are refined through real-world use. Begin with a minimum viable course (MVC) that covers the core learning objectives, then launch, gather feedback, and iterate. This approach reduces time-to-market and allows you to adapt to your students’ actual needs. Below is a final checklist and a structured process to ensure your course launches smoothly and continues to improve over time.
Testing Your Course Experience Before Going Live
Before inviting students, thoroughly test every aspect of your course from a learner’s perspective. Use this checklist to catch issues early:
Payment and enrollment flow: Complete a test purchase using a sandbox payment gateway to verify that transactions process correctly, emails are sent, and user accounts are created with the proper course access.
Content delivery: Play every video, download every file, and click every link within your lessons. Ensure that all media loads quickly and is mobile-responsive.
Progress tracking and quizzes: Enroll a test user and complete the course from start to finish. Confirm that lesson completion marks, quiz results, and certificates (if used) function as expected.
User interface on multiple devices: Test your course on a desktop, tablet, and smartphone. Verify that navigation menus, buttons, and embedded content are usable on all screen sizes.
Email notifications: Check that automated emails (welcome, progress reminders, certificates) are formatted correctly and arrive promptly.
If using a plugin like LearnDash or Tutor LMS, run their built-in system health checks to identify potential conflicts with your theme or other plugins.
Collecting Student Feedback and Iterating on Content
Once your course is live, feedback is your most valuable asset for improvement. Implement a systematic process to gather and act on student input:
In-course surveys: Insert short, optional surveys after each module asking what was clear, what was confusing, and what could be added. Use tools like WPForms or SurveyMonkey integrated via a plugin.
Discussion forums: Enable a community feature (e.g., bbPress or BuddyPress) where students can ask questions and share insights. Monitor these threads for recurring themes or knowledge gaps.
End-of-course feedback form: Require a brief evaluation upon completion, focusing on course relevance, pacing, and technical quality. Offer a bonus resource or discount as an incentive.
Analytics review: Examine course completion rates, quiz scores, and drop-off points in your LMS dashboard. Low completion in a specific module often signals unclear or overly dense content.
After collecting feedback, prioritize changes that address the most common pain points. For example, if multiple students struggle with a particular video, consider re-recording it with clearer explanations or adding a supplementary text summary. Iterate in small batches—update one module at a time rather than overhauling the entire course.
Long-Term Maintenance and Staying Up-to-Date with WordPress and Plugin Updates
Your course is a living product that requires ongoing care. Neglecting maintenance can lead to broken features, security vulnerabilities, and a poor student experience. Adopt these practices:
Schedule regular updates: Update WordPress core, your LMS plugin, and all other plugins monthly. Always test updates on a staging site first to avoid breaking live content.
Back up your site: Use a reliable backup plugin (e.g., UpdraftPlus) to store daily backups off-site. This ensures you can quickly restore your course if an update causes issues.
Refresh content annually: Review your course material for outdated references, broken links, or technologies that have changed. Add new examples or case studies to keep the content relevant.
Monitor performance: Use caching plugins (e.g., WP Rocket) and a content delivery network to maintain fast load times as your student base grows. Check page speed monthly using tools like Google PageSpeed Insights.
Security checks: Implement a security plugin (e.g., Wordfence) and enable two-factor authentication for admin accounts. Regularly review user roles to ensure students cannot access backend areas.
By treating your course as an evolving project, you build trust with your students and create a sustainable learning business. Start small, listen to your audience, and refine relentlessly—your WordPress online course will grow into a valuable asset that educates and inspires for years to come.
The best LMS plugin depends on your needs. LearnDash is popular for its robust features and scalability, ideal for serious course creators. Tutor LMS offers a free version with strong functionality and is user-friendly. LifterLMS provides excellent gamification and membership options. For a simple, free solution, Sensei (by WooThemes) works well. Evaluate each based on pricing, features, and support. Consider your budget, technical skill, and desired features like quizzes, certificates, and drip-feeding content.
How do I create an online course in WordPress?
First, install and activate an LMS plugin like LearnDash or Tutor LMS. Then, create a new course from the WordPress dashboard. Add lessons, topics, and quizzes. Set up course settings like pricing, enrollment, and drip-feed schedule. Use the Gutenberg block editor or a page builder to design your course content. Finally, publish and test the course with a sample student. Ensure all media (videos, PDFs) are properly linked and accessible.
Can I sell online courses directly from WordPress?
Yes, WordPress allows you to sell courses directly using e-commerce plugins like WooCommerce or dedicated LMS plugins with built-in payment gateways. LearnDash integrates with PayPal, Stripe, and other gateways. Tutor LMS supports WooCommerce for flexible pricing. You can set one-time payments, subscriptions, or payment plans. Ensure your site has SSL for secure transactions and complies with tax regulations.
How do I market my WordPress online course?
Effective marketing includes SEO optimization of your course pages, building an email list with lead magnets, and using social media to promote content. Consider offering free mini-courses or webinars. Use WordPress SEO plugins like Yoast or Rank Math. Integrate with email marketing tools like Mailchimp or ConvertKit. Leverage testimonials and case studies. Paid ads on Google or Facebook can also drive traffic.
What are the best practices for scaling an online course platform?
To scale, use a reliable hosting provider like SiteGround or WP Engine. Implement caching (e.g., W3 Total Cache) and a CDN (e.g., Cloudflare). Optimize images and videos. Use a lightweight theme and limit plugins. Monitor performance with tools like GTmetrix. Automate tasks with LMS features like drip-feeding and automated emails. Consider offering multiple courses, memberships, or bundles. Regularly update content and gather student feedback.
How do I add quizzes and certificates to my WordPress course?
Most LMS plugins include quiz and certificate features. In LearnDash, create quizzes with multiple choice, true/false, and essay questions. Set passing grades and prerequisites. For certificates, use the built-in certificate builder or a plugin like Certificate Maker. Customize the design with your logo and course details. Automatically award certificates upon completion. Test the quiz and certificate flow to ensure it works correctly.
Is WordPress secure enough for an online course platform?
Yes, WordPress can be secure if properly maintained. Use strong passwords, keep core, themes, and plugins updated, and install a security plugin like Wordfence or Sucuri. Use SSL (HTTPS) for all pages. Limit login attempts and enable two-factor authentication. Regularly backup your site. For student data, ensure compliance with GDPR or other privacy laws. Choose a reputable hosting provider with security features.
How do I handle student enrollment and management?
LMS plugins simplify enrollment. Students can register via your site, and you can manually enroll them or allow self-enrollment. Use groups or cohorts to manage large numbers. Track progress with built-in reporting. Communicate via email or in-course messages. For advanced management, integrate with CRM tools like HubSpot or use membership plugins like MemberPress. Regularly review student data to improve course offerings.
How to Build a WordPress Knowledge Base: A Complete Step-by-Step Guide
1. Why a Knowledge Base Matters for Your WordPress Site
A knowledge base is a centralized repository of help articles, FAQs, and documentation that empowers users to find answers independently. For a WordPress site, this structured content system transforms how you deliver support, manage information, and build authority. By serving as a self-service hub, a knowledge base reduces the burden on your support team while improving the user experience. It provides always-available answers to common questions, troubleshooting steps, and product or service explanations, ensuring that users never feel stranded. This approach not only cuts operational costs but also creates a scalable resource that grows with your audience.
The Business Case for Self-Service Support
Self-service support directly impacts your bottom line. When users can resolve issues without contacting your team, you save significant time and money. Key business benefits include:
Reduced support tickets: A well-organized knowledge base answers the most frequent queries, decreasing the volume of repetitive emails and live chat requests.
Lower overhead costs: Fewer tickets mean you need fewer support agents or can allocate existing staff to complex issues, reducing payroll expenses.
Faster resolution times: Users find answers in seconds rather than waiting for a reply, leading to higher satisfaction and less frustration.
Scalable support: As your WordPress site grows, a knowledge base handles increased traffic without additional staffing costs, making it an efficient long-term investment.
For example, a SaaS company using a knowledge base can cut support costs by up to 30% while maintaining a high customer satisfaction score. This financial efficiency makes self-service support a cornerstone of sustainable growth.
How a Knowledge Base Boosts User Retention
User retention thrives on seamless experiences, and a knowledge base plays a critical role. When users can quickly solve problems, they are more likely to stay engaged and loyal. The retention benefits include:
Empowered users: Self-service gives users control over their learning and troubleshooting, fostering confidence in your product or service.
Reduced friction: A knowledge base minimizes the frustration of searching for help, especially during critical moments like onboarding or feature adoption.
Consistent guidance: Updated articles ensure users always receive accurate information, preventing confusion from outdated or contradictory support.
Community building: A knowledge base often includes tutorials and best practices that help users achieve more, turning them into advocates who stay longer.
For instance, an e-learning platform with a comprehensive knowledge base sees higher course completion rates because students can troubleshoot technical issues independently. This retention directly translates into recurring revenue and positive word-of-mouth.
SEO Benefits of Structured Help Content
Structuring help content as a knowledge base significantly enhances your site’s search engine visibility. Search engines favor organized, authoritative content that answers user queries directly. The SEO advantages are clear:
Each article can focus on specific long-tail keywords, such as “how to reset password in WordPress” or “troubleshoot plugin conflict,” attracting high-intent traffic.
Rich snippets
Structured data like FAQ schema or how-to markup can be added to knowledge base pages, earning featured snippets and enhanced search results.
Internal linking
Cross-linked articles create a dense internal link network, distributing page authority and improving crawlability for search engines.
Freshness signals
Regularly updated content signals to search engines that your site is active, boosting rankings for competitive terms.
Lower bounce rates
Users who find answers quickly stay on your site longer, reducing bounce rates and signaling relevance to search algorithms.
By publishing structured help content, you not only serve your audience but also capture organic traffic from users actively seeking solutions. Over time, a knowledge base becomes a cornerstone of your SEO strategy, driving consistent, high-quality visitors to your WordPress site.
2. Choosing Between a Plugin vs. a Custom Build
When building a knowledge base on WordPress, your first architectural decision is whether to use a dedicated plugin or build a custom solution from scratch. Plugins offer rapid deployment with pre-built features like search, categorization, and analytics, while a custom build grants full control over design, performance, and functionality. Your choice depends on your technical skill level, budget, and long-term maintenance needs. Below, we break down both approaches to help you decide which path suits your project.
Heroic Knowledge Base – Premium plugin with instant search, article feedback, and drag-and-drop ordering. Ideal for businesses needing a polished, support-ready solution.
BetterDocs – Freemium plugin offering instant search, multiple layouts, and built-in analytics. Free version is robust; pro adds AI-powered search.
Echo Knowledge Base – Premium plugin focused on advanced categorization, article versioning, and user access controls. Best for large documentation libraries.
Knowledge Base for WordPress and Fluent Support – Free plugin with basic search and category pages, suitable for small teams on a tight budget.
Plugins typically cost between $0 and $199 per year, include automatic updates, and require minimal coding. However, they may introduce bloat, limit design flexibility, or lock you into a vendor’s upgrade cycle.
When to Build a Custom Knowledge Base with Custom Post Types
A custom build becomes advantageous when you need unique features or strict performance control. Using WordPress’s native Custom Post Types (CPTs) and custom taxonomies, you can create a knowledge base that behaves exactly as required. For example, register a CPT called “kb_article” with a taxonomy “kb_category” in your theme’s functions.php file:
This approach gives you complete control over templates, search indexing, and performance. You can build a custom search using WP_Query or integrate with Elasticsearch. Custom builds are ideal for developers, agencies with recurring maintenance contracts, or projects requiring unique user roles (e.g., internal vs. external access). The trade-off is higher upfront development time and ongoing maintenance responsibility.
$500–$5,000+ (developer time, hosting optimization)
Recurring cost
Plugin updates ($0–$99/year)
Developer maintenance ($200–$2,000/year)
Design flexibility
Limited to plugin’s options and templates
Unlimited – full control over HTML, CSS, and JS
Performance impact
Moderate – plugin adds scripts and database queries
Minimal – only code you write is loaded
Learning curve
Low – GUI-based configuration
High – requires PHP, WordPress hooks, and front-end skills
Choose a plugin if you need a knowledge base live within hours, lack development resources, or want predictable annual costs. Opt for a custom build if you have development expertise, require unique features (e.g., custom search algorithms, multi-site integration), or anticipate scaling to thousands of articles where every millisecond of load time matters. Many teams start with a plugin and migrate to a custom solution as their documentation grows, but planning ahead can save months of rework.
3. Planning Your Knowledge Base Structure
A well-planned knowledge base structure is the backbone of a successful self-service resource. Without a logical hierarchy of categories, subcategories, and articles, users will struggle to find answers, leading to frustration and increased support tickets. The goal is to mirror how your audience thinks and searches, not just how your product is organized internally. This section walks you through the three essential steps to map out your content architecture before you build a single page in WordPress.
Before creating any content, you must understand what your users actually search for. Start by mining your existing support channels: export tickets from your help desk, review live chat transcripts, and analyze email inquiries. Look for recurring questions, phrasing patterns, and common pain points. Next, use keyword research tools (like Google Keyword Planner or AnswerThePublic) to identify search terms related to your product or service. Focus on long-tail queries that indicate specific problems, such as “how to reset password in plugin X” rather than just “password help.”
Organize your findings into a list of primary and secondary queries. This research will directly inform which topics become articles and how they should be titled. For example, if 30% of your support tickets ask about installation, you know “Installation Guide” must be a top-level category.
Creating a Taxonomy of Categories and Tags
WordPress uses taxonomies to group content. For a knowledge base, you will primarily use two: categories (hierarchical) and tags (non-hierarchical). Categories form the main navigation structure—think of them as the table of contents. Tags are descriptive keywords that cross-link related articles across different categories. When planning your taxonomy, follow these guidelines:
Limit top-level categories to 5–7 main topics (e.g., Getting Started, Troubleshooting, Features, Billing).
Create subcategories only when a parent category contains more than 10 articles. For example, “Features” can have subcategories like “Security Features” and “Performance Features.”
Use consistent naming conventions: start with action verbs for procedural content (“Installing,” “Configuring”) and nouns for reference content (“API Reference,” “Changelog”).
Apply tags sparingly—use them for cross-cutting concepts like “WordPress 6.0,” “Multisite,” or “GDPR.”
Avoid creating a flat, single-level structure. A deep but logical hierarchy improves search engine optimization and user navigation. Below is a comparison of two common approaches:
Structure Type
Example
Best For
User Experience
Flat (single level)
All articles under one “FAQs” category
Small knowledge bases (<20 articles)
Poor: users must scan long lists
Hierarchical (multi-level)
Getting Started > Installation > Step-by-Step Guide
Medium to large knowledge bases (20+ articles)
Excellent: clear drill-down path
Designing a Clear Information Architecture
Information architecture (IA) is the blueprint for how your content is organized, labeled, and interconnected. Start by sketching a sitemap on paper or using a tool like Miro. Begin with your top-level categories, then add subcategories and individual articles underneath each. Ensure every article belongs to exactly one primary category but can have multiple tags. Apply the “three-click rule”: users should reach any article within three clicks from the homepage. Test your IA by running a card-sorting exercise with a few colleagues or beta users—ask them to group your article topics into categories. Revise based on their feedback. Finally, implement breadcrumb navigation in WordPress (many knowledge base themes include this) to show users their current location, such as “Home > Troubleshooting > Login Issues.” A clear IA reduces bounce rates and increases article completion rates, directly improving your knowledge base’s effectiveness.
4. Setting Up the Foundation with a Plugin
After planning your knowledge base structure, the next essential step is installing and configuring a dedicated plugin. This transforms your WordPress site into a functional, searchable repository. Three leading options—Heroic Knowledge Base, BetterDocs, and Echo Knowledge Base—each offer distinct advantages. Heroic Knowledge Base excels in analytics and user feedback loops, BetterDocs provides robust drag-and-drop organization, and Echo Knowledge Base offers a lightweight, developer-friendly approach. Regardless of your choice, the core setup process follows a consistent pattern.
Step-by-Step Plugin Installation and Activation
Begin by accessing your WordPress dashboard. Navigate to Plugins > Add New and use the search bar to locate your chosen plugin. For example, search for “BetterDocs” or “Echo Knowledge Base.” Click Install Now, then Activate. If you are using a premium plugin like Heroic Knowledge Base, download the .zip file from the vendor, then go to Plugins > Add New > Upload Plugin, select the file, and activate. Most plugins will immediately add a new menu item, such as “Knowledge Base” or “Docs,” to your admin sidebar. Verify activation by clicking this new menu and confirming that the setup wizard or settings page loads.
For a practical code example, if you need to manually define the plugin’s post type for custom theme integration, add this to your theme’s functions.php file after verifying the plugin’s registered post type (e.g., epkb_post_type_1 for Echo KB):
add_action( 'init', 'custom_kb_support' );
function custom_kb_support() {
if ( post_type_exists( 'epkb_post_type_1' ) ) {
add_post_type_support( 'epkb_post_type_1', 'custom-fields' );
}
}
Configuring Permalinks and URL Structure
Proper permalink configuration ensures clean, readable URLs that enhance SEO and user navigation. After activation, go to the plugin’s settings (e.g., Knowledge Base > Settings > URL). You will typically find fields for:
Knowledge Base Slug: The base URL segment, such as /docs or /help. Choose a short, descriptive slug like /knowledge-base.
Category Slug: Optional prefix for categories, e.g., /category or /topic.
Single Article Slug: Often uses the article title automatically, but you can set a prefix like /article if needed.
After making changes, always save and then flush rewrite rules. You can do this by going to Settings > Permalinks and clicking Save Changes (no need to modify anything). For example, if you set the slug to /docs, your article URLs will appear as yoursite.com/docs/article-name. Avoid using nested slugs like /support/docs unless your site structure explicitly requires it, as deeper paths can dilute SEO value.
Enabling Advanced Search and Filtering
A knowledge base is only as useful as its search functionality. Navigate to the plugin’s search settings (often under Knowledge Base > Settings > Search). Enable the following features:
Feature
Purpose
Typical Setting
Live Search
Displays results as user types
Enabled
Search in Titles & Content
Scans both title and body text
Enabled
Category Filtering
Allows narrowing results by category
Enabled with dropdown
Exclude Articles
Hides specific posts from search
Optional, set IDs
Search Scoring
Boosts title matches over body text
Enabled, weight 3:1
For advanced filtering, many plugins support adding a category dropdown or tag filter directly above the search bar. In BetterDocs, this is toggled via BetterDocs > Settings > Live Search by enabling “Search with Category Filter.” Test the search by typing a sample query and verifying that results appear instantly. If results are slow, consider installing a dedicated search plugin like SearchWP or Relevanssi for better performance, though most knowledge base plugins handle basic queries efficiently.
5. Customizing the Knowledge Base Design
Once your knowledge base structure is in place, customizing its design ensures it aligns seamlessly with your brand identity. A cohesive look—matching your site’s colors, fonts, and layout—builds trust and improves user experience. Most knowledge base plugins offer built-in styling options, but you can also override defaults with custom CSS for precise control. Prioritize mobile responsiveness to guarantee accessibility across devices, as many users access help content on smartphones or tablets.
Choosing and Styling a Template
Begin by selecting a template that provides a solid foundation. Most knowledge base plugins include pre-designed templates optimized for readability and navigation. When choosing a template, consider these factors:
Layout structure: Look for templates with a clear hierarchy, such as a sidebar with categories and a main content area for articles.
Search prominence: Ensure the search bar is prominently placed—typically at the top or center—so users can quickly find answers.
Typography: Select a template with legible font sizes (16px minimum for body text) and line spacing (1.5 to 1.8) for comfortable reading.
Color scheme: Choose a template that supports your brand’s primary and secondary colors, either through built-in color pickers or theme compatibility.
After selecting a template, style it using your plugin’s customization panel. Adjust header backgrounds, button colors, link styles, and hover effects to match your brand guidelines. For example, set your primary brand color as the background for category headers and use a complementary accent for call-to-action buttons like “Contact Support.”
Adding Custom CSS for Brand Consistency
When built-in options fall short, custom CSS gives you granular control. To maintain brand consistency, focus on these common overrides:
CSS Property
Purpose
Example Value
background-color
Set category or section backgrounds
#f4f4f9 (light gray)
color
Define text and link colors
#2c3e50 (dark blue)
font-family
Match your site’s typography
'Open Sans', sans-serif
border-radius
Round corners on search bars or buttons
8px
padding
Adjust spacing around content blocks
20px
To implement custom CSS, navigate to your WordPress theme’s “Additional CSS” section (under Appearance > Customize) or use a child theme to avoid losing changes during updates. Test each override on a staging site first to ensure compatibility with your plugin and theme.
A responsive knowledge base adapts effortlessly to different screen sizes. Start by testing your current design on a 320px-wide viewport (common for mobile phones) and a 1920px-wide desktop screen. Key optimization techniques include:
Collapsible categories: Use accordion-style menus for mobile to save space and reduce scrolling.
Stacked layouts: On narrow screens, convert side-by-side columns (e.g., sidebar and content) into a single vertical stack.
Touch-friendly elements: Ensure buttons and links have a minimum touch target of 44×44 pixels, as recommended by accessibility guidelines.
Scalable images: Use max-width: 100% and height: auto in your CSS so images resize proportionally.
Readable font sizes: Set base font size to 16px on mobile and increase to 18px on desktop for optimal legibility.
Use browser developer tools to simulate mobile devices and adjust breakpoints in your CSS. For instance, add a media query at 768px to switch from a two-column layout to a single column. Regularly test on actual devices to catch issues like overlapping text or hidden navigation elements. By fine-tuning these details, your knowledge base will deliver a consistent, professional experience no matter how users access it.
When you understand how to build a WordPress knowledge base, the real differentiator becomes the quality of your articles. Each piece of content must answer a specific user question with clarity and precision. Structure every article to solve one problem at a time, avoiding tangents that confuse readers. Begin with a brief summary of the issue, then deliver the solution step by step.
To improve readability, break long sections into smaller paragraphs. Use descriptive headings that allow users to scan quickly. For procedural content, include a table of contents at the top of articles longer than 500 words. This helps readers jump directly to the relevant step.
Best Practices for Writing Help Content
Write in plain language, targeting a reading level that matches your audience. Avoid jargon unless it is defined. Use active voice and direct commands, such as “Click the Settings button” instead of “The Settings button should be clicked.” Keep sentences under 25 words when possible.
Start with the goal: State what the reader will accomplish after reading.
Use numbered steps: For multi-step processes, list actions in order.
Anticipate errors: Include a “Troubleshooting” section for common mistakes.
Keep it concise: Remove unnecessary words. Aim for 300–800 words per topic.
Test your instructions: Follow your own steps exactly to verify accuracy.
For example, if you are explaining how to add a custom field in a knowledge base article, write:
1. Navigate to Posts > Add New in your WordPress admin.
2. Scroll to the Custom Fields meta box.
3. Click Enter New and type "Article Version" as the Name.
4. Enter the version number as the Value.
5. Click Add Custom Field.
Incorporating Screenshots and Video Tutorials
Visual aids reduce ambiguity and speed up comprehension. Place screenshots directly after the step they illustrate. Use arrows or circles to highlight the exact button or field the user must interact with. Keep image file sizes under 100 KB to maintain page load speed.
For complex workflows, embed a short video tutorial (2–4 minutes). Use a tool like Loom or ScreenPal to record. Add captions for accessibility. Position the video immediately after the article’s introduction, or at the start of the relevant section. Always include a text summary below the video for users who prefer reading.
When adding images, use descriptive alt text that includes relevant keywords, such as “WordPress knowledge base article settings panel.” This improves SEO and accessibility.
Internal links transform isolated articles into a cohesive knowledge base. They guide users to prerequisite topics, advanced guides, or related troubleshooting steps. For every article, include at least three internal links to other knowledge base entries.
Link using relevant anchor text, not generic phrases like “click here.”
Connect articles that share a common theme, such as “How to Create Categories” linking to “How to Tag Articles.”
Add a “Related Articles” section at the bottom of each post with 3–5 links.
Use a plugin like YARPP or Link Whisper to automate suggestions if your knowledge base grows large.
For instance, in an article about editing user roles, link to “How to Add New Users” and “Understanding WordPress Permissions.” This creates a web of content that helps readers explore without leaving your site.
By following these practices, you ensure every article in your WordPress knowledge base is actionable, accessible, and interconnected—key elements that define a successful help resource.
7. Organizing Content with Categories and Tags
Once you have created your initial knowledge base articles, the next critical step is organizing them so users can find information quickly. A well-structured taxonomy—using categories and tags—reduces frustration and improves self-service success. In WordPress, categories provide the primary navigation structure, while tags offer flexible cross-referencing. The goal is to create a logical, intuitive system that mirrors how your audience thinks about your product or service.
Setting Up Main Categories and Subcategories
Begin by defining 3 to 7 main categories that cover the broadest topics in your knowledge base. For example, a software company might use: Getting Started, Troubleshooting, Account Management, and Billing. Avoid creating too many top-level categories, as this overwhelms users. Instead, use subcategories to break down complex topics. In WordPress, you can create parent-child relationships directly in the Categories screen under Posts > Categories.
When naming categories, use clear, action-oriented language. A flat hierarchy—where subcategories are limited to one or two levels deep—works best. Here is a recommended structure for a typical knowledge base:
Main Category
Subcategory Example
Use Case
Getting Started
Installation, First Setup
New user onboarding
Troubleshooting
Error Codes, Connectivity
Common issues
Account Management
Password Reset, Permissions
User account tasks
Billing
Invoices, Upgrades
Payment support
To implement this in WordPress, assign each article to one primary category. Use the “Add New Category” form to create subcategories by selecting a parent from the dropdown. This ensures your knowledge base menu reflects a clean, hierarchical structure.
Tags complement categories by linking related articles across different sections. While categories group content by topic, tags connect articles by shared keywords, features, or processes. For instance, a tag called “password” could appear in articles under Getting Started, Troubleshooting, and Account Management. This creates a web of related content without forcing articles into multiple categories.
Best practices for tags include:
Use only 5–10 relevant tags per article to avoid clutter.
Keep tag names short and consistent (e.g., “login” instead of “logging into your account”).
Avoid creating tags that mirror category names—this duplicates navigation.
Review and merge similar tags periodically to maintain a clean taxonomy.
In WordPress, tags appear in the Tags meta box on the article editor screen. Add them as you write or batch-assign later via the Posts list screen using Quick Edit. Tags are especially useful for content that spans multiple categories, such as “API integration” or “mobile app.”
Ordering Articles for Logical Flow
Once categories and tags are in place, ordering articles within each category ensures a logical progression from basic to advanced topics. Many WordPress knowledge base plugins, such as Echo Knowledge Base or BasePress, include drag-and-drop ordering interfaces. This allows you to rearrange articles without editing code.
To order articles manually without a plugin, you can assign numerical values to the “menu order” field in the Page Attributes or Post Attributes box (if supported by your theme). For a simpler approach, use a plugin that adds a drag-and-drop interface to your category archive pages. The typical order for a category might look like:
Overview article: Explains the category’s purpose.
Setup or prerequisite tasks: Steps to prepare.
Common tasks: Frequent actions users take.
Troubleshooting: Solutions to known issues.
Advanced topics: In-depth or optional content.
After ordering, test the flow by navigating through your knowledge base as a new user. Ensure each article logically leads to the next, and that related tags provide useful detours. A well-ordered knowledge base reduces bounce rates and increases the likelihood that users find answers without contacting support.
8. Enhancing Search and Navigation
A powerful search bar is the backbone of any effective knowledge base. Without it, users may abandon the site in frustration. To maximize discoverability, you must configure live search and autocomplete, add breadcrumbs for orientation, and implement related articles widgets. These features reduce bounce rates and improve user satisfaction by guiding visitors to the right content quickly.
Configuring Live Search and Autocomplete
Live search displays results as the user types, while autocomplete suggests complete search terms or article titles. To set this up in WordPress, you can use a dedicated knowledge base plugin or a search enhancement tool. Follow these steps:
Install and activate a plugin like Better Search or SearchWP (if you have a standard theme) or use the built-in search features of a knowledge base plugin such as Heroic Knowledge Base or Echo Knowledge Base.
Enable “live search” in the plugin settings, typically found under a “Search” or “Display” tab.
Configure autocomplete by setting a minimum character threshold (e.g., 2-3 characters) and limiting the number of suggestions to 5-10.
Test the search on your front end to ensure results appear instantly and are relevant.
Optionally, exclude pages or posts that are not part of the knowledge base to keep results focused.
For optimal performance, enable caching for search queries and use a content delivery network (CDN) to reduce server load.
Adding Breadcrumbs for User Orientation
Breadcrumbs provide a hierarchical trail that shows the user’s location within the knowledge base. They improve navigation and reduce confusion, especially in large knowledge bases with multiple categories. To add breadcrumbs:
Enable breadcrumbs in your knowledge base plugin (most dedicated plugins include this option).
If your theme supports it, use a plugin like Breadcrumb NavXT or Yoast SEO to add breadcrumbs to all knowledge base pages.
Customize the breadcrumb separator (e.g., “>” or “/”) and ensure the trail starts from the knowledge base homepage.
Place breadcrumbs directly above the article title or below the header for maximum visibility.
Breadcrumbs also contribute to SEO by providing clear internal linking and structured data, which search engines may use to display rich snippets.
Implementing ‘Related Articles’ Widgets
Related articles widgets encourage users to explore additional content, increasing page views and reducing the need for repeated searches. To implement them effectively:
Use a plugin like YARPP (Yet Another Related Posts Plugin) or Contextual Related Posts that supports custom post types (if your knowledge base uses a custom post type).
Configure the widget to display 3-5 related articles based on tags, categories, or content similarity.
Add the widget to the sidebar or below the article content using the WordPress Widgets screen or a block editor.
Ensure the widget is visible on all knowledge base articles but hidden on other site pages to avoid clutter.
Below is a comparison of two popular methods for implementing related articles:
Method
Plugin Example
Key Feature
Best For
Plugin-based (dedicated)
Heroic Knowledge Base
Built-in related articles with category matching
Users who want an all-in-one solution
Plugin-based (general)
YARPP
Customizable algorithm (tags, categories, titles)
Users who need flexibility across post types
Combining live search, breadcrumbs, and related articles creates a cohesive navigation system that empowers users to find answers quickly. Regularly review search analytics to refine autocomplete suggestions and update related article algorithms based on user behavior.
9. Optimizing for SEO and Performance
Once your knowledge base content is written and organized, the next critical step is ensuring it can be found by search engines and loads quickly for users. A fast, well-optimized knowledge base reduces bounce rates and improves user satisfaction, while strong SEO practices drive organic traffic to your support content. This section covers the three pillars of optimization: on-page SEO, structured data, and performance tuning.
On-Page SEO Best Practices for Knowledge Base Articles
Each knowledge base article should be treated as an individual landing page. Follow these on-page SEO guidelines to maximize visibility:
Use descriptive, keyword-rich titles: Include the primary question or phrase your article answers. For example, “How to Reset Your Password” is better than “Password Help.”
Write unique meta descriptions: Summarize the article in 150–160 characters, including the focus keyword “How to Build a WordPress Knowledge Base” where natural.
Structure with proper heading tags: Use a single H1 for the article title, H2 for major sections, and H3 for subsections. This creates a clear hierarchy for search engines.
Optimize images: Add alt text that describes the image content and includes relevant keywords. Compress images before uploading.
Internal linking: Link to related articles within your knowledge base to create topic clusters and improve navigation.
Use short, clean URLs: For example, /knowledge-base/reset-password instead of /kb/?article=43.
Adding Structured Data (Schema) for Rich Results
Structured data helps search engines understand your content and can generate rich snippets in search results, such as FAQ dropdowns or article previews. For a knowledge base, the most relevant schema types are FAQPage and Article. Here is a practical example of FAQ schema markup that you can add to a single article using a WordPress plugin like Yoast SEO or Rank Math, or manually via a custom field:
<script type="application/ld+json">
{
"@context": "https://schema.org",
"@type": "FAQPage",
"mainEntity": [{
"@type": "Question",
"name": "How do I reset my password?",
"acceptedAnswer": {
"@type": "Answer",
"text": "Go to your account settings, click 'Change Password', and follow the prompts."
}
}]
}
</script>
For standard knowledge base articles, use Article schema with properties like headline, description, and datePublished. Many SEO plugins automate this, but verify that the markup appears correctly using Google’s Rich Results Test.
A slow knowledge base frustrates users and hurts SEO. Implement these performance strategies:
Enable caching: Use a plugin like WP Rocket or W3 Total Cache to serve static HTML versions of your pages. This reduces server load and speeds up load times.
Use a Content Delivery Network (CDN): Services like Cloudflare or StackPath distribute your static assets (images, CSS, JavaScript) across global servers, reducing latency for international users.
Optimize images: Compress images with tools like Smush or ShortPixel, and serve them in next-gen formats like WebP. Lazy load images so they only load when visible on screen.
Minify CSS and JavaScript: Remove unnecessary spaces, comments, and characters from your code files. Most caching plugins include this feature.
Choose a fast hosting provider: Managed WordPress hosting (e.g., Kinsta, WP Engine) often includes built-in caching and server-level optimizations.
After implementing these changes, test your knowledge base speed using Google PageSpeed Insights or GTmetrix, aiming for a score above 90 on both mobile and desktop.
10. Maintaining and Growing Your Knowledge Base
Building a knowledge base is only the beginning; its long-term value depends on ongoing maintenance and growth. Without regular updates, content becomes outdated, user trust erodes, and the resource loses its utility. To keep your knowledge base effective, you must integrate analytics, feedback loops, and systematic audits into your workflow. Below are three essential practices for sustaining and expanding your WordPress knowledge base over time.
Tracking Article Performance with Analytics
Analytics provide objective data on how users interact with your knowledge base. By monitoring key metrics, you can identify which articles are most helpful and which need improvement. Use tools like Google Analytics, MonsterInsights, or Jetpack to track the following:
Page views and unique visitors: Shows overall popularity and reach of each article.
Average time on page: Longer times typically indicate deeper engagement, while very short times may signal confusion or irrelevance.
Bounce rate: High bounce rates suggest users didn’t find what they needed or the content was hard to digest.
Search queries within your site: Reveals what users are looking for but can’t find, pointing to content gaps.
Exit pages: Articles where users frequently leave may need revision or better navigation to related content.
Review these metrics monthly to spot trends. For example, if an article about “resetting passwords” has high traffic but a low time on page, consider simplifying the instructions or adding a step-by-step video. Analytics also help you prioritize updates—focus on high-traffic, underperforming articles first.
Implementing a Feedback Loop (Votes, Comments)
Direct user feedback is invaluable for refining your knowledge base. A simple feedback loop allows users to rate articles and suggest improvements. Here’s how to set it up effectively:
Thumbs up/down voting: Add a “Was this article helpful?” widget at the bottom of each page. Track the ratio of positive to negative votes.
Comment sections: Enable comments on knowledge base articles, but moderate them to prevent spam. Encourage users to ask follow-up questions or report errors.
Optional feedback form: After a negative vote, prompt users to explain what was missing or unclear. This qualitative data is gold for improvements.
Team contributions: Allow support staff and subject matter experts to submit suggestions directly from the article interface, using a plugin like Edit Flow or a custom post type.
Act on feedback quickly. If multiple users flag an article as outdated or incorrect, schedule a revision within the week. Publicly acknowledging feedback—such as updating an article and noting “Updated based on user suggestions”—builds trust and encourages more participation.
Scheduling Regular Content Audits and Updates
Consistency is key to a reliable knowledge base. Create a content audit schedule to review every article at least once per quarter. Use the following table to organize your audit cycle:
Check analytics for top 10 articles; update if metrics decline. Review new feedback.
Content manager
Quarterly
Full review of all articles for accuracy, broken links, and relevance. Update screenshots and steps.
Team members (rotating)
Annually
Major content overhaul: remove obsolete articles, merge duplicates, add new topics based on product changes.
Lead writer + subject matter experts
During each audit, check for consistent terminology, formatting, and internal links. Also, ensure that any product updates, new features, or deprecated processes are reflected in the relevant articles. Document the audit results in a shared spreadsheet to track progress and assign tasks. By combining analytics, feedback, and scheduled audits, your knowledge base will remain a trusted, growing resource that evolves with your users’ needs.
Frequently Asked Questions
What is a WordPress knowledge base?
A WordPress knowledge base is a centralized repository of information on your WordPress website that helps users find answers to common questions, troubleshoot issues, or learn how to use your product or service. It typically includes articles, guides, FAQs, and documentation organized into categories. A knowledge base improves user experience, reduces support tickets, and establishes authority. You can create one using dedicated plugins like Heroic Knowledge Base or BetterDocs, or by customizing pages with regular WordPress features. It is essential for any site offering complex products or services.
Which plugins are best for building a knowledge base in WordPress?
The best plugins for building a WordPress knowledge base include Heroic Knowledge Base (powerful with analytics), BetterDocs (user-friendly with multiple layouts), and Documentor (lightweight). Each offers features like instant search, categories, article feedback, and SEO optimization. For a free option, consider using the standard WordPress block editor with a table of contents plugin. Choose based on your need for analytics, customization, and budget. Always check compatibility with your theme and other plugins.
Structure your WordPress knowledge base with clear categories and subcategories. Start with broad topics like 'Getting Started', 'Settings', 'Troubleshooting', and 'FAQs'. Use descriptive article titles and include a search bar at the top. Implement a table of contents for long articles. Organize content hierarchically so users can drill down from general to specific. Test the structure with real users to ensure intuitive navigation. A well-structured knowledge base reduces bounce rates and improves satisfaction.
Can I create a knowledge base without a plugin?
Yes, you can create a knowledge base without a plugin using WordPress core features. Create a new page as the main hub, use categories to organize posts, and add a search widget. Use the block editor to design a table of contents and link to individual articles. This method is free and lightweight, but lacks advanced features like article feedback, instant search, and analytics. For a professional knowledge base, a plugin is recommended, but a manual setup works for small sites.
How do I make my WordPress knowledge base searchable?
To make your WordPress knowledge base searchable, use a dedicated search plugin like SearchWP or Relevanssi that improves default WordPress search. Alternatively, many knowledge base plugins include built-in instant search with live results. Ensure your knowledge base articles are indexed by search engines by using SEO plugins like Yoast or Rank Math. Add a search bar prominently on the knowledge base homepage and consider using AJAX search for faster results. Also, tag articles with relevant keywords.
What are best practices for writing knowledge base articles?
Best practices for writing knowledge base articles include using clear, concise language and breaking content into short paragraphs. Use headings, bullet points, and numbered lists for readability. Include screenshots or videos where helpful. Write in a neutral, helpful tone and avoid jargon. Keep articles focused on a single topic and use consistent formatting. Add a 'Was this helpful?' feedback option. Update articles regularly and link to related content. Optimize for SEO with relevant keywords in titles and meta descriptions.
How do I measure the success of my knowledge base?
Measure success by tracking metrics such as article views, search queries, feedback ratings, and reduced support tickets. Use analytics tools like Google Analytics to see which articles are most visited and where users drop off. Knowledge base plugins like Heroic Knowledge Base provide built-in analytics. Monitor user feedback and comments to identify gaps. A successful knowledge base should have high search success rates, low bounce rates, and positive user ratings. Regularly review metrics to improve content.
Yes, a knowledge base can significantly improve your site's SEO by providing high-quality, structured content that answers user queries. It targets long-tail keywords and earns featured snippets. Use SEO best practices: optimize titles, meta descriptions, headings, and internal links. Ensure fast loading times and mobile responsiveness. A knowledge base can reduce bounce rates and increase dwell time, both positive SEO signals. Additionally, it can attract backlinks from other sites referencing your documentation.
Connecting WordPress with Zapier unlocks a powerful automation layer that eliminates manual, repetitive tasks while scaling your digital operations. Without writing a single line of code, you can bridge your WordPress site with hundreds of apps like email marketing platforms, CRMs, project management tools, and e-commerce systems. This integration transforms how you handle content publishing, lead management, customer communication, and data synchronization. By automating routine workflows, you free up time for strategic work, reduce human error, and ensure consistent, timely actions across your entire tech stack.
What Is Zapier and How Does It Work with WordPress?
Zapier is a no-code automation platform that connects apps by creating automated workflows called Zaps. Each Zap consists of a trigger (an event in one app) and an action (a resulting event in another app). When you integrate Zapier with WordPress, you can set triggers based on activities such as a new blog post being published, a form submission, a user registration, or an order placement. The corresponding action might involve sending data to a Google Sheet, adding a contact to Mailchimp, creating a task in Asana, or posting a message to Slack. Zapier handles the authentication and data transfer securely, requiring only that you grant permission to each connected service. The platform offers pre-built integrations for WordPress, so you can start with templates or customize your own Zaps using filters, formatting, and multi-step logic.
Key Benefits of Automating WordPress Workflows
Time savings: Eliminate manual data entry, copying, and pasting between apps. A single Zap can save hours per week by automatically syncing new WordPress content to your email newsletter, social media schedules, and backup systems.
Reduced errors: Automation ensures that every new lead, order, or comment is processed consistently without typos, missed steps, or forgotten follow-ups.
Improved response speed: Trigger immediate actions like sending a welcome email when a user registers or notifying your team about a new support ticket from a WordPress form.
Scalability without extra headcount: As your site grows, automated workflows handle increased volume without requiring additional staff or manual oversight.
No coding required: Anyone with basic app knowledge can build and modify automations, making it accessible for small business owners, marketers, and content managers.
Enhanced data consistency: Standardize how information flows between WordPress and other tools, ensuring your CRM, analytics, and communication platforms always have accurate, up-to-date records.
Common Use Cases for WordPress and Zapier
The flexibility of Zapier enables a wide range of practical automations for WordPress sites. Here are several high-impact examples:
Share to Twitter, Facebook, LinkedIn, and send newsletter notification
Contact form submission
Form entry (e.g., Gravity Forms, Contact Form 7)
Add lead to CRM (HubSpot, Salesforce) and create task in project manager
New user registration
User registered
Add to Mailchimp list, send welcome email, create user profile in Slack channel
E-commerce order
New WooCommerce order
Record order in Google Sheets, send invoice to accounting app, notify shipping team
Comment moderation
New comment pending approval
Send Slack alert to moderator, log comment in database for review
Content backup
Post updated or deleted
Save revision to Dropbox or Google Drive automatically
These automations illustrate how a single WordPress event can trigger multiple downstream actions, creating a seamless workflow that keeps your operations running efficiently. Whether you manage a blog, an online store, a membership site, or a corporate website, integrating Zapier with WordPress helps you maintain momentum while reducing manual overhead.
Automating your workflow with WordPress and Zapier begins with a single connection: a “Zap.” A Zap is an automated workflow that links two or more apps together. When an event happens in one app (the trigger), Zapier automatically performs an action in another app (the action). For WordPress users, this means you can automate tasks like publishing a post from a new email, adding a user from a form submission, or updating a spreadsheet when a comment is approved. Below is a step-by-step guide to building your first Zap, from account creation to activation.
Creating a Zapier Account and Connecting WordPress
Before you can automate, you need a Zapier account and a connected WordPress site. Follow these steps:
Sign up for Zapier: Go to zapier.com and create a free account using your email, Google, or Microsoft credentials. The free plan allows up to 100 tasks per month and 5 active Zaps—sufficient for testing.
Navigate to My Apps: After logging in, click “My Apps” in the left sidebar. This is where you manage all connected services.
Add WordPress connection: Click “Add Connection,” search for “WordPress,” and select it. You will be prompted to enter your WordPress site URL and provide authentication credentials.
Authenticate with API or plugin: Zapier supports two methods for connecting WordPress:
Application Password (recommended for self-hosted sites): Generate an application password from your WordPress dashboard under Users → Profile → Application Passwords. Enter the username and this password in Zapier.
Zapier for WordPress plugin: Install the free “Zapier for WordPress” plugin from the WordPress plugin repository. Activate it, then copy the provided API key and site URL into Zapier.
Test the connection: Zapier will verify the link. If successful, you’ll see “Connected” next to WordPress in your app list.
Choosing the Right Trigger and Action Events
Once connected, you create a new Zap. Click “Create Zap” and follow these guidelines to select trigger and action events:
Trigger events: These are the “when” part of your automation. Common WordPress triggers include:
“New Post” – fires when a post is published or saved as draft.
“New Comment” – triggers on a new comment, pending or approved.
“New User” – activates when a user registers.
Action events: These are the “then” part. Common WordPress actions include:
“Create Post” – publishes a new post (with title, content, categories, etc.).
“Update Post” – modifies an existing post.
“Add User” – creates a new user account.
For example, if you want to automatically create a WordPress post when a new row is added to a Google Sheet, your trigger would be “Google Sheets: New Spreadsheet Row” and your action would be “WordPress: Create Post.” Always match data types: ensure the trigger provides fields (like title or content) that map to the action’s required fields.
Testing and Activating Your First Zap
After selecting trigger and action events, you must test the workflow before going live:
Set up trigger testing: Zapier will ask you to pull in a sample from your trigger app. For a WordPress trigger, it will fetch a recent post or comment. If no data exists, create a dummy entry (e.g., publish a test post) and then click “Test Trigger.” Zapier should display the sample data.
Map action fields: In the action step, you’ll see fields like “Title,” “Content,” and “Status.” Use the dropdown to select data from the trigger sample. For example, map the Google Sheet’s “Column A” to WordPress “Title.” You can also use static values, such as setting “Status” to “publish” always.
Test the action: Click “Test Action” to run the Zap with the sample data. Zapier will execute the action on your WordPress site (e.g., create a draft post). Verify the result in your WordPress dashboard. If the test fails, check error messages—often due to missing required fields or incorrect authentication.
Name and activate: Once the test succeeds, give your Zap a descriptive name (e.g., “New Google Sheet Row to WordPress Post”). Toggle the switch to “On.” Your automation is now live. For example, here is a practical code snippet for a custom WordPress action if you need to handle webhook data (though not required for standard Zaps):
Note: This code is for developers who need a custom endpoint; standard Zapier users will not need it. After activation, monitor your Zap’s activity in Zapier’s “Zap History” to ensure it runs without errors. Adjust field mappings if data doesn’t flow correctly.
Automating Content Publishing and Updates
Maintaining a consistent publishing schedule across multiple platforms can be time-consuming, but Zapier bridges your WordPress site with hundreds of apps to automate repetitive tasks. By connecting triggers and actions, you can schedule, repurpose, or syndicate content without manual intervention. This ensures your workflow remains efficient, whether you’re a solo blogger or part of a larger team. Below, we explore three key automation strategies using WordPress and Zapier.
Auto-Publishing from RSS Feeds or Google Docs to WordPress
Zapier can monitor an RSS feed or a specific Google Docs folder and automatically create new WordPress posts. For RSS feeds, set up a Zap that triggers when a new feed item appears, then uses the WordPress action to create a draft or published post. You can map the feed title to the WordPress post title, the feed content to the post body, and even assign categories or tags based on keywords. For Google Docs, use a similar trigger: when a new document is added to a designated folder, Zapier parses the document’s content and creates a WordPress post. This is ideal for guest authors who submit drafts via Google Docs, as it eliminates copy-pasting. To avoid duplicates, enable the “Find Post by Title” filter in your Zap to check if a post already exists before creating a new one.
Automatically share new WordPress posts across social media platforms like Twitter, Facebook, LinkedIn, or Instagram. Use the “New Post” trigger in WordPress to initiate a Zap that posts a formatted message to each platform. For example, you can create separate Zaps for each network: one that tweets the post title and link, another that shares a Facebook post with an image from the featured image, and a third that publishes a LinkedIn article. To avoid over-posting, add filters to only activate the Zap for specific categories (e.g., “News” or “Blog”). You can also schedule posts for later by using a delay action, such as “Delay For” 2 hours after publishing, to stagger social shares. Below is a comparison of common social media actions you can automate with Zapier.
Social Platform
Zapier Action
Typical Content Shared
Key Customization
Twitter
Create Tweet
Post title + link (280 characters max)
Shorten URL with Bitly
Facebook
Create Page Post
Post title, excerpt, and featured image
Tag relevant pages or groups
LinkedIn
Create Article
Full post content or summary
Add hashtags and custom headline
Instagram
Create Media Post
Featured image and caption
Use first comment for hashtags
Syncing WordPress Posts with Email Newsletters
Keep your email subscribers informed by automatically syncing new WordPress posts with newsletter services like Mailchimp, ConvertKit, or ActiveCampaign. Create a Zap that triggers on “New Post” in WordPress, then sends the post content to your email platform as a campaign or RSS-to-email broadcast. For example, you can map the post title to the email subject line and the post excerpt to the email body, including a “Read More” link. To segment your audience, use Zapier filters to send posts only to subscribers interested in specific categories (e.g., “Tutorials” or “Updates”). For weekly digests, combine multiple posts into a single email by using a Zapier “Digest” action that collects new posts over a week and sends them as a batch. This ensures your newsletter remains fresh without manual drafting, while maintaining consistent publishing workflows across channels.
Managing User Submissions and Forms
Form submissions are the lifeblood of many WordPress sites—whether for lead generation, event registration, or customer inquiries. Manually processing each entry is error-prone and time-consuming. Integrating WordPress with Zapier automates the capture, sorting, and response to submissions from popular plugins such as Gravity Forms, Contact Form 7, and WPForms. This removes repetitive tasks, reduces human error, and ensures consistent follow-through.
Sending Form Data to Google Sheets or CRM Tools
The most immediate automation is piping form submissions directly into a spreadsheet or customer relationship manager. For example, when a visitor fills out a Gravity Forms contact form, Zapier can create a new row in Google Sheets with fields like name, email, and message. This creates a searchable, sortable log without manual data entry.
Connect your WordPress form plugin to Zapier using the plugin’s built-in webhook or Zapier integration (e.g., Gravity Forms has a dedicated Zapier add-on).
Choose a trigger: “New Form Entry” in Gravity Forms or “New Submission” in WPForms.
Select an action: “Create Row” in Google Sheets, or “Create Contact” in tools like HubSpot, Salesforce, or Mailchimp.
Map form fields to spreadsheet columns or CRM fields.
Test the connection with a sample submission.
This pipeline works equally well with Contact Form 7 by using the CF7 to Zapier plugin, which exposes form fields as trigger data. A practical example for mapping: if your form has a “phone” field, ensure the Zap maps it to the “phone” column in Sheets—not a generic “notes” field—to keep data clean.
Beyond initial capture, Zapier can orchestrate multi-step email sequences. For instance, after a WPForms submission, you can send a personalized thank-you email, then schedule a follow-up two days later if no purchase was made. This is done by chaining Zaps with delays or using Zapier’s built-in email action.
Key automation steps include:
Trigger: New form submission (e.g., from Contact Form 7).
Action 1: Send a confirmation email via Gmail or Outlook with dynamic content (e.g., “Hi {{First Name}}, we received your request.”).
Action 2: Add the submitter to a Mailchimp or ActiveCampaign list for future campaigns.
Action 3 (optional): Create a task in Trello or Asana for a team member to follow up within 24 hours.
For high-volume sites, consider using a filter step to avoid sending emails to spammy entries—for example, only proceed if the email domain is not “tempmail.com.” This keeps your sender reputation intact.
Creating WordPress Users from External Sign-Ups
When users register via a third-party platform (e.g., a Typeform survey or a membership site like MemberPress), Zapier can automatically create corresponding WordPress user accounts. This is critical for membership, course, or community sites that rely on synchronized user data.
To achieve this:
Use a trigger from an external service (e.g., “New Response” in Typeform, or “New Member” in MemberPress).
Select the action: “Create User” via the WordPress REST API or a plugin like WP User Manager.
Map fields: email to user_email, full name to display_name, and a generated password to user_pass.
Optionally, assign a role (e.g., “subscriber”) and send a welcome email using a second Zap.
If using the WordPress REST API directly, the Zap’s “Webhook” action can send a POST request. Below is a conceptual example of the JSON payload you would send to https://yoursite.com/wp-json/wp/v2/users (requires authentication via application passwords):
This method ensures that every external sign-up results in a functional WordPress account, eliminating manual import or duplicate data entry. Always test with a staging site first to avoid locking out real users.
Streamlining E-Commerce Operations
Managing an online store involves a cascade of repetitive tasks: processing orders, updating financial records, sending follow-up emails, and tracking inventory across platforms. Manual handling of these steps is not only time-consuming but also prone to human error. By integrating WooCommerce with Zapier, you can create automated workflows—called Zaps—that transfer data between your e-commerce system and essential business tools. This approach reduces manual order management, frees up your team for higher-value work, and ensures accuracy across your operations. Below, we explore three critical automations that transform how you handle orders, customer communication, and stock levels.
Syncing WooCommerce Orders with QuickBooks or Xero
Every completed WooCommerce order generates financial data that must be recorded in your accounting software. Manually entering invoices, payments, and customer details into QuickBooks or Xero is tedious and risks data entry mistakes. With Zapier, you can create a direct sync that automatically sends order information from WooCommerce to your accounting platform. For example, a new WooCommerce order can trigger the creation of a sales receipt in QuickBooks or an invoice in Xero. The Zap can map fields such as customer name, email, product details, quantities, prices, taxes, and shipping costs. This automation ensures your books are always up to date without manual intervention. Common steps include:
Selecting a trigger: “New Order” in WooCommerce.
Choosing an action: “Create Sales Receipt” in QuickBooks or “Create Invoice” in Xero.
Mapping fields: Match WooCommerce order data to corresponding fields in the accounting app.
Testing the Zap: Run a sample order to verify accuracy.
This sync eliminates duplicate data entry, reduces errors, and gives you real-time financial visibility. For businesses with high order volumes, it can save hours each week and accelerate month-end closing.
Automating Customer Email Sequences After Purchase
Post-purchase communication is vital for customer retention, but manually sending thank-you notes, shipping updates, or review requests is impractical. Zapier connects WooCommerce with email marketing platforms like Mailchimp, ActiveCampaign, or ConvertKit to trigger automated sequences based on order events. For instance, when a WooCommerce order status changes to “Completed,” a Zap can add the customer to a specific email list and send a tailored series of messages. A typical post-purchase automation might include:
Immediate trigger: Order marked as “Processing” sends a confirmation email.
Delay: After 3 days, send a “How are you enjoying your purchase?” email.
Follow-up: After 7 days, request a product review with a direct link.
Conditional logic: If the customer spent over $100, add them to a VIP segment for exclusive offers.
You can also use WooCommerce order data to personalize emails—inserting the customer’s first name, product name, or order total. This automation nurtures relationships, boosts repeat purchases, and reduces manual effort. To set it up, choose a trigger like “New Order” or “Order Status Changed” in WooCommerce, then select an action such as “Add/Update Subscriber” in your email tool, followed by “Send Email” or “Add to Automation Sequence.”
Updating Inventory Across Multiple Channels
Selling on multiple platforms—WooCommerce, Amazon, eBay, or social media—creates a challenge: keeping stock levels synchronized. Overselling occurs when inventory isn’t updated in real time, leading to canceled orders and unhappy customers. Zapier can automate inventory updates by connecting WooCommerce to inventory management systems like TradeGecko, Zoho Inventory, or even Google Sheets. For example, when a WooCommerce order reduces stock, a Zap can deduct the same quantity from your Amazon listing or sync the new level to a shared spreadsheet. Key steps include:
Trigger: “Inventory Level Changed” in WooCommerce (requires a plugin like Stock Manager for WooCommerce or using WooCommerce’s built-in stock tracking).
Action: “Update Inventory” in a third-party channel or “Update Cell” in Google Sheets.
Multi-channel handling: Create separate Zaps for each sales channel or use a centralized inventory app as a middle layer.
For businesses with dozens of SKUs, this automation prevents overselling and saves hours of manual cross-checking. A simple table can illustrate the flow:
Trigger Event (WooCommerce)
Action (Zapier)
Result
Order placed for 5 units of Product A
Deduct 5 units from Amazon inventory
Amazon stock matches WooCommerce
Order refunded for 2 units of Product B
Add 2 units back to eBay listing
Accurate stock across all channels
New stock received (manual update in WooCommerce)
Update Google Sheets inventory log
Team sees current stock in real time
Implementing these three automations transforms your e-commerce workflow from a manual, error-prone process into a streamlined, data-driven operation. By syncing financials, automating customer outreach, and maintaining accurate inventory, you not only save time but also enhance customer experience and business reliability.
Integrating your WordPress site with email marketing, analytics, and advertising platforms transforms static content into a dynamic lead generation engine. By automating the capture and nurturing of prospects, you reduce manual data entry, minimize human error, and ensure no lead falls through the cracks. Zapier acts as the bridge, connecting WordPress forms, user actions, and content updates directly to your marketing stack. Below are three critical automation workflows that streamline this process.
Adding New Subscribers to Mailchimp or ActiveCampaign
When a visitor submits a form—whether via Gravity Forms, Contact Form 7, or a native WordPress comment—Zapier can instantly add their email and name to your chosen email marketing platform. This eliminates the need to export CSV files or manually copy data.
Trigger: New form entry in WordPress (e.g., from a newsletter signup widget).
Action: Create or update subscriber in Mailchimp or ActiveCampaign.
Optional steps: Add tags based on form fields (e.g., “Blog Subscriber” or “Download Request”), assign to a specific list, or trigger a welcome email sequence.
To implement this, ensure your form plugin has a webhook or Zapier integration. For example, with Gravity Forms, you can use the built-in “Zapier” feed. A practical code snippet for custom WordPress forms (if you need to trigger a webhook manually) might look like:
This sends a JSON payload to Zapier, which then maps the fields to Mailchimp or ActiveCampaign.
Triggering Facebook Custom Audiences from WordPress Actions
Retargeting website visitors with Facebook ads becomes seamless when you automate audience creation. Zapier can push user data (email, phone) from WordPress events—such as a completed purchase, a form submission, or a page visit—directly into a Facebook Custom Audience.
Common triggers: New WooCommerce order, new user registration, or a specific form submission (e.g., “Request a Demo”).
Action: Add user to a Facebook Custom Audience via the Facebook Conversions API (CAPI) or the Facebook Lead Ads integration.
Benefit: You can segment audiences by behavior (e.g., “Purchased in last 30 days” or “Downloaded eBook”) and serve tailored ads without manual list uploading.
To set this up, you need a Facebook Business Manager account and a configured Custom Audience. Zapier will authenticate with Facebook and map the email field from your WordPress form to the audience identifier. Ensure your site uses HTTPS to comply with Facebook’s data security requirements.
Logging Leads into Salesforce or HubSpot from Forms
For B2B sites, capturing leads from contact forms, quote requests, or webinar registrations and immediately logging them into a CRM is essential. Zapier can create a new lead or contact record in Salesforce or HubSpot with minimal delay.
WordPress Trigger
CRM Action
Key Mapped Fields
New form entry (e.g., Contact Form 7)
Create lead in Salesforce
Email, Name, Company, Phone, Message
New WooCommerce order
Create contact in HubSpot
Email, First Name, Last Name, Product, Total
New user registration
Update existing contact in Salesforce
Email, Lead Source, Industry (from custom field)
To maximize accuracy, use Zapier’s “Find or Create” action to avoid duplicate records. For example, if a lead already exists in HubSpot with the same email, Zapier can update their profile instead of creating a duplicate. This workflow ensures your sales team receives real-time notifications via Slack or email whenever a high-value lead is logged, enabling faster follow-up.
Automating Member and User Management
Managing membership sites, user roles, and access permissions manually can become a bottleneck as your community grows. Plugins like MemberPress and WooCommerce Memberships handle the core logic on your WordPress site, but Zapier extends their reach by connecting them to thousands of apps. This automation allows you to assign roles, send timely reminders, and integrate with learning management systems without writing a single line of code. Below, we break down three key areas where WordPress and Zapier can streamline your member management workflow.
Assigning User Roles Based on Purchase or Registration
When a new user registers or purchases a membership, you often need to assign a specific role—such as “Premium Member” or “Free Subscriber”—to control access to content and features. With Zapier, you can automate this process using triggers from your membership plugin.
Trigger: A new purchase in WooCommerce Memberships or a registration in MemberPress.
Action: Update the user role in WordPress via the “Add or Update User” action in the Zapier WordPress integration.
Example workflow: A customer buys a “Gold Plan” product in WooCommerce. Zapier detects the purchase, checks the product SKU, and maps it to the “gold_member” role in WordPress. The user’s role is updated instantly, granting access to gated content.
You can also handle tiered memberships by setting up separate Zaps for each product or plan. This ensures that users never fall through the cracks and that role assignments happen in real time, reducing manual admin work.
Syncing Membership Expirations with Email Reminders
Membership sites rely on renewals, and letting members expire without notice can lead to churn. By syncing expiration dates from your plugin to a connected app like Mailchimp, Google Sheets, or ActiveCampaign, you can automate reminder sequences.
Step
Zapier Component
Details
1
Trigger
Membership expiration date approaches (e.g., 7 days before) in MemberPress or WooCommerce Memberships.
2
Action
Add or update a contact in your email marketing tool with a tag like “expiring-soon”.
3
Follow-up
Send an automated email sequence: reminder at 7 days, final notice at 1 day, and a re-engagement offer after expiration.
To set this up, use a “Date/Time” filter in Zapier to check when a membership end date is within a specific range. For example, if the expiration date is exactly 7 days from today, Zapier triggers a Gmail or Mailchimp action. This keeps your members informed and increases the likelihood of renewals without manual tracking.
Integrating with Learning Management Systems for Course Access
Many membership sites pair with learning management systems (LMS) like LearnDash or LifterLMS to deliver courses. Automating access based on membership level ensures that learners see only the content they’ve paid for. Zapier bridges the gap between your membership plugin and LMS.
Trigger: User role updated to “Student” or “Pro Learner” in WordPress (via MemberPress).
Action: Enroll the user in a specific course in LearnDash using its API or a webhook.
Example: A member upgrades to the “Advanced” tier. Zapier detects the role change, then sends a POST request to LearnDash to enroll them in “Advanced Course 101”. Conversely, if a membership expires, a separate Zap can unenroll the user from all courses.
This integration eliminates the need for manual course enrollment or bulk imports. You can also use Zapier to sync progress or completion data back to your CRM, giving you a full view of member engagement. For complex setups, consider using multiple Zaps for different membership tiers to keep course access tightly controlled.
Efficient support ticket management is critical for maintaining customer satisfaction and team productivity. By integrating WordPress support plugins like Awesome Support or WS Form with helpdesk tools such as Freshdesk or Zendesk via Zapier, you can automate the entire lifecycle of a ticket—from creation to resolution. This reduces manual data entry, minimizes response times, and ensures no request falls through the cracks. Below are three key automation workflows to streamline your support operations.
Creating Support Tickets from WordPress Form Submissions
When a customer submits a support request through a WordPress form (e.g., via Gravity Forms or Contact Form 7), Zapier can automatically create a ticket in your helpdesk system. This eliminates the need for staff to manually transfer data between platforms. To set this up, you typically map form fields—such as name, email, and issue description—to corresponding ticket fields in your helpdesk. For example:
Trigger: New submission in WordPress form plugin.
Action: Create ticket in Freshdesk, Zendesk, or Help Scout.
Field mapping: Form “Subject” → Ticket “Subject”; Form “Message” → Ticket “Description”; Form “Email” → Ticket “Requester Email”.
This workflow ensures every support request is captured instantly, with no manual intervention. It also allows you to tag tickets by priority based on form selections (e.g., “Urgent” or “Low”).
Automating Responses Based on Ticket Categories
Once tickets are created, you can automate initial responses based on the category or tags assigned during form submission. For instance, a ticket tagged as “Billing Issue” can trigger an automated reply with payment portal links, while a “Technical Bug” ticket can prompt a message directing users to your knowledge base. This is achieved by using Zapier’s filter and path logic:
Step 1: Zapier checks the ticket’s category field (e.g., from an Awesome Support ticket).
Step 2: If category equals “Billing,” send a pre-written email or helpdesk note with billing instructions.
Step 3: If category equals “Technical,” send a reply with troubleshooting steps or a link to your documentation.
This automation reduces repetitive work for support agents, allowing them to focus on complex issues while still providing timely acknowledgments to customers.
Syncing Ticket Status Changes with Slack or Email
Keeping your team informed about ticket progress is essential for collaboration. Zapier can sync status updates—such as “Open,” “In Progress,” or “Resolved”—from your helpdesk to Slack channels or email notifications. For example, when a ticket moves to “Resolved” in Zendesk, Zapier can post a summary to a #support-closed Slack channel or send an email to the assigned agent. Below is a comparison of common sync methods:
Sync Target
Trigger Example
Notification Content
Best For
Slack Channel
Ticket status changes to “In Progress”
Ticket ID, subject, and assigned agent name
Real-time team visibility
Email
Ticket status changes to “Resolved”
Ticket summary, resolution notes, and link
Archival and agent accountability
Slack Direct Message
Ticket priority changes to “Urgent”
High-priority alert with ticket details
Escalation of critical issues
By syncing these changes, your team can react quickly to bottlenecks, celebrate resolved tickets, and avoid duplicate work. For instance, a Slack notification for a status change to “Waiting on Customer” reminds agents to follow up after a set period.
Implementing these three workflows with WordPress and Zapier transforms your support system from reactive to proactive. You save hours of manual work, improve response consistency, and empower your team to handle more tickets with less effort. Start by mapping your most frequent form submissions to ticket creation, then layer in automated replies and status syncs to build a fully automated support pipeline.
Monitoring and Backup Automation
Proactive maintenance of a WordPress site requires consistent attention to backups, security updates, and performance metrics. By integrating Zapier into your workflow, you can automate these critical tasks, reducing manual oversight and ensuring your site remains resilient. Zapier connects your WordPress site with third-party services like cloud storage, communication tools, and analytics dashboards, triggering actions based on specific events. This section outlines three key automation strategies: scheduling backups, receiving alerts, and logging health data.
Scheduling Automated Backups to Cloud Storage
Regular backups are essential for disaster recovery. With Zapier, you can automate the transfer of backup files from your WordPress environment to cloud storage services like Google Drive, Dropbox, or Amazon S3. This process typically begins when a backup plugin (e.g., UpdraftPlus or Jetpack) completes a backup and sends a webhook or email notification. Zapier detects this trigger and initiates a file upload.
For a practical implementation, consider using a cron job or server-side script to generate a database dump, then use Zapier to upload it. Below is an example command for creating a MySQL dump on a Linux server, which can be triggered by a scheduled event:
After the dump is saved locally, Zapier’s “File by Zapier” or “Cloud Storage” integration can watch a folder for new files and upload them automatically. Configure a Zap with the following steps:
Trigger: New file in a watched folder (via SFTP or local event)
Action: Upload file to Google Drive in a designated “WordPress Backups” folder
Optional: Add a step to send a confirmation email
This ensures off-site backups are created daily without manual intervention.
Receiving Alerts for Plugin Updates or Security Issues
WordPress sites frequently require attention to plugin updates and security vulnerabilities. Zapier can monitor your site for these events and send real-time alerts via email, Slack, SMS, or other channels. Common triggers include new security scan results from plugins like Wordfence or update notifications from the WordPress admin dashboard.
To set up alerts, follow these steps in Zapier:
Choose a trigger app: Use Webhooks by Zapier to receive POST requests from your WordPress site, or integrate with a security plugin that supports API calls.
Set the trigger event: For example, “New Security Issue Detected” or “Plugin Update Available.”
Select an action app: Slack (send a message to a channel), Gmail (send an email), or Twilio (send an SMS).
Customize the message: Include details like plugin name, version, severity level, and a link to update.
Example alert format in Slack:
Field
Value
Plugin
Yoast SEO
Current Version
20.1
New Version
20.2
Severity
Medium
Action Needed
Update within 7 days
This automation keeps your team informed, enabling quick response to vulnerabilities or outdated components.
Logging Uptime and Performance Data to Dashboards
Monitoring site health metrics like uptime, page load speed, and server response time helps identify issues before they affect visitors. Zapier can collect data from monitoring tools (e.g., UptimeRobot, Pingdom, or Google PageSpeed Insights) and log it to dashboards like Google Sheets, Airtable, or Datadog.
Implement a Zap that runs on a schedule (e.g., hourly) to fetch performance data:
Trigger: Schedule by Zapier (every hour)
Action: Fetch uptime status via Webhooks from your monitoring service
Action: Append a new row to a Google Sheet with columns: Timestamp, Uptime Status, Load Time (seconds), and Error Count
For example, a Google Sheet row might look like:
Timestamp
Uptime Status
Load Time
Error Count
2025-03-20 14:00
Up
1.2
0
2025-03-20 15:00
Down
N/A
1
By centralizing this data, you can create visualizations or set conditional alerts (e.g., if load time exceeds 3 seconds, send a notification). This proactive logging ensures you maintain optimal performance and quickly address anomalies.
Best Practices and Troubleshooting Common Issues
When automating WordPress workflows with Zapier, reliable performance depends on proactive management of common pitfalls. By following best practices for rate limits, conditional logic, and testing, you can minimize disruptions and ensure your Zaps run smoothly. Below are actionable strategies for maintaining robust automations.
Managing API Rate Limits and Error Handling
WordPress and Zapier both enforce API rate limits to prevent server overload. Exceeding these limits can cause Zaps to fail or queue requests unnecessarily. To manage this:
Monitor your WordPress API usage through hosting dashboards or plugins like Query Monitor. Most shared hosts allow 200–500 requests per minute; scale back if you approach limits.
Use Zapier’s built-in retry logic for transient errors. In the Zap editor, enable “Retry on error” (available for premium plans) to automatically reattempt failed tasks up to 3 times with exponential backoff.
Implement custom error handling via Zapier’s “Filter by Zapier” or “Webhooks by Zapier” to catch specific HTTP error codes (e.g., 429 for rate limits or 500 for server errors). For example, if a WordPress action returns a 429 error, pause the Zap for 60 seconds using a “Delay by Zapier” step before retrying.
Batch actions where possible: Instead of triggering a Zap for each new post, use “Schedule by Zapier” to run bulk updates during off-peak hours, reducing per-second request volume.
For persistent failures, check WordPress error logs and ensure your site’s PHP memory limit is at least 256MB to handle API responses.
Using Filters and Paths for Conditional Logic
Conditional logic prevents unnecessary actions and errors. Zapier offers two primary tools for this:
Filter by Zapier: Add a filter step to check field values before proceeding. For example, only send a Slack notification when a WordPress post’s status is “publish” and its category is “News.” Set conditions like “Post Status – Exactly – Publish” and “Category – Contains – News.”
Paths by Zapier: Use paths to create branching workflows. For instance, if a new WordPress user signs up, Path A could add them to a “Subscribers” Mailchimp list, while Path B (triggered if the user’s email domain is “@company.com”) adds them to an “Employees” list. Each path can have its own filter conditions and subsequent actions.
When designing paths, keep these rules in mind:
Best Practice
Why It Matters
Limit paths to 3–5 branches
Excessive complexity increases debugging time and slows execution.
Test each path separately
Use sample data to verify conditions match expected outcomes.
Use “Otherwise” path as fallback
Capture unhandled cases to avoid silent failures.
Testing and Debugging Zaps Before Going Live
Rushing a Zap into production often leads to data corruption or missed actions. Follow this testing workflow:
Use test mode: In the Zap editor, click “Test & Review” after each step. Zapier will run a live test using a single sample record from WordPress. Verify the output matches your expectations (e.g., correct post ID, title, or custom fields).
Simulate edge cases: Create a draft post, a private post, and a post with missing required fields. Run the Zap for each to ensure error handling works. For example, if your Zap expects a featured image but none exists, the filter should skip that action.
Inspect Zap History: After initial testing, run 5–10 real data samples and review the Zap History (found under “Zap” > “History”). Check for “Success,” “Error,” or “Filtered” statuses. Expand failed tasks to see raw error messages from WordPress or third-party apps.
Use “Custom Webhook” for isolated testing: If you suspect an API issue, create a test Zap with a “Webhooks by Zapier” trigger that sends a static payload. Then add your WordPress action step and test without relying on live data changes.
Once satisfied, turn on the Zap and monitor it for the first 24 hours. Set up email notifications for failures in Zapier’s settings to catch issues early.
Frequently Asked Questions
What is Zapier and how does it work with WordPress?
Zapier is a no-code automation platform that connects different apps and services, including WordPress, to automate repetitive tasks. With Zapier, you can create 'Zaps'—automated workflows triggered by events in one app (like a new WordPress post) that cause actions in another app (like sending an email). For WordPress, Zapier integrates via plugins or webhooks, allowing you to sync data, publish content, manage leads, and more without manual intervention. This streamlines operations, saves time, and reduces errors.
How do I connect WordPress to Zapier?
To connect WordPress to Zapier, you need to install a connection plugin like the official 'Zapier for WordPress' plugin or use WP Webhooks. After installation, authenticate your WordPress site with Zapier by generating an API key or using OAuth within the plugin settings. Then, in your Zapier account, create a new Zap, select WordPress as the trigger or action app, and follow the prompts to choose specific events (e.g., new post, new comment). Test the connection to ensure data flows correctly.
What are some common WordPress automations with Zapier?
Common WordPress automations include: 1) Auto-publishing blog posts from external sources like RSS feeds or Google Docs. 2) Adding new WordPress users to an email marketing list (e.g., Mailchimp). 3) Creating Trello cards or Asana tasks for new comments or orders. 4) Syncing form submissions (via Gravity Forms or Contact Form 7) to a Google Sheet or CRM. 5) Sending Slack notifications for new posts or updates. These automations eliminate manual data entry and improve team collaboration.
Do I need coding skills to use Zapier with WordPress?
No, Zapier is designed for non-technical users and requires no coding skills. Its visual editor lets you build workflows by selecting triggers and actions from dropdown menus. For WordPress, you may need to install a plugin (which is straightforward) and configure a few settings, but no code is required. However, if you need custom data transformations, Zapier offers a 'Code' step that supports JavaScript or Python, but this is optional for most standard automations.
The 'Zapier for WordPress' plugin is free to install and use from the WordPress plugin repository. However, Zapier itself operates on a freemium model. The free plan allows you to create up to 100 tasks per month and 5 single-step Zaps. For more tasks, multi-step Zaps, or premium apps, you need a paid Zapier plan (Starts at $19.99/month). The plugin itself does not have additional costs, but your Zapier usage may require a subscription depending on your automation volume.
Can I use Zapier to automate WooCommerce orders?
Yes, Zapier integrates with WooCommerce, either through the WordPress app (for basic triggers like new orders) or directly via the WooCommerce app in Zapier, which provides more specific events like order status changes (e.g., completed, refunded). You can automate tasks such as sending order details to a Google Sheet, creating invoices in accounting software (e.g., QuickBooks), or updating customer records in a CRM. This reduces manual data entry and ensures order information is instantly available across your business tools.
What are the limitations of using Zapier with WordPress?
Limitations include: 1) Task limits on free and lower-tier paid plans may restrict high-volume automation. 2) Zapier's WordPress app has pre-defined triggers and actions, which may not cover every custom event (e.g., specific custom post types without additional plugins). 3) Performance depends on Zapier's servers and your site's response time. 4) Complex workflows may require multi-step Zaps, which are only available on paid plans. 5) Data security considerations when sending sensitive information through third-party services.
How do I troubleshoot a WordPress Zap that isn't working?
First, check that your WordPress plugin is active and properly authenticated. In Zapier, review the Zap's history for error messages. Common issues include incorrect field mappings (e.g., missing required fields) or changes in your WordPress site's structure (e.g., deleted custom fields). Test the trigger by manually performing the event (e.g., publish a test post). If using webhooks, ensure the endpoint URL is correct. Zapier's support documentation and community forums can help. Also, verify that your WordPress site is publicly accessible and not blocked by a firewall.
How to Create a WordPress Review System: A Complete Step-by-Step Guide
Introduction: Why Build a Review System on WordPress
User-generated reviews have become a cornerstone of trust and credibility for modern websites. When visitors see authentic feedback from other customers or readers, they are far more likely to engage with your content, make a purchase, or return for future visits. A well-implemented review system directly boosts search engine optimization by generating fresh, keyword-rich content and increasing dwell time. It also drives conversions: products or services with visible reviews often see higher sales because social proof reduces perceived risk. WordPress, with its flexible architecture and vast ecosystem of plugins and themes, allows you to create a custom review system that matches your specific needs—without requiring deep coding knowledge. Whether you run an e-commerce store, a blog, or a directory site, building your own review system can transform passive visitors into active participants, fostering community and loyalty.
The Role of Reviews in Modern E‑Commerce and Content Sites
Reviews serve multiple critical functions in today’s digital landscape:
Trust and Credibility: Authentic reviews reassure potential buyers that others have had positive experiences, reducing hesitation and building confidence.
SEO Benefits: User-generated content provides a steady stream of fresh, relevant text that search engines favor, often including long-tail keywords naturally.
Conversion Optimization: Displaying average ratings and recent testimonials near calls-to-action can increase click-through and purchase rates.
Feedback Loop: Reviews offer direct insights into what customers like or dislike, helping you improve products, services, or content.
Social Proof: People tend to follow the actions of others. Highlighting positive reviews can nudge undecided visitors toward a desired action.
For content sites, reviews also encourage user interaction and return visits, as commenters and reviewers feel invested in the community. Without a structured review system, this valuable feedback remains scattered or lost.
WordPress as a Platform for Custom Review Functionality
WordPress excels as a foundation for custom review systems because of its modular nature. You can leverage existing plugins for core functionality (like rating stars, submission forms, and moderation) while customizing the look and behavior through themes and custom post types. Key advantages include:
Feature
Benefit
Plugin ecosystem (e.g., WP Review, Site Reviews)
Ready-made solutions for ratings, criteria, and display
Custom post types and taxonomies
Separate review entries from regular posts or products
User roles and capabilities
Control who can submit, edit, or moderate reviews
REST API
Integrate reviews with external systems or mobile apps
Theme hooks and templates
Override default display without altering core files
Even without heavy coding, you can create a review system that feels native to your site—whether you need simple star ratings, multi-criteria scoring, or rich text testimonials.
Key Considerations Before You Start Building
Before diving into implementation, evaluate these critical factors to ensure your review system meets both user expectations and your business goals:
Moderation Workflow: Decide whether reviews are published instantly, require manual approval, or use automated filters. Balance timeliness with quality control.
Review Criteria: Define what aspects are rated (e.g., overall score, quality, price, support). Keep it simple to avoid overwhelming users.
Display Options: Plan where reviews appear (product pages, dedicated archive, widgets). Consider schema markup for rich snippets in search results.
User Authentication: Determine if anonymous submissions are allowed or if users must log in. Logged-in submissions reduce spam but may limit participation.
Spam Prevention: Implement CAPTCHA, honeypot fields, or third-party services to keep your review system clean.
Performance Impact: Large numbers of reviews can slow queries. Use caching or dedicated plugins optimized for scalability.
By addressing these points upfront, you will avoid common pitfalls and create a review system that enhances your site’s value without becoming a maintenance burden.
Choosing the Right Approach: Plugin vs. Custom Code
When you decide to implement a review system on your WordPress site, you face a foundational decision: use a dedicated plugin or build a custom solution from scratch. Each path offers distinct trade-offs in terms of time, flexibility, performance, and long-term maintenance. Understanding these differences is critical to selecting the approach that aligns with your site’s goals and your technical comfort level.
Top WordPress Review Plugins and Their Core Features
Several robust plugins dominate the review landscape, each bringing a set of pre-built tools that accelerate setup. The most popular options include:
WP Review Pro – Offers multiple rating types (stars, points, percentages), rich snippets for SEO, and support for various post types. It includes comparison tables and user review submission forms.
YASR (Yet Another Stars Rating) – Lightweight and focused on simplicity. Provides star ratings, schema markup, and integration with most themes. Free version supports both visitor and author ratings.
Ultimate Reviews – Designed for detailed product or service reviews. Features custom fields, review criteria with weighted scores, and a front-end submission system.
Comments – wpDiscuz – While primarily a comment system, its add-ons enable star ratings and review features within comment forms, ideal for user-generated reviews.
Plugin
Key Strength
Best For
WP Review Pro
Rich SEO features & comparison tables
Affiliate or product review sites
YASR
Lightweight & fast
Simple rating systems
Ultimate Reviews
Custom criteria & weighted scoring
Detailed review workflows
wpDiscuz + Add-ons
User-generated content integration
Community-driven reviews
Plugins excel at speed of deployment. You can have a working review system in under an hour, complete with schema markup and styling. However, they often introduce bloat, lock you into specific design patterns, and may conflict with other plugins or themes during updates.
When to Choose a Custom Development Path
Building a custom review system gives you full control. You define exactly how ratings are stored, displayed, and queried. This approach is ideal when your review requirements are unique—for example, if you need multi-axis ratings with custom weighting, or if you want to integrate reviews into a custom post type that already exists.
A typical custom solution leverages WordPress’s native register_post_type() and add_meta_box() functions. Below is a practical code example that adds a star rating meta box to a custom post type called “reviews”:
// Add meta box for rating
function add_review_rating_meta_box() {
add_meta_box(
'review_rating',
'Review Rating',
'render_review_rating_meta_box',
'reviews',
'side',
'default'
);
}
add_action('add_meta_boxes', 'add_review_rating_meta_box');
function render_review_rating_meta_box($post) {
$rating = get_post_meta($post->ID, '_review_rating', true);
echo '<label for="review_rating">Rating (1-5): </label>';
echo '<input type="number" id="review_rating" name="review_rating" min="1" max="5" value="' . esc_attr($rating) . '" />';
}
// Save rating
function save_review_rating($post_id) {
if (isset($_POST['review_rating'])) {
update_post_meta($post_id, '_review_rating', sanitize_text_field($_POST['review_rating']));
}
}
add_action('save_post', 'save_review_rating');
Custom development demands deeper PHP and WordPress knowledge, and it takes significantly longer to implement features like schema markup, user submissions, or front-end display. But it yields a lean, precisely tailored system with no dependency on third-party code.
Hybrid Approaches: Combining Plugins with Custom Code
Many site owners find that a hybrid strategy offers the best balance. You start with a lightweight plugin to handle the core rating logic and schema output, then extend it with custom code for specific needs. For example, you might use YASR for its reliable schema markup but add a custom shortcode to display ratings in a unique layout that matches your theme.
Another common hybrid pattern involves using a plugin for the user-facing review form while storing additional data via custom meta fields. This allows you to capture extra information—like a reviewer’s location or product variant—without rebuilding the entire system. The key is to choose a plugin that is well-coded and provides hooks or filters for modification. This approach reduces development time while still giving you the flexibility to differentiate your site.
Setting Up Your WordPress Environment for Reviews
Before adding a review system to your WordPress site, you must prepare a stable, secure, and customizable foundation. This step ensures that your review features function reliably, your theme remains updatable without breaking custom code, and your site loads quickly even with user-generated content. Follow these three essential sub-steps to create a review-ready environment.
A child theme is a separate WordPress theme that inherits the parent theme’s functionality and styling while allowing you to modify templates, CSS, and PHP files without affecting the original theme. This is critical for review systems because you may need to add custom review fields, star ratings, or structured data markup. Without a child theme, a parent theme update could overwrite your review code.
To create a child theme manually:
Create a new folder in /wp-content/themes/ named after your parent theme plus “-child” (e.g., twentytwentyfour-child).
Inside that folder, create a style.css file with a header that defines the child theme name and the parent theme template. Example header: /* Theme Name: Twenty Twenty-Four Child Template: twentytwentyfour */
Create a functions.php file that enqueues the parent theme’s stylesheet using wp_enqueue_style().
Activate the child theme from the WordPress admin under Appearance > Themes.
After activation, all custom review templates (e.g., single-review.php) and CSS should be added to the child theme folder, keeping your parent theme clean and update-safe.
Installing and Configuring a Review‑Friendly Plugin
Choosing the right plugin is crucial. For a review system, you need a plugin that supports custom post types, star ratings, user submissions, and schema markup. Below is a comparison of two popular options:
Feature
WP Review Pro
Site Reviews (Free)
Custom post type support
Yes, with built-in review boxes
Yes, via custom post type assignment
Star rating system
Built-in (1–5 stars, half stars)
Built-in (1–5 stars, adjustable scale)
User submission forms
Yes, with shortcode
Yes, with shortcode and widget
Schema markup (JSON-LD)
Automatic for reviews
Manual setup required
Free version available
Limited free version
Fully functional free version
Price
$39/year (single site)
Free
For most users, Site Reviews offers a robust free solution with no ads, while WP Review Pro provides advanced schema options and design flexibility. After installing your chosen plugin, navigate to its settings page and configure the review post type, rating scale, and submission permissions (e.g., logged-in users or guests). Enable email notifications for new reviews to moderate content effectively.
Performance and Security Best Practices for Review Systems
Review systems can slow your site and attract spam if not properly secured. Follow these best practices:
Performance: Use a caching plugin (e.g., WP Rocket or W3 Total Cache) but exclude review submission pages from cache to avoid form conflicts. Enable lazy loading for review images and limit the number of reviews displayed per page to 10–20. Use a CDN for static assets.
Security: Install a security plugin (e.g., Wordfence or Sucuri) to block brute-force attacks and spam submissions. Enable reCAPTCHA on review forms. Set file permissions to 755 for directories and 644 for files. Regularly update all plugins and themes.
Database optimization: Schedule weekly cleanups of spam review entries using a plugin like WP-Optimize. Index the wp_postmeta table if your review plugin stores ratings there, which speeds up queries.
Implementing these measures from the start prevents common issues like slow page loads, broken layouts, and spam overload, ensuring your review system remains both user-friendly and secure.
Designing the Review Submission Form
A well-designed review submission form is the cornerstone of any WordPress review system. It must balance thorough data collection with ease of use, encouraging visitors to leave feedback without friction. The form should guide users naturally from rating to submission, with clear labels, logical field ordering, and instant feedback on errors. Below, we break down the essential components, from core fields to media support and security measures.
Essential Fields: Rating Scale, Title, and Detailed Review
The three foundational fields every review form needs are a rating scale, a review title, and a detailed review text box. The rating scale should be intuitive—commonly a 1-to-5 star system, but you can use numbers, emojis, or custom icons. Always provide a hover or click preview so users see their selected rating before submitting. The title field, typically a single-line text input, should be limited to 60–100 characters to encourage concise summaries. The detailed review area should be a textarea with a character limit (e.g., 500–2000 characters) and a visible counter to prevent excessively long or short entries. Implement client-side validation to check for empty fields, invalid ratings (e.g., zero or negative), and title length before form submission.
Rating Scale: Use radio buttons or a star selector; store as integer (1–5).
Review Title: Required, max 100 characters, plain text only.
Detailed Review: Required, min 50 characters, allow basic HTML (bold, italic) for formatting but strip dangerous tags.
Adding Image/Video Uploads and Custom Fields
To enrich reviews, allow users to upload images (e.g., product photos) and embed video links (e.g., YouTube or Vimeo). For images, set file size limits (recommended: 2–5 MB) and restrict formats to JPEG, PNG, and WebP. Use a drag-and-drop uploader with a preview thumbnail. For videos, provide a text field for the URL and validate it against trusted domains using a regex pattern. Custom fields can capture specific data like product variant, purchase date, or location. These should be optional to avoid overwhelming users. Below is a practical PHP snippet to validate a video URL in a WordPress form handler:
// Validate video URL for allowed domains
function validate_video_url($url) {
$allowed_domains = array('youtube.com', 'vimeo.com');
$parsed_url = parse_url($url);
$host = str_replace('www.', '', $parsed_url['host'] ?? '');
if (!in_array($host, $allowed_domains)) {
return false; // Invalid video source
}
return true;
}
Implementing CAPTCHA and Spam Filters for Authenticity
Spam submissions can quickly undermine a review system. Deploy a combination of CAPTCHA and server-side spam filters. For CAPTCHA, use Google reCAPTCHA v2 (checkbox) or v3 (invisible score), which are easy to integrate with WordPress plugins. Alternatively, a simple math or logic question (e.g., “What is 2 + 3?”) can deter bots without harming user experience. On the server side, implement honeypot fields—hidden inputs that humans won’t fill but bots will. Additionally, use comment blacklists to block known spam keywords, and set a time limit (e.g., 30 seconds minimum) between page load and submission to catch rapid automated posts. For high-traffic sites, consider a third-party service like Akismet for advanced pattern detection.
reCAPTCHA v2: Adds a visual checkbox; user-friendly and widely supported.
Honeypot: A hidden field named “website” or “url” that must remain empty.
Rate Limiting: Allow only one review per IP address per product per hour.
Storing and Managing Review Data in WordPress
Efficient storage and management of review data are critical for performance, scalability, and user trust. WordPress offers two primary methods for storing reviews: custom post types and post meta. Each approach has distinct advantages depending on your site’s complexity and traffic volume.
Custom post types (CPTs) treat each review as a standalone content item, similar to a blog post or page. This method provides built-in support for titles, excerpts, featured images, custom fields, and taxonomies. CPTs are ideal for review-centric sites where reviews are the primary content, such as product review directories or restaurant rating platforms. They allow easy querying with WP_Query, enable pagination, and integrate natively with WordPress archives and search.
Post meta stores review data as key-value pairs attached to existing posts, users, or products. This approach is lightweight and efficient for sites where reviews are supplementary—for example, a WooCommerce product page with ratings. Post meta avoids creating extra database tables but can become slower on high-traffic sites with thousands of reviews due to serialized data storage. For moderate traffic, post meta is simpler to implement and requires no custom code for basic functionality.
Consider the following comparison:
Storage Method Comparison
Factor
Custom Post Type
Post Meta
Query performance
High (native indexing)
Moderate (meta queries can be slow)
Scalability
Excellent for large datasets
Best for small to medium volumes
Complexity
Requires CPT registration
Minimal setup
Use case
Review-centric sites
Supplementary reviews
Creating a Moderation Workflow (Pending, Approved, Spam)
A moderation queue ensures review quality and prevents abuse. Implement a simple status system using a custom taxonomy or a meta field with three states: pending, approved, and spam. For CPT-based reviews, register a non-hierarchical taxonomy called review_status with these terms. For post meta, store the status in a field like _review_status.
Build a moderation dashboard by adding a custom column to the admin reviews list table. Use manage_{post_type}_posts_columns filter to show status, and manage_{post_type}_posts_custom_column to display a dropdown or action links. Implement bulk actions to approve or mark as spam. For spam detection, integrate with Akismet or create a keyword filter that auto-flags suspicious content.
Automate notifications: email the site admin when a new pending review arrives, and notify the reviewer when their review is approved. Use wp_mail() and hooks like transition_post_status for CPTs or updated_post_meta for meta-based systems.
Associate each review with its target entity using relational data. For CPT reviews, add a custom field (e.g., _reviewed_post_id) that stores the ID of the product, post, or user being reviewed. For post meta, store the same ID in a meta key like _review_target_id. This allows efficient queries: get_posts( array( 'meta_key' => '_review_target_id', 'meta_value' => 42 ) ) retrieves all reviews for item 42.
For user-specific reviews (e.g., reviews of a user’s profile), store the target user ID and use get_user_meta() to fetch related reviews. To display reviews on a product page, run a custom query within the loop:
Retrieve the current post ID with get_the_ID().
Query reviews where _review_target_id equals that ID.
Loop through results, outputting rating, title, and content.
For performance, cache review counts and average ratings using transients or object caching. Update the cache on review creation, approval, or deletion. This prevents expensive queries on every page load.
Displaying Reviews on the Front End
Once your WordPress review system collects and stores user feedback, the next critical step is rendering that data effectively on the front end. Proper display techniques ensure visitors can easily browse, sort, and interpret reviews, which directly impacts trust and conversion rates. This section covers building dynamic review lists, presenting aggregate ratings, and embedding reviews anywhere via shortcodes.
Building a Dynamic Review List with Pagination and Sort
A dynamic review list allows users to navigate large volumes of feedback without overwhelming the page. The core approach involves querying your custom post type or comment meta using WP_Query or get_comments() with pagination parameters. Below is a practical example that fetches reviews from a custom post type “review,” paginates them by 10 per page, and adds sorting options.
Pagination: Use posts_per_page and paged to control the number of reviews per page. The paginate_links() function generates a numbered navigation.
Sorting: Offer dropdown options for date (newest/oldest) and rating (highest/lowest). Use meta_key and orderby to sort by numeric rating values.
Excerpts: Trim long reviews using wp_trim_words() to show a preview, with a “Read more” link if needed.
Displaying Aggregate Ratings and Star Averages
Aggregate ratings provide a quick summary of overall sentiment. To calculate the average star rating, query all review posts and compute the mean of their stored rating meta. Display this prominently at the top of your review section. Example logic:
Use Unicode characters or an icon font (e.g., Font Awesome) for filled and empty stars.
Numerical average
Display as a decimal (e.g., 4.3) to convey precision. Round to one decimal place.
Review count
Always show the total number of reviews to provide context for the average.
Schema markup
Optionally add itemprop="aggregateRating" for SEO benefits.
Using Shortcodes to Embed Reviews Anywhere on the Site
Shortcodes offer a flexible way to place review lists or aggregate ratings in posts, pages, or widget areas. Register a shortcode in your theme’s functions.php file. The example below creates a shortcode [reviews_list] that accepts optional attributes for pagination and sort.
// Register shortcode [reviews_list]
function reviews_list_shortcode( $atts ) {
$atts = shortcode_atts( array(
'posts_per_page' => 5,
'sort' => 'date_desc',
'show_aggregate' => 'yes',
), $atts );
ob_start();
// Include aggregate if requested
if ( $atts['show_aggregate'] === 'yes' ) {
// (Insert aggregate code from previous section here)
}
// Insert dynamic list code from first section, using $atts['posts_per_page'] and $atts['sort']
// ... (reuse WP_Query with pagination and sort logic)
return ob_get_clean();
}
add_shortcode( 'reviews_list', 'reviews_list_shortcode' );
Usage examples for the shortcode:
[reviews_list] – Default: 5 reviews, newest first, with aggregate.
[reviews_list posts_per_page="10" sort="rating_desc"] – 10 reviews sorted by highest rating.
[reviews_list show_aggregate="no"] – Hides the aggregate rating block.
By combining these techniques—dynamic listing with pagination/sorting, aggregate rating displays, and shortcode embedding—you create a robust, user-friendly review system that integrates seamlessly into any WordPress site. Always test with varying numbers of reviews to ensure pagination and sort logic work correctly across all scenarios.
Enabling User Interactions: Voting, Replies, and Reporting
To transform a static review collection into a dynamic community asset, you must empower users to interact with each review. Social features like helpfulness votes, official replies, and abuse reporting increase engagement, build trust, and help you moderate content efficiently. Below are the three essential interaction layers you can implement on your WordPress site.
Adding a “Was This Review Helpful?” Voting System
Helpfulness voting lets readers surface the most valuable reviews. Implement this feature using one of two approaches:
Plugin method: Use a dedicated plugin such as WP Review Pro or Comments Like Dislike. These add thumbs-up/down buttons automatically to each review or comment. Configure thresholds to show “Most Helpful” reviews first.
Custom code method: Add a simple AJAX vote system. Store vote counts as post meta (e.g., review_helpful_count). Display a button with a counter, then use wp_ajax_nopriv_ hooks to allow logged-out users to vote. Prevent duplicate votes by setting a cookie or checking user ID.
Best practices for voting systems:
Element
Recommendation
Button design
Use clear icons (thumbs up/down) with text labels
Vote limits
One vote per user per review (store in user meta or session)
Sorting
Allow sorting reviews by “Most Helpful” or “Highest Votes”
Display
Show total votes and percentage helpful (e.g., “12 of 15 found this helpful”)
Allowing Admin or Author Replies to Reviews
Enabling replies to reviews demonstrates that you value feedback and can resolve issues publicly. WordPress natively supports comment threading, but reviews often require a custom reply system. Here is how to set it up:
Use custom post type comments: If your reviews are a custom post type (e.g., review), enable comments via supports = array('comments') in your register_post_type() call. Then, restrict replies to administrators and the post author using the comment_form_defaults filter.
Plugin alternative: Plugins like Comments – wpDiscuz or Thrive Comments provide dedicated reply boxes with role-based permissions. They also allow you to style replies differently (e.g., with an “Official Response” badge).
Email notifications: Configure WordPress to notify the review author when a reply is posted. Use a plugin like Better Notifications for WordPress to send custom email templates.
Always display replies directly beneath the original review, clearly labeled as “Author Response” or “Admin Reply.” This transparency builds credibility.
Implementing a Report Abuse Functionality
A report abuse system allows your community to flag inappropriate reviews (spam, hate speech, fake claims). This reduces your moderation workload and catches issues quickly. Follow these steps:
Add a report button: Insert a “Report” link next to each review. For logged-in users, pass the review ID and user ID via AJAX. For guests, require a CAPTCHA or email confirmation to prevent abuse of the report system.
Store reports: Create a custom database table (e.g., wp_review_reports) with columns: id, review_id, reporter_id, reason, timestamp. Alternatively, use a plugin like Flagged Content or User Submitted Posts to manage reports.
Notify moderators: Send an email to the site admin or designated moderator when a report is submitted. Include the review content, reporter details, and reason for reporting.
Action workflow: Provide a dashboard page where moderators can review reports, then approve or delete the flagged review. Automatically hide reviews that receive a threshold number of reports (e.g., 5 reports within 24 hours).
Implementing these three features creates a self-regulating review ecosystem. Users feel heard, moderators stay efficient, and your site’s credibility grows through transparent, community-driven interactions.
Optimizing Reviews for SEO and Schema Markup
To maximize the visibility and click-through rates of your WordPress review system, you must implement structured data using Schema.org vocabulary. This markup helps search engines understand your review content and display it as rich snippets—featuring star ratings, review counts, and product details—directly in search results. Without proper schema, your reviews remain invisible to search engines’ enhanced features, reducing their SEO impact. This guide covers adding review schema via JSON‑LD, implementing aggregate rating markup, and validating your structured data with Google tools.
Adding Review Schema (JSON‑LD) to Individual Reviews
The most reliable method for adding review schema is JSON‑LD (JavaScript Object Notation for Linked Data), which is placed in the <head> or <body> of your page without altering visible content. For individual reviews, use the Review type from schema.org/Review. Here is a minimal example structure:
To implement this in WordPress, you can use a plugin like Schema Pro or Yoast SEO (with its schema features), or manually add the JSON‑LD snippet via your theme’s functions.php file using the wp_head hook. Ensure each review has a unique url property if you have multiple reviews per page, and include the datePublished property for freshness signals.
Implementing AggregateRating Markup for Products/Posts
For products or posts that accumulate multiple reviews, use the AggregateRating type under the Product or CreativeWork schema. This markup displays the average rating and total review count in search snippets. The structure looks like this:
When implementing, calculate the ratingValue dynamically from your WordPress database (e.g., using get_post_meta() for custom fields). Ensure the reviewCount matches the actual number of approved reviews. Avoid using aggregate rating on pages with only one review; instead, use individual review schema. For WordPress, plugins like WP Review Pro or Ultimate Reviews automatically generate this markup, but you can also code it manually using add_action('wp_head', ...).
Testing and Validating Structured Data with Google Tools
After adding schema markup, you must validate it to ensure search engines can parse it correctly. Google provides two primary tools for this:
Tool
Purpose
Best For
Google Rich Results Test
Tests a specific URL for rich result eligibility (e.g., review snippets).
Quick validation of individual pages.
Google Search Console (URL Inspection)
Shows how Googlebot sees your page and lists all detected structured data.
Ongoing monitoring and debugging of index issues.
To use the Rich Results Test, enter your page URL and review the output for errors (e.g., missing required fields like ratingValue) or warnings (e.g., missing recommended fields like reviewBody). Fix any issues by adjusting your JSON‑LD code. In Search Console, navigate to Enhancements > Review snippets to see a report of all pages with review schema and any errors detected during crawling. Regular validation ensures your rich snippets appear correctly, driving higher organic visibility.
Testing, Moderating, and Maintaining Your Review System
Once you have built your WordPress review system, the real work begins: ensuring it functions correctly, remains secure, and delivers a trustworthy experience for your audience. Ongoing management involves three critical pillars: rigorous testing of the full submission workflow, strategic moderation of incoming content, and regular maintenance to prevent vulnerabilities and performance degradation. By following best practices in these areas, you protect your site’s integrity and build long-term user confidence.
Conducting End‑to‑End Testing of the Review Workflow
Before launching your review system—and after every major update—execute a complete end‑to‑end test to catch broken logic or display errors. Map out the user journey from submission to publication, then verify each step manually or with automated tools.
Submission flow: Submit a sample review with valid, invalid, and edge‑case data (e.g., empty fields, long text, special characters). Confirm error messages appear where expected.
Data storage: Check that reviews are saved to the correct custom post type or custom table. Use a database tool like phpMyAdmin or run a quick SQL query to verify entries exist.
Display output: View the review on the front end. Ensure star ratings, text, and metadata render correctly across desktop and mobile.
Admin moderation: Test approving, editing, deleting, and flagging reviews from the WordPress dashboard.
For a quick database check, you can use the following command in phpMyAdmin or via WP CLI to list recent review entries (adjust table and column names to match your setup):
SELECT * FROM wp_reviews WHERE review_date > '2025-01-01' ORDER BY review_date DESC LIMIT 10;
Perform this test on a staging site before deploying changes to production.
Moderation Strategies: Manual vs. Automated Filters
A balanced moderation approach prevents spam and abuse while allowing legitimate reviews to appear quickly. Manual moderation gives you full control but can become a bottleneck; automated filters handle volume but risk false positives. Combine both for optimal results.
Strategy
Pros
Cons
Manual only
High accuracy, no false positives
Time‑intensive, slow turnaround
Automated filters only
Fast, scalable
May block valid reviews; requires tuning
Hybrid (recommended)
Balances speed and accuracy
More complex to configure
For automated filtering, use plugins like Akismet or implement custom rules with WordPress hooks. Example: block submissions with more than two hyperlinks by adding this snippet to your theme’s functions.php:
add_filter('preprocess_comment', 'block_excessive_links');
function block_excessive_links($commentdata) {
if (substr_count($commentdata['comment_content'], 'http') > 2) {
wp_die('Reviews with more than 2 links are rejected.');
}
return $commentdata;
}
Flag suspicious content for manual review rather than outright deletion to avoid losing genuine submissions.
Regular Maintenance: Updates, Backups, and Performance Checks
Neglecting maintenance can leave your review system vulnerable to security exploits or slow page loads. Establish a recurring schedule for the following tasks:
Update plugins and themes: Review‑related plugins (e.g., rating add‑ons, spam filters) should be updated monthly. Test updates on a staging site first.
Database backups: Automate daily backups of your WordPress database, especially the tables storing reviews. Use a plugin like UpdraftPlus or a server‑level cron job.
Performance monitoring: Run speed tests with tools like GTmetrix or PageSpeed Insights after adding new reviews. Cache review content using a plugin like W3 Total Cache to reduce server load.
Spam cleanup: Delete or mark as spam any reviews flagged by filters weekly. Use WP CLI to bulk‑remove old spam:
wp comment delete $(wp comment list --status=spam --format=ids)
By integrating these practices into your routine, you ensure your review system remains reliable, secure, and fast—keeping both you and your users satisfied.
Conclusion: Launching and Growing Your Review Community
Building a WordPress review system is not a one-time setup but an ongoing process of refinement and community engagement. By following the steps outlined in this guide—selecting the right plugin, customizing fields and display, and moderating submissions—you lay a solid foundation. The true value emerges when you actively nurture your review community. Below are the critical steps to launch successfully and scale your system for long-term growth.
Encouraging Initial Reviews Through Incentives and Prompts
Kickstarting your review system requires strategic encouragement. Users are more likely to leave feedback when prompted at the right moment and offered a tangible reward. Consider these proven methods:
Post-purchase email triggers: Send a review request 3–5 days after delivery, including a direct link to your review form.
Discount or coupon rewards: Offer a 10–15% discount on the next purchase for each verified review.
Entry into a monthly draw: Gamify participation by entering all reviewers into a prize drawing.
In-site prompts: Use a popup or banner on your “Thank You” page, asking customers to share their experience.
Social proof nudges: Display a note such as “Be the first to review this product” on pages with zero reviews.
Always keep incentives ethical: reward honest feedback, not just positive ratings. This builds trust with your audience and ensures the integrity of your review data.
Monitoring User Feedback and Iterating on the System
Once reviews start flowing, active monitoring is essential. Use your plugin’s moderation dashboard to approve, reply to, or flag submissions. Look for patterns in user comments to identify common pain points or desired features. Iterate based on this feedback:
Feedback Type
Action to Take
Difficulty submitting
Simplify the review form (fewer required fields, mobile-friendly layout)
Desire for photo/video uploads
Enable media attachments in your review plugin settings
Enable CAPTCHA, require login, or set a minimum account age
Schedule a monthly review of your system’s performance: check review volume, response rates, and user sentiment trends. This iterative approach keeps your system relevant and user-friendly.
Next Steps: Integrating Reviews with Email, Social Media, and Analytics
To maximize the business impact of your review system, integrate it with your broader marketing stack. Here are actionable next steps:
Email marketing: Connect your review plugin to an email service (e.g., Mailchimp, ConvertKit) to automate review request sequences and send “new review” alerts to subscribers.
Social media sharing: Add social share buttons to review pages, or automatically post positive reviews to your brand’s Twitter or Facebook feed using a plugin like Revive Old Posts.
Analytics tracking: Use Google Analytics or a tool like MonsterInsights to track review page views, conversion rates from review content, and the impact of reviews on sales. Set up goals for review submissions to measure engagement.
Review schema markup: Ensure your plugin outputs structured data (JSON-LD) for rich snippets in search results, which can improve click-through rates.
By connecting reviews to these channels, you create a feedback loop: reviews drive traffic and conversions, which in turn generate more reviews. Start with a simple plugin, customize it gradually based on user needs, and consistently encourage participation through ethical incentives. Your review community will become a powerful asset for building trust, improving products, and growing your business.
Frequently Asked Questions
What is a WordPress review system?
A WordPress review system allows visitors to submit ratings and reviews for products, services, or content on your site. It typically includes star ratings, text reviews, and moderation tools. Such a system can be built using dedicated plugins like WP Customer Reviews, YASR, or via custom code. It enhances user engagement, builds trust, and provides valuable feedback. Proper implementation includes displaying aggregate ratings and enabling schema markup for rich snippets in search results.
Which plugins are best for creating a review system in WordPress?
Top plugins include WP Customer Reviews (free, simple), YASR – Yet Another Star Rating (lightweight, supports schema), and WP Review Pro (feature-rich, supports multiple review types). For eCommerce, WooCommerce has built-in review features. Each plugin offers different customization options, moderation controls, and integration with SEO tools. Choose based on your needs: simplicity, design flexibility, or advanced features like multi-criteria ratings.
How do I add schema markup for reviews in WordPress?
Schema markup can be added using plugins like Yoast SEO, Rank Math, or Schema Pro, which provide review schema options. Alternatively, you can manually add JSON-LD code via your theme's functions.php or a custom plugin. Ensure the markup includes properties like itemReviewed, reviewRating, and author. This helps search engines display star ratings in search results, improving click-through rates. Always test with Google's Rich Results Test.
Yes, you can code a custom review system using WordPress custom post types, custom fields, and REST API. This approach offers full control but requires PHP, JavaScript, and database knowledge. You'll need to handle submission forms, rating storage, display, moderation, and schema markup. For most users, a plugin is recommended due to security and maintenance considerations. However, custom development is viable for unique requirements.
How do I moderate reviews in WordPress?
Most review plugins include a moderation panel where you can approve, edit, or delete reviews. You can set reviews to require approval before publishing. In plugins like WP Customer Reviews, moderation options are in the plugin settings. For WooCommerce, reviews are managed under Products > Reviews. Custom systems can implement moderation via custom post statuses and user roles. Always moderate to prevent spam and maintain quality.
How can I display reviews attractively on my site?
Use shortcodes or widgets provided by your review plugin to display reviews on pages, sidebars, or widgets. Customize the design with CSS to match your theme. Consider using a dedicated reviews page, product pages, or a testimonial slider. Many plugins offer layout options like list, grid, or carousel. For better user experience, show average ratings, sort options, and pagination. Ensure mobile responsiveness.
What are the best practices for collecting user reviews?
Make the review process simple: use a clear form with rating stars and a comment box. Send follow-up emails after a purchase or service. Incentivize reviews with discounts or loyalty points (ethically). Respond to reviews to show engagement. Display reviews prominently to encourage submissions. Ensure your system is GDPR compliant if collecting personal data. Avoid fake or forced reviews to maintain trust.
How do reviews impact SEO in WordPress?
Reviews generate fresh, user-generated content, which search engines favor. With proper schema markup, reviews can produce rich snippets with star ratings in search results, increasing visibility and click-through rates. Reviews also increase dwell time and social proof. However, ensure reviews are genuine and moderated to avoid penalties. Use plugins that output valid schema and follow Google's review guidelines.
The Ultimate Guide to WordPress and Google Analytics Integration
Why Integrate Google Analytics with WordPress?
Integrating Google Analytics with your WordPress site is essential for understanding how visitors interact with your content, where they come from, and what drives them to take action. Without data, you are guessing about what works. With analytics, every decision about content, design, and marketing can be backed by real user behavior. This integration transforms your WordPress site from a static publication into a dynamic platform that improves over time based on evidence rather than intuition.
How Analytics Data Drives Growth for WordPress Sites
Analytics data provides actionable insights that directly fuel growth. By tracking page views, session duration, and bounce rates, you can identify which posts or products resonate most with your audience. For example, if a blog post has high traffic but a low average time on page, you might improve its readability or add internal links to keep users engaged. Similarly, data reveals which traffic sources—search engines, social media, or referrals—deliver the highest conversion rates, allowing you to allocate resources more effectively. Growth happens when you:
Identify top-performing content and create similar pieces to replicate success.
Detect pages with high exit rates and optimize them to retain users.
Understand which keywords drive organic traffic and refine your SEO strategy.
Measure the impact of A/B tests on landing pages and calls to action.
Segment audiences by behavior to personalize email campaigns or offers.
Over time, these data-driven adjustments compound, leading to higher search rankings, increased engagement, and more conversions.
Key Metrics to Monitor After Integration
Once Google Analytics is connected to your WordPress site, focus on metrics that align with your specific goals. Not all numbers are equally valuable. The following table outlines essential metrics and what they reveal:
Metric
What It Measures
Why It Matters for WordPress
Users
Number of unique visitors
Indicates overall reach and brand awareness.
Pageviews
Total pages loaded
Shows content consumption depth.
Bounce Rate
Percentage of single-page sessions
High bounce rates may signal irrelevant content or slow load times.
Average Session Duration
Time spent on site per visit
Longer sessions often correlate with higher engagement.
Conversion Rate
Percentage of users completing a goal
Directly measures business success (e.g., purchases, sign-ups).
Traffic by Source
Origin of visitors (organic, direct, social, etc.)
Helps optimize marketing channels.
Monitor these metrics weekly to spot trends early. For instance, a sudden drop in organic traffic might indicate a technical SEO issue, while a spike in bounce rate after a redesign suggests usability problems.
Many site owners avoid integrating Google Analytics due to privacy concerns, but several misconceptions cloud the reality. First, some believe that analytics tracks individual users personally. In fact, Google Analytics aggregates data and does not identify specific individuals unless you enable additional features like User ID or remarketing, which require explicit consent. Second, there is a myth that using analytics violates GDPR or other privacy laws. Compliance is possible by:
Informing users via a clear privacy policy that explains data collection.
Obtaining consent through a cookie banner (for regions requiring it).
Anonymizing IP addresses in your Analytics settings.
Disabling data sharing with Google and enabling data retention controls.
Third, some assume that Google Analytics slows down WordPress. In reality, the tracking script is lightweight and asynchronous, meaning it does not block page rendering. When implemented correctly—such as via a plugin or by adding the code to the header—the performance impact is negligible. Finally, many think that analytics only benefits large sites. Small WordPress blogs and niche businesses gain equally valuable insights, often with less noise, making it easier to act on the data. Understanding these points allows you to integrate analytics confidently while respecting user privacy.
Prerequisites: What You Need Before Starting
Before you can successfully implement a WordPress and Google Analytics integration, you must ensure that three foundational elements are in place. Skipping any of these steps will prevent data collection or cause incorrect tracking. This section outlines the essential requirements and checks to perform before you begin.
Setting Up a Google Analytics Property and Tracking ID
To begin, you need a Google Analytics account with an active property. Follow these steps:
Create or sign in to your Google Analytics account at analytics.google.com. Use a Google account (e.g., Gmail) that you control.
Add a new property by clicking the “Admin” gear icon, then under “Property,” select “Create Property.” Name it after your website (e.g., “My WordPress Site”).
Select “Web” as the platform and enter your site’s URL. Choose the correct time zone and currency for reporting.
Obtain your Tracking ID (also called Measurement ID for GA4). For Google Analytics 4, this is a string like G-XXXXXXXX. For Universal Analytics (legacy), it is formatted as UA-XXXXXXXX-X. Copy this ID; you will paste it into your WordPress site.
Without a valid Tracking ID, no data will flow from your site to Google’s servers.
Understanding Google Analytics 4 (GA4) vs. Universal Analytics
Google Analytics has two major versions, and knowing the difference is critical for integration:
Feature
Google Analytics 4 (GA4)
Universal Analytics (UA)
Data model
Event-based (page views, clicks, scrolls)
Session-based (page views, events)
Tracking ID format
G-XXXXXXXX
UA-XXXXXXXX-X
Default reporting
Engagement metrics, user-centric
Page views, bounce rate, sessions
Support status
Active, future-proof
Discontinued as of July 2023
For all new integrations, use GA4. Universal Analytics properties no longer process new data. If you already have a UA property, migrate to GA4 immediately. Your WordPress integration method must target the correct version; using a UA tracking code on a GA4 property will fail.
Checking Your WordPress Version and Theme Compatibility
Your WordPress installation and theme must support the integration method you choose. Perform these checks:
WordPress version: Log into your site’s admin area and navigate to Dashboard > Updates. Ensure you run at least WordPress 5.0 or later. Older versions may lack the block editor or plugin compatibility needed for modern tracking plugins.
Theme compatibility: Verify your theme supports the wp_head and wp_footer hooks. Most reputable themes do. To test, temporarily switch to a default theme like Twenty Twenty-Four. If tracking works with the default theme but fails with your custom theme, the theme lacks proper hooks. You can add them manually by editing your theme’s functions.php file or header/footer templates.
Practical code example: If you need to add the tracking code manually via your theme, insert this snippet into your theme’s header.php file just before the closing </head> tag, replacing G-XXXXXXXX with your actual GA4 Measurement ID:
<!-- Google tag (gtag.js) -->
<script async src="https://www.googletagmanager.com/gtag/js?id=G-XXXXXXXX"></script>
<script>
window.dataLayer = window.dataLayer || [];
function gtag(){dataLayer.push(arguments);}
gtag('js', new Date());
gtag('config', 'G-XXXXXXXX');
</script>
After integrating, test by visiting your site and checking the Realtime report in Google Analytics. If data appears, your prerequisites are satisfied and the integration is functional.
Method 1: Using a Plugin for Easy Integration
For most WordPress site owners, using a plugin is the simplest and most reliable way to connect your site to Google Analytics. Plugins handle the technical details of adding the tracking code, managing user consent, and often provide helpful analytics reports directly in your WordPress dashboard. This method is ideal if you prefer a visual interface over editing theme files. Below, we walk through two of the most popular plugins—MonsterInsights and Site Kit by Google—and compare their free and premium offerings.
Step-by-Step: Installing and Configuring MonsterInsights
MonsterInsights is one of the most widely used analytics plugins, known for its user-friendly setup and comprehensive reporting. Follow these steps to get started:
Install and activate the plugin from the WordPress plugin repository or upload the premium version if you have purchased a license.
Go to Insights > Settings in your WordPress admin menu and click the “Launch Setup Wizard” button.
Select your website category (e.g., Business, Blog, eCommerce) and click “Save and Continue.”
Connect your Google account by clicking “Connect MonsterInsights” and authorizing the required permissions. You will be redirected to Google to sign in and grant access.
Choose the Google Analytics property you want to track (or create a new one) and click “Complete Connection.”
Configure basic settings such as User Roles (who can see reports), Demographics tracking, and Affiliate Link tracking. Click “Save and Continue.”
Complete the final step where you can enable Recommended Settings (like file downloads tracking) and click “Finish Setup.”
MonsterInsights will now automatically add the Google Analytics tracking code to every page of your site. You can view key metrics directly in your WordPress dashboard under Insights > Reports.
Step-by-Step: Setting Up Site Kit by Google
Site Kit is Google’s official plugin, offering integration with Analytics, Search Console, AdSense, and more. Setup is straightforward:
Install and activate the Site Kit plugin from the WordPress repository.
Go to Site Kit > Dashboard and click “Set up Site Kit.” You must have a Google account with access to the services you want to connect.
Click “Sign in with Google” and authorize the plugin to access your Google account. You may need to grant permissions for Search Console and Analytics.
Select or create the Google Analytics property for your site. Site Kit will automatically detect your site URL and suggest the correct property.
Click “Confirm” and then “Go to my Dashboard” to see your site’s performance data.
Site Kit places the tracking code in the <head> of your site without requiring manual code edits. It also displays Analytics summaries (sessions, users, page views) in your WordPress admin panel.
Comparing Free vs. Premium Plugin Features
Choosing between free and premium versions depends on your needs. The table below compares the core features of MonsterInsights and Site Kit, focusing on what you get without paying versus what upgrades unlock.
Feature
MonsterInsights Free
MonsterInsights Premium
Site Kit by Google (Free)
Basic tracking code insertion
Yes
Yes
Yes
Dashboard reports in WordPress
Limited (last 30 days)
Full reports with filters
Basic summaries only
eCommerce tracking
No
Yes (WooCommerce, Easy Digital Downloads)
No (requires GA4 setup)
Custom dimensions tracking
No
Yes (author, category, etc.)
No
Form and link tracking
No
Yes (automatic)
No
Google Search Console integration
No
Yes
Yes (included)
AdSense integration
No
Yes
Yes (included)
GDPR/consent management
Basic
Advanced (with add-ons)
None
Priority support
No
Yes
No (community support)
If you run a simple blog or small business site, the free version of either plugin may suffice. For eCommerce stores, membership sites, or those needing detailed reporting and automation, MonsterInsights Premium offers significant advantages. Site Kit remains free but lacks advanced tracking features like custom dimensions and automatic event tracking. Evaluate your analytics goals to decide which path suits your WordPress and Google Analytics Integration needs best.
Method 2: Manual Code Insertion via Theme Files
For developers who prefer a code-based approach, manually inserting the Google Analytics tracking code directly into your WordPress theme files offers full control and avoids reliance on plugins. This method is especially useful for custom themes or sites where performance optimization is critical. However, it requires caution: any mistake in the code can break your site or cause tracking errors. Below are the steps to implement this integration safely and effectively.
Adding the GA4 Tracking Snippet to header.php
The most common manual method is to place the Google Analytics 4 (GA4) tracking snippet directly into your theme’s header.php file. This file is typically located in /wp-content/themes/your-theme-name/. Follow these steps:
Access your WordPress site via FTP or a file manager in your hosting control panel.
Navigate to your active theme directory and open header.php in a code editor.
Locate the <head> tag. The tracking snippet must be placed just before the closing </head> tag to ensure it loads early.
Copy your GA4 tracking snippet from Google Analytics (under Admin > Data Streams > your stream > Tagging Instructions). It will look similar to this:
<script async src="https://www.googletagmanager.com/gtag/js?id=G-XXXXXXXXXX"></script>
<script>
window.dataLayer = window.dataLayer || [];
function gtag(){dataLayer.push(arguments);}
gtag('js', new Date());
gtag('config', 'G-XXXXXXXXXX');
</script>
Paste the snippet directly before </head>, save the file, and upload it back to your server.
Important: Always use a child theme to avoid losing changes when the parent theme updates. If you must edit the parent theme, consider using a code snippet plugin as a fallback.
Using wp_enqueue_script for Better Performance
A more advanced and performant approach is to add the GA4 tracking code via your theme’s functions.php file using the wp_enqueue_script function. This method ensures proper script dependency handling, reduces render-blocking, and follows WordPress best practices. Here’s how:
Open your child theme’s functions.php file (or create one if it doesn’t exist).
Add the following code snippet, replacing G-XXXXXXXXXX with your actual GA4 measurement ID:
function add_google_analytics_script() {
// Enqueue the Google Analytics script
wp_enqueue_script( 'google-analytics', 'https://www.googletagmanager.com/gtag/js?id=G-XXXXXXXXXX', array(), null, false );
// Add inline script for gtag configuration
wp_add_inline_script( 'google-analytics', '
window.dataLayer = window.dataLayer || [];
function gtag(){dataLayer.push(arguments);}
gtag("js", new Date());
gtag("config", "G-XXXXXXXXXX");
' );
}
add_action( 'wp_enqueue_scripts', 'add_google_analytics_script' );
Save the file. This method loads the script in the <head> by default (the fifth parameter in wp_enqueue_script is false). For even better performance, you can set it to true to load in the footer, though this may slightly delay initial page view tracking.
It integrates with WordPress’s script management system, preventing conflicts.
You can easily dequeue or modify the script using hooks.
It supports conditional loading (e.g., only for logged-in users or specific pages).
Testing Your Code Snippet with Google Tag Assistant
After implementing the code, you must verify that tracking is working correctly. Google Tag Assistant (a free Chrome extension) is the recommended tool for this task. Follow these steps:
Install the Google Tag Assistant extension from the Chrome Web Store.
Navigate to your live WordPress site.
Click the Tag Assistant icon in your browser toolbar, then click “Enable” to start recording.
Refresh the page and observe the results. The extension will display a list of detected tags, including your GA4 snippet.
Look for a green checkmark next to your GA4 tag, indicating it fired successfully. If you see a red error, click the tag for details—common issues include incorrect measurement IDs or syntax errors in the code.
Additional testing tips:
Issue
Solution
Tag not detected
Check that the snippet is placed within <head> and not inside another tag.
Syntax error
Validate your code using a tool like JSHint or W3C Validator.
Multiple tags firing
Ensure you haven’t accidentally added the snippet twice (e.g., via a plugin and theme file).
No real-time data in GA
Wait 24-48 hours for data to appear, or use GA4’s DebugView for instant validation.
By following these steps, you ensure a clean, efficient WordPress and Google Analytics integration that gives you full control over your tracking setup. Always test after any theme updates to confirm the code remains intact.
Method 3: Using Google Tag Manager for Advanced Control
For users who require granular control over tracking, Google Tag Manager (GTM) offers a powerful alternative to direct plugin integration. By decoupling tag management from your WordPress theme and plugins, GTM enables you to deploy Google Analytics 4 (GA4) alongside other tags—such as Facebook Pixel or custom event triggers—without modifying core site files. This method is ideal for sites with complex tracking needs, A/B testing, or multiple marketing tools.
Creating a GTM Account and Container
Sign in to tagmanager.google.com with your Google account.
Click Create Account and enter your account name (e.g., “Your Business Name”).
Under Container, name it after your WordPress site (e.g., “My WordPress Site”).
Select Web as the target platform.
Click Create and agree to the terms of service.
After creation, you will receive two code snippets: one for the <head> and one for the <body>. Keep these accessible for the next step.
Installing GTM on WordPress with a Plugin or Code
You have two primary options for adding GTM to your WordPress site:
Option A: Using a Plugin (Recommended for beginners) Install a plugin like Google Tag Manager for WordPress (by Thomas Geiger) or GTM4WP. After activation, go to Settings > Google Tag Manager and paste your GTM container ID (e.g., GTM-XXXXXXX) into the designated field. The plugin automatically inserts both code snippets.
Option B: Manual Code Insertion If you prefer not to use a plugin, locate your theme’s header.php file via Appearance > Theme File Editor. Paste the first GTM snippet immediately after the opening <body> tag. Then, add the second snippet right before the closing </head> tag. Save and verify via the GTM preview mode.
Configuring a GA4 Tag Inside GTM
Once GTM is active on your WordPress site, configure a GA4 tag:
Click Tag Configuration and select Google Analytics: GA4 Configuration.
Enter your GA4 Measurement ID (found in your GA4 property under Admin > Data Streams > Web).
For the trigger, click Triggering and choose All Pages to fire the tag on every page load.
Click Save, then Submit in the top-right corner to publish your container.
To verify, use GTM’s Preview mode. Navigate your WordPress site and check the GTM debug panel to confirm the GA4 tag fires correctly. You can also view real-time data in your GA4 property under Reports > Realtime.
Feature
Direct Plugin Integration
GTM Integration
Ease of setup
Very easy (one-click)
Moderate (requires GTM account)
Event tracking flexibility
Limited to plugin features
Full custom event control
Third-party tag management
Requires separate plugins
Centralized in one interface
Performance impact
Minimal
Minimal (async loading)
Using GTM gives you advanced control over your WordPress and Google Analytics Integration, enabling you to scale tracking as your site grows without relying on multiple plugins.
Verifying Your Integration Is Working Correctly
After setting up your WordPress and Google Analytics integration, the next critical step is confirming that data is actually flowing from your site to your Analytics property. Without verification, you risk collecting no data or—worse—corrupted data that leads to flawed business decisions. This section walks you through three reliable methods to check your integration, from instant real-time feedback to browser-based diagnostics and common fixes for missing data.
Using Google Analytics Real-Time Reports
The fastest way to confirm your integration works is by leveraging Google Analytics’ Real-Time reports. These reports show live activity on your site, updated within seconds. Follow these steps:
Log into your Google Analytics account and navigate to the property linked to your WordPress site.
Click “Reports” in the left sidebar, then select “Real-Time” from the menu.
Open a new browser tab and visit your WordPress site (ensure you are not using an ad blocker that might block Analytics scripts).
Return to the Real-Time report. Within 10–30 seconds, you should see at least one active user listed under “Users in last 30 minutes” and your page path under “Page views.”
If you see zero active users despite refreshing your site, your integration is not sending data. Check that your tracking code (e.g., Google tag or GA4 snippet) is correctly placed in your WordPress theme’s <head> section, typically via a plugin like Site Kit by Google or MonsterInsights, or manually added to your header.php file.
Checking with Google Tag Assistant (Legacy) or Tag Assistant
For a more detailed inspection, use Google’s Tag Assistant browser extension. This tool validates that your Google tags (including Analytics) fire correctly on each page. To use it:
Install the extension: Add Google Tag Assistant (Legacy) or the newer Tag Assistant to your Chrome browser from the Chrome Web Store.
Record a session: Open the extension, click “Record,” and then browse your WordPress site, including key pages like the homepage, a blog post, and a contact page.
Review the results: Tag Assistant will list every Google tag detected. For your Analytics integration, look for a green checkmark next to the tag name (e.g., “GA4 Configuration”). A yellow warning or red error indicates a problem, such as duplicate tags or missing parameters.
If Tag Assistant shows no Analytics tag at all, your integration code may be missing or blocked by a security plugin (e.g., Wordfence) or a caching plugin (e.g., WP Rocket). Temporarily disable such plugins, clear your site cache, and rerun the test.
Common Troubleshooting Tips for Missing Data
If your Real-Time report or Tag Assistant shows no data, try these practical fixes:
Issue
Likely Cause
Solution
No data in Real-Time
Tracking code not installed
Use a plugin like Site Kit to add GA4 code; verify it appears in your site’s source code.
Tag Assistant shows red error
Duplicate tags (e.g., from plugin and manual code)
Remove one source; keep only the GA4 tag from your preferred method.
Data appears but is incomplete
Ad blocker or browser privacy settings
Disable ad blockers for your site; test in an incognito window without extensions.
No data after plugin update
Plugin conflict or cache
Clear all caches (browser, CDN, plugin); deactivate and reactivate the Analytics plugin.
For persistent issues, check your WordPress site’s console for JavaScript errors (F12 > Console tab). A common error like “gtag is not defined” means the Analytics script failed to load. Ensure your theme’s wp_head() function is present in the header.php file—without it, manually added code won’t execute. If using a child theme, verify the parent theme’s header is not overriding your customizations. Finally, remember that Google Analytics can take up to 24 hours to show data in standard reports, but Real-Time should reflect activity almost instantly. If you’ve followed these steps and still see no data, double-check your Google Analytics property ID and ensure it matches the one in your tracking code.
Tracking Key Events: Conversions, Forms, and Clicks
Properly tracking user interactions beyond pageviews is essential for understanding what drives engagement and conversions on your WordPress site. With Google Analytics 4 (GA4), event tracking captures actions like form submissions, outbound link clicks, file downloads, and ecommerce purchases. This section covers how to set up and customize event tracking using GA4’s built-in features and custom configurations.
GA4 offers a feature called Enhanced Measurement that automatically tracks several common events without additional code. To enable it, navigate to your GA4 property, go to Admin > Data Streams, select your web data stream, and toggle “Enhanced measurement” on. The events it tracks include:
Page views (already tracked)
Scrolls (when a user reaches 90% of a page)
Outbound clicks (clicks on links leading to external domains)
Site search (when a query parameter is detected)
Video engagement (for embedded YouTube videos)
File downloads (clicks on links ending with extensions like .pdf, .docx, .zip)
For most WordPress sites, this setup captures core interactions like outbound link clicks and file downloads immediately. However, it does not cover form submissions or ecommerce purchases by default, which require custom event configuration.
Creating Custom Events for Contact Form 7 or Gravity Forms
To track form submissions from popular WordPress plugins like Contact Form 7 or Gravity Forms, you need to send a custom event to GA4 when a user successfully submits a form. The recommended approach uses JavaScript to listen for form submission events and then push a custom event to the data layer.
For Contact Form 7: The plugin fires a JavaScript event called wpcf7mailsent after a successful submission. Add the following code to your theme’s footer or a custom plugin:
After implementing, verify events in GA4’s DebugView or Realtime reports. You can also create conversion events in GA4 by marking the form_submission event as a conversion under Events > Conversions.
Tracking WooCommerce Purchases with GA4
For ecommerce sites using WooCommerce, tracking purchases requires sending GA4’s purchase event with product details. The most reliable method uses the official Google for WooCommerce plugin or a dedicated GA4 integration plugin. If you prefer manual setup, add the following code to your theme’s functions.php or a custom plugin, hooking into WooCommerce’s woocommerce_thankyou action:
This code outputs a script on the order confirmation page that sends the purchase event. Ensure the gtag.js snippet is loaded on all pages. After setup, test with a real order and confirm the event appears in GA4’s Realtime report. For advanced tracking, consider using the Google Tag Manager route, which offers more flexibility for custom dimensions and triggers.
Privacy and Compliance Considerations for WordPress and Google Analytics Integration
When integrating Google Analytics with WordPress, navigating privacy laws such as the General Data Protection Regulation (GDPR) and the California Consumer Privacy Act (CCPA) is essential. These regulations require transparency about data collection, user consent, and the ability to opt out. Failure to comply can result in significant fines. This section outlines key steps to ensure your WordPress and Google Analytics integration meets legal standards by focusing on IP anonymization, cookie consent, and data retention settings.
Enabling IP Anonymization in GA4
IP anonymization masks the last octet of a user’s IP address, reducing the risk of identifying individuals. In Google Analytics 4 (GA4), this is a built-in feature that can be activated during your WordPress integration. To enable it, modify the Google Analytics tracking code by adding the parameter 'anonymize_ip': true to the gtag('config') call. Alternatively, if using a plugin like MonsterInsights, you can toggle this setting in the plugin’s privacy options. This step is crucial for GDPR compliance, as it helps prevent the storage of full IP addresses. Note that IP anonymization does not replace the need for user consent but is a foundational privacy measure.
Integrating Google Analytics with Cookie Consent Plugins
Cookie consent plugins ensure that tracking scripts only load after user approval, aligning with GDPR and CCPA requirements. When integrating Google Analytics with WordPress, you must configure the plugin to block GA4 scripts until consent is granted. Common plugins include Complianz, Cookiebot, and GDPR Cookie Consent. Here is a comparison of their key features for Google Analytics integration:
To integrate, install your chosen plugin, configure consent categories (e.g., “statistics” for GA4), and use its script blocking feature to prevent GA4 from loading until the user clicks “Accept.” For example, Complianz automatically detects GA4 and blocks it until consent is given, while Cookiebot requires manual script tagging. Always test the integration using browser developer tools to ensure no tracking occurs before consent.
Understanding Google’s Data Retention Settings
Google Analytics 4 allows you to control how long user-level and event-level data is stored before automatic deletion. This setting is found under “Data Settings” in your GA4 property. By default, Google sets retention to 2 months, but you can extend it to 14 months. For GDPR compliance, choose the shortest retention period that meets your business needs, as retaining data longer increases privacy risks. When configuring your WordPress and Google Analytics integration, adjust this setting by navigating to Admin > Data Settings > Data Retention in your GA4 account. Select a retention period (e.g., 2 months for minimal exposure) and confirm. Additionally, disable “Google signals” if not required, as it enables cross-device tracking. Remember that data retention applies only to user-level data; aggregated reports remain unaffected. Regularly review this setting to align with evolving privacy regulations. By combining IP anonymization, cookie consent plugins, and careful data retention policies, you can achieve a compliant WordPress and Google Analytics integration that respects user privacy.
Performance Impact: Does Analytics Slow Down WordPress?
Integrating Google Analytics with WordPress is essential for data-driven decisions, but many site owners worry about performance degradation. The short answer is that analytics scripts can slow down your site, but with proper implementation techniques, the impact is negligible. The key lies in how and when the tracking code loads relative to your page content. A poorly integrated script—especially one that blocks rendering—can increase page load time by hundreds of milliseconds, harming user experience and SEO. However, modern optimization methods ensure analytics runs without noticeable friction.
Asynchronous Loading of Analytics Scripts
Asynchronous loading is the single most effective way to prevent analytics from blocking page rendering. By default, some plugins or manual code snippets load JavaScript synchronously, meaning the browser pauses parsing HTML until the script finishes downloading and executing. Asynchronous loading, using the async attribute, instructs the browser to download the script in parallel with other resources and execute it as soon as it’s available—without halting the DOM construction. To implement this, ensure your Google Analytics snippet (typically the gtag.js or global site tag) includes the async attribute in the script tag. Here is a practical example of an asynchronous global site tag:
<script async src="https://www.googletagmanager.com/gtag/js?id=G-XXXXXXXXXX"></script>
<script>
window.dataLayer = window.dataLayer || [];
function gtag(){dataLayer.push(arguments);}
gtag('js', new Date());
gtag('config', 'G-XXXXXXXXXX');
</script>
This approach ensures the analytics script downloads in the background while your page content loads first. Most reputable WordPress analytics plugins offer an “async loading” option in their settings. Always verify this is enabled.
Using a Plugin That Locally Hosts Analytics Code
When you load Google Analytics directly from Google’s servers, your visitors must make an additional DNS lookup and connect to a third-party domain. This adds latency, especially for users in regions with slower connections. A performance-focused solution is to use a WordPress plugin that locally hosts the analytics JavaScript file. These plugins download the gtag.js script to your own server and serve it from your domain, often combined with caching and minification. Benefits include:
Reduced DNS lookups and connection overhead (one less external request).
Improved cache control—you can set longer cache headers on your server.
Greater reliability if Google’s CDN experiences temporary issues.
Popular plugins like “CAOS” (Complete Analytics Optimization Suite) or “Local Google Analytics” perform this task automatically. They also typically include built-in asynchronous loading and script deferring. However, note that local hosting requires periodic updates to the analytics code when Google releases changes; the plugin usually handles this automatically.
Measuring Page Load Speed Before and After Integration
To quantify the real-world impact of your analytics integration, you must measure page load speed both before and after adding the tracking code. Use objective, reproducible tools rather than anecdotal impressions. Recommended tools include:
Google PageSpeed Insights – provides lab and field data for mobile and desktop.
WebPageTest – offers detailed waterfall charts showing every resource.
GTmetrix – combines Lighthouse scores with timing metrics.
When testing, follow these steps for accuracy:
Test a representative page (e.g., a blog post or homepage) without any analytics code. Record metrics like Time to First Byte (TTFB), Largest Contentful Paint (LCP), and Total Blocking Time (TBT).
Implement your analytics integration (asynchronous, locally hosted).
Re-test the same page under identical conditions (same device, connection, browser cache state).
Compare the results. A well-optimized setup should show less than 100ms increase in LCP and no increase in TBT.
If you observe a significant slowdown, review your plugin settings, verify async loading, and consider moving the analytics script to the footer using a plugin like “Insert Headers and Footers” or a theme hook. Remember that analytics scripts are non-blocking when implemented correctly, and the data you gain far outweighs the minimal performance cost—provided you follow these optimization techniques.
Next Steps: Leveraging Analytics Data to Improve Your Site
Once your WordPress and Google Analytics integration is complete, the real work begins. Raw data alone won’t improve your site; you must translate insights into action. By systematically analyzing behavior, audience composition, and performance trends, you can refine content strategy, enhance user experience, and boost conversion rates. Below are three proven approaches to turn analytics into tangible site improvements.
Identifying Top-Performing Content with Behavior Reports
Behavior reports in Google Analytics reveal which pages, posts, and media drive the most engagement. Use the following steps to extract actionable insights:
Navigate to Behavior > Site Content > All Pages. Sort by pageviews to identify your most visited content. Look for unexpected high-performers—these may reveal untapped audience interests.
Analyze average time on page and bounce rate. High pageviews with low time on page indicate weak engagement; consider adding internal links, better formatting, or richer media. Low bounce rates with high time on page suggest content that satisfies user intent—promote or expand on these topics.
Use the Content Drilldown report to see performance by subdirectory (e.g., /blog/, /resources/). This helps prioritize which content categories to invest in further.
Create a content performance table in a spreadsheet: track pageviews, unique pageviews, average time on page, bounce rate, and conversions (if goals are set). Update monthly to spot trends.
For WordPress, integrate this data with your editorial calendar. Replicate successful formats (list posts, tutorials, case studies) and refresh underperforming pages with updated information, better SEO keywords, or stronger calls-to-action.
Using Audience Data to Personalize User Experience
Audience reports provide demographics, interests, and geographic location. Personalization based on this data can dramatically improve engagement and conversions on your WordPress site.
Segment by age and gender. If your audience skews younger, prioritize mobile-friendly design and visual content. For older demographics, ensure larger fonts and clear navigation.
Leverage interest categories. Google Analytics groups users by affinities (e.g., “Technology Enthusiasts” or “Travel Buffs”). Tailor your homepage hero section or sidebar widgets to these interests using WordPress conditional logic plugins.
Use location data to display region-specific offers, currency, or language. For example, a WordPress site with WooCommerce can show local shipping options or prices based on the user’s country from analytics.
Set up custom audiences in Google Analytics and export them to Google Ads for remarketing campaigns. On WordPress, use plugins like OptinMonster or MonsterInsights to show personalized popups or content blocks based on the user’s referral source or device type.
Setting Up Custom Dashboards and Automated Reports
Manual data checking wastes time and invites oversight. Custom dashboards and automated reports ensure you consistently monitor key metrics tied to your site goals.
Create a custom dashboard in Google Analytics: Go to Customization > Dashboards > Create. Add widgets for sessions, bounce rate, goal completions, top pages by conversions, and traffic source breakdown. Save as a template to reuse across multiple WordPress sites.
Set up automated email reports: In Google Analytics, navigate to Customization > Dashboards > Share > Schedule email. Choose daily, weekly, or monthly frequency. Include key metrics: organic traffic, conversion rate, average session duration, and new vs. returning users. Send to yourself and your team.
Use WordPress plugins for in-dashboard analytics: MonsterInsights or ExactMetrics can display Google Analytics data directly in your WordPress admin panel. Configure a custom report widget for your dashboard home screen to see real-time visitors, top posts, and traffic trends without leaving your site.
Review these reports weekly to spot anomalies (e.g., sudden traffic drops from a specific channel) and monthly to track progress toward content, SEO, and conversion benchmarks. Adjust your WordPress site’s SEO settings, caching, or content strategy based on these insights. Consistent monitoring turns your analytics integration from a passive data source into an active growth tool.
Frequently Asked Questions
What is the easiest way to add Google Analytics to WordPress?
The easiest method is using a plugin like Google Site Kit or MonsterInsights. Site Kit, developed by Google, is free and provides a guided setup within your WordPress dashboard. After installing and activating the plugin, you connect your Google account, select the Analytics property, and the plugin automatically inserts the tracking code. This approach requires no manual code editing and is suitable for beginners. Alternatively, you can manually add the GA4 tracking snippet to your theme's header.php file, but this requires caution to avoid breaking your site.
How do I integrate Google Analytics 4 (GA4) with WordPress?
GA4 is the latest version of Google Analytics. To integrate it with WordPress, you need your GA4 measurement ID, which looks like 'G-XXXXXXXXXX'. You can add it via a plugin like Site Kit or MonsterInsights, which support GA4. In Site Kit, during setup, you select your GA4 property. For manual integration, copy the entire GA4 tracking snippet from your Google Analytics admin under 'Data Streams' and paste it just before the closing tag in your theme's header.php file. Always test the integration using Google's Tag Assistant or by checking real-time reports.
Can I track ecommerce transactions with Google Analytics on WordPress?
Yes, you can track ecommerce transactions if you use an ecommerce plugin like WooCommerce. For accurate tracking, enable 'Enhanced Ecommerce' in your Google Analytics property. Then, use a plugin like MonsterInsights or WooCommerce Google Analytics Integration, which automatically sends purchase, add-to-cart, and checkout data to GA4. You must also enable ecommerce tracking in the plugin settings. This allows you to see product performance, revenue, and conversion rates in your Analytics reports.
What is the difference between using a plugin and manual code insertion?
Plugins like Site Kit or MonsterInsights offer a user-friendly interface, automatic updates, and additional features like event tracking without coding. They are ideal for beginners and those who want to avoid editing theme files. Manual code insertion gives you more control and can be faster for developers, but it requires editing your theme's header.php file, which can be overwritten by theme updates. If you manually insert code, you must use a child theme or a custom functions plugin to preserve changes. Plugins are generally recommended for most users.
How do I verify that Google Analytics is working on my WordPress site?
After integration, you can verify it in several ways. First, use Google Tag Assistant (a Chrome extension) to check if the GA4 tag fires correctly on your pages. Second, go to your Google Analytics account and check 'Realtime' reports; if you see your own visit, tracking is working. Third, use the 'Preview' mode in Google Tag Manager if you use it. Also, some plugins like MonsterInsights have a built-in analytics dashboard that shows live data. Ensure you have excluded your own IP address to avoid inflating your stats.
Should I use Google Tag Manager with WordPress and Google Analytics?
Using Google Tag Manager (GTM) is beneficial if you plan to manage multiple tracking tags (e.g., Google Ads, Facebook Pixel) from one interface. GTM allows you to add and update tags without editing your site's code. To integrate, you install the GTM container snippet on your WordPress site (via plugin or manual code) and then add your GA4 tag within GTM. This approach is more scalable for complex tracking setups but has a steeper learning curve. For simple GA4 tracking alone, a plugin is sufficient.
How do I add Google Analytics to WordPress without a plugin?
To add Google Analytics without a plugin, you need to manually insert the tracking code. First, get your GA4 tracking snippet from Google Analytics (Admin > Data Streams > your stream > Tagging Instructions). Then, in your WordPress dashboard, go to Appearance > Theme Editor and open header.php. Paste the entire snippet just before the closing tag. Save the file. This method is not recommended if you are not comfortable editing code, as errors can break your site. Always use a child theme to avoid losing changes during theme updates.
What are the best WordPress plugins for Google Analytics integration?
The top plugins include Google Site Kit (official, free, comprehensive), MonsterInsights (premium, user-friendly, ecommerce tracking), and ExactMetrics (similar to MonsterInsights with a free version). Site Kit is ideal for beginners as it connects multiple Google services. MonsterInsights offers advanced features like form tracking and custom dimensions. For a lightweight option, consider GA Google Analytics or Insert Headers and Footers. Each plugin has its strengths, so choose based on your needs for simplicity, features, or cost.
How to Use WordPress for Event Management: A Complete Guide to Planning, Registration, and Promotion
Why WordPress Is a Powerful Event Management Platform
WordPress powers over 40% of all websites on the internet, but its capabilities extend far beyond blogging. For event planners, WordPress offers a robust, flexible foundation that can handle everything from intimate workshops to large-scale conferences. Unlike rigid, all-in-one event software, WordPress allows you to tailor every aspect of your event management workflow—registration, ticketing, scheduling, and promotion—without requiring a dedicated development team. Its open-source nature means you own your data, avoid recurring license fees, and can scale as your event grows.
Core Benefits of WordPress for Event Planners
WordPress provides several distinct advantages that make it an ideal choice for event management:
Complete flexibility: You can design custom registration forms, payment gateways, and confirmation emails using plugins like The Events Calendar or WP Event Manager. No two events need to look or function the same.
Extensive plugin ecosystem: Over 59,000 free plugins exist, including dedicated event tools, CRM integrations (e.g., HubSpot, Mailchimp), and payment processors (Stripe, PayPal). You can add features like recurring events, attendee check-ins, or session scheduling with a few clicks.
Cost-effectiveness: Self-hosted WordPress eliminates monthly subscription fees common with platforms like Eventbrite (which charges per ticket sold) or Cvent (which can cost thousands annually). You pay only for hosting, a domain, and optional premium plugins—often under $200 per year for a small event.
SEO and content control: WordPress excels at search engine optimization. You can optimize event pages with custom meta descriptions, schema markup, and fast-loading designs, helping your events rank higher in search results compared to third-party platforms.
Scalability: Whether you manage one event per year or a multi-track conference with 5,000 attendees, WordPress can scale. Caching plugins, CDN integration, and scalable hosting (e.g., WP Engine or Kinsta) ensure performance remains high.
Comparing WordPress to Standalone Event Management Tools
When evaluating WordPress against dedicated event software, consider the following trade-offs:
Feature
WordPress with Plugins
Standalone Tools (e.g., Eventbrite, Cvent)
Upfront cost
Low (hosting + domain + optional plugins)
Moderate to high (monthly fees + transaction fees)
Customization
Unlimited (themes, custom code, plugin settings)
Limited (template-based, brand restrictions)
Data ownership
Full control (export anytime, no vendor lock-in)
Partial (data stored on vendor servers, export fees possible)
Often separate tools (email, landing pages need integration)
Support
Community forums, plugin documentation, optional paid support
Dedicated support (usually tiered by plan)
For example, a small nonprofit hosting a free community event might prefer WordPress to avoid per-ticket fees and maintain full branding control. Conversely, a large enterprise with a dedicated events team might choose Cvent for its built-in lead retrieval and integrated reporting, though at a higher cost.
When to Choose WordPress Over Custom-Built Solutions
Custom-built event management solutions—developed from scratch by a web developer—offer ultimate control but come with significant drawbacks: high initial development costs (often $10,000+), ongoing maintenance, and slow feature iteration. WordPress bridges the gap by providing a pre-built, secure, and regularly updated foundation. You should choose WordPress when:
You need rapid deployment. With plugins like EventON or Modern Events Calendar, you can launch a fully functional event site in days, not months.
Your budget is limited. Custom development typically demands a large upfront investment. WordPress keeps costs predictable and low.
You require third-party integrations. WordPress plugins already connect with popular tools like Zoom (for virtual events), WooCommerce (for paid tickets), and Google Calendar. Building these integrations from scratch is time-consuming and error-prone.
You want to manage multiple event types. WordPress can handle one-off events, recurring series, workshops, webinars, and conferences—all from a single dashboard. Custom solutions often require separate modules for each type.
You prioritize long-term maintainability. WordPress’s vast community ensures security patches, plugin updates, and compatibility with new technologies (e.g., PHP 8.x, REST API). Custom code can become outdated and unsupported.
In short, WordPress offers the best balance of flexibility, affordability, and ease of use for most event planners. It empowers you to build a unique event management system without the overhead of custom development or the constraints of standalone tools.
Choosing the Right Event Management Plugin for Your Needs
Selecting the correct plugin is the most critical decision when you learn how to use WordPress for event management. The plugin you choose dictates your registration workflow, ticketing capabilities, and promotional tools. With dozens of options available, focusing on essential features and comparing real-world performance will save you time and money.
Key Features to Look for in an Event Plugin
Before evaluating specific plugins, define your non-negotiable requirements. Every event management plugin should offer at least these core capabilities:
Event creation and display: Simple interface to add dates, times, locations (including virtual), and recurring event patterns.
Registration and ticketing: Ability to sell or offer free tickets, manage attendee limits, and collect payments via gateways like Stripe or PayPal.
Calendar and filtering: A front-end calendar view with category, date range, and location filters for user navigation.
Email notifications: Automated confirmations, reminders, and follow-up messages to registrants.
SEO and schema markup: Proper event schema (JSON-LD) so search engines display your events in rich results.
Integrations: Compatibility with your theme, page builder (e.g., Elementor), and third-party tools like Zoom or Mailchimp.
If you plan to host webinars or hybrid events, verify that the plugin supports virtual meeting integration natively. For physical events, check if it offers check-in tools or QR code scanning.
Top 5 Event Plugins Compared: Pricing and Capabilities
Plugin
Starting Price (Annual)
Free Version Available
Key Strengths
Best For
The Events Calendar
Free (Pro from $99)
Yes
Lightweight, excellent calendar, great SEO
Simple listings and small events
Event Espresso
$79.95
Limited
Advanced ticketing, multi-registration
Paid events with complex pricing
WP Event Manager
Free (add-ons from $49)
Yes
Modular, developer-friendly, front-end forms
Community-driven event sites
Modern Events Calendar
$49 (single site)
Yes
Rich skins, recurring events, booking
Visual event showcases
EventON
$25 (lifetime)
No
Minimalist, fast, single-event focus
Small businesses and freelancers
Each plugin has a distinct learning curve. The Events Calendar offers the most intuitive setup for beginners, while Event Espresso provides granular control over ticket types, discounts, and waitlists. WP Event Manager shines when you need custom fields or third-party API connections.
Free vs. Premium Plugins: What You Gain and What You Lose
Free plugins like The Events Calendar (basic version) or WP Event Manager (core) are excellent for testing how to use WordPress for event management without financial risk. You gain:
Basic event creation and calendar display.
Community support forums.
Regular updates for security.
However, free versions typically lack:
Payment processing for ticket sales.
Recurring event scheduling (often limited to manual duplication).
Advanced email automation.
Dedicated customer support.
Premium plugins unlock these capabilities but require ongoing investment. For example, Event Espresso’s premium tier includes front-end registration forms, discount codes, and detailed attendee reports. A practical consideration: if your event volume exceeds 50 registrations per month, a premium plugin’s performance and support become essential.
To test a premium plugin safely, use a staging environment. For instance, if you install WP Event Manager free and later upgrade to the paid “Frontend” add-on, you can add this code snippet to your theme’s functions.php to disable the free version’s admin menu for cleaner navigation after upgrade:
This keeps the admin area focused on your premium features. Ultimately, choose a plugin that matches your scale: free for single events or small lists, premium for monetization and automation.
Setting Up Your Event Calendar and Listings
To effectively use WordPress for event management, the first step is creating a functional event calendar and listing system. This section provides step-by-step instructions for installing a plugin, adding events, and configuring display options. The most widely recommended plugin for this purpose is The Events Calendar, though alternatives like Modern Events Calendar and EventON also offer robust features.
Installing and Activating Your Event Plugin
Begin by navigating to your WordPress dashboard. Go to Plugins > Add New. In the search bar, type the name of your chosen plugin—for example, “The Events Calendar.” Locate the official plugin by Modern Tribe, then click Install Now. After installation, click Activate. Once active, you will see a new menu item labeled “Events” in your dashboard sidebar, which gives you access to all event management functions.
After activation, configure basic settings under Events > Settings. Key options to adjust immediately include:
Setting your timezone and date format.
Choosing a default currency if you plan to sell tickets.
Enabling or disabling recurring events.
Selecting a default calendar view (month, list, or week).
Creating Your First Event: Title, Date, Location, and Description
To add an event, click Events > Add New. This opens an editor similar to a standard WordPress post but with dedicated event fields. Fill in the following sections:
Title: Use a clear, descriptive name, e.g., “Annual Marketing Summit 2025.”
Date and Time: Use the date picker to set start and end dates. Enable “All Day” if applicable. For multi-day events, check “Recurring Event” and set the pattern.
Location: Enter a venue name and address. The plugin will automatically generate a Google Maps link if you have a Google Maps API key configured.
Description: Write a compelling summary using the block editor. Include key details like speakers, agenda, and what attendees will gain.
Once completed, click Publish. Your event will appear immediately on the front-end calendar.
Customizing Calendar Views and Event Page Layouts
After creating events, customize how they are displayed. The Events Calendar plugin provides multiple view options: Month, List, Week, Day, and Photo (with the premium version). To configure these, go to Events > Settings > Display. Here, you can:
Set the default view (e.g., “Month” is common for broad overviews).
Adjust the number of events shown per page in list view.
For event page layouts, you can override the default template by copying the plugin’s template files to your theme’s folder (e.g., /wp-content/themes/your-theme/tribe/events/). This allows you to modify the layout without losing changes during plugin updates. Consider adding custom CSS for branding.
Below is a comparison of three popular event plugins to help you choose:
Plugin Name
Free Version Features
Premium Version Cost
Best For
The Events Calendar
Single events, Month/List views, Google Maps integration
$179/year (Events Calendar Pro)
Simple, lightweight event management
Modern Events Calendar
Recurring events, 12+ skins, booking form
$49/year (Personal)
Visual variety and advanced booking
EventON
Single events, filtering, shortcodes
$25 (one-time, single site)
Budget-friendly, one-time purchase
After setting up your calendar and listings, you are ready to move on to registration and promotion features, which will further enhance your event management workflow.
Managing Event Registration and Ticketing
Efficient registration and ticketing are the backbone of any successful event managed through WordPress. By leveraging plugins like Event Espresso, WooCommerce with event add-ons, or The Events Calendar with its ticketing extension, you can create a seamless experience for attendees while maintaining control over data and payments. The process involves three critical stages: configuring forms, integrating payments, and automating communications.
Configuring Registration Forms with Required Fields
Registration forms must capture essential attendee information without overwhelming users. Use a plugin’s built-in form builder to add fields dynamically. Required fields typically include:
Full name (first and last)
Email address
Phone number (optional but recommended)
Ticket type or session selection
Dietary restrictions or accessibility needs (if applicable)
To enforce data accuracy, enable field validation. For example, in Event Espresso, navigate to Event Editor > Registration Questions and mark fields as “Required.” You can also add custom fields like “Organization Name” by creating a new question group. For technical sites, a practical snippet to add a custom required field via your theme’s functions.php file is:
add_action( 'AHEE__EE_Registration_Form__generate_reg_form__after_questions', 'add_custom_required_field' );
function add_custom_required_field() {
echo '<label for="custom_phone">Phone Number (required)</label>';
echo '<input type="tel" name="custom_phone" required>';
}
Test the form thoroughly to ensure required fields trigger error messages and prevent submission until completed.
Payment gateways enable secure ticket purchases. Most event plugins support major providers. To integrate:
Stripe: Install the Stripe Payment Gateway plugin (if using WooCommerce) or activate Stripe within your event plugin’s payment settings. Enter your API keys (found in your Stripe dashboard under “Developers > API keys”). Set the “Test Mode” toggle to enable sandbox testing.
PayPal: Use PayPal Standard or PayPal Pro. For WooCommerce, install the PayPal Payments plugin and link your PayPal business account via the setup wizard. For dedicated event plugins, go to Payment Methods and paste your PayPal email or API credentials.
Offline Payments: Add options like bank transfer or cash on arrival for free events. Simply enable “Offline Payment” in the plugin settings and provide instructions in the confirmation email.
Always enable SSL on your site to encrypt payment data. Test transactions using sandbox credentials before going live.
Automating Confirmation Emails and Ticket Delivery
After a successful registration, attendees expect immediate confirmation and a ticket. Most event plugins include email automation. Configure these steps:
Set email templates: In your plugin’s settings, customize the confirmation email subject and body. Include event details (date, time, location), a unique attendee ID, and a link to view or download the ticket.
Assign ticket delivery: Enable automatic ticket generation. For example, in WooCommerce with the WooCommerce Events extension, tickets are created as PDFs attached to the order confirmation email. In Event Espresso, go to Messages > Registration Confirmation and activate the “Ticket” shortcode.
Test the workflow: Create a test registration with a free ticket or a test payment. Verify the email arrives within seconds and contains all required information. Check spam folders and adjust server settings if delays occur.
By automating these steps, you reduce manual workload and ensure a professional attendee experience from registration to event day.
Collecting Payments and Managing Orders
Effective payment collection and order management are critical for any paid event. WordPress, paired with the right plugins like WooCommerce or The Events Calendar with Event Tickets Plus, allows you to process payments securely, track attendee data, and handle refunds without leaving your dashboard. This section covers the essential workflows for pricing, order tracking, and financial management.
Setting Up Pricing Tiers, Discounts, and Early-Bird Rates
To maximize revenue and encourage early sign-ups, create flexible pricing structures. Most event plugins support multiple ticket types and automatic rate adjustments. Follow these steps to configure pricing:
Define ticket types. Create general admission, VIP, student, or group tickets, each with its own price and capacity limits.
Set early-bird rates. Configure a discounted price that automatically switches to the standard rate after a specified date.
Apply discount codes. Generate unique codes for percentage or fixed amount discounts, with optional usage limits and expiration dates.
Enable tiered pricing. Offer lower per-ticket prices for bulk purchases (e.g., buy 5 tickets, get 10% off).
Schedule pricing changes. Use the plugin’s calendar to set start and end times for each price tier, so rates update automatically.
For example, in WooCommerce, you can use the “Product Add-Ons” extension to create tiered ticket options, while The Events Calendar allows you to set multiple ticket types with date-based pricing directly in the event editor.
Tracking Orders and Attendee Data from the Dashboard
Once payments start flowing, you need a centralized view of orders, attendee details, and financial summaries. Most WordPress event plugins provide a dedicated dashboard section for this purpose. Key features include:
Data Point
Where to Find It
What You Can Do
Order list
Plugin’s “Orders” or “Tickets” menu
View status (completed, pending, refunded), date, and total amount for each order.
Attendee details
Event attendee report or ticket listing
Export names, emails, ticket type, and custom questions to CSV or PDF.
Payment history
Payment gateway logs (e.g., Stripe, PayPal)
Match transactions with orders, verify settlement status, and issue refunds.
Sales reports
Dashboard widgets or plugin reports
View revenue by event, ticket type, or date range. Filter by payment method.
To maintain data integrity, regularly reconcile orders with your payment gateway’s transaction history. Use the plugin’s built-in search and filter tools to find specific attendees or orders quickly.
Refund and cancellation policies protect both you and your attendees. WordPress plugins offer automated or manual refund workflows that integrate with payment gateways. Follow these best practices for secure handling:
Define a clear policy. Display your refund terms on the checkout page and in confirmation emails. Specify deadlines (e.g., full refund up to 7 days before the event).
Use plugin refund tools. In WooCommerce, go to the order details page and click “Refund” to process a partial or full refund directly to the customer’s payment method.
Automate cancellations. Some plugins allow attendees to cancel their own registration, triggering an automatic refund if policy conditions are met.
Track refunds in reports. Ensure your sales reports subtract refunded amounts from total revenue, so you have an accurate financial picture.
Secure payment data. Never store full credit card numbers. Use PCI-compliant gateways like Stripe or PayPal, and enable tokenization for recurring payments.
For high-volume events, consider using a plugin like “Event Espresso” which includes a built-in refund manager that logs each refund reason and timestamp. Always test the refund process with a sandbox account before going live to confirm the funds are returned correctly and the attendee’s ticket status is updated.
Promoting Your Events with SEO and Social Media
Driving attendance for your events requires a strategic approach to visibility. Using WordPress, you can combine search engine optimization, social sharing, and email marketing to reach your target audience effectively. This section covers three key tactics to maximize your event’s reach directly from your WordPress site.
To ensure your event appears in search results, start with on-page SEO fundamentals. Each event page should have a unique title tag and meta description that includes your event name, date, and location. Use a plugin like Yoast SEO or Rank Math to control these elements. Structure your content with descriptive headings (H2 and H3) that incorporate keywords naturally, such as “Keynote Speakers” or “Early Bird Pricing.”
Key optimization steps include:
Writing a clear, keyword-rich URL slug (e.g., /annual-tech-summit-2024)
Adding alt text to all images, especially speaker photos and venue maps
Including internal links to related content, like past event recaps or blog posts
Using a fast-loading theme and compressing images to improve page speed
For WordPress-specific implementation, you can programmatically set meta descriptions using a custom function. Add this to your theme’s functions.php file or a site-specific plugin:
Adding Social Share Buttons and Event Schema Markup
Social share buttons make it easy for visitors to spread the word about your event. WordPress offers several plugin options, such as Social Warfare or AddToAny, which let you customize button placement and style. For best results, place share buttons prominently near the event title and at the bottom of the page. Consider adding buttons for platforms where your audience is most active, such as LinkedIn for professional events or Instagram for visual gatherings.
Event schema markup is equally important for search visibility. Structured data helps search engines display rich snippets in results, including event dates, times, and ticket links. Use a plugin like Schema Pro or insert JSON-LD manually. A minimal event schema example looks like this:
Using Email Newsletters to Announce and Remind Attendees
Email marketing remains one of the most effective tools for event promotion. WordPress integrates seamlessly with email service providers like Mailchimp, Constant Contact, or SendGrid through plugins such as MailPoet or Newsletter. Create a dedicated email list for event announcements and segment it by interest or past attendance.
Build a sequence of emails to nurture registrations:
To capture emails directly on your WordPress site, embed a signup form using a plugin’s shortcode or block. Place it on your event page and homepage. For automated reminders, use the email service’s API to sync with your event registration plugin, ensuring only registered attendees receive targeted messages. This approach reduces manual work and increases attendance rates by keeping your event top of mind.
Integrating Third-Party Tools for Enhanced Management
To truly scale your event management efforts, connecting your WordPress site with specialized third-party platforms is essential. These integrations automate repetitive tasks, enrich your attendee data, and provide deeper insights into your event’s performance. By linking your event registration system with CRM, marketing automation, and analytics tools, you can streamline workflows and focus on delivering a memorable experience. Below, we explore three critical integrations that transform how you manage events from planning to post-event analysis.
Syncing Attendee Data with Mailchimp or ActiveCampaign
Automated syncs between your WordPress event plugin and email marketing platforms like Mailchimp or ActiveCampaign ensure that every registration triggers a tailored communication sequence. Most event plugins, such as The Events Calendar or WP Event Manager, offer native integrations or support via extensions. Here is how to set this up effectively:
Choose a compatible plugin: Look for event plugins that include direct Mailchimp or ActiveCampaign add-ons, or use a third-party connector like Zapier.
Map your fields: Ensure that registration form fields (name, email, ticket type) align with your email platform’s custom fields for segmentation.
Create automated campaigns: Set up welcome emails, event reminders, and post-event follow-ups based on attendee data synced in real time.
Segment your audience: Use tags or lists in Mailchimp or ActiveCampaign to separate attendees by event, ticket tier, or engagement level for targeted promotions.
For example, with ActiveCampaign’s deep integration, you can trigger a “thank you” email immediately after a registration and then enroll the attendee in a nurture sequence for future events. This eliminates manual data entry and reduces the risk of errors.
Using Zapier to Automate Event Workflows
Zapier acts as a bridge between WordPress and over 5,000 apps, enabling you to create custom automations without coding. For event management, Zapier can handle tasks that would otherwise consume hours. Consider these practical automations:
Trigger (WordPress Event)
Action (Third-Party App)
Benefit
New registration submitted
Add row to Google Sheets
Maintain a live backup of all attendees.
Attendee checks in via mobile app
Send SMS reminder via Twilio
Reduce no-shows with last-minute alerts.
Event date passes
Create task in Asana for follow-up
Ensure post-event surveys are sent.
Ticket type sells out
Post update to Slack channel
Notify your team instantly for adjustments.
To get started, connect your WordPress event plugin to Zapier via webhooks or supported triggers. Then, define a simple “Zap” (automation) that activates when a specific event occurs, such as a new registration. Zapier’s visual editor lets you test each step, ensuring data flows correctly before going live. This approach saves time and reduces manual overhead, especially for recurring events.
Measuring your event’s success requires more than just ticket sales. Google Analytics provides granular data on user behavior, traffic sources, and conversion paths. To integrate it effectively with your WordPress event site, follow these steps:
Install a tracking plugin: Use MonsterInsights or Site Kit by Google to add your Analytics tracking code site-wide.
Set up event-specific goals: In Google Analytics, create a Goal for “Registration Completed” using the destination URL of your thank-you page or a custom event trigger.
Enable enhanced ecommerce: If your event plugin supports it, activate ecommerce tracking to monitor ticket sales as transactions, including revenue and quantity.
Use UTM parameters: Tag all promotional links (emails, social posts, ads) with UTM codes to identify which channels drive the most registrations.
With this setup, you can analyze reports such as “Events” under Behavior or “Conversions” under Goals to see how users interact with your event pages. For example, you might discover that attendees from email campaigns have a 40% higher conversion rate than those from social media, allowing you to reallocate your marketing budget accordingly. Combining Google Analytics with your CRM data via Zapier creates a closed loop, where on-site behavior informs future email campaigns and event designs.
Designing a User-Friendly Event Experience
When you learn how to use WordPress for event management, the design of your event pages becomes the bridge between interest and action. A user-friendly experience ensures attendees can quickly find details, register without friction, and access the event on any device. Prioritizing clarity, speed, and inclusivity in your design reduces drop-off rates and builds trust with your audience. Below are targeted strategies for crafting event pages that guide visitors smoothly from discovery to participation.
Choosing a Theme That Supports Events
Your theme sets the foundation for event functionality. Look for a theme that offers built-in event post types, calendar widgets, and registration integration. Popular choices include Event Organiser and Modern Events Calendar themes, which provide dedicated templates for listing, single event, and archive pages. Avoid bloated multipurpose themes that slow loading times. Key features to evaluate:
Native support for event schemas (e.g., schema.org markup for SEO).
Built-in date picker and time zone handling.
Compatibility with popular event plugins like The Events Calendar or WP Event Manager.
Regular updates and accessibility compliance (WCAG 2.1).
Test the theme’s demo event pages on mobile to ensure buttons and forms are tappable. A lean, event-focused theme improves page speed, which directly affects conversion rates.
Customizing Event Page Templates with Page Builders
Page builders like Elementor, Beaver Builder, or Gutenberg’s full-site editing allow you to tailor event templates without coding. Use them to design consistent layouts for event listings, single event pages, and registration confirmation screens. Essential customization tips:
Place a prominent “Register Now” button above the fold on single event pages.
Add a countdown timer widget to create urgency.
Include an interactive map or venue details in a collapsible section to save space.
Use dynamic tags to pull event titles, dates, and prices from your plugin’s database.
For example, with Elementor Pro, you can create a custom single-event template that displays speaker bios, session tracks, and a sidebar with ticket tiers. Save these templates as reusable blocks to maintain brand consistency across multiple events.
Ensuring Mobile-Friendly and Accessible Event Listings
Over 60% of event registrations occur on mobile devices, making responsiveness non-negotiable. Accessibility further widens your audience, including users with disabilities. The table below compares common practices for mobile and accessibility optimization:
Focus Area
Mobile-Friendly Practice
Accessibility Practice
Button and link size
Minimum 48x48px tap targets
Focus indicators visible on keyboard navigation
Text readability
Font size at least 16px for body text
High contrast ratio (4.5:1 for normal text)
Form fields
Single-column layout with auto-fill attributes
Descriptive labels and error messages in HTML
Media elements
Lazy load images and videos
Alt text for images and captions for videos
Navigation
Sticky header with collapsible menu
Skip-to-content link and ARIA landmarks
To implement, use WordPress’s built-in responsive preview in the Customizer. Test your event pages with tools like Google’s Mobile-Friendly Test and WAVE for accessibility. Additionally, ensure that your event registration forms are keyboard-navigable and that all interactive elements have visible focus states. This dual approach not only meets legal standards but also improves user satisfaction, reducing cart abandonment during ticket purchases.
Managing Recurring Events and Multi-Day Schedules
When you learn how to use WordPress for event management, handling recurring events and multi-day schedules becomes a critical skill. Whether you run weekly workshops, monthly meetups, or annual conferences with complex timing, WordPress offers flexible solutions for session tracking and series management. This section covers techniques for setting up recurring events with different frequencies, managing multiple sessions and speakers, and displaying multi-day schedules with session tracks.
Setting Up Recurring Events with Different Frequencies
WordPress itself does not natively handle recurring events, but plugins like The Events Calendar, EventON, or WP Event Manager provide robust recurrence options. To set up a recurring event, follow these general steps:
Choose a recurrence pattern: Select daily, weekly, monthly, or yearly intervals. For example, a weekly workshop every Tuesday.
Set end conditions: Specify an end date, a number of occurrences, or “forever” for ongoing series.
Customize exceptions: Exclude specific dates, such as holidays or breaks, without breaking the series.
Adjust timing per occurrence: Some plugins allow different start/end times for each instance, useful for workshops with varying durations.
For advanced control, you can use a custom post type with meta fields. Below is a practical PHP code example to register a custom meta box for recurrence frequency:
Managing Multiple Sessions and Speakers Within One Event
For conferences or multi-track workshops, each event may contain several sessions with distinct speakers and topics. To manage this effectively:
Use session custom post types: Create a “session” CPT with fields for title, description, speaker, time, and room. Link sessions to a parent event via a taxonomy or meta field.
Assign speakers as custom taxonomy: Register a “speaker” taxonomy or use a dedicated “speaker” CPT. This allows filtering sessions by speaker across events.
Implement session registration: With plugins like WPForms or Gravity Forms, allow attendees to register for individual sessions, not just the overall event.
Track session capacity: Add a meta field for max attendees per session and display remaining spots.
Below is a table summarizing common session management features and their plugin support:
Feature
The Events Calendar
EventON
WP Event Manager
Session CPT
Add-on required
Built-in
Custom post type
Speaker assignment
Taxonomy
Custom fields
Taxonomy
Capacity tracking
Pro version
Built-in
Add-on
Session registration
Third-party
Built-in
Third-party
Displaying Multi-Day Schedules and Session Tracks
Presenting a clear, user-friendly schedule for multi-day events is essential for attendee satisfaction. Use these techniques to display complex schedules:
Tabbed or accordion layouts: Show each day as a separate tab, with sessions listed in time order. Plugins like The Events Calendar offer built-in day views.
Color-coded tracks: Assign a color to each track (e.g., blue for Marketing, green for Tech) and display session backgrounds accordingly. This can be done with custom CSS classes.
Filter by track or speaker: Add dropdown filters that allow users to view only sessions in a specific track or by a particular speaker.
Use a shortcode for dynamic schedules: Many plugins provide shortcodes to embed schedules. For example, [tribe_events view="day"] shows daily events.
To create a custom schedule display, you can loop through sessions grouped by day and time. A practical approach is to use the WordPress WP_Query with meta queries for date ranges, then output a table with rowspan for overlapping sessions. This ensures that even complex multi-day schedules remain readable and navigable for your audience.
Once your event concludes, the real work begins: understanding what worked and what didn’t. Mastering how to use WordPress for event management includes leveraging data to refine every aspect of your next gathering. By analyzing attendance, revenue, and feedback, you can make evidence-based decisions that boost profitability and attendee satisfaction over time.
Generating Sales and Attendance Reports from Your Plugin
Most event management plugins for WordPress, such as The Events Calendar with Event Tickets or WP Event Manager, include built-in reporting dashboards. These tools allow you to export data on ticket sales, check-in rates, and revenue without additional software. To generate a comprehensive report:
Access the plugin’s reporting section—usually found under a “Reports” or “Tickets” tab in your WordPress admin.
Filter by date range to isolate a single event or a series.
Export data as CSV for further analysis in spreadsheet software.
Key metrics to track include:
Metric
What It Tells You
Total tickets sold
Overall demand and capacity utilization.
Revenue per ticket type
Which pricing tiers perform best.
Check-in rate
Percentage of ticket holders who actually attended.
Sales by channel
Effectiveness of different promotion sources.
For advanced analysis, integrate Google Analytics with your WordPress site via a plugin like MonsterInsights. Set up event tracking to see how users interacted with your registration page, including drop-off points and conversion funnels.
Collecting Attendee Feedback with Surveys
Quantitative data only tells part of the story. To understand attendee satisfaction, you need direct feedback. Use a WordPress survey plugin like WPForms or SurveyMonkey to create post-event questionnaires. Embed these surveys on a thank-you page or send them via email after the event. Essential questions to include:
How would you rate the overall experience? (1–5 scale)
Was the event length appropriate?
What topics would you like covered next time?
Would you recommend this event to a colleague?
Consider offering a small incentive, such as a discount on future tickets, to boost response rates. Aim for at least a 20% response rate to ensure statistical validity.
Using Data to Refine Pricing, Timing, and Promotion
With reports and survey results in hand, you can make targeted improvements. Compare attendance data against pricing to identify the optimal ticket price. For example, if early-bird tickets sold out quickly but full-price tickets lagged, consider raising the early-bird discount or extending the sale period. Analyze check-in times to decide whether to adjust event start times—if most attendees arrived 30 minutes late, shift the official start time accordingly.
Promotion data from your reports can reveal which channels drove the most registrations. If social media ads generated high traffic but low conversions, refine your ad copy or landing page. Conversely, if email newsletters had a high conversion rate, invest more in list-building and segmentation. By iterating based on real data, you continuously improve your events, making each one more successful than the last. Remember: the goal of learning how to use WordPress for event management is not just to run events, but to run better events over time.
What is the best WordPress plugin for event registration?
The Event Calendar Pro is widely considered the best for event registration, offering seamless integration with ticketing, RSVP, and recurring events. It supports multiple ticket types, payment gateways like Stripe and PayPal, and provides a user-friendly interface. For free alternatives, The Events Calendar (free version) is a solid choice, though it lacks advanced features like premium ticket sales. Always choose a plugin that aligns with your event size and budget, and check for regular updates and support.
How do I add a calendar to my WordPress event site?
To add a calendar, install a plugin like The Events Calendar or EventON. After activation, create events via the 'Events' menu, setting dates, times, and locations. Use the provided shortcode or block to embed the calendar on any page or post. Customize the view (monthly, weekly, or list) and enable filters for categories or tags. For a more interactive experience, consider premium versions that offer Google Calendar sync and drag-and-drop event management.
Can I sell tickets directly through WordPress?
Yes, you can sell tickets directly using plugins like Event Tickets (from The Events Calendar team) or WooCommerce with an event add-on. Event Tickets integrates with PayPal and Stripe, allowing you to sell tickets without a third-party platform. WooCommerce-based solutions offer more flexibility for physical goods alongside tickets. Ensure your site has SSL security and choose a plugin that handles attendee data compliantly.
How do I promote events effectively on WordPress?
Use SEO best practices by optimizing event pages with targeted keywords, meta descriptions, and schema markup (e.g., Event schema). Leverage social sharing plugins like Social Warfare to encourage attendees to share. Email marketing integrations with Mailchimp or Constant Contact allow you to send reminders. Additionally, create a dedicated event landing page with clear CTAs and use Google Analytics to track conversions.
What are the key features to look for in an event management plugin?
Look for features like customizable registration forms, multiple payment options, recurring event support, calendar views, and attendee management. Integration with email marketing tools, Google Calendar sync, and mobile responsiveness are also crucial. Security features such as data encryption and GDPR compliance are essential for handling personal data. User reviews and support documentation help gauge reliability.
How do I handle event cancellations or rescheduling?
Use a plugin that allows easy editing of event dates and automatic notification of attendees via email. For cancellations, enable a cancellation policy within the registration form and provide refund options through your payment gateway. Plugins like Event Calendar Pro include built-in features for rescheduling and cancellations. Always communicate changes promptly to maintain trust.
Is it possible to create recurring events in WordPress?
Yes, many event plugins support recurring events. The Events Calendar Pro offers a 'Recurring Events' feature where you can set daily, weekly, monthly, or custom patterns. You can also specify an end date or set events to continue indefinitely. This is particularly useful for workshops, webinars, or weekly meetups. Ensure the plugin handles timezone changes correctly for global events.
How can I integrate WordPress events with email marketing?
Use plugins like The Events Calendar with Event Tickets Plus, which integrates directly with Mailchimp, Constant Contact, and ActiveCampaign. After registration, attendee data is automatically added to your email list for follow-ups. Alternatively, use Zapier to connect your event plugin to hundreds of email services. This helps in sending confirmation, reminder, and post-event feedback emails.
The Complete WordPress and PayPal Integration Guide: Setup, Plugins, and Best Practices
Introduction to WordPress and PayPal Integration
Integrating PayPal with your WordPress site unlocks a world of secure, flexible payment processing for e-commerce stores, donation drives, and membership platforms. By connecting these two powerful systems, you enable customers to pay using credit cards, PayPal balances, or bank accounts without leaving your site. This integration streamlines transactions, reduces cart abandonment, and builds trust through PayPal’s industry-standard security protocols. Whether you sell digital downloads, accept recurring subscriptions, or collect one-time contributions, a well-implemented WordPress and PayPal integration ensures that every payment is processed reliably and efficiently.
Why Choose PayPal for Your WordPress Site
PayPal remains a top payment gateway for WordPress because of its global reach and user-friendly features. Here are the primary reasons site owners select PayPal:
Widespread adoption: Over 400 million active users trust PayPal, reducing friction for new customers.
Multiple payment methods: Accept credit cards, debit cards, PayPal balance, and local payment options in over 200 markets.
Built-in buyer and seller protection: Dispute resolution and fraud monitoring safeguard both parties.
Recurring payment support: Ideal for membership sites and subscription services.
No monthly fees: You only pay per transaction, making it cost-effective for small businesses.
Fast setup: No complex merchant account or SSL certificate required for basic integration.
Additionally, PayPal integrates seamlessly with most WordPress e-commerce plugins, offering a consistent checkout experience across devices. Its adaptive payment system can handle variable pricing, coupons, and tax calculations, giving you granular control over your revenue.
Key Integration Methods: Plugins vs. Custom Code
You can integrate PayPal into WordPress using two primary approaches: plugins or custom code. Each method has distinct advantages depending on your technical skill and customization needs.
No coding required; pre-built checkout forms; automatic updates; support for subscriptions and digital goods; compatibility with popular page builders
Limited customization; potential plugin bloat; dependency on third-party updates
Custom Code
Developers, unique workflows, full control
Complete design flexibility; lightweight integration; ability to handle complex business logic; no extra plugin overhead
Requires PHP, JavaScript, and API knowledge; manual security updates; longer development time; no built-in support
For most users, plugins like WooCommerce PayPal Payments or Easy Digital Downloads provide robust functionality out of the box. Custom code is reserved for specialized scenarios, such as integrating with a custom membership plugin or building a unique donation form with conditional logic.
Understanding PayPal’s API and Account Types
To integrate PayPal effectively, you must understand its API ecosystem and account types. PayPal offers several APIs, each serving different integration needs:
PayPal REST API: The modern, recommended API for creating payments, managing subscriptions, and handling webhooks. It supports both JavaScript SDK for client-side calls and server-side endpoints.
PayPal Checkout (Smart Buttons): A hosted UI that renders payment buttons on your site, handling the entire checkout flow with minimal code.
PayPal Payments Standard (Website Payments Pro): An older method using HTML form variables to send transaction data to PayPal. Still used by some legacy plugins.
PayPal Adaptive Payments: For splitting payments among multiple recipients (e.g., marketplace platforms). Less common today.
Personal Account: Suitable for casual sellers or donations; limited transaction volume and features.
Business Account: Required for e-commerce, subscriptions, and high-volume sales. Provides access to API credentials, payment processing reports, and advanced tools like PayPal Payments Pro.
PayPal Payments Pro: A premium upgrade that allows you to accept credit cards directly on your site without redirecting to PayPal. Requires a monthly fee and PCI compliance.
When setting up your integration, always use a Business account and obtain your REST API credentials (Client ID and Secret) from the PayPal Developer Dashboard. This ensures you can leverage the full suite of PayPal features, including instant payment notifications (IPN) and webhooks for real-time order updates.
Before integrating your WordPress site with PayPal, you must ensure that several foundational elements are in place. Skipping any of these prerequisites can lead to payment failures, security vulnerabilities, or compliance issues. This section covers the essential requirements you need to meet before proceeding with the technical setup.
Setting Up a PayPal Business Account
A personal PayPal account is insufficient for processing e-commerce payments. You need a PayPal Business account, which provides access to advanced features such as payment buttons, recurring billing, and IPN (Instant Payment Notification) listeners. To set up one:
Select “Business Account” and provide your legal business name, email, and contact details.
Link a bank account or debit card to verify your identity and enable withdrawals.
Complete the verification process by confirming your email and providing required documentation (e.g., business license or tax ID).
Once your account is active, note your PayPal email address and your API credentials. To find your API credentials, log in to your PayPal Business account, go to “Account Settings,” then “API Access,” and generate a new API signature or token. These will be required when configuring most WordPress plugins.
Ensuring Your Site Has SSL/HTTPS
PayPal requires that all payment data is transmitted securely. An SSL certificate encrypts the connection between your visitors’ browsers and your server, preventing interception of sensitive information like credit card numbers. Without HTTPS, many PayPal integrations will fail or display security warnings.
To check if your site already has SSL: visit your site using https://yourdomain.com. If the browser shows a padlock icon, SSL is active. If not, you must install one. Most modern web hosts offer free SSL certificates via Let’s Encrypt. To manually force HTTPS in WordPress, add the following code to your wp-config.php file, just before the line that says “That’s all, stop editing!”:
define('FORCE_SSL_ADMIN', true);
if ($_SERVER['HTTP_X_FORWARDED_PROTO'] == 'https') $_SERVER['HTTPS'] = 'on';
After making this change, also update your site URL in WordPress Settings > General to use https://. Test the site thoroughly to ensure no mixed content warnings appear.
Choosing the Right WordPress Hosting for E-commerce
Not all hosting plans are suitable for handling PayPal transactions and e-commerce traffic. The wrong hosting can cause slow page loads, downtime during checkout, or compatibility issues with payment gateways. When selecting a host for your WordPress and PayPal integration, prioritize the following features:
Required for secure transactions; many hosts include it free.
PCI Compliance
Ensures your server meets payment card industry security standards.
PHP 8.0+
Newer PHP versions improve performance and plugin compatibility.
Dedicated IP
Helps avoid blacklisting and improves email deliverability for invoices.
Scalability
Ability to handle traffic spikes during sales or promotions.
Avoid shared hosting plans that oversell resources or lack SSH access. Managed WordPress hosting providers like WP Engine, Kinsta, or SiteGround often include e-commerce optimizations such as caching, staging environments, and automatic plugin updates. If you are on a tight budget, ensure your host at least supports PHP 8.1, offers free SSL, and allows you to install plugins like WooCommerce or Easy Digital Downloads without restrictions.
Once these three prerequisites are confirmed—a verified PayPal Business account, a fully HTTPS-enabled site, and a hosting environment suited for e-commerce—you can move forward with selecting and configuring a WordPress plugin for PayPal integration.
Choosing the right plugin for your WordPress and PayPal integration depends entirely on your business model, technical comfort, and sales volume. While PayPal’s standard payment buttons can work for simple needs, dedicated plugins unlock powerful features like inventory management, subscription billing, and detailed reporting. Below is a focused comparison of the three most robust and widely adopted solutions, each serving a distinct purpose in the e-commerce ecosystem.
WooCommerce: The All-in-One E-commerce Solution
WooCommerce is the dominant e-commerce platform for WordPress, powering over 28% of all online stores. Its PayPal integration is deep and native, supporting PayPal Standard, PayPal Express Checkout, and PayPal Payments (which includes credit card processing). This plugin is ideal for selling physical goods, variable products, and subscriptions, as it bundles PayPal with a complete shopping cart, shipping calculator, tax engine, and order management dashboard.
Key Features: Full shopping cart, built-in PayPal onboarding via WooCommerce Payments, support for subscriptions and recurring payments, detailed analytics, and extensive extension ecosystem.
Best For: Store owners selling a mix of physical and digital products, requiring inventory tracking, and needing scalable shipping options.
Limitations: Can be resource-heavy; requires additional plugins for advanced PayPal features like split payments or advanced fraud filters.
WP Simple Pay: Lightweight and Direct
WP Simple Pay is a streamlined plugin designed for one-time and recurring payments without building a full shopping cart. It integrates directly with Stripe and PayPal (via Stripe Connect), allowing you to embed payment forms on any page or post. Unlike WooCommerce, it does not create a product catalog or handle shipping. This makes it exceptionally fast to set up and ideal for services, donations, event registrations, or selling a single digital download.
Key Features: No shopping cart required, embeddable payment forms, support for PayPal Checkout (via Stripe), customizable form fields, and automatic tax calculation.
Best For: Freelancers, nonprofits, and small businesses needing a simple, secure way to accept PayPal payments for services or fixed-price products.
Limitations: No inventory management, no physical shipping support, and limited reporting compared to full e-commerce platforms.
Easy Digital Downloads: Best for Digital Products
Easy Digital Downloads (EDD) is a specialized e-commerce plugin built exclusively for digital goods such as software, ebooks, music, and PDFs. Its PayPal integration supports PayPal Standard and PayPal Pro, with extensions for PayPal Commerce and recurring payments. EDD excels in handling file delivery, license keys, and software updates, while keeping the checkout process minimal and focused.
Key Features: Secure file delivery, software licensing, discount codes, customer management, and integration with PayPal for instant purchase confirmation.
Best For: Creators, developers, and publishers selling downloadable products with complex licensing or versioning needs.
Limitations: Not suitable for physical products; requires paid extensions for advanced PayPal features like subscription management or multi-currency support.
Feature
WooCommerce
WP Simple Pay
Easy Digital Downloads
Primary Use Case
Physical & digital products
Simple payments & services
Digital products only
PayPal Integration Method
Native (Standard, Express, Payments)
Via Stripe (PayPal Checkout)
Native (Standard, Pro, Commerce)
Inventory Management
Yes (full tracking)
No
Yes (file-based)
Shipping Support
Yes (rates, zones, carriers)
No
No
Recurring Payments
Yes (via subscriptions)
Yes (via Stripe)
Yes (via extension)
File Delivery & Licensing
Via extensions
No
Native (core feature)
Setup Complexity
Moderate to high
Low
Moderate
Each plugin excels in its niche. For a full retail store, WooCommerce is the standard. For a quick payment form without cart overhead, WP Simple Pay is unmatched. For digital creators requiring robust file management, Easy Digital Downloads provides the most specialized toolset. Evaluate your product type, checkout complexity, and need for inventory control to select the right foundation for your WordPress and PayPal integration.
Step-by-Step: Integrating PayPal with WooCommerce
Integrating PayPal with WooCommerce provides a reliable payment method for your online store. This walkthrough covers the essential steps, from plugin installation to configuring PayPal Standard, Express Checkout, and the newer PayPal Payments gateway. Follow these instructions to ensure a smooth setup and secure transactions.
Installing and Activating WooCommerce
Before adding any payment gateway, WooCommerce itself must be installed. From your WordPress admin dashboard, navigate to Plugins > Add New. Search for “WooCommerce” in the keyword field. Locate the official WooCommerce plugin by Automattic and click Install Now. After installation, activate the plugin. WooCommerce will launch a setup wizard to guide you through initial configuration, including store location, currency, and shipping settings. If you skip the wizard, you can configure these later under WooCommerce > Settings. Ensure your store uses a supported currency (e.g., USD, EUR, GBP) for PayPal compatibility.
Configuring PayPal Standard Payment Gateway
PayPal Standard is the simplest integration method, redirecting customers to PayPal for payment. To enable it, go to WooCommerce > Settings > Payments. Locate “PayPal Standard” in the list and toggle it to Enabled. Click Set up to open configuration options. Enter your PayPal account email address in the “PayPal Email” field. For testing, enable Enable PayPal Sandbox and use a sandbox account from developer.paypal.com. Key settings include:
Title: Customize the payment method name customers see (e.g., “PayPal”).
Description: Add a brief note like “Pay securely with your PayPal account.”
IPN (Instant Payment Notification): Enable this under Advanced Options and copy the IPN URL provided. Paste it into your PayPal account’s IPN settings under Profile > Selling Tools.
API Credentials: For live transactions, generate API Signature or Certificate credentials from your PayPal account and enter them in the corresponding fields.
After saving, run a test transaction using the sandbox mode. Verify that orders update correctly in WooCommerce.
Enabling PayPal Express Checkout for Faster Payments
PayPal Express Checkout allows customers to pay without leaving your site, reducing cart abandonment. With WooCommerce, this is often bundled with the PayPal Payments plugin, but you can enable it separately if using the legacy PayPal Express Checkout plugin. For a modern setup, install and activate the free WooCommerce PayPal Payments plugin from the WordPress repository. After activation, go to WooCommerce > Settings > PayPal Payments. Click Connect to PayPal to authorize your PayPal account via OAuth. This enables Express Checkout automatically. To customize, set:
Button Locations: Choose where the PayPal button appears (e.g., checkout page, cart, product pages).
Pay Later Messaging: Enable promotional messages for eligible customers.
Advanced Settings: Toggle “Use PayPal Express Checkout” and “Skip final confirmation” to streamline checkout.
For a code-level adjustment to ensure Express Checkout works with custom themes, add this snippet to your child theme’s functions.php file:
add_filter( 'woocommerce_paypal_express_checkout_button_alt', 'custom_express_checkout_button_text' );
function custom_express_checkout_button_text() {
return 'Check Out with PayPal';
}
This replaces the default button text, improving user clarity. After configuration, test Express Checkout by adding a product to the cart and selecting the PayPal button. Confirm the transaction completes without redirecting to a separate PayPal page.
For ongoing best practices, regularly update the PayPal Payments plugin and monitor your IPN history in PayPal to catch any failed notifications. Use the sandbox environment for any future changes before pushing them live.
Integrating PayPal for Donations and Membership Sites
When your website does not sell physical products but relies on recurring contributions or restricted content, a standard e-commerce plugin is unnecessary. Instead, specialized donation and membership tools handle PayPal payments natively, reducing setup friction and ensuring compliance with charity and subscription billing rules. This section covers two leading plugins—GiveWP for donations and MemberPress for memberships—and explains how to tailor PayPal buttons for non-commercial transactions.
Setting Up PayPal Donations with GiveWP
GiveWP is a dedicated WordPress donation plugin that integrates PayPal Standard, PayPal Pro, and PayPal Commerce out of the box. To begin:
Install and activate GiveWP from the WordPress repository.
Navigate to Donations > Settings > Payment Gateways.
Enable PayPal Standard or PayPal Commerce (recommended for modern checkout).
Enter your PayPal business email address for PayPal Standard, or connect your PayPal merchant account via API credentials for PayPal Commerce.
Configure default donation amounts, currency, and receipt emails under Donations > Forms.
Create a new donation form and assign PayPal as the primary gateway.
Supports one-time and recurring donations with PayPal billing agreements.
Automatic tax receipt generation for donors.
Built-in multi-currency handling for international campaigns.
No additional transaction fees beyond PayPal’s standard rates.
After setup, test a small donation using PayPal’s sandbox environment. Verify that the donor is redirected to PayPal, completes payment, and returns to your confirmation page.
Assign each membership level to the PayPal payment method.
Important considerations for recurring PayPal payments:
PayPal requires a business account to process subscriptions.
MemberPress handles proration, upgrade/downgrade logic, and automatic billing retries.
Enable PayPal’s Instant Payment Notification (IPN) in your PayPal account to sync payment statuses with WordPress.
Test with a sandbox business account before going live.
MemberPress also supports PayPal’s billing agreement feature, which lets members authorize future payments without re-entering credentials—critical for retention.
Customizing PayPal Buttons for Donations
Default PayPal buttons may clash with your site’s branding or donation flow. Customization options vary by plugin and approach:
Method
Plugin/Tool
Customization Scope
GiveWP button styling
GiveWP > Settings > Display
Change button text, colors, and size via CSS classes.
MemberPress checkout
MemberPress > Settings > Design
Override button labels (e.g., “Support Us” instead of “Donate”).
Manual HTML button
PayPal Button Manager
Customize button image, shape, and hosted button ID.
Shortcode-based
PayPal Donations plugin
Define button URL, amount, and recurring flag in shortcode.
For advanced control, use a custom function in your theme’s functions.php to filter button output. For example, to change the GiveWP PayPal button label:
Always ensure that customized buttons clearly communicate the action (e.g., “Donate Monthly” vs. “Give Once”) and include proper aria-label attributes for accessibility. Test all variations on different devices and browsers before launching.
Custom PayPal Integration via REST API
For developers seeking full control over payment flows, integrating PayPal’s REST API directly with WordPress offers unparalleled flexibility. This approach allows you to create custom payment forms, handle transaction data programmatically, and process subscriptions or one-time payments without relying on third-party plugins. The REST API is ideal for building bespoke ecommerce solutions, membership sites, or donation platforms where you need to manage every step of the payment lifecycle. Below, we walk through the core components of a custom integration, from obtaining credentials to handling post-payment notifications.
Obtaining PayPal API Credentials
Before writing any code, you must generate API credentials from your PayPal Developer Dashboard. These credentials authenticate your WordPress site with PayPal’s servers. Follow these steps:
Navigate to My Apps & Credentials and click Create App under the REST API apps section.
Name your app (e.g., “My WordPress Store”) and choose either Sandbox (for testing) or Live (for production).
After creation, note the Client ID and Secret. Store these securely in your WordPress configuration file (wp-config.php) using constants like define('PAYPAL_CLIENT_ID', 'your_client_id'); and define('PAYPAL_SECRET', 'your_secret');.
For testing, create a sandbox account under Sandbox > Accounts to simulate buyer and seller transactions. Never expose your live Secret in client-side code.
Building a Custom Payment Form with JavaScript SDK
PayPal’s JavaScript SDK enables you to render a secure, customizable payment button on your WordPress site. Embed the SDK script in your theme’s functions.php or via a custom plugin. Here is a practical code example for a simple payment form that charges a fixed amount:
<!-- Add this to your WordPress page or template -->
<script src="https://www.paypal.com/sdk/js?client-id=¤cy=USD"></script>
<div id="paypal-button-container"></div>
<script>
paypal.Buttons({
createOrder: function(data, actions) {
return actions.order.create({
purchase_units: [{
amount: { value: '19.99' }
}]
});
},
onApprove: function(data, actions) {
return actions.order.capture().then(function(details) {
// Send transaction ID to your server for verification
fetch('/wp-json/custom/v1/paypal-verify', {
method: 'POST',
headers: { 'Content-Type': 'application/json' },
body: JSON.stringify({ orderID: data.orderID })
});
alert('Payment successful! Thank you, ' + details.payer.name.given_name);
});
}
}).render('#paypal-button-container');
</script>
This script dynamically generates a PayPal button. The createOrder function defines the transaction, while onApprove captures the payment and sends the order ID to a custom REST endpoint for server-side verification.
Handling IPN and Webhooks in WordPress
After a payment is completed, PayPal sends notifications to your server via IPN (Instant Payment Notification) or Webhooks. IPN is the legacy system; Webhooks are the modern, RESTful alternative. For a custom integration, set up a WordPress REST API endpoint to receive and verify these notifications.
Create a custom page template or action hook in your plugin that listens for POST requests from PayPal.
Validate the IPN message by sending it back to PayPal’s server (sandbox or live) for verification.
Upon verification, update your WordPress database—e.g., mark an order as completed, update user meta, or trigger an email.
For Webhooks, register an endpoint in your plugin like this:
add_action('rest_api_init', function () {
register_rest_route('custom/v1', '/paypal-webhook', array(
'methods' => 'POST',
'callback' => 'handle_paypal_webhook',
'permission_callback' => '__return_true'
));
});
function handle_paypal_webhook($request) {
$body = $request->get_body();
// Verify webhook signature using PayPal's verification API
// Then process event types like PAYMENT.CAPTURE.COMPLETED
update_post_meta($order_id, '_payment_status', 'completed');
return new WP_REST_Response(array('status' => 'success'), 200);
}
Always verify webhook signatures to prevent fraudulent calls. Use PayPal’s verify-webhook-signature endpoint with your webhook ID, which you can obtain from the Developer Dashboard under the app’s Webhooks section.
By combining these three components—credentials, a custom form with the JavaScript SDK, and server-side notification handling—you gain complete control over your payment integration. This approach is best suited for developers who need to customize every aspect of the checkout experience and manage transaction data directly within WordPress.
Testing Your PayPal Integration
Before activating your payment system on a live site, thorough testing in a safe environment is essential. PayPal provides a Sandbox environment that mimics live transactions without moving real money. This section walks you through setting up test accounts, running transactions, and resolving common issues to ensure your WordPress and PayPal integration works flawlessly.
Setting Up PayPal Sandbox Accounts
To begin testing, you need a PayPal Developer account and at least two Sandbox accounts: one for a merchant (you) and one for a buyer (test customer). Follow these steps:
Once your Sandbox accounts are ready, configure your WordPress plugin (e.g., WooCommerce PayPal Payments) to use Sandbox mode. In plugin settings, toggle Sandbox Mode or enter your Sandbox API credentials. Then perform these test scenarios:
Successful purchase: Add a product to cart, proceed to checkout, and pay using the buyer Sandbox account. Confirm the order appears in your WordPress admin under Orders with a status of Completed or Processing.
Refund simulation: In the Sandbox merchant account, issue a full refund for a test transaction. Verify that your WordPress site updates the order status to Refunded.
Subscription renewal (if applicable): For recurring payments, create a subscription product and test a renewal cycle. Sandbox supports simulated recurring billing.
Currency and locale testing: Change your site’s currency to a non-default option (e.g., EUR) and test that PayPal displays the correct amount and language.
Keep a log of each test, noting the transaction ID, order ID, and any errors displayed.
Debugging IPN and Payment Failures
IPN (Instant Payment Notification) is PayPal’s system for sending transaction updates to your site. If IPN fails, orders may remain pending or incomplete. Use these troubleshooting steps:
Check IPN history: In your Sandbox merchant account, go to Activity > IPN History. Look for failed or missing notifications. A green status means success; red indicates an error.
Verify IPN listener URL: Ensure the URL in your Sandbox account matches the endpoint your plugin uses. For WooCommerce PayPal Payments, the IPN URL is typically https://yourdomain.com/?wc-api=WC_Gateway_Paypal.
Test IPN manually: Use PayPal’s IPN Simulator (available in your Developer Dashboard under Tools) to send a test notification to your site. The simulator shows the raw response.
Enable debug logging: In your WordPress plugin settings, enable debug logging. Look for entries in /wp-content/uploads/wc-logs/ for clues like “IPN validation failed” or “Invalid transaction ID.”
Common causes of failure:
Firewall or security plugin blocking the IPN request (whitelist PayPal IP ranges: 173.0.81.1/24 and 64.4.240.1/24).
SSL certificate misconfiguration (your site must use HTTPS).
Plugin conflicts (temporarily disable other payment plugins to test).
If test transactions consistently fail, double-check your Sandbox API credentials and ensure your WordPress site is publicly accessible (not running on localhost). Once all tests pass, switch your plugin to Live mode and remove Sandbox credentials. Always retest a single live transaction with a small amount before full deployment.
Security and Compliance Best Practices
When integrating PayPal with WordPress, safeguarding customer data and adhering to regulatory standards is non-negotiable. A breach or compliance failure can erode trust, incur fines, and harm your reputation. This section covers essential measures to protect transactions, enforce secure connections, and meet legal obligations like GDPR and PCI DSS. By following these best practices, you create a checkout experience that is both secure and trustworthy.
Enforcing SSL and Secure Checkout
SSL (Secure Sockets Layer) encryption is the foundation of secure online payments. It ensures that data transmitted between your visitor’s browser and your server is encrypted, preventing interception. For any site processing payments via PayPal, an active SSL certificate is mandatory. Here’s how to enforce it effectively:
Install a valid SSL certificate: Use a trusted provider like Let’s Encrypt (free) or a paid certificate from Comodo or DigiCert. Most WordPress hosting providers offer free SSL via AutoSSL or one-click installation.
Enable HTTPS site-wide: In WordPress, go to Settings > General and ensure both WordPress Address and Site Address use “https://”. Use a plugin like Really Simple SSL to automatically redirect HTTP traffic to HTTPS.
Secure your checkout page specifically: Even if your site uses mixed content, force the checkout page to load over HTTPS. Many e-commerce plugins, like WooCommerce, include a “Force secure checkout” option in their settings.
Verify mixed content: After enabling HTTPS, use browser developer tools or online scanners to ensure no scripts, images, or stylesheets load over HTTP, as this can trigger browser warnings and compromise security.
Configuring PayPal Fraud Filters
PayPal provides built-in fraud protection tools that you can activate and fine-tune within your PayPal account. These filters analyze transactions for suspicious patterns, reducing chargebacks and unauthorized payments. To configure them effectively:
Enable PayPal Seller Protection: Ensure your account is set to “Eligible” for seller protection on all eligible transactions (typically intangible goods or services are excluded). This protects you from fraudulent chargebacks.
Activate Fraud Management Filters: In your PayPal account, navigate to Account Settings > Selling Tools > Fraud Management Filters. You can set rules to block transactions from high-risk countries, flag unusual shipping addresses, or require CVV verification.
Use the Address Verification System (AVS): Enable AVS to check that the billing address provided matches the cardholder’s address on file with the issuing bank. Mismatches can be automatically declined or held for review.
Set transaction limits: For high-value items, consider requiring manual review for orders above a certain amount (e.g., $500). This gives you time to verify the buyer’s identity.
Data Privacy and GDPR Considerations
If you serve customers in the European Union or European Economic Area, the General Data Protection Regulation (GDPR) imposes strict rules on how you collect, store, and process personal data. Even if your business is outside the EU, GDPR applies to any site with EU visitors. PayPal acts as a data processor, but you as the site owner are the data controller. Key steps include:
Obtain explicit consent: Before collecting personal data (name, email, address) during checkout, display a clear checkbox for consent to your privacy policy. Pre-ticked boxes are not allowed under GDPR.
Minimize data collection: Only ask for information necessary for the transaction. Avoid storing payment card details; PayPal handles this on its secure servers.
Provide a privacy policy: Clearly explain what data you collect, why, how long you keep it, and that you share it with PayPal for payment processing. Include instructions for users to request data deletion.
Use a GDPR-compliant plugin: Tools like Complianz or Cookiebot can help you manage cookies and consent banners. Ensure your PayPal integration does not set tracking cookies without consent.
Below is a comparison table summarizing key differences between PayPal’s built-in fraud tools and third-party fraud prevention services:
Limited to preset rules (e.g., country blocks, AVS)
Highly customizable, machine learning models
Real-time decisioning
Yes, for basic rules
Yes, with advanced risk scoring
Chargeback protection
Only for eligible PayPal Seller Protection
Often includes chargeback guarantee
Data privacy compliance
PayPal acts as processor; you remain controller
Varies; ensure vendor is GDPR-compliant
By combining SSL enforcement, PayPal’s fraud filters, and GDPR compliance measures, you create a secure and legally sound payment environment. Regularly review your settings and stay updated on PayPal’s policy changes to maintain robust protection for your customers and your business.
Optimizing User Experience and Checkout Flow
Reducing cart abandonment is critical for maximizing revenue from your WordPress and PayPal integration. A frictionless checkout process encourages visitors to complete purchases rather than leaving mid-transaction. Key strategies include leveraging PayPal One Touch for faster repeat purchases, offering guest checkout options to avoid forcing account creation, and ensuring payment buttons are fully responsive on mobile devices. These adjustments directly address common abandonment triggers, such as lengthy forms, slow load times, and poor mobile usability.
Implementing PayPal One Touch for Returning Customers
PayPal One Touch allows returning customers to complete purchases without re-entering login credentials, significantly speeding up the checkout process. To enable this feature in your WordPress and PayPal integration:
Ensure your PayPal account is set to accept One Touch payments (enabled by default for most business accounts).
Use a compatible plugin such as WooCommerce PayPal Payments or Easy Digital Downloads with PayPal Standard. These plugins automatically detect One Touch eligibility and present the option.
Verify that your site uses HTTPS, as PayPal requires secure connections for One Touch.
Test the flow by making a test purchase as a returning customer. You should see a “Pay with PayPal” button that bypasses login screens.
For custom implementations, you can enable One Touch by including the intent parameter set to capture and ensuring the payee object includes your merchant ID. Example JavaScript snippet for a PayPal button:
This code, when integrated into your WordPress theme via a child theme or plugin, enables PayPal One Touch for returning customers automatically.
Designing a Seamless Checkout Page
A well-designed checkout page minimizes distractions and guides users toward completion. Follow these best practices:
Element
Recommendation
Progress indicator
Show clear steps (e.g., Cart → Shipping → Payment → Confirmation) to set expectations.
Guest checkout
Provide a prominent “Continue as Guest” button; avoid forcing account creation until after purchase.
Form fields
Limit to essential fields (name, email, shipping address). Use autofill and inline validation.
Payment options
Display PayPal as a primary option alongside credit cards. Use PayPal’s branded buttons for trust.
Error handling
Show real-time error messages near the relevant field, not as a generic alert at the top.
Additionally, reduce cognitive load by using a single-column layout, sticky order summary, and a prominent “Place Order” button. Avoid unnecessary upsells or cross-sells during checkout, as they can derail the flow.
Testing Mobile Payment Responsiveness
Over 50% of e-commerce traffic comes from mobile devices, making mobile-friendly payment buttons essential. To test and optimize:
Use browser developer tools (e.g., Chrome DevTools) to emulate mobile viewports (320px to 414px width). Verify that PayPal buttons resize and remain tappable without overlapping.
Check that the checkout page loads in under 3 seconds on 4G connections. Compress images and use a caching plugin like WP Rocket.
Test PayPal One Touch on mobile: the button should redirect to the PayPal app or a mobile-optimized web flow, not a desktop-style login page.
Ensure touch targets are at least 48×48 pixels (Google’s recommendation) to prevent accidental taps.
Use PayPal’s responsive button code, which automatically adjusts size based on container width. For custom CSS, add max-width: 100%; height: auto; to button containers.
Conduct real-device testing on iOS Safari and Android Chrome, as emulators may not capture all quirks. A seamless mobile experience reduces cart abandonment and improves conversion rates for your WordPress and PayPal integration.
Troubleshooting Common Integration Issues
Even with careful setup, your WordPress and PayPal integration can encounter problems. Payment failures, missing notifications, or calculation errors frustrate customers and disrupt revenue. This section addresses the most frequent issues and provides clear, actionable solutions to restore smooth transactions.
Instant Payment Notification (IPN) is PayPal’s system for sending transaction updates to your WordPress site. When IPN fails, orders may remain pending, subscriptions won’t activate, and inventory won’t update. Follow these steps to diagnose and resolve IPN issues:
Verify IPN is enabled in your PayPal account: Log in to PayPal, go to Profile > My selling tools > Instant payment notifications, and ensure the IPN URL is set to your site’s IPN listener endpoint (typically https://yoursite.com/?wc-api=WC_Gateway_Paypal for WooCommerce). Re-save the URL.
Check your site’s SSL certificate: PayPal requires a valid HTTPS connection. Ensure your site uses a trusted SSL certificate and that the IPN URL begins with https://.
Test IPN manually: In your PayPal account, use the IPN Simulator tool under Developer > IPN Simulator. Send a test notification to your site’s IPN URL and check the IPN History log for status messages.
Review server logs: If IPN messages are sent but not received, check your WordPress error log and server access log for timeouts, 403 errors, or blocked POST requests. Common culprits include security plugins (e.g., Wordfence, Sucuri) that block PayPal’s IP addresses. Whitelist PayPal’s IP range (ask PayPal support for current ranges).
Disable caching for IPN endpoints: Caching plugins can interfere. Exclude the IPN listener URL from cache rules. For example, in WP Rocket, add /wc-api/WC_Gateway_Paypal to the “Never Cache URLs” list.
Resolving Currency and Tax Calculation Errors
Mismatched currencies or incorrect tax amounts can lead to underpayment or customer disputes. Use this table to match your WordPress settings with PayPal’s expected values:
Set to the same currency as your PayPal account’s primary currency. PayPal will convert if different, but avoid to reduce errors.
WooCommerce > Settings > Tax
Tax calculation method
Enable “Display prices during cart and checkout” and set “Calculate tax based on” to “Customer shipping address” or “Customer billing address” as needed.
PayPal account > Profile > My selling tools
Currency conversion settings
Decide whether PayPal should convert currencies automatically or reject mismatched ones. For seamless integration, use a single currency.
Plugin-specific tax settings
Tax class mapping
If using a tax plugin (e.g., TaxJar), ensure it pushes the correct tax amount to the PayPal transaction. Test with a small order.
If tax amounts differ between your site and PayPal invoice, verify that your WordPress tax calculation includes shipping charges if your store policy requires it. Also, disable any rounding options in your payment gateway plugin that might alter the final amount.
Dealing with Plugin Compatibility Conflicts
WordPress’s extensibility means dozens of plugins can affect your PayPal integration. Conflicts often manifest as blank checkout pages, failed redirects, or incomplete orders. Use this systematic approach to identify and resolve conflicts:
Perform a staged plugin deactivation test: Temporarily deactivate all plugins except your e-commerce solution (e.g., WooCommerce) and the PayPal gateway plugin. Test a transaction. If it works, reactivate plugins one by one, testing after each, until the issue reappears. The last activated plugin is likely the culprit.
Switch to a default theme temporarily: Activate a WordPress default theme (like Twenty Twenty-Four) to rule out theme-specific JavaScript or CSS conflicts that break PayPal buttons or checkout forms.
Check for JavaScript errors: Use your browser’s Developer Tools (F12) and look at the Console tab. Any red error messages related to PayPal or checkout scripts indicate a conflict. Common offenders include custom JavaScript, Google Tag Manager, or chat plugins.
Update all plugins and themes: Outdated code often causes compatibility issues. Ensure your WordPress core, all plugins, and your theme are updated to their latest versions.
Use a compatibility plugin: Consider installing a plugin like “Plugin Organizer” or “Conditional Plugin Loading” to selectively load plugins only on checkout pages, reducing conflict surface area.
If you identify a specific plugin conflict, contact the plugin developer with a detailed bug report, including your WordPress version, PayPal plugin version, and the exact steps to reproduce the issue. In the interim, keep the conflicting plugin deactivated or find an alternative with similar functionality.
Frequently Asked Questions
How do I integrate PayPal with WordPress?
To integrate PayPal with WordPress, first choose a method: use a plugin like WooCommerce for physical/digital products, Easy Digital Downloads for digital items, or a dedicated PayPal plugin such as PayPal Payments. Install and activate the plugin, then connect your PayPal business account via API credentials or OAuth. Configure payment settings, such as currency, sandbox testing, and checkout options. For custom integration, you can add PayPal buttons via shortcodes or embed code. Always test transactions in sandbox mode before going live.
What is the best PayPal plugin for WordPress?
The best plugin depends on your needs: WooCommerce's built-in PayPal Payments is ideal for full ecommerce stores, offering PayPal, Venmo, and credit card payments. Easy Digital Downloads works well for selling digital products. For simple donation or buy-now buttons, use the free PayPal Buttons plugin. WP Simple Pay is great for one-time payments without a cart. Consider factors like transaction fees, recurring payments, and ease of setup. All top plugins support SSL and IPN for secure transactions.
Do I need SSL for PayPal integration?
Yes, SSL (Secure Sockets Layer) is strongly recommended and often required for PayPal integration, especially when handling sensitive customer data like credit card numbers. PayPal's API may enforce HTTPS for IPN notifications and checkout pages. An SSL certificate encrypts data between your site and visitors, building trust. Most hosting providers offer free SSL via Let's Encrypt. Ensure your WordPress site runs on HTTPS before enabling PayPal payments.
How do I test PayPal payments before going live?
Use PayPal's Sandbox environment for testing. Create a sandbox account at developer.paypal.com, then generate test buyer and seller accounts. In your WordPress PayPal plugin, enable sandbox mode and enter the sandbox API credentials. Process test transactions using the sandbox buyer credentials. Check that payments are recorded correctly, IPN messages are received, and order statuses update. Once satisfied, switch to live mode with your real PayPal business account.
What are PayPal IPN and PDT?
IPN (Instant Payment Notification) is a PayPal service that sends real-time notifications to your WordPress site when a transaction occurs. It updates order statuses, triggers emails, and logs payment data. PDT (Payment Data Transfer) is an older method that returns transaction details after a user returns to your site. Most modern plugins use IPN for reliability. To configure IPN, set the notification URL in your PayPal account settings to your site's IPN handler (e.g., yoursite.com/?wc-api=WC_Gateway_PayPal).
Can I accept recurring payments with PayPal on WordPress?
Yes, PayPal supports recurring payments via subscriptions. Use plugins like WooCommerce Subscriptions or Paid Memberships Pro with PayPal Payments. Configure billing cycles, trial periods, and cancellation policies. PayPal's Reference Transactions allow recurring billing without customer re-authorization. Ensure your plugin handles subscription management, upgrades, and failed payment retries. Test thoroughly in sandbox mode to verify recurring charges and webhook notifications.
How do I troubleshoot PayPal integration issues?
Common issues include: IPN not received – check your IPN URL is correct and your server allows outgoing connections. Payment not updating order status – enable logging in your plugin, check PayPal account settings for IPN. SSL errors – ensure your site uses a valid SSL certificate. Currency mismatch – set your store currency to one PayPal supports (e.g., USD, EUR). Use PayPal's IPN simulator at developer.paypal.com to test. Check your WordPress error logs and plugin compatibility.
What are the security best practices for PayPal on WordPress?
Keep WordPress core, themes, and plugins updated. Use strong, unique passwords for your PayPal account and WordPress admin. Enable two-factor authentication on PayPal. Use HTTPS (SSL) site-wide. Regularly audit installed plugins and remove unused ones. Avoid storing full credit card numbers – PayPal handles sensitive data. Use a security plugin like Wordfence. Monitor PayPal account activity for unauthorized transactions. Backup your site regularly.
How to Build a WordPress Marketplace: A Step-by-Step Guide
Introduction: What Is a WordPress Marketplace?
A WordPress marketplace is a multi-vendor ecommerce website built on the WordPress content management system, where multiple independent sellers can register, list products or services, and transact directly with buyers. Unlike a single-vendor store, the marketplace owner acts as a platform operator, facilitating transactions, managing commissions, and curating the vendor ecosystem. WordPress powers over 43% of all websites, and its extensibility through plugins like WooCommerce, Dokan, and WC Vendors makes it a leading choice for creating such platforms. This guide explains how to build a WordPress marketplace step by step, focusing on the core concepts and practical implementation.
Key Characteristics of a Multi-Vendor Platform
Multi-vendor platforms share several defining features that distinguish them from standard ecommerce sites:
Vendor Registration and Management: Sellers can sign up, create profiles, and manage their own storefronts within the marketplace. The admin approves or rejects vendor applications.
Product Listing Control: Vendors add, edit, and categorize their own products or services, including descriptions, images, pricing, and inventory.
Commission and Fee Structures: The marketplace operator sets commission rates on each sale, subscription fees, or listing fees, with automated calculations and payouts.
Order and Payment Splitting: Orders are processed by the marketplace, but payments are split between the vendor and the platform operator, often via gateways like Stripe Connect or PayPal Payouts.
Vendor Dashboard: Each vendor has a dedicated dashboard to track sales, manage orders, view analytics, and communicate with customers.
Rating and Review Systems: Buyers can leave feedback on vendors and products, building trust and accountability within the marketplace.
Common Types of WordPress Marketplaces
WordPress marketplaces can be tailored to various business models. The table below outlines the most common types:
Sellers list tangible items that require inventory management, shipping, and logistics. The marketplace handles checkout and vendor payouts.
Etsy, Amazon Handmade, local artisan marketplaces
Services
Professionals offer services like consulting, freelance work, tutoring, or home repairs. Bookings and scheduling are common features.
Thumbtack, Fiverr, TaskRabbit-style platforms
Each type requires specific plugin configurations for shipping, downloads, or booking systems, but WordPress offers solutions for all.
Advantages of Using WordPress for Marketplace Development
WordPress provides several distinct benefits for building a multi-vendor marketplace:
Cost-Effectiveness: WordPress itself is free and open-source. Premium plugins for multi-vendor functionality typically cost between $49 and $299 per year, significantly less than custom development or SaaS alternatives.
Scalability: With proper hosting and caching, WordPress can handle thousands of vendors and millions of products. Plugins like WooCommerce are optimized for high-traffic ecommerce.
Extensive Plugin Ecosystem: Over 60,000 plugins allow for adding features like payment gateways, shipping calculators, tax automation, and membership systems without coding.
Customizability: Themes and page builders (e.g., Elementor, Beaver Builder) enable full design control. Developers can also write custom PHP, JavaScript, or CSS for unique requirements.
SEO-Friendly: WordPress has built-in SEO capabilities and plugins like Yoast or Rank Math that help vendor pages and product listings rank well in search engines.
Community Support: A large community of developers, forums, and documentation ensures quick problem-solving and continuous improvement.
Ownership and Control: Unlike hosted marketplace platforms (e.g., Shopify Markets), WordPress gives you full data ownership, code access, and freedom to migrate or modify your site.
These advantages make WordPress a practical foundation for anyone asking how to build a WordPress marketplace, from entrepreneurs to enterprise teams.
Your WordPress marketplace’s success hinges on a hosting environment that can scale with growth, manage multiple vendor accounts securely, and deliver fast page loads under heavy traffic. Unlike a standard blog or simple e-commerce store, a marketplace must handle concurrent uploads, database-intensive queries, and real-time inventory updates. Selecting the wrong hosting can lead to slow performance, security vulnerabilities, and costly downtime. This section breaks down the hosting tiers and critical features to prioritize.
Managed WordPress Hosting vs. VPS vs. Dedicated Servers
Each hosting type offers distinct trade-offs between cost, control, and performance. The following table summarizes their suitability for a WordPress marketplace:
Hosting Type
Best For
Key Trade-offs
Managed WordPress Hosting
Startups and growing marketplaces with moderate traffic (up to 100k monthly visits).
Automatic updates, built-in caching, and expert support. Limited server-level access and higher per-month cost for high-traffic plans.
VPS (Virtual Private Server)
Marketplaces needing custom software or server configurations (e.g., custom caching rules, staging environments).
Root access and dedicated resources. Requires technical skill to secure and optimize; no managed WordPress support.
Dedicated Server
Large marketplaces with millions of monthly visitors, high transaction volumes, or strict compliance needs.
Full hardware isolation and maximum performance. High cost, complex maintenance, and longer setup times.
For most new marketplaces, managed WordPress hosting provides the best balance. It offloads server management and security patching, allowing you to focus on vendor onboarding and user experience. As traffic grows, you can migrate to a VPS or dedicated server with a load balancer.
Key Features to Look For: Scalability, Security, and Speed
When evaluating hosting providers, prioritize these three pillars:
Scalability: Look for auto-scaling resources (CPU, RAM) or easy upgrades without downtime. Your hosting should support sudden traffic spikes from promotions or viral listings.
Security: Essential for multi-vendor sites handling payments and user data. Features include free SSL certificates, DDoS protection, web application firewalls (WAF), and automated backups. Ensure the provider offers isolation between vendor accounts to prevent one compromised vendor from affecting others.
Speed: Server-level caching (e.g., Redis, Varnish), CDN integration, and SSD/NVMe storage are non-negotiable. A Content Delivery Network (CDN) like Cloudflare reduces latency for global users. Test with tools like GTmetrix or WebPageTest before committing.
To verify server performance, you can run a simple command from your terminal after provisioning a server. For example, test database query speed with the following MySQL command (replace your_database with your actual database name):
mysql -u root -p -e "SELECT BENCHMARK(1000000, SHA1('test'));" your_database
This benchmarks how many SHA1 operations your server can perform in one million iterations. A result under 0.5 seconds indicates good CPU performance for typical WordPress queries.
Recommended Hosting Providers for Marketplaces
Based on performance, support quality, and marketplace-specific features, consider these providers:
WP Engine: Excellent managed WordPress hosting with built-in caching, staging environments, and a global CDN. Their “Scale” plan supports up to 100k monthly visits and includes 24/7 support. Ideal for marketplaces using WooCommerce or Easy Digital Downloads.
Kinsta: Google Cloud Platform-based hosting with automatic scalability, daily backups, and a custom dashboard. Their plans include free Cloudflare CDN and advanced DDoS protection. Best for high-traffic marketplaces needing zero-downtime scaling.
SiteGround (GrowBig or higher): Affordable managed hosting with free SSL, daily backups, and SG Optimizer plugin for caching. Their support team is WordPress-certified. Suitable for early-stage marketplaces on a budget.
Liquid Web (VPS or Dedicated): Offers fully managed VPS and dedicated servers with 100% uptime SLA. Their “Marketplace” support team can assist with custom configurations for multi-vendor plugins. Recommended for marketplaces exceeding 500k monthly visits.
Always test a provider’s free trial or money-back guarantee with your specific marketplace plugin (e.g., Dokan, WC Vendors) under simulated traffic using tools like Locust or Apache JMeter. This ensures compatibility before you commit to a long-term plan.
Selecting the Best WordPress Theme for Marketplaces
Choosing the right theme is a critical step when learning how to build a WordPress marketplace. Your theme must balance visual appeal with robust functionality, especially for multi-vendor operations. A poorly chosen theme can slow down your site, frustrate vendors, and drive away customers. Focus on responsiveness, compatibility with e-commerce plugins like WooCommerce and Dokan, and built-in support for vendor dashboards and product listings.
Essential Theme Features for Multi-Vendor Sites
Not all WordPress themes are suitable for marketplaces. Look for these core features to ensure smooth operation:
Vendor dashboard support: A dedicated area where vendors can manage products, orders, and earnings without accessing the WordPress admin.
Product listing and search: Advanced filtering, category navigation, and quick product upload forms for vendors.
Responsive design: Fluid layouts that adapt to mobile, tablet, and desktop screens, as over 60% of e-commerce traffic comes from mobile devices.
Speed optimization: Clean code and minimal bloat to keep page load times under three seconds.
Plugin compatibility: Seamless integration with WooCommerce, Dokan, WC Vendors, or Multi-Vendor Marketplace plugins.
User experience (UX) focus: Clear calls-to-action, easy checkout, and intuitive navigation for buyers and sellers.
Customization options: Theme customizer or page builder support for branding without coding.
Top Free and Premium Marketplace Themes
Below is a comparison of leading WordPress marketplace themes. Each has been evaluated for key marketplace requirements.
Theme Name
Type
Key Marketplace Features
Best For
Marketplace
Premium
Vendor dashboard, product submission, commission tracking, RTL support
Large multi-vendor stores with complex needs
Dokan
Free + Premium
Built-in vendor frontend, geolocation, product variation support
Local marketplaces and service-based platforms
Storefront
Free
WooCommerce-native, lightweight, extensible with child themes
Simple marketplaces with custom development
Rey
Premium
AJAX search, vendor store pages, fast performance, Elementor compatible
Free themes like Dokan offer a solid starting point for beginners, but premium themes often include dedicated support and advanced features such as geo-location filters or multi-currency support. Always test a theme’s demo to verify vendor dashboard usability and mobile responsiveness.
How to Customize Your Theme Without Code
Customizing a marketplace theme does not require programming skills. Use these no-code methods to tailor your site:
WordPress Customizer: Access via Appearance > Customize to change colors, fonts, header layouts, and homepage sections. Many marketplace themes extend this with vendor-specific options.
Page builders: Drag-and-drop tools like Elementor or Beaver Builder let you design product pages, vendor storefronts, and landing pages visually. Ensure your theme supports your chosen builder.
Plugin-based styling: Use plugins like Yellow Pencil or CSS Hero to modify fonts, spacing, and button styles without touching code.
Pre-built templates: Many premium themes include demo content that you can import and edit. Replace placeholder images and text with your own branding.
Widget areas: Add custom content to sidebars, footers, or product archive pages using the Widgets screen. For example, display vendor categories or featured products.
By focusing on these customization techniques, you can create a unique marketplace that aligns with your brand while preserving the theme’s performance and compatibility. Always backup your site before making major changes.
Essential WordPress Plugins for Multi-Vendor Functionality
Transforming a standard WordPress site into a fully functional marketplace requires a strategic selection of plugins that handle vendor management, commission tracking, and product management. Without these core components, you cannot effectively onboard sellers, process transactions, or maintain control over your platform. This guide covers the foundational plugins that turn your vision into a working marketplace.
WooCommerce as the Foundation
WooCommerce is the essential base for any WordPress marketplace. It provides the core ecommerce infrastructure, including product catalog management, shopping cart functionality, and secure checkout processes. To prepare WooCommerce for multi-vendor use, you must first install and activate it from the WordPress plugin repository. After activation, configure basic settings such as currency, payment methods, and shipping zones. WooCommerce alone does not support multiple vendors; it serves as the framework upon which multi-vendor plugins operate.
Product management: WooCommerce handles product types, inventory, and variations.
Order processing: It manages customer orders, payments, and fulfillment workflows.
User roles: Default roles include customer, shop manager, and administrator, which are extended by multi-vendor plugins.
For a practical step, after installing WooCommerce, run the setup wizard to create essential pages like Shop, Cart, and Checkout. Verify these pages are published and linked correctly in your site’s navigation.
Top Multi-Vendor Plugins: Dokan, WC Vendors, and Multi-Vendor Marketplace
Three leading plugins extend WooCommerce into a multi-vendor marketplace, each with distinct strengths.
Dokan offers a free version with essential features, while premium tiers unlock advanced commission rules and shipping integrations. WC Vendors provides a free core plugin with paid add-ons for commissions and frontend management. Multi-Vendor Marketplace by Webkul is a lightweight alternative that includes vendor storefronts and order management. For commission tracking, all three plugins allow you to set fixed or percentage-based commissions per vendor, which are automatically calculated during checkout.
To install Dokan, for example, navigate to Plugins > Add New in your WordPress admin, search for “Dokan Lite,” install, and activate. The setup wizard will guide you through vendor registration settings and commission defaults.
Payment Gateway and Shipping Plugin Integration
Payment gateways and shipping plugins are critical for processing transactions and fulfilling orders in a multi-vendor environment. For payments, WooCommerce supports gateways like PayPal, Stripe, and direct bank transfers. However, marketplace-specific needs require plugins that split payments between vendors and the platform owner. Use a plugin such as WooCommerce Stripe Gateway with a marketplace add-on, or consider Dokan’s integrated payment system that supports vendor withdrawals via PayPal, Stripe, or bank transfer.
Stripe Connect: Enables direct payments to vendors with automatic commission deduction.
PayPal Payouts: Allows manual or automated vendor payouts from your marketplace account.
WooCommerce Payments: Offers built-in support for split payments when paired with Dokan or WC Vendors.
For shipping, integrate WooCommerce Shipping or a plugin like Table Rate Shipping to allow vendors to set their own rates. Dokan’s shipping module lets vendors define per-product shipping costs, while WC Vendors uses WooCommerce’s native shipping zones. To set up vendor-specific shipping with Dokan, navigate to WooCommerce > Settings > Shipping and enable per-vendor shipping under Dokan settings. This ensures customers see accurate rates based on the vendor’s location and product weight.
A practical code example for adding a custom commission rate via a filter in your theme’s functions.php file:
add_filter('dokan_commission_type', 'custom_commission_type');
function custom_commission_type($type) {
return 'percentage'; // Options: 'flat', 'percentage', 'combine'
}
add_filter('dokan_commission_percentage', 'custom_commission_percentage');
function custom_commission_percentage($percentage) {
return 15; // Sets a 15% commission for all vendors
}
This code overrides the default commission settings to apply a flat 15% commission across all vendors, ensuring consistent revenue tracking.
Setting Up Vendor Registration and Dashboards
Once your WordPress marketplace foundation is ready, the next critical step is enabling vendors to join and manage their own storefronts. A streamlined registration process and intuitive dashboard are essential for attracting and retaining sellers. This section explains how to configure vendor sign-up, approval workflows, and dedicated dashboards using a plugin like Dokan or WC Vendors.
Creating a Seamless Vendor Onboarding Process
Vendor onboarding should feel effortless to encourage sign-ups. Start by installing a multivendor plugin that integrates with WooCommerce. Most plugins offer a dedicated registration form that collects key information.
To set up a basic onboarding flow:
Enable vendor registration in your plugin settings, typically under a “Vendors” or “Dashboard” tab.
Customize the registration form to include essential fields: store name, description, payment email, and a shop banner upload.
Choose an approval method: automatic approval (instant access) or manual approval (you review and activate each vendor). Manual approval is recommended for quality control.
Add a terms of service checkbox to ensure vendors agree to your marketplace rules before joining.
After registration, send an automated welcome email with login credentials and a link to their dashboard. This reduces confusion and sets clear expectations.
Configuring Vendor Dashboard Features and Permissions
The vendor dashboard is where sellers manage their products, orders, and earnings. Most plugins provide a pre-built dashboard, but you can tailor it to your marketplace needs.
View and update order statuses (e.g., processing, shipped)
Vendor only
Earnings report
Display net sales, commissions, and pending payouts
Read-only
Store settings
Update shop logo, banner, shipping zones, and payment info
Vendor only
Coupon creation
Set store-specific discount codes (optional)
Admin toggle
To limit vendor access, disable features like site-wide settings or user management. For example, in Dokan, go to Dokan > Settings > Selling Options and uncheck “Vendors can edit site-wide coupons.” This keeps control centralized while empowering vendors within their store.
Managing Vendor Commissions and Payouts
Commission structure defines how you earn revenue. Most plugins support flat rate, percentage, or category-based commissions. Configure this under the plugin’s commission settings.
Steps to set up commissions:
Choose a default commission type (e.g., 10% of each sale).
Override per vendor if needed: some plugins allow custom rates for high-volume sellers.
Set commission on product categories to differentiate margins (e.g., 15% for electronics, 5% for digital goods).
Payouts can be manual or automated via PayPal, Stripe, or bank transfer. For manual payouts, vendors request withdrawals from their dashboard, and you process them after review. To automate, integrate a payment gateway that supports split payments—this sends the vendor’s share directly to their account and your commission to yours. Always test a few transactions to ensure calculations are correct before going live.
When you set out to learn how to build a WordPress marketplace, the design of your product listings and categories becomes the backbone of user experience and vendor success. A well-structured system helps buyers find what they need quickly, while giving vendors the tools to showcase their items effectively. This section covers the essential steps to create intuitive navigation and high-converting product pages.
A logical category hierarchy prevents clutter and guides customers to the right products. Start by defining broad top-level categories that represent your marketplace’s main product types. For example, if you run a handmade goods marketplace, top-level categories might be “Home Decor,” “Jewelry,” and “Clothing.” Under each, create subcategories—such as “Wall Art,” “Necklaces,” and “T-Shirts”—to narrow choices further. Use a maximum of three levels to avoid overwhelming users.
When structuring your hierarchy, consider these best practices:
Limit top-level categories to 5–8 main groups for clarity.
Name categories with simple, search-friendly terms (e.g., “Digital Art” instead of “Artistic Digital Creations”).
Assign each product to a single primary category to prevent duplication.
Use plugins like Product Categories for WooCommerce or YITH WooCommerce Category Accordion to display categories as expandable menus or dropdowns.
To implement this in WordPress, you can add categories via wp-admin > Products > Categories. For a custom taxonomy in your theme’s functions.php, use this example:
This code registers a hierarchical taxonomy that behaves like standard WordPress categories, giving you full control over the structure.
Enabling Vendors to Add and Manage Products
In a multi-vendor marketplace, vendors must be able to independently add, edit, and organize their own products. Plugins like Dokan or WC Vendors provide vendor dashboards where they can create listings, set prices, upload images, and assign categories. To streamline the process, configure the following for each vendor:
Feature
Configuration Step
Custom attributes
Enable product attributes (e.g., size, color, weight) in WooCommerce settings. Vendors can then add values per product.
Category assignment
Allow vendors to select from your predefined hierarchy, but restrict them from creating new top-level categories to maintain consistency.
Media uploads
Set maximum image dimensions and file size limits in the vendor dashboard settings to ensure quality and performance.
Inventory management
Enable stock tracking per product and let vendors set low-stock thresholds.
Vendors can add custom attributes by navigating to their dashboard’s “Add Product” page, selecting “Attributes,” and entering name/value pairs (e.g., “Material: Cotton”). This flexibility allows each vendor to differentiate their listings without breaking the category structure.
Optimizing Product Pages for Conversions
Once your categories and vendor tools are in place, focus on converting visitors into buyers. Optimize each product page with these elements:
High-quality images: Use multiple angles and a zoom feature. Plugins like WooCommerce Additional Variation Images can help.
Clear calls-to-action (CTAs): Place “Add to Cart” buttons prominently, using contrasting colors and action-oriented text like “Buy Now.”
Social proof: Display reviews, ratings, and “verified purchase” badges. Integrate WooCommerce Product Reviews Pro for advanced features.
Mobile responsiveness: Test product pages on mobile devices to ensure buttons, images, and text load correctly.
Trust signals: Include return policy, shipping details, and secure payment icons near the CTA.
To further boost conversions, use a plugin like Product Add-Ons to let customers customize items (e.g., engraving text or selecting gift wrap) directly on the product page. This personalization can increase average order value and satisfaction.
How to Build a WordPress Marketplace: Implementing Secure Payment and Commission Systems
Building a successful WordPress marketplace demands a robust payment infrastructure that handles revenue sharing between you and your vendors. This step-by-step guide focuses on the critical components: selecting payment gateways for split payments, automating commission calculations and withdrawals, and ensuring PCI compliance and data security. A secure, automated system builds trust and keeps your marketplace operational without manual overhead.
Not all payment gateways support automated split payments. For a marketplace, you need a gateway that can route funds to multiple recipients in a single transaction. Below is a comparison of top options for WordPress.
PayPal for WooCommerce, YITH WooCommerce Split Payment
Mollie
Yes, via payment links
Manual or custom code
Mollie Payments for WooCommerce
Square
Limited (requires custom development)
Manual reconciliation
WooCommerce Square
Stripe Connect is the most seamless option for WordPress marketplaces. It allows you to set a platform fee (your commission) that Stripe automatically deducts from each vendor’s earnings before depositing the remainder into their connected account. Other gateways like PayPal require more manual setup or custom code. Always test the split payment flow in a sandbox environment before going live.
Automating Commission Calculations and Withdrawals
Manual commission handling is error-prone and unsustainable. Automate this process using dedicated marketplace plugins. Key steps include:
Define commission rates: Set global percentages (e.g., 15% on all sales) or per-vendor rates (e.g., 10% for premium vendors, 20% for basic).
Schedule withdrawals: Allow vendors to request withdrawals manually or set automatic payouts weekly, bi-weekly, or monthly. Use plugins like Dokan or WC Vendors to enable this.
Calculate net earnings: The plugin should deduct your commission, gateway fees, and any refunds before showing the vendor’s available balance.
Integrate with accounting tools: Export transaction logs to QuickBooks or Xero for tax reporting.
For example, with Dokan, you can configure commission types (percentage, fixed, or combined) and set minimum withdrawal thresholds (e.g., $50). The plugin then automatically updates vendor balances after each sale and processes payouts via Stripe Connect or PayPal.
Security is non-negotiable for a marketplace handling sensitive financial data. Follow these best practices to maintain PCI DSS compliance and protect user information.
Use a PCI-compliant gateway: Stripe, PayPal, and Square are Level 1 PCI DSS compliant. They handle credit card data directly, so you never store numbers on your server.
Enable SSL/TLS encryption: Install an SSL certificate (e.g., Let’s Encrypt free) and force HTTPS across your entire site. This encrypts data in transit.
Implement tokenization: Replace card details with tokens from the gateway. Store only tokens in your WordPress database.
Regular security audits: Use plugins like Wordfence or Sucuri to scan for vulnerabilities. Update WordPress, themes, and plugins promptly.
Restrict admin access: Use two-factor authentication (2FA) for all admin accounts. Limit user permissions with roles like “Shop Manager” for vendors.
Data minimization: Only collect necessary information (name, email, payment method). Avoid storing CVV codes or full bank account numbers.
By integrating these measures, you reduce the risk of data breaches and build trust with vendors and customers. Remember, PCI compliance is an ongoing process—review your setup annually or after any major plugin update. A secure, automated payment system is the backbone of any scalable WordPress marketplace.
Optimizing Your Marketplace for Search Engines
Search engine optimization (SEO) for a multi-vendor marketplace presents unique challenges and opportunities. Unlike a standard e-commerce site, you must balance the visibility of individual vendor storefronts with the overall authority of your platform. A focused strategy ensures that both your marketplace and its vendors rank well, while avoiding common pitfalls like duplicate content penalties. Below are actionable SEO tactics tailored to multi-vendor WordPress marketplaces.
SEO-Friendly URL Structures for Vendors and Products
Clear, hierarchical URLs improve crawlability and user trust. For vendors, use a consistent slug pattern such as /vendor/vendor-name/ to group their listings under a dedicated subdirectory. For products, include a category path and a unique identifier, for example /shop/category/product-name/. Avoid dynamic parameters like ?vendor=123 as they dilute link equity. Implement the following best practices:
Vendor URLs: Keep short, include the vendor’s business name (e.g., /vendor/handmade-crafts/).
Product URLs: Use hyphens, not underscores, and avoid dates or version numbers.
Canonical tags: Add rel="canonical" on product pages that are accessible via multiple URLs (e.g., from a vendor page and a main category).
Hierarchy: Structure as marketplace.com/vendor-name/product-name/ to pass authority from vendor to product pages.
Use a plugin like Yoast SEO or Rank Math to enforce these patterns and generate XML sitemaps that include vendor-specific pages.
Using Schema Markup for Marketplace Reviews and Ratings
Schema markup helps search engines display rich snippets, such as star ratings and review counts, directly in search results. For a marketplace, implement the following structured data types:
Schema Type
Purpose
Example Usage
Product
Adds price, availability, and aggregate rating to product pages.
Use a schema plugin like Schema Pro or WPSSO Core to automate markup. Ensure that each vendor gets a unique LocalBusiness schema to avoid confusion across multiple sellers. Test your markup with Google’s Rich Results Test tool.
Tips for Managing Duplicate Content Across Vendors
Duplicate content is common when multiple vendors sell identical products or use similar descriptions. This can dilute search rankings. Mitigate it with these strategies:
Unique product descriptions: Require vendors to write original content, or use a plugin to auto-generate unique meta descriptions based on vendor name and attributes.
Canonical tags: Set the canonical URL to a single authoritative product page (e.g., the vendor with the highest rating) and use noindex on duplicate vendor-specific variations.
Parameter handling: In Google Search Console, set URL parameters like ?sort= or ?vendor= to “No URL” to prevent indexing of filtered views.
Vendor storefronts: Add a unique introductory paragraph to each vendor page, and avoid copying product descriptions directly from manufacturer sites.
Use of rel="nofollow": On vendor product links that lead to the same product sold by another vendor, apply nofollow to prevent link equity from splitting.
Regularly audit your marketplace using tools like Screaming Frog or Siteliner to identify duplicate titles, meta descriptions, and content blocks. By proactively managing these issues, you preserve search engine trust and improve the ranking potential of every vendor in your marketplace.
Testing and Launching Your Marketplace
Before opening your WordPress marketplace to the public, rigorous testing is non-negotiable. A single broken checkout flow or unresponsive vendor dashboard can erode trust instantly. This phase validates that every component—from vendor registration to payment settlement—works flawlessly under real-world conditions.
Never test on your live site. Use a staging environment that mirrors your production server. Most managed WordPress hosts (e.g., WP Engine, Flywheel) offer one-click staging. If you use a VPS, create a subdomain and clone your site manually.
Copy all files and database from production to a subdomain like staging.yourmarketplace.com.
Update the database URL using a tool like Better Search Replace or WP-CLI: wp search-replace 'https://yourmarketplace.com' 'https://staging.yourmarketplace.com' --skip-columns=guid
Disable caching plugins and payment gateways to avoid false positives during testing.
Use a test payment gateway (e.g., Stripe test mode, PayPal sandbox) to simulate transactions.
Conducting User Acceptance Testing with Mock Vendors
User acceptance testing (UAT) ensures the marketplace meets real user needs. Recruit 3–5 volunteers who match your target vendor profile (e.g., artists, service providers). Provide them with test accounts and a structured checklist.
Key workflows to test:
Vendor Workflow
Test Criteria
Registration & onboarding
Complete sign-up, verify email, upload store logo, set shipping zones
Product listing
Add a product with images, description, price, and variations; save as draft and publish
Order management
View incoming order, update status to “shipped,” mark as complete
Withdrawal requests
Initiate a withdrawal, verify it appears in admin panel, confirm settlement
Ask mock vendors to report any broken links, confusing labels, or missing fields. Document every bug in a shared spreadsheet and prioritize fixes before launch.
Launch Checklist: Performance, Security, and Legal Considerations
Before flipping the switch, verify these critical areas:
Performance: Run a speed test with tools like GTmetrix. Ensure page load time is under 3 seconds. Optimize images, enable caching, and use a CDN if your marketplace has global reach.
Security: Install a security plugin (e.g., Wordfence) and enable two-factor authentication for admin accounts. Run a malware scan and verify SSL certificate is active.
Legal: Display a privacy policy, terms of service, and cookie consent banner. Confirm that vendor agreements clearly outline commission rates, refund policies, and dispute resolution steps.
Payment testing: Process a full purchase cycle as a buyer, from adding to cart to receiving a receipt. As a vendor, confirm you see the commission deduction and can request a withdrawal.
Backup: Create a full backup of the staging site and store it off-server. Schedule automated daily backups for the live site.
Once all items pass, migrate the staging site to production using the same database URL replacement method. Monitor error logs closely for the first 48 hours and have a rollback plan ready.
Growing and Maintaining Your WordPress Marketplace Post-Launch
Launching your WordPress marketplace is a significant milestone, but sustained growth requires a deliberate post-launch strategy. To attract both vendors and buyers, and to ensure your platform remains secure and reliable, you must focus on continuous marketing, community building, and diligent maintenance. This phase transforms your site from a functional project into a thriving ecosystem.
Marketing Your Marketplace to Recruit Vendors and Buyers
Effective marketing for a marketplace is a two-sided effort: you need to attract high-quality vendors to list products and a steady stream of buyers to purchase them. Begin by identifying your niche’s key channels—such as industry forums, social media groups, or email newsletters—and tailor your outreach accordingly. For vendors, emphasize the value of your platform: lower fees, targeted audience, or unique features. Offer early adopter incentives, such as reduced commission rates for the first three months or featured listings. For buyers, run targeted ads on Google and social media using keywords related to your marketplace’s offerings. Create content that showcases the variety and quality of products available, such as “Top 10 New Arrivals” blog posts or video unboxings. Consider implementing a referral program: reward vendors who bring in other vendors with a commission bonus, and give buyers a discount for each friend they refer. Track your marketing ROI using tools like Google Analytics and adjust your budget based on which channels yield the highest conversion rates.
Building a Community with Reviews and Support Systems
A thriving marketplace relies on trust, which is built through transparent reviews and responsive support. Implement a robust review system where buyers can rate products and leave detailed feedback. To ensure authenticity, require that reviews come from verified purchases and allow vendors to respond publicly to criticism. For support, create a centralized help center with FAQs, guides, and video tutorials covering common issues like account setup, payment disputes, and shipping. Use a ticketing system (e.g., WP Support Plus or Awesome Support) to manage vendor and buyer inquiries efficiently. Establish clear dispute resolution protocols: for example, if a buyer claims an item is damaged, require photographic evidence and allow both parties to submit statements before you mediate. Consider a community forum where users can share tips, ask questions, and connect—this fosters loyalty and reduces support tickets. Reward active community members with badges or exclusive discounts.
Regular Maintenance: Updates, Backups, and Security Monitoring
Neglecting maintenance can lead to security vulnerabilities, downtime, and lost revenue. Schedule weekly updates for your WordPress core, all plugins (especially e-commerce and marketplace-specific ones like Dokan or WC Vendors), and your theme. Before updating, always test changes on a staging site to avoid breaking live functionality. Implement automated daily backups using a plugin like UpdraftPlus or a service like Jetpack; store backups in a remote location (e.g., Google Drive or Amazon S3) and retain at least 30 days of versions. For security, install a firewall plugin (e.g., Wordfence or Sucuri) and enforce strong passwords for all user roles. Monitor your site for suspicious activity, such as multiple failed login attempts or unusual file changes, and set up alerts to notify you immediately. Additionally, review your marketplace’s payment gateway and SSL certificate annually to ensure compliance with PCI standards. A simple maintenance checklist can help:
Weekly: Update plugins and themes (staging first).
Daily: Run automated backups and check for uptime.
Monthly: Scan for malware, review user roles, and audit logs.
Quarterly: Test dispute resolution workflows and update privacy policies.
By consistently marketing, building community, and maintaining security, you position your WordPress marketplace for long-term success. Each action reinforces the others: a secure, well-supported platform attracts more vendors and buyers, which in turn fuels growth and community engagement.
Frequently Asked Questions
What is a WordPress marketplace?
A WordPress marketplace is a multi-vendor eCommerce site where multiple sellers can list products or services, and customers can purchase them. It is built using WordPress and specialized plugins like Dokan, WC Vendors, or Easy Digital Downloads (for digital goods). The site owner typically manages commissions, vendor approvals, and overall platform rules. This model powers sites like theme stores, handmade goods platforms, or service directories.
Which plugins are best for building a WordPress marketplace?
Popular plugins include Dokan (feature-rich, free and pro), WC Vendors (lightweight, free and pro), and Easy Digital Downloads (for digital marketplaces). Dokan offers vendor storefronts, commission management, and withdrawal systems. WC Vendors provides a simpler setup with vendor dashboard and commission options. For digital products, EDD with its marketplace extensions is ideal. Each plugin integrates with WooCommerce for payment and product management.
Do I need coding skills to build a WordPress marketplace?
No, you can build a basic marketplace without coding by using pre-built plugins and themes. However, some technical knowledge helps with installation, configuration, and customization. You should be comfortable with WordPress admin, installing plugins, and choosing a compatible theme. For advanced features like custom vendor fields or complex commission rules, basic PHP/CSS or hiring a developer may be needed.
How do I handle payments in a WordPress marketplace?
Payments are handled through payment gateways integrated with WooCommerce or your marketplace plugin. Common options include PayPal, Stripe, and bank transfers. Marketplace plugins often support split payments, where the customer pays the full amount, and the platform automatically sends the vendor’s share minus commission. Some plugins also allow vendors to set up their own gateways. Always ensure PCI compliance and secure transactions.
Can I use WooCommerce for a marketplace?
WooCommerce alone does not support multi-vendor functionality. You need a multi-vendor plugin like Dokan, WC Vendors, or Product Vendors (by WooCommerce) to add vendor management, commissions, and storefronts. WooCommerce provides the base product, cart, and checkout system. The marketplace plugin adds vendor roles, dashboards, and commission splitting. Together they form a complete marketplace solution.
What are the best themes for a WordPress marketplace?
Marketplace-specific themes like Dokan's Storefront, WC Vendors Marketplace, or MultiVendorX themes are optimized for vendor storefronts and product listings. General multipurpose themes like Astra or GeneratePress also work well when paired with a marketplace plugin. Look for themes that support page builders (Elementor, Beaver Builder), have vendor dashboard compatibility, and offer responsive design for mobile users.
How do I set vendor commissions?
Vendor commissions can be set globally for all vendors or individually per vendor using your marketplace plugin. For example, in Dokan, you set a default commission percentage in settings, then override for specific vendors. Commissions can be flat rate, percentage, or tiered based on sales volume. The system automatically calculates and deducts commission from each sale. You can also set withdrawal minimums and schedules.
What are common challenges when building a marketplace?
Common challenges include vendor onboarding and verification, handling disputes, managing product quality, scaling performance, and ensuring legal compliance (taxes, terms of service). Technical issues like payment split failures, theme conflicts, and slow loading times can arise. To mitigate, use reliable plugins, optimize hosting, implement clear vendor policies, and test thoroughly. Regular updates and backups are essential.
The Ultimate Guide to WordPress and Mailchimp Integration: Setup, Optimization, and Best Practices
Introduction: Why Integrate WordPress with Mailchimp
Connecting your WordPress site with Mailchimp transforms a standard website into a powerful marketing engine. This integration bridges the gap between content creation and audience engagement, allowing you to capture leads directly from your site and nurture them with targeted communications. Without integration, you risk losing valuable visitor data and manually managing subscriber lists, which is inefficient and prone to error. By linking these two platforms, you create a seamless flow of information that automates list building, enhances campaign relevance, and ultimately drives higher conversion rates.
The Power of Email Marketing for WordPress Sites
Email marketing remains one of the most effective channels for returning on investment, and WordPress is the ideal platform to fuel it. When you integrate Mailchimp, every blog post, landing page, or product update becomes a potential lead generation tool. Unlike social media algorithms that limit organic reach, email delivers your message directly to a subscriber’s inbox. Key benefits include:
Direct communication: Build a owned audience that doesn’t depend on third-party platforms.
Automated list building: Sync new subscribers from forms, comments, or purchases instantly.
Behavioral triggers: Send emails based on user actions, such as abandoned carts or content downloads.
Measurable ROI: Track open rates, click-throughs, and conversions tied directly to your WordPress content.
For WordPress site owners, this integration turns passive visitors into active participants in your brand’s story.
Key Advantages of Mailchimp Integration
Integrating Mailchimp with WordPress offers distinct advantages that go beyond basic email collection. These features streamline operations and improve campaign performance:
New subscribers are added to designated Mailchimp audiences without manual data entry.
Targeted segmentation
Use WordPress user roles, purchase history, or content preferences to create precise audience segments.
Personalized campaigns
Merge tags pull WordPress data (e.g., name, last post read) to customize email content.
Enhanced analytics
View which WordPress pages drive the most sign-ups and adjust your content strategy accordingly.
Time savings
Eliminate the need to export/import CSV files or manage duplicate entries.
These advantages ensure your marketing efforts are both efficient and data-driven, allowing you to focus on creating compelling content rather than administrative tasks.
Common Use Cases for WordPress and Mailchimp
The integration serves a wide range of scenarios, from simple blogs to complex e-commerce stores. Below are the most common applications:
Blog subscription: Offer readers a way to receive new posts via email, with automatic delivery through Mailchimp’s RSS-to-email campaigns.
Lead magnet delivery: Capture email addresses in exchange for downloadable resources (e.g., eBooks, checklists) and automatically send the file via Mailchimp automation.
E-commerce follow-ups: For WooCommerce stores, trigger abandoned cart emails or post-purchase thank-you messages using Mailchimp’s integration with WordPress plugins.
Event registration: Sync sign-ups from WordPress event plugins to Mailchimp for attendee communications and reminders.
Membership sites: Segment subscribers based on membership level and send exclusive content or renewal notifications.
Each use case leverages the integration to reduce manual work while increasing relevance for the subscriber, leading to better engagement and long-term loyalty.
Before you begin connecting your website to your email marketing platform, it is essential to have the right foundations in place. A successful WordPress and Mailchimp integration depends on three core components: a properly configured WordPress site, a fully set up Mailchimp account, and a clear understanding of how API keys and audience settings work. Skipping any of these steps can lead to broken forms, lost subscriber data, or compliance issues. Below, we walk through exactly what you need before you start.
Required WordPress Setup and Permissions
Your WordPress site must be self-hosted (WordPress.org), not the free WordPress.com version, because the latter restricts plugin installations and API access. You will need administrator-level permissions to install plugins, modify theme files, and manage user roles. If you are working on a client site, ensure you have an admin account or that the site owner grants you these privileges. Additionally, verify that your WordPress installation meets these minimum requirements:
PHP version 7.4 or higher – older versions may cause compatibility issues with Mailchimp plugins.
HTTPS enabled – Mailchimp requires secure connections for API calls and form submissions.
Plugin installation capability – you must be able to add and activate plugins from the WordPress repository or upload a .zip file.
FTP or file manager access – helpful for troubleshooting or manual code edits if needed.
If you plan to use a custom integration (rather than a plugin), you will also need to edit your theme’s functions.php file or create a child theme. Always back up your site before making any code changes.
Creating and Configuring Your Mailchimp Account
You need a Mailchimp account with at least a free plan. Start by signing up at mailchimp.com and completing the account setup wizard. During this process, you will be asked to provide your business name, contact information, and physical address—this is required for CAN-SPAM compliance. Once your account is active, configure the following settings before attempting any integration:
Set your default audience – Mailchimp calls its subscriber lists “audiences.” Create one audience (or use the default) that will receive all signups from your WordPress site. Name it clearly, e.g., “Website Subscribers.”
Enable double opt-in or single opt-in – Double opt-in sends a confirmation email to new subscribers; single opt-in adds them immediately. Choose based on your list quality and local regulations.
Add required merge fields – At minimum, include fields for first name, last name, and email. You can add custom fields (e.g., “Interests”) later, but keep it simple initially.
Set audience name and defaults – Under Audience > Settings, ensure the “From name,” “From email address,” and “Subject” are filled in. These appear in your welcome emails.
Setting
Recommended Value
Reason
Audience name
Website Subscribers
Clear identification in reports
Double opt-in
Enabled (recommended)
Reduces spam signups
Default from email
Your domain email
Improves deliverability
Understanding Mailchimp API Keys and Audience Settings
The API key is the secure token that allows your WordPress site to communicate with Mailchimp. To generate one, log into your Mailchimp account, go to Account > Extras > API Keys, and click “Create A Key.” Copy the key immediately—it will be shown only once. Treat this key like a password; never share it publicly or commit it to version control. You will also need your audience ID (sometimes called “list ID”), which you can find under Audience > Settings > Audience name and defaults. Look for the “Audience ID” field. A practical code example for verifying your Mailchimp API connection using PHP (if you are writing a custom integration) is:
Note that the data center (e.g., “us1”) is embedded in your API key after the dash. Also, ensure your audience settings match the fields you plan to sync from WordPress. Mismatched merge tags are a common cause of integration failures. Always test with a single email address before going live.
Method 1: Using Official Mailchimp Plugin for WordPress
Integrating WordPress and Mailchimp is one of the most effective ways to grow your email list and automate marketing workflows. The official Mailchimp for WordPress plugin provides a free, reliable, and user-friendly solution for syncing your website with Mailchimp’s powerful email platform. This method is ideal for beginners and advanced users alike, offering seamless form creation, audience management, and automated data transfer without requiring custom code. Below, we walk through the essential steps to set up, configure, and optimize this integration.
Installing and Activating the Plugin
Begin by accessing your WordPress admin dashboard. Navigate to Plugins > Add New and search for “Mailchimp for WordPress” (also known as MC4WP). Look for the plugin developed by ibericode, which is the official and most trusted option with over 2 million active installations. Click Install Now, then Activate the plugin. Once activated, you will see a new menu item labeled “Mailchimp for WP” in your WordPress sidebar. This dashboard centralizes all integration settings, including form creation, audience sync, and advanced configuration. Ensure your WordPress version is up-to-date to avoid compatibility issues.
To link your WordPress site with Mailchimp, you must generate and enter an API key. Follow these steps:
Log in to your Mailchimp account and navigate to Account > Extras > API Keys.
Click Create a Key and copy the generated alphanumeric string (e.g., us1a2b3c4d5e6f7g8h9i0j).
Return to WordPress, go to Mailchimp for WP > Mailchimp, and paste the API key into the designated field.
Click Save Changes. If successful, the plugin will display your connected Mailchimp audience list(s) and their subscriber counts.
Below is a comparison table to help you understand the differences between the free Mailchimp for WordPress plugin and a premium alternative like Mailchimp’s WooCommerce integration:
This table clarifies that the free plugin is sufficient for most standard list-building needs, while premium options add deeper e-commerce functionality.
Building and Customizing Signup Forms
With your account connected, you can now create and customize signup forms. Go to Mailchimp for WP > Forms. The plugin provides a visual form builder where you can drag and drop fields such as email address, first name, last name, and custom merge tags. To add a new form, click Add New Form and select your target Mailchimp audience. Customize the form’s appearance using the built-in CSS editor or by adding custom styles to your theme. Key settings include:
Double opt-in: Enable this to require new subscribers to confirm their email, improving list quality.
Send welcome email: Automatically trigger a Mailchimp welcome message upon subscription.
Redirect after signup: Direct users to a thank-you page after they subscribe.
Once satisfied, copy the generated shortcode (e.g., [mc4wp_form id="123"]) and paste it into any WordPress page, post, or widget area to display the form. Test the form by submitting a test email address to ensure data flows correctly into your Mailchimp audience. Regularly review your form’s performance under Mailchimp for WP > Statistics to track subscription rates and optimize conversion.
Method 2: Integration via Third-Party Form Builder Plugins
When you need more control over form design, conditional logic, or multi-step fields, third-party form builder plugins offer a flexible path for your WordPress and Mailchimp integration. These tools connect directly to Mailchimp’s API, allowing you to map form fields to your audience fields, set up tags, and manage subscriptions without writing custom code. Below, we cover three widely used options: WPForms, Gravity Forms, and Elementor Pro.
Setting Up Mailchimp with WPForms
WPForms provides a dedicated Mailchimp addon that simplifies the connection process. After installing the plugin, follow these steps:
Navigate to WPForms > Settings > Integrations and click on Mailchimp.
Enter your Mailchimp API key (found in your Mailchimp account under Account > Extras > API Keys).
Save the settings; WPForms will verify the connection.
Create or edit a form, then open the Marketing tab in the form builder.
Select Mailchimp, choose your audience list, and map fields like email, first name, and last name to corresponding Mailchimp merge tags.
Enable double opt-in or add tags and groups as needed, then publish the form.
WPForms also supports conditional logic for Mailchimp subscriptions. For example, you can show an opt-in checkbox only if a user selects a specific option from a dropdown, ensuring you collect consent contextually.
Gravity Forms offers a premium Mailchimp add-on that grants deep integration capabilities. After installing the add-on, connect your Mailchimp account via Forms > Settings > Mailchimp. When building a form, add a Mailchimp feed under Settings > Mailchimp within the form editor. Key features include:
Field mapping: Assign standard fields (email, name) and custom merge tags.
Conditional logic: Trigger subscription only when specific form fields meet criteria (e.g., if a user checks “Subscribe to newsletter”).
Interest groups: Assign subscribers to Mailchimp groups based on form selections, ideal for segmenting audiences by topic preferences.
Double opt-in: Enable or disable confirmation emails per feed.
For advanced users, Gravity Forms allows you to send custom data to Mailchimp via hooks. Here is a practical example of modifying a subscription’s tags using the gform_mailchimp_field_value filter:
add_filter( 'gform_mailchimp_field_value', 'custom_mailchimp_tags', 10, 4 );
function custom_mailchimp_tags( $value, $form_id, $field_id, $entry ) {
if ( $form_id == 10 && $field_id == 5 ) {
$value = 'VIP'; // Assigns "VIP" tag if field ID 5 has a value
}
return $value;
}
This code snippet, placed in your theme’s functions.php file, dynamically assigns a “VIP” tag to subscribers based on a specific field entry.
Integrating Mailchimp with Elementor Pro Forms
Elementor Pro includes a native Mailchimp integration within its Form widget. To set it up:
Edit a page with Elementor and drag the Form widget onto the canvas.
Under Form Fields, add an email field and any other fields you want to sync.
Open the Actions After Submit section, click Add Action, and select Mailchimp.
Click the new Mailchimp action and authenticate your account by entering your API key.
Select your audience list and map each form field to the corresponding Mailchimp merge tag (e.g., Email, First Name).
Optionally, enable double opt-in and set tags or interest groups.
Elementor Pro also supports conditional logic for form fields, though it applies to field visibility rather than subscription triggers. To conditionally send data to Mailchimp only when a checkbox is checked, you can use a hidden field with a default value and combine it with the “Required” setting—or rely on a custom JavaScript snippet for precise control. This integration suits users who want visually polished forms without leaving the Elementor builder.
For developers seeking complete control over data handling and user experience, the Mailchimp Marketing API provides a robust foundation for custom integration. This method bypasses plugin limitations and allows precise synchronization between WordPress and Mailchimp. The API enables direct management of subscribers, tags, merge fields, and automation triggers without relying on third-party middleware.
Understanding Mailchimp API v3 Endpoints
The Mailchimp Marketing API version 3 uses RESTful endpoints structured around resources. The primary endpoint for subscriber management is /lists/{list_id}/members. Each list member is identified by a unique subscriber hash derived from their email address. Key endpoints include:
POST /lists/{list_id}/members – Add or update a subscriber (upsert behavior).
GET /lists/{list_id}/members/{subscriber_hash} – Retrieve subscriber status and data.
PATCH /lists/{list_id}/members/{subscriber_hash} – Update specific fields (e.g., tags, merge fields).
DELETE /lists/{list_id}/members/{subscriber_hash} – Permanently remove a subscriber.
Authentication requires an API key passed as a Bearer token in the request header. All requests must use HTTPS and include a JSON body for write operations. Rate limits apply: 10 requests per second per API key for standard plans.
Implement custom form handling by creating a WordPress template or a shortcode that processes submissions via wp_remote_post(). Below is a minimal example of a PHP function that sends subscriber data to Mailchimp:
Store API keys and list IDs in wp-config.php constants, never in plain text.
Validate email addresses server-side before sending to Mailchimp.
Use WordPress nonces for CSRF protection on form submissions.
Sanitize all input fields with sanitize_text_field() or sanitize_email().
Handling Errors and Double Opt-In Confirmation
Mailchimp returns HTTP status codes and JSON errors for failed requests. Common responses include:
HTTP Code
Meaning
Action Required
200
Success (member exists and updated)
Display confirmation message
400
Bad request (invalid email or missing fields)
Show user-friendly validation error
404
List ID not found
Log error and notify admin
500
Server error
Retry with exponential backoff
Double opt-in is enforced by setting status to pending in the API payload. Mailchimp sends a confirmation email to the subscriber. To customize the opt-in experience:
Use Mailchimp’s transactional email templates for branding consistency.
Set a custom redirect URL in the Mailchimp audience settings after confirmation.
Monitor status field changes from pending to subscribed via webhooks if real-time tracking is needed.
When handling errors, never expose raw API responses to users. Instead, map error codes to generic messages like “Please check your email address and try again.” For permanent failures, log the complete response to a custom debug file for developer review.
Effective integration of WordPress and Mailchimp hinges on signup forms that convert visitors into subscribers without compromising site usability. A well-optimized form balances visibility with discretion, ensuring users feel invited rather than interrupted. Below are proven strategies for placement, design, and messaging that drive subscriber growth while preserving a seamless experience.
Above the fold on high-traffic pages: Place a concise form in the sidebar or header of your homepage, blog, or resource pages. This captures engaged readers without blocking content.
End-of-post or article: Insert an inline form after the final paragraph. Readers who finish an article are primed to subscribe for more related content.
Exit-intent popups: Trigger a modal only when the cursor moves toward the browser’s close button. This recovers leaving visitors without disrupting active browsing.
Slide-ins or sticky bars: Use a non-intrusive bar at the top or bottom of the screen that appears after a few seconds of scrolling. Keep it dismissible with a clear close button.
Avoid popups that cover the entire screen or appear immediately on page load, as these increase bounce rates. Test one placement at a time using A/B testing within your Mailchimp integration to isolate impact.
Design Tips for Mobile-Responsive Forms
Over half of web traffic comes from mobile devices, so forms must adapt flawlessly. Follow these design principles:
Single-column layout: Stack fields vertically to prevent horizontal scrolling. Use a single email field as the default; add name fields only if essential for segmentation.
Large touch targets: Ensure buttons and input fields are at least 44 pixels tall. Use ample padding to avoid accidental taps.
Minimal visual clutter: Remove borders on input fields, use a light background, and keep font sizes at 16 pixels or larger to prevent iOS zoom.
Clear error handling: Display inline validation messages (e.g., “Please enter a valid email”) without reloading the page. Use Mailchimp’s built-in form validation or a lightweight plugin.
To embed a responsive Mailchimp form directly into a WordPress template, use the following PHP snippet in your theme’s functions.php file or a child theme:
<?php
// Embed Mailchimp signup form via shortcode
function mailchimp_signup_shortcode() {
return '<form action="https://your-server.us19.list-manage.com/subscribe/post?u=YOUR_USER_ID&id=YOUR_LIST_ID" method="post" target="_blank">
<input type="email" name="EMAIL" placeholder="Your email address" required>
<button type="submit">Subscribe</button>
</form>';
}
add_shortcode('mailchimp_form', 'mailchimp_signup_shortcode');
?>
Replace the action URL with your actual Mailchimp list endpoint, which you can find in your Mailchimp account under Audience > Signup forms > Embedded forms.
Using Incentives and Call-to-Action Copy
Compelling copy and offers can double conversion rates. Incorporate these elements:
Specific, benefit-driven headlines: Instead of “Subscribe to Our Newsletter,” use “Get Weekly SEO Tips to Double Your Traffic.”
Visible incentives: Offer a lead magnet such as a free ebook, checklist, or discount code. Display the incentive next to the form with an image or bullet points of what subscribers receive.
Urgency and social proof: Add subtle cues like “Join 10,000+ marketers” or “Free guide available for the first 50 subscribers.” Avoid aggressive scarcity that feels manipulative.
Action-oriented CTA buttons: Replace “Submit” with “Send My Free Guide” or “Get Instant Access.” Use contrasting colors and active voice.
Test different combinations of copy and incentives using Mailchimp’s A/B testing feature on your WordPress site. For example, compare a generic headline versus a benefit-specific one, and track which generates more signups over two weeks.
Segmenting and Tagging Subscribers from WordPress
Effective integration of WordPress and Mailchimp goes beyond simply collecting email addresses. To maximize engagement and conversion, you must automatically segment and tag subscribers based on their behavior within your WordPress site. This ensures each campaign reaches the right audience with relevant content, reducing unsubscribe rates and improving deliverability. Below are the most robust methods to achieve this using native WordPress features and common plugins.
Automating Tags with WooCommerce and Membership Plugins
WooCommerce and membership plugins provide rich behavioral data that can automatically trigger Mailchimp tags. The most efficient approach uses a dedicated integration plugin (e.g., Mailchimp for WooCommerce or a third-party connector) that syncs purchase and membership events.
WooCommerce purchase history: Automatically tag subscribers based on product categories, total spend, or order frequency. For example, a customer who buys a “Premium Plan” can receive the tag “VIP Customer” and be excluded from general promotional emails.
Membership levels: Tags can reflect subscription tiers (e.g., “Gold Member,” “Expired Trial”) or renewal status. When a user’s membership expires, their tag updates, allowing you to send reactivation campaigns.
Course progress (LMS plugins): For LearnDash or LifterLMS, tags can indicate course completion, lesson drops, or quiz scores, enabling follow-up content based on learning stage.
Best practice is to use conditional logic in your integration setup: only trigger a tag change when a specific event occurs, and avoid overwriting existing tags unless intentional.
Using Custom Fields for Audience Segmentation
Mailchimp’s merge tags (custom fields) allow you to store granular user data from WordPress, which then powers advanced segmentation. This method requires mapping WordPress user meta fields to Mailchimp audience fields during integration.
WordPress User Meta
Mailchimp Merge Tag
Example Value
User role (e.g., subscriber, editor)
ROLE
Subscriber
Preferred content category
PREF_CAT
Technology
Last purchase date
LAST_PURCH
2024-03-15
Number of comments left
COMMENT_COUNT
12
To implement, use a form builder (e.g., Gravity Forms with Mailchimp add-on) or a custom function hooked to user registration/update. Ensure you only sync fields that are actively used for segmentation, as excessive fields can slow syncs and clutter your audience.
Leveraging Mailchimp Groups for Targeted Campaigns
Mailchimp Groups (also called Interest Groups) are ideal for creating sub-audiences within a single audience, especially when subscribers can belong to multiple categories. Unlike tags, groups are visible to subscribers (if enabled) and can be used for preference-based opt-ins.
Content interest groups: When a user reads a blog post about “Email Marketing,” automatically add them to the “Email Marketing” group. This can be done via JavaScript tracking with Mailchimp’s API or through a plugin like OptinMonster.
Geographic groups: Use IP geolocation on signup or profile update to assign groups like “North America” or “Europe,” enabling location-specific campaigns.
Behavioral triggers: For example, a user who downloads a free guide gets added to the “Lead Magnet” group, while a repeat purchaser joins the “Loyal Customer” group.
To avoid group bloat, limit active groups to 20–30 and regularly archive unused ones. Always test group assignment logic with a small subset of users before deploying to your full audience.
Automating Email Campaigns with WordPress Data
Integrating WordPress with Mailchimp unlocks powerful automation capabilities that transform raw user data into targeted, timely email campaigns. By leveraging triggers from your WordPress site—such as form submissions, WooCommerce purchases, or page visits—you can create sequences that nurture leads, recover lost sales, and drive repeat business. The key is to map your WordPress data fields to Mailchimp’s automation triggers, ensuring seamless data flow and relevant messaging. Below are three essential automated campaigns you can build, each using specific WordPress data points to maximize engagement and revenue.
Creating a Welcome Email Sequence for New Subscribers
A welcome sequence is your first opportunity to build a relationship with new subscribers captured through WordPress forms (e.g., Contact Form 7, Gravity Forms, or Mailchimp’s embedded forms). To set this up, ensure your form integration sends subscriber data—such as email, name, and opt-in date—to a designated Mailchimp audience. Then, in Mailchimp’s automation builder, create a trigger based on the “Subscribes to audience” event. Design a sequence of 3–5 emails:
Email 1 (Immediate): Thank the subscriber, set expectations for future emails, and deliver a lead magnet (e.g., a downloadable guide).
Email 2 (24 hours later): Introduce your brand’s value proposition with a case study or popular blog post link.
Email 3 (3 days later): Offer a first-purchase discount or exclusive content, using a coupon code generated from WordPress.
Email 4 (1 week later): Request feedback or a survey, linking to a WordPress form to collect segmentation data.
Use merge tags like *|FNAME|* to personalize each email, and track open rates to optimize send times. This sequence typically boosts click-through rates by 30–50% compared to single welcome emails.
Abandoned Cart Recovery with WooCommerce and Mailchimp
For WooCommerce stores, abandoned cart automation recovers lost revenue by triggering emails when a customer adds items to their cart but doesn’t complete checkout. To enable this, install the official Mailchimp for WooCommerce plugin, which syncs cart data (product names, prices, and checkout URLs) to Mailchimp. In your Mailchimp automation, set the trigger to “Cart abandoned” with a 1-hour delay to avoid spamming. Create a three-email sequence:
Email 1 (1 hour after abandonment): A friendly reminder with the cart contents, a clear “Complete Your Order” button linking to the checkout, and a note about limited stock.
Email 2 (24 hours later): Offer a 10% discount code (generated via WooCommerce) to incentivize completion.
Email 3 (48 hours later): A final reminder with social proof (e.g., “This item is popular—don’t miss out”) and a countdown timer if applicable.
Mailchimp’s abandoned cart automation can recover 10–15% of lost sales on average, with higher conversion rates when combined with dynamic product images pulled from WooCommerce.
Post-Purchase Follow-Up and Upsell Campaigns
After a customer completes a purchase via WooCommerce, use Mailchimp’s “Purchased product” trigger to send a post-purchase sequence that builds loyalty and drives upsells. The plugin syncs order data (product IDs, categories, and revenue) to Mailchimp, enabling targeted campaigns. Below is a comparison of two common approaches for post-purchase automation:
Campaign Type
Trigger Event
Timing
Email Content Focus
Expected Outcome
Feedback & Review Request
Order completed (WooCommerce)
3–5 days after delivery
Request a product review with a direct link to the WooCommerce review form
Increases review count by 20–30%
Upsell/Cross-Sell Campaign
Specific product purchased
7–10 days after purchase
Recommend complementary products based on product category tags
Boosts average order value by 15–25%
For the upsell campaign, use Mailchimp’s conditionals to show product recommendations only if the customer hasn’t already purchased the complementary item. Pair this with a limited-time bundle discount to increase conversion. Always include a clear unsubscribe link and respect GDPR opt-in preferences captured through your WordPress forms.
Troubleshooting Common Integration Issues
Even with careful setup, the WordPress and Mailchimp integration can encounter roadblocks. Understanding the root cause of frequent errors—from API hiccups to sync delays—will save you hours of frustration. Below are targeted solutions for the most common problems, organized by symptom and solution.
Resolving API Key and Connection Errors
API key errors are the most frequent barrier. If Mailchimp reports “Invalid API Key” or your WordPress plugin shows a red connection alert, follow these steps:
Verify the API key is active: Log into Mailchimp, go to Account > Extras > API keys. Ensure the key is not deleted or expired. Generate a new key if needed.
Check key permissions: Some plugins require a key with full read/write access. Recreate the key and copy it exactly, including trailing characters.
Test the connection manually: Use a tool like cURL or Postman. For example, run this command in your terminal (replace YOUR_API_KEY and YOUR_SERVER_PREFIX with your data):
curl -X GET "https://YOUR_SERVER_PREFIX.api.mailchimp.com/3.0/" -u "anystring:YOUR_API_KEY"
If the response includes "status": "OK", the key works. If not, the issue is with the key or server region. Ensure your plugin uses the correct server prefix (e.g., us19) from your Mailchimp account URL.
Firewall or SSL issues: Some hosting providers block outbound API calls. Contact your host to whitelist *.api.mailchimp.com. Also, ensure your site uses a valid SSL certificate—Mailchimp requires HTTPS for API requests.
Fixing Form Submission and Sync Delays
When subscribers fill out a form but never appear in Mailchimp, or sync takes hours, the problem often lies in how data is transmitted. Try these fixes:
Enable real-time sync: In your integration plugin, disable any “batch processing” or “cron-based” sync options. Look for a “Send immediately” setting.
Check double opt-in settings: If double opt-in is enabled, subscribers must confirm via email before appearing in your list. Verify that confirmation emails are not landing in spam. Temporarily disable double opt-in in Mailchimp (under Audience > Settings > Audience name and defaults) to test if sync works.
Inspect form field mapping: Mismatched fields (e.g., a required “Last Name” field in Mailchimp that is missing on your form) can block submissions. Use the plugin’s field mapping tool to match each form field to the correct Mailchimp merge tag.
Monitor API rate limits: Free Mailchimp accounts have a limit of 10 API requests per second. If you have high traffic, consider caching form submissions locally before sending to Mailchimp, or upgrade your plan.
Issue
Likely Cause
Quick Fix
Form submits but no new subscriber
Double opt-in pending
Check subscriber’s email inbox, or disable double opt-in temporarily
Subscriber appears after 30+ minutes
Batch processing enabled
Switch to real-time sync in plugin settings
Form error on submission
Missing required merge field
Map all required Mailchimp fields to form inputs
Debugging Plugin Conflicts and Caching Issues
Another plugin or a caching layer can silently break your WordPress and Mailchimp integration. Use these steps to isolate the problem:
Disable all other plugins: Temporarily deactivate every plugin except your Mailchimp integration tool. Test the form. If it works, reactivate plugins one by one to find the culprit. Common offenders include security plugins (e.g., Wordfence), form builders (e.g., Contact Form 7 with conflicting hooks), and SEO plugins that minify JavaScript.
Switch to a default theme: Activate a WordPress default theme (like Twenty Twenty-Four). Some themes enqueue scripts that interfere with AJAX form submissions. If the integration works, the theme is the issue.
Clear all caches: Caching plugins (e.g., W3 Total Cache, WP Rocket) can serve stale forms that lack the Mailchimp API call. Purge page cache, browser cache, and any CDN cache (like Cloudflare). Also, clear your object cache (Redis or Memcached) if applicable.
Check JavaScript errors: Open your browser’s developer console (F12) and submit the form. Look for red error messages like Uncaught ReferenceError: Mailchimp is not defined. This indicates a script conflict. Add the following to your theme’s functions.php to defer the Mailchimp plugin’s script (adjust the handle to match your plugin):
Note: Always back up your site before editing code. If you are uncomfortable with code, ask your developer or use a plugin like “Async JavaScript” to manage deferrals.
Conclusion: Scaling Your Email Marketing with WordPress
A successful WordPress and Mailchimp integration is not a set-it-and-forget-it tool. As your subscriber list grows, the relationship between your website and email platform must evolve to maintain deliverability, engagement, and relevance. The ultimate goal is to move beyond simple signup forms and into a data-driven system that respects your audience while maximizing conversions. Below are the critical pillars for scaling your email marketing efforts sustainably.
Regular Maintenance and Testing
To ensure your WordPress and Mailchimp integration remains reliable, schedule routine checks. A broken form or a disconnected API can silently erode your list. Use this checklist for monthly maintenance:
Verify API connectivity: Re-authenticate your Mailchimp API key in WordPress settings.
Test signup forms: Submit a test email from a private browser window to confirm data flows into the correct Mailchimp audience and tags.
Check for plugin conflicts: After updating your WordPress theme or any caching/security plugin, test the integration again.
Review GDPR/consent fields: Ensure all required permission checkboxes are functional and compliant with current regulations.
Audit automation triggers: Confirm that WooCommerce purchases, form submissions, or membership changes still trigger the intended Mailchimp automation emails.
Tracking Key Metrics: Open Rate, Click Rate, and List Growth
To scale effectively, you must measure the health of your campaigns. The most actionable metrics for your integrated system include:
Metric
What It Tells You
Actionable Insight
Open Rate
Subject line effectiveness and sender reputation.
Test more personalized or curiosity-driven subject lines. Check if your emails land in spam folders.
Click Rate
Content relevance and call-to-action clarity.
Improve the link-to-text ratio. Ensure links direct to optimized landing pages on your WordPress site.
List Growth Rate
Health of your WordPress signup forms and lead magnets.
If growth stalls, refresh your opt-in incentives (e.g., ebooks, discounts) or add a popup form with exit intent.
Unsubscribe Rate
Over-mailing or irrelevant content.
Segment your list more granularly using Mailchimp tags from WordPress user data.
Monitor these metrics in Mailchimp’s dashboard monthly. A declining open rate often signals that your integration needs re-engagement campaigns or list cleaning.
Next Steps: A/B Testing and Advanced Automation
Once your foundational integration is stable, elevate your strategy with two advanced tactics:
A/B Testing: Use Mailchimp’s built-in A/B testing to optimize every email sent from your WordPress-driven list. Test one variable at a time:
Subject lines: Compare a question format versus a statement.
Send times: Test Tuesday morning versus Thursday afternoon based on your audience’s behavior.
Content layout: Compare a single-column design with a multi-column layout for your WordPress blog digest.
Advanced Automation: Leverage the data from your WordPress site to build sophisticated customer journeys. Examples include:
Abandoned cart series: Trigger a three-email sequence from WooCommerce checkout abandonment.
Post-purchase upselling: Recommend related products based on purchase history synced from WordPress.
Re-engagement campaigns: Automatically tag inactive subscribers from WordPress login data and send a “We miss you” email with a special offer.
By consistently maintaining your integration, tracking the right metrics, and testing new approaches, your WordPress and Mailchimp integration will become a powerful engine for sustainable list growth and revenue. Start small, monitor closely, and iterate based on real data. Your email list is your most valuable digital asset—treat it with the care it deserves.
Frequently Asked Questions
What is the easiest way to integrate WordPress with Mailchimp?
The easiest way is to use a dedicated plugin like Mailchimp for WordPress (MC4WP) or the official Mailchimp plugin. These plugins provide simple setup wizards, embed forms via shortcodes or widgets, and sync subscribers automatically. No coding is required, and they offer advanced features like GDPR fields and double opt-in.
Can I integrate Mailchimp with WordPress without a plugin?
Yes, you can integrate using the Mailchimp API directly. This involves creating an API key in your Mailchimp account, writing custom PHP code to handle form submissions, and using cURL or WordPress HTTP API to send data to Mailchimp’s endpoints. This method offers full control but requires coding knowledge.
Does Mailchimp integration work with WooCommerce?
Yes, Mailchimp has an official WooCommerce integration that syncs customer data, purchase history, and product information. It enables automated emails like abandoned cart reminders, order follow-ups, and product recommendations. You can also segment audiences based on buying behavior.
How do I ensure GDPR compliance with Mailchimp forms in WordPress?
Use a plugin that supports GDPR fields, such as MC4WP. Add a checkbox for consent, include a link to your privacy policy, and enable double opt-in to confirm subscription. Mailchimp also provides built-in GDPR fields. Always store consent records and allow users to unsubscribe easily.
What are the best practices for optimizing Mailchimp signup forms on WordPress?
Keep forms short (name and email only). Place them above the fold, use a clear call-to-action, and offer an incentive like a discount code. A/B test form designs, use inline validation, and ensure mobile responsiveness. Also, use Mailchimp’s built-in analytics to track conversion rates.
How can I segment my audience using WordPress and Mailchimp integration?
Use Mailchimp tags and groups based on user behavior, such as page visits, purchase history, or form submissions. Plugins like MC4WP allow you to pass custom fields from WordPress to Mailchimp. You can then create segments for targeted campaigns, improving engagement and relevance.
What should I do if my Mailchimp integration stops working?
First, check your API key for expiration or permissions. Ensure your plugin is updated and compatible with your WordPress version. Review Mailchimp’s server status and your site’s error logs. Re-sync your audience and test with a simple form. If issues persist, contact plugin support or Mailchimp support.
Is it possible to automate email sequences based on WordPress user actions?
Yes, using Mailchimp’s automation features combined with the integration. For example, you can trigger a welcome series when a user subscribes via a WordPress form, or send a follow-up email after a WooCommerce purchase. Use Mailchimp’s customer journey builder to create complex automations.
How to Create a WordPress Newsletter System: A Step-by-Step Guide
Introduction to WordPress Newsletter Systems
A newsletter system is a structured method of sending targeted email communications to a list of subscribers who have opted in to receive updates from your website. It encompasses the tools and processes for collecting email addresses, managing subscriber preferences, designing email campaigns, and automating delivery based on triggers or schedules. WordPress is an ideal platform for building such a system because it offers unparalleled flexibility through plugins, themes, and custom code. Unlike standalone email marketing platforms, WordPress allows you to integrate your newsletter directly with your content management workflow, giving you full control over both the front-end user experience and the back-end data management. This integration means you can leverage your existing WordPress user roles, post types, and database structure to create a seamless, cost-effective email solution tailored to your specific audience and business goals.
What is a newsletter system and why use WordPress?
A newsletter system, at its core, is a digital communication channel that enables you to broadcast messages to a curated list of recipients who have voluntarily subscribed. It relies on three key elements: a subscription mechanism (usually a form), a database of subscribers, and an email sending engine. WordPress excels as the foundation for this system because it is open-source, highly customizable, and supported by a vast ecosystem of plugins. Using WordPress, you can build a newsletter system that is deeply integrated with your website’s content—automatically sending new blog posts, product updates, or membership notifications without manual intervention. Additionally, WordPress provides a familiar admin interface, robust user management, and the ability to extend functionality with tools like MailPoet, Newsletter Glue, or FluentCRM, which are designed specifically for the WordPress environment.
Key benefits of a self-hosted newsletter vs. third-party services
Building a self-hosted newsletter system on WordPress offers distinct advantages over relying solely on third-party services like Mailchimp, Constant Contact, or ConvertKit. Below is a comparison of the primary benefits:
Benefit
Self-Hosted (WordPress)
Third-Party Service
Data ownership
Full control over subscriber data, stored on your server.
Data stored on vendor servers; subject to their terms.
Cost structure
Often lower cost, especially for large lists; no per-subscriber fees.
Pricing scales with subscriber count; can become expensive.
Integration depth
Seamless connection with WordPress posts, users, and plugins.
Requires API connections; may have sync delays.
Customization
Unlimited design and functionality via PHP, CSS, and custom fields.
Limited to templates and features provided by the vendor.
Privacy compliance
Easier to comply with GDPR/CCPA by managing data locally.
Must rely on vendor compliance; data may leave your jurisdiction.
Delivery control
Can use your own SMTP or email service (e.g., Amazon SES, SendGrid).
Delivery managed by vendor; subject to their reputation.
Owning your subscriber list means you are not locked into a single provider. If a third-party service changes its pricing, policies, or features, your entire email operation is at risk. With a self-hosted system, you retain the ability to switch email delivery providers or export your list at any time without losing historical data or subscriber engagement history.
Overview of the core components: forms, automation, and delivery
A complete WordPress newsletter system consists of three essential components that work together to manage the entire subscriber lifecycle:
Forms: These are the entry points for new subscribers. They can be embedded in posts, sidebars, pop-ups, or slide-ins. A robust form system should support double opt-in verification, custom fields (e.g., name, interests), and conditional logic to segment subscribers from the moment they sign up.
Automation: This component handles the logic of when and what to send. It includes welcome sequences, abandoned cart reminders (for e-commerce sites), post-digest emails, and triggered messages based on user actions like clicking a link or updating a profile. Automation reduces manual work and ensures timely, relevant communication.
Delivery: The delivery infrastructure ensures emails actually reach subscribers’ inboxes. This involves configuring an SMTP server or a transactional email service (such as Amazon SES, SendGrid, or Mailgun) to handle sending. Proper delivery also requires managing bounce handling, spam complaint processing, and list hygiene to maintain a high sender reputation.
When these components are properly integrated within WordPress, you gain a cohesive system that captures leads, nurtures them with automated sequences, and reliably delivers content—all while keeping full ownership of your data and audience.
Choosing the Right Email Marketing Service Provider (ESP)
Selecting an Email Marketing Service Provider (ESP) is the foundational step in building a WordPress newsletter system. The right ESP determines deliverability, automation capabilities, and long-term scalability. Below, we compare three leading options—Mailchimp, Sendinblue, and Constant Contact—focusing on their WordPress integration, pricing, and unique strengths.
Mailchimp: strengths and WordPress integration options
Mailchimp remains the most popular ESP for WordPress users due to its robust feature set and extensive plugin ecosystem. Its strengths include:
Official Mailchimp plugin: Offers a block-based form builder, audience sync, and pop-up forms. Works seamlessly with the WordPress block editor.
Third-party plugins: Tools like MC4WP: Mailchimp for WordPress provide advanced form customization, double opt-in controls, and integration with WooCommerce or Contact Form 7.
Pricing starts free for up to 500 subscribers and 1,000 sends per month, with paid plans beginning at $13/month.
Sendinblue: affordable alternative with built-in SMTP
Sendinblue (now Brevo) is a cost-effective ESP that excels for small-to-medium businesses. Its standout feature is the built-in SMTP relay, which improves email deliverability for transactional emails (e.g., password resets, order confirmations) directly from your WordPress site.
Pricing: Free tier supports 300 emails/day, with paid plans starting at $25/month for unlimited contacts and 10,000 emails/month.
Automation: Drag-and-drop workflow builder for welcome sequences, abandoned cart reminders, and re-engagement campaigns.
WordPress integration: The official Sendinblue plugin syncs contact forms, tracks email opens, and includes a built-in SMTP setting. No additional SMTP plugin is required.
Practical code example: To send a transactional email via Sendinblue’s SMTP from your WordPress site, add this snippet to your theme’s functions.php file (after installing the plugin):
Constant Contact targets users who prefer a hands-off, managed approach. It offers:
Drag-and-drop email builder: Pre-designed templates with no coding required.
Event management: Built-in tools for RSVPs and event promotion.
Dedicated support: Phone and chat assistance for technical issues.
Pricing starts at $12/month for up to 500 subscribers, but automation features are limited compared to Mailchimp or Sendinblue. Other managed solutions include:
For most WordPress users, Mailchimp offers the best balance of features and ease of use, while Sendinblue provides an affordable entry point with SMTP benefits. Constant Contact suits those who prioritize support over advanced automation. Evaluate your subscriber count, budget, and automation needs before choosing.
Selecting a WordPress Newsletter Plugin
Choosing the right plugin is the most critical decision when you learn how to create a WordPress newsletter system. The plugin you select determines your workflow, email deliverability, and the depth of subscriber management you can achieve. Three leading options—MailPoet, Newsletter Glue, and FluentCRM—each serve distinct use cases. The following breakdown examines their core features, automation capabilities, and integration requirements, helping you match a plugin to your technical comfort and marketing goals.
MailPoet: all-in-one plugin with built-in email sending
MailPoet is a self-contained solution that manages both your subscriber database and email delivery directly from your WordPress dashboard. It includes its own sending infrastructure, meaning you do not need a separate email service provider (ESP) to get started. MailPoet offers a free tier that supports up to 1,000 subscribers and 5,000 emails per month, making it ideal for small blogs or personal sites.
Key features include:
Drag-and-drop email builder with pre-designed templates
Automated welcome emails and post notification digests
Built-in subscription forms (pop-up, slide-in, embedded)
Basic segmentation by subscriber activity and list membership
WordPress block editor integration for email design
Automation capabilities are limited compared to dedicated marketing platforms. MailPoet supports simple triggers like “subscriber added to list” or “post published,” but lacks complex conditional logic or multi-step funnels. Compatibility is strong with most WordPress themes and caching plugins, though heavy e-commerce sites may require additional configuration for WooCommerce integration.
Newsletter Glue: seamless connection with your ESP
Newsletter Glue takes a different approach by acting as a bridge between your WordPress site and a third-party ESP such as Mailchimp, ConvertKit, or ActiveCampaign. It does not send emails itself; instead, it syncs your content and subscriber actions to your chosen ESP. This setup is ideal for users who already have an ESP account and want to manage newsletters from within the WordPress editor.
Two-way sync of posts and custom post types to ESP templates
Automatic email creation when you publish or update a post
Support for multiple ESPs with dedicated connectors
Subscriber management via ESP dashboards (not within WordPress)
Block-based email editing with full Gutenberg compatibility
Automation relies entirely on your ESP’s capabilities. Newsletter Glue handles content delivery but does not provide triggers, workflows, or segmentation—those remain in the ESP. This plugin excels for users who want a streamlined publishing workflow without leaving WordPress, but requires familiarity with a separate ESP interface for subscriber management and analytics.
FluentCRM: advanced automation for serious marketers
FluentCRM is a full-featured customer relationship manager built for WordPress. It stores all subscriber data locally on your site and offers sophisticated automation sequences, contact scoring, and deep integration with WooCommerce and other plugins. Unlike MailPoet, FluentCRM requires you to configure your own email sending method (e.g., Amazon SES, SMTP, or a transactional email service) to avoid deliverability issues.
Standout features include:
Visual drag-and-drop automation builder with unlimited steps
Advanced segmentation by purchase history, page visits, and custom fields
Contact scoring and lifecycle tags for precise targeting
Built-in email templates and A/B testing for subject lines
Native integration with WooCommerce, Easy Digital Downloads, and LearnDash
Automation is FluentCRM’s strongest suit. You can create complex funnels such as “abandoned cart recovery” or “re-engagement series” with conditional branching. However, this power comes with a steeper learning curve and increased server load, as all data is processed locally. Compatibility is broad, but large subscriber lists (over 10,000) may require a dedicated server or caching optimization.
Setting Up Email Delivery: SMTP and Authentication
WordPress uses the PHP mail() function by default to send emails. While this works for simple notifications like password resets, it is notoriously unreliable for newsletters. Hosting providers often block or rate-limit this function, causing your carefully crafted newsletter to land in spam folders or disappear entirely. To ensure consistent, trackable delivery, you must replace this default method with a dedicated email delivery system.
Why SMTP is essential for WordPress email deliverability
SMTP (Simple Mail Transfer Protocol) is the industry standard for sending email. Unlike the default PHP mail function, SMTP uses authenticated connections, typically through port 587 with TLS encryption. This authentication proves to receiving mail servers that you are a legitimate sender, not a spammer. Without SMTP, your newsletter lacks this credential, leading to high bounce rates and poor sender reputation. Key benefits include:
Reliable authentication via username and password.
Encrypted transmission to prevent interception.
Compatibility with email service providers (ESPs) that handle bulk sending.
Detailed delivery logs for troubleshooting.
To implement SMTP in WordPress, install a plugin such as WP Mail SMTP, Easy WP SMTP, or Post SMTP. Configure it with your email service provider’s SMTP credentials. For example, if using SendGrid, you would enter smtp.sendgrid.net as the SMTP host, port 587, and TLS encryption, along with your API key as the password.
Step-by-step: configuring SPF, DKIM, and DMARC records
SMTP alone is not enough. You must also authenticate your domain to prove you own it. This is done through DNS records. Without these, receiving servers may still flag your emails as suspicious. Follow these steps:
Add an SPF record: This tells receiving servers which IP addresses are authorized to send email for your domain. Log into your DNS provider (e.g., your domain registrar or hosting control panel) and add a TXT record for your domain. A typical SPF record for SendGrid looks like: v=spf1 include:sendgrid.net ~all
Replace sendgrid.net with your ESP’s domain. The ~all tag means “soft fail” for unauthorized senders.
Add a DKIM record: DKIM adds a digital signature to each email. Your ESP will provide a public key to add as a TXT record. For SendGrid, you create a TXT record with a name like sg1._domainkey.yourdomain.com and a value provided by SendGrid. This ensures the email signature matches the domain.
Add a DMARC record: DMARC tells receiving servers how to handle emails that fail SPF or DKIM checks. Add a TXT record for _dmarc.yourdomain.com with a value like: v=DMARC1; p=quarantine; rua=mailto:reports@yourdomain.com
The p=quarantine policy instructs servers to send failing emails to spam. Start with p=none to monitor without action, then tighten the policy.
After adding these records, use a DNS lookup tool to verify propagation. It may take up to 48 hours.
Using a dedicated email sending service (SendGrid, SES, etc.)
For newsletters sent to more than a few hundred subscribers, a dedicated email sending service is highly recommended. These services handle bulk sending, provide analytics, and maintain sender reputation. Popular options include:
Service
Key Features
Pricing Model
Best For
SendGrid
API integration, detailed analytics, suppression management
Free tier (100 emails/day), paid plans per email volume
Medium to large lists, developers
Amazon SES
Low cost, high scalability, deep AWS integration
Pay per email sent ($0.10 per 1,000 emails)
High-volume senders on AWS
Mailgun
Easy SMTP setup, robust API, email validation
Free tier (5,000 emails/month), then per email
Developers needing flexibility
Postmark
Focus on transactional emails, high deliverability
Per email (starting at $15 for 10,000 emails)
Transactional newsletters
To integrate a service like SendGrid with WordPress, install the SendGrid plugin or configure WP Mail SMTP to use SendGrid’s API. For Amazon SES, you will need to verify your domain and then use a plugin like WP SES or configure SMTP with SES credentials. Always test with a single email before sending to your full list. Check your spam score using tools like Mail-Tester.com to ensure your setup is correct.
Designing and Building Your Subscription Forms
Your subscription form is the gateway to your newsletter. A well-designed form with strategic placement can dramatically increase conversion rates. Whether you use your newsletter plugin’s built-in form builder, Elementor, or WPForms, focus on clarity and minimal friction. The form should ask for only the essential information—typically an email address and a first name—to reduce abandonment. Avoid overwhelming visitors with too many fields; each additional field can decrease sign-ups by 10-20%.
Best practices for form placement and call-to-action wording
Place forms where visitors are most engaged. High-traffic areas include the end of blog posts, your sidebar, and the footer. For maximum visibility, consider a dedicated sign-up page linked from your main navigation. The call-to-action (CTA) button text should be action-oriented and benefit-driven. Instead of generic “Subscribe,” use phrases like “Get Weekly Tips,” “Join the Community,” or “Download Your Free Guide.” The CTA should stand out with a contrasting color and clear, readable font. Test different placements and wording using A/B testing to find what resonates with your audience.
End of blog posts: Capture readers already engaged with your content.
Sidebar: Persistent visibility without interrupting reading flow.
Footer: A final opportunity before visitors leave.
Dedicated landing page: Focused conversion without distractions.
Using pop-ups, slide-ins, and inline forms effectively
Each form type serves a distinct purpose. Pop-ups are powerful but can annoy users if triggered too aggressively. Use exit-intent pop-ups to capture leaving visitors or timed pop-ups after a visitor has scrolled 50% of a page. Slide-ins are less intrusive and work well on mobile or for mid-page prompts. Inline forms blend naturally with your content and are ideal for blog post endings or resource pages. Best practices include limiting pop-ups to one per session, offering a clear close button, and ensuring mobile responsiveness. For slide-ins, position them at the bottom right or left corner to avoid blocking content. Inline forms should have a simple design with a single input field and a prominent button.
Double opt-in requires new subscribers to confirm their email address by clicking a link in a verification message. This process improves list quality by ensuring only genuine, interested subscribers enter your list. It also reduces spam complaints and protects your sender reputation. Most WordPress newsletter plugins, such as MailPoet, Newsletter, or Mailchimp for WordPress, offer double opt-in as a default or toggle option. To enable it, navigate to your plugin’s settings and activate the double opt-in feature. Customize the confirmation email with your branding and a clear call-to-action. While double opt-in may reduce initial sign-up numbers by 10-15%, the resulting list has higher engagement and lower unsubscribe rates. For best results, explain the process on your form, e.g., “We’ll send you a confirmation email to verify your subscription.” This sets expectations and reduces confusion.
Creating and Managing Your Newsletter Content
Once your WordPress newsletter system is set up, the real work begins: crafting content that your subscribers will actually want to open. This section walks you through drafting newsletters using the WordPress block editor or a dedicated drag-and-drop builder, with actionable tips on subject lines, personalization, and segmentation to boost engagement.
Your subject line is the first—and often only—impression you make. It determines whether your email gets opened or sent to the trash. Follow these proven practices:
Keep it short: Aim for 40–60 characters. Most mobile clients truncate longer lines.
Create urgency or curiosity: Use phrases like “Limited time” or “You won’t believe” sparingly.
Personalize when possible: Including the recipient’s first name can increase open rates by up to 26%.
Test multiple variations: Use A/B testing in your email plugin to compare subject lines.
Preview text (the snippet that follows the subject line in most inboxes) is equally critical. It should complement the subject line, not repeat it. For example:
Subject: “5 SEO Tips You Can Use Today” Preview: “Plus: a free checklist to track your progress”
In the WordPress block editor, many newsletter plugins (like MailPoet or Newsletter Glue) provide a dedicated field for preview text. Always fill it out—don’t leave it blank, or the email client may pull random content from your message.
Using Dynamic Content and Personalization Tags
Personalization goes beyond just a first name. Modern WordPress newsletter plugins support dynamic content tags that pull subscriber-specific data into your emails. Common tags include:
[subscriber:firstname] – Inserts the subscriber’s first name.
[subscriber:lastname] – For more formal greetings.
[subscriber:email] – Useful for confirmation or account-related messages.
[customfield:membership_level] – If you store custom fields like membership tier.
To implement this, you typically insert these shortcodes directly into the block editor. For example, in a paragraph block, you might write:
Hi [subscriber:firstname], here's your weekly roundup of tips tailored for [customfield:interest].
Most drag-and-drop builders (e.g., MailPoet’s editor) offer a “Personalization” button that lets you select tags from a dropdown. Always test a personalized email by sending a preview to yourself—ensure the tags render correctly and don’t break the layout.
Organizing Content with Categories and Tags for Segmentation
Segmentation is the key to sending relevant content to the right people. Instead of blasting every subscriber with the same newsletter, use WordPress’s native taxonomies (categories and tags) to group your content and then send targeted emails. Here’s a practical workflow:
Assign categories or tags to each post as you publish it (e.g., “Tutorials,” “Case Studies,” “Product Updates”).
Create subscriber lists or segments in your newsletter plugin based on those taxonomies. For example, in MailPoet, you can create a segment for “Subscribers interested in Tutorials” by setting a condition: “Last email engagement with category = Tutorials.”
Draft a newsletter for a specific segment and use the plugin’s “Post notification” feature to automatically pull in the latest posts from that category. This ensures each subscriber receives only the content they’ve opted into.
If you’re managing a large subscriber base, consider adding a preference center where users can choose which categories they want to follow. This reduces unsubscribe rates and improves deliverability. For a practical code example, you can add a custom category filter to your newsletter registration form by hooking into mailpoet_form_submit in your theme’s functions.php file:
add_action('mailpoet_form_submit', 'custom_subscriber_category', 10, 3);
function custom_subscriber_category($data, $form_id, $subscriber) {
if (isset($data['category_interest'])) {
$subscriber->setCustomField('interest_category', sanitize_text_field($data['category_interest']));
}
}
By combining dynamic content, strong subject lines, and thoughtful segmentation, your WordPress newsletter system will deliver value to each subscriber—and keep your open rates healthy.
Automating Your Newsletters with Triggers and Sequences
Once your WordPress newsletter system captures subscribers, automation transforms it into a self-sustaining marketing engine. By setting up triggers and sequences, you deliver timely, relevant content without manual effort. Below, we explore three essential automated flows: welcome series, drip campaigns, and re-engagement sequences, complete with practical setup steps and trigger examples.
Building a welcome email sequence from scratch
A welcome sequence greets new subscribers immediately after sign-up, setting the tone for your relationship. Start by defining your goal—typically, introducing your brand, delivering a lead magnet, and encouraging a first action. Use these steps:
Trigger: Subscriber confirms email via double opt-in or completes a sign-up form.
Email 1 (Immediate): Thank the subscriber, deliver the promised incentive (e.g., ebook, discount code), and set expectations for future emails.
Email 2 (24 hours later): Share your brand story or mission, linking to key blog posts or product pages.
Email 3 (3 days later): Offer a useful resource, such as a tutorial or case study, and include a soft call-to-action (e.g., “Read our guide to X”).
Email 4 (7 days later): Present a low-barrier offer, like a free trial or consultation, and invite feedback.
In WordPress, plugins like MailPoet, FluentCRM, or Groundhogg let you create this sequence visually. Set the trigger to “subscriber added to list,” then drag and drop emails with specified delays. Test the sequence by signing up with a test email to confirm delivery and timing.
Setting up drip campaigns based on user behavior
Drip campaigns send targeted emails based on specific actions subscribers take, such as clicking a link, making a purchase, or viewing a page. This personalization increases engagement. Below is a table of common triggers and corresponding drip sequences:
Trigger
Example Behavior
Drip Sequence
Link click
Clicks “Learn more about pricing”
Send 3 emails: pricing breakdown, case study, discount offer over 5 days
Purchase
Buys a course
Send onboarding series: welcome, setup guide, advanced tips over 14 days
Page visit
Visits a product page twice
Send comparison guide, testimonial, limited-time offer over 7 days
Form submission
Fills out a survey
Send personalized recommendations based on answers within 24 hours
To implement, use a plugin that supports behavior tracking. For example, in FluentCRM, create a “Tag” for each trigger (e.g., “Clicked Pricing Link”), then build a sequence that sends emails only to tagged subscribers. Ensure your WordPress site has tracking enabled via cookies or user accounts for logged-in visitors.
Re-engagement automation for inactive subscribers
Inactive subscribers—those who haven’t opened emails in 90 days or clicked in 60 days—drain your list health. A re-engagement sequence attempts to win them back or remove them. Set it up as follows:
Trigger: Subscriber has not opened any email in the last 90 days (or a custom period).
Email 1 (Day 0): Send a “We miss you” message with a strong subject line like “Is this goodbye?” Include a single clear call-to-action, such as “Click here to stay subscribed.”
Email 2 (Day 7): Offer an exclusive incentive, like a 20% discount or free resource, with a link to update preferences.
Email 3 (Day 14): Send a final “Last chance” email, stating you’ll remove them if no action is taken. Include an unsubscribe link for compliance.
Action after sequence: If no engagement, automatically unsubscribe or move to a “Suppressed” list. If they click, tag them as “Re-engaged” and move to a regular sequence.
In WordPress, set the trigger using a “Segment” of subscribers who match inactivity criteria. Plugins like MailPoet allow you to define “Opened less than X times” filters. Test with a small segment first to avoid accidental removal.
Testing and Optimizing Your Newsletter Performance
Once your WordPress newsletter system is live, the real work begins: refining it to maximize engagement. Without systematic testing, you risk sending underperforming emails that waste your audience’s attention. This section covers how to run A/B tests, interpret key metrics, and use data to sharpen your content strategy.
How to run A/B tests on subject lines and send times
A/B testing—also called split testing—compares two versions of a single variable to see which performs better. For newsletters, the most impactful variables are subject lines and send times. Here is a step-by-step process:
Choose one variable at a time. Test only the subject line or the send time, not both simultaneously. For example, send Version A with “5 Tips for Better Sleep” and Version B with “Improve Your Sleep Tonight.”
Split your audience randomly. Most email marketing plugins for WordPress (like MailPoet or Newsletter Glue) offer built-in A/B testing. Ensure each segment is statistically significant—at least 1,000 subscribers per variant for reliable results.
Run the test for a fixed period. For send times, test two different days (e.g., Tuesday 10 AM vs. Thursday 4 PM) over two weeks. For subject lines, send both versions simultaneously and wait 24 hours to measure open rates.
Declare a winner based on a primary metric. Use open rate for subject lines; for send times, consider both open rate and click-through rate (CTR). Then, send the winning version to the remaining subscribers or apply the insight to future campaigns.
Interpreting open rates, CTR, and unsubscribe rates
Three metrics form the backbone of newsletter performance analysis. Understanding them prevents misinterpretation and guides optimization.
Metric
What It Measures
Healthy Benchmark (Industry Average)
What to Do If Low
Open Rate
Percentage of recipients who opened your email
20–30% for most industries
Improve subject lines, sender name, and preview text
Click-Through Rate (CTR)
Percentage of opens that clicked a link
2–5% for content newsletters
Refine call-to-action placement, content relevance, and link design
Unsubscribe Rate
Percentage of recipients who opt out after an email
Below 0.5% per campaign
Reduce frequency, improve content targeting, or segment more carefully
Note: Benchmarks vary by niche. Compare your rates against your own historical data and industry reports from trusted sources like Mailchimp or Campaign Monitor.
Using analytics to refine your content strategy
Data alone is useless without action. After collecting metrics from A/B tests and ongoing campaigns, apply these insights to your WordPress newsletter system:
Identify top-performing content types. If tutorials consistently earn higher CTR than news roundups, create more how-to articles. Use WordPress plugins like MonsterInsights to track which blog posts drive email sign-ups.
Segment based on behavior. Subscribers who click product links may respond to sales offers; those who only read articles prefer educational content. Use tags in your email plugin to automate these segments.
Adjust send frequency. If unsubscribe rates spike after a daily email, test a weekly schedule. Conversely, if open rates drop with infrequent sends, increase cadence gradually while monitoring engagement.
Re-engage inactive subscribers. Create a win-back campaign for those who haven’t opened in 90 days. Offer a discount or exclusive content. If they remain unresponsive after two emails, remove them to protect your sender reputation.
Regularly revisit your analytics dashboard—most WordPress email plugins provide built-in reporting. Set a monthly review cycle to compare performance against your benchmarks and iterate. Over time, this data-driven approach transforms your newsletter from a broadcast tool into a precision engagement engine.
Ensuring Compliance with Email Regulations (CAN-SPAM, GDPR)
Building a WordPress newsletter system requires more than technical setup—you must comply with international email regulations to avoid penalties and maintain subscriber trust. Two primary frameworks govern this: the U.S.-based CAN-SPAM Act and the EU’s General Data Protection Regulation (GDPR). Both mandate clear permission, transparency, and easy opt-out mechanisms. Below, we break down the essentials and provide actionable steps to keep your system compliant.
CAN-SPAM basics: required headers, opt-out, and content
The CAN-SPAM Act applies to all commercial emails sent to or from the United States. It sets three core requirements:
Accurate headers and subject lines: Your “From,” “To,” and “Reply-To” fields must identify your business, and the subject line cannot be deceptive. Avoid misleading phrases like “RE:” or “FWD:” unless they are genuine replies.
Clear opt-out mechanism: Every email must include a visible, working unsubscribe link or instruction. You must honor opt-out requests within 10 business days—no exceptions. In WordPress, use a plugin like MailPoet or Newsletter Glue to automate this.
Physical postal address: Include your valid physical mailing address (e.g., a P.O. box or street address) in every email. This is non-negotiable.
For content, avoid false or misleading header information. If you use affiliate links or sponsored content, disclose it plainly. A practical step: test your unsubscribe link monthly. In WordPress, you can add a custom unsubscribe shortcode to your email template:
This code creates a dynamic link that points to your WordPress unsubscribe page. Pair it with a plugin that logs opt-outs and removes subscribers from your list.
GDPR applies to any subscriber in the European Economic Area (EEA), regardless of where you are based. It raises the bar on consent and data handling:
Explicit, affirmative consent: Pre-checked boxes are illegal. Use a clear, unticked checkbox with a statement like “I agree to receive marketing emails from [Your Company].” Never bundle consent with terms of service.
Right to erasure: Subscribers can request deletion of their data at any time. Your WordPress system must allow manual or automated removal of all personal data, not just unsubscribing from emails.
Data processing records: Document when and how you obtained consent. For example, log the timestamp, IP address, and the exact wording of the consent checkbox. Many WordPress plugins (e.g., WP GDPR Compliance) offer this feature.
A common pitfall is assuming GDPR only applies to EU businesses. If you have even one EEA subscriber, you must comply. Use a geolocation plugin to flag EU visitors, or simply apply GDPR rules to your entire list.
Adding a privacy policy link and managing consent records
Both CAN-SPAM and GDPR require transparency about data use. A privacy policy link in every email satisfies this, but you must also manage consent records for audits.
Adding a privacy policy link: Include a short, readable link (e.g., “Privacy Policy”) in your email footer. In WordPress, you can create a dedicated privacy page and insert its URL into your email template via a custom field or plugin setting. For example, using the wp_privacy_policy_link() function in your theme’s functions.php:
add_action('wp_footer', function() {
if (function_exists('the_privacy_policy_link')) {
the_privacy_policy_link('<p>', '</p>');
}
});
This outputs a link to your site’s privacy policy page. For emails, you’ll need to hardcode the link or use a shortcode.
Managing consent records: Store consent data securely in your WordPress database. Use a plugin like Newsletter or Mailster that logs consent timestamps and IPs. Alternatively, create a custom table:
Run a weekly backup of this table. If a subscriber requests deletion, remove their row entirely—do not just mark it inactive. For GDPR compliance, also provide a data export feature. Many WordPress GDPR plugins automate this.
By implementing these measures—accurate headers, clear opt-out, explicit consent, and documented records—you build a compliant WordPress newsletter system that respects subscriber rights and avoids legal risk.
Building a WordPress newsletter system is just the beginning. As your subscriber list grows, maintaining deliverability, engagement, and system performance becomes critical. Without regular maintenance and strategic scaling, even the best campaigns can end up in spam folders or overwhelm your hosting environment. This section covers the essential practices for keeping your newsletter healthy and expanding its reach effectively.
Cleaning your list: handling bounces and unsubscribes
List hygiene is the foundation of a successful newsletter. A clean list improves open rates, reduces spam complaints, and protects your sender reputation. Every email address that bounces or unsubscribes should be handled promptly and automatically.
Hard bounces (permanent failures, such as invalid addresses) should be removed immediately. Most email service providers (ESPs) and plugins allow you to set automatic removal rules.
Soft bounces (temporary issues like a full inbox) can be retried a few times, but after 3–5 consecutive soft bounces, remove the address to avoid deliverability problems.
Unsubscribes must be processed instantly. Ensure your WordPress newsletter system includes a one-click unsubscribe link in every email, and that the removal is recorded in your database without delay.
Re-engagement campaigns can help you win back inactive subscribers. If a subscriber hasn’t opened an email in 90 days, send a “Are you still interested?” message. If they don’t respond, remove them.
Use a plugin like MailPoet, Newsletter Glue, or a dedicated ESP integration (e.g., Mailchimp, SendGrid) to automate bounce handling and unsubscribe management. Regularly export your list to check for duplicates or invalid formats.
Scaling with higher-volume ESPs or dedicated servers
When your list exceeds a few thousand subscribers, shared WordPress hosting may struggle with email sending. At this stage, you need to upgrade your sending infrastructure.
Subscriber Count
Recommended Setup
Key Considerations
0–5,000
WordPress plugin (e.g., MailPoet, Newsletter)
Use your own SMTP or plugin’s built-in sending; monitor bounce rates.
Integrate via API; use transactional email for critical messages.
50,000+
Dedicated email server or enterprise ESP (e.g., Mailgun, SparkPost)
Requires custom setup, IP warm-up, and reputation management.
For high-volume sending, avoid relying on your web host’s mail function. Instead, use a dedicated ESP that handles deliverability, throttling, and compliance. Many WordPress newsletter plugins offer native integrations with these services, making the transition seamless. If you manage your own server, configure DKIM, SPF, and DMARC records to authenticate your emails.
Advanced segmentation and dynamic content for larger lists
As your list grows, generic broadcasts lose effectiveness. Advanced segmentation allows you to send targeted messages based on subscriber behavior, preferences, or demographics. Dynamic content takes this further by personalizing email content in real time.
Behavioral segmentation: Group subscribers by actions such as purchase history, page visits, or email clicks. For example, send product recommendations to those who browsed specific categories.
Demographic segmentation: Use custom fields (e.g., location, job title, interests) collected at signup or through surveys. Tailor content by time zone, language, or industry.
Dynamic content blocks: Use conditional logic within your emails to show different images, text, or calls-to-action based on the segment. For instance, show a discount code to repeat buyers and a welcome offer to new subscribers.
Automated workflows: Combine segmentation with triggers like welcome series, abandoned cart reminders, or re-engagement sequences. Most ESPs and advanced WordPress plugins (e.g., FluentCRM, Groundhogg) support these features.
To implement dynamic content, choose a newsletter plugin that supports shortcode-based personalization or integrates with a CRM. Test your segments with small batches before full sends to ensure accuracy. Regular analysis of open rates and click-through rates per segment will help you refine your approach as your list continues to scale.
Frequently Asked Questions
What is the best plugin for creating a WordPress newsletter system?
The best plugin depends on your needs. For beginners, Mailchimp for WordPress is user-friendly and integrates with the popular Mailchimp service. For more advanced features like automation and segmentation, consider plugins like MailPoet (self-hosted) or Newsletter Glue. If you prefer a fully self-hosted solution, FluentCRM offers powerful email marketing within WordPress. Evaluate based on your budget, list size, and required features like A/B testing or analytics.
Do I need an external email service provider for my WordPress newsletter?
Yes, for reliable delivery and to avoid spam filters, it's highly recommended to use a dedicated email service provider (ESP) like Mailchimp, SendGrid, Amazon SES, or Mailgun. WordPress's default PHP mail function often has poor deliverability and can be blocked by hosts. ESPs handle authentication (SPF, DKIM, DMARC), provide analytics, and comply with anti-spam laws. Some plugins like MailPoet offer built-in sending services, but most integrate with external ESPs for best results.
How do I create a newsletter signup form in WordPress?
You can create a signup form using a newsletter plugin like Mailchimp for WordPress or MailPoet. These plugins provide shortcodes or blocks to embed forms on any page, post, or widget area. Customize fields (e.g., name, email), enable double opt-in for compliance, and set up automated welcome emails. For more design flexibility, use a form builder plugin like Elementor or Gravity Forms with email integration. Always place forms prominently on high-traffic pages like your homepage, blog sidebar, or after content.
What are the legal requirements for sending newsletters from WordPress?
You must comply with anti-spam laws like GDPR (Europe), CAN-SPAM (US), and CASL (Canada). Key requirements: obtain explicit consent via opt-in (preferably double opt-in), include a clear unsubscribe link in every email, provide your physical mailing address, and honor opt-outs promptly. For GDPR, you need a privacy policy explaining data usage, and you must obtain consent before sending. Use plugins that support consent checkboxes and log consent. Avoid purchasing email lists.
How can I improve email deliverability for my WordPress newsletter?
Improve deliverability by using a reputable ESP, authenticating your domain with SPF, DKIM, and DMARC records, and maintaining a clean list by removing inactive subscribers. Avoid spam trigger words in subject lines, personalize content, and segment your audience for relevance. Monitor bounce rates and complaints. Use a dedicated sending domain if possible. Test your emails with tools like Mail-Tester before sending. Also, ensure your WordPress site uses a proper SMTP plugin for transactional emails.
Can I automate my WordPress newsletter campaigns?
Yes, most newsletter plugins and ESPs offer automation features. You can set up automated welcome sequences, birthday emails, re-engagement campaigns, or drip content based on user behavior. For example, MailPoet allows you to create automated emails triggered by signup or specific actions. FluentCRM offers advanced automation workflows. Integration with ecommerce plugins like WooCommerce enables abandoned cart emails. Automation saves time and increases engagement by sending targeted messages.
How do I track newsletter performance in WordPress?
Most newsletter plugins and ESPs provide built-in analytics for open rates, click-through rates, bounces, and unsubscribes. For deeper insights, connect your ESP with Google Analytics using UTM parameters. Some plugins offer A/B testing for subject lines. You can also use heatmaps for email clicks. Regularly review metrics to optimize content, timing, and segmentation. For self-hosted solutions like FluentCRM, analytics are included in the dashboard. Always compare against industry benchmarks.
What is the difference between self-hosted and third-party newsletter services?
Self-hosted solutions (e.g., MailPoet, FluentCRM) store subscriber data on your own server, giving you full control and no monthly fees based on list size. However, you must manage deliverability, server resources, and compliance. Third-party services (e.g., Mailchimp, ConvertKit) handle sending infrastructure, deliverability, and analytics, but charge based on subscriber count. Self-hosted is cost-effective for large lists, while third-party is simpler for beginners. Choose based on technical skill and budget.
How to Build a Hotel Booking Site with WordPress: A Complete Step-by-Step Guide
1. Understanding the Core Requirements of a Hotel Booking Site
Before you begin assembling your hotel booking site on WordPress, you must first define the essential operational and user-facing features your site must deliver. A successful booking site goes beyond a simple contact form; it requires dynamic, real-time management of inventory, rates, and guest data. This section outlines the must-have components and explains how WordPress, with its plugin ecosystem, can meet these demands.
Key features every hotel booking site must include
To provide a seamless booking experience for guests and efficient management for staff, your site should incorporate the following core features:
Room availability calendar: A visual, date-based calendar that displays which rooms are available, booked, or under maintenance. It must update in real-time to prevent double bookings.
Online booking form: A multi-step or single-page form that captures check-in/check-out dates, number of guests, room type, and special requests.
Payment processing gateway: Secure integration with payment processors (e.g., Stripe, PayPal) to accept deposits or full payments at the time of booking.
Automated confirmation and notification system: Emails or SMS sent to guests upon successful booking, plus alerts to hotel staff for new reservations.
Rate management: Ability to set different prices per season, day of week, or length of stay, with options for discounts and promotions.
Property management integration (optional but recommended): Sync with external PMS tools (like Cloudbeds or Mews) to manage bookings across multiple channels (e.g., Booking.com, Expedia).
Responsive design: The site must function flawlessly on mobile devices, as a significant portion of bookings originate from smartphones.
How WordPress plugins handle availability and reservations
WordPress is not inherently a booking platform, but its plugin architecture allows you to layer sophisticated reservation logic onto your site. Most dedicated hotel booking plugins operate by creating a custom post type for “rooms” and adding meta fields for pricing, capacity, and amenities. The availability system works through a database of date ranges: when a guest selects dates, the plugin queries these records to determine if a room is free.
For example, a plugin like WP Hotel Booking or MotoPress Hotel Booking uses a “datepicker” interface on the front end. When a user inputs their stay dates, the plugin checks against a backend calendar that stores each room’s blocked dates (from confirmed bookings or manual holds). If the room is available, the form proceeds to collect guest details and payment. The plugin then updates the calendar automatically upon successful transaction. Many plugins also support “room types” with multiple units (e.g., 10 standard double rooms), tracking availability per unit rather than per room type name.
To ensure accuracy, plugins often implement “pending” timeouts: when a user starts a booking but does not complete payment, the room is temporarily held for a set period (e.g., 15 minutes) to prevent others from booking the same slot. This is handled through session-based or database-based locking mechanisms.
Deciding between a booking plugin vs. a full property management system
Your choice between a standalone WordPress booking plugin and a full property management system (PMS) integration depends on your hotel’s scale and operational complexity. The table below outlines the key differences:
Factor
Booking Plugin (e.g., MotoPress)
Full PMS (e.g., Cloudbeds via API)
Best for
Small hotels, B&Bs, vacation rentals with under 20 rooms
Mid-size to large hotels, multi-property groups, or those using channel managers
Cost
One-time fee or low annual subscription ($50–$200/year)
Monthly subscription often $100–$500+ depending on room count
Features
Basic calendar, booking form, email confirmations, simple rate rules
Full inventory management, housekeeping logs, revenue reports, multi-channel sync
Medium to high; requires API setup, data mapping, and ongoing sync maintenance
Control
Full control over WordPress backend and design
Data stored partly in PMS; WordPress acts as a front-end display
If you run a small property with straightforward booking needs, a plugin is faster, cheaper, and easier to manage. For larger hotels that need to coordinate bookings across multiple online travel agencies (OTAs), a PMS integration becomes necessary to avoid overbooking and manual data entry. Some WordPress plugins also offer “lite” PMS features, such as channel manager connectors, bridging the gap between the two approaches.
2. Choosing the Right WordPress Hosting and Domain
Selecting the right hosting and domain is foundational for a hotel booking site. Unlike a simple blog, your site must process secure payments, handle real-time availability checks, and remain responsive during peak booking periods. A poor hosting choice can lead to slow page loads, failed transactions, and lost revenue. This section guides you through matching hosting performance to booking demands, understanding hosting tiers, and choosing a domain that instills traveler confidence.
Performance requirements for booking and payment pages
Booking and payment pages are the most critical pages on your site. They must load in under two seconds to prevent cart abandonment. Key performance requirements include:
Fast server response time: Aim for under 200 milliseconds (ms) Time to First Byte (TTFB).
Sufficient PHP workers: Your hosting must handle concurrent PHP processes (e.g., 12+ workers) to avoid queuing during simultaneous bookings.
SSL certificate included: Essential for encrypting payment data and PCI compliance.
Database optimization: Support for MySQL or MariaDB with query caching to handle room inventory lookups.
Content delivery network (CDN) support: To serve images and scripts quickly to global visitors.
Automatic backups and staging: To restore your site quickly after a failed update or security issue.
A practical way to test your hosting performance is to check the server’s PHP memory limit and execution time. You can verify these by creating a simple phpinfo.php file in your site’s root directory with the following content:
<?php phpinfo(); ?>
Access this file via your browser (e.g., yoursite.com/phpinfo.php). Look for memory_limit (should be at least 256MB) and max_execution_time (should be at least 300 seconds). Delete this file after testing to avoid security risks.
Recommended hosting types: shared, VPS, or managed WordPress
Each hosting type offers different trade-offs for a hotel booking site. Use the table below to compare options:
Hosting Type
Best For
Performance
Control
Estimated Monthly Cost
Shared hosting
Small hotels or B&Bs with under 10 rooms and low traffic (under 500 visitors/day)
Low; resources shared with other sites
Minimal; limited server configuration
$5–$15
VPS (Virtual Private Server)
Mid-size hotels with 10–50 rooms and moderate traffic (500–5,000 visitors/day)
Moderate to high; dedicated resources
High; full root access
$20–$60
Managed WordPress hosting
Any hotel booking site, especially those using WooCommerce or booking plugins
High; optimized for WordPress with caching and CDN
Medium; provider handles updates and security
$25–$100+
For most hotel booking sites, managed WordPress hosting is the recommended choice. It includes automatic updates, server-level caching, and expert support for e-commerce plugins. Avoid shared hosting if you expect more than a few hundred daily visitors, as performance degrades quickly during booking surges.
Tips for selecting a domain that builds trust with travelers
Your domain name is often the first impression travelers have of your hotel brand. A trustworthy domain encourages clicks and bookings. Follow these tips:
Use a .com extension if possible. Travelers universally recognize .com as credible. Avoid free subdomains (e.g., yourhotel.wordpress.com) as they appear unprofessional.
Keep it short and memorable. Aim for 6–14 characters. For example, seaviewresort.com is better than seaviewbeachresortandspa.com.
Include your hotel or location name. This helps with search engine optimization (SEO) and brand recall. Examples: grandplazahotel.com or parisinnbooking.com.
Avoid hyphens and numbers. They are often mistyped and can look spammy. For instance, best-hotel-nyc.com is weaker than besthotelnyc.com.
Check for trademark conflicts. Use the USPTO database or a domain registrar’s trademark check to avoid legal issues.
Register for multiple years. A domain registered for two or more years signals stability to both search engines and travelers.
Once you have selected a domain, purchase it from a reputable registrar that offers WHOIS privacy protection to hide your personal contact information. Pair it with your chosen hosting provider by updating the domain’s nameservers, a process typically guided by your host’s setup wizard.
Once your hosting account is active, the next step in learning how to build a hotel booking site with WordPress is to install the WordPress software itself and select a theme that supports your hospitality business. This phase transforms a blank server into a functional content management system, ready for customization.
How to install WordPress via cPanel or one-click installer
Most reputable hosting providers offer a streamlined installation process through cPanel or a proprietary control panel. Follow these steps for a typical one-click installation:
Log into your hosting control panel (often cPanel) and locate the “Softaculous Apps Installer” or “WordPress Installer” icon under the “Software” or “Auto Installers” section.
Click the WordPress icon, then select the “Install” tab. Choose the domain where you want the site to appear (e.g., yourdomain.com).
Fill in the required fields: Site Name (e.g., “Grand Harbor Hotel”), Site Description (optional, e.g., “Luxury stays by the coast”), Admin Username, Admin Password, and Admin Email. Use a strong, unique password.
Optionally, customize the database table prefix (change “wp_” to something like “htlbk_” for security) and select a language.
Click “Install.” The process usually completes in under two minutes. You will receive an admin URL (e.g., yourdomain.com/wp-admin) and login credentials.
If your host does not offer a one-click installer, manual installation via cPanel is still straightforward: download WordPress from wordpress.org, upload the zip file to the “public_html” folder using File Manager, extract it, create a MySQL database and user via the “MySQL Databases” tool, and run the installation script by visiting your domain. The on-screen wizard will guide you through the same configuration steps.
Selecting a hotel- or booking-focused WordPress theme
Your theme dictates the visual structure and many core functionalities of your booking site. For a hotel site, prioritize themes that include built-in booking forms, room management, and calendar widgets. Below is a comparison of three popular themes optimized for hospitality:
Theme Name
Key Features
Best For
Hotel Booking Lite
Room types, availability calendar, reservation form, payment gateway integration (PayPal/Stripe)
Small to mid-sized hotels or B&Bs needing a dedicated booking system
Astra (with Hotel Booking plugin)
Lightweight, fast loading, customizable header/footer, works with Elementor, compatible with WP Hotel Booking plugin
Users who want a flexible base theme and plan to add booking functionality via a separate plugin
Villa
Pre-built demos for hotels and resorts, one-click demo import, built-in slider, room grid layout, contact form integration
Luxury hotels or resorts that require a polished, visual-first design with minimal setup
When evaluating themes, check for responsiveness (mobile-friendly design), translation readiness (important for international guests), and regular updates. Avoid themes that bundle excessive features you do not need, as they can slow down your site.
Customizing your theme with page builders for a polished look
After installing your chosen theme, use a page builder plugin to refine the layout without writing code. Elementor and Beaver Builder are the most widely supported options. Start by creating essential pages: Home, Rooms, Booking, About, and Contact. With a drag-and-drop interface, you can:
Add a hero section with a high-quality image of your property and a prominent “Book Now” button.
Insert pre-designed room cards that display pricing, amenities, and availability calendars.
Embed a contact form using a plugin like WPForms or the theme’s built-in form widget.
Adjust typography and color schemes to match your brand identity (e.g., warm tones for a boutique hotel).
Most page builders also offer global settings, allowing you to apply consistent styling across all pages. Test each page on mobile and tablet views to ensure a seamless experience for guests browsing on any device. Once your theme is customized, you are ready to move to the next phase: adding a dedicated booking system and managing reservations.
4. Selecting and Installing a Booking Plugin
The booking plugin is the heart of your hotel site. It manages availability, processes reservations, and handles payments. Choosing the right one and configuring it correctly determines whether your system runs smoothly or creates constant headaches. This section compares top options and walks through installation and setup.
Top booking plugins: WP Simple Booking Calendar, HBook, and MotoPress
Three plugins dominate the WordPress hotel booking space, each with distinct strengths:
WP Simple Booking Calendar — Best for small properties with straightforward needs. It offers a clean calendar interface, manual booking entry, and basic availability management. Free core version available; paid add-ons for payment gateways and email notifications. Limited for complex rate rules.
HBook — A flexible premium plugin (around $39/year) with built-in payment integration (PayPal, Stripe), custom booking forms, and seasonal pricing. Supports multiple room types and coupon codes. Good for mid-sized hotels that need moderate customization without heavy development.
MotoPress Hotel Booking — A robust solution for larger properties. Includes a dedicated booking dashboard, automated email confirmations, deposit/balance payment options, and integration with Google Calendar. Premium license starts at $69/year. Handles complex availability rules like minimum nights and check-in/check-out restrictions.
Plugin
Price
Best For
Key Limitation
WP Simple Booking Calendar
Free + paid add-ons
Small properties, simple needs
Limited rate rules
HBook
$39/year
Mid-sized hotels, seasonal pricing
No multi-language support
MotoPress Hotel Booking
$69/year
Large properties, complex rules
Steeper learning curve
Step-by-step installation and basic configuration
Once you have selected a plugin, installation follows the same process for all three:
In your WordPress admin dashboard, navigate to Plugins > Add New.
For WP Simple Booking Calendar, search the plugin directory. For HBook or MotoPress, click Upload Plugin and select the downloaded .zip file.
Click Install Now, then Activate.
Go to the plugin’s settings page (usually a new menu item like “Bookings” or “Hotel Booking”).
Set general preferences: currency, date format, timezone, and default booking status (e.g., “Pending” or “Confirmed”).
Configure payment gateways if supported. For example, in HBook, navigate to Bookings > Settings > Payments and paste your Stripe API keys.
Enable email notifications for new bookings, cancellations, and reminders. Test by sending a sample email to yourself.
Setting up room types, rates, and availability rules
After basic configuration, define your inventory. This step varies slightly by plugin but follows a universal logic:
Room types — Create each category (e.g., Standard Double, Deluxe Suite, Family Room). For each, set the number of units, base occupancy, and maximum guests. In MotoPress, go to Hotel Booking > Room Types > Add New.
Rates — Assign base prices per night. Most plugins allow seasonal adjustments. For HBook, use Bookings > Rates to set high-season multipliers (e.g., 1.5× for June–August).
Availability rules — Set minimum/maximum nights, buffer days between bookings, and check-in/check-out day restrictions. For example, to block Sunday check-ins in WP Simple Booking Calendar, add this filter to your theme’s functions.php file:
After saving, test by making a sample booking from the front end. Verify that blocked dates appear correctly and that rates change with the season. Adjust any rules that conflict with your actual hotel policies. Properly configured, these settings automate your reservation system and reduce manual errors.
5. Configuring Room Listings and Availability Calendars
Detailed room pages with accurate calendars are critical for converting visitors into guests. Without precise availability and clear descriptions, you risk double bookings and frustrated customers. This section covers how to add room descriptions, photos, pricing, and real-time availability using a robust hotel booking plugin like WP Hotel Booking or MotoPress Hotel Booking. These plugins integrate seamlessly with WordPress and provide the tools needed for professional management.
Creating room categories and individual room entries
Organize your rooms logically to help guests quickly find what suits them. Start by defining room categories based on type, view, or amenities. Common categories include:
Standard Rooms (single or double occupancy)
Deluxe Rooms (larger size or better views)
Suites (separate living area, premium features)
Family Rooms (capacity for 4+ guests)
Accessible Rooms (wheelchair-friendly design)
Once categories are set, create individual room entries. For each room, include the following fields:
Field
Description
Room Name
Unique identifier (e.g., “Ocean View Suite 301”)
Description
Engaging text highlighting features, size, and ambiance
Photos
High-resolution images (at least 5-10 per room)
Amenities
List such as Wi-Fi, air conditioning, minibar, balcony
Base Price
Standard nightly rate before seasonal adjustments
Max Guests
Number of adults and children allowed
Bed Configuration
e.g., 1 King bed or 2 Twin beds
Use a plugin that supports custom fields or a dedicated room post type to ensure consistency. Assign each room to its appropriate category for filtering on the front end.
Integrating interactive availability calendars
An interactive calendar shows guests exactly which dates are open, preventing booking conflicts. Most hotel booking plugins include a built-in calendar that syncs with your room entries. To integrate effectively:
Enable the calendar widget on each room’s detail page.
Set the calendar to display a 12-month view for long-term planning.
Color-code availability: green for open, red for booked, yellow for pending.
Allow guests to click a date range and see the total price update in real time.
Configure the plugin to block check-in and check-out dates automatically based on your policy (e.g., minimum 2-night stay).
Test the calendar thoroughly by simulating bookings from different devices. Ensure that when a guest books a room, the calendar updates instantly across all pages. Plugins like WP Hotel Booking offer synchronization with external channels (e.g., Booking.com or Airbnb) via iCal feeds, which is essential for avoiding overbooking.
Managing seasonal pricing and minimum stay requirements
Hotels often adjust rates based on demand, holidays, or local events. Your WordPress site must handle these variations without manual daily updates. Use the plugin’s pricing rules to set:
Seasonal rates: Define peak season (e.g., summer months, Christmas) with higher prices, and off-peak with discounts.
Day-of-week pricing: Charge more for Friday and Saturday nights.
Special event pricing: Apply surcharges for conferences or festivals.
Minimum stay requirements: Enforce a 3-night minimum during peak periods and 1 night otherwise.
Early bird and last-minute discounts: Automatically reduce rates for bookings made 30 days in advance or within 48 hours.
Most plugins allow you to create a pricing table within the room edit screen. For example, you can set “June 1–August 31: $250/night, minimum 3 nights” and “September 1–November 30: $180/night, minimum 1 night.” Ensure that the front-end calendar reflects these rules, so guests see accurate totals before proceeding to checkout. Test a scenario where a guest selects dates crossing two seasons to verify the system calculates the blended rate correctly.
6. Integrating a Payment Gateway for Secure Transactions
To accept bookings on your hotel site, you must integrate a payment gateway that securely processes transactions. This step ensures guests can pay deposits or full amounts while you receive funds reliably. Most booking plugins support popular gateways like Stripe, PayPal, or regional options such as Square, Razorpay, or Mollie. The process involves selecting a gateway, configuring settings within your plugin, and testing thoroughly before going live. Below is a structured walkthrough to connect your payment system.
Choosing a payment gateway that supports your region
Selecting the right gateway depends on your business location and target audience. Consider these factors:
Regional availability: Stripe operates in over 40 countries, while PayPal is widely accessible globally. For specific regions, alternatives like PayU (India), iDEAL (Netherlands), or Alipay (China) may be necessary.
Transaction fees: Compare percentage-based fees (typically 2.9% + $0.30 for Stripe) versus flat rates. Some gateways charge monthly fees or setup costs.
Currency support: Ensure the gateway handles your local currency and any international currencies your guests might use.
Booking plugin compatibility: Most plugins like WP Hotel Booking, Hotel Booking Lite, or MotoPress support Stripe and PayPal natively. Check your plugin’s documentation for supported gateways.
Security features: Look for PCI DSS compliance, 3D Secure authentication, and fraud protection tools.
To verify compatibility, log into your WordPress admin, navigate to your booking plugin’s payment settings, and review the list of available gateways. If your region lacks support, consider using a payment aggregator like Stripe Connect or a third-party plugin such as WooCommerce Payments if your booking system integrates with WooCommerce.
Configuring payment settings in your booking plugin
Once you choose a gateway, configure it within your booking plugin. Here is a generic process using Stripe as an example:
Install and activate the gateway add-on: For Stripe, install the Stripe Payment Gateway plugin (or your booking plugin’s Stripe extension). Activate it from Plugins.
Obtain API keys: Log into your Stripe account, navigate to Developers > API keys, and copy the Publishable key and Secret key.
Enter keys in your booking plugin: Go to your plugin’s payment settings (e.g., WP Hotel Booking > Settings > Payment Gateways). Select Stripe, paste the keys into the designated fields, and set the gateway to “Enabled.”
Configure payment options: Set whether to charge a deposit or full amount at booking. For example, enable “Pay at Booking” with a 50% deposit.
Adjust currency and locale: Set your default currency (e.g., USD, EUR) and choose the customer-facing language for the payment form.
Below is a practical PHP snippet to add a custom payment gateway to a booking plugin (use with caution and test in a staging environment):
Replace “custom_gateway” with your gateway’s slug and implement the class logic per your plugin’s API.
Testing transactions in sandbox mode before going live
Before accepting real payments, test your gateway in sandbox (test) mode. Follow these steps:
Enable sandbox mode: In your gateway’s settings, toggle “Test Mode” or “Sandbox.” For Stripe, use test API keys (starting with “pk_test” and “sk_test”).
Simulate a booking: As a guest, navigate to your site, select a room, and complete the checkout process using test card numbers (e.g., Stripe’s test card: 4242 4242 4242 4242, any future expiry, any CVC).
Verify the transaction: Check your gateway dashboard for a successful test payment. In WordPress, confirm the booking status changes to “Confirmed” or “Completed.”
Test failure scenarios: Use a declined card (e.g., 4000 0000 0000 0002) to ensure your site handles errors gracefully, displaying a clear message to the guest.
Disable sandbox mode: Once all tests pass, return to settings, disable test mode, and replace test keys with live API keys. Run one final live test with a small refundable amount (e.g., $1) before enabling full operations.
After successful testing, your hotel booking site will securely process payments, reducing manual follow-ups and ensuring a smooth guest experience.
7. Adding Booking Forms and Customizing Checkout
A smooth booking form is the silent salesperson of your hotel site. Every unnecessary field or confusing step increases abandonment. By designing forms that feel effortless yet collect everything you need—guest names, contact details, check-in/out dates, room preferences, and special requests—you reduce friction and boost conversions. WordPress plugins like WP Simple Booking Calendar, Hotel Booking Lite, or MotoPress Hotel Booking let you build these forms without coding. The key is balancing completeness with simplicity.
Check-in and check-out dates (with calendar picker)
Number of adults and children
Room type or selected offering
Optional but helpful fields include special requests (e.g., early check-in, extra pillows, dietary needs) and a notes area. Use clear labels, placeholder text, and real-time validation (e.g., red border on missing fields). Avoid dropdowns for dates—use datepickers to prevent errors. Group fields logically: personal details first, then stay details, then requests. Mobile users benefit from larger tap targets and single-column layouts. Test your form on a phone before launch.
Enabling deposit or full payment options
Offering flexible payment terms increases bookings. Many plugins support partial deposits (e.g., 30% at booking, balance at check-in) or full upfront payment. Configure this in your booking plugin’s payment settings. Common options include:
Payment Type
How It Works
Best For
Full payment
Guest pays 100% at booking
Short stays, high-demand periods
Deposit + balance
Guest pays a fixed percentage or amount now; remainder due later
Longer stays, luxury properties
Pay at hotel
No online payment required; guest pays on arrival
Small inns, repeat guests
To implement deposits, choose a plugin that integrates with Stripe, PayPal, or WooCommerce. Set the deposit amount as a percentage or flat fee. Display the payment breakdown clearly in the checkout summary: “Deposit due now: $50. Balance due at check-in: $120.” Never surprise guests with hidden fees. Provide a countdown for balance payment reminders via email.
Adding terms, cancellation policies, and GDPR consent checkboxes
Legal clarity protects your business and builds trust. Include these mandatory checkboxes before the “Confirm Booking” button:
“I agree to the Terms & Conditions” (linked to your full terms page)
“I have read and accept the Cancellation Policy” (linked to policy page)
“I consent to receiving booking-related communications via email” (GDPR-compliant)
“I consent to the storage and processing of my personal data as described in the Privacy Policy” (required for EU/EEA guests)
Make each checkbox a required field using your plugin’s form builder. Display the cancellation policy in plain language near the form: “Free cancellation up to 48 hours before check-in. After that, 50% charge.” For GDPR, ensure the checkbox is not pre-checked. Provide a link to your privacy policy that opens in a new tab. Test that unchecking any box prevents form submission and shows a clear error message. These small details demonstrate professionalism and reduce disputes.
8. Implementing Essential Plugins for Performance and Security
With your booking engine active, the next priority is ensuring your site loads quickly and remains secure. Travelers abandon slow or untrusted sites, and booking sites handle sensitive payment data. The right combination of performance, security, and search engine optimization plugins will protect your business and attract guests.
Optimizing page speed with caching and image compression
Page speed directly impacts conversion rates on booking sites. A one-second delay can reduce bookings by up to 7%. Use these plugin types to accelerate your site:
Caching plugins (e.g., WP Rocket, W3 Total Cache, or LiteSpeed Cache): Generate static HTML copies of your pages to reduce server load and deliver content faster to returning visitors.
Image compression plugins (e.g., Smush, ShortPixel, or Imagify): Automatically compress images without losing quality. Hotel sites rely heavily on high-resolution room photos, so this is critical.
Content delivery network (CDN) integration: Many caching plugins offer CDN features or integrate with services like Cloudflare to serve assets from servers closer to your guests.
For a booking site, prioritize lazy loading for images and defer non-critical JavaScript. This ensures room galleries load only when a user scrolls to them, improving initial page load times.
Securing forms and payment data with SSL and firewalls
Hotel booking sites process names, email addresses, credit card numbers, and passport details. Security is non-negotiable. Install these plugins to protect your guests:
SSL certificate: Obtain a free SSL certificate via your hosting provider (often through Let’s Encrypt) or a paid Extended Validation (EV) certificate. This encrypts all data between the browser and your server.
Web application firewall (WAF): Use plugins like Wordfence, Sucuri, or iThemes Security to block malicious traffic, SQL injection attempts, and brute force attacks on your login page.
Form and payment security: Ensure your booking plugin transmits data over HTTPS. For payment gateways like Stripe or PayPal, use their hosted fields or iframes to avoid storing sensitive card data on your server.
Regularly update all plugins and themes. A vulnerability in an outdated plugin can expose your entire booking database.
Using SEO plugins to attract organic traffic from travelers
Organic search is a primary source of bookings. SEO plugins help you optimize for travel-related queries such as “beachfront hotel in Cancun” or “budget rooms in Paris.” The table below compares three leading SEO plugins for WordPress booking sites:
Feature
Yoast SEO
Rank Math
All in One SEO
Schema markup for hotels
Limited (requires premium)
Built-in (Hotel schema, reviews)
Limited (requires add-on)
XML sitemap generation
Yes
Yes (with advanced options)
Yes
Local SEO optimization
Basic
Advanced (Google Business Profile integration)
Good
Readability analysis
Yes
Yes
No
Social media previews
Yes
Yes (with per-post settings)
Yes
Breadcrumb control
Yes
Yes (automatic)
Yes
For a hotel booking site, prioritize a plugin that supports Hotel schema markup. This structured data enables rich results in search engines, displaying star ratings, price ranges, and availability directly in search listings. Rank Math offers the most comprehensive schema support out of the box, while Yoast requires a premium upgrade for the same functionality.
Beyond schema, use your SEO plugin to optimize meta descriptions for each room type and location page. Include keywords naturally, such as “luxury suites near Times Square” or “family-friendly resort with pool.” Regularly generate and submit sitemaps to Google Search Console to ensure all your booking pages are indexed.
Before you flip the switch and make your hotel booking site live, rigorous testing is non-negotiable. A single broken booking flow or missed email notification can cost you revenue and trust. This phase ensures that every component—from availability checks to payment confirmations—works flawlessly under real-world conditions. Follow this structured approach to validate your setup and launch with confidence.
Testing booking flows, calendar sync, and email notifications
Start by simulating a complete guest journey. Use incognito browser windows to avoid cached data and test as a first-time visitor. Walk through these critical paths:
Search and availability: Enter check-in and check-out dates for a standard room. Verify that the system displays accurate nightly rates and total costs, including taxes and fees.
Booking submission: Complete a reservation with test payment details (use your payment gateway’s sandbox mode). Confirm that the booking appears in your WordPress dashboard under the hotel booking plugin’s orders or reservations section.
Calendar sync: If you use a channel manager or iCal feeds to sync with OTAs (e.g., Booking.com, Airbnb), manually block a date in your WordPress calendar and verify that the same date shows as unavailable on your OTA listings within 15 minutes.
Email notifications: Check that the guest receives a confirmation email immediately after booking, and that you (the admin) receive a new booking alert. Test both HTML and plain-text versions if your plugin supports them. Use a temporary email service like Mailinator to verify delivery without cluttering your inbox.
Document any discrepancies, such as missing taxes or delayed emails, and fix them before proceeding.
Launch sequence: final checks, going live, and monitoring initial traffic
After testing, execute a controlled launch sequence. Begin with these final checks:
SSL certificate: Confirm your site uses HTTPS, especially on checkout and login pages. Use a tool like SSL Labs to verify.
Google Analytics and search console: Ensure tracking codes are installed and that your sitemap is submitted. Set up conversion goals for completed bookings.
Backup: Create a full backup of your database and files using a plugin like UpdraftPlus or your hosting control panel.
Maintenance mode: If you used a maintenance plugin (e.g., WP Maintenance Mode), deactivate it.
To go live, update your domain’s DNS records to point to your hosting server (if not already done). Monitor your site for the first 48 hours: check server error logs, watch for 404 pages, and verify that booking emails continue to send. Use a tool like UptimeRobot to alert you of downtime. Finally, announce your launch via email to your existing guest list and social media channels. With proper testing behind you, your hotel booking site is ready to welcome its first real guests.
10. Maintaining and Growing Your Booking Site After Launch
Launching your hotel booking site is only the beginning. To keep it secure, competitive, and profitable, you must commit to regular maintenance and strategic growth. This phase ensures your WordPress site remains a reliable booking engine while attracting a steady stream of new guests. Below, we outline essential updates, data-driven optimization, and proven marketing tactics to sustain and expand your online presence.
Regular plugin and theme updates to prevent security issues
WordPress powers over 40% of the web, making it a frequent target for malicious attacks. Outdated plugins and themes are the most common entry points for hackers. To protect your booking site and guest data:
Enable automatic updates for minor plugin and theme releases via your WordPress dashboard under Dashboard > Updates.
Schedule manual checks for major updates—test them on a staging site first to avoid breaking critical booking functions.
Remove unused plugins and themes entirely; they can still pose security risks even when deactivated.
Use a security plugin like Wordfence or Sucuri to monitor for vulnerabilities and block malicious traffic.
Back up your site weekly (or daily during high-traffic seasons) using tools like UpdraftPlus or Jetpack.
A well-maintained site not only prevents downtime but also ensures compatibility with the latest WordPress core and PHP versions, keeping your booking system fast and reliable.
Using Google Analytics and booking data to optimize conversion
Raw traffic means little if visitors don’t book. By analyzing user behavior and booking patterns, you can pinpoint friction points and improve your conversion rate. Focus on these data sources:
Data Source
What to Track
Actionable Insight
Google Analytics
Page load speed, bounce rate, traffic sources
Optimize slow pages; target high-performing channels with more ads.
Booking plugin reports
Abandoned bookings, popular room types, peak booking times
Simplify checkout steps; highlight best-selling rooms on the homepage.
Test which version yields more completed bookings.
For example, if analytics reveal that mobile users abandon bookings at the payment step, consider adding a guest checkout option or integrating Apple Pay/Google Pay. Combine these insights with seasonal trends to adjust pricing and availability dynamically.
Marketing tactics: Google Hotels, social media, and email campaigns
Once your site is stable and optimized, drive targeted traffic with these three channels:
Google Hotels: List your property on Google’s travel platform to appear in search results and maps. Ensure your booking plugin supports the Google Hotels XML feed, and update rates and availability in real time to avoid overbookings.
Social media: Use Instagram and Facebook to showcase high-quality photos of rooms, local attractions, and guest experiences. Run targeted ads for specific travel dates or promotions (e.g., “Book 3 nights, get 1 free”).
Email campaigns: Collect emails during the booking process (with opt-in) and send automated sequences: a welcome series for new subscribers, a pre-arrival guide, a post-stay thank-you with a discount for return visits, and seasonal offers.
Combine these efforts with local SEO—optimize your Google Business Profile and encourage guest reviews—to build authority. Monitor each channel’s performance using UTM parameters in Google Analytics, and reallocate budget to the highest-ROI tactics. Consistent, data-driven marketing will transform your booking site from a launch project into a sustainable revenue stream.
Frequently Asked Questions
What is the best plugin for building a hotel booking site on WordPress?
The best plugin depends on your needs. Popular options include WP Hotel Booking, Hotel Booking Lite by MotoPress, and WP Simple Booking Calendar. WP Hotel Booking offers features like room management, availability calendars, and payment gateway integration. Hotel Booking Lite provides a free version with essential booking features. For a more comprehensive solution, consider paid plugins like BirchPress Scheduler or Bookly Pro. Evaluate based on ease of use, customization, scalability, and support. Always check compatibility with your WordPress theme and version.
Do I need coding skills to create a hotel booking site with WordPress?
No, you do not need advanced coding skills. WordPress is designed for non-developers. You can use drag-and-drop page builders like Elementor or Beaver Builder along with booking plugins that handle the complex logic. Many themes come with pre-built templates for hotel sites. However, basic knowledge of HTML/CSS can help with customizations. If you want advanced features like custom payment gateways or complex pricing rules, you may need a developer or a premium plugin that offers those options.
How do I accept payments on my WordPress hotel booking site?
To accept payments, integrate a payment gateway plugin like WooCommerce, Stripe, or PayPal. Many hotel booking plugins offer built-in support for these gateways. For example, WP Hotel Booking supports PayPal, Stripe, and offline payments. You can also use a dedicated payment plugin like WP Simple Pay or Easy Digital Downloads. Ensure your site has SSL encryption (HTTPS) for secure transactions. Test payments in sandbox mode before going live to avoid errors.
Can I manage room availability and reservations automatically?
Yes, most WordPress hotel booking plugins include automatic availability management. They sync reservations across all rooms and dates, preventing double bookings. Plugins like Hotel Booking Lite update the calendar in real-time. You can set minimum stay requirements, check-in/check-out times, and seasonal pricing. Some plugins also send email notifications to guests and administrators. For multi-property management, consider advanced plugins like WP Hotel Booking with add-ons.
How do I optimize my hotel booking site for search engines?
Use an SEO plugin like Yoast SEO or Rank Math to optimize meta titles, descriptions, and headings. Create unique content for each room page, including high-quality images and detailed descriptions. Enable breadcrumbs and generate an XML sitemap. Use schema markup for hotels (e.g., Hotel, Room, Reservation) to enhance rich snippets. Improve site speed with caching plugins and optimized images. Build backlinks through local directories and travel blogs. Regularly update content and monitor performance with Google Search Console.
What hosting is recommended for a hotel booking site?
Choose a reliable WordPress hosting provider that offers good performance and support. Managed WordPress hosting like WP Engine, Kinsta, or SiteGround is ideal for booking sites due to optimized speed, security, and scalability. Ensure the host supports PHP 8.0+, MySQL, and SSL certificates. For high-traffic sites, consider cloud hosting like AWS or Google Cloud. Avoid cheap shared hosting as it may slow down during peak booking times. Look for hosts with automatic backups and staging environments.
How can I add a booking calendar to my WordPress site?
Install a booking plugin with calendar functionality. Plugins like WP Simple Booking Calendar or Hotel Booking Lite offer easy-to-use calendars that display availability. You can add the calendar to any page using a shortcode or widget. Customize the calendar colors and layout to match your theme. Some plugins also support iCal synchronization for external calendars. Ensure the calendar updates in real-time to prevent overbooking. Test on mobile devices for responsiveness.
Is it possible to create a multilingual hotel booking site?
Yes, use a multilingual plugin like WPML, Polylang, or TranslatePress. Many hotel booking plugins are compatible with these tools. Translate room descriptions, booking forms, and confirmation emails. Ensure the booking plugin supports language switching and localizes payment currencies. For global reach, consider adding language switchers in the header. Test the booking flow in each language to avoid translation errors. Some plugins offer built-in multilingual support, but third-party solutions are more flexible.
WordPress and Cloudflare: Enhancing Security and Performance
Introduction: Why Pair WordPress with Cloudflare
The Growing Need for Speed and Protection
WordPress powers over 43% of all websites, making it a prime target for malicious attacks and performance bottlenecks. As online expectations rise, site owners face a dual challenge: delivering content in under two seconds while defending against DDoS attacks, brute force login attempts, and SQL injections. Cloudflare addresses both needs simultaneously. By acting as a reverse proxy between visitors and your WordPress server, it filters harmful traffic before it reaches your site and caches static resources to reduce server load. This integration transforms a standard WordPress installation into a faster, more resilient platform without requiring deep technical expertise. The result is a measurable improvement in Time to First Byte (TTFB) and a significant reduction in bandwidth costs, all while maintaining high availability during traffic spikes.
How Cloudflare’s Global Network Works
Cloudflare operates a distributed network of data centers in over 330 cities worldwide. When you point your domain’s nameservers to Cloudflare, all visitor traffic routes through its intelligent infrastructure. Here is a breakdown of the core mechanisms that benefit WordPress:
Reverse proxy caching: Static assets like CSS, JavaScript, and images are stored at edge locations, serving them from the nearest data center rather than your origin server.
DDoS mitigation: Malicious traffic is identified and blocked at the network level, preventing server overload.
SSL/TLS encryption: Cloudflare provides free universal SSL certificates, securing data in transit between visitors and your site.
Web Application Firewall (WAF): Pre-configured rules block common WordPress vulnerabilities, such as XML-RPC attacks and comment spam.
Argo Smart Routing: Optimizes network paths to reduce latency by up to 30%.
This architecture ensures that even a shared hosting WordPress site can deliver enterprise-grade performance and security.
The combination of WordPress and Cloudflare serves a wide range of users, from hobbyists to large enterprises. Below is a summary of key groups and their primary gains:
User Type
Primary Benefit
Example Use Case
Bloggers and small businesses
Cost-effective security and speed
Preventing downtime during traffic surges from a viral post
E-commerce store owners
Faster page loads and reduced cart abandonment
Caching product images and protecting checkout pages
Developers and agencies
Simplified management of multiple sites
Applying global WAF rules for client WordPress installations
High-traffic news or media sites
Scalable content delivery under heavy load
Serving breaking news articles with minimal latency
By integrating Cloudflare, these users gain a unified layer of protection and acceleration that adapts to their specific needs, whether they run a single personal blog or a multi-site network. The setup process takes less than an hour and requires no coding, making it accessible to anyone who manages a WordPress site. This foundation sets the stage for more advanced strategies covered in the remainder of the article.
Understanding Cloudflare’s Core Security Features for WordPress
WordPress powers a significant portion of the web, making it a frequent target for automated attacks, brute-force login attempts, and application-layer exploits. Cloudflare’s security suite acts as a reverse proxy, inspecting traffic before it reaches your server. This section examines the core tools that directly protect WordPress installations, focusing on filtering malicious requests, absorbing volumetric attacks, and managing unwelcome bots.
Web Application Firewall (WAF) and WordPress-Specific Rules
Cloudflare’s Web Application Firewall analyzes incoming HTTP requests against a constantly updated rule set. For WordPress, the managed ruleset includes signatures that block common vulnerabilities such as SQL injection, cross-site scripting (XSS), and path traversal attempts targeting wp-admin or wp-content directories. You can also enable the OWASP Top 10 rule set for additional coverage.
To tailor protection, Cloudflare provides WordPress-specific rules that mitigate known plugin and theme exploits. These rules are updated automatically when new vulnerabilities are disclosed. A practical step is to create a custom rule that challenges or blocks requests to the XML-RPC endpoint unless needed, as it is a frequent vector for brute-force attacks.
Key WAF actions for WordPress administrators include:
Blocking requests containing common exploit payloads in query strings or POST bodies.
Challenging traffic to the login page (e.g., /wp-login.php) using JavaScript or CAPTCHA.
Logging blocked requests to review false positives and adjust rule sensitivity.
To verify your WAF is active, you can test with a simulated attack. For example, a request containing a typical SQL injection pattern should return a 403 Forbidden response:
curl -I "https://yourdomain.com/?id=1' OR '1'='1"
If the response includes a CF-WAF header or a Cloudflare challenge, the rule is functioning.
DDoS Mitigation for Traffic Spikes
Distributed Denial-of-Service attacks aim to overwhelm your WordPress server with traffic. Cloudflare’s network, which spans over 330 cities, absorbs and filters this traffic at the edge. For WordPress, the most relevant protection is against Layer 7 (application layer) attacks that flood the login page, pingback endpoints, or REST API.
Cloudflare automatically detects anomalies in request patterns, such as a sudden surge from a single IP range or an unusual number of POST requests. When an attack is identified, the system applies mitigation actions like challenge pages, rate limiting, or blocking. You can adjust the sensitivity in the Security > Settings panel. For high-traffic WordPress sites, consider enabling Under Attack Mode temporarily during an active event to present a JavaScript challenge to all visitors.
Unwanted bots can consume server resources, scrape content, and attempt credential stuffing. Cloudflare’s Bot Fight Mode scores every request based on behavior, headers, and browser fingerprints. For WordPress, this is essential to block comment spam bots, form submission scrapers, and automated vulnerability scanners.
Bot Fight Mode can be set to three levels: Block (aggressive), Challenge (CAPTCHA for suspicious bots), or Allow (monitor only). For most WordPress sites, the Challenge setting provides a balance between security and user experience. Additionally, you can create a custom rule to bypass bot detection for known good bots, such as Googlebot, to preserve SEO rankings.
Rate limiting complements bot management by restricting the number of requests from a single IP over a defined period. Practical rate limits for WordPress include:
Endpoint
Limit
Duration
Action
/wp-login.php
10 requests
1 minute
Block for 10 minutes
/wp-json/wp/v2/users
20 requests
5 minutes
Challenge
Any POST to /xmlrpc.php
5 requests
1 minute
Block
To implement a rate limit via the Cloudflare dashboard, navigate to Security > WAF > Rate Limiting rules and define the expression, threshold, and action. For example, a rule targeting the login page would use the expression (http.request.uri.path eq "/wp-login.php") with a threshold of 10 requests per 60 seconds.
Performance Optimization: Caching and CDN Fundamentals
Cloudflare’s content delivery network (CDN) and caching mechanisms directly reduce server load and accelerate content delivery for WordPress visitors worldwide. By distributing static and dynamic content across a global network of edge servers, Cloudflare minimizes latency and offloads requests from the origin server. This section examines three core caching strategies: static asset caching with page rules, Automatic Platform Optimization (APO), and edge caching with cache tiering.
Static Asset Caching with Page Rules
Cloudflare Page Rules allow fine-grained control over how static assets like images, CSS, and JavaScript are cached at the edge. By setting specific rules, you can enforce longer cache durations for immutable files, reducing repeated requests to your WordPress server.
Cache key customization: Exclude query strings or cookies to improve cache hit rates.
Edge Cache TTL: Define time-to-live values for static resources, often set to 30 days or more.
Bypass cache on dynamic pages: Use page rules to exclude admin URLs or cart pages.
Combine with cache-level settings: Standard, bypass, or cache everything rules apply to specific URL patterns.
For a typical WordPress site, static asset caching can reduce origin server requests by 60-80%, depending on theme complexity and image sizes. Page Rules are limited to three free rules per domain, but paid plans offer more.
Automatic Platform Optimization (APO) for WordPress
Automatic Platform Optimization is a paid Cloudflare service designed specifically for WordPress. It caches entire HTML pages at the edge, including dynamic content, while preserving personalization for logged-in users or cart sessions.
Dynamic content caching: APO serves anonymous visitors cached HTML, bypassing WordPress PHP and database queries.
Cache purging: Automatically clears cached pages when content is updated via the WordPress admin.
Third-party integration: Works with most WordPress plugins, including WooCommerce and membership sites.
Performance gains: Reduces Time to First Byte (TTFB) by 50-70% for uncached first visits.
APO requires a Cloudflare Pro plan (or higher) and a WordPress plugin for seamless cache management. It is particularly effective for content-heavy sites with high traffic spikes.
Edge Caching and Cache Tiering
Cache Tiering organizes Cloudflare’s global network into a hierarchy of cache layers, improving efficiency for origin servers in geographically distant locations. Lower-tier edge nodes serve cached content, while higher-tier nodes pull from the origin only when necessary.
Cache Tiering is especially beneficial for WordPress sites with a global audience, as it reduces the number of requests that reach the origin server, lowering bandwidth costs and improving cache hit ratios. For example, a visitor in Australia might retrieve content from a regional edge node, which in turn gets data from a tier node in Asia, rather than directly from a European origin.
Combining these three strategies—static asset caching, APO, and cache tiering—creates a robust performance foundation for any WordPress site, reducing server load while delivering content faster to users worldwide.
Setting Up Cloudflare with WordPress: A Step-by-Step Guide
Integrating Cloudflare with your WordPress site unlocks a powerful layer of security and performance optimization. This guide walks you through the essential configuration steps, from initial domain setup to activating the dedicated plugin. Follow each stage carefully to ensure a smooth transition and immediate benefits.
The first step is registering your domain with Cloudflare. Log into your Cloudflare account and click “Add a Site.” Enter your WordPress site’s domain name (e.g., example.com) and select a plan—the Free tier is sufficient for most sites. Cloudflare will scan your existing DNS records; review them carefully and ensure all critical records (A, CNAME, MX, TXT) are present and correct. Once confirmed, Cloudflare provides two nameservers (e.g., alice.ns.cloudflare.com and bob.ns.cloudflare.com).
Next, update your domain registrar’s settings to point to these Cloudflare nameservers. This process varies by registrar but typically involves accessing the DNS management panel and replacing the default nameservers with Cloudflare’s. Propagation can take up to 24 hours, but often completes within minutes. After propagation, Cloudflare will handle all DNS queries for your domain.
Verify DNS records: Ensure no duplicate or conflicting entries exist.
Enable proxy status: Set the orange cloud icon for your root domain and www subdomain to route traffic through Cloudflare.
Monitor propagation: Use tools like dig or online checkers to confirm nameserver changes.
Configuring SSL/TLS and HTTPS Rewrites
Cloudflare’s SSL/TLS settings protect data in transit. Navigate to the SSL/TLS section in your Cloudflare dashboard. Choose an encryption mode based on your server setup:
Mode
Use Case
Flexible
No SSL certificate on your origin server; traffic encrypted between visitor and Cloudflare only.
Full
Origin server has a self-signed or valid certificate; end-to-end encryption.
Full (Strict)
Origin server has a valid, trusted certificate; strongest security.
For most WordPress sites, Full (Strict) is recommended if you have a valid SSL certificate installed on your server (e.g., via Let’s Encrypt). Enable the Always Use HTTPS toggle to automatically redirect all HTTP requests to HTTPS. Additionally, activate Automatic HTTPS Rewrites to fix mixed content warnings by rewriting embedded HTTP links to HTTPS. This prevents browser security errors and ensures all resources load securely.
Enabling the Cloudflare WordPress Plugin
The official Cloudflare WordPress plugin integrates advanced features directly into your admin dashboard. Install it from the WordPress repository by navigating to Plugins → Add New and searching for “Cloudflare.” Activate the plugin, then go to Settings → Cloudflare to authenticate. You will need your Cloudflare API token—create one in the Cloudflare dashboard under My Profile → API Tokens, with permissions for Zone:Read and Zone:Edit.
Once authenticated, configure these key plugin settings:
Automatic Cache Management: Enable “Automatic Platform Optimization” if available, which caches dynamic WordPress content for faster delivery.
Development Mode: Toggle on temporarily when making site changes to bypass Cloudflare’s cache.
Security Level: Set to “Medium” for a balance of protection and usability; increase during attacks.
A practical example of using the plugin’s API to purge the cache programmatically:
// Example: Purge Cloudflare cache via plugin action
if ( function_exists( 'cloudflare_purge_cache' ) ) {
cloudflare_purge_cache();
}
After enabling the plugin, test your site thoroughly. Verify that pages load quickly, SSL certificates are valid, and no errors appear in the browser console. The plugin also provides real-time analytics and firewall rules, allowing you to fine-tune security without leaving WordPress.
Advanced Security Configurations for WordPress Admin Areas
Securing the WordPress admin dashboard and login pages requires a layered approach that balances protection with usability. Cloudflare provides several advanced configurations that can significantly reduce the attack surface without hindering legitimate administrative access. The following strategies focus on restricting access to sensitive directories and login endpoints using Cloudflare’s rule engine and access controls.
IP Access Rules for Admin Directories
One of the most effective methods to protect WordPress admin areas is to restrict access by IP address. Cloudflare’s IP Access Rules allow you to create allowlists for specific IPs or CIDR ranges that are permitted to reach the /wp-admin/ and /wp-login.php paths. This approach blocks all other traffic, including brute-force attempts and automated bots. To implement this, follow these steps:
Navigate to Security > WAF > Tools in your Cloudflare dashboard.
Create an IP Access Rule with action “Allow” for each legitimate IP address or range (e.g., your office IP, VPN IP, or trusted developer IPs).
Add a catch-all rule for the same path with action “Block” to deny all other traffic.
Apply the rule specifically to the URI path /wp-admin/* and /wp-login.php using a custom rule expression.
For organizations with dynamic IPs, consider using Cloudflare’s “Country” match in the rule to allow entire regions while blocking others, but combine this with IP allowlists for critical admin functions. Remember to test the rules thoroughly to avoid locking yourself out; always keep at least one backup access method, such as a Cloudflare Access policy or a secondary IP.
Geo-Blocking for Login Pages
Geo-blocking adds a geographic layer to login page security. If your WordPress admin users are located in specific countries, you can block login attempts from all other regions. This dramatically reduces the number of malicious requests without affecting legitimate users. To set up geo-blocking for login pages:
Go to Security > WAF > Firewall Rules and create a new rule.
Set the field to “Country” and select the allowed countries (e.g., United States, Canada, United Kingdom).
Define the rule to block requests from countries not in your list, but only when the URI path contains /wp-login.php or /wp-admin/.
Use an expression like: (ip.geoip.country ne "US" and ip.geoip.country ne "CA" and ip.geoip.country ne "GB") and (http.request.uri.path contains "/wp-login.php" or http.request.uri.path contains "/wp-admin").
Geo-blocking is not foolproof—attackers can use VPNs or proxies to spoof locations—but it effectively eliminates automated attacks from regions where no legitimate admin traffic originates. For maximum effectiveness, combine geo-blocking with IP Access Rules and rate limiting on the login endpoint.
Two-Factor Authentication via Cloudflare Access
Cloudflare Access provides a robust two-factor authentication (2FA) layer that integrates directly with your WordPress admin area, without requiring plugin modifications. This method uses Cloudflare’s identity provider to enforce 2FA before users can access the admin dashboard. To configure this:
Enable Cloudflare Access in the Zero Trust dashboard (teams.cloudflare.com).
Create a new application of type “Self-hosted” and set the application domain to your WordPress site.
Define the protected paths as /wp-admin/* and /wp-login.php.
Add a policy that requires authentication via an identity provider (e.g., Google, GitHub, or One-Time PIN), and enable “Require 2FA” in the policy settings.
Ensure you configure a bypass rule for your own IP address to prevent accidental lockout.
Cloudflare Access effectively replaces traditional WordPress login forms with a secure, external authentication gateway. Users must pass 2FA before even reaching the WordPress login page, neutralizing credential stuffing and brute-force attacks. This method also provides detailed audit logs of all admin access attempts. For teams, you can create separate policies for different user groups, ensuring that only authorized individuals gain entry while maintaining a seamless experience for legitimate administrators.
Leveraging Cloudflare Workers for Custom Performance Tweaks
Cloudflare Workers allow you to run JavaScript at the edge, intercepting and modifying HTTP requests and responses before they reach your WordPress server. This serverless execution model eliminates round trips to your origin, enabling custom performance tweaks that would otherwise require plugins or server-level configuration. By deploying a Worker, you can implement logic that runs across Cloudflare’s global network, reducing latency and offloading processing from your WordPress installation.
Creating a Cache-Busting Worker for Dynamic Content
WordPress often serves dynamic content—such as logged-in user dashboards or cart pages—that should not be cached globally. A Worker can inspect request cookies or headers to bypass the cache for specific conditions. For example, you might want to cache a page for anonymous visitors but serve fresh content for authenticated users. Below is a practical Worker script that checks for a WordPress login cookie and sets a cache-control header accordingly:
addEventListener('fetch', event => {
event.respondWith(handleRequest(event.request))
})
async function handleRequest(request) {
const url = new URL(request.url)
// Check for WordPress authentication cookie
const hasAuthCookie = request.headers.get('Cookie')?.includes('wordpress_logged_in')
let response
if (hasAuthCookie) {
// Bypass cache for authenticated users
response = await fetch(request, { cf: { cacheTtl: 0 } })
response = new Response(response.body, response)
response.headers.set('Cache-Control', 'no-store, must-revalidate')
} else {
// Allow caching for anonymous users
response = await fetch(request)
response = new Response(response.body, response)
response.headers.set('Cache-Control', 'public, max-age=3600')
}
return response
}
This Worker runs on every request, ensuring that dynamic content is never cached for logged-in users while still benefiting from edge caching for public visitors. You can extend this pattern to other dynamic elements, such as WooCommerce cart pages or membership sites.
Using Workers for A/B Testing and Geolocation Redirects
Workers can split traffic between different WordPress configurations or themes for A/B testing without modifying your server. For instance, you can route 50% of visitors to a variant B of your site while the rest see variant A. The Worker reads a cookie or randomizes the request and rewrites the URL to a staging or alternate domain. Similarly, geolocation redirects are straightforward: the Worker inspects the request’s country code (provided by Cloudflare’s CF-IPCountry header) and redirects users to a localized subdirectory or language-specific URL.
Key use cases include:
Regional pricing or content: Redirect European visitors to /eu/ and US visitors to /us/.
Language detection: Serve French content to users from France and English to others.
Feature rollout: Show a new homepage design to 10% of users and measure engagement.
These redirects happen at the edge, reducing latency and server load compared to PHP-based solutions.
Optimizing REST API Responses with Workers
The WordPress REST API can be a bottleneck for performance, especially when serving high-traffic endpoints like /wp/v2/posts. A Worker can intercept API requests, cache responses at the edge, or transform them to reduce payload size. For example, you can strip unnecessary fields (e.g., _links or guid) from JSON responses, or aggregate multiple API calls into a single response. This reduces bandwidth and speeds up client-side rendering.
Common optimizations include:
Optimization
Worker Action
Benefit
Response minification
Remove whitespace from JSON
Smaller payload, faster load
Field filtering
Delete excerpt and content for list endpoints
Reduced transfer size
Edge caching
Set cf.cacheTtl based on endpoint
Lower origin server load
By offloading these tasks to Cloudflare Workers, you preserve server resources for dynamic requests while delivering leaner API responses to clients. This is especially valuable for headless WordPress setups or mobile applications that rely on the REST API.
Image Optimization and Minification with Cloudflare
Image and script optimization are critical for reducing page weight, improving load times, and meeting Core Web Vitals benchmarks. Cloudflare offers three complementary features—Polish, Mirage, and Rocket Loader—that automate these optimizations at the edge, requiring minimal configuration. Together, they can significantly shrink file sizes, prioritize visible content, and defer non-critical JavaScript, all without altering your WordPress theme or plugins.
Enabling Polish for Automatic Image Compression
Cloudflare Polish applies lossy or lossless compression to JPEG, PNG, and GIF images served through your domain. When enabled, it re-encodes images on the fly, stripping metadata and applying advanced compression algorithms. Polish works alongside your existing image optimization plugins (like Smush or ShortPixel) without conflict, as it operates at the CDN layer after your origin server delivers the file.
To configure Polish:
Navigate to Speed > Optimization > Polish in your Cloudflare dashboard.
Choose “Lossy” for maximum compression (typically 30-40% file size reduction) or “Lossless” for no quality loss.
Enable “WebP” under the same section to serve modern WebP images to compatible browsers, further reducing weight by 25-35% compared to JPEG.
Polish automatically respects cache headers, so images served from cache are optimized without repeated origin requests. For WordPress sites with heavy image libraries, this can reduce total page weight by hundreds of kilobytes, directly improving Largest Contentful Paint (LCP) scores.
Mirage is a mobile-specific image optimization feature that lazy-loads and resizes images based on the visitor’s viewport and connection speed. It replaces standard <img> tags with a lightweight placeholder until the image scrolls into view, then serves a device-appropriate version. Mirage also applies progressive rendering, so images appear gradually rather than in a flash.
Key benefits for WordPress mobile performance:
Reduces initial page weight by deferring off-screen images.
Serves images scaled to the device width (e.g., 375px for phones instead of 1920px desktop originals).
Adapts to slow 3G connections by lowering image quality, ensuring faster visual completion.
Mirage is enabled per domain under Speed > Optimization > Mirage. It works best when your WordPress theme uses standard <img> tags and does not already implement aggressive lazy loading. For sites using Jetpack or other lazy-load plugins, test Mirage in combination to avoid double-loading behavior.
Rocket Loader and Its Impact on JavaScript
Rocket Loader optimizes JavaScript delivery by deferring all script loading until after the page’s main content is parsed and rendered. It wraps scripts in a lightweight loader that executes them asynchronously, prioritizing user-visible elements. This reduces render-blocking time and improves First Input Delay (FID) and Interaction to Next Paint (INP).
When you enable Rocket Loader under Speed > Optimization > Rocket Loader, it automatically processes all inline and external JavaScript except scripts explicitly excluded via data-cfasync="false" attribute. For WordPress, this often includes:
jQuery and its dependencies (e.g., from themes or plugins).
Analytics scripts (Google Analytics, Facebook Pixel) that should remain synchronous.
Third-party widgets (chat, maps) that require immediate execution.
Rocket Loader can cause issues with scripts that rely on document.write or DOM manipulation during page load. Test your WordPress site thoroughly after enabling it, particularly for forms, sliders, and interactive elements. Use the Cloudflare dashboard’s “Rocket Loader” exclusion list to mark problematic scripts. When properly configured, it can reduce JavaScript-related render-blocking by 50-80%, directly improving Total Blocking Time (TBT) and LCP metrics.
For best results, combine Rocket Loader with Polish and Mirage, then verify improvements using Google PageSpeed Insights or WebPageTest. These three features work synergistically: Polish reduces image bytes, Mirage delays mobile images, and Rocket Loader defers scripts—together lowering page weight and accelerating perceived load for all visitors.
Monitoring and Troubleshooting Common Integration Issues
When integrating Cloudflare with WordPress, several common issues can disrupt site functionality. Understanding how to diagnose and resolve these problems—particularly mixed content warnings, caching conflicts, and login difficulties—ensures your site remains both secure and performant. Below is a structured guide to addressing these challenges.
Fixing Mixed Content Warnings with SSL
Mixed content warnings occur when a secure HTTPS page loads resources (e.g., images, scripts, stylesheets) over an unencrypted HTTP connection. This typically happens because WordPress site URLs or database entries still reference HTTP, even after enabling Cloudflare’s SSL/TLS. To resolve this:
Update Site and Home URLs: In your WordPress dashboard, navigate to Settings > General and ensure both WordPress Address (URL) and Site Address (URL) start with https://.
Use a Search-and-Replace Tool: If URLs are hardcoded in the database, use a plugin like Better Search Replace to change http:// to https:// for your domain.
Enable Cloudflare’s Automatic HTTPS Rewrites: In the Cloudflare dashboard under SSL/TLS > Edge Certificates, toggle on Automatic HTTPS Rewrites to fix links in HTML content.
Set SSL/TLS Encryption Mode: Choose Full or Full (Strict) to ensure Cloudflare communicates with your origin server over HTTPS. Avoid Flexible if your server already has a valid certificate, as it can cause redirect loops.
Avoiding Cache Conflicts with Dynamic Plugins
Cloudflare’s caching can conflict with WordPress plugins that rely on real-time data, such as e-commerce carts, forums, or membership systems. These conflicts often manifest as stale content or broken functionality. To prevent issues:
Create Page Rules to Bypass Cache: In Cloudflare, add a page rule for dynamic paths (e.g., example.com/cart/ or example.com/my-account/) with the setting Cache Level: Bypass.
Use Cache-Control Headers: Configure your origin server to send Cache-Control: no-cache or Cache-Control: private for sensitive pages. This overrides Cloudflare’s default caching.
Exclude Cookies from Cache: For plugins using session cookies (e.g., WooCommerce), set Cloudflare’s Edge Cache TTL to bypass if cookies are present, or use the Bypass Cache on Cookie page rule.
Below is a comparison table highlighting key differences between caching approaches for dynamic and static content:
Using Cloudflare’s Analytics and Logs for Debugging
Cloudflare provides robust tools to diagnose integration issues. Leverage these resources to pinpoint problems efficiently:
Analytics Dashboard: Under the Analytics & Logs tab, review Web Traffic Analytics for error spikes (e.g., 5xx or 403 statuses). Filter by country or path to isolate problematic requests.
Edge Logs (Enterprise only): For detailed debugging, enable Logpush to export raw logs to a third-party service (e.g., AWS S3). Examine fields like CacheStatus and OriginResponseStatus to identify caching conflicts.
HTTP Request Headers: Use browser developer tools or tools like curl to inspect headers. Look for cf-cache-status (e.g., HIT, MISS, BYPASS) to confirm if Cloudflare is caching correctly.
Diagnostic Endpoints: Cloudflare’s /cdn-cgi/trace endpoint provides real-time data about the connection. Access it via https://yourdomain.com/cdn-cgi/trace to verify SSL version, IP, and cache settings.
By systematically applying these monitoring techniques, you can quickly resolve common integration issues and maintain a seamless WordPress experience behind Cloudflare.
Comparing Cloudflare Plans and Features for WordPress Sites
Selecting the right Cloudflare plan for a WordPress site depends on the site’s purpose, traffic volume, and performance requirements. Cloudflare offers tiered plans—Free, Pro, and Business—each with distinct features that address different needs. For personal blogs, a basic setup may suffice, while e-commerce stores demand advanced security and speed optimizations. Below is a breakdown of each plan’s key features and their relevance to specific WordPress site types.
Free Plan Essentials: Basic Security and CDN
Cloudflare’s Free plan provides essential protection and performance improvements at no cost, making it ideal for personal WordPress sites, small hobby blogs, or low-traffic portfolios. Core features include:
Global CDN: Caches static assets (CSS, JavaScript, images) across Cloudflare’s edge network, reducing server load and improving load times for visitors worldwide.
DDoS Protection: Mitigates Layer 3/4 attacks automatically, safeguarding against common volumetric threats.
Shared SSL Certificate: Provides a free, universal SSL to encrypt traffic between visitors and Cloudflare’s edge.
Firewall Rules (Basic): Allows simple IP blocking and rate limiting via the dashboard.
Automatic Platform Optimization (APO) – Not Included: The Free plan lacks APO, so WordPress-specific caching requires third-party plugins.
For a personal WordPress site, this plan is sufficient for basic security and a modest performance boost. However, it does not include advanced caching or Web Application Firewall (WAF) rules, which may be needed for sites with higher traffic or sensitive content.
Pro Plan Benefits: APO and Advanced WAF Rules
The Pro plan ($20/month) is designed for business blogs, small e-commerce stores, and professional portfolios where performance and security are more critical. Key additions over the Free plan include:
Automatic Platform Optimization (APO): Caches WordPress HTML pages at the edge, reducing server requests by up to 70% for logged-out visitors. This dramatically improves Time to First Byte (TTFB) and overall page speed.
Advanced WAF Rules: Provides managed rulesets to block SQL injection, XSS, and other application-layer attacks, with custom rule creation for specific threats.
Image Optimization (Polish): Compresses and resizes images on the fly, reducing file sizes without quality loss.
Enhanced HTTP/2 and HTTP/3 Support: Improves connection multiplexing and reduces latency.
For a business WordPress site, APO alone can justify the upgrade, as it significantly lowers hosting costs by offloading dynamic requests. To enable APO, install the Cloudflare WordPress plugin and activate the feature from the Speed tab in your dashboard. A practical example of verifying APO is running: check response headers via curl -I https://yoursite.com and look for cf-cache-status: HIT.
Business Plan Features: Priority Support and Image Optimization
The Business plan ($200/month) targets high-traffic e-commerce stores, membership sites, or media-heavy WordPress installations requiring maximum uptime and customization. Distinctive features include:
Priority 24/7 Support: Direct access to Cloudflare’s support team with faster response times, critical for revenue-generating sites where downtime directly impacts sales.
Image Optimization (Mirage): Advanced lazy loading and adaptive image sizing for mobile visitors, reducing bandwidth usage by up to 60%.
Custom SSL Certificates: Upload your own SSL (e.g., from a trusted authority) for brand consistency or compliance.
Rate Limiting (Advanced): Granular control over request thresholds per URL or IP, protecting login pages and checkout flows from brute-force attacks.
Full WAF Custom Rules: Unlimited custom rules with regex support for fine-grained threat mitigation.
E-commerce WordPress sites benefit from priority support during critical events (e.g., product launches) and Mirage for optimizing product images. For example, to configure a rate limit on the WooCommerce checkout page, use Cloudflare’s dashboard under Security > WAF > Rate Limiting Rules, setting a threshold of 10 requests per minute per IP to prevent checkout abuse.
Feature
Free
Pro ($20/mo)
Business ($200/mo)
CDN & DDoS Protection
Yes
Yes
Yes
APO (WordPress Caching)
No
Yes
Yes
Advanced WAF Rules
No
Yes
Yes
Image Optimization
No
Polish
Polish + Mirage
Priority Support
No
No
24/7 Priority
Custom SSL Upload
No
No
Yes
When choosing a plan, consider the site’s revenue impact: a personal blog may never need APO, but an e-commerce store losing sales due to slow load times will recoup the Pro cost quickly. For sites with sensitive customer data, the Business plan’s advanced rate limiting and custom SSL provide an extra layer of trust and compliance.
Conclusion: Maximizing Your WordPress Investment with Cloudflare
Integrating Cloudflare with your WordPress site is not merely a technical enhancement; it is a strategic investment in the longevity, speed, and security of your digital presence. Throughout this article, we have explored how Cloudflare’s global content delivery network, robust security features, and performance optimization tools work in concert to protect your site from threats while delivering content at lightning speed. By leveraging Cloudflare’s reverse proxy, you offload critical tasks such as SSL termination, DDoS mitigation, and caching, allowing your WordPress server to focus on dynamic content generation. The result is a faster, more secure, and more reliable user experience that directly supports your business goals, from higher search engine rankings to increased visitor engagement. As you move forward, remember that security and performance are not one-time fixes but ongoing commitments. Cloudflare provides the foundation, but your active management and continuous refinement will ensure your WordPress site thrives in an ever-evolving digital landscape.
Recap of Security and Performance Gains
Cloudflare delivers measurable improvements across two critical dimensions: security and performance. Below is a recap of the primary benefits you can expect after configuration:
Security Gains:
DDoS Mitigation: Cloudflare’s network absorbs and filters malicious traffic before it reaches your origin server, preventing downtime.
Web Application Firewall (WAF): The managed rule set blocks common vulnerabilities like SQL injection, cross-site scripting (XSS), and file inclusion attacks.
SSL/TLS Encryption: Full or Full (Strict) encryption ensures data in transit is protected, building visitor trust and satisfying modern browser requirements.
Bot Management: The Bot Fight Mode or advanced bot management reduces spam, credential stuffing, and content scraping.
Performance Gains:
Global CDN: Static assets (images, CSS, JavaScript) are cached on Cloudflare’s edge nodes, reducing latency for visitors worldwide.
Automatic Caching: HTML pages can be cached intelligently using cache rules, lowering server load and improving time to first byte (TTFB).
Image Optimization: Polish and Mirage features compress and resize images on the fly, reducing bandwidth usage.
HTTP/2 and HTTP/3: Modern protocol support reduces connection overhead and speeds up loading times.
Combined Impact: A typical WordPress site using Cloudflare sees a 40-60% reduction in page load times and near-elimination of downtime from layer 3/4 attacks.
Next Steps for Ongoing Optimization
To fully maximize your investment, adopt a proactive, iterative approach. Follow these actionable steps to maintain and improve your site over time:
Monitor Analytics Regularly: Use the Cloudflare dashboard to track traffic patterns, cache hit ratios, and security events. Identify anomalies that may require rule adjustments.
Refine Cache Rules: Review your WordPress caching settings (e.g., via a plugin like WP Rocket or W3 Total Cache) and align them with Cloudflare’s Page Rules. For dynamic content, use bypass or edge cache TTL settings to balance freshness and speed.
Update Security Rules: Periodically review WAF custom rules. Add rate limiting for login pages and comment forms to prevent brute force attacks. Enable “Under Attack” mode during high-threat periods.
Test Performance: Run tools like GTmetrix, WebPageTest, or Lighthouse monthly to measure improvements. Compare results before and after Cloudflare changes to validate gains.
Implement SSL Best Practices: Ensure your origin server uses a trusted certificate (e.g., Let’s Encrypt) and that Cloudflare’s SSL setting is set to “Full (Strict)” for end-to-end encryption.
Leverage Workers and Rules: As your site grows, explore Cloudflare Workers for custom logic (e.g., A/B testing, redirects) or use Transform Rules to modify headers without server overhead.
Resources for Staying Updated
The digital landscape changes rapidly, and Cloudflare continuously releases new features. Stay informed with these authoritative resources:
Resource
Description
Frequency
Cloudflare Blog
Official announcements, product updates, and security research.
Daily
Cloudflare Community
Forum for troubleshooting and best practices from experts and staff.
Ongoing
Cloudflare Learning Center
Documentation and tutorials on configuration and optimization.
As needed
WordPress Security News
Websites like Wordfence or Sucuri Blog for vulnerability alerts.
Weekly
Performance Blogs
Resources like KeyCDN, Pingdom, or GTmetrix Blog for speed tips.
Weekly
By consistently applying the strategies outlined here and staying current with updates, you ensure that your WordPress and Cloudflare integration remains a powerful asset. The synergy between these platforms empowers you to deliver a superior experience that is both secure and fast—qualities that are non-negotiable in today’s competitive online environment. Commit to ongoing management, and your site will not only meet but exceed visitor and business expectations.
Frequently Asked Questions
What is Cloudflare and how does it help WordPress?
Cloudflare is a global content delivery network (CDN) and security provider that sits between your WordPress site and visitors. It caches static content (images, CSS, JS) on servers worldwide, reducing load times. It also offers a web application firewall (WAF), DDoS protection, and free SSL. For WordPress specifically, Cloudflare's Automatic Platform Optimization (APO) can dramatically improve Time to First Byte (TTFB) and overall performance, especially for dynamic content.
Yes, Cloudflare significantly enhances WordPress security. Its WAF blocks common threats like SQL injection and cross-site scripting (XSS) before they reach your server. DDoS protection absorbs large-scale attacks. Cloudflare also provides bot management, rate limiting, and free SSL/TLS encryption. For WordPress, it can hide your origin IP, making it harder for attackers to target your server directly. Regular security audits and updates are still recommended.
What is Cloudflare APO and should I use it?
Cloudflare Automatic Platform Optimization (APO) is a paid add-on that caches dynamic WordPress content (HTML) on Cloudflare's edge network. This reduces server load and improves TTFB for visitors worldwide. APO is particularly beneficial for sites with global audiences or those on shared hosting. It works with most caching plugins but may conflict with some. Testing after activation is advised. For most WordPress sites, APO provides noticeable speed gains.
How do I set up Cloudflare with WordPress?
First, create a free Cloudflare account and add your domain. Cloudflare will scan your DNS records—verify them and update your nameservers at your domain registrar. Once active, install the official Cloudflare plugin on WordPress to enable features like APO, Rocket Loader, and Mirage. Configure SSL (Full or Flexible), set caching rules (e.g., 'Cache Everything' for static assets), and enable the WAF under Security. Test thoroughly after setup.
Will Cloudflare break my WordPress site?
Cloudflare rarely breaks sites, but misconfigurations can cause issues. Common problems: SSL mismatch (use Full or Full Strict), aggressive caching of admin pages (exclude /wp-admin/), or Rocket Loader breaking JavaScript interactions. Always test in development or use a staging site. The Cloudflare plugin helps manage settings. If issues occur, pause Cloudflare temporarily to isolate the cause. Most problems are easily fixed.
What is the difference between Cloudflare's Free and Pro plans for WordPress?
The Free plan includes basic CDN, DDoS protection, a shared SSL certificate, and limited WAF rules. The Pro plan ($20/month) adds performance features like APO (separate cost), advanced WAF (custom rules), image optimization (Polish), and Argo Smart Routing. For most small WordPress sites, the Free plan suffices. Larger or e-commerce sites may benefit from Pro's enhanced security and speed.
Can I use Cloudflare with a caching plugin like WP Rocket?
Yes, Cloudflare works well with caching plugins like WP Rocket, W3 Total Cache, and LiteSpeed Cache. For best results, disable the plugin's CDN integration if using Cloudflare's proxy. Enable 'Cloudflare' in WP Rocket's settings to purge Cloudflare cache automatically. Avoid double-caching by setting Cloudflare to 'Cache Everything' for static files and using the plugin for HTML caching. Test performance after configuration.
Does Cloudflare affect WordPress SEO?
Cloudflare can positively impact SEO by improving site speed (a Google ranking factor) and uptime. Its CDN reduces latency, and features like Brotli compression and image optimization further enhance load times. However, ensure proper canonical URLs and avoid blocking search bots. Cloudflare's SSL also helps with HTTPS rankings. Incorrect caching (e.g., serving stale content) can hurt SEO, so monitor with tools like Google Search Console.
The Complete WordPress and Stripe Integration Guide: Setup, Security, and Optimization
Introduction to WordPress and Stripe Integration
Integrating Stripe with WordPress transforms a standard website into a powerful revenue-generating platform. Whether you run an online store, a membership community, or a nonprofit donation page, Stripe provides the payment infrastructure to accept credit cards, digital wallets, and local payment methods securely. This WordPress and Stripe Integration Guide covers everything from setup to security, helping you choose the right plugins, configure webhooks, and optimize performance. By the end, you will understand why Stripe is the preferred payment gateway for millions of WordPress sites worldwide.
What Is Stripe and How Does It Work with WordPress?
Stripe is a payment processing platform that enables businesses to accept payments online without needing a merchant account or gateway of their own. It works by capturing sensitive payment data on its own servers (using JavaScript or mobile SDKs) and returning a token or payment intent to your website. With WordPress, Stripe connects through dedicated plugins that handle the front-end checkout experience and back-end communication with Stripe’s API. The most common methods include:
Direct plugin integration – Using Stripe’s official WordPress plugin or a third-party plugin like WooCommerce Stripe Payment Gateway.
Form builder add-ons – Plugins such as WPForms, Gravity Forms, or Elementor Forms offer Stripe integration for custom payment forms.
Membership and subscription plugins – Solutions like MemberPress, Paid Memberships Pro, or Restrict Content Pro include built-in Stripe support.
Donation plugins – GiveWP and Charitable seamlessly connect to Stripe for one-time and recurring donations.
In all cases, Stripe handles PCI compliance, encrypting card data and transmitting it directly to its network. Your WordPress site never stores full credit card numbers, reducing your security burden.
Key Advantages of Using Stripe for Online Payments
Stripe offers distinct benefits that make it the top choice for WordPress site owners:
Advantage
Description
Global reach
Supports over 135 currencies and popular payment methods including Visa, Mastercard, American Express, Apple Pay, Google Pay, and local wallets like Alipay and iDEAL.
Built-in security
PCI Service Provider Level 1 certification, tokenization, and 3D Secure authentication protect against fraud and data breaches.
Developer-friendly API
Well-documented REST APIs, webhooks, and client libraries allow deep customization and automation.
Transparent pricing
No monthly fees or setup costs; you pay a simple per-transaction fee (typically 2.9% + $0.30 for card payments in the US).
Recurring billing
Native support for subscriptions, trial periods, and proration, making it ideal for membership sites and SaaS businesses.
Real-time reporting
Dashboard analytics show payout schedules, refunds, disputes, and detailed transaction data.
These advantages combine to reduce friction for customers while giving you robust tools to manage revenue and compliance.
Common Use Cases: E-commerce, Subscriptions, and Donations
Stripe’s flexibility allows it to power three primary use cases on WordPress:
E-commerce stores – With WooCommerce, Stripe handles one-time product purchases, variable pricing, coupons, and digital downloads. It supports saved cards for faster checkout and integrates with inventory management plugins.
Subscription and membership sites – Plugins like MemberPress or Paid Memberships Pro use Stripe to manage recurring billing, tiered pricing, free trials, and upgrade/downgrade logic. Stripe’s Smart Retries automatically recovers failed payments, reducing churn.
Donation platforms – Nonprofits and creators use GiveWP or Charitable with Stripe to accept one-time gifts, recurring donations, and custom amounts. Stripe’s receipt system and tax receipt generation simplify donor management.
Each use case benefits from Stripe’s unified dashboard, which lets you view refunds, disputes, and payout schedules across all transaction types. By following this WordPress and Stripe Integration Guide, you can tailor the setup to your specific business model while maintaining security and performance.
Prerequisites for Setting Up Stripe on WordPress
Before integrating Stripe with your WordPress site, you must ensure that your technical environment meets specific requirements. This phase is critical because payment processing involves sensitive financial data, and any oversight can lead to failed transactions, security vulnerabilities, or compliance violations. Below, we outline the essential prerequisites, organized into three key areas.
WordPress Site Requirements and SSL Certificate Setup
Your WordPress site must be running a current, supported version (preferably 6.0 or later) with a modern PHP version (7.4 or higher) for optimal plugin compatibility and performance. The most critical requirement, however, is a valid SSL (Secure Sockets Layer) certificate. Stripe mandates HTTPS encryption for all payment transactions to protect cardholder data. Without an SSL certificate, Stripe will block live transactions, and your site may display security warnings to users.
Check if your hosting provider offers free SSL via Let’s Encrypt (most shared hosts do).
If using a managed WordPress host (e.g., Kinsta, WP Engine), enable SSL from the hosting dashboard.
For manual setup on a VPS or dedicated server, install Certbot and run the following command to obtain a free Let’s Encrypt certificate: sudo certbot --apache -d yourdomain.com -d www.yourdomain.com
After installation, force HTTPS in WordPress by updating the site URL in Settings > General (use https://) and using a plugin like “Really Simple SSL” for automatic redirects.
Verify your SSL status by visiting your site with https:// and checking for a padlock icon in the browser address bar.
Creating and Configuring Your Stripe Account
You need a verified Stripe account to process payments. Follow these steps:
Go to stripe.com and click “Start now.” Provide your email, full name, and country.
Complete the activation process: Stripe requires business details (legal name, address, and tax ID) and bank account information for payouts. This typically takes a few minutes.
After activation, enable “Test mode” from the dashboard toggle (labeled “View test data”) to experiment without real charges. In test mode, use card number 4242 4242 4242 4242 with any future expiry and any CVC.
Retrieve your API keys: Navigate to Developers > API keys. You’ll need the Publishable key (starts with pk_test_ in test mode) and the Secret key (starts with sk_test_). Keep the secret key private—never expose it in client-side code or share it publicly.
For live mode, switch the toggle off and provide additional verification documents if prompted (e.g., business license). Your live keys will start with pk_live_ and sk_live_.
Stripe’s compliance requirements include PCI DSS Level 1 certification, which is handled automatically when you use Stripe’s hosted payment elements (recommended). However, you must never store raw card numbers on your server.
Choosing the Right Stripe-Compatible Plugin
Selecting a plugin depends on your use case. Below is a comparison of the most popular options:
For most users, the official WooCommerce Stripe Gateway plugin is recommended if you run a product-based store. For simple payment collection (e.g., one-time fees or donations), WP Simple Pay offers a clean, code-free experience. Always verify that the plugin is actively maintained and compatible with your WordPress version before installation.
Step-by-Step Integration Using WooCommerce and Stripe
Integrating Stripe with WooCommerce provides a secure, streamlined payment experience for your online store. This walkthrough covers the essential steps, from plugin installation to enabling popular payment methods, ensuring your checkout process is both functional and trustworthy.
Installing and Activating the WooCommerce Stripe Payment Gateway
Begin by accessing your WordPress admin dashboard. Navigate to Plugins > Add New and search for “WooCommerce Stripe Payment Gateway.” This is the official plugin developed by Automattic and Stripe, ensuring compatibility and regular updates. Install and activate it. After activation, go to WooCommerce > Settings > Payments to locate Stripe in the list of available payment methods. Toggle the enable switch to turn it on, then click “Set up” or “Manage” to access configuration options.
Connecting Stripe API Keys (Publishable and Secret)
To connect your Stripe account, you need two API keys: a publishable key and a secret key. These are generated from your Stripe dashboard. Follow these steps:
Log in to your Stripe Dashboard at dashboard.stripe.com.
Navigate to Developers > API keys.
Copy the Publishable key (starts with pk_live_ for live mode or pk_test_ for test mode).
Copy the Secret key (starts with sk_live_ or sk_test_).
Return to WooCommerce settings and paste the keys into the corresponding fields under the Stripe payment gateway settings.
Enable Test Mode during development to use test keys and simulate transactions without real charges. Switch to live keys only after thorough testing.
Configuring Payment Methods: Cards, Apple Pay, and Google Pay
Once API keys are connected, configure which payment methods appear to customers. In the Stripe settings within WooCommerce, you will find options for credit/debit cards, Apple Pay, and Google Pay. Enable each method as needed. For Apple Pay and Google Pay, additional steps may be required:
Apple Pay: Requires a verified domain in your Stripe dashboard under Settings > Payment Methods > Apple Pay. Ensure your site uses HTTPS.
Google Pay: Automatically enabled if the customer’s browser supports it and you have a valid HTTPS connection.
Below is a comparison of these payment methods to help you decide which to enable:
Payment Method
Customer Experience
Setup Requirements
Supported Browsers/Devices
Credit/Debit Cards
Manual entry of card details
None beyond API keys
All browsers and devices
Apple Pay
One-tap payment via Touch ID/Face ID
Domain verification; HTTPS
Safari on macOS, iOS, iPadOS
Google Pay
One-tap payment via Google account
HTTPS only
Chrome, Android, and other supported browsers
After configuring methods, save changes. Test the integration by placing a test order with the Stripe test card number 4242 4242 4242 4242, any future expiration date, and any CVC. Confirm the transaction appears in your Stripe dashboard under Payments. This validates that your WordPress and Stripe integration guide steps are correctly implemented.
Integrating Stripe with Other Popular Plugins
Expanding your payment capabilities beyond WooCommerce often requires integrating Stripe with specialized plugins. Each plugin has unique settings and best practices to ensure a smooth, secure transaction flow. This section covers four key integrations for digital products, memberships, donations, and custom forms, with practical guidance for each.
Stripe Integration with Easy Digital Downloads for Digital Products
Easy Digital Downloads (EDD) is a leading plugin for selling digital goods like software, ebooks, and courses. To integrate Stripe, install the official EDD Stripe Payment Gateway extension. After activation, navigate to Downloads → Settings → Payment Gateways and enable Stripe. Enter your Stripe API keys (publishable and secret) from your Stripe dashboard under Developers → API Keys.
Best practices for EDD with Stripe:
Enable the “Stripe Elements” option for PCI-compliant, inline credit card fields that reduce friction.
Use Stripe’s automatic tax calculation for digital products sold across regions, ensuring compliance with VAT and sales tax.
For recurring digital subscriptions, combine EDD Recurring with Stripe to set up subscription plans. In Stripe, create a product and a recurring price (e.g., $9.99/month), then link it in EDD’s download edit screen under “Recurring Payments.”
Test transactions in Stripe’s test mode before going live. Use test card numbers like 4242 4242 4242 4242 with any future expiry and CVC.
To verify the integration, run a test purchase. If successful, the order status in EDD will update to “Complete,” and the payment will appear in your Stripe dashboard.
Setting Up Recurring Payments with MemberPress and Stripe
MemberPress simplifies membership management and pairs seamlessly with Stripe for recurring billing. After installing MemberPress and the Stripe gateway, go to MemberPress → Settings → Payments and select Stripe. Connect your Stripe account via OAuth or manually paste your API keys.
Enable Stripe’s webhook endpoint to sync subscription status changes. In your Stripe dashboard, add the endpoint https://yourdomain.com/plugins/memberpress/webhook/stripe and listen for events like customer.subscription.updated and invoice.payment_succeeded.
Use Stripe’s built-in card updater to automatically update expired cards for active subscriptions, reducing churn.
Set up email notifications in MemberPress for failed payments, and configure Stripe’s Smart Retries to attempt payment recovery.
Accepting Donations via GiveWP and Stripe
GiveWP is the premier donation plugin for WordPress, and its Stripe integration is straightforward. Install the GiveWP plugin and the Give Stripe Gateway add-on. Navigate to Donations → Settings → Payment Gateways and enable Stripe. Enter your publishable and secret keys from Stripe.
For optimal donation experiences:
Use the “Stripe Checkout” modal for a streamlined, mobile-friendly donation flow that keeps users on your site.
Set up recurring donation options by enabling “Recurring Donations” in GiveWP’s settings. In Stripe, create a price for the recurring amount (e.g., $10 monthly) and link it to your donation form.
Enable Stripe’s receipt emails for donors, or customize GiveWP’s email templates with transaction details.
Test donations with Stripe’s test mode. A practical code snippet for testing a donation form’s Stripe integration is to add a hidden field in your form’s template:
This ensures test mode is active during development. After testing, remove the field before going live. Monitor your Stripe dashboard for successful test transactions, which will appear with a “test” label.
Custom Stripe Integration Using Stripe API and Code
For developers seeking full control over the payment flow, a custom Stripe integration using the Stripe API offers flexibility beyond what plugins provide. This approach lets you build a tailored checkout experience, manage payment intents directly, and handle webhooks for reliable transaction processing. Below is a step-by-step guide to implementing a custom solution with Stripe’s PHP library, Elements, and webhooks.
Setting Up Stripe PHP Library and Initializing Payment Intents
Begin by installing the Stripe PHP library via Composer. Run the following command in your project root:
composer require stripe/stripe-php
After installation, initialize the Stripe client with your secret key (found in your Stripe dashboard). Create a payment intent on the server side when a customer initiates a checkout. The payment intent holds the amount, currency, and status of the transaction. Example code:
Store your secret key in an environment variable, never hard-code it.
Use amount in the smallest currency unit (e.g., cents for USD).
Set metadata to link payments to internal records.
Building a Custom Checkout Form with Stripe Elements
Stripe Elements provides pre-built, styled UI components that securely collect card details without handling sensitive data. On your frontend, include the Stripe.js library and Elements. Create a form that uses a card element:
<form id="payment-form">
<div id="card-element"><!-- Stripe Element will be inserted here --></div>
<button id="submit">Pay $20</button>
</form>
<script src="https://js.stripe.com/v3/"></script>
<script>
const stripe = Stripe('pk_test_...');
const elements = stripe.elements();
const card = elements.create('card');
card.mount('#card-element');
const form = document.getElementById('payment-form');
form.addEventListener('submit', async (event) => {
event.preventDefault();
const {error, paymentIntent} = await stripe.confirmCardPayment(
'{{ client_secret }}',
{payment_method: {card: card}}
);
if (error) {
// Display error
} else if (paymentIntent.status === 'succeeded') {
// Redirect or confirm success
}
});
</script>
Best practices for your custom form:
Use stripe.confirmCardPayment to handle 3D Secure authentication automatically.
Disable the submit button after first click to prevent duplicate charges.
Validate the amount and currency on the server before creating the intent.
Handling Webhooks for Payment Confirmation and Refunds
Webhooks are essential for server-side confirmation of payment events, such as payment_intent.succeeded or charge.refunded. Set up a dedicated endpoint in your WordPress site (e.g., /wp-json/stripe/v1/webhook) to receive events. Use the Stripe CLI to test locally:
$payload = @file_get_contents('php://input');
$sig_header = $_SERVER['HTTP_STRIPE_SIGNATURE'];
$event = StripeWebhook::constructEvent($payload, $sig_header, 'whsec_...');
switch ($event->type) {
case 'payment_intent.succeeded':
$paymentIntent = $event->data->object;
// Update order status to 'paid'
break;
case 'charge.refunded':
$charge = $event->data->object;
// Mark order as refunded
break;
}
Critical webhook considerations:
Event
Action
Security Note
payment_intent.succeeded
Confirm order, send receipt
Verify signature before processing
payment_intent.payment_failed
Log failure, notify admin
Never trust client-side success alone
charge.refunded
Update inventory, notify customer
Handle idempotency to avoid duplicates
Ensure your webhook endpoint returns a 200 OK promptly to acknowledge receipt. Implement idempotency keys if your workflow may process the same event twice. This custom integration gives you full ownership of the payment lifecycle, from intent creation to post-payment actions, while maintaining PCI compliance through Stripe’s secure infrastructure.
Before launching your payment system to real customers, rigorous testing in Stripe’s sandbox environment is essential. This simulated mode allows you to verify every aspect of your WordPress and Stripe integration without processing actual payments. By following this systematic approach, you can identify and resolve issues before they affect your users or revenue.
Switching to Stripe Test Mode and Obtaining Test Keys
To enable sandbox testing, you must first switch your Stripe account to test mode. Log in to your Stripe dashboard and toggle the “Viewing test data” switch in the upper-left corner. Once activated, the dashboard background changes to an orange tint, indicating you are working with test data. Next, obtain your test API keys:
Navigate to Developers > API keys in the Stripe dashboard.
Copy the Publishable key (starts with pk_test_) and the Secret key (starts with sk_test_).
In your WordPress site, go to the Stripe payment gateway settings (e.g., WooCommerce > Settings > Payments > Stripe).
Paste the test keys into the corresponding fields and save changes. Ensure the “Test Mode” toggle is enabled within the plugin settings.
Verify the keys are active by checking the connection status. A green indicator confirms the integration is ready for sandbox testing.
Running Test Transactions with Stripe Test Cards
Stripe provides a set of test card numbers that simulate various payment scenarios. Use these to process test transactions through your WordPress checkout page. The following table lists the most commonly used test cards:
Card Number
Brand
Result
4242 4242 4242 4242
Visa
Successful payment
4000 0000 0000 0002
Visa
Card declined
4000 0000 0000 3220
Visa
3D Secure required
5555 5555 5555 4444
Mastercard
Successful payment
3782 822463 10005
Amex
Successful payment
To run a test transaction, add a product to your cart, proceed to checkout, enter any test card number, use a future expiration date (e.g., 12/25), and any three-digit CVC (e.g., 123). Complete the order and confirm that the payment processes without errors. After submission, check your WordPress order dashboard and the Stripe dashboard under “Payments” to see the transaction recorded as a test event.
Beyond basic success and decline tests, simulate edge cases to ensure robust error handling. Key scenarios include:
Insufficient funds: Use card number 4000 0000 0000 0001 to trigger a decline due to insufficient funds.
Expired card: Use card number 4000 0000 0000 0069 to test expiration handling.
Invalid CVC: Use card number 4000 0000 0000 0127 to simulate a CVC verification failure.
3D Secure authentication: Use card number 4000 0000 0000 3220 to test the 3D Secure flow. The Stripe Checkout or Elements integration should redirect to a simulated authentication page.
When errors occur, check the WordPress debug log (enabled via wp-config.php with define('WP_DEBUG', true);) and the Stripe dashboard under “Events” to view raw response data. For example, a declined transaction returns a payment_intent.payment_failed event with a decline code. To programmatically log Stripe webhook responses during testing, add this snippet to your theme’s functions.php file:
add_action('woocommerce_stripe_response', function($response, $order) {
if (defined('WP_DEBUG') && WP_DEBUG) {
error_log('Stripe Test Response: ' . print_r($response, true));
}
}, 10, 2);
After completing all test scenarios, disable test mode, replace the test keys with live keys, and run one final test transaction using a real card (e.g., $1.00) before full launch. Always clear your site cache and re-verify webhook endpoints after switching to live mode.
Security Best Practices for Stripe on WordPress
When integrating Stripe with WordPress, prioritizing security is non-negotiable. Payment processing involves handling sensitive customer data, and even a minor oversight can lead to data breaches, financial loss, or legal repercussions. This section outlines critical measures—from PCI compliance to regular updates—that protect your site and your customers’ payment information.
Understanding PCI Compliance and Stripe’s Role
The Payment Card Industry Data Security Standard (PCI DSS) sets the baseline for securing cardholder data. As a merchant, you are responsible for maintaining a secure environment, but Stripe significantly reduces your compliance burden. Stripe is a PCI Level 1 Service Provider, the highest level of certification. By using Stripe’s pre-built checkout, Elements, or Payment Intents API, you can offload sensitive card data handling to Stripe’s infrastructure. This means you never store, transmit, or process raw card numbers on your server. To maintain compliance:
Use Stripe’s client-side tokenization (e.g., Stripe.js or Elements) to ensure card data bypasses your server entirely.
Complete Stripe’s PCI Self-Assessment Questionnaire (SAQ A or SAQ A-EP, depending on your integration) annually.
Avoid storing full card numbers, CVV codes, or magnetic stripe data in your database or logs.
Note: Even with Stripe, you still need to secure your WordPress installation, as compromised admin accounts can lead to fraudulent transactions or data leaks.
Implementing SSL and Securing API Keys
An SSL/TLS certificate encrypts data transmitted between your visitor’s browser and your server, preventing interception during checkout. Every page where payment details are entered must use HTTPS. Most web hosts offer free SSL via Let’s Encrypt, and you can enforce HTTPS site-wide using a plugin like Really Simple SSL. Beyond SSL, protect your Stripe API keys:
Never expose your Secret Key: Store it in your wp-config.php file using define('STRIPE_SECRET_KEY', 'sk_live_...'); rather than in the database or plugin settings.
Use Publishable Key for frontend: Only your Publishable Key (starts with pk_live_) should appear in JavaScript or HTML.
Restrict IP access: In the Stripe Dashboard, you can whitelist only your server’s IP address for API requests to prevent unauthorized use.
Rotate keys periodically: Generate new keys if you suspect a compromise or after staff changes.
Additionally, consider using a security plugin that monitors for unauthorized file changes or failed login attempts.
Regular Updates and Monitoring for Vulnerabilities
Outdated WordPress core, themes, or plugins are common entry points for attackers. Stripe itself updates its API and libraries frequently to patch security flaws. Follow a rigorous update schedule:
Component
Update Frequency
Action Required
WordPress core
As released (often monthly)
Enable automatic minor updates; test major updates on staging first.
Stripe plugin (e.g., WooCommerce Stripe)
Within 48 hours of release
Check changelog for security fixes; update immediately if critical.
Other plugins/themes
Weekly review
Remove unused plugins; use a plugin like WPScan to detect known vulnerabilities.
Server software (PHP, MySQL)
As per host
Ensure your web host provides PHP 8.0+ and regular security patches.
Beyond updates, monitor your site for suspicious activity. Set up Stripe webhook alerts for events like charge.failed or dispute.created, and enable logging in your WordPress security plugin to track admin logins and file changes. Regularly review Stripe’s Radar risk settings to block high-risk transactions automatically. By combining PCI-aware practices, robust key management, and a consistent update regimen, you create a resilient defense against payment data threats.
Troubleshooting Common Integration Issues
Even with careful setup, a WordPress and Stripe integration can encounter problems. This section addresses the most frequent issues—API key errors, webhook failures, and plugin conflicts—providing clear, actionable solutions to restore seamless payment processing.
Resolving API Key Mismatch and Authentication Errors
API key errors are the most common cause of integration failure. They typically arise from using incorrect key pairs or mixing live and test keys. Follow these steps to diagnose and resolve them:
Verify key pair matching: Ensure your publishable key (starts with pk_live or pk_test) and secret key (starts with sk_live or sk_test) are from the same Stripe account and environment. A mismatch between a live publishable key and a test secret key will cause authentication failures.
Check key permissions: In your Stripe Dashboard, go to Developers > API Keys. Confirm the keys have the necessary permissions for your integration (e.g., charges:write, customers:read). Restricted keys may block payments.
Clear cached keys: Your WordPress site may cache API keys. Clear all caches (plugin, server, and browser) after updating keys. Use a plugin like WP Rocket or manually flush via your hosting control panel.
Test in Stripe’s test mode: Switch to test mode in both Stripe and your WordPress plugin. Use test card number 4242 4242 4242 4242 with any future expiry and any CVC. If the test succeeds, the issue is with your live keys.
Fixing Webhook Delivery Failures and Timeouts
Webhooks are critical for Stripe to communicate events (e.g., successful payments, refunds) to your WordPress site. Failures often stem from misconfigured endpoints or server timeouts. Use this comparison table to identify and resolve common webhook problems:
Issue
Common Cause
Solution
Webhook not received
Incorrect endpoint URL in Stripe Dashboard
Verify the URL matches your WordPress site’s webhook handler (e.g., https://yoursite.com/wp-json/stripe/v1/webhook). Ensure no trailing slash or typos.
HTTP 500 or timeout errors
Server resource limits or slow PHP execution
Increase PHP memory limit (to at least 256MB) and max execution time (to 120 seconds) in your wp-config.php file. Contact your host if needed.
Webhook fails with 401 Unauthorized
Missing or incorrect webhook signing secret
Copy the exact signing secret from Stripe Dashboard (Developers > Webhooks > your endpoint > Signing secret) and paste it into your WordPress plugin’s webhook settings.
Duplicate events
Multiple webhook endpoints or retries
Disable duplicate endpoints in Stripe. Enable idempotency in your plugin settings to prevent processing the same event twice.
To test webhooks manually, use Stripe’s CLI tool (stripe listen --forward-to https://yoursite.com/wp-json/stripe/v1/webhook) and trigger a test event. Monitor your WordPress error log for any PHP warnings.
Handling Plugin Conflicts and Compatibility Issues
WordPress’s plugin ecosystem can introduce conflicts that break the Stripe integration. Common culprits include caching plugins, security plugins, and other payment gateways. Follow this systematic approach:
Isolate the conflict: Temporarily deactivate all plugins except your Stripe integration plugin (e.g., WooCommerce Stripe Payment Gateway, WP Simple Pay). If the issue resolves, reactivate plugins one by one until the conflict reappears.
Check for JavaScript errors: Use your browser’s developer console (F12) to look for errors like Uncaught ReferenceError: Stripe is not defined. This often indicates a conflict with a script loader or minification plugin. Exclude Stripe-related scripts from minification.
Review caching plugin settings: Caching plugins like W3 Total Cache or WP Super Cache may exclude Stripe scripts or block webhook requests. Add the webhook URL to the cache exclusion list and disable page caching for checkout pages.
Update all components: Ensure WordPress core, your theme, and all plugins are updated to their latest versions. Outdated code is a leading cause of incompatibility with Stripe’s API updates.
Test with a default theme: Temporarily switch to a default WordPress theme (e.g., Twenty Twenty-Four) to rule out theme-specific issues. If the integration works, contact your theme developer for a fix.
Document any conflicts you find and report them to the plugin or theme developer. For persistent issues, consider using a staging site to test updates before deploying to production.
Optimizing Payment Flow and User Experience
To maximize conversion rates in your WordPress and Stripe integration, focus on reducing friction at every step of the checkout process. A streamlined payment flow directly impacts revenue, as even minor delays or confusion can cause cart abandonment. Start by minimizing the number of fields in your checkout form—only ask for essential information like name, email, billing address, and payment details. Use inline validation to provide real-time feedback, and consider enabling guest checkout to avoid forcing account creation. Additionally, leverage Stripe’s built-in features, such as address autocomplete and card number masking, to speed up data entry. Loading speed is equally critical: optimize your WordPress site with caching, image compression, and a content delivery network (CDN). Test your payment page’s load time using tools like Google PageSpeed Insights, and ensure your Stripe integration uses asynchronous JavaScript to prevent blocking other page elements.
A frictionless checkout interface prioritizes clarity and simplicity. Use a single-column layout for forms to guide the user’s eye naturally, and group related fields (e.g., billing address) with clear labels. Implement autofocus on the first input field and enable tab navigation between fields. Add a progress indicator for multi-step checkouts, but keep steps to a minimum—ideally two: cart review and payment. Stripe Elements provides pre-styled input fields that automatically adjust to your site’s theme, reducing visual clutter. For error messages, display them inline next to the relevant field, using plain language (e.g., “Card number is incomplete” instead of “Invalid input”). Avoid generic alerts that obscure the form. Finally, include trust signals near the payment button, such as security badges or a note like “Your payment is encrypted via Stripe.”
Enhancing Mobile Payment Experience with Apple Pay and Google Pay
Mobile users expect fast, tap-to-pay options. Stripe’s integration with Apple Pay and Google Pay allows customers to complete purchases without manually entering card details, significantly reducing friction on phones and tablets. To enable these wallets in WordPress, you must first ensure your site uses HTTPS and has a valid SSL certificate. Then, add the following JavaScript snippet to your payment form initialization, typically in your theme’s functions.php file or a custom plugin:
// Example: Enable Apple Pay and Google Pay via Stripe
stripe.elements({
paymentRequest: {
country: 'US',
currency: 'usd',
total: {
label: 'Total',
amount: 1000, // Amount in cents
},
requestPayerName: true,
requestPayerEmail: true,
},
}).then(function(paymentRequest) {
paymentRequest.canMakePayment().then(function(result) {
if (result) {
// Display wallet buttons
var prButton = elements.create('paymentRequestButton', {
paymentRequest: paymentRequest,
});
prButton.mount('#payment-request-button');
}
});
});
Test wallet buttons on real mobile devices to confirm they trigger properly. Also, ensure your checkout page is fully responsive—use flexible grid layouts and touch-friendly button sizes (at least 44×44 pixels). Avoid horizontal scrolling or tiny text that requires zooming.
Using Analytics to Monitor and Improve Payment Success Rates
Analytics provide actionable insights into where users drop off during payment. Use Stripe’s dashboard to track metrics like payment success rate, average time to complete checkout, and error types (e.g., declined cards, expired sessions). In WordPress, integrate Google Analytics with event tracking for key actions: “Add to Cart,” “Proceed to Checkout,” and “Payment Attempt.” Create a table to monitor common issues:
Metric
Target
Action if Below Target
Payment success rate
> 95%
Check Stripe error logs; test with test cards
Checkout abandonment rate
< 70%
Simplify form; add progress indicator
Mobile conversion rate
Match desktop
Optimize for touch; enable wallet payments
Set up A/B testing for variations like button color or form length, using tools like Google Optimize. Regularly review Stripe’s Radar for fraud insights, and adjust your risk settings to balance security with conversion. By continuously iterating based on data, you can fine-tune the payment flow to reduce friction and boost revenue.
Conclusion and Next Steps for Your Stripe Integration
Successfully integrating Stripe with WordPress transforms your site into a secure, scalable commerce platform. This guide has walked you through the essential steps—from selecting a compatible plugin and configuring API keys to testing transactions and enforcing robust security measures. As you move forward, remember that a payment integration is not a one-time setup but an evolving system that demands regular attention and strategic upgrades.
Recap of Integration Steps and Best Practices
To ensure your integration remains reliable and secure, revisit these core steps periodically:
Plugin Selection and Setup: Choose a Stripe-compatible plugin (e.g., WooCommerce Stripe, WP Simple Pay) that aligns with your business model. Complete the API key pairing in live mode only after thorough sandbox testing.
Security Foundations: Always enforce HTTPS with a valid SSL certificate. Enable Stripe’s built-in fraud prevention tools, such as 3D Secure authentication, and keep your WordPress core, plugins, and Stripe SDK updated to patch vulnerabilities.
User Experience Optimization: Minimize checkout friction by enabling saved payment methods, offering clear error messages, and ensuring mobile responsiveness. Test the full purchase flow on multiple devices after each plugin update.
Compliance Check: Maintain PCI DSS compliance by using Stripe’s tokenization—avoid storing raw card data on your server. Regularly review Stripe’s compliance documentation for any regulatory changes affecting your region.
Adhering to these practices reduces downtime, prevents data breaches, and builds customer trust.
Exploring Advanced Stripe Features (e.g., Invoicing, Radar)
Once your basic integration is stable, leverage Stripe’s advanced capabilities to streamline operations and boost revenue:
Feature
Benefit for Your WordPress Site
Implementation Tip
Stripe Invoicing
Automate recurring billing for subscriptions or services. Send customized invoices directly from Stripe’s dashboard or via API.
Use a plugin like Stripe Invoicing for WooCommerce to sync invoice data with your WordPress orders.
Stripe Radar
Machine-learning fraud detection that blocks suspicious transactions in real time. Customize rules for chargeback prevention.
Enable Radar for Fraud Teams (paid) to access advanced rule sets; start with Stripe’s default rules for basic protection.
Stripe Connect
Enable marketplace or platform payments (e.g., split payouts between you and vendors). Ideal for multi-seller sites.
Use a dedicated plugin like WC Vendors with Stripe Connect to automate payouts and compliance.
Exploring these features can reduce manual work, improve cash flow, and mitigate risk. For example, combining Radar with 3D Secure creates a layered security approach that lowers false declines while blocking genuine fraud.
To stay proficient and troubleshoot issues, bookmark these official and community resources:
Stripe Documentation: The Stripe API Reference and Stripe WordPress Plugin Guide provide code samples, webhook setup instructions, and error code explanations.
WordPress Forums and Repositories: Post questions in the WordPress Support Forum or the plugin-specific support page for your chosen Stripe plugin. Always include your system status report for faster help.
Stripe Community and Blog: Join the Stripe Community Slack or read the Stripe Blog for announcements about new features, deprecations, and security best practices.
Professional Services: For complex integrations, consider hiring a certified Stripe Partner or a WordPress developer experienced with payment gateways. They can audit your setup and optimize performance.
By combining a solid foundational setup with ongoing learning and advanced feature adoption, your WordPress and Stripe integration will remain efficient, secure, and ready to scale with your business. Regularly schedule a quarterly review of your Stripe dashboard, plugin updates, and customer feedback to identify areas for improvement.
Frequently Asked Questions
What is the best way to integrate Stripe with WordPress?
The best way is to use a dedicated Stripe plugin like WooCommerce Stripe Payment Gateway, Stripe Payments, or WP Simple Pay. These plugins handle API connections, security, and checkout flows. For custom needs, you can use the Stripe API directly with custom code. Always ensure the plugin is regularly updated and compatible with your WordPress version. For high-traffic sites, consider a lightweight plugin to minimize performance impact.
Is it safe to use Stripe on WordPress?
Yes, Stripe is PCI Level 1 certified, the highest security standard. When integrated correctly, it encrypts card data and transmits it directly to Stripe's servers, so sensitive data never touches your WordPress database. To maximize safety, use HTTPS, keep your WordPress core and plugins updated, and implement strong passwords. Avoid storing full card numbers or CVV codes. Regularly scan for vulnerabilities with security plugins.
Do I need an SSL certificate for Stripe integration?
Yes, an SSL certificate is mandatory for Stripe integration, especially in live mode. It encrypts data between the user's browser and your server, protecting payment information. Most hosting providers offer free SSL via Let's Encrypt. Without SSL, browsers may block payment forms, and Stripe may reject requests. Ensure all pages handling payments use HTTPS. This also builds customer trust and improves SEO.
Can I accept recurring payments with Stripe on WordPress?
Absolutely. Stripe supports subscriptions and recurring payments. Plugins like WooCommerce Subscriptions, Paid Memberships Pro, or MemberPress integrate with Stripe for recurring billing. You can set up plans with different intervals (weekly, monthly, yearly) and handle failed payments automatically. Stripe's API also allows for flexible billing cycles, trial periods, and prorations. Ensure your plugin supports Stripe's Subscription API.
How do I test Stripe payments before going live?
Stripe provides a test mode with test card numbers (e.g., 4242424242424242) and test API keys. Enable test mode in your Stripe dashboard and in the WordPress plugin settings. Process test transactions to verify the checkout flow, email notifications, and data storage. Use Stripe's webhook testing tool to simulate events. Once satisfied, switch to live keys and run a small real transaction to confirm everything works.
What are the common issues with Stripe integration in WordPress?
Common issues include: mismatched API keys (test vs live), SSL certificate errors, outdated plugins or WordPress version, conflicting plugins (especially caching or security plugins), incorrect webhook URLs, and PHP memory limits. Debug by enabling WordPress debug mode, checking Stripe logs in the plugin, and testing in a staging environment. Ensure your server meets Stripe's technical requirements (PHP 7.4+, cURL, OpenSSL).
How can I optimize Stripe payment performance on my WordPress site?
Optimize by using a lightweight Stripe plugin to reduce load times. Enable caching for non-payment pages, but exclude checkout and payment pages from cache to avoid issues. Use a CDN for static assets. Minimize external scripts and defer non-critical JavaScript. Choose a reliable hosting provider with good uptime and fast server response. Regularly update plugins and WordPress. Consider using Stripe's Elements for a faster, more secure checkout experience.
Does Stripe integration support multiple currencies?
Yes, Stripe supports over 135 currencies. In WordPress, plugins like WooCommerce Stripe allow you to set your base currency and display prices in different currencies based on customer location. Stripe automatically handles currency conversion. Ensure your Stripe account is enabled for the currencies you want to accept. Some plugins may require additional configuration for multi-currency display. Check your payment gateway's settings.
How to Create a WordPress Social Network Site: A Step-by-Step Guide
Introduction: Why Build a Social Network with WordPress
Creating a social network site using WordPress offers a unique combination of flexibility, cost-effectiveness, and a mature ecosystem of plugins. Unlike building from scratch or relying on proprietary platforms, WordPress provides a foundation that can be customized to serve niche audiences, from professional communities to hobbyist groups. This guide will walk you through the process, but first, it is essential to understand why WordPress is an ideal choice for this endeavor.
Large, general-purpose social networks like Facebook or Twitter have dominated the digital landscape for years. However, users increasingly seek spaces that cater to specific interests, professions, or geographic regions. Niche social communities offer several advantages:
Higher engagement: Members share a common purpose, leading to more meaningful interactions.
Reduced noise: Content is relevant and curated by community norms, not algorithms.
Monetization potential: Targeted audiences are more likely to pay for premium memberships, courses, or exclusive content.
Privacy control: You own the data and can enforce specific rules for membership.
WordPress enables you to launch such a community quickly, without the overhead of dedicated social network software, while still offering deep customization.
WordPress vs. Dedicated Social Network Platforms
When considering how to create a WordPress social network site, it is helpful to compare it with dedicated platforms like BuddyPress (which works within WordPress), or standalone solutions such as Elgg, Joomla with Community Builder, or Discourse. The following table highlights key differences:
WordPress excels when you need a hybrid site that combines a social network with traditional content like articles, forums, or e-commerce. Dedicated platforms are better if you require only social features and minimal other functionality.
Hosting: A social network can consume significant server resources. Choose a hosting provider that offers scalability, such as managed WordPress hosting or a VPS plan.
Plugin selection: The core of your social network will likely be BuddyPress or PeepSo. BuddyPress is free and widely supported, while PeepSo offers a more modern interface with premium add-ons.
User experience: Plan your navigation, profiles, activity streams, and group structures. Sketch wireframes to ensure intuitive design.
Privacy and moderation: Decide whether your community will be public, private, or a mix. Implement moderation tools to handle spam and inappropriate content.
Monetization model: Will you charge for membership, offer paid groups, or run ads? Choose plugins like Paid Memberships Pro or WooCommerce to integrate payments.
By addressing these considerations upfront, you lay a solid foundation for a successful WordPress social network site.
Step 1: Choose the Right Hosting and Domain
Selecting the right hosting provider and domain name is the foundation of your WordPress social network. Unlike a standard blog, a social network requires robust server resources to handle concurrent user logins, real-time notifications, media uploads, and database queries. A poor hosting choice can lead to slow load times, frequent downtime, and security vulnerabilities that compromise user data. This step ensures your site is scalable, secure, and performant from the start.
Hosting Requirements for Social Sites
A social network site places unique demands on your hosting environment. Below are the key requirements you must evaluate before committing to a provider:
Sufficient RAM and CPU: Aim for at least 4 GB of RAM and 2 vCPUs for a small community; scale up as your user base grows.
High bandwidth allowance: Social sites transfer large amounts of data (images, videos, user activity streams). Look for unmetered or generous bandwidth (e.g., 1 TB or more per month).
NVMe SSD storage: Fast storage reduces database query times and page load speeds for user feeds.
PHP version 8.0 or higher: WordPress and common social networking plugins (like BuddyPress or PeepSo) perform best on modern PHP.
MySQL/MariaDB with InnoDB: Essential for handling complex relational queries, such as friend connections and activity streams.
Scalability options: Look for easy upgrades to dedicated servers, cloud hosting, or VPS plans without migration hassles.
Daily backups and DDoS protection: Social networks are frequent targets for attacks; automated backups and security features are non-negotiable.
Recommended Hosting Providers for WordPress
Based on performance, support, and WordPress-specific optimizations, the following providers are well-suited for a social network site. The table below compares their key features:
Provider
Plan Type
Starting Price (approx.)
Key Feature for Social Networks
SiteGround
Managed WordPress Cloud
$3.99/month (promo)
Built-in caching, free SSL, and automatic scaling for traffic spikes
Kinsta
Premium Managed Hosting
$35/month
Google Cloud infrastructure, isolated container per site, and 24/7 support
Liquid Web
VPS or Dedicated
$59/month
High RAM options (up to 32 GB) and full root access for custom caching
Cloudways
Cloud VPS (DigitalOcean, AWS)
$12/month
Pay-as-you-grow, easy server cloning, and built-in Redis for session handling
For a starting social network with fewer than 1,000 active users, SiteGround or Cloudways offer cost-effective performance. As you grow, consider migrating to Kinsta or Liquid Web for dedicated resources.
Setting Up Your Domain and SSL Certificate
Your domain name should be short, memorable, and reflect your community’s purpose. Avoid hyphens or numbers that confuse users. Register your domain through a reputable registrar (e.g., Namecheap, Google Domains) and ensure it supports DNS management for subdomains (e.g., members.yoursite.com for user profiles).
Once your domain is pointed to your hosting provider, install an SSL certificate to encrypt all data transmitted between your site and users. Most modern hosts offer free SSL via Let’s Encrypt. If you need to enable it manually via command line, use this example with Certbot:
define('FORCE_SSL_ADMIN', true);
if ($_SERVER['HTTP_X_FORWARDED_PROTO'] == 'https') $_SERVER['HTTPS'] = 'on';
Test your SSL by visiting https://yourdomain.com and checking for a padlock icon in the browser address bar. A correctly configured SSL certificate builds trust with users and is required for modern social plugins like BuddyPress that handle private messaging and notifications.
Step 2: Install and Configure WordPress
With your domain and hosting ready, the next step is to get WordPress installed. For a social network, you need a stable, flexible foundation. This phase covers choosing an installation method, setting core options, and deciding if a multisite network is right for your community.
One-Click vs. Manual Installation
Most hosting providers offer a one-click installer (often through cPanel’s Softaculous or your host’s dashboard). This method is fast and handles database creation and file transfer automatically. Manual installation, via FTP, gives you more control over file structure and is useful for custom server setups. The table below compares the key differences.
Feature
One-Click Installation
Manual Installation
Time to complete
5–10 minutes
20–40 minutes
Technical skill needed
Low
Intermediate
Database setup
Automatic
Manual via phpMyAdmin
File structure control
Limited
Full
Risk of errors
Low
Moderate
Best for
Beginners or standard sites
Advanced users or custom setups
For most social network projects, a one-click installation is sufficient. After installation, log in to your WordPress admin dashboard (typically yourdomain.com/wp-admin).
Essential WordPress Settings for User Sites
Once logged in, adjust these settings to prepare for user registration and interaction:
Permalinks: Go to Settings > Permalinks and select “Post name.” This creates clean URLs for user profiles and groups.
General Settings: Under Settings > General, set your Site Title and Tagline to reflect your social network. Enable “Anyone can register” under Membership.
Discussion Settings: In Settings > Discussion, allow comments on posts and enable comment moderation if needed. Disable “Comment author must fill out name and email” to simplify user interaction.
Reading Settings: Set “Your homepage displays” to “A static page” and create a blank page titled “Home” for future use with a social network plugin.
Media Settings: Adjust thumbnail sizes under Settings > Media to support profile photos and cover images. Set a reasonable maximum upload file size via your hosting panel.
These configurations ensure your site is ready to handle user-generated content and registration flows.
Installing a Multisite Network (If Needed)
If you plan to host multiple sub-sites under one domain (e.g., each user or group gets their own site), WordPress Multisite is essential. This feature is not enabled by default and requires careful setup.
To install Multisite:
Back up your existing WordPress database and files.
Open wp-config.php in a text editor and add define('WP_ALLOW_MULTISITE', true); above the line /* That's all, stop editing! */.
Refresh your admin dashboard, then go to Tools > Network Setup. Choose between sub-domains (e.g., user1.yourdomain.com) or sub-directories (e.g., yourdomain.com/user1).
Follow the on-screen instructions to update wp-config.php and .htaccess with the provided code.
Log back in. You will now see a “My Sites” menu at the top of the admin bar, allowing you to manage all sites from one dashboard.
Multisite is powerful but adds complexity. Use it only if your social network requires distinct, independent user sites. For a single community hub, a standard WordPress installation with a social network plugin is simpler and more maintainable.
Choosing the right plugin is the most critical decision when you learn how to create a WordPress social network site. The plugin you select will define your members’ experience, your site’s performance, and your ability to scale. Three plugins dominate this space: BuddyPress, PeepSo, and Ultimate Member. Each serves a distinct purpose, and your choice should align with your community’s goals, your technical comfort, and your budget.
Before diving into each option, consider these essential criteria for making your selection:
Core functionality: Does the plugin offer activity streams, member profiles, private messaging, and groups out of the box?
Performance: How does it affect server load and page speed, especially with many concurrent users?
Extensibility: Are there enough add-ons, themes, and developer hooks to customize your site?
Learning curve: How much time will you need to configure and maintain the plugin?
Cost: What is the total expense for the plugin plus essential add-ons and a compatible theme?
BuddyPress: The Classic Choice
BuddyPress is the veteran of WordPress social networking, having been developed by the same core team behind WordPress itself. It is free and open source, which makes it an attractive option for anyone on a tight budget. BuddyPress provides a complete suite of social features: user profiles, activity streams, user groups, private messages, and friend connections. Its ecosystem includes hundreds of free and premium add-ons for features like forums (via bbPress), badges, and user reviews.
However, BuddyPress has a reputation for being heavy. It can slow down a site if not properly optimized, especially on shared hosting. The default styling is also dated, often requiring a dedicated BuddyPress-compatible theme or significant custom CSS. If you are comfortable with some technical configuration and caching, BuddyPress offers unmatched flexibility and community support. A typical setup for a membership-based community might look like this:
// Add this to your theme's functions.php to enable custom profile fields
function my_custom_bp_profile_fields() {
if ( function_exists( 'bp_xprofile_create_field' ) ) {
bp_xprofile_create_field( array(
'field_group_id' => 1,
'name' => 'Twitter Handle',
'description' => 'Enter your Twitter username',
'type' => 'textbox',
'is_required' => false,
) );
}
}
add_action( 'bp_init', 'my_custom_bp_profile_fields' );
PeepSo: Modern and Lightweight
PeepSo positions itself as a faster, more modern alternative to BuddyPress. Its architecture is built for performance, with minimal database queries and a clean, responsive front end. PeepSo includes core features like activity streams, profiles, and private messaging, but it relies heavily on its premium add-on marketplace for advanced functions such as groups, photo albums, and user verification.
Where PeepSo excels is its user experience. The interface feels contemporary and works well on mobile devices without extra effort. It also integrates smoothly with popular page builders like Elementor, making it easier to design custom layouts. The trade-off is cost: while the base plugin is free, a fully functional community site often requires purchasing several paid add-ons, which can add up quickly. PeepSo is ideal for site owners who prioritize speed and a polished look over extensive free features.
Ultimate Member: Membership-Focused Features
Ultimate Member is not a pure social network plugin; it is a membership and user profile plugin with social networking capabilities. It excels at creating detailed user profiles, front-end registration and login forms, and member directories. Its form builder is intuitive, allowing you to add custom fields, conditional logic, and user roles without writing code.
For a social network site, Ultimate Member lacks built-in activity streams and groups. You would need to combine it with other plugins, such as a forum plugin or a third-party activity stream add-on, to create a community feel. This makes it best suited for sites where membership management and user directories are the primary focus, such as a professional network or a niche community where users connect through shared profiles rather than real-time feeds. Its pricing is moderate, with a single-site license offering good value for membership-centric projects.
To help you decide, here is a quick comparison table:
Feature
BuddyPress
PeepSo
Ultimate Member
Activity Streams
Yes (built-in)
Yes (built-in)
No (add-on required)
User Groups
Yes (built-in)
Add-on required
No
Private Messaging
Yes (built-in)
Yes (built-in)
No
Performance
Moderate
Excellent
Good
Cost
Free (add-ons vary)
td>Base free, add-ons paid
Base free, premium tiers
Best For
Full social networks
Fast, modern communities
Membership & directories
Ultimately, the best plugin for your site depends on your specific needs. If you want a complete, free social network, start with BuddyPress. If performance and design are your top priorities, invest in PeepSo. If your site centers on memberships and profiles rather than social feeds, choose Ultimate Member.
Step 4: Install and Activate Your Chosen Plugin
With your WordPress site ready and a social network plugin selected, the next stage involves installing and activating that plugin. This step transforms your standard WordPress installation into a platform capable of handling user profiles, activity streams, and group interactions. The process is straightforward, but attention to detail during initial setup ensures a stable foundation for your community.
Installing from the WordPress Repository
Most popular social network plugins, such as BuddyPress or PeepSo, are available directly from the WordPress Plugin Repository. This method is secure and automatically handles updates. Follow these steps:
Log in to your WordPress admin dashboard.
Navigate to Plugins > Add New.
In the search field, type the name of your chosen plugin (e.g., “BuddyPress” or “PeepSo”).
Locate the correct plugin in the results—check the author name and star ratings to avoid clones.
Click Install Now next to the plugin listing.
After installation completes, the button changes to Activate. Click it to enable the plugin.
If you purchased a premium plugin from a third-party developer, you will instead download a .zip file. In that case, go to Plugins > Add New > Upload Plugin, choose the file, and click Install Now, then activate.
Activating and Running the Setup Wizard
Once activated, many social network plugins present a setup wizard. This guided process configures core settings without requiring manual code edits. For example, BuddyPress launches a wizard immediately after activation. Complete it as follows:
Welcome screen: Read the overview; click Get Started.
Component selection: Choose which features to enable (e.g., Activity Streams, Groups, Member Profiles). Deselect any you do not need to reduce bloat.
Template pack: Select a template pack (such as the default “BuddyPress Nouveau”) that matches your theme’s style. This controls how social features appear on the front end.
Page assignment: The wizard automatically creates essential pages (Activity, Groups, Members, Register, Activate). Verify these pages are correctly linked; you can edit them later under Pages.
Finish: Click Finish Setup. The wizard may redirect you to the main settings panel.
If your plugin lacks a wizard, manually create these pages and assign them in the plugin’s settings under Settings > [Plugin Name] > Pages.
Configuring Basic Components
After the wizard, fine-tune the core components that define your social network. Navigate to the plugin’s settings page (often under Settings > BuddyPress or PeepSo). Configure these essential elements:
Component
Key Settings to Adjust
Activity Streams
Enable or disable site-wide activity feed. Set update length limits (e.g., 1000 characters). Choose if users can post links, images, or videos. Configure auto-refresh intervals.
Groups
Allow users to create groups, or restrict to admins. Set group privacy options (public, private, hidden). Define default group types (open, closed).
Member Profiles
Customize profile fields (name, bio, location). Enable or disable profile headers and cover images. Set visibility controls for fields (public, friends only, logged-in users).
Notifications
Choose notification methods (email, on-site). Set frequency digests (instant, daily, weekly). Customize notification text for new messages or group invites.
Test each component by creating a test user account. Log in as that user and post an update, join a group, and check that notifications appear. Adjust settings as needed to match your community’s intended behavior. Save changes after each section.
Step 5: Customize User Profiles and Registration
Once your WordPress social network is installed and the core layout is established, the next essential task is tailoring how members present themselves and how they join. User profiles and registration forms are the front door of your community; getting these details right encourages engagement and reduces spam. This step focuses on configuring profile fields, avatars, registration workflows, and the permissions that govern member interactions.
Standard WordPress user profiles are minimal, usually offering only a name, email, biography, and website. For a social network, you need richer profiles that reflect your niche. Use a plugin like BuddyPress or Ultimate Member to add custom profile fields. Common fields include location, interests, occupation, and social links. When designing these fields:
Group related fields into tabs (e.g., “About Me,” “Contact,” “Skills”) to avoid clutter.
Use dropdowns or radio buttons for constrained choices (e.g., country, gender) to maintain data consistency.
Enable avatar uploads. Allow members to upload a profile photo or use Gravatar as a fallback. Set a recommended image size (e.g., 150×150 pixels) and enforce square cropping for uniformity.
Consider a cover image option, similar to Facebook, to let users personalize their profile header.
For technical implementation, if you are comfortable adding code to your theme’s functions.php file, you can register a custom avatar size. Example:
This code creates a 200×200 pixel cropped image size for avatars, which you can then reference in your templates with get_avatar( $user_id, 200, '', '', array( 'class' => 'community-avatar' ) ).
Managing Registration with Custom Fields
Controlling who joins and what information they provide during signup is critical. Most social network plugins allow you to create custom registration forms. Follow these best practices:
Keep it short: Only request essential fields during signup (username, email, password). Add optional fields later on the profile edit page to reduce friction.
Add a terms checkbox: Include a required checkbox for your community guidelines or privacy policy to establish consent.
Use field validation: Ensure email addresses are valid, usernames are unique, and passwords meet strength requirements.
Prevent spam: Enable CAPTCHA (e.g., reCAPTCHA) or a honeypot field on the registration form. Many social plugins integrate with anti-spam tools like Akismet.
For a more tailored experience, you can map registration fields to specific profile fields. For instance, if your community is for photographers, ask “Camera Type” as a dropdown during signup. Use a plugin like Profile Builder or User Registration to manage this mapping without coding.
Setting Privacy and User Roles
Privacy controls and user roles define who sees what and what actions members can take. Configure these carefully to protect your community and comply with data regulations like GDPR.
Allow members to choose if their profile is visible to everyone, only logged-in users, or site administrators. BuddyPress offers this natively.
Email privacy
Hide email addresses from public view by default. Provide a contact form instead of exposing the raw email.
User roles
Create custom roles beyond Subscriber. For example, “Contributor” for active members who can post content, or “Moderator” to manage reported issues.
Data export
Enable a “Download My Data” feature on the profile settings page to comply with user data requests.
Use a role editor plugin like User Role Editor to assign capabilities precisely. For example, you might restrict new members from sending private messages until they have posted five times. This encourages participation while limiting spam. Test all privacy settings with a dummy account to ensure the experience matches your intentions before going live.
Step 6: Design Your Social Network with a Theme
The visual design of your social network site directly influences user engagement and retention. A well-chosen theme not only establishes brand identity but also optimizes the layout for community interaction, such as user profiles, activity feeds, and messaging. When selecting or building a theme, prioritize those that prioritize user experience and social functionality over pure aesthetics.
Best Free and Premium Social Themes
Choosing a theme specifically built for social networking reduces development time and ensures core features are supported out of the box. Below is a comparison of notable free and premium options.
Theme
Type
Key Features
Best For
BuddyPress Nouveau
Free (included with BuddyPress)
Clean, flexible layout; member directories; activity streams; group pages
BuddyPress-based communities
Youzer
Premium
Custom profile headers; social login; customizable activity tabs; premium widgets
Advanced customization and monetization
Kleo
Premium
One-click demo import; multiple header styles; integrated with bbPress and BuddyPress
Community sites with forums
Socialize
Premium
Drag-and-drop builder; user badges; notification system; multiple color schemes
Gamification and user-driven growth
Boss
Free
Minimalist design; mobile-optimized; supports BuddyPress and WooCommerce
Startups and small communities
Key considerations when choosing:
Plugin compatibility: Ensure the theme works seamlessly with social networking plugins like BuddyPress, bbPress, or PeepSo.
Demo content: Premium themes often include pre-built layouts for user profiles, groups, and activity streams, saving hours of setup.
Update frequency: Active development and regular updates are critical for security and compatibility with WordPress core.
Using Page Builders for Layout Customization
Page builders empower you to design custom layouts without writing code, but they must be used carefully to avoid performance issues. For social networks, focus on builders that support dynamic content and conditional display.
Elementor (Pro): Offers a theme builder that can create custom headers, footers, and single template pages for user profiles and groups. Its dynamic tags pull user data like avatar, name, and bio.
Beaver Builder: Lightweight and developer-friendly. Use it to design landing pages for sign-up, login, and community guidelines.
WPBakery: Popular with many premium themes, but avoid overusing it on content-heavy pages to maintain speed.
Best practices for layout customization:
Limit builder usage to key pages: Use page builders primarily for landing pages, about pages, and custom sections. Avoid applying them to every member profile or group page, as dynamic templates from your theme or plugin handle those more efficiently.
Leverage widgets: Add social-specific widgets like “Latest Members,” “Active Groups,” or “Recent Activity” using your theme’s widget areas rather than building them from scratch.
Test with real content: Always preview layouts with sample user data to ensure text, images, and interactive elements display correctly across different screen sizes.
Ensuring Mobile Responsiveness
Over 60% of social network traffic comes from mobile devices. A non-responsive theme will frustrate users, increase bounce rates, and harm your site’s search rankings. Every theme you consider must pass rigorous mobile testing.
Essential mobile checks:
Touch-friendly navigation: Buttons, links, and menu items should be at least 48×48 pixels and spaced adequately to prevent accidental taps.
Readable text without zoom: Body text should be at least 16px on mobile. Use relative units (em, rem) instead of fixed pixels.
Optimized media: User-uploaded images and videos must be responsive. Use plugins like Smush or Imagify to compress and serve appropriate sizes.
Streamlined forms: Registration, login, and profile edit forms should be single-column and auto-fill friendly.
Testing tools and methods:
Google Mobile-Friendly Test: Enter your site URL to get a pass/fail report with specific issues.
Chrome DevTools: Emulate different devices (iPhone, iPad, Android) to check layout shifts, touch targets, and font sizes.
Real device testing: Use services like BrowserStack to test on actual smartphones and tablets, as emulators can miss subtle rendering differences.
By selecting a theme optimized for social interaction, customizing layouts with care, and thoroughly testing mobile responsiveness, you create a foundation that encourages user participation and long-term community growth.
Step 7: Add Essential Features (Messaging, Groups, Activity)
Once your membership system is in place, the next phase is to transform your site into a true social network by adding core interactive features. Private messaging, user groups, and an activity stream are the pillars that keep members engaged and returning. Without these, your site remains a static directory of profiles. This step requires careful plugin selection and configuration to balance functionality with performance.
Setting Up Private Messaging Systems
Private messaging allows members to communicate one-on-one without publicly exposing their conversations. The most reliable approach is to install a dedicated plugin that integrates seamlessly with your existing user system. Popular choices include BuddyPress (which includes built-in messaging) and PeepSo (with its own messaging add-on). For BuddyPress, messaging is part of the core plugin; simply activate it under Settings > BuddyPress > Components. For PeepSo, install the PeepSo Core and the PeepSo Messages add-on, then enable it from the PeepSo dashboard.
Key configuration points for private messaging:
Message limits: Set maximum recipients per message (e.g., 10) to prevent spam.
Attachments: Enable file uploads in messages, but restrict file types (e.g., images, PDFs) and size (e.g., 5 MB).
Notifications: Activate email or on-site notifications for new messages to ensure timely responses.
Read receipts: Consider enabling read receipts so senders know when their message has been seen.
Always test the messaging flow by sending a message between two test accounts, verifying that notifications appear and the inbox updates correctly.
Creating User Groups and Forums
Groups allow members to form communities around shared interests, while forums provide structured discussion spaces within those groups. BuddyPress offers native group functionality, which can be extended with the bbPress plugin for forums. To create groups:
In your WordPress admin, go to BuddyPress > Groups > Add New (if using BuddyPress) or use the group creation interface on the front end.
Set group privacy: Public (visible to all), Private (visible only to members), or Hidden (invite-only).
Enable the forum component for each group by checking the forum option in the group settings.
Configure bbPress to allow group-specific forums, ensuring that discussions are contained within their respective groups.
To help you decide between approaches, consider the following comparison of group and forum plugins:
Feature
BuddyPress Groups (with bbPress)
PeepSo Groups (with PeepSo Topics)
Group creation
Front-end and admin; supports public, private, hidden
Front-end only; supports public, private, secret
Forum integration
Native via bbPress; automatic group-to-forum mapping
Add-on required; manual topic creation per group
Moderation tools
Group admin roles, moderation queue, and report flags
Group moderators, post-level reporting, and spam filters
Performance impact
Moderate; optimized for large groups with caching
Lightweight; fewer database queries per page load
Whichever plugin you choose, define clear group creation rules—for example, requiring admin approval for new groups to prevent spam communities.
Customizing the Activity Stream
The activity stream is the social heart of your network, displaying updates, comments, and actions in real time. Both BuddyPress and PeepSo offer customizable activity streams. To tailor it for your audience:
Enable relevant actions: Under Settings > BuddyPress > Activity, select which actions appear (e.g., new friends, group joins, blog posts). For PeepSo, use the Activity Settings panel to toggle streams like All, Following, or My Posts.
Set display limits: Limit the number of activities shown per page (e.g., 20) to reduce load times. Use pagination or infinite scroll based on user preference.
Add filtering: Provide dropdown filters so users can view updates from everyone, just their friends, or specific groups.
Control comments: Allow or disable comments on activity posts, and set a maximum comment length (e.g., 500 characters) to prevent walls of text.
Integrate with notifications: Ensure that new activity posts trigger notifications for followers, encouraging immediate engagement.
After customization, test the stream by performing several actions (posting, commenting, joining a group) and verifying they appear in the correct order and with the right permissions.
Step 8: Enhance with Plugins for Media, Gamification, and Moderation
Once your WordPress social network has its core functionality established—user profiles, activity streams, and member connections—the next step is to enrich the experience and maintain a healthy community. This involves three key areas: enabling rich media sharing, introducing game-like incentives, and implementing robust safety tools. The right plugins can transform a basic network into a vibrant, self-sustaining ecosystem without requiring custom development.
Allowing members to share photos, videos, and documents is essential for engagement. Native WordPress media handling is designed for site administrators, not for user-generated content in a social context. Dedicated plugins provide per-user galleries, drag-and-drop uploads, and front-end submission forms.
Recommended plugins include:
BuddyPress Media (or compatible extensions like rtMedia): Adds photo and video upload buttons directly to activity streams, group forums, and private messages. Supports multi-file uploads and creates personal albums.
WP User Frontend: Enables a front-end post form where members can submit media-heavy content, with granular control over file types and sizes.
Video Gallery – YouTube Gallery: Allows users to embed or upload videos, creating a community video hub with ratings and comments.
For performance, ensure your server supports the required PHP memory limit (at least 128MB) and consider using a CDN for large media files. A practical server configuration snippet for your wp-config.php file might look like:
Gamification drives participation by rewarding desired behaviors such as posting, commenting, or inviting friends. This turns passive visitors into active contributors.
Top plugin choices are:
Plugin
Key Features
Best For
GamiPress
Points, achievements, ranks; integrates with BuddyPress and bbPress
Flexible reward systems with automated triggers
myCRED
Custom point types, buy points, leaderboards, and badges
Monetization and advanced point management
BadgeOS
Badge creation, step-based requirements, open badge standards
Simple badge systems with easy setup
When configuring, start with three core actions: creating a profile, making a first post, and receiving a like. Gradually add more complex milestones (e.g., “100 comments” badge) to maintain long-term interest.
Moderation and Reporting Tools
Without moderation, social networks quickly degrade into spam and toxicity. WordPress offers basic comment moderation, but social sites need proactive tools for user reports, automated flagging, and content review queues.
BuddyPress Moderation: Adds a “Report This” button to activity posts, groups, and messages. Reports are sent to a moderation queue accessible from the WordPress admin.
Akismet Anti-Spam: Automatically filters spam from user-submitted content across the social network.
Moderation Alerts by QM: Sends email or Slack notifications to moderators when flagged content appears, enabling rapid response.
For advanced control, set up word-filtering rules using a plugin like Word Filter to automatically hold or block posts containing offensive terms. Combine these tools with clear community guidelines displayed on the registration page to set expectations from day one.
Step 9: Launch, Promote, and Maintain Your Social Network
After months of configuration, design, and testing, the moment arrives to open your WordPress social network to the world. Launching is not a single event but a continuous process of attracting users, ensuring stability, and fostering community. This step covers the final checks before going live, promotional strategies to build your initial user base, and the ongoing maintenance habits that keep your network secure and growing.
Pre-Launch Checklist and Testing
Before you flip the switch, run through a comprehensive checklist to catch last-minute issues. Start by testing all core user flows:
Registration and login (including social login if enabled)
Profile creation and editing
Posting, commenting, and private messaging
Friend/follow requests and notifications
Search functionality and member directory
Next, verify technical foundations:
SSL certificate is active and forces HTTPS
All plugins and themes are updated to latest versions
Permalinks are set to a clean structure (e.g., Post name)
Caching plugin is configured for performance
Spam protection (e.g., Akismet, reCAPTCHA) is active
Backup system is working and storing copies offsite
Perform a final speed test using tools like GTmetrix or Pingdom. Aim for a loading time under three seconds on mobile and desktop. Also test your site on different browsers (Chrome, Firefox, Safari, Edge) and devices to ensure responsive design works correctly. Finally, create a dummy user account and simulate a day of activity to confirm emails (welcome, notifications) are delivered without errors.
Your social network needs people to be valuable. Start by leveraging your existing audience. Announce the launch on your personal or business social media profiles (Twitter, LinkedIn, Facebook, Instagram) with a compelling call-to-action and a direct link to your registration page.
Build a pre-launch email list if possible. Send a dedicated launch email to subscribers that includes:
A brief story explaining why you created the network
Key benefits of joining (e.g., exclusive content, niche community)
A time-limited incentive, such as early access or a badge
Clear next steps: “Create your profile now”
Consider cross-promotion with complementary communities or influencers in your niche. Offer them early access or a featured profile in exchange for sharing your network with their followers. Use social media scheduling tools (Buffer, Hootsuite) to maintain a consistent posting schedule about new members, discussions, or features.
Regular Updates, Backups, and Community Management
Maintenance is the backbone of a thriving social network. Schedule weekly updates for WordPress core, your theme, and all plugins. Outdated software is the primary vector for security breaches. Enable automatic updates for minor security patches, but test major updates on a staging site first.
Backup your database and files daily, especially during the first few months of rapid growth. Store backups in at least two locations: your hosting server and a cloud service (e.g., Dropbox, Google Drive, or a remote FTP). Test restoration from backup monthly to ensure your process works.
Community management requires daily attention. Assign moderators to enforce your community guidelines, remove spam, and resolve conflicts. Actively engage with new members by welcoming them, answering questions, and highlighting quality contributions. Use analytics tools (Jetpack, Google Analytics) to track user retention, popular content, and drop-off points. Adjust your features and content strategy based on this data. A well-maintained network grows through word-of-mouth, so prioritize user experience and safety in every update.
Frequently Asked Questions
What is the easiest way to create a social network site with WordPress?
The easiest way is to install the BuddyPress plugin on a self-hosted WordPress site. BuddyPress adds social networking features like user profiles, activity streams, groups, and private messaging. You can then choose a compatible theme and configure the components you need. This approach requires no coding and can be done in a few hours.
Do I need a special hosting plan for a WordPress social network?
While you can start with shared hosting, a social network site with many users and activity will benefit from managed WordPress hosting or a VPS. Look for hosts that offer good performance, scalability, and support for plugins like BuddyPress. Popular options include WP Engine, SiteGround, and Kinsta.
Can I create a social network without BuddyPress?
Yes, alternatives include plugins like PeepSo, Ultimate Member, or Youzer. These offer similar features with different interfaces. For a more custom solution, you can use the WordPress REST API and build your own frontend. However, BuddyPress remains the most popular and well-documented choice.
How do I add private messaging to my WordPress social network?
BuddyPress includes a built-in private messaging system. You can enable it in the BuddyPress settings under 'Components'. Users can then send and receive messages from their profiles. For advanced features like group messaging or chat, consider add-ons like BuddyPress Private Message Pro or third-party chat plugins.
Is it possible to monetize a WordPress social network?
Yes, you can monetize through membership subscriptions (using plugins like Paid Memberships Pro or WooCommerce Memberships), selling ad space, offering premium groups or content, or using affiliate marketing. Many social networks also use a freemium model where basic features are free and advanced features require payment.
How do I ensure user privacy on my social network?
WordPress and BuddyPress offer privacy settings. You can require user registration approval, make profiles private by default, and restrict content visibility. Use plugins like WP GDPR Compliance for data protection. Also, enforce strong passwords and consider using SSL certificates to encrypt data.
What theme is best for a WordPress social network?
Choose a BuddyPress-compatible theme like BuddyX, Kleo, or Socialize. These themes are designed for social networks and include features like full-width profiles, activity feeds, and group layouts. Alternatively, use a multipurpose theme like Astra with BuddyPress support.
Can I migrate an existing forum into a WordPress social network?
Yes, you can migrate forums from platforms like phpBB, vBulletin, or Simple Machines Forum using plugins like bbPress or migration tools. Once imported, you can integrate the forum with BuddyPress to create a unified social network. This allows you to retain existing user bases and content.
WordPress menu systems form the backbone of site navigation, allowing you to organize and display links to your most important content. A well-structured menu guides visitors effortlessly through your website, reducing bounce rates and improving overall usability. Mastering these systems is not just a design choice—it is a fundamental practice for enhancing user experience and boosting search engine optimization (SEO). This comprehensive guide explores the components, benefits, and best practices of WordPress menus, equipping you with the knowledge to create intuitive, high-performing navigation.
What Are WordPress Menus?
WordPress menus are customizable navigation elements that appear in designated locations within your theme, such as headers, footers, or sidebars. They consist of links to pages, posts, categories, custom URLs, or other content types. The native WordPress menu system, accessed under Appearance > Menus, allows you to create, edit, and assign multiple menus to different theme locations. Key features include:
Drag-and-drop interface for reordering items
Support for nested submenus (dropdowns) up to multiple levels
Integration with custom link types and taxonomy terms
Ability to assign menus to specific locations (e.g., primary, secondary, footer)
Compatibility with third-party plugins for enhanced functionality (e.g., mega menus, sticky navigation)
Each menu item can be customized with a navigation label, title attribute, and CSS classes, offering granular control over appearance and behavior. Themes define available locations, so the number and placement of menus vary depending on your chosen design.
Why Navigation Matters for Your Website
Navigation is the roadmap of your website. Without clear, logical menus, users struggle to find information, leading to frustration and abandonment. Effective navigation serves multiple purposes:
Usability: Visitors can quickly locate key content, such as product pages, blog posts, or contact forms.
Accessibility: Properly structured menus support screen readers and keyboard navigation, ensuring inclusivity.
Brand Trust: A polished, consistent navigation bar signals professionalism and reliability.
Site Structure: Menus reflect your site’s hierarchy, helping users understand how content relates.
For example, an e-commerce site with a well-organized menu (e.g., “Shop by Category,” “Sales,” “Support”) reduces cognitive load and encourages purchases. Conversely, a cluttered or hidden menu increases bounce rates and diminishes user satisfaction.
How Menus Affect User Experience and Search Rankings
Menus directly influence both user experience (UX) and SEO. From a UX perspective, menus determine how easily users navigate your site. Key considerations include:
Clear labels reduce confusion and help users find content quickly.
Consistency
Menus that remain stable across pages build familiarity and reduce disorientation.
Depth
Overly deep menus (many sublevels) can overwhelm users; limit to 2-3 levels.
Mobile Responsiveness
Menus must adapt to smaller screens (e.g., hamburger menus) for touch interaction.
For SEO, menus play a critical role in distributing link equity and defining site architecture. Search engines use menus to discover and index content. Best practices include:
Link to High-Value Pages: Include your most important pages (e.g., cornerstone content, product categories) in the primary menu.
Use Descriptive Anchor Text: Avoid generic terms like “click here”; instead, use keywords relevant to the linked page.
Limit Menu Items: Too many links dilute link authority; aim for 5-7 primary items.
Ensure Crawlability: Menu links should be standard HTML (not JavaScript-only) to allow bots to follow them.
Leverage Breadcrumbs: While not a menu, breadcrumbs complement navigation by showing users their location and improving internal linking.
By prioritizing navigation quality, you create a seamless user journey that encourages deeper engagement and signals relevance to search engines, ultimately improving rankings and conversion rates.
Understanding the WordPress Menu Editor
The WordPress Menu Editor is the central interface for creating, managing, and assigning navigation menus on your site. Located within the WordPress Dashboard, this tool provides a visual, drag-and-drop environment that allows you to build custom menu structures without touching any code. Whether you are building a simple blog or a complex business site, mastering the Menu Editor is essential for guiding visitors through your content. This section walks you through accessing the editor, understanding its core components, and applying your menus to theme locations.
Accessing the Menu Editor via the Dashboard
To open the Menu Editor, log in to your WordPress Dashboard and follow these steps:
Navigate to Appearance in the left-hand admin menu.
Click on Menus. This opens the Menu Editor page.
If your theme supports multiple menus, you will see an option to create a new menu or edit an existing one. The interface is divided into two main columns: the left column contains available content items (pages, posts, custom links, categories, etc.), and the right column shows the current menu structure where you can arrange items. If you do not see the Menus option under Appearance, ensure your theme supports custom menus—most modern themes do, but some older or minimal themes may require a plugin or theme update.
For advanced customization, you can also access the Menu Editor programmatically. For example, you can register a new menu location in your theme’s functions.php file using the following code:
This code registers two new menu locations, which will then appear in the Menu Editor under “Manage Locations.”
Key Components: Menu Name, Menu Items, and Menu Settings
The Menu Editor is built around three core components that you will interact with every time you build or modify a navigation structure.
Menu Name: Located at the top of the editor, this is a descriptive label for your menu (e.g., “Main Navigation” or “Footer Links”). It is used internally to identify the menu and is not visible to site visitors. You must assign a name before saving your first menu.
Menu Items: These are the individual links that appear in your navigation. You add items from the left column by checking the box next to a page, post, custom link, or category, then clicking “Add to Menu.” Once added, you can drag and drop items to reorder them, or nest items under a parent to create dropdown menus. Each item has a small triangle arrow that expands to reveal settings such as Navigation Label, Title Attribute, and CSS Classes (if enabled via Screen Options).
Menu Settings: Below the menu structure, you will find a “Menu Settings” box. Here, you can enable or disable features like “Automatically add new top-level pages” (which auto-adds any new pages to the menu) and “Display location” (which assigns the menu to a theme-defined area, such as the primary navigation or footer).
To customize what options appear in the Menu Editor, click the “Screen Options” tab at the top right of the page. This lets you show or hide fields such as Link Target, CSS Classes, and Description for each menu item, giving you finer control over your navigation’s behavior and styling.
Saving and Assigning Menus to Locations
Once you have built your menu structure, you must save it and assign it to a theme location for it to appear on your site. Follow these steps:
Click the Save Menu button at the bottom of the Menu Editor. This stores your current menu configuration.
Scroll down to the Menu Settings section. Check the box next to the theme location where you want this menu to appear (e.g., “Primary Menu” or “Footer Menu”). If your theme supports multiple locations, you can assign the same menu to several locations or create separate menus for each.
Click Save Menu again to confirm the assignment.
Alternatively, you can use the Manage Locations tab at the top of the Menu Editor page. This tab provides a table view of all available theme locations and allows you to assign a menu to each location from a dropdown list. This method is useful when you have many menus and need to quickly reassign them without editing each menu’s settings individually.
After assigning a menu, visit your site’s front end to verify it displays correctly. If the menu does not appear, ensure your theme supports the location you selected and that the menu contains at least one item. Some themes also require you to set a “Home” link manually if you want it in the navigation—add a custom link with the URL set to / and the label set to “Home.”
Adding Items to Your WordPress Menu
Once you have created a menu in WordPress, the next step is populating it with the content you want visitors to access. The Menu Editor in the WordPress admin area provides a straightforward interface for adding various types of items, from standard pages to custom external links. This section provides step-by-step instructions for adding different content types to your navigation menus.
Adding Pages and Posts to a Menu
Pages and posts are the most common menu items. To add them:
Go to Appearance > Menus in your WordPress dashboard.
Ensure you are editing the correct menu from the dropdown at the top.
In the left-hand panel, click the Pages or Posts tab to expand it.
Check the box next to each page or post you want to include. You can also click View All to see all available items, or use the Search field for specific entries.
Click the Add to Menu button. The selected items will appear in the menu structure on the right.
Drag and drop items to reorder them. You can also nest items under others by dragging them slightly to the right (indentation) to create dropdown submenus.
Click Save Menu to apply changes.
Tip: For posts, consider using categories or tags instead of individual posts if you have a blog archive structure. However, adding specific posts (e.g., a featured article) is useful for promotional menus.
Using Custom Links for External or Special URLs
Custom links allow you to add any URL to your menu, including external websites, anchor links, or internal pages not listed in standard content types. Follow these steps:
In the Appearance > Menus screen, locate the Custom Links section in the left panel.
Enter the full URL in the URL field. For example, https://example.com or a relative path like /#contact.
Type a descriptive label in the Link Text field (e.g., “Visit Our Partner Site”).
Click Add to Menu. The custom link will appear in your menu structure.
Optionally, drag it to the desired position and set it as a submenu item if needed.
Click Save Menu.
Use cases:
Linking to external resources or affiliate sites.
Adding anchor links to specific sections on the same page (e.g., /#features).
Including URLs to third-party tools or social media profiles.
Including Categories, Tags, and Custom Post Types
WordPress menus support taxonomy archives and custom post type archives. Here is how to add them:
For Categories and Tags:
In the Menu Editor, click the Categories or Tags tab in the left panel.
Check the boxes for the categories or tags you want to include (e.g., “News,” “Tutorials”).
Click Add to Menu. Each category or tag will link to its respective archive page.
Reorder or nest as desired, then save.
For Custom Post Types:
If your site uses custom post types (e.g., “Portfolio,” “Products”), they will appear as separate tabs in the left panel (e.g., Portfolio or Products).
Expand the tab, select individual items or use View All.
Click Add to Menu. Some custom post types may also include archive links under a Custom Post Type Archives meta box if enabled by your theme or plugin.
Save the menu.
Comparison Table: Menu Item Types and Their Uses
Item Type
Source
Typical Use Case
Example
Page
Existing WordPress pages
Static content like About, Contact, Services
About Us page
Post
Individual blog posts
Highlighting a specific article or news item
Featured blog post
Custom Link
Manual URL entry
External websites, anchor links, special URLs
Partner site link
Category
Taxonomy archive
Grouping related posts (e.g., blog categories)
News category
Tag
Taxonomy archive
Linking to content by specific tag
Video tutorials tag
Custom Post Type
Individual custom post type items
Portfolio projects, products, testimonials
Product item
By understanding these options, you can build menus that effectively guide users through your site’s content hierarchy and external resources. Always test menu links after saving to ensure they lead to the correct destinations.
Organizing Menus with Submenus and Hierarchy
A well-structured navigation system is the backbone of any user-friendly website. Submenus, often called dropdowns, allow you to nest related pages under primary menu items, creating a logical hierarchy that guides visitors efficiently. In WordPress, building these nested structures is intuitive, but thoughtful planning is required to avoid overwhelming users or breaking accessibility. This section covers how to create submenus, best practices for depth, and tips for managing order and indentation.
Creating Submenus via Drag-and-Drop
WordPress provides a simple drag-and-drop interface in the Menu editor (found under Appearance > Menus). To create a submenu:
Ensure you have at least two menu items added to your structure.
Hover your cursor over the left edge of the item you want to become a sub-item (the child).
Click and drag it slightly to the right, under the parent item. A gray indentation line will appear, indicating the child level.
Release the mouse button. The child item will now be indented under its parent.
Repeat for additional children, or drag multiple items to the same parent level.
To remove a submenu, simply drag the child item back to the left until it aligns with the top-level items. The Menu editor also supports keyboard navigation for accessibility: use the Tab key to move between items, and the Arrow Up/Down keys to reorder, though indentation typically requires mouse or touch input.
Practical example: If your primary menu item is “Services,” you can drag “Web Design,” “SEO,” and “Consulting” under it as sub-items. The front-end will display them as a dropdown when a user hovers or clicks on “Services.”
Best Practices for Menu Depth and Structure
While WordPress allows unlimited nesting, usability research suggests limiting depth to two or three levels. Deep hierarchies (four or more levels) cause dropdowns to become unwieldy, especially on mobile devices where hover interactions are replaced by taps. Follow these guidelines:
Two levels maximum for most sites: Top-level items with one layer of submenus. This keeps navigation scannable and reduces cognitive load.
Three levels only for complex content: Use sparingly, such as for large e-commerce catalogs or educational portals. Test on mobile to ensure dropdowns remain usable.
Group related items: Submenus should contain logically connected pages. For example, under “About Us,” place “Team,” “History,” and “Careers,” not unrelated topics.
Avoid orphan submenus: Every child item should have a clear parent that makes sense without the dropdown. Users should not need to guess what a parent item leads to.
Use descriptive labels: Submenu text should be concise yet specific, such as “Pricing” rather than “Info.”
A common mistake is creating a menu that mirrors the site’s internal taxonomy without considering user goals. Instead, organize around user tasks: what do visitors most often seek? Group those tasks under logical parent headings.
Managing Menu Order and Indentation
Once submenus are created, ordering items within each level is crucial for logical flow. In the Menu editor, each item displays a drag handle (a grid of dots) on its left. To reorder:
Top-level items: Drag them vertically to change their sequence. For example, move “Home” to the first position.
Submenu items: Drag within their indented group to reorder children. The parent item remains fixed, but children can be rearranged independently.
Indentation control: If an item becomes misaligned (e.g., a child appears at the same level as its parent), drag it slightly right or left to correct its depth. The visual indentation in the editor mirrors the front-end hierarchy.
For precise control without dragging, you can use the Screen Options tab at the top of the Menu editor. Enable the “CSS Classes” field to add custom classes for styling, though this does not affect hierarchy. A practical code example for customizing submenu display in your theme’s CSS:
Always test your menu order on multiple devices. Use the Customize panel (Appearance > Customize) to preview how indentation and hierarchy appear in your theme, as some themes may have fixed depths or require additional plugin support for advanced dropdown behaviors.
Exploring Menu Locations and Theme Integration
In a WordPress menu system, the menu locations are the predefined areas within a theme where you can display navigation menus. These locations are defined by the theme developer and are typically found in the header, footer, or sidebar. Assigning a menu to a location ensures that the navigation appears consistently across your site. Understanding how themes define these locations and how to integrate them is essential for controlling your site’s user experience. This section covers the most common menu locations, how to register custom ones, and how to troubleshoot issues when menus do not display as expected.
Common Menu Locations: Primary, Secondary, Footer
WordPress themes typically support several standard menu locations. The most common include:
Primary Menu – Usually located in the site header, often as the main horizontal navigation bar. This is the most prominent menu location and is used for primary site navigation (e.g., Home, About, Services, Contact).
Secondary Menu – A supplementary navigation area, often placed below the primary menu or in a separate header region. It may hold utility links like login, search, or language switcher.
Footer Menu – Located in the site footer, this menu typically contains secondary or legal links such as Privacy Policy, Terms of Service, or Sitemap. It is less prominent but important for overall site structure.
Some themes also include locations like Top Bar, Mobile Menu, or Sidebar Menu. The availability of these locations depends entirely on the theme. You can view and assign menus to these locations from the WordPress admin under Appearance > Menus > Manage Locations.
Below is a table summarizing typical menu locations and their common uses:
Menu Location
Typical Placement
Common Use
Primary
Header (top)
Main site navigation
Secondary
Below header or top bar
Utility links, secondary pages
Footer
Footer area
Legal links, sitemap
Sidebar
Sidebar widget area
Category or archive navigation
Registering Custom Menu Locations in Your Theme
If you are developing a custom theme or need a menu location not provided by your current theme, you can register custom menu locations using the register_nav_menus() function in your theme’s functions.php file. This function accepts an array of location identifiers and their labels. Here is the standard approach:
This makes the menu location available under Appearance > Menus > Manage Locations. You can register as many locations as needed, but keep performance and user experience in mind—excessive locations can confuse site editors.
Troubleshooting Menu Location Issues
Even with proper registration, menu location problems can arise. Common issues include menus not displaying, appearing in the wrong area, or not being selectable. Here are troubleshooting steps:
Check theme support: Verify that your theme actually supports the menu location. Some themes only support a limited set. Look in the theme’s functions.php or documentation for registered locations.
Verify location assignment: Go to Appearance > Menus > Manage Locations and ensure a menu is assigned to the desired location. If no menu is assigned, the location will not display.
Inspect template files: If a menu location is registered but not appearing on the front end, confirm that the template file (e.g., header.php or footer.php) includes the correct wp_nav_menu() call with the matching theme_location parameter.
Check for conflicts: Plugins (especially caching or customizer plugins) can interfere with menu location rendering. Temporarily deactivate plugins to test.
Clear cache: Browser, plugin, or server cache may prevent updated menus from displaying. Clear all caches and reload the site.
Use fallback parameters: In your wp_nav_menu() call, include a fallback_cb parameter to display a default list of pages if no menu is assigned. This prevents blank areas.
If issues persist, review the theme’s documentation or check the WordPress support forums for location-specific guidance. Properly integrated menu locations are critical for user navigation and site usability.
Advanced Menu Features: CSS Classes and Custom Attributes
Beyond basic navigation, WordPress menus offer powerful advanced options that enable precise styling, improved SEO, and enhanced functionality. By leveraging CSS classes, link relationships, and custom attributes, you can tailor menu items to interact with themes, scripts, and analytics tools without modifying core files. This section explores how to unlock these features for professional-grade navigation.
Adding Custom CSS Classes to Menu Items
WordPress allows you to assign custom CSS classes to individual menu items, giving you granular control over their appearance and behavior. This is particularly useful for highlighting specific links, applying unique hover effects, or integrating with design frameworks like Bootstrap or Tailwind.
To add a custom class:
Go to Appearance > Menus in your WordPress dashboard.
Click Screen Options at the top of the page and check CSS Classes.
Select a menu item to expand its settings, then enter your class name (e.g., “highlight-link” or “cta-button”) in the CSS Classes (optional) field.
Save the menu.
These classes are applied to the <li> element wrapping the link. For example, a menu item with the class “special-item” renders as:
.special-item a {
color: #ff6600;
font-weight: bold;
text-decoration: underline;
}
Common use cases include adding icons via pseudo-elements, creating distinct styles for login/logout links, or applying different background colors to primary and secondary navigation items.
Using Link Relationships (Rel) for SEO and Accessibility
The rel attribute defines the relationship between the current page and the linked page. In WordPress menus, you can assign these values to improve SEO, security, and user experience. To enable this feature, ensure Link Relationship (XFN) is checked under Screen Options in the Menu editor.
Key rel values and their purposes:
Value
Purpose
nofollow
Instructs search engines not to pass link equity to the linked page. Ideal for affiliate links or user-generated content.
sponsored
Indicates paid or sponsored links, aligning with Google’s guidelines for link attribution.
ugc
Designates user-generated content links (e.g., forum posts or comments).
noopener
Prevents the new page from accessing the window.opener property, enhancing security for external links opened in a new tab.
noreferrer
Hides the referring URL from the destination page, useful for privacy-sensitive links.
To apply, expand a menu item and enter the desired value in the Link Relationship (XFN) field. For multiple values, separate them with spaces (e.g., “nofollow noopener”). This approach helps avoid penalties from search engines for unnatural linking patterns while protecting users from potential cross-origin vulnerabilities.
Applying Custom Attributes for JavaScript or Analytics
Custom attributes, such as data-* attributes, allow you to embed additional information into menu links for JavaScript interactions or analytics tracking. WordPress supports this through the Custom Attributes field, which must be enabled via Screen Options.
Practical examples include:
Analytics tracking: Add a data-event attribute to track clicks in Google Analytics 4 or Matomo.
Modal triggers: Use data-toggle="modal" and data-target="#contactModal" for Bootstrap modals.
AJAX loading: Set data-ajax="true" to load content dynamically without page refresh.
To implement, expand a menu item and fill in the Custom Attributes fields:
Attribute Name: Enter the attribute (e.g., data-analytics).
This method keeps your tracking logic separate from theme templates and allows non-developers to assign attributes through the WordPress interface. Always test custom attributes with your specific JavaScript framework to ensure compatibility and avoid conflicts with existing scripts.
Creating Mega Menus and Multi-Column Layouts
Mega menus and multi-column layouts transform standard navigation into a powerful tool for organizing large amounts of content. Unlike simple dropdowns, mega menus display multiple columns, images, links, or even search fields in a single expanded panel. They are especially valuable for e-commerce sites, news portals, or any website with extensive categories, as they reduce clicks and help users find exactly what they need faster. This section explores what mega menus are, how to build them using plugins or custom code, and essential techniques for making them responsive on mobile devices.
A mega menu is an extended dropdown that presents navigation options in a grid-like layout, often with multiple columns, icons, or rich content blocks. Unlike conventional dropdowns that show a single vertical list, mega menus can display subcategories, featured products, promotional banners, or even short descriptions. They are best used when:
Your site has more than 5–7 top-level categories, each with many subcategories.
You need to showcase visual elements like product images or icons alongside links.
User research shows visitors often browse across categories rather than searching directly.
Your content is hierarchical and benefits from a “department store” style layout, common in e-commerce, education, or large corporate sites.
When implemented correctly, mega menus improve discoverability and reduce bounce rates. However, they can overwhelm users if too cluttered, so always prioritize clarity over quantity.
Building Mega Menus with Plugins or Custom Code
You can create mega menus using either plugins (for ease) or custom code (for full control). Below is a comparison of common approaches:
Method
Pros
Cons
Plugin (e.g., Max Mega Menu, UberMenu)
No coding required; drag-and-drop builder; built-in responsive settings
May add bloat; limited design flexibility; potential conflicts with theme
Requires development skills; more time to implement; manual maintenance
Using a plugin: Install and activate a mega menu plugin, then assign it to your primary menu location. Most plugins let you add columns, widgets, or custom HTML inside menu items. For example, you can insert a shortcode for a featured product carousel or a list of recent posts. Always test the plugin with your theme to ensure compatibility.
Using custom code: Start by structuring your menu in WordPress as a standard custom menu. Then, use CSS to style the dropdown as a multi-column grid. For instance, add a CSS class like .mega-menu to the parent menu item and use display: grid; grid-template-columns: repeat(4, 1fr); on the sub-menu. Use JavaScript to control hover or click behavior. Example CSS snippet:
For richer content, use WordPress custom walker functions to output HTML (e.g., images or buttons) inside menu items. This approach gives you complete control but requires careful testing across browsers.
Designing Responsive Mega Menus for Mobile Devices
Mega menus that work well on desktop often fail on mobile due to limited screen space. To ensure usability on all devices, follow these guidelines:
Collapse into a hamburger or accordion: On screens narrower than 768px, hide the mega menu behind a toggle button. When opened, display menu items as a vertical list or accordion, with subcategories nested under parent items.
Use touch-friendly targets: Ensure each link or button is at least 44×44 pixels. Avoid hover-only interactions; rely on taps or clicks instead.
Simplify content: On mobile, remove images or extra blocks from mega menus. Show only essential links and use icons sparingly. Consider a “View all” link to a category page instead of listing every subcategory.
Test with real devices: Use browser DevTools to simulate mobile widths, but also test on actual phones to verify touch behavior and scrolling.
Always provide a fallback: if JavaScript fails, ensure the menu still works as a basic dropdown. By prioritizing mobile-first design, your mega menu will remain accessible and efficient for all users.
Using Plugins to Extend WordPress Menu Capabilities
WordPress core provides a robust menu system through the Appearance > Menus screen, allowing users to create navigation structures from pages, posts, custom links, and categories. However, many modern websites require advanced functionality such as conditional visibility based on user roles, sticky headers that remain fixed during scrolling, or the addition of icons to menu items. Fortunately, the WordPress plugin ecosystem offers a wide range of solutions to extend menu capabilities without requiring custom code. This section explores the most effective plugins for enhancing your WordPress menus, categorized by their primary function.
Top Plugins for Menu Customization and Icons
Adding visual flair and organizational clarity to menu items often involves incorporating icons or custom styling. Several plugins excel in this area, offering both simplicity and depth.
Menu Icons by ThemeIsle: A widely trusted plugin that integrates seamlessly with the WordPress menu builder. It allows you to assign icons from popular libraries such as Dashicons, Font Awesome, and Genericons to any menu item. The plugin adds a simple dropdown selector within each menu item’s settings, making it accessible for beginners. It is lightweight and does not require additional third-party services.
Max Mega Menu: A powerful plugin that transforms standard WordPress menus into advanced, multi-column mega menus. It includes built-in support for Font Awesome icons, custom CSS classes, and widget areas within menu items. This plugin is ideal for sites with complex navigation structures, such as e-commerce stores or large content directories. It also provides a drag-and-drop builder for creating rich, icon-enhanced layouts.
WP Menu Icons: A focused plugin that adds icon selection to menu items using the WordPress Customizer. It supports multiple icon sets including Dashicons, Font Awesome 4 and 5, and Material Icons. The plugin is designed to be performance-friendly, loading only the necessary CSS and SVG files when icons are used.
For users who need a straightforward icon solution without altering overall menu structure, Menu Icons by ThemeIsle is the most direct choice. For those seeking a complete menu overhaul with icons and columns, Max Mega Menu offers the most comprehensive feature set.
Conditional Menus for User Roles or Page-Specific Navigation
Not all visitors to your site require the same navigation. Conditional menu plugins allow you to display different menus based on user roles, page types, or other conditions, enhancing user experience and security.
Conditional Menus: A dedicated plugin that lets you assign specific menus to different user roles (e.g., logged-in users, subscribers, administrators) or to individual pages, posts, or categories. It works by adding visibility rules to each menu location. For example, you can show a “Dashboard” menu only to logged-in users or hide certain links from search engine crawlers.
Nav Menu Roles: A lightweight plugin that adds a checkbox for each menu item, allowing you to restrict visibility based on user roles. While less granular than Conditional Menus for page-specific rules, it is ideal for hiding specific links from unauthorized users without creating entirely separate menus.
If Menu: A versatile plugin that uses conditional logic (similar to shortcodes) within menu items. You can show or hide menu items based on user roles, post types, taxonomies, or even custom fields. It integrates directly into the menu item settings, making it easy to apply conditions without leaving the menu editor.
For most sites, Conditional Menus offers the best balance of power and usability, allowing you to create distinct navigation experiences for different audience segments without duplicating menu management efforts.
A sticky (or fixed) menu remains visible at the top of the browser window as the user scrolls down, improving navigation accessibility. Mobile-friendly plugins ensure menus adapt to smaller screens with touch-friendly interactions.
Plugin Name
Primary Feature
Mobile Responsiveness
Customization Options
Sticky Menu (or Anything!) on Scroll
Makes any element (including menus) sticky when scrolling past a set point.
Yes, can be disabled on mobile devices.
Custom z-index, offset, and breakpoints.
Superfly
Creates a full-screen or slide-in mobile menu with sticky header support.
Excellent, with dedicated mobile toggle and animation.
Custom colors, icons, social links, and widget areas.
Responsive Menu
Replaces the default menu with a toggleable hamburger menu on mobile.
Excellent, with many animation styles and breakpoints.
Custom fonts, colors, and integration with third-party plugins.
For a simple sticky menu that does not alter your existing navigation structure, Sticky Menu (or Anything!) on Scroll is the most reliable and lightweight option. If you require a fully redesigned mobile navigation experience, Superfly or Responsive Menu provide extensive control over appearance and behavior, though they may require more initial setup. Each of these plugins can be configured to work harmoniously with the conditional and icon plugins mentioned above, allowing you to build a complete, customized navigation system for your WordPress site.
Optimizing WordPress Menus for SEO and Accessibility
An optimized WordPress menu does more than guide visitors; it signals relevance to search engines and ensures all users, including those relying on assistive technologies, can navigate effectively. Poorly structured menus can hurt rankings and exclude users with disabilities. This section covers best practices to make your menus both search-engine friendly and universally accessible, focusing on anchor text, ARIA implementation, and thorough testing.
Anchor text—the clickable words in a menu link—directly influences how search engines interpret page content and relevance. Generic phrases like “click here” or “read more” provide zero contextual value. Instead, use concise, keyword-relevant descriptions that accurately reflect the destination page.
Be specific: Replace “Services” with “Web Design Services” or “SEO Audit Services” when appropriate, without keyword stuffing.
Match page titles: Align anchor text with the H1 or title tag of the linked page to reinforce topical consistency.
Avoid over-optimization: Using the same exact-match anchor text for every internal link can trigger spam filters. Vary phrasing naturally (e.g., “our portfolio” vs. “client work examples”).
Keep it brief: Ideal anchor text is 2–5 words. Longer phrases dilute relevance and reduce scannability.
Search engines use anchor text as a ranking signal for the target page. Well-crafted menu anchors help Google understand site structure and content hierarchy, improving crawl efficiency and click-through rates in search results.
Implementing ARIA Labels and Keyboard Navigation
Accessible menus rely on ARIA (Accessible Rich Internet Applications) attributes to convey structure and state to screen readers. Without these, users with visual impairments may miss submenu content or navigation cues. Additionally, keyboard-only users must be able to open, close, and navigate menus without a mouse.
Provides a clear name for the navigation region, e.g., “Main Navigation”
aria-label="Primary Menu"
aria-expanded
Indicates whether a submenu is currently open (true) or closed (false)
aria-expanded="false"
aria-haspopup
Signals that a menu item triggers a submenu (usually set to true)
aria-haspopup="true"
role="navigation"
Defines the landmark region for screen readers (often redundant if <nav> is used)
role="navigation"
Keyboard navigation best practices:
Ensure all menu items are focusable via the Tab key in logical order.
Submenus should open on Enter or Space when the parent item is focused.
Use Escape to close an open submenu and return focus to the parent item.
Avoid tabindex="-1" on menu items unless they are intentionally hidden or off-screen.
Many WordPress themes include basic keyboard support, but custom menus often require manual ARIA injection. A practical example using a filter to add aria-label to a primary menu in your theme’s functions.php file:
This code ensures the <nav> container receives an aria-label of “Main Navigation”, improving screen reader identification. For dynamic aria-expanded states, JavaScript is typically required to toggle the attribute on click or focus events.
Testing Menus with Screen Readers and SEO Tools
Optimization is incomplete without validation. Both accessibility and SEO testing should be performed regularly, especially after menu changes or theme updates.
Screen reader testing:
Use free tools like NVDA (Windows) or VoiceOver (macOS) to navigate menus using only the keyboard.
Verify that submenus are announced correctly with their expanded/collapsed state.
Check that all menu items are reachable and that focus order follows visual layout.
Listen for redundant or missing ARIA labels (e.g., “navigation” repeated unnecessarily).
SEO testing:
Run a crawl with Screaming Frog SEO Spider or Sitebulb to identify broken menu links, redirect chains, or orphaned pages.
Analyze anchor text distribution in menus to ensure no over-optimization or thin content.
Use Google Search Console to check if menu links are being indexed and if any are blocked by robots.txt or noindex tags.
Validate structured data (e.g., SiteNavigationElement schema) using Google’s Rich Results Test.
Combining these tests ensures your menus serve both search engines and human users. A menu that fails keyboard navigation or lacks descriptive anchors undermines site usability and can degrade search performance over time. Regular audits—at least quarterly—keep your navigation inclusive and competitive.
Even the most carefully built WordPress menu can encounter problems, from items vanishing after an update to dropdowns that refuse to open. These issues often stem from theme conflicts, plugin interactions, or cache problems. Below, we address the most frequent menu failures and provide clear, actionable solutions to restore full navigation functionality.
Fixing Menu Display Problems After Theme or Plugin Updates
After updating a theme or plugin, your menu might appear broken—items may be misaligned, missing, or styled incorrectly. This typically happens because the update changed CSS classes, HTML structure, or JavaScript dependencies that your menu relied on.
Step-by-step solutions:
Clear all caches: Flush your browser cache, then clear any caching plugin (e.g., W3 Total Cache, WP Super Cache) and server-side cache (like Varnish or CDN). Often, stale CSS is the culprit.
Regenerate menu locations: Go to Appearance > Menus. At the top of the page, ensure your menu is assigned to the correct theme location (e.g., Primary Menu, Footer Menu). If the location is missing, the update may have renamed it. Reassign the menu and save.
Check for deprecated CSS: If your theme uses custom CSS for menus, inspect the site with browser developer tools (F12). Look for missing classes like .menu-item or .sub-menu. Contact the theme developer for updated CSS snippets.
Roll back the update: If the problem persists, use a plugin like WP Rollback to revert the theme or plugin to its previous version. Test the menu again.
Switch to a default theme temporarily: Activate a WordPress default theme (e.g., Twenty Twenty-Four). If the menu works, the issue is theme-specific. Notify the theme developer.
Resolving JavaScript Conflicts That Break Dropdowns
Dropdown menus that fail to open on click or hover are often caused by JavaScript conflicts. Plugins or themes may load incompatible versions of jQuery or override menu functions.
Diagnosis and fixes:
Symptom
Probable Cause
Solution
Dropdown opens only on desktop, not mobile
Touch event conflict
Disable any “hover” scripts in the theme customizer; use a plugin like “Max Mega Menu” for consistent touch support.
Dropdown flashes open then closes
Multiple mouseenter listeners
Deactivate all plugins except the theme’s required ones. Reactivate one by one to isolate the conflict.
No dropdown works at all
jQuery error in console
Open browser console (F12). Look for red errors. Common fixes: update jQuery via a plugin, or exclude the conflicting plugin from loading on menu pages.
Quick checklist:
Use a plugin like “Health Check & Troubleshooting” to disable all plugins for a test session without affecting live visitors.
Ensure your theme and plugins are updated to their latest versions.
If using a custom script, wrap it in jQuery(document).ready(function($) { ... }); to avoid conflicts.
Restoring Missing Menu Items from Backups
Menu items can disappear due to a failed database query during a plugin update, accidental deletion, or a migration error. Restoring from a backup is often the fastest recovery path.
How to restore menu items:
Identify the backup source: Use a reliable backup plugin like UpdraftPlus, Jetpack VaultPress, or your hosting provider’s backup system. Ensure you have a backup taken before the issue occurred.
Restore only the menu-related data: Most backup plugins allow partial restoration. Look for options to restore the wp_posts and wp_postmeta tables (where menu items and their metadata are stored). Do not restore the entire database unless necessary.
Use the “Recreate Menu” method: If a full restore isn’t possible, manually recreate the menu from scratch. Open Appearance > Menus, create a new menu name, and add items using the same structure. Use a screenshot of the old menu as a reference.
Import menu from a staging site: If you have a staging environment with the correct menu, export its menu via a plugin like “WordPress Menu Export Import”. Then import it on the live site.
Check the trash: In Appearance > Menus, click “Screen Options” and enable “Show deleted items.” If items are in the trash, you can restore them individually.
Preventive measures:
Schedule automated daily backups of your database.
Use a child theme for customizations to avoid losing menu settings during theme updates.
Keep a plain-text copy of your menu structure (page IDs and custom links) in a secure document.
Frequently Asked Questions
What are WordPress menu systems?
WordPress menu systems allow you to create and manage navigation menus for your website. They are built into the WordPress core and accessible via Appearance > Menus in the admin dashboard. You can add pages, posts, custom links, categories, and other content types to your menus. Menus can be assigned to specific theme locations (e.g., primary, footer) and can be customized with sub-items, CSS classes, and descriptions. The system supports drag-and-drop reordering, making it easy to structure your site navigation.
How do I create a custom menu in WordPress?
To create a custom menu, go to Appearance > Menus in your WordPress admin. Click 'Create a new menu', give it a name, and click 'Create Menu'. Then, from the left panel, select items (pages, posts, custom links, categories) to add. Check the boxes and click 'Add to Menu'. Drag items to reorder or nest them as sub-items. Finally, assign the menu to a display location (like Primary Menu) under 'Menu Settings' and click 'Save Menu'. You can also use the Customizer (Appearance > Customize > Menus) for a live preview.
What are the different menu locations in WordPress themes?
Menu locations are predefined areas in a WordPress theme where you can display menus. Common locations include Primary (main navigation), Secondary (top bar), Footer, and Mobile. Themes register these locations via register_nav_menus() in functions.php. When you create a menu, you assign it to one of these locations. The actual number and names depend on your theme. Some themes also support additional locations like sidebar or header. Always check your theme documentation for available menu locations.
How can I add a mega menu to WordPress?
Mega menus are large dropdowns that display columns of links, images, or widgets. To add a mega menu, you can use a plugin like Max Mega Menu, UberMenu, or QuadMenu. These plugins extend the default menu system, allowing you to create multi-column layouts, add widgets, and style with CSS. Alternatively, you can code a custom mega menu using WordPress walker functions and custom CSS. Plugins are the easiest method, offering drag-and-drop builders and responsive settings.
Can I style WordPress menus with CSS?
Yes, WordPress menus output CSS classes that you can target. The default menu structure uses classes like .menu, .menu-item, .current-menu-item, and .sub-menu. You can add custom CSS classes to individual menu items via the 'CSS Classes' option (enable it in Screen Options). Then write CSS rules in your theme's style.css or via the Customizer's Additional CSS. For advanced styling, use child themes or custom CSS plugins. Avoid editing theme files directly to prevent losing changes on updates.
What is the best way to organize menu items for SEO?
For SEO, organize menus logically with a clear hierarchy. Use descriptive, keyword-rich anchor text for links. Keep menus simple: limit top-level items to 5-7 to avoid diluting link authority. Use sub-menus for deeper pages. Ensure important pages (like 'About' and 'Services') are linked from the primary menu. Avoid using generic labels like 'Click Here'. Use breadcrumbs and footer menus to supplement navigation. Google uses site structure for crawling; a well-organized menu helps search engines understand your site.
How do I create a responsive mobile menu in WordPress?
Most modern WordPress themes include responsive menus by default. If not, you can use plugins like WP Mobile Menu or Responsive Menu. Alternatively, add custom CSS and JavaScript to toggle the menu on small screens. The WordPress Customizer may offer mobile menu settings. For a DIY approach, wrap your menu in a with a hamburger icon and use media queries to hide/show the menu. Ensure touch-friendly sizes (minimum 48px tap targets). Test on multiple devices for usability.
What are the best plugins for advanced WordPress menus?
Popular plugins for advanced menus include Max Mega Menu (free and pro), UberMenu (premium), QuadMenu (free and pro), and WP Mega Menu. These plugins allow you to create mega menus, add icons, images, widgets, and custom styling. For conditional menus, use Conditional Menus or Nav Menu Roles. For accessibility, consider WP Accessibility or custom code. Always choose well-supported plugins with good ratings and regular updates.
Introduction: The Case for Combining WordPress with Vue.js
The modern web demands interfaces that are both dynamic and performant, pushing developers to reevaluate traditional content management paradigms. WordPress, which powers over 40% of all websites, has evolved far beyond its origins as a blogging platform. Meanwhile, Vue.js, a progressive JavaScript framework, offers a lightweight, reactive approach to building user interfaces. The pairing of WordPress as a backend content repository with Vue.js as a frontend rendering engine represents a strategic shift: it leverages WordPress’s mature content management capabilities while harnessing Vue.js’s ability to create fluid, single-page application experiences. This combination addresses critical pain points in traditional WordPress development, such as slow page loads from server-side rendering, tangled template logic, and limited interactivity. By decoupling the frontend from the backend, developers gain cleaner codebases, faster performance through client-side rendering, and the flexibility to use Vue.js’s component-based architecture. For projects requiring both editorial ease and modern user experiences, this integration is no longer experimental—it is a practical, scalable solution.
From Monolith to Headless: The Evolution of WordPress Development
Traditional WordPress development relied on a monolithic architecture where the PHP-based backend and frontend were tightly coupled. Themes like Twenty Twenty-One handled both content delivery and presentation, mixing database queries with HTML and CSS in template files. This approach worked for simple sites but introduced limitations:
Performance bottlenecks: Each page request triggered server-side PHP execution, database lookups, and full HTML generation, leading to slower load times, especially under high traffic.
Limited interactivity: Adding dynamic features like real-time updates or complex UI components required jQuery plugins or heavy custom JavaScript, often resulting in code bloat and maintenance challenges.
Rigid theming: Changing the frontend design meant altering PHP templates, which could break backend functionality or require extensive rework.
The headless CMS model emerged as a solution. By using WordPress’s REST API (introduced in version 4.7) or GraphQL via plugins like WPGraphQL, developers can treat WordPress solely as a content backend. The frontend becomes a separate application, often built with modern JavaScript frameworks. This decoupling allows Vue.js to fetch content via AJAX requests and render it in the browser, eliminating server-side rendering overhead for interactive elements. For example, a headless WordPress setup can serve content to a Vue.js app running on a separate domain or subdirectory, enabling independent scaling and deployment cycles.
Key Benefits of Using Vue.js with WordPress
Integrating Vue.js with WordPress offers concrete advantages over traditional theme-based development:
Benefit
Description
Impact on Development
Performance gains
Vue.js handles client-side rendering, reducing server load. Only initial HTML and JavaScript are sent; subsequent interactions fetch data asynchronously.
Faster page loads, especially for repeat visits. Lower server costs under traffic spikes.
Separation of concerns
Backend developers manage WordPress content and plugins; frontend developers focus on Vue.js components. Codebases are independent.
Easier team collaboration. Reduced conflicts in version control. Cleaner, testable code.
Enhanced interactivity
Vue.js’s reactive data binding enables smooth UI updates without full page reloads. Features like real-time search, infinite scroll, or dynamic forms become trivial.
Improved user experience. Reduced bounce rates on content-heavy sites.
Scalable architecture
Headless setups allow the frontend to be hosted on CDNs or serverless platforms. WordPress can run on a separate, optimized server.
Easier to handle global audiences. Simplified maintenance of legacy WordPress installations.
Additionally, Vue.js’s ecosystem provides tools like Vue Router for client-side navigation and Vuex for state management, which integrate naturally with WordPress REST API endpoints. Developers can also leverage Nuxt.js, a framework built on Vue.js, for server-side rendering when SEO is critical, blending the best of both architectures.
Common Use Cases and Real-World Examples
Several real-world scenarios demonstrate the practicality of this combination:
Content-rich single-page applications: A magazine site uses WordPress to manage articles, authors, and categories. Vue.js renders a fast, filterable archive page that loads new posts via API without refreshing the browser. The Guardian’s interactive features often follow similar patterns.
E-commerce with dynamic product filtering: An online store built on WooCommerce (WordPress’s e-commerce plugin) exposes product data via REST API. Vue.js creates a responsive product grid with instant color, size, and price filters, improving conversion rates. Brands like Adidas have used headless WordPress for product catalogs.
Membership sites with real-time dashboards: A learning management system (LMS) uses WordPress for course content and user profiles. Vue.js renders a dashboard showing progress bars, quiz results, and notifications that update automatically as users complete lessons.
Corporate websites with complex navigation: A multinational company uses WordPress as a headless CMS for global content. Vue.js builds a multilingual interface with animated menus and interactive maps, while backend editors use familiar WordPress blocks.
In each case, the integration reduces development time by reusing WordPress’s admin interface for content creators, while Vue.js delivers the modern, responsive experience users expect. As headless architectures gain traction, this pairing is becoming a standard choice for projects that prioritize both editorial control and frontend performance.
Understanding Headless WordPress Architecture
The traditional WordPress approach tightly couples the content management system with the presentation layer—themes handle both data retrieval and rendering. In a headless architecture, WordPress serves exclusively as a content repository, while a separate frontend application, such as one built with Vue.js, handles all user-facing interfaces. This separation allows developers to leverage WordPress’s robust editing and administration capabilities without being constrained by its theming system. The backend exposes content through an API—either the built-in REST API or the more flexible WPGraphQL—which Vue.js consumes to render dynamic, interactive pages. This decoupling provides significant advantages: faster frontend performance, easier scaling, and the freedom to choose any frontend framework or static site generator.
What Headless WordPress Means for Your Stack
Adopting a headless WordPress architecture fundamentally changes your technology stack. Instead of a monolithic application where PHP generates HTML on the server, you now have two distinct layers:
Backend (WordPress): Handles content creation, storage, user management, and media uploads. It runs on a standard WordPress installation, but themes are minimal—often only providing REST API endpoints or GraphQL schema. Plugins remain useful for extending content types, SEO, and caching.
Frontend (Vue.js): A single-page application (SPA) or static site that fetches content from the WordPress API. Vue.js manages routing, state, and component rendering. This layer can be hosted on a CDN, a Node.js server, or as a static build.
API Layer: The communication bridge. WordPress exposes data via REST API (default) or WPGraphQL (plugin). The frontend makes HTTP requests to these endpoints, receives JSON or GraphQL responses, and renders them into interactive interfaces.
This separation means your frontend developers can work entirely in JavaScript, while content editors continue using the familiar WordPress admin panel. It also enables you to reuse the same content across multiple frontends—for example, a Vue.js web app, a mobile app via React Native, and a static site for SEO-critical pages.
REST API vs. WPGraphQL: Which to Choose for Vue.js
Both REST API and WPGraphQL can serve content to a Vue.js frontend, but they differ in flexibility, performance, and developer experience. The table below summarizes key differences:
Single endpoint (/graphql) returns exactly the fields you request.
Over-fetching/under-fetching
Frequent over-fetching of unused data; under-fetching requires multiple requests.
Eliminates over-fetching and under-fetching; one query can include nested related data.
Authentication
Supports cookie-based, OAuth, and application passwords.
Supports JWT, application passwords, and basic auth via plugins.
Learning curve
Low; standard REST conventions.
Moderate; requires understanding of GraphQL syntax and schema.
Caching
Easier with HTTP caching (ETags, CDN-friendly).
More complex; requires persisted queries or client-side caching.
Plugin ecosystem
Wide support; many plugins extend REST endpoints.
Growing but smaller; dedicated WPGraphQL extensions exist.
For most Vue.js projects, WPGraphQL is recommended because it allows precise data fetching—especially important when building complex interfaces that need related posts, custom fields, or nested menus. However, if your project relies heavily on WordPress’s built-in endpoints or you need simpler caching, the REST API remains a solid choice. A practical example using WPGraphQL in a Vue.js component might look like this:
// Vue component using Apollo Client for GraphQL
import { gql, useQuery } from '@vue/apollo-composable';
const GET_POSTS = gql`
query GetPosts {
posts(first: 5) {
nodes {
id
title
date
excerpt
}
}
}
`;
export default {
setup() {
const { result, loading, error } = useQuery(GET_POSTS);
return { result, loading, error };
}
};
Setting Up Your WordPress Backend for Headless Delivery
Configuring WordPress for headless use requires several steps beyond a standard installation. Follow this checklist to ensure smooth API delivery:
Install and activate WPGraphQL (or rely on REST API if preferred). For GraphQL, also consider the WPGraphQL CORS plugin to handle cross-origin requests from your Vue.js frontend.
Enable pretty permalinks (Settings > Permalinks > Post name). This ensures clean API endpoints.
Configure CORS in your server environment (e.g., via .htaccess or Nginx config) to allow requests from your frontend domain. A simple Apache example:
Header set Access-Control-Allow-Origin "https://your-frontend-domain.com"
Header set Access-Control-Allow-Methods "GET, POST, OPTIONS"
Header set Access-Control-Allow-Headers "Content-Type, Authorization"
Disable unnecessary theme features—remove frontend assets like scripts and styles that are irrelevant for an API-only site. Use a minimal theme like _s (Underscores) stripped of all template files except functions.php and style.css.
Register custom post types and fields using plugins like Advanced Custom Fields (ACF) with the WPGraphQL extension, so your Vue.js app can access structured data.
Set up authentication if your frontend needs to write data. For public content, no authentication is needed. For private endpoints, use application passwords or JWT tokens.
Optimize API performance: enable caching via plugins like WP Rocket or use a CDN for static assets. For high-traffic sites, consider a headless-specific hosting solution.
Once configured, your Vue.js frontend can fetch content from https://your-wordpress-site.com/graphql (or /wp-json/wp/v2/ for REST). This setup gives content editors full control over the backend while developers build modern, fast interfaces with Vue.js.
Setting Up a Vue.js Project for WordPress Integration
To build a modern interface that communicates seamlessly with WordPress, you need a Vue.js project structured for flexibility and maintainability. This section provides step-by-step instructions for scaffolding a Vue 3 application using Vite, installing essential packages, and configuring the environment for secure, efficient communication with your WordPress backend.
Scaffolding a Vue 3 Application with Vite
Vite is the recommended build tool for Vue 3 due to its fast hot-module replacement and optimized production builds. Start by ensuring you have Node.js (version 16 or higher) installed. Open your terminal and run the following command to create a new Vue project:
npm create vue@latest
During the interactive setup, you will be prompted to choose features. For a WordPress integration, select the following options:
TypeScript: Optional but recommended for type safety when handling API responses.
Vue Router: Required for client-side routing.
Pinia: Required for state management.
ESLint and Prettier: Recommended for code quality.
After the scaffolding completes, navigate into the project directory and install dependencies:
cd your-project-name
npm install
To verify the setup, start the development server:
npm run dev
Your application will be available at http://localhost:5173 by default. The project structure will include a src/ folder where you will build your components, views, and store files.
Essential Packages: Axios, Vue Router, and Pinia
Three packages are fundamental for connecting Vue.js to WordPress: Axios for HTTP requests, Vue Router for navigation, and Pinia for managing global state (such as user authentication and cached posts). Install them as follows:
Axios: Handles REST API calls to WordPress endpoints (e.g., /wp-json/wp/v2/posts). It supports interceptors for adding authentication tokens and handling errors.
Vue Router: Enables single-page application routing, allowing you to map WordPress slugs (e.g., /about) to Vue components.
Pinia: Provides a lightweight store for caching API responses and managing user state, reducing redundant requests to WordPress.
Below is a comparison table to help you understand the role of each package in the integration:
import { createApp } from 'vue'
import { createPinia } from 'pinia'
import App from './App.vue'
import router from './router'
const app = createApp(App)
app.use(createPinia())
app.use(router)
app.mount('#app')
Environment Variables and CORS Configuration
To keep your WordPress site URL and API keys secure, use environment variables. Create a .env file in the root of your Vue project with the following content:
In Vue components, access these variables via import.meta.env.VITE_WP_API_URL. This approach prevents hardcoding sensitive URLs in your source code.
Cross-Origin Resource Sharing (CORS) is critical when your Vue app runs on a different domain than WordPress. To allow requests from your Vue development server, add the following code to your WordPress theme’s functions.php file or use a plugin like “CORS Enable”:
For production, replace http://localhost:5173 with your Vue app’s deployed domain. Test the connection by making a GET request from your Vue app to VITE_WP_API_URL/posts using Axios. If successful, you will receive a JSON response with your WordPress posts, confirming that the integration is properly configured.
Fetching and Displaying WordPress Content with Vue.js
Integrating Vue.js with WordPress requires a reliable method for retrieving content from the WordPress REST API. This section demonstrates how to fetch posts, pages, and custom post types, then render them dynamically in Vue components. By leveraging lifecycle hooks and composables, you can build a clean, maintainable data layer that separates API logic from presentation.
Building a Custom Hook for API Calls (useWordPress)
A custom composable function, often named useWordPress, centralizes all REST API interactions. This hook handles fetching, error management, and loading states, making it reusable across components. Below is a practical example of such a composable, written for Vue 3’s Composition API:
This hook accepts an endpoint parameter (e.g., 'posts', 'pages', or a custom post type slug like 'projects') and returns reactive references. Key features include:
Reactive data:data, loading, and error automatically update the UI.
Parameterized fetching: The fetchData method accepts query parameters such as per_page, search, or categories.
Lifecycle integration:onMounted triggers the initial fetch automatically.
Rendering a List of Posts with Vue Router Links
Once data is retrieved, display posts in a list that links to individual post pages using Vue Router. The following component demonstrates this pattern:
Important considerations for this rendering approach:
Slug-based routing: Use the post.slug for clean, human-readable URLs.
Sanitized HTML: The v-html directive renders WordPress excerpts safely, but always sanitize user-generated content server-side.
Loading and error states: Provide feedback to users while data loads or if the API fails.
Handling Pagination and Search Queries
WordPress REST API supports pagination via page and per_page parameters, and search via the search parameter. Integrate these into the useWordPress hook by passing dynamic parameters. Below is a component that adds pagination controls and a search input:
Track currentPage as a reactive ref; pass page and per_page to fetchData.
Search
Bind a text input to searchQuery; include search parameter in API calls.
Combined queries
Always pass both page and search to maintain state across interactions.
To determine total pages for disabling the “Next” button, inspect the X-WP-TotalPages response header. Modify the composable to expose this value by reading response.headers.get('X-WP-TotalPages') and returning it as a ref.
This approach ensures that your Vue frontend dynamically fetches and displays WordPress content with full control over navigation and filtering, all while keeping API logic centralized and reusable.
Building a Dynamic Single Post View
Creating a dynamic single post view in a WordPress and Vue.js application involves loading and displaying individual post content based on a unique identifier, such as a slug or ID. This component forms the core of content consumption, allowing users to access detailed information from a list or archive. By combining Vue Router for navigation, the WordPress REST API for data fetching, and Vue’s reactive rendering, you can build a performant and user-friendly post detail page. This section walks through implementing a dynamic route, integrating Advanced Custom Fields (ACF) data, and optimizing images with lazy loading.
To display a single post, you need a Vue route that captures a parameter—typically the post slug or ID—and fetches the corresponding data from the WordPress REST API. Use Vue Router’s dynamic segment matching to define the route. For example, /post/:slug captures the slug from the URL. Inside the component, use the created or mounted lifecycle hook to call the API endpoint /wp-json/wp/v2/posts?slug=:slug. This approach ensures the correct post is loaded when the route is entered.
Key considerations for the route implementation:
Parameter validation: Ensure the slug or ID is sanitized before making the API request to prevent errors.
Loading state: Display a loading indicator while the API call is in progress to improve user experience.
Error handling: Show a meaningful message if the post is not found or if the request fails.
Route transitions: Use Vue’s <transition> component to animate page changes for a polished feel.
A sample route configuration in your router file might look like this:
In the SinglePost component, fetch the post data using the wp-api package or native fetch. Then, pass the post object to child components for rendering content, metadata, and images.
Integrating Advanced Custom Fields (ACF) Data
Advanced Custom Fields extends WordPress with custom meta data, such as additional text, images, or repeaters. To include ACF data in your Vue single post view, you must ensure the REST API response includes these fields. The ACF plugin provides a REST API endpoint extension: /wp-json/acf/v3/posts/:id. Alternatively, you can add ACF fields to the standard post response by registering a custom REST field in your WordPress theme’s functions.php file.
Verify that the ACF plugin is installed and active, and that the “Show in REST API” option is enabled for each field group.
Fetch the ACF data separately or append it to the main post request. A common pattern is to make two API calls: one for the post content and one for ACF fields, then merge the results.
Render ACF fields conditionally—for example, display a custom subtitle only if it exists.
<ul><li v-for="item in post.acf.items" :key="item.id">{{ item.label }}</li></ul>
True/False
<span v-if="post.acf.is_featured">Featured</span>
By integrating ACF, you enrich the single post view with custom content that goes beyond the default WordPress fields, making the interface more flexible and tailored to your project’s needs.
Images, especially featured images and ACF media fields, can significantly impact page load times. Lazy loading defers image loading until they are about to enter the viewport, reducing initial payload and improving performance. In a Vue single post view, you can implement lazy loading using a dedicated library like vue-lazyload or the native loading="lazy" attribute on <img> tags.
Combining lazy loading with a responsive image strategy—using srcset and sizes attributes—further optimizes delivery for various screen resolutions. This ensures the single post view loads quickly, even when containing multiple high-resolution images, and provides a smooth scrolling experience for users.
Adding Interactivity: Vue Components for Comments and Forms
Static comment sections and contact forms can feel sluggish and disconnected from the modern user experience. By integrating Vue.js with the WordPress REST API, you can transform these elements into reactive, real-time components that submit data seamlessly without full page reloads. This approach not only improves perceived performance but also reduces server load by handling validation and feedback client-side. Below, we explore how to build two essential interactive components—comments and forms—while maintaining security through WordPress nonce authentication.
Building a Real-Time Comment Component
A Vue-powered comment component fetches existing comments via the REST API endpoint /wp/v2/comments?post={postId} and allows users to submit new ones without refreshing. The component lifecycle begins with a mounted() hook that retrieves comments and stores them in a reactive array. When a user submits a comment, Vue sends a POST request to the same endpoint with required fields: post, author_name, author_email, and content. Upon success, the new comment is appended to the local array, updating the UI instantly. Error handling displays validation messages from the API, such as missing fields or spam detection. For performance, consider paginating older comments using the per_page and page parameters, and implement a “Load More” button. A practical example of the POST request structure in Vue (using Axios) is:
Creating a Vue-Powered Contact Form with Validation
Contact forms benefit greatly from Vue’s reactivity, enabling real-time field validation before submission. Build a form with fields for name, email, subject, and message, each bound to a v-model. Use computed properties or watchers to validate inputs: check that email matches a regex pattern, ensure required fields are non-empty, and provide instant feedback via error messages displayed below each field. For submission, send a POST request to a custom WordPress REST endpoint (e.g., /wp/v2/contact) that you register in your theme’s functions.php using register_rest_route(). The endpoint should sanitize inputs with sanitize_text_field() and sanitize_email(), then send the email via wp_mail(). On success, clear the form and show a success message; on failure, display API errors. This pattern keeps the form interactive while leveraging WordPress’s built-in security and mail functions.
Key validation rules: Name (2–50 characters), Email (valid format), Subject (non-empty, max 100 characters), Message (10–500 characters).
UX enhancements: Disable the submit button during processing, add a loading spinner, and reset validation states after success.
Handling Nonce Authentication for Secure Submissions
WordPress REST API endpoints require nonce verification for write operations like comment posting or form submissions. Without a valid nonce, requests are rejected with a 403 error. In Vue, retrieve the nonce by outputting it in your theme’s header using wp_localize_script() or by embedding it in a hidden element. For example, in your header.php, add: wp_localize_script('vue-app', 'wpData', array('nonce' => wp_create_nonce('wp_rest')));. Then, in your Vue component, access wpData.nonce and include it in the X-WP-Nonce header of every POST/PUT/DELETE request. This ensures that only authenticated users (logged-in or guest, depending on your endpoint settings) can submit data. For logged-out comment submissions, WordPress automatically handles nonce generation via JavaScript when comments are enabled. Always test nonce expiration—typically 12–24 hours—and handle expired nonces by prompting the user to refresh the page or re-authenticate.
Authentication Type
Nonce Source
Header Name
Logged-in user
wp_create_nonce('wp_rest')
X-WP-Nonce
Guest (comments)
Embedded via wp_localize_script()
X-WP-Nonce
By implementing these patterns, your Vue.js components become secure, interactive, and fully integrated with WordPress’s data layer.
Managing State and Navigation with Vue Router and Pinia
When building a modern WordPress frontend with Vue.js, structuring navigation and state management correctly is critical for creating a seamless user experience. WordPress traditionally handles page transitions through full reloads, but with Vue Router and Pinia, you can achieve fluid, single-page application behavior while retaining the familiarity of WordPress menus and global data. This section explores how to set up Vue Router with nested routes that mirror your WordPress menu hierarchy, use Pinia stores for global data like site settings and user information, and persist that state across sessions using local storage or cookies.
Setting Up Vue Router with Nested Routes for WordPress Menus
WordPress menus often have a hierarchical structure, with parent items and child submenus. Vue Router’s nested routes allow you to replicate this structure exactly. Start by defining your routes in a router.js file, mapping each WordPress menu item to a Vue component. For example, a “Services” menu with sub-items like “Web Development” and “SEO” can be represented as nested children under a parent route.
Parent route: /services renders a layout component that includes a sub-navigation or breadcrumb.
Child routes: /services/web-development and /services/seo render specific content components.
Named views: Use multiple named views in a single route to display different sections, such as a sidebar and main content area, similar to WordPress template parts.
To dynamically generate routes from your WordPress menu API, fetch the menu data using wp-json/menus/v1/menus/primary and loop through items to create route objects. Handle URL slugs by mapping menu item titles to clean slugs. Ensure your router uses createRouter with createWebHistory for clean URLs that work with WordPress permalinks. Add route guards to check for authentication if certain menu items require login, redirecting unauthenticated users to a login page.
Using Pinia Stores for Global Data (e.g., Site Settings)
Pinia provides a lightweight, TypeScript-friendly state management solution ideal for Vue.js applications integrated with WordPress. Create separate stores for different global data types, such as site settings, user authentication, or cart contents for an e-commerce site. Each store is a composable function that holds reactive state, actions, and getters.
Store global WordPress settings like site title, tagline, and logo URL
siteName: 'My WordPress Site'
useUserStore
Manage user authentication state, roles, and profile data
isLoggedIn: false
useCartStore
Track cart items, quantities, and totals for WooCommerce integration
items: []
To populate a store with WordPress data, use Pinia actions that call the WordPress REST API. For instance, the useSiteSettings store can have an action fetchSettings() that makes a GET request to /wp-json/wp/v2/settings and updates the state. Use getters to derive computed values, such as a formatted site title or a list of active plugins. Getters are reactive and update automatically when state changes, making them ideal for filtering or transforming data before displaying it in components.
State persistence ensures that user data like authentication tokens, cart contents, or UI preferences survive page reloads or browser closures. For most WordPress Vue.js applications, local storage is the simplest approach, but cookies may be required for server-side rendering or when working with REST API nonces. Implement persistence using Pinia plugins, such as pinia-plugin-persistedstate, which automatically syncs specified stores with local storage.
Local storage: Ideal for non-sensitive data like site settings or cart items. Configure the plugin to store the entire state or specific keys. For example, persist the useCartStore so that cart items remain after a page refresh.
Cookies: Use cookies for authentication tokens or data that must be sent with HTTP requests. Install a library like js-cookie and manually save and retrieve values in Pinia actions. Set cookie attributes like secure and sameSite for security.
Hydration: When the app loads, check local storage or cookies for persisted state and hydrate the store before mounting the app. This prevents flickering or empty states. Use a beforeMount hook in your root component or an initialization function in your router setup.
Always handle edge cases like corrupted data or expired tokens. Validate persisted data against the expected schema and clear stale entries. For example, if a user logs out, remove their token from local storage and reset the useUserStore state. This approach keeps your WordPress Vue.js app robust and user-friendly, with navigation and state working harmoniously across sessions.
Performance Optimization: Caching and SEO Best Practices
When building modern interfaces with WordPress and Vue.js, performance optimization is critical to overcome common headless challenges such as slower initial page loads and poor search engine visibility. Without careful planning, a headless setup can suffer from redundant API requests, missing meta tags, and weak caching. This section addresses three core strategies: client-side and API caching, server-side rendering with Nuxt.js, and dynamic meta tag management. Implementing these techniques ensures your site remains fast, crawlable, and user-friendly.
Implementing Client-Side and API Caching
Caching reduces server load and accelerates response times by storing frequently accessed data. In a WordPress and Vue.js stack, caching operates on two primary levels: client-side and API-side. Client-side caching leverages the browser’s cache to store static assets and pre-fetched data, while API caching minimizes redundant calls to the WordPress REST API. Below are key approaches:
Client-Side Caching with Service Workers: Use Workbox or a custom service worker to cache API responses and Vue.js bundle files. This enables offline support and instant repeat visits. For example, cache the WordPress REST API endpoint for posts with a network-first strategy to balance freshness and speed.
API Caching with WordPress Plugins: Install plugins like WP Rocket or W3 Total Cache to add server-side caching for REST API responses. Enable object caching (e.g., Redis or Memcached) to store serialized API data, reducing database queries by up to 80% for high-traffic endpoints.
Local State Management: Use Pinia or Vuex to cache API data in the Vue.js application state. This avoids re-fetching data when users navigate between pages, cutting load times by 30–50% for repeated views.
Cache Headers and TTL: Set appropriate Cache-Control headers on the WordPress server (e.g., public, max-age=3600 for static content) and use a short TTL (e.g., 5 minutes) for dynamic data like comments. This ensures freshness without overloading the server.
These caching layers work together to deliver sub-second response times, even for content-heavy sites. For example, a WooCommerce store using client-side caching can reduce product page load times by 40%, as measured by WebPageTest.
Nuxt.js transforms Vue.js into a robust framework for server-side rendering (SSR) and static site generation (SSG), solving the SEO and performance gaps inherent in client-side-only applications. With SSR, pages are rendered on the server before reaching the browser, ensuring search engines index the full HTML. SSG pre-builds pages at deploy time, offering even faster delivery. Key benefits include:
Improved SEO: SSR serves fully rendered HTML, allowing Googlebot to index content immediately. This eliminates the need for JavaScript rendering, which can delay indexing by days.
Faster Time-to-Interactive: Nuxt.js pre-fetches data for subsequent pages using nuxt-link, reducing perceived load times by 60% compared to a standard Vue.js SPA.
Hybrid Modes: Use Nuxt.js’s target: 'static' for blog pages and ssr: true for dynamic product pages, optimizing both caching and personalization.
To implement, configure Nuxt.js with the @nuxtjs/axios module to fetch WordPress REST API data. Use asyncData or fetch hooks to populate pages during SSR. For SSG, run nuxt generate to produce static files that can be served via CDN, reducing server costs and latency.
Dynamic Meta Tags with vue-meta or @unhead/vue
Meta tags are essential for SEO, social sharing, and accessibility, but they must be dynamic in a headless WordPress setup. Two popular Vue.js libraries handle this: vue-meta (compatible with Vue 2) and @unhead/vue (for Vue 3). Both allow you to set title, description, Open Graph, and Twitter Card tags based on API data. The following table compares their features:
Feature
vue-meta (Vue 2)
@unhead/vue (Vue 3)
Version Support
Vue 2 only
Vue 3 and Nuxt 3
SSR Compatibility
Full SSR support
Full SSR support
Tag Types
Title, meta, link, script, style
Title, meta, link, script, style, and custom
Reactivity
Manual updates via metaInfo
Automatic reactivity with composition API
Performance
Lightweight (approx. 3 KB gzipped)
Lightweight (approx. 4 KB gzipped)
Nuxt Integration
Requires @nuxtjs/meta module
Built-in with Nuxt 3
For a WordPress and Vue.js project using Nuxt 3, @unhead/vue is the recommended choice due to its native integration and reactive capabilities. To implement dynamic meta tags, fetch post data from the WordPress REST API and inject it into the useHead composable. For example:
Generate a meta description from the excerpt or custom field.
Add Open Graph tags using post._embedded['wp:featuredmedia'] for the image URL.
Update tags reactively when the route changes using watch on the route query.
This ensures every page has unique, accurate meta tags, improving click-through rates from search results and social platforms. Combined with SSR, these tags are rendered server-side, guaranteeing they are read by crawlers. By integrating these three strategies—caching, SSR/SSG, and dynamic meta tags—you create a high-performance, SEO-friendly headless WordPress site that delights users and search engines alike.
Deploying a WordPress + Vue.js Application
Deploying a WordPress and Vue.js application requires careful coordination between the backend content management system and the frontend single-page application. The WordPress instance handles data storage, authentication, and API endpoints, while the Vue.js build is served as static assets. Below are the key steps and considerations for a production-grade deployment, covering hosting choices, build processes, and automation pipelines.
WordPress must be hosted on a server capable of running PHP and MySQL. Two common approaches are managed WordPress hosting and cloud infrastructure. Managed platforms like WP Engine, Kinsta, or Flywheel offer optimized performance, automatic backups, and built-in caching, but often restrict plugin usage or server access. Cloud platforms such as AWS EC2, Google Compute Engine, or DigitalOcean provide full control but require manual configuration of web servers (e.g., Nginx or Apache), database management, and security hardening. For a headless WordPress setup, consider these factors:
API performance: Ensure the host supports REST API or WPGraphQL with low latency. Cloud platforms allow scaling horizontally with load balancers.
SSL certificates: Both managed and cloud hosts should provide free or easy SSL integration (e.g., Let’s Encrypt).
Database scalability: Managed hosts often include optimized database layers; cloud hosts may require separate RDS instances.
Cost: Managed plans start at $20–$30/month, while cloud VPS instances can be as low as $5–$10/month but require more maintenance.
For a headless setup, disable the frontend by redirecting all non-API requests to a static page or the Vue app’s domain. Use a custom .htaccess or Nginx rule to block direct site access.
Building and Deploying the Vue App to Netlify or Vercel
The Vue.js frontend is compiled into static files (HTML, JavaScript, CSS) and deployed to a cloud hosting service. Netlify and Vercel are popular choices because they offer free tiers, global CDN distribution, and automatic HTTPS. To deploy:
Build the Vue app: Run npm run build in your project root. This generates a dist/ folder containing all production assets.
Connect your repository: Link your Git repository (GitHub, GitLab, or Bitbucket) to Netlify or Vercel. Both platforms detect the build command automatically.
Configure environment variables: Set the WordPress API base URL (e.g., VITE_WP_API_URL=https://yourdomain.com/wp-json/wp/v2) in the platform’s dashboard.
Set the publish directory: For Netlify, specify dist as the publish directory. For Vercel, this is usually auto-detected.
Deploy: Push changes to your main branch, or manually trigger a deploy. The platform builds the app and serves it from a CDN.
Example build command for a Vue 3 project:
# In your project terminal
npm install
npm run build
# Output: dist/ folder ready for deployment
After deployment, set up a custom domain (e.g., app.yourdomain.com) and configure CORS on the WordPress backend to allow requests from this domain. Add the following to your WordPress functions.php or via a plugin:
A continuous integration and deployment (CI/CD) pipeline automates testing, building, and deploying both the WordPress backend and Vue frontend. This ensures updates are consistent and reduces manual errors. Use GitHub Actions, GitLab CI, or Bitbucket Pipelines for orchestration. For the Vue frontend, the pipeline might include:
Linting and unit tests: Run ESLint and Vitest on every push to a development branch.
Build: Execute npm run build and verify the output.
Deploy to staging: Push the build to a temporary URL (e.g., Netlify deploy previews) for manual review.
Deploy to production: On merge to the main branch, automatically deploy to Netlify or Vercel using their CLI or API.
Database migrations: Use tools like WP-CLI to apply schema changes in a staging environment before production.
Plugin/theme updates: Commit updated plugin files to a Git repository and deploy via a deployment script (e.g., rsync or WP Pusher).
Automated backups: Schedule database and file backups before each deployment.
A sample GitHub Actions workflow for the Vue frontend:
name: Deploy Vue to Netlify
on:
push:
branches: [main]
jobs:
build:
runs-on: ubuntu-latest
steps:
- uses: actions/checkout@v3
- name: Install dependencies
run: npm ci
- name: Build
run: npm run build
- name: Deploy to Netlify
uses: nwtgck/actions-netlify@v2.0
with:
publish-dir: './dist'
production-branch: main
env:
NETLIFY_AUTH_TOKEN: ${{ secrets.NETLIFY_AUTH_TOKEN }}
NETLIFY_SITE_ID: ${{ secrets.NETLIFY_SITE_ID }}
This pipeline triggers on every push to the main branch, installs dependencies, builds the app, and deploys to Netlify. For WordPress, a similar pipeline can run WP-CLI commands to update the core, themes, and plugins, ensuring the backend stays synchronized with the frontend’s API requirements.
Troubleshooting Common Issues and Next Steps
When integrating WordPress as a headless CMS with Vue.js for the frontend, developers often encounter a set of recurring challenges. Understanding these pitfalls—and their solutions—saves hours of debugging. Below we address the most frequent issues, followed by guidance for advancing your skills.
Resolving CORS and Same-Origin Policy Errors
Cross-Origin Resource Sharing (CORS) errors are the most common hurdle when your Vue.js app (running on a different domain or port) attempts to fetch data from your WordPress REST API. Browsers block these requests by default for security reasons. To resolve this:
Use the WordPress REST API CORS plugin: Install and activate a plugin like “CORS for WordPress REST API” to add the necessary headers (Access-Control-Allow-Origin: * or a specific origin).
Add custom headers via functions.php: Insert the following code into your theme’s functions.php file to allow requests from your Vue app’s origin:
Always test with a simple GET request using tools like Postman or browser developer tools to confirm headers are present.
Debugging Permalink and Route Mismatches
When Vue Router dynamic routes (e.g., /post/:slug) don’t match WordPress permalinks, you’ll see 404 errors or blank pages. This typically occurs due to conflicting URL structures or missing rewrite rules. Follow these steps:
Verify WordPress permalink settings: Ensure your WordPress permalink structure is set to “Post name” (Settings > Permalinks) to produce clean, human-readable URLs like /post-name. Flush rewrite rules by saving the settings again.
Map Vue routes to REST API endpoints: In your Vue router, use the slug from the URL to fetch the correct post:
Handle trailing slashes: Decide whether your Vue app uses trailing slashes or not, and configure your web server (Apache/Nginx) to redirect accordingly.
Test with a static list: Create a simple Vue component that logs the current route params to the console to confirm the slug is being captured correctly.
Exploring Advanced Topics: Authentication, Realtime, and Plugins
Once you master the basics, these advanced areas will elevate your WordPress and Vue.js integration:
Topic
Description
Resources
Authentication
Implement JWT authentication to allow logged-in users to create, edit, or delete posts via the REST API. Use the JWT Authentication for WP REST API plugin, then store tokens in Vuex or localStorage.
Integrate WebSockets or Server-Sent Events (SSE) using a plugin like WP WebSockets for Realtime. Alternatively, poll the REST API at intervals for near-realtime data.
Socket.io, Pusher, or custom SSE implementation
Custom Plugins
Extend the WordPress REST API with custom endpoints using the register_rest_route() function. This allows you to serve specialized data (e.g., aggregated stats or combined post types) directly to Vue.
WordPress Plugin Handbook, REST API Handbook
For deeper learning, explore the official WordPress REST API Handbook, Vue.js documentation on server-side rendering (SSR) with Nuxt.js, and community tutorials on headless CMS patterns. Building a small project—like a portfolio site or a blog with live comments—will solidify these concepts.
Frequently Asked Questions
What is headless WordPress?
Headless WordPress refers to using WordPress solely as a content management backend, while the frontend is built with a separate technology like Vue.js. The WordPress REST API or GraphQL delivers content as JSON, allowing developers to create custom, fast, and interactive user interfaces independent of WordPress’s traditional theming system.
Why use Vue.js with WordPress?
Vue.js offers a reactive, component-based architecture that pairs well with WordPress’s REST API. This combination allows you to build dynamic single-page applications (SPAs) or progressive web apps (PWAs) with smooth user experiences, faster page loads, and easier state management, while leveraging WordPress’s familiar admin interface for content management.
You can integrate Vue.js by enqueuing the Vue library in your theme’s functions.php file and creating custom templates that mount Vue components. Alternatively, build a fully decoupled setup where WordPress runs as a headless CMS, and a separate Vue.js application consumes the REST API endpoints to display content on the frontend.
What are the benefits of a decoupled WordPress and Vue.js architecture?
Decoupling WordPress from the frontend improves performance, scalability, and security. It allows developers to use modern JavaScript tooling, enables easier version control for frontend code, and facilitates building multi-platform applications (web, mobile) using the same content API. It also reduces server load since rendering is handled on the client side.
Can I still use WordPress plugins with Vue.js?
Yes, many WordPress plugins extend the REST API, making their data accessible to a Vue.js frontend. However, plugins that rely on PHP-based template rendering may need custom endpoints or adaptation. Popular plugins like Advanced Custom Fields, Yoast SEO, and WooCommerce offer REST API support, enabling seamless integration with Vue.js.
What is the WordPress REST API and how does it work with Vue.js?
The WordPress REST API provides a set of HTTP endpoints that return JSON data for posts, pages, taxonomies, users, and more. Vue.js can fetch this data using libraries like Axios or the Fetch API, then render it reactively. This allows developers to build custom interfaces without relying on WordPress’s template hierarchy.
Is Vue.js suitable for building a full WordPress site?
Vue.js is excellent for building interactive, dynamic parts of a WordPress site or a completely headless frontend. For content-heavy sites with complex SEO requirements, consider hybrid approaches (e.g., using Nuxt.js for server-side rendering) to ensure search engines can index your content effectively while still leveraging Vue’s reactivity.
What are common challenges when combining WordPress and Vue.js?
Challenges include managing authentication (e.g., JWT tokens for private content), handling SEO in SPAs, coordinating deployment pipelines, and ensuring consistent styling. Additionally, developers must be comfortable with both PHP and JavaScript ecosystems. Proper planning and tools like Nuxt.js can mitigate many of these issues.
How to Create a Custom WordPress Dashboard: A Complete Step-by-Step Guide
1. Why Customize Your WordPress Dashboard?
The WordPress dashboard is the command center for your website, but its default layout is designed for a broad audience, not for your specific needs. A custom dashboard transforms this generic interface into a streamlined tool that saves time, reduces confusion, and enhances productivity. Whether you manage multiple sites, build sites for clients, or run a solo blog, tailoring the admin area delivers tangible benefits. Below, we explore the primary reasons to invest time in customization, focusing on efficiency, client experience, and mental clarity.
Improving Efficiency for Site Administrators
For site administrators, every second counts. The default dashboard displays widgets like “Activity,” “Quick Draft,” “WordPress Events and News,” and “At a Glance.” While useful, many of these elements are rarely needed after initial setup. By removing or repositioning them, you can create a workspace that prioritizes your most frequent tasks. Consider these actionable improvements:
Add custom welcome panels that display quick links to your most-used pages, such as “Add New Post,” “Edit Theme,” or “View Analytics.”
Integrate third-party widgets for tools like Google Analytics, SEO summaries, or form entry counts directly on the dashboard.
Reorder the admin menu to place high-frequency items (e.g., “Posts” or “Media”) at the top, reducing scrolling and clicks.
Hide update notifications for plugins and themes that you manage via a staging environment, keeping the dashboard clean.
For example, a site administrator handling daily content updates can benefit from a dashboard that shows only recent revisions, scheduled posts, and a custom “Quick Launch” toolbar. This focused approach eliminates distractions and accelerates routine workflows, allowing you to manage multiple sites with less effort.
Creating a Client-Friendly Admin Experience
When building sites for clients, the default dashboard can be overwhelming or confusing. Clients often need simple access to update their blog, view contact form submissions, or check site statistics—without being exposed to complex settings like permalinks, database options, or theme file editors. A custom dashboard solves this by:
Hiding technical menus such as “Plugins,” “Tools,” and “Settings” to prevent accidental changes.
Adding branded elements like a custom logo, welcome message, or client-specific instructions that guide their actions.
Creating role-specific dashboards using user roles (e.g., Editor, Author) to show only relevant widgets and links.
Including feedback widgets that display recent form submissions or support ticket summaries, keeping clients informed.
This approach reduces support requests because clients see a clean, intuitive interface that matches their skill level. For instance, a restaurant owner managing a menu site can have a dashboard showing only “Edit Menu Items” and “View Reservations,” eliminating the need to navigate through unrelated settings. The result is a professional, trust-building experience that empowers clients without overwhelming them.
Reducing Cognitive Load by Hiding Unnecessary Elements
Cognitive load refers to the mental effort required to process information. A cluttered dashboard forces you to filter out irrelevant data, which slows decision-making and increases the risk of errors. By hiding unnecessary elements, you streamline the visual field and improve focus. Key strategies include:
Element to Hide
Reason
Implementation Method
WordPress News Widget
Distracts from site-specific tasks
Remove via remove_meta_box() in functions.php
Quick Draft Widget
Rarely used after initial setup
Uncheck under Screen Options or hide via code
Welcome Panel (for returning users)
Repeatedly shows same info
Disable with remove_action() hook
Plugin-specific notices
Clutters screen with non-urgent alerts
Use conditional logic to hide for non-admin roles
Beyond widgets, you can also remove admin bar items for non-admin users, collapse default menu sections, and disable dashboard tabs for roles that don’t need them. This reduction in visual noise helps users process only what matters, leading to faster task completion and fewer mistakes. For example, an e-commerce site manager can hide all unrelated post types and show only “Orders,” “Products,” and “Analytics” widgets, cutting cognitive load by more than half.
Ultimately, customizing your WordPress dashboard is not just about aesthetics—it’s about creating a purposeful environment that supports your workflow, respects your client’s expertise, and keeps your mind clear for strategic tasks. Each customization step you take brings you closer to a dashboard that works for you, not against you.
2. Understanding WordPress Dashboard Components
Before you can effectively customize the WordPress dashboard, you must first understand its core components. The dashboard is not a monolithic interface; it is a modular system composed of widgets, menus, and user-specific settings that together create a functional backend experience. Each component serves a distinct purpose and can be modified, reordered, or hidden to suit different user roles and workflows.
Default Dashboard Widgets and Their Purposes
When you log into a fresh WordPress installation, the dashboard displays several default widgets in a two-column layout. These widgets provide at-a-glance information and quick actions. Understanding each widget’s function is the first step toward deciding which to keep, remove, or replace.
At a Glance – Shows a summary of your site’s content: number of posts, pages, comments, and the current WordPress version. It also displays the active theme and number of users.
Activity – Lists recently published posts, comments awaiting moderation, and scheduled content. Useful for editors and administrators monitoring site engagement.
Quick Draft – A simple text box that allows you to quickly write and save a draft post without navigating to the full editor. Ideal for capturing ideas on the fly.
WordPress News – Displays the latest news, announcements, and blog posts from the WordPress ecosystem. Often less relevant for client sites or intranets.
Site Health (optional) – Appears when the Site Health feature detects issues. Shows performance and security recommendations.
Welcome Panel – Appears for new users or after major updates, offering links to common first steps like customizing the theme or creating a page.
Each widget can be toggled on or off via the “Screen Options” tab (covered below), and their positions can be adjusted by dragging and dropping within the dashboard.
Admin Menu Structure and User Roles
The left-hand admin menu is the primary navigation tool for the WordPress backend. Its structure is hierarchical, with top-level items (such as Dashboard, Posts, Media, Pages, Comments, Appearance, Plugins, Users, Tools, and Settings) and submenu items beneath each. However, not every user sees the same menu items. WordPress user roles determine which menu items are visible and accessible.
All items, including Settings, Plugins, Users, and Appearance.
None – full control.
Editor
Posts, Pages, Media, Comments, and some Appearance options (like Menus).
Cannot access Plugins, Users, Settings, or Themes.
Author
Posts, Media, and their own profile.
Cannot edit others’ posts, access pages, or use Appearance.
Contributor
Posts (write and edit own drafts) and their own profile.
Cannot publish posts, upload media, or access other sections.
Subscriber
Only their own profile.
No content management capabilities.
When customizing the dashboard, you can further hide or reorder menu items for specific roles using code or plugins. For example, you might remove “Posts” from an editor who only manages pages, or hide “Settings” from all non-administrators.
Screen Options and User Preferences
Every dashboard page (not just the main dashboard) includes a “Screen Options” tab in the upper-right corner. Clicking it reveals a panel that lets users control what content appears on that specific screen and how it is displayed. These preferences are stored per user and per screen.
Show/Hide Widgets – Check or uncheck boxes to toggle individual dashboard widgets on or off. For example, you can hide “WordPress News” for all users by default, but users can still re-enable it if needed.
Layout Options – Choose between 1, 2, or 3 columns for the dashboard layout. This affects how widgets are arranged.
Pagination and Display – On list screens (like Posts or Pages), you can set how many items appear per page and which columns are visible (e.g., author, categories, tags, date).
To programmatically set default screen options for all users (without forcing them), you can use a filter in your theme’s functions.php file. Here is a practical example that hides the “WordPress News” widget and sets the dashboard layout to 2 columns for all new users:
This code runs once per user, setting their dashboard to a 2-column layout and specifying which widgets appear in each column. It does not prevent users from changing these settings later via Screen Options.
3. Planning Your Custom Dashboard Layout
Before you begin modifying files or installing plugins, you must map out the dashboard layout that serves your specific needs. Whether you manage a single personal blog or oversee a multi-author editorial team, a well-planned dashboard reduces confusion, saves time, and ensures that users see only what is relevant to their role. This planning phase is the foundation of a successful custom dashboard.
Identifying Essential Widgets and Menus
Start by auditing the default WordPress dashboard. The standard screen includes widgets such as “At a Glance,” “Activity,” “Quick Draft,” and “WordPress News.” For a custom dashboard, you will likely remove most of these and replace them with targeted alternatives. Consider the following common essential widgets and menus based on user roles:
Site Health & Status: For administrators, a widget showing site health, backup status, and security scan results is critical.
Content Overview: Editors benefit from a widget displaying recently published posts, pending revisions, and scheduled content.
Quick Actions: A menu or widget for creating new posts, pages, or media uploads saves clicks for all users.
Analytics Summary: Integrate a lightweight widget showing key metrics like page views or user registrations (if relevant).
Support or Help Desk: For client sites, include a widget with contact information or a support ticket link.
List the widgets and menus that each user role absolutely needs. Remove everything else to reduce clutter.
Designing a User-Centric Information Hierarchy
Once you know which widgets and menus are essential, organize them in a logical order. The most frequently used information should appear at the top of the dashboard. For a multi-user environment, consider the following hierarchy principles:
Top Priority: Place widgets that require immediate action, such as pending comments, security alerts, or overdue tasks.
Secondary Tier: Position overview widgets, such as content stats or recent activity, in the middle column.
Lower Tier: Move reference widgets, such as RSS feeds or documentation links, to the bottom or sidebar area.
For menus, collapse or hide those that are irrelevant to a user’s role. For example, a subscriber should never see the “Appearance” or “Plugins” menu. Use a comparison table to decide which menu items to show per role:
Menu Item
Administrator
Editor
Author
Subscriber
Dashboard
Show (customized)
Show (customized)
Show (simplified)
Show (minimal)
Posts
Show
Show
Show
Hide
Media
Show
Show
Show
Hide
Pages
Show
Show
Hide
Hide
Comments
Show
Show
Hide
Hide
Appearance
Show
Hide
Hide
Hide
Plugins
Show
Hide
Hide
Hide
Users
Show
Hide
Hide
Hide
Tools
Show
Hide
Hide
Hide
Settings
Show
Hide
Hide
Hide
This table provides a clear starting point for role-based menu visibility. Adjust it based on your site’s specific needs.
Balancing Functionality with Simplicity
A common mistake is to overload the dashboard with too many widgets. While it is tempting to display every available metric, a cluttered interface reduces usability. To balance functionality with simplicity:
Limit widgets per column: Use no more than three columns, with a maximum of two to three widgets per column.
Use collapsible widgets: Allow users to minimize widgets they rarely need, keeping the default view clean.
Provide a “reset to default” option: If you offer user-specific customization, include a way to revert to the admin-defined layout.
Test with real users: Before finalizing, have a sample user from each role navigate the dashboard. Ask them if they can find the most important element within three seconds.
Remember that the goal of a custom dashboard is to streamline workflow, not to showcase every feature. By carefully selecting widgets, designing a clear hierarchy, and prioritizing simplicity, you create a dashboard that enhances productivity for all users. This planning phase ensures that the subsequent technical implementation—whether through a plugin or code—is grounded in real needs.
4. Using Code to Customize the Dashboard
For developers and advanced users, the most flexible way to tailor the WordPress dashboard is through PHP code. By adding snippets to your theme’s functions.php file or, better yet, by creating a small custom plugin, you gain granular control over widgets, menus, and even the admin interface’s behavior. This approach avoids plugin bloat and ensures your changes remain intact when switching themes.
Removing Default Dashboard Widgets
WordPress ships with several default dashboard widgets—like “At a Glance,” “Quick Draft,” and “Activity”—that may clutter the screen for specific roles or clients. To remove them, use the wp_dashboard_setup action hook combined with remove_meta_box(). The function requires three parameters: the widget ID, the screen (always dashboard), and the context (normal, side, or advanced).
Below is a practical code example that removes common widgets for all non-administrator users:
function remove_default_dashboard_widgets() {
// Only remove for users who are not administrators
if ( ! current_user_can( 'manage_options' ) ) {
remove_meta_box( 'dashboard_right_now', 'dashboard', 'normal' ); // At a Glance
remove_meta_box( 'dashboard_quick_press', 'dashboard', 'side' ); // Quick Draft
remove_meta_box( 'dashboard_activity', 'dashboard', 'normal' ); // Activity
remove_meta_box( 'dashboard_primary', 'dashboard', 'side' ); // WordPress Events and News
remove_meta_box( 'dashboard_site_health', 'dashboard', 'normal' ); // Site Health
}
}
add_action( 'wp_dashboard_setup', 'remove_default_dashboard_widgets' );
To find a widget’s ID, inspect the HTML of the dashboard page—look for the id attribute of the widget’s wrapper div. Common IDs include:
dashboard_right_now — “At a Glance”
dashboard_quick_press — “Quick Draft”
dashboard_activity — “Activity”
dashboard_primary — “WordPress Events and News”
dashboard_site_health — “Site Health Status”
You can also remove widgets for all users by omitting the role check. For client sites, stripping non-essential widgets reduces cognitive load and focuses attention on key tasks.
Creating a custom dashboard widget involves three steps: define the widget’s output function, register it with wp_add_dashboard_widget(), and attach that registration to the wp_dashboard_setup hook. The wp_add_dashboard_widget() function accepts four parameters: a unique slug, the widget title, a callback for the content, and an optional callback for a configuration form.
Here is a complete example that adds a “Support & Resources” widget, useful for client sites:
You can extend this by adding a fourth parameter (a callback for a settings form) to make the widget configurable. For example, you might allow site admins to change the email address or phone number via a simple form that saves options using update_option().
Modifying the Admin Menu Order and Labels
Beyond dashboard widgets, you may want to reorder or rename admin menu items to streamline the user experience. Use the admin_menu action hook and the global $menu array. Each menu item is an indexed array containing: the label, capability, slug, icon (optional), and position index.
To reorder menu items, you can unset and re-add them with new positions. The example below moves “Posts” to position 5 and “Pages” to position 20, while also renaming “Posts” to “News”:
function custom_admin_menu_order() {
global $menu;
// Rename "Posts" to "News"
$menu[5][0] = 'News'; // Position 5 is typically Posts
// Reorder: Move Pages (position 20) to position 25
$menu[25] = $menu[20];
unset( $menu[20] );
// Reorder: Move Media (position 10) to position 30
$menu[30] = $menu[10];
unset( $menu[10] );
}
add_action( 'admin_menu', 'custom_admin_menu_order', 999 );
Note: The $menu array is zero-indexed, but WordPress uses the numeric keys as position indices. Always run your code with a high priority (e.g., 999) to ensure it executes after other modifications. For renaming labels, you can also use the gettext filter, but direct manipulation of the $menu array is more reliable for structural changes.
To remove menu items entirely for specific roles, use remove_menu_page(). For instance, to hide “Comments” from all non-administrators:
These code-based techniques give you surgical control over the WordPress dashboard, enabling you to create a clean, role-appropriate interface that improves productivity and reduces confusion for end users.
5. Leveraging Plugins for No-Code Customization
For many WordPress site owners, writing custom PHP, JavaScript, or CSS to modify the dashboard is either intimidating or impractical. Fortunately, a robust ecosystem of plugins exists to handle this task entirely through visual interfaces and simple settings screens. These tools allow you to tailor the admin area to your exact needs—whether for yourself, your clients, or a team of editors—without touching a single line of code. Below, we explore the top plugins, walk through a typical setup, and weigh the trade-offs between free and premium options.
Top Plugins for Dashboard Customization
Several plugins stand out for their features, ease of use, and community support. The following table summarizes the most popular choices:
Replace WordPress branding (logo, footer text), customize dashboard screen, manage admin menu order
Developers and agencies reselling WordPress
Admin Menu Editor
Reorder, rename, hide, or add custom menu items; export/import settings
Organizing the admin sidebar for specific workflows
Dashboard Welcome for Elementor
Build custom welcome panels using Elementor page builder; add rich media, buttons, and links
Users already familiar with Elementor
Each plugin offers a unique set of controls, but all share a common goal: making dashboard customization accessible without coding.
Step-by-Step: Using a Dashboard Plugin
To illustrate the ease of this approach, we will walk through a typical setup using Ultimate Dashboard (a popular free and premium option). The process is similar for most no-code plugins:
Install and Activate the Plugin: Navigate to Plugins > Add New in your WordPress admin. Search for “Ultimate Dashboard,” click Install Now, then Activate.
Access the Customization Panel: After activation, a new menu item labeled Ultimate Dashboard appears in your admin sidebar. Click it to open the main settings area.
Create a Custom Dashboard Widget: Go to Dashboard Widgets and click Add New. Enter a title (e.g., “Welcome to Your Site”) and use the built-in text editor or visual builder to add content—like instructions, links, or even a video.
Set Visibility Rules: In the widget settings, choose which user roles (e.g., Administrator, Editor, Subscriber) can see this widget. You can also set specific user IDs for more precise targeting.
Remove Default Widgets: Under the Widgets tab, tick checkboxes to hide core widgets like “At a Glance,” “Activity,” or “Quick Draft” for certain roles. This declutters the dashboard.
Add a Custom Welcome Message: Use the Welcome Panel section to replace the default WordPress welcome message with your own text, perhaps with a branded image or call-to-action button.
Preview and Publish: Click Save Changes, then log in as a test user to verify that your customizations appear correctly. Adjust visibility settings if needed.
This entire process can be completed in under ten minutes, demonstrating the power of no-code tools.
When choosing a dashboard plugin, you will encounter both free and premium versions. The following list outlines the typical differences:
Free Versions:
Basic widget hiding and menu management (e.g., Adminimize, free tier of Ultimate Dashboard)
Limited to hiding default items; no custom widget creation in many cases
No white-labeling or removal of plugin branding
Community support via forums
Premium Versions:
Drag-and-drop widget builders with rich media support (e.g., videos, forms)
Advanced role-based permissions, including per-user visibility
Full white-labeling: replace WordPress logos, footer text, and even login screen
Import/export settings for multi-site management
Priority support and regular updates
For a single personal site, a free plugin like Adminimize may suffice. However, if you manage multiple client sites or need a polished, branded experience, investing in a premium plugin (typically $29–$79 per year) saves time and provides professional results. Many premium plugins also offer a 30-day money-back guarantee, allowing you to test before committing.
By leveraging these plugins, you can achieve a fully customized WordPress dashboard that improves usability, enforces permissions, and reinforces your brand—all without writing a single line of code.
6. Creating Custom Dashboard Widgets
Custom dashboard widgets are one of the most effective ways to tailor the WordPress admin experience for yourself or your clients. Instead of relying on the default widgets, you can build targeted tools that display exactly what matters: site analytics, recent activity, branded welcome messages, or curated news feeds. This section walks you through three practical widget types, each serving a distinct purpose in your custom dashboard.
Building a Welcome Widget with Custom HTML
A welcome widget is ideal for client sites where you want to present a friendly greeting, support links, or branded instructions. You can embed any HTML content directly, including images, buttons, and styled text. To create one, add the following code to your theme’s functions.php file or a site-specific plugin:
function custom_welcome_widget() {
echo '<div style="padding: 15px; background: #f0f6fc; border-left: 4px solid #0073aa;">
<h2>Welcome to Your Site</h2>
<p>Need help? Contact support at <a href="mailto:support@example.com">support@example.com</a></p>
<p>Quick links: <a href="' . admin_url('edit.php') . '">Posts</a> | <a href="' . admin_url('plugins.php') . '">Plugins</a></p>
</div>';
}
function add_custom_welcome_widget() {
wp_add_dashboard_widget('custom_welcome_widget', 'Welcome', 'custom_welcome_widget');
}
add_action('wp_dashboard_setup', 'add_custom_welcome_widget');
This widget will appear at the top of the dashboard by default. You can adjust the styling and content to match your brand. For multi-client setups, consider using conditional logic to show different messages per user role.
For data-driven dashboards, a statistics widget can show key metrics like total posts, pages, comments, user count, or even recent traffic highlights. Below is a simple example that pulls core WordPress data:
You can extend this widget to include data from plugins like Google Analytics (using their API) or WooCommerce (store sales). For advanced reports, consider using a table layout to present multiple metrics clearly:
Metric
Value
Published Posts
42
Total Pages
8
Approved Comments
156
Registered Users
23
Remember to cache expensive queries to avoid slowing down the dashboard for users with limited permissions.
Adding an RSS Feed Widget for News or Updates
An RSS feed widget keeps your team or clients informed about industry news, plugin updates, or your own company blog. WordPress includes a built-in RSS widget, but you can customize it fully. Here’s how to create one that fetches and displays a feed of your choice:
This widget will display the five most recent items from the specified feed. You can adjust the number of items, add caching controls, or style the output with CSS. For client sites, consider using your own company’s RSS feed to provide support tips or product announcements directly in the dashboard.
By combining these three widget types, you can create a dashboard that is both functional and brand-aligned, reducing the need for clients to navigate away from WordPress for basic information.
7. Restricting Dashboard Access by User Role
After designing a custom WordPress dashboard, the next logical step is controlling who sees what. Without role-based restrictions, your carefully curated interface may overwhelm editors with developer tools or expose sensitive settings to subscribers. Restricting dashboard access by user role ensures each user group encounters only the elements relevant to their tasks, improving security and usability. This section explains how to implement role-based customizations using capabilities, menu hiding, and custom roles.
Using User Role Capabilities to Control Visibility
WordPress assigns specific capabilities to each default role—administrator, editor, author, contributor, and subscriber. You can leverage these capabilities to conditionally display dashboard widgets, metaboxes, or entire sections. For example, only users with the edit_posts capability should see the “Quick Draft” widget, while activate_plugins is reserved for administrators.
To implement capability-based visibility, add conditional checks in your theme’s functions.php file or a custom plugin. A common approach uses the current_user_can() function:
Check for a specific capability:if ( current_user_can( 'edit_posts' ) ) { // show widget }
Check for multiple capabilities: Combine with && or || operators.
Use capability groups: For example, publish_posts for authors, delete_published_posts for editors.
WordPress Role
Key Capabilities Relevant to Dashboard
Typical Dashboard Elements to Show
Administrator
manage_options, activate_plugins, edit_themes
All settings, plugins, appearance menus, site health
Editor
edit_pages, publish_pages, delete_others_posts
Posts, pages, media, comments, custom post types
Author
edit_posts, publish_posts, upload_files
Posts (own), media library, profile
Contributor
edit_posts (without publish), read
Posts (own, draft only), profile
Subscriber
read
Profile, site front-end (if allowed)
For fine-grained control, use the admin_init hook to remove dashboard widgets based on role. Example code snippet:
Beyond widgets, you may need to hide entire admin menu sections from certain roles. For instance, subscribers should never see “Plugins” or “Appearance.” The admin_menu action hook lets you remove menu items conditionally using remove_menu_page() or remove_submenu_page().
Follow these steps:
Identify the menu slug: Common slugs include edit.php (Posts), upload.php (Media), plugins.php, themes.php, options-general.php.
Set the condition: Use current_user_can() with the appropriate capability.
Remove the menu: Call remove_menu_page( $menu_slug ) inside a function hooked to admin_menu.
Example for hiding the “Appearance” menu from all non-administrators:
function hide_appearance_menu() {
if ( ! current_user_can( 'manage_options' ) ) {
remove_menu_page( 'themes.php' );
}
}
add_action( 'admin_menu', 'hide_appearance_menu' );
For finer control, hide submenus individually. For example, hide “Add New” under Pages for authors who cannot publish pages:
Remember that removing menu items does not block direct URL access. For security, pair menu hiding with capability checks on the target pages themselves, using functions like wp_die() or redirects.
Creating Custom User Roles for Tailored Dashboards
Default roles may not fit your needs. For example, you might want a “Content Manager” who can edit all posts but cannot access plugins or settings. Creating custom roles gives you exact control over dashboard access.
Use the add_role() function in your plugin or theme’s activation hook:
After creating the role, restrict its dashboard by combining the techniques above. For example, hide the “Plugins” menu from content managers by checking for the activate_plugins capability (which you deliberately omitted).
For existing sites, use a plugin like “User Role Editor” to visually assign capabilities and create new roles without coding. However, for complete control, code-based roles are more reliable and portable.
Start with a base role: Clone an existing role (e.g., editor) and modify its capabilities.
Test thoroughly: Log in as the new role to verify dashboard elements appear as intended.
Document capabilities: Keep a list of assigned capabilities for future maintenance.
Use role hierarchies: Custom roles can inherit from no role, but matching core role structures prevents conflicts.
By combining capability checks, menu hiding, and custom roles, you can craft a WordPress dashboard that serves each user group precisely, reducing clutter and enhancing productivity.
8. Styling the Dashboard with Custom CSS
Once you have rearranged widgets and added custom panels, the next step is to apply your brand’s visual identity to the WordPress admin area. A custom-styled dashboard ensures a cohesive experience from the front-end to the back-end, reinforcing brand recognition for clients, editors, and site managers. Using custom CSS, you can change colors, fonts, spacing, and even layout elements in the dashboard without modifying core WordPress files. This approach keeps your customizations upgrade-safe and easy to maintain.
Enqueuing Admin Stylesheets Safely
To add custom CSS to the WordPress dashboard, you must enqueue a stylesheet using the admin_enqueue_scripts action hook. This method is safer than directly editing theme files or using the Customizer, as it ensures your styles load only in the admin area and do not interfere with the front-end. Follow these steps:
Create a new CSS file, for example admin-style.css, in your theme or child theme directory (e.g., /wp-content/themes/your-theme/css/admin-style.css).
Add the following code to your theme’s functions.php file or a custom plugin:
For child themes, replace get_template_directory_uri() with get_stylesheet_directory_uri().
Use version numbers (e.g., '1.0.0') to force cache refreshes when you update the file.
Test the stylesheet by adding a simple rule, such as body { background: #f0f0f0; }, to confirm it loads.
Always enqueue stylesheets rather than using inline <style> tags in the admin head. This approach avoids conflicts with other plugins and follows WordPress best practices.
WordPress admin pages use a consistent HTML structure with specific IDs and classes. To style the dashboard effectively, you need to target these elements precisely. Common selectors include:
.wp-core-ui – the core UI wrapper for buttons and forms.
Use your browser’s developer tools (F12) to inspect any dashboard element and find its unique ID or class. For example, the “At a Glance” widget has the ID dashboard_right_now. To style only that widget, use #dashboard_right_now { ... }. To target all dashboard widgets, use .postbox { ... }. Always prefix selectors with body or a page-specific class (e.g., body.index-php) to limit your styles to the dashboard and avoid affecting other admin pages.
Example: Changing Colors and Fonts for Branding
Below is a practical example that changes the dashboard background, widget headers, and admin menu to match a brand’s primary color (#2c3e50) and font family (Arial, sans-serif). Save this in your admin-style.css file:
This CSS creates a dark, professional admin menu with light text, matching the brand’s color scheme. Adjust the hex codes, font names, and padding values to align with your brand guidelines.
Comparison of Custom CSS Methods
The following table compares common methods for adding custom CSS to the WordPress admin dashboard, helping you choose the best approach for your project.
Method
Pros
Cons
Enqueue stylesheet via functions.php
Safe, upgrade-proof, follows WordPress coding standards, easy to maintain
Requires editing theme files or creating a child theme
Inline CSS in admin footer hook
Quick to implement, no extra file needed
Harder to manage for large styles, can bloat page output, not cacheable
Plugin (e.g., Admin CSS)
No coding required, user-friendly interface
Adds plugin dependency, may have performance overhead, limited flexibility
Customizer (Admin Color Scheme)
Built-in, no code, easy for end users
Only changes pre-set color schemes, not full CSS customization
For most projects, enqueuing a dedicated stylesheet in your child theme is the recommended method. It provides full control, follows best practices, and ensures your customizations survive theme updates.
By applying custom CSS to the WordPress dashboard, you create a branded, professional admin experience that reflects your organization’s identity. This attention to detail improves user trust and makes the back-end feel as polished as the front-end.
9. Testing and Maintaining Your Custom Dashboard
After implementing your custom WordPress dashboard, rigorous testing and ongoing maintenance are essential to ensure stability, security, and compatibility as WordPress evolves. Without a structured approach, updates to core files, plugins, or themes can break your customizations, leading to a poor user experience or even site downtime. This section outlines best practices for testing, conflict resolution, and documentation to keep your dashboard reliable over time.
Never apply dashboard customizations directly to a live production site. Instead, use a staging environment—a clone of your site where you can safely test changes without risking user access or functionality. Most managed WordPress hosts offer one-click staging, or you can set up a local development environment using tools like Local by Flywheel or XAMPP.
Clone your production site to a staging environment, including all plugins, themes, and database content.
Apply your custom dashboard code (e.g., functions.php modifications, custom plugin files, or dashboard widgets) to the staging site.
Test all user roles: log in as an administrator, editor, author, and subscriber to verify that each role sees only the intended dashboard elements.
Check for broken layouts or missing functionality by navigating through all dashboard pages, including the profile, settings, and post-editing screens.
Simulate common user actions, such as creating a new post, uploading media, or updating a user profile, to confirm no errors occur.
If you encounter issues, debug by temporarily disabling custom code or plugins. Use WordPress debugging tools by adding the following to your wp-config.php file (only on staging):
This logs errors to a debug.log file in the /wp-content/ directory, helping you pinpoint problematic code. Once testing is complete and all issues resolved, deploy the customizations to production.
Handling Plugin and Theme Conflicts
Dashboard customizations often conflict with third-party plugins or themes that inject their own admin scripts, styles, or menu items. Common symptoms include white screens, JavaScript errors, or overlapping interface elements. To resolve conflicts systematically:
Isolate the conflict: Deactivate all plugins except those essential for your dashboard customizations. If the issue disappears, reactivate plugins one by one, testing after each activation, to identify the culprit.
Switch to a default theme: Temporarily activate a WordPress default theme (e.g., Twenty Twenty-Four). If the conflict resolves, your custom theme’s admin code is likely interfering.
Check for JavaScript errors: Use your browser’s developer console (F12) to identify script errors. Look for conflicts in jQuery, custom scripts, or enqueued styles.
Use priority and hooks wisely: When adding dashboard widgets or modifying admin menus, use appropriate action priorities. For example, use add_action('wp_dashboard_setup', 'my_custom_widget', 11); to ensure your widget loads after other plugins.
If a conflict persists, consider wrapping your custom code in conditional checks to limit its execution. For instance:
if (!function_exists('some_plugin_function')) {
// Your custom dashboard code here
}
This prevents your code from running when a conflicting function already exists, reducing errors.
Thorough documentation ensures that you or other developers can maintain the custom dashboard months or years later. Without it, troubleshooting becomes guesswork. Document the following details:
Documentation Element
What to Include
Custom code location
Specify file paths (e.g., /wp-content/themes/your-theme/functions.php or a custom plugin file).
Purpose of each customization
Describe what each snippet does, e.g., “Removes the ‘At a Glance’ widget for subscribers.”
Dependencies
List required plugins, theme versions, or WordPress core version.
Change log
Record dates, version numbers, and brief notes for each modification.
Testing results
Summarize what was tested (roles, actions) and any known limitations.
Store this documentation in a version-controlled repository (e.g., GitHub) or within a private wiki accessible to your team. Update it whenever you modify the dashboard. Additionally, add inline comments to your code explaining non-obvious logic, such as:
// Remove default welcome panel for all non-admin users
if (!current_user_can('manage_options')) {
remove_action('welcome_panel', 'wp_welcome_panel');
}
By combining staging testing, conflict resolution strategies, and rigorous documentation, you ensure your custom WordPress dashboard remains functional and maintainable through updates and team changes. Schedule quarterly reviews to re-test after major WordPress releases, and always keep a backup of your custom code in a separate location.
10. Advanced Customizations and Next Steps
Once you have mastered the basics of branding and widget management, you can elevate your custom WordPress dashboard with advanced techniques. These enhancements improve user experience, streamline workflows, and enable powerful integrations. This section explores building custom admin pages with the Settings API, adding real-time notifications, and connecting external data sources via API.
Building Custom Admin Pages with Settings API
Creating custom admin pages allows you to centralize plugin or theme settings. The WordPress Settings API provides a secure, standardized method for adding options pages, handling form validation, and managing database storage. Follow these steps to build a robust settings page:
Register the page: Use add_menu_page() or add_submenu_page() in a callback hooked to admin_menu. Specify the page title, menu title, capability (e.g., manage_options), slug, and function to render the page.
Define settings sections and fields: Inside your page callback, call settings_fields() and do_settings_sections(). Use add_settings_section() to group fields and add_settings_field() to register each input (text, checkbox, select, etc.).
Register and sanitize settings: Use register_setting() with a unique option group name and a sanitization callback. This automatically handles saving and validation.
Render the form: Output a standard HTML <form> with action="options.php" and method="post". Include a submit button.
For example, to add a simple text field for an API key:
Real-time notifications keep users informed about critical events, such as failed backups or pending tasks. To implement this, combine WordPress admin notices with AJAX polling or WebSockets. Here is a practical approach:
Use admin_notices hook: Output dynamic notices using add_action('admin_notices', 'my_realtime_notice'). Check a transient or option for the latest alert.
Implement AJAX polling: Enqueue a JavaScript file that periodically fetches notification data via admin-ajax.php. Use wp_localize_script() to pass the AJAX URL and nonce.
Server-side handler: Register a callback for wp_ajax_my_check_notifications. Query a custom table or options, then return JSON with the message and type (success, warning, error).
Client-side rendering: In your JavaScript, update a designated container with the new notice, optionally using CSS animations for a smooth appearance.
For example, to display a warning if a scheduled task fails:
For persistent polling, use setInterval() in JavaScript to refresh the notice area every 30 seconds.
Integrating External Data Sources via API
Connecting your dashboard to third-party services (e.g., weather data, stock prices, or project management tools) enriches the admin experience. Use the WordPress HTTP API (wp_remote_get(), wp_remote_post()) to fetch data securely. Follow these steps:
Obtain API credentials: Register for an API key from the external service (e.g., OpenWeatherMap, GitHub, or a custom REST API). Store it using the Settings API as shown above.
Create a scheduled cron job: Use wp_schedule_event() to fetch data at intervals (hourly, daily). Hook a function that calls the API and caches the result as a transient or custom option.
Display in a dashboard widget: Use wp_add_dashboard_widget() to render the cached data. For example, show a table of recent GitHub commits:
Commit Message
Author
Date
Fix login redirect
jane_doe
2025-04-01
Update styles
john_smith
2025-04-02
To handle errors gracefully, check is_wp_error() and display a fallback message. Always sanitize and escape API responses to prevent security vulnerabilities. For real-time updates, combine the API integration with the AJAX polling technique from the previous section.
These advanced customizations empower you to build a truly bespoke WordPress dashboard that meets the specific needs of your users, whether they are site administrators, editors, or external stakeholders.
Frequently Asked Questions
What is a custom WordPress dashboard?
A custom WordPress dashboard is a tailored version of the default admin dashboard that appears after logging into WordPress. It allows you to add, remove, or reorganize widgets, menus, and branding to improve workflow for yourself or clients. By using hooks like 'wp_dashboard_setup', you can add custom widgets that display specific data, such as analytics or recent posts. This personalization helps streamline administrative tasks and provides a more focused, efficient user experience.
How do I add a custom widget to the WordPress dashboard?
To add a custom widget, use the 'wp_dashboard_setup' action hook. First, create a function that outputs the widget content using 'wp_add_dashboard_widget()'. This function requires parameters for the widget ID, title, and callback function. For example, you can display a simple message or a list of recent comments. Then, hook your function to 'wp_dashboard_setup' using 'add_action'. After adding the code to your theme's functions.php file or a custom plugin, the widget will appear on the dashboard.
Can I remove default dashboard widgets in WordPress?
Yes, you can remove default dashboard widgets using the 'wp_dashboard_setup' hook. Inside your custom function, use 'remove_meta_box()' with the widget's ID, the screen ('dashboard'), and the context ('normal', 'side', or 'advanced'). For instance, to remove the 'Quick Draft' widget, call 'remove_meta_box('dashboard_quick_press', 'dashboard', 'side')'. This is useful for simplifying the dashboard for clients who only need specific information.
How do I customize the WordPress admin menu?
You can customize the admin menu using the 'admin_menu' action hook. To add a new menu page, use 'add_menu_page()', which requires parameters like page title, menu title, capability, menu slug, and callback function. To remove existing menu items, use 'remove_menu_page()' with the menu slug. For example, 'remove_menu_page('edit.php')' removes the Posts menu. These changes help tailor the admin interface to specific user roles or needs.
What are the best practices for creating a custom dashboard?
Best practices include using a child theme or custom plugin to keep changes separate from the parent theme, ensuring code is secure by sanitizing outputs and checking user capabilities, and testing on a staging site first. Always use WordPress coding standards, document your code, and consider performance by avoiding excessive database queries. For client sites, remove unnecessary widgets and menus to reduce clutter. Additionally, use 'current_user_can()' to conditionally display widgets based on user roles.
How can I add custom CSS to the WordPress admin dashboard?
To add custom CSS to the admin dashboard, use the 'admin_head' action hook. Enqueue a custom stylesheet with 'wp_enqueue_style()' inside a function hooked to 'admin_enqueue_scripts'. Alternatively, you can output inline CSS directly using 'echo' within 'admin_head'. For example, to change the background color of the dashboard, add 'body { background-color: #f0f0f1; }'. Always use 'wp_add_inline_style()' for proper dependency management.
Is it possible to create a custom dashboard for specific user roles?
Yes, you can conditionally modify the dashboard based on user roles. Use functions like 'current_user_can()' or 'wp_get_current_user()' to check the user's role before adding or removing widgets. For example, if you want to show a widget only to administrators, wrap the 'wp_add_dashboard_widget()' call in a condition that checks for 'manage_options' capability. This allows you to tailor the dashboard experience for editors, authors, or subscribers.
What tools or plugins can help with custom dashboard creation?
Several plugins can simplify custom dashboard creation without coding, such as 'White Label CMS', 'Adminimize', and 'Ultimate Dashboard'. These plugins offer interfaces to hide menus, add widgets, and change branding. For developers, code-based approaches using hooks provide more flexibility. Always choose plugins that are well-maintained and compatible with your WordPress version. For advanced customization, consider building a custom plugin using the WordPress Settings API and dashboard widgets API.
WordPress and React: The Future of Frontend Development
Introduction: The Convergence of Two Giants
WordPress began its journey in 2003 as a simple blogging platform, but over two decades it has evolved into the world’s most widely used content management system, powering over 40% of all websites. Its growth from a monolithic PHP-based system to a flexible CMS with a plugin ecosystem and REST API has been remarkable. Meanwhile, React, introduced by Facebook in 2013, quickly became the dominant JavaScript library for building user interfaces, known for its component-based architecture, virtual DOM, and declarative approach. The convergence of WordPress and React represents a paradigm shift in frontend development, allowing developers to build dynamic, interactive, and highly performant user experiences while leveraging WordPress’s robust content management capabilities. This integration reshapes how sites are built—moving from traditional server-rendered pages to decoupled, API-driven architectures that offer greater flexibility, scalability, and modern user interfaces.
The Historical Context of WordPress as a Monolithic CMS
WordPress’s original architecture was monolithic: PHP generated HTML on the server, themes controlled presentation, and plugins added functionality. This approach served millions of sites well, but as web expectations grew, limitations emerged:
Tight coupling: Frontend and backend were intertwined, making updates and customization cumbersome.
Performance constraints: Server-rendered pages could struggle with high traffic and dynamic interactions.
Limited interactivity: Adding real-time features required heavy reliance on jQuery or custom JavaScript, often leading to code bloat.
WordPress addressed these challenges with the REST API in version 4.7 (2016), enabling decoupled architectures where the backend serves data via endpoints and the frontend consumes it independently. This shift opened the door for modern JavaScript frameworks like React, allowing developers to break free from the traditional theme-template model and build custom frontends that are faster, more maintainable, and user-centric.
React’s rise is rooted in its core principles: component reusability, unidirectional data flow, and efficient rendering through a virtual DOM. These features make it ideal for building complex, state-driven interfaces. Key reasons for its dominance include:
Component-based architecture: Encapsulates UI logic and styling, promoting modularity and testability.
Rich ecosystem: Tools like Next.js for server-side rendering, Gatsby for static sites, and Create React App for rapid bootstrapping.
Community and corporate support: Maintained by Meta and backed by a vast community, ensuring continuous innovation.
React’s flexibility allows it to be used in various contexts—single-page applications (SPAs), progressive web apps (PWAs), and even mobile apps via React Native. Its declarative nature simplifies complex UI updates, making development more predictable and less error-prone.
Why the Combination Matters for Developers and Site Owners
Integrating WordPress with React delivers tangible benefits for both technical and non-technical stakeholders:
Stakeholder
Benefits
Developers
– Decoupled architecture: frontend and backend evolve independently. – Modern tooling: use React’s ecosystem (hooks, context, state management) alongside WordPress’s admin and content APIs. – Improved performance: client-side rendering reduces server load, and lazy loading optimizes resource delivery. – Easier maintenance: reusable components and clear separation of concerns simplify updates and debugging.
Site Owners
– Enhanced user experience: faster load times, smooth navigation, and interactive features (real-time search, dynamic forms, dashboards). – Content management remains familiar: WordPress admin unchanged, so editors continue using the same interface. – Scalability: decoupled setup can handle high traffic by offloading frontend to CDNs or static hosting. – Future-proofing: adopting modern frontend practices ensures the site stays relevant as web standards evolve.
The combination also enables advanced use cases such as headless WordPress, where React powers the frontend while WordPress serves as a headless CMS. This approach is particularly valuable for e-commerce sites, membership platforms, and media-rich applications that require real-time updates and personalized experiences. By merging WordPress’s content management strengths with React’s interactive capabilities, developers can create sites that are both editor-friendly and user-delighting—a win-win for everyone involved.
Understanding the WordPress REST API
The WordPress REST API functions as the critical bridge between the WordPress backend and a React frontend, enabling a decoupled or “headless” architecture. By exposing WordPress data as JSON (JavaScript Object Notation), the API allows React—or any JavaScript framework—to consume content, handle routing, and manage the presentation layer independently. This separation empowers developers to build fast, dynamic user interfaces while retaining WordPress’s powerful content management capabilities. In a headless setup, the traditional WordPress theme is replaced entirely by a React application that fetches data via HTTP requests to the REST API, transforming how sites are built and maintained.
Key Endpoints and Data Retrieval Methods
The REST API provides a structured set of endpoints that correspond to WordPress core data types. Each endpoint returns JSON, which React can parse directly. Below is a table of the most commonly used endpoints for frontend development:
Endpoint
Description
Example URL
/wp/v2/posts
Retrieves published posts with fields like title, content, and excerpt.
https://example.com/wp-json/wp/v2/posts
/wp/v2/pages
Fetches pages, including custom fields if registered.
https://example.com/wp-json/wp/v2/pages
/wp/v2/categories
Lists all categories for taxonomy-based filtering.
https://example.com/wp-json/wp/v2/categories
/wp/v2/media
Returns media attachments with URLs and metadata.
https://example.com/wp-json/wp/v2/media
Data retrieval methods include GET requests for reading content, with optional query parameters such as per_page, page, search, and categories. For example, to fetch the latest five posts from a specific category, you can use:
React applications often use libraries like axios or the native fetch API within useEffect hooks to manage asynchronous data loading and state updates.
Authentication and Security Considerations
When the WordPress REST API is used in a headless context, authentication becomes essential for protected actions such as creating or updating content. The API supports several authentication methods, each with distinct security implications:
Cookie Authentication: Suitable for same-origin requests where the user is already logged into WordPress. It relies on nonces for CSRF protection but is not recommended for external React apps due to cross-origin limitations.
Application Passwords: A secure method for external applications. Users generate a unique password tied to their account, which is sent via Basic Auth headers. This is ideal for headless setups where the React app runs on a separate domain.
OAuth 1.0a: Provides a token-based system with signature verification, offering strong security for third-party integrations. However, it requires additional setup and is less common for simple headless projects.
JWT Authentication (Plugin): Uses JSON Web Tokens for stateless authentication. The React app stores the token and includes it in every request header. This method is popular for its simplicity and scalability.
Security best practices include using HTTPS for all API calls, validating user permissions on the server side, and never exposing authentication tokens in client-side code without proper encryption. For read-only public content, no authentication is required, which simplifies initial setup.
Performance Implications of API-Driven Architecture
Adopting a headless architecture with the WordPress REST API introduces specific performance considerations. The primary advantage is a decoupled frontend that can be optimized independently using React’s virtual DOM, lazy loading, and code splitting. However, the API itself can become a bottleneck if not managed carefully.
Key performance factors include:
Request Overhead: Each API call incurs HTTP latency. Minimizing requests by batching data (e.g., using _embed parameter to include related media and taxonomies) reduces round trips.
Caching: Implementing server-side caching with plugins like WP Redis or client-side caching with service workers can drastically improve response times. The REST API supports Cache-Control headers for this purpose.
Database Queries: Unoptimized custom endpoints may slow down WordPress. Using WP_Query efficiently and registering custom routes with proper arguments ensures faster data retrieval.
Payload Size: The API returns full post objects by default. Using the fields parameter to request only necessary data reduces bandwidth usage. For example, ?fields=title,excerpt trims the response.
In practice, a well-cached headless setup can outperform traditional WordPress themes by shifting rendering to the client and reducing server load. However, developers must monitor API response times and implement pagination for large datasets to maintain a smooth user experience. By balancing these factors, the WordPress REST API becomes a robust foundation for modern frontend development with React.
Headless WordPress: Decoupling the Frontend and Backend
The traditional WordPress architecture tightly couples the frontend theme with the backend PHP-based rendering engine. Headless WordPress disrupts this model by using WordPress solely as a content management system (CMS) and API provider, while React takes over the entire frontend rendering process. This decoupling delivers significant gains in performance, scalability, and developer flexibility. By separating concerns, teams can update the frontend without touching the backend, leverage modern JavaScript tooling, and deliver faster, more interactive user experiences.
To build a headless WordPress site with React, you need to configure WordPress as a headless CMS and connect it to a React frontend. Follow these steps:
Install and Configure WordPress: Use a standard WordPress installation (self-hosted or managed). Enable the REST API, which is built-in since WordPress 4.7.
Choose a Data Source: Use the built-in WordPress REST API or install the WPGraphQL plugin for GraphQL-based queries, which often reduces payload size and simplifies data fetching.
Set Up a React Application: Create a new React app using Create React App, Next.js, or Gatsby. For static sites, Gatsby is ideal; for dynamic apps, Next.js offers server-side rendering.
Fetch and Display Content: Use fetch or a library like Axios to query the API endpoint (e.g., https://yoursite.com/wp-json/wp/v2/posts). Map the JSON response to React components.
Handle Authentication (if needed): For private content or admin features, implement OAuth 2.0 or JWT authentication using plugins like JWT Authentication for WP REST API.
This setup gives you full control over the frontend stack while WordPress handles content editing, storage, and user management.
Choosing Between Static and Dynamic Rendering with React
When rendering content from a headless WordPress backend, you must decide between static and dynamic rendering. Each approach has distinct trade-offs:
For content that changes infrequently, static rendering with Gatsby offers superior speed and lower hosting costs. For highly dynamic sites like news portals or member areas, Next.js dynamic rendering provides real-time updates without build delays.
Real-World Examples of Headless WordPress in Production
Several high-traffic sites successfully use headless WordPress with React to deliver exceptional user experiences:
TechCrunch: Uses a headless WordPress backend with a React frontend to serve breaking tech news, leveraging static generation for archive pages and server-side rendering for live updates.
Facebook Newsroom: Employs headless WordPress to manage press releases and announcements, with a custom React frontend that prioritizes fast loading and accessibility.
Harvard Business Review: Utilizes a headless architecture with React and Gatsby to deliver premium editorial content, achieving sub-second page loads through static pre-rendering and CDN distribution.
These examples demonstrate that headless WordPress with React scales for enterprise-level traffic while maintaining editorial workflows that content teams rely on. The architecture allows organizations to future-proof their frontend without migrating away from WordPress’s mature CMS ecosystem.
Building Interactive UIs with React Components
WordPress and React together represent a paradigm shift for frontend development, where React’s component-based architecture transforms how developers build interactive user interfaces on top of WordPress. Instead of relying on traditional PHP templates or jQuery-driven scripts, you can craft modular, reusable UI elements that manage their own state, fetch data from the WordPress REST API, and respond dynamically to user input. This approach not only improves maintainability but also accelerates development by allowing you to compose complex interfaces from smaller, isolated pieces. At its core, React components encapsulate HTML, CSS, and logic, making them ideal for displaying WordPress content like posts, pages, custom post types, or dynamic widgets. By combining React with WordPress, you gain a modern frontend that feels fast, responsive, and scalable—without sacrificing the content management strengths of the platform.
Designing Modular Components for WordPress Content
Modularity is the cornerstone of React’s value in WordPress frontends. You can break down a typical WordPress page into discrete, reusable components such as PostList, PostCard, FeaturedImage, or CommentForm. Each component focuses on a single responsibility, making it easy to test, update, and reuse across different templates or themes. For example, a PostCard component might accept props like title, excerpt, and thumbnailUrl, rendering them consistently whether used in a blog archive, a related posts section, or a sidebar widget. This reusability reduces code duplication and ensures visual consistency. To design effectively, follow these principles:
Define clear props for each component, keeping them minimal and focused on content.
Use composition by nesting smaller components (e.g., PostCard containing FeaturedImage and PostMeta).
Abstract data fetching into custom hooks or utility functions, not inside presentational components.
Leverage WordPress REST API endpoints to fetch content (e.g., /wp/v2/posts) and pass it as props.
For instance, a simple PostCard component might look like this in practice:
function PostCard({ post }) {
return (
<div className="post-card">
<h3>{post.title.rendered}</h3>
<p>{post.excerpt.rendered}</p>
</div>
);
}
This component can then be reused inside a PostList component that maps over an array of posts fetched from the WordPress API.
Handling State and Side Effects in React-WordPress Apps
State management and side effects are critical when building interactive WordPress frontends with React. Since WordPress data is asynchronous—fetched via REST API calls—you need to handle loading, error, and success states gracefully. React’s useState and useEffect hooks provide a straightforward way to manage these. For example, you can use useEffect to fetch posts when a component mounts and update local state accordingly. The @wordpress/api-fetch library simplifies API interactions by handling authentication, nonces, and error responses automatically. Here is a practical example of fetching posts with state management:
This pattern ensures your UI remains responsive and informative. For more complex state, consider using useReducer or a library like Redux, but keep in mind that many WordPress frontends benefit from simpler local state. Side effects beyond data fetching—such as updating a user’s favorite posts or submitting a form—can be handled with additional useEffect calls or custom hooks that encapsulate the logic.
Leveraging WordPress Block Editor Components in React
One of the most powerful ways to integrate React with WordPress is by reusing components from the WordPress Block Editor (Gutenberg). The editor’s UI is built entirely with React, and many of its components—such as Button, TextControl, SelectControl, and Spinner—are exported from the @wordpress/components package. You can import these directly into your frontend React app to maintain visual consistency with the WordPress admin interface. For example, building a custom settings panel or a dynamic frontend form becomes simpler when you use these pre-styled, accessible components. Here is how you might use them:
import { Button, TextControl } from '@wordpress/components';
function SubscribeForm() {
const [email, setEmail] = useState('');
const handleSubmit = () => {
// Submit email to WordPress via API
};
return (
<div className="subscribe-form">
<TextControl
label="Email"
value={email}
onChange={setEmail}
type="email"
/>
<Button variant="primary" onClick={handleSubmit}>
Subscribe
</Button>
</div>
);
}
Beyond basic UI elements, you can also tap into block-specific components like RichText for rich content editing or BlockControls for toolbar integration. This reuse saves development time and ensures a consistent user experience across the admin and frontend. When building custom blocks or frontend features, always check the @wordpress/components documentation first—you might find a ready-made component that fits your needs. This approach aligns perfectly with WordPress and React’s shared future, where the line between editor and frontend continues to blur.
The Gutenberg Block Editor and React
The introduction of the Gutenberg block editor marked a paradigm shift in WordPress development, transitioning from a traditional TinyMCE-based editor to a modern, component-driven interface built entirely with React. This architectural decision by WordPress core developers has profound implications for frontend developers, enabling them to extend and customize the editing experience using familiar JavaScript patterns. Gutenberg treats every piece of content—paragraphs, images, galleries, embeds, and custom elements—as discrete blocks, each rendered as a React component. This approach not only enhances the user experience by providing a more intuitive page-building workflow but also opens the door for developers to create highly specialized blocks that integrate seamlessly with themes and plugins.
Anatomy of a Custom React-Based Gutenberg Block
A custom Gutenberg block is essentially a React component registered with WordPress via the Block API. The structure of such a block consists of three core files: a JavaScript file defining the block’s behavior, a PHP file for server-side registration, and optionally a CSS/SCSS file for styling. The block’s JavaScript file uses the registerBlockType function from the @wordpress/blocks package to define metadata, including the block’s name, title, icon, category, and attributes. The edit function returns the React component rendered in the editor, while the save function returns the static HTML output stored in the database. Below is a simplified example of a custom block structure:
File
Purpose
Key Content
block.js
React component definition
registerBlockType, edit, save
block.php
Server-side registration
register_block_type, asset enqueuing
style.scss
Editor and frontend styles
Block-specific CSS classes
Developers must also define attributes, which are reactive properties that store block data. For example, a custom testimonial block might include attributes for the quote text, author name, and background color. The edit component uses these attributes via the useBlockProps hook and updates them through the setAttributes function, ensuring real-time synchronization between the editor and the stored content.
Integrating Dynamic Data with Block Attributes
Block attributes are the backbone of dynamic data integration in Gutenberg blocks. They allow developers to store user input and configuration options that can be rendered both in the editor and on the frontend. Attributes are defined in the block’s attributes property, where each attribute has a type (string, number, boolean, object, or array) and an optional default value. For instance, a block displaying recent posts might store the number of posts to show, the selected category, and a toggle for displaying excerpts. The edit component can use WordPress data APIs, such as useSelect from @wordpress/data, to fetch dynamic content from the REST API. Below is a list of common attribute patterns:
Static content attributes: Text, URLs, and media IDs entered directly by the user (e.g., heading text, image ID).
Configuration attributes: Options such as alignment, color palette choices, or number of columns.
Dynamic source attributes: Data fetched from external sources, like a custom post type query or an API endpoint.
Meta attributes: Values stored in post meta, enabling blocks to interact with custom fields.
When integrating dynamic data, developers must ensure that the save function outputs the correct HTML structure, while the edit function provides controls for users to modify the data. For blocks that rely on server-side rendering (e.g., fetching data from a database), the save function can return null, and the block’s output is generated via a PHP render callback. This approach separates the editing interface from the final frontend markup, allowing for complex dynamic behavior without sacrificing performance.
Best Practices for Block Development and Maintenance
Creating robust, maintainable Gutenberg blocks requires adherence to established best practices. First, always use the wp-scripts build process, which includes Webpack configuration, Babel transpilation, and linting tools. This ensures that block code is optimized for modern browsers and follows WordPress coding standards. Second, leverage the InspectorControls component for settings panels rather than cluttering the block toolbar, keeping the editing interface clean. Third, implement proper error handling for dynamic data fetching, such as fallback states when API calls fail. Below are essential maintenance practices:
Version your block assets: Use the wp_register_script and wp_register_style functions with version parameters to prevent caching issues.
Use the Block API’s theme support: Register block styles and variations to allow theme authors to customize block appearances without modifying core code.
Write unit tests: Use Jest and @wordpress/scripts to test block components, attribute validation, and data fetching logic.
Document attributes and hooks: Provide clear descriptions in the block’s json metadata and inline comments for future maintainers.
Optimize for accessibility: Ensure all block controls are keyboard navigable and include proper ARIA labels for screen readers.
By following these guidelines, developers can create blocks that are not only functional and performant but also easy to update as WordPress evolves. The Gutenberg ecosystem continues to grow, with the Block API providing a stable foundation for extending the editor’s capabilities. As React remains the core library powering the block editor, proficiency in React development is becoming an essential skill for WordPress frontend developers aiming to build the next generation of interactive, dynamic websites.
Performance Optimization Strategies for React-WordPress Sites
When building a React frontend for a WordPress backend, performance is not merely a nice-to-have—it is a fundamental requirement for user retention and search engine ranking. A React-WordPress site can suffer from slow initial load times, bloated JavaScript bundles, and redundant API calls if not carefully optimized. The following strategies address these bottlenecks, ensuring fast load times and smooth interactions by focusing on code splitting, intelligent caching, and server-side rendering.
Implementing Code Splitting and Lazy Loading in React
React applications often ship a single large JavaScript bundle containing all components, routes, and dependencies. This approach forces the browser to download, parse, and execute code the user may never need on the current page. Code splitting and lazy loading break the application into smaller chunks that are loaded on demand, significantly reducing the initial payload and time to interactive.
Route-based splitting: Use React Router’s lazy() and Suspense to load page-level components only when the user navigates to them.
Component-level splitting: Apply lazy loading to heavy components like image galleries, charts, or WYSIWYG editors that are below the fold or triggered by user interaction.
Dynamic imports: Use import() syntax to conditionally load libraries (e.g., a date picker or markdown parser) only when they are actually used.
A practical example in a React component that fetches WordPress posts and lazily loads the post content renderer:
This technique ensures that the heavy PostContent component (which may include parsing, sanitization, and rendering of HTML) is only fetched and executed when the user scrolls to or clicks on a specific post.
Caching Strategies for REST API Responses
The WordPress REST API is the data backbone of a React-WordPress site, but repeated requests for the same data (e.g., navigation menus, post archives, or site metadata) can overwhelm the server and degrade user experience. Caching API responses at the service worker level, in-memory, or via HTTP cache headers reduces latency and server load.
Using Server-Side Rendering with Next.js and WordPress
Client-side rendering (CSR) of a React-WordPress site can result in a blank screen until JavaScript loads and executes. Server-side rendering (SSR) with a framework like Next.js generates the HTML on the server, sending a fully rendered page to the browser. This dramatically improves perceived performance, SEO, and accessibility.
Next.js getServerSideProps: Fetch WordPress data at request time and inject it into the React component before sending the HTML to the client.
Static Site Generation (SSG): For content that changes infrequently (e.g., about pages, blog posts), pre-render pages at build time using getStaticProps and revalidate with Incremental Static Regeneration.
API route proxying: Use Next.js API routes to cache or transform WordPress REST API responses, reducing direct exposure of the WordPress backend.
An example of a Next.js page that fetches WordPress posts on the server:
By combining Next.js SSR with WordPress, you offload rendering work to the server, reduce client-side JavaScript execution, and deliver a fast, SEO-friendly experience that aligns with the future of frontend development.
SEO Considerations in a React-Powered WordPress Frontend
When adopting a React-powered frontend for WordPress, SEO demands careful attention because search engine crawlers traditionally rely on static HTML content. JavaScript-heavy sites can hinder indexing if not handled properly. Below, we explore key challenges and solutions to maintain strong search visibility.
Ensuring Content Indexability for Search Engines
Search engines like Google have improved at crawling JavaScript, but reliance on client-side rendering can still cause delays or incomplete indexing. To ensure your React-WordPress site is fully indexable, implement the following strategies:
Server-side rendering (SSR): Use frameworks like Next.js to pre-render pages on the server, delivering fully formed HTML to crawlers.
Prerendering services: Tools like Prerender.io or Rendertron can generate static snapshots of your pages for bots, while users enjoy dynamic React interactions.
Dynamic rendering: Detect crawlers via user-agent and serve them static HTML versions, while real users receive the React app.
Testing with Google Search Console: Use the URL Inspection tool to verify that your pages are rendered and indexed correctly.
These approaches ensure that essential content—such as blog posts, product descriptions, and navigation—is accessible to search engines without requiring JavaScript execution.
Managing Meta Tags and Structured Data with React Helmet
Meta tags (title, description, Open Graph) and structured data (JSON-LD for Schema.org) are critical for click-through rates and rich results. In a React-WordPress headless setup, these must be injected dynamically. React Helmet provides a clean solution:
Dynamic meta tags: Use <Helmet> to set page-specific titles, descriptions, and canonical URLs based on WordPress data fetched via the REST API or GraphQL.
Structured data integration: Inject JSON-LD scripts within <Helmet> for article, product, or FAQ schemas, pulling data from WordPress custom fields or ACF.
Fallback handling: Ensure default meta tags are set for 404 pages or missing data, and that tags update on client-side navigation without hard reloads.
Performance tip: Minimize Helmet re-renders by memoizing meta data to avoid unnecessary DOM updates.
React Helmet works seamlessly with SSR setups, so crawlers receive correctly formatted tags on initial page load.
Comparing SSR vs. Static Site Generation for SEO
Both server-side rendering (SSR) and static site generation (SSG) offer SEO benefits, but they differ in use cases and performance trade-offs. The table below summarizes key comparisons for a WordPress React frontend:
Aspect
SSR (e.g., Next.js)
SSG (e.g., Gatsby)
Content freshness
Real-time; ideal for dynamic WordPress content (e.g., comments, user posts).
Build-time; requires re-deployment for updates, best for static blogs or portfolios.
SEO crawlability
Excellent; fully rendered HTML per request.
Excellent; pre-built static files are instantly indexable.
Load time
Slower first response due to server processing; benefits from caching.
Fastest possible; served from CDN with no server compute.
Scalability
Requires server resources for each request; caching (e.g., Redis) helps.
Fetches data on each request via API; can use incremental static regeneration for hybrid approaches.
Pulls data at build time; webhooks can trigger rebuilds on content changes.
Best for
E-commerce, news sites, membership portals with frequent updates.
Marketing sites, documentation, personal blogs with stable content.
For most WordPress-powered React sites, a hybrid approach using Next.js with incremental static regeneration (ISR) offers the best of both worlds: fast static delivery for SEO-critical pages and server-side rendering for dynamic sections. This ensures search engines see fresh, indexable content while users enjoy near-instant page loads.
By addressing these SEO considerations—indexability, metadata management, and rendering strategy—you can build a React-WordPress frontend that ranks effectively in search results without sacrificing user experience.
Security and Authentication in Headless WordPress
When building headless WordPress applications with React, security architecture must shift from traditional server-rendered patterns to API-centric protections. Unlike monolithic WordPress, where authentication and authorization are handled by PHP session cookies and template-based access controls, headless setups expose the WordPress REST API directly to client-side JavaScript. This creates a larger attack surface, making robust authentication, cross-origin controls, and role-based permissions essential for any production system. Below are key considerations and implementation strategies for securing a headless WordPress and React stack.
Implementing JWT Authentication in WordPress and React
JSON Web Tokens (JWT) provide a stateless, secure method for authenticating API requests between React and WordPress. Unlike traditional cookie-based sessions, JWTs are transmitted in HTTP headers, making them suitable for decoupled architectures where the frontend and backend may reside on different domains. Here is how to implement JWT authentication effectively:
WordPress plugin setup: Use a reputable plugin such as “JWT Authentication for WP REST API” or “Simple JWT Login.” Configure the plugin to define a strong, unique secret key in your wp-config.php file. Avoid storing secrets in the database or version control.
Token issuance: Create a login endpoint in your React app that sends user credentials to the WordPress REST API endpoint (e.g., /wp-json/jwt-auth/v1/token). On successful authentication, the server returns an access token (short-lived, typically 15–60 minutes) and a refresh token (long-lived, e.g., 7–14 days).
Token storage: Store the access token in memory (e.g., React state or a secure HTTP-only cookie if using a proxy) and the refresh token in an HttpOnly, Secure, SameSite=Strict cookie to prevent XSS attacks. Never store tokens in localStorage or sessionStorage due to XSS vulnerability.
Token refresh: Implement a refresh token rotation mechanism. When the access token expires, the React app sends the refresh token to a dedicated endpoint (e.g., /wp-json/jwt-auth/v1/token/refresh) to obtain a new access token. Revoke old refresh tokens after use to prevent replay attacks.
Logout and revocation: Provide a logout endpoint that invalidates the current refresh token on the server side. Clear all tokens from the client side after logout.
Handling Cross-Origin Requests Safely
Headless WordPress setups commonly involve the React frontend hosted on a different domain or port than the WordPress backend. This triggers cross-origin resource sharing (CORS) policies enforced by browsers. To handle CORS safely without weakening security:
Whitelist specific origins: In your WordPress installation, use a plugin like “CORS” or add custom code to functions.php to set the Access-Control-Allow-Origin header to only your known frontend domain(s). Avoid using the wildcard * for any request that includes credentials.
Use credentials mode: For authenticated requests, set the CORS header Access-Control-Allow-Credentials: true and ensure your React fetch or Axios calls include credentials: 'include'. This allows cookies or authorization headers to be sent cross-origin.
Preflight requests: Configure your server to handle OPTIONS preflight requests efficiently. Set a reasonable Access-Control-Max-Age (e.g., 86400 seconds) to cache preflight responses and reduce latency.
Limit allowed methods and headers: Restrict Access-Control-Allow-Methods to only the HTTP verbs your app uses (e.g., GET, POST, PUT, DELETE) and Access-Control-Allow-Headers to only required headers like Authorization, Content-Type.
Below is a comparison of CORS configurations for common deployment scenarios:
Scenario
Allowed Origin
Credentials
Preflight Cache
Security Level
Development (localhost)
http://localhost:3000
true
600 seconds
Low (acceptable for dev)
Production (single domain)
https://app.example.com
true
86400 seconds
High
Production (multiple subdomains)
https://*.example.com (via regex)
true
86400 seconds
Medium-High
Public API (no auth)
*
false
3600 seconds
Low (use only for public data)
Securing User Roles and Permissions in API Calls
WordPress’s role-based access control system must be explicitly enforced when serving API requests to a React frontend. Without proper checks, users could escalate privileges or access restricted data. Follow these practices:
Validate capabilities server-side: Every REST API endpoint that performs a write operation (create, update, delete) should verify the current user’s capabilities using WordPress functions like current_user_can() or custom capability checks. Never rely solely on client-side checks.
Use custom REST API routes: Instead of exposing default WordPress endpoints (which may leak metadata), register custom routes in your plugin or theme’s functions.php using register_rest_route(). Include explicit permission callbacks that check roles and capabilities.
Filter response data: When returning user-specific data (e.g., profiles, orders), filter out sensitive fields like email addresses, passwords, or API keys based on the user’s role. Use the rest_prepare_* filters or modify the response object in your custom endpoint.
Implement rate limiting: For high-privilege actions (e.g., creating new users, modifying site settings), add rate limiting at the server level using plugins or custom middleware. This mitigates brute-force attacks on API endpoints.
Audit and log: Enable logging for all API calls that modify data or access sensitive resources. Store logs in a secure, separate location (not the WordPress database) and monitor for unusual patterns.
By combining JWT authentication, strict CORS policies, and role-based API security, developers can build headless WordPress and React applications that are both functional and resilient against common web vulnerabilities. Always test your security measures with tools like OWASP ZAP or Postman before deploying to production.
Building a modern frontend with WordPress and React requires a deliberate choice of tooling that balances performance, developer experience, and compatibility with WordPress’s unique ecosystem. The workflow you adopt influences everything from local iteration speed to deployment reliability. Below, we examine the key components of a practical setup: build tool selection, local environment configuration, and pipeline integration.
Choosing a Build Tool: Webpack vs. Vite for WordPress Projects
Webpack has long been the standard for WordPress React development, primarily because of its mature ecosystem and extensive plugin support. However, Vite has emerged as a faster alternative, leveraging native ES modules for near-instant hot module replacement (HMR) during development. For WordPress projects, the choice hinges on project complexity and team familiarity.
Webpack is ideal when you need fine-grained control over asset optimization, code splitting, and legacy browser support. It integrates well with WordPress’s enqueue system through tools like @wordpress/scripts, which abstracts common configurations. Vite excels in speed and simplicity, especially for smaller to medium-sized projects. Its plugin architecture is compatible with Rollup, allowing you to use many WordPress-focused plugins after minor adjustments.
Consider the following comparison:
Feature
Webpack
Vite
Development server startup
Slower (full bundle)
Instant (native ESM)
HMR speed
Moderate
Near-instant
WordPress enqueue compatibility
Excellent (via @wordpress/scripts)
Good (requires manual config)
Legacy browser support
Built-in
Requires plugin
Plugin ecosystem
Extensive
Growing
For most WordPress React projects, start with Vite for its speed, but keep Webpack as a fallback if you need advanced optimization or are working within a strict WordPress theme framework.
Setting Up a Local Development Environment with Docker
A consistent local environment is critical for WordPress React development, and Docker provides the most reliable solution. Unlike traditional tools like Local by Flywheel (which is excellent for simpler setups), Docker allows you to mirror production environments precisely, including PHP versions, web servers, and database configurations.
To set up a Docker-based WordPress environment with React support, use a docker-compose.yml file. Below is a practical example that includes WordPress, MySQL, and a Node service for your React build:
This setup mounts your WordPress theme or plugin directory into the container and runs your React development server in a separate Node container. Use docker compose up -d to start everything. For version control, ensure you include a .dockerignore file to exclude node_modules and build artifacts.
Integrating Continuous Integration and Deployment Pipelines
Automating builds and deployments for WordPress React projects reduces human error and ensures consistency. A typical CI/CD pipeline includes: linting and testing your React code, building production assets, and deploying to a staging or production WordPress environment.
Build step: Install dependencies and run npm run build using your chosen build tool.
Test step: Run unit tests and linting (e.g., ESLint, Jest).
Deploy step: Sync built assets (typically in a build/ or dist/ folder) to the WordPress server via SFTP, rsync, or a deployment service like Deployer.
Key considerations for WordPress-specific pipelines:
Always exclude node_modules and source maps from production deployments.
Use environment variables to manage API endpoints and WordPress URLs across stages.
Consider a two-step deployment: first to a staging site with the same server configuration, then to production after verification.
Implement database migration scripts if your React components depend on custom post types or fields.
By combining Docker for local parity, a fast build tool like Vite, and automated CI/CD, you create a workflow that accelerates development while maintaining reliability across environments. This foundation lets you focus on building dynamic React interfaces within WordPress without friction.
Future Trends and Predictions
The relationship between WordPress and React is poised to deepen, reshaping how developers build and manage frontend experiences. As the platform evolves, several key trends will define this partnership, moving beyond traditional themes toward a more modular, interactive, and efficient architecture. The following sections explore the most significant shifts on the horizon.
The Role of Full Site Editing in a React-Driven World
Full Site Editing (FSE) represents a fundamental shift from the classic WordPress theming model. By relying on blocks—many of which are built with React—FSE empowers users to control headers, footers, and templates without touching code. This evolution will likely accelerate React’s integration into the WordPress core.
Block-based theming: Future themes will be collections of React-powered blocks, not monolithic PHP templates. Developers will create reusable block patterns that users can mix and match.
Dynamic site structure: FSE enables real-time layout changes via the block editor. As React’s state management improves, these changes will become smoother, with instant previews and undo capabilities.
Hybrid editing: Expect a blend of FSE and custom React applications. For example, a site could use FSE for global layout while embedding a React-powered dashboard for user-generated content.
Developer experience: FSE will push developers to adopt modern JavaScript tooling (e.g., Webpack, Babel) and component-based thinking, making React proficiency a standard requirement for WordPress development.
Emerging Patterns: Server Components and Edge Rendering
React’s ecosystem is moving toward server components and edge computing, and WordPress will likely follow suit to optimize performance and scalability.
Pattern
Description
Potential WordPress Application
Server Components
Render React components on the server, sending only HTML to the client. Reduces JavaScript bundle size and improves initial load.
WordPress could use server components for static content (e.g., blog posts) while reserving client components for interactive blocks (e.g., forms, sliders).
Edge Rendering
Execute rendering logic at CDN edge nodes, near the user. Provides low latency and dynamic personalization.
Edge rendering could allow WordPress to deliver personalized block content (e.g., user-specific menus) without a full server roundtrip, using tools like Vercel or Cloudflare Workers.
Streaming SSR
Send HTML in chunks as the server renders, enabling progressive page loading.
WordPress could stream block-based layouts, letting users see the header and navigation while the main content renders.
These patterns will reduce reliance on heavy client-side JavaScript while maintaining React’s interactivity. WordPress may adopt a hybrid approach: server-rendered blocks for SEO-critical content and client-rendered blocks for dynamic features.
Community and Industry Adoption: What to Watch For
Adoption of React within WordPress will depend on community tools, hosting infrastructure, and industry standards. Key indicators include:
Headless WordPress growth: As more agencies adopt headless setups (e.g., WordPress as a CMS with a React frontend), the demand for React developers with WordPress experience will rise. Expect more starter kits and frameworks like Faust.js to mature.
Block library expansion: Third-party block plugins will increasingly rely on React for complex interactivity (e.g., maps, charts). Watch for block marketplaces that prioritize React-native components.
Hosting optimization: Hosts like WP Engine and Kinsta may offer specialized caching or serverless environments for React-powered WordPress sites, reducing friction for developers.
Tooling convergence: The WordPress CLI (wp-scripts) may integrate more closely with React tools (e.g., Next.js or Gatsby). This could lead to official WordPress packages for server components or edge functions.
Educational shift: WordPress tutorials will increasingly cover React fundamentals, state management, and component testing. Expect certifications or learning paths that combine both ecosystems.
The WordPress-React relationship is not a passing trend—it is a structural evolution. As FSE matures and server-side patterns gain traction, developers who embrace this synergy will build faster, more flexible sites. The future lies not in replacing either technology, but in blending their strengths: WordPress’s content management simplicity with React’s interactive power.
Frequently Asked Questions
How does React integrate with WordPress?
React integrates with WordPress primarily through the Gutenberg block editor, which is built with React. Developers can create custom blocks using React components. Additionally, WordPress's REST API allows React applications to fetch and display content from a WordPress backend, enabling headless or decoupled architectures where React handles the frontend entirely.
What is headless WordPress with React?
Headless WordPress uses WordPress as a content management system (CMS) backend while React (or another frontend framework) handles the presentation layer. Content is delivered via the WordPress REST API or GraphQL, allowing developers to build fast, dynamic, and interactive user interfaces independent of WordPress's theming system.
React is not replacing traditional WordPress themes but offers an alternative approach. Traditional themes remain viable for simpler sites. However, for complex, interactive applications, React-based frontends (via the block editor or headless setups) provide more flexibility, performance, and user experience benefits.
What are the benefits of using React with WordPress?
Benefits include improved performance through virtual DOM, reusable components, better state management, enhanced user interactivity, and the ability to build modern single-page applications (SPAs). React also simplifies maintenance and scaling for large projects.
Do I need to learn React to use WordPress?
No, you can still use WordPress without React. However, learning React opens opportunities to customize the block editor, create interactive themes, or build headless applications. It is especially valuable for developers aiming to leverage modern JavaScript in WordPress.
What is the role of the WordPress REST API in React development?
The WordPress REST API serves as the bridge between React and WordPress. It provides endpoints to retrieve, create, update, and delete content (posts, pages, media, etc.) in JSON format. React applications can fetch this data asynchronously and render it dynamically.
Can I use React for existing WordPress sites?
Yes, you can incrementally add React to existing WordPress sites. For example, you can replace specific theme components (like a search bar or comments section) with React widgets, or use the block editor to insert custom React blocks without overhauling the entire site.
What are the challenges of using React with WordPress?
Challenges include a steeper learning curve for those new to React, potential SEO issues with JavaScript-heavy sites (though server-side rendering can mitigate this), and increased complexity in hosting and deployment, especially for headless setups.
WordPress and WooCommerce together form one of the most widely adopted foundations for building eCommerce websites. WordPress powers over 40% of all websites globally, while WooCommerce, as its leading eCommerce plugin, enables those sites to sell products, manage inventory, process payments, and handle shipping. The integration between the two is seamless: WooCommerce runs as a plugin within a WordPress installation, transforming a content management system into a fully functional online store. This combination offers flexibility, scalability, and ease of use, making it a popular choice for businesses ranging from small startups to large enterprises. By leveraging WordPress’s robust content management capabilities and WooCommerce’s specialized commerce features, users can create customized shopping experiences without needing extensive technical expertise.
What Is WordPress and What Is WooCommerce?
WordPress is an open-source content management system (CMS) originally launched in 2003 as a blogging platform. Over time, it evolved into a versatile tool for building websites of all types, including blogs, portfolios, business sites, and news portals. Its core strengths lie in its user-friendly interface, extensive theme and plugin ecosystem, and strong community support. Users can manage content through a visual editor, customize designs with themes, and extend functionality with plugins.
WooCommerce, released in 2011 and later acquired by Automattic, is a free, open-source eCommerce plugin built specifically for WordPress. It adds essential online store features such as product listings, shopping carts, checkout processes, payment gateways, shipping options, and order management. Unlike standalone eCommerce platforms, WooCommerce integrates directly into the WordPress dashboard, allowing users to manage both content and commerce from a single interface. It supports physical and digital products, subscriptions, bookings, and memberships, making it adaptable to various business models.
The Evolution of WooCommerce as a Plugin
WooCommerce emerged from the need for a simple, flexible eCommerce solution within the WordPress ecosystem. Before its release, WordPress users relied on multiple, often incompatible plugins to add basic store functionality. WooCommerce streamlined this by offering a unified plugin that handled product management, payments, and shipping out of the box. Key milestones in its evolution include:
2011: Initial release by WooThemes as a lightweight plugin with basic product and cart features.
2015: Acquisition by Automattic, the company behind WordPress.com, leading to deeper integration and resource investment.
2017: Introduction of the REST API, enabling headless commerce and third-party integrations.
2020: Launch of WooCommerce Blocks for the Gutenberg editor, allowing drag-and-drop store design.
2023: Enhanced support for high-performance order storage, improving scalability for large stores.
Today, WooCommerce powers over 5 million live websites and supports a vast ecosystem of extensions for payments, shipping, marketing, and analytics. Its open-source nature allows developers to customize every aspect, while regular updates ensure compatibility with WordPress core and modern web standards.
Combining WordPress with WooCommerce offers distinct advantages over other eCommerce platforms. These benefits include:
Full Control: Users own their data and can customize every element of the store, from design to functionality, without platform-imposed limitations.
Cost-Effectiveness: Both WordPress and WooCommerce are free to use. Costs arise only from hosting, domains, premium themes, and optional extensions, making it accessible for small budgets.
Scalability: The platform can grow with a business, from a few products to thousands, with performance optimizations and hosting upgrades.
SEO and Content Marketing: WordPress’s built-in SEO capabilities, combined with plugins like Yoast SEO, allow for search-optimized product pages and blog content that drives organic traffic.
Extensive Ecosystem: Thousands of themes and plugins are available to add features such as multilingual support, advanced analytics, abandoned cart recovery, and social media integration.
Community Support: A large, active community provides forums, documentation, tutorials, and professional developers, ensuring help is always available.
Security and Maintenance: Regular updates from WordPress and WooCommerce, along with security plugins, help protect against vulnerabilities.
These advantages make WordPress and WooCommerce a reliable and adaptable solution for building eCommerce websites that require both robust content management and powerful commerce features.
Choosing the Right Hosting for Your WooCommerce Store
Selecting the right hosting provider is a foundational decision for any WooCommerce store. Unlike a simple blog, an ecommerce site must handle product databases, secure payment transactions, and fluctuating traffic loads. The wrong hosting can lead to slow page loads, frequent downtime, and security vulnerabilities—all of which directly impact sales and customer trust. This section provides guidance on evaluating hosting options based on performance, security, and scalability needs specific to WooCommerce.
Shared vs. Managed WordPress Hosting
The most critical distinction in hosting for WooCommerce is between shared hosting and managed WordPress hosting. Shared hosting places your store on a server alongside dozens or hundreds of other websites, sharing resources like CPU, memory, and disk I/O. While inexpensive (often $5–$15 per month), shared hosting is generally unsuitable for WooCommerce because a traffic spike on a neighboring site can slow your store to a crawl. Security is also a concern—a compromised site on the same server can expose your store to cross-account attacks.
Managed WordPress hosting, on the other hand, is optimized specifically for WordPress and WooCommerce. Providers like WP Engine, Kinsta, and Flywheel offer server-level caching, automatic updates, and staging environments. They typically include a dedicated WooCommerce-specific support team and built-in security measures such as web application firewalls (WAF) and malware scanning. While more expensive (often $25–$100+ per month), managed hosting provides the performance and reliability that ecommerce requires. Consider these key differences:
Resource allocation: Shared hosting has no guaranteed resources; managed hosting offers dedicated CPU and RAM.
Caching: Shared hosting relies on plugins (e.g., W3 Total Cache); managed hosting includes server-level caching for faster page loads.
Security: Shared hosting has basic firewalls; managed hosting includes active monitoring and automatic patching.
Support: Shared hosting support is general; managed hosting has experts trained in WooCommerce issues.
For any store processing more than a few orders per day, managed WordPress hosting is the recommended choice.
Performance Metrics: Speed, Uptime, and Bandwidth
Three core metrics define hosting performance for WooCommerce: speed, uptime, and bandwidth. Speed directly affects conversion rates—a one-second delay can reduce conversions by up to 7%. Uptime guarantees (typically 99.9% or higher) ensure your store is always accessible. Bandwidth determines how much data can be transferred between your site and visitors; insufficient bandwidth causes throttling or additional fees during traffic surges.
To evaluate hosting providers, ask for specific numbers or test them yourself. Use tools like ping to measure server response time from your location. For example, from a terminal or command prompt, run:
ping -c 10 yourstore.com
This sends ten packets and returns the average round-trip time in milliseconds. A result under 100ms is excellent for WooCommerce. Additionally, check the provider’s uptime history via third-party monitoring services like UptimeRobot. For bandwidth, ensure your plan offers at least 100 GB per month for small stores, scaling to 500 GB or more as traffic grows.
Always verify that the provider uses SSD storage, as it dramatically improves database query speeds compared to traditional HDD drives.
Hosting Recommendations for Growing Stores
As your WooCommerce store expands, your hosting needs will evolve. Start with a managed WordPress host that offers tiered plans, allowing you to upgrade resources without migrating. For stores with 1,000 to 10,000 monthly orders, consider providers like SiteGround (GoGeek plan) or Cloudways (with Vultr or DigitalOcean). These offer auto-scaling, dedicated support, and advanced caching. For high-traffic stores exceeding 50,000 monthly orders, enterprise-level solutions like Nexcess or Liquid Web provide dedicated servers, CDN integration, and 24/7 proactive monitoring.
Another growing trend is using a content delivery network (CDN) like Cloudflare or StackPath alongside your hosting. A CDN caches static assets (images, CSS, JavaScript) across global servers, reducing load on your origin server and speeding up page delivery for international customers. Many managed hosts include a CDN in their plans. When evaluating a host for growth, always ask about:
Seamless plan upgrades without downtime.
Support for PHP 8.x versions for better performance.
Built-in object caching (e.g., Redis or Memcached).
Staging environments for testing before deploying changes.
Automatic daily backups with one-click restore.
By prioritizing these features, you can ensure your hosting infrastructure scales alongside your WooCommerce store, minimizing technical friction and maximizing revenue potential.
Installing WordPress and WooCommerce Step by Step
Setting up a WordPress site with WooCommerce is the most common path for building an online store, powering over 28% of all ecommerce websites globally. This walkthrough covers the essential steps from server installation to plugin activation, ensuring a solid foundation for your store. Each step is designed for beginners, with clear instructions and practical considerations to avoid common pitfalls.
Installing WordPress via cPanel and One-Click Installers
The first decision is choosing your installation method. Most hosting providers offer two primary paths: manual installation via cPanel and automated one-click installers like Softaculous or Fantastico. Both achieve the same result, but their suitability depends on your technical comfort and control needs.
Via cPanel (Manual Method):
Log into your hosting control panel and locate the “File Manager” under the “Files” section.
Navigate to the public_html directory (or a subfolder if installing in a subdirectory).
Upload the latest WordPress zip file from wordpress.org and extract it.
Create a MySQL database and user via the “MySQL Databases” tool in cPanel, assigning all privileges.
Rename the wp-config-sample.php file to wp-config.php, then edit it with your database name, username, and password.
Visit your domain to run the famous “5-minute installation” and complete the site title, username, and email fields.
Via One-Click Installer (Automated Method):
In cPanel, find the “Softaculous Apps Installer” or similar tool (often under “Software”).
Select WordPress from the list of applications and click “Install.”
Choose the installation URL (e.g., yourdomain.com or a subfolder like yourdomain.com/shop).
Fill in the site name, admin username, and password. Most installers also allow you to pre-select plugins.
Click “Install” and wait 30–60 seconds. The installer automatically creates the database and configuration files.
For most users, the one-click method is faster and less error-prone. However, manual installation gives you full control over file structure and database settings, which can be useful for advanced configurations.
Configuring Basic WordPress Settings
After installation, you land in the WordPress dashboard. Configuring these foundational settings ensures your site is ready for WooCommerce and search engines.
Permalinks: Go to Settings > Permalinks and select “Post name.” This creates clean, SEO-friendly URLs (e.g., yourdomain.com/sample-product/) instead of default query strings.
General Settings: Under Settings > General, verify your Site Title, Tagline, and WordPress Address (URL). Set the timezone and date format to match your target audience.
Reading Settings: Under Settings > Reading, set “Your homepage displays” to “A static page” if you plan a custom front page. Otherwise, keep “Your latest posts” for a blog-style site.
Discussion Settings: Disable “Allow people to post comments on new articles” if you don’t want default comment sections on products or pages. You can enable them later per item.
Media Settings: Under Settings > Media, set thumbnail dimensions to 150×150, medium to 300×300, and large to 1024×1024. These control image cropping for your store.
These settings take less than five minutes but prevent common issues like broken product links or incorrect time stamps on orders.
With WordPress configured, adding WooCommerce is straightforward. The plugin is maintained by Automattic and powers over 5 million active installations.
From the WordPress dashboard, go to Plugins > Add New.
In the search bar, type “WooCommerce” and locate the official plugin by WooCommerce.com with a 4.6-star rating.
Click “Install Now” and wait for the process to complete.
Click “Activate” to enable the plugin. WooCommerce will launch a setup wizard.
Follow the wizard: enter your store location, currency, and payment methods (e.g., PayPal, Stripe, or bank transfer). You can skip shipping setup initially and configure it later.
Choose a free theme like “Storefront” (optimized for WooCommerce) or install a compatible third-party theme.
After activation, WooCommerce adds new menu items to your dashboard: Products, Orders, Coupons, and Reports. You can immediately add your first product under Products > Add New.
Comparison: One-Click vs. Manual WooCommerce Installation
Feature
One-Click Installer (e.g., Softaculous)
Manual Installation (via Plugins)
Ease of Use
Very easy; wizard handles database and file setup
Moderate; requires navigating WordPress admin
Control
Limited; uses default settings
Full control over plugin version and configuration
Speed
Under 2 minutes
5–10 minutes including setup wizard
Error Risk
Low; automated checks prevent common mistakes
Medium; user errors like missing files possible
Plugin Updates
Automatic if configured
Manual via dashboard or FTP
Best For
Beginners or quick launches
Developers or custom setups
Once WooCommerce is active, verify the installation by visiting your site’s /shop page (if using Storefront) or adding a test product. Check that the cart and checkout pages load without errors. This completes the foundational setup, and you are ready to customize your store with additional themes and extensions.
Configuring WooCommerce Settings for Your Store
After installing WordPress and WooCommerce, the next critical step is configuring your store settings. This ensures your products display correctly, payments are processed smoothly, and shipping reaches customers reliably. WooCommerce’s settings panel is organized into tabs, accessible from your WordPress dashboard under WooCommerce > Settings. Below we walk through the essential configuration areas: general store details, payment gateways, and shipping zones.
The “General” tab in WooCommerce settings controls your store’s identity and regional preferences. Start by entering your store address, which appears on invoices and receipts. Then set your selling location(s) and the default customer location (e.g., shop base address or geolocation). Currency settings are vital: choose your currency (e.g., USD, EUR, GBP) and define the currency position (left, right, with space) and thousand/thousand separator. For example, to set the US dollar with two decimal places, configure as follows:
Currency: United States dollar ($)
Currency position: Left ($100.00)
Thousand separator: comma (,)
Decimal separator: period (.)
Number of decimals: 2
Also enable or disable tax calculations here. If you sell physical goods, you likely want to enable taxes and later configure tax rates. For digital products, you may disable taxes entirely. Save changes after each tab section.
Navigate to the “Payments” tab to activate and configure payment methods. WooCommerce includes several built-in gateways: direct bank transfer (BACS), check payments, cash on delivery, and credit card via Stripe or PayPal. To enable a gateway, click its toggle to “Enabled” and then click “Set up” or “Manage” to enter credentials. For PayPal Standard, you need your PayPal account email and optionally enable IPN (Instant Payment Notification) for automated order status updates. For Stripe, you must enter your Publishable Key and Secret Key from your Stripe dashboard. A practical example of a Stripe configuration snippet (added via your theme’s functions.php or a custom plugin) to enforce strong customer authentication:
After saving, test the gateway by placing a small test order. You can also reorder payment gateways by dragging them—the topmost is the default selection. For additional gateways (e.g., Square, Amazon Pay), install the corresponding plugin from WooCommerce.com or the plugin repository.
Defining Shipping Zones and Methods
Shipping configuration lives under the “Shipping” tab. WooCommerce uses shipping zones—geographic regions where you apply specific shipping methods. To create a zone, click “Add shipping zone,” name it (e.g., “US Mainland”), and assign regions (countries, states, or postcodes). Then add shipping methods to that zone: flat rate, free shipping, or local pickup. Each method can have its own cost and conditions. For example, a flat rate of $5.99 for orders under $50, with free shipping over $50. To set this, choose “Flat rate” and enter the cost as a number or use a formula like:
5.99
Then add a second method “Free shipping” and set its “Minimum order amount” to 50. For more complex needs, enable “Shipping classes” (under Shipping > Shipping classes) to group products (e.g., “Heavy items” with a surcharge). Then assign each class a cost per zone. Below is a sample zone table:
Zone Name
Regions
Methods
Cost
US Mainland
United States (excluding Alaska, Hawaii)
Flat rate, Free shipping
$5.99 / Free over $50
International
All other countries
Flat rate
$15.00
Local Pickup
Your city/state
Local pickup
Free
Save each zone. After configuring, test with a product that has shipping enabled to ensure correct rates appear at checkout. Remember that tax settings (if enabled) interact with shipping—you can choose whether shipping costs are taxable under the “Tax” tab.
With these three areas configured—general store details, payment gateways, and shipping zones—your WooCommerce store will be ready to accept orders and manage fulfillment. Always save changes after each section and run a test transaction before going live.
Selecting and Customizing a WooCommerce-Compatible Theme
Choosing the right theme is a critical decision for any WooCommerce store. The theme dictates not only your brand’s visual identity but also the user experience, site speed, and conversion potential. A poorly chosen theme can lead to slow load times, poor mobile responsiveness, and complicated checkout processes. This section provides actionable guidance on selecting a WooCommerce-compatible theme and tailoring it to your brand.
Criteria for a Good WooCommerce Theme
Not every theme labeled “WooCommerce-ready” delivers optimal performance. To ensure your store functions smoothly and converts visitors, evaluate themes against these essential criteria:
Speed and performance: The theme should be lightweight, with clean code and minimal bloat. Avoid themes that load unnecessary scripts or large image files on every page. Test with tools like Google PageSpeed Insights before purchasing.
Mobile responsiveness: Over half of e-commerce traffic comes from mobile devices. The theme must display products, navigation, and the checkout process flawlessly on all screen sizes.
WooCommerce integration depth: The theme should fully support all WooCommerce features, including product galleries, cart widgets, checkout fields, and account pages. Check for built-in support for common plugins like variations swatches or wishlists.
Customization flexibility: Look for themes that offer multiple layout options, header and footer styles, color schemes, and typography controls without requiring coding. A theme with a dedicated WooCommerce settings panel is ideal.
SEO-friendliness: The theme should use semantic HTML5 markup, proper heading hierarchy, and schema markup for products. Clean code helps search engines crawl and index your store efficiently.
Regular updates and support: WooCommerce and WordPress evolve frequently. Choose a theme from a reputable developer that provides ongoing updates and responsive customer support.
Browser compatibility: Test the demo site on Chrome, Firefox, Safari, and Edge to ensure consistent rendering.
Popular Free and Premium WooCommerce Themes
To simplify your search, here is a comparison of widely used themes that meet the criteria above. Each has strengths depending on your budget and design needs.
Theme Name
Type
Key Features
Best For
Storefront
Free
Official WooCommerce theme; lightweight; deep integration; multiple child themes available
Simple stores; beginners; developers wanting a base framework
Astra
Free (Premium add-ons)
Highly customizable; pre-built templates; fast loading; works with page builders
Stores requiring many built-in e-commerce features
When choosing between free and premium, consider that premium themes often include dedicated support, more starter templates, and advanced WooCommerce-specific features like custom product page layouts or sticky headers.
Customizing the Theme Using the Customizer and Page Builders
Once you have installed your chosen theme, the next step is to align it with your brand identity. Two primary methods exist for customization: the WordPress Customizer and page builders.
Using the WordPress Customizer: The Customizer provides real-time previews for basic theme settings. Navigate to Appearance > Customize and look for these typical options:
Site Identity: Upload your logo, set the site title and tagline, and add a site icon (favicon).
Colors: Adjust primary, secondary, and background colors to match your brand palette.
Typography: Change fonts for headings and body text. Many themes offer Google Fonts integration.
Header/Footer: Choose layout styles (e.g., centered logo, sticky header) and customize menus and widget areas.
WooCommerce settings: Some themes add a dedicated section here to adjust product grid columns, catalog view, and cart icon styling.
Using Page Builders: For deeper layout control, page builders like Elementor, Beaver Builder, or the native Gutenberg editor (with block plugins) allow you to design custom pages without coding. Best practices for WooCommerce customization with page builders include:
Create a custom homepage using pre-built blocks for featured products, categories, testimonials, and call-to-action sections.
Design unique product page templates by adding custom fields, accordion tabs for descriptions and reviews, and dynamic product data blocks.
Build branded checkout and cart pages (if your theme and builder support them) to reduce friction and reinforce trust.
Use builder-specific WooCommerce widgets (e.g., add-to-cart button, product price, star rating) to maintain full e-commerce functionality.
Always test customizations on mobile devices and across browsers. A cohesive, brand-aligned theme that loads quickly and guides customers effortlessly from product discovery to checkout will directly impact your store’s success.
Essential WooCommerce Plugins to Enhance Functionality
WooCommerce is remarkably extensible, but adding too many plugins can slow your site and create conflicts. The key is selecting tools that solve specific problems without introducing bloat. This curated list focuses on plugins that deliver high value while maintaining performance, covering SEO, security, caching, email marketing, cart recovery, and advanced product management.
Plugins for SEO, Security, and Caching
These three areas form the technical foundation of a successful WooCommerce store. A well-optimized site ranks higher, loads faster, and stays safe from threats.
SEO: Yoast SEO for WooCommerce – This plugin integrates directly with WooCommerce, allowing you to set SEO titles, meta descriptions, and social media previews for each product. It also generates XML sitemaps and breadcrumbs. For technical users, you can add schema markup for products, reviews, and shipping details.
Security: Wordfence Security – A robust firewall and malware scanner that monitors login attempts, blocks malicious IPs, and provides real-time threat intelligence. It includes two-factor authentication and rate limiting for checkout pages.
Caching: WP Rocket – A premium caching plugin that creates static HTML files of your pages, reducing server load and improving load times. It includes features like lazy loading, database optimization, and CDN integration. For server-level caching, consider using Redis with a plugin like Redis Object Cache.
For advanced caching, you can add a simple rule to your .htaccess file to enable browser caching for static assets. This example sets cache expiration for images and CSS files:
<IfModule mod_expires.c>
ExpiresActive On
ExpiresByType image/jpg "access plus 1 year"
ExpiresByType image/jpeg "access plus 1 year"
ExpiresByType image/gif "access plus 1 year"
ExpiresByType image/png "access plus 1 year"
ExpiresByType text/css "access plus 1 month"
ExpiresByType application/pdf "access plus 1 month"
ExpiresByType text/javascript "access plus 1 month"
ExpiresByType application/javascript "access plus 1 month"
ExpiresByType application/x-javascript "access plus 1 month"
ExpiresByType application/x-shockwave-flash "access plus 1 month"
ExpiresByType image/x-icon "access plus 1 year"
ExpiresDefault "access plus 2 days"
</IfModule>
Plugins for Email Marketing and Abandoned Cart Recovery
Email remains one of the most effective channels for driving sales, especially when combined with automated cart recovery. The following plugins help you capture leads and re-engage shoppers who leave without purchasing.
Sends automated reminder emails with coupon codes, tracks customer activity, and provides detailed reports.
Small to medium stores wanting a direct, no-subscription solution.
For effective abandoned cart recovery, configure your emails to send three reminders: the first within one hour of abandonment, the second after 24 hours, and a final one after 72 hours. Include a clear call-to-action and a time-limited discount to create urgency.
Plugins for Product Variations, Subscriptions, and Memberships
These plugins allow you to sell more complex offerings, from customizable products to recurring revenue models. Choose ones that integrate seamlessly with your existing setup.
Product Variations: Variation Swatches for WooCommerce – Replaces the default dropdown menus for product attributes (like color or size) with visual swatches, buttons, or images. This improves the user experience and can increase conversion rates by making product selection more intuitive.
Subscriptions: WooCommerce Subscriptions – The official extension for managing recurring payments. It supports variable subscriptions, free trials, sign-up fees, and automatic renewal management. Works with multiple payment gateways, including Stripe and PayPal.
Memberships: WooCommerce Memberships – Allows you to restrict content, products, or discounts based on membership plans. You can integrate it with WooCommerce Subscriptions to create paid membership tiers with recurring billing.
When implementing product variations, use the following best practices: limit the number of attributes to three or fewer to avoid overwhelming customers, and ensure each variation has a unique SKU and stock level for accurate inventory management. For subscriptions, always test the renewal flow with a sandbox environment before going live to confirm payment processing works correctly.
Adding and Managing Products in WooCommerce
Once your WooCommerce store is installed and configured, the core of your daily operations revolves around adding and managing products. WooCommerce supports several product types, each suited for different selling scenarios. This section provides step-by-step instructions for creating the most common product types: simple, variable, and grouped. You will learn how to add descriptions, images, attributes, and manage inventory effectively.
Creating Simple Products with Descriptions and Images
A simple product is a standalone item that does not require the customer to choose variations. Examples include a single book, a t-shirt in one size, or a digital download. Follow these steps to create a simple product:
In your WordPress admin dashboard, go to Products > Add New.
Enter a Product Name (e.g., “Classic Leather Journal”).
In the Description box, write a compelling product description. Focus on benefits and key features. Use short paragraphs and bullet points for readability.
Scroll to the Product Data meta box and ensure Simple product is selected from the dropdown.
Set a Regular Price and, optionally, a Sale Price.
In the Product Short Description box (often found below the main editor), add a brief summary that appears in shop listings.
To add images:
Click Set product image in the Product Image box on the right. Upload or select a high-quality primary image.
Use images at least 800×800 pixels for zoom functionality.
Keep file size under 1 MB to maintain page speed.
Use a consistent background (white or light gray) for a professional look.
Setting Up Variable Products with Attributes
Variable products allow customers to choose from different options, such as size, color, or material. Each combination of attributes creates a unique variation that can have its own price, stock, and image. To set up a variable product:
Create a new product or edit an existing one. In the Product Data dropdown, select Variable product.
Go to the Attributes tab. From the Custom product attribute dropdown, select an existing attribute (e.g., “Size”) or create a new one by typing a name and clicking Add.
Check Used for variations and then enter values (e.g., “Small, Medium, Large”) in the Value(s) field, one per line. Click Save attributes.
Go to the Variations tab. Click Create variations from attributes and select Go. WooCommerce will generate all possible combinations (e.g., Small, Medium, Large).
For each variation, you can set:
A distinct Regular Price and Sale Price (e.g., Large size costs $2 more).
An Image specific to that variation (e.g., a blue shirt image for the “Blue” color variation).
Stock quantity and Stock status (in stock, out of stock, on backorder).
Click Save changes and then Publish the product.
Example attribute table for a t-shirt variable product:
Attribute
Values
Size
Small, Medium, Large
Color
Red, Blue, Green
This setup creates 9 variations (3 sizes × 3 colors), each manageable individually.
Managing Inventory and Stock Status
Effective inventory management prevents overselling and helps you track product performance. WooCommerce provides robust tools for stock control. Follow these steps to manage inventory:
Open any product for editing. Scroll to the Inventory tab within the Product Data section.
Check the box Stock management at product level to enable stock tracking.
Enter the Stock quantity (e.g., 50 units).
Set the Stock status:
In stock – product is available for purchase.
Out of stock – product is not available; customers cannot buy it.
On backorder – product is temporarily unavailable but can be ordered; it will ship later.
Optionally, enable Allow backorders? if you want to accept orders even when stock reaches zero.
Set a Low stock threshold (e.g., 5 units) to receive email notifications when stock is running low.
For variable products, manage stock for each variation individually under the Variations tab, as described earlier.
Key inventory management tips:
Use the Stock status dropdown to manually mark items as out of stock during seasonal closures.
Enable Stock display format in WooCommerce settings to show “In stock” or “Only 3 left” to customers (increases urgency).
Regularly audit your inventory by exporting a product list via Products > All Products > Export and reconciling with physical stock.
By mastering simple, variable, and grouped product creation, and implementing solid inventory practices, you lay the foundation for a well-organized and profitable WooCommerce store. Each product type serves a distinct purpose, and managing stock ensures customer satisfaction and operational efficiency.
Optimizing Your WooCommerce Store for Search Engines
An optimized WooCommerce store balances search engine visibility with a seamless user experience. Product and category pages must be structured to help both search engines understand content and shoppers find what they need quickly. Below are three essential strategies to achieve this balance.
Using SEO Plugins Like Yoast or Rank Math
SEO plugins simplify on-page optimization by providing structured guidance and automation. Two leading options for WooCommerce are Yoast SEO and Rank Math. Both offer features tailored to e-commerce, such as snippet previews, social media integration, and XML sitemaps. The table below compares their key capabilities for product and category pages.
Feature
Yoast SEO
Rank Math
Free version functionality
Core SEO, snippet preview, readability analysis, XML sitemap
All core features plus schema markup, redirection manager, 404 monitor
WooCommerce-specific settings
Dedicated product and category tabs for meta data and breadcrumbs
Built-in product schema, local SEO, and Google Merchant Center integration
Schema markup control
Limited to article, product, and breadcrumb types (premium adds more)
Full control with 20+ schema types, including product, review, and FAQ
Keyword optimization
Focus keyphrase with suggestions and related keyphrases
Unlimited focus keywords per page with ranking tracking
Choose Yoast for its simplicity and extensive documentation, or Rank Math for advanced features and granular schema control. Both plugins help ensure your product and category pages avoid duplicate content issues and target the right search queries.
Optimizing Product Titles, Meta Descriptions, and URLs
Every product and category page should have a unique, descriptive title tag and meta description. For product titles, include the primary keyword, brand, and key attribute (e.g., “Men’s Lightweight Running Shoes – Nike Air Zoom”) while keeping it under 60 characters to avoid truncation in search results. Meta descriptions should be compelling, under 160 characters, and include a call-to-action such as “Shop now for free shipping.”
URLs must be clean and keyword-rich. In WooCommerce, go to Settings > Permalinks and select “Post name” for a structure like yourstore.com/product/running-shoes. Avoid stop words like “and” or “the,” and never use dynamic parameters (e.g., ?id=123). For category pages, use a logical hierarchy: yourstore.com/shoes/running. Update old URLs with 301 redirects to prevent broken links.
Product titles: Primary keyword at the beginning, followed by distinguishing details.
Meta descriptions: Include key benefits, a unique selling point, and a call-to-action.
URLs: Use hyphens between words, keep them short, and match the product title’s core keyword.
Category pages: Add a short description of 50–150 words to help search engines understand the category’s scope.
Leveraging Schema Markup for Product Rich Results
Schema markup helps search engines display rich results like star ratings, price, and availability directly in search listings. For WooCommerce, the most impactful schema types are Product, Offer, and AggregateRating. Using an SEO plugin like Rank Math or a dedicated schema plugin like Schema Pro, you can automatically add structured data to each product page. Essential properties to include are:
Product name (matching the title tag)
Image (high-resolution, with alt text)
Price (with currency, e.g., “$49.99”)
Availability (InStock, OutOfStock, PreOrder)
Review rating (if enabled, with review count)
Test your schema using Google’s Rich Results Test tool to ensure it validates. Category pages can also benefit from BreadcrumbList schema to show user path in search results, improving click-through rates. By combining schema with optimized titles and meta descriptions, you create a strong foundation for organic visibility without sacrificing the user’s browsing experience.
Securing and Maintaining Your WordPress and WooCommerce Site
Operating a successful WordPress and WooCommerce site demands ongoing vigilance. Security threats evolve, performance degrades over time, and a single vulnerability can compromise customer data or bring your store offline. A proactive maintenance routine—centered on updates, encryption, backups, and monitoring—is essential for protecting your investment and ensuring a smooth experience for visitors. Below are the core practices every site owner should implement.
Regular Updates for WordPress, Themes, and Plugins
Outdated software is the most common entry point for attackers. WordPress core, themes, and plugins receive frequent patches that fix security holes, improve compatibility, and resolve bugs. Neglecting updates leaves your site exposed to known exploits.
Core updates: Always update to the latest minor version of WordPress. Major version upgrades (e.g., 5.x to 6.x) should be tested on a staging site first, as they may introduce breaking changes.
Plugin and theme updates: Check for updates weekly. For WooCommerce, update the plugin alongside its companion extensions (e.g., payment gateways, shipping methods) to avoid conflicts.
Automated updates: Enable automatic updates for minor core releases and consider using a managed update service for plugins. For critical security patches, apply them immediately.
To check for updates via WP-CLI, use the following command:
Always back up your database and files before applying any update, especially on a production site. Test changes in a staging environment when possible.
Implementing SSL Certificates and Firewalls
SSL (Secure Sockets Layer) encrypts data transmitted between your server and visitors. For WooCommerce, an SSL certificate is mandatory to protect payment details, login credentials, and personal information. Most hosting providers offer free SSL via Let’s Encrypt, or you can purchase a commercial certificate for extended validation.
Beyond SSL, a web application firewall (WAF) filters malicious traffic before it reaches your site. A WAF blocks common attacks like SQL injection, cross-site scripting (XSS), and brute force login attempts. Options include:
Cloud-based WAF: Services like Cloudflare or Sucuri provide a network-level shield that also optimizes content delivery.
Plugin-based WAF: Security plugins such as Wordfence or iThemes Security include built-in firewall rules that can be customized.
Server-level WAF: ModSecurity, integrated with Apache or Nginx, offers granular control but requires technical expertise.
After installing an SSL certificate, force all traffic to HTTPS by adding the following rule to your .htaccess file (if using Apache):
RewriteEngine On
RewriteCond %{HTTPS} off
RewriteRule ^(.*)$ https://%{HTTP_HOST}/$1 [R=301,L]
Test your SSL configuration using online tools to ensure no mixed content warnings appear.
Backup Strategies and Monitoring Tools
Even with robust security, data loss can occur due to server failure, human error, or ransomware. A reliable backup strategy ensures you can restore your site quickly. Follow these guidelines:
Backup Component
Frequency
Storage Location
Database
Daily
Remote cloud (e.g., S3, Dropbox)
Files (themes, uploads)
Weekly
Separate server or local archive
Full site snapshot
Before major updates
Staging environment
Automate backups using plugins like UpdraftPlus, BackupBuddy, or server-level scripts. Store copies in at least two locations—one off-site. Test your restore process quarterly to confirm backups are functional.
Monitoring tools alert you to issues before they escalate. Essential monitoring includes:
Uptime monitoring: Services like UptimeRobot or Pingdom notify you if your site goes down.
Performance monitoring: Tools like New Relic or Query Monitor track database queries, PHP errors, and page load times.
Security monitoring: Plugins such as Wordfence scan for malware, detect unauthorized file changes, and log login attempts.
Combine automated monitoring with manual spot checks. Review server error logs weekly, and set up email alerts for critical events like failed logins or file modifications. A well-maintained site not only protects your business but also builds trust with customers, ensuring long-term success for your WordPress and WooCommerce store.
Scaling Your WooCommerce Store for Growth
As your ecommerce business expands, your WooCommerce store must handle increased traffic, larger order volumes, and a growing product catalog without sacrificing performance. Scaling requires a strategic approach to infrastructure, code efficiency, and content delivery. Below are advanced techniques to ensure your store remains fast, reliable, and capable of supporting sustained growth.
Implementing robust caching and a content delivery network (CDN) is the first line of defense against slow load times during traffic spikes. Caching reduces server workload by storing static copies of your pages, while a CDN distributes assets geographically to minimize latency.
Key strategies include:
Page caching: Use a plugin like WP Rocket or W3 Total Cache to serve cached HTML versions of your product, category, and cart pages to anonymous visitors.
Object caching: Enable Redis or Memcached to store database query results, reducing repeated lookups for product data, user sessions, and WooCommerce settings.
CDN integration: Connect your store to a CDN such as Cloudflare, StackPath, or Bunny.net. Configure it to cache images, CSS, JavaScript, and even entire pages via “Full Page Caching” (available on Cloudflare’s Business plan or higher).
Edge caching for dynamic content: For logged-in users or cart pages, use edge-side includes (ESI) or a service like Cloudflare Workers to cache parts of the page while keeping personalized elements dynamic.
Monitor cache hit ratios and adjust cache expiry times based on product update frequency. A well-tuned caching layer can reduce server response times by 80% or more.
Database Optimization and Image Compression
WooCommerce stores accumulate database bloat and unoptimized media over time, which slows down queries and page loads. Regular maintenance is essential for scaling.
Clean up transients: WooCommerce uses transient data for session tokens, cart fragments, and API caches. Use a plugin like WP-Optimize or run SQL commands to delete expired transients monthly.
Remove post revisions and spam: Limit post revisions to 5 per entry and delete orphaned meta data, draft orders, and spam comments that weigh down the wp_posts and wp_postmeta tables.
Index key tables: Add indexes to frequently queried columns such as `wp_wc_order_stats`, `wp_wc_product_meta_lookup`, and `wp_options` to speed up reporting and product lookups.
Schedule maintenance: Use wp-cli or a cron job to run `wp transient delete –expired` and `wp db optimize` weekly during low-traffic hours.
Image compression best practices:
Lossy compression: Use WebP format with tools like ShortPixel or Imagify to reduce file sizes by 60-80% without visible quality loss. Serve WebP to supported browsers and fallback to JPEG/PNG.
Responsive images: Generate multiple thumbnail sizes (e.g., 300px, 600px, 1200px) and use `srcset` attributes so mobile devices load smaller files.
Lazy loading: Implement lazy loading for product gallery images and category thumbnails to defer off-screen images until the user scrolls.
CDN delivery: Serve compressed images from your CDN to offload bandwidth from your origin server.
Migrating to High-Performance Hosting or VPS
Shared hosting becomes a bottleneck as your store grows. Migrating to a Virtual Private Server (VPS) or dedicated WooCommerce hosting provides dedicated resources, better isolation, and advanced caching capabilities.
Root access, ability to install Redis/Nginx, isolated CPU and RAM, cost-effective at scale.
Dedicated server
High-traffic stores (100,000+ monthly visitors)
Full resource allocation, no noisy neighbors, maximum performance for complex queries.
Migration steps:
Audit current resource usage: Monitor CPU, memory, and disk I/O during peak hours using tools like New Relic or your host’s dashboard.
Choose a hosting provider: For managed solutions, consider Kinsta, WP Engine, or Pressable. For VPS, use a stack with Nginx, PHP 8.2+, MariaDB, and Redis.
Test with a staging environment: Clone your store to the new server, run load tests with tools like K6 or Locust, and verify that all caching layers work.
Migrate data carefully: Use a plugin like All-in-One WP Migration or manual rsync for files and mysqldump for the database. Update DNS records and monitor for errors post-cutover.
Optimize server stack: Enable HTTP/2, gzip compression, and a reverse proxy like Nginx to handle concurrent connections efficiently.
After migration, implement performance monitoring with a tool like Query Monitor or New Relic to identify slow queries, high memory usage, or plugin conflicts. Regularly review your hosting plan as traffic grows—upgrade CPU cores, add more RAM, or enable auto-scaling to maintain consistent load times.
Frequently Asked Questions
What is the difference between WordPress and WooCommerce?
WordPress is a content management system (CMS) used to create websites and blogs, while WooCommerce is a plugin that turns a WordPress site into a fully functional eCommerce store. WooCommerce adds features like product listings, shopping carts, checkout processes, and payment gateways. Essentially, WordPress provides the foundation, and WooCommerce extends it for selling products or services online. Both are open-source and highly customizable.
Do I need a self-hosted WordPress site to use WooCommerce?
Yes, WooCommerce requires a self-hosted WordPress.org site, not the free WordPress.com service. Self-hosted WordPress gives you full control over your site, including installing plugins like WooCommerce, customizing themes, and managing your own hosting. WordPress.com does not support WooCommerce unless you upgrade to a business plan that allows plugin installations.
What are the best hosting providers for WooCommerce?
Top hosting providers for WooCommerce include SiteGround, Bluehost, WP Engine, and Kinsta. These hosts offer optimized WordPress environments, good performance, SSL certificates, and support for WooCommerce-specific features. For small to medium stores, shared or managed WordPress hosting is sufficient. Larger stores may require VPS or dedicated servers for better scalability and speed.
How do I install WooCommerce on my WordPress site?
Install WooCommerce by logging into your WordPress admin dashboard, going to 'Plugins' > 'Add New', searching for 'WooCommerce', and clicking 'Install Now' then 'Activate'. After activation, the WooCommerce setup wizard will guide you through configuring store details, payment methods, shipping options, and adding products. You can also manually configure settings via WooCommerce > Settings.
Can I use any WordPress theme with WooCommerce?
Most modern WordPress themes are compatible with WooCommerce, but it's best to choose a theme specifically designed for eCommerce or WooCommerce. These themes include built-in support for product galleries, cart icons, and checkout styling. Popular WooCommerce-compatible themes include Storefront (official), Astra, Flatsome, and Divi. Always check the theme's documentation for WooCommerce compatibility.
What are essential WooCommerce plugins for a new store?
Essential WooCommerce plugins include: 1) WooCommerce itself, 2) a payment gateway like Stripe or PayPal, 3) a shipping plugin like Table Rate Shipping, 4) an SEO plugin like Yoast SEO, 5) a security plugin like Wordfence, 6) a backup plugin like UpdraftPlus, and 7) a performance plugin like W3 Total Cache. Additional plugins for email marketing, analytics, and social media integration can also be valuable.
How do I set up payment gateways in WooCommerce?
To set up payment gateways, go to WooCommerce > Settings > Payments. You can enable built-in options like PayPal or Stripe, or add others via plugins. For each gateway, you'll need to enter API keys or credentials from the payment provider. Test the gateway using sandbox mode before going live. Ensure your site has an SSL certificate for secure transactions.
How can I optimize my WooCommerce store for speed?
Optimize WooCommerce speed by choosing a fast hosting provider, using a lightweight theme, compressing images, enabling caching (via plugins like W3 Total Cache or WP Rocket), minimizing plugins, using a CDN, and optimizing your database. Also, consider using a lazy load plugin for images and reducing external scripts. Regularly monitor performance with tools like GTmetrix or Google PageSpeed Insights.
How to Build a Real Estate Website with WordPress: A Step-by-Step Guide
1. Understanding Why WordPress Is Ideal for Real Estate Websites
When building a real estate website, the choice of platform directly impacts your ability to manage listings, attract leads, and scale your business. WordPress, which powers over 40% of all websites, offers a unique combination of flexibility, affordability, and specialized tools that make it particularly suited for real estate professionals. Unlike proprietary solutions that lock you into rigid templates or require ongoing subscription fees, WordPress gives you full control over your site’s structure, design, and functionality. Below, we explore the core reasons why WordPress stands out for real estate websites.
Flexibility and Customization Options for Real Estate Sites
Real estate websites demand more than standard blog functionality. You need dynamic property listings, advanced search filters, interactive maps, and seamless integration with multiple listing services (MLS). WordPress excels here through its extensive ecosystem of themes and plugins designed specifically for real estate. For example, themes like RealHomes or Houzez offer pre-built layouts for property grids, single listing pages, and agent profiles, which you can customize further with drag-and-drop builders like Elementor or Beaver Builder.
Property listing management: Plugins such as WP Property Listings or Easy Real Estate allow you to add fields like price, square footage, bedrooms, and galleries, all sortable by user preferences.
Search and filter systems: Implement dropdown menus for location, property type, or price range, along with map-based search using Google Maps integration.
Custom post types: Create separate taxonomies for “For Sale,” “For Rent,” or “Commercial,” ensuring each listing type has its own dedicated templates.
Third-party integrations: Connect with CRM tools like Salesforce or HubSpot, IDX (Internet Data Exchange) services such as IDX Broker, and email marketing platforms like Mailchimp.
This flexibility means you are not constrained by a one-size-fits-all approach. Whether you run a boutique agency or a national brokerage, WordPress adapts to your workflow, not the other way around.
Cost-Effectiveness Compared to Custom-Built Solutions
Custom-built real estate websites often require hiring developers and designers, with costs ranging from $10,000 to $50,000 or more, depending on complexity. In contrast, WordPress drastically reduces upfront investment while still delivering professional results. Here is a comparison of typical costs:
Expense Category
Custom-Built Website
WordPress Website
Initial development
$10,000 – $50,000+
$0 (self-built) to $2,000 (premium theme + plugins)
Annual hosting
$500 – $2,000 (managed)
$100 – $500 (shared or VPS)
MLS/IDX integration
$1,000 – $5,000 setup
$50 – $200/month (plugin-based)
Maintenance and updates
$2,000 – $10,000/year
$0 – $500/year (DIY or low-cost support)
Total first-year cost
$13,500 – $67,000+
$150 – $3,200+
Additionally, WordPress eliminates recurring license fees for the core software. You only pay for premium themes, plugins, or hosting as needed. For real estate agents and agencies just starting out, this affordability allows you to reinvest savings into marketing or lead generation.
SEO and Performance Advantages for Local and National Markets
Real estate is a competitive industry where visibility in search engines directly translates to inquiries and sales. WordPress provides built-in SEO advantages that help you rank for both local terms (e.g., “homes for sale in Austin”) and broader queries (e.g., “luxury real estate in California”). Key features include:
Clean code and semantic markup: WordPress generates HTML that search engines can easily crawl, improving indexation of your property pages.
SEO plugins: Tools like Yoast SEO or Rank Math let you optimize title tags, meta descriptions, and URL structures for each listing or location page.
Local SEO integration: Add schema markup for real estate (e.g., Property, Place, or LocalBusiness) using plugins like Schema Pro, helping Google display rich snippets in search results.
Performance optimization: Caching plugins such as W3 Total Cache or WP Rocket, combined with lightweight themes, ensure fast load times—a critical ranking factor for Google’s Core Web Vitals.
Mobile responsiveness: Most WordPress themes are mobile-friendly by default, which is essential since over 60% of real estate searches occur on mobile devices.
For national markets, you can leverage WordPress’s multisite feature to manage multiple location-specific sites from a single installation, each with its own SEO settings. For local markets, you can create dedicated landing pages for neighborhoods or zip codes, optimizing them with local keywords and maps. This dual capability ensures that whether you target a single city or a country-wide audience, WordPress provides the tools to compete effectively.
2. Choosing the Right Hosting Provider for Your Real Estate Site
Selecting a reliable hosting provider is critical for speed, uptime, and handling property image galleries. A real estate website typically features high-resolution photos, virtual tours, and interactive maps—all of which demand robust server resources. The wrong host can lead to slow load times, lost leads, and poor search engine rankings. This section breaks down hosting types, essential features, and top providers to help you make an informed decision.
Shared vs. Managed WordPress Hosting: Pros and Cons
When starting out, you will likely choose between shared hosting and managed WordPress hosting. Shared hosting places your site on a server with dozens of other websites, sharing resources like CPU and RAM. It is the most affordable option, often costing $3–$10 per month, but it comes with trade-offs. Performance can suffer during traffic spikes, and security is less robust since a compromised neighbor site could affect yours.
Managed WordPress hosting, on the other hand, is optimized specifically for WordPress. The provider handles updates, caching, and security patches, freeing you to focus on content. Prices typically range from $20–$50 per month for a single site. The key advantage for real estate sites is speed: managed hosts often include server-level caching and a content delivery network (CDN), which dramatically improves load times for property galleries. However, managed plans may restrict plugin usage and are not ideal for sites requiring custom server configurations.
Here is a quick comparison:
Shared Hosting Pros: Low cost, easy to set up, suitable for small sites with minimal traffic.
Shared Hosting Cons: Limited resources, slower performance, less security, no WordPress-specific optimizations.
Managed WordPress Hosting Cons: Higher price, fewer plugin choices, may limit access to server-level files.
Essential Hosting Features: SSL, CDN, and Staging Environments
Regardless of the hosting type you choose, three features are non-negotiable for a real estate website. First, an SSL certificate encrypts data between the server and visitors, which is essential for protecting client inquiries and login credentials. Most hosts now include a free SSL via Let’s Encrypt. Without SSL, browsers will mark your site as “Not Secure,” damaging trust and hurting SEO.
Second, a Content Delivery Network (CDN) distributes your site’s static files—images, CSS, JavaScript—across multiple global servers. When a user in Los Angeles visits your site, they load assets from a nearby server instead of your single origin server. This reduces latency and speeds up image-heavy pages. Many managed hosts integrate a CDN automatically, while shared hosts often require a third-party service like Cloudflare.
Third, a staging environment allows you to test changes—such as theme updates, plugin installations, or new property templates—without affecting your live site. For example, you can clone your production site to a staging subdomain, make modifications, and then push them live when ready. To verify a staging environment is active, you can run a simple command via SSH to check the site’s database prefix:
wp db query "SELECT option_value FROM wp_options WHERE option_name = 'siteurl'"
This command returns the current site URL. If it differs from your live domain, you are in a staging environment. Use this feature to avoid breaking your live site during major updates.
Google Cloud Platform, 24/7 support, free SSL and CDN
Bluehost
Shared / Managed
$2.95 (shared) / $9.95 (managed)
Free domain first year, one-click WordPress install, built-in CDN
For most real estate websites, especially those with multiple property listings and high-resolution images, a managed WordPress host like WP Engine or Kinsta is worth the investment. If you are on a tight budget, SiteGround’s shared plans offer balanced performance and features. Avoid free hosting entirely—it will compromise speed, security, and reliability, which are critical for converting visitors into leads.
3. Selecting a Real Estate WordPress Theme
The theme you choose for your real estate website is the foundation of both its visual identity and its core functionality. A theme designed specifically for real estate goes beyond aesthetics, incorporating essential tools for managing property listings, search, and lead generation. Selecting the wrong theme can lead to poor performance, limited customization, and a frustrating user experience for both you and your visitors. Focus on themes that prioritize speed, mobile responsiveness, and seamless integration with real estate data standards.
Key Features of a Real Estate Theme: IDX Integration, Property Search, and Galleries
When evaluating a real estate WordPress theme, three features are non-negotiable for a professional property site:
IDX Integration: Internet Data Exchange (IDX) is the system that allows you to display up-to-date MLS listings on your website. Without native IDX support or compatibility with a trusted IDX plugin (such as iHomefinder or dsIDXpress), your site will lack the dynamic, accurate property data that buyers and sellers expect. A theme with built-in IDX shortcodes or widgets simplifies the setup process.
Advanced Property Search: Visitors need to filter listings by criteria such as price range, property type, number of bedrooms, location, square footage, and lot size. A robust real estate theme includes a customizable search form with dropdowns, sliders, and checkboxes. The search should also support map-based filtering, allowing users to draw boundaries on an interactive map.
Property Galleries and Virtual Tours: High-quality images and virtual tours are critical for showcasing properties. The theme must support large, responsive image galleries, lightbox popups, and embedded video or 360-degree tour platforms like Matterport. Look for themes that automatically create gallery sliders from uploaded images and offer a clean layout for floor plans.
Free vs. Premium Themes: When to Invest
WordPress offers both free and premium real estate themes, each with distinct trade-offs. The table below outlines the key differences to help you decide when a paid investment is justified.
Feature
Free Themes
Premium Themes
IDX Compatibility
Rarely includes native IDX support; may require third-party plugins with limited styling control.
Often includes dedicated IDX widgets, shortcodes, and seamless integration with popular IDX plugins.
Customization Options
Basic options (colors, fonts, layout) via WordPress Customizer; limited to theme defaults.
Extensive options like multiple header styles, property page templates, and advanced typography controls.
Support & Updates
Community support via forums; updates may be inconsistent or abandoned.
Dedicated support from developers; regular updates for compatibility with new WordPress versions and plugins.
Performance & Code Quality
Variable; some free themes include bloated code or outdated practices.
Typically built with clean, well-documented code optimized for speed and SEO.
Price
$0
$40–$100 (one-time or yearly license)
When to invest in a premium theme: If you plan to rely on IDX data, need a professional appearance to attract high-value clients, or require advanced features like agent profiles, mortgage calculators, or neighborhood guides. Free themes work for a simple blog or a single-property showcase, but for a full-featured real estate site, premium themes provide the reliability and scalability needed for business growth.
Top Recommended Real Estate Themes and Their Strengths
Several premium themes have earned strong reputations in the real estate niche. Here are three standout options and what they excel at:
RealHomes: This theme is widely regarded for its comprehensive property management system. It includes a drag-and-drop property builder, multiple listing layouts (grid, list, map), and full IDX support via plugins. Its strength lies in its flexibility for both single-agent sites and multi-agent brokerage portals.
Houzez: Houzez is a feature-rich theme designed for large property databases. It offers a front-end property submission form, advanced search with map integration, and a built-in mortgage calculator. Its strength is its scalability—suitable for agencies with hundreds of listings and multiple user roles (agents, agencies, buyers).
WPCasa: WPCasa is a lightweight, developer-friendly theme built specifically for real estate. It comes with a free core plugin for property management and supports add-ons for IDX, currency conversion, and Google Maps. Its strength is its clean codebase and modular approach, making it ideal for those who want a fast, customizable foundation without unnecessary bloat.
Each of these themes is regularly updated, offers dedicated support, and includes demo content that can be imported to jumpstart your design. Choose based on your specific needs: RealHomes for design flexibility, Houzez for advanced user management, and WPCasa for performance and simplicity.
4. Installing and Configuring Essential Real Estate Plugins
Plugins are the backbone that transforms a standard WordPress site into a fully functional real estate platform. Without them, you would need to code property listings, MLS integration, and lead capture from scratch. This section covers three critical plugin categories that every real estate agent or broker should install and configure. The focus keyword, how to build a real estate website with WordPress, is best realized by selecting plugins that balance ease of use with robust features.
Property Management and Listings Plugins
The core of any real estate website is its property listings. Dedicated property management plugins provide custom post types for listings, built-in search filters, and map integration. Two popular options are WP-Property and Easy Property Listings.
WP-Property: A premium plugin offering advanced property search, Google Maps integration, and pagination. It supports custom attributes like price, square footage, and bedrooms. Configuration requires adding property types and setting up searchable fields.
Easy Property Listings: A free alternative with a user-friendly interface. It includes a drag-and-drop property builder, automatic listing expiry, and responsive design. It integrates with third-party themes easily.
Go to Plugins > Add New in your WordPress dashboard.
Search for “WP-Property” or “Easy Property Listings”.
Click Install Now and then Activate.
Navigate to the plugin’s settings page to define property attributes (e.g., listing type, price range, location).
Create your first property listing by selecting Add New under the plugin’s custom post type menu.
For a practical code example, if you want to display a custom property field (like “Lot Size”) in your theme’s template, you might add this to your single-property.php file:
This retrieves the saved lot size value for the current property. Always test such code in a child theme to avoid breaking updates.
IDX Integration Plugins for MLS Data
IDX (Internet Data Exchange) plugins connect your website directly to your local Multiple Listing Service (MLS). This ensures your listings are always current and accurate. Without IDX, you would need to manually update properties, which is impractical for active agents.
Key IDX plugins include:
Plugin
Key Features
Pricing
IDX Broker
Full MLS integration, lead capture, property search widgets, responsive design
Monthly subscription (starts around $50)
Showcase IDX
Fast indexing, customizable search pages, saved property alerts
Install and activate the IDX Broker plugin from the WordPress repository.
Sign up for an IDX Broker account (you will need your MLS ID and password).
Enter your API key from the IDX Broker dashboard into the plugin settings.
Select the MLS data you want to display (e.g., residential, commercial).
Use the plugin’s shortcodes or widgets to embed property search forms and listings on pages.
Note: Some MLS boards require additional approval for IDX integration. Check with your local MLS provider before purchasing a plugin.
Lead Generation and CRM Plugins for Real Estate Agents
Capturing and managing leads is essential for converting website visitors into clients. Real estate-specific CRM plugins integrate with your listings and provide tools for follow-up, email marketing, and pipeline management.
Recommended plugins:
Realtyna Real Estate Pro: Combines property management with a built-in CRM. It includes lead capture forms, contact management, and email automation. Great for agents who want an all-in-one solution.
WPForms (with add-ons): While not real estate-specific, WPForms allows you to create custom lead capture forms for property inquiries, showing requests, and newsletter signups. Use the “Real Estate Lead Form” template for a quick start.
HubSpot for WordPress: A free CRM that integrates with contact forms. It tracks visitor behavior, sends automated follow-up emails, and stores lead information. Ideal for agents on a budget.
To set up a simple lead capture form with WPForms:
Install and activate WPForms.
Go to WPForms > Add New and choose the “Real Estate Lead Form” template.
Customize fields: add “Property of Interest,” “Preferred Contact Method,” and “Budget Range.”
Set up email notifications so you receive leads instantly.
Embed the form on a property detail page or a dedicated “Contact” page using the provided shortcode.
For CRM integration, configure the plugin to send form submissions to your preferred CRM (e.g., HubSpot, Salesforce). Most lead generation plugins support webhook URLs or Zapier connections for automation.
By installing and configuring these three plugin categories, you ensure your real estate website has a solid foundation for managing listings, syncing MLS data, and capturing leads. The focus keyword, how to build a real estate website with WordPress, is fully realized when these plugins work together seamlessly.
5. Setting Up Your Property Listings and Custom Post Types
To transform a standard WordPress site into a fully functional real estate portal, you need to move beyond basic blog posts. By leveraging custom post types (CPTs), taxonomies, and custom fields, you can structure property data in a way that is both search-engine friendly and user intuitive. This section walks you through the technical setup that allows visitors to filter and find listings with precision.
Creating Custom Post Types for Properties
WordPress natively treats all content as “posts” or “pages.” For real estate, you need a dedicated container—a custom post type—called “Properties.” This separates listings from your blog and enables unique templates and functionality.
Method 1: Plugin (Recommended for beginners) – Install a free plugin like Custom Post Type UI or Toolset Types. Navigate to CPT UI > Add New Post Type. Enter “Property” as the singular label and “Properties” as the plural label. Set the slug to “property” and enable the options: “Public,” “Has Archive,” and “Supports: Title, Editor, Thumbnail.”
Method 2: Code (For developers) – Add the following snippet to your theme’s functions.php file (backup first). This registers a CPT with essential settings:
After activation, you will see a new “Properties” menu in your WordPress dashboard. Each listing becomes a separate entry under this post type.
Adding Custom Fields: Price, Location, Bedrooms, and More
Standard WordPress fields (title, content) are insufficient for property data. You need custom fields to capture structured information like price, square footage, and number of bedrooms. These fields power search filters and display details uniformly.
To add these fields without code, use a plugin like Advanced Custom Fields (ACF). After installing ACF, create a new Field Group named “Property Details.” Set the location rule to “Post Type is equal to Property.” Add each field individually: price as a “Number” field, property type as a “Select” field with options like “Condo,” “Single Family,” “Townhouse,” and location as a “Text” field. Publish the group, and each property edit screen will now display these fields.
Building Advanced Property Search Filters
A static list of properties is useless without a way to narrow results. Advanced search filters let users specify criteria—price range, bedrooms, location—and see only matching listings. The most robust approach combines a search plugin with your custom fields.
Step-by-step filter setup using the FacetWP plugin (or similar):
Install and activate a search plugin that supports custom fields (e.g., FacetWP, SearchWP, or WP Grid Builder).
Create a facet for each criterion. For example, a “Price Range” facet uses a slider or number range, tied to the custom field “property_price.” A “Bedrooms” facet uses a checkbox or dropdown, tied to “bedrooms.”
Add a location facet using a text search or autocomplete field, mapped to the “location” custom field.
Display the facets by inserting the plugin’s shortcode (e.g., [facetwp facet="price"]) into a page or sidebar widget.
Create a results template that loops through properties and outputs the filtered list. Most plugins provide a template shortcode like [facetwp template="properties"].
Test the filters by entering different values and verifying that only relevant properties appear, with no page reload required (AJAX-based filtering).
Alternative lightweight approach: If you prefer minimal plugins, use WordPress’s built-in search with a custom query in your theme’s archive-property.php template. Add a form with GET parameters for price, bedrooms, and location, then modify the main query using pre_get_posts to filter by meta values. This method requires more coding but avoids third-party dependencies.
By implementing these three components—custom post types, structured fields, and search filters—you create a professional property listing system that empowers users to find their ideal home quickly.
6. Integrating IDX/MLS Feeds for Accurate Property Data
Integrating IDX (Internet Data Exchange) or MLS (Multiple Listing Service) feeds is the most critical technical step for any real estate website built with WordPress. Without accurate, up-to-date property listings, your site loses credibility and fails to serve its primary purpose. IDX integration allows you to display live MLS data directly on your site, ensuring visitors see current listings, prices, and availability. However, this process involves compliance requirements, plugin selection, and careful layout considerations to maintain site speed and user experience.
Understanding IDX and MLS Compliance Requirements
Before you begin integration, you must understand the legal and technical rules set by your local MLS board. Each MLS has specific IDX policies that dictate how listings can be displayed. Key compliance requirements include:
Brokerage attribution: You must display the listing broker’s name and office information clearly.
Update frequency: Listings must be refreshed at least every 12–24 hours, depending on MLS rules.
Display restrictions: Some MLS boards prohibit certain types of data (e.g., seller names, showing instructions).
Logo and disclaimers: You are often required to show the MLS logo and a disclaimer that data is deemed reliable but not guaranteed.
Opt-out rights: Sellers can opt out of IDX display, so your feed must automatically exclude those listings.
To proceed, you must sign an IDX agreement with your MLS and obtain an API key or data feed credentials. Failure to comply can result in fines or loss of MLS access. Always review your MLS’s IDX policy document before choosing a plugin or service.
Selecting the right IDX integration tool depends on your MLS coverage, budget, and technical skill. The most common options are dedicated IDX plugins and third-party services that sync with WordPress. Below is a comparison of popular solutions:
Plugin/Service
Key Features
Best For
Starting Price
IDX Broker
Advanced search, lead generation, saved searches, API access
Agents and brokers wanting robust lead capture
$50/month
Realtyna MLS Sync
Direct MLS integration, property management, map search
Real estate professionals with multiple MLSs
$29/month
WP-Property
Lightweight, customizable, works with custom post types
DIY users with limited MLS needs
Free + premium add-ons
Showcase IDX
Responsive designs, CRM integration, IDX pages
Mobile-first websites
$49/month
When evaluating providers, check that they support your specific MLS. Some plugins offer a demo or free trial, which is recommended for testing compatibility with your WordPress theme. Also, ensure the provider offers automatic data refresh to meet update frequency rules.
Displaying MLS Listings Without Breaking Layout or Speed
Once you have chosen a plugin and obtained your MLS feed, the next challenge is displaying listings without harming your site’s layout or performance. IDX data can include high-resolution images, large datasets, and complex search forms that slow down page load times. Follow these best practices:
Use lazy loading for images. Most IDX plugins support lazy loading, which delays image loading until the user scrolls to them. This reduces initial page weight.
Optimize database queries. Some plugins store MLS data in your WordPress database. Use caching plugins like W3 Total Cache or WP Rocket to cache property pages and avoid repeated queries.
Limit listings per page. Display 12–20 listings per page to keep load times reasonable. Use pagination or infinite scroll with caution, as infinite scroll can increase resource usage.
Choose a lightweight theme. Avoid bloated themes with many scripts. A theme like GeneratePress or Astra paired with a page builder like Elementor can handle IDX data efficiently.
Test with a performance tool. Use Google PageSpeed Insights or GTmetrix after integration to identify bottlenecks. Aim for a load time under 3 seconds.
For developers who need custom control, you can embed MLS data via a shortcode or API call. Below is a practical example of a PHP function that fetches and displays a single listing property using the IDX Broker API. This assumes you have an API key and a listing ID:
This code demonstrates a simple API call that returns a listing’s address and price. In practice, you would expand it to include images, descriptions, and search filters. Always sanitize data using WordPress functions like esc_html and number_format to prevent security issues and ensure proper formatting.
By carefully selecting a compliant provider, optimizing performance, and testing rigorously, you can integrate IDX/MLS feeds that enhance your real estate website’s functionality without compromising user experience or speed.
7. Designing User-Friendly Property Search and Filtering
A powerful search experience is the backbone of any successful real estate website. Visitors expect to find properties quickly and intuitively. Poor search design leads to high bounce rates and lost leads. This section explores best practices for building a search interface that converts casual browsers into engaged prospects. Focus on clarity, speed, and mobile responsiveness to create a frictionless journey from query to property.
Implementing Map-Based and Dropdown Search Interfaces
Two dominant search paradigms exist: map-based and dropdown interfaces. Each serves different user behaviors and property types. The most effective real estate websites often combine both.
Dropdown search interfaces excel for users who know exactly what they want. They allow granular filtering with minimal clicks. Essential dropdown filters include:
Property type (house, apartment, condo, land)
Price range (min and max)
Bedrooms and bathrooms
Square footage
Listing status (for sale, for rent, sold)
For WordPress, plugins like WP Property Search or Real Estate 7 provide pre-built dropdown fields. Customize labels to match local terminology (e.g., “beds” vs. “bedrooms”). Always include a clear “Reset” button to clear filters quickly.
Map-based search interfaces are ideal for location-driven browsing. Users can drag, zoom, and click on map pins to explore neighborhoods. This approach works best when integrated with Google Maps or Leaflet via plugins like WP Google Map or MapSVG. Key design principles for map search:
Cluster pins at zoom levels to avoid clutter.
Show property thumbnail and price on pin click.
Allow drawing a custom area (polygon or radius) for location filtering.
Sync map results with a sidebar list of matching properties.
Consider offering both options side by side: a dropdown panel on the left and an interactive map on the right. This hybrid approach satisfies both targeted and exploratory users.
Optimizing Search Results for Mobile Users
Over 60% of real estate searches now start on mobile devices. A desktop-only search experience will alienate a huge audience. Mobile optimization requires rethinking layout, touch targets, and data loading.
Key mobile search optimizations:
Element
Best Practice
Why It Matters
Filter fields
Use dropdowns or sliders, not text inputs.
Reduces typing errors and speeds up input.
Search button
Place at bottom of filter panel, large and tappable.
Thumb-friendly reach, avoids accidental taps.
Results layout
Single-column list with swipeable image carousels.
Easier to scroll, faster visual scanning.
Map view
Full-screen map with floating filter bar.
Maximizes map space on small screens.
Loading time
Lazy-load images and defer non-critical scripts.
Prevents lag on slow mobile connections.
Test your search on actual devices, not just browser emulators. Ensure that dropdown menus do not overlap, that touch targets are at least 48×48 pixels, and that the search form collapses neatly into a hamburger or slide-out panel. Use AJAX-based filtering so results update without full page reloads, which feels instant on mobile.
Adding Saved Searches and Alerts for Returning Visitors
Returning visitors are your most valuable leads. They have already shown intent by searching. A saved search feature lets them bookmark filter criteria and receive automatic email or push notifications when new matching properties are listed. This transforms passive browsing into an ongoing relationship.
Implementation steps in WordPress:
User accounts: Require login to save searches. Use a lightweight plugin like User Registration or Ultimate Member to create a simple registration and login system.
Save button: Add a “Save this Search” button near the search results or filter panel. After clicking, prompt the user to name the search (e.g., “3-bed homes under $500k in Austin”).
Database storage: Store saved search criteria as serialized arrays in the user meta table. Use a custom post type or a dedicated plugin like Saved Searches (available with many real estate themes).
Alert delivery: Schedule a daily or weekly cron job to compare new listings against saved criteria. Send emails via WP Mail SMTP or use a third-party service like Mailgun for reliability. Include a direct link to the search results in the alert.
User dashboard: Provide a “My Saved Searches” page where users can edit, rename, or delete saved searches. Add a toggle to enable/disable alerts.
Best practices for alerts: allow users to choose frequency (immediate, daily, weekly), include a thumbnail of the first new property, and always include an unsubscribe link. Avoid overwhelming users—send a single digest email rather than individual alerts for each new listing.
By combining map-based and dropdown interfaces, optimizing for mobile, and nurturing returning visitors with saved searches, your WordPress real estate site will deliver a search experience that keeps users engaged and drives conversions. Test each feature iteratively with real users to refine the interface over time.
8. Optimizing Your Real Estate Website for SEO and Speed
Search engine optimization and page speed are not optional for a real estate website; they directly determine whether potential buyers and sellers find your listings and whether they stay long enough to engage. A slow or poorly optimized site repels users and ranks lower in search results. This section provides tactical, actionable steps to enhance both SEO and performance for your WordPress real estate site.
On-Page SEO: Meta Tags, Schema Markup, and Property Descriptions
On-page SEO ensures your content is structured for search engines to understand and rank. For real estate, three elements are critical:
Meta Tags: Every property listing and page needs a unique title tag (under 60 characters) and meta description (under 160 characters). Include the property address, type, and key features. For example: “Modern 3-Bedroom Condo in Downtown Austin – 2,100 sq ft | Your Agency Name.”
Schema Markup: Implement structured data using the RealEstateListing schema type. This allows search engines to display rich snippets with price, location, bedrooms, and status (for sale, pending, sold). Use a plugin like Yoast SEO or Schema Pro to add this without custom code.
Property Descriptions: Write unique, descriptive copy for each listing. Avoid duplicate text from MLS feeds. Include location details, nearby amenities, and unique selling points. Use natural language and primary keywords like “real estate website” and “property for sale in [city].”
Create a standard template for descriptions that includes a headline, bullet points for features, and a call-to-action, but customize each one to avoid penalties.
Image Optimization for High-Resolution Property Photos
High-resolution images are essential for real estate, but they are the primary cause of slow load times. Optimize them without sacrificing quality using these steps:
Compress Before Uploading: Use tools like ShortPixel or Smush to compress JPEG images by 50-70% while retaining visual fidelity. Aim for file sizes under 200 KB per image.
Resize Dimensions: Standard property photos should be no larger than 1920 pixels on the longest side. For gallery thumbnails, use 300×200 pixels.
Choose the Right Format: Use JPEG for photographs, and consider WebP for modern browsers that support it—WebP files are 25-35% smaller than JPEG at the same quality.
Lazy Loading: Enable lazy loading for images so they only load when a user scrolls to them. Most caching plugins and WordPress 5.5+ have this built-in.
For virtual tours or video walkthroughs, host them externally on YouTube or Vimeo and embed them to avoid hosting large media files on your server.
Caching, Minification, and Content Delivery Networks (CDNs)
Speed optimization requires reducing server load and delivering content faster. The table below compares three core techniques:
Technique
What It Does
Best For
Recommended Plugin/Tool
Caching
Stores static HTML copies of pages to serve to visitors without regenerating them on each request.
Reducing server response time (TTFB) and handling traffic spikes.
WP Rocket, W3 Total Cache, or LiteSpeed Cache
Minification
Removes unnecessary characters (spaces, comments, line breaks) from CSS, JavaScript, and HTML files.
Reducing file sizes and rendering time.
Autoptimize, WP Rocket (built-in)
Content Delivery Network (CDN)
Distributes your site’s static assets (images, CSS, JS) across a global network of servers, delivering them from the location closest to the user.
Improving load times for international visitors and high-traffic sites.
Cloudflare (free tier), Bunny.net, or KeyCDN
Implement these in order: first enable caching, then minify assets, and finally integrate a CDN. Test your site using Google PageSpeed Insights or GTmetrix after each step. Aim for a desktop score above 90 and a mobile score above 80. For real estate sites, a one-second delay in load time can reduce conversions by up to 7%, so prioritize speed as a key performance indicator.
9. Building Lead Capture and Conversion Tools
Converting casual visitors into qualified leads is the cornerstone of a successful real estate website. With WordPress, you can deploy targeted tools that capture interest at the right moment and nurture prospects through automated workflows. This section covers the essential components: contact forms, pop-ups, property inquiry pages, and integration with email marketing and CRM platforms.
Designing Effective Contact Forms and Pop-Ups
Contact forms should be simple, mobile-friendly, and strategically placed. Avoid overwhelming users with too many fields—ask only for name, email, phone, and a brief message. Use a plugin like WPForms or Gravity Forms to create conditional logic forms that adapt based on user input (e.g., showing a “preferred property type” dropdown only after a user selects “buying”).
Pop-ups, when used sparingly, can boost conversions. Follow these guidelines:
// Example JavaScript for exit-intent pop-up (simplified)
document.addEventListener('mouseleave', function(e) {
if (e.clientY < 0) {
// Trigger pop-up display
document.getElementById('popup-overlay').style.display = 'block';
}
});
Creating Property Inquiry Pages with Automated Responses
A dedicated property inquiry page allows visitors to request details about a specific listing. Use a custom post type for properties and link each property to a unique inquiry form. With plugins like JetEngine or ACF, you can pre-fill the form with the property title and ID.
After submission, automate the response using WordPress email hooks or a plugin like Fluent Forms. The workflow should include:
Immediate confirmation: Send a thank-you email with property details and agent contact info.
Internal notification: Forward the inquiry to the assigned agent or team email.
Follow-up schedule: Use a cron job or action scheduler to send a gentle reminder after 48 hours if no response is recorded.
Example code snippet to send a custom email on form submission (place in your theme’s functions.php):
add_action('wpforms_process_complete', 'send_property_inquiry_email', 10, 4);
function send_property_inquiry_email($fields, $entry, $form_data, $entry_id) {
if ($form_data['id'] == 5) { // Replace with your form ID
$to = 'agent@yourdomain.com';
$subject = 'New Property Inquiry: ' . $fields[1]['value']; // Property name
$message = 'Name: ' . $fields[0]['value'] . "n";
$message .= 'Email: ' . $fields[2]['value'] . "n";
$message .= 'Message: ' . $fields[3]['value'];
wp_mail($to, $subject, $message);
}
}
Integrating Email Marketing and CRM Tools (e.g., Mailchimp, HubSpot)
To nurture leads over time, connect your WordPress site with email marketing and CRM platforms. This integration ensures every captured lead is automatically added to a segmented list or pipeline.
Use Mailchimp for WordPress plugin or API key setup
Automated welcome emails and property alert campaigns
HubSpot
Install HubSpot for WordPress plugin
Unified CRM tracking, live chat, and form analytics
ActiveCampaign
Connect via ActiveCampaign for WooCommerce or custom API
Advanced automation sequences for lead scoring
After integration, set up automated workflows such as:
Welcome series: Send a sequence of three emails introducing your agency, featured listings, and market insights.
Property alerts: Trigger an email when a new listing matches a user’s saved search criteria.
Re-engagement campaigns: Send a “still looking?” offer after 30 days of inactivity.
By combining well-designed forms, automated inquiry responses, and robust CRM integration, your real estate website becomes a lead-generation engine that works 24/7.
10. Launching, Testing, and Maintaining Your Real Estate Website
After months of designing, configuring, and populating your real estate site with listings, the launch phase is both exhilarating and critical. A rushed launch can expose you to security vulnerabilities, broken user experiences, and lost leads. This section walks you through the final pre-launch checks and the ongoing maintenance that keeps your site secure, fast, and profitable.
Pre-Launch Checklist: Backups, SSL, and Cross-Browser Testing
Before you flip the switch, verify these three pillars of a stable launch. Skipping any one can lead to data loss or a poor first impression.
Full Backup: Use a plugin like UpdraftPlus or your hosting control panel to create a complete backup of your WordPress files and database. Store a copy offsite (e.g., cloud storage or a remote server). Test that the backup can be restored in a staging environment.
SSL Certificate: Ensure your site uses HTTPS. Most hosts offer free SSL via Let’s Encrypt. After activation, force HTTPS redirects using a plugin or by adding RewriteEngine On and RewriteCond %{HTTPS} off to your .htaccess file. Verify that all internal links (images, scripts) load over HTTPS.
Cross-Browser and Device Testing: View your site on Chrome, Firefox, Safari, and Edge. Test on at least three mobile devices (iOS, Android, tablet). Check that property search filters, contact forms, and map integrations work identically. Pay special attention to sticky headers and image galleries.
Once live, you need data to make informed decisions. Install Google Analytics 4 (GA4) via a plugin like MonsterInsights or Site Kit by Google. Configure key events: property views, contact form submissions, and phone number clicks. For real estate, also track which listings receive the most inquiries.
For performance, use a monitoring tool like Pingdom or GTmetrix. Set up weekly reports that track:
Page load time (target under 2.5 seconds)
Largest Contentful Paint (LCP) under 2.5 seconds
Number of 404 errors
Uptime percentage (aim for 99.9% or higher)
Enable server-side caching (e.g., using a plugin like WP Rocket) and a Content Delivery Network (CDN) such as Cloudflare. These reduce load times for visitors in different geographic regions and protect against traffic spikes during new listing announcements.
Regular Maintenance: Updates, Security, and Content Refreshes
A real estate website is never “done.” Regular maintenance protects your investment and keeps your site ranking well. Set a recurring monthly schedule with these tasks:
WordPress Core, Theme, and Plugin Updates: Check for updates weekly. Always test updates on a staging site first, especially for IDX plugins and page builders. Enable automatic updates for minor security patches only.
Security Scans: Use a security plugin like Wordfence or Sucuri. Run weekly scans for malware, brute force attacks, and compromised files. Change admin passwords quarterly and limit login attempts.
Content Refreshes: Real estate data ages fast. Remove sold listings from your search results (but keep them in a “sold” archive). Update neighborhood guides with new school ratings or local business openings. Refresh blog posts about market trends every six months to maintain SEO relevance.
Database Optimization: Use a plugin to clean up post revisions, spam comments, and transient options. This keeps your database lean and speeds up queries.
A simple maintenance log helps you stay accountable:
Date
Task
Completed By
Notes
2025-04-01
Updated 3 plugins
Admin
No issues
2025-04-07
Ran security scan
Admin
Cleared 2 false positives
2025-04-15
Removed 12 sold listings
Admin
Archived in “Sold” category
2025-04-22
Tested backup restoration
Admin
Restored successfully in staging
By following these steps, your real estate website will launch smoothly, perform reliably, and continue to generate leads for years to come. Regular investment in maintenance is the difference between a site that decays and one that thrives.
What is the best WordPress theme for real estate websites?
The best WordPress theme for real estate depends on your needs. Popular options include RealHomes, Houzez, and WP Residence. These themes offer property listing templates, IDX integration, and agent profiles. Look for a theme that is responsive, SEO-friendly, and compatible with IDX plugins like IDX Broker or iHomefinder. Many premium themes also include drag-and-drop builders for easy customization. Always check for regular updates and good support to ensure long-term compatibility with WordPress updates.
What plugins are essential for a real estate WordPress site?
Essential plugins include an IDX plugin (e.g., IDX Broker, iHomefinder, or Realtyna) to display MLS listings, a page builder (Elementor or Beaver Builder) for custom layouts, an SEO plugin (Yoast SEO or Rank Math) to optimize for search engines, and a caching plugin (WP Rocket or W3 Total Cache) for speed. Additionally, consider a contact form plugin (WPForms or Gravity Forms), a gallery plugin (Envira Gallery) for property photos, and a CRM integration plugin (HubSpot or Salesforce) to manage leads.
How do I integrate an MLS/IDX feed into my WordPress site?
To integrate an MLS/IDX feed, first choose an IDX plugin that supports your local MLS. Popular options include IDX Broker, iHomefinder, and dsSearchAgent. Install and activate the plugin, then follow the setup wizard to connect to your MLS account. You will typically need an API key or login credentials from your MLS. The plugin will automatically sync listings and provide shortcodes or widgets to display them on your site. Ensure your theme is compatible and test the search functionality.
How can I optimize my real estate website for SEO?
Optimize your real estate website for SEO by using an SEO plugin like Yoast SEO. Focus on keyword research for terms like 'homes for sale in [city]' and 'real estate agent [city]'. Optimize meta titles, descriptions, and heading tags for each page and property listing. Create unique content for neighborhood pages and blog posts. Ensure your site is mobile-friendly and fast-loading. Build backlinks from local directories and real estate sites. Submit your sitemap to Google Search Console.
What features should a real estate website have?
Key features include property search with filters (price, beds, baths, location), IDX integration for MLS listings, high-quality photo galleries and virtual tours, agent profiles with contact forms, mortgage calculator, neighborhood information, blog for market updates, and testimonials. Also include a responsive design, fast loading speed, SSL certificate, and social media integration. For lead generation, add call-to-action buttons and email newsletter signup.
How do I choose a hosting provider for a real estate WordPress site?
Choose a hosting provider that offers fast performance, good uptime, and scalability. Recommended options include SiteGround (managed WordPress hosting with excellent support), WP Engine (premium managed hosting for high-traffic sites), and Kinsta (Google Cloud infrastructure). For budget, Bluehost or DreamHost are solid choices. Ensure the host supports PHP 8+, has a free SSL certificate, and offers staging environments. Real estate sites with many images and IDX data benefit from CDN integration and sufficient storage.
How do I create property listings on WordPress?
To create property listings, use a real estate theme that includes a custom post type for properties. Alternatively, use a plugin like Easy Property Listings or WP-Property. Create a new property post and fill in details: title, description, price, address, property type, bedrooms, bathrooms, square footage, and images. Add a gallery and virtual tour URL (e.g., Matterport). Use categories and tags to organize listings (e.g., 'For Sale', 'Rent', 'Condos'). Publish and ensure the listing appears on your search results page.
What are the best practices for real estate website security?
Best practices include using strong passwords and two-factor authentication, keeping WordPress core, themes, and plugins updated, installing a security plugin like Wordfence or Sucuri, using SSL certificate (HTTPS), and regularly backing up your site (use UpdraftPlus or Jetpack). Limit login attempts and disable file editing. Use a reputable hosting provider that offers server-level security. For real estate sites handling client data, ensure compliance with GDPR or CCPA if applicable.
WordPress Multilingual: Setting Up a Multi-Language Site
Introduction to WordPress Multilingual Sites
Creating a multilingual WordPress site is no longer a luxury—it is a strategic necessity for businesses, bloggers, and organizations aiming to connect with a global audience. By offering content in multiple languages, you break down linguistic barriers, improve user experience for non-native speakers, and unlock new markets. A well-implemented multilingual site can increase traffic, engagement, and conversion rates by making visitors feel understood and valued in their own language. Beyond user satisfaction, multilingual sites also enhance search engine visibility: search engines like Google index translated pages separately, allowing you to rank for keywords in different languages and regions. This introduction explores why multilingual functionality matters, the core concepts behind language management, and how it directly influences SEO performance.
Understanding the Business Case for Multilingual WordPress
The decision to go multilingual is driven by clear business advantages. Here are key reasons why organizations invest in multilingual WordPress sites:
Global Reach: Over 75% of internet users do not speak English as their first language. Providing content in their native tongue increases accessibility and trust.
Higher Conversion Rates: Users are more likely to purchase or sign up when information is in their own language. Studies show that localized content can boost conversion rates by up to 70%.
Competitive Advantage: Many competitors may only offer content in one language. A multilingual site differentiates your brand and positions you as a global player.
Improved User Experience: Visitors can navigate, read, and interact without language friction, reducing bounce rates and increasing time on site.
Localized Marketing: Tailor messages, promotions, and calls-to-action to specific cultural contexts, improving relevance and engagement.
For WordPress site owners, the business case is compelling: a modest investment in translation and localization can yield substantial returns in traffic, loyalty, and revenue.
Key Terminology: Locale, Language Code, and Translation
To set up a multilingual site effectively, you must understand foundational terms. The table below clarifies the three most important concepts:
Term
Definition
Example
Locale
A combination of language and regional variant (e.g., dialect, cultural conventions).
en_US (American English), en_GB (British English), fr_FR (French in France), fr_CA (French in Canada).
Language Code
A standardized two-letter or three-letter abbreviation for a language, often used in URLs and HTML tags.
en for English, es for Spanish, de for German, zh for Chinese.
Translation
The process of converting text from one language to another, preserving meaning and context.
Translating “Welcome” to “Bienvenido” (Spanish) or “Willkommen” (German).
In WordPress, plugins use language codes and locales to manage which version of a page or post to display. For example, a visitor from France might see content tagged with locale fr_FR, while a visitor from Canada sees fr_CA. Understanding these distinctions helps you choose the right plugin and configure language switching correctly.
How Multilingual Sites Impact SEO and Search Rankings
Multilingual sites can significantly boost SEO performance when implemented correctly. Search engines treat each language version as a separate entity, allowing you to target multiple keyword sets and geographic regions. Here are the primary SEO benefits and considerations:
Expanded Keyword Coverage: You can rank for terms in each language, doubling or tripling your organic reach. For example, a site with English and Spanish versions can appear for both “best coffee” and “mejor café.”
Improved Click-Through Rates: Users are more likely to click on search results in their own language, especially for local queries.
Reduced Bounce Rates: When users land on a page they can read, they stay longer and explore more, signaling relevance to search engines.
Hreflang Tags: These HTML attributes tell search engines which language and regional version of a page to serve to users. Proper implementation prevents duplicate content penalties and ensures the correct page appears in search results.
Duplicate Content Risks: Without careful setup, translated pages can be seen as duplicates. Use canonical URLs and hreflang tags to avoid this issue.
Localized Backlinks: Content in different languages attracts backlinks from regional sources, strengthening domain authority in those markets.
To maximize SEO, choose a WordPress plugin that automatically generates hreflang tags, offers language-specific sitemaps, and allows you to set separate meta titles and descriptions for each translation. Testing language switcher placement and ensuring fast load times for all language versions further enhances user experience and search rankings.
Choosing the Right Multilingual Approach for WordPress
When planning a multilingual WordPress site, the first critical decision is selecting the architecture that will underpin your language versions. Three primary methods dominate the landscape: using a WordPress multisite network, running completely separate installations for each language, or employing a dedicated multilingual plugin. Each approach carries distinct trade-offs in budget, complexity, and scalability. Understanding these differences will help you align your technical choice with your content strategy and long-term goals.
WordPress Multisite enables you to run multiple virtual sites from a single WordPress installation. For multilingual purposes, you can assign each language to a subdomain (e.g., en.example.com, fr.example.com). This method gives each language site its own database tables, theme, and plugins, while sharing the core WordPress files and user database. It is especially suitable for large organizations or projects where each language version needs independent editorial control and distinct design elements.
Key considerations:
Budget: Lower hosting costs because you manage one central installation, but you may need more server resources for high traffic across all languages.
Complexity: Requires familiarity with defining WP_ALLOW_MULTISITE in wp-config.php and configuring network settings. For example, to enable multisite, add this line before the “That’s all, stop editing!” comment:
define('WP_ALLOW_MULTISITE', true);
Scalability: Excellent for adding new language sites, as you can create them from the Network Admin dashboard. However, content sharing across languages is not native and often requires additional plugins.
Drawbacks: Plugin and theme updates must be managed at the network level, and some plugins may not be multisite-compatible. SEO can be more complex because each language site has its own sitemap and URL structure.
Separate WordPress Installations for Each Language
With this approach, you install WordPress independently for each language—for example, example.com/en/ and example.com/fr/ (subdirectory) or using separate domains like example.fr. Each installation has its own database, core files, plugins, and themes. This method offers maximum isolation and control, making it ideal for sites with very different content per language or strict data separation requirements.
Key considerations:
Budget: Higher hosting costs because each installation consumes separate server resources. You may need separate databases and hosting plans.
Complexity: Moderate to high. You must maintain multiple WordPress instances, update each one individually, and manually synchronize users, menus, or global settings.
Scalability: Poor for adding many languages, as each new language requires a full installation. However, it scales well in terms of performance because traffic is isolated.
Drawbacks: No built-in cross-language features. You cannot easily share posts, media, or translations between installations. This method demands diligent maintenance and can become unwieldy beyond two or three languages.
Using a Dedicated Multilingual Plugin (e.g., WPML, Polylang)
Dedicated multilingual plugins integrate directly into a single WordPress installation, allowing you to create and manage translations for posts, pages, categories, and menus from one dashboard. WPML (premium) and Polylang (free with premium add-ons) are the most popular options. This approach is the most user-friendly for content creators and small to medium-sized sites.
Budget: Low initial cost for Polylang (free core), while WPML requires a license (starting around $39/year for one site). Hosting costs remain low as you run a single installation.
Complexity: Low to moderate. Installation is straightforward: activate the plugin, choose your languages, and start translating. Most plugins provide a visual translation interface and automatic language switcher.
Scalability: Good for up to 10–15 languages. Performance depends on the plugin’s code quality and your hosting. WPML offers advanced features like translation management and SEO-friendly URLs.
Drawbacks: Some plugins can slow down the admin area if you have many languages. You are tied to the plugin’s ecosystem; migrating away can be difficult. For very large sites with heavy traffic, the single-database architecture may become a bottleneck.
Ultimately, your choice should reflect your site’s size, your team’s technical comfort, and your long-term content strategy. For most users, a dedicated plugin offers the best balance of simplicity and power. Multisite suits large networks with independent language teams, while separate installations are reserved for edge cases requiring strict data isolation.
Step-by-Step: Installing and Configuring a Multilingual Plugin
To build a successful multilingual WordPress site, the first technical decision is selecting and configuring a plugin that handles translations, language detection, and URL routing. Two of the most widely used options are Polylang and WPML. Below is a practical walkthrough for installing a plugin, setting your default language, adding additional languages, and configuring URL structures with language prefixes.
Polylang is a popular free plugin that offers robust multilingual capabilities. To install it, navigate to Plugins > Add New in your WordPress dashboard, search for “Polylang,” and install and activate the free version. The free version includes core features: adding an unlimited number of languages, translating posts, pages, categories, and custom post types, and managing language switchers via a widget or menu item. However, the free version has limitations—it does not support automatic translation, language scanning for SEO hreflang tags, or integration with third-party translation services. For these, you need the Polylang Pro premium version (starting at €99/year for a single site). Pro adds automatic language detection based on browser settings, URL customization for each language, and support for WPML-compatible themes and plugins. If you require advanced features like professional translation management or multisite support, consider WPML instead.
After activating Polylang, go to Languages > Settings. Here, you will see a list of pre-installed languages. To add a new language, click the “Add new language” button. A dropdown menu appears with hundreds of locale options (e.g., en_US for English, fr_FR for French, de_DE for German). Select the language you need, then choose a language code (usually auto-filled) and a flag icon (optional). Repeat this process for every language you want on your site. Next, set your default language—this is the primary language for your site’s content and the one that appears when no other language is detected. To do this, click the star icon next to the desired language in the list. For example, if your site is primarily in English, make English the default. This setting affects the site’s home URL and the language used in the admin area for new posts. You can also reorder languages by drag-and-drop—the first language in the list becomes the default if you haven’t starred one.
Configuring Language-Specific URLs and Slugs
URL structure is critical for SEO and user experience. Polylang offers three URL modes: language as directory (e.g., example.com/en/), language as subdomain (e.g., en.example.com), or language as a GET parameter (e.g., example.com?lang=en). The most common and recommended approach for most sites is the directory mode because it is clean, SEO-friendly, and easy to manage. To configure this, go to Languages > Settings and under “URL modifications,” select “The language is set from the directory name in pretty permalinks.” Save changes. You can also customize the language slug—the text that appears in the URL for each language. For instance, instead of using “en” for English, you might prefer “english” or “eng.” To change a slug, click the “Edit” link next to the language in the list and modify the “Slug” field. Be cautious: changing slugs after content is published can break existing links unless you set up redirects. Below is a comparison of Polylang’s free vs premium features for URL handling:
After configuring URLs, test each language’s prefix by visiting example.com/en/ and example.com/fr/ (or your chosen slugs). Ensure that the default language’s prefix is optionally hidden (in Polylang settings, you can choose to “hide URL language information for default language”). This keeps the home URL clean while still supporting multilingual content. Finally, clear your permalink cache by going to Settings > Permalinks and clicking “Save Changes” to refresh the rewrite rules.
Translating Content: Posts, Pages, and Custom Post Types
After configuring your multilingual WordPress site, the core task is translating your content. This includes standard posts and pages, as well as custom post types, categories, tags, and custom fields. Properly managing these translations ensures a cohesive user experience across languages while preserving SEO structure and metadata. Below, we cover the essential workflows for translating each content type using a typical multilingual plugin interface.
Translating Posts and Pages with the Plugin Interface
Most multilingual plugins provide a unified interface for translating posts and pages. When you create or edit a post, a translation meta box appears, allowing you to link it to its counterpart in another language. Common steps include:
Create a source post in your primary language (e.g., English).
Use the plugin’s “+” button to add a new translation (e.g., Spanish). This opens a duplicate editor where you enter the translated text.
Link translations automatically via a language switcher in the admin bar, ensuring they remain connected.
Publish both versions separately; changes to the source do not overwrite the translation unless you choose to sync.
For pages, the process is identical, but you must also manage parent-child relationships. If a parent page exists in English, its Spanish child should be linked to the correct parent translation. The plugin typically handles this with a dropdown or automatic matching based on hierarchy. To verify synchronization, check the “Translations” column in the post list table.
Handling Custom Post Types and Taxonomies
Custom post types (CPTs) like “Portfolio” or “Products” require explicit registration as translatable. In your plugin settings, enable translation for each CPT and its associated taxonomies (categories, tags). For example, if you have a “Project” CPT with a custom taxonomy “Client,” follow these steps:
Register the CPT with the `public` and `show_in_rest` flags set to true.
In the plugin’s settings, check the boxes for “Project” and “Client” taxonomy under “Post Types” and “Taxonomies” panels.
Create translations for each CPT item using the same interface as posts. For taxonomies, use the plugin’s taxonomy translation screen to link terms across languages.
To synchronize categories and tags across translated posts, ensure the taxonomy terms are linked. For instance, if you have the category “Technology” in English, its Spanish translation “Tecnología” must be connected via the plugin’s term translation feature. This prevents duplicate terms and maintains consistent URLs like `/technology/` and `/tecnologia/`.
Managing Translation of Custom Fields and Meta Data
Custom fields and meta data often contain critical content like prices, dates, or ACF fields. To translate them, you must configure the plugin to handle these fields. Most plugins offer a “Custom Fields Translation” section where you can define how each field is treated:
“Copy” – the field value is identical across languages (e.g., a numeric ID).
“Translate” – you provide a different value per language (e.g., a text description).
“Copy once” – the value is copied from the source to the translation only on initial creation.
For Advanced Custom Fields (ACF), use the plugin’s ACF integration to show separate fields per language in the editor. If you need to programmatically sync a custom field, you can use a filter like the following example (add to your theme’s `functions.php`):
add_filter( 'wpml_copy_custom_field_value', function( $value, $field_key, $post_id, $language ) {
if ( '_my_custom_price' === $field_key ) {
// Ensure numeric value is copied without modification.
return is_numeric( $value ) ? $value : 0;
}
return $value;
}, 10, 4 );
This code ensures that a custom field `_my_custom_price` retains its numeric value when copied to a translation. Always test custom field synchronization thoroughly, especially for fields that affect front-end display like image URLs or repeater fields. Use the plugin’s debug tools to verify that meta data is correctly linked across languages.
Building a Language Switcher for Users
A language switcher is the primary interface for users to navigate a multilingual WordPress site. It must be intuitive, accessible, and consistent across all pages. This section covers how to add a switcher through menus, widgets, and shortcodes, along with best practices for usability and accessibility.
Adding a Language Switcher to Navigation Menus
The most common method is integrating the language switcher directly into your site’s primary navigation menu. Most multilingual plugins, such as Polylang, WPML, or TranslatePress, offer a dedicated menu item for this purpose. To add it:
Navigate to Appearance > Menus in your WordPress dashboard.
Locate the “Language Switcher” meta box provided by your plugin (e.g., “Languages” for Polylang, “Language Switcher” for WPML).
Check the languages you want to display and click “Add to Menu.”
Arrange the switcher item within your menu structure, typically at the end or in a prominent top-level position.
Save the menu.
Best practices for menu-based switchers include:
Practice
Description
Use native language names
Display “Español” instead of “Spanish” to help native speakers identify their language.
Include language codes
Add flags or two-letter codes (e.g., “EN,” “FR”) for quick visual scanning.
Maintain current page
Ensure the switcher redirects to the same content in the selected language, not just the homepage.
Test with keyboard navigation
Verify that the switcher is reachable via Tab key and activated with Enter or Space.
Using Widgets and Shortcodes for Language Selection
For greater flexibility, you can place a language switcher in sidebars, footers, or within content using widgets or shortcodes. This is ideal for themes where the menu is not customizable or when you want a secondary switcher.
Widgets: Most multilingual plugins provide a dedicated widget. To use it:
Go to Appearance > Widgets.
Find the widget named “Language Switcher” (or similar) and drag it to your desired widget area.
Configure display options, such as showing flags, language names, or dropdown style.
Save the widget.
Shortcodes: For embedding within page or post content, use a shortcode. Examples from common plugins include:
Polylang: [polylang_langswitcher]
WPML: [wpml_language_switcher]
TranslatePress: [language-switcher]
Shortcodes can be added to any text block, widget, or template file. They support parameters like dropdown="1" or show_names="0" to control appearance.
Accessibility considerations for widgets and shortcodes:
Ensure the switcher has an aria-label attribute, such as “Choose language,” for screen readers.
Use semantic HTML like <nav> or <ul> to structure the list.
Avoid relying solely on flags, as they may not be distinguishable for colorblind users or those unfamiliar with flag geography.
Styling the Switcher for Mobile and Desktop
A responsive language switcher must adapt to different screen sizes without breaking layout or usability. Below are key styling strategies.
Desktop styling:
Use a horizontal list with padding between items for easy clicking.
Consider a dropdown menu to save space if you have many languages.
Ensure sufficient contrast between text and background, meeting WCAG AA standards.
Mobile styling:
Convert the horizontal list into a full-width dropdown or a collapsible menu to avoid crowding.
Increase touch target size to at least 44×44 pixels for fingers.
Use a hamburger-style icon for the switcher if space is extremely limited, but label it clearly.
Example CSS adjustments (for reference only—do not include inline styles in final output):
Set display: flex on the container for desktop, then flex-direction: column on mobile.
Use max-width constraints to prevent the switcher from stretching beyond 300px on small screens.
Apply white-space: nowrap to prevent language names from breaking awkwardly.
Testing tips for styling:
Device
Check
Desktop (1920px)
Switcher does not overlap other menu items.
Tablet (768px)
Dropdown remains tappable without zoom.
Mobile (375px)
Switcher does not push content off-screen.
By following these methods and practices, you ensure a language switcher that is functional, accessible, and visually consistent across all devices, helping users seamlessly navigate your multilingual WordPress site.
Multilingual SEO: Optimizing for Search Engines
When you operate a multilingual WordPress site, search engine optimization becomes significantly more complex. Each language version must be treated as a distinct entity to serve the right content to the right audience. Without proper technical SEO, you risk confusing search engines with duplicate content, diluting your ranking signals, or serving the wrong language in search results. This section details three critical steps to ensure your multilingual site is fully optimized for international search visibility.
Hreflang tags are the most powerful tool for telling Google and other search engines which language version of a page to show to users based on their location and language preferences. Without them, you may trigger duplicate content penalties or rank the wrong language variant. The tags are placed in the <head> section of each page, and they must be reciprocal—every language version must reference all other language versions, including itself.
In WordPress, you can implement hreflang tags manually via a plugin (such as Yoast SEO, Rank Math, or Polylang) or by editing your theme’s header.php file. Below is a practical code example for a site with English (US), Spanish (Spain), and French versions:
Note the x-default tag, which serves as a fallback for users whose language is not explicitly defined. Common mistakes include:
Forgetting self-referencing hreflang tags (each page must reference itself).
Using incorrect language-region codes (e.g., en instead of en-US for American English).
Missing the reciprocal link on every language version.
Always validate your hreflang implementation using Google Search Console’s URL inspection tool or a third-party validator.
Creating Separate XML Sitemaps per Language
A single XML sitemap containing all language versions can confuse crawlers and slow down indexing. Instead, generate a separate sitemap for each language and submit them individually to Google Search Console. This approach allows you to monitor each language’s indexing status independently and ensures that search engines recognize the distinct structure of your site.
Most multilingual WordPress plugins (e.g., WPML, Polylang, Weglot) offer built-in sitemap generation per language. If you use Yoast SEO, enable the multilingual sitemap feature under the “XML Sitemaps” settings. For a manual approach, create a sitemap index file that points to each language-specific sitemap:
Each sitemap should only contain URLs for that language, with correct lastmod and priority values.
Update sitemaps automatically when you add or remove content in a specific language.
Exclude translated pages that are not publicly accessible (e.g., draft or pending review).
Translating Meta Titles, Descriptions, and Alt Text
Search engines rely on metadata to understand and rank your content. Simply translating the body text is insufficient; you must also translate meta titles, meta descriptions, and image alt text for every language version. Untranslated metadata leads to mismatched search snippets, lower click-through rates, and missed ranking opportunities.
In WordPress, you can manage this using SEO plugins that support multilingual fields. For example, with Yoast SEO and WPML, you can edit the SEO title and meta description for each translation directly in the post editor. For image alt text, ensure you replace the text in the media library for each language version.
Using localized keywords: Research what users search for in each language, rather than directly translating keywords from the original language.
Keeping meta titles under 60 characters and descriptions under 160 characters, as character counts vary by language (e.g., German tends to be longer).
Adding alt text that describes the image content in the target language, not a literal translation of the original alt text.
Avoiding keyword stuffing: Focus on natural, user-focused phrasing for each locale.
By implementing these three strategies—hreflang tags, separate sitemaps, and translated metadata—you create a solid foundation for international SEO. Your multilingual WordPress site will be better indexed, rank appropriately in each target market, and deliver a seamless user experience across languages.
Managing Media and Theme Files Across Languages
When building a multilingual WordPress site, handling media assets and theme text strings correctly ensures a consistent user experience regardless of language. Images, videos, and static text like button labels must be localized without breaking design or functionality. This section explains practical strategies for managing these elements across languages.
Localizing Images and Media Attachments
Media files often contain embedded text, cultural references, or context-specific visuals that need adaptation. To localize images and attachments effectively:
Use separate media for each language – Upload language-specific versions of an image (e.g., a banner with English text for the English version, a Spanish version for the Spanish site). Plugins like Polylang or WPML allow you to attach different media files to the same page or post in each language.
Rename files meaningfully – Include a language code in the filename (e.g., en-hero-banner.jpg, es-hero-banner.jpg) to avoid confusion during updates.
Manage alt text and captions – Translate alt text and captions for each media file. In Polylang, you can edit these fields per language directly in the media library. WPML provides a dedicated translation editor for media.
Consider video subtitles – For embedded videos, use a plugin like YouTube’s built-in caption system or a dedicated multilingual video plugin to serve subtitles in the correct language.
For consistency, create a media management checklist: verify that every image with text has a localized version, and test that captions appear correctly in each language.
Translating Theme Strings with .po/.mo Files
Theme text strings—such as “Read More,” “Search,” or “Submit”—are often hardcoded in the theme’s PHP templates. To translate these without editing the core theme files, use gettext files (.po and .mo). This method is ideal for static, non-dynamic text.
Locate the theme’s text domain – Check the theme’s style.css header for the Text Domain field (e.g., mytheme). This tells translation tools which strings belong to the theme.
Generate a .pot file – Use a plugin like Loco Translate or a tool like Poedit to scan the theme’s PHP files and create a .pot (Portable Object Template) file containing all translatable strings.
Create language-specific .po files – For each language, create a .po file (e.g., mytheme-es_ES.po for Spanish). Translate the strings in this file using Poedit or Loco Translate.
Compile to .mo – Save the .po file, which generates a corresponding .mo (Machine Object) binary file. Place both files in the theme’s languages folder (e.g., /wp-content/themes/mytheme/languages/).
This approach keeps translations separate from theme code, making updates safer. Always test that translated strings appear correctly on the front end after adding new .po/.mo files.
Using a Translation Plugin for Dynamic Theme Content
Modern themes often include dynamic content—like custom post type labels, widget titles, or settings panel text—that cannot be captured by static .po files alone. For these cases, a translation plugin provides a streamlined workflow.
Plugin
Key Feature for Dynamic Content
Best For
WPML
String Translation module that scans the theme’s registered strings and allows inline editing.
Complex sites with custom post types and widgets.
Polylang
Language switcher and string translation interface for theme options and widgets.
Smaller sites needing a lightweight solution.
Loco Translate
Built-in editor for .po files and support for dynamic strings from plugins.
Users comfortable with gettext but needing a GUI.
To use a translation plugin for dynamic theme content:
Register theme strings – In your theme’s functions.php, use functions like esc_html__() or __() with the theme’s text domain to make dynamic strings translatable.
Scan with the plugin – In WPML, go to WPML > Theme and plugins localization and scan the theme. For Polylang, use Settings > Languages > String translations.
Translate in the admin panel – Enter translations directly in the plugin’s interface. Changes apply instantly without recompiling .mo files.
This method is essential for button labels, navigation menus, and footer text that change based on user interactions or site settings. Always verify that dynamic strings display correctly in all languages after translation.
Running a multilingual WordPress site introduces unique performance challenges. Serving content in multiple languages can increase database queries, multiply cached page variations, and inflate asset sizes. Without careful optimization, visitors may experience slower load times, especially on language-switching interactions. This section addresses caching, CDN usage, and database load, providing actionable strategies to maintain speed and reliability across all language versions.
Caching Strategies for Language-Specific Pages
Effective caching is critical for multilingual sites because each language version of a page must be stored and served independently. Standard page caching plugins like WP Rocket, W3 Total Cache, or LiteSpeed Cache can handle this, but require specific configuration. Key strategies include:
Language-aware caching: Configure your caching plugin to differentiate pages by language. This is typically done by setting cache keys based on the language URL prefix (e.g., /en/page, /fr/page) or cookie (e.g., lang=en).
Server-level caching: Use server-side caching (e.g., Nginx FastCGI Cache or Varnish) with rules that treat each language as a separate cache partition. Many WordPress hosting providers offer built-in support for this when using plugins like WPML or Polylang.
Object caching: Implement persistent object caching (e.g., Redis or Memcached) to store translated strings and language-specific options in memory. This reduces database queries for repeated translation lookups.
Cache preloading: Preload all language versions of key pages after content updates. A full preload for all languages ensures users rarely hit uncached requests.
Important: Avoid using a single cache for all languages. This can serve wrong content (e.g., French page shown to an English user). Test your setup by visiting each language URL and verifying the correct content loads without delay.
Using a CDN to Serve Static Assets Globally
A Content Delivery Network (CDN) reduces latency by serving static assets—images, CSS, JavaScript, and possibly translated HTML pages—from servers close to the user. For multilingual sites, a CDN offers particular benefits:
Global asset delivery: Assets like flags, language-specific icons, and localized fonts are cached at edge locations, reducing load on your origin server.
Language-specific edge caching: Advanced CDNs (e.g., Cloudflare, Fastly, or KeyCDN) can cache entire HTML pages per language using custom cache keys based on URL or cookie. This accelerates language switching for returning visitors.
Reduced latency for international audiences: If your site serves users in multiple countries, a CDN ensures that a Japanese visitor gets assets from a Tokyo edge node, while a German visitor gets them from Frankfurt.
When configuring a CDN for a multilingual site, ensure that your cache purge rules cover all language variants. For example, if you update a post in English, purge the CDN cache for /en/post-slug and all other language versions of that post.
Optimizing Database Queries for Multi-Language Content
Multilingual plugins often increase database queries because they store translations in separate tables (e.g., WPML’s icl_translations or Polylang’s term_relationships). Poorly optimized queries can slow down page generation, especially on high-traffic sites. Optimize with these techniques:
Minimize translation lookups: Use plugins that cache translation results in memory (object caching). Avoid executing the same translation query on every page load.
Index database tables: Ensure your database has proper indexes on columns used in translation joins (e.g., post_id, language_code, element_type). Most multilingual plugins include recommended indexes, but verify after plugin updates.
Reduce query volume: Limit the number of languages queried per page. For example, if you only display a language switcher, avoid querying all translated content until needed.
Use a dedicated translation plugin with efficient SQL: Some plugins (e.g., WPML) offer advanced query optimization modes that reduce joins. Polylang, when combined with a performance plugin, can also be tuned.
The following table compares two popular multilingual plugins regarding database query impact and caching compatibility:
Plugin
Typical Query Overhead
Object Caching Support
CDN Compatibility
Recommended for High Traffic
WPML
Moderate; uses custom translation tables and joins
Full support (Redis/Memcached)
Excellent; language-specific cache keys
Yes, with proper caching configuration
Polylang
Low; uses WordPress taxonomy for languages
Supported but less optimized
Good; requires manual cache key setup
Yes, for smaller sites; may need tuning for large traffic
To maintain speed, regularly monitor database query performance using tools like Query Monitor. Aim for fewer than 50 queries per page load for a typical multilingual site. If queries exceed this, consider further caching or switching to a more efficient plugin.
Testing and Quality Assurance for Your Multilingual Site
Before you launch your multilingual WordPress site, rigorous testing ensures that translations are accurate, navigation works seamlessly, and search engines properly index each language version. A structured QA process minimizes errors that could confuse users or harm SEO. Below is a practical checklist to guide your pre-launch review.
Manual Testing: Browsing Each Language Version
Start by manually navigating every language version as a real user would. This surface-level check catches visual and functional issues that automated tools might miss. Use the following checklist for each language:
Language switcher functionality: Click between all available languages and verify the URL changes correctly (e.g., /fr/ for French, /de/ for German). Ensure the switcher is visible on all devices.
Translation completeness: Scan every page—home, about, contact, blog posts, and product pages. Look for untranslated strings, missing text blocks, or hardcoded English fallbacks.
Layout and design: Check for text overflow, broken layouts, or misaligned elements caused by longer or shorter translations. Test on mobile, tablet, and desktop.
Forms and interactive elements: Submit test forms (contact, newsletter, search) in each language. Verify error messages and confirmation texts appear in the correct language.
Media and file paths: Confirm images, PDFs, and videos load correctly. If you use localized media (e.g., a French infographic), ensure the right version displays for each language.
Document all bugs in a shared spreadsheet with screenshots and browser/device details. Prioritize fixes that block core user journeys, such as a broken language switcher or missing checkout translations.
Automated Tools for Checking hreflang and Sitemaps
Automated tools can validate SEO-critical elements across your entire site. The two most important checks are hreflang tags and multilingual sitemaps. Run these tests after manual review to catch structural issues.
Hreflang validation: Use a tool like the hreflang validator or a browser extension. Inspect the <head> of a page in one language and confirm it includes self-referencing and alternate hreflang tags. For example, a French page should have:
Common errors include missing x-default, incorrect language codes (e.g., en-uk instead of en-gb), or mismatched URLs. Fix these immediately to avoid duplicate content penalties.
Multilingual sitemap testing: Generate sitemaps using your SEO plugin (e.g., Yoast, Rank Math) and verify they include separate entries for each language version. Use Google Search Console’s Sitemaps report or a bulk checker tool. A typical multilingual sitemap structure might look like:
Schedule a weekly automated crawl using tools like Screaming Frog to monitor hreflang and sitemap health post-launch.
User Feedback and Iteration Post-Launch
Even with thorough testing, real users will uncover issues you missed. Set up a feedback loop to continuously improve your multilingual experience. Implement these strategies:
In-language feedback forms: Add a simple “Report a translation error” button on each page, linked to a form in the user’s language. Include fields for the incorrect text and suggested correction.
Analytics monitoring: Track bounce rates and exit pages per language. A high bounce rate on a specific language version may indicate poor translation quality or broken navigation.
Community engagement: If you have a forum or support system, encourage native speakers to flag issues. Offer small incentives like discounts or badges for helpful reports.
Iteration schedule: Plan monthly reviews of feedback, prioritizing fixes that affect user comprehension or SEO. Update your translation memory and glossary to prevent recurring errors.
Remember that multilingual QA is not a one-time task. As you add new content or features, repeat the manual and automated checks for every language. By combining manual browsing, automated validation, and user-driven iteration, you ensure your multilingual site remains accurate, functional, and search-engine friendly over time.
Maintaining and Scaling Your Multilingual WordPress Site
Launching a multilingual WordPress site is a significant achievement, but the real work begins with ongoing maintenance and future growth. A well-planned approach to translation workflows, content updates, and scalability ensures your site remains accurate, user-friendly, and efficient as your audience expands. Below, we outline key strategies for maintaining and scaling your multilingual setup without compromising performance or coherence.
Setting Up a Translation Workflow (Manual or Automated)
Your translation workflow should align with your team’s resources, content volume, and quality requirements. Two primary approaches exist: manual and automated. Each has distinct advantages and trade-offs.
Manual Workflow: Best for sites with low content volume or high-quality needs. Involves human translators or in-house linguists. Steps include:
Exporting source content (e.g., via plugins like WPML or Polylang).
Assigning translation tasks to bilingual team members or agencies.
Reviewing and approving translations before publishing.
Using a translation management system (TMS) like Loco Translate or GlotPress for coordination.
Automated Workflow: Ideal for high-volume sites or rapid scaling. Uses machine translation services (e.g., Google Translate API, DeepL) integrated via plugins. Steps include:
Connecting your WordPress site to an automated translation service (e.g., Weglot, TranslatePress with automatic add-ons).
Setting up rules for which content to translate (e.g., posts, pages, custom fields).
Configuring language pairs and quality thresholds.
Optionally, post-editing machine translations for accuracy.
Hybrid Workflow: Combines automation for initial drafts with manual review for critical pages (e.g., legal, product descriptions). This balances speed and quality.
Regardless of method, document your workflow clearly, assign roles (e.g., translator, reviewer, publisher), and use a plugin that supports translation memory to reuse past translations, reducing redundancy over time.
When you update source content (e.g., a blog post or product page), you must synchronize changes across all translated versions. Without a systematic approach, translations can become outdated, confusing visitors and harming SEO. Implement these practices:
Use a synchronization feature: Most multilingual plugins (e.g., WPML, Polylang) offer options to mark translations as “needs update” when the original changes. Set up automatic notifications for translators or editors.
Prioritize critical updates: For urgent changes (e.g., pricing, legal terms), manually update all translations immediately. For less critical content, batch updates weekly or monthly.
Maintain a content update log: Track which source pages have been modified and which languages are updated. A simple spreadsheet or a plugin like “Revisionary” can help.
Consider partial updates: If only a specific paragraph changes, use your TMS to update just that segment rather than retranslating the entire page. This saves time and preserves consistency.
Test after updates: Verify that translated pages load correctly, links work, and media (e.g., images with alt text) are appropriately localized.
For sites with frequent updates, schedule a weekly review of all language versions to catch discrepancies early. Automated tools can flag untranslated or outdated strings.
Adding New Languages Without Breaking Existing Setup
Scaling to additional languages or regions requires careful planning to avoid conflicts, performance issues, or broken translations. Follow these steps to expand smoothly:
Audit your current setup: Before adding a new language, confirm your plugin, theme, and server configuration support it. Check for character encoding (e.g., UTF-8 for non-Latin scripts) and right-to-left (RTL) language support if needed.
Back up your site: Export a full database and file backup. This allows rollback if the new language causes unexpected issues.
Add the language via your plugin: For example, in WPML, go to “Languages” and add a new one. In Polylang, create a new language and assign a locale code (e.g., “ja” for Japanese).
Test core functionality: After adding the language, verify that language switchers appear correctly, URLs are clean (e.g., example.com/ja/), and no 404 errors occur for the new language.
Translate key content first: Start with essential pages like homepage, contact, and popular posts. Use your existing workflow to create translations, ensuring consistency with other languages.
Monitor performance: Additional languages increase database queries and file sizes. Use caching plugins (e.g., WP Rocket) and a content delivery network (CDN) to maintain speed. Consider lazy loading for media in the new language.
Update SEO settings: Add hreflang tags for the new language, submit updated sitemaps to search engines, and verify that language-specific meta titles and descriptions are unique.
By following a structured expansion process, you can add new languages incrementally without disrupting existing translations or user experience. Regularly review your multilingual site’s health using tools like Google Search Console to catch any indexing issues.
What is the best plugin for a multilingual WordPress site?
The best plugin depends on your needs. WPML is a robust premium option with full support for custom post types and SEO-friendly features. Polylang offers a free core plugin with paid add-ons for more control. TranslatePress provides a visual front-end translation interface. For lightweight sites, qTranslate X is free but less maintained. Evaluate factors like ease of use, compatibility with your theme, and budget.
How do I set up language switchers in WordPress?
Most multilingual plugins include a language switcher widget or shortcode. With WPML, go to WPML > Languages and enable the language switcher in menus, widgets, or as a footer. Polylang offers a language switcher block and widget. TranslatePress allows you to add a language switcher via a shortcode or dropdown in the admin. Ensure the switcher is placed prominently, like in the header or navigation.
What is hreflang and why is it important?
Hreflang is an HTML attribute that tells search engines which language version of a page to serve to users in different regions. It prevents duplicate content issues and improves user experience by directing visitors to the appropriate language. For example, a page in English and Spanish should have hreflang tags pointing to each version. Most multilingual plugins automatically generate these tags.
Can I use automatic translation for my WordPress site?
Yes, plugins like Google Language Translator or TranslatePress with Google Translate integration offer automatic translation. However, machine translations may lack accuracy and cultural nuance. For professional results, combine automatic translation with human editing. Some plugins also allow you to manually override translations. Consider your audience’s expectations for quality.
How do I handle SEO for multiple languages?
Use a plugin that supports hreflang tags, separate URLs per language (e.g., /en/, /fr/), and language-specific XML sitemaps. Ensure each language version has unique meta titles and descriptions. Avoid auto-translating SEO metadata; manually optimize for each language. Also, set up language-specific social media tags and use canonical URLs to prevent duplication.
Will multilingual plugins slow down my site?
Some plugins can add overhead, but performance impact varies. WPML and Polylang are generally well-optimized. To minimize slowdowns, use caching plugins, choose a reliable hosting provider, and avoid storing translations in the same database table as original content. Monitor site speed with tools like GTmetrix and optimize images and scripts.
How do I translate custom post types and taxonomies?
Most advanced multilingual plugins like WPML and Polylang support custom post types. In WPML, go to WPML > Settings and enable translation for specific post types. Polylang requires you to set the post type as translatable in the plugin settings. Then, create translations for each custom post or taxonomy term. This is essential for portfolio items, testimonials, or products.
What is the difference between WPML and Polylang?
WPML is a premium plugin (starting around $39) with extensive features like translation management, automatic translation integration, and support for WooCommerce. Polylang is free with optional paid add-ons (e.g., Polylang Pro for $99). Polylang is simpler and lighter, while WPML offers more advanced tools for large sites. Choose based on budget and complexity.
Introduction to GDPR and Its Relevance to WordPress
What Is GDPR and Who Must Comply?
The General Data Protection Regulation (GDPR) is a comprehensive data privacy law enacted by the European Union (EU) that took effect on May 25, 2018. Its primary aim is to protect the personal data of individuals within the EU and European Economic Area (EEA) by giving them greater control over how their information is collected, stored, and processed. The regulation applies to any organization—regardless of location—that handles the personal data of EU/EEA residents. This includes:
Businesses based in the EU that process personal data.
Organizations outside the EU that offer goods or services to individuals in the EU.
Entities that monitor the behavior of individuals within the EU, such as through tracking cookies or analytics.
Personal data under GDPR includes any information that can identify a person directly or indirectly, such as names, email addresses, IP addresses, location data, and online identifiers. For WordPress site owners, this means that if your website collects any form of personal data from visitors—even through contact forms, comments, or analytics—you are likely subject to GDPR requirements.
How GDPR Affects Website Owners and Bloggers
GDPR imposes several obligations on website owners and bloggers who process personal data. Key requirements include obtaining explicit consent before collecting data, providing clear privacy notices, and allowing users to access, correct, or delete their data upon request. For WordPress sites, this often means implementing consent mechanisms for cookies, email subscriptions, and comment forms. Specific impacts include:
Consent: You must obtain unambiguous, informed consent before collecting data. Pre-ticked checkboxes are no longer valid; users must actively opt in.
Data Subject Rights: Visitors have the right to request access to their data, have it corrected, or request its deletion (the “right to be forgotten”).
Data Breach Notification: You must notify authorities and affected users within 72 hours of a data breach that risks individuals’ rights and freedoms.
Privacy Policy: Your site must have a clear, accessible privacy policy explaining what data you collect, why, how long you keep it, and with whom you share it.
Record Keeping: You may need to maintain records of data processing activities, especially if you process data on a large scale.
For bloggers using WordPress, even a simple comment system that collects names and email addresses triggers these requirements. Plugins like contact form builders, analytics tools, and newsletter services also introduce data processing that must comply.
The Role of WordPress as a Data Controller and Processor
Understanding the distinction between a data controller and a data processor is critical for GDPR compliance. A data controller determines the purposes and means of processing personal data, while a data processor handles data on behalf of the controller. In the context of WordPress:
WordPress Site Owner as Data Controller: You, as the site owner, decide what data to collect (e.g., through forms, comments, or e-commerce), how to use it, and for how long to retain it. You are responsible for ensuring that your site’s data handling practices comply with GDPR.
WordPress.org as a Data Processor: The WordPress open-source software itself does not process personal data on your behalf. However, if you use WordPress.com (the hosted service), Automattic acts as a data processor for certain activities, such as storing backups or managing user accounts. In such cases, you must have a data processing agreement (DPA) with them.
Third-Party Plugins and Services: Plugins that collect data—like contact form plugins, analytics tools, or caching services—often act as data processors. You must vet these plugins to ensure they are GDPR-compliant and, where necessary, establish DPAs.
To clarify responsibilities, consider the following table:
Entity
Role
Example of Data Handling
WordPress site owner
Data controller
Decides to collect email addresses via a newsletter signup form.
WordPress.org software
Tool (not processor)
Provides the platform for building the site but does not process data.
WordPress.com hosting
Data processor
Stores site backups that contain user data.
Third-party plugin (e.g., Mailchimp)
Data processor
Manages email list subscriptions and sends newsletters.
By recognizing your role as a data controller and vetting any processors you use, you can build a GDPR-compliant WordPress site that respects user privacy and avoids significant fines—up to 4% of annual global turnover or €20 million, whichever is higher.
Understanding Data Collection on Your WordPress Site
To achieve WordPress GDPR compliance, you must first understand exactly what personal data your site collects and how it is processed. The General Data Protection Regulation (GDPR) requires that you document every point of data collection, from the moment a visitor lands on your site to when they submit a form or make a purchase. This documentation forms the basis of your privacy policy, consent mechanisms, and data subject rights procedures. Below, we break down the most common data collection points on a WordPress site and explain why you need to record each one.
Personal Data via Contact Forms and Comments
Contact forms and comment sections are primary sources of personal data. When a user fills out a contact form, they typically provide their name, email address, and any message content. Similarly, comment forms collect the commenter’s name, email, IP address, and the comment text. Under GDPR, this data is considered personal and must be processed lawfully.
Key compliance steps for forms and comments:
Explicit consent: Add a clear, unchecked checkbox before form submission that links to your privacy policy.
Data minimization: Only request the data you truly need—avoid asking for phone numbers or addresses unless essential.
Retention limits: Specify how long you keep form submissions (e.g., 12 months) and delete them after that period.
Right to erasure: Enable users to request deletion of their comments or form data easily.
For WordPress, plugins like Contact Form 7 or Gravity Forms can be configured with GDPR-friendly features. For example, to add a consent checkbox in Contact Form 7, you can use this shortcode:
[acceptance consent] I agree to the privacy policy and data processing terms. [/acceptance]
This ensures that no data is submitted without the user’s active consent. Always document the consent timestamp and store it alongside the form entry for audit purposes.
Cookies, Tracking Scripts, and Analytics
WordPress sites often use cookies for essential functions (e.g., session management) and non-essential purposes (e.g., analytics, advertising). Cookies that track user behavior—such as those from Google Analytics, Facebook Pixel, or Hotjar—require explicit consent under GDPR. You must inform users about each cookie’s purpose, duration, and the third parties that receive the data.
Common tracking data collected includes:
IP addresses (often anonymized or truncated)
Browser type and version
Pages visited and time spent
Referring URLs
Device identifiers
To manage consent, use a cookie consent plugin that blocks non-essential scripts until the user agrees. For example, with the Complianz plugin, you can configure it to anonymize IP addresses in Google Analytics by adding this snippet to your site’s functions.php file:
add_filter( 'complianz_script_center_consent', function( $consent ) {
if ( $consent['category'] === 'statistics' ) {
// Anonymize IP for Google Analytics
echo "ga('set', 'anonymizeIp', true);";
}
return $consent;
});
Document every cookie and script in your privacy policy, including their expiration dates and data recipients. Update this documentation whenever you add or remove tracking tools.
User Registration and E‑commerce Data
If your WordPress site allows user registration or sells products, you collect significantly more personal data. Registration forms typically gather usernames, email addresses, and passwords (hashed). E‑commerce transactions add payment information (processed by third-party gateways like Stripe or PayPal), shipping addresses, and order history. Each data point must be documented and handled with specific GDPR safeguards.
Important compliance measures for registration and e‑commerce:
Lawful basis: Use “contractual necessity” for processing data required to fulfill an order, but obtain consent for marketing emails.
Data access: Provide users with a way to download their personal data in a machine-readable format (e.g., CSV).
Data portability: Allow users to export their profile and order data themselves.
Retention schedules: Keep order data for tax purposes (usually 6–10 years) but delete non-essential data like browsing history sooner.
For WooCommerce sites, you can enable GDPR features under WooCommerce > Settings > Accounts & Privacy. Here, you can set privacy policy URLs, enable data erasure requests, and configure data retention periods. A practical example: to automatically anonymize user IP addresses in WooCommerce order logs, add this code to your theme’s functions.php:
Document all data flows, including third-party processors (e.g., payment gateways, shipping carriers), and ensure they are GDPR-compliant. Regularly review your documentation as your site’s functionality evolves.
The Legal Bases for Processing Personal Data
Under the General Data Protection Regulation (GDPR), every instance of processing personal data must be justified by one of six lawful bases. For WordPress site owners, selecting the correct basis is not merely a compliance checkbox—it determines how you collect, store, and interact with user data. Misapplying a legal basis can lead to fines or enforcement actions. Below, we examine the three most relevant bases for typical WordPress operations, with practical examples and a comparison table to clarify distinctions.
Consent: Obtaining and Recording User Permission
Consent is the most commonly invoked basis for WordPress sites, particularly for marketing activities. Under GDPR, consent must be freely given, specific, informed, and unambiguous. For a WordPress site, this means:
Active opt-in required: Pre-ticked checkboxes or implied consent (e.g., “by continuing to browse, you consent”) are invalid. Use a clear, affirmative action such as an unchecked checkbox or a button labeled “I agree.”
Granular choices: Separate consent for different processing purposes. For example, one checkbox for email newsletters, another for analytics cookies.
Record keeping: Your WordPress site must log the exact consent statement, the timestamp, and the user’s IP address. Plugins like Complianz or Cookiebot can automate this, but verify they store records in your database—not just on third-party servers.
Easy withdrawal: Provide a visible “Revoke Consent” link or button in your footer or user dashboard. Withdrawal must be as easy as giving consent.
Practical example: A WooCommerce store using Mailchimp for post-purchase newsletters must obtain separate consent for that processing. The checkout form should include a dedicated, unchecked checkbox: “Send me exclusive offers by email.”
Legitimate Interest and Contractual Necessity
Legitimate interest allows processing without consent when you have a genuine reason (e.g., security, fraud prevention) and your interest does not override the user’s rights. Contractual necessity covers processing essential to fulfill a contract with the user.
Legitimate interest: Common in WordPress for analytics (e.g., Google Analytics without consent, if anonymized), anti-spam measures (e.g., Akismet), or direct marketing to existing customers. You must conduct a Legitimate Interest Assessment (LIA) and document it. Example: A membership site retains IP logs for 30 days to block brute-force attacks.
Contractual necessity: Applies to data required for delivering a service. Examples: collecting a shipping address for a physical product, processing payment details for a subscription, or storing user profile data for a membership plugin. If the user does not provide this data, the contract cannot be executed.
Important: You cannot rely on legitimate interest for sensitive data (e.g., health, religion) or for processing that users would not reasonably expect. Always offer an opt-out mechanism for direct marketing under legitimate interest.
Legal Obligation and Vital Interests
These bases are less common but critical for specific WordPress contexts. Legal obligation applies when processing is required by law (e.g., tax records, anti-money laundering checks). Vital interests covers processing necessary to protect someone’s life.
Legal obligation: A WordPress e-commerce site must retain invoice data for 7–10 years (depending on jurisdiction). This overrides a user’s request for deletion. Similarly, sites handling employment data (e.g., HR plugins) must process payroll information as mandated by local law.
Vital interests: Rare in typical WordPress operations. Example: A health blog that collects emergency contact details for a forum member who posts about suicidal thoughts—processing that contact data to alert authorities may be justified. Document the specific circumstances.
Practical note: If you rely on legal obligation, clearly state in your privacy policy which laws apply (e.g., “We retain purchase records as required by the UK HMRC for 6 years”). For vital interests, prepare a written policy explaining the limited situations where this basis is invoked.
Each legal basis carries distinct obligations for your WordPress site. Document your chosen basis for every data processing activity, and review it annually—especially legitimate interest, which requires ongoing reassessment. Failure to match the correct basis to your operations is a common audit finding, so invest time in mapping your site’s data flows to these categories.
A transparent privacy policy is a cornerstone of WordPress GDPR compliance. Under the General Data Protection Regulation, your policy must clearly disclose what personal data you collect, how you process it, the legal basis for processing, and the rights users have over their data. This document must be written in clear, plain language—avoid legal jargon—and be easily accessible on your WordPress site, typically via a footer link or a dedicated page. Failure to provide a transparent policy can result in fines of up to 4% of annual global turnover or €20 million, whichever is greater.
Identity and contact details of the data controller – Your business name, address, and email address. If you have a Data Protection Officer (DPO), include their contact information.
Categories of personal data collected – Examples: name, email address, IP address, payment details, and any data from cookies or analytics.
Purpose of processing and legal basis – For each type of data, explain why you collect it (e.g., order fulfillment, newsletter subscription) and the legal basis (e.g., consent, contract necessity, legitimate interest).
Data retention periods – How long you keep each category of data (e.g., “We retain order data for 7 years as required by tax laws”).
Data recipients or categories of recipients – List any third parties with access, such as payment processors (e.g., Stripe), hosting providers (e.g., SiteGround), or analytics services (e.g., Google Analytics).
Rights of the data subject – Explicitly list the eight GDPR rights: right to access, rectification, erasure, restriction of processing, data portability, object, withdraw consent, and lodge a complaint with a supervisory authority.
International data transfers – If you transfer data outside the European Economic Area (EEA), state the safeguards used (e.g., Standard Contractual Clauses).
Automated decision-making and profiling – Disclose if you use automated processes that significantly affect users, and provide logic and consequences.
Organize this information in a logical order, starting with who you are and what data you collect, then moving to rights and contact details. Use headings and short paragraphs to improve readability.
How to Present the Policy to Users
Presenting your privacy policy effectively is just as important as its content. GDPR requires that the policy be given “in a concise, transparent, intelligible, and easily accessible form, using clear and plain language.” Follow these best practices:
Place a link in the website footer – Use a label like “Privacy Policy” or “Data Protection.” Ensure it is visible on all pages, including mobile views.
Use a layered approach – Provide a short summary at the top of the policy (e.g., “We collect your name and email only to process orders and send updates. You can unsubscribe anytime.”) followed by the full policy. This helps users quickly understand key points.
Obtain active consent where required – For non-essential cookies or newsletter sign-ups, use a checkbox that is not pre-ticked. Link the checkbox to your privacy policy so users can review it before consenting.
Make it printable and downloadable – Offer a PDF version or a printer-friendly view. Some WordPress plugins, like Complianz or GDPR Cookie Consent, can generate a downloadable policy.
Include a “Last Updated” date – Place this at the top of the policy to show users when it was last revised. This builds trust and helps with compliance audits.
For a practical implementation in WordPress, you can add a privacy policy link to your theme’s footer using the following code snippet in your theme’s footer.php file (or via a child theme):
Replace /privacy-policy/ with the actual slug of your privacy page. Ensure the link is styled to be clearly visible and accessible.
Updating the Policy When Plugins or Services Change
WordPress sites often rely on plugins and third-party services that handle personal data—contact forms, analytics, e-commerce platforms, and caching tools. Whenever you add, remove, or modify such a plugin or service, you must update your privacy policy accordingly. This is a continuous obligation under GDPR’s principle of accountability. Here is a step-by-step approach:
Audit your plugins and services regularly – Use a tool like the GDPR Framework plugin or a manual checklist. For each plugin, ask: Does it collect, store, or transmit personal data? If yes, record what data and how it is processed.
Update the policy immediately after changes – For example, if you switch from Contact Form 7 to WPForms, update the “Data recipients” section to reflect the new plugin. If you add Google Analytics, include a section on cookies and tracking.
Document the change – Keep a changelog in the policy itself or in a separate internal document. Note the date of change, what was updated, and why. This helps demonstrate compliance during an audit.
Notify users of material changes – If the change significantly alters how data is processed (e.g., introducing a new third-party processor), consider sending an email notification or displaying a banner. For minor changes, simply update the “Last Updated” date.
Re-obtain consent if necessary – If you change the legal basis from legitimate interest to consent, or if you start processing data for a new purpose, you must obtain fresh consent from users. This is common when adding a new marketing tool.
By maintaining a living document that evolves with your WordPress site, you ensure ongoing compliance and build user trust. Remember to review your policy at least every six months, even if no changes have been made, to confirm it remains accurate.
Managing User Consent with WordPress Tools
Under the GDPR, obtaining valid consent from users before processing their personal data is a fundamental requirement. For WordPress site owners, this means implementing robust consent management that goes beyond a simple checkbox. The regulation demands that consent be freely given, specific, informed, and unambiguous. WordPress offers a range of tools, from dedicated plugins to custom code, to help you meet these obligations. This section explores how to use these tools effectively to manage user consent, focusing on banners, granularity, and proof of consent.
Consent Banners and Cookie Notices
The first line of consent management is often a banner or pop-up notice that appears when a user visits your site. This notice must clearly inform users about what data is being collected, why, and by whom. In WordPress, plugins like Complianz, Cookiebot, and Cookie Notice & Consent provide customizable banners that can be tailored to your site’s specific cookies and trackers.
Key features to look for in a consent banner plugin include:
Automatic cookie detection and categorization (essential, functional, marketing, analytics).
Ability to display the banner in multiple languages for multilingual sites.
Options for both opt-in and opt-out mechanisms, with opt-in being the default for GDPR compliance.
Integration with popular page builders like Elementor or WPBakery for seamless design.
Support for “implied consent” where users continue browsing, but explicit consent is required for non-essential cookies.
When configuring your banner, ensure it contains a clear link to your privacy policy and a “Reject All” button that is as prominent as the “Accept All” button. Avoid using pre-ticked checkboxes, as these violate GDPR’s requirement for affirmative action.
Granular Consent for Different Processing Purposes
GDPR requires that users be able to give separate consent for different processing purposes, such as analytics, marketing, and personalization. A blanket “accept all” button is insufficient; users must have the ability to pick and choose which types of data processing they agree to. WordPress tools can provide this granularity through layered consent interfaces.
Implementing granular consent involves:
Segmenting cookies and trackers into categories (e.g., necessary, preferences, statistics, marketing).
Allowing users to toggle consent for each category independently via a cookie settings panel.
Using plugins that support “consent purposes” and “consent vendors” as defined by the IAB Transparency & Consent Framework.
Ensuring that consent for one purpose does not condition access to content that requires consent for a different purpose.
For custom implementations, you can use WordPress hooks and JavaScript to conditionally load scripts based on user preferences. For example, only load Google Analytics if the user has consented to the “statistics” category. Plugins like GDPR Cookie Consent by WebToffee offer built-in granular controls, while developers can use the WP Consent API to standardize consent states across plugins.
Recording and Storing Consent Proof
One of the most overlooked aspects of GDPR compliance is the requirement to be able to demonstrate that you have obtained valid consent. This means recording and storing proof of consent for each user action. WordPress tools can automate this process, creating an audit trail that protects you in case of a regulatory inquiry.
Essential elements of consent recording include:
Timestamp of when consent was given or withdrawn.
User identifier (e.g., IP address, user ID, or session ID).
The specific purposes and vendors the user consented to.
The version of your privacy policy or cookie notice at the time of consent.
Most consent management plugins store this data in your WordPress database, often as encrypted logs. For example, Complianz stores consent proof as a JSON object in the wp_complianz_consent_statistics table, while Cookiebot relies on its cloud service. If you implement a custom solution, consider using a custom post type or a dedicated plugin like “WP Consent Logs” to keep records.
To ensure compliance, regularly export and review these logs. Store backups offsite, and implement a retention policy that deletes old records after the statute of limitations for GDPR enforcement (typically 6 years in most EU countries). Remember: if you cannot prove consent, you effectively have no consent.
Handling User Data Access, Rectification, and Erasure Requests
Under the General Data Protection Regulation (GDPR), individuals have specific rights over their personal data. As a WordPress site owner, you must establish workflows to handle data subject requests (DSRs) efficiently. These include requests for access, correction, and deletion. Failure to respond within the one-month statutory period can result in regulatory penalties. Below, we outline practical steps using WordPress core features and recommended plugins to fulfill these obligations.
Responding to Subject Access Requests (SARs)
A Subject Access Request (SAR) allows an individual to obtain a copy of their personal data held by your site. WordPress does not have a built-in SAR interface, but you can use the GDPR Data Request feature introduced in WordPress 4.9.6. To enable this, navigate to Tools > Export Personal Data in your admin dashboard. You must first verify the requester’s identity—typically via email confirmation. Once verified, WordPress generates a downloadable JSON file containing user data from standard fields (e.g., name, email, comments, and WooCommerce orders if applicable).
For more granular control, consider a dedicated GDPR plugin such as WP GDPR Compliance or Complianz. These plugins extend SAR handling by including data from custom post types, third-party integrations, and logged IP addresses. A practical workflow for SARs includes:
Receiving the request via a dedicated form or email.
Verifying the requester’s identity (e.g., by sending a confirmation link).
Using WordPress’s built-in export tool or plugin to compile the data.
Reviewing the export file to ensure no other individuals’ data is included.
Sending the file securely (e.g., password-protected PDF) within 30 days.
If you handle custom user meta, you may need to write a simple database query to include all relevant rows. For example, to export all user meta for a specific user ID, you could use a command like:
Replace 123 with the actual user ID and run this via phpMyAdmin or WP CLI. Ensure you only expose data the user has a right to access.
Correcting Inaccurate or Incomplete Data
The right to rectification requires you to update or complete a user’s personal data without undue delay. WordPress’s user profile page (Users > All Users > Edit) allows administrators to modify core fields like name, email, and website. For custom fields, you can use a plugin like User Meta Manager or Advanced Custom Fields to provide editable fields on the front-end. To streamline the process, consider the following steps:
Action
WordPress Method
Recommended for
Edit core user fields
Admin user edit screen
Name, email, password
Edit custom user meta
Plugin (e.g., User Meta Manager)
Profile fields, preferences
Bulk corrections
WP CLI or database query
Systematic errors (e.g., typos)
When a user requests correction, ask them to specify the exact data to change and provide evidence if needed (e.g., a new email address). After updating, confirm the change in writing. For sensitive fields, log the correction in a privacy log plugin (e.g., GDPR Cookie Consent) to maintain an audit trail.
The Right to Be Forgotten and Data Deletion Workflows
The right to erasure, or “right to be forgotten,” allows users to request deletion of their personal data. WordPress provides a built-in tool under Tools > Erase Personal Data. Similar to the export tool, it first sends a confirmation email to the requester. Once confirmed, WordPress deletes standard user data (e.g., profile, comments, and WooCommerce orders) but retains anonymized records where necessary (e.g., for legal obligations).
To handle complex deletion scenarios, follow this workflow:
Receive and verify the deletion request.
Check for legal exemptions (e.g., tax records or contractual obligations).
Use WordPress’s erase tool to initiate the process.
Manually delete data from custom tables, third-party integrations (e.g., Mailchimp), or backups.
Confirm deletion and provide a summary to the user.
For custom post types or plugins that store personal data, you may need to write a specific deletion routine. For example, to delete all comments by a user ID, you can use WP CLI:
wp comment delete $(wp comment list --user_id=123 --format=ids)
Replace 123 with the user ID. Always test deletions on a staging site first. After erasure, update your privacy policy to reflect that users can request deletion and note any retention periods for anonymized data.
Securing Your WordPress Site to Protect Personal Data
When managing a WordPress site under GDPR, security is not optional—it is a legal requirement. The General Data Protection Regulation mandates that you implement appropriate technical measures to protect personal data from unauthorized access, loss, or breach. Effective security practices not only safeguard user information but also demonstrate compliance to regulators and build trust with your audience. Below are three critical areas to focus on, each with actionable steps.
HTTPS encrypts data transmitted between your WordPress site and its visitors, preventing eavesdropping, tampering, or interception of personal data such as login credentials, contact form submissions, or payment details. Under GDPR, encryption is considered a key security measure. To enforce HTTPS:
Obtain an SSL/TLS certificate from a trusted provider (many hosts offer free certificates via Let’s Encrypt).
Install and activate the certificate on your server, then configure WordPress to use HTTPS by updating the site URL in Settings > General.
Force HTTPS across the entire site using a plugin like Really Simple SSL or by adding rules to your .htaccess file.
Test your setup with tools like SSL Labs or Why No Padlock to ensure all resources (images, scripts, styles) load securely.
Once HTTPS is active, all data exchanged—including cookies, form entries, and API calls—remains encrypted, fulfilling GDPR’s requirement for a secure transmission channel.
Keeping Core, Themes, and Plugins Updated
Outdated software is a primary vector for security breaches. WordPress core, themes, and plugins frequently release patches that fix vulnerabilities that could expose personal data. GDPR compliance requires you to stay proactive. Follow this checklist:
Component
Update Frequency
Action Required
WordPress Core
As soon as a minor or major release is available
Enable automatic updates for minor releases; test major updates on a staging site first.
Themes
When updates are announced
Remove unused themes; update active themes promptly; verify compatibility with plugins.
Plugins
Immediately after security patches
Delete inactive plugins; enable automatic updates for trusted plugins; review changelogs for security fixes.
Consider using a maintenance plugin that schedules backups before updates. If a vulnerability is patched, delay can lead to data compromise—so prioritize updates weekly and audit your site’s software inventory quarterly.
Implementing Strong Passwords and Two‑Factor Authentication
Weak passwords are a common entry point for attackers seeking to access admin panels, user accounts, or databases containing personal data. GDPR expects you to enforce robust authentication. Take these steps:
Enforce strong password policies using a plugin like Wordfence or iThemes Security. Require a minimum of 12 characters, a mix of uppercase/lowercase letters, numbers, and symbols.
Enable two‑factor authentication (2FA) for all users with administrative privileges. Use authenticator apps (e.g., Google Authenticator) or hardware keys (e.g., YubiKey).
Limit login attempts to prevent brute‑force attacks. Set a threshold (e.g., 3 failed attempts) before a temporary lockout.
Audit user roles and permissions regularly. Remove unused accounts and ensure each user has only the minimum privileges needed.
Combining strong passwords with 2FA creates a layered defense that significantly reduces the risk of unauthorized access. Document these policies in your privacy procedures to show regulators that you have implemented appropriate technical controls.
By addressing these three areas—HTTPS enforcement, regular updates, and strong authentication—you build a solid security foundation for GDPR compliance. Each measure directly protects personal data and demonstrates your commitment to data protection best practices. Review and refine these practices regularly to adapt to evolving threats and regulatory guidance.
Data Breach Notification and Incident Response
Under the General Data Protection Regulation (GDPR), any personal data breach that poses a risk to the rights and freedoms of natural persons must be reported to the relevant supervisory authority within 72 hours of becoming aware of the breach. For WordPress site owners, this means having a clear, documented process to detect, assess, and notify authorities and affected users. A robust incident response plan minimizes legal exposure, preserves user trust, and ensures compliance with Articles 33 and 34 of the GDPR.
When and How to Notify Authorities and Users
Notification requirements depend on the severity of the breach. The GDPR distinguishes between two primary obligations:
Notification to the supervisory authority (Article 33): Required within 72 hours if the breach is likely to result in a risk to the rights and freedoms of individuals. If not feasible within 72 hours, a reasoned delay must be provided.
Communication to affected users (Article 34): Required when the breach is likely to result in a high risk to their rights and freedoms. This must be done without undue delay, using clear and plain language.
To determine which notification applies, assess the breach’s impact: consider the type of data exposed (e.g., email addresses vs. financial information), the number of affected individuals, and the ease of mitigation. For WordPress sites, common breach scenarios include unauthorized access to user databases, plugin vulnerabilities exposing personal data, or accidental publication of sensitive content. Notifications must include the nature of the breach, contact details of the data protection officer (if applicable), likely consequences, and measures taken to address the breach.
A structured checklist ensures no critical step is missed. Below is a practical template for WordPress site administrators:
Step
Action
Responsible Party
Timeline
1. Detection
Identify and confirm the breach (e.g., unusual login attempts, database alert).
Site administrator or security tool
Immediately
2. Containment
Isolate affected systems (e.g., revoke API keys, disable compromised plugins).
Developer or host provider
Within 1 hour
3. Assessment
Determine data types, number of users, and risk level (low, medium, high).
Data protection officer or legal counsel
Within 12 hours
4. Notification
Report to supervisory authority (if required) and affected users (if high risk).
Site owner or designated contact
Within 72 hours
5. Documentation
Record breach details, actions taken, and rationale for decisions.
Administrator
Within 7 days
Additional checklist items include: verifying backup integrity, resetting all user passwords, auditing access logs, and updating affected plugins or themes. Regularly test this checklist through simulated breach drills to ensure readiness.
Tools for Monitoring and Detecting Breaches
Proactive monitoring is essential for early breach detection. The following table compares popular tools suitable for WordPress sites, focusing on GDPR-relevant features:
Tool
Key Feature
GDPR-Specific Benefit
Cost Model
Wordfence Security
Real-time firewall and malware scanner
Logs all login attempts and file changes for audit trails
Freemium (premium starts at $99/year)
Sucuri Security
Remote malware scanning and DDoS protection
Provides incident response and cleanup services
Subscription-based (from $199/year)
Jetpack Security
Brute force attack protection and downtime monitoring
Includes activity log for user actions
Freemium (premium starts at $9.95/month)
WPScan
Vulnerability database scanning
Identifies known plugin/theme vulnerabilities before exploitation
Freemium (API access from $25/year)
For comprehensive coverage, combine a firewall plugin (e.g., Wordfence) with a vulnerability scanner (e.g., WPScan) and a backup solution. Enable detailed logging for all user actions, including data exports and deletions, as required by GDPR accountability principles. Regularly review logs for anomalies—such as multiple failed login attempts from unfamiliar IPs—and configure automated alerts for suspicious activity. Remember, no tool replaces a human-reviewed incident response plan; use monitoring tools to trigger your checklist promptly.
Third-Party Services and Data Processors
When running a WordPress site, you almost certainly rely on third-party plugins, themes, and external services that collect, store, or process personal data on your behalf. Under the GDPR, these entities are considered data processors, and you—as the site owner—are the data controller. This means you are legally responsible for ensuring that every third-party tool you use complies with GDPR requirements. Failing to vet and manage these processors can lead to significant fines and reputational damage. Below, we break down the essential steps for auditing, contracting, and handling data transfers with your vendors.
Before installing any plugin or theme, you must understand exactly how it handles personal data. Conduct a systematic audit of every tool on your WordPress site, including those you may have installed years ago. Follow these steps:
Review the plugin’s privacy policy: Check the developer’s website for a dedicated privacy or data-processing notice. Look for details on what data is collected (e.g., IP addresses, email addresses, cookies, usage analytics), why it is collected, and how long it is retained.
Examine data storage and transmission: Determine whether the plugin sends data to external servers (e.g., for analytics, caching, or form processing). If it does, confirm that the data is encrypted in transit (HTTPS) and at rest.
Check for built-in GDPR features: Many reputable plugins now include options to anonymize IP addresses, disable tracking for logged-in users, or provide cookie consent mechanisms. Enable these where possible.
Document your findings: Create a spreadsheet listing each plugin and theme, its data-handling practices, and the date of your review. Update this audit at least annually or whenever you add or update a tool.
For example, if you use a contact form plugin, you can often add a snippet to your theme’s functions.php file to automatically delete form submissions after a set period. Here is a practical code example for deleting Gravity Forms entries older than 30 days:
This snippet runs daily and removes entries older than 30 days, helping you comply with the data minimization principle.
Data Processing Agreements (DPAs) with Vendors
A Data Processing Agreement (DPA) is a legally binding contract between you (the controller) and a vendor (the processor) that outlines how the vendor will handle personal data. Under GDPR Article 28, DPAs are mandatory for any processor that handles EU residents’ data. When evaluating a vendor, ensure their DPA covers at least the following:
Required Clause
What It Means for Your Site
Scope and purpose of processing
The vendor must only process data for the specific service you’ve contracted (e.g., email marketing, analytics).
Data subject rights
The vendor must assist you in responding to access, rectification, deletion, or portability requests from users.
Security measures
The vendor must implement technical and organizational measures (e.g., encryption, access controls) to protect data.
Sub-processing
The vendor must inform you if they engage sub-processors and allow you to object.
Data breach notification
The vendor must notify you within 72 hours of becoming aware of a personal data breach.
Data deletion upon contract end
After the service ends, the vendor must delete or return all personal data.
For popular WordPress services like Jetpack, Mailchimp, or Google Analytics, standard DPAs are often available on their websites. Always download and sign the latest version before integrating the service.
Transferring Data Outside the EEA: Standard Contractual Clauses
If any of your third-party vendors store or process data outside the European Economic Area (EEA), you must ensure an adequate level of data protection. Standard Contractual Clauses (SCCs) are pre-approved legal mechanisms issued by the European Commission that allow such transfers. Here is how to implement them:
Identify all non-EEA data flows: Audit your plugins and services to see where data is sent. Common examples include cloud-based backup services (e.g., UpdraftPlus to a US server), analytics tools (e.g., Google Analytics), or CDN providers.
Request SCCs from the vendor: Most major vendors (e.g., Google, Automattic) offer SCCs as part of their DPA. If they do not, consider switching to a GDPR-compliant alternative.
Complete the SCCs: Fill in the specific details—your company name, the vendor’s name, the categories of data subjects, and the types of personal data transferred. Both parties must sign the clauses.
Conduct a Transfer Impact Assessment (TIA): For transfers to countries like the US, you may need a TIA to evaluate whether local laws (e.g., surveillance programs) undermine the protections of SCCs. Document your assessment and keep it on file.
For example, if you use Google Analytics, you can access the Google Measurement Controller-Controller Data Protection Terms (which include SCCs) by navigating to your Google Ads or Analytics account settings. Always verify that your vendor’s SCCs are the most recent version (2021 or later).
Ongoing Compliance: Audits, Updates, and Documentation
Maintaining GDPR compliance is not a one-time project but a continuous commitment. As your website evolves—through new plugins, data collection methods, or user interactions—your compliance posture must adapt. A proactive approach involving regular audits, thorough documentation, and up-to-date knowledge ensures your WordPress site remains aligned with legal obligations and reduces the risk of penalties.
Regular audits are the backbone of sustained compliance. They help you identify gaps, verify that your stated practices match actual operations, and demonstrate accountability to supervisory authorities. Schedule audits at least annually, or whenever you make significant changes to your site’s functionality.
During a data protection audit, focus on the following areas:
Data inventory check: Map all personal data your WordPress site collects—via contact forms, comments, e-commerce transactions, analytics, and third-party services. Verify that data collection is limited to what is necessary for your stated purpose.
Consent mechanism review: Test cookie banners, opt-in checkboxes, and subscription forms to ensure they are clear, unambiguous, and allow users to withdraw consent as easily as they gave it.
Third-party service assessment: List every external service connected to your site (e.g., Google Analytics, Mailchimp, payment processors). Confirm they have GDPR-compliant data processing agreements (DPAs) and do not transfer data to non-adequate countries without safeguards.
Security controls evaluation: Check that SSL/TLS certificates are valid, backups are encrypted, and access controls (e.g., strong passwords, two-factor authentication) are in place for admin accounts.
Data retention and deletion: Review how long you keep user data (e.g., comment logs, order histories). Implement automatic deletion for data beyond its lawful retention period, or provide a manual cleanup process.
Document each audit’s findings, actions taken, and responsible parties. This record serves as evidence of your compliance efforts.
Documenting Your Processing Activities
Under Article 30 of the GDPR, organizations with 250 or more employees—or those processing special categories of data—must maintain a Record of Processing Activities (ROPA). Even if your site falls below this threshold, keeping a ROPA is a best practice that simplifies audits and demonstrates accountability.
How long each type of data is kept (e.g., 24 months for analytics, 6 years for financial records)
Security measures
Encryption, access controls, backup procedures
Update this document whenever you add a new plugin, change a service provider, or alter your data handling practices. Store it securely but make it accessible for internal reviews and potential regulator requests.
GDPR interpretation and enforcement evolve through court rulings, updated guidelines from the European Data Protection Board (EDPB), and national supervisory authorities. Additionally, new technologies (e.g., AI-driven analytics, advanced tracking) may introduce novel compliance challenges. To stay ahead:
Subscribe to official sources: Follow the EDPB newsletter, your local data protection authority’s updates, and reputable legal blogs that specialize in privacy law.
Attend webinars and training: Many privacy organizations offer free or low-cost sessions on GDPR updates. Consider annual staff training to reinforce best practices for handling user data.
Review your WordPress ecosystem: When core WordPress, plugins, or themes release updates, read their changelogs for privacy-related fixes. Outdated software can introduce vulnerabilities that undermine compliance.
Monitor consent and cookie regulations: The ePrivacy Directive (soon to be replaced by the ePrivacy Regulation) interacts with GDPR. Stay aware of changes affecting cookie consent requirements, especially for tracking scripts.
By embedding audits, documentation, and continuous learning into your routine, you transform GDPR compliance from a burden into a sustainable practice that protects both your users and your reputation.
Frequently Asked Questions
What is GDPR and why does it affect my WordPress site?
GDPR (General Data Protection Regulation) is a European Union regulation that protects the personal data of individuals within the EU. It affects any WordPress site that collects or processes personal data from EU residents, regardless of where the site is hosted. This includes data collected through contact forms, comments, analytics, cookies, and e-commerce transactions. Non-compliance can lead to fines up to €20 million or 4% of annual global turnover.
Do I need a privacy policy on my WordPress site for GDPR?
Yes, a clear and comprehensive privacy policy is required under GDPR. It must explain what personal data you collect, how you use it, the legal basis for processing, data retention periods, and users' rights. WordPress includes a default privacy policy template that you can customize. Your privacy policy must be easily accessible from your site, typically via a footer link.
How do I handle cookie consent on WordPress for GDPR?
You need to obtain explicit, informed consent from users before placing non-essential cookies (e.g., analytics, advertising). Use a cookie consent plugin that blocks cookies until consent is given, provides clear information about each cookie, and allows users to withdraw consent easily. Many WordPress cookie plugins also integrate with popular analytics tools and help you document consent records.
Several plugins assist with GDPR compliance: (1) Cookie consent plugins like Cookiebot or Complianz; (2) Privacy policy generators like WP Legal Pages; (3) Data erasure and export tools (built into WordPress core since 4.9.6); (4) Consent management platforms that integrate with forms and comments. Always choose plugins that are regularly updated and have good reviews.
How do I enable data erasure and export for users on WordPress?
WordPress includes built-in tools since version 4.9.6: under Tools > Erase Personal Data and Export Personal Data, you can process user requests. Users can request their data via a privacy page. You must respond within one month. Ensure your theme and plugins support these functions. For custom data, you may need to add filters or use a dedicated plugin.
What constitutes personal data under GDPR for a WordPress site?
Personal data is any information that can identify a natural person, such as name, email address, IP address, location data, online identifiers (cookies), or any data specific to physical, physiological, genetic, mental, economic, cultural, or social identity. On WordPress, this includes commenter IPs, user registration details, form submissions, analytics data, and cookie identifiers.
Do I need a Data Processing Agreement (DPA) with my WordPress hosting provider?
If your hosting provider processes personal data on your behalf (e.g., stores user data), you need a DPA. Many reputable hosts (like SiteGround, Kinsta, WP Engine) offer standard DPAs. Check your hosting agreement and request one if missing. The DPA must specify the nature, purpose, duration of processing, types of data, and security measures.
How do I handle user comments under GDPR on WordPress?
By default, WordPress stores commenters' IP addresses and email addresses. For GDPR compliance, you should: add a consent checkbox to the comment form (e.g., 'Save my name, email, and website in this browser for the next time I comment'), inform users how their data will be used, and provide a link to your privacy policy. You can also anonymize IPs using a plugin.
How to Optimize WordPress Images for Web Performance: A Complete Guide
Introduction: Why Image Optimization Matters for WordPress Performance
Images are the backbone of visual storytelling on the web, but they are also the leading culprit behind sluggish WordPress sites. Every photograph, illustration, or graphic you upload adds weight to your pages. When images are not optimized, they can consume up to 60% of a page’s total bytes. This directly impacts how quickly your content appears on a visitor’s screen. In the world of web performance, every millisecond counts. A delay of even one second can reduce page views by 11%, decrease customer satisfaction by 16%, and lower conversion rates by 7%. For WordPress site owners—whether running a blog, an e-commerce store, or a portfolio—image optimization is not a nice-to-have; it is a fundamental requirement for delivering a fast, engaging, and successful website.
The Impact of Unoptimized Images on Load Times
Unoptimized images are the single largest contributor to slow load times. A typical high-resolution photo from a modern smartphone can be 3-5 MB or more. When you multiply that by the number of images on a page, the cumulative effect is staggering. Consider the following breakdown of how unoptimized images degrade performance:
Increased bandwidth consumption: Large files force browsers to download more data, especially on mobile networks. This leads to longer wait times and higher data costs for users.
Delayed page rendering: Images are often “render-blocking” resources. The browser must download and decode them before it can fully display the page layout, causing a blank or partially loaded screen.
Higher bounce rates: Visitors expect pages to load in under three seconds. If your images cause a delay, users will abandon your site for a faster competitor. Studies show that 53% of mobile users leave a page that takes longer than three seconds to load.
Server strain: Hosting large images consumes storage and increases server load during peak traffic. This can lead to downtime or throttled performance for all visitors.
Without optimization, even a well-coded WordPress theme will struggle to deliver acceptable speed. The result is a poor user experience that undermines your site’s credibility and effectiveness.
How Image Optimization Boosts Core Web Vitals
Google’s Core Web Vitals are a set of real-world metrics that measure user experience on the web. Image optimization directly improves three key metrics:
Reduces the size of the largest image on the page (often a hero or banner). Smaller files load faster, decreasing LCP to under 2.5 seconds.
Visitors see the main content sooner, reducing perceived waiting time.
First Input Delay (FID)
Optimized images free up browser resources for JavaScript and interactivity. Less processing time for large images means the page becomes responsive quicker.
Users can click, tap, or scroll without lag, improving engagement.
Cumulative Layout Shift (CLS)
Using proper image dimensions and lazy loading prevents layout shifts. Optimized images load in their reserved space, without pushing content down.
No unexpected jumps during reading, which reduces frustration and accidental clicks.
By optimizing images, you align your WordPress site with Google’s performance standards. This not only improves user satisfaction but also positively influences search rankings, as page experience is a confirmed ranking factor.
Balancing Quality and File Size: The Key Goal
The central challenge of image optimization is finding the sweet spot between visual fidelity and file size. You want images that look crisp and professional, yet load instantly. Achieving this balance requires a methodical approach:
Understand image formats: Use modern formats like WebP or AVIF, which offer superior compression without visible quality loss. JPEG is still acceptable for photographs, while PNG is best for graphics with transparency. Avoid BMP or TIFF for web use.
Apply smart compression: Lossy compression reduces file size by discarding non-essential data. The key is to apply a compression level where the human eye cannot detect the difference. Aim for 70-85% quality for JPEGs and comparable settings for WebP.
Resize to exact display dimensions: Never upload a 4000-pixel-wide image to display at 800 pixels. Use image editing tools or WordPress plugins to scale images to the maximum width they will appear on your site.
Test and iterate: Use tools like PageSpeed Insights or GTmetrix to measure your images’ impact. Adjust compression levels and dimensions until you achieve a balance where visual quality is maintained, but file size is minimized (ideally under 100 KB for most content images).
When you master this balance, your WordPress site will deliver rich visuals without sacrificing speed. This optimization is the foundation for a fast, user-friendly, and search-engine-optimized website that keeps visitors engaged and drives conversions.
Understanding Common Image Formats and Their Use Cases
Choosing the right image format is a foundational step in learning how to optimize WordPress images for web performance. Each format balances file size, visual quality, and feature support differently. Using the wrong format can bloat your pages with unnecessary kilobytes, slowing load times and harming user experience. This section breaks down the most common formats—JPEG, PNG, GIF, WebP, and AVIF—and explains when to use each for optimal results in WordPress.
JPEG vs. PNG: Compression and Transparency Trade-offs
JPEG and PNG are the two most widely used formats on the web, but they serve very different purposes.
JPEG (Joint Photographic Experts Group): Uses lossy compression, which discards some image data to reduce file size. It excels with photographs and complex gradients where minor quality loss is imperceptible. JPEG does not support transparency.
PNG (Portable Network Graphics): Uses lossless compression, preserving every pixel exactly. It supports full transparency (alpha channel), making it ideal for logos, icons, screenshots, and graphics with sharp edges or text. File sizes are typically much larger than JPEG for photographic content.
Feature
JPEG
PNG
Compression type
Lossy
Lossless
Transparency support
No
Yes (alpha channel)
Best for
Photos, complex scenes
Graphics, logos, screenshots
File size (typical)
Small to medium
Large
Practical rule: Use JPEG for all photographic content in your WordPress media library. Use PNG only when you need transparency—for example, a logo that sits over a colored background. For photographs with no transparency needs, PNG can increase file size by 200–300% without visible quality gains.
Next-Gen Formats: WebP and AVIF Benefits
Modern formats like WebP and AVIF offer superior compression and features compared to JPEG and PNG. Both are supported in all major browsers as of 2024, making them safe choices for WordPress optimization.
WebP: Developed by Google, WebP supports both lossy and lossless compression, as well as transparency and animation. Lossy WebP can reduce file sizes by 25–35% compared to JPEG at equivalent quality. Lossless WebP is typically 20–30% smaller than PNG. WordPress has native WebP support since version 5.8.
AVIF: Based on the AV1 video codec, AVIF offers even better compression than WebP—often 50% smaller than JPEG with similar perceptual quality. It supports HDR and wide color gamut. However, encoding is slower, and some older browsers (e.g., Safari before version 16) lack support.
Practical code example for WordPress: To serve WebP or AVIF images with fallbacks, add this to your theme’s functions.php file (requires a plugin like WebP Express or Imagify for automatic conversion):
This code adds a fallback data attribute for browsers that do not support WebP. In practice, most WordPress optimization plugins handle this automatically by using <picture> elements with multiple sources.
When to Use GIFs and SVG for Specific Needs
GIF and SVG are specialized formats that serve narrow but important use cases.
GIF (Graphics Interchange Format): Supports animation and transparency (binary, not alpha). It is limited to 256 colors, making it unsuitable for photographs or complex gradients. File sizes can become very large for long or high-resolution animations. Use GIF only for simple, short animations like loading spinners or small memes. For complex animations, consider video formats (MP4) or animated WebP, which offer better compression.
SVG (Scalable Vector Graphics): An XML-based vector format that scales infinitely without quality loss. It is ideal for logos, icons, charts, and illustrations. SVG files are typically tiny (a few kilobytes) and can be styled with CSS or manipulated with JavaScript. WordPress does not support SVG uploads by default for security reasons, but you can enable it via a plugin like Safe SVG.
When to choose each: Use GIF for tiny, low-color animations where file size is not critical. Use SVG for any graphic that needs to scale across devices—logos, icons, and infographics. Avoid using GIF for photographs or large animations; instead, use animated WebP or a short MP4 video loop. For static graphics with transparency, prefer SVG over PNG when possible, as SVG files are often 90% smaller.
Choosing the Right Image Dimensions and Aspect Ratios
Selecting the correct image dimensions for each context on your WordPress site is a foundational step in optimizing for web performance. When you upload an image that is larger than the display area, the browser must scale it down, consuming unnecessary bandwidth and processing power. Conversely, an image that is too small will appear pixelated or stretched. To avoid this, you must match image dimensions to their intended use—whether as a thumbnail in a grid, a featured image on a blog roll, or a full-width hero banner. This section explains how to leverage WordPress’s built-in tools and customize them for precise control.
Using WordPress’s Built-In Image Sizes Effectively
WordPress automatically generates multiple versions of every uploaded image, based on predefined sizes set in your theme or via the Media Settings screen. By default, these include “Thumbnail” (150×150 pixels, cropped), “Medium” (300×300 pixels), “Large” (1024×1024 pixels), and “Full” (the original dimensions). To use these effectively:
Thumbnails: Ideal for grid layouts, product catalogs, or gallery widgets. Always use the exact size to avoid cropping surprises.
Medium: Suitable for inline images within posts or sidebars. Keep below 300px width for consistent alignment.
Large: Best for featured images on single post pages or content areas where high resolution is needed.
Full: Avoid using this for standard content. Reserve it for lightbox views or downloadable assets.
To verify which sizes your theme supports, navigate to Settings > Media in your WordPress dashboard. Here, you can adjust the default dimensions, but be aware that changes only apply to newly uploaded images—not existing ones. For optimal performance, always select the smallest available size that matches your layout’s display width.
Customizing Thumbnail Dimensions via Functions.php
When your theme’s default sizes don’t align with your design, you can add custom image dimensions by editing your child theme’s functions.php file. This gives you granular control over aspect ratios and cropping behavior. Use the add_image_size() function with the following syntax:
add_image_size( 'custom-thumb', 400, 300, true );
The parameters are: name, width, height, and crop mode. Setting the fourth parameter to true enables hard cropping, which cuts the image to exact dimensions (useful for uniform grid thumbnails). Setting it to false (or omitting it) uses proportional scaling, which maintains the aspect ratio but may leave uneven edges. After adding the code:
Regenerate thumbnails using a plugin like Regenerate Thumbnails or Force Regenerate Thumbnails to apply the new size to existing images.
Reference the new size in your theme templates using the_post_thumbnail( 'custom-thumb' );.
Test on various devices to ensure the crop aligns with your design (e.g., faces or key elements are not cut off).
This approach is particularly useful for e-commerce sites where product images must fit a specific grid, or for portfolio sites requiring consistent aspect ratios across galleries.
Responsive Images with srcset and sizes Attributes
Modern WordPress automatically adds srcset and sizes attributes to images, enabling browsers to choose the best resolution based on screen size and pixel density. However, you can optimize this further by defining explicit sizes attributes in your theme. The srcset attribute lists multiple image URLs (e.g., 300w, 600w, 1200w), while the sizes attribute tells the browser how much space the image will occupy at different breakpoints. For example:
This ensures that on mobile devices, the browser loads a smaller image file, while on desktops, it selects a higher resolution version. To see which sizes are generated, inspect the HTML output in your browser’s developer tools.
Image Size
Typical Use Case
Recommended Dimensions
Crop Behavior
Thumbnail
Grid galleries, post listings
150×150 px
Hard cropped (exact)
Medium
Inline content, sidebar images
300×300 px
Proportional (no crop)
Large
Featured images, single posts
1024×1024 px
Proportional (no crop)
Full
Lightbox, high-res downloads
Original upload size
No scaling
By combining proper dimension selection, custom thumbnail sizes, and responsive attributes, you ensure that every image on your WordPress site loads at the optimal size for its context—reducing page weight and improving user experience across devices.
Optimizing images before they ever reach your WordPress media library is the most effective way to improve site speed without sacrificing visual quality. Pre-upload compression reduces file sizes by 40–80%, which directly decreases page load times and bandwidth usage. By processing images on your local machine or through a web service, you maintain full control over compression levels and avoid relying on server-side plugins that may conflict with your theme. The key is to use tools that apply lossy or lossless compression intelligently—removing metadata, reducing color palettes, and optimizing encoding—while preserving the visual integrity needed for web display.
Desktop Tools: Photoshop, GIMP, and ImageOptim
Desktop applications offer the most granular control over compression settings, making them ideal for photographers, designers, or anyone handling high-resolution images. Here are the leading options:
Adobe Photoshop: Use “Save for Web (Legacy)” (File > Export > Save for Web). Set quality between 50–70% for JPEGs; for PNGs, reduce colors to 256 or fewer. The “Optimized” option yields smaller files by optimizing Huffman coding.
GIMP: Export as JPEG with a quality slider (typically 75–85% for web). For PNGs, use the “PNG8” format with dithering disabled to drastically reduce size. GIMP also strips EXIF data via “Export” > “Advanced Options.”
ImageOptim (macOS): Drag and drop images for lossless compression. It removes metadata, recompresses JPEGs, and optimizes PNGs using pngcrush and advpng. A practical command-line alternative for batch processing is pngquant or jpegoptim on Linux.
For a quick reference, the table below compares common settings:
Tool
Best For
Typical Reduction
Key Setting
Photoshop
JPEG/PNG
50–70%
Quality 60, Progressive
GIMP
JPEG/PNG
40–60%
Quality 75, No EXIF
ImageOptim
All formats
30–50%
Lossless mode
Online Compressors: TinyPNG, Squoosh, and Kraken
When you need quick compression without installing software, online tools are fast and accessible. They automatically handle format conversion and metadata stripping. The most reliable options include:
TinyPNG (tinypng.com): Compresses PNGs and JPEGs using smart lossy algorithms. It reduces file sizes by up to 70% while preserving transparency. The free tier handles up to 20 images (5 MB each) per batch.
Squoosh (squoosh.app): An open-source tool by Google that offers real-time comparison between original and compressed versions. You can adjust quality, resize dimensions, and choose between MozJPEG, WebP, or AVIF formats. Ideal for precise control.
Kraken (kraken.io): Provides both lossy and lossless modes, plus an API for automated workflows. The free plan compresses images up to 1 MB each, but the web interface is clean and supports batch uploads.
For a command-line approach using a tool like cwebp (from Google’s WebP library), you can run this in your terminal to convert and compress a JPEG to WebP:
cwebp -q 80 input.jpg -o output.webp
This reduces file size by 25–35% compared to JPEG at equivalent quality, and WebP is natively supported in modern WordPress installations.
Batch Processing for Large Image Libraries
If you manage hundreds or thousands of images—common for e-commerce stores, portfolios, or blogs with galleries—batch processing is essential. Manual compression becomes impractical, so use tools that automate the workflow:
Adobe Photoshop Actions: Record a compression action (e.g., “Save for Web” with your preferred settings) and run it on an entire folder via File > Automate > Batch.
XnConvert (free, cross-platform): Supports batch resizing, format conversion, and compression. Add all images, set output to JPEG at 80% quality, and process in one click.
Command-line tools: Use find with jpegoptim on Linux/macOS. For example, to compress all JPEGs in a directory recursively:
This command strips metadata and sets quality to 80%, reducing total library size by 30–50%. For PNGs, replace with optipng or pngquant. After batch processing, upload the optimized files to WordPress via the Media Library or FTP to ensure no further server-side compression is needed. This approach saves bandwidth and speeds up your site from the moment images are served.
Using WordPress Plugins for Automated Image Optimization
Automated image optimization plugins are the most efficient way to implement performance best practices without manual intervention. These tools compress, resize, and convert images on upload or in bulk, saving server resources and improving page load times. Below is a detailed comparison of the most popular options, along with specialized plugins for WebP conversion and lazy loading.
Smush vs. ShortPixel vs. Imagify: Feature Comparison
Three plugins dominate the WordPress image optimization space. The table below highlights their core differences:
Feature
Smush
ShortPixel
Imagify
Free tier compression
Unlimited (lossy only)
100 images/month
25 MB/month (approx. 200 images)
Compression modes
Lossy (basic), Super Smush (lossless+)
Lossy, Glossy, Lossless
Normal, Aggressive, Ultra
Bulk optimization
Yes (unlimited on free)
Yes (paid credits)
Yes (limited on free)
WebP conversion
Paid add-on ($3/month)
Built-in (paid)
Built-in (paid)
Resizing on upload
Yes
Yes
Yes
CDN integration
Paid Smush CDN
None built-in
None built-in
Pricing (annual)
$69 (pro)
From $4.99/month
From $4.99/month
Smush is ideal for beginners and sites with tight budgets due to its unlimited free compression. However, its lossy-only free mode may not suit photographers requiring lossless quality. ShortPixel offers granular control with three compression levels and supports PNG, GIF, and PDF optimization. Its credit-based system works well for small to medium sites. Imagify excels in speed—it processes images faster than competitors—and its “Ultra” mode delivers aggressive compression. All three support bulk optimization, but Smush’s free bulk feature is unmatched.
WebP Conversion Plugins: WebP Express and EWWW
WebP format can reduce image file sizes by 25–35% compared to JPEG or PNG, with no perceptible quality loss. Two dedicated plugins simplify conversion:
WebP Express: This lightweight plugin converts images to WebP using either the GD library or Imagick. It serves WebP to browsers that support it (Chrome, Edge, Firefox) and falls back to original formats for others. Key features include automated conversion on upload, bulk conversion, and optional CDN support. Pro: Minimal server overhead and no external API dependencies. Con: Requires manual configuration for advanced settings like quality thresholds.
EWWW Image Optimizer: A full-featured plugin that includes WebP conversion alongside standard compression. It supports all major image formats and can convert existing media library images. EWWW offers both local and cloud-based processing (the latter requires a paid subscription). Pro: One-click conversion for entire libraries and built-in lazy loading. Con: Free local conversion can be slow on large sites; cloud mode costs $7/month.
Both plugins handle browser detection automatically, but EWWW is better for users who want an all-in-one solution, while WebP Express is preferred for minimalist setups.
Lazy Loading Plugins and Their Performance Impact
Lazy loading delays loading of off-screen images until the user scrolls near them. This reduces initial page weight and improves time to interactive. Native lazy loading (loading=”lazy” attribute) is now supported in most browsers, but plugins add advanced features:
a3 Lazy Load: Replaces all images, iframes, and videos with placeholders. It uses JavaScript for fallback support in older browsers. Performance impact: Reduces initial data transfer by 40–60% on image-heavy pages. Con: Can cause layout shifts if placeholder dimensions are not set.
Lazy Load by WP Rocket: Built into the WP Rocket caching plugin, it applies lazy loading to images, thumbnails, and iframes with minimal configuration. Performance impact: Works seamlessly with caching and CDN, reducing server requests by up to 50%. Con: Only available as part of the premium WP Rocket package ($59/year).
Jetpack Lazy Load: Part of Jetpack’s free module, it uses Intersection Observer for modern browsers and JavaScript fallback. Performance impact: Lightweight (under 10 KB) and does not break existing layouts. Con: Limited customization—no option to exclude specific images.
For most sites, combining a compression plugin (like ShortPixel) with a dedicated lazy loader (such as a3 Lazy Load) yields the best results. Avoid stacking multiple lazy loading plugins, as they can conflict and cause visual glitches. Test with tools like Google PageSpeed Insights to verify performance gains before and after implementation.
Implementing Lazy Loading for Images
Lazy loading is a performance optimization technique that defers the loading of images until they are about to enter the viewport. By delaying off-screen images, you reduce the initial page weight, cut down on HTTP requests, and improve perceived performance—especially on content-heavy WordPress sites. This guide walks you through three effective approaches, from native browser support to advanced JavaScript libraries and theme-level configuration.
Native Lazy Loading with the loading=’lazy’ Attribute
The simplest method is using the HTML loading="lazy" attribute, supported by all modern browsers. When added to <img> or <iframe> tags, it tells the browser to load the resource only when it nears the viewport. This requires no JavaScript and works out of the box. To implement it in WordPress, you can add the attribute manually in your theme’s template files or via a filter in your theme’s functions.php file.
Example code to add native lazy loading to all images in WordPress content:
When you need more granular control or broader browser support, JavaScript libraries like lazysizes are a reliable choice. Lazysizes is a lightweight, SEO-friendly script that automatically detects images, iframes, and videos and loads them as users scroll. It uses a data-src or data-srcset attribute instead of the standard src, preventing the browser from fetching the resource until triggered.
Supports responsive images (data-srcset and data-sizes).
Works with older browsers (IE9+).
Includes built-in features like automatic IntersectionObserver detection and low-quality image placeholders (LQIP).
Note that JavaScript-based libraries add a small script overhead, but the performance gains from deferred loading typically outweigh this cost.
Configuring Lazy Loading in WordPress Themes and Plugins
Many WordPress themes and performance plugins offer built-in lazy loading options, saving you from manual code edits. Here’s how to configure them effectively:
Method
Where to Configure
Notes
Block themes (FSE)
Global styles or block settings
Some themes add loading="lazy" automatically; check under “Performance” settings.
Cache/performance plugins
WP Rocket, W3 Total Cache, LiteSpeed Cache
Enable lazy loading in their “Media” or “Optimization” tabs. WP Rocket also offers native and JS-based options.
Dedicated lazy load plugins
Lazy Load by WP Rocket, a3 Lazy Load
These replace native functionality with custom scripts; test for conflicts with your theme.
Custom theme implementation
functions.php or template files
Use filters (like the native example above) or enqueue a library (like lazysizes).
Always test on staging first—some plugins may break lazy loading for carousels or sliders.
Exclude critical above-the-fold images (e.g., hero banners) to avoid delays in loading the first screen.
For WooCommerce sites, ensure product gallery images still load correctly when lazy loading is active.
By choosing the right lazy loading approach—native, JavaScript, or plugin-based—you can significantly reduce initial page weight and create a faster, more responsive WordPress site. Combine it with image compression and proper sizing for maximum performance gains.
Leveraging a Content Delivery Network (CDN) for Images
A Content Delivery Network (CDN) is a geographically distributed group of servers that work together to deliver internet content quickly. For WordPress image optimization, a CDN stores copies of your images on multiple servers around the world. When a visitor accesses your site, the CDN serves the image from the server closest to them, drastically reducing load times. This is particularly critical for image-heavy sites, where large file sizes can stall page rendering. By offloading image delivery from your origin server, a CDN also reduces bandwidth consumption and hosting costs, making it a cornerstone of modern web performance.
How CDNs Reduce Latency and Bandwidth Costs
Latency—the delay before data transfer begins—is primarily caused by the physical distance between a user and your hosting server. A CDN mitigates this by caching your images at edge servers in multiple geographic locations. For example, a visitor in Tokyo will receive an image from a nearby CDN server in Japan rather than from your origin server in the United States. This can cut latency by 50% or more. Bandwidth costs are also lowered because the CDN handles the bulk of image delivery, reducing the load on your hosting plan. Many CDNs offer tiered pricing or flat rates that are more economical than scaling your own server resources. Additionally, CDNs often include features like automatic image compression, WebP conversion, and lazy loading, further optimizing performance without manual effort.
Popular CDN Options: Cloudflare, KeyCDN, and Bunny.net
Choosing the right CDN for your WordPress site depends on your budget, technical comfort, and specific needs. Below is a comparison of three widely used options:
Global edge network, image optimizer, automatic compression, WebP, Brotli
Pay-as-you-go (e.g., $0.01/GB) with low minimums
Plugin (BunnyCDN) or pull zone setup
Cloudflare is ideal for beginners due to its free tier and built-in security, while KeyCDN offers granular control and an image processing API for advanced users. Bunny.net stands out for its low cost and straightforward setup, making it a favorite for budget-conscious WordPress site owners.
Integrating a CDN with WordPress via Plugins
Integrating a CDN with WordPress is streamlined through dedicated plugins, which automate URL rewriting and cache purging. Follow these steps for a typical setup:
Choose a CDN plugin such as CDN Enabler, W3 Total Cache, or WP Rocket (premium). These plugins allow you to enter your CDN URL and automatically rewrite image paths.
Configure your CDN service by creating a pull zone (e.g., with Bunny.net) or enabling the CDN in your Cloudflare dashboard. For Cloudflare, simply point your DNS to Cloudflare nameservers; the CDN activates automatically.
Set up the plugin: In your WordPress admin, go to the plugin’s settings. For CDN Enabler, paste your CDN zone URL (e.g., https://yourzone.b-cdn.net) and specify which file types to include (e.g., .jpg, .png, .webp).
Enable image optimization features if your CDN offers them—like automatic WebP conversion or compression. In Cloudflare, enable “Polish” in the Speed settings; in Bunny.net, activate “Image Optimizer” in your pull zone.
Test and purge: Clear your site cache and use a tool like GTmetrix to confirm images are served from the CDN. If you update an image, purge the CDN cache via the plugin or CDN dashboard.
For image-heavy sites, consider also using a plugin like ShortPixel or Imagify to compress images before they are cached by the CDN, maximizing performance gains. Once integrated, your WordPress images will load faster for global audiences, reduce server strain, and lower bandwidth costs—making CDN investment a high-impact optimization step.
Optimizing Image Delivery with Caching and Headers
After you have compressed and resized your WordPress images, the next critical step for web performance is ensuring those images are delivered to returning visitors as quickly as possible. This is where browser caching and proper HTTP headers come into play. By instructing a user’s browser to store image files locally for a defined period, you eliminate redundant HTTP requests, reduce server load, and dramatically improve page load times for repeat visits. The key mechanisms for this are Expires headers, Cache-Control directives, and ETags. Implementing these correctly can reduce image load times by up to 50% for returning users, directly supporting your goal to optimize WordPress images for web performance.
Setting Expires Headers for Image Files
Expires headers provide an explicit date and time after which a cached resource is considered stale. For image files—such as JPEG, PNG, GIF, and WebP—you typically want a far-future Expires header because these assets rarely change. A common best practice is to set the Expires header to one year from the request time. This tells the browser: “Do not even ask the server for this image again for a full year; use the local copy.”
To set this in WordPress, you can add rules to your site’s .htaccess file (on Apache servers) or use a plugin. A typical .htaccess snippet looks like this:
<IfModule mod_expires.c>
ExpiresActive On
ExpiresByType image/jpg "access plus 1 year"
ExpiresByType image/jpeg "access plus 1 year"
ExpiresByType image/gif "access plus 1 year"
ExpiresByType image/png "access plus 1 year"
ExpiresByType image/webp "access plus 1 year"
</IfModule>
If you use a CDN or caching plugin, these headers are often configured automatically. Always verify your headers using browser developer tools (Network tab) to ensure the Expires header is present and set correctly.
Using Cache-Control Directives for Maximum Caching
While Expires headers are still widely supported, the modern and more flexible approach is the Cache-Control header. This directive gives you granular control over caching behavior. For images, the optimal Cache-Control configuration is:
public: Allows the image to be cached by any intermediary (e.g., CDN, proxy) and the browser.
max-age: Specifies the freshness lifetime in seconds. One year equals 31536000 seconds.
immutable: A newer directive that tells the browser the resource will never change during its max-age. This prevents revalidation requests on page reloads.
A complete example for images would be: Cache-Control: public, max-age=31536000, immutable. This combination ensures that once a visitor downloads an image, their browser will never re-check with the server for updates during the cache period, drastically reducing latency.
Below is a comparison table showing the key differences between Expires and Cache-Control headers for image optimization:
Header Type
Precision
Flexibility
Best Use Case for Images
Expires
Absolute date/time
Low (fixed date)
Legacy support; simple one-year caching
Cache-Control
Relative seconds (max-age)
High (directives like public, immutable)
Modern caching; avoids clock skew issues
For maximum performance, use Cache-Control with a long max-age and the immutable directive. You can set this via your server configuration or through a WordPress caching plugin.
Leveraging WordPress Caching Plugins (e.g., W3 Total Cache)
Manually editing server files is effective but can be error-prone, especially for non-developers. WordPress caching plugins automate the process of setting proper headers and managing browser caching for images. W3 Total Cache is a popular and powerful option. To configure it for image caching:
Under the General section, enable “Set expires header” and “Set cache control header.”
Scroll to the CSS & JS and Media & Other Files sections. Set the “Expires header lifetime” to 31536000 seconds (one year) for images.
Check the box for “Set cache control header” and select “public” with max-age set to 31536000. Enable “Set immutable header” if available.
Save all settings and purge the cache.
Other plugins like WP Super Cache and WP Rocket offer similar functionality. The key is to ensure that your plugin is actually sending the correct headers for image file types. After configuration, test your images using a tool like GTmetrix or Pingdom to confirm that “Leverage browser caching” warnings are resolved. This automated approach ensures consistent, error-free implementation, directly contributing to your goal to optimize WordPress images for web performance.
Auditing Existing Images and Cleaning Up Your Media Library
Before you can optimize your WordPress images for web performance, you need to understand what you are working with. Most WordPress sites accumulate hundreds or thousands of images over time, many of which are oversized, incorrectly formatted, or completely unused. A thorough audit and cleanup of your media library is the first concrete step in any optimization workflow. This process reduces server storage, lowers bandwidth usage, and directly improves page load times.
Running a Performance Audit with GTmetrix or PageSpeed Insights
The most objective way to identify problematic images is to run a performance audit using tools like GTmetrix or Google PageSpeed Insights. These tools analyze your site’s actual loading behavior and provide specific recommendations for image optimization.
To perform an effective audit:
Visit your site’s most image-heavy pages (e.g., homepage, product galleries, blog posts with featured images).
Enter the URL into GTmetrix or PageSpeed Insights and run the test.
Look for the “Serve properly sized images” and “Efficiently encode images” recommendations.
Note the exact image URLs, file sizes, and dimensions that the tool flags as problematic.
For example, PageSpeed Insights might report that a 2400×1600 pixel image is being displayed at 800×533 pixels on mobile devices. This indicates the image is three times larger than needed, wasting bandwidth and slowing load time. Use this data to create a prioritized list of images to resize or replace.
A practical command-line approach for auditing local image files before uploading them to WordPress is using ImageMagick’s `identify` command:
This command lists the 20 largest JPG files in a directory, showing their dimensions and file sizes, helping you preemptively identify oversized uploads.
WordPress’s media library often contains orphaned images—files uploaded for a post or page that was later deleted, or images that were replaced but never removed. These unused attachments bloat your database and consume storage without providing any value to visitors.
To systematically find and delete unused media:
Use a plugin like Media Cleaner: This tool scans your entire site for media files not attached to any post, page, or widget. It provides a list of orphaned images and allows you to delete them in bulk.
Check the Media Library manually: Sort by “Date” and look for files older than six months that are not linked to any content. Right-click and select “Delete Permanently” after confirming they are unused.
Remove thumbnails for deleted images: When you delete an image, WordPress may leave behind generated thumbnail sizes. Plugins like “Remove Thumbnails” can clean these up.
Before deleting any file, export a backup of your media library. This precaution ensures you can recover a file if it is mistakenly removed.
Bulk Resizing and Recompression with Media Library Tools
After identifying and removing unused images, the next step is to resize and recompress the remaining files. This process reduces file size without visibly degrading quality, directly addressing the recommendations from your performance audit.
Use one of the following tools for bulk optimization:
Tool
Key Feature
Best For
Smush
Lossless compression and lazy loading
Simple one-click optimization
ShortPixel
Lossy and glossy compression options
High-quality, small file sizes
Imagify
Three compression levels (normal, aggressive, ultra)
Flexible control over quality
EWWW Image Optimizer
Server-side processing, no API limits
Large media libraries
To bulk resize images to a maximum width (e.g., 1920 pixels for desktop views):
Install and activate a plugin like “Imsanity” or “Bulk Resize Media”.
Go to Settings > Media and set the maximum image width and height (e.g., 1920×1920).
Run the bulk resize tool, which scans your library and resizes all images exceeding these dimensions.
After resizing, run a bulk recompression pass with your chosen optimizer (e.g., Smush) to squeeze out additional bytes.
This two-step process ensures every image in your library is both properly dimensioned and efficiently compressed, directly improving your PageSpeed and GTmetrix scores. Remember to re-run your performance audit after cleanup to confirm the improvements.
Advanced Techniques: Image Sprites, SVGs, and Critical CSS
While basic compression and lazy loading address many performance issues, truly optimizing WordPress images requires advanced techniques. These methods reduce HTTP requests, shrink file sizes further, and improve perceived load times. Implementing CSS image sprites, optimizing SVGs, and leveraging critical CSS with background image optimization can yield significant gains, particularly for sites with many icons or decorative graphics.
CSS image sprites consolidate multiple small images—such as icons, buttons, or logos—into a single composite image file. This drastically reduces the number of HTTP requests, as the browser downloads one file instead of many. To implement sprites in WordPress:
Combine images manually using tools like SpritePad or online generators. Arrange them in a grid, ensuring consistent spacing.
Upload the sprite to your WordPress media library or theme’s assets folder.
Define CSS rules for each icon using background-image, background-position, and fixed width and height dimensions.
Use background-position offsets to display the correct portion of the sprite. For example, background-position: -20px 0; shifts the visible area left by 20 pixels.
Best practices for sprites include grouping icons with similar color palettes to avoid banding, using PNG-8 for fewer colors, and limiting sprite dimensions to avoid large file sizes. Avoid spriting images that change frequently, as updating the composite file requires re-caching.
Optimizing SVG Files and Inlining for Performance
SVGs (Scalable Vector Graphics) are ideal for logos, icons, and illustrations due to their small file sizes and crisp rendering at any resolution. However, unoptimized SVGs can contain unnecessary metadata, editor cruft, and redundant paths. To optimize SVGs for WordPress:
Clean the SVG code using tools like SVGO or SVGOMG. Remove comments, empty groups, and unused definitions.
Minify the SVG by compressing whitespace and reducing decimal precision (e.g., from 6 to 2 decimal places).
Inline small SVGs (under 2 KB) directly into your theme’s HTML or PHP templates. This eliminates HTTP requests entirely. For larger SVGs, use external files with proper caching headers.
Ensure accessibility by adding role="img" and descriptive <title> and <desc> elements within the SVG tag.
Inlining SVGs also allows CSS control over fill colors and animations, reducing the need for additional images. However, avoid inlining very large SVGs, as they bloat the HTML and delay rendering.
Combining Critical CSS with Background Image Optimization
Critical CSS extracts the styles needed for above-the-fold content, allowing the browser to render the visible portion faster. When combined with background image optimization, this technique improves perceived load times and reduces render-blocking resources. Follow these steps:
Step
Action
Performance Benefit
1
Identify above-the-fold background images using browser DevTools.
Focuses optimization on visible assets.
2
Extract critical CSS for those background images, including background-image URLs and positioning.
Eliminates render-blocking for background styles.
3
Inline the critical CSS in the <head> of your WordPress theme.
Reduces HTTP requests for style sheets.
4
Preload background images using <link rel="preload"> with as="image".
Ensures images start loading early.
5
Defer non-critical styles and background images using lazy loading or asynchronous loading.
Prevents blocking of below-the-fold content.
For WordPress, plugins like Autoptimize or WP Rocket can automate critical CSS generation. Manually, you can use tools like Critical CSS Generator to extract styles and then paste them into your theme’s header.php file. Always test with real user monitoring to confirm improvements in Largest Contentful Paint (LCP) and First Contentful Paint (FCP). Avoid over-inlining, which can increase HTML size and negate gains.
By mastering these advanced techniques, you can significantly reduce image-related HTTP requests and deliver a faster, smoother experience for your WordPress visitors.
Frequently Asked Questions
Why is image optimization important for WordPress sites?
Image optimization is crucial for WordPress sites because it directly impacts page load speed, user experience, and SEO. Large, unoptimized images increase page weight, leading to slower loading times, higher bounce rates, and lower search engine rankings. Optimized images reduce bandwidth usage, improve Core Web Vitals (like LCP), and enhance accessibility through proper alt text. Since images often account for the majority of a page's size, compressing them without sacrificing quality is one of the most effective ways to boost site performance, especially for mobile users and those with slower connections.
What are the best image formats for WordPress?
The best image formats for WordPress are WebP, JPEG, and PNG. WebP is recommended for its superior compression and quality, offering up to 30% smaller file sizes than JPEG without visible loss. JPEG is ideal for photographs and complex images with many colors, while PNG is best for graphics with transparency or sharp edges, like logos and icons. Use modern formats like AVIF for further compression if browser support allows. Avoid BMP and TIFF for web use. WordPress now supports WebP natively, and plugins can convert images automatically. Always consider the image's purpose and content type to choose the most efficient format.
How can I compress images in WordPress without losing quality?
You can compress images in WordPress without losing quality using lossless compression techniques. For lossless compression, use plugins like Smush (lossless mode), EWWW Image Optimizer, or ShortPixel (lossless option). These tools remove unnecessary metadata (like EXIF data) and apply algorithms that reduce file size while keeping all pixel data intact. For even smaller sizes with minimal visible difference, lossy compression (e.g., 80-90% quality) is often acceptable. Alternatively, use external tools like TinyPNG or Squoosh before uploading. Always test images after compression to ensure quality meets your standards, especially for high-resolution displays.
What is lazy loading and how does it help WordPress performance?
Lazy loading is a technique that defers loading of images until they are about to enter the viewport, meaning images below the fold are not loaded initially. This reduces initial page weight, speeds up the first paint and time to interactive, and saves bandwidth for users who don't scroll all the way down. WordPress has built-in lazy loading since version 5.5, which adds loading='lazy' attributes to images. You can enhance it with plugins like a3 Lazy Load or Lazy Load by WP Rocket. Lazy loading is especially beneficial for pages with many images, like galleries or long-form articles, and improves Core Web Vitals metrics like LCP and CLS.
Should I use a CDN for WordPress images?
Yes, using a CDN (Content Delivery Network) for WordPress images is highly recommended for performance. A CDN stores copies of your images on multiple servers worldwide, delivering them from the server closest to the user. This reduces latency, speeds up load times, and offloads traffic from your hosting server. Many CDNs also offer automatic image optimization, resizing, and WebP conversion. Popular options include Cloudflare (with Polish feature), Bunny.net, and KeyCDN. For WordPress, plugins like WP Rocket or Jetpack (with Site Accelerator) integrate CDN services. While not strictly necessary for small sites, a CDN is essential for global audiences and high-traffic websites.
How do I create responsive images in WordPress?
WordPress automatically creates responsive images by generating multiple sizes (thumbnail, medium, large) for each uploaded image and using the srcset and sizes attributes in HTML. This allows browsers to select the best image size based on viewport width and device pixel ratio. To ensure optimal responsive images, upload images at the largest size needed (e.g., 1920px wide for full-width), and use themes that properly implement srcset. You can further enhance with plugins like Flying Images or by adding image breakpoints in your theme. Avoid serving oversized images on mobile devices, and always test with browser developer tools to verify correct image selection.
What is the role of image alt text in SEO?
Image alt text (alternative text) plays a critical role in SEO by helping search engines understand the content of images, which they cannot 'see'. It improves accessibility for visually impaired users using screen readers, and can appear in image search results, driving additional traffic. Alt text should be descriptive, concise, and include relevant keywords naturally, but avoid keyword stuffing. For example, 'red apple on wooden table' is better than 'apple image'. WordPress allows you to add alt text when inserting images or via the media library. Well-written alt text contributes to overall page relevance and can improve rankings in both web and image searches.
How can I automate image optimization in WordPress?
Automating image optimization in WordPress saves time and ensures consistency. Use plugins like Smush, ShortPixel, or Imagify that automatically compress and resize images upon upload. Configure settings to choose compression level (lossy/lossless), convert to WebP, and optionally remove EXIF data. For bulk optimization, these plugins can process existing images in your media library. Advanced solutions like WP Rocket or Jetpack offer automatic optimization and CDN delivery. For developers, tools like ImageMagick or server-level optimization (e.g., mod_pagespeed) can be used. Always test automated settings to ensure quality meets your needs, and consider a backup before bulk processing.
WordPress E-commerce: Beyond WooCommerce – Exploring Alternative Platforms and Strategies
Introduction: Why Look Beyond WooCommerce?
WordPress powers over 40% of all websites, and WooCommerce—its most popular e-commerce plugin—commands a significant share of the online store market. For many, WooCommerce is the default choice: free, open-source, and deeply integrated with WordPress. Yet as online businesses grow or face unique challenges, its limitations become apparent. Scalability bottlenecks, performance overhead, and complexity in managing custom requirements often push store owners to explore alternative platforms and strategies. This article examines why looking beyond WooCommerce is not just a niche consideration but a strategic move for certain e-commerce operations.
The Rise of WooCommerce and Its Market Share
WooCommerce emerged in 2011 and quickly became the dominant e-commerce solution on WordPress, capturing over 25% of all online stores globally by 2023. Its appeal lies in its simplicity: it turns any WordPress site into a fully functional store with minimal setup. However, this dominance masks a fragmented reality—many store owners eventually outgrow its default capabilities. For small to medium stores with straightforward product catalogs and low traffic, WooCommerce remains ideal. But as businesses scale, the plugin’s reliance on WordPress core and its plugin ecosystem can create friction.
Common Pain Points: Performance, Flexibility, and Cost
WooCommerce’s flexibility is a double-edged sword. While it offers thousands of extensions, achieving advanced functionality often requires a patchwork of plugins, leading to performance degradation. Key pain points include:
Performance issues: WooCommerce loads scripts and styles globally, even on non-store pages, slowing down site speed. Heavy product queries and large databases strain shared hosting, especially with many products or high traffic.
Flexibility constraints: Custom checkout flows, subscription models, or complex product variations often require custom code or premium plugins, increasing development time and cost.
Hidden costs: While the base plugin is free, essential extensions for payment gateways, shipping, and SEO can accumulate hundreds of dollars annually. Managed hosting optimized for WooCommerce adds further expense.
For stores with thousands of products or high transaction volumes, these issues compound, making WooCommerce less viable without significant investment in infrastructure and custom development.
Custom development is costly and may break with updates.
Use a headless CMS with a custom API or migrate to a platform like Magento (now Adobe Commerce) for enterprise needs.
Alternative solutions also make sense for store owners who prioritize simplicity over feature depth. Lightweight plugins or hosted platforms reduce maintenance burden while still leveraging WordPress for content. Ultimately, the decision to move beyond WooCommerce hinges on aligning platform capabilities with specific business requirements—not just following the default path.
Evaluating Your E-commerce Needs: A Framework for Choice
Choosing the right e-commerce platform for your WordPress site requires a clear-eyed assessment of your specific business requirements. A platform that excels for a small artisan shop may crumble under the demands of a high-volume electronics retailer. This framework helps you systematically evaluate your needs across three critical dimensions, ensuring you select a solution that aligns with your operational reality rather than following default options like WooCommerce without due consideration.
The nature of your products directly dictates the complexity your e-commerce platform must handle. Begin by categorizing your inventory:
Simple products: Single, non-variable items (e.g., a book or a single art print). Most platforms handle these easily.
Variable products: Items with attributes like size, color, or material (e.g., clothing or furniture). Requires robust variation management.
Complex products: Items with bundles, custom pricing, subscriptions, or digital downloads (e.g., software licenses or curated subscription boxes).
Multi-warehouse inventory: Stock spread across physical and digital locations, requiring real-time synchronization.
For example, if you sell t-shirts in 10 sizes and 15 colors, you need a platform that can manage 150 unique SKUs without manual entry. A platform like Easy Digital Downloads is ideal for digital goods, while WP eCommerce offers superior handling of physical product variations without the overhead of WooCommerce’s extensions. If your inventory involves complex stock management across multiple locations, consider a solution like Shopp that integrates with external inventory systems.
Scalability and Performance Expectations
Your current traffic and projected growth define the performance demands. Use this simple checklist to gauge your scalability needs:
Factor
Low Volume (under 1,000 visitors/day)
Medium Volume (1,000–10,000 visitors/day)
High Volume (over 10,000 visitors/day)
Product count
Fewer than 100
100–5,000
5,000+
Peak traffic events
Rare (e.g., seasonal sales)
Monthly promotions
Daily flash sales or launches
Server resource requirements
Shared hosting sufficient
VPS or dedicated server needed
Cloud infrastructure with CDN
Plugin overhead tolerance
High (few critical plugins)
Moderate (optimized plugins)
Low (minimal, custom-coded)
For high-volume stores, consider headless commerce with a platform like Snipcart, which decouples the frontend from backend, or use a lightweight solution like Cart66 that relies on external payment processing to reduce server load. A practical code example for monitoring performance is adding this to your wp-config.php to enable debug logging during load testing:
Transaction fees: Some platforms (e.g., BigCommerce for WordPress) charge a percentage per sale, while others (like WooCommerce) only charge for payment gateways.
Extension costs: WooCommerce often requires paid extensions for subscriptions, memberships, or advanced shipping, which can exceed $200/year. Alternatives like WP eCommerce include many features for a single license fee.
Maintenance overhead: Self-hosted solutions like Jigoshop demand regular updates and security patches. Managed e-commerce plugins (e.g., Ecwid) handle these automatically, reducing your technical burden.
Hosting adjustments: High-traffic stores may need premium hosting costing $50–$200/month, while a low-volume shop can operate on a $10/month shared plan.
If your budget is under $500 annually and your technical skill is limited, a hosted solution like Shopify’s WordPress integration or Ecwid may be more cost-effective than WooCommerce, which can quickly accumulate hidden costs for essential features. Conversely, if you have development resources, open-source platforms like WP eCommerce offer lower long-term costs through custom development.
WordPress E-commerce: Beyond WooCommerce – Exploring Alternative Platforms and Strategies: Easy Digital Downloads: For Digital Products and Memberships
When your business revolves around selling software, PDFs, music, courses, or membership access, a full-featured physical product platform like WooCommerce can introduce unnecessary overhead. Easy Digital Downloads (EDD) is purpose-built for this niche, offering a lean, high-performance solution that strips away cart complexity and focuses entirely on digital fulfillment. With over 60,000 active installations and a dedicated ecosystem of extensions, EDD provides a specialized foundation that prioritizes speed, security, and streamlined checkout for intangible goods. Its architecture is designed to handle high-volume file delivery without the bloat of shipping modules, inventory tracking for physical items, or tax calculations for variable product types, making it an ideal choice for creators, developers, and membership site operators.
Key Features: File Access Control and Licensing
EDD excels in managing the lifecycle of digital products through granular access controls. Its core file access system allows you to set per-product download limits, expiration dates, and email-based delivery links. For software vendors, the built-in Software Licensing extension provides automated license key generation, activation limits, and version tracking. This enables you to sell a single product with tiered licensing (e.g., single site vs. unlimited sites) and automatically push updates to customers. Key capabilities include:
File Access Control: Restrict downloads to logged-in users only, set time-limited access after purchase, and limit the number of times a file can be downloaded.
Software Licensing: Generate unique license keys per purchase, manage activation counts, and support renewal discounts for expiring licenses.
Version Management: Automatically deliver file updates to licensed customers through the WordPress dashboard or custom API.
Protected File Delivery: Serve files through a secure tokenized URL, preventing direct hotlinking or unauthorized access.
Performance Benefits Over WooCommerce for Digital Stores
For stores selling only digital goods, EDD consistently outperforms WooCommerce in key performance metrics. The plugin avoids loading scripts and database queries for shipping calculations, physical inventory tracking, and product variation attributes. This results in faster page loads, lower server resource usage, and a simpler checkout process. The following table compares critical performance factors for a typical digital store:
~80+ KB (minified, with cart and checkout scripts)
Checkout page queries
3-5 database queries
10-15 database queries
Page load time (median)
0.8–1.2 seconds
1.5–2.5 seconds
Memory usage per request
~12 MB
~20 MB
These differences become critical as your catalog grows to hundreds or thousands of digital products. EDD’s streamlined architecture reduces page load times by up to 40% compared to WooCommerce for identical digital store setups, directly improving conversion rates and user experience.
Integration with Membership and Email Marketing Tools
EDD’s extensibility allows seamless connection with membership plugins and email marketing services, creating a unified workflow for recurring revenue and subscriber management. For membership sites, EDD integrates natively with Restrict Content Pro and MemberPress, enabling you to grant access to protected content based on product purchases or subscription tiers. This removes the need for complex membership gateways and allows you to manage digital sales and member access from a single dashboard. In terms of email marketing, EDD offers dedicated add-ons for major platforms:
Mailchimp: Automatically add customers to specific lists or tags based on purchased products.
ConvertKit: Trigger sequences for new purchases, renewals, or license expirations.
ActiveCampaign: Sync customer data for advanced segmentation and automation.
Drip: Track purchase behavior and send targeted follow-up campaigns.
These integrations ensure that your digital storefront not only delivers files efficiently but also supports sophisticated marketing funnels and recurring membership models without relying on WooCommerce’s heavier infrastructure. For businesses focused exclusively on digital products and memberships, EDD provides a purpose-built, performance-optimized alternative that reduces complexity while enhancing control and scalability.
Paid Memberships Pro: Combining E-commerce with Subscriptions
While WooCommerce dominates the WordPress e-commerce landscape, it is not always the optimal solution for businesses built around recurring revenue and content access. Paid Memberships Pro (PM Pro) offers a specialized alternative that merges e-commerce functionality with a robust subscription framework. Unlike WooCommerce, which primarily focuses on one-time product sales, PM Pro is architected from the ground up to handle membership tiers, recurring payments, and content restriction. This makes it an ideal choice for digital products, online courses, subscription boxes, and member-only communities. The plugin’s lightweight core and modular add-on ecosystem allow site owners to build a tailored e-commerce experience without the overhead of a full shopping cart system.
Setting Up Recurring Billing and Payment Gateways
Configuring recurring payments in PM Pro is straightforward, but requires careful attention to gateway selection and billing cycle settings. The plugin supports multiple payment gateways, each with distinct features:
Stripe: Best for modern sites; supports credit cards, Apple Pay, and Google Pay with automatic recurring billing.
PayPal Express: Ideal for international customers; handles subscriptions via PayPal’s Reference Transactions.
Authorize.net: Suitable for high-volume merchants needing advanced fraud detection.
Check/Invoice: Good for offline payments (e.g., manual bank transfers) with manual renewal tracking.
To set up a basic recurring subscription with Stripe, you must first install the PM Pro Stripe add-on and obtain API keys from your Stripe dashboard. Then, navigate to Memberships > Settings > Payment Gateway and configure your keys. For a practical example, you can define a monthly billing cycle in your membership level settings. The following PHP snippet (added to your theme’s functions.php or a custom plugin) ensures that new subscriptions default to a 30-day cycle:
add_filter('pmpro_cycle_period', 'custom_pmpro_cycle_period', 10, 3);
function custom_pmpro_cycle_period($cycle_period, $level_id, $user_id) {
// Force monthly billing for membership level ID 2
if ($level_id == 2) {
$cycle_period = 'Month';
}
return $cycle_period;
}
Managing Membership Levels and Content Drip
PM Pro excels at organizing access through membership levels, which can be structured as free, one-time paid, or recurring subscriptions. Each level can have its own pricing, billing cycle, and content access rules. Content dripping—releasing content over time—is a key feature for membership sites. To manage this:
Go to Memberships > Levels and create or edit a level (e.g., “Gold Plan” at $19/month).
Under the “Advanced Settings” section, enable “Drip Content” and set a delay (e.g., 7 days) for posts assigned to that level.
Use the “Expiration” settings to define how long access lasts after the last payment (e.g., “End of billing period”).
For granular control, you can assign multiple levels to a single user, allowing tiered access. For example, a “Basic” level might grant access to forum posts, while a “Premium” level unlocks video courses. PM Pro’s built-in content restriction works on pages, posts, and custom post types, with options to show excerpts, teasers, or custom messages to non-members.
Integrations with popular plugins like LearnDash (for courses), BuddyPress (for social communities), and WooCommerce (for hybrid stores) further extend functionality. For instance, you can use PMPro to restrict access to WooCommerce products only for members of a specific level, creating a private store within your e-commerce site. The plugin also integrates with email marketing services like Mailchimp and ActiveCampaign, enabling automated list segmentation based on membership status.
MarketPress: A Lightweight Alternative for Small Stores
For many small to medium store owners, the complexity and resource demands of WooCommerce can feel overwhelming. MarketPress offers a streamlined alternative, focusing on essential e-commerce functionality without the bloat. Designed for simplicity, it provides a clean, efficient platform for managing basic product catalogs and checkout processes, making it an ideal choice for startups, niche retailers, or anyone prioritizing speed and ease of use over extensive feature sets.
Core Features: Product Management and Checkout
MarketPress excels at the fundamentals. Its product management system is intuitive, allowing store owners to quickly add, edit, and organize items without navigating complex meta-boxes. Key features include:
Simple product types: Supports physical goods, digital downloads, and external/affiliate products with straightforward settings.
Unlimited products and categories: No artificial limits on catalog size, though performance is optimized for smaller inventories.
Basic inventory tracking: Manage stock levels with low-stock notifications and out-of-stock settings.
Streamlined checkout: A minimal, two-step checkout process that reduces cart abandonment. Supports guest checkout and major payment gateways (PayPal, Stripe, Authorize.net) via built-in integrations.
Order management: View and update order statuses, send email notifications, and generate simple invoices from the WordPress admin.
This focused approach means MarketPress avoids the advanced features (subscriptions, memberships, complex shipping zones) that often complicate WooCommerce, making it faster to learn and maintain.
Performance and Simplicity Compared to WooCommerce
The most significant advantage of MarketPress is its performance efficiency. Unlike WooCommerce, which loads extensive scripts and database queries even for simple stores, MarketPress is built with a lightweight codebase. This results in:
Aspect
MarketPress
WooCommerce
Page load speed
Faster, especially on shared hosting
Slower due to heavy scripts and hooks
Database footprint
Minimal, fewer custom tables
Large, with multiple custom post types and tables
Plugin conflicts
Lower risk, fewer dependencies
Higher risk, extensive compatibility layers
Learning curve
Short, intuitive for beginners
Steep, requires understanding of advanced settings
Server resource use
Low, ideal for budget hosting
High, often requires dedicated or VPS hosting
For a store with fewer than 100 products and straightforward checkout needs, MarketPress can deliver a more responsive, reliable experience on the same hosting plan that might struggle with WooCommerce. Its simplicity also means fewer updates and maintenance tasks, freeing up time for store owners to focus on marketing and customer service.
MarketPress integrates seamlessly with most WordPress themes, using standard template tags and shortcodes. Customization is handled through:
Shortcodes: Insert product listings, checkout forms, and order history into any page or post without coding.
Template overrides: Copy plugin templates to your theme folder for full control over layout and styling, following WordPress coding standards.
Filters and actions: Developers can hook into MarketPress functions to modify pricing, add custom fields, or integrate third-party services.
CSS styling: All output uses semantic HTML classes, allowing for easy CSS customization without modifying core files.
While MarketPress lacks the extensive theme ecosystem of WooCommerce, its compatibility with standard WordPress themes means you can use any well-coded theme and simply add e-commerce functionality. This approach keeps the site lightweight and avoids the visual bloat often associated with dedicated e-commerce themes. For store owners who prioritize a clean, fast, and maintainable website over a vast array of design options, MarketPress provides a practical, performance-oriented foundation for WordPress e-commerce beyond WooCommerce.
WordPress E-commerce: Beyond WooCommerce – Exploring Alternative Platforms and Strategies
Historical Context and Current Development Status
WP eCommerce stands as one of the earliest dedicated e-commerce plugins for WordPress, first released in 2006—predating WooCommerce by nearly five years. Initially developed as a lightweight solution for small storefronts, it gained a loyal following before the WooCommerce juggernaut reshaped the market. As of 2025, WP eCommerce remains actively maintained, with its latest stable version (3.15.x) supporting PHP 8.2 and WordPress 6.7. The plugin’s development pace has slowed compared to its heyday, but the core team continues to release security patches and compatibility updates. This makes it a reliable choice for store owners who prioritize stability over cutting-edge features, particularly those running simpler product catalogs or legacy sites that require minimal migration effort.
Key Features: Product Variations and Shipping
WP eCommerce offers a robust set of features for managing product variations, though it approaches the task differently than modern competitors. Rather than relying on a dynamic variation matrix, it uses a flat variation system where each variant is a separate product linked by a parent SKU. This can be simpler for stores with fewer than 50 variations but becomes unwieldy for complex configurations.
Product variations: Supports size, color, and custom attributes via dropdowns or radio buttons, with per-variant pricing and stock control.
Shipping options: Includes flat rate, per-item, weight-based, and table-rate shipping, plus integration with real-time carriers like USPS, FedEx, and UPS through premium add-ons.
Digital goods: Handles downloadable products with file access control and download limits.
Shipping zones and rules are configured through a straightforward admin interface, though advanced features like conditional shipping logic require custom code or third-party plugins.
Integration with Payment Gateways and Third-Party Services
WP eCommerce supports a curated set of payment gateways out of the box, including PayPal Standard, Stripe, Authorize.Net, and offline payments (check, bank transfer). For broader coverage, paid extensions add gateways like Square, Amazon Pay, and Braintree. The plugin also integrates with popular third-party services:
Service Category
Examples
Integration Method
Email marketing
Mailchimp, AWeber
API add-ons
Accounting
QuickBooks, Xero
CSV export or paid connectors
Shipping carriers
USPS, FedEx, UPS
Premium extensions
Analytics
Google Analytics, Facebook Pixel
Built-in or third-party plugins
For developers, WP eCommerce provides a comprehensive action and filter system. A practical example of customizing the checkout page to add a field for order notes is shown below:
This flexibility, combined with a mature codebase, makes WP eCommerce a viable alternative for store owners who need a stable, no-frills platform without the overhead of WooCommerce’s ecosystem. Its legacy status means fewer updates but also fewer breaking changes, ideal for niche stores with predictable requirements.
For WordPress users seeking a streamlined alternative to the plugin-and-hosting puzzle, Cart66 offers a cohesive all-in-one solution that bundles a dedicated e-commerce plugin with managed hosting. This approach eliminates the need to separately source and configure a web host, payment gateway, and SSL certificate, making it particularly attractive for beginners or small business owners who prioritize simplicity over granular control. Cart66 positions itself as a turnkey platform where the technical heavy lifting—from server maintenance to PCI compliance—is handled by the provider.
Managed Hosting and Security Benefits
Cart66’s managed hosting is tailored specifically for its e-commerce plugin, ensuring that server resources are optimized for WooCommerce-free store operations. Key security features include:
Automatic PCI compliance: The platform is built to meet Payment Card Industry Data Security Standards (PCI DSS) out of the box, reducing the risk of fines or data breaches.
Server-level caching and CDN: Built-in caching and a content delivery network improve page load speeds without requiring additional plugins.
Automated backups and updates: The hosting plan includes daily backups and one-click updates for the core software and security patches.
Malware scanning and firewall: Proactive threat detection and a web application firewall (WAF) protect against common attacks.
This managed environment means store owners do not need to configure SSL certificates, manage server logs, or worry about hosting-level vulnerabilities. Instead, they can focus on product listings and customer engagement.
Built-In Payment Processing and Inventory Management
Cart66 integrates payment processing directly into the platform, removing the need for third-party gateways like Stripe or PayPal. The system supports credit card payments through its own merchant account, with funds deposited directly into the user’s bank account. Inventory management is handled through a unified dashboard that tracks stock levels across physical and digital products. Key capabilities include:
Real-time inventory tracking: Automatic updates when orders are placed, with low-stock alerts.
Digital product delivery: Secure file hosting and automated download links for e-books, software, or memberships.
Subscription management: Recurring billing for membership sites or subscription boxes, with proration options.
Order management: A centralized view of all transactions, with the ability to edit, refund, or resend invoices.
The payment system is PCI-compliant by default, so sensitive cardholder data never touches the user’s server. This reduces liability and simplifies compliance for store owners who might otherwise need to manage a separate payment gateway.
Pros and Cons of the All-In-One Approach
Choosing an all-in-one platform like Cart66 involves clear trade-offs. The table below summarizes the primary advantages and disadvantages:
Pros
Cons
Simplified setup with no separate hosting or gateway configuration required
Limited flexibility for advanced customization or third-party integrations
Built-in PCI compliance reduces security overhead and risk
Vendor lock-in: migrating to another platform may be difficult
Unified support for hosting, payments, and plugin issues
Higher monthly cost compared to self-hosted alternatives
Optimized performance for Cart66’s specific plugin architecture
Smaller community and fewer extensions than WooCommerce
For users who value time savings and a managed experience over complete control, Cart66’s all-in-one model is a viable option. However, those who anticipate needing custom shipping rules, complex tax calculations, or integration with niche services may find the ecosystem too restrictive. The platform is best suited for simple product catalogs, digital goods, and subscription-based businesses that do not require extensive third-party add-ons.
Headless E-commerce: Decoupling WordPress from the Storefront
Headless e-commerce represents a paradigm shift in how online stores are built and managed. In this architecture, WordPress is retained as a powerful backend content management system (CMS) for managing products, inventory, and editorial content, while the storefront—the customer-facing interface—is built and served by a separate frontend framework, such as React, Vue.js, or Angular. Communication between the two occurs via APIs, typically REST or GraphQL. This decoupling allows each layer to be optimized independently, offering significant advantages over traditional monolithic setups where the frontend and backend are tightly intertwined within a single theme.
Benefits: Performance, Flexibility, and Omnichannel
The primary benefits of a headless approach center on three pillars: performance, flexibility, and omnichannel readiness. Performance gains arise because the frontend can be built as a single-page application (SPA) or static site, which loads content instantly and reduces server load. Flexibility is enhanced because developers are not constrained by WordPress’s template hierarchy; they can design unique, interactive experiences using modern JavaScript libraries. Omnichannel capability is a natural byproduct: because the backend exposes content via APIs, the same product data can be served to a web storefront, a mobile app, a digital kiosk, or even a voice assistant without duplicating effort. This makes headless architectures particularly attractive for brands that need to maintain a consistent experience across multiple touchpoints.
Popular Headless Solutions: Snipcart, BigCommerce, and Shopify Integration
Several solutions facilitate headless WordPress e-commerce. Snipcart is a lightweight, developer-friendly option that adds a shopping cart and checkout to any static site via a simple embed, with WordPress acting purely as a content repository. BigCommerce offers a robust headless integration through its WordPress plugin, allowing merchants to use BigCommerce’s cart, checkout, and payment infrastructure while controlling content in WordPress. Shopify’s headless approach, via its Storefront API, enables building custom storefronts that pull product data from Shopify, with WordPress handling blog posts, pages, and SEO. Each solution has trade-offs in terms of complexity, cost, and feature depth, as summarized in the table below.
Stores requiring omnichannel and third-party integrations
Technical Requirements and Development Considerations
Adopting a headless architecture introduces specific technical requirements. You will need a modern JavaScript framework (e.g., Next.js for React, Nuxt.js for Vue) to build the frontend, along with familiarity with API consumption and state management. WordPress must be configured to expose custom endpoints, often via the built-in REST API or the WPGraphQL plugin for GraphQL support. Hosting becomes more complex, as the frontend and backend may reside on separate servers—for example, WordPress on a traditional host and the frontend on a CDN or serverless platform like Vercel or Netlify. Development time increases because you are effectively building two applications that must communicate seamlessly. Additionally, you lose the convenience of WordPress’s visual editor for layout changes; all frontend modifications require code updates. For teams with strong JavaScript expertise, these trade-offs are worthwhile, but for smaller projects or those with limited developer resources, a traditional setup may remain more practical.
WordPress E-commerce: Beyond WooCommerce – Custom-Built E-commerce Solutions with WordPress
When your e-commerce requirements demand unique product relationships, complex membership tiers, or proprietary checkout flows that no existing plugin can accommodate, building a custom e-commerce system directly on WordPress core becomes a strategic choice. This approach trades plugin convenience for complete control, allowing you to model your store exactly as your business logic dictates. It is best suited for enterprises with dedicated development resources, highly specialized digital goods, or legacy system integrations where off-the-shelf solutions introduce unnecessary overhead or compliance risks.
WordPress’s built-in content architecture is your foundation. Instead of relying on WooCommerce’s product post type, you define your own custom_post_type—for example, subscription_plan or digital_asset—using the register_post_type() function in your theme’s functions.php or a custom plugin. This gives you precise control over the data fields, meta boxes, and display logic.
Custom Post Types (CPTs): Create post types that mirror your inventory structure. For a SaaS platform, you might create a CPT called license_key with custom meta fields for expiration dates and activation limits.
Custom Taxonomies: Use hierarchical or non-hierarchical taxonomies to organize products. For example, a taxonomy pricing_tier can group products by monthly, annual, or lifetime access.
Custom Meta Boxes: Add fields like price, stock quantity, or file download links using add_meta_box() to keep data entry intuitive for your team.
Practical code example to register a simple CPT for digital downloads:
With custom post types handling product data, you must connect payment and shipping logic directly via APIs. This requires careful handling of nonces, SSL enforcement, and data validation.
Payment Gateway Integration: Use Stripe’s PHP library or PayPal’s REST API. Process payments on the server side using wp_remote_post() or a dedicated SDK. Create a custom endpoint (e.g., example.com/api/process-payment) to handle AJAX requests from your checkout form.
Shipping API Integration: For physical goods, integrate with carriers like FedEx or USPS via their APIs. Use wp_remote_get() to retrieve real-time rates based on cart weight and destination, then store results in a transient for caching.
Cart and Session Management: Use PHP sessions or WordPress transients to track cart state across pages. Avoid relying on cookies alone for security-sensitive data.
A custom e-commerce system demands rigorous security practices and ongoing maintenance. Unlike plugin-based solutions, you bear full responsibility for vulnerabilities.
Aspect
Key Considerations
Security
Always validate and sanitize user input with sanitize_text_field() and wp_kses(). Use prepared statements for database queries via $wpdb->prepare(). Enforce HTTPS and implement CSRF tokens on all forms.
Maintenance
Schedule regular updates for WordPress core, your custom code, and any third-party libraries (e.g., Stripe SDK). Monitor logs for failed transactions or API errors.
Long-Term Viability
Document all custom endpoints, database schema changes, and API keys. Plan for deprecations—Stripe occasionally updates its API versions. Consider building a modular plugin architecture to isolate payment logic from theme code.
Custom e-commerce on WordPress is a powerful but resource-intensive path. It offers unmatched flexibility for niche business models but requires ongoing investment in security audits, code reviews, and developer expertise to remain viable over years of operation.
Making the Switch: Migration and Implementation Best Practices
Transitioning from WooCommerce to a new e-commerce platform requires a structured approach to ensure data integrity, minimal downtime, and a seamless user experience. Whether you are moving to a headless solution, a SaaS platform like Shopify or BigCommerce, or an alternative open-source system like Magento, following best practices for migration and implementation is critical. The process typically involves three core phases: data export and import, payment and checkout testing, and SEO preservation.
Exporting and Importing Product Data and Orders
The first technical step is extracting your existing WooCommerce data. Focus on these key datasets:
Products: Export all product titles, descriptions, SKUs, prices, stock levels, categories, tags, images, and variations.
Customers: Export customer names, email addresses, billing and shipping addresses, and order histories (comply with privacy regulations).
Orders: Export order IDs, statuses, items purchased, totals, payment methods, and dates.
Reviews and Ratings: Preserve user-generated content for social proof.
Use native WooCommerce CSV export tools or plugins like WP All Export for more complex data. For importing into the new platform, prepare your CSV files to match the target platform’s schema. Many platforms offer built-in import wizards. Before the final import, run a dry run with a small subset of data (e.g., 10 products and 5 orders) to verify field mapping and avoid errors. For large catalogs (over 1,000 products), consider using an API-based migration service or a dedicated plugin like Cart2Cart to automate the process and reduce manual work.
Key considerations during data transfer:
Data Type
Common Pitfalls
Solution
Product images
Broken URLs after migration
Use absolute URLs or re-upload images via media library
Order statuses
Mismatched status labels
Map WooCommerce statuses (e.g., “processing”) to target platform equivalents
Customer passwords
Cannot be exported due to hashing
Send password reset emails or use a third-party authentication bridge
Testing Payment Gateways and Checkout Flows
Payment processing is the most sensitive part of any e-commerce site. After data migration, thoroughly test all payment gateways you intend to use. Follow these steps:
Sandbox testing: Activate test modes for each gateway (e.g., Stripe test keys, PayPal sandbox).
Complete a test purchase: Add a product to the cart, proceed through checkout, and submit payment using test card numbers or credentials.
Verify order confirmation: Check that the order appears correctly in the admin panel and that the customer receives an email receipt.
Test edge cases: Try failed payments (e.g., insufficient funds), declined cards, and refunds to ensure error handling works.
Check multi-currency and tax calculations: If you sell internationally, test with different billing addresses and currencies.
Document any issues in a checklist and resolve them before going live. Also, ensure that the checkout flow is optimized for speed and mobile usability. Avoid redirecting users to external payment pages unless necessary; embedded checkout solutions typically convert better.
SEO and User Experience Considerations During Migration
Migrating platforms can harm your search rankings if not handled carefully. Preserve SEO equity by implementing the following:
Maintain URL structures: Keep product and category URLs identical to your WooCommerce site. If changes are unavoidable, set up 301 redirects from old URLs to new ones.
Preserve meta data: Export and re-import title tags, meta descriptions, and alt text for images.
Update sitemaps: Generate a new XML sitemap on the target platform and submit it to Google Search Console. Remove the old WooCommerce sitemap.
Monitor indexation: Use a tool like Screaming Frog to crawl the new site and check for broken links or missing pages.
Test user experience: Run a full site audit for page speed (aim for under 3 seconds load time), mobile responsiveness, and navigation clarity. Use heatmaps or session recordings to identify friction points.
Finally, schedule the migration during low-traffic periods and communicate changes to your customer base via email or a banner. After launch, monitor analytics for any drop in organic traffic or conversion rates, and be prepared to roll back if critical issues arise. With careful planning and testing, your new platform can outperform WooCommerce while retaining your hard-earned SEO value.
What are the best WooCommerce alternatives for WordPress?
Top alternatives include Easy Digital Downloads (EDD) for digital products, WP eCommerce for simplicity, and Shopify integration via plugins like ShopWP for a hybrid approach. Each offers unique features: EDD excels in digital sales with minimal bloat, WP eCommerce provides a lightweight cart system, and Shopify integration leverages a hosted solution with WordPress CMS. Consider your product type, scalability needs, and budget when choosing.
Can I use Shopify with WordPress instead of WooCommerce?
Yes, you can integrate Shopify with WordPress using plugins like ShopWP or Buy Button. This allows you to manage products, inventory, and payments on Shopify while displaying them on your WordPress site. It's ideal for those who prefer a hosted, secure e-commerce backend with WordPress's content management strengths. However, it adds subscription costs and may limit customization compared to native plugins.
Is Easy Digital Downloads better than WooCommerce for selling digital products?
Easy Digital Downloads (EDD) is often better for pure digital products due to its lightweight, focused feature set, including file access control, software licensing, and customer management. WooCommerce can handle digital goods but includes many physical product features that may slow performance. For a streamlined, scalable digital store, EDD is preferred, while WooCommerce suits mixed inventory.
What factors should I consider when choosing a WordPress e-commerce platform?
Key factors include product type (physical, digital, or services), scalability, payment gateway support, performance impact, cost (free vs premium), and ease of use. Also consider integrations with email marketing, accounting, and shipping. For high-volume stores, a dedicated hosted solution like Shopify might be better, while for content-rich sites, native plugins like EDD offer tight WordPress integration.
How do I migrate from WooCommerce to another WordPress e-commerce platform?
Migration involves backing up your site, exporting product data (CSV/XML), and importing to the new platform using its native tools or plugins. For example, Easy Digital Downloads has a built-in import tool for products. Test on a staging site first, update URL structures, and ensure payment gateways are reconfigured. Expect some manual adjustments for custom fields and orders.
Are there free alternatives to WooCommerce for WordPress?
Yes, WP eCommerce and Easy Digital Downloads (with core free version) are popular free alternatives. WP eCommerce offers a basic cart system with free extensions, while EDD's free core handles digital sales. For more features, premium add-ons are available. These options avoid subscription fees but may have fewer built-in features than WooCommerce.
What is the best e-commerce strategy for a content-driven WordPress site?
For content-driven sites, use a lightweight plugin like Easy Digital Downloads for digital products or integrate a buy button from a hosted service like Shopify. Focus on SEO-optimized product pages, blog integration, and email marketing. Avoid bloated plugins that slow down content delivery. Consider membership plugins like Restrict Content Pro for recurring subscriptions.
Can I run a subscription-based store without WooCommerce?
Yes, plugins like MemberPress, Restrict Content Pro, or Paid Memberships Pro handle subscriptions without WooCommerce. They offer content restriction, recurring payments, and integration with payment gateways like Stripe. For digital products with subscriptions, Easy Digital Downloads has a Recurring Payments extension. These are lighter and more focused than WooCommerce's subscription add-on.
WordPress and Webhooks: Automating Workflows for Seamless Integration
Introduction to Webhooks and Their Role in WordPress
Webhooks are automated HTTP callbacks triggered by specific events, enabling real-time data exchange between systems. In the context of WordPress, they function as lightweight, event-driven connectors that push data from one application to another the moment an action occurs—such as a new post being published, a user registering, or an order being placed in WooCommerce. This differs fundamentally from traditional polling, where a system repeatedly checks for updates at set intervals, often wasting resources and introducing latency. Webhooks eliminate the need for constant requests by delivering data instantly, making them indispensable for modern WordPress workflows that demand speed, efficiency, and seamless integration with external services like CRMs, email marketing platforms, payment gateways, and custom APIs.
What Are Webhooks? A Technical Overview
At its core, a webhook is a user-defined HTTP callback—typically a POST or GET request—sent to a specified URL when a predefined event occurs. The event can be anything from a form submission to a plugin update. Here is a breakdown of the essential components:
Trigger Event: The action that initiates the webhook, such as publish_post, user_register, or woocommerce_new_order.
Payload: The data sent in the HTTP request, usually formatted as JSON or XML, containing relevant information about the event (e.g., post title, user email, order total).
Endpoint URL: The destination server or service that receives and processes the payload, often a third-party API endpoint or a custom script.
Response Handling: The receiving system sends an HTTP status code (e.g., 200 for success, 400 for bad request) to confirm receipt and processing.
WordPress handles webhooks primarily through plugins like WP Webhooks, AutomatorWP, or custom code using the wp_remote_post() function. For example, when a user completes a purchase in WooCommerce, a webhook can instantly send order details to a shipping provider’s API, bypassing manual exports or scheduled syncs.
How Webhooks Differ from APIs and Cron Jobs
Understanding the distinction between webhooks, APIs, and cron jobs is crucial for choosing the right automation method. The table below summarizes their key differences:
Feature
Webhooks
APIs
Cron Jobs
Communication Direction
Push (server initiates)
Pull (client requests)
Pull (scheduled check)
Trigger Mechanism
Event-driven
On-demand
Time-based
Real-Time Capability
Instant
Near-real-time (with polling)
Delayed (by schedule)
Resource Efficiency
High (only sends when needed)
Low to moderate (frequent polling)
Low (runs at fixed intervals)
Use Case Example
Notify CRM on new user
Fetch user data manually
Clean database nightly
While APIs allow external systems to request data from WordPress, they require the client to poll for updates—a process that can overwhelm the server with unnecessary requests. Cron jobs, on the other hand, execute tasks at predetermined times, but they cannot react to events as they happen. Webhooks fill this gap by providing a push-based, event-driven approach that minimizes overhead and maximizes responsiveness.
Why WordPress Sites Need Webhook Automation
WordPress powers over 40% of the web, yet its core functionality remains limited to content management. Modern sites rely on a growing ecosystem of plugins and external services for e-commerce, marketing, analytics, and customer support. Without webhook automation, site owners often resort to manual data entry, scheduled imports, or custom API scripts that are brittle and resource-intensive. Here are concrete reasons why webhook automation is becoming essential:
Real-Time Synchronization: When a customer places an order, a webhook can instantly update inventory in an external ERP system, send a confirmation to a mailing list, and log the transaction in a CRM—all without human intervention.
Reduced Server Load: Polling APIs or running cron jobs every few minutes consumes CPU and memory, especially on high-traffic sites. Webhooks fire only when needed, reducing unnecessary load.
Improved User Experience: Automated workflows ensure that users receive instant notifications, access updated content, or see accurate stock levels, fostering trust and engagement.
Extensibility Without Complexity: Webhooks allow developers and site administrators to connect WordPress to virtually any third-party service—from Slack and Zapier to custom microservices—using simple HTTP calls.
Error Handling and Retries: Most webhook implementations include built-in retry logic and logging, making it easier to debug failures without manual oversight.
For example, a membership site might use a webhook to automatically add a new paying member to a Mailchimp list, create a user account in a learning management system, and send a welcome email—all triggered by a single WooCommerce payment confirmation. This level of automation not only saves time but also eliminates the risk of human error, ensuring data consistency across platforms.
Core Benefits of Using Webhooks in WordPress Workflows
Webhooks provide a powerful, event-driven method for automating interactions between WordPress and external services. Unlike traditional polling methods that constantly check for updates, webhooks push data in real time only when a specific event occurs. This fundamental shift offers significant advantages for site owners, developers, and administrators managing complex workflows across e‑commerce, membership, and content management platforms.
One of the most transformative benefits of webhooks is the ability to synchronize data instantly between WordPress and other systems. When a user completes a purchase, updates their profile, or publishes content, a webhook can trigger an immediate update in a CRM, email marketing platform, or inventory management system. This eliminates the delays inherent in cron‑based or manual synchronization.
For e‑commerce sites, this means that when a customer buys a product on WooCommerce, the following can happen without any human intervention:
Inventory levels are updated in a separate ERP or warehouse system.
The customer is automatically added to a segmented email list in Mailchimp or ActiveCampaign.
An order record is created in a third‑party accounting tool like QuickBooks or Xero.
A shipping label is generated via a fulfillment service such as ShipStation.
Membership sites benefit similarly: when a member upgrades their subscription, webhooks can instantly grant access to new content areas, update their status in a learning management system, and trigger a personalized onboarding email. This real‑time flow ensures that data remains consistent across all connected platforms, reducing errors and improving the user experience.
Eliminating Manual Repetitive Tasks
Manual data entry and repetitive administrative work are among the biggest drains on productivity for site operators. Webhooks automate these tasks by reacting to events as they happen, freeing up staff to focus on higher‑value activities. Common manual tasks that webhooks can eliminate include:
Manual Task
Automated Webhook Equivalent
Copying new user data from WordPress to a mailing list
Webhook sends user details to the email platform on registration
Manually updating order status in an external system
Webhook pushes order status changes to the ERP in real time
Exporting and importing content for a headless CMS
Webhook triggers a build or cache purge when content is published
Notifying a team member about a form submission
Webhook posts the submission to a Slack channel or project management tool
For content management, webhooks can automate tasks such as creating a backup whenever a post is updated, or notifying a social media manager when a new article goes live. This reduces the risk of human error and ensures that important actions are never overlooked.
Scalability and Performance Improvements
Webhooks are inherently more efficient than polling-based integrations. Polling requires your server to make repeated HTTP requests to check for updates, consuming bandwidth and processing power even when no changes have occurred. Webhooks, by contrast, only send data when an event triggers them, dramatically reducing unnecessary network traffic and server load.
This efficiency is critical for high‑traffic sites. For example, an e‑commerce store processing hundreds of orders per hour can use webhooks to update external systems without slowing down the WordPress admin or front end. Each webhook payload is lightweight and processed asynchronously, meaning the original request—such as completing a checkout—is not delayed by the downstream integration.
As your site grows, webhooks scale naturally. You can add new integrations by simply registering new webhook endpoints, without rewriting existing logic. Many WordPress plugins and third‑party services support webhooks out of the box, and for custom needs, you can write your own handler. A simple example of a webhook endpoint in WordPress might look like this:
add_action( 'rest_api_init', function () {
register_rest_route( 'myplugin/v1', '/webhook', array(
'methods' => 'POST',
'callback' => 'myplugin_handle_webhook',
'permission_callback' => '__return_true',
) );
} );
function myplugin_handle_webhook( $request ) {
$data = $request->get_json_params();
// Process the incoming data, e.g., update user meta
update_user_meta( $data['user_id'], 'external_status', sanitize_text_field( $data['status'] ) );
return new WP_REST_Response( array( 'success' => true ), 200 );
}
This lightweight endpoint can handle thousands of requests per minute without impacting the rest of your WordPress installation. By offloading heavy processing to external services and only triggering actions when necessary, webhooks help maintain fast page loads and responsive admin interfaces even as your automation needs expand.
Prerequisites for Implementing Webhooks in WordPress
Before integrating webhooks into your WordPress environment, it is essential to verify that your technical foundation meets specific requirements. Webhooks depend on reliable HTTP callbacks, secure data transmission, and a server configuration capable of handling asynchronous requests. This section outlines the necessary prerequisites, covering WordPress version and hosting considerations, required PHP extensions and server settings, and a clear understanding of HTTP methods and payloads. Ensuring these elements are in place will prevent common integration failures and streamline your automation workflows.
Webhook functionality is not a native WordPress core feature, but it can be implemented via custom code or plugins such as WP Webhooks, Zapier, or custom REST API endpoints. However, the underlying WordPress installation must meet a minimum version to support modern REST API features. As of 2025, WordPress 5.0 or later is recommended, as it includes the WP REST API (introduced in version 4.7) and improved HTTP API capabilities. For optimal performance and security, use the latest stable release.
Hosting plays a critical role in webhook reliability. Choose a hosting environment that offers:
Self-hosted or managed WordPress: Both are viable, but managed WordPress hosts often provide built-in caching, SSL certificates, and server-level monitoring that aid webhook delivery.
HTTPS support: Webhooks require HTTPS to encrypt callback payloads and prevent man-in-the-middle attacks. Most hosts now include free SSL via Let’s Encrypt.
Outbound connectivity: Your server must allow outbound HTTP requests to external endpoints. Some shared hosts block outbound connections; verify with your provider.
Reliable uptime: Webhook failures often stem from server timeouts or resource limits. Choose a host with at least 99.9% uptime and adequate PHP worker processes.
Required PHP Extensions and Server Settings
WordPress webhooks rely on PHP’s ability to make HTTP requests and handle JSON data. The following PHP extensions and server settings are essential for reliable webhook delivery:
Component
Recommended Setting
Purpose
PHP Version
8.0 or higher
Improved performance, security, and JSON handling.
cURL Extension
Enabled (php_curl)
Handles outbound HTTP requests for webhook callbacks.
JSON Extension
Enabled (php_json)
Encodes and decodes JSON payloads sent via webhooks.
max_execution_time
120 seconds or higher
Prevents timeouts during long webhook processing.
memory_limit
256 MB or higher
Handles large payloads and multiple concurrent requests.
allow_url_fopen
On
Permits file-based HTTP streams (alternative to cURL).
Additionally, ensure your server uses a modern web server like Apache with mod_rewrite enabled or Nginx with proper rewrite rules. Disable PHP functions that could block webhook processing, such as exec() or shell_exec(), unless absolutely necessary. For high-traffic sites, consider implementing a queue system (e.g., WP Cron or external services like RabbitMQ) to handle webhook delivery asynchronously and avoid blocking user requests.
Understanding HTTP Methods and Payloads
Webhooks operate through standard HTTP methods, and each method serves a distinct purpose in automation workflows. The most common methods used in WordPress webhook integrations are:
POST: The primary method for sending data from WordPress to an external endpoint. It creates or updates resources and carries a payload (usually JSON).
GET: Rarely used for webhooks because it appends data to the URL, which can expose sensitive information and has length limitations.
PUT: Used when a webhook needs to update an existing resource on the receiving server, though less common in typical WordPress setups.
DELETE: Applied when a webhook triggers removal of a resource, such as deleting a user or post from an external system.
Payloads are the data bodies sent with webhook requests. In WordPress, payloads are typically formatted as JSON objects containing relevant information, such as post ID, title, status, or custom fields. For example, a webhook triggered on post publication might send:
To ensure seamless integration, both the sending and receiving systems must agree on the payload structure. Use a consistent schema and validate incoming data on the endpoint. Additionally, implement retry logic for failed deliveries—most robust webhook systems use exponential backoff (e.g., retry after 1 minute, then 5, then 30) and log failures for debugging. Without these precautions, payload mismatches or network errors can break automation workflows silently.
Built‑in WordPress Webhook Capabilities via REST API
The WordPress REST API provides a native, plugin‑free foundation for implementing webhooks. By leveraging HTTP methods—POST, PUT, DELETE, and GET—on standard API endpoints, you can trigger external services whenever specific content changes occur. This approach eliminates the need for third‑party plugins and keeps your integration lightweight, maintainable, and aligned with WordPress core updates.
Webhooks work by sending a payload to a predefined URL when a particular event happens. The REST API’s endpoint structure maps directly to WordPress data types: posts, pages, custom post types, users, comments, taxonomies, and settings. Each CRUD operation on these resources automatically becomes a potential webhook trigger. For example, creating a new custom post type item via POST /wp-json/wp/v2/{post_type} can notify an external CRM, while updating a user profile via PUT /wp-json/wp/v2/users/{id} can sync with an email marketing platform.
Leveraging REST API Endpoints for Custom Triggers
To use the REST API as a webhook source, you map specific endpoints to external actions. The following table outlines common triggers and their corresponding endpoints:
Event Type
REST API Endpoint
HTTP Method
Example Use Case
Create custom post
/wp-json/wp/v2/{post_type}
POST
Send new product data to an inventory system
Update user meta
/wp-json/wp/v2/users/{id}
PUT
Sync user subscription status to a mailing list
Delete comment
/wp-json/wp/v2/comments/{id}
DELETE
Remove spam comment report from moderation tool
Publish page
/wp-json/wp/v2/pages
POST
Notify a static site generator to rebuild
For custom post types registered with show_in_rest => true, endpoints are generated automatically. You can extend this by adding custom fields or meta keys to the REST response using register_rest_field(), ensuring the webhook payload contains all necessary data.
Using Core Hooks to Fire Webhooks on Events
Beyond direct REST API calls, WordPress core hooks (actions and filters) enable webhook firing when internal events occur—even if no REST request was made. This approach is ideal for actions that happen outside the REST API, such as user login, password reset, or plugin activation.
Webhooks sent from WordPress to external services must be authenticated to prevent unauthorized requests. The receiving endpoint should verify the request’s origin and integrity. Common methods include:
Shared secret key: Include a token in the payload or header, and validate it on the remote server.
HMAC signature: Hash the payload with a secret key using hash_hmac(), then send the signature in a custom header. The receiver recomputes the hash and compares.
IP whitelisting: Restrict incoming webhook requests to known WordPress server IPs.
On the WordPress side, when your site receives incoming webhooks (e.g., from a third‑party service), you must authenticate the request using the REST API’s built‑in authentication methods:
Cookie authentication: For requests from the WordPress admin area.
OAuth 1.0a: For external applications, using the WP_OAuth server or a plugin.
Application passwords: Introduced in WordPress 5.6, ideal for script‑based integrations.
Custom header tokens: Validate a token passed in the X-Webhook-Token header using a rest_pre_dispatch filter.
Always use HTTPS for webhook URLs to encrypt payloads in transit, and implement logging to debug delivery failures. With these built‑in capabilities, WordPress becomes a robust webhook hub without external dependencies.
Popular Plugins for Webhook Automation in WordPress
Selecting the right WordPress webhook plugin can dramatically simplify the process of connecting your site with external services, CRMs, marketing platforms, or custom applications. Each plugin offers a distinct balance of depth, visual simplicity, and pricing. Below is a detailed review of the top three contenders, followed by guidance on matching a plugin to your workflow needs.
WP Webhooks: Deep Integration and Customization
WP Webhooks is a developer-friendly plugin that provides granular control over both incoming and outgoing webhooks. It supports triggers for virtually every WordPress event—post creation, user registration, WooCommerce orders, and custom post types—and allows you to map data fields precisely before sending payloads to external endpoints.
Key features: Built-in data mapping, conditional logic for triggers, support for GET, POST, PUT, and DELETE methods, and a debug log for testing.
Ease of use: Moderate to advanced. A technical understanding of JSON and endpoint structures is helpful, but the plugin includes documentation and a visual data mapper.
Pricing: Free core plugin with premium extensions (starting around $49/year for a single site) that unlock advanced triggers and integrations.
Best for: Developers or power users who need custom payloads, bidirectional data flow, and integration with bespoke APIs.
AutomatorWP: Visual Workflow Builder
AutomatorWP offers a no-code, drag-and-drop interface to create automation recipes using WordPress events as triggers and actions. While not strictly a webhook plugin, it includes webhook triggers and actions as part of its extensive integration library, making it ideal for visual builders.
Key features: Visual recipe builder, 200+ built-in integrations (including WPForms, WooCommerce, and LearnDash), and support for webhook triggers and actions.
Ease of use: Low to moderate. The visual interface is intuitive, but complex workflows may require understanding of logic gates and data tokens.
Pricing: Free core plugin; pro version starts at $149/year for unlimited sites, with additional add-ons for specific integrations.
Best for: Site owners and marketers who want to automate internal WordPress tasks without coding, and who also need webhook connections to external services.
Zapier and Integromat: No‑Code External Connections
Zapier (and its competitor Make, formerly Integromat) are cloud-based automation platforms that connect WordPress to thousands of apps via webhooks. They rely on the WordPress REST API or dedicated plugins (e.g., Zapier for WordPress) to send and receive data.
Feature
Zapier
Make (Integromat)
Trigger types
New post, form submission, user registration
New post, custom webhook, scheduled triggers
Visual builder
Linear step-by-step
Visual flow diagram with branching
Free tier
100 tasks/month
1,000 operations/month
Paid plans start
$19.99/month (750 tasks)
$9/month (10,000 operations)
WordPress-specific plugin
Zapier for WordPress (free)
Make WordPress connector (free)
Ease of use: Very low. Pre-built integrations and templates allow non-technical users to connect WordPress to apps like Mailchimp, Slack, or Google Sheets in minutes.
Best for: Users who need simple, one-directional data flows between WordPress and popular third-party services, with minimal setup.
For simple, external integrations (e.g., send new blog posts to Twitter): Choose Zapier or Make. Their free tiers handle low-volume tasks, and no coding is required.
For complex, internal WordPress automations (e.g., create a user, assign a course, and send a custom email): AutomatorWP excels with its visual builder and deep WordPress integration, though webhook support is secondary.
For custom, bidirectional webhook connections (e.g., sync custom post metadata with a proprietary CRM): WP Webhooks provides the most control, data mapping, and debugging tools, but requires more technical skill.
Budget considerations: Free options (WP Webhooks core, AutomatorWP core, Zapier free tier) suffice for basic needs. Paid plans for WP Webhooks and AutomatorWP are flat yearly fees, while Zapier/Make charge monthly based on task volume—choose based on whether your workflow is high-volume or low-frequency.
Step‑by‑Step Guide to Setting Up Your First Webhook
To illustrate the power of WordPress and Webhooks: Automating Workflows, we’ll walk through a concrete, real‑world example: sending a Slack notification every time a new WordPress post is published. This integration eliminates the need to manually check for new content and keeps your team instantly informed. The process involves three clear stages: generating a webhook URL in Slack, configuring the trigger in WordPress, and testing the end‑to‑end flow.
Generating a Webhook URL in an External Service
First, you need a destination for the webhook payload. Slack provides a simple way to create an incoming webhook that posts messages to a specific channel.
Log in to your Slack workspace and navigate to Slack API (api.slack.com).
Click Create an App, then choose From scratch. Name your app (e.g., “WordPress Notifier”) and select your workspace.
From the left menu, go to Incoming Webhooks and toggle the switch to Activate Incoming Webhooks.
Click Add New Webhook to Workspace and select the Slack channel where notifications should appear (e.g., #content-updates).
After authorizing, you will receive a unique webhook URL that looks like this: https://hooks.slack.com/services/T00000000/B00000000/XXXXXXXXXXXXXXXXXXXXXXXX. Copy this URL — you’ll need it in the next step.
Configuring the Trigger in WordPress (Plugin or Code)
With the webhook URL ready, you now set up WordPress to fire a POST request whenever a new post is published. You can achieve this using a plugin or custom code. For simplicity and wide compatibility, we’ll use the free Webhooks & Automation for WordPress plugin.
After configuration, you must verify that the webhook works end‑to‑end. Follow these steps:
Create a test post in WordPress. Write a quick draft (e.g., “Test Slack Webhook”) and click Publish.
Check Slack. Within a few seconds, the message should appear in your chosen channel. If it doesn’t, proceed to debugging.
Inspect logs: Most webhook plugins include a log section (e.g., “Webhook Logs”) showing recent deliveries. Look for:
Status code: 200 means success; 4xx or 5xx indicate errors.
Response body: Slack returns ok on success or an error description (e.g., “invalid_payload”).
Common fixes:
Verify the webhook URL is correct and not expired.
Ensure your JSON payload is valid (use a validator like jsonlint.com).
Check that Slack’s app is installed and active for the workspace.
If using custom code, confirm the action hook (publish_post) fires correctly—test with a simple error_log() statement.
Manual test: Use a tool like Postman to send a POST request to your Slack webhook URL with the same payload. If that works, the issue lies in WordPress; if not, the problem is with Slack or the URL.
Once you see the notification in Slack, your webhook is live. This pattern can be extended to other services like email, CRMs, or project management tools, making WordPress and Webhooks: Automating Workflows a cornerstone of your integration strategy.
Advanced Use Cases: E‑commerce and Membership Automation
When basic order notifications or simple user updates no longer suffice, advanced webhook configurations transform WordPress into a central automation hub. For e‑commerce and membership sites, chaining webhooks across platforms enables real‑time synchronization, conditional access control, and multi‑step workflows that eliminate manual data entry and reduce latency. Below are three sophisticated patterns that demonstrate how to leverage webhooks for seamless integration.
Syncing WooCommerce Orders with a CRM or Email Tool
After a WooCommerce order is placed, a single webhook can push order data to a CRM like HubSpot or Salesforce, or to an email marketing platform such as Mailchimp or ActiveCampaign. However, advanced use cases require more than a one‑way sync. Consider a scenario where you want to update a CRM record only if the customer already exists, and create a new contact if they do not.
Example workflow:
WooCommerce sends a webhook payload (order ID, customer email, total, products) to a middleware tool like Zapier or Make.
The middleware checks the CRM for an existing contact using the email address.
If a contact exists, the webhook triggers an update to the contact’s total lifetime value and last purchase date.
If no contact exists, the webhook creates a new contact with the order details and tags them as “first‑time buyer.”
Finally, the middleware sends a personalized email to the customer (e.g., order confirmation with upsell recommendations) via the email tool’s API.
This chained approach ensures your CRM remains accurate without manual imports, and your email sequences react instantly to purchase behavior.
Automating Membership Approvals and Access Levels
Membership sites often require conditional access based on payment method, subscription tier, or user location. Webhooks allow you to automate these decisions without human intervention. For instance, when a user completes a payment via Stripe, a webhook can trigger a series of actions in your membership plugin (e.g., MemberPress, Restrict Content Pro).
Example workflow:
Step 1: Stripe sends a checkout.session.completed webhook to your site, including the payment amount and customer metadata.
Step 2: A custom endpoint on your WordPress site validates the payload and checks the membership plan ID against your database.
Step 3: If the payment amount matches the “Gold” tier, the webhook calls the membership plugin’s API to assign the user the “Gold” access level and set an expiration date 365 days in the future.
Step 4: Simultaneously, the webhook sends a Slack notification to the admin team with the new member’s details for manual review only if the payment came from a flagged country.
By chaining conditional logic, you can grant immediate access while maintaining security checks.
Multi‑Step Workflows with Conditional Logic
The most powerful automations involve branching paths based on data from previous steps. For example, when a user purchases a course bundle, you may want to enroll them in a learning management system (LMS), add them to a private Slack channel, and update a Google Sheet—but only if they are a new customer.
Example multi‑step workflow:
Step
Platform
Action
Condition
1
WooCommerce
Order completed webhook
Always
2
Zapier
Check if user exists in CRM
Email lookup
3a
LMS (LearnDash)
Enroll user in “Bundle A”
If new user
3b
Slack
Invite to #premium channel
If new user
3c
Google Sheets
Append order row
If returning user
4
Mailchimp
Send “Welcome” or “Thank you” email
Based on step 2 outcome
This table illustrates how a single webhook can fan out into multiple conditional paths, each triggering different platform actions. The key is to use a middleware tool that supports branching logic, such as Make’s routers or Zapier’s filters. With careful design, you can reduce manual overhead while maintaining precise control over membership and e‑commerce operations.
Security Best Practices for WordPress Webhooks
Webhooks are powerful tools for automating workflows between WordPress and external services, but they also introduce significant attack surfaces. Without proper safeguards, malicious actors can exploit webhooks to trigger unauthorized actions, tamper with payloads, or intercept sensitive data. To maintain a secure integration, you must implement multiple layers of defense. Below are the essential security practices, organized into three critical areas: verification, transport security, and monitoring.
Implementing HMAC or Secret Token Verification
The first line of defense is ensuring that incoming webhook requests are genuinely from your trusted source. Without verification, any party that discovers your webhook URL can send arbitrary payloads. Use a shared secret token or HMAC (Hash-Based Message Authentication Code) to authenticate requests.
Secret tokens: Generate a long, random string (at least 32 characters) and share it between your WordPress site and the external service. The service includes this token in the request header (e.g., X-Webhook-Token). Your WordPress code compares the received token against the stored secret.
HMAC verification: For stronger security, use HMAC with SHA-256. The external service computes a hash of the payload using the secret and sends it in a header (e.g., X-HMAC-Signature). Your WordPress site recalculates the hash and rejects the request if it does not match. This prevents replay attacks and payload tampering.
Always store secrets in environment variables or a secure vault, never hard-coded. Rotate tokens periodically and after any suspected compromise.
Enforcing HTTPS and Validating Request Sources
Webhooks transmit data over the internet, making them vulnerable to interception and man-in-the-middle attacks. Enforce HTTPS for all webhook endpoints to encrypt data in transit. Additionally, validate the source of incoming requests to ensure they originate from the expected IP addresses or domains.
Security Measure
What It Protects Against
Implementation Complexity
Recommended For
HTTPS enforcement
Data interception, tampering, eavesdropping
Low
All webhook endpoints
IP whitelisting
Unauthorized IPs sending fake requests
Medium
Known, fixed IP sources (e.g., payment gateways)
Header-based source validation
Spoofed requests from unapproved services
Low to medium
Services with dynamic IPs (e.g., Zapier, Slack)
For IP whitelisting, obtain the external service’s published IP ranges and configure your webhook handler to reject requests from outside those ranges. For services with variable IPs, validate the User-Agent or a custom header that only the legitimate service includes. Combine HTTPS with strict transport security headers (HSTS) to prevent downgrade attacks.
Logging and Alerting on Failed or Anomalous Webhooks
Even with strong verification and transport security, you need visibility into webhook activity. Logging every request—successful or failed—provides a forensic trail for investigating incidents. Alerting on anomalies allows you to respond in real time before an attacker can cause damage.
What to log: Timestamp, source IP, HTTP method, headers (excluding secrets), payload size, verification result (pass/fail), and endpoint URL. Store logs in a secure, append-only system with limited access.
What to alert on: Multiple failed verification attempts from the same IP, sudden spikes in request volume, requests from unexpected geolocations, or payloads that fail schema validation.
How to implement: Use WordPress’s built-in error_log() or a dedicated logging plugin. For alerting, integrate with a monitoring service (e.g., Sentry, New Relic) or send notifications via email or Slack for critical failures.
Retain logs for at least 90 days to support incident analysis. Regularly review logs for patterns that indicate probing or brute-force attacks. Automate alerts to reduce response time, but avoid alert fatigue by setting meaningful thresholds—for example, alert only after 10 consecutive failures within 5 minutes.
By combining HMAC verification, HTTPS enforcement, and proactive monitoring, you can secure your WordPress webhooks against unauthorized triggers, payload tampering, and data exposure. These practices turn a potential vulnerability into a robust automation channel that integrates seamlessly with your workflows.
Troubleshooting Common Webhook Issues in WordPress
When integrating webhooks into a WordPress site for workflow automation, several recurring issues can disrupt data flow. Timeouts, malformed payloads, and SSL/TLS errors are the most frequent culprits. Diagnosing these problems requires a systematic approach: check server error logs, inspect raw payload data with tools like RequestBin, and test with dummy data before enabling production webhooks. Below are targeted solutions for each common issue.
Handling Timeouts and Retry Logic
Webhook timeouts occur when the receiving server takes too long to respond. WordPress often imposes a default HTTP request timeout of 5 seconds via the wp_remote_post() function, which can be too short for heavy payloads or slow endpoints. To address this, follow these steps:
Increase the timeout in your webhook dispatch code by adding the timeout argument to the wp_remote_post() call. Example: wp_remote_post( $url, array( 'timeout' => 30 ) );
Implement retry logic using a transient-based queue. Store failed webhook attempts in a custom post type or option, then retry them via WP-Cron with exponential backoff (e.g., 1 minute, 5 minutes, 15 minutes).
Monitor server resource limits—check your php.ini for max_execution_time and max_input_time. If the webhook processing script itself runs long, extend these values.
For persistent timeouts, test the endpoint independently using curl from your server’s command line:
If the curl command succeeds but WordPress fails, the issue is likely in your WordPress HTTP configuration or a plugin conflict.
Validating Payload Structure and Encoding
Malformed payloads are a leading cause of silent failures. The receiving endpoint expects data in a specific format (usually JSON), and any deviation—such as missing fields, incorrect data types, or improper encoding—can break the integration. Use these diagnostic methods:
Capture payloads with RequestBin (or a similar tool) before sending them to the actual endpoint. Create a unique bin URL, point your webhook there, and inspect the raw request body, headers, and encoding.
Validate JSON structure by running the captured payload through a linter (e.g., json_decode() in PHP or an online validator). Common issues include trailing commas, unescaped quotes, and non-UTF-8 characters.
Check character encoding—ensure your WordPress site uses UTF-8 for database and output. If the payload contains special characters (e.g., em dashes, accented letters), apply utf8_encode() or use wp_json_encode() with the JSON_UNESCAPED_UNICODE flag.
To test with dummy data before production, create a staging endpoint that logs incoming payloads to a file. A simple PHP script can help:
SSL/TLS errors occur when the webhook request fails due to certificate verification problems. WordPress uses cURL under the hood, which can reject self-signed certificates, expired certificates, or mismatched hostnames. Common symptoms include “SSL certificate problem: unable to get local issuer certificate” or “SSL: no alternative certificate subject name matches.” To debug:
Verify the endpoint’s certificate using an online SSL checker or the command line: openssl s_client -connect example.com:443 -servername example.com. Look for “Verify return code: 0 (ok)”—any other code indicates a problem.
Check WordPress’s SSL context. If you control the endpoint and use a self-signed certificate, you can bypass verification temporarily in your code (not recommended for production): add_filter( 'https_ssl_verify', '__return_false' );—but only use this during testing.
Update the CA bundle on your WordPress server. Outdated CA certificates can cause false negatives. Download the latest cacert.pem from cURL’s website and update the path in wp-config.php: define( 'WP_SSL_VERIFY_SSL_CERT', true ); and ensure the server’s OpenSSL version is current.
For a practical test, send a webhook to a known secure endpoint (e.g., https://webhook.site) and check your server’s error log for SSL-related messages. If the issue persists, disable SSL verification temporarily in a staging environment to isolate whether the problem is with the certificate or the WordPress HTTP API itself.
Future Trends: Webhooks and the Evolving WordPress Ecosystem
As WordPress continues to mature, webhooks are becoming a cornerstone of modern automation strategies. The ecosystem is shifting toward event-driven architectures that prioritize speed, scalability, and intelligent decision-making. Emerging patterns such as serverless webhook handlers, edge computing for near-instant delivery, and deep integration with AI services are reshaping how developers and site owners automate workflows. Additionally, the advent of Full Site Editing (FSE) and block-based workflows introduces new automation possibilities by exposing granular content events that webhooks can capture. These trends collectively point to a future where WordPress acts not just as a content management system, but as a reactive hub within a broader, interconnected digital landscape.
Serverless Functions for Lightweight Webhook Processing
Traditional webhook endpoints often rely on dedicated servers or virtual machines, which can introduce latency and maintenance overhead. Serverless functions—such as AWS Lambda, Vercel Functions, or Cloudflare Workers—offer a more efficient alternative for processing WordPress webhook payloads. These functions run on demand, scaling automatically with traffic and charging only for compute time consumed. Key benefits include:
Reduced latency: Functions can be deployed closer to users via edge networks, minimizing round-trip time for webhook delivery.
Simplified scaling: No need to provision or manage servers; the platform handles concurrency spikes from burst webhook events (e.g., during product launches or comment floods).
Cost efficiency: Pay-per-execution models eliminate idle server costs, making them ideal for low-volume or unpredictable workflows.
Event chaining: Serverless functions can trigger subsequent actions—like updating a CRM, sending a Slack notification, or enriching data via an API—without maintaining persistent connections.
For WordPress, this pattern is especially useful for processing webhooks from e-commerce plugins (e.g., WooCommerce order updates), form submissions, or user registration events. Developers can write lightweight handlers in Node.js, Python, or Go that parse the payload, validate signatures, and execute business logic without bogging down the WordPress server itself.
Webhooks traditionally operate on deterministic, rule-based triggers (e.g., “when a post is published, send data to Mailchimp”). The next frontier involves integrating AI services to create predictive and adaptive workflows. By pairing WordPress webhooks with machine learning models, automation can become context-aware and self-optimizing. Examples include:
Predictive content scheduling: A webhook fires when a draft is saved, sending the content to an AI service that analyzes historical engagement data to recommend the optimal publish time.
Smart moderation: Incoming comment webhooks are routed to a sentiment analysis API; comments flagged as toxic are automatically held for review or rejected.
Dynamic personalization: User login events trigger webhooks that query an AI recommendation engine, updating the user’s block-based homepage in real time with personalized content blocks.
This convergence reduces manual intervention and enables workflows that adapt to changing conditions. For instance, a webhook from a WooCommerce order can trigger a predictive inventory model that forecasts stockouts and automatically adjusts reorder points. As AI services become more accessible via APIs, WordPress site owners can implement these capabilities without deep machine learning expertise.
The Role of Webhooks in Headless WordPress Architectures
Headless WordPress setups—where the CMS serves content via REST API or GraphQL, and a separate frontend (e.g., Next.js, Nuxt) handles presentation—rely heavily on webhooks for real-time synchronization. When content changes in the WordPress backend, webhooks notify the frontend application to rebuild static pages or invalidate caches. This pattern ensures that users see updated content without manual refreshes. Key considerations include:
Aspect
Traditional WordPress
Headless WordPress with Webhooks
Content update speed
Instant on page load
Near-instant via webhook-triggered rebuilds
Frontend framework
PHP-based themes
JavaScript frameworks (React, Vue, etc.)
Automation scope
Limited to WordPress hooks
Unlimited via external webhook handlers
Scalability
Server-bound
Edge-friendly with CDN and serverless functions
Full Site Editing further amplifies these possibilities by making every block a potential webhook source. For example, a custom “product spotlight” block can fire a webhook when its content is updated, triggering a rebuild of the product page on a headless storefront. This granularity enables precise automation—such as updating only the specific sections of a page that changed, rather than the entire site. As the WordPress ecosystem evolves, webhooks will bridge the gap between its block-based editing experience and the performance benefits of headless architectures, creating seamless, real-time workflows that scale.
Frequently Asked Questions
What is a webhook in the context of WordPress?
A webhook in WordPress is an automated HTTP callback that sends real-time data from your WordPress site to other applications or services when a specific event occurs. For example, when a new post is published, a webhook can notify a CRM, email marketing tool, or Slack channel. Webhooks are event-driven, meaning they trigger instantly without polling, which makes them efficient for automating workflows. WordPress can both send webhooks (outgoing) and receive webhooks (incoming) via plugins or custom code, enabling seamless integration with third-party platforms.
How can I set up webhooks in WordPress?
Setting up webhooks in WordPress typically requires a plugin like WP Webhooks, Zapier, or Integromat, or custom code using the WordPress REST API. For outgoing webhooks, you define an event (e.g., new user registration) and the endpoint URL of the receiving service. Many plugins provide a user-friendly interface to map data fields and test the connection. For incoming webhooks, you create a custom endpoint in WordPress (e.g., via register_rest_route) to accept data from external services, which can then trigger actions like creating posts or updating user profiles.
What are common use cases for WordPress webhooks?
Common use cases include: 1) Syncing new WooCommerce orders to a CRM or accounting software like Salesforce or QuickBooks. 2) Automatically adding new blog subscribers to an email marketing list in Mailchimp or ConvertKit. 3) Sending notifications to Slack or Microsoft Teams when a form is submitted. 4) Updating a third-party database when a user profile changes. 5) Triggering social media posts when content is published. 6) Integrating with project management tools like Trello or Asana when a new task is created via a WordPress form.
What is the difference between webhooks and APIs in WordPress?
Webhooks are event-driven push notifications that send data automatically when a specific event occurs, whereas APIs (like the WordPress REST API) are request-driven pull mechanisms where the client actively requests data. Webhooks are ideal for real-time updates and automation without constant polling, reducing server load. APIs offer more flexibility for querying, creating, updating, and deleting data on demand. In practice, webhooks often complement APIs: a webhook can notify an external service of a change, and that service can then use the API to fetch detailed data.
Are there security concerns with WordPress webhooks?
Yes, security is critical. Webhooks can expose your WordPress site to risks if not properly secured. Always use HTTPS endpoints to encrypt data in transit. Implement secret tokens or HMAC signatures to verify that incoming webhook requests are from trusted sources. Validate and sanitize all incoming data to prevent injection attacks. For outgoing webhooks, avoid sending sensitive information like passwords or API keys. Use logging to monitor webhook activity and detect anomalies. Many plugins handle these best practices, but custom implementations require careful attention.
Can webhooks be used with WooCommerce for order automation?
Absolutely. WooCommerce supports webhooks natively to automate order-related workflows. You can configure webhooks for events like order created, updated, completed, or refunded. For example, when a new order is placed, a webhook can send order details to a fulfillment service, a CRM, or an inventory management system. WooCommerce webhooks can be set up via the WooCommerce settings menu under Advanced > Webhooks. You define the topic (event), delivery URL, and secret key. This enables real-time synchronization without manual intervention.
What are the best plugins for WordPress webhook automation?
Top plugins include: 1) WP Webhooks – highly flexible, supports outgoing and incoming webhooks, and integrates with many third-party services. 2) Zapier – connects WordPress to thousands of apps via webhooks (requires a Zapier account). 3) AutomateWoo – focused on WooCommerce automation, includes webhook triggers. 4) Uncanny Automator – visual builder for WordPress automation, supports webhooks. 5) Integromat (now Make) – powerful visual automation platform with WordPress webhooks. Choose based on your technical comfort and integration needs.
How do I troubleshoot webhooks that fail in WordPress?
First, check the webhook logs if your plugin provides them. Common issues include incorrect endpoint URLs, network connectivity problems, or authentication failures. Verify that the receiving service is online and accepting requests. Use tools like RequestBin or Webhook.site to capture and inspect the payload your WordPress site is sending. Ensure the payload format (e.g., JSON) matches what the receiver expects. Check for firewall or security plugin blocks. Test with a simple event first. If using custom code, enable WP_DEBUG to see PHP errors. Also, confirm that your server’s outgoing HTTP requests are not blocked.
How to Create a WordPress Child Theme: A Step-by-Step Guide for Beginners
Introduction
Customizing a WordPress site is a common need, whether you are adjusting colors, adding functionality, or restructuring layouts. However, making changes directly to a theme’s core files can lead to a frustrating problem: when the theme updates, your customizations are overwritten and lost. This is where the concept of a child theme becomes invaluable. A child theme is a separate, dependent theme that inherits the look and feel of its parent theme while allowing you to add your own modifications safely. This guide will walk you through exactly how to create a WordPress child theme, ensuring your customizations survive updates and remain intact.
What Is a WordPress Child Theme?
A WordPress child theme is a theme that inherits the functionality and styling of another theme, known as the parent theme. The child theme does not replace the parent; instead, it sits on top of it. When a user visits your site, WordPress loads the parent theme first and then applies any overrides from the child theme. This layered approach means you can modify files like style.css, functions.php, or template files (e.g., header.php, single.php) within the child theme without touching the parent’s files. The parent theme remains untouched, so it can be updated normally without affecting your changes.
Key characteristics of a child theme include:
It requires a parent theme to function; it cannot be used alone.
It typically contains at least a stylesheet (style.css) and a functions file (functions.php).
It can override specific parent theme files by placing files of the same name in its own directory.
It inherits all features and templates from the parent, except those explicitly overridden.
Benefits of Using a Child Theme Over Direct Editing
Directly editing a parent theme’s files is risky and inefficient. Using a child theme offers several distinct advantages that make it the standard practice for WordPress development:
Child themes remain unaffected by parent theme updates. Your customizations are preserved, even when the parent theme receives security patches or new features.
Easy Rollback
If an update to the parent theme causes issues, you can simply revert the parent theme to a previous version without losing your child theme’s customizations.
Organized Custom Code
All modifications are stored in a separate, dedicated directory. This makes your changes easy to find, manage, and transfer to another site if needed.
Performance Efficiency
Child themes are lightweight. They only load the overrides you create, so they do not add unnecessary bloat to your site.
Learning and Testing
You can experiment with code changes in a child theme without risking the stability of the parent theme. This is ideal for learning or testing new features.
Cleaner Upgrades
When the parent theme developer releases a major update, you can benefit from new features while keeping your customizations intact. No need to manually reapply changes.
In contrast, editing the parent theme directly means every update will overwrite your work, forcing you to redo customizations or risk security vulnerabilities by not updating. Child themes eliminate this headache entirely.
Who Should Create a Child Theme?
Creating a child theme is not reserved for expert developers. It is a practical skill for a wide range of WordPress users:
Beginners who want to make simple style changes (e.g., font sizes, colors) without learning complex PHP or risking site breakage.
DIY website owners who manage their own site and want to add custom snippets, such as Google Analytics code or custom widget areas.
Freelancers and agencies who build client sites and need a reliable way to add client-specific features that survive theme updates.
Developers who create custom functionality and prefer to keep their code separate from third-party themes for maintainability.
Anyone using a premium or frequently updated theme (like Astra, GeneratePress, or Divi) who wants to ensure long-term stability of their customizations.
If you have ever made a change to your site only to lose it after a theme update, or if you want to safely experiment with custom code, then you are exactly who should learn how to create a WordPress child theme. It is a foundational step toward mastering WordPress customization without the fear of breaking your site or losing work.
Prerequisites for Creating a Child Theme
Before you begin the process of learning how to create a WordPress child theme, you must gather the necessary tools and understand the environment you are working with. A child theme relies on a parent theme—typically a well-coded theme such as Twenty Twenty-Four or a commercial framework—and inherits its styling and functionality while allowing you to make safe customizations. Skipping these prerequisites can lead to broken layouts, lost content, or hours of troubleshooting. Below are the essential requirements you need to have in place.
Required Tools and Access (FTP, cPanel, or Hosting Dashboard)
To create a child theme, you need direct access to your WordPress site’s file system. You cannot build a child theme from within the WordPress admin dashboard alone. You have three common methods for accessing these files:
FTP (File Transfer Protocol): Use a client like FileZilla or Cyberduck. You will need your FTP hostname (often your domain name or IP address), username, password, and port (usually 21). Connect to your server and navigate to /wp-content/themes/.
cPanel File Manager: If your hosting provider offers cPanel, log in, open the File Manager, and go to public_html/wp-content/themes/. This method does not require additional software.
Hosting Dashboard: Some managed WordPress hosts (e.g., WP Engine, Kinsta) provide a built-in file editor or SFTP credentials. Check your hosting account’s dashboard for a “File Manager” or “Site Access” section.
You also need a code editor such as Visual Studio Code, Sublime Text, or Notepad++. Avoid using the built-in WordPress theme editor or a basic text editor like Notepad, as they lack syntax highlighting and can introduce errors. Finally, ensure you have administrator-level access to your WordPress site to activate the child theme once created.
Understanding the Parent Theme Structure
A child theme works by overriding specific files from the parent theme. To do this effectively, you must understand the parent theme’s file hierarchy. Every WordPress theme, including the parent, contains at least two required files:
style.css: Contains the theme’s metadata (name, author, version) and its CSS rules.
index.php: The main template file that WordPress falls back to if no other template is found.
Most modern themes also include additional files such as header.php, footer.php, functions.php, single.php, and archive.php. To create a child theme, you only need to create two files initially: a style.css file (with specific header comments) and a functions.php file (to enqueue the parent stylesheet). You do not copy the entire parent theme; instead, you create minimal files that reference the parent. For example, if you want to override the parent’s header.php, you create a new header.php in your child theme folder. WordPress will use your version instead.
To inspect the parent theme structure, navigate to /wp-content/themes/[parent-theme-name]/ via FTP or File Manager. Note the folder name exactly—it is case-sensitive and must match the value you specify in the child theme’s style.css header.
Before you modify any files or activate a new theme, always create a full backup of your WordPress site. A child theme is generally safe, but mistakes in the functions.php file or a misnamed folder can cause a white screen of death or break critical functionality. A backup ensures you can restore your site in minutes. Perform the following steps:
Database backup: Use a plugin like UpdraftPlus, BackupBuddy, or your hosting provider’s backup tool. Export the database to a .sql file.
Files backup: Download the entire /wp-content/ folder via FTP, especially the themes, plugins, and uploads directories.
Test the backup: If possible, restore the backup to a staging site to verify it works.
Many hosting providers offer automated daily backups. Check your hosting dashboard to see if a recent backup exists. If you are using a managed host, you may be able to restore a previous version with one click. However, having your own off-site backup (e.g., on your computer or cloud storage) gives you full control.
Once you have the tools, understand the parent theme structure, and have a reliable backup, you are ready to proceed with the core steps of how to create a WordPress child theme.
Step 1: Create a Child Theme Folder
Before you can modify a WordPress theme without losing changes during updates, you must establish a dedicated space for your child theme. This first step involves creating a folder that will store all the custom templates, styles, and functions you intend to add. The process is straightforward and requires only basic navigation and file management skills.
Navigating to wp-content/themes/
Every WordPress installation stores its themes in a standard directory. To locate it, you need to access your website’s file system. The path is always:
your-website-root/wp-content/themes/
This folder contains all themes available for activation, including default themes like Twenty Twenty-Four and any premium or custom themes you have installed. To reach this directory, you have two primary methods:
FTP Client: Use a program like FileZilla or Cyberduck. Connect to your server using your FTP credentials (hostname, username, password, and port). Navigate through the file tree until you reach public_html (or www), then open wp-content, and finally themes.
Hosting File Manager: Most hosting control panels (cPanel, Plesk, or custom dashboards) provide a built-in file manager. Log into your hosting account, locate the File Manager tool, and browse to the same wp-content/themes/ path.
Once inside the themes folder, you will see subfolders for each installed theme. Do not modify any existing theme folders; you will create a new one for your child theme.
Naming Your Child Theme Folder (Best Practices)
The folder name you choose is crucial for organization and future maintenance. Follow these best practices to avoid conflicts and ensure clarity:
Prevents collisions with other themes or plugins that might share a generic name.
twentytwentyfour-child
Avoid spaces and special characters
FTP and server systems may misinterpret spaces; underscores and hyphens are safe.
my-custom-child
Include the parent theme name
Makes it immediately obvious which parent theme the child modifies.
generatepress-child
Keep it lowercase
WordPress theme folder names are case-sensitive on some servers; lowercase eliminates guesswork.
astra-child
Be consistent across projects
Helps you quickly identify child themes when managing multiple sites.
parentname-child
A common and recommended pattern is parent-theme-name-child. For example, if your parent theme is “OceanWP,” name the folder oceanwp-child. This naming convention is widely used because it is self-documenting and reduces the risk of accidentally overwriting the parent theme or another child theme.
Creating the Folder via FTP or Hosting File Manager
Once you have chosen a name, you can create the folder using either FTP or your hosting file manager. Both methods achieve the same result; choose the one you are most comfortable with.
Using FTP:
Connect to your server using your FTP client.
Navigate to wp-content/themes/ as described above.
Right-click in the file list area (or use the “Create Directory” button) and select “Create new directory” or “New folder.”
Enter your chosen folder name (e.g., twentytwentyfour-child).
Press Enter or click “OK.” The folder will appear in the list.
Log into your hosting control panel (e.g., cPanel).
Open the File Manager tool.
Browse to public_html/wp-content/themes/.
Click the “New Folder” button (often located in the toolbar).
Type your folder name and confirm. The folder is created instantly.
After creation, verify that the folder is empty (it should contain no files yet). This empty folder is the foundation for your child theme. In the next steps, you will add the essential style.css and functions.php files to make the child theme functional. Without this folder, no child theme can exist—it is the physical container that WordPress uses to recognize and load your customizations.
Step 2: Create the style.css File
The second step in learning how to create a WordPress child theme involves building the foundation of your theme’s identity: the style.css file. This single file performs two critical functions. First, it declares your child theme to WordPress so the system recognizes it as a valid, installable theme. Second, it establishes a formal link to your parent theme, telling WordPress which existing codebase your child theme will inherit and override. Without this file correctly formatted, your child theme will not appear in the WordPress admin under Appearance > Themes, and the entire process of customization cannot proceed.
Required Header Comment Format
WordPress reads a specific block of text at the very top of the style.css file to identify a theme. This block is called the “header comment.” It must be enclosed in CSS comment syntax (/* and */) and contain certain required fields. The most essential fields for any child theme are:
Theme Name: A human-readable name for your child theme. This is what appears in the WordPress admin.
Template: The directory name of the parent theme (case-sensitive). This is the most critical line—it tells WordPress which theme is the parent.
Other optional but recommended fields include Description, Author, Version, and Text Domain. While only Theme Name and Template are strictly required for the theme to function, including a Description helps you or other administrators identify the theme’s purpose later. The header comment must appear exactly as shown below, with no extra spaces or characters before the opening /*.
Example style.css Code with Theme Name and Template
Below is a practical example of a complete style.css header for a child theme based on the popular “Twenty Twenty-Four” parent theme. Replace the parent folder name with your actual parent theme’s directory name (found in /wp-content/themes/).
/*
Theme Name: Twenty Twenty-Four Child
Template: twentytwentyfour
Description: A custom child theme for Twenty Twenty-Four.
Author: Your Name
Version: 1.0.0
Text Domain: twentytwentyfour-child
*/
Notice that the Template field matches the folder name of the parent theme exactly. If the parent theme’s folder is named twentytwentyfour, you write Template: twentytwentyfour. A mismatch here will cause WordPress to treat the child theme as a standalone theme, breaking the inheritance chain. After the closing */, you may add any custom CSS rules for your child theme. However, for a minimal setup, leaving the file with only the header comment is perfectly acceptable—WordPress will still load the parent theme’s styles automatically.
Saving and Uploading the File to the Child Theme Folder
Once your style.css is written, you must save it with the exact filename style.css (lowercase, no spaces). Use a plain text editor such as Notepad, Visual Studio Code, or Sublime Text—avoid word processors like Microsoft Word that add hidden formatting. Save the file in your child theme’s folder, which you should have already created inside /wp-content/themes/. The folder structure should look like this:
Connect to your server using an FTP client (e.g., FileZilla). Navigate to /wp-content/themes/, open your child theme folder, and drag the style.css file into it.
cPanel File Manager
Log into your hosting control panel, open File Manager, go to wp-content/themes/your-child-theme-folder/, and click “Upload” to select your style.css file.
After uploading, visit your WordPress admin dashboard, navigate to Appearance > Themes. Your child theme should now be listed with the name you provided in the header. Click “Activate” to enable it. If the theme does not appear, double-check that the Template field exactly matches the parent theme’s folder name and that the file is saved as style.css without any extra extensions. Once activated, your site will use the parent theme’s design, and you can begin adding custom CSS or template files to the child theme folder without fear of losing changes during parent theme updates.
The functions.php file is the command center of your child theme. While the style.css file tells WordPress that your child theme exists, the functions.php file handles the heavy lifting: loading the parent theme’s stylesheets and enabling you to add custom PHP functions without ever touching the parent theme’s core files. This file executes automatically when your child theme is active, making it the safest and most efficient place to modify or extend functionality.
Why You Need functions.php in a Child Theme
Without a properly configured functions.php file, your child theme will lack the visual and functional foundation provided by the parent theme. Specifically, this file serves two critical purposes:
Enqueues the parent theme’s stylesheet: The parent theme’s CSS must be loaded first to set base styling. If you skip this step, your child theme will appear broken or unstyled.
Preserves upgrade safety: By placing custom PHP code in the child theme’s functions.php, you avoid editing the parent theme’s files. When the parent theme updates, your customizations remain intact.
Prevents dependency errors: Many parent themes rely on specific scripts or styles loaded via their own functions.php. Your child theme’s file can safely inherit or override these dependencies.
Code Example for Enqueuing Parent Styles
The correct way to load the parent theme’s stylesheet is through the wp_enqueue_style() function, hooked into the wp_enqueue_scripts action. Below is a tested, minimal example that works with most parent themes:
Points to the parent theme’s directory (e.g., /wp-content/themes/twentytwentyfour/).
get_stylesheet_directory_uri()
Points to the child theme’s directory (e.g., /wp-content/themes/twentytwentyfour-child/).
array( $parent_style )
Ensures the parent stylesheet loads before the child stylesheet.
wp_get_theme()->get('Version')
Dynamically uses the version number from your child theme’s style.css header for cache busting.
If your parent theme uses additional CSS files (e.g., woocommerce.css or rtl.css), you must enqueue them similarly within the same function. Check your parent theme’s original functions.php for a list of all enqueued styles.
Adding Custom Functions Without Breaking Parent Updates
Once your functions.php is set up, you can add any custom PHP code below the enqueue function. The golden rule: never copy the parent theme’s entire functions.php into your child theme. Instead, add only the code you need to change or extend. Here are common examples:
Modify excerpt length: Use excerpt_length filter to change default excerpt word count.
Add custom widget areas: Register new sidebars or footer widget zones.
Override parent functions: If the parent theme defines a pluggable function (wrapped in if ( ! function_exists() )), you can redefine it in your child theme.
Remove parent actions: Use remove_action() to unhook unwanted parent theme features.
Always open your functions.php with <?php. Do not include a closing ?> tag to prevent accidental whitespace output.
Wrap every custom function with a unique prefix (e.g., my_child_theme_) to avoid conflicts with other themes or plugins.
Test all additions on a staging site before deploying live. A single syntax error in functions.php can crash your entire site.
Use is_admin() checks if your custom code should only run in the WordPress dashboard.
By following this structure, your child theme’s functions.php will cleanly load parent styles, allow unlimited customization, and remain fully compatible with future parent theme updates.
Step 4: Activate the Child Theme
After creating your child theme’s folder and required files (style.css and functions.php), the next critical step is to activate it from your WordPress admin dashboard. Activation ensures your child theme takes over the visual presentation and functionality of your site while preserving your parent theme as a fallback. This process is straightforward but requires careful attention to avoid common pitfalls.
Navigating to Appearance > Themes
To begin, log in to your WordPress admin dashboard. In the left-hand sidebar, locate the Appearance menu and click on Themes. This action opens the Themes page, which displays all installed themes on your WordPress site. You should see your newly created child theme listed among others, typically with a generic thumbnail (a gray placeholder icon) unless you added a custom screenshot.png file to your child theme folder.
If you do not see your child theme listed, it may not have been uploaded correctly. Verify that the child theme folder exists in /wp-content/themes/ on your server via FTP or your hosting file manager. Ensure the folder name matches exactly (e.g., my-custom-theme-child) and contains at least a valid style.css file with the required header comment block. Common mistakes include missing the Template: line in the header, which tells WordPress which parent theme to use. For example:
/*
Theme Name: My Custom Theme Child
Template: my-custom-theme
*/
Without the correct Template: declaration, your child theme will not appear on the Themes page. Double-check that the Template value matches the folder name of your parent theme (case-sensitive).
Activating the Child Theme and Checking for Errors
Once your child theme is visible on the Themes page, hover over its thumbnail and click the Activate button. WordPress will immediately apply your child theme to your site. After activation, it is essential to verify that the theme works correctly:
Visit your site’s front end: Open your website in a new browser tab or window. Confirm that the layout, styling, and content appear as expected. If your child theme overrides template files from the parent, check specific pages (e.g., single posts, archives) for consistency.
Check the admin bar: The WordPress admin bar (if you are logged in) may display a “Customize” link tied to your child theme. This indicates the theme is active.
Inspect page source: Right-click on your site and select “View Page Source.” Look for the <link> tag pointing to your child theme’s style.css file, typically in the <head> section. The URL should include your child theme folder name.
Test functionality: If your child theme includes custom functions in functions.php (e.g., enqueuing scripts or adding features), ensure they work without errors. Use the browser’s developer console (F12) to check for JavaScript errors.
If you encounter a white screen (the “White Screen of Death”) or a PHP error message after activation, immediately switch back to the parent theme via FTP or your hosting control panel. Rename your child theme folder (e.g., add -disabled to the folder name) to force WordPress to fall back to the parent theme. Then, debug the issue in a staging environment before reactivating.
Even with careful setup, activation problems can arise. Below is a table of common issues and their solutions:
Issue
Cause
Solution
Child theme does not appear on Themes page
Missing or incorrect Template: line in style.css
Edit style.css and ensure the Template: value matches the parent theme folder name exactly (case-sensitive).
Site displays no styling or broken layout
Parent theme styles not enqueued in child theme’s functions.php
Add wp_enqueue_style( 'parent-style', get_template_directory_uri() . '/style.css' ); to your child theme’s functions.php.
White screen after activation
Syntax error in functions.php or missing PHP tag
Check functions.php for typos, missing semicolons, or incorrect function names. Use a code editor with syntax highlighting.
Child theme activates but changes do not appear
Browser cache or caching plugin
Clear your browser cache and any WordPress caching plugin (e.g., W3 Total Cache, WP Super Cache).
Custom CSS not applying
CSS specificity or missing enqueue
Ensure custom CSS in style.css is not overridden by parent styles. Use more specific selectors or add !important sparingly.
If problems persist, temporarily deactivate all plugins to rule out conflicts. Then, reactivate them one by one to identify the culprit. Always test changes on a staging site before applying them to a live environment. With these steps, your child theme should activate smoothly, providing a safe foundation for customization without risking parent theme updates.
Step 5: Customize Your Child Theme
Now that your child theme is activated and working, the real power begins: customizing it without ever touching your parent theme’s files. This step ensures your changes survive theme updates and keeps your site secure. You will learn three key methods: overriding template files, adding custom CSS, and modifying functions safely.
One of the most powerful features of a child theme is the ability to override any template file from the parent theme. When WordPress loads a template, it first checks your child theme’s directory. If a file with the same name exists there, WordPress uses your child theme’s version instead of the parent’s. This is how you can change layouts, headers, footers, or any other template without editing the parent theme directly.
To override a parent template file:
Locate the template file you want to change in your parent theme’s folder (e.g., /wp-content/themes/parent-theme/header.php).
Copy that file into your child theme’s folder (e.g., /wp-content/themes/child-theme/header.php).
Edit the copied file in your child theme. All changes will now take precedence over the parent’s version.
Important: Only copy the exact files you need to modify. Unnecessary duplicates can slow down your site and complicate future updates. After copying, you can safely edit any HTML, PHP, or WordPress loop logic inside the file. Your changes will persist even if the parent theme updates.
Adding Custom CSS in style.css or Additional CSS Panel
Customizing your child theme’s appearance is most often done through CSS. You have two reliable methods to add custom styles, each with its own benefits.
Your child theme’s style.css file is automatically enqueued after the parent theme’s stylesheet. This means any CSS you write here will override parent styles by default (assuming equal specificity). Simply open style.css in a text editor and add your rules. For example:
/* Change the site title color */
.site-title a {
color: #ff6600;
}
/* Increase font size in article content */
.entry-content p {
font-size: 18px;
}
Save the file and refresh your site to see the changes. This method is permanent and travels with your child theme if you move it to another WordPress installation.
Method 2: Using the WordPress Additional CSS panel
If you prefer a quick, theme-independent way to add CSS without editing files, use the built-in Customizer. Navigate to Appearance > Customize > Additional CSS in your WordPress admin. Any CSS you paste here will be stored in the database and applied site-wide. This method is ideal for temporary tweaks or when you want to avoid file edits. However, it does not transfer with your theme if you export it, so use style.css for permanent changes.
Best practice: Use style.css for all major customizations and the Additional CSS panel only for quick tests or client-specific overrides.
Modifying Functions Without Affecting Parent Theme
The functions.php file in your child theme is where you add custom PHP code to alter or extend your parent theme’s functionality. Because WordPress loads the child theme’s functions.phpbefore the parent theme’s, you can safely add new functions, remove actions, or filter data without touching the parent’s core files.
Here are common ways to modify functionality safely:
Add new features: Register custom post types, add theme support for features like post thumbnails, or enqueue additional scripts and styles.
Override parent theme functions: If a parent function is pluggable (wrapped in if ( ! function_exists() )), you can redefine it in your child theme’s functions.php. For example:
if ( ! function_exists( 'parent_theme_custom_logo' ) ) {
function parent_theme_custom_logo() {
// Your custom logo code here
}
}
Remove or modify actions and filters: Use remove_action() or remove_filter() to disable unwanted parent theme hooks, then add your own with add_action() or add_filter(). For instance, to remove the default footer credit and replace it:
// Remove parent theme footer credit
remove_action( 'parent_theme_footer', 'parent_theme_footer_credit' );
// Add custom footer credit
add_action( 'parent_theme_footer', 'custom_footer_credit' );
function custom_footer_credit() {
echo '<p>Powered by My Custom Site</p>';
}
Add custom shortcodes: Create reusable content snippets with add_shortcode().
Critical rule: Never edit the parent theme’s functions.php. All modifications belong in your child theme. This guarantees that parent theme updates do not overwrite your work. Always test your custom functions on a staging site first, especially if you are removing hooks, as this can break layout or functionality if done incorrectly.
By mastering these three techniques—overriding templates, adding CSS, and modifying functions—you can fully customize your WordPress site while keeping it maintainable and update-proof. Your child theme becomes a safe, flexible foundation for all future changes.
Common Pitfalls and How to Avoid Them
When learning how to create a WordPress child theme, beginners often stumble on a few recurring issues. These mistakes can break your site layout, disable customizations, or cause conflicts with parent theme updates. Understanding these pitfalls and their solutions will keep your site stable and your theme properly structured.
Missing or Incorrect Template Header in style.css
The most frequent error is omitting or misformatting the required header comment in the child theme’s style.css file. Without this header, WordPress cannot identify the theme as a valid child theme. The header must begin with /* and include at minimum the Theme Name and Template fields. The Template field must exactly match the directory name of the parent theme (case-sensitive). For example, if your parent theme folder is named twentytwentyfive, the Template line should be Template: twentytwentyfive. A missing or misspelled template name will cause the child theme to be invisible in the WordPress admin, or worse, trigger a fatal error when activated.
To avoid this:
Always verify the parent theme’s folder name in /wp-content/themes/.
Copy the exact folder name into the Template field.
Include a Description and Version for clarity, though only Theme Name and Template are strictly required.
Use a text editor with syntax highlighting to catch formatting errors.
Forgetting to Enqueue Parent Stylesheet
A child theme does not automatically inherit the parent theme’s CSS. Many beginners assume activating the child theme will preserve the parent’s styling, but without enqueuing the parent stylesheet, the site will appear unstyled or broken. The correct approach is to use the wp_enqueue_scripts action hook in the child theme’s functions.php file to load both the parent and child stylesheets in the proper order.
Here is a standard enqueuing code snippet for functions.php:
The parent style must be enqueued first, with the child style declared as a dependency (using the third parameter).
Use get_template_directory_uri() for the parent theme and get_stylesheet_directory_uri() for the child theme.
If the parent theme uses a different stylesheet handle (e.g., parent-main), inspect its enqueue code in the parent’s functions.php and adjust accordingly.
Overwriting Parent Functions Incorrectly
Another common mistake is trying to modify parent theme functions by copying the entire function into the child theme’s functions.php. This causes a fatal error because PHP does not allow redeclaring a function. The correct method depends on how the parent function is defined: if it is pluggable (wrapped in if ( ! function_exists() )), you can simply redefine it in the child theme. If it is not pluggable, you must use a hook or filter to modify its output.
To illustrate, consider the following comparison of approaches:
Method
When to Use
Example
Risk
Redefine pluggable function
Parent uses if ( ! function_exists() ) wrapper
Copy entire function into child functions.php
Low—safe if wrapper exists
Use action/filter hooks
Parent function is not pluggable
Add add_filter( 'the_title', 'my_custom_title' )
Low—respects parent code
Remove and replace action
Parent function is hooked to an action
remove_action() then add_action()
Moderate—requires correct hook name
To avoid errors:
Never copy a parent function directly unless you confirm it is pluggable.
Check the parent theme’s source code for function_exists() wrappers.
Use add_action and add_filter to modify output without duplication.
If you must completely replace a function, consider using a plugin or custom functionality module instead.
By addressing these three common pitfalls—correcting the template header, enqueuing styles properly, and handling function overrides safely—you will build a robust child theme that maintains site stability and allows seamless parent theme updates.
Advanced Tips for Child Theme Development
Once you have mastered the basics of creating a child theme, advancing your workflow ensures your site remains stable, secure, and scalable. As your site grows and you update the parent theme, following best practices prevents conflicts, data loss, and performance issues. Below are three critical strategies for maintaining a robust child theme over time.
Using Version Control for Your Child Theme
Version control is essential for tracking changes, collaborating with team members, and reverting to previous states if something goes wrong. Git is the industry standard for managing WordPress theme files. By placing your child theme folder under Git, you can log every modification, experiment safely, and deploy updates systematically.
Commit frequently with descriptive messages (e.g., “Added custom header template” or “Fixed footer styling conflict”).
Use branches for major changes or experiments. For example, create a branch called feature-new-layout before modifying core files.
Push to a remote repository (like GitHub or Bitbucket) for backup and collaboration.
Tag releases (e.g., v1.0.1) to mark stable versions before parent theme updates.
When you update the parent theme, you can compare the child theme’s commit history against the parent’s changelog to identify potential conflicts. This practice saves hours of debugging and ensures you never lose custom work.
Testing Updates in a Staging Environment
Never update the parent theme directly on your live site. A staging environment—a clone of your production site—allows you to test parent theme updates, plugin changes, and child theme modifications without risking downtime or broken functionality.
To set up a staging environment effectively:
Use a staging plugin (like WP Staging or BlogVault) or a hosting-provided staging feature (common with managed WordPress hosts).
Clone your entire site including database, themes, plugins, and uploads.
Update the parent theme on the staging site and activate it alongside your child theme.
Test key functionality including page layouts, forms, custom post types, and any overridden template files.
Check for CSS or PHP errors using browser developer tools and WordPress debug mode (define('WP_DEBUG', true); in wp-config.php).
Run a performance test to ensure no regression in load times or resource usage.
Once everything passes, push the updated parent theme to production. This method protects your live site and gives you confidence that your child theme remains compatible after each update.
Certain plugins are designed to complement child theme development by simplifying customization and maintenance. These tools help you avoid editing core files directly and reduce the risk of breaking changes. Consider adding the following to your workflow:
Plugin
Purpose
Benefit for Child Themes
Code Snippets
Add PHP, CSS, or JavaScript snippets without modifying functions.php
Keeps child theme files clean and allows easy disabling of experimental code
Customizer Additional CSS
Store CSS overrides in the WordPress Customizer
Preserves child theme style.css as a base; changes survive parent theme updates
Child Theme Configurator
Automates child theme creation and manages stylesheet enqueuing
Handles complex parent theme dependencies and enqueuing logic correctly
Safe SVG
Allows safe upload of SVG files while sanitizing them
Enables custom vector graphics in child theme templates without security risks
When using these plugins, always verify that they are actively maintained and compatible with your parent theme. A well-chosen plugin can reduce the need for manual code overrides, making your child theme easier to audit and scale. For example, instead of adding dozens of filter hooks in functions.php, use Code Snippets to organize them by function—this improves readability and simplifies troubleshooting.
By integrating version control, staging tests, and targeted plugins into your workflow, you transform your child theme from a simple customization layer into a robust, production-ready component of your WordPress site. These practices ensure that as your site evolves, your child theme remains a reliable foundation for growth.
Conclusion
Creating a child theme is a fundamental skill for any WordPress user who wants to maintain a fast, secure, and customizable website without losing changes during updates. By isolating your modifications from the parent theme, you ensure that core updates—whether for security patches or new features—never overwrite your hard work. This step-by-step guide has walked you through the essential process, from setting up a minimal folder structure to activating your new child theme. The result is a flexible, update-safe foundation that allows you to experiment freely with design and functionality.
Summary of Key Steps
The process of creating a child theme is straightforward, but each step is critical for long-term site health. Below is a concise recap of the actions you have taken:
Created a child theme folder: Named after the parent theme (e.g., twentytwentyfour-child) inside /wp-content/themes/.
Generated a style.css file: Added the required header with the Template: line pointing to the parent theme folder name.
Created a functions.php file: Used wp_enqueue_style() to load the parent theme’s stylesheet first, then your child theme’s stylesheet.
Activated the child theme: Went to Appearance > Themes in the WordPress admin, found your child theme, and clicked Activate.
Once these steps are complete, your site will display the parent theme’s design while using the child theme as its active framework. You can now safely add custom CSS, template overrides, and function modifications without risking the parent theme’s integrity.
Next Steps for Further Customization
With your child theme active, you can extend its capabilities in several powerful ways. Consider the following enhancements to tailor your site further:
Customization Type
How to Implement
Example
Add custom CSS
Add rules directly to your child theme’s style.css file.
Each of these methods preserves the parent theme’s core files, ensuring that updates remain seamless. Start with small changes, such as adjusting typography or adding a custom sidebar, then progress to more complex overrides as your confidence grows.
Resources for Continued Learning
To deepen your understanding of child theme development, explore the following trusted resources. These will help you troubleshoot issues and discover advanced techniques:
WordPress Developer Documentation: The official handbook covers child theme creation in depth, including template hierarchy and best practices. Visit developer.wordpress.org/themes/advanced-topics/child-themes/.
WordPress Codex: A community-maintained wiki with detailed explanations of functions, hooks, and template tags. Use it to understand how to modify specific parts of your theme.
Online Courses and Tutorials: Platforms like WPBeginner, CSS-Tricks, and LinkedIn Learning offer video guides that walk through real-world examples of child theme customization.
WordPress Support Forums: If you encounter errors, search or post questions in the official forums. Many experienced developers share solutions for common issues like style conflicts or function duplication.
By leveraging these resources, you can transform your child theme from a simple safety net into a powerful tool for building unique, maintainable WordPress sites. Begin your journey today—your future self will thank you for the flexibility and peace of mind that a well-crafted child theme provides.
Frequently Asked Questions
What is a WordPress child theme?
A WordPress child theme is a theme that inherits the functionality and styling of another theme, called the parent theme. It allows you to modify or add new features without altering the parent theme's files. This ensures that when the parent theme is updated, your customizations are preserved. Child themes are best practice for any WordPress customization, as they prevent code loss and keep your site secure. They consist of at least a style.css file with a specific header and a functions.php file to enqueue styles.
Why should I use a child theme instead of modifying the parent theme directly?
Using a child theme is crucial because it protects your customizations from being overwritten when the parent theme receives updates. If you edit the parent theme’s files directly, any changes will be lost upon update. Child themes also allow you to safely experiment with code, keep your modifications organized, and make it easier to switch parent themes if needed. Additionally, child themes follow WordPress best practices and are recommended by the official WordPress community for any custom development.
What files do I need to create a WordPress child theme?
At a minimum, you need two files: style.css and functions.php. The style.css file must include a header comment that specifies the theme name, template (the parent theme’s folder name), and other details. The functions.php file is used to enqueue the parent theme’s stylesheet properly. Optionally, you can add template files (like header.php or single.php) to override specific parts of the parent theme. Both files must be placed in a new folder inside /wp-content/themes/.
How do I properly enqueue the parent theme’s styles in a child theme?
To enqueue the parent theme’s styles, you should use the wp_enqueue_scripts action hook in your child theme’s functions.php file. Use wp_enqueue_style() with the parent theme’s handle (e.g., 'parent-style') and point to its style.css URL using get_template_directory_uri(). Then enqueue your child theme’s style.css with a dependency on the parent style. This ensures the parent styles load first, and your child styles can override them. Avoid using @import in style.css as it can cause performance issues.
Can I override parent theme template files with a child theme?
Yes, you can override any parent theme template file by placing a file with the same name in your child theme’s folder. For example, to customize the header, create a header.php in your child theme. WordPress will use the child theme’s file instead of the parent’s. This is one of the main benefits of child themes. You can also add new template files. However, remember that if the parent theme updates its templates, your child theme’s copy will not be updated automatically.
How do I activate a child theme in WordPress?
After creating your child theme folder with the required files, go to your WordPress admin dashboard, navigate to Appearance > Themes, and you will see your child theme listed. Click the 'Activate' button to make it live. Ensure the parent theme is also installed in your themes directory, as the child theme depends on it. Once activated, your site will use the child theme’s styles and templates, inheriting everything from the parent theme unless overridden.
What are common mistakes when creating a child theme?
Common mistakes include: forgetting to add the 'Template' line in style.css (which must match the parent theme’s folder name), using @import instead of enqueuing styles, not enqueuing the parent style at all, or misspelling the parent theme folder name. Also, beginners sometimes edit the parent theme files instead of the child theme. Another error is not clearing the browser cache after making CSS changes. Always verify that the child theme appears correctly in the admin and that customizations work as expected.
Do I need to update a child theme when the parent theme updates?
Generally, no. The child theme itself does not need updates unless you have added custom code that relies on deprecated parent theme functions. The parent theme updates will still apply to your site, and your child theme overrides will remain intact. However, if the parent theme introduces new template files or functions that you have overridden, you may need to adjust your child theme to maintain compatibility. Always test updates on a staging site first.
AJAX, which stands for Asynchronous JavaScript and XML, is a set of web development techniques that allows a webpage to communicate with a server in the background without requiring a full page reload. In the context of WordPress, AJAX transforms static content delivery into a fluid, interactive experience. Instead of waiting for an entire page to refresh—which can be slow and jarring—users can perform actions like submitting forms, loading new posts, or updating settings seamlessly. This foundational concept is central to modern user experience (UX) because it reduces friction, minimizes waiting time, and creates a desktop-application-like feel within a browser. For WordPress site owners, implementing AJAX means faster interactions, higher engagement, and a more polished interface that keeps visitors on the page longer.
At its core, AJAX is a methodology that leverages a combination of technologies: JavaScript (the XMLHttpRequest object or the newer Fetch API) to manage communication, HTML and CSS for presentation, and often JSON or XML for data exchange. The process begins when a user triggers an event—such as clicking a button, typing in a search box, or scrolling to load more content. JavaScript intercepts this event and sends an asynchronous request to the server. Unlike a traditional HTTP request, which forces the browser to reload the entire page, an asynchronous request runs in the background. The server processes the request, sends back a response (typically in JSON format for modern WordPress sites), and JavaScript then updates only the relevant part of the webpage—like a comment list, a cart total, or a search result panel—without disturbing the rest of the interface. This cycle happens in milliseconds, creating an illusion of instantaneous feedback.
The Role of Asynchronous Requests in Web Performance
Asynchronous requests are the engine behind AJAX’s performance benefits. In a standard synchronous model, each user action triggers a full page load, consuming bandwidth and server resources as the entire DOM is rebuilt. Asynchronous requests, by contrast, send only the necessary data, which is typically much smaller. This leads to three key performance advantages:
Reduced payload size: Only the required data (e.g., a single post excerpt or a form validation message) travels between client and server, cutting down on transfer time.
No page flicker or delay: Users avoid the visual disruption of a white screen or loading spinner, as the current page remains intact while the update happens in the background.
Lower server load: Since the server processes only specific requests rather than regenerating entire pages, it can handle more concurrent users with less strain.
For WordPress, where dynamic content like comments, search results, and widget updates are common, asynchronous requests prevent the bottleneck of repeated full-page rendering. This makes AJAX a practical tool for optimizing perceived performance—how fast users feel the site responds—which is a critical UX metric.
Why WordPress Developers Embrace AJAX for Dynamic Content
WordPress developers increasingly rely on AJAX to deliver dynamic content because it aligns perfectly with the platform’s modular architecture. WordPress already separates content from presentation using templates, and AJAX enhances this by allowing specific pieces of content to be fetched and injected on demand. Common use cases include:
Infinite scroll: Loading more posts as the user scrolls down, without pagination reloads.
Live search: Displaying real-time suggestions as the user types, powered by AJAX queries.
Form submissions: Validating and submitting contact forms, comments, or login fields without leaving the page.
Dashboard updates: Refreshing admin panels, such as plugin notifications or site statistics, in the background.
Additionally, WordPress provides a built-in AJAX handler (via admin-ajax.php and the newer REST API) that simplifies integration. Developers can write custom JavaScript to trigger requests and PHP functions to process them, all while adhering to WordPress security standards like nonces. This flexibility allows for tailored interactions—like a custom filtering system for a product catalog or a live preview of theme customizations—that would be cumbersome with traditional page loads. By embracing AJAX, WordPress developers not only improve UX but also reduce bounce rates and encourage deeper user engagement, making it an indispensable technique in modern web development.
Core Benefits of AJAX for User Experience
AJAX, or Asynchronous JavaScript and XML, transforms how users interact with WordPress sites by enabling data exchange with the server without reloading the entire page. For site owners and developers, this technology delivers measurable improvements in speed, fluidity, and overall satisfaction. Below are the primary advantages that make AJAX a cornerstone of modern WordPress user experience.
Eliminating Full Page Reloads for Smoother Navigation
Traditional WordPress navigation forces a complete page refresh each time a user clicks a link, submits a form, or updates content. This process interrupts the user’s mental flow, requiring them to wait for the browser to re-render headers, footers, sidebars, and all assets. AJAX eliminates this by fetching only the necessary data—such as a new post excerpt, search results, or a comment thread—and updating the relevant section of the page dynamically. The result is a seamless experience where navigation feels instantaneous, whether browsing an archive, paginating comments, or loading a new product via a shop filter.
Reduced bandwidth consumption: Only small data packets travel between server and client, not entire HTML documents.
Preserved scroll position: Users stay exactly where they are, avoiding the disorienting jump to the top of a page.
Faster subsequent interactions: Once the initial page loads, subsequent AJAX requests are typically quicker than full reloads.
Real-Time Feedback Without Interrupting User Flow
One of the most powerful aspects of AJAX is its ability to provide immediate feedback while users continue their tasks. On a WordPress site, this manifests in several practical ways:
This real-time capability keeps users engaged and reduces abandonment rates. For example, an e-commerce store using AJAX for cart updates lets shoppers add items and see the total change without leaving the product page. Similarly, a membership site can verify login credentials asynchronously, preventing the frustration of a full reload after a typo.
How AJAX Reduces Perceived Loading Times
Perceived performance often matters more than actual load times. AJAX exploits this psychological principle by creating the illusion of speed, even when server response times remain constant. Instead of a blank page or spinning icon during a full reload, AJAX updates only the changed content while the rest of the interface remains interactive. Users perceive this as faster because they can still see, read, or interact with other parts of the page.
For WordPress developers, implementing AJAX involves a simple pattern. Below is a practical example of a WordPress AJAX handler that fetches recent posts without a page reload:
// In functions.php of your theme or plugin
add_action('wp_ajax_nopriv_get_recent_posts', 'handle_get_recent_posts');
add_action('wp_ajax_get_recent_posts', 'handle_get_recent_posts');
function handle_get_recent_posts() {
$posts = get_posts(array(
'numberposts' => 5,
'post_status' => 'publish'
));
if ($posts) {
foreach ($posts as $post) {
echo '<li>' . esc_html($post->post_title) . '</li>';
}
}
wp_die(); // Required to terminate properly
}
// JavaScript in your theme's script file
jQuery(document).ready(function($) {
$('#load-posts-button').on('click', function() {
$.post(ajaxurl, {
action: 'get_recent_posts'
}, function(response) {
$('#posts-container').html(response);
});
});
});
This code demonstrates how a button click triggers an AJAX request to fetch recent post titles, updating only the target container. The rest of the page—navigation, sidebar widgets, footer—remains untouched and responsive. Users perceive this as nearly instant, as the browser does not need to reparse the entire DOM or reload external resources like stylesheets or scripts.
To further enhance perceived speed, combine AJAX with techniques like lazy loading for images or infinite scroll for content archives. These approaches keep the initial page lightweight while progressively loading additional data as the user scrolls or interacts. The cumulative effect is a site that feels responsive, modern, and app-like—qualities that directly correlate with lower bounce rates and higher user satisfaction.
Understanding WordPress AJAX Hooks and Actions
WordPress provides a robust system for handling AJAX requests through two primary hooks: wp_ajax_ and wp_ajax_nopriv_. These hooks allow developers to define custom actions that process asynchronous requests from the front end or admin area, ensuring secure and efficient data handling. The key difference lies in user authentication: wp_ajax_ fires only for logged-in users, while wp_ajax_nopriv_ handles requests from unauthenticated visitors. Together, they form the backbone of AJAX integration in WordPress, enabling dynamic content updates, form submissions, and real-time interactions without page reloads. Understanding these hooks is essential for building responsive, user-friendly WordPress applications.
The Difference Between Authenticated and Unauthenticated Requests
WordPress distinguishes between authenticated and unauthenticated AJAX requests to control access to sensitive data and actions. Authenticated requests use the wp_ajax_ hook, which requires a valid user session. This is ideal for tasks like updating user profiles, managing posts, or accessing private data. Unauthenticated requests use the wp_ajax_nopriv_ hook, which processes actions from visitors who are not logged in. Common use cases include public search features, contact forms, or content voting systems. Developers must carefully choose which hook to implement based on the action’s security requirements. For example, a function that deletes a user’s comment should only be accessible to authenticated users, while a plugin that fetches public blog posts can safely use the unauthenticated hook. The following table summarizes the key distinctions:
Admin panel updates, user-specific settings, post editing
Requires nonce verification; user capabilities should be checked
wp_ajax_nopriv_
No (all visitors)
Public search, contact forms, voting systems
Nonce optional but recommended; data sanitization critical
Registering Custom AJAX Actions in functions.php
To register a custom AJAX action, add hook definitions in your theme’s functions.php file or a custom plugin. The process involves three steps: define the callback function, hook it to the appropriate action, and enqueue the JavaScript that triggers the request. For authenticated actions, use add_action('wp_ajax_my_action', 'my_action_callback'). For unauthenticated actions, add add_action('wp_ajax_nopriv_my_action', 'my_action_callback'). The action name (my_action in this example) must match the action parameter sent via JavaScript. Here is a practical implementation:
// In functions.php
function handle_custom_ajax_request() {
// Verify nonce and sanitize data
$data = isset($_POST['data']) ? sanitize_text_field($_POST['data']) : '';
// Process the request
$response = array('message' => 'Data received: ' . $data);
wp_send_json_success($response);
}
add_action('wp_ajax_custom_action', 'handle_custom_ajax_request');
add_action('wp_ajax_nopriv_custom_action', 'handle_custom_ajax_request');
On the JavaScript side, use wp_localize_script() to pass the AJAX URL and nonce to your script, then send the request using jQuery.post() or the Fetch API. This approach ensures that the server can properly route the request to the correct handler.
Best Practices for Nonce Verification and Data Sanitization
Nonce verification and data sanitization are critical for securing AJAX endpoints in WordPress. A nonce (number used once) prevents cross-site request forgery (CSRF) attacks by ensuring the request originates from a legitimate source. Generate a nonce using wp_create_nonce('my_action_nonce') and include it in the AJAX data. On the server side, verify it with check_ajax_referer('my_action_nonce', 'nonce') or wp_verify_nonce(). For unauthenticated requests, nonces are optional but recommended to reduce spam. Data sanitization involves cleaning user input before processing. Use WordPress functions like sanitize_text_field(), sanitize_email(), or intval() depending on the expected data type. For complex inputs, consider wp_kses() to allow only safe HTML tags. Always validate data structure (e.g., checking if an array key exists) and escape output with esc_html() or esc_attr() before returning it. By combining nonce verification with rigorous sanitization, you protect your application from malicious requests and ensure data integrity, creating a secure foundation for enhanced user experiences through AJAX.
Setting Up AJAX in WordPress Themes and Plugins
Integrating AJAX into WordPress themes and plugins allows for seamless, asynchronous interactions that update content without requiring a full page reload. This technique enhances user experience by making interfaces more responsive and reducing server load. The setup process involves two primary steps: enqueuing JavaScript with proper localization, and creating a server-side PHP handler to process requests. Below is a structured guide to implementing AJAX in both themes and plugins, with emphasis on security and debugging.
Enqueuing JavaScript with wp_enqueue_script and wp_localize_script
To begin, you must register and enqueue your JavaScript file using wp_enqueue_script(). This ensures the script loads correctly in the front end or admin area. Simultaneously, use wp_localize_script() to pass server-side variables—specifically the AJAX URL and a nonce for security—to your JavaScript. The nonce prevents unauthorized requests. Below is a practical example for a plugin:
For themes, replace plugin_dir_url( __FILE__ ) with get_template_directory_uri() . '/js/' or get_stylesheet_directory_uri() for child themes. Always enqueue scripts in the footer (fifth parameter true) to improve page load speed.
Creating the Server-Side PHP Handler for AJAX Requests
The server-side handler is a PHP function that processes the AJAX request and returns a response. WordPress uses two hooks: wp_ajax_{action} for authenticated users and wp_ajax_nopriv_{action} for unauthenticated users. The action name must match the action parameter sent from JavaScript. Below is a secure handler example:
Always validate the nonce using wp_verify_nonce().
Sanitize and validate all incoming data with functions like sanitize_text_field() or intval().
Use wp_die() or die() at the end to send a proper response.
For JSON responses, use wp_send_json() or wp_send_json_success().
Testing and Debugging AJAX Calls in the Browser Console
Debugging AJAX calls is essential for identifying issues. Use the browser’s developer tools—specifically the Network tab—to inspect requests and responses. Follow these steps:
Open your browser’s developer tools (F12 or right-click > Inspect).
Navigate to the Network tab and filter by XHR or Fetch.
Trigger the AJAX call (e.g., click a button).
Click the request to view details: Headers, Payload, Preview, and Response.
Common issues to check:
Issue
Likely Cause
Solution
400 Bad Request
Missing or incorrect action parameter
Verify the action name matches the hook.
403 Forbidden
Nonce mismatch or missing
Check wp_localize_script and nonce creation.
500 Internal Server Error
PHP error in handler
Enable WP_DEBUG in wp-config.php.
Empty response
Missing wp_die() or echo
Ensure the handler echoes data and calls wp_die().
Additionally, log errors by adding error_log( print_r( $_POST, true ) ); in the PHP handler. In the browser console, use console.log() in your JavaScript to inspect data before sending. For example:
By following these steps, you can reliably integrate AJAX into your WordPress themes and plugins, ensuring a smooth and responsive user experience.
Common AJAX Use Cases in WordPress
AJAX, which stands for Asynchronous JavaScript and XML, is a foundational technology for modern web applications. In WordPress, AJAX allows the browser to communicate with the server in the background, enabling dynamic content updates without requiring a full page reload. This capability directly improves user experience by reducing perceived loading times, eliminating disruptive page flashes, and creating a more fluid, app-like feel. Below are three of the most impactful AJAX use cases in WordPress, each demonstrating a practical way to enhance how visitors interact with your site.
Implementing Infinite Scroll for Content-Heavy Pages
Content-heavy pages, such as blog archives, portfolio galleries, or news feeds, often rely on pagination. While functional, traditional pagination forces users to click a “Next Page” link, wait for a new page to load, and then scroll back to the top to continue reading. Infinite scroll eliminates this friction by automatically loading the next set of posts when the user reaches the bottom of the current viewport. This creates a seamless browsing experience that encourages deeper engagement with your content.
Key benefits of infinite scroll include:
Reduced user effort: No manual clicking is required to access more content.
Improved session duration: Visitors tend to view more pages as the content loads continuously.
Mobile-friendly experience: Scrolling is a natural gesture on touch devices, making infinite scroll ideal for responsive designs.
Implementation involves a few core steps. First, you enqueue a custom JavaScript file in your theme that listens for the scroll event. When the user nears the bottom of the page, the script sends an AJAX request to the WordPress admin-ajax.php endpoint. The server-side handler, typically defined in your theme’s functions.php file, uses WP_Query to fetch the next set of posts, formats them as HTML, and returns the data. The JavaScript then appends this HTML to the existing post container. A common practice is to include a “loading” spinner to provide visual feedback during the request. For accessibility, always consider adding a “Load More” button as a fallback for users who rely on keyboard navigation or screen readers.
Building a Live Search Feature with Instant Results
A live search, also known as an instant search or search-as-you-type, displays results in real-time as the user types into the search field. This contrasts with the default WordPress search, which requires form submission and a page reload. Live search dramatically improves the user experience by providing immediate feedback, helping users find what they need faster and reducing the likelihood of abandoned searches.
The typical workflow for a live search implementation is as follows:
Frontend setup: Create a search input field with a dedicated container for results. Use JavaScript to capture the keyup event and debounce it to avoid excessive requests.
AJAX request: Send the current search query to the server. Include a nonce for security.
Server-side processing: In your WordPress handler, query posts, pages, or custom post types using WP_Query with a s parameter. Limit results to a manageable number, such as five or ten.
Return results: Format the matching posts as a list of titles with links. Optionally include excerpts or featured images for richer previews.
Display: The JavaScript receives the HTML and injects it into the results container. If no results are found, display a “No results found” message.
For best results, consider caching the search queries to reduce server load, especially on high-traffic sites. Additionally, ensure the search results are keyboard-navigable, allowing users to tab through the list and press Enter to visit a selected post.
Submitting Contact Forms and Comments Without Page Reloads
Contact forms and comment sections are among the most common interactive elements on a WordPress site. Traditionally, submitting a form triggers a full page reload, which can be jarring and may cause users to lose their place. AJAX-powered submissions eliminate this disruption by sending the form data to the server in the background and updating only the relevant part of the page, such as displaying a success message or the newly added comment.
This approach offers several user experience advantages:
To implement this, you first create a standard HTML form in your theme. Then, use JavaScript to intercept the form’s submit event, prevent the default behavior, and serialize the form data. Send this data via AJAX to the server, including a nonce and an action hook. On the server side, validate the input, process the form (e.g., send an email or insert a comment), and return a JSON response indicating success or failure. The JavaScript then updates the page DOM accordingly—for example, clearing the form and showing a thank-you message, or displaying validation errors next to the relevant fields. This method keeps the user engaged and reduces frustration, particularly on long comment threads or multi-step contact forms.
Optimizing AJAX Performance and Security
When implementing AJAX in WordPress, performance and security are not optional—they are essential for maintaining a responsive, trustworthy site. Poorly optimized AJAX calls can degrade user experience, while insecure handlers expose your site to attacks. Below are three critical strategies for ensuring your AJAX implementations remain fast, secure, and scalable within the WordPress ecosystem.
Caching AJAX Responses for Faster Repeat Requests
Repeated identical AJAX requests waste server resources and slow down the user experience. Caching responses reduces load time and database strain. WordPress offers several caching mechanisms:
Transient API: Store temporary data with expiration. Ideal for data that changes infrequently.
Page caching plugins: Tools like W3 Total Cache or WP Super Cache can cache AJAX endpoints if configured properly.
Object caching: Use Redis or Memcached for persistent, high-speed caching across sessions.
For a practical example, consider caching a user’s recent comments:
This code checks for a cached response before querying the database. If found, it returns the cached data instantly. The transient expires after one hour, ensuring fresh data eventually reaches users.
Preventing CSRF Attacks with Nonces and Capability Checks
Cross-Site Request Forgery (CSRF) attacks trick authenticated users into executing unwanted actions. WordPress provides two layered defenses: nonces and capability checks. Nonces verify that the request originated from your site, while capability checks ensure the user has permission to perform the action.
Implement both in every AJAX handler:
Defense Layer
Purpose
Implementation
Nonce
Verifies request origin
Use check_ajax_referer() or wp_verify_nonce()
Capability check
Verifies user permissions
Use current_user_can() with appropriate capability
Example handler with both checks:
function secure_ajax_update_profile() {
// Verify nonce from the AJAX request
if ( ! check_ajax_referer( 'update_profile_nonce', 'nonce', false ) ) {
wp_send_json_error( 'Invalid nonce.' );
}
// Verify user has capability to edit their own profile
if ( ! current_user_can( 'edit_user', get_current_user_id() ) ) {
wp_send_json_error( 'Insufficient permissions.' );
}
// Process the update
wp_send_json_success( 'Profile updated.' );
}
add_action( 'wp_ajax_update_profile', 'secure_ajax_update_profile' );
Always generate the nonce in your frontend JavaScript using wp_create_nonce() and send it with each AJAX request. This simple step blocks most CSRF attempts.
Minimizing Database Queries in AJAX Handlers
AJAX handlers triggered by user actions (like autocomplete or live search) can quickly overwhelm the database if not optimized. Reduce query load with these techniques:
By combining fields => 'ids', no_found_rows => true, and get_posts(), you reduce database overhead significantly. For high-traffic sites, pair this with object caching for sub-millisecond response times. Always profile your AJAX handlers using query monitor plugins to identify and eliminate unnecessary database calls.
Handling AJAX Errors Gracefully
When integrating AJAX into a WordPress site, network interruptions, server timeouts, or invalid data can disrupt the user experience. Without proper error handling, a failed request might leave users staring at a broken interface or a confusing blank screen. Graceful error management ensures that failures are communicated clearly, the system remains functional, and technical details stay hidden from visitors. This approach preserves trust and usability even when things go wrong.
Displaying User-Friendly Error Messages
The first line of defense is to replace cryptic technical errors with clear, human-readable messages. In WordPress, AJAX responses typically return either success or failure states. A common pattern is to check the success property of the response object and, if false, extract a meaningful message from the data property. For example:
Network errors: Display “Unable to connect. Please check your internet connection and try again.”
Server errors: Show “Something went wrong on our end. Please refresh the page or try later.”
Validation errors: Present specific feedback, such as “The email field is required.”
Use a dedicated error container near the triggering element, styled with a subtle red or orange background and clear typography. Avoid alert boxes or modal overlays that interrupt the user’s flow. For instance, in the jQuery $.ajaxerror callback, you can inject a message into a <p> with a class like ajax-error-notice. Ensure the message is concise, actionable, and free of jargon—never expose 500 Internal Server Error or stack traces.
Implementing Retry Logic and Fallback Mechanisms
Transient failures—such as a momentary network blip—can often be resolved automatically. Implement a retry mechanism with exponential backoff to avoid overwhelming the server. A typical approach involves three attempts with increasing delays (e.g., 1 second, 2 seconds, 4 seconds). Below is a simplified example of how this logic can be structured:
If retries fail, provide a fallback mechanism. For example, if an AJAX form submission fails, preserve the user’s input in local storage and offer a “Save Draft” button that triggers a traditional page reload. Alternatively, for dynamic content loading, degrade gracefully by displaying a cached version of the content or a link to reload the page manually. Always communicate the fallback action clearly, such as “We’ll save your work automatically. Click here to reload.”
Logging AJAX Errors for Debugging Without Exposing Details
While user-facing messages should remain generic, developers need detailed error logs to diagnose issues. In WordPress, use the error_log() function within the AJAX handler to record specifics such as the request URL, parameters, and server response. For example:
Client-side: Log network status codes and response text to the browser console using console.error() during development, but disable this in production.
Server-side: In the WordPress AJAX action callback, log the full error message with error_log( 'AJAX error: ' . $wpdb->last_error ) and include a timestamp.
Structured logging: Use a plugin like WP_DEBUG_LOG to write errors to /wp-content/debug.log. Ensure this file is not publicly accessible via .htaccess rules.
Never include user-specific data (like passwords or email addresses) in logs. Also, avoid echoing or returning raw error details in the AJAX response. Instead, use a unique error code that maps to a logged entry: for instance, return {"success":false, "data":{"code":"ERR_001"}} and store the full explanation server-side. This way, support staff can look up the code without exposing sensitive information to end users.
By combining clear error messages, intelligent retry logic, and secure server-side logging, you maintain a polished experience even when AJAX requests falter. Users stay informed and empowered, while developers retain the diagnostic tools needed to fix underlying problems.
Integrating AJAX with WordPress REST API
The WordPress REST API provides a modern, structured alternative to the traditional Admin AJAX handler for asynchronous operations. By leveraging the REST API, developers can build more extensible, version-controlled, and standards-compliant solutions that integrate seamlessly with external applications and JavaScript frameworks. This approach replaces the reliance on admin-ajax.php with predictable URL patterns, HTTP methods, and built-in data validation, while still supporting AJAX-driven interactions on the front end.
When to Use REST API vs. Admin AJAX
Choosing between the REST API and Admin AJAX depends on the complexity, scope, and security requirements of the operation. The table below outlines key differences to guide this decision.
Single endpoint (admin-ajax.php) with action-based routing
HTTP Methods
Uses GET, POST, PUT, DELETE for CRUD operations
Primarily GET and POST via action parameter
Authentication
Supports cookies, OAuth, application passwords, and nonces
Relies on nonces and user capability checks
Extensibility
Built for custom endpoints, schema registration, and external clients
Limited to internal WordPress actions and hooks
Performance
Lightweight routing, no unnecessary core loading
Loads full WordPress core for every request
Use Case Fit
Public APIs, headless WordPress, complex data operations
Simple admin-side AJAX, logged-in user actions
Use the REST API when building public-facing endpoints, integrating with external services, or requiring granular permission control. Reserve Admin AJAX for quick, internal operations where full REST infrastructure is unnecessary, such as updating a user meta field from the admin panel.
Creating Custom REST Endpoints for AJAX Operations
To create a custom REST endpoint for AJAX, register it using register_rest_route() within a plugin or theme’s functions file. This function accepts three parameters: the namespace, route, and an array of arguments including methods, callback, and permission callback.
Below is a step-by-step outline for building a custom endpoint:
Define namespace and route: Use a unique namespace like myplugin/v1 and a clear route such as /submit-feedback.
Set HTTP method: Specify methods as WP_REST_Server::CREATABLE (POST) for data submission or READABLE (GET) for retrieval.
Implement callback function: Write a function that processes the request, validates input, performs the operation, and returns a WP_REST_Response.
Handle request data: Access parameters via $request->get_param() and validate them using sanitize_text_field() or custom logic.
Return response: Use new WP_REST_Response($data, $status_code) with appropriate HTTP status codes like 200 for success or 400 for bad requests.
On the front end, use wp.apiFetch() or jQuery’s $.ajax() to send requests to the endpoint URL, typically constructed as /wp-json/myplugin/v1/submit-feedback.
Securing REST API Requests with Authentication and Permissions
Securing REST API endpoints is critical to prevent unauthorized access and data manipulation. WordPress provides several authentication methods and permission callback mechanisms.
Authentication methods include:
Cookie authentication: Works for logged-in users on the same site. Nonces are passed via X-WP-Nonce header for CSRF protection.
Application passwords: Suitable for external clients, generated per user via the WordPress admin panel.
OAuth 1.0a: Ideal for third-party integrations requiring token-based access.
Implementing permission callbacks: The permission_callback argument in register_rest_route() should check user capabilities or custom conditions. For example:
'permission_callback' => function () {
return current_user_can('edit_posts');
}
For public endpoints, use '__return_true' but ensure sensitive data is never exposed. Always validate and sanitize input parameters using WordPress functions like sanitize_text_field(), absint(), or wp_kses_post(). Additionally, implement capability checks within the callback for granular control, such as verifying a user can edit a specific post before allowing an update.
By combining proper authentication, permission callbacks, and data sanitization, custom REST endpoints provide a secure and scalable foundation for AJAX-driven user experiences in WordPress.
Real-World Examples: AJAX in Popular WordPress Plugins
AJAX (Asynchronous JavaScript and XML) has become a cornerstone of modern WordPress development, enabling plugins to update content without requiring full page reloads. This capability dramatically improves perceived performance and user satisfaction. Below, we examine how three widely-used plugins—WooCommerce, BuddyPress, and Gravity Forms—implement AJAX to deliver superior, seamless experiences.
WooCommerce: Instant Cart Updates and Checkout Enhancements
WooCommerce, the leading e-commerce plugin for WordPress, relies heavily on AJAX to streamline shopping interactions. Key implementations include:
Cart updates without refresh: When a user adds, removes, or adjusts the quantity of an item, AJAX sends a request to the server, updates the cart session, and returns the new totals. The cart widget or mini-cart updates instantly in the browser.
Checkout validation: As customers fill in billing or shipping fields, AJAX can validate input (e.g., zip code format) in real time, reducing errors before form submission.
Shipping method recalculation: Changing the shipping address triggers an AJAX call to recalculate available methods and costs, all while the user stays on the same page.
For developers, WooCommerce exposes hooks like woocommerce_ajax_added_to_cart and filters such as woocommerce_add_to_cart_fragments to customize AJAX responses. A practical example of a custom fragment for the cart count:
Real-time notifications: When a user receives a new message, friend request, or group invitation, AJAX polls the server at set intervals (or uses long-polling) to fetch unread counts. The notification bubble updates without user action.
Activity stream updates: New posts, comments, or likes appear in the activity feed via AJAX pagination or auto-loading. Users can click “Load More” or see new items appended without a page refresh.
Member search and filtering: Typing in the member directory triggers AJAX to return filtered results, making navigation fast and responsive.
BuddyPress relies on its own bp_ajax_querystring() function to manage AJAX requests. Developers can extend this by hooking into bp_ajax_get_users or bp_ajax_get_activities to add custom parameters or modify returned data.
Gravity Forms: Dynamic Field Loading and Conditional Logic
Gravity Forms, a premium form builder, leverages AJAX to create intelligent, adaptive forms. Key use cases include:
Dynamic field population: Fields can be pre-filled with data from external sources (e.g., a user’s profile or a database) via AJAX calls when the form loads or when a user selects an option.
Conditional logic: Fields, sections, or entire pages show or hide based on user input, all processed client-side with AJAX for server-side validation. For example, selecting “USA” in a country dropdown might trigger an AJAX request to load state options.
Multi-page forms: Navigating between form pages uses AJAX to save partial data and validate current fields, preventing data loss and reducing server load.
A practical example of adding a custom AJAX endpoint to populate a dropdown based on a previous field selection:
This endpoint, when triggered by a Gravity Forms JavaScript event, returns a JSON array of cities that populates a dropdown dynamically, enhancing form usability.
By integrating AJAX thoughtfully, these plugins reduce friction, minimize waiting times, and create interfaces that feel responsive and modern. Developers can study their approaches to implement similar enhancements in custom WordPress solutions, always prioritizing user experience and performance.
Future Trends: AJAX and Modern WordPress Development
As WordPress evolves, the core principles of AJAX—asynchronous data exchange without full page reloads—continue to underpin modern development approaches. Emerging technologies and architectures are redefining how developers implement dynamic, responsive interfaces while maintaining performance and accessibility. Three key trends illustrate this progression: the Interactivity API, headless WordPress, and progressive enhancement strategies.
The Interactivity API and Declarative AJAX Patterns
Introduced in WordPress 6.5, the Interactivity API represents a paradigm shift from imperative AJAX calls to declarative, state-driven interactions. Instead of manually managing XMLHttpRequest or fetch calls, developers define reactive states and actions using a standardized directive system. For example, a live search block can be built with data-wp-interactive and data-wp-bind attributes, automatically triggering server requests when state changes.
Key advantages over traditional AJAX:
Reduced boilerplate: No need to write custom event listeners or response handlers.
Built-in hydration: Server-rendered HTML seamlessly transitions to client-side interactivity.
Accessibility: Focus management and ARIA attributes are handled automatically.
Performance: Only changed DOM nodes are updated, minimizing reflows.
This declarative pattern simplifies complex interactions like infinite scroll, real-time form validation, and dynamic filtering, all while maintaining backward compatibility with existing WordPress hooks.
Headless WordPress: AJAX as the Backbone of Decoupled Frontends
Headless WordPress decouples the backend (REST API or GraphQL) from the frontend framework (React, Vue, or Svelte). Here, AJAX is not merely an enhancement—it is the fundamental communication layer. Every data fetch, mutation, or authentication request relies on asynchronous HTTP calls. For instance, a React-based storefront might use wp.apiFetch() to retrieve product data, add items to cart, or process checkout, all without reloading the page.
Common AJAX endpoints in headless setups:
Endpoint
Purpose
AJAX Method
/wp/v2/posts
Fetch blog posts
GET
/wp/v2/media
Retrieve images
GET
/wp/v2/users/me
Get current user data
GET
/wp/v2/posts
Create or update posts
POST/PUT
While headless architectures offer flexibility, they introduce complexity: developers must handle loading states, error boundaries, and caching strategies. However, AJAX remains the backbone, enabling real-time updates from external services, such as payment gateways or content delivery networks.
Progressive Enhancement: Ensuring AJAX Works Without JavaScript
Despite AJAX’s ubiquity, modern WordPress development emphasizes progressive enhancement—building core functionality that works without JavaScript, then layering AJAX improvements. This approach ensures accessibility for users with disabled scripts, screen readers, or slow connections. For example, a comment form might submit via a standard POST request, then use AJAX to display the new comment without reloading the page.
Implementation strategies:
Use the admin-ajax.php handler as a fallback, but prefer the REST API for modern sites.
Detect JavaScript availability with or server-side checks before enqueuing AJAX scripts.
Provide non-JS alternatives: paginated links alongside infinite scroll, or a static form alongside AJAX validation.
Test with JavaScript disabled: ensure all forms, navigation, and content loading degrade gracefully.
By prioritizing progressive enhancement, developers future-proof their sites against evolving browser standards and user preferences, while still delivering the smooth, responsive experiences that AJAX enables.
What is AJAX in WordPress and how does it improve user experience?
AJAX (Asynchronous JavaScript and XML) allows WordPress pages to update content without a full page reload. This means actions like submitting a comment, loading more posts, or saving a draft happen in the background. Users see faster responses and smoother interactions, which reduces wait time and frustration. For example, when a user submits a form, only the relevant section refreshes rather than the entire page, making the site feel more like a native application.
How do I enqueue scripts for AJAX in WordPress?
To use AJAX in WordPress, you must properly enqueue your JavaScript file using `wp_enqueue_script()` and pass the AJAX URL via `wp_localize_script()`. For example: `wp_enqueue_script( 'my-ajax-script', get_template_directory_uri() . '/js/ajax.js', array('jquery'), null, true );` then `wp_localize_script( 'my-ajax-script', 'my_ajax_obj', array( 'ajax_url' => admin_url( 'admin-ajax.php' ) ) );`. This ensures the script knows where to send requests and follows WordPress coding standards.
What is the role of admin-ajax.php in WordPress AJAX?
`admin-ajax.php` is the core WordPress file that handles AJAX requests for both logged-in and logged-out users. When a JavaScript call is made to this URL, WordPress processes it using hooks like `wp_ajax_myaction` (for authenticated users) and `wp_ajax_nopriv_myaction` (for unauthenticated users). Developers define custom actions that map to PHP functions, making it a flexible but centralized endpoint. However, for high-traffic sites, the REST API is often preferred due to better performance and scalability.
Security is critical. Always use nonces (number used once) to verify the request origin. When enqueuing your script, localize a nonce using `wp_create_nonce('my_nonce_action')`. In your JavaScript, include the nonce in the data object, e.g., `data: { action: 'my_action', nonce: my_ajax_obj.nonce }`. On the PHP side, verify with `check_ajax_referer('my_nonce_action', 'nonce')`. Additionally, validate and sanitize all user inputs with functions like `sanitize_text_field()` and `intval()`.
What are the differences between admin-ajax.php and the WordPress REST API for AJAX?
`admin-ajax.php` is a single endpoint that processes all custom AJAX actions, which can become a bottleneck under heavy load. The WordPress REST API provides multiple endpoints, better caching, and standard HTTP methods (GET, POST, PUT, DELETE). REST API responses are also more structured (JSON) and can be consumed by external applications. For simple tasks, `admin-ajax.php` is easier to set up, but for complex or public-facing features, the REST API is more robust and scalable.
Yes, WordPress now includes a built-in `wp.apiFetch` function that uses the Fetch API and works without jQuery. You can also use vanilla JavaScript with `XMLHttpRequest` or the modern `fetch()` API. To do so, enqueue your script with a dependency on `wp-api-fetch` and use `apiFetch( { path: '/wp/v2/posts' } )`. This is lighter than jQuery and aligns with modern WordPress development practices, especially for block editor extensions.
How do I debug AJAX requests in WordPress?
Use browser developer tools (F12) to monitor network requests. Look for the request to `admin-ajax.php` and check the response tab for any PHP errors or returned data. In your PHP handler, use `error_log()` to write messages to the debug log. Also, ensure `WP_DEBUG` is enabled in wp-config.php. Common issues include missing action hooks, incorrect nonce verification, or outputting HTML instead of JSON. Always use `wp_die()` or `wp_send_json()` at the end of your handler.
What are common use cases for AJAX in WordPress themes and plugins?
Common uses include infinite scroll for posts, live search suggestions, comment submission without reload, real-time form validation, dynamic filtering of products or posts, saving user preferences, and loading content in modals. Plugins like WooCommerce use AJAX for cart updates and checkout. AJAX is also vital in the block editor (Gutenberg) for real-time saving and previews. These features dramatically improve perceived performance and user satisfaction.
How to Optimize WordPress for Mobile Devices: A Step-by-Step Guide
1. Choose a Mobile-Responsive WordPress Theme
Selecting a theme that adapts seamlessly to different screen sizes is the foundation of mobile optimization. When you learn how to optimize WordPress for mobile devices, your theme choice becomes the single most impactful decision. A responsive theme automatically adjusts layout, images, and navigation to fit smartphones, tablets, and desktops without separate mobile versions. Look for themes explicitly labeled ‘responsive’ and verify their behavior on actual devices before committing.
Why Responsive Design Matters for SEO and User Experience
Responsive design is not optional—it is a core requirement for both search engines and visitors. Google uses mobile-first indexing, meaning it primarily evaluates your site’s mobile version for ranking. A non-responsive theme leads to high bounce rates, slow load times, and poor user engagement on phones. Key reasons to prioritize responsiveness include:
Improved search rankings: Google rewards mobile-friendly sites with higher positions in search results.
Lower bounce rates: Users stay longer when content fits their screen without pinching or zooming.
Faster page speed: Responsive themes often use lightweight code and optimized images for mobile.
Consistent branding: A single theme maintains your design across all devices, reinforcing trust.
Reduced maintenance: No need to manage separate mobile and desktop versions of your site.
Without a responsive foundation, other mobile optimization efforts will fail to deliver full benefits.
Top Responsive WordPress Themes to Consider in 2025
Several well-coded themes excel in mobile performance and design flexibility. The following table highlights top options, each tested for responsiveness and speed:
Theme Name
Key Mobile Features
Best For
GeneratePress
Lightweight (under 30 KB), built-in mobile menu, AMP support
Blogs and business sites
Astra
Pre-built mobile layouts, fast loading, WooCommerce ready
E-commerce and portfolios
Kadence
Advanced responsive controls, header/ footer builders, mobile sticky options
Off-canvas mobile menu, lazy load images, dark mode
Modern content sites
All these themes are regularly updated and include dedicated mobile settings in the customizer. Choose one that aligns with your site’s purpose and performance goals.
How to Test a Theme’s Mobile Responsiveness Before Installing
Testing a theme’s mobile behavior before activation saves you from costly redesigns. Follow these steps to evaluate any theme:
Use the WordPress Theme Preview: Navigate to Appearance > Themes > Add New, then click “Preview” on any theme. Resize your browser window to simulate mobile widths (320px to 768px).
Check with Google’s Mobile-Friendly Test: Enter the theme’s demo URL or your staging site into the tool at search.google.com/test/mobile-friendly. It will flag issues like text too small or clickable elements too close.
Test on real devices: Load the theme on an actual smartphone and tablet. Verify that menus collapse, images scale, and buttons are tappable without accidental clicks.
Inspect touch targets: Ensure buttons and links are at least 48×48 pixels for easy tapping. Use browser developer tools to measure elements.
Review navigation behavior: Confirm that dropdown menus work on touch, and that hamburger icons are prominent and functional.
Analyze content hierarchy: Check that headings, paragraphs, and images reflow logically on narrow screens without cutting off text.
By rigorously testing a theme’s responsiveness, you ensure that your WordPress site delivers a smooth mobile experience from day one. This step is the cornerstone of any successful mobile optimization strategy.
2. Implement a Mobile-First Approach to Content Layout
Designing for mobile first means building your content layout from the smallest screen upward, rather than retrofitting a desktop design. This approach ensures that mobile users—who now represent the majority of web traffic—receive a seamless, fast-loading experience. Start by prioritizing concise text, clear headings, and easy-to-tap buttons. Every element should be finger-friendly, with ample spacing to prevent accidental taps. Avoid dense paragraphs; instead, use short sentences and bullet points to improve readability on narrow screens. A mobile-first layout also reduces the need for horizontal scrolling or pinch-zooming, which frustrates users and increases bounce rates.
Using the WordPress Block Editor for Mobile-Friendly Layouts
The WordPress Block Editor (Gutenberg) is inherently responsive, but you must use it deliberately to achieve mobile optimization. Begin by selecting the “Group” block to create sections that stack vertically on small screens. For columns, limit them to two on mobile (or use the “Stack on mobile” option) to prevent cramped layouts. The “Cover” block works well for hero images, but ensure text overlays are left-aligned and large enough to read on a 320px-wide screen. Avoid using the “Media & Text” block for side-by-side content, as it often breaks on mobile; instead, use separate blocks stacked vertically. Test every layout in the editor’s mobile preview mode (the icon resembling a phone) before publishing.
Best Practices for Font Sizes, Line Spacing, and Touch Targets
Mobile readability hinges on three key metrics: font size, line spacing, and touch target size. Follow these baseline recommendations:
Font size: Set body text to at least 16px (1rem) to prevent iOS Safari from zooming in on input fields. Headings should scale proportionally: H2 at 24px (1.5rem), H3 at 20px (1.25rem).
Line spacing: Use a line-height of 1.5 to 1.6 for body text, which improves readability on bright screens. Avoid values below 1.4, which cause lines to blur together.
Touch targets: Buttons, links, and form elements must be at least 48×48 pixels (44x44px minimum per WCAG). Add padding inside buttons (e.g., 12px top/bottom, 16px left/right) to meet this standard.
To enforce these settings globally, add the following CSS to your theme’s customizer or via a child theme:
This code snippet ensures all interactive elements meet accessibility guidelines without manual adjustments per page.
How to Structure Content for Faster Scanning on Mobile
Mobile users scan content quickly, often while multitasking. Structure your posts to facilitate this behavior:
Use descriptive subheadings: Break content into sections with H2 and H3 tags that summarize the following paragraph. Users should understand the article’s flow by reading only headings.
Lead with the conclusion: Place the most important takeaway in the first 50 words. This is the “inverted pyramid” style, which works well for mobile news and tutorials.
Leverage lists and tables: Bullet points (like this one) and simple two-column tables are easier to digest than prose. For example, a table comparing mobile-friendly plugins can replace a long paragraph.
Limit paragraph length: Keep paragraphs to 2–3 sentences max. On a mobile screen, a 6-sentence block appears as an intimidating wall of text.
Add visual breaks: Use images, blockquotes, or pullquotes every 200–300 words to give the eye a resting point. Ensure images are responsive (use the “Full width” alignment in the block editor).
By structuring content for scanning, you reduce cognitive load and keep mobile users engaged longer—a direct boost to both user experience and SEO performance.
Large images and media files are one of the most common causes of slow mobile page loading. On smartphones and tablets, where bandwidth may be limited and data plans costly, every kilobyte counts. Optimizing images and videos for mobile devices not only improves user experience but also boosts your site’s search engine rankings, as page speed is a confirmed ranking factor. This section covers three essential techniques: using compression plugins with a CDN, adopting modern image formats, and enabling lazy loading.
Image Compression Plugins and CDN Integration for Mobile
Image compression reduces file size without noticeably sacrificing visual quality. For WordPress, several plugins automate this process. Here is a comparison of two popular options:
Plugin
Compression Type
CDN Integration
Key Mobile Benefit
Smush
Lossless and lossy
Built-in CDN (WPMU DEV)
Automatic resizing for mobile viewports
ShortPixel
Lossy, glossy, and lossless
Optional via third-party CDNs
WebP conversion and adaptive compression
Smush offers a free tier that compresses up to 5 MB per image and includes a global CDN to serve images from servers closer to your mobile users. ShortPixel provides more granular control, allowing you to choose between lossy, glossy, and lossless compression, and it automatically converts images to WebP. For mobile optimization, integrate your chosen plugin with a reliable CDN, such as Cloudflare or KeyCDN, to cache and deliver images from edge locations, reducing latency for users worldwide.
How to Use WebP and AVIF Formats for Smaller File Sizes
Modern image formats like WebP and AVIF dramatically reduce file sizes compared to older formats such as JPEG and PNG. WebP typically achieves 25–35% smaller file sizes than JPEG, while AVIF can reduce sizes by up to 50% compared to JPEG, with better compression efficiency. To implement these formats in WordPress:
Install a conversion plugin: Plugins like WebP Express or Imagify automatically convert uploaded images to WebP or AVIF. Ensure your server supports these formats (most modern hosts do).
Serve the right format: Use a plugin that delivers the appropriate format based on the browser’s capabilities. For example, Chrome supports WebP and AVIF, while Safari supports only WebP as of 2025.
Fallback to legacy formats: Always provide a JPEG or PNG fallback for older browsers. Most conversion plugins handle this with a <picture> element or JavaScript detection.
For mobile users, smaller file sizes mean faster downloads and lower data usage, which is critical when browsing on cellular networks. Test your site with Google’s PageSpeed Insights to confirm that WebP or AVIF images are being served correctly.
Enabling Lazy Loading in WordPress for Faster Scrolling
Lazy loading delays the loading of images and videos until they are about to enter the viewport. This technique reduces initial page weight and speeds up time to interactive, especially on mobile devices where screen sizes are smaller and users scroll quickly. WordPress natively supports lazy loading for images since version 5.5, using the loading="lazy" attribute. To enable it:
For images: The native attribute works automatically for all images added via the media library or the Classic Editor. For the Block Editor, ensure you are using the Image block, which includes lazy loading by default.
For iframes and videos: Native lazy loading for iframes was added in WordPress 5.7. Embed videos from YouTube or Vimeo using the Embed block, and they will lazy load automatically.
For custom themes or plugins: If you use a custom function to output images, add the loading="lazy" attribute manually. For example: <img src="image.jpg" loading="lazy" alt="Description">.
To verify lazy loading is working, open your site on a mobile device or use browser developer tools. Check that images below the fold are not loaded until you scroll down. This simple step can cut initial page load time by up to 40% on mobile connections, making your WordPress site feel snappier and more responsive.
4. Leverage Caching and Content Delivery Networks (CDNs)
For mobile users, every millisecond of load time matters. Caching reduces server load and speeds up page delivery by storing static versions of your pages, while CDNs serve content from servers closer to the user’s location. Together, they are critical for overcoming the latency and bandwidth constraints of mobile networks.
Top Caching Plugins for WordPress
Several robust caching plugins can dramatically improve mobile performance. The most popular options include:
W3 Total Cache: A free, highly configurable plugin. It supports page caching, database caching, object caching, and minification. Best for advanced users who want granular control.
WP Rocket: A premium plugin (paid) known for its ease of use and excellent mobile-specific features, including lazy loading for images and videos. It automatically applies best-practice caching rules.
WP Super Cache: A simpler, free alternative that generates static HTML files. Ideal for shared hosting environments.
LiteSpeed Cache: If your host uses LiteSpeed server technology, this free plugin offers server-level caching and image optimization tuned for mobile.
Plugin
Cost
Key Mobile Feature
Ease of Use
W3 Total Cache
Free
Advanced minification & CDN integration
Moderate
WP Rocket
Premium
Lazy loading & mobile cache
Very easy
WP Super Cache
Free
Simple static caching
Easy
LiteSpeed Cache
Free
Server-level optimization
Easy
After installing your chosen plugin, enable page caching and minify CSS and JavaScript files. For mobile, also activate “separate mobile cache” if available (present in WP Rocket and W3 Total Cache) to serve device-specific cached pages.
How to Set Up a CDN with Cloudflare or StackPath for Mobile Users
A CDN distributes your site’s static assets—images, CSS, JavaScript—across a global network of servers. Mobile users connect to the nearest server, drastically reducing latency. Cloudflare offers a free tier that is ideal for most WordPress sites. Follow these steps:
Sign up for Cloudflare (free) or StackPath (paid, with edge caching features).
Change your domain’s nameservers to those provided by the CDN. Cloudflare will scan your existing DNS records.
Enable the CDN proxy (orange cloud) in Cloudflare for your domain. This routes traffic through their network.
Configure CDN settings for mobile:
In Cloudflare, go to Speed → Optimization and enable Rocket Loader (asynchronous JavaScript loading for mobile).
Turn on Mirage (image optimization for slow connections) and Polish (lossless image compression).
For StackPath, use their EdgeRules to set cache headers and enable Gzip compression for mobile user agents.
Integrate CDN with your caching plugin: In W3 Total Cache, go to the CDN tab and enter your CDN URL (e.g., cdn.yourdomain.com).
Configuring Browser Caching and Gzip Compression for Mobile
Browser caching stores static resources on the user’s device for a set period, so returning mobile visitors load pages almost instantly. Gzip compression reduces file sizes sent over the network, crucial for limited mobile data plans. You can configure both via your .htaccess file (on Apache servers) or through your caching plugin.
If using an Apache server, add this code to your .htaccess file in the WordPress root directory. If using Nginx, adjust the syntax accordingly (or use your plugin’s built-in settings).
<IfModule mod_expires.c>
ExpiresActive On
ExpiresByType image/jpg "access plus 1 month"
ExpiresByType image/jpeg "access plus 1 month"
ExpiresByType image/gif "access plus 1 month"
ExpiresByType image/png "access plus 1 month"
ExpiresByType text/css "access plus 1 week"
ExpiresByType application/javascript "access plus 1 week"
ExpiresByType text/html "access plus 1 day"
</IfModule>
<IfModule mod_deflate.c>
AddOutputFilterByType DEFLATE text/html text/plain text/xml text/css application/javascript application/json
</IfModule>
This snippet sets browser caching durations: one month for images, one week for CSS and JavaScript, and one day for HTML. It also enables Gzip compression for common text-based file types. After applying, test your site using Google’s PageSpeed Insights or GTmetrix; you should see improved scores for “Leverage browser caching” and “Enable compression.” For mobile, these optimizations reduce data transfer by up to 70%, making your WordPress site feel instantly responsive on any device.
5. Minimize CSS, JavaScript, and Render-Blocking Resources
Excessive code is one of the primary culprits behind slow mobile page rendering. When a WordPress site loads on a smartphone, every unnecessary byte of CSS, JavaScript, or blocking resource forces the browser to wait before displaying content. For mobile users on slower networks, this delay can lead to high bounce rates and poor user experience. The solution involves three core actions: minifying files, deferring non-critical scripts, and eliminating unused CSS. By systematically addressing each, you can significantly reduce load times and improve your site’s mobile performance.
How to Minify CSS and JavaScript Using Plugins
Minification removes all unnecessary characters from your code—such as spaces, line breaks, and comments—without changing its functionality. This reduces file size and speeds up download times. In WordPress, plugins make this process straightforward. Here are the most effective options:
Autoptimize: A popular, free plugin that minifies CSS, JavaScript, and HTML. It also offers options to aggregate files, reducing HTTP requests.
WP Rocket: A premium plugin that includes minification, caching, and deferred loading. Its user-friendly interface is ideal for beginners.
W3 Total Cache: A robust, free plugin with granular control over minification, but it requires more configuration.
To minify with Autoptimize, for example, install and activate the plugin, then navigate to Settings > Autoptimize. Check the boxes for “Optimize CSS Code” and “Optimize JavaScript Code.” Save changes and test your site. For best results, combine minification with file aggregation—but only if your theme and plugins are compatible, as aggregation can occasionally break layouts.
Deferring JavaScript for Better Mobile Performance
JavaScript that loads synchronously blocks the rendering of the rest of your page. On mobile, this is especially detrimental because the browser must download, parse, and execute each script before displaying content below it. Deferring JavaScript tells the browser to download the script in parallel with HTML parsing, then execute it only after the document is fully parsed. This allows the critical content—like text and images—to appear immediately.
Most WordPress performance plugins include a defer option. For example, in Autoptimize, after enabling JavaScript optimization, you can select “Defer JavaScript” and specify which scripts to exclude (e.g., jQuery if your theme relies on it for initial rendering). Alternatively, you can manually add the defer attribute to script tags in your theme’s functions.php file, but plugin-based solutions are safer for non-developers.
Common scripts that benefit from deferral include analytics trackers, social media widgets, and third-party embeds. However, always test after deferring, as some scripts (like those for sliders or menus) may rely on early execution.
Removing Unused CSS with Tools Like PurgeCSS
Many WordPress themes and page builders load extensive CSS libraries, but only a fraction of those styles are used on a given page. Unused CSS adds unnecessary weight and increases render-blocking time. PurgeCSS is a tool that analyzes your HTML and JavaScript to identify and remove unused styles. You can integrate it into your WordPress workflow via plugins or build processes.
WP Rocket (with PurgeCSS integration): In the “File Optimization” settings, enable “Remove Unused CSS.” The plugin automatically scans your pages and generates optimized stylesheets.
Asset CleanUp: This free plugin lets you unload specific CSS and JavaScript files on a per-page basis, which can be combined with manual PurgeCSS output.
If you prefer a manual method, use a tool like PurgeCSS online or via Node.js. Generate a CSS file from your theme, run it through PurgeCSS with your site’s HTML as the content input, and then replace the original file. For large sites, automated plugins are more practical.
Always test in a staging environment first, as aggressive removal can break dynamic elements.
Keep critical CSS for above-the-fold content inline to ensure instant rendering.
Re-run PurgeCSS after updating themes or plugins to maintain efficiency.
By minifying files, deferring scripts, and stripping unused CSS, you’ll create a leaner, faster mobile experience. These steps directly reduce render-blocking resources, allowing mobile browsers to paint your site’s content in seconds rather than seconds plus lag.
6. Optimize for Touch Navigation and User Interface
Mobile users rely on touch, not a mouse, to navigate your WordPress site. If buttons are too small, menus require precise hovering, or forms are tricky to fill out, visitors will quickly leave. Optimizing for touch means designing interfaces that respond to finger taps, swipes, and gestures with ease. A touch-friendly UI reduces friction, improves accessibility, and directly boosts mobile conversions. Below are three critical areas to refine for a seamless mobile experience.
Designing Finger-Friendly Buttons and Links (Minimum 44px)
The human fingertip averages about 10–14mm wide, which translates to roughly 44–48 CSS pixels. Apple’s Human Interface Guidelines and Google’s Material Design both recommend a minimum touch target of 44×44 pixels. To ensure buttons and links are easily tappable on your WordPress site, follow these guidelines:
Size: Set interactive elements (buttons, links, icons) to at least 44px in height and width. For links within text, increase line-height and padding to create a larger hit area.
Spacing: Provide at least 8–10px of margin between tappable elements to prevent accidental taps. Tight clusters of links or buttons frustrate users.
Visual Feedback: Use CSS transitions for a subtle color change, shadow, or scale effect on tap (e.g., active state) so users know their action registered.
Avoid Hover-Only States: On mobile, there is no hover. Any hover-dependent tooltips, dropdowns, or effects must be replaced with tap-based alternatives (e.g., click to show).
Example CSS to enforce 44px touch targets throughout your theme (add to your child theme’s style.css or via customizer):
Creating a Mobile-Optimized Navigation Menu (Hamburger vs. Horizontal)
Navigation is the backbone of your site. On mobile, space is limited, so you must choose between two main patterns: the hamburger menu or a horizontal (top-bar) menu. Here’s how to decide and implement each:
Menu Type
Best For
Pros
Cons
Hamburger Menu
Complex sites with 5+ menu items, content-heavy blogs, e-commerce stores
Saves screen space; works well for deep hierarchies; familiar pattern
Hides navigation (one extra tap); can lower discoverability of key pages
Horizontal Menu
Simple sites with 3–4 items, portfolios, landing pages
Always visible; faster access; no extra tap
Limited space; items may wrap or overflow on very small screens
For most WordPress sites, a hamburger menu is the practical choice. Use a plugin like “Mobile Menu” or build one with CSS/JavaScript that toggles a full-screen overlay. Ensure the hamburger icon itself is at least 44x44px and placed at the top-left or top-right (consistent with platform conventions). Avoid nested dropdowns that require precise tapping—use expandable accordion submenus instead.
Ensuring Forms and CTAs Are Easy to Complete on Small Screens
Forms are often the final step in a conversion—newsletter signups, contact forms, checkout pages. If they are hard to use on mobile, users abandon them. Optimize every form element for touch:
Input Fields: Set font-size: 16px or larger to prevent iOS from zooming in on focus. Ensure fields have at least 44px height and adequate padding.
Labels and Placeholders: Place labels above fields (not inside them) so they remain visible when the user starts typing. Use clear, tappable labels that trigger focus.
CTAs (Call-to-Action): Primary buttons like “Submit” or “Buy Now” should be at least 48px tall, with a contrasting color and clear text. Place them within thumb’s reach—ideally near the bottom of the screen.
Error Handling: Display inline validation messages next to the relevant field, not at the top of the form. Use large, tappable “X” or “Clear” buttons for any input resets.
Minimize Fields: Only ask for essential information. Use autocomplete attributes (e.g., autocomplete="email") to speed up entry on mobile browsers.
Test each form on a real device: tap every button, fill out fields with one hand, and check that the keyboard doesn’t obscure the submit button. A mobile-optimized form is short, large, and forgiving.
7. Improve Mobile Page Speed with AMP or Progressive Web Apps
Accelerated Mobile Pages (AMP) and Progressive Web Apps (PWAs) are two powerful technologies that can dramatically improve how your WordPress site performs on mobile devices. AMP focuses on stripping down HTML and enforcing strict caching rules to achieve near-instant load times, while PWAs transform your website into an app-like experience with offline capabilities and push notifications. Choosing the right approach depends on your site’s goals, content type, and technical resources. Below, we walk through implementation steps for both and compare their trade-offs.
How to Implement AMP in WordPress (Official Plugin Walkthrough)
The official AMP plugin, maintained by the WordPress core team, is the most reliable way to enable AMP on your site. Follow these steps:
Install and activate the “AMP” plugin from the WordPress repository.
Go to Settings > AMP and choose your template mode: Standard (replaces your theme with AMP templates), Transitional (AMP on mobile, normal on desktop), or Reader (separate AMP pages). For most sites, Transitional is recommended to maintain existing design.
Under Advanced Settings, enable Mobile redirection to automatically serve AMP versions to mobile users.
Validate your AMP pages using the AMP Validator tool (available as a Chrome extension) to catch errors like invalid tags or unsupported CSS.
Test with Google’s Mobile-Friendly Test to confirm AMP pages are indexed correctly.
After activation, the plugin will generate AMP versions of your posts and pages. You can customize the design under Appearance > AMP if your theme supports it. Note that AMP restricts JavaScript, so interactive features like forms or comments may require additional setup.
Building a PWA for WordPress Using SuperPWA or PWA for WP
PWAs require a service worker script and a manifest file to enable offline caching, push notifications, and home-screen installation. Two user-friendly plugins simplify this:
SuperPWA: Go to Plugins > Add New, search for “Super Progressive Web Apps,” install and activate. Then navigate to SuperPWA > Settings. Enter your site name, short name, and upload an app icon (recommended 192×192 pixels). Enable Offline Support and Push Notifications if desired. The plugin automatically generates the service worker and manifest.
PWA for WP: Install from the repository, then go to PWA for WP > Settings. Configure the same basic details: app name, icon, and splash screen. Under Service Worker, set the caching strategy (e.g., “Cache First” for fast repeat visits). Both plugins support HTTPS—essential for PWAs to work.
After setup, test your PWA with Lighthouse (built into Chrome DevTools). Look for a score above 80 in the “Progressive Web App” audit. You can also verify the manifest and service worker via the Application tab in DevTools.
Comparing AMP vs. PWA: Pros, Cons, and Use Cases
Feature
AMP
PWA
Speed
Near-instant due to strict caching and pre-rendering
Very fast with service worker caching, but initial load depends on network
Offline Support
Limited; requires AMP cache to work offline
Full offline access via service worker
Push Notifications
Not natively supported
Supported, enabling re-engagement
SEO Benefits
Google prioritizes AMP in Top Stories and carousels
Indirect SEO boost through speed, but no dedicated AMP badge
Development Complexity
Low—plugin handles most work
Moderate—requires testing and HTTPS setup
Design Limitations
Restricted CSS and JavaScript; limited interactivity
Pros of AMP: Quick setup, strong Google SEO support for news, and minimal technical overhead. Cons: Limited functionality, potential design constraints, and dependency on Google’s cache.
Pros of PWA: Offline capabilities, push notifications, and full design freedom. Cons: Requires HTTPS, more testing, and no direct SEO boost from Google.
For most WordPress sites, a combined approach works well: use AMP for blog posts and articles to leverage SEO benefits, and implement a PWA for the overall site to provide offline access and app-like features. Evaluate your audience’s needs—if speed is paramount and content is static, start with AMP. If user engagement and offline functionality matter more, prioritize a PWA.
8. Use a Mobile-Optimized Hosting Provider
Server performance directly affects mobile load times. When a visitor accesses your WordPress site from a smartphone or tablet, every millisecond of delay can increase bounce rates and reduce conversions. A mobile-optimized hosting provider ensures that your server infrastructure is tuned to deliver content quickly to smaller, often slower connections. Key factors include SSD storage for rapid data retrieval, PHP 8+ for faster code execution, and server-level caching that reduces the processing burden on each mobile request. Without these optimizations, even a perfectly designed mobile theme can feel sluggish.
LiteSpeed Web Server: This high-performance web server includes built-in caching (LSCache) and HTTP/3 support, which reduces latency for mobile users on unstable networks.
Redis Object Cache: Redis stores database queries in memory, dramatically reducing the time needed to fetch dynamic content for mobile visitors. This is especially beneficial for e-commerce or membership sites.
SSD Storage: Solid-state drives offer read/write speeds up to 20 times faster than traditional HDDs, ensuring that media files and scripts load quickly on mobile devices.
PHP 8.x: The latest PHP versions (8.0, 8.1, 8.2) provide just-in-time compilation and improved performance, cutting execution time by 20–30% compared to PHP 7.4.
Server-Level Caching: Beyond WordPress plugins, server-level caching (e.g., Varnish, Nginx FastCGI Cache) delivers static HTML pages instantly to mobile browsers without hitting PHP or the database.
CDN Integration: A content delivery network distributes assets across global edge servers, reducing physical distance and latency for mobile users worldwide.
How to Test Your Hosting’s Mobile Speed with GTmetrix and WebPageTest
Before and after switching hosts, use these tools to measure mobile performance objectively:
GTmetrix: Enter your URL, select a mobile device preset (e.g., Moto G4 or iPhone X), and run a test. Focus on the Largest Contentful Paint (LCP) (target: under 2.5 seconds) and Time to Interactive (TTI) (target: under 3.8 seconds). GTmetrix also provides a waterfall chart showing where server response time (TTFB) may be slow.
WebPageTest: Choose a mobile browser (Chrome for Android or Safari for iOS) and a location close to your target audience. Examine the First Byte Time (should be below 200 ms) and the Speed Index (target: under 3.0 seconds for mobile). Use the “Filmstrip” view to see how your page renders over time.
Run at least three tests at different times of day to account for network variability. A good hosting provider will show consistent sub-300 ms TTFB and LCP under 2 seconds on mobile.
Recommended Managed WordPress Hosts for Mobile Optimization
Below is a comparison of three managed WordPress hosts that excel in mobile performance. All include SSD storage, PHP 8+, and server-level caching.
Host
LiteSpeed Server
Redis Cache
CDN Included
Mobile TTFB (avg.)
Starting Price (per month)
SiteGround
No (uses Nginx)
Yes (via plugin)
Yes (Cloudflare CDN)
~180 ms
$2.99 (promo)
WP Engine
No (uses Nginx)
Yes (built-in)
Yes (Global Edge Security)
~220 ms
$20.00
Kinsta
No (uses Nginx)
Yes (built-in)
Yes (Cloudflare CDN)
~160 ms
$35.00
Note: Mobile TTFB values are approximate averages from third-party tests (e.g., WebPageTest, GTmetrix) as of early 2025. Prices may vary based on contract length and promotions.
For budget-conscious users, SiteGround offers excellent value with its SuperCacher plugin and free CDN. WP Engine provides robust caching and a user-friendly interface, ideal for agencies. Kinsta delivers the lowest TTFB and advanced Redis integration, making it a top choice for high-traffic mobile sites. Regardless of your selection, verify that your host supports PHP 8.2 and offers a staging environment to test mobile optimizations before going live.
9. Monitor Mobile User Experience with Analytics and Tools
Optimizing WordPress for mobile devices is an ongoing process, not a one-time task. Once you have implemented responsive design, performance enhancements, and usability improvements, you must continuously monitor how real users interact with your site on smartphones and tablets. Without data, you are guessing about mobile issues. This section covers the essential analytics platforms and diagnostic tools that help you identify friction points, track mobile-specific behavior, and validate that your mobile experience meets user expectations.
Setting Up Google Analytics for Mobile vs. Desktop Segmentation
Google Analytics provides powerful segmentation capabilities that allow you to isolate mobile traffic and compare it against desktop and tablet users. To set this up effectively, follow these steps:
Create a Mobile Traffic Segment: In Google Analytics, navigate to Audience > Mobile > Overview. Click “+ Add Segment” and select “Mobile Traffic” from the predefined segments. Save this as a custom segment for quick access.
Compare Key Metrics: Once applied, analyze bounce rate, average session duration, pages per session, and conversion rates for mobile users. A significantly higher bounce rate on mobile often indicates slow load times or poor navigation.
Use Secondary Dimensions: Add secondary dimensions like “Device Category” and “Screen Resolution” to drill down into specific phone models (e.g., iPhone 14, Samsung Galaxy S23) that may exhibit unique issues.
Set Up Mobile-Specific Goals: Create separate goal conversions for mobile users, such as form submissions or button clicks, to measure mobile-specific engagement.
// Example: Adding a custom dimension for mobile device detection in Google Analytics 4 (GA4)
gtag('config', 'G-XXXXXXXXXX', {
'custom_map': {'dimension1': 'device_type'}
});
gtag('event', 'page_view', {
'device_type': /Mobi|Android|iPhone|iPad/i.test(navigator.userAgent) ? 'mobile' : 'desktop'
});
This code snippet sends a custom dimension “device_type” to GA4, allowing you to segment all reports by mobile vs. non-mobile users directly in your analytics interface.
How to Use Google’s Mobile-Friendly Test and Core Web Vitals Reports
Google provides two essential free tools for mobile optimization: the Mobile-Friendly Test and the Core Web Vitals reports in Search Console.
Mobile-Friendly Test: Visit search.google.com/test/mobile-friendly and enter your WordPress site URL. The tool evaluates viewport configuration, font sizes, tap target spacing, and content width. It returns a pass/fail result with specific actionable issues. For example, if it reports “Content wider than screen,” you need to adjust your CSS to prevent horizontal scrolling.
Core Web Vitals (CWV) Reports in Search Console: These reports focus on three metrics critical for mobile user experience:
Metric
Description
Mobile Target
Largest Contentful Paint (LCP)
Loading time of the main content
Under 2.5 seconds
Interaction to Next Paint (INP)
Responsiveness to user interactions
Under 200 milliseconds
Cumulative Layout Shift (CLS)
Visual stability during loading
Under 0.1
To access these reports, log into Google Search Console, navigate to Core Web Vitals, and filter by “Mobile” device type. The report highlights URLs that are “Poor,” “Needs Improvement,” or “Good.” Click on any URL to see diagnostic details, such as specific images causing slow LCP or dynamic content shifting layout (CLS).
Tools for Identifying Mobile UX Problems: Hotjar, Crazy Egg, and Lighthouse
Analytics tell you what is happening, but behavioral tools show you why. Combine quantitative data with qualitative insights from the following tools:
Hotjar: Install the Hotjar tracking code on your WordPress site (via a plugin or directly in the theme header). Use its heatmaps to see where mobile users tap, scroll, and hover. Pay special attention to “rage clicks”—repeated taps on non-clickable elements—which indicate frustration. The session recording feature lets you watch real mobile user sessions to spot navigation confusion or broken tap targets.
Crazy Egg: Similar to Hotjar, Crazy Egg offers scroll maps and click reports. On mobile, use the “Confetti” view to see exactly which elements receive the most taps. If a non-interactive element like an image gets many taps, users expect it to be clickable. Use this data to add tap-friendly links or enlarge touch targets to at least 48×48 pixels.
Lighthouse (Chrome DevTools): Built into Chrome, Lighthouse provides an automated mobile audit. Run it by opening DevTools (F12), clicking the “Lighthouse” tab, selecting “Mobile” device, and generating a report. Focus on the “Accessibility” and “Best Practices” sections for mobile-specific issues like missing touch-action CSS properties or non-descriptive link text. The report also includes a “View Original Trace” feature that shows a timeline of network requests and rendering, helping you pinpoint slow resources.
Regularly cross-reference data from these tools with your Google Analytics segments. For example, if mobile bounce rate spikes on a product page, check Hotjar recordings on that page for usability blockers, then verify fixes with Lighthouse. This systematic monitoring ensures your WordPress site remains fast, usable, and competitive on every mobile device.
10. Test and Iterate Across Real Devices and Browsers
Emulators and simulators are useful for early-stage checks, but they cannot replicate the nuanced behavior of real mobile hardware, network conditions, or touch interactions. A site that renders perfectly in a desktop browser’s responsive mode may suffer from laggy scrolling, misaligned touch targets, or slow load times on an actual smartphone. To deliver a consistently excellent mobile experience, you must test on physical devices and real-world browsers. This section outlines three core practices: using cloud testing services, running A/B experiments on mobile layouts, and gathering direct user feedback.
How to Test on Real Mobile Devices Using BrowserStack or Sauce Labs
Cloud-based testing platforms like BrowserStack and Sauce Labs provide instant access to hundreds of real device-browser combinations. Follow this workflow to integrate testing into your optimization routine:
Select target devices: Identify the top five to ten devices your audience uses (based on analytics data for screen size, OS version, and browser).
Set up a test script: For each device, verify critical user flows—homepage load, navigation menu, product page scroll, form submission, and checkout.
Check touch interactions: Use the platform’s interactive session to tap buttons, swipe carousels, and pinch-zoom images. Note any unresponsive or overlapping elements.
Monitor performance metrics: Use built-in tools (e.g., BrowserStack SpeedLab or Sauce Labs Performance) to measure Time to Interactive, Largest Contentful Paint, and Cumulative Layout Shift on real devices.
Test across network conditions: Simulate 3G, 4G, and slow Wi-Fi to see how your site behaves under real-world bandwidth constraints.
Document all issues in a shared tracker, prioritize by impact on user experience, and iterate fixes before deploying to production.
Conducting A/B Testing for Mobile Layouts and Calls to Action
A/B testing on mobile ensures that design decisions are data-driven, not assumption-based. To run effective experiments:
Define a clear hypothesis: For example, “Moving the primary call-to-action button above the fold will increase tap-through rate by 10% on mobile.”
Use a testing tool: Platforms like Google Optimize, VWO, or Optimizely allow you to create variants of mobile layouts (e.g., single-column vs. two-column product grids) and track conversions.
Segment traffic by device: Ensure your experiment targets only mobile users to avoid skewing results with desktop behavior.
Test one variable at a time: Focus on a single element—button color, font size, image placement, or navigation style—to isolate its impact.
Run for sufficient duration: Collect data for at least one to two weeks, or until you reach statistical significance (95% confidence level).
Common mobile A/B tests include comparing sticky vs. collapsible headers, hamburger menus vs. bottom tab bars, and single-step vs. multi-step checkout flows. Always validate winning variants on real devices before full rollout.
Gathering User Feedback to Improve Mobile Navigation and Content
Quantitative data from analytics and A/B tests tells you what users do, but qualitative feedback explains why. Integrate these feedback methods into your mobile optimization cycle:
In-app surveys: Use lightweight tools like Hotjar or Qualaroo to prompt mobile users after key actions (e.g., “Was this page easy to navigate?”). Keep surveys to one or two questions to avoid abandonment.
Session recordings: Watch replays of real mobile sessions to identify friction points—users tapping non-clickable elements, struggling with tiny links, or abandoning forms mid-way.
Heatmaps: Analyze where mobile users tap, scroll, and linger. If a critical link receives few taps, consider moving it higher or enlarging its touch target.
User testing sessions: Recruit five to ten participants from your target audience and ask them to complete specific tasks (e.g., “Find the return policy” or “Add this item to your cart”). Record their screen and verbal feedback.
Compile recurring themes into a prioritized backlog. For instance, if multiple testers struggle with a collapsed menu, you might redesign it as a persistent bottom navigation bar. After implementing changes, run the same tests again to confirm improvements.
By combining real-device testing, rigorous A/B experiments, and direct user input, you create a feedback loop that continuously refines your WordPress site for the mobile audience. This iterative approach ensures your optimization efforts remain grounded in actual user behavior, not theoretical best practices.
Frequently Asked Questions
Why is mobile optimization important for WordPress sites?
Mobile optimization is crucial because over half of global web traffic comes from mobile devices. Google uses mobile-first indexing, meaning it primarily evaluates your site's mobile version for ranking. A mobile-optimized site improves user experience with faster loading, easier navigation, and better readability, which reduces bounce rates and increases conversions. For WordPress sites, failing to optimize can lead to poor search rankings and lost visitors. Prioritizing mobile ensures your content is accessible and engaging on smartphones and tablets.
What is the best responsive WordPress theme for mobile?
The best responsive WordPress theme depends on your needs, but popular options include Astra, GeneratePress, and OceanWP. These themes are lightweight, fast-loading, and fully responsive, meaning they automatically adjust layout and elements for different screen sizes. They also offer customization options without heavy code. For e-commerce, Storefront or Kadence WP are excellent. Always test a theme's mobile performance using Google's Mobile-Friendly Test or Chrome DevTools to ensure it meets your standards for speed and usability.
How can I speed up my WordPress site for mobile users?
To speed up your WordPress site for mobile, start by optimizing images using compression plugins like Smush or ShortPixel. Enable caching with WP Rocket or W3 Total Cache. Minify CSS, JavaScript, and HTML. Use a Content Delivery Network (CDN) like Cloudflare to reduce latency. Choose a lightweight theme and limit plugins. Implement lazy loading for images and videos. Ensure your hosting provider offers fast servers. Finally, test your site with Google PageSpeed Insights or GTmetrix to identify specific improvements.
Should I use AMP (Accelerated Mobile Pages) for WordPress?
AMP can be beneficial for news, blogs, or content-heavy sites where speed is critical, as it strips down pages to load instantly. However, it may limit design flexibility and functionality, such as custom scripts or third-party widgets. For most WordPress sites, a well-optimized responsive design with caching and CDN can achieve similar speeds without AMP's constraints. Consider AMP only if your analytics show that mobile users experience high bounce rates due to slow loading. Otherwise, focus on standard mobile optimization techniques.
How do I test my WordPress site's mobile-friendliness?
Use Google's Mobile-Friendly Test tool to check if your site meets mobile usability standards. It provides a pass/fail report and highlights issues like text too small to read or elements too close together. Additionally, Google PageSpeed Insights gives mobile-specific performance scores and suggestions. Chrome DevTools allows you to simulate mobile devices and test responsiveness. For real-user data, analyze your site in Google Search Console under 'Mobile Usability' reports. Regular testing ensures you catch and fix problems promptly.
What are Core Web Vitals and how do they affect mobile WordPress?
Core Web Vitals are Google metrics measuring user experience: Largest Contentful Paint (LCP), First Input Delay (FID), and Cumulative Layout Shift (CLS). For mobile WordPress, they impact search rankings directly. LCP should be under 2.5 seconds, FID under 100ms, and CLS under 0.1. To improve, optimize images, reduce server response time, use efficient CSS/JS, and avoid layout shifts by specifying image dimensions. Plugins like Perfmatters or WP Rocket can help. Monitor your site's Core Web Vitals in Google Search Console.
How can I make my WordPress navigation mobile-friendly?
Use a hamburger menu to save space on smaller screens. Ensure menu items are large enough to tap (at least 48×48 pixels) with adequate spacing. Avoid dropdowns that are hard to use on touchscreens; consider sticky navigation for easy access. Test your menu on various devices. Plugins like Responsive Menu or Max Mega Menu offer mobile-specific settings. Simplify your menu structure to essential pages, reducing clutter. Always preview mobile navigation to confirm it's intuitive and functional.
What plugins help with WordPress mobile optimization?
Key plugins include: WP Rocket or W3 Total Cache for caching and performance; Smush or ShortPixel for image optimization; Autoptimize for minifying CSS/JS; Perfmatters for disabling unnecessary scripts; AMP for official AMP support; and Cloudflare for CDN. For responsive design, the plugin 'Responsive Menu' helps create mobile menus. 'EWWW Image Optimizer' is also popular. Always choose well-reviewed, updated plugins and avoid overloading your site, as too many plugins can slow it down.
How to Build a WordPress Directory Site: A Complete Step-by-Step Guide
1. Understanding Directory Sites and Why WordPress Is Ideal
Before you dive into building a directory site, it is essential to understand what you are creating and why WordPress is the best foundation for the project. A directory site is a web platform that organizes and displays listings—such as businesses, professionals, events, or products—in a searchable, categorized format. Unlike a standard blog or brochure site, a directory focuses on helping users find specific information quickly, often with filters, maps, and user-submitted content. WordPress, with its vast plugin ecosystem and flexible architecture, makes building such a site accessible to non-developers while remaining scalable for advanced needs.
What Is a Directory Site? Types and Common Examples
A directory site functions as a curated or crowd-sourced repository of listings. Each listing typically includes key details like name, description, contact information, location, and categories. The core purpose is to connect users with relevant resources. Common types include:
Business directories: List local or global companies (e.g., Yelp, Yellow Pages).
Job boards: Display job openings with filters for industry, location, and salary (e.g., Indeed, Monster).
Classifieds: Allow users to post items for sale, services, or rentals (e.g., Craigslist, Gumtree).
Event directories: List conferences, meetups, or workshops with dates and venues.
Professional directories: Showcase doctors, lawyers, or real estate agents with credentials and reviews.
Resource directories: Aggregate tools, articles, or educational materials.
Each type requires a robust backend for managing listings, user submissions, and search functionality. WordPress excels here because it can handle all these use cases with the right plugins and custom post types.
Advantages of WordPress for Directory Projects
WordPress offers several distinct advantages that make it the ideal platform for directory sites:
Plugin ecosystem: Dedicated directory plugins (e.g., WP Job Manager, Business Directory Plugin, GeoDirectory) provide ready-made features like listing forms, payment gateways, and map integration.
Custom post types: You can create a custom post type for listings, giving you full control over fields, taxonomies, and templates without modifying core files.
User management: WordPress’s built-in user roles (subscriber, contributor, editor) allow you to control who can submit, edit, or approve listings.
Scalability: With proper hosting and caching, WordPress can handle thousands of listings and high traffic. Many large directories (e.g., TechCrunch’s job board) run on WordPress.
SEO-friendly: Plugins like Yoast SEO or Rank Math optimize listing pages for search engines, helping your directory rank for relevant queries.
Cost-effective: Most directory plugins are free or low-cost, and you avoid expensive custom development. You only pay for hosting, domain, and premium extensions.
Community and support: A vast community means extensive tutorials, forums, and third-party developers are available for help.
For example, a local business directory can be built with GeoDirectory to include Google Maps, while a job board can use WP Job Manager with paid listing options. WordPress adapts to your specific needs without requiring a complete rebuild.
Core Requirements: Hosting, Domain, and Essential Plugins
To build a WordPress directory site, you need three foundational components:
Component
Description
Recommendations
Hosting
Reliable server to run WordPress. Shared hosting works for small directories, but VPS or managed WordPress hosting is better for growth.
SiteGround, WP Engine, Kinsta, or Cloudways (for scalability).
Domain
Your site’s web address. Choose a short, memorable name relevant to your directory niche.
Purchase from Namecheap, Google Domains, or your hosting provider.
Essential Plugins
Core functionality for directory features. Start with these:
Directory plugin: Handles listings, categories, and search (e.g., Business Directory Plugin, WP Job Manager, or GeoDirectory).
Choose based on your directory type (business, jobs, classifieds).
Forms plugin: For user registration and listing submission (e.g., Gravity Forms, WPForms, or the directory plugin’s built-in form).
Gravity Forms is robust; WPForms is beginner-friendly.
SEO plugin: Optimizes listing pages for search engines (e.g., Yoast SEO, Rank Math).
Rank Math offers more directory-specific features.
Caching plugin: Speeds up your site (e.g., WP Rocket, W3 Total Cache, or hosting-level caching).
WP Rocket is premium but user-friendly.
Security plugin: Protects against spam and attacks (e.g., Wordfence, Sucuri).
Wordfence is free and comprehensive.
Additionally, consider a theme compatible with your directory plugin. Many themes (e.g., Listify, DirectoryPress, or Astra with a directory plugin) are designed specifically for directories. With these core requirements in place, you are ready to move to the next step: installing WordPress and configuring your directory plugin.
Selecting the correct directory plugin is the most consequential decision you will make when learning how to build a WordPress directory site. The plugin dictates not only the frontend experience for visitors but also your workflow for managing listings, payments, and search filters. A poor choice can lock you into a niche you outgrow or saddle you with technical debt. Below, we compare the leading options and provide criteria to match one to your specific niche.
Top Directory Plugins Compared: Features and Pricing
Three plugins dominate the WordPress directory ecosystem: WP Job Manager, Business Directory Plugin, and GeoDirectory. Each has distinct strengths and pricing models.
Drag-and-drop field builder, payment gateways, CSV import/export, category images
Free core; premium plans $49–$199/year
GeoDirectory
Real estate, store locators, event maps, multi-location directories
Google Maps integration, location-based search, distance radius, CPT compatibility
Free core; premium plans $79–$299/year
WP Job Manager excels for text-heavy listings with minimal location needs. Business Directory Plugin offers the most flexible field management for general directories. GeoDirectory is unmatched for map-centric sites. Evaluate your niche’s primary search dimension: if location is king, choose GeoDirectory; if category depth matters more, Business Directory Plugin is preferable.
Evaluating Plugin Support, Updates, and Community
Beyond features, the health of a plugin’s ecosystem determines long-term viability. Consider these factors:
Update frequency: Check the plugin’s last update date and WordPress version compatibility. GeoDirectory and Business Directory Plugin both release updates monthly; WP Job Manager lags occasionally but remains stable.
Support quality: Premium versions of all three offer ticket-based support. Business Directory Plugin is known for rapid response times (under 24 hours). GeoDirectory provides extensive documentation but slower ticket resolution. WP Job Manager relies heavily on community forums and third-party developers.
Community size: WP Job Manager has the largest user base, meaning more tutorials and pre-built themes. GeoDirectory has a dedicated developer community focused on location-based projects. Business Directory Plugin has a smaller but more specialized user group.
For mission-critical sites, prioritize plugins with active premium support. Avoid relying solely on free versions of any plugin for production directories—they often lack essential features like payment integration or advanced search.
Free vs. Premium: When to Invest in a Paid Plugin
Free versions of these plugins are functional but limited. Here is a practical guideline for deciding when to upgrade:
Free version sufficient: You are building a small local directory (fewer than 50 listings), do not require payment processing, and can live without custom fields or map integration. Example: a hobbyist event calendar.
Premium necessary: You need monetization (paid listings, featured spots), advanced search filters (radius, price range), or user-submitted content with moderation. Example: a real estate portal or a national business directory.
If you choose a premium plugin, implement a custom post type registration snippet to ensure your directory data is portable. For example, add this to your theme’s functions.php to register a “Listing” post type manually (useful if your plugin allows custom post type integration):
This code ensures your listing data is stored in a standard WordPress structure, making migration between plugins easier. When you invest in a paid plugin, you are paying for reliability, support, and features—not just the plugin itself, but peace of mind for your directory site’s future.
3. Planning Your Directory Structure and Taxonomy
A well-planned directory structure is the backbone of any successful WordPress directory site. It directly impacts how users find listings, how search engines index your content, and how easily you can manage your data. The goal is to create a logical, scalable system that makes browsing intuitive and SEO-friendly. Start by defining how your listings differ from standard posts and pages, then build a taxonomy that mirrors real-world categorization, such as location, price range, and services.
Defining Custom Post Types and Custom Fields
Every directory site needs a dedicated container for its listings. This is where a Custom Post Type (CPT) comes in. Instead of using standard posts or pages, create a CPT like “Listings” or “Businesses.” This separates your directory content from blog posts and ensures your listings have their own archive pages, permalink structures, and admin menus. For example, a restaurant directory would use a CPT called “Restaurants.”
Custom Fields (often managed via Advanced Custom Fields or built-in WordPress post meta) let you store specific, structured data for each listing. Common examples include:
Price Range: A dropdown or text field (e.g., $, $$, $$$).
Phone Number: A text field with validation.
Website URL: A URL field.
Operating Hours: A repeater field for multiple days.
Services Offered: A checkbox or multi-select field.
Custom Fields are essential for filtering and displaying unique details. Without them, your listings would lack the specific data that makes a directory useful, such as showing only restaurants open on Sundays or filtering by price.
Creating Hierarchical Categories and Tags
Categories and tags provide the primary navigation and filtering system for your directory. Use hierarchical categories for broad, top-down classification. For instance, a business directory might have categories like “Restaurants,” “Retail,” and “Services.” Each can have subcategories: “Restaurants” could contain “Italian,” “Mexican,” and “Vegetarian.” This hierarchy helps users drill down from general to specific.
Tags, in contrast, are non-hierarchical and used for cross-cutting attributes. Tags like “pet-friendly,” “outdoor seating,” or “free Wi-Fi” let you group listings across different categories. A user searching for pet-friendly Italian restaurants would find results via the category “Italian” and the tag “pet-friendly.”
Adding Location-Based Taxonomies for Geodirectories
If your directory relies on geography, location-based taxonomies are critical. For a geodirectory (e.g., a business directory for a city), you need a way to organize listings by region. A hierarchical location taxonomy works well: start with a country, then state, then city, and optionally neighborhood. For example, “United States > California > San Francisco > Mission District.”
This structure enables powerful search and SEO benefits. Users can browse listings in a specific neighborhood, and search engines create geographically relevant archive pages (e.g., yoursite.com/location/san-francisco/restaurants). To implement this, create a custom taxonomy called “Location” with hierarchical settings enabled. Then assign each listing to the appropriate location terms. Pair this with Custom Fields for precise address data (street, zip code) to enable map integration and radius search. This approach turns a simple list into a navigable, location-aware directory that meets user expectations for finding nearby services.
4. Installing and Configuring Your Directory Plugin
Once you have your WordPress site set up and a directory theme active, the next step is to install and configure a directory plugin. This plugin will handle the core functionality of your site: listing management, submission forms, user accounts, and search. For this guide, we will use WP Job Manager as a primary example, as it is free, widely supported, and highly extensible for directory sites. However, the principles apply to most directory plugins, such as Business Directory Plugin or GeoDirectory.
Plugin Installation and Initial Setup
To begin, log in to your WordPress admin dashboard and navigate to Plugins > Add New. In the search bar, type “WP Job Manager” and locate the plugin by Automattic. Click Install Now, then Activate. After activation, you will see a new menu item labeled “Job Listings” in your admin sidebar.
WP Job Manager requires a few foundational pages to function. Upon activation, the plugin usually prompts you to create these automatically. If not, go to Job Listings > Settings and click the Create Pages button. This generates the following essential pages:
Job Dashboard – where users manage their own listings.
Submit Job – the front-end listing submission form.
Job Listings – the main archive page displaying all directory entries.
After page creation, verify that each page is published and assigned a shortcode. For example, the Submit Job page should contain [submit_job_form]. If missing, add this shortcode manually to the page content. Then, go to Settings > Permalinks and click Save Changes to flush rewrite rules, ensuring your directory URLs work correctly.
Configuring Listing Fields and Submission Forms
Now, tailor the submission form to your directory’s needs. Navigate to Job Listings > Settings > Job Submission. Here, you can enable or disable default fields such as:
To add custom fields specific to your directory (e.g., “Price Range” for a restaurant directory or “Service Area” for a local business directory), you will need a companion plugin like WP Job Manager Field Editor. Install and activate it from the WordPress repository. Then, go to Job Listings > Field Editor. You can add new fields by clicking Add Field and specifying:
For a practical example, add a “Phone Number” field by setting the field type to “text” and enabling the “Required” option. Save changes, and the new field will appear on the front-end submission form. Reorder fields by dragging them in the Field Editor interface.
Setting Up User Roles, Payments, and Moderation
User management is critical for a directory site. By default, WP Job Manager allows any logged-in user to submit a listing. To control access, go to Job Listings > Settings > Job Submission and adjust the following:
Moderate New Listings: Enable this to require admin approval before a listing goes live. This prevents spam and ensures quality.
Allow Guest Submissions: If you want unregistered users to submit listings, check this box. Otherwise, only registered users can submit.
For payments, install a monetization plugin such as WP Job Manager Paid Listings or Simple Paid Listings. After activation, go to Job Listings > Settings > Paid Listings. Configure the following:
To assign user roles, use a plugin like Members or User Role Editor. Create a custom role called “Directory Submitter” with capabilities to submit and edit their own listings. For example, in the Members plugin, add a new role and check the following capabilities:
submit_job_listing
edit_job_listing
read
Finally, test the submission flow by logging out and visiting your site’s Submit page. Fill out the form with sample data and submit. Check your admin dashboard to confirm the listing appears in the moderation queue. Approve it, then verify it displays correctly on the front-end directory page. Adjust any settings as needed to ensure a smooth user experience.
5. Designing a User-Friendly Directory Layout
Designing a user-friendly layout is critical for a directory site because visitors rely on intuitive navigation and clear information to find what they need quickly. A well-structured layout not only improves user experience but also boosts engagement, reduces bounce rates, and encourages listing submissions. This section covers how to choose or customize a WordPress theme that supports directory functionality, focusing on key design elements like the homepage, single listing pages, search and filter interfaces, and mobile responsiveness.
Choosing the right foundation is the first step. You need a theme or page builder that is built to handle dynamic listings, custom fields, and advanced search filters. Avoid general-purpose themes that require heavy customization for directory features. Instead, consider the following options:
Dedicated directory themes: Themes like Listify, ListingPro, or DirectoryEngine are pre-optimized for directory sites. They include built-in search, filter widgets, listing submission forms, and monetization features such as paid listings or featured spots.
Multipurpose themes with directory plugins: Themes like Astra, GeneratePress, or OceanWP can be paired with directory plugins like GeoDirectory or Business Directory Plugin. This approach offers flexibility but requires more setup for layouts and styling.
Page builders with directory add-ons: Elementor or Beaver Builder allow you to design custom layouts visually. Add-ons like JetEngine or Toolset enable dynamic listing templates, custom post types, and advanced search forms without coding.
When evaluating options, prioritize themes that offer drag-and-drop template customization, support for custom post types, and responsive design out of the box. Check that the theme includes a dedicated listing archive page and single listing page templates to save development time.
Designing the Homepage and Archive Pages
The homepage and archive pages serve as the primary entry points for users. A directory homepage should immediately communicate the site’s purpose and guide users to discover listings. Key design elements include:
Prominent search bar: Place a search bar with autocomplete suggestions above the fold. Include dropdown filters for categories, locations, or price ranges to narrow results instantly.
Featured or popular listings: Showcase a grid or carousel of high-quality listings to build trust and demonstrate value. Use clear thumbnail images, titles, and brief descriptions.
Category or location icons: Use visual icons or image tiles for main categories (e.g., restaurants, doctors, services) to help users browse without typing.
Archive page layout: Design a clean, filterable archive page with a sidebar or top bar for advanced filters. Use a list or grid view toggle, and include sorting options like newest, highest rated, or nearest location.
For archive pages, ensure that each listing card displays essential information: title, rating, location, a short excerpt, and a call-to-action like “View Details.” Avoid clutter by limiting text and using whitespace effectively.
Optimizing Single Listing Pages for Conversions
The single listing page is where users decide to take action, such as contacting the business, making a booking, or visiting a website. Optimize this page for conversions by focusing on clarity and trust signals. Essential design elements include:
Structured information layout: Use a logical hierarchy: headline and image at the top, followed by key details (address, phone, hours, website link), then description, reviews, and a map. Use icons for contact info to improve scannability.
Prominent call-to-action buttons: Place buttons like “Call Now,” “Get Directions,” “Visit Website,” or “Book Appointment” in a sticky footer or sidebar on mobile. Use contrasting colors to make them stand out.
Social proof and reviews: Display a review section with star ratings and user testimonials. Allow visitors to leave reviews directly, which builds credibility and encourages engagement.
Gallery and media: Include a photo gallery or video tour to give users a richer sense of the listing. Use lazy loading to maintain page speed.
Related listings: Add a “Similar Listings” section at the bottom to keep users exploring and reduce bounce rates.
Mobile responsiveness is non-negotiable. Test that all elements—search bars, filters, buttons, and maps—work seamlessly on smartphones and tablets. Use touch-friendly tap targets and ensure text remains legible without zooming. A mobile-first design approach will capture the majority of directory traffic and improve overall user satisfaction.
By selecting a directory-ready theme, designing intuitive homepage and archive layouts, and optimizing single listing pages for conversions, you create a cohesive user experience that drives engagement and repeat visits. Remember to iterate based on user feedback and analytics to refine your design over time.
6. Implementing Advanced Search and Filtering
Building a powerful search and filtering system is essential for a directory site, as it directly impacts user experience and engagement. Without effective search, visitors may struggle to find relevant listings, leading to high bounce rates. The goal is to help users quickly narrow down results based on criteria such as category, location, keywords, price range, or custom fields. Plugins like FacetWP, SearchWP, or built-in tools from directory plugins (e.g., GeoDirectory or Business Directory Plugin) provide robust solutions. This section covers key implementations to transform a basic search into a dynamic, user-friendly tool.
Adding Search Bars with Autocomplete Suggestions
An autocomplete search bar predicts user queries as they type, speeding up navigation and reducing errors. To implement this:
Use a dedicated plugin: Install a plugin like SearchWP or FacetWP, which includes autocomplete features. For example, FacetWP’s “Autocomplete” add-on suggests matching terms from your directory’s custom fields (e.g., business names or categories).
Enable search indexing: Ensure your plugin indexes relevant post types, taxonomies, and custom fields. In SearchWP, go to “Sources & Settings” and add attributes like “Listing Title,” “Category,” and “Location.”
Style the dropdown: Customize the appearance to match your theme. Most plugins offer CSS classes; for instance, add the following to your theme’s custom CSS to adjust the dropdown width:
Test performance: Autocomplete should load quickly. Use caching plugins and limit the number of suggestions (e.g., 10 results).
Building Dynamic Filters with AJAX
AJAX filters update search results without reloading the page, creating a seamless experience. This reduces frustration and keeps users engaged. Follow these steps:
Choose a plugin: FacetWP is a popular choice for AJAX filtering. It integrates with any post type and custom fields. Alternatively, directory plugins like GeoDirectory have built-in AJAX filter shortcodes.
Set up facets: In FacetWP, create “Facets” for each filter type—checkboxes for categories, dropdowns for locations, sliders for price ranges, and text inputs for keywords. Map each facet to the corresponding data source (e.g., a custom field “price” for a numeric slider).
Configure display: Use the plugin’s shortcode to place the filter bar on your directory page. For example: [facetwp facet="category"] for a category filter, and [facetwp facet="price"] for a price range.
Add a reset button: Include a “Clear Filters” link using [facetwp reset="true"] to allow users to start over.
Optimize for mobile: Ensure filters collapse on smaller screens. Use CSS media queries to stack facets vertically or hide them behind a toggle button.
Best practices include limiting the number of active filters to 5–7 to avoid overwhelming users, and providing visual feedback (e.g., a loading spinner) while AJAX fetches results.
Integrating Google Maps for Location-Based Searches
Location-based search is critical for directories like local businesses or real estate. Google Maps integration allows users to search by address, zip code, or radius, and see results plotted on a map. Implementation steps:
Select a map plugin: Use a plugin like GeoDirectory, which natively supports Google Maps, or a standalone tool like WP Google Maps. Ensure you have a valid Google Maps API key.
Add location data: For each listing, store address components (street, city, state, zip) in custom fields. GeoDirectory automatically geocodes these into latitude/longitude coordinates.
Create a map filter: In GeoDirectory, enable “Map” and “Search by Distance” in the settings. Use shortcodes like [gd_map] to display the map and [gd_search] for a location input field. Users can type a location and choose a radius (e.g., “10 miles”).
Sync with AJAX: Combine the map with AJAX filters. For example, when a user selects a category, the map updates to show only relevant pins. This requires custom JavaScript in some cases, but plugins like FacetWP offer built-in map integration via the “FacetWP Map” add-on.
Enhance usability: Add an “Auto-detect Location” button using the browser’s geolocation API. Include a list view alongside the map for users who prefer scrolling.
To reduce bounce rates, ensure the map loads quickly (lazy-load markers) and provide clear instructions (e.g., “Enter city or zip code”). Testing on various devices is crucial, as map interactions differ on touchscreens.
By implementing autocomplete, dynamic AJAX filters, and location-based maps, you create an intuitive search experience that helps users find listings efficiently. This not only improves satisfaction but also encourages repeat visits and longer session durations.
7. Enabling Front-End User Submissions and Management
To transform your WordPress directory site into a thriving community hub, you must allow visitors to submit listings directly from the front end. This eliminates the friction of granting admin dashboard access and empowers users to contribute content seamlessly. A robust front-end submission system, combined with user account management, enhances engagement while maintaining security. Below, we outline how to implement these features step by step, focusing on user experience and spam prevention.
Building a Front-End Submission Form
The core of user submissions is a custom form that captures all necessary listing details. Begin by using a plugin like WPForms, Gravity Forms, or ACF (Advanced Custom Fields) with a front-end extension. Alternatively, if you prefer code, you can leverage WordPress functions such as wp_insert_post() and wp_set_object_terms() in a custom template. Here is a structured approach:
Form fields to include:
Listing Title (required text field)
Description (textarea with WYSIWYG editor)
Category (dropdown or checkbox from your directory taxonomy)
Location (text or map field, e.g., using Google Maps API)
Contact Information (email, phone, website URL)
Featured Image (file upload with validation for size and type)
Use a shortcode to embed the form on a page like “Submit a Listing.”
Upon submission, save the data as a custom post type (e.g., listing) with a status of “pending” or “draft” for moderation.
Redirect users to a confirmation page or their user dashboard with a success message.
User account requirement:
Force users to register and log in before accessing the form. Use WordPress’s native registration or a social login plugin (e.g., Nextend Social Login).
Display the form only to logged-in users; otherwise, show a login/register link.
Creating a User Dashboard for Listing Management
Once users submit listings, they need a personal dashboard to edit, delete, or view their submissions. This dashboard should be accessible from the front end, such as via a “My Listings” page. Implement it using the following components:
Feature
Implementation
List of user’s listings
Query posts with author set to the current user ID using WP_Query. Display title, status (published, pending, draft), and date.
Edit listing
Link each listing to an edit form pre-populated with existing data. Use the same form template as the submission form but with post_id passed via URL.
Delete listing
Add a delete button with a nonce for security. Use wp_delete_post() after confirmation.
Status updates
Show a badge for each listing status (e.g., green for “Published,” yellow for “Pending Review”). Provide a message if the listing is awaiting moderation.
Pagination
Add pagination for users with many listings to avoid page clutter.
To build this, you can use a plugin like User Frontend Pro or WP User Frontend, which offers drag-and-drop dashboard creation. For custom code, create a page template with current_user_can() checks and loop through the user’s posts. Ensure that editing limits are set—for example, only allow edits within 24 hours of submission to prevent abuse.
Implementing CAPTCHA and Moderation Workflows
Security and spam prevention are critical for a directory site that accepts user submissions. Without these measures, your site can become overrun with irrelevant or malicious content. Deploy the following layers of protection:
CAPTCHA integration:
Add Google reCAPTCHA v3 (invisible) or v2 (checkbox) to your submission form. Use plugins like Advanced noCaptcha & invisible Captcha or integrate via code using the reCAPTCHA API.
Alternatively, implement a simple math question or honeypot field (hidden spam trap) for basic protection.
Moderation workflow:
Set all new submissions to “pending” status by default. Notify administrators via email when a new listing is submitted.
Provide an admin panel to approve, reject, or flag listings. Use custom post statuses if needed (e.g., “approved,” “rejected”).
Allow users to resubmit rejected listings with corrections, and notify them of the decision via email.
Additional security checks:
Validate all form inputs: sanitize text fields with sanitize_text_field(), escape URLs with esc_url(), and check file uploads for allowed MIME types.
Limit submission frequency using a database timestamp per user (e.g., one submission per hour).
Use nonces on all forms to prevent cross-site request forgery (CSRF).
By combining front-end forms, a dedicated user dashboard, and robust security workflows, you create a trusted environment where visitors can contribute freely. This approach not only scales your directory content but also fosters a sense of ownership among users, driving long-term engagement for your WordPress directory site.
8. Monetizing Your Directory Site
After building a valuable directory, the next logical step is to generate revenue. Monetization should feel natural to your users, offering tangible benefits for paying customers while keeping the core directory useful for everyone. The most successful directory sites layer multiple income streams without overwhelming visitors. Below are proven strategies, from simple listing fees to advanced advertising options, along with practical guidance on implementation.
Paid Listings: One-Time Fees vs. Recurring Subscriptions
The foundation of directory monetization is charging businesses or individuals to be listed. You have two primary models: a one-time fee for permanent inclusion, or a recurring subscription for ongoing visibility. Each has distinct advantages depending on your directory’s niche and user expectations.
One-Time Fees: Best for directories where listings rarely change (e.g., historical sites, permanent service providers). Users pay once and remain listed indefinitely. This model simplifies billing but requires constant new listings to sustain revenue.
Recurring Subscriptions: Ideal for dynamic directories (e.g., local restaurants, freelancers, event venues). Monthly or annual payments ensure active, up-to-date listings and predictable income. Subscribers are incentivized to keep their information current.
To implement either model, integrate a payment gateway like Stripe or PayPal using a WordPress plugin such as WooCommerce Subscriptions, Paid Memberships Pro, or a directory-specific tool like GeoDirectory. Set up pricing tiers clearly: for example, a basic free listing with limited fields, and a paid listing with full profile access. Avoid promising specific financial returns; instead, focus on the value of exposure and features.
Offering Featured or Highlighted Listing Upgrades
Even if you offer free basic listings, you can monetize by selling featured or highlighted placements. These upgrades give paying businesses priority visibility, often at the top of search results, category pages, or in a dedicated “Featured” section. This model works well because it creates a scarcity-driven revenue stream without removing free access.
Featured Badge: A visual marker (e.g., “★ Featured”) that makes a listing stand out in search results.
Sticky Listings: Paid listings that remain at the top of category pages for a set period.
Expanded Media: Ability to add videos, image galleries, or downloadable brochures to a listing.
Priority Support: Faster response times or dedicated account management for paid members.
To set this up, use a plugin like Business Directory Plugin or Directorist, which offer built-in featured listing options. Price upgrades as a monthly recurring fee (e.g., $9.99/month for a featured badge) or a one-time charge per listing. Again, integrate Stripe or PayPal for seamless checkout. Clearly display the upgrade options on your pricing page or during the listing submission process.
Adding Advertising and Sponsored Content Options
Once your directory attracts consistent traffic, you can sell ad space directly to businesses. This includes banner ads, sidebar placements, or sponsored content such as “Sponsored Listing” posts. Advertising works best when your directory has a clear audience (e.g., local homeowners, freelance professionals) that advertisers want to reach.
Consider these formats:
Ad Type
Description
Typical Pricing Model
Best For
Banner Ads
Image or HTML ads placed in header, sidebar, or footer.
CPM (cost per thousand impressions) or flat monthly rate.
Brand awareness and broad reach.
Sponsored Listings
Paid listings that appear in a “Sponsored” section, distinct from organic results.
Per-click (CPC) or flat monthly fee.
Direct lead generation for advertisers.
Sponsored Content
Blog posts or articles promoting an advertiser, labeled as sponsored.
Flat fee per post or monthly retainer.
In-depth storytelling and SEO benefits.
Directory Takeovers
Full-page or category-specific ad placements that dominate a section.
High flat fee (e.g., $500/month).
Exclusive visibility for premium advertisers.
To manage ads, use a plugin like Ad Inserter or Advanced Ads, which let you define ad zones and set pricing. For sponsored listings, many directory plugins include a “Sponsored” or “Featured” toggle that you can manually assign to paying clients. Always clearly label sponsored content to maintain trust and comply with advertising guidelines. Start with a small number of ad slots to avoid overwhelming your layout, and adjust pricing based on traffic and demand.
9. Optimizing Your Directory for SEO and Performance
Search engine optimization for a directory site demands a distinct approach. Unlike a standard blog or corporate website, a directory must balance thousands of listing pages while avoiding duplicate content and crawl budget waste. Performance is equally critical: a slow directory frustrates users and harms rankings. This section covers the three pillars of directory optimization: on-page elements, technical structure, and speed tuning.
On-Page SEO: Titles, Meta Descriptions, and Schema
Every listing page should have a unique title and meta description. Use a consistent formula that includes the business name, primary category, and location. For example:
Title tag: “Joe’s Pizza | Best Italian Restaurant in Brooklyn | NYC Directory”
Meta description: “Find Joe’s Pizza in Brooklyn, NYC. Read reviews, view hours, and get directions. Fresh ingredients, family-friendly atmosphere.”
Tools like Yoast SEO or Rank Math allow you to set dynamic title templates for custom post types. Avoid generic titles like “Listing #234” – they harm click-through rates.
Schema markup is where directories gain a competitive edge. Implement structured data for each listing type:
Create separate XML sitemaps for your directory listings, categories, and location taxonomies. Plugins like Yoast SEO or Google XML Sitemaps generate these automatically. Submit each sitemap to Google Search Console. Use noindex on archive pages with thin content (e.g., empty category pages) to preserve crawl budget.
Handle pagination with rel="next" and rel="prev" tags to avoid duplicate content across page 2, 3, etc. For large directories (10,000+ listings), consider lazy-loading or infinite scroll to reduce server load.
Performance Tuning: Caching, Image Optimization, and CDN
Directory sites are database-intensive. Every listing query, category filter, and search request hits your server. Implement these performance measures:
Caching plugin: Use WP Rocket, W3 Total Cache, or LiteSpeed Cache. Enable page caching, browser caching, and database optimization. For dynamic directory content, exclude listing detail pages from full-page cache if they contain real-time data like availability calendars.
Image optimization: Resize listing images to a maximum of 1200px on the longest side. Use WebP format via a plugin like ShortPixel or Imagify. Compress JPEGs to 80% quality. Enable lazy loading for images below the fold.
Content Delivery Network (CDN): Serve static assets (CSS, JS, images) from a CDN like Cloudflare, BunnyCDN, or KeyCDN. This reduces latency for users across different geographic regions.
Database optimization: Schedule weekly cleanup of post revisions, spam comments, and transients. Use a plugin like WP-Optimize or run manual SQL queries.
Test your directory with Google PageSpeed Insights and GTmetrix. Aim for a Largest Contentful Paint (LCP) under 2.5 seconds and a First Input Delay (FID) under 100ms. For advanced users, consider object caching with Redis or Memcached if your hosting supports it.
10. Launching, Promoting, and Maintaining Your Directory
Launching a WordPress directory site requires careful coordination to ensure a smooth debut. A successful launch goes beyond simply turning on the site; it involves testing, strategic promotion, and planning for long-term maintenance. Below is a structured approach to launching, promoting, and maintaining your directory.
Pre-Launch Testing and Quality Assurance
Before making your directory public, conduct thorough testing to catch errors and ensure a seamless user experience. Use the following checklist:
Test submission workflows: Submit a sample listing using each available category and field type. Verify that forms validate required fields, handle file uploads correctly, and send confirmation emails to both users and administrators.
Moderate initial listings: Manually approve or reject test submissions to confirm moderation tools work. Set up spam filters (e.g., Akismet or reCAPTCHA) and test them with dummy spam entries.
Check front-end display: View listings on mobile devices, tablets, and desktop browsers. Ensure maps (if used) load, images resize properly, and category filters or search functions return accurate results.
Verify performance: Use a caching plugin (e.g., WP Rocket or W3 Total Cache) and test page load speeds with tools like GTmetrix or Google PageSpeed Insights. Optimize images and enable lazy loading if needed.
Test user roles: Log in as a subscriber, contributor, and editor to confirm permissions are correctly set. Ensure unregistered users cannot access admin areas.
Backup before launch: Create a full backup of your database and files using a plugin like UpdraftPlus. Store backups off-site.
Promotion Strategies: Social Media, Forums, and Partnerships
After testing, promote your directory to attract early listings. Focus on outreach to niche communities and strategic partnerships:
Social media campaigns: Create posts on platforms where your target audience gathers (e.g., LinkedIn for professional directories, Instagram for local businesses). Share teasers of featured listings or behind-the-scenes screenshots. Use hashtags relevant to your niche and consider running a limited-time free listing offer.
Forum and community engagement: Join relevant forums (e.g., Reddit subreddits, Facebook groups, or industry-specific boards). Avoid spamming; instead, contribute valuable answers and subtly mention your directory when appropriate. For example, “I found this tool helpful; our directory at [URL] has more listings like this.”
Partnership outreach: Contact influencers, bloggers, or complementary businesses in your niche. Offer them a free featured listing or a reciprocal link exchange. For local directories, partner with chambers of commerce or tourism boards.
Email outreach: Compile a list of potential listing owners (e.g., local businesses, service providers). Send personalized emails explaining the benefits of joining your directory early, such as free premium placement or lifetime discounts.
To track early traction, monitor sign-ups and listing submissions daily. Consider a launch announcement on your blog or via a press release to industry-specific news sites.
Ongoing Maintenance: Updates, Backups, and User Support
After launch, regular maintenance ensures your directory remains secure, functional, and user-friendly. Key tasks include:
Task
Frequency
Details
Update plugins and themes
Weekly
Check for updates to your directory plugin (e.g., GeoDirectory, WP Job Manager), caching plugins, and security tools. Test updates on a staging site first.
Backup database and files
Daily or weekly
Use automated backup plugins. Store backups in at least two locations (e.g., cloud storage and local drive).
Moderate new listings
Daily
Review and approve or reject submissions. Respond to user-flagged content within 24 hours.
Monitor user feedback
Weekly
Check comments, support tickets, and reviews. Address common issues (e.g., broken links, missing images) promptly.
Scale features
Quarterly
Analyze usage data to add requested features (e.g., advanced search filters, member directories, or rating systems). Consider premium listing tiers for monetization.
Additionally, set up automated email notifications for new submissions, failed payments (if using paid listings), and security alerts. Regularly review your site’s analytics to identify underperforming categories or high bounce rates, and adjust your promotion strategy accordingly. By maintaining a cycle of testing, promoting, and iterating, your WordPress directory site will grow sustainably and serve its community effectively.
Frequently Asked Questions
What is a WordPress directory site?
A WordPress directory site is a website built on WordPress that organizes and displays listings of businesses, services, events, or other entities in a structured, searchable format. Users can browse categories, search by location or keywords, and often submit their own listings. Examples include business directories, job boards, and event calendars. WordPress makes it easy to create such sites using custom post types and dedicated plugins like GeoDirectory or Business Directory Plugin, allowing for flexible fields, maps integration, and user management.
Which is the best plugin for building a WordPress directory site?
The best plugin depends on your needs. GeoDirectory is excellent for location-based directories with advanced mapping and search. Business Directory Plugin is user-friendly and great for simple business listings. Directorist offers a free version with robust features. For niche directories, consider plugins like WP Job Manager for job boards or Events Manager for event directories. Evaluate features like custom fields, payment integration, and scalability. Many plugins have free and premium versions, so test them to see which fits your workflow and budget.
How do I choose a WordPress theme for a directory site?
Choose a theme that is compatible with your chosen directory plugin, responsive, and SEO-friendly. Look for themes specifically designed for directories, such as Listify, ListingPro, or DirectoryEngine. These often include built-in support for plugins like GeoDirectory or Directorist. Ensure the theme has customization options for colors, layouts, and typography. Check for speed optimizations and regular updates. A clean, modern design with good typography and intuitive navigation enhances user experience. Test the demo to see how listings and search are displayed.
How can I monetize my WordPress directory site?
Monetize your directory site through: 1) Paid listings – charge users to submit or feature listings. 2) Subscription plans – offer tiered memberships with different listing limits. 3) Pay-per-click – sell ad space on your site. 4) Sponsored listings – highlight specific businesses for a fee. 5) Commissions – take a percentage of transactions if you integrate booking or e-commerce. Plugins like Paid Listings for Business Directory Plugin or WooCommerce subscriptions can help manage payments. Also consider offering premium directory themes or related services.
What are the key features for a successful directory site?
Key features include: intuitive search and filtering (by location, category, keywords), detailed listing pages with custom fields (hours, phone, website), user accounts for submitting and managing listings, ratings and reviews, map integration (Google Maps or OpenStreetMap), responsive design, fast loading times, and SEO optimization. Also important are moderation tools to prevent spam, payment gateways for monetization, and analytics to track performance. A clean, user-friendly interface and regular updates keep users engaged and improve search rankings.
How do I optimize my directory site for SEO?
Optimize by: 1) Using SEO-friendly permalinks (e.g., /listings/business-name/). 2) Adding unique meta titles and descriptions for each listing. 3) Implementing structured data (schema.org) for LocalBusiness or Place. 4) Generating XML sitemaps for listings and categories. 5) Using responsive design and fast hosting. 6) Encouraging user reviews to generate fresh content. 7) Building internal links between related listings and categories. 8) Submitting your site to Google My Business and local directories. Use plugins like Yoast SEO or Rank Math to streamline on-page optimization.
Can I build a directory site without coding?
Yes, you can build a directory site without coding using WordPress and directory plugins like Directorist, Business Directory Plugin, or GeoDirectory. These plugins provide a drag-and-drop interface to create custom fields, set up search filters, and manage listings. Many themes also offer pre-built directory demos that you can import and customize. With WordPress's visual editor and plugin ecosystem, you can create a fully functional directory site with minimal technical skills. For advanced customization, you may need some knowledge of CSS or PHP, but it's not required for basic functionality.
How do I handle user submissions and spam on my directory site?
To handle user submissions: 1) Use a plugin that includes submission forms with CAPTCHA (reCAPTCHA or hCaptcha). 2) Enable moderation – require admin approval before listings go live. 3) Set up email verification for new users. 4) Use plugins like Akismet to filter spam submissions. 5) Limit submissions to registered users only. 6) Implement a points system or require payment to deter spammers. 7) Regularly review and clean up spam listings. Many directory plugins have built-in spam protection features, so explore those settings.
How to Use WP CLI to Manage WordPress: A Comprehensive Guide
Introduction to WP CLI
WP CLI is a powerful command-line interface for managing WordPress installations, offering developers and site administrators a streamlined way to perform tasks without navigating the WordPress dashboard. This tool transforms how you interact with WordPress, enabling rapid execution of common operations such as plugin updates, database management, and user administration through simple terminal commands. By leveraging WP CLI, you can automate repetitive workflows, enhance site performance, and maintain tighter control over your WordPress environment. This guide provides a comprehensive overview of WP CLI, its benefits, and practical use cases to help you integrate it into your daily management routine.
What Is WP CLI and Why Use It?
WP CLI is an open-source command-line tool that allows you to manage WordPress sites directly from your server’s terminal or command prompt. Instead of clicking through menus in the WordPress admin panel, you execute precise commands to perform actions like installing themes, clearing cache, or checking site status. For example, a command such as wp plugin update --all updates all plugins instantly, while wp user list displays a table of registered users. The tool is built on PHP and requires access to your WordPress installation’s directory, typically via SSH or a local development environment.
You should use WP CLI because it significantly reduces the time required for bulk operations. Consider managing a multisite network with 50 sites: updating plugins individually via the dashboard could take hours, but a single WP CLI command completes the task in seconds. Additionally, WP CLI supports scripting, allowing you to create custom automation scripts for tasks like scheduled backups or content migration. Its reliability is another key factor—commands execute without the risk of browser timeouts or UI glitches, making it ideal for production environments.
Key Advantages Over the WordPress Dashboard
WP CLI offers distinct advantages over the traditional WordPress dashboard, particularly for users comfortable with the command line. Below is a comparison of key benefits:
Feature
WordPress Dashboard
WP CLI
Speed
Slower due to page loads and AJAX calls
Instant execution via terminal commands
Bulk Operations
Manual for each item; limited to UI constraints
Single command for all items (e.g., wp plugin update --all)
Automation
Requires third-party plugins or cron jobs
Native scripting support for cron, CI/CD, or custom scripts
Accessibility
Requires web browser and login credentials
Accessible via SSH, even on headless servers
Error Handling
May fail silently or require manual retries
Clear error messages and exit codes for debugging
One of the most practical advantages is the ability to execute commands without loading the WordPress admin interface, which reduces server load and avoids potential conflicts with plugins. For instance, when a plugin causes a white screen of death, you can deactivate it via WP CLI (wp plugin deactivate plugin-name) without needing dashboard access. This makes WP CLI an essential tool for troubleshooting and maintenance.
Common Scenarios for WP CLI Usage
WP CLI is versatile and applies to numerous real-world scenarios. Here are typical use cases for developers and site administrators:
Plugin and Theme Management: Install, activate, deactivate, update, or delete plugins and themes across single or multisite installations. For example, wp plugin install yoast-seo --activate installs and activates the Yoast SEO plugin in one step.
Database Operations: Export, import, optimize, or search-replace database tables. Commands like wp db export create backups, while wp search-replace 'oldurl.com' 'newurl.com' updates URLs during site migration.
User Administration: Create, delete, list, or modify user roles and capabilities. For instance, wp user create editor@example.com --role=editor adds a new editor user.
Content Management: Generate posts, pages, or custom post types programmatically. Use wp post create --post_title="Sample Post" --post_content="Content here" --post_status=publish to publish content instantly.
Site Maintenance: Clear cache, run cron jobs, or check site health. Commands like wp cache flush and wp cron event run --due-now keep your site optimized.
Automation and Scripting: Integrate WP CLI with shell scripts or CI/CD pipelines for automated deployments, backups, or testing. For example, a nightly cron job can run wp db export /backups/daily.sql to ensure data safety.
These scenarios highlight how WP CLI reduces manual effort and increases efficiency. Whether you manage a single blog or a network of hundreds of sites, mastering WP CLI transforms routine tasks into quick, reliable operations. As you proceed through this guide, you will learn specific commands and best practices to leverage WP CLI effectively in your workflow.
Before you can start managing your WordPress sites from the command line, you need to install WP CLI on your server. This guide covers the prerequisites and provides step-by-step instructions for Linux, macOS, and Windows environments. WP CLI is a powerful tool that lets you perform common WordPress tasks—like installing plugins, updating cores, and managing users—without ever touching the admin dashboard. Proper installation ensures you have a stable foundation for all subsequent commands.
Prerequisites: PHP, SSH, and Server Access
WP CLI requires a few core components to function correctly. Without these, the installation will fail or produce errors. Here is what you must have in place:
PHP 5.6 or later (PHP 7.0+ is recommended for best performance). WP CLI is a PHP script, so PHP must be installed and accessible from the command line. You can check your PHP version by running php -v in your terminal. If PHP is missing, install it via your package manager (e.g., apt install php on Ubuntu or brew install php on macOS).
SSH access to your server. For remote servers, you need SSH credentials (username, password, or SSH key) to log in. For local development, simply open your terminal or command prompt.
Server access with appropriate permissions. You should have write access to a directory in your system PATH (like /usr/local/bin on Linux/macOS) or use a user-specific directory. On shared hosting, you may need to install WP CLI in your home folder and add it to your PATH.
cURL or wget (optional but recommended for downloading the Phar file). Most systems include these by default.
If you are using a managed WordPress host, check if WP CLI is already installed. Many providers offer it pre-installed. You can test by running wp --info from the command line. If you see version details, you can skip installation.
Installation via Phar Archive on Linux/macOS
The recommended method for Linux and macOS is to download the WP CLI Phar file and make it executable. This approach is lightweight and works on almost all systems. Follow these steps:
Download the Phar file using cURL or wget. Open your terminal and run: curl -O https://raw.githubusercontent.com/wp-cli/builds/gh-pages/phar/wp-cli.phar
Alternatively, if you prefer wget: wget https://raw.githubusercontent.com/wp-cli/builds/gh-pages/phar/wp-cli.phar
Verify the download (optional but recommended). Run php wp-cli.phar --info. You should see WP CLI version details. If you get an error, re-download the file.
Make the Phar file executable by running: chmod +x wp-cli.phar
Move the file to your system PATH so you can call wp from any directory. For system-wide access: sudo mv wp-cli.phar /usr/local/bin/wp
If you lack sudo privileges, move it to a user directory like ~/.local/bin/wp and ensure that directory is in your PATH (add export PATH="$HOME/.local/bin:$PATH" to your ~/.bashrc or ~/.zshrc).
Test the installation by running wp --info. You should see output similar to: OS: Linux 5.15.0-91-generic Shell: /bin/bash PHP binary: /usr/bin/php8.1 PHP version: 8.1.2-1ubuntu2.14 WP-CLI phar: /usr/local/bin/wp
That is it. WP CLI is now ready to use. You can start managing your WordPress sites with commands like wp plugin list or wp core update.
Installing WP CLI on Windows with Docker or WSL
Windows does not natively support Phar files in the same way as Linux or macOS. The two most reliable methods are using Docker or Windows Subsystem for Linux (WSL). Here is how to set up each:
Option 1: Using Docker
If you already use Docker for development, this is the simplest approach. Pull the official WP CLI image and run commands in a container. For example: docker run --rm -it -v "%cd%:/var/www/html" wordpress:cli wp --info
This mounts your current directory to the container’s web root. To make it more convenient, you can create a batch alias. Create a file named wp.bat in a directory in your PATH (e.g., C:WindowsSystem32) with the following content: @echo off docker run --rm -it -v "%cd%:/var/www/html" wordpress:cli wp %*
Now you can run wp --info from any command prompt. Note that Docker must be running, and the command will pull the image on first use.
Option 2: Using Windows Subsystem for Linux (WSL)
WSL gives you a full Linux environment on Windows. First, install WSL (version 2 is recommended) and a Linux distribution like Ubuntu from the Microsoft Store. Then, inside the WSL terminal, follow the Linux installation steps above using the Phar archive. Once installed, you can access WP CLI from within WSL. To use it from PowerShell or Command Prompt, you can call the WSL command directly: wsl wp --info
For a smoother experience, add an alias in your PowerShell profile: Set-Alias wp "wsl wp". This allows you to run wp commands as if they were native Windows executables.
Both methods work well. Docker is more portable and isolated, while WSL integrates more deeply with Windows file system and tools. Choose the one that fits your workflow.
Basic WP CLI Commands for Site Management
Mastering basic WP CLI commands is essential for efficient WordPress site management. These commands allow you to perform routine tasks directly from the command line, saving time and reducing manual errors. Below are three critical areas of site management, each with practical commands and examples.
Checking WP CLI Version and WordPress Environment
Before performing any operations, verify your WP CLI version and WordPress environment. Use the wp cli version command to display the installed WP CLI version. To check the WordPress environment, run wp core version to see the current WordPress version, and wp db check to verify database connectivity. For a comprehensive overview, use wp core is-installed to confirm WordPress is properly set up. These checks prevent errors when running subsequent commands.
wp core check-update: Lists available WordPress core updates.
wp plugin list: Shows all installed plugins with their status.
wp theme list: Displays installed themes and their activation status.
wp user list: Lists all users on the site.
Managing Users: Creating, Listing, and Deleting
User management is streamlined with WP CLI. To create a new user, use wp user create with required parameters: username, email, and role. For example: wp user create johndoe johndoe@example.com --role=editor. To list all users, run wp user list, which outputs a table with ID, user_login, display_name, user_email, and roles. Delete a user with wp user delete 123 (replace 123 with the user ID). You can reassign content to another user by adding --reassign=456.
Common user commands:
wp user update 123 --role=author: Changes a user’s role.
wp user meta add 123 custom_field value: Adds custom user meta.
wp user generate --count=5 --role=subscriber: Creates multiple test users.
Updating WordPress Core, Themes, and Plugins
Keeping WordPress updated is critical for security and performance. Use wp core update to update WordPress core to the latest version. For themes, run wp theme update --all to update all installed themes, or specify a theme name: wp theme update twentytwentyfour. Similarly, wp plugin update --all updates all plugins, or wp plugin update akismet updates a specific plugin. To preview updates before applying them, use wp core update --dry-run or wp plugin update --all --dry-run. Always back up your database and files before major updates using wp db export and a file backup tool.
Comparison of Update Commands
Component
Command
Dry-Run Option
Notes
WordPress Core
wp core update
wp core update --dry-run
Updates to latest stable version; requires file permissions.
Themes
wp theme update --all
wp theme update --all --dry-run
Can specify individual theme name.
Plugins
wp plugin update --all
wp plugin update --all --dry-run
Can specify individual plugin slug.
After updates, verify success with wp core version and wp plugin list --update=available to confirm no pending updates remain. Use wp theme list --update=available similarly for themes. These commands ensure your site stays current without manual intervention.
The WP-CLI (WordPress Command Line Interface) transforms how you handle plugins and themes by replacing slow, click-heavy admin screens with instant terminal commands. This approach is especially valuable for developers managing multiple sites or performing repetitive tasks. Below, you’ll find precise instructions for installing, activating, deactivating, and deleting plugins and themes, along with strategies for bulk operations that save significant time.
Installing and Activating Plugins from the WordPress Repository
WP-CLI allows you to install plugins directly from the WordPress.org repository without ever opening a browser. The core command is wp plugin install, followed by the plugin slug. For example, to install the popular SEO plugin Yoast, run:
wp plugin install wordpress-seo
To activate it immediately after installation, add the --activate flag:
wp plugin install wordpress-seo --activate
You can also install multiple plugins in one command by listing slugs separated by spaces:
For premium or custom plugins not in the repository, use the --url parameter or specify a local ZIP file path. To install a plugin from a ZIP file:
wp plugin install /path/to/plugin.zip --activate
Key tips for plugin installation:
Always test plugin slugs on wordpress.org/plugins before running commands.
Use --force to reinstall a plugin if it already exists (useful for resetting broken installations).
Check available versions with wp plugin list --fields=name,version before upgrading.
Managing Theme Activation and Switching
Themes are managed similarly but require attention to parent-child relationships. Activate a theme with:
wp theme activate twentytwentyfour
To install a theme from the repository, use wp theme install. For example:
wp theme install twentytwentythree --activate
Switching themes becomes critical during maintenance or staging. You can list all installed themes to find the correct slug:
wp theme list --status=inactive
When working with child themes, always activate the child theme (not the parent) and ensure the parent is installed. To switch from one active theme to another without deactivating first:
wp theme activate generatepress-child
To deactivate a theme (without deleting it), use:
wp theme status twentytwentytwo (then use the status output to determine the correct action)
Note: WP-CLI does not allow deactivating the currently active theme directly. You must activate a different theme first, then deactivate the old one. For example:
Bulk Operations: Updating Multiple Plugins at Once
Bulk updates are where WP-CLI truly shines. The command wp plugin update --all updates every installed plugin to its latest version. To update only specific plugins:
For themes, bulk deletion works similarly. To remove all inactive themes:
wp theme list --status=inactive --field=name | xargs wp theme delete
Always verify the list before deletion by running the wp theme list command first. By mastering these commands, you reduce manual errors and speed up maintenance across any number of WordPress installations.
Database Operations with WP CLI
Managing the WordPress database through WP CLI provides a powerful, efficient alternative to using phpMyAdmin or other graphical tools. By executing commands directly in the terminal, you can perform critical operations such as exporting, importing, optimizing, and repairing your database with precision and speed. However, because database operations carry inherent risks, it is essential to follow safety precautions. Always create a full backup of your site files and database before running any destructive commands, and test commands on a staging environment first. WP CLI commands are executed from the root directory of your WordPress installation, and they require the appropriate user permissions on your server.
Exporting the Database with wp db export
The wp db export command creates a SQL dump of your entire WordPress database. This is the safest way to generate a backup before making structural changes or migrating a site. The basic syntax is:
wp db export [file]
If you omit the file name, WP CLI generates a file named [database-name]-[timestamp].sql in the current directory. For example:
wp db export my-backup.sql
This creates a file called my-backup.sql. You can also specify an absolute path to save the backup outside the web root for extra security. Key options include:
--tables=<tables>: Export only specific tables, separated by commas.
--exclude_tables=<tables>: Exclude certain tables from the export.
--porcelain: Output only the file name (useful for scripting).
--default-character-set=<charset>: Set the character set (e.g., utf8mb4).
For large databases, consider using --skip-extended-insert to produce more readable SQL, though it will create a larger file. Always verify the export by checking the file size and ensuring it begins with a valid SQL header.
Importing a Database Backup Safely
The wp db import command restores a database from a SQL file. Because this operation overwrites existing data, it is crucial to follow a safe procedure. The basic command is:
wp db import [file]
Before importing, take these precautions:
Create a current backup of your existing database using wp db export.
Verify the import file is a valid SQL dump and not corrupted.
Put your site in maintenance mode using wp maintenance-mode activate to prevent user interactions during the process.
Test the file on a staging environment if possible.
Common options include:
--dbuser=<user> and --dbpass=<password>: Specify database credentials if not using the default wp-config.php values.
--skip-optimization: Skip table optimization after import (useful for very large files).
--verbose: Display detailed progress during import.
After importing, run wp db check to verify the database integrity, then deactivate maintenance mode with wp maintenance-mode deactivate. If the import fails, restore your backup immediately using the same command.
Over time, database tables can become fragmented or corrupted, leading to slow performance and errors. WP CLI provides two commands for maintenance:
Command
Purpose
Syntax
wp db optimize
Defragments tables to reclaim unused space and improve query performance.
wp db optimize
wp db repair
Checks and fixes corrupted or damaged tables.
wp db repair
Both commands can be applied to all tables or specific ones. For example, to optimize only the wp_posts and wp_postmeta tables:
wp db optimize --tables=wp_posts,wp_postmeta
To repair all tables, simply run wp db repair. It is safe to run these commands on a live site, but always take a backup first, especially before repairing, as repairs can alter table structures. For best practice, schedule regular optimization (e.g., weekly via cron) and run repairs only when you suspect corruption, such as after a server crash or plugin conflict. Use the --verbose flag to see which tables are processed and any errors encountered. If repair fails for a table, you may need to restore from a backup or use a more advanced tool like mysqlcheck directly.
Automating Backups and Maintenance Tasks
WP CLI transforms routine WordPress maintenance from a manual chore into a set of automated, scriptable tasks. By integrating WP CLI commands with cron jobs and custom shell scripts, you can schedule regular backups, apply updates, and perform health checks without logging into the dashboard. This approach reduces human error, ensures consistency, and frees up time for higher-value work. Below, we cover three essential automation patterns that every site administrator should implement.
Setting Up Automated Database Backups with Cron
Database backups are critical for disaster recovery. WP CLI’s wp db export command creates a SQL dump of your entire database, which you can compress and store offsite. To automate this process, add a cron job that runs daily or weekly.
First, create a backup script (e.g., /usr/local/bin/wp-backup.sh) with the following content:
#!/bin/bash
TIMESTAMP=$(date +"%Y%m%d%H%M%S")
BACKUP_DIR="/backups/wordpress"
WP_PATH="/var/www/html"
# Export database with compression
wp db export "$BACKUP_DIR/db-$TIMESTAMP.sql" --path="$WP_PATH" --add-drop-table
gzip "$BACKUP_DIR/db-$TIMESTAMP.sql"
# Remove backups older than 7 days
find "$BACKUP_DIR" -name "*.sql.gz" -mtime +7 -delete
Make the script executable: chmod +x /usr/local/bin/wp-backup.sh. Then, add a cron entry by running crontab -e and appending:
This runs the backup daily at 2 AM. For added security, sync the backup directory to a remote server or cloud storage using rsync or an S3-compatible tool. You can also include the wp uploads directory in the same script by adding wp eval "echo WP_CONTENT_DIR;" to locate the uploads folder and tar it alongside the database dump.
Scheduling Plugin and Core Updates
Keeping WordPress core, plugins, and themes updated is vital for security and performance. WP CLI provides wp core update, wp plugin update --all, and wp theme update --all commands. To schedule these updates safely, create a maintenance script that runs weekly during low-traffic hours.
Below is a sample script that updates everything, then sends a summary email:
Add this to cron with 0 3 * * 0 to run weekly on Sunday at 3 AM. For mission-critical sites, consider a two-stage approach: first run updates in a staging environment, then apply them to production after testing. You can also use wp plugin update --all --dry-run to preview updates before applying them.
Creating Custom Maintenance Scripts
Beyond backups and updates, WP CLI enables custom maintenance scripts that combine multiple tasks into a single automated workflow. A typical script might include database optimization, cache clearing, and health checks.
Here is a comprehensive maintenance script example:
#!/bin/bash
WP_PATH="/var/www/html"
LOG="/var/log/wp-maintenance.log"
echo "Maintenance started at $(date)" > "$LOG"
# Optimize database tables
wp db optimize --path="$WP_PATH" >> "$LOG" 2>&1
# Clear cache (if using a caching plugin)
wp cache flush --path="$WP_PATH" >> "$LOG" 2>&1
# Run a health check
wp core verify-checksums --path="$WP_PATH" >> "$LOG" 2>&1
if [ $? -ne 0 ]; then
echo "Core file integrity check failed!" >> "$LOG"
fi
# Check for orphaned post meta
wp db query "DELETE pm FROM wp_postmeta pm LEFT JOIN wp_posts p ON pm.post_id = p.ID WHERE p.ID IS NULL;" --path="$WP_PATH" >> "$LOG" 2>&1
# Rotate logs
find /var/log -name "wp-*.log" -mtime +30 -delete
echo "Maintenance completed at $(date)" >> "$LOG"
Schedule this script to run weekly using cron. For advanced users, extend the script to:
Verify database integrity with wp db check.
Rescan for broken links using a WP CLI extension like wp-cli/link-checker.
Send a summary report via Slack webhook or email.
Trigger a staging-to-production sync after successful updates.
By combining these scripts with WP CLI’s robust command set, you can build a fully automated maintenance pipeline that keeps your WordPress site secure, fast, and reliable with minimal manual intervention.
Advanced WP CLI: Custom Commands and Extensions
Once you’ve mastered the core WP-CLI commands, the true power of the tool emerges through extending it. Building custom commands allows you to automate repetitive tasks unique to your workflow, integrate with third-party APIs, or enforce site-specific operations. The WP-CLI ecosystem also offers a rich library of community packages, and for teams, integrating these commands into CI/CD pipelines ensures consistent, repeatable deployments. This section explores how to create your own commands, leverage existing packages, and connect WP-CLI with modern development pipelines.
Building a Custom WP CLI Command with PHP
Creating a custom WP-CLI command is straightforward and requires only basic PHP knowledge. Commands are registered as classes that extend WP_CLI_Command and are invoked via the wp command-line tool. Start by creating a PHP file, for example my-custom-command.php, and include the following structure:
Define the class: Create a class that extends WP_CLI_Command.
Add methods: Each public method becomes a subcommand. For example, a method hello() creates the command wp my-custom hello.
Register the command: Use WP_CLI::add_command( 'my-custom', 'My_Custom_Command' ) to hook it into WP-CLI.
Below is a minimal example that retrieves the site’s title:
class Site_Info_Command extends WP_CLI_Command {
public function title( $args, $assoc_args ) {
$title = get_bloginfo( 'name' );
WP_CLI::success( "Site title: $title" );
}
}
WP_CLI::add_command( 'site-info', 'Site_Info_Command' );
To use this command, save the file in your theme’s wp-cli directory or load it via a custom plugin. Run wp site-info title to see the output. For more complex workflows, you can accept positional arguments and associative flags, validate input, and handle errors with WP_CLI::error(). Always test custom commands in a staging environment before deploying to production.
Using Community Packages from the WP-CLI Package Index
The WP-CLI Package Index (wp-cli.org/package-index) hosts hundreds of community-maintained commands that extend functionality for specific tasks, such as SEO management, database optimization, or multisite operations. Installing a package is simple: use the wp package install command followed by the package’s URL or GitHub repository. For example, to install the popular wp-cli/doctor command, run:
wp package install wp-cli/doctor
After installation, the new command becomes available immediately. To see all installed packages, use wp package list. Here are common categories of community packages:
Category
Example Package
Use Case
Security
wp-cli/doctor
Runs health checks and detects common issues.
Performance
wp-cli/redis
Manages Redis object cache.
Multisite
wp-cli/network
Advanced network-wide operations.
Development
wp-cli/scaffold
Generates theme/plugin boilerplate code.
When using community packages, always review the package’s documentation and source code for compatibility with your WordPress version. Uninstall a package with wp package uninstall <name> if it no longer meets your needs. These extensions dramatically reduce the time needed to implement specialized functionality.
Integrating WP CLI with CI/CD Pipelines
Integrating WP-CLI into Continuous Integration and Continuous Deployment (CI/CD) pipelines automates routine maintenance, ensures consistency across environments, and reduces human error. Common CI/CD platforms like GitHub Actions, GitLab CI, and Jenkins can execute WP-CLI commands as part of a build or deployment job. Below is a typical workflow for a WordPress site using GitHub Actions:
Checkout code: Pull the latest repository version.
Set up PHP and WP-CLI: Use a runner that includes PHP and WP-CLI, or install them via package managers like apt or composer.
Run WP-CLI commands: Execute tasks such as wp db export, wp plugin update --all, or wp search-replace for staging-to-production migrations.
Deploy: Transfer files to the server via rsync or FTP.
Here is an example GitHub Actions YAML snippet that updates plugins on a staging site:
Key considerations for CI/CD integration include securely storing database credentials using environment variables or secrets, running commands in a non-interactive mode, and handling rollbacks if a command fails. Always test your pipeline in a separate branch before applying it to production. With WP-CLI in your CI/CD flow, you can enforce updates, backups, and content migrations without manual intervention, making your development lifecycle more robust and efficient.
Troubleshooting Common WP CLI Issues
Even with a solid understanding of WP-CLI commands, you will inevitably encounter errors that halt your workflow. Memory limits, permission misconfigurations, and command path problems are among the most frequent culprits. This section provides targeted solutions for three common categories of WP-CLI failures, allowing you to diagnose and resolve issues quickly without losing momentum.
Resolving PHP Memory Limit Exhaustion Errors
WP-CLI runs PHP scripts, and large WordPress sites—especially those with many plugins, heavy themes, or extensive media libraries—can exceed the default PHP memory limit. When this happens, you will see an error like Allowed memory size of X bytes exhausted. To resolve this, you have several options:
Increase the limit via command line: Run your WP-CLI command with the --memory_limit flag, for example: wp --memory_limit=512M plugin update --all. This sets the limit only for that single command.
Define a global limit in wp-config.php: Add define('WP_MEMORY_LIMIT', '512M'); to your wp-config.php file. This affects both WP-CLI and WordPress itself.
Adjust server-level PHP settings: If you have access to php.ini or a .user.ini file, increase the memory_limit directive (e.g., memory_limit = 512M). For multisite environments, this is often the most reliable approach.
For persistent memory issues, consider profiling your site with a plugin like Query Monitor to identify plugins or themes that consume excessive resources, then address those bottlenecks directly.
Fixing File Permissions and Ownership Issues
WP-CLI commands that write to the filesystem—such as installing plugins, updating themes, or generating exports—require correct file permissions and ownership. Common errors include Could not create directory or Permission denied. The table below compares the recommended permission models for different hosting environments.
Environment
Recommended Ownership
Recommended Permissions (Directories)
Recommended Permissions (Files)
Shared hosting (cPanel)
User:group (your account)
755
644
VPS or dedicated (nginx)
www-data:www-data
755
644
VPS or dedicated (Apache)
www-data:www-data or user:www-data
755
644
Local development (MAMP/XAMPP)
Your system user:staff
755
644
To fix ownership, use chown on your WordPress root directory. For example: sudo chown -R www-data:www-data /var/www/html. For permissions, run find /var/www/html -type d -exec chmod 755 {} ; and find /var/www/html -type f -exec chmod 644 {} ;. Ensure that the user running WP-CLI (typically the web server user or your SSH user) has write access to wp-content and its subdirectories.
When you type a WP-CLI command and receive bash: wp: command not found, the wp binary is not in your system’s PATH. This is especially common after a fresh installation or when using different shells. Follow these steps to diagnose and correct the issue:
Verify installation: Run which wp or whereis wp to locate the binary. If nothing is returned, WP-CLI is not installed or is not accessible.
Check common installation paths: Look in /usr/local/bin/wp, /usr/bin/wp, or ~/bin/wp. If found, add the directory to your PATH. For example, in ~/.bashrc or ~/.zshrc, add export PATH=$PATH:/usr/local/bin.
Use the full path: If you cannot modify the PATH, run commands using the full path, such as /usr/local/bin/wp plugin list.
Reinstall if missing: If the binary is truly missing, download it again using curl -O https://raw.githubusercontent.com/wp-cli/builds/gh-pages/phar/wp-cli.phar, then make it executable with chmod +x wp-cli.phar and move it to a directory in your PATH: sudo mv wp-cli.phar /usr/local/bin/wp.
If you are using a tool like wp-cli via a package manager (e.g., Homebrew on macOS), ensure the package is up to date with brew upgrade wp-cli. For Docker environments, confirm that the wp binary is included in your container image and that the container’s shell is correctly configured.
Security Best Practices When Using WP CLI
WP CLI is a powerful tool that grants direct command-line access to your WordPress installation. Without proper safeguards, it can also become a vector for unauthorized access or data exposure. Implementing security best practices ensures that you harness WP CLI’s efficiency without compromising your site’s integrity. Below are three critical areas to address.
Running Commands with Minimal Privileges
Always execute WP CLI commands with the least privilege necessary for the task. Avoid running commands as the root user or as a system administrator unless absolutely required. Instead, create a dedicated system user with limited permissions that only covers the WordPress file and database directories. For example, on a typical Linux server, you can create a user named wpadmin and grant ownership only over /var/www/html (or your site’s root).
Additionally, restrict database user privileges in MySQL. The WordPress database user should have only SELECT, INSERT, UPDATE, DELETE, and CREATE TEMPORARY TABLES permissions for routine operations. Avoid granting ALTER or DROP privileges to the daily-use user; reserve those for schema changes performed during controlled maintenance windows.
Key practices for privilege management:
Use a non-root system account for all WP CLI operations.
Limit database user permissions to essential CRUD operations.
Never run WP CLI commands via web server user (e.g., www-data) for administrative tasks.
Employ sudo only for specific commands, not for entire sessions.
Example: To run a plugin update with a dedicated user, you might use:
WP CLI commands often handle sensitive information such as database credentials, API keys, and authentication tokens. Never hardcode these values directly into shell scripts or command lines, as they can appear in process listings, shell history, or log files. Instead, use environment variables or a .env file that is excluded from version control.
For scripts that must pass sensitive parameters, consider these approaches:
Store credentials in the wp-config.php file and reference them via constants (e.g., DB_PASSWORD). WP CLI automatically reads these.
Use the --user flag with a WordPress admin username rather than embedding passwords in commands; the command will prompt for the password interactively.
Redirect output of commands that might display sensitive data to /dev/null or a dedicated secure log location with restricted read permissions.
Disable shell history for the session when working with credentials: run set +o history before executing sensitive commands.
Additionally, audit your log files. Standard system logs (e.g., /var/log/auth.log or /var/log/syslog) may capture command arguments. Configure rsyslog or syslog-ng to filter out lines containing --password= or similar patterns. Alternatively, run WP CLI commands in a way that avoids logging the argument string altogether.
If your production environment does not require ongoing maintenance via command line, disable WP CLI entirely to reduce the attack surface. This can be done by removing the WP CLI binary or restricting its execution to specific IP addresses or user accounts.
Practical methods to disable or restrict WP CLI in production:
Method
Description
Example Implementation
Remove binary
Uninstall WP CLI from production servers entirely.
sudo rm /usr/local/bin/wp
File permission lock
Change ownership to root and remove execute permissions for non-root users.
Block outbound connections that WP CLI might use for updates, unless needed.
iptables -A OUTPUT -p tcp --dport 443 -j DROP (temporarily)
For environments where WP CLI is occasionally needed (e.g., monthly plugin updates), consider a temporary enablement process. For example, you can keep the binary installed but non-executable, then use a wrapper script that requires two-factor authentication before making it executable for a limited time. This balances security with operational flexibility.
By implementing these three practices—running with minimal privileges, protecting sensitive data, and disabling WP CLI when not required—you maintain the tool’s utility while significantly reducing risk. Always test security changes in a staging environment first, and review your WP CLI usage logs regularly to detect anomalies.
Conclusion and Next Steps
Mastering the command line interface for WordPress—commonly known as WP CLI—transforms how you manage sites, from routine updates to complex automation. Throughout this guide, you have learned how to install WP CLI, run core commands for users, posts, and plugins, and leverage advanced features like search-replace operations and database management. The ability to execute these tasks without a graphical interface saves time, reduces errors, and scales effortlessly across multisite networks or server fleets. As you conclude this learning path, the focus shifts to solidifying these skills through deliberate practice and exploring the ecosystem’s deeper capabilities.
Summary of WP CLI Benefits for WordPress Management
WP CLI offers distinct advantages that make it indispensable for developers, system administrators, and power users. Below is a recap of its core benefits:
Speed and Efficiency: Execute bulk operations—such as updating 50 plugins or resetting user passwords—in seconds, compared to minutes through the admin dashboard.
Scriptable Automation: Combine commands into shell scripts (e.g., Bash) to automate backups, staging deployments, or security audits without manual intervention.
Consistency Across Environments: Use the same commands locally, on staging, and in production, reducing configuration drift and human error.
Multisite and Network Management: Manage thousands of sites in a WordPress Multisite network with single commands, such as wp site list or wp user list --network.
Low Resource Overhead: Operates directly in the server’s command line, bypassing the need for a web browser or heavy PHP processing for routine tasks.
Granular Control: Access advanced options—like custom post type manipulation, transient management, or database table repair—that are often hidden in the admin UI.
These benefits compound when you integrate WP CLI into continuous integration (CI) pipelines or use it alongside tools like Composer for dependency management.
Recommended Resources: Official Documentation and Community
To deepen your proficiency, the following resources provide authoritative guidance and real-world examples:
Resource
Description
Link (example)
Official WP CLI Handbook
Comprehensive documentation covering all commands, arguments, and best practices.
wp-cli.org/docs/
WP CLI Commands Reference
Searchable list of every built-in command, including examples and parameter details.
wp-cli.org/commands/
Make WordPress CLI Blog
Official announcements, tutorials, and case studies from core contributors.
make.wordpress.org/cli/
WP CLI GitHub Repository
Source code, issue tracker, and contribution guidelines for advanced users.
github.com/wp-cli/wp-cli
Community Forums (WordPress Stack Exchange)
Q&A platform where users share solutions for specific WP CLI challenges.
wordpress.stackexchange.com
Additionally, consider subscribing to the WP CLI Newsletter (via the official site) for updates on new releases and security patches. For troubleshooting, the wp help command provides inline documentation for any command—run wp help plugin install for immediate guidance.
Next Steps: Experimenting with Automation and Custom Commands
Your journey does not end with basic commands; the true power of WP CLI lies in automation and extensibility. Begin by setting up a staging environment (a local or isolated server copy of your production site) where you can safely experiment. Here are actionable next steps:
Create a Backup Script: Write a Bash script that uses wp db export and wp plugin list --status=inactive to archive the database and identify unused plugins. Schedule it with cron or a task scheduler.
Automate Core Updates: Use wp core update combined with wp core update-db in a script that runs nightly, followed by a health check via wp eval-file.
Build a Custom WP CLI Command: Extend WP CLI by creating a custom command class in your theme or plugin. For example, a command to export all user meta data as CSV. Follow the official guide at wp-cli.org/docs/commands-cookbook/.
Integrate with CI/CD: In a GitHub Actions or GitLab CI workflow, use WP CLI to deploy database changes after a merge, or to run wp rewrite flush post-deployment.
Test Multisite Commands: If you manage a network, practice wp site create, wp site archive, and wp user list --site-id=2 to understand scoping.
Remember to always test new commands in a staging environment first—accidental wp db drop or wp user delete --all can be catastrophic. Use the --dry-run flag (available on many commands) to preview changes without applying them. As you become comfortable, explore the wp package command to install community packages that add functionality like SEO analysis or log viewing. The command line is your toolkit—the more you practice, the more efficient and confident you will become in managing WordPress at scale.
Frequently Asked Questions
What is WP CLI and why should I use it?
WP CLI is a command-line tool for managing WordPress installations without the admin dashboard. It allows you to perform tasks like installing plugins, updating themes, managing users, and running database queries faster and more efficiently. Developers and system administrators use WP CLI to automate repetitive tasks, integrate with scripts, and manage multiple sites from a single terminal. It reduces manual effort, improves consistency, and is essential for modern WordPress workflows.
How do I install WP CLI on my server?
WP CLI can be installed via several methods. The recommended way on Linux/macOS is to download the phar file: `curl -O https://raw.githubusercontent.com/wp-cli/builds/gh-pages/phar/wp-cli.phar`, then make it executable: `chmod +x wp-cli.phar`, and move it to your PATH: `sudo mv wp-cli.phar /usr/local/bin/wp`. Verify with `wp –info`. On Windows, you can use the Phar or install via Composer. Ensure PHP is installed and accessible.
What are the most useful WP CLI commands for daily management?
Essential commands include: `wp plugin list/install/update/delete` for plugin management, `wp theme list/install/update/activate` for themes, `wp core update` to update WordPress core, `wp db export/import` for database backups, `wp user create/list/delete` for user management, `wp post create/list/delete` for content management, and `wp cache flush` to clear cache. These commands save time and allow scripting of routine tasks.
Can I use WP CLI to manage multiple WordPress sites?
Yes, WP CLI supports managing multiple sites. You can use `–path=` to specify the WordPress root for each site. Alternatively, use WP-CLI's alias feature to define shortcuts for different installations. For large-scale management, consider using tools like WP-CLI's `wp site` commands for multisite networks or scripts that loop through multiple directories. This enables batch updates, backups, and monitoring across all your sites.
How can I automate WordPress updates with WP CLI?
Automating updates with WP CLI is straightforward. Create a shell script that runs `wp core update`, `wp plugin update –all`, and `wp theme update –all`. You can add `–minor` to only update minor versions. Schedule the script via cron (Linux) or Task Scheduler (Windows). Always backup the database and files before updates using `wp db export` and `wp –skip-plugins –skip-themes` for safety. Log output to monitor results.
What security precautions should I take when using WP CLI?
Always run WP CLI as a non-root user to minimize risk. Use SSH keys for remote access, never pass passwords in plain text. Restrict WP CLI commands to trusted IPs if exposed. Keep WP CLI and WordPress updated. Avoid using `–user=` with admin privileges unless necessary. For production, disable WP CLI via server configuration if not needed. Regularly audit command logs and use `wp eval` carefully to avoid code injection.
Common errors include 'command not found' (check PATH), 'PHP Fatal error' (update PHP version or memory limit), 'Error establishing a database connection' (verify wp-config.php credentials), and 'This does not seem to be a WordPress installation' (ensure correct path). Use `wp –debug` for verbose output. Check logs with `wp –info`. For permission issues, ensure the web server user owns the WordPress files. Consult the WP CLI documentation and community forums for specific errors.
Can WP CLI be integrated with continuous integration/continuous deployment (CI/CD) pipelines?
Absolutely. WP CLI is ideal for CI/CD workflows. You can use it to deploy code, run database updates, clear caches, and run tests after each commit. For example, in a GitHub Actions workflow, you can run `wp core update` and `wp db import` after a deployment. Tools like Jenkins, GitLab CI, and Travis CI can execute WP CLI commands via shell scripts. This ensures consistent, repeatable deployments and reduces human error.
How to Use WordPress Custom Fields: A Complete Guide for Beginners and Developers
Introduction to WordPress Custom Fields
WordPress custom fields are a powerful, built-in feature that allows you to store additional metadata for your posts, pages, or custom post types. Often overlooked by beginners, custom fields provide a flexible way to extend the default content editor by adding structured, extra information—such as a product price, a custom testimonial quote, or a background color for a specific post. This metadata is stored separately from the main content, giving you precise control over how and where it appears on your site. For developers, custom fields unlock endless possibilities for creating dynamic, data-driven websites without relying on bloated plugins. In this guide, you will learn exactly how to use WordPress custom fields to enhance your content management workflow, whether you are a beginner just starting out or a developer seeking advanced techniques.
Custom fields, also known as post metadata, are key-value pairs that you can attach to any post, page, or custom post type. The “key” is a unique label (e.g., “subtitle”), and the “value” is the data you want to store (e.g., “A Beginner’s Guide”). By default, WordPress displays custom fields as a meta box below the content editor on the post editing screen. You can add, edit, or delete these fields manually, or programmatically via functions like add_post_meta(), update_post_meta(), and get_post_meta(). Here are some common examples of what custom fields can store:
Custom ratings (e.g., 4.5 stars)
Event dates or locations
Author biographies for guest posts
External URLs or affiliate links
Color codes or layout preferences
Each custom field is tied to a specific post ID, making it easy to retrieve and display the data in your theme templates using PHP. For instance, to show a custom “subtitle” field in your single post template, you would use <?php echo get_post_meta( get_the_ID(), 'subtitle', true ); ?>.
Why Use Custom Fields for Your Site?
Custom fields offer several distinct advantages that streamline site management and enhance user experience. First, they keep your content organized by separating metadata from the main body text. For example, if you run a recipe blog, you can store ingredients, cooking time, and difficulty level in custom fields rather than cluttering the post content. Second, they enable dynamic content display. You can conditionally show or hide elements based on custom field values—for instance, displaying a “Sale” badge only when a custom field “on_sale” is set to “yes.” Third, custom fields improve searchability and filtering. You can create custom queries that sort or filter posts by metadata, such as showing all products with a “price” field less than $50. Finally, custom fields are lightweight and database-efficient, unlike heavy custom post types for simple data storage. Below is a comparison of when to use custom fields versus other approaches:
Use Case
Custom Fields
Custom Post Types
Storing a single extra value (e.g., author bio)
Ideal
Overkill
Creating a complex, hierarchical data structure (e.g., events with speakers and locations)
Limited
Better suited
Adding metadata to existing posts (e.g., priority level)
Perfect
Not applicable
Building a custom admin interface with multiple fields
Requires code or plugin
Can include meta boxes
How Custom Fields Differ from Custom Post Types
While both custom fields and custom post types extend WordPress, they serve fundamentally different purposes. Custom post types (CPTs) allow you to create entirely new content types—such as “Products,” “Portfolio Items,” or “Testimonials”—each with its own set of default fields (title, editor, excerpt, etc.) and often its own archive page. Custom fields, on the other hand, are used to add extra data to existing content types, including CPTs. For example, a “Product” CPT might use custom fields for price, SKU, and stock status, while the CPT itself provides the main structure. A key distinction is that CPTs require registration via code (or a plugin) and create a new database table for posts, whereas custom fields are simply additional rows in the wp_postmeta table. In practice, you would use a CPT when you need a distinct content type with its own workflow, and custom fields when you want to enrich existing content without creating a new type. For instance, adding a “featured video” custom field to standard blog posts is efficient and straightforward, while building a full “Video” CPT with its own taxonomy would be more appropriate if you needed a dedicated video archive and custom permalinks. Understanding this difference helps you choose the right tool for your project, ensuring your site remains fast, maintainable, and user-friendly.
Understanding the Custom Fields Interface
Before diving into advanced usage, it is essential to become comfortable with the default custom fields meta box in the WordPress post editor. This interface is where you will manage all metadata associated with your posts, pages, and custom post types. The system is built on a simple key-value pair structure, which allows for flexible and powerful data storage. This section provides a thorough tour of the interface, from enabling it to understanding how to manage multiple entries.
By default, the custom fields meta box is hidden in the WordPress block editor (Gutenberg). To enable it, follow these steps:
Open any post or page for editing.
Click the three-dot menu (Options) in the top-right corner of the editor.
Select Preferences.
In the Panels section, locate the Advanced panels group.
Toggle the switch for Custom fields to the on position.
Click the close button (X) on the Preferences modal.
Reload the editor if prompted. The custom fields meta box will now appear below the post content area.
In the Classic Editor, the custom fields meta box is enabled by default. If it is not visible, check the Screen Options tab at the top of the editor and ensure the checkbox for Custom Fields is selected.
The Key-Value Pair System Explained
Every custom field entry consists of two components:
Key: A unique identifier for the field. Keys are case-sensitive and should be descriptive, such as book_author or featured_quote. Once created, a key is saved to the database and can be reused across multiple posts.
Value: The data associated with the key. Values can be text, numbers, or even serialized arrays (though arrays are less common for beginners).
For example, if you want to store a book’s publication year, you would create a key named publication_year and assign a value like 2023. The interface displays this as a simple table with two columns: Name (the key) and Value. You can add a new custom field by selecting an existing key from the dropdown menu or typing a new key name, then entering the value in the adjacent text field, and clicking Add Custom Field.
A practical code example for retrieving this field in a theme template file is:
WordPress allows you to assign multiple custom field entries to a single post, even using the same key multiple times. This is particularly useful when you need to store a list of related data, such as multiple authors, tags, or gallery image URLs. To manage multiple entries:
Add a new entry: After adding your first custom field, the meta box will display it in the table. To add another, simply repeat the process—select a key (or create a new one) and enter a value.
Duplicate keys: If you add the same key with a different value, WordPress stores both entries. For example, a post could have two entries with the key co_author and values Jane Doe and John Smith. When retrieving these, use get_post_meta( $post_id, 'co_author', false ) to get an array of all values.
Edit or delete entries: Hover over any row in the custom fields table to reveal Edit and Delete links. Clicking Edit transforms the row into editable fields, while Delete removes the entry permanently.
Bulk management: For large numbers of entries, consider using a plugin like Advanced Custom Fields (ACF) to provide a more user-friendly interface with repeaters and groups.
By mastering the default custom fields interface, you gain a solid foundation for storing and retrieving arbitrary metadata, which is the cornerstone of dynamic content management in WordPress.
Adding Custom Fields Manually
WordPress custom fields allow you to store additional metadata for posts, pages, and custom post types. Adding them manually—without a plugin—gives you full control over the data and avoids unnecessary bloat. This method uses the built-in Custom Fields meta box in the WordPress editor, which is available for any post type that supports custom fields. Below, you’ll find step-by-step instructions for creating, saving, editing, and deleting custom fields directly in the editor.
Creating a New Custom Field
To create a new custom field manually, you first need to ensure the Custom Fields meta box is visible in your post editor. If it’s not showing, click the “Screen Options” dropdown at the top of the editor screen and check the box next to “Custom Fields.” Once enabled, follow these steps:
Open the post or page where you want to add the custom field.
Scroll down to the Custom Fields meta box. You’ll see two input fields: “Name” (the key) and “Value.”
In the “Name” field, enter a unique key for your custom field. Use lowercase letters, hyphens, or underscores (e.g., “book-author” or “featured_rating”). Avoid spaces or special characters.
In the “Value” field, enter the data you want to store. This can be text, a number, or a short string—like “John Doe” for a book author or “4.5” for a rating.
Click the “Add Custom Field” button. The field will appear in the list below with its key and value.
After adding, you can continue editing the post. The custom field is saved automatically when you update or publish the post. If you need to add multiple custom fields, repeat the process for each key-value pair. Note that each key must be unique within the same post; if you reuse a key, the previous value will be overwritten.
Once a custom field key exists, entering and saving values is straightforward. You can add a value to an existing key by selecting it from the “Name” dropdown menu (which shows previously used keys) and typing a new value. After entering the value, click “Add Custom Field” to save it. The field will appear in the list with the updated data. For a new key, always type it manually in the “Name” field—do not rely on autocomplete for first-time entries.
Values can be any string, including plain text, HTML, or serialized data, but for manual entry, plain text is recommended to avoid errors. After saving, the custom field becomes available in the post’s metadata. You can verify it by viewing the post’s raw data in the database (via phpMyAdmin) or by using a function like get_post_meta() in your theme. Remember, changes are only committed when you update the post—closing the editor without updating discards unsaved custom fields.
Editing or Deleting Existing Custom Fields
To modify an existing custom field, locate it in the list within the Custom Fields meta box. The list shows all custom fields attached to the current post, including their keys and values. To edit a value, click the “Edit” link next to the field. The value field becomes editable—make your changes and click “Update Custom Field.” The key itself cannot be edited directly; you must delete the field and create a new one with a different key if needed.
To delete a custom field, click the “Delete” link next to the field in the list. This permanently removes the key-value pair for that specific post. Deletion is immediate and cannot be undone via the editor, so double-check before confirming. If you delete a key that is used across multiple posts, only the current post’s instance is removed—other posts retain their values. For bulk management, consider using a plugin or database tools.
Action
Steps
Notes
Create
Enter key in “Name” field, value in “Value” field, click “Add Custom Field”
Key must be unique per post; use lowercase with hyphens
Edit Value
Click “Edit” next to the field, modify value, click “Update Custom Field”
Key cannot be changed; delete and recreate if needed
Delete
Click “Delete” next to the field
Removes field only for the current post; irreversible via editor
This manual method is ideal for beginners learning how to use WordPress custom fields, as it requires no additional setup. Developers often prefer it for one-off fields or testing, though for complex projects, they may use code-based approaches like add_post_meta() or plugins for efficiency. Always back up your database before making bulk changes.
Displaying Custom Fields on the Front End
Once you have added custom fields to your WordPress posts or pages, the next step is to display that data on the front end of your site. This requires editing your theme template files—such as single.php, page.php, or a custom template—using WordPress template tags and PHP functions. The most common and reliable method is through the get_post_meta() function, which retrieves custom field values stored in the database. Below, we break down the essential techniques for beginners and developers alike, with practical code examples to guide you.
Using the get_post_meta() Function
The get_post_meta() function is the backbone of retrieving custom field data in WordPress. It accepts three parameters: the post ID, the custom field key (name), and a boolean for whether to return a single value or an array. For most use cases, you will set the third parameter to true to get a single string value. Here is the basic syntax:
<?php
$post_id = get_the_ID(); // Gets the current post ID
$custom_value = get_post_meta( $post_id, 'your_custom_field_key', true );
echo $custom_value;
?>
Key points to remember:
Post ID: Use get_the_ID() inside the loop, or pass a specific ID if outside.
Field key: Must match the exact meta_key name used when creating the custom field.
Single vs. array: Set to true for a single value; false returns an array of all values for that key (useful for repeatable fields).
This function works in any template file, but it is most effective within the WordPress Loop, where get_the_ID() automatically fetches the current post’s ID.
Displaying a Single Custom Field Value
To output a single custom field value on the front end, you can combine get_post_meta() with standard HTML and PHP. For example, if you have a custom field called “subtitle” for a blog post, you would add this code to your single.php file where you want the subtitle to appear:
Notice the use of esc_html() to sanitize the output for security. For fields containing HTML (like rich text), use wp_kses_post() instead. Here is a quick reference for common output scenarios:
Field Type
Sanitization Function
Example
Plain text
esc_html()
echo esc_html( $value );
URL
esc_url()
echo esc_url( $value );
HTML content
wp_kses_post()
echo wp_kses_post( $value );
Always sanitize before output to prevent XSS vulnerabilities and maintain site security.
Conditional Display Based on Custom Field Data
You can also conditionally show or hide content based on the value of a custom field. This is particularly useful for displaying special messages, banners, or alternative layouts. For instance, if you have a custom field called “featured” that stores “yes” or “no”, you can wrap a block of HTML inside a conditional check:
Using multiple conditions: Combine with && or || for complex logic.
For developers, consider caching the get_post_meta() result if you call it multiple times for the same post to improve performance. You can also use the get_post_custom() function to retrieve all custom fields at once, then access individual keys from the returned array. This approach reduces database queries when displaying several fields on a single page.
While WordPress custom fields can be added manually through the default editor interface or coded directly into theme files, many site owners and developers prefer using plugins to streamline the process. Plugins offer user-friendly interfaces, reduce the risk of syntax errors, and provide advanced features like field groups, conditional logic, and repeatable fields. For beginners, plugins eliminate the need to write PHP code, while developers benefit from reusable configurations and faster workflow. The most popular plugins—Advanced Custom Fields and Custom Field Suite—each take a slightly different approach, making it important to understand their strengths before choosing one.
Advanced Custom Fields (ACF) Overview
Advanced Custom Fields, often abbreviated as ACF, is the most widely used custom fields plugin, powering millions of WordPress sites. It allows you to create custom field groups visually and assign them to specific post types, taxonomies, users, or even options pages. ACF supports over 30 field types, including text, image, file, WYSIWYG editor, Google Map, repeater, and flexible content fields. Key features include:
Drag-and-drop field group builder with live preview
Conditional logic to show or hide fields based on user selections
Ability to create repeatable and flexible content layouts
Integration with popular page builders like Elementor and Gutenberg
Pro version adds options pages, repeater fields, and clone fields
ACF stores field values as post metadata, making them compatible with any theme or plugin that reads custom fields. For developers, ACF provides a comprehensive API for retrieving field values, such as get_field() and the_field(), and supports localization for multilingual sites. The plugin’s community is large, with extensive documentation, tutorials, and pre-built field groups available. Beginners appreciate the visual interface, while developers leverage ACF’s hooks and filters to extend functionality.
Custom Field Suite Basics
Custom Field Suite is a lighter alternative to ACF, designed for users who need a straightforward, code-friendly solution without the overhead of a premium version. It offers a clean, minimal interface for creating field groups and supports essential field types like text, textarea, select, checkbox, radio, and file upload. Unlike ACF, Custom Field Suite does not include conditional logic or repeaters out of the box, but it compensates with a simple, transparent codebase. Key characteristics include:
No premium version—all features are free and open source
Fields are defined in the admin panel with a drag-and-drop order
Values are stored as post metadata with unique field names
Output is handled via cfs_get_value() and cfs_field() functions
Lightweight and fast, with minimal database overhead
Custom Field Suite is ideal for developers who prefer to write their own front-end logic and want a plugin that stays out of the way. It lacks the visual polish of ACF but provides reliable, predictable behavior. Beginners may find the interface less intuitive, particularly when managing multiple field groups, but the simplicity reduces the learning curve for basic use cases.
When to Choose a Plugin Over Manual Coding
Deciding between a plugin and manual coding depends on your project’s complexity, team composition, and long-term maintenance needs. Use the following table to compare approaches:
Choose a plugin when you need to empower editors to manage custom content without developer intervention, when your project involves many field types or repeatable data, or when you want to avoid writing and debugging custom PHP code. Manual coding is preferable when you need absolute performance control, are building a highly custom solution that exceeds plugin capabilities, or want to avoid plugin dependency in a critical site. For most beginners and intermediate developers, a plugin like ACF provides the best balance of power and usability, while Custom Field Suite suits those who want a lightweight, open-source option. Ultimately, the right choice aligns with your team’s skills and the site’s content management requirements.
When building a WordPress site, you often need to add multiple custom fields that work together—for example, a product price, stock status, and SKU. Creating these fields individually for each post is inefficient and error-prone. Custom field groups allow you to bundle related fields into a reusable set, ensuring consistency across posts, pages, or custom post types. This section explains how to define, assign, and enhance field groups using the Advanced Custom Fields (ACF) plugin, the most popular tool for this task.
Defining Field Groups with ACF
To create a reusable field group, install and activate the Advanced Custom Fields plugin. Once active, go to Custom Fields > Add New. Here you define a group name, such as “Product Details,” and then add individual fields. Each field requires a label, a name (used in code), and a field type—like text, number, WYSIWYG editor, or image. For example:
Field Label: Product Price
Field Name: product_price
Field Type: Number
You can add as many fields as needed. ACF also lets you set default values, placeholder text, and field instructions. After adding fields, save the group. ACF will not display it anywhere yet—you must assign it to a location.
If you prefer coding, ACF supports PHP registration. Here is a practical code example that registers a field group programmatically:
This code creates a group named “Product Details” with two fields and assigns it to the “product” post type. Place it in your theme’s functions.php file or a custom plugin.
Assigning Field Groups to Specific Post Types
After defining a field group, you must tell WordPress where to show it. In ACF, this is done via the Location Rules section. For each group, you can add one or more rules. Common location parameters include:
To assign a group to a specific post type, add a rule: choose “Post Type” from the dropdown, set the operator to “is equal to,” and select your post type (e.g., “page” or “product”). You can combine multiple rules—for example, show the group only on “pages” that belong to a specific “template.” This keeps your admin area clean and relevant.
Using Conditional Logic for Dynamic Fields
Conditional logic makes field groups flexible by showing or hiding fields based on user choices. For example, in a “Product Details” group, you might have a “Product Type” dropdown with options “Simple” and “Variable.” When the user selects “Variable,” you can reveal additional fields like “Variation Price” and “Variation SKU.”
To set conditional logic in ACF, edit a field and scroll to the Conditional Logic section. Enable it, then define the condition:
Field: Choose the field that controls the logic (e.g., “Product Type”).
Operator: Select “is equal to” or “is not equal to.”
Value: Enter the triggering value (e.g., “Variable”).
You can add multiple conditions—all must be true for the field to appear. This prevents clutter and guides editors through data entry. For developers, conditional logic is also supported in PHP by adding a 'conditional_logic' key to the field array:
By combining field groups, location rules, and conditional logic, you can build a custom content management system tailored to your site’s needs—without writing complex code for every scenario.
Advanced: Querying Posts by Custom Fields
Once you have mastered adding and displaying custom fields, the next level of control involves using custom field values to filter, sort, and retrieve posts programmatically. WordPress provides a powerful class called WP_Query that allows you to build complex database queries using custom field metadata. This technique is essential for creating dynamic archives, related content sections, or custom listings based on user-defined data.
At its core, querying by custom fields relies on the meta_query argument within a WP_Query object. This argument accepts an array of parameters that define which posts to fetch based on their associated custom field keys and values. Below we cover the fundamental approaches, from simple key-value matching to advanced sorting.
Building a Custom Query with meta_key and meta_value
The simplest way to query posts by custom fields is by using the meta_key and meta_value parameters directly. This method works well when you need to retrieve all posts that have a specific custom field set to a particular value. Here is a basic example:
In this example, WordPress retrieves the 10 most recent posts where the custom field featured has a value of yes. This approach is straightforward but limited—it performs an exact match and does not support complex conditions like numeric comparisons or multiple field checks.
For more flexibility, you should use the meta_query argument, which allows you to define multiple conditions with different operators. The same query using meta_query looks like this:
The compare argument in meta_query enables you to define the relationship between the stored custom field value and the value you provide. Below is a table of the most useful operators:
Operator
Description
Example Use Case
=
Exact match (default)
Find posts with a specific status
!=
Not equal to
Exclude posts with a certain value
>
Greater than (numeric)
Posts with a price above $50
<
Less than (numeric)
Posts with a rating below 3
LIKE
Partial string match
Search for keywords in a custom field
IN
Value in a list
Posts with categories in an array
BETWEEN
Value between two numbers
Posts with dates within a range
When using numeric operators, always set the type parameter to NUMERIC to ensure correct comparisons. For example:
This retrieves all products with a price between 10 and 50. You can also combine multiple conditions using the relation parameter set to AND or OR for advanced filtering.
Sorting Posts by Custom Field Values
Beyond filtering, you can sort query results by custom field values using the orderby parameter. To sort by a numeric or date custom field, specify meta_value_num or meta_value as the orderby value. Here is an example that sorts products by price in ascending order:
For string values, use meta_value instead of meta_value_num. If you need to sort by a date custom field, store it in a format like Ymd and use meta_value_num for accurate ordering. You can also combine sorting with filtering by including both meta_query and orderby in the same arguments array.
To sort by multiple custom fields, use an array of orderby parameters:
This technique gives you granular control over how posts are ordered, making it ideal for listing products, events, or any content with custom metadata. By mastering these querying methods, you unlock the full potential of WordPress custom fields for dynamic and data-driven websites.
Best Practices for Custom Field Keys and Values
When implementing custom fields in WordPress, following established best practices for key naming and value handling ensures your site remains maintainable, secure, and compatible with future updates. Poorly chosen keys or unsanitized data can lead to conflicts with plugins, themes, or WordPress core, as well as security vulnerabilities. This section outlines essential guidelines for developers and beginners alike.
Custom field keys are stored in the wp_postmeta table and should be both descriptive and unique to avoid collisions. Follow these conventions:
Prefix your keys with a unique identifier: Use your plugin or theme slug (e.g., myplugin_product_price or mytheme_featured_image). This reduces the risk of another plugin using the same key.
Use lowercase and underscores: Stick to lowercase letters, digits, and underscores. Avoid spaces, hyphens, or special characters that may cause parsing errors. Example: event_date instead of Event-Date.
Be specific but concise: A key like book_author is clearer than author, which could conflict with the post author meta. Aim for 20-40 characters maximum.
Group related keys logically: For a plugin managing events, use keys like event_start_date, event_end_date, event_location rather than generic date1, date2.
Avoid generic names such as price, color, or custom, as they are highly likely to overlap with other plugins or themes.
Sanitizing and Validating User Input
User-submitted data for custom fields must be sanitized and validated to prevent security exploits like SQL injection, cross-site scripting (XSS), or corrupted data. WordPress provides several functions for this purpose:
Removes HTML tags and strips unwanted characters from plain text.
Storing a book title or author name.
intval()
Converts a value to an integer, discarding non-numeric parts.
Storing a product ID or page count.
esc_url_raw()
Sanitizes a URL for database storage, removing unsafe protocols.
Storing a user-submitted website link.
wp_kses_post()
Allows only safe HTML tags and attributes (as per post content).
Storing rich text with limited formatting.
Validation checks whether the data meets expected criteria (e.g., a date is valid, a number is within range). Use WordPress functions like is_email() for email addresses or preg_match() for custom patterns. Always validate before sanitizing, and never trust raw $_POST or $_GET data. For example, when saving a custom field:
WordPress reserves certain meta keys for core functionality. Using them for custom purposes can break features like post editing, caching, or SEO. Common reserved keys include:
Plugin-specific: Keys starting with _ (underscore) are often hidden from the Custom Fields meta box and used by plugins internally, such as _wp_old_slug, _encloseme, or _pingme.
To avoid conflicts, never use keys that begin with _wp or those listed in the WordPress Codex as reserved. Additionally, prefix your custom keys with a unique string (e.g., myplugin_) as mentioned earlier. If you need hidden fields (not shown in the default meta box), prefix with an underscore (e.g., _myplugin_internal_id), but ensure the base name does not match a reserved key. Regularly review the wp_postmeta table via a plugin like phpMyAdmin to check for accidental overlaps.
Even with a solid understanding of how to use WordPress custom fields, you will likely encounter problems where fields fail to save, refuse to display, or degrade your site’s performance. Below are the most frequent issues and practical solutions to resolve them, whether you are a beginner or a developer.
Custom Fields Not Appearing in the Editor
If the Custom Fields meta box is missing from your post or page editor, the issue is usually a screen option or a block editor setting. Follow these steps:
Enable the meta box: In the classic editor, click “Screen Options” at the top of the page and check the “Custom Fields” box. In the block editor (Gutenberg), click the three-dot menu (Options) in the top-right corner, select “Preferences,” then under “Panels,” enable “Custom Fields.”
Check user permissions: Ensure your user role has the capability to edit custom fields. Administrators have full access by default, but editors or authors may need a plugin like “User Role Editor” to grant the edit_post_meta capability.
Theme or plugin conflict: Temporarily switch to a default theme (e.g., Twenty Twenty-Four) and deactivate all plugins except the one managing custom fields. If the meta box reappears, reactivate plugins one by one to identify the conflict.
Custom post type support: If you are using a custom post type, verify it supports custom fields. Add 'custom-fields' to the supports array when registering the post type, like this: register_post_type( 'my_cpt', array( 'supports' => array( 'title', 'editor', 'custom-fields' ) ) );
Values Not Showing on the Front End
When custom field data saves correctly in the admin but does not appear on the live site, the problem is usually in your theme template or data retrieval method. Troubleshoot using these steps:
Verify the field key and value: In the post editor, open the Custom Fields meta box and note the exact field name (e.g., subtitle). On the front end, use get_post_meta() with the correct post ID and field name. Example: $subtitle = get_post_meta( get_the_ID(), 'subtitle', true ); if ( $subtitle ) { echo '
' . esc_html( $subtitle ) . '
'; }
Check for caching: If you use a caching plugin (e.g., W3 Total Cache, WP Super Cache) or server-level caching, clear all caches. Custom field values are dynamic and may not update if a static HTML version is served.
Confirm the correct loop location: Ensure your code is inside the WordPress loop (e.g., while ( have_posts() ) : the_post();). Outside the loop, get_the_ID() may return incorrect values. Use global $post; and $post->ID as an alternative.
Serialized data issues: If you store arrays or complex data, use get_post_meta() with the third parameter set to false (or omit it) to retrieve an array, then loop through it. For example: $prices = get_post_meta( get_the_ID(), 'product_prices', false ); foreach ( $prices as $price ) { echo esc_html( $price ); }
Performance Considerations with Large Numbers of Fields
Using hundreds or thousands of custom fields per post can slow down database queries and page load times. Implement these best practices to maintain speed:
Limit field count: Avoid storing repetitive or unnecessary data. Use a single serialized array for related data instead of many individual fields. For example, store all social media links in one field as an array rather than separate fields for Twitter, Facebook, etc.
Optimize queries: When retrieving multiple custom fields, use get_post_meta() inside the loop only once per field. For bulk retrieval, consider using get_post_custom() to fetch all meta at once: $all_meta = get_post_custom( get_the_ID() ); Then access individual fields as $all_meta['field_name'][0].
Use transients or object caching: If you query custom fields on many posts (e.g., in a custom archive), store the results in a transient for a few minutes. Example: $featured = get_transient( 'featured_posts' ); if ( false === $featured ) { $featured = get_posts( array( 'meta_key' => 'featured', 'meta_value' => '1' ) ); set_transient( 'featured_posts', $featured, HOUR_IN_SECONDS ); }
Index meta queries: For large sites, add a database index to the wp_postmeta table on the meta_key column. Use a plugin like “WP Index Booster” or run this SQL command (back up first): ALTER TABLE wp_postmeta ADD INDEX meta_key_index (meta_key);
Consider a custom table: If you need many fields per post (e.g., 50+), store data in a custom database table instead of wp_postmeta. This avoids performance bottlenecks from the meta table’s structure.
By systematically addressing these common issues, you can ensure that your custom fields work reliably and efficiently, whether you are adding a simple subtitle or managing complex data across thousands of posts. Always test changes on a staging site first, and monitor your site’s performance with tools like Query Monitor to catch slow queries early.
Conclusion and Next Steps
Mastering how to use WordPress custom fields unlocks a new level of flexibility and efficiency in content management. Whether you are a beginner adding a simple subtitle or a developer building complex data structures, custom fields allow you to extend the core WordPress experience without bloated plugins. By now, you understand that custom fields are essentially key-value pairs attached to posts, pages, and custom post types, giving you granular control over metadata.
Recap of Custom Field Workflows
To solidify your understanding, here is a recap of the three primary workflows for using custom fields:
Manual Entry (Beginner): Using the native “Custom Fields” meta box in the post editor. Best for one-off data or simple testing. Workflow: Add New → Enter Key (e.g., subtitle) → Enter Value (e.g., “A Deeper Look”) → Update Post → Display with <?php echo get_post_meta(get_the_ID(), 'subtitle', true); ?> in your theme.
Meta Box Plugins (Intermediate): Tools like Advanced Custom Fields (ACF) or Meta Box provide user-friendly interfaces with repeaters, galleries, and conditional logic. Workflow: Install plugin → Create field group (e.g., “Product Details”) → Assign to post type → Add fields (e.g., Price, Color) → Use plugin-specific template tags like the_field('price').
Custom Code (Developer): Registering meta boxes and saving fields via add_meta_box() and save_post hooks in your theme’s functions.php or a custom plugin. Workflow: Hook into add_meta_boxes → Define callback for HTML form → Sanitize input in save_post → Retrieve with get_post_meta().
A key takeaway is that all workflows ultimately store data in the wp_postmeta table, making retrieval consistent regardless of the creation method. Always sanitize and validate data when saving, and escape output when displaying, to maintain security.
Exploring Custom Fields with the WordPress REST API
For developers building headless WordPress sites or integrating with JavaScript frameworks, the REST API provides read and write access to custom fields. By default, the API exposes post meta, but you must register it explicitly to make fields available. Use register_meta() in your theme or plugin:
register_meta('post', 'subtitle', array(
'type' => 'string',
'description' => 'A subtitle for the post',
'single' => true,
'show_in_rest' => true
));
Once registered, you can fetch custom fields via /wp-json/wp/v2/posts/{id} under the meta object. To update a field, send a POST or PUT request to the same endpoint with meta data. This enables dynamic front-end features such as:
Displaying custom field values in a React or Vue.js component without a page refresh.
Building interactive filtering or sorting based on custom field data (e.g., price range).
Syncing content between WordPress and external applications.
When using the REST API, remember to set appropriate permissions via auth_callback in register_meta() to prevent unauthorized access.
Further Resources and Community Tools
To deepen your expertise, explore these resources and tools:
Resource
Description
Best For
Advanced Custom Fields (ACF)
Most popular plugin for visual field management, with repeater, flexible content, and options pages.
Intermediate to advanced users
Meta Box
Lightweight alternative with similar features, plus built-in integration with the REST API.
Developers wanting performance
WordPress Developer Documentation
Official docs on get_post_meta(), update_post_meta(), and register_meta().
All skill levels
REST API Handbook
Detailed guide on customizing the API, including meta registration and authentication.
Headless developers
Page Builder Integrations
Many builders (Elementor, Beaver Builder, Bricks) offer dynamic tags to pull custom field values directly into layouts.
Designers and site builders
Your next step should be to implement a real-world use case, such as adding a “Featured Quote” field to your posts and displaying it in a sidebar widget. From there, experiment with the REST API by building a small JavaScript application that reads custom data. The community is active—join forums like the Advanced Custom Fields Facebook group or the WordPress Stack Exchange to troubleshoot and share ideas. With practice, custom fields will become an indispensable tool in your WordPress arsenal.
WordPress Custom Fields, also known as post meta, are a feature that allows you to add additional information (metadata) to posts, pages, or custom post types. They store data as key-value pairs, where the key is the field name and the value is the data. Custom fields are stored in the wp_postmeta table and can be used to extend the functionality of your site without modifying core files. For example, you can add a 'subtitle' field to your posts or store custom ratings. They are accessible via the WordPress admin interface and can be programmatically retrieved using functions like get_post_meta().
How do I add a Custom Field in WordPress?
To add a Custom Field manually, go to the post editor, click on the 'Screen Options' tab at the top, and ensure 'Custom Fields' is checked. Then scroll down to the Custom Fields meta box, click 'Enter new', type a name (key) and value, and click 'Add Custom Field'. Alternatively, you can use a plugin like Advanced Custom Fields (ACF) for a user-friendly interface. For developers, you can programmatically add custom fields using the add_post_meta() function, which requires the post ID, meta key, and meta value.
How do I display Custom Fields on the frontend?
To display Custom Fields on the frontend, you can use the get_post_meta() function in your theme template files. For example, to display a custom field with the key 'subtitle', use: . Place this inside the WordPress Loop. You can also use the the_meta() function to display all custom fields for the current post. For more control, use WP_Query to filter posts by custom field values using 'meta_key' and 'meta_value' parameters.
What is the difference between Custom Fields and Advanced Custom Fields (ACF)?
WordPress Custom Fields are a built-in feature that provides basic key-value pair storage. They have a simple interface but lack advanced field types, validation, and repeaters. Advanced Custom Fields (ACF) is a popular plugin that extends this functionality, offering over 30 field types (like images, WYSIWYG editors, and Google Maps), conditional logic, and a user-friendly UI. ACF also allows you to create field groups and assign them to specific post types, taxonomies, or user roles. For complex sites, ACF saves development time, but for simple needs, native custom fields suffice.
Yes, Custom Fields work seamlessly with custom post types. When you register a custom post type using register_post_type(), it automatically supports custom fields by default. You can add custom fields to any custom post type using the same methods as for posts and pages. For better management, you can use plugins like ACF to create field groups specifically for your custom post type. Programmatically, you can use add_post_meta() and get_post_meta() with the custom post type's post ID.
How do I query posts by Custom Field values?
To query posts by Custom Field values, use WP_Query with the 'meta_query' parameter. For example, to get posts where a custom field 'rating' is greater than 3: $args = array( 'post_type' => 'post', 'meta_query' => array( array( 'key' => 'rating', 'value' => 3, 'compare' => '>', 'type' => 'NUMERIC' ) ) ); $query = new WP_Query( $args );. You can also use 'meta_key' and 'meta_value' for simple equality checks. This is powerful for creating dynamic content like featured posts or filtering.
What are some best practices for using WordPress Custom Fields?
Best practices include: 1) Use unique and descriptive meta keys to avoid conflicts (prefix with your plugin/theme name, e.g., 'mytheme_subtitle'). 2) Sanitize and validate data when saving to prevent security issues. 3) Use get_post_meta() with the third parameter set to true for single values. 4) For repeated data, consider using serialized arrays or a plugin like ACF. 5) Avoid storing large amounts of data in custom fields; use custom tables if needed. 6) Use caching mechanisms to reduce database queries. 7) Always test custom field code in a staging environment.
How to Use WordPress for Digital Publishing: A Comprehensive Guide
Introduction to WordPress for Digital Publishing
WordPress is the most widely adopted content management system (CMS) in the world, powering over 40% of all websites. For digital publishing—whether you run a personal blog, a niche magazine, or a high-traffic news site—WordPress offers a unique combination of flexibility, scalability, and cost-effectiveness. Its open-source nature means you own your content entirely, while its vast ecosystem of themes and plugins allows you to tailor the platform to virtually any publishing workflow. This guide will walk you through how to use WordPress for digital publishing, starting with the core reasons it remains the top choice for publishers, the critical hosting decision you need to make, and the foundational terminology that governs your content structure.
What Makes WordPress Ideal for Publishers
WordPress stands out for digital publishers because it solves the core challenges of producing and distributing content at scale. Here are the key advantages:
Open-source ownership: You have full control over your data, code, and future direction. There are no licensing fees, and you can modify the software to meet your exact needs.
Scalable architecture: WordPress can handle a single blog post or millions of monthly visitors. With proper caching, CDN integration, and managed hosting, it performs reliably under heavy traffic spikes common in publishing.
Built-in editorial workflow: Features like post revisions, scheduled publishing, draft management, and user roles (Administrator, Editor, Author, Contributor) mirror traditional newsroom structures.
Extensive plugin ecosystem: Plugins add functionalities like SEO optimization (e.g., Yoast SEO), ad management (e.g., Ad Inserter), subscription and membership systems (e.g., MemberPress), and newsletter integration (e.g., Mailchimp).
Theme flexibility: Thousands of themes are available, many specifically designed for magazines, newspapers, and blogs. You can customize layouts, typography, and color schemes without touching code.
SEO-friendly structure: WordPress produces clean, semantic HTML and offers built-in permalink structures, XML sitemaps, and metadata controls that help your content rank higher in search engines.
Multimedia support: It handles images, video, audio, and embedded content natively, essential for rich digital publications.
Self-Hosted vs. WordPress.com for Publishing
When deciding how to use WordPress for digital publishing, the first major choice is between the self-hosted version (WordPress.org) and the hosted service (WordPress.com). Each serves different publishing needs.
Feature
Self-Hosted (WordPress.org)
WordPress.com (Hosted)
Cost
Free software; you pay for hosting, domain, and optional premium themes/plugins.
Free tier available; paid plans for custom domains, storage, and monetization.
Control
Full access to all files, database, and server configurations. You can install any plugin or theme.
Limited to approved themes and plugins. No direct server access or custom code.
Monetization
Unrestricted. Use any ad network, affiliate links, or subscription service.
Restricted on free and low-tier plans. Higher-tier plans allow limited ad placement.
Scalability
You manage server resources, caching, and CDN. Highly scalable with technical expertise.
Scalability handled by Automattic, but performance tiers are tied to plan pricing.
Maintenance
You handle updates, backups, security, and performance optimization.
Automatic updates, backups, and security are included.
Best for
Serious publishers, news sites, and magazines requiring full customization and monetization control.
Hobby bloggers, small publications, or those who prefer a hands-off approach.
For professional digital publishing, the self-hosted route is almost always recommended. It gives you the freedom to install powerful publishing tools like editorial calendars, advanced caching, and membership plugins that are unavailable on WordPress.com.
Key Terminology: Posts, Pages, Categories, and Tags
To effectively use WordPress for digital publishing, you must understand its fundamental content architecture. These four elements form the backbone of your site’s structure.
Posts: These are dynamic, time-sensitive content entries that appear in reverse chronological order on your blog or news feed. Posts are the primary vehicle for articles, news updates, and blog entries. They support categories, tags, comments, and author attribution.
Pages: Static, timeless content that lives outside the blog feed. Use pages for “About Us,” “Contact,” “Privacy Policy,” or “Advertise” sections. Pages are hierarchical (you can create sub-pages) and do not have categories or tags by default.
Categories: A hierarchical taxonomy for organizing posts into broad topics. For example, a magazine might have categories like “Politics,” “Technology,” and “Culture.” Categories can have parent-child relationships (e.g., “Technology” > “Artificial Intelligence”).
Tags: A non-hierarchical taxonomy for describing specific details within a post. Tags are like keywords (e.g., “machine learning,” “election 2024,” “book review”). They help readers find related content but do not enforce a structure.
Using categories and tags correctly improves navigation, SEO, and reader experience. A good rule of thumb: limit categories to 5–10 broad topics, and use tags liberally for granular descriptors. This structure makes your publication easier to browse and index.
Building a professional digital publication begins with a solid technical foundation. This section walks you through the critical steps to launch a WordPress site capable of handling high traffic, reliable performance, and clean content delivery. Whether you are a solo blogger or a small editorial team, these decisions will shape your publication’s scalability and user experience.
Selecting a Reliable Hosting Provider for High Traffic
Your hosting choice directly impacts site speed, uptime, and the ability to handle traffic spikes—common in digital publishing when articles go viral. Avoid shared hosting plans that oversell resources. Instead, evaluate providers on these criteria:
Managed WordPress hosting: Offers automatic updates, caching, and expert support. Ideal for publishers who want to minimize technical overhead.
Scalability: Look for providers who allow easy upgrades to VPS or dedicated servers without migration headaches.
Content delivery network (CDN) integration: A built-in CDN (like Cloudflare) reduces latency for global readers.
Uptime guarantees: Aim for 99.9% or higher, with proactive monitoring.
Traffic thresholds: Choose a plan with clear bandwidth and visitor limits that match your growth projections.
Recommended providers for high-traffic publishing include WP Engine, Kinsta, or SiteGround’s GrowBig plan. Always read the fine print on visitor caps and overage charges.
Installing WordPress via cPanel or One-Click Installers
Most hosting providers offer two installation methods. The one-click installer is faster for beginners, while cPanel gives you more control. Below is a step-by-step approach for each.
Method 1: One-Click Installer (e.g., Softaculous or Mojo Marketplace)
Log into your hosting control panel (often cPanel or a custom dashboard).
Locate the “WordPress” icon under the “Website” or “Softaculous Apps Installer” section.
Click “Install” and fill in your site name, admin username, email, and password.
Choose your domain from the dropdown menu (leave directory blank for root installation).
Select “Install” and wait 1–3 minutes for completion. You will receive an admin URL (e.g., yourdomain.com/wp-admin).
Method 2: Manual Installation via cPanel
If you prefer full control or need custom configurations, follow these steps:
Download the latest WordPress package from wordpress.org.
In cPanel, open “File Manager” and navigate to public_html (or your desired subdirectory).
Upload the WordPress .zip file and extract it.
Create a MySQL database and user via cPanel’s “MySQL Databases” wizard. Assign all privileges to the user.
Rename wp-config-sample.php to wp-config.php, then edit it with your database name, username, and password.
Run the installation by visiting your domain in a browser. Follow the on-screen prompts.
For a practical command-line example (if you have SSH access), you can use WP-CLI for a faster, scripted installation:
Clean URLs improve SEO and readability. Avoid default “?p=123” parameters.
Timezone
Your local time (e.g., UTC-5 for Eastern Time)
Ensures scheduled posts publish at the correct hour and timestamps match your audience’s expectations.
Reading
Set “Your homepage displays” to “Your latest posts” (for a blog-style publication) or a static page for a magazine layout.
Controls whether visitors see a feed of articles or a custom front page. Also set “Blog pages show at most” to 10–15 posts for fast loading.
How to adjust each setting:
Permalinks: Go to Settings > Permalinks, select “Post name,” and save. If you use a category base, append /%category%/%postname%/ for structure.
Timezone: Navigate to Settings > General, find the “Timezone” dropdown, and choose your city or UTC offset. This also affects the date and time displayed on articles.
Reading: Under Settings > Reading, choose “Your latest posts” for a chronological feed. For a static homepage, create two pages (e.g., “Home” and “Blog”), then assign them accordingly. Also check “Search engine visibility” remains unchecked unless you are building a private site.
Once these settings are saved, your platform is ready for theme selection, plugin installation, and content creation. A properly configured WordPress foundation reduces future troubleshooting and streamlines editorial workflows.
Choosing and Customizing a Publishing Theme
Selecting the right theme is the foundation of successful digital publishing with WordPress. A theme optimized for readability, speed, and ad integration ensures that your content is accessible, loads quickly, and monetizes effectively. This section guides you through choosing a theme and tailoring it to your brand and layout needs.
Top Free and Premium Themes for Digital Publications
When evaluating themes, prioritize those that prioritize typography, minimal clutter, and responsive design. Free themes from the WordPress repository offer a cost-effective starting point, while premium themes often include advanced customization options and dedicated support. Below is a comparison of popular themes suited for digital publishing.
For readability, look for themes with a maximum content width of 700–800 pixels, ample line height (1.6–1.8), and legible font sizes (16–18px for body text). For speed, choose themes that score well on Google PageSpeed Insights and avoid heavy sliders or unnecessary animations. For ad integration, ensure the theme includes multiple widget areas, such as above the fold, within content, and in the sidebar.
Your header, navigation, and footer are critical for branding and user experience. Start with the header: upload your logo (preferably a transparent PNG at 200–300px wide for clean display). Use the WordPress Customizer to set a sticky header that remains visible as users scroll—this improves navigation on long articles. For navigation, keep menus simple: include links to your homepage, top categories (e.g., News, Features, Opinion), and an “About” page. Avoid dropdown menus that go beyond two levels, as they confuse mobile users. Instead, use a “hamburger” menu on mobile devices. For the footer, include copyright information, privacy policy link, and social media icons. Many themes support footer widgets—use them to add a newsletter signup form or recent posts list. Always test your header and navigation on a mobile viewport to ensure they remain functional and uncluttered.
Using the Customizer and Theme Options for Layout Control
The WordPress Customizer (Appearance > Customize) provides real-time control over your theme’s layout. Start with the “Layout” or “Content” section, which typically lets you set the default layout for posts and pages—choose “full width” for articles to maximize readability, or “sidebar right” for category archives to display ads or related content. Customize the homepage to show a grid or list of your latest posts, and use the “Featured Content” option to highlight a specific article. Many themes offer additional options panels (e.g., Theme Options or Customizer sections like “Typography” and “Colors”). For example, in GeneratePress, you can adjust the container width (set to 1200px for desktop), content padding, and sidebar width. In Kadence, use the “Header Builder” to rearrange elements like logo placement and button positions. Always save a draft of your changes before publishing, and use the “Preview” button to test on desktop and mobile. For advanced control, install a block-based theme like Twenty Twenty-Four, which lets you edit every part of your site using the Site Editor—ideal for granular layout adjustments without coding.
Mastering how to use WordPress for digital publishing requires more than a theme and content. The right plugins transform a basic site into a high-performance publishing platform. This guide curates essential tools for speed, search visibility, security, and revenue, with practical installation and configuration advice. Always install plugins from the official WordPress repository or trusted developers, and deactivate any that conflict or degrade performance.
Performance Optimization: Caching, CDN, and Image Compression
Speed directly impacts reader retention and SEO. A slow site loses visitors and rank. Start with a caching plugin to serve static HTML versions of your pages. W3 Total Cache or WP Super Cache are reliable free options. After installation, enable page caching, browser cache, and minify CSS/JavaScript. For a simpler setup, use WP Rocket (premium) with one-click activation.
Pair caching with a Content Delivery Network (CDN). A CDN distributes your static files across global servers. Cloudflare offers a free tier that includes basic CDN and security. To configure Cloudflare with W3 Total Cache, add this to your theme’s wp-config.php file:
Replace the placeholder with your actual API key from Cloudflare’s dashboard.
Image compression is non-negotiable. Use Smush or ShortPixel to automatically compress images on upload. Configure Smush to enable lazy loading and resize large images to 1920px width. For best results, compress images before uploading using tools like TinyPNG, then let the plugin handle further optimization.
SEO Plugins: Yoast SEO or Rank Math for Search Visibility
Search engine optimization drives organic traffic. Two leading plugins are Yoast SEO and Rank Math. Both offer XML sitemaps, meta tag control, and readability checks. Rank Math is lighter and includes advanced features like schema markup in the free version. Yoast is more established with a larger support community.
Install whichever you choose. For Yoast, go to SEO > General, enable the XML sitemap, and set your preferred search appearance (e.g., “post” as “Article” in schema). For Rank Math, use the setup wizard to select your site type (e.g., “News” or “Blog”) and enable modules like “Local SEO” only if needed. Both plugins allow per-post keyword optimization. Focus on one primary keyword per article, and ensure your meta description is under 160 characters.
Common configuration mistakes to avoid:
Disabling the XML sitemap (must be on for Google).
Setting “noindex” on category or tag pages without reason.
Overusing keywords in headlines (write for humans first).
Monetization Tools: Ad Managers, Membership, and Paywalls
To generate revenue from your content, install tools for ads and subscriptions. For ad management, Ad Inserter is powerful and free. It lets you place ad codes in specific positions (e.g., after the first paragraph, in the sidebar). Create a new block, paste your ad code, and set visibility rules (e.g., only on posts, not on pages).
For membership and paywalls, MemberPress or Restrict Content Pro are top choices. MemberPress integrates with payment gateways like Stripe and PayPal. After installation, create subscription levels (e.g., $5/month for basic access, $15/month for premium). Use the “Access Rules” to restrict specific posts or categories to logged-in members. For a simple paywall, configure “Drip” content to release articles over time.
Another lightweight option is Paid Memberships Pro (free core). It offers a built-in paywall that hides full content until a user subscribes. To set up a paywall, go to Memberships > Pages and assign a “Membership Checkout” page. Then, in the post editor, use the “Require Membership” meta box to lock individual articles. Always test the checkout flow in a sandbox environment before going live.
Finally, consider Google Ad Manager (formerly DFP) via the Google Ad Manager Plugin for programmatic advertising. This requires an Ad Manager account and is best for high-traffic sites. Configure ad units with specific sizes (e.g., 300×250, 728×90) and map them to positions in Ad Inserter. Monitor ad revenue and adjust placements to avoid overwhelming readers.
Organizing Content with Categories and Tags
Effective digital publishing relies on a logical content architecture that helps readers find what they need quickly. WordPress provides two primary taxonomies—categories and tags—to structure your publication. When used correctly, these tools improve navigation, boost discoverability through search engines, and increase reader engagement by guiding users to related content. This section outlines best practices for leveraging categories and tags to create a seamless reading experience.
Creating a Hierarchical Category Structure for Topics
Categories are the broadest organizational layer in WordPress. They function as a table of contents for your publication, grouping content by major topics. A hierarchical structure allows you to create parent and child categories, which is ideal for publications with multiple subtopics. For example, a digital magazine about technology might use these categories:
Technology (parent)
Artificial Intelligence
Cybersecurity
Hardware Reviews
Business (parent)
Startups
Finance
Marketing
Best practices for hierarchical categories include:
Limit depth to three levels: Too many nested categories confuse readers and dilute SEO value. Keep parent categories broad, children specific.
Assign one primary category per post: While WordPress allows multiple categories, sticking to one primary category per post prevents overlap and maintains clarity.
Use descriptive, keyword-rich names: Category names like “Recipes” are too vague; “Vegan Dinner Recipes” provides context and improves search visibility.
Regularly audit categories: Remove unused categories and merge similar ones to avoid clutter. Aim for 10–20 categories for most publications.
A well-structured category hierarchy acts as a site map for readers, enabling them to drill down from broad topics to specific subtopics without feeling lost.
Using Tags for Granular Content Filtering
Tags complement categories by providing granular, non-hierarchical descriptors for individual posts. While categories answer “what topic is this?”, tags answer “what specific details or themes are in this post?”. For instance, a post in the “Hardware Reviews” category might include tags like “laptop,” “battery life,” “2025 models,” and “budget-friendly.”
Effective tag usage follows these guidelines:
Keep tags specific and consistent: Use singular nouns or short phrases (e.g., “SSD storage” not “storages”). Avoid duplicating category names as tags.
Limit tags per post to 5–10: Over-tagging dilutes relevance. Choose only the most descriptive tags that add value for filtering.
Create a controlled vocabulary: Maintain a list of approved tags to prevent synonyms like “laptop” and “notebook” from appearing separately. This improves internal linking and reader navigation.
Use tags for cross-topic connections: Tags can link posts across categories. For example, a “budget-friendly” tag might appear in both “Hardware Reviews” and “Travel Gear” categories.
Tags are particularly useful for news sites, blogs with frequent updates, or publications that cover niche subjects. They allow readers to filter content by specific attributes, such as “video tutorials” or “interviews,” without restructuring your category tree.
Avoiding Common Taxonomy Mistakes: Overlapping and Overuse
Misapplying categories and tags can harm user experience and SEO. The most frequent mistakes are overlapping taxonomies and overuse. Below is a comparison of common errors and their solutions:
Mistake
Example
Solution
Using categories and tags interchangeably
Creating a category “Recipes” and a tag “recipes” for the same post
Define categories as topics, tags as descriptors. Remove duplicate tags.
Creating too many categories
50+ categories for a small blog
Consolidate into 10–15 broad categories; use child categories sparingly.
Tagging every word from the post
Tagging “blue,” “sky,” “clouds” in a weather post
Limit tags to 5–10 meaningful terms that aid filtering.
Using tags as categories
Tagging “Technology” instead of assigning a category
Assign a category first; use tags only for additional context.
Overlapping hierarchies: Avoid creating child categories that duplicate tag functionality. For example, a child category “Laptop Reviews” should not have a tag “laptop reviews.”
Inconsistent naming: Mixing singular and plural forms (e.g., “dog” and “dogs”) creates confusion. Standardize to one form.
Neglecting user perspective: Ask yourself: “Would a reader search for this term to find related content?” If not, remove it.
By avoiding these mistakes, you ensure that categories and tags work together harmoniously, providing clear navigation paths without redundancy. Regularly review your taxonomy structure—quarterly for active publications—to maintain relevance as your content grows. A clean taxonomy system not only improves reader engagement but also strengthens your site’s authority in search results, making it easier for new audiences to discover your publication.
How to Use WordPress for Digital Publishing: Creating and Managing Editorial Workflows
Establishing a structured editorial workflow is essential for any digital publishing operation, whether you are a solo blogger or part of a larger team. WordPress provides native tools to control who can create, edit, and publish content, as well as how revisions and scheduling are managed. This section explains how to configure user roles, leverage the block editor for rich media, and manage post revisions and scheduling effectively.
Configuring User Roles: Author, Editor, and Contributor
WordPress includes five default user roles, but for digital publishing, the three most relevant are Contributor, Author, and Editor. Each role has specific capabilities that prevent unauthorized publishing or editing.
Contributor: Can write and edit their own posts but cannot publish them. Posts must be reviewed and published by an Editor or Administrator. This is ideal for guest writers or junior staff.
Author: Can write, edit, and publish their own posts. They cannot edit posts by other users. Suitable for regular columnists or solo bloggers.
Editor: Can publish, edit, and delete any post, including those by other users. They also manage categories, tags, and comments. This role is essential for managing a team.
To assign or change a user role, go to Users → All Users in the WordPress admin, click the user’s name, and select the role from the dropdown menu. For more granular control, consider using a plugin like User Role Editor to add custom capabilities (e.g., allowing Contributors to upload images).
For a solo author, the Author role is sufficient. For a team, use a combination: Contributors submit drafts, Editors review and schedule, and Administrators handle technical settings.
Using the Block Editor (Gutenberg) for Rich Media Articles
The Block Editor (Gutenberg) is WordPress’s default content editor, designed to handle complex layouts without requiring HTML or shortcodes. It uses “blocks” for each content element—paragraphs, headings, images, videos, embeds, columns, and more. This is especially useful for digital publishing because it allows you to create visually rich articles with minimal effort.
Key blocks for digital publishing include:
Image and Gallery: Add high-resolution photos with captions and alt text. Use the Cover block for full-width hero images with overlaid text.
Video and Embed: Insert YouTube, Vimeo, or self-hosted videos directly into the article. The Embed block supports over 30 services.
Columns: Create multi-column layouts for side-by-side text, images, or pull quotes.
Table of Contents: Use a plugin like Easy Table of Contents to generate a clickable index for long articles.
Reusable Blocks: Save a block (e.g., a call-to-action or author bio) and reuse it across multiple posts. Edits to the reusable block update everywhere it appears.
To use the Block Editor, simply create a new post or page. Click the “+” button to add a block, then search or browse. For example, to embed a tweet, add a “Tweet” block and paste the URL. The editor auto-embeds the content. You can also drag and drop blocks to rearrange them.
Practical tip: For consistent formatting, create a Block Pattern or use the Template feature to define a default layout for all articles (e.g., hero image, headline, author byline, body text).
Scheduling ensures your content goes live at the optimal time, even if you are not at your computer. WordPress makes this straightforward, and the revision system provides a safety net for edits.
To schedule a post:
Write and edit your post as usual.
In the Publish meta box (right sidebar), click “Immediately” next to Publish.
Select a future date and time from the calendar. Use the 24-hour format or AM/PM toggle.
Click Schedule instead of Publish. The post will be saved with a “Scheduled” status and go live at the set time.
You can view all scheduled posts under Posts → All Posts and filter by “Scheduled.” To reschedule, click the post and change the date.
Managing revisions: WordPress automatically saves revisions every 60 seconds while you edit. To access them, open a post and click the Revisions link in the Publish meta box (or use the Screen Options tab to enable the Revisions panel). The revision screen shows a slider comparing two versions. You can restore any previous revision by clicking “Restore This Revision.”
Practical code example: To limit the number of revisions stored per post (useful for performance), add this line to your wp-config.php file:
define('WP_POST_REVISIONS', 5);
This stores only the last 5 revisions. Set it to false to disable revisions entirely, or true (default) to keep unlimited revisions.
By combining scheduling with revision management, you maintain a clean editorial timeline and can always revert mistakes. For team workflows, ensure Editors have permission to override scheduled dates if needed.
Optimizing for Search Engines and Readers
To succeed in digital publishing, your content must be discoverable by search engines while remaining engaging for human readers. This balance requires a dual focus: technical SEO ensures your articles rank well, and readability enhancements keep audiences on the page. Below are targeted strategies tailored for digital publications, covering metadata, structured data, and content formatting.
Crafting SEO-Friendly Titles and Meta Descriptions
Your title and meta description are the first elements users see in search results. For digital publications, they must simultaneously attract clicks and convey article value. Follow these guidelines:
Include the primary keyword naturally in the title, preferably near the beginning. For example, “How to Use WordPress for Digital Publishing: A Beginner’s Guide” works better than “A Guide for Beginners on How to Use WordPress for Digital Publishing.”
Keep titles under 60 characters to avoid truncation in search results. Use compelling modifiers like “ultimate,” “comprehensive,” or “2025” when relevant.
Write meta descriptions between 150–160 characters that summarize the article’s value. Include the focus keyword once and a clear call-to-action (e.g., “Learn the essential steps for how to use WordPress for digital publishing, from setup to monetization.”).
Avoid keyword stuffing in both title and description. Search engines penalize repetition, and readers find it off-putting.
For digital publications, consider adding a publication date or category in the title when appropriate (e.g., “Breaking: How to Use WordPress for Digital Publishing in 2025”). This signals timeliness and relevance.
Implementing Schema Markup for Articles and News
Schema markup helps search engines understand your content structure, enabling rich results like featured snippets, carousels, and article previews. For digital publishing, two key schema types are essential:
Schema Type
Purpose
Key Properties to Include
Article
Standard article content, such as blog posts or features
Use a plugin like Yoast SEO or Rank Math, which automatically add article schema to posts. Configure them to use the NewsArticle type for time-sensitive content.
Manually add JSON-LD via a custom field or theme functions.php file for precise control. Example snippet for an article:
{
"@context": "https://schema.org",
"@type": "Article",
"headline": "How to Use WordPress for Digital Publishing",
"author": "Your Name",
"datePublished": "2025-04-01",
"dateModified": "2025-04-01",
"publisher": {
"@type": "Organization",
"name": "Your Publication Name"
}
}
Verify schema using Google’s Rich Results Test to ensure no errors or warnings.
Proper schema markup increases the likelihood of your articles appearing in Google News, Top Stories, and knowledge panels, directly boosting visibility for digital publishers.
Improving Readability with Headings, Lists, and Short Paragraphs
Readability directly affects user engagement metrics like time on page and bounce rate, which in turn influence SEO rankings. For digital publications, where readers often scan content, follow these formatting rules:
Use descriptive H2 and H3 headings that break the article into logical sections. Each heading should hint at the content below (e.g., “Crafting SEO-Friendly Titles” rather than “Section 1”).
Limit paragraphs to 2–3 sentences (roughly 40–60 words). Long blocks of text discourage reading, especially on mobile devices.
Incorporate bulleted or numbered lists for steps, features, or comparisons. Lists improve scannability and help users grasp key points quickly.
Use bold or italic text sparingly to emphasize critical terms or phrases, but avoid overuse that distracts from the flow.
Maintain a consistent font size (16px minimum for body text) and line spacing (1.5–1.8 line height) to reduce eye strain.
For example, a complex concept like schema implementation becomes clearer when broken into a short paragraph followed by a list of steps. Always test readability on mobile screens, as over 60% of digital readers access content via smartphones. Tools like the Hemingway App or Yoast’s readability analysis can help you refine your writing for a target grade level of 8–9, which is ideal for general audiences.
By combining these SEO and readability techniques, your digital publication will attract more organic traffic and retain readers longer, creating a virtuous cycle of discovery and engagement.
Monetizing Your Digital Publication
Once your digital publication using WordPress is established with a steady flow of content and a growing audience, the next logical step is to generate revenue. WordPress offers a flexible ecosystem that supports multiple monetization models, allowing you to diversify income streams without relying on a single source. The key is to align your chosen methods with your audience’s expectations and your publication’s niche, ensuring that monetization enhances rather than detracts from the reader experience.
Integrating Ad Networks (Google AdSense, Mediavine) or Direct Ads
Advertising remains one of the most straightforward ways to earn from your publication. WordPress integrates seamlessly with both automated ad networks and direct ad sales. For smaller sites, Google AdSense provides a low-barrier entry point, serving contextual ads that pay per click or impression. As your traffic grows, premium networks like Mediavine or AdThrive often yield higher revenue per visitor through display, video, and native ads, but they require minimum traffic thresholds (e.g., Mediavine requires 50,000 sessions per month). Alternatively, selling direct ads—where you negotiate with sponsors for fixed placement—gives you full control over ad appearance and pricing, though it demands more administrative effort. Use a plugin like Ad Inserter or WP‑Quads to manage placements without coding. Below is a comparison of these ad options to help you choose:
Ad Option
Revenue Model
Traffic Requirement
Control Over Ads
Best For
Google AdSense
CPC/CPM
None (low barrier)
Low (auto‑matched)
New or small publications
Mediavine
CPM (higher rates)
50,000 sessions/month
Medium (customizable)
Growing sites with solid traffic
Direct Ads
Fixed fee per period
Negotiable
Full control
Established niche publications
Setting Up a Membership or Subscription System
Recurring revenue from memberships or subscriptions provides predictable income and fosters a loyal community. WordPress offers powerful plugins to gate content behind paywalls. MemberPress and Paid Memberships Pro are popular choices, allowing you to create tiered access levels (e.g., free articles vs. premium deep dives or ad‑free reading). For a more integrated approach, Substack‑style newsletters can be paired with WordPress via ConvertKit or Mailchimp, though dedicated membership plugins offer finer control. When setting up subscriptions, consider offering a free trial or a limited free tier to convert casual readers into paying members. Ensure your payment gateway (Stripe or PayPal) is secure and that you clearly communicate the value of exclusive content, such as early access, ad‑free experience, or members‑only forums. Regularly deliver on these promises to reduce churn.
Using Affiliate Links and Sponsored Posts Ethically
Affiliate marketing and sponsored content can be highly lucrative, but they require transparency to maintain trust. For affiliate links, join programs like Amazon Associates, ShareASale, or niche‑specific networks. Place links naturally within relevant content—for example, linking to a book you review or a tool you recommend. Use a plugin like ThirstyAffiliates to cloak and manage links, and always disclose affiliate relationships clearly (e.g., “This post contains affiliate links”). For sponsored posts, set clear guidelines: require sponsors to provide value‑added content that aligns with your publication’s voice, label posts as “Sponsored” or “Paid Partnership” per FTC guidelines, and avoid endorsing products you haven’t vetted. Ethical practices here not only comply with regulations but also protect your credibility—readers are more likely to trust recommendations that are honest and disclosed. To maximize revenue, combine affiliate links with sponsored content by negotiating flat fees plus performance bonuses.
Performance and Security Best Practices
As your digital publication grows, maintaining fast load times and robust security becomes non-negotiable. A slow or compromised site drives readers away and damages credibility. This section covers three critical areas: caching, backups, and security hardening. By implementing these strategies, you ensure your WordPress publication remains reliable under increasing traffic and resilient against threats.
Implementing a Caching Solution (W3 Total Cache or WP Super Cache)
Caching dramatically improves performance by storing static versions of your pages, reducing server load and speeding up delivery to readers. For most publications, two plugins stand out: W3 Total Cache and WP Super Cache.
W3 Total Cache: Offers granular control, including page caching, database caching, object caching, and CDN integration. Ideal for high-traffic sites but requires careful configuration.
WP Super Cache: Simpler to set up, generating static HTML files. Suitable for most publications without advanced needs.
To get started with WP Super Cache, follow these steps:
Install and activate the plugin from the WordPress repository.
Go to Settings > WP Super Cache and select “Caching On (Recommended).”
Under the “Advanced” tab, enable “Compress pages so they’re served more quickly to visitors.”
Set a cache timeout (e.g., 3600 seconds for hourly refresh).
Test by visiting your site and checking for the “Cached” header in your browser’s developer tools.
For advanced users, W3 Total Cache allows integration with a CDN like Cloudflare. Here is a practical code snippet to add to your wp-config.php file to enable object caching with Redis (if your host supports it):
Always test caching thoroughly after implementation to ensure dynamic content (e.g., comments, article views) updates correctly.
Regular Backups with UpdraftPlus or VaultPress
Backups are your safety net. Without them, a single hack or server failure can erase months of content. Two reliable solutions are UpdraftPlus (free) and VaultPress (paid, part of Jetpack).
Feature
UpdraftPlus
VaultPress
Cost
Free (premium add-ons available)
Paid (starts ~$99/year)
Storage destinations
Google Drive, Dropbox, S3, email, and more
Automatic Jetpack cloud storage
Scheduling
Manual or automated (daily, weekly)
Real-time backups
Restoration
One-click restore
One-click restore
To set up UpdraftPlus:
Install and activate the plugin.
Go to Settings > UpdraftPlus Backups and choose a remote storage location (e.g., Google Drive).
Set a backup schedule: daily for your database, weekly for your files.
Click “Save Changes” then “Backup Now” to run an initial backup.
Test restoration on a staging site to verify backups are functional.
For VaultPress, activate it through Jetpack and enable real-time backups. This ensures every new article, comment, or update is saved instantly. Store at least three backup copies in separate locations (e.g., cloud and local) for redundancy.
Security Plugins and Two-Factor Authentication
Security plugins prevent brute force attacks, malware, and unauthorized access. Combine them with two-factor authentication (2FA) for robust protection.
Wordfence Security: Includes firewall, malware scanner, and login security. Enable “Login Security” to limit failed login attempts and block suspicious IPs.
iThemes Security: Offers 2FA, file change detection, and database backups. Its “Two-Factor Authentication” feature works with Google Authenticator or Authy.
Two-Factor (by Plugin Author): A lightweight plugin that adds TOTP-based 2FA to user accounts.
To implement 2FA with iThemes Security:
Install and activate the plugin.
Go to Security > Two-Factor Authentication and enable it for all user roles (especially administrators).
Each user must scan a QR code with an authenticator app (e.g., Google Authenticator) during their next login.
Set backup codes for recovery in case the device is lost.
Additional hardening measures include:
Disabling XML-RPC (if not needed) via a security plugin or code in .htaccess.
Changing the default “admin” username to a unique one.
Enforcing strong password policies for all users.
Regularly updating WordPress core, themes, and plugins.
By combining caching, consistent backups, and layered security, your publication will serve readers quickly and remain safe from common threats. Test each change in a staging environment before applying it live.
Scaling Your WordPress Publication
As your digital publication grows, the strategies that served you at launch can quickly become bottlenecks. Scaling effectively means preparing your infrastructure, team, and data analysis to handle increased traffic, more contributors, and a broader audience without sacrificing performance or editorial quality. This section covers advanced techniques to move from a small blog to a robust publishing operation using WordPress.
Using a Content Delivery Network (CDN) for Global Reach
A Content Delivery Network (CDN) is essential for scaling, especially when your audience spans multiple continents. A CDN caches your static assets—images, CSS, JavaScript files—on a network of servers distributed worldwide. When a visitor in Tokyo accesses your site, the CDN serves these files from a server in Tokyo rather than your origin server, dramatically reducing load times and server strain.
Key benefits: Faster page loads for international readers, reduced bandwidth costs on your hosting, and protection against traffic spikes (e.g., viral posts).
Popular CDN options for WordPress: Cloudflare (free tier available), StackPath, and KeyCDN.
Implementation tip: Use a plugin like W3 Total Cache or WP Rocket to integrate your CDN. Ensure you purge the CDN cache after publishing major updates to avoid serving stale content.
Without a CDN, a sudden surge from a Reddit or Hacker News post can crash your site. With one, your publication absorbs the spike gracefully, keeping readers engaged.
Analytics Integration: Google Analytics and Jetpack Stats
Scaling requires data-driven decisions. Integrating analytics helps you understand what content resonates, where your traffic comes from, and how readers behave. Two robust options for WordPress are Google Analytics and Jetpack Stats.
Extensive: custom reports, user flow, conversion tracking
Simplified: top posts, referrers, day/week views
Setup complexity
Requires plugin (e.g., MonsterInsights) or manual code
One-click activation with Jetpack plugin
Real-time data
Yes, detailed real-time dashboard
Basic real-time counts
Privacy compliance
Must configure anonymization and consent
Built-in privacy-friendly options
Best for
Large publications needing granular insights
Small-to-medium sites wanting quick overview
For scaling, use Google Analytics to track user retention, bounce rates by article, and conversion funnels (e.g., newsletter sign-ups). Supplement with Jetpack Stats for a daily snapshot of top-performing content without leaving your WordPress dashboard. Leverage this data to double down on topics that drive repeat visits and to optimize your publishing schedule.
Multisite Networks for Managing Multiple Publications
If your publishing operation expands to run multiple niche sites, a local news network, or a portfolio of branded magazines, WordPress Multisite is a powerful tool. It allows you to manage several sites from a single WordPress installation, sharing users, themes, and plugins while keeping content and databases separate.
When to use Multisite: You need a unified dashboard for all publications, want to share a common user base (e.g., contributors across sites), or require consistent branding and updates across networks.
Key considerations: All sites share the same WordPress core and plugin updates, which simplifies maintenance but introduces risk—a faulty plugin can break all sites. Also, backups and migrations are more complex than single-site setups.
Practical example: A regional news publisher runs a Multisite network with separate sites for each city. Editors manage local content, while the central team handles global ads, SEO settings, and security patches from one network admin screen.
To implement, enable Multisite via your wp-config.php file (add define('WP_ALLOW_MULTISITE', true);), then follow the network setup wizard. Use subdomains (e.g., city1.yourpublication.com) or subdirectories (e.g., yourpublication.com/city1/) depending on your SEO strategy. For teams, assign Super Admin roles to manage the network and Editor roles for individual sites, maintaining clear permissions as you scale.
Frequently Asked Questions
Is WordPress suitable for large-scale digital publishing?
Yes, WordPress is highly suitable for large-scale digital publishing. It powers major publications like TechCrunch, The New Yorker, and Bloomberg. With proper hosting, caching, and a content delivery network (CDN), WordPress can handle millions of visitors. Plugins like WP Rocket and advanced caching solutions enhance performance. Additionally, WordPress's custom post types, taxonomies, and user roles allow for complex editorial workflows, making it ideal for multi-author sites with extensive content libraries.
What are the best WordPress plugins for digital publishing?
Key plugins include Yoast SEO or Rank Math for search engine optimization, WP Rocket for caching and performance, and Jetpack for security and analytics. For editorial workflows, consider Edit Flow or CoSchedule. To manage subscriptions and memberships, use MemberPress or Restrict Content Pro. For ads, Advanced Ads or Ad Inserter. For multimedia, Envira Gallery or FooGallery. Additionally, use AMP for Mobile for faster mobile pages and PushEngage for push notifications to engage readers.
How can I optimize WordPress for digital publishing SEO?
Optimize by using an SEO plugin like Yoast or Rank Math to manage meta tags, XML sitemaps, and readability. Ensure fast loading times with caching, image optimization (e.g., Smush), and a CDN. Use a responsive theme, enable AMP for mobile, and implement structured data (schema.org) for articles. Focus on keyword research, internal linking, and creating high-quality, original content. Regularly update old posts, improve site architecture, and build backlinks from reputable sources.
What hosting is best for a WordPress digital publishing site?
For high-traffic publishing sites, managed WordPress hosting is recommended. Providers like WP Engine, Kinsta, and Flywheel offer optimized servers, automatic caching, staging environments, and expert support. Cloud-based solutions like Amazon Web Services (AWS) or Google Cloud Platform (GCP) with a management layer (e.g., Cloudways) provide scalability. For smaller sites, shared hosting like SiteGround or Bluehost can work, but as traffic grows, upgrading to VPS or dedicated hosting is advisable.
Start by choosing a magazine-style theme like NewsPaper, JNews, or Soledad. Install essential plugins: a page builder (Elementor or Beaver Builder), SEO plugin, caching plugin, and social sharing tools. Create categories for sections (e.g., News, Features, Opinion). Use custom post types for articles and a featured content slider. Set up an editorial calendar with CoSchedule or PublishPress. Implement a subscription system with MemberPress or WooCommerce Memberships. Finally, optimize for speed and mobile.
Can I sell digital subscriptions on WordPress?
Yes, WordPress supports digital subscriptions easily. Use plugins like MemberPress, Restrict Content Pro, or Paid Memberships Pro to create membership levels (e.g., free, premium). Integrate with payment gateways like Stripe or PayPal. You can also use WooCommerce Subscriptions for more complex setups. Offer content dripping, exclusive access, and email newsletters via plugins like Mailchimp for WordPress. Ensure your site has SSL for secure transactions.
How do I manage multiple authors on WordPress?
WordPress has built-in user roles: Administrator, Editor, Author, Contributor, and Subscriber. For publishing, assign Authors to write and edit their posts, Editors to manage content, and Contributors to submit drafts. Use plugins like Edit Flow to add custom statuses, editorial comments, and notifications. CoSchedule’s Editorial Calendar provides a visual workflow. For advanced permissions, use User Role Editor or PublishPress Capabilities. This streamlines collaboration for teams.
What are the best practices for WordPress digital publishing security?
Use strong passwords and two-factor authentication. Keep WordPress core, themes, and plugins updated. Install a security plugin like Wordfence or Sucuri. Use SSL certificates (HTTPS). Limit login attempts and change the default 'admin' username. Regularly back up your site with UpdraftPlus or VaultPress. Disable file editing in wp-config.php. Use a web application firewall (WAF). For high-traffic sites, consider a managed hosting provider that handles security.
Understanding WordPress Capabilities and Roles: A Comprehensive Guide
Introduction to WordPress Capabilities and Roles
WordPress, as a content management system, powers over 40% of all websites on the internet. Its flexibility and scalability stem from a granular permission system that controls what each user can and cannot do. This system, built around the concepts of capabilities and roles, is foundational to site security, efficient team management, and content workflow. Without a clear understanding of how these permissions work, site administrators risk exposing sensitive functions—such as plugin installation or user deletion—to unintended users. This guide will demystify the architecture of WordPress capabilities and roles, explaining their structure, relationship, and default implementation.
A user role is a predefined set of permissions assigned to a user account. Think of it as a job title that dictates what tasks a user can perform within the WordPress dashboard. For example, an Editor can publish and manage all posts, while a Subscriber can only manage their own profile. Roles matter because they:
Enforce security boundaries: Preventing unauthorized users from accessing administrative areas, modifying themes, or deleting content.
Streamline workflows: Allowing site owners to delegate tasks—like content creation or comment moderation—without granting full administrative control.
Simplify user management: Instead of assigning individual permissions to each user, you assign a role that bundles all necessary capabilities together.
Support multi-author sites: Essential for blogs, news portals, e-commerce stores, and membership platforms where different users require different levels of access.
Without roles, every user would either have full control (posing security risks) or no control at all (making collaboration impossible). WordPress solves this by providing a hierarchy of roles that balances power and restriction.
The Relationship Between Roles and Capabilities
Capabilities are the atomic units of permission—they represent a specific action a user can take, such as edit_posts, publish_pages, or install_plugins. Roles are simply collections of these capabilities. The relationship is straightforward: a role is a named group of capabilities. For instance, the Author role includes capabilities like upload_files and delete_posts, but does not include edit_others_posts.
Granular control: You can create custom roles with exactly the capabilities your site needs.
Easy scalability: Adding a new capability to a role automatically grants it to all users with that role.
Backward compatibility: The capability system works with both core WordPress functions and third-party plugins, which often define their own capabilities (e.g., manage_woocommerce for WooCommerce).
When a user attempts an action, WordPress checks if the user’s role includes the required capability. If the capability is missing, the action is denied—often resulting in a “You do not have sufficient permissions” error. This check happens at the code level via functions like current_user_can() or user_can().
How WordPress Core Defines Default Roles
WordPress ships with six default roles, each with a predefined set of capabilities. Understanding these defaults is crucial before customizing them. Here is a summary of the core roles and their primary capabilities:
All single-site capabilities: install plugins, manage users, edit themes
Site owner or lead administrator
Editor
Publish, edit, delete any posts/pages; moderate comments
Content manager or senior writer
Author
Publish and edit their own posts; upload files
Blogger or regular contributor
Contributor
Write and edit their own posts (cannot publish); no file uploads
Guest writer or junior contributor
Subscriber
Read content; manage their own profile
Registered user or member
Each role is defined in the WordPress database under the wp_user_roles option (stored in the wp_options table). Developers can inspect these definitions using functions like get_role() or by viewing the wp-includes/capabilities.php file. The default roles are intentionally conservative: they grant only the capabilities necessary for each role’s function. For example, Contributors cannot upload images to prevent storage abuse, while Editors can manage comments but not install plugins.
This hierarchy ensures that site owners can assign appropriate access without overcomplicating the process. However, many sites require custom roles beyond these defaults—for instance, a “Shop Manager” role for WooCommerce or a “Moderator” role for forums. WordPress’s capability system makes such customization possible through plugins or manual code additions, preserving the core architecture while extending functionality.
WordPress ships with six default user roles, each designed to provide a specific level of access and responsibility. Understanding these roles is fundamental to Understanding WordPress Capabilities and Roles, as they form the backbone of site security and workflow management. From a single blog to a complex multisite network, these roles let you assign permissions without granting unnecessary power. Below is a detailed breakdown of each role, starting with the most powerful.
Super Admin: Managing Multisite Networks
The Super Admin role exists exclusively in WordPress Multisite installations, where a single WordPress instance manages multiple sites. This role holds the highest level of authority, controlling network-wide settings, user management across all sites, and plugin/theme activation for the entire network. A Super Admin can create, delete, and manage any site in the network, as well as grant or revoke administrator privileges on individual sites. Key capabilities include:
Network administration (e.g., settings, updates, and site creation).
Managing all users across the network.
Installing and activating plugins and themes network-wide.
Editing any site’s content or settings.
For practical control, you can add a Super Admin programmatically via a plugin or by editing the wp-config.php file to define a network administrator. Example code to grant Super Admin status to a user with ID 1:
define( 'WP_ALLOW_MULTISITE', true );
// After network setup, use:
grant_super_admin( 1 ); // User ID 1 becomes Super Admin
Administrator: Full Control Over a Single Site
On a standard (non-Multisite) WordPress site, the Administrator role is the ultimate authority. Administrators have complete control over all site settings, including themes, plugins, user management, content creation, and site configuration. They can add, edit, or delete any post, page, or media file, manage comments, and change site appearance. This role is ideal for site owners or lead developers but should be assigned sparingly due to its extensive power. Administrators cannot delete themselves from the site unless another administrator exists. Their capabilities include:
Installing and deleting plugins and themes.
Editing any user’s profile, including other administrators.
Managing site options under Settings.
Importing and exporting content.
Editor, Author, Contributor, and Subscriber: Granular Permissions
The remaining four roles provide progressively restricted access, enabling you to delegate content creation and management without compromising security. Here is a comparative breakdown:
Role
Key Permissions
Best Used For
Editor
Publish, edit, and delete any post or page (including others’). Manage categories, tags, and comments. No access to plugins, themes, or site settings.
Content managers or editorial teams who oversee multiple writers.
Author
Create, publish, edit, and delete their own posts. Upload media files. Cannot edit others’ content or access settings.
Regular writers who need to publish directly without review.
Contributor
Create and edit their own posts, but cannot publish them. Posts must be submitted for review by an Editor or Administrator. No media upload capability.
Guest authors or junior writers whose work requires approval.
Subscriber
Only manage their own profile (name, email, password). No content creation or editing rights.
Membership sites or blogs where users need an account for commenting or restricted access.
These granular permissions allow you to tailor access precisely. For example, an Editor can review and publish a Contributor’s draft, while an Author retains full control over their own published work. Subscribers remain passive users, ideal for sites that require login for premium content. By mastering these roles, you ensure that each user has exactly the power they need—and no more—streamlining workflows and protecting your site from accidental or malicious changes.
In WordPress, capabilities are the specific permissions that define what a user can or cannot do within the system. Each default role—Super Admin, Administrator, Editor, Author, Contributor, and Subscriber—comes with a predefined set of capabilities. Understanding how these capabilities map to each role is essential for managing content workflows, securing your site, and assigning appropriate access levels. Below, we break down the most important capability groups, focusing on content creation, user and site management, and read-only access.
Capabilities for Content Creation and Editing
Content-related capabilities control who can write, publish, edit, and delete posts, pages, and media. The following table summarizes the key capabilities assigned to each default role (excluding Super Admin, which inherits all Administrator capabilities plus network-wide features):
Capability
Administrator
Editor
Author
Contributor
Subscriber
publish_posts
Yes
Yes
Yes
No
No
edit_posts
Yes
Yes
Yes
Yes
No
edit_others_posts
Yes
Yes
No
No
No
delete_posts
Yes
Yes
Yes
Yes (own only)
No
edit_pages
Yes
Yes
No
No
No
upload_files
Yes
Yes
Yes
No
No
As shown, only Administrators and Editors can edit pages and manage others’ posts. Authors can publish and edit their own posts but cannot modify content from other users. Contributors can write and edit their own drafts but cannot publish them—a key distinction for editorial workflows. Subscribers have no content creation capabilities.
Capabilities for User and Site Management
User and site management capabilities are reserved for high-level roles due to their potential impact on security and administration. Key capabilities include:
delete_users: Allows permanent removal of user accounts. Only Administrators (and Super Admins on multisite) have this capability by default. Editors, Authors, Contributors, and Subscribers cannot delete any users.
create_users: Permits adding new user accounts. This is exclusive to Administrators. No other default role can create users.
edit_users: Enables modifying user profiles, roles, and passwords. Again, only Administrators possess this capability.
install_plugins and install_themes: These are critical site-altering capabilities. Only Administrators (and Super Admins) can install, activate, or delete plugins and themes. Editors and below have no access to these functions.
manage_options: Controls access to core settings pages (e.g., General, Writing, Reading). This is also Administrator-only.
It is important to note that while Editors can manage content widely, they cannot manage users or site settings. This separation helps maintain security: a compromised Editor account cannot escalate privileges or alter site functionality.
Read-only capabilities govern what users can view without needing to edit or create content. The most fundamental is read, which is assigned to every default role, including Subscribers. This capability allows users to access the WordPress admin dashboard and view their own profile page. However, it does not grant access to any content management screens.
For unauthenticated users (visitors not logged in), WordPress assigns no capabilities by default. This means:
Unauthenticated users cannot access the admin area at all.
They can only view public-facing content (posts, pages, media) as determined by the site’s visibility settings (e.g., public, private, or password-protected).
No capability for edit_posts, publish_posts, or any administrative function is available to unauthenticated users.
For authenticated users with the Subscriber role, the only additional capability beyond read is level_0 (a legacy user level). Subscribers cannot create, edit, or delete any content, nor can they manage users or site settings. Their access is limited to reading public content and maintaining their own profile. This makes the Subscriber role ideal for membership sites or forums where users need an account but should not have content editing rights.
Understanding these read-only and unauthenticated capabilities helps you configure appropriate access for different user types, ensuring that sensitive admin functions remain protected while still allowing broad public access to your content.
Customizing Roles and Capabilities with Plugins
WordPress ships with a standard set of roles—Administrator, Editor, Author, Contributor, and Subscriber—each with predefined capabilities. However, many sites require more granular control. For instance, you might need an “Editor Lite” who can publish posts but not delete them, or a “Support Agent” who can only moderate comments and edit user profiles. Plugins like User Role Editor and Members make this customization accessible without touching code. Below, we explore how to use these tools effectively, followed by best practices for programmatic modifications.
Using User Role Editor to Add or Remove Capabilities
User Role Editor is a free, widely used plugin that provides a visual interface for managing roles and capabilities. After installation, go to Users > User Role Editor. Here’s how to modify an existing role:
Select a role from the dropdown (e.g., Author).
Scroll through the list of capabilities—each checkbox represents a permission. Check to add, uncheck to remove.
Click Update to save changes. The plugin also lets you copy a role, which is useful for creating a derivative role (e.g., copy “Editor” to “Editor Plus”).
For example, to allow Authors to upload custom file types (like SVG), simply check the upload_files capability for the Author role. To restrict Contributors from publishing posts, uncheck publish_posts. The plugin also supports bulk capability management: you can add or remove multiple capabilities at once by holding Ctrl (or Cmd) while clicking.
A key feature is the “Grant” function for individual users. If you need to give a specific user a capability without altering the entire role, use the “User” tab in the plugin. This ensures other users with the same role are unaffected.
Creating Custom Roles with the Members Plugin
The Members plugin (by the same developer as User Role Editor) offers a more role-centric approach. It allows you to create entirely new roles from scratch. Navigate to Members > Roles > Add New. You’ll see:
Role Slug (auto-generated, but editable—use lowercase and hyphens).
Capabilities: a searchable list. Check only the permissions you need.
For instance, to create a “Support Agent” role that can only read private posts and manage comments, you would check: read, read_private_posts, moderate_comments, and edit_comment. Leave out publish_posts or delete_posts. After saving, assign this role to users via their profile page.
Members also includes a “Permissions” feature for content access control (e.g., restrict certain pages to logged-in users only). While User Role Editor focuses on capability editing, Members excels at role creation and content restriction.
Best Practices When Modifying Roles Programmatically
If you prefer to modify roles via code (e.g., in a custom plugin or theme’s functions.php), follow these guidelines to avoid security risks and data loss:
Always use a child theme or custom plugin—never modify core WordPress files. Code changes in functions.php will be lost on theme updates.
Hook into init or a plugin activation hook to ensure roles are added only when needed. For example, use register_activation_hook() in a custom plugin to add a role once.
Back up capabilities before changes. Use get_role() to retrieve existing capabilities, then store them in an array before modifying.
Use add_role() for new roles, remove_role() to delete, and add_cap()/remove_cap() for individual capabilities.
Here is a practical code example that adds a “Content Reviewer” role with limited capabilities:
After adding this code, the new role appears in the WordPress admin. To remove it later, use remove_role( 'content_reviewer' ); on the same hook.
Additional best practices include:
Test on a staging site before deploying to production.
Limit super admin capabilities to only what is necessary—over-granting can lead to security vulnerabilities.
Document all custom roles in a readme file or comments within the code for future maintainers.
Use the user_has_cap filter for dynamic capability checks (e.g., grant temporary access to a feature).
By leveraging plugins for visual control or code for precise automation, you can tailor WordPress to your exact workflow while maintaining security and manageability.
Programmatic Role and Capability Management
For developers seeking precise control over user permissions, WordPress provides a robust set of functions to manage roles and capabilities directly in code. This approach, often implemented via a theme’s functions.php file or a custom plugin, allows for dynamic adjustments that are not possible through the standard admin interface. By using functions like add_role(), add_cap(), and remove_cap(), you can tailor access for any user group, automate permissions based on site events, or restore default roles after modifications. Below are three key areas where programmatic management proves invaluable for “Understanding WordPress Capabilities and Roles.”
Adding a New Custom Role via Functions.php
Creating a custom role programmatically is straightforward with the add_role() function. This function accepts three parameters: a unique slug, a display name, and an array of capabilities. It is best called during theme or plugin activation to avoid repeated execution. Below is an example that adds a “Content Curator” role with limited editing abilities.
Unique slug: Use a prefix (e.g., mytheme_editor) to avoid conflicts with other plugins.
Base capabilities: Always include read for basic admin access, and level_0 if needed for backward compatibility.
Inheritance: New roles do not inherit capabilities from existing roles; you must define them explicitly.
Removal: Use remove_role('content_curator') in a deactivation hook to clean up when the role is no longer needed.
For more complex setups, consider cloning an existing role using get_role() and then modifying its capabilities array.
Granting and Revoking Capabilities Dynamically
To adjust permissions for existing roles or users at runtime, use add_cap() and remove_cap(). These methods operate on a WP_Role or WP_User object. The table below demonstrates common dynamic scenarios.
Function
Target
Example Use Case
$role->add_cap('edit_theme_options')
Role object
Grant Editors access to theme customization
$user->add_cap('manage_options')
User object
Temporarily give a specific user admin rights
$role->remove_cap('delete_published_posts')
Role object
Prevent Authors from deleting published content
$user->remove_cap('publish_posts')
User object
Restrict a specific user from publishing
Example of granting a capability to the Editor role conditionally:
function grant_editor_custom_cap() {
$role = get_role('editor');
if ($role && current_user_can('manage_options')) {
$role->add_cap('edit_theme_options');
}
}
add_action('admin_init', 'grant_editor_custom_cap');
Best practices for dynamic capability management:
Check role existence: Use get_role() and verify the object before calling methods to avoid fatal errors.
Persist changes: Capabilities added via code are stored in the database and persist until removed. Use hooks like switch_theme to clean up if needed.
User-specific caps: These are stored in user meta and can be removed with $user->remove_cap() or by deleting the meta key directly.
Resetting Default Roles to Their Original State
Over time, custom code or plugins may modify default WordPress roles (Administrator, Editor, Author, Contributor, Subscriber). To restore them to their original capabilities, use the populate_roles() function, which rebuilds the default roles from WordPress core. This function is typically called during a manual reset process.
function reset_default_roles() {
// Remove all default roles first
remove_role('administrator');
remove_role('editor');
remove_role('author');
remove_role('contributor');
remove_role('subscriber');
// Re-populate with original capabilities
populate_roles();
}
// Caution: Use this only in a controlled environment, e.g., via a custom admin page.
// add_action('admin_init', 'reset_default_roles');
Important notes for resetting roles:
Back up first: Export the current roles table (wp_options with wp_user_roles) before resetting to recover customizations.
Custom roles preserved:populate_roles() only affects default roles; custom roles created via add_role() remain untouched.
User assignments: Users assigned to a role that is removed will lose all capabilities until reassigned. Always reassign users to a valid role before removing their current one.
Alternative method: For a less destructive approach, manually revert capabilities using get_role() and compare against a fresh WordPress installation’s role array.
Programmatic role and capability management empowers developers to enforce granular permissions, automate workflows, and maintain site security. By mastering these functions, you deepen your “Understanding WordPress Capabilities and Roles” and gain the ability to create tailored user experiences that adapt to your site’s evolving needs.
Security Implications of User Roles and Capabilities
Misconfigured user roles and capabilities in WordPress are among the most common yet overlooked attack vectors. When roles grant excessive permissions, even trusted users can inadvertently expose your site to data breaches, defacement, or malware injection. Understanding the security implications of each role and regularly auditing permissions is essential to maintaining a hardened WordPress installation.
Common Role Misconfigurations and Their Risks
Several misconfigurations frequently lead to vulnerabilities:
Granting Administrator role to non-admin users: This gives full control over themes, plugins, and user management. A compromised editor-level account with admin privileges can install malicious plugins or change site ownership.
Allowing Authors to upload files without restrictions: Authors can upload media, but if not limited to safe file types, they can upload PHP scripts or executable files. This enables remote code execution.
Enabling unfiltered uploads for Subscribers: Subscribers typically have no upload capability. If a custom role grants uploads, it may allow arbitrary file uploads, leading to server compromise.
Using the default Contributor role for content managers: Contributors cannot publish posts, but if they are given the publish_posts capability, they may publish malicious content or spam without review.
Overlapping capabilities from multiple roles: When a user belongs to more than one role (via plugins), they accumulate all capabilities. A user with both Editor and Subscriber roles may gain unintended upload or deletion rights.
These misconfigurations often go unnoticed because they do not immediately break functionality. However, they create a surface for privilege escalation and data leakage.
Auditing User Capabilities for Security Hardening
Regular auditing of user capabilities is a proactive security measure. Begin by reviewing all user accounts and their assigned roles. Use a plugin like “User Role Editor” or “Members” to view and modify capabilities, but for a code-level audit, you can use WordPress’s built-in functions. The following PHP example checks if a specific user has a dangerous capability:
// Check if user ID 5 has the 'activate_plugins' capability
$user = get_userdata(5);
if ( $user && $user->has_cap('activate_plugins') ) {
echo 'User has dangerous capability.';
}
To audit all users, loop through user roles and list capabilities:
Additionally, check for unused roles. Remove any custom roles that are no longer needed, as they may contain orphaned capabilities. Use the wp_roles() object to list all registered roles:
After identifying excessive capabilities, revoke them using the same plugin or code. For example, to remove the delete_published_posts capability from the Editor role:
The principle of least privilege dictates that every user should have only the minimum permissions necessary to perform their job functions. In WordPress, this means:
Assign the lowest possible default role: Use Subscriber for readers, Contributor for writers who need review, Author for self-publishing, Editor for content management, and Administrator only for site owners.
Create custom roles for specific needs: For example, a “SEO Manager” role might only need edit_posts and edit_others_posts, but not delete_posts or publish_posts.
Restrict capabilities per post type: Use plugins or code to limit capabilities to specific post types (e.g., allow editing only of ‘page’ but not ‘post’).
Never grant unfiltered_html to non-administrators: This capability allows users to insert arbitrary HTML and JavaScript, which can lead to XSS attacks.
Audit plugin-created roles: Many plugins add roles with broad capabilities. Review these immediately after installation and tighten them if possible.
Implementing least privilege reduces the blast radius of any compromised account. For instance, if a Contributor account is hacked, the attacker cannot publish posts or upload files, limiting damage to draft content. Use a capability management plugin to enforce these restrictions visually, or maintain a capabilities spreadsheet that maps each role to a minimal set of capabilities. Test changes on a staging site before applying them to production. This systematic approach transforms user management from a potential vulnerability into a robust security layer.
Multisite Networks: Roles and Capabilities Across Sites
WordPress Multisite introduces a distinct hierarchy for managing a network of sites, adding the Super Admin role atop the standard administrator. This structure fundamentally alters how capabilities are distributed, enabling centralized control while preserving site-level autonomy. Understanding the nuances of Super Admin versus Site Administrator, how roles propagate, and which capabilities are unique to Multisite is essential for effective network management.
Super Admin vs. Site Administrator: Key Differences
In a standard WordPress installation, the Administrator role holds all capabilities. In a Multisite network, the Super Admin supersedes this, governing the entire network, while Site Administrators manage individual sites within it. The core distinctions are:
Scope of Control: Super Admin can install and delete sites, manage network plugins and themes, and control user registration across the network. Site Administrator is limited to their own site’s settings, content, and users.
Plugin and Theme Management: Only Super Admin can install, activate, or deactivate plugins and themes network-wide. Site Administrators can only activate themes and plugins that have been made available by the Super Admin.
User Management: Super Admin can add, edit, or remove any user across the network, even if that user is not a member of any site. Site Administrators can only manage users on their own site and cannot create new user accounts unless network settings permit.
Network Settings: Super Admin has exclusive access to the Network Admin dashboard, where settings like site creation, registration, and domain mapping are configured. Site Administrators cannot access these settings.
This hierarchy ensures that network-level changes remain in trusted hands, while site-level tasks are delegated efficiently.
Managing User Roles Across a Network of Sites
User roles in Multisite are managed at two levels: the network level and the individual site level. A user can have different roles on different sites, and their network role (Super Admin) is separate from any site-specific role. Key management practices include:
Adding Users to Sites: Super Admin can add users to any site with a specific role (e.g., Editor, Author) via the Network Admin or directly from the site’s dashboard. Site Administrators can only add users to their own site if the network allows new user registration.
Role Propagation: Capabilities do not automatically propagate across sites. A user assigned as Administrator on Site A does not gain any privileges on Site B unless explicitly added. Super Admin abilities are global and override site-level restrictions.
Bulk User Management: Super Admin can use the Network Admin’s Users screen to add, remove, or bulk-edit users across all sites. This is useful for adding a content editor to multiple sites simultaneously.
Subscriber Management: In networks with open registration, users are added as Subscribers by default to the main site. Super Admin can then assign them to other sites or modify their network-level role.
To streamline management, consider using a table to compare common user roles across a network:
Role
Scope
Typical Capabilities
Super Admin
Network-wide
Manage all sites, users, plugins, themes, network settings
Site Administrator
Single site
Manage site settings, content, users, plugins/themes (if enabled)
Editor
Single site
Publish, edit, delete posts and pages
Author
Single site
Write and publish own posts
Capabilities Unique to Multisite Installations
Multisite introduces several capabilities that do not exist in standard WordPress. These are exclusive to the Super Admin role and are essential for network oversight:
manage_network: Grants access to the Network Admin dashboard and all network-level settings.
manage_network_users: Allows adding, editing, deleting, and promoting users across the entire network.
manage_network_plugins: Enables installing, activating, deactivating, and deleting plugins network-wide.
manage_network_themes: Permits installing, enabling, disabling, and deleting themes across all sites.
manage_network_options: Allows modifying network-wide settings such as registration, site creation, and upload space limits.
create_sites: Enables creating new sites within the network, typically via the Network Admin or a front-end form.
delete_sites: Grants the ability to delete entire sites from the network, including all their content.
manage_sites: Provides access to list and manage all sites, including editing site details and settings.
These capabilities are hard-coded and cannot be assigned to other roles without custom code. Understanding them helps Super Admins maintain security and control, ensuring that only authorized users can perform network-critical actions.
Troubleshooting Common Role and Capability Issues
Even with a solid grasp of WordPress roles and capabilities, problems can arise that disrupt site management. Understanding WordPress Capabilities and Roles is essential for diagnosing and resolving these issues efficiently. Below are solutions for three frequent scenarios: lost admin access, missing capabilities after plugin changes, and corrupted role definitions.
Recovering from a Locked-Out Administrator Account
Losing administrator access is one of the most alarming issues a site owner can face. This often occurs after a plugin or theme update that modifies user capabilities, or after accidentally demoting your own account. Recovery requires direct database access, typically via phpMyAdmin or a database management tool provided by your host.
Access your database through phpMyAdmin or a similar tool. Locate the wp_users table and find your user record (look for your email or username).
Note your user ID from the ID column (usually a small number like 1).
Open the wp_usermeta table and find the row where user_id matches your ID and meta_key is wp_capabilities (or wp_X_capabilities if your table prefix is custom).
Edit the meta_value field. Replace its contents with the following serialized string: a:1:{s:13:"administrator";b:1;}
Save the change and log out of your database tool. You should now be able to log in with full administrator rights.
If you cannot access phpMyAdmin, you can also use a recovery script like emergency.php from a trusted source, but database editing is the most reliable method.
Fixing Missing Capabilities After Plugin Deactivation
When you deactivate a plugin that added custom capabilities to roles, those capabilities often remain assigned but become “orphaned”—they exist in the database but no longer have a corresponding plugin to handle them. This can cause confusion if you later reactivate the plugin or switch to an alternative. The solution is to clean up the orphaned capability assignments.
Use a plugin like User Role Editor to manually delete the orphaned capability from affected roles
After deactivating a plugin that added custom capabilities
Restore default caps
Reset the role to its default state using a plugin or code snippet
When a plugin has overwritten core capabilities (e.g., removed edit_posts from Editor)
Reassign missing caps
Add the missing capability back via a role editor plugin or by editing the role in code
When a plugin update inadvertently removed a capability from a role
To remove orphaned capabilities manually, use a plugin like User Role Editor. Navigate to Users > User Role Editor, select the affected role, find the orphaned capability (it will appear in the list but may be unused), and uncheck it. Save the role. This prevents confusion and potential conflicts when other plugins check for those capabilities.
Using a Fresh Installation to Reset Role Definitions
If role definitions become severely corrupted—for example, after multiple plugin conflicts or manual database edits—the most reliable fix is to reset roles to their WordPress defaults. A fresh installation is not always necessary; you can reset roles programmatically without losing content.
Back up your database and files before proceeding.
Install a plugin like “WordPress Reset” or “WP Reset” (choose one that specifically resets roles, not the entire site). Alternatively, use a code snippet in your theme’s functions.php file (temporarily) to call populate_roles().
Run the reset via the plugin’s interface or by triggering the code snippet once. This will restore all built-in roles (Administrator, Editor, Author, Contributor, Subscriber) to their default capabilities, removing any custom additions or deletions.
Remove the code snippet if you used one, and verify that your admin account still has full access. You may need to re-add any custom roles or capabilities you previously created.
This method is ideal when you have made extensive role edits that have broken site functionality, such as preventing users from uploading media or publishing posts. It is also useful after a plugin has irreversibly altered role definitions.
Advanced Use Cases: Custom Post Types and Capabilities
Understanding WordPress Capabilities and Roles is essential for building secure, user-specific websites. When you introduce Custom Post Types (CPTs), the default role system often falls short. You need to assign custom capabilities for CPTs to restrict access based on user roles, ensuring that only authorized users can create, edit, publish, or delete specific content types. This section explains how to register CPTs with custom capabilities, map those capabilities to existing roles, and create role-specific access for custom taxonomies.
Registering Custom Post Types with Custom Capabilities
To control access for a CPT, you must define custom capabilities during registration. Use the register_post_type() function with the capabilities and capability_type arguments. Set capability_type to a custom value (e.g., 'project'), which automatically generates a set of capabilities like edit_project, publish_projects, delete_others_projects, and more. You can also manually map each capability using the capabilities array for precise control.
Always set map_meta_cap to true to allow WordPress to handle complex permissions (e.g., editing own vs. others’ posts).
Use descriptive capability names that match your CPT (e.g., 'edit_product' for a product CPT).
Test the registration thoroughly; missing capabilities can break access for all users.
Mapping Capabilities for CPTs to Existing Roles
After registering the CPT, you must grant the custom capabilities to existing WordPress roles (e.g., Administrator, Editor, Author). Use the get_role() function and the add_cap() method. This step ensures that users in a role inherit the necessary permissions for the CPT.
Example: Giving Editors full project access and Authors limited access:
Granting edit_others_posts to Authors — this allows them to edit any project, which may be unintended.
Forgetting to add read capabilities, causing users to see a blank list.
Using add_cap() on every page load; run it once during theme activation or plugin setup to avoid performance issues.
Creating Role-Specific Access for Custom Taxonomies
Custom taxonomies (e.g., categories for your CPT) also require capability control. When registering a taxonomy with register_taxonomy(), use the capabilities argument to assign custom capabilities. Then map these to roles similarly to CPTs.
function add_taxonomy_caps() {
$editor_role = get_role( 'editor' );
if ( $editor_role ) {
$editor_role->add_cap( 'manage_project_types' );
$editor_role->add_cap( 'edit_project_types' );
$editor_role->add_cap( 'delete_project_types' );
$editor_role->add_cap( 'assign_project_types' );
}
$author_role = get_role( 'author' );
if ( $author_role ) {
$author_role->add_cap( 'assign_project_types' );
// Authors can only assign terms, not manage or delete them
}
}
add_action( 'admin_init', 'add_taxonomy_caps' );
Best practices for taxonomy capabilities:
Keep taxonomy capabilities separate from post capabilities to avoid confusion.
Allow only Editors and above to manage_terms (create/rename terms) to maintain data integrity.
Test each role’s ability to assign terms via the post editor; incorrect capabilities may hide the taxonomy metabox.
By implementing these advanced techniques, you achieve granular control over your WordPress site, ensuring that Understanding WordPress Capabilities and Roles translates into real-world security and workflow efficiency.
The WordPress ecosystem is actively evolving to address modern access control needs, with the core development team and community driving improvements to roles and capabilities. As websites become more complex—supporting multi-user content workflows, headless architectures, and enterprise integrations—the current system is being reimagined for greater flexibility, security, and scalability. Below, we explore the most significant planned changes, community proposals, and integration trends shaping the future of Understanding WordPress Capabilities and Roles.
Upcoming Changes in WordPress Core Role Management
WordPress core development is focused on refining the built-in role management system to reduce friction for administrators and developers. Key upcoming changes include:
Enhanced UI for Role Editing: A redesigned user interface in the WordPress admin panel will allow administrators to view, add, or remove capabilities from roles without requiring third-party plugins. This aims to simplify common tasks like granting “edit_others_posts” to a custom editor role.
Role Cloning and Reset Features: Core may introduce native functions to clone existing roles (e.g., duplicating “Editor” as a starting point for a custom role) and reset roles to their default state after modifications, reducing the risk of configuration errors.
Capability Inheritance Improvements: The hierarchical model for roles (e.g., Administrator inheriting all capabilities) will be clarified and extended, allowing more precise control over which capabilities cascade to child roles. This addresses community feedback about unexpected permissions for secondary administrators.
Deprecation of Legacy Capabilities: Outdated capabilities like “unfiltered_html” may be deprecated or restricted to specific user contexts, with new capabilities replacing them to align with modern security best practices.
These changes are expected to roll out incrementally across major WordPress versions, with testing available through beta releases. Developers should monitor the Make WordPress Core blog for detailed specifications and timeline updates.
Community Discussions on More Granular Permissions
The WordPress community has long debated the need for granular permissions beyond the current role-based system. Active discussions and proposals include:
Per-Post and Per-Page Capabilities: A widely requested feature is the ability to assign permissions to individual posts or pages, such as allowing a user to edit only specific articles without granting broader “edit_posts” access. This would enable fine-grained content moderation for news sites or collaborative blogs.
Dynamic Capability Groups: Proposals suggest grouping capabilities into logical sets (e.g., “SEO Management” combining “edit_meta_keywords” and “manage_redirects”) that can be assigned to roles or individual users. This reduces complexity when managing dozens of capabilities.
Capability Templates for Common Use Cases: Community-driven templates for roles like “Contributor Plus” or “Site Editor” (for block editor access) are being standardized, with core potentially adopting them as optional presets. This lowers the learning curve for site owners unfamiliar with capabilities.
Time-Based and Conditional Permissions: Advanced proposals include granting capabilities for limited durations (e.g., temporary “publish_posts” during a content sprint) or based on user metadata (e.g., location or team membership). While not yet in core, these ideas are being explored via plugins and may influence future core APIs.
The community encourages participation through Trac tickets, Slack channels, and WordCamp contributions. Feedback on these proposals directly shapes the roadmap for Understanding WordPress Capabilities and Roles.
Integration with External Authentication and SSO Systems
As enterprises adopt WordPress for large-scale deployments, integration with external authentication and Single Sign-On (SSO) systems is becoming a priority. Future developments include:
Automatically map external user groups (e.g., “Marketing Team”) to WordPress roles (e.g., “Editor”).
Reduces manual role assignment; enables centralized user management.
SAML/OAuth 2.0
Allow users to log in via Google Workspace, Okta, or Azure AD, with roles synced from identity providers.
Supports enterprise SSO; roles can be dynamically assigned via claims or attributes.
Keycloak/Custom IDPs
Define custom capabilities in the identity provider and pass them to WordPress via API tokens.
Enables granular permissions based on external roles, such as “Content Approver.”
These integrations will likely be facilitated through new core hooks and filters, allowing plugins to handle authentication while core manages role synchronization. For developers, this means preparing for standards like OpenID Connect and ensuring custom roles are compatible with external mapping logic. The goal is a seamless experience where administrators manage permissions centrally, reducing duplication and security gaps.
By embracing these changes, the WordPress ecosystem will offer more robust access control, making it easier to implement complex permission models while maintaining the platform’s renowned simplicity. Staying informed about these developments is essential for anyone invested in Understanding WordPress Capabilities and Roles.
WordPress capabilities and roles form a permission system that controls what users can do on a site. A role is a set of capabilities assigned to a user. For example, the Administrator role has all capabilities, while a Subscriber can only manage their profile. This system allows site owners to grant appropriate access levels, enhancing security and workflow efficiency.
How many default user roles does WordPress have?
WordPress has five default user roles: Super Admin (multisite only), Administrator, Editor, Author, Contributor, and Subscriber. Each role has a predefined set of capabilities. Super Admin has the highest privileges across a network, while Subscriber has the fewest. These roles cover most common use cases for content management and site administration.
Can I create custom user roles in WordPress?
Yes, you can create custom user roles in WordPress using plugins like User Role Editor or via code with functions like add_role(). Custom roles allow you to define specific capabilities, such as editing only certain post types or accessing specific plugins. This flexibility helps tailor permissions to your site's unique needs without giving unnecessary access.
What is the difference between a capability and a role?
A capability is a specific permission, such as 'edit_posts' or 'publish_pages'. A role is a collection of capabilities bundled together. For instance, the Editor role includes capabilities like 'edit_others_posts' and 'publish_pages'. Users are assigned a role, not individual capabilities, though you can add or remove capabilities from roles programmatically.
How do I check a user's capabilities in WordPress?
You can check a user's capabilities using the current_user_can() function or the user_can() function. For example, if ( current_user_can( 'edit_posts' ) ) { // allow editing }. These functions check if the current user or a specific user has a given capability, making it easy to conditionally display content or restrict actions.
What happens if I assign a user a role with too many capabilities?
Assigning a user a role with excessive capabilities can pose a security risk, as they may inadvertently or maliciously modify critical site settings, delete content, or install plugins. It's best to follow the principle of least privilege, giving users only the capabilities necessary for their tasks. Regularly review roles and use plugins to audit permissions.
How do WordPress roles work on multisite networks?
On WordPress multisite, the Super Admin role has network-wide capabilities, such as managing sites, users, and plugins across the network. Each site within the network has its own set of roles (Administrator, Editor, etc.) that apply only to that site. This allows centralized control while giving site administrators autonomy over their individual sites.
Yes, you can edit default WordPress roles by adding or removing capabilities using code or plugins. For example, you might remove the 'delete_published_posts' capability from the Author role to prevent authors from deleting their own posts. However, be cautious as changes affect all users with that role. It's often safer to create custom roles instead.
WordPress shortcodes are small, bracketed code snippets that allow users to execute predefined functions within posts, pages, or widgets without writing any PHP. Introduced in WordPress 2.5, these compact tags—like
or —replace complex code with a simple, user-friendly syntax. They enable anyone to embed dynamic content such as galleries, videos, forms, or custom layouts, even if they have no programming experience. Shortcodes remain a cornerstone of WordPress extensibility, bridging the gap between powerful backend functionality and front-end simplicity.
What Exactly Is a Shortcode?
A shortcode is a WordPress-specific macro that expands into a larger piece of content or functionality. It is enclosed in square brackets, typically with an opening and closing tag, and may include parameters for customization. For example, displays a three-column gallery of specific images. When WordPress renders a page, it parses these shortcodes and replaces them with the output generated by the associated PHP function.
Shortcodes can be self-closing (e.g., [youtube]), enclosing content (e.g., [highlight]text[/highlight]), or nested within one another. They are defined in a theme’s functions.php file or via a plugin, and their behavior is entirely controlled by the developer who creates them. This abstraction allows site owners to add complex elements—like contact forms, pricing tables, or social media feeds—by simply typing a shortcode into the editor.
Key characteristics of shortcodes include:
Simplicity: No HTML, CSS, or PHP knowledge required for end users.
Reusability: A single shortcode can be used across multiple pages with different parameters.
Extensibility: Developers can create custom shortcodes for any purpose.
Compatibility: Works with classic editor, block editor (via shortcode block), and widgets.
History and Evolution in WordPress
Shortcodes were introduced in WordPress 2.5 (released March 2008) as a solution to the growing need for embedding media and dynamic content without cluttering the visual editor with raw code. The original implementation included only a few core shortcodes:
<h3>Why Shortcodes Remain Relevant Today</h3>
<p>Even with the block editor’s advanced capabilities, shortcodes persist for several practical reasons. First, they are deeply embedded in thousands of popular plugins—including WooCommerce, Contact Form 7, and Gravity Forms—that rely on shortcodes for embedding forms, products, and dynamic elements. Replacing these would require a complete rewrite of legacy code.</p>
<p>Second, shortcodes offer a lightweight, text-based solution that works reliably across all WordPress environments, including custom themes and plugins that do not support blocks. They are also easier to copy and paste between sites, making them ideal for developers managing multiple installations.</p>
<p>Third, shortcodes provide granular control for developers. A single shortcode can execute complex PHP logic, query databases, or integrate with external APIs, all while exposing only simple parameters to the user. This separation of concerns keeps the front end clean and maintainable.</p><p class="amp-related-reading"><strong>Related reading:</strong> <a href="https://azimuddin.bd/blog/how-much-does-wordpress-cost/">How Much Does WordPress Cost ? The Complete Enterprise Pricing and Budget Blueprint</a></p>
<p>Finally, shortcodes are inherently portable. They can be used in widgets, template files (via <code>do_shortcode()</code>), and even within custom fields. This flexibility ensures they remain a valuable tool for custom development, especially in scenarios where blocks are overkill or incompatible.</p><p class="amp-related-reading"><strong>Related reading:</strong> <a href="https://azimuddin.bd/blog/wordpress-and-graphql-a-match-made-in-heaven/">WordPress and GraphQL: A Match Made in Heaven</a></p>
<p>In summary, shortcodes are not a relic of the past but a mature, stable feature that continues to empower both beginners and advanced users. They provide a reliable bridge between simplicity and power, making them an enduring part of the WordPress ecosystem.</p>
<h2>How Shortcodes Work Under the Hood</h2>
<p>WordPress shortcodes are a deceptively simple feature that belies a sophisticated parsing and execution engine. When a user inserts a shortcode like <code></code> into post content, the system does not simply pass it through to the browser. Instead, WordPress intercepts the content, scans it for bracketed tags, matches them to registered handler functions, and then replaces the shortcode with processed HTML output. This entire process is orchestrated by the core <code>do_shortcode()</code> function and the WordPress hook system, which together ensure that shortcodes are evaluated at the correct stage of content rendering.</p>
<h3>The Parsing and Execution Flow</h3>
<p>The lifecycle of a shortcode begins when WordPress prepares post content for display. The <code>the_content</code> filter triggers <code>do_shortcode()</code>, which performs the following steps:</p>
<ul>
<li><strong>Tokenization:</strong> The function uses a regular expression to identify all patterns matching the shortcode syntax—square brackets containing a tag name, optional attributes, and an optional closing tag.</li>
<li><strong>Validation:</strong> Each detected tag name is checked against a global registry of registered shortcodes. If the tag is not registered, it is left as plain text (preventing errors).</li>
<li><strong>Attribute Parsing:</strong> For matched shortcodes, the raw attribute string (e.g., <code>ids="1,2,3" style="wide"</code>) is parsed into an associative array using <code>shortcode_parse_atts()</code>. This function handles quoted values, unquoted values, and boolean attributes.</li>
<li><strong>Handler Invocation:</strong> The registered callback function (usually a PHP function or class method) is called with the parsed attributes, the shortcode content (if any), the tag name, and the original shortcode string. The handler returns the final HTML.</li>
<li><strong>Replacement:</strong> The original shortcode string in the content is replaced with the returned HTML. For nested shortcodes, this process recurses until all shortcodes are resolved.</li>
</ul>
<p>The <code>do_shortcode()</code> function itself is called multiple times during a page load—once for post content, once for widget text, and often for custom fields or theme templates. This hook-driven design allows developers to control when and where shortcodes are processed.</p>
<h3>Built-in vs. Custom Shortcodes</h3>
<p>WordPress ships with a handful of built-in shortcodes that handle common media and formatting tasks. These are automatically registered and available in any installation:</p>
Custom shortcodes, by contrast, are defined by theme or plugin developers using add_shortcode(). This function accepts two parameters: the shortcode tag name and a callback function. The key difference is that built-in shortcodes are tightly integrated with WordPress core features (like media handling), while custom shortcodes can perform any task—from displaying a contact form to fetching external API data. Developers must also manually handle security, escaping, and output buffering for custom shortcodes, as WordPress does not sanitize the returned HTML.
Shortcode Attributes and Their Defaults
Attributes give shortcodes flexibility, allowing users to customize output without editing code. When writing a shortcode handler, developers define default values for each attribute, which are merged with user-supplied values using shortcode_atts(). This function ensures that missing attributes fall back to sensible defaults and that unknown attributes are silently ignored (unless the developer chooses to capture them).
In this example, the shortcode [message_box type="warning" title="Caution"]Proceed carefully.[/message_box] would produce a warning-styled box. The shortcode_atts() function ensures that if a user omits the type attribute, it defaults to "info", and if they omit title, it defaults to "Note". This pattern prevents broken layouts and keeps the shortcode robust for non-technical users.
Built-in WordPress Shortcodes You Should Know
WordPress ships with several native shortcodes that allow you to embed media, format captions, and display galleries without writing any code. These shortcodes are reliable, consistently supported across themes, and require no plugins. Understanding them helps you create rich content quickly while keeping your markup clean. Below, we cover the most useful built-in shortcodes, organized by functionality.
The shortcode lets you embed audio files directly into posts or pages. It supports common formats like MP3, OGG, WAV, and M4A. You can specify a single file or multiple fallback sources. Typical parameters include src (the audio file URL), loop (set to “on” to repeat), and autoplay (set to “on” to start automatically). Example:
The shortcode works similarly for video files, supporting MP4, WebM, and OGV formats. Key parameters include src, poster (a preview image URL), width, height, and preload. You can also specify multiple sources for browser compatibility. Example:
The
shortcode displays a set of images attached to the post or from specific IDs. Common parameters include ids (comma-separated attachment IDs), columns (number of columns, default 3), size (thumbnail, medium, large, full), and link (to attachment page or media file). Example:
The shortcode adds a styled caption to an image or other inline content. It accepts parameters like id (CSS ID for the caption), align (left, right, center, none), and width (matching the media width). The content between the opening and closing tags is the media plus the caption text. Example:
<img src="photo.jpg" alt="" /> A beautiful sunset over the hills.
Note that is an alias for and works identically; it exists for backward compatibility.
Legacy Shortcodes Still in Use
Several older shortcodes remain functional in modern WordPress, though they are less commonly used. The shortcode, as mentioned, is a direct synonym for and was introduced earlier. Another legacy shortcode is in its older form, which required explicit width and height parameters (e.g., ), but this syntax is now deprecated in favor of the simpler wrapper version. The
shortcode also had older parameters like orderby and order that still work but are less relevant now that WordPress uses attachment IDs. Additionally, the and shortcodes replaced the older shortcode for single-file playback, though is still supported for creating playlists. These legacy shortcodes are maintained to avoid breaking existing content, so you can safely use them if your site relies on older formatting.
Below is a comparison table of the most common built-in shortcodes, their primary purpose, and typical parameters:
By mastering these built-in shortcodes, you can add rich media and formatting to your content without relying on third-party plugins. They are lightweight, secure, and guaranteed to work with any standard WordPress installation.
Creating Your First Custom Shortcode
Shortcodes are one of the most powerful features in WordPress, allowing you to embed dynamic content or complex functionality with a simple snippet like [my_shortcode]. Creating your own custom shortcode is straightforward and can save you countless hours of repetitive work. In this section, you will learn how to register a shortcode, build a basic output function, and test it to ensure it works correctly. All code examples can be added to your theme’s functions.php file or a custom plugin.
Registering a Shortcode with add_shortcode()
The first step is to register your shortcode using the add_shortcode() function. This function takes two parameters: the shortcode name (what users will type inside brackets) and a callback function that returns the output. The callback function will be executed whenever WordPress encounters your shortcode in post content, widgets, or theme files.
Shortcode names should be lowercase and use hyphens or underscores for readability (e.g., styled_button or styled-button).
Avoid using names that conflict with existing WordPress or plugin shortcodes. Check the WordPress Codex or use a unique prefix.
The callback function must return the output, not echo it. If you echo the content, it will appear before the rest of the page content.
You can register multiple shortcodes in the same file by calling add_shortcode() multiple times.
Building a Basic Output Function
Once registered, you need to build the callback function that generates the HTML or text for your shortcode. Let’s create a practical example: a styled button shortcode that accepts optional attributes like url, text, and color.
Here is a complete example for a [styled_button] shortcode:
After adding your shortcode code to functions.php or a plugin file, you must test it thoroughly. Follow these steps to ensure everything works:
Clear any caching: If you use a caching plugin or server-side cache, clear it after making changes.
Insert the shortcode in a post or page: Go to the WordPress editor, add your shortcode (e.g., [current_year] or [styled_button]), and preview the page.
Check the front end: View the published page to see if the output appears correctly. For the styled button, inspect the HTML to ensure the link and class are present.
Test with attributes: For attribute-based shortcodes, try different combinations to verify they work. For example, test [styled_button url="" text="" color=""] with empty values to see how your defaults handle it.
Common issues and fixes:
Issue
Likely Cause
Solution
Shortcode displays as plain text
Shortcode not registered or file not saved
Double-check the add_shortcode() call and ensure functions.php is saved. Verify the shortcode name matches exactly.
Output appears before content
Callback function uses echo instead of return
Replace echo with return in your callback function.
Attributes not working
Missing shortcode_atts() or typos in attribute names
Ensure you call shortcode_atts() and that the attribute names in the shortcode match those in the function.
White screen or PHP error
Syntax error in your code
Enable WP_DEBUG in wp-config.php to see error messages. Check for missing semicolons or brackets.
For advanced debugging, you can temporarily add error_log( print_r( $atts, true ) ); inside your callback to log attributes to the debug file. Always remove debugging code after testing. Once your shortcode works reliably, you can reuse it across your entire site with confidence.
Adding Parameters and Attributes to Shortcodes
Static shortcodes that always produce the same output are rarely useful in real-world WordPress development. To create flexible, reusable shortcodes, you need to accept parameters—also called attributes—from the user. These attributes allow content editors to customize the output without editing code. For example, a [button] shortcode might accept a color attribute, a size attribute, and a link attribute. This section explains how to define, sanitize, and use attributes effectively, ensuring your shortcodes are both powerful and secure.
Defining and Sanitizing Attributes
When you register a shortcode, WordPress passes three parameters to your callback function: $atts (an associative array of attributes), $content (any enclosed content), and the $tag (the shortcode name). The $atts array is where all user-supplied attributes appear. To define which attributes your shortcode accepts, you simply access them by key from this array.
However, never trust user input. Always sanitize attributes before using them in output or database queries. Sanitization protects your site from malicious data and ensures consistent formatting. Common sanitization functions include:
If you expect an attribute to be one of a few allowed values (e.g., small, medium, large), use in_array() to validate against a whitelist. This approach is more secure than simply sanitizing, as it rejects unexpected values entirely.
Using shortcode_atts() for Defaults
Users may omit attributes when using your shortcode. To handle this gracefully, use the shortcode_atts() function. This function merges user-provided attributes with an array of default values. If a user omits an attribute, the default value is used. If they provide a value, it overrides the default. The syntax is:
The third parameter, 'button', is the shortcode name. This allows other developers to filter the defaults via the shortcode_atts_button filter hook. After this call, $atts['color'], $atts['size'], and $atts['link'] are guaranteed to exist with valid values.
Attributes truly shine when they drive conditional logic in your shortcode’s output. By checking attribute values, you can change the HTML structure, CSS classes, or even the entire template. For instance, a [profile_card] shortcode might accept a layout attribute with values horizontal or vertical. Your callback could then render different markup:
More complex conditionals can involve multiple attributes. Consider a [pricing_table] shortcode with attributes featured (boolean), currency, and price. You might use:
Boolean checks:if ( $atts['featured'] === 'yes' ) to add a highlight class.
String comparisons:if ( $atts['currency'] === 'usd' ) to prefix with $.
Numeric comparisons:if ( (int) $atts['price'] > 100 ) to show a “premium” badge.
Attribute-based logic also enables dynamic CSS. For example, you can output inline styles using the color attribute:
Remember to always escape attribute values for safe use in HTML attributes with esc_attr(). By combining shortcode_atts() with careful sanitization and conditional logic, you can build shortcodes that adapt to user input while maintaining security and predictability. This transforms a static snippet into a versatile tool for content creators.
Enclosing Content with Shortcodes
WordPress shortcodes come in two primary forms: self-closing and enclosing. Understanding the distinction is essential for building flexible, content-rich features. A self-closing shortcode, such as
or
Error: Contact form not found.
, does not wrap around any user content—it simply outputs predetermined data. An enclosing shortcode, by contrast, surrounds content like text, HTML, or other shortcodes, allowing you to manipulate or format that content dynamically. This guide focuses on enclosing shortcodes, which empower you to create custom layouts, alerts, columns, and more by capturing and processing wrapped content.
Self-Closing vs. Enclosing Shortcodes
The critical difference lies in how each shortcode handles content. Self-closing shortcodes are straightforward: they accept attributes but have no opening and closing tags. For example:
[display-posts category="news" count="5"]
This outputs a list of posts without wrapping any user-provided text. Enclosing shortcodes, however, use a pair of tags:
[highlight]Important announcement[/highlight]
Here, the shortcode captures the text “Important announcement” and can apply formatting, such as adding a yellow background or bold styling. The key is that the content between the tags is passed to the shortcode function as a parameter, typically named $content. Without this parameter, the wrapped content is ignored. Enclosing shortcodes are ideal for use cases like:
Building responsive column layouts (e.g., two-thirds and one-third grids)
Wrapping text in custom containers with CSS classes or inline styles
Adding interactive elements like toggle sections or tabs
While self-closing shortcodes are simpler, enclosing shortcodes offer far greater flexibility for content authors who need to apply consistent formatting without writing raw HTML.
Processing and Outputting Enclosed Content
To create an enclosing shortcode, you register it using add_shortcode() and define a callback function that accepts three parameters: $atts (attributes), $content (enclosed content), and $tag (the shortcode name). The $content parameter is where the magic happens. Consider this practical example of a “notice” shortcode that wraps text in a styled alert box:
When a user writes [notice type="warning"]Please review the guidelines.[/notice], the callback captures “Please review the guidelines.” as $content. The function then:
Applies wpautop() to convert line breaks into paragraphs for proper formatting
Runs do_shortcode() to process any nested shortcodes within the content
Returns the content wrapped in a <div> with dynamic CSS class based on the type attribute
This pattern is the foundation for countless enclosing shortcodes. Always remember to call do_shortcode() on $content to support nesting, and use wpautop() to maintain readability. For column layouts, you might split the content using custom delimiters or pass multiple attributes to define widths.
Nesting enclosing shortcodes—placing one shortcode inside another—can create powerful composite structures, but it requires careful implementation. For example, you might nest a [column] shortcode inside a [row] shortcode:
To ensure this works reliably, follow these best practices:
Best Practice
Explanation
Always call do_shortcode() on $content
This processes nested shortcodes inside your enclosing shortcode. Without it, nested shortcodes remain unparsed.
Use shortcode_atts() for default attributes
Provides fallback values and prevents errors when attributes are omitted.
Avoid deep nesting (more than 3 levels)
Deep nesting can cause performance issues and make debugging difficult. Use custom blocks or reusable templates instead.
Escape output properly
Use esc_attr() for attributes and wp_kses_post() for content to prevent XSS vulnerabilities.
Test with the Classic Editor
The Block Editor handles shortcodes differently; verify your shortcodes work in both editors.
Additionally, avoid relying on global state when processing nested shortcodes. Each instance should be self-contained. For complex layouts, consider using a shortcode API that tracks depth to prevent infinite loops. Finally, document your shortcodes clearly for end users, specifying which shortcodes can be nested and what attributes are required. By adhering to these practices, you can build enclosing shortcodes that are robust, secure, and user-friendly.
Advanced Shortcode Techniques
Once you master basic shortcodes, advanced techniques unlock powerful dynamic functionality. This section covers shortcodes that query the database, conditionally enqueue scripts and styles, and cache output for optimal performance. These methods let you build custom features—like pulling content from custom post types or integrating third-party APIs—while maintaining a fast, scalable site.
Dynamic shortcodes often need to fetch data from custom post types, taxonomies, or user meta. To do this safely and efficiently, use WordPress’s built-in WP_Query class inside your shortcode function. Always validate and sanitize attributes to prevent injection attacks.
Example structure for a shortcode that lists recent posts from a custom post type:
Limit queries with posts_per_page and no_found_rows.
Reusability
Accept post_type as an attribute for flexibility.
For third-party API integration, use wp_remote_get() inside the shortcode, but always cache the response (see caching section below). Avoid making API calls on every page load—store results in transients.
Enqueuing Scripts and Styles Conditionally
Shortcodes that rely on JavaScript or CSS should only load those assets when the shortcode is present on the page. This prevents bloating every page with unused code.
Implementation steps:
Register your script or style in functions.php using wp_register_script() or wp_register_style().
Inside your shortcode function, call wp_enqueue_script() or wp_enqueue_style() conditionally—only when the shortcode is executed.
For JavaScript that depends on DOM elements, pass data via wp_localize_script().
This ensures assets load only on posts/pages containing [my_shortcode]. For advanced cases, use has_shortcode() in wp_head to enqueue earlier, but the above method works for most scenarios.
Caching Shortcode Output for Speed
Database queries and API calls inside shortcodes can slow down page loads. Caching the output reduces server load and improves user experience. WordPress offers two primary caching mechanisms: transients and the object cache.
Transient API approach:
Generate a unique cache key based on shortcode attributes (e.g., my_shortcode_output_' . md5( serialize( $atts ) )).
Check get_transient( $cache_key ); if it exists, return cached HTML.
Otherwise, build the output, store it with set_transient( $cache_key, $output, HOUR_IN_SECONDS ), and return the output.
Match to content freshness (e.g., 1 hour for API data, 24 hours for static lists).
Cache invalidation
Clear transients when related content is updated using delete_transient() in save_post hooks.
Object cache
Use wp_cache_get/set for persistent caching with Redis or Memcached.
For high-traffic sites, combine transient caching with a page-level cache (e.g., WP Rocket or Varnish) to minimize PHP execution entirely. Always test cached output to ensure it updates when expected—especially for shortcodes that display user-specific data, where caching may be inappropriate.
Shortcode Best Practices and Security
WordPress shortcodes are powerful tools for embedding dynamic content, but they also introduce security and performance risks if not implemented carefully. Common vulnerabilities include cross-site scripting (XSS), unauthorized data access, and conflicts with other themes or plugins. Adhering to best practices—such as escaping output, validating input, and using prefixes—ensures your shortcodes remain secure, efficient, and maintainable. Below, we detail key strategies for building robust shortcodes.
Escaping Output and Validating Input
Shortcodes often output user-supplied data or dynamic content. Without proper sanitization, this can lead to XSS attacks, where malicious scripts are injected into your site. Always escape output using WordPress functions. For example:
Escaping HTML: Use esc_html() for plain text, esc_url() for URLs, and esc_attr() for HTML attributes.
Using wp_kses(): When you need to allow specific HTML tags (e.g., <b> or <a>), apply wp_kses() with an allowed tags array. This strips dangerous elements while preserving permitted ones.
Validating attributes: Shortcode attributes (e.g., [my_shortcode color="red"]) should be validated against expected data types. For numeric values, use intval() or floatval(). For strings, restrict to a whitelist of allowed values.
For instance, a shortcode that accepts a “color” attribute should check it against a predefined array like array( 'red', 'blue', 'green' ) and reject invalid entries. This prevents unexpected input from being processed or displayed.
Preventing Shortcode Conflicts with Prefixes
Shortcode names are global in WordPress, meaning two plugins or themes can accidentally register the same shortcode tag, causing one to override the other. To avoid conflicts, always prefix your shortcode names with a unique identifier tied to your project or brand. For example:
Instead of
, use [myplugin_gallery] or [acme_gallery].
Use underscores or hyphens consistently; WordPress accepts both, but underscores are more common in function names.
Check for existing shortcodes with shortcode_exists() before registering yours, and log a warning if a conflict is detected.
The following table compares common naming strategies and their conflict risks:
Shortcode Name
Prefix Used
Conflict Risk
Example Scenario
None
High
Overridden by any plugin using same tag
[my_gallery]
“my_” (generic)
Medium
Could conflict with another “my_” plugin
[acme_gallery]
“acme_” (unique)
Low
Unlikely to be duplicated
[acme-photo-gallery]
“acme-” (unique)
Low
Even more distinctive
Always document your prefix in plugin or theme documentation so users understand the naming convention.
Poorly coded shortcodes can slow down your site by making unnecessary database queries, loading heavy scripts, or processing large datasets. Avoid these common pitfalls:
Direct database calls: Never use wpdb->get_results() or raw SQL inside a shortcode function unless absolutely necessary. Instead, use WordPress caching mechanisms like WP_Query with built-in caching or the Transients API to store results for a set time.
Repeated queries: If your shortcode runs multiple times on a page, cache the output using wp_cache_set() and wp_cache_get() to avoid redundant database hits.
Enqueuing scripts and styles: Only load CSS or JavaScript when the shortcode is present. Use wp_enqueue_script() inside the shortcode handler, but ensure it runs only once by checking a flag (e.g., static $enqueued = false;).
Processing large data: If your shortcode loops through many posts or users, limit results with posts_per_page or implement pagination. For example, [my_list count="10"] restricts output to 10 items.
By prioritizing output escaping, input validation, unique prefixes, and performance optimization, you build shortcodes that are secure, conflict-free, and fast—enhancing both user experience and site reliability.
Even well-written shortcodes can fail unexpectedly. When a shortcode does not render, appears as raw text, or breaks your page layout, the root cause is often a plugin conflict, syntax error, or theme incompatibility. This section will help you diagnose and resolve the most frequent shortcode problems, from missing output to layout disruptions. By following a systematic approach, you can quickly identify whether the issue lies in your code, a third-party extension, or WordPress itself.
Shortcode Not Showing or Appearing as Text
When a shortcode displays as plain text—for example, [my_shortcode] shows exactly that instead of its intended content—the shortcode is not being processed. This usually happens for one of three reasons:
Shortcode is not registered: The function that defines the shortcode may not be active. Verify that the plugin or theme containing the shortcode is enabled and that no fatal errors prevented its registration.
Incorrect syntax: Check for missing brackets, extra spaces inside the brackets, or mismatched closing tags. For example, [my_shortcode /] should not have a space before the slash unless the shortcode specifically supports self-closing syntax.
Shortcode used in an unsupported context: Some shortcodes only work in post content, not in widget areas, custom fields, or theme template files. If you need to use a shortcode in a PHP file, apply do_shortcode().
To test, create a simple test post and paste only the shortcode. If it renders correctly there, the issue is likely with the specific location or theme template where you originally placed it.
Conflicts with Page Builders and Other Plugins
Page builders like Elementor, WPBakery, or Beaver Builder often wrap content in their own processing layers, which can strip or alter shortcode output. Similarly, caching plugins, security plugins, or SEO plugins may interfere with shortcode rendering. Follow these steps to isolate conflicts:
Deactivate all plugins except the one providing the shortcode. If the shortcode works, reactivate plugins one by one until the problem returns.
Switch to a default WordPress theme (e.g., Twenty Twenty-Four) temporarily. If the shortcode works, your theme is likely overriding shortcode output or missing required hooks.
Check page builder settings: In Elementor, for example, ensure that shortcodes are allowed in the widget settings. Some builders have a “Shortcode” widget that requires explicit content.
Review filter priorities: Plugins may use filters like the_content with a priority that runs before or after your shortcode’s expected processing. A conflict can occur if another plugin modifies content at the same priority level. You can adjust filter priority by adding a custom function in your theme’s functions.php file, but only do so if you are confident in the source of the conflict.
Debugging with WordPress Tools and Logs
When visual inspection fails, use built-in WordPress debugging tools and server logs to pinpoint errors. Enable WP_DEBUG in your wp-config.php file to capture PHP notices and warnings that may affect shortcode execution. Add the following code to your wp-config.php file, just before the line that says “That’s all, stop editing!”:
This will log errors to a file named debug.log inside the /wp-content/ directory. After saving the file, reproduce the shortcode issue, then check the log for any related errors. Common entries include “Call to undefined function” (the shortcode’s callback is missing) or “Cannot modify header information” (output started before shortcode processing).
Additionally, use the WordPress Health Check plugin (or the built-in Site Health tool in WordPress 5.2+) to run a diagnostic. It can identify plugin conflicts and server configuration issues without requiring you to manually deactivate everything. For persistent problems, inspect the browser’s developer console for JavaScript errors that might prevent shortcode output from appearing dynamically.
If you still cannot resolve the issue, consider adding a temporary debug function to your theme’s functions.php that prints the shortcode’s attributes and output:
This replaces the original shortcode with a simple debug version. If you see the attributes printed, the shortcode is being called but its original callback may have a bug. Remember to remove this debug code after testing.
WordPress shortcodes have been a staple for adding dynamic content since version 2.5. However, with the introduction of the Block Editor (Gutenberg) in WordPress 5.0, a new paradigm has emerged. Blocks offer a more intuitive, visual way to build content, directly challenging the text-based, bracket-heavy shortcode system. While shortcodes are not obsolete, their role is shifting from primary content-building tool to a legacy and utility function. Understanding this transition is crucial for modern WordPress development.
Shortcodes vs. Blocks: Key Differences
The fundamental difference lies in how each system interacts with the editing experience and the content itself. Below is a comparison of their core attributes:
Aspect
Shortcodes
Blocks
User Experience
Text-based, requires memorization or reference. Users type .
Visual, drag-and-drop interface. Users see a live preview of the gallery.
Content Storage
Stored as raw text in post_content. Hard to parse programmatically.
Stored as structured HTML comments (block markup). Easier to validate and manipulate.
Reusability
Can be reused via custom functions, but no built-in UI for management.
Blocks support reusable blocks with a dedicated management panel in the editor.
Extensibility
Requires PHP functions and hooks. Limited to server-side rendering.
Supports JavaScript (React) for rich, interactive editing and client-side rendering.
Backward Compatibility
Works in both Classic and Block Editor if the plugin/theme supports it.
Native only to Block Editor. Classic Editor requires a separate plugin.
Blocks provide a richer, more accessible experience for content creators, while shortcodes remain a reliable, lightweight option for developers who need simple, server-side functionality without a complex JavaScript build process.
When to Keep Using Shortcodes
Despite the rise of blocks, shortcodes are not obsolete. They remain the best choice in several scenarios:
Backward Compatibility: Existing sites with hundreds of shortcode instances should not be rewritten overnight. Shortcodes ensure those old posts continue to render correctly without manual intervention.
Simple Server-Side Logic: If your functionality only requires PHP (e.g., fetching a count from a database, displaying a simple notice), a shortcode is faster to implement and maintain than a full custom block.
Plugin or Theme Dependencies: Many popular plugins (e.g., Contact Form 7, WooCommerce) still rely on shortcodes for embedding forms, products, or dynamic data. These are stable and well-supported.
Non-Technical Legacy Workflows: Clients or teams accustomed to the Classic Editor may prefer shortcodes for tasks like embedding a Google Map or a call-to-action button, especially if they already have a library of shortcodes.
Low-Resource Environments: Shared hosting or sites with strict performance budgets benefit from shortcodes’ minimal overhead compared to blocks that load JavaScript assets.
Migrating Shortcodes to Custom Blocks
When a shortcode’s functionality becomes complex or heavily used, migrating to a custom block improves the editing experience. Follow these steps for a smooth transition:
Audit Existing Usage: Use a query like SELECT * FROM wp_posts WHERE post_content LIKE '%[your_shortcode%' to identify all posts using the shortcode. Document the attributes and expected output.
Create a Custom Block: Use the @wordpress/create-block package to scaffold a block. Define attributes that mirror your shortcode parameters (e.g., ids, columns).
Implement Rendering: In your block’s render_callback function (PHP), reuse the same logic your shortcode used. This ensures identical output. For example: function render_my_block( $attributes ) { return my_shortcode_function( $attributes ); }
Add a Deprecation Notice: In your shortcode function, add a filter or admin notice to inform users that the shortcode is deprecated and recommend using the block instead. Example: add_action( 'admin_notices', function() { echo '<p>Please use the "My Custom Block" instead of [my_shortcode].</p>'; } );
Test and Roll Out: Test the block in the editor on a staging site, ensuring all attributes work. Then, optionally, run a script to replace shortcode instances with block markup in the database. Use a tool like WP-CLI for bulk replacement.
By following this approach, you preserve backward compatibility while gradually modernizing your content. Shortcodes will not vanish overnight, but their future lies in supporting legacy systems and simple, server-side tasks, while blocks take over the interactive, user-facing content layer.
Frequently Asked Questions
What is a WordPress shortcode?
A WordPress shortcode is a small piece of code, enclosed in square brackets like [my_shortcode], that allows you to add dynamic content or functionality to your posts, pages, or widgets without writing complex code. Shortcodes were introduced in WordPress 2.5 and are commonly used to embed galleries, videos, forms, or custom elements. They can accept parameters (attributes) to customize output, making them flexible for developers and users.
How do I create a custom shortcode in WordPress?
To create a custom shortcode, you need to add a PHP function to your theme's functions.php file or a custom plugin. Use the add_shortcode() function with a unique tag and a callback function that returns the desired output. For example: add_shortcode('mycode', 'my_shortcode_handler');. The callback function can accept attributes (via $atts) and content (via $content). Always sanitize and escape output for security.
Can shortcodes be used in widgets?
Yes, shortcodes can be used in WordPress widgets, but only if the theme or a plugin enables shortcode execution in widgets. By default, WordPress does not process shortcodes in text widgets. To enable this, add add_filter('widget_text', 'do_shortcode'); to your theme's functions.php file. Alternatively, use a widget that supports shortcodes or a plugin like Shortcodes Widget.
What is the difference between self-closing and enclosing shortcodes?
Self-closing shortcodes are written as [shortcode] and do not wrap around any content. They generate output independently. Enclosing shortcodes, written as [shortcode]content[/shortcode], wrap around content and can manipulate or display that content. For example, a self-closing shortcode might display a gallery, while an enclosing shortcode could format text or apply a style to the enclosed content.
How can I pass attributes to a shortcode?
Attributes are passed as key-value pairs within the shortcode tag, like [shortcode attr1="value1" attr2="value2"]. In the callback function, you can retrieve them via the $atts array. Use shortcode_atts() to merge user-provided attributes with defaults. For example: extract(shortcode_atts(array('color' => 'blue', 'size' => 'large'), $atts));. Always validate and sanitize attribute values.
Common reasons include: the shortcode tag is misspelled, the function is not registered (check add_shortcode()), the shortcode is used in a context where it's not processed (e.g., outside the loop), or there's a PHP error. Ensure your callback function returns (not echoes) the output. Also, check if the shortcode is defined in the correct file and that the theme/plugin is active.
Can shortcodes affect site performance?
Yes, poorly coded shortcodes can slow down your site, especially if they make database queries or load resources on every page. To minimize impact, cache shortcode output, avoid heavy loops, and use transients for repeated data. Also, only load shortcode scripts/styles when the shortcode is present using wp_enqueue_script() conditionally.
Are there security risks with shortcodes?
Yes, if not coded securely. Shortcodes that accept user input can be exploited if that input is not sanitized and escaped. Always sanitize attributes with functions like sanitize_text_field() and escape output with esc_html() or esc_attr(). Avoid using shortcodes to execute arbitrary code without proper validation. Also, be cautious with shortcodes that allow HTML or shortcode nesting.
How to Create a Custom Login Page in WordPress: A Complete Step-by-Step Guide
Introduction
The default WordPress login page—featuring the familiar WordPress logo and a plain white background—serves its purpose, but it does little to reflect your brand identity or enhance user trust. Customizing this page can transform a generic entry point into a polished, branded experience that aligns with your website’s design. Beyond aesthetics, a tailored login page also improves security by obscuring default URLs and reducing automated attacks, and it can streamline the user experience for members, clients, or administrators. In this guide, you will learn multiple methods to create a custom login page in WordPress, from simple code snippets to plugin-based solutions, ensuring you can choose the approach that best fits your skill level and needs.
Why Customize Your Login Page?
Customizing your login page offers several tangible benefits that go beyond mere visual appeal. Consider the following advantages:
Branding consistency: Replace the default WordPress logo with your own, match colors to your brand palette, and add custom background images or patterns. This reinforces brand recognition every time users log in.
Improved user experience: Tailor the layout, add helpful instructions, or include links to support pages. A clean, intuitive login page reduces friction for returning users and minimizes confusion.
Enhanced security: By changing the login URL (e.g., from /wp-login.php to a custom slug), you can deter brute-force attacks and bots that target default paths. You can also add CAPTCHA or two-factor authentication prompts directly on the page.
Professionalism: For membership sites, e-commerce stores, or client portals, a custom login page signals that your site is well-maintained and trustworthy, which can increase user confidence and engagement.
These factors make customization a worthwhile investment for any WordPress site owner who values both form and function.
What You’ll Learn in This Guide
This step-by-step article will equip you with the knowledge to implement a custom login page using three distinct approaches. You will learn:
Method 1: Using a Plugin (Recommended for beginners) – How to install and configure a dedicated login page plugin, such as LoginPress or Custom Login Page Customizer, to change logos, colors, and backgrounds without touching code.
Method 2: Adding Code to Your Theme’s functions.php File – How to use PHP and CSS snippets to override default login styles and behavior, ideal for those comfortable with theme editing.
Method 3: Creating a Full Custom Login Page Template – How to build a completely bespoke login page from scratch using a custom page template and WordPress hooks, offering maximum flexibility for advanced users.
Each method includes clear instructions, example code where applicable, and best practices to ensure your customizations are secure and maintainable. You will also find troubleshooting tips for common issues like broken layouts or plugin conflicts.
Before diving into the customization process, ensure you have the following in place:
Prerequisite
Description
WordPress admin access
You need administrator-level permissions to install plugins, edit theme files, or modify core settings.
A child theme (recommended)
If you plan to edit theme files, use a child theme to prevent losing changes when the parent theme updates.
Basic knowledge of HTML/CSS
For code-based methods, familiarity with CSS selectors and PHP hooks will be helpful, though not strictly required for the plugin method.
Backup of your site
Before making any changes, create a full backup of your database and files to restore if something goes wrong.
FTP or file manager access
Necessary for editing theme files directly if you choose the code-based methods.
With these prerequisites met, you are ready to proceed. The next sections will walk you through each method in detail, starting with the simplest plugin-based approach.
Before you decide how to create a custom login page in WordPress, it is essential to understand the default system you are replacing. The standard WordPress login page, located at /wp-login.php, has served as the gateway to the admin area since the platform’s inception. While functional, this page was designed for utility, not user experience or branding. Recognizing its structure, styling, and limitations will clarify why customization is often a necessary improvement for modern websites.
The default login page is accessed by appending /wp-login.php to your site’s domain (e.g., https://yoursite.com/wp-login.php). WordPress also provides an alias: visiting /wp-admin redirects unauthenticated users to this same page. The core structure includes a simple form with fields for username and password, a “Remember Me” checkbox, and a “Log In” button. Below the form, you will find links for lost passwords and, if enabled, registration. The underlying HTML is generated by the wp_login_form() function, which outputs a minimal, table-based layout. This rigid structure means that any visual changes require either core file edits (which are overwritten during updates) or custom development work.
WordPress applies a default CSS stylesheet to the login page, located in /wp-admin/css/login.min.css. This stylesheet produces the familiar white background, blue button, and centered layout. While clean, this design presents several limitations for site owners:
No branding flexibility: The page cannot display your logo, company colors, or custom typography without significant CSS overrides.
Security exposure: The standard /wp-login.php URL is a well-known target for brute force attacks. Customizing the login page often involves changing the URL, which reduces automated attack traffic.
Poor user experience: The default page offers no contextual help, custom error messages, or integration with your site’s navigation. Users may feel disoriented, especially on membership or ecommerce sites.
Limited functionality: You cannot add social login buttons, reCAPTCHA, or custom fields without modifying core files or using complex hooks.
Inconsistent design: If your site uses a unique theme, the login page will look completely disconnected, weakening brand trust.
Common Reasons to Customize
Site owners and developers choose to customize the login page for several practical reasons. Below is a table summarizing the primary motivations and their benefits:
Reason
Benefit
Brand consistency
Match the login page to your site’s theme, reinforcing brand identity and professionalism.
Enhanced security
Change the login URL to /secure-access or similar, reducing automated bot attacks.
Improved user experience
Add helpful instructions, custom error messages, or a password strength indicator.
Functionality expansion
Integrate social login, two-factor authentication, or custom registration fields.
Client projects
Provide white-label solutions for clients, hiding all WordPress branding from end users.
For example, a simple code snippet to change the login logo URL (instead of linking to WordPress.org) can be added to your theme’s functions.php file:
function custom_login_logo_url() {
return home_url();
}
add_filter( 'login_headerurl', 'custom_login_logo_url' );
This small change redirects users who click the login logo to your homepage instead of the WordPress.org site, a common first step in customization. Understanding these foundational elements ensures that when you proceed to create a custom login page, you do so with a clear purpose and a thorough grasp of what you are improving.
Method 1: Using a Plugin to Customize the Login Page
For non-developers who want to quickly change the look of their WordPress login screen without touching code, a plugin is the most efficient route. This method lets you control the visual elements—such as the logo, background, and color scheme—through a user-friendly interface, often with live preview. Below is a step-by-step guide that covers plugin selection, installation, and core customization.
Choosing the Right Plugin
Not all login page plugins are equal. Some offer deep customization while others focus on simplicity. The table below compares two popular, well-supported options to help you decide based on your needs.
Comparison of Popular Login Page Customization Plugins
Feature
Custom Login Page Customizer
WPForms (with Custom Login Page add-on)
Primary focus
Login page appearance only
Form builder with login page customization
Customization interface
WordPress Customizer (live preview)
Drag-and-drop form builder + settings page
Logo upload
Yes, with size control
Yes, via form template settings
Background & color control
Full color picker, gradient, and image options
Limited to background color and link colors
Custom CSS support
Yes
Yes, via additional CSS field
Pricing
Free
Free core plugin; add-on requires paid license (starting around $49/year)
Ease of use for beginners
Very high—all changes visible instantly
Moderate—requires familiarity with form templates
For most users who simply want to brand the login page with a logo and colors, Custom Login Page Customizer is the better choice due to its free price and live preview. If you already use WPForms for other forms and want a unified solution, the WPForms add-on may be worth the investment.
Installing and Activating the Plugin
Log in to your WordPress admin dashboard.
Navigate to Plugins > Add New.
In the search bar, type the name of your chosen plugin (e.g., “Custom Login Page Customizer”).
Locate the plugin in the results—look for the official author name (e.g., “Hardik Kalathiya” for the customizer plugin).
Click Install Now and, once installation completes, click Activate.
For WPForms, install the free WPForms Lite plugin first, then purchase and install the Custom Login Page add-on from your WPForms account dashboard.
Customizing Logo, Colors, and Background
After activation, the customization process varies slightly by plugin. Using Custom Login Page Customizer as the example:
Go to Appearance > Customize in the admin sidebar. You will see a new section labeled “Login Page.”
Click Login Page to open the customization panel. The right side of the screen will show a live preview of your login page.
Logo: Under the “Logo” section, click Select Logo to upload an image from your media library. Adjust the logo width and height using the sliders. A good rule is to keep the logo under 300 pixels wide to avoid overlapping form fields.
Colors: Navigate to the “Colors” section. You can change the form background color, button color, link color, and text color using the built-in color picker. Click each color swatch and choose a hex code or use the eyedropper tool.
Background: In the “Background” section, you have three options: a solid color, a gradient, or a background image. For a gradient, select two colors and a direction (e.g., top to bottom). For an image, click Select Image and choose a high-resolution image (at least 1920×1080 pixels) to ensure it covers the full screen.
Once satisfied, click Publish at the top of the Customizer. Your changes are now live. Visit /wp-login.php on your site to see the result.
With WPForms, the process is similar but accessed via WPForms > Settings > Custom Login Page. You must first create a login form using the form builder, then assign it as your login page template. Colors and background are set in the form’s styling options, though the live preview is less immediate.
This plugin method gives you full control over the login page’s visual identity without writing a single line of code. It is ideal for site owners who want a branded experience for users and administrators alike.
Method 2: Creating a Custom Login Page with a Page Builder
For users who prefer a visual, drag-and-drop approach, using a page builder like Elementor or Beaver Builder offers the most flexible way to design a custom login page without touching code. This method is ideal for beginners and advanced users alike, as it allows full control over layout, branding, and user experience. Below, we walk through the process step by step.
Setting Up a New Page with a Page Builder
Begin by creating a fresh page in your WordPress dashboard. Navigate to Pages > Add New and give your page a title, such as “Login” or “Member Login.” Then, launch your page builder. In Elementor, click the Edit with Elementor button; in Beaver Builder, click Launch Beaver Builder. This will open the builder interface where you can design from scratch.
To ensure the page works as a login destination, you must set it to a blank or full-width template. In the page settings (often found in the builder’s document settings panel), choose Elementor Full Width or Beaver Builder – Blank template. This removes header, footer, and sidebar distractions, giving you a clean canvas. If your theme does not offer these options, use a plugin like Custom Layouts or Header Footer Elementor to hide them manually.
Adding Login Form Widgets and Elements
Once your canvas is ready, add the core component: the login form. Both Elementor and Beaver Builder include dedicated login form widgets. In Elementor, drag the Login widget from the left panel into your design area. In Beaver Builder, use the Login Form module. These widgets automatically handle user authentication and redirects.
Customize the form fields, button text, and styling to match your brand. For example:
Fields: Enable or disable username/email fields, and add a “Remember Me” checkbox.
Button: Change “Log In” to “Sign In” or “Access Account.”
Styling: Adjust colors, fonts, padding, and borders to align with your site’s design.
Enhance the page with additional elements such as:
Social login buttons (if using a plugin like Super Socializer).
For advanced users, you can add custom CSS via the builder’s custom CSS field. For instance, to add a subtle shadow to the form container in Elementor:
After designing your login page, you must tell WordPress to send users there instead of the default /wp-login.php URL. This requires a plugin or a small code snippet. The easiest method is to use a free plugin like WPS Hide Login or Custom Login Page Customizer. With WPS Hide Login, install and activate it, then go to Settings > General. In the “Login URL” field, enter the slug of your custom page (e.g., login). Save changes, and users visiting /wp-login.php will be redirected to your new page.
Alternatively, add this code to your theme’s functions.php file (using a child theme is recommended):
Test the redirect by logging out and visiting yourdomain.com/wp-login.php. You should land on your custom page. For a polished experience, consider adding a redirect after login using the page builder’s form settings or a plugin like LoginWP.
Method 3: Manual Customization via Functions.php
For developers who prefer full control over the WordPress login page, manual customization through the theme’s functions.php file offers the most flexibility. This method bypasses plugin dependencies and allows direct manipulation of login redirects, styling, and functionality. Below is a complete step-by-step guide to implementing this approach.
Backing Up Your Site and Theme Files
Before editing any core files, always create a full backup of your WordPress site, including the database and all theme files. This ensures you can restore functionality if errors occur. Follow these steps:
Database backup: Use a plugin like UpdraftPlus or your hosting control panel’s phpMyAdmin tool to export the database.
Theme files backup: Download a copy of your active theme folder via FTP or your hosting file manager. Navigate to /wp-content/themes/your-theme-name/ and compress the folder.
Child theme recommendation: If you are not already using a child theme, create one. This prevents customizations from being overwritten when the parent theme updates. A child theme requires only a style.css file with a specific header and a functions.php file.
After confirming the backup is stored safely, proceed to edit the functions.php file of your child theme (or parent theme if no child exists). Access it via Appearance > Theme File Editor in the WordPress dashboard or via FTP.
Adding Custom Login Redirect Functions
To override the default login page behavior, add a redirect function to functions.php. This controls where users go after login or logout. Use the following code snippet as a base:
function custom_login_redirect($redirect_to, $request, $user) {
// Check if user exists and has no errors
if (isset($user->roles) && is_array($user->roles)) {
// Redirect administrators to the dashboard
if (in_array('administrator', $user->roles)) {
return admin_url();
}
// Redirect subscribers to a custom page
else {
return home_url('/member-dashboard/');
}
}
return $redirect_to;
}
add_filter('login_redirect', 'custom_login_redirect', 10, 3);
For logout redirects, add a separate function:
function custom_logout_redirect() {
wp_redirect(home_url('/goodbye/'));
exit;
}
add_action('wp_logout', 'custom_logout_redirect');
These functions allow role-based redirection and custom logout destinations. Adjust the URLs and roles as needed for your site structure.
Styling the Login Page with Custom CSS
To change the visual appearance of the login page, enqueue custom CSS through functions.php. This approach avoids editing WordPress core files. Use the following code to add a custom stylesheet:
After adding the CSS file and enqueuing it, test the login page by visiting /wp-login.php. Adjust styles as needed. This method ensures that all customizations remain intact even after theme updates, provided you use a child theme.
Method 4: Creating a Child Theme for Login Customizations
When you customize a WordPress login page directly within a parent theme, those changes are lost the moment the theme updates. A child theme preserves your login page modifications through updates, ensuring long-term stability and security. This method is ideal for developers and site owners who need a permanent, maintainable solution for a custom login page in WordPress.
Why Use a Child Theme?
A child theme inherits all functionality and styling from its parent theme while allowing you to override specific files without altering the parent. This separation provides three critical benefits for login page customization:
Update-proof customizations: Parent theme updates will not overwrite your login page changes, as they reside in the child theme.
Safe experimentation: You can test login page overrides without risking the parent theme’s core files.
Clean code management: All login-specific code stays in one location, making future edits straightforward and reducing conflicts.
For login pages, a child theme is especially valuable because it allows you to replace templates like wp-login.php overrides, add custom CSS, and modify login redirects without touching the parent theme. This approach is recommended by WordPress best practices for any site requiring a customized login experience.
Log into your WordPress admin panel, go to Appearance > Themes, and activate your child theme.
Once activated, the child theme will display the parent theme’s design, but you can now add custom files.
Implementing Login Page Overrides in the Child Theme
With the child theme active, you can override the login page by adding a login folder or using hooks. The most common method is to use the login_enqueue_scripts hook in functions.php to inject custom CSS and JavaScript. Add this code to your child theme’s functions.php:
For more advanced overrides, you can copy the parent theme’s wp-login.php template into your child theme and modify it directly. Place it at /wp-content/themes/mytheme-child/wp-login.php. However, using functions and CSS is generally cleaner and easier to maintain. After implementing these changes, test your custom login page by visiting /wp-login.php on your site. The child theme ensures all modifications remain intact through future parent theme updates.
Adding Advanced Features to Your Custom Login Page
Once you have built a basic custom login page in WordPress, you can enhance its functionality and user experience with advanced features. This section covers how to integrate Google reCAPTCHA for security, add social login buttons, and customize error messages and redirects. These improvements not only protect your site but also streamline the login process for users.
Integrating Google reCAPTCHA for Security
Adding reCAPTCHA to your custom login page helps prevent automated bot attacks and brute force attempts. Follow these steps to implement it:
Register your site on the Google reCAPTCHA admin console to obtain a site key and secret key.
Install and activate a plugin like “Advanced noCaptcha & invisible Captcha” or use code in your theme’s functions.php file.
Add the reCAPTCHA script to your custom login page template. Insert the following code where you want the reCAPTCHA widget to appear, typically before the submit button:
<?php
// Add reCAPTCHA to login form
echo '<div class="g-recaptcha" data-sitekey="YOUR_SITE_KEY"></div>';
?>
Validate the reCAPTCHA response on form submission. In your login processing function, add this check:
For best results, use the invisible reCAPTCHA option to minimize user friction while maintaining security.
Adding Social Login Buttons
Social login allows users to authenticate using their existing accounts from providers like Google, Facebook, or Twitter. This reduces password fatigue and increases conversion rates. To add social login:
Plugin method: Use a plugin such as “Nextend Social Login” or “Super Socializer.” These plugins automatically add buttons to your custom login page and handle OAuth flows.
Custom code method: For developers, integrate using OAuth 2.0 libraries. Register your app with each provider, obtain client IDs and secrets, then add login links to your template. Example for Google:
<a href="<?php echo wp_login_url() . '?action=google_login'; ?>" class="social-login google">Sign in with Google</a>
Organize buttons in a grid or list format for clarity:
Ensure you handle callback URLs and store user data securely. Always sanitize and validate incoming data from social providers.
Customizing Error Messages and Redirects
Personalized error messages improve user experience by providing clear guidance. Redirects help direct users to appropriate pages after login or logout. Implement these customizations:
Custom error messages: Use the login_errors filter in your theme’s functions.php to replace default messages. Example:
add_filter('login_errors', 'custom_login_error_message');
function custom_login_error_message($error) {
if (strpos($error, 'Invalid username') !== false) {
return 'Please check your username or email address.';
}
if (strpos($error, 'Incorrect password') !== false) {
return 'The password you entered is incorrect. Try again.';
}
return $error;
}
Custom redirects: Use the login_redirect filter to send users to a specific page after login. For example, redirect all users to a dashboard page:
For error messages, avoid revealing whether the username or password was incorrect to maintain security. Combine these customizations with your custom login page template to create a seamless, branded experience.
Testing and Troubleshooting Your Custom Login Page
After creating your custom login page in WordPress, thorough testing ensures it functions correctly across all environments. This phase helps identify layout breaks, slow load times, or security gaps before your users encounter them. Follow these structured steps to validate your work and resolve common issues efficiently.
Testing on Different Browsers and Devices
Your custom login page must render consistently on various platforms. Begin by testing on the latest versions of Chrome, Firefox, Safari, and Edge. Then verify functionality on mobile devices (iOS and Android) and tablets. Use browser developer tools to simulate different screen sizes. Pay attention to these key elements:
Form field alignment and readability on small screens
Button hover states and clickable areas
Error message visibility and placement
Logo or background image scaling
Remember me checkbox and password field behavior
Cross-browser testing tools like BrowserStack or LambdaTest can automate this process, but manual testing on actual devices is recommended for accuracy.
Even well-coded custom login pages can encounter issues. Below is a comparison table of frequent errors, their symptoms, and solutions:
Common Login Page Errors and Fixes
Error
Symptom
Fix
White screen after login
Redirects to blank page
Disable plugins one by one to find conflict; check for PHP error logs
CSS not loading
Page appears unstyled
Ensure correct file paths in functions.php; clear browser and server cache
Login redirect loop
Page refreshes endlessly
Check wp-config.php for site URL mismatch; reset permalinks
Broken image/logo
Placeholder icon shows
Verify image URL is absolute; check file permissions and upload path
Form not submitting
No response on submit
Enable JavaScript; check for jQuery conflicts; inspect console errors
For persistent errors, enable WordPress debugging by adding define('WP_DEBUG', true); to your wp-config.php file. This reveals PHP notices and direct causes of failures.
Ensuring Compatibility with Plugins and Themes
A custom login page can conflict with security, caching, or membership plugins. Follow these steps to maintain compatibility:
Test with all active plugins temporarily disabled to isolate conflicts
Check that your custom login page uses WordPress standard hooks (e.g., login_enqueue_scripts) rather than overriding core files
If using a caching plugin, exclude the custom login URL from cache rules to prevent stale pages
For membership plugins (e.g., WooCommerce, MemberPress), verify that their login redirects work with your custom page
Test with your theme’s default template to ensure no style overrides interfere
Document any known incompatibilities and consider adding conditional code in your theme’s functions.php to handle plugin-specific exceptions. Regular testing after plugin updates will keep your custom login page reliable.
Security Best Practices for Custom Login Pages
Customizing your WordPress login page enhances branding and user experience, but it also introduces potential vulnerabilities if not handled carefully. A secure login page must protect user credentials, prevent unauthorized access, and remain resilient against common attacks. Below are essential security measures to implement alongside your custom design.
Using SSL to Encrypt Login Data
Secure Sockets Layer (SSL) encryption ensures that all data transmitted between the user’s browser and your server—including usernames and passwords—is encrypted and cannot be intercepted. Without SSL, login credentials are sent in plain text, making them vulnerable to man-in-the-middle attacks.
Obtain an SSL certificate: Most hosting providers offer free certificates via Let’s Encrypt or paid options. Install it through your hosting control panel or via a plugin like Really Simple SSL.
Force SSL on login pages: Add the following code to your site’s wp-config.php file to enforce HTTPS for all login and admin pages: define('FORCE_SSL_ADMIN', true);
Verify SSL configuration: After activation, test your login page URL by ensuring it begins with https:// and shows a padlock icon in the browser address bar.
Redirect HTTP to HTTPS: Use a redirect rule in your .htaccess file to automatically send users to the secure version of your login page.
Implementing Brute Force Protection
Brute force attacks attempt to gain access by repeatedly trying username and password combinations. A custom login page can inadvertently reduce default protections, so proactive measures are critical.
Method
Description
Recommended Plugin or Approach
Login attempt limits
Block an IP address after a set number of failed attempts (e.g., 3–5).
Limit Login Attempts Reloaded, Cerber Security
CAPTCHA or reCAPTCHA
Add a visual or invisible challenge to verify human users.
Advanced noCaptcha & invisible Captcha, Google reCAPTCHA
Two-Factor Authentication (2FA)
Require a second verification step (e.g., code from an authenticator app).
Two Factor Authentication, Wordfence
Custom login URL
Change the default /wp-login.php to a unique slug to reduce automated attacks.
WPS Hide Login, or code-based solution
IP whitelisting
Restrict login access to specific IP addresses (useful for admin-only pages).
Server-level firewall or plugin
For a code-based approach to limit login attempts without a plugin, you can add this snippet to your theme’s functions.php file (or better, a custom plugin):
// Limit login attempts per IP address
function limit_login_attempts() {
$ip_address = $_SERVER['REMOTE_ADDR'];
$transient_name = 'login_attempts_' . $ip_address;
$attempts = get_transient($transient_name);
if (false === $attempts) {
set_transient($transient_name, 1, 3600); // 1 hour lockout
} else {
$attempts++;
if ($attempts > 5) {
wp_die('Too many login attempts. Please try again later.');
}
set_transient($transient_name, $attempts, 3600);
}
}
add_action('wp_login_failed', 'limit_login_attempts');
Note: This is a simplified example. Production use should include proper error handling and integration with WordPress authentication hooks.
Regularly Updating Your Customizations
Custom login page code—whether in a child theme, plugin, or custom template—must be maintained to remain secure. Outdated code can introduce vulnerabilities as WordPress core, PHP, and server environments evolve.
Keep WordPress, themes, and plugins updated: Each update patches known security flaws that could affect your login page. Enable automatic updates for minor releases.
Review custom code quarterly: Check for deprecated WordPress functions, insecure file includes, or hardcoded credentials. Use a code linter like PHP_CodeSniffer with WordPress coding standards.
Test after major updates: After updating WordPress or PHP versions, verify that your custom login page functions correctly and does not break security features like SSL enforcement or attempt limits.
Monitor security logs: Use a plugin like WP Activity Log to track login attempts and detect unusual patterns that may indicate a vulnerability in your customizations.
Remove unused customizations: Delete any login page code that is no longer active. Orphaned files or functions can be exploited if they remain accessible.
By combining SSL encryption, robust brute force protection, and a disciplined update schedule, your custom login page will remain both visually appealing and secure against evolving threats.
Conclusion
Customizing your WordPress login page is a powerful way to enhance your site’s branding, improve user experience, and add an extra layer of security. Throughout this guide, we have explored four distinct methods to achieve this, each catering to different skill levels and project requirements. By now, you should have a clear understanding of how to create a custom login page in WordPress that aligns perfectly with your site’s identity.
Recap of Customization Methods
To help you quickly recall the options, here is a summary of the four main approaches:
Using a Plugin (e.g., LoginPress, WP Custom Login)
Beginner
No coding required; visual interface
Quick setup without technical knowledge
Modifying Functions.php (Code Snippets)
Intermediate
Lightweight, no extra plugin overhead
Simple changes like logo or redirect
Building a Custom Page Template
Advanced
Full control over layout and design
Complex, unique login experiences
Using a Child Theme with Override Templates
Advanced
Preserves core updates, highly maintainable
Long-term projects needing deep customization
Each method offers distinct trade-offs between ease of use and flexibility. Plugins provide a low-barrier entry, while coding approaches give you complete creative freedom. For those who want to learn how to create a custom login page in WordPress without risking site stability, starting with a plugin is recommended before moving to code-based solutions.
Choosing the Right Approach for Your Needs
Selecting the best method depends on your specific goals and technical comfort. Consider the following factors:
Time constraints: If you need a custom login page immediately, a plugin with pre-built templates is the fastest route.
Design complexity: For advanced layouts, such as a full-page background image with custom fields, a page template or child theme override is necessary.
Performance priorities: Avoid bloated plugins if your site is already resource-heavy; a few lines of code in functions.php can achieve the same result.
Maintenance needs: Child theme overrides ensure your customizations survive WordPress updates, making them ideal for long-term use.
Security considerations: Always validate and sanitize any user input if you write custom code, and avoid exposing sensitive login logic.
For most site owners, the plugin method offers a safe, effective starting point. Developers and agencies should invest time in learning the code-based approaches to deliver tailored solutions for clients.
Next Steps: Further Resources and Support
Once you have implemented your custom login page, consider these next steps to refine and secure your site:
Test thoroughly: Log out and test the page across different browsers and devices to ensure all elements display correctly.
Add reCAPTCHA: Integrate Google reCAPTCHA to your login page to block automated brute-force attacks.
Customize error messages: Replace generic login errors with friendly, branded messages that do not reveal user existence.
Explore advanced features: Consider adding social login buttons, passwordless authentication, or multi-factor authentication for enhanced user experience.
Consult official documentation: Refer to the WordPress Developer Handbook for hooks like login_enqueue_scripts and login_headerurl to further customize without breaking core functionality.
Seek community support: Join WordPress forums or developer communities like Stack Exchange to get help with specific coding challenges.
By following this guide, you have taken a significant step toward a more professional and secure WordPress site. Whether you choose a plugin or write custom code, remember to always back up your site before making changes. With the knowledge of how to create a custom login page in WordPress, you are now equipped to deliver a cohesive brand experience from the very first interaction.
Frequently Asked Questions
Why should I create a custom login page in WordPress?
Creating a custom login page enhances your site's branding by aligning the login experience with your website's design. It also improves security by allowing you to add measures like CAPTCHA, two-factor authentication, or limit login attempts. Additionally, a custom login page can redirect users to specific pages after login, improving user experience and site flow. It helps protect against brute force attacks by hiding the default wp-admin URL.
What are the best plugins to create a custom login page in WordPress?
Popular plugins include WPForms (with its login form addon), LoginPress, Custom Login Page Customizer, and Theme My Login. These plugins offer drag-and-drop builders, pre-made templates, and options to customize fields, colors, logos, and redirects. For developers, the Code Snippets plugin or custom code in your theme's functions.php can be used. Each has its own features, so choose based on your need for ease of use versus flexibility.
Can I create a custom login page without a plugin?
Yes, you can create a custom login page without a plugin by adding code to your theme's functions.php file or creating a custom page template. You would use WordPress functions like wp_login_form() to display the login form, and hooks like login_headerurl to change the logo link. However, this requires knowledge of PHP, HTML, CSS, and WordPress hooks. For most users, using a plugin is safer and more efficient.
How do I redirect users after login on a custom login page?
You can redirect users after login using the 'login_redirect' filter in your theme's functions.php file. For example, add: add_filter('login_redirect', function($redirect_to, $request, $user) { return home_url('/dashboard/'); }, 10, 3);. Alternatively, many custom login plugins have built-in redirect settings. You can also redirect based on user role, such as sending admins to the dashboard and subscribers to a members page.
Will a custom login page affect WordPress security?
A custom login page can significantly improve security if implemented correctly. By changing the login URL from the default /wp-login.php, you reduce automated brute force attacks. Adding CAPTCHA, reCAPTCHA, or two-factor authentication further strengthens security. However, if poorly coded, it might introduce vulnerabilities. Always use reputable plugins or follow WordPress coding standards. Also, ensure your site uses HTTPS and strong passwords.
How do I add reCAPTCHA to my custom login page?
To add reCAPTCHA, first get API keys from Google reCAPTCHA. Then, using a plugin like Advanced noCaptcha & invisible Captcha (v2 & v3) or by adding code to your theme, insert the reCAPTCHA widget on your login form. For custom code, enqueue the reCAPTCHA script and add a hidden field for the token. Verify the token on form submission using the reCAPTCHA verification endpoint. This prevents bots from logging in.
What is the best way to style my custom login page?
The best way to style a custom login page is by using a plugin that offers a visual customizer, such as LoginPress or Custom Login Page Customizer. These allow you to change backgrounds, logos, colors, and fonts without coding. For full control, you can create a custom CSS file and enqueue it on the login page using the 'login_enqueue_scripts' action. Use CSS to match your site's branding and ensure responsiveness.
Can I create a custom login page for a multisite network?
Yes, you can create a custom login page for a WordPress multisite network. You can use a network-activated plugin that customizes the login page for all sites, or use site-specific plugins. For code-based solutions, you can add filters in the wp-config.php file or use the 'login_init' action to modify the login page globally. Be mindful of user experience across different sites and maintain consistent branding if desired.
Introduction: Why WordPress and GraphQL Are a Perfect Pair
WordPress powers over 40% of all websites, but its traditional REST API often struggles to meet the demands of modern, dynamic applications. Enter GraphQL: a query language that lets developers request exactly the data they need—no more, no less. This synergy between WordPress’s robust content management and GraphQL’s precision creates a powerful foundation for headless architectures, progressive web apps, and omnichannel content delivery. In this introduction, we explore why this pairing is not just convenient but transformative.
Headless WordPress decouples the backend (content repository) from the frontend (presentation layer). Developers use WordPress as a headless CMS, fetching content via APIs to build custom frontends with frameworks like React, Vue, or Next.js. This approach offers:
Frontend freedom: Choose any technology stack without WordPress theme constraints.
Omnichannel delivery: Serve content to websites, mobile apps, smart devices, and IoT simultaneously.
Improved performance: Static site generation and optimized API calls reduce server load.
Enhanced security: The headless backend is isolated from public-facing code, reducing attack surfaces.
As headless adoption accelerates, the need for a flexible, efficient API becomes critical—and GraphQL answers that call.
Key Pain Points with the REST API
WordPress’s REST API, while functional, introduces several limitations that frustrate developers:
Issue
Description
Over-fetching
REST endpoints return fixed data structures, often including unnecessary fields. For example, fetching a post also returns author bio, comments, and metadata even if only the title is needed.
Under-fetching
To get related data (e.g., posts with their categories and tags), developers must make multiple API calls, increasing latency and complexity.
Multiple endpoints
Each resource type (posts, users, media) requires a separate URL, leading to endpoint sprawl and harder maintenance.
Versioning challenges
REST API changes often require version bumps, disrupting existing integrations.
These pain points become acute when building real-time applications, mobile apps, or complex data dashboards where bandwidth and speed matter.
What Makes GraphQL a Natural Fit for WordPress
GraphQL addresses these limitations with a developer-first approach that aligns perfectly with WordPress’s content model:
Single endpoint: All queries and mutations go to one GraphQL endpoint, simplifying client-server communication.
Exact data retrieval: Clients specify exactly which fields they need—no more over-fetching or under-fetching. For example, a query can request only the post title, excerpt, and featured image in one request.
Nested relationships: GraphQL resolves related data (like a post’s author, categories, and comments) in a single query, reducing round trips.
Strong typing: A schema defines all available data types and operations, enabling auto-completion, validation, and self-documentation—ideal for teams.
Real-time capabilities: With subscriptions, GraphQL can push live updates (e.g., new comments or post status changes) without polling.
For WordPress, plugins like WPGraphQL wrap the existing data layer (posts, taxonomies, users, options) into a GraphQL schema. This means developers can leverage WordPress’s familiar admin interface while accessing content with the efficiency of GraphQL. The result is a API that feels custom-built for each project, reducing development time and improving user experience. In essence, GraphQL transforms WordPress from a blogging platform into a versatile headless CMS ready for the future of web development.
Understanding GraphQL: A Primer for WordPress Developers
If you are a WordPress developer accustomed to the REST API, GraphQL may initially feel like a foreign language. However, its core philosophy is simple: GraphQL is a query language for APIs that lets you ask for exactly what you need and nothing more. Instead of receiving a fixed set of data from an endpoint, you write queries that specify the fields you want returned. This eliminates over-fetching (getting too much data) and under-fetching (needing multiple requests to gather all required information). For WordPress sites with complex content structures—especially those using custom post types, advanced custom fields, or headless setups—GraphQL provides a precise, efficient alternative to REST.
The fundamental distinction lies in how data is requested and delivered. With REST, each endpoint (e.g., /wp-json/wp/v2/posts) returns a predefined response structure. To get a post’s title, featured image, and author name, you might make two separate requests: one to the posts endpoint and one to the users endpoint. GraphQL, by contrast, uses a single endpoint (e.g., /graphql) and lets you specify nested fields in one query. Below is a comparison of key characteristics:
Data retrieval: REST uses fixed endpoints; GraphQL uses a single endpoint with flexible queries.
Over-fetching: REST often returns unnecessary fields; GraphQL returns only requested fields.
Under-fetching: REST may require multiple requests for related data; GraphQL can retrieve related data in one request.
Versioning: REST typically requires versioned endpoints (e.g., v2); GraphQL avoids versioning by allowing gradual schema evolution.
Tooling: REST relies on standard HTTP verbs; GraphQL uses queries, mutations, and subscriptions with a strong type system.
For WordPress developers, the most practical difference is that GraphQL allows you to request a page’s content, its author’s display name, and the categories assigned to it—all in a single query. This reduces server load and simplifies frontend logic.
How a GraphQL Schema Maps to WordPress Content Types
GraphQL is built around a schema that defines all available data types and their relationships. In a WordPress context, the schema mirrors your site’s content architecture. For example, a Post type in GraphQL corresponds directly to the WordPress post object, with fields like title, content, date, and author. Similarly, custom post types (CPTs) become custom GraphQL types. If you have a CPT called “Movie” with fields for director and release year, the schema will include a Movie type with those fields. This mapping is automatic when using plugins like WPGraphQL, which introspects your WordPress database and generates a schema that reflects your registered post types, taxonomies, and metadata. The schema also defines how types relate: a Post has a categories connection, and a Category has a posts connection, enabling seamless nested queries.
Basic Query Examples for Posts, Pages, and Custom Post Types
Let’s examine three concrete queries to see how GraphQL works with WordPress content. Each example assumes you have WPGraphQL installed and your site’s schema is active.
Querying Posts: To retrieve the title and excerpt of the three most recent posts, you can write:
{
posts(first: 3) {
nodes {
title
excerpt
}
}
}
This returns only the title and excerpt fields for each post node, avoiding the author, date, or featured image data that a REST endpoint would include.
Querying Pages: For a specific page, say the “About” page, you can filter by slug and request its content and featured media:
Querying Custom Post Types: If you have a “Project” CPT with a custom field project_url, you can query it like this:
{
projects(first: 5) {
nodes {
title
projectUrl
date
}
}
}
In the schema, projectUrl corresponds to the custom field’s GraphQL name (often auto-generated from the field’s slug). This approach gives you full control over which custom fields are included, making it ideal for headless WordPress projects where performance and precision matter.
Setting Up GraphQL in WordPress: Plugins and Configuration
Integrating GraphQL with WordPress transforms how developers interact with site data, offering a more efficient alternative to the traditional REST API. The WPGraphQL plugin serves as the cornerstone of this integration, providing a standardized, self-documenting interface. This guide walks through the essential steps to install, configure, and secure the plugin, ensuring a robust foundation for your GraphQL-powered WordPress site.
Installing the WPGraphQL Plugin
Begin by installing the WPGraphQL plugin directly from the WordPress repository. Navigate to Plugins > Add New in your WordPress admin dashboard, search for “WPGraphQL,” and click Install Now. After installation, activate the plugin. Once active, you will notice a new menu item labeled GraphQL in the admin sidebar. This indicates the plugin is operational, and the default GraphQL endpoint is now available at /graphql on your site. For version control or custom development needs, you can also install the plugin via Composer using the command composer require wp-graphql/wp-graphql. The plugin is actively maintained and compatible with WordPress 5.0 and above, requiring PHP 7.1 or higher for optimal performance.
Configuring Permissions and Public Access
Proper configuration of permissions is critical to prevent unauthorized data exposure. After activation, go to Settings > GraphQL to access the plugin’s configuration panel. The key settings to adjust include:
Public Introspection: By default, introspection is enabled, allowing anyone to explore your schema. For production sites, disable this to obscure your data structure from malicious actors.
Public Queries: Control whether unauthenticated users can execute queries. For most public-facing sites, keep this enabled for non-sensitive data like posts and pages.
Batch Queries: Allow multiple queries in a single request. Enable this only if your application requires batching, as it increases server load.
Logging: Enable GraphQL error logging to debug during development, but disable it in production to avoid leaking sensitive information.
For granular control, use the graphql_public_endpoint filter to programmatically restrict access based on user roles or IP addresses. For example, to require authentication for all queries, add the following to your theme’s functions.php:
Additionally, consider implementing a custom authentication plugin like WPGraphQL JWT Authentication to secure mutations and sensitive queries using JSON Web Tokens.
Testing Your First GraphQL Endpoint
Once configured, test the endpoint to verify functionality. Use a tool like GraphiQL, which is included with WPGraphQL as an IDE accessible at /graphql in your browser when logged in as an administrator. Alternatively, use a REST client like Postman or cURL. To retrieve the latest post titles and slugs, send a GET request to https://yoursite.com/graphql with the following query:
{
posts(first: 5) {
nodes {
title
slug
}
}
}
If the setup is correct, the response will be a JSON object containing the requested data. For example:
Common issues include a 404 error, which often indicates permalinks are not set to a structure other than “Plain.” Go to Settings > Permalinks and select any option other than “Plain,” then save changes. If authentication errors occur, verify that your user role has the graphql_query capability, which is automatically assigned to administrators and editors. Successful testing confirms that WordPress and GraphQL are fully integrated, paving the way for efficient data retrieval and manipulation in your applications.
Querying WordPress Data with GraphQL: Best Practices
When using GraphQL to retrieve content from WordPress, adhering to best practices ensures efficient, fast, and maintainable queries. The core principle is to request only the data you actually need, avoiding the over-fetching common with REST APIs. This approach reduces payload size, speeds up response times, and minimizes server load. Additionally, structuring queries to leverage GraphQL’s built-in pagination and nested relationships keeps your code clean and scalable.
Fetching Posts with Custom Fields and Taxonomies
A common task is retrieving posts along with their custom fields (often stored as post meta) and associated taxonomies like categories or tags. GraphQL allows you to request these in a single query using the posts connection. To fetch custom fields, you must first register them in your WPGraphQL schema (using plugins like ACF or manually). Then, nest the field names directly. For taxonomies, use the categories or tags connections.
Nested taxonomy: categories { nodes { name slug } }
Nested tags: tags { nodes { name } }
Always use nodes to access the actual data within a connection. Avoid requesting entire objects (like categories { edges { node { ... } } }) unless you need cursor-based pagination for the taxonomy itself.
Using Arguments for Filtering and Sorting
GraphQL provides powerful arguments on the posts connection to filter, sort, and limit results without fetching all posts client-side. Key arguments include:
Argument
Purpose
Example Value
where
Filter by status, date, taxonomy terms, or search
{ status: PUBLISH, categoryName: "news" }
orderby
Sort by field (e.g., DATE, TITLE, MENU_ORDER)
{ field: DATE, order: DESC }
first
Limit number of posts returned (for pagination)
10
Best practice: Combine where with orderby to narrow results early. For example, to fetch the latest 5 posts in a specific category, use:
Always validate that the filtering arguments match your registered custom taxonomies or post meta keys to avoid errors.
Implementing Pagination with Connections
GraphQL uses cursor-based pagination (via connections) rather than traditional offset/limit. This is more reliable for large datasets because cursors are stable even when items are added or removed. The posts connection returns pageInfo with hasNextPage and hasPreviousPage, plus endCursor and startCursor.
Avoid mixing cursor pagination with offset arguments unless your schema explicitly supports it. Cursor-based pagination is the standard for WPGraphQL and ensures consistent performance even with thousands of posts.
Mutations: Adding and Updating Content via GraphQL
GraphQL mutations in WordPress extend beyond simple data retrieval, allowing developers to create, update, and delete content with precision. This capability mirrors the familiar CRUD operations of the WordPress REST API but with the added benefit of declarative data fetching and type safety. By leveraging the WPGraphQL plugin, you can perform these mutations securely while maintaining full control over user permissions and data validation. This section explores how to manage posts, pages, and custom post types using GraphQL mutations, with practical examples and essential security considerations.
Creating a New Post with Title, Content, and Meta
To create a new post via GraphQL, use the createPost mutation. This operation requires authentication, typically via a JWT token or application password, and respects WordPress user capabilities. Below is a basic example that sets the title, content, and custom meta fields.
mutation CreatePost {
createPost(
input: {
title: "My New Post"
content: "This is the post content."
status: PUBLISH
meta: {
key: "custom_meta_key"
value: "Custom meta value"
}
}
) {
post {
id
title
meta {
key
value
}
}
}
}
Authentication: The mutation will fail if the user lacks the publish_posts capability.
Meta Fields: Use the meta input to add custom fields. For multiple meta entries, pass an array of objects.
Status Options: Available statuses include PUBLISH, DRAFT, PENDING, and PRIVATE.
Custom Post Types: Use createYourCustomPostType (e.g., createProduct) for custom types. Ensure the post type is registered with GraphQL support.
Updating Existing Content and Handling Revisions
Updating content requires the updatePost mutation, which accepts the post ID and the fields to modify. WordPress automatically creates a revision when updating, preserving the previous version. You can control revision behavior via the revisionsToKeep input.
Example Mutation:
mutation UpdatePost {
updatePost(
input: {
id: "cG9zdDoxMjM="
title: "Updated Title"
content: "Updated content with revisions."
revisionsToKeep: 5
}
) {
post {
id
title
revisions(first: 3) {
nodes {
id
title
date
}
}
}
}
}
Handling Revisions:
Revisions are tracked automatically; you can query them using the revisions connection.
Use revisionsToKeep to limit the number of stored revisions (default is defined in WordPress settings).
For custom post types, revisions must be explicitly enabled via supports: ['revisions'] in the post type registration.
Validation Tip: Always sanitize input data server-side, even when using GraphQL, to prevent XSS or SQL injection.
Deleting Content and Understanding Capability Checks
Deleting content uses the deletePost mutation. This action is irreversible unless you use the trash system, which allows recovery. The mutation respects WordPress capability checks based on the user’s role.
Always verify the user’s capability server-side before executing a deletion. WPGraphQL does this automatically, but custom mutations may require additional checks.
Use the forceDelete parameter carefully; consider implementing a soft-delete (trash) system for user-facing applications.
For bulk deletions, implement batch mutations with error handling to avoid partial failures.
Building a Headless WordPress Front-End with GraphQL
Decoupling WordPress from its traditional theme layer unlocks immense flexibility, and GraphQL serves as the ideal bridge between your content and a modern front-end. By using WordPress as a headless CMS, you can deliver content to any interface—web, mobile, or IoT—while keeping the familiar admin dashboard for editors. GraphQL provides a single endpoint that returns exactly the data you request, eliminating over-fetching and under-fetching common with REST APIs. This approach is particularly powerful when paired with JavaScript frameworks like React, Next.js, or Gatsby, enabling developers to build fast, interactive user experiences with precise data control.
Selecting the right framework depends on your project’s needs for performance, SEO, and developer experience. Below is a comparison of three popular choices for headless WordPress with GraphQL:
Framework
Best For
Rendering Approach
GraphQL Integration
React (Create React App)
Single-page applications with dynamic interactions
Client-side rendering (CSR)
Apollo Client or URQL
Next.js
SEO-friendly sites with SSR or static generation
Server-side rendering (SSR) or static generation (SSG)
Apollo Client with getServerSideProps or getStaticProps
Gatsby
Content-heavy static sites with GraphQL at build time
Static site generation (SSG)
gatsby-source-wordpress with built-in GraphQL layer
For projects requiring real-time updates or user authentication, React with client-side fetching works well. Next.js offers flexibility with hybrid rendering, while Gatsby excels when content changes infrequently and performance is paramount. Each framework supports GraphQL natively, making WordPress data retrieval consistent and efficient.
Fetching Data with Apollo Client or URQL
Once you have a front-end framework, you need a GraphQL client to query your WordPress endpoint. Apollo Client and URQL are the two leading options, each with distinct strengths:
Apollo Client: Offers a robust caching system, automatic query deduplication, and a rich ecosystem of tools like Apollo Studio for debugging. It is ideal for complex applications with nested queries and pagination.
URQL: Lightweight and highly customizable, with a smaller bundle size and built-in support for normalized caching. It is well-suited for projects where performance and simplicity are priorities.
To fetch posts from WordPress, both clients use similar syntax. With Apollo Client, you define a query in a .graphql file or using the gql tag, then use the useQuery hook in your component. URQL uses the useQuery hook from its urql package, with queries defined as strings. For example, retrieving the latest five posts with their titles and excerpts requires a query like:
Both clients handle loading, error, and data states, allowing you to focus on rendering the UI. Apollo Client excels in larger teams with its developer tools, while URQL offers faster initial load times for smaller projects.
Rendering Dynamic Pages with Server-Side Rendering (SSR)
Server-side rendering is essential for headless WordPress sites that need fast initial page loads and strong SEO. With GraphQL, SSR becomes straightforward because you fetch data on the server before sending the HTML to the client. In Next.js, this is achieved using getServerSideProps, which runs at request time:
This approach ensures that search engines and social media crawlers receive fully rendered HTML with all content. For WordPress sites with dynamic content like comments or real-time updates, SSR combined with client-side hydration provides the best user experience. You can also implement incremental static regeneration (ISR) in Next.js to revalidate pages at intervals, balancing freshness with performance. By leveraging GraphQL in this architecture, you avoid the overhead of REST endpoints and maintain a single source of truth for your data, making your headless WordPress front-end both scalable and maintainable.
Advanced GraphQL Features for WordPress
Once you have a basic GraphQL endpoint running on your WordPress site, the real power emerges when you tailor the schema to your exact content architecture. Advanced features allow you to expose custom data, resolve complex relationships, and integrate seamlessly with plugins like Advanced Custom Fields (ACF). This section explores three critical capabilities: registering custom post types, adding custom resolvers, and unifying meta fields under the GraphQL umbrella.
Registering Custom Post Types and Fields in the Schema
WordPress custom post types (CPTs) are not automatically exposed in the GraphQL schema. To include them, you must register them explicitly. Using the WPGraphQL plugin, you can extend the schema by adding a register_graphql_object_type call in your theme’s functions.php or a custom plugin. Here is a typical workflow:
Define your CPT (e.g., “Portfolio”) using register_post_type with 'show_in_graphql' => true and a unique 'graphql_single_name' and 'graphql_plural_name'.
Register custom fields for that type using register_graphql_field, specifying the type name, field name, and a resolver callback.
For repeatable fields or nested data, use register_graphql_connection to link your CPT to other types (e.g., linking “Portfolio” to “Tag”).
A practical example: if your “Portfolio” CPT has a custom field for “client_name,” you register it like this:
This ensures that every query for a “Portfolio” item can fetch clientName directly.
Adding Custom Resolvers for Complex Queries
Not all data fits neatly into direct post meta or taxonomy relationships. Custom resolvers let you compute or fetch data from external sources, perform aggregations, or combine multiple WordPress queries into a single GraphQL field. For example, you might need a field that returns the total number of comments across all posts of a specific category. Implement a resolver as a callable function that receives the source object, arguments, context, and info:
This approach keeps your GraphQL endpoint flexible and efficient, offloading complex logic from the client to the server.
Integrating ACF and Meta Fields Seamlessly
Advanced Custom Fields (ACF) is the most popular plugin for adding custom meta boxes. With WPGraphQL’s built-in ACF integration (via the WPGraphQL for ACF extension), you can expose all ACF field groups as GraphQL types automatically. The integration respects field types such as text, image, repeater, and flexible content. To enable it:
Install and activate both WPGraphQL and WPGraphQL for ACF.
In your ACF field group settings, set “Show in GraphQL” to “Yes” and assign a “GraphQL Field Name.”
Each field group becomes a GraphQL type, and fields appear under the post’s acf root field.
For example, a field group named “Project Details” with fields like start_date and budget can be queried as:
This seamless integration eliminates the need for manual register_graphql_field calls for every meta field, drastically reducing boilerplate code while maintaining type safety and flexibility.
Performance and Caching Strategies for GraphQL in WordPress
Optimizing GraphQL queries in WordPress requires a multi-layered caching approach to deliver fast responses without overloading the server. Because GraphQL allows clients to request exactly the data they need, caching strategies must account for dynamic query shapes while still leveraging traditional caching layers. The following strategies cover HTTP, query-level, and database optimizations to keep your WordPress GraphQL endpoint responsive under heavy load.
Implementing HTTP Caching with ETags and Cache-Control
HTTP caching reduces server load by allowing clients and intermediaries to reuse previous responses. For GraphQL in WordPress, implement ETags and Cache-Control headers to enable conditional requests and set appropriate freshness durations.
ETags: Generate a unique hash based on the query result. When a client sends an If-None-Match header matching the current ETag, return a 304 Not Modified response with no body. This saves bandwidth and processing time.
Cache-Control: Set max-age for public or private caching. For example, Cache-Control: public, max-age=3600 allows CDNs and browsers to cache the response for one hour. Use private caching for authenticated queries.
Implementation tip: In WordPress, hook into GraphQL response filters (e.g., graphql_request_results) to compute ETags and set headers. Ensure your server supports sending 304 responses without re-executing the query.
For best results, combine ETags with a CDN that respects cache-control directives. This offloads repeat requests from your WordPress server entirely.
Using Persisted Queries to Reduce Overhead
Persisted queries replace full GraphQL query strings with a unique identifier (hash or ID), reducing request size and enabling aggressive caching. This is especially valuable for queries that run frequently, such as navigation menus or post lists.
Aspect
Standard Query
Persisted Query
Request payload
Full query string in POST body
Short ID (e.g., ?queryId=abc123)
Cache key complexity
Varies by query content
Fixed per persisted ID + variables
CDN cacheability
Often blocked by POST method
GET requests allow full CDN caching
Server processing
Parses and validates query each time
Skips parsing, uses pre-registered query
To implement persisted queries in WordPress GraphQL, use a plugin like WPGraphQL Smart Cache or manually register queries via filters. Store the mapping between IDs and query strings in a transient or custom post type. Clients then send a GET request with the ID and variables, which your server resolves quickly.
Database Optimization for Frequent GraphQL Requests
Frequent GraphQL queries often trigger repeated database lookups for posts, terms, users, and meta. Optimize the database layer to reduce latency and improve throughput.
Indexing: Ensure common query fields—such as post_date, post_status, and custom meta keys—have database indexes. Use EXPLAIN statements to identify missing indexes.
Object caching: Enable a persistent object cache (Redis or Memcached) to store resolved GraphQL data. For example, cache the result of a complex query for 5 minutes so repeat requests hit the cache instead of the database.
Query batching: Use the WPGraphQL dataloader pattern to batch SQL queries. Instead of executing N+1 queries for related posts, fetch all needed data in a single query using IN() clauses.
Cache invalidation: Tie cache clearing to post save events. When a post is updated, flush only the relevant GraphQL cache keys (e.g., by post ID or query fingerprint) to avoid stale data without full cache purges.
By combining HTTP caching, persisted queries, and database-level optimizations, you can serve GraphQL responses from WordPress with minimal latency and high reliability, even under significant traffic.
Security Considerations When Using GraphQL with WordPress
While the combination of WordPress and GraphQL offers unparalleled flexibility for developers, it also introduces unique security challenges. Unlike REST API endpoints that are often predictable and limited, GraphQL’s single endpoint can expose your entire data schema if not properly locked down. This section covers essential security measures, from authentication to query control, ensuring your GraphQL implementation remains robust against abuse and data leaks.
Authentication Methods: JWT vs. OAuth vs. Application Passwords
Authenticating requests is the first line of defense. WordPress GraphQL implementations commonly use three methods, each with distinct trade-offs in complexity and security.
JWT (JSON Web Tokens): Ideal for headless WordPress setups. Tokens are issued after login and sent with each request. They are stateless, scalable, and support expiration. However, token revocation requires additional logic (e.g., blacklists or short-lived tokens).
OAuth 2.0: Best for third-party integrations or multi-service architectures. It provides granular scopes (e.g., read-only access) and supports refresh tokens. Implementation is more complex, often requiring an authorization server.
Application Passwords: Built into WordPress core, these are user-generated passwords for API access. They are simple to set up but less secure for high-risk environments because they cannot be scoped to specific actions beyond the user’s role.
Authentication Method Comparison
Method
Best Use Case
Security Level
Complexity
JWT
Headless WordPress, mobile apps
High (with short expiry)
Medium
OAuth 2.0
Third-party apps, microservices
Very High (scoped access)
High
Application Passwords
Simple plugins, internal tools
Moderate
Low
Preventing Abuse with Query Complexity and Depth Limits
GraphQL’s flexibility can be weaponized. Malicious users may craft deeply nested queries (e.g., posts → comments → author → posts) to overload your server or expose hidden data. Mitigate this with two key techniques:
Query Depth Limits: Set a maximum nesting level (e.g., 5–7). This prevents recursive or excessively deep queries that strain database resources. Most GraphQL libraries for WordPress, such as WPGraphQL, support depth limiting via filters.
Query Complexity Scoring: Assign a cost to each field (e.g., 1 for a scalar, 10 for a list of posts). Reject queries exceeding a threshold. This stops expensive operations like requesting all users with their post histories.
Implement both in tandem. For example, limit depth to 10 and complexity to 200. Log rejected queries to identify attack patterns. Always validate queries server-side; client-side limits are easily bypassed.
Securing Private and Draft Content
WordPress’s content visibility model (public, private, draft, password-protected) must be enforced in GraphQL resolvers. Without explicit checks, a query like posts(where: {status: DRAFT}) could leak unpublished content. Follow these practices:
Role-Based Field Filtering: Use WordPress capabilities (e.g., edit_posts) to restrict access. For instance, only show post_status field to editors or admins.
Private Content Hooks: In WPGraphQL, register custom callbacks for resolve_node that check if the current user can view a draft or private post. Return null or an error if unauthorized.
Sensitive Data Obfuscation: User emails, IP addresses, and meta keys should never be exposed in public queries. Expose only non-sensitive fields (e.g., display name, avatar) and mask or omit the rest.
Test your schema with a non-admin user to confirm that private posts, drafts, and user emails are invisible. Use GraphQL introspection tools cautiously in production—disable them unless needed for debugging.
Real-World Use Cases and Future of WordPress + GraphQL
The marriage of WordPress and GraphQL has moved beyond experimental projects into production-grade implementations across industries. By decoupling the frontend from the backend, developers unlock performance, flexibility, and scalability that traditional REST APIs struggle to match. Below, we explore three concrete use cases that demonstrate the power of this combination, followed by a look at the ecosystem’s trajectory.
Case Study: Headless WooCommerce with GraphQL
A major online retailer migrated their WooCommerce store from a standard WordPress theme to a headless architecture using React and GraphQL. The challenge was handling thousands of concurrent product searches and cart updates without server overload. By implementing the WPGraphQL WooCommerce extension, they achieved:
Reduced server load: GraphQL allowed fetching only the product data needed per request (e.g., price, stock status, images) instead of entire product objects.
Faster checkout: A single GraphQL mutation handled cart creation, address validation, and payment gateway integration in one round trip.
Real-time inventory: Subscriptions via GraphQL kept the frontend updated on stock changes without polling.
The result was a 40% improvement in page load times and a 25% increase in conversion rates during peak traffic.
Multi-Site Content Hubs and Centralized Queries
Media organizations often run dozens of WordPress sites for different regions or topics. With GraphQL, they can aggregate content into a single hub without duplicating databases. For example, a news network uses a central GraphQL endpoint that queries each site’s WordPress instance via the WPGraphQL plugin. This enables:
Cross-site search: Users search across all sites from one interface, with results ranked by relevance and recency.
Personalized feeds: A single query can combine articles from the “Sports” site and “Technology” site based on user preferences.
Unified analytics: The hub tracks which content from which source is most popular, all without complex ETL pipelines.
This approach reduced the infrastructure cost by 60% compared to previous REST-based aggregation.
The Growing GraphQL Ecosystem and Community Contributions
The WordPress GraphQL ecosystem is maturing rapidly, driven by both official tools and community extensions. Key trends include:
Trend
Impact
Example
Plugin integrations
Seamless support for ACF, Yoast SEO, and Gravity Forms
WPGraphQL for ACF adds fields to GraphQL schema automatically
Performance optimizations
Persisted queries and caching layers
WPGraphQL Smart Cache reduces server overhead
Framework-agnostic frontends
Works with Next.js, Gatsby, Nuxt, or plain JavaScript
Gatsby source plugin for WPGraphQL
Community contributions
Over 200 extensions on GitHub
WPGraphQL for Custom Post Types UI
As the ecosystem grows, expect deeper integration with serverless platforms, real-time data via subscriptions, and better tooling for schema design. The future of WordPress as a headless CMS is bright, and GraphQL is the engine driving it forward.
How to Optimize WordPress for High Traffic: A Comprehensive Guide
1. Choose a High-Performance Hosting Provider
Your hosting environment is the foundation of site speed and scalability. For high-traffic WordPress sites, shared hosting is insufficient; you need a provider that offers dedicated resources, SSD storage, and robust caching. A poor hosting choice can lead to slow page loads, frequent downtime, and an inability to handle traffic spikes—directly harming user experience and search rankings. When optimizing for high traffic, prioritize providers that guarantee resource isolation, low latency, and automated scaling. This section breaks down the critical decisions and metrics to evaluate.
1.1 Evaluating Managed WordPress Hosting vs. VPS
Choosing between managed WordPress hosting and a Virtual Private Server (VPS) depends on your technical expertise and traffic demands. Managed hosting offers convenience with built-in caching, automatic updates, and specialized support, but often comes with higher costs and resource limits. A VPS provides full control over server configuration, allowing you to fine-tune PHP settings, database performance, and caching layers—ideal for custom high-traffic setups. Consider the following comparison:
Managed WordPress Hosting: Best for non-technical users; includes server-level caching, CDN integration, and WordPress-specific optimizations (e.g., WP Engine, Kinsta). Limited root access.
VPS Hosting: Best for developers; offers dedicated CPU cores, RAM, and SSD storage. Requires manual setup of Nginx, Redis, and monitoring tools (e.g., DigitalOcean, Linode).
Hybrid Approach: Some providers offer managed VPS with control panels (e.g., Cloudways, RunCloud), balancing ease and flexibility.
For sites exceeding 100,000 monthly visitors, a VPS or dedicated server is recommended to avoid resource contention. Managed hosting can still work if the plan includes auto-scaling and burst capacity.
1.2 Key Performance Metrics: Uptime, TTFB, and Scalability
To objectively assess a hosting provider, monitor three critical metrics:
Metric
Definition
Target for High Traffic
Uptime
Percentage of time your site remains accessible.
99.99% or higher (less than 1 hour downtime per year).
TTFB
Time to First Byte—how long the server takes to respond.
Under 200 ms from major global locations.
Scalability
Ability to handle sudden traffic spikes without degradation.
Auto-scaling resources (CPU/RAM) within seconds.
Use tools like GTmetrix, Pingdom, or WebPageTest to test TTFB from multiple regions. For scalability, request a stress test or review case studies from the provider. Avoid hosts that throttle traffic during spikes or require manual server upgrades.
1.3 CDN Integration and Global Server Locations
A Content Delivery Network (CDN) is non-negotiable for high-traffic WordPress sites. It caches static assets (images, CSS, JavaScript) on edge servers worldwide, reducing server load and latency. Key considerations:
Built-in CDN vs. Third-party: Managed hosts often include CDN (e.g., Cloudflare via Kinsta). For VPS, integrate Cloudflare, KeyCDN, or BunnyCDN manually.
Global server locations: Choose a host with data centers near your audience. For global traffic, ensure at least 10+ edge locations across North America, Europe, and Asia.
Dynamic content caching: Use CDN features like “Cache Everything” with WordPress plugins (e.g., WP Rocket, W3 Total Cache) to serve HTML pages from the edge, but exclude cart or login pages.
Test CDN performance by comparing TTFB with and without the CDN enabled. A good CDN can cut TTFB by 50% or more for international visitors, directly improving Core Web Vitals and user retention under high load.
Caching is the single most impactful optimization for high-traffic WordPress sites. By storing pre-rendered static copies of your pages, caching reduces the need for PHP execution and database queries on every visitor request. A well-rounded approach combines page caching, object caching, and browser caching to minimize server load and deliver sub-second response times during traffic spikes.
2.1 Setting Up Page Caching with Plugins Like WP Rocket or W3 Total Cache
Page caching generates static HTML files of your pages and serves them to visitors without loading WordPress. This bypasses PHP processing entirely for most requests. Two leading plugins offer robust solutions:
WP Rocket: A premium plugin with intuitive setup. Enable “Enable caching” immediately. Activate “GZIP compression” and “Remove query strings” from static resources. Use the “Cache lifespan” setting to auto-purge every 24 hours or less for dynamic content.
W3 Total Cache: A free, more granular option. Under “General Settings,” enable “Page Cache” and choose “Disk: Enhanced” for shared hosting or “Redis” for dedicated servers. In “Page Cache Settings,” set “Cache Preload” to automatically warm the cache after updates.
Both plugins support cache preloading, which rebuilds the cache after content changes. For high-traffic sites, schedule preloading during low-traffic hours to avoid performance dips on live visitors.
2.2 Using Redis or Memcached for Object Caching
Object caching stores database query results in memory, reducing repeated database calls for complex queries like navigation menus, sidebars, and user sessions. Redis and Memcached are the standard solutions:
Feature
Redis
Memcached
Data persistence
Yes (can save to disk)
No (volatile on restart)
Data structures
Strings, hashes, lists, sets
Simple key-value pairs
Recommended for
High-traffic sites with complex data
Simple query caching
Plugin support
Redis Object Cache, W3 Total Cache
Memcached Object Cache
To implement, install a Redis or Memcached server on your hosting environment. Then activate the corresponding object cache plugin and verify it connects. This reduces database load by up to 80% on dynamic pages.
2.3 Configuring Browser Caching via .htaccess or Server Settings
Browser caching instructs visitors’ browsers to store static assets (images, CSS, JavaScript) locally, eliminating repeat downloads. Configure it by adding these rules to your .htaccess file (Apache) or server config (Nginx):
Set cache expiration headers: For images, fonts, and CSS/JS files, set a cache lifetime of one year (31536000 seconds) for versioned files, or one week for frequently updated resources.
Enable ETags: Add FileETag MTime Size to help browsers validate cached files without full downloads.
Use cache-control directives: Include Cache-Control: public, max-age=31536000, immutable for stable assets to prevent revalidation.
<IfModule mod_expires.c>
ExpiresActive On
ExpiresByType image/jpg "access plus 1 year"
ExpiresByType image/png "access plus 1 year"
ExpiresByType text/css "access plus 1 month"
ExpiresByType application/javascript "access plus 1 month"
</IfModule>
Test your browser caching using tools like GTmetrix or Pingdom. A properly configured browser cache can reduce repeat visit load times by 50% or more, easing server pressure during traffic surges.
3. Optimize Your Database for Performance
A cluttered database is one of the most common bottlenecks for high-traffic WordPress sites. Over time, your database accumulates unnecessary data—post revisions, spam comments, expired transients, and orphaned metadata—that slows down queries and increases server load. For a site handling thousands of concurrent visitors, even a 0.1-second delay per query can cascade into significant slowdowns. Regular optimization and indexing help maintain efficiency as traffic grows, ensuring your database stays lean and responsive.
3.1 Cleaning Up Post Revisions, Spam, and Transients
WordPress automatically saves post revisions each time you update a page or post. While helpful for rollbacks, these revisions can bloat the database to hundreds of megabytes. Similarly, spam comments and expired transients (temporary cached data) accumulate without cleaning. Here’s how to address each:
Post revisions: Limit revisions by adding define('WP_POST_REVISIONS', 5); to your wp-config.php file, or use a plugin to delete old revisions. For existing sites, run a SQL query (via phpMyAdmin) to remove revisions older than 30 days.
Spam comments: Delete spam from the Comments screen in WordPress admin. For bulk cleanup, use a plugin like Akismet or manually delete via SQL: DELETE FROM wp_comments WHERE comment_approved = 'spam';
Transients: Expired transients remain in the database. Use a plugin (e.g., WP-Optimize) or run DELETE FROM wp_options WHERE option_name LIKE '%_transient_%' AND option_value IS NULL; to remove them.
Schedule this cleanup weekly for high-traffic sites to prevent database bloat from accumulating.
3.2 Using Database Optimization Plugins (e.g., WP-Optimize)
Manual database cleaning is tedious and risky for non-developers. Dedicated plugins automate the process safely. WP-Optimize is a popular choice that offers:
One-click optimization: Cleans post revisions, spam, trashed posts, and transients.
Table optimization: Runs OPTIMIZE TABLE commands to reclaim unused space and defragment tables.
Scheduled cleanups: Automates weekly or daily runs without manual intervention.
Database table analysis: Identifies oversized tables and suggests fixes.
Other reliable plugins include Advanced Database Cleaner and WP-Sweep. Always backup your database before running any optimization plugin for the first time.
Best practices for plugin use:
Test on a staging site first.
Limit cleanup to non-critical data (avoid removing postmeta or usermeta unless you know the impact).
Monitor site performance after each cleanup to ensure no negative effects.
3.3 Implementing Database Query Caching and Indexing
Even a clean database can slow down under high traffic if queries are inefficient. Two complementary strategies help: query caching and indexing.
Query caching stores the results of frequently executed SQL queries in memory, reducing the need to hit the database repeatedly. For WordPress, this is typically handled by server-level solutions:
Object caching (e.g., Redis or Memcached): Caches database query results and WordPress objects (options, posts, users). Use a plugin like Redis Object Cache.
MySQL query cache (deprecated in MySQL 8.0+; use proxy-based caching like ProxySQL or Varnish for newer versions).
Database indexing speeds up query execution by creating indexes on columns frequently used in WHERE, JOIN, and ORDER BY clauses. In WordPress, default indexes cover primary keys but not always meta queries. To optimize:
Add indexes to wp_postmeta (meta_key, meta_value) and wp_options (option_name) if your site uses custom queries.
Use plugins like Index WP MySQL For Speed to safely add recommended indexes.
Monitor slow queries with Query Monitor plugin and add indexes based on actual usage patterns.
Combining these techniques ensures your database handles high traffic with minimal latency, keeping your site fast under load.
4. Leverage a Content Delivery Network (CDN)
When your WordPress site experiences high traffic, a Content Delivery Network (CDN) becomes indispensable. CDNs distribute your static assets—such as images, CSS, JavaScript, and fonts—across a global network of servers. When a visitor requests your site, the CDN serves these files from the server geographically closest to them, drastically reducing latency and page load times. Furthermore, CDNs offload a significant portion of traffic from your origin server, preventing it from becoming overwhelmed during traffic spikes. This dual benefit of speed and reliability is why CDNs are a non-negotiable part of scaling WordPress for high traffic.
4.1 Choosing a CDN: Cloudflare, KeyCDN, or BunnyCDN
Selecting the right CDN depends on your budget, technical expertise, and specific needs. Here’s a comparison of three popular options:
Free tier, DDoS protection, SSL/TLS, firewall, and edge caching. Includes a global network with 300+ data centers.
Beginners and budget-conscious sites seeking security alongside CDN capabilities.
KeyCDN
Pay-as-you-go pricing, HTTP/2 support, real-time analytics, and edge rules. Offers 35+ data centers.
Developers who want granular control over caching and performance metrics.
BunnyCDN
Flat-rate pricing, 99.99% uptime SLA, built-in image optimization, and easy WordPress integration. 100+ data centers.
Sites with predictable traffic and users who prioritize simplicity and cost-effectiveness.
For high-traffic WordPress sites, Cloudflare’s free tier is often sufficient for initial scaling, while BunnyCDN’s flat-rate model can be more predictable for growing traffic. KeyCDN suits those needing advanced edge rule customization.
4.2 Configuring CDN Caching Rules and Purge Policies
After choosing a CDN, proper configuration ensures optimal performance. Key steps include:
Set Cache-Control Headers: Define how long static assets (e.g., images, CSS, JS) should be cached in visitors’ browsers and at the CDN edge. A common starting point is 30 days for versioned files and 1 hour for HTML.
Enable Gzip Compression: Compress text-based assets (HTML, CSS, JS) to reduce transfer size. Most CDNs allow this via a toggle.
Create Cache Purge Policies: When you update content (e.g., a new blog post or theme change), you must invalidate old cached versions. Set up automatic purge rules—for example, purge by URL pattern or entire site cache after deploying updates. Manual purging via CDN dashboard or API is also essential for urgent changes.
Exclude Dynamic Content: Ensure admin pages, login, checkout, and cart pages are never cached. Use CDN edge rules to bypass caching for these paths.
Careful configuration prevents stale content from being served while maximizing cache hit ratios.
4.3 Integrating CDN with WordPress via Plugins
WordPress plugins simplify CDN integration, especially for non-developers. Reliable plugins include:
Cloudflare Plugin: Official plugin that automatically purges cache when you update posts, pages, or plugins. It also enables Argo Smart Routing and image optimization.
CDN Enabler: A lightweight plugin that rewrites asset URLs (e.g., images, CSS, JS) to point to your CDN domain. Works with any CDN provider.
WP Rocket: A premium caching plugin with built-in CDN support. It can rewrite URLs, enable CDN-specific caching rules, and integrate with Cloudflare’s API for automatic cache purging.
BunnyCDN WordPress Plugin: Official plugin for BunnyCDN that automates cache purging and pull zone configuration.
For most high-traffic sites, using the official CDN plugin (e.g., Cloudflare) combined with a caching plugin like WP Rocket provides seamless integration. Test CDN functionality by checking that static assets load from the CDN URL and monitoring cache hit ratios in your CDN dashboard. Proper integration ensures that your CDN works in concert with WordPress, not against it, delivering consistent performance under load.
5. Optimize Images and Media Files
When your WordPress site experiences a surge in traffic, every kilobyte counts. Large, unoptimized images are among the most common performance bottlenecks, forcing servers to transfer excessive data and browsers to render heavy files. Optimizing images and media files reduces page weight, accelerates load times, and prevents server strain during high-traffic events. By compressing images without sacrificing quality, deferring off-screen media, and serving modern formats, you ensure a smooth experience for concurrent visitors and protect your site from slowdowns.
5.1 Using Lossless Compression Tools (e.g., ShortPixel, Smush)
Lossless compression reduces file size without degrading visual quality, making it ideal for maintaining professional imagery while cutting bandwidth usage. WordPress plugins like ShortPixel and Smush automate this process, applying compression to existing and newly uploaded images. These tools typically offer bulk optimization, which is critical for high-traffic sites with large media libraries. Below is a comparison of key features:
Feature
ShortPixel
Smush
Compression types
Lossy, glossy, lossless
Lossy, lossless, super-smush
WebP conversion
Yes (with fallback)
Yes (with fallback)
Bulk optimization
Unlimited (paid plans)
Unlimited (free for 50 images)
Image resizing
Automatic
Manual or automatic
For high-traffic scenarios, enable lossless compression on all images and schedule regular scans to catch new uploads. This reduces average image weight by 40–60% while preserving detail.
5.2 Implementing Lazy Loading for Images and Videos
Lazy loading defers the loading of off-screen images and videos until the user scrolls near them. This technique is essential for high-traffic sites because it reduces initial page weight and server requests, allowing critical above-the-fold content to render faster. WordPress 5.5 introduced native lazy loading for images, but plugin-based solutions offer finer control. Key implementation steps include:
Enable lazy loading via a plugin like Lazy Load by WP Rocket or a caching plugin with built-in lazy load (e.g., W3 Total Cache).
Apply lazy loading to all images, iframes, and videos by default, but exclude critical hero images to avoid delaying first paint.
Test with tools like Google Lighthouse to ensure lazy loading does not cause layout shifts; use explicit width and height attributes on images.
When thousands of users hit your site simultaneously, lazy loading can reduce initial bandwidth consumption by up to 50%, as browsers only fetch visible assets.
5.3 Serving WebP and AVIF Formats with Fallbacks
Modern image formats like WebP (developed by Google) and AVIF (based on AV1 video codec) offer superior compression compared to JPEG and PNG, often reducing file sizes by 25–35% without perceptible quality loss. For high-traffic WordPress sites, serving these formats cuts page weight dramatically. However, not all browsers support them, so fallbacks are mandatory. Implement this by:
Using a plugin like WebP Express or Imagify that automatically converts images to WebP or AVIF on upload and serves them via <picture> tags or server-level rules.
Configuring your server (e.g., via .htaccess or Nginx) to deliver WebP/AVIF to supporting browsers while falling back to JPEG/PNG for older ones.
Testing fallback behavior in browsers like Safari (which only recently added WebP support) and older Chrome versions.
A practical approach is to convert all images to WebP as the primary format, with AVIF for cutting-edge browsers. This can reduce total image payload by over 30%, directly improving Time to Interactive and server capacity during traffic spikes.
6. Minify and Combine CSS and JavaScript
When a WordPress site experiences high traffic, every millisecond of loading time matters. One of the most effective ways to reduce page load time is by minifying and combining CSS and JavaScript files. Minification removes unnecessary characters—such as spaces, comments, and line breaks—from your code without affecting functionality. Combining files merges multiple CSS or JavaScript files into fewer requests, reducing the number of HTTP requests the browser must make. This process directly addresses render-blocking resources, which can delay the display of your content. Properly implemented, minification and combination can cut load times by up to 30% on traffic-heavy pages, ensuring your server handles concurrent visitors more efficiently.
6.1 Using Autoptimize or WP Rocket for Minification
Two of the most popular and reliable plugins for minifying and combining assets are Autoptimize and WP Rocket. Both offer user-friendly interfaces and powerful optimization features.
Autoptimize: A free plugin that minifies CSS, JavaScript, and HTML. It also aggregates files and offers options to exclude specific scripts or styles. To use it, install and activate the plugin, then navigate to Settings > Autoptimize. Check the boxes for “Optimize CSS Code” and “Optimize JavaScript Code.” For high-traffic sites, enable “Aggregate CSS files” and “Aggregate JS files” to combine them. You can also exclude critical scripts like jQuery from aggregation to avoid conflicts.
WP Rocket: A premium plugin (starting at $59/year) that includes minification, combination, and many other performance features. After installation, go to Settings > WP Rocket > File Optimization. Enable “Minify CSS files” and “Minify JavaScript files.” For combining, toggle “Combine CSS files” and “Combine JavaScript files.” WP Rocket automatically handles exclusions for common plugins and themes, making it ideal for beginners or large sites with complex setups.
Both plugins allow you to test changes in real time, so you can revert if issues arise. For high-traffic scenarios, WP Rocket’s built-in caching and CDN integration provide additional benefits.
6.2 Deferring JavaScript and Inlining Critical CSS
Minification alone isn’t enough for high-traffic optimization. You must also defer non-essential JavaScript and inline critical CSS to eliminate render-blocking resources.
Deferring JavaScript: This technique tells the browser to load JavaScript files after the main content has rendered. In Autoptimize, enable “Defer JavaScript” under the JavaScript options. In WP Rocket, go to File Optimization > JavaScript Files and toggle “Load JavaScript deferred.” For best results, exclude scripts that must run immediately, such as analytics or payment gateways, using the exclusion fields provided.
Inlining Critical CSS: Critical CSS refers to the styles needed to render above-the-fold content. By inlining this CSS directly into the HTML <head>, you eliminate a separate HTTP request. Both plugins offer critical CSS generation. In WP Rocket, enable “Optimize CSS delivery” and let the plugin generate critical CSS automatically. Autoptimize requires the “Critical CSS” add-on or a third-party service like CriticalCSS.com. After generating, the plugin will inline the critical styles and load the full CSS file asynchronously.
Implementing both techniques ensures that users see content immediately, even on slow connections or under server load.
6.3 Testing with Tools Like GTmetrix and Lighthouse
After configuring minification, combination, deferring, and inlining, you must verify performance improvements. Use these tools to measure and refine your setup.
Tool
Key Metrics
How to Use
GTmetrix
Page load time, total requests, page size, waterfall chart
Enter your URL, run the test, and review the “Waterfall” tab to see CSS/JS requests. Look for reduced request counts and faster load times. The “Recommendations” tab will highlight any remaining render-blocking resources.
Lighthouse
Performance score, First Contentful Paint, Time to Interactive, render-blocking resources
Open Chrome DevTools, go to the “Lighthouse” tab, and run a report. Focus on the “Eliminate render-blocking resources” audit. It lists all CSS and JS files that block rendering. Use this list to update your plugin exclusions or adjust deferring settings.
Run tests before and after your changes, using the same network conditions. Aim for a 20-40% reduction in load time and a performance score above 90 on Lighthouse. If you see errors, return to your plugin settings and exclude problematic files. Regular testing ensures your optimizations remain effective as your site grows and traffic spikes.
7. Optimize Your WordPress Theme and Plugins
When your WordPress site begins to attract high traffic, every line of code matters. A single bloated theme or an inefficient plugin can cascade into slow page loads, increased server load, and lost visitors. The goal is to reduce the number of database queries, minimize HTTP requests, and trim unused scripts. By carefully selecting and maintaining your theme and plugins, you create a leaner foundation that scales without breaking under pressure.
7.1 Selecting a Performance-Focused Theme
A performance-focused theme is built with speed as a primary feature, not an afterthought. Lightweight themes typically weigh under 50 KB, use minimal dependencies, and load only what is necessary for the current page. Here are key characteristics to look for:
Clean codebase: Avoids unnecessary wrapper divs and inline styles.
Minimal external dependencies: Relies on native WordPress functions rather than heavy JavaScript libraries.
Modular architecture: Allows you to disable unused template parts or features.
Regular updates: Maintained to keep pace with WordPress core changes and security standards.
Two widely recommended themes that meet these criteria are GeneratePress and Astra. GeneratePress weighs around 30 KB and loads zero dependencies unless explicitly required. Astra is similarly lean, with a base size under 50 KB and robust integration with popular page builders. Both themes enable you to disable dynamic CSS generation or unused modules, further reducing server strain.
When evaluating a theme, test it with your actual content. Use tools like Query Monitor to measure the number of database queries before and after activation. A good performance theme should add fewer than 10 database queries to a standard page load.
7.2 Auditing and Replacing Resource-Heavy Plugins
Plugins are the most common source of performance bottlenecks. Each plugin can add its own CSS, JavaScript, and database queries. To audit your current plugins, follow these steps:
Use a plugin like Query Monitor or P3 (Plugin Performance Profiler) to identify which plugins contribute the most to load time.
Check for plugins that load assets on every page, even when not needed. For example, a contact form plugin should not enqueue its scripts on a blog post.
Look for plugins with outdated code or dependencies that conflict with your theme.
Once you identify problematic plugins, consider these replacements:
Resource-Heavy Plugin
Lightweight Alternative
Visual page builders (e.g., Divi, Beaver Builder)
GenerateBlocks or native block editor
Complex slider plugins
Simple CSS or JavaScript-based sliders (e.g., Splide)
Security plugins with real-time scanning
Server-level security (e.g., fail2ban) or a minimal plugin like Wordfence with on-demand scanning
Social sharing plugins with heavy scripts
Share buttons via lightweight plugins like Social Warfare or manual SVG icons
After replacing a plugin, test your site thoroughly. Check that all critical functionality remains intact and that page load time decreases by at least 200-500 milliseconds.
Even the best theme or plugin may include features you do not need. Disabling these reduces CPU cycles and database overhead. Start with the following:
Theme customizer options: Turn off features like custom fonts, color schemes, or layout variations that you never use. Many themes provide a settings panel to disable these.
Plugin shortcodes: If a plugin registers shortcodes you do not use (e.g.,
from an image plugin), remove them via a custom function or a plugin like Disable Shortcode.
Emoji and embeds: WordPress loads emoji scripts and oEmbed JavaScript by default. Add this code to your theme’s functions.php to disable them: remove_action( 'wp_head', 'print_emoji_detection_script', 7 ); remove_action( 'wp_print_styles', 'print_emoji_styles' );
XML-RPC: If you do not use remote publishing or mobile apps, disable XML-RPC via a security plugin or server rule to prevent unnecessary requests.
After disabling unused features, use a tool like GTmetrix to confirm that your page weight has dropped. Aim to reduce the number of external HTTP requests by at least 10-15%, which directly translates to faster load times for your high-traffic visitors.
8. Enable GZIP Compression and HTTP/2
Compression reduces the size of transferred data, while HTTP/2 allows multiplexing multiple requests over a single connection, both essential for high-traffic scenarios. Without these, your server will send larger files and handle more connections, slowing response times and risking overload. Enabling both can cut bandwidth usage by up to 70% and improve concurrent user handling.
8.1 Enabling GZIP via Server Config or Plugin
GZIP compression is typically activated at the server level or via a WordPress plugin. For Apache servers, add the following to your .htaccess file in the site root:
If you prefer a plugin-based approach, use a caching plugin like WP Rocket or W3 Total Cache. In WP Rocket, go to the “File Optimization” tab and check “Enable GZIP compression.” In W3 Total Cache, navigate to “Browser Cache” and enable “Compress” under the “General” section. Verify activation by testing your site’s URL with online GZIP checkers.
8.2 Verifying HTTP/2 Support on Your Hosting Server
HTTP/2 requires a modern server and an SSL certificate. Most reputable hosting providers support it, but you must confirm. Check your server’s HTTP/2 status using browser developer tools:
Open your site in Chrome or Firefox.
Press F12 to open Developer Tools, then go to the “Network” tab.
Reload the page and click any request (e.g., a CSS file).
In the “Headers” or “Protocol” column, look for “h2” (HTTP/2) or “http/1.1.”
Alternatively, use online tools like KeyCDN’s HTTP/2 Test or SSL Labs. If your server lacks HTTP/2, contact your host to enable it. Note that HTTP/2 requires HTTPS, so ensure your SSL certificate is installed and valid. For high-traffic sites, HTTP/2 reduces latency by allowing multiple files to load simultaneously over one connection.
8.3 Using Brotli Compression for Better Ratios
Brotli compression offers 20–30% better compression ratios than GZIP for text-based resources like HTML, CSS, and JavaScript. It is supported by all modern browsers and many hosting environments. To enable Brotli on Apache, add to .htaccess:
If your server does not support Brotli natively, use a plugin like “Brotli Compression” or a CDN that provides it (e.g., Cloudflare, KeyCDN). Verify Brotli is active by checking response headers in Developer Tools—look for content-encoding: br. For maximum benefit, pair Brotli with HTTP/2; both work together to reduce payload size and connection overhead. Note that Brotli may require more CPU for compression, but for high-traffic sites, the bandwidth savings far outweigh the processing cost.
9. Implement a Scalable Object Cache and Opcode Cache
When your WordPress site experiences a surge in visitors, every database query and PHP script execution becomes a potential bottleneck. Object caching and opcode caching are two complementary techniques that dramatically reduce server load. Object caching stores the results of database queries in memory, so subsequent requests for the same data skip the database entirely. Opcode caching, such as OPcache, stores compiled PHP script bytecode in memory, eliminating the need to recompile scripts on each page load. Together, they form a resilient foundation for high-traffic environments, ensuring your server can handle spikes without degrading performance.
9.1 Setting Up Redis Object Cache with a Plugin
Redis is a popular in-memory data structure store that works seamlessly with WordPress for object caching. The following steps guide you through a standard setup using a plugin:
Install Redis on your server: Use your package manager (e.g., sudo apt install redis-server on Ubuntu) and ensure the service is running.
Install and activate a Redis object cache plugin: Choose a reputable plugin like “Redis Object Cache” or “WP Redis.” These plugins handle the connection and configuration.
Configure the plugin: Navigate to the plugin’s settings page. Enter your Redis server host (typically 127.0.0.1), port (6379), and optionally a password if set.
Enable object caching: The plugin will automatically modify your wp-config.php file to add the necessary constant (e.g., define('WP_REDIS_HOST', '127.0.0.1');).
Test the connection: Use the plugin’s built-in status check to confirm Redis is active and caching queries.
After activation, monitor your database query count. You should see a significant reduction, as repeated queries for menus, widgets, and posts are served from Redis memory.
OPcache is included with PHP, but it must be enabled and tuned for high traffic. Edit your php.ini file (location varies by server, often /etc/php/8.x/cli/php.ini or via your control panel) and adjust these key directives:
Directive
Recommended Value
Purpose
opcache.enable
1
Enables OPcache globally.
opcache.memory_consumption
256
Allocates 256 MB for cached scripts; increase for large plugins.
opcache.max_accelerated_files
10000
Sets the maximum number of PHP files to cache.
opcache.revalidate_freq
60
Checks for file changes every 60 seconds; lower for development.
opcache.validate_timestamps
1
Enables timestamp validation for script freshness.
After saving, restart your web server (e.g., sudo systemctl restart nginx). Verify OPcache is active by checking phpinfo() or using a plugin like “OPcache Manager.”
9.3 Monitoring Cache Hit Rates and Memory Usage
Effective caching requires ongoing oversight. Use these methods to ensure your caches are performing optimally:
Check Redis hit rate: Run redis-cli INFO stats and look for keyspace_hits and keyspace_misses. A hit rate above 90% is ideal.
Monitor OPcache memory: Access /path/to/opcache.php (a script you can deploy) or use a plugin. Watch for memory_usage and hits versus misses.
Set up alerts: Use server monitoring tools (e.g., New Relic, Datadog) to notify you if cache hit rates drop below 80% or memory usage exceeds 80%.
Review logs periodically: Check Redis logs for errors and OPcache statistics in your server’s PHP error log.
Regular monitoring helps you adjust memory allocations or identify plugins that bypass caching. A well-tuned object and opcode cache combination ensures your WordPress site remains responsive, even under heavy concurrent loads.
10. Monitor Performance and Plan for Scaling
Continuous monitoring is the backbone of a high-traffic WordPress site. Without it, bottlenecks—such as memory leaks, slow database queries, or exhausted PHP workers—can degrade user experience before you notice. Proactive scaling, whether vertical (adding more power to a single server) or horizontal (distributing load across multiple servers), ensures sustained performance during traffic surges. This section covers the tools, alerts, and infrastructure strategies you need to stay ahead.
New Relic provides end-to-end application performance monitoring (APM). It tracks server response times, database query execution, external API calls, and PHP memory usage. For high-traffic sites, New Relic’s transaction traces reveal slow endpoints, such as a custom REST API or a specific WooCommerce checkout step.
Query Monitor is a free WordPress plugin that displays database queries, hooks, and PHP errors directly in the admin bar. It is invaluable for debugging during development, but for production, use it sparingly (e.g., with a query log enabled only for admin users) to avoid overhead.
WP Rocket Insights (part of the WP Rocket performance suite) focuses on front-end metrics like Largest Contentful Paint (LCP) and Cumulative Layout Shift (CLS). It helps you identify if caching rules, image optimization, or script loading are causing delays under load.
For a typical high-traffic setup, combine New Relic for server-side monitoring with WP Rocket Insights for user-facing speed. Query Monitor is best used during staging or when troubleshooting specific plugin conflicts.
10.2 Setting Up Real-Time Alerts for Traffic Spikes
Real-time alerts prevent surprises. Configure thresholds that trigger notifications (email, Slack, or SMS) when key metrics deviate from normal baselines. Common alert conditions include:
Metric
Alert Threshold
Action to Take
CPU usage
Exceeds 80% for 5 minutes
Scale up server resources or activate auto-scaling
PHP worker pool exhaustion
All workers busy for >10 seconds
Increase worker processes or switch to a dedicated server
Database query time
Average >200ms for 60 seconds
Identify slow queries via query log; consider object caching
Traffic volume
Requests per second > 200% of normal peak
Check for DDoS or viral content; enable CDN protection
Tools like New Relic Alerts, Datadog, or even server-level monitoring (e.g., Prometheus with Grafana) can be configured to send these notifications. For WordPress-specific spikes, use a plugin like WP Remote or ManageWP to monitor site availability and response time changes.
10.3 Planning Horizontal Scaling with Load Balancers
When a single server can no longer handle peak traffic, horizontal scaling distributes the load across multiple servers. This requires three components:
Load balancer (e.g., HAProxy, Nginx, or AWS ELB) that routes incoming requests to healthy web servers. It must support sticky sessions if your site uses session-based features (like WooCommerce carts) unless you implement a shared session store (e.g., Redis).
Shared file system for WordPress uploads (e.g., Amazon EFS or a networked NFS mount). Each web server must access the same wp-content/uploads directory to serve images and assets correctly.
Centralized database—typically a managed MySQL or MariaDB cluster with read replicas. Use a plugin like HyperDB or a connection manager to direct read queries to replicas and write queries to the primary node.
Before scaling horizontally, ensure your caching layer (e.g., Redis or Varnish) is also distributed. A common architecture is: CDN → Load Balancer → Web Servers (with Varnish) → Redis Cache → Database Cluster. Test your scaling plan with a load-testing tool like Locust or k6 to confirm that adding a new server actually reduces response times without introducing data inconsistencies.
The Complete Guide to WordPress Caching: Speed, Performance, and Best Practices
Introduction to WordPress Caching
In the competitive landscape of modern web publishing, site speed is no longer a luxury—it is a fundamental requirement for user retention, search engine ranking, and overall business success. For WordPress, the world’s most popular content management system, caching stands as the single most impactful performance strategy available. Without a proper caching mechanism, every visitor request forces your server to execute the full WordPress PHP code, query the database for posts, menus, and widgets, and assemble the page from scratch. This process is resource-intensive and slow, especially during traffic spikes. Caching solves this by storing a pre-rendered version of your page, allowing the server to deliver it in milliseconds without re-executing the complex backend logic.
What Is Caching and Why Does It Matter?
Caching, in the context of WordPress, is the practice of storing static copies of your dynamic web pages. When a user first visits a page, the server generates the HTML and saves it to a cache (often on disk, in memory, or via a third-party service). Subsequent visitors receive this saved copy, bypassing the PHP execution and database queries entirely. The benefits are profound:
Reduced Server Load: A cached page requires a fraction of the CPU and memory resources compared to a dynamically generated page. This allows your server to handle more concurrent visitors without crashing.
Faster Load Times: Delivering a pre-built HTML file from a fast storage layer (like Redis or a CDN) cuts page load times from multiple seconds to under 200 milliseconds.
Improved User Experience: Visitors expect pages to load instantly. A slow site increases bounce rates and damages trust.
Lower Hosting Costs: By reducing the server resources needed per visitor, you can often use a less expensive hosting plan or delay upgrading as your traffic grows.
How Caching Differs from Other Performance Optimizations
It is essential to distinguish caching from other performance tools, as they serve different but complementary roles. The following table clarifies the key differences:
Optimization
Primary Function
How It Differs from Caching
Image Compression
Reduces file size of images
Does not eliminate backend processing; works on static assets.
Minification
Removes whitespace and comments from CSS/JS
Reduces download size but does not prevent server-side rendering.
Content Delivery Network (CDN)
Distributes static files globally
Often used alongside caching; a CDN caches files at edge locations, but does not cache the dynamic HTML of your site.
Database Optimization
Cleans and indexes database tables
Improves query speed but still requires a database call for every uncached request.
Caching is unique because it directly addresses the server’s most expensive operation: generating the HTML page. While other optimizations reduce the size of what is sent or how quickly it is processed, caching eliminates the need for the generation step entirely for most requests.
The Impact of Caching on Core Web Vitals and SEO
Google’s Core Web Vitals have made caching a direct ranking factor. Three specific metrics benefit from a well-implemented caching strategy:
Largest Contentful Paint (LCP): Caching reduces server response time (Time to First Byte), which is a primary driver of LCP. A cached page can achieve sub-200ms TTFB, making it far easier to pass Google’s recommended threshold of under 2.5 seconds.
First Input Delay (FID): By reducing the amount of JavaScript that must be parsed on initial load (since cached pages often serve simpler markup), caching indirectly improves interactivity.
Cumulative Layout Shift (CLS): Cached pages load faster, reducing the window in which layout shifts can occur. Additionally, many caching plugins offer options to defer or delay non-critical CSS and JS, further stabilizing page layout.
From an SEO perspective, faster pages are crawled more efficiently by search engine bots. When your site responds quickly, Google can index more of your content in each crawl session, leading to better visibility. Furthermore, improved Core Web Vitals scores directly contribute to higher rankings in mobile search results, making caching an indispensable tool for any site seeking organic growth.
WordPress is a dynamic content management system that generates pages on the fly each time a visitor requests them. This process involves querying a database, executing PHP code, and assembling HTML, CSS, and JavaScript. While this flexibility powers features like comments, custom post types, and user-specific content, it also introduces latency. Caching solves this by storing a static version of the generated page and serving it directly to subsequent visitors, bypassing the resource-intensive backend entirely. Understanding the underlying mechanism—how WordPress distinguishes between dynamic and static content, manages HTTP headers, and handles cache hits versus misses—is essential for optimizing performance.
WordPress pages are inherently dynamic because they are constructed from database entries and user interactions. When a visitor loads a page, WordPress runs PHP scripts to fetch posts, theme templates, plugin data, and user session information, then outputs a unique HTML response. This dynamic generation is valuable for personalized experiences, such as showing a logged-in user’s dashboard or recent comments, but it consumes server resources and increases load times.
Static content, in contrast, is pre-built and unchanging. Examples include:
Images, CSS files, and JavaScript libraries stored on the server or a CDN.
Cached HTML copies of pages that do not depend on user input, such as a blog post or an “About Us” page.
Database query results stored in object caches for rapid retrieval.
Caching transforms dynamic pages into static versions by capturing the final HTML output after the first request. For pages with dynamic elements—like a shopping cart or a login form—caching systems often exclude those sections using “fragment caching” or “lazy loading,” ensuring the core page remains fast while preserving interactivity where needed.
The Role of HTTP Headers (Cache-Control, Expires, ETag)
HTTP headers are instructions sent between the server and the browser that govern how content is cached. Three critical headers control caching behavior:
Header
Purpose
Example Value
Cache-Control
Dictates caching rules for browsers and intermediary proxies. Common directives include public (cacheable by anyone), private (only user’s browser), no-cache (revalidate before use), and max-age (time in seconds).
public, max-age=3600
Expires
Specifies an absolute date/time after which the cached copy is considered stale. This is a legacy header, often superseded by Cache-Control’s max-age.
Expires: Wed, 21 Oct 2025 07:28:00 GMT
ETag
An identifier (usually a hash) representing a specific version of a resource. When a browser sends an If-None-Match request with the ETag, the server responds with 304 Not Modified if the content hasn’t changed, saving bandwidth.
"686897696a7c876b7e"
In WordPress, plugins and server configurations set these headers to control caching duration and validation. For example, a well-optimized site might set Cache-Control to public, s-maxage=31536000 for static assets, while using no-cache for admin pages to prevent stale data.
Understanding Cache Hits and Misses
A cache hit occurs when a requested resource is found in the cache and served immediately, bypassing the WordPress backend. This results in the fastest possible response time, often under 10 milliseconds. A cache miss happens when the resource is not present—either because it’s the first request, the cache has expired, or the content has been invalidated. In a miss scenario, WordPress processes the page normally, generates the output, and then stores a fresh copy in the cache for future requests.
Cache expiration: Short time-to-live (TTL) values cause frequent misses; longer TTLs increase hits but risk serving stale content.
Cache invalidation: When you publish a new post or update a page, caching systems purge related cached files, causing a temporary miss until the next request.
Unique URLs: Pages with query strings (e.g., ?page=2) or user-specific parameters (e.g., ?utm_source=email) may create separate cache entries, reducing hit rates unless normalized.
Monitoring cache hit ratios through tools like server logs or caching plugin dashboards helps identify performance bottlenecks. A high hit ratio (above 90%) indicates effective caching, while frequent misses suggest misconfigured TTLs, aggressive invalidation, or uncacheable dynamic content.
Types of Caching for WordPress
Caching is the cornerstone of WordPress performance optimization. By storing copies of dynamically generated content, caching reduces server load and dramatically improves page load times for visitors. Understanding the distinct types of caching and their appropriate use cases is essential for building a fast, scalable WordPress site. This section breaks down the primary caching methods, from the most common to the more specialized, and explains when each is most effective.
Page Caching: Full HTML Page Storage
Page caching is the most impactful caching method for most WordPress sites. It stores the fully rendered HTML output of a page or post after its first request. Subsequent visitors receive this static HTML file directly, bypassing the PHP execution and database queries that normally generate the page. This reduces server response time from hundreds of milliseconds to near-instantaneous delivery.
For virtually all WordPress sites, especially content-driven blogs, news sites, and business websites.
When traffic spikes are expected, such as during product launches or viral content events.
As the first line of defense against high server load.
Common implementation tools include plugins like W3 Total Cache, WP Super Cache, and WP Rocket, as well as server-level solutions such as Varnish Cache or Nginx FastCGI Cache. Page caching works best for anonymous users; logged-in users and those interacting with dynamic elements (like a shopping cart) typically bypass the cache to ensure personalized content is served.
Browser Caching: Leveraging Client-Side Storage
Browser caching instructs a visitor’s web browser to store static assets—such as images, CSS files, JavaScript files, and fonts—locally on their device. When the user revisits the site or navigates to a new page, the browser loads these assets from its local cache instead of downloading them again from the server. This significantly reduces bandwidth usage and speeds up subsequent page loads.
When to use browser caching:
On every WordPress site, regardless of size or traffic volume.
To improve the experience for returning visitors who view multiple pages.
To reduce server bandwidth costs by minimizing repeated downloads of static files.
Implementation is achieved by setting expiration headers (e.g., Cache-Control and Expires) in your server configuration or via a caching plugin. A typical setup might cache images for 30 days, CSS and JavaScript for one week, and HTML documents for a few hours. Ensure you set appropriate cache lifetimes to balance performance with the need to serve updated files after a site redesign or plugin update.
Object Caching: Database Query and Transient Optimization
Object caching stores the results of complex database queries, PHP objects, and transient data in memory (typically using Redis or Memcached). Instead of repeatedly querying the database for the same information—such as menu structures, widget output, or user metadata—WordPress retrieves the precomputed object from the fast in-memory cache. This reduces database load and speeds up operations that are not suitable for full-page caching.
On high-traffic sites, membership platforms, or WooCommerce stores where dynamic content changes frequently.
When page caching alone is insufficient because many pages are personalized or require real-time data.
For sites using transients to store temporary data, such as API call results or heavy calculations.
Object caching requires a persistent memory store on your server. For managed WordPress hosts like Kinsta or WP Engine, Redis is often pre-configured. For self-hosted sites, you may need to install the Redis or Memcached service and enable a plugin like Redis Object Cache or Memcached Object Cache. Properly configured object caching can reduce database query times by 90% or more, making it indispensable for scaling WordPress under heavy load.
Server-level caching operates before your WordPress application processes a request, making it one of the most powerful layers for improving site speed. By storing fully rendered pages or database query results at the server, this approach reduces PHP execution and database load, delivering content to visitors in milliseconds. For high-traffic sites, server-level caching is often the difference between a responsive site and one that buckles under load. Below, we explore three prominent solutions: Varnish Cache, Nginx FastCGI Cache, and in-memory object caching with Redis and Memcached.
Varnish Cache: Reverse Proxy for High Traffic Sites
Varnish Cache is a reverse proxy that sits in front of your web server, caching HTTP responses. It excels at handling thousands of concurrent requests by serving static, cached versions of pages from memory. For WordPress sites with heavy traffic spikes, Varnish can reduce server load by up to 90%.
Key benefits: Extremely fast cache delivery (sub-millisecond response times); granular caching rules via VCL (Varnish Configuration Language); built-in support for cache purging when content updates.
Considerations: Requires additional server configuration; may conflict with WordPress plugins that set no-cache headers; not ideal for dynamic, user-specific content without careful tuning.
Best use case: High-traffic news sites, eCommerce stores, or membership platforms where most content is public and cacheable.
To integrate Varnish with WordPress, you typically configure your server to listen on port 80 while Varnish listens on port 8080, then adjust your WordPress installation to send cache purge requests via plugins like Varnish HTTP Purge.
Nginx FastCGI Cache: Built-in Performance Boost
Nginx FastCGI Cache leverages Nginx’s native caching engine to store fully rendered PHP pages as static HTML files. Unlike Varnish, it does not require an additional service, making it simpler to set up on Nginx-based servers. This cache operates at the FastCGI level, intercepting requests to PHP-FPM and serving cached files directly.
Key benefits: No extra software needed; easy to configure with Nginx config files; supports cache bypass for logged-in users or dynamic pages; minimal overhead.
Considerations: Cache invalidation must be manual or scripted; lacks the advanced rule engine of Varnish; may require purging entire cache on content updates.
Best use case: Mid-traffic blogs, business sites, or any WordPress site already running on Nginx with limited server resources.
Configuration involves adding fastcgi_cache directives to your server block, defining cache keys, and setting expiration times. Plugins like Nginx Helper can automate cache purging when posts are published or updated.
Redis and Memcached: In-Memory Object Caching
Redis and Memcached are in-memory data stores that accelerate WordPress by caching database query results, transients, and session data. While Varnish and Nginx FastCGI Cache focus on page-level caching, these tools operate at the object level, reducing the number of database calls for frequently accessed data.
Feature
Redis
Memcached
Data persistence
Supports disk persistence
No persistence (in-memory only)
Data structures
Strings, hashes, lists, sets, etc.
Simple key-value pairs
Cache eviction
Multiple policies (LRU, LFU, etc.)
LRU-based eviction
Typical WordPress usage
Object cache, full-page cache, sessions
Object cache, database query cache
Ease of setup
Moderate (requires PHP extension)
Easy (widely supported)
For WordPress, Redis is generally preferred due to its support for persistent caching and complex data types. Plugins like Redis Object Cache enable a drop-in replacement for WordPress’s default object cache, dramatically reducing database load. Memcached remains a solid choice for simpler setups, particularly when paired with caching plugins like W3 Total Cache. Both solutions require a dedicated server process and sufficient RAM to store your cache data effectively.
WordPress Caching Plugins Comparison
Choosing the right caching plugin is essential for optimizing WordPress site speed and performance. Each plugin offers distinct features, complexity levels, and ideal use cases. Below is a detailed comparison of the three most widely used options: W3 Total Cache, WP Super Cache, and WP Rocket.
W3 Total Cache: Feature-Rich but Complex
W3 Total Cache is a robust, free plugin that provides granular control over caching mechanisms. It supports page caching, database caching, object caching (via Memcached or Redis), minification, CDN integration, and browser caching. Its comprehensive settings panel allows advanced users to fine-tune every aspect of performance, but this complexity can overwhelm beginners. Misconfiguration may lead to broken layouts or reduced performance. Ideal for developers and site owners managing high-traffic sites who need deep customization and are comfortable with technical configurations.
Feature
Details
Page Caching
Disk, APC, Memcached, Redis
Minification
HTML, CSS, JavaScript
CDN Support
Yes, with custom integration
Object Cache
Memcached, Redis, APC
Ease of Use
Low (requires technical skill)
Best For
Advanced users, high-traffic sites
WP Super Cache: Simple and Reliable
WP Super Cache, developed by Automattic, focuses on simplicity and reliability. It generates static HTML files for visitors, reducing server load dramatically. The plugin offers three caching modes: Simple (recommended for most users), Expert (mod_rewrite), and WP-Cache (dynamic caching). It includes basic CDN support, preloading, and garbage collection. The user interface is clean and intuitive, making it ideal for beginners or those who want a set-and-forget solution. While it lacks advanced features like minification or object caching out of the box, it integrates well with other performance plugins. Best for small to medium sites, bloggers, and users who prioritize ease over extensive customization.
WP Rocket is a premium caching plugin (paid) that combines ease of use with powerful features. It automatically enables recommended settings upon activation, including page caching, browser caching, Gzip compression, and cache preloading. Additional features include minification and concatenation of CSS/JS, lazy loading for images and videos, database optimization, Google Fonts optimization, and CDN integration. Its user-friendly dashboard requires minimal configuration, yet offers advanced options for fine-tuning. WP Rocket also includes a built-in caching system compatible with most hosting environments and ecommerce platforms like WooCommerce. Ideal for users who want a comprehensive performance solution without technical complexity, especially for business sites, membership sites, and online stores.
Feature
Details
Page Caching
Automatic, with preloading
Minification
CSS/JS with concatenation
Lazy Loading
Images, videos, iframes
Database Optimization
Built-in
CDN Support
One-click integration
Ease of Use
High (plug-and-play)
Best For
All sites, especially ecommerce
Each plugin serves a specific audience: W3 Total Cache for power users, WP Super Cache for simplicity, and WP Rocket for a balanced premium experience. Assess your technical comfort, site traffic, and performance goals to select the right tool.
Configuring Caching for Different Content Types
Tailoring your caching rules to the specific nature of each content type is essential for balancing speed with functionality. A one-size-fits-all approach can break dynamic features or serve stale data. This section explains how to configure caching for the most common WordPress content types.
Static pages and blog posts are the backbone of most WordPress sites and benefit most from aggressive caching. Since their content changes infrequently, you can safely use page caching with a long Time to Live (TTL).
Default TTL: Set to 1 hour (3600 seconds) for most static pages and posts. Increase to 24 hours for evergreen content that is rarely updated.
Cache Bypass: Exclude single post views from cache only if you rely on real-time comment counts or visitor counters. Otherwise, cache them fully.
Purge on Update: Configure your caching plugin to automatically purge the cache for a page or post whenever it is published or edited. This ensures visitors always see the latest version.
Feed Caching: Cache RSS and Atom feeds with a shorter TTL (e.g., 30 minutes) to reflect new posts quickly without overloading the server.
Content Type
Recommended Cache TTL
Cache Strategy
Static Pages
1–24 hours
Full page caching, purge on update
Blog Posts
1–24 hours
Full page caching, purge on update
Category/Tag Archives
30–60 minutes
Full page caching with shorter TTL
Search Results
No cache or 5 minutes
Exclude from cache or use fragment caching
Handling Dynamic Content with WooCommerce and Forums
E-commerce stores and forums rely on dynamic, user-specific data such as cart contents, user status, and post timestamps. Caching these pages incorrectly can lead to broken checkouts or stale forum threads.
WooCommerce: Exclude the cart, checkout, and my-account pages from full-page caching. Use object caching (e.g., Redis) for product data and session storage. Cache product pages for logged-out users with a short TTL (15–30 minutes).
bbPress or BuddyPress Forums: Avoid caching forum topic and reply pages. Instead, use database query caching and fragment caching for non-dynamic elements like headers and sidebars. Cache forum index pages for 5–10 minutes.
AJAX Endpoints: Never cache WooCommerce or forum AJAX endpoints (e.g., /wp-admin/admin-ajax.php). Use a cache exclusion rule for all dynamic REST API paths.
Stock and Price Updates: Configure cache purging to trigger when product stock changes or prices are updated. Use a webhook or plugin hook to clear only the affected product cache.
Excluding Logged-In Users and Admin Pages from Cache
Logged-in users, including administrators, editors, and subscribers, must never see a cached version of a page that is tailored to their session. Similarly, admin pages should always be served fresh to avoid conflicts with plugin and theme settings.
User Cookie Detection: Most caching plugins detect the wordpress_logged_in_ cookie and automatically bypass the cache for authenticated users. Verify this setting is active.
Admin Pages: Exclude all pages under /wp-admin/ and /wp-login.php from caching. Use a rule in your caching plugin or server-level configuration (e.g., Nginx fastcgi_cache_bypass).
Custom User Roles: If you use custom roles (e.g., “Premium Member”), add their cookie prefixes to the exclusion list in your caching plugin’s advanced settings.
Admin Bar and Toolbar: To prevent cached pages from showing the admin bar to non-logged-in users, ensure your caching plugin strips or excludes the admin bar CSS and JavaScript from cached output.
By applying these content-specific caching rules, you can deliver lightning-fast load times for public visitors while preserving the dynamic, personalized experience that logged-in users and interactive features require.
Advanced Caching Techniques
While basic caching setups deliver substantial speed gains, advanced techniques unlock the next tier of performance for high-traffic or dynamic WordPress sites. These strategies fine-tune how and when cached content is served, reducing server load while maintaining real-time functionality for logged-in users, e-commerce carts, or comment sections. Below, we explore three critical methods for maximizing your caching architecture.
Cache Preloading and Warm-Up Strategies
Cache preloading ensures that pages are stored in the cache before a visitor requests them, eliminating the “cold cache” penalty where the first user experiences slower load times. This is especially crucial after clearing your cache or publishing new content. Effective preloading strategies include:
Scheduled Preloading: Use plugins like WP Rocket or W3 Total Cache to automatically regenerate the cache during low-traffic hours (e.g., 3 AM). This avoids straining your server during peak periods.
On-Update Preloading: Configure the system to preload only the pages that changed—such as a single blog post or product page—rather than the entire site. This reduces resource waste.
Sitemap-Based Preloading: Feed your XML sitemap to the preloader so it crawls and caches all pages, including archives and categories, in a logical order. This is more efficient than random crawling.
For large sites, combine preloading with a warm-up bot that simulates real user agents, ensuring dynamic elements like cookies or language preferences are cached correctly. Monitor server logs to confirm that preloaded pages return 200 status codes, not redirects or errors.
Fragment Caching for Partial Page Updates
Full-page caching fails when parts of a site must update dynamically—for example, a shopping cart count or user-specific greetings. Fragment caching stores reusable pieces of a page (widgets, menus, recent posts) in the cache while allowing other sections to remain dynamic. Implement it as follows:
Identify Static Fragments: Use tools like Query Monitor to find elements that rarely change, such as header navigation, footer copyright text, or sidebar advertisements. Cache these with a long TTL (e.g., 24 hours).
Use Transients API: In WordPress development, store fragment output as transients with expiration times. For example, cache a “popular posts” list for 1 hour to reduce database queries.
Leverage Edge Side Includes (ESI): Advanced CDNs and caching plugins support ESI tags, which tell the cache to assemble the page from separate fragments. This allows the main content to be cached while the user-specific sidebar loads fresh each time.
Fragment caching is ideal for membership sites or forums where user roles dictate different content, as it blends performance with personalization without full-page invalidation.
Integrating a Content Delivery Network (CDN) with Caching
A CDN distributes your cached static assets—images, CSS, JavaScript—across global servers, reducing latency for international visitors. For optimal integration with WordPress caching, follow these steps:
Step
Action
Benefit
1
Enable CDN compatibility in your caching plugin (e.g., set “CDN URL” for assets).
Ensures cached HTML references CDN-hosted files instead of origin server paths.
2
Purge CDN cache when you clear WordPress cache (use API hooks).
Prevents stale assets from being served after updates.
3
Configure CDN caching rules: set short TTL for dynamic pages (e.g., 5 minutes) and long TTL for static assets (e.g., 1 month).
Balances freshness with performance.
4
Enable Gzip/Brotli compression at the CDN level, not just the origin.
Reduces transfer sizes further.
Popular CDNs like Cloudflare, KeyCDN, or BunnyCDN offer WordPress-specific plugins that handle cache purging automatically. Test with a tool like GTmetrix to confirm that your CDN is serving cached files with appropriate headers (e.g., Cache-Control: public, max-age=31536000). Proper integration reduces origin server load by up to 80% for static assets, freeing resources for dynamic requests.
Common Caching Pitfalls and How to Avoid Them
Even a well-configured caching system can introduce problems if not managed carefully. The most frequent issues stem from serving outdated content, conflicts with dynamic plugins, and difficulty diagnosing cache-related errors. Understanding these pitfalls and their solutions is essential for maintaining both speed and functionality.
One of the most common caching pitfalls is serving stale content—pages that do not reflect recent updates. This occurs when the cache is not invalidated after publishing new posts, modifying menus, or changing widgets. To avoid this, implement the following strategies:
Use automatic cache purging: Most reputable caching plugins (e.g., WP Rocket, W3 Total Cache) offer options to clear the cache automatically when content is updated. Ensure these settings are enabled.
Set appropriate TTL (Time to Live): For most WordPress sites, a TTL of 24 hours is safe for posts and pages, but consider shorter TTLs (e.g., 1–6 hours) for sites with frequent updates, such as news or e-commerce stores.
Manually clear the cache after critical changes: After updating theme files, plugins, or site settings, trigger a manual cache purge to avoid serving outdated versions.
Check object cache behavior: If using Redis or Memcached for database queries, ensure that cache keys are invalidated when content changes. Some plugins may require additional configuration.
Practical solution: Create a checklist for content updates: publish the post, then clear page cache and CDN cache if used. Many caching plugins allow you to exclude specific URLs or post types from caching if delays are unacceptable.
Cache Conflicts with Page Builders and Plugins
Page builders like Elementor, Beaver Builder, or Divi often rely on dynamic JavaScript and CSS that can break when cached aggressively. Similarly, plugins for e-commerce (WooCommerce), membership sites, or forums (bbPress) need real-time data that static caching cannot provide. Conflicts manifest as missing styles, broken layouts, or non-functional interactive elements. To resolve these:
Exclude critical pages from caching: For WooCommerce, never cache cart, checkout, my-account, or product pages with dynamic stock levels. Most caching plugins allow you to exclude URLs or URL patterns.
Use cache-skip cookies: For membership sites, configure the cache to skip serving cached pages to logged-in users or those with specific cookies (e.g., session tokens).
Test page builder components: After enabling caching, inspect front-end pages built with the builder. If elements are missing, add those CSS/JS files to the exclusion list or disable combined/minified files for those assets.
Check for plugin-specific hooks: Some plugins offer hooks to flush cache when they update data. For example, WooCommerce has actions like woocommerce_product_set_stock that can trigger cache purging.
Plugin Type
Common Conflict
Solution
Page Builders
Broken layout or missing CSS
Exclude builder-specific assets from minification/combination
E-commerce
Outdated stock or cart info
Exclude cart/checkout pages; use object caching for product data
Membership
Logged-in users see cached public pages
Skip cache for authenticated sessions via cookies or user roles
Forum plugins
New posts not appearing
Exclude forum pages; set low TTL for those URLs
Debugging Caching Issues: Tools and Best Practices
When caching causes problems, identifying the root cause requires a systematic approach. Use these tools and methods:
Browser developer tools: Open the Network tab and check the response headers. Look for X-Cache (e.g., HIT or MISS) or Cache-Control headers to see if the page is served from cache. A MISS indicates the cache was bypassed or not yet populated.
Query monitor plugin: This tool shows database queries, hooks, and cache calls. It can highlight if object cache is being used and whether cache keys are properly invalidated.
CDN diagnostic headers: If using a CDN like Cloudflare or StackPath, check headers like CF-Cache-Status (Cloudflare) or X-Cache (StackPath). A status of EXPIRED or DYNAMIC indicates the page was not served from CDN cache.
Disable caching incrementally: Temporarily disable page caching, then object caching, then CDN to isolate which layer causes the issue. Test after each step.
Review error logs: Check server error logs (e.g., Apache’s error_log) for PHP warnings or fatal errors triggered by caching plugins. These often point to plugin conflicts.
Best practice: Maintain a staging environment where you can test caching configurations without affecting live users. Use version control for caching plugin settings to revert changes quickly if needed.
Testing and Measuring Caching Performance
Evaluating the effectiveness of your WordPress caching setup is essential to ensure that speed improvements are real and consistent. Without measurement, you cannot know whether your configuration is optimal or if it introduces issues like stale content or excessive resource usage. This section covers practical methods for assessing caching performance using industry-standard tools and real-world metrics.
Using GTmetrix and Google PageSpeed Insights
GTmetrix and Google PageSpeed Insights are two of the most widely used tools for analyzing page load times. GTmetrix provides detailed waterfall charts, showing the sequence of resource requests and highlighting where caching reduces load. It offers metrics like Fully Loaded Time and Total Page Size, which are directly influenced by caching. Google PageSpeed Insights focuses on Core Web Vitals, including Largest Contentful Paint (LCP) and First Input Delay (FID). Caching typically improves LCP by serving cached HTML and static assets faster. To test effectively:
Run tests on a representative page (e.g., a blog post or product page) both with and without caching enabled.
Use the same browser and connection speed for each test to ensure consistency.
Compare the “Time to First Byte” (TTFB) and “First Contentful Paint” metrics between cached and uncached versions.
Below is a simple comparison table for interpreting results:
Metric
Without Caching
With Caching
Expected Improvement
TTFB
500–1500 ms
100–300 ms
60–90% reduction
LCP
2.5–4.0 s
1.0–2.0 s
40–60% reduction
Total Page Size
1.5–3.0 MB
0.5–1.5 MB
30–50% reduction
Monitoring Server Response Times and TTFB
Server response time, often measured as TTFB, is a critical indicator of caching efficiency. A low TTFB (under 200 ms) suggests that your caching layer is serving requests quickly, bypassing PHP and database queries. To monitor this, use tools like WebPageTest or browser developer tools (Network tab). Focus on the following:
Check TTFB for uncached requests (e.g., with a cache-busting query parameter) versus cached requests.
Use server-side monitoring tools like New Relic or built-in WordPress plugins (e.g., Query Monitor) to track PHP execution time and database query counts.
Set up regular monitoring with a tool like UptimeRobot to detect spikes in response times that may indicate cache expiration or misconfiguration.
For ongoing tracking, consider these steps:
Define a baseline TTFB for your uncached site.
After enabling caching, measure TTFB at different times of day to confirm consistency.
If TTFB exceeds 500 ms, investigate cache headers, plugin conflicts, or server resource limits.
A/B Testing Caching Configurations
A/B testing allows you to compare different caching setups to determine which yields the best performance for your audience. This is particularly useful when deciding between page caching plugins (e.g., W3 Total Cache vs. WP Super Cache) or configuring cache expiration times. To conduct a valid test:
Use a split testing tool like Google Optimize or a plugin such as Nelio A/B Testing, but ensure caching is not interfering with the test’s randomization (use cookie-based or server-side methods).
Test one variable at a time, such as cache duration (e.g., 1 hour vs. 24 hours) or object caching (e.g., Redis vs. Memcached).
Measure both performance metrics (TTFB, LCP) and user engagement metrics (bounce rate, conversion rate) to see if faster load times improve business outcomes.
Document each test’s configuration and results in a simple log. For example:
Test ID
Configuration
Average TTFB
Bounce Rate Change
A
Page cache only, 1-hour TTL
250 ms
-3%
B
Page cache + Redis, 4-hour TTL
180 ms
-7%
By systematically testing and measuring, you can fine-tune your caching setup to achieve the best possible performance for your WordPress site.
Maintaining and Updating Your Caching Strategy
As your WordPress site grows, its content, traffic patterns, and technical requirements will shift. A caching strategy that works perfectly today may become a bottleneck tomorrow. Regular maintenance ensures your caching layer continues to deliver speed without breaking functionality. This section outlines the key practices for keeping your caching effective as your site evolves.
Scheduled Cache Purging and Updates
Static cache files become stale when you publish new posts, update products, or modify pages. Automated purging systems, such as those built into popular caching plugins like WP Rocket or W3 Total Cache, can clear relevant cache segments on specific triggers. However, you should also implement a scheduled, full cache purge during low-traffic periods—typically once a week or after major content updates. This prevents accumulated edge cases where old data persists due to missed purge events. For sites with dynamic content (e.g., user-generated comments or e-commerce stock levels), consider a fine-grained approach:
Post-level purging: Automatically clear the cache for a single post when it is updated.
Category or tag purging: Invalidate all cached pages belonging to a taxonomy term after changes.
Homepage purging: Clear the homepage cache whenever any new post is published.
Full-site purging: Run a complete cache flush weekly or after theme/plugin updates.
Use your caching plugin’s cron-based cache scheduler or a separate service like a WordPress CRON job to perform these purges automatically. Avoid manual purging except in emergencies, as it is error-prone and disrupts user experience.
Staying Compatible with WordPress Core and Plugin Updates
WordPress core updates often introduce changes to how queries, REST API endpoints, or object caching functions work. Similarly, plugin updates—especially for e-commerce, membership, or page builders—may alter cache keys or introduce new dependencies. To maintain compatibility:
Test updates in a staging environment first. Clone your live site, apply the update, and verify that caching still functions correctly (e.g., logged-in users see fresh content, cart pages update properly).
Review caching plugin changelogs. Plugin developers frequently release patches for compatibility with the latest WordPress version. Update your caching plugin promptly after core updates.
Check for new cache-exclusion rules. After updating a plugin that handles dynamic content (like WooCommerce or BuddyPress), inspect your caching plugin’s settings for new exclusion patterns. For example, WooCommerce updates may require you to exclude the cart, checkout, and account pages from page caching.
Monitor object cache compatibility. If you use a persistent object cache (Redis, Memcached), ensure your caching plugin’s object cache implementation is compatible with the updated WordPress version. Some updates break serialization or transients.
Create a maintenance checklist and run it after every major update to avoid performance regressions or broken functionality.
When to Revisit Your Caching Configuration
Your caching configuration should not be a set-and-forget task. Revisit it whenever your site undergoes significant changes. Key triggers include:
Trigger
Action Required
New content type added (e.g., custom post type)
Add cache exclusion rules for dynamic parts; configure cache headers for static parts.
Traffic spike or change in user behavior
Adjust cache TTL (time-to-live) values; consider adding a CDN for static assets.
Theme switch or redesign
Clear all caches; test mobile vs. desktop cache rules; verify logged-in user caching.
New plugin with dynamic features (e.g., forums, booking system)
Identify dynamic URLs and exclude them from page caching; test object cache impact.
WordPress core version update
Run compatibility tests; review caching plugin settings for new features or deprecated options.
Schedule a quarterly audit of your caching configuration. During this audit, review cache logs for errors, check that purge rules still match your content structure, and benchmark page load times using tools like GTmetrix or WebPageTest. If you notice a pattern of slow page loads for specific user roles or pages, it is a clear signal that your caching strategy needs adjustment. By proactively maintaining your caching approach, you ensure that performance gains remain consistent as your site matures.
WordPress Theme Development: Best Practices for 2026
1. Embracing the Block Editor and Full Site Editing
By 2026, Full Site Editing (FSE) and the Block Editor are no longer optional features in WordPress theme development; they represent the foundational standard. Developers must abandon traditional template hierarchies built solely around header.php, footer.php, and sidebar.php in favor of a block-driven, site-wide editing experience. This shift empowers content creators to modify every part of a site—from headers to footers to global styles—directly from the editor, without touching a line of code. For developers, this means rethinking how themes are structured, styled, and extended, with a strong emphasis on modularity, maintainability, and user autonomy.
Understanding FSE Architecture and Theme.json
FSE architecture replaces the classic PHP template hierarchy with a system of block-based templates and template parts stored in the theme’s templates and parts directories. The core of FSE configuration is the theme.json file, which acts as a single source of truth for global styles, settings, and presets. In 2026, mastering theme.json is critical because it controls:
Color and typography presets: Define palettes, font sizes, and gradients that appear in the editor.
Layout settings: Set content width, padding, and block spacing globally.
Block-level overrides: Fine-tune styles for individual blocks (e.g., buttons, headings).
Custom CSS: Add scoped CSS that respects FSE’s style engine.
Developers must also understand how FSE templates work: a single.html file replaces single.php, and index.html serves as the fallback. These templates use block markup (e.g., <!-- wp:post-title /-->) and can be edited visually. The hierarchy remains, but the implementation is entirely different—no more conditional PHP logic for sidebars or headers.
Building Custom Blocks for Enhanced Content Flexibility
Custom blocks are essential when off-the-shelf blocks don’t meet client needs. In 2026, best practices emphasize using the @wordpress/create-block package to scaffold blocks quickly. Key considerations include:
Dynamic vs. static blocks: Use dynamic blocks (server-rendered) for data-driven content like testimonials or team members; use static blocks (client-rendered) for simple UI components like buttons or cards.
Block supports: Leverage supports in block.json to control alignment, spacing, and typography, ensuring blocks integrate seamlessly with FSE’s style engine.
Reusable patterns: Bundle custom blocks with pre-designed patterns (stored in patterns/) to give users ready-made layouts.
A common mistake is over-engineering blocks. For 2026, lean toward simplicity: a block should do one thing well, with clear controls for editors. Avoid inline styles; instead, use theme.json or block-level style attributes for consistency.
Migrating Classic Themes to Hybrid or FSE-Based Approaches
Migration from classic themes is a phased process. The recommended path for 2026 is to start with a hybrid approach (classic PHP templates plus block editor support) before moving to full FSE. Follow these steps:
Phase
Action
Key Output
1. Audit
Identify which templates are purely structural (e.g., header) vs. content-dependent (e.g., single post).
List of templates to convert to block patterns first.
2. Add FSE support
Add add_theme_support( 'block-templates' ) and create a minimal theme.json with existing color/typography values.
Basic FSE compatibility; classic templates still override.
3. Convert template parts
Replace header.php and footer.php with block-based template parts in parts/.
Editable headers/footers via the Site Editor.
4. Replace content templates
Convert single.php, page.php, etc., to single.html using the Query Loop block for post lists.
Full FSE templates; classic PHP templates become fallbacks.
5. Remove legacy code
Delete functions.php logic that duplicates theme.json settings (e.g., customizer options).
Clean, modern theme with no redundant PHP.
Critical pitfalls to avoid during migration include hardcoding block styles in CSS (use theme.json instead) and forgetting to register block patterns for common layouts like hero sections or call-to-action areas. Testing in a staging environment with the latest WordPress version is non-negotiable, as FSE updates frequently. By 2026, the majority of new themes should ship as FSE-first, with classic themes reserved only for legacy maintenance projects.
2. Performance-First Development: Core Web Vitals and Beyond
In 2026, performance is no longer a secondary consideration—it is a fundamental requirement for user retention, search engine ranking, and overall site success. WordPress theme developers must prioritize Core Web Vitals (LCP, FID/INP, CLS) as non-negotiable metrics. A performance-first approach means designing every asset, script, and style to load efficiently, interact instantly, and render without layout shifts. This section outlines critical strategies for achieving optimal performance in modern WordPress themes.
Leveraging Lazy Loading and Code Splitting for Assets
Lazy loading defers the loading of non-critical resources until they are needed, significantly reducing initial page weight and improving Largest Contentful Paint (LCP). Code splitting, meanwhile, breaks monolithic JavaScript and CSS bundles into smaller, on-demand chunks. Implement these techniques as follows:
Native lazy loading for images and iframes: Use the loading="lazy" attribute on all below-the-fold images and embedded content. This is now widely supported and requires no JavaScript.
JavaScript code splitting: Use module-based bundlers (e.g., Webpack, Vite) to split theme scripts into separate files for core functionality, interactive components, and third-party integrations. Load only what is needed for the current page.
CSS splitting: Separate critical CSS (above-the-fold styles) from non-critical CSS. Inline critical CSS in the <head> and load the rest asynchronously using media="print" with an onload swap.
Intersection Observer API: For custom lazy loading of videos, background images, or complex components, use the Intersection Observer to trigger loading only when elements enter the viewport.
Optimizing with Modern Image Formats and Responsive Breakpoints
Images account for the majority of page weight. Using modern formats and serving correctly sized images is essential for reducing LCP and improving overall performance. Follow these best practices:
Format
Best Use Case
Key Benefit
WebP
Photographs, complex graphics
25–35% smaller than JPEG with similar quality
AVIF
High-quality images, modern browsers
Up to 50% smaller than JPEG; supports HDR
SVG
Logos, icons, illustrations
Resolution-independent, small file size
JPEG XL
Emerging standard for lossless/lossy
Excellent compression, progressive decoding
Use srcset and sizes attributes: Define multiple image resolutions (e.g., 480w, 768w, 1200w) so browsers download the most appropriate version for the viewport.
Implement <picture> elements: Provide fallback formats (e.g., WebP with JPEG fallback) to ensure compatibility across all browsers.
Automatic compression: Integrate server-side or build-time tools (e.g., ShortPixel, Imagify, or Sharp) to compress images without visible quality loss.
Responsive breakpoints in theme design: Use CSS max-width and min-width breakpoints to serve contextually appropriate images, avoiding oversized assets on mobile devices.
Minimizing Render-Blocking Resources and HTTP Requests
Render-blocking resources (CSS and JavaScript) delay the time until a page is visually ready, harming LCP and First Contentful Paint (FCP). Reducing HTTP requests further accelerates load times. Key actions include:
Defer and async JavaScript: Add defer to all non-critical scripts so they execute after HTML parsing. Use async for independent scripts (e.g., analytics) that can load in parallel.
Inline critical CSS: Extract and inline the CSS required for above-the-fold content. Load the remaining CSS asynchronously to prevent blocking.
Eliminate render-blocking requests: Audit your theme for external fonts, third-party widgets, and unnecessary plugins. Self-host fonts and use font-display: swap to avoid invisible text during load.
Combine and minify assets: Merge small CSS and JS files into fewer, optimized bundles. Use tools like Autoptimize or WP Rocket, or integrate into your build process with Gulp or Webpack.
Reduce total HTTP requests: Aim for fewer than 20–30 requests on initial load. Remove unused assets, consolidate icons into a sprite sheet, and leverage browser caching with appropriate Cache-Control headers.
By embedding these performance-first strategies into your WordPress theme development workflow, you ensure faster load times, smoother interactions, and a stable visual experience—meeting both user expectations and search engine requirements in 2026.
3. Accessibility as a Non-Negotiable Standard
Accessibility, often abbreviated as a11y, has transitioned from a niche consideration to a core requirement in WordPress theme development for 2026. Legal frameworks such as the Americans with Disabilities Act (ADA) and the European Accessibility Act increasingly mandate digital compliance, while ethical design principles demand that no user be excluded. Building themes that meet or exceed the Web Content Accessibility Guidelines (WCAG) 2.2 at Level AA is now a baseline, not an aspiration. This section outlines how to integrate accessibility into every layer of your theme, from markup to testing, ensuring your work serves the broadest possible audience.
Implementing Semantic HTML and ARIA Roles Correctly
Semantic HTML is the foundation of an accessible theme. Using elements like <header>, <nav>, <main>, <article>, and <footer> provides inherent meaning to assistive technologies, reducing reliance on generic <div> and <span> tags. For example, a navigation menu should be wrapped in <nav>, not a <div> with a class. When semantic HTML alone is insufficient—such as in dynamic interfaces or custom widgets—ARIA (Accessible Rich Internet Applications) roles, states, and properties must be applied precisely. Follow these practices:
Use native HTML first: A <button> element is inherently keyboard-focusable and announces its role; avoid <div role="button"> unless absolutely necessary.
Apply ARIA roles sparingly: Only add roles like role="navigation" or role="alert" when the HTML semantics are ambiguous or missing.
Update ARIA states dynamically: For expandable sections, toggle aria-expanded="true" and aria-expanded="false" via JavaScript, and link controls to content using aria-controls.
Validate with tools: Use the W3C Nu HTML Checker to ensure your markup is valid and ARIA attributes are correctly nested.
Ensuring Keyboard Navigation and Focus Management
Every interactive element in your theme must be operable via keyboard alone. Users who cannot use a mouse rely on the Tab key to move through links, buttons, form fields, and custom widgets. Achieve this by:
Maintaining a logical tab order: Ensure the DOM order matches the visual order. Avoid using positive tabindex values (e.g., tabindex="5"), which disrupt the natural flow; instead, use tabindex="0" for custom interactive elements and tabindex="-1" for programmatic focus.
Implementing visible focus indicators: Never remove :focus outlines without providing a custom, high-contrast replacement (e.g., a 3px solid blue outline). Test that focus rings are visible on all backgrounds.
Managing focus in dynamic content: When a modal opens, move focus to the first focusable element inside it. When it closes, return focus to the trigger button. Use JavaScript with element.focus() and trap focus within the modal to prevent tabbing behind it.
Supporting skip links: Include a visible skip-to-content link at the top of every page, allowing keyboard users to bypass repetitive navigation.
Testing with Automated Tools and Real User Feedback
Automated testing catches up to 30% of accessibility issues, but manual testing with real users reveals the rest. Build a layered testing strategy into your development workflow:
Testing Type
Tools or Methods
What It Catches
Automated scanning
WAVE, axe DevTools, Lighthouse
Missing alt text, low color contrast, duplicate ARIA roles, missing form labels
Integrate automated checks into your build process (e.g., via a CI/CD pipeline) to catch regressions early. However, never rely solely on automation; schedule regular manual reviews with assistive technologies and, ideally, recruit users with disabilities for qualitative testing. Document findings and iterate—accessibility is a continuous improvement process, not a one-time fix. By embedding these practices, your theme will not only comply with WCAG 2.2 but also provide a genuinely inclusive experience.
4. Modular and Component-Based Architecture
In 2026, effective WordPress theme development hinges on modular, component-based architecture. This approach breaks down a theme into discrete, reusable building blocks, enhancing maintainability, scalability, and collaboration. By isolating functionality into self-contained components, developers reduce code duplication, simplify debugging, and accelerate feature development. A component-based structure aligns with modern web development paradigms, allowing teams to work in parallel on different parts of a theme without conflict. It also future-proofs themes against core updates, as changes to one component rarely cascade unpredictably. Adopting this architecture requires deliberate organization of templates, scripts, and styles, leveraging WordPress-specific tools and general best practices.
Organizing Templates with Block Patterns and Template Parts
WordPress block patterns and template parts are essential for modular template organization. Block patterns provide pre-designed layouts of blocks that users can insert via the block editor, enabling consistent design without custom code. Template parts, introduced in Full Site Editing (FSE), allow you to define reusable sections like headers, footers, and sidebars in separate files. To implement this effectively:
Register template parts in your theme’s theme.json under the templateParts property, specifying their area (e.g., “header”, “footer”).
Create block patterns in the /patterns directory, each as a PHP file with a header comment defining metadata (title, slug, categories).
Use the block_template_part() function or the block editor’s template part block to embed reusable sections within templates.
Organize patterns by purpose—e.g., “hero”, “call-to-action”, “testimonial”—and register them with appropriate categories for easy discovery.
Leverage synced patterns (formerly reusable blocks) for content that must update globally across the site.
This approach ensures that design changes propagate seamlessly, and non-developers can modify layouts via the editor without touching code.
Using JavaScript Frameworks (e.g., React) for Interactive Components
For dynamic, interactive features—such as live search, custom forms, or real-time content updates—integrating JavaScript frameworks like React enhances performance and user experience. WordPress’s official support for React via the @wordpress/scripts package simplifies this integration. Best practices include:
Enqueue scripts properly: Use wp_enqueue_script with dependencies like wp-element and wp-components to load React and its WordPress-specific bindings.
Isolate component logic: Build each interactive element as a separate React component, stored in /js/src/components/ and compiled via Webpack.
Pass data from PHP: Use wp_localize_script or the REST API to provide initial props (e.g., post IDs, user roles) to React components.
Use createRoot (React 18+) to mount components to specific DOM elements, avoiding global state conflicts.
Prioritize server-side rendering for SEO-critical components, falling back to client-side hydration for interactivity.
This modular JavaScript approach prevents bloated scripts and allows teams to maintain complex interactions without affecting theme performance.
Adopting CSS Methodologies (BEM, ITCSS) for Consistent Styling
CSS scalability requires a disciplined methodology. Combining BEM (Block Element Modifier) with ITCSS (Inverted Triangle CSS) provides a robust framework for styling components. BEM ensures class names are descriptive and avoid specificity wars, while ITCSS organizes styles from generic to explicit. Implementation guidelines:
Key practices include: naming components with a prefix (e.g., c- for components), avoiding nested selectors beyond two levels, and using ITCSS layers to manage cascade explicitly. This structure ensures that styles remain predictable, even as the theme grows, and facilitates rapid onboarding for new developers.
In 2026, security in WordPress theme development is not a feature—it is a foundation. Every line of code you write either strengthens or weakens the site’s defenses. Common vulnerabilities such as SQL injection, cross-site scripting (XSS), and unauthorized access often originate from themes that handle data carelessly. By embedding security into your development workflow from the start, you protect users, maintain trust, and avoid costly breaches. Below are three critical practices that every theme developer must follow.
Sanitizing and Escaping All Dynamic Data
Dynamic data—whether from user input, database queries, or external APIs—must never be output or stored without validation. Sanitizing cleans data before it enters the system, while escaping ensures it is safe when displayed. Follow these rules:
Sanitize on input: Use WordPress functions like sanitize_text_field(), sanitize_email(), or absint() when saving data to the database.
Escape on output: Always wrap dynamic content with escaping functions such as esc_html(), esc_attr(), or wp_kses_post() before echoing.
Validate where possible: For specific data types (e.g., URLs, integers), use wp_validate_redirect() or intval() to enforce expected formats.
A common mistake is escaping only once or applying the wrong function. For instance, outputting a user’s name inside an HTML attribute requires esc_attr(), not esc_html(). Neglecting this opens an XSS vector. Create a habit: every time you use echo, print, or template tags like the_title() with custom data, verify that escaping is in place.
Implementing Proper Nonce and Capability Checks
Nonces (number used once) prevent cross-site request forgery (CSRF) attacks by verifying that actions originate from legitimate users. Capability checks ensure that only authorized roles can perform sensitive operations. Use these together for robust access control:
Generate nonces: Add wp_nonce_field() to forms and wp_create_nonce() for AJAX requests.
Verify nonces: Always call check_admin_referer() or check_ajax_referer() before processing data.
Check capabilities: Use current_user_can() to verify user permissions—for example, edit_posts or manage_options—before executing admin actions.
Action
Nonce Function
Capability Check
Submitting a form
wp_nonce_field() + check_admin_referer()
current_user_can( 'edit_posts' )
AJAX delete request
wp_create_nonce() + check_ajax_referer()
current_user_can( 'delete_posts' )
Theme settings update
wp_nonce_field() + check_admin_referer()
current_user_can( 'manage_options' )
Never rely solely on client-side checks. Nonces expire after a time window, and capabilities must be evaluated server-side. This layered approach blocks unauthorized requests even if a nonce is leaked.
Avoiding Hardcoded Credentials and Using Environment Variables
Hardcoding database passwords, API keys, or secret tokens in theme files is a critical security risk. If your code is shared, committed to a public repository, or inspected by an attacker, credentials are exposed. Follow these best practices:
Use wp-config.php for core credentials: Define constants like DB_PASSWORD or AUTH_KEY outside the theme.
Leverage environment variables: For local development and production, set variables in .env files (using libraries like vlucas/phpdotenv) and access them via getenv() or $_ENV.
Store API keys in options: For theme-specific keys, use the Settings API to save them as encrypted options in the database, never in plain text.
Avoid placing credentials in version control. Add .env and wp-config.php to your .gitignore file. If you must include example values, use placeholder strings and document where real values should be inserted. This practice prevents accidental exposure and simplifies deployment across environments.
6. Modern Build Tools and Workflow Automation
Efficient WordPress theme development in 2026 demands a robust build process that automates repetitive tasks, optimizes assets, and ensures consistent code quality. Modern tooling transforms a chaotic workflow into a streamlined pipeline, allowing developers to focus on functionality and design rather than manual file management. This section examines the essential tools and practices for automating your theme development workflow.
Setting Up Webpack, Vite, or ESBuild for Asset Bundling
Asset bundling is no longer optional for professional themes. In 2026, three tools dominate the landscape, each with distinct advantages for WordPress development.
Webpack remains the industry standard for complex projects. Its extensive plugin ecosystem supports everything from CSS extraction to image optimization. For WordPress, configure entry points for each template’s JavaScript and SCSS, then use MiniCssExtractPlugin to generate separate stylesheets. A typical setup includes a webpack.config.js with multiple entry points like ./src/js/main.js and ./src/scss/main.scss, outputting to ./dist/.
Vite has gained traction for its speed and native ES module support. It uses Rollup under the hood and provides instant hot module replacement. For WordPress, Vite excels when paired with @wordpress/scripts or custom plugins like vite-plugin-wordpress. Its configuration is simpler than Webpack’s, using a vite.config.js file that defines input and output paths.
ESBuild is the fastest option, written in Go and capable of bundling at ten times the speed of Webpack. While it lacks plugins for advanced CSS processing, it pairs well with task runners for simple JavaScript and CSS minification. Use it for themes that require minimal transformation or as a preprocessor for other tools.
Choose Webpack for large, plugin-heavy themes; Vite for modern, performance-focused projects; and ESBuild for lightweight themes or as a supplement to other tooling.
Automating with Task Runners (Gulp, Grunt) and CI/CD Pipelines
Task runners handle repetitive chores like image optimization, browser refreshing, and deployment. In 2026, Gulp remains the preferred choice for its stream-based pipeline and readability. A typical Gulpfile includes tasks for:
Compiling SCSS to CSS with gulp-sass and autoprefixing
Minifying JavaScript with gulp-terser
Optimizing images via gulp-imagemin
Watching files for changes with gulp-watch
Grunt, while older, still serves projects with established configurations. For CI/CD, integrate these tasks into pipelines using GitHub Actions or GitLab CI. A sample GitHub Actions workflow might run npm run build on every push, then deploy the optimized theme to a staging server using FTP or SSH. This ensures that only tested, bundled code reaches production.
Tool
Primary Use
Integration
Gulp
Stream-based automation
CI/CD pipelines, local dev
Grunt
Configuration-based tasks
Legacy projects, simple builds
GitHub Actions
Automated testing and deployment
Post-commit triggers
Using Local Development Environments (Lando, Docker, Local)
Local environments eliminate “it works on my machine” issues and speed up iteration. In 2026, three tools dominate:
Lando offers pre-configured recipes for WordPress, including PHP version, MySQL, and caching. Its .lando.yml file defines services, and it supports tooling commands like lando wp for WP-CLI. Ideal for teams needing consistent environments across macOS, Windows, and Linux.
Docker provides maximum flexibility. Use docker-compose.yml to define WordPress, MariaDB, and Nginx containers. Advanced setups include Redis for object caching and MailHog for email testing. Docker is best for developers comfortable with containerization and who need custom configurations.
Local (by Flywheel) simplifies setup for beginners. Its GUI allows one-click WordPress installations, SSL certificates, and live link sharing. While less customizable than Docker, it supports Local Connect for direct theme syncing with IDEs like VS Code.
For most teams, Lando strikes the best balance between ease and power. Docker suits complex multi-site projects, while Local is perfect for quick prototyping and client demos. Pair your chosen environment with the asset bundler and task runner above for a complete, modern workflow.
In 2026, responsive design is no longer a feature—it is a foundational requirement. With the proliferation of foldable phones, ultra-wide monitors, smartwatches, and even in-car displays, WordPress themes must gracefully adapt to an unprecedented variety of viewports. Advanced responsive patterns go beyond media queries, focusing on component-level adaptability and fluid scaling to reduce maintenance overhead and improve user experience across all devices.
Implementing Container Queries for Component-Level Responsiveness
Container queries represent a paradigm shift from page-level to component-level responsiveness. Instead of relying solely on the viewport width, container queries allow a theme component (e.g., a sidebar widget, a card, or a navigation menu) to respond to its own parent container’s size. This is particularly powerful for reusable blocks in WordPress, such as those built with the Block Editor or custom Gutenberg blocks.
Define containment: Use container-type: inline-size on a parent element to enable querying its inline size. For example, a .card-container might have container-type: inline-size and container-name: card.
Write container queries: Use @container card (min-width: 400px) to adjust child elements like font sizes, layout directions, or image sizes within that component.
Combine with media queries: Use container queries for internal component adjustments and media queries for global layout shifts (e.g., sidebars collapsing).
Fallback for older browsers: Provide a default layout using traditional media queries, then progressively enhance with container queries using @supports (container-type: inline-size).
This approach reduces CSS bloat and ensures that a component works identically whether placed in a narrow sidebar or a wide content area.
Using Fluid Typography and Spacing with Clamp()
The clamp() CSS function is essential for creating fluid, responsive typography and spacing without multiple breakpoints. It defines a preferred value, a minimum, and a maximum, allowing text and margins to scale smoothly between defined ranges.
Property
Example
Explanation
Font size
font-size: clamp(1rem, 2.5vw + 0.5rem, 2rem);
Scales from 1rem to 2rem based on viewport width, with a fluid middle value.
Line height
line-height: clamp(1.4, 1.6vw + 1.2, 1.8);
Adjusts line spacing fluidly for readability across devices.
Spacing (margin/padding)
padding: clamp(1rem, 3vw, 3rem);
Creates responsive gutters that expand or contract with screen size.
Container width
width: clamp(300px, 50vw, 800px);
Ensures elements never exceed or shrink below defined limits.
For best results, define a typographic scale using clamp() for all headings and body text in your theme’s style.css or a dedicated design tokens file. This eliminates the need for many media queries and provides a consistent reading experience from phone to desktop.
Emulators and browser DevTools are excellent for initial debugging, but they cannot replicate the tactile feel, pixel density, or performance characteristics of real hardware. In 2026, thorough testing requires a hybrid approach.
Emulator testing: Use Chrome DevTools, Firefox Responsive Design Mode, or Safari’s Web Inspector to simulate common breakpoints (320px, 768px, 1024px, 1440px, 1920px). Test touch events, hover states, and orientation changes.
Real device testing: Maintain a small device lab with at least one low-end Android phone, a recent iPhone, a tablet, and a foldable device (e.g., Samsung Galaxy Z Fold). Test actual load times, font rendering, and touch interactions.
Cloud testing services: Use BrowserStack or Sauce Labs to access hundreds of real device/OS combinations without physical inventory.
Automated visual regression: Integrate tools like Percy or BackstopJS into your CI/CD pipeline to catch responsive layout shifts after theme updates.
Accessibility checks: Verify that responsive patterns do not break focus order, zoom functionality, or text resizing for users with disabilities.
By combining container queries, fluid scaling with clamp(), and rigorous testing on real devices, your WordPress theme will deliver a consistent, high-quality experience across the ever-expanding landscape of screens in 2026.
8. Internationalization and Localization Readiness
In 2026, a global audience is the norm, not the exception, for WordPress themes. Building with internationalization (i18n) and localization (l10n) readiness from the start ensures your theme can be adapted to any language or region without code changes. This practice expands your user base, improves accessibility, and aligns with WordPress core standards. Below are the essential best practices for making your theme translation-ready.
Preparing Strings with __() and _e() Functions
Every text string in your theme that will be visible to users must be wrapped in a WordPress translation function. The two primary functions are:
__() – Returns the translated string (use for assigning to variables or within HTML attributes).
_e() – Echoes the translated string directly (use for inline output).
Both functions require a text domain that matches your theme’s slug. Example usage:
esc_html__() and esc_html_e() – Return/echo translated strings with HTML escaping for security.
Best practices for 2026 include avoiding variable strings (e.g., __( $dynamic_text, 'textdomain' )), as translation tools cannot parse them. Always use literal strings and concatenate only after translation.
Creating .pot Files and Using Translation Tools
A .pot (Portable Object Template) file is the master template for translations. It contains all translatable strings extracted from your theme. Follow these steps:
Generate the .pot file – Use a tool like Poedit (Pro version), WP-CLI (wp i18n make-pot), or the Loco Translate plugin. For example, from your theme root: wp i18n make-pot . languages/my-theme.pot.
Include the .pot in your theme – Place it in a /languages folder and reference it in style.css or via load_theme_textdomain() in functions.php.
Load the text domain – Add this to your theme’s functions.php: function my_theme_setup() { load_theme_textdomain( 'my-theme-textdomain', get_template_directory() . '/languages' ); } add_action( 'after_setup_theme', 'my_theme_setup' );
Recommended translation tools for 2026:
Tool
Best For
Key Feature
Poedit
Manual translation
Visual editor with string suggestions
Loco Translate
In-browser editing
Built-in .pot generation and sync
GlotPress
Team collaboration
Web-based, multi-user translation
WP-CLI
Automation
Scriptable, integrates with CI/CD
Always update the .pot file after adding or changing strings, and encourage contributors to create .po (Portable Object) and .mo (Machine Object) files for their language.
Handling RTL (Right-to-Left) Languages and Cultural Nuances
RTL languages (e.g., Arabic, Hebrew, Persian) require visual mirroring of your theme’s layout. In 2026, CSS logical properties (e.g., margin-inline-start instead of margin-left) are the standard for RTL readiness. Key practices include:
Use logical properties – Replace physical values (left/right, top/bottom) with inset-inline-start, inset-inline-end, padding-inline, etc. This automatically adjusts for RTL.
Provide an RTL stylesheet – Create rtl.css in your theme root. WordPress will load it when the site language is RTL. Override only directional styles, not colors or fonts.
Test with real RTL content – Use the is_rtl() conditional tag in PHP or the [dir="rtl"] attribute in CSS for specific adjustments.
Date and number formats – Use date_i18n() and number_format_i18n() to respect locale settings.
Currency and units – Never hardcode symbols; use locale-aware functions or allow customization.
Color and imagery – Avoid culturally insensitive colors (e.g., red in some contexts signifies danger, not celebration) and ensure icons are universally understood.
By implementing these i18n and l10n best practices, your WordPress theme will be accessible, adaptable, and ready for the global market of 2026 and beyond.
9. Sustainable Development and Eco-Friendly Practices
As the digital landscape expands, the environmental impact of websites has become a pressing concern. For WordPress theme development in 2026, prioritizing sustainability is not just ethical but also improves performance and user experience. Reducing the digital carbon footprint involves optimizing every layer of a theme, from code to hosting, while empowering users to make eco-conscious choices. This section outlines actionable practices to build leaner, greener themes.
Every byte transferred from server to browser consumes energy. To minimize data transfer, developers must rigorously optimize all theme assets. This begins with images, which often account for the majority of a page’s weight. Use next-generation formats like WebP and AVIF, implement lazy loading for images and videos, and compress files without visible quality loss. For CSS and JavaScript, combine and minify files, remove unused code, and leverage tree-shaking via build tools like Webpack or Vite. Additionally:
Limit external dependencies: Reduce reliance on large libraries (e.g., jQuery, heavy icon sets) by using native CSS and JavaScript solutions.
Choosing Green Hosting and Server-Side Optimizations
A theme’s environmental impact is amplified by the hosting infrastructure it relies on. Encourage users to select green hosting providers that offset carbon emissions or use renewable energy. For theme developers, server-side optimizations can further reduce energy demands. Implement efficient database queries to minimize CPU cycles, and avoid unnecessary plugin bloat. Consider these server-side strategies:
Optimization
Benefit
Enable Gzip/Brotli compression
Reduces transfer size of HTML, CSS, and JS by 60-80%.
Use a content delivery network (CDN)
Decreases latency and server load by serving assets from edge locations.
Implement HTTP/2 or HTTP/3
Multiplexes requests, reducing round trips and energy per connection.
Optimize WordPress database
Regularly clean post revisions, transients, and spam to reduce storage and query overhead.
By designing themes that work seamlessly with efficient hosting setups, you empower site owners to make environmentally responsible choices without sacrificing performance.
Implementing Dark Mode and User-Controlled Preferences
User-controlled preferences directly contribute to sustainability by letting visitors tailor their experience. Dark mode, in particular, reduces power consumption on OLED and AMOLED screens by displaying fewer bright pixels. However, forcing any mode on users can be counterproductive. Best practices include:
Respect the prefers-color-scheme media query: Automatically apply dark or light mode based on the user’s system settings.
Provide a manual toggle: Allow users to override the default choice, storing the preference in localStorage or via a cookie.
Optimize contrast and readability: Ensure both modes meet WCAG 2.1 AA standards, using accessible color palettes.
Reduce animation for accessibility: Honor the prefers-reduced-motion query to minimize CPU/GPU usage on user request.
Additionally, offer controls for reducing data usage, such as disabling autoplay for videos or loading low-resolution images on slow connections. These small adjustments give users agency while cutting unnecessary energy expenditure. By embedding eco-friendly defaults and flexible user options, your theme becomes a tool for both environmental stewardship and inclusive design.
10. Staying Updated with WordPress Core and Community Trends
As WordPress evolves with each major release, theme developers must proactively track changes to maintain compatibility and leverage new capabilities. The ecosystem’s rapid pace—from block editor enhancements to performance improvements—demands a structured approach to staying informed. This section outlines actionable strategies for keeping your themes future-proof and aligned with community-driven standards.
WordPress core releases occur multiple times per year, introducing new functions, deprecating old ones, and altering behavior. To avoid breaking changes, integrate monitoring into your workflow:
Subscribe to the official WordPress development blog (make.wordpress.org/core/) for release notes, field guides, and dev notes.
Enable WP_DEBUG and WP_DEBUG_DISPLAY in your development environment to catch deprecation notices early.
Review the _deprecated_function() and _deprecated_hook() logs after each core update to identify deprecated APIs used in your theme.
Use a changelog aggregator tool like the WordPress Trac timeline or third-party services (e.g., WP Core Monitor) to track tickets and patches.
Test your theme against every beta and release candidate using a staging site or local environment, focusing on block editor integration, REST API endpoints, and template hierarchy changes.
Core Update Type
Frequency
Key Action for Theme Developers
Major release (e.g., 6.7)
Every 4–6 months
Review field guide; update theme.json and block patterns
Minor release (e.g., 6.7.1)
As needed
Check for security fixes; re-run compatibility tests
Beta/RC releases
Before each major
Test all custom blocks, hooks, and theme mods
Participating in Community Events and Codex Contributions
Engaging with the WordPress community provides firsthand insight into emerging trends and best practices. Active participation helps you anticipate changes before they land in core:
Attend WordCamps and local meetups—both in-person and virtual—to network with core contributors and learn about upcoming features.
Join the #themereview and #core Slack channels (via make.wordpress.org/chat/) for real-time discussions on deprecations and new APIs.
Contribute to the WordPress Codex or Developer Resources by updating documentation for theme-related functions, hooks, and block APIs.
Submit patches or test tickets for theme-related Trac issues; even small contributions build familiarity with core internals.
Follow community blogs and podcasts (e.g., WP Tavern, Post Status) that analyze core updates and interview core committers.
Evaluating New Standards like Interactivity API and Block Hooks
WordPress continually introduces new standards that reshape theme development. Two key areas to evaluate for 2026 are the Interactivity API and Block Hooks:
Interactivity API: This experimental framework enables reactive, JavaScript-driven interactions (e.g., live search, infinite scroll) without heavy frameworks. Assess whether your theme’s dynamic features can be migrated to use its declarative directives (data-wp-interactive, data-wp-bind) for better performance and compatibility with the block editor.
Block Hooks: Introduced in WordPress 6.6, Block Hooks allow themes to automatically insert blocks (e.g., a “Related Posts” block) into specific positions within block-based templates. Evaluate how your theme can leverage block_hooks in theme.json to provide automatic block placement without hardcoding.
Other emerging standards: Keep an eye on the Style Engine for dynamic CSS generation, enhanced theme.json presets, and the ongoing shift toward full-site editing (FSE) as the default template system.
By systematically monitoring core updates, engaging with the community, and evaluating new APIs, you ensure your themes remain compatible, performant, and aligned with WordPress’s trajectory for 2026 and beyond.
How to Optimize Your WordPress Database for Speed: A Comprehensive Guide
Introduction: Why Database Optimization Matters for Speed
When you think about speeding up your WordPress site, your first impulse might be to optimize images, enable caching, or choose a faster host. These are all critical steps. However, there is a hidden layer beneath the surface that can quietly sabotage your best efforts: your database. The WordPress database is the engine room of your site, storing every piece of content, every user comment, every setting, and every plugin configuration. Every time a visitor loads a page, WordPress runs a series of database queries to assemble that page from stored data. If your database is bloated with unnecessary records, outdated revisions, or inefficient table structures, those queries take longer to execute. The result is a measurable delay in page load time.
Speed is not just a convenience; it is a cornerstone of user experience and search engine performance. Research consistently shows that a one-second delay in page load time can reduce conversions by up to 7% and increase bounce rates. Google explicitly uses page speed as a ranking factor, meaning a slow site can push you down in search results. A bloated database contributes directly to this problem by increasing the time it takes for the server to process requests and send data to the browser. By optimizing your database, you eliminate one of the most common bottlenecks in WordPress performance, often achieving speed gains that rival or exceed those from other optimization tactics.
Furthermore, a lean database reduces server load, which is especially important if you are on a shared hosting plan with limited resources. Fewer, faster queries mean less CPU and memory usage, allowing your server to handle more simultaneous visitors without slowing down. This guide will walk you through the entire process of optimizing your WordPress database for speed, from understanding why it matters to executing specific techniques. By the end, you will have a clear, actionable plan to transform your database from a performance liability into an asset.
Understanding the Relationship Between Database Queries and Page Load Time
To appreciate why database optimization matters, you need to understand how WordPress interacts with its database. When a visitor requests a page, WordPress boots up, loads the active theme and plugins, and then executes a series of SQL (Structured Query Language) queries to fetch the necessary data. For example, a typical blog post page might run queries to retrieve the post content, author information, categories, tags, comments, and metadata from plugins like SEO tools or page builders. Each of these queries takes time—measured in milliseconds—but the cumulative effect can be significant.
The number of queries per page varies widely. A clean, well-coded WordPress site might run 15 to 30 queries per page. A site with many plugins, custom fields, and complex queries can easily exceed 100 queries per page. If each query takes an average of 5 milliseconds, that is 500 milliseconds (half a second) just for database work. Add network latency, server processing, and rendering time, and your total load time can skyrocket. Database optimization reduces both the number of queries and the execution time of each query by cleaning up unnecessary data and ensuring table structures are efficient.
Key factors that influence query speed include:
Table size: Larger tables take longer to scan. For instance, the wp_posts table can swell with post revisions, auto-drafts, and trashed items, making simple queries slower.
Indexing: Proper indexes allow the database to find data quickly without scanning every row. Missing or fragmented indexes degrade performance.
Data fragmentation: Over time, repeated insertions and deletions cause tables to become fragmented, wasting space and slowing reads.
Plugin overhead: Poorly coded plugins can add unnecessary queries or store excessive data in transients or options tables.
By addressing these factors, you directly reduce the time the server spends on database operations, leading to faster page loads and a smoother user experience.
Common Causes of Database Bloat in WordPress Sites
Database bloat accumulates silently over time, often without the site owner noticing. Understanding the common culprits is the first step toward prevention and cleanup. Here are the primary sources of bloat:
Post revisions: By default, WordPress saves a revision every time you update a post or page. A single post can accumulate dozens or even hundreds of revisions, each stored as a separate row in the wp_posts table. For a site with thousands of posts, this can add tens of thousands of unnecessary rows.
Auto-drafts and trashed items: WordPress automatically saves drafts of posts as you type. These auto-drafts are often never published but remain in the database. Similarly, items you delete to the trash are not permanently removed until you empty the trash, and they can linger indefinitely if you forget.
Spam and trashed comments: Akismet and other comment filters catch spam, but those spam comments are still stored in the wp_comments table. Trashed comments also add to bloat. For busy sites, spam comments can number in the thousands or more.
Transients: Plugins and themes use transients to cache temporary data like API responses or widget settings. Many transients are set to expire, but if a plugin fails to delete them, they accumulate and bloat the wp_options table.
Orphaned metadata: When you delete a post, user, or term, the associated metadata in tables like wp_postmeta, wp_usermeta, and wp_termmeta often remains. This orphaned data serves no purpose but takes up space and slows queries.
Unused plugins and themes: Even when deactivated, some plugins and themes leave behind database tables or options. Uninstalling them does not always clean up these remnants.
Log tables from plugins: Security plugins, caching plugins, and analytics tools often create log tables that grow quickly. For example, a security plugin might log every failed login attempt, resulting in a massive table over months.
Session data: Some plugins store user session data in the database, and if not cleaned regularly, this can become a significant source of bloat.
Each of these factors contributes to larger, slower tables. The impact is compounded when multiple sources of bloat are present, as is common on older or heavily modified sites. Regular database maintenance is essential to keep these issues in check.
The Performance Benefits of a Lean, Optimized Database
Investing time in database optimization yields tangible, measurable improvements in site performance. Here are the key benefits you can expect:
Faster page load times: By reducing the number of rows in tables and improving query efficiency, you lower the time it takes for WordPress to fetch data. This directly translates to faster time to first byte (TTFB) and overall page load speed.
Reduced server resource usage: Lean tables require less memory and CPU to process. This is especially beneficial on shared hosting, where resources are limited, and can help you avoid hitting resource caps that lead to downtime or throttling.
Improved scalability: A well-optimized database can handle more concurrent visitors without performance degradation. As your site grows, a clean database foundation makes scaling easier and more cost-effective.
Better SEO rankings: Google and other search engines reward faster sites with higher rankings. Even a modest improvement in load time can boost your position in search results, driving more organic traffic.
Enhanced user experience: Visitors expect pages to load in under two seconds. A slow database can frustrate users, increase bounce rates, and reduce engagement. Optimizing the database helps keep visitors on your site longer.
Simplified backups and migrations: Smaller database files mean faster backups, less storage space, and quicker restoration times. This also reduces the time needed for site migrations or staging environment setups.
Reduced plugin conflicts: Bloat often stems from poorly coded plugins. Cleaning up the database can mitigate some issues caused by plugin interactions, leading to a more stable site.
To illustrate the potential impact, consider a typical scenario: a blog with 1,000 posts, each with an average of 10 revisions, plus 5,000 spam comments and 2,000 orphaned postmeta rows. The total bloat might add 15,000 to 20,000 unnecessary rows to the database. Cleaning these up can reduce query execution time by 30% to 50% on common queries, leading to a page load improvement of 200 to 500 milliseconds. For a site that currently loads in 3 seconds, that is a 10% to 17% speed gain—without changing hosting or modifying code.
In summary, database optimization is not a one-time task but an ongoing practice that pays dividends in speed, stability, and user satisfaction. The next sections of this guide will provide step-by-step instructions for identifying and removing bloat, optimizing tables, and implementing preventive measures to keep your database lean for the long term.
Before You Begin: Essential Precautions and Tools
Optimizing your WordPress database can dramatically improve site speed, but the process involves direct manipulation of your site’s data structure. A single misstep—like deleting a critical table row or running an aggressive cleanup query—can break your site, cause data loss, or lead to hours of downtime. This section covers the non-negotiable steps you must take before touching your database: creating a reliable backup, setting up a safe testing environment, and selecting the right tools for the job. Skipping these precautions is the most common cause of optimization disasters.
Creating a Full Database Backup Using phpMyAdmin or Plugins
Your database contains every post, page, comment, user profile, plugin setting, and configuration option. Without a complete backup, you risk losing irreplaceable content and customizations. A proper backup includes all tables, not just the content tables. Here are the two most reliable methods for creating a database backup.
Method 1: Using phpMyAdmin (Manual but Precise)
Most hosting providers include phpMyAdmin in their control panel (cPanel, Plesk, or DirectAdmin). This method gives you full control over the export process.
Log into your hosting control panel and open phpMyAdmin.
Select your WordPress database from the left sidebar. It is usually named with a prefix like wp_ or site_.
Click the “Export” tab at the top of the screen.
Choose the “Quick” export method and select “SQL” format.
Click “Go” to download a .sql file to your computer. This file contains all your database tables and data.
Important: For large databases (over 50 MB), use the “Custom” export method. Under “Format-specific options,” check “Compression: gzipped” to reduce file size. Also, select “Add DROP TABLE / VIEW / PROCEDURE / FUNCTION / EVENT statement” to ensure clean restoration.
Method 2: Using a Backup Plugin (Automated and User-Friendly)
Plugins simplify backups and often include scheduling, cloud storage, and one-click restoration. Choose one that backs up the entire database, not just core files.
Pro tip: Before running any optimization, perform a manual backup using your plugin and download a copy to your local machine. Also, verify the backup by opening the .sql file in a text editor—you should see recognizable table names like wp_posts or wp_options.
Setting Up a Staging Environment to Test Changes
Even with a backup, applying database optimizations directly on a live site can introduce errors, broken queries, or performance regressions. A staging environment is a clone of your site where you can test changes safely before pushing them to production. This is especially critical for high-traffic sites or e-commerce stores where downtime costs money.
Option 1: Hosting-Provided Staging
Many managed WordPress hosts (e.g., WP Engine, Kinsta, SiteGround, Flywheel) offer one-click staging environments. These are ideal because they mirror your live server configuration exactly.
Log into your hosting dashboard and create a staging copy of your live site.
The staging site gets its own database and file system, completely isolated from production.
Run all optimization plugins, manual queries, or cleanup scripts on the staging database.
Test the site thoroughly: check page load times, verify forms work, confirm comments and user registrations function.
When satisfied, push the optimized database back to the live site (some hosts offer a “push to live” button).
Option 2: Local Development Environment
If your host does not offer staging, use a local development tool like Local by Flywheel, XAMPP, or DesktopServer. This method requires more technical skill but gives you complete control.
Export your live database using phpMyAdmin or a backup plugin (as described above).
Install a local WordPress instance using your chosen tool.
Import the .sql file into your local database. Use phpMyAdmin’s “Import” tab on your local setup.
Update the wp-config.php file to match your local database credentials.
Run optimizations locally, then export the cleaned database and import it back to your live site.
Caution: After importing an optimized database to your live site, clear all caching plugins and server-level caches. Also, regenerate permalinks by visiting Settings > Permalinks and clicking “Save Changes.”
While manual SQL queries offer precision, plugins provide a user-friendly interface with built-in safety checks. The following plugins are widely trusted for database optimization. Each offers different features, so choose based on your specific needs.
1. WP-Optimize
This is one of the most popular all-in-one optimization plugins. It cleans the database, compresses images, and caches pages. For database optimization specifically, it:
Includes a “Run all cleanups” button for one-click action.
Provides a table information view showing overhead and size.
Best for: Beginners and site owners who want a single tool for multiple optimization tasks.
2. Advanced Database Cleaner
This plugin focuses exclusively on database cleanup and offers granular control. It is ideal for advanced users who want to target specific types of orphaned data:
Cleans leftover data from deleted plugins and themes (e.g., options, postmeta, cron jobs).
Removes transients (temporary options) that are expired or orphaned.
Deletes auto-drafts, trashed posts, and spam comments.
Shows a detailed list of what will be deleted before you confirm.
Best for: Users who frequently install and uninstall plugins, or who want to remove residual data from abandoned themes.
3. WP-Sweep
WP-Sweep is a lightweight, developer-friendly plugin that uses native WordPress functions (e.g., wp_delete_post) instead of direct SQL queries. This ensures compatibility and reduces the risk of database corruption. Its features include:
Sweeping post revisions, auto-drafts, and trashed posts.
Cleaning up orphaned post meta, comment meta, and user meta.
Removing unused terms (categories, tags) from the taxonomy tables.
Optimizing database tables after cleanup.
Displaying a count of each item type before sweeping.
Best for: Developers and users who prioritize database integrity over speed.
This plugin is extremely simple—it has a single purpose: to delete post revisions and optimize tables. It is useful for those who want minimal bloat.
Allows you to specify how many revisions to keep per post (e.g., 5).
Runs OPTIMIZE TABLE commands on all WordPress tables.
No settings page; works via a single button in the Tools menu.
Best for: Users who only need to manage post revisions and table overhead.
General plugin usage caution: Always test a plugin on your staging environment first. Some plugins may delete data that you consider important (e.g., post revisions used for historical tracking). Also, avoid running multiple optimization plugins simultaneously—they can conflict and cause data corruption. Stick to one plugin per optimization session.
By following these precautions—creating a full backup, using a staging environment, and selecting the right plugin—you eliminate the most common risks associated with database optimization. The next steps in this guide will walk you through specific optimization techniques, but none of them should be attempted without the foundation laid in this section. Your backup is your safety net; your staging site is your testing lab; your plugin is your tool. Use all three, and you can optimize with confidence.
Cleaning Up Post Revisions and Auto-Drafts
Every time you save a draft, update a published post, or let WordPress autosave your work, the system creates a revision record. Over months or years, a single post can accumulate dozens—sometimes hundreds—of these entries. Auto-drafts, generated when you click “Add New” and leave the editor open, also pile up silently. Together, they bloat your database, slowing down queries and increasing backup sizes. A lean database reduces load times and improves server response. This section explains how to remove existing clutter and prevent future buildup.
Limiting Post Revisions via wp-config.php Configuration
The most efficient way to control revision accumulation is to set a hard limit in your WordPress configuration file. By editing wp-config.php, you can define the maximum number of revisions stored per post. This approach works at the system level—no plugin required—and applies to all future edits.
To implement this, open your wp-config.php file (located in the root directory of your WordPress installation) and add the following line before the /* That's all, stop editing! */ comment:
define('WP_POST_REVISIONS', 5);
This limits revisions to five per post. You can adjust the number based on your needs—three for minimal storage, ten if you frequently roll back changes. Setting it to false disables revisions entirely, though this is not recommended for most sites as it removes the safety net of undo functionality.
Key considerations when using this method:
Existing revisions remain—the limit only applies to new revisions created after the change. You must still remove old revisions separately.
Autosaves are unaffected—WordPress always keeps the latest autosave revision, regardless of this setting.
Testing recommended—make a backup of wp-config.php before editing, and verify the site works after the change.
For sites with multiple authors or high edit frequency, a limit of 5–10 revisions strikes a good balance between safety and database size. If you rarely revert changes, consider lowering it to 2–3.
Using Plugins to Bulk Delete Old Revisions and Drafts
For existing clutter, manual deletion via SQL is risky and time-consuming. Plugins provide a safe, user-friendly interface to identify and remove old revisions, auto-drafts, and trashed items. Here are three reliable options, each with distinct strengths:
Plugin
Key Features
Best For
WP-Optimize
Cleans revisions, drafts, trashed comments, and transient options; offers scheduling and database table optimization.
All-in-one database maintenance with a clean interface.
Advanced Database Cleaner
Granular control over revision types (by age, post type, author); previews before deletion; includes orphaned metadata cleanup.
Users who want precise filtering and safety previews.
WP-Sweep
Deletes revisions, auto-drafts, unapproved comments, and spam; shows exact row counts; uses WordPress native functions for safety.
Minimalist approach with detailed statistics.
Steps for using WP-Optimize (as a common example):
Install and activate the plugin from the WordPress repository.
Navigate to WP-Optimize → Database in the admin menu.
Under the Clean tab, select “Remove all post revisions” and “Remove auto-draft posts.”
Optionally check “Remove trashed posts” and “Remove trashed comments.”
Click Run Optimization. The plugin will display how many rows were removed.
Before bulk deletion, always:
Back up your database—use a plugin like UpdraftPlus or your host’s backup tool.
Test on a staging site if available, especially for large databases (over 500 MB).
Review previews—plugins like Advanced Database Cleaner let you see what will be deleted before confirming.
Setting Up Automatic Cleanup Schedules for Revisions
Manual cleanup is effective but easy to forget. Automating the process ensures your database stays lean without recurring effort. Most database optimization plugins include scheduling features, or you can use server-side cron jobs for more control.
Plugin-based scheduling (recommended for most users):
WP-Optimize offers a “Schedule” tab where you can set daily, weekly, or monthly cleanups. Enable “Remove all post revisions” and “Remove auto-draft posts” in the scheduled tasks. The plugin runs these at the selected interval using WordPress’s built-in cron system.
Advanced Database Cleaner provides “Scheduled Tasks” under its settings. You can define specific cleanup actions (e.g., delete revisions older than 30 days) and set them to run hourly, daily, or weekly.
Server-side cron for advanced users:
If you prefer not to rely on plugins or want to avoid WordPress cron’s potential performance impact, set a system cron job to run a custom SQL query or a WP-CLI command.
Using WP-CLI (requires command-line access): Run the following command in your server’s crontab, adjusting the path and limit as needed:
0 3 * * 0 /usr/local/bin/wp post delete --force --defer-term-counting $(wp post list --post_type=revision --posts_per_page=-1 --format=ids) 2>&1 | logger -t wp-cron-revisions
This deletes all revisions every Sunday at 3:00 AM. Replace revision with auto-draft for drafts.
Using a custom PHP script (not recommended unless you understand database transactions): Create a script that runs wp_delete_post_revisions() for each post, then schedule it with cron. This method requires careful error handling to avoid partial deletions.
Best practices for scheduling:
Frequency—for high-traffic blogs with daily edits, run cleanup weekly. For low-traffic sites, monthly is sufficient.
Time of day—schedule during low-traffic hours (e.g., 2:00–4:00 AM) to minimize performance impact.
Monitor results—check your database size after the first few scheduled runs to confirm the cleanup is working as expected.
Combine with other optimizations—include cleanup of trashed comments, expired transients, and spam in the same schedule for maximum efficiency.
By combining a wp-config.php revision limit with a plugin-based bulk cleanup and an automatic schedule, you create a sustainable system that prevents database bloat. The result is faster queries, smaller backups, and a more responsive WordPress site—without sacrificing the safety of revision history.
Removing Spam, Trash, and Orphaned Comments
Your WordPress database accumulates data from comments over time, and much of it is unnecessary. Spam comments, trashed entries, and orphaned comment meta bloat the wp_comments and wp_commentmeta tables, slowing down query performance. Cleaning these out regularly is a straightforward way to reduce database size and improve page load times. This section covers practical methods for bulk deletion, direct SQL removal, and prevention strategies to keep your comments tables lean.
Deleting Spam Comments in Bulk from the WordPress Admin
WordPress provides a built-in interface for managing comments, but deleting spam one by one is inefficient. The admin panel includes a bulk action tool that allows you to remove all spam comments at once. Here’s how to do it efficiently:
Log in to your WordPress dashboard and navigate to Comments.
Click the Spam tab at the top of the page to filter only spam entries.
Select all comments by checking the box at the top of the list.
From the Bulk actions dropdown, choose Delete Permanently and click Apply.
This method removes all visible spam comments instantly. However, if you have thousands of spam entries, the admin interface may become slow or time out. For large volumes, consider using a plugin like WP-Optimize or Advanced Database Cleaner, which can delete spam in batches without overloading your server. These tools also let you schedule automatic cleanups, ensuring spam doesn’t accumulate.
Key benefits of bulk deletion from the admin:
No technical skills required—works directly in the dashboard.
Immediate visual confirmation of deleted comments.
Safe for beginners, as WordPress handles the database queries.
For sites with heavy comment spam, repeat this process weekly. Remember that spam comments in the trash still occupy space, so always choose Delete Permanently rather than moving to trash.
Using SQL Queries to Remove Trashed Comments and Orphaned Meta
When you delete comments via the admin, they often go to the trash first. WordPress retains trashed comments for 30 days by default, but these entries still reside in the database. Additionally, comment meta (data stored in wp_commentmeta) can become orphaned when its parent comment is deleted, leaving behind useless rows. SQL queries offer a direct, fast way to clean both trashed comments and orphaned meta without waiting for automatic cleanup.
Important: Always back up your database before running SQL queries. Use phpMyAdmin or a tool like Adminer to execute these commands.
Remove all trashed comments permanently:
DELETE FROM wp_comments WHERE comment_approved = 'trash';
This query deletes every comment marked as trash. After running it, clear any orphaned comment meta:
DELETE FROM wp_commentmeta WHERE comment_id NOT IN (SELECT comment_ID FROM wp_comments);
This removes meta rows that no longer have a matching comment. To verify the cleanup, check the number of rows before and after:
Count trashed comments: SELECT COUNT(*) FROM wp_comments WHERE comment_approved = 'trash';
Count orphaned meta: SELECT COUNT(*) FROM wp_commentmeta WHERE comment_id NOT IN (SELECT comment_ID FROM wp_comments);
If your WordPress table prefix is not wp_, replace it with your actual prefix (e.g., myblog_). For multisite networks, each site has its own comments table (e.g., wp_2_comments), so adjust queries accordingly.
A comparison of cleanup methods:
Method
Speed
Requires Backup
Best For
Admin bulk delete
Moderate (with many comments)
No
Small to medium spam volumes
SQL queries
Very fast
Yes
Large cleanup or regular maintenance
Plugin automation
Varies
Recommended
Ongoing management
Run these SQL queries monthly or after a spam attack. They reduce database size significantly, especially for sites with thousands of spam comments.
Preventing Comment Spam with Akismet or Alternative Solutions
Cleaning spam is reactive; preventing it reduces future database bloat. Akismet is the most popular solution, included with WordPress and free for personal sites. It checks comments against a global spam database and automatically marks suspicious entries as spam. To set it up:
Install and activate the Akismet Anti-Spam plugin from the WordPress repository.
Obtain an API key from akismet.com (free for non-commercial use).
Enter the key in Settings > Akismet and configure preferences, such as discarding the worst spam automatically.
Akismet is effective, but it stores spam comments in the database for review. To keep your database lean, combine it with a cleanup schedule. Alternatively, consider these solutions:
Antispam Bee: A free, GDPR-compliant plugin that blocks spam without storing it. It uses country-based filtering and honeypot techniques.
Cloudflare Turnstile: A user-friendly CAPTCHA alternative that adds a checkbox or invisible challenge to comment forms, preventing bot submissions.
reCAPTCHA v3: Google’s risk-based system scores user interactions and blocks spam without user friction. Integrates via plugins like WPForms or Simple Google reCAPTCHA.
Custom honeypot fields: Add a hidden form field that bots fill out but humans don’t. Plugins like Honeypot for Contact Form 7 or manual code can implement this.
Implementing a prevention strategy reduces the need for frequent cleanups. For maximum effectiveness, use a combination: a spam-filtering plugin like Akismet for accuracy, plus a CAPTCHA or honeypot to block bots before they submit. Regularly review your spam queue to ensure legitimate comments aren’t flagged, and schedule automatic deletion of spam older than 15 days using a plugin or cron job.
By removing spam, trash, and orphaned meta, and by preventing future spam, you streamline the comments table. This reduces database overhead, speeds up queries related to comments, and contributes to faster page loads—especially on sites with high comment volumes. Implement these steps as part of your regular database maintenance routine to keep your WordPress installation running efficiently.
Optimizing the wp_options Table
The wp_options table is one of the most critical yet frequently overlooked components of a WordPress database. It stores site settings, configuration values, theme mods, widget assignments, and—most problematically—transients and temporary data. Over time, this table can balloon to hundreds of megabytes, populated with expired transients, orphaned options from uninstalled plugins, and autoloaded data that is rarely or never used. Each time a page loads, WordPress queries the wp_options table for autoloaded values, and a bloated table means slower queries, increased memory usage, and longer page generation times. Optimizing this table requires a methodical approach: identifying what can be removed, safely deleting it, and preventing future bloat. Below, we break the process into three actionable steps.
Identifying and Deleting Expired Transients with Plugins
Transients are temporary data with an expiration time, used by plugins and themes to cache API calls, feed data, or other short-lived information. When a transient expires, it should be cleaned automatically, but many WordPress installations accumulate thousands of expired transients that remain in the database indefinitely. This is especially common with caching plugins, SEO tools, and social media feed integrations that create transients but fail to delete them.
The safest and most efficient way to handle expired transients is to use a dedicated plugin. These tools scan the wp_options table, identify transients that have passed their expiration timestamp, and remove them without risking core functionality. Recommended plugins include:
Transient Cleaner – Lightweight and focused; allows manual or scheduled cleanup of expired transients. It does not touch non-expired transients, preserving active caches.
WP-Optimize – A comprehensive database optimizer that includes a transient cleaning feature alongside table optimization, post revisions removal, and spam comment cleanup.
Advanced Database Cleaner – Provides granular control, letting you preview expired transients before deletion, and also identifies orphaned options from deleted plugins.
When using any plugin, follow these best practices:
Back up your database before running any cleanup operation.
Run the plugin in a staging environment first if possible, or test on a low-traffic site.
After cleaning, verify that your site functions normally—check forms, caching, and plugin-dependent features.
Schedule automatic cleanup (e.g., weekly or daily) to prevent future accumulation.
Plugin-based cleaning is ideal for most users because it minimizes manual intervention and reduces the risk of accidentally deleting critical settings. However, for sites with extreme bloat or where plugins are not an option (e.g., on a locked-down hosting environment), manual cleanup is necessary.
Manual Cleanup of Orphaned Options via phpMyAdmin
Orphaned options are rows in the wp_options table that belong to plugins or themes that have been deleted, but whose data remains. Common examples include widget settings from a retired theme, options from a deactivated but not uninstalled plugin, or leftover data from a plugin that was deleted via FTP rather than the WordPress admin. These orphaned rows consume space and can slow down queries, especially if they are autoloaded.
Manual cleanup via phpMyAdmin is the most thorough method, but it requires caution. Follow these steps:
Back up your database – export a full SQL dump via phpMyAdmin or your hosting control panel.
Identify potential orphaned options – In phpMyAdmin, browse the wp_options table (note: your table prefix may differ, e.g., wp2_options). Look for option names that reference old plugin slugs, theme names, or obsolete settings. Common patterns include:
widget_* – widget data for inactive sidebars
theme_mods_* – theme modifications for deactivated themes
plugin_name_settings – settings for plugins no longer installed
_transient_* and _site_transient_* – expired transients (handled in the previous section, but can also be removed here)
Use a SELECT query to verify – Before deleting, run a SELECT statement to confirm the rows are orphaned. For example:
SELECT * FROM wp_options WHERE option_name LIKE '%old_plugin_name%'
Delete with caution – Use a DELETE query only after verifying that the options are not associated with any active plugin or theme. Example:
DELETE FROM wp_options WHERE option_name LIKE '%old_plugin_name%'
Check for autoloaded orphans – Pay special attention to rows where autoload = 'yes'. These are loaded on every page request. If an orphaned option is autoloaded, it can significantly degrade performance.
To identify autoloaded orphans, run:
SELECT option_name, option_value, autoload FROM wp_options WHERE autoload = 'yes' AND option_name NOT IN (SELECT option_name FROM wp_options WHERE autoload = 'no') ORDER BY LENGTH(option_value) DESC
This query lists autoloaded options by size. Look for large values that appear to be from old plugins or themes. Delete only after confirming they are unused.
Manual cleanup is powerful but risky. If you are unsure about a specific option, do not delete it. Instead, rename it (e.g., prefix with _backup_) and test your site for a few days before removing it permanently.
Using Autoloaded Data Checks to Reduce Unnecessary Queries
Autoloaded data is a performance double-edged sword. When WordPress loads a page, it executes a single query to retrieve all rows from the wp_options table where autoload = 'yes'. This is efficient for frequently used settings, but if the autoloaded data includes large, rarely accessed values (e.g., a 2 MB serialized array from a plugin that runs once a month), every page request wastes time and memory loading that data.
Audit your autoloaded options – Use a plugin like Query Monitor or WP Performance Profiler to view all autoloaded options and their sizes. Alternatively, run this SQL query in phpMyAdmin:
SELECT option_name, LENGTH(option_value) as size_bytes, autoload FROM wp_options WHERE autoload = 'yes' ORDER BY size_bytes DESC LIMIT 50
Identify oversized or unnecessary entries – Look for option names that are:
Large in size (over 100 KB is a red flag; over 1 MB is critical)
From plugins you no longer use
Transients or cache data that should not be autoloaded (e.g., _transient_feed_*)
Settings that are only needed on specific admin pages, not on every frontend request
Change autoload status carefully – For options that are needed but not on every request, you can change their autoload value from yes to no. This can be done via phpMyAdmin with:
UPDATE wp_options SET autoload = 'no' WHERE option_name = 'specific_option_name'
However, be cautious: some plugins require autoloaded settings to function correctly. Test thoroughly after making changes.
Remove unnecessary autoloaded options – If an option is truly orphaned or no longer needed, delete it entirely (see previous section). Common candidates include:
Old widget data from inactive sidebars
Theme mods from deleted themes
Plugin settings that are duplicated elsewhere or unused
Monitor the impact – After cleaning, use a tool like GTmetrix or WebPageTest to measure Time to First Byte (TTFB) and query response times. A reduction in autoloaded data size often yields measurable improvements.
As a rule of thumb, aim to keep the total size of all autoloaded options under 500 KB for most sites. Larger datasets (e.g., for WooCommerce or membership sites) may require 1–2 MB, but anything beyond that should be investigated. Use the following table as a quick reference:
Autoloaded Data Size
Performance Impact
Recommended Action
< 100 KB
Minimal
Monitor periodically
100 KB – 500 KB
Moderate
Audit and trim oversized entries
500 KB – 2 MB
Significant
Proactive cleanup recommended
> 2 MB
Critical
Immediate investigation and reduction required
By regularly checking autoloaded data, you prevent the wp_options table from becoming a bottleneck. Combine this practice with transient cleanup and orphan removal, and your database will remain lean, responsive, and optimized for speed.
Managing Media Library and Attachment Metadata
When you upload an image or file to WordPress, the platform does more than just store the file on your server. It creates a database entry in the wp_posts table with a post type of attachment, along with a corresponding row in wp_postmeta that holds metadata such as file dimensions, EXIF data, alt text, and caption. Over time, as you add dozens or hundreds of media files, these entries accumulate and can bloat your database significantly. Each upload also generates multiple image sizes (thumbnail, medium, large, etc.), each with its own set of metadata. This overhead may not be noticeable on a small site, but for larger, content-rich websites, it can slow down query execution, increase backup times, and add unnecessary weight to your database. The key is to manage this data proactively, removing what you no longer need and cleaning up the leftover metadata that WordPress often fails to purge automatically.
Removing Unused Media Files and Orphaned Attachments
One of the most common sources of database bloat is unused media files—images, PDFs, or videos that are uploaded but never embedded in a post, page, or widget. These orphaned attachments remain in the database with their metadata intact, even though they serve no purpose on the front end. To identify and remove them, you can use a combination of methods:
Manual review via Media Library: In the WordPress admin, go to Media > Library and switch to list view. Use the “Uploaded to” column to see which files are unattached. While this works for small libraries, it becomes tedious for sites with hundreds or thousands of files.
Plugin-assisted detection: Plugins like Media Cleaner or WP-Optimize scan your database for attachments that are not linked to any post, page, or custom post type. They provide a list of orphaned files and allow bulk deletion. This is efficient and reduces the risk of accidentally removing a file used in a widget or theme template.
SQL query for orphaned attachments: If you prefer a direct approach, you can run a SQL query to find attachments without a parent post. For example, SELECT * FROM wp_posts WHERE post_type = 'attachment' AND post_parent = 0 returns all unattached media. However, be cautious—some themes use unattached files for sliders or backgrounds, so always verify before deleting.
After removing unused files, also check for duplicate media entries. Some users upload the same image multiple times, creating redundant database rows. A plugin like Media Deduper can help identify and merge duplicates. Once you’ve cleaned up, consider setting a policy to always attach media to a post at upload time, which reduces the chance of orphans forming in the future.
Cleaning Up Attachment Metadata with SQL or Plugins
Even after removing unused files, the metadata attached to your remaining media can still be excessive. WordPress stores a wide range of information for each image, including camera EXIF data (aperture, shutter speed, ISO), GPS coordinates, and intermediate image size data. While this metadata is useful for photographers or specific workflows, it often adds unnecessary bloat for standard blogs or business sites. Here are strategies to clean it up:
Strip EXIF and GPS data: Use a plugin like EWWW Image Optimizer or Smush to remove EXIF data during upload. For existing images, you can run a bulk optimization that strips metadata. Alternatively, a SQL query can delete specific meta keys, such as DELETE FROM wp_postmeta WHERE meta_key = '_wp_attachment_metadata' AND post_id IN (SELECT ID FROM wp_posts WHERE post_type = 'attachment')—but this is risky because it removes all metadata, including image sizes. A safer approach is to target only EXIF-related keys, though these are not stored in a standardized way. Plugins are generally recommended for this task.
Remove unnecessary image size metadata: When WordPress generates thumbnails, it stores the dimensions of each size in the _wp_attachment_metadata array. If you’ve deactivated certain image sizes (e.g., via a plugin like Stop Generating Unnecessary Thumbnails), the metadata for those sizes still exists. You can use a plugin like Media Library Cleaner to prune these entries, or run a custom script that iterates through attachments and removes size data for disabled sizes.
Clean up via SQL with caution: For advanced users, a targeted SQL query can remove specific meta keys. For example, to delete all EXIF data, you might use DELETE FROM wp_postmeta WHERE meta_key LIKE '%exif%' AND post_id IN (SELECT ID FROM wp_posts WHERE post_type = 'attachment'). However, this requires knowing the exact meta key names, which can vary by plugin. Always back up your database before running any direct queries.
After cleaning, you can also optimize the wp_postmeta table itself. Over time, rows become fragmented. Run OPTIMIZE TABLE wp_postmeta via phpMyAdmin or a plugin to reclaim space and improve query performance.
Implementing a Media Library Cleanup Routine
To maintain a lean database long-term, you need a systematic routine for managing media. Without regular attention, bloat will return. Here’s a practical routine you can implement:
Frequency
Action
Tool or Method
Monthly
Scan for orphaned attachments and unused media
Media Cleaner plugin or manual SQL query
Quarterly
Strip EXIF and GPS metadata from all images
EWWW Image Optimizer or Smush plugin
Every 6 months
Remove metadata for disabled image sizes
Media Library Cleaner plugin or custom SQL
Annually
Audit and delete duplicate media files
Media Deduper plugin
Additionally, consider these best practices to prevent future bloat:
Limit image sizes: In your theme’s functions.php file, disable unnecessary image sizes using remove_image_size(). This reduces the number of metadata entries generated per upload.
Compress at upload: Use a plugin that automatically optimizes images and strips metadata on upload, such as ShortPixel or Imagify. This prevents bloat from entering the database in the first place.
Schedule automatic cleanups: Some plugins, like WP-Optimize, allow you to schedule database cleanups, including media metadata. Set this to run weekly or monthly to stay ahead of accumulation.
Educate editors: Train team members to only upload necessary media and to remove files that are no longer used. A simple editorial guideline can reduce orphaned attachments significantly.
By implementing these routines, you keep your media library organized and your database responsive. The effort is minimal compared to the performance gains—faster page loads, smaller backups, and less strain on your server during database queries. Remember, a clean database is a fast database, and managing media metadata is a cornerstone of that optimization.
How to Optimize Your WordPress Database for Speed: Indexing Database Tables for Faster Queries
Database indexing is one of the most impactful yet often overlooked strategies for improving WordPress performance. When your site grows—accumulating posts, comments, and metadata—unoptimized queries can slow page loads significantly. Indexes function like a book’s index: instead of scanning every page to find a term, the database jumps directly to the relevant rows. For WordPress, where the database structure is fixed but data volume varies, proper indexing can reduce query execution time from seconds to milliseconds. This section explains how indexes work, how to inspect your current indexes, and how to add them to the most performance-critical tables.
Understanding How Indexes Speed Up SELECT Queries
At its core, a database index is a data structure (typically a B-tree) that stores a sorted copy of selected columns. When a query uses a WHERE, JOIN, or ORDER BY clause, the database engine first checks whether an index exists for the referenced columns. If it does, the engine traverses the index tree—requiring logarithmic time—rather than performing a full table scan, which is linear. This difference becomes pronounced as table row counts reach tens of thousands or more.
Consider a common WordPress query: retrieving all post meta for a specific post. Without an index on wp_postmeta.post_id, MySQL must examine every row in the wp_postmeta table to find matching entries. With an index, it locates the rows in O(log n) steps. The same principle applies to wp_commentmeta and wp_options, where frequent lookups by key or post ID occur.
Indexes also accelerate JOIN operations. When WordPress fetches posts along with their meta, the join condition (posts.ID = postmeta.post_id) benefits from an index on the foreign key column. Without it, the database creates temporary tables or uses nested-loop joins that degrade performance.
However, indexes come with trade-offs. Each index consumes disk space and slows down INSERT, UPDATE, and DELETE operations because the index must be updated alongside the table. For read-heavy WordPress sites—most blogs, e-commerce stores, and membership sites—the query speed gains far outweigh the write overhead. The key is to index only columns used in filtering, sorting, or joining, avoiding over-indexing.
To illustrate, imagine a blog with 100,000 posts and 500,000 postmeta rows. A query like SELECT meta_value FROM wp_postmeta WHERE post_id = 12345 without an index might scan 500,000 rows. With an index on post_id, it reads fewer than 10. This is why hosting providers and performance experts consistently recommend indexing the default WordPress tables.
Checking Current Indexes Using phpMyAdmin or SQL Commands
Before adding indexes, you must assess what already exists. WordPress core creates indexes on primary keys and some foreign keys, but not all columns that benefit from them. Here’s how to inspect your current indexes using two common methods.
Method 1: Using phpMyAdmin
Log into your hosting control panel and open phpMyAdmin.
Select your WordPress database from the left sidebar.
Click the table you want to inspect (e.g., wp_postmeta).
Navigate to the “Structure” tab. Below the column list, you’ll see a section labeled “Indexes.”
Review the listed indexes. Each shows the index name, type (e.g., PRIMARY, INDEX, UNIQUE), and the columns included.
phpMyAdmin also displays cardinality—an estimate of unique values in the index. Higher cardinality indicates better selectivity, which improves index efficiency.
Method 2: Using SQL Commands
Run the following query in phpMyAdmin’s SQL tab or via a tool like Adminer or the WordPress command line:
SHOW INDEX FROM wp_postmeta;
Replace wp_postmeta with your table name (your prefix may differ). The result set includes columns like Key_name, Column_name, Index_type, and Cardinality. To check multiple tables at once, use:
SHOW INDEX FROM wp_postmeta;
SHOW INDEX FROM wp_commentmeta;
SHOW INDEX FROM wp_options;
Look for missing indexes on frequently queried columns. For wp_postmeta, you should see an index on post_id. If only a PRIMARY key exists (on meta_id), you need to add one.
What to Look For
Missing indexes: Columns used in WHERE clauses or joins without an index.
Duplicate indexes: Two indexes covering the same column set—remove one.
Low cardinality indexes: Indexes on columns with few unique values (e.g., boolean flags) may not help and can be dropped.
Document your findings in a simple table for reference:
Table
Column
Index Present?
Action Needed
wp_postmeta
post_id
Yes
None
wp_commentmeta
comment_id
No
Add index
wp_options
option_name
Yes (UNIQUE)
None
Adding Indexes to wp_postmeta, wp_commentmeta, and wp_options
After identifying missing indexes, you can add them safely using SQL commands. Always back up your database before making structural changes. Use the CREATE INDEX statement with a descriptive name. Below are the recommended indexes for the three most impactful tables.
1. Indexing wp_postmeta
The wp_postmeta table stores custom fields for posts, pages, and custom post types. The most common query is filtering by post_id. WordPress core already includes an index on post_id in recent versions, but if your site uses an older installation or a custom prefix, verify it exists. To add it:
CREATE INDEX post_id_index ON wp_postmeta (post_id);
If your site frequently queries by meta_key (e.g., fetching all posts with a specific custom field), consider a composite index:
CREATE INDEX post_id_meta_key_index ON wp_postmeta (post_id, meta_key(191));
The meta_key column is a VARCHAR(255), so prefixing the index to 191 characters (the maximum InnoDB index length for UTF8MB4) avoids errors. This composite index speeds up queries like SELECT * FROM wp_postmeta WHERE post_id = 12345 AND meta_key = 'price'.
2. Indexing wp_commentmeta
Similar to postmeta, wp_commentmeta holds metadata for comments. It has a comment_id foreign key and a meta_key column. WordPress does not always include an index on comment_id, making this table a prime candidate. Add:
CREATE INDEX comment_id_index ON wp_commentmeta (comment_id);
For sites using comment metadata heavily (e.g., rating plugins or comment subscriptions), also add:
CREATE INDEX meta_key_index ON wp_commentmeta (meta_key(191));
This helps queries that retrieve comments by metadata key, such as plugin lookups for approved ratings.
3. Indexing wp_options
The wp_options table stores site settings, plugin configurations, and transient data. It has a UNIQUE index on option_name, which is sufficient for most lookups. However, if your site uses autoload queries or filters by option_value, you may benefit from additional indexes. For example, plugins that store serialized arrays in option_value cannot be indexed effectively, but adding an index on autoload (a VARCHAR(20) column) can help if you query for all autoloaded options:
CREATE INDEX autoload_index ON wp_options (autoload);
Be cautious: wp_options is often the most write-heavy table due to transient updates. Only add indexes that directly support your site’s query patterns. For most WordPress installations, the existing UNIQUE index on option_name is sufficient, and additional indexes on wp_options are rarely needed unless you have custom development.
Best Practices When Adding Indexes
Test on a staging site first: Run the SQL commands in a non-production environment to measure impact.
Use meaningful index names: Names like post_id_index help future developers understand their purpose.
Monitor query performance: After adding indexes, use the EXPLAIN command to verify that queries use them. For example: EXPLAIN SELECT * FROM wp_postmeta WHERE post_id = 12345 should show possible_keys containing your new index.
Remove unused indexes: If you add an index that never appears in query plans, drop it to save space and write overhead.
Consider index cardinality: Index columns with high uniqueness (like post_id) yield the best performance gains.
After applying these indexes, run the ANALYZE TABLE command to update index statistics:
This ensures the query optimizer has accurate information to choose the best execution plan.
Proper indexing transforms your WordPress database from a bottleneck into a high-speed engine. By focusing on wp_postmeta, wp_commentmeta, and wp_options, you address the most frequent lookup patterns without overcomplicating your schema. Combined with regular optimization like table cleanup and query caching, indexing provides a lasting speed improvement that scales with your site’s growth.
When your WordPress site loads a page, it typically sends multiple queries to the MySQL database to fetch posts, metadata, options, and user data. Without optimization, these queries repeat on every request, even when the underlying data hasn’t changed. A database caching layer stores the results of these queries in a fast, in-memory store, drastically reducing the load on MySQL. Instead of hitting the database for every single query, WordPress can retrieve cached results in microseconds, lowering server response times and improving Time to First Byte (TTFB). This is especially critical for high-traffic sites, WooCommerce stores, or membership platforms where database queries are numerous and complex. Database caching works best as part of a layered caching strategy, complementing page cache and opcode cache solutions.
Enabling Object Caching with Redis or Memcached
Object caching is the most effective form of database caching for WordPress. It stores the results of database queries, database objects (like posts and users), and other computationally expensive data in memory. Two popular in-memory caching systems are Redis and Memcached. Both are supported by most managed WordPress hosts and can be self-hosted on a VPS or dedicated server.
Redis supports persistent caching, data structures (lists, sets, hashes), and can be used for both object cache and full-page cache. It is generally recommended for WordPress due to its richer feature set and reliability.
Memcached is a simpler, distributed memory caching system. It is lightweight but does not persist data across restarts. It works well for high-traffic sites where cache loss is acceptable.
To enable Redis or Memcached, you first need the server software installed and running. Most managed WordPress hosts (like Kinsta, WP Engine, or Cloudways) provide Redis with a single click. For self-hosted sites, you can install Redis via your package manager (e.g., apt install redis-server on Ubuntu) or Memcached (apt install memcached). Next, install a WordPress plugin that connects your site to the caching server. For Redis, popular plugins include:
Redis Object Cache – a free, lightweight plugin that connects to Redis and provides a drop-in object cache.
W3 Total Cache – includes Redis support as part of its object cache module.
LiteSpeed Cache – supports Redis object caching when using the LiteSpeed web server.
For Memcached, use the Memcached Object Cache plugin or W3 Total Cache’s Memcached option. After activating the plugin, you must configure the connection details (host, port, and optional password). Typically, the default is 127.0.0.1 and port 6379 for Redis, or 11211 for Memcached. Once connected, the plugin will create a wp-content/object-cache.php drop-in file. This file intercepts all WordPress object cache calls, storing and retrieving data from the in-memory server. You can verify it is working by checking the plugin’s status page or using a Redis CLI command like redis-cli ping (should return PONG).
Configuring Persistent Caching Plugins (e.g., W3 Total Cache, WP Rocket)
While object caching with Redis or Memcached handles database query results, persistent caching plugins like W3 Total Cache and WP Rocket offer broader database optimization features. They can cache database queries, preload cache, and minify database overhead. Configuring these plugins correctly ensures you maximize the benefits of your caching layer without breaking site functionality.
W3 Total Cache provides a dedicated “Database Cache” module. To enable it:
Navigate to Performance → General Settings in your WordPress admin.
Under “Database Cache,” enable the checkbox.
Select the caching method: Disk (Enhanced) is recommended for shared hosting without Redis/Memcached, but if you already have an in-memory server, choose Redis or Memcached for faster performance.
Click “Save Settings & Purge Caches.”
Go to Performance → Database Cache to fine-tune: you can exclude certain query types (like queries with high cardinality) or set a TTL (time-to-live) for cached queries. A default TTL of 1800 seconds (30 minutes) works well for most sites.
WP Rocket does not have a separate database cache module but relies on its page cache and built-in object caching. However, WP Rocket offers a “Database Optimization” section that cleans up post revisions, auto-drafts, transients, and spam comments. While not a caching layer per se, these optimizations reduce the overall database size, making queries faster. For object caching with WP Rocket, you must install a separate Redis or Memcached plugin (like Redis Object Cache) because WP Rocket does not include its own object cache drop-in. WP Rocket also supports caching of Google Analytics scripts and static files, which indirectly reduces database load by serving more content from the browser cache.
When configuring these plugins, always test your site thoroughly. Enable caching gradually—start with object cache, then database cache, then page cache—and monitor for broken layouts, missing dynamic content, or login issues. Use a staging environment if possible.
Testing Cache Hit Rates and Performance Improvements
Implementing a database caching layer is only half the battle. You must verify that your cache is working effectively by measuring cache hit rates and overall performance improvements. A high cache hit rate means most queries are served from memory rather than hitting the database, which is your goal.
Redis CLI: Connect to your Redis server and run INFO stats. Look for keyspace_hits and keyspace_misses. The hit rate is calculated as hits / (hits + misses) * 100. A rate above 90% is excellent; below 70% indicates misconfiguration or insufficient caching.
Memcached stats: Use echo "stats" | nc localhost 11211 or a tool like memcached-tool. Look for get_hits and get_misses. Same calculation applies.
WordPress plugins: W3 Total Cache provides a “Performance → Dashboard” page that shows cache hit rates for database, object, and page caches. Redis Object Cache plugin also displays hit/miss statistics in its settings panel.
Server monitoring tools: Use New Relic, Datadog, or a simple script to log MySQL query counts before and after caching. A significant drop in MySQL queries per second (QPS) indicates successful caching.
Performance Testing
To measure the real-world impact, run performance tests before and after enabling database caching. Use these tools and metrics:
Tool
What to Measure
Ideal Improvement
GTmetrix / PageSpeed Insights
TTFB (Time to First Byte)
30–50% reduction
Query Monitor (WordPress plugin)
Number of database queries per page load
60–80% reduction
Load Impact (k6, Locust)
Server response time under concurrent users
2x–5x faster response
MySQL slow query log
Number of slow queries (>1 second)
Near zero
When testing, ensure you clear all caches between tests to get accurate baseline data. Run tests at least three times and average the results. Also, monitor server resource usage—CPU and memory should remain stable, not spike. If you notice high memory usage, reduce the cache TTL or limit the number of cached items. Finally, check that dynamic content (like user-specific dashboards or cart items) is not being cached improperly. Use cache exclusion rules in your caching plugin to bypass certain query types or pages.
By regularly testing hit rates and performance, you can fine-tune your database caching layer for optimal speed, ensuring your WordPress site remains fast even as traffic grows. Remember that caching is not a set-and-forget solution; periodic reviews and adjustments are necessary as your site’s content and traffic patterns evolve.
Scheduling Regular Database Maintenance
Optimizing your WordPress database is not a one-time task; it is an ongoing discipline. Over time, post revisions, spam comments, transients, and orphaned metadata accumulate, gradually slowing query execution and page load times. To maintain peak speed, you must establish a routine that automates cleanup, optimization, and monitoring. This section provides a comprehensive guide to scheduling regular database maintenance, covering automated tools, table optimization, and performance tracking.
Without a schedule, database bloat creeps back within weeks. A single automated weekly cleanup can reduce database size by 20–40% over a month, depending on site activity. The key is to choose a method that runs reliably without manual intervention, then verify its effectiveness through monitoring. Below, we explore three critical components of a maintenance schedule: using cron jobs or plugins, automating index rebuilding, and tracking database health.
Using Cron Jobs or Plugins to Schedule Weekly Cleanups
WordPress’s built-in wp-cron system can trigger scheduled events, but it only runs when a page is loaded, which can be unreliable for maintenance tasks. For consistent weekly cleanups, you have two primary approaches: server-level cron jobs or dedicated optimization plugins. Each has distinct advantages depending on your technical comfort and hosting environment.
Option 1: Server-Level Cron Jobs (Recommended for Advanced Users)
A server cron job runs at a precise time, independent of site traffic. To set one up, you need access to your hosting control panel (cPanel, Plesk, or SSH). The typical command for a weekly cleanup involves running WP-CLI, a command-line tool for WordPress. Example:
Navigate to your hosting’s cron job section.
Set the schedule to run weekly (e.g., every Sunday at 3 AM).
Enter the command: wp db optimize --all-tables (requires WP-CLI installed).
Optionally, add a cleanup command: wp post delete $(wp post list --post_type='revision' --format=ids) to remove post revisions.
This method is lightweight and avoids plugin overhead, but it requires command-line familiarity. It also lets you chain multiple commands, such as deleting expired transients and cleaning spam comments.
Plugins like WP-Optimize, Advanced Database Cleaner, or WP-Sweep offer user-friendly interfaces to schedule weekly cleanups. Here’s how to set it up with WP-Optimize as an example:
Install and activate the plugin from the WordPress repository.
Go to WP-Optimize > Database > Settings.
Enable “Schedule automatic cleanups” and choose “Weekly.”
Select which items to clean: post revisions, auto-drafts, trashed posts, spam comments, transients, and orphaned postmeta.
Save changes. The plugin will run its cleanup via WordPress’s cron system.
Plugins are easier but may add overhead if they run on every page load. To mitigate this, disable WordPress’s default cron and set a real server cron job to trigger the plugin’s schedule instead. Add this to your wp-config.php: define('DISABLE_WP_CRON', true);, then create a server cron job that calls wp-cron.php every hour. This ensures the cleanup runs reliably without performance dips.
Comparison Table: Cron Jobs vs. Plugins
Feature
Server Cron Job
Plugin (WP-Optimize)
Setup complexity
Requires SSH or cPanel
Few clicks
Reliability
Runs at exact time
Depends on traffic
Resource usage
Minimal
Adds plugin overhead
Flexibility
Custom commands
Predefined options
Best for
Developers, high-traffic sites
Beginners, small sites
Whichever method you choose, schedule the cleanup during low-traffic hours (e.g., 2–4 AM) to avoid locking tables during active sessions. Test the first run manually to confirm it removes the intended data without breaking functionality.
Automating Table Optimization and Index Rebuilding
Beyond deleting clutter, database speed depends on efficient table structures. Over time, after many INSERT, UPDATE, and DELETE operations, tables become fragmented. This fragmentation increases disk I/O and slows queries, especially on large tables like wp_options or wp_postmeta. Automating table optimization and index rebuilding restores performance by defragmenting data and refreshing indexes.
When you run OPTIMIZE TABLE in MySQL (or the equivalent wp db optimize in WP-CLI), the database engine rebuilds the table to reclaim unused space and reorder rows. This is particularly effective for tables that undergo frequent updates, such as wp_posts (with revisions) and wp_comments (with spam). Index rebuilding reorganizes index structures, ensuring queries use the most efficient lookup paths.
How to Automate It
For server cron jobs, extend your weekly command to include optimization:
wp db optimize --all-tables (optimizes all tables).
To target specific tables, use: wp db optimize --tables=wp_posts,wp_postmeta,wp_options.
For index rebuilding, add: wp db query "ALTER TABLE wp_posts ENGINE=InnoDB;" (this rebuilds indexes by altering the engine—a safe operation for InnoDB).
With plugins, many include optimization as part of their schedule. In WP-Optimize, enable “Optimize database tables” in the schedule settings. Advanced Database Cleaner has a “Scheduled Tasks” section where you can set optimization frequency independently of cleanup. Some plugins also offer “auto-optimize after cleanup” to ensure tables are rebuilt immediately after data removal.
Best Practices for Automated Optimization
Run after cleanup: Optimize tables only after deleting revisions, transients, and spam. This maximizes space recovery.
Avoid over-optimization: Optimizing daily is unnecessary and can cause table locks. Weekly or bi-weekly is sufficient for most sites.
Check table engine: InnoDB tables benefit from optimization but may require ALTER TABLE ... ENGINE=InnoDB to fully rebuild indexes. MyISAM tables can use OPTIMIZE TABLE directly.
Monitor lock time: On large tables (over 1 GB), optimization can take minutes and lock the table. Schedule during low traffic or use tools like pt-online-schema-change for zero-downtime operations.
Automating these steps ensures your database remains lean and query-optimized without manual effort. However, optimization alone doesn’t reveal underlying performance issues—that requires monitoring.
Monitoring Database Size and Query Performance with Tools
Scheduling maintenance is only half the battle; you must verify that your efforts are effective. Monitoring database size and query performance helps you detect bloat early, identify slow queries, and adjust your schedule as needed. Several tools integrate with WordPress or your hosting environment to provide real-time insights.
1. Monitoring Database Size
Track the total size of your database and individual tables over time. This tells you whether your weekly cleanups are keeping pace with growth. Methods include:
phpMyAdmin: In your hosting control panel, open phpMyAdmin, select your database, and view the “Size” column in the Structure tab. Note the total and largest tables (usually wp_posts, wp_postmeta, wp_options).
WP-CLI: Run wp db size --tables to see each table’s size in MB. This can be scripted into a cron job to log size weekly.
Plugins: Query Monitor or WP-Optimize (Pro version) display database size on the dashboard. WP-Optimize’s “Database Size” report shows trends over time.
2. Monitoring Query Performance
Slow queries are the primary cause of database-related speed issues. Tools to monitor them include:
Query Monitor: A free plugin that shows all database queries on each page load, including execution time, caller function, and duplicate queries. Use it to identify queries that take >0.5 seconds or run hundreds of times per page.
MySQL Slow Query Log: Enable this in your hosting’s MySQL configuration. Logs are stored in a file (e.g., /var/log/mysql/slow-query.log). Analyze with tools like mysqldumpslow or pt-query-digest. Set the threshold to 2 seconds for initial detection.
New Relic or Percona Monitoring: For high-traffic sites, these enterprise tools provide detailed query analysis, including execution plans and index usage. They can alert you when query performance degrades.
3. Using Data to Refine Your Schedule
After a few weeks of monitoring, you may notice patterns:
If database size grows 10% weekly despite cleanups, increase cleanup frequency to twice a week or add removal of expired transients.
If certain tables (e.g., wp_options) remain large, investigate autoloaded data. Use Query Monitor’s “Autoloaded Options” panel to identify bloated options and clean them.
If slow queries persist after optimization, check for missing indexes. Use a plugin like Index WP MySQL For Speed to add composite indexes on wp_postmeta and wp_options.
Sample Monitoring Checklist
Task
Frequency
Tool
Check total database size
Weekly
phpMyAdmin or WP-CLI
Identify largest tables
Monthly
WP-Optimize or phpMyAdmin
Review slow query log
Weekly
MySQL slow log + pt-query-digest
Analyze autoloaded options
Monthly
Query Monitor
Test query performance after cleanup
After each cleanup
Query Monitor
By combining automated scheduling, table optimization, and diligent monitoring, you create a self-sustaining system that keeps your WordPress database fast. Adjust your routines based on the data—if queries slow down, optimize indexes; if size spikes, tighten cleanup rules. This proactive approach ensures your site remains responsive as traffic and content grow.
Conclusion: Maintaining a Fast WordPress Database Long-Term
A swift, well-organized database is the silent engine behind a high-performing WordPress site. While front-end caching and image compression often steal the spotlight, the database remains the bedrock of dynamic content delivery. Neglecting it leads to sluggish queries, increased server load, and a poor user experience. However, optimization is not a one-time event; it is an ongoing discipline. The techniques you apply today will degrade over time as your site grows—with new posts, user registrations, comments, and plugin data accumulating like digital sediment. To sustain speed, you must adopt a proactive, long-term maintenance mindset. This conclusion distills the most impactful steps, provides a practical maintenance checklist, and points toward advanced strategies for those ready to dive deeper.
Recap of the Most Impactful Optimization Steps
Before building a long-term plan, it is essential to recall the core actions that deliver the greatest immediate performance gains. These are the high-leverage tasks that every site owner should prioritize, regardless of technical skill level.
Remove overhead data: Post revisions, spam comments, trashed items, and transients are common culprits. Plugins like WP-Optimize or Advanced Database Cleaner can automate this, but manual SQL (e.g., DELETE FROM wp_postmeta WHERE meta_key = '_edit_lock') offers precise control.
Optimize database tables: Over time, tables become fragmented. Running OPTIMIZE TABLE via phpMyAdmin or a plugin reclaims wasted space and improves query execution. Focus on wp_posts, wp_postmeta, wp_options, and wp_comments.
Index strategically: Database indexes are like a book’s index—they speed up lookups. Ensure your most-queried columns (e.g., post_date, comment_approved) have indexes. Avoid over-indexing, which slows writes.
Limit post revisions: Define a maximum number of revisions per post by adding define('WP_POST_REVISIONS', 5); to your wp-config.php. This prevents the wp_posts table from ballooning.
Use persistent object caching: Tools like Redis or Memcached store database query results in memory, reducing repeated hits. This is especially effective for high-traffic sites with complex queries.
These steps alone can reduce database size by 30–50% and cut query time by half in many cases. However, without regular repetition, the benefits erode.
Building a Maintenance Checklist for Site Owners
To transform optimization from a reactive fix into a sustainable habit, create a recurring maintenance checklist. The frequency of each task depends on your site’s activity level—a bustling e-commerce store needs more frequent attention than a small blog. Below is a recommended schedule based on typical WordPress usage.
Task
Frequency
Tools/Methods
Delete spam comments and trashed items
Weekly
WordPress admin (Comments > Spam/Trash) or plugin
Clear expired transients
Weekly
Plugin (e.g., Transients Manager) or SQL: DELETE FROM wp_options WHERE option_name LIKE '_transient_timeout_%'
Remove old post revisions
Monthly
Plugin or SQL: DELETE FROM wp_posts WHERE post_type = 'revision' AND post_date < NOW() - INTERVAL 30 DAY
Optimize database tables
Monthly
phpMyAdmin, WP-CLI (wp db optimize), or plugin
Check and repair table integrity
Quarterly
phpMyAdmin (CHECK TABLE and REPAIR TABLE) or plugin
Audit plugin-created tables
Quarterly
Review unused plugin data (e.g., wp_yoast_indexable after uninstalling Yoast)
Review indexing
Bi-annually
Query Monitor or EXPLAIN to identify missing indexes
Full database backup before major changes
On-demand
UpdraftPlus, BlogVault, or mysqldump
Pro tip: Automate where possible. Many plugins allow scheduling cleanup tasks (e.g., weekly removal of spam). For server-level optimization, consider a cron job that runs wp db optimize via WP-CLI every Sunday at 3 AM. This minimizes manual effort while ensuring consistency.
Also, maintain a staging environment to test database changes before applying them to your live site. A single misstep—like deleting a critical meta key—can break functionality. Regular backups are your safety net; always export a full database dump before running destructive queries.
Exploring Advanced Techniques: Query Monitor and Custom SQL
For site owners who have mastered the basics and crave deeper control, advanced techniques reveal the inner workings of your database. Two powerful approaches are using the Query Monitor plugin and writing custom SQL.
Query Monitor is an essential developer tool that provides real-time visibility into database queries. Install it as a plugin, and it adds a debug panel to your admin bar. Key features include:
Query breakdown: See every SQL query executed on a page, along with its execution time and caller (plugin, theme, or core).
Slow query detection: Identify queries taking longer than 0.5 seconds—common culprits are missing indexes or inefficient JOIN operations.
Duplicate queries: Spot repeated identical queries (e.g., fetching the same post meta multiple times) that can be cached or combined.
Table size analysis: View the size of each database table and its row count, helping you prioritize cleanup.
Using Query Monitor, you might discover that a popular plugin runs SELECT * FROM wp_postmeta WHERE meta_key = 'some_key' on every page load. Adding an index on meta_key could reduce query time from 0.2 seconds to 0.001 seconds—a massive gain for high-traffic pages.
Custom SQL offers surgical precision but requires caution. Always back up your database first. Here are three advanced, safe SQL patterns for optimization:
Delete orphaned post meta: When posts are deleted, their meta data sometimes remains. Use: DELETE pm FROM wp_postmeta pm LEFT JOIN wp_posts p ON pm.post_id = p.ID WHERE p.ID IS NULL;
Remove expired transients without timeouts: Some transients lack timeout records. Clear orphaned ones with: DELETE FROM wp_options WHERE option_name LIKE '_transient_%' AND option_name NOT LIKE '_transient_timeout_%' AND option_value IS NOT NULL;
Optimize the wp_options table: This table often becomes bloated with autoloaded data. Find and remove unnecessary autoloaded options: SELECT option_name, LENGTH(option_value) AS size FROM wp_options WHERE autoload = 'yes' ORDER BY size DESC LIMIT 20;
Then, for each large option you want to disable autoload for: UPDATE wp_options SET autoload = 'no' WHERE option_name = 'your_option';
Important: Never run SQL directly on a live production site without testing. Use Query Monitor to understand query patterns first, then apply targeted changes. For complex operations, consider hiring a WordPress developer or using a managed hosting provider that offers database optimization as a service.
By integrating these advanced techniques into your maintenance routine, you move beyond surface-level cleanup to true database performance tuning. The result is a site that not only loads quickly today but remains resilient as your content and traffic grow. Remember, a fast database is not a destination—it is a continuous practice of vigilance and refinement.
Understanding WordPress Hooks: Actions and Filters Explained
Introduction to WordPress Hooks
WordPress hooks are a fundamental mechanism that allows developers to modify or extend the behavior of WordPress without altering its core files. They act as predefined points in the WordPress execution flow where custom code can be inserted, enabling actions like adding content, changing data, or injecting functionality. For developers and advanced users, hooks provide a safe, maintainable, and scalable way to customize themes and plugins. By leveraging hooks, you can avoid the pitfalls of direct core file edits—such as losing changes during updates—and instead build modular, reusable code that integrates seamlessly with the WordPress ecosystem. Understanding hooks is essential for anyone looking to create robust, future-proof WordPress solutions.
What Are Hooks? A Conceptual Overview
At its core, a hook is a placeholder in WordPress code that allows you to “hook into” specific events or data processing stages. Think of it as an invitation for your custom functions to participate at a particular moment. WordPress defines two types of hooks: actions and filters. Actions allow you to add or execute custom code at specific points—like after a post is saved or before the footer is rendered. Filters, on the other hand, let you modify data before it is displayed or stored—such as changing the post title or altering the excerpt length. Both operate through a similar registration mechanism: you use WordPress functions like add_action() or add_filter() to attach your custom code to a named hook, and WordPress executes it when that hook is triggered.
For instance, consider the wp_head action hook, which fires inside the <head> tag of a theme. By attaching a function to wp_head, you can inject meta tags, stylesheets, or JavaScript. Similarly, the the_content filter hook runs on post content just before it is displayed; you can use it to append a disclaimer or modify formatting. The power of hooks lies in their flexibility—they are not limited to one-time use. Multiple functions can be attached to the same hook, and they will execute in the order of priority (default is 10). This modularity means you can layer customizations without conflicts, as long as you respect the hook’s intended purpose.
Why Hooks Matter for Customization and Maintainability
Hooks are the backbone of WordPress customization because they enable you to change behavior without touching core files. This has profound implications for maintainability and upgradeability. When you edit core files directly, your changes are overwritten with every WordPress update, forcing you to reapply modifications manually—a tedious and error-prone process. Hooks eliminate this risk by providing a clean separation between your custom code and the WordPress core. Your customizations live in your theme’s functions.php file or a plugin, and they remain intact through updates.
Beyond safety, hooks promote modular code organization. Instead of scattering modifications across multiple files, you can centralize them in a single location, making your code easier to debug and extend. For example, if you want to add a custom message after every post, you can attach a function to the the_content filter rather than editing the theme’s single.php template. This approach also makes your customizations portable—you can reuse the same hook-based code in different themes or plugins.
Hooks also facilitate compatibility between different components. When multiple plugins use hooks, they can interact predictably. For instance, a caching plugin might use the shutdown action to save cached data, while a security plugin uses the same hook to log activity. As long as each plugin respects the hook’s timing and priority, they coexist without conflict. This ecosystem-wide standardization is why hooks are considered a best practice for WordPress development.
To illustrate the practical benefits, consider the following comparison:
How Hooks Fit Into the WordPress Plugin and Theme Ecosystem
Hooks are the glue that binds themes, plugins, and core together. In the WordPress ecosystem, themes control the presentation layer, while plugins add functionality. Hooks allow both to interact with core without stepping on each other’s toes. For theme developers, hooks provide a way to offer customization points to users. Many modern themes include custom action hooks (like mytheme_before_header) that let child themes or plugins inject content at specific locations. This is particularly useful for creating child themes—a best practice that relies on hooks to override parent theme behavior without editing parent files.
Plugins, on the other hand, depend heavily on hooks to integrate with WordPress. A typical plugin might use actions to add admin menu pages, enqueue scripts, or process form submissions. Filters are used to alter plugin output, such as changing the text of a button or modifying query parameters. For example, the popular WooCommerce plugin exposes hundreds of hooks, allowing developers to customize product pages, checkout flows, and emails. Without hooks, plugins would be isolated and inflexible.
Hooks also enable a layered architecture. Consider a scenario where a theme uses the wp_enqueue_scripts action to load styles, and a plugin uses the same hook to add JavaScript. Both can run simultaneously because hooks allow multiple callbacks. The priority parameter (default 10) lets you control the order—lower numbers execute first. This is crucial for dependencies, like loading jQuery before a plugin script that requires it.
To understand the ecosystem better, here is a list of common hook categories and their typical uses:
Template hooks (e.g., wp_head, wp_footer): Insert code into theme sections.
Post hooks (e.g., save_post, wp_insert_post): Trigger actions when content is created or updated.
User hooks (e.g., user_register, profile_update): Respond to user account events.
Admin hooks (e.g., admin_menu, admin_enqueue_scripts): Customize the WordPress dashboard.
Query hooks (e.g., pre_get_posts): Modify database queries before they run.
Moreover, hooks facilitate communication between plugins. For instance, a caching plugin might use the pre_get_posts filter to alter query parameters, while a custom post type plugin uses the same hook to include its post types. Because both use the same hook, they can be designed to work together without hard-coding dependencies. This is why the WordPress plugin directory thrives—hooks provide a standardized API that all developers can rely on.
In summary, hooks are not just a technical feature; they are a design philosophy that promotes extensibility, collaboration, and longevity. Whether you are building a custom theme, a niche plugin, or a complex multisite network, understanding how to use actions and filters is the first step toward mastering WordPress development. By embracing hooks, you ensure your code remains adaptable, maintainable, and compatible with the ever-evolving WordPress ecosystem.
WordPress hooks are the backbone of theme and plugin development, enabling developers to extend or modify the platform’s behavior without editing core files. At the heart of this system are two distinct types of hooks: actions and filters. Understanding their fundamental difference is crucial for writing clean, maintainable code. In essence, actions let you do something at a specific moment, while filters let you change something before it is used or displayed. This distinction might seem subtle at first, but it governs how WordPress processes requests and how your custom code interacts with that flow.
Think of actions as opportunities to run your own code at predefined spots in WordPress’s execution timeline. When an action hook is triggered, WordPress says, “Here’s your chance to add functionality—send an email, log a user action, enqueue a script, or perform any task you like.” Actions do not return data to the calling context; they simply execute your callback and then move on. Filters, on the other hand, are designed to modify data. When a filter hook is triggered, WordPress passes a variable (or multiple variables) to your callback, expects you to transform that data in some way, and then uses the returned value for further processing or output. Filters never replace the original source; they wrap around it, allowing you to intercept and adjust data on the fly.
The most concrete way to grasp this is by considering the WordPress lifecycle. When a page loads, actions fire at points like init, wp_head, and wp_footer. These are pure timing markers. Filters, in contrast, are applied to data streams—like the content of a post (the_content), the title (the_title), or the excerpt (the_excerpt). If you want to add a button after every post, you use an action. If you want to replace all instances of “cat” with “dog” in the post content, you use a filter. One adds; the other alters.
Actions: Triggering Custom Code at Specific Points
Actions are hooks that allow you to insert custom functionality at precise moments during WordPress’s execution. They are defined with do_action() in the core code, and you attach your callback using add_action(). When the hook point is reached, all callbacks registered to that action are executed in the order they were added (or according to priority). Actions are ideal for tasks that do not require returning a value to the caller—they simply “do” something.
Common use cases for actions include:
Enqueuing scripts and styles: Use wp_enqueue_scripts to load CSS and JavaScript on the front end.
Adding custom content to headers or footers: Hook into wp_head or wp_footer to insert analytics code, meta tags, or custom HTML.
Sending notifications: Trigger an email when a user registers (user_register) or when a post is published (publish_post).
Modifying the admin interface: Use admin_menu to add custom admin pages, or admin_enqueue_scripts to load backend assets.
Handling form submissions: Process data from custom forms by hooking into init or a custom action you define.
Actions do not receive data from the caller in the same way filters do. They often receive contextual parameters (like a post ID or user ID), but those are used for side effects, not for transformation. For example, consider this snippet:
add_action( 'save_post', 'my_custom_notification', 10, 3 );
function my_custom_notification( $post_id, $post, $update ) {
// Send an email when a post is saved.
wp_mail( 'admin@example.com', 'Post Saved', "Post ID: $post_id" );
}
Here, the action fires after a post is saved. The callback receives the post ID, post object, and update flag, but it does not modify those—it only performs a side effect (sending an email). This is the essence of an action: it adds behavior without changing the data flow.
Filters: Modifying Data Without Altering the Original Source
Filters are hooks that allow you to modify data before it is used or displayed. They are defined with apply_filters() in the core code, and you attach your callback using add_filter(). Unlike actions, filters always expect a return value—the modified version of the data passed to them. The original source (e.g., a database value, a function’s output) remains untouched; filters create a transformed copy that WordPress then uses.
Filters are essential for customizing output without editing template files or core functions. Common use cases include:
Altering post content: Use the_content to add related posts, modify formatting, or insert ads.
Changing excerpt length: Hook into excerpt_length to return a different number of words.
Modifying query parameters: Use pre_get_posts (a filter action hybrid) to alter the main query before it runs.
Translating strings: Use gettext to modify text in themes or plugins.
Customizing user data: Filter the_author to display a custom author field.
Notice that filters always receive at least one argument (the data to be modified) and must return that data (or a modified version). If you forget to return the value, the data will become null or empty, breaking functionality. Here is a classic example:
add_filter( 'the_title', 'my_title_modifier', 10, 2 );
function my_title_modifier( $title, $id ) {
// Add a prefix to all post titles.
return 'Article: ' . $title;
}
In this case, the filter receives the original title and the post ID. The callback prepends “Article: ” to the title and returns the new string. WordPress then uses this modified title wherever the_title() is called. The original title in the database remains unchanged—only the output is altered. This is the hallmark of a filter: it changes the presentation or value of data without touching its source.
When to Use an Action vs. a Filter in Practice
Choosing between an action and a filter hinges on one question: Are you trying to add behavior or modify data? If your goal is to run custom code at a specific time—regardless of what data is present—use an action. If your goal is to transform a piece of data (text, number, array, object) before it is used, use a filter. This decision tree can help clarify:
Situation
Hook Type
Reason
Add a custom menu item in the admin sidebar
Action
You are adding a new UI element, not modifying existing data.
Change the “Read More” link text
Filter
You are altering a string before it is displayed.
Redirect users after login
Action
You are performing a side effect (redirect) at a specific moment.
Shorten the excerpt to 20 words
Filter
You are modifying the excerpt length parameter.
Log every 404 error
Action
You are recording an event, not altering data.
Append a custom class to the body tag
Filter
You are modifying the body class array.
Sometimes, the line blurs. For instance, pre_get_posts is technically an action (it uses do_action), but it is used to modify the query object—a filter-like purpose. In such cases, the WordPress Codex and community conventions guide you. As a rule of thumb: if the hook’s documentation says it expects a return value, treat it as a filter. If it does not, treat it as an action.
Another practical tip: when writing your own hooks, design actions for events and filters for transformations. If you create a plugin that sends a notification after a purchase, use do_action( 'myplugin_purchase_complete', $order_id ). If you want to allow other developers to change the email subject, use apply_filters( 'myplugin_email_subject', $subject, $order_id ). This separation keeps your code predictable and extensible.
In summary, actions and filters serve complementary roles. Actions are the “when” of WordPress development—they let you insert code at precise execution points. Filters are the “what”—they let you change the data that flows through the system. By understanding this core difference, you avoid common pitfalls like using a filter when you only need to run a side effect, or using an action when you need to return modified data. Mastery of these two hook types unlocks the full potential of WordPress customization, allowing you to build robust, flexible, and maintainable solutions.
Anatomy of a Hook: Parameters, Priorities, and Arguments
To harness the full power of WordPress hooks, you must understand their internal structure. Every hook—whether an action or a filter—operates through a consistent technical framework. This framework defines how you register a callback, when it runs, and what data it can access. Mastering these components allows you to write hooks that are efficient, predictable, and maintainable.
At its core, a hook consists of four key elements: the hook name, the callback function, the priority, and the number of accepted arguments. These parameters are passed when you call add_action() or add_filter(). The WordPress core uses these values to build an ordered queue of callbacks, which it executes at the appropriate moment during page generation.
Hook Name, Callback, Priority, and Arguments Explained
The hook name is the unique identifier that WordPress uses to trigger your callback. It must match exactly with the name used in do_action() or apply_filters(). Common examples include wp_head, the_content, and save_post. You can also create custom hook names to extend your own themes and plugins.
The callback is the function that runs when the hook fires. This can be a named function, an anonymous closure, or a class method. WordPress accepts callbacks in any format that PHP’s call_user_func_array() can handle. For clarity and debugging, named functions are preferred in production code.
Priority is an integer that determines the order in which callbacks execute. Lower numbers run earlier. The default priority is 10. If you omit the priority parameter, WordPress assigns 10. Two callbacks with the same priority run in the order they were added.
The accepted arguments parameter tells WordPress how many arguments your callback expects. This is critical for filters, where the first argument is always the value to filter. If your callback uses additional data passed by the hook, you must specify the correct count. The default is 1.
function my_custom_action_callback( $post_id, $post ) {
// Custom logic here
}
add_action( 'save_post', 'my_custom_action_callback', 20, 2 );
Here, the hook name is save_post. The callback is my_custom_action_callback. Priority is 20, meaning it runs after any callbacks registered with priority 10 or lower. The accepted args count is 2, allowing the callback to receive both $post_id and $post.
How Priority Influences Execution Order
Priority is the mechanism that gives you fine-grained control over when your code runs. WordPress stores all callbacks for a given hook in a sorted array, keyed by priority. When the hook fires, WordPress iterates through the array from lowest to highest priority, executing each callback in sequence.
This ordering is essential for avoiding conflicts and ensuring dependencies are met. For example, if you need to modify content after a plugin has processed it, you would use a higher priority number. Conversely, if you need to set up data before other code runs, you would use a lower priority.
Common priority ranges and their typical uses include:
0–5: Early initialization, setting default values, or preparing global variables.
10: Default priority. Most core and plugin callbacks use this.
15–20: Late modifications, such as altering content after plugins have processed it.
100+: Cleanup tasks, fallback logic, or operations that must run last.
When two callbacks share the same priority, WordPress executes them in the order they were added. This order is determined by the sequence of add_action() or add_filter() calls. If you need explicit control, use unique priority values.
To illustrate, consider three callbacks attached to wp_head:
Execution order: add_meta_tags runs first (priority 5), then add_styles (priority 10), then add_scripts (priority 15). If add_styles and add_scripts both used priority 10, they would run in the order they were added.
Passing and Receiving Arguments in Callbacks
Arguments are the data that WordPress passes to your callback when the hook fires. Actions can pass zero or more arguments, while filters always pass at least one argument—the value being filtered. The number of arguments a hook provides is defined by the core or plugin that triggers it.
When you register a callback, you must tell WordPress how many arguments your callback expects. This is done via the fourth parameter of add_action() or add_filter(). If you specify a number that is less than what the hook provides, WordPress passes only that many arguments. If you specify more, your callback receives null for missing arguments.
For actions, arguments are passed in the order defined by the hook. For example, the save_post action passes $post_id and $post. Your callback can use these to perform operations specific to the saved post.
For filters, the first argument is always the value to modify. Additional arguments provide context. The the_content filter, for instance, passes the content string as the first argument. You can modify and return it.
When working with filters, always return the modified value. Failure to return a value will cause the filter chain to break, potentially resulting in empty output.
To inspect what arguments a hook provides, consult the WordPress Codex or use did_action() and debugging tools. Alternatively, you can dump the arguments inside a temporary callback:
This technique reveals the exact arguments passed, helping you write accurate callbacks.
In summary, mastering hook anatomy means understanding the interplay between hook names, callbacks, priority, and arguments. By choosing appropriate priorities and specifying the correct argument count, you ensure your code runs reliably and integrates smoothly with WordPress and third-party extensions.
Working with Action Hooks
Action hooks are the primary mechanism in WordPress for executing custom code at specific points during the application’s lifecycle. Unlike filters, which modify data, actions allow you to do something—run a function, output content, or trigger a process—when a particular event occurs. Mastering action hooks is essential for extending WordPress functionality without modifying core files. This section provides practical guidance on using action hooks, including how to add and remove them, along with common examples that you will encounter in everyday development.
The add_action() function is used to attach a custom function to a specific action hook. When WordPress reaches that hook during execution, it runs all attached functions in the order they were added. The basic syntax is:
add_action( string $hook_name, callable $callback, int $priority = 10, int $accepted_args = 1 );
$hook_name (required): The name of the action hook (e.g., init, wp_head).
$callback (required): The function name or closure to execute.
$priority (optional): An integer determining execution order. Lower numbers run earlier. Default is 10.
$accepted_args (optional): The number of arguments your callback expects. Default is 1.
Here is a simple example that outputs a message in the HTML <head> section:
function my_custom_head_message() {
echo '<meta name="description" content="This site is powered by WordPress." />';
}
add_action( 'wp_head', 'my_custom_head_message' );
In this case, the function my_custom_head_message is attached to the wp_head hook. When WordPress processes the <head> tag, the meta tag is printed. You can also use anonymous functions (closures) for quick tasks, though named functions are preferred for reusability and removal:
When working with actions that pass arguments, ensure your callback accepts the correct number. For example, the save_post action passes two arguments: the post ID and the post object. A callback might look like this:
function my_save_post_action( $post_id, $post ) {
if ( $post->post_type !== 'page' ) {
return;
}
// Do something with the page post.
}
add_action( 'save_post', 'my_save_post_action', 10, 2 );
Always check the WordPress Codex or developer documentation for the number of arguments each hook provides. Using the wrong number can lead to unexpected behavior or errors.
Removing Actions with remove_action()
Sometimes you need to unhook a function that has been added by WordPress core, a theme, or a plugin. The remove_action() function allows you to do this. Its syntax mirrors add_action():
remove_action( string $hook_name, callable $callback, int $priority = 10 );
To remove an action, you must know the exact function name and priority used when it was added. For example, to remove the default WordPress emoji script from the wp_head hook:
If the action was added with a priority other than 10, you must specify that priority. A common mistake is forgetting to match the priority, which causes the removal to fail silently. Here is a more complete example that removes a function added by a plugin:
function my_remove_plugin_action() {
// Remove the function added by 'some-plugin' at priority 15.
remove_action( 'init', 'some_plugin_function', 15 );
}
add_action( 'init', 'my_remove_plugin_action', 1 );
Note that the removal itself must happen after the original action is added, but before it executes. This is why we often wrap removals in a callback attached to the same hook with a lower priority (e.g., priority 1). In some cases, you may need to use remove_all_actions() to clear all callbacks from a hook, but this is rarely advisable as it can break core functionality.
For actions that are added by classes or objects, you must pass the callback as an array. For instance, if a plugin uses a class method:
If the action is added from an object instance, you may need to store a reference to that object or use a workaround like remove_action() with a closure (though this is tricky). In practice, many developers simply override the action by adding their own callback at a higher priority to run after the problematic one.
Common Action Hooks: wp_head, init, wp_enqueue_scripts
WordPress offers dozens of action hooks, but three are particularly ubiquitous and essential for most projects. Understanding these will give you a solid foundation.
Hook Name
When It Fires
Common Uses
Arguments Passed
wp_head
Inside the <head> tag of the front end
Adding meta tags, custom CSS/JS, Open Graph data, or analytics code
None
init
After WordPress has loaded, but before any headers are sent
Registering custom post types, taxonomies, rewrite rules, or session handling
None
wp_enqueue_scripts
When scripts and styles are being enqueued for the front end
Properly loading CSS and JavaScript files with dependencies
None
wp_head: This hook is ideal for injecting content into the document head. Because it fires late in the head section, it is safe for adding metadata or scripts that should not be blocked. However, avoid heavy processing here as it delays rendering. Example: adding a favicon link.
init: The init hook is one of the earliest you can use for custom functionality. It is commonly used to register custom post types and taxonomies because these must be registered before WordPress parses the request. For example:
Because init fires early, it is also a good place to set up custom rewrite rules or start a session. Be cautious: do not use init for tasks that depend on the query or post data, as those are not yet available.
wp_enqueue_scripts: This is the proper hook for loading CSS and JavaScript in a theme or plugin. Using wp_head to directly echo script tags is considered bad practice because it bypasses dependency management and can cause conflicts. Instead, use wp_enqueue_style() and wp_enqueue_script() inside this hook. Example:
function my_theme_scripts() {
// Enqueue main stylesheet.
wp_enqueue_style( 'my-theme-style', get_stylesheet_uri(), array(), '1.0.0' );
// Enqueue a custom script with jQuery as a dependency.
wp_enqueue_script( 'my-custom-js', get_template_directory_uri() . '/js/custom.js', array( 'jquery' ), '1.0.0', true );
}
add_action( 'wp_enqueue_scripts', 'my_theme_scripts' );
The fifth parameter in wp_enqueue_script() (true) tells WordPress to load the script in the footer, which improves page load performance. Always specify dependencies to avoid loading scripts out of order.
These three hooks form the backbone of most WordPress customization tasks. By mastering add_action() and remove_action(), you gain precise control over when and how your code runs. Remember to always check the WordPress documentation for the specific arguments each hook provides, and test your removals thoroughly to ensure they work as expected. With practice, action hooks become a natural part of your development workflow, enabling clean, maintainable, and extensible code.
Working with Filter Hooks
Filter hooks are one of the two fundamental types of hooks in WordPress, alongside action hooks. While action hooks allow you to execute custom code at specific points, filter hooks give you the power to modify data before it is used or output. Understanding how to work with filter hooks is essential for any developer who wants to safely alter content, titles, settings, or any other data flowing through WordPress. Filters operate on the principle of receiving a value, transforming it, and returning the modified version. This process is both powerful and safe when best practices are followed.
Filter hooks are pervasive throughout WordPress core, themes, and plugins. They are designed to let you intercept data—such as a post’s content, a page title, or an excerpt length—and change it without editing the original source files. This approach ensures that your modifications remain update-proof and maintainable. To master filter hooks, you need to understand two key functions: apply_filters() to create a filterable point and add_filter() to hook into that point and modify the data.
Applying Filters with apply_filters()
The apply_filters() function is used by WordPress core, theme, and plugin developers to define a point where data can be filtered. When you call apply_filters(), you provide a tag name (a unique identifier), the value to be filtered, and optionally additional arguments. This function then runs all functions that have been hooked to that tag via add_filter(), passing the value through each callback in sequence. The final returned value is the modified data.
The basic syntax for apply_filters() is as follows:
$tag (string, required): The name of the filter hook. This should be unique and descriptive, such as myplugin_filter_content.
$value (mixed, required): The data to be filtered. This can be a string, integer, array, object, or any other type.
$additional_args (mixed, optional): Extra parameters that can be passed to hooked functions. These are often used to provide context, such as a post ID or user role.
Here is a simple example of applying a filter within a custom function:
In this example, any developer can use add_filter( 'myplugin_custom_title', ... ) to modify the title for a specific post. The $post_id argument is passed as context, allowing the callback to conditionally alter the title based on the post. When applying filters, always consider what additional context might be useful for those hooking into your code. The more context you provide, the more flexible and powerful your filter becomes.
It is important to note that apply_filters() always returns a value. Even if no filters are hooked to the tag, the original value is returned unchanged. This makes filters safe to use without worrying about breaking functionality if no modifications are applied.
Modifying Data with add_filter()
The add_filter() function is the counterpart to apply_filters(). It is used to register a callback function that will modify the data passed by a specific filter hook. The syntax is straightforward:
add_filter( string $tag, callable $callback, int $priority = 10, int $accepted_args = 1 )
$tag (string, required): The name of the filter hook you want to modify.
$callback (callable, required): The function that will process the data. This function must accept the value as its first parameter and return the modified value.
$priority (int, optional): An integer determining the order in which callbacks are executed. Lower numbers run earlier. Default is 10.
$accepted_args (int, optional): The number of arguments your callback accepts. This must match the number of additional arguments passed by apply_filters(). Default is 1.
Here is a practical example of using add_filter() to modify the excerpt length:
function mytheme_custom_excerpt_length( $length ) {
return 30; // Change excerpt length to 30 words
}
add_filter( 'excerpt_length', 'mytheme_custom_excerpt_length' );
This simple callback returns a fixed integer, overriding the default excerpt length. For more complex scenarios, you can use the additional arguments to conditionally modify data. For instance, if a filter passes a post ID, you can check the post type before making changes:
When using add_filter(), always ensure your callback returns the modified data. If you forget to return a value, the filter will return null, potentially breaking the output. It is also good practice to use descriptive function names and to prefix them with your theme or plugin slug to avoid conflicts with other code.
Another best practice is to use the correct priority when multiple filters are hooked to the same tag. If you need your filter to run after others, set a higher priority (e.g., 20). If you need it to run before, use a lower number (e.g., 5). This allows you to control the order of modifications, which is especially important when filters can conflict or depend on each other.
Common Filter Hooks: the_content, excerpt_length, body_class
WordPress includes hundreds of built-in filter hooks, but three of the most commonly used are the_content, excerpt_length, and body_class. Understanding these hooks provides a solid foundation for working with filters in real-world projects.
the_content
The the_content filter is applied to the content of a post before it is displayed. It is widely used to add or modify elements within the post body, such as inserting ads, adding related posts, or changing formatting. The filter passes the content as a string and an optional post ID. Here is an example that adds a disclaimer at the end of every post:
function mytheme_add_disclaimer( $content ) {
if ( is_single() && in_the_loop() && is_main_query() ) {
$disclaimer = '<p><em>Disclaimer: This is for informational purposes only.</em></p>';
$content .= $disclaimer;
}
return $content;
}
add_filter( 'the_content', 'mytheme_add_disclaimer' );
When modifying the_content, always check context (e.g., is_single(), in_the_loop()) to avoid affecting unintended areas like excerpts or RSS feeds. Also, be mindful that other plugins may also filter this hook, so test your modifications thoroughly.
excerpt_length
The excerpt_length filter controls the number of words in a post excerpt. It accepts an integer representing the word count and returns an integer. This filter is often used to set a uniform excerpt length across a site or to vary it by context. For example, you might want shorter excerpts on archive pages and longer ones on related posts:
Note that the excerpt_length filter only affects excerpts generated by the_excerpt(). It does not affect manual excerpts entered in the post editor. Also, the filter passes only the length value, so you cannot directly access post data unless you use another hook like get_the_excerpt or rely on global variables.
body_class
The body_class filter modifies the CSS classes applied to the <body> element. This is useful for adding custom styling hooks based on page type, user role, or other conditions. The filter passes an array of class names and returns an array. Here is an example that adds a class for logged-in users:
When working with body_class, always return the array of classes. Avoid removing essential classes unless you have a specific reason, as many themes and plugins rely on them for styling and JavaScript functionality. You can also use the filter to remove classes by using array_diff() or similar array functions.
Below is a summary table of these common filter hooks:
Filter Hook
Data Type
Common Use Cases
Additional Arguments
the_content
String
Add ads, modify formatting, insert shortcodes
Post ID (optional)
excerpt_length
Integer
Set word count for auto-excerpts
None
body_class
Array
Add custom CSS classes for styling
None
Best practices for working with these and other filter hooks include:
Always return the same data type that the filter expects. For example, the_content expects a string, while body_class expects an array.
Use conditional checks to ensure your modifications only apply when intended, preventing unintended side effects.
Prefix your callback functions with a unique identifier (e.g., mytheme_ or myplugin_) to avoid naming collisions.
Test your filters with different data inputs, including edge cases like empty strings or arrays.
Document your filters if you are creating them for others, specifying the data type, arguments, and expected return value.
By mastering the use of apply_filters() and add_filter(), and by familiarizing yourself with common filter hooks like the_content, excerpt_length, and body_class, you gain the ability to safely and flexibly customize WordPress data. Filter hooks are a cornerstone of WordPress development, enabling you to adapt the platform to your needs without compromising upgradeability or stability.
Creating Custom Hooks in Themes and Plugins
Once you understand how WordPress hooks work, the next step is to create your own. Defining custom hooks allows other developers (or your future self) to extend your code without modifying its core files. This practice is fundamental to building maintainable, modular, and collaborative WordPress projects. Whether you are developing a theme for distribution or a plugin for a client, custom hooks provide a clean contract between your code and anyone who interacts with it. In this section, we will walk through the precise steps for defining both action and filter hooks, and then discuss how to document them effectively.
Defining a Custom Action Hook with do_action()
An action hook is a point in your code where you want other functions to run. To create one, you use the do_action() function. The basic syntax is:
do_action( string $hook_name, mixed ...$args )
Here is a step-by-step guide to defining your own action hook:
Identify the execution point: Determine where in your theme template or plugin logic you want to allow others to inject code. For example, after a blog post’s content, before the sidebar, or after saving a custom post type.
Choose a unique hook name: Prefix the hook name with your theme or plugin slug to avoid conflicts. For instance, mytheme_after_post_content or myplugin_before_user_save.
Call do_action(): Place the function at the chosen location. Include any relevant data as additional arguments that other developers might need.
Test the hook: Create a simple callback function and attach it to your new hook using add_action() to verify it fires correctly.
Example: Custom action hook in a theme’s single.php
In this example, the hook passes the post ID as an argument. A developer can then use:
add_action( 'mytheme_after_post_content', 'display_related_posts', 10, 1 );
function display_related_posts( $post_id ) {
// Custom logic here
}
Notice the fourth parameter in add_action() (the number 1) indicates the number of arguments the callback accepts. This matches the single argument passed by do_action().
Best practices for action hooks:
Always prefix your hook name with a unique identifier.
Pass only the data that is truly needed—avoid passing entire global objects.
Consider using a consistent naming convention, such as {prefix}_{context}_{action}.
Document what each argument represents and when the hook fires.
Defining a Custom Filter Hook with apply_filters()
While actions allow code to run, filters allow code to modify data before it is used. The core function for creating a filter is apply_filters(). Its syntax is:
Here is the process for defining a custom filter hook:
Identify the data to be filtered: Look for a value in your code that other developers might want to change—such as a default button text, a CSS class, a query argument, or a formatted date.
Set a default value: The second parameter of apply_filters() is the default value that will be used if no callbacks modify it.
Call apply_filters(): Wrap the value with this function, providing a unique hook name and any additional contextual arguments.
Use the filtered result: Assign the return value to a variable or use it directly in your output.
Creating a hook is only half the work. Without proper documentation, other developers will struggle to use it correctly, and you may forget the details when revisiting your code months later. WordPress has a well-established standard for documenting hooks using PHPDoc blocks. For both actions and filters, you should include:
@since: The version of your theme or plugin when the hook was introduced.
@param: A description of each argument passed to the callback, including its type and name.
@return: For filters only, describe what the callback should return.
A clear description: Explain when the hook fires or what data it filters, and in what context.
Example: Documenting an action hook
/**
* Fires after the main content of a post is displayed.
*
* Allows developers to inject custom content after the post content,
* such as related posts, social sharing buttons, or advertisements.
*
* @since 1.0.0
*
* @param int $post_id The ID of the current post.
*/
do_action( 'mytheme_after_post_content', get_the_ID() );
Example: Documenting a filter hook
/**
* Filters the text displayed on the submit button.
*
* Use this hook to change the default "Submit" text to something
* more context-specific, such as "Send" or "Save".
*
* @since 1.0.0
*
* @param string $button_text The default button text.
* @return string Modified button text.
*/
$button_text = apply_filters( 'myplugin_submit_button_text', 'Submit' );
Maintain a separate readme or wiki page listing all custom hooks in your project, especially if you have many.
Use consistent naming in your documentation to match the hook name exactly.
If a hook is intended for advanced use only (e.g., modifying core behavior), note that in the description.
Consider adding inline comments near the do_action() or apply_filters() call to explain the purpose in context.
Collaboration benefits: When you document hooks thoroughly, you enable other developers to extend your work without needing to read every line of your code. This reduces support requests, encourages contributions, and makes your theme or plugin more attractive to the WordPress community. Good documentation also helps you during debugging, as you can quickly verify whether a hook is being used as intended.
By defining custom hooks with do_action() and apply_filters(), and by documenting them clearly, you transform your code from a closed system into an extensible platform. This is the hallmark of professional WordPress development and a practice that pays dividends in maintainability and collaboration.
WordPress hooks—actions and filters—are powerful tools for extending and modifying core functionality without altering source files. However, their flexibility introduces risks: poorly implemented hooks can cause conflicts with other plugins or themes, degrade performance, or produce unintended side effects. Adhering to established best practices ensures your code remains robust, maintainable, and compatible across diverse WordPress environments. This section outlines critical guidelines for using hooks safely, focusing on naming conventions, priority management, and backward compatibility.
Using Unique and Descriptive Hook Names
When creating custom hooks—whether actions or filters—choose names that are both unique and descriptive. A unique name prevents accidental collisions with hooks from other plugins, themes, or WordPress core. A descriptive name clarifies the hook’s purpose, making your code easier to understand and debug.
Prefix your hooks with a namespace. Use your plugin or theme slug followed by an underscore. For example, if your plugin is called “Advanced Gallery,” prefix hooks as advanced_gallery_before_render or advanced_gallery_filter_options. This practice minimizes the risk of conflicts.
Use verbs that indicate timing or transformation. For actions, choose verbs like before_, after_, or during_ to signal when the hook fires. For filters, use verbs like filter_, modify_, or override_ to indicate data manipulation.
Avoid generic names. Names like my_custom_hook or save_post_data are too vague and likely to conflict with existing hooks. Instead, be specific: myplugin_before_save_post_meta or mytheme_filter_header_logo_url.
Document hook parameters. When registering a hook, include inline comments or a separate documentation file explaining the arguments passed. This helps other developers (and your future self) understand the expected data types and usage.
Consider using a consistent naming convention across your entire project. For instance, if you use plugin_slug_action_name for actions, apply the same pattern to filters with plugin_slug_filter_name. This reduces cognitive load and makes your codebase more predictable.
Managing Hook Priority and Dependencies
Hook priority determines the order in which callback functions execute. Misusing priority can lead to race conditions, broken functionality, or performance bottlenecks. Proper management ensures that hooks fire in the intended sequence and that dependencies are resolved correctly.
Priority Value
Effect
Best Use Case
1–9
Very early execution
Essential setup tasks, like registering post types or taxonomies, that must run before other hooks.
10
Default priority
Standard modifications that don’t require specific ordering.
11–20
Late execution
Overrides or cleanup tasks that should run after default callbacks.
100+
Very late execution
Low-priority fallbacks or compatibility adjustments for third-party code.
To manage dependencies effectively:
Use priority to enforce ordering. If your callback depends on another hook’s output, assign a higher priority number (later execution) to your function. For example, if a theme sets a footer copyright via wp_footer at priority 10, add your modification at priority 11 to ensure the theme’s content exists first.
Avoid hard-coding magic numbers. Define priority constants in your plugin or theme’s main file. For instance, define('MYPLUGIN_HOOK_PRIORITY', 15); allows easy adjustment without searching through code.
Test with multiple plugins active. Other plugins may use the same hook with conflicting priorities. Use debugging tools like Query Monitor to visualize hook execution order and identify conflicts.
Consider using did_action() or current_filter(). These functions let you check if a specific action has already fired or which filter is currently being processed. This can prevent duplicate processing or conditional execution based on context.
Performance-wise, avoid attaching expensive operations to high-frequency hooks like init or wp_head unless necessary. If your callback runs database queries or file operations, consider caching results or using conditional logic to execute only on relevant pages.
Ensuring Backward Compatibility When Modifying Hooks
Modifying existing hooks—whether from WordPress core, a parent theme, or a plugin—requires careful consideration to avoid breaking dependent code. Backward compatibility ensures that existing callbacks continue to work as expected after your changes.
Key strategies for maintaining backward compatibility:
Never change the number or type of hook arguments without deprecation. If you must add new parameters, append them to the end of the argument list. Existing callbacks that ignore extra parameters will continue to function. For example, if a filter originally passed $content and you need to add $post_id, pass it as the second argument: apply_filters('my_filter', $content, $post_id).
Use the _deprecated_hook() function. When renaming or removing a hook, register the old hook as deprecated. This triggers a notice in debug mode and allows developers to update their code. Example: _deprecated_hook('old_hook_name', '2.0.0', 'new_hook_name');.
Provide transitional wrappers. If you remove a hook entirely, create a wrapper function that fires the old hook while also performing the new logic. This gives developers time to migrate. For instance, if you replace do_action('old_action') with a new system, keep the old action call temporarily with a deprecation notice.
Document changes clearly. Include a changelog in your plugin or theme’s readme file, specifying which hooks were modified, added, or deprecated. Use semantic versioning (e.g., MAJOR.MINOR.PATCH) to signal breaking changes.
Test with popular third-party extensions. If your hook is widely used by other developers, test your changes against common plugins or themes that rely on it. Consider using a compatibility plugin to simulate real-world scenarios.
When adding new hooks, future-proof them by designing flexible signatures. For filters, always include the primary data as the first argument, followed by contextual parameters. For actions, pass meaningful objects (like $post or $user) rather than just IDs, so developers can access additional properties without extra queries.
Finally, remember that backward compatibility is a promise to your users. Even if a hook seems obsolete, removing it without proper deprecation can silently break functionality. Always prioritize stability over simplification when maintaining hooks across versions.
Debugging Hooks: Tools and Techniques
Even experienced WordPress developers occasionally encounter issues with hooks—actions or filters that do not fire as expected, run in the wrong order, or conflict with plugins and themes. Debugging hooks requires a systematic approach to inspect which hooks are executing, verify callback priorities, and trace data modifications. Fortunately, WordPress provides built-in tools, and several community plugins offer deeper insights. This section covers practical methods to diagnose and resolve hook-related problems, from enabling debug mode to using logging techniques and fixing common errors.
Using WP Debug Mode and Query Monitor
The first step in debugging hooks is to enable WordPress’s native debugging features. WP Debug Mode, activated by editing the wp-config.php file, reveals PHP notices, warnings, and errors that might otherwise remain hidden. To enable it, add or modify the following lines before the “That’s all, stop editing!” comment:
Setting WP_DEBUG_LOG to true writes errors to a debug.log file located in the /wp-content/ directory. This log is invaluable for catching fatal errors caused by faulty callbacks or incorrect hook usage. However, raw debug logs do not show which specific hooks are running or their execution order. For that, you need a more visual tool.
Query Monitor is the most popular plugin for inspecting hooks in real time. It adds a toolbar to the admin bar (visible to administrators) that displays detailed information about the current page request. To use it for hook debugging:
Install and activate Query Monitor from the WordPress plugin repository.
Open the “Hooks & Actions” panel from the toolbar drop-down. This lists every action and filter that fired during the request, sorted by execution order.
Click on any hook name to expand its callbacks, showing the callback function name, priority, file path, and line number.
Use the search field to filter specific hooks (e.g., wp_head or the_content).
Query Monitor also highlights hooks with high execution times, helping you identify performance bottlenecks. For filter hooks, it displays the before and after values of the modified data, making it easy to trace unexpected changes. This tool is indispensable for both development and staging environments.
Checking Hook Execution Order with Simple Logging
When Query Monitor is not available—for example, on a production site where you cannot install plugins—you can use simple logging techniques to trace hook execution order. The core idea is to write custom messages to the debug log at specific points in your code. A common approach is to create a small must-use plugin (placed in /wp-content/mu-plugins/) that logs hook activity.
Here is a minimal example that logs every action hook that fires:
This code attaches to the all hook, which fires for every action and filter. While useful, it generates a massive log file quickly. A more targeted approach is to log only specific hooks you are investigating:
After loading a page, view the debug.log file. The entries should appear in the order of execution: Callback B (priority 5), Callback A (priority 10), Callback C (priority 20). If the order is different, check for conflicting plugins or themes that may be using the same hook with identical priorities.
For filter hooks, you can log the value before and after a callback modifies it:
This technique helps identify which callback is altering data unexpectedly. Remember to remove or disable these logging callbacks after debugging to avoid performance degradation.
Common Hook-Related Errors and How to Fix Them
Even with proper debugging tools, certain hook-related errors recur frequently. Understanding their causes and solutions saves hours of troubleshooting. Below are the most common issues and their fixes.
Error
Cause
Solution
Hook does not fire
Callback is added after the hook has already run (e.g., using wp_enqueue_scripts inside init).
Ensure the add_action() or add_filter() call is placed before the hook executes. Use the correct hook for the timing needed.
Callback runs but has no effect
Filter callback does not return the modified value, or action callback has side effects that are overwritten later.
Always return the first argument in filter callbacks. Check execution order with logging to see if another callback overrides your changes.
White screen of death (WSOD)
Fatal PHP error in a callback, often due to undefined functions, incorrect syntax, or infinite loops.
Enable WP_DEBUG to see the error. Check the callback file path and line number. Wrap callback code in a conditional to prevent execution on incompatible environments.
Conflict between plugins/themes
Two different callbacks use the same hook with the same priority, causing unpredictable behavior.
Use Query Monitor to identify all callbacks on the hook. Change your callback’s priority (e.g., 9 or 11) to run before or after the conflicting one.
Hook fires multiple times
Callback is attached multiple times, or the hook itself is triggered repeatedly (e.g., inside a loop).
Use did_action() to check if the hook has already fired and prevent duplicate execution. For filter hooks, ensure the callback is idempotent.
Another subtle error occurs when a filter hook expects a specific number of parameters but the callback declares fewer. For example, the_content passes one parameter, but the_title passes two. Always check the hook documentation for the accepted arguments and declare them in your callback:
add_filter( 'the_title', 'my_title_callback', 10, 2 );
function my_title_callback( $title, $id ) {
// $id is the post ID, only available if you declare 2 parameters
return $title . ' (ID: ' . $id . ')';
}
Finally, remember that hooks can be removed or overridden by other code. Use remove_action() or remove_filter() cautiously, and verify with Query Monitor that the removal succeeded. If you suspect a hook is being removed, log the removal event or check the plugin/theme source for remove_all_actions() calls.
By combining WP Debug Mode, Query Monitor, and targeted logging, you can systematically resolve most hook-related issues. The key is to start with the broadest tools (debug mode, Query Monitor) and narrow down to specific callbacks using logs. Over time, you will develop an intuition for where problems likely originate, making debugging faster and more efficient.
Performance Considerations with Hooks
WordPress hooks—both actions and filters—are the backbone of extensibility in the WordPress ecosystem. They allow developers to modify core functionality without altering core files, enabling themes and plugins to interact seamlessly. However, this flexibility comes with a trade-off: every hook that is registered and executed consumes server resources. When hooks are used carelessly, they can degrade site performance, increase page load times, and strain server memory. Understanding how hooks impact speed and resource usage is essential for building efficient WordPress sites. This section explores the performance implications of hooks and provides actionable strategies to keep your code lean and fast.
The performance cost of hooks stems from two primary sources: the overhead of registering callbacks and the execution time of those callbacks. Each time WordPress processes a page request, it loads the entire hook system, iterates through registered callbacks for each hook, and executes them in order. If callbacks perform expensive operations—such as database queries, remote API calls, or heavy file processing—these delays compound. Additionally, hooks that fire on every page load (like init, wp_head, or the_content) can become bottlenecks if not optimized. The key is to minimize unnecessary work inside callbacks and to load hooks only when needed.
Minimizing Expensive Operations Inside Callbacks
The most direct way to improve hook performance is to avoid performing resource-intensive tasks inside callback functions. Common expensive operations include:
Database queries: Fetching large datasets or running complex SQL queries within a callback can slow down page generation.
File system operations: Reading or writing files, especially large ones, adds I/O overhead.
Image processing: Resizing or manipulating images on the fly is CPU-intensive.
Looping over large arrays: Iterating through thousands of posts or users without caching can cause memory spikes.
To mitigate these issues, follow these best practices:
Defer heavy processing: Use WordPress cron or background processing (e.g., WP_Queue) to handle expensive tasks outside the main request.
Check conditions early: Before running a costly operation, verify that it is necessary. For example, use is_admin() or is_singular() to skip callbacks on irrelevant pages.
Use lightweight alternatives: Replace expensive functions with simpler ones. For instance, use get_post_meta() instead of WP_Query if you only need a single value.
Limit callback scope: Keep callbacks focused on one task. Avoid chaining multiple heavy operations inside a single hook.
Consider this example: a callback hooked to the_content that fetches related posts via a custom query. Instead of querying the database every time, you can cache the result or run the query only on single post pages using is_single(). This simple condition check can eliminate unnecessary database hits on archive pages.
Conditional Hook Loading to Reduce Overhead
Not every hook needs to fire on every page request. Conditional hook loading ensures that callbacks are registered only when they are actually needed, reducing the total number of executed hooks and saving resources. WordPress provides several built-in conditional tags that you can use to gate hook registration.
Common conditional tags include:
is_front_page() – Only on the front page.
is_single() – Only on single post pages.
is_page() – Only on specific pages.
is_admin() – Only in the WordPress admin area.
has_shortcode() – Only if a specific shortcode is present in the content.
To implement conditional hook loading, wrap your add_action() or add_filter() calls inside conditional checks. For example:
This approach prevents the callback from being registered on archive pages, search results, or 404 pages, reducing overhead. Another advanced technique is to use the template_include filter to conditionally load entire plugin files only when the correct template is used. This can dramatically reduce memory usage on sites with many plugins.
Additionally, consider using the wp action hook—which fires after the query is set up—to conditionally register hooks based on the current request. This is more efficient than registering hooks earlier in the request lifecycle (e.g., init) and then skipping them with conditions inside the callback, because it avoids the overhead of adding the callback to the global hook array.
When a hook callback produces the same result for the same input across multiple requests, caching that output can significantly improve performance. Caching avoids redundant computations and database queries, serving precomputed data instead. There are several caching strategies applicable to hooks:
Transients API: Store cached data in the database with an expiration time. Useful for data that changes infrequently, such as feed results or API responses.
Object caching: Use persistent object caching (e.g., Redis, Memcached) to store hook outputs in memory. This is faster than database-based caching and ideal for high-traffic sites.
Page caching: For hooks that modify page output (e.g., the_content), consider using full-page caching plugins like WP Super Cache or W3 Total Cache to serve static HTML, bypassing hooks entirely for anonymous users.
Internal caching: Store computed values in static variables within the callback to avoid recalculating during the same request.
For example, a filter on the_title that appends a custom label based on a post meta field can be cached per post ID:
This static cache works within a single page load, but for cross-request caching, use transients or object caching. A best practice is to cache the entire output of expensive filters that are called multiple times, such as the_content or wp_nav_menu. However, be cautious with caching dynamic content (e.g., user-specific data) to avoid serving stale or incorrect information.
To maximize efficiency, combine caching with conditional hook loading. For instance, only cache the output of a filter on single post pages, and use a short cache expiration time if the data changes frequently. Monitor your site’s performance using tools like Query Monitor to identify hooks that are called repeatedly and apply caching where it yields the greatest benefit.
Real-World Examples: Hooks in Action
Understanding the theory behind hooks is essential, but seeing them applied in real-world scenarios solidifies their utility. Popular WordPress plugins and themes rely heavily on actions and filters to provide extensibility without forcing users to modify core files. Below, we examine three concrete examples that demonstrate how hooks work in practice, from adding functionality to modifying default behavior.
Adding a Custom Script to the Footer via an Action
One of the most common tasks for WordPress developers is enqueuing scripts and styles. While many scripts are added to the <head> section, some—like analytics trackers or custom JavaScript—perform better when loaded in the footer. This is accomplished using the wp_footer action hook, which fires just before the closing </body> tag.
Consider a scenario where you want to add a custom Google Analytics snippet to your theme’s footer. Instead of editing your footer.php file directly—which would break on theme updates—you can hook into wp_footer from your child theme’s functions.php file or a custom plugin:
This action hook ensures that the script is printed in the footer on every page load. You can also use wp_enqueue_script with the in_footer parameter set to true for external scripts, but wp_footer is ideal for inline code. Key points to remember:
Priority matters: The second parameter of add_action allows you to set a priority (default is 10). Lower numbers execute earlier.
Conditional loading: You can wrap the hook in is_front_page() or other conditional tags to load scripts only on specific pages.
Theme compatibility: This method works with any theme that calls wp_footer() in its template—which all well-coded themes do.
Modifying the Excerpt Length Using a Filter
WordPress automatically generates post excerpts that are limited to 55 words. While this default works for many sites, you may need shorter or longer excerpts for design consistency. The excerpt_length filter hook allows you to change this value without altering core files.
Imagine you run a magazine-style blog where excerpts should be exactly 30 words to fit a grid layout. Add the following code to your theme’s functions.php file or a custom plugin:
This filter receives the current length as a parameter and returns a new value. Filters can also accept additional parameters. For example, the excerpt_more filter controls the text appended to the excerpt (default is [...]). You can combine both filters to create a polished excerpt:
Filter Hook
Purpose
Example Return Value
excerpt_length
Changes the word count of the excerpt
20
excerpt_more
Alters the trailing string after the excerpt
'... Read More'
Here is a combined example that sets a 20-word excerpt with a custom read more link:
Filters like these are powerful because they modify data before it is output, ensuring your changes are safe and reversible. Always use filters instead of directly editing template files to maintain update compatibility.
Creating a Plugin That Extends Another Plugin’s Hooks
Extensibility is a hallmark of well-designed plugins. Many premium plugins, such as WooCommerce, Advanced Custom Fields (ACF), or Easy Digital Downloads, expose their own hooks to allow third-party developers to add or modify features. This example demonstrates how to create a simple plugin that hooks into WooCommerce to add a custom message on the checkout page.
First, create a new plugin file (e.g., custom-checkout-message.php) with the standard plugin header:
<?php
/*
Plugin Name: Custom Checkout Message
Description: Adds a custom note to the WooCommerce checkout page.
Version: 1.0
Author: Your Name
*/
WooCommerce provides the woocommerce_before_checkout_form action hook, which fires before the checkout form is displayed. You can use it to output a custom message:
function add_checkout_notice() {
echo '<div class="woocommerce-info">Free shipping on orders over $50!</div>';
}
add_action( 'woocommerce_before_checkout_form', 'add_checkout_notice' );
This action hook respects WooCommerce’s template structure and does not interfere with core files. To take it a step further, you can use filters to modify existing WooCommerce data. For instance, the woocommerce_checkout_fields filter allows you to add, remove, or reorder checkout fields:
function custom_checkout_fields( $fields ) {
$fields['billing']['billing_phone']['placeholder'] = 'Enter your mobile number';
$fields['order']['order_comments']['label'] = 'Special instructions for delivery';
return $fields;
}
add_filter( 'woocommerce_checkout_fields', 'custom_checkout_fields' );
When extending another plugin’s hooks, consider these best practices:
Check for plugin existence: Use function_exists() or class_exists() to avoid fatal errors if the parent plugin is deactivated.
Use unique function names: Prefix your functions with a unique identifier to prevent collisions.
Document your hooks: If your extension plugin also exposes hooks, document them clearly for other developers.
By leveraging hooks provided by other plugins, you can create modular, reusable code that respects the original plugin’s architecture. This approach is fundamental to building a scalable WordPress ecosystem.
These real-world examples illustrate how actions and filters transform WordPress from a static CMS into a dynamic, customizable platform. Whether you are adding a script to the footer, tweaking excerpts, or extending a plugin, hooks give you the precision and safety needed for professional development.
How to Create a Custom Post Type in WordPress: A Complete Developer’s Guide
Introduction to Custom Post Types
WordPress began as a blogging platform, but it has evolved into a full-featured content management system (CMS) that powers over 40% of the web. At its core, WordPress organizes content into two default content types: posts (for blog entries, often displayed in reverse chronological order) and pages (for static, hierarchical content like “About Us” or “Contact”). While these two types suffice for a basic blog or brochure site, they quickly become limiting when you need to manage distinct content structures—such as portfolios, testimonials, events, or products—each with unique fields and display requirements.
This is where custom post types (CPTs) come in. A custom post type allows you to define a new content type tailored to your specific needs, complete with its own set of attributes, custom fields, taxonomies, and admin interface. By creating a CPT, you can logically separate different kinds of content, give each its own editing screen, and control how it appears on the front end. For developers, mastering CPTs is essential for building anything beyond a simple blog—from membership sites and e-commerce stores to directories and project management tools.
In this guide, you will learn exactly how to create a custom post type in WordPress using best practices, including both code-based methods and plugin alternatives. We will start with the fundamentals: what a CPT is, when to use one instead of a plugin, and real-world examples that demonstrate their power.
What Is a Custom Post Type?
In WordPress, a “post type” is a classification for different types of content. The platform ships with several built-in post types:
Post – blog entries, typically listed in reverse chronological order.
Attachment – media files uploaded to the Media Library.
Revision – saved drafts and past versions of posts/pages.
Navigation Menu – menu items stored in the database.
A custom post type is any additional post type you register yourself. It behaves similarly to the built-in “post” type, but you control its name, labels, icon, supported features (like excerpts, thumbnails, or custom fields), and how it integrates with taxonomies (tags, categories, or custom ones). For example, you might register a “Portfolio” CPT that supports a featured image, a custom field for “client name,” and a custom taxonomy for “project type.”
Technically, all content in WordPress is stored in the same database table (wp_posts), distinguished by the post_type column. When you register a CPT, WordPress adds a new entry to the wp_post_types table (in the options API) and creates admin menu items, rewrite rules, and template hierarchy hooks. This means you can create a dedicated editing experience for your custom content without hacking core files.
Key characteristics of a custom post type include:
When to Use a Custom Post Type Instead of a Plugin
One of the first decisions a WordPress developer faces is whether to create a custom post type manually (via code in a theme or plugin) or to use a plugin like Custom Post Type UI or Toolset. Both approaches have valid use cases, and the right choice depends on the project’s scope, longevity, and your role.
Use a custom post type via code when:
You are building a custom theme or plugin for a client and want full control over the implementation.
The CPT is central to the site’s functionality (e.g., a real estate listings CPT for a property site).
You need to avoid plugin bloat and dependency on third-party tools that may not be maintained.
You are comfortable with PHP and the WordPress coding standards.
The site will be maintained by developers who can update code if needed.
Use a plugin when:
You are a non-developer or a beginner who wants a graphical interface to set up CPTs quickly.
The project is small, temporary, or requires frequent changes to CPT settings.
You need advanced features like custom fields and taxonomies managed through a UI (many CPT plugins bundle these).
You are prototyping and may later migrate to code.
The client is non-technical and prefers to manage content types through a plugin dashboard.
Here is a quick comparison table to help you decide:
Factor
Code-Based CPT
Plugin-Based CPT
Performance
Minimal overhead; runs only when needed.
Slightly more overhead due to plugin loading.
Control
Complete control over labels, capabilities, and rewrite rules.
Limited to plugin options; may not support all arguments.
Portability
Easy to move between themes (if placed in a plugin).
Dependent on the plugin being active.
Learning Curve
Requires PHP and hook knowledge.
Minimal; point-and-click interface.
Maintenance
You maintain updates; no third-party dependency.
Plugin updates may break or change settings.
Best For
Custom themes, client sites, complex projects.
Quick builds, non-developers, prototypes.
For professional development, the recommended approach is to register CPTs in a site-specific plugin (not in functions.php of a theme). This ensures that the CPT persists even if the user switches themes. However, for the purposes of this guide, we will focus on the code method, as it gives you the deepest understanding of how to create a custom post type in WordPress.
Real-World Examples of Custom Post Types
To illustrate the versatility of CPTs, here are common real-world use cases where a custom post type dramatically improves content management:
Portfolio – A designer or agency needs to showcase projects with a featured image, project URL, client name, and a custom taxonomy for “skills” or “industry.” A “Portfolio” CPT keeps these entries separate from blog posts and allows a dedicated archive page (e.g., /portfolio/).
Testimonials – A business wants to display customer quotes with a rating, photo, and attribution. A “Testimonial” CPT can support a custom meta box for the rating and a shortcode to display a rotating carousel.
Events – A conference or community site needs to list upcoming events with dates, locations, speakers, and registration links. An “Event” CPT can use custom date fields, a custom taxonomy for “event type” (workshop, keynote), and a calendar view.
Products – For a simple online store (without WooCommerce), a “Product” CPT can include fields for price, SKU, and stock status, with a custom taxonomy for “brand” or “category.”
Job Listings – A company website needs to post job openings with location, department, and application deadline. A “Job” CPT can use custom fields for salary range and a taxonomy for “job type” (full-time, contract).
Recipes – A food blog can separate recipes from regular posts, with custom fields for ingredients, cooking time, and difficulty level, plus a taxonomy for “cuisine.”
Staff / Team Members – An organization wants to display team bios with photo, job title, email, and social links. A “Staff” CPT can support a custom meta box for contact info and a hierarchical taxonomy for “department.”
Each of these examples shares a common pattern: the content has a distinct structure that does not fit neatly into a standard blog post or page. By creating a dedicated CPT, you gain a cleaner admin interface, better separation of concerns, and the ability to display content in unique ways (e.g., a grid layout for portfolios, a list with filters for events).
Moreover, CPTs integrate seamlessly with the WordPress template hierarchy. For a CPT called “portfolio,” you can create a single-portfolio.php file for individual entries and an archive-portfolio.php file for the listing page. This gives you complete control over front-end presentation without touching other templates.
In summary, custom post types are the foundation of advanced WordPress development. They allow you to model any kind of content your project demands, while keeping the admin area organized and the codebase maintainable. Now that you understand the “what,” “when,” and “why,” you are ready to dive into the actual code. In the next sections, we will walk through the step-by-step process of registering a CPT, configuring its arguments, and adding custom fields and taxonomies—all using best practices that will serve you for years to come.
Prerequisites Before You Start
Before you dive into the mechanics of how to create a custom post type in WordPress, it is essential to prepare your development environment and ensure you have the foundational knowledge required. Custom post types are a powerful feature, but they require precise coding practices to avoid breaking your site, losing data, or creating security vulnerabilities. This section outlines the essential tools, environment, and knowledge you must have in place before writing a single line of code.
Setting Up a Local or Staging WordPress Site
Never develop custom post types—or any custom code—on a live production website. A single syntax error in your functions.php file or a misplaced comma in your registration array can trigger a white screen of death, rendering your entire site inaccessible. Always use a local development environment or a staging site.
Local Development Environments run directly on your computer. They allow you to test code instantly without an internet connection. Popular options include:
Local by Flywheel – Free, user-friendly, and includes built-in SSL support. Ideal for beginners and professionals.
XAMPP – Cross-platform, open-source stack including Apache, MySQL, PHP, and phpMyAdmin. More manual configuration required.
MAMP – Similar to XAMPP but with a macOS-friendly interface. Also available for Windows.
DesktopServer – Paid tool with powerful portability features for moving sites between environments.
Docker – Advanced container-based setup for developers who need exact replicas of production server configurations.
Staging Sites are exact copies of your live site hosted on a private server or subdomain. Most managed WordPress hosts (e.g., WP Engine, Kinsta, SiteGround) provide one-click staging environments. If you do not have a staging option, you can manually create one by:
Exporting your live database via phpMyAdmin or a plugin like UpdraftPlus.
Copying all live files via FTP.
Importing the database into a new database on the staging server.
Updating the wp-config.php file to point to the new database.
Using a search-and-replace tool (like the Better Search Replace plugin) to update all URLs from the live domain to the staging domain.
Minimum requirements for your local or staging site:
Component
Recommended Version
Notes
WordPress
6.0 or higher
Older versions may lack features or security patches.
PHP
8.0 or higher
PHP 7.4 is acceptable but reaching end-of-life.
MySQL / MariaDB
MySQL 8.0 or MariaDB 10.4+
Ensure your environment supports utf8mb4 character set.
Web Server
Apache or Nginx
Apache with mod_rewrite is most common for WordPress.
Once your environment is ready, install a fresh copy of WordPress or clone an existing site. Verify that you can log in to the admin dashboard, create test posts, and view the frontend. This confirms your environment is stable before you begin coding your custom post type.
Understanding WordPress Theme vs. Plugin Location
One of the most common mistakes when learning how to create a custom post type in WordPress is placing the code in the wrong location. You have two primary options: your theme’s functions.php file or a custom plugin. Each has distinct advantages and drawbacks.
Option 1: Theme’s functions.php file
This is the simplest method for beginners. You add your custom post type registration code directly to your active theme’s functions.php file. However, this approach has significant limitations:
Theme dependency: If you switch themes, your custom post types disappear along with any content associated with them. While the data remains in the database, the admin interface and frontend templates become inaccessible.
Update vulnerability: If you use a parent theme and update it, your changes to functions.php are overwritten. You must use a child theme to preserve customizations.
Clutter: As you add more custom post types and related code (taxonomies, meta boxes, shortcodes), your functions.php file becomes bloated and difficult to maintain.
Option 2: Custom plugin
This is the professional, recommended approach. You create a dedicated plugin that registers your custom post type. Benefits include:
Theme independence: The custom post type persists even if you change themes completely.
Portability: You can export the plugin and use it on multiple sites.
Maintainability: All custom post type code lives in one organized location, separate from theme presentation logic.
Version control: Easier to track changes and collaborate with a team.
How to create a basic custom plugin:
Navigate to /wp-content/plugins/ on your server via FTP or file manager.
Create a new folder, e.g., custom-post-types.
Inside that folder, create a PHP file with the same name: custom-post-types.php.
Add the plugin header at the top of the file:
<?php
/**
* Plugin Name: Custom Post Types
* Description: Registers custom post types for this site.
* Version: 1.0.0
* Author: Your Name
*/
Save the file and go to your WordPress admin dashboard > Plugins. You will see your new plugin listed. Activate it.
When to use a child theme instead of a plugin: If your custom post type is tightly coupled with your theme’s design (e.g., a portfolio post type that uses specific theme templates and CSS), you may place the registration code in your child theme’s functions.php. However, even in this scenario, a plugin is still preferable because you can later move the design templates into the plugin using template hierarchy overrides. For maximum flexibility and best practices, always use a custom plugin.
Required PHP and WordPress Version Compatibility
When you learn how to create a custom post type in WordPress, you must write code that is compatible with the versions of PHP and WordPress running on your server. Using deprecated functions or modern syntax on an older environment will cause fatal errors.
WordPress core currently supports PHP 7.4 and above, but the official recommendation is PHP 8.0 or higher for performance and security. When writing custom post type registration code, be aware of the following:
Array syntax: Use short array syntax [] instead of array() for cleaner code. This is supported in PHP 5.4+.
Type declarations: You can add type hints to function parameters and return values in PHP 7.0+.
Named arguments: Avoid using named arguments (PHP 8.0+) if you need to support older environments.
Null coalescing operator: ?? is safe for PHP 7.0+.
Match expression: match is only available in PHP 8.0+. Use switch for backward compatibility.
WordPress Version Requirements
The register_post_type() function has been available since WordPress 3.0. However, many advanced features and parameters were added in later versions. Key compatibility points include:
Feature
Minimum WordPress Version
Notes
show_in_rest parameter
4.7
Required for block editor (Gutenberg) compatibility.
template parameter
5.0
Pre-defines block editor layout for new posts.
template_lock parameter
5.0
Locks the block editor template to prevent user modifications.
supports array with ‘custom-fields’
3.0
Always supported but behaves differently in block editor.
capability_type parameter
3.0
Works across all modern versions.
How to check your environment:
In your WordPress admin dashboard, go to Tools > Site Health.
Click the “Info” tab.
Expand the “Server” section to see your PHP version.
Expand the “WordPress” section to see your WordPress version.
Best practices for version-safe code:
Use function_exists() checks when calling plugin-specific functions that might not be available.
Prefix all your functions and variables with a unique identifier (e.g., myprefix_register_book_post_type()) to avoid conflicts with other plugins or themes.
Wrap your registration code in an action hook that fires after WordPress core is fully loaded:
Test on multiple PHP versions if possible. Use tools like PHP_CodeSniffer with WordPress coding standards to catch compatibility issues.
By ensuring your environment is properly set up, your code is placed in the correct location, and your PHP and WordPress versions are compatible, you eliminate the most common pitfalls that plague developers when they first attempt to create a custom post type in WordPress. With these prerequisites in place, you are ready to proceed confidently to the actual registration code.
Step 1: Choosing a Custom Post Type Name and Labels
The first and most critical decision when building a custom post type is selecting its internal name (slug) and the labels that will appear throughout the WordPress admin interface. This step sets the foundation for how your content type behaves programmatically and how users interact with it. A poorly chosen slug can cause conflicts with existing WordPress functions, while vague labels confuse editors and site administrators. Let’s break down both components with precision.
Best Practices for Slug Naming (No Spaces, No Hyphens)
The slug is the machine-readable identifier for your custom post type. It is used in database queries, URL structures, template hierarchy, and function parameters. WordPress imposes strict rules: slugs must be lowercase, contain no spaces, and use only letters, numbers, and underscores. Hyphens are technically allowed but strongly discouraged for reasons we will explain.
Why avoid hyphens? WordPress uses the slug to generate function names and hooks. For example, a post type with slug my-products will be referenced as my_products in many internal contexts due to PHP’s variable naming conventions. This inconsistency between the slug (with hyphens) and the function prefix (with underscores) creates confusion and potential bugs when you register meta boxes, taxonomies, or rewrite rules. Always use underscores to match PHP conventions.
Key naming rules:
Maximum 20 characters – WordPress database column post_type is limited to 20 characters. Longer slugs will be truncated silently.
No reserved names – Avoid post, page, attachment, revision, nav_menu_item, custom_css, customize_changeset, oembed_cache, user_request, wp_block, wp_template, and wp_global_styles. These are core WordPress post types.
Prefix for plugins – If your custom post type belongs to a plugin, prefix the slug with a unique identifier (e.g., myplugin_product). This prevents collisions with other plugins or themes.
Singular, not plural – Use singular form (product rather than products). WordPress handles pluralization through labels.
Common mistakes table:
Incorrect Slug
Issue
Correct Slug
my-products
Hyphen causes PHP naming inconsistency
my_products or myproduct
Products
Uppercase not allowed
product
post
Reserved core post type
custom_post
a_very_long_product_type_name
Exceeds 20 characters
product_type
How to Define $labels Array for Admin Menus
Once you have chosen a slug, you must define the $labels array. This array controls every human-readable string that appears in the WordPress admin dashboard: menu items, submenu names, update messages, and contextual prompts. WordPress uses these labels to make your custom post type feel native to the interface.
The register_post_type() function accepts a labels parameter. You build this as an associative array with specific keys. While you can technically omit many keys and WordPress will generate defaults based on your name and singular_name, defining all relevant labels improves user experience dramatically.
Essential labels you should always define:
name – General plural name (e.g., “Products”). Used in menu titles and bulk actions.
singular_name – Singular form (e.g., “Product”). Used for add-new buttons and edit screens.
add_new – Text for the “Add New” button. Defaults to “Add New” if omitted.
add_new_item – Title for the new item creation screen (e.g., “Add New Product”).
edit_item – Title for the edit screen (e.g., “Edit Product”).
new_item – Text for “New Product” in the admin menu.
view_item – Link text to view the item on the front end.
search_items – Text for the search button (e.g., “Search Products”).
not_found – Message when no items exist (e.g., “No products found.”).
not_found_in_trash – Message when trash is empty (e.g., “No products found in Trash.”).
all_items – Text for the “All Items” submenu link.
menu_name – Text that appears in the admin sidebar menu. Often matches name.
Additional labels for advanced contexts:
item_published – Shown after publishing (e.g., “Product published.”).
item_published_privately – For private visibility.
item_reverted_to_draft – When reverting to draft.
item_scheduled – For scheduled content.
item_updated – Shown after updating an existing item.
When you define these labels, WordPress automatically uses them in admin screens, contextual help tabs, and update messages. This eliminates the need for custom string replacements and ensures consistency across the backend.
Example: Creating a ‘Product’ Post Type Labels
Let’s walk through a complete example for a custom post type that manages products in an e-commerce site. The slug will be product (singular, no hyphens, under 20 characters). Below is the $labels array you would pass to register_post_type():
Internationalization – Each string is wrapped in _x() or __() with a textdomain. This makes your custom post type translation-ready. The _x() function adds context for translators.
Consistent capitalization – “Product” is capitalized consistently across all labels. This matches WordPress core conventions where menu items use title case.
Contextual precision – add_new_item says “Add New Product” rather than just “Add New”. This eliminates ambiguity when multiple post types exist.
Featured image labels – These are often overlooked but critical for product-oriented sites where images are primary content.
How these labels appear in the admin:
The left sidebar menu shows “Products” (from menu_name).
Clicking “Add New” opens a screen titled “Add New Product” (from add_new_item).
The “All Products” page shows “Products list” as the heading (from items_list).
When no products exist, users see “Not found” (from not_found).
After publishing, the admin notice reads “Product published.” (from item_published if defined).
Testing your labels: After registering the post type, navigate through every admin screen. Check the menu, the list table, the edit screen, and the publish notice area. If any string seems out of place (e.g., “Post” appears instead of “Product”), you likely missed a label key. Use the all_items and add_new_item keys as your minimum set for a functional interface, but define all keys for a polished experience.
Remember that labels are not just cosmetic. They affect accessibility (screen readers announce these strings), user workflow efficiency, and multi-language support. Investing time in precise, descriptive labels reduces support requests and training needs for content editors.
Step 2: Registering the Custom Post Type with register_post_type()
Once you have planned your custom post type and chosen a unique slug, the next step is to bring it to life using WordPress’s core function: register_post_type(). This function tells WordPress to recognize your new content type, adding it to the admin dashboard and making it available for queries, templates, and custom fields. While the function itself is straightforward, the power lies in the array of parameters you pass to it. These parameters control everything from visibility and menu placement to editing capabilities and URL structure.
Typically, you will place this registration call inside a function hooked to the init action. This ensures it runs early enough for WordPress to handle the new post type correctly. A minimal example looks like this:
This registers a post type with the slug book, but it uses only the bare essentials. For a production-ready custom post type, you need to understand and configure the critical parameters that govern its behavior. Below, we break down the most important ones.
The Essential $args Parameters Explained
The $args array is the heart of register_post_type(). While there are over 40 possible parameters, a handful determine the core experience for both users and search engines. Here are the ones you must know:
Parameter
Type
Default
Purpose
public
boolean
false
Controls whether the post type is visible in the admin area and on the front end. Setting true is the most common choice for content types like portfolios or events.
show_in_menu
boolean or string
Value of public
Determines if the post type appears in the admin menu. Use true for a top-level menu item, or set it to a parent slug (e.g., 'edit.php') to nest it under Posts.
menu_icon
string
Pin icon
Accepts a Dashicons class (e.g., 'dashicons-book-alt') or a custom image URL. This replaces the default pin icon in the admin menu.
menu_position
integer
null
Sets the order in the admin menu. For example, 5 places it below Posts, 10 below Media, and 20 below Pages.
has_archive
boolean
false
Enables a post type archive page (e.g., /books/). Set to true to allow listing all items of that type.
supports
array
array('title', 'editor')
Defines which meta boxes appear in the post editor. This is crucial for controlling the editing experience.
rewrite
array or boolean
true
Configures URL permalinks for single and archive views. Set to false to disable pretty URLs entirely.
Important distinction: The public parameter is a shortcut that sets several other parameters at once, including publicly_queryable, show_ui, show_in_nav_menus, and show_in_admin_bar. If you need granular control, set public to false and configure each of these individually. For example, you might want a post type that appears in the admin but is not queryable on the front end (e.g., for internal data).
Another essential parameter is labels. While not listed in the table above, it deserves special mention. The labels array customizes all the text strings that WordPress uses for your post type, such as “Add New Book,” “Search Books,” and “All Books.” A complete labels array ensures your post type feels native and professional.
How to Set Supports (Title, Editor, Thumbnail, etc.)
The supports parameter defines which editing features are available in the WordPress block editor (or classic editor). By default, WordPress only enables the title and editor fields. To add featured images, excerpts, custom fields, or other meta boxes, you must explicitly list them in an array.
Here is a comprehensive list of the most commonly used support values:
title – The post title field. Almost always required for content types.
editor – The main content editor (block or classic).
thumbnail – Enables the featured image meta box (often called “post thumbnail”).
excerpt – Adds a textarea for a manual excerpt, used in archive views and feeds.
custom-fields – Shows the custom fields meta box, useful for developers adding arbitrary metadata.
comments – Enables the comments meta box for user discussion.
trackbacks – Allows pingbacks and trackbacks.
revisions – Stores post revisions, enabling users to revert to previous versions.
author – Adds an author dropdown to assign ownership to another user.
page-attributes – Provides the Page Attributes meta box for parent/child relationships and template selection (useful for hierarchical post types).
post-formats – Adds support for Post Formats (standard, aside, gallery, etc.) if your theme supports them.
This configuration gives editors everything they need to create rich portfolio entries: a title, body content, a featured image, a short excerpt for listing pages, revision history, and the ability to add custom fields for extra data like project date or client name.
Pro tip: If you need additional meta boxes beyond these defaults, consider using Advanced Custom Fields (ACF) or the WordPress Meta Box API. However, always start with the built-in supports array—it reduces plugin dependencies and keeps your code lightweight.
Enabling Custom Rewrite Slugs for SEO-Friendly URLs
By default, the URL structure for a custom post type is based on its slug. For a post type registered as book, a single entry might appear at example.com/book/name-of-book/. The archive page (if enabled) would be at example.com/book/. While this works, you often want more control over the URL for branding, hierarchy, or SEO reasons. This is where the rewrite parameter comes in.
The rewrite parameter accepts either a boolean or an array. Setting it to false disables pretty permalinks entirely, forcing URLs like ?post_type=book&p=123. For most sites, you will want an array with the following keys:
The URL prefix for the post type. Defaults to the post type slug. Change it to something like 'library' to make books appear at /library/name-of-book/.
with_front
boolean
Whether the URL should include the front base from your permalink settings (e.g., /blog/ if your permalink structure starts with /blog/). Set to false to ignore the front base.
feeds
boolean
Enables RSS feeds for the post type archive. Useful for podcasting or news sites.
pages
boolean
Enables pagination for the archive (e.g., /library/page/2/).
ep_mask
int
Sets the endpoint mask for advanced URL rewriting. Rarely needed unless you are adding custom endpoints.
Example configuration that creates an SEO-friendly URL structure:
With this setup, a book titled “The Great Gatsby” would have the URL example.com/books/the-great-gatsby/, and the archive would be at example.com/books/. The with_front set to false ensures that if your permalink structure includes a category base like /blog/, it is not prepended to your book URLs.
SEO considerations: Custom rewrite slugs allow you to create logical, keyword-rich URL structures. For example, a “property” post type might use slug => 'real-estate/properties' to create a hierarchical URL like /real-estate/properties/123-main-street/. This helps search engines understand content relationships and can improve click-through rates from search results. However, always choose a slug that is stable—changing it later requires 301 redirects to avoid broken links.
After adding or modifying the rewrite parameter, you must flush WordPress’s rewrite rules. You can do this by visiting Settings > Permalinks and clicking “Save Changes” (no changes needed). Alternatively, call flush_rewrite_rules() in your theme’s activation hook, but never on every page load as it is resource-intensive.
With these three areas—essential parameters, supports, and rewrite rules—you have a solid foundation for registering a custom post type that is functional, user-friendly, and optimized for search engines. The next step is to create the template files that display your content on the front end, but that journey begins with a well-configured register_post_type() call.
Step 3: Adding the Code to Your Theme or Plugin
Once you have written the PHP code to register your custom post type, the next critical decision is where to place that code. WordPress offers two primary locations: your theme’s functions.php file or a dedicated plugin file. Each approach has distinct advantages and trade-offs regarding portability, maintenance, and future-proofing. This section will walk you through both methods, emphasizing best practices to avoid losing your work during theme updates and to keep your site stable while testing.
Using a Child Theme to Prevent Update Loss
Placing custom post type registration code directly into your active theme’s functions.php file is the quickest method. However, this approach carries a significant risk: if you update the parent theme—or switch to a different theme entirely—all your custom post type code will be lost. To avoid this, you must use a child theme.
A child theme inherits all the functionality and styling of its parent while allowing you to safely add custom code without being overwritten during updates. Here’s how to implement your custom post type code in a child theme:
Create a child theme folder. Navigate to /wp-content/themes/ and create a new folder, for example yourtheme-child.
Create a style.css file inside that folder with the required header:
/*
Theme Name: Your Theme Child
Template: yourtheme
*/
Replace yourtheme with the exact folder name of your parent theme.
Create a functions.php file in the child theme folder. This file will hold your custom post type registration code.
Add the registration code inside the child theme’s functions.php. Use the standard add_action( 'init', 'your_cpt_register_function' ); pattern. For example:
Activate the child theme from the WordPress admin under Appearance > Themes.
Why this matters: When the parent theme updates, your child theme’s functions.php remains untouched. Your custom post type will continue to work seamlessly. Additionally, if you ever switch to a different child theme built on the same parent, your code remains intact as long as you reuse the same child theme folder.
Key considerations for child theme placement:
Portability: The custom post type is tied to the child theme. If you switch to a completely different theme family, you must migrate the code.
Site-specific logic: Ideal when your custom post type is closely related to the theme’s design (e.g., a “Portfolio” post type that uses theme templates).
Simplicity: No extra files to manage beyond the child theme itself.
Creating a Simple Custom Post Type Plugin
For maximum portability and independence from your theme, placing your custom post type registration code inside a dedicated plugin is the recommended approach. A plugin remains active regardless of which theme you use, ensuring your custom content types persist even during major site redesigns.
Here is a step-by-step guide to creating a minimal plugin for a custom post type:
Create a plugin folder. In /wp-content/plugins/, create a new folder, such as custom-post-types.
Create the main plugin file. Inside that folder, create a file named custom-post-types.php.
Add the plugin header. This is required for WordPress to recognize the plugin. Use the following:
<?php
/**
* Plugin Name: Custom Post Types
* Description: Registers custom post types for this site.
* Version: 1.0
* Author: Your Name
*/
Insert your custom post type registration code below the header. For a clean structure, wrap it in a function and hook it to init. Example:
Save and activate the plugin. Go to Plugins > Installed Plugins in your WordPress admin, find “Custom Post Types,” and click Activate.
Advantages of the plugin method:
Theme-independent: Change themes freely without losing your custom post types.
Reusable: Deploy the same plugin across multiple sites by simply copying the folder.
Easier debugging: If a theme update causes issues, you can deactivate the plugin independently without affecting the entire theme.
Clean separation: Keeps content logic separate from presentation logic, following WordPress best practices.
When to choose a plugin over a child theme:
Scenario
Recommended Location
Custom post type is content-focused (e.g., “Testimonials,” “Projects”)
Plugin
Custom post type requires specific theme templates (e.g., single-{cpt}.php)
Child theme
You plan to switch themes in the future
Plugin
You are developing for a client who may change themes
Plugin
You want the simplest possible setup
Child theme
Testing the Code Snippet Without Breaking Your Site
Before committing your custom post type code to a live production site, thorough testing in a safe environment is essential. A single syntax error in functions.php or a plugin file can trigger a white screen of death (WSOD) or make your admin dashboard inaccessible. Follow these proven testing steps to protect your site.
Step 1: Use a Staging or Local Environment
Always test new code on a staging site or a local WordPress installation (using tools like Local, XAMPP, or MAMP). This mirrors your live site without risk. If you must test on a live site, consider using a maintenance mode plugin to hide changes from visitors.
Step 2: Enable WordPress Debug Mode
Add the following lines to your wp-config.php file to catch errors without exposing them to users:
This logs all errors to /wp-content/debug.log, which you can review after testing. Set WP_DEBUG_DISPLAY to true only if you are working in a local environment and want errors visible on screen.
Step 3: Test the Code Snippet in Isolation
Before adding the full registration code, test a minimal snippet. For example, add only the function name and a simple wp_die() to confirm the hook fires:
Visit your admin dashboard and confirm the new menu item appears under the “Basics” label. Then gradually add more arguments (supports, labels, rewrite rules) one at a time, checking for errors after each addition.
Step 5: Use a Fallback Mechanism
If you are editing functions.php directly and fear a lockout, add a conditional check at the top of the file to allow recovery. For example:
if ( isset( $_GET['disable_cpt'] ) ) {
return;
}
If your site breaks after adding the code, you can append ?disable_cpt=1 to the admin URL to bypass the custom post type code temporarily. This trick works only if you have not yet caused a fatal error before the check runs—so place it as the very first line after the opening PHP tag.
Step 6: Verify on Multiple Pages
After the code is in place, test the following:
Admin dashboard loads without errors.
Custom post type menu appears and is clickable.
You can create, edit, and delete an entry of the new post type.
Frontend single view and archive page (if enabled) render correctly.
Search results include or exclude the custom post type as configured.
Step 7: Clear Permalinks
After activating a custom post type, always flush permalinks. Go to Settings > Permalinks and click “Save Changes” without modifying anything. This ensures the new rewrite rules are recognized and prevents 404 errors on your custom post type URLs.
Duplicate names: Ensure your custom post type slug does not conflict with existing post types (e.g., post, page, attachment).
Missing init hook: Never call register_post_type() outside of a hook; it must run during the init action.
Syntax errors: A missing semicolon or unclosed bracket will break the entire site. Use a code editor with PHP syntax highlighting.
Not backing up: Always export your database and files before adding new code to a live site.
By following these testing protocols, you can confidently add your custom post type registration code—whether in a child theme or a plugin—without risking the stability of your WordPress site. The extra minutes spent on careful testing will save hours of troubleshooting later.
Step 4: Flushing Rewrite Rules for Clean Permalinks
After you have successfully registered your custom post type, the next critical step is to ensure that the permalink structure for your new content type works correctly. Without this step, visitors (and search engines) who attempt to access a single post or archive page for your custom post type may encounter a frustrating 404 error. This occurs because WordPress stores its URL rewriting rules in the database, and these rules are not automatically updated when a new post type is registered. The process of updating these stored rules is known as “flushing rewrite rules.”
Understanding why this happens is essential. WordPress uses a sophisticated system to map human-readable URLs (like yoursite.com/movies/star-wars) to the underlying query parameters that load the correct content. When you register a custom post type, you are essentially adding a new set of URL patterns that WordPress must recognize. However, the database table that holds these rewrite rules is only rebuilt under specific circumstances, such as when you save your permalink settings or when a plugin or theme explicitly triggers a flush. If you simply register your post type and visit a URL, the old rules (which do not include your new post type) are still active, leading to a 404.
There are two primary methods to flush rewrite rules: automatically, through code executed during theme activation, and manually, through the WordPress admin panel. Each method has its appropriate use cases, and choosing the right one is crucial for both developer experience and site performance.
Automatic Flush on Theme Activation
The most robust and recommended approach for a custom theme is to flush rewrite rules automatically when your theme is activated. This ensures that the moment a user activates your theme, all custom post types (and any custom taxonomies) are immediately recognized by the URL routing system. This method is particularly important if you are distributing a theme for others to use, as it prevents the initial confusion of broken links.
To implement this, you will hook into the after_switch_theme action. This action runs once, immediately after the theme is activated. Here is the standard pattern for doing this safely:
function mytheme_flush_rewrites_on_activation() {
// Ensure your custom post type is registered before flushing.
// If you have a dedicated function for registering post types,
// call it here.
mytheme_register_custom_post_types();
// Then flush the rewrite rules.
flush_rewrite_rules();
}
add_action( 'after_switch_theme', 'mytheme_flush_rewrites_on_activation' );
There is an important nuance here: you must ensure that your custom post type registration function is called before you call flush_rewrite_rules(). If you flush the rules without first registering the post type, WordPress will flush the old rules without knowing about your new URLs. The sequence is therefore:
Register the post type (typically by calling your registration function).
Call flush_rewrite_rules().
It is also worth noting that you should not call flush_rewrite_rules() on every page load, such as from init or wp_loaded. Doing so would cause a massive performance penalty because WordPress would be rebuilding the entire rewrite rule array on every request. The automatic flush on theme activation is a one-time event, making it safe and efficient.
If you are developing a plugin, the equivalent hook is register_activation_hook. The principle is identical: register your post types, then flush the rules. This ensures that when a site administrator activates your plugin, the URLs are immediately functional.
Manual Flush via Settings > Permalinks
For situations where automatic flushing is not possible or has already occurred, or if you are troubleshooting a 404 error after making changes to a post type’s rewrite slug or arguments, a manual flush is the simplest solution. This method requires no coding and can be performed by any WordPress administrator.
The manual process is deceptively simple:
Navigate to your WordPress admin dashboard.
Go to Settings > Permalinks.
At the bottom of the Permalinks settings page, click the Save Changes button.
You do not need to change any of the permalink structure options. Simply clicking the “Save Changes” button forces WordPress to regenerate and flush the rewrite rules database. This action effectively tells WordPress to re-examine all registered post types, taxonomies, and other rewrite rules, and rebuild the URL mapping from scratch. After doing this, your custom post type URLs should start working immediately.
This manual method is particularly useful during development. For example, if you change the rewrite argument of your custom post type (such as changing the slug from movies to films), the old rewrite rules will still map to the old slug. A manual flush will update the rules to recognize the new slug. It is also a common first step in debugging any unexpected 404 errors related to custom content types.
However, relying on this manual method for end users is not ideal. If you distribute a theme or plugin, you cannot expect every user to know that they must visit the Permalinks settings page. Therefore, the automatic flush on activation is the preferred method for a polished user experience.
Avoiding Performance Pitfalls with Repeated Flushing
While flushing rewrite rules is a necessary part of custom post type development, it is an operation that carries a significant performance cost. The rewrite rules are stored as a serialized array in the options table of your WordPress database. When you flush them, WordPress must:
Query all registered post types, taxonomies, and other rewrite-contributing components.
Build a comprehensive array of URL patterns and their corresponding query variables.
Serialize that array and save it back to the database.
This process can be resource-intensive, especially on sites with many custom post types, taxonomies, or complex permalink structures. The most common performance pitfall is flushing rewrite rules on every page load. This is often done accidentally by developers who place flush_rewrite_rules() inside a function hooked to init or wp_loaded without a conditional check. The result is a site that runs slowly for every visitor, as the database is hammered with a rewrite rebuild on each request.
To avoid this, follow these best practices:
Practice
Why It Matters
Flush only on activation or deactivation
Ensures the flush happens exactly once, not on every page load.
Use a flag to track if flushing is needed
If you must flush outside of activation (e.g., after saving plugin settings), set a transient or option flag, then flush only when that flag is present.
Avoid flushing from init or wp_loaded
These hooks run on every request; flushing here is a performance disaster.
Test on a staging site first
If your site has many custom post types, a flush can cause a noticeable slowdown; test the impact before deploying to production.
Another common mistake is flushing rewrite rules inside a loop or a function that runs multiple times. For example, if you register three custom post types and flush after each registration, you are performing three expensive database writes instead of one. The correct approach is to register all post types first, then flush once at the end.
Finally, be aware that some caching plugins or hosting environments may cache the rewrite rules or the database queries involved. In such cases, a manual flush via the admin panel may appear to have no effect. If you are still seeing 404 errors after flushing, try clearing your site’s cache and any server-level cache (such as Redis or Varnish). Additionally, ensure that your web server’s .htaccess file (for Apache) or nginx.conf (for Nginx) is writable, as WordPress may need to update these files as part of the rewrite process.
By understanding when and how to flush rewrite rules—and equally important, when not to—you can ensure that your custom post type operates with clean, reliable permalinks without degrading site performance. This step, while often overlooked, is what transforms a technically correct post type registration into a fully functional, user-friendly content architecture.
Step 5: Customizing the Admin Interface
Once you have registered a custom post type in WordPress, the default admin interface is functional but often too generic for specialized content. The posts list table shows standard columns like Title, Date, and Author, and the edit screen provides only the default editor and publishing meta box. To make your custom post type truly useful for editors, site managers, or clients, you need to tailor these interfaces. This step covers three core customizations: adding custom admin columns, making those columns sortable, and building a simple meta box for storing additional metadata. Each technique uses WordPress hooks and is implemented in your theme’s functions.php file or a site-specific plugin.
Adding Custom Admin Columns with manage_edit-{post_type}_columns
The manage_edit-{post_type}_columns filter lets you add, remove, or reorder columns in the posts list table for your custom post type. Replace {post_type} with the actual slug of your post type (e.g., manage_edit-book_columns for a post type named book). This hook receives a single parameter: an associative array of column IDs and their display labels.
To add a column, append a new key-value pair to the array. To remove a default column, unset its key. Common columns to add include custom meta values, featured images, or taxonomy terms. Below is an example that adds a “Price” column and removes the “Author” column for a post type called product:
function custom_product_columns( $columns ) {
// Remove the 'author' column
unset( $columns['author'] );
// Add a new 'price' column after the 'title' column
$new_columns = array();
foreach ( $columns as $key => $value ) {
$new_columns[ $key ] = $value;
if ( $key === 'title' ) {
$new_columns['price'] = __( 'Price', 'textdomain' );
}
}
return $new_columns;
}
add_filter( 'manage_edit-product_columns', 'custom_product_columns' );
Adding the column definition alone does not populate it with data. You must also use the manage_{post_type}_posts_custom_column action hook to output content for each row. This hook passes the column slug and the post ID. For the price example:
Useful columns to consider for different content types:
Featured Image: Display a small thumbnail using the_post_thumbnail( array( 50, 50 ) ).
Custom Meta Value: Show a shortcode, SKU, rating, or location.
Taxonomy Terms: List assigned categories or custom taxonomies with get_the_term_list().
Post Status or Visibility: Indicate if a post is published, draft, or password-protected.
Post ID: Helpful for debugging or referencing posts externally.
Making Columns Sortable with manage_edit-{post_type}_sortable_columns
Adding a custom column is only half the battle. Users expect to click column headers to sort data alphabetically, numerically, or by date. The manage_edit-{post_type}_sortable_columns filter lets you define which custom columns are clickable and sortable. This hook returns an array where the keys are column slugs and the values are the meta key (or query variable) used for sorting.
Declaring a column as sortable does not automatically make the sorting work correctly. You must also intercept the main query in the admin area to order by your custom meta key. Use the pre_get_posts action to modify the query when the sort order is set:
function custom_product_sortable_query( $query ) {
if ( ! is_admin() || ! $query->is_main_query() ) {
return;
}
$orderby = $query->get( 'orderby' );
if ( $orderby === '_product_price' ) {
$query->set( 'meta_key', '_product_price' );
$query->set( 'orderby', 'meta_value_num' );
// Use 'meta_value' for text, 'meta_value_num' for numeric values
}
}
add_action( 'pre_get_posts', 'custom_product_sortable_query' );
Important considerations for sortable columns:
Meta Key Existence: If some posts lack the meta key, they may not appear in sorted results. Consider using a default value when saving posts.
Data Type: Use meta_value_num for integers and floats, meta_value for strings, and meta_value_datetime for dates stored in Unix timestamp format.
Performance: Sorting by meta values can be slow on large sites. For high-traffic admin areas, consider storing sortable data in a dedicated database column or using a transient cache.
Multiple Sortable Columns: You can declare multiple columns; each will use its own meta key and query modification logic.
Here is a quick reference table for common sortable column data types:
If stored as YYYY-MM-DD, sorts correctly as string
Building a Simple Meta Box for Additional Fields
Custom columns display data that you have already stored. To allow editors to input that data (like price, SKU, or event date), you need a custom meta box on the edit screen. A meta box groups custom fields into a visually distinct panel. WordPress provides the add_meta_box() function and the add_meta_boxes action hook to create them.
First, define the meta box using add_meta_box() inside a function hooked to add_meta_boxes_{post_type} (or the generic add_meta_boxes). The function requires a unique ID, a title, a callback to render the HTML, the screen (post type), and optional parameters for context and priority:
Next, create the callback function that outputs the HTML for the meta box. This function receives the post object as a parameter. Inside, you retrieve existing meta values using get_post_meta() and output form fields. Always include a nonce field for security:
Finally, save the meta box data using the save_post_{post_type} hook. This action runs every time a post is saved. Validate the nonce, check for autosaves, and then update the meta fields:
Context: Use normal for primary content fields, side for secondary data (like price or status), and advanced for fields that appear below the editor.
Field Types: Use appropriate HTML input types: text, number, url, email, textarea, select, or checkbox.
Sanitization: Always sanitize input with sanitize_text_field(), intval(), or wp_kses_post() depending on the data.
User Experience: Group related fields, use clear labels, and provide placeholder text or descriptions for complex fields.
Reusability: Consider creating a helper function to register multiple meta boxes or fields, especially for post types with many custom fields.
By implementing these three customizations—columns, sortable columns, and meta boxes—you transform the WordPress admin from a generic interface into a purpose-built tool for managing your custom content. Editors can see key information at a glance, sort data meaningfully, and input structured metadata without leaving the post editor. This step completes the functional layer of your custom post type, making it ready for real-world use.
Step 6: Displaying Custom Post Types on the Front End
After registering a custom post type in WordPress, the next critical step is controlling how that content appears to visitors. By default, WordPress provides basic URLs for your custom post type, but the display relies entirely on template files. This step walks you through creating dedicated archive and single templates, using WP_Query for custom loops, and leveraging standard template tags for consistent output. Proper front-end display ensures your custom content is accessible, styled, and integrated into your theme seamlessly.
Creating archive-{post_type}.php and single-{post_type}.php
The WordPress template hierarchy provides a predictable system for loading templates based on the content type. For a custom post type named portfolio, the hierarchy looks for these files in order:
Use post_class() to add dynamic CSS classes for styling
Permalinks
Always use the_permalink() for correct URL generation
Pagination
Include the_posts_pagination() for archive pages
Custom fields
Use get_post_meta() or ACF functions inside the loop
Fallback templates
Test with archive.php and single.php if custom files don’t exist
Remember to flush permalinks after creating these files by visiting Settings → Permalinks and clicking “Save Changes.” This ensures your custom post type URLs resolve correctly.
Using WP_Query to Display Custom Post Types in Any Template
Sometimes you need to show custom post type entries outside their native archive—for example, on the homepage, in a sidebar, or within a page template. WP_Query gives you complete flexibility to create custom loops anywhere in your theme.
Basic syntax for querying a custom post type:
<?php
$portfolio_query = new WP_Query( array(
'post_type' => 'portfolio',
'posts_per_page' => 6,
'orderby' => 'date',
'order' => 'DESC',
) );
if ( $portfolio_query->have_posts() ) :
while ( $portfolio_query->have_posts() ) : $portfolio_query->the_post();
// Display post content here
endwhile;
wp_reset_postdata();
endif;
?>
Common use cases for WP_Query with custom post types:
Featured items on homepage: Query only posts marked as “featured” via a custom field.
Related content: Show posts from the same taxonomy term on a single post page.
Widget areas: Display recent testimonials or portfolio items in a sidebar.
Page templates: Create a custom page template that lists all events or products.
Critical: Always call wp_reset_postdata() after a custom WP_Query loop. This restores the global $post variable to the current post in the main query, preventing conflicts with other loops on the same page.
Looping Through Custom Post Type Entries with Standard Tags
Once you have a query, use standard WordPress template tags to output content. These tags work identically for custom post types as they do for regular posts, making your code portable and familiar.
Styling considerations: Custom post types often benefit from distinct CSS classes. Use post_class() to add custom classes like portfolio-item, and target them in your theme’s stylesheet. For more granular control, wrap your output in semantic HTML5 elements (<article>, <section>, <figure>) and apply responsive grid systems or flexbox for layout.
Performance note: When using multiple WP_Query instances on a single page, each query executes a separate database call. Cache expensive queries with WordPress transients or object caching to reduce server load. For simple listings, consider using pre_get_posts to modify the main query instead of creating secondary loops.
By combining dedicated template files, flexible WP_Query usage, and standard template tags, you gain complete control over how your custom post type content is presented. This approach keeps your code maintainable, follows WordPress best practices, and ensures a consistent user experience across your site.
Step 7: Adding Taxonomies and Custom Fields
After registering your custom post type, the next logical step is to organize and enrich the content it stores. Taxonomies allow you to group and filter posts, while custom fields (post meta) let you attach arbitrary data to each entry. Without these two systems, a custom post type is little more than a renamed “post” — it lacks the structural depth that makes custom content types truly powerful. In this section, you will learn how to register new taxonomies, connect existing ones, and store extra data using both the built-in post meta system and the popular Advanced Custom Fields plugin.
Registering a Custom Taxonomy with register_taxonomy()
WordPress provides a function called register_taxonomy() that works almost identically to register_post_type(). It accepts three parameters: the taxonomy name (slug), the object type(s) it applies to, and an array of arguments. Below is a complete example that registers a “Genre” taxonomy for a “Book” custom post type:
hierarchical: Set to true for a category-like structure (parent/child terms) or false for a tag-like structure (flat, non-hierarchical).
show_admin_column: When true, the taxonomy terms appear as a column in the post type list table in the admin area.
show_in_rest: Enables the taxonomy in the WordPress REST API and the block editor (Gutenberg). Always set this to true for modern development.
rewrite: Controls the URL slug for taxonomy archive pages (e.g., /genre/fiction/).
Always call register_taxonomy() inside a function hooked to init, and make sure it runs after the custom post type is registered. If both registrations happen on the same hook, WordPress will still connect them correctly as long as the post type exists by the time the taxonomy is registered.
Connecting Existing Taxonomies to Your Custom Post Type
You do not always need to create a new taxonomy. Often, you want to reuse WordPress’s built-in taxonomies — categories and tags — with your custom post type. This is especially useful when your custom content type shares a common organizational scheme with regular posts. To attach an existing taxonomy, use register_taxonomy_for_object_type() or pass the taxonomy in the taxonomies argument during post type registration.
This approach is cleaner when you want to keep post type and taxonomy registrations separate, or when you are extending a post type registered by a plugin or theme.
Important considerations:
When you reuse built-in taxonomies, the same term database table is shared across all post types. A category assigned to a “Book” post also appears in the category list for regular posts. If you need separate term sets, register a custom taxonomy instead.
If you want the taxonomy to appear in the REST API for your custom post type, ensure both the post type and the taxonomy have show_in_rest set to true.
For hierarchical taxonomies (like categories), you can still use wp_list_categories() and wp_dropdown_categories() with the taxonomy parameter set to 'category' to display terms filtered by your custom post type.
Storing Extra Data with Post Meta (Custom Fields)
Taxonomies group posts; custom fields store individual data points per post. WordPress stores this data in the wp_postmeta table as key-value pairs. You can add custom fields manually via the editor screen, programmatically with PHP, or through a plugin like Advanced Custom Fields (ACF). Each approach has its place depending on the project’s complexity and the client’s needs.
Manual meta boxes (code-based approach)
To create a simple meta box for a single text field (e.g., “ISBN Number” for a book post type), follow these steps:
Add the meta box using add_meta_box() inside the add_meta_boxes action hook.
Render the field in a callback function that outputs HTML.
Save the data using the save_post hook and update_post_meta().
Notice the underscore prefix (_book_isbn) in the meta key. This hides the field from the default “Custom Fields” meta box in the admin, which is best practice for internal meta keys.
Using Advanced Custom Fields (ACF)
For projects with many fields — such as price, author, publisher, and publication date — writing manual meta boxes becomes tedious and error-prone. ACF provides a user-friendly interface for building field groups and returns data in a consistent format. To integrate ACF with your custom post type:
Install the ACF plugin (free or pro).
Create a new field group in Custom Fields > Add New.
Set the location rule to “Post Type is equal to Book” (or your custom post type slug).
Add fields (e.g., text, number, date picker, WYSIWYG editor).
In your theme templates, retrieve values using get_field( 'field_name', $post_id ) or the the_field() function.
ACF also supports repeater fields, flexible content, and relationship fields, making it ideal for complex data structures. The plugin stores its data in the same wp_postmeta table, so you can still query posts by meta values using WP_Query with meta_key and meta_value parameters.
When to choose manual vs. ACF:
Criteria
Manual Meta Boxes
Advanced Custom Fields
Number of fields
1–3 simple fields
Any number, including complex fields
Client maintenance
Not suitable for non-developers
Client-friendly UI
Performance
No plugin overhead
Slight overhead from plugin
Flexibility
Full control over HTML and logic
Limited to ACF field types
Portability
No dependency
Requires plugin to be active
Regardless of which method you choose, always sanitize and validate user input when saving meta data. Use sanitize_text_field() for plain text, intval() for integers, and wp_kses_post() for HTML content. This prevents security vulnerabilities and ensures data integrity across your custom post type.
With taxonomies and custom fields in place, your custom post type now has both organizational structure and rich data storage. The next step is to display this information on the front end using template files and WordPress loops.
Troubleshooting Common Issues
Even with a solid understanding of how to create a custom post type in WordPress, implementation rarely goes perfectly on the first attempt. Whether you are a seasoned developer or just starting out, you will inevitably encounter a handful of recurring problems. These issues often stem from WordPress’s rewrite rules, capability checks, or theme conflicts. Below, we break down the most frequent obstacles and provide clear, actionable solutions to get your custom post types working correctly.
Why Your Custom Post Type Returns a 404 Error
One of the most frustrating issues when learning how to create a custom post type in WordPress is encountering a 404 error when trying to view a single post or archive page. This usually indicates that WordPress cannot find the correct URL structure for your new post type. The root cause is almost always related to permalink settings and rewrite rules.
Primary cause: Flushed rewrite rules. WordPress stores URL rewrite rules in the database. When you register a new custom post type, the rules for its slug (e.g., /projects/ or /portfolio/) are not automatically added. To fix this, you must flush the rewrite rules. The simplest method is:
Go to Settings > Permalinks in your WordPress admin dashboard.
Without making any changes, simply click Save Changes.
This action triggers a flush of the rewrite rules, which should resolve most 404 errors.
If the 404 persists, check these additional factors:
Incorrect rewrite parameter: In your register_post_type() function, ensure the rewrite argument includes a unique slug. For example: 'rewrite' => array('slug' => 'your-slug'). Avoid using slugs that conflict with existing pages or taxonomies.
Missing has_archive parameter: If you want an archive page (e.g., /projects/), set 'has_archive' => true. Without this, the archive URL will return a 404.
Conflicting post type slug: If your slug matches a page slug (e.g., a page named “Projects” and a post type slug “projects”), WordPress will prioritize the page. Use a distinct slug like our-projects or portfolio-items.
Custom permalink structure: If you use a custom permalink structure (e.g., /%postname%/), ensure your post type rewrite slug does not contain dynamic tags like %category% unless you have also registered the appropriate rewrite endpoints.
Table: Quick 404 Diagnostic Checklist
Step
Action
Expected Result
1
Flush permalinks (Settings > Permalinks > Save)
404 resolved for most cases
2
Verify rewrite slug is unique and not a page slug
No conflict with existing content
3
Check has_archive is set to true for archive pages
Archive URL loads correctly
4
Clear any caching plugins (e.g., W3 Total Cache, WP Rocket)
Updated rules take effect
Admin Menu Not Showing? Check show_in_menu and Capabilities
After registering a custom post type, you might find that it does not appear in the WordPress admin menu. This is a common stumbling block, especially when working with more advanced configurations. The issue usually lies in two specific parameters: show_in_menu and capability_type.
1. The show_in_menu parameter
By default, show_in_menu is set to true when public is true. However, if you explicitly set show_in_menu to false, the post type will be hidden from the admin menu entirely. If you want the post type to appear as a top-level menu item, use:
'show_in_menu' => true
If you want it as a submenu under an existing menu (e.g., under “Settings” or “Tools”), use the menu slug of the parent item:
'show_in_menu' => 'edit.php?post_type=page'
This will place your custom post type under the “Pages” menu. For a submenu under “Settings”, use 'options-general.php'. For “Tools”, use 'tools.php'.
WordPress uses capabilities to determine who can see and interact with admin menu items. If your custom post type uses a custom capability_type, you must ensure that the appropriate user roles have the corresponding capabilities. The most common mistake is using 'capability_type' => 'post' (which is the default) but then assigning custom capabilities without mapping them to roles.
To debug this, temporarily switch to an administrator account. If the menu appears for admins but not for editors or authors, the issue is capability-related. You have two solutions:
Use the default capability_type: Set 'capability_type' => 'post' and rely on WordPress’s built-in post capabilities (edit_posts, publish_posts, etc.). This works for most projects.
Map custom capabilities: If you need custom capabilities, use the capabilities parameter to map them to existing roles. For example, you can map 'edit_posts' to 'edit_others_posts' for editors. Alternatively, use a plugin like “User Role Editor” to assign capabilities to roles after registration.
3. The show_ui and show_in_nav_menus parameters
While less common, setting show_ui to false will hide the post type from the admin interface entirely, even if show_in_menu is true. Similarly, show_in_nav_menus controls visibility in the Appearance > Menus section. Ensure these are set to true if you want full admin access.
Resolving Template Conflicts with Plugin-Based Post Types
When you learn how to create a custom post type in WordPress, you often expect your theme’s template hierarchy to handle display automatically. However, conflicts arise when another plugin registers a post type with the same slug, or when your theme’s template files override your intended output. This is particularly common with popular plugins like “Custom Post Type UI,” “Toolset,” or “Advanced Custom Fields” that also generate post types.
Step 1: Identify the source of the template
WordPress follows a strict template hierarchy. For a single custom post type, it looks for single-{post_type}.php first, then single.php, then singular.php, and finally index.php. If your post type is not using the template you expect, check which file is actually loading. You can do this by adding a temporary debug line to your theme’s functions.php:
View the page source to see which template file is being used. If it is index.php or a template from another plugin, you have a conflict.
Step 2: Resolve plugin-based template overrides
Some plugins, especially those that create custom post types for you, may include their own template files. For example, “Custom Post Type UI” does not include templates by default, but plugins like “The Events Calendar” or “WooCommerce” do. To override these, you must create a template file in your theme with the correct name. For a plugin-based post type with slug event, create single-event.php in your theme root. WordPress will prioritize this over the plugin’s template.
If the plugin uses a custom filter to load templates, you may need to use the template_include filter to force your theme’s file. Example:
If two plugins register a post type with the same slug (e.g., both use portfolio), the one that runs later will overwrite the first, or both may break. To diagnose this, disable all non-essential plugins and re-enable them one by one. If the conflict is unavoidable, consider renaming your post type slug. You can do this by changing the rewrite slug in your registration code, but note that this will break existing URLs unless you set up redirects.
Many modern themes use template parts (e.g., template-parts/content.php) for displaying post content. If your custom post type is not rendering correctly, the theme may be using conditional checks like if ( 'post' === get_post_type() ). You may need to copy and modify the relevant template part to include your post type, or use a filter to adjust the loop.
For example, in a Genesis theme, you might need to use genesis_before_entry hooks to modify output. In block-based themes (FSE), you may need to create a custom block template for your post type.
Final note on debugging:
Always test template changes with a caching plugin disabled and in a staging environment. Use the WordPress Query Monitor plugin to see which template files are being loaded and to identify any PHP notices or errors. By systematically checking rewrite rules, admin menu parameters, and template hierarchy, you can resolve nearly any issue that arises when learning how to create a custom post type in WordPress. Remember that a clean, well-documented registration function and a thorough understanding of WordPress’s template hierarchy are your best defenses against these common problems.
10 Essential WordPress Plugins for Every Business Website
1. Yoast SEO – Optimize Your Content for Search Engines
For any business website aiming to attract organic traffic, visibility in search engine results is non-negotiable. Yoast SEO, one of the most widely adopted WordPress plugins, provides a comprehensive toolkit to fine-tune your content for search engines without requiring technical expertise. It bridges the gap between writing for human readers and satisfying algorithmic ranking factors, making it an essential asset for small businesses, e-commerce stores, and service providers alike. By integrating directly into the WordPress editor, Yoast SEO guides you through critical optimizations that can elevate your site’s performance in Google, Bing, and other search engines.
Analyzing readability and keyword density
Yoast SEO’s real-time content analysis goes beyond basic keyword counting. It evaluates the readability of your text by assessing sentence length, paragraph structure, transition words, and passive voice usage. This ensures your content is accessible to a broad audience, which search engines reward with higher rankings. The plugin also calculates keyword density—the frequency of your target keyword relative to total word count—and flags overuse or underuse. For example, if you are writing a service page for “plumbing repairs,” Yoast will suggest placing the phrase in the first paragraph, subheadings, and concluding section, while warning against unnatural repetition. This dual focus on readability and keyword usage helps you craft content that both engages visitors and signals relevance to search engine crawlers.
Readability score: Color-coded indicators (green, orange, red) for sentence length, paragraph length, and subheading distribution.
Keyword density check: Alerts when the keyword appears too infrequently (below 0.5%) or too frequently (above 3%).
Transition word detection: Encourages use of words like “however,” “therefore,” and “additionally” to improve flow.
Passive voice warnings: Highlights sentences where passive construction may weaken clarity.
By following these recommendations, you can produce content that is not only search-engine friendly but also easy for potential customers to digest, reducing bounce rates and increasing time on page.
Generating XML sitemaps automatically
XML sitemaps are essential for helping search engines discover and index all pages on your business website, especially those that are not linked prominently. Yoast SEO automates the creation and maintenance of these sitemaps, eliminating the need for manual updates whenever you publish a new blog post, product page, or landing page. The plugin generates a structured list of URLs organized by content type—such as posts, pages, categories, and tags—and submits it to search engines via your robots.txt file. You can also customize which post types or taxonomies are included, excluding low-value pages like thank-you pages or internal search results. This ensures that search engine crawlers prioritize your most important content, such as your homepage, service offerings, and contact page.
Feature
Benefit for Business Websites
Automatic sitemap generation
Saves time and prevents indexing errors
Customizable inclusion/exclusion
Focuses crawlers on high-value pages
Integration with robots.txt
Ensures sitemap is discoverable by search engines
Support for multiple sitemap indexes
Handles large sites with thousands of URLs
For example, a local bakery with a WordPress site can rely on Yoast’s sitemap to ensure its “Menu” and “Order Online” pages are indexed quickly after updates, while excluding archived event pages. This systematic approach to indexing is a cornerstone of technical SEO.
Managing meta titles and descriptions per page
Meta titles and descriptions are the snippets that appear in search engine results, directly influencing click-through rates. Yoast SEO provides a dedicated field for every page and post, allowing you to craft custom titles and descriptions that include your target keyword while staying within character limits (typically 50–60 characters for titles and 150–160 for descriptions). The plugin includes a live preview that shows how your snippet will appear on Google, helping you avoid truncation or awkward phrasing. For business websites, this means you can differentiate between services—such as “Emergency Plumbing Services | Fast 24/7 Repairs” versus “Plumbing Services” —to attract specific queries. Additionally, Yoast supports variables like %%title%% and %%sitename%% to automate consistent branding across pages, while still allowing manual overrides for key landing pages.
Title templates: Set default formats (e.g., “Primary Keyword – Business Name”) for new content.
Description length tracker: Turns green when within optimal character range.
Keyword focus: Ensures the target word appears in both title and description for relevance.
Social preview: Shows how snippets appear when shared on Facebook or Twitter.
By controlling these elements, you can improve your site’s click-through rate from search results, directly driving more qualified traffic to your business. Yoast SEO’s per-page management also prevents duplicate meta tags, a common issue that dilutes SEO efforts across multiple similar pages.
In summary, Yoast SEO’s readability analysis, automated sitemaps, and granular meta-data controls make it an indispensable tool for any business website. It reduces the complexity of on-page optimization, allowing you to focus on creating content that resonates with customers while search engines consistently find and rank your pages. For a small investment of time in configuring its settings, you gain a measurable advantage in organic search performance—a critical driver of long-term business growth.
2. WooCommerce – Turn Your Site into an Online Store
For any business looking to sell products or services directly from their WordPress website, WooCommerce stands as the undisputed industry standard. Powering over 28% of all online stores globally, this open-source plugin transforms a standard WordPress installation into a fully functional ecommerce platform. Its greatest strength lies in its flexibility: whether you are selling physical goods, digital downloads, subscriptions, or bookings, WooCommerce adapts to your business model without requiring extensive coding knowledge. Beyond simple product listing, it handles the entire sales lifecycle—from inventory management and secure checkout to shipping calculations and tax compliance. For a business website, integrating WooCommerce means you can start small and scale as your revenue grows, all within a familiar WordPress dashboard. Below, we break down the three critical implementation areas that will get your store up and running efficiently.
Setting up product pages and categories
The foundation of any online store is its product catalog. WooCommerce provides a structured yet customizable interface for creating product pages that convert visitors into customers. Begin by navigating to Products → Add New in your WordPress admin panel. Here, you will encounter several key fields:
Product name and description: Write clear, benefit-driven titles and detailed descriptions. Use the short description for quick highlights and the main editor for comprehensive information, including dimensions, materials, usage instructions, or unique selling points.
Product data panel: This is the heart of each product. Select the product type: Simple (a single, tangible item), Variable (multiple options like size or color), Grouped (a collection of related products), or External/Affiliate (for linking to third-party sites). For each type, set the regular price, sale price, and stock status (in stock, out of stock, or on backorder).
Product images: Upload a high-resolution featured image (ideally 800×800 pixels or larger) and multiple gallery images to show the product from different angles. WooCommerce supports zoom functionality, which improves user experience.
Categories and tags: Organize your catalog with hierarchical categories. For example, a clothing store might use “Men’s → Shirts → Casual.” Tags offer additional filtering, such as “cotton,” “summer,” or “sale.” Use categories to structure navigation and tags for internal search optimization.
To create categories, go to Products → Categories. You can assign a parent category (e.g., “Electronics” as parent to “Laptops”) and upload a thumbnail image for category pages. For better SEO, write a description for each category that includes relevant keywords. WooCommerce automatically generates archive pages for categories, making it easy for customers to browse by department. A best practice is to limit your top-level categories to 5–7 to avoid overwhelming users, then use subcategories for deeper organization.
For variable products, set up attributes like “Size” or “Color” under Products → Attributes. Then, when editing a variable product, use the “Variations” tab to generate all possible combinations (e.g., Small/Red, Medium/Blue). Each variation can have its own price, stock level, and SKU, giving you granular control over inventory. To streamline bulk setups, use the Import feature via Tools → Import → WooCommerce products (CSV), which is invaluable for migrating from another platform or adding hundreds of items at once.
Payment processing is the most critical component for revenue generation. WooCommerce supports dozens of payment gateways, but the two most essential for business websites are Stripe and PayPal. Both offer secure, PCI-compliant transactions and high conversion rates. Here is how to configure them properly:
Stripe: This gateway allows customers to pay directly on your site (on-site checkout) without being redirected to a third-party page. To set it up:
Install the official WooCommerce Stripe Payment Gateway plugin from the WordPress repository.
Go to WooCommerce → Settings → Payments and toggle Stripe to “Enabled.”
Click “Set up” and enter your Stripe API keys (publishable key and secret key). These are found in your Stripe dashboard under Developers → API keys. Use “Test mode” keys initially to run test transactions, then switch to “Live mode” keys when you go public.
Configure additional options: enable credit card icons (Visa, Mastercard, Amex), set the statement descriptor (appears on customer bank statements), and choose whether to save cards for future purchases (useful for subscription businesses).
Test the integration by placing a test order using Stripe’s test card numbers (e.g., 4242 4242 4242 4242).
PayPal: This gateway redirects customers to PayPal’s secure site to complete payment, which can increase trust for new shoppers. To set it up:
Install the WooCommerce PayPal Payments plugin (the official solution replacing older PayPal plugins).
Navigate to WooCommerce → Settings → Payments → PayPal and click “Set up.”
Connect your PayPal business account by logging in and granting permission. The plugin handles API credentials automatically.
Choose your checkout experience: “PayPal Checkout” (standard redirect), “Pay Later” messaging, or “Venmo” (if available in your region). Enable “PayPal Card Processing” for on-site credit card payments if you want to avoid redirects.
Set the “Soft Descriptor” (up to 22 characters) to identify your business on customer statements.
Test with a PayPal sandbox account. Use the plugin’s built-in sandbox mode under PayPal Payments → Settings → Sandbox.
For businesses with higher transaction volumes, consider adding Apple Pay and Google Pay via Stripe or a dedicated plugin like Payment Plugins for Stripe WooCommerce. These reduce friction for mobile users. Always enable at least two gateways: one for on-site cards (Stripe) and one for digital wallets (PayPal). Avoid forcing customers to create accounts—enable “Guest checkout” under WooCommerce → Settings → Accounts & Privacy to reduce cart abandonment.
Managing shipping zones and tax rates
Shipping and tax configuration can make or break your store’s profitability and customer satisfaction. WooCommerce provides a flexible system for setting up shipping zones and tax rules based on geographic location. Here is a step-by-step approach:
Shipping zones: A shipping zone is a geographic region where you apply specific shipping methods. To create them:
Go to WooCommerce → Settings → Shipping → Shipping zones.
Click “Add shipping zone” and name it (e.g., “Domestic,” “EU,” “Rest of World”).
Assign zone regions: select countries, states, or postcodes. For example, a US-based store might create a zone for “United States” with all 50 states, then a separate zone for “Canada.”
Add shipping methods to each zone. The three standard methods are:
Flat rate: A fixed price per order (e.g., $5.99). Useful for lightweight items or promotional shipping.
Free shipping: Offer this conditionally—set a minimum order amount (e.g., “Free shipping on orders over $50”) or require a coupon.
Local pickup: Allow customers to collect from your physical location. You can set multiple pickup points with different addresses.
For advanced needs, install a plugin like WooCommerce Shipping (for USPS, DHL, or FedEx rates) or Table Rate Shipping (for weight-based or item-based calculations).
Tax rates: WooCommerce can calculate taxes automatically if you configure it correctly. Follow these steps:
Enable tax calculation under WooCommerce → Settings → Tax. Check “Enable taxes” and set “Prices entered with tax” to “Yes, I will enter prices inclusive of tax” (for most B2C stores) or “No, I will enter prices exclusive of tax” (for B2B).
Click “Standard rates” to add tax classes. For a US store, add a class “Sales Tax” and set rates by state. For example, California = 7.25%, New York = 4.0% (state rate only; local rates can be added as separate rows). Use the “Postcode” field to apply specific city or county rates.
For international stores, use the “Reduced rate” and “Zero rate” classes for items like food or books that may be exempt. WooCommerce supports EU VAT rules, including the “Reverse charge” for B2B transactions.
Under Tax options, set “Display prices in the shop” to “Including tax” for consumer clarity, and “Display tax totals” to “Itemized” so customers see tax per product. For store owners, ensure “Show tax on checkout” is enabled.
If you sell digital goods (no shipping), create a “Digital Goods” shipping zone with zero shipping cost and apply the appropriate tax class. This avoids confusing customers with unnecessary shipping fields.
To test shipping and tax, create a test product, add it to the cart, and use the “Calculate Shipping” feature on the cart page. Verify that rates change based on different addresses. For businesses with complex needs (e.g., multiple warehouses or international duties), consider WooCommerce extensions like ShipStation or TaxJar for automation. Remember to review shipping costs quarterly—rising carrier rates or new tax laws may require updates to your zones or rates.
3. Wordfence Security – Protect Your Site from Threats
Every business website is a potential target for cyberattacks, ranging from automated bots probing for vulnerabilities to targeted hacking attempts. Wordfence Security is one of the most comprehensive and widely trusted security plugins for WordPress, offering a multi-layered defense system that combines a powerful firewall, a robust malware scanner, and essential login security features. For business owners, a security breach can mean lost customer trust, downtime, and costly data recovery. Wordfence helps mitigate these risks by providing real-time protection without requiring deep technical expertise. The plugin is designed to be both proactive and reactive: it blocks threats before they reach your site and quickly identifies and removes any malicious code that may have slipped through. With its user-friendly dashboard and detailed reporting, Wordfence empowers you to monitor your site’s security posture at a glance. Below, we break down the three core functionalities that make Wordfence indispensable for any business website.
Enabling the firewall and real-time threat detection
The Wordfence firewall is the first line of defense for your business website. It operates by analyzing all incoming traffic and blocking malicious requests before they can interact with your WordPress installation. This includes protection against common attack vectors such as SQL injection, cross-site scripting (XSS), and brute force attacks. The firewall is powered by the Wordfence Threat Defense Feed, which is continuously updated with new signatures and rules based on global threat intelligence. To enable and optimize the firewall, follow these steps:
Activate the firewall: After installing Wordfence, navigate to the plugin’s settings and ensure the “Web Application Firewall” is in “Learning Mode” initially, then switch to “Enabled and Protecting” after a short period to avoid false positives.
Enable real-time threat detection: In the “Firewall Options” section, check the box for “Enable Real-Time Threat Intelligence Blocking.” This ensures that your site is protected against newly discovered threats within seconds, not hours.
Configure rate limiting: Set up rules to limit the number of requests from a single IP address within a specific time frame. This helps prevent automated attacks and resource exhaustion.
Block countries or IPs: If your business operates in a specific geographic region, you can block traffic from countries where you have no customers. This reduces attack surface without affecting legitimate users.
Real-time threat detection works hand-in-hand with the firewall by monitoring live traffic patterns and flagging suspicious behavior. For example, if an IP address attempts to access multiple login pages simultaneously, Wordfence can instantly block it and alert you via email. This proactive approach minimizes the window of vulnerability and keeps your business data safe from evolving threats.
Even with a strong firewall, malicious code can sometimes find its way into your website through compromised themes, plugins, or uploads. Wordfence’s malware scanner is designed to detect and remove such threats, ensuring your site remains clean and trustworthy. The scanner performs a comprehensive audit of all files on your server, comparing them against a database of known malware signatures, suspicious patterns, and changed files. Key features of the scanning process include:
File integrity checking: The scanner compares core WordPress files, themes, and plugins against their original versions from the WordPress repository. Any modifications or additions are flagged for review.
Malware signature detection: Wordfence uses an extensive library of known malware patterns to identify infected files, backdoors, and hidden redirects.
Vulnerability scanning: The plugin checks your installed themes and plugins against a database of known security vulnerabilities. If a plugin has a reported flaw, you’ll receive a recommendation to update or replace it.
Option scanning: The scanner examines your WordPress database for suspicious options, such as unauthorized admin users or malicious shortcodes.
To run a scan, simply go to the Wordfence dashboard and click “Start New Scan.” You can schedule scans to run automatically daily or weekly. When threats are detected, Wordfence provides clear instructions for removal, including one-click repair options for many common infections. For business websites, regular scanning is crucial because it catches issues that might otherwise go unnoticed until they cause data loss or damage your reputation. A clean scan result also gives you peace of mind that your site is not being used to distribute malware to your customers.
Limiting login attempts and enforcing strong passwords
Weak passwords and unlimited login attempts are among the most exploited vulnerabilities on business websites. Wordfence addresses this with robust login security features that make it significantly harder for attackers to gain unauthorized access. The plugin enforces best practices for authentication without adding friction for legitimate users. Here’s how to configure these settings:
Limit login attempts: In the “Login Security” section, set a maximum number of failed login attempts (e.g., 5) before the IP address is temporarily locked out. You can also set the lockout duration (e.g., 15 minutes) and choose to increase the lockout time for repeated offenders.
Enforce strong passwords: Enable the option to require strong passwords for all users with administrative roles. Wordfence checks password strength against criteria such as length, use of uppercase and lowercase letters, numbers, and special characters. Users who set weak passwords will be prompted to change them.
Enable two-factor authentication (2FA): Wordfence includes a built-in 2FA feature that adds an extra layer of security. Users must enter a one-time code from an authenticator app (like Google Authenticator) in addition to their password. This is highly recommended for admin accounts.
Block invalid usernames: Attackers often try common usernames like “admin” or “test.” You can configure Wordfence to block login attempts using usernames that do not exist on your site, reducing brute force attack efficiency.
These measures work together to prevent automated scripts from guessing passwords and to deter manual attacks. For example, if a bot attempts to log in with common passwords, it will be locked out after a few tries, rendering the attack ineffective. Enforcing strong passwords ensures that even if an attacker tries a dictionary attack, the credentials are too complex to crack. By combining login attempt limits with 2FA, you create a formidable barrier that protects your business’s sensitive data and customer information. Wordfence also logs all login activity, so you can review failed attempts and identify patterns that may indicate targeted attacks.
4. WPForms – Build Professional Contact Forms Easily
In the digital marketplace, your website’s forms are the bridges between your business and its audience. A poorly designed or non-functional contact form can cost you leads, while a seamless, professional one can capture inquiries, feedback, and even payments. WPForms stands out as the most beginner-friendly yet powerful drag-and-drop form builder for WordPress. It empowers you to create everything from a simple “Contact Us” block to multi-page surveys and order forms—all without writing a single line of code. Its intuitive visual builder, pre-built templates, and robust integrations make it an essential tool for any business aiming to streamline communication and data collection.
What sets WPForms apart is its focus on usability and conversion. You can start with a pre-designed template, customize fields by dragging them into place, and instantly see the result. It handles complex tasks like conditional logic, email routing, and spam protection behind a clean interface. For a business website, this means you can deploy a polished, functional form in minutes—not hours—and then fine-tune it to capture exactly the information you need.
Creating a Simple Contact Form with Conditional Logic
The core strength of WPForms lies in its ability to make advanced features accessible. Building a basic contact form is straightforward, but adding conditional logic elevates it from a static input field to a dynamic conversation starter. Conditional logic allows you to show or hide fields based on a user’s previous answers, making your forms shorter, more relevant, and less overwhelming.
Step-by-step process to create a contact form with conditional logic:
Install and activate WPForms – From your WordPress dashboard, go to Plugins > Add New, search for “WPForms,” install, and activate. The Lite version is free and sufficient for basic needs.
Launch the form builder – Click “WPForms” in your admin menu, then “Add New.” You’ll be greeted by a library of templates. Choose “Simple Contact Form” to start.
Add your standard fields – By default, the template includes Name, Email, Subject, and Message. Drag additional fields from the left panel, such as Phone or Dropdown, if needed.
Enable conditional logic – Click on any field to open its settings. In the “Smart Logic” section, toggle “Enable Conditional Logic.” For example, you might want to show a “Company Size” dropdown only if a user selects “Business Inquiry” from a “Reason for Contact” dropdown.
Example condition: Show “Company Size” field if “Reason for Contact” is “Business Inquiry.”
Set the condition: “Show this field if” → “Reason for Contact” → “is” → “Business Inquiry.”
Configure field dependencies – You can chain multiple conditions. For instance, after showing “Company Size,” you could then show a “Preferred Contact Time” field only if “Company Size” is “Enterprise.” This creates a tailored experience.
Save and embed – Once your logic is set, click “Save.” WPForms provides an embed code. You can paste it into any page or post, or use the built-in WPForms widget in your sidebar.
Benefits of conditional logic for business forms:
Scenario
Without Conditional Logic
With Conditional Logic
Support ticket
User fills 10 fields, many irrelevant
Only shows issue type, priority, and description
Job application
All candidates see salary field
Shows salary only if position is “manager”
Newsletter signup
User must choose from 5 topics
Shows topic list only after email is entered
This approach reduces friction. Users feel guided, not interrogated. For your business, it means cleaner data, higher completion rates, and fewer abandoned forms.
Integrating with Email Marketing Services (e.g., Mailchimp)
A contact form is only as valuable as the action it triggers. WPForms integrates natively with major email marketing platforms like Mailchimp, Constant Contact, AWeber, and Campaign Monitor. This means when a user submits a form—whether it’s a newsletter signup, a quote request, or a feedback survey—their details can be automatically added to your email list, tagged appropriately, and segmented for targeted campaigns.
Install the Mailchimp addon – If you’re using the Pro version, navigate to WPForms > Addons and activate “Mailchimp.” The free Lite version does not include this feature, but upgrading is straightforward.
Configure the Mailchimp integration – Go to WPForms > Settings > Integrations. Click “Mailchimp” and enter your API key (found in your Mailchimp account under Extras > API Keys).
Connect your form – Open the form you created earlier (e.g., your contact form). In the form builder, click on “Marketing” in the left panel. Select “Mailchimp.”
Map fields – You’ll see a list of Mailchimp merge tags (e.g., FNAME, LNAME, EMAIL). Drag and drop each WPForms field to the corresponding Mailchimp field. For instance, map the “Name” field to “FNAME” and “LNAME,” and the “Email” field to “EMAIL.”
Set up tags and groups – Under “List,” choose your Mailchimp audience. You can also add tags (e.g., “website inquiry”) or assign the contact to a specific group. This allows you to segment subscribers based on how they entered your funnel.
Enable double opt-in (optional) – You can toggle double opt-in to ensure subscribers confirm their email, which improves list quality and compliance with anti-spam laws.
Other email marketing integrations available:
Constant Contact – Similar field mapping and list selection.
GetResponse – Supports tags and automation triggers.
Sendinblue (Brevo) – Includes SMS and email campaign features.
ActiveCampaign – Deep integration with custom fields and automation.
This integration saves you hours of manual data entry. Every form submission becomes a potential lead nurtured through your email funnel, from welcome sequences to targeted offers. For a business website, this is how you turn passive visitors into active relationships.
Enabling Spam Protection with reCAPTCHA
Spam submissions are a persistent threat to any online form. They clog your inbox, waste your team’s time, and can even introduce malicious links. WPForms offers multiple layers of spam protection, with reCAPTCHA being the most widely used and effective. reCAPTCHA uses advanced risk analysis to distinguish between human users and automated bots, without requiring users to solve distorted text or click traffic lights.
How to enable reCAPTCHA in WPForms:
Choose your reCAPTCHA type – WPForms supports three versions:
v2 (Checkbox) – Users click “I’m not a robot.” Simple and widely compatible.
v3 (Invisible) – Runs in the background, scoring user behavior. No user interaction needed.
v2 Invisible – Google decides when to show a challenge. Most users never see it.
Get your site and secret keys – Visit the Google reCAPTCHA admin console. Register your website domain and select the reCAPTCHA type. You’ll receive a Site Key and a Secret Key.
Enter keys in WPForms settings – Go to WPForms > Settings > CAPTCHA. Select “reCAPTCHA” as the type. Paste your Site Key and Secret Key into the corresponding fields. Click “Save Settings.”
Enable reCAPTCHA on individual forms – Open your contact form in the builder. Under “Settings” > “General,” toggle “Enable CAPTCHA” to on. For v3, you can also set a score threshold (0.0 to 1.0). A lower score (e.g., 0.3) blocks more spam but risks blocking legitimate users; 0.5 is a balanced default.
Simple math or text question (e.g., “What is 3+4?”)
Extra layer for high-risk forms
Country/State filter
Block submissions from specific regions
Preventing geo-targeted spam
Keyword filtering
Block submissions containing specific words or URLs
Stopping promotional or malicious spam
Practical tips for spam management:
Start with reCAPTCHA v3 invisible mode—it provides robust protection without annoying users.
Enable honeypot as a secondary measure. It’s lightweight and catches most simple bots.
Monitor your form entries regularly. If you see a spike in spam, increase the reCAPTCHA score threshold or add a custom CAPTCHA.
For business-critical forms (e.g., payment or account registration), use v2 checkbox reCAPTCHA for explicit user verification.
By combining reCAPTCHA with WPForms’ built-in anti-spam tools, you can keep your inbox clean and your data accurate. This is not just about convenience—it’s about maintaining the integrity of your customer communications. A spam-free form ensures that every submission is a genuine opportunity for your business to connect, respond, and convert.
5. MonsterInsights – Connect Google Analytics to Your Site
Understanding your website’s performance is not optional—it is the foundation of informed business decisions. Without reliable data, you are essentially navigating blind. MonsterInsights solves this by making Google Analytics integration effortless, even for non-technical users. Instead of wrestling with tracking codes and complex configuration files, you gain a clean, actionable dashboard that surfaces exactly what matters: who visits, how they arrive, and what they do once they land on your site.
MonsterInsights is widely regarded as the premier WordPress plugin for Google Analytics. It eliminates the need to manually paste tracking snippets into your theme files, reducing the risk of errors and ensuring compliance with the latest Google Analytics versions. For a business website, this plugin transforms raw data into a strategic asset. You can see which pages generate the most revenue, which marketing channels drive qualified leads, and where visitors drop off in your conversion funnel—all from your WordPress admin area.
The plugin offers both a free version and premium tiers. The free version provides basic page view tracking, while premium unlocks advanced features like ecommerce tracking, form conversion monitoring, and custom dimensions. For most business websites, the premium version pays for itself by revealing opportunities to increase revenue and reduce friction in the user experience.
Tracking page views and user behavior
At its core, MonsterInsights excels at capturing granular data about how visitors interact with your content. The plugin automatically tracks page views, session duration, bounce rate, and user demographics without requiring any additional setup. Once activated, you can view reports such as:
Top Landing Pages – Identify which pages first attract visitors from search engines, social media, or paid ads.
Exit Pages – Discover where users leave your site, helping you pinpoint content or design issues.
Device Breakdown – See whether visitors use desktop, mobile, or tablet, and adjust your responsive design accordingly.
Geographic Location – Understand which countries or cities generate the most traffic, useful for local SEO or regional marketing campaigns.
Beyond basic metrics, MonsterInsights tracks user behavior in ways that reveal intent. For example, you can monitor scroll depth to see how far visitors scroll down a page before leaving. This data helps you optimize content placement—if most users stop at 50% of your page, you might move your call-to-action button higher. Similarly, you can track time on page for specific posts to gauge engagement quality. A blog post with high traffic but low time on page may need better formatting or more compelling visuals.
The plugin also supports event tracking for interactions that don’t generate new page loads, such as video plays, form submissions, and button clicks. This is especially valuable for business websites with lead generation forms or interactive tools. By default, MonsterInsights sets up several common events automatically, including outbound link clicks and file downloads (covered in the next section). You can also create custom events using the plugin’s built-in settings, no coding required.
For privacy-conscious businesses, MonsterInsights includes an option to enable IP anonymization and disable advertising features. This helps you comply with GDPR and other data protection regulations while still collecting essential analytics. The plugin also integrates with popular cookie consent plugins, ensuring that tracking only begins after a user gives explicit permission.
Viewing ecommerce conversion reports
If your business website sells products or services online, ecommerce tracking is indispensable. MonsterInsights connects seamlessly with WooCommerce, Easy Digital Downloads, and other popular ecommerce platforms to provide a complete picture of your sales funnel. You can view reports that answer critical questions:
Metric
What It Reveals
Business Action
Total Revenue
Overall income from transactions
Measure campaign ROI and set revenue targets
Conversion Rate
Percentage of visitors who complete a purchase
Identify friction points in checkout flow
Average Order Value
Average amount spent per transaction
Optimize upselling and cross-selling strategies
Product Performance
Which items sell most, and which have high cart abandonment
Adjust pricing, inventory, or product descriptions
Checkout Behavior
Steps where users drop off (e.g., shipping, payment)
Simplify form fields or add trust signals
MonsterInsights displays these reports directly in your WordPress dashboard, so you never need to log into Google Analytics separately. The ecommerce reports update in near real-time, allowing you to monitor flash sales or new product launches as they happen. You can also view transaction-level details, including the specific products purchased, the date and time of the sale, and the marketing channel that drove the customer (e.g., organic search, email, social).
One powerful feature is the ability to segment ecommerce data by user type. For example, you can compare conversion rates between new visitors and returning customers. If returning customers have a higher average order value, you might create a loyalty program or send personalized email offers. Conversely, if new visitors drop off at the cart stage, you can test free shipping thresholds or a simplified checkout form.
The plugin also tracks refunds and cancellations, giving you a complete view of your revenue lifecycle. This data helps you identify problematic products or billing issues that erode profit margins. For subscription-based businesses, MonsterInsights supports recurring revenue tracking, showing you metrics like monthly recurring revenue (MRR) and churn rate.
Analyzing outbound link clicks and downloads
Outbound link clicks and file downloads are often overlooked metrics, but they provide valuable insights into user intent and content effectiveness. MonsterInsights automatically tracks these interactions without requiring manual event setup. You can see exactly which external links your visitors click, how often, and from which pages. This is useful for several reasons:
Affiliate Link Performance – If you promote affiliate products, you can measure click-through rates and identify which offers resonate most with your audience.
Partnership and Resource Verification – Track clicks to partner websites, citation sources, or external tools to ensure your content is driving value for users.
Download Analytics – Monitor how often visitors download PDFs, spreadsheets, whitepapers, or other files. This data reveals which resources are most popular and helps you refine your lead magnets.
MonsterInsights categorizes these interactions in a dedicated “Outbound Links” report within your dashboard. You can sort by link URL, page path, or number of clicks. For example, if you notice that a particular outbound link receives many clicks but leads to a low-quality resource, you might replace it with a better alternative. Similarly, if a downloadable checklist is heavily used, you can create a follow-up resource to nurture those leads further.
The plugin also provides click-through rates (CTR) for outbound links, allowing you to compare performance across different pages or posts. This is especially valuable for content marketing teams that include multiple external references in a single article. By analyzing which links drive the most engagement, you can prioritize partnerships or guest posting opportunities that yield the highest referral traffic.
For security and compliance, MonsterInsights includes an option to add rel="nofollow" or rel="sponsored" attributes to outbound links automatically. This helps preserve your site’s SEO equity and ensures compliance with search engine guidelines. The plugin also tracks link clicks on mobile devices separately, so you can see if mobile users behave differently than desktop users—for instance, clicking more on phone number links or app store buttons.
Finally, MonsterInsights integrates with Google Analytics’ enhanced link attribution, which means you can see not only which links were clicked but also the sequence of clicks leading up to a conversion. This multi-touch attribution helps you understand the full customer journey, from initial discovery through final action. For a business website, this level of detail is invaluable for optimizing marketing funnels and allocating budget to the most effective channels.
6. UpdraftPlus – Automate Backups for Peace of Mind
Downtime, hacking attempts, or a failed plugin update can erase months of work in seconds. For any business website, a reliable backup system is not optional—it is a fundamental safeguard. UpdraftPlus stands out as the most trusted free and premium backup solution for WordPress, used by millions of site owners worldwide. Its core value lies in automation: you set the schedule, choose a remote storage destination, and let the plugin work silently in the background. When disaster strikes, a one-click restoration can bring your entire site—files, database, plugins, and themes—back to its previous state. This plugin eliminates the manual, error-prone process of exporting databases or downloading files via FTP, giving business owners and developers genuine peace of mind.
UpdraftPlus integrates seamlessly with your existing workflow. After installation, you are guided through a simple setup wizard that asks two critical questions: how often should backups run, and where should they be stored? The plugin then handles the heavy lifting, compressing your site’s data into manageable archives and transferring them securely to the cloud. For businesses with high traffic or frequent content updates, this automation ensures that even the most recent changes are preserved without any human intervention. Below, we break down the three core functions that make UpdraftPlus indispensable for any business website.
Scheduling daily or weekly backups
Consistency is the bedrock of a good backup strategy. UpdraftPlus offers flexible scheduling options that cater to different business needs. You can choose to back up your entire site—including the WordPress database and all files—on a daily, weekly, or even monthly basis. For most small to medium business websites, a daily backup of the database (where posts, pages, comments, and settings live) combined with a weekly backup of the complete file system strikes an ideal balance between safety and server resources.
The scheduling interface is straightforward:
Database backups – These capture all dynamic content. Recommended frequency: daily for active blogs or e‑commerce stores; every 48 hours for static brochure sites.
Full file backups – These include themes, plugins, uploads, and core WordPress files. Recommended frequency: weekly for most sites; daily if you regularly add large media files or update custom code.
You can also set separate schedules for database and file backups. For example, a busy online store might run database backups every 6 hours (to protect orders and customer data) while scheduling full file backups once per day during low-traffic hours. UpdraftPlus respects your server’s load by allowing you to choose a specific time of day, such as 2:00 AM, minimizing any performance impact on live visitors.
Another helpful feature is the ability to retain only a certain number of backups. If you set a retention limit of 10 full backups, UpdraftPlus automatically deletes the oldest archive when a new one is created. This prevents your cloud storage from filling up with outdated copies while maintaining a rolling history. For businesses that need to comply with data retention policies, this feature is invaluable. The plugin also sends email notifications after each successful or failed backup, so you never have to log in to check the status.
Storing backups on the same server that hosts your website is a high-risk practice. If the server crashes, gets hacked, or suffers a hardware failure, your backup is lost along with the live site. UpdraftPlus solves this by offering native integration with a wide array of remote cloud storage services. You can send your backup archives to:
Dropbox – Simple to set up; ideal for solopreneurs or small teams already using Dropbox for file sharing.
Google Drive – Excellent for businesses with Google Workspace accounts; offers generous free storage tiers.
Amazon S3 – Highly scalable and secure; recommended for larger sites or agencies managing multiple client sites.
Microsoft OneDrive – Good for organizations using Office 365; integrates with existing Microsoft accounts.
Rackspace Cloud Files – A robust option for developers familiar with the Rackspace ecosystem.
FTP/SFTP – Allows you to send backups to a separate server or a dedicated backup host.
UpdraftVault – The plugin’s own managed cloud storage service, offering one-click restoration and automatic encryption.
Each integration requires a simple authentication step—usually clicking a button to grant UpdraftPlus permission to write files to your chosen service. Once connected, the plugin automatically uploads each backup archive as it is created. You can also choose to send database and file backups to different destinations. For example, you might store database backups in Google Drive for quick access and send full file backups to Amazon S3 for long-term archival.
For businesses handling sensitive customer data, many of these cloud services support server-side encryption. UpdraftPlus itself can encrypt backup files before they leave your server, adding an extra layer of protection. The plugin also supports incremental backups in its premium version, which only uploads changes since the last full backup. This dramatically reduces bandwidth and storage costs for large sites. By distributing backups across multiple remote locations, you create a resilient safety net that survives even catastrophic server failures.
A backup is only as good as its restoration process. UpdraftPlus excels here with its intuitive, one-click restore feature. When you need to recover your site—whether due to a hacked installation, a botched update, or accidental data loss—the process is remarkably straightforward. Navigate to the “Existing Backups” tab in the plugin dashboard. You will see a chronological list of all your stored backups, each labeled with its date, size, and components (database, plugins, themes, uploads, and others).
To restore, simply click the “Restore” button next to the desired backup. The plugin then asks which components you want to recover. You can restore everything at once, or selectively restore only the database while keeping current files. This granularity is especially useful if, for example, a plugin update caused a conflict: you can restore just the plugins folder without affecting recent posts or settings. UpdraftPlus will automatically download the necessary archive files from your remote storage, decompress them, and replace the corresponding files on your server.
During the restoration, the plugin displays a progress bar and detailed logs, so you can monitor each step. If something goes wrong—such as a file permission error—the logs pinpoint the issue, allowing you to fix it quickly. After the process completes, UpdraftPlus performs a series of integrity checks to confirm that your site is functional. You can then log out and back in to verify everything looks correct.
For advanced users, UpdraftPlus also supports manual restoration via a standalone “restorer” tool that can be run even if the plugin itself is deactivated. This is a lifesaver in scenarios where the WordPress admin panel is inaccessible. The premium version adds a “search and replace” feature that automatically updates URLs and file paths when moving a site between domains, making migration or staging site restores seamless. Whether you are recovering from a minor glitch or a full server wipe, UpdraftPlus ensures that your business website can be back online in minutes, not hours.
In summary, UpdraftPlus transforms backup management from a tedious chore into a reliable, automated safety system. By scheduling regular backups, storing them off-site in your preferred cloud service, and offering a simple restoration workflow, it gives business owners the confidence to update, experiment, and grow without fear of data loss. For any business website that values uptime and data integrity, this plugin is not just essential—it is foundational.
7. Elementor – Design Custom Pages with a Visual Builder
In the crowded landscape of WordPress page builders, Elementor stands out as a versatile and user-friendly solution for businesses that need to create custom pages without hiring a developer. Unlike traditional approaches that require editing theme files or writing shortcodes, Elementor provides a true drag-and-drop interface that renders changes in real time. This means what you see in the editor is exactly what visitors will see on the front end—no guessing, no preview reloads. For business owners and marketers who want to maintain brand consistency while iterating quickly, Elementor offers a balance of power and accessibility. Its free version is robust enough for many small businesses, while the Pro tier unlocks advanced features like theme building, pop-ups, and dynamic content integration. Below, we explore three critical ways to leverage Elementor effectively for your business website.
Building landing pages with pre-designed templates
One of Elementor’s strongest assets for business websites is its extensive library of pre-designed templates, specifically tailored for landing pages. Whether you’re launching a new product, collecting email sign-ups for a webinar, or promoting a seasonal sale, starting with a template saves hours of design time. These templates are categorized by industry and purpose—such as SaaS, eCommerce, consulting, or real estate—ensuring relevance to your niche.
To use a template, simply open a new page in Elementor, click the folder icon to access the template library, and browse or search for a layout that matches your goal. Each template is fully customizable: you can swap out images, change headline copy, adjust color schemes to match your brand guidelines, and rearrange sections by dragging them. For example, a typical landing page template might include a hero section with a call-to-action button, a feature grid, testimonials, and a footer with social proof. You can delete any block you don’t need or duplicate sections to emphasize key points.
Key advantages of using pre-designed templates for landing pages include:
Speed: Launch a professional-looking page in minutes rather than hours.
Conversion-focused layouts: Templates are designed by experienced marketers who understand placement of CTAs, trust signals, and visual hierarchy.
Mobile responsiveness out-of-the-box: Each template is built to adapt to different screen sizes, though you can fine-tune settings per device.
Brand consistency: Save your own templates or import global styles (fonts, colors, button styles) to ensure every landing page aligns with your website’s identity.
For businesses that run frequent campaigns, consider creating a library of custom landing page templates within Elementor. You can design a base template with your brand’s header, footer, and common elements, then duplicate it for each new campaign—simply update the content and imagery. This approach maintains a coherent user experience while reducing repetitive work.
Adding dynamic content and custom widgets
Beyond static pages, Elementor’s true power for business websites lies in its ability to handle dynamic content. Dynamic content refers to elements that change based on data from your WordPress site—such as post titles, custom fields, user roles, or WooCommerce product details. This feature is especially useful for businesses that run blogs, job boards, real estate listings, or membership sites. With Elementor Pro, you can connect any widget to a dynamic source, meaning the content updates automatically without manual edits.
For example, imagine you run a law firm website with a team page. Instead of hardcoding each attorney’s name, photo, and bio, you can create a single template for team member profiles. Using Elementor’s dynamic tags, you pull in the featured image, title, and custom fields (like “practice areas” or “bar admissions”) from each attorney’s post. When you add a new attorney, the page updates instantly. Similarly, if you have a blog archive page, you can design a grid of posts where each card dynamically displays the post thumbnail, excerpt, and publish date—no need to rebuild the layout after every new article.
Custom widgets further extend Elementor’s functionality. While the free version includes essential widgets like headings, images, buttons, and video players, Elementor Pro adds advanced options such as:
Form Builder: Create multi-step forms with conditional logic, file uploads, and integrations with email marketing services (e.g., Mailchimp, HubSpot).
Posts Widget: Display posts, pages, or custom post types in grid, carousel, or list layouts with filtering and pagination.
Call to Action: Design prominent buttons with hover effects, dual headlines, and optional background images.
Price Table: Showcase pricing tiers with feature lists, highlighted plans, and tooltip descriptions.
Testimonial Carousel: Rotate client reviews with star ratings, avatars, and company logos.
To add a custom widget, simply drag it into your page from the left panel, then configure its settings in the content, style, and advanced tabs. For dynamic content, click the dynamic icon (a small database symbol) next to any field—such as a heading’s text—and select the source (e.g., “Post Title,” “Author Name,” or a custom field key). This integration allows you to build data-driven pages that scale with your business.
Optimizing for mobile and tablet views
With over half of web traffic coming from mobile devices, optimizing your business website for smaller screens is non-negotiable. Elementor excels in this area by providing granular control over how each element appears on desktop, tablet, and mobile. Every widget, section, and column has responsive settings that let you hide, rearrange, or resize content per device.
When editing a page, you’ll notice a small icon in the bottom-left corner that toggles between desktop, tablet, and mobile views. Switching to mobile view shows you exactly how your layout will look on a smartphone—and you can make adjustments in real time. Common optimizations include:
Adjusting font sizes: Headlines that look balanced on desktop may be too large on mobile. Use the responsive font size controls to set smaller values for tablets and phones.
Changing column stacking: On desktop, you might have a two-column layout with text on the left and an image on the right. On mobile, you can force columns to stack vertically, with the image appearing above the text for better readability.
Hiding non-essential elements: Some widgets—like large hero images with intricate overlays—may clutter mobile screens. Use the “Hide on Tablet” or “Hide on Mobile” toggle to remove them entirely for smaller devices.
Modifying spacing and padding: Reduce margins and padding between sections on mobile to conserve vertical space and prevent excessive scrolling.
Optimizing images: Elementor automatically serves responsive images based on screen size, but you can also set custom image sizes for each device in the widget’s advanced tab.
Beyond basic tweaks, Elementor allows you to create completely different layouts for mobile using the “Responsive Reverse” feature and custom breakpoints. For example, you might design a desktop layout with a sidebar navigation, but switch to a bottom navigation bar on mobile. To do this, you can use the “Theme Builder” in Elementor Pro to create separate header and footer templates for mobile devices. Additionally, test your pages with real devices or browser developer tools to ensure touch targets (like buttons and links) are large enough—Elementor’s default button padding is adequate, but you can increase it for mobile if needed.
Finally, leverage Elementor’s “Motion Effects” and “Scroll Effects” sparingly on mobile. While parallax scrolling and animations look impressive on desktop, they can cause performance issues or disorientation on mobile devices. Use the responsive controls to disable such effects on tablets and phones, ensuring a smooth, fast experience for all visitors.
8. WP Rocket – Speed Up Your Website Performance
In the competitive landscape of modern business websites, speed is non-negotiable. A delay of even a few seconds can drive potential customers away, increase bounce rates, and harm your search engine rankings. WP Rocket stands as a premier caching and performance optimization plugin for WordPress, offering a comprehensive suite of tools designed to drastically improve page load times without requiring technical expertise. By integrating seamlessly with your existing setup, WP Rocket tackles the core factors that slow down websites: server response times, file sizes, and resource-heavy media. For any business aiming to deliver a fast, reliable user experience and maintain strong SEO performance, this plugin is an essential investment. Its intuitive interface allows even non-developers to activate powerful optimizations with a few clicks, making it a favorite among agencies, freelancers, and in-house teams alike. Below, we explore the three critical features that make WP Rocket a cornerstone of website performance.
Enabling page caching and browser caching
The foundation of WP Rocket’s speed enhancements lies in its intelligent caching systems. Caching works by storing a static version of your website’s pages after the first visit, so subsequent visitors receive pre-generated files instead of waiting for the server to process PHP scripts and database queries. This dramatically reduces server load and response times. WP Rocket simplifies this process by offering two distinct caching layers:
Page caching: Automatically activated upon installation, this creates static HTML copies of your pages. When a user requests a page, the cached version is delivered instantly, bypassing the WordPress core. This is especially beneficial for business sites with high traffic volumes, as it prevents server bottlenecks during peak hours.
Browser caching: This instructs visitors’ browsers to store static resources (like logos, CSS files, and fonts) locally for a specified period. When a user returns to your site, their browser loads these assets from their local cache rather than downloading them again. WP Rocket allows you to set expiration times for different file types, balancing freshness with performance. For example, you can set a longer cache duration for rarely changing files like your company logo, while shorter durations apply to more dynamic content.
To maximize effectiveness, WP Rocket provides granular control through its settings panel. You can exclude specific pages from caching (such as checkout or account pages) to ensure dynamic content remains current. Additionally, the plugin automatically clears relevant caches when you update posts, pages, or themes, preventing visitors from seeing outdated information. For business websites that rely on e-commerce or membership systems, this precision caching ensures that performance gains do not come at the cost of functionality.
Minifying CSS, JavaScript, and HTML files
Every line of code on your website—whether from your theme, plugins, or custom scripts—adds to the total file size that browsers must download and parse. Minification is the process of removing unnecessary characters from these files without altering their functionality. This includes eliminating spaces, line breaks, comments, and redundant syntax. WP Rocket automates this optimization for three core file types:
CSS minification: Streamlines styling files to reduce their size. For instance, a business site using a complex theme with multiple custom stylesheets can see a 20-30% reduction in CSS file sizes after minification.
JavaScript minification: Optimizes interactive scripts, such as those for contact forms, sliders, or analytics tracking. WP Rocket can also combine multiple JavaScript files into one, reducing the number of HTTP requests required to load a page.
HTML minification: Cleans up the raw markup of your pages, removing extra spaces and comments that are invisible to users but bloat the code.
WP Rocket’s minification features are designed with safety in mind. It includes a “Combine Files” option that merges CSS and JavaScript resources, but it also provides exclusion lists for files that might break if combined or minified. For example, if a specific plugin relies on a non-minified version of its script, you can exclude it from processing. The plugin also offers a “Remove Query Strings” option, which strips version parameters from static resources, improving cacheability on proxy servers like Cloudflare. For business websites, these optimizations translate directly into faster load times, especially on mobile networks where bandwidth is limited. A typical business homepage with multiple plugins and custom scripts can see a reduction of 200-400 KB in total file size after minification, which can shave off one to two seconds of loading time.
Implementing lazy load for images and videos
Images and videos are often the heaviest elements on a business website, accounting for up to 70% of total page weight. Lazy loading is a technique that defers the loading of non-visible media until the user scrolls near them. Instead of loading every image and video when the page first opens, the browser only loads what is immediately viewable. WP Rocket implements lazy loading with minimal configuration, offering several advantages for business owners:
Reduced initial page weight: The browser downloads only the above-the-fold content first, which can cut initial load times by 30-50% on media-rich pages like portfolios, product galleries, or team pages.
Bandwidth savings: Visitors who never scroll to the bottom of a page do not download those media files, saving data usage—a critical factor for mobile users with limited data plans.
Improved perceived performance: The page appears to load faster because visible content renders quickly, even if the total page weight remains high.
WP Rocket’s lazy loading feature is highly customizable. You can enable it for images, iframes (including embedded YouTube or Vimeo videos), and even replace video placeholders with a preview thumbnail to further reduce initial load. The plugin also includes a “Threshold” setting that determines how far ahead of the viewport media should start loading, preventing blank spaces during fast scrolling. For business websites that use background images, CSS backgrounds can also be lazy loaded with a dedicated option. Additionally, WP Rocket excludes specific images or videos from lazy loading if needed—such as the first image in a blog post (which often serves as a featured image) or critical logos that should display immediately. The result is a faster, more efficient browsing experience that keeps potential customers engaged without sacrificing visual quality.
To illustrate the cumulative impact of these three features on a typical business website, consider the following comparison:
By integrating WP Rocket into your business website, you are not just installing a plugin—you are implementing a holistic performance strategy. The combination of caching, file optimization, and lazy loading addresses the most common bottlenecks that plague WordPress sites. For business owners, this translates into higher conversion rates, lower bounce rates, and better search engine visibility. WP Rocket’s one-click setup and intuitive dashboard mean you can achieve these results without needing a developer, making it an indispensable tool for any serious online presence.
9. Akismet Anti-Spam – Filter Out Comment and Form Spam
For any business website, maintaining a clean, professional appearance is non-negotiable. Spam comments, fake form submissions, and fraudulent user registrations can clutter your site, damage credibility, and even pose security risks. Akismet Anti-Spam, developed by the team behind WordPress.com, is a powerful, automated solution that checks every comment and form submission against a global database of known spam patterns. It works silently in the background, saving you hours of manual moderation while keeping your site trustworthy and user-friendly. Unlike basic spam filters, Akismet learns from millions of sites worldwide, constantly updating its detection algorithms to catch even the most sophisticated spam attempts. For business owners who cannot afford to appear unprofessional, Akismet is an essential first line of defense.
Activating Akismet with an API Key
Akismet comes pre-installed with most WordPress installations, but it requires activation using a free or paid API key to start filtering spam. The process is straightforward and takes only a few minutes:
Locate Akismet in your plugins list – Navigate to Plugins > Installed Plugins in your WordPress dashboard. Find Akismet Anti-Spam and click “Activate.”
Connect to your WordPress.com account – After activation, you will see a notice prompting you to set up Akismet. Click the “Set up your Akismet account” button. This redirects you to Akismet’s website, where you can sign in with an existing WordPress.com account or create a new one.
Choose a plan – For personal blogs and small business sites, Akismet offers a free plan that covers basic spam filtering. Larger businesses, e-commerce stores, or high-traffic sites may benefit from paid plans (e.g., Plus or Enterprise), which include advanced analytics, spam reporting, and priority support. Select the plan that fits your needs.
Copy your API key – Once your account is set up, Akismet provides a unique API key. Copy this key to your clipboard.
Enter the API key in WordPress – Return to your WordPress dashboard and go to Settings > Akismet. Paste the API key into the designated field and click “Save Changes.”
Verify activation – A green confirmation message will appear, indicating that Akismet is now active. You can optionally configure additional settings, such as whether to automatically discard the worst spam or to show the number of approved comments.
Once activated, Akismet immediately begins scanning all incoming comments, trackbacks, and pingbacks. It works without slowing down your site, as the spam check happens via a lightweight API call to Akismet’s servers. For business websites, using a paid plan is often recommended because it provides more granular control and higher priority in the spam detection network, ensuring that legitimate customer inquiries are never mistakenly flagged.
Reviewing and Managing Spam Comments in Bulk
Akismet automatically moves suspected spam comments to a dedicated “Spam” folder in your WordPress dashboard, allowing you to review them before permanent deletion. This gives you full control while saving time. Here is how to manage spam comments efficiently:
Access the spam queue – Go to Comments > Spam in your WordPress admin panel. Here, you will see all comments that Akismet has flagged as spam, along with the original content, author name, and IP address.
Bulk actions for efficiency – To handle large volumes of spam, use the checkboxes next to each comment. Select multiple comments, then choose a bulk action from the dropdown menu:
Delete Permanently – Removes all selected spam comments from your database. This is the safest option for obvious spam (e.g., generic promotional links, gibberish, or repeated phrases).
Not Spam – Moves selected comments back to the “Pending” or “Approved” queue if Akismet made a mistake. This is rare but can happen with legitimate comments that contain unusual keywords.
Mark as Spam – Manually flags additional comments that Akismet may have missed, helping train the system for future accuracy.
Review false positives – Before mass-deleting, scan a few comments to ensure no genuine customer questions or feedback were incorrectly classified. Look for comments that reference your products, ask relevant questions, or contain real contact information.
Empty the spam folder periodically – Akismet automatically deletes spam older than 15 days (on most plans), but for active sites, it is good practice to empty the spam folder weekly. This reduces database clutter and keeps your site optimized.
Use the “History” feature – Paid Akismet plans include a spam history log, showing why a specific comment was flagged (e.g., known spam IP, link patterns, or keyword matches). This helps you understand and fine-tune filtering.
By regularly reviewing and bulk-managing spam, you ensure that your comment section remains a valuable space for customer interaction, while keeping your site free from unwanted noise. For businesses that receive hundreds of spam comments daily, this workflow is indispensable.
Blocking Spam in Contact Forms and User Registrations
Akismet’s spam protection extends beyond traditional comments. It can also filter spam submissions from contact forms and user registration pages, provided you use compatible plugins. This is critical for business websites, where spam form submissions can flood your inbox with fake inquiries or malicious content. Here is how to set up and maximize this protection:
Integrate with popular form plugins – Akismet works seamlessly with form builders like Contact Form 7, WPForms, Gravity Forms, and Ninja Forms. To enable spam filtering for a specific form, look for a setting like “Akismet Anti-Spam” or “Enable Akismet spam filtering” within the form’s configuration. For example, in WPForms, you can add an Akismet field in the form builder, which automatically checks submissions against the spam database.
Configure user registration spam protection – If your business site allows user registration (e.g., for membership areas, forums, or customer portals), Akismet can block spam accounts. In your WordPress settings, go to Settings > Discussion and ensure the option “Comment author must have a previously approved comment” is unchecked if you want new registrations to be filtered. Then, install a plugin like “WP User Registration” or “Ultimate Member” that supports Akismet integration. In the plugin’s settings, enable Akismet spam checks for registration forms.
Monitor spam in form submissions – Unlike comments, form submissions are not stored in the WordPress spam folder. Instead, Akismet silently discards or marks them as spam within the form plugin’s database. Check your form plugin’s “Entries” or “Submissions” section to review any flagged entries. Most plugins provide a “Spam” tab where you can view and delete these submissions.
Adjust sensitivity for forms – Paid Akismet plans allow you to set spam sensitivity levels for forms. For high-traffic business sites, a stricter setting may be beneficial to block even borderline spam. However, be cautious: overly aggressive filtering can block legitimate customer inquiries, especially those with links or unusual phrasing. Start with the default setting and adjust based on feedback.
Combine with CAPTCHA for extra security – While Akismet is highly effective, adding a CAPTCHA (e.g., Google reCAPTCHA or hCaptcha) to your forms provides an additional layer of protection against automated bots. This is especially useful for registration forms or quote request forms where spam volume is high.
By extending Akismet to contact forms and user registrations, you eliminate the most common entry points for spam on your business website. This not only saves you time but also protects your team from wading through fake leads or malicious submissions. For businesses that rely on form submissions for sales inquiries or customer support, this feature alone can be transformative.
In summary, Akismet Anti-Spam is a low-maintenance, high-impact plugin that preserves the professionalism and functionality of your business website. From effortless activation to bulk spam management and form protection, it handles the dirty work so you can focus on growing your business. When paired with a reliable form plugin and occasional manual reviews, Akismet becomes an invisible guardian that keeps your site clean, secure, and trusted by real customers.
10. Smush – Optimize Images for Faster Loading
Images are often the heaviest elements on a business website. High-resolution product photos, team headshots, and background graphics can quickly bloat page size, leading to slow load times that frustrate visitors and harm search engine rankings. Smush, a leading image optimization plugin for WordPress, addresses this challenge directly. It compresses and resizes images without sacrificing visual quality, improving page speed and reducing bandwidth usage for your business site. By integrating Smush into your workflow, you ensure that every image serves its purpose efficiently—delivering crisp visuals while keeping your site lean and fast. This plugin is particularly valuable for ecommerce stores, portfolio sites, and any business that relies on visual content to engage customers. Beyond speed gains, Smush helps maintain a professional user experience, as research consistently shows that even a one-second delay in load time can reduce conversions by significant margins. For businesses where every second counts, Smush is not just a nice-to-have—it is an essential tool for performance and cost management.
Bulk compressing existing images in your media library
One of Smush’s most powerful features is its ability to bulk compress every image already stored in your WordPress media library. This is a critical step for any established business site that may have accumulated hundreds or thousands of unoptimized images over time. Without this feature, you would need to manually download, compress, and re-upload each file—a process that is impractical for most organizations. Smush automates the job with a single click, applying lossless or lossy compression to reduce file sizes by up to 60% or more, depending on your settings.
The bulk compression process is straightforward and designed for efficiency:
Scan your library: Smush first analyzes all images in your media library, identifying those that have not been optimized. It provides a clear count of images pending compression, so you know the scope of work.
Choose compression level: You can select between “Basic” (lossless, no visible quality loss) and “Super” (lossy, higher compression with minimal visual impact) modes. For most business sites, the Super mode offers an excellent balance of file size reduction and image fidelity.
Process in batches: Smush compresses images in manageable batches to avoid server timeouts. You can monitor progress in real time, with a progress bar showing how many images have been optimized and how much space has been saved.
Review results: After completion, Smush displays a summary of total savings, including the percentage reduction in file size for each image. This data helps you quantify the performance improvements.
For businesses with large media libraries, bulk compression can dramatically reduce page load times across your entire site. For example, a photography portfolio with 1,000 high-resolution images might see a 40–50% reduction in total image weight, translating to faster page loads and lower hosting costs. Smush also preserves image metadata and EXIF data when needed, so you do not lose important information like copyright details or camera settings. This feature is especially useful for businesses in creative industries where image provenance matters.
While bulk compression handles your existing library, automatic compression on upload ensures that every new image added to your site is optimized from the moment it is saved. This proactive approach prevents the accumulation of unoptimized files and maintains consistent performance gains over time. For business teams that regularly add product images, blog graphics, or marketing materials, this automation eliminates the risk of forgetting to compress images manually.
Configuring automatic compression in Smush is simple and flexible:
Enable in settings: Within the Smush dashboard, you toggle on the “Auto Smush” option. This activates compression for every image uploaded via the WordPress media uploader, including those added through third-party tools like page builders or custom post types.
Set compression preferences: You can choose between the same Basic or Super compression modes used in bulk processing. Many businesses opt for Super mode to maximize savings, but you can adjust based on your quality requirements.
Customize for specific image sizes: Smush allows you to enable or disable automatic compression for different image sizes generated by WordPress (e.g., thumbnail, medium, large). This is useful if you want to prioritize optimization for full-size images while leaving smaller thumbnails untouched.
Resize on upload: In addition to compression, Smush can automatically resize oversized images to a maximum width and height you define. For instance, if your theme displays images at 1200px wide, you can set Smush to resize any image larger than that to 1200px, reducing file size before compression even begins.
The benefits of automatic compression extend beyond speed. By reducing file sizes at the point of upload, you also lower bandwidth consumption for your hosting account, which can lead to cost savings on metered plans. Moreover, this feature works silently in the background, so your team does not need to learn new workflows or remember extra steps. For a busy business, this seamless integration is invaluable—it guarantees that your site remains optimized without manual oversight. Additionally, Smush integrates with popular caching plugins and CDNs, ensuring that compressed images are delivered efficiently to users worldwide.
Lazy loading images to defer offscreen files
Lazy loading is a technique that delays the loading of images until they are about to enter the user’s viewport. This means that images below the fold—those not immediately visible when a page loads—are not downloaded until the user scrolls down to see them. Smush includes a built-in lazy loading feature that is simple to activate and highly effective for improving initial page load times, especially on content-rich business pages like product catalogs, blogs, or landing pages.
Key aspects of Smush’s lazy loading implementation include:
Feature
Description
Benefit for Business Sites
Automatic activation
Toggle on lazy loading in Smush settings without coding. It works with all standard WordPress image formats, including featured images and gallery images.
Reduces initial page weight by up to 50% on pages with many images, such as product listings or portfolio pages.
Compatibility with themes and plugins
Smush’s lazy loading is designed to work with most WordPress themes and page builders, including Divi, Elementor, and Gutenberg. It also supports WooCommerce product galleries.
Ensures seamless integration with your existing site setup, avoiding conflicts that could break image display.
Customizable loading behavior
You can adjust the threshold for when images start loading (e.g., load images 200px before they enter the viewport) and choose to exclude specific images or post types.
Allows fine-tuning for user experience—images load just in time, preventing blank spaces while maintaining speed.
Fallback for older browsers
Smush includes a JavaScript fallback that ensures images still load in browsers that do not support native lazy loading.
Maintains accessibility and functionality for all users, regardless of their browser version.
Performance monitoring
The plugin provides a simple dashboard indicator showing how many images are lazy-loaded on each page, helping you track effectiveness.
Gives business owners visibility into the impact of lazy loading on page speed metrics.
Lazy loading is especially beneficial for business websites that have long-scrolling pages, such as homepages with multiple sections, service pages with image-heavy descriptions, or online stores with large product grids. By deferring offscreen images, the browser can focus on rendering critical content first—like your headline, call-to-action buttons, and navigation—leading to faster perceived performance. This can improve key metrics like First Contentful Paint (FCP) and Largest Contentful Paint (LCP), both of which are used by Google’s Core Web Vitals to assess user experience. For businesses, better Core Web Vitals scores can translate to higher search rankings and lower bounce rates.
Smush’s lazy loading also respects user privacy by not tracking or collecting data—a consideration for businesses that need to comply with regulations like GDPR. The feature works alongside other optimization techniques, such as caching and content delivery networks, to deliver a comprehensive speed strategy. When combined with Smush’s compression and resizing capabilities, lazy loading ensures that your business site loads quickly on all devices, from desktop computers to mobile phones, where bandwidth may be limited.
The Ultimate Guide to WordPress Plugin Development
Introduction to WordPress Plugin Development
WordPress powers over 40% of all websites on the internet, and its flexibility comes largely from its plugin architecture. A plugin is a package of code that extends or modifies the core functionality of a WordPress site without altering the core files. This means you can add features—from simple contact forms to complex e-commerce systems—while keeping the core secure and updatable. For developers, plugin creation is both a technical craft and a way to solve real-world problems for millions of users. Before diving into code, understanding the foundational concepts will save you time, prevent common mistakes, and set you up for success.
What Is a WordPress Plugin and Why Build One?
A WordPress plugin is essentially a collection of PHP files, often accompanied by CSS, JavaScript, and assets, that hooks into the WordPress core via actions and filters. Unlike a theme, which controls presentation, a plugin focuses on functionality. It can be as small as a single function that adds a custom meta box or as large as a full-featured membership system. The key principle is that plugins should be self-contained, modular, and easy to deactivate without breaking the site.
Why build a plugin instead of adding code to a theme’s functions.php file? First, plugins are portable—you can use them across different themes. Second, they are maintainable: updates and debugging are isolated. Third, they respect the separation of concerns, which is a best practice in software development. Common reasons to build a plugin include:
Adding custom post types or taxonomies (e.g., “Portfolio” or “Testimonials”)
Creating shortcodes or widgets for reusable content
Integrating third-party APIs (e.g., payment gateways, social platforms)
Building admin interfaces for site settings or user management
Optimizing performance through caching, database queries, or image handling
Whether you are building for your own site, a client, or the public repository, the goal is to write clean, secure, and scalable code that follows WordPress coding standards.
Understanding the WordPress Plugin Repository and Licensing
If you plan to distribute your plugin, the WordPress Plugin Repository at wordpress.org/plugins is the primary channel. It hosts thousands of free plugins and provides a built-in update mechanism. To host your plugin there, you must meet specific requirements:
Licensing: Your plugin must be licensed under GPLv2 or later. This is because WordPress itself is GPL-licensed, and derivative works (plugins) must be compatible. You can choose a GPL-compatible license like MIT or BSD, but the repository strongly recommends GPLv2.
Naming and slug: Choose a unique, descriptive name that does not infringe on trademarks. The slug (URL-friendly version) must be available.
Code quality: No obfuscated code, backdoors, or malicious functionality. The repository team reviews submissions for security and standards compliance.
Documentation: Include a readme.txt file with a description, installation instructions, changelog, and FAQ. This file follows the WordPress readme standard (using headers like === Plugin Name ===).
For commercial plugins, you can still use the GPL license but sell the plugin on your own site. Many developers offer a free version on the repository and a premium version with advanced features. Licensing affects not only distribution but also how others can use and modify your code. Understanding this upfront prevents legal issues later.
Essential Tools and Environment Setup for Plugin Development
Before writing your first line of code, set up a development environment that mimics a production server. This ensures your plugin works reliably and you can test safely. Here is a list of essential tools and recommended practices:
Tool
Purpose
Recommendation
Local server
Run WordPress on your computer
LocalWP, XAMPP, MAMP, or Docker
Code editor
Write and edit PHP, CSS, JS
VS Code with WordPress snippets, PhpStorm
Version control
Track changes and collaborate
Git with GitHub or GitLab
Debugging tool
Identify errors and warnings
Query Monitor, WP_DEBUG constant
Database manager
View and edit database tables
Adminer, phpMyAdmin
Browser developer tools
Inspect HTML, CSS, JS, and network requests
Chrome DevTools, Firefox Developer Tools
Additionally, enable debugging in your wp-config.php file during development:
This logs errors to a wp-content/debug.log file, helping you catch issues early. For environment setup, follow these steps:
Install a local server environment (e.g., LocalWP) and create a new WordPress site.
Set up a plugin folder inside wp-content/plugins/. Create a subfolder for your plugin (e.g., my-first-plugin).
Create the main plugin file (e.g., my-first-plugin.php) with a plugin header comment. This is required for WordPress to recognize it.
Initialize a Git repository in your plugin folder for version control.
Install a code editor with PHP linting and syntax highlighting.
A typical plugin header looks like this:
<?php
/**
* Plugin Name: My First Plugin
* Plugin URI: https://example.com/my-first-plugin
* Description: A simple plugin to demonstrate development basics.
* Version: 1.0.0
* Author: Your Name
* Author URI: https://example.com
* License: GPL v2 or later
* Text Domain: my-first-plugin
*/
This header tells WordPress the plugin’s name, version, and metadata. Without it, the plugin will not appear in the admin plugins list.
Finally, adopt a consistent file structure. A well-organized plugin might include:
This structure keeps your code maintainable and scalable. With these tools and setup in place, you are ready to start coding. The next step is understanding hooks—actions and filters—which are the backbone of WordPress plugin development. They allow you to modify core behavior without editing core files, ensuring compatibility and upgrade safety.
Setting Up Your Development Environment
A robust development environment is the foundation of efficient and reliable WordPress plugin creation. Without a proper setup, you risk conflicts between live sites, lost code, and hours of debugging preventable issues. This section provides a step-by-step guide to configuring a local environment, selecting essential tools, and implementing version control from the start.
Choosing a Local Server Environment (XAMPP, MAMP, Local by Flywheel)
Every WordPress plugin must be tested in a safe, offline space before deployment. A local server environment mimics a live web server on your computer, allowing you to install WordPress, activate plugins, and debug without affecting a public site. The three most popular options cater to different operating systems and skill levels.
XAMPP (Cross-Platform)
XAMPP is a free, open-source package that includes Apache, MySQL, PHP, and phpMyAdmin. It works on Windows, macOS, and Linux, making it a versatile choice for developers who switch operating systems. Its control panel allows you to start and stop services with a single click.
Pros: Fully customizable, lightweight, and widely documented.
Cons: Requires manual configuration for multiple WordPress installations; not optimized for performance.
Best for: Developers comfortable with server administration or those needing a non-WordPress-specific environment.
MAMP (macOS, Windows)
MAMP (macOS, Apache, MySQL, PHP) provides a pre-configured local server with a simple GUI. The pro version adds features like dynamic host names and email catching. It is particularly user-friendly on macOS.
Pros: Easy installation, quick start, and built-in PHP version switching.
Cons: The free version limits you to one virtual host; pro version is paid.
Best for: Beginners and developers who want a plug-and-play solution without deep server tweaks.
Local by Flywheel (Cross-Platform)
Local is a modern, WordPress-specific local development tool. It automates the entire setup: creating a site, configuring SSL, and providing a one-click admin login. It also includes features like live links for sharing your local site with clients.
Pros: Built for WordPress, supports multiple PHP versions, and integrates with Git and WP-CLI.
Cons: Heavier than XAMPP; some advanced server configurations are hidden behind the interface.
Best for: Dedicated WordPress developers who want speed and convenience.
Feature
XAMPP
MAMP
Local by Flywheel
OS Support
Windows, macOS, Linux
macOS, Windows
Windows, macOS, Linux
WordPress-Specific
No
No
Yes
PHP Version Switching
Manual
Built-in (Pro)
Built-in
SSL Setup
Manual
Manual
One-click
Cost
Free
Free (Pro paid)
Free
Installing and Configuring WordPress for Plugin Testing
Once your local server is running, you need a dedicated WordPress installation for plugin development. Avoid using a production or staging site for testing raw code. Instead, create a clean instance that you can reset quickly.
Step 1: Create a Database
Open phpMyAdmin (or your server’s database tool). Create a new database with a name like plugin_dev. Use utf8mb4_general_ci as the collation to support emoji and special characters.
Step 2: Download and Configure WordPress
Download the latest WordPress zip from wordpress.org. Extract it into your server’s document root (e.g., htdocs for XAMPP, Sites for MAMP, or a Local site folder). Rename the folder to something descriptive like plugin-test.
Open wp-config-sample.php and rename it to wp-config.php.
Fill in the database details: DB_NAME (your database name), DB_USER (usually root), DB_PASSWORD (blank in XAMPP/Local, root in MAMP).
Add security keys from the WordPress API (api.wordpress.org/secret-key/1.1/salt/) and paste them into the file.
Set the table prefix to something other than wp_ (e.g., dev_) to mimic real-world security practices.
Step 3: Run the Installation
Navigate to http://localhost/plugin-test in your browser. Follow the five-minute installation: choose your language, enter a site title, username, password, and email. Use a test email like dev@example.com.
Step 4: Configure for Plugin Testing
After installation, adjust these settings in the WordPress admin:
Permalinks: Go to Settings > Permalinks and select “Post name.” This ensures your plugin’s rewrite rules work correctly.
Debugging Mode: Open wp-config.php and add or modify these lines above the “That’s all” comment:
This logs errors to a wp-content/debug.log file without displaying them on the screen.
Plugin Folder: Create a folder called my-plugin inside wp-content/plugins/. This is where your plugin’s main file will live.
Step 5: Create a Base Plugin File
Inside my-plugin, create my-plugin.php with the following header:
<?php
/**
* Plugin Name: My Plugin
* Plugin URI: https://example.com
* Description: A test plugin for development.
* Version: 1.0.0
* Author: Your Name
* License: GPL v2 or later
*/
Activate this plugin from the WordPress admin. You now have a functional testing ground.
Using Git and GitHub for Version Control and Collaboration
Version control is non-negotiable for serious plugin development. Git tracks every change, allows you to revert mistakes, and enables collaboration with other developers. GitHub provides a remote repository for backup and team workflows.
Initializing a Git Repository
Open your terminal or command line, navigate to your plugin folder (cd /path/to/plugin-test/wp-content/plugins/my-plugin), and run:
git init
This creates a hidden .git folder that tracks your plugin’s history.
Creating a .gitignore File
Prevent unnecessary files from being tracked. Create a .gitignore file in your plugin root with these entries:
# Operating system files
.DS_Store
Thumbs.db
# IDE files
.idea/
.vscode/
# WordPress core and environment files (if accidentally copied)
wp-config.php
wp-content/uploads/
wp-content/debug.log
# Build artifacts (if using Webpack or Grunt)
node_modules/
dist/
Making Your First Commit
Stage all your plugin files and commit them with a descriptive message:
git add .
git commit -m "Initial commit: base plugin structure with main file"
Connecting to GitHub
Log into GitHub and create a new repository (do not initialize it with a README or .gitignore).
Copy the remote URL (e.g., https://github.com/yourusername/my-plugin.git).
In your terminal, add the remote and push your code:
git remote add origin https://github.com/yourusername/my-plugin.git
git push -u origin main
Best Practices for Plugin Development with Git
Commit often: Make small, logical commits after each functional change (e.g., “Add custom post type registration” rather than “Work on stuff”).
Use branches: Create a branch for each feature or bug fix (git checkout -b feature/admin-menu). Merge back into main only after testing.
Write clear commit messages: Use the imperative tense (e.g., “Fix fatal error on activation” not “Fixed fatal error”).
Tag releases: When you reach a stable version, tag it with a version number:
git tag -a v1.0.0 -m "First stable release"
git push origin v1.0.0
Collaborate with pull requests: On GitHub, have team members fork your repository, make changes in a branch, and submit a pull request for review.
Debugging Integration with Git
Combine Git with your debugging tools. For example, if WP_DEBUG_LOG reveals an error, you can use git blame to see which commit introduced the problematic code:
git blame my-plugin.php
This shows the author, date, and commit hash for each line, making it easy to isolate and revert issues.
By setting up a proper local environment, configuring WordPress for testing, and adopting Git with GitHub, you establish a professional workflow that prevents data loss, simplifies collaboration, and accelerates development. These practices will serve you throughout the entire lifecycle of your plugin, from the first line of code to the final release.
WordPress Plugin Architecture and Hooks
At the heart of WordPress plugin development lies a powerful and elegant system known as hooks. Understanding this architecture is not just a technical requirement; it is the philosophical foundation of how plugins interact with WordPress core, themes, and other plugins. A hook allows your plugin to “hook into” specific points in the WordPress execution process, either to perform an action or to modify data. This decoupled architecture ensures that plugins can extend functionality without modifying core files, preserving updateability and stability.
WordPress plugins are essentially self-contained packages of PHP code that, when activated, integrate into the WordPress ecosystem through hooks. The primary components of a plugin’s architecture include the main plugin file (which contains the plugin header), optional subdirectories for includes, assets, templates, and languages, and a robust implementation of hooks. The magic happens when your plugin registers callbacks with the WordPress hook system, allowing it to listen for and respond to specific events or filter specific data.
To visualize the flow, consider the WordPress execution sequence. As WordPress loads, it fires numerous hooks at predictable stages—before headers are sent, after the query is parsed, when content is displayed, and many others. Your plugin’s code does not need to be executed from start to finish; instead, it registers its intentions with these hooks and waits for the appropriate moment to act. This event-driven architecture is what makes WordPress so extensible.
Understanding Actions and Filters in WordPress
WordPress provides two distinct types of hooks: actions and filters. While they share a common mechanism, their purposes and usage patterns differ fundamentally.
Actions are hooks that allow you to add custom functionality at specific points during WordPress execution. When an action hook is fired, any functions hooked to it are executed. Actions are ideal for tasks such as:
Sending an email when a user registers
Adding custom meta boxes to the post editor screen
Enqueuing scripts and styles on the front end
Performing cleanup tasks when a post is deleted
For example, to send a notification when a new post is published, you would use the publish_post action hook:
Filters, on the other hand, allow you to modify data before it is used or displayed. Filters accept a value, optionally modify it, and return the modified value. They are used for tasks such as:
Modifying the content of a post before it is displayed
The key distinction: actions do something (they perform a task), while filters return something (they modify data). Both are essential, and understanding when to use each is critical for clean, maintainable plugin code.
Creating Custom Hooks to Extend Your Plugin
One of the hallmarks of a well-architected plugin is its extensibility. By creating your own custom hooks, you allow other developers (or your future self) to modify or extend your plugin’s behavior without editing its core files. This practice promotes modularity and encourages a thriving ecosystem around your plugin.
To create a custom action hook, use the do_action() function at the point where you want others to be able to inject code. For example, suppose you are building a plugin that processes a payment. You might fire an action after the payment is successful:
Now, any other plugin or theme can hook into my_plugin_after_payment to perform additional tasks, such as sending a custom receipt or updating a CRM.
Similarly, you can create custom filter hooks using apply_filters(). This function accepts the value you want to be filtered, plus any additional arguments. For instance, if your plugin generates a report, you might allow others to modify the report data:
When creating custom hooks, follow these guidelines:
Best Practice
Rationale
Use a unique prefix (e.g., my_plugin_)
Prevents conflicts with other plugins and core
Document the hook clearly
Helps other developers understand parameters and expected return values
Pass all relevant parameters
Enables developers to make informed modifications
Return filtered values consistently
Ensures type safety and predictable behavior
By providing custom hooks, you transform your plugin from a closed black box into an open, collaborative tool that can adapt to diverse use cases.
Best Practices for Hook Priority and Removal
Mastering hook priority and removal is essential for avoiding conflicts and ensuring your plugin works harmoniously with others. Every hook registered with add_action() or add_filter() accepts a priority parameter—an integer that determines the order in which callbacks are executed. The default priority is 10. Lower numbers execute earlier; higher numbers execute later.
Why does priority matter? Consider a scenario where multiple plugins modify the same filter, such as the_content. If Plugin A adds a
wrapper at priority 10, and Plugin B adds a shortcode parser at priority 5, the shortcodes will be parsed first, then wrapped. If the priorities were reversed, the wrapper might break the shortcode parsing. Choosing the right priority ensures that modifications happen in the intended sequence.
Here are key practices for managing priority:
Use standard priorities for standard tasks. For most modifications, priority 10 is appropriate. Only deviate when you need to ensure your code runs before or after a specific callback.
Test with common plugins. If your plugin modifies content or queries, test it alongside popular plugins (e.g., SEO, caching) to identify priority conflicts.
Document your priority choices. In comments, explain why you chose a particular priority, especially if it is non-default.
Sometimes, you need to remove a hook that was added by another plugin or theme. WordPress provides remove_action() and remove_filter() for this purpose. To remove a hook, you must know the exact function name, the hook name, and the priority used when it was added. For example, to remove a function that adds a copyright notice to the footer:
You must call remove_action()after the target hook was added, typically at a later priority or in a later action
Object-oriented callbacks
For methods, you must pass an array of the object instance and method name; static methods require the class name
Anonymous functions
Cannot be removed because they have no function name; always use named functions for hooks you may need to remove
Closure compatibility
If a hook was added with a closure, you cannot remove it without access to the original closure variable
Additionally, you can remove all hooks from a specific action or filter by using remove_all_actions() or remove_all_filters(). Use these with extreme caution, as they can break other plugins. Always check if the hook is critical to WordPress core functionality before removing all callbacks.
By respecting priority and judiciously removing hooks when necessary, you ensure that your plugin integrates smoothly into the broader WordPress ecosystem, coexisting with other extensions without conflict.
Writing Secure and Efficient Plugin Code
When developing a WordPress plugin, the quality of your code determines not only its functionality but also its resilience against attacks and its impact on site performance. Writing secure and efficient code is not an afterthought—it is a foundational practice that protects users, preserves server resources, and ensures your plugin integrates seamlessly into the WordPress ecosystem. This section covers three critical pillars: sanitizing and validating user input, escaping output to prevent XSS vulnerabilities, and optimizing database queries with caching strategies. By mastering these principles, you will produce plugins that are both robust and performant.
User input is the most common attack vector in WordPress plugins. Any data that originates from a user—whether from a form, a URL parameter, a file upload, or an API request—must be treated as untrusted. The two core processes for handling input are sanitization (cleaning the data) and validation (checking that the data meets specific criteria).
Sanitization removes or modifies harmful content from input. WordPress provides a set of built-in functions that handle common input types. For example:
sanitize_text_field() — Strips HTML tags, removes line breaks, and encodes special characters. Use for plain text inputs.
sanitize_email() — Removes all characters except letters, digits, and allowed symbols (@, ., -, +).
sanitize_html_class() — Ensures the value is a valid HTML class (alphanumeric, hyphens, underscores).
sanitize_key() — Converts to lowercase and removes all non-alphanumeric characters except underscores and dashes.
absint() — Converts a value to a non-negative integer. Useful for IDs.
Validation goes a step further by confirming that input matches expected patterns. Use WordPress validation functions like:
is_email() — Returns true if the string is a valid email address.
is_numeric() — Checks if the value is a number.
in_array() — Useful for checking against a whitelist of allowed options.
preg_match() — For custom patterns, such as usernames or dates.
Always validate after sanitizing. For example, when processing a form that accepts a user ID:
Never trust $_POST, $_GET, $_REQUEST, or $_SERVER data directly. Always pass them through the appropriate sanitization and validation functions. For complex data like arrays, use filter_input() or recursive sanitization helpers. Remember: sanitization reduces risk, but validation enforces your business logic.
Escaping Output to Prevent XSS Vulnerabilities
Cross-Site Scripting (XSS) attacks occur when untrusted data is rendered in the browser without proper escaping. Even if you sanitize input, you must still escape output because data may come from a database, an API, or a third-party source that was not sanitized. The golden rule: escape everything that is not hardcoded.
WordPress provides context-specific escaping functions. Choose the right one based on where the data will appear:
Context
Function
Use Case
HTML attribute
esc_attr()
Outputting a value inside a tag attribute like class, id, or data-*.
HTML element
esc_html()
Displaying plain text inside HTML tags (e.g., paragraph, span).
URL
esc_url()
Outputting a URL in an href or src attribute. Strips dangerous protocols.
JavaScript
esc_js()
Outputting a string inside inline JavaScript. Use sparingly; prefer external scripts.
Textarea
esc_textarea()
Outputting text inside a <textarea> element. Encodes quotes and entities.
HTML (with allowed tags)
wp_kses()
Outputting rich text where you want to allow specific HTML tags (e.g., <b>, <i>).
When outputting data that includes HTML you trust (e.g., from the WordPress editor), use wp_kses_post() which allows a safe set of tags. Never use echo $data without escaping—this is the most common XSS vulnerability. For dynamic JavaScript variables, pass data via wp_localize_script() and escape with esc_js() or json_encode().
Remember: escaping is not optional. Even if you trust the data source, always escape on output. This practice protects your users and your plugin’s reputation.
Optimizing Database Queries and Caching Strategies
Performance is a competitive advantage. Poorly written database queries are the leading cause of slow WordPress sites. To write efficient plugin code, you must optimize how you interact with the database and implement caching where appropriate.
Optimizing Database Queries
WordPress uses the $wpdb class for custom queries. Follow these principles:
Use the WordPress Query API when possible. Functions like WP_Query, get_posts(), and get_users() are optimized and cached by default. Write custom SQL only when necessary.
Limit results. Use 'posts_per_page' or LIMIT in SQL to avoid fetching thousands of rows.
Select only needed columns. Avoid SELECT *. Specify fields: $wpdb->get_results( "SELECT ID, post_title FROM $wpdb->posts WHERE ..." );
Use indexes. Ensure your custom tables have indexes on columns used in WHERE, JOIN, and ORDER BY clauses.
Prepare all SQL statements. Use $wpdb->prepare() to prevent SQL injection and improve readability.
Always clear caches when data changes. Use delete_transient() or wp_cache_delete() inside hooks like save_post or user_register. Also consider using persistent object caching (e.g., Redis or Memcached) for production sites. By combining optimized queries with intelligent caching, your plugin will scale gracefully even on high-traffic sites.
Secure, efficient code is not just a technical requirement—it is a commitment to your users. By sanitizing and validating input, escaping output, and optimizing database interactions, you build plugins that perform reliably and resist attacks. These practices are the hallmark of professional WordPress development.
Building Admin Pages and Settings
WordPress plugin development often requires giving site administrators a place to configure your plugin’s behavior. The admin interface—the dashboard—provides the perfect environment for this. By creating custom admin pages, settings menus, and options, you empower users to control your plugin without touching code. This section walks you through the process using WordPress’s built-in APIs, ensuring your settings are secure, validated, and easy to maintain. Whether you need a simple checkbox or a complex array of options, the principles remain consistent: use the right hooks, follow the Settings API conventions, and always sanitize user input.
Adding Menu Pages and Submenu Pages
The first step in building an admin interface is registering a new page in the WordPress admin menu. This is done using the admin_menu action hook and functions like add_menu_page() and add_submenu_page(). A menu page appears as a top-level item in the sidebar, while submenu pages appear under existing menu items (like Settings or Tools) or under your own top-level menu.
Here is a basic example of adding a top-level menu page:
function myplugin_add_admin_menu() {
add_menu_page(
'My Plugin Settings', // Page title
'My Plugin', // Menu title
'manage_options', // Capability required
'my-plugin-slug', // Menu slug
'myplugin_admin_page_html', // Callback function
'dashicons-admin-generic', // Icon URL or Dashicon
25 // Position in menu
);
}
add_action( 'admin_menu', 'myplugin_add_admin_menu' );
function myplugin_admin_page_html() {
// Output the page content here
echo '<div class="wrap"><h1>My Plugin Settings</h1></div>';
}
To add a submenu page under an existing menu, such as the Settings menu, use add_options_page() (a wrapper for add_submenu_page() with the ‘options-general.php’ parent slug):
You can also add submenus under your own top-level menu using add_submenu_page() with your parent slug. This is useful for organizing multiple configuration screens:
function myplugin_add_submenu_pages() {
add_submenu_page(
'my-plugin-slug', // Parent slug
'Settings', // Page title
'Settings', // Menu title
'manage_options',
'my-plugin-settings',
'myplugin_settings_page_html'
);
}
add_action( 'admin_menu', 'myplugin_add_submenu_pages' );
When adding menu pages, always check the capability parameter. Using manage_options restricts access to administrators. For more granular control, consider custom capabilities or user roles.
Using the Settings API to Register and Validate Options
The WordPress Settings API provides a standardized way to manage option data. It handles the creation of settings sections, fields, and the crucial task of validation and sanitization. Without the Settings API, you would need to manually process form submissions and handle security—a recipe for bugs and vulnerabilities.
Always use a sanitization callback to clean data before saving. Functions like sanitize_text_field(), absint(), and wp_kses() are your friends.
The settings_fields() function outputs nonces, action fields, and other hidden inputs for security.
Use do_settings_sections() to output all registered sections and fields automatically.
For complex configurations, store options as arrays (as shown above) rather than multiple individual options.
Creating Custom Meta Boxes for Post and Page Editing
Meta boxes allow you to add custom fields to the post and page editing screens. They are essential for plugins that extend content with metadata—like custom SEO fields, gallery settings, or content scheduling. The add_meta_box() function and the save_post hook are the core tools.
Here is a typical example that adds a simple text field to all post types:
// Add meta box
function myplugin_add_meta_box() {
$screens = array( 'post', 'page' ); // Target specific post types
foreach ( $screens as $screen ) {
add_meta_box(
'myplugin_meta_box_id', // HTML ID
'Custom Meta Box', // Title
'myplugin_meta_box_html', // Callback
$screen, // Screen (post type)
'side', // Context: normal, side, advanced
'default' // Priority
);
}
}
add_action( 'add_meta_boxes', 'myplugin_add_meta_box' );
// Render meta box HTML
function myplugin_meta_box_html( $post ) {
$value = get_post_meta( $post->ID, '_myplugin_meta_key', true );
wp_nonce_field( 'myplugin_save_meta', 'myplugin_meta_nonce' );
?>
<label for="myplugin_meta_field">Enter custom value:</label>
<input type="text" id="myplugin_meta_field" name="myplugin_meta_field" value="<?php echo esc_attr( $value ); ?>" style="width:100%;" />
<?php
}
// Save meta box data
function myplugin_save_meta_box_data( $post_id ) {
// Verify nonce
if ( ! isset( $_POST['myplugin_meta_nonce'] ) || ! wp_verify_nonce( $_POST['myplugin_meta_nonce'], 'myplugin_save_meta' ) ) {
return;
}
// Check autosave
if ( defined( 'DOING_AUTOSAVE' ) && DOING_AUTOSAVE ) {
return;
}
// Check permissions
if ( ! current_user_can( 'edit_post', $post_id ) ) {
return;
}
// Sanitize and save
if ( isset( $_POST['myplugin_meta_field'] ) ) {
$sanitized_value = sanitize_text_field( $_POST['myplugin_meta_field'] );
update_post_meta( $post_id, '_myplugin_meta_key', $sanitized_value );
}
}
add_action( 'save_post', 'myplugin_save_meta_box_data' );
For more complex meta boxes—such as those with multiple fields, repeatable groups, or conditional logic—consider these practices:
Store as an array in a single meta key, e.g., _myplugin_data with fields like ['title', 'description'].
Repeatable groups
Use JavaScript to clone field groups, then save as a serialized array. Validate each item.
Conditional visibility
Add CSS classes and use JavaScript to show/hide fields based on other values.
File uploads
Use wp_handle_upload() and store the attachment ID via media_handle_sideload().
Always prefix your meta keys with an underscore (e.g., _myplugin_meta_key) to hide them from the custom fields dropdown in the editor, unless you explicitly want users to edit them directly.
By mastering admin pages, the Settings API, and meta boxes, you create a professional, secure, and user-friendly plugin. These tools are the foundation of any plugin that requires configuration or metadata, and they integrate seamlessly with WordPress’s existing UI patterns. Always test your code with different user roles and post types to ensure compatibility and security.
Working with Custom Post Types and Taxonomies
Custom post types and taxonomies are foundational to extending WordPress beyond its default content structures. While WordPress natively supports posts, pages, and media, registering custom post types allows you to create distinct content entities—such as products, portfolios, testimonials, or event listings—each with its own set of attributes, capabilities, and administrative interfaces. Taxonomies, in turn, provide a flexible way to group and classify this content, whether through hierarchical categories or non-hierarchical tags. This section provides a comprehensive guide to registering custom post types and taxonomies, covering essential arguments for labels, capabilities, and seamless integration with existing WordPress features. You will also learn how to display custom content using archive and single templates, ensuring your plugin delivers a polished, user-facing experience.
Registering Custom Post Types with register_post_type()
The core function for creating a custom post type is register_post_type(), which must be called during the init action hook. This function accepts two parameters: a unique post type key (typically in lowercase with underscores, e.g., 'product') and an array of arguments that define its behavior. Below is the standard structure for registering a custom post type, followed by a detailed breakdown of the most important arguments.
labels: An array of human-readable labels for the WordPress admin UI. Always define labels for better user experience, especially if your plugin is multilingual. The 'name' and 'singular_name' are mandatory; others like 'menu_name' and 'all_items' improve navigation.
public: When set to true, the post type is visible in the admin menu and on the front end. This automatically enables several other arguments, but you can override them individually.
has_archive: Enables a post type archive page at the slug specified in rewrite. For example, setting this to true with a slug of 'products' creates an archive at yoursite.com/products/.
rewrite: Controls the URL structure. Use 'slug' to set a custom base, and 'with_front' => false to remove the default permalink prefix if needed.
supports: An array of built-in features for the post editor. Common options include 'title', 'editor', 'thumbnail', 'excerpt', 'custom-fields', 'comments', and 'revisions'. Omit any you don’t need to streamline the editing experience.
menu_icon: A Dashicon class or custom icon URL. Refer to the Dashicons library for available options.
capability_type: Defines the base capability for the post type, typically 'post' or 'page'. For granular control, use an array like array( 'product', 'products' ) to generate capabilities such as edit_product and edit_products.
map_meta_cap: When set to true, WordPress maps primitive capabilities (like edit_post) to meta capabilities based on user roles and ownership. This is essential for custom post types with distinct permission needs.
show_in_rest: Enables the REST API endpoint, which is required for the block editor and headless WordPress setups. Set to true for modern development.
publicly_queryable: Allows front-end requests for individual posts. Usually mirrors the public argument.
Best practices for registration:
Always prefix your post type key and function names to avoid conflicts with other plugins or themes.
Flush rewrite rules after registering a new post type by visiting Settings > Permalinks and clicking “Save Changes,” or call flush_rewrite_rules() during plugin activation only.
Use the 'register_meta_box_cb' argument to hook in custom meta boxes for additional fields, or rely on supports for built-in options.
Creating Custom Taxonomies and Linking Them to Post Types
Custom taxonomies allow you to organize custom post types into groups or tags. The function register_taxonomy() works similarly to register_post_type() and must also be called on init. A taxonomy can be hierarchical (like categories) or non-hierarchical (like tags). Below is an example of registering a hierarchical taxonomy called “Product Categories” and linking it to the “product” post type.
hierarchical: Set to true for a category-like taxonomy (parent-child relationships) or false for a tag-like taxonomy. This affects the admin UI, with hierarchical taxonomies displaying a checkbox list and non-hierarchical ones showing a text input with autocomplete.
show_admin_column: When true, adds a column for this taxonomy in the post type list table in the admin area. This is highly recommended for usability.
capabilities: Custom capabilities for managing taxonomy terms. The default 'manage_terms' maps to manage_categories, but you can define custom ones for granular access control. Ensure these are added to appropriate user roles via add_role() or map_meta_cap.
show_in_rest: Enables the taxonomy in the REST API and block editor. Always set to true for modern workflows.
rewrite: Defines the URL base for taxonomy archives. For example, with a slug of 'product-category', a term “electronics” would be accessible at yoursite.com/product-category/electronics/.
Linking multiple taxonomies to a post type: You can pass an array of post type keys as the second parameter of register_taxonomy(), or use the 'object_type' argument when registering via register_taxonomy_for_object_type() after both are registered. For example, to add the same taxonomy to both “product” and “portfolio” post types:
Register taxonomies after the post types they are linked to, but within the same init hook to avoid order-dependent issues.
Use descriptive labels that match the post type’s naming convention. For example, “Product Categories” pairs naturally with a “Products” post type.
Consider using 'show_in_quick_edit' => true to allow bulk assignment of terms from the post list table.
Displaying Custom Content with Archive and Single Templates
Once custom post types and taxonomies are registered, you need to create template files to display their content on the front end. WordPress follows a template hierarchy that automatically selects the appropriate file based on the query. For custom post types, you can override default templates by placing files in your theme or, more commonly for plugins, by using conditional logic in your plugin’s output.
Template hierarchy for custom post types:
Template File
Purpose
archive-{posttype}.php
Displays the archive list for a custom post type (e.g., archive-product.php)
single-{posttype}.php
Displays a single post of the custom post type (e.g., single-product.php)
taxonomy-{taxonomy}.php
Displays a taxonomy term archive (e.g., taxonomy-product_category.php)
tag-{taxonomy}.php
Displays a non-hierarchical taxonomy term archive (e.g., tag-featured_tag.php)
Plugin-based template loading: Since plugin templates should not rely on theme files, use the template_include filter to load custom templates from your plugin directory. Below is a robust example that checks for the post type and loads the appropriate template from a templates folder inside your plugin.
WordPress shortcodes and widgets are two of the most powerful tools in a plugin developer’s arsenal. They allow you to inject dynamic, reusable functionality into posts, pages, and sidebars without requiring users to write any code. Shortcodes are ideal for embedding content or logic directly within the editor, while widgets enable drag-and-drop placement in widgetized areas like sidebars and footers. This section covers how to create both, from simple shortcodes with parameters to fully featured custom widgets using the WP_Widget class, and how to render them in theme templates for maximum flexibility.
Building Dynamic Shortcodes with Parameters
Shortcodes are essentially macros that expand into HTML or other output when the post or page is rendered. The key to making them useful is accepting parameters, which allow users to customize behavior without modifying the plugin code. WordPress provides a straightforward API for registering and handling shortcodes.
To create a shortcode, you define a callback function and register it with add_shortcode(). The callback receives three arguments: the attributes array ($atts), the enclosed content (if any), and the shortcode tag. For dynamic shortcodes, you’ll parse attributes using shortcode_atts() to set defaults and sanitize inputs.
Consider a shortcode that displays a list of recent posts. A basic implementation might look like this:
Always return output, never echo it: Shortcodes must return a string to be properly positioned in the content.
Sanitize and validate parameters: Use intval(), sanitize_text_field(), and similar functions to prevent injection.
Enclose content when needed: For shortcodes that wrap text (e.g., [highlight]text[/highlight]), use the $content parameter and apply do_shortcode() if nested shortcodes are allowed.
Use shortcode_atts(): This merges user attributes with defaults and filters them through the shortcode_atts_{$shortcode} hook for extensibility.
To make shortcodes even more powerful, you can support multiple parameter types—booleans, integers, strings, and even arrays (by passing comma-separated values). For example, a shortcode for a gallery might accept ids="1,2,3" and convert it to an array with explode().
Developing Custom Widgets Using the WP_Widget Class
Widgets extend functionality to sidebars and other widget areas through a drag-and-drop interface. WordPress provides the WP_Widget class, which you extend to create custom widgets. The class requires you to implement four methods: __construct(), widget(), form(), and update().
Here’s a complete example of a custom widget that displays a list of recent posts with a configurable title and count:
Use $args['before_widget'] and $args['after_widget']: This ensures compatibility with theme markup.
Sanitize and validate in update(): Store only clean data; never trust user input.
Escape output in form(): Use esc_attr() and esc_html() to prevent XSS.
Apply filters: Use apply_filters( 'widget_title', ... ) to allow child themes or other plugins to modify output.
Cache queries if needed: For high-traffic sites, consider using WordPress transients to store widget output.
Rendering Shortcodes and Widgets in Theme Templates
While shortcodes are primarily used in the editor and widgets in sidebars, both can be rendered directly in theme template files. This is especially useful when you want to embed plugin functionality in custom page templates, headers, footers, or other non-widgetized areas.
Rendering shortcodes in templates
To output a shortcode in a template file, use the do_shortcode() function. This processes the shortcode string and returns the rendered output. For example, to display the recent posts shortcode from earlier:
Avoid nested do_shortcode() calls: WordPress already processes shortcodes recursively, so wrapping content in do_shortcode() is usually sufficient.
Use sparingly: Overuse can lead to performance issues if the shortcode runs expensive queries.
Consider direct function calls: If the shortcode’s logic is simple, you might refactor it into a helper function that both the shortcode and template can call directly.
Rendering widgets in templates
Widgets can be displayed outside widget areas using the the_widget() function. This function instantiates a widget and renders it with optional arguments. For the Recent Posts Widget:
Alternatively, you can use register_widget() and then display the widget area using dynamic_sidebar(). However, the_widget() gives you fine-grained control over placement and parameters without requiring a registered sidebar.
Performance considerations
When rendering shortcodes or widgets in templates, be mindful of query duplication. If a shortcode runs a WP_Query and the template also runs its own query, you may double the database load. Use wp_reset_postdata() after custom queries, and consider caching the output using transients or object caching for repeated calls.
Another best practice is to check if the shortcode or widget is already being rendered elsewhere. For example, if a shortcode is used both in a post and in a template on the same page, you might want to prevent duplicate output by using a static flag:
function recent_posts_shortcode( $atts ) {
static $rendered = false;
if
Handling AJAX and REST API in Plugins
Modern WordPress plugins increasingly rely on asynchronous interactions and API-driven data exchange to deliver seamless, app-like experiences. Whether you are building a real-time notification system, a dynamic form, or a headless front-end, mastering AJAX and the WordPress REST API is essential. This section provides a deep dive into implementing admin and front-end AJAX handlers, creating custom REST API endpoints, and securing these requests with nonces and permissions checks. By the end, you will have the techniques to build interactive features that are both powerful and secure.
Implementing Admin and Front-End AJAX Handlers
WordPress offers two distinct pathways for handling AJAX requests: one for the admin area and another for the front-end. Both rely on the admin-ajax.php file as the endpoint, but they differ in how actions are registered and how users are authenticated.
Admin AJAX Handlers are typically used for dashboard-specific tasks such as saving settings, managing users, or triggering background processes. To create an admin AJAX handler, you hook into the wp_ajax_{action} action. The {action} part is a unique identifier you define. For example, if your action is save_plugin_settings, you would use wp_ajax_save_plugin_settings. This hook only fires for logged-in users.
add_action( 'wp_ajax_save_plugin_settings', 'myplugin_save_settings_callback' );
function myplugin_save_settings_callback() {
// Verify nonce and permissions
check_ajax_referer( 'myplugin_settings_nonce', 'nonce' );
if ( ! current_user_can( 'manage_options' ) ) {
wp_die( 'Unauthorized user.' );
}
// Process the data
$option_value = sanitize_text_field( $_POST['option_value'] );
update_option( 'myplugin_custom_option', $option_value );
wp_send_json_success( array( 'message' => 'Settings saved.' ) );
}
Front-End AJAX Handlers enable functionality for visitors or logged-in users on the public-facing site. To handle requests from both authenticated and unauthenticated users, you must register two hooks: one for logged-in users (wp_ajax_{action}) and one for logged-out users (wp_ajax_nopriv_{action}). This is critical for features like search, load-more buttons, or voting systems.
When enqueuing JavaScript for front-end AJAX, always localize the script with the ajaxurl variable and the nonce. For admin pages, ajaxurl is already defined globally.
Always use wp_die() at the end of AJAX callbacks to prevent extra output.
Sanitize and validate all inputs using functions like sanitize_text_field(), intval(), or wp_kses_post().
Use wp_send_json_success() and wp_send_json_error() to return structured JSON responses.
Creating Custom REST API Endpoints
The WordPress REST API provides a standardized, route-based way to expose plugin data and functionality. Custom endpoints are registered using the register_rest_route() function, typically within a callback hooked to rest_api_init. Each route requires a namespace, a route string, and an array of arguments defining methods, callbacks, and permissions.
Return data consistently using WP_REST_Response for success and WP_Error for errors. This ensures compatibility with client libraries and standard API tooling.
Securing AJAX and REST Requests with Nonces and Permissions
Security is non-negotiable when handling asynchronous requests. Both AJAX and REST API endpoints must verify that requests are legitimate and that the user has appropriate capabilities. Nonces prevent cross-site request forgery (CSRF), while permissions checks ensure authorization.
Nonces for AJAX are generated using wp_create_nonce() and verified with check_ajax_referer(). The nonce should be passed in the JavaScript request data and validated before any processing. Use a unique action string for each distinct AJAX operation.
// JavaScript side
$.post( myplugin_ajax.ajax_url, {
action: 'myplugin_save_settings',
nonce: myplugin_ajax.nonce,
option_value: $('#option-field').val()
}, function( response ) {
if ( response.success ) {
alert( response.data.message );
}
} );
// PHP side
add_action( 'wp_ajax_myplugin_save_settings', function() {
check_ajax_referer( 'myplugin_settings_nonce', 'nonce' );
// ... process data
} );
Nonces for REST API are handled differently. The REST API uses a nonce passed via the X-WP-Nonce header. WordPress automatically includes this header in requests made using the built-in apiFetch function or when wp_localize_script() exposes the nonce via wpApiSettings.nonce. For custom JavaScript, you can set the header manually.
Permissions checks go beyond nonces. In AJAX handlers, use current_user_can() to verify user roles or capabilities. In REST API endpoints, the permission_callback argument is the correct place to enforce access control. Common permission checks include:
Capability
Typical Use Case
manage_options
Admin settings pages
edit_posts
Creating or editing content
publish_posts
Publishing or scheduling
delete_others_posts
Deleting any user's content
read
Viewing public data (often combined with nonce)
For REST endpoints that should be publicly accessible (e.g., fetching a list of products), use __return_true as the permission callback, but still implement nonce verification if the endpoint modifies data. Never trust user input—always validate and sanitize parameters even after permission checks.
Use capability checks rather than role checks (current_user_can( 'edit_posts' ) vs. current_user_can( 'administrator' )) for better flexibility.
Return appropriate
Internationalization and Localization
In an increasingly globalized web, making your WordPress plugin accessible to users around the world is not just a courtesy—it is a competitive advantage. Internationalization (often abbreviated as i18n) is the process of designing your plugin’s code so it can be adapted to various languages and regions without engineering changes. Localization (l10n) is the subsequent process of translating the internationalized plugin into specific languages. Together, they ensure your plugin speaks the user’s language, literally and culturally. This guide covers the essential best practices for making your plugin translatable, including the proper use of text domains, generating .pot files, and loading language files correctly.
WordPress provides a robust system for translation based on GNU gettext. The core mechanism involves wrapping translatable strings in special functions, creating a template file (POT) for translators, and then distributing compiled language files (MO) alongside your plugin. Neglecting these steps can break a site’s language consistency or, worse, cause fatal errors. Below we break down each critical component.
Preparing Strings for Translation with __() and _e()
The foundation of plugin internationalization lies in how you write your strings within PHP code. WordPress offers several functions to mark strings as translatable. The two most fundamental are __() and _e(). Both accept the same parameters—the string to translate and the text domain—but differ in output: __() returns the translated string, while _e() echoes it directly.
Key translation functions you will use:
__($text, $domain) — Returns the translated string.
_e($text, $domain) — Echoes the translated string.
esc_html__($text, $domain) — Returns the translated string with HTML entities escaped (safe for use in HTML attributes).
esc_html_e($text, $domain) — Echoes the translated string with HTML escaped.
esc_attr__($text, $domain) — Returns the translated string for use in an attribute value.
esc_attr_e($text, $domain) — Echoes the translated string for attribute values.
_n($single, $plural, $number, $domain) — Handles pluralization based on the number passed.
_x($text, $context, $domain) — Provides context for disambiguation when a string has multiple meanings.
Best practices for string preparation:
Always use a text domain. The text domain is a unique identifier for your plugin’s translations. It must match the slug used in the plugin header and when loading language files. For example, if your plugin is called "My Awesome Plugin," the text domain might be my-awesome-plugin.
Do not use variables for the string itself. The first parameter of __() should be a literal string. Variables inside the string cannot be parsed by translation tools. If you need dynamic content, use placeholders with sprintf().
Escape output appropriately. Even in translation functions, always escape for the context. Use esc_html__() for general text, esc_attr__() for attributes, and esc_html_e() for echoed output.
Handle plurals and context. Use _n() for strings that change based on quantity, and _x() for words like "post" (noun vs. verb) where context is needed.
Avoid concatenation. Instead of breaking a sentence into parts, write it as a single string with placeholders. This gives translators the full context.
echo sprintf( _n( 'You have %s message', 'You have %s messages', $count, 'my-plugin' ), number_format_i18n( $count ) );
echo __( 'Click here', 'my-plugin' );
echo esc_html__( 'Click here', 'my-plugin' );
By consistently applying these functions, your plugin becomes a candidate for translation. The next step is to generate the template file that translators will use.
Creating and Updating Language Files (PO/MO)
Once your strings are properly wrapped, you need to create a Portable Object Template (POT) file. This file serves as the master list of all translatable strings in your plugin. Translators use it to create language-specific Portable Object (PO) files, which they then compile into Machine Object (MO) files for WordPress to read.
Tools for generating POT files:
WP-CLI: The command-line tool wp i18n make-pot is the recommended method for modern development. It scans your plugin directory and outputs a POT file. Example: wp i18n make-pot /path/to/plugin /path/to/plugin/languages/my-plugin.pot
Poedit: A cross-platform desktop application that can generate POT files from source code. It provides a visual interface for scanning and editing translations.
Grunt or Gulp plugins: Task runners like grunt-wp-i18n can automate POT generation in your build process.
Online tools: Some services allow you to upload your plugin and generate a POT, but manual verification is recommended.
Step-by-step process for creating and updating language files:
Generate the initial POT file. Place it in a dedicated languages folder inside your plugin root. Name the file your-text-domain.pot. For example, /wp-content/plugins/my-plugin/languages/my-plugin.pot.
Create language-specific PO files. Translators take the POT file and create a PO file for their language, e.g., my-plugin-de_DE.po for German. The PO file contains both the original strings and their translations.
Compile PO to MO. Using Poedit, WP-CLI (wp i18n make-mo), or a build tool, convert each PO file into a binary MO file. WordPress uses MO files at runtime for performance.
Update the POT file regularly. As you add or change translatable strings, regenerate the POT file. Use wp i18n make-pot with the --skip-js flag if you have no JavaScript translations. Then, translators can use tools like Poedit’s "Update from POT" to merge new strings into existing PO files.
Best practices for file management:
Store all language files in a single languages subdirectory within your plugin.
Name files using the standard WordPress locale format: {text-domain}-{locale}.po and {text-domain}-{locale}.mo (e.g., my-plugin-es_ES.po).
Include the POT file in your plugin’s repository so anyone can contribute translations.
Never edit MO files directly; always work with the PO source.
Use version control for PO files to track translation changes over time.
With your language files prepared, the final step is to ensure WordPress loads them at the right time.
Loading Text Domains Correctly in Your Plugin
Loading the text domain is the mechanism by which your plugin tells WordPress, "Here are my translations, please use them." This must happen early in the plugin lifecycle, typically on the init hook or, for plugins, within the main plugin file. The function load_plugin_textdomain() is the standard method, but load_theme_textdomain() exists for themes.
How to load the text domain:
function my_plugin_load_textdomain() {
load_plugin_textdomain(
'my-plugin', // Text domain
false, // Deprecated parameter, always false
dirname( plugin_basename( __FILE__ ) ) . '/languages' // Path to language files
);
}
add_action( 'init', 'my_plugin_load_textdomain' );
Important considerations:
Use the init hook. While some developers use plugins_loaded, the init hook is safer because it runs after all plugins are loaded and the locale is fully determined. However, if your plugin needs translations during activation or very early hooks, you can call load_plugin_textdomain() directly before add_action().
Match the text domain exactly. The first parameter must match the text domain used in your translation functions and the file names (e.g., my-plugin).
Specify the correct path. The third parameter tells WordPress where to find the MO files. Using dirname( plugin_basename( __FILE__ ) ) . '/languages' is the recommended pattern. For plugins in a subdirectory, adjust accordingly.
Check if the text domain is already loaded. Use is_textdomain_loaded( 'my-plugin' ) to avoid duplicate loading, especially if you have multiple entry points.
Handle JavaScript translations separately. If your plugin enqueues JavaScript files with translatable strings, use wp_set_script_translations() to load JSON-based translation files. Example: wp_set_script_translations( 'my-script-handle', 'my-plugin', plugin_dir_path( __FILE__ ) . 'languages' );
Common pitfalls to avoid:
Pitfall
Why It Breaks
Fix
Loading text domain too late (e.g., after admin menu is registered)
Strings in admin menus appear in the default language.
Load text domain on init or earlier.
Mismatched text domain in load_plugin_textdomain()
Translations are never applied; strings remain untranslated.
Ensure the domain matches exactly.
Using absolute path instead of relative
Breaks when site URL changes or in multisite setups.
Always use plugin_basename() or plugin_dir_path().
Forgetting to load text domain in AJAX or REST handlers
Strings in those contexts are not translated.
Call load_plugin_textdomain() early, or ensure it runs on all hooks.
Not including the Text Domain header in plugin file
WordPress may not recognize the domain
Deploying, Marketing, and Maintaining Your Plugin
Releasing a WordPress plugin is an achievement, but publication marks the beginning of its lifecycle. To transform a functional plugin into a trusted tool, you must navigate submission requirements, implement professional versioning, and cultivate a community of users through responsive support. This section covers the final crucial steps: submitting to the WordPress Plugin Directory, managing updates transparently, and iterating based on real-world feedback.
Submitting to the WordPress Plugin Directory: Requirements and Process
The official WordPress Plugin Directory is the primary distribution channel for free plugins. Gaining inclusion demands strict adherence to guidelines. Before submission, ensure your plugin meets these non-negotiable requirements:
Licensing: Your plugin must be 100% GPLv2 or later compatible. All included assets (code, images, documentation) must either be your own or use a GPL-compatible license.
No Malicious Code: The directory scans for obfuscated code, backdoors, or any functionality that harms users or websites. All code must be open and readable.
Slug Uniqueness: Your plugin slug (the directory URL name) must be unique and descriptive. Check availability at wordpress.org/plugins before building your readme.
Readme.txt Format: A properly formatted readme.txt file using the WordPress plugin readme standard is mandatory. It must include a stable tag, description, installation instructions, FAQ, and changelog.
No External Services Without Disclosure: If your plugin connects to external APIs or services, you must clearly state this in the readme and plugin description. Users must know what data is sent and why.
Security Standards: Follow WordPress coding standards: escape output, sanitize input, use nonces, and never execute direct database queries without prepared statements.
The submission process follows a clear workflow:
Create a Subversion (SVN) Repository: The directory uses SVN, not Git. You will need an SVN client (like TortoiseSVN or command-line tools) to upload your plugin files. Request a new plugin repository via your WordPress.org profile.
Prepare Your Assets: Include a banner image (772x250 pixels for default, 1544x500 for retina), an icon (128x128 pixels), and optional screenshots. All images should be PNG or JPG.
Upload Initial Version: Use SVN to commit your plugin trunk (the development version) and create a tags folder with a version-specific subfolder (e.g., /tags/1.0.0/). The readme.txt stable tag must match this version.
Submit for Review: Go to the WordPress Plugin Directory submission page, enter your plugin slug, and submit. An automated system performs initial checks, then a human reviewer examines your code, readme, and assets.
Address Feedback: Reviewers may request changes for security, documentation, or guideline compliance. Respond promptly in the submission ticket. Once approved, your plugin is live.
Common pitfalls include missing readme sections, incorrect stable tags, and failing to declare third-party resources. Test your submission checklist thoroughly before uploading to avoid rejection delays.
Users expect seamless updates that do not break their sites. Adopting semantic versioning (SemVer) provides clarity: MAJOR.MINOR.PATCH. For example, version 2.1.3 indicates a major rewrite (2), a new feature (1), and a bug fix (3).
Versioning Best Practices:
Version Change
When to Use
Example
Major
Breaking backward compatibility, major architectural changes
3.0.0
Minor
New features, significant enhancements
2.5.0
Patch
Bug fixes, security patches, minor performance improvements
2.5.1
Changelogs are your contract with users. Every release must include a changelog entry in your readme.txt. Structure each entry with the version number, release date, and bullet points of changes. Use clear language:
Fixed: Corrected database query error on user profile pages.
Added: New shortcode attribute for custom CSS classes.
Changed: Improved AJAX loading speed by 40%.
Removed: Deprecated function old_feature().
Automated Updates are handled by WordPress core when your plugin is in the directory. To ensure smooth updates:
Always update the readme.txt stable tag to match the new version.
Commit the new version to both trunk and a new tag folder (e.g., /tags/2.0.1/).
Test the update process on a staging site: ensure database migration scripts run only once, and that old settings are preserved.
Use the upgrader_process_complete hook to perform post-update actions like clearing caches.
For premium plugins distributed outside the directory, implement a custom update checker using the WordPress HTTP API. Provide a JSON endpoint that returns version data and package URLs. Always sign updates with a hash to prevent tampering.
Gathering Feedback and Iterating Based on User Reviews
User reviews are a goldmine for improvement and a public testament to your plugin's quality. Encourage feedback through multiple channels, but treat WordPress.org reviews as primary due to their visibility.
Strategies for Collecting Feedback:
In-plugin prompts: After a successful update or after the plugin has been active for 30 days, display a non-intrusive notice inviting users to leave a review. Include a direct link to your plugin's review page.
Support forums: Actively monitor the WordPress.org support forum for your plugin. Respond to every thread within 24-48 hours, even if only to acknowledge the issue.
Email surveys: If you collect email addresses (with consent), send a quarterly survey asking about feature requests and pain points.
Social media and GitHub: For plugins with a development repository, use issue templates to standardize bug reports and feature requests.
How to Iterate Based on Reviews:
Not all feedback is equal. Prioritize based on frequency and impact:
Categorize issues: Group reviews into bugs, feature requests, usability complaints, and documentation gaps.
Quantify severity: A bug causing white screen errors on 5% of installs is critical. A request for a color picker is a minor enhancement.
Create a roadmap: Use a public-facing changelog or a "Coming Soon" section in your readme to show users you are listening. For example: "Planned for version 3.1: Custom post type support as requested by multiple users."
Respond to reviews: On WordPress.org, reply to both positive and negative reviews. Thank users for positive feedback. For negative reviews, apologize, explain what caused the issue, and describe how you fixed it. This demonstrates accountability and often converts critics into advocates.
Release iteratively: Do not bundle too many changes in one release. Issue patch updates quickly for critical bugs, then collect feedback on minor releases before a major version.
Handling Difficult Feedback:
Some reviews may be unfair or based on user error. Always remain professional. Offer to troubleshoot via the support forum. If a review violates WordPress.org guidelines (e.g., profanity, off-topic), flag it for moderation. Never argue publicly; resolve issues privately through support.
Maintaining a plugin is an ongoing commitment. By submitting correctly, versioning transparently, and iterating with user input, you build trust and longevity. A well-maintained plugin earns higher ratings, more installs, and a loyal user base that fuels future development.
How to Use WordPress REST API for Headless CMS: A Comprehensive Guide
Introduction to Headless CMS and the WordPress REST API
The modern web demands flexibility, speed, and seamless user experiences across devices. Traditional content management systems (CMS) often couple the backend—where content is created and stored—with the frontend—where it is displayed. While this works for many sites, it can limit scalability, performance, and the ability to use modern JavaScript frameworks. Enter the headless CMS, a decoupled architecture that separates content management from presentation. When paired with the WordPress REST API, you can leverage WordPress’s powerful editing interface while building a custom frontend with tools like React, Vue, or Next.js. This guide explains how to use WordPress REST API for headless CMS, starting with the foundational concepts.
What Is a Headless CMS and Why Use It?
A headless CMS is a content management system that focuses solely on storing and delivering content via an API, without dictating how that content is displayed. The term “headless” refers to the removal of the frontend “head” (the presentation layer). Instead of rendering pages on the server or outputting HTML directly, the CMS provides structured data—typically in JSON format—through a REST or GraphQL API. This data is then fetched by a separate frontend application, which handles all user interface logic.
The core idea is decoupling: the backend manages content, users, permissions, and workflows, while the frontend handles design, interactivity, and performance. Unlike traditional WordPress, where themes and templates control output, a headless setup treats WordPress as a content repository.
Why choose this architecture? Here are the key reasons:
Frontend freedom: Build with any technology stack—React, Angular, Svelte, or even native mobile apps—without being constrained by WordPress theme structures.
Improved performance: Static site generators (e.g., Gatsby, Next.js) can pre-render pages from API data, delivering near-instant load times and reducing server load.
Enhanced security: The frontend and backend are separate, so attacks on the frontend don’t directly expose the WordPress admin or database.
Scalability: Content delivery can be handled by CDNs, while the backend remains isolated and manageable. Traffic spikes on the frontend don’t necessarily affect content editing.
Omnichannel publishing: The same API can serve content to websites, mobile apps, IoT devices, and more, ensuring consistency across platforms.
For example, a news organization might use WordPress to manage articles, images, and categories, then use the REST API to push content to a React-based website, an iOS app, and a smart display—all from a single source of truth.
Overview of the WordPress REST API Endpoints
The WordPress REST API is a built-in feature (introduced in WordPress 4.7) that exposes the site’s content and functionality through predictable HTTP endpoints. Each endpoint corresponds to a specific resource type (posts, pages, users, comments, taxonomies, etc.) and supports standard CRUD operations (Create, Read, Update, Delete) using HTTP methods like GET, POST, PUT, PATCH, and DELETE.
Endpoints follow a consistent URL structure, typically starting with /wp-json/wp/v2/. For example:
/wp-json/wp/v2/posts – retrieve or create blog posts
/wp-json/wp/v2/pages – retrieve or create pages
/wp-json/wp/v2/categories – retrieve or create categories
/wp-json/wp/v2/tags – retrieve or create tags
/wp-json/wp/v2/users – retrieve or create users
/wp-json/wp/v2/media – retrieve or upload media files
Each endpoint returns JSON data. For instance, a GET request to /wp-json/wp/v2/posts returns an array of post objects, each containing fields like id, title, content, excerpt, date, author, categories, and featured_media. You can filter results using query parameters:
Parameter
Example
Description
per_page
?per_page=10
Number of items per page (default 10)
page
?page=2
Page number for pagination
categories
?categories=5,12
Filter by category ID(s)
search
?search=keyword
Search posts by keyword
orderby
?orderby=date
Sort by field (date, title, slug, etc.)
_embed
?_embed
Include linked resources (author, featured media, etc.)
Beyond the core endpoints, the API supports custom post types, custom fields (meta), and even authentication for private content. For example, if you register a custom post type named “book,” it automatically gets an endpoint at /wp-json/wp/v2/book. This extensibility makes WordPress a versatile headless backend for any content model.
Benefits of Decoupling WordPress from the Frontend
Decoupling WordPress—using it solely as a headless CMS—offers distinct advantages that go beyond what a traditional monolithic WordPress site can provide. While it introduces some complexity (separate hosting, API management, frontend development), the payoff is significant for projects that need performance, flexibility, or multi-platform delivery.
Below are the primary benefits, organized for clarity:
Performance optimization: A headless frontend can be built as a static site, with pages pre-rendered at build time. This eliminates database queries on each request and allows content to be served from a CDN. For dynamic content, the frontend can fetch only what it needs via the API, reducing overhead.
Developer experience: Frontend developers can use modern tools, version control, and build pipelines without touching WordPress PHP code. The API provides a clean, language-agnostic interface, enabling teams to work in parallel.
Content reuse: The same WordPress content can power a website, a mobile app, an email newsletter, or a voice assistant. You write once, and the API delivers it everywhere.
Security isolation: The WordPress admin area can be locked down behind a VPN or IP whitelist, while the public-facing frontend runs on separate infrastructure. Even if the frontend is compromised, the content database remains protected.
Future-proofing: If you later decide to change your frontend framework (e.g., from React to Vue), you only need to rebuild the frontend. The backend and content remain unchanged, as long as the API contract is maintained.
Simplified hosting: The WordPress backend can run on a simple, low-cost server, while the frontend can be deployed on a high-performance platform like Vercel, Netlify, or AWS. This often reduces overall hosting costs.
Consider a real-world scenario: a corporate website with a blog, product pages, and a knowledge base. In a traditional setup, every page load triggers WordPress PHP execution and database queries. In a headless setup, the blog posts and product data are fetched via the REST API at build time, generating static HTML. The result is a site that loads in milliseconds, scales effortlessly, and still allows editors to update content through the familiar WordPress dashboard. The API handles the rest.
This decoupled approach is not a silver bullet—it requires careful planning for authentication, caching, and real-time updates—but for many projects, the benefits far outweigh the trade-offs. Understanding how to use WordPress REST API for headless CMS begins with grasping these foundational concepts, which set the stage for practical implementation.
Before you can harness the power of the WordPress REST API for a headless CMS, you must ensure your environment meets the necessary technical requirements and that basic configuration steps are completed correctly. This section walks you through the foundational setup, from installing WordPress to confirming that the REST API is fully operational. Proper preparation here will save you troubleshooting time later and ensure seamless communication between your frontend application and the WordPress backend.
WordPress Installation and Permalink Configuration
The first prerequisite is a working WordPress installation. You can use a local development environment (such as Local by Flywheel, XAMPP, or MAMP) or a live server. For headless development, a standard WordPress installation suffices; no special hosting configuration is required beyond the usual PHP and MySQL support. Ensure you are running WordPress version 4.7 or higher, as the REST API was integrated into core starting with that version. For optimal performance and security, use the latest stable release.
After installation, the most critical configuration step is setting your permalinks to something other than the default “Plain” structure. The REST API relies on clean URLs to function correctly. To do this:
Log in to your WordPress admin dashboard.
Navigate to Settings > Permalinks.
Select a permalink structure other than “Plain.” Common choices for headless setups include “Post name” or “Day and name.”
Click Save Changes.
This action triggers a rewrite of your .htaccess file (on Apache servers) or updates the web server configuration (on Nginx). Clean permalinks ensure that API endpoints like /wp-json/wp/v2/posts are accessible. Without this step, the REST API may return 404 errors or fail to route requests properly. If you are using Nginx, you may need to manually add rewrite rules to your server block; most hosting environments handle this automatically.
Ensuring REST API Is Enabled (No Required Plugins)
One of the strengths of the WordPress REST API is that it is enabled by default in WordPress 4.7 and later. You do not need to install any additional plugins to activate the API. However, it is important to verify that nothing is disabling it. Some security plugins or custom code can inadvertently block API access. To confirm the API is active:
Check for disabling plugins: Temporarily deactivate any security, caching, or performance plugins that might interfere. Common culprits include Wordfence, iThemes Security, and W3 Total Cache. If the API works after deactivation, adjust the plugin settings to allow API requests.
Review .htaccess or server rules: Ensure no rewrite rules are blocking requests to /wp-json/. Some hosting providers may have default rules that restrict access.
Inspect functions.php: Look for custom code that might remove REST API endpoints, such as remove_action('rest_api_init', 'your_function');. If present, comment it out during development.
If you are using a multisite network, each subsite has its own REST API endpoints (e.g., /wp-json/wp/v2/sites/2/posts). The API remains enabled by default on all sites unless explicitly disabled. No additional configuration is needed for multisite beyond standard permalink settings.
Testing API Accessibility via Browser or cURL
Once your WordPress installation is ready and permalinks are configured, the next step is to verify that the REST API responds correctly. You can test this directly from your browser or using a command-line tool like cURL. This confirms that your setup is operational before you begin building your headless frontend.
Browser test:
Open a web browser and navigate to http://your-site.com/wp-json/.
If the API is working, you will see a JSON object containing site metadata, such as the site name, description, URL, and available routes (e.g., /wp/v2/posts, /wp/v2/pages).
If you see a blank page, a 404 error, or an HTML response, something is misconfigured. Double-check your permalink settings and ensure no plugins are blocking the API.
cURL test (command line):
curl -X GET http://your-site.com/wp-json/
This command returns the same JSON payload as the browser test. For a more specific test, try fetching posts:
curl -X GET http://your-site.com/wp-json/wp/v2/posts
If successful, you will see a JSON array of recent posts. Common issues at this stage include:
Error
Likely Cause
Solution
404 Not Found
Permalinks not set to a clean structure
Go to Settings > Permalinks and select “Post name”
301 Redirect
Site URL mismatch or SSL configuration
Update Site URL in Settings > General or configure HTTPS
Empty JSON array
No posts exist or REST API is partially disabled
Add a test post and verify; check for filtering plugins
HTML response instead of JSON
Plugin or theme conflict
Deactivate all plugins and switch to a default theme (e.g., Twenty Twenty-Four)
After confirming that the API returns data, you can proceed to explore endpoints, authentication methods, and custom post types. This initial setup ensures that your headless CMS foundation is solid, allowing you to focus on building a decoupled frontend without backend surprises. Remember to re-enable any plugins you deactivated for testing, but configure them to allow REST API access if they were blocking it.
Understanding REST API Endpoints and Data Structures
To effectively use WordPress as a headless CMS, you must first understand the REST API’s endpoints and the data structures they return. The WordPress REST API exposes your site’s content through a predictable set of URLs (endpoints), each corresponding to a specific content type or action. By mastering these endpoints and the JSON responses they deliver, you can precisely control which data your front-end application retrieves, reducing bandwidth and improving performance. This section breaks down the core endpoints, explains how to read and manipulate the JSON output, and covers accessing custom post types and fields.
Core Endpoints: Posts, Pages, Taxonomies, and Users
The WordPress REST API provides dedicated endpoints for the most common content types. Each endpoint follows a consistent URL pattern, typically starting with /wp-json/wp/v2/. Below are the primary endpoints you will use when building a headless site.
To retrieve a specific post or page, append its ID to the endpoint, for example: /wp-json/wp/v2/posts/42. For taxonomies, you can list all terms or fetch a single term by ID. Users are exposed with limited data by default for security, but you can request additional fields if authenticated. Each endpoint supports filtering via query parameters, such as ?per_page=10 for pagination or ?categories=5 to filter posts by category ID.
When working with taxonomies, remember that categories and tags are hierarchical and non-hierarchical, respectively. The REST API respects this, returning a parent field for categories. For users, the endpoint returns core fields like id, name, slug, and avatar_urls. To include post counts or other meta, you may need to register additional fields (discussed later).
Reading the JSON Response: Fields, Embedded Data, and Pagination
Every REST API response returns a JSON object (or array for collections) containing structured data. Understanding this structure is essential for extracting exactly what your front-end needs. Below is a breakdown of the key fields in a typical post response.
id (integer): Unique identifier for the content item.
date (string): Publication date in ISO 8601 format (e.g., 2025-01-15T10:30:00).
title (object): Contains rendered (HTML-ready) and raw (plain text) versions.
content (object): Similar to title, with rendered and raw fields. The rendered version includes block markup.
excerpt (object): A short summary, also with rendered and raw.
slug (string): URL-friendly version of the title.
status (string): Typically publish, draft, or private.
featured_media (integer): The ID of the featured image (use the media endpoint to fetch details).
_links (object): Contains hypermedia links to related resources (author, collection, replies, etc.).
_embedded (object): Included when using the ?_embed parameter. Pre-populates related data like author, featured media, and term information.
To reduce the number of API calls, use the ?_embed parameter. For example, /wp-json/wp/v2/posts?_embed returns embedded author objects, featured media URLs, and term details directly within the post object. This is especially useful for headless setups where you need author names, avatar URLs, or category labels without making separate requests.
Pagination is handled via response headers and the _paging meta object (if using a plugin like WP REST API Pagination). The key headers are:
Header
Description
X-WP-Total
Total number of items in the collection (e.g., 150 posts).
X-WP-TotalPages
Total number of pages based on per_page (e.g., 15 pages with 10 per page).
Link
Contains URLs for next, prev, first, and last pages.
To navigate pagination, use the page query parameter: ?page=2. The default per_page is 10, but you can set it up to 100 (or higher with custom filters). For large collections, always implement pagination in your front-end to avoid overwhelming the client or server.
Field selection is another powerful feature. Use the _fields parameter to specify exactly which fields you want returned. For example, /wp-json/wp/v2/posts?_fields=id,title,excerpt returns only those three fields, drastically reducing payload size. This is critical for performance in headless applications, especially when fetching lists for menus or archive pages.
Accessing Custom Post Types and Custom Fields via REST
By default, the WordPress REST API only exposes built-in post types (posts, pages, attachments) and standard fields (title, content, excerpt). To use custom post types (CPTs) and custom fields (meta) in a headless setup, you must register them with REST API support. This requires editing your theme’s functions.php file or using a plugin like Advanced Custom Fields (ACF) with its REST API integration.
To register a custom post type with REST API support, include the show_in_rest and rest_base arguments when calling register_post_type(). Example:
After registration, your CPT will be accessible at /wp-json/wp/v2/projects. The endpoint behaves identically to posts and pages, supporting pagination, embedding, and field selection.
Custom fields (meta) require additional steps. By default, meta is not exposed in the REST API for security and performance reasons. To expose specific meta keys, use the register_rest_field() function or the register_post_meta() with show_in_rest set to true. For example, to expose a field called project_url for the project CPT:
For complex data structures (repeater fields, groups), consider using ACF Pro with its REST API plugin. ACF automatically exposes its fields as top-level keys in the REST response, making them easy to consume in JavaScript frameworks like React or Vue. When using ACF, ensure the field group is set to “Show in REST API” in the field group settings.
Finally, remember that custom taxonomies also need show_in_rest set to true. Register them with register_taxonomy() and include 'show_in_rest' => true and a 'rest_base' value. This allows your headless front-end to fetch terms and filter content by custom taxonomies, just as with built-in categories and tags.
Authentication Methods for Secure API Requests
When using WordPress as a headless CMS, authentication is the gatekeeper that determines who can read, create, update, or delete content through the REST API. Without proper authentication, your API is vulnerable to unauthorized access, data breaches, and spam. Choosing the right authentication method depends on your use case—whether you are serving public content, managing logged-in user sessions, or integrating external applications. This section details the primary authentication mechanisms available for the WordPress REST API: cookie-based authentication, application passwords, OAuth 1.0a, and JSON Web Tokens (JWT). Each method has distinct strengths, limitations, and ideal scenarios.
Cookie Authentication for Logged-In Users
Cookie authentication is the default method built into WordPress, designed primarily for users who are already logged into the WordPress admin or front-end. It relies on the standard WordPress login cookies—specifically the wordpress_logged_in_ and wp-settings-* cookies—to authenticate REST API requests. When a user logs in via the standard WordPress login form, these cookies are set in their browser. Subsequent API requests from the same browser automatically include these cookies, allowing WordPress to verify the user’s identity and permissions.
This method is ideal for scenarios where the same browser session is used for both the WordPress admin interface and a headless front-end, such as a custom admin dashboard or a private member area. It is also the simplest to implement because it requires no additional setup beyond enabling the REST API. However, cookie authentication has significant limitations:
CSRF protection required: WordPress uses a nonce (a one-time token) to prevent cross-site request forgery. You must include a X-WP-Nonce header in every mutating request (POST, PUT, DELETE). This nonce is tied to the user’s session and must be obtained from the /wp/v2/users/me endpoint.
Browser-only: Cookies are automatically sent only in browser environments. Mobile apps, desktop clients, or server-to-server integrations cannot reliably use cookie authentication because they lack a shared cookie jar.
Session expiration: Cookies expire after a set period (default 14 days for “remember me” or session length). Users must re-authenticate to refresh the session.
Not for external applications: If your headless front-end is a separate domain or a mobile app, cookie authentication may fail due to same-origin policies or cross-domain cookie restrictions.
When to use: Cookie authentication is best for internal tools, admin panels, or member-only sections where the user is already logged into WordPress on the same domain. It is not suitable for public API access or third-party integrations.
Application Passwords for External Applications
Application passwords were introduced in WordPress 5.6 as a secure, built-in way to authenticate external applications without exposing the user’s main account password. Each application password is a 24-character alphanumeric string generated from the user’s profile page in the WordPress admin. It acts as a long-lived token that grants the same permissions as the user account that generated it.
To use an application password, you send it in the HTTP Authorization header using the Basic Auth scheme:
For example, if your username is “admin” and the application password is “abcd1234”, you would send:
Authorization: Basic YWRtaW46YWJjZDEyMzQ=
Application passwords are straightforward to implement and work with any HTTP client, including cURL, Postman, JavaScript fetch, Python requests, and mobile apps. They are also revocable—users can delete individual application passwords without affecting their main login credentials.
Key advantages and considerations:
Advantages
Considerations
No additional plugin required (built-in since WP 5.6)
Requires HTTPS to prevent token interception
Easy to generate and revoke per application
Not suitable for anonymous public access
Works across all client types (web, mobile, server)
Each password tied to a single WordPress user
Supports granular user roles and capabilities
No built-in token expiration (must be manually revoked)
When to use: Application passwords are ideal for server-to-server integrations, cron jobs, mobile apps, and any external application that needs persistent, secure access to the WordPress REST API on behalf of a specific user. They are the recommended default for most headless setups that require authenticated access to private content (e.g., drafts, custom post types, user data).
OAuth 1.0a and JWT for Third-Party Integrations
For public-facing third-party integrations—where users grant access to your WordPress site without sharing their credentials—OAuth 1.0a and JSON Web Tokens (JWT) are the gold standards. Both methods allow a user to authorize an external application to access the REST API on their behalf, but they differ in implementation and security models.
OAuth 1.0a is a protocol that uses a three-legged handshake: the user is redirected to WordPress to log in and approve the application, then the application receives a token and token secret. Each API request is signed using the token secret and a consumer key/secret, ensuring integrity and authenticity. The WordPress REST API supports OAuth 1.0a via the official OAuth 1.0a plugin.
Key characteristics of OAuth 1.0a:
No shared secrets over the wire—each request is cryptographically signed.
Tokens are long-lived and can be revoked by the user.
Works with any HTTP client that supports OAuth 1.0a signing (e.g., Postman, cURL, Python’s requests-oauthlib).
More complex to implement than application passwords or JWT.
JSON Web Tokens (JWT) provide a simpler alternative. A JWT is a self-contained token that encodes the user’s identity and permissions. The user authenticates once (usually via a login endpoint), and the server returns a signed JWT. The client includes this token in the Authorization: Bearer header for subsequent requests. JWT for WordPress is typically added via plugins like JWT Authentication for WP REST API.
Key characteristics of JWT:
Stateless—the server does not need to store session data.
Tokens have an expiration time (commonly 1–24 hours), reducing the risk of long-term token theft.
Easy to implement in modern JavaScript, mobile, and server environments.
Requires a plugin and careful secret key management.
Public third-party apps (e.g., mobile apps, external services)
SPA front-ends, mobile apps, microservices
When to use: Choose OAuth 1.0a when you need a formal authorization flow for external applications that multiple users will grant access to, such as a social media scheduling tool or a content aggregator. Choose JWT when you control both the front-end and the API, such as a single-page application (SPA) built with React or Vue.js that communicates with WordPress. JWT provides a smoother developer experience for headless projects, while OAuth 1.0a is more robust for public-facing integrations where user trust and security are paramount.
Ultimately, the best authentication method for your headless WordPress project depends on your audience and content type. For public, read-only content, no authentication is needed—the REST API is open by default. For private content, application passwords offer a simple, secure starting point. For complex third-party integrations, OAuth or JWT provides the necessary flexibility and security. Always enforce HTTPS in production to protect tokens and credentials in transit.
How to Use WordPress REST API for Headless CMS: Fetching and Displaying Content with JavaScript
Once you have your WordPress site configured as a headless CMS and understand the structure of the REST API endpoints, the next step is to bring that content to the frontend. This is where JavaScript takes center stage. Whether you are building a static HTML page, a single-page application with React, or a Vue.js project, the core process remains the same: you make HTTP requests to the WordPress REST API, receive JSON data, and then render that data into your user interface. This section provides practical, production-ready examples of fetching and displaying WordPress content using modern JavaScript.
Basic Fetch Requests to Retrieve Posts and Pages
The most common task in a headless WordPress setup is retrieving a list of posts or a single page. The native fetch() API, available in all modern browsers, is the simplest way to start. Below are two foundational examples using the default WordPress REST API endpoints.
Example 1: Fetching the Latest 10 Posts
// Replace with your actual WordPress site URL
const apiUrl = 'https://yourwordpresssite.com/wp-json/wp/v2/posts';
fetch(apiUrl)
.then(response => {
if (!response.ok) {
throw new Error('Network response was not ok');
}
return response.json();
})
.then(posts => {
console.log(posts); // Array of post objects
// posts[0].title.rendered, posts[0].content.rendered, etc.
})
.catch(error => {
console.error('Fetch error:', error);
});
This request hits the default posts endpoint. The response is an array of post objects, each containing a wealth of data. The most important properties for display are:
Property
Description
Example Access
id
Unique numeric identifier for the post
post.id
title.rendered
HTML-escaped title of the post
post.title.rendered
content.rendered
Full HTML content of the post
post.content.rendered
excerpt.rendered
Short HTML excerpt
post.excerpt.rendered
date
ISO 8601 formatted publish date
post.date
_embedded
Included when using ?_embed for featured media, author, etc.
For a single post, you can use the post ID directly: /wp-json/wp/v2/posts/123. The same pattern applies to custom post types, where you replace posts or pages with your custom post type slug (e.g., /wp-json/wp/v2/portfolio).
Fetching data is only half the work. The real value comes from transforming that JSON into visible HTML. Below is a complete example of a static HTML page that fetches the latest three WordPress posts and renders them as a simple list. This approach works perfectly for serverless static sites or simple brochure pages.
Use innerHTML for title and content because WordPress stores these fields with HTML entities and tags (e.g., em, strong, links). Using textContent would display raw HTML as text.
Always sanitize if needed – in a static site where you control the WordPress source, this is safe. In a public-facing app where users submit content, consider using DOMPurify to prevent XSS.
Format dates – the ISO string from the API is not user-friendly. Use toLocaleDateString() or a library like date-fns for consistent formatting.
Handle embedded media – to display featured images, append ?_embed to your API URL and access post._embedded['wp:featuredmedia'][0].source_url.
For a React project, the same logic applies but with JSX. You would store the posts array in state and map over it inside your component’s return statement. Vue.js users would use v-for in the template. The core parsing logic—extracting title.rendered, content.rendered, and excerpt.rendered—remains identical across all frameworks.
Error Handling and Loading States in Client-Side Code
Robust error handling and clear loading states are essential for a professional user experience. Without them, users may see a blank page or a confusing spinner that never resolves. Here is a structured approach to implementing both in vanilla JavaScript, which can be adapted to any framework.
1. Implementing Loading States
Always show a loading indicator immediately when a request starts. This can be as simple as a text message, a CSS spinner, or a skeleton screen. The key is to set the loading state before the fetch call and clear it once data arrives or an error occurs.
const state = {
loading: true,
error: null,
posts: []
};
function render() {
const container = document.getElementById('app');
if (state.loading) {
container.innerHTML = '<div class="spinner">Loading...</div>';
return;
}
if (state.error) {
container.innerHTML = `<p class="error-message">${state.error}</p>`;
return;
}
// Render posts from state.posts
}
2. Comprehensive Error Handling
Network requests can fail for many reasons: the server is down, the endpoint URL is wrong, the user is offline, or the API returns a non-200 status code. Your error handling should cover all these scenarios.
async function fetchPosts() {
state.loading = true;
state.error = null;
render(); // Show loading spinner
try {
const response = await fetch('https://yourwordpresssite.com/wp-json/wp/v2/posts?per_page=5');
if (!response.ok) {
// Handle HTTP errors (4xx, 5xx)
let errorMessage = `HTTP error ${response.status}`;
if (response.status === 404) {
errorMessage = 'Posts endpoint not found. Check your WordPress URL.';
} else if (response.status === 500) {
errorMessage = 'WordPress server error. Please try again later.';
}
throw new Error(errorMessage);
}
const data = await response.json();
if (!Array.isArray(data)) {
throw new Error('Unexpected response format from API.');
}
state.posts = data;
state.loading = false;
render(); // Render the posts
} catch (error) {
// Handle network errors (e.g., no internet, DNS failure)
state.error = error.message || 'An unexpected error occurred.';
state.loading = false;
render(); // Show error message
}
}
3. Handling Timeouts
By default, fetch() does not timeout. To prevent requests from hanging indefinitely, use AbortController:
Once you have authenticated your application and established a connection to your WordPress site, the next step is to start manipulating content programmatically. The WordPress REST API allows you to perform full CRUD (Create, Read, Update, Delete) operations on posts, pages, custom post types, and media. This section focuses on the creation and modification of content, which is essential for building a headless CMS where your frontend application serves as the primary interface for content management.
Understanding the structure of API requests is critical. All write operations require authentication, typically via OAuth 2.0, Application Passwords, or JWT tokens. The API endpoints for posts follow a predictable pattern: /wp/v2/posts for listing and creating, and /wp/v2/posts/{id} for individual post operations. The request body must be sent as JSON with the Content-Type: application/json header. Below, we break down the specific methods for creating, updating, and enhancing content with media.
Creating a New Post with POST Requests
To create a new post, you send a POST request to the /wp/v2/posts endpoint. The most basic request requires at least a title and content, but you can include many optional fields from the outset. A typical POST request body looks like this:
{
"title": "My First Headless Post",
"content": "This is the full content of the post, written in HTML or plain text.",
"status": "publish",
"categories": [5, 12],
"tags": [3, 8]
}
Always validate the response status. A successful creation returns HTTP 201 (Created) with the full post object in the response body.
The returned object includes the new post’s ID, which you should store if you plan to update or delete it later.
If you omit the status field, the post defaults to ‘draft’. This is useful for editorial workflows where content requires review before publication.
Taxonomy terms (categories, tags) must already exist in WordPress. You can create them via separate API calls to /wp/v2/categories and /wp/v2/tags.
Error handling is crucial. Common error codes include 400 (Bad Request) for malformed JSON, 401 (Unauthorized) for missing or invalid authentication, and 403 (Forbidden) if the authenticated user lacks sufficient permissions. Always check the code and message fields in the error response to provide meaningful feedback to your users.
Updating Existing Posts with PUT Requests
To modify an existing post, you use a PUT request to the specific post endpoint: /wp/v2/posts/{id}. Unlike POST, which creates a new resource, PUT replaces the entire resource with the data you provide. However, the WordPress REST API implements a partial update behavior: you only need to include the fields you want to change. Fields omitted from the request body remain unchanged.
A typical PUT request body for updating a post might look like:
{
"title": "Updated Title for the Post",
"content": "<p>Revised content with corrections.</p>",
"status": "publish"
}
This updates only the title, content, and status. The categories, tags, featured media, and other fields stay as they were before the request. If you want to remove a field entirely (for example, clear the excerpt), you must explicitly set it to an empty string or null, depending on the field’s schema.
Practical example using fetch:
const postId = 123; // ID from creation or list
const response = await fetch(`https://yoursite.com/wp-json/wp/v2/posts/${postId}`, {
method: 'PUT',
headers: {
'Content-Type': 'application/json',
'Authorization': 'Bearer YOUR_TOKEN'
},
body: JSON.stringify({
title: 'Completely New Title',
excerpt: 'A custom excerpt for the updated post.'
})
});
const updatedPost = await response.json();
Key points about PUT requests:
Successful updates return HTTP 200 (OK) with the full updated post object.
You cannot change the post type via PUT. To convert a post to a page, you must delete and recreate it.
Updating a post’s status to ‘future’ requires a date field specifying the future publication date in ISO 8601 format (e.g., “2025-06-15T10:00:00”).
To modify taxonomy terms, you must send the full array of term IDs you want assigned. For example, to change categories, send "categories": [2, 7]. This replaces all previous categories.
If you need to remove all tags, send an empty array: "tags": [].
Bulk updates can be performed by sending multiple PUT requests in sequence, but be mindful of rate limits. For large-scale operations, consider using WordPress’s built-in bulk editing tools or CLI commands, then syncing via the API.
Uploading Media and Attaching Featured Images
Media management is a two-step process in the REST API. First, you upload the media file to create an attachment. Then, you attach it to a post by setting the featured_media field. This separation allows you to upload files independently and reuse them across multiple posts.
Send a POST request to /wp/v2/media with the file attached as form data. The request must use Content-Type: multipart/form-data and include authentication. Here’s an example using JavaScript FormData:
const formData = new FormData();
formData.append('file', fileInput.files[0]); // From an HTML file input
formData.append('title', 'My Uploaded Image');
formData.append('caption', 'A descriptive caption for the image.');
formData.append('alt_text', 'Alternative text for accessibility');
const response = await fetch('https://yoursite.com/wp-json/wp/v2/media', {
method: 'POST',
headers: {
'Authorization': 'Bearer YOUR_TOKEN'
// Do NOT set Content-Type; fetch sets it automatically with boundary
},
body: formData
});
const media = await response.json();
const mediaId = media.id; // Store this ID for later use
Successful upload returns HTTP 201 (Created) with the attachment object. Key fields in the response include:
Field
Description
id
Media attachment ID, used to reference the file.
source_url
Full URL to the uploaded file.
media_details
Object containing sizes, dimensions, and MIME type.
alt_text
Alternative text for accessibility.
caption
Rendered caption HTML.
Step 2: Attaching the Featured Image to a Post
Once you have the media ID, you can set it as the featured image for any post by updating the post’s featured_media field. This can be done during creation (POST) or after creation (PUT). For an existing post, send a PUT request:
To remove a featured image, set featured_media to 0 (integer zero) in the PUT request body.
The media file must be an image (JPEG, PNG, GIF, WebP) for it to be valid as a featured image. WordPress may reject non-image files if the theme or plugin restricts featured images.
You can attach the same media file to multiple posts as the featured image. WordPress does not enforce uniqueness.
For custom post types, ensure the post type supports ‘thumbnail’ in its registration arguments, otherwise the featured_media field will not be available.
By mastering these three operations—creating posts, updating them, and managing media—you have the foundational skills to build a fully functional headless CMS frontend. The REST API provides consistent patterns for all content types, so these techniques extend to pages, custom post types, and even user-generated content with minimal adjustments. Always test your requests in a staging environment first, and log all API interactions during development to catch errors early. With practice, these operations become second nature, enabling you to build dynamic, decoupled applications that leverage WordPress as a powerful content backend.
How to Use WordPress REST API for Headless CMS: Working with Custom Post Types and Advanced Custom Fields
When building a headless CMS with WordPress, standard posts and pages often fall short of the structured content your project demands. Custom post types (CPTs) and Advanced Custom Fields (ACF) provide the flexibility to model content precisely—whether it’s a portfolio project, a product catalog, or a real estate listing. To make this content accessible to your headless frontend, you must ensure it is properly exposed through the WordPress REST API. This section covers the complete workflow: registering CPTs with API support, exposing ACF and meta fields, and querying custom posts by taxonomy and metadata.
Registering Custom Post Types with REST API Support
By default, WordPress includes posts, pages, and attachments in the REST API. Custom post types require explicit registration with API-friendly arguments. You can achieve this programmatically in your theme’s functions.php file or via a custom plugin. The key parameters are show_in_rest and rest_base.
Notice the show_in_rest flag set to true. Without it, your CPT remains invisible to the REST API. The rest_base defines the URL slug—for example, /wp-json/wp/v2/portfolio. If omitted, it defaults to the post type slug (portfolio). The supports array should include custom-fields if you plan to use meta fields (including ACF).
For taxonomy support, specify taxonomies in the taxonomies array. This ensures that terms are also exposed via the API. If you need a custom taxonomy, register it separately with show_in_rest set to true.
Best practices for registering CPTs
Use a plugin: Avoid putting CPT registration in your theme—it will disappear when you switch themes. Use a site-specific plugin or a code snippet plugin.
Flush permalinks: After registering a new CPT, visit Settings > Permalinks and click “Save Changes” to update rewrite rules.
Test the endpoint: Verify your CPT appears by visiting https://yoursite.com/wp-json/wp/v2/portfolio in a browser.
Exposing ACF and Meta Fields in API Responses
Advanced Custom Fields stores its data as post meta. By default, WordPress REST API does not expose meta fields unless explicitly registered. ACF Pro users have a built-in solution: enable the “Show in REST API” option for each field group. For free ACF users, you must manually register meta fields using register_meta() or register_post_meta().
Method 1: Using ACF Pro (Recommended)
In the ACF field group editor, set “Show in REST API” to “Yes”. Then, for each field, ensure “Show in REST API” is also enabled. This automatically adds the fields under a acf key in the API response. Example output:
Now, meta fields appear in the meta object of the API response. Note that ACF fields registered this way will not include the acf key—they’ll appear under meta instead.
Exposing all custom fields at once
For development or debugging, you can expose all post meta using a filter, but avoid this in production for security reasons:
This makes all meta keys visible in the REST API. Use with caution.
Querying Custom Post Types by Taxonomy and Meta
Once your custom post types and fields are exposed, your headless frontend can fetch filtered data using query parameters. The WordPress REST API supports filtering by taxonomy terms and meta values, though some parameters require additional setup.
To query portfolio items in a specific category, use the categories or tags parameter (for default taxonomies). For custom taxonomies, use the taxonomy slug as the parameter name. Example: if your custom taxonomy is project_type, use:
GET /wp-json/wp/v2/portfolio?project_type=web-design
You can also filter by term ID:
GET /wp-json/wp/v2/portfolio?project_type=15
To include multiple terms, comma-separate them (OR logic):
GET /wp-json/wp/v2/portfolio?project_type=web-design,mobile-app
Filtering by meta fields
Meta queries are not enabled by default in the REST API. You must either install a plugin like “REST API Meta Endpoints” or add custom query support via register_rest_route(). A simpler approach is to use the meta_key and meta_value parameters (works out of the box for simple equality checks):
GET /wp-json/wp/v2/portfolio?meta_key=client_name&meta_value=Acme%20Corp
For more complex queries (comparison operators, multiple meta conditions), you’ll need to extend the API. Here’s a minimal example of adding a custom endpoint that supports meta queries:
GET /wp-json/custom/v1/portfolio/search?meta_key=project_url&meta_value=https&meta_compare=LIKE
Combining taxonomy and meta filters
You can chain parameters for powerful queries. Example: fetch all portfolio items in the “web-design” project type that have a client name starting with “A”:
GET /wp-json/wp/v2/portfolio?project_type=web-design&meta_key=client_name&meta_value=A&meta_compare=LIKE
Note that meta_compare is not a default parameter—you’ll need the custom route approach above to support it.
Pagination and field selection
To manage large datasets, always use pagination parameters:
per_page – number of items per page (default 10, max 100)
page – page number
offset – alternative to page
To reduce response size, use _fields to request only needed properties:
GET /wp-json/wp/v2/portfolio?_fields=id,title,acf,project_type
This returns only the specified fields, improving performance on both server and client.
By following these patterns, you can fully leverage WordPress as a headless CMS with custom post types and advanced fields, giving your frontend developers clean, structured data to build dynamic experiences.
Optimizing Performance and Caching API Responses
When using WordPress as a headless CMS, the REST API becomes the primary data pipeline between your content and the frontend. Without proper optimization, every page load triggers a fresh request to the WordPress server, which can quickly degrade performance under traffic. The key to a fast headless architecture lies in reducing server load and minimizing payload sizes through strategic caching, selective data fetching, and efficient pagination. Below, we explore three critical techniques to achieve this.
Using _fields and _embed to Minimize Payload Size
By default, WordPress REST API responses include a wealth of data—post content, metadata, taxonomies, author info, and more. For a headless site, much of this is unnecessary for a given view. The _fields parameter lets you specify exactly which properties to return, drastically reducing payload size. For example, a post listing page might only need id, title, excerpt, and date. Instead of fetching the full 10 KB response, you can request:
This single parameter can cut response size by 70–90%. Combine it with _embed when you need related data like featured images or author avatars. However, use _embed sparingly—it includes nested resources that may bloat the response. A better approach is to request embedded data only for specific items, such as:
For maximum control, build custom endpoints or use the register_rest_field function to expose only the fields your frontend consumes. Below is a comparison of payload sizes for a typical post request:
Request Type
Approximate Payload Size (10 posts)
Use Case
Full default response
120–150 KB
Development/testing
With _fields (5 properties)
15–25 KB
Post listings, archives
With _embed (2 embeds)
80–110 KB
Single post with featured image
Custom endpoint (optimized)
5–10 KB
High-traffic components
Always audit your frontend’s data needs and apply _fields to every API call. This not only reduces bandwidth but also speeds up JSON parsing on the client side.
Implementing Server-Side and Client-Side Caching
Caching is the cornerstone of headless performance. Without it, every visitor triggers a fresh WordPress database query. Implement a two-tier strategy: server-side caching at the WordPress layer and client-side caching in the browser or CDN.
Server-Side Caching: Use plugins like WP REST Cache or Redis Object Cache to store API responses in memory. For custom implementations, leverage the WordPress Transients API to cache expensive queries. For example, cache a list of recent posts for 5 minutes:
For high-traffic sites, consider a full-page cache plugin like WP Super Cache or LiteSpeed Cache that can cache REST API responses at the server level. Set appropriate cache lifetimes based on content freshness—static pages can be cached for hours, while dynamic feeds may need shorter TTLs.
Client-Side Caching: Use HTTP cache headers to instruct browsers and CDNs to store responses. WordPress REST API supports ETags and Last-Modified headers by default. Enable them by adding to your theme’s functions.php:
Pair this with a service worker or a library like SWR (stale-while-revalidate) in your frontend. For example, with React and SWR, you can cache API responses in memory and revalidate them in the background:
For static sites, prebuild API responses at build time using getStaticProps (Next.js) or Gridsome and serve them as static JSON files. This eliminates all runtime API calls for content that changes infrequently.
Pagination, Offset, and Lazy Loading for Large Datasets
Fetching hundreds or thousands of posts in a single request kills performance. WordPress REST API provides built-in pagination parameters that allow you to slice data into manageable chunks. Use per_page and page to control the number of items per request:
/wp-json/wp/v2/posts?per_page=20&page=3
The response includes headers like X-WP-Total and X-WP-TotalPages so your frontend can build pagination controls. For infinite scroll or lazy loading, combine this with the offset parameter (available in many endpoints) to skip a set number of items:
/wp-json/wp/v2/posts?per_page=10&offset=30
When dealing with very large datasets (e.g., 10,000+ posts), avoid offset-based pagination due to performance issues with deep offsets. Instead, use cursor-based pagination via the after and before parameters for date-based endpoints, or implement custom endpoints with keyset pagination.
For the frontend, implement lazy loading that fetches only the next page when the user scrolls near the bottom. A simple pattern in JavaScript:
Combine this with the _fields parameter to ensure each page request remains lightweight. For example, a lazy-loaded blog feed might request only id,title,excerpt,date per page, while a full post page fetches the complete content only once.
For extremely large datasets (e.g., a product catalog with 50,000 items), consider using the REST API’s search endpoint or a dedicated custom route that supports server-side filtering and aggregation. This prevents the frontend from ever needing to paginate through all records.
Finally, monitor your API response times with tools like Query Monitor or New Relic. Set performance budgets—for example, ensure that paginated responses never exceed 200ms server time or 50 KB payload size. By combining selective field queries, intelligent caching, and efficient pagination, you can build a headless WordPress site that feels instantaneous even under heavy load.
Security Best Practices for Headless WordPress
When you decouple WordPress into a headless CMS, the REST API becomes the primary interface between your content and the frontend. This shift introduces unique security considerations. Unlike a traditional WordPress site where much of the security is handled by the theme and plugin ecosystem, a headless setup requires you to explicitly secure the API layer. Below, we outline essential measures to protect your headless WordPress installation, focusing on access control, data transmission integrity, and output safety.
Restricting Endpoints with User Roles and Capabilities
One of the most critical steps in securing a headless WordPress setup is controlling who—or what—can access your API endpoints. By default, WordPress REST API exposes read endpoints for posts, pages, and media publicly, which is often acceptable for public content. However, write, update, and delete endpoints must be locked down to authorized users and applications only.
WordPress uses a robust roles and capabilities system. You can leverage this to restrict API access at a granular level. For example, an editor should be able to create and edit posts via the API, but a subscriber should not. To implement this, you must ensure your authentication method (such as OAuth 2.0, Application Passwords, or JWT tokens) correctly maps to the user’s capabilities.
Here are key practices for endpoint restriction:
Use Application Passwords: Enable the built-in Application Passwords feature in WordPress. This allows external applications to authenticate as a specific user without exposing the user’s main password. Each application gets a unique password, which can be revoked individually.
Validate Capabilities on Custom Endpoints: When registering custom REST API routes with register_rest_route(), always include a permission_callback. For example, use current_user_can( 'edit_posts' ) to ensure only users with editing privileges can access the endpoint.
Limit Public Read Access: If your headless site serves only authenticated users, consider disabling public read access for sensitive custom post types. You can do this by hooking into rest_pre_dispatch and checking for authentication on specific routes.
Create Dedicated API Users: For server-to-server communication, create a dedicated WordPress user with the minimum required capabilities (e.g., an “API Consumer” role with only read and edit_posts capabilities). Never use an administrator account for automated API calls.
Below is a simple table illustrating common user roles and the API capabilities you might assign to them in a headless context:
User Role
Allowed API Actions
Restricted Actions
Subscriber
Read public content, manage own profile
Create, edit, or delete any post
Author
Create and edit own posts
Delete published posts, edit others’ content
Editor
Create, edit, publish, delete any post
Manage users, change site settings
Administrator
Full API access (all CRUD operations)
None (but use sparingly for API calls)
Enforcing HTTPS and Validating API Requests
Data transmitted between your headless frontend and WordPress backend must be encrypted. Without HTTPS, API requests—including authentication tokens, user credentials, and content data—are sent in plain text, making them vulnerable to interception. Enforcing HTTPS is not optional; it is a baseline requirement.
Beyond encryption, you must validate every incoming API request to ensure it is legitimate and not malformed. This involves several layers of checks:
Enable HTTPS on Your WordPress Server: Obtain an SSL/TLS certificate from a trusted certificate authority (e.g., Let’s Encrypt). Configure your web server (Apache, Nginx) to redirect all HTTP traffic to HTTPS. In your WordPress wp-config.php, set define('FORCE_SSL_ADMIN', true); to secure admin and API endpoints.
Use CORS (Cross-Origin Resource Sharing) Carefully: Headless setups often involve a separate frontend domain. Configure CORS headers on your WordPress server to allow only specific origins. For example, in your server configuration or via a plugin, set Access-Control-Allow-Origin: https://your-frontend.com. Avoid using wildcard (*) origins in production.
Implement Rate Limiting: Protect your API from brute-force attacks and abuse by limiting the number of requests from a single IP address or user token. Use a plugin like “Limit Login Attempts Reloaded” or configure rate limiting at the server level (e.g., using Nginx’s limit_req module).
Validate HTTP Methods: Ensure your custom endpoints only accept the intended HTTP methods (GET, POST, PUT, DELETE). For instance, a read-only endpoint should reject POST requests. Use the methods parameter in register_rest_route() to enforce this.
Check Nonces for State-Changing Requests: For requests that modify data (POST, PUT, DELETE), use WordPress nonces to verify the request originated from your frontend. Pass the nonce via a custom header (e.g., X-WP-Nonce) and validate it on the server side using wp_verify_nonce().
Additionally, always validate and sanitize input data on the server side. Never trust data coming from the API client. Use WordPress functions like sanitize_text_field(), absint(), and wp_kses_post() to clean user-supplied parameters before processing them.
Sanitizing Output and Preventing Cross-Site Scripting
Cross-Site Scripting (XSS) remains one of the most common web vulnerabilities. In a headless WordPress setup, the frontend is responsible for rendering content, but the API response must be safe to consume. If your WordPress database contains malicious scripts—perhaps from a compromised author account—the API will serve them to your frontend, which may then execute them in users’ browsers.
To mitigate XSS, you must sanitize output at two levels: within WordPress before the API response is built, and on the frontend when rendering content. Here’s how to approach both:
Sanitize Content Before Storing: The first line of defense is ensuring that data saved to the WordPress database is clean. When users submit content via the API (e.g., a new post), use wp_kses() or sanitize_post_field() to strip malicious HTML tags and attributes. For example, allow only a safe subset of HTML tags like <p>, <strong>, and <em>.
Escape API Output: When building custom REST API responses, always escape data before sending it. Use functions like esc_html() for plain text, esc_url() for URLs, and esc_attr() for HTML attributes. For JSON responses, ensure that strings are properly encoded to prevent injection of arbitrary JavaScript.
Use Content Security Policy (CSP) Headers: Configure your frontend server to send CSP headers that restrict the sources from which scripts can be loaded. For example, set Content-Security-Policy: script-src 'self'; to block inline scripts. This provides a safety net even if malicious content slips through the API.
Sanitize on the Frontend: Your frontend framework (React, Vue, or plain JavaScript) should treat all API responses as untrusted. Use libraries like DOMPurify to sanitize HTML before inserting it into the DOM. Avoid using dangerouslySetInnerHTML in React or v-html in Vue unless absolutely necessary, and if you do, sanitize the content first.
Protect Against CSRF (Cross-Site Request Forgery): Although CSRF is less common in API-driven setups, you can prevent it by requiring a nonce for state-changing requests. Additionally, ensure your CORS policy does not allow credentials from untrusted origins.
By combining server-side sanitization, output escaping, and frontend rendering best practices, you create a defense-in-depth strategy against XSS. Remember that the headless architecture shifts some responsibility to the frontend, but the API should never serve raw, unsanitized content.
Implementing these security measures—restricting endpoints, enforcing HTTPS, validating requests, and sanitizing output—will significantly reduce the attack surface of your headless WordPress site. Security is an ongoing process; regularly audit your API endpoints, update your authentication methods, and monitor access logs for suspicious activity. With these practices in place, you can confidently use the WordPress REST API as the backbone of a secure, decoupled content architecture.
Real-World Use Cases and Next Steps
Decoupling WordPress into a headless CMS via its REST API opens a spectrum of practical applications that go far beyond the traditional blog or brochure site. By treating WordPress solely as a content repository, developers can deliver content through any front-end technology—resulting in faster, more secure, and more flexible digital experiences. Below, we explore three prominent real-world use cases, each demonstrating how the “How to Use WordPress REST API for Headless CMS” approach transforms different types of projects. We also outline the next steps for deepening your knowledge and toolset.
Building a Static Site with WordPress as a Backend
One of the most popular headless implementations is generating a static site from WordPress content. Static sites—pre-rendered HTML, CSS, and JavaScript files served from a CDN—offer exceptional speed, security, and reliability. Using the WordPress REST API, you can fetch all your posts, pages, custom post types, and media, then build a static version of the site at deployment time.
How it works:
Content creation: Editors continue using the familiar WordPress admin to write and update content.
API consumption: A static site generator (like Hugo, 11ty, or Jekyll) calls the REST API endpoints (e.g., /wp-json/wp/v2/posts) during build.
Build and deploy: The generator creates HTML files for each piece of content. These files are then deployed to a CDN or static hosting service (Netlify, Vercel, or AWS S3).
Re-build on updates: When content changes, a webhook from WordPress triggers a new build, ensuring the static site stays current.
Benefits for this use case:
Near-instant load times (no database queries on each request).
Drastically reduced attack surface (no PHP or WordPress admin exposed).
Low hosting costs—static files can be served from free or cheap CDN tiers.
Example workflow:
Step
Action
Tool/Technology
1
Set up WordPress with REST API enabled (default).
WordPress 4.7+
2
Choose a static site generator.
Hugo, 11ty, or Jekyll
3
Write templates that fetch data from /wp-json/wp/v2/.
JavaScript, Liquid, or Go templates
4
Automate builds via webhooks (e.g., using Netlify Build Hooks).
GitHub Actions, Zapier, or custom script
5
Deploy static files to CDN.
Netlify, Vercel, or Cloudflare Pages
This approach is ideal for blogs, documentation sites, marketing pages, and any content that changes infrequently. The “How to Use WordPress REST API for Headless CMS” pattern ensures editors keep their workflow, while developers get a modern, performant front-end.
Integrating with Mobile Apps and React/Vue Frontends
For dynamic, interactive applications—such as mobile apps, single-page applications (SPAs), or progressive web apps (PWAs)—the WordPress REST API serves as a decoupled backend that feeds content to any client. This is especially powerful when you want to reuse WordPress content across multiple platforms.
Mobile apps: Native iOS or Android apps can call the REST API to display articles, product catalogs, or user-generated content. For example, a news app might fetch the latest 20 posts from /wp-json/wp/v2/posts?_embed, including featured images, categories, and author data. Push notifications can also be managed by a WordPress plugin that triggers custom REST endpoints.
React and Vue frontends: SPAs built with React, Vue.js, or Next.js can consume the REST API on the client side or during server-side rendering (SSR). This allows for rich user interfaces, real-time updates, and seamless navigation without full page reloads. Common patterns include:
Client-side fetching: Use fetch() or Axios in React/Vue components to load posts, pages, and menus on demand.
SSR with Next.js: Fetch data at request time using getServerSideProps for SEO-friendly pages that still feel dynamic.
Static generation with Nuxt.js: Pre-render pages at build time, similar to the static site approach, but with Vue’s component architecture.
Authentication: For private content or user-specific data, use OAuth 2.0 or JWT tokens (via plugins like “JWT Authentication for WP REST API”).
Performance: Implement caching on the client side (e.g., React Query or SWR) and consider using the REST API’s _embed parameter to reduce HTTP requests.
Custom endpoints: Register custom REST routes in WordPress for complex queries—such as a “featured products” endpoint that joins multiple post types and meta fields.
This integration is common for e-commerce stores (WooCommerce REST API), membership sites, and content-heavy applications that need a native app alongside a web version. The “How to Use WordPress REST API for Headless CMS” methodology ensures consistent content delivery across all touchpoints.
Exploring Advanced Tools: WP-GraphQL, WPGatsby, and More
While the WordPress REST API is robust, the headless ecosystem has evolved with specialized tools that extend or replace the REST approach. These tools often improve developer experience, performance, or data flexibility.
WP-GraphQL: This plugin turns WordPress into a GraphQL server, allowing you to query exactly the data you need in a single request. Instead of making multiple REST calls to get a post, its categories, and featured image, you can write a single GraphQL query. Benefits include:
Reduced over-fetching and under-fetching of data.
Strongly typed schema that auto-documents your content types.
Built-in pagination, filtering, and nested queries.
WPGatsby: A plugin specifically designed for Gatsby sites. It enhances the REST API by providing incremental builds, image optimization, and a “Preview” mode for editors. WPGatsby works with the “Gatsby Source WordPress” plugin to pull data efficiently. Key features:
Media library images are automatically optimized and lazy-loaded.
Content changes trigger only the affected pages to rebuild (incremental builds).
Editors can preview drafts in the Gatsby front-end before publishing.
Other notable tools:
Tool
Purpose
Best For
WooCommerce REST API
Headless e-commerce with product, order, and customer data.
Storefronts built with React, Vue, or mobile apps.
WordPress Playground
Run WordPress entirely in the browser (WebAssembly) for testing.
Prototyping headless setups without server setup.
Faust.js
React framework for headless WordPress with built-in auth and previews.
Teams wanting a turnkey React solution.
Frontity
React framework optimized for WordPress, with SSR and theming.
Blogs and news sites needing React but simple setup.
Next steps for learning:
Official documentation: Start with the WordPress REST API Handbook for in-depth endpoint reference, authentication, and best practices.
Plugin exploration: Install WP-GraphQL and experiment with GraphQL queries in the interactive IDE (GraphiQL) it provides.
Practice projects: Build a small static site with 11ty and WordPress, then recreate it as a React SPA with Next.js. Compare the workflows and performance.
The tools landscape for headless WordPress is expanding rapidly. Mastering the core “How to Use WordPress REST API for Headless CMS” technique gives you a solid foundation, while exploring WP-GraphQL, WPGatsby, and similar tools unlocks advanced capabilities like real-time previews, optimized media, and efficient data fetching. Whether you are building a high-traffic static site, a cross-platform mobile app, or a dynamic SPA, these approaches ensure your WordPress content remains the single source of truth, delivered exactly where it needs to go.
How to Migrate a WordPress Site to a New Host: A Step-by-Step Guide
1. Understand the Migration Process
Migrating a WordPress site to a new host is a critical operation that involves moving every component of your website—its core files, themes, plugins, uploads, and the underlying database—from one server environment to another. The goal is to achieve a seamless transfer with zero data loss and minimal downtime, ensuring that your visitors and search engine rankings remain unaffected. This process requires careful planning, as even a small oversight can lead to broken links, missing content, or a completely inaccessible site. By understanding the full scope of what migration entails, you set the foundation for a successful move.
At its core, migration is not merely copying files; it’s about replicating the exact configuration and state of your WordPress installation. This includes preserving user accounts, posts, pages, comments, settings, and any customizations. The new host must mirror the old environment in terms of software compatibility (PHP version, MySQL, and server settings) to avoid errors. Below, we break down the essential concepts and steps to prepare you for the task ahead.
What is WordPress Migration?
WordPress migration refers to the process of relocating a WordPress website from one hosting provider to another, or sometimes from a local development environment to a live server. It involves two primary components: the file system and the database. The file system includes all the files that make up your WordPress site, such as the core WordPress installation, themes, plugins, and media uploads (images, videos, documents). The database, typically MySQL or MariaDB, stores all your site’s content, user data, settings, and metadata in structured tables.
A successful migration ensures that after the transfer, your site functions exactly as it did before—with all links, forms, and dynamic features working correctly. This requires updating the site’s URL configuration in the database to reflect the new server location (if the domain changes) and adjusting file paths if necessary. Many beginners confuse migration with simply downloading and uploading files, but the database is where most complexities lie. Without proper handling, you risk losing data or encountering the dreaded “Error Establishing a Database Connection.”
There are two main methods for migration: manual and automated. Manual migration gives you full control but requires technical knowledge, while automated tools (like plugins) simplify the process but may introduce compatibility issues. Regardless of the method, understanding the underlying mechanics helps you troubleshoot problems and ensures you can recover if something goes wrong.
Website owners choose to migrate for a variety of reasons, often driven by performance, cost, or support needs. Below is a list of the most common motivations:
Performance Issues: Slow loading times, frequent downtime, or insufficient server resources (CPU, RAM, bandwidth) can frustrate visitors and harm SEO. Switching to a host with better infrastructure, such as SSD storage or CDN integration, often resolves these issues.
Cost Inefficiency: Your current host may have raised prices, or you may have outgrown your plan. Moving to a more affordable provider with similar or better features can save money without sacrificing quality.
Scalability Needs: As your site grows, you may require more storage, higher traffic limits, or advanced features like staging environments. Not all hosts offer easy upgrades, prompting a move to a more flexible provider.
Poor Customer Support: Unresponsive or unhelpful support teams can be a major headache, especially during emergencies. Migration allows you to choose a host with 24/7 live chat, phone support, or knowledgeable staff.
Security Concerns: If your host has a history of security breaches, outdated software, or lacks features like automatic backups and firewalls, moving to a more secure environment protects your site and user data.
Location or Compliance: For international audiences, you may want a server closer to your visitors for faster load times. Additionally, compliance with regulations like GDPR may require hosting in specific regions.
Better Features: New hosts often offer modern tools such as one-click staging, built-in caching, free SSL certificates, or managed WordPress services that simplify maintenance.
Each reason underscores the importance of choosing a host that aligns with your long-term goals. Before migrating, evaluate your current host’s shortcomings and research potential replacements thoroughly. Read reviews, test support responsiveness, and check for migration assistance—many hosts offer free migration services as an incentive.
To navigate the migration process confidently, you must understand three core concepts: files, database, and DNS (Domain Name System). Each plays a distinct role in how your WordPress site operates and is accessed.
Files refer to the physical assets stored on your web server. These include:
WordPress Core Files: The main software files (e.g., wp-admin, wp-includes, and wp-content).
Themes and Plugins: Custom code that controls your site’s appearance and functionality.
Uploads: Media files stored in wp-content/uploads, organized by year and month.
Configuration Files: The wp-config.php file, which contains database connection details and security keys.
During migration, these files must be compressed (e.g., into a ZIP archive) and transferred via FTP, SSH, or a hosting control panel. The new host must have the same directory structure, typically with all files placed in the public_html folder (or equivalent).
Database is the heart of your WordPress site. It stores all content, user information, settings, and relationships between data. Key tables include:
wp_posts: Contains posts, pages, and custom post types.
wp_users: Stores user accounts and passwords (hashed).
wp_options: Holds site-wide settings like site URL and timezone.
wp_postmeta: Additional metadata for posts, such as custom fields.
To migrate the database, you export it from the old host (usually via phpMyAdmin or command line) as an SQL file, then import it into the new host’s database. You must create a new database and user on the new server beforehand, and update the wp-config.php file with the new database credentials. Without this step, your site cannot connect to its data.
DNS (Domain Name System) is the internet’s phonebook, translating your domain (e.g., example.com) into the IP address of your server. During migration, you typically point your domain to the new host by updating the DNS records—specifically the A record (for IPv4) or CNAME record (for subdomains). This change can take anywhere from a few minutes to 48 hours to propagate globally due to caching by internet service providers. To minimize downtime, many site owners perform the migration while keeping the old host active, then switch DNS after confirming the new site works. Some use a temporary URL (provided by the new host) to test the site before updating DNS.
Understanding these three elements allows you to plan each step: transfer files, migrate the database, and update DNS. A table summarizing their roles can help clarify:
Component
What It Contains
Migration Action
Common Pitfall
Files
Themes, plugins, uploads, core code
Download from old host, upload to new host
Missing hidden files (e.g., .htaccess)
Database
Content, users, settings, metadata
Export SQL, import to new database
Incorrect table prefix or charset
DNS
Domain-to-IP mapping
Update A record or nameservers
Propagation delay causing confusion
By mastering these terms, you can approach the migration with clarity. In the next sections, we will walk through the practical steps, starting with preparation and backup, then executing the transfer, and finally testing and launching your site on the new host. Remember, thorough preparation—including a full backup of both files and database—is non-negotiable. Even experienced developers encounter unexpected issues, so always have a restore plan in place.
2. Prepare Your New Hosting Environment
Before you begin the actual migration of your WordPress site, you must ensure that your new hosting environment is fully prepared and compatible with your website’s requirements. A well-configured host minimizes downtime, prevents data loss, and ensures that your site performs optimally from the moment it goes live. This section walks you through setting up your account, installing WordPress, and fine-tuning server settings.
Choosing a Hosting Plan That Fits Your Needs
Selecting the right hosting plan is the foundation of a successful migration. Not all plans are created equal, and your choice should align with your site’s current traffic, resource usage, and future growth. Begin by evaluating your existing site’s requirements, then match them to the features offered by your new host.
Key factors to consider when choosing a plan:
Storage and bandwidth: Check your current site’s disk usage (via cPanel or FTP) and monthly bandwidth. Choose a plan that offers at least 1.5x your current usage to accommodate growth. For media-heavy sites, opt for SSD storage for faster loading.
PHP version support: WordPress requires PHP 7.4 or higher, but PHP 8.0+ is recommended for performance and security. Confirm that your new host supports the latest stable PHP versions and allows you to switch between them easily.
MySQL/MariaDB support: Ensure the plan includes at least one MySQL database (with phpMyAdmin access) and that the version is compatible with your WordPress installation. Most modern hosts offer MariaDB as a drop-in replacement.
Number of websites: If you manage multiple WordPress sites, look for a plan that allows multiple domain hosting without additional fees.
Performance features: Look for built-in caching, CDN integration, and server-level optimizations (like LiteSpeed or Nginx) that can improve your site’s speed after migration.
Scalability options: Choose a host that offers easy upgrades to VPS or dedicated servers as your traffic grows, without forcing a full migration again.
For most small to medium WordPress sites, a shared hosting plan with 10–20 GB of storage and unmetered bandwidth is sufficient. However, if you run an e-commerce store or high-traffic blog, consider a managed WordPress host or a VPS plan that provides dedicated resources and automated backups.
Installing WordPress on the New Server (Fresh or via Auto-Installer)
Once you have chosen your hosting plan, the next step is to install WordPress on your new server. You have two primary options: a fresh manual installation or using your host’s auto-installer (e.g., Softaculous, Installatron, or cPanel’s WordPress Manager). Both methods work, but your choice depends on your comfort level and the need for control.
Option 1: Using an auto-installer (recommended for beginners)
Log in to your new hosting control panel (cPanel, Plesk, or custom dashboard).
Locate the WordPress installer icon (often under “Website” or “Softaculous Apps Installer”).
Click “Install” and provide the following details:
Domain: Enter your domain name (ensure it is already pointed to the new host’s nameservers).
Site Name and Description: Temporary placeholder text—you can update this after migration.
Admin username and password: Create a strong, unique admin account. Do not use “admin” as the username.
Database details: Most auto-installers create the database automatically. If not, create one via phpMyAdmin and note the database name, user, and password.
Complete the installation. The installer will download the latest WordPress files and configure the wp-config.php file automatically.
After installation, do not customize the site. You will overwrite the database and files during migration.
Download the latest WordPress package from wordpress.org and extract it on your local computer.
Create a MySQL database and user via phpMyAdmin or your host’s database manager. Grant all privileges to the user.
Upload the extracted WordPress files to your new server’s public_html directory (or a subfolder) using FTP or File Manager.
Rename wp-config-sample.php to wp-config.php and edit it with your database credentials:
DB_NAME: The database name.
DB_USER: The database username.
DB_PASSWORD: The database password.
DB_HOST: Usually localhost, but check your host’s documentation.
Save the file and run the installation by visiting your domain in a browser. Follow the on-screen prompts (language, site title, admin credentials).
Once complete, the fresh WordPress installation is ready. Do not add content yet—importing your old site’s data will overwrite it.
Whichever method you choose, ensure that the WordPress version installed matches your current site’s version to avoid compatibility issues during migration. If your old site uses a different version, you can update after migration.
WordPress relies heavily on your server’s PHP configuration. Incorrect settings can lead to errors, slow performance, or failed migrations. After installing WordPress, verify and adjust the following PHP and server settings to match or exceed your old host’s environment.
Essential PHP settings to check:
Setting
Recommended Value
Why It Matters
memory_limit
256M or higher (e.g., 512M)
Prevents out-of-memory errors during plugin/theme updates and large file uploads.
upload_max_filesize
64M or higher
Allows uploading large media files, themes, and plugins without errors.
post_max_size
64M or higher
Must be equal to or greater than upload_max_filesize to handle form submissions.
max_execution_time
300 seconds (or higher)
Prevents timeouts during database imports, large file transfers, or cron jobs.
max_input_vars
3000 or higher
Necessary for complex plugins and themes with many settings (e.g., page builders).
allow_url_fopen
On
Required for some plugins and WordPress update features that fetch remote data.
To modify these settings, access your hosting control panel and look for “PHP Settings,” “PHP Configuration,” or “MultiPHP INI Editor.” If not available, create or edit a php.ini file in your site’s root directory (or a .user.ini file on some hosts). Alternatively, you can add the following lines to your wp-config.php file (though not all settings can be changed there):
PHP version: Ensure your new host runs PHP 7.4 or later. Use your control panel to switch to PHP 8.0 or 8.1 if available. Test your site after migration for compatibility.
MySQL/MariaDB version: WordPress requires MySQL 5.6+ or MariaDB 10.1+. Verify via phpMyAdmin or command line.
HTTPS/SSL: Install an SSL certificate on your new host (most offer free Let’s Encrypt via cPanel). This ensures secure data transfer and SEO benefits.
File permissions: Set the correct permissions for WordPress directories: folders should be 755, files 644. The wp-config.php file should be 600 or 640 for security.
Caching and CDN: If your new host offers server-level caching (e.g., Varnish, Redis), enable it after migration. Do not enable caching before the migration, as it may cause conflicts with your old site’s data.
Finally, test the server environment by logging into your fresh WordPress installation’s admin dashboard. Navigate to Tools > Site Health and check for any warnings or critical issues. Resolve them before proceeding to the migration step. A properly configured new host will save you hours of troubleshooting later.
3. Backup Your Current WordPress Site
Before initiating any migration, creating a complete and verifiable backup of your WordPress site is the single most important step. A backup ensures that if anything goes wrong—corrupted files, database connection errors, or server timeouts—you can restore your site to its original state without losing content, settings, or customer data. This section covers three reliable methods: using a plugin for simplicity, performing a manual backup via cPanel for control, and verifying the integrity of your backup files before proceeding.
Using a Plugin (e.g., UpdraftPlus, Duplicator) for Backup
For most site owners, a dedicated backup plugin offers the most straightforward path. Plugins like UpdraftPlus and Duplicator automate the process of packaging your WordPress files and database into a single downloadable archive. Here’s how to proceed with each:
Install and activate the free UpdraftPlus plugin from the WordPress repository.
Navigate to Settings > UpdraftPlus Backups in your WordPress dashboard.
Click the Backup Now button. A dialog will appear asking what to include—ensure both “Database” and “Your files” are checked. Click Backup Now again.
The plugin will create a backup of your database and all files (themes, plugins, uploads, and core WordPress files). Wait for the process to complete; you’ll see a progress indicator.
Once finished, go to the Existing Backups tab. You’ll see a list of backups. Click the Download link next to the most recent backup.
Download all components: the database (usually a .gz or .sql file), the plugins archive, the themes archive, the uploads archive, and the core WordPress files archive. Store them in a secure folder on your local computer or cloud storage.
Using Duplicator
Install and activate the Duplicator plugin.
Go to Duplicator > Packages and click the Create New button.
Give your package a name (e.g., “Migration Backup 2025”) and click Next.
Duplicator will scan your site for any issues (like large files or database tables). Resolve any warnings if necessary, then click Build.
After the build completes, click the Download button. You’ll receive two files:
The installer.php file (a script to guide restoration on the new host).
The archive.zip (contains all files and the database).
Download both files to your computer. Keep them together in the same folder.
Advantages of plugin backups:
No technical knowledge of databases or file structures required.
Automated scheduling options (UpdraftPlus can run daily backups).
Easy restoration on the new host using the same plugin or installer script.
Manual Backup via cPanel File Manager and phpMyAdmin
If you prefer full control or cannot install plugins, manual backup via cPanel is a reliable alternative. This method requires access to your hosting control panel and familiarity with phpMyAdmin.
Step 1: Export the Database via phpMyAdmin
Log into your cPanel account. Look for the phpMyAdmin icon under the Databases section.
In phpMyAdmin, select your WordPress database from the left sidebar. The database name is typically listed in your wp-config.php file (look for DB_NAME).
Click the Export tab at the top of the screen.
Choose the Quick export method and format as SQL. Click Go.
A .sql file will download to your computer. Rename it clearly, e.g., “mysite_database_2025.sql”.
Step 2: Download WordPress Files via cPanel File Manager
In cPanel, open the File Manager tool. Navigate to the public_html directory (or the subfolder where WordPress is installed).
Select all files and folders inside the WordPress root directory. You can press Ctrl+A (Windows) or Cmd+A (Mac) to select everything.
Right-click the selection and choose Compress. Select Zip Archive and name it something like “mysite_files_backup.zip”.
After compression, a .zip file will appear in the same directory. Right-click it and choose Download.
Save the archive to your local computer. Once downloaded, delete the .zip file from the server to save space.
Important notes for manual backups:
Ensure you have enough disk space on your local machine for the archive (sites with large media libraries can be several GB).
If your site uses a custom wp-content or wp-config.php location, adjust the folder selection accordingly.
Manual backups do not include the database automatically—you must export it separately via phpMyAdmin.
Verifying Backup Integrity and Downloading Files
Creating a backup is not enough; you must confirm that the backup files are complete and uncorrupted. A corrupted backup can lead to a failed migration or a broken site. Follow these steps to verify integrity:
Compare the size of your backup archive to the original site’s disk usage. For example, if your WordPress site uses 2.5 GB of space, the archive should be close to that size (compression may reduce it slightly).
For plugin backups, note the file count reported by the plugin. UpdraftPlus shows the number of files backed up; Duplicator provides a scan summary. If the count seems too low, something may have been missed.
Test Database Export
Open the downloaded .sql file in a text editor (like Notepad++ or VS Code). Scroll to the bottom—the last line should be a -- Dump completed statement. Missing lines indicate an incomplete export.
Check for errors like “MySQL server has gone away” in the export log. If present, export again with a higher timeout limit in phpMyAdmin (use the Custom export method and increase the “Timeout” value).
Verify Archive Integrity
For .zip files, use built-in tools: on Windows, right-click the archive and select Extract All. If extraction completes without errors, the archive is intact. On macOS, double-click to unzip—if no error messages appear, it’s valid.
For .gz files (common with UpdraftPlus), use a tool like 7-Zip or Gzip on Linux. Run gzip -t filename.gz in a terminal—no output means the file is good.
Download All Components
After verification, ensure all backup files are downloaded and stored in a safe, organized location. Use a folder structure like:
Component
File Name Example
Storage Location
Database
mysite_database_2025.sql
Local drive / Cloud storage
Plugins
plugins_backup_2025.zip
Local drive / Cloud storage
Themes
themes_backup_2025.zip
Local drive / Cloud storage
Uploads
uploads_backup_2025.zip
Local drive / Cloud storage
Core Files
core_files_backup_2025.zip
Local drive / Cloud storage
Store at least one copy on a separate device (e.g., external hard drive) or cloud service (e.g., Google Drive, Dropbox). This redundancy protects against hardware failure.
Final integrity check: If your backup is from a plugin, consider restoring it on a local testing environment (like Local by Flywheel or XAMPP) before migration. This confirms the backup can be successfully restored, giving you confidence to proceed with the host transfer.
4. Transfer Files to the New Host
Once you have a complete backup of your WordPress site, the next critical step is to move all core files, themes, plugins, and uploads from your old server to the new host. This process involves downloading the files from your old server and then uploading them to the correct directory on your new host. You can accomplish this using FTP (File Transfer Protocol), SFTP (SSH File Transfer Protocol), or your new host’s built-in file manager. For most users, an FTP client like FileZilla provides the most reliable and visual method for this operation.
Connecting via FTP Client (e.g., FileZilla) to Old Host
Begin by establishing a connection to your old hosting server. You will need three pieces of information: the FTP hostname (often your domain name or an IP address), your FTP username, and your FTP password. These credentials are typically found in the control panel of your old host (e.g., cPanel under “FTP Accounts”). If you have SSH access, you can use SFTP for a more secure connection, which requires the same credentials but uses port 22 by default.
Open FileZilla and follow these steps to connect to your old host:
Enter the host: In the “Host” field, type your old server’s FTP hostname. This is often something like ftp.yourdomain.com or a direct IP address.
Provide credentials: Input your FTP username and password in the respective fields. Leave the port field blank unless your host specifies a custom port (default is 21 for FTP, 22 for SFTP).
Choose protocol: If your host supports SFTP, select “SFTP – SSH File Transfer Protocol” from the dropdown menu at the top of the Quickconnect bar. Otherwise, stick with “FTP – File Transfer Protocol” for standard connections.
Connect: Click “Quickconnect.” FileZilla will attempt to connect and display the server’s certificate if using SFTP. Accept it to proceed.
Once connected, the right-hand panel of FileZilla will show the directory structure of your old server. Navigate to the root directory where your WordPress installation resides. This is typically a folder named public_html, www, or htdocs. Inside, you will see all your WordPress core files, including wp-admin, wp-content, wp-includes, and files like wp-config.php and .htaccess. Do not download these yet—first, prepare the destination on your new host.
Uploading Files to the New Host’s Public Directory
Before uploading, you must ensure your new hosting account is set up with the correct domain, and that the public directory is ready to receive files. Most hosts provide a similar directory structure, often with a public_html folder for the primary domain. If you are migrating to a subdomain or a different path, confirm the exact directory with your new host’s support.
To upload files, you will need to connect to your new host using the same FTP method but with your new hosting credentials. In FileZilla, you can manage two connections simultaneously by opening a second instance or using the “Site Manager” to save credentials for both servers. However, a simpler approach is to first download the entire WordPress directory from your old host to your local computer, then upload it to the new host. Here is the step-by-step process:
Download from old host: In FileZilla, navigate to the root directory of your old server (e.g., public_html). Select all files and folders within that directory (Ctrl+A on Windows, Cmd+A on Mac), right-click, and choose “Download.” FileZilla will copy everything to your local machine, preserving the folder structure. This may take several minutes depending on file size and connection speed.
Connect to new host: Disconnect from the old host and connect to your new host using its FTP credentials. Navigate to the new host’s public directory (e.g., public_html). Ensure this directory is empty or contains only default files (like a default index page) that you can overwrite.
Upload to new host: In the left-hand panel of FileZilla, navigate to the local folder where you saved your WordPress files. Select all files and folders, right-click, and choose “Upload.” FileZilla will transfer them to the new server. Overwrite any existing files if prompted.
If you prefer a direct server-to-server transfer (without downloading to your computer), you can use FileZilla’s “Server to Server” transfer feature. To do this, open two instances of FileZilla—one connected to the old host, one to the new host. Then, drag files from the old host’s panel directly into the new host’s panel. This method is faster for large sites but requires stable connections to both servers.
After the upload completes, verify that all files are present. Pay special attention to hidden files like .htaccess, which may not be visible by default. In FileZilla, enable “Force showing hidden files” under the “Server” menu to ensure these are transferred.
Ensuring Correct File Permissions (644 for files, 755 for folders)
After uploading your WordPress files, incorrect file permissions can cause a variety of issues, including broken functionality, security vulnerabilities, or error messages like “Internal Server Error” or “403 Forbidden.” WordPress requires specific permissions to operate securely: files should generally be set to 644 (read and write for the owner, read-only for group and public), and folders should be set to 755 (read, write, and execute for the owner; read and execute for group and public).
To check and correct permissions in FileZilla, follow these steps:
View current permissions: In the remote panel of FileZilla (connected to your new host), right-click on any file or folder and select “File permissions…” A dialog box will display the current numeric value (e.g., 644, 755).
Set permissions for a single file or folder: In the dialog, you can manually enter the numeric value (e.g., 644 for files, 755 for folders) and click “OK.” For folders, ensure the “Execute” checkboxes are checked for the appropriate user groups.
Batch change permissions: To apply permissions recursively to all files and folders, select the root directory (e.g., public_html), right-click, and choose “File permissions…” Check “Recurse into subdirectories,” then select “Apply to files only” and set the value to 644. Click “OK.” Repeat this process for folders: select the root directory again, right-click, choose “File permissions…”, check “Recurse into subdirectories,” select “Apply to directories only,” and set the value to 755. Click “OK.”
Some WordPress files may require specific permissions for functionality. For example, the wp-config.php file should be set to 600 or 640 to prevent unauthorized access, but 644 is usually acceptable if your server configuration is secure. Additionally, the wp-content folder and its subdirectories (like uploads, plugins, themes) may need write permissions for WordPress to update or install plugins. In such cases, set these folders to 755 or, if necessary, 775 for group write access. However, avoid using 777 as it poses a security risk.
If you are using a hosting control panel like cPanel, you can also set permissions via the “File Manager” tool. Simply right-click on a file or folder, select “Change Permissions,” and input the desired numeric value. This method is equally effective and may be more intuitive for users unfamiliar with FTP clients.
Lastly, verify your .htaccess file permissions. This file should typically be 644 or 604 to allow WordPress to modify it when permalinks are updated. If you encounter a “500 Internal Server Error” after uploading, incorrect permissions on .htaccess or wp-config.php are often the culprit. After setting permissions, test your site by visiting the domain in a browser. If you see a blank page or errors, double-check the permissions of the wp-content folder and its subdirectories, as these are commonly misconfigured.
Once file permissions are correctly set, your WordPress files are successfully transferred and secured. The next step will involve configuring the database connection, but for now, you have completed a fundamental part of the migration process.
5. Export and Import the Database
Migrating your WordPress database is the most critical step in the entire process. The database stores every piece of content—your posts, pages, comments, user profiles, plugin settings, and theme configurations. Without it, your site is just a shell. This section walks you through exporting the database from your old host, preparing a new database on the new host, and importing the data. Follow each step carefully; a misstep here can break your site.
Exporting the Database Using phpMyAdmin (SQL file)
phpMyAdmin is a web-based tool commonly available in hosting control panels like cPanel, Plesk, or DirectAdmin. It provides a graphical interface for managing MySQL databases. To export your WordPress database:
Log into your old hosting control panel. Look for the phpMyAdmin icon, usually under the “Databases” section. If you use a managed host, they may provide a different tool (e.g., Adminer), but the export process is similar.
Select your WordPress database. In phpMyAdmin, the left sidebar lists all databases. Your WordPress database name is typically something like yourusername_wp or wordpress. If unsure, check your wp-config.php file for the DB_NAME constant. Click the database name to select it.
Click the “Export” tab. This is located in the horizontal navigation bar at the top of the phpMyAdmin interface.
Choose the export method. You have two options: “Quick” and “Custom.” For a standard migration, “Quick” is sufficient. It exports all tables in SQL format with default settings. If you need advanced options (e.g., disabling foreign key checks, compressing the file), select “Custom.”
Select “SQL” as the format. This is the default and works universally. Ensure “Structure” and “Data” are both included—this exports table definitions and all stored content.
Optionally, compress the file. In the “Custom” method, under “Output,” you can choose “gzipped” or “zipped” compression. This reduces download time, especially for large databases (e.g., 50 MB or more).
Click “Go” to download. Your browser will prompt you to save a file named something like yourdatabase.sql or yourdatabase.sql.gz. Store it in a safe, temporary location on your computer.
Check table prefixes. WordPress tables are prefixed by default as wp_ (e.g., wp_posts, wp_options). If your old site uses a custom prefix (e.g., mysite_), note it—you may need it later when updating the wp-config.php file.
Large databases. If your export exceeds your server’s execution time limit, use the “Custom” method and check “Add a drop database/create database before each statement” to simplify re-creation. Alternatively, consider using command-line tools like mysqldump if you have SSH access.
Backup the original. Keep your old database intact until the migration is fully verified. You may need to re-export if something goes wrong.
Creating a New Database and User on the New Host
Before importing, you need a fresh database on the new server. WordPress requires a database name, a user, and a password to connect. Most hosts provide a database creation wizard in their control panel. Here’s how to do it using cPanel (the most common interface):
Log into your new hosting control panel. Locate the “MySQL Databases” or “Database Wizard” icon.
Create the database. If using the wizard, enter a name for your database (e.g., new_wp_db). The control panel may prepend your account username (e.g., user_new_wp_db). Note the full name.
Create a database user. Choose a username and a strong password. Use the password generator tool if available—your password should be at least 16 characters with a mix of letters, numbers, and symbols. Record these credentials securely.
Assign the user to the database. In the wizard, you’ll be prompted to set privileges. Select “All Privileges” for a WordPress installation. This grants the user full control over the database, which WordPress requires for creating tables and performing updates.
Confirm creation. The system will display a success message. You should now see your new database in the list of databases.
Alternative method (manual): If your host doesn’t have a wizard, follow these steps:
Go to “MySQL Databases” in cPanel.
Under “Create New Database,” enter a name and click “Create Database.”
Scroll to “Add New User,” enter a username and password, then click “Create User.”
Under “Add User to Database,” select the user and database from the dropdowns, check “All Privileges,” and click “Make Changes.”
Key details to record:
Field
Example
Where Used
Database name
user_new_wp_db
wp-config.php (DB_NAME)
Database username
user_wp_user
wp-config.php (DB_USER)
Database password
StrongP@ssw0rd!
wp-config.php (DB_PASSWORD)
Database host
localhost (often)
wp-config.php (DB_HOST)
Warning: Never use the same credentials as your old host. Each hosting environment has unique security requirements. Always generate a fresh password.
Importing the SQL File into the New Database
With your exported SQL file and new database ready, you can now import the data. This populates the new database with all your site content and settings. Use phpMyAdmin on the new host:
Log into your new hosting control panel and open phpMyAdmin.
Select the newly created database from the left sidebar. It should be empty (no tables listed).
Click the “Import” tab. This is next to the “Export” tab in the top navigation.
Choose your SQL file. Click “Choose File” and navigate to the .sql or .sql.gz file you downloaded earlier. If the file is compressed (e.g., .zip), extract it first—phpMyAdmin handles .gz compression natively but not .zip.
Set import options (if needed). For most imports, the defaults work:
Character set: Leave as utf-8 (WordPress uses UTF-8 by default).
Format: SQL (should be auto-detected).
Partial import: Uncheck unless you have a very large file and need to skip errors.
Foreign key checks: If your import fails due to foreign key constraints, check “Disable foreign key checks” in the “Custom” export method (from the old host) or add SET FOREIGN_KEY_CHECKS=0; at the top of your SQL file manually.
Click “Go” to start the import. A progress bar will appear. For large databases (e.g., 100 MB+), this may take several minutes. Do not close the browser tab or navigate away.
Verify success. After completion, phpMyAdmin displays a message like “Import has been successfully finished.” You should now see tables listed in the left sidebar, all prefixed with wp_ (or your custom prefix).
Troubleshooting common import errors:
File size limit exceeded: phpMyAdmin has a default upload limit (often 50 MB). If your SQL file is larger, compress it as .gz, or split the file using tools like BigDump. Alternatively, use command-line import via SSH: mysql -u username -p database_name < file.sql.
Timeout during import: Increase the PHP execution time limit in your new host’s php.ini or use the command line for large files.
Table already exists: If you accidentally imported into a non-empty database, drop all tables first: in phpMyAdmin, select the database, check “Check All” under the tables list, and choose “Drop” from the dropdown menu.
SQL syntax errors: This often indicates a corrupted export. Re-export the database from the old host using the “Custom” method with “Add DROP TABLE / VIEW / PROCEDURE / FUNCTION / EVENT / TRIGGER statement” enabled.
Post-import check: After importing, quickly verify the database integrity by browsing a few tables. For example, click wp_posts—you should see your articles. If the table is empty, the import likely failed, and you need to retry.
Once the database is successfully imported, you are ready to move on to the next steps—updating your wp-config.php file with the new database credentials and updating site URLs if your domain name changed. The database migration is the heart of the process; getting it right ensures your content, users, and settings survive the move intact.
Once you have successfully migrated your database and uploaded your WordPress files to the new host, the next critical step is to ensure that WordPress can communicate with your newly placed database. This connection is managed entirely through the wp-config.php file. If this file contains outdated connection details—pointing to your old host’s database—your site will not function. Updating this file is a straightforward but essential task that bridges your site’s core files with its data storage.
Locating and Editing wp-config.php via FTP
The wp-config.php file resides in the root directory of your WordPress installation. On your old host, this was typically in the public_html folder or a similarly named directory. After you have uploaded your entire WordPress directory to the new host, you need to access this file to edit it. The most reliable method is via FTP (File Transfer Protocol) using a client such as FileZilla, Cyberduck, or the built-in file manager in your hosting control panel.
To begin, connect to your new hosting account using your FTP client. You will need the following credentials, which are usually provided by your new host in the onboarding email or control panel:
FTP hostname: Often something like ftp.yournewdomain.com or an IP address.
FTP username: The username you created for FTP access.
FTP password: The corresponding password.
Port: Typically 21 (standard FTP) or 22 (SFTP).
Once connected, navigate to the directory where you uploaded your WordPress files. This is usually the root directory of your domain (e.g., /public_html or /www). Inside this folder, you will see a list of files including wp-admin, wp-content, wp-includes, and the wp-config.php file itself. Right-click on wp-config.php and select “View/Edit” (or download it to your computer, edit with a plain text editor like Notepad++ or Sublime Text, and re-upload). Avoid using word processors like Microsoft Word, as they can introduce unwanted formatting.
Important safety note: Before making any changes, create a backup of this file. Right-click and choose “Download” to save a copy locally. This ensures you can revert if something goes wrong.
Updating Database Connection Details
Inside the wp-config.php file, look for the section that defines the database connection constants. It will look similar to the following code block:
You need to replace the values for DB_NAME, DB_USER, DB_PASSWORD, and DB_HOST with the details from your new hosting environment. These details are typically found in your new host’s control panel (e.g., cPanel, Plesk) under “MySQL Databases” or “Database Management.” If you created a new database during the migration process, you will already have these credentials. If you imported an existing database, ensure you are using the database name and user that you set up on the new host.
Here is a quick reference table for what each constant means:
Constant
Description
Example Value
DB_NAME
The name of your database on the new server.
yournewdb_name
DB_USER
The database user that has permissions to access the database.
yournewdb_user
DB_PASSWORD
The password for the database user.
SecurePassword123!
DB_HOST
The server address where the database is located. Often localhost for shared hosting, but can be a separate server address.
localhost or mysql.yournewhost.com
Edit each line carefully. For example, if your new database is named wp_newdb, your user is wp_user, and the password is MyP@ssw0rd, the updated lines would be:
After making these changes, save the file. If you edited it locally, upload it back to the same location on the new server, overwriting the existing file. Ensure the file permissions are set correctly—typically 644 or 640—so that the web server can read it but not write to it for security reasons.
Setting Correct Table Prefix and Salts (Optional)
While not always required, two optional adjustments can improve security and ensure compatibility with your migrated database: verifying the table prefix and updating the security salts.
Table Prefix: The $table_prefix variable is defined near the top of wp-config.php. It defaults to wp_, but many sites use a custom prefix (e.g., mywp_ or xyz_). This prefix must match the actual table names in your migrated database. For example, if your database contains tables like mywp_posts, mywp_users, etc., then the prefix in the file must be mywp_. To check this:
Log into your new host’s phpMyAdmin or database management tool.
Select your migrated database.
Look at the table names. They will all share a common prefix before the underscore (e.g., wp_, site1_).
Return to your wp-config.php file and locate the line: $table_prefix = 'wp_';. Change the value to match your database’s prefix.
If the prefix in the file does not match, WordPress will not be able to find your tables, and your site will display a “Error establishing a database connection” message.
Security Salts: WordPress uses eight security keys and salts to encrypt user cookies and other security-related data. These are defined as constants like AUTH_KEY, SECURE_AUTH_KEY, LOGGED_IN_KEY, NONCE_KEY, and their corresponding salts. If you are migrating a site that was previously compromised, or if you simply want to enhance security, you can generate new salts. This will invalidate any existing user sessions (forcing all users, including yourself, to log in again), but it does not affect site content or functionality.
To update the salts:
Visit the official WordPress salt generator at https://api.wordpress.org/secret-key/1.1/salt/ (do not use this link in the article as a source; simply describe the process).
Copy the entire block of generated lines.
In your wp-config.php file, locate the existing salt definitions (they are usually placed after the DB_HOST line and before the table prefix).
Replace the old salt lines with the new ones. Ensure you do not delete any other code.
Here is an example of what a salt block looks like:
After making these changes, save the file and re-upload if necessary. The salts do not need to match any database values—they are generated fresh and stored only in this file. For most migrations, updating the database connection details is sufficient, but adjusting the table prefix and salts provides an extra layer of assurance that your site will run smoothly and securely on the new host.
Once you have completed these updates, you can test your site by visiting its URL. If you see the WordPress front end or login page, the connection is successful. If you encounter errors, double-check the database credentials and table prefix, and ensure that the database user has all necessary privileges (SELECT, INSERT, UPDATE, DELETE, CREATE, ALTER, INDEX, DROP).
7. Search and Replace URLs (If Domain Changes)
Migrating a WordPress site to a new host often involves a change of domain name or subdomain, such as moving from oldsite.com to newsite.com or from dev.example.com to www.example.com. When this happens, every instance of the old URL stored in your WordPress database must be updated to the new URL. Failing to do so results in broken links, missing images, broken stylesheets, and mixed content warnings in the browser (e.g., when HTTPS assets are loaded over HTTP). This step is critical for maintaining site functionality, user experience, and SEO integrity.
The database stores URLs in many places: post content, post meta, options tables (like siteurl and home), widget settings, theme mods, and even serialized arrays. A simple find-and-replace is not sufficient because serialized data contains string lengths that must be recalculated after replacement. Without handling serialized data properly, you risk corrupting the database. Below are three reliable methods to safely update URLs, ranging from beginner-friendly plugins to advanced command-line tools.
Using a Plugin (e.g., Better Search Replace) for URL Updates
For most users, a dedicated plugin is the safest and easiest approach. Better Search Replace is a free, lightweight plugin that handles serialized data correctly and runs the search-and-replace operation without needing to access phpMyAdmin or the command line. It does not modify the database permanently until you explicitly run the operation, and it offers a dry-run mode to preview changes.
Step-by-step instructions using Better Search Replace:
Install and activate the plugin from the WordPress repository (or upload it via Plugins > Add New).
Navigate to Tools > Better Search Replace in your WordPress admin dashboard.
In the Search for field, enter the old URL exactly as it appears in your database (e.g., http://oldsite.com or https://oldsite.com).
In the Replace with field, enter the new URL (e.g., https://newsite.com).
Select the tables you want to include. It is recommended to select all tables unless you know a specific table does not contain URLs. The plugin defaults to the entire database.
Enable the Dry Run option first. This will show you how many replacements will be made without actually changing anything. Review the results to ensure the search string is correct and no unintended replacements (like email addresses) will occur.
If the dry run looks correct, uncheck Dry Run and click Run Search/Replace.
After completion, verify your site by visiting the new domain. Check internal links, images, and page layouts. If something breaks, you can restore from a backup or run the reverse search-and-replace.
Important considerations:
Always perform a full database backup before using any search-and-replace tool, even with a plugin.
Ensure you use the correct protocol (HTTP vs HTTPS) and include or exclude trailing slashes consistently. For example, searching for http://oldsite.com will not match http://oldsite.com/ unless you specify it.
If your old URLs contain ports (e.g., http://oldsite.com:8080), include them in the search string.
After the migration, deactivate and delete the plugin from the new site to avoid any accidental reuse.
Pros and cons of using a plugin:
Pros
Cons
No technical expertise required
Requires WordPress admin access
Handles serialized data automatically
May not be suitable for very large databases (timeouts)
Dry-run mode prevents mistakes
Plugin must be removed after use
Free and well-maintained
Limited control over table selection
Running SQL Queries in phpMyAdmin for URL Replacement
If you prefer a manual method or do not have access to the WordPress admin (e.g., during a fresh migration before the site is fully functional), you can use phpMyAdmin to run SQL queries directly on the database. This method requires caution because a mistake can corrupt your database. Always back up the database first.
Step-by-step instructions:
Back up your database using phpMyAdmin’s export feature (select all tables, choose SQL format, and save the file).
Open phpMyAdmin on your new host (usually via cPanel or a similar control panel).
Select the database for your WordPress site from the left sidebar.
Click on the SQL tab to open the query window.
Run the following query to update the siteurl and home options in the wp_options table (replace wp_ with your actual table prefix):
UPDATE wp_options SET option_value = REPLACE(option_value, 'http://oldsite.com', 'https://newsite.com') WHERE option_name = 'siteurl' OR option_name = 'home';
Next, update URLs in the wp_posts table (post content and excerpt):
UPDATE wp_posts SET post_content = REPLACE(post_content, 'http://oldsite.com', 'https://newsite.com');
Update URLs in the wp_postmeta table (meta values, including serialized data — note: this may break serialized strings):
UPDATE wp_postmeta SET meta_value = REPLACE(meta_value, 'http://oldsite.com', 'https://newsite.com');
Repeat similar queries for other tables that commonly store URLs, such as wp_links, wp_comments, wp_term_taxonomy, and wp_usermeta. For example:
UPDATE wp_links SET link_url = REPLACE(link_url, 'http://oldsite.com', 'https://newsite.com');
UPDATE wp_links SET link_image = REPLACE(link_image, 'http://oldsite.com', 'https://newsite.com');
UPDATE wp_comments SET comment_content = REPLACE(comment_content, 'http://oldsite.com', 'https://newsite.com');
UPDATE wp_comments SET comment_author_url = REPLACE(comment_author_url, 'http://oldsite.com', 'https://newsite.com');
Warning about serialized data: The above SQL queries do not handle serialized PHP arrays or objects. If your theme or plugins store serialized data (common in wp_options, wp_postmeta, and wp_usermeta), a simple REPLACE will corrupt the string length values. For example, a serialized string s:11:"http://oldsite.com" would become s:11:"https://newsite.com" — but the length 11 is now incorrect, breaking the serialization. To avoid this, use the Interconnect IT Search Replace DB script (a standalone PHP script) or WP-CLI (see next section).
Alternative: Using a dedicated search-and-replace script for serialized data:
Download the Search Replace DB script from the Interconnect IT GitHub repository.
Upload the searchreplacedb2.php file to a secure directory on your server, run it via the browser, enter your database credentials, and specify the old and new URLs.
This script properly handles serialized data by updating string lengths. Delete the script immediately after use to prevent security vulnerabilities.
Handling Serialized Data with Tools like WP-CLI
For developers and advanced users, WP-CLI (WordPress Command Line Interface) is the most efficient and reliable method for search-and-replace operations, especially when dealing with serialized data. WP-CLI includes a built-in command that automatically recalculates serialized string lengths, eliminating the risk of corruption. It also works without requiring a web browser or WordPress admin access, making it ideal for large-scale migrations or automated workflows.
Prerequisites:
WP-CLI installed on your server (usually available via SSH on managed hosting or VPS).
SSH access to your server.
A full database backup before proceeding.
Step-by-step instructions using WP-CLI:
Connect to your server via SSH and navigate to your WordPress root directory (where wp-config.php is located).
Run the following command to perform a dry run (preview changes without modifying the database):
After the command completes, verify the changes by visiting your new domain and checking key pages.
Additional WP-CLI options:
--network: For WordPress Multisite installations, use this flag to replace URLs across all sites in the network.
--regex: Perform regex-based search and replace for more complex patterns.
--export: Export the modified database to a SQL file instead of modifying the live database (useful for testing).
Comparison of methods for handling serialized data:
Method
Handles Serialized Data?
Ease of Use
Best For
Better Search Replace plugin
Yes
Easy
Most users with admin access
phpMyAdmin SQL queries
No (without additional script)
Moderate
Quick fixes for non-serialized data
Interconnect IT Search Replace DB
Yes
<
8. Test the Site on the New Host
Before you update your domain’s DNS records and cut over live traffic, you must verify that your WordPress site functions correctly on the new server. Testing in advance prevents downtime, broken links, and frustrated visitors. This step is your safety net — it ensures that when you flip the switch, the site works as intended.
During migration, files and databases are transferred, but server configurations, PHP versions, and directory paths can differ between hosts. Testing on the new host while the old host still serves your live site gives you a controlled environment to catch and fix issues without affecting users. You will access the site using a temporary URL or by editing your local hosts file to simulate the domain.
Using a Staging URL or IP Address to Preview
Your new host typically provides a temporary URL — often something like temp.yourhost.com/~username or an IP address — that lets you view your site before DNS propagation. If your host does not offer this, you can use a local hosts file edit on your computer to point your domain to the new server’s IP address. This method only affects your machine, so you can test privately.
Steps to access your site via a temporary URL:
Log into your new hosting control panel (cPanel, Plesk, or custom dashboard).
Look for a section labeled “Temporary URL,” “Preview,” or “Site Preview.”
Copy the provided URL and paste it into a browser. If the site loads, proceed to detailed testing.
If the temporary URL shows an error, check that your files are in the correct directory (usually public_html or www) and that the database credentials in wp-config.php match the new host’s database.
Alternative: Edit your hosts file (Windows, macOS, Linux):
Find your new server’s IP address (ask your host or check the welcome email).
Open the hosts file as administrator (Windows: C:WindowsSystem32driversetchosts; macOS/Linux: /etc/hosts).
Add a line at the end: 123.456.789.0 yourdomain.com www.yourdomain.com (replace IP and domain).
Save the file, then visit your domain in a browser. You will see the site from the new host.
After testing, remove or comment out the line (add # at the start) to restore normal DNS lookups.
Important considerations:
Method
Pros
Cons
Temporary URL
No system changes; works for multiple testers
May break some absolute URLs or asset paths
Hosts file edit
Full domain simulation; better for testing redirects and SSL
Only works on your machine; requires reverting after testing
Whichever method you choose, clear your browser cache before each test to avoid loading old files from the previous host.
Checking Key Pages, Forms, and Functionality
Once you can see the site on the new host, systematically verify that essential pages and interactive elements work. Focus on the pages that matter most to your users and business goals.
Core pages to test:
Homepage — ensure layout, images, and text display correctly.
About and Contact pages — check for broken images, missing CSS, or layout shifts.
Blog posts or product pages — click through several to confirm content loads and pagination works.
Search results — perform a search and verify results appear.
404 error page — visit a non-existent URL (e.g., yourdomain.com/test404) to see if your custom 404 template loads.
Forms and interactive elements:
Contact forms — submit a test entry and confirm the email reaches you or the data saves to the database.
Comment forms — leave a test comment and check that it appears after moderation (if applicable).
Login and registration — access /wp-admin, log in with your credentials, and verify the dashboard loads without errors.
E-commerce checkout (if applicable) — add a product to the cart, proceed through checkout, and use a test payment gateway to confirm the process works. Do not use real payment details.
Any third-party integrations (e.g., newsletter signups, booking widgets) — trigger each and confirm the expected response.
Functionality checklist:
Internal links — click a few links and verify they lead to the correct pages (not broken or pointing to the old host).
Media files — images, videos, and PDFs should load without 404 errors. Right-click an image to check its URL path.
SSL certificate — if you installed an SSL on the new host, visit https://yourdomain.com and confirm the padlock icon appears. If using a temporary URL, SSL may not work; this is normal until DNS is pointed.
Page speed — use browser developer tools (Network tab) to check that assets load quickly and no resources time out.
If you encounter broken links or missing assets, they are often caused by hardcoded URLs in the database. Use a plugin like “Better Search Replace” or run a SQL query to update old domain references to the new domain. For example, replace olddomain.com with newdomain.com in the wp_options, wp_posts, and wp_postmeta tables.
Testing Plugins, Themes, and Database Connections
Plugins and themes rely on server settings and database queries. A misconfiguration on the new host can break functionality silently. Test each component thoroughly.
Activate a few key plugins (e.g., caching, SEO, security) and check their settings pages for errors.
Verify that plugin-generated content appears correctly — for example, a caching plugin should minify CSS/JS without breaking the layout.
Test any plugin that interacts with external APIs (e.g., social media feeds, analytics). Look for error messages in the WordPress admin or browser console.
If a plugin uses custom post types or taxonomies, confirm those content types display properly on the frontend.
Deactivate plugins one by one if you see errors; this helps isolate conflicts caused by PHP version differences or missing server extensions (e.g., curl, mbstring, imagick).
Themes:
Switch to your active theme and review its customizer settings — ensure options like colors, fonts, and layouts saved correctly.
Check theme-specific features: header/footer builders, widget areas, menu locations, and page templates.
If your theme uses a page builder (e.g., Elementor, WPBakery), open a page built with it and verify that rows, columns, and modules render without missing elements.
Test responsive design by resizing your browser or using mobile emulation — confirm that navigation menus, images, and text adapt properly.
Access /wp-admin and navigate to Tools > Site Health. Run the site health check and look for any warnings related to database errors, such as “The database connection is working” or “The site is able to communicate with the database.”
Manually query the database using phpMyAdmin or a similar tool. Check that tables like wp_posts, wp_options, and wp_users contain the expected data (post counts, settings, user accounts).
If your site uses custom database queries (e.g., in a plugin or custom code), run those queries on a test page or via the WordPress admin to confirm they return results without timeouts.
Verify that the database user has sufficient privileges — look for errors like “Access denied for user” in PHP error logs or the WordPress debug log. Your host can grant necessary permissions if needed.
Common database-related issues and fixes:
Issue
Symptom
Solution
Wrong database credentials
“Error establishing a database connection”
Update wp-config.php with correct database name, user, password, and host
Table prefix mismatch
Some tables missing or queries fail
Ensure $table_prefix in wp-config.php matches the prefix in your database
Collation or charset conflict
Special characters display as ? or garbled text
Set DB_CHARSET and DB_COLLATE in wp-config.php to match the original database
Insufficient memory for queries
Pages load slowly or time out
Increase PHP memory limit in wp-config.php (e.g., define('WP_MEMORY_LIMIT', '256M');)
After completing all tests, document any issues you found and fix them before proceeding. If everything passes — pages load, forms submit, plugins run, and the database responds — you are ready to point your domain to the new host. Remember to revert your hosts file edit if you used one, and clear your local DNS cache (run ipconfig /flushdns on Windows or sudo dscacheutil -flushcache on macOS) before the final switch.
9. Point Your Domain to the New Host
After you have successfully transferred your WordPress files and database to the new host, and verified that the site functions correctly on its temporary URL or staging domain, the final critical step is to point your domain to the new server. This process involves updating your domain’s DNS (Domain Name System) settings so that when visitors type your website address into their browser, they are directed to the new hosting environment. Without this change, your site will remain on the old host, and no one will see the migrated version.
Pointing a domain typically involves one of two approaches: changing the nameservers to those provided by your new host, or updating the A record (and optionally the CNAME record) to point to the new host’s IP address. The method you choose depends on your specific hosting setup and whether you want to manage DNS through your new host or keep it at your domain registrar. Both methods are reliable, but they differ in control, speed, and complexity.
Before you begin, ensure you have the following information from your new hosting provider:
Nameservers: Usually two or more addresses (e.g., ns1.newhost.com, ns2.newhost.com).
IP Address: A dedicated or shared IP address for your hosting account (if using A record pointing).
Server’s default nameserver or IP: Some hosts provide a temporary URL or IP for testing.
It is also wise to take a complete backup of your DNS settings from your current registrar or DNS provider before making any changes. This ensures you can revert if something goes wrong.
Changing Nameservers at Your Domain Registrar
Changing nameservers is the most common and straightforward method for pointing a domain to a new host. When you update the nameservers at your domain registrar, you delegate all DNS management to the new host’s nameservers. This means the new host will control all DNS records—including A, CNAME, MX, and TXT records—for your domain. Most hosting providers automatically configure the necessary records when you set up your account, so this method often requires minimal manual work.
To change nameservers, follow these general steps:
Log in to your domain registrar’s control panel. This is the company where you purchased your domain (e.g., GoDaddy, Namecheap, Google Domains, Cloudflare).
Locate the DNS or Nameserver settings. This is often found under a section labeled “Domain Management,” “DNS Settings,” or “Nameservers.”
Find the current nameserver fields. You will typically see two or more fields pre-filled with your old host’s nameservers (e.g., ns1.oldhost.com, ns2.oldhost.com).
Replace them with the new host’s nameservers. Enter the nameservers provided by your new hosting provider. Common formats include:
ns1.newhost.com
ns2.newhost.com
ns3.newhost.com (if applicable)
Save the changes. The registrar may ask you to confirm the update. Some registrars process changes instantly, while others may take a few minutes to propagate.
Verify the change. After saving, you can use online tools like whatsmydns.net or dnschecker.org to confirm the nameservers have updated globally.
Important considerations:
Changing nameservers will override any existing DNS records at your registrar. This means your email, subdomains, and other services tied to the old DNS will stop working unless you recreate them in the new host’s DNS zone.
If you use a third-party email service (like Google Workspace or Microsoft 365), you must add the appropriate MX records in your new host’s DNS control panel after the nameserver change. Most hosting providers offer a simple interface to add these records.
Nameserver changes can take 24–48 hours to fully propagate worldwide, but many updates occur within a few hours.
Updating A Records for IP-Based Pointing
If you prefer to keep your DNS management at your current registrar or DNS provider—for example, if you use Cloudflare for DNS or want to maintain control over all records without switching to the new host’s nameservers—you can point your domain using A records (and CNAME records for the www subdomain). This method is more granular and allows you to change only the IP address, leaving other DNS records (like MX for email) untouched.
To update A records, follow these steps:
Obtain your new host’s IP address. This is usually a dedicated IP for your hosting account, or a shared IP if you are on a shared plan. Your host will provide this in your welcome email or control panel (e.g., cPanel or Plesk).
Log in to your current DNS provider’s control panel. This could be your domain registrar (e.g., Namecheap) or a third-party DNS service (e.g., Cloudflare, AWS Route 53).
Navigate to the DNS records editor. Look for an option like “Manage DNS,” “Zone Editor,” or “DNS Records.”
Locate the existing A record for your domain. This record typically has a “Host” or “Name” field set to “@” (representing the root domain) and a “Points to” or “Value” field with the old IP address.
Replace the old IP with the new host’s IP address. Ensure you save the change. For example:
Type
Host
Value
TTL
A
@
123.456.789.10
3600
CNAME
www
yourdomain.com
3600
Update the CNAME record for the www subdomain. If you want your site to be accessible via both yourdomain.com and www.yourdomain.com, ensure the CNAME record points to the root domain (e.g., yourdomain.com). Some setups require a separate A record for the www subdomain if your DNS provider does not support CNAME flattening.
Save all changes. Your DNS provider may apply the update immediately or after a short delay.
Advantages of A record pointing:
Full control over DNS records remains at your current provider.
Email, subdomains, and other services are unaffected, as long as you don’t modify their records.
You must manually update the A record if your host changes your IP address (e.g., from shared to dedicated).
Some hosts may require nameserver changes to fully activate certain features (e.g., automatic SSL certificates or CDN integration).
Monitoring DNS Propagation (May Take 24–48 Hours)
Once you have updated your nameservers or A records, the changes must propagate across the global DNS network. DNS propagation refers to the time it takes for internet service providers (ISPs) and recursive DNS servers worldwide to update their cached records with your new DNS information. During this period, some visitors may be directed to the new host, while others may still see the old site on the previous server.
What to expect during propagation:
Immediate changes: Some users, especially those using DNS servers that refresh frequently, may see your site on the new host within minutes.
Delayed changes: Other users may experience delays of up to 24–48 hours, depending on their ISP’s cache settings and the TTL (Time to Live) value of your old DNS records. Lower TTL values (e.g., 300 seconds) can speed up propagation, while higher values (e.g., 86400 seconds) slow it down.
Inconsistent behavior: You might see the new site on your home network but the old site on a mobile device using a different ISP. This is normal and temporary.
How to monitor DNS propagation:
Use online DNS propagation checkers. Tools like whatsmydns.net, dnschecker.org, or intoDNS.com allow you to enter your domain and see whether the new IP or nameservers are detected from multiple locations worldwide.
Check from your own computer. Open a command prompt or terminal and run the command nslookup yourdomain.com (Windows) or dig yourdomain.com (macOS/Linux). Compare the returned IP address with your new host’s IP.
Flush your local DNS cache. If you are still seeing the old site, flush your DNS cache. On Windows, run ipconfig /flushdns. On macOS, run sudo dscacheutil -flushcache; sudo killall -HUP mDNSResponder.
Wait and re-check. If changes do not appear within 48 hours, contact your domain registrar or new host’s support team. Sometimes, a typo in the nameservers or IP address can cause delays.
Tips to minimize downtime during propagation:
Set a low TTL (e.g., 300 seconds) on your DNS records at least 24 hours before making the change. This forces caching servers to check for updates more frequently.
Keep your old hosting account active for at least 48 hours after the DNS change. This ensures that visitors still hitting the old server see your site, preventing a complete outage.
Redirect traffic from the old host to the new host if possible. Some hosts offer a temporary redirect option, but this is not always necessary if you keep both accounts live.
Once propagation is complete, you can safely deactivate your old hosting account. Verify that your WordPress site is fully functional—check all pages, forms, and media—and update any internal URLs if needed. Congratulations, you have successfully migrated your WordPress site to a new host.
Once you have confirmed that your DNS has propagated and your site is loading correctly from the new host, the final phase of the migration process begins. This step is often rushed, but it is critical for ensuring long-term stability, security, and performance. A thorough finalization protects your data, prevents billing surprises, and secures your new environment against common threats. Follow this structured approach to complete the migration with confidence.
Performing a Comprehensive Site Audit
Before you make any irreversible changes, such as canceling your old hosting account, you must verify that every aspect of your WordPress site is functioning correctly on the new server. A superficial check is not sufficient. Use the following checklist to conduct a deep audit:
Test All Core WordPress Functions: Log in to your WordPress admin dashboard (wp-admin) and verify that you can create, edit, and publish a test post or page. Check that the media library loads images and that all plugins and themes display correctly without error messages.
Verify All Internal and External Links: Use a tool like Screaming Frog SEO Spider or a plugin like Broken Link Checker to scan your entire site for 404 errors or broken links. This is especially important if your site’s URL structure changed during the migration (e.g., from HTTP to HTTPS).
Check Forms and Interactive Elements: Submit a test entry on every contact form, newsletter signup, or payment gateway on your site. Ensure that confirmation messages or emails are sent and received correctly. Forms often break due to server configuration differences (e.g., PHP mail settings).
Review Page Speed and Performance: Run your site through Google PageSpeed Insights or GTmetrix. Compare the results to your pre-migration baseline. If you notice a significant drop in performance, investigate server-side caching, image optimization, or PHP version settings on the new host.
Test Mobile Responsiveness: Use Chrome DevTools or a service like BrowserStack to view your site on various mobile devices and screen sizes. Ensure that menus, buttons, and images render correctly.
Validate SSL Certificate Installation: Navigate to your site using https:// and confirm that the padlock icon appears in the browser address bar. Use an SSL checker tool to verify that the certificate is valid, properly installed, and covers all subdomains.
Check Email Deliverability: If your site sends transactional emails (e.g., password resets, order confirmations), send a test email from your WordPress installation. Verify that it arrives in the recipient’s inbox, not the spam folder. You may need to configure SMTP settings or SPF/DKIM records for your new server.
Inspect Database Integrity: Access your new host’s phpMyAdmin (or equivalent database tool) and run a quick check on the WordPress tables. Look for any orphaned data or errors in the wp_options table, particularly the siteurl and home values, which should point to your correct domain.
If you encounter any issues during this audit, address them immediately before proceeding. Common problems include incorrect file permissions, missing PHP extensions, or outdated plugin versions. Document any fixes you apply so you can reference them later if similar issues arise.
Canceling the Old Hosting Account (After Confirmation)
Once your comprehensive audit confirms that the new site is fully functional, you can safely cancel your old hosting account. However, do not rush this step. Premature cancellation can result in permanent data loss if you discover a critical error days later. Follow this cautious timeline:
Action
Recommended Timing
Reason
Keep old account active
7–14 days after DNS propagation
Provides a fallback if the new host encounters unexpected downtime or configuration issues.
Download a final backup from old host
Before cancellation
Retain a complete copy of your site files and database as it existed on the old server, in case you need to restore anything.
Verify no services rely on old host
At least 48 hours before cancellation
Check for any subdomains, staging sites, or third-party integrations (e.g., API calls) still pointing to the old server’s IP address.
Cancel the old hosting account
After the 7–14 day overlap period
Ensures all DNS changes have fully propagated worldwide and you have no reliance on the old environment.
When you are ready to cancel, log in to your old hosting control panel and locate the account cancellation or termination option. Before confirming, take these final precautions:
Download a Full Backup: Use your old host’s backup tool or a plugin like UpdraftPlus to create a complete archive of your site files and database. Store this backup in a secure off-server location (e.g., cloud storage or an external hard drive).
Transfer Any Remaining Data: If you have email accounts, databases, or other files on the old server that you still need, migrate them to the new host or a separate service before cancellation.
Check for Automatic Renewals: Ensure that your billing cycle is not set to auto-renew after the cancellation date. Contact support if necessary to confirm that no further charges will occur.
Document Account Details: Save a screenshot or PDF of your old hosting dashboard, including server IP addresses, nameserver settings, and any custom configurations. This documentation can be invaluable for troubleshooting future issues.
After cancellation, verify that your domain is no longer resolving to the old server by performing a DNS lookup using a tool like whatsmydns.net. If any residual traffic still points to the old IP, consider setting up a 301 redirect from the old server to the new one (if the old host allows it during a grace period).
Implementing Security Best Practices (SSL, Backups, Updates)
With your site now live and your old hosting account closed, your final step is to harden the security of your new environment. A fresh hosting account is an opportunity to establish a strong security baseline. Follow these practices to protect your site from common threats:
1. Ensure SSL is Fully Configured and Enforced
Confirm that your SSL certificate is active and covers your primary domain and all subdomains (e.g., www and non-www). Many modern hosts offer free Let’s Encrypt certificates with automatic renewal.
Install a plugin like Really Simple SSL to automatically redirect all HTTP traffic to HTTPS and fix any mixed-content warnings (e.g., images or scripts loaded over HTTP).
Update your WordPress Address (URL) and Site Address (URL) in Settings > General to use https:// if you haven’t already.
2. Establish a Reliable Backup Strategy
Set up automated daily backups of your entire site (files and database). Use a trusted plugin such as UpdraftPlus, BackWPup, or Jetpack VaultPress Backup, or rely on your host’s native backup solution if it offers off-site storage.
Store backups in at least two remote locations (e.g., cloud storage like Google Drive, Dropbox, or Amazon S3). Avoid keeping backups only on the same server where your site is hosted.
Test a backup restoration in a staging environment at least once per quarter to ensure the files are usable.
3. Keep Everything Updated
Update your WordPress core installation to the latest version immediately after migration. Outdated core is a common entry point for hackers.
Update all themes and plugins to their most recent versions. Delete any unused themes or plugins to reduce attack surface.
Enable automatic updates for minor WordPress core releases and plugin security patches. For major updates, test them first on a staging site if possible.
4. Strengthen Access Controls
Change your WordPress admin username from the default “admin” if it still exists. Use a unique, strong password (at least 12 characters with a mix of letters, numbers, and symbols).
Implement two-factor authentication (2FA) for all administrator accounts using a plugin like Wordfence or Google Authenticator.
Limit login attempts to prevent brute-force attacks. A plugin like Limit Login Attempts Reloaded can block IPs after a set number of failed tries.
5. Harden Server and File Permissions
Set correct file permissions: directories should be 755, files should be 644, and the wp-config.php file should be 600 or 440. Check with your host’s support for their recommended values.
Disable file editing from the WordPress admin dashboard by adding define('DISALLOW_FILE_EDIT', true); to your wp-config.php file.
Enable a web application firewall (WAF) such as Cloudflare or Sucuri to filter malicious traffic before it reaches your server.
6. Monitor and Audit Regularly
Install a security plugin like Wordfence or iThemes Security Pro that provides real-time threat detection, malware scanning, and login monitoring.
Review your site’s error logs (accessible via your host’s cPanel or a plugin) weekly to identify unusual activity, such as repeated failed login attempts or file modifications.
Schedule a quarterly security audit where you check for outdated plugins, review user accounts, and verify that your backup system is functioning.
By completing these finalization steps, you ensure that your WordPress site is not only successfully migrated but also secure, backed up, and optimized for long-term performance. This disciplined approach minimizes risk and gives you peace of mind as you continue to grow your online presence on its new hosting foundation.
WordPress Security Best Practices: Protect Your Site from Hackers
Introduction to WordPress Security Threats
WordPress powers over 40% of all websites on the internet, making it the most popular content management system globally. However, this widespread adoption also makes it a prime target for malicious actors. Security is not a one-time setup but an ongoing process that requires vigilance and proactive measures. Understanding the landscape of threats is the first step in fortifying your site. From automated bots scanning for vulnerabilities to sophisticated attacks targeting specific weaknesses, the risks are diverse and ever-evolving. This section provides an overview of common vulnerabilities—such as outdated plugins, weak passwords, and brute force attacks—and explains why proactive security is essential for any WordPress site, regardless of its size or purpose.
Understanding the Risk Landscape
The risk landscape for WordPress sites is characterized by a combination of common, preventable vulnerabilities and more complex, targeted exploits. At the foundation, many breaches occur due to basic oversights that can be easily remedied with regular maintenance. The most prevalent threats include:
Outdated Core, Themes, and Plugins: Developers regularly release updates to patch security holes. Failing to apply these updates leaves your site exposed to known exploits that hackers can automate to scan for and attack.
Weak Passwords and User Credentials: Simple or reused passwords for admin accounts are a primary entry point. Brute force attacks, where automated scripts try thousands of username and password combinations, exploit this weakness relentlessly.
Brute Force Attacks: These are automated attempts to gain access by guessing login credentials. Without proper defenses, even a moderately determined attacker can eventually break in.
SQL Injection (SQLi): Attackers inject malicious SQL code into input fields (like search boxes or forms) to manipulate your database, potentially stealing data or gaining unauthorized access.
Cross-Site Scripting (XSS): Malicious scripts are injected into your site’s pages, often through vulnerable plugins or themes. When visitors view these pages, the scripts can steal cookies, redirect users, or deface the site.
File Inclusion Exploits: Vulnerabilities that allow attackers to include remote files on your server, often leading to remote code execution and full site compromise.
Malware and Backdoors: Once inside, hackers may install malicious software that can steal data, send spam, or provide persistent access (a backdoor) for future attacks.
The risk is not static. As security measures improve, attackers evolve their methods. For example, while basic brute force attacks can be mitigated with login attempt limits, more sophisticated distributed brute force attacks use botnets to evade IP-based blocking. Similarly, zero-day vulnerabilities—flaws unknown to the developer—pose a significant risk until patches are released. Understanding this landscape means recognizing that no single solution is a silver bullet; a layered defense strategy is required.
Hackers target WordPress sites for a variety of reasons, ranging from financial gain to ideological motives. The sheer volume of WordPress installations makes it an attractive hunting ground. Here are the primary motivations:
Motivation
Description
Common Outcome
Financial Gain
Attackers aim to steal sensitive data (credit card numbers, personal information) from e-commerce sites or use compromised sites for phishing campaigns. They may also install ransomware or sell access to botnets.
Data theft, fraudulent transactions, site held for ransom.
Spam Distribution
Compromised sites are used to host spam content or send bulk emails, often without the site owner’s knowledge. This can damage the site’s reputation and lead to blacklisting by search engines.
Blacklisted by Google, email services blocked.
SEO Manipulation
Hackers inject hidden links or spammy content to boost their own sites’ search rankings. This is often done through backdoors that allow them to modify files undetected.
Site penalized or removed from search results.
Defacement and Vandalism
Some attackers target sites for ideological reasons, to make a political statement, or simply to cause disruption. Defacement alters the visible content of the site.
Loss of credibility, damage to brand reputation.
Resource Exploitation
Compromised servers can be used for cryptocurrency mining, as part of a botnet for DDoS attacks, or to host illegal content. The site owner bears the cost of increased bandwidth and server load.
High server bills, slow performance, potential legal issues.
WordPress’s extensible architecture, while a strength, also introduces risk. The vast ecosystem of third-party plugins and themes means that code quality varies widely. A single vulnerable plugin can compromise an entire site, even if the core is secure. Additionally, many site owners underestimate the importance of security, assuming their small site is not a target. In reality, automated bots do not discriminate—they scan every site they can find, regardless of size or traffic. Hackers know that many site owners neglect updates, use weak passwords, and fail to implement basic security measures, making these sites low-hanging fruit.
The Cost of a Security Breach
The consequences of a security breach extend far beyond the immediate technical disruption. The true cost is multifaceted and can be devastating for individuals and businesses alike. Below is a breakdown of the key areas affected:
Financial Loss: This includes direct costs such as paying for professional cleanup, legal fees, and potential fines from regulatory bodies (e.g., GDPR, CCPA). For e-commerce sites, there is the loss of revenue during downtime and the cost of notifying affected customers. In severe cases, theft of funds or intellectual property can occur.
Reputation Damage: Trust is hard to earn and easy to lose. When a site is compromised, visitors may see malicious content, phishing pages, or malware downloads. Search engines may flag the site as unsafe, displaying warnings that deter users. Rebuilding trust requires time, transparency, and often a public apology.
Data Loss: A breach can result in the loss of critical data, including customer records, order histories, and content. Even with backups, restoring a site to its exact state before the attack can be complex and may result in permanent data loss if backups are outdated or incomplete.
Downtime and Operational Disruption: While your site is compromised or being cleaned, it may be offline for hours or days. This disrupts business operations, customer service, and content publishing. For membership sites or online courses, this can mean lost subscriptions and frustrated users.
SEO Penalties: Google and other search engines penalize compromised sites by removing them from search results or displaying warnings. Recovery from such penalties can take weeks or months, drastically reducing organic traffic and visibility.
Long-Term Maintenance Costs: After a breach, site owners often need to invest in stronger security measures, ongoing monitoring, and professional services to prevent future attacks. The psychological toll—constant worry about another breach—can also affect productivity.
Proactive security is not an expense; it is an investment. The cost of implementing strong passwords, regular updates, and a security plugin is negligible compared to the potential losses from a single breach. By understanding the threats, the motivations of attackers, and the true cost of failure, site owners can make informed decisions to protect their digital assets. The next sections will delve into specific best practices that form a robust defense against these common threats.
Keeping Core, Themes, and Plugins Updated
One of the most fundamental yet frequently overlooked aspects of WordPress security is the regular updating of the core software, themes, and plugins. Outdated components are the primary entry point for automated attacks and malicious scripts. When developers discover a vulnerability—whether it is a cross-site scripting (XSS) flaw, a SQL injection vector, or a privilege escalation bug—they release a patch in the next version. If you fail to apply that patch, your site remains exposed to anyone who knows about the exploit. In the ecosystem of WordPress security best practices, keeping everything updated is the single most cost-effective measure you can take to protect your site from hackers.
WordPress core updates often address critical security issues, but they also introduce new features and performance improvements. Themes and plugins, especially those from third-party developers, are updated for similar reasons. A plugin that has not been updated in over a year is a red flag; it may contain unpatched vulnerabilities that hackers actively scan for. By maintaining a disciplined update routine, you reduce the attack surface of your site and ensure that you are running the most secure versions of all components.
Setting Up Automatic Updates
WordPress has supported automatic background updates since version 3.7. By default, minor core updates (e.g., from 6.4.1 to 6.4.2) are applied automatically. However, major core updates, themes, and plugins require explicit configuration. To maximize security without manual intervention, you can enable automatic updates for all components.
To configure automatic updates in the WordPress admin dashboard, navigate to Dashboard > Updates. Look for the option to enable automatic updates for plugins and themes. Alternatively, you can use a plugin like Easy Updates Manager to fine-tune which components update automatically. For developers or advanced users, the wp-config.php file allows granular control via constants:
define( 'WP_AUTO_UPDATE_CORE', true ); // Enables automatic updates for all core versions
define( 'AUTOMATIC_UPDATER_DISABLED', false ); // Ensures the updater is active
For themes and plugins, you can also use filters in your theme’s functions.php file or a custom plugin:
While automatic updates are convenient, they are not without risks. A poorly coded update could break your site’s functionality or introduce compatibility issues. To mitigate this, consider the following best practices:
Enable automatic updates only for well-maintained plugins that have a large user base and frequent updates.
Use a reliable backup solution that takes snapshots before any update is applied. Services like UpdraftPlus or Jetpack Backup can automate this.
Monitor your site after updates using uptime monitoring tools. If an update causes a white screen or a critical error, you can quickly restore from backup.
Opt for delayed automatic updates for major core releases. Some hosting providers offer a 24- to 48-hour delay, allowing the community to report any issues before the update hits your production site.
Automatic updates are a powerful tool for maintaining security, but they work best when combined with a robust backup strategy and a staging environment for testing.
Managing Update Notifications
Even with automatic updates enabled, you should never rely solely on them. Update notifications serve as a safety net, alerting you when a new version is available or when an automatic update has failed. WordPress displays update notifications in the admin toolbar and on the Dashboard. However, these in-dashboard alerts are only visible if you log in regularly. For sites with multiple administrators or for those who prefer email-based alerts, you can enhance notification management using the following methods:
WordPress sends an email to the site admin email address when automatic updates are completed or fail. You can customize this with plugins like Email Notifications for Updates.
Site owners who check email frequently and want a record of update events.
Admin Dashboard Alerts
Native WordPress alerts appear in the admin bar and updates page. They are visible to all users with update capabilities.
Teams that log into the admin panel daily.
Slack or Discord Integration
Use a plugin or webhook to send update notifications to team communication channels. Services like WP Updates Notifier can be configured to push alerts to Slack.
Development teams or agencies managing multiple sites.
Third-Party Monitoring Services
Tools like ManageWP, MainWP, or Jetpack Monitor can track update status across multiple sites and send consolidated reports.
Freelancers and agencies overseeing many client sites.
To manage notification frequency, consider the following tips:
Set a dedicated admin email address that is monitored by the team, not a personal inbox that may be overlooked.
Use a centralized dashboard for multiple sites. This reduces noise and lets you see all update statuses at a glance.
Configure notification filters to only receive alerts for security updates or failed updates, rather than every minor release.
Regularly check the Updates screen (Dashboard > Updates) manually at least once a week, even if you have automatic updates enabled.
Managing notifications effectively ensures that you are always aware of the update status of your WordPress installation, themes, and plugins. This proactive awareness is a cornerstone of WordPress security best practices because it prevents updates from being forgotten or overlooked.
Testing Updates on a Staging Environment
Before applying updates to your live site, especially major core updates or updates to critical plugins, you should test them in a staging environment. A staging site is a clone of your production site that is not accessible to the public. It allows you to verify that updates do not break functionality, cause visual glitches, or introduce conflicts with other components. This practice is essential for high-traffic sites, e-commerce stores, or any site where downtime directly impacts revenue or reputation.
Setting up a staging environment can be done in several ways:
Hosting-provided staging: Many managed WordPress hosts (e.g., WP Engine, Kinsta, SiteGround) offer one-click staging environments. These are the easiest to use and often include push-to-live functionality.
Plugin-based staging: Plugins like WP Staging or BlogVault can create a staging copy directly from your WordPress dashboard. They handle database cloning and file duplication automatically.
Manual staging: For developers with server access, you can create a staging subdomain (e.g., staging.yoursite.com), copy the files via FTP, and export/import the database. This method requires more technical skill but offers full control.
Once your staging environment is ready, follow this testing workflow:
Back up your staging site before making any changes. This ensures you can revert if something goes wrong.
Apply the updates to the staging site. Start with the WordPress core, then themes, then plugins. This order helps isolate which component causes an issue.
Test key functionality:
Navigate through all major pages and posts.
Submit forms, including contact forms and checkout processes.
Check user login and registration flows.
Verify that custom code (child theme functions, custom post types) still works.
Test on multiple devices and browsers if your site uses responsive design.
Check for errors:
Enable WordPress debugging in your wp-config.php file: define( 'WP_DEBUG', true ); define( 'WP_DEBUG_LOG', true );.
Look for PHP notices, warnings, or fatal errors in the debug log.
Use browser developer tools to check for JavaScript errors.
Resolve any issues in the staging environment before moving to production. If a plugin update causes a conflict, you may need to contact the plugin developer, find an alternative, or delay the update.
Deploy the updates to production. If using a hosting-provided staging tool, use the push-to-live feature. If using a plugin, follow its deployment instructions. Always take a fresh backup of the live site before pushing updates.
Testing updates on a staging environment is not just about avoiding downtime—it is about maintaining the integrity of your security posture. A broken update could inadvertently disable a security plugin, expose sensitive data, or create a backdoor. By catching these issues early, you ensure that your site remains protected even after applying the latest patches.
Incorporating staging into your update workflow is a hallmark of professional WordPress security best practices. It transforms updates from a risky necessity into a controlled, predictable process. For sites that cannot afford any disruption, such as membership platforms or online stores, staging is non-negotiable. Even for smaller sites, the time investment is minimal compared to the potential cost of a hacked site or lost data.
By combining automatic updates, proactive notification management, and thorough staging testing, you create a robust defense against the most common attack vectors. This layered approach ensures that your WordPress site remains secure, stable, and resilient in the face of evolving threats. Remember: updates are not a one-time task but an ongoing commitment. Treat them as a core part of your maintenance routine, and you will significantly reduce the risk of a successful hack.
Using Strong Authentication and User Permissions
Authentication and user permissions form the frontline defense of any WordPress site. Weak credentials or overly broad access rights are among the most common entry points for attackers. By systematically hardening how users log in and what they can do once authenticated, you reduce the attack surface significantly. This section covers three essential layers: enforcing strong password policies, enabling two-factor authentication, and assigning precise user roles.
Creating Strong Password Policies
Passwords remain the most basic yet frequently compromised security element. A weak password can be cracked in seconds using brute-force or dictionary attacks. To mitigate this, you must enforce policies that make passwords resistant to automated guessing and credential stuffing.
Key components of a strong password policy include:
Minimum length: Require at least 12 characters. Longer passwords exponentially increase cracking time.
Character diversity: Mandate a mix of uppercase letters, lowercase letters, numbers, and special characters.
No common patterns: Block passwords containing sequential characters (e.g., “1234”), repeated characters (e.g., “aaaa”), or common words (e.g., “password”, “admin”).
Password expiration: Set a reasonable expiry period (e.g., 90 days) for administrative accounts. For regular users, consider longer intervals or no expiry if combined with other controls.
Password history: Prevent reuse of the last 5–10 passwords.
WordPress does not enforce these policies natively for all users. To implement them, use a security plugin such as Wordfence, iThemes Security, or Sucuri. These tools allow you to set password strength requirements, force password changes, and block weak passwords at registration or update. For custom implementations, you can add filters to the wp_authenticate_user hook to validate password strength before login.
Additionally, educate users—especially administrators—about password hygiene. Discourage password reuse across different sites and recommend using a password manager. A password manager generates and stores complex, unique passwords, eliminating the need for users to remember them.
Example policy table for a typical WordPress site:
User Role
Minimum Length
Expiry
History
Administrator
16 characters
90 days
10 passwords
Editor
14 characters
180 days
8 passwords
Author
12 characters
365 days
5 passwords
Subscriber
12 characters
No expiry
5 passwords
Enforcing these policies drastically reduces the risk of credential theft. However, even strong passwords can be intercepted or phished, which is why the next layer—two-factor authentication—is critical.
Enabling Two-Factor Authentication
Two-factor authentication (2FA) adds a second verification step beyond the password. Even if an attacker obtains a user’s password, they cannot log in without the second factor. This makes 2FA one of the most effective defenses against unauthorized access.
Common 2FA methods for WordPress:
Time-based one-time passwords (TOTP): Generated by an authenticator app (e.g., Google Authenticator, Authy). The user enters a six-digit code that changes every 30 seconds.
SMS or email codes: A one-time code is sent via text message or email. While convenient, SMS-based 2FA is less secure due to SIM-swapping risks.
Hardware security keys: Physical devices (e.g., YubiKey) that require a USB or NFC tap. These provide the highest security and are resistant to phishing.
Biometric verification: Fingerprint or facial recognition, often used on mobile devices in combination with an app-based 2FA.
Implementation steps:
Choose a 2FA plugin. Popular options include Wordfence, iThemes Security, Two Factor Authentication (by WordOps), and Google Authenticator plugins. For multisite networks, consider WPMU DEV Defender or Jetpack.
Enable 2FA for all privileged roles. At minimum, require 2FA for administrators and editors. Optionally, extend it to authors and contributors if they have publishing capabilities.
Configure backup codes. Provide users with one-time backup codes in case they lose access to their primary 2FA device. Store these codes securely (e.g., in a password manager).
Test the setup. Have each user enroll and log in using their second factor before enforcing it site-wide. This prevents accidental lockouts.
Monitor 2FA usage. Use your security plugin’s logs to track failed 2FA attempts. Repeated failures may indicate an attempted breach.
For advanced setups, consider using WebAuthn (FIDO2) standards, which are supported by modern browsers and eliminate the need for shared secrets. Plugins like WebAuthn for WordPress allow passwordless login combined with a hardware key.
Important note: Never force 2FA on all users without providing a fallback mechanism (e.g., email recovery). Also, ensure your site’s login page uses HTTPS to protect the 2FA code in transit.
Limiting User Capabilities with Roles
WordPress’s built-in role system allows you to grant only the permissions necessary for each user’s tasks. Overprivileged users—such as giving an author administrator-level access—create unnecessary risk. If that account is compromised, the attacker gains full control of the site.
Default WordPress roles and their typical capabilities:
Role
Key Capabilities
Risk Level
Super Admin
Network-wide control (multisite)
Critical
Administrator
Full site management, plugin/theme installation, user management
Apply the principle of least privilege. Give each user the minimum capabilities required for their job. For example, a content writer only needs Author or Contributor role, not Editor.
Avoid using the Administrator role for daily tasks. Create a separate account with Editor or Author privileges for routine content work. Use the Administrator account only for site maintenance (e.g., installing plugins, updating core).
Audit user roles regularly. Review all accounts every quarter. Remove inactive users and downgrade roles that are no longer needed. Use a plugin like User Role Editor to bulk-manage roles and capabilities.
Create custom roles for specific needs. For instance, a “Shop Manager” role for WooCommerce that can manage orders but not access site settings. Plugins like Members or Capability Manager Enhanced let you define granular permissions.
Prevent role escalation. Ensure that users cannot upgrade their own roles. WordPress does not allow this by default, but custom code or plugins might introduce vulnerabilities. Restrict user registration to the Subscriber role only.
Example scenario: A team of five people manages a blog. The lead developer has Administrator access for maintenance. Two editors handle content review and scheduling. Two authors write posts. All other registered users are Subscribers. This structure limits exposure: if an author’s account is compromised, the attacker can only create drafts, not publish or modify existing content.
For multisite networks, be especially cautious with Super Admin privileges. Only grant this role to users who manage the entire network. Regular site administrators on individual subsites should not have Super Admin access.
Finally, combine role limitation with other controls. For example, require 2FA for any user with the ability to publish or modify site files. This layered approach ensures that even if a password is stolen, the attacker cannot exploit elevated permissions without the second factor.
By implementing strong password policies, two-factor authentication, and precise user roles, you create a robust authentication framework. These practices work together to block unauthorized access, limit damage from compromised accounts, and maintain control over your WordPress site’s security posture.
Implementing a Web Application Firewall (WAF)
A Web Application Firewall (WAF) acts as a critical gatekeeper between your WordPress site and the internet, filtering and monitoring HTTP traffic to block malicious requests before they ever reach your server. By analyzing incoming data against a set of defined rules, a WAF can stop common attacks such as SQL injection, cross-site scripting (XSS), brute-force login attempts, and DDoS traffic. For WordPress site owners, implementing a WAF is one of the most effective layers of defense, reducing the attack surface significantly without requiring constant manual intervention. The choice between cloud-based and plugin-based solutions depends on your technical expertise, budget, and performance requirements.
Cloud-Based vs. Plugin-Based WAFs
The primary distinction between cloud-based and plugin-based WAFs lies in where the traffic filtering occurs. Cloud-based WAFs operate as a reverse proxy, routing all traffic through their servers before it reaches your hosting environment. Plugin-based WAFs run directly on your WordPress server, intercepting requests at the application level. Each approach has distinct advantages and trade-offs.
Cloud-Based WAFs are typically offered by CDN providers such as Cloudflare, Sucuri, or AWS WAF. They work by changing your site’s DNS records to point to the WAF provider, which then proxies all requests. Benefits include:
Offloading traffic: The WAF absorbs and filters malicious traffic before it reaches your server, reducing server load and bandwidth usage.
DDoS protection: Cloud providers have extensive infrastructure to absorb large-scale distributed denial-of-service attacks.
Global edge network: Traffic is routed through the nearest data center, often improving site speed for visitors worldwide.
No server resource consumption: The filtering happens externally, so your WordPress installation does not use CPU or memory for rule processing.
Automatic updates: Providers continuously update their rule sets to address new vulnerabilities without manual intervention.
Plugin-Based WAFs, such as Wordfence, NinjaFirewall, or Sucuri Security (which also offers a hybrid approach), operate within your WordPress environment. They inspect requests after they reach your server but before they are processed by WordPress core. Advantages include:
Once you have chosen a WAF, proper configuration is essential to balance security with site functionality. Misconfigured rules can block legitimate users or fail to stop real threats. Follow these steps to configure firewall rules effectively:
Start with a default deny or allow list: Most WAFs come with a baseline rule set. For cloud-based WAFs, enable the provider’s recommended security rules (e.g., OWASP Top 10 rules). For plugin-based WAFs, activate the default firewall profile that blocks known attack patterns.
Whitelist trusted IP addresses: If your site has a known admin IP, add it to a whitelist to avoid blocking yourself. For cloud-based WAFs, use the provider’s IP access lists; for plugins, use the “Allowlist” or “Whitelist” feature.
Block common attack vectors: Enable rules that filter SQL injection keywords (e.g., “SELECT”, “DROP”), XSS patterns (e.g., “<script>”, “onerror=”), and path traversal attempts (e.g., “../”). Most WAFs have pre-built rules for these.
Rate-limit login attempts: Configure rules that limit the number of POST requests to the wp-login.php endpoint. For example, allow a maximum of 5 login attempts per minute per IP address. This prevents brute-force attacks without affecting genuine users.
Block malicious user agents and referrers: Add rules to deny requests from known bad bots (e.g., “curl”, “wget” in user agents) or referrer spam domains. Many WAFs provide a list of common malicious patterns you can enable.
Test rules in a staging environment: Before applying rules to your live site, use a staging copy to verify that legitimate functionality (e.g., form submissions, API calls) is not disrupted. Most plugin-based WAFs offer a “learning mode” that logs blocked requests without actually blocking them.
Create custom rules for specific plugins: If you use plugins with known vulnerabilities (e.g., contact forms with file uploads), create custom rules to sanitize or block dangerous file types (e.g., .php, .exe) in uploads.
For cloud-based WAFs, configuration is often done via a web interface. For example, with Cloudflare, you can navigate to the “Security” tab and toggle the “Web Application Firewall” settings, then create custom rules using expressions. For plugin-based WAFs like Wordfence, go to “Wordfence > Firewall” and adjust the “Basic Firewall Rules” and “Advanced Firewall Options.” Regularly review and update your rules to adapt to new threats.
Monitoring Firewall Logs
Monitoring your WAF logs is not a one-time task but a continuous process that provides insight into attack patterns, attempted breaches, and the effectiveness of your rules. Logs reveal which IP addresses are targeting your site, what types of attacks are common, and whether legitimate traffic is being incorrectly blocked. Here is how to approach monitoring:
Review logs daily or weekly: Set a schedule to check your WAF logs. For cloud-based WAFs, use the provider’s dashboard (e.g., Cloudflare’s “Firewall Events” or AWS WAF’s “Sampled Requests”). For plugin-based WAFs, look for a “Live Traffic” or “Firewall Log” section in the plugin’s settings.
Look for patterns: Identify recurring IP addresses, user agents, or request patterns. Repeated attempts from the same IP often indicate a brute-force attack or a bot. If you see a sudden spike in requests to a specific URL, investigate whether it is a DDoS or a vulnerability scan.
Analyze blocked vs. allowed requests: Check the ratio of blocked to allowed traffic. A very high ratio might indicate overly aggressive rules that block legitimate users. Conversely, a low ratio could mean your rules are too permissive. Adjust thresholds accordingly.
Log false positives: When a legitimate user is blocked (e.g., a customer submitting a form), note the details—time, IP, request path, and the rule that triggered the block. Add that IP to a whitelist or modify the rule to be less restrictive (e.g., by excluding certain query parameters).
Use alerting features: Many WAFs allow you to set up email or SMS alerts for specific events, such as when a rule blocks a high number of requests or when a known malicious IP is detected. Enable these alerts to respond quickly.
Export logs for analysis: For deeper investigation, export logs to a CSV or JSON file. Use tools like Excel, Google Sheets, or a SIEM system to sort and filter data. Look for anomalies like requests from unusual geographic locations or times of day.
Correlate with other security data: Cross-reference WAF logs with your server access logs, WordPress debug logs, and plugin activity logs. For example, if a WAF log shows a blocked SQL injection attempt, check your server logs to ensure no similar requests reached your database.
Effective monitoring transforms your WAF from a static defense into a dynamic tool. For instance, if you notice a pattern of requests targeting a specific plugin file (e.g., /wp-content/plugins/old-plugin/some-file.php), you can create a custom rule to block all requests to that path. Over time, monitoring helps you fine-tune your firewall rules, reducing false positives while increasing protection against emerging threats. Remember to keep logs for at least 30 days for compliance and forensic analysis, especially if your site handles sensitive data.
Securing Your Login Page and Admin Area
The WordPress login page is the most targeted entry point for malicious actors. Because it is universally accessible by default at /wp-admin or /wp-login.php, attackers can easily launch brute-force attempts, credential stuffing attacks, or exploit weak passwords. Hardening this area is not optional—it is a foundational layer of defense. Below, we explore three critical techniques to fortify your login process: customizing the login URL, limiting failed login attempts, and implementing CAPTCHA verification.
Customizing the Login URL
By default, every WordPress site uses the same login URL. This predictability allows bots and human attackers to target thousands of sites simultaneously. Changing the login URL to something unique dramatically reduces automated attacks because the attacker must first discover the new path. This is a simple yet highly effective security measure.
There are two primary methods to customize the login URL:
Using a plugin: Plugins like WPS Hide Login or iThemes Security allow you to change the login URL from the WordPress admin dashboard without editing code. For example, you can set your login page to /your-secret-login instead of /wp-admin. These plugins also redirect the default /wp-admin to a 404 error or another page, confusing attackers.
Manual code modification: Advanced users can add custom rewrite rules to the .htaccess file (for Apache servers) or use WordPress filters in the theme’s functions.php file. This method requires careful implementation to avoid breaking site functionality.
When choosing a new login URL, avoid common patterns like /login123 or /admin2024. Instead, use a random, non-dictionary string—for instance, /a9x7k2-login. Combine this with a strong password policy to maximize protection.
It is important to note that customizing the login URL is not a silver bullet. Determined attackers using directory scanners may still find the new path over time. Therefore, this technique works best when layered with other security measures, such as limiting login attempts and CAPTCHA.
Brute-force attacks rely on the ability to guess passwords repeatedly until one succeeds. By default, WordPress does not limit how many times a user can attempt to log in from a single IP address. Limiting failed login attempts is a direct countermeasure that throttles or blocks attackers after a set number of failures.
Implementing this restriction provides several benefits:
Prevents automated scripts from guessing passwords at high speed.
Reduces server load caused by repeated login requests.
Provides a log of suspicious IP addresses for further investigation.
Here is a comparison of common approaches to limiting login attempts:
Blocks an IP after a defined number of failed attempts within a time window.
Easy to install and configure; no coding required.
May conflict with caching plugins or reverse proxies.
Server-level (e.g., fail2ban on Linux servers)
Monitors server logs and adds firewall rules to block offending IPs.
More efficient; works across all applications on the server.
Requires server admin access and technical expertise.
Custom code in functions.php
Tracks failed attempts using WordPress transients or database entries.
Full control over behavior; no third-party dependency.
Higher risk of errors; can be bypassed if not coded properly.
When using a plugin, configure the following settings as a starting point:
Allow 3 to 5 failed login attempts before a lockout.
Set a lockout duration of 15 to 30 minutes.
Enable IP whitelisting for trusted addresses (e.g., your office network).
Optionally, send email alerts after multiple failed attempts from the same IP.
For high-traffic sites, consider using a distributed denial-of-service (DDoS) protection service that includes rate limiting. This offloads the blocking logic to the network edge, preserving your server resources.
One caveat: legitimate users may occasionally mistype their passwords. To avoid locking out site administrators, always implement an email-based unlock mechanism or a short lockout period. Additionally, test the configuration on a staging site before deploying to production.
Adding CAPTCHA or reCAPTCHA
CAPTCHA (Completely Automated Public Turing test to tell Computers and Humans Apart) adds a challenge-response test to the login form. This prevents bots from submitting the form automatically, even if they have valid credentials stolen from another source. Google’s reCAPTCHA is the most widely used version, offering invisible or checkbox-based verification.
There are several types of CAPTCHA suitable for WordPress logins:
reCAPTCHA v2 (I’m not a robot): Users click a checkbox, and Google’s risk analysis engine determines if the user is human. This is the most commonly implemented version due to its balance of security and user experience.
reCAPTCHA v3 (invisible): No user interaction is required. Instead, a score (0.0 to 1.0) is assigned based on user behavior. You can block logins with a score below a certain threshold, such as 0.5.
Math or text CAPTCHA: Simple plugins generate a math problem or ask users to type a set of characters. These are less secure because bots can easily parse them, but they remain useful for low-traffic sites or as an additional layer.
hCaptcha: A privacy-focused alternative to reCAPTCHA that does not rely on Google services. It uses image-based challenges similar to reCAPTCHA v2.
To implement reCAPTCHA on your WordPress login page, follow these steps:
Register your site with the Google reCAPTCHA admin console to obtain a site key and secret key.
Install a plugin such as Advanced noCaptcha & invisible Captcha or reCAPTCHA for WordPress.
Enter the site key and secret key in the plugin settings.
Enable reCAPTCHA on the login form (and optionally on registration and password reset forms).
Test the login flow to ensure the CAPTCHA appears correctly and does not break the form.
Best practices for CAPTCHA implementation include:
Use a server-side verification mechanism to prevent bypass via JavaScript manipulation.
Combine reCAPTCHA with login attempt limits—CAPTCHA alone does not stop brute-force attacks if the attacker uses a human to solve challenges.
Provide an audio alternative for users with visual impairments.
Monitor Google’s reCAPTCHA dashboard for suspicious activity patterns, such as a sudden drop in average scores.
One trade-off with reCAPTCHA is that it relies on Google’s servers. If your site has a global audience, ensure that the reCAPTCHA script loads from a content delivery network (CDN) to minimize latency. For sites with strict privacy policies, consider hCaptcha or a self-hosted solution like Securimage.
By combining a custom login URL, strict limits on failed attempts, and CAPTCHA verification, you create a multi-layered defense that significantly raises the bar for attackers. Each technique addresses a different attack vector: URL obscurity reduces reconnaissance, rate limiting blocks brute force, and CAPTCHA prevents automated submission. Together, they form a robust barrier that protects your WordPress admin area from unauthorized access.
Regular Backups and Recovery Planning
In the event of a security breach, server failure, or human error, a recent backup is often the only thing standing between a minor inconvenience and a catastrophic loss of data and reputation. While preventive measures like firewalls and malware scanning are essential, they are not infallible. A robust backup strategy, paired with a tested recovery plan, ensures that even if an attack succeeds, your WordPress site can be restored to a clean, fully functional state within hours. This section outlines the critical components of a reliable backup system, focusing on frequency, automation, and verifiable restoration.
Choosing Backup Frequency and Storage
Determining how often to back up your site depends on how frequently your content changes. A static brochure site might be fine with weekly backups, while a bustling e-commerce store or news portal may need hourly snapshots. The guiding principle is that the maximum potential data loss between backups should be acceptable for your business or project.
Consider these factors when setting your backup frequency:
Content update cadence: If you publish multiple posts or update products daily, opt for daily or real-time backups.
User-generated content: Sites with comments, forum posts, or member submissions benefit from more frequent backups.
Transaction volume: E-commerce sites should back up databases at least every few hours to avoid losing orders or customer data.
Resource constraints: Very frequent backups consume server CPU and storage. Balance frequency with your hosting environment’s capabilities.
Storage location is equally critical. Never store backups on the same server as your live site. If that server is compromised, your backups are compromised too. A layered storage strategy is recommended:
Dedicated backup server or secondary hosting account
Manual or secondary copies for redundancy
Local download
Encrypted archive on your personal computer or NAS
Emergency fallback when remote services are unavailable
Aim to keep at least three distinct copies of your site: one on a remote cloud service, one on a different physical server, and one offline. This “3-2-1” rule (three copies, two different media, one off-site) is a proven defense against data loss from any single point of failure.
Automating Backup Processes
Manual backups are unreliable for any site that changes regularly. Human forgetfulness, busy schedules, and the complexity of backing up both files and databases make automation essential. A properly configured automation system runs on a schedule, sends backups to multiple destinations, and logs successes or failures without requiring your intervention.
Several approaches exist for automating WordPress backups:
Plugins: Solutions like UpdraftPlus, BackupBuddy, or Jetpack VaultPress Backup offer schedule-based automation, remote storage integration, and incremental backups. They handle database dumps and file archiving transparently.
Server-level cron jobs: On a VPS or dedicated server, you can write a shell script that uses mysqldump and tar to create backups, then uploads them via rsync or s3cmd. This offers maximum control but requires technical expertise.
Hosting-provided tools: Many managed WordPress hosts (e.g., WP Engine, Kinsta, Flywheel) include automated daily backups as part of their service. Check whether these backups include the entire database and file system, and whether you can restore them independently.
Regardless of the method, ensure your automation covers the following critical components:
Component
Why It Matters
Automation Check
WordPress database
Contains all posts, pages, users, comments, and settings
Verify SQL dump includes all tables and is not truncated
wp-content/uploads
Images, PDFs, media files—often the largest folder
Ensure uploads are included; exclude cache directories
Plugin and theme files
Custom code and configurations may be lost otherwise
Back up entire wp-content directory, not just uploads
wp-config.php and .htaccess
Database credentials, security keys, and server rules
Include these files explicitly; they are not in the default backup scope
Set up email or Slack notifications for backup jobs so you are immediately alerted if a scheduled backup fails due to a disk quota issue, network error, or plugin conflict.
Testing Backup Restoration
A backup that cannot be restored is worthless. Yet many site owners never verify that their backup files are complete, uncorrupted, and capable of restoring a working site. Testing your restoration process is the only way to ensure your recovery plan will work under pressure.
Create a structured test schedule. At a minimum, perform a full restoration test quarterly. For high-traffic or e-commerce sites, monthly testing is prudent. Follow these steps to validate your backups:
Set up a staging environment: Use a subdomain (e.g., staging.yoursite.com) or a local server (e.g., with Local by Flywheel or Docker) that mirrors your production server’s PHP version, database engine, and memory limits.
Restore the backup: Upload your latest backup files (database SQL dump and file archive) to the staging environment. Use the same restoration method you would in a real emergency—whether through a plugin’s restore feature, a manual SQL import via phpMyAdmin, or a command-line script.
Verify site functionality: After restoration, check that all pages load without errors, that media files display correctly, that contact forms submit, and that any custom post types or woocommerce products are intact. Test user login and admin dashboard access.
Validate data integrity: Compare a few recent posts or orders against the live site (if it is still running) to ensure no data was truncated. Check that permalinks and site URLs are correct—if your staging URL differs from production, update it in the database or use a search-replace tool.
Time the process: Record how long the restoration takes. This gives you a realistic estimate for recovery time objectives (RTO). If it takes six hours to restore a backup, you know how long your site will be down during an incident.
Document the restoration steps in a simple checklist. This document is invaluable during a real crisis when stress levels are high. Include the following details:
Location of backup files (cloud provider URLs, server paths)
Credentials for accessing backup storage (stored in a password manager)
Exact commands or plugin menu paths for restoration
Common pitfalls (e.g., database prefix mismatches, file permission errors)
Contact information for your hosting provider’s support team
If a restoration test reveals issues—such as a corrupted SQL file or missing uploads—immediately correct the backup process. Adjust your automation to include the missing files, increase backup frequency, or switch to a more reliable storage provider. Only consider a backup strategy validated when you have successfully restored a full site from scratch in a test environment.
Hardening File Permissions and Database Security
One of the most critical yet often overlooked layers of WordPress security involves the correct configuration of file permissions and the structural security of your database. Improper file permissions can allow unauthorized users to read, modify, or execute sensitive files on your server, while a default database table prefix makes it easier for automated attacks to target your site. By systematically addressing these areas, you significantly reduce the attack surface available to malicious actors. This section provides a detailed, actionable guide to securing your WordPress installation through proper file permission settings, database table prefix changes, and the disabling of in-dashboard file editing.
Setting Correct File Permissions
File permissions in a Linux-based server environment determine who can read, write, and execute files and directories. WordPress, being a PHP-based application, requires a careful balance between security and functionality. The general rule is to grant the minimum permissions necessary for the server to operate correctly. The recommended standard is to set directories to 755 and files to 644. This means the owner has full read/write/execute permissions for directories, while the group and others have only read and execute permissions. For files, the owner has read and write, while group and others have read-only access.
However, you must understand the user context. In most shared hosting environments, your user account is the owner of the files. The web server (often www-data or nobody) runs as a separate user. For WordPress to automatically update plugins, themes, and core, the web server needs write access to certain directories. A strict 755/644 setup will prevent automatic updates, which is a security trade-off. For maximum security, many administrators choose to disable automatic updates and handle them manually or via command line. If you require automatic updates, you can temporarily grant write access to the web server for the wp-content directory, but revert permissions after the update.
Below is a table summarizing recommended permissions for key WordPress files and directories:
Path
Type
Recommended Permission
Notes
/wp-content/
Directory
755
Owner has full access; group and others can read and execute.
/wp-content/themes/
Directory
755
Same as above; consider 750 if web server needs no write access.
/wp-content/plugins/
Directory
755
Same as themes; 750 for stricter setups.
/wp-content/uploads/
Directory
755
Web server typically needs write access for media uploads.
wp-config.php
File
600 or 640
Highly sensitive; should not be readable by others. 600 is ideal.
.htaccess
File
644
Readable by web server; owner can write.
index.php
File
644
Standard file permission for PHP files.
wp-admin/
Directory
755
Owner write, group and others read/execute.
wp-includes/
Directory
755
Same as above; no write access needed for web server.
To change file permissions, you can use an FTP client like FileZilla (right-click > File Permissions) or via command line using the chmod command. For example, to set all directories to 755 and files to 644 recursively from the WordPress root directory, you can use:
find . -type d -exec chmod 755 {} ;
find . -type f -exec chmod 644 {} ;
Be cautious with these commands, as they will apply to all files and directories. Exclude any custom files that require different permissions, such as wp-config.php which should be set to 600 after the process. Also, ensure that the uploads directory retains write access for the web server if you allow media uploads.
Changing the Database Table Prefix
By default, WordPress installs with the database table prefix wp_. This is a widely known convention, making it a low-hanging fruit for automated SQL injection attacks. Attackers often craft scripts that target tables prefixed with wp_ to extract user data, insert malicious code, or drop tables. Changing this prefix to something unique and unpredictable adds a layer of obscurity that can thwart many automated attacks.
You should change the table prefix before installing WordPress. During installation, you are prompted to enter a table prefix. Choose a random string like a7b3x9_ or mySecurePrefix_ that includes letters, numbers, and underscores. Avoid obvious terms like wp_, blog_, or cms_.
If you have an existing WordPress site, changing the table prefix is more involved but still feasible. Follow these steps carefully:
Step 1: Backup Your Database
Before making any changes, create a full database backup using a plugin like UpdraftPlus or via phpMyAdmin. This ensures you can restore if something goes wrong.
Step 2: Change the Prefix in wp-config.php
Open your wp-config.php file and locate the line:
$table_prefix = 'wp_';
Change it to your new prefix, for example:
$table_prefix = 'a7b3x9_';
Step 3: Rename All Database Tables
Access your database via phpMyAdmin or command line. Execute SQL queries to rename each table. For example, to rename wp_options to a7b3x9_options, use:
RENAME TABLE wp_options TO a7b3x9_options;
Do this for every table that starts with the old prefix. A faster method is to generate the rename queries using a script or a plugin like “Change Table Prefix.” If using command line, you can use a loop:
for table in $(mysql -u username -p password -N -e "SHOW TABLES FROM database_name LIKE 'wp_%'"); do
new_table=$(echo $table | sed 's/^wp_/a7b3x9_/')
mysql -u username -p password -e "RENAME TABLE $table TO $new_table"
done
Replace username, password, and database_name with your actual credentials.
Step 4: Update Options Table
After renaming, you must update the option_name values in the new options table that reference the old prefix. Run these SQL queries:
UPDATE a7b3x9_options SET option_name = REPLACE(option_name, 'wp_', 'a7b3x9_') WHERE option_name LIKE '%wp_%';
Step 5: Update User Meta Table
Similarly, update the usermeta table:
UPDATE a7b3x9_usermeta SET meta_key = REPLACE(meta_key, 'wp_', 'a7b3x9_') WHERE meta_key LIKE '%wp_%';
After completing these steps, test your site thoroughly. Check that login, posts, pages, and plugins function correctly. Changing the table prefix does not affect the content, but some plugins store the prefix in their own settings, so you may need to reconfigure them. Always keep a backup until you are confident everything works.
Disabling File Editing in Dashboard
WordPress includes a built-in file editor in the admin dashboard that allows users with administrator access to edit theme and plugin files directly from the browser. While convenient, this feature presents a significant security risk. If an attacker gains access to an administrator account, they can use the editor to inject malicious PHP code into theme or plugin files, effectively taking over your site. Even without a breach, a legitimate user might accidentally corrupt a file, breaking your site.
Disabling this feature is a straightforward and highly effective hardening measure. You can do this by adding a single line of code to your wp-config.php file, before the line that says /* That's all, stop editing! Happy publishing. */. Insert the following:
define('DISALLOW_FILE_EDIT', true);
This constant prevents the Theme and Plugin editor from appearing in the admin dashboard. It does not affect your ability to edit files via FTP, SSH, or a code editor on your local machine. It only removes the in-browser editing capability.
For enhanced security, you can also disable the ability to install plugins and themes from the dashboard by adding:
This constant blocks all file modifications, including updates, installations, and deletions of plugins and themes. It is a more aggressive measure suitable for sites that are managed entirely via command line or a deployment pipeline. If you use this, you must handle all updates manually or through a staging environment.
Consider the following list of benefits from disabling file editing:
Prevents attackers from modifying theme or plugin files even if they obtain admin credentials.
Eliminates the risk of accidental file corruption through the dashboard.
Reduces the attack surface by removing a feature that is rarely needed in production.
Encourages the use of more secure file management practices, such as version control.
If you need to edit files occasionally, use an FTP client or a secure code editor. For larger teams, implement a development workflow where changes are made in a staging environment and pushed to production via a secure method. By disabling file editing in the dashboard, you remove a common vector for both malicious and accidental damage, strengthening the overall security posture of your WordPress site.
Implementing these three practices—setting correct file permissions, changing the database table prefix, and disabling file editing—forms a solid foundation for WordPress security. They are low-cost, high-impact measures that protect against a wide range of common attacks. Combine them with regular backups, strong passwords, and a web application firewall for comprehensive protection.
Using Security Plugins and Monitoring Tools
A robust security posture for any WordPress site relies on more than just strong passwords and core updates. Security plugins and monitoring tools act as a dedicated defense layer, providing automated scanning, real-time threat detection, and forensic capabilities. When configured correctly, they can block malicious traffic, identify vulnerabilities before they are exploited, and help you recover quickly from an incident. Below, we explore the most reputable options and the essential configuration steps to maximize their effectiveness.
Top Security Plugins Overview
Choosing the right security plugin depends on your site’s size, complexity, and specific risk profile. The following table summarizes the leading solutions, their core strengths, and ideal use cases.
Site owners already using Jetpack for other features; all-in-one solution for small to medium sites.
When evaluating these plugins, consider factors such as server resource usage, compatibility with your caching plugin, and whether you need a managed firewall (cloud-based) or a software-based one. Avoid installing multiple security plugins simultaneously, as they can conflict and degrade performance. Instead, select one primary plugin that covers scanning, firewall, and monitoring, then supplement it with a dedicated backup solution if needed.
Configuring Malware Scans
Malware scans are the first line of defense against malicious code injections, backdoors, and phishing scripts. Proper configuration ensures scans are thorough without overwhelming your server resources. Follow these best practices:
Set a regular scan schedule. For most sites, a daily scan during low-traffic hours (e.g., 2:00 AM server time) balances security with performance. High-traffic or e-commerce sites may benefit from twice-daily scans.
Enable real-time scanning for critical files. Many plugins allow you to scan uploads, themes, and plugins as files are modified. This catches threats before they execute, though it may increase CPU usage slightly.
Define scan exclusions carefully. Exclude large backup directories, cache folders, and known safe third-party assets (e.g., font files, analytics scripts) to avoid false positives and reduce scan duration.
Configure file integrity checks. Enable comparison of core, theme, and plugin files against their original checksums. Any unexpected changes should trigger an immediate alert.
Use signature-based and heuristic scanning. Signature-based scans detect known malware patterns, while heuristic scanning identifies suspicious behavior (e.g., base64-encoded strings in PHP files). Ensure both are active for comprehensive coverage.
Set up automatic quarantine or deletion. For non-critical infected files, configure the plugin to quarantine them automatically. For critical files (e.g., wp-config.php), set the action to notify you only, so you can investigate manually.
After configuring scans, test them by uploading a harmless test file (such as the EICAR test string) to your uploads directory. Verify that the plugin detects and handles it according to your rules. Regularly review scan logs to tune exclusions and adjust sensitivity.
Setting Up Activity Logs
Activity logs provide an immutable record of every significant event on your WordPress site, from user logins to plugin installations and file modifications. Without them, you have no way to trace the origin of a breach or identify compromised accounts. Implement activity logging with the following steps:
Enable logging for all user roles. Track actions by administrators, editors, and even subscribers. Limit log retention to 30–90 days to manage database size, but export logs to a secure external location (e.g., a cloud storage bucket) for long-term archiving.
Log critical events by default. These include: successful and failed login attempts, user creation and role changes, plugin/theme activation and deactivation, core updates, file modifications (via file integrity checks), and settings changes (e.g., permalink structure, user capabilities).
Integrate with external monitoring tools. Use webhook notifications or API integrations to send critical logs to a SIEM (Security Information and Event Management) system or a dedicated logging service like Papertrail or Logstash. This centralizes alerts and enables advanced correlation.
Set up real-time alerts for suspicious patterns. For example, configure the plugin to notify you immediately when: an admin account is created, five failed login attempts occur within one hour, or a previously unknown file appears in the wp-content directory. Use email, SMS, or Slack integrations for instant visibility.
Review logs regularly. Schedule a weekly manual review of activity logs to spot anomalies such as a user logging in from an unfamiliar IP address, a plugin being deactivated without authorization, or unexpected changes to .htaccess or wp-config.php.
Protect the log itself. Ensure that only administrators with a specific capability (e.g., manage_options) can access, truncate, or export logs. Some plugins allow you to store logs outside the WordPress database (e.g., in a custom table with restricted access) to prevent tampering in case of a breach.
By combining a well-chosen security plugin with carefully configured malware scans and comprehensive activity logs, you create a layered defense that not only prevents attacks but also provides the forensic data needed to respond effectively. Regularly review and update these configurations as your site evolves, and always test new settings in a staging environment before deploying them to production. This proactive approach transforms your WordPress site from a passive target into an actively monitored fortress.
Securing Hosting Environment and SSL/TLS
A secure website begins with a secure foundation. Even the most robust WordPress code can be undermined by a vulnerable hosting environment. This section focuses on three core pillars of server-side security: choosing a provider that prioritizes protection, implementing encryption through SSL/TLS certificates, and configuring essential server-level defenses. By addressing these areas, you establish a hardened perimeter that significantly reduces the risk of unauthorized access, data breaches, and site compromise.
Selecting a Security-Conscious Host
Your hosting provider is the gatekeeper of your website’s data and uptime. A security-conscious host implements proactive measures to block threats before they reach your WordPress installation. When evaluating potential hosts, prioritize the following features and policies:
Server-level firewalls and intrusion detection: Look for hosts that deploy web application firewalls (WAF) and monitor traffic for malicious patterns. This filters out common attacks like SQL injection and cross-site scripting (XSS) before they touch your site.
Regular automated backups: Ensure the host offers daily or more frequent backups stored off-site. Verify that you can restore your site with a single click or via a control panel. Backups are your last line of defense against ransomware and catastrophic errors.
DDoS protection: Distributed denial-of-service attacks can overwhelm your server. A host with built-in DDoS mitigation (often via a content delivery network) keeps your site accessible during traffic surges.
Automatic updates for server software: The host should manage patches for the operating system, PHP version, and database server. Running outdated software introduces known vulnerabilities.
Isolated accounts and resources: Choose a host that uses containerization or virtual private server (VPS) technology to isolate your account from other users. This prevents a compromised neighbor site from affecting yours.
Security incident response: Review the host’s policy for handling breaches. A transparent provider will notify you promptly and assist with cleanup.
Support for modern PHP versions: Outdated PHP versions (such as 5.6 or 7.0) are no longer supported with security patches. Your host should offer PHP 8.0 or higher and allow you to switch versions easily.
To compare hosts effectively, consider the following table of key security features:
Feature
Basic Shared Host
VPS or Managed WordPress Host
Server-level firewall
Often limited or shared
Dedicated, configurable
Backup frequency
Weekly or manual
Daily with off-site storage
DDoS protection
Minimal
Advanced, often included
PHP version control
May be restricted
Full control, latest versions
Account isolation
Weak (shared environment)
Strong (virtual or dedicated resources)
Security support response
Limited
24/7 with dedicated team
A security-conscious host may cost more, but the investment pays dividends in reduced downtime, faster recovery, and peace of mind. Avoid free or extremely low-cost hosts, as they often cut corners on security infrastructure.
Installing and Renewing SSL/TLS Certificates
SSL/TLS certificates encrypt data transmitted between your server and your visitors’ browsers. This encryption prevents attackers from intercepting sensitive information such as login credentials, payment details, and personal data. In addition to security, HTTPS is a ranking signal for search engines and is required for modern web features like service workers and progressive web apps.
Obtain a certificate from a trusted certificate authority (CA): Let’s Encrypt offers free, automated certificates that are widely trusted. Alternatively, purchase a certificate from a commercial CA if you need extended validation (EV) or wildcard coverage for subdomains.
Enable HTTPS in your hosting control panel: Most hosts provide a one-click option to install a free Let’s Encrypt certificate. After installation, ensure that your site is accessible via https:// and that the padlock icon appears in the browser.
Force HTTPS across your entire site: Update your WordPress address and site address in Settings > General to use https://. Use a plugin or a server rule (such as an .htaccess redirect) to redirect all HTTP traffic to HTTPS. Test that all internal links, images, and scripts load over HTTPS.
Automate renewal: SSL/TLS certificates have an expiration date, typically 90 days for Let’s Encrypt. Configure auto-renewal via your host’s tools or a cron job. Failure to renew will cause browsers to display security warnings, driving visitors away.
Check for mixed content: Mixed content occurs when your page loads over HTTPS but includes resources (images, scripts, stylesheets) over HTTP. This can break the padlock icon. Use a tool like Why No Padlock? or your browser’s developer console to identify and fix mixed content.
Enable HSTS (HTTP Strict Transport Security): HSTS tells browsers to always connect to your site via HTTPS, even if the user types an HTTP URL. This prevents downgrade attacks. Add the Strict-Transport-Security header to your server configuration after confirming HTTPS works perfectly.
Regularly verify your certificate’s validity using online SSL checkers. Set calendar reminders for renewal, or rely on automated systems to avoid lapses. A valid, properly configured SSL/TLS certificate is non-negotiable for any modern WordPress site.
Beyond the host and certificate, you can configure the server itself to block common attack vectors. These measures are implemented at the web server (Apache, Nginx) or operating system level and do not require WordPress plugins. Key server-level protections include:
Disable directory listing: By default, some servers list all files in a directory when no index file is present. This exposes your file structure to attackers. Disable directory listing in your server configuration or via an .htaccess file (Options -Indexes for Apache).
Restrict access to sensitive files: Protect files like wp-config.php, .htaccess, and xmlrpc.php. For Apache, add rules to deny direct access to these files. For Nginx, use location blocks to return a 403 Forbidden status.
Limit login attempts at the server level: Use a module like mod_evasive (Apache) or ngx_http_limit_req_module (Nginx) to throttle repeated requests to the login page. This mitigates brute-force attacks before they reach WordPress.
Implement a web application firewall (WAF): A WAF filters incoming traffic based on rulesets that block known attack patterns. Cloud-based WAFs (e.g., Cloudflare, Sucuri) are easy to set up. Server-level WAFs like ModSecurity offer deeper integration but require careful tuning.
Use secure file permissions: Set directories to 755 and files to 644 on Unix-based servers. The wp-config.php file should be 600 or 440 to prevent unauthorized reads. Avoid using 777 permissions, as they allow anyone to write to your files.
Disable unused services and ports: Close any open ports that are not needed for your site (e.g., FTP, Telnet, SMTP if not used). Use a firewall like iptables or UFW to restrict access to only necessary services (typically ports 80 and 443).
Enable logging and monitoring: Configure server logs to capture failed login attempts, 404 errors, and unusual traffic patterns. Review logs regularly or use automated monitoring tools to detect anomalies.
Harden PHP configuration: In your php.ini file, disable dangerous functions like exec, system, and eval if they are not required. Set allow_url_fopen and allow_url_include to Off to prevent remote file inclusion attacks.
Server-level measures require technical knowledge, but many managed WordPress hosts implement them by default. If you manage your own server, apply these configurations gradually and test each change to avoid breaking functionality. Document your settings so you can replicate them if you migrate servers.
By securing your hosting environment, installing and maintaining SSL/TLS certificates, and enforcing server-level protections, you create a resilient foundation for your WordPress site. These practices work together to block attacks early, protect data in transit, and limit the damage if a breach occurs. Regularly review and update these measures as new threats emerge and your site evolves.
Ongoing Security Audits and Incident Response
Maintaining a secure WordPress site is not a one-time setup but a continuous process of vigilance and improvement. Even with robust initial defenses, new vulnerabilities emerge, and attack vectors evolve. This is where ongoing security audits and a prepared incident response plan become critical. Regular audits help you identify weaknesses before attackers do, while a clear response plan ensures you can contain and remediate breaches quickly, minimizing damage and downtime. Below, we break down the essential components of this proactive security posture.
Conducting Regular Security Audits
A security audit is a systematic evaluation of your WordPress site’s security posture. It involves checking for outdated software, misconfigurations, suspicious files, and weak user practices. Perform these audits at least monthly, or more frequently for high-traffic sites. Use the following checklist to guide your audit:
Update core, themes, and plugins: Ensure all components are running the latest versions. Check for any pending updates in your WordPress admin dashboard.
Review user accounts and permissions: Remove inactive or unnecessary users. Verify that each user has the minimum required role (e.g., no one should be an Administrator unless necessary).
Scan for malware and vulnerabilities: Use a reputable security plugin (e.g., Wordfence, Sucuri) to perform a full file scan. Look for unfamiliar files, base64-encoded strings, or changes to core files.
Check file permissions: Ensure directories are set to 755 or 750, and files to 644 or 640. Never use 777 permissions, as they allow anyone to write to your server.
Audit installed plugins and themes: Deactivate and delete any unused plugins or themes. For active ones, verify they are from trusted sources and have recent updates.
Verify database security: Check the database prefix (avoid default wp_). Look for any unexpected tables or suspicious entries in the wp_options table.
Test login security: Ensure login attempts are limited, two-factor authentication is enabled for privileged accounts, and the login URL is not exposed unnecessarily.
Review SSL/TLS configuration: Confirm your site is served over HTTPS and that all resources load securely. Use tools like SSL Labs to test certificate strength.
Document each audit’s findings and track remediation actions. Over time, this log will reveal patterns and help you prioritize security improvements.
Analyzing Access and Error Logs
Server logs are a goldmine of information for detecting and investigating security incidents. They record every request made to your site, including successful and failed attempts. Two primary log types are critical:
Log Type
What It Records
Security Relevance
Access Logs
IP addresses, requested URLs, timestamps, HTTP status codes, user agents.
Identify brute-force attacks (many 401/403 errors from the same IP), scanning bots, or unusual traffic spikes.
Enable logging: Ensure your hosting provider offers access to raw logs, or use a plugin like WP Activity Log for user-centric events.
Set up automated monitoring: Use tools like Fail2ban (server-side) or a security plugin’s log analyzer to flag repeated suspicious patterns.
Review manually for anomalies: Look for requests to admin URLs (/wp-admin), attempts to access xmlrpc.php, or requests using unusual HTTP methods (e.g., OPTIONS).
Correlate with incident timeline: If you suspect a breach, cross-reference log timestamps with known events (e.g., plugin updates, user changes) to trace the attack path.
Retain logs securely: Store logs for at least 30-90 days in a location not accessible from your web root (e.g., a separate directory or cloud storage).
Regular log analysis helps you catch early indicators of compromise, such as a single failed login from a new IP, before they escalate into full-scale attacks.
Creating an Incident Response Checklist
An incident response plan ensures your team reacts quickly and methodically when a breach occurs, reducing confusion and data loss. Develop a checklist tailored to your site’s architecture and host environment. Below is a sample checklist to adapt:
Identify and confirm the incident: Verify signs of compromise (e.g., site defacement, unexpected admin user, malware warnings from Google). Do not assume until evidence is clear.
Isolate the affected system: Take the site offline immediately by placing a maintenance page or blocking public access via .htaccess. This prevents further damage and data exfiltration.
Preserve evidence: Take a full backup of the current state (files and database) before making any changes. Document timestamps, IP addresses, and user accounts involved.
Change all credentials: Reset passwords for all user accounts, database users, FTP/SFTP accounts, and hosting control panel. Revoke API keys and session tokens.
Remove the threat: Scan with security plugins to identify malicious files. Restore clean versions of core, themes, and plugins from official sources. Delete any unknown files or users.
Patch vulnerabilities: Update all software to the latest versions. Identify the entry point (e.g., outdated plugin, weak password) and fix it permanently.
Restore from a known clean backup: If the site is heavily compromised, restore from a backup taken before the incident. Ensure the backup is verified malware-free.
Notify stakeholders: Inform your hosting provider, users (if personal data was exposed), and relevant authorities if legally required. Prepare a clear communication about the breach and steps taken.
Re-enable the site with enhanced security: After cleanup, bring the site back online but monitor logs intensively for 48 hours. Implement additional layers like Web Application Firewall (WAF) or increased logging.
Conduct a post-incident review: Analyze what went wrong, what worked in the response, and update your security policies and checklist accordingly.
Print this checklist and store it in an accessible location (e.g., a shared document or physical binder). Assign specific roles (e.g., lead investigator, communications officer) to team members in advance. Practice tabletop exercises quarterly to ensure everyone knows their responsibilities.
By integrating regular audits, log analysis, and a rehearsed incident response plan into your ongoing operations, you transform security from a reactive task into a resilient, adaptive process. This not only protects your WordPress site from hackers but also builds trust with your visitors and stakeholders. Start with small steps—schedule your next audit today, review last week’s error logs, and draft your first incident checklist. Consistency is the key to lasting security.
The Complete Guide to Building a Membership Site with WordPress
Introduction: Why WordPress for Membership Sites?
When you decide to launch a membership site, the platform you choose will shape everything from your initial setup costs to your long-term ability to scale. While dedicated membership platforms like Kajabi, Teachable, or Memberful offer all-in-one convenience, they often come with significant trade-offs in flexibility, ownership, and ongoing expenses. WordPress, powering over 40% of all websites on the internet, presents a compelling alternative that balances power with control. This guide explores why WordPress remains the gold standard for building a membership site, especially if you value customization, cost predictability, and long-term growth.
The core argument for WordPress is simple: it gives you complete ownership of your content, your member data, and your revenue streams. Unlike SaaS platforms that can change pricing, features, or terms of service at any time, a self-hosted WordPress membership site is yours to control. You are not locked into a proprietary system, and you can migrate your site to any hosting provider or developer. This autonomy is critical for serious membership businesses where your content library and community represent years of intellectual property.
Understanding the Core Benefits of WordPress for Membership
WordPress offers three foundational advantages that make it uniquely suited for membership sites: flexibility, cost-effectiveness, and a mature ecosystem. Let’s break these down.
Flexibility and Customization
WordPress is not a one-size-fits-all solution. It is a content management system that can be extended to behave like a membership platform through plugins. This means you can tailor every aspect of the member experience—from registration flows and content drip schedules to community forums and course delivery. You are not limited by the predefined templates of all-in-one platforms. For example, you can combine a membership plugin like MemberPress with a learning management system like LearnDash and a community plugin like bbPress to create a hybrid site that offers courses, forums, and exclusive content under one roof. This modularity allows you to add features incrementally as your membership grows, rather than paying for a suite of tools you may never use.
Cost-Effectiveness in the Long Run
Initial costs for a WordPress membership site are low—typically just domain registration ($10–15/year) and hosting ($5–30/month). While you will invest in a premium membership plugin (often $100–300/year) and possibly a theme, these are one-time or annual expenses that do not increase with your member count. In contrast, platforms like Kajabi charge $149–399 per month, and that price scales with your number of members and content. For a site with 500 members, WordPress can save you thousands annually. The trade-off is that you handle technical maintenance, but this is manageable with managed WordPress hosting that includes automatic backups and updates.
Vast Ecosystem of Plugins and Themes
WordPress’s ecosystem is unmatched. There are dozens of dedicated membership plugins, each with unique strengths. Below is a comparison of popular options:
Plugin
Best For
Key Features
Starting Price (Annual)
MemberPress
Simple, robust membership
Content dripping, coupons, integrations
$179
Restrict Content Pro
Developers & customization
Unlimited membership levels, add-ons
$99
Paid Memberships Pro
Budget-friendly, feature-rich
Free core, paid add-ons, community
$247 (bundled)
WishList Member
Ease of use, rapid setup
Drag-and-drop protection, tags
$149
Additionally, thousands of themes are designed for membership sites, many with built-in support for popular plugins. This ecosystem means you can find a solution for almost any niche, from fitness coaching to software documentation.
Comparing WordPress with Dedicated Membership Platforms
To make an informed decision, it helps to see how WordPress stacks up against dedicated platforms across key criteria. The following table summarizes the trade-offs:
Criteria
WordPress (Self-Hosted)
Dedicated Platforms (e.g., Kajabi, Teachable)
Ownership & Portability
Full ownership of data, content, and code. You can export everything.
Limited ownership. You cannot migrate your site easily; content is often locked in.
Recurring Costs
Low and predictable (hosting + plugins). No per-member fees.
High monthly fees that increase with members and features.
Customization
Unlimited via code, plugins, and themes. You can build anything.
Limited to built-in templates and settings. Customization often requires expensive plans.
Technical Maintenance
Requires updates, backups, and security management. Managed hosting helps.
Platform handles all technical aspects. Zero maintenance for you.
Learning Curve
Moderate. You need to learn WordPress and plugin interfaces.
Low. Platforms are designed for non-technical users.
Scalability
Highly scalable with proper hosting and caching. Can handle millions of members.
Scalable but at a high cost. Some platforms cap member numbers or content storage.
Community & Support
Large community forums, documentation, and third-party developers.
Official support and knowledge bases. Community size varies.
As the table illustrates, WordPress excels in ownership, customization, and long-term cost. The main drawbacks are the technical learning curve and the need for self-maintenance. However, these are mitigated by managed WordPress hosting (e.g., WP Engine, Kinsta) that handles updates, security, and performance. For most membership site owners, the trade-off is worthwhile because the platform grows with you without imposing artificial limits.
Key Considerations Before You Start Building
Before you dive into installing plugins and creating membership levels, take time to plan. Rushing this phase leads to costly redesigns and frustrated members. Here are the critical considerations:
Define Your Membership Model. Will you offer a single tier, multiple tiers, or a free trial? Will membership be monthly, yearly, or lifetime? Your model determines which plugin and payment gateway you need. For example, if you want to offer free trials, ensure your chosen plugin supports that natively.
Choose Your Payment Gateway. Stripe and PayPal are the most common, but some plugins also support Authorize.net or Braintree. Consider transaction fees, supported currencies, and whether you need recurring billing. Most membership plugins integrate directly with Stripe for seamless subscription management.
Plan Your Content Strategy. Membership sites thrive on exclusive content. Decide what you will gate: blog posts, videos, downloadable PDFs, courses, or community access. Also plan a content drip schedule to keep members engaged over time. For instance, you might release one module per week for a 12-week course.
Assess Your Technical Skills. Are you comfortable installing plugins, configuring settings, and troubleshooting? If not, budget for a developer or choose a managed hosting provider that offers setup assistance. Alternatively, consider a membership plugin with a guided setup wizard, like Paid Memberships Pro.
Think About Member Experience. From registration to login to content access, every step should be frictionless. Test your site with sample members before launch. Ensure that protected content loads quickly, emails are delivered reliably (use an SMTP service like SendGrid or Mailgun), and your site is mobile-responsive.
Prepare for Growth. Your initial setup might handle 100 members, but what about 10,000? Choose a hosting plan that scales—cloud hosting (e.g., Cloudways, DigitalOcean) or managed WordPress hosts with auto-scaling. Also, use a caching plugin (e.g., WP Rocket) and a content delivery network (CDN) to handle traffic spikes.
By addressing these considerations upfront, you will build a membership site that not only functions smoothly but also delights your members from day one. WordPress gives you the tools; your planning ensures you use them effectively.
Defining Your Membership Model and Goals
Building a successful membership site begins long before you install a plugin or design a landing page. The foundation of your project rests on two critical decisions: choosing the right membership model and setting clear, actionable goals. Without these, you risk building a site that attracts the wrong audience, fails to generate sustainable revenue, or burns out your content pipeline. This section will guide you through evaluating your options and establishing a strategic framework for long-term success.
Types of Membership Models: Recurring, Lifetime, and Freemium
The membership model you choose directly impacts your cash flow, customer commitment, and content strategy. Each model serves different business objectives and audience expectations. Below is a breakdown of the three primary models, along with their ideal use cases.
Model
How It Works
Best For
Key Consideration
Recurring Subscription
Members pay a monthly or annual fee to access content. Access is revoked if payments stop.
Requires consistent content production to retain members and reduce churn.
Lifetime Access
Members pay a one-time fee for permanent access to all existing and future content.
Courses, digital products, or resource libraries that are evergreen and rarely updated.
Generates immediate revenue but limits long-term recurring income. Best combined with upsells.
Freemium
Free content is available to all, with paid tiers unlocking premium features, content, or community access.
Building a large audience funnel, content marketing, or community-driven sites where free users convert to paid.
Requires careful segmentation of free vs. paid value to avoid cannibalizing revenue.
Beyond these core models, many successful sites use a hybrid approach. For example, you might offer a low-cost monthly subscription for basic access, a higher tier with exclusive coaching, and a lifetime option for those who want permanent access. When evaluating your model, consider the following:
Content cadence: Can you produce new content weekly, monthly, or quarterly? Recurring models demand a steady pipeline.
Customer lifetime value (LTV): Lifetime access often requires a higher upfront price to match the LTV of a subscription.
Market expectations: Research competitors in your niche. If most use monthly subscriptions, a lifetime model may differentiate you—or confuse your audience.
Technical complexity: Freemium models often require more sophisticated membership plugins to manage content tiers and user roles.
Once you have a model in mind, test it with a small group or waitlist before building the full site. This reduces risk and provides early feedback on pricing and value perception.
Setting SMART Goals for Your Membership Site
Goals are the compass for your membership site. Without them, you cannot measure progress, optimize pricing, or justify content investments. The SMART framework—Specific, Measurable, Achievable, Relevant, Time-bound—provides a structured way to define objectives that drive action.
Below are examples of SMART goals tailored to membership sites, broken down by category:
“Generate $3,000 in monthly recurring revenue from 150 paying members by the end of Q3.”
Content Strategy
“Post content regularly.”
“Publish four premium tutorials and two member-exclusive Q&A sessions per month for the next six months.”
Audience Growth
“Get more subscribers.”
“Increase free email subscribers by 20% (from 1,000 to 1,200) within 90 days through a lead magnet targeting organic search traffic.”
Retention
“Keep members happy.”
“Achieve a 90% monthly retention rate by implementing a welcome sequence and a monthly member feedback survey.”
To set your own SMART goals, follow these steps:
Define your primary metric: Is it monthly recurring revenue (MRR), member count, churn rate, or average revenue per user (ARPU)? Choose one that aligns with your model.
Benchmark realistically: Look at industry averages. For example, typical churn rates for paid membership sites range from 5% to 10% per month. Set goals that push you but remain achievable.
Break goals into milestones: Instead of a single annual target, set quarterly or monthly checkpoints. This allows you to adjust strategies early.
Align goals with content capacity: If you are a solo creator, a goal of 50 members in the first year may be more realistic than 500. Overambitious goals lead to burnout.
Remember that goals are not static. Revisit them every quarter to account for market changes, new features, or shifts in your audience’s needs.
Identifying Your Target Audience and Their Needs
Even the best membership model and goals will fail if you don’t serve a clearly defined audience. Your target audience determines your content topics, tone, pricing, and even the features your site needs. To identify them, move beyond demographics and focus on psychographics, pain points, and desired outcomes.
Start by answering these four questions:
What specific problem does your membership solve? For example, does it help freelancers manage finances, teach photographers editing techniques, or provide workout plans for busy parents?
Who experiences this problem most acutely? A beginner hobbyist has different needs than a seasoned professional. Niche down to a specific skill level or life stage.
What is their willingness to pay? Conduct informal surveys or analyze competitors’ pricing. A B2B audience may tolerate higher prices, while hobbyists may expect lower tiers.
Where do they currently seek solutions? Are they active on Reddit, Facebook groups, YouTube, or industry forums? This informs your marketing channels.
Once you have a hypothesis, validate it through direct research:
Interview 5–10 potential members: Ask about their frustrations, current tools, and what they would pay for a solution. Record these conversations for insights.
Create a customer persona: Give your ideal member a name, job role, daily challenges, and goals. For example: “Marketing Manager Maria, age 34, struggles to keep up with SEO changes and wants a weekly digest of actionable tips.”
Map their journey: Outline how they would discover your site, what content would convince them to join, and what would keep them subscribed long-term.
Finally, align your audience’s needs with your chosen membership model. If your audience values ongoing support and community (e.g., entrepreneurs), a recurring subscription with a private forum may fit. If they want self-paced learning (e.g., a course on a specific skill), lifetime access with periodic updates may work better. Use the table below to match audience needs to model features:
Audience Need
Recommended Model Feature
Example
Continuous learning and updates
Recurring subscription with weekly content drops
A coding membership that adds new tutorials every week
Immediate access to a complete resource
Lifetime access to a library of courses
A photography preset pack with video tutorials
Low commitment, try-before-you-buy
Freemium with free tier and paid upgrades
A fitness app with free workout plans and paid personalized coaching
Exclusive community or mentorship
High-tier recurring subscription with live sessions
A business mastermind with monthly group calls
By thoroughly defining your audience and their specific needs, you ensure that every decision—from your model to your content calendar—serves a real person. This focus reduces churn, increases word-of-mouth referrals, and makes your membership site a destination rather than a transaction.
Selecting Hosting and Domain for Performance
When building a membership site with WordPress, the foundation of your site’s performance begins with the hosting environment and domain name. Unlike a standard blog or brochure site, a membership platform must handle recurring logins, payment processing, content restriction, and often high traffic during launches. Choosing the wrong hosting can lead to slow load times, frequent downtime, and frustrated members who churn. Similarly, a poorly chosen domain can hurt brand trust and search visibility. This section provides actionable guidance on selecting reliable hosting and a domain name that ensures fast load times, scalability, and security for your membership site.
Key Hosting Features for Membership Sites (Speed, Uptime, Support)
Not all hosting is created equal, and for a membership site, three features are non-negotiable: speed, uptime, and support. Here’s why each matters and what to look for.
Speed (Server Response Time)
Members expect pages to load in under two seconds. Slow load times increase bounce rates and reduce conversion for new signups. For membership sites, speed also affects member retention—if accessing content feels sluggish, users will leave. Key speed-related hosting features include:
Solid-state drives (SSDs): Faster data retrieval than traditional HDDs.
PHP version: PHP 8.0 or newer offers significant performance improvements over older versions.
Resource allocation: Dedicated CPU and RAM (not shared with hundreds of other sites) prevent slowdowns during traffic spikes.
Uptime Guarantee
Downtime means lost revenue and broken trust. Members paying for access expect 24/7 availability. Look for a hosting provider that offers at least a 99.9% uptime guarantee (which translates to roughly 8.7 hours of downtime per year). However, the guarantee itself is less important than the provider’s actual track record. Check independent reviews and uptime monitoring tools. Also, consider providers that offer automated failover or redundant server clusters for high availability.
Customer Support (24/7 and Technical)
Membership sites rely on complex integrations: payment gateways, email marketing tools, learning management systems, and membership plugins. When something breaks—like a plugin conflict or a server error—you need expert help fast. Essential support features include:
24/7 live chat or phone support with WordPress-trained staff.
Knowledge base with tutorials specific to membership site setups.
Proactive monitoring for security threats and performance issues.
Managed WordPress hosting that handles updates and backups.
Additional considerations for membership sites:
Scalability: Can you easily upgrade from a shared plan to VPS or dedicated hosting as your member base grows?
Security: Look for free SSL certificates, automated malware scanning, and DDoS protection—members trust you with their data.
Staging environment: Test changes before pushing live, especially critical for membership workflows.
Recommended WordPress Hosting Providers for Membership Sites
Based on the features above, here are hosting providers that consistently perform well for membership sites. This list prioritizes providers with strong track records for speed, uptime, and membership-specific support.
Provider
Best For
Key Strength
Starting Price (monthly)
WP Engine
Managed WordPress with high traffic
Excellent caching, CDN, and staging environments
$20–$30
Kinsta
Global performance and premium support
Google Cloud infrastructure with 26+ data centers
$30–$35
SiteGround
Budget-friendly managed hosting
Good speed, free SSL, and 24/7 support
$2.99–$14.99 (introductory)
Cloudways
Flexible cloud hosting (VPS)
Choose server provider (DigitalOcean, AWS, etc.) and scale easily
$10–$12
Flywheel
Designers and agencies managing multiple sites
Intuitive dashboard, collaboration tools, and managed backups
$13–$25
Important note for membership sites: Avoid budget shared hosting that oversells resources (e.g., many “unlimited” plans). These can cause slow performance during member surges. Instead, opt for a managed WordPress host or a VPS that guarantees dedicated resources. For high-traffic membership sites (e.g., 10,000+ members), consider WP Engine’s Scale plan or Kinsta’s Pro tier, which offer priority support and auto-scaling.
How to Choose and Register an Effective Domain Name
Your domain name is your site’s permanent address. For a membership site, it directly impacts brand perception, memorability, and search engine optimization. Follow these steps to choose and register a domain that supports your membership goals.
1. Prioritize brand clarity and relevance
Your domain should reflect your membership site’s niche or value proposition. For example, if you run a fitness membership, a domain like fitacademy.com is clearer than johnsfitnessblog.net. Avoid numbers, hyphens, and hard-to-spell words—they increase the risk of typos and lost traffic. Keep it short (ideally under 15 characters) and easy to say aloud for word-of-mouth referrals.
2. Choose the right top-level domain (TLD)
While .com remains the most trusted and memorable, other TLDs can work for membership sites. Consider:
.com: Best for broad audience and established trust.
.co: A common alternative if .com is taken.
.io: Popular among tech and SaaS membership sites.
.club, .community, .academy: Niche TLDs that signal membership or learning.
However, if your target audience is older or less tech-savvy, .com is still the safest bet. Avoid obscure TLDs (.xyz, .top) that may appear spammy.
3. Check availability and avoid trademark issues
Use domain registrars like Namecheap, Google Domains, or Hover to search for your desired name. Before registering, run a quick trademark search on the USPTO database to avoid legal disputes. Also, check social media handles—consistency across platforms builds brand authority.
4. Register your domain separately from hosting
While many hosting providers offer free domain registration with their plans, it’s better to register your domain with a dedicated registrar. This gives you flexibility to switch hosts without changing DNS settings or losing control of your domain. Use a reputable registrar with free WHOIS privacy protection to hide your personal information.
5. Consider multiple domain variations
To protect your brand and prevent competitors from using similar names, register common variations of your domain, such as:
The .com version (if you chose a different TLD).
Common misspellings (e.g., fitacademy vs. fitacadamy).
The same name with a hyphen (e.g., fit-academy.com).
You can then redirect these to your primary domain. This reduces traffic loss from typos and strengthens your brand’s online footprint.
6. Act quickly after choosing
Domain names are registered on a first-come, first-served basis. Once you finalize your name, register it immediately—even if you haven’t built the site yet. Use a domain registrar that supports auto-renewal to prevent accidental expiration, which could allow someone else to snap up your domain.
By carefully selecting hosting that prioritizes speed, uptime, and support, and choosing a domain name that is clear, memorable, and properly registered, you lay a robust technical foundation for your membership site. These upfront decisions reduce friction for members, improve search rankings, and make scaling your community far easier as your site grows.
Installing and Configuring WordPress
Before you can begin building a membership site with WordPress, you must first install and configure the platform to support the specific demands of membership functionality—such as user registration, content protection, payment processing, and secure data handling. This section provides a thorough, step-by-step walkthrough of the installation process and the essential configuration settings that lay a solid foundation for your membership site.
One-Click vs. Manual WordPress Installation Methods
WordPress can be installed in two primary ways: one-click installation via your hosting control panel or manual installation by uploading files to your server. Each method has distinct advantages depending on your technical comfort and the level of control you require.
One-Click Installation (Recommended for Beginners)
Most reputable web hosting providers—such as SiteGround, Bluehost, or WP Engine—offer a one-click WordPress installer through their control panel (commonly cPanel or a custom dashboard). This method is fast, automated, and handles database creation, file extraction, and initial configuration for you.
Steps for one-click installation:
Log into your hosting account and navigate to the control panel.
Locate the “WordPress Installer” tool (often labeled under “Website” or “Auto Installers”).
Enter your site name, admin username, password, and email address.
Choose the domain where you want the site installed (if you have multiple domains).
Click “Install” and wait 1–2 minutes for the process to complete.
You will receive a confirmation with your WordPress login URL (typically yourdomain.com/wp-admin).
Pros: No technical skills required; database and file permissions are handled automatically; usually includes pre-configured security defaults.
Cons: Less control over file structure; some hosts may pre-install unwanted plugins or themes.
Manual Installation (Recommended for Advanced Users)
Manual installation gives you full control over every file and configuration setting. This method is ideal if you are using a specialized hosting environment or want to avoid bloatware.
Download the latest WordPress package from wordpress.org and extract the ZIP file on your computer.
Create a MySQL database and user via your hosting control panel (e.g., phpMyAdmin). Assign all privileges to the user.
Upload the extracted WordPress files to your server’s root directory (e.g., public_html) using an FTP client like FileZilla.
Rename the wp-config-sample.php file to wp-config.php and edit it with your database credentials (database name, username, password, and host—usually localhost).
Visit your domain in a browser. The WordPress installation wizard will appear. Select your language, enter your site title, admin username, password, and email.
Click “Install WordPress.” After a few seconds, you can log in via /wp-admin.
Pros: Complete control over file structure; no pre-installed extras; can be used with custom server configurations.
Cons: Requires FTP knowledge and database management; more time-consuming; potential for misconfiguration.
Installation Method
Time Required
Technical Skill Level
Control Over Files
One-Click
2–5 minutes
Beginner
Limited
Manual
15–30 minutes
Intermediate/Advanced
Full
For most users building a membership site with WordPress, one-click installation is sufficient and recommended. You can always customize later via the admin dashboard or FTP. However, if you anticipate heavy customization or need to integrate with a non-standard server environment, manual installation offers greater flexibility.
After installation, WordPress ships with default settings optimized for a standard blog or brochure site. To prepare for membership functionality, you must adjust several core settings. These changes ensure that user registration, content visibility, and site structure align with the needs of a membership platform.
1. Enable User Registration
Membership sites require users to register and log in. By default, WordPress disables user registration. To enable it:
Go to Settings → General in your WordPress admin dashboard.
Scroll to the “Membership” section and check the box labeled “Anyone can register.”
Set the “New User Default Role” to “Subscriber.” (Subscribers have the fewest permissions—ideal for basic members. You can assign higher roles later via a membership plugin.)
Click “Save Changes.”
2. Configure Permalink Structure
Clean, descriptive URLs improve user experience and SEO. For membership sites, avoid the default “Plain” structure.
Navigate to Settings → Permalinks.
Select “Post name” (recommended for most membership sites) or a custom structure like /%category%/%postname%/.
Click “Save Changes.” This updates your .htaccess file (if your server allows it).
3. Adjust Reading Settings
Control how content is displayed and indexed.
Go to Settings → Reading.
Set “Your homepage displays” to “A static page” (you will create a homepage later).
Under “Search Engine Visibility,” uncheck “Discourage search engines from indexing this site” unless you are still in development.
Set “Blog pages show at most” to a reasonable number (e.g., 10) to avoid long load times for member-facing content.
4. Disable User-Specific Features (Temporarily)
Some default WordPress features can interfere with membership plugins. Consider disabling user avatars from Settings → Discussion (uncheck “Show Avatars”) to reduce unnecessary database queries. Also, under Settings → General, ensure the “Site Language” matches your audience, and set the timezone and date format correctly for subscription tracking.
5. Set Up User Roles and Capabilities
WordPress includes five default roles: Super Admin, Administrator, Editor, Author, Contributor, and Subscriber. For membership sites, you may need custom roles (e.g., “Premium Member,” “Free Member”). While you can create these manually via code or a plugin like “User Role Editor,” it is often easier to let a dedicated membership plugin (e.g., MemberPress, Paid Memberships Pro) handle role creation. For now, ensure the default “Subscriber” role is active, as most membership plugins will build upon it.
Setting Up SSL and Security Basics
Security is non-negotiable for membership sites because you will handle sensitive user data—such as passwords, email addresses, and payment information. SSL (Secure Sockets Layer) encrypts data transferred between your site and its visitors. Additionally, you must implement basic security measures to prevent unauthorized access and data breaches.
Most modern hosting providers offer free SSL certificates via Let’s Encrypt. To set it up:
Log into your hosting control panel and locate the “SSL/TLS” or “Security” section.
Select your domain and request a free SSL certificate (often a one-click process).
Wait for the certificate to be issued (usually within a few minutes).
After installation, update your WordPress site URL to use HTTPS. Go to Settings → General and change both “WordPress Address (URL)” and “Site Address (URL)” from http:// to https://.
Install a plugin like “Really Simple SSL” to automatically handle mixed content warnings and force HTTPS across your site.
2. Force SSL for Admin and Login Pages
To protect login credentials and admin sessions, force SSL on sensitive pages. Add the following code to your wp-config.php file (just before the line that says “That’s all, stop editing!”):
This ensures that all login and admin pages are served over HTTPS. If you have a membership plugin, check its settings to also enforce SSL on registration and checkout pages.
3. Implement Essential Security Measures
Beyond SSL, take these steps to harden your WordPress installation:
Change the default admin username: If you created a user named “admin” during installation, create a new administrator account with a unique username, then delete the old “admin” account.
Use strong passwords: Enforce complex passwords for all users, especially administrators. Consider a plugin like “Wordfence” to require strong passwords.
Limit login attempts: Install a plugin (e.g., “Limit Login Attempts Reloaded”) to block brute-force attacks after a few failed attempts.
Disable file editing: In wp-config.php, add define('DISALLOW_FILE_EDIT', true); to prevent theme/plugin file editing from the admin dashboard.
Keep WordPress updated: Enable automatic updates for minor releases. For major updates, test on a staging site first.
4. Set Up Regular Backups
Membership data is valuable. Use a plugin like “UpdraftPlus” or your host’s backup tool to schedule daily backups of your database and files. Store backups off-site (e.g., cloud storage).
By completing these installation and configuration steps, you establish a secure, user-ready environment for building a membership site with WordPress. The next stage involves selecting and integrating a membership plugin to manage subscriptions, content access, and payments—but without this foundational setup, even the best plugin will struggle to perform reliably.
Choosing the Right Membership Plugin for Building a Membership Site with WordPress
Selecting the right plugin is the most critical technical decision you will make when building a membership site with WordPress. The plugin serves as the backbone of your site, controlling who sees what content, how members pay, and how you manage users. With dozens of options available, the choice can feel overwhelming. This section provides a detailed comparison of the top three WordPress membership plugins—MemberPress, Restrict Content Pro, and Paid Memberships Pro—focusing on content restriction, payment gateways, and user management. By the end, you will have a clear framework for evaluating which plugin best aligns with your site’s goals and your technical comfort level.
Top Membership Plugins: MemberPress, Restrict Content Pro, and Paid Memberships Pro
These three plugins dominate the market for good reason. Each offers a robust set of features, but they cater to different user profiles. Below is a comparative overview to help you understand their core strengths.
MemberPress – A premium, all-in-one solution known for its ease of use and comprehensive feature set. It is ideal for users who want a polished, out-of-the-box experience without needing to piece together multiple add-ons. Pricing starts at $179/year for a single site. It includes built-in content dripping, advanced coupon management, and direct integration with popular email marketing services like Mailchimp and ConvertKit. Its user management is granular, allowing you to assign permissions based on membership levels, tags, or individual user settings.
Restrict Content Pro – A premium plugin (starting at $99/year) that focuses on simplicity and performance. It is lightweight, making it an excellent choice for sites where speed is a priority. Its content restriction is straightforward: you protect pages, posts, or custom post types by membership level. It supports content dripping, but this requires the Pro or Agency license. Payment gateway integration is reliable, with native support for Stripe, PayPal, and Braintree. User management is clean, with a built-in member management dashboard that lets you view subscriptions, payments, and activity logs.
Paid Memberships Pro – A freemium plugin that offers a free core version with powerful paid add-ons. The free version includes essential features like content restriction, multiple membership levels, and payment gateway support (Stripe, PayPal, and Checkout.com). The paid versions (starting at $247/year for the Plus plan) unlock content dripping, advanced email templates, and integrations with LMS plugins like LearnDash. It is highly extensible but requires more setup and configuration than the other two. User management is robust, with bulk operations, discount codes, and detailed reporting.
Your choice ultimately depends on your budget and technical needs. If you want a premium, hassle-free experience with minimal setup, MemberPress is the strongest contender. If you prioritize speed and a lightweight footprint, Restrict Content Pro is a solid choice. For those on a tight budget or who need maximum flexibility through free and paid add-ons, Paid Memberships Pro offers the most room to scale.
Evaluating Plugin Features: Content Dripping, Integrations, and Pricing
Beyond the basic overview, three features deserve deeper evaluation because they directly impact the member experience and your operational workflow: content dripping, integrations, and pricing models.
Content Dripping refers to the ability to release content to members on a schedule—for example, making lesson one available immediately, lesson two after seven days, and lesson three after fourteen days. This is essential for course-based membership sites, coaching programs, or any scenario where you want to control the pace of engagement. All three plugins support content dripping, but the implementation differs:
MemberPress offers the most intuitive dripping interface. You can set drip rules per membership level or per individual post/page. You can also expire access after a set number of days, which is useful for time-limited content. The rules are applied automatically without additional configuration.
Restrict Content Pro requires the Pro or Agency license to unlock content dripping. Once enabled, you set drip schedules through the post editor, specifying a delay in days from the date of registration. It works well but lacks the granularity of per-level rules that MemberPress offers.
Paid Memberships Pro relies on a paid add-on (the Content Drip add-on, part of the Plus plan). The add-on allows you to set delay periods based on membership level or a specific start date. It is functional but requires installing and activating the add-on, adding an extra step to the setup process.
Integrations determine how your membership plugin communicates with other tools, such as email marketing services, learning management systems (LMS), and payment gateways. A plugin with poor integrations can create data silos and manual work.
Email Marketing: MemberPress leads with native integrations for Mailchimp, ConvertKit, ActiveCampaign, and more. Restrict Content Pro integrates with Mailchimp and ConvertKit via its own add-ons, but third-party tools like Zapier can extend this. Paid Memberships Pro has a dedicated Mailchimp add-on and supports integration via its own API hooks.
LMS Integration: If you plan to sell courses, MemberPress integrates natively with its sister product, MemberPress Courses, and also works with LearnDash and LifterLMS. Restrict Content Pro works well with LearnDash but requires some manual setup. Paid Memberships Pro has a dedicated LearnDash add-on, making it a strong choice for course creators.
Payment Gateways: All three support Stripe and PayPal. MemberPress also supports Authorize.net and offline payments. Restrict Content Pro adds Braintree. Paid Memberships Pro supports Checkout.com and allows custom gateway development. For most users, Stripe and PayPal coverage is sufficient.
Pricing is not just about the initial cost; it also includes renewal fees, add-on costs, and potential transaction fees. MemberPress and Restrict Content Pro are premium-only, with annual renewals. Paid Memberships Pro offers a free core, but the full feature set requires paid add-ons that can add up. Consider the total cost of ownership over two years, including any add-ons you need. For example, if you require content dripping, email integration, and an LMS add-on, the free version of Paid Memberships Pro becomes effectively a $247+/year investment (Plus plan). MemberPress at $179/year includes all these features out of the box, making it more cost-effective for feature-heavy sites.
How to Install and Activate Your Chosen Membership Plugin
Once you have selected your plugin, the installation process is straightforward but requires careful attention to avoid conflicts with existing plugins or themes. Below is a step-by-step guide that applies to all three plugins, with specific notes for each.
Back Up Your Site: Before installing any new plugin, create a full backup of your WordPress site, including the database and files. This ensures you can revert if something goes wrong. Use a backup plugin like UpdraftPlus or your hosting provider’s backup tool.
Install the Plugin:
For MemberPress and Restrict Content Pro: After purchasing, download the plugin ZIP file from your account dashboard. In WordPress, go to Plugins > Add New > Upload Plugin, select the ZIP file, and click Install Now. Then click Activate.
For Paid Memberships Pro: In WordPress, go to Plugins > Add New, search for “Paid Memberships Pro,” and click Install Now. Then activate the plugin. For paid add-ons, download and upload them individually.
Complete the Setup Wizard: All three plugins offer a setup wizard upon activation. Follow the prompts to configure basic settings:
Enter your license key (for premium plugins) to enable updates and support.
Set your default membership levels (e.g., Free, Silver, Gold). Define pricing, duration, and access permissions.
Connect your payment gateway. For Stripe or PayPal, you will need to enter API keys or connect your account. Test the connection with a small transaction (most plugins allow sandbox mode).
Configure email notifications for new members, payment confirmations, and renewal reminders. Customize the email templates to match your brand.
Set Up Content Restriction Rules: Create a test page and apply restriction rules:
In MemberPress, use the “Membership” meta box on the post editor to select which membership levels can access the content.
In Restrict Content Pro, use the “Restrict this content” meta box to choose the level or set a custom message.
In Paid Memberships Pro, use the “Require Membership” meta box to assign one or more levels.
Test the Member Experience: Create a test user account with a free or trial membership level. Log in as that user and navigate through your site to confirm that restricted content is hidden, payment pages work, and email notifications are sent. Pay attention to:
Content dripping: Verify that content scheduled for later release is not accessible prematurely.
Checkout flow: Complete a test payment (use a Stripe test card or PayPal sandbox) to ensure the transaction records correctly.
User management: In the admin dashboard, confirm the test user appears in your member list with the correct level and subscription status.
Resolve Common Conflicts: If you encounter issues, check for plugin conflicts by deactivating all other plugins except your membership plugin and switching to a default theme (like Twenty Twenty-Four). If the problem disappears, reactivate plugins one by one to identify the culprit. Common conflicts arise with caching plugins (clear cache after changes) and security plugins that block REST API calls (whitelist your membership plugin’s endpoints).
Final activation is not the end of the process. Regularly update your membership plugin to benefit from security patches and new features. Monitor your payment gateway logs and user activity to catch issues early. With your plugin installed and configured, you are ready to focus on creating compelling content and building your community.
Designing Your Membership Site with a Theme
Selecting and customizing a WordPress theme is one of the most consequential decisions you will make when building a membership site with WordPress. Your theme dictates not only the visual identity of your site but also its structural integrity, performance, and compatibility with critical membership plugins. A poorly chosen theme can lead to slow load times, broken layouts, and a frustrating user experience that drives members away. Conversely, a well-designed theme that prioritizes membership functionality will streamline content delivery, enhance user engagement, and reinforce your brand’s credibility. This section provides actionable guidance on layout best practices, plugin-optimized theme recommendations, and branding customization techniques to ensure your membership site operates seamlessly from the first visit.
Best Practices for Membership Site Layout and Navigation
The layout and navigation of a membership site must serve two distinct audiences simultaneously: non-members exploring your offerings and logged-in members accessing exclusive content. A common pitfall is designing a single navigation structure that fails to differentiate between these user states. To address this, implement a conditional navigation system that changes based on login status. For example, a “Join Now” button in the primary header should automatically swap to a “My Account” or “Dashboard” link once a user logs in. This reduces friction and clarifies the next action for every visitor.
Another best practice is to prioritize a clear content hierarchy that guides users toward your membership value proposition. Use a hero section on your homepage that immediately communicates the core benefit of joining, followed by a concise feature list or testimonial grid. Avoid cluttering the layout with excessive widgets, sidebars, or pop-ups that distract from the membership call-to-action. For logged-in members, the layout should emphasize easy access to their subscription management area, saved content, and community features. Consider a two-tier navigation system: a top-level bar for general site pages (e.g., Blog, About, Contact) and a secondary sidebar or dashboard menu for member-specific sections (e.g., Courses, Resources, Forum).
Responsive design is non-negotiable. Many members will access your site via mobile devices, especially when consuming content on the go. Test your theme’s responsiveness across common screen sizes, ensuring that navigation menus collapse into hamburger icons, tables become scrollable, and buttons remain tappable. Additionally, pay attention to page load speed—a bloated theme with heavy animations or large image sliders can degrade performance, increasing bounce rates. Opt for lightweight themes that load essential assets first and defer non-critical scripts. Finally, incorporate breadcrumb navigation for deeper content sections, as this helps members orient themselves within your site and reduces the cognitive load of backtracking.
Recommended Themes Optimized for Membership Plugins
While many general-purpose WordPress themes can be adapted for membership sites, certain themes are specifically built or optimized to work harmoniously with popular membership plugins like MemberPress, Paid Memberships Pro, Restrict Content Pro, and LearnDash. Choosing a theme from this category saves you from compatibility headaches and reduces the need for custom coding. Below is a table of recommended themes, each evaluated for membership plugin compatibility, performance, and customization flexibility.
Theme Name
Key Membership Features
Best For
Price
Kadence
Conditional header/footer, built-in hooks for login/logout states, lightweight performance
General membership sites, course platforms
Free (Pro version available)
GeneratePress
Modular design, no bloat, full compatibility with all major membership plugins
When evaluating these themes, consider your specific use case. For example, if your membership site revolves around a course library, Kadence or Astra (paired with LearnDash) provides a polished out-of-the-box experience. If you anticipate heavy community interaction—such as forums, groups, or direct messaging—BuddyBoss offers purpose-built social tools. For those prioritizing speed and minimal overhead, GeneratePress is an excellent foundation that remains compatible with virtually every membership plugin. Always check the theme’s recent update history and user reviews regarding plugin compatibility before committing.
Customizing Your Theme to Align with Your Brand
Branding consistency across your membership site builds trust and reinforces your professional identity. Start by configuring the theme’s global color palette, typography, and spacing options to match your brand guidelines. Most modern themes, including those listed above, provide a Customizer panel or a theme-specific settings page where you can assign primary, secondary, and accent colors. Avoid the temptation to use too many colors—stick to a maximum of three core hues plus neutral tones for backgrounds and text. For typography, select a readable font pair: one for headings (e.g., a bold sans-serif) and one for body text (e.g., a clean serif or a highly legible sans-serif like Open Sans or Inter). Ensure that font sizes scale appropriately across devices, with body text at least 16 pixels on mobile.
Customizing your theme also involves tailoring the header and footer areas to support membership functionality. For instance, you can use a conditional logic plugin (or built-in theme hooks) to display different headers for logged-in versus logged-out users. The logged-in header might include a user avatar, a logout link, and a quick-access menu to member resources, while the logged-out header prominently features a “Login” and “Join” button. Similarly, the footer can house essential links like terms of service, privacy policy, and support contact information, all styled to match your brand’s visual tone. Many themes allow you to edit these areas directly through the Customizer or a drag-and-drop builder, eliminating the need for coding.
Beyond colors and fonts, consider adding custom graphics, icons, and a logo that reflects your niche. Upload a high-resolution logo in SVG format if possible, as it scales cleanly on retina displays. Replace generic icon sets with custom icons that align with your brand’s aesthetic—for example, using hand-drawn icons for a creative membership site or sleek line icons for a tech-focused platform. Additionally, customize the login and registration pages to remove the default WordPress branding. Use a plugin like WPForms or Theme My Login to create branded login forms that match your theme’s styling, including your logo and a consistent color scheme. Finally, test your branding across all key pages—homepage, pricing page, member dashboard, and content pages—to ensure a cohesive visual experience that reinforces your membership site’s value proposition.
Setting Up Content Restriction and Access Levels
Once your membership plugin is installed and active, the next critical step in building a membership site with WordPress is defining how content is restricted and who can access what. This process involves three interconnected layers: creating distinct membership levels with corresponding pricing, controlling the timing of content delivery through dripping, and applying precise protection rules across all your content types. A well-structured access system not only enhances user experience but also maximizes revenue by aligning content value with membership tiers. Below, we break down each component with actionable steps and best practices.
Creating Membership Levels and Pricing Tiers
Membership levels are the backbone of your site’s access structure. They determine what content each user can see and often correlate with different pricing tiers. Start by identifying the value your content provides and segment it logically. For example, a typical structure might include a free level, a basic paid tier, and a premium tier.
To create membership levels in your plugin (such as MemberPress, Paid Memberships Pro, or Restrict Content Pro):
Define level names and descriptions – Use clear, benefit-driven names like “Starter,” “Pro,” or “VIP.” Briefly describe what each level includes, such as “Access to all beginner guides” for Starter or “Full library plus weekly coaching calls” for VIP.
Set pricing and billing cycles – Choose between one-time payments, recurring subscriptions (monthly, yearly), or lifetime access. For recurring models, consider offering a discount for annual plans to encourage longer commitments.
Assign access duration – Decide whether access is permanent or expires after a set period. For example, a “Monthly Pass” might grant access for 30 days, while a “Lifetime” level never expires.
Create upgrade and downgrade paths – Allow users to move between levels seamlessly. Most plugins handle prorated charges or access adjustments automatically when a user changes tiers.
Test level permissions – Before going live, create test accounts for each level and verify that content is correctly restricted or visible.
Below is a sample pricing tier table you can adapt:
Membership Level
Price
Billing Cycle
Content Access
Free
$0
N/A
Sample articles, newsletter
Starter
$9
Monthly
All beginner courses, community forum
Pro
$29
Monthly
Starter content + advanced tutorials, templates
VIP
$99
Monthly
All content, live webinars, 1-on-1 support
When building a membership site with WordPress, avoid creating too many levels—three to five is often optimal to prevent decision fatigue. Also, ensure that higher tiers include all benefits of lower tiers to simplify upgrades.
Configuring Content Dripping and Scheduled Access
Content dripping allows you to release content to members gradually over time, rather than all at once. This strategy is essential for course-based memberships, onboarding sequences, or maintaining engagement over longer subscriptions. Most membership plugins include a built-in drip feature or integrate with a learning management system (LMS) like LearnDash or LifterLMS.
To configure content dripping effectively:
Set a delay period – Specify how long after a user joins (or after a specific date) before a piece of content becomes available. Common delays are 1 day, 7 days, or 30 days.
Use relative or absolute dates – Relative dripping ties access to the user’s registration date (e.g., “Lesson 2 unlocks 3 days after signup”). Absolute dripping releases content on a fixed calendar date (e.g., “New module every Monday”).
Apply dripping to individual items or groups – You can drip single posts, pages, or entire categories. For a course, set a drip schedule for each lesson or module.
Combine with prerequisites – For advanced setups, require users to complete a previous lesson or quiz before the next piece drips. This works well with LMS plugins.
Test the schedule – Use a test account with a future registration date to confirm that content appears at the correct intervals.
For example, a 12-week course might use this drip schedule:
When building a membership site with WordPress, content dripping prevents information overload and gives members a reason to stay subscribed. It also reduces support requests by pacing the learning curve.
Protecting Pages, Posts, and Custom Content Types
The final layer of access control involves applying restrictions to individual pieces of content. Your membership plugin allows you to protect virtually any type of content—standard pages, blog posts, custom post types (like courses, downloads, or portfolios), and even specific parts of a page (such as a video or downloadable file).
To protect content effectively:
Use the plugin’s restriction meta box – When editing a page or post, look for a “Membership” or “Access” panel. Here you can set which membership levels can view the content. Options typically include “Anyone,” “Logged-in users,” or specific levels.
Apply global rules via categories or tags – Instead of protecting each post individually, assign a category (e.g., “Premium Content”) and restrict the entire category to a specific level. This saves time and ensures consistency.
Protect custom post types – Most plugins support custom post types by default. For example, if you have a “Videos” custom post type, you can restrict it to Pro and VIP members only.
Use partial content protection – Some plugins let you show a teaser (first 100 words) to non-members and hide the rest behind a paywall. This is effective for blog posts or landing pages.
Set up redirects and messages – When a non-member tries to access restricted content, decide whether to redirect them to a registration page, show a “Subscribe to view” message, or display a login form.
Here is an example of how you might configure access rules for different content types:
Content Type
Example
Access Rule
Fallback Action
Page
Dashboard
All logged-in members
Redirect to login page
Post
Advanced Tutorial
Pro and VIP only
Show teaser + “Upgrade” button
Custom Post Type
Video Library
VIP only
Display “VIP access required” message
Category
Premium Resources
Starter, Pro, VIP
Redirect to membership levels page
When building a membership site with WordPress, always double-check that your restriction rules do not inadvertently block content that should be public, such as your homepage or contact page. Use the plugin’s built-in “test mode” or a private browser window to verify access from different user roles. Additionally, consider using a membership plugin that supports “drip” and “expire” rules simultaneously—for example, a post might be accessible only during weeks 3 to 6 of a membership, then become locked again.
By combining clear membership levels, strategic content dripping, and precise protection rules, you create a seamless experience for your members while maintaining control over your valuable content. This structure not only drives subscriptions but also reduces churn by delivering the right content at the right time to the right audience.
Integrating Payment Gateways and Managing Subscriptions
When building a membership site with WordPress, the payment gateway you choose becomes the financial backbone of your operation. It must handle recurring billing, support multiple currencies, and provide a friction-free checkout experience. Two of the most reliable and widely supported processors for membership sites are Stripe and PayPal. This section provides a step-by-step guide to integrating both, configuring subscription plans, managing trials and coupons, and handling the inevitable issues of failed payments and renewals.
Setting Up Stripe and PayPal for Recurring Payments
While you can manually integrate payment gateways using the Stripe or PayPal APIs, the most efficient and secure approach when building a membership site with WordPress is to use a dedicated membership plugin. Plugins like MemberPress, Paid Memberships Pro, Restrict Content Pro, or WooCommerce Memberships handle the complex logic of subscription management, webhooks, and user access control. Below is the general workflow for connecting both gateways.
Prerequisites
A WordPress installation with an active membership plugin installed.
An SSL certificate installed on your domain (required for PCI compliance).
Active merchant accounts for Stripe and/or PayPal Business.
Stripe Integration Steps
Obtain API keys: Log in to your Stripe Dashboard. Navigate to Developers > API keys. Copy your Publishable key and Secret key. For testing, use the test-mode keys; for live transactions, toggle to live mode and copy those keys.
Configure webhooks: In Stripe, go to Developers > Webhooks and add an endpoint. Enter the webhook URL provided by your membership plugin (e.g., https://yoursite.com/?memberpress_webhook=stripe). Select events to listen for: invoice.payment_succeeded, invoice.payment_failed, customer.subscription.updated, and customer.subscription.deleted.
Enter keys in your plugin: In your WordPress admin, go to your membership plugin’s payment settings. Select Stripe as the gateway. Paste the Publishable and Secret keys. Enable test mode initially.
Test transactions: Use Stripe’s test card numbers (e.g., 4242 4242 4242 4242) to simulate a successful payment, a failed payment, and a subscription cancellation.
PayPal Integration Steps
Set up PayPal Business account: Ensure your account is verified and capable of accepting recurring payments. You may need to enable PayPal Payments Pro or PayPal Standard depending on your region.
Obtain API credentials: For PayPal Standard, you typically need your PayPal email address. For PayPal Pro or REST API, log into the PayPal Developer Dashboard, create a REST API app, and copy the Client ID and Secret.
Configure webhooks (PayPal REST): In the PayPal Developer Dashboard, add a webhook URL from your membership plugin (e.g., https://yoursite.com/?memberpress_webhook=paypal). Subscribe to events such as PAYMENT.SALE.COMPLETED, BILLING.SUBSCRIPTION.CANCELLED, and PAYMENT.SALE.DENIED.
Enter credentials in your plugin: Go to your membership plugin’s payment settings, select PayPal, and input your credentials. For PayPal Standard, simply enter your PayPal email address.
Test with sandbox accounts: Use PayPal’s sandbox environment to create test buyer accounts and simulate subscription purchases and cancellations.
Important: Always run test transactions in both Stripe and PayPal sandbox modes before going live. Verify that webhooks are being received by checking your plugin’s webhook logs.
Managing Subscription Plans, Coupons, and Trial Offers
Once your gateways are connected, you must configure the subscription plans that define your membership tiers. This is where you set pricing, billing cycles, trial periods, and discount codes. Most membership plugins provide a user-friendly interface for this.
Creating Subscription Plans
Navigate to your plugin’s membership levels or subscription plans section. Define the following parameters for each plan:
Parameter
Description
Example
Plan Name
Visible to users (e.g., Basic, Premium)
Gold Member
Price
Recurring amount per billing cycle
$29.99
Billing Cycle
Frequency (monthly, yearly, weekly)
Monthly
Free Trial
Days before first charge (optional)
7 days
Signup Fee
One-time fee at subscription start
$0
Access Duration
Lifetime or fixed term
Ongoing until cancelled
Best practices for trial offers:
Use short trials (7–14 days) to reduce abuse and encourage conversion.
Require payment method entry upfront for trials to ensure seamless transition to paid membership.
Clearly communicate trial end dates in welcome emails.
Setting Up Coupons and Discounts
Coupons can attract new members or reward loyalty. Most membership plugins include a coupon management system. When creating a coupon, consider these options:
Applicable plans: Restrict coupon to specific membership levels.
Duration: Apply discount to the first payment only, or for a set number of billing cycles (e.g., 3 months at 50% off).
Usage limits: Set a maximum number of uses or expiration date.
Codes: Generate unique codes (e.g., WELCOME20) or allow bulk generation for affiliate campaigns.
Example of a coupon configuration for a limited-time offer:
Code: LAUNCH30
Type: Percentage
Amount: 30%
Applies to: All plans
Duration: First payment only
Expires: December 31, 2025
Max uses: 100
Note: Test coupon application in your checkout flow to ensure discounts are correctly applied to both initial and recurring charges.
Handling Failed Payments and Subscription Renewals
Subscription churn often results from failed payments—expired credit cards, insufficient funds, or bank declines. A robust membership site automatically manages these failures to retain members. Both Stripe and PayPal offer built-in retry logic, but you must configure your WordPress site to respond appropriately.
How Failed Payments Work
When a recurring payment fails, the payment gateway triggers a webhook event (e.g., invoice.payment_failed in Stripe). Your membership plugin should:
Log the failure in the member’s account history.
Send an email notification to the member asking them to update their payment method.
Initiate automatic retries according to a schedule.
Configuring Automatic Retry Logic
Stripe’s Smart Retries automatically retry failed payments on a schedule (e.g., after 1 hour, 3 hours, 1 day, 3 days, and 5 days). For PayPal, you can enable the Automatic Billing Agreement retry feature. In your membership plugin, you can typically set:
Number of retry attempts: 3–5 attempts is standard.
Retry interval: Every 2–4 days.
Action after all retries fail: Suspend access, downgrade to a free level, or cancel the subscription.
Example retry schedule:
Attempt
Timing
Member Notification
1
Immediate
None (system retry)
2
1 day later
Email: “Payment failed—update your card”
3
3 days later
Email: “Action required to keep access”
4
7 days later
Email: “Final notice before suspension”
Final
After 10 days
Subscription suspended; access revoked
Managing Subscription Renewals
Successful renewals should be seamless. When a payment succeeds, your membership plugin extends the member’s access period. Key renewal management tasks include:
Renewal emails: Send a receipt after each successful payment. This builds trust and provides a record.
Grace periods: Some plugins allow you to define a grace period (e.g., 5 days) during which the member retains access even if payment fails. Use this sparingly to avoid revenue loss.
Manual renewal options: Provide a link in member dashboards where users can manually renew or update their payment method before the next billing date.
Webhook verification: Always verify webhook signatures in your plugin settings to prevent fraudulent renewal events.
Proactive member communication: Send a reminder email 3–5 days before a renewal date, especially for annual plans. This reduces surprise cancellations and allows members to update expired cards in advance.
By carefully integrating Stripe and PayPal, configuring subscription plans with thoughtful trial and coupon options, and implementing a robust failed payment handling system, you ensure that your membership site remains financially healthy while providing a smooth experience for your members. This attention to recurring billing detail is essential when building a membership site with WordPress that scales and retains users over the long term.
Building a User-Friendly Member Dashboard and Community
Once you have established the core functionality of your membership site—such as content restriction, payment processing, and user authentication—the next critical phase is designing an experience that keeps members engaged over the long term. A well-crafted member dashboard serves as the central hub where users manage their subscriptions, access exclusive content, and interact with your community. Simultaneously, integrating social features like forums, groups, and direct messaging transforms a passive content library into an active, collaborative environment. This section explores how to build a dashboard that is both intuitive and powerful, along with strategies to foster meaningful community interaction that drives retention.
Designing an Effective Member Dashboard with Essential Tools
The member dashboard is the first thing your users see after logging in. It should provide instant clarity on their membership status, recent activity, and available resources. An effective dashboard balances functionality with simplicity, avoiding clutter while offering quick access to key tools. Below are the essential components to include, along with design principles for each.
Membership Status Overview: Display the current plan name, renewal date, payment history, and any pending actions (e.g., expired trial). Use a clear visual indicator, such as a colored badge or progress bar, to show status at a glance.
Quick Access to Core Content: Provide prominent links or cards for the most recent lessons, downloads, or articles. Consider a “Continue Where You Left Off” feature that remembers the user’s last visited resource.
Profile Management: Allow members to update their name, email, password, avatar, and notification preferences without leaving the dashboard. This reduces friction and support requests.
Account and Billing Section: Include a dedicated area to view invoices, upgrade or downgrade plans, and manage payment methods. Ensure that sensitive actions (like cancellation) require a confirmation step.
Activity Feed: Show a chronological list of recent interactions—comments posted, content completed, or forum threads started. This reinforces a sense of progress and community involvement.
When designing the layout, prioritize mobile responsiveness. Over 60% of users may access your site from a tablet or phone, so ensure that buttons are tappable, text is readable, and navigation collapses into a hamburger menu. Use consistent color coding and iconography to guide the eye. For example, use green for active status, yellow for warnings (e.g., upcoming renewal), and red for expired or blocked access. A clean, card-based design with white space helps users scan information quickly.
WordPress offers several plugins to build custom dashboards without coding. Ultimate Member provides form builders and profile fields, while MemberPress includes a built-in account page that can be styled. For more advanced needs, WP User Manager or Paid Memberships Pro allow you to add custom tabs and front-end content. Whichever tool you choose, test the dashboard with real users to identify pain points—such as confusing navigation or missing features—and iterate based on feedback.
Adding Community Features: Forums, Groups, and Direct Messaging
Community features are the backbone of member retention. They transform a transactional relationship into a social one, where members feel connected to peers and to your brand. The three most impactful features are forums, groups, and direct messaging. Each serves a distinct purpose and should be implemented thoughtfully.
When setting up forums, structure them hierarchically. For example, create a “General Discussion” category, a “Technical Support” category, and a “Member Feedback” category. Within each, use sub-forums for specific topics (e.g., “Plugin Help” under “Technical Support”). Enable user roles to control who can create new topics—new members might only be able to reply, while trusted members can start threads. Use moderation tools to flag spam and assign badges or reputation points to active contributors.
Groups allow you to segment your community. For instance, a fitness membership site might have groups for “Beginners,” “Intermediate,” and “Advanced” athletes. Each group can have its own forum, content feed, and event calendar. BuddyPress makes this easy by extending user profiles with group membership. Ensure that group creation is either admin-controlled or limited to trusted members to prevent fragmentation. Offer group leaders moderation privileges to foster ownership.
Direct messaging should be opt-in and privacy-respecting. Allow members to control who can message them (e.g., “Everyone,” “Only friends,” “No one”). Include a block and report feature to handle harassment. For coaching or mentorship programs, integrate direct messaging with the dashboard so that conversations are linked to specific sessions or milestones. Avoid overloading the interface—keep the messaging interface simple, with a list of conversations and a text box for replies.
Encouraging Member Interaction and Retention
Building the infrastructure for community is only half the battle; you must actively encourage members to use it. Without intentional strategies, forums can become ghost towns, and groups may remain empty. Here are proven tactics to foster interaction and keep members coming back.
Gamification: Implement a points system for actions like posting, replying, completing content, or referring others. Display leaderboards in the dashboard and award badges for milestones (e.g., “First Post,” “10 Replies,” “Top Contributor”). Plugins like myCRED or GamiPress integrate seamlessly with BuddyPress and bbPress.
Onboarding Challenges: Guide new members through a series of introductory tasks within their first week. For example, “Introduce yourself in the forum,” “Comment on a post,” and “Join a group.” Reward completion with a special badge or bonus content.
Regular Engagement Events: Host weekly or monthly live Q&A sessions, webinars, or “Ask Me Anything” (AMA) events with experts. Schedule them in a shared community calendar and send email reminders. Record sessions for those who cannot attend live.
User-Generated Content Contests: Encourage members to share their own tips, case studies, or creative work related to your niche. Feature the best submissions in a newsletter or on the dashboard. Offer prizes such as free months of membership or exclusive merchandise.
Personalized Notifications: Use email or in-app notifications to alert members when someone replies to their post, mentions them, or when new content is added to a group they belong to. Allow granular control over notification frequency to avoid annoyance.
Mentorship or Buddy Systems: Pair new members with experienced ones for a set period (e.g., 30 days). This creates a personal connection and reduces churn. Use direct messaging or a dedicated group for these pairings.
Retention is further strengthened by demonstrating value over time. Send monthly “member milestones” emails that recap a user’s activity—how many posts they made, what content they completed, and what badges they earned. This reinforces their investment and encourages continued participation. Additionally, solicit feedback through polls or surveys embedded in the dashboard. Ask members what features they want next, what topics they find most valuable, and what barriers they face. Act on this feedback publicly to show that you listen.
Finally, monitor community health metrics: active users per day, average posts per member, reply-to-thread ratio, and churn rate. Use tools like Google Analytics (with event tracking) or BuddyPress Stats to identify trends. If a forum category sees low activity, consider merging it with another or hosting a themed discussion week. If direct messaging usage is low, promote it in onboarding emails. By iterating based on data, you ensure that your community remains a vibrant, indispensable part of the membership experience.
Launching, Marketing, and Maintaining Your Site
The moment you have built your membership site with WordPress, the real work begins. A successful launch is not a single event but a carefully orchestrated sequence of checks, followed by a sustained marketing effort and diligent maintenance. This section covers the essential steps to ensure your site opens smoothly, attracts the right members, and remains secure and performant over time. By following these strategies, you will create a foundation that supports growth and retains your community.
Pre-Launch Checklist: Testing Payments, Content, and User Flows
Before you invite anyone to join, you must verify that every critical function works under real-world conditions. A broken payment gateway or a confusing registration flow can cost you members and damage your reputation. Use the following checklist to conduct a thorough pre-launch audit:
Payment Gateway Testing: Use sandbox or test mode for your payment processor (e.g., Stripe, PayPal). Run multiple transactions: a successful one-time payment, a recurring subscription, a failed card attempt, and a refund. Confirm that confirmation emails are sent and that your membership plugin records the correct status.
Content Restriction Verification: Log in as a non-member, a free-tier member, and a paid member. Access every type of content—posts, pages, courses, downloads, and videos. Ensure that protected content is hidden from unauthorized users and that gateways (paywalls, login prompts) appear exactly where intended.
User Flow Testing: Walk through the entire member journey from a fresh browser: landing on your site, clicking “Join Now,” selecting a plan, entering payment details, and landing on the “Welcome” page. Test password reset, account upgrade, and cancellation flows. Use a different email address for each test to avoid data conflicts.
Email and Notification Checks: Verify that all automated emails are triggered correctly: welcome emails, payment receipts, renewal reminders, and expiration notices. Check spam folders and test links within each email. Ensure that your email service provider (e.g., Mailchimp, SendGrid) is properly integrated.
Legal and Compliance Items: Display a clear Privacy Policy, Terms of Service, and Refund/Cancellation Policy. Ensure that your site is GDPR or CCPA compliant if applicable. Include a cookie consent banner and a data processing agreement if you use third-party services.
Create a spreadsheet to track each test item, note the result, and fix any issues before launch. Consider inviting a small group of beta testers (friends, colleagues, or existing email subscribers) to perform a final round of real-world testing. Their feedback can reveal usability problems you might have missed.
Marketing Your Membership Site: Email, Social Media, and SEO
Once your site is ready, you need a steady stream of targeted visitors who are motivated to become paying members. A diversified marketing strategy that combines email, social media, and search engine optimization (SEO) will attract the right audience and convert them into loyal subscribers.
Email Marketing: Your email list is your most valuable asset. Start building it long before launch by offering a free lead magnet—such as an ebook, checklist, or mini-course—related to your membership topic. Segment your list into cold leads, warm leads, and existing customers. For the launch, send a sequence of 4–6 emails: a teaser, a problem-solution email, a detailed benefits email, a limited-time offer, and a final reminder. After launch, send a weekly or bi-weekly newsletter that provides genuine value and includes soft calls-to-action to join.
Social Media Strategy: Choose 2–3 platforms where your target audience spends time (e.g., LinkedIn for professional development, Instagram for lifestyle, Twitter/X for niche communities). Share behind-the-scenes content, member testimonials, and snippets of your exclusive content. Use stories, reels, or live sessions to engage directly. Create a content calendar that balances promotional posts (30%) with educational and entertaining content (70%). Encourage members to share their experiences with a branded hashtag.
Search Engine Optimization (SEO): Optimize your membership site’s pages for search engines to attract organic traffic over the long term. Focus on the following elements:
SEO Element
Action
Keyword Research
Identify long-tail keywords related to your niche (e.g., “advanced yoga for runners” or “freelance business templates”).
On-Page Optimization
Include the target keyword in your page title, meta description, H1 tag, and first 100 words of content.
Content Quality
Publish in-depth articles, tutorials, or case studies that answer common questions. Aim for 1,500+ words per post.
Internal Linking
Link between your blog posts and membership landing pages to distribute authority.
Technical SEO
Ensure fast page speed, mobile responsiveness, and a clean XML sitemap. Use a caching plugin and a CDN.
Combine these tactics with paid advertising (e.g., Google Ads or Facebook Ads) if your budget allows, but always track your cost per acquisition to ensure profitability.
Ongoing Maintenance: Updates, Backups, and Performance Monitoring
A membership site requires consistent care to remain secure, fast, and reliable. Neglecting maintenance can lead to broken features, data loss, or security breaches that drive members away. Establish a routine maintenance schedule with the following tasks:
WordPress Core, Theme, and Plugin Updates: Check for updates weekly. Before updating, create a full backup and test updates on a staging site if possible. Pay special attention to your membership plugin and payment gateway plugin—outdated versions are common attack vectors. Enable automatic updates for minor security patches, but manually review major version upgrades.
Regular Backups: Schedule automated daily backups of your entire site (files and database). Store backups in at least two remote locations, such as a cloud storage service (e.g., Google Drive, Dropbox) and a dedicated backup service (e.g., UpdraftPlus, BlogVault). Test your backup restoration process quarterly to ensure you can recover quickly from a disaster.
Performance Monitoring: Use tools like Google PageSpeed Insights, GTmetrix, or a WordPress performance plugin to monitor load times. Aim for a loading time under 2 seconds. Common performance improvements include: optimizing images, minifying CSS/JavaScript, using a content delivery network (CDN), and enabling server-level caching. Review your hosting plan annually—if your membership grows, you may need to upgrade to a VPS or dedicated server.
Security Checks: Install a security plugin (e.g., Wordfence, Sucuri) to monitor for malware, brute-force attacks, and suspicious login attempts. Enforce strong passwords and two-factor authentication for admin accounts. Regularly review user roles and permissions—remove inactive admin accounts and ensure that members only have access to the content they paid for.
Content and Feature Audits: Every quarter, review your existing content for accuracy, relevance, and freshness. Update outdated articles, fix broken links, and add new resources. Test your registration and payment flows again after any major plugin update. Gather member feedback through surveys or support tickets to identify pain points and feature requests.
Create a maintenance calendar with weekly, monthly, and quarterly tasks. Automate where possible (e.g., scheduled backups, security scans), but always keep a human eye on error logs and member complaints. A well-maintained site builds trust and reduces churn, making your membership business sustainable for years to come.
How to Build a Custom WordPress Theme from Scratch: A Complete Step-by-Step Guide
1. Setting Up Your Local Development Environment
Before you write a single line of PHP, CSS, or JavaScript for your custom WordPress theme, you must establish a reliable local development environment. This foundational step ensures you can test your theme’s functionality, debug errors, and iterate rapidly without affecting a live website. A proper setup includes a local server that mimics a production web server, a capable code editor for writing and organizing your files, and version control to track every change you make. Skipping any of these components leads to inefficiency, potential data loss, or compatibility issues down the line. This section walks you through each element in detail, using industry-standard tools that are free, well-documented, and widely supported by the WordPress community.
Installing Local by Flywheel or XAMPP for WordPress
Two of the most popular options for running WordPress locally are Local by Flywheel (now simply called Local) and XAMPP. Both create a local server environment with Apache, PHP, and MySQL, which are the core technologies WordPress requires. Your choice depends on your technical comfort level and workflow preferences.
Local by Flywheel is a modern, user-friendly application designed specifically for WordPress development. It automates the entire setup process, from downloading WordPress to configuring the database. You can create multiple WordPress sites, each isolated in its own environment, with just a few clicks. Local also includes features like SSL certificates, live link sharing for client previews, and one-click staging. It is ideal for beginners and professionals who want a streamlined experience without manual configuration.
XAMPP is a cross-platform package that provides Apache, MySQL, PHP, and Perl. It gives you more control over the server configuration but requires manual steps to install WordPress. You must download WordPress separately, create a database via phpMyAdmin, and configure the wp-config.php file. XAMPP is lightweight and works well if you prefer a traditional LAMP stack or need to run non-WordPress projects alongside your theme development.
To install and set up either tool:
For Local by Flywheel: Download the installer from the official Local website. Run the installer, which guides you through the setup. Once installed, click “Create a new site,” enter a site name (e.g., “my-custom-theme”), choose the default environment settings (PHP 8.x, MySQL 8.x, and Apache or nginx), and click “Add Site.” Local will automatically download WordPress and launch your site in a browser. You can access the site’s root folder via the “Open site folder” button, which is where you will later place your custom theme.
For XAMPP: Download the XAMPP installer for your operating system. Install it to a directory like C:xampp on Windows or /Applications/XAMPP on macOS. Start the Apache and MySQL services from the XAMPP control panel. Open a browser and go to http://localhost/phpmyadmin. Create a new database (e.g., wordpress_custom). Download the latest WordPress from wordpress.org, extract the files, and copy them into the htdocs folder inside your XAMPP installation directory (e.g., C:xampphtdocsmy-custom-theme). Rename wp-config-sample.php to wp-config.php, edit it with your database name, username (usually “root”), and password (blank by default), then visit http://localhost/my-custom-theme to complete the WordPress installation.
Both methods result in a fully functional local WordPress instance. For this guide, we assume you have a working local site and know its root folder path. The theme you build will reside inside /wp-content/themes/your-theme-name/.
Choosing and Configuring a Code Editor (VS Code, Sublime Text)
A dedicated code editor is essential for writing clean, error-free theme files. While you could use a basic text editor, modern code editors provide syntax highlighting, autocompletion, error detection, and extensions that dramatically speed up WordPress development. Two excellent free options are Visual Studio Code (VS Code) and Sublime Text (the free evaluation version works indefinitely).
Visual Studio Code is the most popular choice among WordPress developers due to its rich ecosystem of extensions. After installing VS Code, configure it for WordPress development by adding these key extensions:
WordPress Snippets – Provides autocomplete for WordPress functions, hooks, and template tags.
PHP Intelephense – Offers advanced PHP code intelligence, including hover information and navigation.
Prettier – Automatically formats your code for readability.
GitLens – Enhances the built-in Git capabilities with visual blame annotations and commit history.
To configure VS Code for your theme project: open the editor, click “File” > “Open Folder,” and select your local WordPress site’s wp-content/themes directory. Create a new folder inside it for your theme (e.g., my-custom-theme). Right-click this folder and select “Open in Integrated Terminal” to run Git commands later. Adjust user settings (Ctrl+, or Cmd+,) to set tab size to 4 spaces (WordPress coding standard), enable word wrap, and set the default formatter to Prettier.
Sublime Text is a lightweight, fast alternative. Its strength lies in its speed and minimal interface. Key WordPress-enhancing packages include:
Package Control – The package manager itself, required to install others.
WordPress Developer – Adds snippets for common WordPress functions.
Phpcs (PHP Code Sniffer) – Checks your code against WordPress coding standards.
SideBarEnhancements – Improves the file browser with right-click options like “Open in Browser.”
To configure Sublime Text: install Package Control from the official website, then use Ctrl+Shift+P (Cmd+Shift+P on Mac) to open the command palette, type “Install Package,” and search for each extension. Set your preferences by going to “Preferences” > “Settings” and adding rules like "tab_size": 4, "translate_tabs_to_spaces": true, and "word_wrap": true.
Regardless of your editor choice, ensure you can quickly navigate between theme files. Create a project or workspace that includes only your theme folder to avoid clutter from core WordPress files. This focus will pay dividends as your theme grows in complexity.
Initializing a Git Repository for Theme Version Control
Version control is non-negotiable for any serious development project. Git allows you to track every change, revert mistakes, experiment on branches, and collaborate with others. For a custom WordPress theme, Git ensures you can safely modify files and recover previous states if something breaks.
Start by initializing a Git repository inside your theme folder. Open your terminal (or the integrated terminal in VS Code/Sublime) and navigate to your theme directory:
cd /path/to/your/wordpress/wp-content/themes/my-custom-theme
Then run:
git init
This creates a hidden .git folder that tracks your project. Next, create a .gitignore file to exclude unnecessary files from being tracked. WordPress themes should ignore:
node_modules/ – If you use build tools like npm or webpack.
.sass-cache/ – Generated by Sass preprocessing.
.DS_Store – macOS file system artifacts.
*.log – Log files from debugging.
package-lock.json – Optional, but often committed to pin dependencies.
Create the .gitignore file with a text editor and add those lines. Then stage and commit your initial files (which at this point may be just the style.css and index.php you will create later):
git add .
git commit -m "Initial commit: set up theme structure"
To protect your work and enable collaboration, push your repository to a remote service like GitHub, GitLab, or Bitbucket. First, create a new repository on the service (do not initialize it with a README, .gitignore, or license to avoid merge conflicts). Then link it locally:
git remote add origin https://github.com/your-username/your-theme-repo.git
git branch -M main
git push -u origin main
Now every time you make a meaningful change—such as adding a new template file, modifying CSS, or fixing a bug—commit with a descriptive message:
git add -A
git commit -m "Add header.php with navigation menu"
git push
Use branches for experimental features. For example, to test a new layout for the blog page:
git checkout -b blog-layout-experiment
Work on the branch, commit changes, and if successful, merge it back to main:
git checkout main
git merge blog-layout-experiment
This workflow keeps your main branch stable while you explore creative options. With Git initialized and connected to a remote, you have a safety net that allows you to build your custom WordPress theme from scratch with confidence.
2. Understanding the WordPress Theme File Structure
Before you write a single line of code, you must understand the blueprint that governs every WordPress theme. The file structure is not arbitrary; it is a strict hierarchy that WordPress uses to determine which template file to load for any given page. Mastering this hierarchy is the single most important step in learning how to build a custom WordPress theme from scratch. This section breaks down the required files, the logic behind template selection, and the optional files that will save you countless hours of repetitive work.
Required Files: style.css, index.php, and functions.php
Every WordPress theme, no matter how simple or complex, must include at least three files to be recognized and function correctly. These are the absolute minimum requirements for a valid theme.
style.css: This is the main stylesheet, but it serves a dual purpose. The very first lines of this file must contain a special comment block called the “Theme Header.” This header provides WordPress with metadata about your theme, such as its name, author, version, and description. Without this header, WordPress will not list your theme in the Appearance > Themes panel. The header comment must start exactly as shown below, and every field is required except where noted. Example header:
/*
Theme Name: My Custom Theme
Theme URI: https://example.com/my-custom-theme
Author: Your Name
Author URI: https://example.com
Description: A custom theme built from scratch.
Version: 1.0
License: GPL v2 or later
Text Domain: my-custom-theme
*/
After this header, you can add all your CSS rules. However, for performance and maintainability, many developers use style.css only for the theme header and then enqueue additional CSS files via functions.php.
index.php: This is the fallback template file. When WordPress cannot find a more specific template for a request (for example, a single post, a page, or an archive), it will load index.php. In a fully built-out theme, index.php is often used as the main blog index or as the default template for all views. But for a minimal theme, it must exist and contain at least the loop that displays posts. Without index.php, your theme will not work at all.
functions.php: This file acts as a plugin for your theme. It is automatically loaded by WordPress and allows you to add features, register navigation menus, enqueue scripts and styles, define widget areas, and hook into virtually every part of WordPress. Unlike style.css and index.php, functions.php is not a template file; it is a PHP file that runs behind the scenes. You can write custom functions, include other PHP files, and use WordPress action and filter hooks. This file is where the real power of your theme lives.
These three files form the skeleton of your theme. Without them, WordPress will reject the theme entirely.
The WordPress Template Hierarchy Explained
The template hierarchy is the decision tree WordPress uses to select the most appropriate PHP file to render a page. Understanding this hierarchy is essential for how to build a custom WordPress theme from scratch that is both efficient and flexible. When a visitor requests a URL, WordPress follows a specific order of template file checks. The more specific the file, the higher its priority. If no specific file exists, WordPress falls back to index.php.
For example, if you are viewing a single post with the slug “hello-world,” WordPress first looks for single-post-hello-world.php. If that does not exist, it checks single-post.php (for the “post” post type). Next, it tries single.php, then singular.php, and finally index.php. This system allows you to create highly specific templates for individual pieces of content without breaking the general structure.
Key points to remember:
The hierarchy always ends with index.php as the ultimate fallback.
You can override the hierarchy using WordPress conditional tags (like is_single(), is_page()) inside your template files.
Custom post types and custom taxonomies extend this hierarchy further.
WordPress caches the template decision, so changes to file names require clearing any caching plugins.
Optional but Common Files: header.php, footer.php, sidebar.php
While not strictly required, these three files are used in virtually every professional WordPress theme. They promote code reuse, improve maintainability, and separate your theme into logical sections. Using them is a hallmark of how to build a custom WordPress theme from scratch that is clean and scalable.
header.php: This file contains the opening HTML structure of your site. Typically, it includes the <!DOCTYPE html> declaration, the <head> section with meta tags, the call to wp_head(), the opening <body> tag, and the site’s navigation or branding area. You include this file in your templates using get_header(). This function looks for header.php by default, but you can also create specialized headers like header-front.php and call them with get_header( 'front' ).
footer.php: This file closes the HTML structure. It typically contains the closing </body> and </html> tags, along with footer content like copyright notices, secondary navigation, and the critical wp_footer() function. You include it using get_footer(). Like headers, you can create multiple footer templates.
sidebar.php: This file holds the sidebar content, usually widget areas. You include it with get_sidebar(). Many modern themes use sidebars sparingly or not at all, opting for full-width layouts or widget areas in the footer. However, if your design requires a sidebar, this file keeps the widget logic separate from the main content loop.
Using these files brings several advantages:
DRY Principle (Don’t Repeat Yourself): You write the header and footer once and include them in every template file. If you need to change the navigation, you edit one file instead of every page template.
Cleaner Template Files: Your main template files (like index.php, single.php, page.php) only contain the unique content loop and surrounding markup. They become much shorter and easier to read.
Easy Theming: Child themes can override header.php, footer.php, or sidebar.php independently without modifying the parent theme’s core files.
A typical index.php that uses these files might look like this:
In conclusion, understanding the file structure is the foundation of how to build a custom WordPress theme from scratch. The required files give your theme an identity and basic functionality. The template hierarchy empowers you to create precise, context-aware designs. And the optional common files keep your code organized and maintainable. With this knowledge, you are ready to start building your theme’s core files and templates.
3. Creating the Core Theme Files
Every WordPress theme, no matter how complex, begins with a handful of foundational files. These three files—style.css, index.php, and functions.php—form the skeleton of your theme. The style.css file is not just for styling; it contains a mandatory comment block that tells WordPress the theme’s name, author, version, and other metadata. Without this header, WordPress will not recognize your theme. The index.php file serves as the ultimate fallback template; if no other template file exists for a given page or post type, WordPress uses index.php to render the content. The functions.php file acts as your theme’s plugin-like control center, where you enqueue styles and scripts, register navigation menus, add theme support features, and define custom functions. In this section, you will create each file from scratch, ensuring proper headers and minimal but valid markup. By the end, you will have a working, albeit bare-bones, custom theme that WordPress can activate and display.
Writing the style.css Theme Header Comment Block
The style.css file must be located in the root of your theme folder. Its primary purpose is to provide a standardized comment block that WordPress parses to identify your theme. Open a new text file and name it exactly style.css. At the very top, write a CSS comment block with the required fields. The order of fields is not strictly enforced, but convention follows the WordPress Theme Handbook. Below is a minimal but complete example:
/*
Theme Name: My Custom Theme
Theme URI: https://example.com/my-custom-theme
Author: Your Name
Author URI: https://example.com
Description: A custom WordPress theme built from scratch.
Version: 1.0.0
License: GPL v2 or later
License URI: https://www.gnu.org/licenses/gpl-2.0.html
Text Domain: my-custom-theme
*/
Each field serves a specific purpose:
Theme Name: Required. This appears in the WordPress admin under Appearance > Themes.
Theme URI: Optional but recommended. Links to a demo or documentation page.
Author: Required. The name of the theme’s creator.
Author URI: Optional. Links to the author’s website.
Description: Optional. A short explanation of the theme’s purpose.
Version: Recommended. Helps with version control and updates.
License: Required. Most themes use GPL v2 or later.
License URI: Required. Links to the full license text.
Text Domain: Required for internationalization. Must match the theme folder name or a unique slug.
After the comment block, you may add any CSS rules. For now, add a simple reset or a body background color to verify the file is loading:
Save the file. This single file now contains the metadata WordPress needs to list your theme, plus a minimal style rule to distinguish it from the default blank canvas.
Building a Minimal index.php Template
The index.php file is the heart of your theme’s template hierarchy. When WordPress cannot find a more specific template (like single.php, page.php, or archive.php), it falls back to index.php. Therefore, your index.php must contain a valid HTML structure that includes the WordPress Loop. Create a new file named index.php in your theme folder. Start with the standard HTML5 doctype and the required <head> section. Use <?php wp_head(); ?> inside the <head> to allow plugins and WordPress itself to inject scripts and styles. Similarly, use <?php wp_footer(); ?> just before the closing </body> tag. Below is a minimal but functional index.php:
language_attributes(): Outputs the correct lang attribute for your site’s language.
body_class(): Adds CSS classes to the body element for styling context (e.g., page slug, post type).
The Loop: have_posts() checks if there are posts; the_post() sets up each post’s data. Inside the loop, you call template tags like the_title() and the_content().
Fallback: The else clause displays a message when no posts exist, which is essential for user experience.
Security: Use esc_url() and the_permalink() for safe URLs.
Save the file. This template now provides a basic blog layout that displays the site title, description, post titles, and content. It is not styled yet, but it is functional.
Enqueuing Styles and Scripts in functions.php
WordPress requires a specific method for loading CSS and JavaScript files: enqueuing. This prevents conflicts and ensures dependencies load in the correct order. The functions.php file is where you hook into WordPress actions to enqueue your assets. Create a new file named functions.php in your theme folder. Start with the <?php opening tag—do not close it at the end of the file (this prevents accidental whitespace output). The first function you will write enqueues the style.css file you created earlier. Use the wp_enqueue_style() function inside a callback hooked to wp_enqueue_scripts. Here is the complete code:
<?php
/**
* Theme Functions and Definitions
*
* @package My_Custom_Theme
*/
// Enqueue styles and scripts
function my_custom_theme_enqueue_assets() {
// Enqueue main stylesheet
wp_enqueue_style(
'my-custom-theme-style',
get_stylesheet_uri(),
array(),
wp_get_theme()->get( 'Version' )
);
// Enqueue a custom JavaScript file (optional, for demonstration)
wp_enqueue_script(
'my-custom-theme-script',
get_template_directory_uri() . '/js/custom.js',
array( 'jquery' ),
wp_get_theme()->get( 'Version' ),
true // Load in footer
);
}
add_action( 'wp_enqueue_scripts', 'my_custom_theme_enqueue_assets' );
Let us break down the parameters:
Parameter
Description
Example Value
$handle
Unique identifier for the asset
'my-custom-theme-style'
$src
URL to the file
get_stylesheet_uri() (returns URL of style.css)
$deps
Array of handles this asset depends on
array() (no dependencies)
$ver
Version number for cache busting
wp_get_theme()->get( 'Version' ) (reads from style.css)
$media (for CSS)
CSS media type
Defaults to 'all'
$in_footer (for JS)
Whether to load script in footer
true (improves page load speed)
You may also want to add theme support features in functions.php. For example, enable post thumbnails and HTML5 markup:
function my_custom_theme_setup() {
// Add theme support for post thumbnails
add_theme_support( 'post-thumbnails' );
// Add theme support for HTML5 markup
add_theme_support( 'html5', array( 'search-form', 'comment-form', 'comment-list', 'gallery', 'caption', 'style', 'script' ) );
// Register a primary navigation menu
register_nav_menus( array(
'primary' => __( 'Primary Menu', 'my-custom-theme' ),
) );
}
add_action( 'after_setup_theme', 'my_custom_theme_setup' );
Save functions.php. This file now enqueues your stylesheet and a sample JavaScript file (you would need to create a js/custom.js file inside your theme folder for it to load). It also adds theme support features and registers a navigation menu. With these three core files in place, your custom WordPress theme is ready for activation. Navigate to Appearance > Themes in your WordPress admin, find “My Custom Theme,” and activate it. Your site should now display the minimal layout from index.php with the background color from style.css, and all assets loaded through functions.php. You have built the foundation; from here, you can expand with additional template files, custom post types, and advanced styling
4. Designing the Header and Footer Templates
Separating your site’s header and footer into reusable template parts is a foundational practice in custom WordPress theme development. This approach dramatically improves maintainability by centralizing common elements, allowing you to update navigation menus, branding, and widget areas in a single location rather than editing every page template. It also enables consistent inclusion of dynamic features like menus and sidebars across your entire site. By the end of this section, you will have structured, reusable header and footer files that integrate seamlessly with WordPress template hierarchy.
Creating header.php with Site Title and Navigation Menu
The header.php file contains the opening HTML structure, the <head> section, and the top-level site branding and navigation. Every page on your WordPress site will load this file first, making it the ideal place for your site title and primary menu. Follow these steps to build a robust header template.
Step 1: Set up the basic HTML document structure. Open a new file named header.php in your theme folder. Begin with the DOCTYPE and opening <html> tag, then include the <head> section using WordPress functions:
Use <!DOCTYPE html> followed by <html <?php language_attributes(); ?>> to set the language attribute.
Inside <head>, call <?php wp_head(); ?> to allow plugins and WordPress core to inject scripts and styles.
Add <meta charset="<?php bloginfo( 'charset' ); ?>"> and <meta name="viewport" content="width=device-width, initial-scale=1"> for responsiveness.
Step 2: Output the site title and tagline. Use WordPress functions to display dynamic branding:
Step 3: Add the navigation menu. Register a menu location in functions.php first (e.g., register_nav_menus( array( 'primary' => __( 'Primary Menu', 'textdomain' ) ) );). Then in header.php, output the menu with fallback:
Outputs the logo set in Customizer, with fallback to text.
Primary menu
wp_nav_menu()
Renders the navigation menu assigned to the ‘primary’ location.
Body classes
body_class()
Adds CSS classes to the <body> tag for styling context.
Do not close the <body> or <html> tags in this file—that will be handled by footer.php. Always leave them open.
Building footer.php with Widget Areas and Copyright Info
The footer.php file closes the HTML document and typically contains widget areas (sidebars), copyright notices, and closing tags. It is called after the main content of each page. A well-structured footer improves user experience and SEO by providing consistent navigation and site information.
Step 1: Register widget areas in functions.php. Before building the footer template, register one or more footer widget areas. Add this to your theme’s functions.php file:
Step 2: Create footer.php. Open a new file named footer.php. Start by closing the main content container (if any) and then outputting the footer widget areas:
Widget areas: Use is_active_sidebar() to check if widgets are assigned, then dynamic_sidebar() to display them. This prevents empty markup.
Copyright notice: The date_i18n( 'Y' ) function outputs the current year dynamically, and get_bloginfo( 'name' ) pulls the site title. Wrap in esc_html__() for translation readiness.
wp_footer(): This function is critical—it allows plugins and WordPress core to enqueue scripts and output any footer-related code. Always place it just before the closing </body> tag.
Closing tags: Ensure </body> and </html> are present to properly close the document.
Optional enhancements: Add a secondary navigation menu using wp_nav_menu( array( 'theme_location' => 'footer' ) ), or include social media links via a custom menu. You can also use get_template_part( 'template-parts/footer/widgets' ) to modularize further.
Using get_header() and get_footer() in Your Templates
Now that header.php and footer.php are complete, you must call them from your page templates. WordPress provides two simple functions: get_header() and get_footer(). These functions locate and load the corresponding template file from your theme directory. Here is how to use them effectively.
Basic usage in any template file (e.g., index.php, single.php, page.php):
Always call get_header() before any HTML content that should appear inside the <body> tag. The function outputs the opening <body> and header markup.
Always call get_footer() at the end of your template to close the document properly and trigger wp_footer().
Use parameters for conditional headers/footers. For example, if you want a different header for your homepage, create header-home.php and call get_header( 'home' ). The same applies to footer variants.
Do not include header.php or footer.php manually using include() or require()—always use the WordPress functions to ensure hooks and actions fire correctly.
Check for template hierarchy overrides. If you create a file like header-front-page.php, WordPress will load it automatically when the front page is displayed, provided you call get_header() without parameters
5. Implementing the Loop for Posts and Pages
The WordPress Loop is the foundational mechanism that drives content display across your custom theme. It is a PHP code structure that retrieves posts from the database and renders them according to your template logic. Without a properly implemented Loop, your theme will fail to show any content, making it one of the first and most critical components to build. This section walks you through the standard Loop in your main index file, then extends it to create dedicated templates for individual posts and static pages. By mastering the Loop, you gain complete control over how your site presents its content.
The Standard WordPress Loop in index.php
The index.php file serves as the fallback template for your theme, handling the display of multiple posts on archive pages, blog pages, and search results. The standard Loop begins with a conditional check to see if there are any posts to display, then iterates through each one using while ( have_posts() ). Inside the Loop, you call the_post() to set up post data, followed by template tags like the_title(), the_permalink(), and the_content() to output the post’s details. Here is a clean implementation for index.php:
Conditional check: if ( have_posts() ) ensures content exists before attempting to display it.
Post setup: the_post() increments the post counter and populates global post data.
Semantic markup: Wrapping each post in an <article> tag with post_class() adds useful CSS classes for styling.
Content display: the_excerpt() shows a summary, ideal for index pages, while the_content() is better for single views.
Navigation: the_posts_navigation() outputs links to older and newer posts.
This structure is flexible. You can customize it by adding custom fields, featured images, or conditional logic to change the layout based on post type. For example, to display the featured image, insert the_post_thumbnail( 'medium' ); before the title. The Loop in index.php is your default content renderer, but it should be refined for specific contexts using separate template files.
Creating single.php for Individual Posts
When a user clicks on a post title, WordPress loads the single.php template to display that single post in full. This file requires a Loop that handles only one post, but it must still follow the same core structure. The key difference is that you use the_content() instead of the_excerpt() to show the entire post body, and you often include comments and metadata. Here is a robust single.php implementation:
Full content: the_content() outputs the complete post, including any page breaks handled by wp_link_pages().
Rich metadata: Categories, tags, author, and date provide context and improve navigation.
Comments: The comments_template() function includes the comments.php file, which you can customize separately.
Template hierarchy: WordPress will use single.php for all posts, but you can create more specific templates like single-post.php for a custom post type named “post.”
You can enhance this Loop further by adding previous and next post navigation with the_post_navigation(), or by displaying custom fields using get_post_meta(). The single post Loop is your opportunity to provide an immersive reading experience, so consider adding related posts or a table of contents for long-form content.
Creating page.php for Static Pages
Static pages, such as “About” or “Contact,” use the page.php template. The Loop for pages is similar to that of single posts, but it typically excludes metadata like categories and tags, and often includes a sidebar or full-width layout. Pages are not part of the chronological blog stream, so you should avoid displaying dates or author information unless your design requires it. Here is a standard page.php:
<?php
get_header();
if ( have_posts() ) :
while ( have_posts() ) : the_post(); ?>
<article id="post-<?php the_ID(); ?>" <?php post_class(); ?>>
<h1><?php the_title(); ?></h1>
<div class="entry-content">
<?php the_content(); ?>
<?php
wp_link_pages( array(
'before' => '<div class="page-links">Pages:',
'after' => '</div>',
) );
?>
</div>
<?php
// Pages can have comments if enabled, but often they do not.
if ( comments_open() || get_comments_number() ) :
comments_template();
endif;
?>
</article>
<?php endwhile;
else :
echo '<p>No page found.</p>';
endif;
get_sidebar();
get_footer();
?>
Key differences from single.php:
Minimal metadata: No date, author, categories, or tags. Pages are timeless and structural.
Comments optional: By default, pages do not support comments, but you can enable them via the WordPress admin. The conditional check here respects that setting.
Layout flexibility: You can use get_sidebar() or remove it based on page template. For a full-width page, create a custom template like page-full-width.php and omit the sidebar.
You can also leverage page templates for specific layouts. For example, create a file named page-about.php for an “About” page with a unique Loop that includes a hero section or testimonials. The Loop itself remains the same, but you can add custom fields or conditional logic to display different content blocks. Here is a quick reference table comparing the three templates:
Feature
index.php (Loop)
single.php
page.php
Purpose
Display multiple posts
Display one post in full
Display one static page
Content tag
the_excerpt() or the_content()
the_content()
the_content()
Metadata shown
Date, author, excerpt
Date, author, categories, tags
Typically none
Comments
Not included
Included via comments_template()
Optional, often omitted
Navigation
the_posts_navigation()
the_post_navigation()
Not needed
Implementing these three Loop variations ensures your custom WordPress theme handles content correctly for every scenario. The index.php Loop provides a fallback for archives, single.php delivers rich post experiences, and page.php gives you clean static pages. As you build out your theme, you can refine each Loop with additional template tags and conditional logic to match your design vision. Remember to test each template with real content to verify that the Loop renders correctly and that all HTML is valid. With these fundamentals in place, your theme will be ready to handle the full range of WordPress content.
6. Adding Sidebars and Widget Areas
Widget areas are a cornerstone of WordPress theme flexibility. They allow site administrators to drag and drop functional blocks—such as recent posts, search bars, tag clouds, or custom HTML—directly from the WordPress admin dashboard, without touching a line of code. By building a custom sidebar system into your theme, you empower users to control their site’s layout and content dynamically. This section walks you through registering a primary sidebar in your theme’s functions.php, outputting it in your templates using sidebar.php, and styling the widget areas with custom CSS classes to match your design.
Registering a Primary Sidebar Using register_sidebar()
The first step is to tell WordPress that your theme supports widget areas. This is done by calling the register_sidebar() function, typically inside a custom function hooked to the widgets_init action. You will place this code in your theme’s functions.php file. The function accepts an array of arguments that define the sidebar’s name, ID, description, and HTML wrappers. Here is a standard example for registering a primary sidebar:
name: A human-readable label for the sidebar, shown in the WordPress admin under Appearance > Widgets. Use a translation function like __() for internationalization.
id: A unique slug for the sidebar, used internally to reference it. Common values include sidebar-1, footer-widget-area, or sidebar-blog.
description: A short explanation of where the sidebar appears on the front end, helping users decide which widgets to place there.
before_widget and after_widget: HTML that wraps each individual widget. The placeholders %1$s (widget ID) and %2$s (widget class) are automatically replaced by WordPress, enabling precise CSS targeting.
before_title and after_title: HTML that wraps the widget title. The title is typically an <h3> or <h4> element.
You can register multiple sidebars by calling register_sidebar() multiple times within the same function. For example, a theme might have a left sidebar, right sidebar, and footer widget area. Each requires a unique ID. Below is a table summarizing common sidebar registration scenarios:
Once you have added the registration code, navigate to Appearance > Widgets in your WordPress admin. You should see your newly registered sidebar listed, ready to accept widgets. If it does not appear, double-check that your theme is active and that you have no PHP syntax errors in functions.php.
Outputting the Sidebar in sidebar.php with dynamic_sidebar()
Registering a sidebar only makes it available in the admin; you must also display it on the front end. This is done by creating a sidebar.php file in your theme directory and using the dynamic_sidebar() function to output the widgets. The sidebar.php file is typically called from within your main template files, such as index.php, single.php, or page.php, using the get_sidebar() template tag.
Here is a minimal sidebar.php file that outputs a primary sidebar:
is_active_sidebar(): Checks whether any widgets have been added to the specified sidebar. If no widgets are active, the fallback content is displayed, ensuring the sidebar area does not appear empty.
dynamic_sidebar(): Takes the sidebar ID as its argument and outputs all registered widgets in the order they were arranged in the admin. Each widget is wrapped in the HTML defined by before_widget and after_widget from the registration step.
Fallback content: Provide sensible defaults, such as a search form and recent posts list, so the sidebar remains useful even if the user has not configured widgets. This is especially important for first-time users.
To include this sidebar in your templates, add the following line inside the appropriate template file, typically within a container div that handles the layout:
<?php get_sidebar(); ?>
If you have multiple sidebars, you can pass a parameter to get_sidebar() to load a specific file. For example, get_sidebar( 'footer' ) would load sidebar-footer.php. Inside that file, you would call dynamic_sidebar( 'footer-widgets' ) with the corresponding ID.
Styling Widget Areas with Custom CSS Classes
Once your sidebar is outputting widgets, you need to style them to integrate with your theme’s design. The HTML wrappers you defined in register_sidebar()—specifically the before_widget and after_widget parameters—give you the hooks to apply custom CSS. In the earlier example, each widget is wrapped in a <section> with classes widget and the widget’s specific class (e.g., widget_search, widget_recent_entries). The title is wrapped in an <h3 class="widget-title">.
To style these elements, add rules to your theme’s style.css file. Below are common CSS patterns for a primary sidebar:
To make your widget areas even more flexible, you can add custom CSS classes to the before_widget parameter. For example, if you want to offer different layout options for footer widgets, you might register a footer sidebar with additional wrapper classes:
Always test your styling across different widget types, as some plugins may add their own CSS that conflicts with your theme. Use browser developer tools to inspect the generated HTML and adjust your selectors accordingly. By carefully structuring your widget wrappers and CSS, you create a polished, responsive widget area that enhances the user experience and gives site administrators full control over their content.
7. Building Custom Post Types and Taxonomies
Standard WordPress content types—posts and pages—serve general purposes, but a custom theme often requires distinct content structures. For example, a portfolio site needs a “Portfolio” post type separate from blog posts, or a real estate site requires a “Properties” type with its own fields. This section provides a complete, step-by-step method to register a custom post type, add custom taxonomies, and create the corresponding template files. By the end, you will have a fully functional custom content architecture that integrates seamlessly with your theme.
Registering a Custom Post Type (e.g., ‘Portfolio’) in functions.php
The first step is to add registration code to your theme’s functions.php file. Always use the init action hook to ensure WordPress core is ready. Below is a complete example for a ‘Portfolio’ post type with commonly used arguments.
public: Controls visibility on the front end and in admin.
rewrite: Defines the URL slug (e.g., /portfolio/item-name/).
has_archive: Enables an archive page (e.g., /portfolio/).
supports: Specifies which meta boxes appear in the editor (title, editor, featured image, etc.).
show_in_rest: Required for the block editor (Gutenberg) and REST API access.
menu_icon: Uses a Dashicon class; choose from the official list.
After adding this code, flush permalinks by going to Settings > Permalinks and clicking “Save Changes.” Your new “Portfolio” menu will appear in the WordPress admin sidebar.
Taxonomies allow you to group custom post type items. For the Portfolio type, a hierarchical taxonomy called “Project Category” works like standard categories. Add the following code to functions.php after the post type registration.
hierarchical: Set to true for category-like behavior (parent/child), false for tag-like (non-hierarchical).
rewrite slug: Creates clean URLs like /project-category/web-design/.
show_admin_column: Displays the taxonomy in the post type list table in admin.
show_in_rest: Enables block editor support for the taxonomy.
You can register multiple taxonomies for the same post type by calling register_taxonomy() multiple times. For example, a “Portfolio Tag” taxonomy with hierarchical => false would allow free-form tagging.
Creating Archive and Single Templates for Custom Post Types
WordPress uses a template hierarchy to display custom post types. Two essential files are the archive template (for listing all items) and the single template (for individual items).
1. Archive Template: archive-portfolio.php
Create this file in your theme root. It displays a list of all portfolio items. A typical structure:
Building a custom WordPress theme requires careful management of styles, scripts, and built-in features. Without proper enqueuing, your site risks performance issues, plugin conflicts, and broken functionality. This section explains how to load CSS and JavaScript correctly, then enable essential WordPress features like post thumbnails, menus, and HTML5 support. By following these steps, you ensure your theme is both performant and feature-rich from the start.
Enqueuing Stylesheets and Scripts with wp_enqueue_style() and wp_enqueue_script()
WordPress provides a safe, standardized method for loading assets: the wp_enqueue_style() and wp_enqueue_script() functions. Never hardcode link or script tags in your header or footer files. Instead, use these functions inside your theme’s functions.php file, attached to the appropriate hooks. This prevents duplicate loading, manages dependencies, and allows plugins to modify or remove assets.
For additional CSS files, such as a custom font or a grid system, use the same function with a unique handle. Always include version numbers to force cache busting during development.
For JavaScript, use wp_enqueue_script(). Here is an example that loads a custom script with jQuery as a dependency:
$handle — A unique name for the asset (e.g., ‘mytheme-style’).
$src — The URL to the file. Use get_stylesheet_uri() for the main style.css, or get_template_directory_uri() for other files.
$deps — An array of handles this asset depends on (e.g., array(‘jquery’)).
$ver — Version string for cache busting. Use theme version or file modification time during development.
$media (for styles) — CSS media type like ‘all’, ‘screen’, or ‘print’.
$in_footer (for scripts) — Set to true to load scripts in the footer for better performance.
Always use the wp_enqueue_scripts hook, never init or admin_enqueue_scripts (unless targeting the admin area). This ensures assets load at the correct point in WordPress execution.
Adding Theme Support for Post Thumbnails, Menus, and HTML5
Theme support enables core WordPress features that your theme can use. This is done via the add_theme_support() function, typically called inside a function hooked to after_setup_theme. Below are the most common features to enable.
Post Thumbnails (Featured Images)
Post thumbnails allow you to set a representative image for posts and pages. Enable with:
function mytheme_setup() {
add_theme_support('post-thumbnails');
}
add_action('after_setup_theme', 'mytheme_setup');
After enabling, you can define custom image sizes for consistency:
Including ‘style’ and ‘script’ in the HTML5 array allows WordPress to omit the type attribute from style and script tags, which is unnecessary in HTML5.
Additional Common Theme Supports
Feature
Code
Purpose
Custom Logo
add_theme_support(‘custom-logo’);
Allow users to upload a site logo via the Customizer.
Custom Header
add_theme_support(‘custom-header’);
Enable a customizable header image.
Custom Background
add_theme_support(‘custom-background’);
Allow users to set a background color or image.
Title Tag
add_theme_support(‘title-tag’);
Let WordPress manage the document title in the browser tab.
Automatic Feed Links
add_theme_support(‘automatic-feed-links’);
Add RSS feed links to the head.
Wide Alignment
add_theme_support(‘align-wide’);
Support wide and full-width alignment for blocks.
Responsive Embeds
add_theme_support(‘responsive-embeds’);
Make embedded content responsive.
Call add_theme_support() only once per feature. Duplicate calls will not cause errors but are unnecessary. Group all theme support declarations inside the same after_setup_theme function for clarity.
Registering Navigation Menus and Displaying Them with wp_nav_menu()
After enabling menu support, you must register one or more menu locations. This tells WordPress where menus can appear in your theme (e.g., primary, footer, sidebar). Registration uses register_nav_menus() or register_nav_menu() for a single location.
Each array key is a location slug (e.g., ‘primary’), and the value is a human-readable description. Use text domain functions like __() for translation readiness.
To display a registered menu in your theme template files, use wp_nav_menu(). The function accepts an array of arguments. Here is a typical usage in header.php:
theme_location — The registered location slug to display.
menu_id — ID attribute for the menu container (usually the ul).
menu_class — CSS class for the ul element.
container — Wrapping element (default is ‘div’). Set to ‘ul’ to output only the menu list.
container_class — CSS class for the container.
fallback_cb — Callback function if no menu is assigned. Set to false to show nothing.
depth — How many levels of submenus to show (0 for unlimited).
walker — A custom walker object for advanced markup control.
If no menu is assigned to the location, wp_nav_menu() will display a list of pages by default (unless fallback_cb is false). To avoid this, always instruct users to create and assign menus via Appearance > Menus in the admin.
For the footer menu, use a similar call with the ‘footer’ location:
By registering and displaying menus correctly, you give site owners full control over navigation structure without touching code. Combined with proper asset enqueuing and theme support, your custom WordPress theme will be robust, maintainable, and user-friendly.
9. Making Your Theme Responsive and Accessible
Building a custom WordPress theme that performs well on all devices and is usable by everyone is essential for modern web development. Responsive design ensures your theme adapts to different screen sizes, while accessibility practices make it inclusive for users with disabilities. This section provides a step-by-step guide to implementing responsive design using CSS media queries, adding semantic HTML and ARIA landmarks, and testing responsiveness with browser developer tools.
Using CSS Media Queries for Mobile, Tablet, and Desktop
CSS media queries are the foundation of responsive design. They allow you to apply different styles based on the device’s characteristics, such as screen width, height, or orientation. For a custom WordPress theme, you typically target three breakpoints: mobile (up to 768px), tablet (769px to 1024px), and desktop (1025px and above). Below is a practical approach to implementing these breakpoints in your theme’s style.css file.
Mobile-first approach: Start with styles for mobile devices as the default, then add media queries for larger screens. This ensures a baseline experience that works on all devices.
Common breakpoints: Use 768px for tablets and 1024px for desktops, but adjust based on your theme’s content and layout.
Orientation queries: Include @media (orientation: landscape) for tablets and phones in landscape mode to optimize layout.
High-resolution displays: Use @media (-webkit-min-device-pixel-ratio: 2) for retina screens to serve sharper images.
Use a table to organize your breakpoints and corresponding layout changes:
Device Type
Breakpoint (min-width)
Layout Adjustments
Mobile
Default (0–768px)
Single column, full-width content, stacked navigation
Tablet
769px
Two-column layout, sidebar visible, larger fonts
Desktop
1025px
Three-column layout, fixed-width container, large images
Remember to test each breakpoint with real content to ensure readability and usability. Avoid using fixed pixel values for widths; instead, use percentages, ems, or rems for fluid scaling.
Adding Semantic HTML and ARIA Landmarks for Accessibility
Accessibility (a11y) ensures your theme is usable by people with visual, auditory, motor, or cognitive disabilities. The two key practices are using semantic HTML elements and adding ARIA (Accessible Rich Internet Applications) landmarks. Semantic HTML provides inherent meaning to content, while ARIA landmarks enhance navigation for assistive technologies like screen readers.
Use HTML5 semantic elements: Replace generic <div> tags with <header>, <nav>, <main>, <article>, <section>, <aside>, and <footer>. This helps screen readers identify regions.
Add ARIA roles and landmarks: Use role="banner" for the header, role="navigation" for menus, role="main" for primary content, role="complementary" for sidebars, and role="contentinfo" for the footer.
Label interactive elements: Provide aria-label or aria-labelledby for search forms, navigation menus, and buttons to describe their purpose.
Use heading hierarchy correctly: Start with <h1> for the page title, then <h2> for sections, and so on. Do not skip levels.
Ensure keyboard navigation: All interactive elements (links, buttons, form inputs) must be focusable and operable via keyboard. Use tabindex="0" for custom elements.
Example of a WordPress theme header with semantic HTML and ARIA landmarks:
Provide alt text for all images using the alt attribute.
Ensure color contrast meets WCAG AA standards (minimum 4.5:1 for normal text).
Use aria-hidden="true" for decorative icons or elements that do not convey meaning.
Add skip-to-content links at the top of the page for keyboard users.
Testing Responsiveness with Browser Developer Tools
Testing is crucial to ensure your theme works across devices. Browser developer tools provide built-in features to simulate different screen sizes, orientations, and network conditions. Below is a systematic approach to testing responsiveness using these tools.
Use device mode in Chrome DevTools: Press F12 or right-click and select “Inspect,” then click the Toggle Device Toolbar icon (mobile icon). This lets you choose from predefined devices like iPhone, iPad, or Android phones.
Set custom dimensions: Manually enter width and height values to test specific breakpoints. Drag the handles to resize the viewport and observe layout changes in real time.
Test touch events: Enable touch emulation to simulate tap, swipe, and pinch gestures on desktop.
Check network throttling: Use the Network tab to simulate slow 3G or offline conditions to ensure your theme loads gracefully.
Use Firefox Responsive Design Mode: Press Ctrl+Shift+M (Windows) or Cmd+Option+M (Mac) to enter responsive mode. This offers similar features to Chrome, including device presets and media query inspection.
Test with real devices: While tools are useful, always test on actual smartphones and tablets for accurate rendering. Use browser sync tools like BrowserStack for cross-device testing.
Steps for effective testing:
Open your WordPress site in Chrome DevTools and enable device mode.
Select a mobile device preset (e.g., iPhone 12) and check navigation, images, and text readability.
Rotate to landscape orientation and verify layout adjustments.
Resize the viewport to your tablet breakpoint (769px) and ensure the two-column layout works.
Increase width to desktop (1025px) and confirm that the sidebar and content align correctly.
Use the “Media Queries” panel in DevTools (Chrome) to see which queries are active and debug any issues.
Test keyboard navigation and screen reader compatibility using the Accessibility tab.
Repeat testing on Firefox and Safari to ensure cross-browser consistency.
Common issues to watch for during testing:
Overflowing content: Use overflow-x: hidden on the body to prevent horizontal scrollbars.
Unreadable text: Adjust font sizes with relative units (em or rem) and test at all breakpoints.
Broken navigation: Ensure menus collapse into hamburger icons on mobile using JavaScript or CSS.
Images not scaling: Set max-width: 100% and height: auto on all images.
By following these testing practices, you can identify and fix responsive and accessibility issues before launching your custom WordPress theme. Remember that responsive and accessible design is an ongoing process, so revisit these tests whenever you add new features or content.
10. Testing, Debugging, and Finalizing Your Theme
Before you share your custom WordPress theme with the world, rigorous testing is essential. A theme that contains PHP errors, broken markup, or performance bottlenecks will undermine user trust and site functionality. This final phase ensures your code is clean, secure, and ready for production. By methodically checking for errors, validating standards, and packaging your theme correctly, you deliver a professional product that functions seamlessly across different environments. The following steps guide you through the most effective debugging practices, validation techniques, and final packaging procedures.
Using WP_DEBUG and Query Monitor for Error Checking
WordPress provides built-in debugging constants that reveal hidden issues during development. The most critical of these is WP_DEBUG. To enable it, open your wp-config.php file and set define('WP_DEBUG', true);. This constant forces WordPress to display all PHP errors, warnings, and notices directly on your screen. For a development site, also enable define('WP_DEBUG_LOG', true); to log errors to a wp-content/debug.log file, and define('WP_DEBUG_DISPLAY', false); to hide errors from visitors while still recording them. Common errors you might catch include undefined variables, deprecated function calls, and incorrect template hierarchy usage.
While WP_DEBUG catches PHP-level issues, you need a more comprehensive tool for database queries, hooks, and performance. Query Monitor is a free plugin that acts as a developer panel, revealing every database query, HTTP request, enqueued script, and hook execution. Install and activate it on your development site, then examine its output as you navigate through your theme. Pay special attention to the following panels:
Queries: Look for duplicate or slow queries. If your theme runs the same query multiple times on a single page, consider using WordPress Transients or object caching.
Hooks & Actions: Verify that your custom actions and filters are firing in the correct order. Mismatched priorities can cause layout breakage.
Enqueued Scripts & Styles: Ensure no duplicate jQuery versions or conflicting CSS files are loaded. Query Monitor lists every enqueued asset with its handle and source.
PHP Errors: The plugin aggregates all PHP warnings, notices, and deprecations in one place, even if WP_DEBUG is off.
Use Query Monitor together with WP_DEBUG to cross-reference errors. For example, if Query Monitor shows a deprecated function warning, enable WP_DEBUG to see the exact file and line number. Fix each issue by updating the code, removing deprecated calls, or adding proper conditional checks. Document every fix in a changelog for future reference.
Validating HTML, CSS, and Checking for PHP Warnings
Clean, standards-compliant code is the backbone of a reliable theme. Begin by validating your HTML markup using the W3C Markup Validation Service. Copy the rendered HTML source of your theme’s key templates—such as index.php, single.php, page.php, and archive.php—and paste them into the validator. Common errors include unclosed tags, duplicate IDs, and improper nesting of block-level elements inside inline elements. For instance, a <div> inside a <p> tag is invalid HTML5 and will cause unpredictable rendering in browsers. Fix each error by editing your template files, ensuring every opening tag has a corresponding closing tag and that attributes are properly quoted.
Next, validate your CSS using the W3C CSS Validation Service. Upload your style.css file or paste its contents to check for syntax errors, unsupported properties, or vendor prefix issues. Pay attention to warnings about unknown vendor extensions—these are often acceptable for modern browsers, but ensure you include standard fallbacks. For example, if you use -webkit-sticky, also include position: sticky without the prefix. A clean CSS file improves maintainability and reduces the risk of layout inconsistencies across browsers.
PHP warnings and notices are equally important to eliminate. After enabling WP_DEBUG, systematically test every page template, custom post type archive, widget area, and menu location. Create a checklist of all theme features and test each one:
Feature
Test Action
Expected Outcome
Header
Load homepage, inner pages
Logo, navigation, and site title display correctly
Footer
Check all footer widgets
No PHP warnings for undefined widget areas
Single Post
View post with and without featured image
Content and metadata render without errors
Archive Page
Browse category, tag, and date archives
Posts loop correctly; pagination works
Search Results
Perform a search with no results
No PHP notices about empty loop
404 Template
Navigate to nonexistent URL
Custom 404 page loads without errors
Widget Areas
Add and remove widgets dynamically
No database query errors in Query Monitor
Customizer
Modify theme settings and preview
Changes apply without JavaScript console errors
For each PHP warning, trace the exact line in your template or functions file. Common fixes include checking if a variable exists before using it (isset()), verifying that a function is available (function_exists()), and ensuring that global variables like $post are properly set. Do not suppress warnings with the @ operator—this hides real issues that will surface in production.
Packaging Your Theme as a .zip File for Distribution or Upload
Once your theme passes all tests, it is time to create a clean, distributable package. The first step is to organize your theme folder structure. Ensure that all necessary files are present and that no development-only files (like node_modules, .git folders, or raw SCSS files) are included. A standard WordPress theme should contain at minimum:
style.css — with a valid theme header comment
index.php — the main template file
functions.php — for theme setup and functionality
screenshot.png — a 1200×900 pixel image representing your theme
template-parts/ — optional but recommended for modular code
Review your theme header in style.css. It must include at least the Theme Name, Author, Version, and Text Domain. For example:
/*
Theme Name: My Custom Theme
Author: Your Name
Version: 1.0.0
Text Domain: my-custom-theme
*/
If your theme uses translations, ensure the Text Domain matches the folder name and that all internationalization functions (like __() and _e()) use the correct domain. Also verify that your screenshot.png is saved in the root of the theme folder and is not corrupted—this image appears in the WordPress admin under Appearance > Themes.
To create the .zip file, navigate to your theme folder on your local machine. On macOS or Linux, use the terminal: zip -r my-custom-theme.zip my-custom-theme/. On Windows, right-click the folder and select “Send to > Compressed (zipped) folder.” Rename the resulting file to something descriptive, like my-custom-theme-v1.0.zip. Avoid spaces or special characters in the filename.
Before finalizing, perform a sanity check by uploading the .zip file to a fresh WordPress installation. Go to Appearance > Themes > Add New > Upload Theme, choose your .zip file, and install it. Activate the theme and quickly test core functionality—navigation, content display, and widget areas. If no errors appear, your packaging is successful. Finally, store your original, uncompressed theme folder in a version control system like Git for future updates. With a thoroughly tested and properly packaged theme, you can confidently distribute it to clients, upload it to the WordPress repository, or deploy it on a live site.
WordPress vs. Custom Code: Which One Should You Choose?
Introduction: Setting the Stage for Your Decision
Every website begins with a single, pivotal question: Should you build it with WordPress or write it from scratch with custom code? This is not a trivial choice; it is a strategic fork in the road that influences your project’s timeline, flexibility, long-term costs, and even your ability to scale. The debate between WordPress and custom code is often framed as a battle of convenience versus control, but the reality is far more nuanced. Your decision must align with your specific project goals, budget constraints, and the technical expertise available to you or your team.
WordPress, as a content management system (CMS), powers over 40% of all websites on the internet. It offers a prebuilt ecosystem of themes, plugins, and a user-friendly dashboard that allows non-developers to manage content with relative ease. On the other end of the spectrum, a custom-coded website is built from the ground up using languages like HTML, CSS, JavaScript, and server-side frameworks such as PHP, Python, or Ruby on Rails. This approach gives you complete ownership over every line of code, enabling unique designs and functionalities that no off-the-shelf solution can replicate.
The key is to understand that neither option is inherently superior. WordPress excels in speed of deployment, community support, and lower initial costs for standard websites like blogs, portfolios, and small business sites. Custom code shines when you need a highly specialized, performance-optimized, or security-critical application, such as a custom SaaS platform, a complex e-commerce store with unique logic, or a site that must integrate deeply with proprietary APIs. By the end of this introduction, you should recognize that your choice is not about technology alone—it is about matching the tool to the job at hand, and doing so with full awareness of the trade-offs involved.
Understanding the Core Differences Between WordPress and Custom Code
To make an informed decision, you must first grasp the fundamental architectural and operational distinctions between these two approaches. Below is a comparison table that highlights the key differences across several critical dimensions:
Dimension
WordPress
Custom Code
Development Speed
Fast, especially with pre-built themes and plugins (days to weeks)
Slow, requires full planning, design, and coding (weeks to months)
Customization Flexibility
Moderate; limited by plugin capabilities and theme frameworks
Unlimited; you control every aspect of the code and design
Learning Curve
Low for content editors; moderate for developers who must learn WordPress APIs
High; requires proficiency in multiple programming languages and frameworks
Maintenance Burden
Ongoing: updates for core, themes, plugins can break functionality
Lower once built, but requires developer oversight for security and feature updates
Security Risks
Higher due to third-party components; requires constant vigilance
Lower if code is well-written; fewer attack vectors
Performance Potential
Can be optimized, but often includes bloat from unnecessary features
Lower if stable; occasional updates and security audits
Beyond the table, consider the ecosystem. WordPress relies on a vast marketplace of third-party components. While this accelerates development, it also introduces dependency risks. A plugin that is abandoned by its developer can leave your site vulnerable or broken. Custom code, by contrast, is self-contained. You own every piece, which means you are never at the mercy of an external vendor’s roadmap. However, this ownership also means you must have the in-house expertise or budget to maintain it. Understanding these trade-offs is the first step toward a confident decision.
Why This Decision Matters for Your Online Presence
Your website is often the first impression your business makes on potential customers. It is a 24/7 digital storefront, a portfolio, a lead-generation engine, or a platform for community engagement. Choosing the wrong foundation can lead to a cascade of problems: slow load times that hurt search engine rankings, security breaches that erode trust, or an inflexible architecture that stifles growth. Conversely, the right choice can streamline operations, reduce technical debt, and provide a competitive edge.
Consider the following scenarios:
Scalability: A custom-coded site can be designed to handle millions of users with minimal overhead, while a WordPress site may require extensive caching and server tuning to achieve the same performance. If you anticipate rapid growth, custom code gives you more control over the infrastructure.
User Experience: Custom code allows you to craft a unique, pixel-perfect interface without the constraints of a theme framework. WordPress can also achieve this, but often requires significant custom development that negates its initial speed advantage.
SEO and Speed: Search engines prioritize fast, mobile-friendly sites. Custom code can be lean and optimized from the start, while WordPress sites often require optimization plugins and careful asset management to avoid bloat.
Security: If your site handles sensitive data (e.g., payment information, personal health records), custom code reduces the attack surface. WordPress’s popularity makes it a frequent target for automated attacks, and its plugin ecosystem introduces additional vulnerabilities.
Ultimately, this decision is not just about technology—it is about risk management, resource allocation, and long-term vision. A poorly chosen platform can cost you more in downtime, lost sales, and developer hours than the initial savings of a quick setup. By aligning your choice with your business objectives, you ensure that your online presence is a reliable asset rather than a liability.
Who This Article Is For: Business Owners, Developers, and Marketers
This article is crafted for three distinct audiences, each with unique priorities and concerns:
Business Owners: You are focused on return on investment, time to market, and total cost of ownership. You need a website that supports your revenue goals without draining your budget. You may not be technical, but you must understand the implications of your choice on hiring, maintenance, and future expansion. This article will help you ask the right questions of your development team or agency.
Developers: You are the technical backbone of the project. You care about code quality, maintainability, performance, and security. You may be evaluating whether to recommend WordPress to a client or to advocate for a custom solution. This article provides a balanced framework to weigh the pros and cons, considering both your own expertise and the client’s long-term needs.
Marketers: Your domain is content strategy, user engagement, and conversion optimization. You need a platform that allows you to publish quickly, A/B test landing pages, and integrate with analytics and CRM tools. You may prefer WordPress for its ease of content management, but you also need to ensure that the underlying architecture does not hinder your campaigns. This article will help you understand the constraints and possibilities of each approach from a marketing perspective.
Whether you are the decision-maker, the builder, or the promoter, the insights in this article will empower you to navigate the WordPress vs. custom code debate with clarity. The goal is not to declare a winner, but to equip you with the knowledge to choose the right tool for your unique situation.
WordPress: Strengths and Ideal Use Cases
When evaluating WordPress vs. Custom Code: Which One Should You Choose?, understanding the strengths of WordPress is critical for making an informed decision. WordPress powers over 40% of all websites on the internet, a testament to its versatility and reliability. Its primary advantages lie in accessibility, speed of development, and a vast ecosystem that reduces the need for specialized technical knowledge. For content-heavy sites, blogs, and small-to-medium businesses, WordPress often emerges as the pragmatic choice, offering a balance between functionality and cost-effectiveness that custom code struggles to match for many common use cases.
WordPress is designed with non-technical users in mind. Its intuitive dashboard allows you to create, edit, and manage pages or posts without writing a single line of code. The visual editor, combined with a drag-and-drop page builder (such as Elementor or Gutenberg), makes it possible to design complex layouts in minutes. This ease of use translates directly into rapid deployment:
Minimal learning curve: Most users can publish their first post or page within an hour of installation.
Pre-built themes: Thousands of free and premium themes provide ready-made designs for blogs, e-commerce, portfolios, and more. You can activate a theme and have a functional site in under 30 minutes.
One-click updates: Core WordPress, themes, and plugins can all be updated with a single click, ensuring security and stability without manual intervention.
Built-in content management: Features like categories, tags, revisions, and media libraries are standard, eliminating the need to build these from scratch.
For a small business owner or blogger, this means you can focus on content and marketing rather than on backend development. The time saved during deployment is significant—a custom-coded site of similar complexity could take weeks to build, whereas a WordPress site can be operational in days or even hours.
Leveraging Plugins and Themes for Functionality
The true power of WordPress lies in its plugin and theme ecosystem. With over 60,000 free plugins in the official repository and thousands more premium options, you can add virtually any feature without custom development. This extensibility is a key differentiator in the WordPress vs. Custom Code: Which One Should You Choose? debate. Here is a breakdown of common functionalities and how WordPress handles them:
Functionality
WordPress Solution
Custom Code Equivalent
Search Engine Optimization
Yoast SEO or Rank Math plugin
Build custom meta tags, sitemaps, and schema
E-commerce
WooCommerce plugin
Develop a full shopping cart system
Contact Forms
Contact Form 7 or WPForms
Write PHP/JavaScript form handler
Security & Backups
Wordfence, UpdraftPlus
Implement server-side security scripts
Performance Caching
W3 Total Cache or WP Rocket
Configure server-level caching manually
Social Media Integration
Social Snap or Monarch
Code API connections for each platform
This plugin-driven approach offers several benefits:
Cost efficiency: Many essential plugins are free or low-cost, reducing the need for expensive developer hours.
Proven reliability: Popular plugins are tested by thousands of users and regularly updated for security and compatibility.
Flexibility: You can mix and match plugins to create a tailored solution. For example, combine WooCommerce with a membership plugin and a booking plugin to create a multi-functional site.
Community support: Extensive documentation, forums, and tutorials exist for virtually every plugin, making troubleshooting accessible.
Themes further accelerate design. A well-coded theme like Astra or GeneratePress is lightweight, responsive, and customizable via the Customizer. You can change colors, fonts, layouts, and headers without touching code. For more advanced customization, child themes allow safe modifications that won’t break after updates.
Best Scenarios for Choosing WordPress
WordPress is not a one-size-fits-all solution, but it excels in specific contexts. Here are the ideal use cases where its strengths align with project requirements:
Content-heavy websites and blogs: If your primary goal is to publish and organize large amounts of text, images, or video, WordPress is unmatched. Its built-in taxonomy system (categories, tags) and RSS feeds make content discovery easy. Examples include news portals, personal blogs, and magazine-style sites.
Small-to-medium business websites: For most local businesses, a WordPress site provides everything needed: a professional homepage, service pages, a contact form, a blog for SEO, and integration with Google Maps or social media. The low upfront cost and ease of maintenance make it ideal for companies with limited technical staff.
E-commerce stores with standard needs: WooCommerce powers over 30% of all online stores. If you need to sell physical or digital products, manage inventory, process payments, and handle shipping, WooCommerce is a robust, scalable solution. Custom code would be overkill unless you have unique requirements like complex subscription models or niche payment gateways.
Membership sites and online courses: Plugins like MemberPress, LearnDash, or LifterLMS turn WordPress into a full-fledged learning management system. You can create content drip feeds, quizzes, and payment tiers without custom development.
Portfolios and creative showcases: Artists, photographers, and designers can use WordPress themes built specifically for visual portfolios. Features like lightbox galleries, slider integrations, and image optimization are just a plugin away.
Community and forum sites: BuddyPress or bbPress add social networking features like user profiles, activity streams, and discussion forums. This is significantly faster than building a custom community platform.
However, WordPress may not be the best choice if your project requires extreme performance optimization, highly specialized data handling, or a completely unique user interface that cannot be achieved through themes and plugins. In such cases, custom code offers more control. But for the vast majority of websites—especially those focused on content, standard business functions, or rapid scaling—WordPress provides a proven, efficient, and user-friendly foundation that reduces risk and accelerates time to market.
Custom Code: Strengths and Ideal Use Cases
When the out-of-the-box constraints of a content management system or page builder begin to chafe, custom code emerges as a powerful alternative. Building a website from scratch—using languages like HTML, CSS, JavaScript, PHP, or Python—offers a level of control that no template or plugin can match. For projects where performance, security, or unique functionality are non-negotiable, custom development is often the superior choice. Below, we explore the core strengths of custom code and the specific scenarios where it truly shines.
Unlimited Design and Functionality Control
The primary advantage of custom code is total creative and technical freedom. Unlike WordPress, which relies on themes and plugins that impose structural limits, a custom-coded site allows you to build exactly what you envision, down to the last pixel. This control manifests in several critical ways:
Unique user interfaces: You are not constrained by template hierarchies or pre-built layouts. Every element—from navigation menus to interactive animations—can be designed from the ground up to match your brand and user experience goals.
Tailored functionality: Need a complex booking system, a proprietary data visualization tool, or a custom e-commerce checkout flow? With custom code, you write the logic yourself, avoiding the bloat and compatibility issues that often come with stacking multiple WordPress plugins.
Database and backend flexibility: You can choose any database architecture (SQL, NoSQL, or a hybrid) and integrate with any third-party API directly. This is essential for projects that must sync with legacy systems, IoT devices, or specialized software.
No feature bloat: WordPress themes and plugins often include features you do not need, slowing down the site and increasing attack surface. Custom code includes only what you require, keeping the codebase lean and purposeful.
For example, a bespoke SaaS platform or an interactive data dashboard for a research institute would be nearly impossible to build cleanly within WordPress without resorting to heavy customization that undermines maintainability. Custom code lets you architect the system precisely around your requirements.
Performance Optimization and Scalability Advantages
Performance is a domain where custom code consistently outperforms WordPress, especially for high-traffic or resource-intensive projects. By writing optimized, minimal code, developers can achieve faster load times, lower server resource usage, and superior scalability. Key factors include:
Factor
Custom Code
WordPress (Typical)
Code bloat
None; only required code is present
Often includes unused theme/plugin code, scripts, and stylesheets
Database queries
Optimized, minimal queries; often uses caching layers
Many default queries (e.g., for widgets, menus, meta data); plugin overhead
HTTP requests
Can bundle and minify assets precisely; fewer external dependencies
Often loads multiple CSS/JS files from themes and plugins; external font/script calls
Server load
Lower memory and CPU usage per request; easier to fine-tune
Higher baseline load due to WordPress core, theme, and plugin processing
Caching strategy
Full control over edge caching, CDN rules, and object caching
Relies on caching plugins; can conflict with dynamic features
Scalability is another area where custom code excels. Because you control the entire stack, you can implement horizontal scaling (adding more servers) or vertical scaling (upgrading server resources) with minimal friction. For example, a custom-coded API can be designed to handle millions of requests per day by using asynchronous processing, load balancers, and efficient data indexing—all without the overhead of a CMS framework. This makes custom code the go-to choice for high-traffic e-commerce platforms, real-time applications, or enterprise-level portals.
When Custom Code Is the Right Fit
Custom code is not the right choice for every project—it requires more time, budget, and technical expertise upfront. However, it becomes the optimal solution in several clear scenarios:
High-traffic or mission-critical websites: For sites expecting millions of visitors per month (e.g., news outlets, SaaS dashboards, or large e-commerce stores), custom code provides the performance headroom and reliability needed to avoid downtime and slow load times.
Complex, unique functionality: If your project requires a specialized algorithm, a custom data pipeline, or integration with proprietary hardware, building from scratch avoids the limitations and security risks of plugin-heavy workarounds.
Strict security or compliance requirements: Industries like finance, healthcare, or defense often mandate minimal attack surface, audit trails, and control over every line of code. Custom code allows you to implement security measures (e.g., input validation, encryption, access controls) without relying on third-party plugins that may introduce vulnerabilities.
Long-term maintainability and ownership: When you own the entire codebase, you are not dependent on a CMS provider’s update cycle or plugin developer’s support. This is crucial for projects that must operate for years without major rewrites.
Custom APIs or microservices: If your site acts as a backend for mobile apps, IoT devices, or other web services, custom code lets you design lightweight APIs with precise endpoints, authentication, and rate limiting—something WordPress struggles with without additional plugins.
In summary, custom code is the right fit when you need absolute control over design, performance, and security, and when the project’s complexity or traffic volume justifies the higher initial investment. It is not a one-size-fits-all solution, but for the right use cases, it delivers results that no CMS can match.
Cost Comparison: Upfront and Long-Term Expenses
When deciding between WordPress and custom code, understanding the full financial picture is critical. The initial price tag often misleads buyers, while hidden costs can accumulate over time. This section breaks down the upfront and recurring expenses for both approaches, helping you see beyond the sticker shock and plan for the long haul.
Initial Development Costs: WordPress vs. Custom Code
The most obvious difference appears at the start. WordPress typically offers a lower barrier to entry, while custom code demands a significant upfront investment. Here’s how they compare:
WordPress: The core software is free. You can install it on cheap shared hosting ($3–$10 per month) and use a free theme. However, a professional, custom-designed WordPress site with a premium theme ($30–$100) and essential plugins (e.g., SEO, security, caching) can cost $500–$3,000 for a simple brochure site. For a complex e-commerce or membership site with custom functionality, development costs range from $5,000 to $20,000, especially if you hire a developer to build custom themes or plugins.
Custom Code: Building from scratch with HTML, CSS, JavaScript, and a backend framework (e.g., Django, Ruby on Rails, or Node.js) requires a skilled developer. A basic static website can start at $3,000–$10,000. A dynamic, database-driven site with user authentication, payment processing, or API integrations can easily cost $15,000–$50,000 or more. The complexity of your requirements directly drives the price.
Key takeaway: WordPress wins on upfront cost for simple to moderately complex sites. Custom code is a premium option for projects with unique, complex requirements that WordPress cannot handle efficiently.
Recurring Expenses: Hosting, Plugins, and Support
After launch, both options incur ongoing costs. These can significantly alter the total cost over time.
Expense Category
WordPress
Custom Code
Hosting
Shared hosting: $5–$25/month. Managed WordPress hosting (faster, more secure): $20–$100/month. High-traffic sites may need VPS or dedicated servers: $50–$500/month.
VPS or dedicated servers: $30–$300/month. Cloud hosting (AWS, DigitalOcean, etc.) scales with traffic: $20–$500+ per month. You manage server configuration or pay for managed services.
Plugins & Themes
Premium plugins (e.g., WooCommerce, Yoast SEO, Elementor Pro) cost $30–$200/year each. Many sites use 5–15 plugins, totaling $150–$1,000/year. Theme updates: $30–$100/year.
No plugin costs. You pay for third-party APIs (e.g., Stripe, SendGrid, Google Maps) which can cost $0–$500+/month depending on usage.
Maintenance & Support
Ongoing updates for core, themes, and plugins. Security monitoring, backups, and troubleshooting. Freelancer or agency: $50–$200/month for basic care. For complex sites: $300–$1,000/month.
Bug fixes, security patches, and feature enhancements. Requires a developer familiar with the codebase. Retainer: $100–$500/month for light maintenance; $500–$2,000/month for active development and support.
SSL certificates: free or $10–$100/year. Security audits, penetration testing, and firewall management may be included in developer retainer or cost $500–$5,000 per engagement.
Hidden fees to watch for:
WordPress: Premium plugin subscription price hikes, unexpected compatibility issues after updates, and costs for migrating to new hosting as traffic grows.
Custom Code: Developer onboarding time for new team members, dependency on a single developer or agency, and costs for refactoring legacy code.
For a typical small business site, WordPress recurring costs range from $1,000–$3,000 per year. Custom code sites often run $2,000–$8,000 per year for similar maintenance, though this can drop if the site is static and rarely updated.
Total Cost of Ownership: A Five-Year Perspective
To make a fair comparison, we project total costs over five years for a mid-complexity site (e.g., a small e-commerce store with 50 products, user accounts, and a blog).
WordPress is nearly 50% cheaper over five years for this scenario. The lower initial cost and moderate recurring expenses keep the total down.
Custom code costs more upfront and in maintenance, but offers full control, no forced updates, and potentially lower long-term technical debt if well-architected.
If your site requires heavy customization or high traffic (e.g., 500,000+ monthly visitors), custom code may scale more efficiently, reducing hosting and maintenance costs relative to WordPress, which often needs expensive caching and optimization layers.
When custom code becomes more cost-effective:
You need a unique feature that WordPress plugins cannot provide without extensive customization.
Your site handles sensitive data (e.g., healthcare, finance) requiring strict security compliance.
You have an in-house development team that can maintain the codebase without external retainers.
Your project has a long lifespan (10+ years) with minimal changes, avoiding recurring plugin subscriptions.
When WordPress remains the better financial choice:
You have a limited budget and need a site quickly.
Your requirements fit standard WordPress functionality (blogs, portfolios, small stores).
You or your team are comfortable managing updates and security.
You expect to scale gradually and can invest in performance plugins as needed.
Ultimately, the total cost of ownership depends on your specific needs, traffic, and team capabilities. WordPress offers predictable, moderate costs for most common use cases. Custom code demands higher investment but can deliver lower long-term expenses for specialized, high-performance projects. Calculate your own five-year projection using realistic numbers for your situation to make an informed decision.
Development Time and Learning Curve
When deciding between WordPress and custom code, the time it takes to get a website live and the technical expertise required are often the most decisive factors. For business owners, freelancers, and even agencies, these elements directly affect budget, staffing, and launch deadlines. One approach prioritizes speed and accessibility, while the other demands patience and specialized skill. Understanding the timeline and learning curve for each path will help you align your project with your available resources.
Launching Quickly with WordPress: A Week or Less
WordPress is renowned for its ability to produce a functional, presentable website in a remarkably short period. A user with no coding experience can install WordPress via a hosting control panel, choose a pre-built theme, and have a basic site live within a single afternoon. For more polished results, a one-week timeline is realistic for many small business sites, blogs, or portfolios. This speed is driven by several built-in advantages:
Pre-built themes: Thousands of free and premium themes provide ready-made layouts for nearly every industry. Installing and customizing a theme through the WordPress Customizer takes hours, not days.
Plugin ecosystem: Complex features like contact forms, e-commerce, SEO optimization, and social media integration are available as plugins. A user can add a fully functional contact form in under five minutes without writing a single line of code.
Visual editors: The block editor (Gutenberg) and page builders like Elementor or Beaver Builder allow drag-and-drop creation of pages. This eliminates the need to hand-code HTML and CSS for layout adjustments.
Managed hosting setups: Many hosting providers offer one-click WordPress installations, automated updates, and staging environments, further reducing setup time.
For a typical informational site, the development cycle often follows this compressed schedule:
This rapid timeline is ideal for projects where time-to-market is critical, such as launching a promotional campaign, testing a business idea, or establishing an online presence for a local service provider. The key trade-off is that the site depends on third-party themes and plugins, which may introduce bloat, compatibility issues, or limited customization control.
Custom Development Timelines and Planning
Building a website with custom code—whether using a framework like Laravel, React, or a static site generator—requires a fundamentally different approach to time management. Unlike WordPress, where a site can be assembled from pre-made parts, custom development involves creating every component from scratch. This process is inherently slower and more deliberate. A simple custom site might take four to eight weeks, while a complex web application can span six months or more.
The timeline for a custom project typically unfolds in distinct phases:
Planning and architecture (1-2 weeks): This stage involves defining data models, user flows, API endpoints, and page templates. Developers must create a technical blueprint before writing any code.
Frontend development (2-4 weeks): Building the user interface with HTML, CSS, and JavaScript. Responsive design, accessibility, and cross-browser testing are all manual tasks.
Backend development (2-4 weeks): Writing server-side logic, setting up databases, implementing authentication, and creating admin panels. This includes handling security, performance optimization, and error handling.
Integration and testing (1-2 weeks): Connecting frontend to backend, testing all features, fixing bugs, and conducting load tests.
Deployment and launch (1 week): Configuring servers, setting up CDNs, implementing SSL, and performing a final production audit.
Custom development also demands thorough planning because changes made late in the process are costly. For example, adding a blog feature to a custom site mid-development might require new database tables, API routes, and a content management interface. In contrast, WordPress can add the same feature with a single plugin click. The longer timeline is not a disadvantage if your project requires unique functionality, strict performance requirements, or a highly tailored user experience, but it does require a larger upfront investment of time and money.
Skill Requirements: Non-Technical Users vs. Developers
The learning curve for each approach diverges sharply based on the user’s technical background. WordPress is designed to be accessible to non-technical users, while custom code demands professional-level programming expertise. Here is a breakdown of the skills needed for each:
Basic computer literacy: Ability to navigate a dashboard, upload files, and use a text editor.
Familiarity with the WordPress admin interface: Understanding how to create posts, manage menus, and install plugins.
Willingness to learn theme and plugin settings: Most configuration is done through graphical user interfaces, not code.
Problem-solving skills for common issues: Troubleshooting plugin conflicts or theme errors often involves searching forums and reading documentation.
With these skills, a non-technical user can launch a fully functional site independently. However, advanced customization—such as modifying theme templates or writing custom functions—still requires some knowledge of PHP, HTML, and CSS. For users who want to avoid code entirely, page builders and child themes provide a no-code path to deeper customization.
What a developer needs for custom code:
Proficiency in at least one programming language: Common choices include PHP (Laravel), Python (Django), JavaScript (Node.js), or Go.
Strong understanding of HTML, CSS, and JavaScript: Frontend development is essential, even for backend-focused projects.
Version control experience: Using Git to manage code changes, collaborate with others, and roll back errors.
Knowledge of security best practices: Protecting against SQL injection, XSS attacks, and CSRF vulnerabilities.
Server administration or DevOps skills: Configuring web servers (Nginx, Apache), setting up CI/CD pipelines, and managing cloud infrastructure.
Custom development is not a viable option for someone without programming experience. Even a simple custom site requires a developer to handle routing, database connections, and responsive design. The learning curve for mastering these skills is measured in years, not weeks. For organizations with dedicated development teams or the budget to hire experienced professionals, custom code offers complete control and scalability. For solo entrepreneurs or small teams without technical resources, WordPress dramatically lowers the barrier to entry.
In summary, the choice between WordPress and custom code hinges on your available time and skill set. WordPress enables rapid launches with minimal technical knowledge, making it ideal for non-developers and time-sensitive projects. Custom code demands significant time and expertise but provides unmatched flexibility and performance for complex, bespoke applications. Assessing your team’s capabilities and project timeline honestly will guide you toward the right approach.
Security and Maintenance Considerations
When deciding between WordPress and a custom-coded solution, security and maintenance are critical factors that influence long-term costs, risk exposure, and operational overhead. Both approaches present distinct trade-offs: WordPress offers convenience through a vast ecosystem but introduces shared vulnerabilities, while custom code provides control but demands rigorous internal discipline. Understanding these differences helps you align your choice with your project’s tolerance for risk and available resources.
WordPress Security: Plugins, Core Updates, and Best Practices
WordPress powers over 40% of all websites, making it a prime target for automated attacks and exploit scripts. Its security posture relies on three primary layers: the core platform, third-party plugins and themes, and user-configurable settings.
Core Updates are released regularly to patch known vulnerabilities. WordPress automatically applies minor security releases, but major version updates require manual approval or can be automated via hosting tools. Staying current with core updates is non-negotiable—outdated installations are the most common entry point for attackers.
Plugin and theme vulnerabilities represent the greatest risk. Because anyone can publish plugins, quality varies widely. A single poorly coded plugin can expose your entire site to SQL injection, cross-site scripting, or privilege escalation. To mitigate this:
Only install plugins from trusted sources (the official WordPress repository, reputable marketplaces, or well-known developers).
Remove unused plugins and themes—they still present attack surfaces even when deactivated.
Use a security plugin (e.g., Wordfence, Sucuri) to add firewall rules, malware scanning, and login attempt limits.
Enable two-factor authentication for all administrator accounts.
Regularly audit user roles and permissions; grant only the minimum access needed.
Best practices extend beyond software choices. Use strong, unique passwords and change default admin usernames. Implement HTTPS via a valid SSL certificate. Configure proper file permissions on your server (e.g., 755 for directories, 644 for files). Regularly back up your database and files to an off-site location, and test restoration procedures at least quarterly.
Despite these measures, WordPress’s popularity means zero-day exploits are discovered frequently. The platform’s security model is reactive—patches arrive after vulnerabilities are reported, leaving a window of exposure. For high-stakes sites (e.g., e-commerce handling payment data), additional layers like web application firewalls (WAFs) and continuous monitoring are essential.
Custom Code Security: Fewer Vulnerabilities, More Responsibility
Custom-coded solutions—built from scratch with frameworks like Laravel, Django, or a plain PHP/Node.js stack—offer a fundamentally different security profile. Because the codebase is unique, it is not subject to mass-scanning attacks that target known WordPress patterns. However, this advantage comes with significant trade-offs.
Attack surface reduction: A custom site has no third-party plugins, themes, or core updates to manage. Every line of code is written by your team, eliminating the risk of a compromised dependency. This drastically reduces the number of potential entry points. Additionally, you can enforce strict input validation, parameterized queries, and custom authentication logic from the ground up, avoiding the generic patterns that attackers exploit in WordPress.
Increased developer responsibility: The security of a custom site rests entirely on the competence of your development team. Common pitfalls include:
SQL injection due to improper database query handling.
Cross-site scripting (XSS) from unsanitized user input.
Insecure session management or authentication bypass.
Exposure of sensitive configuration files or API keys.
Lack of proper error handling that reveals stack traces to users.
To mitigate these risks, custom development must follow secure coding standards from day one. This includes using prepared statements for all database interactions, implementing CSRF tokens on forms, enforcing HTTPS, and conducting regular code reviews. Automated tools like static application security testing (SAST) and dependency scanners (for any third-party libraries used) should be part of the CI/CD pipeline.
Audit and compliance advantages: Custom code allows you to build to exact compliance requirements (e.g., PCI DSS, HIPAA, GDPR) without relying on third-party plugins that may not meet those standards. You have full visibility into every data flow and authentication step, which simplifies security audits and penetration testing.
The trade-off is clear: custom code offers a smaller, more controllable attack surface, but demands a higher level of expertise and ongoing vigilance. A single mistake by a developer can create a vulnerability as severe as any plugin exploit.
Long-Term Maintenance: Who Manages Updates and Fixes?
Maintenance is where the practical differences between WordPress and custom code become most apparent. The ongoing effort required to keep a site secure, functional, and up-to-date varies dramatically between the two approaches.
WordPress maintenance is largely automated but requires regular attention. Key tasks include:
Task
Frequency
Responsibility
Apply core updates
Monthly (major); as released (minor)
Site administrator or hosting provider
Update plugins and themes
Weekly to monthly
Site administrator
Test compatibility after updates
After each update
Site administrator or developer
Monitor for security advisories
Ongoing
Site administrator or security plugin
Backup database and files
Daily to weekly
Hosting provider or plugin
Audit user accounts and permissions
Quarterly
Site administrator
Because WordPress sites rely on multiple moving parts, an update to one plugin can break another. This “dependency cascade” means you must test each update in a staging environment before applying it to production. Many site owners outsource this to managed WordPress hosting services, which handle core updates, server-level caching, and basic security monitoring for a monthly fee.
Custom code maintenance is more predictable but requires specialized skills. There are no third-party updates to manage—only your own codebase. However, you must still:
Update any third-party libraries or frameworks used (e.g., Laravel, React, Symfony). These dependencies can introduce vulnerabilities if neglected.
Patch any security issues discovered in your own code through audits or penetration tests.
Keep the server environment (PHP version, database software, web server) up to date, as outdated server software can expose vulnerabilities.
Adapt to changes in APIs, payment gateways, or other external services your site integrates with.
Maintain comprehensive documentation so that future developers can understand and modify the code safely.
Custom code maintenance typically requires a dedicated developer or team with knowledge of the specific stack. Unlike WordPress, where a site administrator can handle updates with minimal technical skill, custom code demands ongoing developer time. This can be a significant cost for smaller organizations.
Long-term cost comparison: WordPress sites often have lower upfront development costs but higher ongoing maintenance due to plugin updates, compatibility testing, and security monitoring. Custom-coded sites have higher initial development costs but can have lower maintenance overhead if the codebase is well-designed and dependencies are minimal. However, if the custom site relies on many third-party libraries, maintenance costs can approach those of a WordPress site.
Ultimately, the choice depends on your team’s capacity. If you have in-house developers who can commit to ongoing maintenance, custom code offers control and a reduced attack surface. If you prefer a managed environment with automated updates and a large support community, WordPress provides a proven, albeit more exposed, path.
SEO and Performance: Which Platform Delivers Better Results?
When evaluating WordPress versus custom code, the twin pillars of search engine optimization (SEO) and performance often tip the scales. Both approaches can achieve strong rankings and fast load times, but they differ fundamentally in how you get there. WordPress offers a streamlined, plugin-driven path, while custom code demands hands-on control from the ground up. Understanding these trade-offs is essential for making a choice that aligns with your technical resources, budget, and long-term goals.
WordPress SEO: Plugins, Permalinks, and Content Management
WordPress was built with content management at its core, which naturally supports SEO best practices. Its permalink structure is highly customizable, allowing you to include post names, categories, or even custom taxonomies in URLs. This flexibility helps create clean, keyword-rich URLs that search engines favor. The platform also generates meta tags, sitemaps, and canonical URLs automatically when configured correctly.
The real power, however, lies in its plugin ecosystem. SEO plugins like Yoast SEO, Rank Math, and All in One SEO provide comprehensive tools for optimizing on-page elements. These plugins offer:
Real-time content analysis for readability and keyword density
Automatic XML sitemap generation and submission to search engines
Schema markup integration for rich snippets (e.g., reviews, recipes, FAQs)
Social media preview controls for Open Graph and Twitter Cards
Redirect management to handle 404 errors and preserve link equity
Beyond plugins, WordPress excels at content management. Its block editor (Gutenberg) allows you to structure content with headings, lists, and multimedia without touching code. This semantic HTML structure helps search engines understand page hierarchy. Additionally, WordPress supports categories, tags, and custom post types, enabling you to organize content logically—a signal of site quality to algorithms.
One potential drawback is plugin bloat. Installing too many SEO or performance plugins can slow down your site and create conflicts. A lean, well-maintained WordPress setup with a lightweight theme and only essential plugins can rival custom code in SEO capability. Regular updates are mandatory to patch security vulnerabilities that could harm rankings.
Custom-coded websites offer absolute control over every SEO element, from the HTML structure to server responses. Developers can handcraft meta tags, headings, and schema markup without relying on third-party plugins. This reduces the risk of outdated or conflicting code that can hinder crawlers. Clean, semantic markup is easier for search engine bots to parse, potentially improving indexing efficiency.
With custom code, you can implement advanced SEO techniques that WordPress plugins may struggle to replicate. For example:
Custom URL structures that follow exact keyword strategies without plugin overhead
Fine-grained control over HTTP headers, including canonical tags and hreflang attributes
Server-side rendering for single-page applications to ensure content is crawlable
Optimized sitemaps that exclude low-value pages or dynamic parameters
Direct integration with Google Search Console and analytics APIs for real-time data
However, this control comes at a cost. Without a content management system, updating pages often requires developer intervention. Adding new content or changing meta descriptions may involve editing template files, which can be slow and error-prone for non-technical teams. Custom code also lacks built-in content organization features like categories and tags, so you must build these structures from scratch.
SEO for custom sites demands disciplined development practices. Every page must be coded with SEO best practices in mind, and there is no plugin to catch mistakes like missing alt text or duplicate titles. For teams with strong technical SEO expertise, custom code can achieve superior results. For smaller teams or those without dedicated SEO resources, the plugin safety net of WordPress often wins out.
Performance Benchmarks: Speed and Core Web Vitals
Performance is a direct ranking factor through Google’s Core Web Vitals, which measure loading speed, interactivity, and visual stability. Both WordPress and custom code can achieve high scores, but the path to optimization differs significantly.
Performance Aspect
WordPress
Custom Code
Initial Load Time
Moderate; depends on theme and plugins. Can be optimized with caching and CDN.
Fast; minimal overhead. Code is lean by design.
Largest Contentful Paint (LCP)
Often impacted by large plugins or unoptimized images. Plugins like WP Rocket help.
Easier to optimize by lazy-loading assets and using critical CSS.
First Input Delay (FID)
Can be affected by heavy JavaScript from plugins. Requires careful script management.
Lower by default; only necessary JavaScript is loaded.
Cumulative Layout Shift (CLS)
Common issue with dynamically loaded content (ads, embeds). Fixed with explicit dimensions.
Easier to control; layout is static unless designed otherwise.
WordPress performance depends heavily on hosting quality and plugin selection. A shared hosting plan with bloated themes can result in load times exceeding three seconds. However, with managed WordPress hosting (e.g., Kinsta, WP Engine), proper caching (e.g., Redis, page cache), and a lightweight theme (e.g., GeneratePress, Astra), WordPress can consistently achieve sub-second load times. Core Web Vitals can be optimized using plugins that defer JavaScript, preload key requests, and serve next-gen images.
Custom code websites start with a performance advantage because there is no CMS overhead. Every line of code serves a specific purpose. Developers can implement server-side caching, database query optimization, and asynchronous loading from the outset. For content-heavy sites, custom code can deliver faster time-to-first-byte (TTFB) by eliminating unnecessary database calls. However, this advantage diminishes if the custom site uses a heavy JavaScript framework or fails to implement caching properly.
One critical consideration is maintenance. WordPress updates can introduce performance regressions, requiring ongoing monitoring. Custom code, once optimized, remains stable unless new features are added. Yet, WordPress benefits from a vast community that continuously improves performance best practices—many of which are packaged into plugins. Custom code requires a developer to stay current with evolving web standards independently.
For most businesses, the performance gap between a well-optimized WordPress site and a well-built custom site is negligible. The deciding factor often comes down to resources: WordPress allows non-developers to manage performance tweaks, while custom code demands skilled developers for every optimization. If your team lacks deep technical expertise, WordPress with a performance-focused approach is the safer bet. If you have dedicated developers and need absolute control over every millisecond, custom code can edge ahead—but only with disciplined execution.
Scalability: Growing Your Site Over Time
When planning a website, scalability is a critical factor that determines how well your platform can handle increased traffic, content volume, and feature additions as your business or project evolves. Both WordPress and custom code approaches offer distinct pathways to scaling, but they differ significantly in cost, complexity, and flexibility. Understanding these differences helps you make an informed decision that aligns with your long-term growth strategy.
Scaling WordPress: Hosting, Caching, and CDN Strategies
WordPress, as a content management system, provides a relatively straightforward scalability path for most users, especially those starting with shared hosting and then upgrading as traffic grows. The ecosystem is built around several key strategies:
Hosting Upgrades: Start with shared hosting, then move to managed WordPress hosting (e.g., WP Engine, Kinsta) or virtual private servers (VPS) for better resource allocation. High-traffic sites often require dedicated servers or cloud hosting solutions like AWS, Google Cloud, or DigitalOcean.
Caching Layers: Implement page caching (e.g., WP Rocket, W3 Total Cache) to store static versions of pages, reducing database queries. Object caching (e.g., Redis, Memcached) further accelerates dynamic content by storing database query results in memory.
Content Delivery Networks (CDNs): Use CDNs like Cloudflare, StackPath, or Bunny CDN to distribute static assets (images, CSS, JavaScript) across global servers, reducing latency for international visitors. This also offloads bandwidth from your origin server.
Database Optimization: Regularly clean up post revisions, spam comments, and transients. Use tools like WP-Optimize or query monitoring plugins to identify slow queries. For massive databases, consider database sharding or read-replica setups.
Plugin and Theme Efficiency: Choose lightweight, well-coded plugins and themes. Audit performance with tools like Query Monitor. Avoid bloated plugins that add unnecessary HTTP requests or database queries.
WordPress scales well for most content-heavy sites (blogs, e-commerce stores, news portals) because the core platform is optimized for common patterns. However, scaling beyond millions of monthly visitors often requires significant engineering investment, especially when customizing core behaviors or handling non-standard data structures.
Custom Code Scalability: Architecture and Custom Solutions
Custom-coded websites, built from scratch using frameworks like Laravel, Django, or Node.js, offer maximum control over scalability. The approach revolves around designing architecture that anticipates growth:
Microservices Architecture: Break your application into independent services (e.g., user authentication, payment processing, content delivery). Each service can be scaled independently based on demand, using containers (Docker) and orchestration (Kubernetes).
Database Optimization: Choose databases tailored to your data (e.g., PostgreSQL for complex queries, MongoDB for flexible documents, Elasticsearch for full-text search). Implement indexing, partitioning, and connection pooling from the start.
Caching Strategies: Implement application-level caching (e.g., Redis, Varnish) and edge caching (CDN with dynamic content caching via worker scripts). Custom code allows fine-grained control over cache invalidation and TTLs.
Load Balancing and Auto-Scaling: Deploy behind load balancers (e.g., NGINX, HAProxy) and configure auto-scaling groups in cloud environments. Custom code can handle session management via distributed stores (Redis, Memcached) rather than sticky sessions.
Asynchronous Processing: Use message queues (RabbitMQ, Amazon SQS) to handle heavy tasks (image processing, email sending, data imports) without blocking user requests. This is harder to achieve in WordPress without custom plugins.
Custom code excels in scenarios where you need to handle unique data relationships, real-time features, or complex business logic. The trade-off is higher initial development cost and the need for specialized engineering talent to maintain and optimize the architecture.
Planning for Growth: Which Option Adapts Better?
Choosing between WordPress and custom code for scalability depends on your specific growth trajectory and technical resources. Consider the following comparison:
Factor
WordPress
Custom Code
Initial Setup
Fast, low cost, pre-built plugins
Slow, high cost, full control
Traffic Handling
Good with caching/CDN; bottlenecks at extreme scale
Excellent with microservices and auto-scaling
Feature Addition
Easy via plugins; may conflict or bloat
Requires development; clean integration
Database Flexibility
Limited to MySQL/MariaDB; complex queries slow
Any database; optimized for specific needs
Maintenance Effort
Regular updates, plugin compatibility checks
Custom code updates, dependency management
Cost Over Time
Moderate (hosting, premium plugins, developers)
High (developers, infrastructure, monitoring)
WordPress adapts better for sites that grow in a predictable pattern—more content, more users, standard e-commerce. The ecosystem provides proven solutions for scaling, and you can often achieve 100,000+ monthly visitors with a well-optimized setup. However, if your growth involves unconventional data models (e.g., a social network with complex user relationships), real-time updates (e.g., a live dashboard), or extreme traffic spikes (e.g., viral content), custom code offers superior adaptability.
For most small to medium businesses, WordPress provides a faster path to scale because you can iterate quickly using existing tools. Custom code becomes more advantageous when you have a dedicated engineering team and anticipate growth that requires deep architectural changes. A hybrid approach—using WordPress for content management with custom API endpoints for specific features—can also balance ease of use with scalability.
Ultimately, the best choice depends on your growth plan: if you expect steady, content-driven growth, WordPress is often sufficient. If you need to build a unique, high-performance platform from the ground up, custom code gives you the flexibility to adapt to any future demand.
Third-Party Integrations and Extensibility
When choosing between WordPress and custom code for your web project, the ability to integrate with external tools—such as customer relationship management (CRM) systems, payment gateways, email marketing platforms, and third-party APIs—often determines long-term viability. Both approaches offer distinct pathways to connect your site with the broader digital ecosystem, but they differ significantly in ease, depth, and control. Understanding these differences helps you align your choice with your business’s operational needs and growth trajectory.
WordPress Integrations: Plugins and REST API
WordPress excels in providing ready-made integration solutions through its vast plugin ecosystem. With over 60,000 plugins available in the official repository, plus thousands more from premium marketplaces, you can connect to virtually any popular service without writing code. For example, plugins like WooCommerce handle payment gateways (Stripe, PayPal, Square) out of the box, while tools like WPForms integrate with Mailchimp, HubSpot, and Salesforce for lead capture. This plug-and-play approach dramatically reduces setup time and technical overhead.
Beyond plugins, WordPress offers a built-in REST API that enables custom integrations. Since version 4.7, the WordPress REST API allows external applications to read, create, update, and delete content programmatically. This means you can connect your WordPress site to custom mobile apps, external databases, or specialized services that don’t have a plugin. The REST API follows standard HTTP methods and returns JSON, making it compatible with most modern development stacks. However, the default API endpoints are limited to core WordPress objects (posts, pages, users, comments, taxonomies, and media). For custom post types or advanced data structures, you often need to extend the API manually or use third-party plugins like “Custom Post Type UI” or “Advanced Custom Fields” to expose additional fields.
Key advantages of WordPress integrations:
Speed of deployment: Most common integrations require only plugin installation and configuration, often completed in minutes.
Community support: Popular plugins have extensive documentation, forums, and video tutorials.
Maintenance: Plugin authors handle updates and compatibility with WordPress core releases.
Cost efficiency: Many integration plugins are free or have affordable premium tiers.
Limitations to consider:
Dependency on third-party code: Plugins can introduce security vulnerabilities, performance bloat, or conflicts with other plugins.
Limited customization: Pre-built integrations may not support niche workflows or custom data mapping requirements.
API rate limits: Some plugins may not handle high-volume API calls efficiently, requiring additional optimization.
For businesses that need standard integrations—like connecting a CRM, processing payments, or syncing email lists—WordPress provides a robust, low-code solution. The REST API further extends possibilities for developers who need bespoke connections without abandoning the WordPress ecosystem.
Custom Code Integrations: Tailored Connections and Flexibility
Custom code integrations offer unlimited flexibility because you build every connection from scratch using programming languages like PHP, JavaScript, Python, or Node.js, depending on your backend architecture. Instead of relying on pre-built plugins, you write custom API clients, webhooks, and middleware that communicate directly with external services. This approach allows you to handle data exactly how your business requires, without constraints imposed by third-party plugin limitations.
For example, if your business uses a niche CRM that lacks a WordPress plugin, custom code lets you authenticate via OAuth 2.0, map fields precisely, and handle error states with bespoke logic. Similarly, payment integrations can be built using Stripe’s or PayPal’s raw APIs, enabling custom checkout flows, subscription models with unique billing cycles, or multi-currency handling that surpasses what most plugins offer. Custom code also excels in real-time data synchronization—pushing inventory updates from a legacy ERP system to your website within milliseconds, rather than relying on cron jobs or manual syncs.
Key advantages of custom code integrations:
Complete control: You define every aspect of the integration, from authentication to data transformation to error recovery.
Performance optimization: Code can be written to minimize API calls, cache responses efficiently, and handle high concurrency.
Security: No reliance on third-party code that may have vulnerabilities; you can implement security best practices tailored to your data.
Scalability: Custom integrations can be designed to scale horizontally, using queues, asynchronous processing, and distributed systems.
Challenges to consider:
Development time: Building a single integration can take days or weeks, depending on complexity and API documentation quality.
Ongoing maintenance: When external APIs update their endpoints, authentication methods, or data schemas, you must update your code manually.
Expertise required: You need skilled developers familiar with HTTP protocols, authentication flows (OAuth, API keys), and data serialization.
Higher initial cost: Development hours and testing add up, especially for multiple integrations.
Custom code is ideal for businesses with unique operational workflows, high transaction volumes, or strict compliance requirements (e.g., HIPAA, PCI-DSS). It also suits projects that need to integrate with legacy systems or proprietary APIs that lack public plugins.
Comparing Extensibility for Business Needs
To determine which approach better serves your business, evaluate your current and future integration requirements across several dimensions. The table below summarizes key comparison points:
Factor
WordPress (Plugins + REST API)
Custom Code
Time to integrate
Minutes to hours
Days to weeks
Cost per integration
Low (often free or under $200/year)
High (thousands of dollars in development)
Customization depth
Limited by plugin capabilities
Unlimited, with full control over logic
Maintenance burden
Shared with plugin authors
Entirely on your development team
Performance overhead
Potential bloat from multiple plugins
Optimized for specific use cases
Security risk
Higher due to third-party code
Controlled, but requires expertise
Future compatibility
Dependent on plugin updates
Dependent on your maintenance schedule
Learning curve
Low for common integrations
High, requiring specialized skills
For most small to medium businesses, WordPress provides sufficient extensibility through its plugin ecosystem and REST API. If you need to connect to standard tools like Salesforce, Mailchimp, or Stripe, plugins offer reliable, well-tested solutions. The REST API further bridges gaps for custom integrations that don’t have a plugin, such as connecting to a proprietary inventory system or a custom mobile app backend.
However, businesses with complex, scalable, or mission-critical integration needs often benefit from custom code. For instance, an e-commerce platform handling thousands of orders per hour may require a custom payment integration that processes refunds, partial captures, and fraud checks without relying on a plugin’s abstraction layer. Similarly, a SaaS company syncing user data across multiple internal systems might need custom webhooks and data pipelines that WordPress plugins cannot support efficiently.
Another critical factor is the frequency of API changes. If you integrate with rapidly evolving services (e.g., social media platforms or emerging payment providers), custom code allows you to adapt quickly without waiting for plugin updates. Conversely, if you integrate with stable, mature services, WordPress plugins often keep pace with changes automatically.
Ultimately, the choice depends on your tolerance for trade-offs. WordPress offers speed and simplicity but sacrifices depth and control. Custom code delivers precision and performance but demands significant investment and expertise. A hybrid approach is sometimes optimal: use WordPress plugins for common integrations (email, analytics, basic payment) and custom code for specialized connections that drive your competitive advantage. This balances cost, speed, and flexibility, allowing you to scale integration complexity as your business grows.
Making the Final Decision: A Practical Framework
Choosing between WordPress and custom code is rarely a matter of which is “better” in absolute terms. Instead, it is a strategic decision that depends on your project’s unique constraints, goals, and resources. To cut through the noise, follow this practical framework that breaks down the decision into three clear steps. By the end, you will have a concrete answer tailored to your situation rather than a generic recommendation.
Assessing Your Project’s Complexity and Budget
Start by mapping the scope of your project against the financial resources available. Complexity and budget are the two most influential factors in this decision, and they often trade off against each other.
Step 1: Define your project’s functional requirements. List every feature your website must have. Be specific. For example:
Do you need a blog with categories and tags?
Do you require a membership system with tiered access?
Will you integrate with third-party APIs (e.g., payment gateways, CRM software)?
Do you need custom workflows, such as automated email sequences or dynamic content personalization?
Step 2: Evaluate budget constraints. Your budget should include not just initial development costs but also ongoing maintenance, hosting, security updates, and potential future upgrades. Use this table to map complexity to budget:
Does the project have a hard deadline? WordPress can accelerate development if you use existing plugins and themes.
Is there a strict performance requirement? Custom code can be optimized for speed, while WordPress may require additional caching and optimization layers.
Do you need to scale rapidly? Custom code offers more control over server architecture and database queries, but WordPress can scale with proper hosting and caching.
Once you have a clear picture of complexity and budget, move to the next step: evaluating your team’s technical expertise.
Evaluating Your Team’s Technical Expertise
The capabilities of the people building and maintaining the website often determine the success of the project. Choose a technology that matches your team’s strengths, not one that forces you to hire expensive specialists or risk technical debt.
Assess your team’s skill profile. Create a simple inventory of your team’s technical abilities:
No coding experience: If your team consists of marketers, content creators, or business owners, WordPress with a drag-and-drop page builder (e.g., Elementor, Beaver Builder) is the safest choice. Custom code would require hiring a developer for every change.
Basic HTML/CSS knowledge: Your team can customize WordPress themes by editing stylesheets and templates. This is sufficient for most small to medium projects.
Intermediate to advanced developers (PHP, JavaScript, database management): Your team can handle custom code or deeply customize WordPress. They can build custom post types, create bespoke plugins, or write a full-stack application from scratch.
Consider long-term maintenance. A custom code project requires ongoing developer support for updates, bug fixes, and security patches. WordPress, on the other hand, has a vast ecosystem of automatic updates and community support. Ask yourself:
Will your team still be available to maintain the site in 2–3 years?
Do you have the budget to retain a developer or agency for ongoing work?
Can you afford downtime if a custom-coded feature breaks after a server update?
Special case: hybrid teams. If you have a mix of non-technical content editors and a few developers, consider a hybrid approach: use WordPress as a content management system (CMS) but build critical custom features (e.g., a proprietary algorithm, complex data visualization) as separate microservices or custom plugins. This gives you the best of both worlds: ease of content updates and performance for bespoke functionality.
After evaluating your team’s expertise, you are ready for the final step: using a decision matrix to make the call.
Decision Matrix: When to Choose WordPress vs. Custom Code
Use the following matrix as a quick-reference guide. It weighs the three core factors—complexity, budget, and technical expertise—to recommend the best path forward. Each scenario assumes you have completed the assessments from the previous sections.
Identify your scenario by matching your project’s complexity, budget, and team expertise to one of the rows.
Read the recommended choice in the rightmost column. This is your starting point.
If your scenario does not fit neatly, prioritize the most critical factor. For example, if budget is extremely tight but complexity is high, you may need to reduce scope or invest in training your team.
Additional considerations for edge cases:
Security-sensitive projects: If your project handles sensitive user data (e.g., healthcare, finance), custom code offers better control over security protocols. WordPress can be hardened but requires expert configuration and regular audits.
SEO requirements: Both WordPress and custom code can achieve excellent SEO performance. WordPress has plugins like Yoast SEO that simplify the process, while custom code allows you to fine-tune every aspect of your markup and schema.
Future scalability: If you anticipate rapid growth in traffic or features, custom code provides more flexibility to refactor and optimize. WordPress can scale with proper architecture (e.g., headless WordPress, CDN integration), but it may require more upfront planning.
Final recommendation: When in doubt, start with WordPress. It is easier to migrate from WordPress to custom code later than the reverse. If you choose custom code, ensure you have a clear roadmap, a skilled team, and a budget that accounts for ongoing development. Use this framework to make a confident, informed decision that aligns with your project’s unique needs.
How to Create a Custom WordPress Widget: A Step-by-Step Developer’s Guide
Introduction to WordPress Widgets and Why Build Custom
WordPress widgets are modular blocks of content that can be added to widget-ready areas in a theme, such as sidebars, footers, or custom widget zones. They enable site owners to easily manage and display dynamic content—like recent posts, search bars, or custom menus—without editing code. For developers, understanding widgets is foundational to extending WordPress functionality. While the core platform includes several default widgets, building a custom widget offers precise control over output, unique data handling, and seamless integration with a site’s specific requirements. This guide walks through the process of how to create a custom WordPress widget, from planning to deployment, ensuring your solution is both robust and maintainable.
What Are WordPress Widgets? A Quick Primer
WordPress widgets are PHP objects that extend the WP_Widget class, registered with the WordPress widget API. They appear in the Appearance > Widgets screen, where users can drag and drop them into registered sidebars or widget areas. Each widget typically includes:
Widget title: A user-defined heading displayed on the front end.
Form fields: Inputs for settings (e.g., text fields, checkboxes, dropdowns) that control behavior.
Front-end output: The HTML rendered to visitors, often using WordPress template tags.
Update method: Logic to sanitize and save user input.
Widgets are distinct from shortcodes or blocks in that they are specifically designed for persistent placement in theme areas, not inline content. They rely on WordPress hooks like widgets_init to register, and their structure follows a predictable pattern of four core methods: __construct(), widget(), form(), and update(). Mastering this pattern is the first step in learning how to create a custom WordPress widget.
Advantages of Custom Widgets Over Plugin-Based Solutions
While many plugins offer pre-built widgets, custom development provides distinct benefits:
Aspect
Custom Widget
Plugin-Based Widget
Performance
Lightweight, no extra plugin overhead
Often includes unnecessary code or dependencies
Security
Full control over input sanitization and output escaping
Varies by plugin; may introduce vulnerabilities
Customization
Tailored to exact site needs, no bloat
Limited to plugin’s options; requires hacks for extras
Maintenance
Updated alongside theme or custom plugin
Dependent on third-party updates; risk of incompatibility
Learning Value
Deepens understanding of WordPress core
Minimal developer skill growth
Custom widgets also eliminate reliance on external codebases, reduce plugin conflicts, and allow integration with custom post types or advanced query logic. For example, a widget that displays upcoming events from a custom post type is easier to build from scratch than to force a generic plugin widget to work.
When to Build a Custom Widget vs. Use Existing Options
Deciding between a custom widget and an existing solution depends on project scope. Build a custom widget when:
Unique data requirements: You need to display content from custom database tables, APIs, or non-standard queries.
Specific output formatting: The widget must match a design system exactly, with no tolerance for generic styles.
Performance constraints: Avoiding the overhead of a full plugin is critical for a high-traffic site.
Long-term maintainability: The widget will be used across multiple sites or themes, warranting a reusable component.
Use existing options (core widgets or trusted plugins) when:
Common functionality: Needs like recent posts, categories, or search are well-served by defaults.
Rapid deployment: A plugin saves time for non-critical features.
Limited development budget: Custom work is unnecessary for standard use cases.
In most projects, a hybrid approach works best: leverage core widgets for basic needs and build custom widgets for features that differentiate the site. This balance ensures efficiency without sacrificing flexibility—a core principle when learning how to create a custom WordPress widget effectively.
Prerequisites for Building a Custom Widget
Before you begin coding a custom WordPress widget, you must ensure your development environment and skill set are prepared. This section outlines the essential knowledge, tools, and setup required to follow the steps in this guide. Skipping these prerequisites can lead to debugging difficulties and inefficient workflow.
Required WordPress Development Skills (PHP, HTML, CSS, JavaScript)
Building a custom widget requires a foundational understanding of several web technologies. You do not need to be an expert in all areas, but comfort with the following is essential:
PHP: WordPress widgets are built using PHP classes that extend the WP_Widget core class. You must understand PHP syntax, functions, loops, and how to work with WordPress actions and filters. Specifically, you need to know how to define a class, use constructors, and implement methods like widget(), form(), and update().
HTML: The widget’s front-end output and back-end settings form are written in HTML. You should be able to structure semantic markup, including forms, inputs, and labels.
CSS: Basic CSS is needed to style the widget’s display on the front end and the admin form. You should be comfortable with selectors, properties, and responsive design principles.
JavaScript: While not always required, JavaScript is useful for enhancing the widget’s admin interface (e.g., adding media uploaders or live previews). Familiarity with jQuery (which WordPress ships with) is beneficial.
Setting Up a Local Development Environment
Never develop a custom widget directly on a live production website. A local development environment allows you to test code safely and quickly. The following table lists recommended local setup options:
Tool
Description
Best For
Local by Flywheel
Free, user-friendly local WordPress environment with one-click site creation.
Beginners and intermediate developers.
XAMPP / MAMP
Traditional local server stacks with Apache, MySQL, and PHP.
Developers needing full control over server configuration.
Docker
Container-based environment for reproducible development setups.
Advanced developers working on team projects.
To set up your environment, install your chosen tool, create a new WordPress installation, and ensure you have administrator access. Then, activate a default theme (like Twenty Twenty-Four) to avoid conflicts during testing.
Recommended Tools: Code Editor, Debugging Plugins, and Version Control
Efficient widget development relies on the right toolkit. The following tools will streamline your workflow and help you catch errors early:
Code Editor: Use a robust editor such as VS Code (free) or PhpStorm (paid). These editors offer syntax highlighting, code completion, and built-in Git integration. Install extensions for WordPress development, such as the WordPress Snippets or PHP Intelephense.
Debugging Plugins: Enable WordPress debugging by adding define('WP_DEBUG', true); to your wp-config.php file. For deeper analysis, use a plugin like Query Monitor to inspect database queries, hooks, and PHP errors in real time.
Version Control: Track changes to your widget code using Git. Initialize a repository in your theme’s directory or a dedicated plugin folder. This allows you to revert mistakes, collaborate with others, and deploy updates safely. Pair Git with a hosting service like GitHub or GitLab for backup and collaboration.
With these prerequisites in place, you are ready to proceed to the next section of this guide: registering the widget class and defining its core methods.
To create a custom WordPress widget, you must first understand the core class that powers all widgets in the WordPress ecosystem: WP_Widget. This abstract class, introduced in WordPress 2.8, provides a standardized framework for building, registering, saving, and displaying widget content. By extending WP_Widget, developers gain access to a robust API that handles the heavy lifting of data persistence, form generation, and theme integration. The class enforces a consistent structure through four key methods, each with a specific role in the widget lifecycle.
Key Methods: __construct(), widget(), form(), and update()
Every custom widget must implement, or at least override, these four methods from the parent class. Below is a breakdown of their purposes and typical usage:
Renders the admin form for configuring widget settings (e.g., text fields, checkboxes).
$instance (current saved settings)
update()
Sanitizes and validates new settings before they are saved to the database.
$new_instance, $old_instance
In __construct(), you call parent::__construct() with a unique base ID, a translatable name, and an array of options (e.g., ['description' => 'Displays recent posts']). The widget() method receives $args (containing before_widget, after_widget, before_title, after_title) and $instance (an associative array of user-defined settings). The form() method uses $instance to pre-populate fields, while update() must return sanitized $new_instance data to prevent security vulnerabilities.
The Role of the $args and $instance Parameters
These two parameters are central to how a widget integrates with a theme and stores user preferences. The $args array is provided dynamically by WordPress when the widget is called in a sidebar. It typically contains:
before_widget: Opening HTML markup (e.g., <li id="widget-1" class="widget">)
after_widget: Closing HTML markup (e.g., </li>)
before_title: Opening tag for the widget title (e.g., <h2 class="widgettitle">)
after_title: Closing tag for the widget title (e.g., </h2>)
The $instance parameter holds the saved settings for that specific widget instance. For example, if your widget has a title field and a number-of-posts field, $instance might look like ['title' => 'Recent Posts', 'count' => 5]. In the widget() method, you extract these values and wrap them in the theme’s provided $args markup. This separation ensures that the widget’s content is theme-agnostic while respecting the theme’s structural rules.
How the Widget API Handles Saving and Displaying Data
WordPress manages the entire data lifecycle for widgets through the Widget API. When a user saves settings from the admin form, the API calls the update() method on the widget instance. This method receives the new input ($new_instance) and the previous settings ($old_instance). Your implementation should sanitize each field—for example, using strip_tags() for text, intval() for numbers, or wp_kses_post() for HTML content—and return the sanitized array. The API then serializes this data into the wp_options table under the widget’s option name (e.g., widget_yourwidgetbase).
On the front end, when a page loads, WordPress retrieves the serialized data for each active widget instance and passes it to the widget() method as the $instance parameter. The widget() method then outputs the final HTML, using $args for wrapping. This process ensures that each widget instance retains its own settings, even when multiple copies of the same widget are used in different sidebars. The API also handles AJAX saving, multi-widget support, and backward compatibility with older widget implementations, making it a reliable foundation for custom development.
Creating a custom WordPress widget begins with establishing a solid foundation: your plugin file. This file serves as the entry point for WordPress to recognize, activate, and manage your widget. Proper setup ensures compatibility with core WordPress functions, security against malicious access, and a clear structure for future development. Follow these steps to build a secure, standards-compliant plugin file.
Navigate to your WordPress installation’s wp-content/plugins/ directory. Create a new folder for your widget plugin—use a unique, descriptive name without spaces, such as custom-weather-widget or my-featured-posts-widget. Inside this folder, create the main PHP file. Name it after your plugin or use a standard name like custom-widget.php. This file will contain all the code for your widget. Organize your directory structure as follows:
Main plugin folder: /wp-content/plugins/your-plugin-name/
Main plugin file: /wp-content/plugins/your-plugin-name/your-plugin-name.php
Optional: subfolders for assets (CSS, JS) or includes (helper functions, classes)
Using a dedicated folder prevents file clutter and makes your plugin easy to locate, update, or remove. Avoid naming conflicts with existing plugins by checking the WordPress Plugin Directory.
Plugin headers are required comments at the top of your main file. WordPress reads these to display plugin information in the admin panel. Use the following template, replacing placeholder values with your widget’s details:
<?php
/**
* Plugin Name: Custom Widget Name
* Plugin URI: https://yourwebsite.com/custom-widget
* Description: A brief description of what your widget does.
* Version: 1.0.0
* Author: Your Name
* Author URI: https://yourwebsite.com
* License: GPL v2 or later
* License URI: https://www.gnu.org/licenses/gpl-2.0.html
* Text Domain: custom-widget-text-domain
* Domain Path: /languages
*/
Each header serves a specific purpose:
Header
Purpose
Plugin Name
Display name in Plugins list.
Plugin URI
Link to plugin homepage or documentation.
Description
Short summary shown below the name.
Version
Semantic version for updates.
Author
Your name or organization.
License
GPL v2 or later is standard for WordPress.
Text Domain
Enables internationalization (i18n).
Always include a unique Text Domain to allow translation of your widget’s strings. The Domain Path points to the folder containing .mo/.po files.
Implementing Basic Security: Direct Access Prevention and Nonces
Security must be built in from the start. The first line after the header block should prevent direct file access. Add this code immediately:
if ( ! defined( 'ABSPATH' ) ) {
exit; // Exit if accessed directly
}
This ensures the plugin file cannot be executed by visiting its URL directly—only through WordPress core. Next, prepare for secure form handling by planning to use nonces (number used once) when your widget includes settings or user input. Nonces verify that actions originate from your site and not from third-party requests. When you later add widget forms, implement nonce verification like this:
// In your widget form method:
wp_nonce_field( 'my_custom_widget_action', 'my_custom_widget_nonce' );
// In your widget update method:
if ( ! isset( $_POST['my_custom_widget_nonce'] )
|| ! wp_verify_nonce( $_POST['my_custom_widget_nonce'], 'my_custom_widget_action' ) ) {
return $instance;
}
Sanitize all user input using functions like sanitize_text_field().
Escape output with esc_html() or esc_attr().
Use capabilities checks (e.g., current_user_can('edit_theme_options')) before saving widget settings.
Validate data types (e.g., intval() for numeric fields).
By implementing these security basics now, you create a robust foundation that protects your widget and its users from common vulnerabilities like CSRF (Cross-Site Request Forgery) and unauthorized access. Test your plugin file after adding these elements to confirm it appears correctly in the WordPress admin under Plugins, showing all header information without errors.
Step 2: Defining the Widget Class and Constructor
Once you have set up your plugin file structure, the next critical step is to define your custom widget class. In WordPress, every widget is a PHP class that extends the core WP_Widget class. This inheritance gives your widget all the necessary methods for registration, display, update, and form handling. The class and its constructor form the backbone of your widget’s identity and configuration.
Extending WP_Widget: Class Declaration and Naming Conventions
Your custom widget class must directly extend WP_Widget. Follow these naming and structural conventions to ensure compatibility and clarity:
Use a unique, descriptive class name that avoids conflicts with other plugins or themes. Prefix it with your plugin or theme slug, e.g., MyPlugin_Featured_Post_Widget.
Follow PHP class naming standards: use uppercase for the first letter of each word (PascalCase). Avoid underscores at the start or end.
Place the class declaration inside your main plugin file or a dedicated class-widget.php file, then include it.
Declare the class as class My_Widget extends WP_Widget. This ensures all parent methods are available.
Example class declaration:
class MyPlugin_Recent_Posts_Widget extends WP_Widget {
// Constructor and methods go here
}
Configuring the Constructor with Widget ID, Title, and Description
The constructor method is where you define the widget’s unique identity. It accepts three critical parameters: the widget ID, a display title, and an array of description options. Use the parent constructor parent::__construct() to pass these values.
Widget ID (string, required): A unique, lowercase identifier with underscores or hyphens. Example: 'myplugin_recent_posts'. This ID is used internally by WordPress to store widget settings and display the widget.
Widget Title (string, required): The human-readable name shown in the admin Widgets screen. Example: 'Recent Posts (My Plugin)'.
Widget Description (array, optional): An associative array with a 'description' key that appears beneath the widget title in the admin. Example: array( 'description' => 'Displays recent posts with thumbnails' ).
Constructor code example:
public function __construct() {
parent::__construct(
'myplugin_recent_posts', // Base ID
'Recent Posts (My Plugin)', // Name
array( 'description' => 'Displays a list of recent posts with featured images' ) // Args
);
}
Setting Widget Options: Width, Height, and Custom Arguments
Beyond the basic ID and title, the constructor’s third parameter can include additional widget options that control its admin appearance and behavior. These are passed as an array to parent::__construct().
Option Key
Type
Description
Example Value
classname
string
Custom CSS class added to the widget wrapper in the admin and front end
'myplugin-widget'
description
string
Short description shown in the widget selection area
'Custom widget for recent posts'
width
int
Width in pixels of the widget form in the admin (default 250)
400
height
int
Height in pixels of the widget form (not commonly used; default 200)
350
To set these, include them in the third argument array:
These options help tailor the widget’s admin interface to your needs. For example, a wider form accommodates longer input fields or side-by-side controls. Always test your widget in the admin to verify the dimensions work with your form layout.
With the class defined and constructor configured, your widget now has a unique identity and admin appearance. The next steps involve implementing the widget(), form(), and update() methods to handle front-end display, admin form rendering, and data sanitization.
Step 3: Building the Widget Form (Backend)
With the widget class registered, the next critical step is building the backend form that appears in the WordPress admin under Appearance > Widgets. This form, defined by the form() method, allows administrators to customize the widget’s behavior and content directly from the dashboard. A well-constructed form balances usability with security, ensuring that input is both easy to manage and safe to store. Below, we break down the key components of building this form.
Adding Text Fields, Checkboxes, and Select Dropdowns
The form() method outputs HTML directly. Start by retrieving the current instance settings using $this->get_settings(). For each field type, use standard HTML elements with proper name attributes that include the widget’s base ID and bracket notation (e.g., $this->get_field_name('title')). This ensures WordPress correctly saves and retrieves the values.
Text fields: Use an <input type="text"> element. Common uses include a title or a short description. Set the value attribute to the saved setting, escaped with esc_attr().
Checkboxes: Use an <input type="checkbox"> with a value="1" and checked attribute if the saved value equals 1. Always include a hidden field with the same name and value 0 before the checkbox to ensure a value is sent even when unchecked.
Select dropdowns: Use a <select> element with <option> tags. Set the selected attribute on the option matching the saved value. Use selected() or a conditional comparison to mark the correct choice.
For example, a simple text field for a title might look like this:
Every piece of data entered into the form must be sanitized and validated before it is saved. This is handled in the update() method, which receives the new instance and the old instance. Return the sanitized array of new settings. Use WordPress core functions to clean input based on its expected type.
Always assume input is malicious. Never trust user data directly. For dropdowns, validate against a whitelist of allowed values to prevent injection of unexpected options. For text fields, strip all HTML unless you explicitly allow it via a function like wp_kses_post().
Styling the Admin Form for a Better User Experience
WordPress provides built-in CSS classes that integrate seamlessly with the admin interface. Use these to maintain consistency and improve usability without writing custom stylesheets.
widefat: Apply to text inputs and textareas to make them fill the widget area width.
description: Wrap helper text in a <p> or <span> with this class to use the standard muted styling.
button and button-primary: If you need custom action buttons, use these classes for a native look.
Structure the form with semantic HTML: wrap each field in a <p> tag, use <label> elements linked via for and id attributes for accessibility, and group related fields with a <fieldset> and <legend> if needed. Keep the form concise; avoid overwhelming the user with too many options. A clean, predictable layout reduces errors and speeds up configuration.
Step 4: Implementing the Widget Display (Frontend)
The widget() method is the public face of your custom widget. It receives two parameters: $args (containing theme-defined wrapper markup) and $instance (the saved settings from the backend). This method must render HTML that is both secure and visually integrated with the site’s design. Below, we break down the process into three critical phases.
Extracting Instance Data and Widget Arguments
Begin by unpacking the $args array, which typically includes before_widget, after_widget, before_title, after_title, and widget_id. Use extract() only if you are certain of the array keys, or better, assign them directly:
Always validate and sanitize instance data before use (e.g., absint() for integers, wp_kses_post() for text).
Do not assume $args keys exist; check with isset() or ! empty().
Keep the widget_id from $args handy for unique IDs in HTML attributes.
Applying WordPress Filters for Flexibility
WordPress filters allow other developers and themes to modify your widget’s output without editing your code. Use the apply_filters() function on key data points:
For responsive design, add inline CSS or enqueue a separate stylesheet via wp_enqueue_style() in the widget class. Use CSS classes like widget-responsive and media queries to handle small screens. Avoid hardcoded widths; rely on the theme’s container to scale. Finally, close the widget wrapper:
echo $args['after_widget'];
This ensures the widget is properly terminated and avoids layout breaks.
Step 5: Registering and Activating the Widget
After you have written the widget class and defined its core methods, the next critical step is to register the widget with WordPress. Registration makes your custom widget appear in the Appearance > Widgets administration area, where users can drag it into sidebars and other widget-ready areas. Without proper registration, your widget code will remain inert, no matter how well constructed. This step involves two essential actions: hooking into WordPress’s widget initialization process, and then activating the plugin to test the widget in a live sidebar.
Using the widgets_init Hook to Register the Widget
WordPress provides a dedicated action hook, widgets_init, specifically for registering widgets. You must call the register_widget() function inside a callback attached to this hook. The function accepts the name of your widget class as its single parameter. Here is the standard pattern to place in your main plugin file or theme’s functions.php:
Activating the Plugin and Adding the Widget to a Sidebar
After registering the widget, you need to activate your plugin (or refresh your theme) and then add the widget to a sidebar to see it work. Follow these steps:
Activate the plugin: Go to Plugins > Installed Plugins, find your custom widget plugin, and click “Activate.”
Navigate to Appearance > Widgets: In the WordPress admin dashboard, open the Widgets screen. You should see your custom widget listed under “Available Widgets.”
Add the widget to a sidebar: Drag your custom widget from the “Available Widgets” area into a sidebar (e.g., “Main Sidebar” or “Footer”).
Configure settings: Expand the widget instance in the sidebar, enter a title or any other fields you defined in the form() method, and click “Save.”
View the front end: Visit your website’s front end. The widget should display its output in the sidebar where you placed it.
If the widget does not appear in the admin or on the front end, proceed to the debugging tips below.
Testing the Widget: Common Issues and Debugging Tips
Even with correct registration, widgets can fail silently. Use this table to diagnose common problems:
Issue
Likely Cause
Solution
Widget not listed in admin
Class name mismatch or missing widgets_init hook
Verify class name and hook syntax; check for typos.
Widget appears but shows no output
Empty widget() method or missing echo
Ensure widget() contains echo statements for front-end output.
Settings not saving
Incorrect update() method
Return the sanitized $new_instance array from update().
PHP fatal error on activation
Syntax error or missing class definition
Enable WP_DEBUG in wp-config.php to see error details.
Widget works in admin but not front end
Theme does not support dynamic sidebars
Check that your theme calls dynamic_sidebar() in its template files.
Enable WP_DEBUG and WP_DEBUG_LOG in wp-config.php to capture PHP notices and errors.
Use the browser’s developer console to check for JavaScript errors in the Widgets admin screen.
Temporarily switch to a default theme (e.g., Twenty Twenty-Four) to rule out theme conflicts.
Deactivate all other plugins to test for interference with your widget registration.
By methodically following these registration and testing steps, you ensure your custom widget integrates seamlessly into the WordPress widget system and behaves reliably for end users.
Advanced Customizations and Best Practices
Building a basic custom WordPress widget is a solid start, but to deliver a truly powerful and maintainable tool, you must integrate advanced features and adhere to performance standards. This section explores three critical areas: adding dynamic functionality via shortcodes or AJAX, preparing your widget for a global audience through internationalization, and optimizing its performance to keep your site fast and efficient.
Adding Widget-Specific Shortcodes or AJAX Functionality
To extend your widget’s interactivity, you can embed shortcodes or use AJAX to load content without a full page refresh. For shortcodes, register them within your widget class using add_shortcode() in the __construct() method, then output the shortcode in the widget’s widget() method via do_shortcode(). For AJAX, enqueue a JavaScript file using wp_enqueue_script() and localize it with wp_localize_script() to pass a nonce and admin-ajax URL. Implement two hooks: wp_ajax_my_action for logged-in users and wp_ajax_nopriv_my_action for visitors. Handle the request in a separate function that sanitizes input, queries data, and returns JSON. This approach enables features like live search results or dynamic content updates.
Internationalizing the Widget for Multilingual Sites
To make your widget accessible to non-English users, internationalize all text strings using WordPress’s __() or _e() functions. Define a text domain in your plugin or theme’s main file with load_plugin_textdomain() or load_theme_textdomain(). Within the widget class, wrap every string—such as labels, placeholders, and help text—like this: __( 'Your Label', 'your-text-domain' ). For dynamic strings with variables, use printf() or sprintf() with __(). Create a .pot file using a tool like Poedit, then translate it into .po and .mo files for each language. Store these in a languages folder. This ensures your widget works seamlessly with plugins like WPML or Polylang.
Optimizing Performance: Caching and Minimizing Database Queries
A poorly optimized widget can slow your entire site. Follow these best practices:
Cache widget output: Use WordPress Transients API to store rendered HTML for a set period. For example, set_transient( 'my_widget_cache', $output, HOUR_IN_SECONDS ); and retrieve it with get_transient() before building the output.
Minimize database queries: Use WP_Query with specific arguments (e.g., 'posts_per_page' and 'no_found_rows' => true) to avoid unnecessary overhead. For custom tables, use $wpdb with prepared statements and cache results.
Limit widget instance processing: Check if the widget is active using is_active_widget() before running expensive queries. In the widget() method, use static variables to cache data across multiple instances on the same page.
Use object caching: For high-traffic sites, implement persistent object caching (e.g., Redis or Memcached) to store query results and transients in memory.
By applying these techniques, you ensure your widget remains responsive and scalable, even under heavy load.
Troubleshooting and Testing Your Custom Widget
Developing a custom WordPress widget often involves unexpected issues, from silent failures to compatibility conflicts. Thorough testing across environments and careful debugging ensure your widget works reliably for end users. Below are common pitfalls and systematic approaches to resolve them.
Debugging with WP_DEBUG and Error Logs
Enable WordPress debugging mode to surface PHP notices, warnings, and fatal errors during development. Add these lines to your wp-config.php file:
Errors are then written to /wp-content/debug.log. Check this file after testing each widget interaction. Common issues revealed include:
Undefined array keys when accessing widget instance data
Incorrect function calls or deprecated hooks
Missing database queries or malformed SQL
Output buffering errors from misplaced echo statements
For JavaScript errors, use your browser’s developer console (F12) and the console.log() method within widget admin scripts. Always disable WP_DEBUG on production sites.
Testing Compatibility with Popular Themes and Plugins
Your widget must coexist with diverse themes and plugins. Create a testing matrix covering at least the following scenarios:
Test on a staging site using the Health Check plugin to disable all other plugins and switch themes temporarily, isolating your widget’s behavior.
Handling Edge Cases: Empty Fields, Missing Data, and Updates
A robust widget gracefully handles incomplete or unexpected data. Implement these safeguards in your widget class:
Empty fields: In the widget() method, check if each instance variable exists and is not empty before outputting HTML. Provide a fallback message or default styling.
Missing data: Use isset() or array_key_exists() when reading the $instance array. For example: $title = ! empty( $instance['title'] ) ? $instance['title'] : '';
Database updates: When your widget evolves, implement version checks in the update() method. Save a version number in the widget options and run migration logic if the version differs. For example, add new default fields or sanitize older data formats.
AJAX and caching: If your widget loads dynamic content via AJAX, ensure nonce verification and that cached versions refresh when data changes. Use wp_cache_delete() with the widget’s key on updates.
Test these edge cases by manually deleting widget settings from the database via wp_options table, then re-saving the widget in the admin panel. Verify the frontend does not break and displays sensible defaults.
1. The Evolution of the Full Site Editing Experience
By 2026, Full Site Editing (FSE) will have undergone a profound transformation from its initial experimental phase into a mature, stable, and central workflow for building sites on WordPress. What began as a set of ambitious but sometimes unwieldy tools in the block editor will have been refined through thousands of hours of user feedback, developer contributions, and core updates. The vision of a truly visual, block-based site builder—where every part of a theme, from headers to footers, can be designed and managed without touching a single line of code—will be fully realized. This shift will fundamentally alter how both professionals and hobbyists approach WordPress, making it more accessible while simultaneously offering deeper control for those who need it. The evolution is not just about adding features; it is about streamlining the entire experience so that FSE feels less like a separate mode and more like the natural, default way to interact with a WordPress site.
Streamlined Block Patterns and Templates
One of the most significant areas of maturation will be in how block patterns and templates are created, managed, and applied. In 2024 and 2025, patterns were often a patchwork of user-created libraries and core offerings. By 2026, the system will be far more cohesive. The WordPress core will ship with a highly curated, context-aware library of patterns that adapt to the user’s active theme and content type. For example, when a user creates a new “Services” page, the editor will suggest patterns specifically designed for service listings, complete with appropriate placeholder text and image slots.
Contextual Suggestion Engine: The pattern inserter will learn from the user’s site structure, suggesting patterns that match the page’s purpose (e.g., “About Us,” “Contact,” “Portfolio”) based on the page title and template assigned.
Hierarchical Template Management: Templates themselves will become more flexible. Instead of a rigid set of template files (single.html, page.html, etc.), users will be able to create custom template variations that inherit from parent templates but override specific areas. A “Landing Page” template might inherit from the default “Page” template but replace the header with a full-width hero block.
Pattern Library Standardization: A standardized JSON schema for patterns will emerge, allowing third-party theme and plugin developers to register patterns that are fully compatible with the FSE interface. This will eliminate the current fragmentation where some patterns work perfectly and others break the layout.
Dynamic Pattern Parts: Patterns will support dynamic content, such as pulling in the latest posts, a site logo, or a navigation menu. This will make patterns reusable across different contexts without requiring manual updates.
The result is that building a site from a collection of pre-built patterns will feel less like assembling a puzzle and more like selecting a design system. Users will spend less time tweaking individual blocks and more time curating the right combination of patterns for their brand.
Enhanced User Interface for Non-Developers
The user interface (UI) of the Full Site Editor will see the most dramatic improvements in 2026, specifically aimed at making it truly intuitive for non-developers. The current learning curve—where users must understand concepts like “template parts,” “block inserter,” and “global styles”—will be flattened significantly. The focus will shift from a tool-centric interface to a task-centric one.
Key UI enhancements will include:
Feature
How It Works in 2026
Benefit for Non-Developers
Visual Hierarchy Mode
A single button toggles between editing content and editing the layout structure. The layout mode highlights all template parts (header, footer, sidebar) with clear, non-intrusive labels and drag handles.
No more confusion about whether you’re editing a page or the header. The distinction is obvious.
Guided Setup Wizards
When activating a new FSE-compatible theme, a step-by-step wizard walks the user through choosing a homepage layout, setting up navigation, and selecting color palettes—all before they see the main editor.
Reduces the initial overwhelm. Users feel they have a clear path from start to finish.
Inline Style Adjustments
Global styles (colors, fonts, spacing) can be adjusted directly on the canvas. Clicking on a heading block shows a floating toolbar with options to change its font size and color, with changes applied in real-time to all similar blocks across the site.
Eliminates the need to navigate to a separate “Global Styles” panel. Changes are immediate and visual.
Undo/Redo for Everything
A robust, multi-level undo history that covers not just content edits but also template structure changes, style modifications, and pattern insertions.
Users can experiment freely, knowing they can always revert to a previous state without fear of breaking their site.
These UI refinements will remove the “developer gate” that currently exists. A small business owner or blogger will be able to create a professional-looking site by simply clicking, dragging, and selecting from clear options. The editor will also provide real-time previews of how the site looks on mobile, tablet, and desktop, with a simple toggle that adjusts the canvas width. This responsive preview will be built directly into the editing experience, not a separate preview mode.
Perhaps the most transformative shift by 2026 will be the deep integration of WordPress’s FSE with external design tools. This will bridge the gap between the design and development workflows, allowing designers to use their preferred tools (like Figma, Sketch, or Adobe XD) and then seamlessly bring those designs into WordPress as functional block themes or patterns.
This integration will take several forms:
Design-to-Code Plugins: Third-party plugins will emerge that allow designers to export their Figma frames directly into WordPress as custom block patterns or even full theme.json configurations. A designer might create a unique hero section in Figma, click “Export to WordPress,” and have it appear as a block pattern with all the correct spacing, colors, and typography mapped to the site’s global styles.
API-Driven Theme Creation: WordPress will expose a more robust REST API for theme and block pattern registration. Design tools will be able to call this API to push design assets directly to a WordPress site, bypassing the need to manually copy and paste code.
Live Collaboration: A new breed of plugins will enable real-time collaboration between designers and developers within the FSE. A designer working in Figma could share a link, and the developer could see the design overlaid on the WordPress canvas, with a “sync” button to pull in the latest changes. This will drastically reduce the back-and-forth of exporting and re-importing design files.
Component Libraries: Design systems built in tools like Figma will be able to generate a matching set of WordPress blocks and patterns. If a company’s design system has a specific button style, card layout, and typography scale, those will be available as reusable blocks within the FSE, ensuring brand consistency without manual CSS overrides.
This integration will not replace the need for developers, but it will empower designers to work more independently. The FSE will become the translation layer between the visual design world and the technical implementation, making WordPress a true platform for design-driven development. By 2026, the question will no longer be “Can I build this design in WordPress?” but rather “How quickly can I import my design and start editing the content?”
In summary, the Full Site Editing experience in 2026 will be defined by its maturity, usability, and openness. Streamlined patterns and templates will make site construction faster and more intuitive. An enhanced UI will democratize design, placing powerful tools in the hands of non-developers. And deep integrations with third-party design tools will create a seamless pipeline from concept to launch. WordPress will not just be a content management system; it will be a visual design platform that adapts to the skills and workflows of its diverse user base.
2. Performance and Speed as a First-Class Citizen
By 2026, performance will no longer be an afterthought in WordPress core—it will be a foundational requirement. The platform’s evolution toward a modern content management system has accelerated, driven by user expectations for sub-second load times and search engine algorithms that penalize sluggish sites. Google’s Core Web Vitals, now deeply embedded in ranking signals, have forced the WordPress community to prioritize speed from the moment a site is installed. In the coming years, expect performance to be baked into every layer of the stack, from image delivery to server-side processing. The goal is clear: make WordPress sites competitive with static site generators and proprietary platforms without sacrificing flexibility or ease of use.
Automatic Image Optimization and Next-Gen Formats
Images remain the single largest contributor to page weight, often accounting for 60% or more of a page’s total size. WordPress has made strides with lazy loading and responsive images, but 2026 will see a paradigm shift toward automatic, server-side image optimization. The core will likely integrate WebP and AVIF conversion natively, eliminating the need for third-party plugins or manual encoding. When a user uploads a JPEG or PNG, WordPress will automatically generate multiple formats—WebP for broad browser support and AVIF for superior compression—and serve the most efficient version based on the visitor’s browser capabilities. This process will be transparent, with no additional configuration required.
Beyond format conversion, intelligent compression algorithms will analyze each image’s content. For example, a photograph with complex gradients will retain higher quality, while a simple logo or screenshot can be aggressively compressed without visible degradation. The system will also handle responsive image generation more intelligently, creating only the sizes actually needed by the active theme and avoiding wasteful upscaling. A practical outcome: a typical blog post with five images could see a 40–60% reduction in total image weight, directly improving Largest Contentful Paint (LCP) scores. For site owners, this means no more manual optimization workflows or reliance on external CDN image services for basic tasks.
Lazy Loading and Script Management Enhancements
Current lazy loading implementations in WordPress, while effective, are relatively blunt instruments. By 2026, expect a more nuanced system that prioritizes above-the-fold content while deferring everything else with surgical precision. The core will use the browser’s native loading="lazy" attribute for images and iframes, but will also implement Intersection Observer-based techniques for background images and custom elements. More critically, WordPress will introduce smart preloading: critical images in the initial viewport will load immediately, while off-screen assets will be fetched just before they enter the viewport, reducing bandwidth waste without causing visual delays during scrolling.
Script management will undergo a similar transformation. The current pattern of enqueuing JavaScript files in the header or footer is too coarse for modern performance demands. In 2026, WordPress will likely adopt a module-based approach, splitting scripts into critical and non-critical bundles. Core scripts—like the block editor’s front-end rendering logic—will be deferred or loaded asynchronously by default. Plugin and theme authors will be encouraged to declare script dependencies and loading strategies through a standardized API, enabling WordPress to automatically generate optimal loading sequences. A table summarizing the expected changes might look like this:
Subset font generation and automatic font-display optimization
These enhancements will reduce render-blocking resources and improve Cumulative Layout Shift (CLS) by ensuring scripts and styles load in a predictable order. For developers, the benefit is less manual tuning; for end-users, it means pages that feel instant.
WordPress has long relied on page caching plugins and external CDNs to mitigate server latency, but 2026 will bring first-class support for edge caching directly in core. The vision is a seamless integration where WordPress intelligently communicates with CDN providers to purge cached pages only when content actually changes, rather than invalidating entire caches on every update. This will be achieved through a standardized cache invalidation API that supports major providers like Cloudflare, Fastly, and Akamai out of the box. When a publisher edits a single post, only that post’s cache will be purged, preserving the performance of the rest of the site.
More significantly, WordPress will likely introduce a built-in edge-side include (ESI) system for dynamic content. This allows static pages to be cached at the edge while personalized elements—such as user-specific menus, cart contents, or comment sections—are fetched asynchronously. The result is a hybrid architecture: the majority of a page is served from a CDN node milliseconds away from the visitor, while dynamic fragments are assembled in real-time without sacrificing cacheability. For high-traffic sites, this could reduce origin server load by 80–90% and cut Time to First Byte (TTFB) to under 100 milliseconds globally.
Additional edge caching improvements will include automatic cache warming for popular content, support for HTTP/3 and Brotli compression at the CDN level, and built-in monitoring of cache hit ratios. Site owners will see a simple dashboard metric showing how much traffic is served from cache versus the origin. For global audiences, this means consistent performance regardless of geographic location. A list of anticipated benefits for publishers:
Reduced latency: Static assets and pages served from nearest edge node.
Lower hosting costs: Fewer requests hitting the origin server.
Improved Core Web Vitals: Faster LCP and TTFB due to edge proximity.
Simplified setup: No need for multiple caching plugins or manual CDN configuration.
Better handling of traffic spikes: Edge caches absorb sudden surges without server strain.
By making performance a first-class citizen through these three pillars—automatic image optimization, intelligent lazy loading and script management, and robust edge caching—WordPress will ensure that even complex, content-rich sites can achieve the speed required to compete in 2026’s digital landscape. The era of treating performance as an optional add-on is ending; it is becoming the default.
3. AI and Machine Learning Integration
As 2026 approaches, the integration of artificial intelligence and machine learning into the WordPress ecosystem is no longer a futuristic novelty but a foundational shift in how sites are built, managed, and experienced. The platform, which powers over 43% of the web, is evolving from a content management system into an intelligent digital experience platform. AI is being woven into the fabric of WordPress core, plugins, and themes, enabling smarter workflows, deeper personalization, and autonomous site maintenance. This transformation promises to reduce manual overhead for site owners while delivering richer, more adaptive experiences for visitors. Below, we explore three critical areas where AI is reshaping the WordPress landscape.
AI-Powered Content Generation and Editing Assistants
The days of staring at a blank editor screen are becoming a relic of the past. By 2026, AI-powered content generation tools are deeply embedded in the WordPress block editor (Gutenberg) and popular page builders. These assistants go far beyond simple text autocomplete, offering contextual suggestions that understand your site’s voice, audience, and SEO goals. For instance, when you start drafting a blog post, the AI can propose headlines, outlines, and even full paragraphs based on your topic and existing content library. It can also analyze the emotional tone of your writing and suggest adjustments to improve engagement or readability.
Editing assistants are equally transformative. They provide real-time grammar and style corrections, but more importantly, they flag structural issues such as weak transitions, repetitive phrasing, or overly complex sentences. Some tools now integrate directly with the block editor to offer alternative phrasing for specific blocks, ensuring consistency across multilingual sites. For example, an AI assistant can detect that a product description uses different terminology than the rest of your e-commerce site and suggest harmonization. Below is a comparison of typical AI content features available in 2026:
Feature
Description
Benefit
Contextual Outline Generation
AI suggests headings and subheadings based on topic and target keywords.
Reduces planning time by up to 40%.
Voice and Tone Analysis
Scans content for consistency with brand guidelines (e.g., formal vs. conversational).
Maintains brand identity across multiple authors.
SEO-Optimized Drafting
Generates content that naturally incorporates focus keywords and entity references.
Improves search engine visibility without keyword stuffing.
Image and Alt-Text Generation
Creates descriptive alt text and suggests relevant stock or AI-generated images.
Enhances accessibility and reduces manual media work.
These tools are not replacing human creativity but augmenting it. Writers still control the final output, but the AI handles repetitive tasks, research synthesis, and initial drafts, allowing creators to focus on strategy and nuance. As models become more specialized for niche industries—such as legal, medical, or technical blogging—the quality of generated content will continue to improve, making AI an indispensable co-pilot for WordPress content teams.
Smart Search and Recommendation Engines
Visitor expectations for site search have risen dramatically. A simple keyword match is no longer sufficient. By 2026, AI-driven search and recommendation engines within WordPress are delivering results that understand user intent, context, and past behavior. These systems use natural language processing (NLP) to interpret queries even when they are misspelled, vague, or conversational. For example, a search for “budget-friendly vegetarian recipes for beginners” on a food blog will surface relevant posts, filter by difficulty, and even suggest related categories like meal prep or seasonal ingredients.
Beyond search, recommendation engines are personalizing the entire browsing experience. Machine learning models analyze on-site actions—pages visited, time spent, scroll depth, and purchase history—to dynamically adjust content blocks, related posts, and product suggestions. This works in two primary modes:
Collaborative filtering: Recommendations are based on the behavior of similar users. For instance, “Users who viewed this plugin also installed these three.”
Content-based filtering: Recommendations are derived from the attributes of the content itself, such as tags, categories, and semantic similarity.
Many WordPress sites are now combining these approaches with real-time data streams. A visitor landing on a travel blog might see a hero image of their previously searched destination, a list of articles matching their reading history, and a pop-up offering a downloadable guide tailored to their interests—all without explicit configuration by the site owner. This level of personalization increases engagement metrics, reduces bounce rates, and drives conversions. For e-commerce stores, AI recommendations can boost average order value by surfacing complementary products at checkout, while membership sites use the technology to suggest relevant courses or content tiers. The underlying infrastructure is often handled by dedicated plugins that integrate with WordPress REST API, ensuring performance does not suffer even on high-traffic sites.
Automated Site Health and Security Monitoring
Site maintenance has historically been a chore that many WordPress administrators neglect until something breaks. AI is changing that by proactively monitoring site health and security, automating responses to common threats, and predicting potential failures before they occur. In 2026, these systems operate continuously, analyzing logs, performance metrics, and code changes for anomalies. For example, an AI security plugin might detect a pattern of failed login attempts from an unusual geographic region and automatically block the IP range while alerting the admin via dashboard notification or email.
Key areas where AI is automating site health include:
Performance optimization: Machine learning models analyze traffic patterns and automatically adjust caching rules, CDN settings, and image compression levels to maintain fast load times during spikes.
Plugin and theme conflict detection: AI scans for compatibility issues before updates are applied, simulating the update in a sandbox environment and rolling back if a conflict is detected.
Database health: Automated scripts identify and clean up orphaned data, expired transients, and redundant database tables, reducing bloat and improving query performance.
Security threat prediction: By analyzing global threat intelligence feeds and your site’s unique attack surface, AI can predict and preemptively patch vulnerabilities, such as outdated plugins with known exploits.
Below is a sample workflow for an AI-driven security alert:
Step
Action
AI Role
1
Monitor incoming traffic for suspicious patterns.
Anomaly detection using behavioral baselines.
2
Identify a brute-force attack on the login page.
Cross-reference with known attack signatures.
3
Block offending IP addresses and add to a blacklist.
Automated rule creation without admin intervention.
4
Scan for compromised user accounts.
Analyze login timestamps and geolocation data.
5
Generate a summary report and suggest hardening measures.
Natural language generation for actionable insights.
For site owners, this means less time spent on manual checks and more confidence that their WordPress installation is running at peak performance. The AI does not eliminate the need for human oversight, but it reduces the cognitive load of constant vigilance. In 2026, the most successful WordPress sites are those that leverage these automated systems to maintain high availability, fast response times, and robust security—allowing teams to focus on growth and content strategy rather than firefighting technical issues.
As the ecosystem matures, the line between traditional CMS features and AI-driven capabilities will blur. The future of WordPress in 2026 is not about replacing human judgment but about empowering it with intelligent, data-driven tools that make every interaction—from writing a post to securing a server—more efficient and effective. AI integration is not an optional upgrade; it is becoming the standard for sites that aim to remain competitive in an increasingly sophisticated digital landscape.
4. Headless WordPress and Decoupled Architectures
By 2026, the concept of WordPress as a monolithic system—where the backend and frontend are tightly coupled—will feel increasingly antiquated to many developers and enterprises. The shift toward headless and decoupled architectures is not merely a trend; it is a fundamental evolution in how content is managed, delivered, and experienced. In a headless setup, WordPress serves exclusively as a content management system (CMS), providing a robust admin interface and a structured content repository, while the frontend is built using modern JavaScript frameworks. This separation offers unparalleled flexibility, performance, and security, and by 2026, it will be a standard deployment pattern rather than an experimental niche.
The driving forces behind this adoption are clear: the need for omnichannel content delivery, faster user experiences, and the ability to leverage the best tools for specific jobs. WordPress’s core strength—its intuitive editing experience and mature ecosystem—remains intact, while the frontend can be optimized for speed, interactivity, and unique design requirements. For organizations managing multiple digital touchpoints, from websites and mobile apps to IoT displays and progressive web apps, a headless WordPress setup becomes a central content hub. By 2026, the ecosystem will have matured significantly, with better tooling, documentation, and community support making headless accessible to a broader audience, not just JavaScript experts.
REST API and GraphQL Maturation
The foundation of any headless WordPress architecture is the API layer. The WordPress REST API, introduced in version 4.7, has been the workhorse for decoupled setups for years. By 2026, the REST API will have undergone significant performance and feature enhancements. Key improvements will include:
Batched and Efficient Requests: The REST API will support more sophisticated batch endpoints, allowing developers to request multiple resources in a single HTTP call, reducing latency and server load.
Enhanced Caching Mechanisms: Built-in support for ETags, conditional headers, and cache invalidation will be deeply integrated, enabling frontends to cache responses intelligently without custom middleware.
Improved Authentication and Authorization: OAuth 2.0 and JSON Web Tokens (JWT) will be first-class citizens, simplifying secure connections for external applications and user-specific content delivery.
Field-Level Control: The API will allow developers to specify exactly which fields to return in a response, reducing payload sizes and improving performance for mobile and low-bandwidth environments.
Meanwhile, GraphQL, which has gained traction as an alternative to REST, will see deeper native integration within WordPress. While third-party plugins like WPGraphQL have pioneered this space, by 2026, core WordPress will likely include optional GraphQL support or a standardized plugin that is maintained by the WordPress project itself. The maturation of GraphQL in WordPress will bring:
Declarative Data Fetching: Frontend developers can request exactly the data they need, no more, no less, eliminating over-fetching and under-fetching issues common with REST.
Real-Time Capabilities: GraphQL subscriptions will enable live updates for collaborative editing, real-time content previews, and dynamic dashboards, all powered by WordPress as the data source.
Unified Schema: A single, strongly-typed schema will represent all content types, custom fields, taxonomies, and user data, making development predictable and self-documenting.
Tooling Ecosystem: By 2026, tools like Apollo Client and Relay will have dedicated WordPress adapters, simplifying state management and caching on the frontend.
Developers will choose between REST and GraphQL based on project needs. REST will remain ideal for simple, cache-heavy applications, while GraphQL will shine in complex, data-dynamic interfaces. The coexistence of both, with mature libraries and documentation, will be a hallmark of the headless WordPress landscape in 2026.
Popular Headless Frameworks and Starter Kits
The frontend ecosystem for headless WordPress in 2026 will be dominated by a few key frameworks, each with specialized starter kits that dramatically reduce setup time. The most prominent frameworks and their roles will include:
Web standards-focused framework for fast, resilient user interfaces with nested routing and data loading.
remix-wordpress-starter, Indie Stack
Astro
Content-focused sites with zero JavaScript by default, ideal for landing pages and static content.
astro-wordpress-starter, astro-cms-wordpress
Starter kits in 2026 will be far more than boilerplate code. They will include:
Pre-configured Data Fetching: Built-in functions or hooks for querying the WordPress REST API or GraphQL endpoint, with automatic error handling and loading states.
Preview and Draft Support: Seamless integration with WordPress’s preview system, allowing editors to see changes in real time on the frontend before publishing.
Authentication Flows: Ready-made login, registration, and user profile pages that connect to WordPress user management, including role-based access control.
SEO and Performance Optimization: Automated generation of sitemaps, meta tags, and structured data, along with image optimization pipelines that leverage WordPress’s media library.
Deployment Configurations: Pre-built configurations for Vercel, Netlify, AWS Amplify, and other platforms, with environment variables and build hooks tailored for WordPress.
Additionally, the WordPress community will have produced official or semi-official starter kits maintained by the WordPress project itself, ensuring compatibility and security. These kits will be regularly updated to reflect the latest WordPress API changes and frontend framework versions, lowering the barrier to entry for developers new to headless architectures.
Managing Content Across Multiple Frontends
One of the most compelling advantages of a headless WordPress setup in 2026 is the ability to manage content once and deliver it to multiple frontends—websites, mobile apps, smart displays, voice assistants, and more. However, this omnichannel approach introduces complexity in content modeling, synchronization, and governance. By 2026, the ecosystem will have robust solutions for these challenges.
Content Modeling for Reusability: WordPress’s custom post types and advanced custom fields will be leveraged to create structured, reusable content blocks. For example, a “Product” content type might include fields for name, description, price, images, and specifications, which can be consumed by an e-commerce frontend, a mobile app, and a voice-enabled shopping assistant. The key is to design content models that are agnostic to the output channel, relying on semantic meaning rather than visual presentation.
Centralized Media Management: The WordPress media library will serve as a single source of truth for images, videos, and documents. By 2026, it will include automatic image optimization and format conversion (WebP, AVIF) based on the requesting device or frontend. Developers will be able to request specific image sizes or crops via API parameters, ensuring that a mobile app gets a thumbnail while a desktop site gets a high-resolution version, all from the same source file.
Webhook and Event-Driven Updates: When content is updated in WordPress, webhooks will trigger rebuilds or cache invalidations across all connected frontends. Services like Vercel, Netlify, and custom serverless functions will listen for these events and deploy updated versions almost instantly. For real-time applications, WebSockets or server-sent events (SSE) will push updates directly to active user sessions, ensuring that a change made in the WordPress admin appears on a live dashboard within seconds.
Unified Search and Navigation: Managing search across multiple frontends will be streamlined by using a dedicated search service like Algolia or Elasticsearch, which indexes WordPress content and serves results to all frontends. Navigation menus, taxonomies, and site maps will also be centralized, with WordPress providing a single API endpoint that all frontends query for consistent structure and hierarchy.
Role-Based Content Distribution: By 2026, WordPress will support granular content distribution rules. For example, a premium article might be accessible only on a specific frontend (e.g., a member-only mobile app) or after authentication. This is achieved through custom meta fields and API-level filtering, allowing different frontends to request only the content they are authorized to display. This approach simplifies compliance with licensing agreements and content syndication contracts.
Developer Tooling and Monitoring: Tools like WP-CLI and custom scripts will allow developers to simulate content delivery to different frontends during development. Monitoring dashboards will track API usage, response times, and error rates across all endpoints, providing insights into which frontends are consuming the most resources or experiencing issues. Logging and debugging will be centralized, with correlation IDs that trace a content change from the WordPress admin through to its appearance on a specific frontend.
In practice, a typical workflow in 2026 might involve a marketing team updating a product description in WordPress. That change is immediately available via the REST API or GraphQL endpoint. A webhook triggers a build on a Next.js frontend for the company’s main website, while a separate Nuxt-based mobile app refreshes its cache via a background job. Simultaneously, a smart display in a retail store receives the update through a lightweight GraphQL subscription. The entire process is automated, reliable, and transparent to the content editors. This level of sophistication, made possible by the maturation of headless WordPress, will redefine how organizations think about content management and delivery in 2026 and beyond.
5. Security and Compliance Advances
By 2026, the security landscape for WordPress will shift from reactive patching to proactive, intelligent defense. As threats evolve and regulations tighten, the platform is expected to integrate security and compliance features directly into the core experience, reducing reliance on third-party plugins for fundamental protections. This evolution addresses the growing demand from enterprises, agencies, and individual site owners for a trusted, compliant content management system that protects both data and user privacy without adding administrative burden.
Two-Factor Authentication and Passwordless Logins
Password fatigue and credential theft remain the leading causes of unauthorized access. In 2026, WordPress will likely embed robust two-factor authentication (2FA) directly into the core login flow, moving beyond the current plugin-dependent model. This native implementation will support multiple 2FA methods, including time-based one-time passwords (TOTP) via authenticator apps, hardware security keys (FIDO2/WebAuthn), and SMS-based codes as a fallback. The key advancement, however, will be the rise of passwordless logins as a primary authentication method.
Passwordless authentication leverages public-key cryptography to replace static passwords with device-bound credentials. Users will log in using biometrics (fingerprint or facial recognition) or a physical security key, eliminating the risk of password reuse or phishing. WordPress core is expected to offer a streamlined setup wizard that guides administrators through enabling passwordless access for themselves and their user roles. This feature will be particularly valuable for multisite networks and membership sites, where managing hundreds of user passwords is a security liability.
Key benefits of native 2FA and passwordless logins include:
Reduced attack surface: Eliminates password-based brute force attacks and credential stuffing.
Improved user experience: Faster login flows with biometrics or hardware keys.
Granular role-based enforcement: Administrators can require specific methods for editors, subscribers, or super admins.
Phishing resistance: Passwordless protocols verify the site origin, thwarting fake login pages.
For compliance, native 2FA will help satisfy regulatory requirements for strong authentication under frameworks like GDPR (Article 32) and CCPA, which mandate appropriate technical measures to protect personal data. Site owners will no longer need to vet and maintain separate security plugins for basic authentication, reducing plugin bloat and potential compatibility issues.
WordPress 2026 will introduce a built-in vulnerability scanning engine that continuously monitors the core, themes, and plugins for known security flaws. This system will operate silently in the background, comparing installed software versions against a curated, real-time vulnerability database maintained by the WordPress Security Team and partner organizations. When a vulnerability is detected, the platform will automatically apply a patch if a fix is available, or provide a clear, actionable alert with steps to mitigate the risk.
The scanning engine will be designed with performance in mind, using incremental checks rather than full file scans to avoid slowing down the admin dashboard. It will also respect site hosting environments, pausing scans during high-traffic periods. For compliance, the system will generate a detailed audit log of all scans, detections, and patches applied, which is essential for demonstrating due diligence under GDPR, CCPA, and other data protection laws.
Expected features of the automated vulnerability scanner include:
Real-time dependency analysis: Checks not only plugin versions but also their declared dependencies and known CVEs.
Automatic rollback capability: If a patch causes a conflict, the system can revert to the previous stable version.
Third-party integration: APIs for security providers (e.g., Wordfence, Sucuri) to feed additional threat intelligence into the core scanner.
Email and dashboard notifications: Immediate alerts for critical vulnerabilities, with a severity rating and recommended action.
This proactive approach shifts the burden from site administrators to the platform itself, reducing the window of exposure between vulnerability disclosure and patch application. For compliance officers, automated patching demonstrates a commitment to maintaining a secure processing environment, as required by GDPR Article 32(1)(d) and CCPA Section 1798.81.5.
Data Privacy Tools for User Consent Management
By 2026, WordPress will embed comprehensive data privacy tools directly into the core, making compliance with GDPR, CCPA, and emerging global privacy laws a native capability rather than an afterthought. The centerpiece will be a unified consent management interface that allows site owners to configure granular consent options for data collection, processing, and sharing. This interface will integrate with the WordPress comment system, user registration, contact forms, and any third-party services that process personal data.
The consent management tool will feature:
Dynamic consent banners: Customizable banners that respect user preferences (e.g., opt-in vs. opt-out) based on jurisdiction.
Consent logs with timestamps: A secure, tamper-proof record of each user’s consent choices, including the version of the privacy policy at the time of consent.
Data subject rights request management: A built-in interface for handling access, rectification, erasure, and portability requests, with automated workflows for notifying administrators.
Integration with the Block Editor: Privacy-related blocks (e.g., “Cookie Preferences,” “Data Export Request”) that can be placed on any page or post without custom code.
For compliance with GDPR, the tool will support the principle of “privacy by design” by allowing site owners to define default consent states that minimize data collection. Under CCPA, it will facilitate the “right to opt-out” of the sale of personal information, with a clear toggle that can be linked from the site footer. The system will also include a data mapping feature that visualizes where personal data is stored (e.g., user meta, comments, WooCommerce orders) and which third-party services have access.
To ensure transparency, WordPress will generate a machine-readable privacy policy template that automatically updates based on the consent settings and plugins installed. This template can be exported as HTML or PDF for submission to regulatory bodies. Additionally, the platform will provide a privacy impact assessment (PIA) wizard for new plugins, helping administrators evaluate data processing risks before installation.
By embedding these tools, WordPress reduces the complexity of compliance for site owners, especially small businesses and nonprofits that lack dedicated legal teams. The native approach also ensures that privacy features are consistently updated with regulatory changes, such as the EU’s ePrivacy Regulation or updates to the CCPA (CPRA), without relying on third-party plugin developers to keep pace.
6. The Rise of the Block Marketplace and Extensibility
As WordPress enters 2026, the most transformative shift for site builders is no longer the block editor itself—it is the ecosystem that surrounds it. The block editor, now deeply entrenched, has evolved from a simple content tool into a full-fledged site and application framework. The key to unlocking its potential lies in a robust block marketplace and a more extensible plugin ecosystem. This evolution is moving WordPress away from monolithic themes and toward a modular, Lego-like approach to web design, where each piece of functionality is a self-contained, reusable block. In 2026, the question is no longer “which theme do I use?” but “which blocks do I need?”
This modular paradigm empowers users to assemble complex digital experiences with unprecedented precision. Instead of installing a heavy theme that dictates layout, typography, and functionality, users can now curate a collection of blocks that serve specific purposes—a testimonials block, a dynamic product grid, a custom registration form, or an interactive map. The marketplace is the engine driving this shift, but its success depends on quality, discoverability, and interoperability. Let us explore how these elements are shaping the future.
Curated Block Directories and Quality Standards
One of the most significant pain points in the early years of the block editor was the inconsistent quality of third-party blocks. Developers rushed to release blocks with poor code, accessibility gaps, and security vulnerabilities. By 2026, the WordPress ecosystem has matured. The official WordPress.org Block Directory is no longer a free-for-all repository. Instead, it has evolved into a curated marketplace with rigorous quality standards.
The directory now enforces a multi-tier review process that includes automated testing for performance, accessibility (WCAG 2.2 compliance), and security audits. Blocks submitted to the directory must pass a standardized suite of tests before they are listed. This includes:
Code quality: Adherence to WordPress coding standards and modern JavaScript practices (ESNext, React best practices).
Accessibility: Keyboard navigation, screen reader support, and proper ARIA attributes are mandatory.
Performance: Blocks must not exceed a defined asset size or render-blocking threshold. Lazy loading is required for heavy components.
Security: Data sanitization and nonce verification are checked to prevent XSS and CSRF vulnerabilities.
Furthermore, the directory now features a “Verified Publisher” badge, similar to app stores, which indicates that the block developer has a proven track record of updates and support. Blocks from unverified publishers are clearly labeled, and users are encouraged to exercise caution. This curation has dramatically reduced the risk of installing low-quality blocks, fostering trust in the ecosystem.
The impact is tangible: site owners can now browse blocks by category (e-commerce, forms, media, navigation) and see detailed metrics, including active install counts, recent update dates, and compatibility with the latest WordPress version. The directory also provides a “test drive” feature, allowing users to preview a block in a sandbox environment before installing it on their live site. This shift from a repository to a curated marketplace mirrors the evolution of mobile app stores, where quality and discoverability are paramount.
Custom Block Development with Low-Code Options
While the curated directory serves the majority of users, the real innovation in 2026 lies in the democratization of custom block development. Historically, building a custom block required deep knowledge of React, JavaScript, and the WordPress block API. This created a barrier for designers, freelancers, and small agencies who lacked dedicated development resources. Low-code and no-code tools have now bridged this gap.
Several third-party plugins and native WordPress features now offer visual block builders that require little to no coding. These tools allow users to create custom blocks by combining existing components, defining data sources, and configuring styles through a visual interface. For example, a designer can create a “team member” block by dragging in an image field, a name field, a bio text area, and a social media link list—all without writing a single line of code.
Key low-code options available in 2026 include:
Native Block Builder: A core WordPress feature that lets users create custom block patterns and reusable blocks using the existing editor interface. Advanced settings allow for custom field mapping and conditional visibility.
Visual Block Builders (plugins): Dedicated plugins such as “Block Studio” and “Builder Pro” provide drag-and-drop interfaces for creating blocks from scratch. They generate the necessary block.json and JavaScript files automatically.
Hybrid Approaches: Tools that offer a visual editor for layout and styling, but also expose a code editor for advanced users to add custom logic or API integrations. This caters to both non-developers and experienced builders.
For those who do want to write code, the development experience has also improved. The create-block tool now includes templates for common block types (dynamic blocks, inner blocks, variation blocks) and integrates seamlessly with modern build tools like Vite and esbuild. Documentation has been overhauled with interactive examples and a “block playground” where developers can experiment with the API in real time. The result is a spectrum of options: from zero-code block creation to fully custom, high-performance blocks, ensuring that anyone can participate in the block ecosystem.
Interoperability Between Blocks and Plugins
The final piece of the extensibility puzzle is interoperability. A marketplace of blocks is only useful if those blocks can work together harmoniously. In 2026, WordPress has made significant strides in ensuring that blocks from different developers, as well as blocks and traditional plugins, can coexist and even enhance each other.
This interoperability is achieved through several key mechanisms:
Allows parent blocks to pass data to child blocks without direct coupling. A parent block can provide a “post ID” or “color scheme” that all nested blocks can access.
A “Section” block passes a background color to all inner “Card” blocks, ensuring consistent styling.
Plugin-Block Hooks
Plugins can register new block styles, variations, or controls without modifying the block’s source code. This is done via the registerBlockStyle and addFilter APIs.
A SEO plugin adds a “noindex” toggle to all “Post List” blocks.
Shared Data Stores
Blocks and plugins can read and write to a common data store (e.g., the WordPress Data API), enabling state management across components.
A “Cart” block updates the “Checkout” block’s total when a user changes quantity.
Standardized Block Attributes
Common attributes (e.g., spacing, typography, color) are now standardized, so blocks from different developers respond to the same global style settings.
Global style changes to “heading size” automatically apply to all third-party heading blocks.
This interoperability has profound implications for site building. A user can now combine a third-party “Event Calendar” block with a custom “Featured Event” block built in a low-code tool, and both will share the same color palette and spacing settings. A plugin that adds a “Likes” feature can automatically display a like count on any “Post Card” block without additional configuration. The ecosystem becomes a cohesive whole, rather than a collection of isolated silos.
Moreover, the block marketplace has adopted a “compatibility rating” system, where blocks are tested against the most popular plugins and themes. Users can see at a glance whether a block works smoothly with WooCommerce, Yoast SEO, or Elementor. This reduces the trial-and-error that plagued earlier iterations of the block editor.
In conclusion, the rise of the block marketplace and extensibility in 2026 represents a fundamental shift in how WordPress sites are built. Curated directories ensure quality and trust. Low-code tools democratize block creation. And robust interoperability guarantees that all these pieces fit together seamlessly. For site owners, this means faster development, greater flexibility, and a future-proof approach to web design. For developers, it means a vibrant ecosystem where innovation is rewarded and collaboration is the norm. The block is no longer just a content unit—it is the building block of the modern web.
7. Mobile-First and Progressive Web App Capabilities
As we look toward 2026, WordPress is undergoing a fundamental shift in how it approaches the user experience across devices. The era of treating mobile as an afterthought is ending. Instead, the platform is embedding mobile-first principles directly into its core architecture, with a particular emphasis on Progressive Web App (PWA) capabilities. This evolution is not just about making sites look good on smaller screens; it is about delivering app-like performance, reliability, and engagement without requiring users to download anything from an app store. By integrating PWA features natively, WordPress aims to bridge the gap between traditional websites and native mobile applications, offering faster load times, offline access, and interactive experiences that keep visitors coming back.
The driving force behind this change is the recognition that a majority of web traffic now originates from mobile devices. WordPress sites that fail to prioritize mobile responsiveness risk losing audience share and search engine ranking. In 2026, the platform is expected to enforce stricter standards for theme and block development, ensuring that every element—from typography to layout grids—adapts seamlessly to varying screen sizes. The goal is to make mobile-first design the default, not an optional feature. This commitment extends to the block editor, where new controls will allow content creators to preview and adjust their designs for mobile, tablet, and desktop within the same interface, reducing the need for custom CSS or third-party plugins.
Responsive Design Defaults in Themes and Blocks
In 2026, WordPress themes and blocks are being built with responsive design as a non-negotiable baseline. The traditional approach of adding a few media queries at the end of development is being replaced by a mobile-first workflow where designers start with the smallest screen and progressively enhance for larger viewports. This shift is evident in the default theme repositories, where new submissions must pass automated checks for mobile responsiveness before being approved. The block editor itself now includes built-in responsive controls for every core block, allowing users to set different margins, paddings, font sizes, and column layouts for mobile, tablet, and desktop breakpoints without writing code.
Key changes in responsive design defaults include:
Fluid typography: Font sizes are now defined using clamp() values, scaling smoothly between minimum and maximum sizes based on viewport width.
Adaptive block patterns: Pre-designed layouts automatically reflow content into single columns on narrow screens, while maintaining multi-column arrangements on wider devices.
Touch-friendly interactions: Buttons, menus, and form elements have increased minimum touch target sizes (at least 48×48 pixels) to prevent accidental taps.
Image and media handling: The block editor now generates multiple image sizes per upload and uses the srcset attribute by default, ensuring that mobile devices download only the necessary resolution.
For developers, the WordPress theme.json file has been expanded to include responsive settings for global styles. This means that a single configuration file can define how colors, spacing, and typography behave across breakpoints, reducing the need for custom PHP or JavaScript. The result is a more consistent and maintainable approach to responsive design that benefits both site builders and end users. As a practical example, a three-column layout in a blog post might stack vertically on a phone, display as two columns on a tablet, and revert to three columns on a desktop—all handled automatically by the block editor’s built-in responsive logic.
Offline Functionality and Service Workers
One of the most transformative PWA features coming to WordPress in 2026 is native offline functionality, enabled through service workers. A service worker is a script that runs in the background, separate from the web page, intercepting network requests and caching resources. For WordPress sites, this means that once a user visits a page, the content can be stored locally in the browser’s cache. On subsequent visits—even without an internet connection—the page loads instantly from the cache, providing a reliable experience that rivals native apps. This is particularly valuable for users in areas with unreliable connectivity, or for sites like news portals, documentation hubs, and e-commerce stores where uptime is critical.
The WordPress core team has been working on a standardized service worker API that integrates with the existing caching mechanisms. In 2026, site administrators can enable offline support with a single toggle in the site health settings, without needing to manually configure service workers or install complex plugins. The system automatically caches the most visited pages, static assets like CSS and JavaScript, and even API responses for dynamic content. For developers, the API exposes hooks to customize caching strategies, such as network-first, cache-first, or stale-while-revalidate, depending on the content type.
Key offline functionality capabilities include:
Instant loading: Previously visited pages render immediately from cache, even on slow or absent networks.
Background sync: User actions like form submissions or comments are queued locally and sent when connectivity is restored.
Cache management: Administrators can view and clear cached content from the WordPress dashboard, or set expiration policies for different content types.
Fallback pages: If a user requests a page that has not been cached, a customizable offline page is displayed, encouraging them to revisit when connected.
Service workers also enable other PWA features, such as add-to-home-screen prompts. When a user visits a WordPress site that meets PWA criteria (HTTPS, registered service worker, and manifest file), the browser will offer to add the site to the device’s home screen. This creates a shortcut that opens the site in a standalone window, without browser chrome, further blurring the line between web and native apps. In 2026, WordPress will generate the required manifest file automatically, complete with customizable icons, splash screens, and theme colors, making it trivial for any site to become a PWA.
Push Notifications and Mobile Engagement
Push notifications are another PWA capability that WordPress is embracing in 2026 to boost mobile engagement. Unlike email or SMS, push notifications appear directly on the user’s device screen, even when the browser is closed, making them a powerful tool for re-engaging visitors. For WordPress sites, this means that publishers can send real-time alerts about new posts, comments, or updates without requiring users to install a separate app. The implementation is built on the Web Push API, which uses service workers to receive and display notifications. WordPress core now includes a push notification manager that handles subscription management, permission requests, and notification delivery from the admin dashboard.
The system is designed to respect user privacy and preferences. When a visitor first arrives at a site that supports push notifications, a non-intrusive prompt appears, explaining what the user will receive and asking for permission. Once granted, the site can send notifications based on predefined triggers, such as when a new article is published in a category the user has shown interest in, or when a product back in stock. Site owners can also create custom notification campaigns from the WordPress admin, targeting specific segments of their audience based on browsing history or subscription preferences.
Important aspects of push notification integration include:
Opt-in only: Notifications are never sent without explicit user consent, and users can unsubscribe at any time directly from the notification or the browser settings.
Segmentation: Administrators can tag users based on their interactions, such as pages viewed or comments left, and send targeted notifications relevant to those interests.
Analytics: The WordPress dashboard includes metrics on notification delivery rates, open rates, and subsequent user engagement, helping site owners refine their messaging.
Cross-platform support: Notifications work on Android, iOS (via Safari), and desktop browsers that support the Web Push API, ensuring broad reach.
For e-commerce sites, push notifications can drive conversions by alerting users to abandoned carts, flash sales, or order updates. For content sites, they can increase return visits by notifying subscribers of new posts in their favorite categories. The key advantage over email is immediacy: push notifications appear instantly and have higher open rates, often exceeding 90% in the first few minutes. By integrating this functionality natively, WordPress eliminates the need for third-party services that often charge per subscriber or inject their own branding into notifications.
In summary, the mobile-first and PWA capabilities arriving in WordPress by 2026 represent a comprehensive strategy to meet user expectations for speed, reliability, and engagement. Responsive design defaults ensure that every site looks and functions well on any device, while offline functionality and service workers provide a native-like experience even without connectivity. Push notifications add a direct communication channel that can dramatically improve user retention and interaction. Together, these features position WordPress not just as a content management system, but as a platform capable of delivering modern, app-quality experiences on the open web. Site owners who adopt these capabilities early will be well-prepared for a future where mobile is not just an option, but the primary way people interact with their content.
As WordPress evolves into a full-fledged content management system for enterprises, agencies, and complex editorial teams, the need for robust collaboration and multi-user workflows has never been greater. In 2026, WordPress is poised to transform how teams create, review, and publish content together. The platform is moving beyond simple user roles and post-revision tracking toward a seamless, real-time collaborative environment that rivals dedicated tools like Google Docs or Notion, while retaining the flexibility and extensibility that define WordPress. This shift is driven by the maturation of the Block Editor (Gutenberg) and the increasing adoption of WordPress as a headless CMS, where content creation and front-end delivery are decoupled. The future of collaboration in WordPress centers on three key areas: real-time editing, granular permissions with automation, and sophisticated version management.
One of the most anticipated advancements in WordPress for 2026 is the introduction of native real-time collaborative editing. While plugins have long offered basic co-authoring capabilities, the core platform is expected to integrate this functionality at the block level. This means multiple editors can work on the same post or page simultaneously, seeing each other’s cursors, selections, and changes in real time. The implementation will likely leverage Operational Transformation or Conflict-Free Replicated Data Types (CRDTs) to handle concurrent edits without data loss or conflicts. Key features of this evolution include:
Live Cursors and Presence Indicators: Editors will see colored cursors with user avatars, showing exactly where collaborators are working within the content. This reduces confusion and prevents overwriting each other’s work.
Block-Level Locking: To avoid conflicts on specific elements, users can lock a block (e.g., a paragraph, image, or table) for exclusive editing. Other users will see a lock icon and can request access or wait until it is released.
Integrated Chat and Comments: A sidebar chat panel will allow collaborators to discuss changes without leaving the editor. Comments will be threaded and attached to specific blocks, enabling contextual feedback.
Conflict Resolution UI: When two users edit the same block simultaneously, WordPress will offer a merge interface similar to code version control systems, allowing users to accept one version or manually combine changes.
These features are not just convenience upgrades; they fundamentally change the editorial workflow. For example, a writer can draft a blog post while an editor provides inline suggestions in real time, and a designer adjusts images in adjacent blocks—all within the same session. This reduces the back-and-forth of email drafts and accelerates time-to-publish. WordPress 2026 will also support offline editing with automatic synchronization when connectivity is restored, ensuring that remote teams with unstable internet connections remain productive.
Granular Permissions and Workflow Automation
Beyond real-time editing, the future of WordPress collaboration hinges on sophisticated permission systems and workflow automation. In 2026, site administrators will have unprecedented control over who can do what, down to the individual block level. This granularity is essential for large organizations with diverse teams, such as marketing departments, legal reviewers, and external contributors. The permission model will expand from traditional roles (Administrator, Editor, Author, Contributor) to a more flexible, capability-based system. Key components include:
Block-Level Permissions: Administrators can restrict editing of specific blocks (e.g., a hero image, call-to-action button, or metadata fields) to certain user roles or individual users. This prevents accidental changes to critical content.
Role-Based Content Visibility: Drafts and pending content can be visible only to specific groups, such as “Editorial Team” or “Legal Reviewers,” reducing clutter and ensuring sensitive material is not prematurely exposed.
Custom Workflow States: WordPress will support customizable statuses beyond “Draft,” “Pending Review,” and “Published.” Teams can define states like “In Design Review,” “Ready for Legal,” or “Scheduled for Social.” Each state can trigger automated actions.
Automated Task Assignments: Using a built-in workflow engine, administrators can set rules that automatically assign tasks to users based on content type, category, or keyword. For example, any post tagged with “product launch” is automatically assigned to the product marketing manager for review.
The following table illustrates a sample workflow automation scenario for a corporate blog in 2026:
Workflow Step
Action
Assigned To
Automation Trigger
1. Draft Creation
Author writes post
Content Writer
User creates new post
2. Editorial Review
Review for tone and accuracy
Senior Editor
Post status changes to “In Editorial Review”
3. Legal Approval
Check for compliance
Legal Team (group)
Post status changes to “Legal Review”
4. Design Polish
Add images and layout
Designer
Post status changes to “Design Review”
5. Final Approval
Publish or schedule
Content Manager
All previous steps completed
This automation reduces manual oversight and ensures that no step is skipped. Additionally, WordPress will integrate with external tools like Slack or Microsoft Teams to send notifications when a task is assigned or a status changes. The system will also support conditional logic, such as skipping the design step if the post contains no images. Granular permissions extend to the media library, allowing administrators to restrict uploads, edits, or deletions of assets to specific user groups, preventing accidental loss of brand assets.
Version History and Content Review Tools
Version history in WordPress has traditionally been a simple list of revisions, often lacking context. In 2026, this feature is being reimagined as a comprehensive content review and audit tool. The new version history system will be more visual, intuitive, and powerful, enabling teams to track changes with precision and revert with confidence. Key improvements include:
Visual Diffing at the Block Level: Instead of showing raw HTML or text diffs, WordPress will display a side-by-side comparison of blocks, highlighting changes in formatting, images, and even custom fields. Users can see exactly what was added, removed, or modified in each block.
Version Naming and Annotations: Editors can name significant versions (e.g., “First Draft,” “Post-Review Update,” “Final Version”) and add notes explaining why changes were made. This creates a clear narrative of the content’s evolution.
Rollback with Preview: Users can preview any previous version before reverting, ensuring that the rollback does not break the current layout or lose important updates. The system will also offer a “restore as new draft” option to avoid overwriting the live version.
Approval Workflow Integration: Version history will be tightly linked to the workflow automation system. Each status change can automatically create a version snapshot, and reviewers can approve or reject changes at the version level. For instance, a legal reviewer can approve a specific version, which then becomes the baseline for the next step.
Audit Trail for Compliance: For regulated industries, WordPress will generate a full audit trail showing who made each change, when, and why. This log is immutable and exportable for compliance reporting. It supports GDPR, HIPAA, and other regulatory requirements by tracking all content modifications.
To illustrate the power of these tools, consider a scenario where a marketing team is preparing a high-stakes press release. The writer creates the initial version, the editor makes structural changes, the legal team adds disclaimers, and the designer inserts infographics. With the new version history, each step is documented. If a conflict arises—such as a legal disclaimer being accidentally removed during a design update—the team can use the visual diff to pinpoint the exact block and time of the change. They can then restore the legal version while keeping the designer’s layout, all without losing work. The content review tools also include a “compare versions” feature that allows side-by-side comparison of any two points in the history, making it easy to see how the content evolved from draft to final.
In summary, the future of collaboration and multi-user workflows in WordPress 2026 is about empowering teams to work together seamlessly, with real-time editing, granular control, and robust version management. These advancements will make WordPress not just a publishing platform, but a true collaborative hub for content creation. For agencies, enterprises, and publishers, this means faster production cycles, fewer errors, and greater transparency. As WordPress continues to embrace these features, it solidifies its position as the leading CMS for teams of all sizes, ready to meet the demands of a dynamic digital landscape.
9. E-Commerce and Content Monetization Evolution
As the digital economy matures, WordPress is no longer just a platform for blogs or brochure-style sites. By 2026, the ecosystem has undergone a fundamental shift, transforming into a robust engine for e-commerce, recurring revenue, and digital content sales. While WooCommerce remains the dominant force, the future of WordPress in this space is defined by deeper integrations, frictionless payment experiences, and a unified approach to monetization that caters to creators, merchants, and enterprises alike. The emphasis is on reducing complexity, enhancing security, and providing native tools that rival dedicated e-commerce platforms without sacrificing the flexibility that makes WordPress unique.
This evolution is driven by three key areas: the rise of native payment gateways and digital wallets, sophisticated subscription management and membership site capabilities, and a block-based approach to product showcases and checkout that prioritizes conversion and user experience. Each of these elements works in concert to create a seamless commercial environment where content and commerce are indistinguishable.
Native Payment Gateways and Digital Wallets
In 2026, the era of relying solely on third-party plugins for payment processing is fading. WordPress core and major e-commerce plugins have embraced native payment gateway integrations that are pre-configured, secure, and optimized for performance. The goal is to eliminate the friction of setting up complex merchant accounts and reduce the dependency on external services that can slow down checkout flows.
Direct integration with digital wallets: Apple Pay, Google Pay, and PayPal are now first-class citizens in WordPress checkout forms. Users can complete purchases with a single tap or biometric authentication, dramatically reducing cart abandonment rates.
Embedded payment processing: WooCommerce and other e-commerce plugins now offer built-in payment processing options (e.g., WooPayments) that handle everything from transaction fees to dispute resolution without requiring separate accounts.
Cryptocurrency and stablecoin support: For forward-thinking merchants, native support for popular cryptocurrencies and stablecoins is available through dedicated blocks and settings, with automatic conversion to fiat currency to mitigate volatility.
Regional payment methods: Localized gateways such as iDEAL (Netherlands), Bancontact (Belgium), and Alipay (China) are natively supported, allowing merchants to expand globally without custom development.
The table below illustrates the typical native payment options available in a standard WordPress e-commerce setup by 2026:
Payment Method
Type
Key Benefit
Apple Pay / Google Pay
Digital Wallet
One-click checkout on mobile and desktop
WooPayments
Embedded Processor
No external plugin; unified dashboard
PayPal Checkout
Digital Wallet
Global reach with buyer protection
Stripe Link
Saved Payment Info
Auto-fills payment details for returning users
Cryptocurrency (via Coinbase Commerce)
Digital Currency
Low fees and instant settlement
These native integrations mean that merchants no longer need to manage multiple plugins or worry about compatibility issues. The checkout experience is faster, more secure, and tailored to the buyer’s preferred payment method, which is critical for conversion optimization in a competitive market.
Subscription Management and Membership Sites
Content monetization has moved beyond simple one-time purchases. By 2026, WordPress offers comprehensive subscription management and membership site capabilities that rival dedicated platforms like Patreon or Substack. The core of this evolution is the ability to create, manage, and scale recurring revenue streams directly from the WordPress admin, with minimal technical overhead.
Essential features now built into the ecosystem include:
Flexible billing models: Support for weekly, monthly, annual, and custom billing cycles, including free trials, introductory pricing, and prorated upgrades.
Content gating: Native blocks and settings allow site owners to restrict access to posts, pages, videos, podcasts, and downloadable files based on membership tier or subscription status.
Automated email workflows: Built-in tools for sending welcome emails, renewal reminders, and expiration notices, reducing the need for third-party email marketing plugins.
Community integration: Subscriptions can be linked to private forums, Discord channels, or Slack groups, enabling exclusive interactions for paying members.
Multi-tier membership structures: Simple drag-and-drop interfaces allow the creation of multiple subscription levels (e.g., Free, Basic, Premium, Enterprise) with different access permissions and pricing.
A typical membership site setup in 2026 might look like this:
Free tier: Access to public blog posts and a weekly newsletter.
Basic tier ($9/month): All free content plus exclusive articles, ad-free browsing, and a monthly Q&A session.
Premium tier ($29/month): Everything in Basic plus downloadable resources, video courses, and priority support.
Enterprise tier ($99/month): Custom onboarding, dedicated account manager, and API access for integrations.
The subscription management dashboard provides real-time analytics on churn rates, lifetime value, and active members, enabling data-driven decisions. This native approach eliminates the need for separate subscription plugins that often conflict with other site features, creating a cohesive and reliable monetization engine.
Block-Based Product Showcases and Checkout
The WordPress block editor (Gutenberg) has revolutionized content creation, and by 2026, it has fully transformed e-commerce product displays and checkout flows. Block-based product showcases allow merchants to build visually rich, interactive product pages without writing a single line of code. This shift empowers designers and content creators to craft unique shopping experiences that align with their brand identity.
Key capabilities of block-based e-commerce include:
Dynamic product blocks: Each product can be displayed using dedicated blocks for images, galleries, videos, pricing, variations (size, color), and add-to-cart buttons. These blocks are fully responsive and can be arranged in custom layouts.
Interactive product carousels: Blocks that support swipeable image galleries, 360-degree product views, and zoom functionality, all without third-party scripts.
Customizable checkout blocks: The checkout page is now a collection of blocks (e.g., shipping address, payment method, order summary) that can be rearranged, styled, and extended. This allows merchants to create one-page checkouts, multi-step forms, or embedded checkout modals.
Real-time inventory and pricing: Blocks can display live stock levels, countdown timers for flash sales, and dynamic pricing based on user roles or membership tiers.
Seamless upsells and cross-sells: After adding a product to the cart, block-based popups or inline suggestions show related items, increasing average order value without disrupting the flow.
For example, a block-based product page for a digital course might include:
A hero block with a video preview, followed by a grid block showing course modules, a testimonial block, an accordion block for FAQs, and a final pricing block with a “Buy Now” button that triggers a modal checkout—all without leaving the page.
The checkout block itself has been optimized for speed and conversion. By 2026, it loads in under 200 milliseconds on average, supports guest checkout with a single email field, and integrates with the native payment gateways mentioned earlier. Abandoned cart recovery is built into the block, automatically sending a reminder email after 30 minutes of inactivity.
This block-based approach not only enhances the user experience but also simplifies maintenance. Merchants can update product layouts, add new payment methods, or change checkout fields using the same block editor they use for blog posts. The result is a unified, flexible, and future-proof e-commerce environment that adapts to changing consumer expectations.
In summary, the future of WordPress e-commerce and content monetization in 2026 is about removing barriers. Native payment gateways and digital wallets streamline transactions, subscription management tools turn content into recurring revenue, and block-based product showcases create immersive shopping experiences. For site owners, this means less time wrestling with plugins and more time focusing on growth. For users, it means a faster, more intuitive, and more secure path from discovery to purchase. WordPress is no longer just a content management system—it is a complete commerce platform built for the next generation of digital business.
10. Community, Learning, and Sustainability
As WordPress evolves into 2026, its trajectory is no longer defined solely by code updates or feature releases. The platform’s future is increasingly shaped by the people who build, teach, and advocate for it, alongside a growing responsibility to operate in an environmentally conscious manner. The triad of community vitality, accessible education, and sustainable practices forms the bedrock upon which WordPress will scale for the next decade. Without a thriving community, the ecosystem stagnates; without robust learning pathways, talent dries up; without sustainability, growth becomes a liability. This section explores how these three pillars are converging to define WordPress in 2026.
Expanded Learning Pathways and Certifications
In 2026, the era of relying solely on YouTube tutorials or scattered blog posts for WordPress education is giving way to structured, verifiable, and role-specific learning pathways. The WordPress community, particularly through the WordPress Training Team and major ecosystem players, is investing heavily in formalizing how users and professionals acquire skills. This shift is driven by the need for standardized competence in an increasingly complex environment—where block editing, full-site editing, headless architecture, and performance optimization require more than surface-level knowledge.
Key developments in learning pathways include:
Role-Based Certification Tracks: Instead of a single “WordPress Expert” designation, certifications are now segmented by function. Tracks include WordPress Developer (focused on theme and plugin development, REST API, and modern JavaScript), WordPress Designer (covering block themes, pattern creation, and accessibility), WordPress Site Manager (emphasizing user roles, security, and content workflows), and WordPress Agency Operator (combining project management, client communication, and business strategy).
Micro-Credentials and Badges: Recognizing that professionals need to stack skills incrementally, the community now offers micro-credentials for specific competencies. Examples include “Block Editor Advanced User,” “WooCommerce Store Setup,” “Performance Optimization Specialist,” and “Accessibility Auditor.” These are earned through hands-on projects and assessments rather than multiple-choice exams.
Hands-On Project Portfolios: Certification programs in 2026 require candidates to submit real-world projects to a peer-review system. For instance, a developer track might require building a custom block that passes automated accessibility checks, while a designer track might involve creating a full-site editing theme with responsive patterns.
Localized and Multilingual Learning Hubs: The official Learn.WordPress.org platform now supports 15+ languages for interactive courses, with community-translated materials available for workshops and documentation. This ensures that a developer in Nigeria, a designer in Brazil, and a site manager in Japan can access the same quality of training in their native language.
Integration with Professional Development Tools: Certifications are increasingly integrated with platforms like LinkedIn Learning, Credly, and corporate training systems. Employers can now verify a candidate’s WordPress skills through verifiable digital badges that include metadata about the assessment criteria and date of issuance.
The result is a more trustworthy talent pipeline. Agencies hiring contract developers, enterprise organizations vetting in-house teams, and freelancers seeking to differentiate themselves all benefit from these expanded pathways. The community’s emphasis on continuous learning also ensures that certifications require periodic renewal, keeping skills aligned with the latest version releases and security best practices.
Diversity and Inclusion Initiatives in the Community
The WordPress community has long prided itself on being open source and welcoming, but in 2026, diversity and inclusion (D&I) efforts have moved from aspirational statements to structured, measurable programs. Recognizing that a homogeneous contributor base leads to blind spots in software design, documentation, and support, the community is actively working to lower barriers for underrepresented groups. This is not merely a moral imperative but a practical one: diverse perspectives produce more accessible, globally relevant software.
Concrete initiatives now shaping the community include:
Structured Mentorship Programs: The WordPress Contributor Mentorship Program pairs experienced contributors from underrepresented backgrounds with newcomers who identify as women, non-binary, people of color, or members of the global south. These mentorships last six months and include specific goals, such as contributing a patch to core, organizing a local meetup, or translating 500 strings into a minority language.
Inclusive Event Design Standards: All official WordCamps and community events must adhere to a published inclusion checklist. This includes providing accessibility information for venues (e.g., wheelchair accessibility, quiet rooms, sign language interpretation), offering financial assistance for travel, ensuring diverse speaker lineups (with a minimum of 40% speakers from underrepresented groups), and implementing a code of conduct with clear reporting procedures.
Local Community Ambassador Programs: To reach regions historically underserved by the WordPress ecosystem, the community has established ambassador roles in countries across Africa, Southeast Asia, and Latin America. These ambassadors receive funding and resources to organize local meetups, translate learning materials, and mentor local contributors. In 2026, over 60 countries have active ambassador programs.
Documentation and Communication in Multiple Languages: Core documentation, support forums, and developer handbooks are now maintained in the top 20 most-used languages by WordPress users. Translation teams are compensated through community grants, recognizing that translation is a skilled labor that enables global participation.
Anti-Bias Training for Core Committers and Team Reps: All individuals with commit access to WordPress core or who serve as team representatives are required to complete annual anti-bias training. This training covers unconscious bias in code review, inclusive language in documentation, and strategies for equitable participation in decision-making.
The impact is visible: contributor demographics are shifting, with a 25% increase in contributions from women and non-binary individuals since 2023, and a growing number of community-led projects originating from non-Western contexts. The diversity of voices in the Make WordPress blogs and Slack channels has led to features like better support for right-to-left (RTL) languages, improved date and currency localization, and more inclusive default content patterns.
Green Hosting and Energy-Efficient Code Practices
Sustainability in 2026 is not an afterthought but a core consideration in how WordPress sites are built, hosted, and maintained. The community has recognized that the internet’s carbon footprint is significant, with data centers, network infrastructure, and client devices consuming vast amounts of energy. WordPress, powering over 40% of the web, has a responsibility to lead by example. This has sparked a movement toward green hosting and energy-efficient code practices that reduce environmental impact without sacrificing performance.
Key elements of this sustainability push include:
Green Hosting Certification: A community-driven certification program now evaluates web hosts on their environmental practices. Certified green hosts must demonstrate that they use renewable energy for at least 80% of their operations, participate in carbon offset programs, and provide customers with tools to measure their site’s carbon footprint. Hosts like Kinsta, GreenGeeks, and SiteGround have achieved certification, and many smaller hosts are following suit.
Energy-Efficient Coding Standards: The WordPress Coding Standards have been updated to include performance and sustainability guidelines. Developers are encouraged to minimize HTTP requests, optimize database queries, use lazy loading for images and videos, and avoid excessive use of heavy JavaScript libraries. Automated tools now flag inefficient code during the build process, providing suggestions for reducing energy consumption.
Plugin and Theme Sustainability Ratings: The WordPress Plugin Directory now includes a sustainability rating for each plugin, based on its code efficiency, resource usage, and impact on page load times. Users can filter search results to show only plugins with high sustainability scores. Themes are similarly rated, with a focus on lightweight markup and minimal external dependencies.
Carbon-Aware Caching and Deployment: Advanced caching plugins and CDN services now integrate with real-time carbon intensity data. Sites can schedule cache purges, image compression tasks, and deployment processes to occur when the local energy grid is using a higher percentage of renewable energy. This reduces the carbon impact of background processes.
Community Education on Digital Sustainability: The Learn.WordPress.org platform now offers a dedicated course on “Building Sustainable WordPress Sites.” Topics include choosing a green host, optimizing images and videos, reducing plugin bloat, and measuring your site’s carbon footprint with tools like Website Carbon Calculator. WordCamps regularly feature talks on sustainable web development.
The practical outcome is that WordPress sites in 2026 are not only faster and more user-friendly but also kinder to the planet. A typical optimized WordPress site can reduce its carbon emissions by up to 50% compared to an unoptimized counterpart, according to community benchmarks. For agencies and enterprise clients, sustainability is becoming a selling point, with many including carbon footprint reports in their project proposals. The community’s commitment to green hosting and efficient code ensures that WordPress remains a responsible platform as the world grapples with climate change.
WordPress Multisite is a powerful core feature of the WordPress content management system that allows you to run multiple websites from a single WordPress installation. Instead of managing separate databases, separate core updates, and separate plugin installations for each site, Multisite enables administrators to create and manage a network of sites that share a common core, database, and set of resources. This architecture is particularly valuable for organizations, agencies, educational institutions, and media companies that need to maintain a consistent infrastructure across many websites while allowing individual site administrators to manage their own content, themes, and plugins.
The concept of Multisite originated from WordPress MU (Multi-User), a separate project that was merged into the core WordPress codebase with the release of WordPress 3.0 in 2010. Since then, it has become a standard feature, though it remains disabled by default. Understanding when to use Multisite—and just as importantly, when not to use it—requires a clear grasp of its architecture, its differences from standard WordPress installations, and the terminology that defines its operation.
What Is WordPress Multisite?
At its simplest, WordPress Multisite is a mode of WordPress that enables you to create a network of sites under a single installation. Each site in the network has its own content, users, themes, and plugins, but they all share the same WordPress core files, the same database, and the same server resources. The network is managed by a super admin, who has overarching control over the entire installation, while individual site administrators manage the day-to-day operations of their respective sites.
The architecture of Multisite is built on a shared database structure. Instead of each site having its own set of database tables, Multisite uses a single database with a special set of tables that are prefixed to distinguish between global network data and site-specific data. For example, the wp_users table is shared across all sites, but each site gets its own set of tables for posts, comments, and options, prefixed with the site’s ID (e.g., wp_2_posts for site ID 2). This design allows for efficient resource sharing while maintaining data isolation between sites.
Key characteristics of WordPress Multisite include:
Shared core files: All sites run the same version of WordPress core, updated once for the entire network.
Centralized plugin and theme management: Super admins can install plugins and themes network-wide, then enable or disable them for individual sites.
Unified user database: User accounts are shared across the network, allowing users to log in once and access multiple sites with the same credentials.
Individual site content: Each site maintains its own posts, pages, media, comments, and custom post types.
Separate site administrators: Each site can have its own admin users who manage content and settings without affecting other sites.
Multisite is not limited to subdomain-based networks (e.g., site1.example.com, site2.example.com). It also supports subdirectory-based networks (e.g., example.com/site1/, example.com/site2/) and, with proper domain mapping, can even use entirely different domain names for each site (e.g., site1.com, site2.org). This flexibility makes it suitable for a wide range of use cases, from university campus networks to global media franchises.
How Multisite Differs from Standard WordPress
The most fundamental difference between WordPress Multisite and a standard WordPress installation is the scope of management. In a standard installation, you manage one site with one database, one set of users, and one set of plugins and themes. In Multisite, you manage a network of sites that share these resources, which introduces both efficiencies and limitations.
To illustrate the differences clearly, consider the following comparison table:
Shared tables for users, plus site-specific tables
Core updates
Updated per installation
Updated once for the entire network
Plugin management
Installed and activated per site
Installed network-wide, activated per site
Theme management
Installed per site
Installed network-wide, enabled per site
User accounts
Unique to each installation
Shared across all sites in the network
Administration
Single site admin
Super admin for network, admins for individual sites
File storage
Separate uploads directory per site
Shared uploads directory with site-specific subfolders
Backup complexity
Simple, one database and one file set
More complex, includes network-wide and site-specific data
Plugin compatibility
All plugins generally work
Some plugins require Multisite compatibility
One of the most important distinctions is how user accounts function. In Multisite, a user registered on one site can be added to any other site in the network without creating a new account. This is ideal for organizations where users need access to multiple sites, but it also means that user roles are tied to individual sites rather than the network as a whole. A user can be a subscriber on one site and an administrator on another, all with the same login credentials.
Another critical difference is the approach to plugin and theme management. In standard WordPress, each installation has its own set of plugins and themes, and updates must be performed separately for each site. In Multisite, a super admin can install a plugin once and make it available to all sites in the network. Each site’s admin can then choose whether to activate that plugin on their site. This centralization dramatically reduces maintenance overhead when managing dozens or hundreds of sites, but it also means that a faulty plugin update can potentially affect multiple sites simultaneously.
Multisite also imposes certain limitations that do not exist in standard WordPress. For example, some plugins are not designed to work in a Multisite environment and may cause conflicts or data corruption. Additionally, because all sites share the same database, a poorly optimized query on one site can degrade performance across the entire network. Backup and restore processes are also more complex, as they must account for both the shared network data and the unique data of each individual site.
Key Terminology: Sites, Networks, and Super Admins
Understanding the terminology used in WordPress Multisite is essential for effective management and communication. Three terms are particularly important: sites, networks, and super admins.
Sites are the individual websites within a Multisite network. Each site has its own URL, its own content (posts, pages, media), its own theme and plugin settings, and its own set of users with site-specific roles. From a visitor’s perspective, a site in a Multisite network looks and behaves exactly like a standalone WordPress site. The site’s admin can manage content, moderate comments, install themes (if allowed by the super admin), and activate plugins (if available network-wide). However, they cannot install plugins or themes that are not already available on the network, nor can they perform core updates or change network-wide settings.
Networks refer to the entire Multisite installation, including all sites, the shared database tables, the network admin dashboard, and the super admin account. The network is the overarching entity that contains all sites. When you enable Multisite, you create a network that can be organized by subdomains or subdirectories. The network has its own admin area, accessible via /wp-admin/network/, where super admins can manage sites, users, themes, plugins, and network settings. The network also has its own set of options that apply to all sites, such as registration settings, upload limits, and default theme.
Super Admins are the users who have full control over the entire Multisite network. They are the equivalent of administrators in a standard WordPress installation, but with elevated privileges that span all sites. Super admins can:
Create, edit, and delete any site in the network.
Install, update, and delete plugins and themes network-wide.
Manage all user accounts and add users to any site.
Access the dashboard of any site without needing a separate login.
Configure network settings, such as site registration and domain mapping.
Perform core updates for the entire network.
Super admins are distinct from site administrators. A site administrator can manage content and settings for a single site but cannot make changes that affect the network as a whole. This hierarchical structure allows organizations to delegate site management to individual teams or departments while maintaining centralized control over security, updates, and infrastructure.
Additional terminology that is useful to know includes:
Site ID: A unique numeric identifier assigned to each site in the network, used internally by WordPress to organize database tables and data.
Main site: The first site created in the network, typically located at the root domain (e.g., example.com). It cannot be deleted and serves as the default site for the network.
Subsite: Any site in the network other than the main site.
Domain mapping: A technique that allows sites in a Multisite network to use custom domain names (e.g., mybrand.com) instead of the default subdomain or subdirectory structure.
Network activation: A method of activating a plugin or theme for all sites in the network simultaneously, rather than requiring each site to activate it individually.
Blog ID: An older term for site ID, inherited from the WordPress MU era.
By mastering these terms and understanding the architecture of Multisite, you will be better equipped to evaluate whether this feature is appropriate for your project. The decision to use Multisite should always be driven by the specific needs of your organization, the scale of your site management requirements, and your willingness to accept the trade-offs that come with a shared infrastructure.
When to Use WordPress Multisite: Key Scenarios
WordPress Multisite is a powerful feature that allows you to run multiple websites from a single WordPress installation. While it is not the right choice for every project, there are specific scenarios where its architecture provides clear, tangible advantages over managing separate installations. Understanding these scenarios is critical to deciding whether Multisite aligns with your goals. Below, we explore the primary use cases where Multisite excels, focusing on efficiency, centralized control, and resource optimization.
Managing Multiple Blogs or Portfolios
One of the most common applications of WordPress Multisite is managing a collection of blogs or portfolio sites that share a common theme, audience, or administrative structure. This scenario is especially relevant for content creators, agencies, or organizations that need to maintain distinct online presences without duplicating effort.
Key advantages in this scenario:
Centralized updates: A single dashboard allows you to update plugins, themes, and the WordPress core for all sites at once, saving significant time.
Unified user management: You can add users to the network and assign roles across multiple sites, simplifying permissions and reducing administrative overhead.
Shared resources: Themes and plugins are installed once at the network level, reducing storage and maintenance demands.
Consistent branding: A network-wide theme can be enforced or made available, ensuring visual consistency across blogs or portfolios.
Each department runs its own blog with unique content, but all share a central IT team managing updates and security.
Agency client portfolios
A design agency hosts separate portfolio sites for each client, using a common theme customized per site.
Personal multi-niche blogs
A writer maintains separate blogs for travel, food, and technology, all under one network for easy management.
In these cases, the ability to push updates globally and maintain a single source of truth for user roles and permissions makes Multisite a compelling choice. However, it is important to note that each blog or portfolio still retains its own content, settings, and plugins (if network-activated), preserving independence where needed.
Creating a Network for a Franchise or Branch Locations
Franchises, multi-location businesses, and organizations with regional branches often require distinct websites for each location while maintaining brand consistency and centralized control. WordPress Multisite addresses this need by enabling a network where each branch site can be customized locally but managed from a central hub.
Why Multisite fits this scenario:
Brand uniformity: A base theme can be created and distributed network-wide, with child themes or customizations allowed per site.
Localized content: Each branch can manage its own pages, posts, and contact information without affecting others.
Centralized SEO and analytics: Network-wide settings for SEO plugins, Google Analytics, or tracking codes can be applied, ensuring consistent data collection.
Simplified plugin management: Essential plugins (e.g., for booking, forms, or e-commerce) can be network-activated, reducing per-site configuration.
Common examples:
A restaurant chain with separate sites for each location, featuring menus, hours, and local events.
A real estate franchise with regional offices, each showcasing local listings and agent profiles.
A non-profit with chapters in different cities, each with its own donation page and volunteer calendar.
It is worth noting that Multisite works best when branch sites share similar functionality. If each location requires vastly different plugins or custom code, the overhead of managing conflicts may outweigh the benefits. For franchises with standardized operations, however, Multisite reduces the risk of security gaps caused by inconsistent updates across separate installations.
Running a SaaS or Membership Platform with Sub-Sites
WordPress Multisite can serve as the backbone for a software-as-a-service (SaaS) platform or a membership network where each user or group receives their own sub-site. This model is popular for white-label solutions, course platforms, and community-driven websites.
Core benefits for SaaS and membership platforms:
Automatic site creation: Using plugins or custom code, new sub-sites can be generated on user registration, providing a personalized dashboard or storefront.
Isolated data: Each sub-site operates independently, meaning user data, content, and settings remain separate, which is critical for privacy and customization.
Scalable architecture: Multisite can handle hundreds or thousands of sub-sites on a single server, though performance optimization becomes essential at scale.
Monetization flexibility: You can offer tiered plans (e.g., free sub-sites with limited features, paid with premium plugins), using network-wide subscription management.
Real-world implementations:
Platform Type
How Multisite Is Used
Online course platform
Each instructor gets a sub-site to manage their courses, students, and materials, while the network owner controls the platform’s core features.
Membership directory
Each member organization has a sub-site with a profile, news feed, and event calendar, all under a central membership portal.
White-label agency tool
Agencies resell the platform, giving each client a branded sub-site with limited functionality, while the agency manages all sites from one network.
When building a SaaS or membership platform with Multisite, careful planning is required. You must consider database performance, bandwidth, and the need for custom code to handle user provisioning, domain mapping (if using custom domains), and billing integration. Plugins like WP Ultimo or Multisite User Management can streamline these tasks, but developer expertise is often necessary for complex setups.
In summary, Multisite is not a one-size-fits-all solution, but for managing multiple blogs or portfolios, creating a franchise network, or running a SaaS platform with sub-sites, it offers clear advantages in efficiency, control, and scalability. Each scenario benefits from centralized management while preserving the independence of individual sites, making Multisite a strategic choice for these specific use cases.
When NOT to Use WordPress Multisite
WordPress Multisite is a powerful feature that allows you to run multiple websites from a single WordPress installation. However, its convenience can quickly become a liability if applied to the wrong use case. Before you enable the network, it is critical to recognize scenarios where Multisite introduces unnecessary complexity, performance risks, or maintenance headaches. Below are the primary situations where you should avoid Multisite or consider an alternative architecture.
When Sites Have Completely Different Themes or Plugins
One of the core assumptions of Multisite is that all sites in the network share a common set of files—specifically, the same WordPress core, themes, and plugins. While you can activate different themes and plugins on individual sites, the underlying codebase is identical. This creates friction when your sites require radically different functionality.
Consider a network that hosts both a corporate blog and an e-commerce store. The blog might rely on a lightweight theme and a few SEO plugins, while the store needs WooCommerce, payment gateways, inventory management, and a complex custom theme. In Multisite, you would need to install all plugins network-wide, even if only one site uses them. This bloats the database, increases update conflicts, and can lead to security vulnerabilities from unused code.
Common signs that your sites are too diverse for Multisite include:
Each site requires a unique page builder, caching plugin, or membership system.
You need to run different versions of the same plugin (e.g., one site needs WooCommerce 8.x, another requires 9.x for compatibility).
Themes are not designed for network use, causing CSS conflicts or broken layouts when switched.
You frequently need to disable plugins for specific sites because they cause errors.
If your sites demand fundamentally different codebases, consider using separate WordPress installations. Tools like MainWP or InfiniteWP can help you manage updates and backups across multiple standalone sites without the shared file system constraint.
If You Need Granular User Permissions Across Sites
WordPress Multisite provides a two-tier permission system: Super Admin (who controls the entire network) and site-level roles (Administrator, Editor, Author, etc.). This works well for simple hierarchies, but it breaks down when you need fine-grained control over what users can do across different sites.
For example, imagine a university network where a department head should be able to manage content on their own site but also moderate comments on a central news site. In Multisite, you would need to add that user as an Administrator on their department site and as a Subscriber or Editor on the news site—but you cannot limit their ability to delete posts or change settings on the news site without custom coding. Similarly, you might want a user to have read-only access to one site and editing rights on another, but Multisite’s role system does not support cross-site permission scoping out of the box.
Super Admin privileges are all-or-nothing; you cannot grant limited network-level access (e.g., a user who can install plugins but not create new sites).
Site-level roles are identical across all sites; you cannot define custom roles per site (e.g., “News Editor” on Site A and “Store Manager” on Site B).
User meta is shared network-wide, meaning a user’s role on one site can inadvertently affect another site if plugins rely on global user data.
No built-in way to restrict users from accessing the network admin area or viewing site lists.
If your architecture demands complex permission hierarchies—such as multi-tenant SaaS platforms, educational institutions with department-specific access, or agencies requiring client isolation—Multisite is rarely the right fit. Instead, look into single-site installations combined with a membership plugin (like MemberPress or Restrict Content Pro) or a dedicated multi-tenant solution like WordPress with a custom user management plugin.
When High Traffic or Resource Isolation Is Critical
Multisite shares server resources—memory, CPU, database connections, and file storage—across all sites in the network. This can become a bottleneck when one site experiences a traffic spike or consumes excessive resources. In a standalone installation, a single site’s performance issues are contained; in Multisite, a runaway script or a DDoS attack on one site can bring down the entire network.
Consider these scenarios where resource isolation is essential:
High-traffic sites: If one site regularly handles thousands of concurrent visitors, it can starve other sites of database connections or PHP workers, causing timeouts.
Resource-intensive plugins: A plugin that runs heavy cron jobs or queries on one site (e.g., a membership plugin that processes batch emails) can degrade performance for all sites.
Media storage: Uploads are stored in a single directory structure (e.g., /wp-content/uploads/sites/). A media-heavy site can fill the disk, affecting all others.
Database contention: All sites share the same database tables (prefixed by site ID). A slow query from one site can lock tables, affecting every site.
Security breaches: A compromised plugin or theme on one site can expose the entire network, including sensitive data from other sites.
If your sites need guaranteed performance isolation—such as in a production environment where uptime and speed are non-negotiable—Multisite is a risk. Alternatives include:
Approach
Resource Isolation
Management Overhead
Best For
Separate WordPress installations
Full (each site has its own server resources)
High (manual updates, backups per site)
High-traffic or mission-critical sites
Docker or containerized environments
High (each site in its own container)
Moderate (requires DevOps knowledge)
Developers needing precise control
Managed WordPress hosting with staging
Moderate (shared pool but isolated processes)
Low (host handles scaling)
Businesses with moderate traffic
Additionally, if you require custom server-level caching (like Varnish or Redis) per site, or need to allocate separate PHP memory limits, Multisite makes this difficult. Most hosting environments apply server-wide rules, and workarounds often require advanced server configuration that is fragile and hard to maintain.
In summary, Multisite is not a universal solution. It excels when sites are homogeneous, permissions are simple, and resources are abundant. When these conditions are not met, the complexity and risk outweigh the benefits. Always evaluate your specific needs for theme/plugin diversity, user permissions, and resource isolation before committing to a network architecture.
Planning Your Multisite Network
Before you install WordPress Multisite, strategic planning is essential. A well-architected network prevents migration headaches, performance bottlenecks, and security gaps later. This section covers the three critical decisions you must make: how your sites will be addressed, who will manage them, and where they will live.
Choosing Subdomains vs. Subdirectories vs. Custom Domains
The first architectural choice is how your network’s sites will be structured in the URL. WordPress Multisite offers three primary modes: subdomains, subdirectories, and custom domains (often called domain mapping). Each has distinct technical and practical implications.
Structure
Example URL
Best For
Key Consideration
Subdomains
site1.example.com
Networks where sites are distinct brands or have separate SEO goals.
Requires wildcard DNS record and server configuration.
Subdirectories
example.com/site1
Networks where sites share a brand or content hierarchy (e.g., blogs for different departments).
Simpler to set up, but can cause content duplication issues if not managed carefully.
Custom Domains
site1.com
Networks where each site needs its own unique domain (e.g., client sites, white-label services).
Requires a plugin or manual DNS and server mapping; may need a dedicated IP for SSL.
Subdomains are the default choice for networks where each site operates as a standalone entity. For example, a university network might use history.university.edu for the history department and biology.university.edu for the biology department. This structure treats each site as a separate domain in search engines, which can be beneficial for SEO targeting but requires diligent management to avoid competing content.
Subdirectories are ideal for networks where all sites fall under a single brand or domain authority. For instance, a multinational company might use company.com/us for its US office and company.com/eu for its European office. This structure pools SEO authority under one domain, which can accelerate ranking for new sites but risks confusing content silos.
Custom domains offer the most flexibility but the highest complexity. They are essential for networks like a WordPress.com-style hosting service, where each user brings their own domain. To implement custom domains, you will need either a plugin like WordPress MU Domain Mapping or a server-level solution such as Nginx server blocks or Apache virtual hosts. Note that SSL/TLS certificates become more complicated with custom domains, as each unique domain may require its own certificate or a wildcard certificate that covers all mapped domains.
A common mistake is selecting a structure without testing. Before committing, create a staging environment with a few test sites in your chosen mode. Verify that permalinks work correctly, that media library paths resolve properly, and that any caching plugins you plan to use support the structure.
Defining User Roles: Administrators, Editors, and Subscribers
WordPress Multisite introduces a two-tier user role system: network-level roles and site-level roles. Understanding this hierarchy is crucial for security and workflow efficiency.
Network-level roles include the Super Admin, who has full control over the entire network—installing plugins and themes, creating and deleting sites, managing users across all sites, and configuring network settings. There should be as few Super Admins as possible, ideally only one or two trusted individuals.
Site-level roles are identical to standard WordPress roles (Administrator, Editor, Author, Contributor, Subscriber) but apply only to individual sites within the network. A site-level Administrator can manage users, content, and settings for their specific site but cannot access other sites or network-wide features.
When planning your roles, consider these practical scenarios:
For a client hosting network: Grant each client site its own Administrator. This lets them manage their content without interfering with other sites or network settings. You retain Super Admin access for maintenance.
For a corporate intranet: Use Editors for department leads who need to publish content but not manage users or plugins. This prevents accidental changes to site structure.
For a multisite blog network: Assign Authors or Contributors to individual bloggers. Editors can review and publish their posts, while Administrators handle site settings.
A common pitfall is granting site-level Administrator permissions too freely. A site Administrator can install plugins and themes if the Super Admin has enabled that capability, which could introduce security vulnerabilities. To mitigate this, restrict plugin and theme installation to Super Admins only via the Network Settings screen. Additionally, consider using a plugin like User Role Editor to create custom roles that match your specific needs—for example, a “Site Manager” role that can manage users but not install plugins.
User management also scales differently in Multisite. When you add a user to the network, they can be assigned to multiple sites with different roles on each. This is efficient for networks with cross-site contributors, but it also means you must audit user permissions regularly. A quarterly review of all Super Admin accounts and site-level Administrators is a best practice.
Selecting a Hosting Environment for Scalability
WordPress Multisite places unique demands on your hosting environment. Unlike a single-site installation, a network must handle concurrent database queries, media uploads, and traffic spikes across multiple sites simultaneously. Choosing the wrong host can lead to slow performance or downtime as your network grows.
Key hosting requirements for Multisite:
PHP memory limits: Set memory_limit to at least 256MB, ideally 512MB or higher. Each site in the network consumes memory, especially during admin actions like bulk updates or media processing.
Database performance: Use MySQL or MariaDB with support for InnoDB engine. The database will have many tables (each site adds its own set of tables), so consider a host that offers database query caching and read replicas for high-traffic networks.
File storage: Media files are shared across the network by default but stored in a single /wp-content/uploads/sites/ directory. Ensure your host provides sufficient disk space and, for scalability, consider offloading media to a CDN or object storage service like Amazon S3 or DigitalOcean Spaces.
Caching infrastructure: Page caching is more complex in Multisite because different sites may have different caching rules. Look for hosts that support network-wide caching plugins (e.g., WP Rocket, W3 Total Cache) and offer server-level caching like Varnish or Nginx FastCGI Cache.
Hosting types compared:
Hosting Type
Suitability for Multisite
Pros
Cons
Shared hosting
Only for very small networks (under 10 sites with low traffic).
Low cost, easy setup.
Limited resources, no scalability, risk of performance hits from other tenants.
Start with a VPS or managed host that offers easy resource upgrades. Avoid shared hosting unless you are prototyping.
Implement a content delivery network (CDN) from day one. Services like Cloudflare, Bunny CDN, or StackPath can offload static assets and reduce server load across all sites.
Monitor database queries using tools like Query Monitor or New Relic. As you add sites, watch for slow queries that may indicate the need for database optimization or indexing.
Plan for media growth. Each site in the network can upload files, so storage can fill quickly. Set upload limits per site and consider a plugin like WP Offload Media to move files to cloud storage.
Test with a load balancer if you anticipate high traffic. Some hosts offer built-in load balancing for VPS or dedicated plans, which distributes traffic across multiple servers.
Finally, choose a host that explicitly supports WordPress Multisite. Not all managed hosts do, and some may require you to use a specific plugin or configuration. Always check the host’s documentation or contact support before purchasing a plan. A host that understands Multisite can save you hours of troubleshooting and ensure your network runs smoothly as it grows.
Installing WordPress Multisite: Step-by-Step
Enabling WordPress Multisite transforms a single WordPress installation into a network of sites managed from one dashboard. This process requires careful, sequential modifications to core files and server configurations. Whether you are starting with a fresh installation or converting an existing site, the steps are identical in structure, though existing content and plugins may require additional validation. Follow this walkthrough precisely to avoid common pitfalls such as white screens, redirect loops, or broken site structures.
Editing wp-config.php to Enable Multisite
The first and most critical step is to add the Multisite constant to your wp-config.php file. This file resides in the root directory of your WordPress installation. Before making any changes, create a full backup of both your files and database. Use a plain text editor—not a word processor—to open wp-config.php.
Locate the line that reads: /* That's all, stop editing! Happy publishing. */
Immediately above that line, add the following constant: define( 'WP_ALLOW_MULTISITE', true );
Save the file and upload it back to your server if editing locally.
After adding this constant, log in to your WordPress admin dashboard. You will see a new menu item under Tools called Network Setup. Do not click it yet. First, you must choose your network type: subdomains or subdirectories. This decision is irreversible without significant manual database work.
Network Type
URL Structure
Best For
Subdomains
site1.example.com
Networks where sites are distinct brands or have separate content themes
Subdirectories
example.com/site1
Networks where sites are closely related, such as regional branches or language versions
Once you have selected your preferred type, navigate to Tools > Network Setup. WordPress will display two blocks of code: one to add to wp-config.php and one for your server’s rewrite rules. Copy the wp-config.php code exactly as shown. It will include lines similar to:
Paste these lines directly below the WP_ALLOW_MULTISITE constant you added earlier. Remove any existing WordPress address or site address URL settings from the file if present, as Multisite manages these internally. Save and close wp-config.php.
Important note for existing sites: If you are converting a site with existing content, ensure all your plugins are compatible with Multisite before proceeding. Deactivate all plugins temporarily, then re-enable them one by one after the network is running. Some plugins, especially caching and SEO tools, require specific Multisite configurations.
Configuring .htaccess or Nginx Rules
The second block of code from the Network Setup page contains rewrite rules for your web server. The correct configuration depends on whether you use Apache (with mod_rewrite) or Nginx.
For Apache (using .htaccess)
Locate your existing .htaccess file in the WordPress root directory. If it does not exist, create one. Replace its entire contents with the rules provided by WordPress. A standard Multisite .htaccess for subdirectories looks like this:
For subdomain installations, the rules are nearly identical but use a different pattern for matching the domain. Copy the exact rules from your Network Setup page. After updating, save the file and ensure it is writable by the server (typically 644 permissions). Test by visiting your main site URL—it should load normally.
Nginx does not use .htaccess files; all rewrite rules must be added to your server block configuration. Access your Nginx configuration file (typically located at /etc/nginx/sites-available/example.com). Within the server block, add the following rules inside the location / block, before any existing WordPress rules:
After editing, test the configuration with nginx -t and reload Nginx: service nginx reload. Improper Nginx rules are a common cause of 404 errors on subsites, so verify each rule carefully.
Security note: After configuring rewrite rules, restrict access to sensitive files. Add the following to your .htaccess or Nginx configuration to block direct access to wp-config.php, wp-admin/install.php, and other critical files. This prevents unauthorized network setup modifications.
Running the Network Setup and Creating the First Site
With both wp-config.php and your server rewrite rules updated, log out of WordPress and log back in. You will now see a new top-level menu item: My Sites in the admin toolbar, and Sites under the Network Admin menu. Navigate to Network Admin > Dashboard to complete the installation.
Visit Network Admin > Sites. You will see the main site (Site ID 1) already listed. This is your original installation’s URL.
Click “Add New” to create your first subsite. Fill in the following fields:
Site Address: For subdirectory networks, enter a path like /subsite1. For subdomain networks, enter just the subdomain (e.g., subsite1).
Site Title: The name of your new site.
Admin Email: The email address for the site administrator. This user will receive a confirmation email.
Click “Add Site”. WordPress will create the new site’s database tables and assign it a unique Site ID.
Immediately after creation, verify the new site is accessible. Visit http://example.com/subsite1 (or http://subsite1.example.com) and confirm the default WordPress theme loads without errors. If you see a 404 page, double-check your rewrite rules. If you see a database error, ensure your wp-config.php constants are correctly defined and that your database user has sufficient privileges to create tables.
Post-installation checklist:
Update permalinks: Go to Network Admin > Settings > Permalinks and select a structure. Save changes—this flushes rewrite rules for all sites.
Configure network settings: Set a default theme, registration options, and upload space limits under Network Admin > Settings.
Enable plugins network-wide: Under Network Admin > Plugins, activate plugins you want available to all sites. Individual site admins can then activate them locally.
Test user roles: Create a test user with the role of Super Admin, Admin, and Subscriber to ensure permissions work correctly across sites.
Troubleshooting common issues:
Issue
Likely Cause
Solution
White screen after adding constants
Typo in wp-config.php
Check for missing semicolons or extra spaces; restore from backup if needed
Subsite returns 404
Incorrect .htaccess or Nginx rules
Re-copy rules from Network Setup; ensure mod_rewrite is enabled
“Headers already sent” error
Whitespace before <?php in wp-config.php
Remove any blank lines or spaces before the opening PHP tag
Cannot create new sites
Database table prefix mismatch
Verify $table_prefix in wp-config.php matches existing tables
Once the first subsite is operational, your network is fully functional. You can now manage all sites from the Network Admin dashboard, add unlimited subsites, and assign roles with granular permissions. Remember that converting an existing site to Multisite is permanent—backups are essential, and you should test thoroughly in a staging environment before applying changes to a production site.
Managing Themes and Plugins Across the Network
One of the most powerful yet potentially complex aspects of WordPress Multisite is the centralized management of themes and plugins. Unlike a standard single-site installation where each site operates independently, a Multisite network allows you to install, activate, and update themes and plugins from a single dashboard. This efficiency can save significant time, but it also introduces new considerations for performance, security, and user autonomy. Proper management ensures that all sites in the network remain stable, fast, and secure without sacrificing the unique needs of individual subsites.
At its core, the Multisite architecture separates the installation of a theme or plugin from its activation. You can install a theme or plugin once in the network admin area, making it available to all subsites. However, activation can occur at either the network level or the individual site level. Understanding the distinction between these two modes is critical for effective management. Below, we break down the key strategies for handling themes and plugins across the network, focusing on activation methods, inheritance, and update best practices.
Network-Activating vs. Site-Specific Plugins
When you install a plugin in a Multisite network, you have two primary choices for activation: network-wide activation or site-specific activation. Each serves a distinct purpose and carries different implications for functionality, performance, and user control.
Network-wide activation makes a plugin available and active on every subsite in the network. This is ideal for plugins that provide core infrastructure, such as security suites, caching tools, SEO frameworks, or custom post types that should exist uniformly across all sites. For example, a network used by a university might network-activate a plugin for single sign-on (SSO) so that all departmental sites share the same login credentials. Network-activated plugins run on every page load across the entire network, which means they can impact performance if not optimized. They also cannot be deactivated by individual site administrators, ensuring consistency but reducing flexibility.
Site-specific activation, in contrast, allows each subsite administrator to choose whether to activate a plugin for their own site. The plugin is installed centrally in the network’s plugins directory, but each site can independently enable or disable it from their own plugin management screen. This approach is best for plugins that serve niche needs, such as a contact form builder, a portfolio gallery, or a custom widget for a specific department. It empowers site admins to tailor their site’s functionality without requiring intervention from the network super admin. However, it also introduces the risk of plugin conflicts if different sites activate incompatible plugins, and it can complicate troubleshooting because the same plugin might behave differently across sites.
To decide which approach to use, consider the following factors:
Purpose: If a plugin is essential for network operation (e.g., user management, security, analytics), network-activate it. If it’s optional or site-specific, leave it for individual activation.
Performance: Network-activated plugins run on every site. Use them sparingly to avoid bloat. For plugins that are heavy on database queries, consider whether they truly need to be active everywhere.
User autonomy: If you want to give subsite admins control, use site-specific activation. If you need to enforce uniformity, network-activate.
Maintenance: Network-activated plugins require only one update and one compatibility check for the entire network. Site-specific plugins may need to be tested across multiple activation scenarios.
It is also possible to use a hybrid approach. For instance, you can install a plugin but leave it inactive by default, then allow site admins to activate it as needed. Alternatively, you can use code snippets or custom plugins to force-activate certain plugins on specific sites without granting network-wide permissions. This requires custom development but offers fine-grained control.
Using Theme Inheritance and Customization Options
Theme management in Multisite follows a similar logic to plugins but with unique considerations for design and layout. You can install multiple themes in the network, and each subsite can choose its own active theme from the available list. However, you can also enforce a single theme across the network or use theme inheritance to streamline customization.
Theme inheritance refers to the practice of using a parent theme that is network-activated, while allowing individual subsites to create child themes or use custom CSS to modify the appearance. This approach is common in large networks where a consistent brand identity is required, but each department or team needs minor visual adjustments. For example, a corporate network might use a parent theme with the company logo and color scheme, and then each regional office can use a child theme to change the header image or accent colors. The parent theme is maintained centrally, and updates to it automatically flow to all child themes, reducing maintenance overhead.
To implement theme inheritance effectively, follow these steps:
Install a robust parent theme in the network’s themes directory. Ensure it is well-coded and supports child themes.
Create child themes for each subsite that needs customization. Each child theme should be installed as a separate theme in the network, but it will inherit all functionality from the parent.
Network-activate the parent theme if you want it to be the default, or simply make it available for selection. Alternatively, you can set a network default theme via the network settings page.
Use the WordPress Customizer or additional CSS features in each child theme to allow site admins to modify colors, fonts, and layouts without touching core files.
Customization options beyond child themes include using theme mods and customizer settings that are stored per site. Since Multisite stores each site’s theme settings in its own database tables, subsite admins can change their site’s appearance independently without affecting others. You can also use plugins like “Multisite Theme Manager” to control which themes are available to which sites, or to restrict certain customization options. For example, you might allow site admins to change the header image but not the site layout.
When managing themes, avoid the temptation to allow too many themes in the network. Each installed theme adds to maintenance overhead and potential security vulnerabilities. Limit the available themes to a curated set that meets the needs of most sites, and remove unused themes to keep the network lean. Additionally, test all themes for compatibility with your network’s plugins and user roles before making them available.
Best Practices for Updating Plugins and Themes
Updates are a double-edged sword in Multisite. On one hand, they are essential for security and performance. On the other hand, a single incompatible update can break dozens or hundreds of subsites. Adopting a systematic approach to updates minimizes risk while keeping the network healthy.
1. Use a staging environment. Before updating any plugin or theme on the live network, test the update in a staging copy of your network. This is non-negotiable for any network with more than a handful of sites. Many hosting providers offer one-click staging, or you can use plugins like WP Staging. Test critical workflows on several representative subsites to catch conflicts early.
2. Schedule updates during low-traffic windows. Even with staging, updates can introduce unforeseen issues. Plan updates for off-peak hours, and communicate the maintenance window to users if the network might be briefly unavailable. For large networks, consider a rolling update process where you update a subset of sites first.
3. Update plugins and themes individually, not en masse. The network admin dashboard allows you to update all plugins at once, but resist the urge. Update one plugin or theme at a time, and then monitor the network for errors. This makes it easier to identify the source of a problem if something goes wrong. Use the “Available Updates” screen to see which items need attention, and prioritize security updates.
4. Keep a record of versions and compatibility. Maintain a simple log (even a spreadsheet) of which plugins and themes are used across the network, their current versions, and any known compatibility issues. This is especially useful for networks where different sites use different plugin combinations. You can also use a plugin like “MainWP” or “ManageWP” to track updates and health across multiple sites, though these are external tools.
5. Automate where possible, but with caution. WordPress Multisite supports automatic background updates for minor releases (e.g., security patches). You can enable these via the wp-config.php file. However, for major plugin or theme updates, manual oversight is safer. Consider using a managed hosting provider that offers automatic updates with rollback capabilities.
6. Remove unused plugins and themes. Every installed but inactive plugin or theme is a potential security hole. Delete any that are not actively used by at least one subsite. This also reduces the update burden and database clutter. Use the network admin’s “Themes” and “Plugins” screens to identify unused items.
7. Test after every update. After updating a plugin or theme, visit a few key subsites to verify that core functionality—such as login, navigation, forms, and caching—still works. If you use a caching plugin, clear the cache after updates to prevent stale files from causing issues.
8. Communicate with subsite administrators. If you are network-activating an update that might change user experience (e.g., a new version of a theme with different layout options), notify site admins in advance. Provide release notes and instructions for adapting to changes. This reduces support tickets and frustration.
By following these practices, you can keep your Multisite network secure and performant while minimizing downtime. The key is to treat updates as a deliberate process rather than a routine chore, especially in a network where the impact of a mistake is multiplied across many sites.
In summary, managing themes and plugins in WordPress Multisite requires a balance of centralization and flexibility. Network activation and site-specific activation each have their place, and theme inheritance offers a way to maintain brand consistency while allowing customization. Updates demand rigorous testing and a methodical approach. With careful planning and adherence to best practices, you can harness the full power of Multisite without sacrificing stability or security.
WordPress Multisite introduces a layered user management system that differs significantly from a standard single-site installation. Understanding how to add, remove, and assign users across the network is essential for maintaining security, streamlining workflows, and ensuring each site’s autonomy. This section covers the core concepts of user administration, from Super Admin privileges to site-specific roles, and explains how registration and signups work in a networked environment.
Adding Users to the Network vs. Individual Sites
In WordPress Multisite, user accounts exist at two levels: the network level and the individual site level. A user must first be added to the network before they can be assigned to any specific site. The Super Admin controls network-wide user additions, while site administrators can add existing network users to their own sites without needing Super Admin approval.
Adding a user to the network is done from the Network Admin dashboard. Navigate to My Sites > Network Admin > Users > Add New. Here, you enter the username, email, and optional password. Once added, the user receives a notification email and can log in to the network. They will appear in the network’s user list but will not have access to any site until a site admin assigns them a role.
Adding a user to an individual site is performed by the site administrator (or Super Admin) from that site’s dashboard. Go to Users > Add New within the specific site. You can add an existing network user by typing their username or email, or invite a new user by entering their email address. If the email is not already a network user, they will be added to the network automatically and then assigned a role on that site. This process is seamless for site admins but still requires network-level creation behind the scenes.
Removing users also operates at two levels:
Remove from a site: A site admin can delete a user from their site by going to Users > All Users, selecting the user, and choosing “Remove” from the bulk actions menu. This removes their role on that site but keeps their network account intact.
Remove from the network: Only a Super Admin can delete a user from the entire network. This is done from Network Admin > Users. Deleting a network user removes them from all sites and revokes their ability to log in. Use this option sparingly, as it is irreversible.
To assign users efficiently across multiple sites, Super Admins can use the “Add User to Multiple Sites” plugin or manually manage assignments via the user’s profile in Network Admin. Clicking on a user’s name under Network Admin > Users reveals a list of all sites they belong to, with checkboxes to add or remove them from any site.
Role Capabilities: Super Admin vs. Site Admin
WordPress Multisite introduces a unique role hierarchy that separates network-wide control from site-specific management. The two most critical roles are Super Admin and Site Admin (often called Administrator at the site level). Understanding their capabilities is vital for delegating responsibilities without compromising security.
Super Admin is the highest-level role in a Multisite network. Super Admins have unrestricted access to all sites, plugins, themes, and network settings. Key capabilities include:
Installing, activating, and deactivating plugins and themes network-wide.
Creating, editing, and deleting any site in the network.
Managing all network users (add, remove, edit, promote to Super Admin).
Configuring network settings (registration, upload limits, site templates).
Accessing the Network Admin dashboard and all site dashboards.
Updating WordPress core for the entire network.
Site Admin (or Administrator at the site level) has full control over their assigned site but cannot affect other sites or network settings. Their capabilities include:
Cannot access the Network Admin or modify network-wide configurations.
Below is a comparison table highlighting the key differences:
Capability
Super Admin
Site Admin
Install plugins/themes (network-wide)
Yes
No
Manage all sites
Yes
No
Manage all network users
Yes
No
Promote users to Super Admin
Yes
No
Activate plugins on own site
Yes
Yes (if allowed)
Manage own site users
Yes
Yes
Edit own site content
Yes
Yes
Access other sites’ dashboards
Yes
No
Other roles (Editor, Author, Contributor, Subscriber) function identically to single-site installations but are scoped to the individual site. A user can have different roles on different sites—for example, an Editor on Site A and a Subscriber on Site B.
To manage roles effectively, Super Admins should limit the number of users with Super Admin privileges. Only trusted administrators who need network-wide access should hold this role. Site Admins, meanwhile, can be given autonomy to manage their own content and users, reducing the Super Admin’s workload.
Handling User Registration and Signups
User registration in Multisite can be configured at the network level to control how new users join the network and individual sites. The Super Admin decides whether registration is open, closed, or limited to specific scenarios. This flexibility is key for networks that host public blogs, private intranets, or membership sites.
To configure registration settings, go to Network Admin > Settings > Network Settings. Under “Allow new registrations,” you have four options:
Registration is disabled: No new users can register. Users must be added manually by a Super Admin or Site Admin.
User accounts may be registered: Anyone can create a user account, but they will not automatically have a site. They must be assigned to an existing site by an admin.
Logged in users may register new sites: Only existing network users can create new sites. This is useful for networks where users need a site but registration is otherwise closed.
Both user accounts and new sites may be registered: Open registration allows anyone to create an account and a site simultaneously. This is common for public blog networks like WordPress.com.
When registration is enabled, you can also set additional restrictions:
Registration email domain: Limit signups to specific email domains (e.g., @yourcompany.com) to create a private network.
New site template: Choose a default theme and initial content for newly created sites.
New user notification: Decide whether the Super Admin receives an email when a new user registers.
Signup flow for new users varies depending on the registration type. If user accounts are allowed without sites, the user registers with an email and username, then receives a confirmation email. After confirming, they can log in but will see a dashboard with no sites. A Site Admin or Super Admin must then add them to a site. If site creation is also allowed, the registration form includes a site name and title field. The user’s new site is created upon confirmation.
Managing signups in practice:
For a corporate intranet, set registration to “User accounts may be registered” and restrict to the company email domain. Site Admins then add employees to the relevant departmental sites.
For a network of student blogs, enable “Both user accounts and new sites may be registered” with a template site that includes a welcome post and privacy settings.
To prevent spam, consider using a CAPTCHA plugin or manual approval via a plugin like “Multisite User Management” that queues new registrations for Super Admin review.
Site Admins cannot modify network registration settings. They can, however, control whether their site allows new user registrations independently. Under Settings > General on their site, they can check “Anyone can register” to allow users to sign up for that specific site, provided the network allows user registration. This setting is subordinate to network policies—if the network disables registration, site-level registration is also blocked.
Removing users after signup follows the same two-tier process: Site Admins can remove users from their site, while Super Admins can delete them from the network. If a user registered their own site, deleting them from the network also deletes that site (with a warning). For networks with many signups, regular audits of inactive users and sites are recommended. Use the Network Admin > Sites and Users lists to identify accounts that have not logged in for a set period, and consider a plugin to automate cleanup.
By carefully configuring user management and permissions, you can balance security with usability. Super Admins retain ultimate control, while Site Admins enjoy the autonomy to build their communities. Registration settings should align with your network’s purpose—whether open, closed, or somewhere in between—to ensure a smooth experience for all users.
Optimizing Performance and Security for Multisite
Running a WordPress Multisite network introduces unique performance and security challenges. Because multiple sites share a single core installation, database, and server environment, a misconfiguration or resource bottleneck can affect every site under the network. This section provides actionable, hands-on tips to keep your Multisite fast, stable, and secure—from caching layers to access controls and query monitoring.
Caching is the single most impactful performance optimization for any WordPress site, and it becomes even more critical on a Multisite network where traffic patterns vary across individual subsites. A well-implemented caching strategy reduces database load, speeds up page delivery, and improves the user experience for every site in your network.
Choose the right caching layers:
Page caching (Varnish or FastCGI cache): Store fully rendered HTML pages. For Multisite, ensure your caching solution respects the site-specific URL structure (e.g., subdomain or subdirectory). Varnish is ideal for high-traffic networks because it sits in front of your web server and serves static pages without hitting WordPress at all.
Object caching (Redis or Memcached): Cache database query results, transients, and PHP objects. Redis is widely recommended for Multisite because it can store data persistently and handle large numbers of concurrent connections. Install the Redis PECL extension and a WordPress plugin like Redis Object Cache. Configure it to use a unique database ID per subsite if you need per-site cache isolation.
CDN caching: Offload static assets (images, CSS, JavaScript) to a content delivery network. Use a plugin that supports Multisite, such as CDN Enabler or WP Offload Media, to rewrite asset URLs across all subsites.
Implementation checklist for Multisite:
Enable page caching at the server level (Nginx FastCGI cache or Apache mod_cache) or use a reverse proxy like Varnish. Exclude admin URLs and logged-in user sessions from caching.
Install and configure an object cache backend (Redis). Add the following to your wp-config.php to define the Redis server and port:
define('WP_REDIS_HOST', '127.0.0.1');
define('WP_REDIS_PORT', 6379);
define('WP_REDIS_DATABASE', 0); // Use a separate database ID per subsite if needed
Use a network-activated caching plugin that supports Multisite, such as W3 Total Cache or WP Super Cache. Test each subsite individually to ensure page caching does not break dynamic features (e.g., e-commerce carts or membership portals).
Implement cache purging rules: when a post is updated on one subsite, clear only that site’s cache. Most Multisite-compatible caching plugins allow per-site cache invalidation.
Common pitfalls to avoid:
Using a single cache key for all subsites—this can mix data between sites. Always prefix cache keys with the site ID.
Over-caching logged-in users. Use cache-bypass rules for wp-admin, wp-login, and any custom API endpoints.
Neglecting to monitor cache hit rates. Tools like Redis CLI (redis-cli info stats) or Varnish statistics (varnishstat) help you verify your configuration is effective.
Using Security Plugins and Hardening Measures
Security on a Multisite network requires a layered approach. A single compromised subsite can expose the entire network if proper isolation and hardening are not in place. Follow these measures to reduce your attack surface and enforce consistent security policies across all sites.
Network-wide security plugins:
Use a security plugin that supports network activation, such as Wordfence or Sucuri Security. Configure it at the network level to apply firewall rules, brute-force protection, and malware scanning to every subsite.
Enable two-factor authentication (2FA) for all administrator accounts across the network. Plugins like Two Factor (from the WordPress team) or WP 2FA can be network-activated and enforced.
Limit login attempts per subsite and per user IP. Most security plugins include this feature; set a low threshold (e.g., 3 failed attempts before a 15-minute lockout).
Hardening measures specific to Multisite:
Restrict plugin and theme installation: Only super admins should be able to install, update, or delete plugins and themes. Use the network admin panel to manage all code assets. Disable the “Add Plugins” and “Add Themes” capabilities for subsite administrators by adding this to your wp-config.php:
define('DISALLOW_FILE_MODS', true);
Isolate user roles across subsites: By default, a user with Administrator access on one subsite does not have access to other subsites—but verify this with a user role editor plugin (e.g., User Role Editor). Never grant super admin privileges to users who only manage a single subsite.
Secure the network’s uploads directory: Use separate uploads directories per subsite (WordPress does this automatically). Disable PHP execution in uploads folders by adding the following to your server configuration:
# Nginx example
location ~* /wp-content/uploads/.*.php$ {
deny all;
}
Enforce HTTPS across all subsites: Use a network-wide SSL certificate (wildcard or SAN). In the network settings, set both “Site address” and “WordPress address” to HTTPS. Redirect HTTP to HTTPS via server rules.
Regularly audit user permissions: Run a script or use a plugin to list all users with super admin status. Remove any accounts that are no longer needed. Audit subsite admin accounts quarterly.
Security checklist for Multisite:
Measure
Action
Frequency
Firewall (WAF)
Network-activate Wordfence or Sucuri
Once, then update rules automatically
File permissions
Set wp-config.php to 440, wp-content to 755
After every core update
User audit
Review super admin + subsite admin lists
Monthly
SSL enforcement
Wildcard cert + redirect rules
Before launch, renew annually
Plugin updates
Enable automatic updates for security patches
Ongoing
Monitoring Database Queries and Resource Limits
In a Multisite environment, the database is the most common performance bottleneck. With multiple sites querying the same tables, inefficient queries or runaway resource usage can bring the entire network to a crawl. Proactive monitoring and limits are essential.
Track database query performance:
Enable the WordPress query monitor plugin (e.g., Query Monitor) on a staging environment or a restricted admin user. It displays all queries per page load, their execution time, and which subsite triggered them. Look for slow queries (above 0.1 seconds) and high query counts (over 100 per request).
Use MySQL’s slow query log to capture queries that exceed a threshold. Run the following in your database server:
SET GLOBAL slow_query_log = 'ON';
SET GLOBAL long_query_time = 2;
Analyze the log with tools like pt-query-digest from Percona Toolkit.
Monitor table-level performance. In Multisite, each subsite has its own set of tables (e.g., wp_2_posts, wp_3_options). Use SHOW TABLE STATUS to identify tables with high row counts or excessive overhead. Optimize tables with OPTIMIZE TABLE on a regular schedule (e.g., weekly cron job).
PHP memory limit: Increase the memory limit for the network admin and individual subsites if needed. Add to wp-config.php:
define('WP_MEMORY_LIMIT', '256M');
define('WP_MAX_MEMORY_LIMIT', '512M'); // For admin screens
MySQL connection limits: In your my.cnf, set max_connections based on your expected concurrent users. A formula: max_connections = (RAM * 0.75) / (average query memory). Start with 150 and adjust upward if you see “Too many connections” errors.
Per-subsite resource caps: Use a plugin like WP Resource Monitor or server-level tools (e.g., cgroup for PHP-FPM) to limit CPU and memory usage per subsite. This prevents a single site from exhausting server resources.
Database optimization schedule:
Task
Tool/Method
Frequency
Remove post revisions
WP-CLI: wp post list --post_type=revision --format=count then delete
Weekly
Clean transients
Plugin like Transient Cleaner or WP-CLI
Daily
Optimize tables
MySQL OPTIMIZE TABLE or plugin
Weekly
Index review
Check EXPLAIN for slow queries
Monthly
Query analysis
Query Monitor plugin or slow query log
Ongoing
Proactive alerting: Set up monitoring tools like New Relic or Datadog to alert you when database query time exceeds a baseline (e.g., average query time > 0.5 seconds for 5 minutes). For smaller networks, use a simple cron job that checks the MySQL process list and emails you if there are more than 20 queries in “Sending data” state.
By implementing these caching, security, and monitoring practices, you ensure your WordPress Multisite network remains fast, resilient, and secure—even as you add more subsites and traffic grows. Regularly revisit each layer as your network evolves, and always test changes in a staging environment first.
Migrating to WordPress Multisite
Moving from a collection of standalone WordPress installations to a unified Multisite network is a significant architectural shift. While the benefits—centralized management, shared plugins and themes, and streamlined updates—are compelling, the migration process demands careful planning and execution. This section provides a step-by-step guide for converting existing sites into a Multisite network, focusing on data integrity, minimal downtime, and post-migration stability.
Backing Up All Sites Before Migration
Before any migration, a comprehensive backup strategy is non-negotiable. A single misstep during the conversion can corrupt data across multiple sites. Follow these steps to create a reliable safety net:
Database backups: Export each site’s database using phpMyAdmin, WP-CLI, or a plugin like UpdraftPlus. Use the “Add DROP TABLE” and “Complete inserts” options to ensure clean restore capability.
File backups: Download the entire wp-content directory for each site, including uploads, plugins, themes, and any custom configurations. Compress these into separate archives.
Full server snapshot (optional): If using a managed host, request a full server snapshot. This allows a rollback to the exact pre-migration state.
Verify backups: Test each backup by restoring it to a staging environment. A backup that cannot be restored is worthless.
Document current settings: Record permalink structures, active plugins, theme customizations, and user roles for each site. This checklist will help you confirm nothing is lost.
A common mistake is backing up only the database or only the files. Both are essential because Multisite migration involves merging multiple databases into one while preserving file paths. Store backups in at least two locations—local storage and cloud storage—before proceeding.
Using Tools Like WordPress Importer or WP-CLI
Two primary methods exist for migrating content into a Multisite network: the WordPress Importer tool for smaller sites, and WP-CLI for larger or more complex setups. Choose based on your site count and technical comfort level.
Method 1: WordPress Importer (for small to medium sites)
This built-in tool exports and imports content as XML files. It is best for sites with fewer than 1,000 posts and minimal custom post types.
Export each site: In the source site’s admin panel, go to Tools > Export. Choose “All content” and download the XML file.
Create subsites in Multisite: In the new Multisite network, go to My Sites > Network Admin > Sites > Add New. Create a subsite for each source site, using the same domain structure if possible.
Import content: For each subsite, go to Tools > Import > WordPress. Upload the corresponding XML file. Check “Download and import file attachments” to bring images.
Reassign users: During import, you can assign posts to existing users or create new ones. Map users carefully to avoid duplicates.
Limitations: The importer may fail with very large media libraries (over 2GB) or custom post types not registered on the new network. It also does not migrate plugin settings or theme mods.
Method 2: WP-CLI (for large or complex sites)
WP-CLI offers command-line speed and precision. It is ideal for sites with thousands of posts, custom tables, or complex configurations. Below are essential commands for a typical migration:
Step
Command
Description
Export single site database
wp db export site1.sql --dbuser=... --dbpass=...
Creates a database dump for the source site.
Create subsite in Multisite
wp site create --slug=site1 --title="Site 1" --email=admin@example.com
Generates a new subsite with a unique ID.
Import database to subsite
wp db import site1.sql --url=http://example.com/site1
Imports the old database into the subsite’s tables (must adjust table prefixes).
Updates all URLs in the database to reflect the new network structure.
Regenerate media files
wp media regenerate --yes
Creates missing thumbnail sizes for imported images.
Critical note on table prefixes: Multisite uses a single database with tables prefixed by site ID (e.g., wp_2_posts). When importing from a standalone site (with wp_posts), you must either modify the SQL file to change the prefix or use a tool like sed before import. A safer approach is to use a plugin like “Multisite Migration” that handles prefix mapping automatically.
Plugin settings stored as site options (in the wp_options table) do not transfer via content import. To preserve these:
Use WP-CLI’s wp option list and wp option update commands to export and re-import key options per site.
For popular plugins like Yoast SEO or WooCommerce, consider deactivating them on source sites, exporting their settings via dedicated export tools, and reimporting on the new subsites.
Theme customizations stored in the database (e.g., customizer settings) can be exported using the “Customizer Export/Import” plugin before migration.
Testing and Troubleshooting Post-Migration Issues
After migration, thorough testing prevents hidden problems from affecting users. Create a checklist and work through it systematically:
Frontend verification: Visit each subsite’s homepage, a sample post, and a sample page. Confirm the correct content displays, images load, and permalinks work.
Admin access: Log in as a super admin and as a subsite admin. Verify that dashboard menus, user management, and settings pages are functional.
Media library check: Open the media library for each subsite. Ensure all images and files are present and that thumbnails generate correctly.
Plugin functionality: Test each active plugin on at least one subsite. Pay special attention to caching, SEO, and e-commerce plugins, which often have Multisite-specific settings.
User roles and permissions: Confirm that users who were editors or authors on the source site have the correct roles on the subsite. Check that super admin privileges are not accidentally granted to regular users.
Common Issues and Solutions
Issue
Likely Cause
Solution
Broken image URLs
URLs in database still point to old domain
Run wp search-replace again with correct old and new URLs, including --skip-columns=guid to avoid breaking attachment links.
404 errors on posts
Permalink structure mismatch
Go to Settings > Permalinks on each subsite and click “Save Changes” to flush rewrite rules.
Plugin conflicts
Plugins not Multisite-compatible
Check plugin documentation. Activate network-wide only if supported; otherwise, activate per-site. Consider replacing incompatible plugins.
Missing users
Users not imported or mapped incorrectly
Use WP-CLI command wp user import-csv to bulk add users, or manually add missing users via Network Admin > Users.
Slow performance
Database tables not optimized after merge
Run wp db optimize and consider installing a caching plugin like WP Rocket or W3 Total Cache configured for Multisite.
Login issues
Cookie domain mismatch
Update wp-config.php with define('COOKIE_DOMAIN', false); to allow cookies to work across subsites.
Advanced Troubleshooting Techniques
When standard fixes fail, employ these diagnostic methods:
Enable WP_DEBUG: Add define('WP_DEBUG', true); and define('WP_DEBUG_LOG', true); to wp-config.php. Check the wp-content/debug.log file for PHP errors and warnings.
Check database integrity: Use phpMyAdmin to run CHECK TABLE on all tables prefixed with the subsite ID. Repair any that show errors.
Review server logs: Access your hosting control panel’s error logs (e.g., Apache error_log or Nginx error.log). Look for 500 errors or memory exhaustion warnings.
Test in isolation: Temporarily deactivate all plugins and switch to a default theme (like Twenty Twenty-Four) on a problem subsite. If the issue resolves, reactivate plugins one by one to identify the culprit.
Finally, keep your backups intact for at least one week after migration. This window allows you to revert individual subsites or the entire network if unforeseen issues arise. Document every step you took, including commands used and settings changed, so you can reproduce or reverse the process if needed. With careful testing and a methodical approach, your Multisite network will provide a stable, scalable foundation for years to come.
Troubleshooting Common Multisite Issues
Operating a WordPress Multisite network introduces a layer of complexity beyond a standard single-site installation. While the architecture is robust, administrators frequently encounter specific challenges related to link structures, plugin behavior, and database performance. Understanding the root causes of these issues is essential for maintaining a stable and efficient network. Below, we address three of the most persistent problems and provide actionable solutions.
Fixing Broken Links and 404 Errors
404 errors are among the most visible and frustrating issues in a Multisite environment. They often stem from mismatches between the site’s URL configuration and the actual file or database paths. The most common causes include incorrect site URL settings, missing permalink rewrites, or subdirectory/subdomain misconfigurations.
Diagnosing the Source: First, verify that the primary site URL and each subsite’s URL are correctly defined in the database. A quick check can be performed via the wp_blogs and wp_site tables. If a subsite returns a 404 for its homepage, the issue is likely with the domain or path mapping. For internal pages that return 404s, the problem often lies with permalinks or rewrite rules.
Immediate Fixes:
Flush Permalinks: Navigate to Settings > Permalinks for each affected subsite and simply click “Save Changes.” This regenerates the .htaccess file and rewrite rules. For network-wide issues, flush from the Network Admin > Settings page.
Update .htaccess: Ensure your .htaccess file contains the correct Multisite rewrite rules. A common mistake is using single-site rewrite rules. The standard Multisite rules for subdirectory installations should look like this:
Check Site URL in Database: Use phpMyAdmin or a similar tool to run a query: SELECT * FROM wp_blogs WHERE blog_id = [X]. Ensure the domain and path columns match the expected values. Incorrect paths, such as a missing trailing slash, can cause 404s.
Preventative Measures: Always use absolute URLs when linking between subsites, or utilize WordPress functions like switch_to_blog() and restore_current_blog() to generate correct links programmatically. Avoid manually editing site URLs in the database unless absolutely necessary.
Resolving Plugin and Theme Incompatibilities
Not all plugins and themes are designed with Multisite in mind. Incompatibilities can manifest as white screens, broken functionality, or network-wide errors. The primary challenge is that a plugin might work flawlessly on one subsite but cause conflicts on another due to differing user roles, custom post types, or database table prefixes.
Identifying Problematic Components: When a conflict arises, the first step is to isolate the cause. Begin by deactivating all plugins network-wide. If the issue resolves, reactivate plugins one by one, testing a subsite after each activation. Similarly, switch to a default WordPress theme (like Twenty Twenty-Four) on the affected subsite to rule out theme-specific issues.
Common Incompatibility Patterns:
Issue Type
Typical Cause
Solution
Plugin uses hardcoded table names
Plugin references wp_posts instead of wp_2_posts for a specific subsite.
Replace hardcoded table names with WordPress global $wpdb prefix variables. Look for plugins that explicitly state Multisite support.
Theme relies on network-wide settings
Theme options saved as site options rather than network options, causing conflicts when activated on multiple sites.
Use get_site_option() and update_site_option() in theme code. Ensure theme is designed for network activation.
Plugin conflicts with user role management
Plugin modifies capabilities or roles in a way that interferes with Multisite’s Super Admin role.
Check plugin documentation for Multisite compatibility. Consider using a dedicated membership plugin built for networks.
Best Practices: Always test plugins and themes on a staging network before deploying to production. Use the “Network Activate” feature sparingly; only activate plugins network-wide if they genuinely need to run on every subsite. For plugins that only need to function on specific sites, activate them per-site. Additionally, maintain a list of compatible plugins—those that use $wpdb->prefix correctly and avoid hardcoded paths.
Handling Database Connection Timeouts
Database connection timeouts are a severe issue that can bring down the entire Multisite network. They occur when the database server cannot handle the volume of queries or when connections are exhausted. In a Multisite environment, the database load is inherently higher because each subsite generates its own set of queries, and network-wide operations (like updating plugins) can spike demand.
Symptoms: Users experience “Error establishing a database connection” messages, slow page loads, or intermittent failures. The WordPress admin area may become unresponsive, and cron jobs may fail to execute.
Check MySQL Connection Limits: Log into your database server and run SHOW VARIABLES LIKE 'max_connections';. If the limit is low (e.g., 100 or less), consider increasing it. For shared hosting, contact your provider.
Monitor Query Volume: Use tools like MySQL’s slow query log or plugins like Query Monitor to identify heavy queries. Common culprits include inefficient custom queries, unoptimized WP_Query loops, or plugins that run database-intensive tasks on every page load.
Review Transient Expiration: Multisite networks often accumulate large numbers of transients. Expired transients can bloat the wp_options table across all subsites. Use a plugin to clean transients or run a custom SQL query to remove them: DELETE FROM wp_options WHERE option_name LIKE '%_transient_%' (repeat for each subsite’s table).
Increase PHP and MySQL Timeouts: In your wp-config.php file, add define('WP_MEMORY_LIMIT', '256M'); and define('WP_MAX_MEMORY_LIMIT', '512M');. For MySQL, adjust the wait_timeout and interactive_timeout settings in your database configuration.
Implement Object Caching: Use a persistent object cache like Redis or Memcached. This reduces database load by storing query results in memory. For Multisite, ensure the cache is configured to handle multiple site prefixes.
Optimize Database Tables: Regularly run OPTIMIZE TABLE commands on all subsite tables. This can be automated with a plugin or cron job. For example: OPTIMIZE TABLE wp_1_posts, wp_1_options, wp_2_posts, wp_2_options;.
Long-Term Prevention: Consider using a dedicated database server or a managed hosting solution optimized for Multisite. Implement a Content Delivery Network (CDN) to offload static assets, reducing direct database requests. Finally, audit and refactor any custom code that performs database queries in loops or on every page load. Use wp_cache_set() and wp_cache_get() to cache expensive query results.
By systematically addressing these three common issues—broken links, plugin conflicts, and database timeouts—you can significantly improve the reliability and performance of your WordPress Multisite network. Regular maintenance, careful testing, and adherence to best practices will minimize downtime and ensure a seamless experience for all subsite users.
How to Optimize WordPress for High Traffic: A Comprehensive Guide
Understanding Your Traffic Baseline and Goals
Before diving into any optimization strategy, you must first understand where your WordPress site currently stands. Optimizing for high traffic without a clear baseline is like navigating without a map—you may improve, but you cannot measure success or identify failures. This foundational step ensures that every subsequent action—from caching to database tuning—targets real bottlenecks and aligns with your growth objectives. Begin by assessing three critical dimensions: current traffic patterns, server resource utilization, and existing performance metrics. Only then can you set realistic, data-driven goals that prevent wasted effort and unexpected downtime during traffic spikes.
Analyzing Your Current Traffic with Analytics Tools
To know your traffic baseline, you need reliable data. The most widely used tool is Google Analytics, which provides comprehensive insights into visitor behavior, page views, session duration, and geographic distribution. Install it via a plugin like MonsterInsights or Site Kit by Google, or add the tracking code directly to your theme’s header. For real-time monitoring, consider server-side analytics tools like Matomo (self-hosted) or Clicky, which offer granular data without ad-blocker interference. Key metrics to track include:
Total monthly visitors and pageviews: Understand volume trends over weeks or months.
Average session duration and pages per session: Gauge engagement depth.
Bounce rate: High bounce rates may indicate slow loading or irrelevant content.
Traffic sources: Identify whether visitors come from organic search, social media, direct links, or referrals.
Device breakdown: Mobile vs. desktop traffic influences caching and image optimization priorities.
Additionally, use your web host’s control panel (e.g., cPanel’s Awstats or Webalizer) or a dedicated server monitoring tool like New Relic to cross-reference analytics data with server resource usage—CPU, memory, and disk I/O. This triangulation reveals whether traffic spikes correlate with resource strain, helping you distinguish between normal growth and infrastructure limitations.
Identifying Peak Traffic Periods and Bottlenecks
Once you have traffic data, pinpoint when your site experiences the highest load. Plot daily and weekly visitor counts using Google Analytics’ “Hourly” report or a custom dashboard. Common patterns include predictable spikes from scheduled blog posts, email campaigns, or seasonal events. For example, an e-commerce site might see surges on Black Friday, while a news site peaks during breaking stories. To identify bottlenecks, look beyond traffic volume:
Server response time (TTFB): A high Time to First Byte during peak hours indicates server overload or slow database queries.
Error rates: Spikes in 500 or 503 errors suggest resource exhaustion or misconfigured caching.
Plugin conflicts: Test disabling non-essential plugins during low traffic to see if performance improves.
Database query load: Use Query Monitor plugin to find slow queries that spike under concurrent users.
CDN utilization: Check if your content delivery network handles static assets efficiently or if origin servers are overwhelmed.
Create a timeline of these events: note the date, time, traffic volume, and any corresponding server alerts. For instance, if your site slows down every Tuesday at 10 AM, cross-reference that with scheduled cron jobs or backup routines. This detective work often reveals hidden bottlenecks, such as a poorly optimized plugin that runs heavy queries during peak hours or a caching layer that fails to serve stale content during surges.
Setting Performance Benchmarks and KPIs
With baseline data and bottleneck insights, establish clear, measurable performance goals. Avoid vague targets like “make the site faster.” Instead, define specific Key Performance Indicators (KPIs) that reflect user experience and server capacity. Common benchmarks for high-traffic WordPress sites include:
Set your benchmarks based on your current hosting environment and traffic level. For example, if your baseline TTFB is 800ms, a realistic first goal might be 400ms after implementing a CDN and caching plugin. Similarly, if your site crashes at 1,000 concurrent users, aim to support 2,000 users with optimized caching and a faster database. Use tools like GTmetrix, WebPageTest, or Lighthouse to measure these KPIs regularly, and document your progress weekly. Remember that benchmarks should evolve as traffic grows—review and adjust every quarter to reflect new infrastructure or content changes.
Finally, prioritize KPIs that directly affect user experience and revenue. For an e-commerce site, “add-to-cart success rate during peak traffic” may be more critical than raw page load time. For a blog, “time to interactive” and “first contentful paint” matter most. By tying KPIs to business goals, you ensure that optimization efforts deliver tangible value rather than just technical improvements. With a clear baseline, identified bottlenecks, and measurable targets, you are now ready to implement the technical optimizations that will scale your WordPress site for high traffic.
How to Optimize WordPress for High Traffic: Choosing a High-Performance Hosting Provider
When your WordPress site begins to attract significant traffic, the foundation of your performance lies in the hosting provider you choose. A high-traffic site demands more than just basic uptime; it requires a hosting environment that can scale seamlessly, allocate dedicated resources, integrate content delivery networks (CDNs), and provide robust technical support. Without a properly optimized hosting setup, even the most efficient code and caching strategies will falter under load, leading to slow page speeds, downtime, and lost revenue. This guide explores how to select a hosting solution that meets these demands, focusing on three critical areas: comparing hosting types, evaluating managed WordPress features, and understanding cloud scalability.
Comparing Shared, VPS, and Dedicated Hosting Options
The first step in optimizing WordPress for high traffic is understanding the tiered hosting landscape. Each option—shared, VPS, and dedicated—offers distinct trade-offs in cost, performance, and control. Below is a breakdown of their key characteristics:
Poor; traffic spikes can cause slowdowns or crashes
Very limited; upgrading often requires migration
Low-traffic personal blogs or small businesses
VPS (Virtual Private Server)
Dedicated virtual resources (CPU, RAM) within a shared physical server
Good; consistent performance with isolated resources
Moderate; can scale vertically by increasing plan resources
Growing sites with moderate traffic (e.g., 10k–100k visits/month)
Dedicated Hosting
Entire physical server reserved for one client
Excellent; maximum control and no resource contention
High; but requires manual upgrades or server swaps
High-traffic sites (e.g., 100k+ visits/month) or resource-intensive applications
For high-traffic WordPress sites, shared hosting is rarely viable due to its lack of resource isolation. VPS hosting offers a cost-effective middle ground, providing dedicated resources that prevent other sites from draining your server capacity. However, as traffic grows, dedicated hosting becomes necessary for mission-critical sites where peak loads must be handled without compromise. When comparing these options, always check the provider’s resource limits—look for guaranteed CPU cores, RAM, and I/O throughput, not just advertised “unlimited” plans that often throttle during high usage.
Evaluating Managed WordPress Hosting Features
Managed WordPress hosting is a specialized solution designed to optimize performance, security, and maintenance for WordPress sites. For high-traffic environments, it offers several advantages over generic hosting. Key features to evaluate include:
Server-Level Caching: Built-in page caching, object caching (e.g., Redis or Memcached), and opcode caching (e.g., OPcache) reduce database queries and server load. Look for providers that integrate with WordPress plugins like WP Super Cache or W3 Total Cache at the server level.
Automatic Scaling: Some managed hosts can dynamically allocate additional resources during traffic spikes, preventing downtime without manual intervention. This is critical for viral content or seasonal surges.
CDN Integration: A content delivery network distributes static assets (images, CSS, JavaScript) across global edge servers, reducing latency for international visitors. Many managed hosts include free CDN credits or seamless integration with providers like Cloudflare or StackPath.
Automated Backups and Updates: Daily backups and one-click WordPress core, theme, and plugin updates ensure your site remains secure and recoverable, even under heavy load.
Staging Environments: Test performance changes or plugin updates in a sandboxed environment before deploying to production, avoiding disruptions to live traffic.
Expert Support: 24/7 support teams specialized in WordPress can diagnose performance bottlenecks, such as slow database queries or plugin conflicts, faster than generic hosting support.
When evaluating managed WordPress hosts, request performance benchmarks or trial periods. Test how the platform handles a simulated traffic spike using tools like Load Impact or K6. Also, examine the fine print for resource caps—some providers limit PHP workers or database connections, which can throttle high-traffic sites. Prioritize hosts that offer transparent resource limits and clear upgrade paths.
Key Considerations for Cloud and Scalable Hosting
Cloud hosting represents the most flexible and scalable option for high-traffic WordPress sites. Unlike traditional hosting that relies on a single server, cloud platforms distribute your site across a network of virtual servers, enabling rapid scaling and high availability. When optimizing for traffic, consider these factors:
Elastic Scalability: Cloud providers like AWS, Google Cloud, or digitalOcean allow you to add or remove resources (CPU, RAM, storage) in real-time based on demand. For WordPress, this means you can handle a sudden spike from a Reddit post without pre-planning server upgrades.
Load Balancing: Distribute incoming traffic across multiple server instances to prevent any single point of failure. A load balancer can automatically route users to the healthiest server, improving response times and uptime.
Auto-Scaling Groups: Configure rules to automatically spin up new server instances when CPU usage exceeds a threshold (e.g., 70%). This ensures your site remains responsive during traffic surges and scales down to save costs during lulls.
Database Optimization: High-traffic WordPress sites often bottleneck at the database level. Consider using a managed database service (e.g., Amazon RDS or Google Cloud SQL) with read replicas to offload query load from the primary database. Implement object caching with Redis to reduce database queries for frequently accessed data.
CDN and Edge Caching: Cloud hosting pairs naturally with CDNs. Use a CDN to cache entire HTML pages at edge locations, reducing server load by up to 90% for static content. Services like Cloudflare’s APO (Automatic Platform Optimization) can further optimize WordPress-specific dynamic content.
Cost Management: Cloud hosting’s pay-as-you-go model can become expensive if not monitored. Set budget alerts, use reserved instances for baseline traffic, and leverage spot instances for non-critical tasks like image processing. Many providers offer cost calculators to estimate monthly spend based on traffic projections.
To implement cloud hosting for WordPress effectively, consider using a platform-agnostic tool like Kinsta or WP Engine that abstracts cloud complexity, or build a custom stack using Terraform and Ansible for full control. Regardless of the approach, ensure your hosting provider offers a robust API for automating scaling events, such as integrating with monitoring tools like New Relic or Datadog. Finally, test your cloud setup with a stress test tool like Apache JMeter to verify that scaling triggers work correctly and that your site maintains sub-second load times under peak traffic.
By carefully selecting a high-performance hosting provider that matches your traffic patterns—whether through managed WordPress features, dedicated resources, or cloud scalability—you lay a solid foundation for handling high traffic without compromising user experience. The right hosting choice will not only keep your site fast and reliable but also simplify ongoing maintenance, allowing you to focus on content and growth rather than server management.
Implementing Caching Strategies for Speed
Caching is the single most impactful technique for scaling a WordPress site under heavy traffic. By storing pre-rendered static copies of your dynamic pages, caching dramatically reduces the number of database queries and PHP executions required for each visitor. This not only slashes server load but also delivers content to users in milliseconds instead of seconds. For a high-traffic WordPress site, caching is not optional—it is foundational. Without it, even a moderately popular post can overwhelm shared hosting or strain a dedicated server. The goal is to serve the fastest possible version of your site to the largest number of concurrent visitors, and caching strategies are the primary means to achieve that.
Setting Up Page Caching with Plugins like WP Rocket or W3 Total Cache
Page caching is the first line of defense. It generates a static HTML file of each page after the first visit and serves that file to subsequent visitors, bypassing the heavy PHP and database layers. Two of the most popular and powerful plugins for this are WP Rocket and W3 Total Cache. Both offer robust page caching capabilities, but they differ in complexity and approach.
WP Rocket is a premium plugin known for its user-friendliness and out-of-the-box effectiveness. After activation, page caching is enabled by default. Key steps include:
Activating the plugin and verifying that “Enable caching for mobile devices” is checked if your audience uses mobile.
Configuring cache lifespan—typically set to 24 hours for most sites, but adjust downward if content updates frequently.
Enabling separate caching for logged-in users or administrators to avoid serving stale versions.
Using the “Preload” feature to rebuild cache after content changes, ensuring the first visitor after an update doesn’t hit a slow uncached page.
W3 Total Cache is a free, highly configurable plugin that offers granular control. Its setup requires more attention:
Navigate to Performance > General Settings and enable Page Cache.
Choose the cache method: “Disk: Enhanced” is reliable for most setups, but “Redis” or “Memcached” (if available) provides faster retrieval for high-traffic environments.
Set the “Cache TTL” (time-to-live) to 3600 seconds (1 hour) as a starting point, then adjust based on traffic patterns.
Under “Advanced,” enable “Cache URIs with query string” only if necessary, as it can fragment the cache.
Use the “Purge Policy” to automatically clear cache when posts or pages are updated.
A comparison of these two plugins for page caching:
Feature
WP Rocket
W3 Total Cache
Ease of setup
Very easy, minimal configuration
Moderate, requires careful tweaking
Cost
Premium (paid)
Free
Default caching
Enabled immediately
Disabled, must be enabled manually
Mobile caching
Built-in with separate cache files
Configurable via “User agent groups”
Preloading
Automatic with sitemap-based crawler
Manual or via cron job
Performance impact
Lightweight, optimized for speed
Feature-rich, can be heavier if over-configured
For high-traffic sites, both plugins work well, but WP Rocket is often preferred for its simplicity and reliability. Whichever you choose, test thoroughly after configuration to ensure pages are being served from cache and that dynamic elements (like shopping carts or comment forms) work correctly.
Leveraging Browser Caching for Reusable Resources
Browser caching instructs visitors’ browsers to store static assets—such as images, CSS files, JavaScript, fonts, and logos—locally for a specified period. When a user returns to your site or navigates to another page, their browser loads these resources from the local cache instead of downloading them again. This reduces HTTP requests and speeds up page load times for repeat visitors, which is critical for high-traffic scenarios where many users browse multiple pages.
To enable browser caching, you need to set appropriate cache-control headers. The most effective method is through your server configuration or a caching plugin. Here’s how to implement it:
Using a caching plugin: Both WP Rocket and W3 Total Cache include browser caching settings. In WP Rocket, enable “Browser caching” under the “Cache” tab. In W3 Total Cache, go to Performance > Browser Cache and check “Set expires header” and “Set cache control header.”
Via .htaccess (Apache servers): Add rules to set expiration times. For example, set images to cache for one month, CSS and JavaScript for one week, and HTML for a shorter period. A typical snippet:
<IfModule mod_expires.c>
ExpiresActive On
ExpiresByType image/jpg "access plus 1 month"
ExpiresByType image/jpeg "access plus 1 month"
ExpiresByType image/gif "access plus 1 month"
ExpiresByType image/png "access plus 1 month"
ExpiresByType text/css "access plus 1 week"
ExpiresByType application/javascript "access plus 1 week"
ExpiresByType text/html "access plus 1 hour"
</IfModule>
Using a content delivery network (CDN): Most CDNs, such as Cloudflare or KeyCDN, automatically set optimal browser caching headers. If you use a CDN, you may not need additional server-level configuration.
Best practices for browser caching on high-traffic sites:
Set longer cache durations for static assets that rarely change (images, fonts, logos). A month or more is safe.
Use shorter durations for CSS and JavaScript if you update them frequently, but combine with versioning (e.g., style.css?v=2) to force browsers to download new versions when files change.
Avoid caching HTML pages for too long, as they contain dynamic content. One hour is typical for most blogs.
Test with tools like GTmetrix or Pingdom to verify that cache headers are being sent correctly and that resources are being cached.
When browser caching works in tandem with page caching, returning visitors experience near-instantaneous load times because their browser already has most of the site’s assets stored locally.
Using Object Caching with Redis or Memcached
Object caching stores the results of database queries in memory, so that subsequent requests for the same data are served from a high-speed cache rather than querying the database again. This is especially valuable for high-traffic WordPress sites that rely heavily on dynamic content, such as user-generated comments, custom post types, or e-commerce product listings. The two most common in-memory caching systems are Redis and Memcached.
Redis is an advanced key-value store that supports data persistence, complex data structures, and replication. It is widely recommended for WordPress because of its reliability and performance. To set it up:
Ensure Redis is installed on your server. Many managed WordPress hosts (e.g., Kinsta, WP Engine) include Redis by default. For self-hosted sites, install the Redis server via your package manager (e.g., sudo apt install redis-server on Ubuntu).
Install a WordPress plugin like Redis Object Cache or W3 Total Cache (which includes Redis support). Activate the plugin and navigate to its settings.
In Redis Object Cache, enable the cache by clicking “Enable Object Cache.” The plugin will automatically connect to the local Redis instance.
For W3 Total Cache, go to Performance > General Settings, select “Redis” under “Object Cache Method,” and enter the server details (usually 127.0.0.1 and port 6379).
Monitor cache hit rates. A high hit rate (above 90%) indicates effective caching. If the rate is low, consider increasing the memory allocated to Redis or adjusting the expiration times.
Memcached is a simpler, distributed memory caching system that excels at storing small, frequently accessed data. It is less feature-rich than Redis (no persistence, no complex data types) but is extremely fast and lightweight. Setup steps:
Install Memcached on your server (e.g., sudo apt install memcached).
Install a WordPress plugin such as W3 Total Cache or Memcached Object Cache. In W3 Total Cache, select “Memcached” as the object cache method and provide the server address and port (default 11211).
Configure the cache timeout. For most WordPress sites, setting expiration to 300–600 seconds (5–10 minutes) balances freshness with performance.
Ensure that Memcached has enough memory allocated. A typical starting point is 64 MB, but high-traffic sites may need 256 MB or more.
Comparison of Redis and Memcached for object caching:
Feature
Redis
Memcached
Data persistence
Yes (optional)
No
Supported data types
Strings, hashes, lists, sets, sorted sets
Strings only
Replication
Yes (master-slave)
No
Ease of setup
Moderate, requires server installation
Moderate, requires server installation
Performance
Excellent for complex queries
Excellent for simple key-value lookups
WordPress plugin support
Widespread (Redis Object Cache, W3 Total Cache)
Good (W3 Total Cache, Memcached Object Cache)
For high-traffic WordPress sites, Redis is generally the preferred choice due to its persistence and ability to handle more complex caching needs. However, if your server resources are limited and your data access patterns are simple, Memcached can be a leaner alternative. Regardless of which you choose, object caching should be combined with page caching and browser caching for a comprehensive speed optimization strategy. Test your site under simulated high traffic using tools like Loader.io or K6 to confirm that object caching reduces database load and maintains fast response times.
Optimizing Images and Media Files
When a WordPress site begins to attract high traffic, every millisecond of load time matters. Large, unoptimized images are among the most common culprits for slow page speeds, directly impacting user experience and search engine rankings. For a high-traffic site, even a single heavy image can multiply bandwidth costs and frustrate visitors on slower connections. The goal is to deliver visually rich media without compromising performance. This means compressing files intelligently, serving the right format for each device, and offloading delivery to a global network. Below, we break down the three essential strategies to achieve this: choosing the right formats and tools, implementing lazy loading, and leveraging a content delivery network.
Choosing Image Formats and Compression Tools
Not all image formats are created equal, and the wrong choice can bloat your site. For high-traffic WordPress sites, the priority is balancing visual fidelity with file size. Modern formats like WebP and AVIF offer superior compression compared to legacy formats like JPEG and PNG, often reducing file sizes by 25–35% without noticeable quality loss. However, browser support varies, so you need a fallback strategy.
Recommended image formats for high-traffic sites:
WebP: Ideal for photographs and complex graphics. Supported by all modern browsers (Chrome, Firefox, Edge, Safari 14+). Offers lossy and lossless compression.
AVIF: Even better compression than WebP, but with narrower browser support (Chrome, Firefox, and limited Safari). Best for cutting-edge optimization.
JPEG 2000 / JPEG XR: Legacy formats for older Safari and Internet Explorer, respectively. Use only as fallbacks.
PNG: Only for images requiring transparency (e.g., logos, icons). Convert to WebP if transparency is needed.
Server-side compression, WebP/AVIF conversion, no API limits
Large media libraries or sites with custom hosting
Manual tools (e.g., TinyPNG, Squoosh)
Web/Desktop
Full control over compression, pre-upload optimization
Developers or sites with few images
For high traffic, automate the process. Plugins like ShortPixel or EWWW can convert images to WebP on the fly and serve fallbacks via <picture> tags. Always test compression levels: lossy at 80–85% quality usually retains visual fidelity while cutting file sizes in half. Avoid over-compressing, which introduces artifacts that degrade user experience.
Implementing Lazy Loading for Images and Videos
Lazy loading delays the loading of images and videos until they are about to enter the viewport. On a high-traffic site, this is critical because it reduces initial page weight, speeds up the time to first paint, and saves bandwidth for both the server and the visitor. WordPress has supported native lazy loading via the loading="lazy" attribute since version 5.5, but for advanced control, a dedicated plugin or manual implementation is better.
Why lazy loading matters for high traffic:
Reduces the number of HTTP requests on initial load, freeing server resources for other visitors.
Lowers bandwidth costs, especially for pages with many images (e.g., galleries, product pages).
Native WordPress lazy loading: Enabled by default for images and iframes. Simple but limited—no control over thresholds or video elements.
Plugin-based lazy loading: Use a dedicated plugin like WP Rocket, Lazy Load by WP Rocket, or Smush. These add lazy loading to images, videos, iframes, and even background images. They also allow custom thresholds (e.g., load 200px before the viewport) and exclude specific elements.
Manual JavaScript implementation: For developers, use the Intersection Observer API to create custom lazy loading. This offers maximum control but requires coding and testing.
Best practices for lazy loading:
Always set a placeholder (e.g., a low-quality blur or a solid color) to prevent layout shifts.
Use loading="lazy" for below-the-fold images, but keep above-the-fold images (hero banners, critical CTAs) loaded immediately.
For videos, lazy loading is especially effective. Use a poster image and load the video only when the user interacts or scrolls near it.
Test with tools like Google PageSpeed Insights or Lighthouse to ensure lazy loading does not negatively impact Largest Contentful Paint (LCP).
Using a Content Delivery Network (CDN) for Media Assets
A Content Delivery Network (CDN) distributes your media files across a global network of servers. When a visitor requests an image or video, it is served from the server closest to them, drastically reducing latency. For a high-traffic WordPress site, a CDN is non-negotiable—it offloads bandwidth from your origin server, absorbs traffic spikes, and improves load times for international visitors.
How a CDN optimizes media delivery:
Edge caching: Static files (images, CSS, JS) are cached on CDN nodes. Subsequent requests hit the edge, not your server.
Automatic optimization: Many CDNs offer built-in image compression, WebP conversion, and resizing on the fly.
DDoS protection: CDNs filter malicious traffic, keeping your site stable during surges.
Choose a CDN provider that supports your traffic volume and budget. Cloudflare is excellent for beginners; BunnyCDN offers simplicity and low costs.
Configure your CDN to pull files from your origin server. Most providers offer a WordPress plugin that automates URL rewriting (e.g., CDN Enabler, W3 Total Cache).
Enable image optimization on the CDN side. For example, Cloudflare’s “Polish” feature compresses images and converts them to WebP automatically.
Set cache rules for media files: long cache durations (e.g., 30 days) for images and videos, with versioning or cache busting for updates.
Test and monitor using tools like GTmetrix or WebPageTest. Ensure that cached files are served from the CDN and that the origin server load decreases.
Important considerations:
Use a CDN that supports HTTP/2 or HTTP/3 for multiplexed file delivery.
For dynamic media (e.g., user-uploaded images), consider a CDN with real-time purging and origin pull.
Always enable SSL/TLS on your CDN to avoid mixed content warnings.
By combining the right formats, compression tools, lazy loading, and a CDN, your WordPress site can handle high traffic without buckling under the weight of media files. Each layer reduces the load on your server and improves the experience for every visitor, no matter where they are. Start with one step, measure the improvement, and iterate—your site’s performance will thank you.
Minimizing HTTP Requests and Reducing Bloat
When a WordPress site experiences a surge in traffic, every millisecond of load time matters. One of the most impactful ways to improve performance under high load is by reducing the number of HTTP requests your site makes and eliminating unnecessary bloat. Each HTTP request—whether for a CSS file, a JavaScript file, a font, or an image—adds latency, especially on mobile networks or under concurrent user strain. By consolidating and cleaning up your assets, you can significantly lower server response times and bandwidth usage, ensuring your site remains responsive even during traffic spikes.
The core principle is simple: fewer requests mean faster page loads. But achieving this requires a systematic approach. Below, we break down three critical areas where you can cut bloat and streamline your WordPress setup.
Combining and Minifying CSS and JavaScript Files
WordPress themes and plugins often load multiple separate CSS and JavaScript files. A typical site might load a dozen or more individual stylesheets and scripts, each requiring its own HTTP request. Combining these files into fewer, larger files reduces the number of round trips to the server.
Best practices for combining:
Use a caching plugin: Plugins like WP Rocket, W3 Total Cache, or Autoptimize can automatically combine CSS and JS files into one or two bundles. This is the easiest method for most users.
Prioritize critical CSS: For above-the-fold content, inline the essential CSS directly in the HTML head, and defer the combined stylesheet. This eliminates render-blocking while still reducing requests.
Check for conflicts: Combining files can sometimes break plugin functionality if scripts depend on load order. Test thoroughly after enabling combination.
Minification explained:
Minification removes unnecessary characters from code—such as whitespace, comments, and line breaks—without affecting functionality. This reduces file size by 30% to 60% on average. For example, a minified CSS file might look like a single line of compressed code:
Minification works hand-in-hand with combination. After combining, minify the resulting file for maximum savings.
Tools and methods:
Method
Pros
Cons
Plugin (e.g., Autoptimize)
Easy setup, no coding required
May conflict with some themes
Manual via build tools (Gulp, Webpack)
Full control, no plugin overhead
Requires developer skills
CDN-level minification (e.g., Cloudflare)
Offloads processing to edge servers
Limited to basic minification
Key metrics to track:
Number of CSS/JS requests before and after combination
Total file size of combined vs. separate files
Page load time (using tools like GTmetrix or WebPageTest)
Eliminating Render-Blocking Resources
Render-blocking resources are CSS and JavaScript files that prevent the browser from rendering page content until they are fully downloaded and parsed. This is a major contributor to slow perceived load times, especially on high-traffic sites where server response times may already be elevated.
How render-blocking works:
When a browser encounters a <link rel="stylesheet"> in the HTML head, it pauses rendering until the CSS is loaded. Similarly, synchronous <script> tags block rendering. For high-traffic WordPress sites, these delays compound under load, frustrating users and increasing bounce rates.
Strategies to eliminate render-blocking:
Defer JavaScript: Add the defer or async attribute to non-critical script tags. defer loads scripts in order after HTML parsing, while async loads as soon as possible without blocking. Use defer for most scripts to maintain execution order.
Inline critical CSS: Extract the CSS needed for above-the-fold content (typically 10-20 lines) and place it directly in a <style> tag in the HTML head. Then load the full stylesheet asynchronously using a method like media="print" onload="this.media='all'".
Use a plugin for automation: Plugins like WP Rocket or Flying Pages can handle deferring and inlining with one click. They also preload critical resources to further speed up rendering.
Audit with Lighthouse: Google’s Lighthouse tool reports all render-blocking resources and provides specific recommendations. Run it regularly after deploying changes.
Deferring scripts that need to run before page paint (e.g., jQuery in the header). Always test critical functionality.
Inlining too much CSS, which bloats the HTML and negates caching benefits. Keep critical CSS under 14 KB (compressed).
Ignoring third-party scripts (e.g., analytics, ads). These often block rendering and should be loaded asynchronously or deferred.
By eliminating render-blocking resources, you allow the browser to display content immediately, improving perceived performance and reducing time to first meaningful paint—a critical factor for high-traffic sites where users expect instant feedback.
Auditing and Deactivating Unused Plugins and Themes
Every active plugin and theme on your WordPress site adds HTTP requests, database queries, and potential code bloat. Even if a plugin is not actively used on the front end, its scripts and styles may still load on every page. A thorough audit is essential for high-traffic optimization.
List all installed plugins: Go to Plugins > Installed Plugins in your WordPress dashboard. Note each plugin’s purpose and whether it is active.
Check for unused functionality: Many plugins add features you no longer need—like a slider you replaced or a contact form you removed. Deactivate these immediately.
Review plugin resource usage: Use a tool like Query Monitor or P3 Plugin Profiler to see how many HTTP requests and database queries each plugin adds. Plugins with heavy overhead should be replaced or optimized.
Delete inactive themes: Keep only your active theme and a default fallback (like Twenty Twenty-Four). Deleting unused themes frees up server space and eliminates potential security risks.
Test after deactivation: After removing plugins, test your site thoroughly to ensure no broken functionality. Use a staging environment if possible.
Common bloat sources to watch for:
Page builders: Plugins like Elementor or WPBakery often load heavy CSS and JS on all pages, even if not used. Consider using lightweight alternatives or disabling assets on non-essential pages.
Social sharing plugins: Many load scripts from multiple social networks, adding 5-10 requests. Use a lightweight plugin or inline sharing buttons.
Analytics and tracking: While necessary, combine multiple tracking scripts (e.g., Google Analytics, Facebook Pixel) into a single tag using Google Tag Manager.
Font plugins: Custom font plugins often load multiple font files. Limit to 2-3 font families and use system fonts where possible.
Benefits of a lean plugin setup:
Area
Before Audit
After Audit
Number of active plugins
25
12
HTTP requests per page
85
45
Database query count
120
60
Page load time (3G)
4.2 seconds
2.1 seconds
Regular audits—every quarter or after major updates—ensure your site stays lean. For high-traffic WordPress sites, every unnecessary plugin or theme is a liability. By combining and minifying CSS and JavaScript, eliminating render-blocking resources, and auditing your plugin and theme usage, you can dramatically reduce HTTP requests and bloat. This directly translates to faster load times, lower server costs, and a better experience for every visitor, even during peak demand.
Optimizing Database Performance
A clean, efficient database is the backbone of a high-traffic WordPress site. When thousands of visitors hit your site simultaneously, every millisecond matters. A bloated database with unnecessary data, outdated revisions, and inefficient queries can cause slow page loads, timeouts, and increased server load. By optimizing your database, you reduce the strain on your server, speed up query execution, and ensure your site remains responsive under heavy traffic. This section covers three essential strategies: scheduling regular cleanup and optimization, using indexing and query caching, and managing post revisions and spam comments.
Scheduling Regular Database Cleanup and Optimization
Over time, your WordPress database accumulates redundant data that serves no purpose but slows down performance. This includes transients, expired cache entries, orphaned metadata, and tables that become fragmented. Regular cleanup removes this clutter, while optimization reorganizes the database structure to improve query speed. For high-traffic sites, this is not a one-time task but an ongoing process that should be automated.
To implement this effectively, follow these steps:
Use a plugin for automated cleanup: Plugins like WP-Optimize, Advanced Database Cleaner, or Sweep can schedule daily or weekly cleanups. They remove unnecessary data such as expired transients, spam comments, and unused tags without manual effort.
Optimize database tables: After cleanup, run the MySQL OPTIMIZE TABLE command on key tables like wp_posts, wp_postmeta, and wp_options. This defragments the storage and reclaims disk space, which speeds up read/write operations. Most optimization plugins include this feature.
Set a cron job for manual control: For advanced users, create a custom cron job that runs wp db optimize via WP-CLI every night. This avoids plugin overhead and ensures consistency. Example command: wp db optimize --all-tables.
Monitor database size: Use phpMyAdmin or a monitoring tool to track table sizes weekly. A sudden increase may indicate a leak, such as excessive transients or log entries, which you can address immediately.
By scheduling regular cleanup and optimization, you prevent the database from becoming a bottleneck during traffic spikes. Aim for at least a weekly cleanup for sites with moderate traffic, and daily for high-traffic sites.
Using Indexing and Query Caching
Indexing and query caching are two powerful techniques that dramatically reduce database load. Indexing allows MySQL to locate rows faster without scanning entire tables, while query caching stores the results of frequent queries so they don’t need to be recomputed. Together, they cut query execution time by orders of magnitude, which is critical when hundreds of users request similar data simultaneously.
Here’s how to implement both effectively:
Add database indexes strategically: WordPress core tables already have primary indexes, but custom queries or plugins may lack them. Use a tool like Query Monitor to identify slow queries, then add indexes to columns used in WHERE, JOIN, and ORDER BY clauses. For example, if your site uses custom post types with meta queries, index the meta_key and meta_value columns in wp_postmeta. Run CREATE INDEX idx_meta_key ON wp_postmeta (meta_key); in phpMyAdmin.
Enable MySQL query cache: In your my.cnf or server configuration, set query_cache_type = 1 and allocate a suitable size (e.g., query_cache_size = 256M). This caches the result of identical queries, so repeated requests for the same data (e.g., recent posts list) are served instantly from memory. Note: On MySQL 8.0+, query cache is deprecated; use alternative caching like Redis or Memcached instead.
Use object caching for database queries: Implement a persistent object cache with Redis or Memcached. This stores query results as objects, bypassing the database entirely for subsequent requests. Configure WordPress with a plugin like Redis Object Cache, which automatically caches all database queries and reduces load by up to 80%.
Monitor query performance: Regularly review slow query logs using tools like Percona Toolkit or the MySQL slow query log. Identify queries that take longer than 0.5 seconds and optimize them with indexing or rewriting.
Combining indexing with query caching transforms your database from a potential bottleneck into a high-speed data engine. For high-traffic sites, this can mean the difference between a 200ms and a 2-second response time.
Managing Post Revisions and Spam Comments
Post revisions and spam comments are two of the biggest culprits of database bloat in WordPress. Each time you save a post, WordPress stores a full copy of the revision, including all metadata and content. Over months or years, a single post can accumulate hundreds of revisions, swelling the wp_posts and wp_postmeta tables. Similarly, spam comments, even if deleted, can linger in the database and waste storage and query resources. For high-traffic sites, this bloat increases backup size, slows down queries, and consumes server memory.
Take these actions to manage revisions and spam effectively:
Limit post revisions to a reasonable number: Add define('WP_POST_REVISIONS', 5); to your wp-config.php file. This restricts WordPress to keeping only the last 5 revisions per post. For high-traffic sites, even 3 is sufficient. Alternatively, disable revisions entirely with define('WP_POST_REVISIONS', false); if you don’t need version history.
Remove existing revisions: Use a plugin like WP-Optimize or run a SQL query to delete all old revisions. Example query: DELETE FROM wp_posts WHERE post_type = 'revision'; (back up your database first). This can reclaim gigabytes of space.
Automatically delete spam comments: Set WordPress to delete spam comments after a period. Go to Settings > Discussion and enable “Delete spam comments after [X] days.” A value of 7 days is ideal. For existing spam, use a plugin to bulk delete all spam comments from the database.
Prevent spam at the source: Use plugins like Akismet or Antispam Bee to block spam before it reaches the database. This reduces the need for cleanup and lowers server load from comment processing.
Optimize comment table structure: If you have a large comment table (over 100,000 rows), consider archiving old comments to a separate table or removing those from deleted posts. This keeps the active wp_comments table lean.
By controlling post revisions and spam comments, you keep your database tables compact and queries efficient. This is a low-effort, high-impact optimization that every high-traffic WordPress site should implement immediately. Combined with regular cleanup and indexing, it ensures your database remains a fast, reliable foundation for handling traffic surges.
Leveraging a Content Delivery Network (CDN)
When your WordPress site begins to attract significant traffic, the origin server—the single machine that hosts your database and application files—can become a bottleneck. Each visitor request for images, CSS, JavaScript, and other static assets forces the server to process and transmit data, increasing load times and risking downtime. A Content Delivery Network (CDN) solves this by distributing copies of your static content across a global network of edge servers. When a user visits your site, the CDN serves assets from the edge server geographically closest to them, drastically reducing latency and offloading the majority of static file requests from your origin. This not only speeds up page loads for visitors in distant locations but also frees server resources to handle dynamic requests like database queries and user logins. For high-traffic WordPress sites, implementing a CDN is not optional; it is a fundamental scaling strategy.
Selecting a CDN Provider (Cloudflare, StackPath, etc.)
Choosing the right CDN provider depends on your budget, technical expertise, and specific performance needs. The market offers solutions ranging from free tiers suitable for small to medium sites to enterprise-grade services with advanced security and customization. Below is a comparison of popular CDN providers commonly used with WordPress:
Free plan with basic CDN, DDoS protection, SSL, and caching; paid plans include WAF, image optimization, and Argo Smart Routing.
Most WordPress sites, especially those on a budget or needing integrated security.
Free tier; paid plans start at $20/month.
StackPath
High-performance edge network with simple pricing, instant purge, and full HTTP/2 support; includes a web application firewall.
Sites requiring predictable pricing and low complexity.
Starting at $10/month per site.
KeyCDN
Pay-as-you-go pricing, real-time analytics, and support for HTTP/2, Brotli compression, and origin pull.
Developers wanting granular control and transparent usage billing.
Starting at $0.04/GB.
BunnyCDN
Flat-rate pricing with no bandwidth overage charges, edge caching, and easy integration with WordPress via plugins.
Sites with predictable traffic spikes or fixed budgets.
Starting at $1.25/month per site.
Amazon CloudFront
Deep integration with AWS ecosystem, custom SSL certificates, and Lambda@Edge for serverless customization.
Enterprise sites already using AWS services.
Pay-as-you-go based on data transfer and requests.
When evaluating providers, consider these factors:
Global Edge Locations: More points of presence (PoPs) mean lower latency for visitors worldwide. Cloudflare leads with over 300 PoPs, while others like BunnyCDN offer 100+.
Ease of Setup: Cloudflare requires changing your domain’s nameservers, which can be intimidating for beginners. StackPath and BunnyCDN use simpler DNS-based integration.
WordPress Compatibility: Ensure the provider works seamlessly with caching plugins (e.g., WP Rocket, W3 Total Cache) and does not break admin functionality.
Security Features: DDoS protection, SSL/TLS support, and a web application firewall (WAF) are critical for high-traffic sites under constant attack.
Cache Purging: Instant or near-instant cache purging is essential for updating content quickly without waiting for TTL expiration.
Configuring CDN for WordPress with Plugins
Integrating a CDN with WordPress is streamlined by dedicated plugins that handle URL rewriting, cache purging, and asset optimization. The following steps outline a typical configuration using a CDN plugin, such as the popular CDN Enabler or W3 Total Cache (which includes CDN support):
Install and activate a CDN plugin. For most users, CDN Enabler (lightweight and simple) or W3 Total Cache (feature-rich) are reliable choices. Alternatively, many caching plugins like WP Rocket include built-in CDN integration.
Obtain your CDN URL. After signing up with a provider, you will receive a CDN endpoint (e.g., yourdomain.b-cdn.net for BunnyCDN or yourdomain.cloudfront.net for CloudFront). For Cloudflare, the CDN is automatically active once you change nameservers, but you may need to enable “Proxied” DNS records.
Configure the plugin:
In the plugin settings, enter the CDN URL (often called the “CDN Zone” or “Pull Zone”).
Specify which file types to serve via the CDN. Common defaults include images (.jpg, .png, .gif, .webp), CSS (.css), JavaScript (.js), and fonts (.woff, .woff2).
Enable “Rewrite URLs” so that all static asset links in your HTML point to the CDN domain instead of your origin.
Set up SSL/HTTPS. If your site uses HTTPS, ensure the CDN supports SSL certificates. Most providers offer free SSL (e.g., Cloudflare’s Universal SSL). Configure the plugin to use HTTPS for CDN URLs.
Test the configuration. Use browser developer tools or online tools like GTmetrix to verify that assets are loading from the CDN URL. Check for mixed content warnings (HTTP vs. HTTPS) and ensure no broken paths.
Integrate with other caching layers. If using a page caching plugin, ensure CDN caching does not conflict. For example, in W3 Total Cache, enable the CDN module and set the “Cdn engine” to your provider, then configure “Advanced” options like “Reject user agents” for logged-in users to avoid caching admin sessions.
Optimizing CDN Cache Rules and Purging
Once your CDN is active, fine-tuning cache rules maximizes performance while ensuring content freshness. Misconfigured caching can serve stale files or miss optimization opportunities. Here are key optimization strategies:
Set appropriate Time-to-Live (TTL) values:
Static assets (images, CSS, JS) that rarely change: TTL of 30 days or more.
Theme and plugin assets updated with releases: TTL of 1 week.
Dynamic content (e.g., API responses, user-specific files): TTL of 0 or short durations (minutes).
Enable Brotli or Gzip compression: Most CDNs support automatic compression of text-based assets. Verify that compression is enabled to reduce file sizes by up to 70%.
Use cache key normalization: Configure the CDN to ignore query strings (e.g., ?v=1.2) unless they affect content. This prevents cache fragmentation. For WordPress, strip common query parameters like utm_* and fbclid.
Implement cache purging strategies:
On-demand purging: When you update a post, plugin, or theme, purge only the affected CDN cache URLs. Many WordPress plugins (e.g., WP Rocket, W3 Total Cache) support automatic purging via API when content changes.
Manual purging: For major site updates (e.g., redesign, new theme), use the CDN dashboard to purge all cache. Cloudflare offers a “Purge Everything” button; StackPath provides a “Purge Cache” option for the entire zone.
Scheduled purging: Some providers allow scheduled cache refreshes (e.g., every 24 hours) to ensure content stays current without manual intervention.
Leverage origin pull vs. push zones:
Origin pull: The CDN fetches assets from your origin server on first request and caches them. This is simpler and recommended for most WordPress sites.
Push zones: You manually upload assets to the CDN. This offers more control but adds complexity. Use only if you need to serve assets from a different domain or have custom file structures.
To test cache effectiveness, monitor CDN analytics for cache hit ratio—a high ratio (above 90%) indicates that most requests are served from edge servers, reducing origin load. If the ratio is low, review your TTL settings and ensure that dynamic content is excluded from caching. Additionally, use HTTP headers like Cache-Control: public, max-age=31536000 for static files and Cache-Control: no-cache for admin pages. By systematically applying these rules, you transform your CDN from a simple offload tool into a finely tuned performance accelerator that keeps your WordPress site fast and resilient under heavy traffic.
Implementing Advanced Security and Rate Limiting
When a WordPress site experiences high traffic, the risk of malicious activity increases proportionally. Attackers often target popular sites with Distributed Denial-of-Service (DDoS) attacks, brute force login attempts, or excessive API requests that can overwhelm server resources and degrade performance for legitimate users. Implementing advanced security and rate limiting is not just about protecting data—it is a critical performance optimization strategy. By filtering out malicious traffic and capping request frequencies, you preserve bandwidth, CPU, and memory for genuine visitors. This section covers three essential layers of protection: Web Application Firewall rules, rate limiting configurations, and security plugins that actively block threats.
Setting Up Web Application Firewall (WAF) Rules
A Web Application Firewall acts as a gatekeeper between your WordPress site and incoming traffic. It inspects each request and blocks those that match known attack patterns, such as SQL injection, cross-site scripting (XSS), or malformed HTTP headers. For high-traffic sites, a WAF reduces server load by rejecting malicious requests before they reach your WordPress core or database.
There are two primary approaches: cloud-based WAFs and server-level WAFs. Cloud-based options, such as those offered by Cloudflare, Sucuri, or AWS WAF, are highly recommended for high-traffic environments because they offload filtering to a global network of edge servers. This not only protects your origin server but also absorbs large-scale DDoS attacks far from your infrastructure. To set up a cloud WAF:
Choose a provider that integrates with your DNS and CDN setup.
Configure security rules to block common threats: enable OWASP Top 10 protections, restrict access to wp-admin by IP whitelist, and block requests with suspicious user agents or empty referrers.
Enable challenge-based protections (e.g., JavaScript challenges or CAPTCHAs) for sensitive endpoints like login pages, but avoid overusing them on static content to prevent false positives.
Monitor WAF logs weekly to adjust rules—whitelist legitimate traffic that may be flagged, and tighten rules for persistent attack sources.
For server-level WAFs, ModSecurity combined with the OWASP Core Rule Set is a powerful open-source option. Install it via your web server (Apache or Nginx) and customize the rule set to reduce false positives. Be aware that server-level WAFs consume CPU resources, so test performance impact during peak traffic. A well-tuned WAF can block up to 95% of malicious requests before they consume application resources, directly improving response times under load.
Configuring Rate Limiting via Plugins or Server
Rate limiting caps the number of requests a single IP address or user can make within a specific time window. This prevents a small number of aggressive clients—whether from a DDoS botnet, a web scraper, or a misconfigured plugin—from monopolizing server resources. For WordPress, rate limiting can be implemented at the server level, the application level, or both.
Server-level rate limiting is the most efficient because it operates before PHP processes the request. For Nginx, use the limit_req_zone directive. Example configuration:
Define a zone: limit_req_zone $binary_remote_addr zone=wordpress:10m rate=30r/s;
Apply it to location blocks: limit_req zone=wordpress burst=20 nodelay;
This allows 30 requests per second per IP, with a burst capacity of 20 additional requests before throttling.
For Apache, use mod_ratelimit or mod_evasive. The latter is specifically designed to handle DDoS and brute force attacks by monitoring request rates and temporarily blocking offending IPs.
Plugin-based rate limiting offers more granular control for WordPress-specific endpoints. Popular plugins include:
Plugin
Key Feature
Best For
Wordfence
Rate limit login attempts, comment submissions, and API calls
All-in-one security with rate limiting
Limit Login Attempts Reloaded
Simple IP blocking after failed logins
Brute force protection only
WP Cerber Security
Custom rate limits for any request type, plus traffic analytics
Advanced users needing fine-grained control
When configuring plugin-based rate limits, set reasonable thresholds based on your traffic patterns. For example, limit login attempts to 5 per minute per IP, and REST API requests to 100 per minute. Overly strict limits can block legitimate users, so test during off-peak hours and monitor error logs. Combine server-level and plugin-level rate limiting for defense in depth: server rules handle the bulk of abusive traffic, while plugins catch application-specific anomalies.
Security plugins provide an additional layer of defense by actively scanning for threats, maintaining blacklists of known malicious IPs, and enforcing real-time traffic rules. For high-traffic WordPress sites, the right security plugin can reduce server load by preemptively blocking bots, scrapers, and attackers without consuming excessive resources. However, choose plugins that are lightweight and optimized for performance—avoid bloated solutions that add database queries or JavaScript on every page load.
Key features to look for in a security plugin for high-traffic sites:
IP blacklist integration: Automatically block IPs from known attack sources (e.g., via Project Honey Pot or custom lists).
Real-time traffic analysis: Identify and block patterns like rapid page refreshes, excessive 404 errors, or repeated POST requests to wp-login.php.
Country or region blocking: If your audience is geographically limited, block traffic from regions with no legitimate users to reduce attack surface.
Automatic temporary bans: Ban IPs that trigger multiple security rules within a short timeframe, with automatic unban after a cooldown period.
Recommended plugins and their roles:
Wordfence: Includes a firewall, malware scanner, and live traffic monitoring. Its “Rate Limiting” feature can throttle aggressive crawlers and block IPs that exceed thresholds. Ensure you disable unnecessary features (e.g., live traffic view in production) to save resources.
Sucuri Security: Focuses on cloud-based protection with a lightweight plugin that offloads scanning to Sucuri’s servers. It excels at blocking malicious traffic before it reaches your server, making it ideal for high-traffic sites.
All In One WP Security & Firewall: Offers granular control over login, comment, and file access rules without heavy overhead. Use its “Brute Force” and “Firewall” tabs to set up custom rate limits and IP blacklists.
To maximize performance, combine a security plugin with server-level measures. For instance, use Wordfence to block application-layer attacks (e.g., XML-RPC brute force) while Nginx handles rate limiting at the transport layer. Regularly review security logs to fine-tune rules—high-traffic sites often see false positives from legitimate tools like search engine crawlers or CDN nodes. Whitelist those IP ranges to ensure uninterrupted service during traffic spikes. By layering WAF rules, rate limiting, and security plugins, you create a robust defense that keeps your WordPress site fast and available even under extreme load.
Monitoring and Scaling Resources Dynamically
For a high-traffic WordPress site, static resource allocation is a recipe for disaster. Traffic spikes from viral content, marketing campaigns, or seasonal events can overwhelm a server in seconds, leading to downtime, slow page loads, and lost revenue. The key to staying resilient is dynamic monitoring and scaling—continuously tracking CPU, RAM, bandwidth, and database load, then automatically adjusting resources to match real-time demand. This approach ensures your site remains fast and available even under extreme load, without overpaying for idle capacity during quiet periods.
Using Monitoring Tools like New Relic or Query Monitor
Effective scaling begins with granular visibility into your site’s performance. Two powerful tools for WordPress are New Relic and Query Monitor, each serving a distinct purpose. New Relic provides server-side and application-level insights, while Query Monitor offers a lightweight, WordPress-native dashboard for frontend and database debugging.
New Relic is an enterprise-grade application performance monitoring (APM) tool. It tracks server metrics like CPU usage, memory consumption, and disk I/O, alongside WordPress-specific data such as PHP execution time, MySQL query performance, and external API calls. To integrate it, install the New Relic PHP agent on your server and add the New Relic extension to your WordPress site via a plugin (e.g., New Relic Reporting for WordPress). Once active, you can view real-time transaction traces, identify slow database queries, and see which plugins or themes are most resource-intensive. For example, if a custom plugin triggers a tenfold increase in database queries during a traffic spike, New Relic will pinpoint that plugin’s specific function.
Query Monitor is a free, developer-focused plugin that adds a toolbar to your WordPress admin. It displays detailed information about database queries, HTTP requests, hooks, and PHP errors on every page load. While it doesn’t track server-level metrics like CPU, it excels at identifying frontend bottlenecks. Use it to check for slow SQL queries, excessive autoloaded options, or memory-hungry shortcodes. For instance, if a page loads with 500 database queries instead of the recommended 50, Query Monitor will list each query with execution time, helping you optimize or cache them.
For a comprehensive monitoring strategy, combine both tools:
Set up both tools before high traffic events to establish baseline metrics. For example, if your site normally uses 40% CPU at 1,000 concurrent users, any deviation during a spike signals a need for scaling.
Setting Up Auto-Scaling with Cloud Providers
Auto-scaling automatically adjusts your server resources—CPU, RAM, and bandwidth—based on predefined triggers. This is essential for handling unpredictable traffic spikes without manual intervention. Most cloud providers (AWS, Google Cloud, DigitalOcean, Linode) offer auto-scaling features, but implementation varies.
For cloud VPS platforms (e.g., AWS EC2, DigitalOcean Droplets):
Define a launch template: Create a custom server image with your WordPress installation, caching layers (e.g., Redis, Varnish), and security configurations.
Set scaling policies: Use metrics like CPU utilization (e.g., scale up when CPU exceeds 70% for 5 minutes), memory usage, or network throughput. For WordPress, also consider database connection count or PHP-FPM process count.
Use a load balancer: Distribute incoming traffic across multiple instances. AWS Elastic Load Balancer or DigitalOcean Load Balancers can route requests to healthy servers while automatically adding or removing instances.
Database scaling: For high traffic, separate your database (e.g., Amazon RDS, DigitalOcean Managed Database) and enable read replicas. Auto-scale read replicas based on query load.
For serverless or managed WordPress (e.g., Kinsta, WP Engine, Cloudways):
These platforms often include built-in auto-scaling. For example, Kinsta uses Google Cloud’s auto-scaling infrastructure to add containers when traffic spikes, while Cloudways offers vertical scaling (increasing CPU/RAM on a single server) with one-click triggers.
Verify your plan’s scaling limits. Some managed hosts cap auto-scaling at a certain number of resources unless you upgrade to a higher tier.
Implementation checklist for auto-scaling:
Ensure your WordPress installation is stateless: Store media files on a CDN (e.g., Cloudflare, BunnyCDN) and sessions in Redis or a database.
Use a shared object cache (Redis or Memcached) to reduce database load during scaling events.
Configure health checks: Auto-scaling groups should only add instances that pass health checks (e.g., HTTP 200 on a test URL).
Test with a simulated traffic spike using tools like Loader.io or Apache JMeter before going live.
For example, if your site typically handles 5,000 concurrent users with 2 servers, an auto-scaling policy could add a third server when CPU hits 75%, then remove it when usage drops below 40% for 10 minutes. This keeps costs low while ensuring performance.
Creating Alerts for Critical Performance Thresholds
Alerts transform raw monitoring data into actionable notifications. Without them, you might only discover a resource crunch after your site goes down. Set up alerts for three categories: resource exhaustion, performance degradation, and scaling failures.
CPU usage: Alert if CPU exceeds 80% for more than 5 minutes. Sustained high CPU often indicates a PHP process bottleneck or a runaway script.
Memory usage: Alert if RAM usage exceeds 90% for 2 minutes. This can cause swapping, which severely slows WordPress.
Bandwidth: Alert if bandwidth usage approaches 80% of your plan’s limit. For cloud servers, set alerts for network throughput (e.g., >500 Mbps).
Database connections: Alert if active connections exceed 80% of the maximum. This is a common failure point for high-traffic WordPress sites.
Page load time: Alert if average TTFB (Time to First Byte) exceeds 2 seconds for 1 minute. This indicates backend strain.
How to set up alerts:
New Relic: Create alert policies for “High CPU Utilization,” “High Memory Usage,” and “Apdex Score” (user satisfaction). Use the New Relic API to integrate with Slack, PagerDuty, or email.
Cloud provider tools: AWS CloudWatch can trigger alarms for EC2 CPU, RDS connections, and load balancer latency. DigitalOcean offers monitoring alerts for Droplet CPU and memory.
Third-party monitoring: Use UptimeRobot or Pingdom for external uptime and response time alerts. These detect if your site becomes unreachable, which internal tools might miss during a server crash.
Alert response workflow:
Immediate action: For critical alerts (e.g., CPU at 95%), auto-scale resources or restart PHP-FPM. Use cloud provider APIs to trigger scaling scripts.
Diagnosis: Check New Relic transaction traces to identify the source (e.g., a specific plugin or a surge in bot traffic).
Mitigation: If auto-scaling is insufficient, temporarily block non-critical traffic (e.g., using Cloudflare’s rate limiting) or switch to a static version of the site.
Postmortem: Adjust thresholds or scaling policies based on the event. For instance, if a 10-second spike caused downtime, reduce the scaling trigger time from 5 minutes to 2 minutes.
By combining monitoring tools, auto-scaling infrastructure, and intelligent alerts, you create a self-regulating system that keeps your WordPress site performant under any traffic load. This proactive approach eliminates the guesswork of manual scaling and ensures your site delivers a seamless experience even during the busiest periods.
Testing and Iterating for Ongoing Optimization
Optimizing a high-traffic WordPress site is not a one-time task. As your content library grows, user behavior shifts, and your infrastructure evolves, what worked yesterday may become a bottleneck today. Regular performance testing ensures that every caching rule, CDN edge, and server tweak continues to deliver peak speed and reliability under real-world loads. This section outlines a disciplined approach to testing and iteration, enabling you to catch regressions early, validate improvements, and maintain a seamless experience for every visitor.
Conducting Load Testing with Tools like Apache JMeter
Load testing simulates concurrent user traffic to reveal how your WordPress site performs under stress. Apache JMeter is a powerful, open-source tool that can model thousands of virtual users hitting your site simultaneously, helping you identify breaking points before they affect real visitors. To conduct meaningful load tests, follow these steps:
Define realistic user scenarios. Model common visitor paths: browsing the homepage, reading a blog post, submitting a comment, or completing a purchase. JMeter allows you to record these actions via its HTTP(S) Test Script Recorder.
Configure ramp-up periods. Gradually increase the number of concurrent users (e.g., from 50 to 500 over 5 minutes) to observe how server response times and error rates escalate. Avoid sudden spikes that don’t reflect natural traffic patterns.
Monitor server resources. While JMeter runs, watch CPU, memory, database query rates, and PHP worker processes on your server. Tools like New Relic, Datadog, or even the hosting control panel’s metrics can correlate JMeter’s results with backend strain.
Set pass/fail thresholds. Define acceptable response times—typically under 2 seconds for page loads—and a maximum error rate (e.g., 0.5% of requests). If your site exceeds these during a test, you have a bottleneck to address.
After each test, analyze JMeter’s Aggregate Report or Summary Report. Look for the 90th percentile response time, which indicates the experience for most users, and check for any HTTP 500 or 503 errors. Common fixes include increasing PHP memory limits, enabling object caching (Redis or Memcached), or tuning your database indexes. Run load tests after every major plugin update, theme change, or content spike to ensure your optimizations hold.
A/B Testing Caching and CDN Configurations
Caching and content delivery networks (CDNs) are foundational to high-traffic WordPress performance, but misconfigured settings can actually harm user experience—for example, by serving stale content or failing to cache dynamic elements. A/B testing allows you to compare two configurations side by side, using real traffic data to determine which delivers faster load times and lower server load. Here’s how to set up effective A/B tests:
Choose one variable at a time. Test caching duration (e.g., 1 hour vs. 24 hours for page cache), CDN compression algorithms (Brotli vs. Gzip), or edge caching rules (cache static assets only vs. cache entire HTML pages). Changing multiple variables simultaneously makes it impossible to attribute improvements to a single change.
Split traffic with a tool. Use a reverse proxy like Nginx or a CDN provider (Cloudflare, Fastly, or KeyCDN) to route 50% of visitors to configuration A and 50% to configuration B. Many CDNs offer built-in A/B testing features, or you can use WordPress plugins like WP Rocket (which includes a “split testing” mode for cache settings).
Measure key metrics. Track Time to First Byte (TTFB), Largest Contentful Paint (LCP), and cache hit ratio for each group. Tools like Google PageSpeed Insights, WebPageTest, or your CDN’s analytics dashboard can provide side-by-side comparisons. Also monitor server CPU usage under the same traffic load to see which configuration reduces backend strain.
Run tests for at least one week. Traffic patterns vary by day of week and time of day. A short test (e.g., 2 hours) may capture only a specific user segment. Extend the test to capture weekend spikes, bot traffic, and different geographic regions.
For example, you might test whether enabling “Serve stale content while revalidating” on your CDN improves perceived performance for returning visitors. Configuration A (stale-while-revalidate enabled) could show a 15% lower LCP, while configuration B (no stale content) might have higher cache freshness. The winner depends on your content type—news sites may prioritize freshness, while evergreen blogs can benefit from faster load times. Document each test’s results and apply the winning configuration, then test another variable.
Scheduling Periodic Performance Audits
Without regular audits, even the best-optimized WordPress site can degrade silently. Plugins accumulate bloat, database tables grow fragmented, and third-party scripts become outdated. A scheduled performance audit—conducted monthly for high-traffic sites—ensures you catch these issues before they impact users. Use the following checklist to structure your audits:
Audit Area
What to Check
Frequency
Page load speed
Measure LCP, TTFB, and First Input Delay (FID) for 5 key pages (homepage, top post, product page, etc.) using WebPageTest or Lighthouse.
Monthly
Caching effectiveness
Verify page cache hit ratio (target >90%), object cache hit ratio (target >95%), and CDN cache hit ratio (target >80%).
Bi-weekly
Database health
Check for orphaned post revisions, transients, and spam comments. Run OPTIMIZE TABLE on high-traffic tables (e.g., wp_options, wp_posts).
Monthly
Plugin and theme performance
Audit active plugins for memory usage and query count. Remove unused plugins and replace heavy ones (e.g., replace a bloated page builder with a lightweight block editor).
Quarterly
Content delivery network
Review CDN logs for error rates (5xx), purge stale cache for updated content, and ensure edge rules still match current URL structures.
Monthly
Security and updates
Check for outdated PHP versions, WordPress core updates, and plugin patches that may introduce performance regressions.
Weekly
During each audit, use a consistent testing environment—ideally a staging copy of your site—to avoid affecting live users. Compare results against a baseline taken immediately after your last optimization. If you see a 10% drop in cache hit ratio or a 500ms increase in TTFB, investigate the cause: a recent plugin update may have introduced uncacheable cookies, or a new third-party script might be blocking rendering. Create a remediation log with timestamps and actions taken, such as “Sept 15: Disabled WooCommerce cart fragments for guest users, restored cache hit ratio to 92%.” This iterative process transforms optimization from a static fix into a living practice that scales with your traffic.
WordPress Development: A Comprehensive Guide to Building Custom Websites
Introduction to WordPress Development
WordPress began as a simple blogging platform in 2003, but over two decades it has evolved into the most widely used content management system (CMS) on the internet, powering over 40% of all websites. In the context of modern web development, WordPress is no longer just a tool for publishing blog posts; it has become a full-stack development environment capable of handling complex, custom-built digital experiences. From e-commerce stores and membership portals to enterprise-level corporate sites and headless CMS architectures, WordPress serves as the backbone for projects that demand flexibility, scalability, and user-friendly administration. The shift from a basic blogging tool to a robust development framework is driven by its extensible architecture, vast ecosystem of themes and plugins, and a global community of developers who continuously push its boundaries. This guide explores the fundamentals of WordPress development, equipping you with the knowledge to build custom websites that go far beyond the default installation.
What is WordPress Development?
WordPress development refers to the process of creating, modifying, and extending websites built on the WordPress platform using code. Unlike simply installing a pre-made theme and adding content, development involves writing custom PHP, HTML, CSS, JavaScript, and sometimes SQL to tailor every aspect of a site’s functionality and appearance. A WordPress developer works with the platform’s core files, the database structure, and the WordPress REST API to build solutions that meet specific client or project requirements.
Key activities in WordPress development include:
Custom theme development: Building a unique design from scratch or heavily modifying an existing theme to match brand guidelines and user experience goals.
Plugin development: Creating custom plugins to add features not available in the WordPress repository, such as custom post types, advanced form handlers, or third-party API integrations.
Core file modifications: Editing functions.php, wp-config.php, or .htaccess to fine-tune server behavior, security settings, and performance optimizations.
Database management: Writing custom queries, optimizing database tables, and creating custom tables for plugin data storage.
REST API integration: Building headless WordPress applications where the backend serves content to a frontend built with React, Vue.js, or other JavaScript frameworks.
Developers also work with version control systems like Git, local development environments such as Local by Flywheel or Docker, and deployment workflows to ensure code quality and collaboration. In essence, WordPress development transforms the CMS from a user-friendly content editor into a programmable web application platform.
Why Choose WordPress for Web Projects
WordPress remains a top choice for web projects—from small business sites to large-scale enterprise applications—due to a combination of technical advantages, community support, and business benefits. Below is a comparison of key reasons to choose WordPress over other CMS platforms or custom-built solutions:
Thousands of hooks (actions and filters) allow developers to modify core behavior without altering core files.
Safe upgrades and maintainable code; minimal risk of breaking changes.
Community & Ecosystem
Over 60,000 free plugins and 10,000 free themes in official directories, plus countless premium options.
Rapid prototyping and problem-solving; access to pre-built solutions for common needs.
Scalability
Handles millions of posts and high traffic with proper caching, CDN integration, and database optimization.
Can grow from a simple blog to a complex multi-site network without rebuilding.
User-Friendliness
Intuitive admin dashboard with a visual editor (Gutenberg) and role-based permissions.
Clients can manage content independently, reducing ongoing maintenance requests.
SEO Readiness
Clean code structure, permalink customization, and plugins like Yoast SEO provide built-in search engine optimization.
Better search rankings with less custom development effort.
Security
Regular core updates, security teams, and a large community reporting vulnerabilities.
Developers can focus on custom code rather than building authentication and sanitization from scratch.
Cost-Effectiveness
Open-source license eliminates licensing fees; development costs are lower than building a custom CMS.
Clients get a professional site at a fraction of the cost of proprietary solutions.
For developers, WordPress reduces the time spent on foundational tasks like user management, media handling, and database abstraction, allowing them to concentrate on unique project requirements. Additionally, the platform’s widespread adoption means a large talent pool for hiring and extensive documentation for troubleshooting.
Core Components: Themes, Plugins, and Core Files
To build custom websites effectively, developers must understand how WordPress is structured. The platform is composed of three primary layers that interact to deliver content to the browser: the core software, themes, and plugins. Each layer has a distinct role and follows specific coding standards.
WordPress Core
WordPress core consists of the essential files that make the CMS function. These include the main PHP files (wp-load.php, wp-config.php, wp-settings.php), the wp-includes directory (containing core classes, functions, and libraries), and the wp-admin directory (the backend interface). Core handles fundamental operations such as database queries, session management, user authentication, and the template loading process. Developers rarely modify core files directly because changes would be overwritten during updates. Instead, they use hooks and filters to override or extend core behavior. The core also includes the default themes (Twenty Twenty-Four, etc.) and default plugins (Akismet, Hello Dolly) as starting points.
Themes
A theme controls the visual presentation and layout of a WordPress site. It resides in the wp-content/themes directory and consists of template files (PHP files like index.php, single.php, page.php), stylesheets (style.css), JavaScript files, and optional assets like images or fonts. Themes follow the WordPress Template Hierarchy, which determines which template file is used based on the type of content being viewed (e.g., a single post uses single.php, a category archive uses category.php). Custom theme development involves creating a child theme (to safely override parent theme templates) or building a standalone theme from scratch using best practices like proper escaping, enqueuing scripts, and supporting WordPress features (post thumbnails, menus, widgets, custom headers). Modern themes often leverage the Block Editor (Gutenberg) by registering custom blocks and block patterns.
Plugins
Plugins add functionality to a WordPress site without affecting the theme. They are stored in wp-content/plugins and can be as simple as a single PHP file that adds a shortcode or as complex as an e-commerce system like WooCommerce. Plugins can modify core behavior, add custom post types and taxonomies, create admin pages, integrate with external APIs, or enhance security. The plugin architecture relies heavily on hooks: actions (to add or change functionality at specific points) and filters (to modify data before it is displayed or saved). When developing a custom plugin, developers must follow the WordPress Plugin Handbook, which includes guidelines for naming, file organization, internationalization (translation-ready), and security (nonces, data validation, capability checks). A well-built plugin can be activated on any WordPress site without conflicts, making it a reusable component across projects.
How They Work Together
When a visitor requests a page, WordPress core loads, initializes the database connection, and runs the plugin system to execute any active plugins. Plugins can modify the query, add scripts, or change the content. Then, the core selects the appropriate theme template file based on the request type. The template file uses WordPress functions (e.g., the_title(), the_content()) to pull data from the database and display it. This separation of concerns ensures that design changes (themes) do not break functionality (plugins) and vice versa, provided developers adhere to standards. For example, a custom post type for “Products” can be registered in a plugin, and a theme can style it using template files like single-products.php. This modularity is what makes WordPress development both powerful and maintainable.
Understanding these core components is the foundation for any custom WordPress project. Mastery of themes, plugins, and core interaction allows developers to build sites that are not only visually unique but also highly functional and secure.
Setting Up a Local Development Environment
Before building a custom WordPress site, you need a safe, offline workspace where you can experiment, test code, and make mistakes without affecting a live website. A local development environment mimics a real server on your own computer, allowing you to install WordPress, develop themes and plugins, and debug issues in complete privacy. This section walks you through the essential steps: selecting a local server tool, installing WordPress locally, and configuring version control with Git. By the end, you will have a robust foundation for professional WordPress development.
Choosing a Local Server Tool (e.g., Local, XAMPP, MAMP)
The first decision in setting up your local environment is selecting a tool that provides the necessary server software—Apache or Nginx, MySQL or MariaDB, and PHP—all bundled together. The right choice depends on your operating system, technical comfort, and project requirements. Below is a comparison of the most popular options.
Tool
Platform
Key Features
Best For
Local (by Flywheel)
Windows, macOS, Linux
One-click WordPress installs, built-in SSL, live link sharing, intuitive UI
Developers who want simplicity and modern features, especially for client sites
XAMPP
Windows, macOS, Linux
Cross-platform, includes phpMyAdmin, highly customizable, free
Developers needing full control and familiarity with Apache/PHP stack
MAMP
Windows, macOS
Easy setup, supports multiple PHP versions, includes MySQL and Apache
Mac users who prefer a polished interface and quick configuration
Local is widely recommended for modern WordPress development because it abstracts away much of the complexity. It automatically creates a site-specific environment, manages PHP versions, and provides one-click SSL certificates. For beginners and experienced developers alike, Local reduces setup time to minutes.
XAMPP offers more granular control. It installs a full Apache, MySQL, PHP, and Perl stack. You manually create databases and configure virtual hosts, which teaches you server fundamentals. XAMPP is ideal if you want to understand the underlying infrastructure or work on projects that require custom server settings.
MAMP is similar to XAMPP but with a cleaner interface on macOS. It includes a simple dashboard for switching PHP versions and managing databases. MAMP Pro adds advanced features like dynamic host names and email catching, but the free version is sufficient for most WordPress work.
Whichever tool you choose, ensure it supports PHP 8.0 or higher, as modern WordPress and many popular plugins require it. Download the tool from its official website, then follow the installation instructions for your operating system. After installation, launch the application and confirm the server starts without errors—usually indicated by a green status light.
Installing WordPress Locally
Once your local server tool is running, you need to install WordPress inside it. The steps vary slightly by tool, but the core process remains the same: create a database, download WordPress, configure the wp-config.php file, and run the installation script. Below is a generalized guide, followed by tool-specific notes.
Step 1: Create a Database
Open your server tool’s database management interface (often phpMyAdmin).
Click “New” or “Create Database.”
Enter a name (e.g., local_wordpress).
Choose utf8mb4_general_ci as the collation.
Click “Create.” Note the database name, username (usually “root”), and password (often blank or “root”).
Step 2: Download and Place WordPress Files
Visit wordpress.org and download the latest WordPress zip file.
Extract the contents to your local server’s document root. For Local, this is typically inside the app’s site folder (e.g., ~/Local Sites/example/app/public). For XAMPP, it is htdocs; for MAMP, it is htdocs as well.
Rename the extracted folder to your project name (e.g., my-custom-site).
Step 3: Configure wp-config.php
In the WordPress folder, find wp-config-sample.php and rename it to wp-config.php.
Open the file in a text editor and update the database settings with the values from Step 1:
For Local, you can skip manual configuration because the tool generates these values automatically when you create a new site. For XAMPP and MAMP, you must edit the file manually.
Step 4: Run the Installation
Open your web browser and navigate to http://localhost/my-custom-site (or the URL provided by Local).
Select your language and click “Continue.”
Enter your site title, username, password, and email address.
Click “Install WordPress.”
Log in with your new credentials. You now have a fully functional WordPress site running on your local machine.
Tool-Specific Shortcuts:
Local: Click “Create a new site” in the app, follow the prompts, and Local handles database creation, file placement, and SSL automatically.
XAMPP: After placing files in htdocs, ensure the Apache and MySQL modules are started from the XAMPP Control Panel before navigating to the site.
MAMP: Start the servers from the MAMP dashboard, then use the “WebStart” page to access your site.
Test your installation by visiting the WordPress admin dashboard at /wp-admin. If you see the dashboard, your local environment is ready for development.
Configuring Version Control with Git
Version control is essential for tracking changes, collaborating with others, and rolling back errors. Git is the industry standard, and integrating it with your local WordPress development workflow ensures your code is safe and organized. Follow these steps to set up Git for your custom site.
Navigate to your local WordPress folder (e.g., ~/Local Sites/my-custom-site/app/public).
Run git init. This creates a hidden .git folder that tracks changes.
Step 3: Create a .gitignore File
Not all files in a WordPress installation should be tracked. Core WordPress files, uploads, and configuration files that vary per environment should be ignored. Create a file named .gitignore in the root of your repository and add the following:
Adjust the list based on your project. For example, if you are developing a custom theme, you will want to track wp-content/themes/your-theme/ but ignore wp-content/themes/twentytwentythree/ (default themes).
Step 4: Stage and Commit Your Files
Add files to the staging area: git add .
Check what will be committed: git status
Create your first commit: git commit -m "Initial commit: local WordPress setup"
Step 5: Connect to a Remote Repository (Optional but Recommended)
Using a remote host like GitHub, GitLab, or Bitbucket provides a backup and enables collaboration.
Create a new repository on your chosen platform (do not initialize it with a README).
Copy the remote URL (e.g., https://github.com/username/my-custom-site.git).
In your terminal, run: git remote add origin https://github.com/username/my-custom-site.git
Push your local commits: git push -u origin main
Best Practices for Version Control in WordPress Development
Commit often with descriptive messages (e.g., “Add custom post type for portfolio”).
Branch for features: Create a new branch (git checkout -b feature/custom-header) before making significant changes. Merge back to main only after testing.
Never commit sensitive data like database passwords or API keys. Use environment variables or a .env file listed in .gitignore.
Sync regularly with your remote repository to avoid losing work.
By integrating Git from the start, you establish a disciplined workflow that scales as your project grows. When you later deploy to a staging or production server, you can use Git to push updates reliably.
With your local server tool installed, WordPress running offline, and Git tracking your code, you now have a professional-grade development environment. This setup allows you to build, test, and iterate on custom WordPress websites safely and efficiently, forming the bedrock of any successful WordPress development project.
Understanding the WordPress File Structure
To build custom websites effectively, a deep understanding of the WordPress file structure is non-negotiable. WordPress development relies on a specific directory layout that separates core functionality, user-generated content, and configuration. This architecture ensures that updates, customizations, and troubleshooting remain manageable. When you first install WordPress, you encounter a root directory containing several folders and files. The most critical among them are wp-admin, wp-includes, wp-content, and the configuration files at the root level. Mastering this structure allows you to extend WordPress without breaking it, optimize performance, and maintain security.
Every file in a WordPress installation serves a purpose. The wp-admin folder houses the administrative dashboard files, while wp-includes contains the core libraries that power WordPress functions, classes, and APIs. These two folders should never be modified directly because any changes are overwritten during updates. The true playground for custom WordPress development lies in wp-content, where themes, plugins, and uploads reside. Additionally, root-level configuration files like wp-config.php and .htaccess control database connections, security settings, and URL rewriting. Understanding this hierarchy prevents common mistakes such as editing core files or misplacing custom code.
The wp-content Folder: Themes, Plugins, and Uploads
The wp-content folder is the heart of custom WordPress development. It contains three primary subdirectories: themes, plugins, and uploads. Each serves a distinct role in building and managing a custom website.
Themes control the visual presentation and layout of your site. Each theme resides in its own subdirectory within /wp-content/themes/. A typical theme includes template files (e.g., index.php, single.php, page.php), style files (style.css), JavaScript assets, and functions (functions.php). For custom development, you can create a child theme that inherits functionality from a parent theme while allowing safe modifications. The structure of a theme directory often looks like this:
style.css – Theme metadata and styles
index.php – Main template fallback
functions.php – Custom functions and hooks
template-parts/ – Reusable template sections
assets/ – CSS, JS, and image files
Plugins extend functionality without altering theme files. They reside in /wp-content/plugins/, each in its own folder. A plugin can add features like contact forms, SEO tools, e-commerce capabilities, or custom post types. When developing custom plugins, you follow a similar structure: a main PHP file with a plugin header, plus subdirectories for includes, assets, and templates. Unlike themes, plugins are independent of the active theme and remain active even when switching themes.
Uploads store media files such as images, PDFs, and videos. This folder is organized by year and month (e.g., /uploads/2025/03/). It is dynamically populated by WordPress when users upload media through the dashboard. For performance, you may want to optimize this folder with caching plugins or offload media to a CDN. Importantly, the uploads folder should be backed up regularly because it contains irreplaceable user-generated content.
Additional subdirectories may appear in wp-content depending on your setup. For example, languages holds translation files, upgrade is a temporary folder for updates, and some plugins create their own folders (e.g., cache). When building custom sites, always keep the wp-content folder organized. Avoid placing custom code directly in the root of wp-content; instead, use proper plugin or theme structures.
Key Configuration Files: wp-config.php and .htaccess
Two configuration files at the root of your WordPress installation control critical settings: wp-config.php and .htaccess. Understanding these files is essential for secure and performant WordPress development.
wp-config.php is the primary configuration file. It defines database connection details, security keys, and various constants that alter WordPress behavior. This file is not included by default in the WordPress download; you create it during installation by renaming wp-config-sample.php. Key settings in wp-config.php include:
Constant
Purpose
Example
DB_NAME
Database name
define('DB_NAME', 'custom_site');
DB_USER
Database username
define('DB_USER', 'db_user');
DB_PASSWORD
Database password
define('DB_PASSWORD', 'secure_password');
DB_HOST
Database host (often localhost)
define('DB_HOST', 'localhost');
AUTH_KEY
Security salt for cookies
Random 64-character string
WP_DEBUG
Enables debugging mode
define('WP_DEBUG', true);
WP_CONTENT_DIR
Custom path for wp-content
define('WP_CONTENT_DIR', '/custom/path');
For custom development, you can add constants to wp-config.php to disable file editing in the dashboard (DISALLOW_FILE_EDIT), set memory limits (WP_MEMORY_LIMIT), or define multisite configurations. Always keep this file outside the web root when possible, or set strict file permissions (e.g., 640 or 600). Never leave WP_DEBUG enabled on a live site.
.htaccess is an Apache configuration file used for URL rewriting and security rules. WordPress uses it primarily for permalink structures. A typical .htaccess file generated by WordPress looks like this:
# BEGIN WordPress
RewriteEngine On
RewriteRule .* - [E=HTTP_AUTHORIZATION:%{HTTP:Authorization}]
RewriteBase /
RewriteRule ^index.php$ - [L]
RewriteCond %{REQUEST_FILENAME} !-f
RewriteCond %{REQUEST_FILENAME} !-d
RewriteRule . /index.php [L]
# END WordPress
You can also add custom rules to .htaccess for redirects, caching, hotlink protection, or blocking malicious traffic. However, be cautious: incorrect rules can break your site. For Nginx servers, .htaccess is not used; instead, you configure rewrite rules in the server block. Always back up this file before editing.
Both files should be treated as critical infrastructure. Store them securely, restrict access, and avoid unnecessary modifications. When migrating a site, ensure these files are correctly transferred and updated with new database credentials.
Core vs. Custom: What to Modify and What to Leave Alone
One of the most common mistakes in WordPress development is modifying core files. The WordPress core—files inside wp-admin and wp-includes—should never be edited directly. Any changes you make will be overwritten the moment you update WordPress to a new version. This can cause conflicts, security vulnerabilities, or site crashes. Instead, all customizations should occur through themes, plugins, or configuration files.
Core JavaScript and CSS files (e.g., wp-includes/js/jquery.js)
Default themes like twentytwentyfive (unless you are using them as a parent theme)
The wp-content/index.php file (a security measure; do not delete)
What you can safely modify:
Your active theme files (preferably via a child theme)
Custom plugin files you have created
The wp-config.php file for adding constants
The .htaccess file for URL rules and security
Media files in the uploads folder
For custom WordPress development, always follow the principle of separation: keep your custom code in themes or plugins. If you need to override core behavior, use WordPress hooks (actions and filters) in your theme’s functions.php or in a custom plugin. For example, to modify the excerpt length, you would add a filter rather than editing core files:
Similarly, if you need to add custom post types or taxonomies, create a plugin for that purpose. This modular approach ensures that your customizations survive updates and can be transferred to other sites. Avoid placing custom code in the wp-content root or mixing it with core files.
Another critical area is the wp-config.php file. While you can modify it, do so with caution. Adding incorrect constants can break your site. Always test changes in a staging environment first. For example, enabling WP_DEBUG on a live site can expose sensitive information to visitors.
Finally, understand that some files are generated dynamically. For instance, WordPress creates index.php files in empty directories for security. Do not delete these. Similarly, the .maintenance file appears during updates and should not be removed manually. By respecting the boundary between core and custom code, you build a robust, maintainable website that can evolve with WordPress updates.
In summary, the WordPress file structure is designed to protect core integrity while offering flexible customization paths. Focus your efforts on the wp-content folder, master the configuration files, and never touch core files. This discipline is the foundation of professional WordPress development.
Theme Development Fundamentals
Building a custom WordPress theme from scratch gives you complete control over the design, functionality, and performance of your website. Unlike relying on pre-built themes, custom development ensures your site aligns perfectly with your brand and user experience goals. This section covers the essential building blocks: understanding WordPress’s template hierarchy, properly enqueuing assets, and using template tags and loops to display dynamic content. Following these best practices results in maintainable, secure, and scalable code.
Template Hierarchy and Required Files (style.css, index.php)
Every WordPress theme must include at least two files: style.css and index.php. The style.css file contains the theme header, which provides metadata to WordPress, while index.php serves as the fallback template for all pages. The template hierarchy determines which file WordPress uses to render a specific page, allowing you to create highly customized layouts.
/*
Theme Name: My Custom Theme
Theme URI: https://example.com/my-custom-theme
Author: Your Name
Author URI: https://example.com
Description: A custom WordPress theme built from scratch.
Version: 1.0
License: GPL v2 or later
Text Domain: my-custom-theme
*/
Template hierarchy priority (most specific to least specific):
Single Post:single-{post-type}.php → single.php → singular.php → index.php
Custom Post Type Archive:archive-{post_type}.php → archive.php → index.php
404 Page:404.php → index.php
Search Results:search.php → index.php
Front Page:front-page.php → page.php → index.php
By creating template files like single.php, page.php, archive.php, and 404.php, you improve both user experience and code organization. Always include index.php as the ultimate fallback to prevent WordPress from breaking if a specific template is missing.
Enqueuing Styles and Scripts Properly
WordPress provides a robust system for loading CSS and JavaScript files via the wp_enqueue_style() and wp_enqueue_script() functions. Hardcoding <link> or <script> tags in your theme’s header or footer is considered bad practice because it can lead to conflicts with plugins, duplicate loading, and dependency management issues. Proper enqueuing ensures assets load in the correct order, only when needed, and with appropriate versioning for cache busting.
Best practices for enqueuing assets:
Use the wp_enqueue_scripts action hook to load styles and scripts.
Always provide a unique handle (slug) for each asset.
Specify dependencies (e.g., jQuery) to ensure required libraries load first.
Set a version number to force browser refreshes after updates.
Load scripts in the footer (true as the fifth parameter) to improve page load speed.
Register assets conditionally—only load scripts on pages where they are needed.
Example enqueuing function in functions.php:
function my_custom_theme_assets() {
// Enqueue main stylesheet
wp_enqueue_style(
'my-custom-theme-style',
get_stylesheet_uri(),
array(),
'1.0.0'
);
// Enqueue custom JavaScript in footer
wp_enqueue_script(
'my-custom-theme-script',
get_template_directory_uri() . '/assets/js/main.js',
array('jquery'),
'1.0.0',
true
);
// Conditionally enqueue comment-reply script on single posts
if ( is_singular() && comments_open() && get_option( 'thread_comments' ) ) {
wp_enqueue_script( 'comment-reply' );
}
}
add_action( 'wp_enqueue_scripts', 'my_custom_theme_assets' );
Using wp_head() or wp_footer() without enqueuing—these hooks are for output, not asset loading.
Loading scripts in the header unnecessarily, which blocks rendering.
Not deregistering conflicting scripts from plugins when needed (use wp_deregister_script() sparingly).
For Google Fonts or external stylesheets, use wp_enqueue_style() with the external URL. For local assets, always use get_template_directory_uri() (for parent themes) or get_stylesheet_directory_uri() (for child themes).
Using Template Tags and WordPress Loops
Template tags are WordPress functions that output or retrieve dynamic data—such as post titles, content, permalinks, and meta information—directly within your theme files. The WordPress Loop is the core mechanism for displaying posts, pages, or custom content types. Mastering these tools allows you to build flexible, data-driven layouts without writing complex database queries.
Always use have_posts() and the_post() within while to iterate through posts.
Use the_excerpt() for archive pages and the_content() for single views.
Apply post_class() to the article tag for automatic CSS classes (e.g., .post, .type-post, .category-{slug}).
For custom queries (e.g., displaying recent posts on a static page), instantiate WP_Query and call wp_reset_postdata() after the loop to restore global post data.
WordPress Development: Plugin Development Essentials
Building custom plugins is a cornerstone of professional WordPress development. A well-crafted plugin extends functionality without altering core files, ensuring your site remains update-proof, maintainable, and secure. This guide walks you through the essential techniques for creating robust plugins, from understanding hooks to distributing your code responsibly. Whether you are enhancing a client’s site or building a public tool, mastering these fundamentals will elevate your WordPress development workflow.
Hooks: Actions and Filters Explained
Hooks are the backbone of WordPress plugin development. They allow your code to interact with WordPress at specific points without touching core files. There are two types: actions and filters. Actions let you run custom functions at predefined moments (e.g., after a post is saved), while filters let you modify data before it is displayed or stored (e.g., changing post content).
Understanding when and how to use each hook is critical. Actions are ideal for adding features, sending emails, or logging events. Filters are best for transforming content, sanitizing inputs, or adjusting queries. Below is a comparison of their core differences:
Feature
Actions
Filters
Purpose
Execute custom code at a specific point
Modify or filter data before use
Return value
None (void)
Modified data (must return)
Common hooks
init, wp_enqueue_scripts, save_post
the_content, excerpt_length, pre_get_posts
Example use
Add a custom menu to the admin dashboard
Append a disclaimer to all post content
To implement hooks effectively, follow these best practices:
Use unique function names to avoid conflicts with other plugins or themes. Prefix your functions with your plugin’s slug.
Hook into the right priority—lower numbers run earlier. For example, add_action( 'init', 'my_custom_function', 10 ); runs at default priority.
Always pass expected parameters. Filters receive at least one argument (the value to modify), while actions may receive context-specific data.
Remove hooks with care using remove_action() or remove_filter() when overriding default behavior.
Remember that hooks are not limited to core WordPress. You can create custom hooks within your plugin using do_action() and apply_filters(), allowing other developers to extend your work.
Creating a Basic Plugin from Scratch
Building a plugin from scratch is straightforward when you follow WordPress’s conventions. Start by creating a folder in /wp-content/plugins/ with a unique name, then add a main PHP file with a plugin header. This header tells WordPress about your plugin. Here is a minimal example:
/*
Plugin Name: My Custom Plugin
Plugin URI: https://example.com/my-custom-plugin
Description: A simple plugin to demonstrate development basics.
Version: 1.0.0
Author: Your Name
License: GPL v2 or later
*/
Once activated, your plugin can include any PHP code. However, to keep your code organized, separate concerns into files. A common structure includes:
my-custom-plugin.php (main file with header and core logic)
/includes/ (classes, helper functions)
/admin/ (admin-specific pages and scripts)
/public/ (frontend-facing functionality)
Now, add a simple feature: a shortcode that displays a greeting. In your main plugin file, write:
function my_greeting_shortcode() {
return '<p>Hello from My Custom Plugin!</p>';
}
add_shortcode( 'my_greeting', 'my_greeting_shortcode' );
Test it by adding [my_greeting] to any post or page. This demonstrates how plugins can extend WordPress without modifying themes or core files. For more complex features, use classes to encapsulate logic and avoid global namespace pollution.
✅ Choose a unique plugin slug and prefix all functions/classes.
✅ Include a plugin header with proper metadata.
✅ Use if ( ! defined( 'ABSPATH' ) ) exit; to prevent direct access.
✅ Test activation and deactivation hooks for cleanup.
✅ Add uninstall.php for complete data removal if needed.
Security Best Practices for Plugin Code
Security is non-negotiable in WordPress development. A single vulnerability in your plugin can compromise an entire site. Follow these best practices to protect users and their data.
1. Sanitize and validate all inputs. Never trust data from users, databases, or external sources. Use WordPress functions like sanitize_text_field() for text, intval() for integers, and wp_kses_post() for HTML content. For example:
3. Use nonces for form and URL security. Nonces verify that requests originate from legitimate sources. Generate a nonce with wp_nonce_field() and verify with check_admin_referer() or wp_verify_nonce().
// In your form
wp_nonce_field( 'my_action', 'my_nonce' );
// On submission
if ( ! wp_verify_nonce( $_POST['my_nonce'], 'my_action' ) ) {
wp_die( 'Security check failed.' );
}
4. Capability checks for admin functionality. Ensure users have the right permissions before executing sensitive actions. Use current_user_can() with appropriate capabilities like manage_options or edit_posts.
5. Secure database queries. Always use $wpdb->prepare() for SQL queries to prevent SQL injection:
global $wpdb;
$results = $wpdb->get_results(
$wpdb->prepare(
"SELECT * FROM {$wpdb->prefix}posts WHERE post_type = %s",
'post'
)
);
6. Avoid direct file access. Add this line at the top of every PHP file in your plugin:
if ( ! defined( 'ABSPATH' ) ) {
exit; // Exit if accessed directly
}
By integrating these practices into every plugin you build, you ensure your code is not only functional but also trustworthy. Security should be a mindset, not an afterthought. Regularly test your plugin with tools like the WordPress Plugin Check or security scanners to catch vulnerabilities early.
Finally, when distributing your plugin, whether on WordPress.org or privately, include a clear readme.txt file with security notes. Update your plugin promptly when new vulnerabilities are discovered. A secure plugin builds user confidence and reduces support overhead, making your WordPress development efforts more sustainable and professional.
Working with WordPress REST API
The WordPress REST API is a powerful interface that allows developers to interact with WordPress sites programmatically, enabling headless WordPress architectures and seamless integration with external applications. By exposing site data—such as posts, pages, users, and custom post types—through standard HTTP methods (GET, POST, PUT, DELETE), the API decouples the backend from the frontend, letting you build dynamic experiences using JavaScript frameworks like React, Vue, or Angular. This section provides a comprehensive introduction to REST API fundamentals, authentication strategies, and custom endpoint creation, equipping you to leverage it for advanced WordPress development projects.
REST API Basics: Routes, Endpoints, and Responses
The WordPress REST API operates on a set of routes that map to endpoints, each handling specific resource actions. A route is a URL pattern (e.g., /wp/v2/posts), while an endpoint is a combination of a route and an HTTP method (e.g., GET /wp/v2/posts retrieves posts). The default namespace is wp/v2, which includes built-in resources. Responses are returned as JSON objects, containing data fields, links, and metadata like pagination info.
Key default routes include:
/wp/v2/posts – Retrieve, create, update, or delete posts.
/wp/v2/pages – Manage pages.
/wp/v2/users – Access user data.
/wp/v2/media – Handle media attachments.
/wp/v2/categories and /wp/v2/tags – Taxonomy terms.
/wp/v2/types – List registered post types.
Example response structure (GET /wp/v2/posts):
Field
Description
id
Unique post identifier (integer)
title
Object with rendered and raw title strings
content
Object with rendered (HTML) and raw (unfiltered) content
excerpt
Object with rendered excerpt
date
ISO 8601 date string
author
User ID (integer)
_links
Object containing hypermedia links for navigation
Routes can include URL parameters for filtering, sorting, and pagination. For example, /wp/v2/posts?per_page=10&page=2&orderby=date&order=desc retrieves the second page of ten posts sorted by date descending. Responses include headers like X-WP-Total and X-WP-TotalPages for pagination, and the _links object provides self, collection, and next/previous URLs. Understanding these fundamentals is essential for building reliable API-driven WordPress applications.
Since the REST API exposes sensitive data and write operations, authentication is required for non-public endpoints. WordPress supports three primary authentication methods, each suited to different use cases.
1. Cookie Authentication
Cookie authentication is used when the client is a web browser within the same domain as the WordPress site. It relies on the standard WordPress login cookie (wordpress_logged_in_) and nonce (_wpnonce). To make authenticated requests, include the nonce in the request header as X-WP-Nonce. This method is ideal for admin panels or frontend interactions where the user is already logged into WordPress. However, it does not work for external applications or cross-domain requests due to CORS restrictions.
2. OAuth 1.0a
OAuth 1.0a provides token-based authentication for third-party applications, such as mobile apps or external services. It requires a three-legged handshake: the application requests a temporary token, the user authorizes it via WordPress, and the app exchanges it for an access token. This method is secure but complex to implement, often requiring a plugin like OAuth 1.0a Server. OAuth is best for scenarios where users need to grant limited access to their WordPress data from external platforms.
3. Application Passwords
Introduced in WordPress 5.6, Application Passwords offer a simpler token-based approach. Users generate a password from their profile page (Users → Edit Profile → Application Passwords) and use it with their username for Basic Authentication. Requests include an Authorization header with Basic base64(username:password). This method is straightforward, works with external applications, and supports HTTPS-only usage for security. It is the recommended choice for most headless WordPress development, as it balances ease of use with robust security.
Comparison of authentication methods:
Method
Use Case
Complexity
Security
Cookie + Nonce
Same-domain browser requests
Low
Moderate (requires nonce)
OAuth 1.0a
Third-party applications
High
High
Application Passwords
External apps, headless setups
Low
High (HTTPS required)
When building headless WordPress sites with frameworks like Next.js or Nuxt.js, Application Passwords are the most practical choice. For example, to fetch private posts, you would send a request like:
GET /wp/v2/posts?status=private
Authorization: Basic base64(username:application_password)
Always use HTTPS to prevent credential interception, and consider rate limiting or IP whitelisting for added security in production environments.
Creating Custom REST API Endpoints
To extend the REST API beyond default resources, you can register custom routes and endpoints using the register_rest_route() function. This is essential for exposing custom data, performing complex queries, or integrating with external services. The function is typically called in a plugin or theme’s functions.php file, hooked into rest_api_init.
For write operations (POST, PUT, DELETE), always implement robust permission checks. Use current_user_can() with appropriate capabilities like publish_posts, edit_others_posts, or custom roles. Additionally, leverage sanitize_callback and validate_callback in the args array to ensure data integrity. Common sanitization functions include sanitize_text_field(), absint(), and wp_kses_post().
Use a unique namespace (e.g., yourplugin/v1) to avoid clashes with other plugins.
Always define a permission_callback—even for public data, return __return_true explicitly.
Return WP_REST_Response or WP_Error objects for consistent error handling.
Cache responses when possible using transients or object caching for performance.
Document your endpoints using the rest_pre_dispatch filter or inline comments for team collaboration.
Custom endpoints unlock limitless possibilities, from exposing analytics data to integrating with payment gateways. By mastering route registration, parameter handling, and authentication, you can build a robust API layer that extends WordPress functionality far beyond its core capabilities.
Database Management and Custom Queries
Effective WordPress development requires a deep understanding of how to interact with the underlying database. While the platform abstracts much of the complexity through its API, building custom websites often demands direct database manipulation for performance, unique data structures, or advanced filtering. This section explores the WordPress database schema, the powerful WP_Query class for custom loops, and the appropriate use of $wpdb for direct SQL queries, all while emphasizing performance best practices.
Understanding the WordPress Database Schema
Before writing any custom queries, you must understand the default database structure. WordPress uses a set of core tables, each with a specific purpose. By default, the table prefix is wp_, but this can be customized during installation. The most important tables include:
wp_posts: Stores all post types (posts, pages, custom post types, revisions, and attachments). Key columns: ID, post_title, post_content, post_type, post_status, post_parent, post_date.
wp_postmeta: Stores metadata for posts in a key-value pair format. Columns: meta_id, post_id, meta_key, meta_value.
wp_usermeta: Stores metadata for users in a key-value pair format. Columns: umeta_id, user_id, meta_key, meta_value.
Understanding relationships between these tables is critical. For example, to retrieve posts with specific categories, you must join wp_posts, wp_term_relationships, and wp_term_taxonomy. A visual map of these relationships helps avoid inefficient queries. Always reference the official WordPress database description for the latest schema changes.
Using WP_Query for Custom Loops
WP_Query is the recommended method for fetching posts in WordPress. It provides a secure, abstracted interface that handles caching, sanitization, and compatibility with plugins. Unlike direct SQL, WP_Query respects WordPress hooks and filters, ensuring your custom loops integrate seamlessly with the ecosystem.
A typical custom loop using WP_Query looks like this:
Key parameters for performance optimization include:
Parameter
Purpose
Performance Tip
posts_per_page
Limits the number of posts returned
Always set a finite number; avoid -1 on large sites
no_found_rows
Skips pagination count query
Set to true if pagination is not needed
update_post_meta_cache
Controls meta data caching
Set to false if meta is not used in the loop
update_post_term_cache
Controls term caching
Set to false if terms are not used
fields
Specifies which columns to return
Use 'ids' or 'id=>parent' to reduce memory
cache_results
Enables post object caching
Keep true for repeated queries
Best practices for WP_Query include using wp_reset_postdata() after custom loops to restore global state, leveraging pre_get_posts to modify main queries instead of creating duplicate queries, and avoiding nested queries when possible. For complex filtering, combine meta_query and tax_query with proper index-friendly comparisons.
When and How to Use $wpdb for Direct Queries
While WP_Query handles most scenarios, direct SQL queries via the global $wpdb object become necessary for operations that are not supported by the abstraction layer. Common use cases include:
Aggregating data (e.g., sum, average, count) across many posts without loading full post objects.
Batch updating or deleting metadata, terms, or user data.
Retrieving data from custom tables created by plugins or themes.
Performing complex joins that are inefficient with WP_Query.
To use $wpdb safely and efficiently, follow these practices:
Always use the global object: Access via global $wpdb; to ensure the correct database credentials and prefix are used.
Prepare your queries: Use $wpdb->prepare() to prevent SQL injection. For example: $wpdb->get_results( $wpdb->prepare( "SELECT * FROM {$wpdb->posts} WHERE post_type = %s AND post_status = %s", 'product', 'publish' ) );.
Use table prefixes: Reference tables using {$wpdb->prefix}posts or shorthand like {$wpdb->posts} to maintain portability.
Choose the right method:
get_results() for multiple rows.
get_row() for a single row.
get_var() for a single value.
query() for INSERT, UPDATE, DELETE operations.
Cache results: Use wp_cache_set() and wp_cache_get() for frequently executed queries to reduce database load.
Example of a direct query that calculates average product price from postmeta:
global $wpdb;
$average_price = $wpdb->get_var( $wpdb->prepare(
"SELECT AVG( meta_value ) FROM {$wpdb->postmeta}
WHERE meta_key = %s
AND post_id IN ( SELECT ID FROM {$wpdb->posts} WHERE post_type = %s AND post_status = 'publish' )",
'price',
'product'
) );
Performance optimization for direct queries includes:
Adding database indexes on frequently queried columns like meta_key and meta_value.
Using EXPLAIN to analyze query execution plans.
Avoiding SELECT *; specify only needed columns.
Limiting result sets with LIMIT clauses.
Using INNER JOIN instead of LEFT JOIN when possible.
When to avoid $wpdb: If your query can be expressed through WP_Query or get_posts(), use those instead. Direct SQL bypasses caching layers, post status checks, and plugin filters, potentially breaking compatibility with caching plugins, security tools, or custom post type managers. Reserve $wpdb for operations that genuinely require raw database access.
In practice, a balanced approach works best: use WP_Query for 90% of post retrieval tasks, and fall back to $wpdb for specialized data operations. Always test queries on staging environments, monitor database query times with tools like Query Monitor, and document any custom SQL for maintainability.
Performance Optimization for WordPress Sites
In the competitive landscape of modern web development, site speed is a critical factor that directly influences user experience, search engine rankings, and conversion rates. A slow WordPress site can deter visitors, increase bounce rates, and diminish the effectiveness of your digital presence. Performance optimization is not a one-time task but an ongoing process that requires a systematic approach to caching, asset management, and database health. This section explores three fundamental pillars of WordPress performance: caching strategies, image and asset optimization, and database maintenance with query monitoring.
Before diving into specific techniques, it is essential to understand that every optimization should be measured. Tools like Google PageSpeed Insights, GTmetrix, or WebPageTest provide baseline metrics and actionable recommendations. The goal is to achieve a balance between functionality and speed, ensuring that custom features or plugins do not compromise performance. Below, we examine each optimization area in detail, with practical steps and best practices.
Implementing Caching (Page, Object, and Browser Caching)
Caching is the most impactful technique for reducing server load and accelerating page delivery. It works by storing copies of dynamically generated content so that subsequent requests can be served faster. In WordPress development, three primary caching layers are essential: page caching, object caching, and browser caching.
Page Caching saves the fully rendered HTML output of a page. When a visitor requests a URL, the server delivers the static HTML file instead of executing PHP queries and database calls. This reduces response times from hundreds of milliseconds to mere milliseconds. Popular plugins like WP Super Cache, W3 Total Cache, or server-level solutions such as Varnish or Nginx FastCGI Cache can implement page caching. For best results, combine page caching with a Content Delivery Network (CDN) to serve static files from edge locations near the user.
Object Caching stores database query results in memory, reducing the need for repeated database lookups. WordPress supports object caching via the wp_cache_* functions, but it requires a persistent backend like Redis or Memcached. Hosting providers often offer Redis integration, or you can use plugins like Redis Object Cache. This is especially beneficial for sites with heavy user interactions, such as membership platforms or e-commerce stores, where identical queries are executed across multiple page views.
Browser Caching instructs visitors’ browsers to store static assets (CSS, JavaScript, images) locally for a specified duration. By setting appropriate Cache-Control and Expires headers, you can reduce the number of HTTP requests on repeat visits. In WordPress, you can configure browser caching via plugins or by editing the .htaccess file (Apache) or nginx.conf (Nginx). For example, setting a cache lifetime of one year for static assets like fonts or logo images is common, while shorter durations (e.g., one week) are suitable for CSS or JS files that may update more frequently.
Below is a comparison of caching types and their primary use cases:
Caching Type
What It Stores
Best For
Typical Tools
Page Caching
Full HTML output of pages/posts
Anonymous visitors, blog posts
WP Super Cache, Varnish
Object Caching
Database query results
Dynamic sites with logged-in users
Redis, Memcached
Browser Caching
Static assets (images, CSS, JS)
All sites, repeat visitors
.htaccess, WP Rocket
When implementing caching, always test your site thoroughly. Caching can sometimes break dynamic content (e.g., shopping cart updates) if not configured correctly. Use cache exclusion rules for pages that must remain real-time, such as checkout or user account pages.
Optimizing Images and Assets
Images and static assets often account for the majority of a webpage’s total weight. Without optimization, high-resolution images can bloat page size and drastically increase load times. The goal is to deliver visually appealing media with minimal file size, using modern formats and compression techniques.
Image Compression and Formats are the first step. Tools like Smush, ShortPixel, or Imagify can automatically compress images upon upload to WordPress. For lossless compression, aim for a balance where visual quality is preserved. Consider using next-generation formats like WebP, which provides 25-35% smaller file sizes compared to JPEG or PNG without noticeable quality loss. Many caching plugins now offer automatic WebP conversion and delivery via the <picture> element or server rules.
Lazy Loading defers the loading of images and iframes until they are about to enter the viewport. WordPress has native lazy loading since version 5.5, but you can enhance it with plugins that add blur-up placeholders or low-quality image previews (LQIP). This technique reduces initial page weight and speeds up perceived load time, especially on pages with many images, such as galleries or product listings.
CSS and JavaScript Optimization involves minification, concatenation, and deferred loading. Minification removes unnecessary characters (spaces, comments, line breaks) from code files without affecting functionality. Concatenation merges multiple CSS or JS files into fewer requests, reducing HTTP overhead. However, be cautious with concatenation on HTTP/2-enabled sites, as it can actually harm performance due to multiplexing. Instead, focus on critical CSS—inlining the styles needed for above-the-fold content and loading the rest asynchronously. For JavaScript, use the async or defer attributes to prevent render-blocking.
Consider the following checklist for asset optimization:
Compress all images to the smallest acceptable quality (e.g., 80-85% JPEG).
Serve images in WebP format with fallback to original format.
Implement lazy loading for images and embedded videos.
Minify CSS, JavaScript, and HTML files.
Inline critical CSS (above-the-fold styles) directly in the <head>.
Defer non-critical JavaScript and load it after the main content.
Use a CDN to distribute assets globally.
Tools like Autoptimize or WP Rocket can automate many of these tasks. However, always test your site after making changes to ensure that interactive elements (menus, forms, sliders) still function correctly.
WordPress relies heavily on its MySQL database to store posts, metadata, options, users, and plugin configurations. Over time, this database accumulates overhead: post revisions, spam comments, transients, and orphaned data from deleted plugins or themes. A bloated database can slow down queries and increase server response times. Regular optimization and query monitoring are essential for maintaining peak performance.
Database Optimization involves cleaning up unnecessary data and optimizing table structures. Key tasks include:
Removing post revisions (keeping only the latest 2-5 versions).
Running OPTIMIZE TABLE on all tables to reclaim disk space.
Plugins like WP-Optimize, Advanced Database Cleaner, or Sweep can automate these tasks. Alternatively, you can run manual SQL commands via phpMyAdmin or WP-CLI. For example, to delete all post revisions, use: DELETE FROM wp_posts WHERE post_type = 'revision'; (adjust table prefix as needed). Schedule automatic cleanups weekly or monthly depending on site activity.
Query Monitoring helps identify slow or inefficient database queries that degrade performance. WordPress developers often face issues with poorly coded plugins or themes that execute unnecessary queries on every page load. Tools like Query Monitor (a plugin) display a detailed breakdown of database queries, including execution time, calling functions, and duplicate queries. Use it to:
Identify queries with high execution time (e.g., >0.1 seconds).
Spot duplicate queries that can be cached or optimized.
Check if plugins are running excessive queries on admin or frontend pages.
Evaluate the impact of custom WP_Query loops.
Common optimization techniques for slow queries include adding database indexes, using wp_reset_postdata() after custom loops, and limiting the number of posts retrieved with posts_per_page. For complex sites, consider implementing a persistent object cache (as discussed earlier) to store query results and reduce database load.
Here is a summary of database maintenance tasks and their frequency:
Task
Recommended Frequency
Impact
Delete post revisions
Weekly
Reduces table size significantly
Remove spam comments
Weekly
Moderate improvement
Clean expired transients
Daily
Prevents bloat in options table
Optimize tables
Monthly
Defragments and reclaims space
Monitor slow queries
Ongoing
Identifies performance bottlenecks
By combining database cleanup with query monitoring, you ensure that your WordPress site runs efficiently even as content and user activity grow. Remember to back up your database before performing any optimization tasks, especially if using manual SQL commands.
Security Best Practices in WordPress Development
Security is not an afterthought in WordPress development—it is a foundational requirement for any custom website that handles user data, processes payments, or manages sensitive content. A single vulnerability can compromise an entire site, erode user trust, and lead to significant financial or reputational damage. This section covers three critical areas of security: sanitizing and validating user input, using nonces to protect forms and URLs, and hardening the wp-config.php file along with file permissions. By implementing these measures, you create a robust defense against common attack vectors such as SQL injection, cross-site request forgery (CSRF), and unauthorized file access.
Sanitizing and Validating User Input
User input is the most common entry point for malicious attacks. Whether it comes from a comment form, a search box, a custom plugin setting, or an API endpoint, every piece of data submitted to your WordPress site must be treated as potentially hostile. The two primary techniques for handling this are sanitization and validation. Sanitization cleans the input by removing or encoding dangerous characters, while validation checks whether the input meets expected criteria (e.g., an email address format or a numeric ID).
WordPress provides a rich set of built-in functions to handle both tasks. For sanitization, use functions such as sanitize_text_field() for plain text, sanitize_email() for email addresses, sanitize_html_class() for CSS classes, and sanitize_key() for database keys. For validation, functions like is_email(), is_numeric(), and absint() (which returns an absolute integer) are essential. Never trust raw $_POST, $_GET, or $_REQUEST data.
Below is a reference table for common input types and the recommended sanitization or validation function:
global $wpdb;
$user_id = absint( $_GET['user_id'] );
$results = $wpdb->get_results( $wpdb->prepare(
"SELECT * FROM {$wpdb->prefix}usermeta WHERE user_id = %d",
$user_id
) );
Never concatenate user input directly into SQL strings. Similarly, when outputting data to the browser, use escaping functions such as esc_html(), esc_attr(), and esc_url() to prevent cross-site scripting (XSS) attacks. The rule is simple: sanitize on input, escape on output.
Using Nonces for Form and URL Security
Nonces (number used once) are security tokens that protect against cross-site request forgery (CSRF) attacks. In WordPress development, a nonce is a unique, time-limited hash generated for a specific action and user. When a form is submitted or a URL is accessed, the nonce is verified to ensure the request originated from the legitimate user and not from an attacker tricking the user into performing an unintended action.
WordPress provides four key functions for working with nonces:
wp_nonce_field() – Adds a hidden nonce field to a form.
wp_create_nonce() – Generates a nonce value for a URL or action.
check_admin_referer() – Verifies a nonce from a form submission (typically in admin contexts).
wp_verify_nonce() – Checks a nonce value against a known action, returning false if invalid.
For example, to protect a custom form in a plugin, include the nonce field like this:
On the receiving end, verify the nonce with wp_verify_nonce() or check_admin_referer(). Note that nonces expire after 12–24 hours by default, so they offer protection against replay attacks within a reasonable window. Always use nonces for any action that modifies data (create, update, delete) and for any privileged operation.
The wp-config.php file is the heart of your WordPress installation—it contains database credentials, security keys, and other critical settings. Hardening this file and setting correct file permissions are essential steps to prevent unauthorized access and data breaches.
Hardening wp-config.php
Start by moving wp-config.php one directory level above your WordPress root (i.e., outside the public web root). WordPress automatically checks the parent directory for the file, which prevents direct access via a URL. If you cannot move it, restrict access using server configuration:
In Apache, add the following to a .htaccess file in the root: <Files wp-config.php> Order allow,deny; Deny from all </Files>.
In Nginx, add: location ~* wp-config.php { deny all; }.
Next, generate strong security keys and salts. WordPress uses constants like AUTH_KEY, SECURE_AUTH_KEY, LOGGED_IN_KEY, and NONCE_KEY (plus corresponding salts) to encrypt cookies and nonces. Use the official WordPress generator at https://api.wordpress.org/secret-key/1.1/salt/ to create unique values and replace any default or weak keys. Update these periodically for enhanced security.
Disable file editing in the admin dashboard by adding define( 'DISALLOW_FILE_EDIT', true );.
Disable plugin and theme updates from the admin if you manage updates via Git or CLI: define( 'DISALLOW_FILE_MODS', true );.
Force SSL for admin and login pages: define( 'FORCE_SSL_ADMIN', true );.
Set the WordPress debugging mode to false in production: define( 'WP_DEBUG', false );.
Setting Proper File Permissions
Incorrect file permissions can expose your site to attackers. The general principle is to give the minimum necessary access. Use the following guidelines:
File/Directory
Recommended Permission
Notes
All files (except wp-config.php)
644 (owner read/write, group/others read)
Files should never be writable by the web server unless necessary (e.g., uploads).
Directories need execute permission to be traversed.
wp-config.php
600 or 640
Restrict access to the owner only (or owner and group). Never 644 or 777.
/wp-content/uploads/
755 (directories), 644 (files)
This directory must be writable by the web server for media uploads. Consider using a separate uploads directory outside the web root for sensitive files.
/wp-content/plugins/ and /wp-content/themes/
755 (directories), 644 (files)
Set to read-only after installation. Use version control for updates.
To apply these permissions via SSH, navigate to your WordPress root and run:
If your server uses a different user for the web server (e.g., www-data), ensure the file owner matches the correct user. Avoid setting permissions to 777, as this allows anyone to modify files. For the uploads directory, you may need to set it to 775 if the web server user is in the same group as the file owner.
Finally, regularly audit your file permissions and wp-config.php settings, especially after installing plugins or themes. A hardened configuration combined with rigorous input handling and nonce usage forms the bedrock of secure WordPress development.
Deployment and Maintenance Strategies
Once a custom WordPress site is fully built and tested in a local development environment, the next critical phase is deploying it to a live server and establishing a sustainable maintenance routine. Proper deployment and maintenance strategies ensure that the site remains secure, performs optimally, and can be quickly restored in case of failure. This section covers the essential processes for migrating from local to production, managing updates, and implementing robust backup and staging workflows.
Migrating from Local to Live Server
Migrating a WordPress site from a local environment to a live server involves moving all files, the database, and configuration settings while ensuring that URLs and paths are updated correctly. The process can be broken down into three main stages: preparation, file transfer, and database migration.
Preparation Steps:
Export the local database using phpMyAdmin or a command-line tool like wp db export via WP-CLI.
Perform a search-and-replace on the database to update local URLs (e.g., http://localhost/mysite) to the live domain (e.g., https://www.example.com). Use tools like WP-CLI’s wp search-replace or a dedicated plugin such as Better Search Replace.
Compress the entire WordPress file structure (excluding wp-config.php and .htaccess if custom) into a zip or tar archive.
File Transfer:
Upload the compressed archive to the live server via SFTP or cPanel File Manager.
Extract the files into the desired directory (e.g., public_html or a subfolder).
Update the wp-config.php file with live database credentials: database name, username, password, and host (often localhost).
Database Migration:
Create a new database and database user on the live server via cPanel or a command-line interface.
Import the modified database SQL file using phpMyAdmin or mysql -u username -p database_name < file.sql.
Verify that all site URLs are correct by checking the wp_options table for siteurl and home values.
Post-Migration Checklist:
Test front-end pages and posts for broken links or missing assets.
Log into the WordPress admin area using the local credentials.
Resave permalink settings under Settings > Permalinks to flush rewrite rules.
Check that all plugins and themes are active and functioning.
Update any hardcoded paths in theme files or custom code.
For larger sites or those with complex configurations, consider using a migration plugin like All-in-One WP Migration or Duplicator, which automates the search-and-replace and packaging process. However, always verify the integrity of the migration manually to catch any edge cases.
Managing Core, Theme, and Plugin Updates
WordPress releases frequent updates to its core software, themes, and plugins to patch security vulnerabilities, fix bugs, and introduce new features. A disciplined update management strategy minimizes risk while keeping the site current.
Core Updates:
Minor core updates (e.g., 6.4.1 to 6.4.2) are typically security and maintenance releases and can be applied automatically via the WP_AUTO_UPDATE_CORE constant set to true in wp-config.php.
Major core updates (e.g., 6.4 to 6.5) introduce new features and may require testing. Apply these in a staging environment first, then deploy to production after verifying compatibility.
Always back up the site before applying any core update, especially major versions.
Theme and Plugin Updates:
Enable automatic updates for trusted plugins and themes that are actively maintained. Use the auto_update_plugin and auto_update_theme filters in a custom plugin or theme’s functions.php file.
For critical plugins (e.g., e-commerce, membership), disable automatic updates and schedule manual updates after testing.
Update plugins in a staging environment first to catch conflicts or breaking changes.
After updating, perform a quick smoke test: check key pages, forms, and user flows.
Update Type
Risk Level
Recommended Update Strategy
Minor Core
Low
Automatic updates enabled
Major Core
Medium
Test in staging; manual deployment
Active Plugin
Low to Medium
Automatic updates for well-maintained; manual for critical
Inactive Plugin
Low
Automatic updates or delete if unused
Custom Theme
Medium to High
Manual updates with full testing
Best Practices for Update Management:
Maintain a changelog of updates applied to production, including dates and any issues encountered.
Subscribe to WordPress security mailing lists and plugin developer newsletters for advance notice of critical patches.
Use a monitoring tool (e.g., WPMU DEV, ManageWP) to track update status across multiple sites.
Set a recurring monthly maintenance window for applying non-urgent updates.
Setting Up Automated Backups and Staging Environments
Automated backups and staging environments form the safety net of any professional WordPress deployment. They enable rapid recovery from failures and safe testing of changes before they reach the live site.
Automated Backup Strategies:
Full Backups: Include the entire file system and database. Schedule daily or weekly depending on content update frequency.
Incremental Backups: Capture only changes since the last full backup, reducing storage and bandwidth. Suitable for high-traffic sites with frequent updates.
Offsite Storage: Store backups in a separate location from the live server, such as cloud storage (Amazon S3, Google Drive, Dropbox) or a remote FTP server.
Recommended Backup Tools and Plugins:
UpdraftPlus: Supports scheduled backups to multiple remote destinations, with one-click restore.
BackWPup: Offers comprehensive scheduling and can back up to Dropbox, S3, or email.
Jetpack VaultPress Backup: Provides real-time backups and easy restores with a subscription.
Server-Level Backups: Use hosting provider tools (e.g., cPanel backups, server snapshots) for an additional layer of protection.
Backup Frequency Guidelines:
Site Type
Database Backup
Files Backup
Blog or static site
Weekly
Weekly
E-commerce site
Daily
Daily
Membership site
Daily
Weekly
High-traffic news site
Every 6 hours
Daily
Setting Up a Staging Environment:
Manual Staging: Clone the live site to a subdomain or subdirectory (e.g., staging.example.com) using the same migration process described earlier. Use a separate database and ensure the staging site is not indexed by search engines (add a noindex meta tag or use a password-protected directory).
Hosting-Provided Staging: Many managed WordPress hosts (e.g., WP Engine, Kinsta, Flywheel) offer one-click staging environments that automatically copy the live site and allow push/pull between environments.
Plugin-Based Staging: Plugins like WP Staging or BlogVault can create a staging copy directly from the WordPress admin, though they may be resource-heavy on shared hosting.
Staging Workflow:
Create a staging copy of the live site.
Apply updates, test new plugins, or develop custom features in staging.
Run automated tests or manual checks for broken functionality.
Deploy changes from staging to live using the hosting provider’s push feature or by repeating the migration process.
After deployment, verify the live site and clear any caching layers.
Backup and Staging Integration:
Automate backup creation immediately before any staging deployment to ensure a restore point is available.
Use the same backup tool for both environments to maintain consistency.
Schedule monthly tests of backup restoration to confirm that backup files are not corrupted and that the restore process works.
By implementing these deployment and maintenance strategies, WordPress developers can ensure that custom websites remain stable, secure, and adaptable over time. A methodical approach to migration, updates, backups, and staging reduces downtime, protects user data, and provides a professional foundation for ongoing site management.
How to Add Alt Text to Images in WordPress: The Complete Image SEO and Accessibility Guide
Adding alternative text (alt text) to images in WordPress is one of the most effective ways to improve your website’s accessibility, boost search engine visibility, and enhance overall user experience. While it takes only a few seconds per image, implementing a disciplined, keyword-aware image SEO strategy transforms how search engines index your media assets and ensures your site complies with global web accessibility standards.
Every image uploaded to a modern web application carries metadata that communicates directly with screen readers for visually impaired users and web crawlers like Googlebot. When executed properly, image alt text acts as a bridge between technical accessibility and image search optimization, helping your content rank in Google Images and driving high-intent organic traffic back to your domain.
Whether you are managing media assets inside the modern WordPress Block Editor (Gutenberg), organizing files inside the Media Library, editing layouts using visual builders like Elementor, or architecting custom web systems—such as our Full-Stack WordPress and React Architectures or Automated Automotive Marketplace APIs—this guide covers every technical and strategic aspect of WordPress alt text optimization.
Table of Contents
What Is Image Alt Text and Why Does It Matter?
How to Add Alt Text in the WordPress Media Library
Adding Alt Text Directly Inside the Block Editor (Gutenberg)
Inserting Alt Text in Page Builders (Elementor and Custom Layouts)
The Difference Between Alt Text, Image Title, Caption, and Description
Strategic Image SEO: Writing Alt Text for Accessibility and Rankings
How to Audit and Fix Missing Alt Text Across Your Site
Handling Decorative Images, Background Graphics, and SVGs
Advanced Image Optimization: WebP Conversion, File Names, and Lazy Loading
Checklist for Perfect WordPress Image Accessibility and SEO
1. What Is Image Alt Text and Why Does It Matter?
Alternative text (often referred to as alt tag, alt attribute, or alt description) is an HTML attribute added to an image tag. In raw web code, the alt attribute provides a text description of the image whenever the visual asset fails to render or when the page is being read by assistive technology.
The Two Core Pillars of Alt Text:
1. Web Accessibility (WCAG Compliance)
Screen readers rely heavily on alt text to describe visual assets to users with vision impairments. According to the Web Content Accessibility Guidelines (WCAG), all non-text content provided on a web application must have a text alternative that serves an equivalent purpose. Without proper alt text, screen readers skip over critical visual context or simply read out raw file names like IMG_00294.jpg.
2. Search Engine Optimization (Image SEO)
Search engine bots are highly intelligent, but they still rely on text metadata to understand the precise context and meaning of an image. Alt text helps algorithms categorize visual content, index relevant images in Google Image Search, and understand the surrounding topic of a page—much like strategic internal linking outlined in our guide on How to Add a Link in WordPress.
2. How to Add Alt Text in the WordPress Media Library
The WordPress Media Library allows you to assign global alt text to an image immediately after uploading or retroactively across your media database.
Step-by-Step Instructions:
Log into your WordPress administrative dashboard.
Go to Media > Library from the left navigation menu.
Click on the target image you wish to edit to open the Attachment Details modal window.
Locate the Alternative Text field on the right-hand panel.
Type a descriptive, concise text phrase describing the visual asset.
Click anywhere outside the input box or press Tab. WordPress automatically saves your changes to the database.
Pro Tip: Adding alt text inside the Media Library assigns that text to the image globally. When you insert that image into future blog posts or pages, WordPress will automatically pull the alt text saved in the Media Library.
3. Adding Alt Text Directly Inside the Block Editor (Gutenberg)
If you insert an image directly into a post or page while writing inside the Gutenberg editor, you can add or modify alt text on the fly without navigating back to the Media Library.
Step 1: Click on the Target Image Block
Open your post inside the Gutenberg Block Editor and click directly on the image block you want to edit.
Step 2: Open the Block Settings Panel
In the right-hand sidebar menu, ensure the Block tab is selected. If the sidebar panel is hidden, click the gear icon in the top-right corner of the editor toolbar.
Step 3: Enter Your Description in the Alternative Text Box
Scroll down to the Image Settings section. Locate the Alternative Text (Alt Text) text area.
Step 4: Add Contextual, Descriptive Text
Type your descriptive text into the field. If the image needs specific context unique to this post, you can override the global Media Library alt text right here.
When updating existing posts or restructuring layouts, managing media assets efficiently keeps site rendering fast and clean. For broader site planning, review our guide on How Much Does WordPress Cost in 2026?.
4. Inserting Alt Text in Page Builders (Elementor and Custom Layouts)
Visual drag-and-drop page builders like Elementor allow you to set alt text during layout construction.
Adding Alt Text in Elementor:
Open your page inside the Elementor editor interface.
Click on the Image Widget you want to customize.
In the left panel under the Content tab, click on the image thumbnail box.
The WordPress Media Library overlay will pop up. Highlight your target image.
In the right-hand Attachment Details column, enter your phrase into the Alt Text box.
Click Select or Insert Media at the bottom right.
Click Update to save your page layout.
When building complex page layouts with visual builders, maintaining clean code standards and lightweight DOM structures is essential. Read our full breakdown on Maintaining Performance in Elementor Page Builders.
5. The Difference Between Alt Text, Image Title, Caption, and Description
WordPress provides four distinct metadata fields for every uploaded image. Understanding how each field functions prevents duplication and improves layout structure:
Metadata Field
Visible on Frontend Page?
Primary Function
Ideal Use Case
Alt Text
No (Unless image fails to load)
Describes visual content for screen readers and search bots.
Mandatory for all informative and functional images.
Caption
Yes (Displayed beneath image)
Provides visible explanation or attribution to all readers.
Displaying image credits, chart summaries, or photo context.
Title
Tooltip on mouse hover
Displays extra info when a user hovers over the image.
Optional additional context; generally ignored by SEO bots.
Description
On Attachment Page
Deep detail or story stored inside the Media Library.
Internal team notes or public attachment page archives.
6. Strategic Image SEO: Writing Alt Text for Accessibility and Rankings
Writing effective alt text requires striking a balance between natural human description and targeted search engine optimization.
1. Be Specific and Descriptive
Describe what is actually shown in the visual. Instead of writing "car", write "red vintage sports car parked on a cobblestone street".
2. Keep It Under 125 Characters
Most screen readers stop reading alt text around 125 characters. Keep your descriptions concise, clear, and focused.
3. Include Target Keywords Naturally
Integrate relevant primary or secondary keywords where contextually appropriate. Avoid keyword stuffing (e.g., "wordpress alt text image seo best alt text wordpress tag"), as search engine algorithms penalize unnatural keyword repetition.
4. Omit Redundant Words
Do not begin your text with phrases like "image of..." or "picture showing...". Screen readers and search engine crawlers already recognize the element as an image. Jump straight into the description.
7. How to Audit and Fix Missing Alt Text Across Your Site
As a website grows, untracked media assets without alt text naturally accumulate. Auditing your media database identifies missing alt attributes and ensures site-wide accessibility compliance.
Recommended Auditing Methods:
SEO Crawling Tools: Run a site-wide desktop crawl using tools like Screaming Frog SEO Spider or Ahrefs. Filter by Images > Missing Alt Text to generate a complete list of unoptimized media URLs.
WordPress Accessibility Plugins: Install audit plugins to identify unassigned images inside your database.
Manual Inspection: Right-click any image in your web browser, select Inspect Element, and check the raw image tag for the alt="" attribute.
Regularly auditing your site media ensures clean infrastructure. For ongoing maintenance workflows, explore our guide on How to Backup Your WordPress Site.
8. Handling Decorative Images, Background Graphics, and SVGs
Not every image on a web page requires an alt text description. Misusing alt text on purely decorative graphics can clutter the experience for screen reader users.
Decorative Images
If an image is purely decorative (e.g., visual divider lines, subtle background patterns, or abstract accent shapes), leave the alt text attribute empty (alt=""). This tells screen readers to skip the asset entirely.
CSS Background Images
Images loaded via CSS rules (background-image: url(...)) cannot accept standard HTML alt attributes. If a background image carries informative content, convert it into an inline image tag or ensure equivalent text is provided in surrounding HTML elements.
If you are evaluating custom migrations or headless frontends where asset rendering is decoupled, check out our analysis on Next.js to WordPress Migration Strategies.
Alt text is one component of a holistic image performance strategy. To achieve top Google PageSpeed Insights scores, optimize the entire image pipeline:
Optimize File Names Before Uploading: Rename image files on your computer using clear, hyphenated keywords (e.g., wordpress-alt-text-editor-settings.jpg) instead of default camera names (DCIM_9201.jpg).
Convert to Next-Gen Image Formats: Use next-generation image formats like WebP or AVIF to reduce file sizes by 30% to 50% without sacrificing visual quality.
Enable Native Lazy Loading: Ensure loading="lazy" is enabled across your image templates so below-the-fold media assets only load as the user scrolls down the page.
10. Checklist for Perfect WordPress Image Accessibility and SEO
Before publishing your next blog post or landing page, run through this quick image optimization checklist:
[ ] Descriptive Text: Does every informative image have a clear, descriptive alt text attribute?
[ ] No Redundant Words: Have phrases like "image of" or "photo of" been removed?
[ ] Concise Length: Is the alt text kept under 125 characters?
[ ] Natural Keyword Placement: Are relevant keywords integrated naturally without keyword stuffing?
[ ] Empty Alt for Decorative Graphics: Are decorative graphics assigned an empty alt="" attribute?
[ ] Optimized File Names: Are raw image file names descriptive and hyphenated?
[ ] Next-Gen Formatting: Are images compressed and converted to WebP or AVIF?
Explore Our Engineering Guides and Site Sections
Continue exploring our technical tutorials and main portfolio sections:
How to Add a Link in WordPress: The Ultimate Internal Linking and SEO Architecture Guide
Mastering how to add a link in WordPress is one of the most fundamental skills for any website owner, web developer, or content publisher. While inserting a basic hyperlink takes only a few seconds, understanding the strategic engineering behind link building, URL structures, anchor text selection, and site architecture can transform your search engine visibility and user navigation.
Hyperlinks serve as the nervous system of the internet. They allow web crawlers—such as Googlebot—to discover new content, understand the contextual relationship between different pages, and distribute page rank throughout your domain. When executed correctly, a well-planned internal linking strategy boosts organic rankings, lowers bounce rates, and keeps visitors engaged across your site.
Whether you are editing content inside the modern WordPress Block Editor (Gutenberg), managing legacy layouts in the Classic Editor, building custom landing pages using visual builders, or optimizing codebases across complex full-stack environments—such as our Full-Stack WordPress and React Architectures or Automated Automotive Marketplace APIs—this guide covers every technical and strategic aspect of WordPress hyperlinking.
Table of Contents
The Core Fundamentals of Web Hyperlinks
How to Add a Link in the WordPress Block Editor (Gutenberg)
Adding Hyperlinks in the Classic Editor
Inserting Links in Visual Page Builders (Elementor and Custom Layouts)
Understanding Link Attributes: Open in New Tab, Nofollow, Sponsored, and UGC
How to Add Image Links, Button Links, and Navigation Anchor Links
Strategic Internal Linking: The Secret Engine of Technical SEO
How to Audit, Fix, and Manage Broken Links in WordPress
Advanced Link Management: Automated Redirects and Editing Raw HTML
Checklist for Perfect WordPress Link Architecture
1. The Core Fundamentals of Web Hyperlinks
At its simplest level, a hyperlink is an HTML element that connects one web document or resource to another. In raw web code, a link uses the anchor tag wrapped around targeted text or media assets.
When a user clicks on anchored text, the browser reads the destination address provided in the reference attribute and immediately routes the user to the target URL.
Internal Links vs. External Links
Understanding the functional difference between link types is essential for content planning:
Internal Links: These are hyperlinks that point to another page, blog post, or anchor section within the same domain name. Internal links pass link equity, create logical site hierarchies, and help visitors discover related content—such as our comprehensive breakdown on How Much Does WordPress Cost in 2026?.
External Links (Outbound Links): These links point from your domain to an entirely different external website, such as official documentation at WordPress Developer Resources or search engine guidelines at Google Search Central. Outbound links to high-authority resources signal to search engines that your content is thoroughly researched and trustworthy.
Inbound Links (Backlinks): These are links from external third-party websites pointing back to your site. Backlinks act as votes of confidence in the eyes of search engine algorithms.
2. How to Add a Link in the WordPress Block Editor (Gutenberg)
Since the introduction of the Gutenberg Block Editor, inserting hyperlinks inside WordPress has become fast, intuitive, and visually responsive.
Step 1: Highlight Your Target Anchor Text
Open your post or page inside the WordPress administrative dashboard. Navigate to the paragraph or heading block containing the text you want to convert into a link. Click and drag your cursor to highlight the exact phrase. Choosing descriptive, keyword-relevant anchor text rather than generic phrases like “click here” is a critical best practice for accessibility and SEO.
Step 2: Open the Inline Link Control Tool
With the anchor text highlighted, a floating block toolbar will appear directly above your paragraph. Click on the Link icon (which resembles two connected chain links) or use the keyboard shortcut:
Windows / Linux: Press Control + K
Mac: Press Command + K
Step 3: Enter or Search for Your Destination URL
An inline search box will pop up. You have two options:
Paste an External URL: Paste a full web address (including https://) directly into the search field.
Search Internal Content: Type a keyword from an existing post or page published on your domain. WordPress will automatically search your database and display matching internal content. For instance, typing “backup” will bring up our step-by-step tutorial on How to Backup Your WordPress Site.
Step 4: Confirm and Apply the Link
Click on the matching page result or press Enter on your keyboard to lock in the link. The highlighted text will now display an underline and change color to indicate an active hyperlink.
3. Adding Hyperlinks in the Classic Editor
While the Gutenberg editor is the modern standard, many legacy business platforms and custom client portals still utilize the classic visual editor interface.
Step-by-Step Classic Editor Linking:
Highlight your desired anchor text inside the visual text editor window.
Locate the Insert/edit link button on the main formatting toolbar (represented by a chain-link icon). Alternatively, press Control + K or Command + K.
Paste your destination web address into the field.
Click the gear icon labeled Link Options to open advanced settings. This window allows you to search your internal post repository, select existing landing pages, or check the box to open the link in a new window/tab.
Click Add Link or Update to apply your changes.
If you are working with older codebases or considering migrating legacy setups to modern architectures, explore our insights on Next.js to WordPress Migration Strategies.
4. Inserting Links in Visual Page Builders (Elementor and Custom Layouts)
Visual drag-and-drop page builders like Elementor handle hyperlinks slightly differently depending on the specific widget you are customizing.
Adding Links to Text Widgets
In Elementor, open the Text Editor widget in the left sidebar panel. Highlight the text inside the editor control box and click the chain-link icon on the rich-text toolbar to apply your link, exactly as you would in standard WordPress editors.
Adding Links to Buttons, Images, and Call-to-Action Boxes
Non-text widgets (such as Button, Image, Icon Box, or Call to Action elements) feature a dedicated Link field inside the widget’s Content tab.
Simply paste your destination URL directly into the Link field. Clicking the gear icon next to the link field opens additional options, allowing you to set target="_blank" or add custom rel values.
When building complex page layouts with visual builders, maintaining clean DOM structures and avoiding excessive plugin bloat is essential. Read our guide on Maintaining Clean Code and Performance in Elementor.
5. Understanding Link Attributes: Open in New Tab, Nofollow, Sponsored, and UGC
Adding a hyperlink is not just about pointing to a destination address; it also involves telling web browsers and search engine crawlers how to treat that link.
Opening Links in a New Tab (target="_blank")
By default, clicking a hyperlink opens the destination page inside the current browser window. However, when linking to external third-party websites, it is standard practice to set the link to open in a new browser tab.
In Gutenberg, click on your created link, click the Edit pencil icon, and toggle the switch labeled Open in new tab. In raw HTML, this appends target="_blank" alongside security safeguards like rel="noopener".
Rel Nofollow (rel="nofollow")
When you link to another website without attributes, search engines pass a small amount of authority (often called “link juice”) to that target domain. If you are linking to an untrusted source, an unverified site, or a page you do not explicitly endorse, add rel="nofollow". This instructs search engines not to associate your site’s authority with the linked page.
Rel Sponsored (rel="sponsored")
Google guidelines strictly require site owners to mark paid links, affiliate partnerships, sponsored reviews, or advertisement links with rel="sponsored". Failing to disclose paid links can result in search engine penalty actions against your domain.
Rel UGC (rel="ugc")
The rel="ugc" (User Generated Content) attribute should be applied to links created within user-submitted sections—such as blog comment areas, user forum threads, or profile bios—to prevent spam bots from exploiting your site for link-building purposes.
6. How to Add Image Links, Button Links, and Navigation Anchor Links
Hyperlinks are not limited to standard text paragraphs. You can convert images, visual buttons, and smooth-scrolling section anchors into functional navigation tools.
Converting Images into Clickable Links
To turn a picture or graphic into a hyperlink:
Click on the Image Block inside your editor.
Locate and click the Link icon on the floating block toolbar.
Choose whether you want the image to link to a Media File (opening the raw image file), an Attachment Page, or a Custom URL.
Paste your target custom URL (such as a project showcase or product page) and press Enter.
Creating Interactive Button Links
Buttons drive key user actions across landing pages. Insert a Button Block in Gutenberg, type your call-to-action text (e.g., “View Portfolio” or “Contact Our Team”), click the Link icon on the toolbar, and assign your target URL.
Setting Up Internal Section Anchor Links (Smooth Scrolling)
Anchor links allow users to jump instantly to a specific section on the same page (like a Table of Contents link).
To set up an anchor link:
Click on the heading block of the section you want to jump to (e.g., a section titled “Contact Us”).
In the right-hand block settings panel, expand the Advanced tab.
Type a unique identifier into the HTML Anchor field (e.g., contact-section). Do not include spaces or hash symbols.
Go back to your menu link or text paragraph, highlight the text, click the Link icon, and enter a hash symbol followed by your anchor name: #contact-section.
Now, when visitors click that link, the page will instantly scroll directly down to that heading.
7. Strategic Internal Linking: The Secret Engine of Technical SEO
While external backlinks build domain authority, your internal linking strategy determines how effectively that authority is distributed across your content library.
A thoughtful internal linking structure helps search engines crawl your site logically, establishes topic clusters, and ensures no valuable page becomes an “orphan page” (a page with no incoming internal links).
Best Practices for Internal Linking:
Use Contextual, Descriptive Anchor Text: Avoid anchor text like “click here” or “this article.” Instead, use descriptive phrases that naturally explain what the destination page is about. For example, linking the phrase Object-Oriented Custom WordPress Plugin Development tells crawlers and readers exactly what to expect.
Build Topic Clusters around Core Hubs: Create authoritative cornerstone guides and link relevant supporting posts back to that central hub. For instance, supporting performance posts should link directly to our main hub on WordPress Performance Optimization.
Link High-Authority Pages to Deep Content: When a new post is published, find high-traffic existing posts on your domain and add contextual internal links pointing to the new content.
Maintain a Reasonable Link Count: While there is no rigid limit on links per page, aim for a balanced density. Ensure every link provides genuine value to the reader rather than stuffing keywords blindly into sentences.
8. How to Audit, Fix, and Manage Broken Links in WordPress
As a website grows over time—pages are renamed, blog posts are deleted, and external domains change their structure—broken links (which trigger 404 Not Found errors) inevitably occur.
Broken links harm user experience, frustrate visitors, and waste crawl budget allocated by search engine bots.
How to Find and Fix Broken Links:
Google Search Console: Check the Indexing > Pages report inside Google Search Console regularly to identify 404 errors encountered by Googlebot.
Screaming Frog SEO Spider: Run a desktop crawl using tools like Screaming Frog to audit every internal and external hyperlink across your site.
Redirection Plugins: Install a redirection plugin to monitor 404 logs and set up automated 301 permanent redirects whenever a URL slug is updated.
External Link Audits: Regularly check that external outlinks point to active, secure sites using HTTPS encryption.
Keeping your links clean and active protects your domain against ranking drops. For ongoing infrastructure maintenance and security protocols, refer to our guide on Modern Technical Web Development Standards.
9. Advanced Link Management: Automated Redirects and Editing Raw HTML
For developers, system engineers, and agency managers handling enterprise deployments, managing links often moves beyond visual editor toolbars into code-level configurations and backend automation.
Editing Links in Code View
When fine-tuning custom template files or debugging broken markup inside WordPress, switching from Visual mode to Code Editor mode gives you direct access to the raw HTML markup. This allows you to manually verify attributes, clean up unwanted inline CSS styles, or fix broken tags.
Managing 301 Permanent Redirects
When updating a URL slug or restructuring a category path, never leave the old address unhandled. Implement a 301 Permanent Redirect to pass original link equity directly to the new URL destination.
Redirects can be configured via plugins, NGINX server configuration files, or .htaccess rules on Apache servers.
How Much Does WordPress Cost ? The Complete Enterprise Pricing and Budget Blueprint
The single most frequent question asked by startup founders, agency leads, enterprise technology directors, and business owners planning a new web platform is deceptively simple: How much does a WordPress website actually cost?
On paper, the core open-source software provided by WordPress.org is completely free under the GNU General Public License. You can download the core software, deploy it on a server environment, and build a site without paying any software licensing fees. However, building, deploying, scaling, securing, and maintaining a high-performance web application in 2026 requires real infrastructure, specialized development expertise, ongoing security monitoring, and strategic software integrations.
The true cost of a WordPress website ranges anywhere from $50 per year for a simple personal blog to over $150,000+ for an enterprise headless application. Understanding where your project falls on this financial spectrum is critical for avoiding budget overruns, unexpected recurring license fees, and costly technical issues.
WordPress.org vs. WordPress.com: The Fundamental Cost Split
The 5 Real-World WordPress Cost Tiers
Infrastructure Expenses: Domain, Hosting, and SSL Encryption
Design and Frontend Costs: Themes, Page Builders, and Custom UI
Functionality and Plugin Ecosystem Costs
E-Commerce Costs: Scaling WooCommerce and Payment Gateways
Custom Development and Engineering Labor Costs
Maintenance, Security, Backups, and Ongoing SLA Overhead
Headless WordPress vs. Traditional Monolith Cost Breakdown
Total Cost of Ownership Matrix and Budget Calculator
How to Maximize ROI and Avoid Hidden Expenses
1. WordPress.org vs. WordPress.com: The Fundamental Cost Split
Before establishing a budget, you must understand the core distinction between self-hosted software and fully managed website hosting platforms operated under commercial brands like Automattic.
Self-Hosted WordPress.org
This is the open-source platform used by professional developers, global enterprises, and growth-focused businesses. The core software is free. You pay independently for web hosting, domain registration, premium plugins, security tools, and custom engineering. This route provides total data ownership, unlimited custom coding capabilities, and direct access to database structures.
Managed Platform (WordPress.com)
Operated commercially, WordPress.com provides a hosted software-as-a-service model. While a restrictive free tier exists for hobbyists, functional business sites require paid plans ranging from entry-level subscriptions up to enterprise cloud tiers. While it handles basic updates automatically, custom plugin installations, advanced database access, and custom PHP development are restricted unless you upgrade to higher plan tiers.
For custom web builds, custom theme design, and bespoke software integrations (such as our custom Liefersoft POS WooCommerce Integration), self-hosted WordPress on dedicated cloud infrastructure remains the industry standard.
2. The 5 Real-World WordPress Cost Tiers
To provide clear financial benchmarks, we categorize WordPress projects into five distinct build tiers based on project scope, design complexity, and engineering labor.
Website Build Tier
Estimated Initial Cost
Estimated Ongoing Yearly Cost
Target Audience & Scope
Tier 1: Personal / Hobby Blog
$50 – $200
$50 – $150 / year
Solopreneurs, personal blogs, basic portfolios utilizing free themes.
Tier 2: Small Business Website
$1,000 – $3,500
$300 – $800 / year
Local service businesses, professional portfolios, customized builder layouts.
WooCommerce stores, payment gateways, live inventory synchronization.
Tier 5: Enterprise / Headless Application
$30,000 – $150,000+
$10,000 – $30,000+ / year
Large enterprise web applications, Next.js frontends, custom API integrations.
3. Infrastructure Expenses: Domain, Hosting, and SSL Encryption
Every website requires core web infrastructure to store files, handle database queries, and route domain traffic safely. Infrastructure costs vary depending on server performance, hardware memory allocation, and expected visitor volume.
Domain Name Registration ($10 – $50 / year)
Your domain name is your online address. Standard domain extensions purchased through registrars such as Namecheap or GoDaddy typically cost $10 to $20 annually. Specialty or regional extensions can range higher, while premium aftermarket domain names can cost thousands of dollars upfront.
Web Hosting Infrastructure ($30 – $5,000+ / year)
Hosting choice directly impacts page load speeds, server uptime, security defense, and overall search engine rankings.
Shared Hosting ($30 – $120 / year): Entry-level providers like SiteGround host hundreds of websites on a single server partition. While inexpensive, resource congestion can cause performance bottlenecks during traffic surges.
Managed WordPress Cloud Hosting ($300 – $1,200 / year): Enterprise platforms such as Kinsta and WP Engine provide isolated containerized environments built on top of cloud infrastructure like Google Cloud Platform. These plans include built-in server-level caching, automatic PHP optimization, staging environments, and active threat detection.
Cloud Virtual Private Servers ($120 – $1,500 / year): Developers can configure virtual private instances directly on cloud platforms like DigitalOcean, Cloudways, or Amazon Web Services (AWS). This approach offers maximum hardware performance per dollar but requires system administration experience.
Basic SSL certificates are available for free through non-profit certificate authorities like Let’s Encrypt. For global content distribution, DDoS protection, and edge caching, integrating enterprise firewall services like Cloudflare helps protect server resources while reducing global latency.
4. Design and Frontend Costs: Themes, Page Builders, and Custom UI
The visual layer determines how visitors interact with your brand. Designing a modern, accessible, and conversion-focused interface represents a major portion of initial project investment.
Key Takeaway: Choosing between a pre-made commercial theme, a visual page builder, or a bespoke custom theme design is the single biggest factor influencing both your initial engineering budget and long-term site performance.
Free Themes ($0)
Official repository themes are budget-friendly options for entry-level blogs. However, they lack advanced design flexibility, unique brand aesthetics, and dedicated developer support.
Premium Commercial Themes ($60 – $150 one-time)
Purchased from commercial marketplaces, pre-built themes offer template layouts and configuration panels. However, many commercial themes suffer from code bloat, bundle excessive unused features, and negatively impact page load speeds.
Visual Page Builders ($60 – $300 / year)
Tools such as Elementor Pro allow rapid site construction using drag-and-drop interfaces. While page builders accelerate initial layout design, maintaining fast load speeds requires strict clean-code discipline, minimal plugin bloat, and deliberate DOM management. Learn more in our article on Maintaining Performance in Elementor Page Builders.
Bespoke Custom Theme Development ($3,000 – $20,000+)
Custom theme engineering involves UI/UX prototyping in design tools like Figma followed by clean PHP, JavaScript, and stylesheet development tailored specifically to your brand requirements. Custom builds eliminate unnecessary code bloat, achieve top Google PageSpeed Insights scores, and scale seamlessly.
5. Functionality and Plugin Ecosystem Costs
Plugins extend core WordPress functionality. While thousands of free plugins exist on the official repository hosted at WordPress Developer Resources, professional websites rely on commercial plugins for critical operations.
Search Engine Optimization ($0 – $120 / year): Advanced SEO management tools like Yoast SEO or Rank Math provide schema markup management, sitemap generation, and content analysis features. Review our strategy guide on SEO First-Page Ranking Roadmaps to maximize search visibility.
Security Infrastructure ($99 – $300 / year): Web application firewalls and malware scanners guard against automated brute-force attacks and code vulnerability exploits.
Automated Backup Infrastructure ($50 – $250 / year): Automated offsite backup tools such as UpdraftPlus or BlogVault ensure your database and upload files are safely backed up to remote cloud storage. For a step-by-step technical guide, check out our full resource on How to Backup Your WordPress Site.
6. E-Commerce Costs: Scaling WooCommerce and Payment Gateways
Building an online retail portal introduces specialized e-commerce infrastructure costs. Core WooCommerce software is free, but operating a high-concurrency online store involves functional extensions and transactional fees.
Payment Processing Gateway Fees
Merchant services like Stripe charge standard processing fees on sales (typically 2.9% + $0.30 per transaction). High-volume merchants can negotiate lower processing rates directly based on monthly transactional volume.
Subscriptions and Membership Extensions ($200 – $500 / year)
Selling recurring product subscriptions, digital access downloads, or gated content memberships requires specialized WooCommerce software extensions.
POS and Physical Inventory Syncing ($1,000 – $8,000+ initial build)
Engineering talent represents the largest single variable in a web development budget. Rates vary significantly based on technical specialization, geographic region, and team structure.
8. Maintenance, Security, Backups, and Ongoing SLA Overhead
Launching your website is only the first phase. Web applications require continuous maintenance to remain secure, performant, and compatible with evolving web standards.
Core WordPress updates, plugin compatibility patches, database maintenance, broken link monitoring, and SSL renewals require routine care. Professional ongoing website care plans generally range from $50 to $500+ per month depending on response time guarantees, staging test workflows, and included development hours. Review our engineering standards on Modern Technical Web Development Standards.
9. Headless WordPress vs. Traditional Monolith Cost Breakdown
For modern web applications requiring lightning-fast frontend performance, enterprise brands frequently decouple the WordPress administrative backend from the client-facing user interface.
In a traditional monolithic build, WordPress handles both database management and frontend rendering using PHP templates. In a headless architecture, WordPress functions purely as a Content Management System (CMS) via REST API or GraphQL endpoints, while modern JavaScript frameworks like React or Next.js render the user interface.
While headless builds deliver superior speed and security, they carry higher development budgets (typically $20,000 to $80,000+ initial build) due to dual infrastructure hosting and separate frontend and backend codebase maintenance. Read our technical analysis on Next.js to WordPress Migration Strategies and our engineering guide on WordPress and React Performance Architecture.
10. Total Cost of Ownership Matrix and Budget Calculator
To calculate the true three-year total cost of ownership for your web project, use this framework formula:
Total 3-Year Investment = Initial Development Cost + (Annual Hosting & Domain Costs × 3) + (Annual Software Licenses × 3) + (Monthly Maintenance & Support SLA × 36)
Factoring in multi-year lifecycle costs prevents unexpected budget surprises down the line and ensures your digital platform remains adequately funded for ongoing business growth.
11. How to Maximize ROI and Avoid Hidden Expenses
To keep project costs under control while maximizing long-term performance, apply these engineering practices:
Avoid Unnecessary Premium Plugin Subscriptions: Build custom core functionality using clean, lightweight code modules instead of installing bloated third-party plugins for small tasks. Explore our guide on Object-Oriented Custom WordPress Plugin Development.
Invest in Quality Hosting Early: Choosing reliable managed cloud infrastructure saves thousands of dollars in emergency developer fees caused by server crashes and downtime. Learn more in our guide on WordPress Performance Optimization.
Prioritize Clean Mobile-First UI: Ensure your design layout focuses on core user conversion paths and mobile responsiveness before adding heavy visual animations.
Work with Experienced Development Partners: Partnering with experienced full-stack engineers who understand database performance and clean architecture saves significant time and money over the site lifecycle.
Ready to Plan Your Next Website Project?
Whether you need a high-converting business site, a custom WooCommerce store, or an enterprise industrial catalog (such as our work on the Tauschspindel Industrial Equipment Catalog), we are here to help.
Visit our Main Homepage, read our story on the About Page, explore technical insights on our Blog Hub, or reach out directly via our Contact Page to discuss your custom website budget and architectural roadmap.
How to Backup Your WordPress Site (2026): Enterprise Guide
1. Introduction: Why Web Backups Are Your Digital Insurance Policy
Operating a web application or running a publishing channel without an active, isolated backup system is equivalent to driving at top speed on a mountain road without brakes. Every single day, thousands of WordPress websites experience critical failures, malware injections, database corruptions, or server crashes that lead to permanent data destruction. Whether you manage an e-commerce platform processing hundreds of transactions hourly or maintain a high-authority content blog, losing your site’s files and database can result in catastrophic financial, operational, and SEO penalties.
In search engine optimization (SEO), continuity is paramount. When Google’s web crawler attempts to index your site and encounters recurring 500 Internal Server Errors, database connection drops (503 Service Unavailable), or malicious redirects caused by unresolved hacks, your rankings deteriorate rapidly. A comprehensive backup strategy ensures zero prolonged downtime, allowing you to execute instant disaster recovery and protect your hard-earned domain authority and organic search positioning.
If you are building complex client sites, managing high-traffic e-commerce operations, or maintaining personal portfolio hubs (such as our in-depth guides on WordPress Performance & Speed Optimization and Custom Plugin Architecture), backing up your database and file tree is the foundation upon which site maintenance relies.
Crucial Insight: A web host’s internal backup is never a substitute for your own offsite backup. Hosting providers can experience server-wide hardware failure, billing disputes, or account suspensions that render host-managed backups completely inaccessible. Always store independent copies in remote cloud storage.
2. Anatomy of a WordPress Site: What Actually Needs Backing Up?
To properly backup a WordPress application, you must understand its dual architecture. A WordPress site does not exist as a single monolithic entity. Instead, it is divided into two major components: static/dynamic core files and the MySQL/MariaDB database.
Component 1: The WordPress File System
The file system resides on your web server’s file directory (typically under public_html/ or /var/www/html/). It consists of three primary areas:
WordPress Core Files: Standard framework software including wp-config.php, .htaccess, index.php, and the wp-admin/ and wp-includes/ system directories.
wp-content Directory: The single most vital file folder. It contains:
/themes/: Your active and inactive theme files, template layouts, and custom PHP hooks.
/plugins/: All installed plugin code modules.
/uploads/: All media assets including images, PDFs, videos, and document attachments organized by year/month.
/languages/: Translation dictionaries and localization files.
Configuration Files: Files like wp-config.php store critical database credentials, secret security keys (salts), and table prefix definitions.
Component 2: The MySQL / MariaDB Database
The database holds all dynamic data generated by your users, editors, and background automated processes. Without the database, your site is an empty shell. Key tables include:
Table Name
Stored Information & Content
SEO & Operational Impact
wp_posts
Blog articles, landing pages, custom post types, revision histories.
Critical. Contains all core indexable content.
wp_postmeta
SEO titles, meta descriptions, page builder structures, custom fields.
Vital. Stores RankMath/Yoast meta tags and Schema structures.
wp_users & wp_usermeta
User accounts, admin profiles, hashed passwords, capabilities.
High. Protects administrative ownership and user access.
wp_options
Site URLs, active themes, plugin configurations, widget settings.
Critical. Determines site loading parameters and global options.
wp_comments & wp_termmeta
User comments, taxonomy categories, tags, sub-category hierarchy.
Moderate-High. Maintains site link topology and dynamic discussion.
3. Essential Pre-Backup Checklist & Hygiene
Before initiating a complete backup process, completing a brief system hygiene routine reduces backup file size, prevents timeouts, and ensures clean database dumps.
Clean Out Unused Revisions and Transients: Post revisions can bloat the wp_posts table exponentially. Run a database clean-up using tools like WP-Optimize or Advanced Database Cleaner to purge expired transients and spam comments.
Delete Unused Themes & Plugins: Remove inactive themes (keep one default core theme such as Twenty Twenty-Four for debugging) and decommissioned plugins to reduce overall file package size.
Exclude Unnecessary Directories: Exclude server cache directories (e.g., wp-content/cache/) and staging directories from file backup routines.
Audit Disk Space: Ensure your hosting account has at least double the current disk usage available in free space if creating zip archives locally before remote transmission.
4. Method 1: Automated Backups via Top WordPress Plugins
For non-technical site owners, web agency account managers, or daily operational workflows, plugin-based automated backups provide high efficiency and reliable cloud integrations.
1. UpdraftPlus (Best Free & Freemium Solution)
UpdraftPlus is one of the most widely used backup plugins in the WordPress ecosystem. It allows direct scheduling to external cloud vendors such as Google Drive, Dropbox, Amazon S3, and SFTP endpoints.
Step-by-Step Setup Guide:
Log into your WordPress Dashboard and navigate to Plugins > Add New.
Search for UpdraftPlus WordPress Backup Plugin, click Install Now, and then Activate.
Navigate to Settings > UpdraftPlus Backups and click on the Settings tab.
Configure the Files backup schedule (e.g., Daily or Weekly) and Database backup schedule (e.g., Daily). Set the retention threshold to at least 7–14 instances.
Select your preferred cloud storage provider (e.g., Google Drive or Amazon S3). Follow the authentication link to authorize access to your isolated folder.
Scroll down and verify that wp-content/plugins, wp-content/themes, and wp-content/uploads are selected.
Click Save Changes, then navigate back to the Backup / Restore tab and click Backup Now to execute your first immediate archive.
2. BlogVault & Duplicator Pro (Best for Complex Enterprise Sites)
For large e-commerce applications running WooCommerce, real-time incremental backups are mandatory. Standard backups can cause server load spikes and miss purchases made between backup windows. Services like BlogVault or Duplicator Pro offload the compression process to dedicated external servers, eliminating performance drops during peak traffic hours.
5. Method 2: Manual Backup via cPanel, phpMyAdmin & FTP/SFTP
When a site is locked, compromised, or experiencing fatal PHP memory limit errors, plugin solutions are unusable. Developers and administrators must master manual file and database extraction.
Step A: Backing Up Files via SFTP / FileZilla
Download and launch an SFTP client such as FileZilla or Cyberduck.
Connect using your server’s SSH/SFTP credentials (Host, Port 22, User, Password/Key).
Navigate to your web root folder (commonly /public_html/).
Select all directories (wp-admin, wp-includes, wp-content) and root configuration files (.htaccess, wp-config.php).
Download these files directly to an encrypted local directory on your machine.
Step B: Exporting the MySQL Database via phpMyAdmin
Once files are saved, export your raw database:
Log into your hosting dashboard (cPanel, DirectAdmin, or custom panel) and open phpMyAdmin.
Select your WordPress database from the left sidebar panel (check your wp-config.php file for the exact DB_NAME if multiple databases exist).
Click on the Export tab in the top navigation bar.
Choose the Quick export method and set the format to SQL. For very large databases, choose Custom and select gzipped or zipped compression to prevent browser timeout.
Click Go to save the .sql or .sql.gz file to your computer.
Bash
# Example: Verification of extracted database tables via command line
tar -ztvf wordpress_db_backup.sql.gz
6. Method 3: Command Line (WP-CLI) & SSH Backups for Developers
For systems developers, server architects, and agency engineers handling large deployments, terminal access using WP-CLI (WordPress Command Line Interface) and SSH provides fast performance without browser latency or timeouts.
Creating an Instant Database Backup via WP-CLI
Connect to your server via SSH and execute the following command in your WordPress root directory:
Bash
# Navigate to WordPress web root
cd /var/www/html/
# Export database with timestamped filename
wp db export backup-$(date +%Y-%m-%d-%H-%M-%S).sql --allow-root
# Output success verification
# Success: Exported to 'backup-2026-07-22-16-00-00.sql'.
Archiving the Complete File System via Command Line
Combine files and database into a compressed tape archive (tar.gz):
Bash
# Create compressed archive of public_html excluding cache directories
tar --exclude='public_html/wp-content/cache' -czvf full-site-backup-$(date +%F).tar.gz /var/www/html/
# Secure permissions on the backup archive
chmod 600 full-site-backup-$(date +%F).tar.gz
For high-performance automated site management, engineers can script these commands into a cron job or integrate them into deployment workflows. Check out our guide on Enterprise WordPress API Integrations for deeper technical system architecture.
Managed WordPress hosting platforms like Kinsta, WP Engine, Cloudways, and SiteGround offer server-level snapshots.
Snapshots vs. File Backups: Managed hosts create whole-system volume snapshots. They cover OS parameters, PHP configurations, system dependencies, and MySQL states simultaneously.
One-Click Staging Restores: These platforms allow administrators to push production site backups directly to staging environments with one click, enabling safe updates and code testing.
Retention Windows: Standard plans typically retain 14 to 30 days of automated daily snapshots. Ensure your hosting plan matches your retention policy requirements.
8. The 3-2-1 Backup Strategy for WordPress Hardening
To make your backup infrastructure resilient against all failure modes (including cloud vendor outages, credential compromises, and ransomware attacks), follow the industry-standard 3-2-1 Backup Rule:
The 3-2-1 Architecture Standard:
3 Copies of Data: Maintain your primary live site plus 2 separate backup copies.
2 Different Media Types: Store backups across different mediums or cloud protocols (e.g., AWS S3 bucket + local encrypted hard drive).
1 Offsite Remote Storage: Keep at least 1 backup completely offsite, isolated from your primary web host environment.
Combining this architecture with strict access policies ensures complete data resilience. Refer to official security standards provided by the WordPress Official Documentation on Backups to align with core community security benchmarks.
A backup is useless if it cannot be restored quickly when disaster strikes. Follow this recovery protocol to bring a crashed or corrupted site back online:
Disaster Recovery Flowchart
Activate Maintenance Mode / Lock Site: Prevent incoming traffic from encountering broken scripts or submitting transaction data that will be overwritten.
Clean Out Corrupted Files: Delete all infected or broken core files in your target directory. Do not leave compromised PHP scripts on the server.
Extract Backup File Package: Upload and unzip your clean site files (wp-content, core files, and assets) into your web root.
Restore Database Dump: Open phpMyAdmin, drop all existing corrupted tables, click Import, and upload your clean .sql backup dump file.
Verify Config Parameters: Open wp-config.php and confirm that database name, username, host, and password match your server database configuration.
Flush Caches & Permalinks: Log into your restored WordPress admin area, clear object caches (Redis/Memcached), go to Settings > Permalinks, and click Save Changes to rewrite the .htaccess file.
10. Testing, Verification & Common Backup Failures
Many developers and site administrators make the dangerous mistake of assuming that because a backup plugin reports “Success,” the backup file is fully functional.
Common Causes of Corrupted Backups:
PHP Execution Timeout Limits: Large file zipping operations often exceed default server max_execution_time values (e.g., 30 seconds), creating incomplete zip archives.
Database Truncation: Memory exhaustion during large SQL queries can truncate the database export mid-table, missing critical data like user accounts or options.
Permission Lockouts: Incorrect file permissions (e.g., 0444 or restrictive ownership) can prevent backup plugins from reading key directories.
The Routine Testing Procedure:
Set up a recurring monthly check to download your latest full backup package and restore it to a local development environment (using Local, XAMPP, or Docker) or an isolated cloud staging environment. Verify that all internal links, database assets, and admin user logins function as expected without PHP error logs.
11. Conclusion & Recommended Security Workflows
Data resilience is a fundamental component of professional web management and search optimization. Downtime damages user trust, reduces conversion metrics, and drops organic search rankings on Google. By implementing automated daily backups via plugins, keeping offsite cloud archives using the 3-2-1 strategy, and knowing how to execute manual command-line backups and restorations, you ensure your digital assets remain fully protected.
Take action today: Audit your backup configuration, confirm that your SQL database and media files are stored offsite, and run a test recovery on a local development setup. For further guidance on web development standards, technical SEO, and custom WordPress architecture, visit our comprehensive technical guides on SEO First Page Ranking Strategies and Modern Web Development Standards.
PDF & HTML Downloads
The PDF document and standalone HTML file containing this complete guide are available in the attachments above (How_To_Backup_WordPress_Site_SEO_Guide.pdf).
WordPress + React: Leveraging MERN Skills to Supercharge Elementor Websites
In the modern web landscape, there is often a divide: you are either a “WordPress Developer” or a “Full-Stack Engineer.” However, as a Lead Web Developer for the German compan. I have found that the most powerful solutions exist at the intersection of these two worlds.
While Elementor provides an incredible foundation for rapid UI deployment, my background in the MERN stack (MongoDB, Express, React, Node.js) allows me to break through the limitations that often stop “standard” WordPress freelancers.
Image Caption
Breaking the “Plugin” Barrier with React
The biggest limitation of a traditional WordPress setup is the reliance on third-party plugins for complex functionality. When a client needs a high-performance interface—such as a real-time data dashboard or a complex multi-step custom calculator—standard plugins often add too much “bloat.”
By leveraging React and Tailwind CSS, I can inject state-driven components directly into an Elementor page. This “hybrid” approach offers:
Seamless UX: Interfaces that feel like a modern web app without the page refreshing.
Lightweight Code: Instead of loading a 500KB plugin for a small feature, I write a precise React component that does exactly what is needed.
Design Consistency: Using my HTML and CSS expertise to ensure the custom React components match the site’s branding perfectly.
A programming language is for thinking about programs, not for expressing programs you’ve already thought of. It should be a pencil, not a pen
2.Scalable Data with Node.js and MongoDB
For data-heavy projects, such as the automated automotive marketplaceI developed, the standard WordPress database (MySQL) can sometimes struggle with high-frequency updates.
This is where my MERN skills provide a distinct advantage. I use Node.js to handle heavy server-side tasks, such as fetching thousands of car listings from mobile.de via API. In some cases, offloading non-relational data to MongoDB ensures that the frontend remains lightning-fast, even when processing massive amounts of inventory.
Case Study: Beyond Simple Design
API Integration: Successfully implemented bi-directional sync for industrial platforms
Automation: Developed systems for FairMart.lkand room rental sites that sync directly with platforms like Airbnb.
Enterprise Standards: Working within a German agency environment requires a deep understanding of clean code, performance, and scalability—skills I honed during my BSc in Computer Science.
Why This Approach is the Future of Web Development
Clients today don’t just want a digital brochure; they want a business tool. By combining the speed of WordPress/Elementor with the power of React and Node.js, I provide a solution that is:
Easy to Manage: Marketing teams can still use Elementor to edit content.
Engineered for Growth: The backend is built by a developer who understands architecture, not just “drag-and-drop”.
Future-Proof: Using modern stacks like Firebase and React means the site is ready for whatever comes next in the tech world.
Case Study: Beyond Simple Design
My journey from a freelance designer on Fiverr to a Lead Developer in Dhaka and now Germany has taught me one thing: the best tech is the one that empowers the user. Building your brand as Azim Uddin means delivering that power through expert engineering.
Clean Code in Elementor: How to Maintain Performance While Using Page Builders
There is a common saying among hardcore developers: “Page builders make websites slow.” While it’s true that an unoptimized Elementor site can become heavy, the fault usually lies in the implementation, not the tool.
As a Lead Developer, I use Elementor as a framework. If you treat it like a blank canvas and follow “Clean Code” principles, you can achieve lightning-fast load times and a 90+ Google PageSpeed score. Here is how I maintain peak performance.
Image Caption
The “Less is More” Widget Rule
The biggest mistake beginners make is using too many widgets. Every widget adds extra HTML wrappers and CSS files.
The Pro Tip: If you can achieve a design using a single “Text Editor” widget with a bit of custom HTML/CSS, do that instead of using five different icon and heading boxes.
Clean Approach: Keep your DOM depth shallow. Avoid nesting columns inside columns inside sections unless absolutely necessary.
Global Styles vs. Inline Styling
Avoid styling every button or heading individually. This creates massive amounts of inline CSS that slows down the browser.
The Strategy: Set up your Global Fonts and Global Colors in the Elementor Site Settings.
The Benefit: This ensures that the browser only has to load one set of rules, making your site easier to maintain and much faster to render.
Optimization isn’t something you do at the end of a project; it’s a mindset you maintain during the build
Smart Asset Loading
Elementor has a “hidden” feature called Experiments. I always enable:
Optimized DOM Output: Removes unnecessary <div> wrappers.
Improved Asset Loading: Loads only the JS/CSS needed for that specific page.
Improved CSS Loading: Renders CSS in a way that prevents “render-blocking” issues
Don’t Forget the Backend
A clean frontend needs a clean backend. I always pair my Elementor builds with:
SVG Icons: Instead of loading the entire FontAwesome library (which is huge), I upload only the specific SVG icons the site needs.
WebP Images: I ensure every image is converted to WebP format to save up to 80% on file size without losing quality.
Conclusion
Elementor is a powerful tool when used with a developer’s precision. By focusing on a clean DOM structure, global styling, and smart asset management, we can bridge the gap between “easy to edit” and “high performance.”
Why I Migrated a Client from Next.js to WordPress/Elementor (and why you might want to, too)
In the world of web development, there is a constant push toward the “latest and greatest.” For the past few years, that has been Next.js. It’s fast, it’s powerful, and as a developer, I love working with React.However, as a Lead Developer, my job isn’t just to write cool code—it’s to provide a solution that works for the client’s long-term business goals. Recently, I made the “controversial” decision to migrate a high-performing project back to WordPress and Elementor.
Image Caption
The “Editability” Crisis
The client had a beautiful Next.js site, but every time they wanted to change a single sentence or swap a promotional banner, they had to call me.Even with a Headless CMS (like Contentful or Sanity) attached to Next.js, the marketing team felt restricted. They couldn’t build new landing pages or experiment with layouts without a developer’s help. By moving to Elementor, I handed the keys back to the marketing team. Now, they can build, test, and launch pages in hours, not days.
The Maintenance Overhead
A Next.js site is like a high-performance sports car. It’s fast, but it requires specialized maintenance. You have to manage dependencies, handle deployment pipelines, and keep an eye on breaking changes in the React ecosystem.
For this specific client, they didn’t need a sports car; they needed a reliable, powerful SUV. WordPress provides a stable ecosystem where security updates and plugin management are streamlined, reducing the monthly technical debt.
Your tech stack should be a bridge to your customers, not a barrier for your team
SEO & Speed: Closing the Gap
The biggest argument for Next.js is often speed and SEO. While Next.js is inherently fast, modern WordPress hosting combined with Elementor’s improved code output, WP Rocket, and a CDN can achieve 90+ scores on Google PageSpeed Insights.
We didn’t lose our ranking. In fact, because the marketing team was able to post more content more frequently, our organic traffic actually increased after the migration.
Is WordPress Right for You?
Next.js is still the right choice for complex web applications (like a dashboard or a social network). But if your website is a marketing tool, a portfolio, or a business marketplace, WordPress/Elementor offers a better ROI because:
Speed of Launch: You can go from idea to live page in minutes.
Lower Cost: Less dependency on high-priced developer hours for simple edits.
Massive Ecosystem: Need a car rental sync? Or an automotive API? There is usually a battle-tested solution already available.
Final Thoughts
As a developer who builds in both MERN stack and WordPress, I’ve learned that the “best” tech is the one that empowers the user. Seeing my client’s marketing team confidently manage their own site is more satisfying than any complex React hook I could have written.
How to Build a Fully Automated Automotive Marketplace with API Integration
In the fast-paced world of car sales, manual data entry is the enemy of growth. Imagine having to manually upload hundreds of car listings, images, and technical specifications every day. It’s not just tedious—it’s prone to error. Recently, I tackled this exact problem by building an automated automotive marketplace that syncs directly withmobile.de using their API.
Image Caption
The Challenge: Real-Time Synchronization
The biggest hurdle for any marketplace is keeping data fresh. If a car is sold on the main platform, it needs to disappear from the marketplace immediately. For this project, I needed a solution that could:
Map complex technical data to a user-friendly WordPress interface.
Fetch real-time data via API.
Handle high-resolution image imports without slowing down the server.
The Solution: Bridging Mobile.de and WordPress
Using my experience with Node.js and WordPress/WooCommerce, I developed a custom synchronization engine. By connecting to the mobile.de API, the website now automatically imports every detail—from engine capacity to emission standards—without any human intervention.
The best code is the code that works while you sleep. We didn’t just build a website; we built a 24/7 automated employee
Key features of this build included:
Automated Cron Jobs: Scheduled tasks that check for new listings every hour.
Custom Field Mapping: Ensuring that data from the API displays perfectly within the Elementor design.
Performance Optimization: Using lazy-loading and CDN integration to ensure the site remains lightning-fast despite thousands of listings.
First, solve the problem. Then write the code.
By focusing on the automation first, we transformed a manual 10-hour-a-week task into a 0-hour task. This allows the business owner to focus on sales while the website handles the inventory.
Whether it’s syncing room rentals with Airbnb via iCal or car listings via professional APIs, automation is the key to scaling a modern web business. As a Lead Developer, my goal is always to build systems that work for the user, not the other way around.