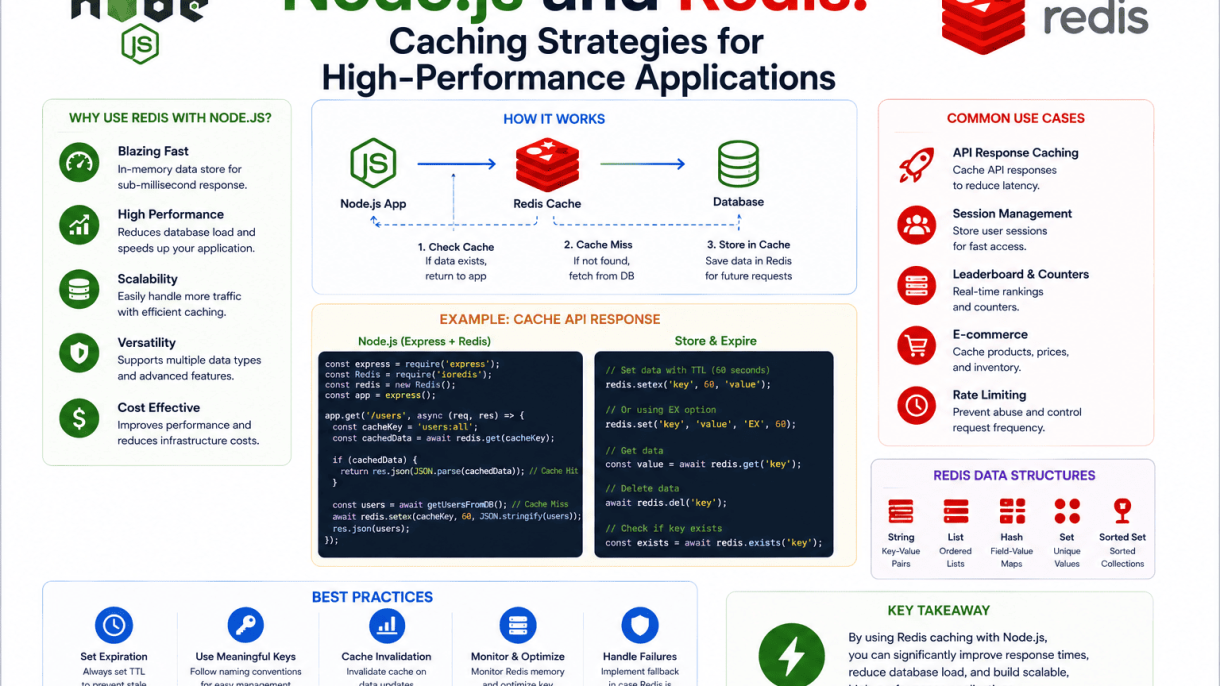

Introduction to Caching with Node.js and Redis
Caching is a foundational technique for building high-performance Node.js applications. Without it, every user request that requires data—whether from a database, an external API, or a computation-heavy process—can introduce latency that degrades the user experience and strains backend resources. Node.js, with its event-driven, non-blocking architecture, excels at handling concurrent requests, but it still relies on upstream systems that can become bottlenecks under load. Redis, an open-source, in-memory data structure store, addresses this challenge by providing a sub-millisecond caching layer. When integrated with Node.js, Redis enables developers to store frequently accessed data in memory, drastically reducing response times, offloading databases from repetitive queries, and ensuring that applications can scale horizontally without proportional increases in infrastructure costs. The synergy between Node.js and Redis is particularly powerful because both are designed for speed and concurrency, making them a natural fit for real-time applications, e-commerce platforms, and API gateways.
What is Redis and How It Works with Node.js
Redis is a key-value store that holds data primarily in RAM, allowing for extremely fast read and write operations—typically in the microsecond to millisecond range. Unlike traditional databases that persist data to disk, Redis keeps the working dataset in memory, though it offers optional persistence for durability. In a Node.js environment, Redis is accessed via robust client libraries such as redis (the official Node.js client) or ioredis, which provide asynchronous, promise-based interfaces. The workflow is straightforward: a Node.js application connects to a Redis instance, sets a key-value pair with an optional expiration time (TTL), and retrieves it on subsequent requests. Because Redis supports various data structures—strings, hashes, lists, sets, sorted sets, and more—it can cache not only simple scalar values but also complex objects, JSON blobs, or aggregated query results. The integration typically involves a middleware pattern where the application checks the cache first; if a hit occurs, the cached value is returned immediately, bypassing the database or computation. If a miss occurs, the data is fetched, stored in Redis, and then served.
Key Benefits of Using Redis for Caching in Node.js
Implementing Redis as a caching layer in Node.js applications delivers several measurable advantages:
- Reduced Latency: In-memory access eliminates network round trips to databases or external services, cutting response times from tens of milliseconds to under a millisecond.
- Database Offloading: By serving repeated read requests from cache, Redis reduces the query load on primary databases, preventing performance degradation and delaying the need for costly database scaling.
- Improved Scalability: Caching with Redis allows Node.js applications to handle more concurrent users without proportionally increasing backend resources, as cached responses are served with minimal CPU overhead.
- Automatic Expiration: Redis TTL (time-to-live) ensures stale data is automatically evicted, keeping the cache fresh without manual invalidation logic.
- Atomic Operations: Redis supports atomic commands like
INCRandSETNX, enabling reliable rate limiting and counters without race conditions. - High Availability: With Redis Sentinel or Redis Cluster, caching remains resilient to node failures, ensuring consistent performance in production environments.
Common Use Cases: Session Store, API Response Cache, and Rate Limiting
Redis excels in three canonical use cases within Node.js applications:
Session Store: Stateless Node.js applications often rely on external session storage to maintain user state across requests. Redis stores session data—such as user authentication tokens, preferences, or shopping cart contents—in memory with fast reads and writes. Because sessions are transient, the built-in TTL feature automatically cleans up expired sessions, reducing storage overhead. This approach is far more performant than storing sessions in a relational database or on disk.
API Response Cache: For endpoints that return relatively static or slowly changing data—like product catalogs, blog posts, or configuration settings—Redis caches the entire API response. The Node.js server checks Redis before executing the request handler; on a cache hit, it returns the cached JSON payload directly. This pattern can reduce response times by over 90% for popular endpoints and dramatically lower the load on backend services.
Rate Limiting: Redis’s atomic counters and sorted sets make it ideal for implementing rate limiting in Node.js. By tracking request counts per user IP or API key with a sliding window (using TTL and INCR), developers can enforce limits without race conditions. For example, a common pattern uses INCR with a TTL of 60 seconds to allow a maximum of 100 requests per minute, returning a 429 status when the limit is exceeded. This protects the application from abuse and ensures fair resource allocation.
Setting Up Redis in a Node.js Environment
Installing Redis and Choosing a Client Library
To begin integrating Redis with Node.js, you must first have Redis running. For local development, install Redis directly on your operating system. On macOS, use brew install redis; on Ubuntu, run sudo apt-get install redis-server; on Windows, the recommended approach is to use Windows Subsystem for Linux (WSL) with the Ubuntu command above. Alternatively, cloud services like Redis Cloud, Amazon ElastiCache, or Azure Cache for Redis provide managed instances with high availability and scaling, ideal for production workloads.
Once Redis is installed or provisioned, choose a Node.js client library. The two primary options are ioredis and node-redis (the official Redis client). ioredis offers a robust feature set including built-in cluster support, Lua scripting, and a promise-based API, making it suitable for complex caching strategies. node-redis is lightweight, officially maintained, and optimized for performance. For most high-performance applications, ioredis is the preferred choice due to its advanced capabilities and active community.
| Client Library | Key Features | Best For |
|---|---|---|
| ioredis | Cluster support, pipelining, Lua scripting, promise-based | Complex caching, multi-node setups, high throughput |
| node-redis | Lightweight, official, minimal dependencies | Simple caching, small projects, production speed |
Install your chosen library via npm: npm install ioredis or npm install redis. This step completes the prerequisite setup for connecting Node.js to Redis.
Basic Connection Configuration and Error Handling
After installation, establish a connection to your Redis instance. Below is a practical example using ioredis that demonstrates connection configuration and error handling:
const Redis = require('ioredis');
const redis = new Redis({
  host: 'localhost',
  port: 6379,
  retryStrategy: (times) => Math.min(times * 50, 2000),
  maxRetriesPerRequest: 3
});

redis.on('connect', () => console.log('Connected to Redis'));
redis.on('error', (err) => console.error('Redis error:', err));
redis.on('reconnecting', () => console.log('Reconnecting to Redis...'));
Key configuration points include:
- Host and port: Default to localhost:6379 for local Redis; change these for cloud services.
- Retry strategy: Prevents infinite retry loops by using exponential backoff, capped at 2 seconds.
- Max retries per request: Limits failed operations to avoid resource exhaustion.
- Event listeners: Essential for logging and debugging connection states.
Always handle errors gracefully in production. For cloud Redis, include authentication parameters like password and tls: {} for encrypted connections. Test the connection with redis.ping() to verify readiness.
Environment Variables and Connection Pooling Best Practices
To maintain security and flexibility, store Redis connection details in environment variables. Use a .env file or a secrets manager for sensitive values such as host, port, password, and TLS settings. Example environment variables:
REDIS_HOST=localhostREDIS_PORT=6379REDIS_PASSWORD=your_secure_passwordREDIS_TLS_ENABLED=true
Load these in your application using process.env with a library like dotenv. This approach decouples configuration from code, enabling seamless deployment across environments.
Connection pooling is critical for high-performance applications. Both ioredis and node-redis manage a pool of connections internally, but you can tune behavior with these best practices:
| Practice | Why It Matters |
|---|---|
| Use a single client instance | Avoids creating multiple connections; reuse one instance across modules. |
Set maxRetriesPerRequest |
Prevents queue buildup during outages; set to a low number (e.g., 3). |
| Enable lazy connect | Delays connection until first command, useful for serverless environments. |
| Monitor connection events | Logs reconnections and errors to detect pool exhaustion early. |
For production, consider using a connection manager like generic-pool if you need fine-grained control, but most applications perform optimally with the default pooling in ioredis. Always close the connection gracefully on application shutdown with redis.quit() to free resources.
Simple Key-Value Caching Patterns
The most fundamental caching pattern in Node.js and Redis is the simple key-value store. This pattern involves storing the result of a computation or a fetched resource under a unique key, then retrieving that key on subsequent requests to avoid repeating expensive operations. For high-performance applications, this pattern reduces latency and offloads backend services, such as databases or external APIs. The key insight is that Redis operates entirely in memory, providing sub-millisecond read and write times for simple string or JSON values. When implemented correctly, this pattern can reduce response times from hundreds of milliseconds to under five milliseconds for cached data.
Cache-Aside Pattern: Read Through and Lazy Loading
The cache-aside pattern, also known as lazy loading, is the most widely adopted simple caching strategy. In this approach, the application code is responsible for both reading from and writing to the cache. The typical flow works as follows:
- On a read request, the application first checks Redis for the key.
- If the key exists (a cache hit), the value is returned directly to the client.
- If the key does not exist (a cache miss), the application fetches the data from the primary data source, such as a database.
- The fetched data is then stored in Redis under the appropriate key, and the value is returned to the client.
This pattern is called “lazy” because the cache is populated only when data is first requested, not proactively. The application must also handle cache invalidation: when data is updated in the database, the corresponding cache key should be deleted or updated to maintain consistency. In Node.js, this pattern is straightforward to implement using the redis client library. For example, a typical middleware function checks Redis, falls back to the database on a miss, and stores the result with a time-to-live (TTL).
Setting Expiration (TTL) to Avoid Stale Data
Every cached value should have an expiration time, known as time-to-live (TTL). Without TTL, cached data can become stale, meaning it no longer reflects the current state of the source. Stale data leads to incorrect application behavior and user-facing errors. TTL is set in seconds and can be applied when storing the key or updated later. Common TTL values depend on data volatility:
| Data Type | Typical TTL | Rationale |
|---|---|---|
| User session tokens | 3600 seconds (1 hour) | Balances security with user convenience; tokens can be refreshed. |
| Product catalog details | 600 seconds (10 minutes) | Prices and descriptions change infrequently; short TTL ensures freshness. |
| Aggregated analytics | 300 seconds (5 minutes) | Near-real-time dashboards require rapid updates without constant recalculation. |
| Static reference data | 86400 seconds (24 hours) | Country lists, currency codes, or configuration rarely change. |
When a key expires, Redis automatically evicts it. The next request triggers a cache miss and repopulates the cache with fresh data. This mechanism prevents memory bloat and ensures that the application does not serve outdated information. In Node.js, TTL is set using the SET command with the EX option: client.set('key', 'value', 'EX', 600).
Example: Caching Database Query Results
A concrete example illustrates the pattern. Consider a Node.js application that queries a PostgreSQL database for user profiles. Without caching, every page load executes a SQL query, which may take 50–200 milliseconds. With Redis caching, the flow becomes:
- User requests profile for
user_id:1234. - Application checks Redis for key
user:1234. - If found, return the JSON profile immediately (under 5 ms).
- If not found, execute
SELECT * FROM users WHERE id = 1234, serialize the result to JSON, store it in Redis with a TTL of 600 seconds, and return it.
In code, this translates to an async function that first calls client.get('user:1234'), then on null, runs the database query, and calls client.set('user:1234', JSON.stringify(result), 'EX', 600). This simple pattern reduces database load by orders of magnitude for frequently accessed records. For high-traffic endpoints, the reduction in response time and database connections directly improves application scalability and user experience.
Cache Invalidation Strategies
Effective cache invalidation is critical for maintaining data consistency between Redis and the primary database. Without a robust strategy, applications risk serving stale data, which undermines reliability. The challenge lies in balancing performance gains with accuracy. Two primary approaches dominate: time-based expiration and event-driven invalidation, each suited to different use cases. Proactive invalidation removes data predictably, while reactive invalidation responds to changes in real time.
Time-Based Expiration vs. Event-Driven Invalidation
Time-based expiration, implemented via Redis EXPIRE or TTL commands, sets a fixed lifespan for cached data. This is ideal for data that changes predictably, such as session tokens or static content. For example, a product catalog might expire every hour. Event-driven invalidation, conversely, triggers cache removal when the source data updates—such as after a database write or API call. This ensures near-immediate consistency but requires integration with application logic. Consider the trade-offs:
- Time-based: Simple to implement; no external triggers needed; risk of serving stale data within the TTL window.
- Event-driven: High consistency; reduces stale reads; adds complexity and potential for missed updates if events fail.
In practice, many systems combine both: set a short TTL as a safety net while relying on events for critical updates. For instance, a user profile cache might expire after 10 minutes but is invalidated immediately when the user changes their email.
Using Redis Pub/Sub for Cross-Process Cache Updates
In distributed applications, multiple processes or services may cache the same data. Redis Pub/Sub provides a lightweight mechanism to broadcast invalidation messages across all instances. When one service updates a key, it publishes a message to a channel (e.g., cache:invalidate:users). Subscribers listen and delete the corresponding key from their local cache. This pattern avoids polling and reduces latency. A practical implementation in Node.js might look like:
const redis = require('redis');
const subscriber = redis.createClient();
const publisher = redis.createClient();

subscriber.subscribe('cache:invalidate');
subscriber.on('message', (channel, key) => {
  redisClient.del(key); // Remove stale entry
});

// After updating user data
async function updateUser(id, data) {
  await db.users.update(id, data);
  publisher.publish('cache:invalidate', `user:${id}`);
}
This approach ensures all processes see consistent data without duplicating invalidation logic. However, note that Pub/Sub is fire-and-forget; if a subscriber is offline, the message is lost. For critical consistency, consider using Redis streams or a message queue.
Handling Cache Stampedes and Thundering Herd Problems
A cache stampede occurs when many requests simultaneously miss the cache and attempt to rebuild it, overwhelming the database. This is common after a key expires or is invalidated. To mitigate this, use probabilistic early expiration (e.g., random TTL jitter) or a mutex lock. Redis SET NX (set if not exists) can act as a distributed lock: the first request to acquire the lock rebuilds the cache, while others wait or serve a stale value. Example:
async function getCachedData(key) {
  let data = await redisClient.get(key);
  if (data) return JSON.parse(data);

  // Attempt to acquire lock
  const lockKey = `lock:${key}`;
  const lockAcquired = await redisClient.set(lockKey, 'locked', { NX: true, PX: 5000 });
  if (!lockAcquired) {
    // Wait briefly or serve stale data
    await sleep(100);
    return getCachedData(key); // Retry
  }

  try {
    data = await fetchFromDatabase();
    await redisClient.set(key, JSON.stringify(data), { EX: 60 });
    return data;
  } finally {
    await redisClient.del(lockKey);
  }
}
Additional strategies include using a background refresh (recompute before expiration) or employing a cache-aside pattern with a “dogpile” prevention mechanism. Combining these techniques with appropriate TTLs ensures high availability under load.
Node.js and Redis: Caching Strategies
Using Redis Hashes for Partial Object Caching
When caching complex objects such as user profiles or product details in Node.js, storing entire serialized JSON strings as simple key-value pairs leads to inefficiencies. Updating a single field requires fetching, deserializing, modifying, and rewriting the entire cached object. Redis hashes solve this by mapping field-value pairs within a single key. For example, a user profile can be stored as a hash with fields for name, email, and lastLogin. This allows Node.js to use HGET to retrieve only the needed field, or HSET to update a single attribute without touching others. This strategy reduces network transfer, lowers latency for partial updates, and simplifies cache invalidation for specific object properties. It is especially effective for high-traffic endpoints that frequently read or modify one or two fields of large objects.
Sorted Sets for Leaderboards and Pagination
Redis sorted sets combine the uniqueness of sets with the ordering of linked lists, making them ideal for caching ranked data like leaderboards, score-based rankings, or time-ordered feeds. Each member in a sorted set has an associated score, and Redis maintains the set sorted by that score. For a gaming leaderboard, Node.js can call ZADD to insert or update a player’s score, then ZREVRANGE to fetch the top N players in descending order. The same structure supports efficient pagination: using ZRANGE with offsets and counts retrieves any slice of the sorted set without scanning the entire dataset. This avoids expensive database queries for paginated lists, reduces response times, and scales well under concurrent writes. Sorted sets also enable real-time updates, as scores can be incremented atomically with ZINCRBY, keeping the cache consistent without manual re-sorting.
Lists and Streams for Queue-Based Caching
Redis lists and streams provide robust caching solutions for asynchronous workflows and ordered data processing. Lists, implemented as linked lists, support push and pop operations on both ends, making them natural for simple FIFO queues. Node.js can use LPUSH and BRPOP to build a task queue where workers consume cached items, reducing load on primary databases. For more advanced needs, Redis streams offer persistent, append-only logs with consumer groups, enabling reliable message delivery and replay. A common pattern is to cache recent activity feeds or event logs in a stream, then use XREADGROUP to distribute processing across multiple Node.js workers. This approach ensures that cached data is consumed exactly once, supports backpressure, and allows for historical replay if a consumer fails. Both lists and streams are memory-efficient and can be trimmed to a fixed size, preventing unbounded growth while maintaining high throughput.
Comparison of Redis Data Structures for Caching
| Data Structure | Best Use Case | Key Operations in Node.js |
|---|---|---|
| Hashes | Partial object caching, field-level updates | HGET, HSET, HGETALL |
| Sorted Sets | Leaderboards, paginated rankings | ZADD, ZRANGE, ZREVRANGE, ZINCRBY |
| Lists | Simple queues, FIFO task processing | LPUSH, RPOP, BRPOP |
| Streams | Event logs, reliable message queues | XADD, XREADGROUP, XTRIM |
Each advanced data structure addresses specific caching challenges in Node.js applications. Hashes minimize overhead for partial updates, sorted sets enable efficient ranked access, and lists or streams handle queue-based caching with varying levels of durability. Choosing the right structure depends on whether the cached data requires atomic field modifications, ordering, or reliable consumption. Together, they form a powerful toolkit for building high-performance, responsive systems.
Distributed Caching with Redis Cluster and Sentinel
Scaling Redis beyond a single node is essential for high-traffic Node.js applications that demand both low latency and fault tolerance. Two primary architectural patterns—Redis Cluster and Redis Sentinel—address different aspects of distributed caching: data sharding for horizontal scalability and automatic failover for high availability. Understanding when and how to deploy each, along with client-side consistency considerations, ensures your Node.js caching layer remains resilient under production loads.
Redis Cluster: Sharding and Data Distribution
Redis Cluster partitions data across multiple nodes using a concept of hash slots. The entire keyspace is divided into 16,384 slots, and each node in the cluster manages a subset of these slots. When a Node.js client, such as ioredis, connects to a cluster, it uses a consistent hashing algorithm to determine which node holds a given key. This eliminates the need for a separate proxy layer.
Key characteristics of Redis Cluster include:
– **Automatic resharding**: Slots can be moved between nodes without downtime, allowing for dynamic scaling.
– **Partial availability**: If a subset of nodes fails, the cluster remains operational for keys not stored on those nodes, assuming no replica is promoted.
– **No cross-node transactions**: Multi-key operations are supported only when all keys belong to the same hash slot (use hash tags to enforce this).
A practical Node.js connection example using ioredis:
“`javascript
const Redis = require(‘ioredis’);
const cluster = new Redis.Cluster([
{ host: ‘127.0.0.1’, port: 7000 },
{ host: ‘127.0.0.1’, port: 7001 },
{ host: ‘127.0.0.1’, port: 7002 }
]);
await cluster.set(‘user:session:123’, ‘data’);
const value = await cluster.get(‘user:session:123’);
“`
The client automatically handles slot redirection and node discovery, making the cluster transparent to application logic.
Redis Sentinel for Automatic Failover
Redis Sentinel provides high availability for non-clustered Redis deployments by monitoring master and replica nodes. When the master fails, Sentinel orchestrates an automatic failover, promoting a replica to master and reconfiguring the remaining replicas. Node.js applications using Sentinel must connect through a Sentinel-aware client.
The typical setup involves:
– **Sentinel processes**: At least three Sentinel instances for quorum-based decision making.
– **Client configuration**: The Node.js client monitors Sentinel nodes for the current master endpoint.
– **Failover behavior**: During failover, the client receives a redirect or reconnects to the new master after a brief interruption.
Example connection using ioredis with Sentinel:
“`javascript
const Redis = require(‘ioredis’);
const sentinel = new Redis({
sentinels: [
{ host: ‘127.0.0.1’, port: 26379 },
{ host: ‘127.0.0.1’, port: 26380 },
{ host: ‘127.0.0.1’, port: 26381 }
],
name: ‘mymaster’
});
await sentinel.set(‘config:rate_limit’, 100);
“`
Unlike Cluster, Sentinel does not shard data; all nodes hold the full dataset. This makes it suitable for applications requiring strong consistency and simple key access patterns, but limits horizontal write scalability.
Client-Side Hashing and Consistency Considerations
Both Redis Cluster and Sentinel introduce consistency challenges that Node.js developers must address:
| Consideration | Redis Cluster | Redis Sentinel |
|—————|—————|—————-|
| Data loss risk | During failover, writes to a failing master may be lost if asynchronous replication is used. | Same risk; use WAIT command or configure min-replicas-to-write to mitigate. |
| Stale reads | Replicas may serve stale data; use READONLY mode carefully in Cluster. | Read from replicas only when stale data is acceptable. |
| Key distribution | Use hash tags (e.g., {user:123}:cart) to co-locate related keys. | Not applicable; all keys reside on the same node. |
Client-side hashing strategies help reduce cross-node operations in Cluster. For example, when caching user-specific data, prefix keys with a user identifier enclosed in curly braces:
“`javascript
const key = `{user:${userId}}:profile`;
await cluster.set(key, JSON.stringify(profile));
“`
This ensures all keys for the same user hash to the same slot, enabling multi-key operations and atomic updates. For Sentinel deployments, consistency is simpler because all data resides on a single master, but the trade-off is limited write throughput and a single point of failure for writes during failover windows.
In production, many Node.js applications combine both patterns: use Redis Cluster for large, partition-tolerant datasets and Sentinel for critical metadata requiring strong consistency. Monitor latency and error rates during failover events to tune timeouts and retry policies in your client library.
Monitoring and Optimizing Redis Cache Performance
To ensure your Node.js application maintains low latency and high throughput, continuous monitoring and tuning of Redis are essential. Poorly configured caches can become bottlenecks rather than accelerators. Focus on three pillars: tracking key metrics, optimizing memory usage, and establishing automated monitoring.
Essential Redis Metrics to Track via INFO and SLOWLOG
Redis provides two powerful diagnostic tools built into its core: INFO and SLOWLOG. The INFO command returns a wealth of statistics. For Node.js workloads, prioritize these metrics:
- Keyspace hits and misses — Calculate the cache hit rate as
keyspace_hits / (keyspace_hits + keyspace_misses). A rate below 80% often indicates an ineffective caching strategy or a poorly chosen eviction policy. - Used memory and peak memory — Track
used_memoryandused_memory_rssto detect memory leaks or overconsumption. Compare againstmaxmemoryto see how close you are to the limit. - Connected clients — Sudden spikes or sustained high numbers may indicate connection leaks in your Node.js Redis client (e.g., ioredis or node-redis).
- Total commands processed — A high rate of
total_commands_processedper second helps gauge throughput.
The SLOWLOG command lists queries that exceed a configurable latency threshold. In Node.js, long-running commands (like KEYS or SMEMBERS on large sets) can block the event loop. Regularly review slow logs to identify and refactor such operations, or use non-blocking alternatives like SCAN.
Memory Optimization: Eviction Policies and Data Serialization
Redis operates entirely in memory, so how you manage memory directly impacts performance. Two critical levers are eviction policies and serialization format.
Eviction policies determine what happens when Redis reaches maxmemory. For Node.js caches, the most suitable policies are:
| Policy | Best Use Case |
|---|---|
allkeys-lru |
General-purpose caching where recent access patterns matter |
allkeys-lfu |
When frequently accessed data is more important than recency |
volatile-ttl |
When you explicitly set TTLs and want to expire short-lived data first |
Avoid noeviction in production caches, as it can cause write errors. For session stores, allkeys-lru is often the safest default.
Data serialization is equally critical. Node.js objects serialized as JSON strings are human-readable but verbose. For high-throughput scenarios, consider:
- MessagePack — Reduces payload size by 30–50% compared to JSON, with faster serialization/deserialization in Node.js via libraries like
msgpackr. - Protocol Buffers — Even more compact, but requires schema definitions.
- Hashes — Store structured data as Redis hashes instead of serialized strings. This allows partial updates without reading the entire object, reducing network overhead.
Test serialization overhead with your actual data shapes. A 20% reduction in value size can significantly lower memory usage and improve throughput.
Using Redis Benchmark and Prometheus for Continuous Monitoring
Manual INFO checks are not sustainable for production systems. Instead, automate monitoring with two complementary tools.
Redis Benchmark (redis-benchmark) is a built-in tool for stress-testing your Redis instance. Run it with representative command mixes and payload sizes to establish baseline performance. For Node.js-specific workloads, simulate realistic patterns: use -t GET,SET with -d 1000 (1KB values) and -n 100000 (100,000 requests). Compare results after configuration changes to measure impact.
Prometheus integration provides real-time, historical, and alertable metrics. Use the official redis_exporter to expose Redis metrics in Prometheus format. Key dashboards to build:
- Cache hit rate over time (with alert if below threshold).
- Memory usage as a percentage of
maxmemory. - Slow log count per minute (alert on sustained increases).
- Command latency percentiles (p50, p95, p99) from
INFO COMMANDSTATS.
Pair Prometheus with Grafana for visualization. Set alerts for:
- Memory usage exceeding 80% of
maxmemory. - Cache hit rate dropping below 75% for more than 5 minutes.
- Any single command taking longer than 10ms (from SLOWLOG).
This continuous loop of measurement, tuning, and validation keeps your Node.js and Redis caching strategy performing optimally under varying loads.
Security Best Practices for Redis in Node.js
Implementing Redis caching in Node.js applications demands rigorous security measures to protect against unauthorized access, data breaches, and malicious exploitation. In cloud and containerized environments, the attack surface expands significantly, making authentication, network isolation, and input validation critical. The following best practices provide a layered defense for Redis instances integrated with Node.js backends.
Authentication with Redis AUTH and ACLs
Redis offers two primary authentication mechanisms: the legacy AUTH command using a single password, and the more granular Access Control Lists (ACLs) introduced in Redis 6. For production Node.js applications, ACLs are strongly recommended because they allow per-user permissions on specific commands and keys. When configuring a Redis client in Node.js, always pass credentials securely through environment variables, never hardcoded in source code. Example using ioredis:
- Set a strong, randomly generated password for the default user.
- Create custom ACL users with minimal required permissions (e.g., read-only for cache-aside, write for write-through).
- Rotate credentials periodically and revoke unused users.
- Use
redis.acl setusercommands in Redis config or via startup scripts.
ACLs prevent an attacker who compromises a Node.js process from executing destructive commands like FLUSHALL or CONFIG SET.
Network Security: Firewalls, TLS, and VPCs
Redis is designed for fast in-memory access, not for exposure to untrusted networks. In cloud environments (AWS, GCP, Azure) and container orchestration (Kubernetes, Docker), enforce these network-level controls:
- Firewalls: Bind Redis to localhost (
127.0.0.1) unless necessary. Use security groups or network policies to allow inbound traffic only from trusted Node.js application servers. - TLS encryption: Enable Redis TLS for all client-server communication. Node.js libraries like
ioredissupport TLS natively viatlsoptions. This prevents eavesdropping and man-in-the-middle attacks on cached data. - VPCs and private subnets: Deploy Redis inside a Virtual Private Cloud (VPC) with no public IP address. Use internal DNS or service discovery for Node.js connections.
- Container isolation: In Docker or Kubernetes, never expose Redis port 6379 to the host network unless proxied through a secure sidecar.
| Security Layer | Redis Default | Recommended for Node.js |
|---|---|---|
| Authentication | None (AUTH disabled) | ACL-based with strong passwords per user |
| Network Binding | 0.0.0.0 (all interfaces) | 127.0.0.1 or private subnet IP |
| Encryption in Transit | Plaintext (no TLS) | TLS 1.2+ with mutual authentication |
| Firewall Rules | No default restrictions | Allow only Node.js application IPs/ports |
Avoiding Injection Attacks and Protecting Sensitive Data
Redis does not have SQL injection, but it is vulnerable to command injection if user input is concatenated into Redis commands. Node.js applications must sanitize all data before constructing keys or arguments. Use parameterized commands via libraries like ioredis which prevent injection by design. Additionally, never store sensitive data (passwords, PII, session tokens) in Redis without encryption. Apply these measures:
- Validate and escape key names that include user-provided strings.
- Use Redis
EXPIREandTTLto limit data lifetime, reducing exposure if a breach occurs. - Encrypt sensitive values at the application layer before caching, using Node.js
cryptomodule with AES-256-GCM. - Enable Redis
rename-commandin configuration to block dangerous commands likeEVALorSCRIPTif not needed.
By combining strong authentication, network isolation, and input hygiene, Node.js developers can build high-performance caching layers that resist common attack vectors while maintaining the speed Redis provides.
Common Pitfalls and Anti-Patterns
Even with a solid understanding of Node.js and Redis: Caching Strategies, developers frequently fall into traps that degrade performance or introduce subtle bugs. Recognizing these anti-patterns early can save hours of debugging and prevent costly production incidents.
Over-Caching and Cache Pollution
The most pervasive mistake is caching too much data without considering its size or access frequency. When developers cache every database result, including large blobs or rarely accessed records, they pollute the cache with “cache junk.” This forces Redis to evict useful keys under memory pressure, causing cache misses for truly hot data.
To avoid this anti-pattern:
- Analyze access patterns before caching. Cache only data that is read frequently and written infrequently.
- Set appropriate TTLs. Even for “static” data, a TTL of a few hours prevents indefinite accumulation.
- Use key naming conventions that include version numbers or timestamps to invalidate stale caches intentionally.
A practical rule: if a key is accessed less than once per minute in a high-traffic application, it likely does not belong in Redis. Instead, rely on the primary database for such data.
Ignoring Connection Timeouts and Reconnection Logic
Redis connections in Node.js are asynchronous and can fail silently if not handled correctly. A common mistake is assuming the connection remains open indefinitely without implementing reconnection strategies. When Redis restarts or the network briefly drops, the Node.js client may queue commands indefinitely or throw unhandled errors, making the entire application unresponsive.
Here is a practical code example using the ioredis client to configure robust reconnection:
const Redis = require('ioredis');

const redis = new Redis({
  host: 'localhost',
  port: 6379,
  retryStrategy(times) {
    // Exponential backoff with a maximum delay of 10 seconds
    const delay = Math.min(times * 50, 10000);
    return delay;
  },
  maxRetriesPerRequest: 3,
  reconnectOnError(err) {
    const targetError = 'READONLY';
    if (err.message.includes(targetError)) {
      // Only reconnect when Redis is in read-only mode
      return true;
    }
    return false;
  }
});

// Gracefully handle connection events
redis.on('error', (err) => {
  console.error('Redis connection error:', err.message);
});

redis.on('reconnecting', () => {
  console.warn('Redis reconnecting...');
});
Additionally, always set a connection timeout (e.g., connectTimeout: 10000) to fail fast when Redis is unreachable, rather than hanging indefinitely.
Mixing Cache Layers Without Clear Expiration Policies
Many applications combine in-memory caching (e.g., Node.js Map or node-cache) with Redis caching. This creates a multi-tier cache hierarchy. The pitfall arises when these layers have inconsistent or missing expiration policies. For example, an in-memory cache may hold stale data for hours while Redis evicts its copy after a short TTL, leading to unpredictable read results.
To manage this anti-pattern:
- Define a primary expiration source. Let Redis be the source of truth for TTLs. The in-memory cache should always check Redis TTL before serving stale data.
- Use a unified TTL configuration. Store expiration values in a shared constants file or environment variable.
- Implement cache stampede protection. When multiple layers expire simultaneously, use Redis locks or probabilistic early expiration to prevent thundering herd problems.
A simple rule: never let an in-memory cache hold data beyond the Redis TTL. If Redis evicts a key after 60 seconds, the in-memory layer should also invalidate it within that window, not persist it for 10 minutes.
Conclusion and Next Steps
Throughout this exploration of Node.js and Redis: Caching Strategies, we have established that Redis is not merely a key-value store but a robust, in-memory data structure server that, when paired with Node.js, dramatically reduces latency and database load. The strategies discussed form a toolkit for building high-performance applications that can handle traffic spikes gracefully. The core insight is that caching is not a one-size-fits-all solution; it requires deliberate design around data access patterns, expiration policies, and consistency guarantees. By implementing a caching layer, you shift from a reactive scaling posture to a proactive performance optimization, ensuring your Node.js application delivers sub-millisecond response times for frequently accessed data.
Recap of Core Caching Strategies Discussed
The strategies we covered provide a foundation for most real-world caching scenarios. The following table summarizes their primary use cases and trade-offs:
| Strategy | Primary Use Case | Key Benefit | Potential Drawback |
|---|---|---|---|
| Cache-Aside (Lazy Loading) | Read-heavy workloads with moderate write frequency | Simple to implement; cache is populated on demand | Cache miss penalty; potential for stale data if not combined with invalidation |
| Write-Through | Applications requiring strong consistency between cache and database | Cache always contains fresh data | Higher write latency; cache may store rarely-read data |
| Write-Behind (Write-Back) | High-volume write operations where throughput is prioritized | Reduces database write pressure; low latency for writes | Risk of data loss on cache failure; complex recovery logic |
| Time-To-Live (TTL) Eviction | Data with natural expiration, e.g., session tokens, rate limits | Automatic cleanup; prevents stale data accumulation | Requires careful tuning of TTL values |
Additionally, we discussed the importance of cache invalidation patterns—such as explicit deletion on update, using Redis keyspace notifications, or leveraging consistent hashing for distributed caches. The choice of serialization format (JSON, MessagePack, or custom binary) also significantly impacts performance, with faster serialization often yielding better throughput at the cost of human readability.
Further Reading: Redis Documentation and Node.js Patterns
To deepen your understanding of Node.js and Redis: Caching Strategies, the following resources are indispensable:
- Official Redis Documentation: Start with the Redis Commands reference for EXPIRE, SETEX, and the SCAN family. Then explore the Persistence and Replication sections to understand data durability and high availability.
- Node.js Redis Client (node-redis): The official client library provides a promise-based API, built-in connection pooling, and support for Redis 7 features like sharded Pub/Sub. Review its Examples directory for advanced patterns like caching with automatic serialization.
- Design Patterns for Caching: Study the Cache Stampede pattern (using Redlock or probabilistic early expiration) and the Thundering Herd prevention techniques. The Redis in Action book by Josiah L. Carlson remains a classic reference.
- Node.js Performance Patterns: Combine caching with async/await, stream processing, and clustering. The Node.js Design Patterns book by Mario Casciaro covers these in depth.
Call to Action: Prototype a Simple Cache in Your Application
The most effective way to internalize these strategies is to build a prototype. Begin with a single endpoint in your Node.js application that suffers from high database latency. Implement a Cache-Aside pattern using the following steps:
- Install the
redispackage and create a client instance with connection retry logic. - Wrap your database query function with a cache check: first attempt to retrieve the key from Redis. On a miss, query the database, store the result in Redis with a TTL of 60 seconds, then return the data.
- Add an invalidation hook: after a successful write operation that updates the data, delete the corresponding cache key.
- Measure the response times using a tool like
autocannonork6before and after your caching implementation.
This minimal prototype will expose you to the core mechanics—connection management, serialization, TTL handling, and invalidation—while providing immediate performance feedback. From here, you can iterate by adding write-through for critical data, implementing distributed caching across multiple Node.js instances, or integrating Redis Stack modules like RediSearch for cached full-text queries. The key is to start small, measure relentlessly, and avoid premature optimization. Your users will thank you for the snappy responses, and your database will thank you for the reduced load. Implement your first cache today.
Frequently Asked Questions
What is the cache-aside pattern in Node.js and Redis?
The cache-aside pattern loads data into the cache on demand. When an application requests data, it first checks the Redis cache. If found (cache hit), it returns the data. If not (cache miss), it retrieves the data from the primary database, stores it in Redis with a TTL, and returns it to the client. This ensures frequently accessed data is served quickly while reducing database load. Node.js libraries like `ioredis` or `node_redis` can implement this pattern by checking cache keys and populating them on misses.
How does TTL (Time-To-Live) work in Redis caching?
TTL is a value set on a Redis key that defines how long the key should remain in the cache before being automatically deleted. In Node.js, you can set TTL using the `SETEX` command or `expire` method on a key. A reasonable TTL depends on data volatility—shorter TTLs (seconds to minutes) for rapidly changing data, longer TTLs (hours) for static data. Proper TTL management prevents stale data and optimizes memory usage by evicting old entries.
What is the difference between cache-aside and write-through caching?
Cache-aside caching loads data into the cache only when read, while write-through caching updates the cache synchronously whenever data is written to the database. In write-through, every write operation also writes to the cache, ensuring data consistency but potentially increasing write latency. Cache-aside is simpler and better for read-heavy workloads, whereas write-through suits applications requiring strong consistency between cache and database. Node.js can implement write-through by intercepting write operations to update both Redis and the database.
How can I handle cache invalidation in Node.js with Redis?
Cache invalidation removes or updates cached data when the underlying data changes. Common strategies include TTL expiry, explicit deletion on writes, or versioned keys. In Node.js, you can use `DEL` to remove specific keys after a database update. For complex scenarios, consider using Redis pub/sub to notify other services of changes. Pattern-based deletion (e.g., `KEYS user:*`) can also help, but avoid `KEYS` in production—use `SCAN` instead. Proper invalidation prevents stale data without sacrificing performance.
What are the common Redis data structures used in Node.js caching?
Redis supports strings, hashes, lists, sets, sorted sets, and more. For simple key-value caching, strings are most common. Hashes store multiple fields (e.g., user profile). Sorted sets are useful for leaderboards or time-based caching. Lists can queue tasks. In Node.js, you can use these with `ioredis` commands like `hset`, `zadd`, or `lpush`. Choosing the right structure improves efficiency and reduces memory overhead.
How can I avoid cache stampede in Node.js and Redis?
Cache stampede happens when many requests simultaneously miss the cache and overload the database. To avoid it, use techniques like: (1) locking—use Redis `SETNX` to let only one process recompute the cache; (2) early expiration—refresh the cache before TTL expires; (3) probabilistic early recomputation—randomly recompute before TTL ends. In Node.js, you can implement a mutex with `ioredis` to prevent concurrent recomputation, ensuring only one request rebuilds the cache while others wait.
What is Redis pipelining and how does it benefit Node.js caching?
Pipelining allows sending multiple Redis commands without waiting for replies, reducing round-trip latency. In Node.js, `ioredis` supports pipelining via the `pipeline()` method. This is beneficial for batch operations like populating cache on startup or clearing many keys. It can significantly improve throughput in high-latency networks. However, ensure commands are not dependent on each other, as pipelining does not guarantee atomicity.
How do I monitor Redis cache performance in a Node.js app?
Monitor key metrics like hit rate, memory usage, evictions, and latency. Use Redis `INFO` command or tools like RedisInsight, Prometheus with redis_exporter, or built-in Node.js logging. In your app, track cache hits/misses by incrementing counters (e.g., with `ioredis` `incr`). Set up alerts for low hit rates or high evictions. Regularly analyze slow queries using Redis SLOWLOG to optimize. Monitoring helps tune TTLs and identify inefficient patterns.
Sources and further reading
- Redis Documentation: Introduction to Redis
- Node.js Official Documentation
- ioredis GitHub Repository
- Redis Cache-Aside Pattern (Azure)
- Redis TTL Documentation
- Redis Pipelining
- Redis Eviction Policies
- Redis Sorted Sets
- Redis Hashes
- Mozilla Developer Network: HTTP Caching
Need help with this topic?
Send us your details and we will contact you.