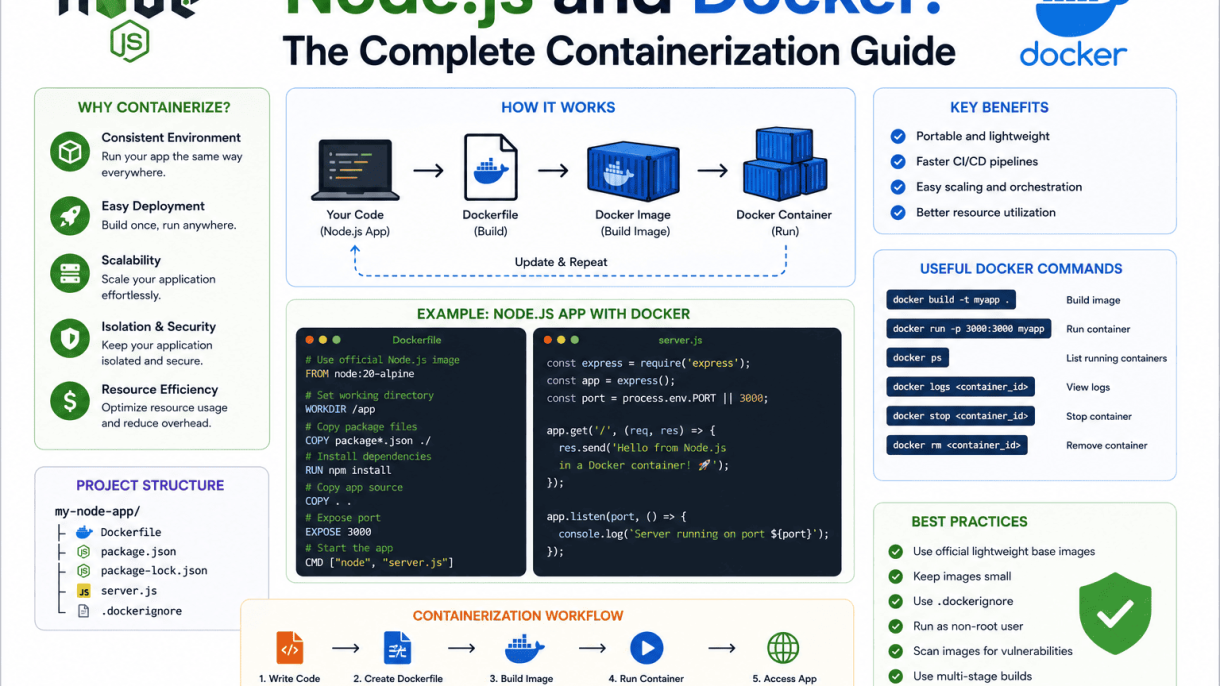

Introduction to Node.js and Docker Containerization
Combining Node.js with Docker represents a paradigm shift in how developers build, ship, and run applications. Node.js, with its event-driven, non-blocking I/O model, excels at handling concurrent requests and building scalable network applications. Docker, on the other hand, provides lightweight, portable containers that encapsulate an application and its dependencies into a single, self-sufficient unit. Together, they solve the age-old problem of “it works on my machine” by ensuring consistent environments from development through production. This guide explores the synergy between these two technologies, focusing on practical steps to containerize Node.js applications for modern workflows.
What is Docker and How Does It Work?
Docker is an open-source platform that automates the deployment of applications inside isolated containers. Unlike virtual machines, which require a full guest operating system, containers share the host OS kernel while maintaining process-level separation. This makes them lightweight, fast to start, and resource-efficient. Docker uses a client-server architecture:
- Docker Daemon: Runs on the host, managing containers, images, networks, and storage volumes.
- Docker Client: A command-line tool that communicates with the daemon via REST API.
- Docker Images: Read-only templates that define the application environment, including the base OS, Node.js runtime, dependencies, and code.
- Docker Containers: Runnable instances of images, each with its own filesystem, network, and process space.
When you run a Node.js application inside a container, Docker ensures that the runtime environment (Node.js version, system libraries, environment variables) is identical regardless of the underlying host. This eliminates configuration drift and simplifies collaboration across teams.
Benefits of Containerizing Node.js Applications
Containerizing Node.js applications offers several tangible advantages for development, deployment, and scaling:
| Benefit | Description |
|---|---|
| Environment Consistency | Containers bundle Node.js, npm packages, and system dependencies, ensuring the same behavior across local, staging, and production environments. |
| Isolation | Each container runs independently, preventing conflicts between different Node.js applications or versions on the same host. |
| Fast Startup | Containers start in seconds, enabling rapid iteration and horizontal scaling in orchestration tools like Kubernetes. |
| Simplified CI/CD | Docker images can be built, tested, and deployed consistently, reducing integration issues and deployment failures. |
| Resource Efficiency | Containers share the host kernel and use only the resources they need, making them more lightweight than virtual machines. |
| Portability | Docker images run on any system with Docker installed, including local machines, cloud VMs, and bare-metal servers. |
For Node.js specifically, containerization helps manage npm dependencies, environment variables, and process lifecycle (e.g., using process managers like PM2 inside containers). It also simplifies debugging by allowing developers to replicate production-like environments locally.
Prerequisites: Docker and Node.js Installation
Before diving into containerization, ensure you have the following installed on your development machine:
- Docker: Download and install Docker Desktop (Windows/Mac) or Docker Engine (Linux). Verify installation with
docker --version. Docker Desktop includes Docker Compose, which is useful for multi-container applications. - Node.js: Install the latest LTS version from the official Node.js website or via a version manager like nvm. Verify with
node --versionandnpm --version. - A Code Editor: Use Visual Studio Code, WebStorm, or any editor with Docker support (e.g., Docker extension for VS Code).
- Basic Familiarity: Understanding of Node.js project structure (package.json, modules) and command-line tools.
Optional but recommended: Install Docker Compose for orchestrating multiple services (e.g., Node.js app with a database). With these prerequisites in place, you are ready to create a Dockerfile for your Node.js application and experience the benefits of containerization firsthand.
Setting Up Your Node.js Project for Docker
Properly preparing a Node.js application for Docker involves structuring the project to leverage containerization benefits like reproducibility, isolation, and efficient builds. This section covers foundational practices for dependency management, environment configuration, and application structure that align with Docker’s layered filesystem and build caching.
Creating a Basic Node.js Application Structure
Organize your project with a clear separation of concerns. A typical Node.js project for Docker includes a root-level src/ directory for application code, a tests/ directory for test files, and configuration files at the root. Avoid placing large assets or generated files inside the source tree, as they bloat Docker build contexts and invalidate layer caches. Use a .dockerignore file to exclude unnecessary files like node_modules, .git, and logs from the Docker build context. A minimal structure might look like this:
src/– Application entry point and modulestests/– Unit and integration testspackage.json– Metadata and dependenciespackage-lock.json– Locked dependency versions.dockerignore– Excludes local artifactsDockerfile– Container build instructions
Place the main entry point, often src/index.js or src/app.js, in the src/ directory. This structure keeps the root clean and makes it easier to mount volumes for development without interfering with the container’s file system.
Managing Dependencies with package.json and package-lock.json
Docker builds rely on caching layers to speed up subsequent builds. For Node.js projects, always commit both package.json and package-lock.json to version control. The lock file ensures deterministic installations across environments, which is critical for reproducible containers. In your Dockerfile, copy these two files first, then run npm ci (instead of npm install) to install exact versions from the lock file. This strategy allows Docker to cache the npm ci layer unless the dependency files change. A practical Dockerfile snippet demonstrating this approach:
FROM node:18-alpine
WORKDIR /app
COPY package*.json ./
RUN npm ci --only=production
COPY src/ ./src/
CMD ["node", "src/index.js"]
Separating dependency installation from source code copying leverages Docker’s layer caching. When only source files change, the dependency layer remains cached, drastically reducing build time. For development, include dev dependencies by omitting --only=production, but for production builds, exclude them to minimize image size.
Environment Variables and Configuration Files
Containerized applications must handle configuration without hardcoding values. Use environment variables for settings that vary between environments (e.g., database URLs, API keys, port numbers). Node.js can read these via process.env. Avoid bundling environment-specific files like .env into the Docker image; instead, pass variables at runtime using Docker’s -e flag or a .env file with --env-file. For default values, use a configuration module that falls back to sensible defaults when variables are missing. Example approach:
- Define a
config.jsmodule that readsprocess.env.PORTandprocess.env.DB_URLwith defaults. - Set
NODE_ENVtoproductionin the Dockerfile for production builds. - Use Docker Compose to manage multiple environment variables cleanly for local development.
Never store secrets in the Dockerfile or image layers. Use Docker secrets or a dedicated secrets manager for sensitive data. This practice keeps the container portable and secure across staging, testing, and production environments.
Writing an Optimized Dockerfile for Node.js
Crafting an efficient Dockerfile for a Node.js application requires more than copying files and running npm install. An optimized Dockerfile reduces build times, minimizes image size, and hardens security. The following sections provide a step-by-step approach to achieving these goals using best practices for base image selection, multi-stage builds, and runtime user management.
Choosing the Right Base Image for Node.js
The base image sets the foundation for your container’s size, security, and performance. For Node.js applications, the official node images on Docker Hub offer several variants. The table below compares the most common options, helping you select based on your needs for size, speed, and security.
| Image Variant | Base OS | Approximate Size | Best Use Case |
|---|---|---|---|
node:22-alpine |
Alpine Linux 3.20 | ~125 MB | Production deployments where minimal size is critical; requires native module compilation |
node:22-slim |
Debian (minimal) | ~190 MB | Balance of size and compatibility; pre-built binaries for common native modules |
node:22 (full) |
Debian (full) | ~350 MB | Development and CI environments needing build tools, compilers, and full package support |
node:22-bookworm-slim |
Debian 12 (slim) | ~200 MB | Security-focused production with long-term support and reduced attack surface |
For most production Node.js applications, node:22-alpine is the recommended choice because of its small footprint and reduced vulnerability surface. However, if your application uses native modules that require compilation (e.g., sharp, bcrypt), the node:22-slim variant may be more reliable due to its inclusion of essential build tools like gcc and make.
Implementing Multi-Stage Builds for Smaller Images
Multi-stage builds allow you to separate the build environment from the runtime environment, drastically reducing the final image size. The typical pattern uses a first stage for installing dependencies and compiling assets, and a second stage that copies only the production necessities. Follow these steps:
- Stage 1: Build – Start with a full base image (e.g.,
node:22) to install all dependencies (including devDependencies) and run build commands likenpm run build. - Stage 2: Production – Start with a lean base image (e.g.,
node:22-alpine), copy only thepackage.json,package-lock.json, and thedistorbuildfolder from the first stage, then runnpm ci --only=productionto install runtime dependencies.
Example optimized multi-stage Dockerfile structure:
# Stage 1: Build
FROM node:22 AS builder
WORKDIR /app
COPY package*.json ./
RUN npm ci
COPY . .
RUN npm run build

# Stage 2: Production
FROM node:22-alpine
WORKDIR /app
COPY --from=builder /app/package*.json ./
RUN npm ci --only=production
COPY --from=builder /app/dist ./dist
EXPOSE 3000
USER node
CMD ["node", "dist/server.js"]
This approach reduces the final image size by excluding build tools, source maps, and development dependencies that are unnecessary at runtime.
Security Considerations: Avoid Running as Root
Running a Node.js application as the root user inside a container is a critical security risk. If an attacker exploits a vulnerability in your application, they gain root access to the container, which can lead to host compromise through container escape. Docker’s official Node.js images include a non-root user called node (UID 1000). To enforce this:
- Add
USER nodein your Dockerfile after copying files and before theCMDinstruction. - Ensure that any directories or files your application writes to (e.g., logs, uploads) have appropriate ownership or permissions set during the build. Use
RUN chown -R node:node /app/dataif needed. - Never use
RUN npm install -gwithout the--userflag, as global installations often require root. Instead, install tools locally or usenpx.
Additional security best practices include pinning specific base image tags (e.g., node:22.0.0-alpine instead of node:22) to avoid unexpected updates, and regularly scanning your images with tools like Docker Scout or Trivy for known vulnerabilities. By following these guidelines, you ensure your Node.js container runs with the least privilege necessary, reducing the attack surface significantly.
Using .dockerignore to Reduce Build Context
When you build a Docker image, the Docker client sends a build context—the directory containing your Dockerfile and any referenced files—to the Docker daemon. By default, this context includes every file and subdirectory in the specified path, which can inadvertently transfer gigabytes of irrelevant data, such as node_modules, logs, or environment files. A .dockerignore file solves this by instructing Docker to exclude specific files and directories from the context, leading to faster builds, smaller image sizes, and improved security by preventing sensitive information from reaching the daemon.
Files and Directories to Exclude by Default
For any Node.js project, certain files and directories are almost never needed inside a Docker build context. Excluding them by default is a best practice. The following list covers the most common candidates:
- node_modules – Rebuilt inside the container via
npm install; including them bloats the context and may cause platform-specific issues. - .git – Contains the entire version history; unnecessary for production builds and a security risk if secrets are committed.
- .env and .env.* – Environment variable files often hold API keys or database credentials; never include them in the build context.
- npm-debug.log*, yarn-error.log* – Debug logs from package managers; irrelevant to the container runtime.
- .dockerignore itself – While including it won’t break builds, it’s redundant to send the ignore file to the daemon.
- Dockerfile and .dockerignore – These are read by the client, not needed in the context after processing.
- dist or build (if generated) – May be stale; regenerate inside the container for consistency.
- coverage, .nyc_output – Test artifacts; not required for production images.
Examples of .dockerignore for Node.js Projects
A well-crafted .dockerignore file balances exclusion breadth with project-specific needs. Below is a practical example suitable for most Node.js applications:
# Dependencies
node_modules

# Version control
.git
.gitignore

# Environment files
.env
.env.*
!.env.example

# Logs
npm-debug.log*
yarn-debug.log*
yarn-error.log*

# Build artifacts
dist
build
.next

# Test and coverage
coverage
.nyc_output

# IDE and editor files
.vscode
.idea
*.swp
*.swo

# OS files
.DS_Store
Thumbs.db

# Docker files (redundant in context)
Dockerfile
.dockerignore
Note the use of !.env.example—this negation pattern allows a template environment file while still excluding actual .env files. Adjust the list to include any project-specific directories like tmp or uploads that should not enter the context.
Impact on Build Performance and Image Size
Excluding unnecessary files directly reduces the build context size, which has two primary benefits. First, it shortens the time Docker takes to tar and send the context to the daemon, especially noticeable in CI/CD pipelines or over slow network connections. Second, a smaller context means that Docker’s layer caching works more efficiently—when you change a source file, Docker invalidates only the affected layer, but if you previously included node_modules (which changes frequently), cache misses become more common, slowing down subsequent builds.
Regarding image size, .dockerignore does not directly shrink the final image—that depends on what you COPY into the image. However, by excluding files like .git or node_modules, you prevent them from being accidentally copied into an intermediate layer, which could otherwise be committed into the final image if not cleaned up. This practice also reduces the risk of including secrets or unnecessary binaries. For a typical Node.js project, a .dockerignore file can reduce the build context from hundreds of megabytes (e.g., a node_modules folder of 200 MB) to a few kilobytes, making builds faster and more predictable.
Docker Compose for Multi-Container Node.js Applications
When developing Node.js applications that depend on databases, caching systems, or message brokers, managing each service manually becomes error-prone and time-consuming. Docker Compose solves this by letting you define and run multi-container environments with a single YAML configuration file. This approach ensures every developer on your team uses identical service versions, networking, and storage configurations, eliminating the classic “it works on my machine” problem.
Defining Services in docker-compose.yml
The heart of Docker Compose is the docker-compose.yml file, where you declare each container as a service. A typical Node.js application with a database requires at least two services: one for your app and one for the data store. Below is a minimal but complete example for a Node.js app paired with PostgreSQL:
version: '3.8'
services:
  app:
    build: .
    ports:
      - "3000:3000"
    environment:
      - DB_HOST=db
      - DB_PORT=5432
      - DB_USER=postgres
      - DB_PASSWORD=secret
      - DB_NAME=mydb
    depends_on:
      - db
  db:
    image: postgres:15-alpine
    environment:
      POSTGRES_USER: postgres
      POSTGRES_PASSWORD: secret
      POSTGRES_DB: mydb
Key points for defining services:
- Build context: Use
build: .to build your Node.js image from a local Dockerfile, orimageto pull a prebuilt image. - Port mapping: Map host ports to container ports (e.g.,
"3000:3000"). - Environment variables: Pass configuration like database credentials and hostnames. Use
DB_HOST=dbbecause Docker Compose creates a network where service names act as hostnames. - Dependency ordering: The
depends_ondirective ensures the database container starts before the app container, though your app should still implement retry logic for readiness.
Linking Node.js with a PostgreSQL or MongoDB Container
Connecting your Node.js application to a database container requires consistent configuration across both sides. For PostgreSQL, your Node.js code should read environment variables and connect using the service name as the host:
const { Pool } = require('pg');
const pool = new Pool({
  host: process.env.DB_HOST,
  port: process.env.DB_PORT,
  user: process.env.DB_USER,
  password: process.env.DB_PASSWORD,
  database: process.env.DB_NAME
});
For MongoDB, the approach is similar but uses a connection string:
const mongoose = require('mongoose');
mongoose.connect(`mongodb://${process.env.DB_HOST}:${process.env.DB_PORT}/${process.env.DB_NAME}`);
When using MongoDB with Docker Compose, define the database service as follows:
services:
  mongo:
    image: mongo:7
    environment:
      MONGO_INITDB_ROOT_USERNAME: admin
      MONGO_INITDB_ROOT_PASSWORD: secret
    ports:
      - "27017:27017"
Your Node.js service then connects using the service name mongo as the host. The depends_on directive ensures the database starts first, but consider adding a health check to wait for the database to accept connections before your app starts querying.
Using Volumes for Persistent Data and Hot Reloading
Volumes serve two critical purposes in development: preserving database data across container restarts, and enabling hot reloading for your Node.js application code. For persistent database storage, add a named volume to your database service:
services:
  db:
    image: postgres:15-alpine
    volumes:
      - pgdata:/var/lib/postgresql/data

volumes:
  pgdata:
This volume pgdata survives container removal, so your development data remains intact after docker-compose down.
For hot reloading, mount your local project directory into the Node.js container. This allows tools like nodemon or ts-node-dev to detect file changes and restart your application automatically:
services:
  app:
    build: .
    volumes:
      - .:/app
      - /app/node_modules
    command: npx nodemon src/index.js
Notice the second volume entry /app/node_modules — this is an anonymous volume that prevents your local node_modules from overriding the container’s installed dependencies, which may differ due to platform-specific native modules. This pattern gives you instant feedback during development without rebuilding the image.
For optimal performance, combine both volume types: one named volume for database persistence, and one bind mount for your application code with hot reloading. This setup mirrors production-like data handling while maintaining a rapid development cycle.
Managing Node.js Processes Inside Containers
Running Node.js inside Docker containers introduces unique process management challenges. Containers are designed to run a single primary process, but Node.js applications often require handling multiple concurrent connections, graceful shutdowns, and resource constraints. Following best practices ensures reliability, performance, and maintainability in production environments.
Using PM2 or Node.js Built-in Clustering
Node.js runs on a single thread by default, which limits its ability to fully utilize multi-core CPUs inside containers. Two primary approaches exist for scaling Node.js processes horizontally within a container: PM2 and the built-in cluster module.
- PM2 (Process Manager 2): A production-grade process manager that supports clustering, automatic restarts, and zero-downtime deployments. It can fork multiple worker processes equal to the number of CPU cores available in the container.
- Node.js Built-in Cluster: A native module that creates child processes (workers) sharing the same server port. It requires manual setup but avoids external dependencies.
For most Dockerized Node.js applications, PM2 is recommended due to its simplicity and built-in features like log management and health checks. Below is a practical example of a Dockerfile using PM2 with clustering:
FROM node:18-alpine
WORKDIR /app
COPY package*.json ./
RUN npm install --production
COPY . .
EXPOSE 3000
CMD ["pm2-runtime", "start", "ecosystem.config.js", "--instances", "max"]
In this setup, pm2-runtime runs PM2 in the foreground (essential for Docker), and --instances max spawns one worker per CPU core. The ecosystem.config.js file defines your app’s entry point and environment variables.
Graceful Shutdown with SIGTERM and SIGKILL
When Docker stops a container, it sends a SIGTERM signal to the main process (PID 1). After a grace period (default 10 seconds), it sends SIGKILL to forcibly terminate the process. Without proper handling, this can drop active connections, corrupt data, or leave resources unclosed.
Implementing graceful shutdown involves listening for SIGTERM and performing the following steps before exiting:
- Stop accepting new requests (e.g., close the HTTP server).
- Wait for existing requests to complete (set a timeout, typically 5–30 seconds).
- Close database connections, message queues, and file handles.
- Flush logs and emit final metrics.
- Exit with code 0 after cleanup.
Example with Node.js built-in HTTP server:
const server = require('http').createServer((req, res) => {
  // Handle request
});

process.on('SIGTERM', () => {
  console.log('SIGTERM received, shutting down gracefully...');
  server.close(() => {
    console.log('HTTP server closed');
    // Close database connections here
    process.exit(0);
  });
  // Force shutdown after 10 seconds
  setTimeout(() => process.exit(1), 10000);
});

server.listen(3000);
When using PM2, the process manager automatically handles SIGTERM and forwards it to workers, but you should still implement your own shutdown logic in the application code.
Monitoring and Logging Node.js Processes
Containers are ephemeral, so traditional monitoring approaches (SSH, file-based logs) are ineffective. Instead, adopt these practices for visibility:
| Area | Best Practice | Tools/Approach |
|---|---|---|
| Logging | Write all logs to stdout/stderr |
Use console.log, pino, or winston with JSON format |
| Health Checks | Provide /health endpoint |
Return 200 with status; configure Docker HEALTHCHECK |
| Metrics | Expose Prometheus metrics | Use prom-client library; scrape via Docker or orchestration |
| Process Monitoring | Track CPU, memory, and event loop lag | PM2 built-in dashboard; process.resourceUsage() |
For logging, ensure your Node.js application outputs structured logs to stdout in JSON format. This allows Docker’s logging driver (e.g., json-file, gelf, or awslogs) to collect and forward them to centralized systems like ELK or Datadog. Avoid writing logs to files inside the container, as they are lost when the container stops.
For health checks, add a simple endpoint that returns HTTP 200 when the process is ready. Then define a HEALTHCHECK instruction in your Dockerfile:
HEALTHCHECK --interval=30s --timeout=3s --start-period=5s --retries=3
  CMD wget --no-verbose --tries=1 --spider http://localhost:3000/health || exit 1
This ensures Docker can detect and restart unhealthy containers automatically. By combining these practices, you can run Node.js processes inside Docker containers with confidence, knowing they will handle traffic, shutdowns, and diagnostics reliably.
Networking and Port Mapping for Node.js Containers
Configuring Docker networking correctly is essential for exposing your Node.js applications to external traffic and enabling secure communication between microservices. This section covers port mapping, container-to-container networking, and strategies for handling dynamic ports and reverse proxies in production.
Exposing Ports with EXPOSE and -p Flags
Docker provides two mechanisms for managing ports: the EXPOSE instruction in the Dockerfile and the -p (or --publish) flag at runtime. Understanding their distinct roles prevents connectivity issues.
EXPOSE(Dockerfile): Documents the port your Node.js app listens on (e.g.,EXPOSE 3000). It is informational only—does not publish the port or make it accessible outside the container. Use it as documentation for maintainers.-pflag (docker run): Maps a container port to a host port, making the app reachable from outside. Syntax:-p host_port:container_port. For example,-p 8080:3000maps host port 8080 to container port 3000.
Common practice: include EXPOSE in your Dockerfile for clarity, then use -p in your run command or Compose file to actually bind ports. In production, bind to 127.0.0.1 (e.g., -p 127.0.0.1:8080:3000) when using a reverse proxy to prevent direct external access.
Custom Networks for Inter-Container Communication
When your Node.js application needs to talk to other containers (e.g., a database or Redis cache), the default bridge network is not ideal. Create custom user-defined networks for better isolation and service discovery.
Steps to set up a custom network:
- Create a network:
docker network create my-node-app-net - Run containers on that network:
docker run --network my-node-app-net --name node-api my-node-image - Connect additional containers (e.g., MongoDB):
docker run --network my-node-app-net --name mongo-db mongo:6
Benefits of custom networks:
| Feature | Default Bridge | Custom Network |
|---|---|---|
| Automatic DNS resolution | No (use links) | Yes (container name resolves to IP) |
| Isolation | All containers on host can communicate | Only containers on same network |
| Environment variable injection | Manual | Automatic via Docker Compose |
In your Node.js code, connect to the database using the container name as hostname (e.g., mongoose.connect('mongodb://mongo-db:27017/mydb')). This eliminates hardcoded IPs.
Handling Dynamic Ports and Reverse Proxies
Production Node.js deployments often use dynamic port allocation or reverse proxies for load balancing and SSL termination. Two common scenarios require specific attention.
Dynamic port allocation: When using -P (capital P) to map container ports to random high-numbered host ports, your Node.js app must read the assigned port from environment variables. Set PORT=0 in the container and have your app listen on that dynamic port. Use docker port <container> to discover the actual mapping.
Reverse proxy integration: For production, place a reverse proxy (Nginx, Traefik, or Caddy) in front of your Node.js containers. Configure the proxy to:
- Listen on standard ports (80/443) on the host.
- Forward requests to the Node.js container’s internal port (e.g.,
proxy_pass http://node-api:3000;). - Strip the
X-Forwarded-*headers correctly so your Node.js app knows the original client IP and protocol.
In your Node.js middleware (e.g., Express), enable trust proxy: app.set('trust proxy', 1). This ensures req.ip returns the client IP, not the proxy’s IP. Avoid exposing the Node.js container’s port directly to the internet—bind the proxy to the host’s public interface instead.
For Docker Compose setups, define a shared network between the proxy and Node.js services. Example snippet:
version: '3.8'
services:
  node-app:
    networks:
      - app-net
  nginx:
    networks:
      - app-net
networks:
  app-net:
This pattern keeps your Node.js containers secure and scalable while maintaining clean networking.
Testing and Debugging Node.js in Docker Containers
Containerizing a Node.js application introduces new considerations for testing and debugging workflows. The isolated nature of containers can obscure runtime behavior, but with deliberate strategies, you can achieve the same fidelity and speed as local development. This section covers three critical practices: running unit tests inside containers, attaching debuggers with Node.js Inspector, and using Docker volumes to enable live code changes. Each technique preserves the reproducibility of containers while maintaining developer productivity.
Running Unit Tests in a Dockerized Environment
To run unit tests reliably inside a Docker container, you must ensure the test runner and all dependencies are available in the image. The standard approach involves creating a separate Dockerfile stage or a dedicated docker-compose service for testing. This isolates test execution from production builds and prevents test utilities from bloating the final image.
Begin by adding a test script to your package.json, such as "test": "jest --ci --coverage". Then, in your Docker setup, you can execute tests using a command like docker run --rm my-app:latest npm test. For more complex setups, a docker-compose.test.yml file can define a service that overrides the default command:
version: '3.8'
services:
  app-test:
    build: .
    command: npm test
    volumes:
      - .:/app
      - /app/node_modules
    environment:
      - NODE_ENV=test
Key considerations for containerized unit tests include:
- Dependency isolation: Always install
devDependenciesin the test stage to ensure test runners and assertion libraries are present. - Database or service mocking: Use in-memory databases or mock services to avoid external dependencies during unit tests.
- CI/CD integration: In continuous integration pipelines, run the test service as a step before building the production image, failing the build if tests do not pass.
For larger test suites, consider using multi-stage builds where the test stage copies only source code and package.json, runs tests, and then discards the layer. This keeps the final image lean while enforcing test coverage.
Attaching Debuggers with Node.js Inspector and Docker
Node.js applications running in Docker can be debugged using the built-in Node.js Inspector, which exposes a WebSocket-based debugging protocol. To attach a debugger, you must start the container with the --inspect flag and expose the appropriate port. For example:
docker run -p 9229:9229 --rm my-app:latest node --inspect=0.0.0.0:9229 app.js
The --inspect=0.0.0.0:9229 flag binds the inspector to all network interfaces, allowing external connections from your host machine. Once the container is running, you can attach Chrome DevTools by navigating to chrome://inspect and adding the container’s IP and port, or use VS Code’s debugger configuration with a launch.json that specifies the remote address:
{
  "version": "0.2.0",
  "configurations": [
    {
      "type": "node",
      "request": "attach",
      "name": "Attach to Docker",
      "address": "localhost",
      "port": 9229,
      "localRoot": "${workspaceFolder}",
      "remoteRoot": "/app"
    }
  ]
}
For production-like debugging, use the --inspect-brk flag to pause execution at the first line, giving you time to connect the debugger before the application starts. Note that exposing the inspector port in production environments is a security risk; restrict access using Docker network configurations or SSH tunnels.
To illustrate the trade-offs between common debugging approaches, consider the following comparison:
| Method | Setup Complexity | Breakpoint Support | Live Reload Integration | Security Considerations |
|---|---|---|---|---|
| Node.js Inspector | Low | Full | Manual | Expose port 9229; restrict via firewall or SSH |
| VS Code Attach | Medium | Full | Partial (requires nodemon) | Same as Inspector; uses localhost mapping |
| Chrome DevTools | Low | Full | Manual | Requires browser; suitable for development only |
| Docker Compose with Debug Service | High | Full | Yes (with volume mounts) | Isolated network; no public exposure |
Using Docker Volumes for Live Code Changes
Docker volumes enable live code changes by mounting your local source directory into the container, so edits are reflected immediately without rebuilding the image. This is essential for rapid development and debugging cycles. The basic command for a development container with a volume mount is:
docker run -v $(pwd):/app -v /app/node_modules -p 3000:3000 my-app:dev
The second volume mount (/app/node_modules) is a named or anonymous volume that prevents the local node_modules from overriding the container’s installed dependencies, which may differ due to operating system or architecture differences. For Node.js applications, this pattern avoids “module not found” errors when native modules are compiled for a different platform.
To fully leverage live code changes, combine volumes with a process manager like nodemon or pm2 that restarts the application on file changes. In your Dockerfile’s development stage, install nodemon globally and set the command to nodemon app.js. Then, in your docker-compose.yml for development:
services:
  app-dev:
    build:
      context: .
      target: development
    volumes:
      - .:/app
      - /app/node_modules
    ports:
      - "3000:3000"
      - "9229:9229"
    command: npx nodemon --inspect=0.0.0.0:9229 app.js
This setup provides both live reloading and debugger attachment, creating an efficient inner loop for development. Be mindful of file system performance on macOS and Windows when using bind mounts; consider using Docker’s delegated or cached mount options (e.g., :cached on macOS) to improve speed. For large codebases, exclude node_modules and build artifacts from the mount using a .dockerignore file to prevent unnecessary file-watching events.
Deploying Node.js Docker Containers to Production
Transitioning a containerized Node.js application from development to production requires careful orchestration of image management, platform selection, and automated pipelines. This guide covers the essential steps to deploy robust, scalable Node.js Docker containers in production environments.
Pushing Images to Docker Hub or Private Registries
Before deployment, container images must be stored in a registry. Docker Hub is the default public registry, while private registries (e.g., AWS ECR, Google Container Registry, Azure Container Registry) offer enhanced security and compliance for enterprise workloads.
To push an image, first tag it with the registry URL:
docker tag my-node-app:latest docker.io/yourusername/my-node-app:v1.0.0
docker push docker.io/yourusername/my-node-app:v1.0.0
For private registries, authenticate first using docker login or cloud-specific CLI tools. Consider these best practices:
- Tag images semantically (e.g., v1.2.3, latest, sha-abc123) for traceability.
- Use multi-stage builds to minimize image size by separating build and runtime dependencies.
- Scan images for vulnerabilities using tools like Docker Scout, Trivy, or Snyk before pushing.
- Implement retention policies to prune old or untagged images, reducing storage costs.
Deploying with Kubernetes or Docker Swarm
Container orchestrators manage scaling, load balancing, and self-healing for Node.js applications. Kubernetes is the industry standard for complex, multi-service architectures, while Docker Swarm offers simpler native orchestration for smaller teams.
| Feature | Kubernetes | Docker Swarm |
|---|---|---|
| Setup complexity | High | Low |
| Scaling granularity | Pod-level with HPA | Service-level |
| Load balancing | Ingress controllers + Services | Built-in mesh routing |
| Rolling updates | Configurable strategies | Simple update delays |
For Kubernetes, create a deployment manifest that references your registry image:
apiVersion: apps/v1
kind: Deployment
metadata:
  name: node-app-deployment
spec:
  replicas: 3
  selector:
    matchLabels:
      app: node-app
  template:
    metadata:
      labels:
        app: node-app
    spec:
      containers:
      - name: node-app
        image: yourregistry/my-node-app:v1.0.0
        ports:
        - containerPort: 3000
Apply with kubectl apply -f deployment.yaml. For Swarm, use docker stack deploy with a compose file that specifies the image and replicas.
CI/CD Pipelines for Automated Builds and Deployments
Automating the build-test-deploy cycle ensures consistency and reduces human error. A robust pipeline typically includes these stages:
- Source control trigger (e.g., push to main branch).
- Code quality checks (linting, unit tests).
- Build Docker image using
docker buildwith cached layers. - Run integration tests against the containerized application.
- Push image to registry with a unique tag (e.g., commit SHA).
- Deploy to staging/infrastructure via kubectl or Swarm commands.
Example GitHub Actions workflow snippet for Node.js Docker deployment:
jobs:
  deploy:
    runs-on: ubuntu-latest
    steps:
      - uses: actions/checkout@v4
      - name: Build and push Docker image
        uses: docker/build-push-action@v5
        with:
          push: true
          tags: yourregistry/my-node-app:${{ github.sha }}
      - name: Deploy to Kubernetes
        run: |
          kubectl set image deployment/node-app-deployment
            node-app=yourregistry/my-node-app:${{ github.sha }}
            --record
Integrate secret management for registry credentials and cluster access tokens to maintain security. Monitor deployments with logging and alerting to catch failures early.
Performance Tuning and Security Hardening
Optimizing a Node.js container for production requires a dual focus: ensuring the application runs efficiently under load and protecting it from common vulnerabilities. This guide provides advanced techniques for tuning container performance and hardening the security posture of your Node.js and Docker stack.
Limiting Resource Usage with Docker CPU and Memory Constraints
Without resource limits, a single Node.js container can consume all host CPU or memory, causing instability for other containers or the host OS. Docker provides built-in flags to cap usage, which you should apply in both docker run commands and docker-compose.yml files. For memory, use the --memory flag (e.g., --memory="512m") to set a hard limit. For CPU, use --cpus to specify the number of CPU cores the container can use (e.g., --cpus="1.5"). In Node.js, also set the --max-old-space-size flag (e.g., NODE_OPTIONS="--max-old-space-size=384") to align the V8 garbage collector with the container memory limit, preventing out-of-memory crashes. Below is a comparison of key parameters:
| Parameter | Docker Flag | Example | Node.js Equivalent |
|---|---|---|---|
| Memory limit | --memory |
--memory="512m" |
--max-old-space-size=384 |
| CPU limit | --cpus |
--cpus="1.5" |
None directly |
| Memory reservation | --memory-reservation |
--memory-reservation="256m" |
None directly |
Use docker stats to monitor real-time usage and adjust limits based on load testing results.
Scanning Images for Vulnerabilities with Trivy or Snyk
Container images often include outdated base layers or dependencies with known vulnerabilities. Integrate scanning into your CI/CD pipeline. Trivy is a fast, open-source scanner that detects vulnerabilities in OS packages (Alpine, Debian) and application dependencies (npm, yarn). Run it with: trivy image your-node-app:latest. Snyk offers a broader set of features, including continuous monitoring and integration with Docker registries. Use Snyk with: snyk container test your-node-app:latest. For maximum coverage, scan both the final image and the intermediate build layers. Prioritize fixes for critical and high-severity vulnerabilities, and rebuild images regularly to incorporate security patches.
Using Secrets Management for Sensitive Data
Never hardcode secrets like database passwords, API keys, or JWT tokens in Dockerfiles or environment files. Docker provides native secrets management in Swarm mode. For standalone containers, use environment variables injected at runtime via a secure mechanism. In docker-compose.yml, reference external secret files:
- Create a secret file (e.g.,
db_password.txt) with the sensitive value. - Define secrets in the compose file under the
secretstop-level key. - Mount the secret to
/run/secrets/inside the container.
Alternatively, use a dedicated secrets manager like HashiCorp Vault or AWS Secrets Manager, and retrieve secrets via environment variables set at container startup. Avoid storing secrets in image layers by using multi-stage builds and never copying secret files into the final image. For example, use a build argument to pass a token temporarily, then unset it in the final stage:
# Dockerfile
FROM node:18-alpine AS builder
ARG NPM_TOKEN
RUN echo "//registry.npmjs.org/:_authToken=${NPM_TOKEN}" > .npmrc
RUN npm install

FROM node:18-alpine
COPY --from=builder /app /app
ENV NODE_ENV=production
CMD ["node", "app.js"]
This approach ensures secrets are not persisted in the final image layers, reducing exposure risk.
Frequently Asked Questions
Why use Docker with Node.js?
Docker containerizes Node.js applications, ensuring consistent environments from development to production. It eliminates 'it works on my machine' issues by packaging the app, dependencies, and runtime into a portable container. This simplifies deployment, scaling, and collaboration. Docker also isolates processes, improves resource utilization, and integrates with orchestration tools like Kubernetes for managing microservices.
How to create a Dockerfile for Node.js?
Start with an official Node.js base image (e.g., FROM node:18-alpine). Set the working directory (WORKDIR /app). Copy package.json and package-lock.json, then run npm install to cache dependencies. Copy the rest of the application code. Expose the app port (EXPOSE 3000). Define the start command (CMD ["node", "app.js"]). Use .dockerignore to exclude node_modules and logs for smaller builds.
What are Docker multi-stage builds for Node.js?
Multi-stage builds optimize Docker images by separating build and runtime stages. For Node.js, the first stage installs dev dependencies and compiles assets. The second stage copies only production artifacts (e.g., built code and production node_modules) to a slim base image. This reduces image size significantly, improving security and deployment speed. It's ideal for production deployments.
How to manage environment variables in Docker Node.js?
Use Docker's –env-file flag to pass a file with key-value pairs, or set individual variables with -e. In Docker Compose, define them under the environment or env_file key. Node.js accesses them via process.env. For secrets, use Docker secrets or a vault service. Never hardcode sensitive values in Dockerfiles or images.
What are best practices for Node.js Docker images?
Use official, slim base images (e.g., node:18-alpine). Leverage .dockerignore to exclude unnecessary files. Run npm install only for production dependencies (npm ci –only=production). Implement multi-stage builds. Avoid running as root—create a non-root user. Set NODE_ENV=production. Use health checks (HEALTHCHECK instruction). Tag images with meaningful versions.
How to scale Node.js containers with Docker Compose?
Define services in docker-compose.yml. Use the 'replicas' key under deploy in version 3+ to specify instance count. For example, deploy: replicas: 3. Combine with a load balancer (like nginx) to distribute traffic. Ensure your Node.js app is stateless and uses external storage for sessions or data to allow horizontal scaling.
How to handle logging in Docker Node.js containers?
Write logs to stdout/stderr (console.log/console.error) so Docker collects them. Docker's logging drivers (json-file, syslog, etc.) forward logs to external systems. Use structured logging libraries (like winston or pino) for parseable output. Avoid logging to files inside containers, as they complicate log management and can fill disk.
How to debug Node.js in a Docker container?
Enable the Node.js inspector by passing –inspect=0.0.0.0:9229 to node. Map the port in docker-compose or run with -p 9229:9229. Use Chrome DevTools or VS Code's debugger to attach. For production, avoid exposing the debug port. Alternatively, use docker exec -it /bin/sh to inspect the container interactively.
Sources and further reading
- Docker Docs: Dockerfile best practices
- Node.js Official Docker Image
- Docker Compose Overview
- Docker Multi-stage Builds
- 12 Factor App: Config
- Docker Security: Non-root user
- Docker Logging Drivers
- Docker Healthcheck Instruction
- Alpine Linux Official
- Debian Slim vs Alpine for Node.js
Need help with this topic?
Send us your details and we will contact you.