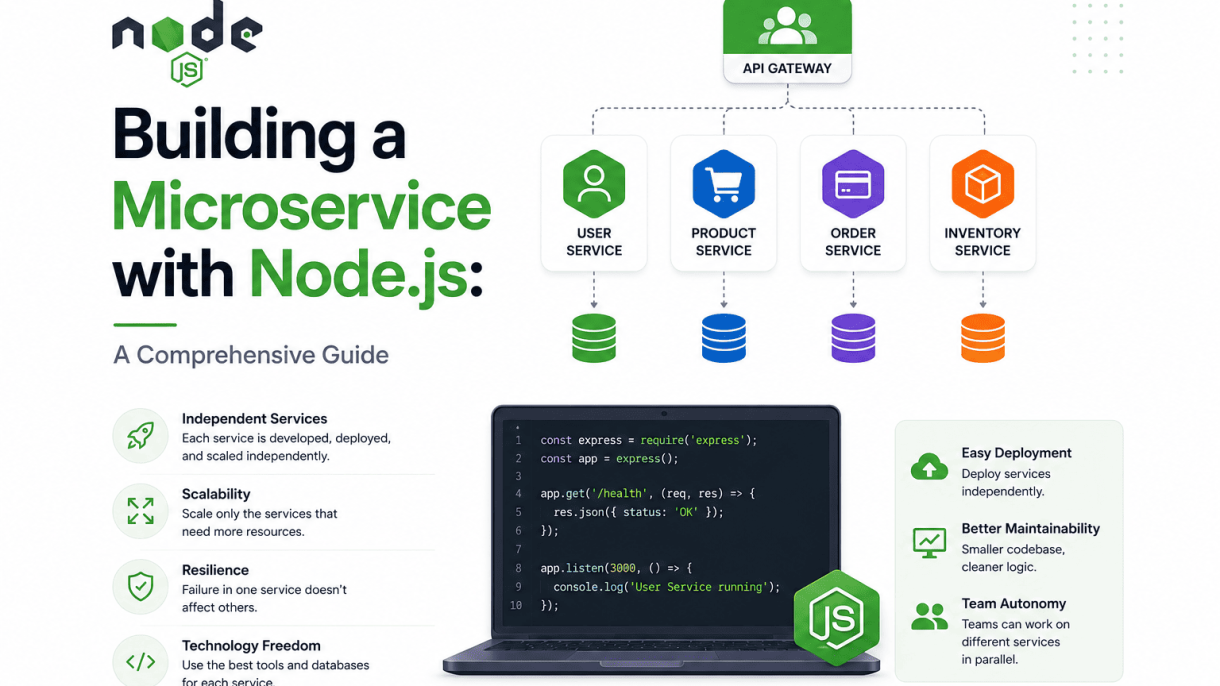

Introduction to Microservices and Node.js
What Are Microservices?
Microservices are an architectural approach to software development where a single application is composed of small, independent services that communicate over a network. Each service is responsible for a specific business capability and can be developed, deployed, and scaled independently. Unlike monolithic architectures, where all functionality is tightly coupled into one large codebase, microservices promote modularity and separation of concerns. Services typically expose lightweight APIs, often using HTTP/REST or messaging protocols, and can be written in different programming languages. This design enables teams to work on separate services concurrently, reduces the risk of system-wide failures, and allows for more granular scaling based on demand.
Benefits of Node.js for Microservice Development
Node.js has emerged as a leading runtime for building microservices due to its unique characteristics. Its event-driven, non-blocking I/O model makes it inherently suited for handling numerous concurrent connections with minimal overhead. Below are key advantages:
- Asynchronous and event-driven architecture: Node.js uses an event loop to manage multiple requests without creating additional threads, making it efficient for I/O-heavy tasks such as API calls, database queries, and file operations.
- High scalability: The lightweight nature of Node.js processes allows services to be scaled horizontally with ease, supporting rapid growth in traffic.
- Rich ecosystem: The npm registry offers hundreds of thousands of packages, enabling rapid development of common microservice patterns like routing, authentication, and message queues.
- JSON-native: Since microservices often exchange data in JSON format, Node.js parses and generates JSON efficiently, reducing transformation overhead.
- Fast prototyping: Its simple syntax and low boilerplate allow developers to quickly build and iterate on services.
Furthermore, Node.js aligns well with containerization technologies like Docker, which are frequently used to deploy microservices. The combination of small memory footprints and fast startup times makes Node.js ideal for ephemeral, stateless services.
Common Use Cases for Node.js Microservices
Node.js microservices excel in scenarios that require real-time data processing, high concurrency, or rapid feature delivery. Common applications include:
| Use Case | Description |
|---|---|
| Real-time applications | Chat systems, live notifications, and collaborative editing tools benefit from Node.js’s event-driven model and WebSocket support. |
| API gateways | Node.js can efficiently route and aggregate requests from multiple backend services, handling high throughput with low latency. |
| Data streaming services | Streaming platforms for video, audio, or log data leverage Node.js’s ability to process data in chunks without buffering entire payloads. |
| E-commerce backends | Services for inventory, user accounts, and order processing can be built as independent Node.js services that scale based on traffic patterns. |
| IoT and device management | Node.js handles large numbers of concurrent device connections and can process telemetry data in real time. |
These use cases demonstrate how Building a Microservice with Node.js enables developers to create responsive, maintainable, and cost-effective systems that adapt to evolving business needs.
Setting Up Your Development Environment
Before you begin building a microservice with Node.js, you must prepare your local machine with the correct tools and runtime. A properly configured environment ensures smooth development, debugging, and deployment. This section walks you through installing Node.js and npm, selecting a code editor with essential extensions, and setting up version control with Git.
Installing Node.js and npm
Node.js is the runtime that executes your JavaScript code outside the browser, while npm (Node Package Manager) manages dependencies. Follow these steps to install both on your system.
- Visit the official Node.js website at
nodejs.org. - Download the LTS (Long-Term Support) version for your operating system. LTS is recommended for production and most development work.
- Run the installer and follow the default setup steps. This installs both Node.js and npm.
- Verify the installation by opening a terminal or command prompt and running the following commands:
node --version
npm --version
You should see version numbers for both, such as v20.11.0 and 10.2.4. If you encounter errors, ensure your system PATH includes the Node.js installation directory.
For macOS or Linux users, consider using a version manager like nvm (Node Version Manager) to switch between Node.js versions easily. Install nvm via its GitHub repository, then run:
nvm install node --lts
nvm use --lts
This approach is especially useful when working on multiple microservices that require different Node.js versions.
Choosing a Code Editor and Extensions
A capable code editor enhances productivity when building a microservice with Node.js. While any text editor works, Visual Studio Code (VS Code) is the most popular choice due to its rich ecosystem. Download it from code.visualstudio.com.
After installing VS Code, add these essential extensions for Node.js development:
- ESLint – Lints JavaScript code to catch errors and enforce style consistency.
- Prettier – Formats code automatically for readability.
- npm Intellisense – Provides autocomplete for npm module imports.
- Node.js Modules Intellisense – Helps with module resolution in require statements.
- GitLens – Enhances Git capabilities inside the editor.
- Thunder Client or REST Client – Tests HTTP endpoints directly from VS Code.
Optional but recommended: install Docker extension if you plan to containerize your microservice, and YAML extension for configuration files. To install any extension, open VS Code, click the Extensions icon (or press Ctrl+Shift+X), search for the name, and click “Install”.
Using Version Control with Git
Git is indispensable for tracking changes, collaborating, and rolling back errors in microservice projects. Install Git from git-scm.com if you don’t have it. After installation, configure your identity in the terminal:
git config --global user.name "Your Name"
git config --global user.email "your.email@example.com"
Create a new repository for your microservice by navigating to your project folder and running:
cd my-microservice
git init
Add a .gitignore file to exclude unnecessary files like node_modules and environment variables. A typical Node.js .gitignore includes:
node_modules/
.env
dist/
*.log
Commit your initial setup with:
git add .
git commit -m "Initial commit: project setup"
For remote collaboration, connect your local repo to a service like GitHub, GitLab, or Bitbucket. Add a remote origin and push:
git remote add origin https://github.com/yourusername/my-microservice.git
git branch -M main
git push -u origin main
Now your development environment is ready. You have Node.js and npm installed, a powerful code editor with relevant extensions, and Git for version control—all essential for building a robust microservice with Node.js.
Designing the Microservice Architecture
When building a microservice with Node.js, the architecture design phase determines the system’s scalability, maintainability, and resilience. Three critical decisions shape this foundation: how to split the system into services, how those services communicate, and how each manages its data. A well-structured architecture prevents tight coupling and enables independent deployment—core goals of any microservice system.
Defining Service Boundaries
Service boundaries must align with business capabilities, not technical layers. In a Node.js context, each microservice should own a distinct domain, such as user management, order processing, or inventory. The key principle is high cohesion within a service and loose coupling between services. To identify boundaries, use Domain-Driven Design (DDD) techniques: map bounded contexts and aggregate roots. For example, an e-commerce system might have separate services for Catalog, Cart, and Payment. Each service exposes a well-defined API and owns its logic. Avoid creating services that share databases or implement cross-cutting concerns like authentication directly; instead, delegate those to an API gateway or dedicated authentication service.
Synchronous vs. Asynchronous Communication
Microservices communicate either synchronously (e.g., HTTP/REST, gRPC) or asynchronously (e.g., message queues, event streams). Each pattern suits different use cases. Synchronous calls are simple and intuitive for request-response flows, such as fetching user details. However, they introduce temporal coupling and can cascade failures. Asynchronous communication, using tools like RabbitMQ or Kafka, decouples services, improves fault tolerance, and handles high-throughput event-driven workflows, such as order placement triggering inventory updates and notifications. The table below compares these approaches for Node.js microservices.
| Characteristic | Synchronous (e.g., HTTP/REST) | Asynchronous (e.g., Message Queue) |
|---|---|---|
| Latency | Low for single request-response | Higher due to message processing |
| Coupling | Tight (caller waits for response) | Loose (producer sends and continues) |
| Failure handling | Requires retries, timeouts, circuit breakers | Built-in via message persistence and redelivery |
| Scalability | Limited by synchronous dependencies | High; consumers scale independently |
| Use case example | Fetching user profile | Order placement triggering multiple services |
| Node.js tooling | Express, Fastify, gRPC-Node | Bull, RabbitMQ, KafkaJS |
In practice, use synchronous calls for queries where low latency is critical and asynchronous events for commands that can be processed eventually. A hybrid approach often works best: for instance, an API gateway handles synchronous requests, while internal service-to-service interactions favor asynchronous messaging.
Data Storage and Database Per Service
Each microservice should own its data store—a pattern known as “database per service.” This ensures loose coupling: no two services share a database schema or write to the same tables. Node.js supports a variety of databases, so choose based on the service’s data model. For example, a User service might use PostgreSQL for relational data, while a Product Catalog service might use MongoDB for flexible document storage. Avoid a single monolithic database; instead, implement data synchronization via events or API calls. For instance, when an order service updates an order, it emits an event that the inventory service consumes to adjust stock. This approach prevents direct database access across services and maintains data consistency through eventual consistency patterns like sagas or outbox tables.
Scaffolding the Node.js Project
Scaffolding is the foundational step in building a microservice with Node.js. A well-organized project structure ensures maintainability, scalability, and clarity as your service grows. This section walks you through creating a logical folder hierarchy, initializing npm for dependency management, and setting up a basic Express.js server to handle HTTP requests efficiently.
Project Folder Structure
A clean folder structure separates concerns and makes navigation intuitive. For a typical microservice, organize your project like this:
- src/ — Contains all application source code
- src/controllers/ — Handles request/response logic
- src/routes/ — Defines API endpoints
- src/services/ — Business logic and data processing
- src/middleware/ — Custom middleware (e.g., authentication, logging)
- src/models/ — Data schemas or database models
- src/config/ — Configuration files (e.g., environment variables, database settings)
- src/utils/ — Helper functions and utilities
- tests/ — Unit and integration tests
- public/ — Static assets if needed (optional for API-only services)
- node_modules/ — Auto-generated by npm
- package.json — Project metadata and dependencies
- .env — Environment variables (not committed to version control)
- .gitignore — Files to exclude from Git
This structure is modular and allows you to add features without cluttering the root directory. For smaller microservices, you may flatten some folders, but consistency is key.
Initializing package.json
The package.json file is the heart of any Node.js project. It tracks dependencies, scripts, and metadata. To initialize it, run the following command in your project root:
npm init -y
The -y flag accepts default values. You can edit the generated file later to add specific details like the service name, version, description, and entry point (usually index.js or server.js). Next, install essential dependencies for a microservice:
- express — Web framework for routing and middleware
- dotenv — Loads environment variables from a
.envfile - cors — Enables Cross-Origin Resource Sharing if needed
- helmet — Adds security headers
Install them with:
npm install express dotenv cors helmet
For development, consider adding nodemon to auto-restart the server on file changes:
npm install --save-dev nodemon
Update the "scripts" section in package.json:
"scripts": {
  "start": "node src/server.js",
  "dev": "nodemon src/server.js"
}
Setting Up an Express Server
With dependencies installed, create the entry point file, typically src/server.js. This file initializes Express, applies middleware, and starts listening for requests. Below is a minimal yet robust setup:
// src/server.js
require('dotenv').config();
const express = require('express');
const cors = require('cors');
const helmet = require('helmet');

const app = express();
const PORT = process.env.PORT || 3000;

// Middleware
app.use(helmet());
app.use(cors());
app.use(express.json());
app.use(express.urlencoded({ extended: true }));

// Health check endpoint
app.get('/health', (req, res) => {
  res.status(200).json({ status: 'UP', timestamp: new Date().toISOString() });
});

// Import routes
const apiRoutes = require('./routes/api');
app.use('/api', apiRoutes);

// Global error handler
app.use((err, req, res, next) => {
  console.error(err.stack);
  res.status(500).json({ error: 'Internal Server Error' });
});

// Start server
app.listen(PORT, () => {
  console.log(`Microservice running on port ${PORT}`);
});
This server includes essential middleware for security, CORS, and JSON parsing. The health check endpoint is useful for monitoring. Routes are modularized under /api, keeping the server file clean. The global error handler ensures uncaught errors return a consistent response. Run the server with npm run dev during development or npm start in production.
Implementing Core Business Logic
After setting up the Node.js environment and dependencies, the next critical phase in building a microservice with Node.js is implementing the core business logic. This layer translates incoming API requests into meaningful operations, enforces business rules, and manages data persistence. A well-structured implementation separates concerns into three distinct layers: routes, controllers/services, and data models. This separation ensures maintainability, testability, and scalability as the microservice evolves.
Creating RESTful Routes
RESTful routes define the endpoints through which clients interact with the microservice. They map HTTP methods and URL patterns to specific controller functions. Each route should follow REST conventions for resource-based URLs. For a typical user management microservice, routes might include:
- GET /users – Retrieve a list of all users (with optional filters and pagination)
- GET /users/:id – Retrieve a single user by ID
- POST /users – Create a new user
- PUT /users/:id – Update an existing user entirely
- PATCH /users/:id – Partially update a user
- DELETE /users/:id – Delete a user
Routes are typically defined in dedicated route files using Express Router. They should remain thin, delegating all logic to controllers. Error handling middleware can be attached at the route level or globally. When building a microservice with Node.js, keep routes focused on URL matching and parameter extraction, never on business decisions.
Building Controllers and Services
Controllers act as intermediaries between routes and services. They extract validated data from the request object, call the appropriate service method, and format the HTTP response. Services contain the actual business logic, including validation, calculations, and orchestration of multiple operations. This separation is crucial for testing: controllers can be tested for request/response handling, while services can be tested independently for logic correctness.
| Layer | Responsibility | Example Code |
|---|---|---|
| Route | URL matching, HTTP method binding | router.get('/users/:id', userController.getUser) |
| Controller | Request parsing, response formatting | const user = await userService.findById(req.params.id); res.json(user); |
| Service | Business rules, data aggregation, validation | async findById(id) { if (!id) throw new Error('ID required'); return UserModel.findById(id); } |
A common pattern is to inject dependencies (like the data model) into the service constructor, making the service easily testable with mock models. Controllers should never directly access the database or perform business validation. This layered approach ensures that when building a microservice with Node.js, each component has a single, well-defined purpose.
Defining Data Models with Mongoose
Mongoose provides a schema-based solution for modeling MongoDB data. When building a microservice with Node.js, Mongoose schemas define the structure, validation rules, and default values for each document. A typical user model might include:
- Fields: name (String, required), email (String, unique, lowercase), role (String, enum: [‘admin’, ‘user’]), createdAt (Date, default: Date.now)
- Validation: Custom validators for email format, minimum string lengths, and uniqueness constraints
- Middleware (hooks): Pre-save hooks for password hashing, pre-remove hooks for cleanup
- Virtuals: Computed properties like full name from first and last name
- Indexes: Compound indexes for frequently queried fields
Schemas are compiled into models that provide CRUD methods: find(), findById(), create(), findByIdAndUpdate(), findByIdAndDelete(). Mongoose also supports population for referencing documents from other collections, essential for relational data in a microservice context. Always define schemas in separate files, export the model, and import it into services. This modularity allows the data layer to be replaced or extended without affecting controllers or routes. When building a microservice with Node.js, careful schema design prevents data inconsistency and reduces the need for manual validation in the service layer.
Handling Inter-Service Communication
In a microservice architecture, services must exchange data reliably and efficiently. Two primary communication paradigms dominate: synchronous HTTP calls for request-response patterns and asynchronous message queues for event-driven workflows. Choosing the right approach depends on your use case—HTTP suits simple queries and CRUD operations, while message queues excel at decoupling services and handling bursts of traffic. This section explores practical implementations of both methods using Node.js, focusing on Axios for HTTP and RabbitMQ for messaging, along with essential error handling strategies.
Using HTTP Requests with Axios
Axios is a promise-based HTTP client for Node.js that simplifies making requests to other microservices. It supports automatic JSON parsing, request cancellation, and interceptors for logging or authentication. Below is a practical example of a service fetching user data from another service using Axios with a timeout and error handling.
const axios = require('axios');

async function getUserData(userId) {
  try {
    const response = await axios.get(`http://user-service/users/${userId}`, {
      timeout: 5000,
      headers: { 'X-Service-Auth': process.env.SERVICE_TOKEN }
    });
    return response.data;
  } catch (error) {
    if (error.code === 'ECONNABORTED') {
      throw new Error('User service timed out');
    }
    if (error.response) {
      throw new Error(`User service returned status ${error.response.status}`);
    }
    throw new Error('Network error contacting user service');
  }
}
Key considerations when using HTTP for inter-service communication:
- Service discovery: Use environment variables or a registry (e.g., Consul) to locate service endpoints dynamically.
- Circuit breakers: Implement patterns like the circuit breaker to prevent cascading failures when a downstream service is slow or down.
- Connection pooling: Reuse HTTP connections via keep-alive to reduce latency and resource usage.
Implementing a Message Broker with RabbitMQ
RabbitMQ implements the AMQP protocol and is ideal for decoupling services. Producers publish messages to exchanges, which route them to queues based on binding rules. Consumers then process messages asynchronously. Below is a step-by-step guide to setting up a basic producer-consumer pattern.
Producer example (publishing an order event):
const amqp = require('amqplib');

async function publishOrderEvent(orderData) {
  const connection = await amqp.connect('amqp://localhost');
  const channel = await connection.createChannel();
  const exchange = 'order.events';
  const routingKey = 'order.created';

  await channel.assertExchange(exchange, 'topic', { durable: true });
  channel.publish(exchange, routingKey, Buffer.from(JSON.stringify(orderData)), {
    persistent: true
  });

  console.log(`Published order ${orderData.id} to exchange`);
  await channel.close();
  await connection.close();
}
Consumer example (processing order events):
async function consumeOrderEvents() {
  const connection = await amqp.connect('amqp://localhost');
  const channel = await connection.createChannel();
  const exchange = 'order.events';
  const queue = 'notification-service';

  await channel.assertExchange(exchange, 'topic', { durable: true });
  await channel.assertQueue(queue, { durable: true });
  await channel.bindQueue(queue, exchange, 'order.*');

  channel.consume(queue, (msg) => {
    if (msg) {
      const order = JSON.parse(msg.content.toString());
      console.log(`Processing order ${order.id}`);
      channel.ack(msg);
    }
  });
}
RabbitMQ offers several benefits for microservices:
| Feature | Benefit |
|---|---|
| Message persistence | Messages survive broker restarts |
| Consumer acknowledgments | Guarantees processing completion |
| Flexible routing | Direct, topic, fanout exchanges for varied patterns |
| Load leveling | Queues buffer spikes in traffic |
Error Handling and Retry Logic
Network failures, service unavailability, and transient errors are inevitable in distributed systems. Robust error handling must cover both synchronous and asynchronous communication. For HTTP requests, implement exponential backoff with jitter to avoid overwhelming a recovering service. For message queues, use dead-letter exchanges to isolate failed messages for later inspection.
Below is a retry utility for HTTP calls using Axios with exponential backoff:
async function withRetry(requestFn, maxRetries = 3) {
  for (let attempt = 1; attempt  setTimeout(resolve, delay));
    }
  }
}

// Usage
const user = await withRetry(() => axios.get('http://user-service/users/123'));
Additional best practices include:
- Idempotency keys: Ensure retries do not duplicate side effects (e.g., duplicate payments).
- Dead-letter queues: Route messages that exceed retry limits to a separate queue for manual analysis.
- Monitoring: Log retry attempts and failures to track service health and identify persistent issues.
- Timeout configuration: Set sensible timeouts per service based on expected response times.
Adding Authentication and Authorization
Securing your microservice is essential for protecting sensitive data and ensuring that only authorized users can access specific resources. This section covers implementing JSON Web Tokens (JWT) for authentication and role-based access control (RBAC) for authorization, providing a robust security layer for your Node.js microservice.
Implementing JWT Authentication
JSON Web Tokens offer a stateless authentication mechanism ideal for microservices. To implement JWT authentication, you need to generate tokens upon successful login and validate them on each subsequent request. Start by installing the jsonwebtoken and bcrypt packages. Use bcrypt to hash user passwords before storing them in your database. The authentication flow works as follows:
- User submits credentials (email and password) via a POST request to a login endpoint.
- The server verifies the credentials against the stored hash using bcrypt.compare().
- If valid, the server creates a JWT containing a payload with the user ID and an expiration time, signed with a secret key stored in environment variables.
- The token is returned to the client, which stores it (typically in localStorage or an HTTP-only cookie) and includes it in the Authorization header of subsequent requests.
Example token payload structure includes:
| Claim | Description | Example |
|---|---|---|
| sub | Subject (user ID) | “user_12345” |
| iat | Issued at timestamp | 1700000000 |
| exp | Expiration timestamp | 1700086400 |
| role | User role for RBAC | “admin” |
Protecting Routes with Middleware
Middleware functions intercept incoming requests and execute validation logic before reaching the route handler. Create a reusable authentication middleware that extracts the JWT from the Authorization header, verifies it using the secret key, and attaches the decoded payload to the request object. Implement this middleware as follows:
- Extract the token from the “Bearer ” format in the Authorization header.
- Use jwt.verify() to validate the token’s signature and expiration.
- If verification fails, return a 401 Unauthorized response with a clear error message.
- If successful, attach the decoded payload (e.g., req.user) and call next().
Apply this middleware to any route that requires authentication. For example, in Express, you can use router.get('/profile', authenticate, profileHandler). This ensures that only requests with a valid, non-expired token can access protected endpoints. For enhanced security, consider implementing token refresh mechanisms and blacklisting invalidated tokens.
Managing User Roles and Permissions
Role-based access control extends authentication by restricting actions based on user roles. Define roles such as “admin”, “moderator”, and “user”, each with specific permissions. Store the role in the JWT payload during authentication and create an authorization middleware that checks the user’s role against required permissions for a route.
Implement role management with these steps:
- Define a hierarchical role system where higher roles inherit permissions from lower roles (e.g., admin can do everything a user can).
- Create an authorize middleware function that accepts required roles as parameters.
- Inside the middleware, compare the user’s role from req.user.role against the allowed roles array.
- Return a 403 Forbidden response if the user lacks sufficient permissions.
Example permission mapping for a blogging microservice:
| Role | Permissions |
|---|---|
| admin | Create, read, update, delete any post; manage users |
| moderator | Read, update, delete any post; cannot manage users |
| user | Create, read, update, delete own posts only |
By combining JWT authentication with role-based middleware, your microservice can enforce granular access control while remaining stateless and scalable. Store role definitions in a database or configuration file for easy updates without redeploying the service.
Testing the Microservice
Testing is a non-negotiable pillar of any production-grade microservice built with Node.js. Without a disciplined testing strategy, the benefits of modularity and independent deployment are quickly eroded by regressions, integration failures, and brittle code. A comprehensive approach layers unit tests, integration tests, and end-to-end tests to validate correctness at every level of the stack. This section outlines three essential testing pillars for your Node.js microservice, using industry-standard tools and patterns.
Writing Unit Tests with Jest
Unit tests verify the smallest isolated units of code—typically individual functions or methods—in complete isolation from external systems like databases, file systems, or network calls. For Node.js microservices, Jest is the dominant testing framework due to its zero-configuration setup, built-in mocking, and rich assertion library. When writing unit tests for a microservice, focus on pure business logic: validation functions, transformation pipelines, and domain model methods. Avoid testing framework internals or database queries directly. A typical pattern involves importing the module under test, mocking its dependencies using jest.fn() or jest.mock(), and asserting on outputs or side effects. For example, a function that calculates order totals should be testable without hitting a payment gateway. Jest’s describe and it blocks structure tests logically, while expect provides matchers like toBe, toEqual, and toThrow. Aim for high code coverage on critical paths, but prioritize meaningful assertions over arbitrary coverage thresholds.
Integration Testing with Supertest
Integration tests validate that your microservice’s components work together correctly, including the HTTP layer, middleware, route handlers, and database access. Supertest is the de facto library for integration testing Express.js (or similar) applications. It allows you to start your server in-process, send real HTTP requests, and inspect responses without needing a separate running instance. Use Supertest to test endpoints end-to-end against a test database (e.g., an in-memory MongoDB via mongodb-memory-server or a PostgreSQL test container). A typical integration test flow is: spin up the app, seed test data, send a GET or POST request via Supertest, and assert on status codes, response bodies, and headers. This catches routing errors, middleware misconfigurations, and serialization bugs that unit tests miss. Avoid coupling integration tests to production databases; always use isolated, throwaway environments to ensure repeatability.
Mocking External Dependencies
Microservices rarely operate in isolation—they depend on databases, message queues, third-party APIs, and other services. Mocking external dependencies is critical to test reliability, speed, and determinism. Without mocking, tests become slow, flaky, and dependent on network availability. Use Jest’s built-in jest.mock() to replace entire modules (e.g., an HTTP client or database driver) with fake implementations. For more granular control, use jest.spyOn() to stub specific methods on objects. When testing interactions with external services, consider using a dedicated mocking library like nock for HTTP requests or sinon for general stubs and spies. A best practice is to define mock factories that return consistent, controllable data, allowing you to test edge cases like timeouts, errors, and empty responses. The table below compares common mocking approaches for Node.js microservices.
| Approach | Granularity | Best Use Case | Example Tool |
|---|---|---|---|
| Module-level mock | Entire module | Replacing a database driver or HTTP client | jest.mock('axios') |
| Method-level spy | Single function | Verifying a specific method was called | jest.spyOn(obj, 'method') |
| HTTP request mock | Specific endpoints | Simulating third-party API responses | nock('https://api.example.com') |
| In-memory service | Full service replica | Testing database interactions without a real DB | mongodb-memory-server |
By layering unit tests, integration tests, and strategic mocking, you build a robust safety net that catches defects early, accelerates development, and ensures your microservice remains reliable as it evolves.
Containerizing and Deploying with Docker
Containerization is the final step in building a microservice with Node.js, ensuring consistent behavior across development, staging, and production environments. Docker packages the application with its dependencies into a lightweight, portable container that can run on any system with Docker installed. This section covers creating a Dockerfile, orchestrating multi-service setups with Docker Compose, and deploying to a cloud provider such as AWS or Heroku.
Creating a Dockerfile
The Dockerfile defines the steps to build a container image for the Node.js microservice. A typical Dockerfile uses a multi-stage build to minimize image size and improve security. Below is an example for a Node.js application that listens on port 3000:
# Stage 1: Install dependencies
FROM node:18-alpine AS dependencies
WORKDIR /app
COPY package*.json ./
RUN npm ci --only=production

# Stage 2: Build and run
FROM node:18-alpine
WORKDIR /app
COPY --from=dependencies /app/node_modules ./node_modules
COPY . .
EXPOSE 3000
CMD ["node", "server.js"]
Key considerations when writing a Dockerfile for a microservice:
- Base image: Use an official Alpine-based Node.js image to keep the image small (e.g.,
node:18-alpine). - Layer caching: Copy
package.jsonandpackage-lock.jsonbefore the rest of the source code to leverage Docker’s cache for dependency installation. - Non-root user: Add a user with limited privileges to run the application for security.
- Health checks: Include a
HEALTHCHECKinstruction to monitor the service’s status.
After creating the Dockerfile, build the image with docker build -t my-microservice . and test it locally using docker run -p 3000:3000 my-microservice.
Using Docker Compose for Multi-Service Setup
When the microservice depends on other services—such as a database, message queue, or caching layer—Docker Compose simplifies orchestration. A docker-compose.yml file defines all services, networks, and volumes in a single configuration. Below is an example that includes the Node.js microservice and a MongoDB instance:
version: '3.8'
services:
  app:
    build: .
    ports:
      - "3000:3000"
    environment:
      - DB_HOST=mongodb
    depends_on:
      - mongodb
  mongodb:
    image: mongo:6
    volumes:
      - mongo-data:/data/db

volumes:
  mongo-data:
Benefits of using Docker Compose for building a microservice with Node.js include:
- Environment consistency: All developers and CI/CD pipelines use the same service definitions.
- Simplified networking: Services communicate via service names (e.g.,
mongodb) instead of IP addresses. - Scalability: Use
docker-compose up --scale app=3to run multiple instances for load testing.
Run the entire stack with docker-compose up and tear it down with docker-compose down.
Deploying to a Cloud Provider (e.g., AWS, Heroku)
Once the Docker image is tested locally, deploy it to a cloud platform. The deployment method varies by provider. Below is a comparison of common approaches for AWS and Heroku:
| Provider | Deployment Method | Key Commands/Steps | Considerations |
|---|---|---|---|
| AWS (ECS) | Push image to Amazon ECR, then create an ECS task definition and service. | aws ecr get-login-password --region us-east-1 | docker login --username AWS --password-stdin [account].dkr.ecr.us-east-1.amazonaws.comdocker tag my-microservice [account].dkr.ecr.us-east-1.amazonaws.com/my-microservice:latestdocker push [account].dkr.ecr.us-east-1.amazonaws.com/my-microservice:latest |
Requires IAM roles, VPC configuration, and load balancer setup for production. |
| Heroku | Use the Heroku Container Registry to release a Docker image. | heroku container:loginheroku create my-microservice-appheroku container:push web --app my-microservice-appheroku container:release web --app my-microservice-app |
Simpler for small deployments; automatic HTTP routing and SSL provided. |
For a production-grade deployment on AWS, consider using Amazon ECS with Fargate for serverless container management. Heroku offers a quicker path for prototyping or low-traffic applications. Regardless of the provider, always set environment variables for secrets (e.g., database passwords) and avoid hardcoding them in the Dockerfile or source code. After deployment, test the microservice endpoint (e.g., http://your-app-url:3000/api) to confirm it responds correctly.
Monitoring, Logging, and Scaling
Once your microservice is deployed to production, maintaining its reliability and performance becomes the primary concern. Without deliberate strategies for observability and capacity management, even a well-architected service can fail silently or become a bottleneck. This section outlines three essential practices for keeping your Node.js microservice healthy and responsive under real-world loads.
Implementing Centralized Logging
In a distributed system, logs scattered across multiple instances are useless for debugging. Centralized logging aggregates all log output into a single, searchable platform. For your Node.js microservice, follow these best practices:
- Use structured logging: Output logs as JSON objects with consistent fields such as
timestamp,level,serviceName,requestId, andmessage. This enables automated parsing and filtering. - Leverage a logging library: Use mature tools like
pinoorwinstonthat support log levels, transports, and child loggers for context propagation. - Ship logs to a central store: Configure your logging library to send logs to a system like Elasticsearch, Loki, or a cloud-native solution (e.g., AWS CloudWatch, Azure Monitor). Avoid writing logs only to the local filesystem.
- Correlate requests across services: Pass a unique request identifier (e.g., via HTTP headers like
x-request-id) through your microservice chain. Include this ID in every log entry to trace a single user request across multiple services.
Example of a structured log entry:
{"level":"info","timestamp":"2025-03-27T10:00:00.000Z","serviceName":"order-service","requestId":"abc-123","message":"Order created successfully"}
Setting Up Health Checks and Monitoring
Health checks allow orchestration tools (like Kubernetes or Docker Swarm) and load balancers to determine if your microservice is alive and ready to accept traffic. Implement two types of endpoints:
- Liveness check: A simple endpoint (e.g.,
GET /health/live) that returns a 200 status if the process is running. This tells the orchestrator whether to restart the container. - Readiness check: A more thorough endpoint (e.g.,
GET /health/ready) that verifies the service can handle requests—checking database connectivity, cache availability, and external dependency status. The load balancer will stop sending traffic if this check fails.
Beyond health checks, monitor key metrics:
| Metric Category | Example Metrics | Why It Matters |
|---|---|---|
| Application | Request rate, latency (p50/p95/p99), error rate | Reveals performance degradation and error spikes |
| System | CPU usage, memory consumption, event loop lag | Indicates resource exhaustion or blocking operations |
| Business | Orders processed, successful payments, user registrations | Aligned with service goals and domain health |
Use a monitoring stack (e.g., Prometheus for metrics collection, Grafana for dashboards) to visualize these data and set up alerts for anomalous behavior.
Horizontal Scaling with Load Balancing
Node.js microservices benefit greatly from horizontal scaling—running multiple instances of the same service behind a load balancer. This approach improves both throughput and fault tolerance. Key considerations include:
- Stateless design: Ensure your microservice does not store session or user state in memory. Use external stores (Redis, database) for any required state. This allows any instance to handle any request.
- Choose a load balancer: Use a reverse proxy like Nginx, HAProxy, or a cloud-native load balancer (e.g., AWS ALB, Google Cloud Load Balancing). Configure it to distribute traffic using a round-robin or least-connections algorithm.
- Manage concurrency with Node.js cluster: Within a single machine, use the built-in
clustermodule to fork worker processes that share a port. This maximizes CPU core utilization, as Node.js is single-threaded by default. - Implement graceful shutdown: When scaling down or updating, ensure your service stops accepting new requests from the load balancer (via a health check failure or a
SIGTERMsignal) while finishing in-flight requests. This prevents dropped connections.
By combining centralized logging, robust health checks, and horizontal scaling, you can maintain a Node.js microservice that is observable, resilient, and ready to grow with demand.
Frequently Asked Questions
What is a microservice and why use Node.js?
A microservice is a small, independent service that performs a specific business function, communicating with other services via APIs. Node.js is ideal for microservices due to its non-blocking I/O, event-driven architecture, and npm ecosystem. It handles high concurrency with low overhead, making it perfect for lightweight, scalable services. Node.js also offers fast development cycles and strong support for RESTful APIs, message queues, and containerization, which are core to microservice patterns.
What are the key steps to build a microservice with Node.js?
Key steps include: 1) Define the service boundary and API contract. 2) Set up a Node.js project with Express or Fastify. 3) Implement business logic and data models. 4) Connect to a database (e.g., MongoDB or PostgreSQL). 5) Add error handling and logging. 6) Write unit and integration tests. 7) Containerize with Docker. 8) Deploy using orchestration like Kubernetes. 9) Implement service discovery and health checks. 10) Monitor and scale as needed.
How do Node.js microservices communicate?
Node.js microservices communicate via synchronous protocols like HTTP/REST or gRPC, or asynchronously through message brokers like RabbitMQ, Kafka, or Redis. REST is common for simple CRUD APIs, while gRPC offers better performance for high-throughput systems. Async messaging decouples services, improving resilience and scalability. Each service exposes endpoints or subscribes to queues, using JSON or Protocol Buffers for data serialization. Service discovery tools like Consul or Kubernetes DNS help locate instances.
What are best practices for Node.js microservices?
Best practices include: keep services small and focused on one domain; use API versioning; implement centralized logging (e.g., ELK stack); use health checks and circuit breakers; secure with HTTPS, authentication, and rate limiting; design for failure with retries and timeouts; use environment variables for configuration; containerize with Docker; automate CI/CD; and monitor with Prometheus and Grafana. Also, avoid shared databases—each service should own its data.
How do you deploy a Node.js microservice?
Deploying a Node.js microservice typically involves containerization with Docker, pushing the image to a registry (e.g., Docker Hub), and orchestrating with Kubernetes or Docker Swarm. Use CI/CD pipelines (e.g., GitHub Actions, Jenkins) to automate testing and deployment. Configuration management tools like Helm or Kustomize help manage manifests. For cloud, use AWS ECS, Google Cloud Run, or Azure Container Instances. Implement horizontal scaling via replicas and load balancers.
What common pitfalls should be avoided?
Common pitfalls include: making services too large (monolith in disguise); tight coupling via shared databases; ignoring distributed tracing; lack of proper error handling leading to cascading failures; not implementing retries with exponential backoff; over-engineering with too many services; neglecting security; and poor API design without versioning. Also, avoid synchronous calls for critical paths—use async messaging to improve resilience. Always test for network failures and latency.
How do you test Node.js microservices?
Testing involves unit tests for individual functions (e.g., Mocha, Jest), integration tests for API endpoints (Supertest), and end-to-end tests across services. Use mocks and stubs (Sinon) to isolate dependencies. Contract testing with tools like Pact ensures service compatibility. For async services, test message handling with in-memory brokers. Load testing with Artillery or k6 helps validate performance. CI pipelines should run tests automatically on each commit.
What tools are essential for Node.js microservices?
Essential tools include: Express.js or Fastify for HTTP servers; Sequelize or Mongoose for databases; Docker for containerization; Kubernetes for orchestration; RabbitMQ or Kafka for messaging; Redis for caching; Prometheus and Grafana for monitoring; ELK Stack for logging; Consul for service discovery; and CI/CD tools like Jenkins or GitHub Actions. Additionally, use npm or Yarn for package management and ESLint/Prettier for code quality.
Sources and further reading
- Node.js Official Documentation
- Express.js Official Guide
- Microservices Pattern: Microservice Architecture
- Docker Documentation: Get Started
- Kubernetes Documentation: Concepts
- Fastify Official Documentation
- gRPC Documentation: Introduction
- RabbitMQ Tutorials
- Apache Kafka Documentation
- Redis Official Documentation
Need help with this topic?
Send us your details and we will contact you.