
Introduction to Serverless Architecture and Firebase
What Is Serverless Computing?
Serverless computing is a cloud execution model where the cloud provider dynamically manages the allocation and provisioning of servers. Developers write and deploy code without worrying about the underlying infrastructure, such as virtual machines, containers, or operating systems. In a serverless architecture, applications are broken into discrete functions that are triggered by events—such as HTTP requests, database changes, or file uploads—and scale automatically based on demand. The term “serverless” does not mean servers are absent; rather, it signifies that server management is abstracted away from the developer. This approach reduces operational overhead, lowers costs through pay-per-execution pricing, and enables rapid iteration, making it ideal for startups, prototypes, and applications with unpredictable traffic patterns. Common serverless platforms include AWS Lambda, Google Cloud Functions, and Azure Functions, but Firebase offers a uniquely integrated experience for frontend developers.
Key Firebase Services for Serverless Development
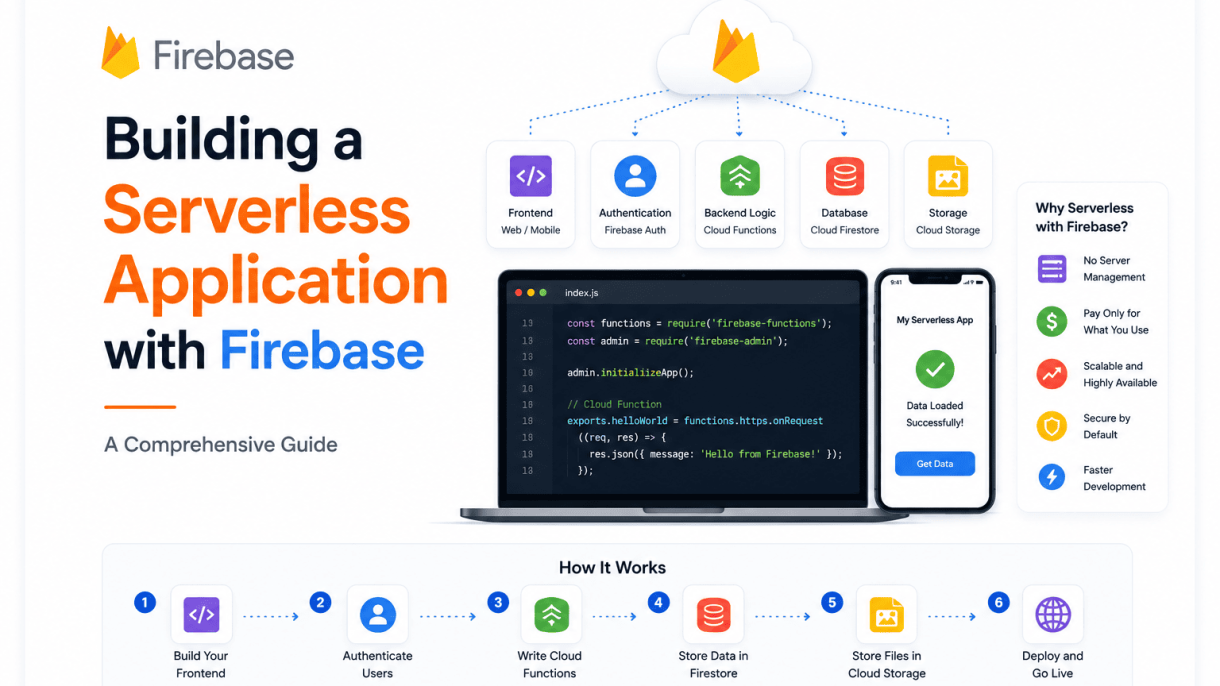
Firebase, a Google-owned platform, provides a fully managed backend that eliminates the need for server provisioning or maintenance. Its core services work together to support serverless application development:
- Firebase Authentication: Offers drop-in authentication methods, including email/password, phone, Google, Facebook, and Apple sign-in. It provides secure token-based user management without custom server code.
- Cloud Firestore: A flexible, scalable NoSQL database that synchronizes data in real time across client devices. It supports offline persistence and automatic scaling, with security rules enforced directly at the database level.
- Firebase Cloud Storage: Designed for storing and serving user-generated content like images, videos, and audio files. It integrates with Firebase Authentication for secure file access and uses Google Cloud Storage under the hood.
- Firebase Hosting: A fast, secure static web hosting service with built-in CDN support, custom domain mapping, and one-click SSL certificate provisioning. It can serve single-page applications, static assets, and even cloud functions as a backend.
- Cloud Functions for Firebase: Enables running backend code in response to events from Firebase services and HTTPS requests. Functions are written in Node.js, Python, Go, or Java and scale automatically from zero to thousands of concurrent invocations.
These services are designed to work together seamlessly, allowing developers to build complete serverless applications without managing a single server.
Comparing Firebase with Other Serverless Platforms
While Firebase is a powerful option, it is not the only serverless platform available. Below is a comparison highlighting key differences:
| Feature | Firebase | AWS Amplify | Vercel |
|---|---|---|---|
| Database | Cloud Firestore (NoSQL, real-time) | DynamoDB (NoSQL, limited real-time) | Postgres via Neon or Vercel Postgres |
| Authentication | Built-in, 10+ providers | Built-in, with Cognito | Third-party integrations |
| Hosting | Static + CDN, serverless functions | Static + CDN, Lambda@Edge | Static + CDN, Edge Functions |
| Function trigger | Events from Firebase services | Events from AWS services | HTTP requests, cron jobs |
| Pricing model | Pay-per-use with free tier | Pay-per-use with free tier | Pay-per-use with generous free tier |
Firebase excels in real-time data synchronization, integrated authentication, and a unified SDK that works across web, iOS, and Android. It is particularly well-suited for mobile-first applications and projects that require rapid prototyping with minimal backend code. In contrast, AWS Amplify offers deeper integration with the broader AWS ecosystem, while Vercel focuses on frontend-centric serverless functions and static site generation. Choosing between them depends on project requirements, existing cloud infrastructure, and the development team’s expertise.
Setting Up a Firebase Project and Environment
Before you can begin building a serverless application with Firebase, you must establish both the cloud-side project and your local development environment. This foundational setup ensures that your application can leverage Firebase’s backend services—such as authentication, a real-time database, and cloud functions—without managing a single server. The process involves three clear stages: creating the project in the Firebase console, installing the command-line interface (CLI), and initializing the specific services your application will need.
Creating a Firebase Project in the Console
Start by navigating to the Firebase Console and signing in with your Google account. Click the “Create a project” button. In the dialog that appears, you can either create an entirely new project or import an existing Google Cloud project. For most serverless applications, a fresh project is recommended to avoid configuration conflicts.
- Step 1: Enter a unique project name (e.g., “my-serverless-app”). Firebase will generate a project ID based on this name, which you can edit if desired.
- Step 2: Review and accept the Firebase terms and conditions. You may also be asked to enable Google Analytics; for a serverless application, this is optional but can be useful for monitoring user engagement.
- Step 3: Click “Create project” and wait a few seconds for the provisioning to complete. Once done, you will be redirected to the project overview dashboard.
After creation, navigate to the “Project settings” (gear icon) and note your project ID. You will use this ID to link your local environment to the cloud project. Also, under “General,” you can register a web app by clicking the web icon (</>) to obtain your Firebase configuration object—a JSON snippet containing API keys and identifiers. Store this securely; it will be needed when you connect your client-side code.
Installing and Configuring the Firebase CLI
The Firebase CLI is the primary tool for managing your project from the terminal. It enables you to deploy code, emulate services locally, and configure security rules. To install it on macOS or Linux, use the Node Package Manager (npm), which requires Node.js version 18 or later:
npm install -g firebase-tools
On Windows, you can also use npm or download the standalone installer from the Firebase website. After installation, verify the version with firebase --version. Next, authenticate the CLI with your Google account by running:
firebase login
This opens a browser window where you grant the CLI permission to access your Firebase projects. Once authenticated, list your projects to confirm the connection:
firebase projects:list
If your newly created project appears, the configuration is successful. You may also set a default project for convenience using firebase use --add, which stores the project alias locally.
Initializing Firebase Services for Your Application
With the CLI authenticated, navigate to your application’s root directory in the terminal. Run the initialization command:
firebase init
A interactive menu will appear. Use the arrow keys and spacebar to select the services you intend to use. For a typical serverless application, common choices include:
| Service | Purpose in Serverless App |
|---|---|
| Firestore | Store and sync structured data in real time |
| Authentication | Manage user sign-in and identity |
| Cloud Functions | Run backend code in response to events |
| Hosting | Deploy static assets and web app |
After selecting services, the CLI will prompt you to associate the directory with your existing Firebase project (select the one you created earlier). For each chosen service, you may be asked to configure files—for example, Firestore will ask for security rules and indexes files. Accept the defaults for now; you can customize them later. The initialization process creates a firebase.json configuration file and a .firebaserc file that maps your project alias. It also generates service-specific subfolders (e.g., functions/ for Cloud Functions). Your local environment is now ready for development, and you can begin building your serverless application with Firebase.
Implementing User Authentication with Firebase Auth
Firebase Authentication provides a robust backend service for managing user identities in serverless applications. It abstracts away the complexity of credential storage, password hashing, and token generation, allowing developers to focus on building secure user flows. This section covers the integration of email/password and social login providers, along with session management strategies for protecting routes in your Firebase-powered application.
Setting Up Email/Password Authentication
To enable email/password authentication, begin in the Firebase Console under the Authentication section. Activate the Email/Password sign-in method. On the client side, use the Firebase SDK to handle user creation and sign-in. The following steps outline the core implementation:
- User Sign-Up: Call
createUserWithEmailAndPassword(email, password)to register a new user. This returns aUserCredentialobject containing the new user’s profile and authentication token. - User Sign-In: Use
signInWithEmailAndPassword(email, password)for returning users. The SDK automatically manages token refresh and session persistence. - Error Handling: Catch common errors such as weak passwords (
auth/weak-password), email already in use (auth/email-already-in-use), or invalid credentials (auth/user-not-found,auth/wrong-password). Provide clear feedback to users. - Password Reset: Implement
sendPasswordResetEmail(email)to allow users to reset their password via a secure email link.
Firebase automatically handles session persistence. By default, the SDK persists the user’s authentication state across page reloads using local storage. You can configure this behavior using browserLocalPersistence, browserSessionPersistence, or inMemoryPersistence depending on your security needs.
Adding Social Login Providers (Google, Facebook, etc.)
Social login reduces friction by allowing users to authenticate with existing accounts. Firebase supports multiple providers including Google, Facebook, Twitter, and GitHub. Each provider requires specific setup in both the Firebase Console and the provider’s developer dashboard. The table below compares the three most common providers:
| Provider | Required Setup | User Data Returned | Best For |
|---|---|---|---|
| Enable in Firebase Console; configure OAuth consent screen in Google Cloud Console | Display name, email, profile photo, and ID token | Broad user base; minimal friction; works across Android, iOS, and web | |
| Enable in Firebase Console; create Facebook App; configure OAuth redirect URIs | Name, email, profile picture URL (subject to Facebook permissions) | Applications targeting a social-media-savvy demographic | |
| GitHub | Enable in Firebase Console; register OAuth App in GitHub Developer Settings | GitHub username, email (if public), avatar URL, and profile URL | Developer tools, coding platforms, or open-source projects |
To implement social login, use the provider-specific signInWithPopup or signInWithRedirect methods. For Google, instantiate a GoogleAuthProvider object and call signInWithPopup(auth, provider). Firebase returns the user’s profile information and a credential object that can be used for additional operations, such as linking accounts.
Handling User Sessions and Secure Routes
Once a user authenticates, Firebase provides an onAuthStateChanged listener that fires whenever the authentication state changes. Use this listener to:
- Track Login State: Update your application’s UI to show authenticated content or redirect to a login page.
- Secure Routes: In a single-page application, wrap protected components in a guard that checks
currentUserbefore rendering. If no user exists, redirect to the sign-in page. - Token Management: The Firebase SDK automatically refreshes ID tokens every hour. Use
currentUser.getIdToken()to retrieve a valid token for authenticated API calls to your backend or Firebase Functions. - Sign Out: Call
signOut(auth)to clear the session and trigger theonAuthStateChangedlistener with anulluser.
For serverless backends, verify the ID token on each request using the Firebase Admin SDK. This ensures that only authenticated users can access protected endpoints. By combining client-side route guards with server-side token verification, you create a layered security model that protects your application from unauthorized access.
Designing a Real-Time Database with Firestore
When building a serverless application with Firebase, Cloud Firestore serves as the flexible, scalable NoSQL database that powers real-time data synchronization. Structuring your data correctly from the start is critical for performance, cost efficiency, and maintainability. Firestore organizes data into collections, documents, and subcollections, each with specific rules and best practices that differ from traditional relational databases.
Understanding Firestore Data Model
Firestore uses a hierarchical data model built on three core components:
- Collections: Containers for documents. Each collection holds multiple documents and can be created implicitly when you add the first document. Collections are lightweight and do not appear in queries unless they contain documents.
- Documents: Individual records within a collection, stored as JSON-like objects with fields (key-value pairs). Documents have a maximum size of 1 MiB and support nested maps and arrays, but avoid deep nesting to prevent performance issues.
- Subcollections: Collections nested under a specific document, allowing you to structure related data without denormalization. For example, a
userscollection might contain a document for each user, with apostssubcollection for that user’s posts.
Best practices for NoSQL structuring in Firestore include:
- Design collections around query patterns, not entity relationships. Ask: “What queries will my app run most often?”
- Use subcollections for data that grows unboundedly (e.g., user posts, comments) to avoid hitting the 20,000-field limit on a single document.
- Avoid creating deeply nested data structures (more than 20 levels) as they make reads and writes slower and more expensive.
- Leverage composite indexes for complex queries, but design your data to minimize the need for them.
Writing and Reading Data with Client SDKs
Firebase provides client SDKs for web, iOS, Android, and more, enabling direct read and write operations from client apps. Here is a practical example using the Web SDK (version 9 modular):
import { collection, addDoc, getDocs, doc, getDoc } from "firebase/firestore";
import { db } from "./firebaseConfig";

// Writing a new document to the "tasks" collection
async function addTask(title, priority) {
  try {
    const docRef = await addDoc(collection(db, "tasks"), {
      title: title,
      priority: priority,
      createdAt: new Date(),
      completed: false
    });
    console.log("Task written with ID: ", docRef.id);
  } catch (e) {
    console.error("Error adding task: ", e);
  }
}

// Reading all documents from the "tasks" collection
async function getAllTasks() {
  const querySnapshot = await getDocs(collection(db, "tasks"));
  querySnapshot.forEach((doc) => {
    console.log(doc.id, " => ", doc.data());
  });
}

// Reading a single document by ID
async function getTask(taskId) {
  const docSnap = await getDoc(doc(db, "tasks", taskId));
  if (docSnap.exists()) {
    console.log("Task data:", docSnap.data());
  } else {
    console.log("No such task!");
  }
}
Key considerations for client-side operations:
- Use
addDoc()for auto-generated IDs orsetDoc()with a custom ID for deterministic references. - Read operations count toward your Firestore usage quota, so batch reads where possible.
- Always handle errors and loading states in the UI, especially for large datasets.
Implementing Real-Time Listeners for Live Updates
Real-time listeners are the backbone of live data synchronization in Firestore. They subscribe to changes in a document, collection, or query and trigger a callback whenever the data changes. This enables features like live chat, collaborative editing, and dashboards that update instantly.
To set up a real-time listener for a collection:
import { collection, onSnapshot } from "firebase/firestore";
import { db } from "./firebaseConfig";

// Listen for real-time updates to the "tasks" collection
const unsubscribe = onSnapshot(collection(db, "tasks"), (snapshot) => {
  snapshot.docChanges().forEach((change) => {
    if (change.type === "added") {
      console.log("New task: ", change.doc.data());
    }
    if (change.type === "modified") {
      console.log("Modified task: ", change.doc.data());
    }
    if (change.type === "removed") {
      console.log("Removed task: ", change.doc.data());
    }
  });
});

// Later, to stop listening:
// unsubscribe();
Best practices for real-time listeners:
- Always call the unsubscribe function when the component unmounts or the user navigates away to prevent memory leaks and unnecessary reads.
- Use
docChanges()to handle only the changes (add, modify, remove) rather than re-rendering the entire dataset. - Limit the scope of listeners to the smallest dataset needed—avoid listening to entire collections when a query filter suffices.
- Be aware that each listener incurs at least one read per change event, so design your app to minimize unnecessary listeners.
Storing and Serving User-Generated Content with Cloud Storage
Firebase Cloud Storage provides a scalable and secure solution for handling user-generated files such as profile pictures, post images, and videos in a serverless application. By integrating directly with Firebase Authentication and Security Rules, you can control access at the file level while offloading infrastructure management. This section walks through configuring your storage bucket, uploading files from client-side code, and managing download URLs for serving content.
Configuring Cloud Storage Bucket and Security Rules
When you enable Cloud Storage in the Firebase console, a default bucket is created in the region you select. You can configure multiple buckets if needed, but a single bucket is sufficient for most applications. Security Rules are written in a declarative JSON-like syntax and are evaluated on every file operation.
To set up basic rules for user-generated content, follow this pattern:
- Authenticated write: Allow only signed-in users to upload files.
- User-scoped paths: Store files under a path that includes the user’s UID, such as
users/{uid}/images/. - Read access: Grant read access to all authenticated users or, for public content, to anyone.
Example security rule snippet for a bucket:
rules_version = '2';
service firebase.storage {
  match /b/{bucket}/o {
    match /users/{userId}/{allPaths=**} {
      allow read: if request.auth != null;
      allow write: if request.auth.uid == userId;
    }
  }
}
This rule ensures that only the owning user can write to their folder, while any authenticated user can read files. For public content, change the read rule to allow read: if true. Always test rules using the Firebase console’s Rules playground before deploying.
Uploading Files from the Client
Client-side uploads are handled using the Firebase SDK. The process involves getting a reference to the storage location, then using put() for raw data or putFile() for blobs. Here is a typical workflow using JavaScript:
- Import Firebase and initialize the app with your project configuration.
- Get a reference to the storage service:
const storage = getStorage(); - Create a reference to the file path:
const fileRef = ref(storage, 'users/' + user.uid + '/images/' + fileName); - Upload the file:
await uploadBytes(fileRef, file);
For better user experience, track upload progress using the uploadBytesResumable() method, which returns a task that emits state_changed events. You can then display a progress bar:
const uploadTask = uploadBytesResumable(fileRef, file);
uploadTask.on('state_changed',
  (snapshot) => {
    const progress = (snapshot.bytesTransferred / snapshot.totalBytes) * 100;
    console.log('Upload is ' + progress + '% done');
  },
  (error) => { /* handle error */ },
  () => { /* upload complete */ }
);
Common file types include images (JPEG, PNG, WebP) and videos (MP4, MOV). For large files, consider using Firebase Extensions like “Resize Images” to generate thumbnails automatically.
Generating Download URLs and Managing Files
After a file is uploaded, you need a download URL to serve it to users. Use the getDownloadURL() function:
const downloadURL = await getDownloadURL(fileRef);
This URL is a long-lived token that can be stored in Firestore alongside other user data. For example, store it in the user’s profile document or a post object. To manage files, you can:
- Delete files: Call
deleteObject(ref)to remove a file when a user deletes their account or content. - List files: Use
listAll(ref)to get all items in a folder, but for large datasets, paginate withlist()and a max results parameter. - Update metadata: Use
updateMetadata()to change content type or custom metadata like alt text.
For serving images efficiently, combine download URLs with Firebase Hosting or a CDN. You can also use Cloud Functions to generate signed URLs with expiration times for temporary access. Always revoke download tokens by deleting the file or updating security rules when a user leaves your app.
Running Backend Logic with Cloud Functions
Firebase Cloud Functions allow you to run backend code in response to events triggered by Firebase features and HTTPS requests, eliminating the need to manage your own servers. This serverless approach enables you to process data, integrate third-party APIs, send notifications, and perform complex computations automatically. By writing functions in Node.js, you can extend your Firebase application’s capabilities while benefiting from automatic scaling and pay-as-you-go pricing. The following sections cover the essential setup, triggering mechanisms, and security considerations for deploying effective Cloud Functions.
Setting Up Cloud Functions with Node.js
To begin, you need the Firebase CLI and a Node.js environment configured on your development machine. After initializing your Firebase project, install the Firebase Admin SDK to interact with Firebase services from your functions. The typical setup process includes:
- Installing Node.js (version 18 or later recommended) and the Firebase CLI via npm:
npm install -g firebase-tools - Logging into Firebase:
firebase login - Initializing Cloud Functions in your project directory:
firebase init functions - Selecting your project and language (JavaScript or TypeScript)
- Installing dependencies with
npm installinside thefunctionsfolder
Once initialized, you write your function logic in the index.js or index.ts file under the functions directory. A basic HTTP function example looks like this:
const functions = require('firebase-functions');
const admin = require('firebase-admin');
admin.initializeApp();

exports.helloWorld = functions.https.onRequest((request, response) => {
  response.send('Hello from Firebase Cloud Functions!');
});
Deploy your function using firebase deploy --only functions or firebase deploy --only functions:helloWorld for a single function. After deployment, the function URL is displayed in the console, which you can test in a browser or via curl.
Triggering Functions from Firestore, Auth, and Storage
Cloud Functions can react to events from multiple Firebase services, enabling automated workflows. Common triggers include:
- Firestore triggers: Execute logic when documents are created, updated, deleted, or written. For example, automatically generate a summary when a new blog post is added.
- Authentication triggers: Respond to user sign-ups, deletions, or metadata updates. Use cases include sending a welcome email or creating a user profile document.
- Cloud Storage triggers: Process files upon upload, update, or deletion. This is ideal for image resizing, thumbnail generation, or virus scanning.
Each trigger type uses a specific event handler. For instance, a Firestore create trigger for a collection named “orders” would be:
exports.onOrderCreate = functions.firestore
  .document('orders/{orderId}')
  .onCreate((snapshot, context) => {
    const orderData = snapshot.data();
    console.log('New order:', orderData);
    return admin.firestore().collection('logs').add({
      message: `Order ${context.params.orderId} created`,
      timestamp: admin.firestore.FieldValue.serverTimestamp()
    });
  });
To set up a Storage trigger for image uploads in a bucket named “profile-pics”:
exports.onProfilePicUpload = functions.storage
  .object()
  .onFinalize((object) => {
    const filePath = object.name;
    const bucket = object.bucket;
    console.log(`File ${filePath} uploaded to bucket ${bucket}`);
    // Add image processing logic here
  });
These triggers run in response to changes, providing a seamless way to automate backend tasks without manual intervention.
Calling Functions via HTTP and Securing Endpoints
HTTP-triggered functions allow you to build RESTful APIs or webhooks that respond to external requests. To secure these endpoints, you must implement authentication and authorization measures. Key practices include:
- Using Firebase Authentication: Require a valid Firebase ID token in the request header. Verify the token using the Admin SDK before processing the request.
- Enabling CORS: Configure Cross-Origin Resource Sharing to allow requests from your web app’s domain. Use the
corspackage or handle headers manually. - Rate limiting: Protect against abuse by limiting requests per IP or user. This can be implemented with a simple in-memory store or by integrating with Firebase Realtime Database.
An example of an HTTP function with token verification:
const cors = require('cors')({ origin: true });

exports.secureEndpoint = functions.https.onRequest((req, res) => {
  cors(req, res, async () => {
    const idToken = req.headers.authorization?.split('Bearer ')[1];
    if (!idToken) {
      res.status(401).send('Unauthorized');
      return;
    }
    try {
      const decodedToken = await admin.auth().verifyIdToken(idToken);
      const uid = decodedToken.uid;
      res.status(200).send(`Hello user ${uid}`);
    } catch (error) {
      res.status(403).send('Invalid token');
    }
  });
});
Additionally, restrict function invocation to specific HTTP methods (GET, POST, etc.) and validate request payloads to prevent injection attacks. For production, consider using Firebase App Check to verify that requests originate from your genuine app, further hardening your serverless endpoints. By combining these security measures, you ensure that your Cloud Functions only respond to legitimate, authenticated traffic.
Managing Application Configuration with Remote Config
Firebase Remote Config is a cloud-based service that enables you to modify the behavior and appearance of your application on the fly, without requiring users to download an update. By storing key-value pairs on Firebase servers, you can control feature flags, UI text, API endpoints, or even the frequency of certain prompts. This capability is essential for building a serverless application with Firebase, as it decouples configuration from deployment, allowing you to adapt your app to changing conditions or user segments in real time. The service also integrates seamlessly with other Firebase tools, making it a cornerstone of dynamic, responsive serverless architectures.
Creating and Deploying Remote Config Parameters
To start using Remote Config, you first define parameters in the Firebase Console or via the Firebase Admin SDK. Each parameter consists of a key (a string identifier) and a value (which can be a string, number, Boolean, or JSON object). You can organize parameters into groups and set default values that apply to all users unless overridden by more specific conditions.
Key steps for creating and deploying parameters:
- Define parameters: In the Firebase Console, navigate to Remote Config and add new parameters. For example, a Boolean parameter
show_bannerwith a default value offalse. - Set conditional values: Use conditions based on user properties (e.g., language, app version, audience) or custom attributes. For instance, you might set
show_bannertotruefor users in version 2.0 or higher. - Publish changes: After configuring parameters and conditions, click “Publish” to deploy them to your app. Changes take effect immediately for new fetch requests, but clients must fetch and apply them.
- Version history: Remote Config maintains a history of published versions, allowing you to roll back if needed.
For advanced use cases, you can use the Firebase Admin SDK to programmatically manage parameters, which is useful for automated deployment pipelines or dynamic updates based on server-side logic.
Fetching and Applying Config on the Client
Once parameters are published, your client application retrieves and applies them. The Firebase SDK handles caching and background fetching, but you control when and how to apply the values. This process is typically integrated into the app’s startup sequence or triggered by specific events.
Implementation workflow on the client:
- Initialize Remote Config: In your app, import the Firebase Remote Config module and set default values. Defaults ensure your app works offline or before the first fetch.
- Fetch parameters: Call
fetch()to retrieve the latest values from the server. You can specify a cache expiration interval (e.g., 12 hours) to control how often the app checks for updates. - Activate fetched values: Use
activate()to apply the retrieved parameters to the active configuration. This step is separate from fetching to allow you to apply changes at a safe point, such as after a user action. - Access parameter values: Retrieve values using methods like
getBoolean(),getString(), orgetNumber(). For example,const showBanner = remoteConfig.getBoolean('show_banner'). - Handle real-time updates: Optionally, use the
onConfigUpdatelistener to react to changes while the app is running, enabling dynamic behavior without a restart.
Best practices include setting short cache intervals during development, using defaults to avoid blank states, and fetching only when necessary to reduce network usage.
A/B Testing Configurations for Feature Rollouts
Firebase Remote Config integrates with A/B Testing to help you experiment with different configurations and measure their impact on user behavior. This is particularly useful for gradual feature rollouts, where you want to validate a change before exposing it to all users.
How to set up an A/B test with Remote Config:
| Step | Description |
|---|---|
| 1. Define a hypothesis | Decide what you want to test, such as whether a new onboarding flow increases retention. |
| 2. Create a test in Firebase Console | Under A/B Testing, create an experiment. Choose a Remote Config parameter (e.g., onboarding_flow) and define variants (e.g., control = “old”, variant = “new”). |
| 3. Set targeting and duration | Specify the percentage of users in each variant and the experiment duration. You can also target by app version, language, or other attributes. |
| 4. Configure goals | Select metrics from Firebase Analytics, such as daily active users or purchase events, to evaluate performance. |
| 5. Start the experiment | Launch the test. Remote Config automatically serves the appropriate parameter values to users in each group. |
| 6. Analyze results | After the experiment ends, review the statistical significance and decide whether to roll out the winning variant to all users. |
This approach minimizes risk by exposing changes to a small subset first, and it provides data-driven insights that guide your product decisions. Combined with Remote Config’s ability to update without releasing builds, A/B testing becomes a powerful tool for iterative improvement in your serverless application.
Monitoring Performance and Debugging with Firebase Tools
Building a serverless application with Firebase removes the burden of infrastructure management, but it also shifts the responsibility for observability onto the developer. Without direct access to server logs or runtime environments, you must rely on Firebase’s integrated monitoring suite to maintain application health and user experience. Firebase provides three primary tools—Performance Monitoring, Crashlytics, and Test Lab—that together offer a comprehensive view of how your application behaves in production and during development. By proactively using these tools, you can identify bottlenecks, fix crashes, and validate code changes before they affect users.
Setting Up Performance Monitoring to Track Latency
Firebase Performance Monitoring automatically collects trace data from your app, measuring key metrics such as HTTP request latency, screen rendering time, and custom network calls. To set it up, add the Performance Monitoring SDK to your project and enable the service in the Firebase console. The SDK captures traces without requiring manual instrumentation for basic network requests, but you can also create custom traces to monitor specific user flows, such as checkout processes or image uploads. The data is aggregated into dashboards that show percentiles (e.g., 50th, 95th, and 99th) for key attributes, allowing you to detect regressions over time. For example, if the 95th percentile response time for a Cloud Function increases from 500ms to 2 seconds, you can investigate backend configuration or database queries. Use the following checklist to ensure comprehensive coverage:
- Enable automatic network request tracing for all HTTP calls.
- Add custom traces for critical user interactions, such as login or payment.
- Set custom attributes (e.g., user tier or app version) to segment performance data.
- Configure alerts in the Firebase console to notify your team when latency exceeds thresholds.
Integrating Crashlytics for Error Reporting
Crashlytics provides real-time crash and error reporting with contextual data, helping you prioritize fixes based on impact. After adding the Crashlytics SDK, crashes are automatically logged with stack traces, device information, and user activity logs. You can also log non-fatal errors using recordError to capture recoverable issues, such as failed API calls or invalid user input, without crashing the app. Crashlytics organizes issues by severity and frequency, showing the number of unique users affected and the percentage of sessions impacted. This data enables you to focus on bugs that affect the most users first. For a serverless app, common crash sources include unhandled promises in Cloud Functions, null reference errors from Firestore data, and memory issues from large image processing. Integrate Crashlytics with your development workflow by setting up email or Slack alerts for new critical issues.
Using Firebase Test Lab for Automated Testing
Firebase Test Lab allows you to run automated tests on real devices hosted in Google data centers, covering a range of Android and iOS versions, screen sizes, and locales. You upload your app build along with test scripts (e.g., Espresso for Android or XCTest for iOS), and Test Lab executes them while capturing logs, screenshots, and performance data. This is particularly valuable for serverless applications because it validates how your app interacts with Firebase services under different network conditions and device capabilities. For example, you can test how your app handles Firestore offline persistence or Cloud Functions with high latency. Test Lab integrates with Crashlytics and Performance Monitoring, so any crashes or slow operations detected during tests are automatically reported. Below is a comparison of the three tools to clarify their distinct roles:
| Tool | Primary Purpose | Key Output | Best For |
|---|---|---|---|
| Performance Monitoring | Track latency and throughput | Percentile charts, trace data | Identifying slow network calls or UI jank |
| Crashlytics | Report and analyze crashes | Stack traces, user impact metrics | Fixing bugs that cause app termination |
| Test Lab | Automated testing on real devices | Test logs, screenshots, video recordings | Validating behavior across device configurations |
By combining these tools, you create a feedback loop: Test Lab catches issues pre-release, Crashlytics monitors production errors, and Performance Tracking ensures your app remains fast and responsive. This approach is essential for building a serverless application with Firebase, where you must rely on automated observability to compensate for the lack of direct server access.
Deploying and Hosting the Application with Firebase Hosting
Firebase Hosting provides fast, secure, and reliable hosting for your serverless application. It leverages a global content delivery network (CDN) to serve your static assets and dynamic content with low latency, while also managing SSL certificates and custom domains automatically. This section walks you through configuring Firebase Hosting, deploying your app via the CLI and CI/CD pipelines, and setting up custom domains with SSL.
Configuring Firebase Hosting for Your App
Before deploying, you must configure Firebase Hosting to point to your app’s build output. Start by initializing Firebase in your project directory using the Firebase CLI:
firebase init hosting
During initialization, you will be prompted to specify the public directory (commonly public or build), whether to configure as a single-page app (rewrite all URLs to index.html), and whether to set up automatic builds with GitHub. The generated firebase.json file contains the hosting configuration. A typical configuration looks like this:
{
  "hosting": {
    "public": "build",
    "ignore": [
      "firebase.json",
      "**/.*",
      "**/node_modules/**"
    ],
    "rewrites": [
      {
        "source": "**",
        "destination": "/index.html"
      }
    ]
  }
}
Key configuration options include:
- public: The directory containing your built app files.
- ignore: Files or patterns to exclude from deployment.
- rewrites: Rules for routing requests, essential for single-page applications.
- headers: Custom HTTP headers for security or caching.
- redirects: URL redirect rules for SEO or legacy paths.
After configuring, run a local preview with firebase serve to verify your app works before deploying.
Deploying with the CLI and CI/CD Pipelines
Deploying your application is straightforward with the Firebase CLI. Use the following command to push your latest build to Firebase Hosting:
firebase deploy --only hosting
This command uploads the contents of your public directory and updates the hosting configuration. For production deployments, consider integrating Firebase Hosting with a CI/CD pipeline. Popular options include GitHub Actions, GitLab CI, and CircleCI. A sample GitHub Actions workflow automates deployment on every push to the main branch:
name: Deploy to Firebase Hosting
on:
  push:
    branches:
      - main
jobs:
  deploy:
    runs-on: ubuntu-latest
    steps:
      - uses: actions/checkout@v3
      - run: npm ci && npm run build
      - uses: FirebaseExtended/action-hosting-deploy@v0
        with:
          repoToken: '${{ secrets.GITHUB_TOKEN }}'
          firebaseServiceAccount: '${{ secrets.FIREBASE_SERVICE_ACCOUNT }}'
          channelId: live
          projectId: your-project-id
This pipeline builds your app, authenticates with Firebase using a service account secret, and deploys to the live channel. For staging or preview deployments, you can use channel IDs like staging or a pull request number.
Setting Up Custom Domains and SSL Certificates
Firebase Hosting supports custom domains with automatic SSL certificate provisioning via Let’s Encrypt. To add a custom domain, navigate to the Firebase Console, select Hosting, and click “Add custom domain.” Enter your domain (e.g., app.example.com) and follow the verification steps, which typically involve adding a TXT record to your DNS provider. Once verified, Firebase provisions an SSL certificate automatically—no manual renewal required. The following table summarizes the DNS record types you may need:
| Record Type | Purpose | Example Value |
|---|---|---|
| TXT | Domain ownership verification | firebase=your-verification-code |
| A | Root domain pointing to Firebase IPs | 151.101.1.195, 151.101.65.195 |
| CNAME | Subdomain pointing to Firebase Hosting | your-project.web.app |
After DNS propagation (which may take up to 48 hours), your app will be accessible via your custom domain with HTTPS enforced. Firebase also allows you to set up redirects from the www subdomain to your apex domain or vice versa, ensuring a consistent user experience. With these steps, your serverless application is globally available, secure, and professionally hosted.
Security Best Practices and Cost Optimization
Securing your Firebase resources while managing costs is critical for any serverless application. By implementing robust security rules, leveraging custom claims, and setting up budget controls, you can protect user data and avoid unexpected expenses. This section provides actionable guidelines for hardening your Firebase project and optimizing its operational efficiency.
Writing Secure Firestore and Storage Security Rules
Firestore and Cloud Storage rely on declarative security rules to control access. Always follow the principle of least privilege: grant only the minimum permissions required for each operation. For Firestore, use the request.auth object to verify user identity and resource.data to validate document fields. For example, a rule allowing users to read only their own profile documents might look like:
match /users/{userId} {
  allow read, write: if request.auth != null && request.auth.uid == userId;
}
For Storage, enforce file type and size constraints using request.resource.size and request.resource.contentType. Avoid allowing public read or write access to any bucket. Instead, scope rules to specific paths and operations. Regularly test rules using the Firebase console simulator and review them after each feature update.
Using Firebase Authentication with Custom Claims
Custom claims allow you to assign role-based permissions (e.g., “admin”, “premium”) to authenticated users without storing roles in a separate database. This reduces latency and simplifies rule logic. To set claims, use the Firebase Admin SDK in a trusted server environment (e.g., Cloud Functions):
admin.auth().setCustomUserClaims(uid, { admin: true });
Then, in your security rules, check the claim directly:
allow write: if request.auth.token.admin == true;
Key benefits include:
- Centralized role management — claims are cached and available on every request.
- Reduced database reads — no need to query Firestore for each authorization check.
- Granular control — combine claims with Firestore data for fine-grained access.
Estimating and Controlling Usage with Budget Alerts
Firebase bills based on usage (e.g., Firestore reads/writes, Cloud Functions invocations, Storage bandwidth). To avoid surprises, estimate your monthly costs using the Firebase Pricing Calculator. Set up budget alerts in the Google Cloud Console to receive notifications when spending approaches a threshold (e.g., 50%, 90%, 100%). Steps to configure alerts:
- Go to Billing > Budgets & alerts in the Google Cloud Console.
- Create a new budget and link it to your Firebase project.
- Set threshold percentages and email recipients.
Additional cost optimization tips include:
- Use Firestore composite indexes only when necessary to reduce read costs.
- Implement Cloud Functions with minimum instances set to 0 to avoid idle costs.
- Monitor real-time usage with the Firebase console dashboard and Cloud Monitoring.
By combining secure rules, custom claims, and proactive budget tracking, you build a serverless application that is both safe and cost-efficient.
Frequently Asked Questions
What is Firebase and how does it enable serverless development?
Firebase is a Google-backed platform that provides a suite of cloud services, including a NoSQL database (Firestore), authentication, cloud functions, and hosting. It enables serverless development by abstracting server management—developers write code that runs in response to events, without provisioning or scaling servers. Firebase handles infrastructure, scaling, and security automatically, allowing developers to focus on building features. Billing is based on usage, making it cost-effective for startups and enterprises alike.
What are the key components of a Firebase serverless application?
A typical Firebase serverless app uses Firestore for real-time NoSQL data storage, Firebase Authentication for user sign-in (supporting email/password, Google, Facebook, etc.), Cloud Functions for backend logic triggered by HTTP requests or database changes, and Firebase Hosting for static assets. Optionally, Cloud Storage for files and Firebase Extensions for pre-built integrations can be added. These components work together to create a fully serverless architecture.
How do I set up Firebase Authentication in a serverless app?
To set up Firebase Authentication, first enable sign-in methods (email/password, Google, etc.) in the Firebase console. Install the Firebase SDK in your app, then initialize it with your project config. Use `signInWithEmailAndPassword` or `signInWithPopup` for authentication. Firebase handles token generation and session management. For custom backend logic, use Firebase Admin SDK in Cloud Functions to verify ID tokens. Authentication integrates seamlessly with Firestore security rules to restrict data access.
What are Firebase Cloud Functions and how are they used?
Cloud Functions are serverless backend functions that run in response to events (HTTP requests, Firestore changes, user creation). Written in Node.js, they allow you to execute custom logic without managing servers. For example, you can create an HTTP function to process payments, or a Firestore trigger to send a welcome email on user signup. Functions scale automatically and are billed per invocation. They can access other Firebase services and external APIs via the Firebase Admin SDK.
How do I structure data in Firestore for a serverless app?
Firestore is a NoSQL document database that stores data in documents (key-value pairs) organized into collections. Structure data based on your app's query patterns—avoid deep nesting to prevent scaling issues. Use subcollections for related data (e.g., users/{userId}/posts). Design documents to contain the data needed for common reads (denormalization is common). Use composite indexes for complex queries. Security rules protect data at the document level based on user authentication.
What are the best practices for securing a Firebase serverless app?
Use Firebase Security Rules to restrict read/write access to Firestore and Storage based on user authentication and data validity. Validate input in Cloud Functions to prevent abuse. Enable Firebase App Check to block unauthorized client apps. Use environment variables for sensitive keys in Cloud Functions. Regularly audit rules and logs. Implement rate limiting using Cloud Functions or third-party services. Never expose Firebase Admin SDK credentials on the client side.
How does Firebase Hosting work for serverless apps?
Firebase Hosting provides fast, secure hosting for static assets (HTML, CSS, JS) with a global CDN. It integrates with Cloud Functions to serve dynamic content via rewrites (e.g., `/api/*` to a function). You can deploy with a single command (`firebase deploy`). Hosting supports custom domains, SSL certificates, and rollbacks. For server-rendered content, use Cloud Functions or Cloud Run. It's ideal for single-page applications (SPAs) and progressive web apps (PWAs).
What are the cost implications of using Firebase for serverless apps?
Firebase offers a generous free tier (Spark plan) that includes 1 GB Firestore storage, 10 GB hosting, and 125K Cloud Function invocations per month. Beyond that, the Blaze plan (pay-as-you-go) charges based on usage: Firestore reads/writes/deletes, Cloud Function compute time, and hosting bandwidth. Costs can be unpredictable if not monitored—use budgeting alerts in Google Cloud Console. For high-traffic apps, consider optimizing queries and using caching to reduce costs.
Sources and further reading
- Firebase Documentation: Build apps fast, without managing infrastructure
- Firestore Data Model
- Firebase Authentication Documentation
- Cloud Functions for Firebase
- Firebase Security Rules
- Firebase Hosting Documentation
- Firebase Pricing Plans
- Google Cloud Documentation: Serverless Computing Overview
- Firebase App Check Documentation
- Firebase Extensions Documentation
Need help with this topic?
Send us your details and we will contact you.