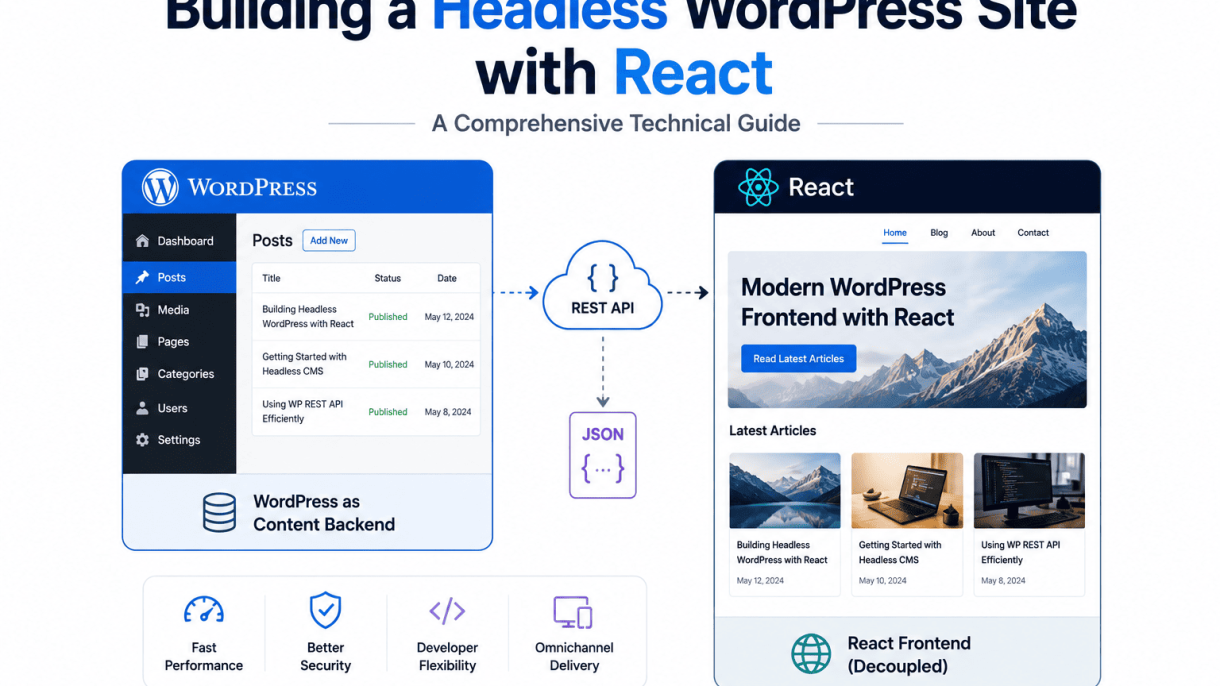

Introduction to Headless WordPress and React
Building a Headless WordPress Site with React represents a modern architectural shift that separates content management from presentation. In this model, WordPress serves exclusively as a content repository and API provider, while React handles all frontend rendering and user interaction. This decoupling enables developers to leverage WordPress’s mature editorial tools alongside React’s component-based, reactive interface, resulting in a site that is both content-rich and highly performant.
What Is a Headless CMS and How Does It Differ from Traditional WordPress
A headless CMS is a content management system that delivers content via APIs without dictating how that content is displayed. Unlike traditional WordPress, where the PHP-based theme engine tightly couples content, templates, and styling, a headless WordPress backend outputs JSON or GraphQL data through the WordPress REST API or WPGraphQL. The frontend is built independently, consuming this data and rendering it in any framework or device.
Key differences include:
- Separation of concerns: Content editors work in the WordPress admin panel; developers control the frontend stack independently.
- API-first delivery: Content is fetched as structured data rather than pre-rendered HTML, enabling reuse across web, mobile, and IoT applications.
- No theme dependency: The frontend is a standalone application, eliminating WordPress theme bloat and security vulnerabilities from outdated PHP templates.
- Static site potential: Headless setups can pre-render pages at build time, dramatically reducing server load and improving time-to-first-byte.
Why Choose React for the Frontend of a Headless WordPress Site
React is the leading choice for headless WordPress frontends because of its component architecture, virtual DOM diffing, and vast ecosystem. When building a headless WordPress site with React, developers gain:
- Reusable components: Blocks like headers, post cards, and navigation menus are built once and composed declaratively, reducing code duplication and ensuring consistency.
- Efficient rendering: React’s virtual DOM minimizes direct DOM manipulation, resulting in smooth interactions even on complex content-heavy pages.
- Rich state management: Libraries like Redux, Zustand, or React Query handle caching, pagination, and real-time updates from the WordPress API seamlessly.
- SEO-friendly options: With Next.js or Gatsby, React applications can pre-render WordPress content server-side or statically, ensuring search engines index pages without JavaScript execution.
- Developer velocity: React’s declarative syntax, hot module replacement, and extensive tooling (ESLint, Prettier, Storybook) accelerate development and testing.
Core Advantages: Performance, Flexibility, and Security in Decoupled Architecture
Adopting a headless WordPress architecture with React delivers three foundational benefits:
| Advantage | Description |
|---|---|
| Performance | React can pre-render content as static HTML at build time or serve it via CDN, reducing server-side processing. The WordPress backend handles only API requests, not template rendering, lowering resource consumption. |
| Flexibility | Developers can use any frontend toolchain (React, Vue, Svelte) and deploy to any platform (Vercel, Netlify, AWS). Content is reusable across websites, mobile apps, and third-party integrations without duplication. |
| Security | The frontend and backend are isolated. WordPress’s admin panel is hidden behind a private domain or VPN, while the public React app has no direct database access. This reduces attack surfaces for SQL injection, XSS, and plugin exploits. |
By separating the content layer from the presentation layer, teams can scale development independently, improve site speed through static generation, and maintain a secure, future-proof digital ecosystem. The result is a site that combines WordPress’s editorial strengths with React’s dynamic, component-driven user experience.
Setting Up WordPress as a Headless Backend
To transform a standard WordPress installation into a headless backend, you must decouple the content management layer from the front-end presentation. This involves configuring WordPress to serve data exclusively via APIs while disabling all front-end rendering features. Begin with a fresh WordPress installation (version 6.0 or later) on a server with PHP 8.0+ and MySQL 8.0+. Ensure your permalink structure is set to a non-default option, such as “Post name,” because the REST API relies on clean URL rewriting for proper endpoint routing. Navigate to Settings > Permalinks and select the “Post name” option, then save changes. This step is critical because the default “Plain” permalink structure breaks API routes.
For security, disable file editing in the WordPress admin by adding define('DISALLOW_FILE_EDIT', true); to your wp-config.php file. Also, remove any theme or plugin that generates front-end HTML, such as page builders or caching plugins designed for traditional sites. Your WordPress installation will now act solely as a content repository, with all data access occurring through API calls from your React application.
Installing and Configuring the WordPress REST API (Core and Custom Endpoints)
WordPress ships with a built-in REST API that exposes core content types—posts, pages, media, users, taxonomies, and comments—by default. Verify its functionality by visiting /wp-json/wp/v2/posts in your browser after installation. The response will be a JSON array of your posts. To extend the API with custom endpoints, register them in your theme’s functions.php file or a custom plugin. For example, to create an endpoint that returns only featured images with post IDs:
add_action('rest_api_init', function () {
    register_rest_route('custom/v1', '/featured-images/', array(
        'methods' => 'GET',
        'callback' => function () {
            $posts = get_posts(array('posts_per_page' => -1));
            $data = array();
            foreach ($posts as $post) {
                $data[] = array(
                    'id' => $post->ID,
                    'featured_image' => get_the_post_thumbnail_url($post->ID, 'full')
                );
            }
            return new WP_REST_Response($data, 200);
        },
        'permission_callback' => '__return_true'
    ));
});
Test your custom endpoint at /wp-json/custom/v1/featured-images/. Always include a permission_callback to control access; use __return_true only for public data.
Using WPGraphQL for GraphQL-Based Data Fetching
If your React application prefers GraphQL over REST, install the WPGraphQL plugin (free from the WordPress plugin repository). After activation, navigate to GraphQL > Settings and enable introspection for development. The plugin automatically generates a GraphQL schema from your WordPress data, including custom post types and taxonomies. Access the GraphQL endpoint at /graphql and use tools like GraphiQL (included in the plugin) to test queries. For example, to fetch post titles and slugs:
query GetPosts {
  posts {
    nodes {
      title
      slug
    }
  }
}
WPGraphQL supports mutations for creating, updating, and deleting content, making it ideal for headless architectures where the front-end manages content operations. Ensure your server has adequate memory and execution time limits, as GraphQL queries can be resource-intensive.
Essential Plugins: Custom Post Type UI, ACF to REST API, and JWT Authentication
Three plugins are indispensable for a production headless setup:
- Custom Post Type UI (CPT UI): Enables creation of custom post types and taxonomies via an admin interface without coding. For example, create a “Projects” post type with a “Technology” taxonomy. After saving, these appear automatically in both the REST API and WPGraphQL.
- ACF to REST API: Integrates Advanced Custom Fields (ACF) with the REST API. Install both ACF (free or pro) and ACF to REST API. Configure field groups in the admin; they will be appended to API responses under the
acfkey. For instance, a “Price” field on a “Products” post type becomes accessible via/wp-json/wp/v2/products/123asacf.price. - JWT Authentication: Secures API endpoints by issuing JSON Web Tokens for user authentication. Install the JWT Authentication for WP REST API plugin and add
define('JWT_AUTH_SECRET_KEY', 'your-secret-key');towp-config.php. Generate a token by posting credentials to/wp-json/jwt-auth/v1/token. Use this token in theAuthorization: Bearerheader for authenticated requests, such as creating posts or accessing private content.
These plugins extend WordPress’s headless capabilities without bloating the backend. Always update them to the latest versions to maintain compatibility with WordPress core and your React front-end.
Setting Up Your React Frontend Environment
When building a headless WordPress site with React, the frontend environment serves as the foundation for performance, developer experience, and scalability. The initial scaffolding choices—framework selection, dependency management, and project structure—directly influence how efficiently you can integrate with the WordPress REST API or WPGraphQL. This section covers three critical decisions and configurations to ensure a robust setup.
Choosing the Right React Framework: Next.js vs. Create React App vs. Vite
Each framework optimizes for different priorities. Next.js excels in server-side rendering (SSR) and static site generation (SSG), which are ideal for SEO-driven headless WordPress sites. Create React App (CRA) offers a zero-configuration start but suffers from slower builds and limited SSR capabilities. Vite provides lightning-fast hot module replacement (HMR) and leaner production bundles, making it suitable for dynamic, client-heavy applications.
| Feature | Next.js | Create React App (CRA) | Vite |
|---|---|---|---|
| Rendering Strategy | SSR, SSG, ISR | Client-side only (CSR) | CSR, optional SSR via plugins |
| Build Speed (cold start) | Moderate (2-5s) | Slow (10-20s) | Fast (1-3s) |
| SEO-Friendliness | Excellent (pre-rendered HTML) | Poor (requires additional tools) | Good (with prerendering) |
| API Routes | Built-in | None (requires Express) | None (requires middleware) |
| Use Case | Content-heavy, SEO-critical sites | Simple SPAs or prototypes | Performance-focused SPAs |
For most headless WordPress projects, Next.js is the pragmatic choice due to its native support for data fetching from external APIs and incremental static regeneration (ISR), which allows content updates without full rebuilds. Vite is a strong alternative if you prioritize development speed and do not need SSR. CRA is best reserved for internal tools or learning environments.
Installing Dependencies: Axios, Apollo Client, and React Router
Three core libraries streamline communication between your React frontend and WordPress backend. Install them using npm or yarn:
- Axios: A promise-based HTTP client for interacting with the WordPress REST API. It simplifies request cancellation, interceptors, and error handling.
- Apollo Client: Essential if your WordPress instance uses the WPGraphQL plugin. It manages GraphQL queries, caching, and state synchronization.
- React Router: Handles client-side routing for single-page applications, enabling navigation between pages like blog posts, categories, and custom post types.
Example installation command for a Next.js project:
npm install axios @apollo/client graphql react-router-dom
If you are using Next.js, note that React Router is often redundant because Next.js provides its own file-based routing system. In that case, omit react-router-dom and rely on Next.js’s Link component and dynamic routes.
Environment Variables and Project Structure for Scalability
Proper environment variable management prevents hardcoding API endpoints and secrets. Create a .env.local file at the project root with variables prefixed by REACT_APP_ (for CRA/Vite) or NEXT_PUBLIC_ (for Next.js). Example:
# For Next.js
NEXT_PUBLIC_WP_API_URL=https://your-site.com/wp-json/wp/v2
NEXT_PUBLIC_GRAPHQL_URL=https://your-site.com/graphql

# For CRA/Vite
REACT_APP_WP_API_URL=https://your-site.com/wp-json/wp/v2
A scalable project structure separates concerns and anticipates growth. Organize your source folder as follows:
/components– Reusable UI elements (e.g., Header, PostCard)/pagesor/routes– Route-level components (e.g., HomePage, SinglePost)/libor/utils– API clients, helpers, and configuration files/hooks– Custom React hooks for data fetching or state management/styles– Global CSS, theme files, or CSS modules
This structure supports team collaboration and makes it straightforward to add features like authentication, caching, or third-party integrations later. By investing in this setup upfront, you avoid refactoring as the site grows in complexity.
Fetching and Displaying WordPress Content with REST API
Integrating a React frontend with a headless WordPress backend requires efficient data retrieval from the WordPress REST API. This section provides a practical walkthrough for fetching posts, pages, and custom fields, handling pagination, and rendering content in React components. By leveraging the API’s endpoints, you can build dynamic interfaces that update seamlessly without reloading the page.
Making API Calls with Axios: GET Requests for Posts and Pages
Axios is a popular HTTP client for React that simplifies making GET requests to the WordPress REST API. Install Axios via npm or yarn, then create a service file to centralize your API calls. For example, to fetch the latest 10 posts:
import axios from 'axios';

const API_BASE = 'https://your-site.com/wp-json/wp/v2';

export const fetchPosts = async (page = 1, perPage = 10) => {
  try {
    const response = await axios.get(`${API_BASE}/posts`, {
      params: {
        _embed: true,
        page,
        per_page: perPage,
      },
    });
    return {
      posts: response.data,
      totalPages: parseInt(response.headers['x-wp-totalpages'], 10),
      total: parseInt(response.headers['x-wp-total'], 10),
    };
  } catch (error) {
    console.error('Error fetching posts:', error);
    throw error;
  }
};
For pages, use the same pattern with the /pages endpoint. Include the _embed parameter to automatically include featured media, author, and other linked data. Always handle errors gracefully to maintain a robust user experience.
Rendering a Blog List with Dynamic Pagination and Filters
To display a paginated blog list, maintain state for the current page and total pages in your React component. Use the useEffect hook to fetch data when the page changes. Implement pagination controls as buttons or a page selector:
- Previous/Next buttons: Disable them on the first or last page.
- Page numbers: Show a limited range (e.g., 1, 2, 3 … last).
- Per-page selector: Allow users to choose 10, 20, or 50 items.
For filters, pass query parameters like categories or search to the API. For example, to filter by category ID:
const fetchFilteredPosts = async (categoryId, page) => {
  const response = await axios.get(`${API_BASE}/posts`, {
    params: { categories: categoryId, page, _embed: true },
  });
  return response.data;
};
Combine filters with pagination by resetting the page to 1 whenever a filter changes. Display the current filter state (e.g., “Showing posts in ‘Technology'”) for clarity.
Handling Featured Images, Categories, and Custom Meta Fields
Featured images require the _embed parameter to include the _embedded['wp:featuredmedia'] array. Access the image URL and alt text from the response:
const featuredImage = post._embedded?.['wp:featuredmedia']?.[0];
const imageUrl = featuredImage?.source_url || '';
const altText = featuredImage?.alt_text || '';
Categories are linked via IDs in post.categories. Fetch category names separately using the /categories endpoint, or embed them by requesting _embed=wp:term. For custom meta fields registered with register_meta in WordPress, expose them by adding show_in_rest to the field registration. Access them via post.meta.your_field_key.
To display these elements efficiently, create reusable React components:
| Component | Props | Description |
|---|---|---|
PostCard |
post, imageUrl, categories | Renders a single post with featured image, title, excerpt, and category badges. |
Pagination |
currentPage, totalPages, onPageChange | Provides navigation controls and page indicators. |
CategoryFilter |
categories, selectedCategory, onCategoryChange | Dropdown or button group for filtering by category. |
By structuring your components this way, you maintain a clean separation of concerns and ensure that the headless setup scales gracefully with your content needs.
Implementing GraphQL with WPGraphQL and Apollo Client
Integrating GraphQL into a headless WordPress architecture unlocks precise data fetching, eliminating over-fetching and under-fetching common with REST APIs. By pairing WPGraphQL on the server with Apollo Client in React, developers can query exactly the fields each component needs, improving performance and developer experience. This section details the complete setup process, from WordPress configuration to React integration.
Installing and Configuring WPGraphQL on WordPress
Begin by installing the WPGraphQL plugin on your WordPress site. Navigate to Plugins > Add New, search for “WPGraphQL,” and install and activate it. For production environments, consider using Composer for dependency management.
After activation, verify the GraphQL endpoint is accessible at /graphql by default. To configure key settings:
- Go to Settings > GraphQL in the WordPress admin.
- Enable public introspection for development; disable it in production for security.
- Set batch queries to “off” unless your application requires them.
- Configure CORS headers under “CORS Settings” to allow requests from your React app’s origin.
Test the endpoint using a tool like GraphiQL (included in the plugin). Run a simple query to confirm data retrieval:
{
  posts(first: 5) {
    nodes {
      title
      slug
    }
  }
}
If you need custom post types or fields, extend WPGraphQL via filters or register them in your theme’s functions.php. For example, to expose ACF fields, install the WPGraphQL for Advanced Custom Fields plugin.
Setting Up Apollo Client in React with Query and Mutation Hooks
In your React project, install Apollo Client and its dependencies:
npm install @apollo/client graphql
Create an Apollo Client instance by configuring the ApolloClient with the GraphQL endpoint and an in-memory cache. In a new file, e.g., apollo-client.js:
import { ApolloClient, InMemoryCache, createHttpLink } from '@apollo/client';

const httpLink = createHttpLink({
  uri: 'https://your-wordpress-site.com/graphql',
});

const client = new ApolloClient({
  link: httpLink,
  cache: new InMemoryCache(),
});

export default client;
Wrap your app’s root component with ApolloProvider to make the client accessible throughout the component tree:
import { ApolloProvider } from '@apollo/client';
import client from './apollo-client';

function App() {
  return (
    <ApolloProvider client={client}>
      <YourComponents />
    </ApolloProvider>
  );
}
For data fetching, use the useQuery hook. For mutations (e.g., submitting comments), use useMutation. Both hooks return loading, error, and data states, enabling clean UI state management.
Writing GraphQL Queries for Posts, Pages, and Related Content
With Apollo Client ready, craft queries that fetch only the required fields for each component. For a blog post list, request title, excerpt, and featured image:
import { gql, useQuery } from '@apollo/client';

const GET_POSTS = gql`
  query GetPosts {
    posts(first: 10) {
      nodes {
        title
        excerpt
        featuredImage {
          node {
            sourceUrl
            altText
          }
        }
        slug
      }
    }
  }
`;

function PostList() {
  const { loading, error, data } = useQuery(GET_POSTS);
  if (loading) return <p>Loading...</p>;
  if (error) return <p>Error: {error.message}</p>;

  return (
    <ul>
      {data.posts.nodes.map(post => (
        <li key={post.slug}>
          <h3>{post.title}</h3>
          <div dangerouslySetInnerHTML={{ __html: post.excerpt }} />
        </li>
      ))}
    </ul>
  );
}
For a single page, query by slug or ID:
const GET_PAGE = gql`
  query GetPage($slug: String!) {
    pageBy(uri: $slug) {
      title
      content
      seo {
        metaDesc
      }
    }
  }
`;
To fetch related content, such as categories or tags for a post, include nested fields:
const GET_POST_WITH_TAXONOMIES = gql`
  query GetPostWithTaxonomies($slug: String!) {
    postBy(slug: $slug) {
      title
      categories {
        nodes {
          name
          slug
        }
      }
      tags {
        nodes {
          name
        }
      }
    }
  }
`;
Use variables in queries to dynamically fetch data based on user interaction or routing. For pagination, leverage WPGraphQL’s cursor-based pagination with after and first parameters. This approach ensures your React components receive exactly the data they need, keeping the headless architecture efficient and maintainable.
Managing Authentication and User Sessions
In a headless WordPress setup, authentication moves from server-rendered sessions to stateless, token-based mechanisms. This shift requires careful handling to secure user login, registration, and protected content access without relying on WordPress’s built-in session cookies. Two primary approaches—JWT (JSON Web Tokens) and OAuth—dominate headless authentication, with JWT being the most common for custom React front-ends due to its simplicity and stateless nature. The following subsections detail how to implement secure authentication using WordPress plugins, manage tokens in React, and build user-facing components.
Implementing JWT Authentication via WordPress Plugins
To enable JWT authentication on the WordPress backend, install and activate a reliable plugin such as “JWT Authentication for WP REST API” or “Simple JWT Login.” These plugins expose endpoints—typically /wp-json/jwt-auth/v1/token—that accept user credentials and return a JWT access token and a refresh token. Configure the plugin by adding the following constant to your wp-config.php file to define a secret key:
define('JWT_AUTH_SECRET_KEY', 'your-unique-secret-key-here');
After activation, verify that the plugin adds the necessary REST routes by sending a POST request to the token endpoint with username and password fields. The response includes an access_token (short-lived, e.g., 1 hour) and a refresh_token (long-lived, e.g., 14 days). For OAuth, consider plugins like “WP OAuth Server” or “OAuth 2.0 for WordPress,” though JWT remains simpler for most React projects.
Storing and Refreshing Tokens in React with Context or Redux
Once tokens are obtained, store them securely in the browser. Avoid localStorage for access tokens due to XSS vulnerabilities; instead, use HTTP-only cookies for production or, for simplicity in development, store the access token in memory (e.g., React state) and the refresh token in an HTTP-only cookie. Use React Context or Redux to manage authentication state globally. Below is a Context-based approach:
- AuthContext: Holds user object, access token, and loading state.
- Login function: Calls the WordPress JWT endpoint, stores tokens, and updates context.
- Token refresh logic: Intercepts 401 responses from API calls, sends refresh token to a custom endpoint (e.g.,
/wp-json/jwt-auth/v1/token/refresh), and updates the access token.
Implement an Axios interceptor that automatically attempts token refresh on 401 errors. For Redux, create an auth slice with actions for login, logout, and token refresh, and use middleware to handle async flows. Always clear tokens from memory and cookies on logout.
Building Login, Registration, and Protected Route Components
Create reusable components that integrate with your authentication context or Redux store. For login and registration, use controlled forms that send POST requests to WordPress REST endpoints (e.g., /wp-json/jwt-auth/v1/token for login, /wp-json/wp/v2/users/register for registration, if enabled). After successful authentication, redirect the user to a protected dashboard.
For protected routes, wrap your route components with a higher-order component or a custom ProtectedRoute component that checks the authentication state:
const ProtectedRoute = ({ children }) => {
  const { isAuthenticated, loading } = useAuth();
  if (loading) return <div>Loading...</div>;
  return isAuthenticated ? children : <Navigate to="/login" />;
};
Combine this with error handling for expired tokens—redirect to login if refresh fails. For registration, validate fields like username, email, and password on the client side before submission. Use WordPress’s built-in nonce mechanism for additional security on write operations, though JWT itself covers most authentication needs. Test all flows thoroughly, especially token expiration and refresh, to ensure seamless user sessions.
Optimizing Performance and SEO for Headless Sites
When building a headless WordPress site with React, performance and search engine visibility become intertwined challenges. Since the frontend is decoupled from WordPress, you must deliberately implement rendering strategies, SEO metadata injection, and caching to match or exceed traditional WordPress speeds. The following subsections detail proven methods for achieving fast page loads and strong search rankings.
Using Next.js SSR and SSG for Faster Page Delivery
Next.js offers two primary rendering modes that dramatically improve perceived performance for headless WordPress sites. Server-side rendering (SSR) generates HTML on each request, ensuring that users and search engine crawlers receive fully rendered pages immediately. This is ideal for dynamic content like blog comments or user-specific dashboards. Static site generation (SSG) pre-builds HTML at build time, serving it via a CDN with near-instant load times. For content-heavy sites with infrequent updates, SSG is the better choice.
- SSR use cases: Real-time data, authenticated pages, frequently changing content.
- SSG use cases: Blog posts, landing pages, documentation, product catalogs.
- Hybrid approach: Use
getServerSidePropsfor dynamic routes andgetStaticPropswith incremental static regeneration (ISR) for content that changes periodically.
To implement, fetch WordPress data via the REST API or GraphQL inside Next.js page components. For SSG, set a revalidate interval in getStaticProps to rebuild pages when content updates. This balances freshness with speed.
Implementing Yoast SEO or Rank Math with Headless WordPress
Traditional SEO plugins like Yoast or Rank Math manage meta titles, descriptions, and sitemaps within WordPress. In a headless setup, you must expose this data through the API. Both plugins output SEO metadata as custom fields or REST API endpoints. For Yoast, enable the REST API integration in its settings; for Rank Math, the data appears automatically in the REST response under yoast_head_json or rank_math keys.
| Plugin | API Endpoint | Key Metadata |
|---|---|---|
| Yoast SEO | /wp/v2/posts/{id}?_fields=yoast_head_json |
Title, description, canonical URL, Open Graph tags |
| Rank Math | /wp/v2/posts/{id}?rank_math=1 |
Title, description, focus keyword, schema markup |
In your React frontend, parse this data and inject it into the page’s <head> using Next.js’s next/head component. For example, map yoast_head_json.title to a <title> tag. This ensures search engines see optimized metadata without server-side PHP rendering.
Caching Strategies: CDN Integration and Client-Side Caching
Effective caching reduces server load and accelerates content delivery. Start by integrating a CDN like Cloudflare or Fastly. For SSG sites, the CDN caches static HTML files at the edge, serving them globally with minimal latency. For SSR, enable CDN caching of rendered pages with appropriate cache-control headers (e.g., public, s-maxage=600 for 10-minute freshness).
- CDN caching: Cache entire HTML responses for anonymous users. Purge cache via webhook when WordPress content updates.
- Client-side caching: Use service workers with Workbox to cache API responses and assets. Set a stale-while-revalidate strategy for WordPress REST API calls.
- API response caching: Implement Redis or Memcached on the WordPress server to cache REST API responses. Use the
wp_cache_setfunction in custom endpoints. - Image optimization: Serve images via a CDN that supports WebP conversion and responsive sizing (e.g., Cloudinary or Imgix).
Combine these layers: CDN for static assets, server-side caching for API data, and client-side caching for repeated navigation. Test with tools like Lighthouse to verify time-to-first-byte (TTFB) under 200ms and fully loaded pages under 2 seconds.
Building Advanced Features: Custom Endpoints and Dynamic Routing
When a headless WordPress site outgrows its default REST API capabilities, developers must extend the backend with custom endpoints and pair them with sophisticated front-end routing. This section details how to build these advanced features, ensuring your React front-end can efficiently handle specialized data, custom post types, and external service integrations without compromising performance or maintainability.
Creating Custom REST Endpoints for Specialized Data Needs
WordPress’s built-in REST API provides standard routes for posts, pages, and custom post types, but complex queries—such as aggregating data from multiple post types, applying custom business logic, or returning computed fields—require tailored endpoints. To create a custom endpoint, register it in your theme’s functions.php or a custom plugin using register_rest_route(). The following example returns a curated list of upcoming events with a calculated “days until event” field:
add_action('rest_api_init', function () {
    register_rest_route('myapp/v1', '/upcoming-events', array(
        'methods' => 'GET',
        'callback' => 'get_upcoming_events_with_days',
        'permission_callback' => '__return_true',
    ));
});

function get_upcoming_events_with_days($data) {
    $events = get_posts(array(
        'post_type' => 'event',
        'posts_per_page' => 10,
        'meta_key' => 'event_date',
        'orderby' => 'meta_value',
        'order' => 'ASC',
        'meta_query' => array(
            array(
                'key' => 'event_date',
                'value' => date('Ymd'),
                'compare' => '>=',
                'type' => 'DATE',
            ),
        ),
    ));
    $response = array();
    foreach ($events as $event) {
        $event_date = get_field('event_date');
        $days_until = (strtotime($event_date) - time()) / (60 * 60 * 24);
        $response[] = array(
            'id' => $event->ID,
            'title' => $event->post_title,
            'date' => $event_date,
            'days_until' => intval($days_until),
        );
    }
    return new WP_REST_Response($response, 200);
}
Key considerations for custom endpoints:
- Permission callbacks: Use
__return_truefor public data, or implement authentication checks for protected endpoints. - Pagination: Add
per_pageandpageparameters to avoid overwhelming the server or client. - Field selection: Return only necessary fields to reduce payload size—avoid sending entire post objects.
- Caching: Set appropriate cache headers or use transients for expensive queries.
Dynamic Routing with React Router for Custom Post Types and Taxonomies
Once custom endpoints are ready, the React front-end must handle dynamic routing for custom post types and taxonomies. Using React Router v6, you can define parameterized routes that map to custom post type slugs and taxonomy terms. For example, a site with “portfolio” custom post types and “portfolio-category” taxonomies might use the following route structure:
import { BrowserRouter, Routes, Route } from 'react-router-dom';
import PortfolioList from './components/PortfolioList';
import PortfolioSingle from './components/PortfolioSingle';
import PortfolioCategory from './components/PortfolioCategory';

function App() {
  return (
    <BrowserRouter>
      <Routes>
        <Route path="/portfolio" element={<PortfolioList />} />
        <Route path="/portfolio/:slug" element={<PortfolioSingle />} />
        <Route path="/portfolio/category/:categorySlug" element={<PortfolioCategory />} />
        <Route path="*" element={<NotFound />} />
      </Routes>
    </BrowserRouter>
  );
}
Inside each component, use the useParams() hook to extract the slug and fetch data from your custom endpoint. For taxonomy archives, query the endpoint with the term slug to filter results. This approach ensures that every custom post type and taxonomy has a clean, SEO-friendly URL that mirrors your content hierarchy.
Integrating External APIs: Maps, Payments, and Social Feeds
Headless WordPress sites often need to blend CMS content with third-party services. When integrating external APIs, consider these patterns:
- Maps (Google Maps or Mapbox): Fetch location coordinates from WordPress meta fields (e.g., Advanced Custom Fields), then render a map component using the service’s JavaScript library. Never expose API keys in client-side code; proxy requests through a custom WordPress endpoint or serverless function.
- Payments (Stripe or PayPal): Use WordPress as a product catalog via custom endpoints, then handle checkout entirely in React using Stripe Elements or PayPal’s JavaScript SDK. Store order metadata in WordPress as a custom post type for administrative tracking.
- Social feeds (Instagram or Twitter): Create a WordPress plugin that periodically caches social media data in a custom table or post type, then expose it through a REST endpoint. This avoids rate limits and keeps the front-end fast.
The following table compares two common approaches for integrating external APIs in a headless setup:
| Integration Method | Pros | Cons |
|---|---|---|
| Direct client-side API calls | Simple to implement; real-time data; no server overhead | Exposes API keys; subject to CORS and rate limits; slower initial load |
| Proxy through WordPress endpoint | Secure key management; server-side caching; unified data format | Adds server load; requires custom endpoint development; increased latency for uncached requests |
For most production sites, the proxy approach is recommended because it centralizes security and caching, though direct calls may suit low-traffic prototypes. Always validate and sanitize data from external APIs before displaying it in React to prevent XSS vulnerabilities.
Deployment and Hosting Best Practices
Deploying a headless WordPress site requires treating the WordPress backend and the React frontend as independent services, each with its own hosting, scaling, and security considerations. The following best practices cover managed versus self-managed hosting for WordPress, modern deployment platforms for React, and essential configuration steps for production readiness.
Hosting WordPress on Managed Servers (e.g., Kinsta, WP Engine) vs. VPS
Choosing between managed WordPress hosting and a Virtual Private Server (VPS) depends on your team’s operational capacity and traffic expectations.
- Managed hosting (Kinsta, WP Engine): These providers offer automatic caching, server-level security patches, daily backups, and expert support. They are ideal for teams that want to focus on content and frontend development without managing server infrastructure. However, they may restrict certain plugins or custom server configurations.
- VPS (DigitalOcean, Linode, AWS EC2): A VPS gives full root access, allowing custom Nginx or Apache configurations, Redis object caching, and fine-tuned PHP settings. This is preferable for high-traffic sites or those requiring non-standard setups (e.g., custom REST API endpoints with heavy caching). The trade-off is the need for ongoing sysadmin work: OS updates, security hardening, and performance monitoring.
Recommendation: Use managed hosting for most projects unless you need granular server control. For a VPS, consider using a provisioning tool like Ansible or Laravel Forge to automate setup.
Deploying the React App to Netlify, Vercel, or AWS Amplify
React frontends are static files after build, making them perfect for Jamstack platforms. Each platform provides a global CDN, automatic HTTPS, and seamless Git integration.
| Platform | Strengths | Best For |
|---|---|---|
| Netlify | Instant rollbacks, form handling, split testing | Teams needing rapid iteration and preview deployments |
| Vercel | Serverless functions, ISR, Next.js optimization | Projects using Next.js or requiring server-side rendering |
| AWS Amplify | Full CI/CD, custom build images, AWS integration | Enterprises already on AWS needing deep infrastructure control |
All three platforms support automatic deployment from Git branches. For a standard create-react-app setup, a typical build command is npm run build with the output directory set to build. Example Netlify configuration in netlify.toml:
[build]
  command = "npm run build"
  publish = "build"

[[redirects]]
  from = "/*"
  to = "/index.html"
  status = 200
This redirect rule ensures client-side routing works on page refresh.
Setting Up Custom Domains, SSL Certificates, and Environment Variables
Production headless sites require three configuration steps across both backend and frontend.
Custom domains: Point a CNAME record (e.g., app.yourdomain.com) to the React app’s default domain (e.g., your-app.netlify.app). For WordPress, add a CNAME or A record pointing to the server IP. Use separate subdomains for backend and frontend to avoid cookie conflicts.
SSL certificates: Managed hosts and Jamstack platforms auto-provision free SSL via Let’s Encrypt. For VPS WordPress, use Certbot to obtain certificates:
sudo apt install certbot python3-certbot-nginx
sudo certbot --nginx -d api.yourdomain.com
Environment variables: Store sensitive data like the WordPress REST API URL, authentication tokens, and Google Analytics IDs. In Netlify, set these in Site Settings > Build & Deploy > Environment Variables. In the React app, prefix them with REACT_APP_ (e.g., REACT_APP_WP_API_URL=https://api.yourdomain.com/wp-json/wp/v2). Never commit .env files to version control; use a .env.example template instead.
Final checklist: Verify CORS headers allow the frontend domain, test SSL expiry monitoring, and use a staging environment that mirrors production before every deployment.
Testing, Debugging, and Maintenance
Unit and Integration Testing for React Components with Jest and React Testing Library
Testing is critical in a headless architecture because the frontend and backend are decoupled, making integration errors harder to catch. For React components, Jest serves as the test runner and assertion library, while React Testing Library provides utilities to render components and simulate user interactions. Focus on testing component behavior rather than implementation details. For unit tests, isolate individual components by mocking API calls or WordPress data. For example, test that a PostList component renders a list of titles when given mock post data. For integration tests, render a component that fetches data from a real or mocked REST endpoint, verifying that loading states, error messages, and successful renders appear correctly. Use @testing-library/user-event to simulate clicks and form inputs. Always clean up after each test with afterEach to prevent state leakage. Key practices include:
- Mocking
fetchoraxioscalls usingjest.fn()or libraries likemsw(Mock Service Worker). - Testing error boundaries by throwing intentional errors in mocked API responses.
- Running tests in a CI pipeline to catch regressions before deployment.
Debugging API Errors: CORS, Authentication, and Data Mismatches
API errors are the most common headaches in headless WordPress. CORS (Cross-Origin Resource Sharing) errors occur when the React frontend runs on a different domain or port than the WordPress backend. To fix this, add the following to your WordPress .htaccess or server config:
Header set Access-Control-Allow-Origin "https://your-frontend-domain.com"
For authentication errors (401 or 403), ensure you are using proper nonces or JWT tokens. WordPress REST API requires a nonce for authenticated requests; pass it via the X-WP-Nonce header. Data mismatches happen when the expected schema differs from the API response. Use TypeScript or PropTypes to enforce shape, and log the full response object during development. Common debugging steps include:
- Inspect network tab for request/response headers and payloads.
- Test endpoints directly with Postman or
curlto isolate backend issues. - Check for WordPress plugin conflicts that modify REST responses.
Scheduled Maintenance: WordPress Updates, Plugin Audits, and Frontend Refactoring
Maintaining a headless site requires separate attention to both stacks. For WordPress, schedule monthly updates for core, themes, and plugins. Before updating, take a database backup and test on a staging environment. Audit plugins quarterly—remove unused ones and replace deprecated ones with modern alternatives. For the React frontend, refactor components when dependencies update or when performance degrades. Use tools like Lighthouse to monitor bundle size and load times. A maintenance checklist might include:
| Task | Frequency | Owner |
|---|---|---|
| WordPress core updates | Monthly | Backend team |
| Plugin security audit | Quarterly | Security team |
| React dependency upgrades | Bi-monthly | Frontend team |
| Performance profiling | Monthly | DevOps |
Additionally, monitor API response times and set up alerts for 5xx errors. Regularly review custom REST endpoints for security vulnerabilities, such as SQL injection or data exposure. By following this structured approach, you ensure your headless site remains stable, secure, and performant over time.
Frequently Asked Questions
What is a headless WordPress site?
A headless WordPress site decouples the backend (WordPress as a content management system) from the frontend (a separate client, like React). Content is managed in WordPress and delivered via its REST API or GraphQL, while the frontend handles presentation. This allows for greater flexibility, performance, and security, as the frontend is built with modern JavaScript frameworks and can be hosted separately.
Why use React with WordPress in a headless setup?
React provides a dynamic, component-based UI that can consume WordPress content via APIs. It enables faster page loads through client-side rendering or static site generation, better user experiences with SPAs, and easier integration with modern tools. Developers can leverage React's ecosystem for routing, state management, and optimization, while WordPress remains a familiar backend for content editors.
How do I set up WordPress as a headless CMS?
Start by installing WordPress on a server. Enable the REST API (built-in) or install the WPGraphQL plugin for GraphQL. Configure custom post types and fields if needed. Ensure permalinks are set to a clean structure. For security, disable the frontend (e.g., using a plugin like 'Headless Mode') and use authentication (OAuth, JWT) for private content. Then, connect your React app to the API endpoints.
What are the best practices for fetching data from WordPress in React?
Use a dedicated library like `axios` or `fetch` for REST API calls, or Apollo Client for GraphQL. Implement caching with tools like SWR or React Query to reduce requests. For static sites, pre-fetch data at build time (e.g., with Next.js `getStaticProps`). Always handle errors and loading states. Use environment variables for API URLs and consider pagination for large datasets.
What are the performance benefits of a headless WordPress with React?
Performance improvements come from reduced server load (WordPress only serves API responses), faster frontend rendering (React's virtual DOM), and the ability to use CDNs for static assets. Headless setups can leverage static site generation (e.g., with Gatsby or Next.js) to pre-build pages, resulting in near-instant load times. Additionally, you can optimize images and assets independently of WordPress.
How do I handle authentication in a headless WordPress React app?
For public content, no authentication is needed. For private content (e.g., user-specific data), use JWT authentication via plugins like 'JWT Authentication for WP REST API'. In React, store tokens securely (e.g., httpOnly cookies) and send them with API requests. Implement login/logout flows, token refresh, and role-based access. For GraphQL, WPGraphQL supports JWT out-of-the-box.
Can I use WordPress plugins in a headless setup?
Yes, many plugins work with the REST API or GraphQL. Plugins for SEO (Yoast), custom fields (ACF), and media management remain effective. However, avoid plugins that rely on frontend rendering (e.g., page builders). Some plugins may need configuration to expose data via API. Always test plugins in a headless environment to ensure compatibility.
What deployment options are best for a headless WordPress React site?
Deploy the React frontend on static hosting (Netlify, Vercel) or a cloud platform (AWS, Firebase). Use a separate server for WordPress (managed hosting like WP Engine or Kinsta). For optimal performance, host WordPress on a fast server with a CDN for API responses. Use CI/CD pipelines to rebuild the frontend when content changes (webhooks).
Sources and further reading
- WordPress REST API Handbook
- React Official Documentation
- Next.js Documentation
- Gatsby WordPress Integration
- JWT Authentication for WP REST API
- ACF (Advanced Custom Fields) REST API
- Static Site Generation vs Server-Side Rendering (Next.js)
- Apollo Client for React
- React Query (TanStack Query) Documentation
- Netlify Deployment Guide
Need help with this topic?
Send us your details and we will contact you.