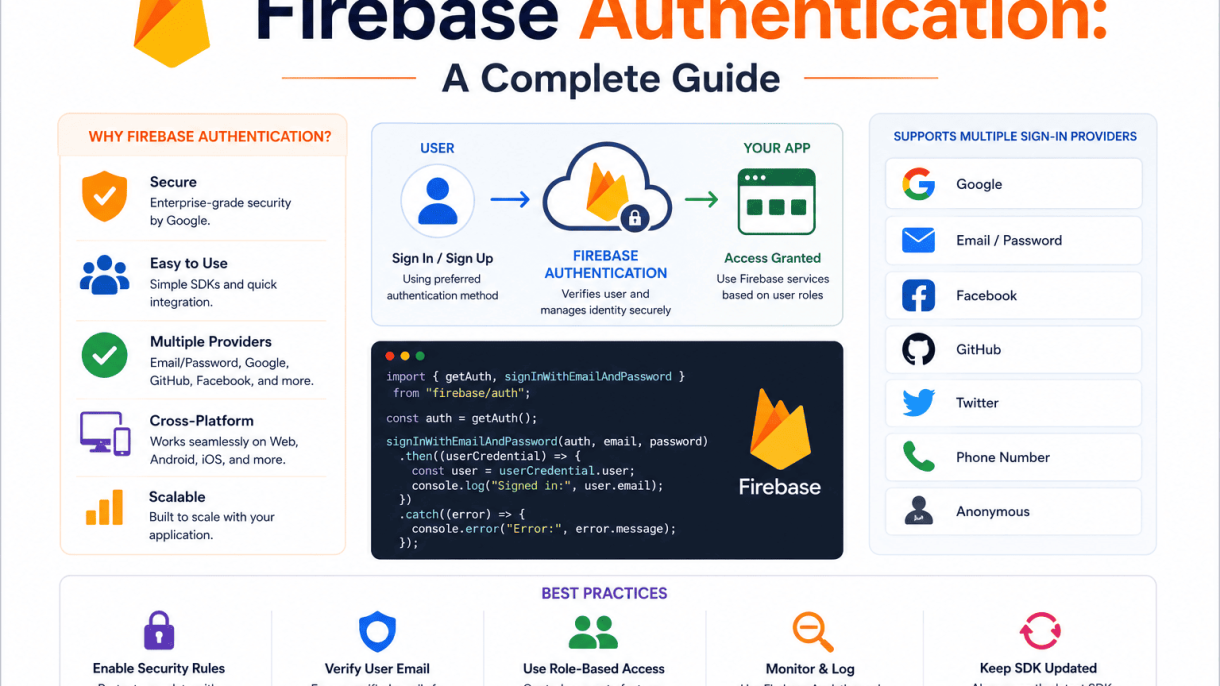

Introduction to Firebase Authentication
What Is Firebase Authentication?
Firebase Authentication is a backend-as-a-service solution for managing user identity in web, mobile, and server applications. It abstracts the complexity of building secure authentication infrastructure by providing pre-built UI components, client SDKs, and server-side libraries. Developers can authenticate users using email and password combinations, phone numbers, or federated identity providers such as Google, Facebook, Twitter, GitHub, Microsoft, and Apple. The service also supports anonymous authentication for temporary sessions and custom authentication tokens for integrating existing identity systems.
Under the hood, Firebase Authentication generates JSON Web Tokens (JWTs) for each authenticated user, which can be used to authorize access to Firebase-hosted resources or custom backend APIs. The service handles token refresh, session management, and password reset flows automatically, eliminating common security pitfalls like token leakage or improper session handling. All communication is encrypted via HTTPS, and the system is SOC 2 and ISO 27001 certified, ensuring enterprise-grade security compliance.
Key Benefits and Use Cases
Firebase Authentication offers several advantages that make it a preferred choice for developers:
- Reduced development time: Pre-built UI flows for sign-up, sign-in, and password recovery eliminate the need to build and test these features from scratch.
- Multi-platform support: SDKs are available for iOS, Android, JavaScript, Flutter, Unity, and C++, enabling consistent authentication logic across platforms.
- Scalability: The service automatically scales to handle millions of concurrent authentications without infrastructure provisioning.
- Security defaults: Built-in protection against brute force attacks, account enumeration, and credential stuffing.
- Cost efficiency: The service includes a generous free tier (50,000 monthly active users) with pay-as-you-go pricing beyond that.
Common use cases include:
- Social login integration for consumer apps to reduce friction and increase conversion rates.
- Phone number authentication for two-factor verification or passwordless login.
- Anonymous sessions that convert to permanent accounts when users decide to register.
- Enterprise applications using SAML or OIDC providers via custom authentication.
How It Fits into the Firebase Ecosystem
Firebase Authentication serves as the identity layer that connects seamlessly with other Firebase products. When a user authenticates, their unique user ID (UID) becomes the primary key for data stored in Firestore or Realtime Database, enabling row-level security through Firebase Security Rules. For example, a rule like allow read, write: if request.auth.uid == resource.data.user_id ensures users can only access their own data.
Integration with Firebase Cloud Functions allows developers to trigger server-side logic on authentication events such as user creation, deletion, or login. This is useful for sending welcome emails, initializing user profiles, or auditing authentication activity. Firebase Crashlytics can correlate crashes with authenticated user sessions, helping developers debug issues specific to logged-in users. Additionally, Firebase Remote Config can deliver personalized feature flags based on user attributes like sign-in method or account creation date.
The authentication state is also leveraged by Firebase Cloud Messaging for targeting push notifications to specific user segments, and by Firebase Performance Monitoring to track how authentication flows affect app responsiveness. This tight integration creates a unified development experience where one authentication system powers the entire application ecosystem.
| Firebase Product | How Authentication Integrates |
|---|---|
| Cloud Firestore | Security rules use request.auth.uid for data access control |
| Cloud Functions | Triggers on functions.auth.user().onCreate() events |
| Cloud Storage | File access rules tied to authenticated user IDs |
| Remote Config | Conditional parameters based on user authentication state |
Firebase Authentication: A Complete Guide
Firebase Authentication provides a robust, backend-as-a-service solution for managing user identity in web and mobile applications. It abstracts away the complexity of building secure authentication systems, offering a range of built-in providers that cover most common use cases. This section examines each supported provider in detail, outlining their strengths, implementation considerations, and typical use scenarios.
Email and Password Authentication
The email/password provider is the most fundamental and widely used authentication method in Firebase. It allows users to sign up and sign in using their email address and a custom password. Firebase handles password hashing and storage securely, and provides built-in email verification and password reset flows via its SDKs.
- Setup: Enable the provider in the Firebase Console under Authentication > Sign-in method. No additional configuration is required beyond setting a project name.
- Key Features: Supports email verification, password reset via email, and account linking with other providers. Firebase enforces a minimum password length of 6 characters by default (configurable).
- Limitations: No built-in support for password strength policies beyond length. Requires users to remember credentials, which can lead to higher abandonment rates compared to social sign-in.
// Example: Creating a new user with email and password (JavaScript SDK)
import { getAuth, createUserWithEmailAndPassword } from "firebase/auth";

const auth = getAuth();
const email = "user@example.com";
const password = "securePassword123";

createUserWithEmailAndPassword(auth, email, password)
  .then((userCredential) => {
    const user = userCredential.user;
    console.log("User created:", user.email);
  })
  .catch((error) => {
    console.error("Error:", error.code, error.message);
  });
Phone Number Authentication
Phone number authentication uses SMS verification to confirm a user’s identity. Firebase sends a one-time code (OTP) to the user’s phone number, which they enter to complete sign-in. This method is particularly useful for applications targeting mobile-first users or regions with limited email adoption.
- Setup: Enable the phone provider in the Firebase Console. You may need to configure reCAPTCHA verification for web apps to prevent abuse. For iOS, additional APNs setup is required.
- Key Features: No password management needed; session tokens are automatically refreshed. Supports automatic code detection on Android via SMS Retriever API.
- Limitations: Cost associated with SMS delivery (varies by region). Users without a phone or with limited SMS access are excluded. Requires careful handling of reCAPTCHA challenges on web.
| Platform | Verification Method | Additional Setup |
|---|---|---|
| Web | reCAPTCHA invisible widget | Firebase project with reCAPTCHA enabled |
| Android | SMS Retriever API | Google Play Services, SHA-1 certificate |
| iOS | APNs silent push | Apple Developer account, APNs key |
Social Sign-In (Google, Facebook, Apple, etc.)
Social sign-in allows users to authenticate using existing accounts from popular identity providers. Firebase supports Google, Facebook, Apple, Twitter, GitHub, Microsoft, and Yahoo out of the box. This method reduces friction by eliminating password creation and leveraging the user’s existing social graph.
- Google: Uses OAuth 2.0. Requires a Google Cloud Platform project with OAuth consent screen configured. Firebase automatically handles token refresh.
- Facebook: Requires a Facebook App ID and App Secret from the Facebook Developer portal. The user is prompted for specific permissions (e.g., email, public profile).
- Apple: Mandatory for iOS apps that use social sign-in (App Store requirement). Uses OAuth 2.0 with JWT-based tokens. Firebase supports the “Sign in with Apple” flow, including the private email relay feature.
Implementation considerations:
- Always handle the case where a user signs in with a social provider that has the same email as an existing email/password account. Use Firebase’s
linkWithCredentialmethod to merge accounts. - Social providers may return limited profile data (e.g., Facebook may not provide email if the user denies permission). Always design your app to work with partial data.
- Firebase provides a unified
Userobject regardless of the provider, simplifying frontend logic.
Each provider has its own setup wizard in the Firebase Console, which guides you through obtaining the necessary API keys and secrets. Once configured, you initiate sign-in using the corresponding Firebase SDK method, such as signInWithPopup (for web) or signInWithCredential (for native apps).
Setting Up Firebase Authentication in Your Project
Firebase Authentication provides backend services, easy-to-use SDKs, and ready-made UI libraries to authenticate users to your app. It supports authentication using passwords, phone numbers, popular federated identity providers like Google, Facebook, and Twitter, and more. This section walks you through the essential steps to enable and integrate Firebase Authentication into your web, iOS, or Android project.
Creating a Firebase Project and Enabling Authentication
Begin by navigating to the Firebase Console. If you already have a Google account, sign in and click Create a project. Follow the on-screen prompts to name your project and configure Google Analytics if desired. Once your project is ready, locate Authentication in the left-hand menu under the Build section. Click Get started, then select the Sign-in method tab. Here you can enable one or more providers:
- Email/Password: Enable this to allow users to sign up and sign in with an email address and password.
- Google: Toggle the switch, then configure the OAuth consent screen by providing a support email and optional branding details.
- Phone: Enable this to verify phone numbers via SMS. Note that this requires a reCAPTCHA verification on web.
- Anonymous: Enable this to create temporary anonymous accounts for users before they sign up.
For each provider you enable, you may need to provide additional configuration details, such as OAuth client IDs or API keys. Save your changes before proceeding.
Installing and Configuring the Firebase SDK
After enabling authentication in the console, integrate the Firebase SDK into your application. The installation method depends on your platform. Below is a comparison of the primary approaches:
| Platform | Package Manager / Method | Install Command or Step |
|---|---|---|
| Web (JavaScript) | npm or CDN | npm install firebase or add script tags for Firebase modules |
| iOS (Swift) | CocoaPods or Swift Package Manager | pod 'FirebaseAuth' in Podfile, then pod install |
| Android (Kotlin/Java) | Gradle (Module-level build.gradle) | implementation platform('com.google.firebase:firebase-bom:latest-version') then implementation 'com.google.firebase:firebase-auth' |
After installing the SDK, you must register your app with Firebase. In the Firebase Console, click Add app and select your platform. Download the configuration file:
- Web: A
firebaseConfigobject that you will paste into your JavaScript code. - iOS: A
GoogleService-Info.plistfile to add to your Xcode project. - Android: A
google-services.jsonfile to place in theapp/directory of your Android project.
For Android, also ensure you have the Google Services plugin added to your root-level build.gradle file.
Initializing the Auth Instance in Your App
With the SDK installed and the configuration file in place, initialize Firebase in your application code and obtain an Auth instance. This instance is the central object for all authentication operations.
Web (JavaScript):
import { initializeApp } from "firebase/app";
import { getAuth } from "firebase/auth";

const firebaseConfig = {
  apiKey: "YOUR_API_KEY",
  authDomain: "YOUR_PROJECT.firebaseapp.com",
  projectId: "YOUR_PROJECT_ID",
  // ... other config values
};

const app = initializeApp(firebaseConfig);
const auth = getAuth(app);
iOS (Swift):
import FirebaseCore
import FirebaseAuth

FirebaseApp.configure()
let auth = Auth.auth()
Android (Kotlin):
import com.google.firebase.FirebaseApp
import com.google.firebase.auth.FirebaseAuth

FirebaseApp.initializeApp(this)
val auth = FirebaseAuth.getInstance()
Once you have the auth instance, you are ready to implement sign-in flows, listen for authentication state changes, and manage user sessions. For example, on web, you can listen for the user’s current authentication status with onAuthStateChanged. On mobile platforms, similar listener patterns are available. This foundational setup is identical regardless of which sign-in providers you choose to enable later.
Implementing Email and Password Sign-In
Email and password authentication remains the most widely used method for securing user access in web and mobile applications. Firebase Authentication simplifies this process by providing a complete backend service that handles credential validation, token generation, and session management. This section walks through the core implementation steps for registering users, managing sign-in flows, and handling common account lifecycle events.
User Registration with Email and Password
To create a new user account with an email and password, you use the createUserWithEmailAndPassword method provided by the Firebase Authentication SDK. This method accepts the user’s email address and a password (minimum 6 characters by default) and returns a promise that resolves with user credentials upon success. Below is a practical example using JavaScript:
import { getAuth, createUserWithEmailAndPassword } from "firebase/auth";

const auth = getAuth();
const email = "user@example.com";
const password = "securePassword123";

createUserWithEmailAndPassword(auth, email, password)
  .then((userCredential) => {
    // User account created successfully
    const user = userCredential.user;
    console.log("User registered:", user.email);
  })
  .catch((error) => {
    const errorCode = error.code;
    const errorMessage = error.message;
    console.error("Registration error:", errorCode, errorMessage);
  });
Common registration errors include invalid email format, weak password, and email already in use. You should handle each error gracefully by displaying user-friendly messages. After registration, consider sending a verification email (covered below) to confirm the user’s identity.
Sign-In Flow and Session Management
Signing in an existing user follows a similar pattern using the signInWithEmailAndPassword method. Upon successful authentication, Firebase automatically manages the user session by storing a refresh token and an ID token. The session persists across page reloads and browser restarts, so you do not need to manually store tokens. To check the current authentication state, use the onAuthStateChanged observer:
import { getAuth, onAuthStateChanged } from "firebase/auth";

const auth = getAuth();
onAuthStateChanged(auth, (user) => {
  if (user) {
    // User is signed in
    console.log("User signed in:", user.uid);
  } else {
    // User is signed out
    console.log("No user signed in");
  }
});
Session management best practices include:
- Listening to
onAuthStateChangedin a central location (e.g., app root component) to update UI state. - Handling token expiration by relying on Firebase’s automatic token refresh (no manual intervention required).
- Implementing sign-out with
signOut(auth)to clear the local session and redirect to a login page.
For multi-device scenarios, consider using Firebase’s multi-factor authentication or custom claims to restrict access based on user roles.
Password Reset and Email Verification
Two critical account security features are password reset and email verification. Firebase provides dedicated methods for both, which send emails to the user’s registered address. The password reset flow uses sendPasswordResetEmail, while email verification uses sendEmailVerification on the current user object. Example implementations:
import { getAuth, sendPasswordResetEmail, sendEmailVerification } from "firebase/auth";

const auth = getAuth();

// Send password reset email
sendPasswordResetEmail(auth, "user@example.com")
  .then(() => {
    console.log("Password reset email sent");
  })
  .catch((error) => {
    console.error("Reset email error:", error);
  });

// Send email verification (requires signed-in user)
const user = auth.currentUser;
if (user) {
  sendEmailVerification(user)
    .then(() => {
      console.log("Verification email sent");
    })
    .catch((error) => {
      console.error("Verification error:", error);
    });
}
Key considerations for these features:
- Configure email templates in the Firebase Console under Authentication > Templates to customize the sender name, subject, and content.
- For email verification, check the
user.emailVerifiedproperty before granting access to sensitive features. - Password reset emails include a link that redirects users to a Firebase-hosted page by default; you can customize this URL in the console.
- Handle errors such as “user not found” or “too many requests” by showing appropriate messages and implementing rate limiting.
By implementing these three core flows—registration, sign-in, and account recovery—you establish a robust authentication foundation that can be extended with additional providers like Google, Facebook, or phone number authentication.
Firebase Authentication: A Complete Guide
Configuring OAuth Providers in the Firebase Console
Before implementing social login, you must enable and configure each OAuth provider in the Firebase Console. Navigate to the Authentication section, then the Sign-in method tab. For each provider (Google, Facebook, Apple, etc.), click the corresponding entry and toggle the Enable switch. You will need to provide provider-specific credentials:
- Google: No additional configuration required beyond enabling; Firebase auto-generates a Web client ID and secret.
- Facebook: Obtain an App ID and App Secret from the Facebook Developers portal. Under Facebook Login settings, add your Firebase OAuth redirect URI (found in the Firebase Console) to the Valid OAuth Redirect URIs field.
- Apple: Requires an Apple Developer account. Register a Service ID, configure domain and return URLs in the Apple Developer portal, then enter the Service ID and private key in Firebase.
After saving, Firebase generates a unique OAuth client ID and secret for each provider (except Google, which uses its own). These credentials are automatically used during authentication. You can also configure custom OAuth scopes (e.g., email, profile, public_profile for Facebook) to request additional user data. For production apps, ensure your OAuth consent screen (for Google) or app review (for Facebook) is completed.
Implementing Sign-In with Google
To integrate Google Sign-In, use the Firebase Authentication SDK. In your web app, include the Firebase SDK and initialize the GoogleAuthProvider:
import { getAuth, signInWithPopup, GoogleAuthProvider } from "firebase/auth";

const provider = new GoogleAuthProvider();
provider.addScope('https://www.googleapis.com/auth/contacts.readonly');
const auth = getAuth();
signInWithPopup(auth, provider)
  .then((result) => {
    const credential = GoogleAuthProvider.credentialFromResult(result);
    const token = credential.accessToken;
    const user = result.user;
  })
  .catch((error) => {
    const errorCode = error.code;
    const errorMessage = error.message;
    const email = error.email;
    const credential = GoogleAuthProvider.credentialFromError(error);
  });
For a redirect-based flow (recommended for mobile or single-page apps), use signInWithRedirect and handle the result with getRedirectResult. The accessToken from the credential object allows you to call Google APIs on behalf of the user. You can also configure a custom OAuth scope, such as openid or profile, by calling provider.addScope().
Handling Facebook and Apple Sign-In
Facebook Sign-In follows a similar pattern but uses the FacebookAuthProvider. Configure the provider with your Facebook App ID and enable the Facebook Login product in the Facebook Developers portal. In your code:
import { FacebookAuthProvider, signInWithPopup } from "firebase/auth";

const fbProvider = new FacebookAuthProvider();
fbProvider.addScope('public_profile');
signInWithPopup(auth, fbProvider)
  .then((result) = {
    const credential = FacebookAuthProvider.credentialFromResult(result);
    const token = credential.accessToken;
  });
Apple Sign-In uses the OAuthProvider with the provider ID apple.com. It requires a nonce for security. Generate a cryptographically random nonce, then pass it during sign-in:
import { OAuthProvider, signInWithPopup } from "firebase/auth";

const appleProvider = new OAuthProvider('apple.com');
appleProvider.setCustomParameters({ locale: 'en' });
const nonce = generateNonce(); // your custom function
appleProvider.setCustomParameters({ nonce });
signInWithPopup(auth, appleProvider)
  .then((result) = {
    const credential = OAuthProvider.credentialFromResult(result);
    const idToken = credential.idToken;
    const accessToken = credential.accessToken;
  });
For all providers, handle token expiry by using Firebase ID tokens (which auto-refresh) rather than OAuth access tokens for user session management. Store OAuth tokens securely (e.g., in a backend session) if you need to call provider APIs later. Always implement error handling for cases like account-exists-with-different-credential, which can be resolved by linking providers.
Managing User Sessions and State
Effective session management is critical for any application using Firebase Authentication. Users expect their login state to persist seamlessly across app restarts, and developers need reliable mechanisms to respond to authentication changes in real time. This section covers the three core techniques for managing user sessions: observing state with listeners, persisting sessions locally, and handling token lifecycle events.
Observing Authentication State with Listeners
Firebase provides a built-in listener via the onAuthStateChanged method that fires whenever the user’s sign-in state changes—such as on login, logout, or token refresh. This listener is the recommended way to react to authentication changes and should be attached early in the app lifecycle, typically in the main activity or application class.
- Immediate callback: The listener fires immediately with the current user object (or null) upon registration.
- Real-time updates: It triggers on every state change, including token refresh, without requiring manual polling.
- Cleanup required: Always detach the listener when the component or activity is destroyed to prevent memory leaks.
Example in JavaScript (web SDK):
import { onAuthStateChanged, getAuth } from "firebase/auth";

const auth = getAuth();
const unsubscribe = onAuthStateChanged(auth, (user) => {
  if (user) {
    // User is signed in; update UI or fetch user data
    console.log("User signed in:", user.uid);
  } else {
    // User is signed out; redirect to login
    console.log("No user signed in");
  }
});

// Later, when no longer needed:
unsubscribe();
Persisting User Sessions Locally
Firebase automatically persists the authentication state to local storage (e.g., IndexedDB on web, SharedPreferences on Android, Keychain on iOS). This ensures that when a user closes and reopens the app, they remain signed in without re-entering credentials. However, you can control this behavior explicitly using setPersistence.
Available persistence modes:
| Mode | Storage Location | Use Case |
|---|---|---|
local |
Device local storage | Default; persists across browser or app restarts |
session |
Session storage (web only) | Clears when tab or window is closed |
none |
In-memory only | No persistence; user must re-authenticate on restart |
To set persistence explicitly (web example):
import { getAuth, setPersistence, browserLocalPersistence } from "firebase/auth";

const auth = getAuth();
setPersistence(auth, browserLocalPersistence)
  .then(() => {
    // Persistence is set; proceed with sign-in
  })
  .catch((error) => {
    console.error("Persistence error:", error);
  });
Handling Token Refresh and Expiration
Firebase Authentication uses JSON Web Tokens (JWTs) that expire after one hour. The SDK automatically refreshes tokens in the background when the listener is active, but you may need to handle token lifecycle manually for custom backend integrations or long-running operations.
- Automatic refresh: The
onAuthStateChangedlistener triggers on token refresh, so you always have a valid token viauser.getIdToken(). - Force refresh: Call
user.getIdToken(true)to force a token refresh, useful before sending a request to a backend that requires a fresh token. - Expiration handling: If a token expires while the user is idle, the SDK will attempt a silent refresh. If that fails (e.g., due to revoked credentials), the listener will fire with
null, and you should redirect to login.
Example of forcing a token refresh before an API call:
import { getAuth } from "firebase/auth";

const auth = getAuth();
const user = auth.currentUser;

if (user) {
  user.getIdToken(true) // Force refresh
    .then((token) => {
      // Send token to backend
      fetch("https://api.example.com/data", {
        headers: { Authorization: `Bearer ${token}` }
      });
    })
    .catch((error) => {
      console.error("Token refresh failed:", error);
    });
}
By combining these three techniques—observing state, persisting sessions, and managing token lifecycles—you can build a robust authentication experience that feels seamless to users and reliable under varying network conditions.
Security Rules and Access Control
Firebase Authentication integrates directly with Firestore, Realtime Database, and Cloud Storage security rules to enforce data access based on user identity. By referencing the authenticated user’s unique ID, email, or custom claims within your rules, you can ensure that only authorized individuals read, write, or delete data. This approach prevents unauthorized access and maintains data integrity across your application.
Writing Security Rules That Reference Auth
Every Firebase security rule set includes a built-in request.auth object that contains authentication data when a user is signed in. For unauthenticated requests, request.auth is null. You can use this object to restrict access to specific documents, nodes, or files. Below are common patterns for Firestore, Realtime Database, and Cloud Storage.
| Service | Rule Example | Behavior |
|---|---|---|
| Firestore | allow read, write: if request.auth != null && request.auth.uid == resource.data.userId; |
Only the user whose UID matches the userId field in the document can read or write. |
| Realtime Database | ".read": "auth !== null && auth.uid === data.child('userId').val()" |
Only the authenticated user with a matching userId child can read the node. |
| Cloud Storage | allow read, write: if request.auth != null && request.auth.uid == objectMetadata.userId; |
Only the user whose UID matches the file’s metadata userId can access the object. |
When writing rules, always consider the following best practices:
- Use
request.auth.uidfor direct user identification — this is the most reliable way to tie data to a specific user. - Validate ownership on every write — ensure the authenticated user’s UID matches the data being created or modified.
- Never rely solely on client-side checks — security rules are your server-side enforcement layer.
- Use
request.auth.tokenfor custom claims — accessrequest.auth.token.roleto check roles likeadminormoderator.
Role-Based Access Control Patterns
For applications requiring multiple permission levels, you can implement role-based access control (RBAC) using Firebase Authentication custom claims. Set claims via the Admin SDK, then reference them in your security rules. Common roles include admin, editor, and viewer.
Example Firestore rule using custom claims:
match /documents/{documentId} {
  allow read: if request.auth != null;
  allow create: if request.auth.token.role == 'admin';
  allow update: if request.auth.token.role in ['admin', 'editor'];
  allow delete: if request.auth.token.role == 'admin';
}
For more granular control, combine custom claims with document-based ownership. This pattern is especially useful for multi-tenant applications where users have different roles across organizations. Store the role mapping in a separate collection (e.g., user_roles) and reference it within your rules using exists() or get() functions.
Testing and Validating Rules Locally
Before deploying security rules to production, test them thoroughly using the Firebase Emulator Suite. The emulator provides a local environment where you can simulate authenticated and unauthenticated requests without incurring costs or risking real data.
Steps to test locally:
- Install the Firebase CLI and initialize the emulators for Firestore, Realtime Database, or Cloud Storage.
- Start the emulator suite with
firebase emulators:start. - Use the Firebase Emulator UI (available at
http://localhost:4000) to write and test rules interactively. - Write automated tests using the Firebase Test SDK for your platform (e.g.,
@firebase/rules-unit-testingfor Node.js). - Simulate different auth states — test with
nullauth, a regular user, and a user with custom claims.
Example test scenario using the Node.js SDK:
const testEnv = await initializeTestEnvironment({ projectId: 'demo-project' });
const authedContext = testEnv.authenticatedContext('user123', { role: 'admin' });
await assertSucceeds(authedContext.firestore().doc('documents/doc1').set({ data: 'test' }));
await testEnv.cleanup();
Always validate edge cases, such as users attempting to read data they do not own or unauthenticated write attempts. Regularly review and update your rules as your authentication model evolves.
Custom Authentication and Token Management
Firebase Authentication provides robust built-in providers, but many applications require integration with existing identity systems or need fine-grained control over user sessions. Custom authentication bridges this gap by allowing you to mint and manage your own JSON Web Tokens (JWTs) on a trusted server, while still leveraging Firebase’s secure backend services. This approach is essential when migrating from legacy systems, using custom user stores, or implementing multi-factor authentication flows not natively supported by Firebase.
Generating Custom Tokens with the Admin SDK
To generate custom tokens, you must use the Firebase Admin SDK on a server you control. The Admin SDK requires a service account key (a JSON file) downloaded from the Firebase console, which grants your server privileged access to mint tokens. The process involves three steps:
- Initialize the Admin SDK – Load the service account credentials and initialize the SDK with your Firebase project ID.
- Set custom claims – Optionally attach metadata such as roles, permissions, or group memberships to the token payload. Claims are limited to 1000 bytes and should not store sensitive data.
- Mint the token – Call
admin.auth().createCustomToken(uid, additionalClaims)whereuidis a unique user identifier (string) andadditionalClaimsis an optional object. The returned token is a JWT valid for one hour by default.
Example snippet (Node.js):
const admin = require('firebase-admin');
admin.initializeApp({ credential: admin.credential.applicationDefault() });
const uid = 'some-uid';
const additionalClaims = { premiumAccount: true };
admin.auth().createCustomToken(uid, additionalClaims)
  .then(token => console.log(token))
  .catch(error => console.error(error));
Signing In with Custom Tokens
Once the server returns a custom token to the client application, the user signs in using the Firebase client SDK. The method differs slightly by platform:
- Web/JavaScript – Call
signInWithCustomToken(token)on theauthinstance. - Android – Use
FirebaseAuth.signInWithCustomToken(token). - iOS/macOS – Call
Auth.auth().signIn(withCustomToken: token).
After successful sign-in, Firebase automatically refreshes the custom token before expiration (every hour) using a secure internal mechanism. The client receives a new ID token, but the custom claims embedded in the original token persist across refreshes. You can access these claims on the client via user.getIdTokenResult() or on the server via admin.auth().verifyIdToken().
Best Practices for Secure Token Handling
Custom tokens introduce additional security responsibilities. The following table contrasts recommended and risky practices:
| Aspect | Recommended Practice | Risky Practice |
|---|---|---|
| Token generation location | Server-side only (e.g., Node.js, Python) | Client-side generation or hardcoded tokens |
| Service account key storage | Environment variables or secret manager | Embedded in client code or public repositories |
| Custom claims size | Under 1000 bytes; minimal payload | Large objects or raw database queries in claims |
| Token expiration | Default 1 hour; avoid extending | Setting expiration beyond 1 hour manually |
| UID format | Consistent, non-guessable identifiers | Sequential integers or email addresses |
Additional critical practices include: never logging full tokens in server logs, always verifying custom tokens on the server using admin.auth().verifyIdToken() before granting access to sensitive operations, and revoking tokens immediately when a user is removed from your system by calling admin.auth().revokeRefreshTokens(uid). Also, avoid storing sensitive authorization logic in custom claims—use them only for fast lookups, and keep authoritative data in your own database.
Common Pitfalls and Troubleshooting
Firebase Authentication is robust, but developers often encounter recurring issues that can derail user experience. Understanding these pitfalls—from unexpected sign-outs to quota limits—saves hours of debugging. This section provides targeted solutions for the most frequent problems, with practical steps to resolve them efficiently.
Debugging Authentication Errors
Authentication errors often stem from misconfigured providers, incorrect SDK initialization, or network issues. The first step is always to check the Firebase console’s Authentication logs under the “Logs” tab. Common error codes include:
- auth/argument-error: Invalid parameters passed to a method (e.g., null email). Verify input validation.
- auth/email-already-in-use: The user exists; handle with a “forgot password” prompt.
- auth/wrong-password: Usually indicates a typo; implement rate limiting on sign-in attempts.
- auth/network-request-failed: Check client-side connectivity and Firebase project’s Firestore/Realtime Database rules for unintended blocking.
For debugging, enable verbose logging in the Firebase SDK. In web apps, set firebase.auth().useDeviceLanguage() to localize error messages. Example snippet for catching and logging errors:
firebase.auth().signInWithEmailAndPassword(email, password)
  .then((userCredential) => {
    console.log("Sign-in successful:", userCredential.user.uid);
  })
  .catch((error) => {
    console.error("Auth error code:", error.code);
    console.error("Auth error message:", error.message);
    // Map error codes to user-friendly messages
    if (error.code === 'auth/user-not-found') {
      alert("No account found for this email.");
    }
  });
Handling Quota and Rate Limits
Firebase Authentication enforces quotas to prevent abuse. Exceeding these limits can cause temporary blocks or degraded performance. Key limits include:
| Resource | Default Quota | Common Issue |
|---|---|---|
| Create account requests | 100 per IP per hour | Rapid sign-up flows or bots |
| Sign-in attempts | 50 per IP per hour | Brute-force attacks or retry loops |
| Password reset emails | 10 per hour per user | Spam triggers from multiple requests |
To mitigate these, implement client-side throttling (e.g., disable the sign-in button for 2 seconds after a failed attempt). For production apps, upgrade to the Blaze plan to increase quotas. Monitor usage in the Firebase Console under “Authentication > Usage.” If you hit rate limits, pause requests for 5–10 minutes; Firebase automatically resets the counter after the window expires. Avoid retrying failed requests immediately—use exponential backoff (e.g., wait 1s, then 2s, then 4s).
Resolving Cross-Origin and Domain Issues
Cross-origin errors occur when your authentication domain doesn’t match the configured authorized domains in the Firebase console. This is especially common with custom domains or multiple subdomains. Symptoms include “auth/unauthorized-domain” errors or blank popup windows during OAuth sign-ins. To resolve:
- In the Firebase Console, go to “Authentication > Settings > Authorized domains.” Add every domain and subdomain that will host your app (e.g.,
app.example.com,admin.example.com). - For OAuth providers (Google, Facebook, etc.), ensure the redirect URI in the provider’s developer console exactly matches your Firebase project’s callback URL (found in the Authentication provider settings). Common mismatches include trailing slashes or HTTP vs. HTTPS.
- If using custom domains with Firebase Hosting, verify the domain is properly verified in the Hosting section and that SSL is enabled. For non-Hosting setups, use the
authDomainparameter in your Firebase config to point toyour-project.firebaseapp.com. - Test with browser developer tools: open the Network tab, filter by “auth,” and inspect the redirect URL for 302 or 400 errors. A 400 “redirect_uri_mismatch” indicates a domain mismatch.
For single-page apps using redirect sign-in, ensure your app’s URL is exactly as listed—including port numbers if developing locally. Use http://localhost:3000 for local development and add it to authorized domains temporarily.
Best Practices and Production Considerations
Deploying Firebase Authentication in production requires a deliberate approach to security, user experience, and observability. While the SDK simplifies integration, production environments demand careful hardening of configurations, thoughtful UX design across platforms, and continuous monitoring to detect anomalies. The following best practices help ensure a reliable, secure, and user-friendly authentication system.
Securing API Keys and Environment Configurations
Firebase API keys are not secret by design—they identify your project to Google servers but do not alone grant access to data. However, exposing them in client code is standard practice for web and mobile apps. The real security lies in Firebase Security Rules, not in hiding keys. To harden configurations:
- Use Firebase App Check to verify that incoming requests originate from your genuine app. This blocks unauthorized clients from using your API keys.
- Restrict API key usage in the Google Cloud Console to only Firebase Authentication and other required services. Set HTTP referrer or iOS/Android app restrictions to limit key exposure.
- Store environment variables (e.g., Firebase project ID, database URLs) outside version control. Use a
.envfile for local development and a secret manager for production builds. - Never embed service account keys in client code. Service accounts grant elevated privileges and must only be used in trusted server environments (Cloud Functions, your backend).
- Rotate keys periodically and revoke any keys leaked in logs or error messages. Monitor Firebase Console for unusual API key usage.
Optimizing Sign-In UX for Different Platforms
Authentication flows must be frictionless while maintaining security. Platform-specific optimizations reduce drop-off and improve conversion:
- Web: Use the FirebaseUI library for pre-built sign-in widgets. Implement multi-factor authentication (MFA) for sensitive actions. Leverage session persistence with
firebase.auth().setPersistence(firebase.auth.Auth.Persistence.LOCAL)to keep users logged across page reloads. - iOS: Integrate Sign in with Apple for compliance. Use the
revokeTokenmethod on credential revocation. Support biometric authentication (Face ID/Touch ID) via the Local Authentication framework after initial sign-in. - Android: Enable Smart Lock for Passwords to auto-fill credentials. Use the Credential Manager API for passwordless sign-in with passkeys. Handle activity lifecycle properly to avoid token expiration during configuration changes.
- Cross-platform: Offer multiple sign-in methods (email/password, Google, Apple, phone) but prioritize the most popular for your audience. Implement a consistent error-handling strategy—display user-friendly messages for common errors like “email already in use” or “wrong password.”
- Performance: Prefetch authentication state on app launch using
onAuthStateChangedto avoid flickering or loading spinners. Cache user profiles locally for offline-first experiences.
Monitoring Usage and Auditing Authentication Events
Production monitoring ensures you detect abuse, track adoption, and debug issues. Firebase provides several tools for this:
| Tool | Purpose | Key Metrics |
|---|---|---|
| Firebase Console Authentication Dashboard | View sign-in methods, user growth, and recent activity | Daily active users, sign-in method breakdown, error rates |
| Cloud Logging | Audit all authentication events (sign-in, sign-up, token refresh) | Timestamps, user UIDs, IP addresses, event type |
| Firebase Performance Monitoring | Measure latency of authentication operations | Sign-in duration, token refresh time, network errors |
| Custom Analytics | Track funnel conversion (e.g., sign-up to first login) | Completion rates, drop-off points, retry counts |
To implement auditing effectively:
- Enable Cloud Audit Logs for Firebase Authentication to capture admin operations (e.g., user creation, deletion) and security-sensitive events.
- Set up alerts for unusual patterns—for example, a spike in failed sign-in attempts from a single IP, or a sudden increase in new user registrations from an unexpected geographic region.
- Log custom events in your application (e.g., “MFA enrollment completed,” “password reset requested”) to correlate with authentication data.
- Regularly review the Authentication dashboard for inactive users or accounts using deprecated sign-in methods. Use the Firebase Admin SDK to batch-disable stale accounts.
- Test monitoring in staging with simulated traffic to validate that alerts trigger correctly and logs contain actionable information.
Frequently Asked Questions
What is Firebase Authentication?
Firebase Authentication is a backend service that provides easy-to-use SDKs and ready-made UI libraries to authenticate users to your app. It supports email and password, phone number, popular federated identity providers like Google, Facebook, Twitter, and GitHub, as well as anonymous authentication. It integrates seamlessly with other Firebase services, enabling secure access control.
How do I set up Firebase Authentication in my app?
To set up Firebase Authentication, first create a Firebase project in the Firebase console. Enable the sign-in methods you need (e.g., email/password, Google). Then add the Firebase SDK to your app (web, iOS, Android). For web, include the Firebase Auth library. Initialize the Firebase app with your project's configuration, and use the provided functions like createUserWithEmailAndPassword or signInWithPopup to handle authentication.
What authentication methods does Firebase support?
Firebase Authentication supports a variety of methods: email/password, phone number (via SMS), and federated identity providers including Google, Facebook, Twitter, GitHub, Microsoft, Apple, and Yahoo. It also supports anonymous authentication, which allows temporary user accounts, and custom authentication tokens for integrating with your own backend systems.
How does Firebase handle user sessions?
Firebase manages user sessions via ID tokens and refresh tokens. When a user signs in, the Firebase Auth SDK obtains an ID token (JWT) that expires after one hour. The SDK automatically refreshes the token using a long-lived refresh token, ensuring a seamless experience. Developers can listen to auth state changes using onAuthStateChanged to react to sign-in and sign-out events.
Can I use Firebase Authentication with my own backend?
Yes, Firebase Authentication can be integrated with your own backend server. You can verify Firebase ID tokens on your server using the Firebase Admin SDK or third-party JWT libraries. This allows you to securely authenticate users and authorize access to your own APIs and resources. Custom tokens can also be generated by your server to authenticate users with Firebase.
What is multi-factor authentication (MFA) in Firebase?
Firebase Authentication supports multi-factor authentication (MFA) to add an extra layer of security. You can enable SMS-based second factors. Users enroll a phone number, and during sign-in, after verifying their primary factor (e.g., password), they must provide a one-time code sent via SMS. This is available for email/password and phone auth methods.
How secure is Firebase Authentication?
Firebase Authentication is built on Google's secure infrastructure. It uses industry-standard protocols like OAuth 2.0 and OpenID Connect. ID tokens are signed JWTs that can be verified. Firebase enforces HTTPS for all communications and provides security rules for Firestore and Realtime Database to control access based on user identity. You can also enable email verification and multi-factor authentication.
What is the difference between Firebase Authentication and custom authentication?
Firebase Authentication provides a ready-to-use, hosted authentication system with SDKs and UI. It handles token lifecycle, session management, and integrates with Firebase services. Custom authentication involves building your own authentication logic, typically using your own user database and generating custom tokens that Firebase can verify. Custom auth gives you full control but requires more development effort.
Sources and further reading
- Firebase Authentication Documentation
- Firebase Authentication Pricing
- Firebase Authentication: Supported Providers
- Firebase Auth: Manage Users
- Firebase Auth: Multi-Factor Authentication
- Firebase Auth: Security Rules
- Firebase Auth: Verify ID Tokens
- Firebase Auth: Anonymous Authentication
- Firebase Auth: Phone Authentication
- Firebase Auth: Client SDK Reference
Need help with this topic?
Send us your details and we will contact you.