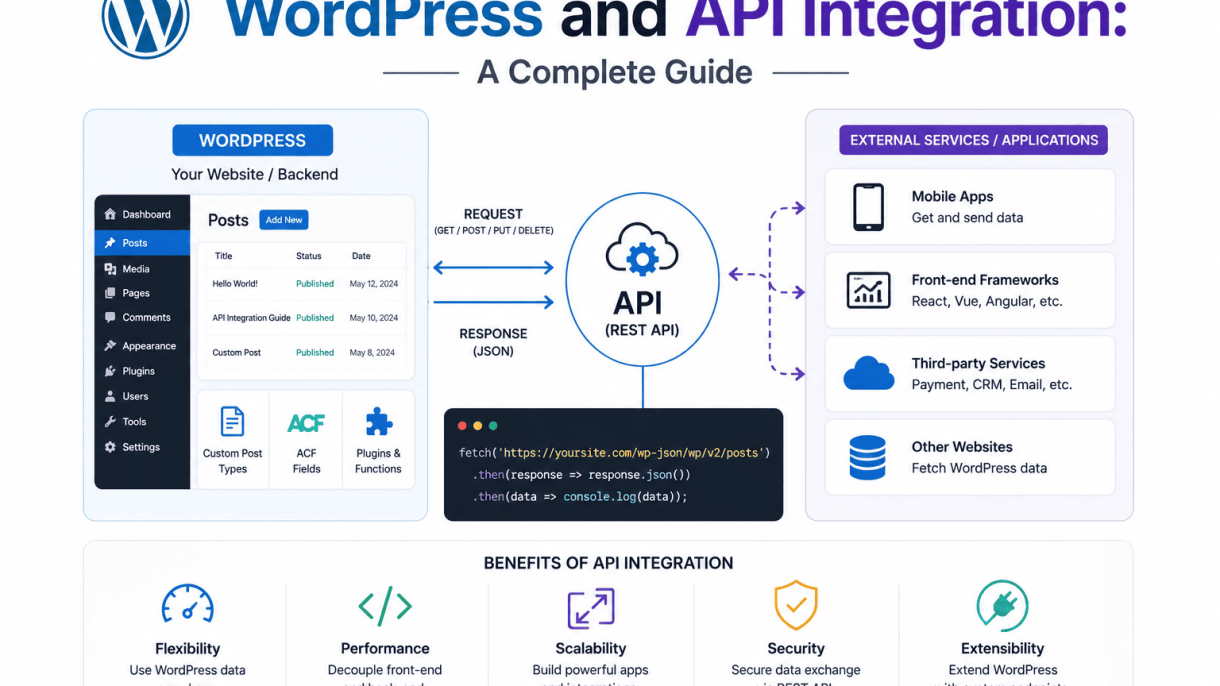

Introduction to API Integration in WordPress
In the modern web ecosystem, a standalone WordPress site often falls short of meeting complex business or user needs. The solution lies in API integration—a technical bridge that allows your WordPress installation to communicate with external platforms, services, and data sources. This guide provides a complete overview of how APIs work with WordPress, why they matter, and what you can achieve by connecting your site to the wider web. Understanding these fundamentals is the first step toward building a more dynamic, efficient, and scalable WordPress presence.
What Is an API? A Non-Technical Overview
An API, or Application Programming Interface, is essentially a messenger that allows two software applications to talk to each other. Think of it like a restaurant menu: you (the customer) place an order (a request) with the waiter (the API), who then communicates your order to the kitchen (the external system). The kitchen prepares your meal (processes the request) and the waiter brings it back to you (the response). In the context of WordPress, an API lets your site request specific data or actions from another service—such as fetching the latest tweets, processing a credit card payment, or pulling weather information—without you needing to understand the complex inner workings of that service. APIs use standardized formats like JSON or XML to ensure both sides can understand the exchange, making integration reliable and scalable.
Why Integrate APIs with WordPress? Key Benefits
Integrating APIs into your WordPress site unlocks a range of advantages that go far beyond what plugins alone can offer. The primary benefits include:
- Extended functionality without custom code: You can add features like live chat, booking systems, or analytics dashboards by connecting to proven third-party services, saving development time and reducing bugs.
- Improved efficiency and automation: Automate repetitive tasks such as syncing customer data between WordPress and your CRM, posting content to social media, or updating inventory from an external database.
- Enhanced user experience: Deliver real-time data—like flight statuses, stock prices, or event calendars—directly on your site, keeping visitors engaged and informed.
- Seamless third-party connectivity: Connect your site to payment gateways (Stripe, PayPal), email marketing platforms (Mailchimp, ConvertKit), or shipping carriers (UPS, FedEx) to create a unified backend.
- Scalability and future-proofing: As your needs grow, you can swap or add new integrations without overhauling your entire site, thanks to the modular nature of API-driven architecture.
Common Use Cases: From Payment Gateways to Social Media
WordPress and API integration powers a wide array of practical applications across different industries. Below is a table outlining some of the most common use cases, along with the typical APIs involved:
| Use Case | Example API | What It Does |
|---|---|---|
| Payment processing | Stripe, PayPal | Securely handle transactions, subscriptions, and refunds within WooCommerce or custom checkout forms. |
| Social media integration | Twitter, Instagram Graph, Facebook | Display live feeds, auto-post blog updates, or pull user-generated content for marketing. |
| Email marketing & CRM | Mailchimp, HubSpot, Salesforce | Sync subscriber lists, trigger automated emails, and track lead interactions from your site. |
| Maps & location services | Google Maps, Mapbox | Add interactive maps, store locators, or route planning features to your pages. |
| Content syndication | YouTube Data API, Flickr, RSS feeds | Embed video galleries, photo streams, or news feeds from external sources directly into posts. |
| Analytics & reporting | Google Analytics, Mixpanel | Pull visitor data, conversion rates, and custom metrics into your WordPress dashboard or public reports. |
These examples illustrate how API integration transforms WordPress from a simple content management system into a powerful hub that interacts with the digital ecosystem. Whether you are running an e-commerce store, a membership site, or a media outlet, the ability to connect with external services through APIs is no longer optional—it is essential for staying competitive and responsive to user expectations.
Understanding the WordPress REST API
The WordPress REST API is a powerful, built-in interface that allows developers to interact with WordPress data programmatically using standard HTTP methods. It exposes the core content management system as a collection of JSON endpoints, enabling headless WordPress implementations, mobile applications, and third-party integrations. The API follows RESTful principles, meaning each endpoint represents a specific resource (like posts or users) and supports common operations such as GET, POST, PUT, and DELETE. This architecture decouples the front-end presentation from the back-end data layer, giving developers flexibility to build custom experiences using any technology stack.
Core Endpoints and Resources (Posts, Users, Comments)
The REST API organizes data into distinct resource types, each with its own base URL path. All endpoints start with /wp-json/wp/v2/ followed by the resource name. Below are the primary endpoints and their common use cases:
- Posts:
/wp/v2/posts— Retrieve, create, update, or delete blog posts. Supports parameters likecategories,tags, andsearch. - Users:
/wp/v2/users— Access user profiles, including metadata like name, description, and avatar URLs. Requires authentication for write operations. - Comments:
/wp/v2/comments— Manage comments on posts. Includes fields for author name, content, and status (approved, pending, spam).
Each resource returns a JSON object with standard fields (e.g., id, title, content) plus custom fields if registered via register_rest_field(). Developers can also extend the API by creating custom endpoints using register_rest_route().
Authentication: OAuth, Application Passwords, and Cookies
Authentication ensures that only authorized users can perform write operations or access private data. WordPress supports three primary methods:
| Method | Best For | How It Works |
|---|---|---|
| OAuth 1.0a | Third-party apps (e.g., mobile or desktop clients) | Uses consumer keys and tokens; requires the OAuth plugin. Provides secure, token-based access without sharing passwords. |
| Application Passwords | External scripts, automation, or custom integrations | Built into WordPress 5.6+. Generate a 24-character password from the user profile; send via Authorization: Basic header. |
| Cookies | Logged-in users on the same domain | Uses the standard WordPress login cookie (wordpress_logged_in_*). Nonce required for state-changing requests via _wpnonce parameter. |
For most external integrations, Application Passwords offer the simplest balance of security and ease of use.
Making Your First API Request with cURL or JavaScript
To get started, you can test the API using cURL in a terminal or JavaScript in a browser console. Below is a practical example that retrieves the latest published posts from a WordPress site.
cURL command:
curl -X GET "https://example.com/wp-json/wp/v2/posts?per_page=5&status=publish"
  -H "Accept: application/json"
JavaScript (Fetch API) equivalent:
fetch('https://example.com/wp-json/wp/v2/posts?per_page=5&status=publish')
  .then(response => response.json())
  .then(posts => {
    posts.forEach(post => {
      console.log(post.title.rendered);
    });
  })
  .catch(error => console.error('Error:', error));
This request returns a JSON array of post objects. Each object includes fields like id, title (with rendered HTML), excerpt, and link. To create a new post, send a POST request with authentication headers and a JSON body containing title and content. For example, using JavaScript with Application Passwords:
const username = 'admin';
const appPassword = 'XXXX XXXX XXXX XXXX XXXX XXXX';
const auth = btoa(`${username}:${appPassword}`);

fetch('https://example.com/wp-json/wp/v2/posts', {
  method: 'POST',
  headers: {
    'Authorization': `Basic ${auth}`,
    'Content-Type': 'application/json'
  },
  body: JSON.stringify({
    title: 'New Post from API',
    content: 'Hello, world!',
    status: 'draft'
  })
})
.then(response => response.json())
.then(post => console.log('Created post ID:', post.id));
With these basics, you can start building integrations that leverage the full power of WordPress data programmatically.
Setting Up Your Development Environment
Preparing a robust development environment is the foundation for successful WordPress and API integration. A local or staging setup allows you to test endpoints, debug authentication, and iterate without affecting a live site. This guide covers essential tools, REST API configuration, and secure key management to ensure a smooth workflow.
Local Development Tools: LocalWP, MAMP, or Docker
Choosing the right local environment depends on your project complexity, team size, and familiarity with containerization. Below is a comparison of three popular options for WordPress development.
| Tool | Best For | Key Features | Drawbacks |
|---|---|---|---|
| LocalWP | Beginners and solo developers | One-click WordPress setup, built-in SSL, live link sharing | Limited advanced server configuration |
| MAMP | Quick prototyping on macOS/Windows | Simple Apache, MySQL, PHP stack; easy database management | No built-in WordPress management; less portable |
| Docker | Team projects and reproducible environments | Containerized services, version control for setups, multi-site support | Steeper learning curve; requires Docker Compose knowledge |
For most API integration tasks, LocalWP offers the fastest path to a secure, HTTPS-enabled environment. Docker is preferred when you need to mirror production server configurations or collaborate across teams. MAMP remains viable for simple tests but lacks modern conveniences like automatic SSL.
Enabling the REST API and Testing Endpoints
WordPress’s built-in REST API is enabled by default since version 4.7. To verify it is active and accessible:
- Navigate to your site’s base URL followed by
/wp-json/(e.g.,http://localhost:8080/wp-json/). A JSON response confirms the API is running. - Common endpoints to test include
/wp-json/wp/v2/posts,/wp-json/wp/v2/users, and/wp-json/wp/v2/categories. - Use a tool like Postman, Insomnia, or
curlin the terminal to send GET requests and inspect responses. For example:curl http://localhost:8080/wp-json/wp/v2/posts. - If the API returns a 404 or empty response, check that permalinks are set to “Post name” under Settings > Permalinks, and flush rewrite rules by saving the settings again.
- For authenticated endpoints (e.g., creating posts), enable the “Application Passwords” feature in WordPress 5.6+ by going to Users > Profile and generating a password for your user account.
Always test endpoints in a local or staging environment before deploying to production. This prevents accidental data modification or exposure of sensitive information.
Managing API Keys and Secret Tokens Securely
API keys and secret tokens grant access to your WordPress data and external services. Mishandling them can lead to security breaches. Follow these practices to keep credentials safe:
- Never hardcode keys in source code. Store them in environment variables or a
.envfile using a library likevlucas/phpdotenvfor WordPress. - Use WordPress’s built-in secrets. For Application Passwords, store them only in the user meta table, never in plaintext files.
- Restrict key permissions. Generate keys with the minimum scope needed—for example, read-only keys for public data retrieval, and write keys only for specific users.
- Rotate keys regularly. Set a schedule (e.g., every 90 days) to regenerate tokens and update your configuration.
- Monitor usage. Enable logging for failed authentication attempts and review API access patterns in your server logs.
By implementing these measures, you protect your WordPress site and any integrated third-party services from unauthorized access. A secure development environment ensures that your API integration remains reliable and maintainable throughout the project lifecycle.
Connecting WordPress to External APIs
Integrating external APIs into a WordPress site unlocks dynamic data, such as live weather updates, social media feeds, or payment gateway responses. The process involves sending HTTP requests from your WordPress environment to a third-party server, handling the returned data, and presenting it on the frontend. WordPress provides robust built-in functions for this task, abstracting away low-level cURL complexities while maintaining security and compatibility with the WordPress HTTP API. Below are the essential steps and best practices for connecting to external APIs.
Using wp_remote_get() and wp_remote_post()
WordPress offers two primary functions for making HTTP requests: wp_remote_get() for retrieving data and wp_remote_post() for sending data. Both functions accept a URL and an optional array of arguments, returning a response array that includes headers, body, and status code. Here is a practical code example that fetches user data from a placeholder API and logs the response:
$response = wp_remote_get( 'https://jsonplaceholder.typicode.com/users/1' );
if ( is_wp_error( $response ) ) {
    $error_message = $response->get_error_message();
    error_log( "API request failed: $error_message" );
} else {
    $body = wp_remote_retrieve_body( $response );
    $data = json_decode( $body, true );
    // Use $data array in your template
    echo 'User name: ' . esc_html( $data['name'] );
}
For POST requests, include a body parameter in the arguments array. For example, to submit form data to an API:
$response = wp_remote_post( 'https://example.com/api/submit', array(
    'body' => array(
        'name'  => 'John Doe',
        'email' => 'john@example.com',
    ),
) );
Always validate the response using wp_remote_retrieve_response_code() to check for HTTP status codes like 200 (success) or 404 (not found).
Parsing JSON and XML Responses in PHP
Most modern APIs return JSON, while some legacy systems use XML. For JSON, use PHP’s built-in json_decode() function, passing true as the second argument to convert the result into an associative array for easier manipulation. Handle XML responses with simplexml_load_string(), which returns a SimpleXMLElement object. Below is a comparison of parsing methods:
| Response Type | Parsing Function | Example Usage |
|---|---|---|
| JSON | json_decode( $body, true ) |
Access $data['key'] as an array |
| XML | simplexml_load_string( $body ) |
Access $xml->element->child as an object |
When parsing XML, convert the object to an array using json_decode( json_encode( $xml ), true ) for consistency, but be aware that this can lose attributes. Always escape output with esc_html() or wp_kses_post() before displaying on the frontend to prevent XSS vulnerabilities.
Error Handling and Timeout Management
External APIs can fail due to network issues, server errors, or invalid endpoints. WordPress wraps errors in a WP_Error object, which you must check with is_wp_error() before proceeding. Set timeouts to avoid hanging page loads. Use the timeout argument in your request array to define how long WordPress waits for a response. The default is 5 seconds; increase it for slower APIs but keep it reasonable (e.g., 15 seconds). Below are recommended timeout settings:
- Connection timeout: Use
'timeout' => 10for the overall request. - Stream timeout: Use
'stream_timeout' => 5for reading data in chunks. - Retry logic: Implement a loop with
wp_remote_retrieve_response_code()to retry failed requests up to 3 times with a 1-second delay.
Example with timeout and error handling:
$args = array(
    'timeout' => 15,
);
$response = wp_remote_get( 'https://api.example.com/data', $args );
if ( is_wp_error( $response ) ) {
    return 'Unable to fetch data. Please try again later.';
}
$http_code = wp_remote_retrieve_response_code( $response );
if ( 200 !== $http_code ) {
    error_log( "API returned HTTP $http_code" );
    return 'Service temporarily unavailable.';
}
$data = json_decode( wp_remote_retrieve_body( $response ), true );
if ( empty( $data ) ) {
    return 'No data available.';
}
// Display data safely
echo '<p>Data retrieved: ' . esc_html( $data['value'] ) . '</p>';
By following these patterns, you ensure your WordPress site remains responsive and secure when interacting with external APIs, providing a reliable experience for users.
Building Custom API Endpoints in WordPress
WordPress provides a robust REST API out of the box, but to expose your unique data or business logic, you need to build custom endpoints. This process allows you to control exactly what data is returned, how it is authenticated, and how requests are handled. Creating custom API routes involves registering them with the WordPress REST API infrastructure, defining callback functions to process requests, and returning data in a structured JSON format. Below, we break down the essential steps and best practices.
Registering Custom Routes with register_rest_route()
The core function for creating custom API endpoints is register_rest_route(). You typically call this function inside a hook attached to rest_api_init. The function accepts three main parameters: the namespace (a unique prefix for your routes, e.g., myplugin/v1), the route itself (e.g., /custom-data), and an array of arguments defining the endpoint’s behavior. Here is a basic example:
add_action( 'rest_api_init', function () {
    register_rest_route( 'myplugin/v1', '/custom-data/', array(
        'methods' => 'GET',
        'callback' => 'my_custom_data_callback',
    ) );
} );
Key considerations when registering routes:
- Namespace: Must be unique to avoid conflicts with other plugins or themes.
- Route: Use forward slashes and dynamic segments (e.g.,
/items/(?P<id>d+)) for variable data. - Methods: Specify the HTTP method (GET, POST, PUT, DELETE) or use
WP_REST_Server::READABLEfor clarity. - Multiple endpoints: Register several routes under the same namespace for a complete API.
Creating Callbacks and Permissions Callbacks
Every registered route requires a callback function that processes the request and returns a response. You may also specify a permissions callback to control who can access the endpoint. The permissions callback runs before the main callback; if it returns false, the request is rejected with a 403 error. Below is an expanded example with both callbacks:
add_action( 'rest_api_init', function () {
    register_rest_route( 'myplugin/v1', '/protected-data/', array(
        'methods'             => 'GET',
        'callback'            => 'my_protected_data_callback',
        'permission_callback' => 'my_permission_check',
    ) );
} );

function my_permission_check( $request ) {
    // Allow only users with 'edit_posts' capability.
    return current_user_can( 'edit_posts' );
}

function my_protected_data_callback( $request ) {
    // Process request and return data.
}
Important details for callbacks:
| Parameter | Description | Example |
|---|---|---|
$request |
Instance of WP_REST_Request containing parameters, headers, and body. |
$request->get_param( 'id' ) |
| Return value | Must be a WP_REST_Response or WP_Error object. |
new WP_REST_Response( $data, 200 ) |
| Permissions | Return true or WP_Error for granular control. |
return new WP_Error( 'rest_forbidden', 'Access denied', array( 'status' => 403 ) ); |
Returning Data in JSON Format with Custom Fields
WordPress automatically serializes your callback’s return value into JSON. To include custom fields—such as post meta, ACF fields, or computed values—you should structure your response data as an associative array. Use get_post_meta() or get_field() to retrieve custom field values and add them to the response. Here is an example that returns a post with additional custom fields:
function my_custom_post_data_callback( $request ) {
    $post_id = $request->get_param( 'id' );
    $post    = get_post( $post_id );

    if ( empty( $post ) ) {
        return new WP_Error( 'no_post', 'Post not found', array( 'status' => 404 ) );
    }

    $custom_fields = array(
        'subtitle' => get_post_meta( $post_id, 'subtitle', true ),
        'featured' => (bool) get_post_meta( $post_id, 'featured', true ),
        'rating'   => floatval( get_post_meta( $post_id, 'rating', true ) ),
    );

    $data = array(
        'id'            => $post->ID,
        'title'         => $post->post_title,
        'content'       => $post->post_content,
        'custom_fields' => $custom_fields,
    );

    return new WP_REST_Response( $data, 200 );
}
Best practices for returning JSON data:
- Use
WP_REST_Responseto set proper HTTP status codes. - Sanitize and validate all custom field data before including it in the response.
- Structure nested data logically (e.g., group related custom fields under a key like
custom_fields). - Return
WP_Errorfor invalid requests to provide meaningful error messages.
By following these patterns, you can build secure, flexible, and well-structured custom API endpoints that extend WordPress functionality for any application.
Authenticating API Requests Securely
Securing API integrations is paramount in WordPress development, as improperly authenticated requests can expose sensitive data, allow unauthorized access, or lead to site compromise. The foundation of a robust integration lies in selecting the right authentication method, implementing preventative measures against cross-site request forgery (CSRF), and maintaining vigilant monitoring. Below, we examine the core practices that ensure your WordPress API endpoints remain both functional and fortified.
OAuth 2.0 vs. API Keys: Choosing the Right Method
The choice between OAuth 2.0 and API keys depends on the use case, required security level, and user experience. API keys are simpler but less granular, while OAuth 2.0 provides delegated, scoped access. The table below compares these two methods:
| Feature | OAuth 2.0 | API Keys |
|---|---|---|
| Authentication model | Token-based, with scopes and refresh tokens | Static key, often sent in headers or query strings |
| Granularity | Scoped to specific actions or resources | Typically all-or-nothing access |
| Revocation | Immediate via token expiry or server-side invalidation | Requires key rotation or manual removal |
| Complexity | Higher implementation overhead | Lower initial effort |
| Best for | Third-party apps, user-specific integrations | Internal services, server-to-server communication |
For WordPress, OAuth 2.0 is strongly recommended when the integration acts on behalf of a user—for example, a mobile app that posts content. Use the WP_OAuth2_Server library or a plugin like “OAuth Server” to implement authorization code or client credentials grants. API keys are acceptable for simple, internal cron jobs or trusted services, but never expose them in client-side code or public repositories.
Implementing Nonces and CSRF Protection
Cross-site request forgery (CSRF) attacks trick authenticated users into performing unintended actions. WordPress mitigates this with nonces—cryptographic tokens that verify the request’s origin and intent. Every API endpoint that modifies data must validate a nonce. Here is a practical example of how to implement nonce validation in a custom REST API endpoint:
add_action( 'rest_api_init', function () {
    register_rest_route( 'myplugin/v1', '/update-post', array(
        'methods'  => 'POST',
        'callback' => 'myplugin_update_post',
        'permission_callback' => function ( $request ) {
            // Validate the nonce sent with the request
            $nonce = $request->get_header( 'X-WP-Nonce' );
            if ( ! wp_verify_nonce( $nonce, 'wp_rest' ) ) {
                return new WP_Error( 'rest_forbidden', 'Invalid nonce', array( 'status' => 403 ) );
            }
            // Additional permission checks (e.g., user capability)
            return current_user_can( 'edit_posts' );
        }
    ) );
} );
In addition to nonces, enforce CSRF protection by:
- Using same-origin policy checks via the
OriginandRefererheaders. - Rejecting requests with unexpected HTTP methods (e.g., disallow GET for state-changing operations).
- Setting the
X-Content-Type-Options: nosniffheader to prevent MIME-type sniffing.
Logging and Monitoring API Activity
Without logging, detecting abuse or debugging failed integrations becomes nearly impossible. Implement structured logging for all API requests, focusing on these key data points:
- Timestamp and IP address of the requester.
- Authenticated user ID or client identifier.
- Endpoint called, HTTP method, and response status code.
- Request duration and payload size.
Use WordPress’s built-in WP_Logging class or a dedicated plugin like “Stream” to capture events. For rate limiting, combine IP-based throttling (e.g., using the WP_Rate_Limit library) with user-level caps. Monitor logs for patterns such as repeated 403 errors, sudden spikes from a single IP, or unusual request payloads. Set up alerts for anomalies using tools like New Relic or custom Slack hooks. Regularly review logs to identify and block malicious actors before they escalate. By combining authentication best practices with active monitoring, you create a defense-in-depth strategy that keeps your WordPress API integrations secure.
Integrating Popular Third-Party APIs
Connecting WordPress to external services through API integration unlocks powerful functionality without reinventing the wheel. Below are concrete examples of how to integrate Stripe, PayPal, Mailchimp, SendGrid, and Google Maps, complete with practical code snippets and configuration notes.
Payment Gateways: Stripe and PayPal Integration
For processing payments securely, Stripe and PayPal are the most common choices. Both offer REST APIs that can be called from WordPress using HTTP requests or dedicated libraries.
Stripe Integration Example (using Stripe PHP library via Composer):
// Include Stripe PHP library
require_once plugin_dir_path(__FILE__) . 'vendor/autoload.php';

StripeStripe::setApiKey('sk_test_YourSecretKey');

function create_stripe_charge($amount, $source, $description) {
    try {
        $charge = StripeCharge::create([
            'amount'      => $amount * 100, // amount in cents
            'currency'    => 'usd',
            'source'      => $source,
            'description' => $description,
        ]);
        return $charge->id;
    } catch (StripeExceptionCardException $e) {
        return 'Error: ' . $e->getError()->message;
    }
}
PayPal Integration (REST API with cURL):
function create_paypal_order($total, $currency = 'USD') {
    $url = 'https://api-m.sandbox.paypal.com/v2/checkout/orders';
    $client_id = 'YourClientID';
    $secret = 'YourSecret';

    $ch = curl_init();
    curl_setopt($ch, CURLOPT_URL, $url);
    curl_setopt($ch, CURLOPT_RETURNTRANSFER, 1);
    curl_setopt($ch, CURLOPT_POST, 1);
    curl_setopt($ch, CURLOPT_USERPWD, $client_id . ':' . $secret);
    curl_setopt($ch, CURLOPT_POSTFIELDS, json_encode([
        'intent' => 'CAPTURE',
        'purchase_units' => [[
            'amount' => ['currency_code' => $currency, 'value' => $total]
        ]]
    ]));
    curl_setopt($ch, CURLOPT_HTTPHEADER, ['Content-Type: application/json']);
    $response = curl_exec($ch);
    curl_close($ch);
    return json_decode($response, true);
}
| Feature | Stripe | PayPal |
|---|---|---|
| PHP Library | Official Composer package | REST API with cURL or SDK |
| Webhook Required | Yes (events like charge.succeeded) | Yes (IPN or webhooks) |
| Recurring Payments | Built-in via Stripe Billing | Requires PayPal Subscriptions API |
| Testing Sandbox | Test keys from dashboard | Sandbox account credentials |
Email Marketing: Connecting Mailchimp or SendGrid
Email marketing APIs allow you to add subscribers, send transactional emails, or trigger campaigns directly from WordPress. Both Mailchimp and SendGrid use REST APIs with API keys.
Mailchimp: Add Subscriber to List
function mailchimp_add_subscriber($email, $list_id, $api_key) {
    $dc = substr($api_key, strpos($api_key, '-') + 1); // extract data center
    $url = "https://{$dc}.api.mailchimp.com/3.0/lists/{$list_id}/members";

    $response = wp_remote_post($url, [
        'headers' => [
            'Authorization' => 'apikey ' . $api_key,
            'Content-Type'  => 'application/json',
        ],
        'body' => json_encode([
            'email_address' => $email,
            'status'        => 'subscribed',
        ]),
    ]);

    return wp_remote_retrieve_response_code($response) === 200;
}
SendGrid: Send Transactional Email
function sendgrid_send_email($to, $subject, $body, $api_key) {
    $url = 'https://api.sendgrid.com/v3/mail/send';
    $response = wp_remote_post($url, [
        'headers' => [
            'Authorization' => 'Bearer ' . $api_key,
            'Content-Type'  => 'application/json',
        ],
        'body' => json_encode([
            'personalizations' => [['to' => [['email' => $to]]]],
            'from'             => ['email' => 'noreply@yoursite.com'],
            'subject'          => $subject,
            'content'          => [['type' => 'text/html', 'value' => $body]],
        ]),
    ]);
    return wp_remote_retrieve_response_code($response) === 202;
}
- Mailchimp: Best for newsletter subscriptions and audience management. Requires list ID and API key.
- SendGrid: Ideal for transactional emails (order confirmations, password resets). Offers 100 free emails/day.
- Both: Use
wp_remote_post()for clean WordPress HTTP API integration.
Mapping Services: Embedding Google Maps Dynamic Data
Google Maps API allows embedding interactive maps with custom markers, directions, and location-based data. Use the JavaScript API for dynamic behavior or the Geocoding API for address-to-coordinates conversion.
Geocoding Example (convert address to lat/lng):
function geocode_address($address, $api_key) {
    $url = 'https://maps.googleapis.com/maps/api/geocode/json';
    $response = wp_remote_get(add_query_arg([
        'address' => urlencode($address),
        'key'     => $api_key,
    ], $url));

    if (is_wp_error($response)) return false;

    $body = json_decode(wp_remote_retrieve_body($response), true);
    if ($body['status'] !== 'OK') return false;

    return $body['results'][0]['geometry']['location']; // returns ['lat' => ..., 'lng' => ...]
}
Dynamic Map Embedding with JavaScript (in theme or plugin):
// Enqueue Google Maps API script with your key
wp_enqueue_script('google-maps', 'https://maps.googleapis.com/maps/api/js?key=YOUR_API_KEY&callback=initMap', [], null, true);

// Inline JavaScript for map initialization
function add_map_init_script() {
    ?>

    function initMap() {
        var location = { lat: 40.7128, lng: -74.0060 };
        var map = new google.maps.Map(document.getElementById('map'), {
            zoom: 12,
            center: location
        });
        var marker = new google.maps.Marker({ position: location, map: map });
    }

    <?php
}
add_action('wp_footer', 'add_map_init_script');
Important Considerations for Google Maps:
- Enable billing in Google Cloud Console to avoid API errors.
- Restrict API key to your domain for security.
- Use Geocoding API sparingly (limited to 50 requests/day on free tier).
- For static maps, consider using the Maps Static API instead.
Caching and Performance Optimization
When integrating external APIs into WordPress, each request introduces latency, potential rate limits, and server load. Without optimization, even a well-built plugin or theme can degrade site performance. Effective caching and processing strategies are essential to minimize overhead while keeping data fresh. This section covers three reliable techniques: temporary storage via the Transient API, deferred background updates with WP_Cron, and client-side caching through JavaScript.
Transient API: Storing API Responses Temporarily
The WordPress Transient API provides a simple key-value storage system with an expiration time, ideal for caching API responses. Instead of calling an external endpoint on every page load, store the result for a defined period—such as 1 hour for weather data or 24 hours for stock prices. Use set_transient() to save data and get_transient() to retrieve it. If the transient is expired or missing, fetch fresh data; otherwise, serve the cached copy. This reduces external requests dramatically. For example, a news aggregator plugin can cache headlines for 30 minutes, cutting API calls by 96% during peak traffic. Always use a unique transient name (e.g., myplugin_weather_data) and avoid storing large datasets—transients are stored in the options table, where size can affect performance. For high-traffic sites, consider using an external object cache (like Redis) to offload transient storage from the database.
Background Processing with WP_Cron
Fetching API data during a user request blocks the page until the response arrives. WP_Cron enables scheduled, asynchronous tasks that run in the background, updating cached data without affecting visitor experience. To implement this, hook a custom function into a cron schedule (e.g., wp_schedule_event() for hourly updates). The function calls the API, processes the response, and stores it using the Transient API or custom options. For instance, a currency converter plugin can update exchange rates every 6 hours via a cron job, ensuring the frontend always serves pre-cached values. WP_Cron is triggered on page loads, so for precise timing on low-traffic sites, use the DISABLE_WP_CRON constant and a real system cron job. This approach offloads heavy I/O to non-blocking tasks, improving Time to First Byte (TTFB) by avoiding synchronous API waits.
Using Client-Side Caching with JavaScript
For non-critical data that changes infrequently—like user-specific settings or public feed items—JavaScript can cache API responses directly in the browser. Use the Fetch API with the Cache-Control header or implement a simple in-memory cache using a JavaScript object or localStorage. For example, after fetching a list of recent blog posts from a third-party service, store the result in localStorage with a timestamp. On subsequent page loads, check if the cached data is still valid (e.g., less than 10 minutes old) before making a new request. This reduces server load and network traffic, especially for repeat visitors. However, client-side caching is not suitable for sensitive or real-time data—it relies on the user’s browser and may expose stale information if not cleared properly. Combine it with server-side caching for a layered approach.
| Technique | Storage Location | Lifespan Control | Best Use Case |
|---|---|---|---|
| Transient API | WordPress database (or object cache) | Explicit expiration via set_transient() |
Frequently accessed, server-side cached data (e.g., weather, stock prices) |
| WP_Cron background processing | Database (transient or options table) | Scheduled intervals (e.g., hourly, daily) | Large or slow API updates that should not block user requests |
| Client-side JavaScript caching | Browser (localStorage, memory) | JavaScript-based timestamp or Cache-Control header |
Non-sensitive, user-specific or public data with low update frequency |
Troubleshooting Common API Integration Issues
When integrating APIs with WordPress, even well-designed integrations can encounter roadblocks. The most frequent issues include CORS errors, authentication failures, data format mismatches, and server timeouts. This section provides a systematic approach to diagnosing and resolving these problems, helping you maintain a stable connection between your WordPress site and external services.
Debugging with WP_DEBUG and Log Files
The first step in troubleshooting any API integration is enabling WordPress debugging. Modify your wp-config.php file to activate detailed error logging. Add the following lines before the “That’s all, stop editing!” comment:
define( 'WP_DEBUG', true );
define( 'WP_DEBUG_LOG', true );
define( 'WP_DEBUG_DISPLAY', false );
This configuration writes all errors, warnings, and notices to a debug.log file located in /wp-content/. For API-specific issues, use error_log() within your integration code to capture raw API responses, HTTP status codes, and request parameters. A typical debugging routine includes:
- Checking the log file after a failed API call for PHP warnings or fatal errors.
- Logging the full cURL or wp_remote_get/response data using
error_log( print_r( $response, true ) );. - Disabling
WP_DEBUGon production sites to prevent exposing sensitive information to users.
Handling CORS and Same-Origin Policy
Cross-Origin Resource Sharing (CORS) errors occur when a WordPress site makes an API request to a different domain, and the server does not permit it. These errors typically appear in the browser console as “No ‘Access-Control-Allow-Origin’ header is present.” To resolve CORS issues:
- On the API server side: Ensure the server includes the appropriate CORS headers. For example, in Apache, add to the
.htaccessfile:Header set Access-Control-Allow-Origin "*"(use specific origins in production). - In WordPress: If you cannot control the API server, consider using a server-side proxy. Create a custom WordPress REST endpoint that forwards requests to the external API, bypassing browser CORS restrictions entirely.
- For local development: Use a browser extension that disables CORS temporarily, or configure your local environment to match the production domain.
Fixing Common HTTP Error Codes (401, 403, 500)
HTTP error codes provide immediate clues about integration failures. Below is a table of the most common codes and their typical fixes:
| HTTP Code | Meaning | Common Cause | Solution |
|---|---|---|---|
| 401 Unauthorized | Authentication failed | Invalid API key, expired token, or missing credentials | Verify API key and regenerate if expired; ensure credentials are sent in headers (e.g., Authorization: Bearer token) |
| 403 Forbidden | Server understands but refuses | IP whitelisting, insufficient permissions, or blocked user agent | Whitelist your server IP in the API dashboard; check that your user agent matches allowed patterns |
| 500 Internal Server Error | Server-side error | Malformed request payload, endpoint changes, or server overload | Review API documentation for updated endpoint formats; reduce request size; implement exponential backoff for retries |
For all error codes, implement robust error handling in your WordPress integration. Use wp_remote_retrieve_response_code() to check the status and log the full response body. For timeouts, adjust the timeout parameter in wp_remote_get() or wp_remote_post() to a higher value, such as 30 seconds, and consider using asynchronous processing for long-running API calls.
Future-Proofing Your WordPress API Integrations
As your WordPress site grows and external services evolve, maintaining stable API integrations requires deliberate planning. Future-proofing ensures that your connections remain functional, secure, and scalable without requiring complete rewrites. By adopting proactive strategies, you can minimize disruptions caused by API changes, extend the lifespan of your integrations, and accommodate increasing data volumes or user demands.
Following API Versioning and Deprecation Notices
Third-party APIs frequently update their endpoints, data structures, or authentication methods. To avoid sudden breakage, always use versioned endpoints (e.g., /api/v2/ instead of /api/). Monitor the provider’s changelog and subscribe to deprecation notices—most reputable APIs announce endpoint retirement months in advance. In your WordPress code, implement a version-checking routine that logs warnings when your integration calls an older endpoint. Consider storing the API version used per integration in your site’s options table, allowing you to update the version centrally when needed.
- Always specify an API version in your requests (e.g.,
wp_remote_get( 'https://api.example.com/v2/resource' )). - Set up a cron job to periodically fetch the API’s status endpoint and compare it against your configured version.
- Maintain a local dictionary of deprecated endpoints and their replacements, updating your integration logic as soon as a notice is received.
Using Hooks and Filters for Extensibility
WordPress’s hook system is your strongest ally for future-proofing. Rather than hardcoding API calls directly in template files or plugins, wrap them in custom actions and filters. This allows you to modify request parameters, response handling, or error logging without touching core integration logic. For example, create a filter my_integration_api_args that other developers or future you can use to add custom headers or adjust timeout values. Similarly, use an action my_integration_after_response to hook in additional data processing or caching layers.
| Hook Type | Example Usage | Benefit |
|---|---|---|
| Filter | apply_filters( 'my_api_request_args', $args, $endpoint ) |
Allows modification of request parameters without altering the main function. |
| Action | do_action( 'my_api_response_received', $response, $endpoint ) |
Enables additional processing (e.g., logging, caching, webhook triggers). |
| Filter | apply_filters( 'my_api_error_message', $message, $code ) |
Customizes error messages displayed to users or logged for debugging. |
Automating Testing with Postman and Unit Tests
Manual testing becomes impractical as integrations multiply. Automate your verification process using Postman for API-level checks and PHPUnit for WordPress-side logic. Create a Postman collection that simulates every endpoint your site consumes, including edge cases like invalid tokens or rate limits. Export the collection as a Newman runnable script and integrate it into your deployment pipeline. For WordPress-specific testing, write PHPUnit tests that mock API responses and verify your hooks, filters, and error handling behave correctly. This catches regressions before they reach production.
- Postman Collection: Store test requests for each endpoint, including authentication, expected status codes, and response schemas.
- Newman CLI: Run the collection automatically via
newman run collection.jsonin your CI/CD workflow. - PHPUnit Tests: Use
WP_MockorBrain Monkeyto simulatewp_remote_getresponses and assert that your integration functions handle them correctly. - Regular Schedule: Trigger automated tests weekly, or immediately after any API provider announces a change.
By combining version awareness, extensible code architecture, and automated testing, your WordPress API integrations will remain robust against external changes and scale gracefully alongside your site’s growth. These practices reduce maintenance burden and ensure reliability for years to come.
Frequently Asked Questions
What is WordPress API integration?
WordPress API integration refers to connecting a WordPress site with external applications, services, or data sources using APIs (Application Programming Interfaces). The most common is the WordPress REST API, which allows developers to interact with WordPress data (posts, users, comments, etc.) via HTTP requests. Integration can involve fetching data from third-party services, sending data from WordPress to other systems, or building headless WordPress architectures. This enables functionalities like syncing content with mobile apps, automating workflows, or embedding external data directly into WordPress pages.
How do I authenticate API requests in WordPress?
Authentication for the WordPress REST API can be done using several methods. The simplest is cookie authentication, which is used for logged-in users within the admin area. For external applications, OAuth 1.0a is a common choice, requiring a consumer key, secret, and token. Another method is Basic Authentication (over HTTPS), though it's less secure. Application passwords, introduced in WordPress 5.6, provide a straightforward way for external apps to authenticate. For custom integrations, you can use JSON Web Tokens (JWT) or nonce-based authentication for specific actions.
Can I create custom REST API endpoints in WordPress?
Yes, you can create custom REST API endpoints in WordPress by using the `register_rest_route()` function within a plugin or theme's `functions.php`. This function allows you to define a route (e.g., `/my-plugin/v1/data`), specify HTTP methods (GET, POST, PUT, DELETE), and provide a callback function that processes the request and returns data. You can also add arguments, permissions callbacks, and schema validation. Custom endpoints are ideal for exposing specific data or functionality not covered by the core API, such as custom post types or third-party service interactions.
What are the security best practices for WordPress API integration?
Security is crucial for API integration. Always use HTTPS to encrypt data in transit. Implement proper authentication (e.g., OAuth, application passwords) and avoid exposing API keys in client-side code. Use permission callbacks to restrict access to authorized users only. Validate and sanitize all input data with functions like `sanitize_text_field()` and `validate_callback`. Limit request rates to prevent abuse, and use nonces for state-changing requests. Regularly review and update API endpoints, and consider using Web Application Firewalls (WAF) for additional protection.
How do I handle errors in WordPress API integration?
Error handling in WordPress API integration involves checking HTTP response codes and using try-catch blocks (if using PHP exceptions). For REST API requests, use `wp_remote_get()` or `wp_remote_post()` and check for `is_wp_error()` to catch connection issues. Log errors using `error_log()` or a dedicated logging plugin. Return meaningful error messages to users, but avoid exposing sensitive data. For custom endpoints, use `WP_Error` objects to return structured error responses with appropriate HTTP status codes (e.g., 400 for bad request, 401 for unauthorized).
What is a headless WordPress setup?
A headless WordPress setup uses WordPress as a content management system (CMS) for its admin interface and database, but the front-end is built with a separate technology like React, Vue.js, or Angular. The front-end communicates with WordPress via the REST API or GraphQL to fetch content. This decoupling allows for greater flexibility, improved performance, and a more dynamic user experience. It's popular for building modern web applications, mobile apps, or static sites, as developers can use their preferred tools while leveraging WordPress's powerful content management capabilities.
How do I integrate third-party APIs like Google Maps or Stripe?
Integrating third-party APIs involves making HTTP requests from your WordPress site using functions like `wp_remote_get()` or `wp_remote_post()`. For Google Maps, you'd obtain an API key, then make requests to the Geocoding or Maps JavaScript API. For Stripe, you'd use their PHP library or direct API calls to handle payments. Always store API keys securely in `wp-config.php` or an environment file. Use transient caching to reduce API calls and improve performance. For complex integrations, consider using a plugin like WP Remote API or building a custom plugin.
What are the common use cases for WordPress API integration?
Common use cases include: syncing content between WordPress and external platforms (e.g., CRM, email marketing), building mobile apps that consume WordPress data, creating headless websites with modern JavaScript frameworks, integrating e-commerce with shipping or payment gateways, automating social media posting, pulling data from external sources (weather, stock prices) into WordPress pages, and enabling single sign-on (SSO) with third-party identity providers. API integration also powers custom dashboards, analytics tools, and workflow automation, making WordPress a versatile hub for various digital operations.
Sources and further reading
- WordPress REST API Handbook
- OAuth 1.0a Protocol Specification
- WordPress Application Passwords
- JSON Web Token (JWT) Introduction
- HTTP Status Codes – MDN Web Docs
- REST API Authentication – WordPress Developer Resources
- HTTPS – Let's Encrypt
- Google Maps Platform API Key Best Practices
- Stripe API Reference
- Headless WordPress – WP Engine
Need help with this topic?
Send us your details and we will contact you.