
Introduction to WordPress Multisite
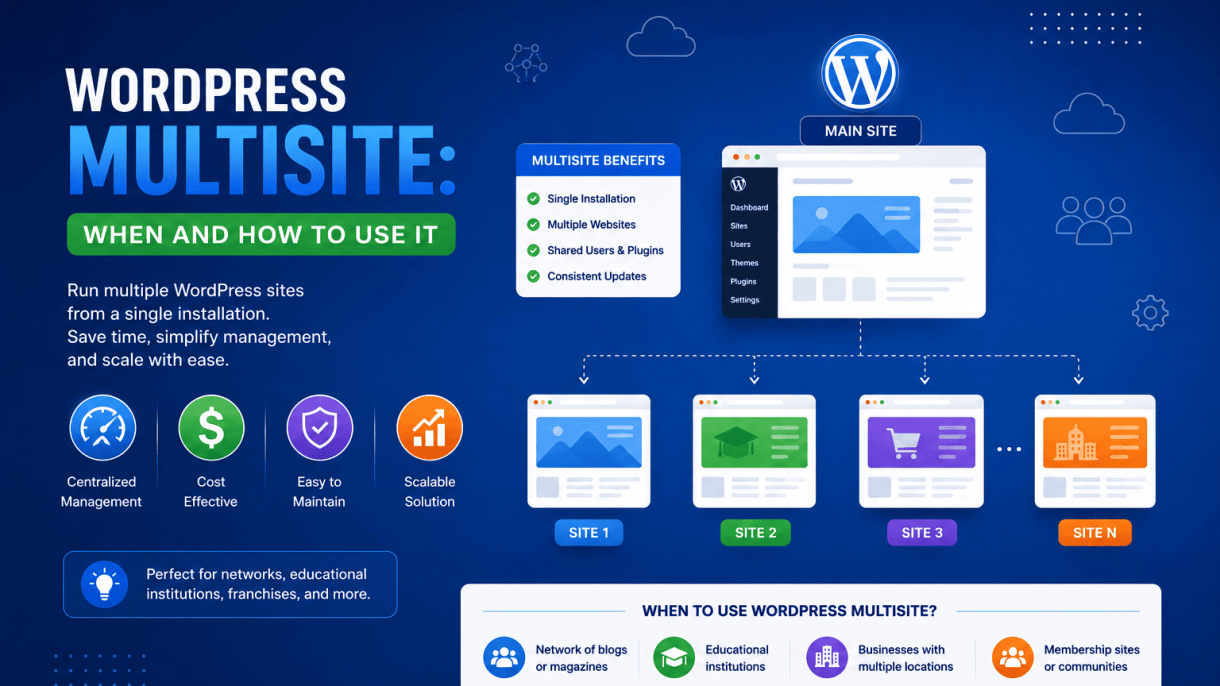
WordPress Multisite is a powerful core feature of the WordPress content management system that allows you to run multiple websites from a single WordPress installation. Instead of managing separate databases, separate core updates, and separate plugin installations for each site, Multisite enables administrators to create and manage a network of sites that share a common core, database, and set of resources. This architecture is particularly valuable for organizations, agencies, educational institutions, and media companies that need to maintain a consistent infrastructure across many websites while allowing individual site administrators to manage their own content, themes, and plugins.
The concept of Multisite originated from WordPress MU (Multi-User), a separate project that was merged into the core WordPress codebase with the release of WordPress 3.0 in 2010. Since then, it has become a standard feature, though it remains disabled by default. Understanding when to use Multisite—and just as importantly, when not to use it—requires a clear grasp of its architecture, its differences from standard WordPress installations, and the terminology that defines its operation.
What Is WordPress Multisite?
At its simplest, WordPress Multisite is a mode of WordPress that enables you to create a network of sites under a single installation. Each site in the network has its own content, users, themes, and plugins, but they all share the same WordPress core files, the same database, and the same server resources. The network is managed by a super admin, who has overarching control over the entire installation, while individual site administrators manage the day-to-day operations of their respective sites.
The architecture of Multisite is built on a shared database structure. Instead of each site having its own set of database tables, Multisite uses a single database with a special set of tables that are prefixed to distinguish between global network data and site-specific data. For example, the wp_users table is shared across all sites, but each site gets its own set of tables for posts, comments, and options, prefixed with the site’s ID (e.g., wp_2_posts for site ID 2). This design allows for efficient resource sharing while maintaining data isolation between sites.
Key characteristics of WordPress Multisite include:
- Shared core files: All sites run the same version of WordPress core, updated once for the entire network.
- Centralized plugin and theme management: Super admins can install plugins and themes network-wide, then enable or disable them for individual sites.
- Unified user database: User accounts are shared across the network, allowing users to log in once and access multiple sites with the same credentials.
- Individual site content: Each site maintains its own posts, pages, media, comments, and custom post types.
- Separate site administrators: Each site can have its own admin users who manage content and settings without affecting other sites.
Multisite is not limited to subdomain-based networks (e.g., site1.example.com, site2.example.com). It also supports subdirectory-based networks (e.g., example.com/site1/, example.com/site2/) and, with proper domain mapping, can even use entirely different domain names for each site (e.g., site1.com, site2.org). This flexibility makes it suitable for a wide range of use cases, from university campus networks to global media franchises.
How Multisite Differs from Standard WordPress
The most fundamental difference between WordPress Multisite and a standard WordPress installation is the scope of management. In a standard installation, you manage one site with one database, one set of users, and one set of plugins and themes. In Multisite, you manage a network of sites that share these resources, which introduces both efficiencies and limitations.
To illustrate the differences clearly, consider the following comparison table:
| Feature | Standard WordPress | WordPress Multisite |
|---|---|---|
| Number of sites | One | Unlimited (within server capacity) |
| Database structure | One set of tables per installation | Shared tables for users, plus site-specific tables |
| Core updates | Updated per installation | Updated once for the entire network |
| Plugin management | Installed and activated per site | Installed network-wide, activated per site |
| Theme management | Installed per site | Installed network-wide, enabled per site |
| User accounts | Unique to each installation | Shared across all sites in the network |
| Administration | Single site admin | Super admin for network, admins for individual sites |
| File storage | Separate uploads directory per site | Shared uploads directory with site-specific subfolders |
| Backup complexity | Simple, one database and one file set | More complex, includes network-wide and site-specific data |
| Plugin compatibility | All plugins generally work | Some plugins require Multisite compatibility |
One of the most important distinctions is how user accounts function. In Multisite, a user registered on one site can be added to any other site in the network without creating a new account. This is ideal for organizations where users need access to multiple sites, but it also means that user roles are tied to individual sites rather than the network as a whole. A user can be a subscriber on one site and an administrator on another, all with the same login credentials.
Another critical difference is the approach to plugin and theme management. In standard WordPress, each installation has its own set of plugins and themes, and updates must be performed separately for each site. In Multisite, a super admin can install a plugin once and make it available to all sites in the network. Each site’s admin can then choose whether to activate that plugin on their site. This centralization dramatically reduces maintenance overhead when managing dozens or hundreds of sites, but it also means that a faulty plugin update can potentially affect multiple sites simultaneously.
Multisite also imposes certain limitations that do not exist in standard WordPress. For example, some plugins are not designed to work in a Multisite environment and may cause conflicts or data corruption. Additionally, because all sites share the same database, a poorly optimized query on one site can degrade performance across the entire network. Backup and restore processes are also more complex, as they must account for both the shared network data and the unique data of each individual site.
Key Terminology: Sites, Networks, and Super Admins
Understanding the terminology used in WordPress Multisite is essential for effective management and communication. Three terms are particularly important: sites, networks, and super admins.
Sites are the individual websites within a Multisite network. Each site has its own URL, its own content (posts, pages, media), its own theme and plugin settings, and its own set of users with site-specific roles. From a visitor’s perspective, a site in a Multisite network looks and behaves exactly like a standalone WordPress site. The site’s admin can manage content, moderate comments, install themes (if allowed by the super admin), and activate plugins (if available network-wide). However, they cannot install plugins or themes that are not already available on the network, nor can they perform core updates or change network-wide settings.
Networks refer to the entire Multisite installation, including all sites, the shared database tables, the network admin dashboard, and the super admin account. The network is the overarching entity that contains all sites. When you enable Multisite, you create a network that can be organized by subdomains or subdirectories. The network has its own admin area, accessible via /wp-admin/network/, where super admins can manage sites, users, themes, plugins, and network settings. The network also has its own set of options that apply to all sites, such as registration settings, upload limits, and default theme.
Super Admins are the users who have full control over the entire Multisite network. They are the equivalent of administrators in a standard WordPress installation, but with elevated privileges that span all sites. Super admins can:
- Create, edit, and delete any site in the network.
- Install, update, and delete plugins and themes network-wide.
- Manage all user accounts and add users to any site.
- Access the dashboard of any site without needing a separate login.
- Configure network settings, such as site registration and domain mapping.
- Perform core updates for the entire network.
Super admins are distinct from site administrators. A site administrator can manage content and settings for a single site but cannot make changes that affect the network as a whole. This hierarchical structure allows organizations to delegate site management to individual teams or departments while maintaining centralized control over security, updates, and infrastructure.
Additional terminology that is useful to know includes:
- Site ID: A unique numeric identifier assigned to each site in the network, used internally by WordPress to organize database tables and data.
- Main site: The first site created in the network, typically located at the root domain (e.g.,
example.com). It cannot be deleted and serves as the default site for the network. - Subsite: Any site in the network other than the main site.
- Domain mapping: A technique that allows sites in a Multisite network to use custom domain names (e.g.,
mybrand.com) instead of the default subdomain or subdirectory structure. - Network activation: A method of activating a plugin or theme for all sites in the network simultaneously, rather than requiring each site to activate it individually.
- Blog ID: An older term for site ID, inherited from the WordPress MU era.
By mastering these terms and understanding the architecture of Multisite, you will be better equipped to evaluate whether this feature is appropriate for your project. The decision to use Multisite should always be driven by the specific needs of your organization, the scale of your site management requirements, and your willingness to accept the trade-offs that come with a shared infrastructure.
When to Use WordPress Multisite: Key Scenarios
WordPress Multisite is a powerful feature that allows you to run multiple websites from a single WordPress installation. While it is not the right choice for every project, there are specific scenarios where its architecture provides clear, tangible advantages over managing separate installations. Understanding these scenarios is critical to deciding whether Multisite aligns with your goals. Below, we explore the primary use cases where Multisite excels, focusing on efficiency, centralized control, and resource optimization.
Managing Multiple Blogs or Portfolios
One of the most common applications of WordPress Multisite is managing a collection of blogs or portfolio sites that share a common theme, audience, or administrative structure. This scenario is especially relevant for content creators, agencies, or organizations that need to maintain distinct online presences without duplicating effort.
Key advantages in this scenario:
- Centralized updates: A single dashboard allows you to update plugins, themes, and the WordPress core for all sites at once, saving significant time.
- Unified user management: You can add users to the network and assign roles across multiple sites, simplifying permissions and reducing administrative overhead.
- Shared resources: Themes and plugins are installed once at the network level, reducing storage and maintenance demands.
- Consistent branding: A network-wide theme can be enforced or made available, ensuring visual consistency across blogs or portfolios.
Practical examples:
| Use Case | Description |
|---|---|
| University department blogs | Each department runs its own blog with unique content, but all share a central IT team managing updates and security. |
| Agency client portfolios | A design agency hosts separate portfolio sites for each client, using a common theme customized per site. |
| Personal multi-niche blogs | A writer maintains separate blogs for travel, food, and technology, all under one network for easy management. |
In these cases, the ability to push updates globally and maintain a single source of truth for user roles and permissions makes Multisite a compelling choice. However, it is important to note that each blog or portfolio still retains its own content, settings, and plugins (if network-activated), preserving independence where needed.
Creating a Network for a Franchise or Branch Locations
Franchises, multi-location businesses, and organizations with regional branches often require distinct websites for each location while maintaining brand consistency and centralized control. WordPress Multisite addresses this need by enabling a network where each branch site can be customized locally but managed from a central hub.
Why Multisite fits this scenario:
- Brand uniformity: A base theme can be created and distributed network-wide, with child themes or customizations allowed per site.
- Localized content: Each branch can manage its own pages, posts, and contact information without affecting others.
- Centralized SEO and analytics: Network-wide settings for SEO plugins, Google Analytics, or tracking codes can be applied, ensuring consistent data collection.
- Simplified plugin management: Essential plugins (e.g., for booking, forms, or e-commerce) can be network-activated, reducing per-site configuration.
Common examples:
- A restaurant chain with separate sites for each location, featuring menus, hours, and local events.
- A real estate franchise with regional offices, each showcasing local listings and agent profiles.
- A non-profit with chapters in different cities, each with its own donation page and volunteer calendar.
It is worth noting that Multisite works best when branch sites share similar functionality. If each location requires vastly different plugins or custom code, the overhead of managing conflicts may outweigh the benefits. For franchises with standardized operations, however, Multisite reduces the risk of security gaps caused by inconsistent updates across separate installations.
Running a SaaS or Membership Platform with Sub-Sites
WordPress Multisite can serve as the backbone for a software-as-a-service (SaaS) platform or a membership network where each user or group receives their own sub-site. This model is popular for white-label solutions, course platforms, and community-driven websites.
Core benefits for SaaS and membership platforms:
- Automatic site creation: Using plugins or custom code, new sub-sites can be generated on user registration, providing a personalized dashboard or storefront.
- Isolated data: Each sub-site operates independently, meaning user data, content, and settings remain separate, which is critical for privacy and customization.
- Scalable architecture: Multisite can handle hundreds or thousands of sub-sites on a single server, though performance optimization becomes essential at scale.
- Monetization flexibility: You can offer tiered plans (e.g., free sub-sites with limited features, paid with premium plugins), using network-wide subscription management.
Real-world implementations:
| Platform Type | How Multisite Is Used |
|---|---|
| Online course platform | Each instructor gets a sub-site to manage their courses, students, and materials, while the network owner controls the platform’s core features. |
| Membership directory | Each member organization has a sub-site with a profile, news feed, and event calendar, all under a central membership portal. |
| White-label agency tool | Agencies resell the platform, giving each client a branded sub-site with limited functionality, while the agency manages all sites from one network. |
When building a SaaS or membership platform with Multisite, careful planning is required. You must consider database performance, bandwidth, and the need for custom code to handle user provisioning, domain mapping (if using custom domains), and billing integration. Plugins like WP Ultimo or Multisite User Management can streamline these tasks, but developer expertise is often necessary for complex setups.
In summary, Multisite is not a one-size-fits-all solution, but for managing multiple blogs or portfolios, creating a franchise network, or running a SaaS platform with sub-sites, it offers clear advantages in efficiency, control, and scalability. Each scenario benefits from centralized management while preserving the independence of individual sites, making Multisite a strategic choice for these specific use cases.
When NOT to Use WordPress Multisite
WordPress Multisite is a powerful feature that allows you to run multiple websites from a single WordPress installation. However, its convenience can quickly become a liability if applied to the wrong use case. Before you enable the network, it is critical to recognize scenarios where Multisite introduces unnecessary complexity, performance risks, or maintenance headaches. Below are the primary situations where you should avoid Multisite or consider an alternative architecture.
When Sites Have Completely Different Themes or Plugins
One of the core assumptions of Multisite is that all sites in the network share a common set of files—specifically, the same WordPress core, themes, and plugins. While you can activate different themes and plugins on individual sites, the underlying codebase is identical. This creates friction when your sites require radically different functionality.
Consider a network that hosts both a corporate blog and an e-commerce store. The blog might rely on a lightweight theme and a few SEO plugins, while the store needs WooCommerce, payment gateways, inventory management, and a complex custom theme. In Multisite, you would need to install all plugins network-wide, even if only one site uses them. This bloats the database, increases update conflicts, and can lead to security vulnerabilities from unused code.
Common signs that your sites are too diverse for Multisite include:
- Each site requires a unique page builder, caching plugin, or membership system.
- You need to run different versions of the same plugin (e.g., one site needs WooCommerce 8.x, another requires 9.x for compatibility).
- Themes are not designed for network use, causing CSS conflicts or broken layouts when switched.
- You frequently need to disable plugins for specific sites because they cause errors.
If your sites demand fundamentally different codebases, consider using separate WordPress installations. Tools like MainWP or InfiniteWP can help you manage updates and backups across multiple standalone sites without the shared file system constraint.
If You Need Granular User Permissions Across Sites
WordPress Multisite provides a two-tier permission system: Super Admin (who controls the entire network) and site-level roles (Administrator, Editor, Author, etc.). This works well for simple hierarchies, but it breaks down when you need fine-grained control over what users can do across different sites.
For example, imagine a university network where a department head should be able to manage content on their own site but also moderate comments on a central news site. In Multisite, you would need to add that user as an Administrator on their department site and as a Subscriber or Editor on the news site—but you cannot limit their ability to delete posts or change settings on the news site without custom coding. Similarly, you might want a user to have read-only access to one site and editing rights on another, but Multisite’s role system does not support cross-site permission scoping out of the box.
Key limitations to watch for:
- Super Admin privileges are all-or-nothing; you cannot grant limited network-level access (e.g., a user who can install plugins but not create new sites).
- Site-level roles are identical across all sites; you cannot define custom roles per site (e.g., “News Editor” on Site A and “Store Manager” on Site B).
- User meta is shared network-wide, meaning a user’s role on one site can inadvertently affect another site if plugins rely on global user data.
- No built-in way to restrict users from accessing the network admin area or viewing site lists.
If your architecture demands complex permission hierarchies—such as multi-tenant SaaS platforms, educational institutions with department-specific access, or agencies requiring client isolation—Multisite is rarely the right fit. Instead, look into single-site installations combined with a membership plugin (like MemberPress or Restrict Content Pro) or a dedicated multi-tenant solution like WordPress with a custom user management plugin.
When High Traffic or Resource Isolation Is Critical
Multisite shares server resources—memory, CPU, database connections, and file storage—across all sites in the network. This can become a bottleneck when one site experiences a traffic spike or consumes excessive resources. In a standalone installation, a single site’s performance issues are contained; in Multisite, a runaway script or a DDoS attack on one site can bring down the entire network.
Consider these scenarios where resource isolation is essential:
- High-traffic sites: If one site regularly handles thousands of concurrent visitors, it can starve other sites of database connections or PHP workers, causing timeouts.
- Resource-intensive plugins: A plugin that runs heavy cron jobs or queries on one site (e.g., a membership plugin that processes batch emails) can degrade performance for all sites.
- Media storage: Uploads are stored in a single directory structure (e.g.,
/wp-content/uploads/sites/). A media-heavy site can fill the disk, affecting all others. - Database contention: All sites share the same database tables (prefixed by site ID). A slow query from one site can lock tables, affecting every site.
- Security breaches: A compromised plugin or theme on one site can expose the entire network, including sensitive data from other sites.
If your sites need guaranteed performance isolation—such as in a production environment where uptime and speed are non-negotiable—Multisite is a risk. Alternatives include:
| Approach | Resource Isolation | Management Overhead | Best For |
|---|---|---|---|
| Separate WordPress installations | Full (each site has its own server resources) | High (manual updates, backups per site) | High-traffic or mission-critical sites |
| Docker or containerized environments | High (each site in its own container) | Moderate (requires DevOps knowledge) | Developers needing precise control |
| Managed WordPress hosting with staging | Moderate (shared pool but isolated processes) | Low (host handles scaling) | Businesses with moderate traffic |
Additionally, if you require custom server-level caching (like Varnish or Redis) per site, or need to allocate separate PHP memory limits, Multisite makes this difficult. Most hosting environments apply server-wide rules, and workarounds often require advanced server configuration that is fragile and hard to maintain.
In summary, Multisite is not a universal solution. It excels when sites are homogeneous, permissions are simple, and resources are abundant. When these conditions are not met, the complexity and risk outweigh the benefits. Always evaluate your specific needs for theme/plugin diversity, user permissions, and resource isolation before committing to a network architecture.
Planning Your Multisite Network
Before you install WordPress Multisite, strategic planning is essential. A well-architected network prevents migration headaches, performance bottlenecks, and security gaps later. This section covers the three critical decisions you must make: how your sites will be addressed, who will manage them, and where they will live.
Choosing Subdomains vs. Subdirectories vs. Custom Domains
The first architectural choice is how your network’s sites will be structured in the URL. WordPress Multisite offers three primary modes: subdomains, subdirectories, and custom domains (often called domain mapping). Each has distinct technical and practical implications.
| Structure | Example URL | Best For | Key Consideration |
|---|---|---|---|
| Subdomains | site1.example.com | Networks where sites are distinct brands or have separate SEO goals. | Requires wildcard DNS record and server configuration. |
| Subdirectories | example.com/site1 | Networks where sites share a brand or content hierarchy (e.g., blogs for different departments). | Simpler to set up, but can cause content duplication issues if not managed carefully. |
| Custom Domains | site1.com | Networks where each site needs its own unique domain (e.g., client sites, white-label services). | Requires a plugin or manual DNS and server mapping; may need a dedicated IP for SSL. |
Subdomains are the default choice for networks where each site operates as a standalone entity. For example, a university network might use history.university.edu for the history department and biology.university.edu for the biology department. This structure treats each site as a separate domain in search engines, which can be beneficial for SEO targeting but requires diligent management to avoid competing content.
Subdirectories are ideal for networks where all sites fall under a single brand or domain authority. For instance, a multinational company might use company.com/us for its US office and company.com/eu for its European office. This structure pools SEO authority under one domain, which can accelerate ranking for new sites but risks confusing content silos.
Custom domains offer the most flexibility but the highest complexity. They are essential for networks like a WordPress.com-style hosting service, where each user brings their own domain. To implement custom domains, you will need either a plugin like WordPress MU Domain Mapping or a server-level solution such as Nginx server blocks or Apache virtual hosts. Note that SSL/TLS certificates become more complicated with custom domains, as each unique domain may require its own certificate or a wildcard certificate that covers all mapped domains.
A common mistake is selecting a structure without testing. Before committing, create a staging environment with a few test sites in your chosen mode. Verify that permalinks work correctly, that media library paths resolve properly, and that any caching plugins you plan to use support the structure.
Defining User Roles: Administrators, Editors, and Subscribers
WordPress Multisite introduces a two-tier user role system: network-level roles and site-level roles. Understanding this hierarchy is crucial for security and workflow efficiency.
Network-level roles include the Super Admin, who has full control over the entire network—installing plugins and themes, creating and deleting sites, managing users across all sites, and configuring network settings. There should be as few Super Admins as possible, ideally only one or two trusted individuals.
Site-level roles are identical to standard WordPress roles (Administrator, Editor, Author, Contributor, Subscriber) but apply only to individual sites within the network. A site-level Administrator can manage users, content, and settings for their specific site but cannot access other sites or network-wide features.
When planning your roles, consider these practical scenarios:
- For a client hosting network: Grant each client site its own Administrator. This lets them manage their content without interfering with other sites or network settings. You retain Super Admin access for maintenance.
- For a corporate intranet: Use Editors for department leads who need to publish content but not manage users or plugins. This prevents accidental changes to site structure.
- For a multisite blog network: Assign Authors or Contributors to individual bloggers. Editors can review and publish their posts, while Administrators handle site settings.
A common pitfall is granting site-level Administrator permissions too freely. A site Administrator can install plugins and themes if the Super Admin has enabled that capability, which could introduce security vulnerabilities. To mitigate this, restrict plugin and theme installation to Super Admins only via the Network Settings screen. Additionally, consider using a plugin like User Role Editor to create custom roles that match your specific needs—for example, a “Site Manager” role that can manage users but not install plugins.
User management also scales differently in Multisite. When you add a user to the network, they can be assigned to multiple sites with different roles on each. This is efficient for networks with cross-site contributors, but it also means you must audit user permissions regularly. A quarterly review of all Super Admin accounts and site-level Administrators is a best practice.
Selecting a Hosting Environment for Scalability
WordPress Multisite places unique demands on your hosting environment. Unlike a single-site installation, a network must handle concurrent database queries, media uploads, and traffic spikes across multiple sites simultaneously. Choosing the wrong host can lead to slow performance or downtime as your network grows.
Key hosting requirements for Multisite:
- PHP memory limits: Set
memory_limitto at least 256MB, ideally 512MB or higher. Each site in the network consumes memory, especially during admin actions like bulk updates or media processing. - Database performance: Use MySQL or MariaDB with support for InnoDB engine. The database will have many tables (each site adds its own set of tables), so consider a host that offers database query caching and read replicas for high-traffic networks.
- File storage: Media files are shared across the network by default but stored in a single
/wp-content/uploads/sites/directory. Ensure your host provides sufficient disk space and, for scalability, consider offloading media to a CDN or object storage service like Amazon S3 or DigitalOcean Spaces. - Caching infrastructure: Page caching is more complex in Multisite because different sites may have different caching rules. Look for hosts that support network-wide caching plugins (e.g., WP Rocket, W3 Total Cache) and offer server-level caching like Varnish or Nginx FastCGI Cache.
Hosting types compared:
| Hosting Type | Suitability for Multisite | Pros | Cons |
|---|---|---|---|
| Shared hosting | Only for very small networks (under 10 sites with low traffic). | Low cost, easy setup. | Limited resources, no scalability, risk of performance hits from other tenants. |
| Managed WordPress hosting | Good for medium networks (10–100 sites). | Automatic updates, built-in caching, expert support. | Higher cost, may restrict plugins or custom configurations. |
| Virtual Private Server (VPS) | Excellent for growing networks. | Full control, scalable resources, customizable. | Requires server administration skills. |
| Dedicated server or cloud | Best for large networks (100+ sites) or high-traffic sites. | Maximum performance, isolated resources, advanced caching. | High cost, requires expert management. |
Scalability planning steps:
- Start with a VPS or managed host that offers easy resource upgrades. Avoid shared hosting unless you are prototyping.
- Implement a content delivery network (CDN) from day one. Services like Cloudflare, Bunny CDN, or StackPath can offload static assets and reduce server load across all sites.
- Monitor database queries using tools like Query Monitor or New Relic. As you add sites, watch for slow queries that may indicate the need for database optimization or indexing.
- Plan for media growth. Each site in the network can upload files, so storage can fill quickly. Set upload limits per site and consider a plugin like WP Offload Media to move files to cloud storage.
- Test with a load balancer if you anticipate high traffic. Some hosts offer built-in load balancing for VPS or dedicated plans, which distributes traffic across multiple servers.
Finally, choose a host that explicitly supports WordPress Multisite. Not all managed hosts do, and some may require you to use a specific plugin or configuration. Always check the host’s documentation or contact support before purchasing a plan. A host that understands Multisite can save you hours of troubleshooting and ensure your network runs smoothly as it grows.
Installing WordPress Multisite: Step-by-Step
Enabling WordPress Multisite transforms a single WordPress installation into a network of sites managed from one dashboard. This process requires careful, sequential modifications to core files and server configurations. Whether you are starting with a fresh installation or converting an existing site, the steps are identical in structure, though existing content and plugins may require additional validation. Follow this walkthrough precisely to avoid common pitfalls such as white screens, redirect loops, or broken site structures.
Editing wp-config.php to Enable Multisite
The first and most critical step is to add the Multisite constant to your wp-config.php file. This file resides in the root directory of your WordPress installation. Before making any changes, create a full backup of both your files and database. Use a plain text editor—not a word processor—to open wp-config.php.
- Locate the line that reads:
/* That's all, stop editing! Happy publishing. */ - Immediately above that line, add the following constant:
define( 'WP_ALLOW_MULTISITE', true ); - Save the file and upload it back to your server if editing locally.
After adding this constant, log in to your WordPress admin dashboard. You will see a new menu item under Tools called Network Setup. Do not click it yet. First, you must choose your network type: subdomains or subdirectories. This decision is irreversible without significant manual database work.
| Network Type | URL Structure | Best For |
|---|---|---|
| Subdomains | site1.example.com |
Networks where sites are distinct brands or have separate content themes |
| Subdirectories | example.com/site1 |
Networks where sites are closely related, such as regional branches or language versions |
Once you have selected your preferred type, navigate to Tools > Network Setup. WordPress will display two blocks of code: one to add to wp-config.php and one for your server’s rewrite rules. Copy the wp-config.php code exactly as shown. It will include lines similar to:
define('MULTISITE', true);
define('SUBDOMAIN_INSTALL', false); // or true
define('DOMAIN_CURRENT_SITE', 'example.com');
define('PATH_CURRENT_SITE', '/');
define('SITE_ID_CURRENT_SITE', 1);
define('BLOG_ID_CURRENT_SITE', 1);
Paste these lines directly below the WP_ALLOW_MULTISITE constant you added earlier. Remove any existing WordPress address or site address URL settings from the file if present, as Multisite manages these internally. Save and close wp-config.php.
Important note for existing sites: If you are converting a site with existing content, ensure all your plugins are compatible with Multisite before proceeding. Deactivate all plugins temporarily, then re-enable them one by one after the network is running. Some plugins, especially caching and SEO tools, require specific Multisite configurations.
Configuring .htaccess or Nginx Rules
The second block of code from the Network Setup page contains rewrite rules for your web server. The correct configuration depends on whether you use Apache (with mod_rewrite) or Nginx.
For Apache (using .htaccess)
Locate your existing .htaccess file in the WordPress root directory. If it does not exist, create one. Replace its entire contents with the rules provided by WordPress. A standard Multisite .htaccess for subdirectories looks like this:
RewriteEngine On
RewriteRule .* - [E=HTTP_AUTHORIZATION:%{HTTP:Authorization}]
RewriteBase /
RewriteRule ^index.php$ - [L]

# add a trailing slash to /wp-admin
RewriteRule ^([_0-9a-zA-Z-]+/)?wp-admin$ $1wp-admin/ [R=301,L]

RewriteCond %{REQUEST_FILENAME} -f [OR]
RewriteCond %{REQUEST_FILENAME} -d
RewriteRule ^ - [L]
RewriteRule ^([_0-9a-zA-Z-]+/)?(wp-(content|admin|includes).*) $2 [L]
RewriteRule ^([_0-9a-zA-Z-]+/)?(.*.php)$ $2 [L]
RewriteRule . index.php [L]
For subdomain installations, the rules are nearly identical but use a different pattern for matching the domain. Copy the exact rules from your Network Setup page. After updating, save the file and ensure it is writable by the server (typically 644 permissions). Test by visiting your main site URL—it should load normally.
For Nginx
Nginx does not use .htaccess files; all rewrite rules must be added to your server block configuration. Access your Nginx configuration file (typically located at /etc/nginx/sites-available/example.com). Within the server block, add the following rules inside the location / block, before any existing WordPress rules:
location / {
    try_files $uri $uri/ /index.php?$args;
}

# Multisite specific rewrites
if (!-e $request_filename) {
    rewrite ^/([_0-9a-zA-Z-]+/)?(wp-(content|admin|includes).*) /$2 last;
    rewrite ^/([_0-9a-zA-Z-]+/)?(.*.php)$ /$2 last;
}
Additionally, add a map directive at the top of your http block or within the server block to handle subdomain mapping if you chose subdomains:
map $http_host $blog_id {
    default 0;
    # example mappings
    site1.example.com 2;
    site2.example.com 3;
}
After editing, test the configuration with nginx -t and reload Nginx: service nginx reload. Improper Nginx rules are a common cause of 404 errors on subsites, so verify each rule carefully.
Security note: After configuring rewrite rules, restrict access to sensitive files. Add the following to your .htaccess or Nginx configuration to block direct access to wp-config.php, wp-admin/install.php, and other critical files. This prevents unauthorized network setup modifications.
Running the Network Setup and Creating the First Site
With both wp-config.php and your server rewrite rules updated, log out of WordPress and log back in. You will now see a new top-level menu item: My Sites in the admin toolbar, and Sites under the Network Admin menu. Navigate to Network Admin > Dashboard to complete the installation.
- Visit Network Admin > Sites. You will see the main site (Site ID 1) already listed. This is your original installation’s URL.
- Click “Add New” to create your first subsite. Fill in the following fields:
- Site Address: For subdirectory networks, enter a path like
/subsite1. For subdomain networks, enter just the subdomain (e.g.,subsite1). - Site Title: The name of your new site.
- Admin Email: The email address for the site administrator. This user will receive a confirmation email.
- Site Address: For subdirectory networks, enter a path like
- Click “Add Site”. WordPress will create the new site’s database tables and assign it a unique Site ID.
Immediately after creation, verify the new site is accessible. Visit http://example.com/subsite1 (or http://subsite1.example.com) and confirm the default WordPress theme loads without errors. If you see a 404 page, double-check your rewrite rules. If you see a database error, ensure your wp-config.php constants are correctly defined and that your database user has sufficient privileges to create tables.
Post-installation checklist:
- Update permalinks: Go to Network Admin > Settings > Permalinks and select a structure. Save changes—this flushes rewrite rules for all sites.
- Configure network settings: Set a default theme, registration options, and upload space limits under Network Admin > Settings.
- Enable plugins network-wide: Under Network Admin > Plugins, activate plugins you want available to all sites. Individual site admins can then activate them locally.
- Test user roles: Create a test user with the role of Super Admin, Admin, and Subscriber to ensure permissions work correctly across sites.
Troubleshooting common issues:
| Issue | Likely Cause | Solution |
|---|---|---|
| White screen after adding constants | Typo in wp-config.php |
Check for missing semicolons or extra spaces; restore from backup if needed |
| Subsite returns 404 | Incorrect .htaccess or Nginx rules | Re-copy rules from Network Setup; ensure mod_rewrite is enabled |
| “Headers already sent” error | Whitespace before <?php in wp-config.php |
Remove any blank lines or spaces before the opening PHP tag |
| Cannot create new sites | Database table prefix mismatch | Verify $table_prefix in wp-config.php matches existing tables |
Once the first subsite is operational, your network is fully functional. You can now manage all sites from the Network Admin dashboard, add unlimited subsites, and assign roles with granular permissions. Remember that converting an existing site to Multisite is permanent—backups are essential, and you should test thoroughly in a staging environment before applying changes to a production site.
Managing Themes and Plugins Across the Network
One of the most powerful yet potentially complex aspects of WordPress Multisite is the centralized management of themes and plugins. Unlike a standard single-site installation where each site operates independently, a Multisite network allows you to install, activate, and update themes and plugins from a single dashboard. This efficiency can save significant time, but it also introduces new considerations for performance, security, and user autonomy. Proper management ensures that all sites in the network remain stable, fast, and secure without sacrificing the unique needs of individual subsites.
At its core, the Multisite architecture separates the installation of a theme or plugin from its activation. You can install a theme or plugin once in the network admin area, making it available to all subsites. However, activation can occur at either the network level or the individual site level. Understanding the distinction between these two modes is critical for effective management. Below, we break down the key strategies for handling themes and plugins across the network, focusing on activation methods, inheritance, and update best practices.
Network-Activating vs. Site-Specific Plugins
When you install a plugin in a Multisite network, you have two primary choices for activation: network-wide activation or site-specific activation. Each serves a distinct purpose and carries different implications for functionality, performance, and user control.
Network-wide activation makes a plugin available and active on every subsite in the network. This is ideal for plugins that provide core infrastructure, such as security suites, caching tools, SEO frameworks, or custom post types that should exist uniformly across all sites. For example, a network used by a university might network-activate a plugin for single sign-on (SSO) so that all departmental sites share the same login credentials. Network-activated plugins run on every page load across the entire network, which means they can impact performance if not optimized. They also cannot be deactivated by individual site administrators, ensuring consistency but reducing flexibility.
Site-specific activation, in contrast, allows each subsite administrator to choose whether to activate a plugin for their own site. The plugin is installed centrally in the network’s plugins directory, but each site can independently enable or disable it from their own plugin management screen. This approach is best for plugins that serve niche needs, such as a contact form builder, a portfolio gallery, or a custom widget for a specific department. It empowers site admins to tailor their site’s functionality without requiring intervention from the network super admin. However, it also introduces the risk of plugin conflicts if different sites activate incompatible plugins, and it can complicate troubleshooting because the same plugin might behave differently across sites.
To decide which approach to use, consider the following factors:
- Purpose: If a plugin is essential for network operation (e.g., user management, security, analytics), network-activate it. If it’s optional or site-specific, leave it for individual activation.
- Performance: Network-activated plugins run on every site. Use them sparingly to avoid bloat. For plugins that are heavy on database queries, consider whether they truly need to be active everywhere.
- User autonomy: If you want to give subsite admins control, use site-specific activation. If you need to enforce uniformity, network-activate.
- Maintenance: Network-activated plugins require only one update and one compatibility check for the entire network. Site-specific plugins may need to be tested across multiple activation scenarios.
It is also possible to use a hybrid approach. For instance, you can install a plugin but leave it inactive by default, then allow site admins to activate it as needed. Alternatively, you can use code snippets or custom plugins to force-activate certain plugins on specific sites without granting network-wide permissions. This requires custom development but offers fine-grained control.
Using Theme Inheritance and Customization Options
Theme management in Multisite follows a similar logic to plugins but with unique considerations for design and layout. You can install multiple themes in the network, and each subsite can choose its own active theme from the available list. However, you can also enforce a single theme across the network or use theme inheritance to streamline customization.
Theme inheritance refers to the practice of using a parent theme that is network-activated, while allowing individual subsites to create child themes or use custom CSS to modify the appearance. This approach is common in large networks where a consistent brand identity is required, but each department or team needs minor visual adjustments. For example, a corporate network might use a parent theme with the company logo and color scheme, and then each regional office can use a child theme to change the header image or accent colors. The parent theme is maintained centrally, and updates to it automatically flow to all child themes, reducing maintenance overhead.
To implement theme inheritance effectively, follow these steps:
- Install a robust parent theme in the network’s themes directory. Ensure it is well-coded and supports child themes.
- Create child themes for each subsite that needs customization. Each child theme should be installed as a separate theme in the network, but it will inherit all functionality from the parent.
- Network-activate the parent theme if you want it to be the default, or simply make it available for selection. Alternatively, you can set a network default theme via the network settings page.
- Use the WordPress Customizer or additional CSS features in each child theme to allow site admins to modify colors, fonts, and layouts without touching core files.
Customization options beyond child themes include using theme mods and customizer settings that are stored per site. Since Multisite stores each site’s theme settings in its own database tables, subsite admins can change their site’s appearance independently without affecting others. You can also use plugins like “Multisite Theme Manager” to control which themes are available to which sites, or to restrict certain customization options. For example, you might allow site admins to change the header image but not the site layout.
When managing themes, avoid the temptation to allow too many themes in the network. Each installed theme adds to maintenance overhead and potential security vulnerabilities. Limit the available themes to a curated set that meets the needs of most sites, and remove unused themes to keep the network lean. Additionally, test all themes for compatibility with your network’s plugins and user roles before making them available.
Best Practices for Updating Plugins and Themes
Updates are a double-edged sword in Multisite. On one hand, they are essential for security and performance. On the other hand, a single incompatible update can break dozens or hundreds of subsites. Adopting a systematic approach to updates minimizes risk while keeping the network healthy.
1. Use a staging environment. Before updating any plugin or theme on the live network, test the update in a staging copy of your network. This is non-negotiable for any network with more than a handful of sites. Many hosting providers offer one-click staging, or you can use plugins like WP Staging. Test critical workflows on several representative subsites to catch conflicts early.
2. Schedule updates during low-traffic windows. Even with staging, updates can introduce unforeseen issues. Plan updates for off-peak hours, and communicate the maintenance window to users if the network might be briefly unavailable. For large networks, consider a rolling update process where you update a subset of sites first.
3. Update plugins and themes individually, not en masse. The network admin dashboard allows you to update all plugins at once, but resist the urge. Update one plugin or theme at a time, and then monitor the network for errors. This makes it easier to identify the source of a problem if something goes wrong. Use the “Available Updates” screen to see which items need attention, and prioritize security updates.
4. Keep a record of versions and compatibility. Maintain a simple log (even a spreadsheet) of which plugins and themes are used across the network, their current versions, and any known compatibility issues. This is especially useful for networks where different sites use different plugin combinations. You can also use a plugin like “MainWP” or “ManageWP” to track updates and health across multiple sites, though these are external tools.
5. Automate where possible, but with caution. WordPress Multisite supports automatic background updates for minor releases (e.g., security patches). You can enable these via the wp-config.php file. However, for major plugin or theme updates, manual oversight is safer. Consider using a managed hosting provider that offers automatic updates with rollback capabilities.
6. Remove unused plugins and themes. Every installed but inactive plugin or theme is a potential security hole. Delete any that are not actively used by at least one subsite. This also reduces the update burden and database clutter. Use the network admin’s “Themes” and “Plugins” screens to identify unused items.
7. Test after every update. After updating a plugin or theme, visit a few key subsites to verify that core functionality—such as login, navigation, forms, and caching—still works. If you use a caching plugin, clear the cache after updates to prevent stale files from causing issues.
8. Communicate with subsite administrators. If you are network-activating an update that might change user experience (e.g., a new version of a theme with different layout options), notify site admins in advance. Provide release notes and instructions for adapting to changes. This reduces support tickets and frustration.
By following these practices, you can keep your Multisite network secure and performant while minimizing downtime. The key is to treat updates as a deliberate process rather than a routine chore, especially in a network where the impact of a mistake is multiplied across many sites.
In summary, managing themes and plugins in WordPress Multisite requires a balance of centralization and flexibility. Network activation and site-specific activation each have their place, and theme inheritance offers a way to maintain brand consistency while allowing customization. Updates demand rigorous testing and a methodical approach. With careful planning and adherence to best practices, you can harness the full power of Multisite without sacrificing stability or security.
User Management and Permissions in Multisite
WordPress Multisite introduces a layered user management system that differs significantly from a standard single-site installation. Understanding how to add, remove, and assign users across the network is essential for maintaining security, streamlining workflows, and ensuring each site’s autonomy. This section covers the core concepts of user administration, from Super Admin privileges to site-specific roles, and explains how registration and signups work in a networked environment.
Adding Users to the Network vs. Individual Sites
In WordPress Multisite, user accounts exist at two levels: the network level and the individual site level. A user must first be added to the network before they can be assigned to any specific site. The Super Admin controls network-wide user additions, while site administrators can add existing network users to their own sites without needing Super Admin approval.
Adding a user to the network is done from the Network Admin dashboard. Navigate to My Sites > Network Admin > Users > Add New. Here, you enter the username, email, and optional password. Once added, the user receives a notification email and can log in to the network. They will appear in the network’s user list but will not have access to any site until a site admin assigns them a role.
Adding a user to an individual site is performed by the site administrator (or Super Admin) from that site’s dashboard. Go to Users > Add New within the specific site. You can add an existing network user by typing their username or email, or invite a new user by entering their email address. If the email is not already a network user, they will be added to the network automatically and then assigned a role on that site. This process is seamless for site admins but still requires network-level creation behind the scenes.
Removing users also operates at two levels:
- Remove from a site: A site admin can delete a user from their site by going to Users > All Users, selecting the user, and choosing “Remove” from the bulk actions menu. This removes their role on that site but keeps their network account intact.
- Remove from the network: Only a Super Admin can delete a user from the entire network. This is done from Network Admin > Users. Deleting a network user removes them from all sites and revokes their ability to log in. Use this option sparingly, as it is irreversible.
To assign users efficiently across multiple sites, Super Admins can use the “Add User to Multiple Sites” plugin or manually manage assignments via the user’s profile in Network Admin. Clicking on a user’s name under Network Admin > Users reveals a list of all sites they belong to, with checkboxes to add or remove them from any site.
Role Capabilities: Super Admin vs. Site Admin
WordPress Multisite introduces a unique role hierarchy that separates network-wide control from site-specific management. The two most critical roles are Super Admin and Site Admin (often called Administrator at the site level). Understanding their capabilities is vital for delegating responsibilities without compromising security.
Super Admin is the highest-level role in a Multisite network. Super Admins have unrestricted access to all sites, plugins, themes, and network settings. Key capabilities include:
- Installing, activating, and deactivating plugins and themes network-wide.
- Creating, editing, and deleting any site in the network.
- Managing all network users (add, remove, edit, promote to Super Admin).
- Configuring network settings (registration, upload limits, site templates).
- Accessing the Network Admin dashboard and all site dashboards.
- Updating WordPress core for the entire network.
Site Admin (or Administrator at the site level) has full control over their assigned site but cannot affect other sites or network settings. Their capabilities include:
- Managing users on their site (add, remove, assign roles—except Super Admin).
- Activating and deactivating plugins that are already network-activated or allowed by the Super Admin.
- Selecting themes from those enabled by the Super Admin.
- Editing posts, pages, and media on their site.
- Configuring site-specific settings (general, writing, reading, discussion).
- Cannot access the Network Admin or modify network-wide configurations.
Below is a comparison table highlighting the key differences:
| Capability | Super Admin | Site Admin |
|---|---|---|
| Install plugins/themes (network-wide) | Yes | No |
| Manage all sites | Yes | No |
| Manage all network users | Yes | No |
| Promote users to Super Admin | Yes | No |
| Activate plugins on own site | Yes | Yes (if allowed) |
| Manage own site users | Yes | Yes |
| Edit own site content | Yes | Yes |
| Access other sites’ dashboards | Yes | No |
Other roles (Editor, Author, Contributor, Subscriber) function identically to single-site installations but are scoped to the individual site. A user can have different roles on different sites—for example, an Editor on Site A and a Subscriber on Site B.
To manage roles effectively, Super Admins should limit the number of users with Super Admin privileges. Only trusted administrators who need network-wide access should hold this role. Site Admins, meanwhile, can be given autonomy to manage their own content and users, reducing the Super Admin’s workload.
Handling User Registration and Signups
User registration in Multisite can be configured at the network level to control how new users join the network and individual sites. The Super Admin decides whether registration is open, closed, or limited to specific scenarios. This flexibility is key for networks that host public blogs, private intranets, or membership sites.
To configure registration settings, go to Network Admin > Settings > Network Settings. Under “Allow new registrations,” you have four options:
- Registration is disabled: No new users can register. Users must be added manually by a Super Admin or Site Admin.
- User accounts may be registered: Anyone can create a user account, but they will not automatically have a site. They must be assigned to an existing site by an admin.
- Logged in users may register new sites: Only existing network users can create new sites. This is useful for networks where users need a site but registration is otherwise closed.
- Both user accounts and new sites may be registered: Open registration allows anyone to create an account and a site simultaneously. This is common for public blog networks like WordPress.com.
When registration is enabled, you can also set additional restrictions:
- Registration email domain: Limit signups to specific email domains (e.g., @yourcompany.com) to create a private network.
- New site template: Choose a default theme and initial content for newly created sites.
- New user notification: Decide whether the Super Admin receives an email when a new user registers.
Signup flow for new users varies depending on the registration type. If user accounts are allowed without sites, the user registers with an email and username, then receives a confirmation email. After confirming, they can log in but will see a dashboard with no sites. A Site Admin or Super Admin must then add them to a site. If site creation is also allowed, the registration form includes a site name and title field. The user’s new site is created upon confirmation.
Managing signups in practice:
- For a corporate intranet, set registration to “User accounts may be registered” and restrict to the company email domain. Site Admins then add employees to the relevant departmental sites.
- For a network of student blogs, enable “Both user accounts and new sites may be registered” with a template site that includes a welcome post and privacy settings.
- To prevent spam, consider using a CAPTCHA plugin or manual approval via a plugin like “Multisite User Management” that queues new registrations for Super Admin review.
Site Admins cannot modify network registration settings. They can, however, control whether their site allows new user registrations independently. Under Settings > General on their site, they can check “Anyone can register” to allow users to sign up for that specific site, provided the network allows user registration. This setting is subordinate to network policies—if the network disables registration, site-level registration is also blocked.
Removing users after signup follows the same two-tier process: Site Admins can remove users from their site, while Super Admins can delete them from the network. If a user registered their own site, deleting them from the network also deletes that site (with a warning). For networks with many signups, regular audits of inactive users and sites are recommended. Use the Network Admin > Sites and Users lists to identify accounts that have not logged in for a set period, and consider a plugin to automate cleanup.
By carefully configuring user management and permissions, you can balance security with usability. Super Admins retain ultimate control, while Site Admins enjoy the autonomy to build their communities. Registration settings should align with your network’s purpose—whether open, closed, or somewhere in between—to ensure a smooth experience for all users.
Optimizing Performance and Security for Multisite
Running a WordPress Multisite network introduces unique performance and security challenges. Because multiple sites share a single core installation, database, and server environment, a misconfiguration or resource bottleneck can affect every site under the network. This section provides actionable, hands-on tips to keep your Multisite fast, stable, and secure—from caching layers to access controls and query monitoring.
Implementing Caching Solutions (e.g., Redis, Varnish)
Caching is the single most impactful performance optimization for any WordPress site, and it becomes even more critical on a Multisite network where traffic patterns vary across individual subsites. A well-implemented caching strategy reduces database load, speeds up page delivery, and improves the user experience for every site in your network.
Choose the right caching layers:
- Page caching (Varnish or FastCGI cache): Store fully rendered HTML pages. For Multisite, ensure your caching solution respects the site-specific URL structure (e.g., subdomain or subdirectory). Varnish is ideal for high-traffic networks because it sits in front of your web server and serves static pages without hitting WordPress at all.
- Object caching (Redis or Memcached): Cache database query results, transients, and PHP objects. Redis is widely recommended for Multisite because it can store data persistently and handle large numbers of concurrent connections. Install the Redis PECL extension and a WordPress plugin like Redis Object Cache. Configure it to use a unique database ID per subsite if you need per-site cache isolation.
- CDN caching: Offload static assets (images, CSS, JavaScript) to a content delivery network. Use a plugin that supports Multisite, such as CDN Enabler or WP Offload Media, to rewrite asset URLs across all subsites.
Implementation checklist for Multisite:
- Enable page caching at the server level (Nginx FastCGI cache or Apache mod_cache) or use a reverse proxy like Varnish. Exclude admin URLs and logged-in user sessions from caching.
- Install and configure an object cache backend (Redis). Add the following to your
wp-config.phpto define the Redis server and port:
define('WP_REDIS_HOST', '127.0.0.1');
define('WP_REDIS_PORT', 6379);
define('WP_REDIS_DATABASE', 0); // Use a separate database ID per subsite if needed
- Use a network-activated caching plugin that supports Multisite, such as W3 Total Cache or WP Super Cache. Test each subsite individually to ensure page caching does not break dynamic features (e.g., e-commerce carts or membership portals).
- Implement cache purging rules: when a post is updated on one subsite, clear only that site’s cache. Most Multisite-compatible caching plugins allow per-site cache invalidation.
Common pitfalls to avoid:
- Using a single cache key for all subsites—this can mix data between sites. Always prefix cache keys with the site ID.
- Over-caching logged-in users. Use cache-bypass rules for wp-admin, wp-login, and any custom API endpoints.
- Neglecting to monitor cache hit rates. Tools like Redis CLI (
redis-cli info stats) or Varnish statistics (varnishstat) help you verify your configuration is effective.
Using Security Plugins and Hardening Measures
Security on a Multisite network requires a layered approach. A single compromised subsite can expose the entire network if proper isolation and hardening are not in place. Follow these measures to reduce your attack surface and enforce consistent security policies across all sites.
Network-wide security plugins:
- Use a security plugin that supports network activation, such as Wordfence or Sucuri Security. Configure it at the network level to apply firewall rules, brute-force protection, and malware scanning to every subsite.
- Enable two-factor authentication (2FA) for all administrator accounts across the network. Plugins like Two Factor (from the WordPress team) or WP 2FA can be network-activated and enforced.
- Limit login attempts per subsite and per user IP. Most security plugins include this feature; set a low threshold (e.g., 3 failed attempts before a 15-minute lockout).
Hardening measures specific to Multisite:
- Restrict plugin and theme installation: Only super admins should be able to install, update, or delete plugins and themes. Use the network admin panel to manage all code assets. Disable the “Add Plugins” and “Add Themes” capabilities for subsite administrators by adding this to your
wp-config.php:
define('DISALLOW_FILE_MODS', true);
- Isolate user roles across subsites: By default, a user with Administrator access on one subsite does not have access to other subsites—but verify this with a user role editor plugin (e.g., User Role Editor). Never grant super admin privileges to users who only manage a single subsite.
- Secure the network’s uploads directory: Use separate uploads directories per subsite (WordPress does this automatically). Disable PHP execution in uploads folders by adding the following to your server configuration:
# Nginx example
location ~* /wp-content/uploads/.*.php$ {
    deny all;
}
- Enforce HTTPS across all subsites: Use a network-wide SSL certificate (wildcard or SAN). In the network settings, set both “Site address” and “WordPress address” to HTTPS. Redirect HTTP to HTTPS via server rules.
- Regularly audit user permissions: Run a script or use a plugin to list all users with super admin status. Remove any accounts that are no longer needed. Audit subsite admin accounts quarterly.
Security checklist for Multisite:
| Measure | Action | Frequency |
|---|---|---|
| Firewall (WAF) | Network-activate Wordfence or Sucuri | Once, then update rules automatically |
| File permissions | Set wp-config.php to 440, wp-content to 755 | After every core update |
| User audit | Review super admin + subsite admin lists | Monthly |
| SSL enforcement | Wildcard cert + redirect rules | Before launch, renew annually |
| Plugin updates | Enable automatic updates for security patches | Ongoing |
Monitoring Database Queries and Resource Limits
In a Multisite environment, the database is the most common performance bottleneck. With multiple sites querying the same tables, inefficient queries or runaway resource usage can bring the entire network to a crawl. Proactive monitoring and limits are essential.
Track database query performance:
- Enable the WordPress query monitor plugin (e.g., Query Monitor) on a staging environment or a restricted admin user. It displays all queries per page load, their execution time, and which subsite triggered them. Look for slow queries (above 0.1 seconds) and high query counts (over 100 per request).
- Use MySQL’s slow query log to capture queries that exceed a threshold. Run the following in your database server:
SET GLOBAL slow_query_log = 'ON';
SET GLOBAL long_query_time = 2;
Analyze the log with tools like pt-query-digest from Percona Toolkit.
- Monitor table-level performance. In Multisite, each subsite has its own set of tables (e.g.,
wp_2_posts,wp_3_options). UseSHOW TABLE STATUSto identify tables with high row counts or excessive overhead. Optimize tables withOPTIMIZE TABLEon a regular schedule (e.g., weekly cron job).
Set resource limits at multiple levels:
- PHP memory limit: Increase the memory limit for the network admin and individual subsites if needed. Add to
wp-config.php:
define('WP_MEMORY_LIMIT', '256M');
define('WP_MAX_MEMORY_LIMIT', '512M'); // For admin screens
- MySQL connection limits: In your
my.cnf, setmax_connectionsbased on your expected concurrent users. A formula:max_connections = (RAM * 0.75) / (average query memory). Start with 150 and adjust upward if you see “Too many connections” errors. - Per-subsite resource caps: Use a plugin like WP Resource Monitor or server-level tools (e.g., cgroup for PHP-FPM) to limit CPU and memory usage per subsite. This prevents a single site from exhausting server resources.
Database optimization schedule:
| Task | Tool/Method | Frequency |
|---|---|---|
| Remove post revisions | WP-CLI: wp post list --post_type=revision --format=count then delete |
Weekly |
| Clean transients | Plugin like Transient Cleaner or WP-CLI | Daily |
| Optimize tables | MySQL OPTIMIZE TABLE or plugin |
Weekly |
| Index review | Check EXPLAIN for slow queries |
Monthly |
| Query analysis | Query Monitor plugin or slow query log | Ongoing |
Proactive alerting: Set up monitoring tools like New Relic or Datadog to alert you when database query time exceeds a baseline (e.g., average query time > 0.5 seconds for 5 minutes). For smaller networks, use a simple cron job that checks the MySQL process list and emails you if there are more than 20 queries in “Sending data” state.
By implementing these caching, security, and monitoring practices, you ensure your WordPress Multisite network remains fast, resilient, and secure—even as you add more subsites and traffic grows. Regularly revisit each layer as your network evolves, and always test changes in a staging environment first.
Migrating to WordPress Multisite
Moving from a collection of standalone WordPress installations to a unified Multisite network is a significant architectural shift. While the benefits—centralized management, shared plugins and themes, and streamlined updates—are compelling, the migration process demands careful planning and execution. This section provides a step-by-step guide for converting existing sites into a Multisite network, focusing on data integrity, minimal downtime, and post-migration stability.
Backing Up All Sites Before Migration
Before any migration, a comprehensive backup strategy is non-negotiable. A single misstep during the conversion can corrupt data across multiple sites. Follow these steps to create a reliable safety net:
- Database backups: Export each site’s database using phpMyAdmin, WP-CLI, or a plugin like UpdraftPlus. Use the “Add DROP TABLE” and “Complete inserts” options to ensure clean restore capability.
- File backups: Download the entire
wp-contentdirectory for each site, including uploads, plugins, themes, and any custom configurations. Compress these into separate archives. - Full server snapshot (optional): If using a managed host, request a full server snapshot. This allows a rollback to the exact pre-migration state.
- Verify backups: Test each backup by restoring it to a staging environment. A backup that cannot be restored is worthless.
- Document current settings: Record permalink structures, active plugins, theme customizations, and user roles for each site. This checklist will help you confirm nothing is lost.
A common mistake is backing up only the database or only the files. Both are essential because Multisite migration involves merging multiple databases into one while preserving file paths. Store backups in at least two locations—local storage and cloud storage—before proceeding.
Using Tools Like WordPress Importer or WP-CLI
Two primary methods exist for migrating content into a Multisite network: the WordPress Importer tool for smaller sites, and WP-CLI for larger or more complex setups. Choose based on your site count and technical comfort level.
Method 1: WordPress Importer (for small to medium sites)
This built-in tool exports and imports content as XML files. It is best for sites with fewer than 1,000 posts and minimal custom post types.
- Export each site: In the source site’s admin panel, go to Tools > Export. Choose “All content” and download the XML file.
- Create subsites in Multisite: In the new Multisite network, go to My Sites > Network Admin > Sites > Add New. Create a subsite for each source site, using the same domain structure if possible.
- Import content: For each subsite, go to Tools > Import > WordPress. Upload the corresponding XML file. Check “Download and import file attachments” to bring images.
- Reassign users: During import, you can assign posts to existing users or create new ones. Map users carefully to avoid duplicates.
Limitations: The importer may fail with very large media libraries (over 2GB) or custom post types not registered on the new network. It also does not migrate plugin settings or theme mods.
Method 2: WP-CLI (for large or complex sites)
WP-CLI offers command-line speed and precision. It is ideal for sites with thousands of posts, custom tables, or complex configurations. Below are essential commands for a typical migration:
| Step | Command | Description |
|---|---|---|
| Export single site database | wp db export site1.sql --dbuser=... --dbpass=... |
Creates a database dump for the source site. |
| Create subsite in Multisite | wp site create --slug=site1 --title="Site 1" --email=admin@example.com |
Generates a new subsite with a unique ID. |
| Import database to subsite | wp db import site1.sql --url=http://example.com/site1 |
Imports the old database into the subsite’s tables (must adjust table prefixes). |
| Search and replace URLs | wp search-replace 'http://oldsite1.com' 'http://example.com/site1' --all-tables |
Updates all URLs in the database to reflect the new network structure. |
| Regenerate media files | wp media regenerate --yes |
Creates missing thumbnail sizes for imported images. |
Critical note on table prefixes: Multisite uses a single database with tables prefixed by site ID (e.g., wp_2_posts). When importing from a standalone site (with wp_posts), you must either modify the SQL file to change the prefix or use a tool like sed before import. A safer approach is to use a plugin like “Multisite Migration” that handles prefix mapping automatically.
Migrating Plugin and Theme Settings
Plugin settings stored as site options (in the wp_options table) do not transfer via content import. To preserve these:
- Use WP-CLI’s
wp option listandwp option updatecommands to export and re-import key options per site. - For popular plugins like Yoast SEO or WooCommerce, consider deactivating them on source sites, exporting their settings via dedicated export tools, and reimporting on the new subsites.
- Theme customizations stored in the database (e.g., customizer settings) can be exported using the “Customizer Export/Import” plugin before migration.
Testing and Troubleshooting Post-Migration Issues
After migration, thorough testing prevents hidden problems from affecting users. Create a checklist and work through it systematically:
Immediate Post-Migration Tests
- Frontend verification: Visit each subsite’s homepage, a sample post, and a sample page. Confirm the correct content displays, images load, and permalinks work.
- Admin access: Log in as a super admin and as a subsite admin. Verify that dashboard menus, user management, and settings pages are functional.
- Media library check: Open the media library for each subsite. Ensure all images and files are present and that thumbnails generate correctly.
- Plugin functionality: Test each active plugin on at least one subsite. Pay special attention to caching, SEO, and e-commerce plugins, which often have Multisite-specific settings.
- User roles and permissions: Confirm that users who were editors or authors on the source site have the correct roles on the subsite. Check that super admin privileges are not accidentally granted to regular users.
Common Issues and Solutions
| Issue | Likely Cause | Solution |
|---|---|---|
| Broken image URLs | URLs in database still point to old domain | Run wp search-replace again with correct old and new URLs, including --skip-columns=guid to avoid breaking attachment links. |
| 404 errors on posts | Permalink structure mismatch | Go to Settings > Permalinks on each subsite and click “Save Changes” to flush rewrite rules. |
| Plugin conflicts | Plugins not Multisite-compatible | Check plugin documentation. Activate network-wide only if supported; otherwise, activate per-site. Consider replacing incompatible plugins. |
| Missing users | Users not imported or mapped incorrectly | Use WP-CLI command wp user import-csv to bulk add users, or manually add missing users via Network Admin > Users. |
| Slow performance | Database tables not optimized after merge | Run wp db optimize and consider installing a caching plugin like WP Rocket or W3 Total Cache configured for Multisite. |
| Login issues | Cookie domain mismatch | Update wp-config.php with define('COOKIE_DOMAIN', false); to allow cookies to work across subsites. |
Advanced Troubleshooting Techniques
When standard fixes fail, employ these diagnostic methods:
- Enable WP_DEBUG: Add
define('WP_DEBUG', true);anddefine('WP_DEBUG_LOG', true);towp-config.php. Check thewp-content/debug.logfile for PHP errors and warnings. - Check database integrity: Use phpMyAdmin to run
CHECK TABLEon all tables prefixed with the subsite ID. Repair any that show errors. - Review server logs: Access your hosting control panel’s error logs (e.g., Apache error_log or Nginx error.log). Look for 500 errors or memory exhaustion warnings.
- Test in isolation: Temporarily deactivate all plugins and switch to a default theme (like Twenty Twenty-Four) on a problem subsite. If the issue resolves, reactivate plugins one by one to identify the culprit.
Finally, keep your backups intact for at least one week after migration. This window allows you to revert individual subsites or the entire network if unforeseen issues arise. Document every step you took, including commands used and settings changed, so you can reproduce or reverse the process if needed. With careful testing and a methodical approach, your Multisite network will provide a stable, scalable foundation for years to come.
Troubleshooting Common Multisite Issues
Operating a WordPress Multisite network introduces a layer of complexity beyond a standard single-site installation. While the architecture is robust, administrators frequently encounter specific challenges related to link structures, plugin behavior, and database performance. Understanding the root causes of these issues is essential for maintaining a stable and efficient network. Below, we address three of the most persistent problems and provide actionable solutions.
Fixing Broken Links and 404 Errors
404 errors are among the most visible and frustrating issues in a Multisite environment. They often stem from mismatches between the site’s URL configuration and the actual file or database paths. The most common causes include incorrect site URL settings, missing permalink rewrites, or subdirectory/subdomain misconfigurations.
Diagnosing the Source: First, verify that the primary site URL and each subsite’s URL are correctly defined in the database. A quick check can be performed via the wp_blogs and wp_site tables. If a subsite returns a 404 for its homepage, the issue is likely with the domain or path mapping. For internal pages that return 404s, the problem often lies with permalinks or rewrite rules.
Immediate Fixes:
- Flush Permalinks: Navigate to Settings > Permalinks for each affected subsite and simply click “Save Changes.” This regenerates the
.htaccessfile and rewrite rules. For network-wide issues, flush from the Network Admin > Settings page. - Update .htaccess: Ensure your
.htaccessfile contains the correct Multisite rewrite rules. A common mistake is using single-site rewrite rules. The standard Multisite rules for subdirectory installations should look like this:
RewriteEngine On RewriteRule .* - [E=HTTP_AUTHORIZATION:%{HTTP:Authorization}] RewriteBase / RewriteRule ^index.php$ - [L] # add a trailing slash to /wp-admin RewriteRule ^wp-admin$ wp-admin/ [R=301,L] RewriteCond %{REQUEST_FILENAME} -f [OR] RewriteCond %{REQUEST_FILENAME} -d RewriteRule ^ - [L] RewriteRule ^(wp-(content|admin|includes).*) $1 [L] RewriteRule ^(.*.php)$ $1 [L] RewriteRule . index.php [L] - Check Site URL in Database: Use phpMyAdmin or a similar tool to run a query:
SELECT * FROM wp_blogs WHERE blog_id = [X]. Ensure thedomainandpathcolumns match the expected values. Incorrect paths, such as a missing trailing slash, can cause 404s.
Preventative Measures: Always use absolute URLs when linking between subsites, or utilize WordPress functions like switch_to_blog() and restore_current_blog() to generate correct links programmatically. Avoid manually editing site URLs in the database unless absolutely necessary.
Resolving Plugin and Theme Incompatibilities
Not all plugins and themes are designed with Multisite in mind. Incompatibilities can manifest as white screens, broken functionality, or network-wide errors. The primary challenge is that a plugin might work flawlessly on one subsite but cause conflicts on another due to differing user roles, custom post types, or database table prefixes.
Identifying Problematic Components: When a conflict arises, the first step is to isolate the cause. Begin by deactivating all plugins network-wide. If the issue resolves, reactivate plugins one by one, testing a subsite after each activation. Similarly, switch to a default WordPress theme (like Twenty Twenty-Four) on the affected subsite to rule out theme-specific issues.
Common Incompatibility Patterns:
| Issue Type | Typical Cause | Solution |
|---|---|---|
| Plugin uses hardcoded table names | Plugin references wp_posts instead of wp_2_posts for a specific subsite. |
Replace hardcoded table names with WordPress global $wpdb prefix variables. Look for plugins that explicitly state Multisite support. |
| Theme relies on network-wide settings | Theme options saved as site options rather than network options, causing conflicts when activated on multiple sites. | Use get_site_option() and update_site_option() in theme code. Ensure theme is designed for network activation. |
| Plugin conflicts with user role management | Plugin modifies capabilities or roles in a way that interferes with Multisite’s Super Admin role. | Check plugin documentation for Multisite compatibility. Consider using a dedicated membership plugin built for networks. |
Best Practices: Always test plugins and themes on a staging network before deploying to production. Use the “Network Activate” feature sparingly; only activate plugins network-wide if they genuinely need to run on every subsite. For plugins that only need to function on specific sites, activate them per-site. Additionally, maintain a list of compatible plugins—those that use $wpdb->prefix correctly and avoid hardcoded paths.
Handling Database Connection Timeouts
Database connection timeouts are a severe issue that can bring down the entire Multisite network. They occur when the database server cannot handle the volume of queries or when connections are exhausted. In a Multisite environment, the database load is inherently higher because each subsite generates its own set of queries, and network-wide operations (like updating plugins) can spike demand.
Symptoms: Users experience “Error establishing a database connection” messages, slow page loads, or intermittent failures. The WordPress admin area may become unresponsive, and cron jobs may fail to execute.
Diagnostic Steps:
- Check MySQL Connection Limits: Log into your database server and run
SHOW VARIABLES LIKE 'max_connections';. If the limit is low (e.g., 100 or less), consider increasing it. For shared hosting, contact your provider. - Monitor Query Volume: Use tools like MySQL’s slow query log or plugins like Query Monitor to identify heavy queries. Common culprits include inefficient custom queries, unoptimized WP_Query loops, or plugins that run database-intensive tasks on every page load.
- Review Transient Expiration: Multisite networks often accumulate large numbers of transients. Expired transients can bloat the
wp_optionstable across all subsites. Use a plugin to clean transients or run a custom SQL query to remove them:DELETE FROM wp_options WHERE option_name LIKE '%_transient_%'(repeat for each subsite’s table).
Immediate Solutions:
- Increase PHP and MySQL Timeouts: In your
wp-config.phpfile, adddefine('WP_MEMORY_LIMIT', '256M');anddefine('WP_MAX_MEMORY_LIMIT', '512M');. For MySQL, adjust thewait_timeoutandinteractive_timeoutsettings in your database configuration. - Implement Object Caching: Use a persistent object cache like Redis or Memcached. This reduces database load by storing query results in memory. For Multisite, ensure the cache is configured to handle multiple site prefixes.
- Optimize Database Tables: Regularly run
OPTIMIZE TABLEcommands on all subsite tables. This can be automated with a plugin or cron job. For example:OPTIMIZE TABLE wp_1_posts, wp_1_options, wp_2_posts, wp_2_options;.
Long-Term Prevention: Consider using a dedicated database server or a managed hosting solution optimized for Multisite. Implement a Content Delivery Network (CDN) to offload static assets, reducing direct database requests. Finally, audit and refactor any custom code that performs database queries in loops or on every page load. Use wp_cache_set() and wp_cache_get() to cache expensive query results.
By systematically addressing these three common issues—broken links, plugin conflicts, and database timeouts—you can significantly improve the reliability and performance of your WordPress Multisite network. Regular maintenance, careful testing, and adherence to best practices will minimize downtime and ensure a seamless experience for all subsite users.
Sources and further reading
- Create a Network
- Before You Create a Network
- Multisite Network Administration
- WordPress Multisite: What It Is and How to Set It Up
- How to Install WordPress Multisite
- WordPress Multisite: Pros, Cons, and How to Set It Up
- WordPress Multisite: The Ultimate Guide
Need help with this topic?
Send us your details and we will contact you.